

Page 1
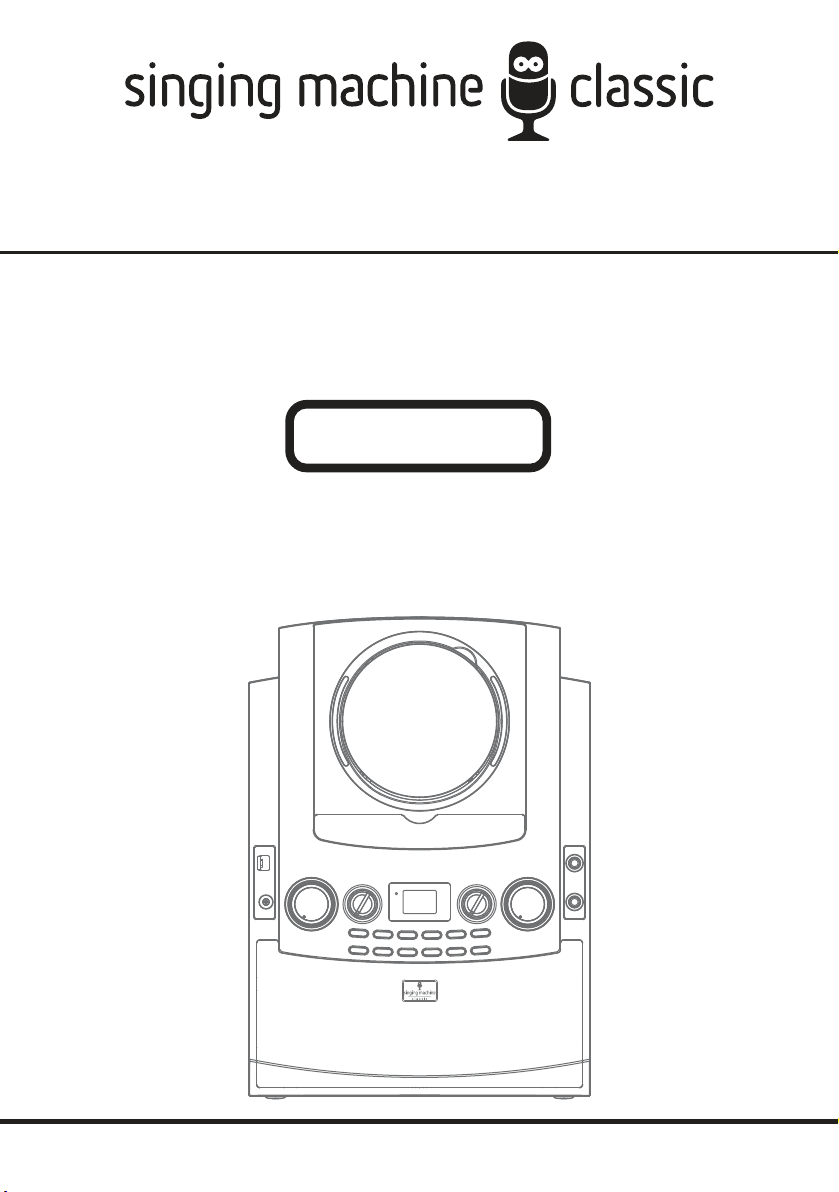
Instruction Manual
Manual de Instrucciones
iSM990BT
Please read before using this unit.
THE SINGING MACHINE® is a registered trademark of The Singing Machine Company, Inc.
THE SINGING MACHINE® es marca registrada de The Singing Machine Company., Inc.
Page 2
CAN ICES-3(B)/NMB-3(B)
The distance between user and products should be no less than 20 cm.
La distance entre l’utilisateur et de produits ne devrait pas être inférieure à 20 cm.
This device complies with Industry Canada licence-exempt RSS
standard(s). Operation is subject to the following two conditions: (1) this
device may not cause interference, and (2) this device must accept any
interference, including interference that may cause undesired operation
of the device.
Le présent appareil est conforme aux CNR d'Industrie Canada applicables
aux appareils radio exempts de licence. L'exploitation est autorisée aux
deux conditions suivantes : (1) l'appareil ne doit pas produire de
brouillage, et (2) l'utilisateur de l'appareil doit accepter tout brouillage
radioélectrique subi, même si le brouillage est susceptible d'en compromettre le fonctionnement.
E - 1
Page 3
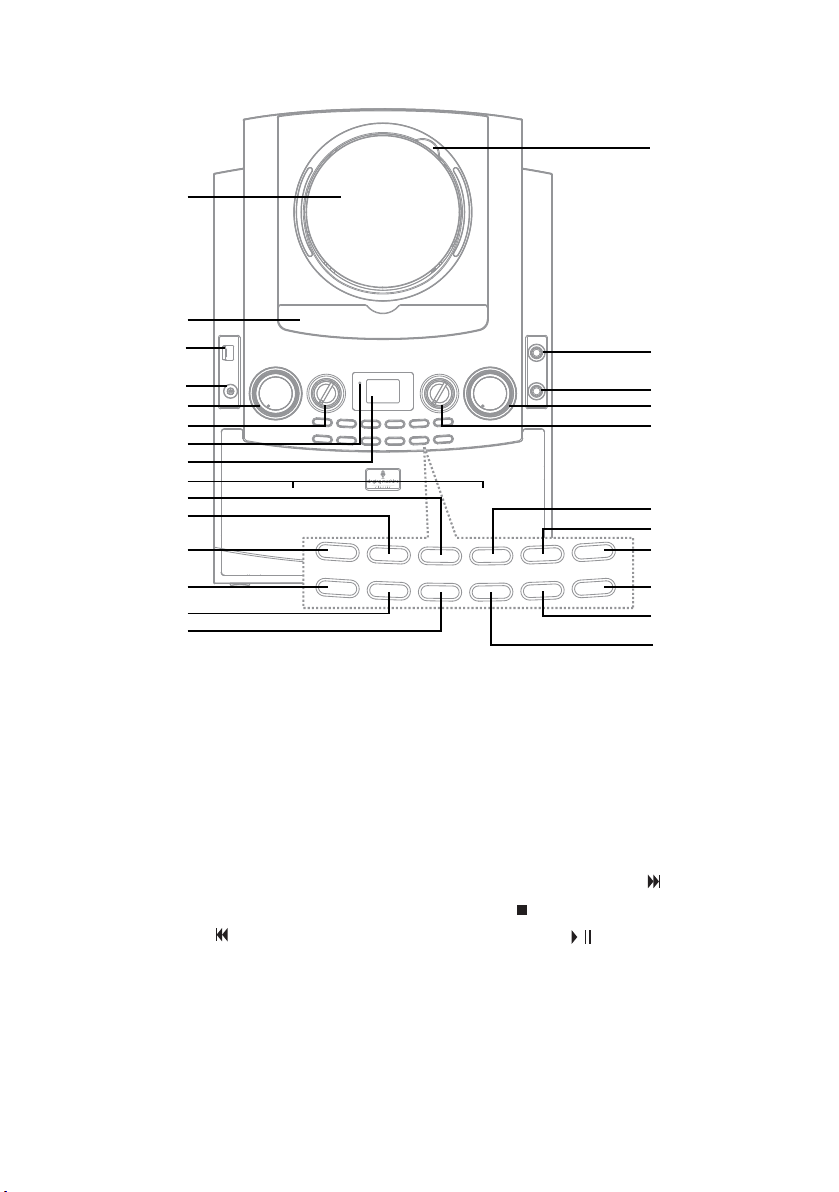
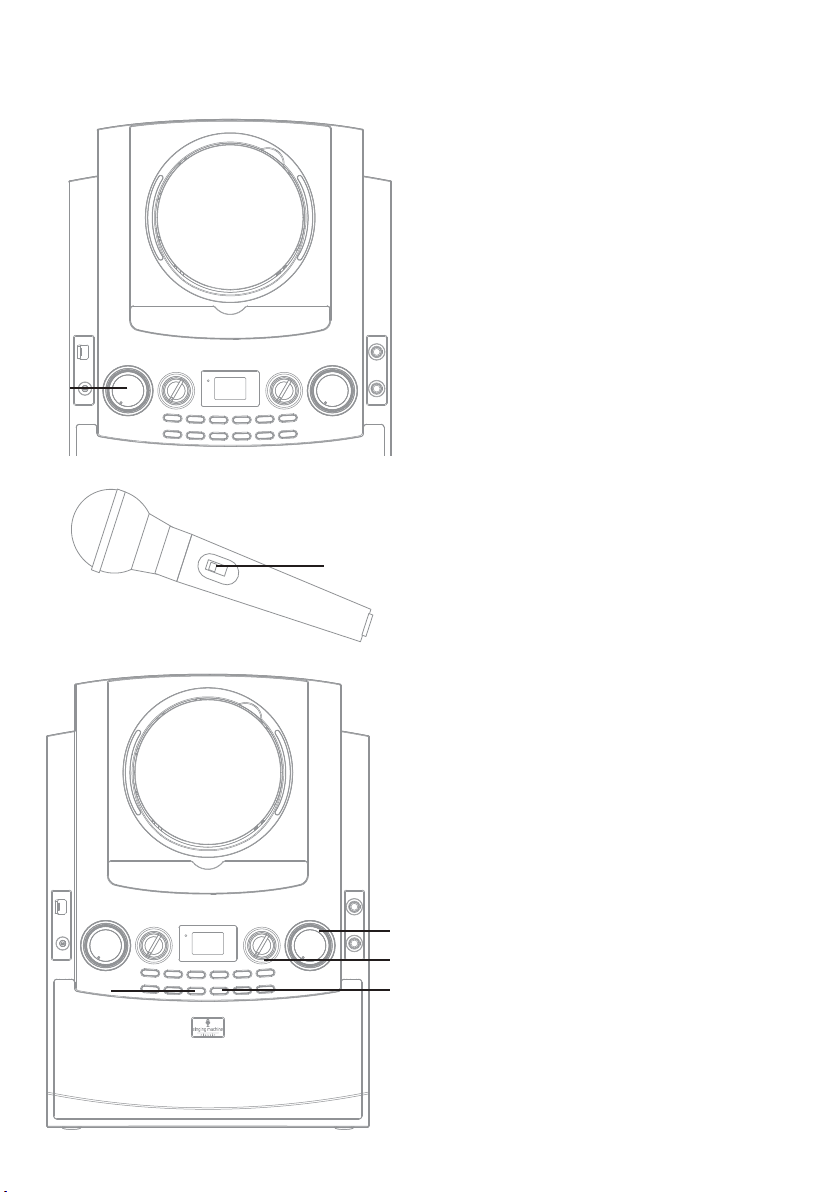
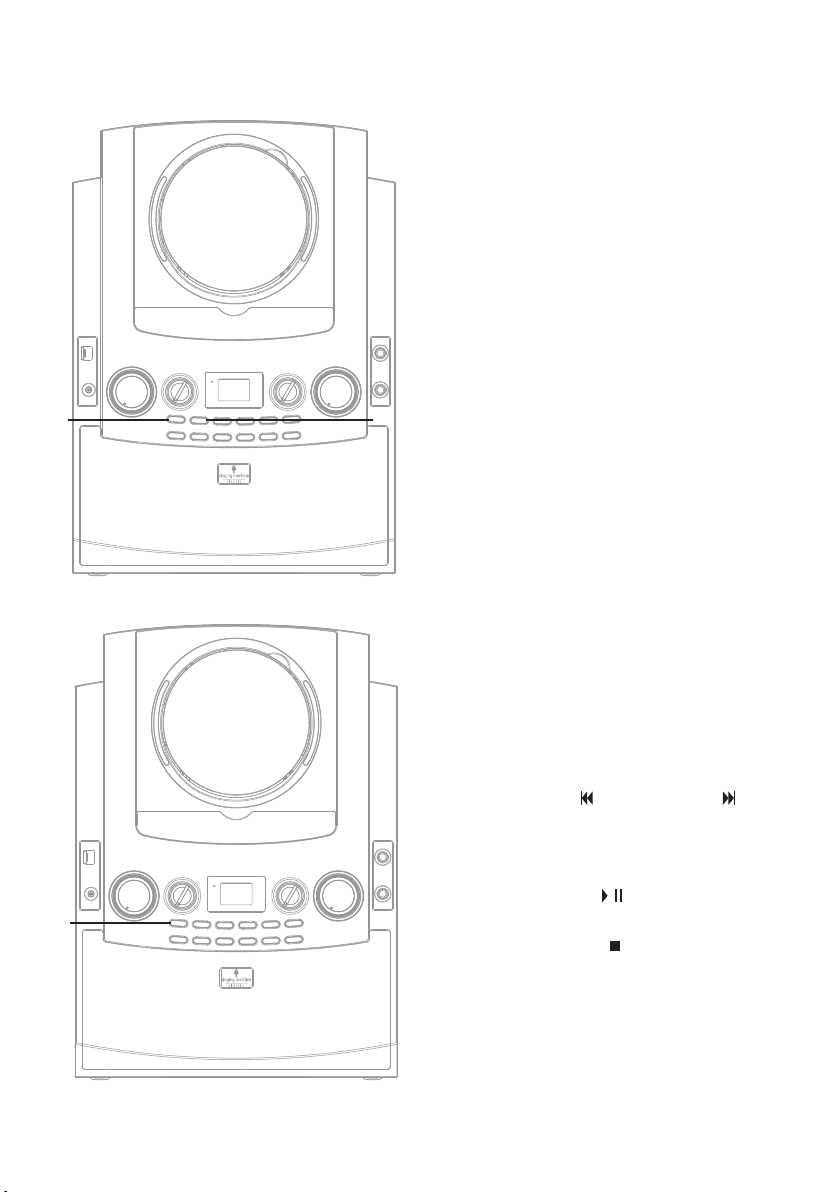
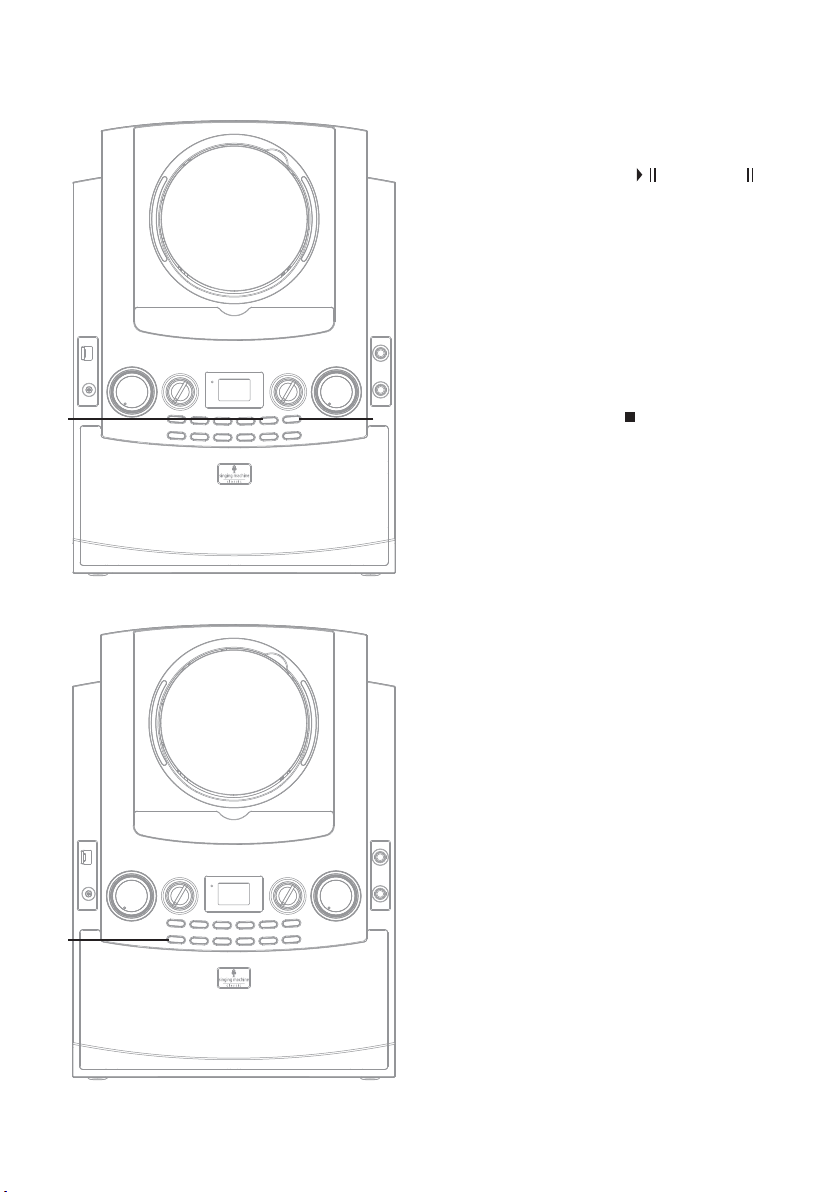
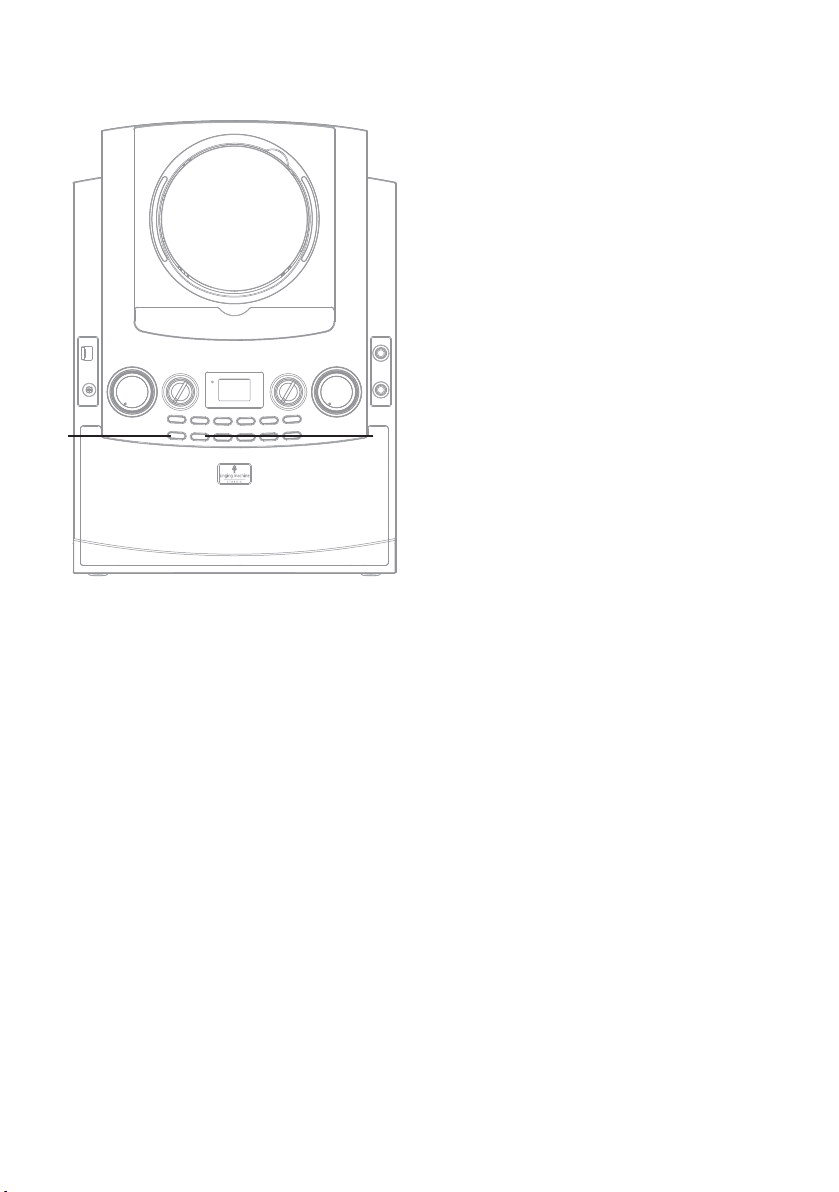
Location of Controls
Front
1
2
3
16
17
4
5
6
7
8
9
10
11
12
13
14
15
1. CD Compartment
2. Cradle
3. USB Port
4. LINE IN Jack
5. MASTER VOLUME Control
6. BALANCE Control
7. Power Indicator
8. Display
9. Speakers
10. Skip/Search Back Button (for CD)
11. 10+ Track Button
12. PROGRAM/REPEAT Button
13. Power ON/OFF Button
14. FUNCTION Button
18
19
20
21
22
23
24
25
26
15. KEY –/PAGE – Button (for MP3 and
MP3+G only)
16. CD OPEN Area
17.
Mic 1 Jack
18.
Mic 2 Jack
19.
MIC VOLUME Control
20.
ECHO Control
21.
Skip/Search Forward Button (for CD)
22.
Stop Button
23.
Play/Pause Butto
24.
AVC (Auto Voice Control) ON/OFF Button
PAIRING Button
25.
6.
2
KEY +/PAGE + Button (for MP3 and
MP3+G only)
n
E - 2
Page 4
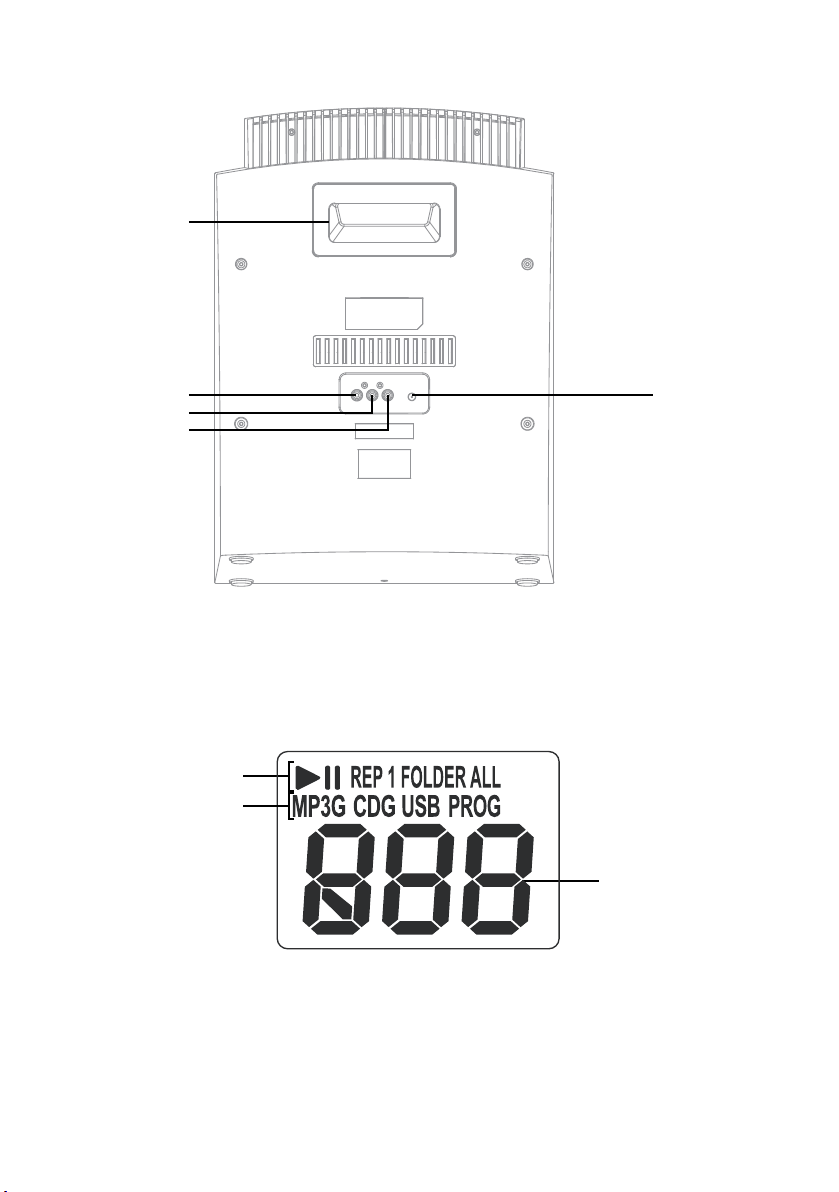
Location of Controls
3
1
2
1
2
3
4
5
Rear
1. Handle
2. VIDEO OUT Jack
3. AUDIO OUT Right Jack
Display
1. PLAY/PAUSE, REPEAT ONE, REPEAT
FOLDER, REPEAT ALL
2. MP3(MP3+G) PLAYBACK, CD(CD+G)
PLAYBACK, USB FUNCTION MODE,
PROGRAM ON
4. AUDIO OUT Left Jack
5. DC Jack
3. TRACK NUMBER/FUNCTION MODES
E - 3
Page 5
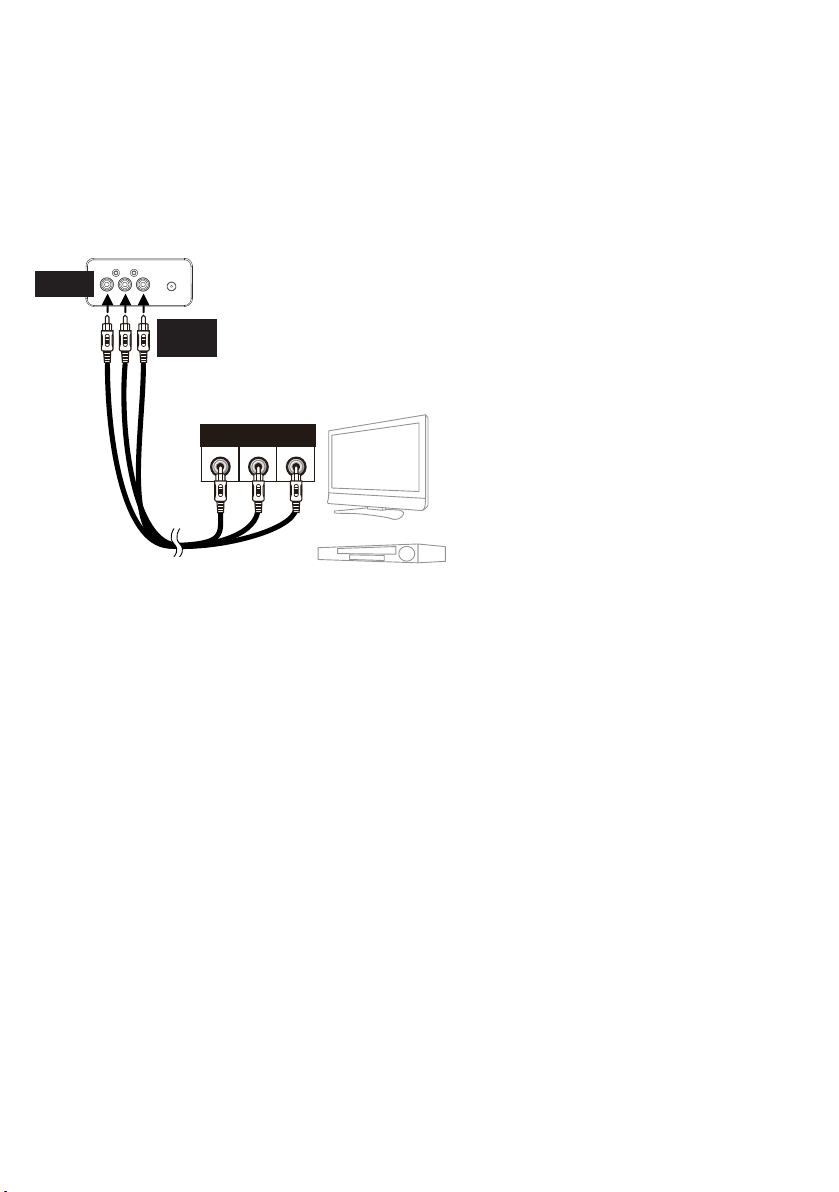
Connection
VIDE O
INPUT
AUDIO
INPUT
R L
REAR VIEW OF TV OR DVD PLAYER
REAR VIEW OF SINGING MACHINE
RCA cables
AUDIO OUT
(white - L
red - R)
VIDE O OUT
(yellow)
Connecting the Unit to an External TV, Stereo, etc.
Your Singing Machine is designed to
connect to your TV the same way you
would connect most video cameras, DVD
players or video game consoles, as follows:
Connect the Audio/Video cable’s
1
yellow plug to the yellow VIDEO
OUT jack on the iSM990BT and the
other end to the external unit’s
yellow Video In jack.
Connect the Audio/Video cable’s
2
red and white plugs to the red and
white AUDIO OUT jacks on the
iSM990BT and
the other ends to
the external unit’s red and white
Audio In jacks.
If left unconnected, the audio will
just play through this unit’s speakers.
Notes:
• This unit can be used with or without
a TV.
• To see the lyrics, you must use a CD+G
disc or MP3+G and an external TV.
• Also refer to the TV’s or external unit’s
User Guide.
• Audio/Video cables are included.
E - 4
Page 6
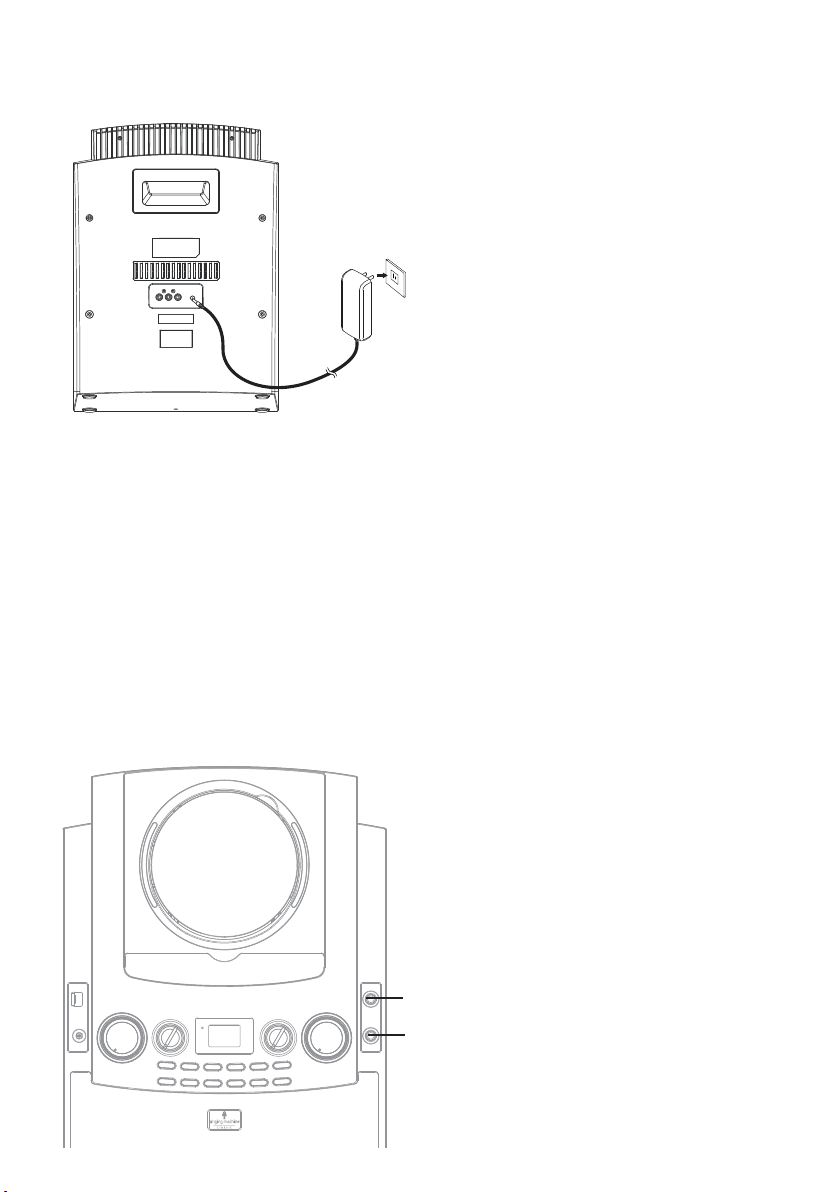
Connection
Insert the small end of the AC adapter into
the DC IN jack on the rear of the unit. Insert
the other end (with the 2 blades)
conveniently located AC outlet having
110-240V AC, 50/60Hz.
Notes:
• Only use the supplied AC adapter. Failure to
do so may cause a fire or damage the unit.
• The AC adapter included with this unit is
for its use only. Do not use it with other
equipment.
• Turn off the unit before unplugging the AC
adapter from the unit to avoid damaging
the unit.
• When the unit is not going to be used for
a long time, disconnect the AC adapter
from the AC outlet.
• If the unit acts erratically or malfunctions,
unplug the unit, wait 20 seconds and plug
it back in.
• Never use an AC adapter that is damaged.
Route power lead in a safe manner and
make sure it is not subjected to trapping
or pinching. If the power lead is damaged,
refer to a qualified service agent.
into a
Connecting the Microphone
Insert a microphone’s plug into the Mic 1
u
jack � . Insert the other microphone’s plug
into the Mic 2 jack � (if desired).
Note: Do not drop or tap the mic, as damage
to the mic or speakers may occur. Do not
spin the microphone around for the same
reason.
v
u
v
E - 5
Page 7

Operation
Playing a CD (with or without MP3+G files), CD+G or USB Drive
Connect the unit as described
1
previously. Press the Power ON/OFF
button to turn the unit on; the Power
indicator will light.
u
v
Lift open the CD door and insert a CD
2
(with standard or MP3+G files) or a
CD+G by gently pressing it on the
center spindle. Then close the CD door.
If using the USB drive with MP3+G
files, insert the USB into the USB slot.
(Always turn on the unit before
inserting your USB Flash Drive.)
AQs
F
• What is a CD+G?
A CD+G (CD+Graphics), is the standard
format for most karaoke discs that will
display the words on the screen.
• What is an MP3+G?
MP3+G is the newest format for karaoke
music utilizing the MP3’s small file size. It
will display the words on the screen. See page
E -16 to order and download MP3+G files.
Repeatedly press the FUNCTION
3
button until the display shows “Cd” to
select the CDG/CD mode or “USb” to
select the USB mode.
w
x
E - 6
Press the Play/Pause button to
4
start playback; if listening to an
MP3+G or CD+G file and connected to
an external TV, the image and lyrics
will appear on the TV (if connected).
Page 8
Operation
U
Playing a CD (with or without MP3+G files), CD+G or USB Drive
Adjust the volume to a comfortable
5
level using the MASTER VOLUME
control.
Notes:
• Never place anything other than a CD in
the compartment, as foreign objects can
damage the unit.
• If no disc is inserted, “no” will appear in the
display.
• If no USB drive is inserted, “no” will appear
y
in the display.
• If connected to a TV or other audio source,
the sound will come from this unit and the
TV, so adjust either Volume as desired.
Connect microphone(s) as shown on
6
page E - 5, and slide the ON/OFF
switch to the ON position.
Adjust the MIC VOLUME control as
7
desired. Increasing this control will
increase the volume of the respective
microphone.
X
V
W
X
E - 7
Adjust the Echo control to add an echo
8
effect to your voice.
Adjust the Key to obtain the best key
9
for the singer on the track. Adjust the
key using the KEY –/PAGE – and KEY
+/PAGE + buttons; the level will
appear in the display. There are a total
f 12 keys.
o
Page 9
Operation
Playing a CD (with or without MP3+G files), CD+G or USB Drive
Press the AVC (Auto Voice Control)
10
ON/OFF button to the On position
and the vocals on a multiplex
recording will be muted as soon as the
singer begins singing into the
microphone. When the singer stops
singing, the vocals are automatically
unmuted.
IMPORTANT: This feature only works
with multiplex media.
ak
al
am
BALANCE: Balance allows you to
at
11
Note: When playing an audio CD or music-
only recording, the balance will shift to the
right or left speaker.
12
Note: If using a USB drive and connected to a
TV, during Stop mode you can also select a
file using the KEY –/PAGE – and
+ buttons to scroll up/down or the Skip Back
13
al
am
Note: The Search function is not available for
CD+G playback.
eliminate the lead singer’s voice by
rotating the knob to the left when
playing a multiplex recording, or
eliminate the music by rotating the
knob to the right.
SKIP: Advance or go back one track
by pressing the Skip Back /Skip
Forward buttons.
/Skip Forward buttons to scroll left/right.
SEARCH: During playback, press and
hold the Skip Back /Skip Forward
button to move the player forward
or backward within a track to locate a
specific musical passage. When you
release the button, normal playback
will resume.
KEY +/PAGE
E - 8
Page 10
Operation
Playing a CD (with or without MP3+G files), CD+G or USB Drive
SKIP 10 TRACKS: During playback,
ao
14
15
an
Note: Repeat FOLDER function is not available
for normal music CD/CD+G playback.
you can press the 10+ button to skip
foward 10 tracks.
REPEAT: To repeat the current track,
press the PROGRAM/REPEAT button
once during playback. REP1 will
appear in the display and the current
track will be repeated. Press the
PROGRAM/REPEAT button twice, REP
FOLDER will appear and all MP3
tracks inside the current folder will be
repeated continuously. To repeat all
tracks, press the PROGRAM/REPEAT
button again, REP ALL will display on
the LCD display. Press again to cancel
the Repeat feature.
ap
PROGRAM: You can program up to 20
16
Note: Press the Stop button TWICE to stop
and clear the program.
E - 9
tracks for playback in any desired order.
While in Stop mode, press the
PROGRAM/REPEAT button; PROG and
the track number will appear in the
display. Select the first track using the
Skip Back /Skip Forward buttons,
then press the PROGRAM/REPEAT
button. Repeat to set up to 20 tracks
into memory. When done, press the
Play/ Pause button to start
playback.
Page 11
Operation
Playing a CD (with or without MP3+G files), CD+G or USB Drive
PAUSE: During playback, if you wish
17
Note: Pausing the unit while playing a CD+G
may distort the lyrics on the screen. This will
remain until the screen is refreshed.
to pause the disc momentarily, press
the Play/Pause button; “ ” will
appear in the display. Press again to
resume normal playback.
ar
as
aq
18
19
Press the Stop button to stop
playback.
Press the Power ON/OFF button to
turn the unit off; the Power indicator
will turn off.
E - 10
Page 12
Operation
Using a Bluetooth Device
u
Connect the unit as described
1
previously. Press the Power ON/OFF
button to turn the unit on; the Power
indicator will light.
Repeatedly press the FUNCTION button
2
until “bt” blinks in the display to select
the Bluetooth mode.
“bt” will blink rapidly to show the unit is
3
in the Pairing mode. If it is not blinking
v
rapidly, press and hold the PAIRING
button until “bt” blinks rapidly in the
display.
Switch on the Bluetooth function of
4
your Bluetooth compatible device
within three feet of the iSM990BT. You
will see “Singing Machine” appear on
your device’s search list.
Note: Please always refer to the user manual of
your Bluetooth device for detailed instructions.
Select “Singing Machine” to start
5
pairing. Wait for completion of the
pairing and “bt” will stop blinking in the
display.
Notes:
• If your Bluetooth device prompts you for a
passcode during the pairing process,
please enter “0000” to connect.
• After initial pairing, the unit will stay paired
unless unpaired manually by the user or
erased due to a reset of the devices.
• If your device should become unpaired,
follow the above steps again. If any pairing
issues should occur, unpair the unit on your
Bluetooth device and follow the above steps
again.
E - 11
Page 13

Operation
W
Using a Bluetooth Device
V
U
PLAY/PAUSE: Press the Play/Pause
6
7
Note: If connected to a TV or other audio
source, adjust the volume of the TV using its
own volume control.
8
9
button to start playback.
Make sure the Bluetooth device has its
volume set to mid range, then adjust
the volume to a comfortable level
using the MASTER VOLUME control.
Connect microphone(s) as shown on
page E - 5, and slide the ON/OFF
switch to the ON position. Also, if
desired, put your Bluetooth device
onto the cradle after it is paired.
Adjust the MIC VOLUME control as
desired. Increasing this control will
increase the volume of the respective
microphone.
X
at
ak
E - 12
10
11
Adjust the Echo control to add an
echo effect to your voice.
Press the AVC (Auto Voice Control)
ON/OFF button to the On position
and the vocals on a multiplex
recording will be muted as soon as the
singer begins singing into the
microphone. When the singer stops
singing, the vocals are automatically
unmuted.
IMPORTANT: This feature only works
with multiplex media.
Page 14

Operation
Using a Bluetooth Device
BALANCE: Balance allows you to
12
Note: This feature only works with multiplex
media.
eliminate the lead singer’s voice by
rotating the knob to the left when
playing a multiplex recording, or
eliminate the music by rotating the
knob to the right.
al
am am
ao
an
SKIP: Advance or go back one track
13
14
N
and/or your Bluetooth device is taken out of
communication range. An active connection
will be re-established when your Bluetooth
device returns within range. When the unit is
turned on again, it will automatically try to
reconnect with the most recently paired
Bluetooth device. When the Bluetooth
function of your Bluetooth-enabled device is
turned on again, reconnection
achieved by pressing the Bluetooth button on
the unit.
15
by pressing the Skip Back /Skip
Forward buttons.
PAUSE: During playback, if you wish
to pause the disc momentarily, press
the Play/Pause button; “ ” will
appear on the screen. Press again to
resume normal playback.
ote:
Pairing remains intact when the unit
can be
Press the Power ON/OFF button to
turn the unit off; the Power indicator
will turn off.
E - 13
Page 15

Operation
y
Using the LINE IN Jack
Connect the unit as described
1
previously. Press the Power On button
to turn the unit on; the Power indicator
will light.
v
AUDIO OUTPUT
/ HEADPHONE JACK
YOUR iPHONE/iPOD OR
DIGITALPLAYER OR
MP3 PLAYER
x
w
LINE IN
u
Connect the external unit to the LINE
2
IN jack.
Notes:
• It is highly recommended to set the volume
on the auxillary unit to 1/3 or lower to
avoid distortion.
• Skipping files/tracks is not possible when
using an external device.
Repeatedly press the FUNCTION
3
button until the display shows “AU” to
select the AUX mode.
Adjust the volume to a comfortable
4
level using the MASTER VOLUME
control.
Connect microphone(s) as shown on
5
page E - 5, and slide the ON/OFF
switch to the ON position.
U
E - 14
6
Adjust the MIC VOLUME control as
desired. Increasing this control will
increase the volume of the respective
microphone.
Page 16

Operation
Using the LINE IN Jack
7
8
Adjust the Echo and Balance effects
as shown on pages E - 7 and E - 8.
Press the Power ON/OFF button to
turn the unit off; the Power indicator
will turn off.
V
W
V
E - 15
Page 17

Operation
Where to Download MP3+G Files
Helpful Hints:
The .mp3 and .cdg files are delivered for
download in a single, compressed MP3+G.zip file.
The MP3+G file cannot be played as a .zip file on
a USB flash drive. To play karaoke songs using a
USB flash drive, the MP3+G .zip file must be
unzipped as follows:
• Connect a USB flash drive to your computer.
• Download the MP3+G file from your Digital
Locker and save the .zip* file to a folder on
your computer.
• Double click the .zip file to open the .zip (you
ill see the .mp3 and .cdg files).
w
• Drag and drop the .mp3 and .cdg files to the
USB flash drive.
• Remove (eject) the USB flash drive from your
computer.
Turn on the Singing Machine and connect the USB
flash drive.
FAQ
• Where can I get additional help with the file
formats?
While on the Singing Machine Store’s web
page, simply click FILE FORMATS at the
lower left.
To purchase and download karaoke music,
please visit http://store.singingmachine.com to
access over 12,000 of your favorite karaoke
songs. You will need a USB flash drive (not
included) to transfer the downloads to this unit.
Follow these easy steps:
Go to http://store.singingmachine.com
1
using your internet browser, and then
register.
Select and purchase your favorite
2
karaoke music from the Singing
Machine Download Store.
Download your selected purchase(s)
3
from the Singing Machine Digital Locker
to your USB flash drive.
Insert the USB flash drive as shown on
4
page E - 6 and enjoy!
Note: Your downloaded songs can also be
burned to a blank CDR/CDRW.
E - 16
Page 18

Care and Maintenance
B
E
N
Z
E
N
E
C
L
E
A
N
E
R
COMPACT
DIGITAL AUDIO
GRAPHICS
Care for Compact Discs
Treat the compact disc carefully. Handle the compact disc
only by its edges. Never allow your fingers to come in
contact with the shiny, unprinted side of the compact disc.
Do not attach adhesive tape, stickers, etc. to the
compact disc label. Clean the compact disc periodically
with a soft, lint-free, dry cloth. Never use detergents or
abrasive cleaners to clean th
use a CD cleaning kit.
If a disc skips or gets stuck on a section of the compact
disc, it is probably dirty or damaged (scratched).
When cleaning the compact disc, wipe in straight lines
from the center of the compact disc to the outer edge of
the compact disc. Never wipe in circular motions.
This unit is designed to play only compact discs bearing
the identification logos as shown here. Other discs may
not conform to the CD standard and may not play properly.
e compact disc. If necessary,
Compact discs should be stored in their cases after each
use to avoid damage. Do not expose compact discs to
direct sunlight, high humidity, high temperatures or dust,
etc. Prolonged exposure or extreme temperatures can
warp the compact disc.
Do not stick anything on either side of the compact disc.
Also do not write on the shiny side of the disc, as sharp
writing instruments, or the ink, may damage the surface.
Cleaning the Unit
To prevent fire or shock hazard, disconnect your unit
from the AC power source when cleaning. The finish on
your unit may be cleaned with a dust cloth and cared for
as other furniture. Use caution when cleaning and wiping
the plastic parts.
E - 17
Page 19

Troubleshooting Guide
Should this unit exhibit a problem, check the following before seeking service:
No Power
• Power is not on; press the Power ON/OFF button to turn power on.
• Make sure the unit is connected to AC power.
No Sound – General
• Master Volume is set to minimum; raise volume.
• Correct Function was not selected; select using the FUNCTION button.
No Sound – If connected to a TV
• Volume on the TV is muted or too low.
• White and red audio plugs are not connected properly; see page E - 4.
• Correct source (usually AV) was not selected in the TV’s menu.
CD section is not working properly
• No disc inserted, or disc inserted upside down; insert disc correctly.
• Make sure to use a CD, CD+G, or when downloaded music has been burned, ensure the disc
is a CDR or CDRW.
• Lens is dirty. Disconnect the power and clean the lens with a CD lens cleaner.
Moisture has formed. Turn the unit off, unplug the unit from the outlet and allow 20-30
•
minutes to dry.
No sound from the microphone
• Make sure it is firmly connected to the MIC1 or MIC2 jack.
• Make sure it is turned on, see page E - 7.
• Make sure the MIC VOLUME control is not on the lowest setting.
• MASTER VOLUME is set to minimum; raise volume.
File(s) on USB jack not playing
The file is corrupted; replace file.
•
• The file is not in a format this unit will play.
• The connected USB device is not supported by the product.
The Bluetooth device cannot be paired or connected with the unit.
• You have not activated the Bluetooth function of your device; see page E - 11 or refer to
the Bluetooth device’s user manual.
• The unit is not in pairing mode; see page E - 11 to pair.
The Music playback is not available on the unit after successfully connecting the Bluetooth.
• Ensure your Bluetooth device can support the A2DP Bluetooth profile.
E - 18
Page 20

Specifications
AUDIO
Output Power (Maximum)............................................................................. 10W + 10W (RMS) 10% THD
Output Impedance ............................................................................................................................ 8 Ohms
CD PLAYER
Frequency Response......................................................................................................... 100 Hz-20 KHz
Signal to Noise Ratio..............................................................................................................................50 dB
Sampling System.................................................................................................... 8 Times Oversampling
Disc Diameter .....................................................................................................................4.72" (120 mm)
.............................................................................................................................. 3.15" (80 mm) Single CD
BLUETOOTH
Bluetooth Version ........................................................................................................................V3.0 + EDR
Working Distance.................................................................Up to 10 meters measured in open space
GENERAL
Power................................................................................................................. AC 110-240 V, 50/60 Hz
Dimensions .......................................................... 17.0 x 8.1 x 12.1 inches / 30.8 x 20.6 x 43.2 cm
eight ....................................................................................................................................8.2 lbs / 3.7 kg
W
Microphone............................ -74 dB 600 Ohms impedance with 6.3 mm Dynamic Microphone
Power ............................................................................................DC12V, 2.5A Center Positive Adapter
USB..............................................................................................................Supports USB Flash up to 8 GB
Specifications are subject to change without notice.
E - 19
Page 21

Advertencias
PRECAUCIÓN
RIESGO DE DESCARGA ELÉCTRICA
NO ABRIR
PRECAUCIÓN: PARA REDUCIR EL RIESGO DE DESCARGAS ELÉCTRICAS, NO QUITE
LA CUBIERTA (NI LA TAPA POSTERIOR) NO HAY PIEZAS REPARABLES POR EL
USUARIO DENTRO. DERIVE LAS REPARACIONES A PERSONAL DE SERVICIO
CALIFICADO.Las marcas de Precaución se ubican en el panel inferior.
TENSIÓN PELIGROSA: La luz intermitente con símbolo de flecha dentro
de un triángulo pretende alertar al usuario de la presencia de tensión
peligrosa no aislada, dentro del paquete del producto, que puede ser de
magnitud suficiente para constituir un riesgo de descarga eléctrica para
las personas.
ATENCIÓN: El signo de exclamación dentro de un triángulo pretende
alertar al usuario de la presencia de instrucciones importantes de
operación y mantenimiento (reparaciones) en el material que
acompaña a este producto.
PELIGRO: Este símbolo pretende alertar al usuario del riesgo de
exposición a radiación láser invisible y peligrosa si la cubierta o tapa
posterior están abiertos, si falla el interbloqueo o está adulterado. La
exposición directa al rayo puede dañar su vista.
ADVERTENCIA DE GOTEO: Este producto no se podrá exponer a goteo o salpicaduras, y no
se colocará ningún objeto lleno con líquidos, como jarrones, encima del producto.
ADVERTENCIA DE VENTILACIÓN: La ventilación normal del producto no se bloqueará si se
le da el uso previsto.
VERIFICACIÓN DE SEGURIDAD: Este dispositivo está fabricado y evaluado en cumplimiento
tándares de seguridad de la FCC, requisitos y cumplimiento de rendimiento de
de los es
seguridad del Departamento de Salud y Servicios Humanos de EE.UU. y también la FDA.
Subcapítulo 21 del Código de reglamentos federales, Estándares de rendimiento de radiación.
Símbolo de equipo Clase II.
Este símbolo indica que la unidad tiene sistema de doble aislamiento.
PRECAUCIÓN: PARA EVITAR DESCARGAS ELÉCTRICAS, INSERTE COMPLETAMENTE UNA
HOJA ANCHA DEL ENCHUFE A LA RANURA ANCHA.
ADVERTENCIA: PARA EVITAR INCENDIOS O PELIGROS DE DESCARGA,
NO EXPONGA ESTA UNIDAD A LA LLUVIA O HUMEDAD.
AVISO DE LA FCC: Este equipo puede generar o usar energía de radio frecuencia.
Los ca mbios o m odificaciones realizado s en el aparato pueden p rovocar
interferencia perjudicial, a menos que dichas modificaciones estén autorizadas en
el manual de instrucciones. El usuario puede perder toda autoridad para operar el
equipo si realiza cambios o modificaciones sin autorización.
Este aparato cumple con la part
está sujeto a las dos condiciones que figuran a continuación: (1) Es probable que
no cause interferencia perjud icial y (2) deberá aceptar c ualquier interferencia
recibida, incluyendo la interferencia que pueda llegar a causar un funcionamiento
indeseado.
NOTA: Este equipo fue probado y se concluyó que cumple con los límites
establecidos para los dispositivos digitales Clase B, de acuerdo con el Apartado 15
de las normas de la FCC. Estos límites fueron pensados para proporcionar
protección razonable ante la interferencia perjudicial en una instalación residencial.
ste equipo genera, usa y puede emitir energía de radio fr
E
instala y utiliza de conformidad con las instrucciones, puede causar interferencia
perjudicial a las comunicaciones radiales. No obstante, no existe ninguna garantía
de que no se produzca interferencia en una instalación en particular. Si este equipo
provoca interferencia perjudicial a la recepción de radio o televisión, lo cual puede
determinarse apagando y encendiendo el equipo, el usuario puede intentar
gir la interferencia de alguna/s de las siguientes maneras:
corre
• Reoriente la antena receptora o ubíquela en otro lugar.
• Aumente la distancia entre el equipo y el receptor.
• Conecte el equipo a un tomacorrien te de un circuito distinto al que está
conectado el receptor.
• Consulte al distribuidor o a un técnico experimentado de radio y televisi ón
para que lo asesore.
mación
• La infor
SEGURIDAD DEL L ÁSER: Esta unidad utiliza un láser. Sólo el personal de
reparaciones calificado es quien puede reparar este dispositivo debido a
p
osibles lesiones en la vista.
PRECAUCIÓN: EL USO DE LOS CONTROLES, AJUSTES O PROCEDIMIENTO
DE RENDIMIENTO QUE CONSTAN EN EL PRESENTE, PUEDEN CAUSAR
EXPOSICIÓN PELIGROSA A LA RADIACIÓN.
Este dispositivo cumple con las normas industriales RSS exentas de
licencia de Canadá. La operación está sujeta a las dos condiciones
siguientes:
1. Este dispositivo no puede causar interferencias perjudiciales y
2. Este dispositivo debe aceptar cualquier interferencia recibida,
incluidas aquellas que puedan provocar un funcionamiento no
deseado.
CAN ICES-3(B)/NMB-3(B)
e 15 de
las Normas de la FCC. El funcionamiento
ecuencia
y, si no se lo
de clasificación está ubicada en la parte inferior de la unidad.
Información importante sobre seguridad
1. Lea estas instrucciones.
2. Conserve estas instrucciones.
3. Preste atención a todas las advertencias.
4. Siga todas las instrucciones.
5. No utilice este artefacto cerca del agua.
6. Límpielo únicamente con un paño seco.
7. No obstruya las aberturas para ventilación. Instálelo de acuerdo con las
instrucciones del fabricante.
8. No instale cerca de fuentes de calor,
alefacción, estufas u otros aparatos (incluso amplificadores) que
c
produzcan calor.
9. No desafíe el fin de seguridad del enchufe polarizado o de conexión a
tierra. Un enchufe polarizado tiene dos clavijas y una es más ancha que
la otra. El enchufe de conexión a tierra tiene dos clavijas, y una tercera
punta a tierra. La clavija ancha o la tercera punta se suministran para
s
eguridad. Si el enchufe suministrado no coincide con su tomacorriente,
consulte con un electricista para reemplazar el tomacorriente obsoleto.
10. Evite pisar o apretar el cable de alimentación, especialmente en los
enchufes, tomacorrientes y en el punto por donde salen del artefacto.
11. Utilice sólo los complementos y accesorios especificados por el
fabricante.
12. Utilice la unidad sólo con el car
comendados por el fabricante, o que se vendan junto con el producto
re
como radiadores, rejillas de
ro, soporte, trípode, repisa o mesa
su
Cuando se utiliza un carro, tenga cuidado cuando
mueva el carro y artefacto junto a para evitar
lesiones producidas por la caída del producto.
13. Desenchufe este artefacto durante las tormentas
eléctricas o cuando no se lo utilice durante
períodos prolongados.
14. Derive todas las reparaciones al per
reparaciones c
artefacto cuando se encuentra dañado; por
ejemplo, cuando el cable de suministro de energía o el enchufe están
dañados, cuando se derrama líquido sobre la unidad o caen objetos dentro
del mismo, cuando el producto ha estado expuesto a la lluvia o a la
humedad, cuando no funciona con normalidad o cuando se ha caído.
15. ADVERTENCIA: Para reducir el
o exponga este artefacto a la lluvia o la humedad. No coloque objetos
n
llenos de agua, como jarrones, sobre el aparato.
16. El enchufe de conexión de CA se utiliza como dispositivo de desconexión
eléctrica y deberá estar siempre accesible y en funcionamiento durante
el uso previsto. Para desconectar completamente el aparato de la
electricidad, el enchufe de cone
tom
17. PRECAUCIÓN: Para reducir el riesgo de incendio o explosión no exponga
las baterías al calor excesivo, como al rayo del sol, fuego u otras fuentes
de calor.
alificado. Es necesario reparar el
acorriente de CA.
sonal de
riesgo de incendio o descarga eléctrica,
xión deberá quitarse por completo del
S - 1
Page 22

Ubicación de controles
Delantero
1
2
3
16
17
4
5
6
7
8
9
10
11
12
13
14
15
1. Compartimiento del CD
2. Soporte
3. Puerto USB
4. Entrada de LINE IN
5. Control de VOLUMEN PRINCIPAL
(MASTER VOLUME)
6. Control de BALANCE
7. Indicador de Encendido/Apagado (Power)
8. Pantalla
9. Altavoces
10. Botón de Saltear/Buscar atrás (Skip/Search
Back) (para CD)
11. Botón para pistas 10+
12. Botón de PROGRAMAR/REPETIR
(PROGRAM/REPEAT)
13. Botón de ENCENDIDO/APAGADO (ON/OFF)
14. Botón FUNCIÓN (FUNCTION)
18
19
20
21
22
23
24
25
26
15. Botón CLAVE –/PÁGINA – (KEY–/PAGE–)
solo para MP3 y MP3+G)
(
16.
Área de APERTURA DE CD
17.
Entrada para micrófono 1
18.
Entrada para micrófono 2
19.
Control de VOLUMEN DE MICRÓFONO
(MIC VOLUME)
20.
Control de ECO (ECHO)
Botón de Saltear/Buscar hacia adelante
21.
(Skip/Search Forward) (para CD)
22.
Botón de Detención (Stop)
23.
Botón Reproducir/Pausar (Play/Pause)
24.
Botón de Control de voz automático
(Auto Voice Control, AVC)
Botón de CONFIGURACIÓN (PAIRING)
25.
Botón CLAVE +/PÁGINA + (KEY+/PAGE+)
26.
(solo para MP3 y MP3+G)
S - 2
Page 23

Ubicación de controles
3
1
2
1
2
3
4
5
Reverso
1. Manija
2. SALIDA DE VIDEO
3. SALIDA DE AUDIO (Derecha)
Pantalla
1. REPRODUCIR/PAUSAR (PLAY/PAUSE),
REPETIR UNA (REPEAT ONE), REPETIR
CARPETA (REPEAT FOLDER), REPETIR TODAS
(REPEAT ALL)
2. REPRODUCCIÓN DE MP3 (MP3+G)
(MP3[MP3+G] PLAYBACK), REPRODUCCIÓN
DE CD (CD+G) (CD [CD+G]PLAYBACK),
4. SALIDA DE AUDIO (Izquierda)
5. Conector para CC
MODO PARA FUNCIÓN USB (USB FUNCTION
MODE), PROGRAMACIÓN ACTIVADA
(PROGRAM
3. NÚMERO DE PISTA/ MODOS DE FUNCIONES
(TRACK NUMBER/FUNCTION MODES)
ON)
S - 3
Page 24

Conexión
VIDE O
INPUT
AUDIO
INPUT
R L
VISTA POSTERIOR DE LA TV O DVD
VISTA POSTERIOR DE LA SINGING MACHINE
CABLES RCA
SALIDA DE AUDIO
(blanco-Izquierda
rojo-Derecha)
SALIDA DE VIDEO
(AMARILLO)
Conexión de la unidad a un televisor externo, estéreo, etc.
Singing Machine está diseñada para
conectarse al televisor del mismo modo
que conecta la mayoría de las cámaras de
video, los reproductores de DVD o las
consolas de videojuegos, de la siguiente
manera:
Conecte el enchufe amarillo del
1
cable de Audio/Video en la SALIDA
DE VIDEO amarilla en el iSM990BT
y el otro extremo en la Entrada de
Video amarilla de la unidad externa.
Conecte los enchufes rojo y blanco
2
del cable de Audio/Video en las
SALIDAS DE AUDIO roja y blanca en
el iSM990BT y los otros extremos
en las entradas de Audio roja y
blanca de la unidad externa.
Si se deja sin conectar, el audio
saldrá a través de los parlantes de
la unidad.
Notas:
• Esta unidad se puede usar con o sin
televisor.
• Para ver las letras de canciones debe
utilizar un disco CD+G o MP3+G y un
aparato de TV externo.
• También consulte la Guía de usuario de
la unidad externa o televisor.
• Se incluyen los cables de audio y video.
S - 4
Page 25

Conexión
Introduzca el extremo pequeño del adaptador de
CA en el conector de entrada de CC ubicado en la
arte trasera de esta unidad. Introduzca el otro
p
extremo (con 2 clavijas) en un tomacorriente
con CA, correctamente ubicado y que posea
110-240V de CA, 50/60Hz.
Notas:
• Sólo utilice el adaptador de CA provisto. Si no lo
hace puede causar un incendio o que la unidad
se dañe.
• El adaptador de CA que viene con esta unidad
sólo se provee para uso de la misma. No lo
utilice con otro equipo.
• Apague la unidad
adaptador de CA para evitar que ésta se dañe.
• Cuando la unidad no se vaya a utilizar por un
largo periodo de tiempo, desconecte el
adaptador de CA del tomacorriente
correspondientt.
• Si la unidad funciona incorrectamente o tiene
mal funcionamiento, desconecte la misma,
espere 20 segundos y enchúfela nuevamente.
• Nunca utilice un adaptador de CA que esté
dañado. Oriente el cable de alimentación de
manera segura y asegúrese de que no esté
enredado o aplastado. Si el cable de
alimentación está dañado, consulte con un
agente de reparaciones calificado.
antes de desenchufar el
Conexión de micrófono
Inserte el enchufe de un micrófono en la
entrada para micrófono 1 � . Inserte el otro
u
enchufe de micrófono en la entrada para
micrófono 2 � (si lo desea).
v
Nota: No arroje o dé golpecitos al micrófono,
puede dañar el micrófono o los parlantes.
Por la misma razón, no haga girar el
micrófono.
u
v
S - 5
Page 26

Funcionamiento
Reproducción de un CD (con o sin archivos MP3+G), CD+G o dispositivo USB
Conecte la unidad como se describió
1
previamente. Oprima el botón de
ENCENDIDO/APAGADO (ON/OFF) para
encender la unidad. El indicador de
Encendido/Apagado (Power) se iluminará.
u
v
Abra el compartimiento de CD e introduzca
2
un CD (con archivos estándar o MP3+G) o
un CD+G presionándolo cuidadosamente
en el husillo central. Cierre la tapa del CD.
Si utiliza el dispositivo USB con archivos
MP3+G, introduzca el USB en la ranura de
USB. (Siempre encienda la unidad antes de
colocar la memoria USB.)
PREGUNTAS FRECUENTES
• ¿Qué es un CD+G?
Un CD+G (CD+ Graphics), es el formato
estándar para la mayoría de los discos de
karaoke que mostrarán las letras de canciones
en pantalla.
• ¿Qué es un MP3+G?
MP3+G es el formato más nuevo para música
Karaoke usando el tamaño de archivo pequeño
de MP3. Mostrará las letras de canciones en la
alla. Consulte la página S - 16 para comprar
pant
y descargar archivos MP3+G.
Oprima repetidamente el botón FUNCIÓN
3
(FUNCTION) hasta que la pantalla muestre
“CD” para seleccionar el modo CDG/CD o
“USB” para seleccionar el modo de USB.
w
x
S - 6
Oprima Reproducción/Pausa (Play/Pause)
4
para iniciar la reproducción; si está
escuchando un archivo MP3+G o CD+G y
está conectado a un aparato de TV
externo, la imagen y las letras de canciones
aparecerán en la pantalla de TV (si está
onectado.
c
Page 27

Funcionamiento
U
Reproducción de un CD (con o sin archivos MP3+G), CD+G o dispositivo USB
Ajuste el volumen a un nivel conveniente,
5
usando el control de VOLUMEN PRINCIPAL
(MASTER VOLUME).
Notas:
• Nunca coloque nada que no sea un CD en el
compartimiento, como por ejemplo objetos
extraños que puedan dañar la unidad.
• Si no introdujo un disco, "no" aparecerá en la
pantalla.
• Si no introdujo un dispositivo USB, "no"
aparecerá en la pantalla.
y
• Si está conectado a un aparato de TV u otra
fuente de audio, el sonido saldrá de esta unidad
y d
e la TV, por ello debe ajustar cualquier
volumen, según lo desee.
Conecte el/los micrófono/s como se
6
muestra en la página S - 5 y deslice el botón
ENCENDIDO/ APAGADO (ON/OFF) hasta la
posición ENCENDIDO (ON).
Ajuste el control de VOLUMEN DEL
7
MICRÓFONO (MIC VOLUME) según el
nivel deseado. Al aumentar el nivel de este
control se incrementará el volumen del
micrófono respectivo.
X
V
W
X
S - 7
Ajuste el control de ECO (ECHO) para darle
8
un efecto de eco a su voz.
Ajuste la Clave (Key) para obtener la mejor
9
clave en la pista, para el cantante. Ajustar
la clave utilizando los botones CLAVE –
/PÁGINA – (KEY –/PAGE –) y CLAVE
+/PÁGINA (KEY +/PAGE +); el nivel
aparecerá en la pantalla. Existen en total
12 claves.
Page 28

Funcionamiento
Reproducción de un CD (con o sin archivos MP3+G), CD+G o dispositivo USB
Oprima el botón de ENCENDIDO/
ak
10
11
at
Nota: Cuando se reproduce un CD de audio o una
grabación sólo con música, el balance pasará al
altavoz derecho o izquierdo.
12
Nota: S
un aparato de TV, durante el modo Detener (Stop)
puede también seleccionar un archivo con los
botones CLAVE –/PÁGINA – (KEY –/PAGE –) y
CLAVE +/PÁGINA + (KEY +/PAGE +) para
desplazarse hacia arriba o abajo o los botones Salto
hacia atrás /hacia adelante (Skip Back/Skip
Forward) para desplazarse a la izquierda o la derecha.
APAGADO (ON/OFF) de AVC (control de
voz automático) para encender esta
opción y silenciar las voces en grabación
multiplex en cuanto el cantante comience
a cantar en el micrófono. Cuando se
detiene, las voces comienzan a escucharse
nuevamente de forma automática.
IMPORTANTE: Esta función sólo funciona
con medios multiplex.
BALANCE: El Balance le permite eliminar la
voz del cantante principal al rotar la perilla
hacia la izquierda cuando se reproduce una
grabación multiplex o eliminar la música al
rotar la perilla a la derecha.
SALTO (SKIP): Avance o retroceda una
pista oprimiendo los botones de Salto
hacia adelante/Atrás (Skip Back /Skip
Forward ).
i usa un dispositivo USB y está conectado a
al
am
BÚSQUEDA: Durante la reproducción,
13
al
am
Nota: La función Búsqueda (Search) no está
disponible para la reproducción de CD+G.
S - 8
a y mantenga presionado el botón
oprim
de Salto hacia atrás (Skip Back) o el de
Salto hacia adelante (Skip Forward)
para mover el reproductor hacia adelante
o hacia atrás dentro de una pista para
ubicar un pasaje musical específico.
Cuando libera el botón, se reanuda la
reproducción normal.
Page 29

Funcionamiento
Reproducción de un CD (con o sin archivos MP3+G), CD+G o dispositivo USB
SALTAR 10 PISTAS: Durante la
reproducción puede oprimir el botón
10+ para saltar 10 pistas.
FUNCIÓN REPETIR: Para repetir la pista
actual, oprima una vez PROGRAMAR/
REPETIR (PROGRAM/REPEAT) durante la
reproducción. En la pantalla aparecerá
REP1 y se repetirá la pista actual. Oprima
dos veces el botón PROGRAMAR/REPETIR
(PROGRAM/REPEAT), aparecerá CARPETA
DE REP (REP FOLDER) y se repetirán de
a continua todas las pistas MP3
form
dentro de la carpeta actual. Para repetir
todas las pistas, oprima nuevamente
PROGRAMAR/REPETIR (PROGRAM/
REPEAT), en la pantalla LCD aparecerá REP
TODAS (REP ALL). Oprima otra vez para
cancelar la función Repetir (Repeat).
ao
14
15
an
Nota: La función Repetir CARPETA (Repeat
FOLDER) no está disponible para la reproducción
normal de música en CD/CD+G.
ap
PROGRAMAR: Puede programar hasta 20
16
Nota
(Stop) para detener y eliminar el programa.
S - 9
pistas para reproducir en cualquier orden
deseado. En el modo Detener (Stop),
oprima el botón PROGRAMAR/REPETIR
(PROGRAM/REPEAT); en la pantalla
aparecerá PROG y el número de pista.
Seleccione la primera pista con los botones
Saltar hacia atrás / hacia adelante
(Skip Back/Skip Forward), luego presione el
botón PROGRAMAR/REPETIR
(PROGRAM/REPEAT). Repita hasta agregar
un máximo de 20 pistas a la memoria. Al
finalizar, presione el botón
Reproducir/Pausar (Play/ Pause) para
comenzar la reproducción.
: Oprima DOS VECES el botón de Detener
Page 30

Funcionamiento
Reproducción de un CD (con o sin archivos MP3+G), CD+G o dispositivo USB
PAUSA: Durante la reproducción, si desea
17
Nota: Si pausa la unidad mientras reproduce un
CD+G esto puede distorsionar las letras de
canciones que aparecen en pantalla. Esto seguirá
hasta que se actualice la pantalla.
pausar momentáneamente el disco,
oprima el botón Reproducción/Pausa
(Play/Pause) ; “ ” aparecerá en la
pantalla. Oprima nuevamente para
reanudar la reproducción normal.
ar
as
aq
18
19
Oprima STOP (DETENER) para detener
la reprodu
Oprima el botón ENCENDIDO/APAGADO
(Power ON/OFF) para apagar la unidad; el
indicador también se apagará.
cción.
S - 10
Page 31

Funcionamiento
Utilizar un dispositivo Bluetooth
u
Conecte la unidad como se describió
1
previamente. Oprima ENCENDIDO/
APAGADO (Power ON/OFF) para encender
la unidad. El indicador de Encendido/
Apagado (Power) se iluminará.
Oprima varias veces FUNCIÓN (FUNCTION)
2
hasta que “bt” parpadee en la pantalla para
seleccionar el modo Bluetooth.
“bt” parpadeará rápido para mostrar que la
3
unidad se encuentra en el modo de
Emparejamiento (Pairing). Si no parp
rápido, presione y mantenga presionado el
v
botón EMPAREJAMIENTO (PAIRING) hasta
que “bt” parpadee rápido en la pantalla.
ENCIENDA la función Bluetooth de su
dispositivo compatible con Bluetooth a tres
4
pies de la iSM990BT. Verá que “Singing
Machine” aparece en su lista de búsqueda de
su dispositivo.
ota:
N
Siempre consulte el manual de usuario de su
dispositivo Bluetooth para más instrucciones.
adea
Seleccione “Singing Machine” para comenzar
5
la configuración. Espere hasta que finalice el
emparejamiento y “bt” dejará de parpadear
en la pantalla.
Notas:
• Si su dispositivo Bluetooth le solicita una
clave de acceso durante el proceso de
configuración, ingrese “0000” para conectarse.
• Luego del emparejamiento inicial
permanecerá conectada hasta que el usuario la
desconecte manualmente o se elimine al reiniciar
los dispositivos.
• Si el dispositivo se desconecta siga nuevamente
los pasos antes mencionados. Si surgen problemas
al realizar el emparejamiento, desconecte la
unidad de su dispositivo Bluetooth y siga las pasos
antes mencionados.
S - 11
la unidad
Page 32

Funcionamiento
W
Utilizar un dispositivo Bluetooth
Oprima Reproducción/Pausa (Play/Pause)
6
7
Nota: Si se conecta a un televisor u otra fuente de
audio, ajuste el volumen del televisor con su propio
control de volumen.
para iniciar la reproducción
Asegúrese que el volumen de su dispositivo
Bluetooth se encuentra en un nivel
intermedio, luego ajuste el volumen al nivel
deseado utilizando el control de VOLUMEN
PRINCIPAL (MASTER VOLUME).
V
U
X
at
ak
Conecte el/los micrófono/s como se
8
muestra en la página S - 5 y deslice el
interruptor de ENCENDIDO/APAGADO
(ON/OFF) hasta la posición ENCENDIDO
(ON). Si desea podrá colocar su dispositivo
Bluetooth en el soporte luego de que se
haya emparejado.
Ajuste el control de VOLUMEN DEL
9
10
11
MICRÓFONO (MIC VOLUME) según el
nivel deseado. Al aumentar el nivel de este
control se incrementará el volumen del
micrófono respectivo.
Ajuste el control de ECO (ECHO) para
darle un efecto de eco a su voz.
Oprima el botón de ENCENDIDO/
APAGADO (ON/OFF) de AVC (control de
voz automático) para encender esta
opción y silenciar las voces en grabación
multiplex en cuanto el cantante comience
a cantar en el micrófono. Cuando se
detiene, las voces comienzan a escucharse
nuevamente de forma automática.
IMPORTANTE: Esta función sólo funciona
con medios multiplex.
S - 12
Page 33

Funcionamiento
Utilizar un dispositivo Bluetooth
al
am am
BALANCE: El Balance le permite eliminar la
12
13
14
N
la unidad y/o su dispositivo Bluetooth salga del
rango de comunicación. Se reestablecerá una
conexión activa cuando su dispositivo Bluetooth
vuelva dentro del rango. Cuando se vuelve a
encender la unidad, intentará automáticamente
reconectarse con el dispositivo Bluetooth
recientemente configurado. Cuando la función
Bluetooth de su dispositivo Bluetooth se vuelve a
e
botón MENÚ en la unidad.
voz del cantante principal al rotar la perilla
hacia la izquierda cuando se reproduce una
grabación multiplex o eliminar la música al
rotar la perilla hacia la derecha.
IMPORTANTE: Esta función sólo funciona
con medios multiplex.
SALTO (SKIP): Avance o retroceda una
pista oprimiendo los botones de Salto
hacia adelante/Atrás (Skip Back /Skip
Forward ).
PAUSA: Durante la reproducción, si desea
pausar momentáneamente el disco,
oprima el botón Reproducción/Pausa
(Play/Pause) ; “ ” aparecerá en la
pantalla. Oprima nuevamente para
reanudar la reproducción normal.
ota:
La configuración permanece intacta cuando
ncender, se podrá reconectar presionando el
ao
an
S - 13
15
Oprima el botón ENCENDIDO/APAGADO
(Power ON/OFF) para apagar la unidad; el
indicador también se apagará.
Page 34

Funcionamiento
y
U
Uso de la entrada LINE IN
Conecte la unidad como se describió
1
previamente. Oprima Encendido/Apagado
(Power On) para encender la unidad. El
indicador de Encendido/Apagado (Power)
se iluminará.
v
AUDIO OUTPUT
/ HEADPHONE JACK
YOUR iPHONE/iPOD OR
DIGITALPLAYER OR
MP3 PLAYER
x
w
LINE IN
u
Conecte la unidad externa al conector de
ENTRADA DE LÍNEA (LINE IN).
2
Notas:
• Se recomienda que configure el volumen en la
unidad auxiliar a 1/3 o menos para evitar
distorsiones.
• No es posible saltar archivos o pistas cuando se
usa un dispositivo externo.
Oprima varias veces el botón FUNCIÓN
3
(FUNCTION) hasta que la pantalla muestre
“AU” para seleccionar el modo AUX.
Ajuste el volumen a un nivel conveniente
4
usando el control de VOLUMEN PRINCIPAL
(MASTER VOLUME).
Conecte el/los micrófono/s como se
5
muestra en la página S - 5 y deslice el
interruptor de ENCENDIDO/APAGADO
(ON/OFF) hasta la posición ENCENDIDO
(ON).
S - 14
6
Ajuste el control de VOLUMEN DEL
MICRÓFONO (MIC VOLUME) según el
vel deseado. Al aumentar el nivel de este
ni
control se incrementará el volumen del
micrófono respectivo.
Page 35

Funcionamiento
Uso de la entrada LINE IN
7
8
Ajuste los efectos de Eco (Echo) y Balance
como lo muestran las páginas S - 7 y S - 8.
Oprima el botón ENCENDIDO/APAGADO
(Power ON/OFF) para apagar la unidad; el
indicador también se apagará.
V
W
V
S - 15
Page 36

Funcionamiento
Dónde descargar archivos MP3+G
Recomendaciones útiles:
Los archivos .mp3 y .cdg. se entregan para
descargarse en un único archivo, comprimido MP3
+G.zip. El archivo MP3+G no se puede reproducir
como un archivo .zip en un dispositivo flash USB.
Para reproducir canciones de karaoke utilizando un
dispositivo flash USB, el archivo MP3+G.zip se
debe descomprimir de la siguiente manera:
• Conecte un dispositivo flash USB a su
computadora
• Descargue el archivo MP3+G d
digital y guarde el archivo .zip* en una carpeta
en su computadora.
• Haga doble clic en el archivo .zip para abrirlo
(visualizará los archivos .mp3 y .cdg).
• Arrastre los archivos .mp3 y .cdg al dispositivo
flash USB.
• Quite (expulse) el dispositivo flash USB de su
computadora.
Encienda el Singing Machine y conecte el
dispositivo flash USB.
PREGUNTAS FRECUENTES
• ¿Dónde puedoobtener ayuda adicionalcon los
formatos de archivo?
En la página web de Singing Machine Store,
a clic en FORMATOS DE ARCHIVO (FILE
hag
FORMATS) en el extremo inferior izquierdo.
e su casillero
Para adquirir y descargar música de Karaoke visite
http://store.singingmachine.com y acceda a más de
12000 de sus canciones favoritas para karaoke.
Necesitará un dispositivo flash USB (no incluido) para
transferir las descargas a esta unidad.
Siga estos sencillos pasos:
Ingrese en http://store.singingmachine.com
con su navegador de Internet y regístrese.
1
Seleccione y adquiera su música de karaoke
favorita de la Tienda de descargas de
2
Singing Machine.
Descargue su compra seleccionada del
Singing Machine Digital Locker a su
3
dispositivo flash USB.
Introduzca el dispositivo flash USB como se
muestra en la página S - 6 y ¡disfrute!
4
Nota:Suscancionesdescargadastambiénsepueden
grabarenun CDR/CDRW.
S - 16
Page 37

Cuidado y mantenimiento
B
E
N
Z
E
N
E
C
L
E
A
N
E
R
COMPACT
DIGITAL AUDIO
GRAPHICS
Cuidado de los discos compactos
Trate con cuidado al disco compacto. Manipule el disco solo
tomándolo de los bordes. Nunca apoye sus dedos en el lado
brillante no impreso.
No pegue cinta adhesiva, autoadhesivos, etc. a la etiqueta del
disco compacto. Límpielo periódicamente con un paño suave,
seco y sin pelusas. Nunca use detergentes ni limpiadores
abrasivos para limpiar el disco com
kit de limpieza para CD.
Si el disco salta o se atasca en alguna sección, probablemente
esté sucio o dañado (rayado).
Cuando lo limpie, hágalo en líneas rectas desde el centro hacia
el borde exterior. Nunca limpie en movimientos circulares.
Esta unidad está diseñada para reproducir solo discos
compactos con logotipos de identificación como los que se
muestran aquí. Otros discos
con el CD estándar y no se pueden reproducir correctamente.
Los discos se deben almacenar en sus cajas, después de cada
uso, para evitar daños. No exponga discos compactos a la luz
solar directa, humedad elevada, altas temperaturas o polvo,
etc. La exposición prolongada o temperaturas extremas pueden
deformarlo.
pacto. Si es necesario use un
tal vez no guardan conformidad
No pegue nada en ninguno de los lados. Además, no escriba en
l lado brillante del disco, ya que los instrumentos de escritura
e
afilados, o la tinta, pueden dañar la superficie.
Limpieza de la Unidad
Para prevenir incendios o descargas eléctricas, desconecte la
unidad del tomacorriente de CA cuando efectúe la limpieza. El
exterior de la unidad puede limpiarse con un paño suave. Su
mantenimiento puede ser el mismo que el de cualquier
mobiliario. Limpie las partes plá
S - 17
sticas con cuidado.
Page 38

Guía de Resolución de Problemas
Si esta unidad presentara un problema, lea el siguiente cuadro antes de llamar al servicio técnico:
No hay energía
• Si la unidad no está encendida, presione ENCENDIDO/APAGADO (Power ON/OFF) para encenderla.
• Asegúrese de que la unidad esté conectada a la alimentación de corriente alterna.
No hay sonido (General)
• El Volumen principal (Master Volume) está en mínimo: suba el volumen.
No se seleccionó la Función correcta, seleccione con el botón FUNCIÓN (FUNCTION).
•
No hay sonido – si está conectado a un televisor
• El volumen del televisor está silenciado o demasiado bajo.
• Los enchufes de audio blanco y rojo no están bien conectados; consulte las página S - 4.
• No se seleccionó la fuente correcta (en general AV) en el menú del televisor.
La sección de CD no funciona correctamente
se introdujo un disco, o se colocó al revés; introduzca correctamente el disco.
• No
• Asegúrese de utilizar un CD, CD+G, o bien, cuando se haya grabado la música descargada asegúrese de
que el disco sea CDR o CDRW.
• La lente está sucia. Desconecte la energía y limpie las lentes con un limpiador de lentes para CD.
• Se ha formado humedad. Apague la unidad, desconecte la unidad del tomacorriente por 20-30 minutos
a que se seque.
par
No hay sonido desde el micrófono
• Asegúrese de que está firmemente conectado a la entrada para el MICRÓFONO 1 o 2.
• Asegúrese de que esté encendido; consulte la página S - 7.
• Asegúrese de que los controles de VOLUMEN DEL MICRÓFONO (MIC VOLUME) no estén en su
configuración más baja.
• El Volumen principal (Master Volume) está en mínimo: suba el volumen.
No se reproducen los archivos en la entrada de USB
El archivo está dañado; reemplácelo.
•
• El archivo no está en un formato que esta unidad pueda reproducir.
• El producto no admite el dispositivo de USB conectado.
El dispositivo Bluetooth no se puede configurar o conectar con la unidad.
• No ha activado la función Bluetooth de su dispositivo; ver la página S - 11 o consultar manual de usuario
usuario del dispositivo Bluetooth.
• La unidad no se encuentra en modo de emparejamiento; consulte la página S - 11 para emparejar.
La r
eproducción de la música no está disponible en la unidad luego de conectar de manera exitosa el
Bluetooth.
• Asegúrese de que su dispositivo Bluetooth es compatible con el perfil Bluetooth A2DP.
S - 18
Page 39

Especificaciones
AUDIO
Potencia de salida (Máximo).......................................................................... 10W + 10W (RMS) 10% THD
Impedancia de salida......................................................................................................................... 8 Ohms
REPRODUCTOR DE CD
Respuesta de frecuencia.................................................................................................. 100 Hz-20 KHz
Proporción de señal y ruido .................................................................................................................50 dB
Sistema de muestreo............................................................................................... Sobremuestreo por 8
Diámetro del disco.............................................................................................................4,72" (120 mm)
............................................................................................................................... 3,15” (80 mm) Único CD
BLUETOOTH
Version Bluetooth........................................................................................................................V3.0 + EDR
Distancia de trabajo......................................................Hasta 10 metros medidos en espacio abierto
GENERAL
Energía............................................................................................................... AC 110-240 V, 50/60 Hz
imensiones........................................................ 17,0 x 8,1 x 12,1 inches / 30,8 x 20,6 x 43,2 cm
D
Peso .........................................................................................................................................8,2 lbs / 3,7 kg
Micrófono............................ Impedancia con micrófono dinámico -74 db 600 Ohm con 6,3 mm
Energía..........................................................................CC 12V, Adaptador de centro positivo de 2,5A
USB ....................................................................................Compatible con memoria USB de hasta 8 GB
Las especificaciones están sujetas a cambios sin previo aviso.
S - 19
Page 40

4060 E. Jurupa St., Unit B, Ontario, CA 91761-1413 USA
© 2014
 Loading...