

Page 1

iSM1020BT
INSTRUCTION MANUAL
MANUAL DE INSTRUCCIONES
www.singingmachine.com
The Singing Machine® is a registered trademark of The Singing Machine Co., Inc.
The Singing Machine® es marca registrada de The Singing Machine Co., Inc.
Page 2
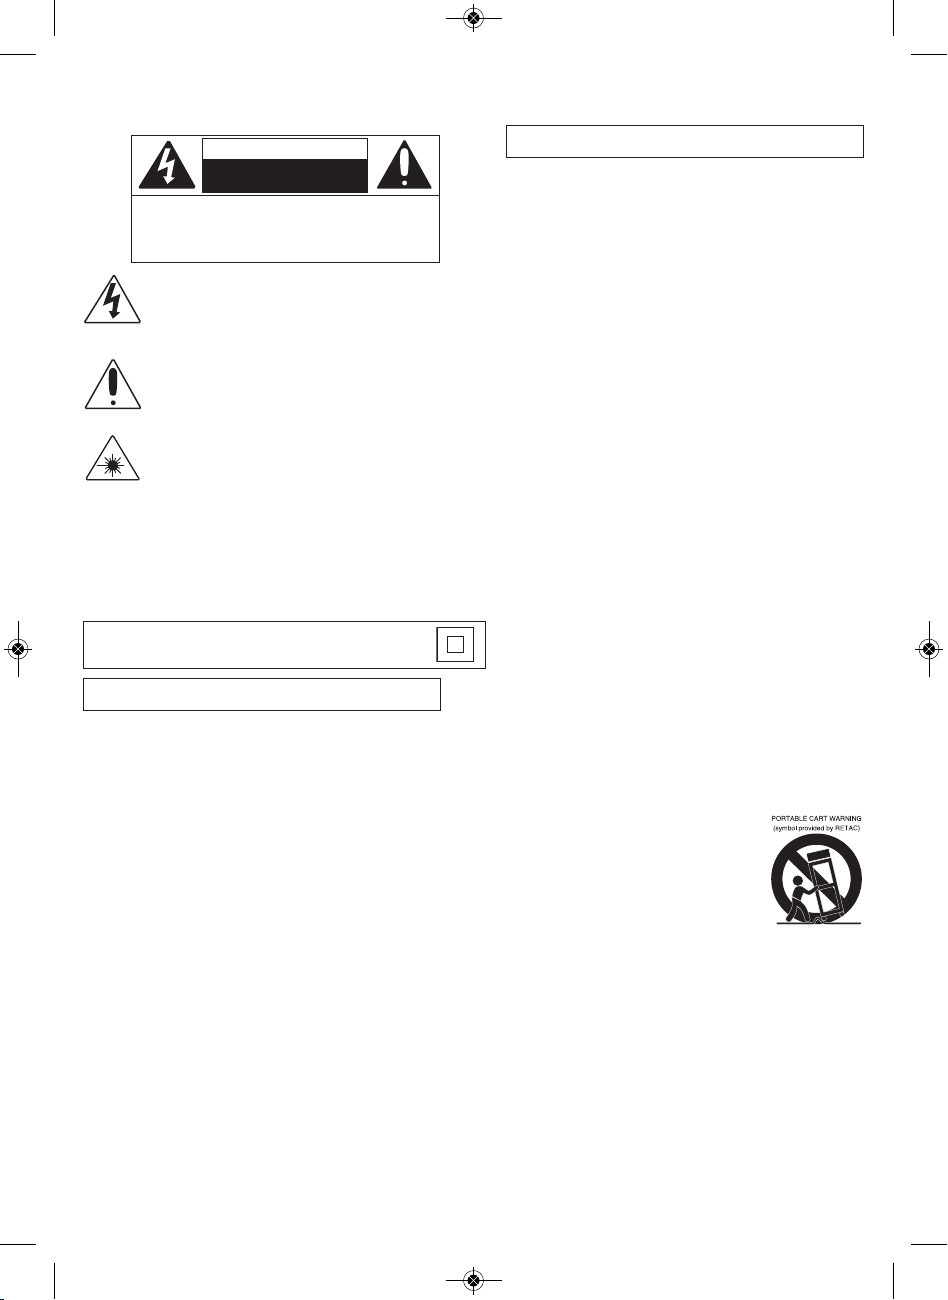
Warnings
CAUTION
RISK OF ELECTRIC SHOCK
DO NOT OPEN
CAUTION: TO REDUCE THE RISK OF ELECTRIC SHOCK, DO NOT
REMOVE COVER (OR BACK). NO USER-SERVICEABLE PARTS
INSIDE. REFER SERVICING TO QUALIFIED SERVICE PERSONNEL.
The Caution marking is located on the bottom panel.
DANGEROUS VOLTAGE: The lightning flash with arrowhead symbol
within an equilateral triangle is intended to alert the user to the
presence of uninsulated dangerous voltage within the product’s
enclosure that may be of sufficient magnitude to constitute a risk of
electric shock to persons.
ATTENTION: The exclamation point within an equilateral triangle is
intended to alert the user to the presence of important operating and
maintenance (servicing) instructions in the literature accompanying
this product.
DANGER: This symbol is intended to alert the user to the risk of
exposure to invisible and hazardous laser radiation if the cover or back
is opened, the interlock fails or is defeated. Direct exposure to the
beam may damage your eyesight.
IPPING WARNING: This product shall not be exposed to dripping or splashing,
DR
and no objects filled with liquids, such as vases, shall be placed on the product.
VENTILATION WARNING: The normal ventilation of the product shall not be
impeded for intended use.
SAFETY VERIFICATION: This device is made and tested to meet safety standards of
the FCC, requirements and compliance with safety performance of the U.S.
Department of Health and Human Services and also with FDA Radiation Performance
Standards 21 CFR Subchapter.
Class II equipment symbol.
This symbol indicates that the unit has a double insulation system.
CAUTION: TO PREVENT ELECTRIC SHOCK, MATCH WIDE BLADE OF
PLUG TO WIDE SLOT AND FULLY INSERT.
WARNING: TO PREVENT FIRE OR SHOCK HAZARD, DO NOT EXPOSE
THIS UNIT TO RAIN OR MOISTURE.
FCC WARNING: This equipment may generate or use radio frequency
energy. Changes or modifications to this equipment may cause harmful
interference unless the modifications are expressly approved in the
instruction manual. The user could lose the authority to operate this
equipment if an unauthorized change or modification is made.
This device complies with part 15 of the FCC Rules. Operation is subject
to the following two conditions : (1) This device may not cause harmful
interference, and (2) this device must accept any interference received,
including inte
NOTE: This equipment has been tested and found to comply with the limits
for
limits are designed to provide reasonable protection against harmful
interference in a residential installation. This equipment generates, uses and
can radiate radio frequency energy and, if not installed and used in
accordance with the instructions, may cause harmful interference to radio
communications. However, there is no guarantee that interference will not
occur in a particular installation. If this equipment does cause harmful
interferen
turning the equipment off and on, the user is encouraged to try to correct
the interference by one or more of the following measures:
• Reorient or relocate the receiving antenna.
• Increase the separation between the equipment and receiver.
• Connect the equipment into an outlet on a circuit different from that to
• Consult the dealer or an experienced radio/TV technician for help.
• The rating information is located at the bottom of the un
LASER SAFETY: This unit employs a laser. Only qualified service personnel
should attempt to service this device due to possible eye injury.
CAUTION: USE OF CONTROLS, ADJUSTMENTS OR PERFORMANCE
PROCEDURE HEREIN MAY RESULT IN HAZARDOUS RADIATION
EXPOSURE.
INDUSTRY CANADA NOTICE:
This device complies with Industry Canada Iicense-exempt RSS standard(s).
Operation is subject to the following two conditions:
1. This device may not cause interference, and
2. This device must accept any interference, including interference that
CAN ICES-3(B)/NMB-3(B)
rference that may cause undesired operation.
a Class B digital device, pursuant to part 15 of the FCC Rules. These
ce to radio or television reception, which can be determined by
which the receiver is connected.
it.
may cause undesired operation of the device.
Important Safety Information
1. Read these Instructions.
2. Keep these Instructions.
3. Heed all Warnings.
4. Follow all Instructions.
5. Do not use this apparatus near water.
6. Clean only with a dry cloth.
7. Do not block any of the ventilation openings. Install in accordance
with the Manufacturer’s instructions.
8. Do not install near any heat sources such as radiators, heat
registers, stoves, or other apparatus (including amplifiers) that
produce heat.
9. Do not defeat the safety purpose of the polarized or groundingtype plug. A polarized plug has two blades with
other. A grounding type plug has two blades and a third grounding
prong. The wide blade or the third prong are provided for your
safety. When the provided plug does not fit into your outlet, consult
an electrician for replacement of the obsolete outlet.
10. Protect the power cord from being walked on or pinched
particularly at plugs, convenience receptacles, and the point where
they exit from the apparatus.
one wider than the
11. Only use attachments/accessories specified by the manufacturer.
12. Use only with a cart, stand, tripod, bracket, or table specified by
manufacturer, or sold with the apparatus. When a cart is used,
the
use caution when moving the cart/apparatus
combination to avoid injury from tip-over.
13. Unplug this apparatus during lightning storms
or when unused for long periodsof time.
14. Refer all ser vicing to qualified service
personnel. Servicing is required when the
apparatus has been damaged in any way,
such as power-supply cord or plug is
damaged, liquid has been spilled or objects
have fallen into the apparatus, the apparatus has been exposed to
rain or moisture, does not operate normally, or has been dropped.
15. WARNING: To reduce the risk of fire or electric shock, do not expose
this apparatus to rain or moisture. Do not place objects filled with
water, such as a vase, on the apparatus.
16. The AC mains plug is used as the power disconnect device and it
should remain readily accessible and operable during intended use.
In order to completely disconnect the apparatus from power, the
mains plug should be completely removed from the AC outlet
socket.
17. CAUTION: To reduce the risk of fire or explosion, do not expose
batteries to excessive heat such
sources.
1
as sunshine, fire or other heat
Page 3

Included
Please make sure the following items are included.
Detachable Mic
Holder x 2
(One wired microphone included)
Audio/Video Cable
iSM1020BT Base
One Wired Microphone
Pedestal with built-in Speakers
Foot x 5
Stand
2
Detachable Cradle
Black Screw x 10
(for the foot)
Silver Screw x 2
(to secure monitor and stand )
Manual
Page 4
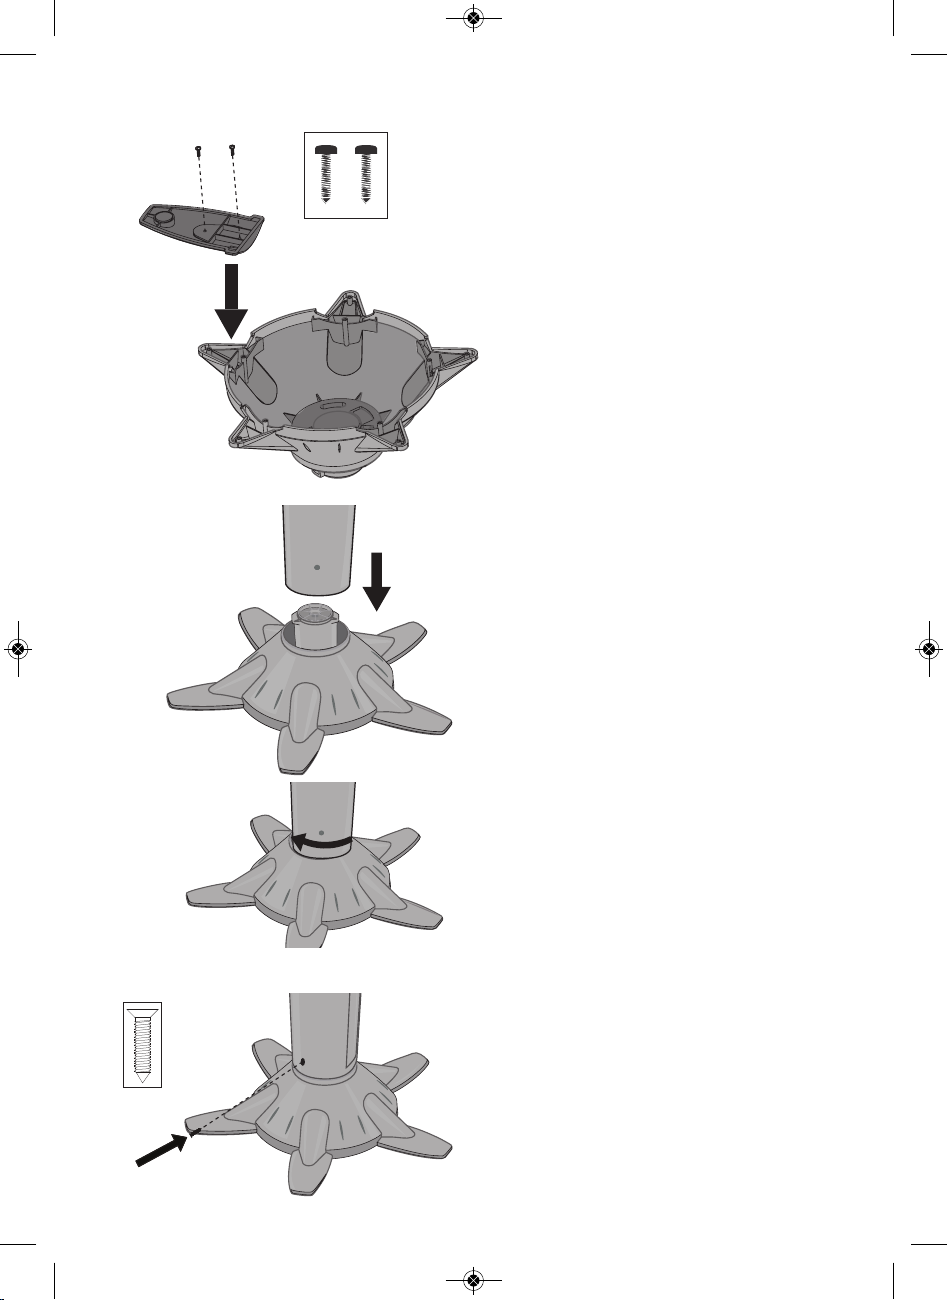
Installation
u
1. Turn the stand upside down and
insert the feet as illustrated.
Insert and tighten 2 black screws
for each foot (as illustrated).
Repeat the above step for other
feet.
2. Insert the Pedestal into the Stand
u
and then gently rotate clockwise
v
until tight, making sure the
screw hole in the Pedestal aligns
with the screw hole in the Stand.
v
3. Insert and tighten 1 of the 2 silver
self tapping screws to secure the
speaker/pedestal to the stand
(as illustrated).
3
Page 5
Installation
u
v
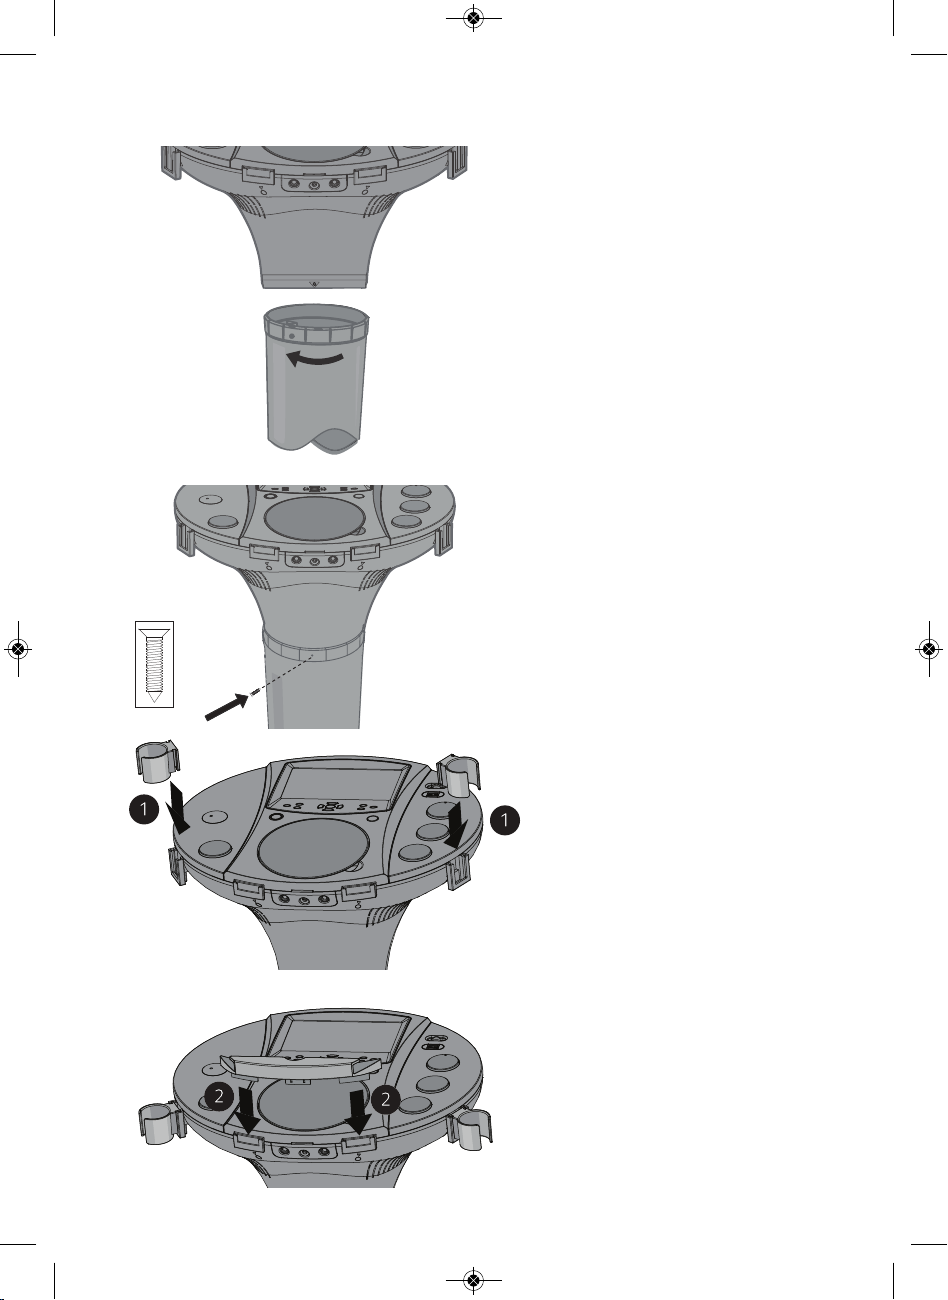
4. Insert the Base into the Pedestal
u
and then gently rotate
clockwise vuntil the screw hole
in the Base aligns with the screw
hole in the Pedestal.
5. Insert and tighten 1 of the 2 silver
self tapping screws to secure the
monitor to the speaker/pedestal.
6. Insert the detachable mic holders
u into the base mic holder slots.
7. Insert the detachable cradle
into the base cradle slots.
4
v
Page 6
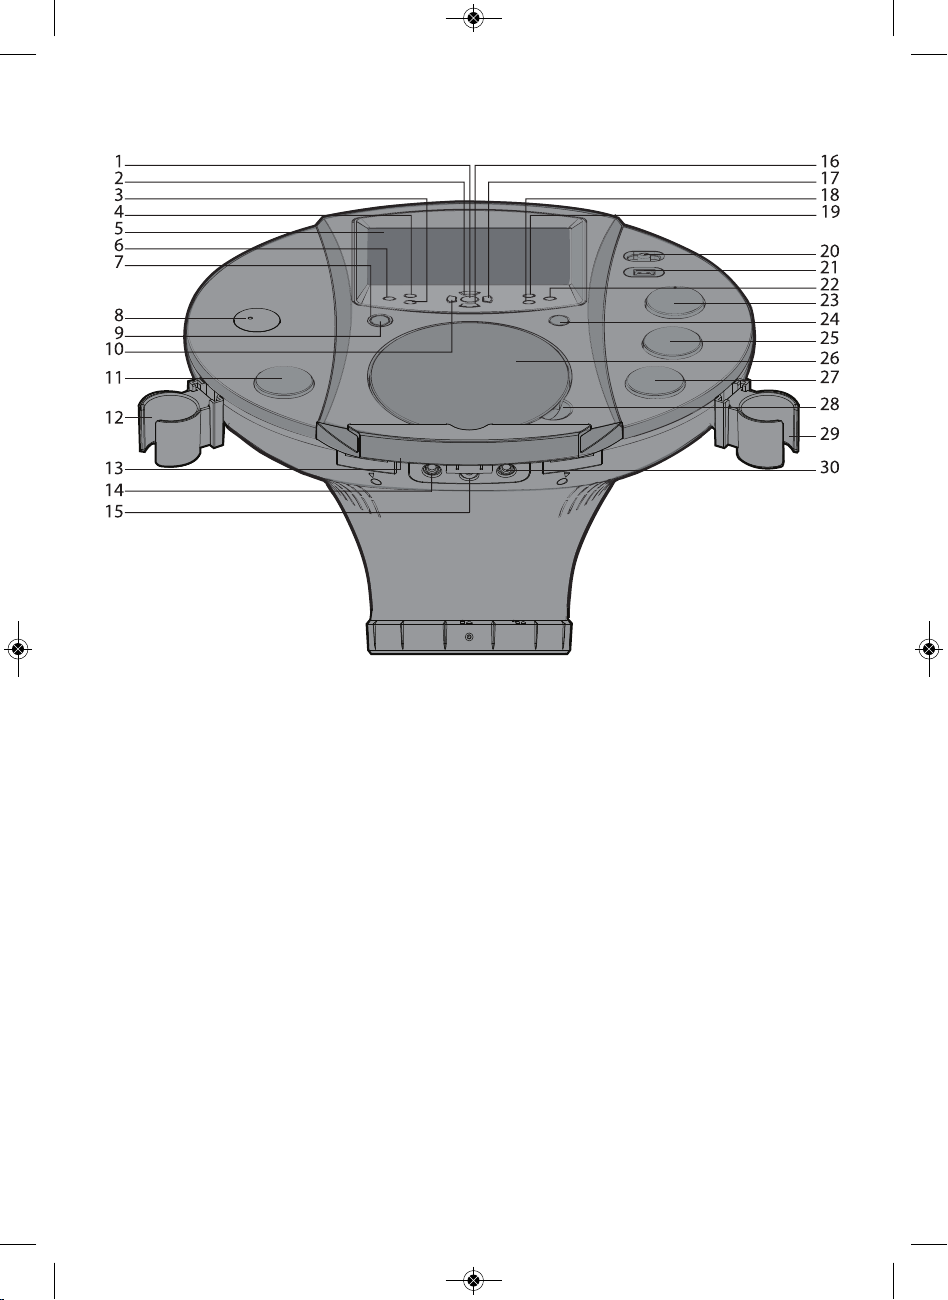
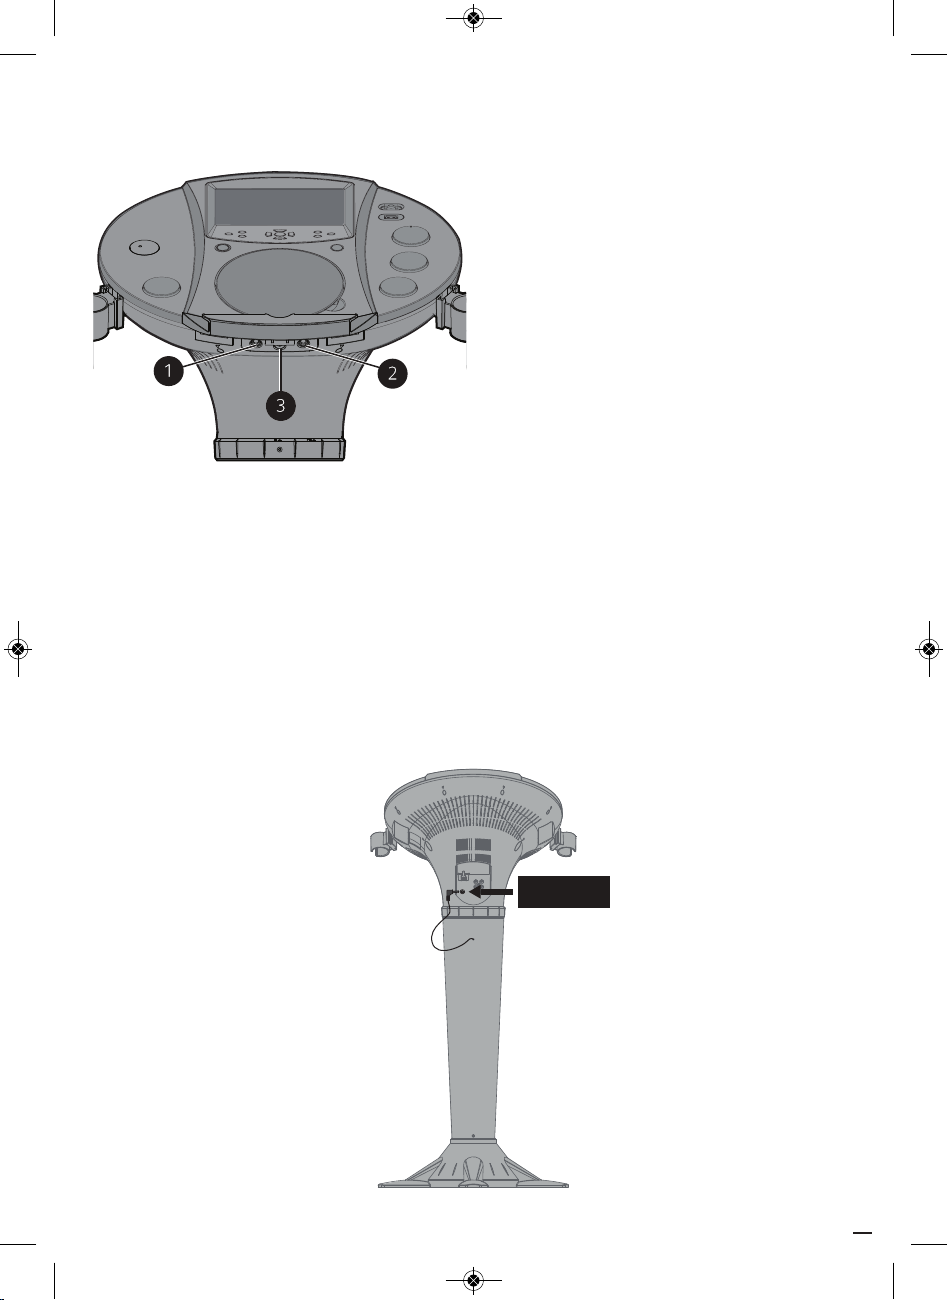
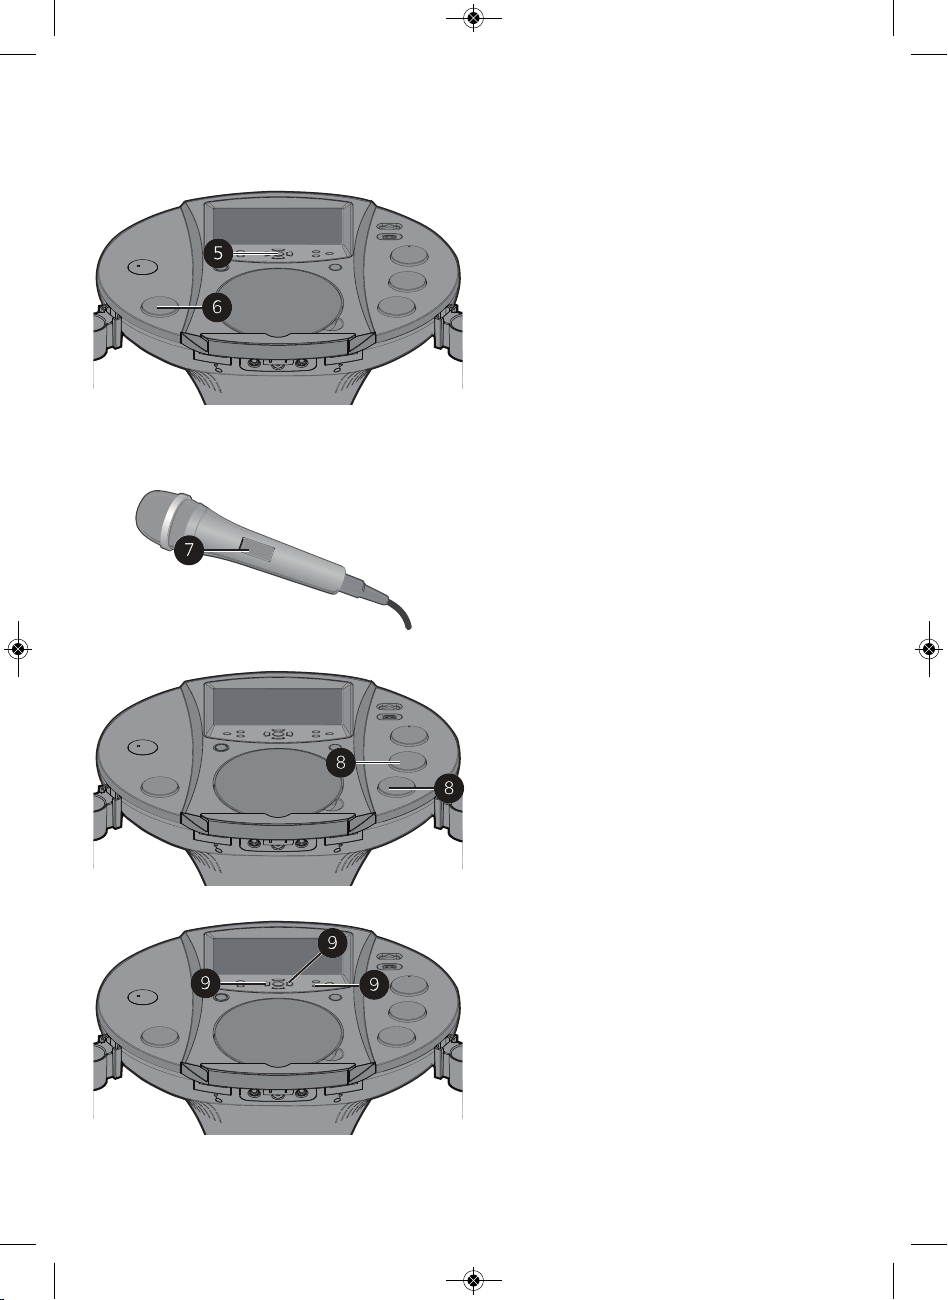
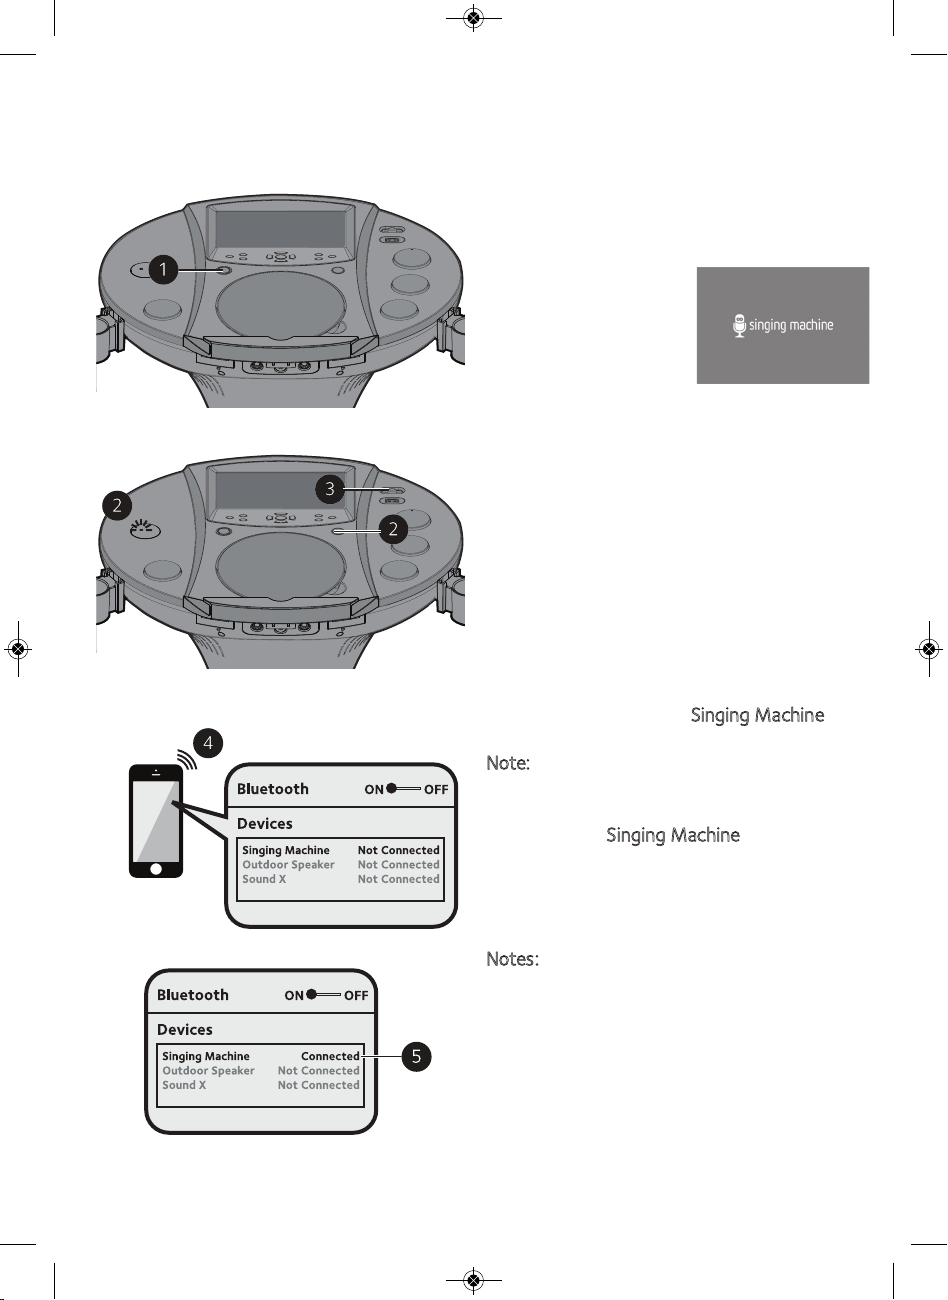
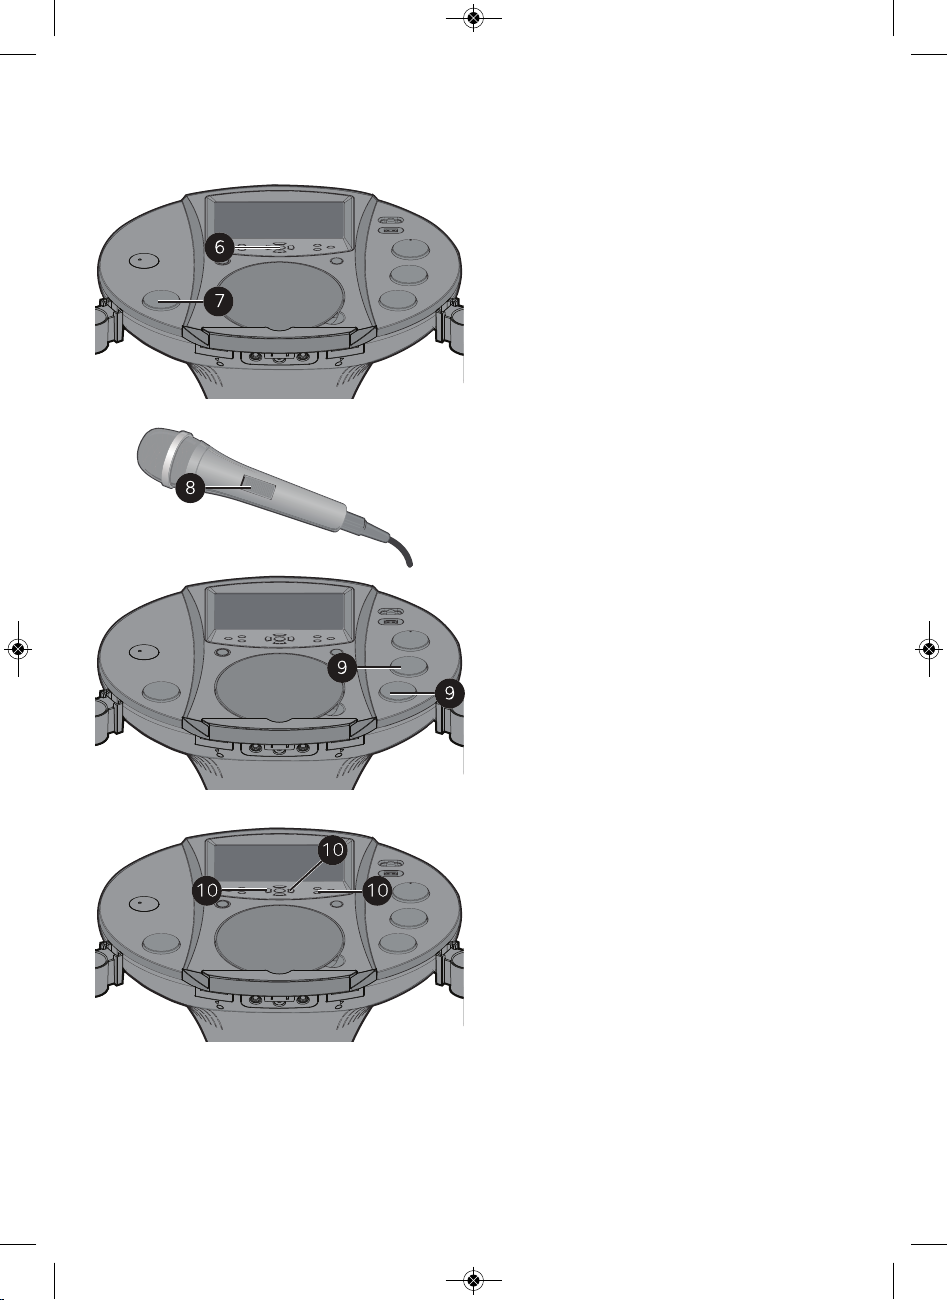
Location of Controls (Top/Front)
1. Play/Pause / Bluetooth Pairing
Restart Button
2. Navigation Up Button
3. Stop Button
4. MENU/Bluetooth Pairing Button
5. TFT LCD Color Screen
6. RECORD Button
7. On/Standby Indicator
8. Bluetooth Status Indicator
9. ON/STANDBY Button
10. Skip/Search Back Button
11. MASTER VOLUME Control
12. Mic 1 Holder
13. Cradle
14. Mic 1 Jack
15. Headphone Jack
16. Navigation Down Button
17. Skip/Search Forward Button
18. ECHO Button
19. Auto Voice Control (AVC) Button
20. MONITOR Switch
21. USB Port
22. BALANCE Button
23. TUNING Control
24. FUNCTION Button
25. MIC 1 VOLUME Control
26. CD Compa
27. MIC 2 VOLUME Control
28. CD Lift Open Area
29. Mic 2 Holder
30. Mic 2 Jack
5
rtment
Page 7
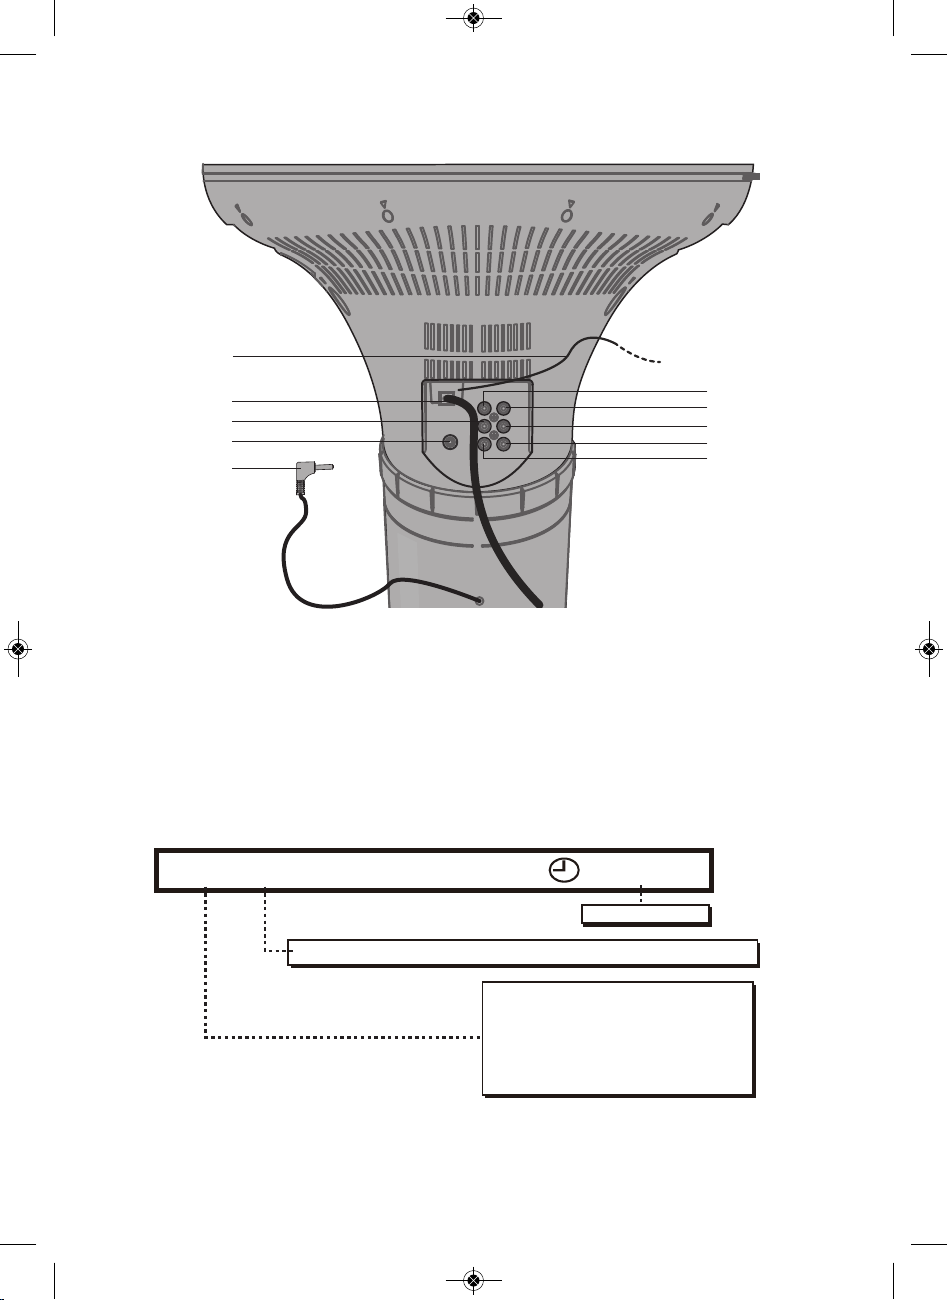
Location of Controls (Back)
1
2
3
4
5
1. FM Antenna Wire
2. AC Power Cord
3. AUX IN (Left) Jack
4. Pedestal Speaker Jack
5. Pedestal Speaker Plug
CDG TRK 8/ 8 00: 16: 0 4
PL AYIN G T R AC K NUMBER AND T O TAL T R AC K NUMBER
6. VIDEO IN Jack
7. VIDEO OUT Jack
8. AUX OUT (Left) Jack
9. AUX OUT (Right) Jack
10. AUX IN (Right) Jack
PL AYIN G TI ME
6
7
8
9
10
MEDIA SOURCE
- CD P LAY I N G
CD
- CDG P LAY I N G
CDG
- USB P LAY IN G
USB
- MP3+G FILES P LAY IN G
MP3G
6
Page 8
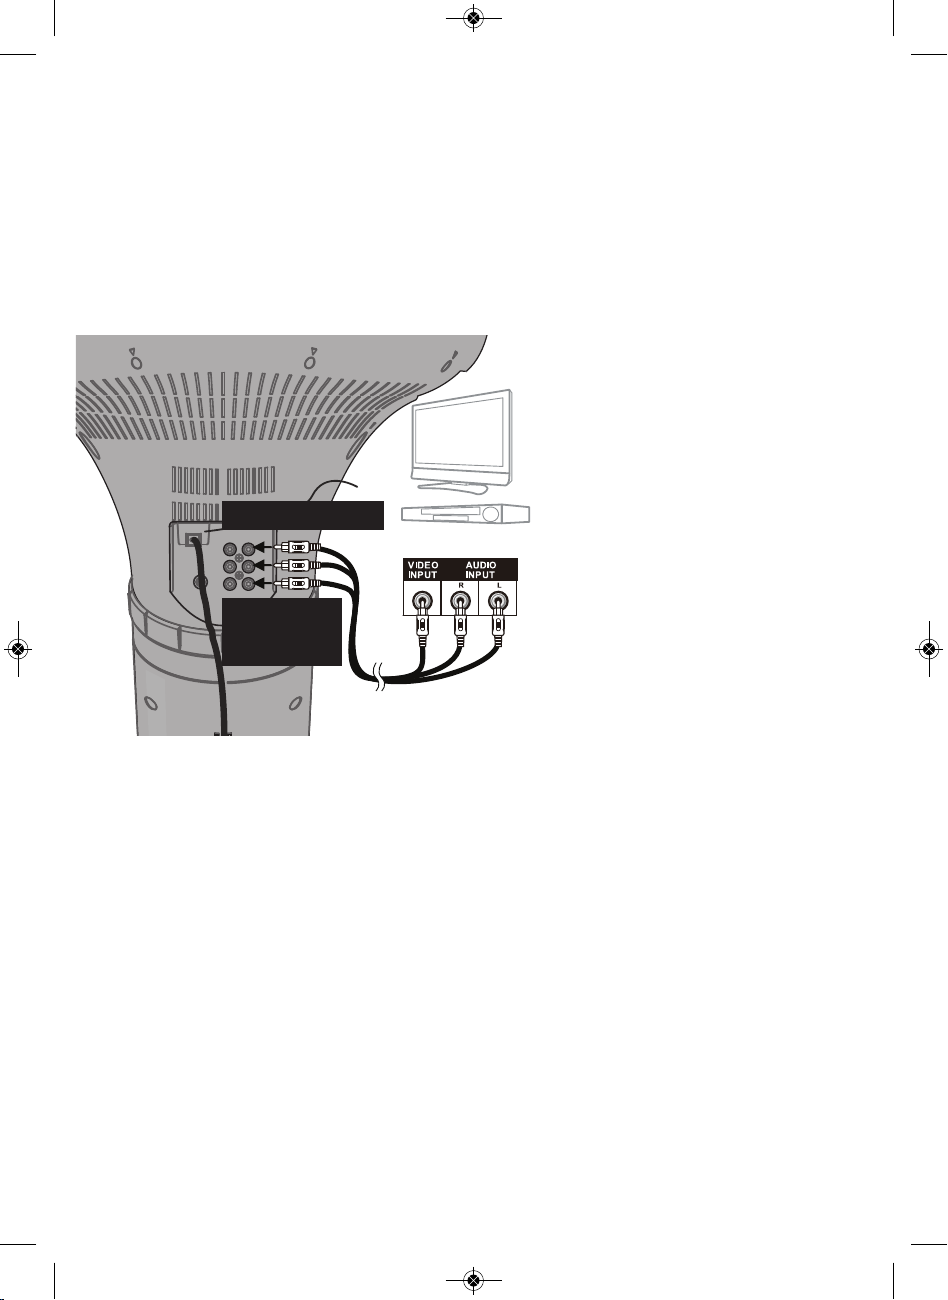
Connection
Connecting the Unit to an External TV, Stereo, etc.
The video and lyrics will be shown on
the built-in screen. If you would
prefer to output the video and/or
audio through your TV, DVD player,
stereo, etc., then perform the
following steps:
Connect the Audio/Video
1
cables yellow plug to the
yellow VIDEO OUT jack on the
iSM1020BT and the other end
to the external unit’s yellow
Video In jack.
Video Out (Yellow)
Audio Out
White - Left
Red - Right
Audio/Video Cables
Rear of External Unit
Connect the Audio/Video
2
cables red and white plugs to
the red and white AUDIO OUT
jacks on the iSM1020BT and
the other ends to the external
unit’s red and white Audio In
jacks.
If left unconnected, the audio
will just play through this unit’s
speakers.
Notes:
• This unit can be used with
without a TV.
• To see the lyrics on the screen,
you must use a CD+G disc or an
MP3+G.
• Also refer to the TV’s or external
unit’s User Guide.
• Audio/Video cables are included.
or
7
Page 9

Connection
Connecting an External TV, Stereo, etc. to this Unit
Video In (Yellow)
Rear of External Unit
VIDEO
OUTPUT
Audio In
White - Left
Red - Right
Audio/Video Cables
AUDIO
OUTPUT
Connect the Audio/Video
1
cables yellow plug to the
yellow VIDEO IN jack on the
iSM1020BT and the other end
to the external unit’s yellow
Video Out jack.
Connect the Audio/Video
2
cables red and white plugs to
the red and white AUDIO IN
jacks on the iSM1020BT and
the other ends to the external
unit’s red and white Audio Out
jacks.
Notes:
• Also refer to the TV or the
external unit’s User Guide.
• Audio/Video cables are included.
• Do not connect to AC power until
all connections have been made.
See below.
Connecting to AC Power
Insert the AC power cord into a
conveniently located AC outlet having
120V AC, 60Hz.
Notes:
• Make all connections before
connecting to AC power.
• The AC Power Cord has a polarized
plug that fits into the AC outlet
only one way. If the plug does not
fit properly, turn it over and try
again. Do not force and do not file
or cut the wide blade.
8
Page 10
Connection
Connecting the Microphones and Headphones
Microphones:
Insert a microphone plug into the Mic 1
u
jack . Insert the other microphone plug
into the Mic 2 jack (if desired).
Note: Do not drop or tap the mic as
damage to the mic or speakers may occur.
Do not spin the microphone around for the
same reason.
Headphones:
For private listening, use headphones (not
included). Insert a headphone plug into the
Headphone jack . Disconnect when finished
so the included speakers can be used.
Connecting the Pedestal Speaker
To protect the speakers, make sure the iSM1020BT is off and the MASTER VOLUME and
1
the MIC 1 and 2 VOLUME controls are set to minimum.
Connect the Pedestal Speaker plug to the Pedestal Speaker jack.
v
w
2
Turn the power on and slowly raise the MASTER VOLUME and the MIC 1 and 2 VOLUME
3
controls to a comfortable level.
Pedestal Speaker
Jack
9
Page 11
Operation
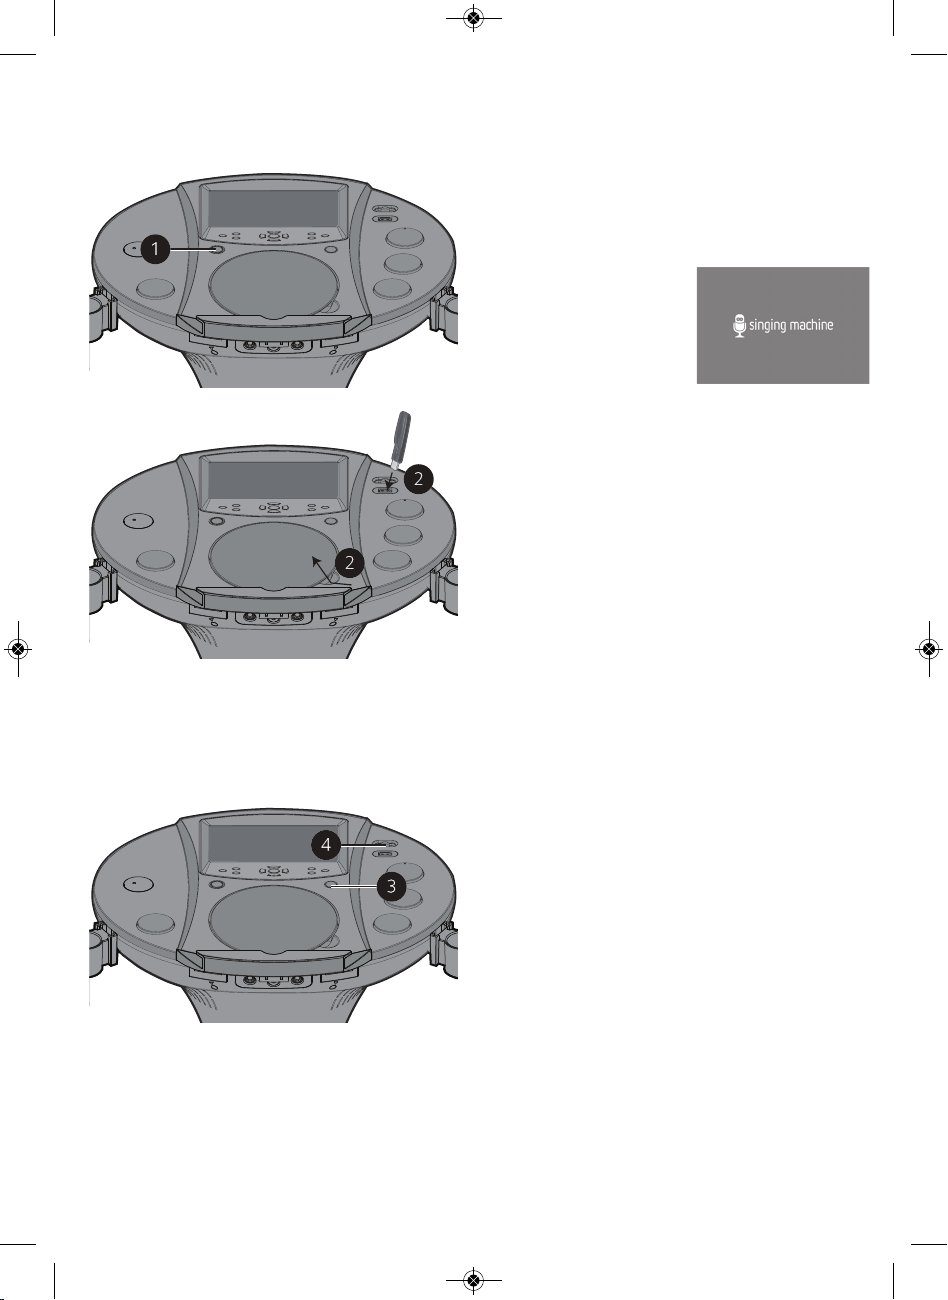
Playing a CD (with or without MP3+G files), CD+G or USB Drive
Connect the unit as described
1
previously. Press the ON/STANDBY
button to turn the unit on; the
On/Standby indicator will light blue and
the LCD Screen
will display below:
Lift open the CD door and insert a CD
2
(with standard or MP3+G files) or a
CD+G by gently pressing it on the
center spindle. Then close the CD door.
If using the USB drive with MP3+G
files, insert the USB into the USB slot.
FAQs
• What is a CD+G?
A CD+G (CD+ Graphics), is the standard
format for most karaoke discs that will
display the words on the screen.
• What is an MP3+G?
MP3+G is the newest format for karaoke
music utilizing the MP3’s small file size. It
will display the words on the screen. See page
24 to order and download MP3+G files.
10
Repeatedly press the FUNCTION
3
button until the LCD Screen displays
DISC to select the CDG/CD mode or
USB to select the USB mode.
Slide the MONITOR switch to the On
4
(right) position to view the information
and lyrics (if playing a CD+G or
MP3+G file) or slide to the Off (left)
position to turn the LCD Screen off.
Page 12
Operation
Playing a CD (with or without MP3+G files), CD+G or USB Drive
Press the Play/Pause button to
5
start playback; if listening to an
MP3+G or CD+G file, the image and
lyrics will appear on the LCD Screen.
Adjust the volume to a comfortable
6
level using the MASTER VOLUME
control.
Notes:
• Never place anything other than a CD in
the compartment, as foreign objects can
damage the unit.
• If no disc is inserted, “NO DISC” will appear
on the LCD screen.
• If no USB drive is inserted, “NO USB” will
appear on the LCD screen.
• If connected to a TV or other audio source,
adjust the volume using the other device’s
volume control.
Connect the microphone(s) as shown
7
on page 9. Slide the power switch to
the ON position
11
Adjust the MIC VOLUME 1 or 2 control
8
as desired. Increasing this control will
increase the volume of the respective
microphone.
Adjust the Echo to add an echo effect
9
to your voice. Press the ECHO button,
and then increase/decrease the echo
using the Skip Forward /Skip Back
buttons. The higher the number, the
more echo effect.
Page 13
Operation
Playing a CD (with or without MP3+G files), CD+G or USB Drive
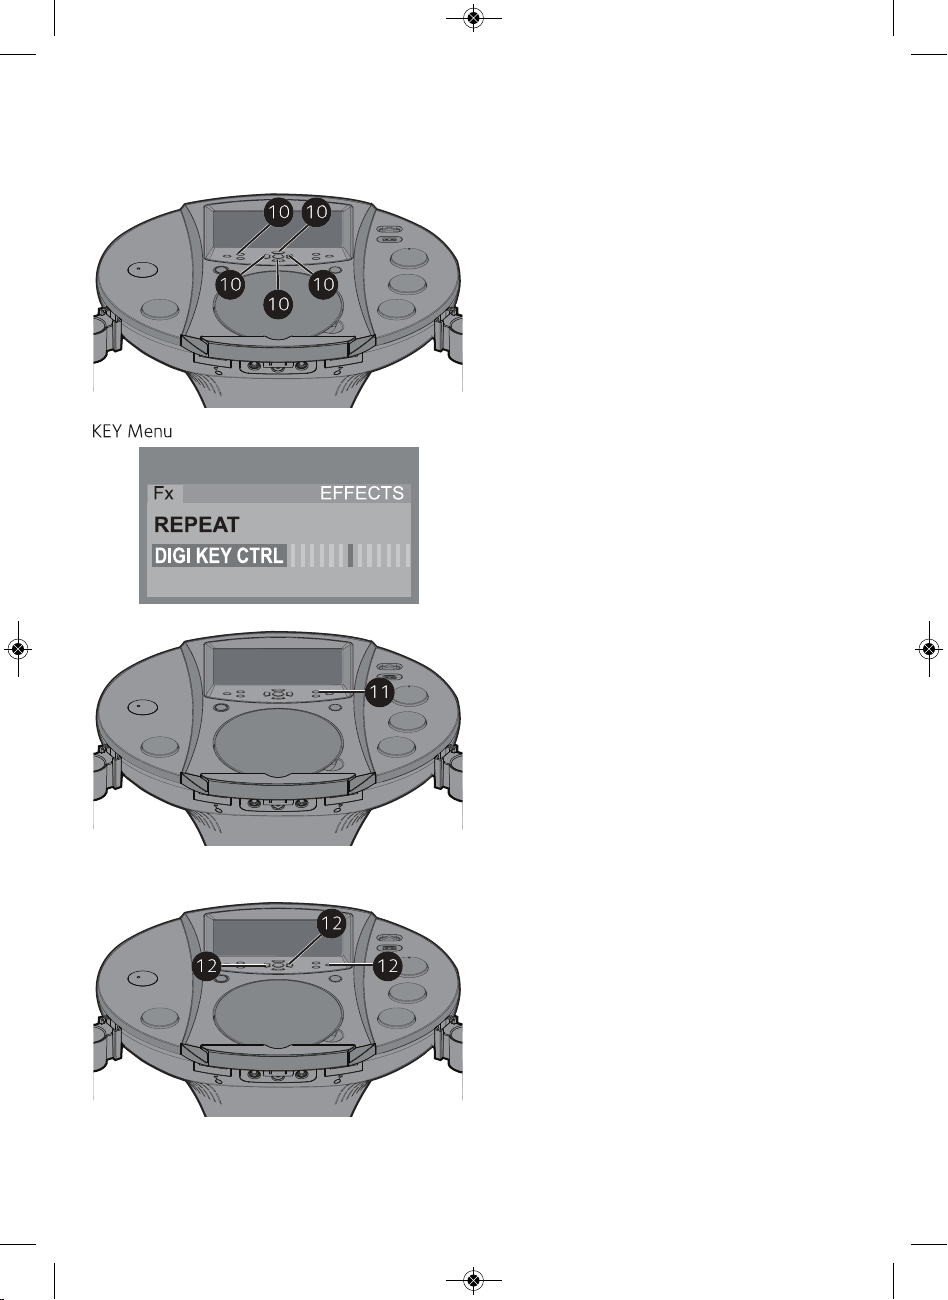
Adjust the Key to obtain the best key
10
11
for the singer. During playback, press
the MENU button, and then navigate
to DIGI KEY CTRL using the
Navigation / buttons. Adjust the
key using the Skip Forward /Skip
Back buttons. Press the MENU
button again when done.
Press the Auto Voice Control (AVC)
button to turn this option On (AVC
ON will appear in the screen) and the
vocals on a multiplex recording are
muted as soon as the singer begins
singing into the microphone. When
the singer stops singing, the vocals
are automatically unmuted.
IMPORTANT: This feature only works
with multiplex media.
12
12
Press the BALANCE button, and then
adjust the balance level using the Skip
Forward /Skip Back buttons.
On mult
Back button to reduce or eliminate
the lead singer’s voice and use the
Skip Forward button to reduce or
eliminate the music.
IMPORTANT: This feature only works
with multiplex media.
iplex recordings, use the Skip
Page 14
Operation
Playing a CD (with or without MP3+G files), CD+G or USB Drive
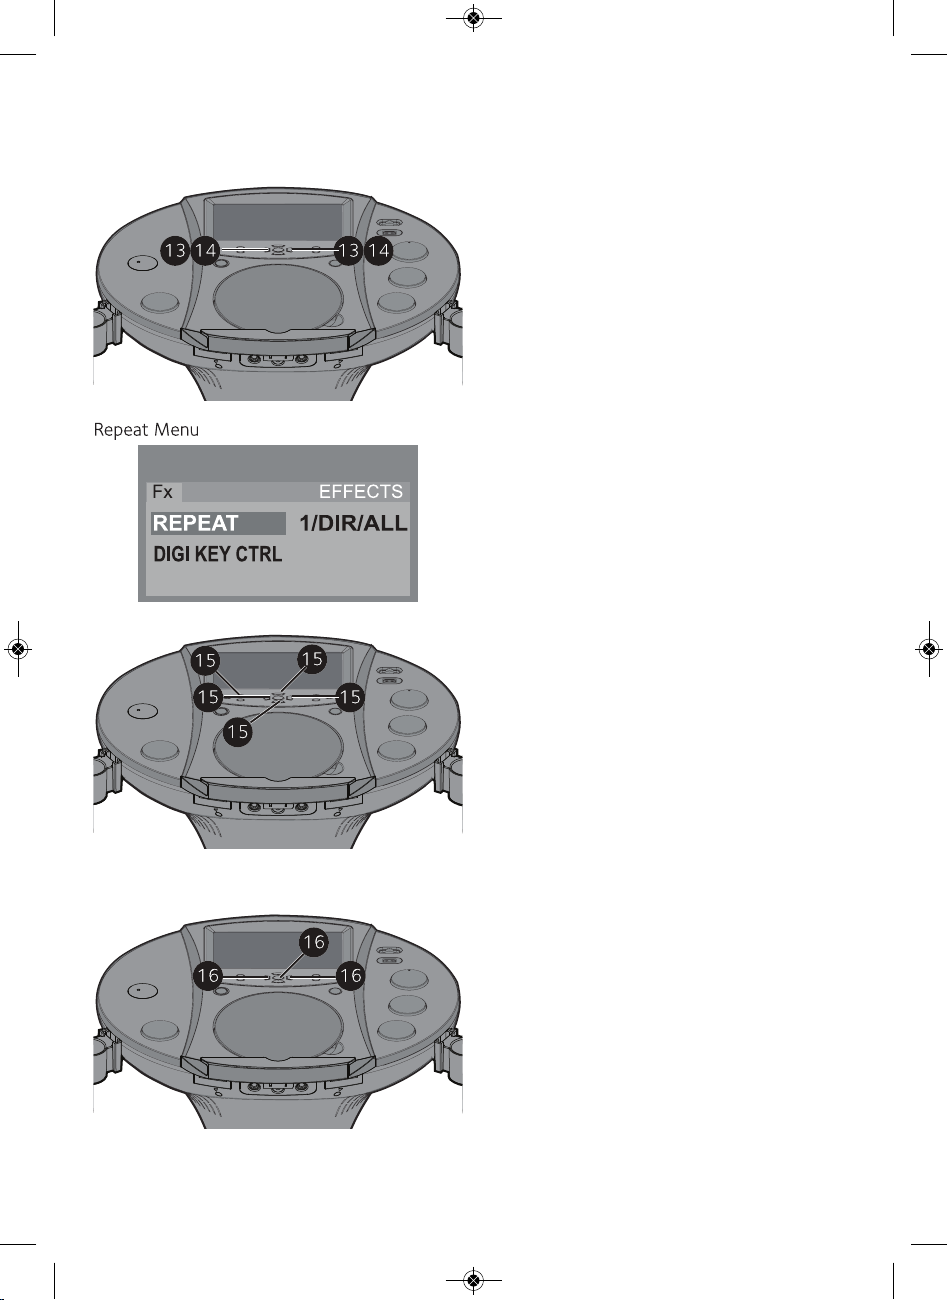
SKIP: Advance or go back one track
13
Note: If using a USB drive, during STOP mode
you can also select a file using the Navigation
Skip Back /Skip Forward buttons to
scroll left/right.
14
15
by pressing the Skip Back /Skip
Forward buttons.
/ buttons to scroll up/down and/or the
SEARCH: During playback, press and
hold either the Skip Back or Skip
Forward button to move the player
forward or backward within a track to
locate a specific musical passage.
When you release the button, normal
playback will resume.
REPEAT: During playback, press the
MENU button, and then navigate to
REPEAT using the Navigation /
buttons. Select the desired Repeat
setting {ONE (Repeat One song), ALL
(Repeat All tracks/files) or DIR (Rep
Directory - this only appears when
using a USB drive)} using the Skip
Forward /Skip Back buttons. Press
the MENU button again when done.
eat
PROGRAM: You can program up to 20
16
Note: Press the Stop button TW
and clear the program.
13
tracks on any disc for playback in any
desired order. While in the Stop mode,
press the MENU button; PRG P01 : 00
(01 represents the program number
and 00 represents the track) will
appear in the LCD Screen. Select the
first track using the Skip Forward /
Skip Back buttons. Press the MENU
button again to confirm the entry.
Repeat to set up to 20 tracks into
memory. When done, press the Play/
Pause button to start playback.
ICE to stop
Page 15
Operation
Playing a CD (with or without MP3+G files), CD+G or USB Drive
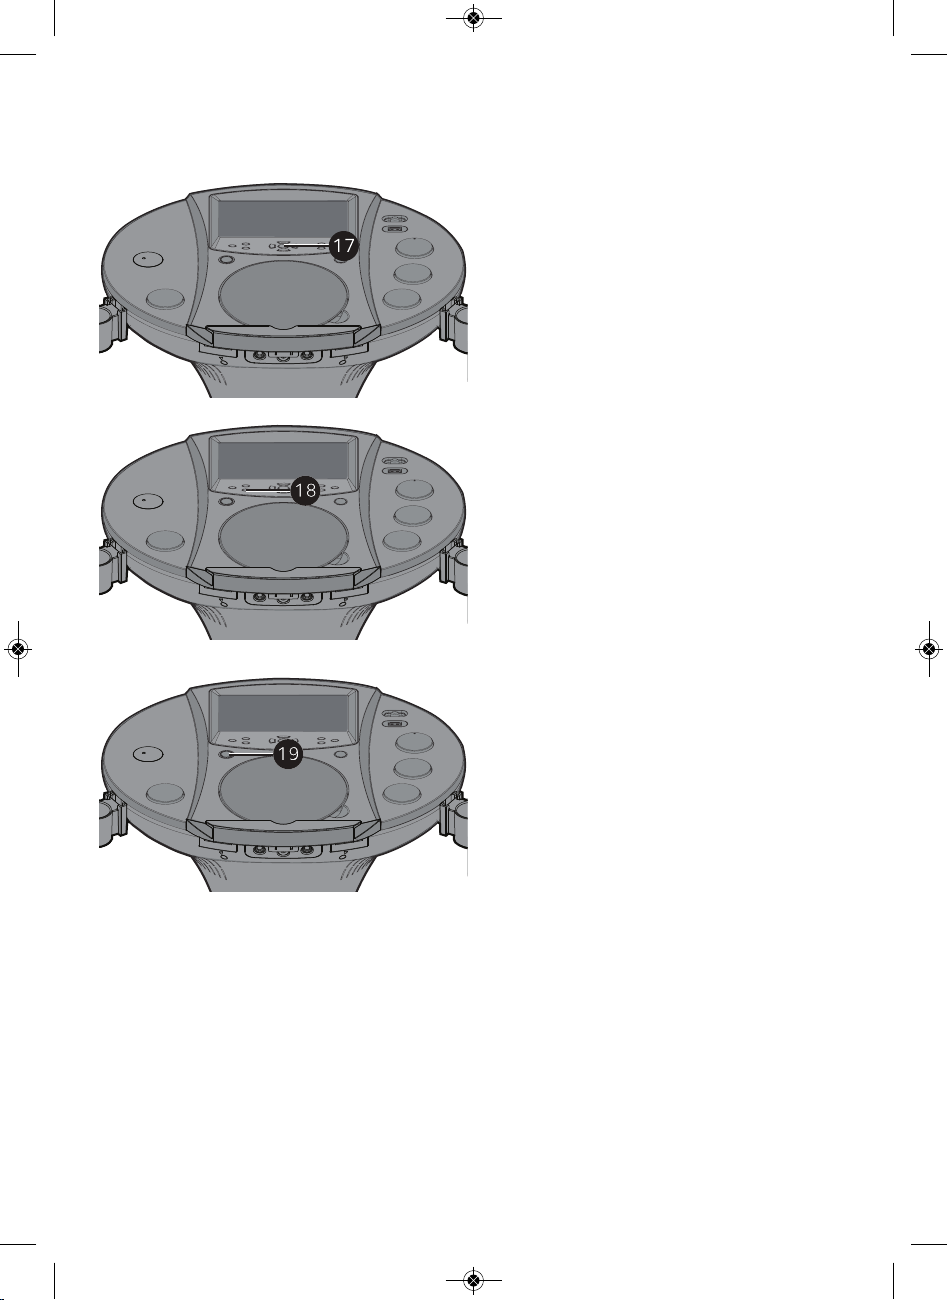
PAUSE: During playback, if you wish
17
Note:
may distort the lyrics on the screen. This will
remain until the screen is refreshed.
18
to pause the disc momentarily, press
the Play/Pause button; “PAUSE”
will appear on the screen. Press the
Play/Pause button again to resume
normal playback.
Pausing the unit while playing a CD+G
Press the Stop button to stop
playback.
Press the ON/STANDBY button to
19
Note: You can record your singing as well as
the song/video onto a USB drive. See page
22 for more details.
14
turn the unit off; the On/Power
indicator will light red and the LCD
Screen will turn off.
Page 16
Operation
Using a Bluetooth Device
Connect the unit as described
1
previously. Press the ON/STANDBY
button to turn the unit on; the
On/Standby indicator will light blue and
the LCD Screen
will display below:
Repeatedly press the FUNCTION button
2
until the LCD Screen displays
“BLUETOOTH” to select the Bluetooth
mode; you will hear the Bluetooth sound
and the Bluetooth Status indicator will
blink red and blue.
Slide the MONITOR switch to the Off
3
(left) position to turn the LCD Screen off.
Switch ON the Bluetooth function of
4
your bluetooth compatible device within
10 meters (30 ft) from the pedestal
inging Machine
unit. You will see “
appear on your device’s search list.
ote:
N
Please always refer to the user manual of
your bluetooth device for detailed instructions.
S
”
inging Machine
Select “
5
pairing. Wait for completion of the
pairing until you hear a beep from the
unit. The Bluetooth status indicator will
display a solid blue color.
otes:
N
• If your Bluetooth device prompts you for a
passcode during the pairing process,
please enter “0000” to connect.
• If you have paired before, a list of previous
searched results will be displayed. Select
“Singing Machine” and confirm.
• On some Bluetooth devices (i.e., computers),
once pairing is complete, you must select
your Bluetooth device as “Use as Audio
Device” or similar.
15
S
” to start
Page 17
Operation
Using a Bluetooth Device
PLAY/PAUSE: Press the Play/Pause
6
7
Note: If connected to a TV or other audio
source, adjust the volume using the other
device's volume control.
8
9
button to start playback.
Adjust the volume to a comfortable
level using the MASTER VOLUME
control.
Connect the microphone(s) as shown
on page 9. Slide the power switch to
the ON position
Adjust the MIC VOLUME 1 or 2
control as desired. Increasing this
control will increase the volume of the
respective microphone.
16
10
Adjust the Echo to add an echo effect
to your voice. Press the ECHO button,
and then increase/decrease the echo
using the Skip Forward
buttons. The higher the number,
the more echo effect.
/Skip Back
Page 18

Operation
Using a Bluetooth Device
11
12
Press the Auto Voice Control (AVC)
button to turn this option On (AVC
ON will appear in the screen) and the
vocals on a multiplex recording are
muted as soon as the singer begins
singing into the microphone. When
the singer stops singing, the vocals
are automatically unmuted.
IMPORTANT: This feature only works
with multiplex media.
Press the BALANCE button, and then
adjust the balance level using the Skip
Forward /Skip Back buttons.
On multiplex recordings, use the Skip
Back button to reduce or eliminate
the lead singer’s voice and use the
Skip Forward button to reduce or
eliminate the music.
IMPORTANT: This feature only works
with multiplex media.
13
17
SKIP: Advance or go back one track
by pressing the Skip Back /Skip
Forward buttons.
Page 19

Operation
Using a Bluetooth Device
PAUSE: During playback, if you wish
14
Note:
and/or your Bluetooth device is taken out of
communication range. An active connection
will be re-established when your Bluetooth
device returns within range. When the unit is
turned on again, it will automatically try to
reconnect with the most recently paired
Bluetooth device. When the Bluetooth
function of your Bluetooth enabled device is
turned on again, reconnection can be
achieved by pressing the MENU button on the
unit.
15
to pause the track momentarily, press
the Play/Pause button. Press
the Play/Pause button again to
resume normal playback.
Press and hold the Play/Pause
button to restart the pairing process.
Pairing remains intact when the unit
Press the Stop button to stop
playback.
Press the ON/STANDBY button to
16
Note: There is no recording function when
listening to the Bluetooth function.
17
18
turn the unit off; the On/Standby
indicator will light red and the LCD
Screen will turn off.
You can always put your Bluetooth
device onto the attached cradle after
it is paired.
Page 20

Operation
Using the AUX Jack
Connect the unit as described
1
previously. Press the ON/STANDBY
button to turn the unit on; the
On/Standby indicator will light blue and
the LCD Screen
will display below:
Connect the external unit to the
2
VIDEO/AUX in jacks on the rear of this
unit as shown on page 8.
Notes:
• It is highly recommended to set the volume
on the auxillary unit to 1/3 or lower to
avoid distortion.
• Skipping files/tracks is not possible when
using an external device.
Repeatedly press the FUNCTION
3
button until the LCD Screen displays
"Aux" on the upper left hand corner of
the LCD screen.
19
Slide the MONITOR switch to the On
4
(right) position to view the video from
the external device or slide to the Off
(left) position to turn the LCD Screen
off.
Connecting an external unit will allow
5
the audio and video to be played
through your Singing Machine (provided
that the other device is compatible.).
Adjust the volume to a comfortable
6
level using the MASTER VOLUME
control.
Connect the microphone(s) as illustrated
7
on page 9. Slide the ON/OFF switch on
the microphone to power it on or off.
Page 21

Operation
Using the AUX Jack
Adjust the MIC VOLUME 1 or 2
8
9
10
Note: There is no recording function when
listening to the Aux function.
control as desired. Increasing this
control will increase the volume of the
respective microphone.
Adjust the Echo and Balance effects
as shown on pages 11 and 12.
Press the ON/STANDBY button to
turn the unit off; the On/Standby
indicator will light red and the LCD
Screen will turn off.
20
Page 22

Operation
Using the FM Radio
Connect the unit as described
1
previously. Press the ON/STANDBY
button to turn the unit on; the
On/Standby indicator will light blue and
the LCD Screen
will display below:
Repeatedly press the FUNCTION
2
button until the LCD Screen displays
"Radio" on the left hand corner of the
LCD screen.
Slide the MONITOR switch to the OFF
3
position to turn the LCD Screen off.
Tune in on a station using the Tuning
4
control.
Extend and uncoil the FM Wire
5
Antenna on the rear of the unit for
best FM reception.
Note: There is no Karaoke or recording
function when listening to the radio.
Press the ON/STANDBY button to turn
6
the unit off; the On/Standby indicator
will light red and the LCD Screen will
turn off.
21
Page 23

Operation
Recording on a USB Drive
Connect the unit as described
1
previously. Press the ON/STANDBY
button to turn the unit on; the
On/Standby indicator will light blue
and the LCD Screen will display "USB"
on the left hand corner of the LCD
screen.
Insert a USB drive with available space
2
into the USB jack.
Lift the CD door and insert a standard
3
disc or a CD+G by gently pressing it on
the center spindle as shown on pages
10 and 11.
Press the Function button until the
4
LCD screen displays “DISC” on the upper
left hand corner of the LCD screen to
select the CDG/CD mode.
22
Slide the MONITOR switch to the On
5
(right) position to view the information
and lyrics (if playing a CD+G or
MP3+G file) or slide to the Off (left)
position to turn the LCD Screen off.
Press the Play/Pause button to
6
start playback; if listening to an
MP3+G or CD+G file, the image and
lyrics will appear on the LCD Screen.
Connect and set the microphone’s
7
volume as shown on page 11.
Page 24

Operation
Recording on a USB Drive
Press the RECORD button; the LCD
8
Screen will display REC and the
percentage remaining on the USB
device. Sing/speak into the microphone
and your voice will record along with
the music and video (if video is
present) onto the USB drive.
When done recording, press the
9
RECORD button again to stop
recording.
Press the ON/STANDBY button to
10
Note: To play the recording, repeatedly press
the FUNCTION button to select USB and then
select the file under the RECORD sub-menu.
turn the unit off; the On/Standby
indicator will light red and the LCD
Screen will turn off.
23
Page 25

Operation
Where to Download MP3+G Files
Helpful Hints:
The .mp3 and .cdg files are delivered for
download in a single, compressed MP3+G.zip file.
The MP3+G file cannot be played as a .zip file on
a USB flash drive. To play karaoke songs using a
USB flash drive, the MP3+G .zip file must be
unzipped as follows:
• Connect a USB flash drive to your computer
• Download the MP3+G file from your Digital
Locker and save the .zip* file to a folder on
your computer
• Double click the .zip file to open the .zip (you
will see the .mp3 and .cdg files)
• Drag and drop the .mp3 and .cdg files to the
USB flash drive
• Remove (eject) the USB flash drive from your
computer
Turn on the Singing Machine and connect the USB
flash drive
FAQ
• Where can I get additional help with the file
formats?
While on the Singing Machine Store’s web
page, simply click FILE FORMATS at the
lower left.
To purchase and download karaoke music,
please visit http://store.singingmachine.com to
access over 12,000 of your favorite karaoke
songs. You will need a USB flash drive (not
included) to transfer the downloads to this unit.
Follow these easy steps:
Go to http://store.singingmachine.com
1
using your internet browser, and then
register.
Select and purchase your favorite
2
karaoke music from the Singing
Machine Download Store.
Download your selected purchase(s)
3
from the Singing Machine Digital Locker
to your USB flash drive.
Insert the USB flash drive as shown on
4
page 11 and enjoy!
Note: Your downloaded songs can also be
burned to a blank CDR/CDRW.
24
Page 26

Care and Maintenance
B
E
N
Z
E
N
E
C
L
E
A
N
E
R
Care for Compact Discs
Treat the compact disc carefully. Handle the compact disc
only by its edges. Never allow your fingers to come in
contact with the shiny, unprinted side of the compact disc.
Do not attach adhesive tape, stickers, etc. to the
compact disc label. Clean the compact disc periodically
with a soft, lint-free, dry cloth. Never use detergents or
abrasive cleaners to clean the compact disc. If necessary,
use a CD cleaning kit.
If a disc skips or gets stuck on a section of the compact
disc, it is probably dirty or damaged (scratched).
When cleaning the compact disc, wipe in straight lines
from the center of the compact disc to the outer edge of
the compact disc. Never wipe in circular motions.
This unit is designed to play different compact discs bearing
DIGITAL AUDIO
GRAPHICS
DIGITAL AUDIO
the identification logos as shown here. Other discs may
not conform to the CD standard and may not play properly.
Compact Discs should be stored in their cases after each
use to avoid damage. Do not expose compact discs to
direct sunlight, high humidity, high temperatures or dust,
etc. Prolonged exposure or extreme temperatures can
warp the compact disc.
Do not stick anything on either side of the compact disc.
Also do not write on the shiny side of the disc, as sharp
writing instruments, or the ink, may damage the surface.
Cleaning the Unit
To prevent fire or shock hazard, disconnect your unit
from the AC power source when cleaning. The finish on
your unit may be cleaned with a dust cloth and
cared for
as other furniture. Use caution when cleaning and wiping
the plastic parts.
25
Page 27

Troubleshooting Guide
Should this unit exhibit a problem, check the following before seeking service:
No Power
• Power is not on; press the ON/STANDBY button is illuminated blue.
• Make sure unit is connected to AC power.
No Sound – General
• Master Volume is set to minimum; raise volume.
• Correct Function was not selected; select your function choice by pressing the FUNCTION
button
• The pedestal speaker is not connected in the back of the system
• Headphones are still connected to headphones jack; unplug headphones.
No Sound – If connected to a TV
• Volume on the TV is muted or too low.
• White and Red audio plugs are not connected properly, see pages 7 and 8.
• Select the source on your TV (AV, AV1, AV2, Input 1, Input 2, etc).
Lyrics do not appear on the screen
• If connected to an external TV, Yellow Video plug is not connected properly, see pages 7 and 8.
• If connected to a TV, the source was not selected on your TV.
• The file/track being played is not an MP3+G or CD+G file. These are the only files that allow
you to view the lyrics on the screen.
CD section is not working properly
• No disc inserted, or disc inserted upside down; insert disc correctly.
• Make sure to use a CD, CD+G or when downloaded music has been burnt; insure the disc is a
CDR or CDRW.
• Lens is dirty. Disconnect the power and clean the lens with a CD lens cleaner.
• Moisture has formed. Power the unit off, unplug the unit from the outlet and allow the system
to dry for approximately 20-30 minutes.
No sound from the microphone
• Make sure it is firmly connected to the Mic jack 1 or Mic jack 2.
• Confirm the microphone power switch is ON, see page 11.
• Make sure the perspective MIC VOLUME control(s) is/are rotated to the right to increase the
volume
• Rotate the MASTER VOLUME dial to the right to increase the volume.
File(s) on USB jack not playing
• The file is corrupted; replace file.
• The file is not in a format this unit will play.
• The connected USB device is not supported by the product.
26
Page 28

Troubleshooting Guide
The Bluetooth device can not be paired or connected with the unit.
• You have not activated the Bluetooth function of your device; see page 16 or refer to the Bluetooth
device user manual.
• The unit is not in pairing mode; press and hold the Play/Pause button to restart pairing.
• The unit is already connected with another Bluetooth device, press and hold the Play/Pause
button to disconnect that device and then start pairing with your desired device.
The Music playback is not available on the unit after successfully connecting the Bluetooth.
• Ensure your Bluetooth device can support A2DP Bluetooth profile.
27
Page 29

Specifications
AUDIO
Output Power........................................................................................................................ 7 Watts (RMS)
Output Impedance ............................................................................................................................ 3 Ohms
CD PLAYER
Frequency Response......................................................................................................... 100 Hz-20 KHz
Signal to Noise Ratio..............................................................................................................................50 dB
Sampling System.................................................................................................... 8 Times Oversampling
Disc Diameter .....................................................................................................................4.72” (120 mm)
.............................................................................................................................. 3.15” (80 mm) Single CD
BLUETOOTH
Bluetooth Version .....................................................................................................................................V2.0
Working Distance .................................................................Up to 10 meters measured in open space
FM RADIO
Frequency............................................................................................................................. 88 to 108 MHz
JACKS
Headphone Jack ........................................................................................... 3.5 mm Stereo Headphones
Microphone....................................................................................................... 6.3mm Microphone Jacks
GENERAL
Power........................................................................................................................ AC 110-120 V, 60 Hz
Dimensions - Main Unit.................................19.5 x 14.3 x 37.9 inches (49.6 x 36.4 x 96.1 cm)
Weight - Main Unit............................................................................................................9.7 lbs (4.4 kg)
Monitor................................................................................................................... 7” Color TFT LCD NTSC
Microphone............................ -74 dB 600 Ohms impedance with 6.3 mm Dynamic Microphone
Specifications are subject to change without notice.
28
Page 30

Advertencias
PRECAUCIÓN
RIESGO DE DESCARGA ELÉCTRICA
NO ABRIR
PRECAUCIÓN: PARA REDUCIR EL RIESGO DE DESCARGAS ELÉCTRICAS, NO QUITE
LA CUBIERTA (NI LA TAPA POSTERIOR) NO HAY PIEZAS REPARABLES POR EL
USUARIO DENTRO. DERIVE LAS REPARACIONES A PERSONAL DE SERVICIO
CALIFICADO.Las marcas de Precaución se ubican en el panel inferior.
TENSIÓN PELIGROSA: La luz intermitente con símbolo de flecha dentro
de un triángulo pretende alertar al usuario de la presencia de tensión
peligrosa no aislada, dentro del paquete del producto, que puede ser
de magnitud suficiente para constituir un riesgo de descarga eléctrica
para las personas.
ATENCIÓN: El signo de exclamación dentro de un triángulo pretende
alertar al usuario de la presencia de instrucciones importantes de
operación y mantenimiento (reparaciones) en el material que
acompaña a este producto.
PELIGRO: Este símbolo pretende alertar al usuario del riesgo de
exposición a radiación láser invisible y peligrosa si la cubierta o tapa
posterior están abiertos, si falla el interbloqueo o está adulterado. La
exposición directa al rayo puede dañar su vista.
ADVERTENCIA DE GOTEO: Este producto no se podrá exponer a goteo o salpicaduras, y no
se colocará ningún objeto lleno con líquidos, como jarrones, encima del producto.
ADVERTENCIA DE VENTILACIÓN: La ventilación normal del producto no se bloqueará si se
le da el uso previsto.
VERIFICACIÓN DE SEGURIDAD: Este dispositivo está fabricado y evaluado en cumplimiento
de los estándares de segur idad de la FCC, requisitos y cumplimiento de rendimiento de
seguridad del Departamento de Salud y Servicios Humanos de E E.UU. y también la FDA.
Subcapítulo 21 del Código de reglamentos federales, Estándares de rendimiento de radiación.
Símbolo de equipo Clase II.
Este símbolo indica que la unidad tiene sistema de doble aislamiento.
PRECAUCIÓN: PARA EVITAR DESCARGAS ELÉCTRICAS, INSERTE COMPLETAMENTE UNA
HOJA ANCHA DEL ENCHUFE A LA RANURA ANCHA.
ADVERTENCIA: PARA EVITAR INCENDIOS O PELIGROS DE DESCARGA,
NO EXPONGA ESTA UNIDAD A LA LLUVIA O HUMEDAD.
AVISO DE LA FCC: Este equipo puede generar o usar energía de radio frecuencia.
Los cambio s o modif icaciones realizados en el aparato pueden provoca r
interferencia perjudicial, a menos que dichas modificaciones estén autorizadas en
el manual de instrucciones. El usuario puede perder toda autoridad para operar
el equipo si realiza cambios o modificaciones sin autorización.
Este aparato cumple con la parte 15 de las Normas de la FCC. El funcionamiento
está sujeto a las dos condiciones que figuran a continuación: (1) Es probable que
no cause interferencia perjudicial y (2) deberá a ceptar cualqu
recibida, incluyendo la interferencia que pueda llegar a causar un funcionamiento
indeseado.
NOTA: Este equipo fue probado y se concluyó que cumple con los límites
establecidos para los dispositivos digitales Clase B, de acuerdo con el Apartado
15 de las normas de la FCC. Estos límites fueron pensados para proporcionar
protección razonable ante la interferencia perjudicial en una instalación residencial.
Este equipo genera, usa y puede emitir energía de radio frecuencia y, si no se lo
la y utiliza de conformidad con las instrucciones, puede causar interferencia
insta
perjudicial a las comunicaciones radiales. No obstante, no existe ninguna garantía
de que no se produzca interferencia en una instalación en particular. Si este equipo
provoca interferencia perjudicial a la recepción de radio o televisión, lo cual puede
determinarse apagando y encendiendo el equip o, el usuario puede intentar
corregir la interferencia de alguna/s de las siguientes maneras:
• Reoriente la antena receptora o ubíquela en otro lugar.
• Aumente la distancia entre e
• Conecte el equipo a un tomacorriente de un c ircuito distinto al que está
conectado el receptor.
• Consulte al distribuidor o a un técnico experimentado de radio y televisión
para que lo asesore.
• La información de clasificación está ubicada en la parte inferior de la unidad.
SEGURIDAD DEL L ÁSER: Esta unidad utiliza un láser. Sólo el personal de
reparaciones calificado es quien puede reparar este dispositivo debido a
posibles lesiones en la vista.
PRECAUCIÓN: EL USO DE LOS CONTROLES, A JUSTES O PROCEDIMIENTO
DE RENDIMIENTO QUE CONSTAN EN EL PRESENTE, PUEDEN CAUSAR
EXPOSICIÓN PELIGROSA A LA RADIACIÓN.
Este dispositivo cumple con las normas industriales RSS exentas de licencia
1. Este dispositivo no puede causar interferencias perjudiciales y
2. Este dispositivo debe aceptar cualquier interferencia recibida, incluidas
CAN ICES-3(B)/NMB-3(B)
l equipo y el receptor.
ier inter ferencia
Información importante sobre seguridad
1. Lea estas instrucciones.
2. Conserve estas instrucciones.
3. Preste atención a todas las advertencias.
4. Siga todas las instrucciones.
5. No utilice este artefacto cerca del agua.
6. Límpielo únicamente con un paño seco.
7. No obstruya las aberturas para ventilación. Instálelo de acuerdo con las
instrucciones del fabricante.
8. No instale cerca de fuentes de calor, como radiadores, rejillas de
calefacción, estufas u otros aparatos (incluso amplificadores) que
produzcan calor.
9. No desafíe el fin de seguridad del enchufe polarizado o de conexión a
tierra. Un enchufe polarizado tiene dos clavijas y una es más ancha que
la otra. El enchufe de conexión a tierra tiene dos clavijas, y una tercera
punta a tierra. La clavija ancha o la tercera punta se suministran para su
seguridad. Si el enchufe suministrado no coincide con su tomacorriente,
consulte con un electricista para reemplazar el tomacorriente obsoleto.
10. Evite pisar o apretar el cable de alimentación, especialmente en los
enchufes, tomacorrientes y en el punto por donde salen del artefacto.
11. Utilice sólo los complementos y accesorios especificados por el
fabricante.
12. Utilice la unidad sólo con el carro, soporte, trí
recomendados por el fabricante, o que se vendan junto con el producto
pode, repisa o mesa
Cuando se utiliza un carro, tenga cuidado cuando
mueva el carro y artefacto junto a para evitar
lesiones producidas por la caída del producto.
13. Desenchufe este artefacto durante las tormentas
eléctricas o cuando no se lo utilice durante
períodos prolongados.
14. Derive todas las reparaciones al personal de
reparaciones calificado. Es necesario reparar el
artefacto cuando se encuentra dañado; por
ejemplo, cuando el cable de suministro de energía o el enchufe están
dañados, cuan
del mismo, cuando el producto ha estado expuesto a la lluvia o a la
humedad, cuando no funciona con normalidad o cuando se ha caído.
15. ADVERTENCIA : Para reducir el riesgo de incendio o descarga eléc trica,
no exponga este artefacto a la lluvia o la humedad. No coloque objetos
llenos de agua, como jarrones, sobre el aparato.
16. El enchufe de conexión de CA se utiliza como dispositivo de desconexión
eléctrica y deberá estar siempre accesible y en funcionamiento durante
el uso previsto. Para des
electricidad, el enchufe de conexión deberá quitarse por completo del
tomacorriente de CA.
17. PREC AUCIÓN: Para reducir el riesgo de incendio o explosión no exponga
las baterías al calor excesivo, como al rayo del sol, fuego u otras fuentes
de calor.
do se derrama líquido sobre la unidad o caen objetos dentro
conectar completamente el aparato de la
29
Page 31

Se incluyen
Asegúrese de que estén incluidos los siguientes elementos.
Porta micrófono
desmontable x 2
(Un micrfófono de cable incluído)
Cable de Audio/Video
Cable de Audio/Video
Base iSM1020BT
Micrófono con cable
Pedestal con altavoces
Patas x 5
Base
Soporte desmontable
Tornillo negro x 10
(para el suelo)
Tornillo platino x 2
(para asegurar el monitor y estante)
Manual
30
Page 32

Instalación
u
1. Coloque el estante boca abajo e
inserte los pies según ilustrado.
Inserte y apriete 2 tornillos
negros en cada pata
(según ilustrado).
Repita el paso anterior para la
otra pata.
2. Introduzca el Pedestal en la base
u
y luego gire cuidadosamente
hacia la derecha vhasta que esté
ajustado. Asegúrese de que el
orificio del tornillo en el Pedestal
esté alineado con el orificio del
tornillo de la Base.
v
3. Introduzca y apriete 1 de los 2
tornillos platinos para asegurar el
parlante/pedestal al estante
(según ilustrado)
31
Page 33

Instalación
u
v
4. Introduzca la base en el Pedestal
u
y luego gire cuidadosamente
hacia la derecha hasta que el
orificio del tornillo en la base esté
alineado con el orificio del tornillo
en el Pedestal.
5. Insertar y apretar 1 de los 2
tornillos platinos para sujetar el
monitor con el parlante/pedestal.
v
32
6. Introduzca los porta micrófonos
desmontables u en la ranura de la
base de los porta micrófonos.
7. Introduzca el soporte desmontable
v en las ranuras de soporte de la
base.
Page 34

Ubicación de controles (Superior/delantero)
1. Botón Reproducir/Pausar (Play/Pause)
/ Reiniciar Configuración Bluetooth
2. Botón de Navegación hacia arriba
3. Botón de Detención (Stop )
4. Botón MENÚ/ Configuración Bluetooth
(Bluetooth Pairing)
5. Pantalla color del LCD TFT
6. Botón GRABAR (RECORD)
7. Indicador Encendido/Espera (On/Standby)
8. Indicador de estado Bluetooth
9. Botón de ENCENDIDO/ESPERA
(ON/STANDBY)
10. Botón de Saltar/Buscar atrás (Skip/Search
Back)
11. Control de VOLUMEN PRINCIPAL (MASTER
VOLUME)
12. Soporte para micrófono 1
13. Soporte
14. Entrada para micrófono 1
15. Entrada para auriculares
16. Botón de Navegación hacia abajo
17. Botón de Sa
(Skip/Search Forward)
18. Botón de ECO (ECHO)
19. Botón de Control de voz automático
(Auto Voice Control, AVC)
20. Interruptor de MONITOR
21. Puerto USB
22. Botón de BALANCE
23. Control de SINTONÍA (TUNING)
24. Botón FUNCIÓN (FUNCTION)
25. Control de VOLUMEN DE MICRÓFONO 1
26. Compartimiento del CD
27. Control de VOLUMEN DE MICRÓFONO 2
28. Área para abrir y levantar CD
29. Soporte para micrófono 2
30. Entrada para micrófono 2
33
ltar/Buscar hacia adelante
Page 35

Ubicación de los controles (reverso)
1
2
3
4
5
1. Cable Antena FM
2. Cable de Alimentación de CA
3. Entrada de audio (AUX IN) (Izquierda)
4. Orificio para enchufe de pedestal
5. Enchufe de pedestal
CDG TRK 8/ 8 0 0 : 16: 0 4
NÚMERO DE PISTA DE REPRODUCCIÓN Y CANTIDAD TOTAL D E PISTAS
6
7
8
9
10
6. ENTRADA DE VIDEO
7. SALIDA DE VIDEO
8. SALIDA DE AUDIO (AUX OUT) (Izquierda)
9. SALIDA DE AUDIO (AUX OUT) (Derecha)
10. ENTRADA DE AUDIO (AUX IN) (Derecha)
TIEMPO DE REPRODUCCIÓN
FUENTE DE SOPORTE
- REPRODUCCIÓN DE CD
CD
- REPRODUCCIÓN DE CDG
CDG
- REPRODUCCIÓN DE USB
USB
MP3G
34
- REPRODUCCIÓN DE
ARCHIVOS MP3+G
Page 36

Conexión
na
Conexión de la unidad a un televisor externo, estéreo, etc.
El video y las letras de la canción
aparecerán en la pantalla integrada. Si
prefiere tener salida de video o audio a
través de su televisor, reproductor de
DVD, estéreo, etc. siga estos pasos:
Conecte el enchufe amarillo del
cable de Audio/Video en la SALIDA
1
DE VIDEO amarilla en el
iSM1020BT y el otro extremo en
la Entrada de Video amarilla de la
unidad externa.
Salida de video (amarillo)
Parte posterior de la unidad exter
Salida de audio
Blanco - Izquierda
Rojo - Derecha
Cables de audio/video
Conecte los enchufes rojo y blanco
del cable de Audio/Video en las
2
SALIDAS DE AUDIO roja y blanca
en el iSM1020BT y los otros
extremos en las entradas de Audio
roja y blanca de la unidad externa.
Si se deja sin conectar, el audio
saldrá a través de los parlantes de
la unidad.
Notas:
• Esta unidad se puede usar con o sin
televisor.
• "También consulte la Guía de Usuario
para televisor o unidades externas"
• Si tiene un televisor mono con una
sola entrada de Audio, deberá comprar
un adaptador "Y" (estéreo a mono) en
su tienda local de accesorios de
lectrónica.
e
• Cables de audio y video incluidos.
35
Page 37

Conexión
na
Conexión de televisor externo, estéreo, etc a la unidad.
1
2
Entrada de video (amarillo)
Parte posterior de la unidad exter
VIDEO
AUDIO
OUTPUT
OUTPUT
Salida de audio
Blanco - Izquierda
Rojo - Derecha
Cables de audio/video
Notas:
• También consulte la Guía de Usuario de
• Se incluyen los cables de audio y
• No conecte a alimentación de
Conecte el enchufe amarillo del
cable de Audio/Video en la
ENTRADA DE VIDEO amarilla en el
iSM1020BT y el otro extremo en
la Salida de Video amarilla de la
unidad externa.
Conecte los enchufes rojo y blanco
del cable de Audio/Video en las
ENTRADAS DE AUDIO roja y
blanca en el iSM1020BT y los
otros extremos en las salidas de
Audio roja y blanca de la unidad
externa.
la unidad externa o televisor.
video.
corriente alterna.
Conexión a alimentación de corriente alterna
36
Introduzca el cable de
alimentación de CA en un
1
tomacorriente de CA de ubicación
conveniente con 120V de CA,
60 Hz.
Asegure el cable de alimentación
en los sujetadores de alimentación
2
instalados previamente.
Notas:
• Haga todas las conexiones antes de
enchufar a la alimen
• El cable de alimentación de CA tiene un
enchufe polarizado que encaja en el
tomacorriente de CA de una sola
manera. Si el enchufe no cabe
correctamente, gírelo y pruebe
nuevamente. No lo fuerce.
tación de CA.
Page 38

Conexión
Conexión de micrófonos y auriculares
Micrófonos:
Inserte el enchufe de un micrófono en la entrada
para micrófono u . Inserte el otro enchufe de
micrófono en la entrada para micrófono v (si
lo desea).
Nota: No arroje o dé golpecitos al micrófono,
puede dañar el micrófono o los parlantes. Por la
misma razón, no haga girar el micrófono.
Auriculares:
Para escuchar en privado use auriculares (no se
incluyen). Inserte el enchufe del auricular en la
entrada para auriculares . Desconecte cuando
termine para poder utilizar los parlantes incluidos.
Conectando el parlante en el pedestal
Para proteger los parlantes asegúrese de que el iSM1020BT esté apagado y el VOLUMEN
PRINCIPAL (MASTER VOLUME) y los controles de VOLUMEN DEL MICRÓFONO 1 y 2 estén en su
1
mínima configuración.
Conecte el cable del pedestal al enchufe del pedestal.
w
2
Encienda el aparato y lentamente suba el VOLUMEN PRINCIPAL (MASTER VOLUME) y los controles
de VOLUMEN DEL MICRÓFONO 1 y 2 al nivel que le resulte cómodo.
3
Orificio para
enchufe de pedestal
37
Page 39

Funcionamiento
Reproducción de un CD (con o sin archivos MP3+G), CD+G o dispositivo USB
Conecte la unidad como se describió
previamente. Oprima el botón
1
ENCENDIDO/ESPERA (ON/STANDBY) para
encender la unidad; El indicador de On/
STANDBY se tornará azul y la pantalla LCD
tendrá la imagen debajo:
Abra el compartimiento de CD e introduzca un
CD (con archivos estándar o MP3+G) o un
2
CD+G presionándolo cuidadosamente en el
husillo central. Cierre la tapa del CD. Si utiliza el
dispositivo USB con archivos MP3+G, introduzca
el USB en la ranura de USB.
PREGUNTAS FRECUENTES
• ¿Qué es un CD+G?
Un CD+G (CD+ Graphics), es el formato estándar para
la mayoría de los discos de karaoke que mostrarán las
letras de canciones en pantalla.
• ¿Qué es un MP3+G?
MP3+G es el formato más nuevo para música Karaoke
usando el tamaño de archivo pequeño de MP3.
Mostrará las letras de canciones en la pantalla.
Consulte la página 50 para comprar y descargar
archivos MP3+G.
38
Oprima repetidamente el botón FUNCIÓN
(FUNCTION) hasta que la pantalla de LCD
3
muestre DISCO (DISC) pa
CDG/CDoUSB para seleccionar el modo de
USB.
Deslice el interruptor MONITOR hacia la posición
de Encendido (ON) (derecha) para ver la
4
informaciónyletras de canciones (si reproduce
un archivo CD+G o MP3+G) o deslice hacia la
posición Apagado (Off) (izquierda) para apagar
la pantalla del LCD.
ra seleccionar el modo
Page 40

Funcionamiento
Reproducción de un CD (con o sin archivos MP3+G), CD+G o dispositivo USB
Oprima Reproducción/Pausa (Play/Pause)
para iniciar la reproducción; si escucha
5
un archivo MP3+G o CD+G aparecerán la
imagen y las letras de canciones en la
pantalla de LCD.
Ajuste el volumen a un nivel conveniente,
usando el control de VOLUMEN PRINCIPAL
6
(MASTER VOLUME).
Notas:
• Nunca coloque nada que no sea un CD en el
compartimiento, como por ejemplo objetos
extraños que puedan dañar la unidad.
• Si no introdujo un disco, "NO DISC" aparecerá
en la pantalla de LCD.
• Si no introdujo un dispositivo USB, "NO USB"
aparecerá en la pantalla de LCD.
• Si se conecta a un televisor u otra fuente de
audio, Ajuste el volumen utilizando el control
de volumen de la otra unidad
Conecte el/los micrófono/s como se
muestra en la página 37. Deslice el botón
7
de encendido a la posición ON.
39
Ajuste el control de VOLUMEN DEL
MICRÓFONO (MIC VOLUME) 1 o 2 según
8
el nivel deseado. Al aumentar el nivel de
este control se incrementa
del micrófono respectivo.
Ajuste el control de ECO (ECHO) para darle
9
un efecto de eco a su voz. Oprima el botón
ECO (ECHO) y luego aumente/disminuya el
eco usando los botones de Salto hacia
adelante/Atrás (Skip Forward /Skip Back
). Cuanto más alto sea el número, habrá
más efecto de eco.
rá el volumen
Page 41

Funcionamiento
Reproducción de un CD (con o sin archivos MP3+G), CD+G o dispositivo USB
Ajuste la Clave (Key) para obtener la mejor
10
Menú de CLAVES (KEY)
11
clave para el cantante. Durante la
reproducción, oprima el botón MENÚ y
luego navegue a la tecla CONTROL DE
CLAVES DIGITALES (DIGI KEY CTRL)
usando los botones de Navegación
(Navigation) / . Ajuste la clave
usando los botones de Salto hacia
adelante/Atrás (Skip Forward /Skip
Back ). Para terminar, oprima el botón
Menú.
Oprima el botón de control de Auto Voz
(Auto Voice, AVC) para encender esta
opción (aparecerá AVC ON en la pantalla).
Se silenciarán las voces en grabación
multiplex en cuanto el cantante comience
a cantar en el micrófono. Cuando deje de
cantar, las voces comienzan a escucharse
nuevamente de forma automática.
IMPORTANTE: Esta función sólo funciona
con medios multiplex.
12
40
Oprima el botón BALANCE y luego ajuste
el nivel de balance usando los botones
Salto hacia adelante/atrás (Skip Forward
/Skip Back ).
En grabaciones multiplex, use el botón de
Salto hacia atrás (Skip Back) para
reducir o eliminar la voz del cantante
principal. Utilice el botón
adelante (Skip Forward) para reducir o
eliminar la música.
IMPORTANTE: Esta función sólo funciona con
medios multiplex.
de Salto hacia
Page 42

Funcionamiento
Reproducción de un CD (con o sin archivos MP3+G), CD+G o dispositivo USB
SALTO (SKIP): Avance o retroceda una pista
oprimiendo los botones de Salto hacia
adelante/Atrás (Skip Back /Skip Forward ).
BÚSQUEDA: Durante la reproducción, oprima y
mantenga presionado el botón de Salto hacia
atrás (Skip Back) o el de Salto hacia
adelante (Skip Forward) para mover el
reproductor hacia adelante o hacia atrás dentro
de una pista para ubicar un pasaje musical
específico. Cuando libera el botón, se reanuda la
reproducción normal.
REPETIR: Durante la reproducción, oprima el
botón MENÚyluego navegueala tecla
REPETICIÓN (REPEAT) usando los botones de
Navegación (Navigation) / . Seleccione la
configuración deseada de Repetición {UNO
(ONE) (Repetir una canción),
(Repetir todas las canciones/pistas) o DIR
(Repetir directorio; esto solo aparece si usa un
dispositivo USB)} usando losbotonesde Salto
hacia adelante o atrás (Skip Forward /Skip Back
). Para terminar, oprima el botón Menú.
TODOS (ALL)
Menú de Repetición (Repeat)
13
Nota: Si usa un dispositivo USB durante el modo de
DETENER (STOP) puede también seleccionar un archivo
usando los botones de navegación / para
desplazarse hacia arriba o abajo, o bien los botones de
Salto hacia adelante/Atrás (Skip Back /Skip Forward )
para desplazarse a la izquierda o derecha.
14
15
PROGRAMA (PROGRAM): Puede programar
16
Nota: Oprima DOS VECES el botón de Detener (Stop)
para detener y eliminar el programa.
41
hasta 20 pistas encualquier disco para que se
reproduzcan en cualquierorden deseado. Estando
en modo Detener (Stop) oprima el botón MENÚ;
PRG P01:00 (01representa el número de
programay00 representa la pista) aparecerá en
la pantalla de LCD. Seleccione la primera pista
usando los botones de Salto hacia adelante/Atrás
(Skip Forward / Skip Back ). Oprima el
botón de MENÚ otra vez, pa
entrada. Repita para configurar hasta 20 pistas en
la memoria. Cuando termine oprima
Reproducción/Pausa (Play/Pause) para
empezar la reproducción.
ra confirmar la
Page 43

Funcionamiento
Reproducción de un CD (con o sin archivos MP3+G), CD+G o dispositivo USB
PAUSA: Durante la reproducción, si desea
17
Nota: Si pausa la unidad mientras reproduce un CD+G
esto puede distorsionar las letras de canciones que
aparecen en pantalla. Esto seguirá hasta que se actualice
la pantalla.
18
pausar momentáneamente el disco, oprima el
botón Reproducción/Pausa (Play/Pause) ;
“PAUSA” (PAUSE) aparecerá en la pantalla.
Oprima nuevamente para reanudar la
reproducción normal.
Oprima STOP (DETENER) para detener la
reproducción.
Oprima el botón ENCENDIDO/ESPERA
19
Nota: Puede grabarse cantando o grabar una canción
y/o video en el dispositivo USB. Consulte la página 50
para obtener más información.
42
(ON/STANDBY) para apagar la unidad; el
indicador de ENCENDIDO/ESPERA
cambiará a rojo y se apagará la pantalla de
LCD.
Page 44

Funcionamiento
Utilizar un dispositivo Bluetooth
Conecte la unidad como se describió
previamente. Oprima el botón
1
ENCENDIDO/ESPERA (ON/STANDBY) para
encender la unidad; El indicador de
On/STANDBY se tornará azul y la pantalla
LCD tendrá la imagen debajo:
Oprima el botón FUNCIÓN (FUNCTION)
2
varias veces hasta que en la pantalla LCD
se lea “BLUETOOTH” para seleccionar el
modo Bluetooth; escuchará el sonido de
Bluetooth y el indicador de estado
Bluetooth parpadeará en rojo y azul.
Desplace el interruptor de MONITOR a
posición de Apagado (OFF) (izquierda) para
3
apagar la pantalla de LCD.
ENCIENDA la función Bluetooth de su
4
dispositivo compatible con Bluetooth a 10
metros (30 pies) del pedestal de la unidad.
Verá que “Singing Machine” aparece en su
lista de búsqueda en su dispositivo.
N
ota:
Siempre consulte el manual de usuario de su
dispositivo Bluetooth para más instrucciones.
Seleccione “Singing Machine” para
5
comenzar la configuración. Espere hasta
que se haya finalizado la configuración
hasta que escuche un pitido que emite la
unidad. El indicador de estado Bluetooth se
iluminará en color azul.
otas:
N
• Si su dispositivo Bluetooth le solicita una
clave de acceso durante el proceso de
configuración, ingrese “0000” para conectarse.
• Si lo configuró antes, se visualizará una lista
de resultados previos. Seleccione
“Singing Machine” y confirme.
• En algunos dispositivos Bluetooth (por ejemplo
computadoras), una vez que se haya
completado la configuración, deberá
seleccionar su dispositivo Bluetooth como “Usar
como dispositivo de Audio” o similar.
43
Page 45

Funcionamiento
Utilizar un dispositivo Bluetooth
PLAY/PAUSE: Press the Play/Pause button
6
to start playback.
Ajuste el volumen a un nivel conveniente,
usando el control de VOLUMEN PRINCIPAL
7
(MASTER VOLUME).
Nota: Si se conectaaun televisor u otra fuente de
audio, ajuste el volumen utilizando el control de
volumen del otro dispositivo.
Conecte el/los micrófono/s como se
muestra en la página 37, deslice el botón
8
de encendido a la posición de ON.
Ajuste el control de VOLUMEN DEL
9
MICRÓFONO (MIC VOLUME) 1 o 2 según
el nivel deseado. Al aumentar el nivel de
este control se incrementará el volumen del
micrófono respectivo.
Ajuste el control de ECO (ECHO) para darle
10
un efecto de eco a su voz. Oprima el botón
de ECO (ECHO), y luego aumente o
disminuya el eco usando los botones de
Salto hacia adelante/atrás (Skip Forward
/Skip Back ). Cuanto más alto sea el
número, habrá más efecto de eco.
44
Page 46

Funcionamiento
Utilizar un dispositivo Bluetooth
11
12
Oprima el botón de control de Auto Voz
(Auto Voice, AVC) para encender esta
opción (aparecerá AVC ON en la pantalla).
Se silenciarán las voces en grabación
multiplex en cuanto el cantante comience
a cantar en el micrófono. Cuando se
detiene, las voces comienzan a escucharse
nuevamente de forma automática.
IMPORTANTE: Esta función solo funciona
con medios mutiplex.
Oprima el botón BALANCE y luego ajuste el
nivel de balance usando los botones de
Salto hacia adelante y atrás (Skip Forward
/Skip Back ).
En grabaciones multiplex, use el botón
Salto hacia atrás (Skip Back) para
reducir o eliminar la voz del cantante
principal y use el botón de Salto hacia
adelante (Skip Forward) para reducir o
eliminar la música.
IMPORTANTE: Esta función sólo funciona
con medios multiplex.
45
13
SALTO (SKIP): Avance o retroceda una
pista oprimiendo los botones de Salto
hacia adelante/atrás (Skip Back /Skip
Forward ).
Page 47

Funcionamiento
Utilizar un dispositivo Bluetooth
PAUSAR (PAUSE): Durante la reproducción
14
N
la unidad y/o su dispositivo Bluetooth salga del
rango de comunicación. Se reestablecerá una
conexión activa cuando su dispositivo Bluetooth
vuelva dentro del rango. Cuando se vuelve a
encender la unidad, intentará automáticamente
reconectarse con el dispositivo Bluetooth
recientemente configurado. Cuando la función
Bluetooth de su dispositivo Bluetooth se vuelve a
encender, se podrá reconectar presionando el
botón MENÚ en la unidad.
15
si desea pausar momentáneamente la
pista oprima el botón Reproducir/ Pausar
(Play/Pause) . Oprima nuevamente
para reanudar la reproducción normal.
Mantenga presionado el botón
Reproducir/Pausar (Play/Pause) ,
para reiniciar el proceso de configuración.
ota:
La configuración permanece intacta cuando
Oprima el botón Detener (Stop) para
detener la reproducción.
Oprima el botón ENCENDIDO/ESPERA
16
Nota: No existe función de grabación cuando se
escucha a través de la función Bluetooth.
17
46
(ON/STANDBY) para apagar la unidad; el
indicador de Encendido/Espera
(On/Standby) será rojo y se apagará la
pantalla de LCD.
Podrá colocar su dispositivo Bluetooth en
el soporte adjunto luego de que se haya
configurado.
Page 48

Funcionamiento
Uso de la entrada AUX
Conecte la unidad como se describió
previamente. Oprima el botón
1
ENCENDIDO/ESPERA (ON/STANDBY) para
encender la unidad; El indicador de
ON/STANDBY se tornará azul y la pantalla
LCD tendrá la imagen debajo:
Conecte la unidad externa a las entradas de
2
VIDEO/AUX en la parte trasera de esta
unidad como lo muestra la página 36.
Notas:
• Se recomienda que configure el volumen en la
unidad auxiliar a 1/3 o menos para evitar
distorsiones.
• No es posible saltar archivos o pistas cuando se
usa un dispositivo externo.
Repetidamente, oprima el botón FUNCION
(FUNCTION) hasta que la palabra “AUX”
3
aparezca en la parte superior izquierda de
la pantalla LCD.
47
Desplace el interruptor de MONITOR a la
4
posición de Encendido (On- derecha) si
verá videos desde el dispositivo externo, o
deslice a la posición de Apagado (Offizquierda) para apagar la pantalla de LCD.
Conectar una unidad externa permitirá
5
reproducir audio y video a través de su
Singing Machine. (siempre y cuando el otro
dispositivo sea compatible).
Ajuste el volumen a un nivel conveniente
6
usando el control de VOLUMEN PRINCIPAL
(MASTER VOLUME).
Conecte el/los micrófono/s como se
7
muestra en la página 37, deslice el botón
de encendido a la posición de ON
Page 49

Funcionamiento
Uso de la entrada AUX
Ajuste el control de VOLUMEN DEL
8
9
10
Nota: No existe función de grabación cuando se
escucha a través de la función Aux.
MICRÓFONO (MIC VOLUME) 1 o 2 según
el nivel deseado. Al aumentar el nivel de
este control se incrementará el volumen
del micrófono respectivo.
Ajuste los efectos de Eco (Echo) y Balance
como lo muestran las páginas 39 y 40.
Oprima el botón ENCENDIDO/ESPERA
(ON/STANDBY) para apagar la unidad; el
indicador de ENCENDIDO/ESPERA será
rojo y se apagará la pantalla de LCD.
48
Page 50

Funcionamiento
Uso de radio FM
Conecte la unidad como se describió
previamente. Oprima el botón
1
ENCENDIDO/ESPERA (ON/STANDBY) para
encender la unidad; El indicador de
ON/STANDBY se tornará azul y la pantalla
LCD tendrá la imagen debajo:
Para seleccionar el modo FM oprima
repetidamente el botón FUNCIÓN
2
(FUNCTION) hasta que “Radio” aparezca
en la esquina izquierda de la pantalla LCD.
Desplace el interruptor de MONITOR a
posición de APAGADO (OFF) para apagar la
3
pantalla de LCD.
Sintonice la estación usando el control de
Sintonización (Tuning).
4
6
Extienda y desenrosque el cable de antena
FM en la parte trasera de la unidad, para
5
una mejor recepción de FM.
Nota: No hay Karaoke o función de grabación
cuando se escucha la radio.
Oprima el botón ENCENDIDO/ESPERA
6
(ON/ STANDBY) para apagar la unidad; el
indicador de ENCENDIDO/ESPERA será rojo
y se apagará la pantalla de LCD.
49
Page 51

Funcionamiento
Grabación en un dispositivo USB
Conecte la unidad como se describió
previamente. Oprima el botón
1
ENCENDIDO/ ESPERA (ON/STANDBY) para
encender la unidad; hasta que aparezca la
palabra “USB” en la parte izquierda de la
pantalla LCD.
Introduzca un dispositivo USB con espacio
disponible en la entrada de USB.
2
Levante la tapa del CD e introduzca un
3
disco con archivos estándar o CD+G
cuidadosamente presionándolo sobre el
husillo central como se muestra en las
páginas 39 y 40.
Para seleccionar el modo CDG/CD oprima
el botón de Función (Function) hasta que la
4
pantalla de LCD muestre “DISC”.
50
Deslice el interruptor MONITOR a la
posición de Encendido (ON) (derecha) para
5
ver la información y letras de canciones (si
reproduce un archivo CD+G o MP3+G) o
deslice hacia la posición Apagado (Off)
(izquierda) para apagar la pantalla de LCD.
Oprima Reproducción/Pausa (Play/Pause)
6
7
para iniciar
música a través de un archivo MP3+G o
CD+G aparecerán la imagen y las letras de
canciones en la pantalla de LCD.
Conecte y fije el volumen del micrófono
como lo muestra la página 37.
la reproducción; si escucha
Page 52

Funcionamiento
Grabación en un dispositivo USB
Oprima el botón de GRABAR (RECORD); la
8
pantalla de LCD mostrará REC y un
porcentaje que falta en el dispositivo USB
introducido. Cante o hable en el micrófono.
Su voz se grabará con la música y el video
(si lo hay) en el dispositivo USB.
Cuando finalice de grabar, oprima
9
nuevamente el botón de GRABAR
(RECORD) para detener la grabación.
Oprima el botón ENCENDIDO/ ESPERA
10
Nota: Para reproducir la grabación, oprima
repetidamente el botón FUNCIÓN (FUNCTION)
para seleccionar USB y luego elija el archivo bajo el
submenú de GRABAR (RECORD).
(ON/ STANDBY) para apagar la unidad; el
indicador de ENCENDIDO/ESPERA será
rojo y se apagará la pantalla de LCD.
51
Page 53

Funcionamiento
Dónde descargar archivos MP3+G
Recomendaciones útiles:
Los archivos .mp3 y .cdg. están dispinibles para
descargarse en un único archivo, comprimido MP3
+G.zip. El archivo MP3+G no se puede reproducir
como un archivo .zip en un dispositivo flash USB.
Para reproducir canciones de karaoke utilizando un
dispositivo flash USB, el archivo MP3+G.zip se
debe descomprimir de la siguiente manera:
• Conecte un dispositivo flash USB a su
computadora
• Descargue el archivo MP3+G de su casillero
digital y guarde el archivo .zip* en una carpeta
en su computadora.
• Haga doble clic en el archivo .zip para abrirlo
(visualizará los archivos .mp3 y .cdg).
• Arrastre los archivos .mp3 y .cdg al dispositivo
flash USB.
• Quite (expulse) el dispositivo flash USB de su
computadora.
Encienda el Singing Mach
dispositivo flash USB.
PREGUNTAS FRECUENTES
• ¿Dónde puedo obtener ayuda adicional conlos
formatosde archivo?
En la página web de Singing Machine Store,
haga clic en FORMATOS DE ARCHIVO (FILE
FORMATS) en el extremo inferior izquierdo.
ine y conecte el
Para adquirir y descargar música de Karaoke visite
http://store.singingmachine.com y acceda a más de
12000 de sus canciones favoritas para karaoke.
Necesitará un dispositivo flash USB (no incluido) para
transferir las descargas a esta unidad.
Siga estos sencillos pasos:
Ingrese en http://store.singingmachine.com
con su navegador de Internet y regístrese.
1
Seleccione y adquiera su música de karaoke
favorita de la Tienda de descargas de
2
Singing Machine.
Descargue su compra seleccionada del
Singing Machine Digital Locker a su
3
dispositivo flash USB.
Introduzca el dispositivo flash USB como se
muestra en la página 40 y ¡disfrute!
4
Nota:Sus canciones descargadas también se pueden
r en un CDR/CDRW.
graba
52
Page 54

Cuidado y mantenimiento
B
E
N
Z
E
N
E
C
L
E
A
N
E
R
Cuidado de los discos compactos
Trate el disco compacto con cuidado.Manipuleeldiscosolo
tomándolo de los bordes. No permita que sus dedos hagan
contacto con el lado brillante sin impresión del disco compacto.
No pegue cinta adhesiva, autoadhesivos, etc.ala etiqueta del
disco compacto. Límpielo periódicamente con un paño suave,
seco y sin pelusas. Nunca use detergentes ni limpiadores
abrasivos para limpiar el disco compacto. Si es necesario use un
kit de limpieza para CD.
Si el disco salta o se atasca en alguna sección, probablemente
esté sucio o dañado (rayado).
Cuando lo limpie, hágalo en líneas rectas desde el centro hacia
el borde exterior. Nunca limpie en movimientos circulares.
Esta unidad ha sido creada para reproducir diferentes discos
compactos con los logos de identificación mostrados aquí.
Otros discos tal vez no guardan conformidad con el CD estándar
DIGITAL AUDIO
GRAPHICS
DIGITAL AUDIO
y no se puede
Los discos se deben almacenar en sus cajas, después de cada
uso, para evitar daños. No exponga discos compactosala luz
solar directa, humedad elevada, altas temperaturas o polvo,
etc. La exposición prolongada o temperaturas extremas pueden
deformarlo.
n reproducir correctamente.
No pegue nada en ninguno de los lados. Además, no escriba en
el lado brillante del disco, ya que los instrumentos de escritura
afilados,ola tinta, pueden dañar la superficie.
Limpieza de la Unidad
Para prevenir incendios o descargas eléctricas, desconecte la
unidad del tomacorriente de CA cuando efectúe la limpieza. El
exterior de la unidad puede limpiarse con un paño suave. Su
mantenimiento puede ser el mismo que el de cualquier
iliario. Limpie las partes plásticas con cuidado.
mob
53
Page 55

Guía de Resolución de Problemas
Si esta unidad presentara un problema, lea el siguiente cuadro antes de llamar al servicio técnico:
No hay energía
• La unidad no está encendida; presione el botón de ON/STANDBY está iluminado de color azul.
• Asegúrese de que la unidad esté conectada a la alimentación de corriente alterna.
No hay sonido (General)
• El Volumen principal (Master Volume) está en mínimo: suba el volumen.
• No se seleccionó la Función correcta, haga su selección presionando el botón de FUNCTION.
• Los altavoces en torre no están conectados.
• Los auriculares aún están conectados a la entrada para auriculares; desconéctelos.
No hay sonido – si está conectado a un televisor
• El volumen del televisor está silenciado o demasiado bajo.
• Los enchufes de audio blanco y rojo no están bien conectados; consulte las páginas 37 y 38.
• Selecione el recurso en su televisor (AV, AV1, AV2, input1, input2, etc)
La letra de la canción no aparece en la pantalla
• Si está conectado a un televisor externo, no se conectó correctamente el enchufe amarillo de video;
consulte las pá
• Si está conectado a un televisor externo, no se seleccionó la fuente correcta (generalmente AV) en el
menú del televisor.
• El archivo o pista que se está reproduciendo no es un archivo MP3+G o CD+G. Estos son los únicos
archivos que le permiten ver las letras de las canciones en la pantalla.
ginas 37 y 38.
La sección de CD no funciona correctamente
• No se introdujo un disco, o se colocó al revés; introduzca correctamente el disco.
• Asegúrese de utilizar un CD, CD+G, o bien, cuando se haya grabado la música descargada asegúrese de
que el disco sea CDR o CDRW.
• El lente está sucio. Desconecte la energía y limpie las lentes con un limpiador de lentes para CD.
• Se ha formado humedad. Apague la unidad, desconecte la unidad del tomacorriente por 20-30 minutos
para que se seque.
No hay sonido desde el micrófono
• Asegúrese de que está firmemente conectado a la entrada para el MICRÓFONO 1 o 2.
• Confirme que el botón de encendido esta en ON, vea página 41.
• Asegúrese que el/los control(les) en perspectiva esté(n) girados a la derecha para aumentar el volumen.
• Gire la esfera del volumen maestro para subir el volumen.
No se reproducen los arc
• El archivo está dañado; reemplácelo.
• El archivo no está en un formato que esta unidad pueda reproducir.
• El producto no admite el dispositivo de USB conectado.
hivos en la entrada de USB
54
Page 56

Guía de Resolución de Problemas
El dispositivo Bluetooth no se puede configurar o conectar con la unidad.
• No ha activado la función Bluetooth de su dispositivo; ver la página 45 o consultar el manual de usuario
del dispositivo Bluetooth.
• La unidad no está en modo configuración; mantenga presionado el botón Reproducir/Pausar
(Play/Pause) para reiniciar la configuración.
• La unidad ya está conectada a otro dispositivo Bluetooth, mantenga presionado el botón
Reproducir/Pausar (Play/Pause) para desconectar ese dispositivo y luego comenzar la configuración
con otro dispositivo que desee.
La reproducción de la música no está disponible en la unidad luego de conectar de manera exitosa el
Bluetooth.
• Asegúrese de que su dispositivo Bluetooth es compatible con el perfil Blueto
oth A2DP.
55
Page 57

Especificaciones
AUDIO
Potencia de salida................................................................................................................. 7 Watts (RMS)
Impedancia de salida......................................................................................................................... 3 Ohms
REPRODUCTOR DE CD
Respuesta de frecuencia.................................................................................................. 100 Hz-20 KHz
Proporción de señal y ruido .................................................................................................................50 dB
Sistema de muestreo............................................................................................... Sobremuestreo por 8
Diámetro del disco.............................................................................................................4,72” (120 mm)
............................................................................................................................... 3,15” (80 mm) Único CD
BLUETOOTH
Versión Bluetooth.....................................................................................................................................V2.0
Distancia de trabajo......................................................Hasta 10 metros medidos en espacio abierto
RADIO FM
Frecuencia .............................................................................................................................. 88 a 108 MHz
ENTRADAS
Entrada para auriculares........................................................................ Auriculares estéreo de 3,5 mm
Micrófono ........................................................................................Entradas para micrófono de 6,3 mm
GENERAL
Energía...................................................................................................................... AC 110-120 V, 60 Hz
Dimensiones - Unidad principal ............. 19,5 x 14,3 x 37,9 pulgadas (49,6 x 36,4 x 96,1 cm)
Peso - Unidad principal ................................................................................................. 9,7 libras (4,4 kg)
Monitor................................................................................................................... 7” Color TFT LCD NTSC
Micrófono............................. Impedancia con micrófono dinámico -74 db 600 Ohm con 6.3 mm
Las especificaciones están sujetas a cambios sin previo aviso.
56
Page 58

4060 E. Jurupa St., Unit B, Ontario, CA 91761-1413 USA
© 2015
 Loading...