

Page 1
Page 2

Table of Contents
Installing the Software............................................................................................................................ 1
Introduction ..........................................................................................................................................
Opening a Library Design.....................................................................................................................
Modifying a Design
.............................................................................................................................. 9
2
5
Dimensions............................................................................................................................................. 11
Changing Color......................................................................................................................................
13
Embroidery Simulator............................................................................................................................. 15
Lettering - Pre-Digitized Fonts .............................................................................................................. 16
Changing Lettering Stitches from Satin to Fill
......................................................................................
20
Lettering Shapes and Modes.................................................................................................................. 22
Library and Text Combinations.............................................................................................................. 25
Creative Lettering.................................................................................................................................. 26
Scanning
...............................................................................*.............................................................
30
Changing Scale of .wmf and .bmp......................................................................................................... 32
Importing dst and exp Designs
.............................................................................................................. 33
Digitizing Hints...................................................................................................................................... 35
Image Span............................................................................................................................................. 36
Digitizing................................................................................................................................................ 37
Opening an xxx File Along with a bmp or wmf
..................................................................................
43
Autotrace ............................................................................................................................................... 44
Digitizing - Planning the Design..........................................................................................................
48
Digitizing Underlay................................................................................................................................ 50
Adding a Stitch Point to the Outline
...................................................................................................
51
Changing Stitch Type Block.................................................................................................................. 53
Changing Stitch Parameters................................................................................................................... 54
Editing - Changing the Stitch Inclination.............................................................................................
55
Changing the Stop and Start Points....................................................................................................... 56
Editing - Inserting New Blocks Between Blocks.................................................................................. 57
Combining Multiple dst or exp Designs............................................................................................... 58
Editing - Deleting a Stitch Block
.................................................................................................. 60
Editing - Moving a Design or Segment................................................................................................. 62
Editing - Repositioning the First Jump Stitch........................................................................................ 64
Editing Stitch Edit
..............................................................................................................................
65
Editing - Deleting or Adding Color Stops.............................................................................................. 68
Reorder Color Segments........................................................................................................................ 70
Multiple Hoop Lettering........................................................................................................................
Digitizing with Method 2 - Creating a Hole in a Segment
...................................................................
71
77
Page 3

Professional Sew-Ware
Installation of the Software
1. Setup:
Connections between the Computer and the PSW Card Writer
• Turn the computer off.
• Connect the interface cable to the computer (9 pin serial port)
• Connect interface cable to PSW Card Writer.
• Connect PSW adapter to outlet and PSW Card Writer
• Turn on the computer
2. installation:
Install the software on the computer
The Professional Sew-Ware program comes on a CD-ROM
Start the Windows 95
Insert the PSW CD-ROM In the CD drive (usually drive “D")
Setup window appears
Immediately following Welcome window appears
Read instructions, click Next
Read license agreement, click Yes
Type name or company name (this must be done), click Next
To install to the default folder, click Next
Select language (English. French, German)
Check settings, dick Next
Start copying Files appear, click Next
During the installation, three indicators appear on the screen providing
information on installation progress .
File copying progress
CD copying progress
Remaining free disk space
When installation is complete, click Finish
Path names showing where the PSW program is installed in the computer:
C\PSW for the main program directory
C\PSW\FONT for the lettering fonts
C\PSW\IMAGES for the sample image
C\PSW\LIBRARY for the library designs
C\PSW\PALETTES for the color palette
C\PSW\HOOPS for the hoop frames
Page 4
Professional Sew-Ware
Introduction
INTRODUCTION TO SINGER PROFESSIONAL SEW-WARE
■ When you turn on the computer, there will be an icon on the main screen that says
Professional Sew-Ware 1.0, or in the Start menu bar it will say Professional Sew
Ware 1.0.
■ Double click the left mouse on either icon.
■ The white introductory Screen will appear that says. Singer Professional Sew-Ware,
then the main working screen will automatically appear.
At the very top of the screen it says Professional Sew Ware v1.00.
^Professional Sew-Ware vl.00
Filoi Cfosto Edit Modfly Chotoes ,Paranr«>torG UtJrtes Wr\ikw_ Hoip - ,
A
Vt-
ijn
yj"
s
A.
i-r
■l’. C;.
Jv
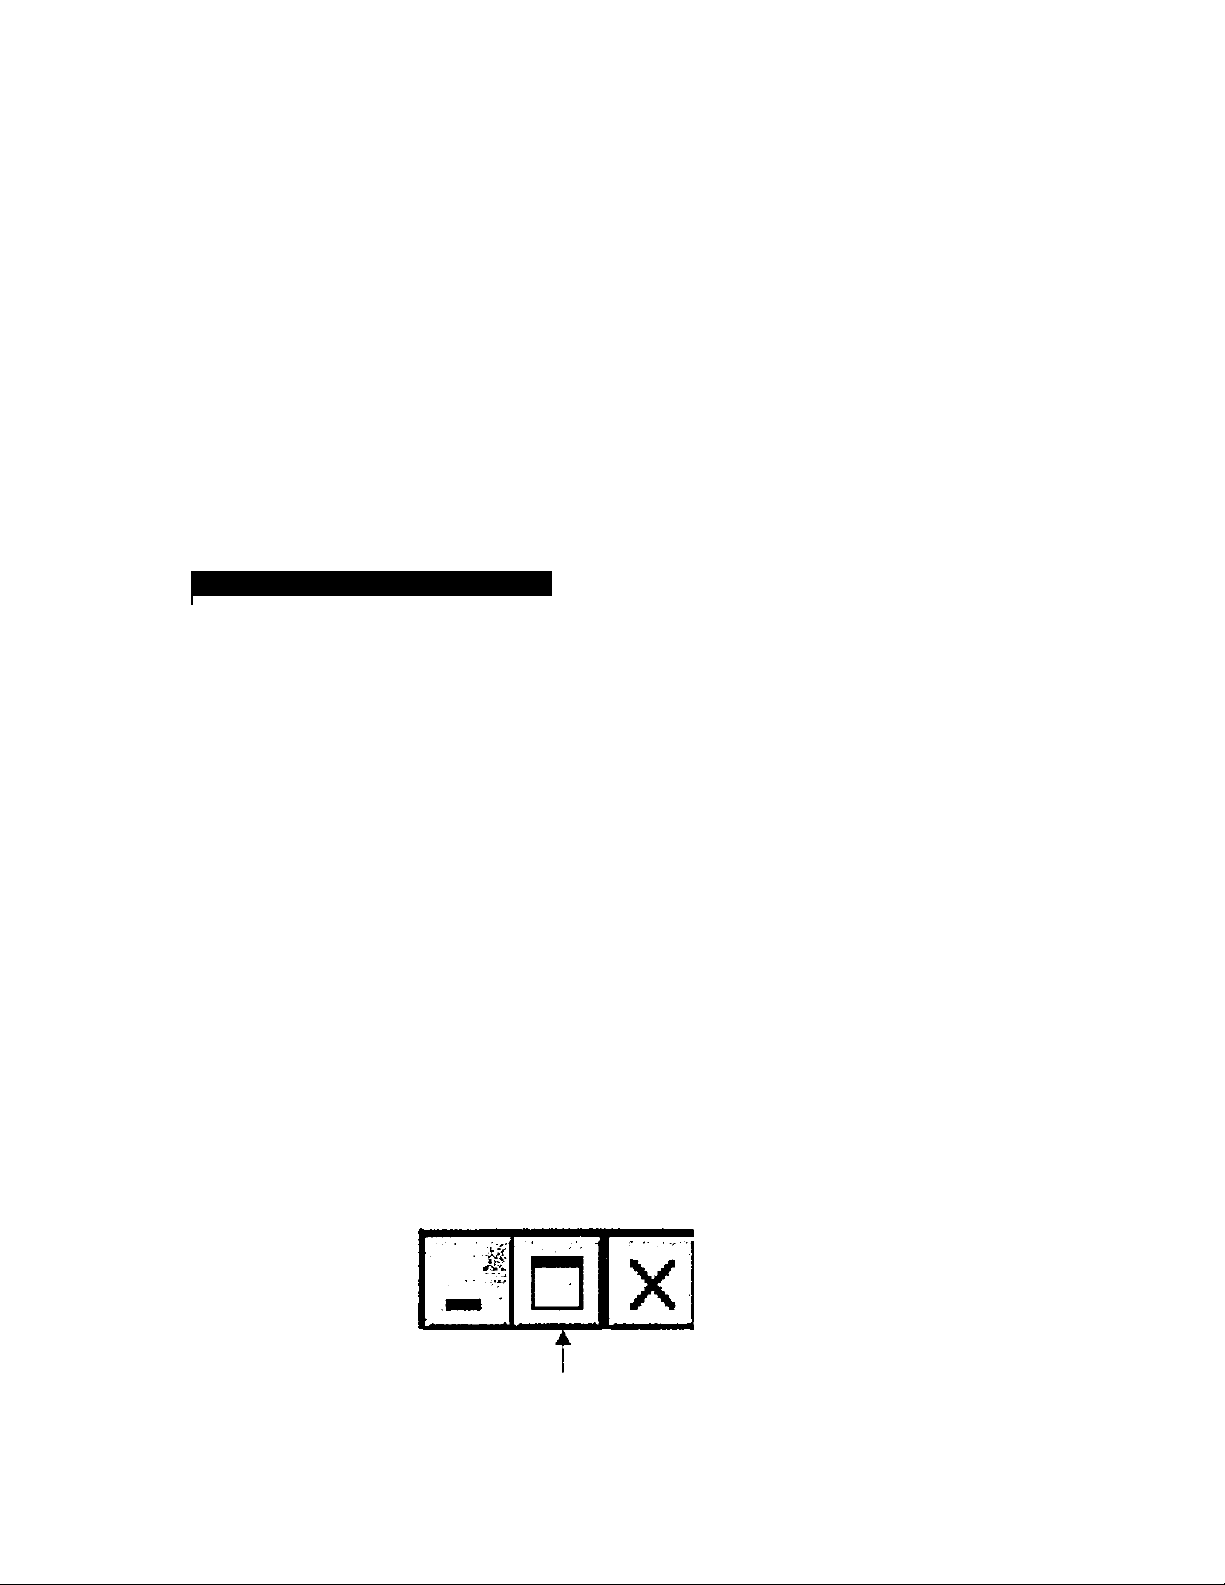
At the far right there are 3 boxes:
The first box
will minimize
the screen.
lo.o "'T
A
The third box is to
exit the software.
The second box is
for full screen.
Page 5
Professional Sew-Ware
Introduction
■ Across the top of the screen is the main menu. This menu is very similar to other
software menus such as word processing.
Professional Sew-Ware vl.OO
Files^:^Gгeate ; Edit-vModify Choices'"Parameters3: Utilities;aW
■ Below the main menu is a horizontal tool bar.
Coordinates
New
Load
Save
Print
Copy
▼ t
G»
B
V V
•'■Si
Paste
o '.O
Undo
Redo
Edit Outline
Current Method
Q, [s^i
Zoom
Stitch Type
Density / Size
Number of Stitches
Page 6
Professional Sew-Ware
To the left of the screen is a vertical tool bar.
Introduction
u
№
'* Vv'iM'V-
yy-
...
.
fp'
Im
Lettering
Library
Special functions
Jump function
Ruler
Show Image
Stitch Colors
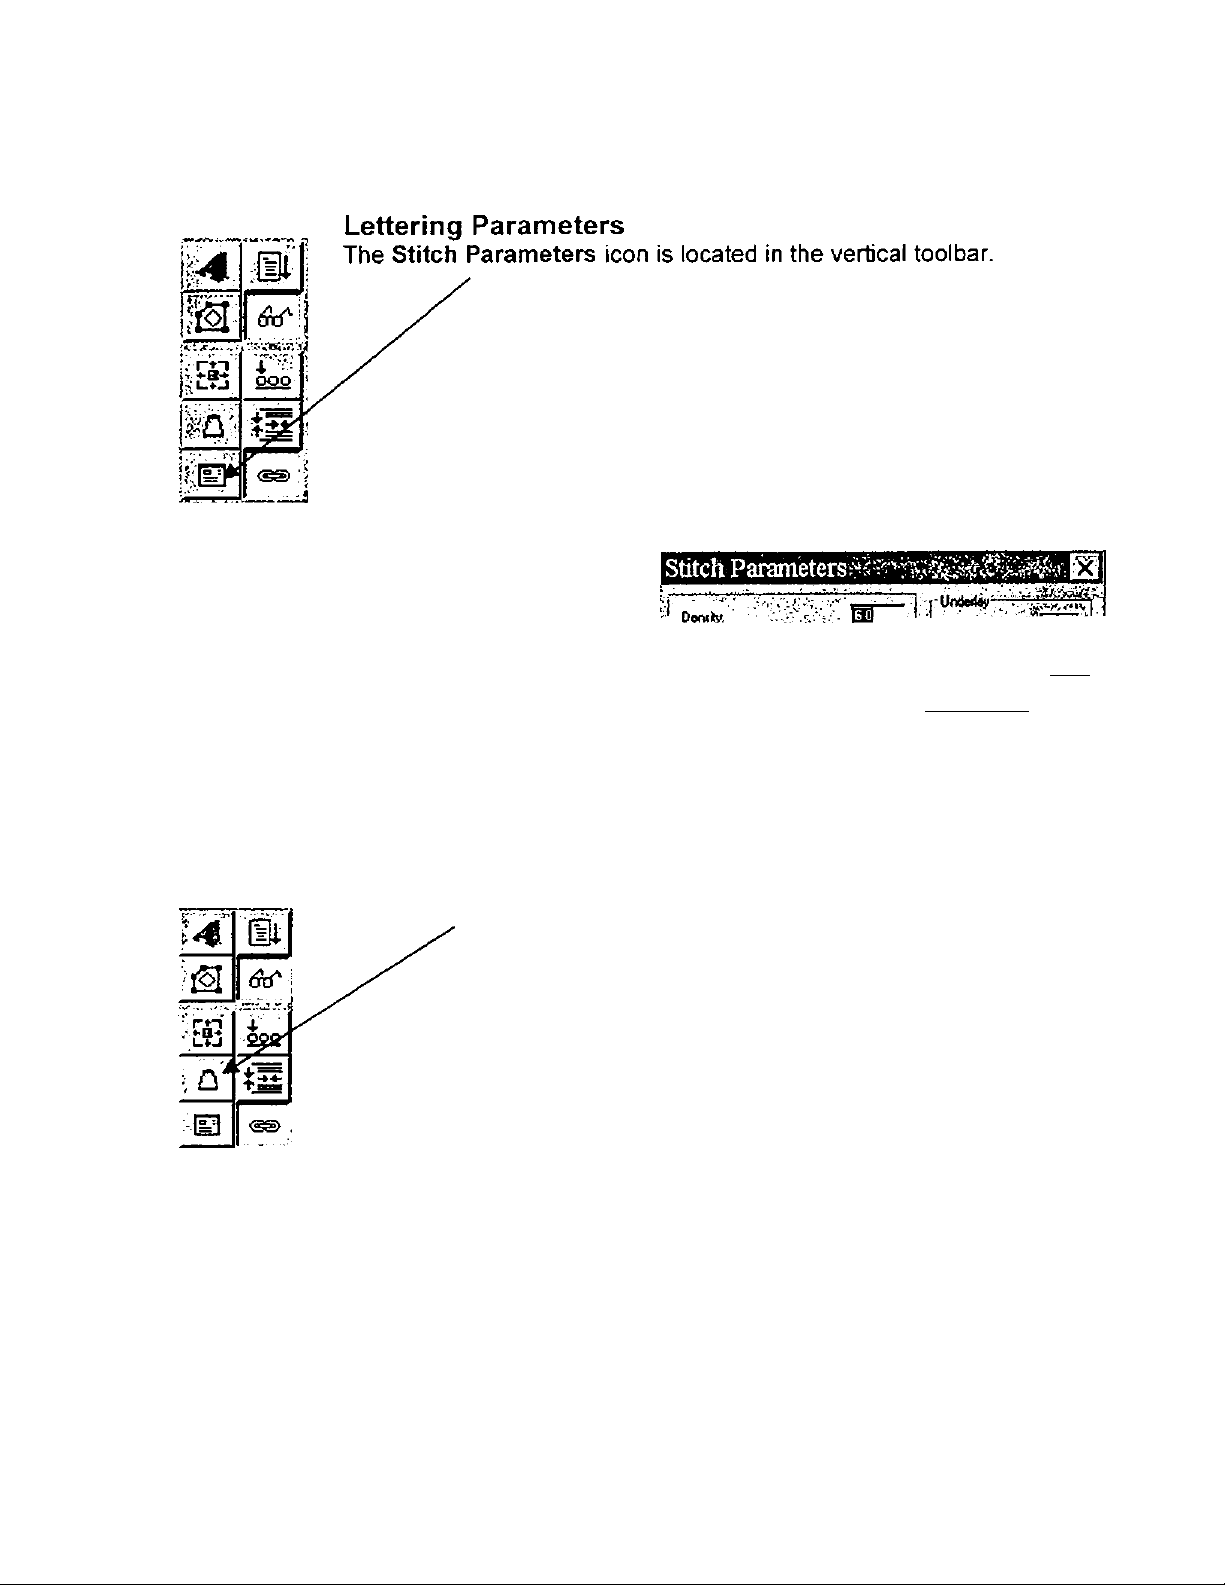
Stitch Parameters
Draw
Grid
Embroidery Simulator
Hoop
Tutorial
Contents (Help)
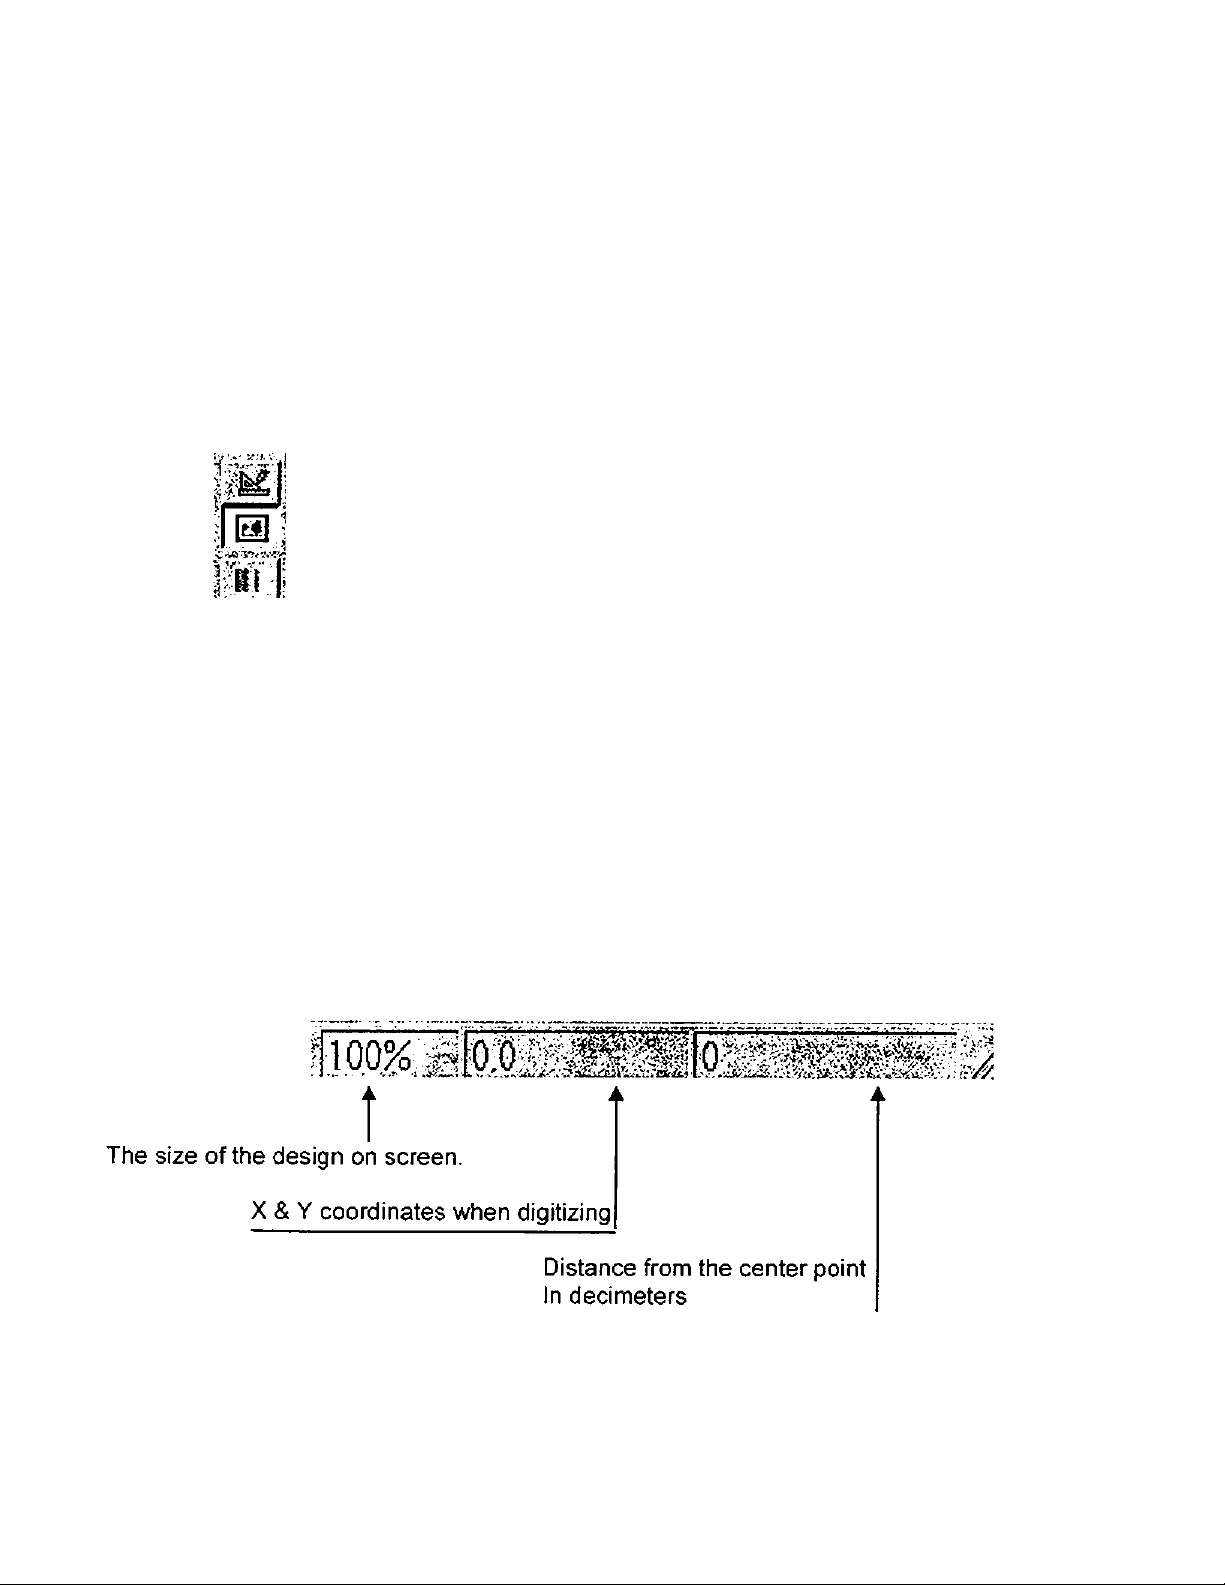
The right bottom area shows:
Page 7
Professional Sew-Ware
Opening PSW Library Designs
1. Click the left mouse on Files in the menu bar and choose New - or - click on
the
NEW t\=
icon in the toolbar
2. An Open dialog box will appear on the screen.
Open
. -Oiiw
i
>-flcw©r bmp
; ffclyp» -^V.'liinsgafW’Meto-tBiTp) vtV!-, ■ 'ciiaiv' l
!'_]) Inwg«
SANTA bmp
Wialo bmp
“3 'M’d f^«l
»aiasslil'i
?|X
3. Click the left mouse on NEW and the New dialog box will appear on the
screen.
Page 8
Professional Sew-Ware
Opening PSW Library Designs
6. The screen will appear with a white rectangle that represents the hoop size
selected.
^Professional Sew-Ware vi.OO • [Designi]
p/ttes- Create Sdit lyjodiV .vPwiw• Wndow Halo
B?l y|^| ifelil Qili:?s|in::
----
3
7. Click the left mouse on the Library Icon 1
the PSW Library will appear on the screen.
8. Click the left mouse to highlight a selection such as BIRD, scroll through the
designs using the scroll bar.
|anmajs
6ASNCft$
•k'.
RSH
FLOWERS
•S'
HOME
A
jrtoru
I SEA
't
^^srv
6 tm
'^VAROUS
.OSMOa).
tlHllli I Hi iHi Ii ■
t
VB
The Pre-digitized designs in
\T r
m
CCS
-iUS.
Page 9
Professional Sew-Ware
Opening PSW Library Designs
9. Click the left mouse on 006; (Parrot). The design will appear in the hoop area
in a black/gray tone. Click OK.
10. Click the right mouse and the design will now appear on the screen in
color.
Professional Sew-Ware vl.OO • [Designl
I ^a| cii aid) '¿I«1 ial'^l: ¿jcil;;---- ^ Z1
Writing a design to the Singer PSW Card Writer
HSE3I
1. Click on Files in the menu bar and choose Write to Card Writer.
It may take a moment for the information to compute, then the Save Design
to Card dialog box will appear.
2. Click on one of the 6 spaces/cells available on the card.
7
Page 10
Professional Sew~Ware
Opening PSW Library Designs
3. Click on Write and design will be transferred to the Design Card
Important:
Make sure the red light on the Card Writer is off before the card is
removed.
4. When the design has been transferred to the card, the Save Design to Card
dialog box will disappear and the design v/ill reappear on the screen.
5. To preview what is stored on the card, follow step 1 again.
6. The dialog box will reappear showing the designs that have been transferred
onto the card.
Note:
Designs can be moved around in the Design Card by clicking and
dragging.
Icons in the Save dsign to card dialog box :
8. Insert the card Into the XL-1000.
Load Directory
Adjust card options
Delete
Initialize the card
Write design to card
Close dialog
9. Select your design and sew. Close the design in the PSW.
8
Page 11

Professional Sew-Ware
Modifying a Library Design
1. Click the left mouse on Files in the menu bar and choose New -or- click on
NEW icon in the toolbar.
2. An Open dialog box will appear on the screen -
3. Click the left mouse on NEW and the New dialog box will appear on the
screen.
4. Click the left mouse on the Hoop Size 130 x 240 mm.
5. Click OK. The screen will appear with a white rectangle that represents the
hoop size selected.
6. Click the left mouse on the Library icon. The Pre-digitized designs in the
PSW Library will appear on the screen.
7. Click the left mouse to highlight a selection such as BIRD, scroll through the
designs using the scroll bar.
8. Double dick the left mouse on 006: Parrot. The design will appear in the
hoop area in a black/gray tone.
The design can be edited at this point before the stitches are added.
Move
1. To move the design within the hoop area, place the mouse pointer inside the
rectangle that is around the design (still appearing in black) and it willchange
to 4 white arrows.
2. Click the left mouse and move the design to a new position.
3. Click the left mouse once again to lock the design in the new position.
Rotate
1. Move the mouse pointer to one of the “arrow corners" and it changes to 2
half-circle arrows.
2. Click the left mouse to rotate the design.
Page 12

Professional Sew-Ware
Modifying a Library Design
3. Click the left mouse once again to lock the design in the new rotated position.
Change the size
1. Move the mouse pointer to any of the small black squares and it changes to 2
arrows.
2. Click the left mouse to change the size and alter the proportions.
3. Click right mouse button and watch the stitches appear as the XL-1000 will
sew them out.
4. The PSW program recalculates the stitches for the new size selection. The
stitch density of the Library design will be preserved even if the size is
enlarged.
10
Page 13
Professional Sew-Ware
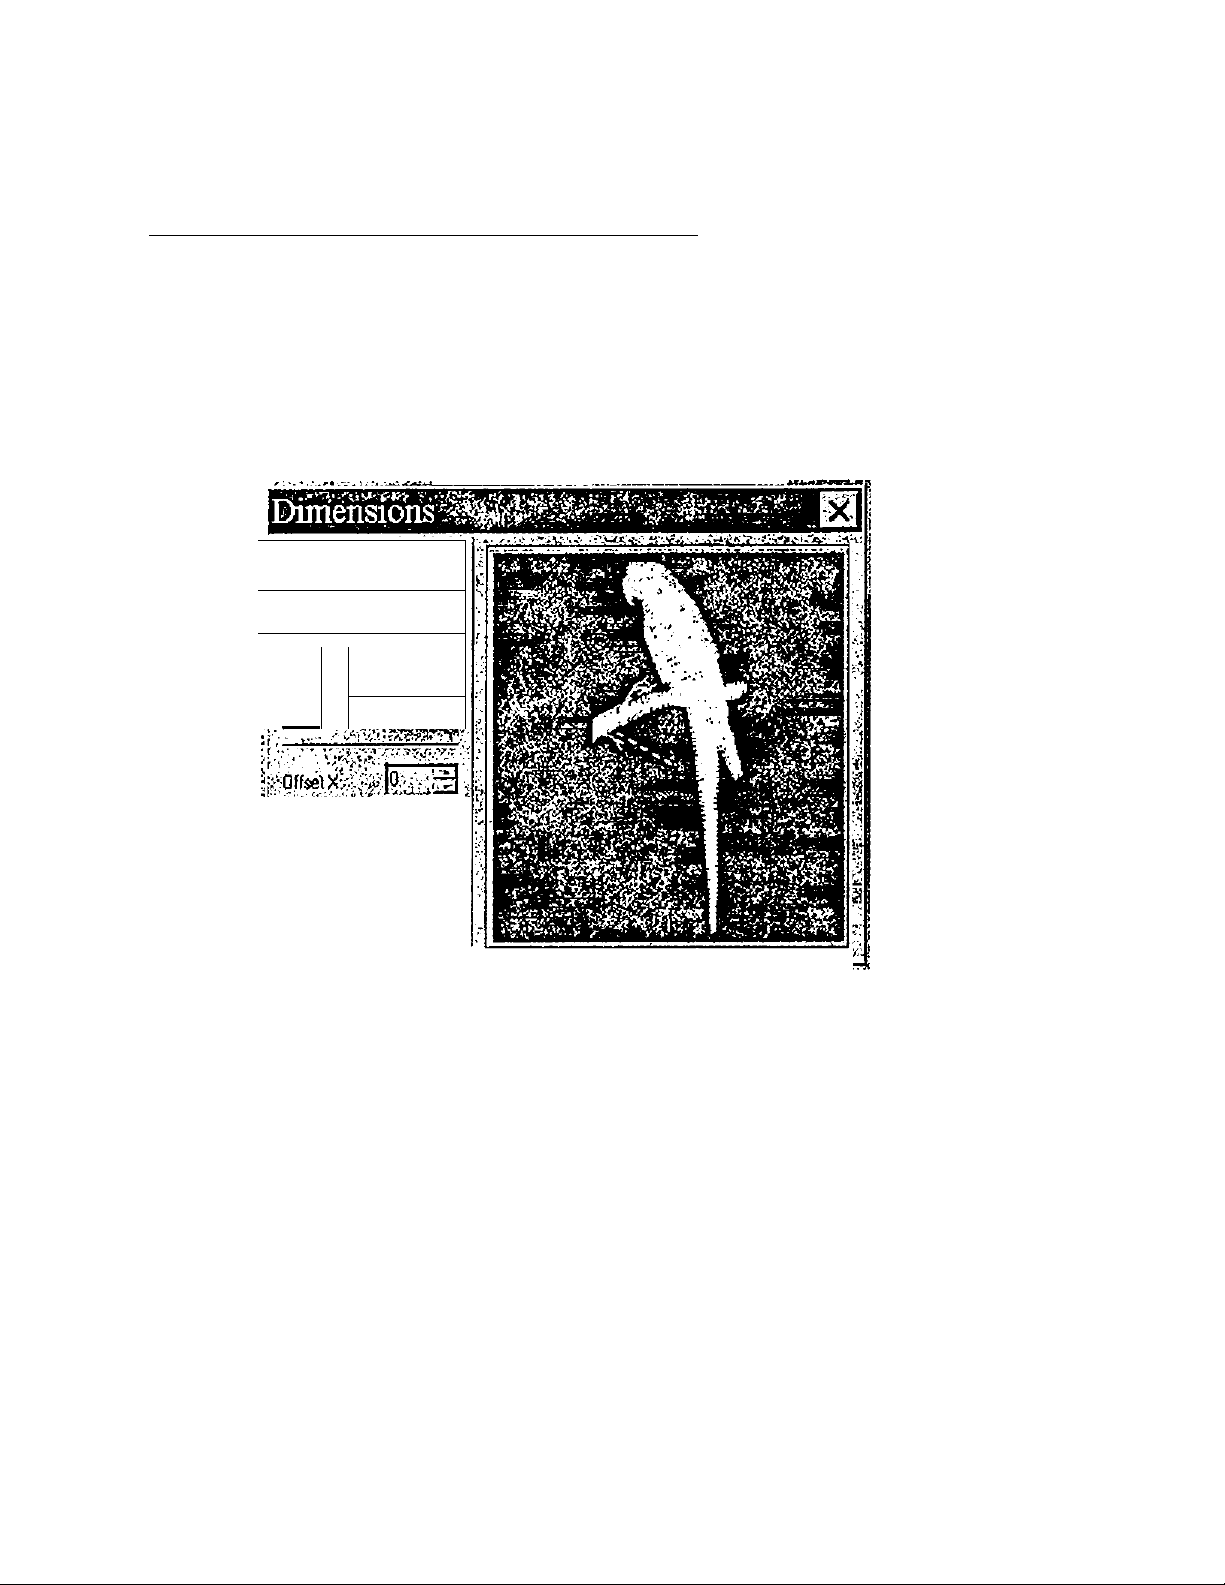
Howto Modify a LIBRARY design using Dimensions
1. On the Menu bar and select Modify.
2. Click on Dimensions
3. The Dimensions dialog box will appear.
4. The design is shown as a white silhouette.
'.N'r
’ QO
Dimensions
|’:S8L
¡'
-S'
Canee* '!
5. X: and Y: represent the height and width in 1/10mm and can be changed by
pressing the arrows or typing the number in the box.
6. Click on the LOCK icon to maintain the ratio of the design.
7. Click the % box to change dimensions as a percentage value. A check mark
will appear in the box.
- 100 % is defaults.
-120% will increase the size by 20%
-70% will decrease the size by 30%
8. Mirror • click on square horizontal arrow icon
9. Invert - (upside down) -click on square vertical arrow icon.
QD
CT
Cli
11
Page 14

Professional Sew-Ware
Dimensions
10. Rotate - in increments of 1 degree, type in Rotation Angle
- select the direction of rotation jo
11. The Offset X and Y can not be accessed.
12. Click OK.
13. The Modified parrot appears.
14. The PSW program has recalculated the stitches for the altered Library design
to keep the same density as the original design.
12
Page 15
Professional Sew-Ware
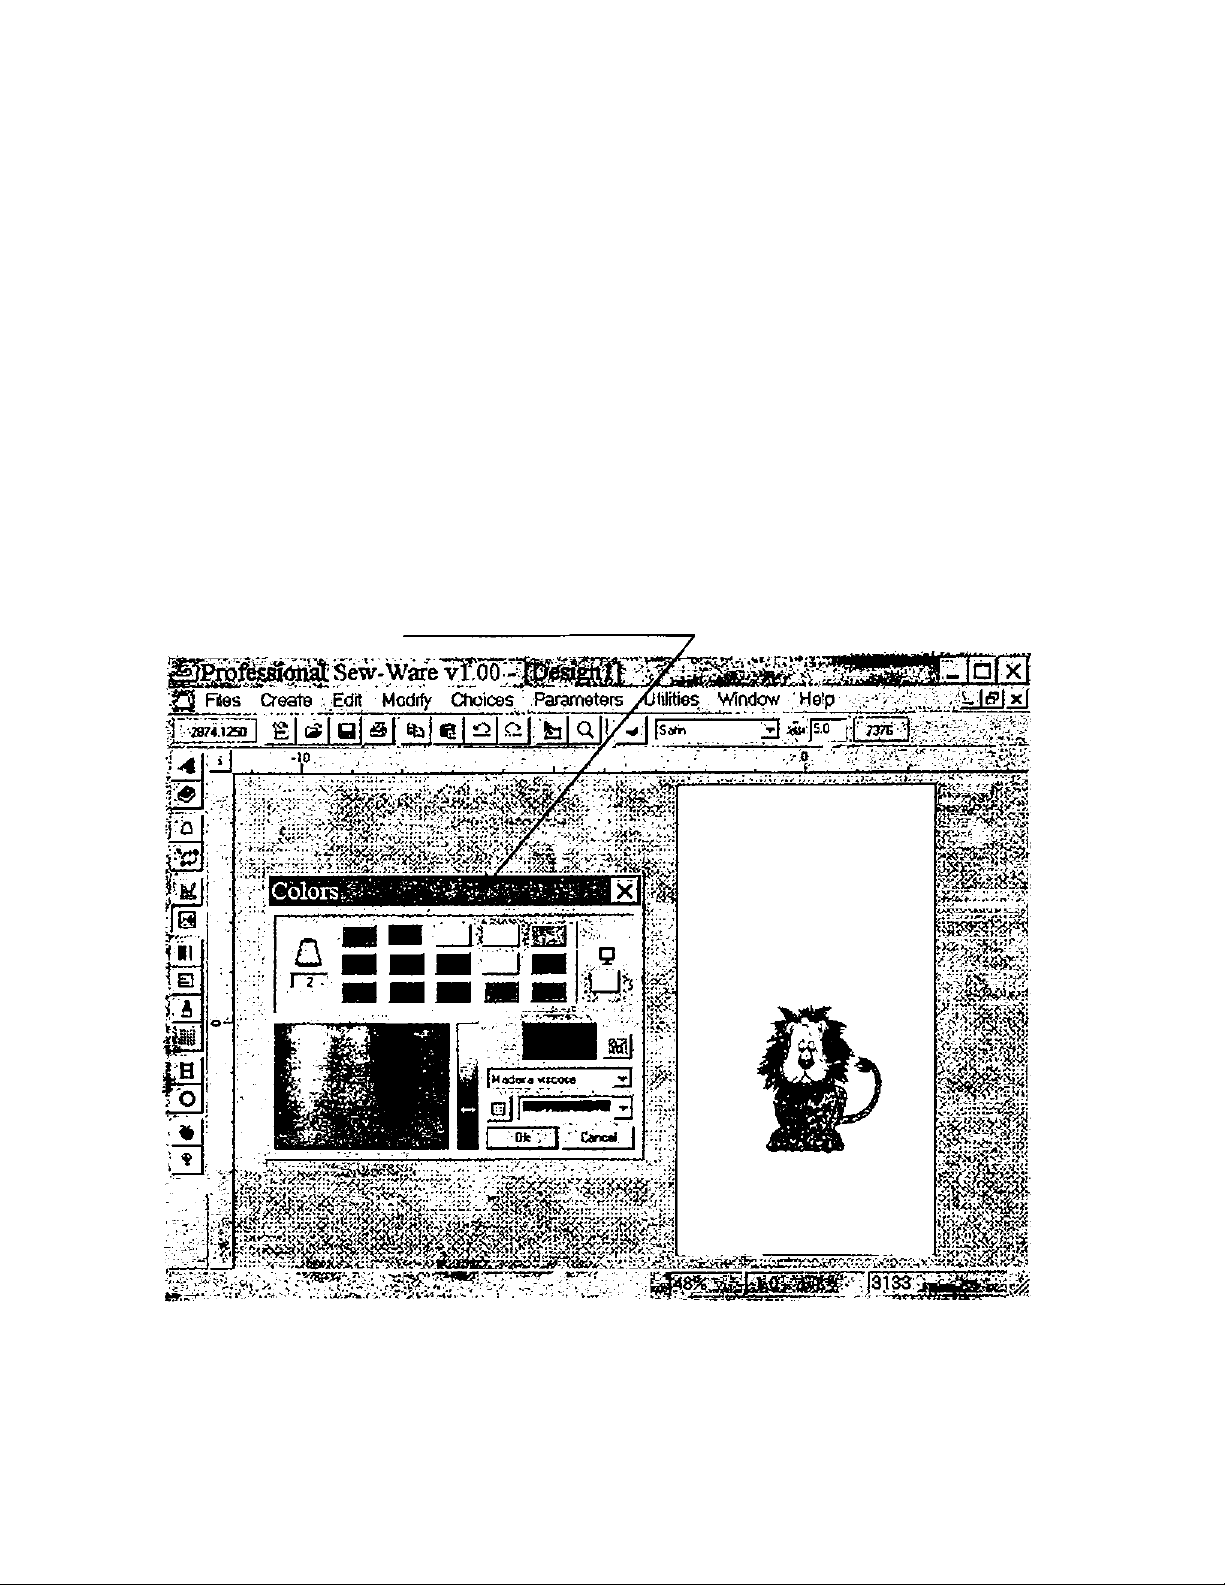
Changing Colors of a Design
How to Change the Colors of a Design
The PSW software remembers the last color selections chosen. To set up new
colors for a design follow these instructions.
1. Open a design and click the right mouse to input the colors.
2. For easy viewing of both the design and the color dialog box, use the arrows
on the keyboard to move the design to the right on the screen.
3. Select the Stitch Colors icon from the left vertical tool bar. - B l
4. The Stitch Colors dialog box will now open. Click and hold the left mouse in
the upper colored area of the dialog box drag to the left as shown. Both the
Color dialog box and the design can be seen clearly as shown.
13
Page 16
Professional Sew-Ware
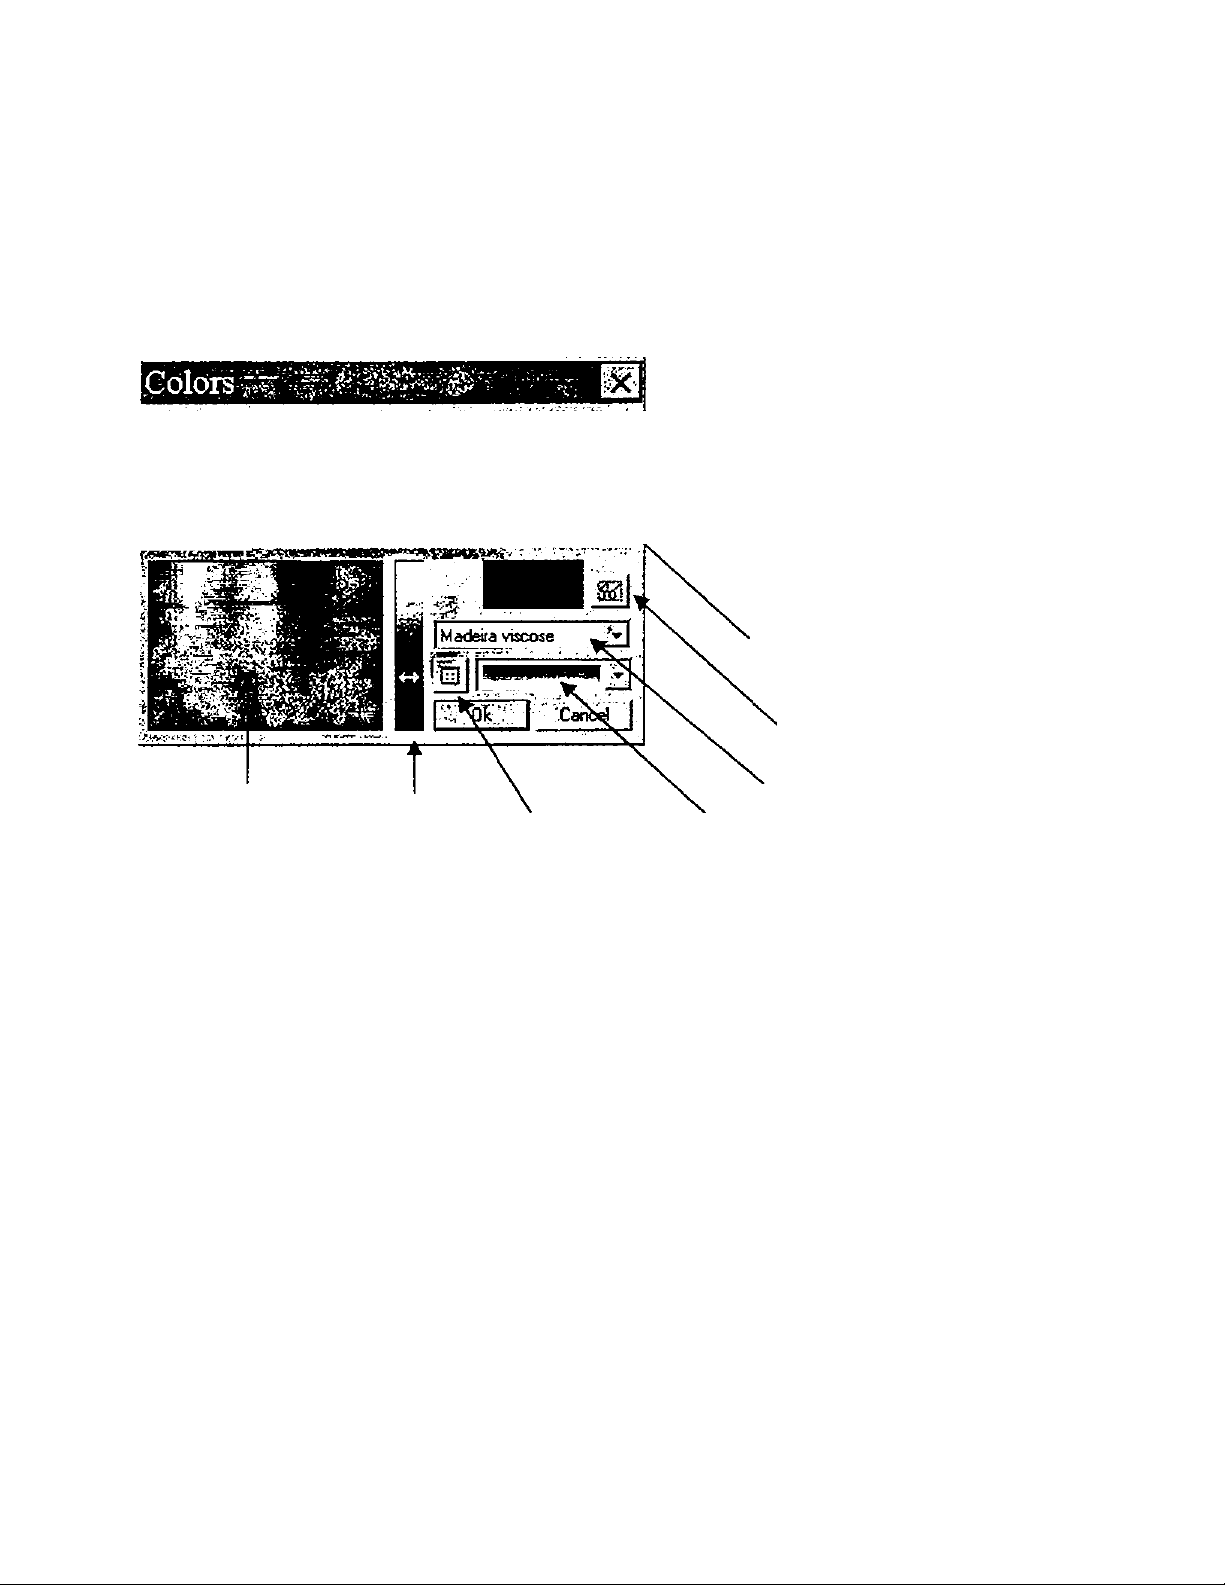
Changing Colors of a Design
.Ta»r.
■-P
igr-'"'-
V .
_ ,, *v.,>
5. To select a new color click the left
mouse on a color segment of the
design.
-OR-
6. Click on a color box and select new
colors from the color palette or
choose one of the thread code lists.
7. After a color is selected, it can be
previewed in the design by
selecting the Preview Button.
Monitor Screen Color
Preview Bi/tton
Color Palette Shading
Full page
thread code list
Vertical thread code list
Thread code list
8. When all colors are selected, click on OK to set the colors and close the color
dialog box.
9. The background screen color can be changed. To do this click on the
Monitor Screen Color box below the representation of the monitor (See
above illustration). Choose the color or shade you would like to use. Click
OK and the background screen color will change.
14
Page 17

Professional Sew-Ware
Embroidery Simulator
EMBROIDERY SIMULATOR
The embroidery simulator shows how the design on the screen will appear actually
stitched out. It also shows how different light sources will change the appearance of the
stitches, and how different weights of thread will change the design.
TO ACTIVATE THE EMBROIDERY SIMULATOR:
1. Click the left mouse on the icon that looks like a ladder on the left side of the screen.
2. The simulator control panel now appears in the upper left side of the screen.
3. Click the left mouse on the icon of the arrow pointing to the right. This activates the
simulator. The screen will now show how the design actually looks stitched out.
TO ACTIVATE THE LIGHT SOURCE:
1. Click the left mouse on the light bulb icon on the control panel. The Light Direction
Box now appears on the screen
2. Click the left mouse on the directional squares to change the direction of the light
source.
TO PREVIEW THREAD THICKNESS
Thread thickness is measured in tenths of millimeters.
1. Click on the box at the bottom of the control panel. The number 2 will be displayed.
Change the number by left clicking on the up or down arrow in the box.
2. To activate the thread change; click on the Run icon (the solid arrow pointing the
right. Notice how the change affects the embroidery.
15
Page 18

Professional Sew-Ware
Lettering - Pre-Digitized Fonts
1. Click the left mouse on Files and select New.
2. An Open dialog box will appear. Click on New.
3. In the New dialog box click on OK.
There are 3 different ways to access
the lettering function of the PSW:
On horizontal tool bar, go to Create, then choose lettering,
-OR-
Click on the “^”icon at the top of the vertical tool bar
-OR—
Touch the F key on the keyboard
4. Choose one of the methods described above to access the lettering function.
5. The TEXT dialog box will appear on the screen. Type the word “Singer”.
6. Click OK. The outline of the word “Singer” will appear on the screen. The
letters can now be customized before the stitches are added.
Customizing the Letters
Notice a new horizontal tool appears at the top of the screen.
^ Cheltenham Large
G.O
16
Page 19
Professional Sew-Ware
Lettering - Pre-Digitized Fonts
CHOOSING FONT STYLE (14 selections)
Cheltenham Large
[HI Fonilist...
Cheltenham Large
^ Century Medium
Block Large
^
Block Small
Athletic
S Block Large
^ Block Small
Brush
^
Carrrpus
Century Medium
M Century Small
^
Cheltenham Large
^ Cheltenham Srriall
S Coifier
^ Pearl Scfpl
Tango
M,
Times Large
1. Click on the down arrow next to the
displayed font name, to view the font
tv'
>
it
list, then either;
2. Click on the desired font name.
i :
!■:
1
, V
A ..
f:'. •
i -
f
fe;
i'. -
/.
(- ■'
3. Click on “Font List" to preview the fonts
on screen, then click on the desired font
from the preview list.
-OR-
NOTE:
'
V *
1
P '
s. ►
\ ■
i.
. ^ ■
There are 2 fonts (Athletic & Campus)
which sew in 2 colors.
There are 2 fonts (Campus & Century
Small) which sew in capital letters
only
Ei
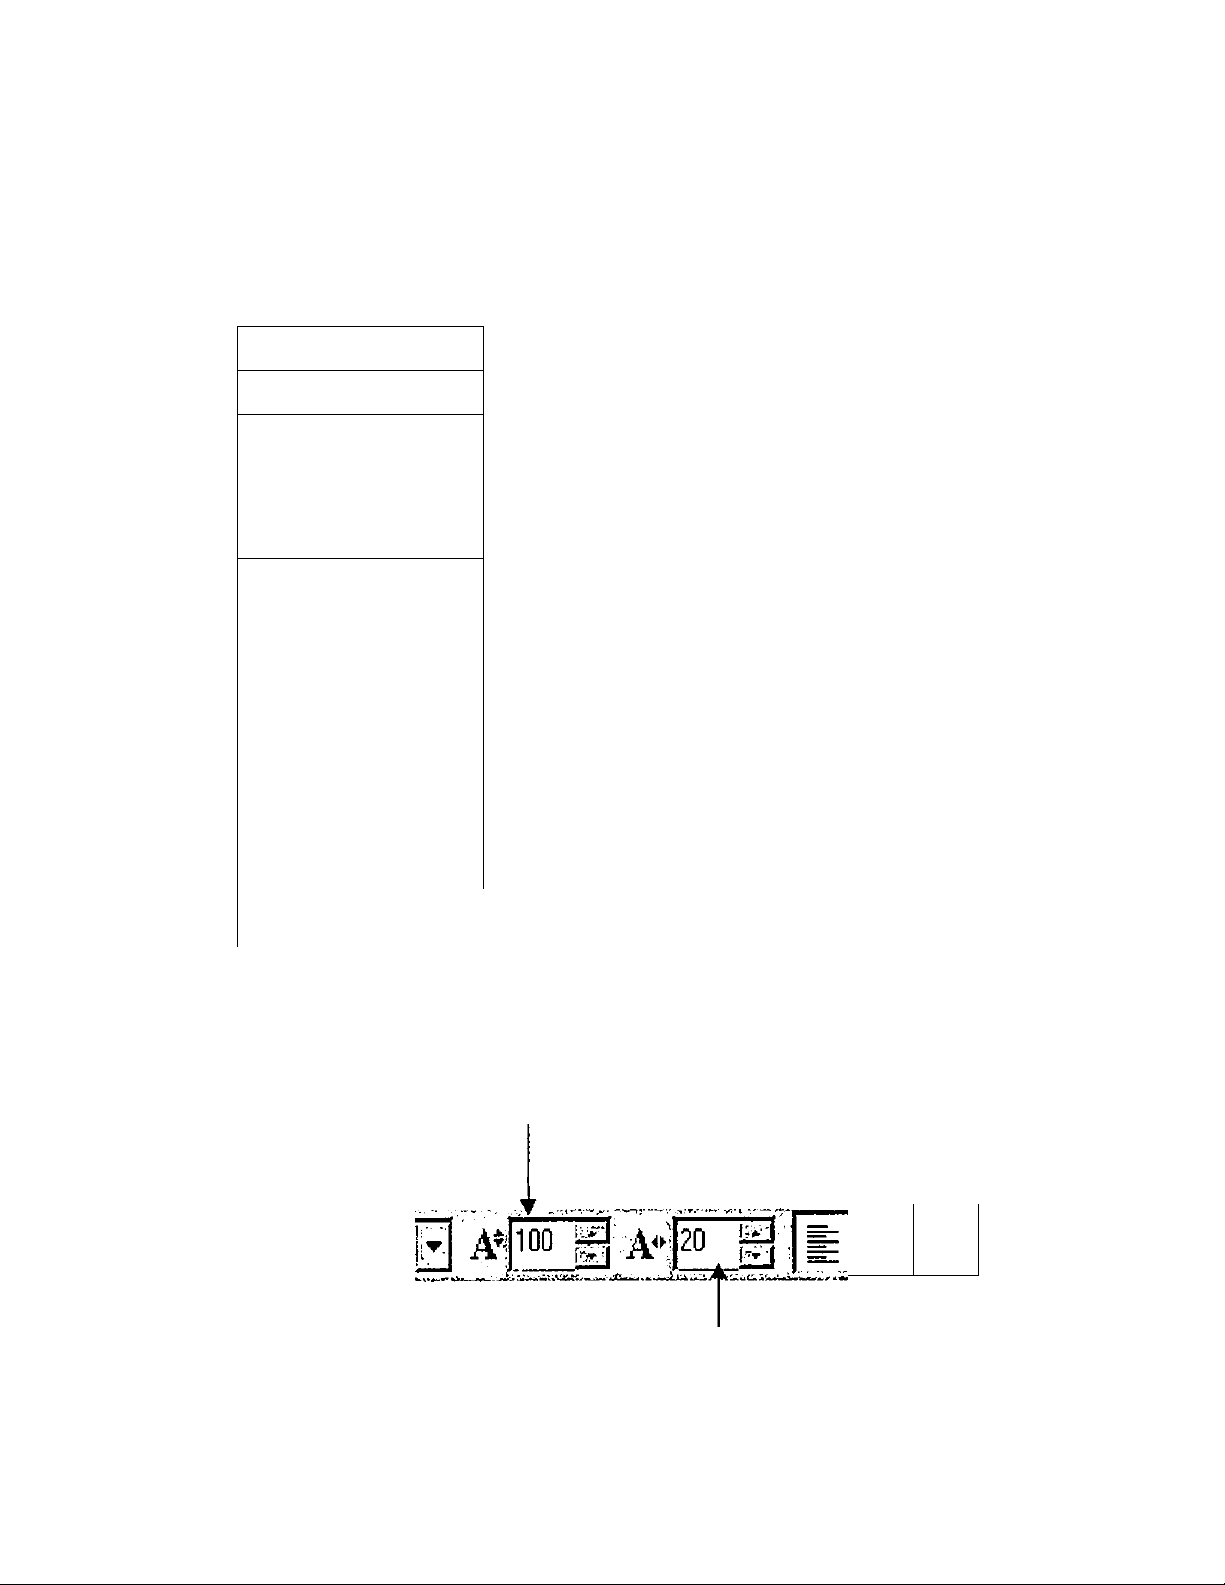
Changing Letter Height and Spacing
1. To change the height of ‘‘Singer", go to the first A in the horizontal tool bar.
Select the desired height (in tenths of millimeters). Click the left mouse on the
screen to activate the change.
B, Century Medium
2. To change the amount of space between individual letters, go to the second
A in the horizontal tool bar. Select the desired amount of space (in tenths of
millimeters). Click left mouse on the screen to activate the change.
' ^=:
r-.. i
‘ ^vllltli' h
17
Page 20
Professional Sew-Ware
Lettering - Pre-Digitized Fonts
3. To move “Singer”, click the cursor anywhere within the “box” around the
word. The white 4-directional arrow icon will appear. Move the word to the
desired placement.
Manual Method for Changing the Size of a Word
ABC
D
H
A - click & move left mouse to
B - click & move left mouse to
C - click & move left mouse to
degrees
D - click & move left mouse to
E - click & move left mouse to
F - click & move left mouse to
G - click & move left mouse to
H - click & move left mouse to
change width & height simultaneously, up & left
raise or lower parameters of word from upper side
rotate the word to any position from 0-360
widen or narrow word from right side
vflden or narrow word from left side
italicize (or slant) word forward or backward
raise or lower word parameters from bottom side
change width & height together, down & right
Other Letter Editing Features
JUSTIFY TEXT
In the Horizontal toolbar are the justify text functions , the software default
is set for Justify Left, click on Justify Center or Justify Right to alter text.
Note: Be sure there is not a space entered at the end of any line of text,
or it will justify left, center, or right including the space
Justify Text
E, Century Medum ; ▼
#191 -i]#
zTg:
-s- ■"S
6.0
18
Page 21
Professional Sew-Ware
Lettering - Pre-Digitized Fonts
Density - set the distance between stitches
Step Length - defines length of each stitch
inside a stepping-stitch area
Running stitch Length - controls length of
stitches in a line of automatic running
stitches
Satin Width - the width of the satin
stitches.
Underlay - adds underlay stitching to an
area before creating the topstitching. can be
done in perimeter or zig-zag
•;t, Siwtentfh, ___V
•;l:
Runng (tilch lenQtft y
• j SofTunidir.
_
0««iH •-■>:v^2c.o <
aa,;
I'l"' ak-';’';|..-.'Cancei
• '/'>'’t.''r< DÍídjÍ ‘ ^
Machine Code
Select the Machine Code icon in the vertical
toolbar.
The Stop Sign is placed wherever a thread
change Is desired. When the stitches display on
screen, thread changes will appear as letters
change color. Use this function to change colors
between individual letters and change colors
between words or lines of text
Creating the Stitches
Once “Singer" is manipulated to its desired shape & size, stitches can be
inserted in either of 2 ways;
Click on the right mouse key,
-OR—
Go to the Fill Stitches icon In the vertical toolbar
19
Page 22
Singer - Professional Sew-Ware
Changing Lettering Stitches from Satin to Fill Stitches
Lettering in the PSW is set automatically for satin stitches. Use the following procedure
to change the letters from satin stitching to step-satin stitching (which looks like fill
stitches).
1. Click the left mouse on Files and select New.
2. In the Open dialog box click on New
3. Click OK.
4. Touch F on keyboard to recall the Text box.
5. Type in PSW, then click OK.
6. Use the reference points to increase the height and width of PSW for easier viewing.
7. Click the right mouse to fill the PSW with stitches.
8. Go to Edit at top tool bar, and click on Edit Outline (At this point, the W should be
selected)
9. Go to the Stitch-type icon {located under the Edit of the tool bar), for display of
various stitch-type options.
lO.Choose Step-Satin and click OK.
••• '•.r-v'.iCancel.
20
Page 23
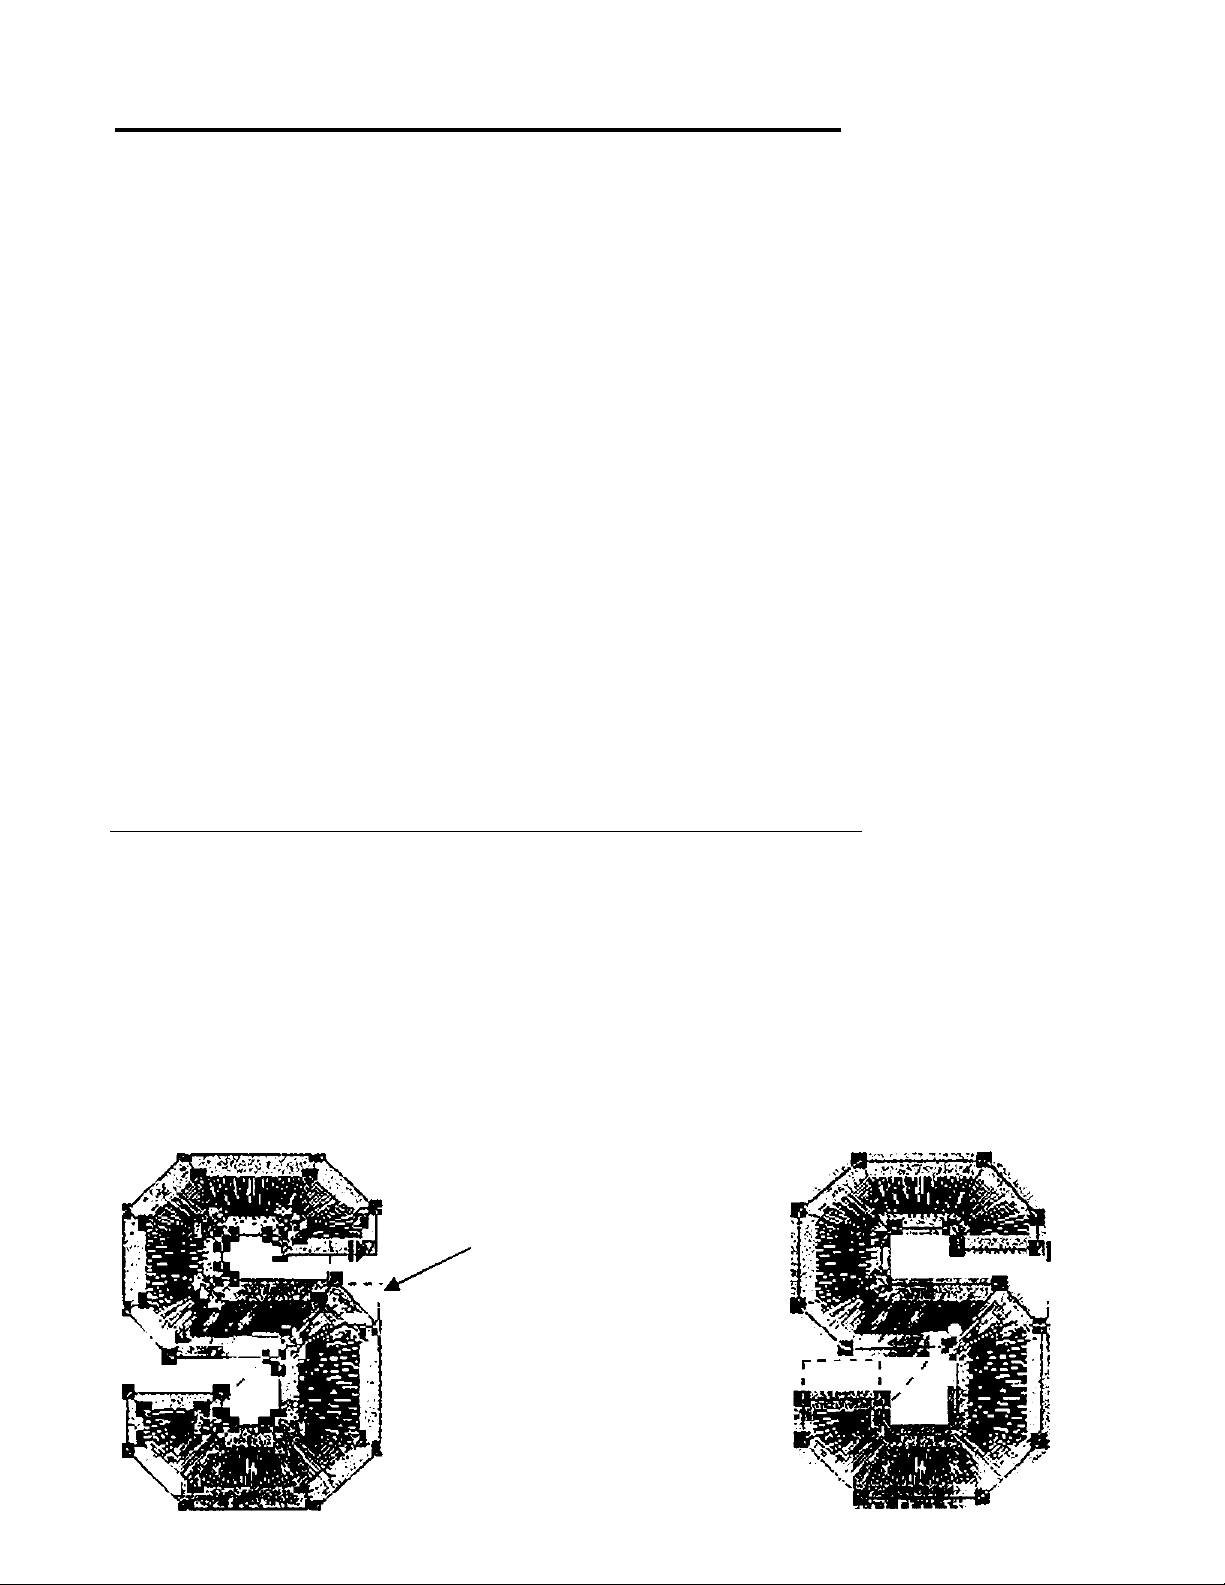
Singer - Professional Sew-Ware
Changing Lettering Stitches from Satin to Fill Stitches
11. Click the right mouse and W now becomes step-satin stitches.
12. T0 move to next letter, go to Edit again, then pull down to Edit Outline.
13. On the computer keyboard use the position arrow pointing to the left to move to the
letter S. The S should now be highlighted.
14. Go again to the Stitch-type icon (located under the Edit on the menu bar) and again
select Step-Satin and click OK.
15. CIick the right mouse and S becomes step-satin.
16. T0 move to next letter, go to Edit again, then pul! down to Edit Outline.
17. Use the position arrow pointing to the left on your keyboard and press it once to
move left by one letter. The P should now be highlighted.
18. Go again to the Stitch-type icon (located under Edit on the menu bar) and again
select Step-Satin and click OK. Click the right mouse. P becomes Step-Satin
stitches.
Changing the Stitch Type for Campus and Athletic Fonts
1. Zoom into each individual letter for easy viewing.
2. Follow the same procedure as described above using Edit Outline and the arrow
keys on the computer keyboard or by clicking your mouse on the segment.
3. There are two sections to each letter in the Campus and Athletic fonts. When
using the arrow keys or clicking the mouse on the segment in the Edit Outline
function, it is possible to highlight either section to change the stitch type. When
more than one letter is being created, click the mouse on the segment to change the
inside and the outline.
Outside stitches are
highlighted
Use arrow keys or click
mouse to select the inside
stitches.
21
Page 24
Professional Sew-Ware
Lettering - Shapes and Modes
1. Click the left mouse on Files:Newor click on the New icon in the top
horizontal tool bar
2. An Open dialog box will appear on the screen.
3. Click the left mouse on New and the New dialog box will appear. Click OK.
4. Click the left mouse on the lettering icon.
SINGER, then click OK. ^—“
5. Font: Block Small - Size: 200, Space: 20. Click on screen for changes to take
effect
6. To customize lettering shapes, click on Letters frame icon.
A Text box will appear, type
Lettering Shapes
Lettering shape refers to entire text.
There are 3 categories:
line (2 styles), circle (3 styles) and box
{5 styles).
The default is box shape
M
M:
'W
JM;.
Modes
There are 2 kinds of tools to edit text.
Outline Mode:
Reference points are
used to manipulate the
entire text.
------------
^
r
Point Mode:
Reference points for each letter.
Letters can be manipulated
individually.
7. Click on Line Shapes, Outline Mode
"SINGER" appears on a line. Move the mouse pointer near the word and it
changes to 4 white arrows. Click the left mouse once and the word Singer can
be repositioned by moving the mouse on the screen. Click again to set the
new position.
Click on the Letters frame icon.
22
Page 25

Professional Sew-Ware
Lettering - Shapes and Modes
Click on Line Shapes, Point Mode8.
Each individual letter now has 2 reference points within it:
■ The diamond shaped reference point allows movement up, down, left,
right
• The rectangle shaped reference point alters placement left or right to
create new spacing
■ Points at the end of each line allow movement to any incline, and also
move left or right to stretch or scrunch a word
Click on Letters frame once again.
9. Box Shapes, Outline Mode
Click on any of the 5 box shapes. Click on Outline Mode.
Reference points on the box alter height, width, rotation, and slant of word as
an entire unit
Click on Letters frame once again.
10. Box Shapes, Point Mode
Click on any of the 5 box shapes. Click on Point Mode.
Individual letters can now be manipulated up, down,
left, & right. Click and drag the reference points on the
outside parameters of the box surrounding the word to alter
the overall shape of the entire word.
Click on Letters frame icon.
11.Circle Shapes, Outline Mode
Click on first of 3 circle shapes
Click on Outline Mode
■ The first circle shape positions text in the upper part of
a circular form.
Click on Letters frame icon once again.
Click on second of 3 circle shapes
■ The second circle shape positions the text in lower
part of a circular form.
23
Page 26

Professional Sew-Ware
Lettering - Shapes and Modes
Reference points on the circle allow for further
alteration of word placement and circular shapes.
Click and drag on the various points of the circle to
manipulate the shape as desired.
A - move beginning point of 1*‘ word in the circle
B - move end point of last word in the circle
C - move outside circumference up or down
D - move inside circumference up or down
E - change circle into ellipse horizontally
F - change circle into ellipse vertically
Click on Letters frame.
Click on third of 3 circle shapes
Click on the Letter icon in the left vertical tool bar. In the Text box type
SINGER; press the ENTER key on the keyboard and type Sewing. This will
place the text on two separate lines. Click OK.
(Use the following settings: Font; Block Small - Size: 200, Space: 20, Justify
Center, Density 5.0)
Click on the Letters frame icon. Choose the third circle shape position the
text will be in the upper and lower part of the circle.
9 Circle Shapes, Point Mode
Click on Point Mode.
Now letters may be individually manipulated while in circle form. (There will
be reference points on each individual letter)
10. Click the right mouse to input the stitches.
11. Click on the Special Function icon and choose STOP to insert a color stop.
24
Page 27

Professional Sew-Ware
Library and Text Combination Design
Inserting a Library Design in the Center of the Lettering
1. Click the left mouse on the Library icon,
2. Click to highlight category - BIRD
3. Click the left mouse on 005 - Dove. Click OK.
¿LjU
4. Click on Change Dimension icon in the top toolbar.
5. The Dimensions dialog box will open.
Dimensions
6. Click on the Lock icon to
maintain the proportions of the
design
7. Click the mouse on the box
beside the % to change the
dimensions as a % value.
C«nori
8. Click on the Box showing 100 by the X or Y - Enter 120. Click OK.
9. Move the mouse pointer inside the rectangle that is around the design (still in
black) and it changes to 4 white arrows.
10. CIick and rectangle appear with dashed lines. Move the mouse to position the
rectangle with dove in the center of the lettering. Click the left mouse again to
confirm the new location.
11. Click right mouse button and the stitches will appear.
Note: Remember to make sure the red light on the Card Writer is
no longer flashing before removing the Design Card.
25
Page 28

Professional Sew-Ware
Creative Lettering
The fine tuning lettering features of the PSW' almost seem endless! Take
some time to experiment with these wonderful features and watch the
creative lettering appear before your eyes!
Multiple Circles #1
1. Access the PSW software.
2. Choose Files:New.
3. In the Open dialog box choose New.
4. Choose the Lettering icon.
5. Type in one line of text. Click on OK.
6. Choose the Letter Frame icon
icon.
7. The letters should now appear as shown in Figure 1.
8. Size and move circle as desired.
then choose the top circle
im
26
Page 29

Professional Sew-Ware
Creative Lettering
9. Click the right mouse to set the stitches.
10. From the Special Functions icon, click on Stop to insert a Color
Stop.
11. Choose the Lettering icon and type one line of text.
12. The screen should now appear as shown in Figure 2.
13. Size and move circle as desired.
14. Click the right mouse to set the stitches.
15. From the Special Functions icon click on Stop to insert a color stop
beri^^een segments.
27
Page 30

Professional Sew-Ware
Creative Lettering
16. At this point a design can be added under the lettering as shown in
Figure 3.
Multiple Circles #2
Figure 3
28
Page 31

Professional Sew-Ware
Creative Lettering
29
Page 32

Professional Sew-Ware
Scanning
SCANNING WITH PROFESSIONAL SEW-WARE
1. Load the scanner software on your computer according to the scanner’s
manufacturer’s instructions.
2. Access the Singer Professional Sew Ware software.
3. If only one scanner is connected to the computer, go directly to Files and click on
Twain Scanner.
4. A dialog box will appear. (Each dialog box will be different for each scanner.)
5. Follow the Instructions in the dialog box.
6. Scan an image.
7. After the image is scanned, a Twain dialog box will appear giving you the opportunity
to save the file.
8. Click the left mouse once in the box under File: to name the scanned image. Be
sure bmp is after the file name. (For example, flower2.bmp.)
9. In the dialog box notice the file will automatically be saved in Directories:
C:\PSW\lmages
10. AIso note the File Type is Image (Window bmp)
11. If you choose, you can save the design under a different drive by clicking the down
arrow beside DRIVE; (For example Drive;A will save to a disk)
12. The design can be rotated 90® or 180® at this point also.
13. Dpi means the dots per inch the design was scanned.
14. Above OK is shown whether a Black & White or color Image was scanned.
15. If a color image was scanned, another box will be shown that says Dither; Dither is
an option mainly for users who do not have high resolution monitors or who choose
to have their monitors set to 16 / 256 colors, instead of true color. Dither acts as a
filter to make lower color settings resemble ‘true color" settings Most of the time
the Dither box will be unchecked.
16. Click on OK when all desired settings have been chosen.
30
Page 33

Professional Sew-Ware
Scanning
17. Click the left mouse on Files and click on New.
18. In the Open dialog box, click the left mouse once to highlight the design.
19. Click OK. The scanned image will now appear on the screen, ready to be digitized.
NOTE: The PSW will read a scanned design as the entire page that passed
through the scanner. It's a good idea to “crop” the image after it has been
scanned and before you begin to digitize. Drawing programs and possibly your
scanner software will have a “crop” function.
Bsa
Image that was scanned
but not cropped.
Cropped image
31
Page 34

Professional Sew-Ware
Changing the Scale of .WMF and .BMP Files
.WMF and .BMP files that have been scanned or taken from clip art can be scaled
to the desired size in the Professional Sew-Ware software.
1. Click the left mouse once on Files, then select New.
2. In the Open dialog box that appears, click on File Type and choose the format
{.WMF or .BMP) of the
picture to be scaled.
3. Choose the Drive: where
the picture is located.
4. Click the left mouse once
to highlight the design.
^flower.v»mf
^ outlines, wmf
5. If desired, click on the
Preview to view the
picture.
6. Click the left mouse once
on the box beside Dpi:.
7. A dimensions dialog box
will appear. Notice the X
dimensions will be
highlighted. Change
either the X or Y
dimensions to scale to the
desired size. X and Y are
in centimeters {cm)
KRe:
f>;.. • •
; Vile type:
---------------------- /
in Height
l^^-.Dpc 9:7&6t'31 cro
:h' ■ ■ ^ -
Size:
To change centimeters into inches
remember:
Approx. 2.54 cm = 1 inch
Number of cm -s- 2.54 = inches
-p Preview ' •
8. When the X or Y dimensions have been changed to the desired scale, click OK.
9. Click OK in the Open dialog box. The rescaled .WMF or .BMP file will appear.
32
Page 35

Professional Sew-Ware
Importing .dst and .exp Design Formats
When purchasing additional embroidery designs the installation instructions
included with the design package must be followed exactly before the designs
can be utilized in the Professional Sew-Ware software. Some software design
packages are ready to use. Simply place the disk into the 3.5” floppy disk slot of
the computer and open the designs in the PSW software. Others may contain
compressed data and require loading onto the computer hard drive and the files
extracted before the designs can be used in the Professional Sew-Ware.
Remember the Professional Sew-Ware reads the formats Tajima - .dst, Melco
Expanded - .exp, and of course Singer - .xxx.
Instructions for opening a .dst or .exp formatted design.
1. In the PSW software, click the left mouse on Files:Load
2. A Load Design dialog box will appear.
Load design
. CriviT
FIk
FIo9p«
■
Sttrhw
•* -.•1 '''
Sk
IE
3. Choose the drive. (Usually A for
3 disk or C for the hard drive.)
Load design
i Onvw. 1 ABC EmtaoKhiv Dwioftt JtJ ’I
4. Choose the File where the
designs are located.
Sim
3B
Page 36

Professional Sew-Ware
Importing .dst and .exp Design Formats
Load design
Choose (he File type. Design is
for .XXX - Tajima is for.dst Meico is for .exp.
6. When the correct format has
been chosen, the designs for
that format and folder will
appear in the rectangular
7. Choose the desired design
and dick OK.
Load design
34
Page 37

Professional Sew-Ware
Digitizing Hints
1. Use a printed image of the design as a guide to digitize.
2. Use the Utilities: Image Span function to create a new starting position to
prevent an initial jump stitch.
3. Most of the time, fewer points are better than more points for smoother
segments.
4. Round off a pointed segment if it overlaps another segment. Too many small
stitches in one area can create lumps in the embroidery, break the thread or
break the needle.
5. Overlap adjoining segments to compensate for push/pull.
6. Use underlay stitches to help compensate for the push/pull effect.
7. When digitizing satin stitches, begin by digitizing several manual stitches to
create a lock stitch.
8. Use the clean up function to erase extra small stitches.
9. Be aware of the start and stop points of each segment to prevent
unnecessary jump stitches.
10. If possible, place the start and stop points close together to prevent lines in a
digitized segment/block.
11. Save your embroidery often during the digitizing process!
35
Page 38

Professional Sew-Ware
Image Span
Image Span
This feature allows you to change the starting position of an /mage ready to be digitized.
The PSW automatically starts with the position in the center of a scanned or clip art
design. Image Span provides the ability to move the starting position to wherever
desired.
1. Click on Utilities and choose Image Span
2. Click the left mouse button once on the desired startng position and notice the drde
and cursor have moved to this new starting position.
OhginaJ starting position of design. New starting position of design
3. Moving the starting position to the first segment to be digitized will prevent a large
jump stitch at the beginning of the design when sewn.
36
Page 39

Professional Sew-Ware
Digitizing Using Create Methods
Create Methods are the techniques used to input stitches in designs
JSatin
f --
’ '•
i'-]>
There are Four Digitizing Methods Available in PSW:
Method 1: Reference Line Fill
\ a
.. I
Digitizing
Method 2: Complex Fill
Method 3: Running Stitch
; \ 1
* 1
ig
Method 4: Satin Line
Reference Line Fill
This method creates stitch points in pairs and defines the length and inclination (stitch
angle) of the stitch as the segment is digitized.
1
Each pair of stitch
points plots the stitch
angle of a segment.
37
Page 40

Professional Sew-Ware
Digitizing
1. Click the left mouse once on the NEW icon. i
2. In the Open dialog box. choose under File type: Windows Metafile (WMF).
Open
Dfmr 1 ^taagn
j^didqjllv^
^Floral Riigwrrif
Mfloweiwmf
t-FJe:
flops
- Irtormatton—
V.>»h i
jiMiknex-MM
WrdoMx fWVPl ^
-r>Me iWndOM« 6rc1
E r#MncedVi^ndoiNt MeUMt (CMF]
IIFF inn
Pane
iPCGpPGl
>jxl* ftntcCD PCD]
I«<;4 (TGA)
AiMie nwothop [PSOl
SHeanOwlwnf SParc'
^HeartsofTufcpswmf SPrac.
Sins Ouilwnnf SSpar.
S outtfies wTtf (SSttcft
__
3. Choose the file outline.wmf. Click OK.
i-rn-e
1--: ■■
pt' ■
, 0 ^
Cdrod
No .
D0
±
1
‘i ’ $
Outline.wmf File
38
Page 41

Professional Sew-Ware
Digitizing
4. Click the left mouse once on the Current Method icon.
(or under the Main menu, click on Create : Create Methods.)
5. Select Method 1 by clicking on the first icon in the Current Methods tool bar. ;>
6. The density of the segment to be digitized can be set at this time by highlighting the
number in the box and typing in the new density.
; Satin
Remember:
The higher the number the less dense the stitches.
The lower the number the more dense the stitches.
7. From the top menu bar choose Utilitiesrimage Span. Click the left mouse on a point
where the design will begin.
8. Press the right mouse to activate the digitizing function.
5.0
density
39
Page 42

Professional Sew-Ware
Digitizing
9. Click the left mouse to start inputting stitch points. Remember Method 1 must be
created in pairs as shown below. Finish the segment by clicking on top of the first
pair to close the entire segment.
Finish the segment
by creating the last
pair of stitches on
top of the first one.
Use long mouse
clicks to create
straight lines on
A long click with the left mouse will create straight fines.
A short click with the left mouse will create curved lines.
Holding down the Shift key on the keyboard while clicking a long
left mouse click is a ‘*snap-to-grid” function and creates
perfectly straight lines.
40
Page 43

Professional Sew-Ware
Method 2: Complex Fill
This method works best for digitizing large irregular segments in a design.
1
Points are plotted around the
outline of the segment in a
consecutive order.
The stitch inclination or angle
is determined after the points
have been plotted.
Digitizing
1. Select Method 2 by clicking on the second icon in the Current Methods tool bar ^
2. The density for Method 2 can be set the same as Method 1.
3. Choose the stitch type.
4. Use the outline.wmf file to practice digitizing the large irregular shape.
Method 3: Running Stitch
This method is a straight stitch used for outlining and detailing in a design.
1. Select Method 3 by clicking on the third icon in the Current Methods tool bar. .
2. Stitch length can be changed with the running stitch, not density. The default
setting of 25.0 is set in tenths of a millimeter. Therefore, 25.0 would be 2.5
millimeters.
dì
41
Page 44

Professional Sew-Ware
Digitizing
3. Use the outline.wmf file to practice Method 3.
Method 4: Satin Line
This method is a satin stitch line that can be used for thicker outlining and detailing of a
design.
1. Select Method 4 by clicking on the fourth icon in the Current Methods tool bar.
2. The density of the segment can be changed in the same manner as Method 1 and 2
3. Use the outline.wmf file to practice Method 4
42
Page 45

Professional Sew-Ware
Opening an ,xxx File Along With a .bmp or .wmf FiU
Opening a Partially Digitized Design (.xxx file) Along With the
Corresponding Image (.bmp or ,wmf file)
This feature allows both files to be open at the same time to finish or edit a digitized
design.
1. With the left mouse, click once on FILES. Then click the left mouse once on LOAD
2. In the LOAD dialog box, choose the DRIVE: where the design xxx was saved.
Click the mouse once to highlight the file and click OK. Or double click the left
mouse on the file name.
3. The OPEN dialog box will now appear. Choose the Drive: where the bmp or .wmf
file was saved.
4. If necessary, select the File Type to choose the correct file format.
5. Click the left mouse once to highlight the file, then click OK. Or double click the left
mouse on the file name.
6. The image file along with the digitized file will open.
7. Continue digitizing or editing the design.
43
Page 46

Professional Sew-Ware
Autotracing
Autotrace Stitch Segments/Blocks
Autotrace is a function, which you can use to trace an outline automatically,
instead of inputting reference points or outlines v/ith the mouse.
It's a great time saving feature in PSW and practice will tell you which parts of a
design can be used with Autotrace and which parts cannot Due to different
scanning techniques and different qualities of artwork, Autotrace is not suitable
for every piece of every design you are ever going to digitize. Autotracing works
best on independent segments of a single color in a particular design. You may
have to split your work using traditional methods of digitizing together with
autotracing.
Autotracing Using Colored .bmp images
Autotracing actually uses the colors in a scanned image to get around an area. It
depends on the color in the image
1. In the PSW software, click the left mouse once on Files.
2. Click the left mouse once on New.
3. Open dialog box will appear.
4. In the Drive box make sure PSW or Images are shown.
5. If PSW is shown, double click the left mouse.
6. In the Open dialog box click the left mouse once on Images, then click the
Flower.bmp should now appear in the box. Click left mouse once to highlight
flowers.bmp.
7. Click OK.
8. The flower should now be on the screen.
9. Notice the stitch type area is located on the right of the top tool bar.
10. Click the left mouse on Current Method icon in the top tool bar. (The red
icon)
11. Another tool bar will drop down. Click the left mouse once on the second
icon, which is Complex Fill
12. The Complex Fill icon will now replace the Current Method icon.
44
Page 47

Professional Sew-Ware
Autotracing
13.Click the left mouse on the down arrow beside the word Satin.
14.Select Step Satin.
15. Place the mouse pointer on the left flower and click the right mouse once to
activate the auto trace process.
16. Notice in the lower left-hand corner the directions in the Prompt Line states
Input the outline.
17. Hold down the control key and click the left mouse to auto trace the flower.
18. Click the right mouse once, this completes auto tracing the first segment of
the design.
19. You will see the message Input the direction in the lower left comer of the
screen.
20. Click the left mouse once on a point at the top of the flower, and then click the
left mouse again toward the bottom of the flower. This will determine the
angle of the stitches.
21. The Prompt Line now states. Input the first block point. Click the mouse once
in the desired starting point.
22. The Prompt Line now reads. Input the last block point. Click the left mouse
once to input sewing end point. It will automatically create stitch formation.
Changing Colors of Segments
1. When moving on to a second color segment click the left mouse once on the
Special Function icon on the left-hand tool bar.
2. A second tool bar will appear. Click the left mouse once on stop.
3. Click the left mouse once on the Stitch Color icon
4. The Colors dialog box appears on the screen.
5. Color one appears in the first box and the number one will be shown. To
select color two. click in the second box. You are now ready to choose the
second color.
6. Using the eyedropper symbol, move the dropper across to the desired colors.
45
Page 48

Professional Sew-Ware
Autotracing
7. Select the shade of the color by moving the mouse pointer up or down the
shade bar. Notice the color will change in the right hand rectangular box.
8. Click on OK when the desired color is selected.
9. Remember to always follow steps 1 through 8 for each color change.
Auto Trace with Satin Stitch using the Outline Satin
1. In the top tool bar select the Current Method icon
2. A second tool bar will appear.
3. Click the left mouse once on the far right icon.
4. Place the mouse cross point on the inside of the segment you wish to outline.
5. Click the right mouse. A tone in the computer will acknowledge the auto
trace outline stitch being activated.
6. Hold down Ctrl on the keyboard and click the left mouse. The outline Satin
Stitch fills in around the segment you had chosen.
Changing Direction of Stitches
1. Once the two flower petals have been autotraced in the flower design, click
the left mouse once on the ‘Edit Outline" icon on the top tool bar. 3'^ icon from
the right. This function is used to change the stitch type/design parameter in
a block. The first reference points around the segment of the design last
autotraced will be shown. Click the left mouse button once on the desired
segment of the design to change the stitch direction.
2. Click the left mouse once on the “outline Mode:" icon found on the top tool
bar, 4^^ icon from the right. This now changes to a new toolbar on the top
screen.
3. To move the stitch inclination lines, click on the left mouse button once on the
“Select Edit Mode", 5‘^ icon from the right on the top toolbar. Each time the
left mouse is clicked on the icon, three different functions will be highlighted;
46
Page 49

Professional Sew-Ware
Autotracing
Edit Outline. Edit the First and Last Points and Edit the Inclination. Click the
left mouse until the message on the bottom left screen states 'Edit the
Inclination''.
4. Click toward either of the stitch inclination lines to “pick up" just that end. It’s
stitch inclination can them be changed.
5. Once the desired inclination is achieved, click the left mouse to confirm. Click
the right mouse and the PSW v/ill automatically recalculated the stitch
inclination of the block
47
Page 50

Professional Sew-Ware
Digitizing - Planning the Design
Careful planning before you start to digitize can save a great deal of
time.
1. start with a clean image of the design to
be digitized. Size and clean up in a
drawing program.
2. Print the image out on a computer
printer to create a guide to use while
digitizing.
3. Use color pencils to color in the design.
4. To plan the sequence of the segments,
place numbers in each block.
5. Plan the type of stitches.
6. Plan the Inclination of the stitches.
7. Plan the stop and start points. Use
symbols such as start) (* stop)
8. Plan the underlay stitches.
9. Use Image Span to create a new
starting position.
48
Page 51

49
Page 52

Professional Sew-Ware
Digitizing - Underlay Stitches
Underlay stitches are manual or open fiii stitches placed underneath the top
embroidery stitches. The purpose of this “fiase" stitching is to secure the fabric to
the stabilizer, reduce the push-puii effect, and to prevent the top sfiiches from
sinking into thick textured fabrics.
There are two types of underlay stitches available in the PSW. The
perimeter/outline and the zig-zag stitch.
Stitch parameters
Underlay Density
To create different effects, the density of the underlay may be changed.
The value is in tenths of millimeters. The higher the number the less dense the
underlay. The lower the number the more dense the underlay.
Suggestions for Using Underlay
Satin stitches have a tendency to pull the fabric in toward the center of the
segment. For this reason it is a good idea to use the perimeter/outline underlay
for narrow satin columns.
For complex fill segments it’s a good idea to use the combination of
perimeter/outline and zig-zag underlay.
50
Page 53

Professional Sew-Ware
Adding a Stitch Point to the Outline of a Digitized Segment
1. Open an .XXX digitized design.
2. Use the Zoom feature to zoom into segment to be changed.
3. Choose EditEdit Outline -or- choose Edit Outline from the tool bar.
4. Click on the left mouse once on the outline of the segment to be edited. The
outline of the segment will then be highlighted.
5. Choose Outline Mode in the top horizontal tool bar. jg
Be sure it says Edit the Points in the prompt line at the bottom left of the screen.
If not click on the 2 rounded arrows icon, r . *
Q
Click the left mouse 2 times on a stitch beside the area the new stitch will be
added.
A box will appear around
the stitch point.
8. Click on the Insert icon.
51
Page 54

9. Click the left mouse once where a new point is to be inserted. Be sure to follow the
stitching direction of the outline or a curly curved line will appear, instead of a point
following the stitching line.
Right direction
Straight Line
Wrong Direction
Curly line
10. Click the right mouse to insert the nev/ stitch point and end the function.
To continue inserting new points you must follow the stitch direction of the segment.
Otherwise, if moving between two other block points, the process must be started again.
52
Page 55

Professional Sew-Ware
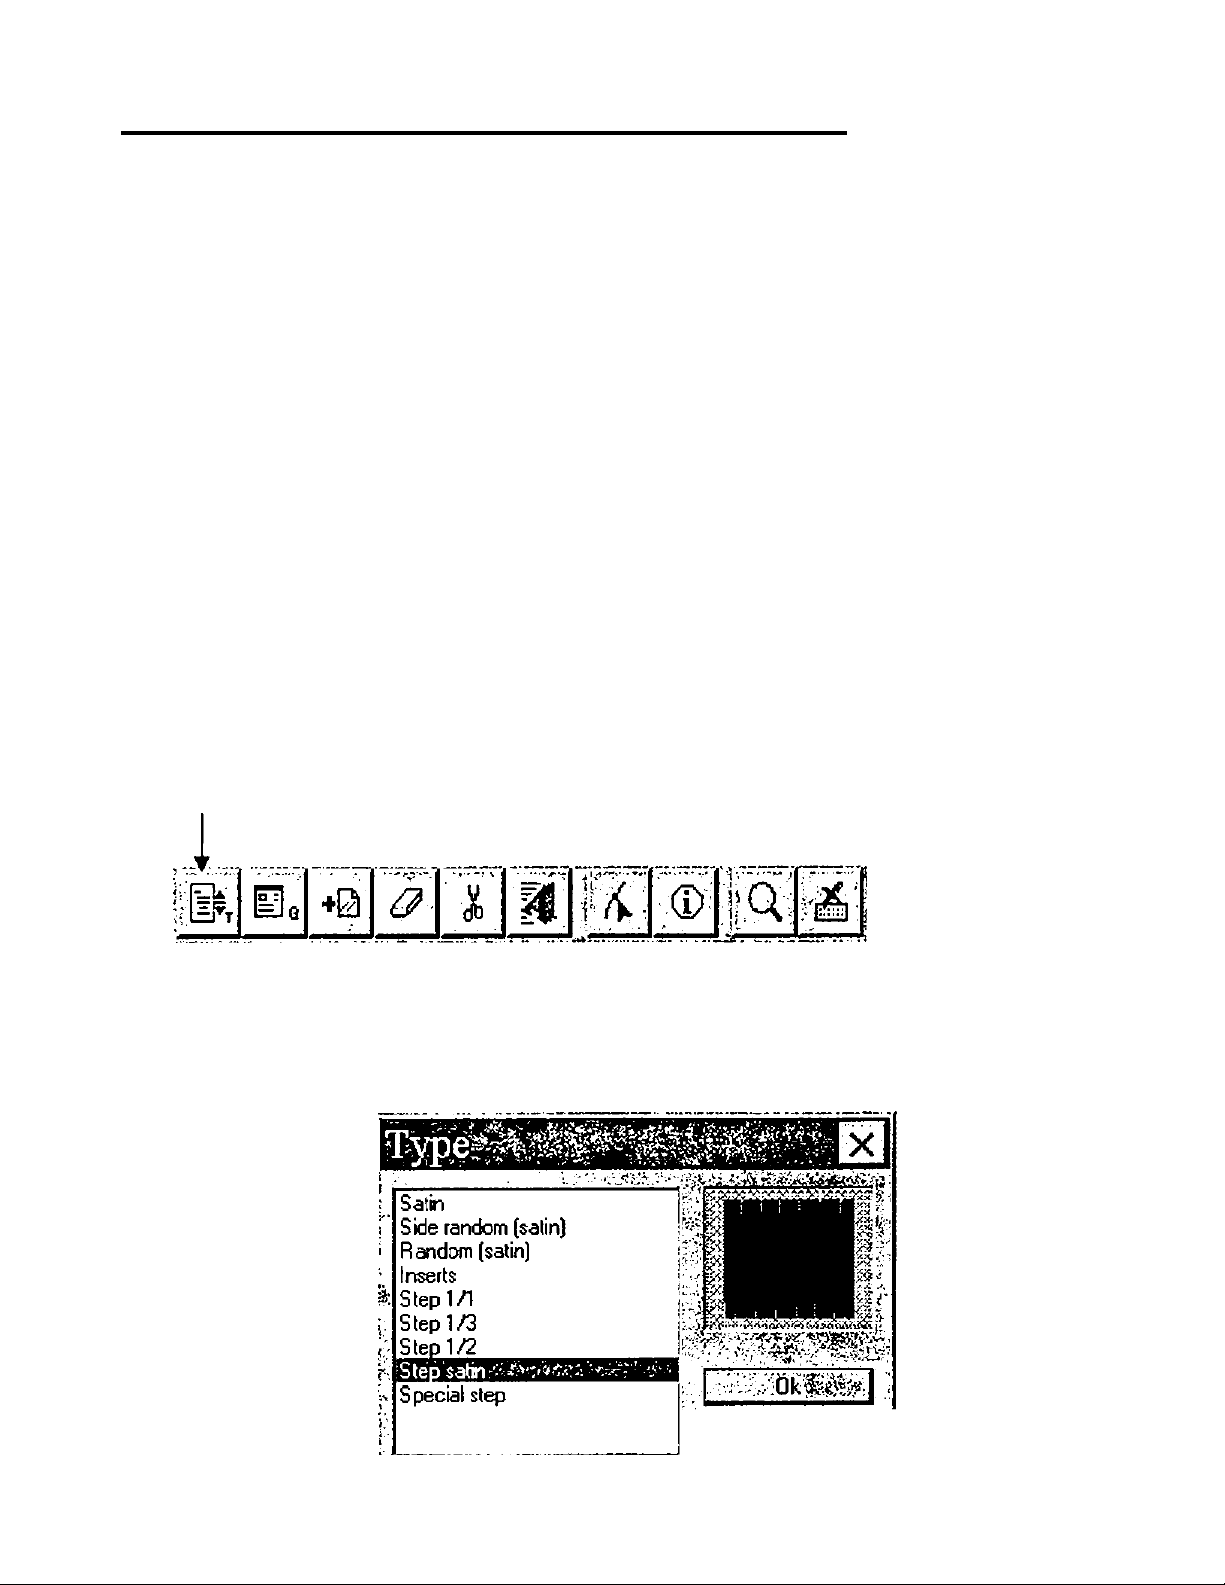
Changing the Stitch Type of a Block
Changing Stitch Type of a Block
1. Load a digitized design onto the PSWscreen.
2. Zoom into the block to be edited.
3. From the top menu bar choose Edit:Edit Outline.
4. Click the left mouse once on the block to be changed. The block will be outlined as
shown.
Outlined block
lAl
5. On the top horizontal tool bar click on the first icon. 1^$ Stitch Type
6. The stitch type dialog box will appear.
Choose the desired stitch type and click OK.
7.
Click the right mouse on the outlined block. The stitch type of the block will now be
8.
changed.
53
Page 56

Professional Sew-Ware
Changing the Stitch Parameters of a Block
This function is used with designs that have been digitized using the PSW
software.
1. Load a digitized design onto the PSW screen. FilesiLoad
2. Choose EditEdit Outline from the top menu bar or the Edit Outline icon.
3. Click the left mouse once on the block/segment to be changed. The stitches
will be outlined.
Outlined Block
4. On the top horizontal tool bar click on the second icon ¿IS q
Parameters
5. The Stitch Parameters dialog box will appear.
stitch Parameters
; StepV
Stitch
Rumr^ ^ length: :kS-:^25:o^
Satin width: V . C • / v^;^;/,|15
I
54
Page 57

Professional Sew-Ware
Editing - Changing the Stitch Inclination of Method 2
The Stitch inclination of a block that was digitized using Method 2 - Complex Fill can be
changed.
1. Load digitized design onto PSW^ screen.
2. Zoom into block to be edited.
3. Choose Edit:Edit Outline
4. Click the left mouse once on the block to be changed.
5. On the top horizontal tool bar click on the Outline Mode icon.
6. A new horizontal tool bar will appear at the top of the screen. Click on the Select
Edit Mode icon.
7. There are three options in this function. The first option is Edit the Inclination
{This information is in the lower left prompt line.)
Note: The inclination option is not an option for the running stitch or satin stitch.
8. If you click the mouse again (or press the spacebar) the second option is Edit the
First and last point.
9. If you click the mouse a third time (or press the spacebar) the option is Edit the
Outline. Click the mouse once again to return to Edit the Inclination.
10. A colored line with a dashed box will be shown in the block that represents the stitch
inclination line. Click the left mouse once on either end of the colored line. The end
of the line will now be “attached” to the mouse pointer and can be moved to a new
inclination. Click the left mouse again to place the line at the new inclination.
11. Click the right mouse once to set the new stitch inclination,
55
Page 58

Professional Sew-Ware
Changing the Stop and Start Points of a Digitized Design
1. Load a digitized design.
2. Zoom into the block to be edited.
3. Choose Edit Outline.
4. Click the left mouse once on the block to be changed.
5. On the top horizontal tool bar clock on the Outline Mode icon.
6. A new horizontal tool bar will appear.
7. Click on Select Edit Mode until it states Edit the first and last point in the
lower left prompt line.
For easy viewing of the first and last point click on
ChotcesiShow Image. The image will now be hidden.
8. Click the left mouse once on the point to be moved, then click again on the
new location.
9. Right click the mouse to end the function.
56
Page 59

Professional Sew-Ware
Editing - Inserting New Blocks Between Existing Blocks
1. Open a design.
2. Choose Edit Outline from the top horizontal tool bar.
3. If the design is a PSIV design or has been digitized using the PSW, blocks
will be outlined. Use the arrow keys on the keyboard to move through the
design block by block until the segment is reached where a new block is to
be inserted or click your mouse to choose a block.
4. If the design is a .dst. .exp, or has been converted, stitch points will be
highlighted when Edit Outline is chosen. Use the arrow keys on the
keyboard to move through the design stitch by stitch.
5. When the area is reached where a new block is to be inserted, click the left
mouse on the Insert icon t*m\ o*’ press the Insert [ key on the keyboard.
[Beside the letter P)
6. All stitches and blocks will turn gray on the screen from the Insert point and
on.
7. Go to the top horizontal tool bar and choose the Current Method icon.
8. If the inserted block is to be the same color as the previous block, proceed to
step 9. If the insert block is to be a separate color, insert a color stop at this
point.
9. Choose a digitizing method and create the new block.
10. When the new block has been created, Choose Edit:lnsert End or press the
Insert End ] key on the keyboard.
11. The gray will disappear and all the colors will reappear with the new block
inserted.
EV.vv
57
Page 60
Professional Sew-Ware
Combining Multiple .dst or .exp Designs
Howto Copy and Paste Embroideries to Create Combination Designs
1. Access the PSWsoftware.
2. Choose Files:Load. A Load design dialog box will appear. Select an embroidery
from the appropriate Drive (Usually C: or A:) and select the correct format (dst or
exp). When the desired design has been highlighted, click OK.
3. Go back to FilesiLoad and select a second embroidery from the appropriate Drive.
Load the design as described above.
4. To easily view both of the open design files, select Windows from the top menu bar
and choose Cascade or Tile.
^Professional Sew*Ware vl.oo • Helrloom.dst
Parts Eit rteo y : >>>-
-aljglolal
.A
-»Helrloom.dst
m
in
33
This illustration is
using
Windows:Tile to
view the tow
open design files.
Ilf:
im
•••Si'W.d.l
Lil
'M
1-. '■? ‘ -•
. r.
' •¥ •,
. 1 J.
ill
■H
5. Make sure the design to be copied has a check mark beside it in the Windows
menu.
NOTE: This
function is only to
view the open
files. This step
can be skipped if
desire.
V'/inoow
; Cascade - ^
f ^ Tile '<
! Arrange Ieohs .
> Iflower.dst
2boat.dst, ’
58
Page 61

Professional Sew~Ware
Combining Multiple .dst or .exp Designs
6. Choose Edit:Copy. A new horizontal tool bar will appear at the top of the screen.
7. Choose the icon for Select All.
8. Close the window of the copied design by click on Files:Close.
9. The first design will be shown on the screen. Click on the center icon to maximize
the design screen. ^
- |n|x
10., To place the hoop around the designs for accurate positioning, select the Hoop
icon
11. From the top menu bar, choose Edit:Paste. The copied design will appear ready to
be positioned or edited before the stitches are set.
12. When the design is in the desired position, click the right mouse to input the
stitches.
o
from the left vertical tool bar.
The entire design has now been copied.
TIP:
For multiple copies of the same design, click on Edit:Paste again.
59
Page 62

Professional Sew-Ware
Editing - Deleting a Stitch Block
The PSW software can delete a stitch block of an xxx, dst or exp design.
1. Open a design by choosing Files:Load
2. In the Load dialog box choose the Drive and File type of the design.
3. Click the mouse to highlight the design and choose OK.
4. When the design appears on the screen, choose EditiDelete. {Delete on the
keyboard can also be used)
5. A new horizontal tool bar will appear at the top of the screen.
Zoom
a
/
Cancel
t t
Outline Select All
h I L" iz I
Select Current Block
Select Current Color
To Delete a Block of a .dst or .exp Design:
1. Select All will delete the whole design.
2. Select Current Color will delete the l^t block of the .dst or .exp design.
(The last block will have the cursor flashing.)
3. Select Current Block will only delete one stitch at a time of a .dst or .exp
design.
To Delete a Block of a PSW .xxx Design
1. Select All will delete the whole design.
2. Select Current Color will delete the outlined segment/block and all the
segments that are the same color as the outlined segment
3. Select Current Block will delete only the outlined block.
60
Page 63

Professional Sew-Ware
Editing - Deleting a Stitch Block
Outline
Outline works in the same manner for .dst, .exp and .xxx designs.
^Prolcssioiial Sew-Ware vl.OO - INoeLdst
1.
From the top menu, click on EditiDelete.
2.
Choose Outline from the horizontal tool bar that appears.
@Ii]E3
Notice the prompt line states. Input the points. To do this, click the left
3.
mouse at points around the outside of the design to create an outline
surrounding the design.
Click the right mouse to end the Input the Points function.
4.
A new tool bar will appear across the top of the screen with the colors of the
5.
segments/blocks in the design.
a ^
Click the mouse on each color to be deleted. Notice the color of the
segment/block on the screen will change to white.
Click the right mouse to end the color selection function. A dialog box will
appear asking Delete Block? Click yes if all the correct colors are chosen,
The segments/blocks will be deleted from the design.
m
%
61
Page 64

Professional Sew-Ware
Editing - Moving a Design or Segment of a Design
After stitches have been input, designs or segments of a design can be
repositioned.
1. Access the PSW software,
2. Open a design.
3. From the top menu bar, select Edit:Move. A new horizontal tool bar will
appear at the top of the screen.
CXlSi
IT-?:-
4. Choose the Outline icon. [’‘''''Vd
5. Click the left mouse at numerous points around the design to block out and
outline. Click the right mouse to set the outline.
•ii^i I LrKKe
6. A set of color blocks will appear at the top of the screen.
i-rri
7. Click the left mouse once on each color block of the design to be moved
62
Page 65

Professional Sew-Ware
Editing - Moving a Design or Segment of a Design
8. Click the right mouse to activate the move function.
9. The chosen design or segment will appear black on the screen with a box
around it. and ready to be moved.
10. Click the left mouse on the selected design or segment and move it into the
desired position.
11. Click the right mouse to set the new position.
12. This technique can also be used on individual embroideries in a combination
design to customize the placement within the hoop.
63
Page 66

Professional Sew-Ware
Editing - Repositioning the First Jump Stitch
1. Load the design that needs to be edited.
2. From the top horizontal tool bar select Modify;Center Design.
3. Use the Zoom function to zoom into the first jump stitch.
4. From the top horizontal tool bar choose Choices Stitch Edit.
.3Professional S«w>War« v 1.00 »(Design
Click the left mouse on the
endpoint of the jump stitch
and move it up into the
design.
.sprofessionai sew-v/are vtoo • iDesKinO
JJ.pies. QjMte e^t .wWb -Cftoiow 'PwomWBti vWo*i( ; - ..x ,>a.algljU
•WfVWtil'H'e'
HEilESl
6. Click the left mouse
again on the
remaining endpoint
of the jump stitch
and move it up into
the design.
This technique can also be
used to reposition other
jump stitches in a design.**
64
Page 67

Professional Sew~Ware
Editing - Stitch Edit
Choices:Stitch Edit-or- (X)
This editing feature provides the ability to move through a design stitch by stitch.
Stitches can be added, deleted, moved, extended, or shortened.
Important Note: Editing of the block outlines of an xxx design must be done
before individual stitches are edited. Stitch Exiit changes will be canceled if
done before Edit Outline changes. (See Edit Outline for block outline editing
tips.)
1. Files.’Load
2. In the Load Design dialog box. choose the desired embroidery. Click OK.
3. The Open dialog box will now appear. Click Cancel.
(This box appears to provide the option of loading the coordinating bmp Tile
with embroidery design, if the design was digitized.)
4. The design will now appear on the screen. Choose ChoicesiStitch Edit.
5. The mouse pointer will turn into an extra large cross. Notice in the lower left
prompt line information for each stitch is provided.
x: asy: are the vertical and
horizontal distances traveled by the
stitch.
S= Displays the
number of the traced
stitch in the design.
x:-1Q3.y;-393.d;0.Q .c: Eod, s= 12931
i
c: Displays the code
d: Direct distance
traveled by the stitch.
of each stitch
65
Page 68

Professional Sew-Ware
Edit\ng ~ St\tch Ed\t
6. The large mouse pointer cross can be move through the design by using the
computer keyboard:
♦ Press the right arrow key to move forward through the design
♦ Press the left arrow key to move backwards through the design.
♦ Press Page Up to move 100 stitches forward.
♦ Press Page Down to move 100 stitches backwards.
♦ Press Home on the keyboard to move to the first stitch of the design.
♦ Press End to move to the last stitch of the design.
♦ Press ESC on the keyboard to end the function.
Adding a Stitch:
7. Follow steps 1 through 6.
8. Use the Zoom function to closely view where the stitches will be added.
9. Move through the design until the position is reached where the stitch or
stitches are to be added.
10. Press insert on the keyboard or click on the
11. Add the stitch or stitches by moving the mouse pointer to the desired location
and clicking the left mouse to set the stitch. Continue in this manner until all
the new stitches have been created. Click the right mouse to end the
function.
Deleting a Stitch:
12. Follow steps 1 through 6.
13. Use the Zoom function to clearly view where the stitches will be deleted.
icon.
14. Move through the design until the position is reached where the stitch or
stitches are to be deleted.
66
Page 69

Professional Sew-Ware
Editing - Stitch Edit
15.Delete the stitch or stitches by pressing the
on the computer keyboard.
16. Press the
stitches.
Moving, Extending or Shortening Stitches:
17. Follow steps 1 through 6.
18. Use the Zoom function to clearly view where the stitches will be moved,
extended, or shortened.
19. Click the left mouse once on the desired stitch.
20. An elastic line will now be attached to the mouse pointer. This represents the
stitch and can be moved, extended or shortened.
21. Click the left mouse once again to lock the stitch into the new position.
icon or ESC on the keyboard, when finished deleting
icon or the Delete key
67
Page 70

Professional Sew-Ware
Editing - Deleting or Adding Color Stops
Sometimes you may want to customize or edit a design by adding or deleting
color stops.
1. To decide exactly where to delete or add a color stop, use the Redraw
Controlled function of the software. Select Choices : Redraw Controlled.
2. Click on Next Color (This will redraw each color v/ith each click of the
mouse.)
^Professional Sew-Ware vl.OO - [Designi] ^
Files Create Edit Modrty p^oic^s Utilities ;..WSndow 'help.
«89.1239
DÌX
..... .. .. .. .. ... .. .. .' '."v.v ■- •/.* V/ c •/».• • .* : WM * .* ' V • V»AW n ataaw *.■ w w/>^» • ^
x: ^20 ,6 ; : f
3. When the color stop to be deleted is reached, note the stitch number in the
Prompt :Line S=
4. Click on Cancel to return to the whole design.
5. Select Choices:Stitch Edit.
________
68
Page 71

Professional Sew-Ware
Editing - Deleting or Adding Color Stops
6.
Move through the design using page up / page down and the arrow keys on
the computer keyboard. When the stitch number is reached from Step 3.
press Delete on the computer keyboard and the color stop will be deleted.
-OR- When the stitch number is reached from Step 3. choose the Change
Function icon and then choose the Stop icon to add a color stop.
K
0
0
m
7. Repeat Steps 1 through 7 to remove or add additional color stops.
69
Page 72

Professional Sew-Ware
Reorder Color Segments of Design
The reorder function allows you to change the order in which the color segments in the
embroidery design are sewn.
1. Click the left mouse on Edit:Reorder at the top of the screen. The reorder box now
appears on the screen.
2. To move a color to a new position, click the left mouse on the color box number to
be moved. The box is now highlighted
3. Then click, hold and drag the left mouse to move the color box to it's new position.
Reorder
m
I
• ^ *'i * ■ ■ ■ ■ I I ■ ■ - V- ^ s« '• '“•'i *V» '** t**«'' ^ Vr* • * * »
4. Notice a shadow of the color segment will appear on the screen as the segment is
dragged into a new position.
/•' - ••
5. Release the mouse when the color segment is in the desired position.
6. Click OK to set the color segment reorder.
70
Page 73

Professional Sew-Ware
Multiple Hoop Lettering
1. Choose Files: New.
2. In the OPEN dialog box click on New.
3. In the NEW dialog box choose 210 x 430 mm. then choose OK.
4. From the left vertical tool bar choose Lettering.
5. In the TEXT box type Singer.
6. Click OK. The word Singer now appears on the screen with a box around it.
Fonts
\
^ Proresslo.nal Sew-VVare v > .00 - [Designs]
5^ Fi’es Cfoatj^ Ldt Mcofy ^oices P^neto's utiiTies
Height Space Density
' r, / /
JB
___
__
ricTxl
Rotate
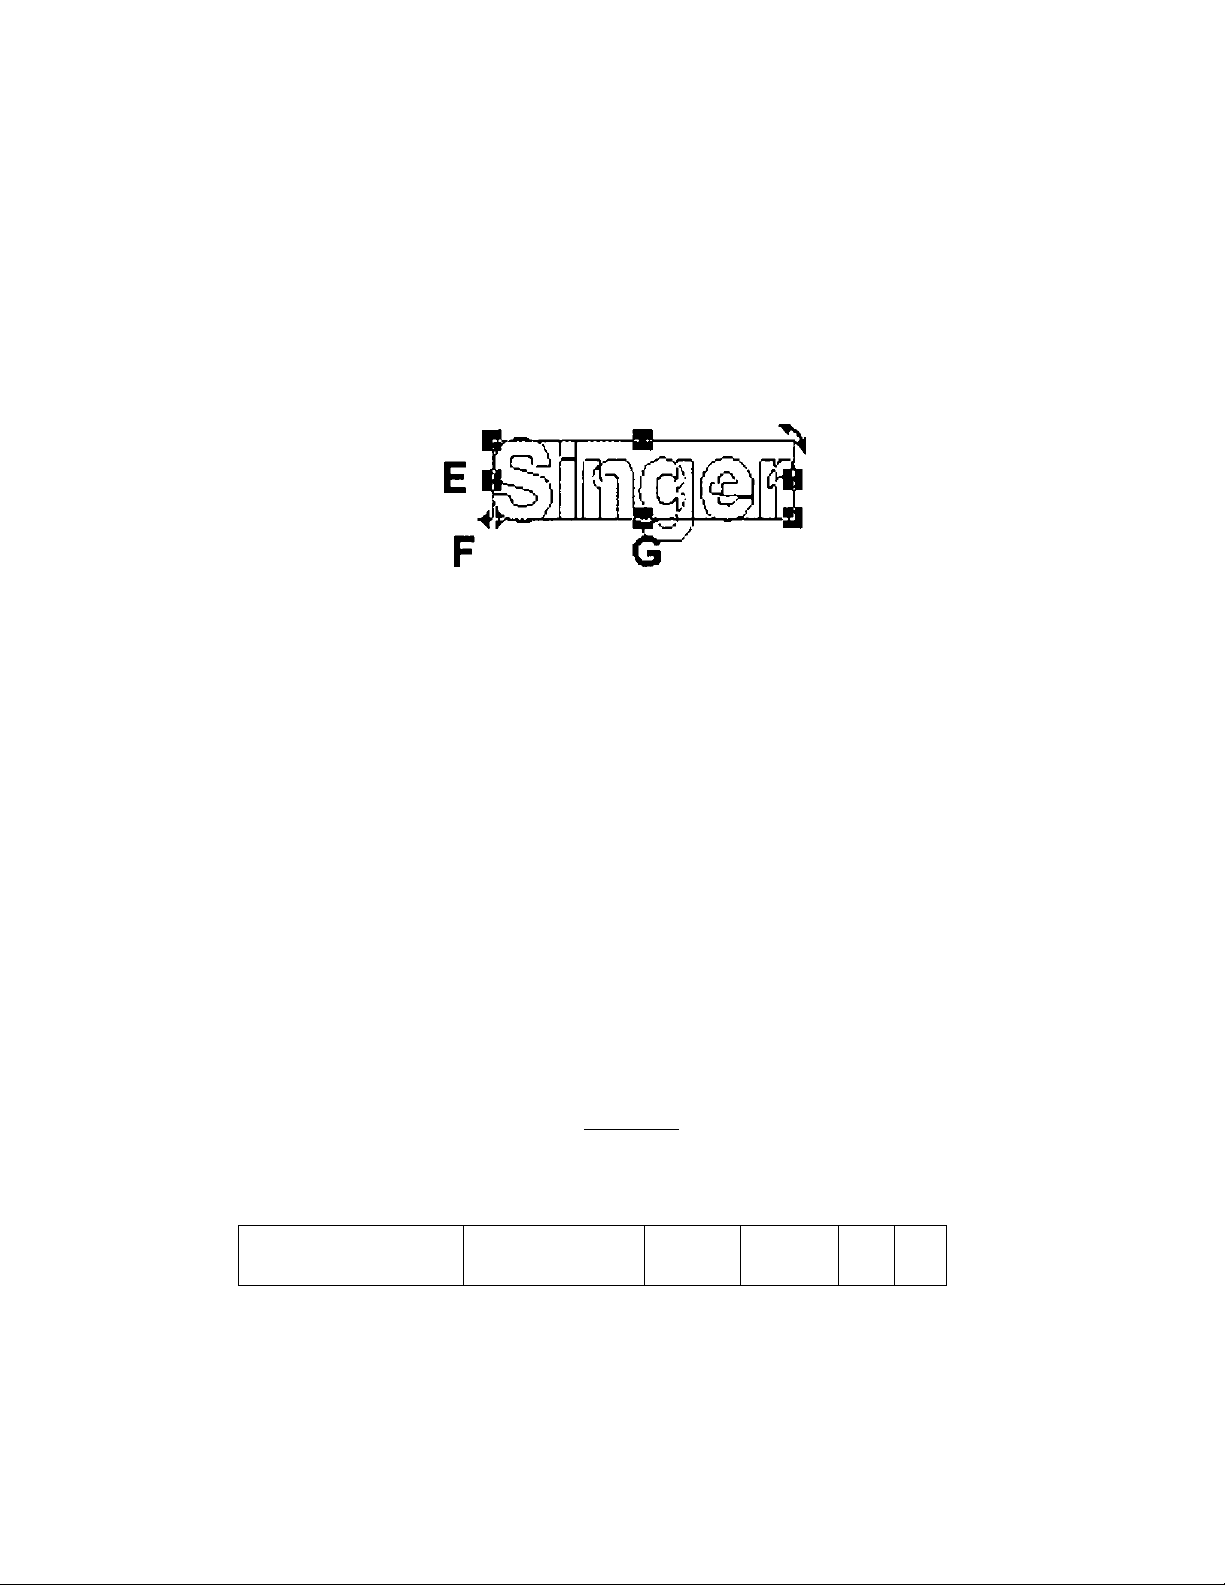
7. Resize the word Singer, by typing in a number in the Height box. (Type 800)
8. Choose the font style by click on the arrow beside the font names. (Choose
Cheltenham Large)
9. Change the spacing to 30 by adjusting the numbers in the box beside the Height
box.
10. Rotate the word by clicking and dragging the left mouse on the upper right corner
with the arrow.
71
Page 74

Professional Sew-Ware
Multiple Hoop Lettering
11. For ease in splitting the word for Multiple Hooping, , click the left mouse once on
the Machine Code icon, in the left vertical tool bar.
■3 Professional Sew*Ware v 1.00 - [q Machine code
Q Files Creete...gdt M03ify-:Glwces' fr■ ■
JJ
«3: 84
«2
i .
o
V/’ : «.•.-»«%^*’77*r-
gJ
9
J
50
'!•. - >5 C* V‘»*r ij i
128% ; -loii ;\'%-:.,.-i5iaM)(2949-.v-j;",4
12. When the Machine Code dialog box appears, place a stop between the i & n and
the g & e. Press OK.
13. When the word has been sized, spaced, and rotated to the desired effect, click the
right mouse to set the stitches.
14. The word S/nger should now have the stitches inserted, with three different colors.
72
Page 75

Professional Sew-Ware
Multiple Hoop Lettering
Changing the Stitch Type of the Letters
1. To change the stitch type of the lettering, click the left mouse on Edit Outline.
2. The last letter should be outlined with small circles and lines.
3. Click the left mouse on the first icon (Stitch Type) in the horizontal tool bar at the
top of the screen.
ik ■?
..........
I
•aProfessional Sew*Ware v1
Q Pilos
cit l/odiV Choiras Píjríimateri utiiacs V/ncow Help
0 •
. -•-.T..
4. A Type dialog box should now appear on the screen. Choose one of the stitch types
and click on OK.
Type
Solin
Side (««Join t'sdln)
Random (salinl
InuMis
Step 1/1
Siep1/3
mH&im
|S| 6p
5. Click the right mouse on the screen to set the new stitch type.
6. Repeat steps 1 through 5 to change the stitch type of each letter.
73
Page 76

Professional Sew-Ware
Multiple Hoop Lettering
Changing Density of Lettering
1. To change the density of the lettering, click the left mouse on Edit Outline —
2. Click the left mouse on the first letter to be changed. The letter should be outlined
with small circles and lines
3. Click the left mouse on the second Icon Stitch Parameters in the top horizontal tool
bar.
4. When the dialog box appears change the density to the desired setting. Click OK
5. Click the right mouse to input the stitch changes.
L=JO
Stitch Parameters
Dersi^.
SleplenQlh:
^urrii^ sti(ch
wdttv
j-.m
7 . -. x f t .
■ ■^pQ V
s
^.Uftderfdy
;•] Density ■ ^120.0 ,
' Ok '’'; (if .CSi^el' '
---
—
6. Repeat steps 1 through 4 to change the density of each letter.
Writing to Multiple Hood
1. Click the left mouse on the Hoop icon in the left tool bar.
2. A Hoop dialog box will appear on the screen. Make sure
beside Load, then click on OK.
3. Choose the 210 x 430 mm hoop size. Click on OK.
4. A representation of the hoop should now be on the screen around the design.
5. If the hoop is not centered around the design, click on the Hoop icon again and
choose Wove in the Hoop dialog box,
6. Click, hold and drag the left mouse, to position the hoop. Then click the left mouse
to lock the hoop in position.
7. Choose CreateiAdd multiple hoop cross.
lot is in the circle
74
Page 77

Professional Sew-Ware
Multiple Hoop Lettering
8. Click on Files:Write using Multiple hoop.
9. Notice in the lower left corner it reads, Input the points. The multiple hoop design
is now ready to be broken down into segments to be loaded onto the PSW card.
10. Click the left mouse to block out a section of the design. Include the center point
v/here the X and Y lines intersect. (It is not necessary to always include the X
and Y axis lines with each quadrant, but it does help when aligning the
segment in the XL1-000.)
11. After surrounding the section, click the right mouse.
12. A color box will appear at top of the screen.
j
........
___
'd^B
i _l . i _ ,i ... . I
13. Click the left mouse on each color that will be in the first quadrant saved to the card
writer. (In this case, it will be the color of the first hvo letters S & i and the center
cross point color. Notice the colors disappear from the design as they are selected.)
14. Click the right mouse to activate the function.
_____
I
lilB
I ,
.
75
Page 78

Professional Sew-Ware
Multiple Hoop Lettering
Remember:
Each of the cells on the PSW card holds approximately 30,000 stitches and 15
colors. The sewing area of each individual large hoop quadrant within the
multiple hoop function is 105mm (X axis) x 215mm (Y axis).
If a quadrant exceeds the 30,000 stitches, or is larger than 105mm (X axis) x
215mm (Y axis), a dialog box will appear that states, Design is too Big. If there
are more than 15 colors, a dialog box will state, Too many colors.
15. A Save Design to Card dialog box will appear with the cells of the card shown.
Select a ceil and click on write.
16. The design quadrant will be written to the card. This quadrant will now appear gray
on the screen.
17. Repeat steps 9 through 16 for the letters n & g. Remember to include the center
cross point when blocking out the letters.
IS.Repeat steps 9 through 16 for the letters e & r. Again, remember to include the
center cross point when blocking out the letters.
19. AI1 quadrants have been transferred to the card and the entire design will be gray on
the screen. When the red light is no longer blinking, the card can be removed from
the writer box and place in the XL-1000 machine.
20. Be sure to use the Multiple Hoop selection on the XL-1000 when accessing the
card.
76
Page 79

Professional Sew-Ware
Digitizing with Method 2 - Creating a Hole in a Segment
1. Choose Files:New.
• Oriv«; ; Vmv** ~3
Sflowef-wml
OLOine^yimi
In the Open dialog box, choose the
Drive: PSW/lmages, then choose File
type: Windov/s Metafile (WMF).
f ' ^ Jj
3. Choose the file outirne.wmf.
Click OK.
4. Click the left mouse once on the Current Method icon.
(or under the Main menu, click on CreateiCreateMethods.)
77
Page 80

Professional Sew^Ware
Digitizing with Method 2 - Creating a Hole in a Segment
5. Select Method 2 by clicking on the second icon • 'V
Methods tool bar.
;j Satin
A. d
6. Press the right mouse to activate the digitizing function.
7. Click the left around the outside of the
circular image in the lov/er right corner.
8. Do not click the right mouse to end the
function. Instead click the left mouse on
the hole icon in the top tool bar .
-or press number 5 on the computer
keyboard.
in the Current
iSil
9. Continue by clicking the left mouse
around the open area or hole in the
center of the circular image.
10. When the hole has been outlined, click
the right mouse to end the function.
11, Choose the stitch inclination and start and stop points.
12. The stitches will now fill in leaving a hole in the middle.
78
 Loading...