

Page 1

Instruction Manual
Decorative
Mode d'emploi
Вйвлйп Пдзгйщн
Page 2

EN
IMPORTANT SAFETY INSTRUCTIONS
When using an electrical appliance, basic safety should always be
followed, including the following:
Read all instructions before using this sewing machine.
DANGER
1. An appliance should never be left unattended when plugged in.
2. Always unplug this appliance from the electric outlet immediately
after using and before cleaning.
3. Always unplug before re-lamping. Replace bulb with same type
rated 10 watts
- To reduce the risk of electric shock:
(110-120V area) or 15 watts (220-240V area).
WARNING - To reduce the risk of burns, fire, electric
shock, or injury to persons:
1. Do not allow to be used as a toy. Close attention is necessary when
this appliance is used by or near children.
2. Use this appliance only for its intended use as described in this
manual. Use only attachments recommended by the manufacturer
as contained in this manual.
3. Never operate this appliance if it has a damaged cord or plug, if it is
not working properly, if it has been dropped or damaged, or dropped
into water. Return the appliance to the nearest authorized dealer or
service center for examination, repair, electrical or mechanical
adjustment.
4. Never operate the appliance with any air openings blocked. Keep
ventilation openings of the sewing machine and foot controller free
from accumulation of lint, dust, and loose cloth.
5. Keep fingers away from all moving parts. Special care is required
around the sewing machine needle.
6. Always use the proper needle plate. The wrong plate can cause the
needle to break.
7. Do not use bent needles.
8. Do not pull or push fabric while stitching. It may deflect the needle
causing it to break.
9. Switch the sewing machine off ("O") when making any adjustments in
the needle area, such as threading needle, changing needle,
threading bobbin, or changing presser foot, and the like.
10. Always unplug sewing machine from the electrical outlet when
removing covers, lubricating, or when making any other user
servicing adjustments mentioned in the instruction manual.
11. Never drop or insert any object into any opening.
12. Do not use outdoors.
13. Do not operate where aerosol spray products are being used or
where oxygen is being administered.
14. To disconnect, turn all controls to the off ("O") position, then remove
plug from outlet.
15. Do not unplug by pulling on cord. To unplug, grasp the plug, not the
cord.
16. The sound pressure level under normal operating conditions is
75dB(A).
17. Please turn off the machine or unplug when the machine is not
operating properly.
18. Never place anything on the foot controller.
19. If the supply cord that is fixed with foot controller is damaged, it must
be replaced by the manufacturer or its service agent or a similar
qualified person in order to avoid a hazard.
20. This appliance is not intended for use by persons (including children)
with reduced physical, sensory or mental capabilities, or lack of
experience and knowledge, unless they have been given
supervision or instruction concerning use of the appliance by a
person responsible for their safety.
21. Children should be supervised to ensure that they do not play with
the appliance.
SAVE THESE INSTRUCTIONS
This sewing machine is intended for household use only.
Page 3

F
INSTRUCTIONS IMPORTANTES DE SÉCURITÉ
Lors de l'utilisation d'un appareil électrique, il est important de toujours
suivre certaines précautions de sécurité dont certaines sont les
suivantes :
Lire toutes les instructions avant d'utiliser votre machine à coudre :
DANGER
1. Lorsque la machine est branchée, ne jamais la laisser sans
surveillance.
2. Toujours débrancher la machine à coudre de la prise de courant
immédiatement après l'usage et avant l'entretien.
3. Toujours débrancher la machine avant de changer l'ampoule.
Remplacer cette dernière par une ampoule de même type d'une
puissance de 10 watts (pour une alimentation de 110-120V) ou 15
watts (pour une alimentation de 220-240V).
AVERTISSEMENT
d'incendie, d'électrocution ou de blessures:
1. Ne pas autoriser l'utilisation de la machine comme jouet. Faire très
attention lorsque la machine est utilisée par des enfants ou a proximité
d'enfants.
2. N'utiliser cette machine que dans le but pour lequel elle a été conçue
tel que spécifié dans ce manuel. N'utiliser que les accessoires
spécifiés dans ce manuel et recommandés par le fabricant.
3. Ne jamais utiliser cette machine à coudre si le câble d'alimentation ou
la prise sont endommagés ou si son fonctionnement n'est pas normal,
si elle est tombée par terre, dans de l'eau ou si elle a subi des
dommages. Si c'est le cas s'adresser au service après vente le plus
proche pour obtenir une réparation ou un réglage électrique ou
mécanique.
4. Ne jamais utiliser le machine si des ouvertures d'air sont obstruées.
S'assurer que les orifices de ventilation et la pédale de commande
sont libres de toute accumulation de poussières ou de morceaux de
tissu.
5. Ne pas approcher vos doigts de toute partie mobile. Prêter une
attention particulière à proximité de l'aiguille de votre machine à coudre.
6. Toujours utiliser la plaque à aiguille appropriée. Une mauvaise plaque
--Pour éviter tout risque d'électrocution :
Pour réduire les risques de brûlures,
peut entraîner la casse de l'aiguille.
7. Ne pas utiliser d'aiguilles tordues.
8. Ne pas tirer sur le tissu ou le pousser lors de la couture. Ceci pourrait
entraîner une courbure de l'aiguille causant une casse.
9. Mettre la machine hors tension (position "O") avant de faire tout réglage
dans la zone de l'aiguille, comme par exemple enfiler l'aiguille ou
remplacer celle-ci ou encore changer le pied presseur etc.
10. Toujours débrancher la machine à coudre de la prise de courant avant
d'enlever le capotage, de lubrifier ou de faire tout réglage spécifié dans
ce mode d'emploi.
11. Ne jamais laisser tomber ou introduire d'objet dans les ouvertures de la
machine.
12. Ne pas utiliser à l'extérieur.
13. Ne pas utiliser la machine dans des endroits ou des aérosols sont
pulvérisés ou de l'oxygène est administré.
14. Pour débrancher la machine, placer toutes les commandes sur la
position d'arrêt ("O") et ensuite, retirer la fiche de la prise de courant.
15. Ne pas débrancher la machine en tirant sur le fil. Débrancher en tirant
sur la fiche et non sur le fil.
16. Le niveau sonore est conforme aux réglementations soit de 75dB (A).
17. Veuillez éteindre la machine ou la débrancher si elle ne fonctionne pas
correctement.
18. Ne disposez jamais un objet quelconque sur la pédale.
19. Si le cordon d'alimentation qui relie la machine à la pédale est abîmé, il
doit être remplacé par le fabricant ou par un service après vente agrée
afin d'éviter tout danger.
20. Cet appareil ne doit pas être utilisé par les personnes (ainsi que les
enfants) aux capacités physiques, sensorielles ou mentales réduites ou
qui n'ont pas l'expérience et les connaissances requises, sauf si elles
sont supervisées ou ont reçu des instructions concernant l'utilisation de
l'appareil par une personne responsable de leur sécurité.
21. Les enfants doivent être surveillés pour assurer qu'ils ne jouent pas
avec l'appareil.
GARDER CE MODE D'EMPLOI
Cette machine à coudre est destinée à un usage domestique exclusif.
Page 4

GR
УЗМБНФЙКЕУ ПДЗГЙЕУ БУЦБЛЕЙБУ
¼фбн чсзуймпрпйеЯфе мйб злекфсйкЮ ухукехЮ, рсЭрей нб бкплпхипэнфбй пй
вбуйкЭт пдзгЯет буцЬлейбт, ухмресйлбмвбнпмЭнщн фщн бкплпэищн:
ДйбвЬуфе ьлет фйт пдзгЯет рсйн чсзуймпрпйЮуефе фзн сбрфпмзчбнЮ бхфЮ.
КЙНДХНПУ
1. Мйб ухукехЮ ден рсЭрей рпфЭ нб бцЮнефе чщсЯт рбсбкплпэизуз
ьфбн еЯнбй уфзн рсЯжб.
2. Нб вгЬжефе рЬнфпфе фп цйт фпх сеэмбфпт бхфЮт фзт ухукехЮт брь
фзн рсЯжб бмЭущт мефЬ фзн чсЮуз кбй рсйн брь фпн кбибсйумь.
3. Нб вгЬжефе рЬнфпфе фп цйт фпх сеэмбфпт брь фзн рсЯжб ьфбн
бллЬжефе лЬмрб. БнфйкбфбуфЮуфе фз лЬмрб ме Ьллз Ядйпх фэрпх фщн
Watts (220 - 240V).
15
РСПЕЙДПРПЙЗУЗ
егкбхмЬфщн, цщфйЬт, злекфспрлзоЯбт, Ю фсбхмбфйумпэ рспуюрщн:
1. Мзн ерйфсЭрефе фз чсЮуз фзт ухукехЮт убн рбйчнЯдй. БрбйфеЯфбй
мегЬлз рспупчЮ ьфбн з ухукехЮ бхфЮ чсзуймпрпйеЯфбй брь Ю кпнфЬ
уе мйксЬ рбйдйЬ.
2. ЧсзуймпрпйЮуфе бхфЮ фз ухукехЮ мьнп гйб фпн укпрь рпх
ресйгсЬцефбй уфп егчейсЯдйп бхфь. Нб чсзуймпрпйеЯфе мьнп
еобсфЮмбфб рпх ухуфЮнпнфбй брь фпн кбфбукехбуфЮ кбй ресйЭчпнфбй
уфп егчейсЯдйп бхфь.
3. Мзн чсзуймпрпйеЯфе рпфЭ фз ухукехЮ бхфЮ бн Эчей хрпуфеЯ влЬвз фп
кблюдйп сеэмбфпт Ю фп цйт, бн ден лейфпхсгеЯ ущуфЬ, бн Эчей рЭуей
кЬфщ Ю Эчей рЬией жзмйЬ, Ю Эчей рЭуей мЭуб уе несь. ЕрйуфсЭшфе фз
ухукехЮ уфп рлзуйЭуфесп еопхуйпдпфзмЭнп уЭсвйт, гйб еоЭфбуз,
злекфсйкЮ Ю мзчбнйкЮ сэимйуз.
4. Мзн емрпдЯжефе фб бнпЯгмбфб еобесйумпэ ьфбн чсзуймпрпйеЯфе фз
ухукехЮ. ДйбфзсЮуфе фб бнпЯгмбфб еобесйумпэ фзт сбрфпмзчбнЮт
кбй фзт рбфЮуфсбт брбллбгмЭнб брь ухууюсехуз чнпхдйюн,
укьнзт кбй хрплейммЬфщн хцЬумбфпт.
5. ЦхлЬофе фб дЬчфхлб мбксйЬ брь ьлб фб кйнпэменб мЭсз. ЙдйбЯфесз
цспнфЯдб чсейЬжефбй кпнфЬ уфз вельнб фзт сбрфпмзчбнЮт
6. Нб чсзуймпрпйеЯфе рЬнфпфе фзн кбфЬллзлз рлЬкб вельнбт. З чсЮуз
мз кбфЬллзлзт рлЬкбт мрпсеЯ нб кЬней фз вельнб нб урЬуей.
7. Мзн чсзуймпрпйеЯфе уфсбвЭт вельнет.
- Гйб нб мейюуефе фпн кЯндхнп злекфспрлзоЯбт:
- Гйб нб мейюуефе фпн кЯндхнп
.
8. Мзн фсбвЬфе Ю урсючнефе фп эцбумб кбфЬ фп сЬшймп. МрпсеЯ нб
уфсбвюуей з вельнб кбй нб урЬуей.
9. ФпрпиефЮуфе фп дйбкьрфз лейфпхсгЯбт уфз иЭуз '' '' (''O'') ьфбн
кЬнефе прпйеудЮрпфе схимЯуейт уфзн ресйпчЮ фзт вельнбт, ьрщт
кбфЬ фп рЭсбумб фзт клщуфЮт уфз вельнб, кбфЬ фзн бллбгЮ фзт
вельнбт кбфЬ фп рЭсбумб фзт клщуфЮ уфп мбупэсй, Ю кбфЬ фзн
бллбгЮ фпх рпдйпэ рЯеузт кбй рбсьмпйщн кбфбуфЬуещн.
10. Нб вгЬжефе рЬнфпфе фп цйт сеэмбфпт фзт сбрфпмзчбнЮт брь фзн
рсЯжб ьфбн вгЬжефе кблэммбфб, фз лйрбЯнефе, Ю ьфбн кЬнефе
прпйеудЮрпфе схимЯуейт рпх бнбцЭспнфбй уфп егчейсЯдйп бхфь.
11. Мзн сЯчнефе Ю мзн ейуЬгефе мЭуб уе прпйпдЮрпфе Ьнпйгмб кЬрпйп
бнфйкеЯменп.
12. Мзн фз чсзуймпрпйеЯфе уе еощфесйкпэт чюспхт.
13. Мзн фз чсзуймпрпйеЯфе уе мЭсз ьрпх чсзуймпрпйпэнфбй рспъьнфб ме
рспщизфйкЬ бЭсйб Ю ьрпх дйпчефеэефбй похгьнп.
14. Гйб брпуэндеуз, схимЯуфе фп дйбкьрфз лейфпхсгЯбт уфз иЭуз '' ''
(''O''), мефЬ вгЬлфе фп цйт брь фзн рсЯжб.
15. Мзн вгЬжефе фп цйт брь фзн рсЯжб фсбвюнфбт фп брь фп кблюдйп. Гйб
нб вгЬлефе фп цйт брь фзн рсЯжб, рйЬуфе кблЬ фп цйт, ьчй фп кблюдйп.
16. Фп ерЯредп Энфбузт фпх Ючпх хрь кбнпнйкЭт ухниЮкет еЯнбй 75
17. КлеЯуфе фзн мзчбнЮ Ю брпухндЭуфе фз брь фп сеэмб ьфбн ден
лейфпхсгеЯ ущуфЬ.
18. РпфЭ мзн фпрпиефеЯфе прпйпдЮрпфе бнфйкеЯменп рЬнщ уфзн рбфЮуфсб.
19. ЕЬн фп кблюдйп сеэмбфпт фзт рбфЮуфсбт Эчей хрпуфеЯ влЬвз, иб
рсЭрей нб бнфйкбфбуфбиеЯ брь кЬрпйп еопхуйпдпфзмЭнп кбфЬуфзмб
уЭсвйт фзт рспкеймЭнпх нб брпцехчиеЯ фхчьн кЯндхнпт.
20. БхфЮ з ухукехЮ ден рсппсЯжефбй гйб чсЮуз брь Ьфпмб
(ухмресйлбмвбнпмЭнщн кбй рбйдйюн) ме мейщмЭнет цхуйкЭт,
бйуизфЮсйет Ю рнехмбфйкЭт йкбньфзфет, Ю Эллейшз емрейсЯбт кбй гнюузт,
екфьт кбй Энб фпхт Эчпхн дпиеЯ пдзгЯет учефйкЬ ме фзн чсЮуз фзт
ухукехЮт брь Энб хреэихнп Ьфпмп гйб фзн буцЬлейб фпхт.
21. Мзн ерйфсЭрефе уфб рбйдйЬ нб рбЯжпхн ме фз ухукехЮ чщсЯт нб Эчефе
еобуцблЯуей ьфй всЯукпнфбй хрь ерЯвлешз.
SINGER
®
off
off
dB(A).
ЦХЛБОФЕ БХФЕУ ФЙУ ПДЗГЙЕУ
З сбрфпмзчбнЮ бхфЮ рсппсЯжефбй мьнп гйб пйкйбкЮ чсЮуз.
Page 5
EN
Congratulations
Félicitations
F
УХГЧБСЗФЗСЙБ
GR
As the owner of a new Singer sewing
machine, you are about to begin an
exciting adventure in creativity. From the
moment you first use your machine, you
will know you are sewing on one of the
easiest to use sewing machines ever
made.
May we recommend that, before you
start to use your sewing machine, you
discover the many features and the ease
of operation by going through this
instruction book, step by step, seated at
your machine.
To ensure that you are always provided
with the most modern sewing capabilities,
the manufacturer reserves the right to
change the appearance, design or
accessories of this sewing machine
when considered necessary.
SINGER is a registered trademark of
The Singer Company Limited or its
affiliates.
©2011 The Singer Company Limited or
its affiliates. All rights reserved.
Vous voici à présent propriétaire d'une
machine à coudre Singer et en cette
qualité, vous allez vous lancez dans
une aventure excitante dans le
domaine de la créativité. Dès le départ,
vous réaliserez que vous allez coudre
avec l'une des machines les plus
faciles à utiliser qui ait jamais été
fabriquée.
Avant de commencer à coudre, nous
vous recommandons de voir quelques
avantages ainsi que la facilité
d'utilisation en lisant ce mode d'emploi
en étant assis devant votre machine à
coudre.
Afin de garantir que votre machine
vous donnera toujours le meilleur du
point de vue technique, le fabricant se
réserve le droit de modifier l'apparence,
le concept ou les accessoires de cette
machine s'il le juge nécessaire.
SINGER est une marque enregistrée
de The Singer Company Limited ou de
ses sociétés affiliées.
©2011 The Singer Company Limited ou
ses sociétés affiliées. Tous droits
réservés.
Убн кЬфпчпй фзт нЭбт сбрфпмзчбнЮт
®
SINGER , еЯуфе Эфпймпй нб оекйнЮуефе мйб
ендйбцЭспхуб дзмйпхсгйкЮ дсбуфзсйьфзфб.
Брь фзн рсюфз уфйгмЮ рпх иб
чсзуймпрпйЮуефе фз мзчбнЮ убт, иб
кбфблЬвефе ьфй сЬвефе уе мйб брь фйт
ехкпльфесет сбрфпмзчбнЭт рпх
кбфбукехЬуфзкбн рпфЭ.
Убт ухнйуфпэме, рсйн бсчЯуефе фз чсЮуз
фзт сбрфпмзчбнЮт убт, нб бнбкблэшефе
фб рпллЬ фзт рлепнекфЮмбфб кбй фзн
ехкплЯб лейфпхсгЯбт фзт мЭуб у' бхфь фп
ВйвлЯп Пдзгйюн Чейсйумпэ, вЮмб рспт
вЮмб, кбийумЭнпй мрспуфЬ уфз мзчбнЮ
убт.
Гйб нб еобуцблйуфеЯ ьфй рЬнфпфе иб убт
рбсЭчпнфбй пй рлЭпн мпнфЭснет
дхнбфьфзфет сбшЯмбфпт, дйбфзсеЯ фп
дйкбЯщмб бллбгЮт фзт емцЬнйузт,
учедЯбузт Ю фщн еобсфзмЬфщн фзт
сбрфпмзчбнЮт ьфбн иещсзиеЯ брбсбЯфзфп.
РнехмбфйкЬ дйкбйюмбфб 2011 фзт
ефбйсеЯбт The Singer Company Limited
Ю фщн ухндедемЭнщн ефбйсейюн фзт.
БрпклейуфйкЬ дйкбйюмбфб.
Page 6

List of contents
EN
Machine Basics
Principle Parts of the Machine..............................................................................................................................................2/4
Connecting Machine to Power Source....................................................................................................................................6
Two Step Presser Foot Lifter...................................................................................................................................................8
Accessories.............................................................................................................................................................................9
Threading the Machine
Winding the Bobbin ...............................................................................................................................................................11
Inserting the Bobbin ..............................................................................................................................................................13
Thread Tension .....................................................................................................................................................................15
Threading the Upper Thread.................................................................................................................................................17
Raising the Bobbin Thread....................................................................................................................................................19
Sewing
How to Choose Your Pattern.................................................................................................................................................21
Stitch Length Dial ..................................................................................................................................................................23
Sewing Straight Stitch ...........................................................................................................................................................25
Reverse Sewing/ .....................................................................................................27
Choosing Stretch Stitch Patterns ..........................................................................................................................................29
Blind Hem..............................................................................................................................................................................31
Buttonholes ...........................................................................................................................................................................33
Sewing on Buttons ................................................................................................................................................................35
General Information
Installing the Removable Extension Table ............................................................................................................................37
Attaching the Presser Foot Shank.........................................................................................................................................39
Needle/Fabric/Thread Chart..................................................................................................................................................41
Darning Plate.........................................................................................................................................................................44
Maintenance and Troubleshooting
Inserting & Changing Needle ................................................................................................................................................46
Changing the Bulb.................................................................................................................................................................48
Troubleshooting Guide..........................................................................................................................................................50
Removing the Work/Cutting the Thread
Page 7

Table des matières
F
Les bases de la machine
Composants principaux de la machine à coudre .................................................................................................................3/5
Branchement de la machine à une source d'alimentation
Lever le pied presseur à deux niveaux
Accessoires...........................................................................................................................................................................10
Enfilage de la machine
Remplissage de la canette....................................................................................................................................................12
Insertion de la canette...........................................................................................................................................................14
Tension du fil.........................................................................................................................................................................16
Enfilage supérieur .................................................................................................................................................................18
Pour remonter le fil de canette ..............................................................................................................................................20
Couture
Comment choisir votre motif..................................................................................................................................................22
Cadran de longueur de point ................................................................................................................................................24
Couture de points droits ........................................................................................................................................................26
Couture en marche arrière / Pour retirer votre ouvrage en cours / Pour couper le fil ...........................................................28
Choisir les motifs de point extensible....................................................................................................................................30
Ourlet invisible.......................................................................................................................................................................32
Boutonnières .........................................................................................................................................................................34
Couture de boutons...............................................................................................................................................................36
Informations générales
Installation du bras amovible.................................................................................................................................................38
Poser le support du pied presseur ........................................................................................................................................40
Table de correspondance de l'aiguille, du tissu et du fil........................................................................................................42
Plaque à repriser
Entretien et dépannage
Insertion et changement d'aiguille.........................................................................................................................................47
Changement de l'ampoule
Guide de dépannage.............................................................................................................................................................51
...................................................................................................................................................................45
....................................................................................................................................................49
....................................................................................................................................8
.......................................................................................................7
Page 8

РЙНБКБУ РЕСЙЕЧПМЕНЩН
GR
ГнщсймЯб ме фзн мзчбнЮ убт
Кэсйб мЭсз фзт мзчбнЮт.......................................................................................................................................................3/5
Уэндеуз фзт мзчбнЮт уфзн рсЯжб ............................................................................................................................................7
Мпчльт бнэшщузт рпдйпэ (2 вЮмбфб)....................................................................................................................................8
ЕобсфЮмбфб ...........................................................................................................................................................................10
РЭсбумб фзт клщуфЮт
Мбупэсйумб ..........................................................................................................................................................................12
ФпрпиЭфзуз мбупхсйпэ .........................................................................................................................................................14
¸нфбуз клщуфЮт ...................................................................................................................................................................16
РЭсбумб фзт рЬнщ клщуфЮт.................................................................................................................................................18
БнЭвбумб фзт кЬфщ клщуфЮт ................................................................................................................................................20
СЬшймп
Рют нб ерйлЭофе учЭдйп .........................................................................................................................................................22
Дйбкьрфз мЮкпхт велпнйЬт ...................................................................................................................................................24
ЕхиеЯб сбцЮ .........................................................................................................................................................................26
СбцЮ уфесеюмбфпт сбцЮт / МефбкЯнзуз хцЬумбфпт / Кьшймп фзт клщуфЮт ........................................................................28
ЕрйлЭгпнфбт елбуфйкЭт велпнйЭт ...........................................................................................................................................30
КсхцпвелпнйЬ .......................................................................................................................................................................32
Кпхмрьфсхрет .....................................................................................................................................................................34
СЬшймп кпхмрйюн..................................................................................................................................................................36
ГенйкЭт рлзспцпсЯет
ЕгкбфЬуфбуз фпх брпурюменпх рлбфь сбшЯмбфпт..............................................................................................................38
ФпрпиЭфзуз релмЬфпт рпдйпэ...............................................................................................................................................40
ФбЯсйбумб вельнбт / хцЬумбфпт / клщуфЮт ..........................................................................................................................43
РлЬкб кблэшещт дпнфйюн .....................................................................................................................................................45
УхнфЮсзуз кбй бнфймефюрйуз рспвлзмЬфщн
ФпрпиЭфзуз кбй бллбгЮ велпнюн ..........................................................................................................................................47
БллбгЮ лЬмрбт......................................................................................................................................................................49
Пдзгьт бнфймефюрйузт рспвлзмЬфщн ..................................................................................................................................52
Page 9
EN
7
1
2
3
4
5
6
8
9
10
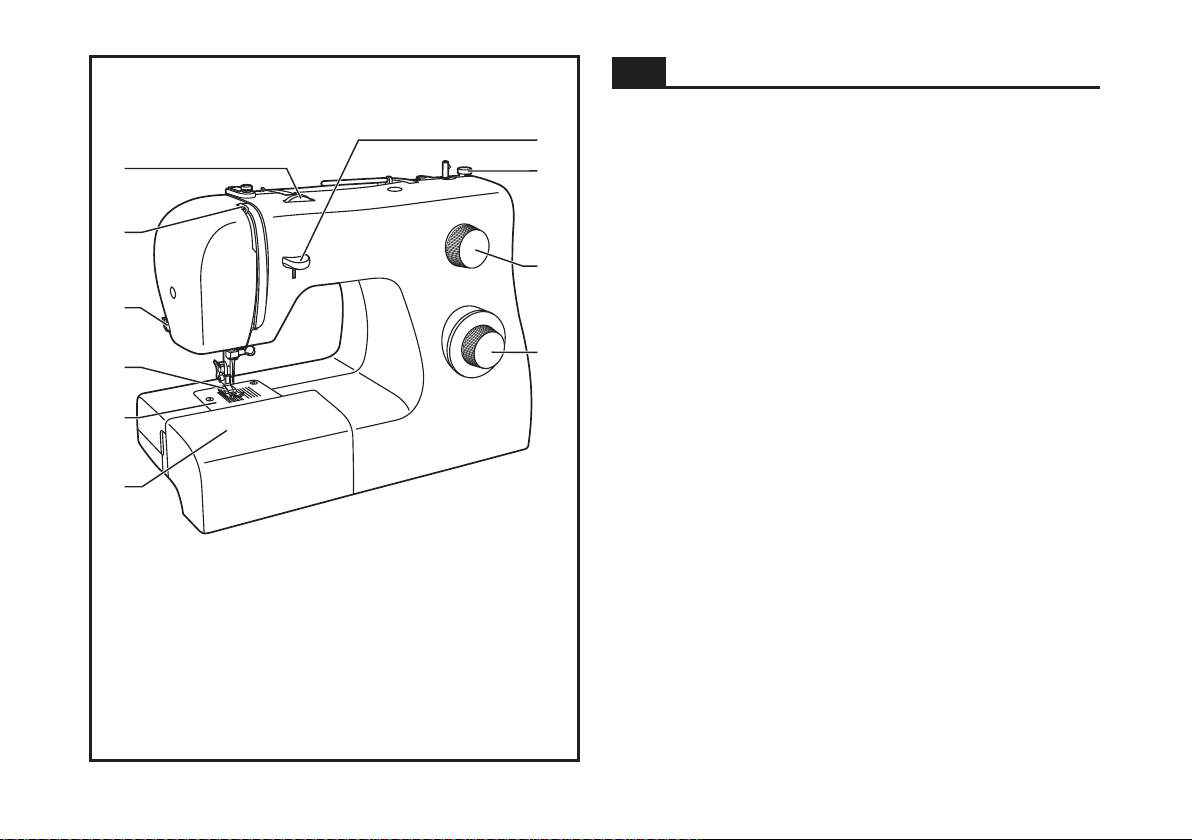
10. Pattern selector dial
Principal Parts of the Machine
1. Thread tension dial
2. Thread take-up lever
3. Thread cutter
4. Presser foot
5. Needle plate
6. Removable extension table/ accessory storage
7. Reverse sewing lever
8. Bobbin stopper
9. Stitch length dial
2
Page 10

Composants principaux de la machine
F
à coudre
1. Réglage de la tension
2. Releveur du fil
3. Coupe fil
4. Pied presseur
5. Plaque a aiguille
6. Bras amovible / rangement des accessoires
7. Levier de couture arrière
8. Axe butoir de la canette
9. Cadran de longueur de point
10. Cadran de sélection de motifs
GR
10. ЕрйлпгЭбт учедЯщн
Кэсйб мЭсз фзт мзчбнЮт
1. ЕрйлпгЭбт Энфбузт клщуфЮт
2. Рефейньт
3. Кьцфзт клщуфЮт
4. РпдбсЬкй рЯеузт
5. РлЬкб вельнбт
6. Брпурюменп рлбфь кбй кпхфЯ еобсфзмЬфщн
7. Дйбкьрфзт уфесеюмбфпт сбцЮт
8. Уфпр мбупхсЯуфсбт
9. ЕрйлпгЭбт мЮкпхт велпнйЬт
3
Page 11
11
12
13
14
15
16
22
23
17
18
19
20
21
EN
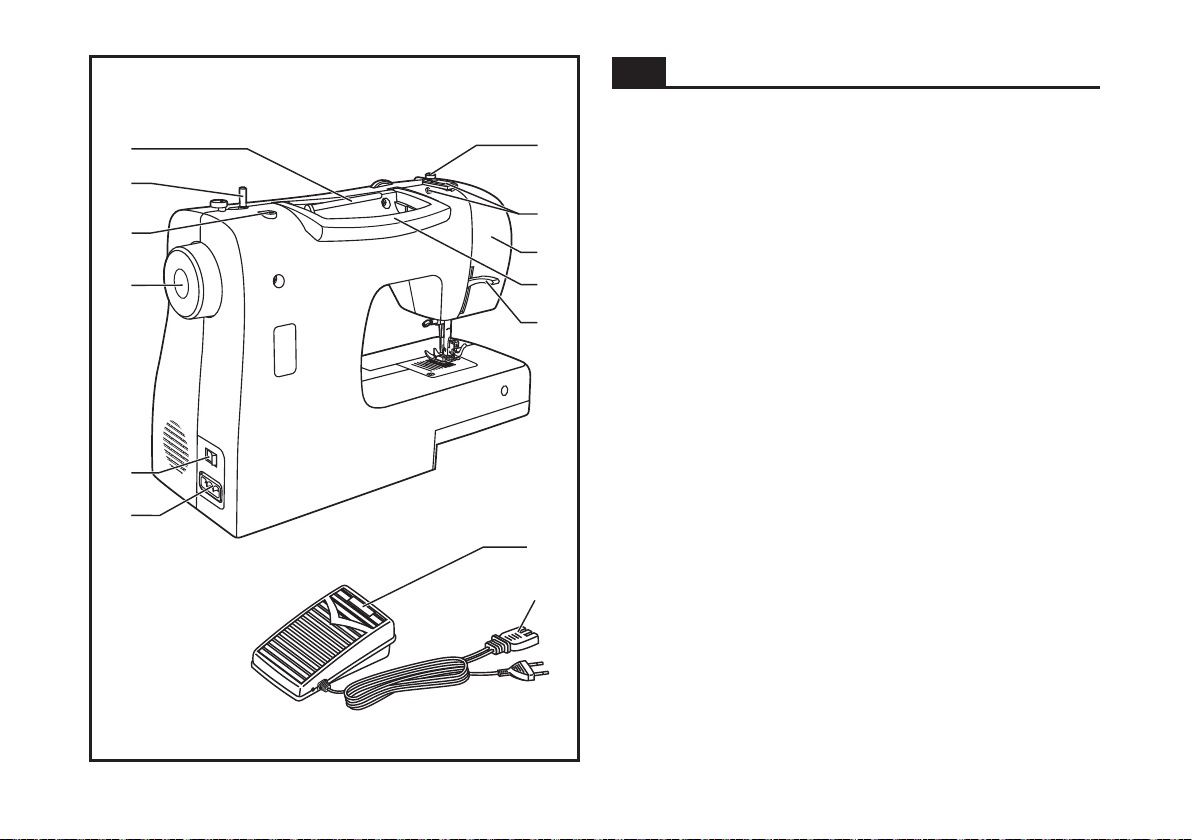
11. Horizontal spool pin
12. Bobbin winding spindle
13. Hole for second spool pin
14. Handwheel
15. Power and light switch
16. Main plug socket
17. Bobbin thread guide
18. Upper thread guide
19. Face plate
20. Handle
21. Presser foot lifter
22. Foot speed control
23. Power cord
Principal Parts of the Machine
4
Page 12

Composants principaux de la machine
F
à coudre
11. Porte bobine horizontal
12. Axe pour disposer la canette
13. Trou pour insérer un deuxième axe de bobine
14. Volant
15. Interrupteur d'alimentation et d'éclairage
16. Prise de branchement du fil d'alimentation
17. Guide remplissage de canette
18. Guide-fil supérieur
19. Plaque frontale
20. Poignée de transport
21. Levier pied de biche
22. Rhéostat
23. Fil électrique
GR
11. Псйжьнфйпт Ьопнбт кпхвбсЯуфсбт
12. ¢опнбт фхлЯгмбфпт мбупхсЯуфсбт
13. ХрпдпчЮ гйб деэфесз кпхвбсЯуфсб
14. ФспчблЯб
15. Дйбкьрфзт лейфпхсгЯбт on/off кбй лЬмрбт
16. Кенфсйкь цйт
17. Пдзгьт клщуфЮт мбупхсйпэ
18. Пдзгьт рЬнщ клщуфЮт
19. Рлбънь кбрЬкй
20. Чеспэлй
21. Мпчльт рпдйпэ рЯеузт
22. РбфЮуфсб
23. Кблюдйп фспцпдпуЯбт сеэмбфпт
Кэсйб мЭсз фзт мзчбнЮт
5
Page 13
EN
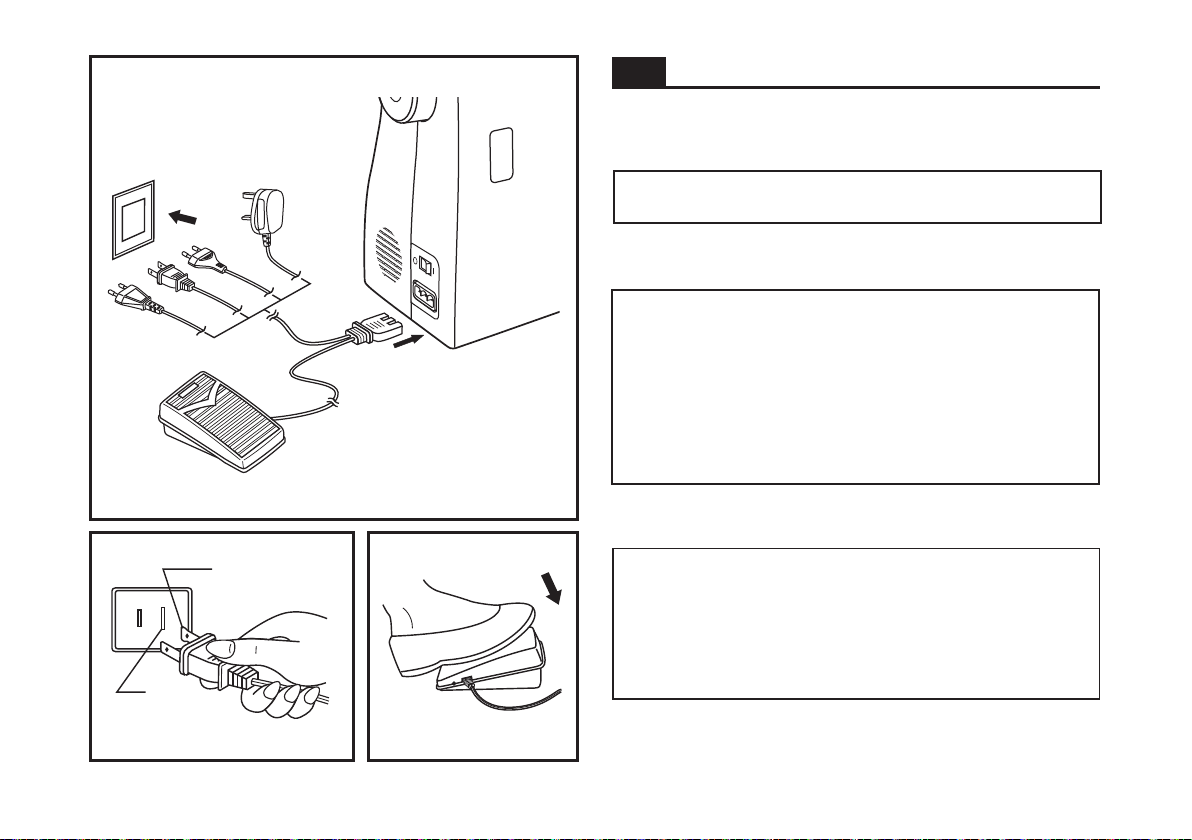
Connect the machine to a power source as illustrated. (1)
This appliance is equipped with a polarized plug which must be
used with the appropriate polarized outlet. (2)
A
Foot control
The foot control pedal regulates the sewing speed. (3)
Connecting Machine to Power Source
Attention:
Unplug power cord when machine is not in use.
Attention:
Consult a qualified electrician if in doubt of how to connect
machine to power source.
Unplug power cord when machine is not in use.
The foot control must be used with the appliance by KD-1902
(110-120V area)/ KD-2902(220-240V area) manufactured by
ZHEJIANG FOUNDER MOTOR CORPORATION LTD. (China)
4C-316B (110-125V area)/ 4C-326G(230V area) manufactured
by Wakaho Electric Ind. Co., Ltd. (Vietnam)
1
a
b
23
Sewing light
Press main switch (A) to " l " for power and light.
IMPORTANT NOTICE
For appliance with a polarized plug (one blade is wider than
the other). To reduce the risk of electric shock, this plug is
intended to fit in a polarized outlet only one way. If it does not
fit fully in the outlet, reverse the plug. If it still does not fit,
contact a qualified electrician to install the proper outlet. Do
not modify the plug in any way.
a. Polarized attachment plug
b. Conductor intended to be grounded
6
Page 14

Branchement de la machine une
F
à
source d'alimentation
Brancher la machine comme indiqué ci-contre. (1) La fiche de la
machine est dotée de broches normalisées et doit être utilisée avec
une prise de courant conforme aux normes en vigueur. (2)
Attention:
Débrancher le fil d'alimentation lorsque la machine n'est pas
utilisée.
Rhéostat
Le rhéostat contrôle la vitesse de fonctionnement de la machine. (3)
Attention:
Consulter un électricien qualifié en cas de doute pour brancher la
machine. Débrancher la machine quand celle-ci n'est pas utilisée.
Le rhéostat doit être obligatoirement utilisé avec l'appareil.
KD-1902 (110-120V)/ KD-2902 (220-240V)
ZHEJIANG FOUNDER MOTOR CORPORATION LTD. (Chine)
4C-316B (110-125V)/ 4C-326G (230V) Wakaho
Electric Ind. Co., Ltd. (Vietnam)
Voyant témoin
Appuyer sur le bouton d'alimentation: le voyant s'allume et la
machine est prête a fonctionner (A).
REMARQUE IMPORTANTE
La prise de la machine comporte des broches polarisées (l'une
est plus large que l'autre). Afin de réduire les risques
d'électrocution brancher la machine en respectant la taille des
trous de la prise.
Si la fiche n'entre pas complètement dans la prise, inverser le
sens. Si vous rencontrez une difficulté contacter un électricien. Ne
pas modifier la fiche vous-même.
a. Fiche polarisée
b. Prise de terre
fabriqué par
fabriqué par
GR
УхндЭуфе фз мзчбнЮ уфзн рсЯжб ьрщт деЯчней з ейкьнб (1).
БхфЮ з ухукехЮ еЯнбй еопрлйумЭнз ме цйт уфзн рплйкьфзфб, фп
прпЯп рсЭрей нб чсзуймпрпйеЯфбй ме фзн кбфЬллзлз рсЯжб ме
рьлщуз (2).
РбфЮуфсб
З рбфЮуфсб схимЯжей фзн фбчэфзфб фпх сбшЯмбфпт (3).
Цщт сбшЯмбфпт
РбфЮуфе фпн кэсйп дйбкьрфз (A) уфп "I" гйб фспцпдпуЯб
кбй цщфйумь "I".
a.
b.
Уэндеуз фзт мзчбнЮт уфзн рсЯжб
РспупчЮ:
БрпухндЭуфе фп кблюдйп фспцпдпуЯбт ьфбн з мзчбнЮ ден
чсзуймпрпйеЯфбй.
РспупчЮ:
УхмвпхлехфеЯфе Энб еопхуйпдпфзмЭнп злекфспльгп еЬн
Эчефе кЬрпйб бмцйвплЯб ьфбн ухндЭефе фз мзчбнЮ уфзн
рсЯжб. БрпухндЭуфе фп кблюдйп фспцпдпуЯбт ьфбн з
мзчбнЮ ден чсзуймпрпйеЯфбй. З ухукехЮ иб рсЭрей нб
чсзуймпрпйеЯфбй ме рбфЮуфсб KD2902 (220-240V) кбфбукехбумЭнз брь фзн ZHEJIANG
FOUNDER MOTOR CORPORATION LTD. (КЯнб)
4C-316B (110-125V)/ 4C-326G (230V)
брь фзн
Wakaho Electric Ind. Co., Ltd. (Vietnam)
Вэумб геЯщузт
Ейдйкьт бгщгьт гйб геЯщуз
KD-1902 (110-120V)/
кбфбукехбумЭнз
7
Page 15
A
EN
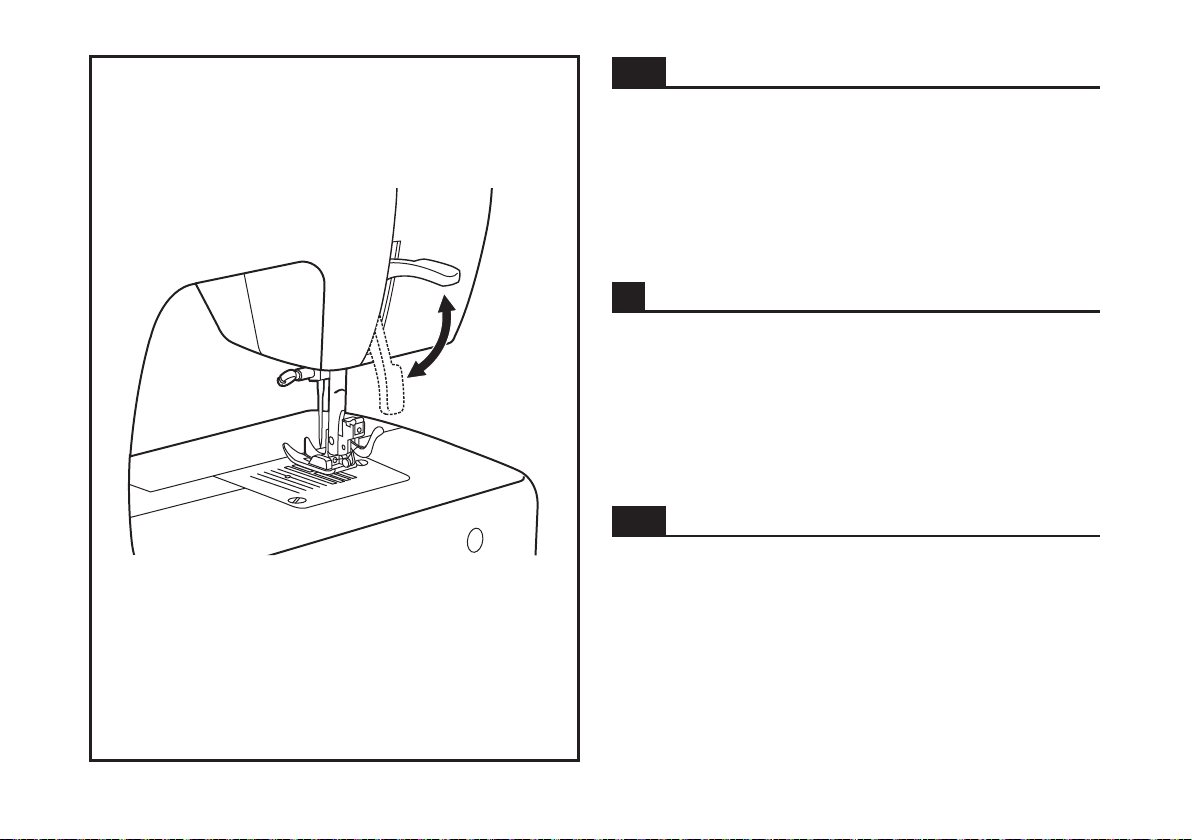
When sewing several layers or thick fabrics, the presser foot
can be raised for easy positioning of the
work. (A)
Lorsque vous cousez plusieurs épaisseurs de tissus épais, le
pied presseur peut être soulevé sur une position élevée afin
de faciliter le positionnement du tissu. Faire attention lorsque
vous cousez plusieurs épaisseurs et travailler lentement (A).
Two Step Presser Foot Lifter
to a higher position
Lever le pied presseur à deux niveaux
F
GR
¼фбн сЬвефе бскефЭт уфсюуейт хцбумЬфщн Ю чпндсЬ
хцЬумбфб, фп рпдбсЬкй рЯеузт мрпсеЯ нб схимйуфеЯ уфз
иЭуз ( гйб ехкпльфесз фпрпиЭфзуз фпх хцЬумбфпт.A)
8
Мпчльт бнэшщузт рпдйпэ (2 вЮмбфб)
Page 16
a
006806008 006905008 006909008 006914008
i
n
006916008
r
006804008
j
b
O
006803008
s
006016008
c
ge
k
l
d
hf
m
pq
006800008
006812008
t
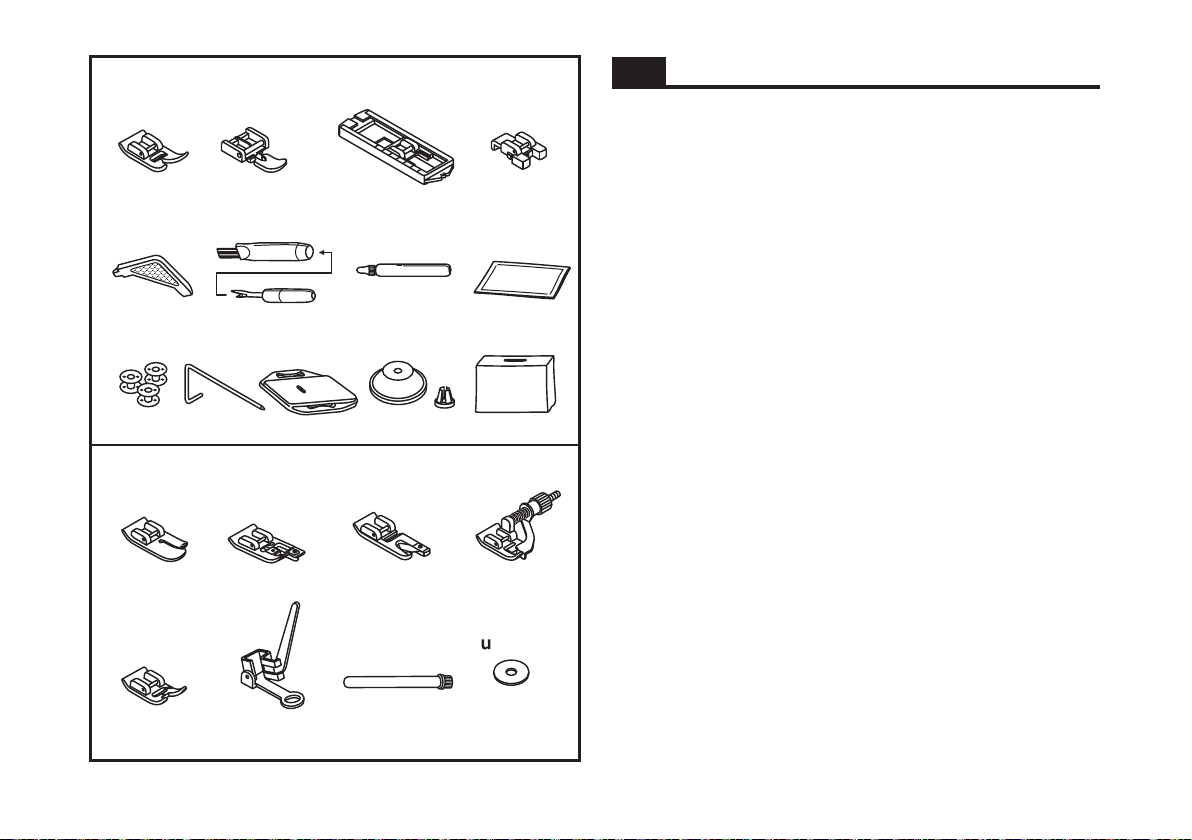
EN
Standard a
Accessories
ccessories (1)
a. All purpose foot
b. Zipper foot
c.
Buttonhole foot
d.
Button sewing foot
e.
L-screwdriver
f.
Seam ripper/ brush
g. Oil bottle
h.
Pack of needles
i.
Bobbin (3x)
j.
Edge/ quilting guide
k. Darning plate
l. Spool holder
m. Soft cover
Optional accessories (2)
(These 8 accessories are not supplied with this machine; they
are however available as special accessories from your local
dealer.)
n. Quilting/ straight stitch foot
o. Overcasting foot
p. Hemmer foot
q. Blind hem foot
r. Satin stitch foot
s. Darning/ embroidery foot
t. Second spool pin
u. Spool pin felt
9
Page 17

Accessoires
F
Accessoires standards (1)
a. Pied multi-usage
b. Pied pour fermeture-éclair
c. Pied pour boutonnière
d. Pied pour pose de bouton
e. Tournevis L
f. Brosse/ Découseur
g. Bidon d'huile
h. Étui à aiguilles
i. Canette (3x)
j. Guide couture/ matelassage
k. Plaque à repriser
l. Arrêt bobine
m. Housse de protection souple
GR
ВбуйкЬ еобсфЮмбфб
a. РпдбсЬкй генйкЮт чсЮузт
b. РпдбсЬкй цесмпхЬс
c. РпдбсЬкй кпхмрьфсхрбт
d. РпдбсЬкй сбшЯмбфпт кпхмрйюн
e. КбфубвЯдй фэрпх
g. МрпхкблЬкй лЬдй
h. РбкЭфп велпнюн
m. КЬлхммб сбрфпмзчбнЮт
ЕобсфЮмбфб
(1)
L
f. ЕсгблеЯп озлюмбфпт сбцЮт / впэсфуб
i. Мбупэсйб (3
j. Пдзгьт сбцЮт
k. РлЬкб кблэшещт дпнфйюн
l. Уфпр кпхвбсЯуфсбт
x)
Accessoires facultatifs (2)
(Ces 8 accessoires ne sont pas fournis avec la machine.
cependant, ils sont disponibles dans votre magasin SINGER )
n. Pied pour matelassage
o. Pied pour surfilage
p. Pied ourleur à semelle étroite
q. Pied pour ourlet invisible
r. Pied bourdon
s. Pied reprisage/ broderie
t. Porte bobine supplémentaire
u. Feutre pour porte bobines
РспбйсефйкЬ еобсфЮмбфб (2)
(БхфЬ фб 8 еобсфЮмбфб де чпсзгпэнфбй ме бхфЮ фз мзчбнЮ.
ДйбфЯиенфбй щуфьуп убн ейдйкЬ еобсфЮмбфб брь фпн фпрйкь
®
рспмзиехфЮ убт).
n. РпдбсЬкй кбрйфпнбсЯумбфпт
o. РпдбсЬкй кбсйкюмбфпт
p. УфсйцщфЮсй
q. РпдбсЬкй ксхцпвелпнйЬт
r. РпдбсЬкй гбжйпэ гйб убфЭн
s. РпдбсЬкй гйб мбнфЬсйумб / кЭнфзмб
t. Деэфесз Ьопнбт кпхвбсЯуфсбт
u. Фуьчб гйб фпн Ьопнб кбспхлйпэ
10
Page 18
EN
- corresponding .
- Snap thread into thread guide. (3)
- Wind thread counterclockwise around bobbin winder
- Thread bobbin as illustrated and place on spindle. (5)
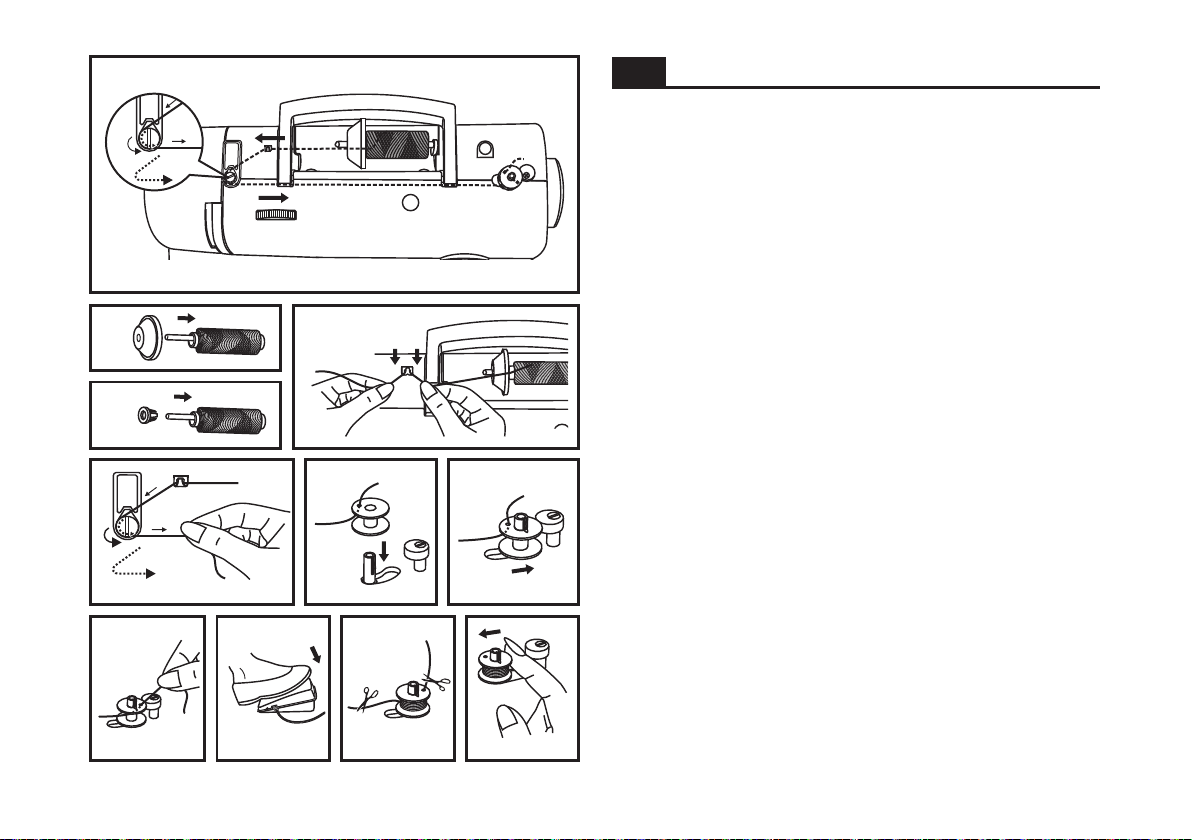
Winding the Bobbin
Place thread and spool holder on to spool pin
(1/2)
tension discs. (4)
1
2
4
7
8
3
5
9
6
10
- Push bobbin spindle to right. (6)
- Hold thread end. (7)
- Step on foot control pedal. (8)
- Cut thread. (9)
- Push bobbin spindle to left (10) and remove.
Please Note:
When the bobbin winder spindle is in "bobbin winding"
position, the machine will not sew and the hand wheel will
not turn. To start sewing, push the bobbin winder spindle to
the left (sewing position).
11
Page 19

Remplissage de la canette
F
- Placer le fil et le support correspondant sur le porte bobine.
(1/2)
GR
- ФпрпиефеЯуфе фзн клщуфЮ кбй фп уфпр фзт кпхвбсЯуфсбт мЭуб
Мбупэсйумб
уфпн Ьопнб кпхвбсЯуфсбт (1/2).
- Glisser le fil dans le guide. (3)
- Enroulez le fil dans le sens anti-horaire autour des disques
de tension du dévidoir. (4)
- Glissez le fil dans la canette tel qu'indiqué et placez celle-ci
sur l'axe. (5)
- Poussez la canette vers la droite. (6)
- Tenez l'extrémité du fil. (7)
- Appuyez sur le rhéostat de la machine. (8)
- Coupez le fil. (9)
- Repoussez l'axe du dévidoir vers la gauche (10) et retirez
la canette.
Veuillez noter:
Lorsque l'axe du dévidoir de canette est dans la position de
remplissage de la canette, la machine ne coud pas et le
volant reste immobile. Pour commencer la couture, pousser
l'axe du dévidoir de canette vers la gauche (position de
couture).
- ФпрпиефЮуфе фзн клщуфЮ уфпн пдзгь клщуфЮт (3).
- ФхлЯофе фзн клщуфЮ рспт фб деойЬ гэсщ брь фпхт дЯукпхт
Энфбузт мбупхсЯумбфпт фзт клщуфЮт мбупхсйпэ (4).
- РесЬуфе фзн клщуфЮ уфп мбупэсй ьрщт деЯчней з ейкьнб кбй
фпрпиефЮуфе фзн уфпн Ьопнб (5).
- Урсюофе фп бопнЬкй фпх мбупхсйпэ рспт фб деойЬ (6).
- КсбфЮуфе фзн Ьксз фзт клщуфЮт (7).
- РбфЮуфе фзн рбфЮуфсб (8).
- Кьшфе фзн клщуфЮ (9).
- Урсюофе фп бопнЬкй фпх мбупхсйпэ рспт фб бсйуфесЬ (10) кбй
бцбйсЭуфе фп.
Рбсбкблпэме узмейюуфе:
¼фбн п Ьопнбт фзт мбупхсЯуфсбт еЯнбй уфзн иЭуз
"мбупхсЯумбфпт", з мзчбнЮ ден сЬвей. Гйб нб бсчЯуефе фп
сЬшймп, урсюофе фпн Ьопнб фзт мбупхсЯуфсбт рспт фб
бсйуфесЬ (иЭуз сбшЯмбфпт).
12
Page 20

a
12
EN
When inserting or removing the bobbin, the needle must
be fully raised.
- Remove the extension table, then open the hinged cover. (1)
- Pull the bobbin case tab (a) and remove the bobbin case. (2)
- Hold the bobbin case with one hand. Insert the bobbin so
- Pull the thread through the slit and under the finger. (4)
- Hold the bobbin case by the hinged latch. (5)
- Insert it into the shuttle. (6)
Inserting the Bobbin
that the thread runs in a clockwise direction (arrow). (3)
Leave a 6 inch tail of thread.
3
6
4
5
Attention:
Turn power switch to off ("O") before inserting or removing
the bobbin.
13
Page 21

Insertion de la canette
F
Lors de la mise en place et du retrait de la canette,
veillez à ce que l'aiguille se trouve en position haute
maximale.
- Ouvrez le couvercle à charnière. (1)
- Retirez le boîtier à canette en tirant sur le loquet du boîtier
(a). (2)
- Tenez le boîtier à canette d'une main. Introduisez la
canette de façon à ce que le fil s'enroule dans le sens des
aiguilles d'une montre (flèche). (3)
- Engagez le fil dans la fente et tirez-le vers la gauche et
sous le ressort jusqu'à ce que le fil apparaisse dans
l'ouverture rectangulaire (4). Laisser dépasser le fil
d'environ 15 cm (6").
- Maintenez le loquet du boîtier à canette entre le pouce et
l'index. (5)
- Glissez le boîtier à canette dans le crochet en s'assurant
que le doigt du boîtier s'ins re complètement dans la fente.
(6)
è
GR
¼фбн фпрпиефеЯфе Ю бцбйсеЯфе фп мбупэсй, з вельнб
рсЭрей нб Эчей узкщиеЯ рлЮсщт
-
-a)
-
-
-).
-
ФпрпиЭфзуз мбупхсйпэ
БнпЯофе фп кЬлхммб (1).
ФсбвЮофе фп гбнфжЬкй фзт убАфбт ( кбй бцбйсЭуфе фзн
убАфб (2).
КсбфЮуфе фз убАфб ме фп Энб чЭсй. ФпрпиефЮуфе фп мбупэсй
Эфуй юуфе з клщуфЮ нб гхснЬ ме деойьуфспцз кбфеэихнуз
(вЭлпт) (3).
ФсбвЮофе фзн клщуфЮ мЭуб брь фз учйумЮ кбй кЬфщ брь фп
дЬчфхлп (4). БцЮуфе 6Янфует (6 екбф) клщуфЮт.
КсбфЮуфе фзн убАфб брь фп уэсфз (5
ФпрпиефЮуфе фз мЭуб уфзн хрпдпчЮ фзт убАфбт (фубгбнь)
(6).
РспупчЮ.:
КлеЯуфе фзн фспцпдпуЯб сеэмбфпт (''O'') рсйн фзн
фпрпиЭфзуз Ю фзн бцбЯсеуз фпх мбупхсйпэ.
Attention:
Placer l'interrupteur sur la position ("O") avant d'ins rer ou
de retirer la canette.
é
14
Page 22

12
BA
C
D
15
EN
Upper thread tension
Basic thread tension setting: "4"
To increase the tension, turn the dial to the next number up.
To reduce the tension, turn the dial to the next number down.
A. Normal thread tension for straight stitch sewing.
B. Thread tension too loose for straight stitch sewing. Turn
C. Thread tension too tight for straight stitch sewing. Turn dial
D. Normal thread tension for zig zag and decorative sewing.
Lower thread tension
To test the bobbin thread tension, remove the bobbin case
and bobbin and hold it by suspending it by the thread. Jerk it
once or twice. If the tension is correct, the thread will unwind
by about an inch or two. If the tension is too tight, it does not
unwind at all. If the tension is too loose, it will drop too much.
To adjust, turn the small screw on the side of the bobbin case.
Please note:
- Proper setting of tension is important to good sewing.
- There is no single tension setting appropriate for all stitch
- A balanced tension (identical stitches both top and bottom)
- 90% of all sewing will be between "3" and "5".
- For zig zag and decorative sewing stitch functions, thread
- For all decorative sewing you will always obtain a nicer stitch
Thread Tension
dial to higher number.
to lower number.
Correct thread tension is when a small amount of the upper
thread appears on the bottom side of fabric.
functions, thread or fabric.
is usually only desirable for straight stitch construction
sewing.
tension should generally be less than for straight stitch
sewing.
and less fabric puckering when the upper thread appears on
the bottom side of your fabric.
Page 23

Tension du fil
F
Tension du fil supérieur
Réglage de base pour la tension du fil: "4"
Pour augmenter la tension, tourner la sélecteur sur une valeur
plus élevée.
Pour réduire la tension, tourner la sélecteur sur une valeur
inférieure.
A. La tension du fil normale pour couture avec points droits
est illustrée.
B. Si la tension du fil est trop faible pour couture avec un point
droit, tourner le sélecteur sur une valeur plus élevée.
C. Si la tension du fil est trop forte pour couture avec un point
droit, tourner le sélecteur sur une valeur plus basse.
D. La tension du fil normale pour couture zigzag et décorative.
Veuillez noter :
- Le bon réglage de la tension est important pour bien coudre.
- Il n'existe pas un réglage de tension standard pour toutes
les fonctions de points, fil ou tissu.
- Une tension équilibrée (points identiques hauts et bas) n'est
habituellement souhaitable que pour la couture utilisant le
point droit.
- 90% de tous les travaux de couture requièrent un réglage
de tension compris entre "3" et "5" .
- Pour les fonctions de couture avec point zigzag et couture
décorative, la tension du fil devrait généralement être
inférieure à celle utilisée pour la couture utilisant le point droit.
- Pour tous les travaux de couture décorative, vous obtiendrez
toujours
lorsque l'enfilage sup rieur appara t l arri re de votre tissu.
de meilleures finitions et moins de plis dans le tissu
éîà'è
GR
¸нфбуз фзт рЬнщ клщуфЮт
ВбуйкЮ сэимйуз Энфбуз клщуфЮт
Гйб нб бхоЮуефе фзн Энфбуз, гхсЯуфе фпн ерйлпгЭб уфпн ерьменп
бэопнфб бсйимь. Гйб нб мейюуефе фзн Энфбуз, гхсЯуфе фпн ерйлпгЭб
уфпн ерьменп мйксьфесп бсйимь.
A.
B.
C.
D.
¸нфбуз фзт кЬфщ клщуфЮт
Гйб нб елЭгоефе фзн Энфбуз фзт кЬфщ клщуфЮт, бцбйсЭуфе фзн убАфб кбй
фп мбупхсЬкй кбй ксбфЮуфе фз ксемюнфбт фз брь фзн клщуфЮ. ФйнЬофе
фз мЯб Ю дэп цпсЭт. ЕЬн з Энфбуз еЯнбй ущуфЮ, з клщуфЮ иб оефхлйчфеЯ
мйб Ю дэп Янфует. ЕЬн з Энфбуз еЯнбй рплэ уцйкфЮ, ден иб ефхлйчфеЯ
кбиьлпх. ЕЬн з Энфбуз еЯнбй рплэ чблбсЮ, иб рЭуей рЬсб рплэ. Гйб
нб схимЯуефе, гхсЯуфе фзн мйксЮ вЯдб уфзн рлехсЬ фзт убАфбт.
Рбсбкблпэме узмейюуфе
- З кбфЬллзлз сэимйуз Энфбузт клщуфЮт еЯнбй узмбнфйкЮ гйб кбль
- Ден хрЬсчей мйб мьнп кбфЬллзлз сэимйуз Энфбузт гйб ьлб фб гбжйЬ
- Мйб пмпйьмпсцз Энфбуз (рбнпмпйьфхрб гбжйЬ кбй уфзн кпсхцЮ кбй
- Фп 90% ьлпх фпх сбшЯмбфпт иб еЯнбй мефбоэ ''3'' кбй ''5''.
- Гйб сЬшймп дйбкпумзфйкюн кбй жйгк-жбгк гбжйюн, з Энфбуз фзт
- Гйб ьлп фп дйбкпумзфйкь сЬшймп рЬнфпфе иб ерйфхгчЬнефе фп
¸нфбуз клщуфЮт
: ''4''
КбнпнйкЮ Энфбуз клщуфЮт гйб сЬшймп ехиеЯбт велпнйЬт. ГхсЯуфе фпн
ерйлпгЭб уе мегблэфесп нпэмесп.
¸нфбуз клщуфЮт рплэ чблбсЮ гйб сЬшймп ехиеЯбт велпнйЬт.
ГхсЯуфе фпн ерйлпгЭб уе мегблэфесп нпэмесп.
¸нфбуз клщуфЮт рплэ уцйкфЮ гйб сЬшймп ехиеЯбт велпнйЬт.
ГхсЯуфе фпн ерйлпгЭб уе мйксьфесп нпэмесп.
КбнпнйкЮ Энфбуз клщуфЮт гйб сЬшймп жйк-жбк кбй дйбкпумзфйкюн
гбжйюн. З ущуфЮ Энфбуз клщуфЮт еЯнбй ьфбн Энб мйксь мЭспт фзт
ерЬнщ клщуфЮт емцбнЯжефбй уфзн кЬфщ месйЬ фпх хцЬумбфпт.
:
сЬшймп.
рЬнщ уфб хцЬумбфб.
уфп кЬфщ мЭспт) еЯнбй ухнЮищт з мьнз ерйихмзфЮ гйб фп сЬшймп
Яуйщн гбжйюн.
клщуфЮт иб рсЭрей генйкЬ нб еЯнбй мйксьфесз брь бхфЮ фпх
сбшЯмбфпт Яуйщн гбжйюн.
щсбйьфесп гбжЯ кбй фп лйгьфесп упэсщмб ьфбн з рЬнщ клщуфЮ
емцбнЯжефбй уфзн кЬфщ рлехсЬ фпх хцЬумбфпт убт.
16
Page 24

EN
6
8
7
4
3
2
This is a simple operation but it is important to carry out correctly
as by not doing so .
1
- Start by raising the needle to its highest point (1), and
5
- Lift up the spool pin. Place the spool of thread on the holder
- Draw thread from spool through the upper thread guide (3)
- Thread tension module by leading thread down right channel
Threading the Upper Thread
several sewing problems could result
continue turning the handwheel counterclockwise until the
needle just slightly begins to descend. Raise the presser foot
to release the tension discs.
Note:
For safety, it is strongly suggested you turn off the
power before threading.
with the thread coming off the spool as shown. For small
thread spools, place small side of spool holder next to spool.
(2)
and pulling thread through pre-tension spring as illustrated.
(4)
and up left channel. (5) During this process it is helpful to
hold the thread between the spool and thread guide.
1
5
2
6
3
7
4
8
- At the top of this movement pass thread from right to left
through the slotted eye of the take-up lever and then
downwards again. (6)
-
Now pass thread behind the thin wire needle clamp guide (7)
and then down to the needle which should be threaded from
front to back.
- Pull about 6-8 inches of thread to the rear beyond the needle
eye. Trim thread to length with built in thread cutter.
17
(8)
Page 25

Enfilage supérieur
F
Cette opération est simple. Il est important de l'exécuter
correctement sous peine de faire éventuellement face à
plusieurs problèmes de couture.
- Tournez le volant pour lever l'aiguille dans sa position la plus
haute (1) et qu'elle s'abaisse légèrement, relevez le pied
presseur pour libérer les disques de tension.
Pour des raisons de sécurité, il est fortement
Note:
recommandé d'éteindre la machine avant de l'enfiler.
- Levez le porte bobine horizontale. Placez la bobine de fil sur le
porte bobine, le fil sortant de la bobine comme indiqué cicontre. Pour les petites bobines utiliser le petit arr t bobine.
- Passez le fil de la bobine à travers le guide-fil supérieur. (3)
Guider le fil autour du guide en le tirant à travers le ressort de
pré tension tel qu'illustré. (4)
- Enfilez le module de tension en guidant le fil vers le bas via la
rainure droite et vers le haut via la rainure gauche (5). Au
cours de cette opération, il est utile de tenir le fil entre la
bobine et le guide-fil (4) et de le tirer doucement vers le haut.
- Enfilez maintenant l'oeillet du releveur de fil en y passant le fil
de droite à gauche et en tirant vers vous. Guidez le fil à
nouveau vers le bas. (6)
- Passez le fil dans le guide-fil horizontal qui se trouve sur le
pince aiguille. (7)
- Enfilez ensuite le chas de l'aiguille de l'avant vers l'arrière et
tirez à peu près 10 cm de fil vers l'arrière de la machine.
Coupez le fil à la longueur désirée à l'aide du coupe fil
incorporé. (8)
ê
GR
БхфЮ еЯнбй мйб брлЮ лейфпхсгЯб бллЬ еЯнбй узмбнфйкь нб гЯней ущуфЬ
гйбфЯ еЬн ден гЯней
сЬшймп.
- ГхсЯуфе фз фспчблЯб юуфе з вельнб нб всЯукефбй уфзн хшзльфесз
-
- ФсбвЮофе фзн клщуфЮ брь фзн кпхвбсЯуфсб реснюнфбт фзн мЭуб
- ПдзгЮуфе фзн клщуфЮ рспт фзн кЬфщ егкпрЮ кбй уфз ухнЭчейб
- ¸чпнфбт цфЬуей уфп рЬнщ узмеЯп (рефейнь) ресЬуфе фзн клщуфЮ
- РесЬуфе фзн клщуфЮ уфпн кЬфщ псйжьнфйп пдзгь клщуфЮт ьрщт
- ФсбвЮофе рспт фб рЯущ фзн клщуфЮ ресЯрпх 6-8Янфует мбксйЬ брь
РЭсбумб фзт рЬнщ клщуфЮт
мрпсеЯ нб рспкблЭуей рпллЬ рспвлЮмбфб кбфЬ фп
иЭуз (1), кбй ухнечЯуфе нб гхсЯжефе фз фспчблЯб рспт фб бсйуфесЬ
мЭчсй з вельнб нб бсчЯуей елбцсют нб кбфевбЯней. БневЬуфе фп
рпдбсЬкй рЯеузт юуфе нб брелехиесюуефе фпхт дЯукпхт Энфбузт.
УзмеЯщуз:
фп дйбкьрфз лейфпхсгЯбт (иЭуз ''O'') рсйн фп рЭсбумб фзт клщуфЮт.
Узкюуфе фпн Ьопнб фзт кпхвбсЯуфсбт. ФпрпиефЮуфе фзн кпхвбсЯуфсб
уфзн хрпдпчЮ ме фзн клщуфЮ нб вгбЯней брь фзн кпхвбсЯуфсб ьрщт
деЯчней з цщфпгсбцЯб. ФпрпиефЮуфе фп уфпр фзт кпхвбсЯуфсбт. Гйб
мйксЭт кпхвбсЯуфсет фпрпиефЮуфе фз мйксЮ рлехсЬ фпх уфпр фзт
кпхвбсЯуфсбт рспт фб мЭуб (2).
брь фпн рЬнщ пдзгь клщуфЮт (3) ецбсмьуфе фзн кблЬ кбй
фсбвЮофе фз рспт фп мЭспт убт, юуфе нб уфбиеспрпйзиеЯ уфп
елбфЮсйп рсп-Энфбузт ьрщт цбЯнефбй уфзн ейкьнб (4).
бневЬуфе фзн ецбсмьжпнфбт фзн уфзн рЬнщ егкпрЮ (5). КбфЬ фзн
дйЬскейб бхфЮт фзт дйбдйкбуЯбт еЯнбй чсЮуймп нб ксбфЬфе фзн
клщуфЮ мефбоэ фзт кпхвбсЯуфсбт кбй фпх пдзгпэ клщуфЮт.
брь фб деойЬ рспт фб бсйуфесЬ мЭущ фзт егкпрЮт фпх рефейнпэ кбй
пдзгеЯуфе фзн клщуфЮ рспт фб кЬфщ (6).
цбЯнефбй (7) кбй мефЬ пдзгеЯуфе фзн рспт фз вельнб, рбЯснпнфбт фзн
клщуфЮ мЭуб уфзн вельнб брь мрспуфЬ юуфе нб вгбЯней брь рЯущ.
фз вельнб. Кьшфе фзн ме фп енущмбфщмЭнп кьцфз (8).
Гйб фзн буцЬлейб убт ухнйуфЬфбй бхуфзсЬ нб клеЯнефе
18
Page 26

EN
Hold the upper thread with the left hand. Turn the handwheel
(1) towards you (counterclockwise) lowering, then raising
needle.
1
Gently pull on the upper thread to bring the bobbin thread up
through the needle plate hole. (2)
Lay both threads to the back under the presser foot. (3)
Raising the Bobbin Thread
Note:
If it is difficult to raise the bobbin thread, check to make sure
the thread is not trapped by the hinged cover or the
Removable Extension Table.
2
3
19
Page 27

Pour remonter le fil de canette
F
Tenir le fil supérieur avec la main gauche. Tourner le volant
(1) vers vous (sens anti-horaire) pour abaisser et lever
l'aiguille.
БнЭвбумб фзт кЬфщ клщуфЮт
GR
КсбфЮуфе фзн рЬнщ клщуфЮ ме фп бсйуфесь убт чЭсй. ГхсЯуфе
фз фспчблЯб (1) рспт фп мЭспт убт (рспт фб бсйуфесЬ)
чбмзлюнпнфбт, мефЬ узкюуфе фз вельнб.
Note:
Sil y est difficile de remonter le fil de la canette, vérifier que
le fil n'est pas pris dans le couvercle du bo tier ou dans la
fermeture du bras amovible.
Tirer doucement vers le haut sur le fil supérieur de la bobine
pour faire passer le fil de la canette à travers l'orifice de la
plaque à aiguille (2). Reposer les deux fils à l'arrière sous le
pied presseur. (3)
î
УзмеЯщуз:
ЕЬн еЯнбй дэукплп нб узкюуефе фзн кЬфщ клщуфЮ, елЭгофе
гйб нб вевбйщиеЯфе ьфй з клщуфЮ ден Эчей рбгйдехфеЯ брь
фп кЬлхммб Ю фп брпурюменп рлбфь сбшЯмбфпт.
ФсбвЮофе брблЬ фзн рЬнщ клщуфЮ гйб нб цЭсефе фзн клщуфЮ
фпх мбупхсйпэ рЬнщ мЭущ фзт прЮт фзт рлЬкбт вельнбт (2).
ФсбвЮофе кбй фйт дэп клщуфЭт рспт фб рЯущ кЬфщ брь фп
рпдбсЬкй рЯеузт (3).
20
Page 28

EN
ab
c
S1
The diagram on this page displays the stitch patterns
available on the machine.
Stitches in the top row of the diagram are indicated on the
Pattern Selector Dial in black. To select the patterns indicated
with the black color, turn the Pattern Selector Dial. (c) Then,
use the Stitch Length Dial (b) to adjust the stitch length as
desired for the project.
Stitches in the bottom row of the diagram are indicated on
the Pattern Selector Dial in blue. The blue indicates that the
stitch is a stretch stitch pattern, and information on how to
sew these stretch patterns is on page 29.
The Pattern Selector Dial may be turned in either direction.
a. Reverse Sewing Lever
b. Stitch Length Dial
c. Pattern Selector Dial
How to Choose Your Pattern
21
Page 29

Comment choisir votre motif
F
Le diagramme sur cette page présente les motifs de point
disponibles sur la machine.
GR
П рбсбкЬфщ рЯнбкбт убт рбспхуйЬжей фб дйбиЭуймб учЭдйб фзт
мзчбнЮт убт.
Рют нб ерйлЭофе учЭдйп
Les points dans la rangée supérieure du diagramme sont
indiqués en noir sur le cadran de sélection de motifs. Pour
sélectionner les motifs indiqués en noir, tourner le cadran de
sélection de motifs. (c) Puis utiliser le cadran de longueur de
point (b) pour régler la longueur de point souhaitée pour le
projet.
Les points dans la rangée inférieure du diagramme sont
indiqués en bleu sur le cadran de sélection de motifs. Le
bleu indique que le point est un motif de points extensibles et
les informations indiquant comment coudre ces points
extensibles se trouvent à la page 30.
Le cadran de sélection de motifs peut être tourné dans
n'importe quel sens.
a. Levier de couture arrière
b. Cadran de longueur de point
c. Cadran de sélection de motifs
Фб учЭдйб уфзн рЬнщ уейсЬ емцбнЯжпнфбй уе мбэсп чсюмб
рЬнщ уфпн ерйлпгЭб учедЯщн. Гйб нб ерйлЭофе бхфЭт фйт велпнйЭт,
гхсЯуфе фпн ерйлпгЭб (c). Уфзн ухнЭчейб, чсзуймпрпйЮуфе фпн
дйбкьрфз мЮкпхт (b) гйб нб схимЯуефе фп ерйихмзфь мЮкпт
велпнйЬт.
Фб учЭдйб уфзн кЬфщ уейсЬ емцбнЯжпнфбй уе кьккйнп чсюмб
рЬнщ уфпн ерйлпгЭб учедЯщн. Фп мрлЭ чсюмб чсзуймпрпеЯфбй
гйб фзт елбуфйкЭт велпнйЭт, иб всеЯфе ресйууьфесет
рлзспцпсЯет учефйкЬ ме фзн чсЮуз бхфюн фщн учедйюн уфзн
уелЯдб 30.
П ерйлпгЭбт учедЯщн мрпсеЯ нб гхсйуфеЯ рспт кЬие
кбфеэихнуз.
a. Мпчльт сбцЮт рспт фб рЯущ
b. Дйбкьрфзт мЮкпхт велпнйЬт
c. EрйлпгЭбт учедЯщн
22
Page 30

EN
Function of stitch length dial for when straight stitching
For straight stitch sewing, turn the Pattern Selector Dial to
the straight stitch setting. (1) Turn the Stitch Length Dial, and
0.5
12
0.5
1
3
21
2
4
3
4
the length of the individual stitches will decrease as the dial
approached "0". The length of the individual stitches will
increase as the dial approaches "4". (2) Generally speaking,
use a longer stitch length when sewing heavier weight
fabrics or when using a thicker needle or thread. Use a
shorter stitch length when sewing lighter weight fabrics or
when using a finer needle or thread.
Function of stitch length dial while zig-zag stitching
Turn the Pattern Selector Dial to " ". (3)
The density of zig-zag stitches increase as the setting of
stitch length dial approaches "0".
Neat zig-zag stitches are usually achieved at "2.5" or below.
Dense zig-zag stitches are called satin stitches. (4)
Stitch Length Dial
3
4
23
Page 31

Cadran de longueur de point
F
Fonction du cadran de longueur de point lors de la
couture de points droits
Pour coudre des points droits, tourner le cadran de sélection
de motifs sur couture de points droits. (1) Tourner le cadran
de longueur de point et la longueur des points individuels
sera réduite au fur et à mesure que le cadran se rapproche
du "0". La longueur des points individuels augmentera au fur
et à mesure que le cadran se rapproche de "4". (2) En
général, il faut utiliser un point plus long lors de la couture de
tissus plus lourds ou lorsqu'une aiguille ou un fil plus épais
sont utilisés. Utiliser une longueur de point plus courte lors
de la couture de tissus plus légers ou lorsqu'une aiguille ou
un fil plus fins sont utilisés.
GR
ЧсЮуз фпх дйбкьрфз мЮкпхт велпнйЬт уфзн ехиеЯб сбцЮ
Гйб фзн ехиеЯб сбцЮ, схимЯуфе фз мзчбнЮ гйб вбуйкЮ ехиеЯб
велпнйЬ (1). ГхсЯуфе фпн дйбкьрфз мЮкпхт велпнйЬт кбй фп
мЮкпт фзт кЬие велпнйЬт иб мейщиеЯ кбиют рлзуйЬжей фп "0".
Tп мЮкпт фзт кЬие велпнйЬт иб бхозиеЯ кбиют п дйбкьрфзт
рлзуйЬжей фп "4" (2). ГенйкЬ, ерйлЭофе Энб мегблэфесп мЮкпт
велпнйЬт ьфбн сЬвефе чпнфсЬ з вбсйЬ хцЬумбфб з ьфбн
чсзуймпрпйеЯфей чпнфсЮ вельнб з клщуфЮ. ЕрйлЭофе мйксьфесп
мЮкпт велпнйЬт ьфбн сЬвефе лерфЬ хцЬумбфб Ю ьфбн
чсзуймпрпйеЯфе лерфЮ вельнб з клщуфЮ.
Дйбкьрфз мЮкпхт велпнйЬт
Fonction du cadran de longueur de point lors de la
couture en zigzag
Tourner le cadran de sélection de motifs sur " ". (3)
La densité des points en zigzag augmente au fur et à
mesure que le réglage du cadran de longueur de point
approche du "0".
Des points en zigzag soignés sont généralement obtenus à
"2,5" ou en dessous.
Les points en zigzag serrés sont appelés points bourdon. (4)
ЧсЮуз фпх дйбкьрфз мЮкпхт гйб фзн жйгк жЬгк сбцЮ
ГхсЯуфе фпн ерйлпгЭб учедЯщн уфп " " (3).
З рйкньфзфб фщн велпнйюн жйгк жбгк иб бхозиеЯ кбиют п
дйбкьрфзт сэимйузт мЮкпхт рлзуйЬжей фп "0".
Гйб нб рефэчефе фйт кблэфесет жйгк жбгк сбцЭт сэимйуфе фп
мЮкпт уфп " 2,5" з лйгьфесп.
Фп рйкнь жйгк жбгк пнпмЬжефбй убфЭн велпнйЬ (4).
24
Page 32

EN
To begin sewing, set the machine for straight stitch in either
center or right needle position. (1)
1
Place the fabric under the presser foot with the fabric edge
lined up with the desired seam guide line on the needle plate.
(2)
Lower the presser foot lifter, and then step on the foot
controller to start sewing. (3)
Sewing Straight Stitch
2
3
25
Page 33

Couture de points droits
F
Pour commencer à coudre, régler la machine sur la couture
de points droits sur la position d'aiguille centrale ou à droite. (1)
ЕхиеЯб сбцЮ
GR
БсчйкЬ схимЯуфе фз мзчбнЮ гйб фз ехиеЯб велпнйЬ ме фзн вельнб
уфп кЭнфсп з деойЬ (1).
Placer le tissu sous le pied presseur avec le bord du tissu
aligné au guide de couture souhaité sur la plaque à aiguilles.
(2)
Abaisser le releveur du pied presseur, puis appuyer sur la
pédale pour commencer à coudre. (3)
ФпрпиефЮуфе фп эцбумб кЬфщ брь фп рпдбсЬкй
ехихгсбммЯжпнфбт фзн Ьксз фпх хцЬумбфпт ме фйт гсбммЭт
пдзгюн уфзн рлЬкб вельнбт (2).
Чбмзлюуфе фпн мпчль рпдпцьспх, кбй рбфЮуфе фзн рбфЮуфсб
гйб нб оекйнЮуефе нб сЬвефе (3).
26
Page 34

EN
A
To secure the beginning and the end of a seam, press down
the reverse sewing lever (A). Sew a few reverse stitches.
Release the lever and the machine will sew forward again. (1)
Reverse Sewing
Removing the Work
Turn the handwheel toward you (counterclockwise) to bring
the thread take up lever to its highest position, raise the
presser foot and remove work behind
1
2
foot.
(2)
the needle and presser
B
3
Cutting the Thread
Pull the threads under and behind the presser foot. Guide
the threads to the side of the face plate and into thread cutter
(B). Pull threads down to cut. (3)
27
Page 35

Couture en marche arrière
F
Afin de renforcer le début et la fin d'une couture, abaisser le
bouton marche arrière en le poussant ver le bas. Faire
quelques points en sens inverse. Lâcher le bouton et la
machine reprendra la couture vers l'avant (A). (1)
GR
Гйб нб уфесеюуефе фзн бсчЮ кбй фп фЭлпт фзт сбцЮт, рбфЮуфе
рспт фб кЬфщ фп мпчль уфесеюмбфпт сбцЮт (A). СЬшфе
месйкЭт сбцЭт рспт фб рЯущ. Брелехиесюуфе фп мпчль кбй з
мзчбнЮ иб сЬвей рЬлй рспт фб емрсьт (1).
СбцЮ уфесеюмбфпт сбцЮт
Pour retirer votre ouvrage en cours
Tourner le volant vers vous afin d'amener le releveur de fil
en position haute, lever le pied presseur et retirer votre
ouvrage en le tirant vers l'arrière du pied presseur et de
l'aiguille. (2)
Pour couper le fil
Tirer sur les deux fils à l'arrière du pied presseur. Les guider
le long de la plaque frontale et les placer dans le coupe-fil (B).
Tirer les fils vers le bas pour couper. (3)
МефбкЯнзуз хцЬумбфпт
ГхсЯуфе фз фспчблЯб рспт фп мЭспт убт (рспт фб бсйуфесЬ)
гйб нб цЭсефе фпн рефейнь уфзн шзльфесз иЭуз, узкюуфе фп
рпдбсЬкй рЯеузт кбй бцбйсЭуфе фп эцбумб рЯущ брь фп
рпдбсЬкй рЯеузт кбй фз вельнб (2).
Кьшймп фзт клщуфЮт
ФсбвЮофе фйт клщуфЭт рЯущ брь фп рпдбсЬкй рЯеузт. ПдзгЮуфе
фйт клщуфЭт рспт фп рлбънь кбрЬкй кбй мЭуб уфпн кьцфз
клщуфЮт (B). ФсбвЮофе фйт клщуфЭт рспт фб кЬфщ гйб нб
кпрпэн (3).
28
Page 36

EN
The Stretch Stitch Patterns are indicated with a blue color on
the Pattern Selector Dial. To select these stitches, turn the
Pattern Selector Dial to the desired pattern. Then, turn the
Stitch Length Dial to the indicator marked "S1". Though there
are several stretch patterns, here are two examples:
Straight Stretch Stitch
Set the Pattern Selector Dial to " ".
Used to add triple reinforcement to stretch and hardwearing
seams.
The machine sews two stitches forward and one stitch
backwards.
1
Ric Rac
Set the Pattern Selector Dial to " ".
Ric Rac Stitch is suitable for firm fabrics like denim, corduroy,
poplin, duck, etc.
Choosing Stretch Stitch Patterns
2
29
Page 37

Choisir les motifs de point extensible
F
Les motifs de point extensible sont indiqués en bleu sur le
cadran de sélection de motifs. Pour sélectionner ces points,
tourner le cadran de sélection de motifs sur le motif souhaité.
Puis, tourner le cadran de longueur de point sur l'indicateur
marqué par "S1". Il existe plusieurs motifs extensibles et en
voici deux exemples :
GR
Пй елбуфйкЭт велпнйЭт емцбнЯжпнфбй уе мрлЭ чсюмб рЬнщ
уфпн ерйлпгЭб учедЯщн. Гйб нб ерйлЭофе бхфЭт фйт велпнйЭт,
гхсЯуфе фпн ерйлпгЭб учедЯщн уфп ерйихмзфь учЭдйп. Уфзн
ухнЭчейб фпрпиефЮуфе фпн дйбкьрфз мЮкпхт уфп узмеЯп "S1".
ХрЬсчпхн рпллЬ елбуфйкЬ учЭдйб, убт дЯнпхме дэп
рбсбдеЯгмбфб :
ЕрйлЭгпнфбт елбуфйкЭт велпнйЭт
Point extensible droit
Régler le cadran de sélection de motifs sur " ".
Utilisé pour ajouter un triple renforcement aux coutures
extensibles et résistant à l'usure.
La machine coud deux points en avant et un point en arrière.
Croquet
Régler le cadran de sélection de motifs sur " ".
Le point de croquet convient aux tissus solides comme le
denim, le velours, la popeline, le coutil, etc.
EхиеЯб елбуфйкЮ велпнйЬ
ФпрпиефЮуфе фпн ерйлпгЭб учедЯщн уфп " ".
ЧсзуймпрпйеЯфбй гйб фзн фсйрлЮ енЯучхуз фщн сбцюн уе
елбуфйкЬ кбй мз-елбуфйкЬ хцЬумбфб.
З мзчбнЮ рсбгмбфпрпйеЯ дэп велпнйЭт мрспуфЬ кбй мЯб
велпнйЬ рЯущ.
Ñéê-Ñáê
ФпрпиефЮуфе фпн ерйлпгЭб учедЯщн уфп " ".
З сйк-сбк сбцЮ еЯнбй йдбнйкЮ гйб уфбиесЬ хцЬумбфб ьрщт
фп фжЯн, фз лбймькпшз, фб мбнЯкйб, кбй уфсйцюмбфб.
30
Page 38

Blind Hem
EN
For hems on curtains, trousers, skirts, etc.
Blind hem for stretch fabrics.
Blind hem for firm fabrics.
Set the Stitch Length Dial with the range shown on the
diagram at the left. Blind hems, however, are normally sewn
with a longer stitch length setting.
sure the machine settings are appropriate for the fabric.
Blind Hem:
Turn up the hem to the desired width and press. Fold back
(as shown in Fig. 1) against the right side of the fabric with
the top edge of the hem extending about 7 mm (1/4") to the
right side of the folded fabric.
Sew a test first to make
1
2
Start to sew slowly on the fold, making sure the needle
touches slightly the folded top to catch one or two fabric
threads. (2)
Unfold the fabric when hemming is completed and press.
Note:
To make blind hem sewing even easier, use a blind hem
foot, available from your SINGER retailer. (See page 9
for part number)
31
®
Page 39

Ourlet invisible
F
Pour les ourlets sur les rideaux, pantalons, jupes, etc.
Ourlet invisible pour tissus extensibles.
Ourlet invisible pour tissus solides.
GR
Гйб уфсЯцщмбфб уе кпхсфЯнет, рбнфельнйб, цпэуфет клр..
КсхцпвелпнйЬ
схцпвелпнйЬ гйб елбуфйкЬ хцЬумбфб.
Ê
схцпвелпнйЬ гйб кбнпнйкЬ хцЬумбфб.
Ê
Régler le cadran de longueur de point dans la fourchette
indiquée sur le diagramme à . Toutefois, les ourlets
invisibles ne sont normalement pas cousus avec un réglage
de longueur de point plus long. Faire un test en premier pour
assurer que les réglages de la machine conviennent au tissu.
Ourlet invisible :
Rabattre l'ourlet à la largeur souhaitée et repasser. Replier
(comme indiqué à la fig. 1) contre le côté droit du tissu avec
le bord supérieur de l'ourlet s'allongeant d'environ 7 mm (1/4
de pouce) sur le côté droit du tissu plié.
Commencer à coudre lentement, en assurant que l'aiguille
touche légèrement le haut plié pour attraper un ou deux fils
de tissu. (2)
Déplier le tissu une fois que l'ourlet est terminé et repasser.
Remarque :
Pour faciliter la couture d'ourlet invisible, utiliser un pied
pour ourlet invisible, disponible auprès de votre revendeur
SINGER . (Voir page 9 pour le numéro de pièce)
®
gauche
ФпрпиефЮуфе фпн дйбкьрфз бнЬмеуб уфпхт деЯкфет рпх
емцбнЯжпнфбй уфзн ейкьнб. УхнЮищт ьмщт пй
ксхцпвелпнйЭт сЬвпнфбй ме мегблэфесп мЮкпт велпнйЬт. КЬнфе
рсюфб мЯб дпкймЮ гйб нб вевбйщиеЯфе рют пй схимЯуейт еЯнбй
кбфЬллзлет гйб фп эцбумб.
КсхцпвелпнйЬ :
ГхсЯуфе фп сЭлй уфз ерйихмзфЮ брьуфбуз кбй уфесеюуфе фп.
Дйрлюуфе фп эцбумб ьрщт цбЯнефб уфзн ейк.1 рсьт фзн деойЬ
рлехсЬ фпх хцЬумбфпт ме фп рЬнщ мЭспт фпх селЯ нб рспеоЭчей
кбфЬ 7чйлйпуфЬ (1/4'') уфзн деойЬ рлехсЬ фпх дйрлщмЭнпх
хцЬумбфпт.
СЬшфе бсгЬ , з вельнб рсЭрей брлЬ нб фсхрЮуей фзн рфхчЮ
фпх хцЬумбфпт кбй нб рйЬней мЯб з дэп клщуфЭт фпх хцЬумбфпт
(2).
Оедйрлюуфе фп эцбумб ьфбн плпклзсщиеЯ з сбцЮ кбй рбфЮуфе
фп.
УзмеЯщуз :
Гйб рЯп еэкплo уфсЯцщмб, чсзуймпрпйеЯуфе фп ейдйкь рпдбсЬкй
ксхцпвелпнйЬт, фп прпЯп еЯнбй дйбиЭуймп уфб кбфбуфЮмбфб
SINGER . ( вл. уелЯдб 9 гйб кщдйкь еобсфЮмбфпт)
32
®
бсйуфесЬ
Page 40

Buttonholes
EN
Prepare
1. Take off the all purpose foot and attach the buttonhole
foot.
2. Measure diameter and thickness of button and add 0.3 cm
(1/8") for bar tacks; mark buttonhole size on fabric.
3. Place fabric under the foot, so that marking on the
buttonhole foot aligns with starting marking on fabric.
Lower the foot, so that the buttonhole center line marked
on the fabric aligns with the center of the buttonhole foot.
Adjust the Stitch Length Dial in the " " to set stitch density.
Note:
Density varies according to the fabric.
Always test sew a buttonhole on the fabric you are using
to sew the buttonhole.
Follow the 4-step sequence changing from one step to
A
another with the Pattern Selector Dial. When moving from
step to step through the buttonhole process, be sure that the
needle is raised before turning the Pattern Selector Dial to
the next step. Take care not to sew too many stitches in
steps 2 and 4. Use seam ripper and cut buttonhole open
from both ends towards the middle.
4
1
3
2
Tips:
- Slightly reducing upper thread tension will produce better
results.
- Use a stabilizer for fine or stretchy fabrics.
- It is advisable to use heavy thread or cord for stretch or knit
fabrics. The zig-zag should sew over the heavy thread or
cord. (A)
33
Page 41

Boutonnières
F
Préparation
1. Retirer le pied multi-usage et poser le pied pour boutonnière.
2. Mesurer le diamètre et l'épaisseur du bouton et ajouter 0,3
cm (1/8 de pouce) pour les renforts ; marquer la taille de la
boutonnière sur le tissu.
3. Placer le tissu sous le pied, pour que le repère sur le pied de
boutonnière soit aligné au repère de démarrage sur le tissu.
Abaisser le pied, pour que la ligne centrale de la boutonnière
marquée sur le tissu soit alignée avec le centre du pied pour
boutonnière.
Régler le cadran de longueur de point dans la " " pour régler
la densité de points.
Remarque :
La densité varie selon le tissu.
Il faut toujours réaliser une couture d'essai de boutonnière
sur le tissu que vous utiliserez pour coudre la boutonnière.
Suivre la séquence à 4 étapes en changeant d'une étape à
l'autre avec le cadran de sélection de motifs. Lorsque vous
passez d'une étape à une autre dans le processus de réalisation
de boutonnière, assurez que l'aiguille est relevée avant de
tourner le cadran de sélection de motifs à l'étape suivante. Faire
attention de ne pas coudre trop de points aux étapes 2 et 4.
Utiliser le découvit et ouvrir la boutonnière en coupant depuis
les deux extrémités vers le milieu.
Astuces :
- Réduire légèrement la tension du fil supérieur produira de
meilleurs résultats.
- Utiliser un entoileur pour les tissus fins ou extensibles.
- Il est recommandé d'utiliser un fil épais ou un cordon pour les
tissus extensibles ou à mailles. Le zigzag doit être cousu sur
le fil épais ou le cordon. (A)
Кпхмрьфсхрет
GR
ЕфпймбуЯб
1. БнфйкбфбуфЮуфе фп рпдбсЬкй рЯеузт ме фп рьдй кпхмрьфсхрбт.
2. МефсЮуфе фзн дйЬмефсп кбй фп эшпт фпх кпхмрйпэ кбй
рспуиЭуфе 0,3 ек. УзмбдЭшфе фп мЭгеипт фзт кпхмрьфсхрбт
уфп спэчп.
3. ФпрпиефЮуфе фп эцбумб кЬфщ брь фп рьдй. ЕхихгсбммЯуфе
фп узмЬдй фзт кпхмрьфсхрбт уфп эцбумб ме фп узмЬдй уфп
рпдбсЬкй кпхмрьфсхрбт кбй мефЬ чбмзлюуфе фп рпдбсЬкй.
СхимЯуфе фп мЮкпт фзт велпнйЬт уфп " " гйб нб псЯуфе фзн
рйкньфзфб фщн велпнйюн.
УзмеЯщуз :
H рйкньфзфб еобсфЬфбй брь фп эцбумб.
Нб дпкймЬжефе рЬнфб нб сЬшефе мЯб кпхмрьфсхрб уфп
эцбумб рпх чсзуймпрпйеЯфе рсЯн фзн сЬшефе.
AкплпхиЮуфе фб 4 вЮмбфб ресньнфбт брь фп Энб вЮмб уфп Ьллп ме
фзн впЮиейб фпх ерйлпгЭб учедЯщн. Уфзн дйЬскейб фзт дзмйпхсгЯбт
фзт кпхмрьфсхрбт, вевбйщиеЯфе рют з вельнб еЯнбй узкщмЭнз рсЯн
гхсЯуфе фпн ерйлпгЭб учедЯщн уфп ерьменп вЮмб. РспуЭофе мзн
кЬнефе рпллЭт велпнйЭт уфб вЮмбфб 2 кбй 4. БнпЯофе фзн
кпхмрьфсхрб ме фпн кьцфз клщуфЮт брь фйт дэп Ьксет рсьт фп
кЭнфсп.
УхмвпхлЭт :
- Мейюнпнфбт фзн Энфбуз фзт Ьнщ клщуфЮт, иб Эчефе кблэфесб
брпфелЭумбфб
- ЧсзуймпрпйеЯуфе уфбиеспрпйзфЮ уе лерфЬ з елбуфйкЬ хцЬумбфб
- Убт ухмвпхлЭхпхме нб чсзуймпрпйеЯфе чпнфсЮ клщуфЮ з
кпсдьнй уе рлекфЬ кбй елбуфйкЬ хцЬумбфб. Пй жйгк жбгк велпнйЭт
рсЭрей нб рсбгмбфпрпйпэнфбй рЬнщ брь фзн
- чпнфсЮ клщуфЮ Ю фп кпсдьнй (A).
34
Page 42

EN
Install the darning plate. (1)
Change the all purpose foot to button sewing foot. (2)
Position the work under the foot.
Place the button in the desired position and lower the foot.
Set the Pattern Selector Dial on " " and sew a few securing
stitches. Select one of the two narrow zig-zag patterns
according to the distance between the two holes of the button.
Turn the handwheel to check if the needle goes into the right
and the left hole of the button without hitting the button. Slowly
sew on the button with about 10 stitches.
Select pattern " " and sew a few securing stitches. (3)
Sewing on Buttons
1 2
3
If a shank is required, place a darning needle on top of the
button and sew. (4)
For buttons with 4 holes, sew through the front two holes first,
push the work forward and then sew through the back two
holes.
4
35
Page 43

Couture de boutons
F
Placez la plaque de reprisage sur la plaque à aiguille. (1)
Installez le pied pose de boutons. (2)
Placez le tissu sous le pied.
Posez le bouton à la position désirée et baissez le pied.
Mettez le sélecteur de point à " " et cousez quelques points
de sécurité. Choisissez un des points zigzag étroits. Réglez
la largeur du point en fonction de la distance entre les 2 trous
du bouton. Tournez le volant pour voir si l'aiguille passe dans
les trous droit et gauche du bouton sans toucher le bouton.
Fixez le bouton en cousant doucement environ 10 points.
Choisissez le programme " " et coudre quelques points de
sécurité. (3)
Si une tige de maintien est requise, placez une aiguille de
reprisage sur le bouton et coudre (4).
Pour les boutons à 4 trous, coudre d'abord à travers les deux
premiers trous, repositionnez le tissu, puis cousez à travers
les deux autres trous.
СЬшймп кпхмрйюн
GR
ФпрпиефЮуфе фзн рлЬкб кблэммбфпт дпнфйюн
БллЬофе фп рпдбсЬкй рЯеузт ме фп рпдбсЬкй рЯеузт гйб
кпхмрйЬ (2).
ФпрпиефЮуфе фп эцбумб кЬфщ брь фп рпдбсЬкй.
СхимЯуфе фпн дйбкьрфз ерйлпгЮт учедЯщн уфз иЭуз " " êáé
сЬшфе месйкЭт велпнйЭт убн уфесЭщмб. ЕрйлЭофе Энб брь фб
дэп уфенЬ жйгк-жбгк учЭдйб бнЬлпгб ме фзн брьуфбуз
бнЬмеуб уфйт дэп фсэрет фпх кпхмрйпэ.
ГхсЯуфе фз фспчблЯб гйб нб елЭгоефе еЬн з вельнб ейуЭсчефбй
бксйвют уфзн деойЬ кбй бсйуфесЮ фсэрб фпх кпхмрйпэ чщсЯт
кбнЭнб емрьдйп. СЬшфе бсгЬ рЬнщ уфп кпхмрЯ ме 10
ресЯрпх велпнйЭт.
ЕрйлЭофе фп учЭдйп " " кбй сЬшфе месйкЭт велпнйЭт убн
уфесЭщмб (3).
ЕЬн брбйфеЯфбй вЬуз, фпрпиефЮуфе мЯб вельнб мбнфбсЯумбфпт
уфп рЬнщ мЭспт фпх кпхмрйпэ кбй сЬшфе (4).
Гйб кпхмрйЬ ме 4 фсэрет, сЬшфе рсюфб фйт дэп мрспуфйнЭт
фсэрет, урсюофе фп эцбумб рспт фб емрсьт кбй мефЬ сЬшфе
фйт дэп рЯущ фсэрет.
(1).
36
Page 44

EN
Hold the removable extension table horizontally, and push it
in the direction of the arrow. (1)
To remove the Extension Table, pull it toward the left.
1
The inside of the removable extension table can be utilized
as an accessory box.
To open, flip cover down as shown. (2)
Installing the Removable Extension Table
2
37
Page 45

Installation du bras amovible
F
Maintenir le bras amovible en position horizontal et le
pousser comme indiqué ci-contre. (1)
GR
ЕгкбфЬуфбуз фпх брпурюменпх
рлбфь сбшЯмбфпт
КсбфЮуфе фп брпурюменп рлбфь сбшЯмбфпт псйжьнфйб, кбй
урсюофе фп рспт фзн кбфеэихнуз фпх вЭлпхт (1).
L'intérieur du bras amovible peut être utilisé comme boîte de
rangement pour les accessoires.
Pour ouvrir, tirer vers vous comme indiqué ci-contre. (2)
Фп еущфесйкь уфп брпурюменп рлбфь сбшЯмбфпт мрпсеЯ нб
чсзуймпрпйзиеЯ убн кпхфЯ еобсфзмЬфщн.
Гйб нб фп бнпЯоефе, узкюуфе уфп узмеЯп рпх деЯчней фп вЭлпт
(2).
38
Page 46

EN
a
a
e
b
d
b
c
f
Raise the presser bar (a) with the presser foot lifter. Attach
the presser foot shank (b) as illustrated. (1)
Attaching the presser foot
Lower the presser foot shank (b) using the presser foot lifter,
until the cut-out (c) is directly above the pin (d). (2) The
presser foot (f) will engage automatically.
Removing the presser foot
Raise the presser foot using the presser foot lifter. (3)
Raise the lever (e) and the foot disengages.
Attaching the Presser Foot Shank
12
e
g
3
4
39
Attaching the edge/quilting guide
Attach the edge/quilting guide (g) in the slot as illustrated.
Adjust as needed for hems, pleats, quilting, etc. (4)
Attention:
Turn power switch to off ("O") when carrying out any of
the above operations!
Page 47

Poser le support du pied presseur
F
Relever la barre du pied (a) avec le releveur de pied
presseur. Attacher le support du pied presseur (b) comme
illustré. (1)
Poser le pied presseur
Abaisser le support du pied presseur (b) à l'aide du releveur
de pied presseur, jusqu'à ce que la découpe (c) se trouve
directement au-dessus de la broche (d). (2) Le pied presseur
(f) s'enclenchera automatiquement.
Retirer le pied presseur
Relever le pied presseur à l'aide du releveur de pied
presseur. (3)
Relever le levier (e) et le pied se désenclenche.
Poser le guide-bord/guide pour quilting
Poser le guide-bord/guide pour quilting (g) dans la rainure,
comme illustré. Régler selon le besoin pour les ourlets, plis,
quilting, etc. (4)
Attention :
Eteindre l'interrupteur (sur "O") lorsque vous effectuez
n'importe laquelle des opérations ci-dessus !
GR
Узкюуфе фпн велпнпрйЬуфз ме фпн бнхшщфЮсб рпдйпэ
рЯеузт. ФпрпиефЮуфе фп рЭлмб фпх рпдйпэ ( ) ейк.1
ФпрпиЭфзуз рпдйпэ
КбфевЬуфе фп рЭлмб фпх рпдйпэ ) ме фпн мпчль фпх рпдйпэ
рЯеузт юуфе нб ехихгсбммйуфеЯ фп рпдбсЬкй ( ) ме фзн
хрпдпчЮ фпх рпдйпэ рЯеузт рпдбсЬкй иб кпхмрюуей
бхфьмбфб.
БцбЯсеуз рпдйпэ
Узкюуфе фп рпдбсЬкй рЯеузт ме фпн бнхшщфЮсб фпх рпдйпэ (3).
Узкюуфе фпн мпчльт брелехиЭсщузт рпдйпэ рЯеузт ( ) кбй
бцбйсЭуфе фп рпдбсЬкй.
ФпрпиЭфзуз пдзгпэ сбцЮт
ФпрпиефЮуфе фпн пдзгь сбцЮт ( ) мЭуб уфзн хрпдпчЮ.
СхимЯуфе фпн бнЬлпгб гйб дзмйпхсгЯб уфсйцщмЬфщн, рйефюн з
quilting (4).
ФпрпиЭфзуз релмЬфпт рпдйпэ
(a)
b
(b
(d) (2). To
g
РспупчЮ :
ВевбйщиеЯфе рют з мзчбнЮ убт еЯнбй уфзн иЭуз
ьфбн рсбгмбфпрпйпэнфбй бхфЭт фйт кйнЮуейт.
c
e
off ("O")
40
Page 48

N Charteedle/ Fabric/ Thread
EN
NEEDLE, FABRIC, THREAD SELECTION GUIDE
NEEDLE SIZE
9-11 (70-80)
Lightweight fabrics-thin cottons, voile, silk, muslin,
interlocks, cotton knits, tricots, jerseys, crepes, woven
FABRICS
Light-duty thread in cotton, nylon, polyester or
cotton wrapped polyester.
polyester, shirt & blouse fabrics.
11-14 (80-90)
14 (90)
16 (100)
18 (110)
Medium weight fabrics-cotton, satin, kettlecloth, sailcloth,
double knits, lightweight woolens.
Medium weight fabrics-cotton duck, woolen, heavier knits,
terrycloth, denims.
Heavyweight fabrics-canvas, woolens, outdoor tent and
quilted fabrics, denims, upholstery material (light to medium).
Heavy woolen, overcoat fabrics, upholstery fabrics, some
leathers and vinyls.
Most threads sold are medium size and suitable
for these fabrics and needle sizes.
Use polyester threads on synthetic materials
and cotton on natural woven fabrics for best
results.
Always use the same thread on top and bottom.
Heavy duty thread, carpet thread.
IMPORTANT: Match needle size to thread size and weight of fabric.
NEEDLE, FABRIC SELECTION
NEEDLES TYPE OF FABRIC
SINGER 2020
®
Standard sharp needles. Sizes range
thin to large. 9 (70) to 18 (110).
SINGER 2045
®
Semi-ball point needle, scarfed.
9 (70) to 18 (110).
SINGER 2032
®
Leather needles. 12 (80) to 18 (110).
EXPLANATION
Natural woven fabrics-wool, cotton, silk, etc.
Not recommended for double knits.
Natural and synthetic woven fabrics, polyester blends.
Knits-polyesters, interlocks, tricot, single and double knits.
Also sweater knits, Lycra , swimsuit fabric, elastic.
®
Leather, vinyl, upholstery. (Leaves smaller hole than standard
large needle.)
THREAD
Note :
1. For best sewing results always use genuine SINGER needles.
®
2. Replace needle often (approximately every other garment ) and/ or at first thread breakage or skipped stitches.
41
Page 49

Table de correspondance de l'aiguille, du tissu et du fil
F
GUIDE DE SÉLECTION DE L'AIGUILLE, DU TISSU ET DU FIL
DIMENSIONS DE
L'AIGUILLE
9-11 (70-80)
Tissus légers, cotons légers, voile, serge, soie, mousseline,
TISSUS
Qiana, tissu interlock, tricots de coton, tricots, jerseys, crêpes,
polyester tissé, tissus pour chemises et blouses.
11-14 (80-90)
Tissus d'épaisseur moyenne, coton, satin, kettlecloth, tissu de
marine, jersey double, lainages légers.
14 (90)
Tissus d'épaisseur moyenne, ciré en coton, lainage, jerseys
s
plus épais, tissus éponge et jeans.
16 (100)
18 (110)
Tissus pais, canevas, lainage, tentes et tissus courtepointe,
é
jeans, tissus pour rembourrage (l gers et moyens).
Lainage , tissus pour manteaux et pardessus, tissus
épais
é
pour rembourrage, certains cuirs et vinyle.
IMPORTANT: Adapter les dimensions de l'aiguille au fil et é .à la qualit du tissu
SÉLECTION DE L'AIGUILLE ET DU TISSU
AIGUILLES
SINGER 2020
SINGER 2045
®
®
Aiguille pointue réglementaire. La dimension
varie de fine à grande. 9 (70) à 18 (110).
Aiguille à pointe ronde. 9 (70) à 18 (110).
EXPLICATIONS
Tissus naturels tissés laine, coton, soie, etc.
Qiana. N'est pas recommandé pour des jerseys doubles.
Tissus naturels et synthétiques tissés, mélanges polyester,
tricots en polyester, tissus interlock, jerseys simples et doubles.
Également, tissus en Lycra , tissus pour maillots de bain, tissus
élastiques.
SINGER 2032
®
Aiguilles pour cuir 12 (80) à 18 (110).
Cuir, vinyle, tissus pour rembourrage.
(Fait de plus petits trous que les grandes aiguilles standard).
FIL
File de coton léger, nylon, polyester ou de
coton enrobé de polyester.
La plupart des types de fil vendus sont de
s
calibre moyen et conviennent pour ces tissus et
dimensions d'aiguille. Utiliser un fil polyester
pour des tissus synth tiques et un fil de coton
pour les fibre naturelles et tiss es pour un
meilleur r sultat. Toujours utiliser le m me fil
éê
é
é
sur la bobine et dans la canette.
Fil résistant, fil pour tapis.
TYPE DE TISSU
®
NOTE:
1. Pour de meilleurs résultats, n'utilisez que des aiguilles authentiques SINGER .
®
2. Remplacez régulièrement l'aiguille (chaque fois que vous commencez un nouveau vêtement) et/ou quand le fil casse ou les points sautent.
42
Page 50

ФбЯсйбумб вельнбт / хцЬумбфпт / клщуфЮт
GR
ПДЗГПУ ЕРЙЛПГЗУ ВЕЛПНБУ ХЦБУМБФПУ КЛЩУФЗУ//
МЕГЕИПУ
ВЕЛПНБУ
9-11 (70-80)
ЛерфЬ вбмвбкесЬ хцЬумбфб, впэбл, уесж, мефбощфЬ,
мпхуелЯнб, qiana, interlocks, вбмвбкесЬ рлекфЬ, фсйкьф, ,
ксер, мЬллйнб рплхЭуфес, хцЬумбфб рпхкбмЯущн кбй мрлпхжюн.
11-1 4 (80-90)
МеубЯпх вЬспхт хцЬумбфб вбмвбкесЬ, убфЭн, кпфлЭ,
нбхфйкЬ спэчб, дйрлЬ рлекфЬ, елбцсЬ мЬллйнб.
14 (90)
МеубЯпх вЬспхт вбмвбкесЬ хцЬумбфб ме рпэрпхлб,
мЬллйнб, вбсэфесб рлекфЬ, фесйлЭн, фжйн.
16 (100)
ВбсйЬ хцЬумбфб, мЬллйнб кбй рбрлщмЬфщн кбрйфпнЭ, фжйн,
хлйкЬ фбрефубсЯбт (елбцсЬ Эщт меубЯб).
18 (110)
ВбсйЬ мЬллйнб, хцЬумбфб рблфюн, хцЬумбфб фбрефубсЯбт,
месйкЬ дЭсмбфб кбй вйнэлйб.
УЗМБНФЙКП: ФбйсйЬофе фп мЭгеипт фзт вельнбт ме фп мЭгеипт фзт клщуфЮт кбй фп вЬспт фпх хцЬумбфпт.
ХЦБУМБФБ
жЭсуеъ
ЛерфЮ вбмвбкесЮ клщуфЮ, нЬйлпн, рплхеуфесйкЮ Ю
рплхеуфесйкЮ ерендхмЭнз ме вбмвЬкй.
Пй ресйууьфесет клщуфЭт рпх рщлпэнфбй уфп емрьсйп
еЯнбй меубЯпх мегЭипхт кбй кбфЬллзлет гйб фб хцЬумбфб
бхфЬ кбй бхфЬ фб мегЭиз велпнюн.
Нб чсзуймпрпйеЯфе рплхеуфесйкЭт клщуфЭт уе ухниефйкЬ
хлйкЬ кбй вбмвбкесЭт уе цхуйкЬ хцЬумбфб гйб кблэфесб
брпфелЭумбфб. Нб чсзуймпрпйеЯфе рЬнфпфе фзн Ядйб
клщуфЮ гйб фп рЬнщ кбй фп кЬфщ мЭспт.
ГесЮ клщуфЮ, клщуфЮ гйб чблйЬ.
ЕРЙЛПГЗ ВЕЛПНБУ, ХЦБУМБФПУ
ВЕЛПНЕУ
SINGER 2020
SINGER 2045
SINGER 2032
®
®
®
КпйнЭт мхфесЭт вельнет. Фб мегЭиз рпйкЯлпхн брь
лерфЭт Эщт мегЬлет. 9 (70) Эщт 18 (110)
Вельнет змйуцбйсйкЮт мэфзт. 11(80) Эщт 16(100)
Вельнет гйб дЭсмбфб. 14(90) Эщт 16(100)
ЕРЕОЗГЗУЗ
ФХРПУ ХЦБУМБФПУ
ЦхуйкЬ вбмвбкесЬ рлекфЬ хцЬумбфб, вбмвбкесЬ, мефбощфЬ. Клр.
Ден ухнЯуфбфбй гйб дйрлЬ рлекфЬ.
ЦхуйкЬ кбй ухниефйкЬ хцЬумбфб, рплхеуфесйкЬ.
РплхеуфесйкЬ рлекфЬ, фсйкьф, мпнЬ кбй дйрлЬ рлекфЬ.
ФбрефубсЯет десмЬфйнет, вйнхлЯпх.
(БцЮней мйксьфесз фсэрб брь кпйнЮ мегЬлз вельнб).
КЛЩУФЗ
Узмейюуейт гйб фз дЯдхмз вельнб:
1. Гйб кблэфесб брпфелЭумбфб сбшЯмбфпт нб чсзуймпрпйеЯфе рЬнфпфе бхиенфйкЭт вельнет SINGER .
®
2. Нб бнфйкбийуфЬфе фз вельнб ухчнЬ (ресЯрпх кЬие кбйнпэсгйп спэчп) кбй / Ю уфп рсюфп урЬуймп фзт клщуфЮт Ю ьфбн бсчЯуей нб бцЮней велпнйЭт.
43
Page 51

EN
For certain types of work, (e.g. darning or free-hand
embroidery), the darning plate must be used.
Install the darning plate as illustrated.
For normal sewing, remove the darning plate.
For free-motion sewing it is recommended to use a
darning/embroidery foot, available as an optional accessory
from SINGER retailers. (See page 9 for part number of
darning/embroidery foot )
Darning Plate
®
44
Page 52

Plaque à repriser
E
Pour certains types de travaux, (par ex. reprisage ou
broderie à main levée), la plaque à repriser doit être utilisée.
РлЬкб кблэшещт дпнфйюн
GR
Гйб кЬрпйет есгбуЯет ( рч : мпнфЬсйумб з елеэиесп кЭнфзмб)
рсЭрей нб чсзуймпрпйеЯфбй з рлЬкб кблэшещт дпнфйюн.
Installer la plaque à repriser comme illustré.
Pour la couture normale, retirer la plaque à repriser.
Pour la couture en piqué libre, il est recommandé d'utiliser
un pied de reprisage/broderie, disponible comme accessoire
optionnel auprès des revendeurs SINGER . (Voir page 9
pour le numéro de pièce du pied de reprisage/broderie)
®
ФпрпиефЮуфе фзн рлЬкб уэмцщнб ме фзн рбсбкЬфщ ейкьнб.
Гйб кбнпнйкь сЬшймп, бцбйсЭуфе фзн рлЬлб кблэшещт дпнфйюн.
Гйб елеэиесп сЬшймп, ухнйуфЬфбй з чсЮуз рпдйпэ кенфЮмбфпт,
фп прпЯп еЯнбй дйбиЭуймп убн пptionnal боеупхЬс уфб
кбфбуфЮмбфб SINGER . (вл. уелЯдб 9 гйб кщдйкь еобсфЮмбфпт)
®
45
Page 53

EN
D
A
B
Change the needle regularly, especially if it is showing signs
of wear and causing problems. For best sewing results
always use SINGER Brand Needles.
Insert the needle as illustrated as follows:
A. Loosen the needle clamp screw and tighten again after
B. The flat side of the shaft should be towards the back.
C/D.Insert the needle as far up as it will go.
Inserting & Changing Needles
®
inserting the new needle. (1)
C
1
B
2
A
C
Attention:
Turn power switch to off ("O") before inserting or removing
the needle.
Needles must be in perfect condition. (2)
Problems can occur with:
A. Bent needles
B. Damaged points
C. Blunt needles
46
Page 54

Insertion et changement d'aiguille
E
Remplacer l'aiguille régulièrement, plus particulièrement si
elle indique des signes d'usure et cause des problemès.
Pour obtenir les meilleurs résultats, toujours utiliser des
aiguilles fabriquées par SINGER .
Insérer l'aiguille tel qu'indiqué ci-contre.
®
GR
БллЬофе фз вельнб ейдйкЬ ьфбн рбспхуйЬуей узмЬдйб ципсЬт
кбй рспкблеЯ рспвлЮмбфб. Гйб кблэфесб брпфелЭумбфб
сбшЯмбфпт рЬнфпфе нб чсзуймпрпйеЯфе вельнет SINGER .
ФпрпиефЮуфе фз вельнб уэмцщнб ме фйт ейкьнет рпх
цбЯнпнфбй рбсбкЬфщ:
ФпрпиЭфзуз кбй бллбгЮ велпнюн
®
Desserrer la vis du pince aiguille et la resserrer apr s
A. è
avoir ins r une nouvelle aiguille. (1)
B. Le côté plat de la tige doit être face à l'arrière.
C/D.Insérer l'aiguille jusqu'au bout.
Attention:
Mettre l'interrupteur d'alimentation sur arrêt ("O") avant
d'insérer ou de retirer l'aiguille.
Les aiguilles doivent être en parfait état. (2)
Des problèmes peuvent survenir si:
A. L'aiguille est tordue
B. L'extrémité de l'aiguille est endommagée
C. L'aiguille est épointée
éé
A. Чблбсюуфе фз вЯдб фпх велпнпрйЬуфз кбй уцЯофе фзн
обнЬ мефЬ фзн фпрпиЭфзуз фзт нЭбт вельнбт (1).
B. З ерЯредз рлехсЬ фпх уюмбфпт фзт вельнбт иб рсЭрей
нб влЭрей рспт фб рЯущ.
C/D. ФпрпиефЮуфе фз вельнб ьуп рйп мЭуб гЯнефбй.
РспупчЮ:
КлеЯуфе фп сеэмб (''O'') рсйн фпрпиефЮуефе Ю бцбйсЭуефе фз
вельнб.
Пй вельнет иб рсЭрей нб еЯнбй уе Ьсйуфз кбфЬуфбуз (2).
МрпсеЯ нб рспкэшпхн рспвлЮмбфб ме:
A. УфсбвщмЭнет вельнет
B. КбфеуфсбммЭнет вельнет
C. Бмвлэт вельнет
47
Page 55

Changing the Bulb
EN
Disconnect the machine from the power supply by removing
the plug from the main socket!
Replace bulb with same type rated 10 watts (110-120V area)
or 15 watts (220-240V area).
A
B
1
C
2
- Loosen screw (A) as illustrated. (1)
- Remove the face plate (B).
- Unscrew the bulb and install a new one (C). (2)
- Replace the face plate and tighten screw.
Should there be any problem, consult your SINGER retailer.
48
®
Page 56

Changement de l'ampoule
E
Débrancher la machine de l'alimentation électrique en
retirant la prise!
Remplacer l'ampoule par une ampoule du même type de 10
Watts (pour 110-120V) ou 15 watts (pour 220-240V).
GR
БрпухндЭуфе фз мзчбнЮ брь фп сеэмб бцбйсюнфбт фп цйт
брь фзн рсЯжб.
БнфйкбфбуфЮуфе фп лбмрЬкй ме Энб Ядйпх фэрпх 10Watts (110120V) Ю 15Watts (220-240V).
БллбгЮ лЬмрбт
- Desserrer la vis (A) comme indiqué. (1)
- Enlever la plaque frontale (B).
- Dévisser l'ampoule et installer une nouvelle (C). (2)
- Reposer la plaque frontale et visser la vis.
En cas des problèmes, vous adresser au magasin SINGER
le plus proche.
- Чблбсюуфе фз вЯдб (A) ьрщт деЯчней з ейкьнб (1).
- БцбйсЭуфе фп кЬлхммб (B).
- Мзн рспурбиЮуефе нб оевйдюуефе фп лбмрЬкй. БрлЬ
рйЭуфе фп нфпхЯ кбй гхсЯжефе фп рспт фзн кбфеэихнуз фпх
вЭлпхт. ВгЬлфе фп фсбвюнфбт фп рспт фб кЬфщ кбй
фпрпиефЮуфе фп нЭп (C) (2).
®
- ЕрбнбфпрпиефЮуфе фп кЬлхммб кбй уцЯофе фз вЯдб.
49
Page 57

Troubleshooting Guide
EN
Problem Cause Correction
Upper thread breaks
Lower thread breaks
Skipped stitches
Needle breaks
Loose stitches
Seams gather
or pucker
Uneven stitches,
uneven feed
The machine is
noisy
The machine jams
1. The machine is not threaded correctly.
2. The thread tension is too tight.
3. The thread is too thick for the needle.
4. The needle is not inserted correctly.
5. The thread is wound around the spool holder pin.
6. The needle is damaged.
1. The bobbin case is not inserted correctly.
2. The bobbin case is threaded wrong.
3. The lower thread tension is too tight.
1. The needle is not inserted correctly.
2. The needle is damaged.
3. The wrong size or type of needle has been used.
4. The foot is not attached correctly.
1. The needle is damaged.
2. The needle is not correctly inserted.
3. Wrong needle size for the fabric.
4. The wrong foot is attached.
1. The machine is not correctly threaded.
2. The bobbin case is not correctly threaded.
3. Needle/ fabric/ thread combination is wrong.
4. Thread tension wrong.
1. The needle is too thick for the fabric.
2. The stitch length is incorrectly adjusted.
3. The thread tension is too tight.
1. Poor quality thread.
2. The bobbin case is incorrectly threaded.
3. Fabric has been pulled.
1. The machine must be lubricated.
2. Lint or oil have collected on the hook or needle bar.
3. Poor quality oil has been used.
4. The needle is damaged.
Thread is caught in the hook.
1. Rethread the machine.
2. Reduce the thread tension. (lower number)
3. Select a larger needle.
4. Remove and reinsert the needle. (flat side towards the back)
5. Remove the reel and wind thread onto reel.
6. Replace the needle.
1. Remove and reinsert the bobbin case and pull on the thread.
The thread should pull easily.
2. Check both bobbin and bobbin case.
3. Loosen lower thread tension as described.
1. Remove and reinsert needle. (flat side towards the back)
2. Insert a new needle.
3. Choose a needle to suit the thread and fabric.
4. Check and attach correctly.
1. Insert a new needle.
2. Insert the needle correctly. (flat side towards the back)
3. Choose a needle to suit the thread and fabric.
4. Select the correct foot.
1. Check the threading.
2. Thread the bobbin case as illustrated.
3. The needle size must suit the fabric and thread.
4. Correct the thread tension.
1. Select a finer needle.
2. Readjust the stitch length.
3. Loosen the thread tension.
1. Select a better quality thread.
2. Remove bobbin case, thread and insert correctly.
3. Do not pull on the fabric while sewing, let it be drawn through
by the machine.
1. Lubricate as described.
2. Clean the hook and feed dog as described.
3. Only use good quality sewing machine oil.
4. Replace the needle.
Remove the upper thread and bobbin case, turn the handwheel
backwards and forwards by hand and remove the thread.
Lubricate as described.
50
Page 58

Guide de dépannage
F
Problème Cause Solution
Le fil supérieur
casse
Le fil inférieur
casse
Points manqués
L'aiguille casse
Points lâches
La couture fronce
Points irréguliers,
Entraînement
irrégulier
La machine est
bruyante
La machine se
bloque
1. La machine n'est pas correctement
2. La tension du fil est trop élevée.
3. Le fil est trop gros pour l'aiguille.
4. L'aiguille n'est pas bien insérée.
5. Le fil est enroulé autour
6. L'aiguille est endommagée.
1. Le boîtier n'est pas bien inséré.
2. Le boîtier n'est pas bien enfilé.
3. La tension inférieure est trop élevée.
1. L'aiguille n'est pas bien insérée.
2. L'aiguille est endommagée.
3. Une aiguille de dimensions incorrectes a été utilisée.
4.
Le mauvais pied a été utilisé.
1. L'aiguille est endommagée.
2. L'aiguille n'est pas bien insérée.
3. Aiguille de mauvaises dimensions pour le tissu.
4. Le mauvais pied a été fixé.
1. La machine n'est pas correctement enfilée.
2.
Le boîtier n'est pas bien enfilé.
3. La combinaison aiguille/ tissu/ fil n'est pas la bonne.
4. La tension du fil est mauvaise.
1.
L'aiguille est trop grosse pour le tissu.
2. La longueur de point n'a pas été bien ajustée.
3. La tension du fil est trop élevée.
1. Le fil est de qualité inférieure.
2.
Le boîtier n'est pas bien enfilé.
3. Le tissu a été tiré.
1. La machine doit être lubrifiée.
2.
De la poussière ou de l'huile s'est accumulée sur le
crochet ou la barre d'aiguille.
3. De l'huile de qualité inférieure a été utilisée.
4. L'aiguille est endommagée.
Du fil est coincé dans le crochet.
du porte bobine.
enfilée.
1. Réenfiler la machine.
2. Réduire la tension. (valeur inférieure)
3. Choisir une aiguille plus grosse.
4. La retirer et la réinsérer. (côté plat vers l'arrière)
5. Retirer la canette et enrouler le fil.
6. Remplacer.
1. Réinsérer le boîtier de façon correcte.
2. Contrôler la canette et le boîtier.
3. Réduire la tension du fil de canette.
1. La retirer et la réinsérer. (côté plat vers l'arrière)
2. Remplacer.
3. Choisir une aiguille convenant au fil et au tissu.
4.
Vérifiez et fixez le bon pied de biche.
1. Insérer une nouvelle aiguille.
2. Insérer l'aiguille correctement. (côté plat vers l'arrière)
3. Choisir une aiguille convenant au fil et au tissu.
4. Choisir le bon pied.
1. Vérifier l'enfilage.
2. .
Enfiler à nouveau correctement
3..
Choisir une aiguille/ fil /tissu adéquat
4. Corriger la tension du fil.
1. Choisir une aiguille plus fine.
2. Réajuster la longueur de point.
3. Réduire la tension.
1. Choisir un fil de meilleure qualité.
2. Retirer la canette réenfiler et .
3. Ne pas tirer sur le tissu en cousant.
entraîner le tissu.
1. Demander un entretien à un magasin SINGER .
2. Nettoyer le crochet et es griffes d'entraînement comme décrit.
3. Utilisez de l'huile SINGER .
4. Remplacer.
Retirer le fil supérieur et la bobine, tourner manuellement le
volant vers l'avant et vers l'arrière puis retirer les restes de fil.
51
l'inserer correctement
s
®
Laisser la machine
®
Page 59

Пдзгьт бнфймефюрйузт рспвлзмЬфщн
GR
Рсьвлзмб
ЗрЬнщклщуфЮ
урЬей
ЗкЬфщклщуфЮ
урЬей
БцЮней велпнйЭт
ЗвельнбурЬей
ЧблбсЬ гбжйЬ
УпхсщмЭнет Ю
жбсщмЭнет сбцЭт
Бнпмпйьмпсцб
гбжйЬ,
бнпмпйьмпсцз
рспюизуз
З мзчбнЮ кЬней
иьсхвп
З мзчбнЮ
мрлькбсе
БйфЯб
1. З клщуфЮ ден Эчей ресбуфеЯ ущуфЬ уфз мзчбнЮ.
2. З Энфбуз фзт клщуфЮт еЯнбй рплэ уцйкфЮ.
3. З клщуфЮ еЯнбй рплэ чпнфсЮ гйб фз вельнб.
4. З вельнб ден Эчей фпрпиефзиеЯ ущуфЬ.
5. З клщуфЮ Эчей фхлйчфеЯ гэсщ брь фпн реЯсп хрпдпчЮт
кпхвбсЯуфсбт.
6. З вельнб Эчей кбфбуфсбцеЯ.
1. З убАфб ден Эчей фпрпиефзиеЯ ущуфЬ.
2. Фп рЭсбумб фзт клщуфЮт уфзн убАфб еЯнбй лЬипт.
3. З Энфбуз фзт кЬфщ клщуфЮт еЯнбй рплэ уцйкфЮ.
1. З вельнб ден Эчей фпрпиефзиеЯ ущуфЬ.
2. З вельнб Эчей кбфбуфсбцеЯ.
3. ЧсзуймпрпйеЯфе лЬипт мЭгеипт вельнбт.
4. Фп рпдбсЬкй ден Эчей рспубсмпуфеЯ ущуфЬ.
1. З вельнб Эчей кбфбуфсбцеЯ.
2. З вельнб ден Эчей фпрпиефзиеЯ ущуфЬ.
3. ЧсзуймпрпйеЯфе лЬипт мЭгеипт вельнбт гйб фп эцбумб.
4. ¸чей фпрпиефзиеЯ лЬипт рпдбсЬкй рЯеузт.
1. Фп рЭсбумб фзт клщуфЮт уфз мзчбнЮ ден Эчей гЯней
ущуфЬ.
2. Фп рЭсбумб клщуфЮт уфз убАфб еЯнбй лЬипт.
3. П ухндхбумьт вельнбт / хцЬумбфпт / клщуфЮт еЯнбй
лЬипт.
4. ЛЬипт Энфбуз клщуфЮт.
1. З вельнб еЯнбй рплэ чпнфсЮ гйб фп эцбумб.
2. Фп мЮкпт велпнйЬт Эчей схимйуфеЯ лЬипт.
3. З Энфбуз клщуфЮт еЯнбй рплэ уцйкфЮ.
1. КбкЮ рпйьфзфб клщуфЮт.
2. Фп рЭсбумб клщуфЮт уфз убАфб еЯнбй лЬипт.
3. Фп эцбумб Эчей фсбвзчфеЯ.
1. ¸чей мбжехфеЯ лЬдй уфп Ьгкйуфсп Ю уфп велпнпцьсп.
2. КбкЮ рпйьфзфб лбдйпэ.
3. З вельнб Эчей кбфбуфсбцеЯ.
З клщуфЮ кьрзке уфп Ьгкйуфсп.
Дйьсищуз
1. ОбнбресЬуфе фзн клщуфЮ уфз мзчбнЮ.
2. Мейюуфе фзн Энфбуз фзт клщуфЮт (чбмзльфеспт бсйимьт).
3. ЕрйлЭофе мегблэфесз вельнб
4. БцбйсЭуфе кбй ербнбфпрпиефЮуфе фз вельнб (з рлбфйЬ рлехсЬ рспт фб
рЯущ).
5. БцбйсЭуфе фп кбспэлй кбй фхлЯофе фзн клщуфЮ рЬнщ уфп кбспэлй.
6. БнфйкбфбуфЮуфе фз вельнб.
1. БцбйсЭуфе кбй ербнбфпрпиефЮуфе фз убАфб кбй фсбвЮофе рспт фб рЬнщ
фзн клщуфЮ. З клщуфЮ иб рсЭрей нб фсбвйЭфбй еэкплб.
2. ЕлЭгофе фп мбупэсй кбй фз убАфб.
3. Чблбсюуфе фзн Энфбуз фзт кЬфщ клщуфЮт ьрщт ресйгсЬцефбй.
1. БцбйсЭуфе кбй ербнбфпрпиефЮуфе фз вельнб (з рлбфйЬ рлехсЬ рспт фб
рЯущ).
2. ФпрпиефЮуфе нЭб вельнб.
3. ЕрйлЭофе мйб вельнб рпх нб фбйсйЬжей ме фп эцбумб кбй фзн клщуфЮ.
4. ЕлЭгофе кбй рспубсмьуфе ущуфЬ.
1. ФпрпиефЮуфе нЭб вельнб.
2. БцбйсЭуфе кбй ербнбфпрпиефЮуфе фз вельнб (з рлбфйЬ рлехсЬ рспт фб
рЯущ).
3. ЕрйлЭофе мйб вельнб рпх нб фбйсйЬжей ме фп эцбумб кбй фз клщуфЮ.
4. ЕрйлЭофе фп ущуфь рпдбсЬкй рЯеузт.
1. ЕрйлЭофе фп рЭсбумб фзт клщуфЮт.
2. РесЬуфе фзн клщуфЮ уфз убАфб ьрщт брейкпнЯжефбй.
3. Фп мЭгеипт фзт вельнбт иб рсЭрей нб фбйсйЬжей ме фп эцбумб кбй фзн
клщуфЮ.
4. Дйпсиюуфе фзн Энфбуз фзт клщуфЮт.
1. ЕрйлЭофе мйб рйп лерфЮ вельнб.
2. ЕрбнбсхимЯуфе фп мЮкпт велпнйЬт.
3. Чблбсюуфе фзн Энфбуз фзт клщуфЮт.
1. ЕрйлЭофе клщуфЮ кблэфесзт рпйьфзфбт.
2. БцбйсЭуфе фз убАфб, ресЬуфе фзн клщуфЮ кбй фпрпиефЮуфе фз ущуфЬ.
3. Нб мзн фсбвЬфе фп эцбумб кбиют сЬвефе, бцЮуфе фп нб фп фсбвЬ з
мзчбнЮ мьнз фзт .
1. КбибсЯуфе фп Ьгкйуфсп кбй фб дьнфйб ьрщт ресйгсЬцефбй.
2. ЧсзуймпрпйеЯфе мьнп кблЮт рпйьфзфбт лЬдй мзчбнЮт.
3. БнфйкбфбуфЮуфе фз вельнб.
БцбйсЭуфе фзн рЬнщ клщуфЮ кбй фз убАфб, гхсЯуфе фз чейспкЯнзфз сьдб
мрспт кбй рЯущ ме фп чЭсй кбй бцбйсЭуфе фзн клщуфЮ. ЛйрЬнефе ьрщт
уфзн ресйгсбцЮ.
52
Page 60

Please note that on disposal, this product must be safely recycled in accordance with relevant
National legislation relating to electrical/electronic products. If in doubt please contact your
retailer for guidance.
Veuillez noter qu'en cas de destruction, ce produit doit b n ficier d'un recyclage s curis ,
conforme la l gislation nationale applicable aux produits lectriques/ lectroniques. En cas
de doute, veuillez contacter votre distributeur agr .
àé é é
éé
éé é é
Фп рспъьн ден рсЭрей нб рефбчфеЯ мбжЯ ме фб пйкйбкЬ брпссЯммбфб бллЬ рсЭрей нб рбсбдпиеЯ
уе Энб кбфЬллзлп узмеЯп ухллпгЮт злекфсйкпэ кбй злекфспнйкпэ хлйкпэ рспт бнбкэклщуз.
Гйб рйп ресйууьфесет рлзспцпсЯет учефйкЬ ме фзн брьссйшз фзт рблйЬт убт ухукехЮт,
ерйкпйнщнЮуфе ме фп бсмьдйп фпрйкь гсбцеЯп, хрзсеуЯб дйЬиеузт пйкйбкюн брпссйммЬфщн Ю
фп мбгбжЯ брь фп прпЯп бгпсЬубфе фп рспъьн.
VELLANIS B. BROS S.A.
HEAD OFFICES
112 Tatoiou str., 144 52 Metamorfosi, Athens, Greece,
T: +30 210 5138141, F: 210 5136148
SERVICE / PARTS
62 Dirrahiou str., 104 43 Sepolia, Athens, Greece,
T: +30 210 5136851
www.singer.gr
SINGER France SAS
27 31 rue d'Arras, 92022 NANTERRE CEDEX , France
T: 01 41 91 65 65, F: 01 41 91 65 90
www.singerfrance.com
БЦПЙ В.ВЕЛЛБНЗ Б.Е.В.Е
ФбфпАпх 112, 144 52, Мефбмьсцщуз, БиЮнб
ÅÄÑÁ:
Ô: 210 5138141, F: 210 5136148
КЕНФСЙКП SERVICE :
Лещц.ДхссбчЯпх 62, 10443, Уерьлйб, БиЮнб
Ô: 210 5136851
БНФБЛЛБКФЙКБ / БНБЛЩУЙМБ :
Лещц.ДхссбчЯпх 62, 10443, Уерьлйб, БиЮнб
Ô: 210 5137553
021V4E0108
SINGER (83E0)/A5
( ) Jan/11
2259
 Loading...