

Page 1
MODEL CSP1
COMPACT STEAM PRESS™1
MODEL CSP1 Instruction Manual
Page 2

MODEL CSP1
TABLE OF CONTENTS
Important Safeguards
Special Instruction
Getting to Know the Compact Steam press
How to Operate the Compact Steam Press
Before Plugging into Outlet
Filling the Water Tank
Turning on the Press
Temperature Selection
Cleaning the Compact Steam Press
Pressing Selections
Fabric Tips
Buttons, Zippers, Etc.
Additional Steam Pressing Methods
Using the Pressing Cushion
Applications
Shirts and Blouses
Steam Control
Pressing
Orientation Change of Pressing Plate
and Ironing Board
When Pressing is Finished
Pants
Pleated Skirts
Curtains
Other Applications
Troubleshooting
Page 3

MODEL CSP1
THE COMPACT STEAM PRESS 1
Congratulations!
You have made the right decision in purchasing this
STEAM PRESS.
The scope of this manual covers the installation and
operation of Singer's COMPACT STEAM PRESS
CSPI. For the best performance of this piece of
precision engineered equipment, a section has been
devoted to its maintenance as well as a
troubleshooting section.
No special skill is needed to operate the COMPACT
STEAM PRESS 1. Simply read through the following
instructions and learn how to operate the Press. In
addition, you will find many useful tips on how to
obtain the best possible results.
Copyright 1993
by the Singer Sewing Company
All rights reserved throughout the world.
The manufacturer reserves the right to change the
appearance, design, or accessories of the Compact
Stream Press 1 as considered necessary without any
notification or obligation.
Remember to choose a spot that is free from dust,
moisture and direct sunshine. For the ease of
operation, you should locate this equipment close to a
power outlet.
03
Page 4

MODEL CSP1
IMPORTANT SAFEGUARDS
SAVE THESE INSTRUCTIONS
When using your Compact Steam Press 1, the
following safety precautions should be followed.
1. Read all instructions.
2. Use Compact Steam Press 1 only for its intended
use.
3. Before Plugging in the Compact Steam Press 1, be
sure the electrical information on the label on the base
agrees with your power supply.
4. To protect against risk of electric shock, do not
immerse the press in water or other liquids.
5. The Compact Steam Press 1 should always be
turned OFF before plugging into or unplugging from
electrical outlet. Never yank cord to disconnect from
outlet; instead, grasp plug and pull to disconnect.
10. Close supervision is necessary for any appliance
being used by or near children. Do not leave Compact
Steam Press 1 unattended while connected to power
supply.
11. When not in use, keep the Pressing Plate and
Ironing Board locked together with the Locking Knob.
12. To avoid a circuit overload, do not operate another
high wattage appliance on the same circuit.
13. If the extension cord is absolutely necessary, a 10
Ampere (for 220/240V appliances) or a 15 Ampere
(for 120V) cord should be used. Cord rated for less
amperage may overheat. Care should be taken to
arrange the cord so that it cannot be pulled or tripped
over.
14. Accessible parts of housing will get warmer than
140 Degrees F (60 Degrees C).
6. Do not allow cord to touch hot surfaces. Loop cord
loosely and store in base of press. Let Compact
Steam Press 1 cool completely (at least 30 minutes)
before putting away.
7. Always disconnect press from electrical outlet when
filling with or emptying water. Be careful to avoid
spilling water over press when filling.
8. Always disconnect press from electrical outlet when
not in use.
9. Do not operate Compact Steam Press 1 with a
damaged cord or if the Press has been dropped or
damaged. To avoid the risk of electric shock do not
disassemble the Compact Steam Press 1; take it to an
authorized Singer Service Center for examination and
repair. Incorrect reassembly can cause risk of electric
shock.
04
15. It is important that this appliance be grounded
(earthed).
16. Burns can occur from touching hot metal parts,
hot water, or steam.
17. Pressing Plate is very hot. Always cool down the
Pressing Plate before changing the Pressing Plate
orientation.
In areas with hard water, use distilled water when
possible to extend the life of your press. Do not use
perfumed products or products containing alcohol,
they will deteriorate your press. Do not use defrosted
water from the refrigerator.
Special Instructions
Page 5
MODEL CSP1
GETTING TO KNOW THE
COMPACT STEAM PRESS
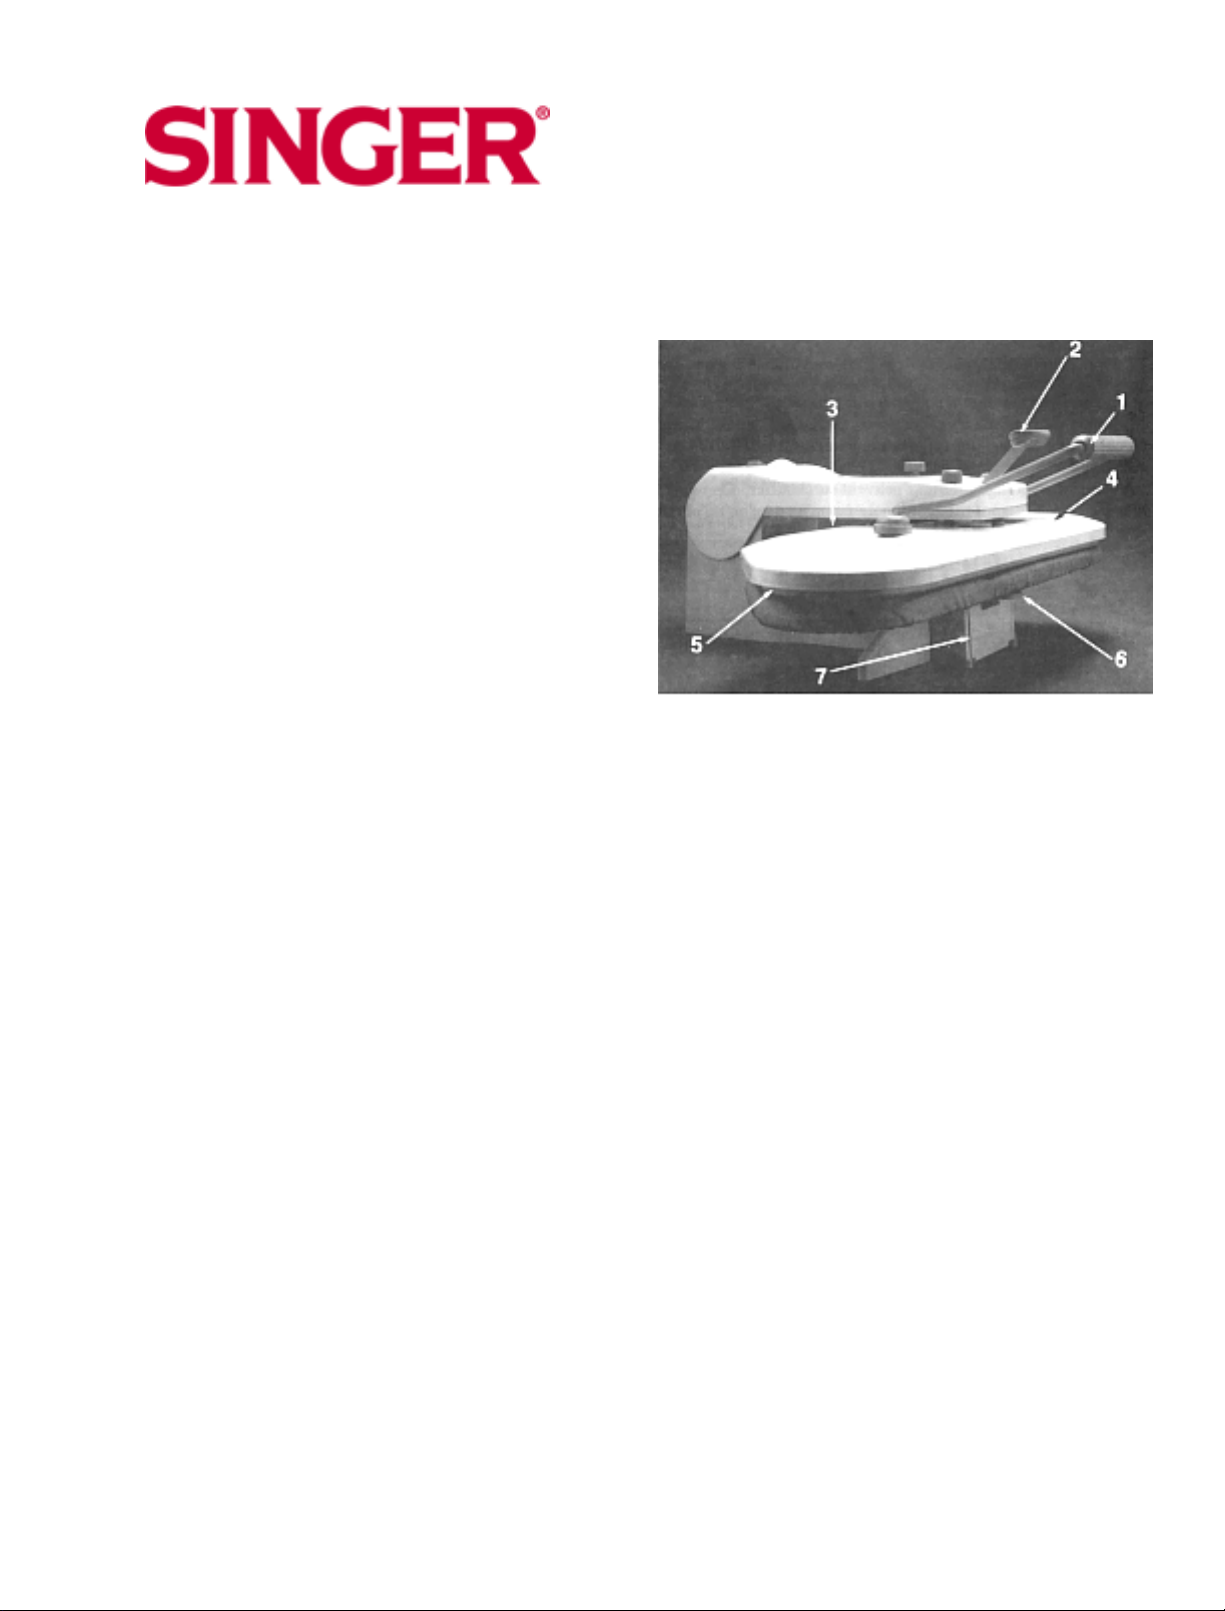
I. PRESSING HANDLE. Use for raising and lowering
the pressing plate. For Automatic Maximum Pressure:
with the Pressing Plate against the Ironing Board,
continue lowering the handle until it reaches its lowest
position. When the Pressing Plate and Ironing board
are locked together with the locking Knob, use the
Handle to carry the Press.
2. BURST OF STEAM HANDLE. Produces an extra
burst of steam during steam pressing. May also be
used during dry pressing.
3. DRAIN KNOB. Allows for easy draining of the
Water Tank.
4. PRESSING PLATE. Temperature controlled
surface for heating and pressing fabric.
5. IRONING BOARD. The padded surface that holds
your fabric during pressing.
6. ORIENTATION CHANGE LEVER. Press to release
the Ironing Board.
7. BASE WITH RUBBER FEET. Provides a stable
platform for the Compact Steam Press 1.
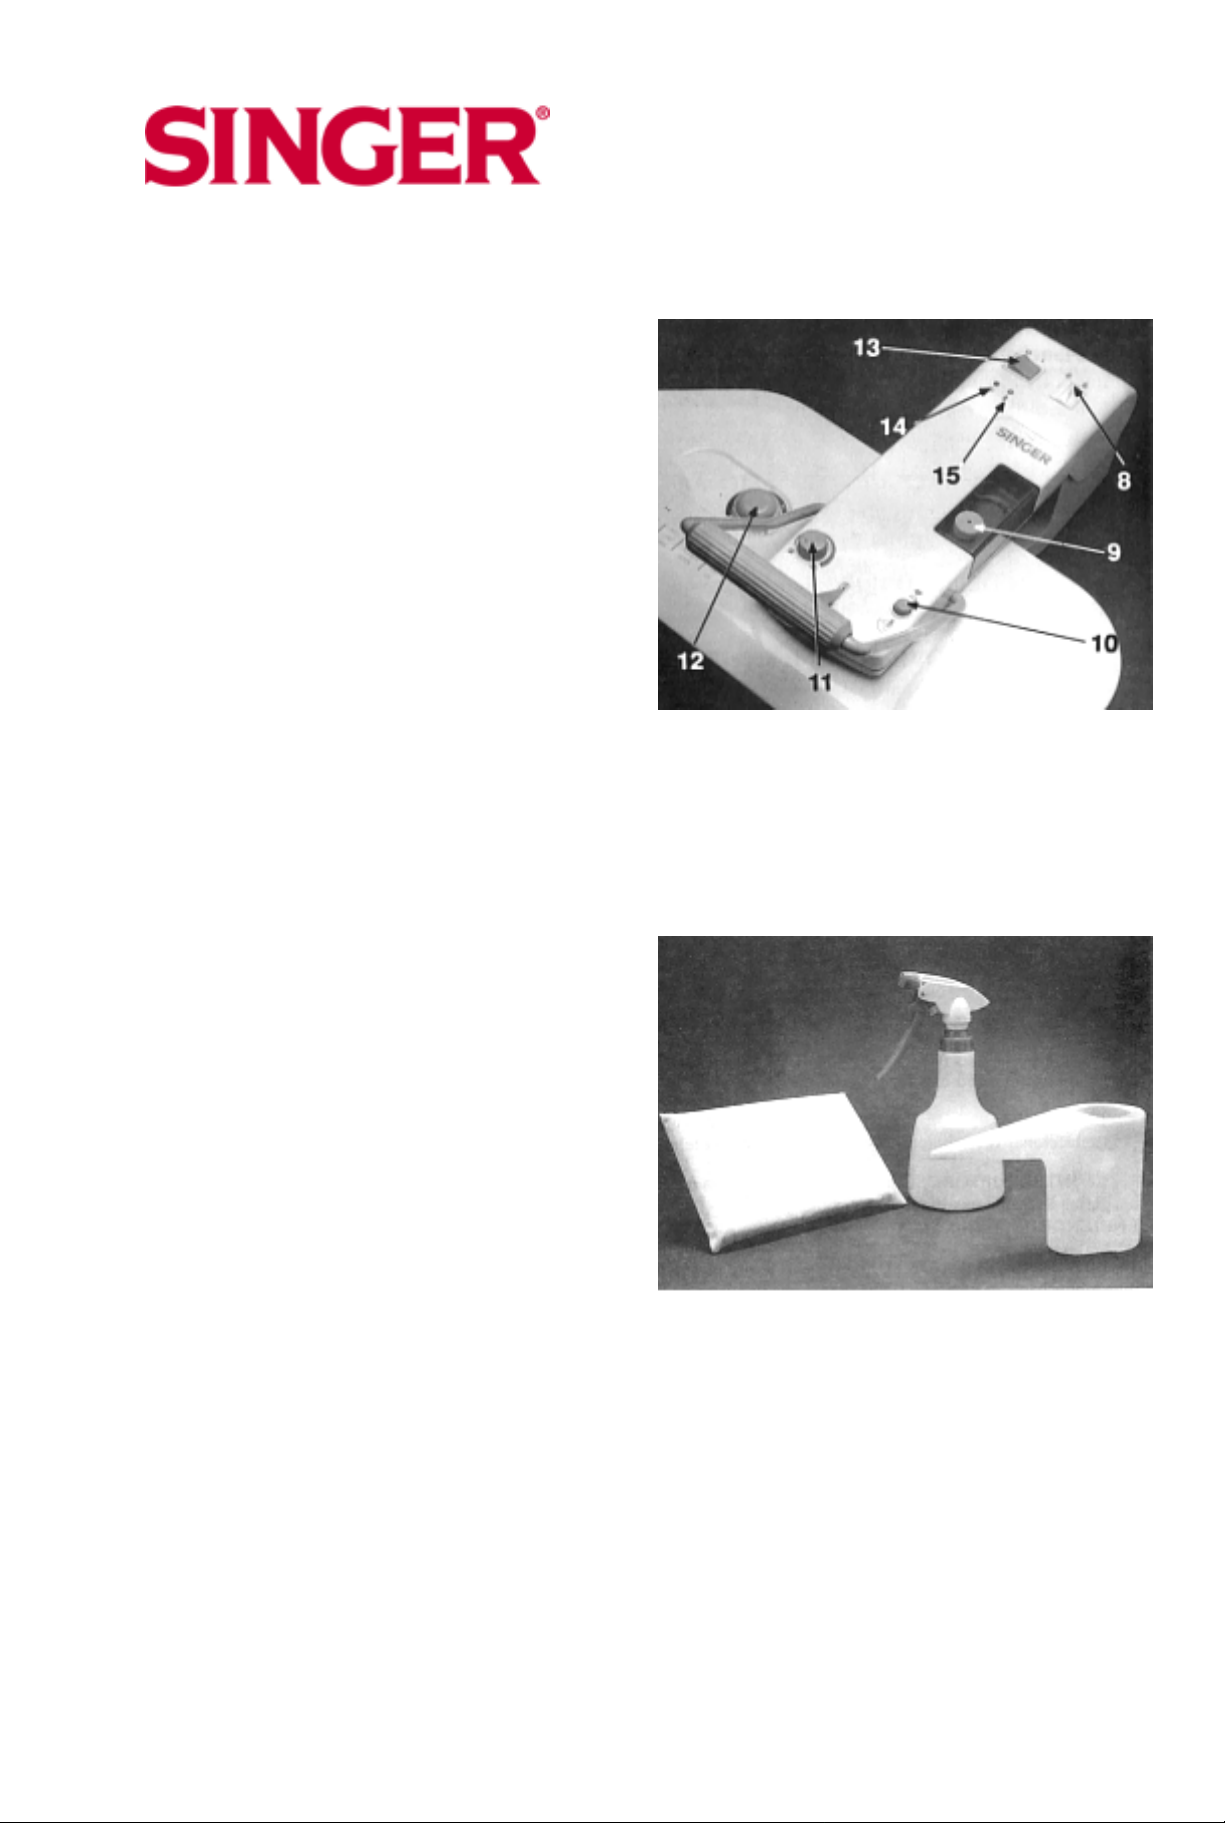
8. LOCKING KNOB. Lower the Pressing Handle to its
lowest position (Automatic Maximum Pressure
position). Put Locking Knob to the locked position to
hold the Pressing Plate and Ironing Board together.
Use when moving or storing the Press.
9. WATER TANK FILL HOLE AND CAP. Remove cap
to fill water tank.
10. ORIENTATION CHANGE BUTTON. Press down
and then turn the Pressing Plate through 90 degrees.
05
Page 6
MODEL CSP1
11. STEAM CONTROL. Turn dial to set steam amount
- no steam through maximum.
12. TEMPERATURE CONTROL DIAL. Turn to set the
Press' temperature for your fabric.
13. ON/OFF SWITCH. Push to turn the power ON (1)
or OFF (0).
14. POWER INDICATING LIGHT. A red light which
comes on when the switch is moved to the ON
position.
15. READY LIGHT. An yellow/orange light which
comes on when the Press has reached the selected
temperature.
16. PRESSING CUSHION. Fabric covered pad used
for pressing gathered or contoured areas such as
sleeves, darts, and yokes.
17. SPRAY BOTTLE. Plastic water bottle for
dampening fabric before pressing.
18. WATER CONTAINER. Use for filling and emptying
the Water tank.
19. IRONING BOARD COVER. Removable and
washable for extended life.
A multi function safety feature. Turns off electrical
power to the press when the Pressing Plate has been:
- left against the Ironing Board for more than 30
Automatic Safety Shutoff Switch
seconds
or
- left in the open position without use for about 15
minutes.
To turn power back on, press the ON/OFF Switch to
the OFF (0) position and then back to ON (1). Raising
and lowering the Pressing Plate will also turn power
back on.
06
Page 7
MODEL CSP1
HOW TO OPERATE
THE COMPACT STEAM PRESS
1. Before Plugging into Outlet
Check the voltage printed on the bottom of the Press
to be sure it is the same as your line voltage.
Place Compact Steam Press 1 on a firm level
surface.
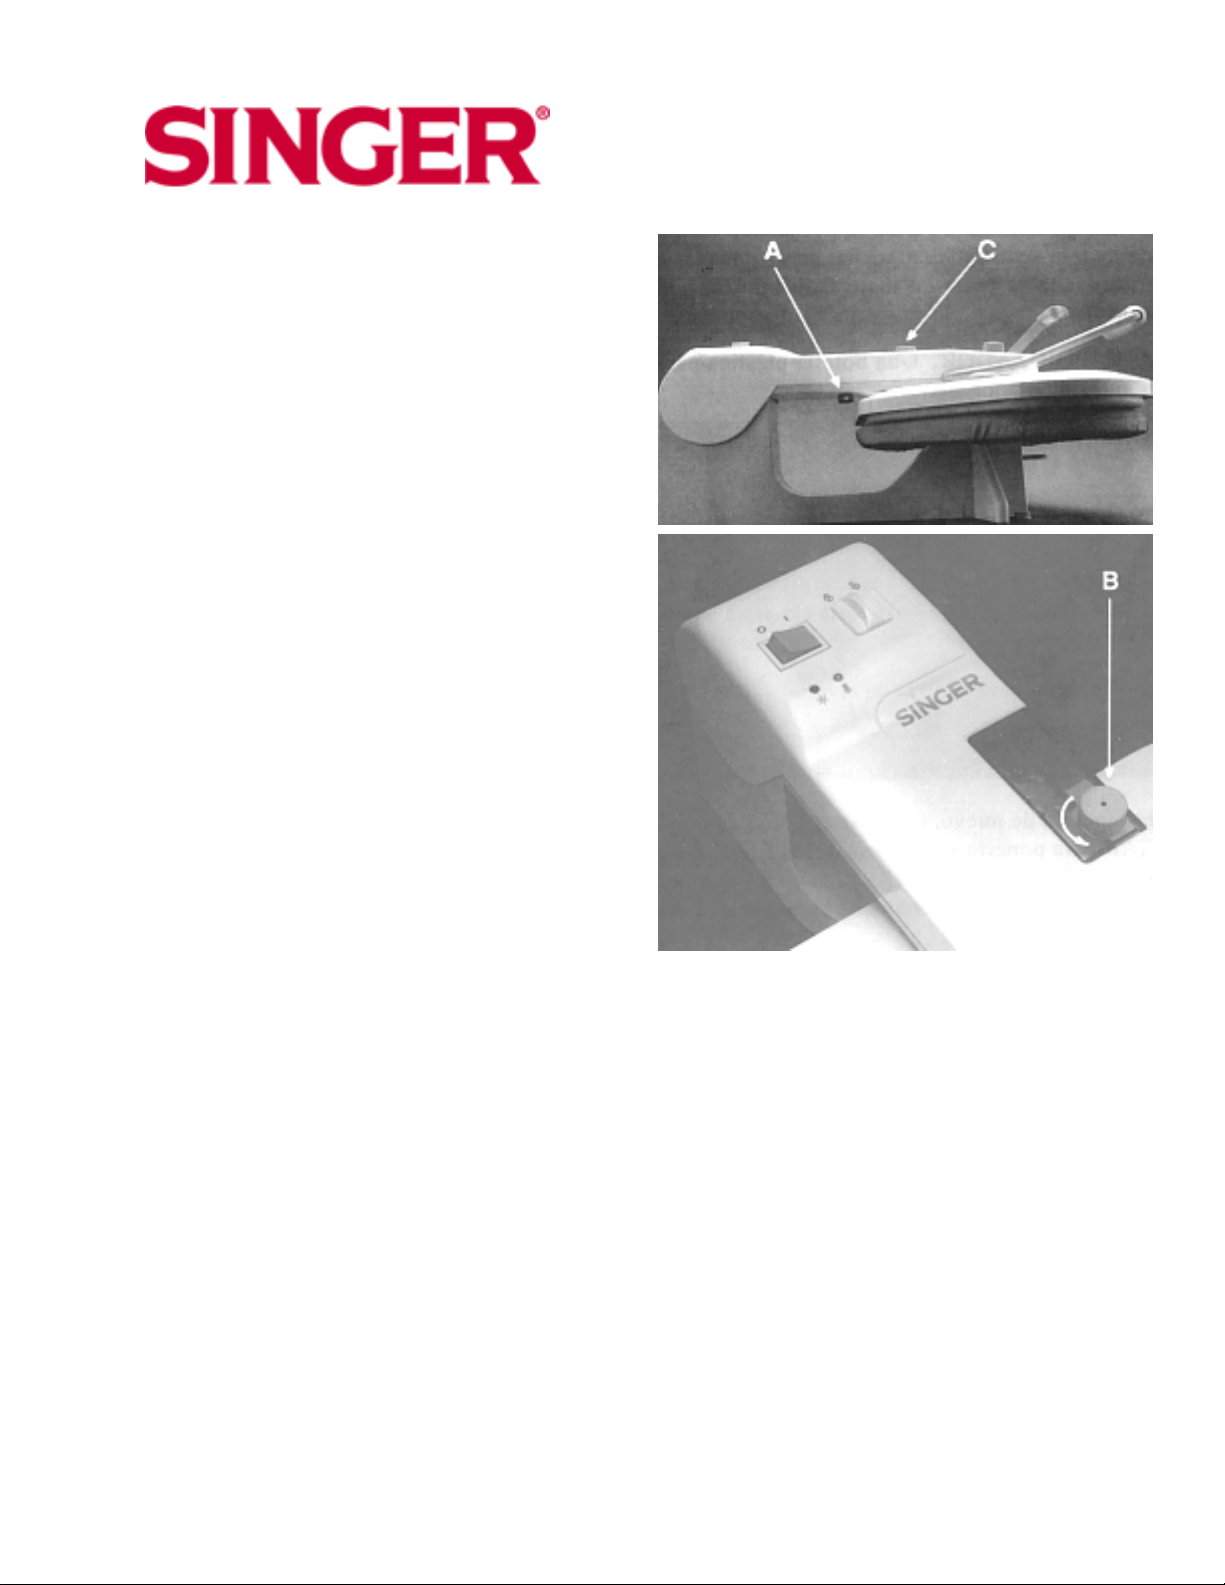
2. Filling the Water Tank
CAUTION: Always disconnect press from electrical
outlet when filling with or empty water. Fill the Water
Tank with the ironing arm in the raised position. Be
careful to avoid spilling water over press when filling.
Make sure the Drain is closed by plugging in the Drain
Knob 'A' in the direction of the arrow.
Unscrew Water Tank Cap 'B' in the direction of the
arrow and remove.
Using the Water Container, slowly pour up to 2/3 cups
(150cc) of water into the Water Tank Fill Hole 'C'.
Replace Tank Cap and tighten.
07
Page 8

MODEL CSP1
3. Turning on the Press
Check the voltage printed on the bottom of the Press
to be sure it is same as your power outlet.
Check to make sure the ON/OFF Switch 'A' is in the
OFF position by pressing the side of the switch
labeled '0'.
Unlock the Pressing Plate and Ironing Board by
sliding Locking Knob 'B' to the open position.
Grasp the Pressing Handle and lift the Pressing Plate
to the full open position.
Rotate the pressing Plate from storage position to
ironing position by pressing the Orientation Change
Button 'C'.
Rotate the Ironing Board from Storage position to
ironing position by pressing the Orientation Change
Lever 'D'.
Plug the power cord into the power outlet.
Switch on the press by moving the ON/OFF Switch to
the ON position by pressing the side of the switch
labeled '1'.
The red Indicator LED will light.
08
Page 9

MODEL CSP1
4. Temperature Selection
Turn the Temperature Control Dial 'A' until the arrow points to the number of
dots which correspond to your fabric. (Compare garment label to Fabric
Chart 'B'. If your are unsure of the fiber content of your fabric, try a low
setting first and gradually increase until the desired results are obtained.)
After several minutes the Ready Light 'C' will come on. This indicates that
the pressing Plate temperature has increased to the selected setting.
NOTE: The Pressing Plate must be in the up position until it reaches the
selected temperature.
If you have decreased the temperature setting, allow the Pressing Plate to
cool before pressing. Wait for the Ready Light to relight at the new setting. It
is for this reason that we recommend pressing fabrics which require low
temperatures first (NYLON) and gradually increasing the temperature as
needed.
09
Page 10

MODEL CSP1
5. Steam Control
For steam pressing, turn Steam Control 'A' clockwise.
The farther
the dial is moved in this direction, the more steam will
be produced.
Your Temperature Control Dial must be in the Steam
zone (4 dots or above) to produce steam.
NOTE: If this is the first time you are using the Press
after filling with water or after a long period of storage,
lift the Pressing Plate to the raised position and pump
the Burst of Steam Handle several times until steam
begins to flow.
For dry pressing, turn Steam Control 'A'
counterclockwise as far as it will go.
10
Page 11

MODEL CSP1
6. Pressing
Carefully spread the area to be pressed on the Ironing
Board removing all unwanted folds.
Grasp the Pressing Plate Handle 'A' and lower the
Pressing Plate 'B' on to the Ironing Board 'C'. If steam
has been selected, it will be pumped into and
absorbed by the fabric. You may:
leave the Pressing Plate in this position for light
pressing
for heavier pressure, push down on the Handle until it
moves into its lowest position (Automatic Maximum
Pressure position).
or
After a few seconds, lift the Handle to raise the
Pressing Plate.
Regardless of the Steam Control setting, you can
produce an extra Burst of Steam to remove stubborn
wrinkles. Simply lower the Pressing Plate against the
Ironing Board and press down on the Burst of Steam
Handle 'D' and release.
NOTE: The heater in the Pressing Plate will
automatically shutoff after approximately 30 seconds
with the Pressing Plate lowered against the Ironing
Board.
11
Page 12

MODEL CSP1
7. Orientation Change of Pressing Plate and
Ironing Board
For pressing wide and long clothing, press the
Orientation Change Button 'A' and turn the Pressing
Plate 'C' through 90 degrees.
Push down the Orientation Change Lever 'B' and turn
the Ironing Board 'D' through 90 degrees.
The Pressing Plate and the Ironing Board will be
automatically locked in the new position when the
Button and Lever are released.
CAUTION: Pressing Plate is very hot when ironing.
Always cool down the Pressing Plate before changing
the orientation.
12
Page 13

MODEL CSP1
8. When Pressing is Finished
Push ON/OFF Switch to OFF (0) position. The red
light will go out.
Disconnect plug from outlet.
CAUTION: Let the Compact Steam Press I cool
completely (at least 30 minutes) before continuing.
Drain the Water Tank if the Press will be stored:
* When the Press is cooled, remove the Water Tank
Cap and hold
* Water Container below Tank Drain 'A'.
* Remove Drain Knob by pulling out from water
container.
* When the water stops flowing, plug in the Drain
Knob and replace the Water Tank Cap.
Rotate the Pressing Plate and the Ironing Board
through 90 degrees.
Lower the Pressing Plate onto the Ironing Board and
push down the handle 'B' until it moves into the
Automatic Pressing Position.
Put the Locking Knob 'C' to the locked position. This
will prevent the Press from opening while being
moved or stored.
Store the press on Base or its end 'D'.
13
Page 14

MODEL CSP1
CLEANING THE COMPACT STEAM PRESS
Your Compact Steam Press 1 is virtually maintenance
free. However the following steps will extend the life of
the Press if performed occasionally.
1. To clean the Pressing Plate vents:
* Center the Pressing Cushion on the Ironing Board
as shown.
* Place a towel over the Pressing Cushion and Ironing
Board.
* Set the Steam Control and Temperature Control Dial
for maximum steam and temperature.
* When the Ready Light comes on, gently lower the
Pressing Plate onto the Pressing Cushion.
CAUTION: Burns can occur from touching the metal
parts, hot water or steam. Avoid contact with steam.
* Press down the Burst of Steam Handle 6 or 7 times.
2. Clean the Pressing Plate regularly with a damp
cloth. Do not use abrasive cleansers.
3. The Ironing Board Cover is easily removed for
washing.
14
Page 15

MODEL CSP1
PRESSING SUGGESTIONS
Fabric Tips
1. Always begin with the fabric requiring the lowest
temperature setting. In this way you will avoid waiting
for the unit to cool down.
2. You may find it desirable to place a press cloth
between your fabric and Pressing Plate.
3. Blends should be pressed on the temperature
setting for the lowest temperature fiber. If you are
unsure of the fiber content of your fabric, try a low
setting first and gradually increase until the desired
results are obtained.
Buttons, Zippers, Etc.
Most of today's buttons, zippers, and other notions
require no special attention. However, some may be
sensitive to heat. Care should be taken with items that
may melt. Place these items face down on the Ironing
Board or cover with a press cloth before pressing.
15
Page 16

MODEL CSP1
Additional Steam Pressing Methods
Some fabrics benefit from the use of moisture during
pressing. If you choose to set your Steam Control for
no steam, you have two other choices for steam
pressing:
1. Using the Spray Bottle, lightly spray entire garment
before placing on the Ironing Board or spray the area
to be pressed after it is positioned for pressing. (This
method may also be used for starch.)
2. Place a damp press cloth over the area to be
pressed.
In either case, press for a few seconds and then raise
Pressing Plate to allow steam to escape. Repeat until
the fabric is dry.
16
Page 17

MODEL CSP1
Using the Pressing Cushion
Certain garment construction details such as darts,
curved seams, and shoulder caps are not intended to
be pressed flat. A Pressing Cushion has been
supplied with your Press for use on these areas. Use
the Cushion whenever pressing areas where no
creases are desired and to shape tailored garments.
1. Place the area to be pressed on the Ironing Board.
2. Place Pressing Cushion under the dart, curved
seam, etc.
3. Lower Pressing Plate. Since the cushioned area is
raised, it is the only area which the Plate will contact.
4. Raise Pressing Plate after a few seconds.
IMPORTANT: The Pressing Plate and Ironing Board
cannot be locked for Automatic Maximum Pressure
position when using the Pressing Cushion. Attempting
to lock into Automatic Maximum Pressure position can
damage the Press.
17
Previous Page | Table of Contents | Back to Manual Index | Download Manual in PDF Format | Next Page
Page 18

MODEL CSP1
APPLICATIONS
The following pages will show you how to obtain the
best pressing results for a variety of common
applications.
When pressing large pieces of fabric, place entire
piece in the storage area behind the Ironing Board.
The area you want to press first should be on top.
Place this area on the Board and press. Continue to
the next area by pulling the fabric towards you.
A. Place shoulder yoke on Ironing Board as shown
and press
B. Place sleeves on Board with fold parallel to long
seam and press.
Shirts and Blouses
C. Place cuffs on end of Ironing Board. Press.
18
Previous Page | Table of Contents | Back to Manual Index | Download Manual in PDF Format | Next Page
Page 19

MODEL CSP1
Shirts and Blouses continued...
D. Place shirt into storage area and press the side
front including the placket. Pull the shirt towards you
and position the next area. Continue until the entire
body of the shirt has been pressed.
E. Place shoulder yoke flat on Board. Press to remove
crease formed in Step A.
F. Place collar right side up on the Ironing Board and
press.
19
Page 20

MODEL CSP1
Pants
A. Place Pressing Cushion under waistband and
press. Reposition waistband and continue until entire
waistband is pressed.
B. To press in-seam, place the Cushion under the
area to be pressed as shown. Press entire in-seam.
Repeat for other leg.
C. Front and back pleats are pressed using the same
technique: Fold one leg along crease line. Place on
Board as shown such that the seams will not be
pressed. Press crease. Long pants will require you to
repeat this step on the bottom of the leg.
20
Page 21

MODEL CSP1
Pleated Skirts
A. Place Pressing Cushion under waistband and
press. Reposition waistband and continue until entire
waistband is pressed.
B. Place pleated area on Ironing Board. Fold pleats
carefully and press. Continue with next pleated area
until all pleats are pressed.
21
Page 22

MODEL CSP1
Curtains
Rotate the Pressing Plate and Ironing Board through
90 degrees. Place curtain on Ironing Board as shown
and press. Continue until the entire body of the curtain
has been pressed.
These techniques can be used for a multitude of
items! Here are just a few suggestions for use of your
Compact Steam Press 1:
* Household Linens
* Garment Construction
Other applications
* Attaching Fusible Interfacing
* Dresses (use the pressing Cushion)
* Embroidery (place face down on Ironing Board)
22
Page 23

TROUBLESHOOTING
MODEL CSP1
Problem Cause
1. Press cannot be
opened using Pressing
Handle.
2. Pressing Plate
cannot be rotated.
3. Ironing Board cannot
be rotated.
4. Press becomes
warm but does not
remove wrinkles.
5. Press does not get
warm.
Locking Knob is in locked
position.
Orientation Change Button in
locked position.
Orientation Change Lever in
locked position.
Temperature setting is not hot
enough for fabric.
Temperature has not been
selected.
Press is not plugged into outlet.
Automatic Shutoff. Pressing Plate
has been lowered against Ironing
Board for 30 seconds or more
without being raised.
Remedy
Turn Locking Knob to open
position.
Press the Orientation Change
Button, rotate the pressing Plate.
Press the Orientation Change
Lever, rotate the Ironing Board.
Gradually increase temperature
until desired results are
obtained.
Turn Temperature Control Dial
to appropriate setting.
Connect Press to outlet.
Push ON/OFF Switch to OFF
(O) position and back to ON (1)
to turn Compact Press back on.
Keep Pressing Plate raised
during warm-up period.
Automatic Shutoff. Unit has not
been used for 15 minutes or
more
6. No steam. Water level is too low.
Controls have not been set
properly.
7. Water Drips from
Pressing Plate.
8. Pressing Handle will
not move into
Automatic Pressure
Position.
Temperature control Dial has not
been set properly.
Pressing Plate has not reached
steam temperature setting.
Item on pressing plate is too thick Use lighter pressure on thick
Push ON/OF Switch to OFF (O)
position and back to ON (1) to
turn Compact Press back on. If
necessary, allow Press to warmup to selected temperature.
Fill water tank.
Turn Temperature Control Dial
to steam zone.
Turn Steam Control in clockwise
direction.
Turn Temperature Control dial to
steam zone.
Wait for Ready Light.
items.
23
 Loading...