

Singer 90 Instruction Manual

çj
C
C
n
rn
o
z
cl
—-
—Th
---——
N
—
_
/
ir7
N
(j
Cj
z
I
-
I
r
/
___;
ThV
____——t
TABLE
OF
CONTENTS
Knowing
Using
Sewing
Your
ldentyfying
Converting
Bobbin
Threading-Top
the
to
Controls
parts
Free-arm
Thread
Machine
Sewing
2,3
4
5,6,7
8
Tension
Top
Bobbin
Checking
Reverse
Pressure
Darning
Sewing
Seam
Presser
Accessories
Needles
Needles
Needle,
Presser
Starting
Garment
Straight
Zig
Stretch
And
Control
Tension
Tensions
Stitch
Regulator
Plate
Light
Guide
Lever
Foot
Thread,
Feet
Sew
to
Construction
Stitching
Stitching
zag
Decorative
Adjusting.
Control
Fabric
Stitches
Stitches
Chart.
.9.10
11
12
13
14
15
15
16
16
17
17
18
19
20
21
21
Stretch
Stitch
Stitching
Stitch.
Stretch
Leaf
On
Sewing
Zigzag
Stretch
Stitch
Stretch
Or
Stitch
For
Stitch
Blind
Pine
Instruction
3-Step
Blindstitching
Stretchable
Straight
Rickrack
Smocking
Serging
Overcast
1
Buttonholes
Material
Stitching.
21
22
23
24
24
•
25
25
25
26
26
Special
Finsi
Special
Caring
Finish
Blind
Hemming
Satin
Stitching
Appliqueing
Button
Sewing,
Mending,
Zipper
Application
Free
Arm
Special
Stitches,
Checking
For
The
Cleaning
Oiling
in
Stitches
Bar
Darning
Sewing
Guidance
Performance
Machine
Feed
Dogs
Face
Cover
Tacking
Problem
And
Shuttle
Plate
On
Use
27
28
28
29
30
31
32
33,34
35,36
37
38
la
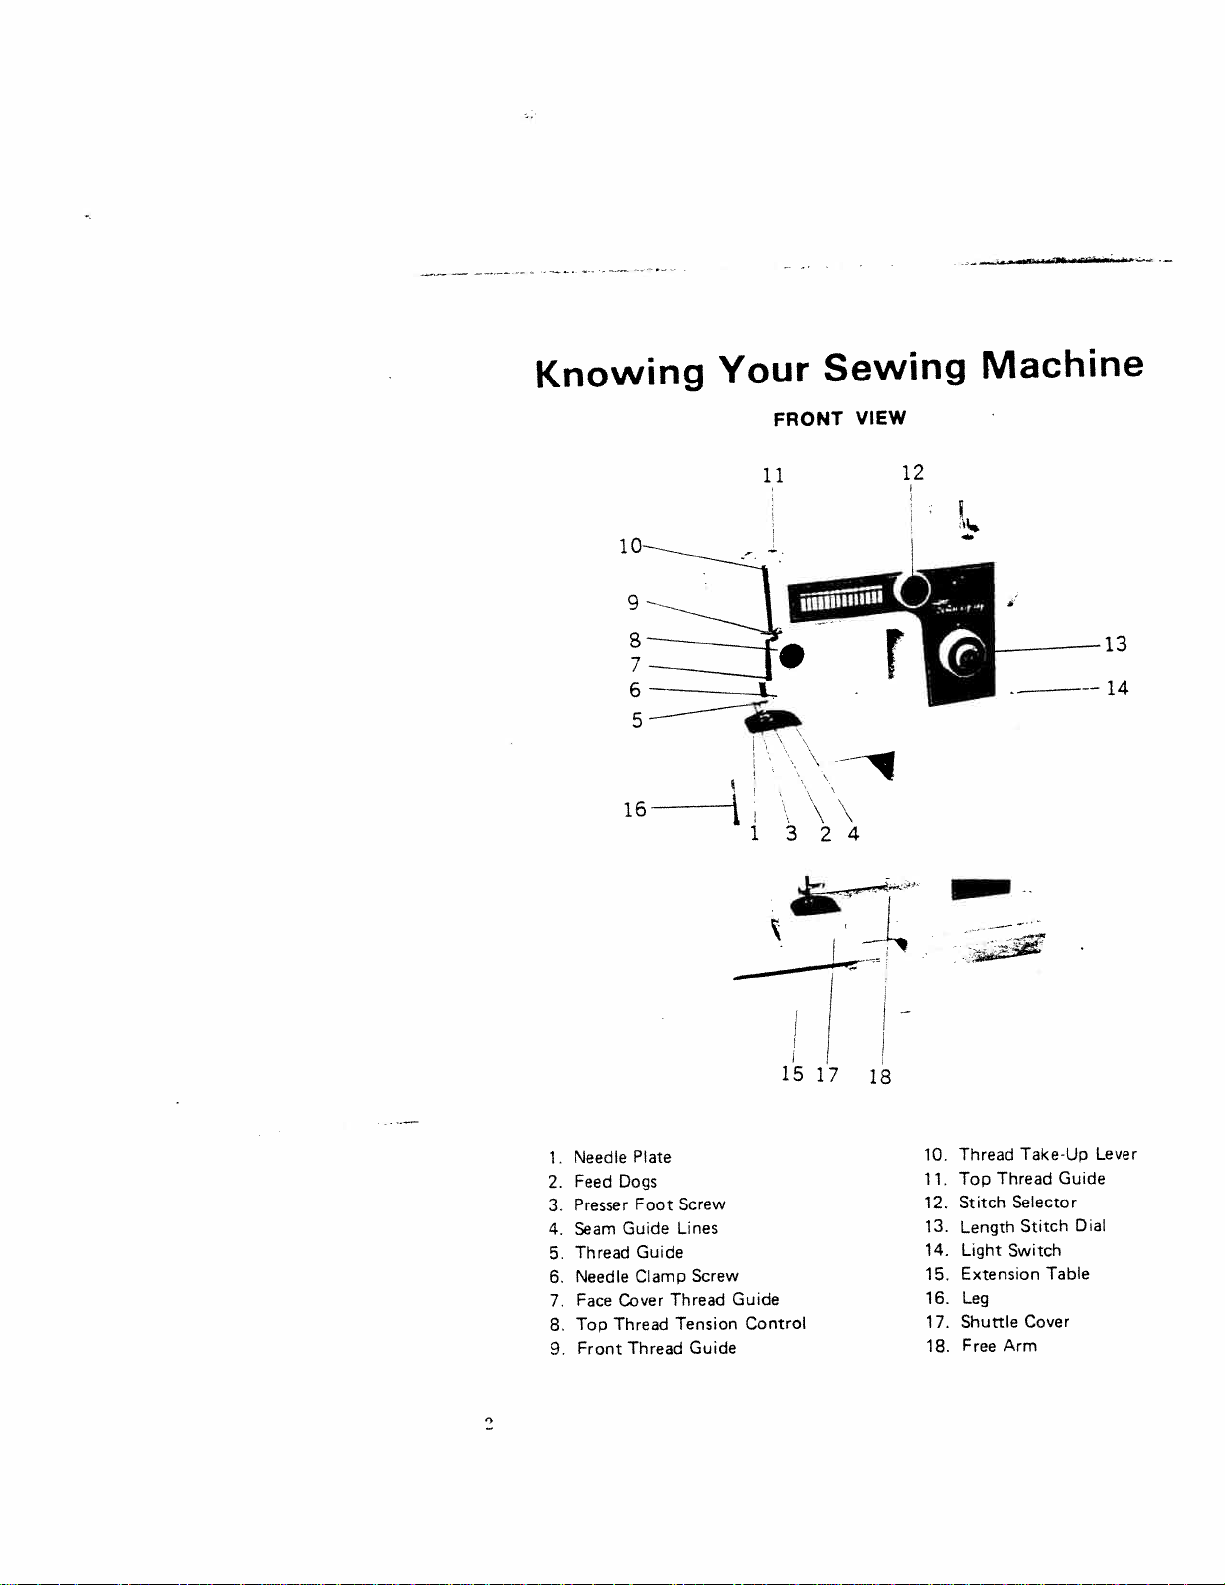
Knowing
Your
Sewing
Machine
10
16
9
6
5—
—_L
FRONT
1
1324
VIEW
-_-__—---—
13
.
.—--
14
1.
2.
3.
4.
5.
6.
7.
8.
9.
Needle
Feed
Presser
Seam
Thread
Needle
Face
Top
Front
Plate
Dogs
Foot
Guide
Guide
Clamp
Cover
Thread
Thread
Screw
Lines
Screw
Thread
Tension
Guide
Guide
Control
15
17
18
10.
11.
12.
13.
14.
15.
16.
17.
18.
Thread
Top
Thread
Selector
Stitch
Length
Light
Switch
Extension
Leg
Shuttle
Arm
Free
TakeUp
Guide
Stitch
Table
Cover
Lever
Dial
2O—.
19
2122
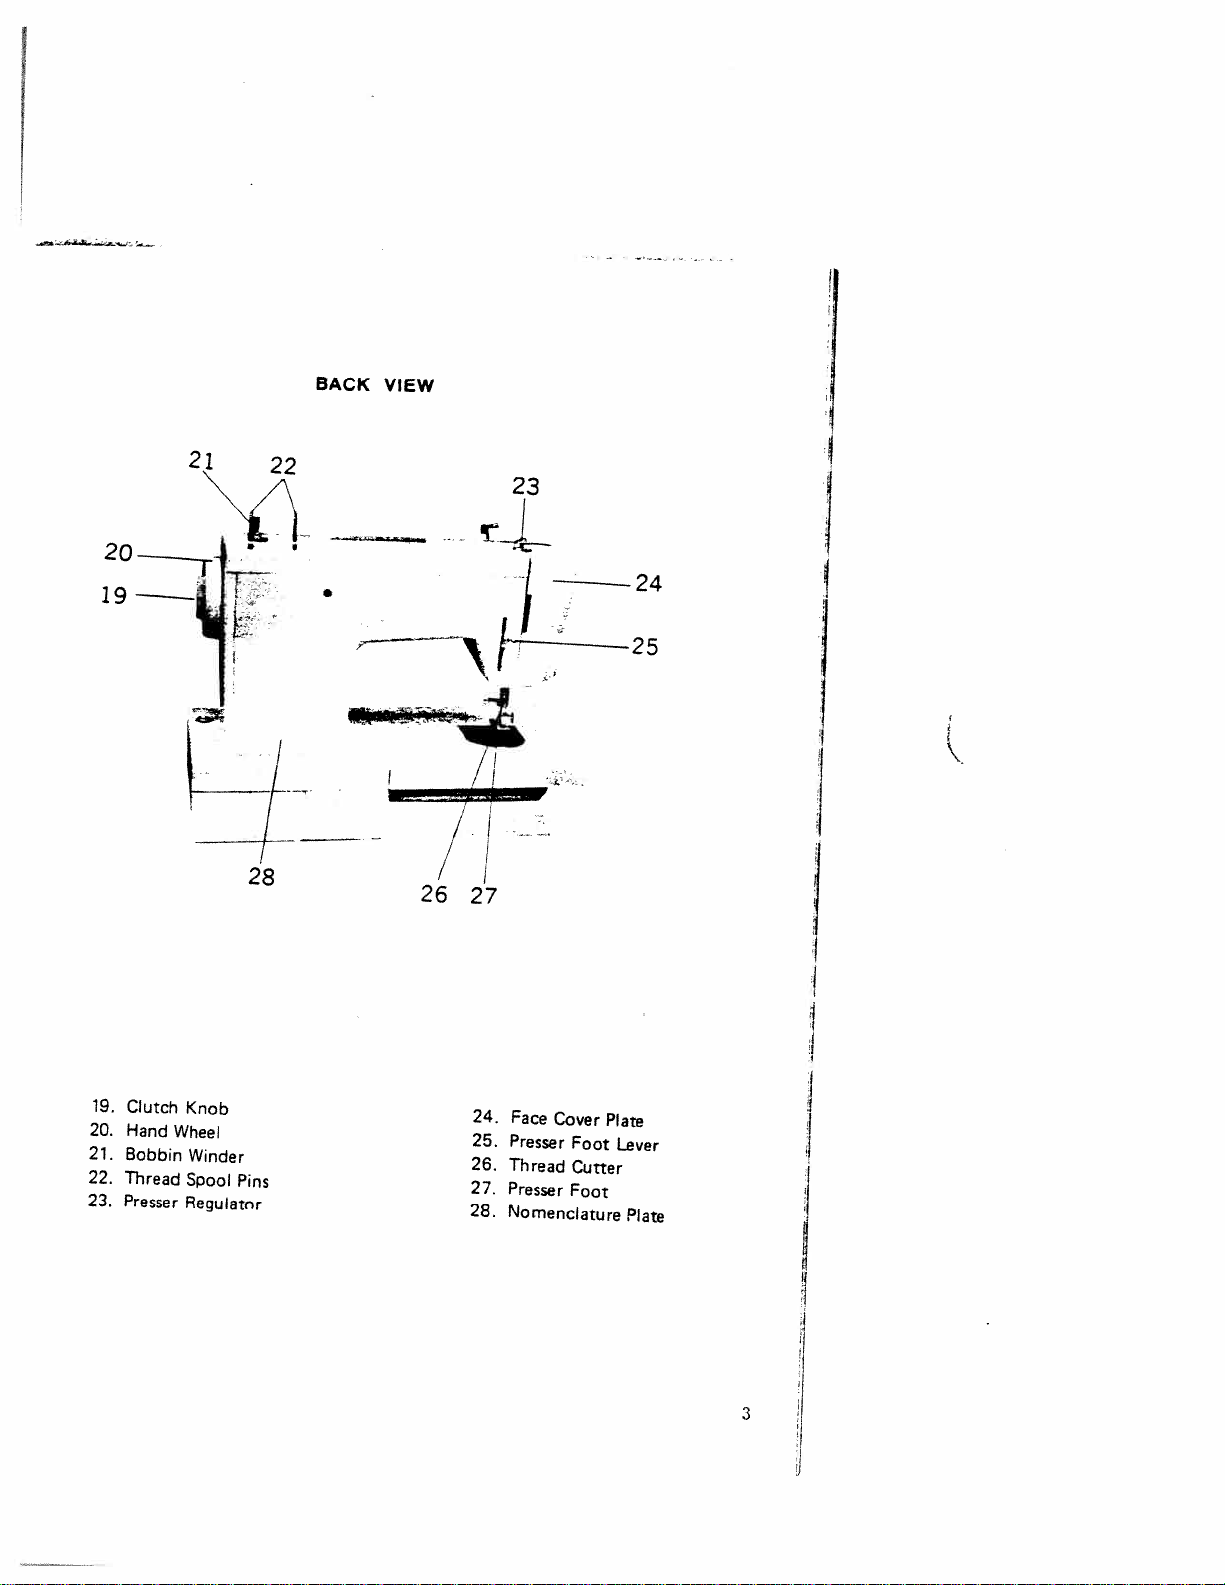
BACK
fr_
VIEW
26
24
27
19.
20.
21.
22.
23.
Clutch
Hand
Bobbin
Thread
Presser
Knob
Wheel
Winder
Spool
Regulatnr
Pins
24.
Face
25.
Presser
26.
Thread
27.
Presser
28.
Nomenclature
Cover
Foot
Cutter
Foot
Plate
Lever
Plate
3
ii
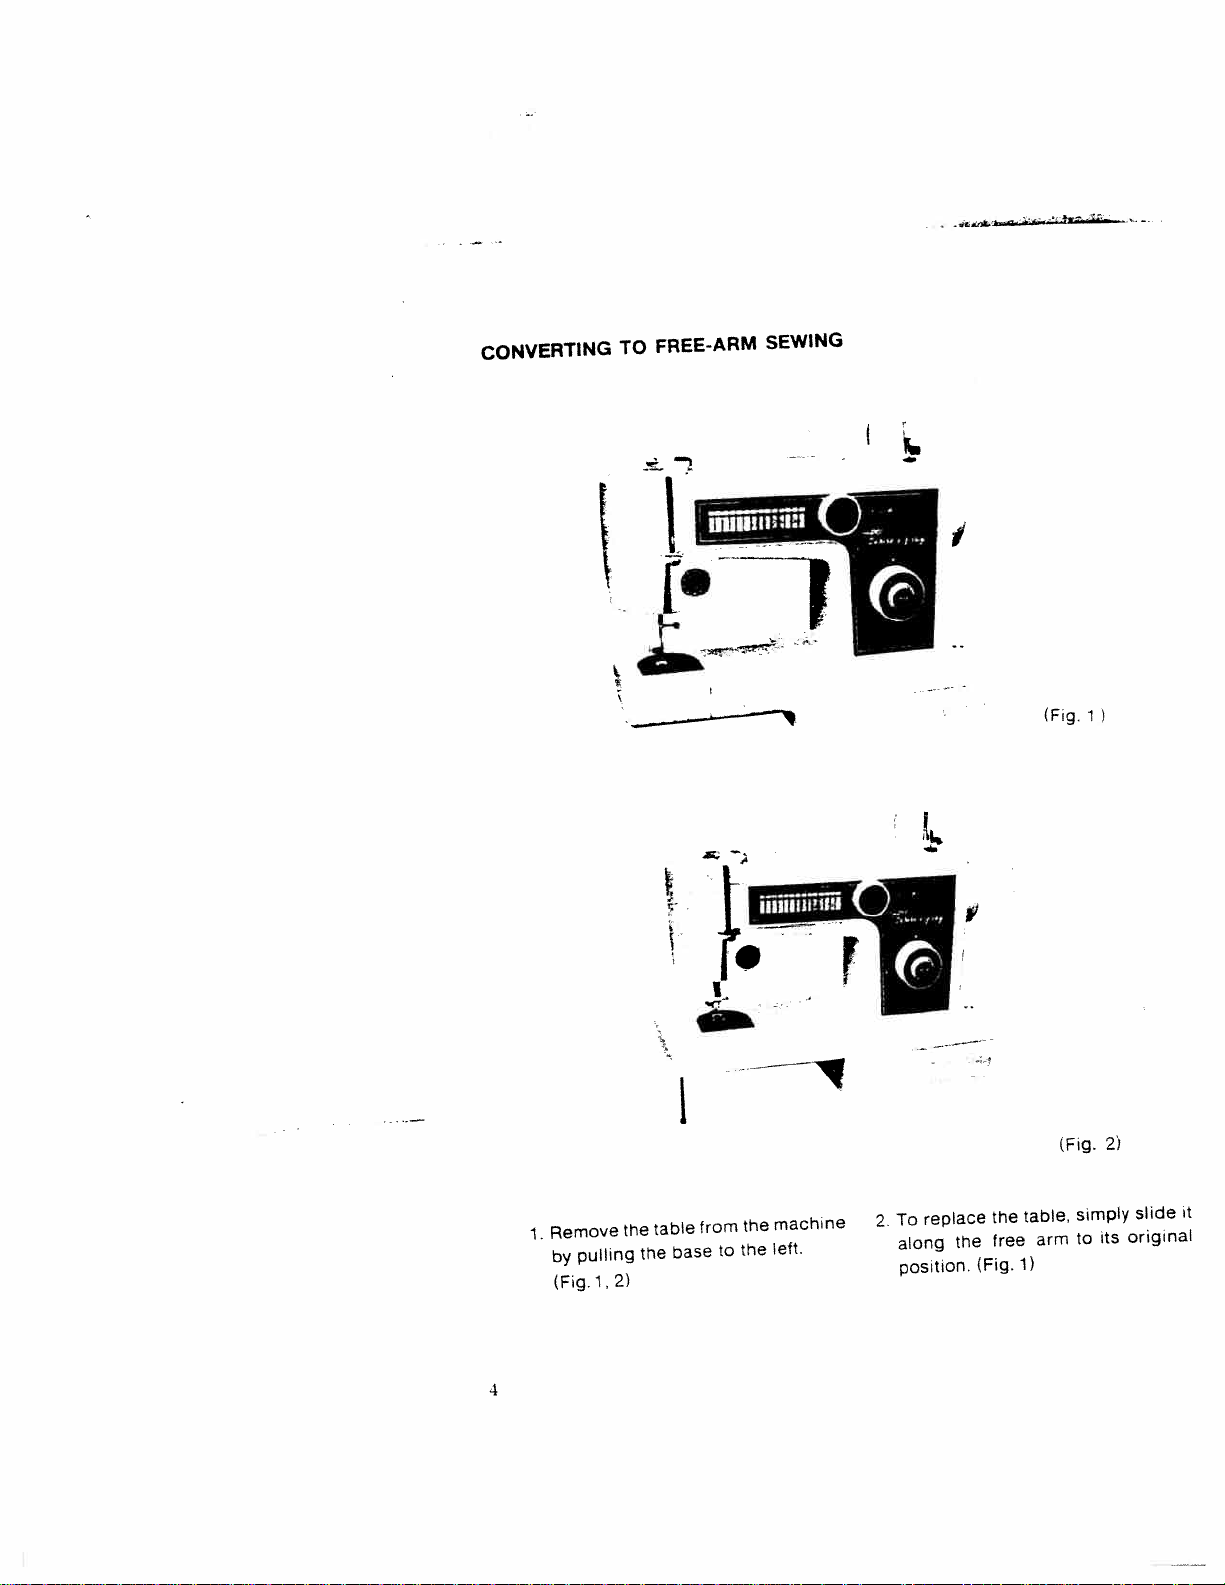
CONVERTING
FREE-ARM
TO
SEWING
1
Ii
(Fig.
1)
2)
(Fig.
it
its
slide
original
simply
table,
the
the
tree
(Fig.
to
arm
1)
replace
To
machine
the
from
table
pulling
the
base
the
2)
left.
the
tO
Remove
1.
by
(Fig1,
4
2.
along
position
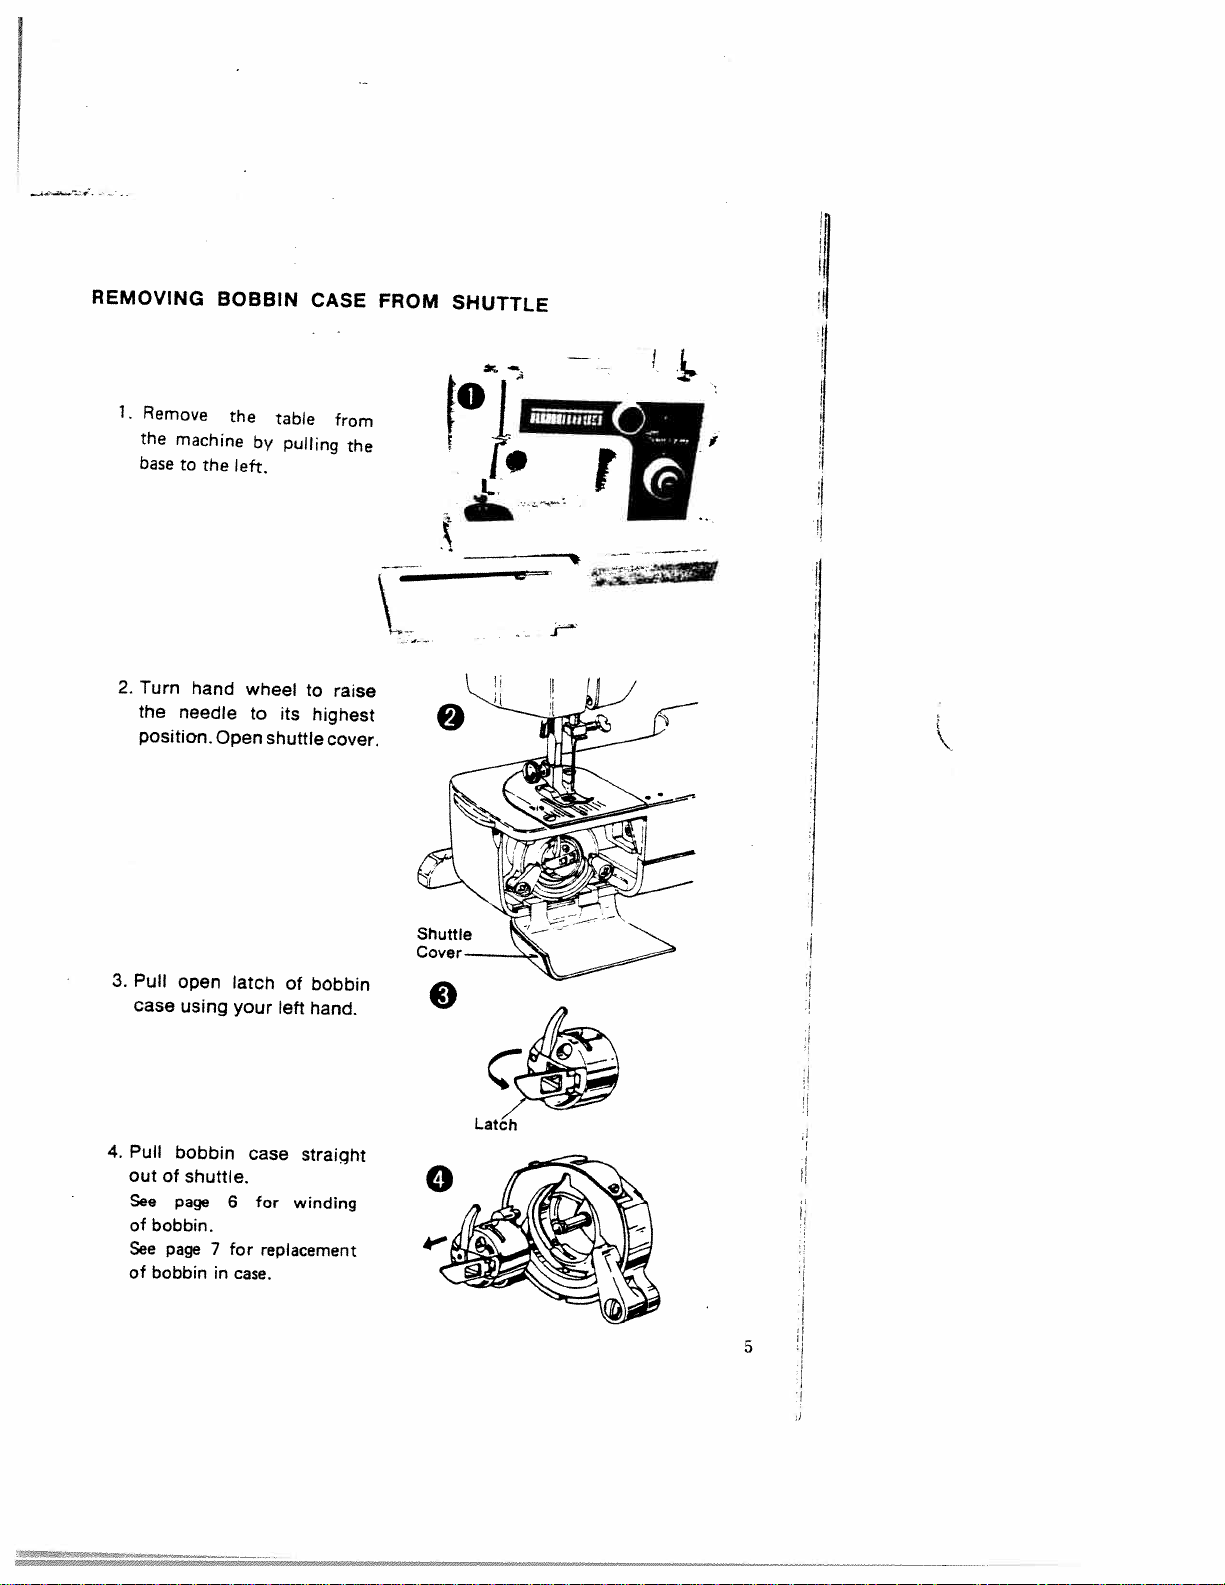
REMOVING
1.
Remove
the
machine
base
to
2.
Turn
the
needle
position.
BOBBIN
the
hand
Open
the
left.
by
wheel
to
shuttle
table
pulling
its
CASE
from
to
raise
highest
cover.
the
FROM
SHUTTLE
—=
Pull
3.
4.
case
Pull
out
See
of
See
of
open
using
bobbin
shuttle.
of
page
bobbin.
page
bobbin
latch
your
6
7
for
in
case.
of
left
case
straight
for
winding
replacement
bobbin
hand.
4-
0
0
a
Latch
5
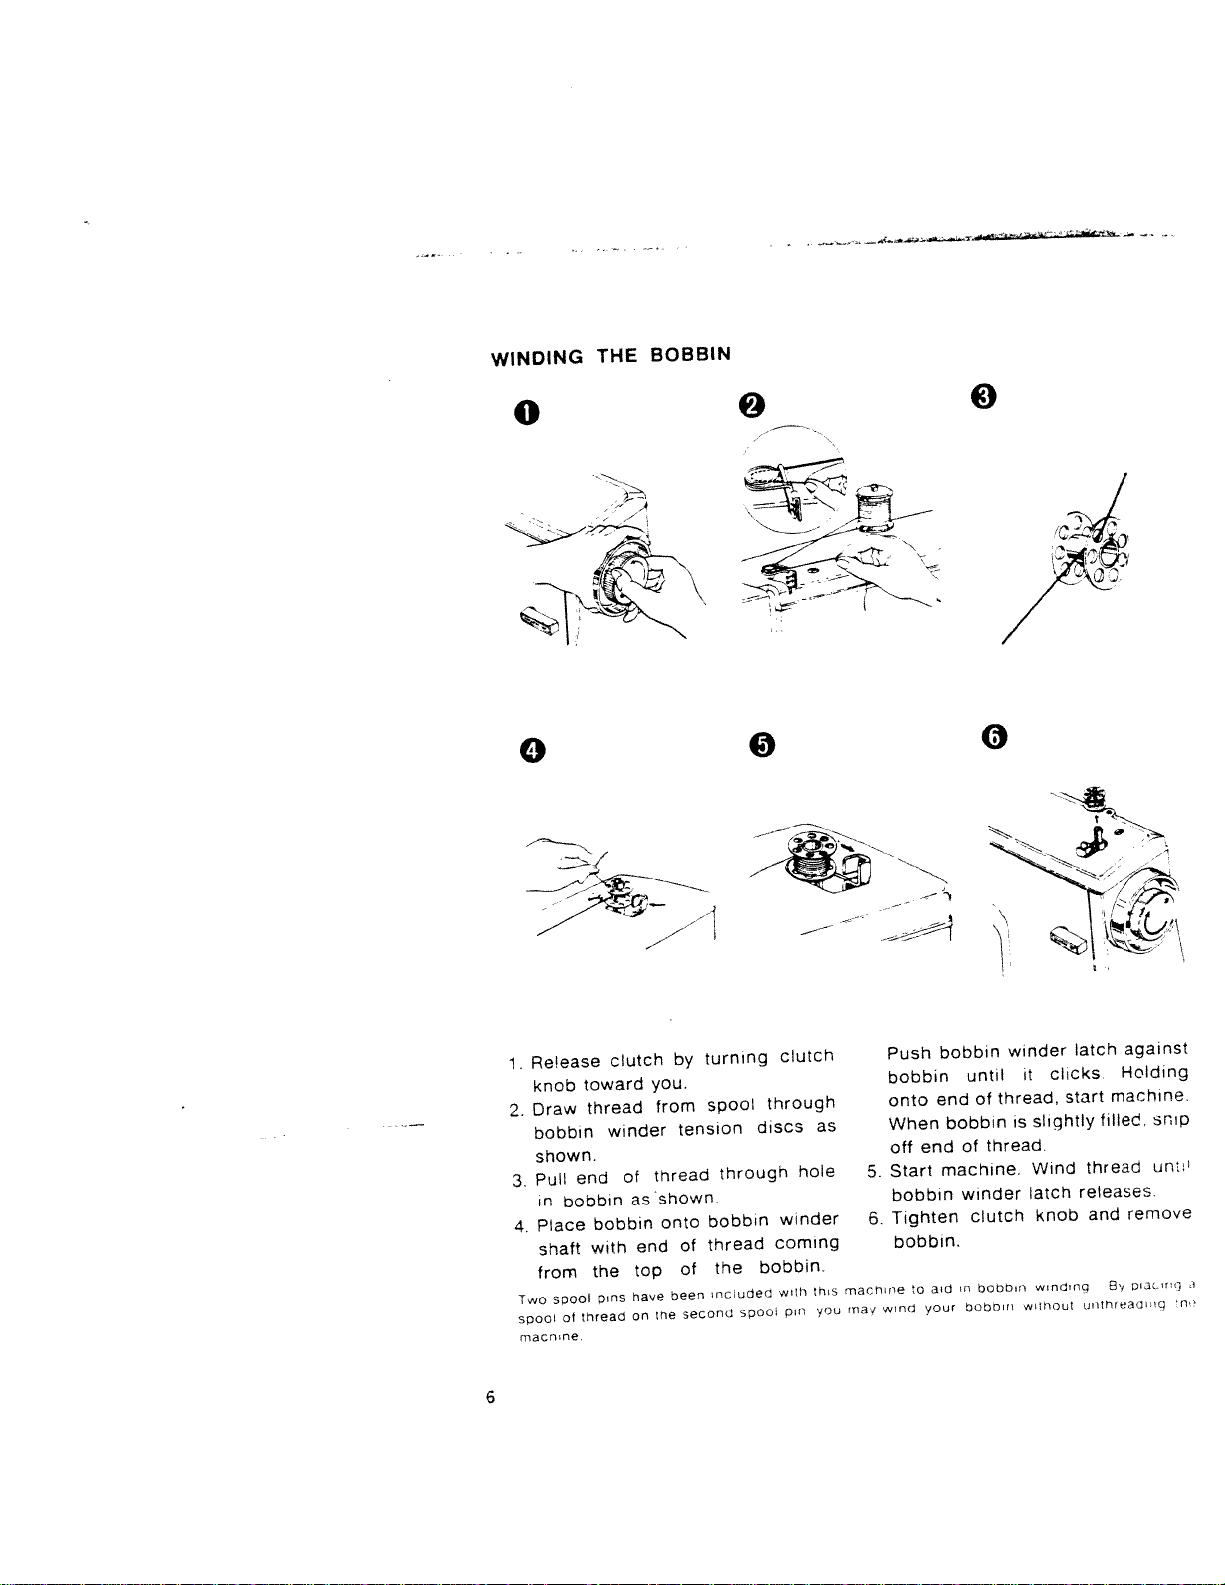
WINDING
THE
BOBBIN
0
0
t:’
0
_1_:
0
0
/
0
against
1
2.
3,
4.
Two
spooi
macn
Release
knob
Draw
bobbin
shown.
Pull
in
Oobbsn
Place
shaft
from
spool
ot
ne.
toward
thread
end
bobbin
with
the
pins
thread
clutch
winder
of
as
end
top
have
on
you.
from
thread
shown
onto
been
he
by
tension
of
of
second
turning
spool
through
bobbin
thread
the
ncudeO
sporu
clutch
through
discs
winder
coming
bobbin.
Nih
pin
hole
rhs
as
you
macrune
nay
5.
6.
Push
bobbin
onto
When
off
Start
bobbin
Tighten
bobbin.
to
wnd
bobbin
end
bobbin
end
machine.
aid
your
until
of
thread.
of
winder
clutch
in
bobbin
bobbin
winder
thread,
is
it
slightly
Wind
latch
knob
windinO
witnout
clicks
start
latch
machine.
filled,
thread
releases.
and
BY
untnraai’q
Holding
snip
univ
remove
diaciiii
.1
n
6
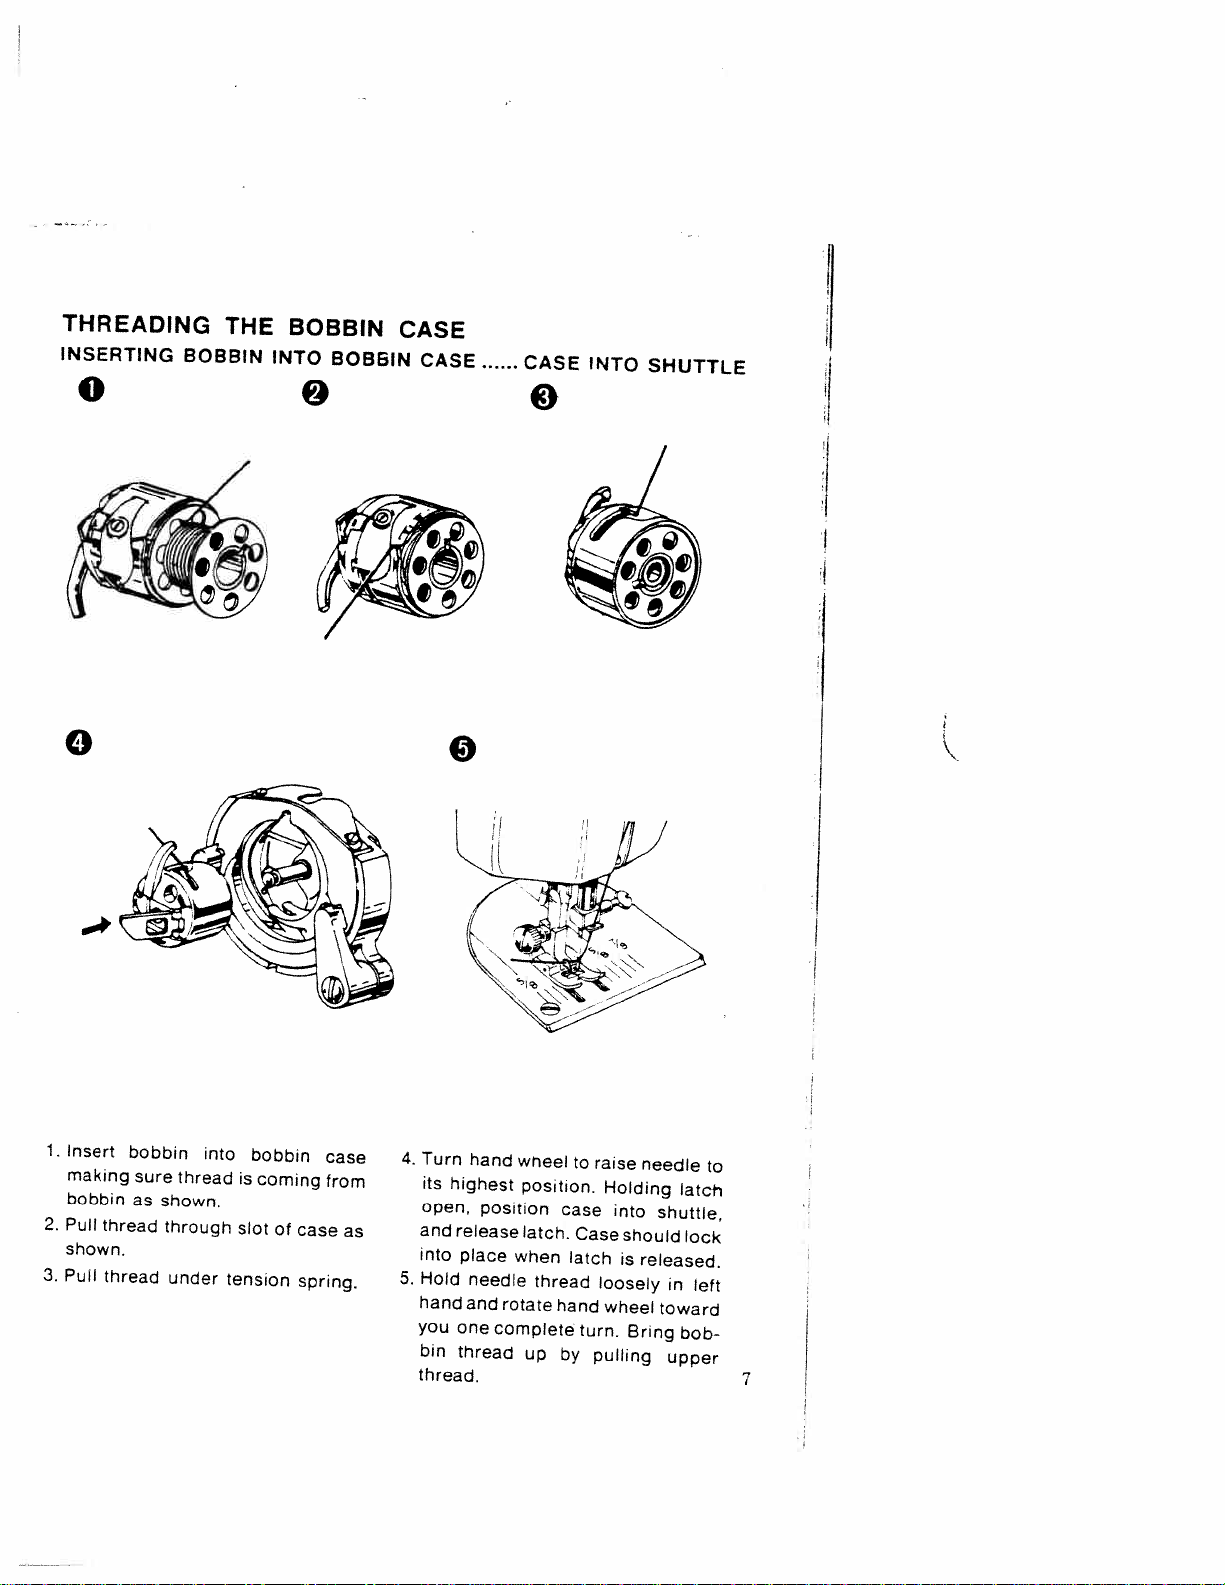
THREADING
INSERTING
0
THE
BOBBIN
BOBBIN
INTO
0
BOBBIN
CASE
CASE
......
CASE
INTO
SHUTTLE
0
1.
2.
3.
0
Insert
making
bobbin
Pull
shown.
Pull
bobbin
thread
thread
sure
as
thread
shown.
through
under
into
bobbin
is
coming
slot
tension
of
case
from
case
spring.
0
4.
Turn
hand
wrieel
to
raise
its
highest
open,
and
5.
into
Hold
hand
you
bin
thread,
release
place
one
thread
as
position
needle
and
position.
latch.
when
thread
rotate
complete
up
case
Case
latch
hand
turn.
by
Holding
into
should
is
loosely
wheel
pulling
needle
released.
Bring
latch
shuttle,
lock
in
toward
bob
upper
to
left
7
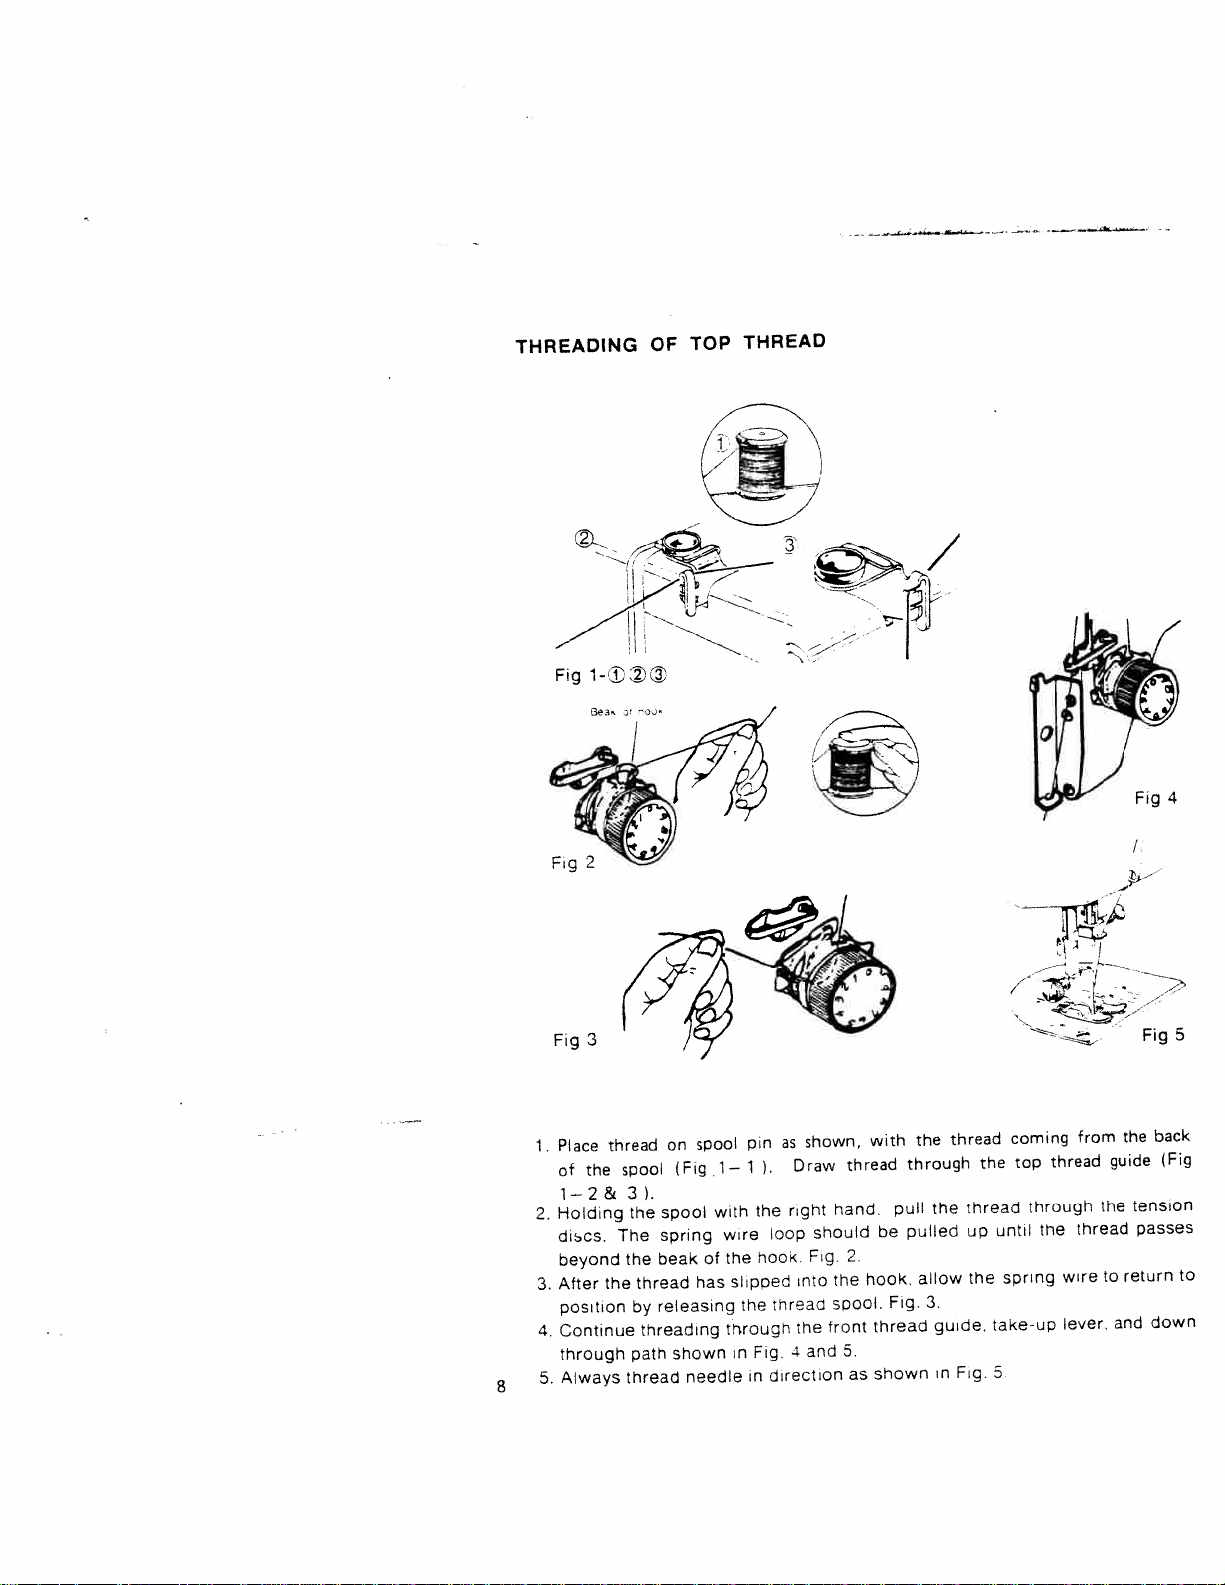
THREADING
OF
TOP
THREAD
/
the
to
the
guide
return
and
..
rig
back
(Fig
tension
passes
to
down
Y*L
Fi?
3
thread
through
the
wire
lever,
from
thread
thread
up
the
Fig.
the
until
take-up
5
coming
top
spring
thread
the
hand,
should
the
soool.
front
thread
2.
hook.
5.
as
with
be
Fig.
thread
shown
through
pull
pulled
the
allow
3.
guide.
in
shown,
as
pin
spool
spool
3).
the
The
the
thread
by
path
thread
on
(Fig
spool
spring
beak
releasing
threading
shown
needle
has
1—
with
of
1
the
wire
hooK.
the
slipoed
the
trwough
in
Fig.
in
Draw
).
right
loop
into
threac
the
.i
direction
Fig.
and
thread
Place
1.
of
the
1—2&
Holding
2.
discs.
beyond
the
After
3.
position
4.
Continue
through
Always
5.
8
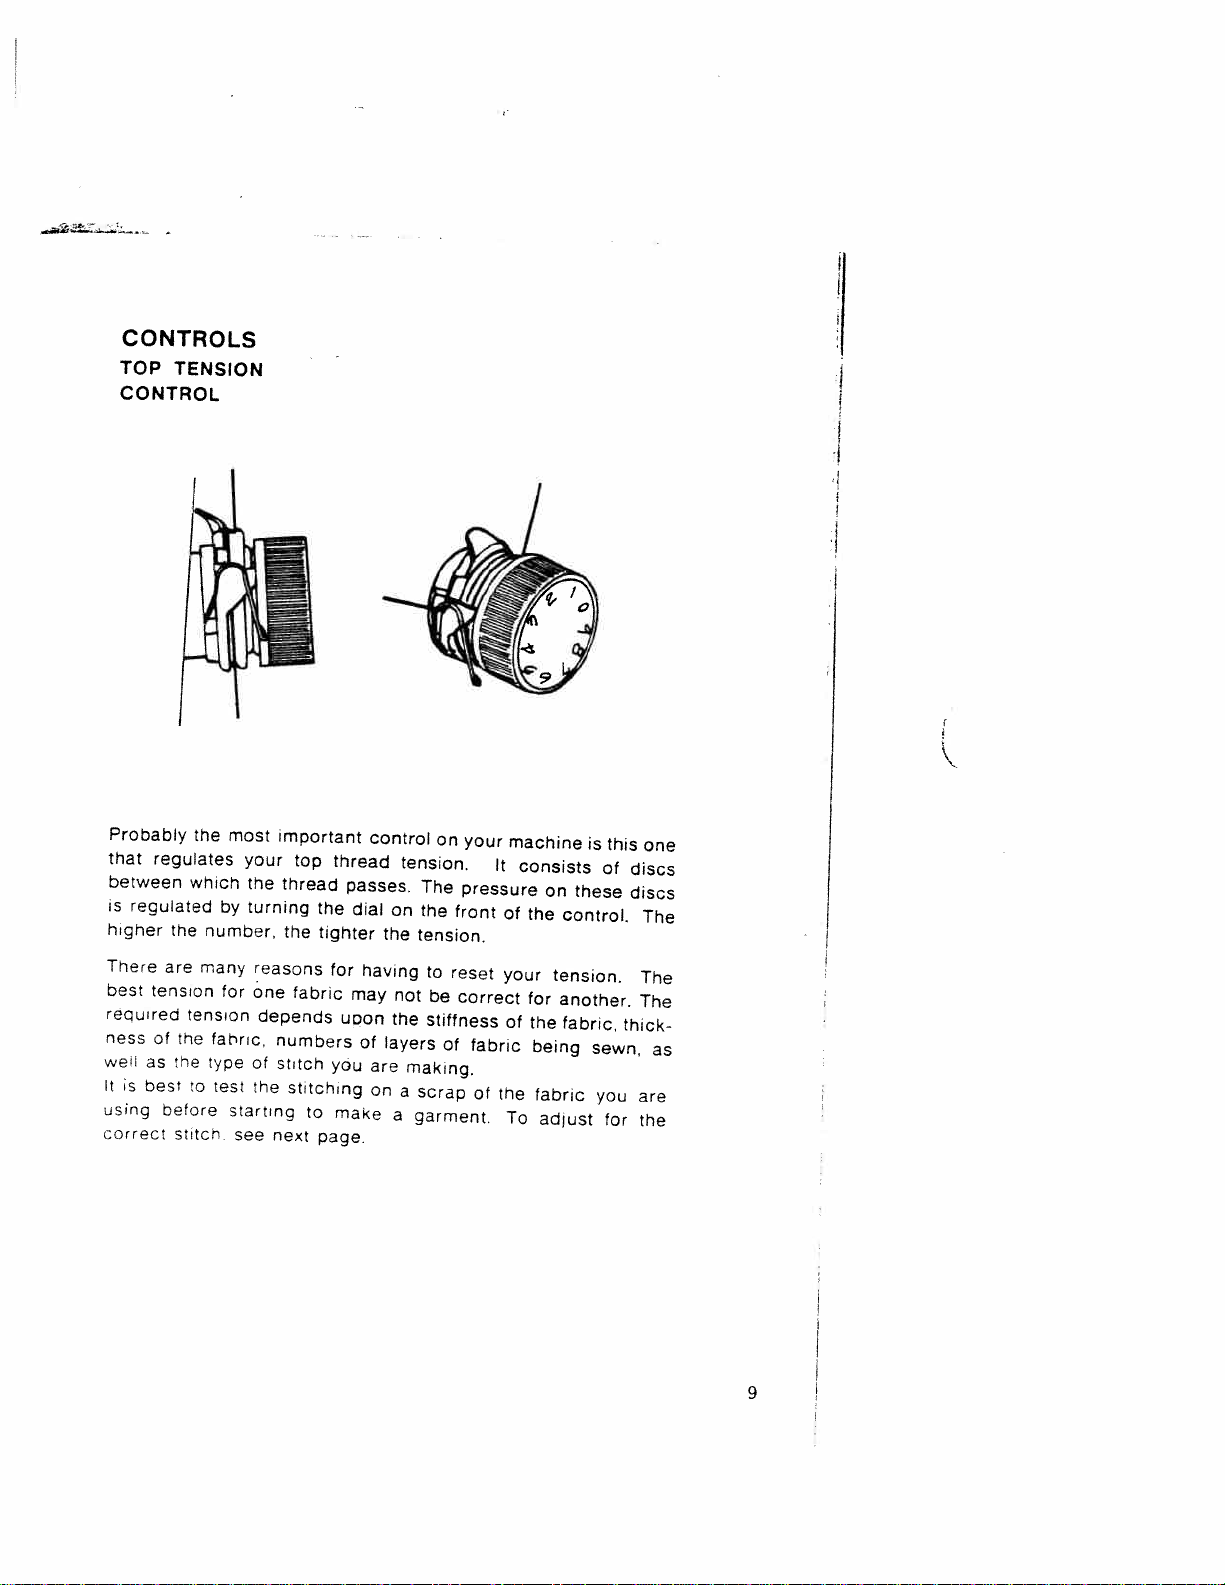
CONTROLS
TOP
TENSION
CONTROL
Probably
that
between
is
regulated
higher
There
best
tension
required
ness
weU
as
Itsbest
using
correct
the
regulates
which
the
are
tension
of
the
the
to
betore
stitcn
most
by
number,
many
for
fabric,
type
test
starting
see
your
the
turning
reasons
one
depends
of
the
next
important
top
thread
the
the
tighter
fabric
numbers
stitch
stitching
to
page.
thread
passes.
dial
for
may
uoon
you
make
control
the
having
of
layers
are
on
tension.
on
tension.
not
the
making.
a
scrap
a
garment.
on
The
the
front
to
reset
be
stiffness
of
your
pressure
correct
fabric
of
machine
It
consists
of
the
your
for
of
the
To
on
the
being
fabric
adlust
is
these
control.
tension.
another.
fabric,
this
of
sewn,
you
for
one
discs
discs
The
The
The
thick
as
are
the
9

ADJUSTING
TOP
TENSION
perfect
A
ocked
fabric
nottom,
0
Stitch
between
with
rio
wiH
the
oops
nave
rwo
on
threads
layers
top
o
or
oi
REMEDY
Decrease
Increase
Tension
Tension
Upper
Upper
PROBLEM
thread
too
--
thread
too
tight
loose
0
.
10
 Loading...