

Singer 14J334 User Manual
MODEL 14J334
SINGER
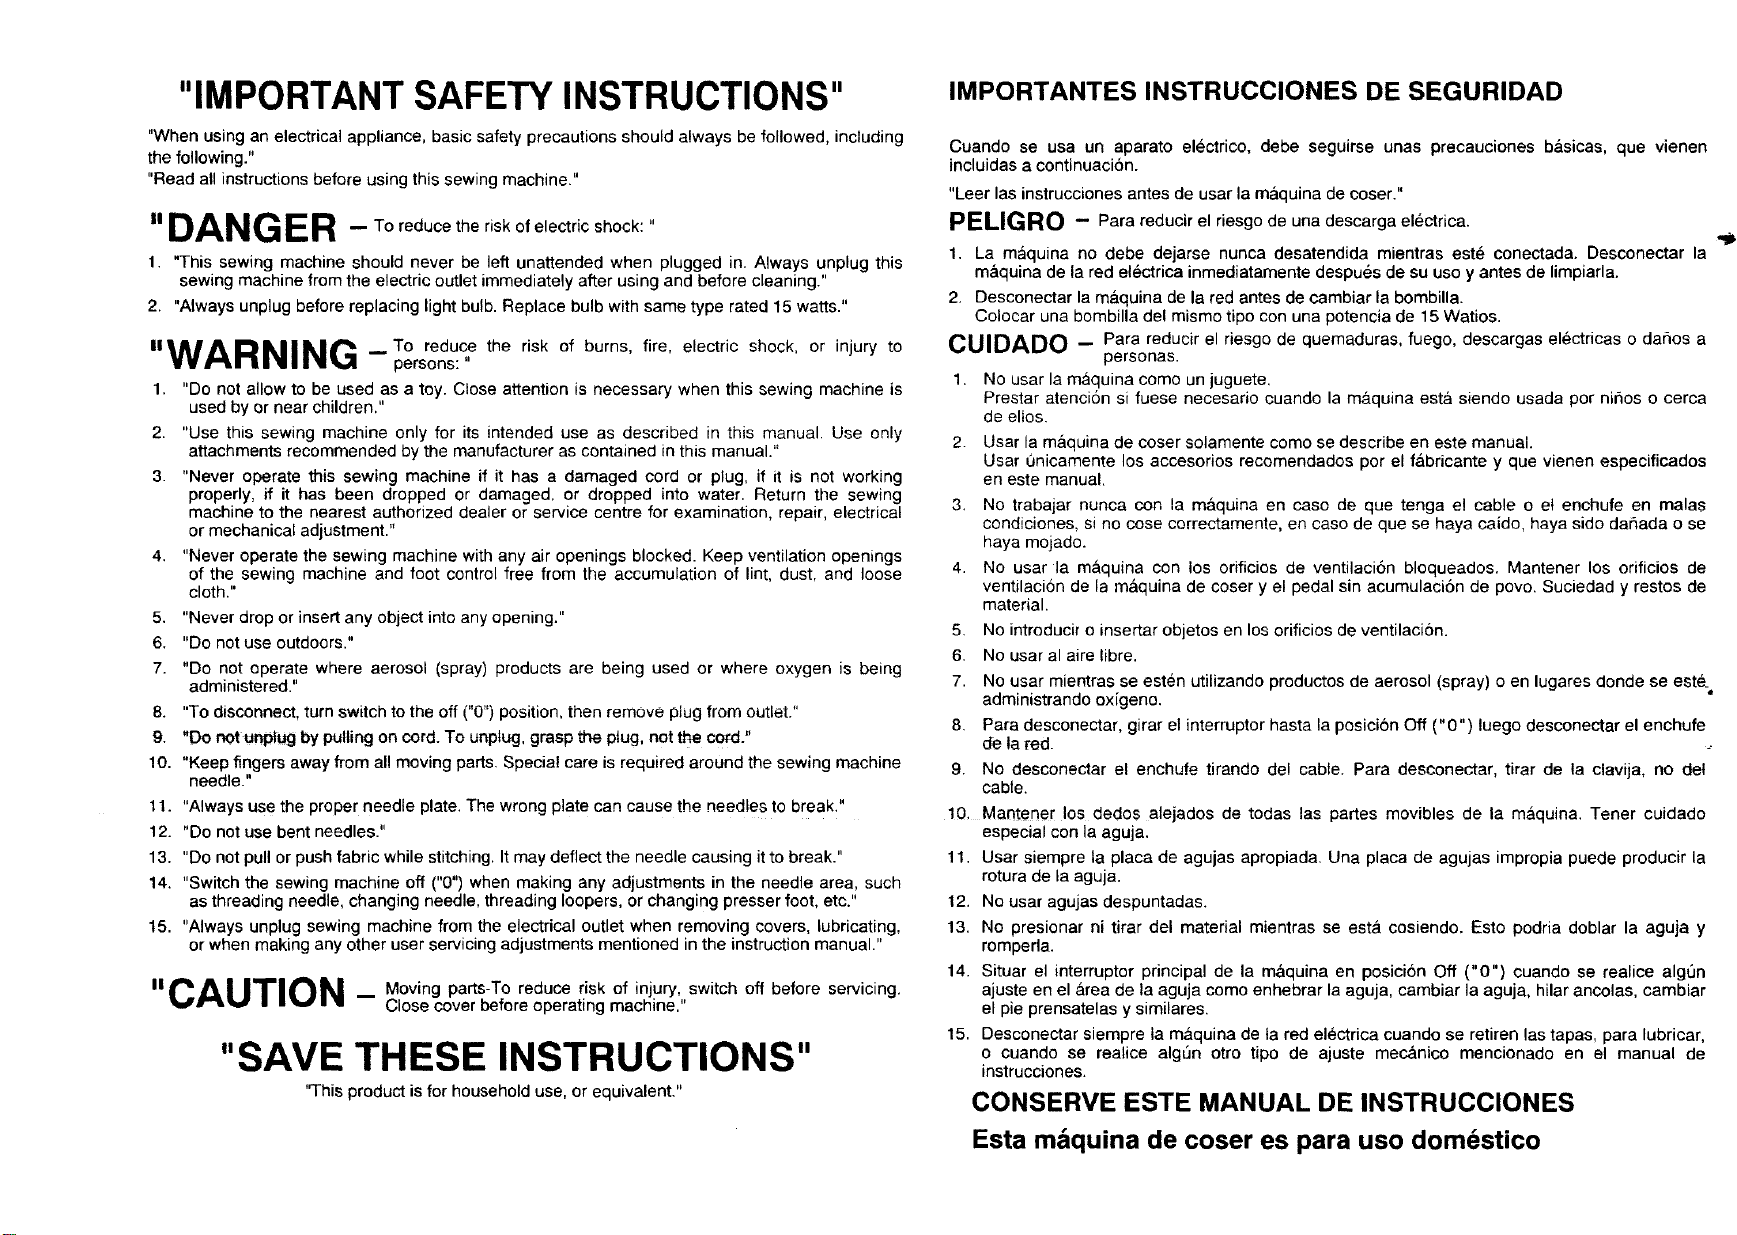
"IMPORTANT SAFETY INSTRUCTIONS"
IMPORTANTES INSTRUCCIONES DE SEGURIDAD
"When using an electrical appliance, basic safety precautions should always be followed, including
the following."
"Read all instructions before using this sewing machine."
II DAN GER - To reduce the risk of electric shock: "
1. "This sewing machine should never be left unattended when plugged in. Always unplug this
sewing machine from the electric outlet immediately after using and before cleaning."
2. "Always unplug before replacing light bulb. Replace bulb with same type rated 15 watts."
|Vr'UlIII I|_
1. "Do not allow to be used as a toy. Close attention is necessary when this sewing machine is
used by or near children,"
2. "Use this sewing machine only for its intended use as described in this manual. Use only
attachments recommended by the manufacturer as contained in this manual."
3. "Never operate this sewing machine if it has a damaged cord or plug, if it is not working
properly, if it has been dropped or damaged, or dropped into water. Return the sewing
machine to the nearest authorized dealer or service centre for examination, repair, electrical
or mechanical adjustment."
4. "Never operate the sewing machine with any air openings blocked. Keep ventilation openings
of the sewing machine and foot control free from the accumulation of lint, dust, and loose
cloth."
5. "Never drop or insert any object into any opening."
6. "Do not use outdoors."
7. "Do not operate where aerosol (spray) products are being used or where oxygen is being
administered."
8. "To disconnect, turn switch to the off ("0") position, then remove plug from outlet."
9. "Do not un_ug by pulling on cord. To unplug, grasp the plug, not the cord."
!0. "Keep fingers away from al! moving parts. Special care is required around the sewing machine
needle."
11. "Always use the proper needle plate. The wrong plate can cause the needles to break,"
12. "Do not use bent needles."
13. "Do not pull or push fabric while stitching, It may deflect the needle causing it to break."
14. "Switch the sewing machine off ("0") when making any adjustments in the needle area, such
as threading needle, changing needle, threading loopers, or changing presser foot, etc."
15. "Always unplug sewing machine from the electrical outlet when removing covers, lubricating,
or when making any other user servicing adjustments mentioned in the instruction manual."
"CA UTION - Mov,ngpartsToreduce risk of injury, switch off before servicing.
--Toreducether,skofburns,fire.e,ectr,cshockorinjuryto
persons: "
Close cover before operating machine."
Cuando se usa un aparato electrico, debe seguirse unas precauciones b&sicas, que vienen
incluidas a continuaci6n.
"Leer las instrucciones antes de usar la m&quina de coser."
PELIGRO - Para reducir el riesgo de una descarga electrica.
1. La maquina no debe dejarse nunca desatendida mientras este conectada. Desconectar la
2. Desconectar la maquina de la red antes de cambiar la bombilla.
CMIDADO - Para reducir el riesgo de quemaduras, fuego, descargas electricas o dar_os a
1. No usar la m,&quina como un juguete,
2. Usar la m&quina de coser solamente como se describe en este manual.
3. No trabajar nunca con la m&quina en caso de que tenga el cable o et enchufe en malas
4. No usar la maquina con los orificios de ventilaci6n bloqueados. Mantener los orificios de
5. No introducir o insertar objetos en los orificios de ventilaci6n.
6. No usar al aire libre.
7. No usar mientras se esten utilizando productos de aerosol (spray) o en lugares donde se este.=
8. Para desconectar, girar el interruptor hasta la posici6n Off ("0") luego desconectar el enchufe
9. No desconectar el enchufe tirando de! cable. Para desconectar, tirar de la clavija, no dot
10, Mantener los dedos alejados de todas las partes movibles de la m&quina. Tenor cuidado
11. Usar siempre la placa de agujas apropiada. Una placa de agujas impropia puede producir la
12, No usar agujas despuntadas.
13. No presionar ni tirar del material mientras se esta cosiendo. Esto podria doblar la aguja y
14. Situar el interruptor principal de la m&quina en posici6n Off ("0") cuando se realice algSn
15. Desconectar siempre la m&quina de la red electrica cuando se retiren las tapas, para lubricar,
"SAVE THESE INSTRUCTIONS"
'rThis product is for household use, or equivalent."
m&quina de la red electrica inmediatamente despu6s de su uso y antes de limpiarla.
Colocar una bombilla del mismo tipo con una potencia de 15 Watios.
personas.
Prestar atenci6n si fuese necesario cuando la maquina est& siendo usada por niSos o cerca
de eltos.
Usar unicamente los accesorios recomendados por el f&bricante y que vienen especificados
en este manual.
condiciones, si no cose correctamente, en caso de que se haya caido_ haya sido da_ada o se
haya mojado.
ventilaci6n de la m&quina de coser y el pedal sin acumulaci6n de povo. Suciedad y restos de
material.
administrando oxigeno.
de la red.
cabte.
especial con la aguja.
rotura de la aguja.
romperla.
ajuste en el &rea de la aguja como enhebrar la aguja, cambiar la aguja, hilar ancolas, cambiar
el pie prensatelas y similares.
o cuando se reatice algSn otro tipo de ajuste mec&nico mencionado en el manual de
instrucciones.
CONSERVE ESTE MANUAL DE INSTRUCCIONES
Esta m&quina de coser es para uso domestico
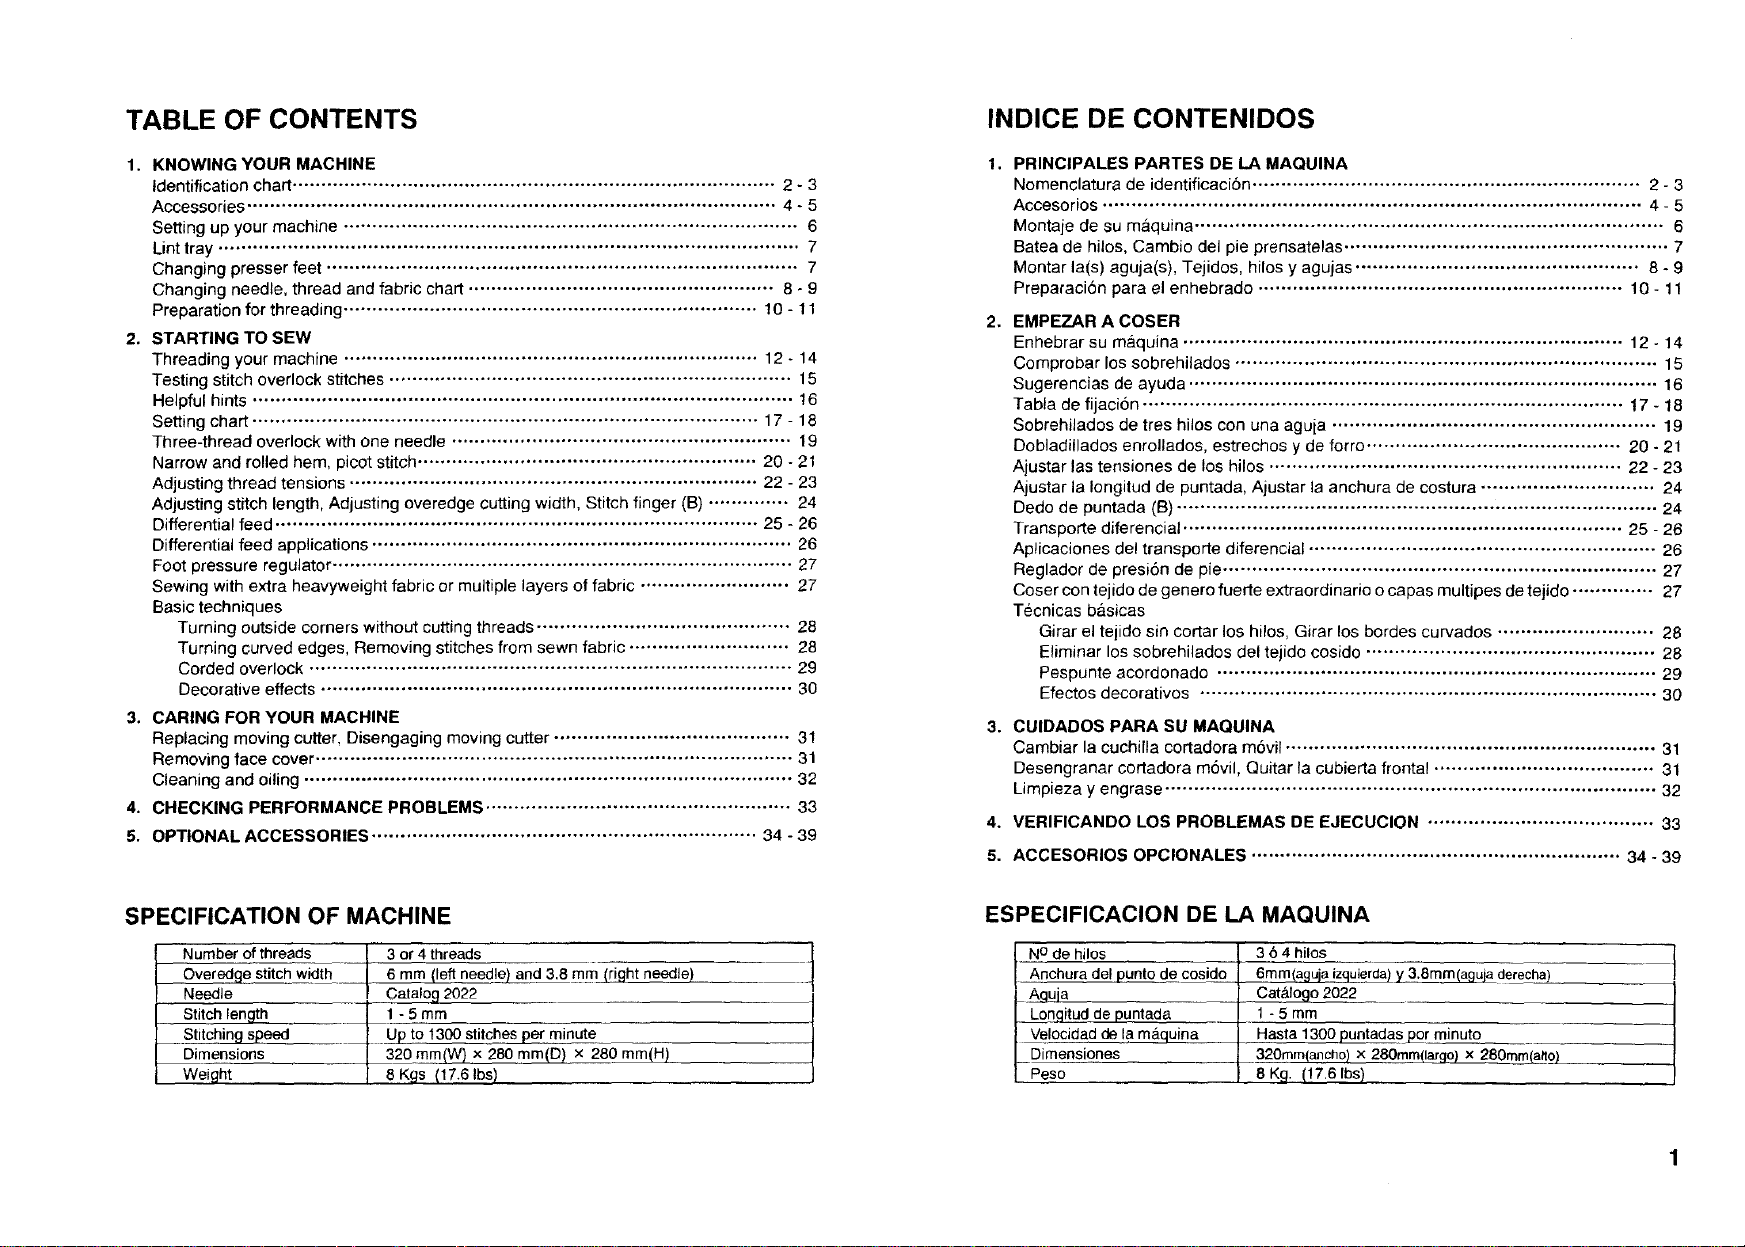
TABLE OF CONTENTS
INDICE DE CONTENIDOS
1. KNOWING YOUR MACHINE
Identification chart .................................................................................... 2 - 3
Accessories ............................................................................................ 4 - 5
Setting up your machine ............................................................................... 6
Linttray ..................................................................................................... 7
Changing presser feet .................................................................................. 7
Changing needle, thread and fabric chart ..................................................... 8 - 9
Preparationfor threading........................................................................ 10 - 11
2. STARTING TO SEW
Threading your machine ........................................................................ 12 - 14
Testingstitch overlockstitches ...................................................................... 15
Helpful hints .............................................................................................. t 6
Setting chart ........................................................................................ 17 - 18
Three-thread overlock withone needle ........................................................... 19
Narrow and rolled hem, picot stitch ........................................................... 20 - 21
Adjusting thread tensions ....................................................................... 22 - 23
Adjusting stitch length, Adjusting overedge cutting width, Stitch finger (B) .............. 24
Differential feed .................................................................................... 25 - 26
Differential feed applications......................................................................... 26
Foot pressure regulator................................................................................ 27
Sewing with extra heavyweightfabric or multiple layersof fabric .......................... 27
Basic techniques
Turning outside corners without cutting threads ............................................ 28
Turning curved edges, Removing stitches from sewn fabric ............................ 28
Corded overlock .................................................................................... 29
Decorative effects .................................................................................. 30
3. CARING FOR YOUR MACHINE
Replacing movingcutter, Disengaging moving cutter ......................................... 31
Removing face cover................................................................................... 31
Cleaning and oiling ..................................................................................... 32
4. CHECKING PERFORMANCE PROBLEMS ..................................................... 33
5. OPTIONAL ACCESSORIES ................................................................... 34 - 39
1,
PRINCIPALES PARTES DE LA MAQUINA
Nomenclatura de identificacion ................................................................... 2 - 3
Accesorios ............................................................................................. 4 - 5
Montaje de su maquina ................................................................................. 6
Batea de hilos, Cambio del pie prensatelas ........................................................ 7
Montarla(s) aguja(s), Tejidos, hilos y agujas................................................. 8 - 9
Preparacian para el enhebrado ............................................................... 10 - 11
2,
EMPEZAR A COSER
Enhebrar su maquina ............................................................................ 12.14
Comprobar lossobrehilados ......................................................................... 15
Sugerencias de ayuda ................................................................................. 16
Tabta de fijacian ................................................................................... 17 - 18
Sobrehilados de tres hilos con una aguia ........................................................ 19
Dobladillados enroltados, estrechos y de forro............................................ 20 - 21
Ajustar las tensiones de los hilos ............................................................. 22 - 23
Ajustar la Iongitudde puntada, Ajustar la anchura de costura .............................. 24
Dedo de puntada (B)................................................................................... 24
Transporte diferencial ............................................................................ 25 - 26
Apticaciones del transporte diferencial ............................................................ 26
Reglador de presiSnde pie ........................................................................... 27
Cosercontejidodegenerofuerteextraerdinarioocapasmultipesdetejido .............. 27
Tecnicas ba,sicas
Girar el telido sin cortar los hilos, Girar losbordes curvados ........................... 28
Eliminar los sobrehilados del tejido cosido .................................................. 28
Pespunte acordonado ............................................................................ 29
Efectos decorativos ............................................................................... 30
3. CUIDADOS PARA SU MAQUINA
Cambiar la cuchilla cortadora mavil ................................................................ 31
Desengranar cortadora mavil, Quitar la cubierta frontal ...................................... 31
Limpieza y engrase..................................................................................... 32
4, VERIFICANDO LOS PROBLEMAS DE EJECUCION ....................................... 33
5. ACCESORIOS OPCIONALES ................................................................ 34 - 39
SPECIFICATION OF MACHINE
Number of threads
Overedqe stitch width
Needle
Stitch length
Stitching speed
Dimensions
Weight
3 or 4threads
_le_d 3.8mm_rightneedle)
Catalo 9 2022 .....
I U to 1300stitches er minute
1320 ram{W)x 280 mm(D) x 280
[ 8Kgs(17.61bs)
ESPECIFICACION DE LA MAQUINA
N° de hilos Jr 36 4 hilos - -- l
I Anchura delpunto de cosido / 6mm(agujaizquierd__derecha) J
L Aquia - J_ Cat&logo2022 -- )
I- LO0i_q_ddepuntad_ ____ 1- 5 mm ....... 1
l Velocidadde la m_quina ]i_-___ 1
l Dimensiones J 320mm(ancllo) x 280rnrn__o) _
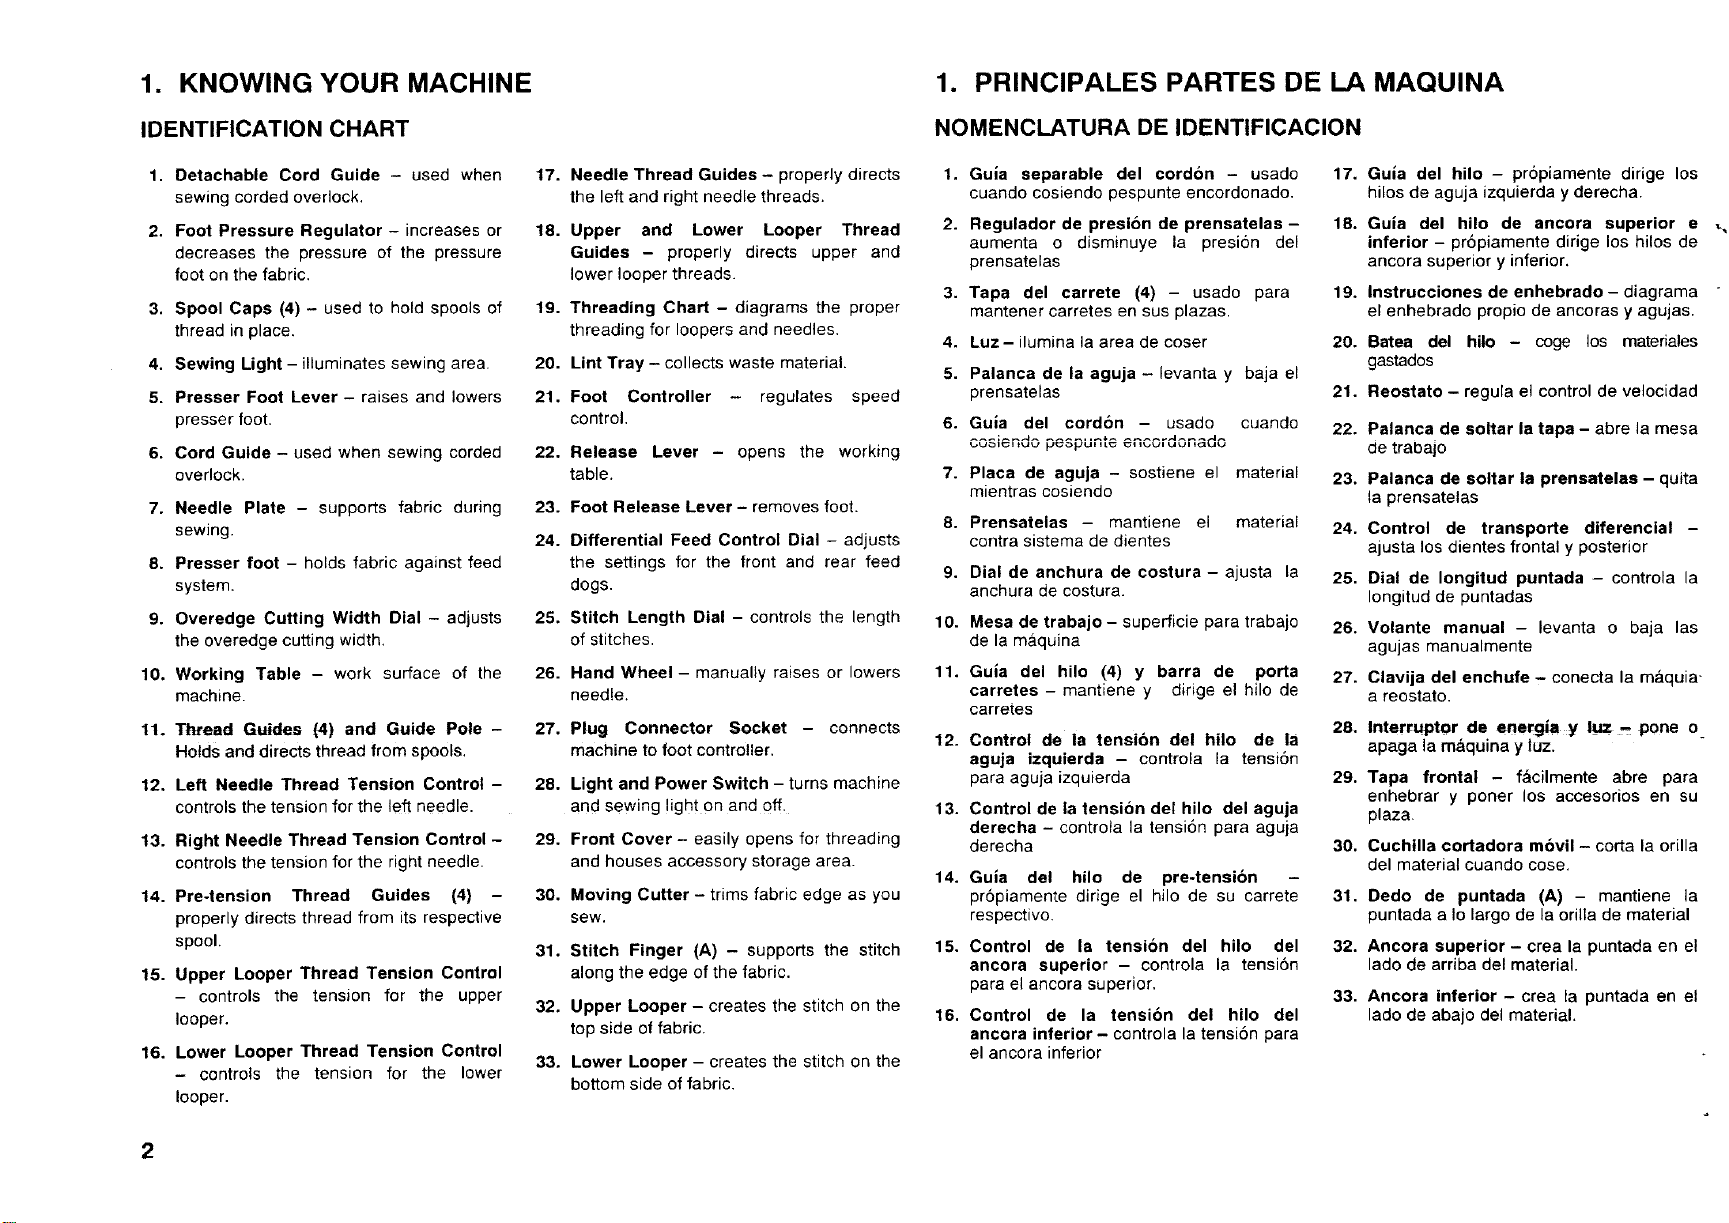
1. KNOWING YOUR MACHINE 1. PRINCIPALES PARTES DE LA MAQUINA
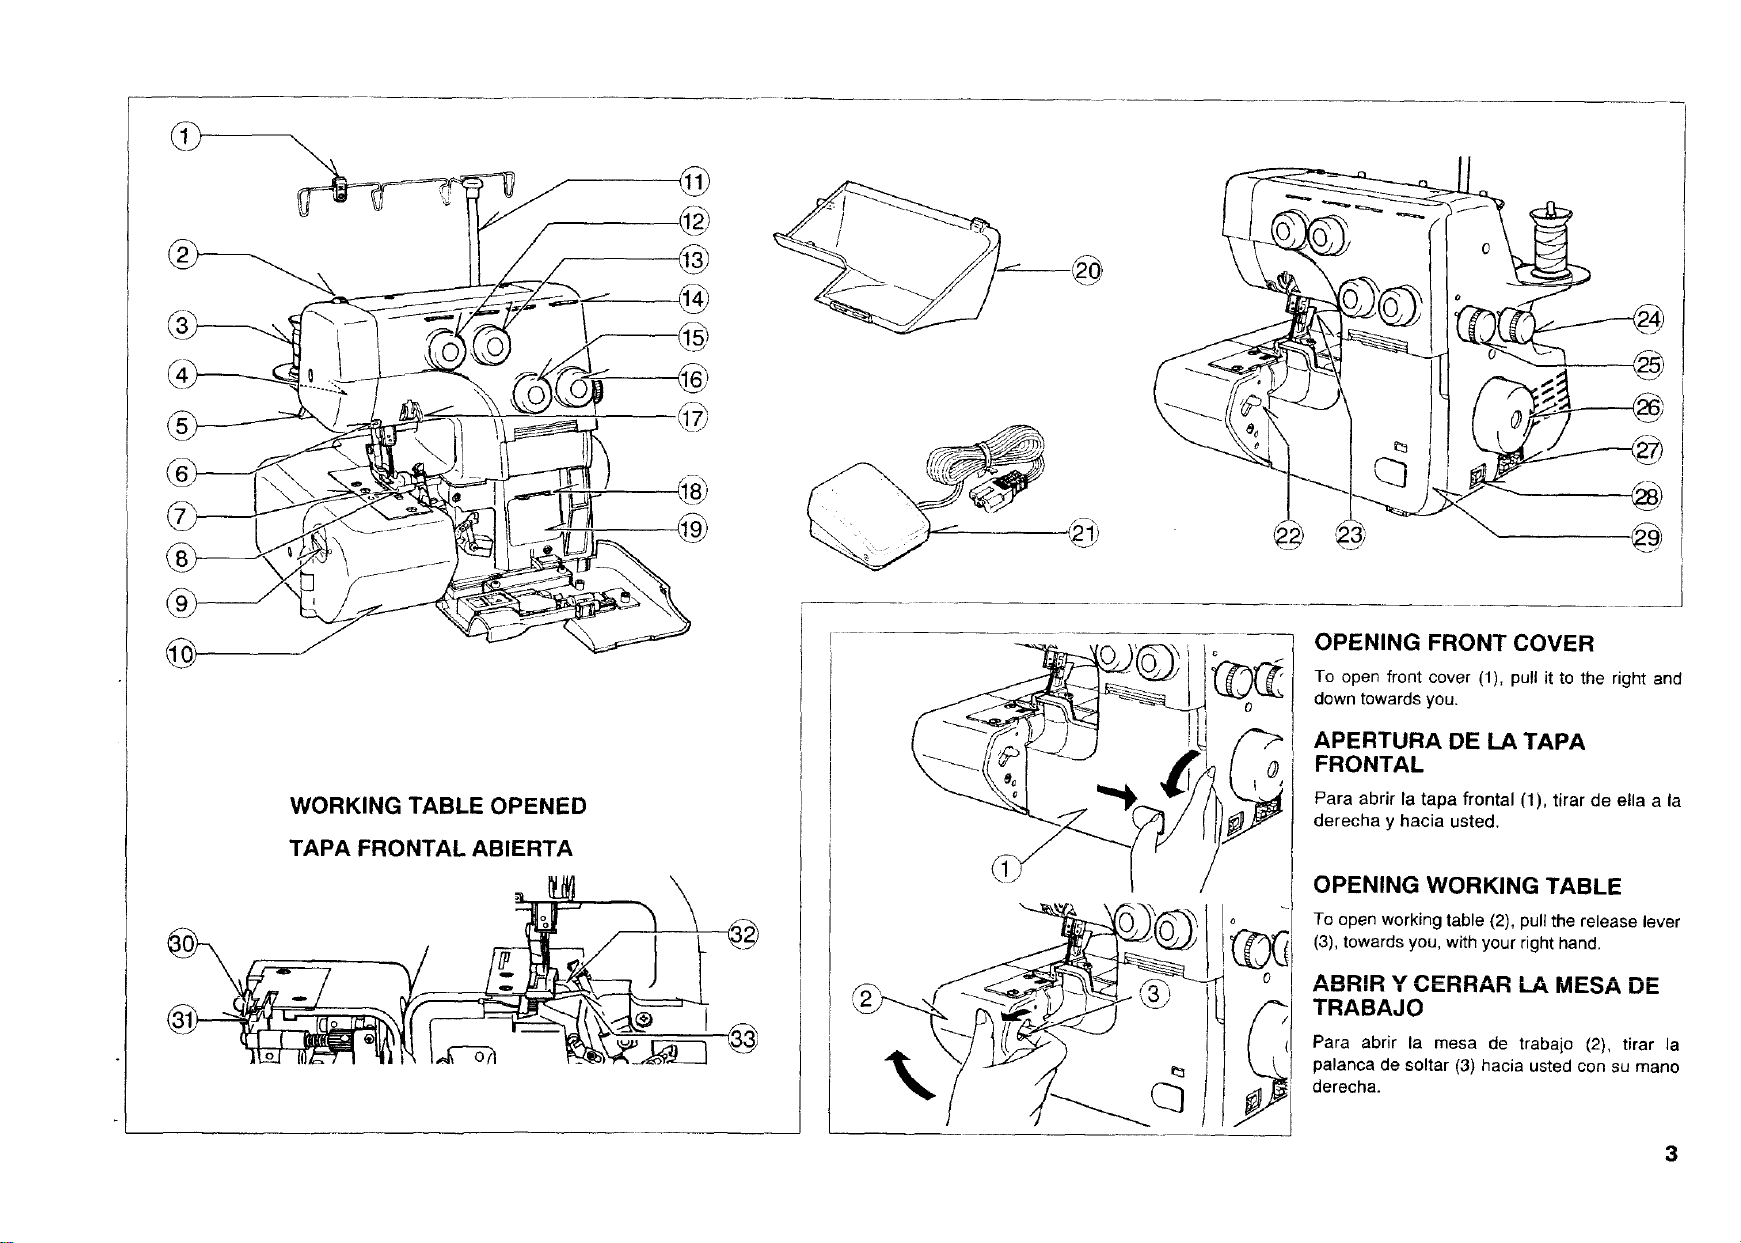
IDENTIFICATION CHART
1. Detachable Cord Guide - used when 17.
sewing corded overlock.
2. Foot Pressure Regulator - increases or 18.
decreases the pressure of the pressure
foot on the fabric.
3. Spool Caps (4) - used to hold spools of
thread in place,
4. Sewing Light - illuminates sewing area.
5. Presser Foot Lever- raises and lowers
presser foot.
6. Cord Guide - used when sewing corded
overlock.
7. Needle Plate - supports fabric during
sewing.
8. Presser foot - holds fabric against feed
system.
9. Overedge Cutting Width Dial - adjusts
the overedge cutting width,
10, Working Table - work surface of the
machine.
11. Thread Guides (4) and Guide Pole -
Holds and directs thread from spools,
12. Left Needle Thread Tension Control -
controls the tension for the left needle.
13. Right Needle Thread Tension Control -
controls the tension for the right needle.
14. Pre-tension Thread Guides (4) -
properly directs thread from its respective
spool,
15. Upper Looper Thread Tension Control
- controls the tension for the upper
looper.
16. Lower Looper Thread Tension Control
- controls the tension for the lower
looper.
Needle Thread Guides - properly directs
the left and right needle threads,
Upper and Lower Looper Thread
Guides - properly directs upper and
lower looper threads,
19.
Threading Chart - diagrams the proper
threading for loopers and needles.
20.
Lint Tray - collects waste material.
21.
Foot Controller - regulates speed
control,
22.
Release Lever - opens the working
table,
23.
Foot Release Lever - removes foot.
24.
Differential Feed Control Dial - adjusts
the settings for the front and rear feed
dogs.
25.
Stitch Length Dial - controls the length
of stitches.
26.
Hand Wheel - manually raises or lowers
needle,
27.
Plug Connector Socket - connects
machine to foot controller.
28.
Light and Power Switch - turns machine
and sewing light on and off. 13.
29.
Front Cover - easily opens for threading
and houses accessory storage area.
30.
Moving Cutter - trims fabric edge as you
sew.
31.
Stitch Finger (A) - supports the stitch 15.
along the edge of the fabric.
32.
Upper Looper - creates the stitch on the
top side of fabric,
33,
Lower Looper - creates the stitch on the
bottom side of fabric.
NOMENCLATURA DE IDENTIFICACION
1,
Guia separable del cordon - usado 17.
cuando cosiendo pespunte encordonado.
2.
Regulador de presion de prensatelas -
aumenta o disminuye la presion del
prensatelas
3. Tapa del carrete (4) - usado para 19.
mantener carretes en sus plazas.
4. Luz- ilumina la area de coser 20.
5. Palanca de la aguja - levanta y baja el
prensatelas 21.
6. Guia del cordon - usado cuando 22.
cosiendo pespunte encordonado
7. Placa de aguja - sostiene el material 23.
mientras cosiendo
8. Prensateias - mantiene el material 24.
contra sistema de dientes
9. Dial de anchura de costura - ajusta la 25.
anchura de costura.
10. Mesa de trabajo - superficie para trabajo 26.
de la maquina
11. Guia del hilo (4) y barra de porta 27.
carretes - mantiene y dirige el hilo de
carretes
12. Control de la tension del hUo de la
aguja izquierda - controla la tensi6n
para aguja izquierda 29.
Control de la tension del hilo del aguja
derecha - controla la tensi6n para agula
derecha
14.
Guia del hilo de pro-tension -
pr6piamente dirige el hilo de su carrete
respectivo,
Control de la tension del hilo del
ancora superior - controla la tensi6n
para el ancora superior.
16.
Control de la tensi6n del hilo del
ancora inferior - controla la tensi6n para
el ancora inferior
18.
28,
30.
31,
32.
33.
Guia del hilo - propiamente dirige los
hilos de aguja izquierda y derecha.
Guia del hilo de ancora superior e _,
inferior - pr6piamente dirige los hilos de
ancora superior y inferior,
Instrucciones de enhebrado- diagrama "
el enhebrado propio de ancoras y agujas.
Batea del hilo - coge los materiales
gastados
Reosfato - regula el control de velocidad
Palanca de soltar la tapa - abre la mesa
de traba|o
Palanca de soltar la prensatelas - quita
la prensatelas
Control de transporte diferencial -
alusta los dientes frontal y posterior
Dial de Iongitud puntada - controla la
Iongitud de puntadas
Volante manual- levanta o baja las
agujas manualmente
Clavija del enchufe - conecta la m&quia-
a reostato.
lnterruptor de energia y luz -- pone o
apaga la m&quina y luz.
Tapa frontal - facilmente abre para
enhebrar y poner los accesorios en su
plaza.
Cuchilla cortadora m6vil - corta la orilla
del material cuando cose.
Dedo de puntada (A) - mantiene la
puntada a Io largo de la orilla de material
Ancora superior - crea la puntada en et
lado de arriba del material.
Ancora inferior - crea la puntada en el
lado de abajo del material.
2
@
@
(/--\i
, Ji,
@
@
OPENING FRONT COVER
To open front cover (1), pull it to the right and
down towards you.
APERTURA DE LA TAPA
FRONTAL
WORKING TABLE OPENED
TAPA FRONTAL ABIERTA
@
Para abrir la tapa frontal (1), tirar de ella a la
derecha y hacia usted.
OPENING WORKING TABLE
To open working table (2), pull the release lever
(3), towards you, with your right hand.
ABRIR Y CERRAR LA MESA DE
TRABAJO
Para abrir la mesa de trabajo (2), tirar la
palanca de soltar (3) hacia usted con su mano
derecha.
3
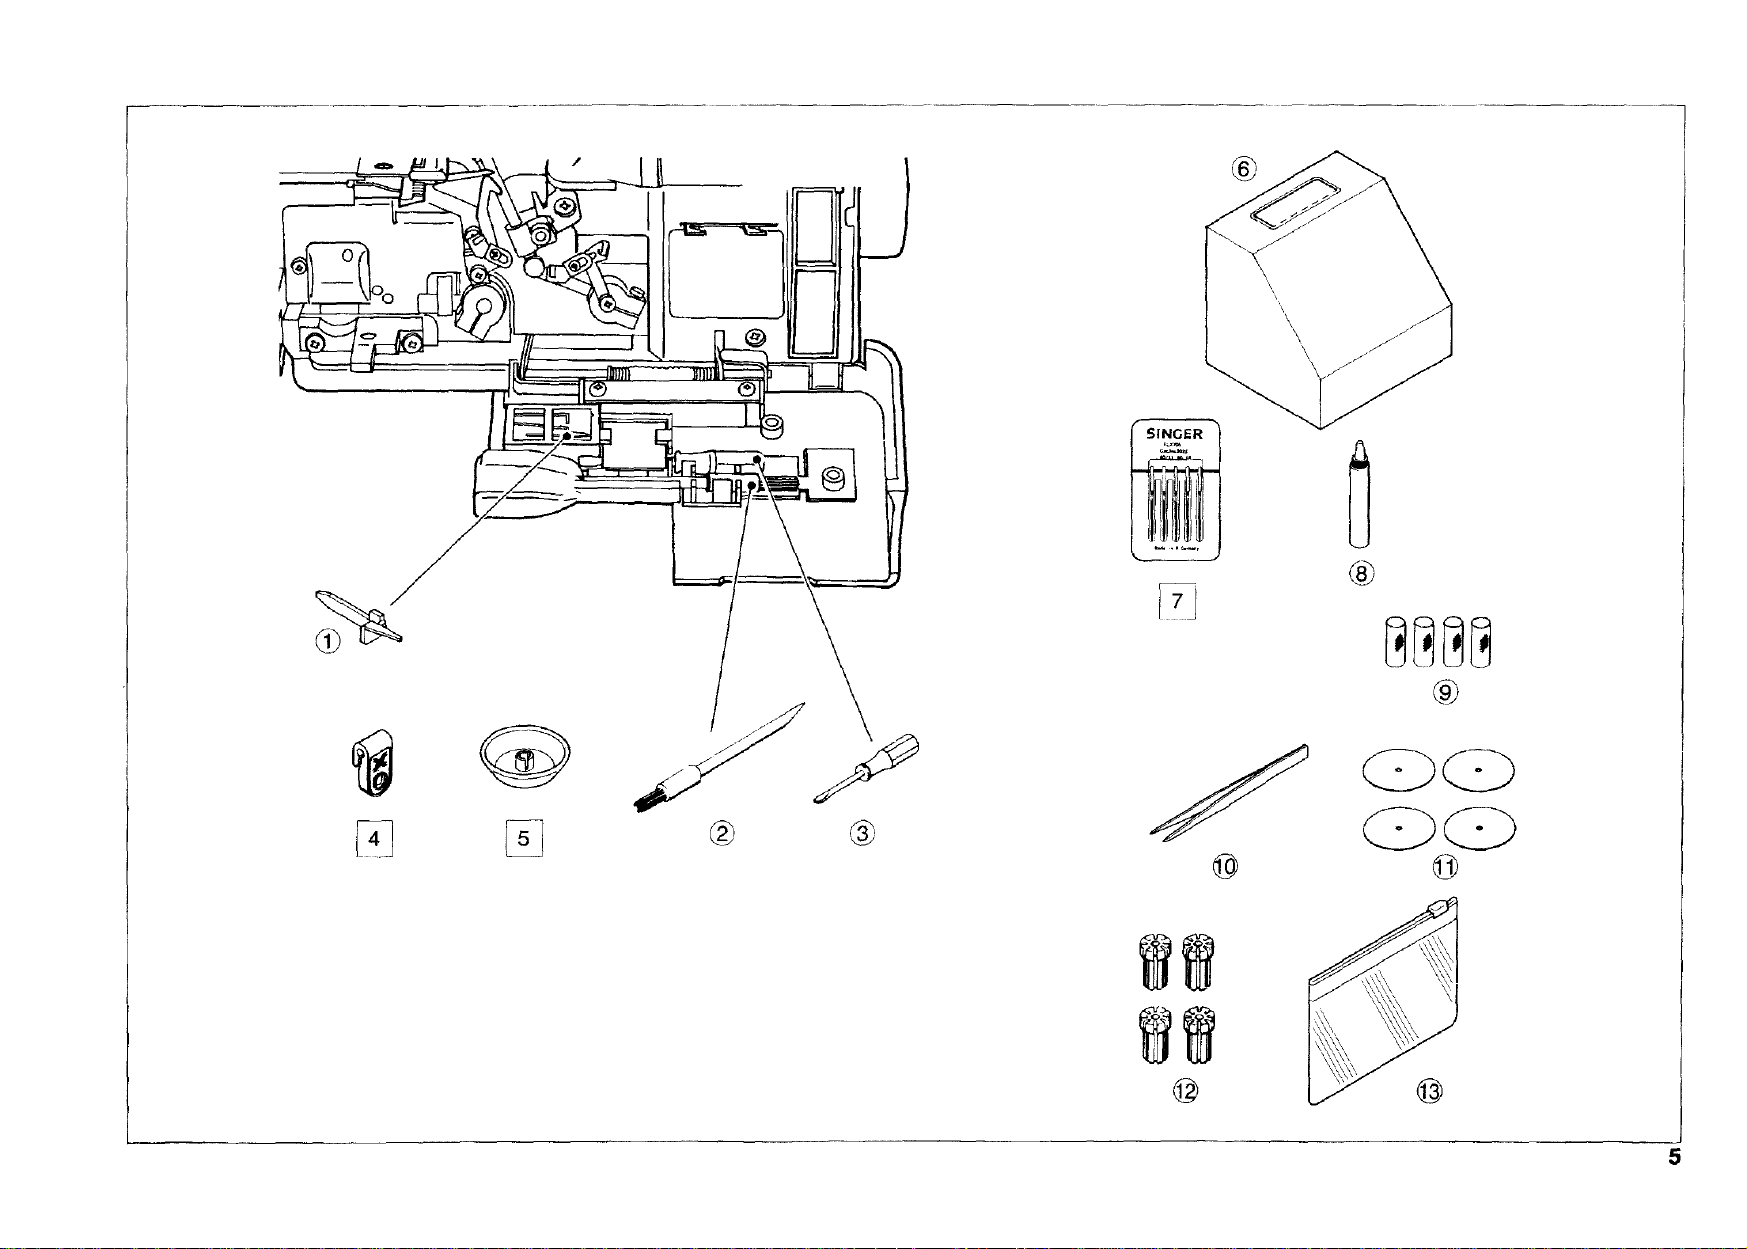
ACCESSORIES
ACCESORIOS
Some of the accessories are stored in the accessory storage area located under the front cover.
The remaining accessories are either on the machine or stored in the accessory bag included
with the machine.
1. Stitch Finger B - #J72391
Supports the stitch along the edge of the fabric, Stitch finger B
is used when sewing lightweight fabric using three threads.
2. Brush- #J65650
Used for cleaning the machine.
3. Screw Driver - #J74793
Used to change needles.
4. Detachable Cord Guide - #J79000
(On Machine)
Used when sewing corded overlock,
5, Spool Caps (4) - #J79070
(On Machine)
Used to hold smaller spools of thread in place.
6. Machine Cover- #J72543
Used to cover machine when not in use.
7. Needle Pack - Singer 2022
Includes an assortment for sewing various types of fabrics.
8. Oiler - J363398:
Used to oil the machine.
9. Spool Nets (4) - #J63523
Fits over thread spools to keep consistent feeding of threads such as
polyester or bulky nylon which may become loose while unwinding.
10. Tweezers- #J72828
Aids in threading the machine.
11. Spool Discs (4)-#J59455
Used to support larger cones of thread.
12. Spool Holders (4) - #J45773
Used to keep larger cones from moving while sewing.
13. Accessory Bag- #J72847
Used to store accessories.
Algunos accesorios estan en almacenaje de accesorio que esta debajo de la tapa frontal.
Los otros est&n sobre la m&quina o en el bolso de accesodo incluido con la maquina.
1. Dedo de puntada (B) - #J72391
Soporta la puntada a Io largo de la orilla del material. El dedo de
puntada (B) se usa cuando cose el material ligero usando tres hilos.
2. Cepillo- #J65650
Usado para limpiar la m_.quina,
3. Destornillador- #J74793
Usado para cambiar las agujas.
4, Guia separable del cord6n - #J79000
(sobre ia maquina)
Usado cuando cosiendo pesl_unte encordonado.
5. Tapa del carrete (4) - #J79070
(sobre la maquina)
Usado para mantener carretes pequer_as en sus plazas.
6, Cubierta de la maquina - #J72543
Usado para cubrir la maquina cuando no usa.
7. Paquete de agujas - Singer 2022
Incluye unos tamar_os para coser varios tipos de material.
8. Aceiteras- #J63398
Usado para aceitar ta maquina
9. Mallas de carrete (4) - #J63523
Se ponen sobre loscarretes para mantener el avance consistente de
hilos como poliester o nyl6n que se puede estar floja mientras cose.
10. Pinzas- #J72828
Se usan para enhebrar la maquina.
11. Placa de prolongacion - #J59455
Usado para mantener carretes conicos grandes.
12. Tapa del carrete- #J45773
Usado para mantener carretes c6nicos grandes de movimiento mientras cosiendo.
13. Bolso de accesorios - #J72847
Usado para poner accesorios.
4
®
®
@
1@
@
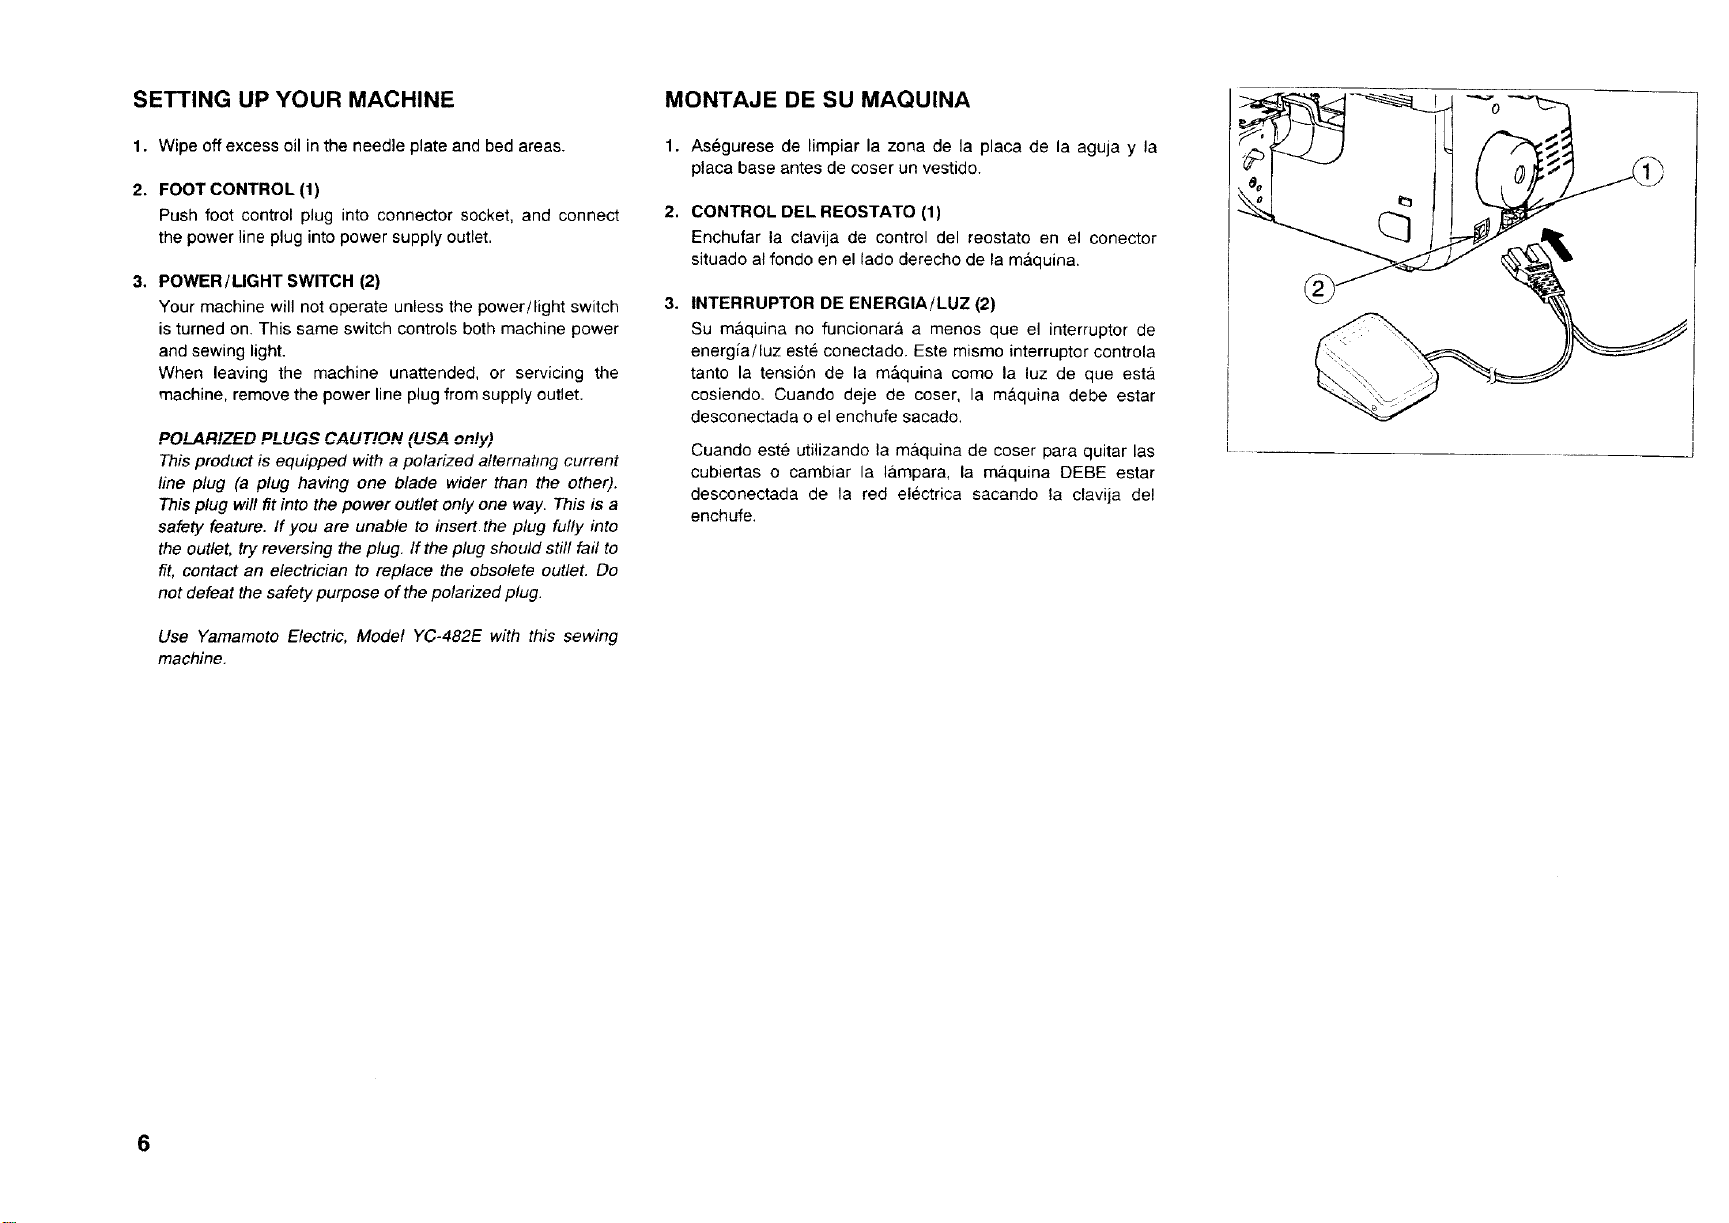
SETTING UP YOUR MACHINE
MONTAJE DE SU MAQUINA
1. Wipe off excess oil in the needle plate and bed areas.
2, FOOT CONTROL (1)
Push foot control plug into connector socket, and connect
the power line plug into power supply outlet,
3. POWER/LIGHT SWITCH (2)
Your machine will not operate unless the power/light switch
is turned on. This same switch controls both machine power
and sewing light.
When leaving the machine unattended, or servicing the
machine, remove the power line plug from supply outlet.
POLARIZED PLUGS CAUTION (USA only)
This product is equipped with a polarized alternating current
line plug (a plug having one blade wider than the other).
This plug wil! fit into the power outlet only one way. This is a
safety feature. If you are unable to insert the plug fully into
the outlet, try reversing the plug. If the plug should still fail to
fit, contact an electrician to replace the obsolete outlet. Do
not defeat the safety purpose of the polarized plug.
Use Yamamoto Electric, Model YC-482E with this sewing
machine.
1. Asegurese de limpiar la zona de la placa de la aguja y la
placa base antes de coser un vestido.
2, CONTROL DEL REOSTATO (1)
Enchufar la clavija de control del reostato en el conector
situado al rondo en el lado derecho de la mdquina.
INTERRUPTOR DE ENERGIAiLUZ (2)
Su m&quina no funcionara a menos que el interruptor de
energia/luz est6 conectado. Este mismo interruptor controla
tanto la tensiSn de la m&quina como la luz de que esta
cosiendo. Cuando deje de coser, la m&quina debe estar
desconectada o el enchufe sacado.
Cuando este utilizando la m&quina de coser para quitar las
cubiertas o cambiar la tampara, la m,_quina DEBE estar
desconectada de la red electrica sacando la clavija de!
enchufe.
6
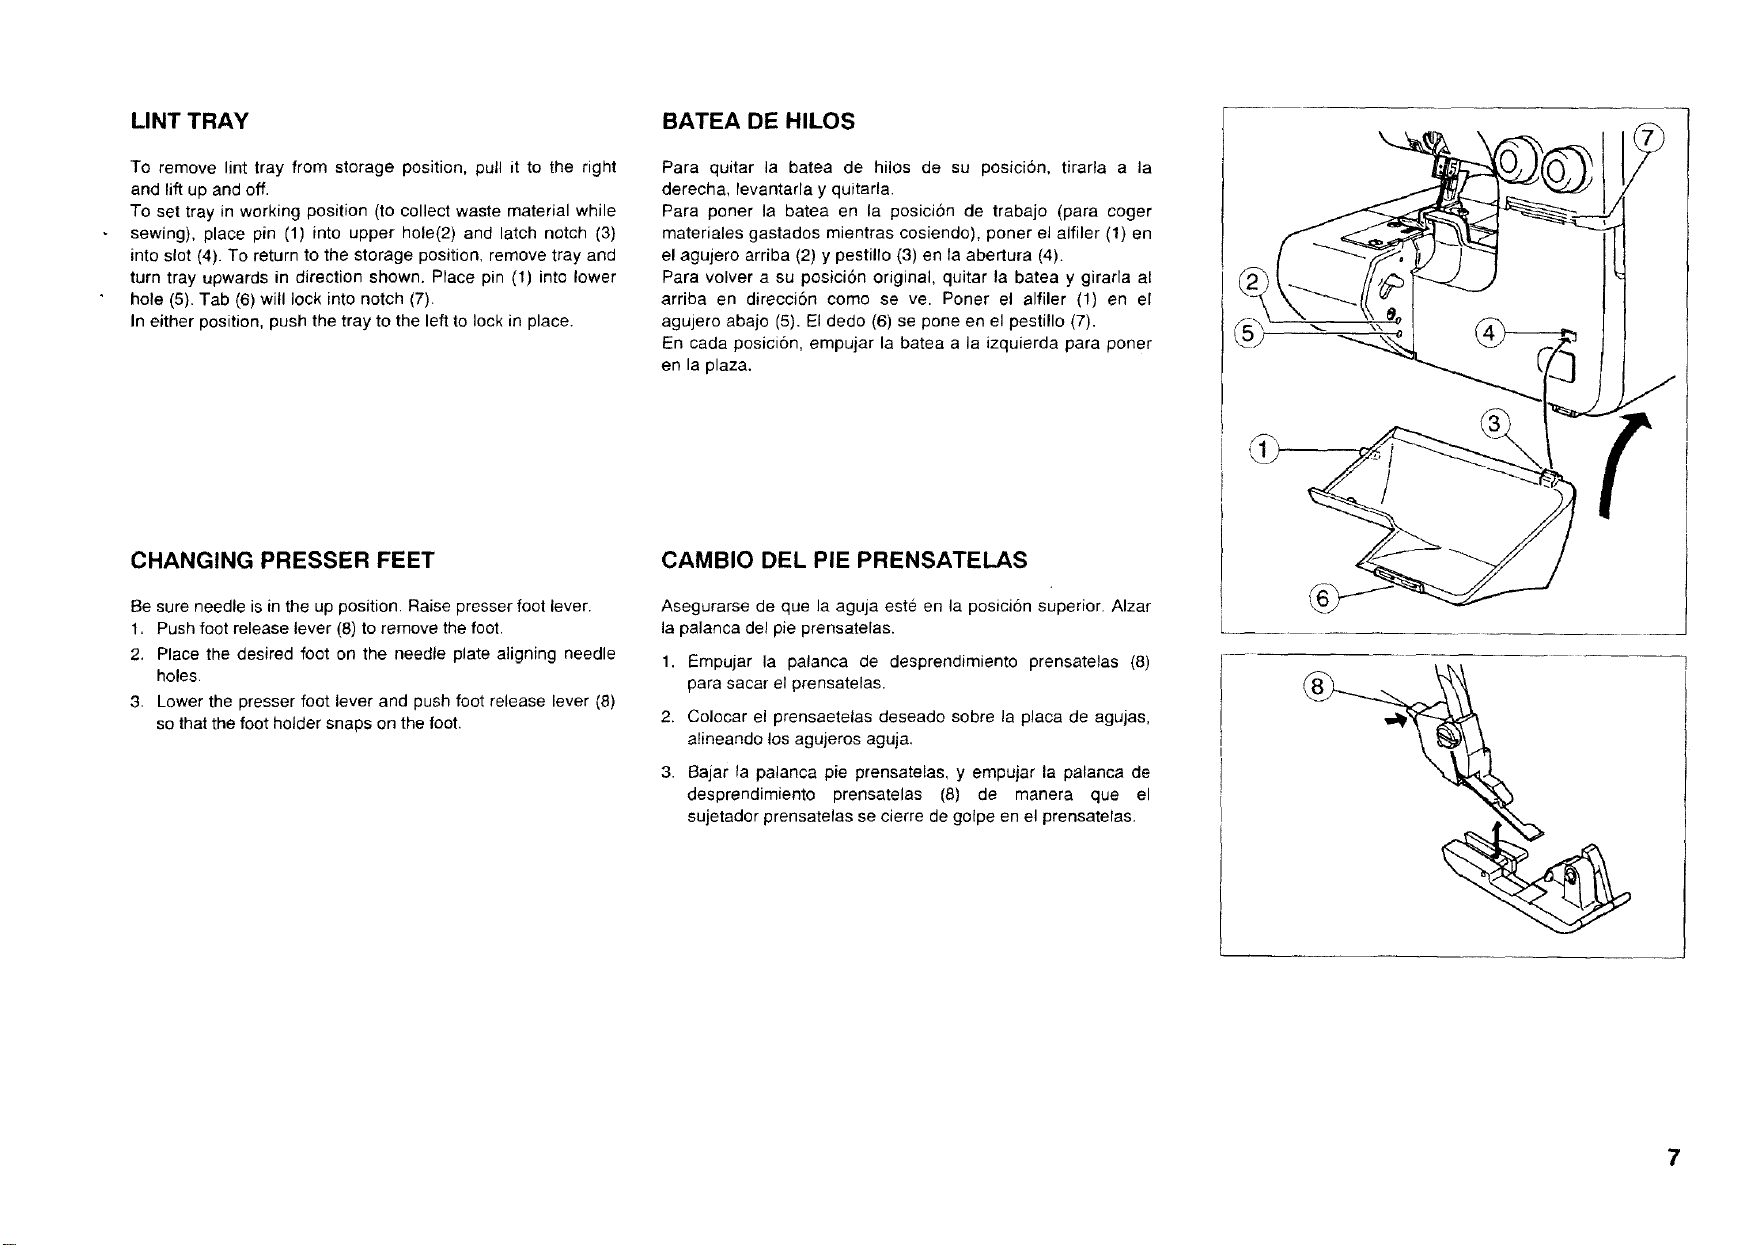
LINT TRAY
BATEA DE HILOS
To remove lint tray from storage position, pull it to the right
and lift up and off.
To set tray in working position (to collect waste material while
sewing), place pin (11 into upper hole(2) and latch notch (3)
into slot (4). To return to the storage positien, remove tray and
turn tray upwards in direction shown. Place pin (1) into lower
hole (5). Tab (6) will lock into notch (7).
In either position, push the tray to the left to lock in place.
CHANGING PRESSER FEET
Be sure needle is in the up position. Raise presser foot lever.
1. Push foot release lever (8) to remove the foot.
2. Place the desired foot on the needle plate aligning needle
holes.
3. Lower the presser foot lever and push foot release lever (8)
so that the foot holder snaps on the foot.
Para quitar la batea de hilos de su posici6n, tirarla a la
derecha, levantarla y quitarla.
Para poner la batea en la posicion de trabajo (para coger
materiales gastados mientras cosiendo), poner el alfiler (1) en
el agujero arriba (2) y pestillo (3) en la abertura (4).
Para volver a su posicibn original, quitar la batea y girarla al
arriba en direcci6n come se ve. Poner el alfiler (1) en el
agujero abajo (5). El dedo (6) se pone en el pestillo (7).
En carla posici6n, empujar la batea a la izquierda para porter
en la plaza.
CAMBIO DEL PIE PRENSATELAS
Asegurarse de que la aguja este en la posici6n superior. Alzar
la palanca del pie prensatelas.
1. Empujar la palanca de desprendimiento prensatelas (8)
para sacar el prensatelas.
2. Colocar el prensaetelas deseado sobre la placa de agujas,
a!ineando los agujeros aguja.
3. Bajar la palanca pie prensatelas, y empujar la patanca de
desprendimiento prensatelas (8) de manera que el
sujetador prensatelas se cierre de golpe en el prensatelas.
!
7
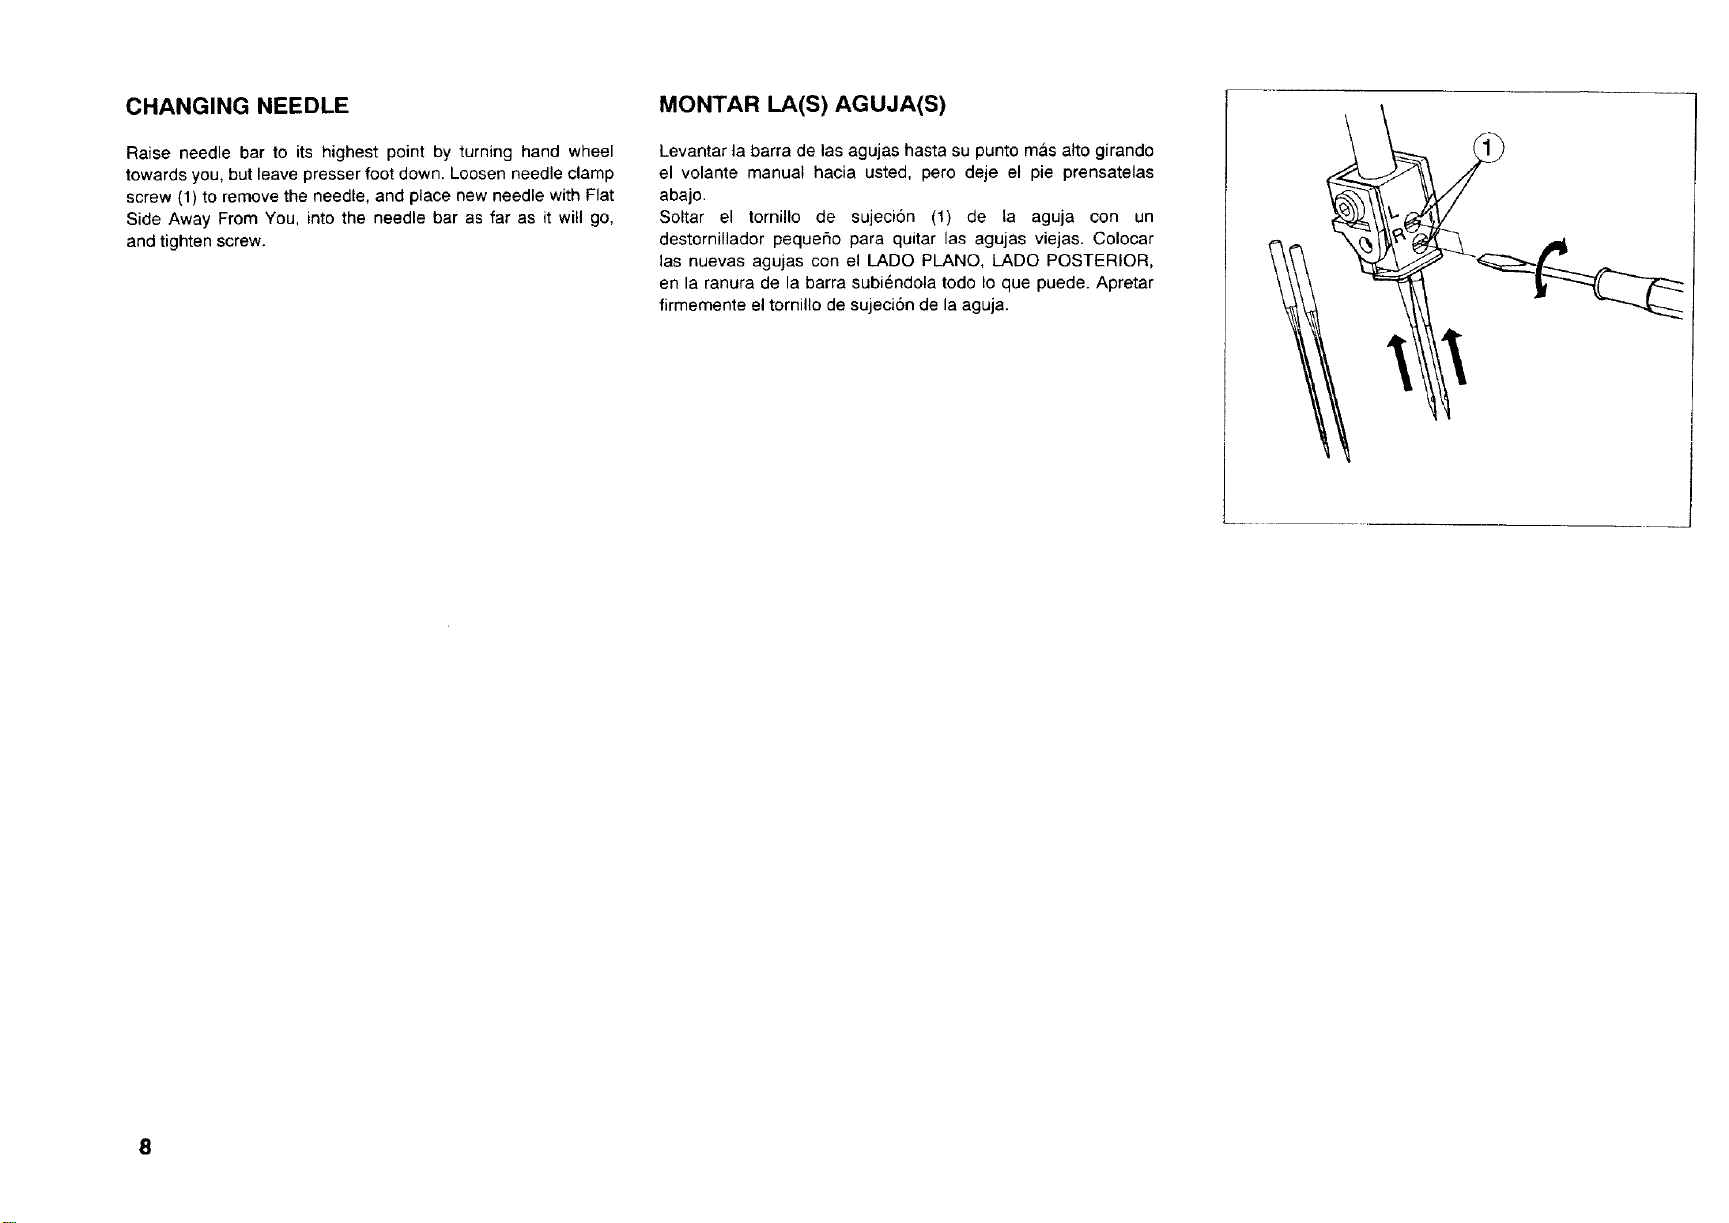
CHANGING NEEDLE
MONTAR LA(S) AGUJA(S)
Raise needle bar to its highest point by turning hand wheel
towards you, but leave presser foot down. Loosen needle clamp
screw (1) to remove the needle, and place new needle with Flat
Side Away From You, into the needle bar as far as it will go,
and tighten screw.
Levantar la barra de las agujas hasta su punto mas alto girando
el volante manual hacia usted, pero deje el pie prensatelas
abajo.
Soltar el tornillo de sujeci6n (1) de la aguja con un
destornillador pequer_o para quitar las agujas viejas. Colocar
las nuevas agujas con el LADO PLANO, LADO POSTERIOR,
en la ranura de la barra subi6ndola todo Io que puede. Apretar
firmemente el tornillo de sujeciSn de la aguja.
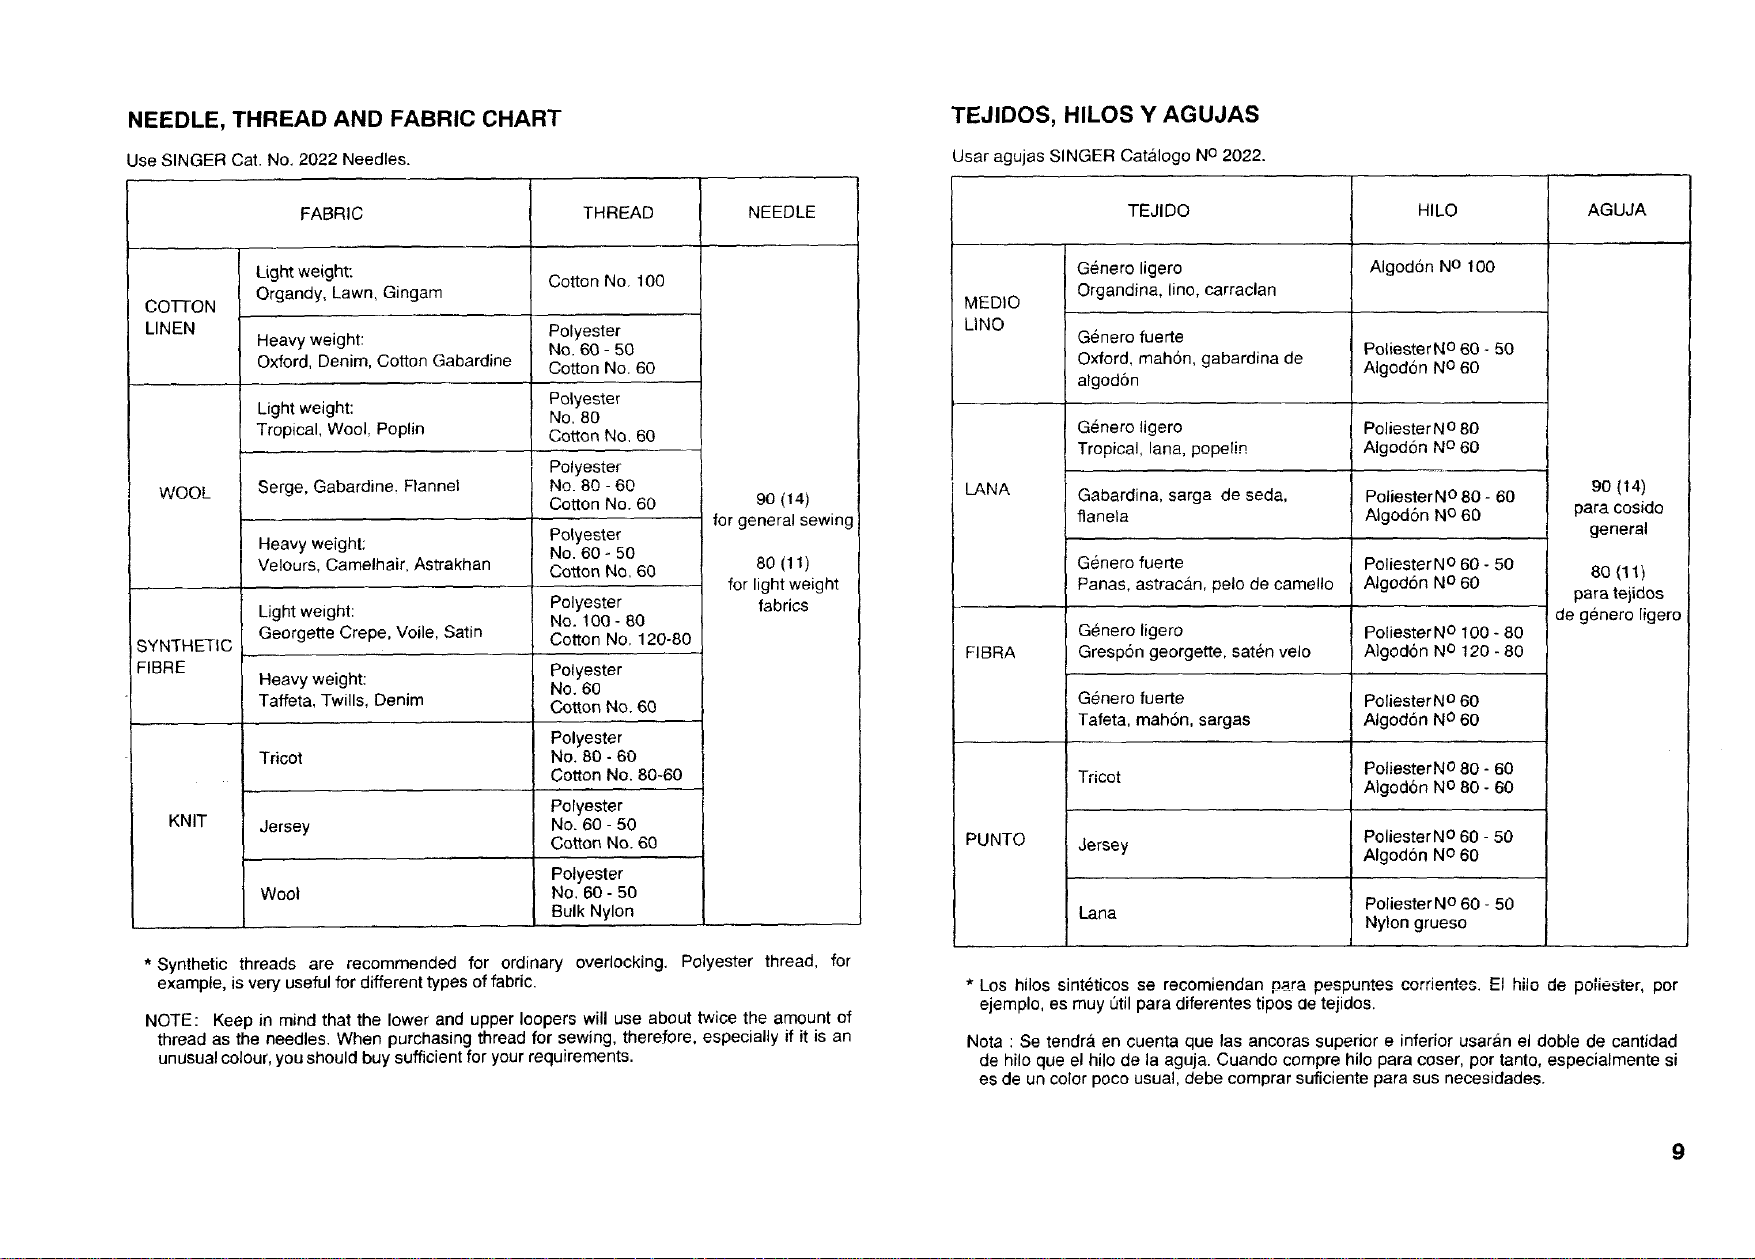
NEEDLE, THREAD AND FABRIC CHART
TEJIDOS, HILOS Y AGUJAS
Use SINGER Cat, No, 2022 Needles.
FABRIC THREAD NEEDLE
Light weight:
COI-ION
LINEN Heavy weight: Polyester
WOOL
SYNTHETIC Georgette Crepe, Voile, Satin Cotton No. 120-80
FIBRE Heavy weight: Polyester
KNIT Jersey No. 60 - 50
Organdy, Lawn, Gingam
Oxford, Denim, Cotton Gabardine Cotton No. 60
Light weight: No. 80
Tropical, Wool, Poplin Cotton No, 60
Serge, Gabardine. Flannel
Heavy weight: Polyester
Velours, Camelhair, Astrakhan Cotton No, 60
Light weight: Polyester
Taffeta, Twills, Denim Cotton No. 60
Tricot No. 80 - 60
Wool
Cotton No, 100
No. 60 - 50
Polyester
Polyester
No. 80 - 60
Cotton No. 60
No. 60 _ 50
No. 100 - 80
No. 60
Polyester
Cotton No. 80-60
Polyester
Cotton No. 60
Polyester
No. 60 - 50
Bulk Nylon
I
90 (14)
for general sewing
8o (! t)
for light weight
fabrics
Usar agujas SINGER Catalogo NO 2022.
TEJIDO HILO AGUJA
Genero ligero
MEDIO
LINO
Organdina, line, carraclan
Genero fuerte
Oxford. mahSn, gabardina de
algod6n
Genero ligero
Trop cal, lana, popelin
LANA
FIBRA Gresp6n georgette, sat6n velo Algodon NO 120 - 80
PUNTO Jersey PoliesterNO 60 - 50
Gabardina. sarga de seda,
flanela
Genero fuerte PoliesterNO 60 - 50
Panas, astraca, n, pelo de camello Atgod6n NO 60
Genero ligero PoliesterN o 100 - 80
G_nero fuerte PoliesterNO 60
Tafeta, mahon, sargas Algod6n No 60
Tricot PoliesterNO 80 - 60
Lana
Algodon No 100
PoliesterN o60 - 50
Algodon N° 60
Poliester NO 80
Algodon NO 60
Poliester N o 80 - 60
Algod6n N° 60
Algodon NO 80 - 60
Algodon NO 60
Poliester NO60 - 50
Nylon grueso
9o (14)
para cosido
general
80 (1t)
para tejidos
de genero ligero
* Synthetic threads are recommended for ordinary overlocking. Polyester thread, for
example, is very useful for different types of fabric.
NOTE: Keep in mind that the lower and upper loopers will use about twice the amount of
thread as the needles. When purchasing thread for sewing, therefore, especially if it is an
unusual colour, you should buy sufficient for your requirements.
ejemplo, es muy Qtil para diferentes tipos de tejidos.
= ........ LI
Nota : Se tendra en euenta que las ancoras superior e inferior usaran el doble de cantidad
de hilo que el hilo de la aguja. Cuando compre bile para coser, per tanto, especialmente si
es de un color poco usual, debe comprar suficiente para sus necesidades.
co ..... t_o. de per* Los hilos sinteticos se recomiendan nara p_spunt,=_ ,,i"" "_ =_ ,k;',,,o ....pOllester,
9
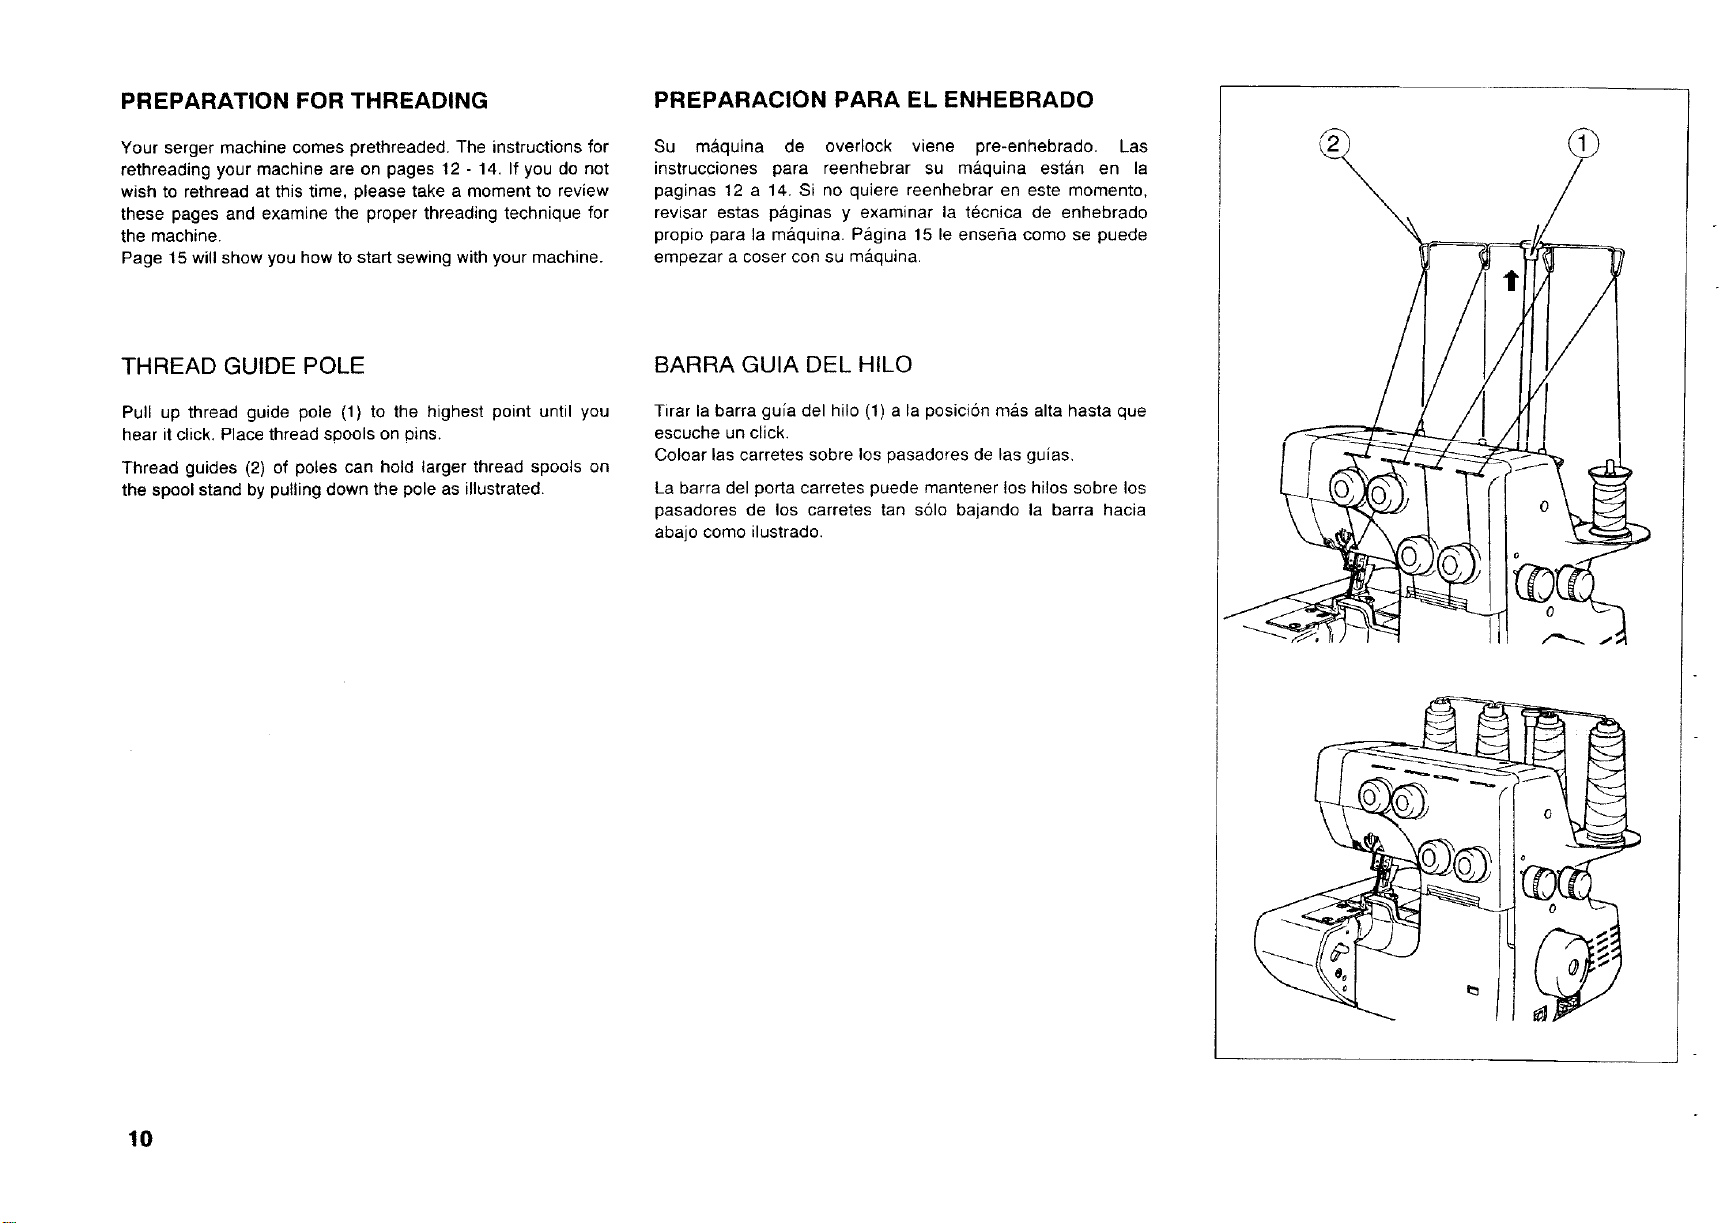
PREPARATION FOR THREADING
PREPARACION PARA ELENHEBRADO
Your serger machine comes prethreaded. The instructions for
rethreading your machine are on pages 12 - 14. If you do not
wish to rethread at this time, please take a moment to review
these pages and examine the proper threading technique for
the machine.
Page 15 will show you how to start sewing with your machine.
THREAD GUIDE POLE
Pull up thread guide pole (1) to the highest point until you
hear it click. Place thread spools on pins.
Thread guides (2) of poles can hold larger thread spools on
the spool stand by pulling down the pole as illustrated.
Su m&quina de overlock viene pre-enhebrado. Las
instrucciones para reenhebrar su ma.quina est&n en la
paginas 12 a 14. Si no quiere reenhebrar en este momento,
revisar estas paginas y examinar la tecnica de enhebrado
propio para la m&quina. Pagina 15 le enser_a como se puede
empezar a coser con su m&quina.
BARRA GUIA DEL HILO
Tirar la barra guia del hilo (1) a la posicion m&s alta hasta que
escuche un click.
Coloar las carretes sobre los pasadores de las guias,
La barra del porta carretes puede mantener los hilos sobre los
pasadores de los carretes tan s61o bajando la barra hacia
abajo como ilustrado.
0
10
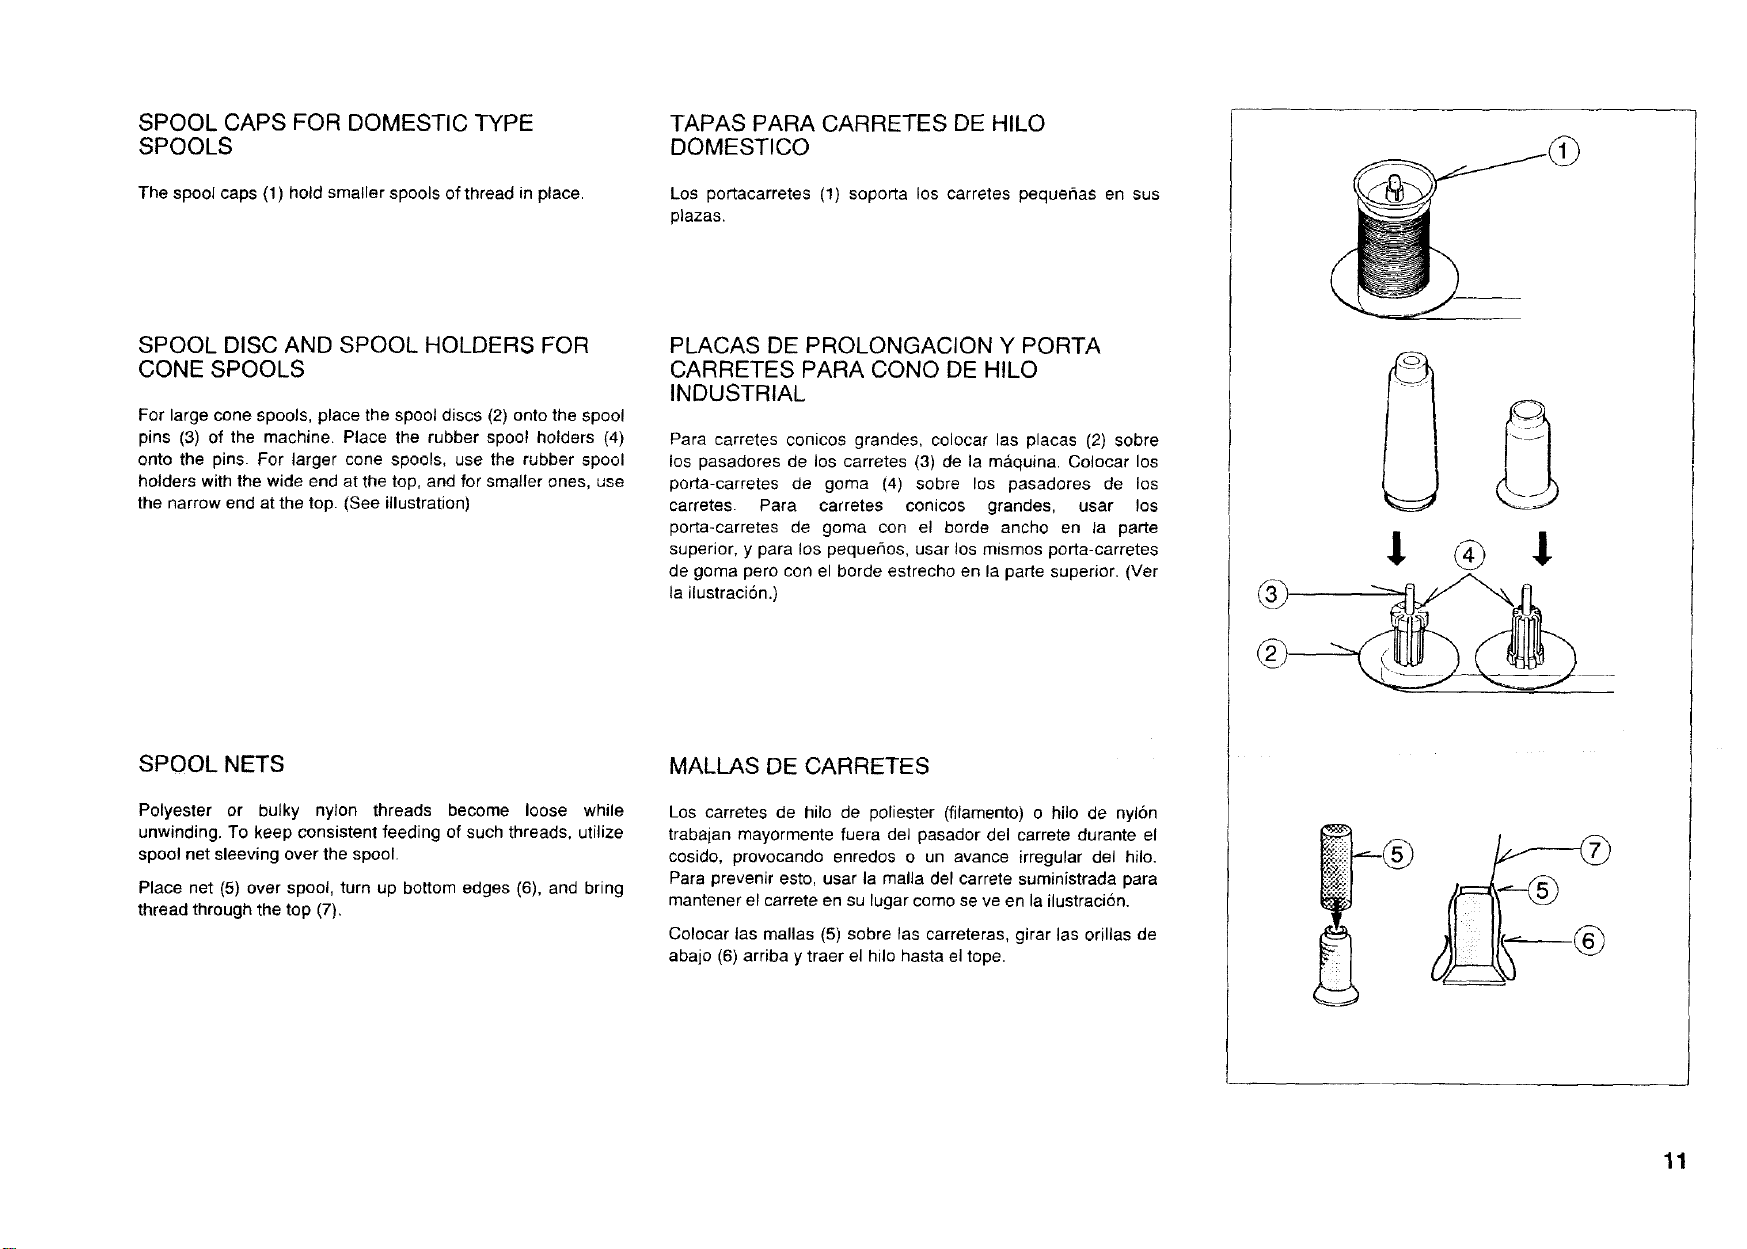
SPOOL CAPS FOR DOMESTIC TYPE TAPAS PARA CARRETES DE HILO
SPOOLS DOMESTICO
The spool caps (1) hold smaller spools of thread in place.
SPOOL DISC AND SPOOL HOLDERS FOR
CONE SPOOLS
For large cone spools, place the spool discs (2) onto the spool
pins (3) of the machine. Place the rubber spool holders (4)
onto the pins. For larger cone spools, use the rubber spool
holders with the wide end at the top, and for smaller ones, use
the narrow end at the top. (See illustration)
SPOOL NETS
Los portacarretes (1) soporta los carretes pequefias en sus
plazas.
PLACAS DE PROLONGACION Y PORTA
CARRETES PARA CONe DE HILO
INDUSTRIAL
Para carretes conicos grandes, colocar las placas (2) sobre
ios pasadores de los carretes (3) de la m&quina. Colocar los
porla-carretes de gema (4) sobre los pasadores de los
carretes. Para carretes conicos grandes, usar los
porla-carretes de goma con el horde ancho en la parte
superior, y para los pequefios, usar los mismos porta-carretes
de goma pero con el borde estreche en la parle superior. (Ver
la ilustraci6n.)
MALLAS DE CARRETES
Polyester or bulky nylon threads become loose while
unwinding. To keep consistent feeding of such threads, utilize
spool net sleeving over the spool.
Place net (5) over spool, turn up bottom edges (6), and bring
thread through the top (7).
Los carretes de hilo de poliester (filamento) o hilo de nylon
trabajan mayormente fuera del pasador del carrete durante el
cosido, provocando enredos o un avance irregular del hilo.
Para prevenir esto, usar la malla del carrete suministrada para
mantener el carrete en su lugar come se ve en la ilustraci6n.
Colocar tas mallas (5) sobre las carreteras, girar las orillas de
abajo (6) arriba y traer el hilo hasta el tope.
11
 Loading...