

Page 1
14SH744/14CG744
(2.3.4 THREAD OVERLOOK MACHINE)
(2.3.4 MAQUINA SOBREORILLADORA)
(SURJETEUSE2.3.4FILS)
14SH754/14CG754/14ET754/14SH764
(2.3.4 THREAD OVERLOOK MACHINE WITH DIFFERENTIAL FEED)
(2.3.4 MAQUINA SOBREORILLADORA CON TRANSPORTE DIFERENCIAL)
(SURJETEUSE2.3.4FILS ENTRAINEMENT DIFFERNTIEL)
Manual de Instrucciones
Operator's Guide
Manuel D'instructions
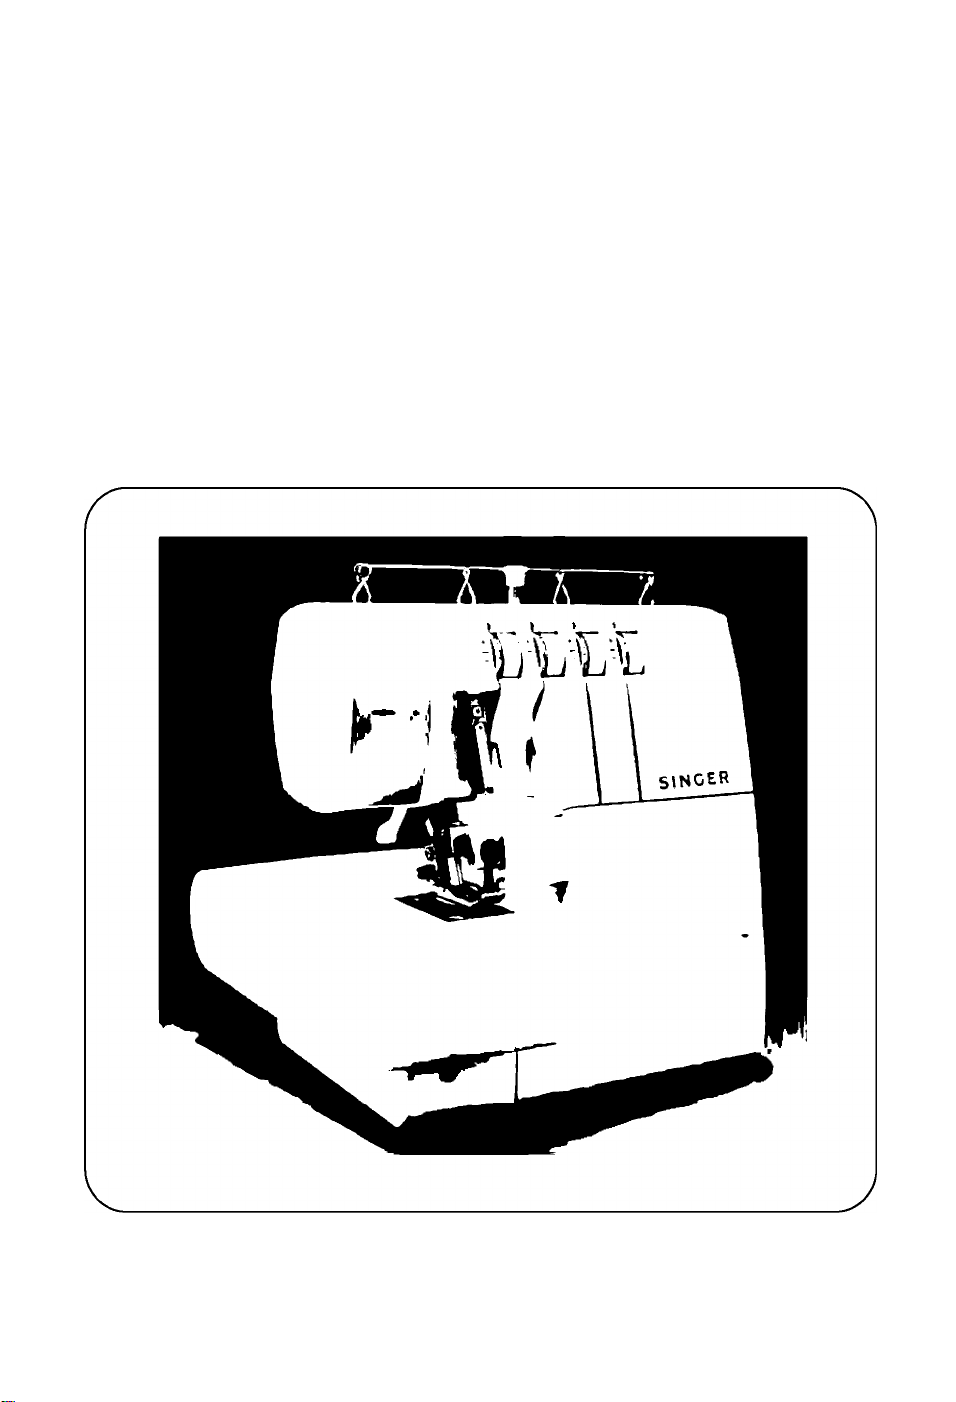
SINGER
Page 2

14SH744/14CG744
(2.3.4 THREAD OVERLOOK MACHINE)
14SH754/14CG754/14ET754/14SH764
(2.3.4 THREAD OVERLOOK MACHINE WITH DIFFERENTIAL FEED)
Operator's Guide
Page 3

14SH744/14CG744
14SH754/14CG754/14ET754/14SH764
For European Territories:
This Singer Sewing Machine was tested according to European norms and meets the requirements
regarding electrical safety radio interference and electromagnetic immunity.
The conformity is documented with the ^ ^ mark.
C€
* Before servicing the appliance , unplug the machine.
* If the light Is damaged, It must be replace by authorized dealer.
i) Singer is a registered trademark of The Singer Company Limited or its affiliates.
Copyright©2005 The Singer Company Limited
Page 4

IMPORTANT SAFETY INSTRUCTIONS
When using this machine, basic safety precautions should always be followed including the following.
Read all instructions before using the machine
A DANGER
The machine should never be left unattended when plugged in. Always unplug the machine from the
electric outlet immediately after using and before cleaning.
- To reduce the risk of electric shock:
A WARNING -To reduce the risk of burns, fire, electric shock or iniury lo persons:
• Be sure that the electrical voltage of the electric outlet (wall receptacle) is the same as the rated voltage of
the motor.
. Use this machine only for its intended use as described in this Operator’s Guide. Use only attachments
recommended by the manufacturer as contained in the Operator's Guide
• To disconnect, turn all controls to the off (“0") position, then remove plug from outlet.
. Disconnect the power line plug from the socket outlet or switcti tlie machine oft when making any adjustments
in the needle area, such as threading needle and loopers, changing needle, changing throat plate or
changing presser foot, etc.
. Always unplug the machine from the electrical outlet when removing covers, lubricating, or when making
any other user servicing adjustments mentioned in the Operator's Guide
• Do not attempt to adjust the motor belt. Contact your nearest Service Center should any adjustment be
required.
• Do not unplug by pulling on cord. To unplug, grasp the plug, not the cord.
- Handle the foot controller with care and avoid dropping it on the floor. Be sure not to place anything on top
of it.
. Always use the proper throat plate The wrong plate can cause the needle to break
• Do not use bent needles.
. When sewing, keep fingers away from all moving parts. Special care is required around the sewing
machine needle.
• Do not pull or push fabric while stitching. It may deflect the needle causing it to break.
. Use only the handle to lift and move the machine.
. Never operate the machine if it has a damaged cord or plug, if it is not working properly, if it has been
dropped or damaged, or dropped into the water. Return the machine to the nearest authorized dealer or
Service Center for examination, repair, electrical, or mechanical adjustment.
- Never operate the machine with any air openings blocked. Keep ventilation openings of the machine and
foot controller free from the accumulation of lint, dust and loose cloth.
. Never drop or insert any object into any opening.
Page 5

+ Do not use outdoors.
* Do not operate where aerosol (spray) products are being used or where oxygen is being administered.
» Do not allow to be used as a toy. Close attention is necessary when the machine is used by or near
children.
* Do not expose the machine or machine plastic case to sunlight directly. Also, do not keep it in a very warm
or damp place.
» Do not touch the machine, toot controller and power line cord with wet hand, wet cloth or with anything wet.
♦ Do not connect power line cord to one of the many cords connected to one power outlet with adapters.
• Use machine on flat and stable table.
V Be sure to close the cylinder cover and looper cover before operating the machine.
• Keep presser foot and needles away from children’s reach.
« Do not dismantle or modify the machine yourself.
♦ Be sure to turn off the power switch and disconnect the power line plug before caring for your machine as
instructed in the operator's guide.
SAVE THESE INSTRUCTIONS
Servicing should be performed by an authorized service representative.
This product is not intended for industrial use.
FOR EUROPEAN AND SIMILAR TERRITORIES:
Machines for Great Britain and some other countries having similar wiring standards are shipped from the
factory without a plug for connection to the mains. The wires in this mains lead are colored In accordance with
the following code.
Blue: neutral (N) Brown: live (L)
As the colors of the wires in the mains lead of this appliance may not correspond with the colored markings
identifying the terminals in your plug, proceed as follows:
The wire which Is colored blue must be connected to the terminal which is marked with the letter N or colored
black. The wire which is colored brown must be connected to the terminal which is marked with letter L or
colored red. If a 13 Amp. (BS 1363) plug is used, a 3 Amp. fuse must be fitted, or if any other type of plug is
used, a 5 Amp. fuse must be fitted either in the plug or adaptor or at the distribution board.
Neither cord is to be connected to the earth terminal of a Ihree-pin plug.
Page 6

CONTENTS
Page
1. Selection of Stitches..............................................5
2. Handy Reference Chan..........................................6
3. Accessories
4. Needle Information
............................................................
................................................
7
7
5. Principal Parts........................................................8
6. How to Open Looper Cover
..................................
9
7. Principal Parts Behind Looper Cover ..................9
8. Preparation Prior to Sewing
.................................
9
9. Preparation for Threading................................................................ 10
•Setting up the thread guide holder
10. How to Remove and Insert Needles
•To remove needle(s)
.............................................
.....................
...................
10
11
11
•To insert needle(s)................................................11
11. Threading the Machine..........................................12
•Threading diagram
•Understanding the color code
•To thread the machine correctly
1) Threading the upper looper (Orange)
2) Threading the lower looper (Yellow)
3) Threading the right needle (Green)
................................................
.............................
.........................
...........
.............
................
12
12
12
14
4) Threading the left needle (Blue).....................I8
•Important threading information
12. How to Change Threads / Tie on Method
.........................
............
19
20
13. How to Adjust the Stitch Length .........................21
14. How to Adjust the Seam Width
...........................
21
•Width adjustment by changing needle position .. .21
•Width adjustment with adjustment knob
15. How to Adjust the Presser Foot Pressure
16. Differential Feed
..............................................
............
..........
1 - - 23
22
• Gathered overedge...............................................23
• Stretch overedge
17. How to Disengage Movable Upper Knife
..................................................
...........
24
25
18. Converting the upper looper into spreader..., 26
19. Free Arm Sewing (Tubular Work)
.......................
27
20. Standard Overedge and Rolled Hem Stitching .. 28
• To sew standard overedge
..................................
•To sow rolled hem.................................................28
21. Chaining Off and Test Sewing .............................29
22. Suggested Tension Setting
1) 2-thread wrapped edge overlook
...............................................
2) 2-thread standard rolled hem stitching
3) 3-Thread Overlook......................................................32
4) 3-Thread Flatlock
5) 3-Thread Wrapped Edge Overirick..........................34
....
..................................................33
6) 4-Thread Ultra Stretch Mock Sateiy Slilch...............35
23. How to Sew a Rolled Hem
1) 2-thread wrapped edge overlook
...............................................
2- thread standard rolled hem stitching.............37
2) 3-thread standard rolled hem stitching
3- thread upper looper thread wrapped
rolled hem stitching
24 Stitch Variations and Sewing Techniques.........................40
• Hov/ to sew a flatlock decorative seam
•Hov/ to sew an overlock blind hem..................................42
• How to sew pin tucks........................................................42
12
15
2I
•Turning square corners.....................................................43
•Pin placement.....................................................................44
•Securing the thread chain............................................... 44
•How to reinforce a seam....................................................45
•Braiding by chaining off....................................................45
25. Machine Maintenance.........................................................46
•Cleaning the machine
• Oiling the machine...........................................................
•How to replace the stationary knife
26. Troubleshooting Chart.......................................................48
27. Relationship between Cloth. Thread and Needle. . 49
28. Specification
.......................................................................
...............................................
........................................................
.................................
28
Page
..............................
..................
............................
..................
..........................
30
30
31
36
37
38
38
40
46
46
47
50
Page 7
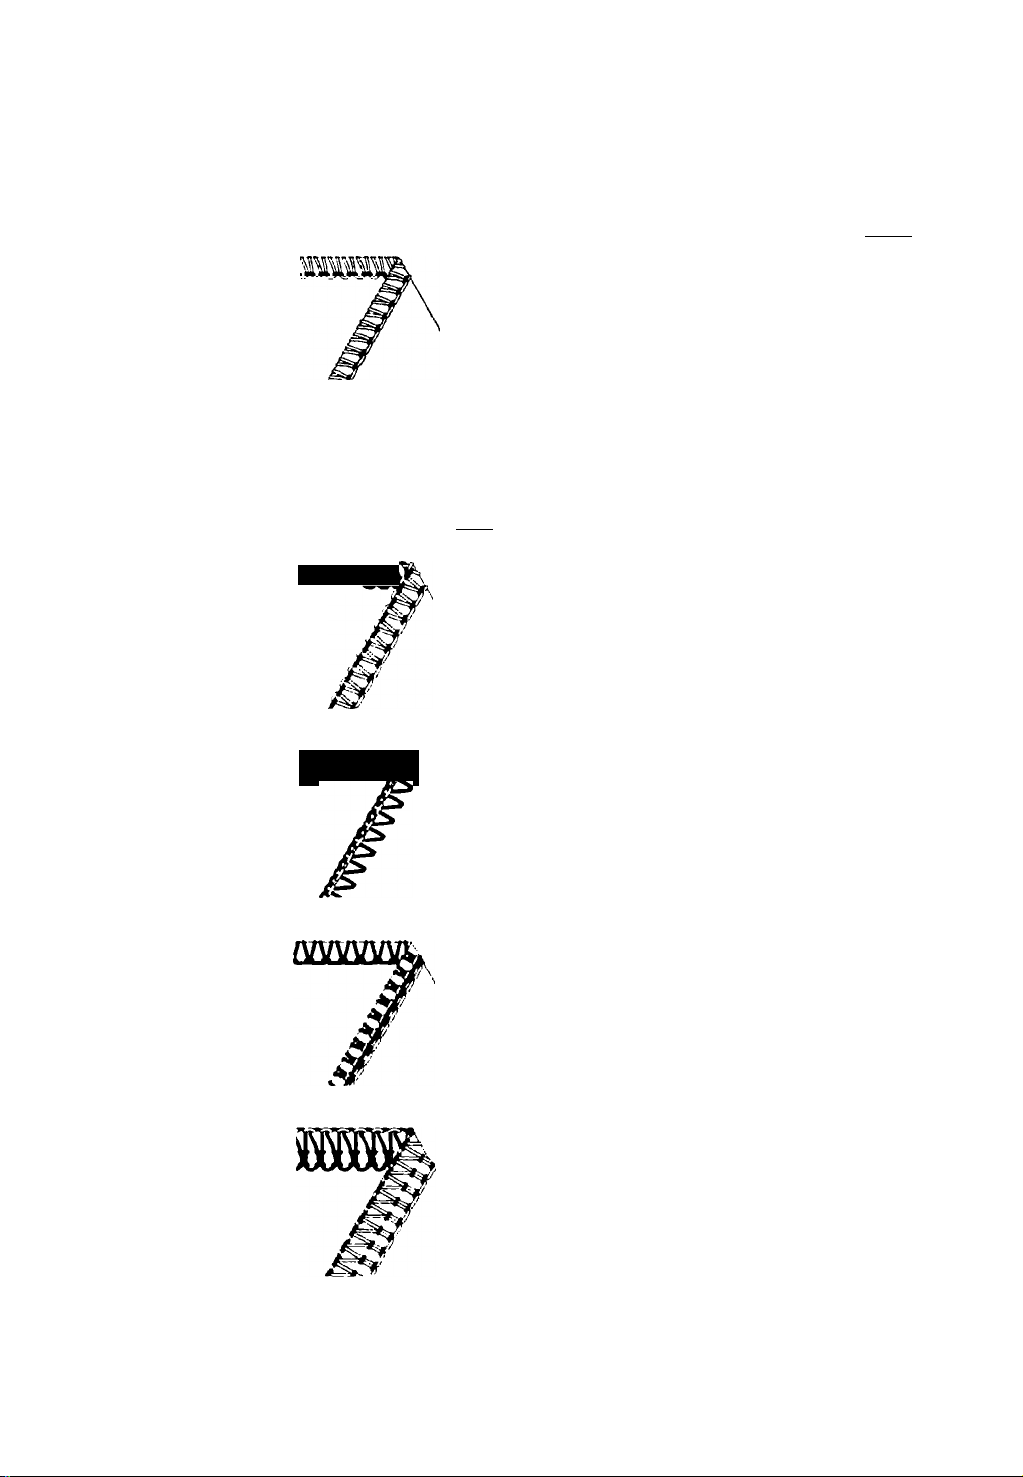
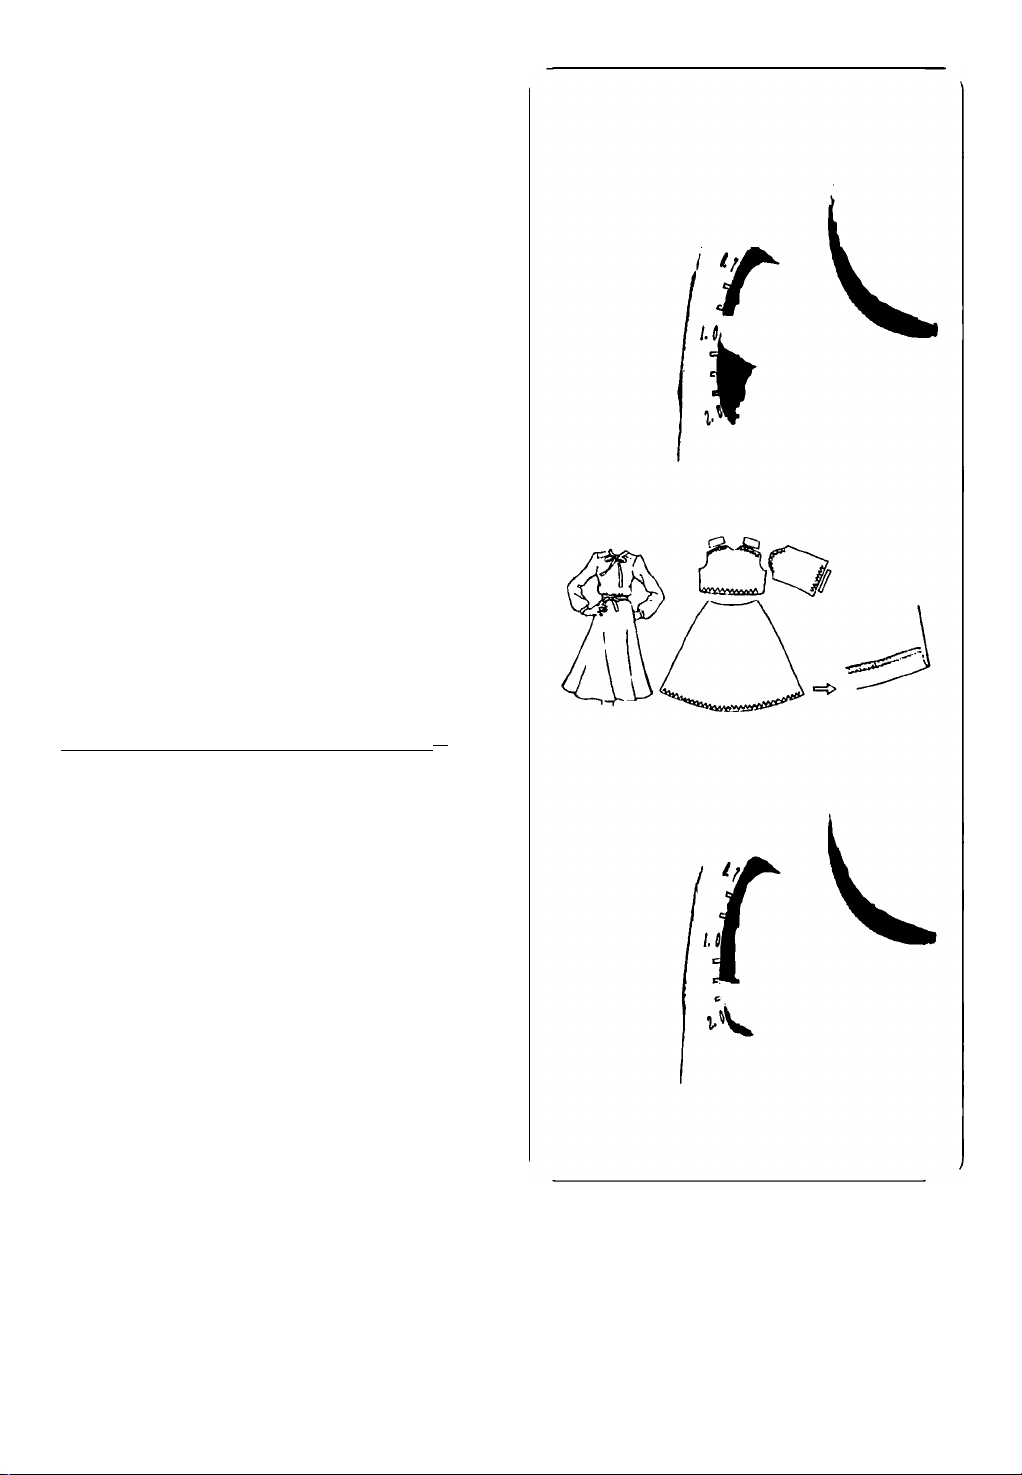
1. SELECTION OF STITCHES
This machine is capable of producing various types of stitches according to the combination ot needle positions,
threading methods, tension adjustment,
Stitch Type
Reference
Pages
1. Two-thread
wrapped edge
overtook
2. Two-thread
standard rolled
hem stitching
3. Three-thread
Overlock
4. Three-thread
Flatlock
4?
miimm
(502)
(503)
(504)
1-needle 2-thread stitch is used for
light weight or knits fabrics. Also.a
3.5mm and 5.7mm wrapped overlock
seam width can be obtained by
changing the needle position.*
1-needle 2-thread stitch is used for
overedge seaming.blindstitch
hemming on edge finishing operations.
Also.a 3.5mm and 5.7mm standard
rolled hem seam width can be obtained
by changing the needle position.*
1-needle 3-thread stitch is used for
overedging and seaming on common
fabrics. Also, a 3 5mm and 5.7mm
overlook seam width can oe obtained by
changing the needle position "
1-needle 3-thread stitch is used for butted
or lapped seams and ornamental stiiching
with decorative thread. Also, a 3.5mm and
5.7mm flatlock width can be obtained by
changing the needle position.'
30
31
32
33
(505)
5. Three-thread
Wrapped Edge
Overlook
1-needle 3-thread stitch is used for sewing
narrow rolled hems or ornamental edges.
Also, a 3.5mm and 5.7mm wrapped
34
overlook seam width can be obtained by
changing the needle position *
6. Four-thread
Stretch Mock
Safety Stitch
(514)
* Depending on the needle positions used, this machine can sew 3-thread standard width 3.5mm overedge and
a 5.7mm wide overedge seams.
2-needle 4-thread stitch which is ideal lor
medium to heavy weight stretchy fabrics
such as double knits and swim wear.
35
Page 8
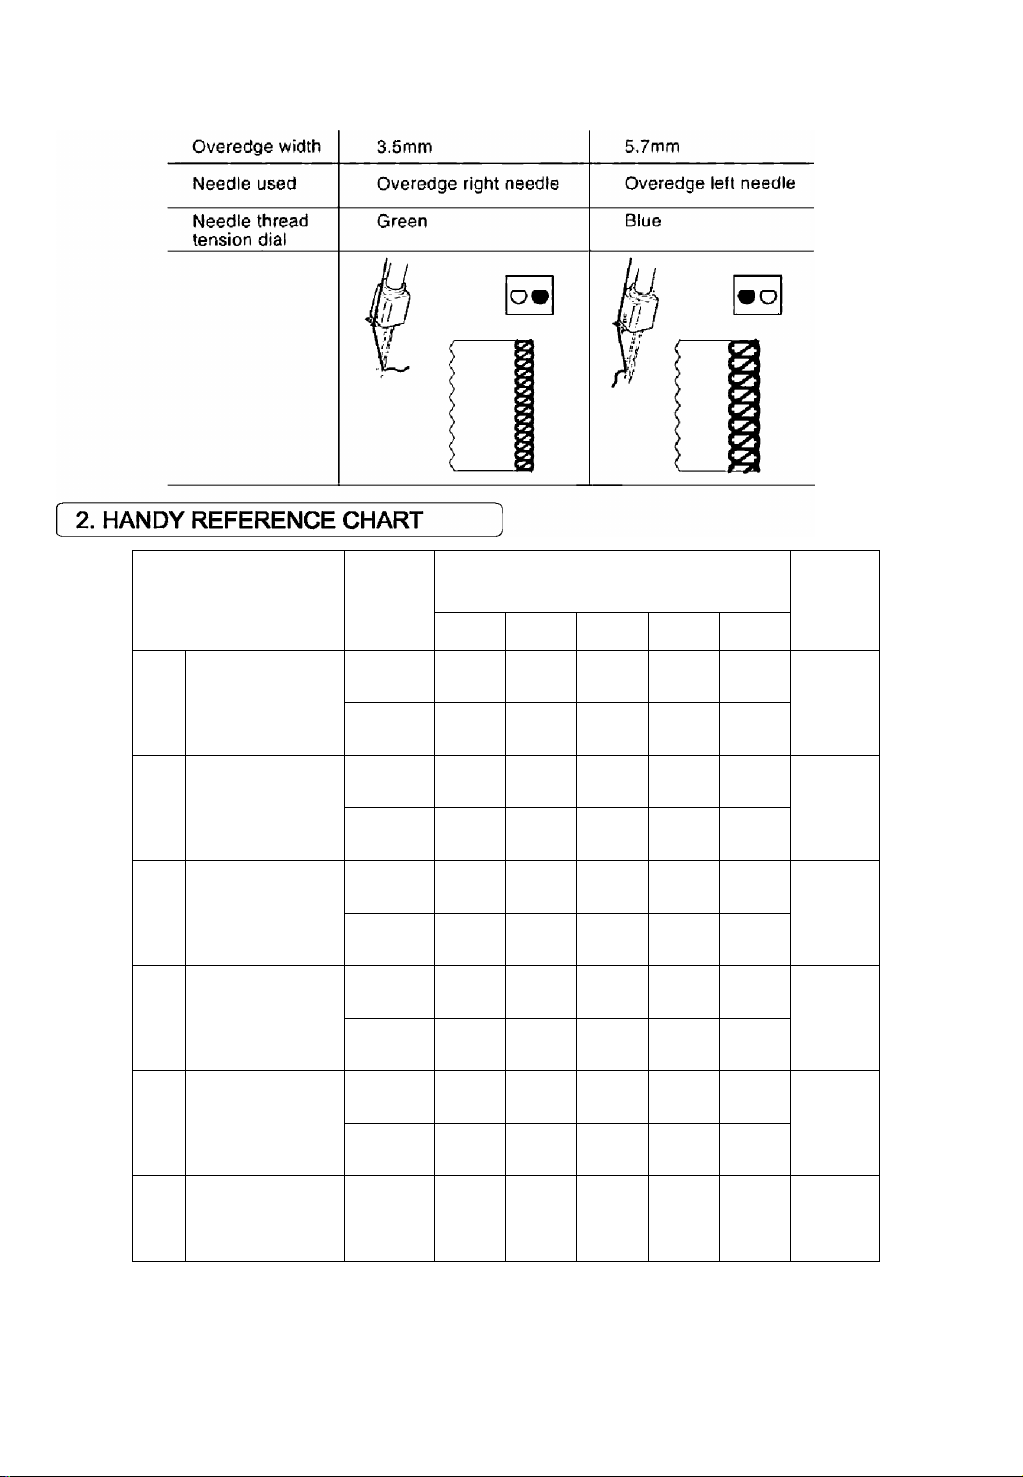
Also, for overedging heavyweight fabrics, the seam width can be increased still more by turning the overedge
seam width adjustment knob. (See page 21)
Tension Dial: Numbers shown are average
settings on medium weight fabric with
standard #80 polyester spun thread
Blue Green Orange Yellow
4.0 2.0
3.5 1.0
0.5 6.0
0.5
3.0
3.0 3.0 3.0
0.5 5.0
0.5 5.0 7.0
3.0
5.0 0 8.5
3.0 3.0
1.0
5.0
7.0
7.0
spreader
Spreader
Spreader
Spreader
Spreader
Upper
looper
Upper
looper
Upper
looper
Upper
looper
Upper
looper
Upper
looper
Page
30
31
32
33
34
Stitch Type
Two-Thread
Wrapped Edge
Overiock
1
Two-Thread
Standard Rolled
2
Hem Stitching
Three-Thread
Overlock
3
Three-Thread
Flatlock
4
Three-Thread
Wrapped Edge
5
Overlock
Needle
Positions
3.5mm
5.7mm
(602)
3.5mm
5.7mm
(503)
3.5mm
5.7mm
(504)
3.5mm
S
5.7mm
(505)
3.5mm
S
5.7mm
Four-Thread Ultra-
Stretch Mock
6
Safety Stitch
3.0 3.0 3.0 3.0
(514)
Upper
looper
35
The thread tension becomes tighter as the dials are turned to higher numbers. The tension sellings shown on
this page as well as throughout the operator's manual are suggested guides. Adjust thread tensions to suit the
fabric and size of thread used. For host results make tension adjustments in small increments of no greater
than half a number at a time.
Page 9

3. ACCESSORIES
Accessories are contained in the accessory case in
the cloth plate.
744 / 754 / 764
1 Needle set
2 Screw driver (small size)
3 Tweezers
4 Spreader
1
1
1
1
4. NEEDLE INFORMATION
• Needle #2022 size 90/14 Is furnished with the
machine.
• In an emergency, standard needle #2020 may
be used.
However, unless the suggested tension setting is
readjusted, skipping of the stitches may occur.
•
Page 10
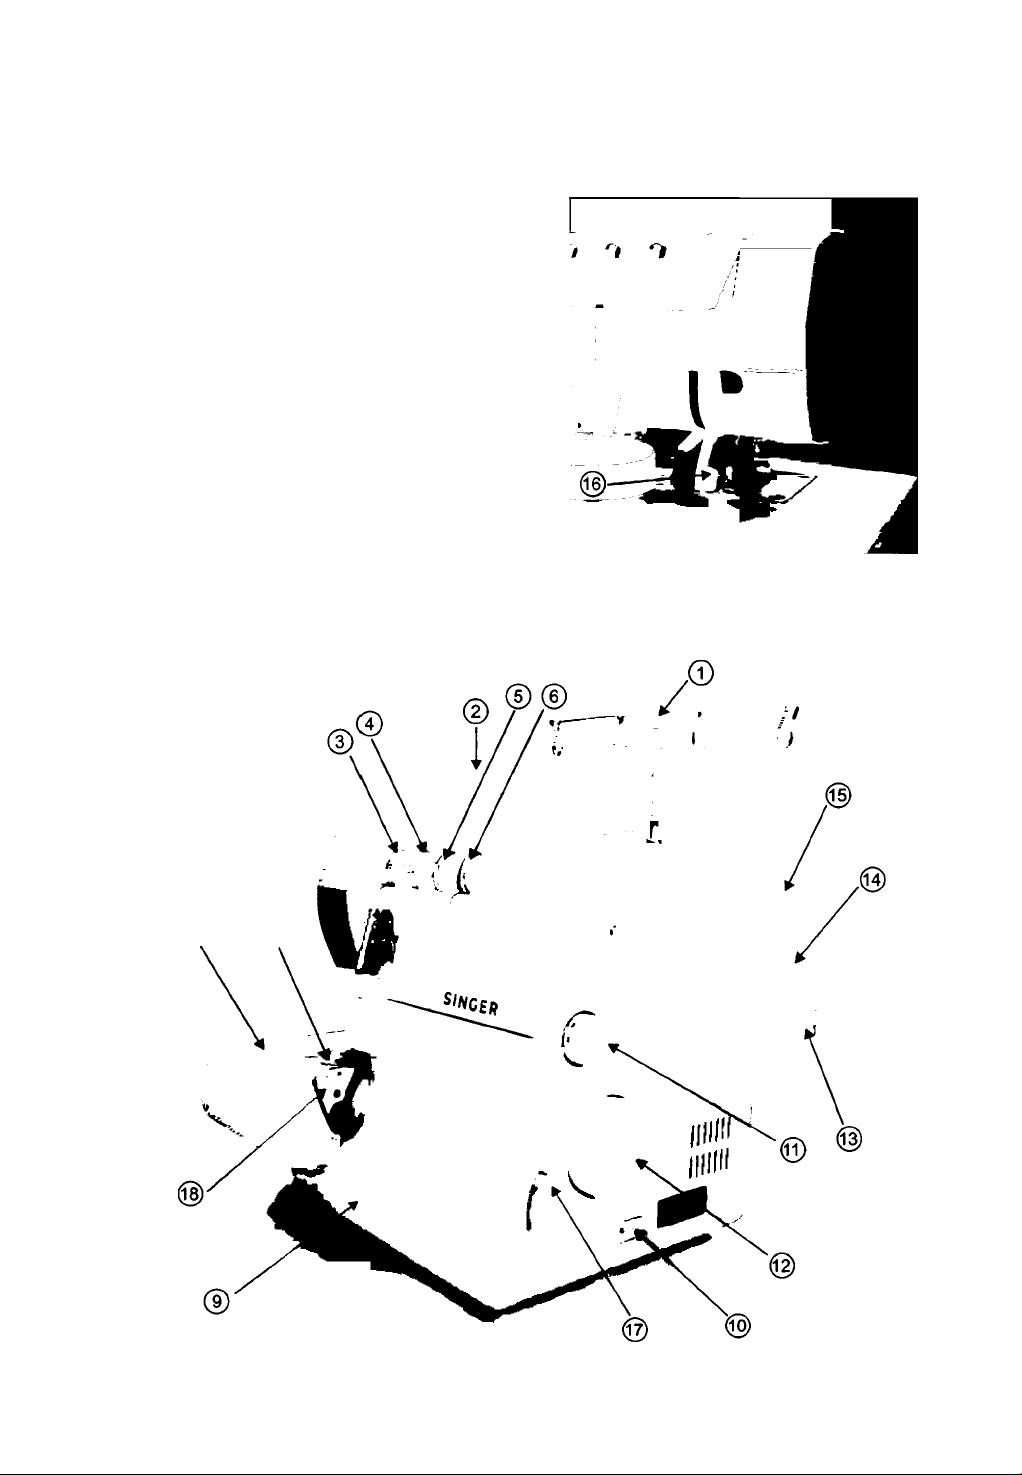
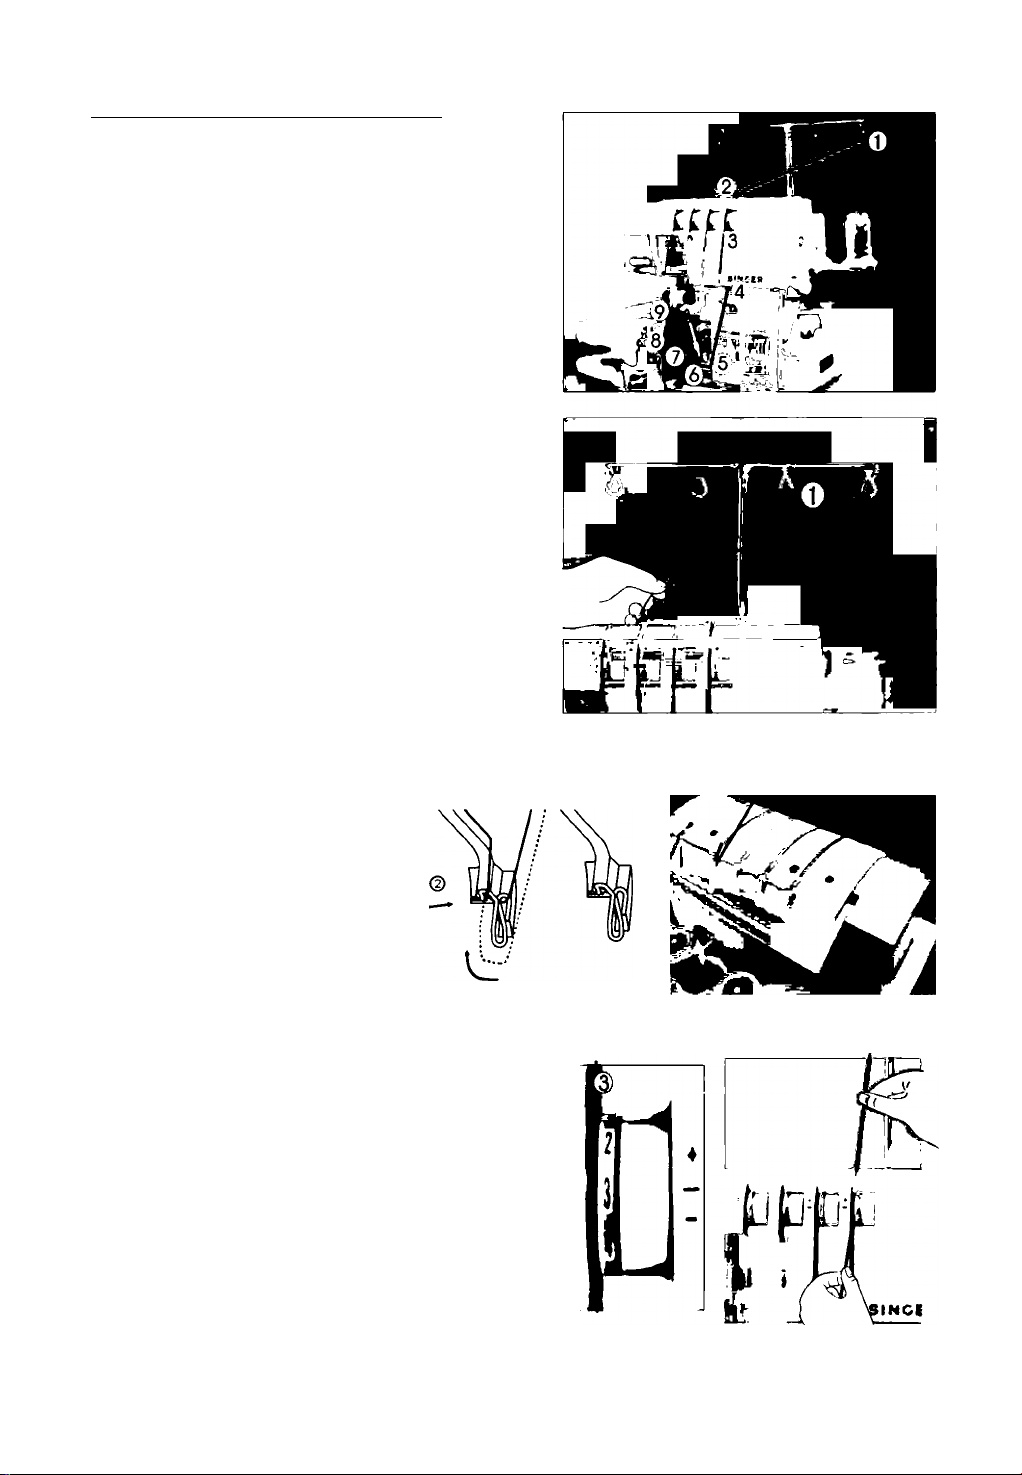
5. PRINCIPAL PARTS
1 Thread guides and holder
2 Handle
3 Left needle thread tension dial (blue)
4 Right needle thread tension dial (green)
5 Upper looper thread tension dial (orange)
6 Lower looper thread tension dial (yellow)
7 Throat plate
8 Cloth plate
9 Looper cover
10 Power & light switch
11 Stitch length dial
12 Handwheel
13 Spool stand
14 Spool holder
15 Spool pin
16 Presser bar lifter
17 Differential feed adjusting lever knob
18 Seam width finger support plate
Page 11
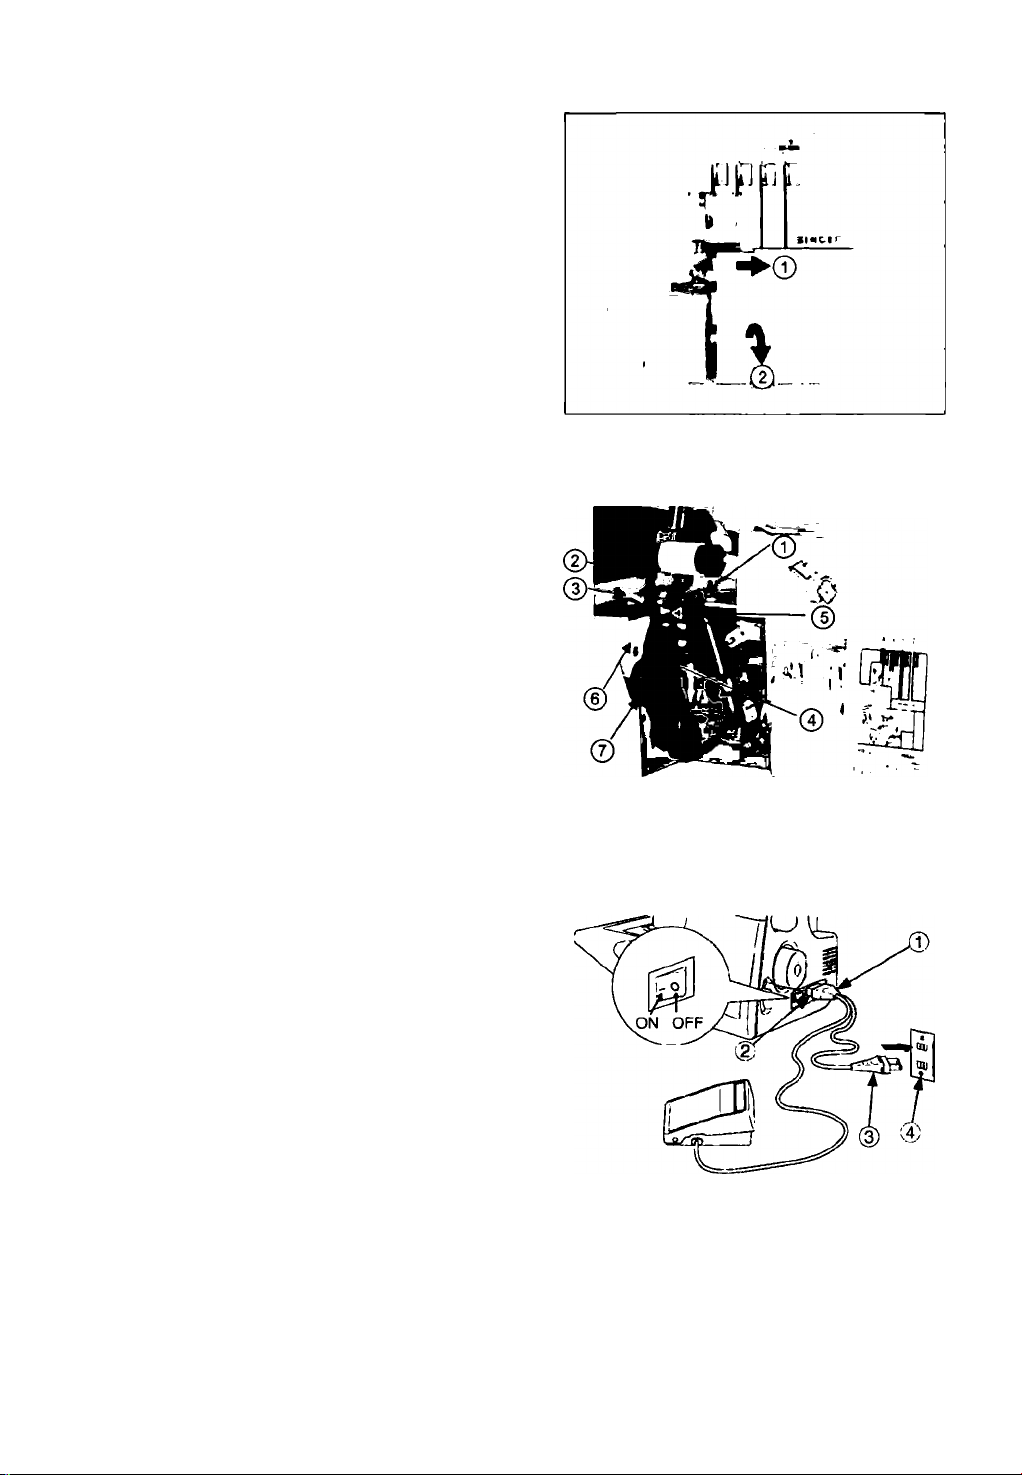
6. HOW TO OPEN LOOPER COVER
Caution ;
A
• Push the cover to the right as far as it will go 1 .
• Pull cover down toward you 2 .
A
Be sure to turn off power switch.
Caution:
Be sure looper cover is closed when sewing.
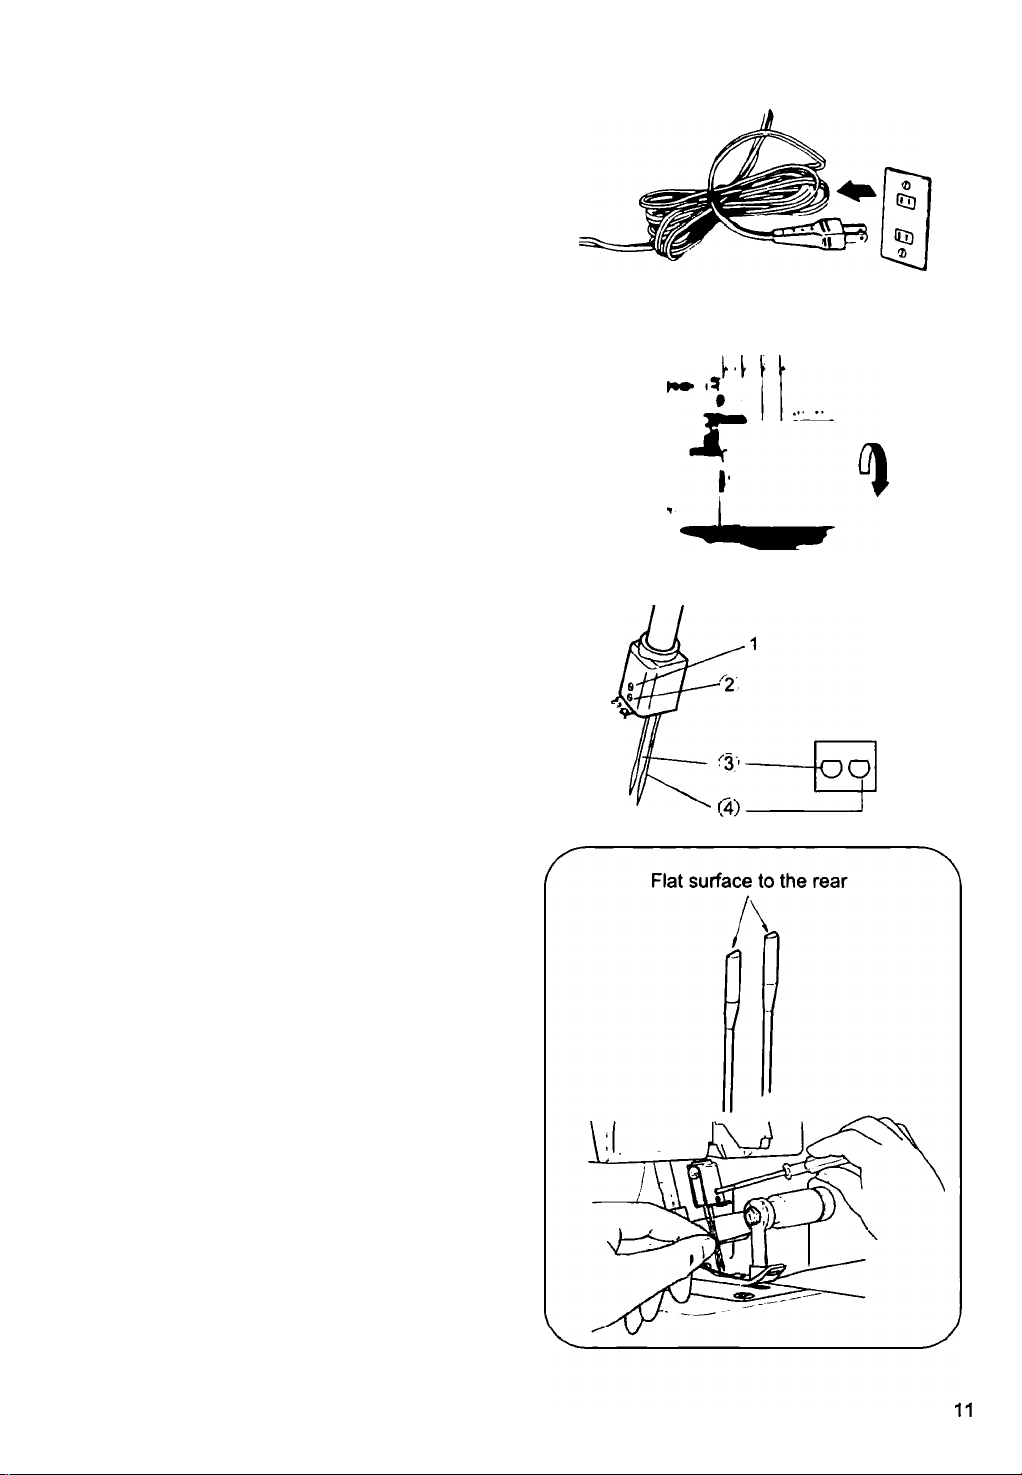
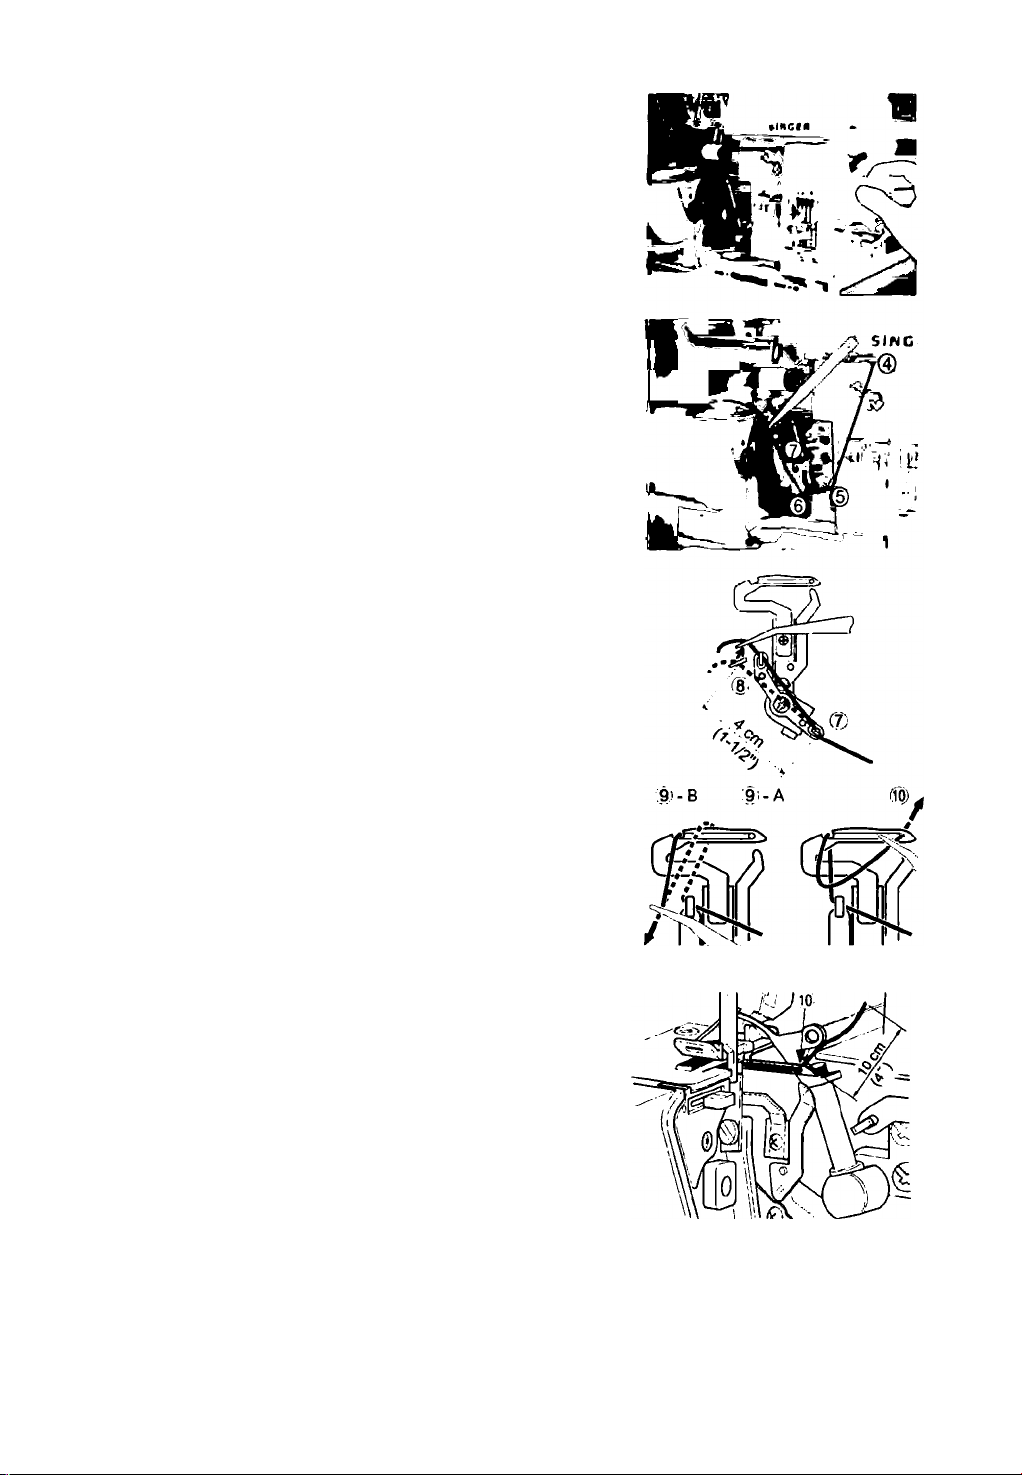
7. PRINCIPAL PARTS BEHIND
LOOPER COVER
1 Upper looper
2 Movable upper knife
3 Presser foot
4 Stationary lower knife
5 Lower looper
6 Seam width finger knob
7 Seam width adjustment knob
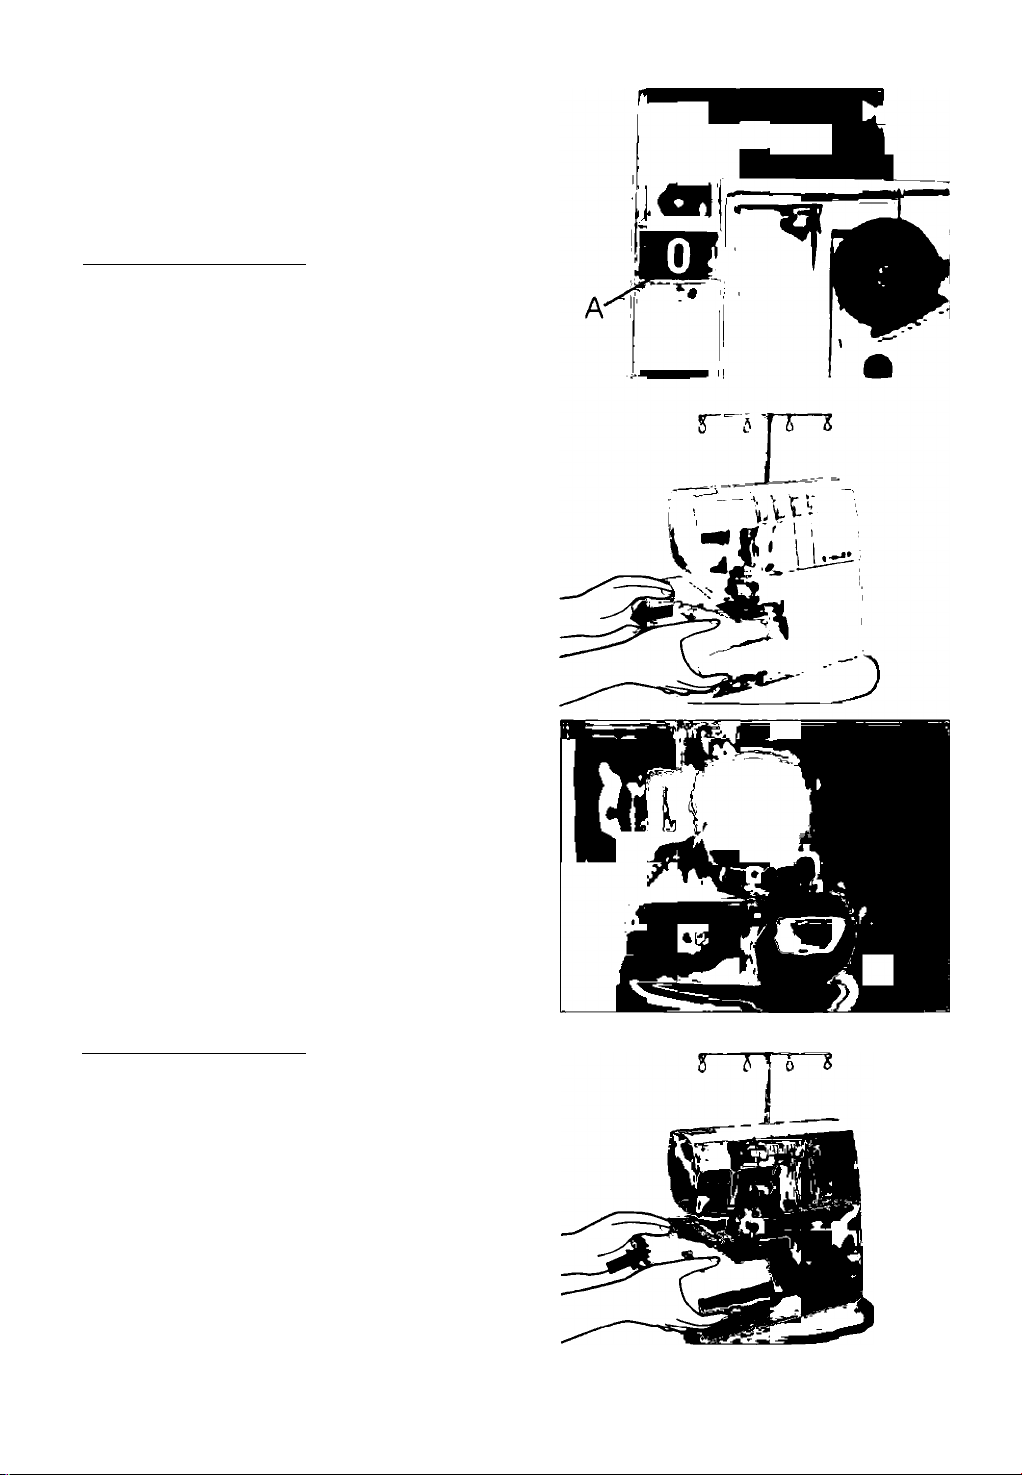
8. PREPARATION PRIOR TO SEWING
• Connect the controller / electric plug 1 to the
machine receptacle 2.
• Plug power line 3 into electric outlet 4 .
^ ■ I« W k n
• Power Switch: Push mark side to turn “ON".
Push “O" mark side to turn “OFF".
• To run the machine and control the speed, press
the controller.
• The harder you press, the faster the machine will
•
sew.
• To stop the machine from sewing, remove your foot
from the controller.
WARNING:
Use only foot controller provided with this
machine. (YC-482 for U.S.A. & CANADA only)
Be sure to make reference to "Warning" on
following page.
Page 12

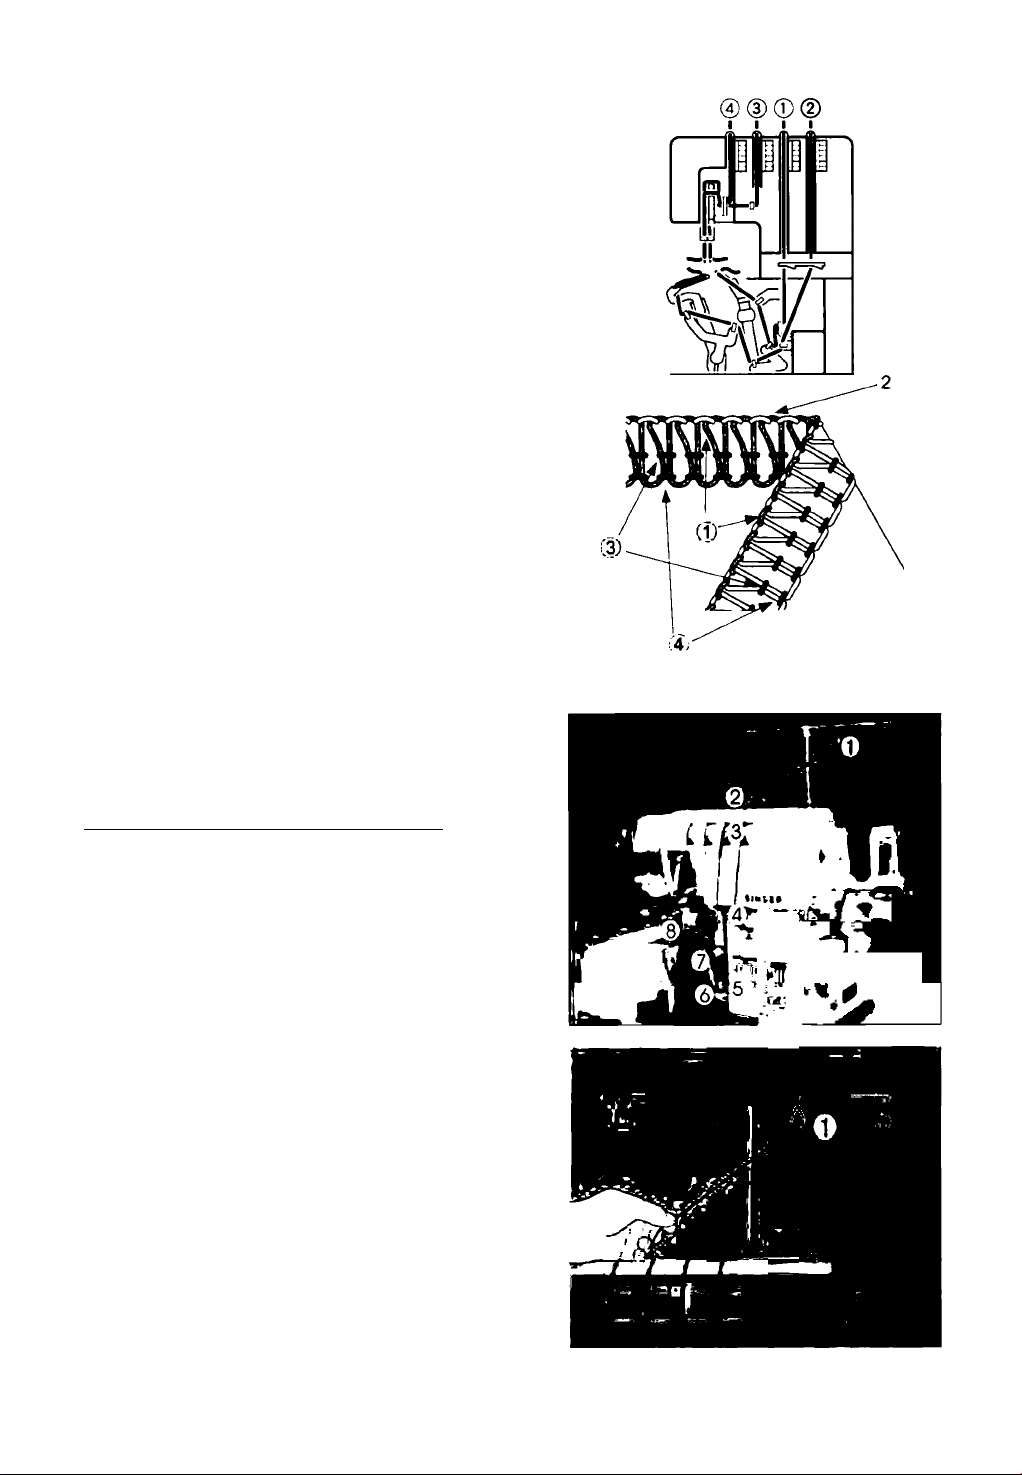
POLARIZED PLUG INFORMATION (FOR U.S.A. & CANADA ONLY)
This appliance has a polarized plug (one blade wider than the other). To reduce the risk of
electric shock, this plug is intended to fit in a polarized outlet only one way. If the plug
does not fit fully in the outlet, reverse the plug. If it still does not tit, contact a qualified
electrician to install the proper outlet. Do not modify the plug in any way.
Warning;
A
* Be sure that the electrical voltage of the electric outlet (wall receptacle) is the same as the rated
voltage of the motor.
* Handle the foot controller with care and avoid dropping it on the floor. Be sure not to place
anything on top of it when not in use.
* Disconnect the power line plug from the electric outlet when changing needles, presser feet or
throat plates, or when leaving the machine unattended. This eliminates the possibility of starting
the machine by accidentally pressing the controller.
9. PREPARATION FOR THREADING
Setting Up the Thread Guide Holder
This machine is shipped with the thread guide bolder
in the lowered position.
Fully extend the thread guide holder.
The two joints on the telescope will click into place
when they are correctly positioned.
Center the thread guides above the spool pins.
Place thread over the cone adapters on the spool
pins.
Note: If the machine is threaded, straighten the
threads to prevent tangling.
i
SlftfOfill
O
10
Page 13
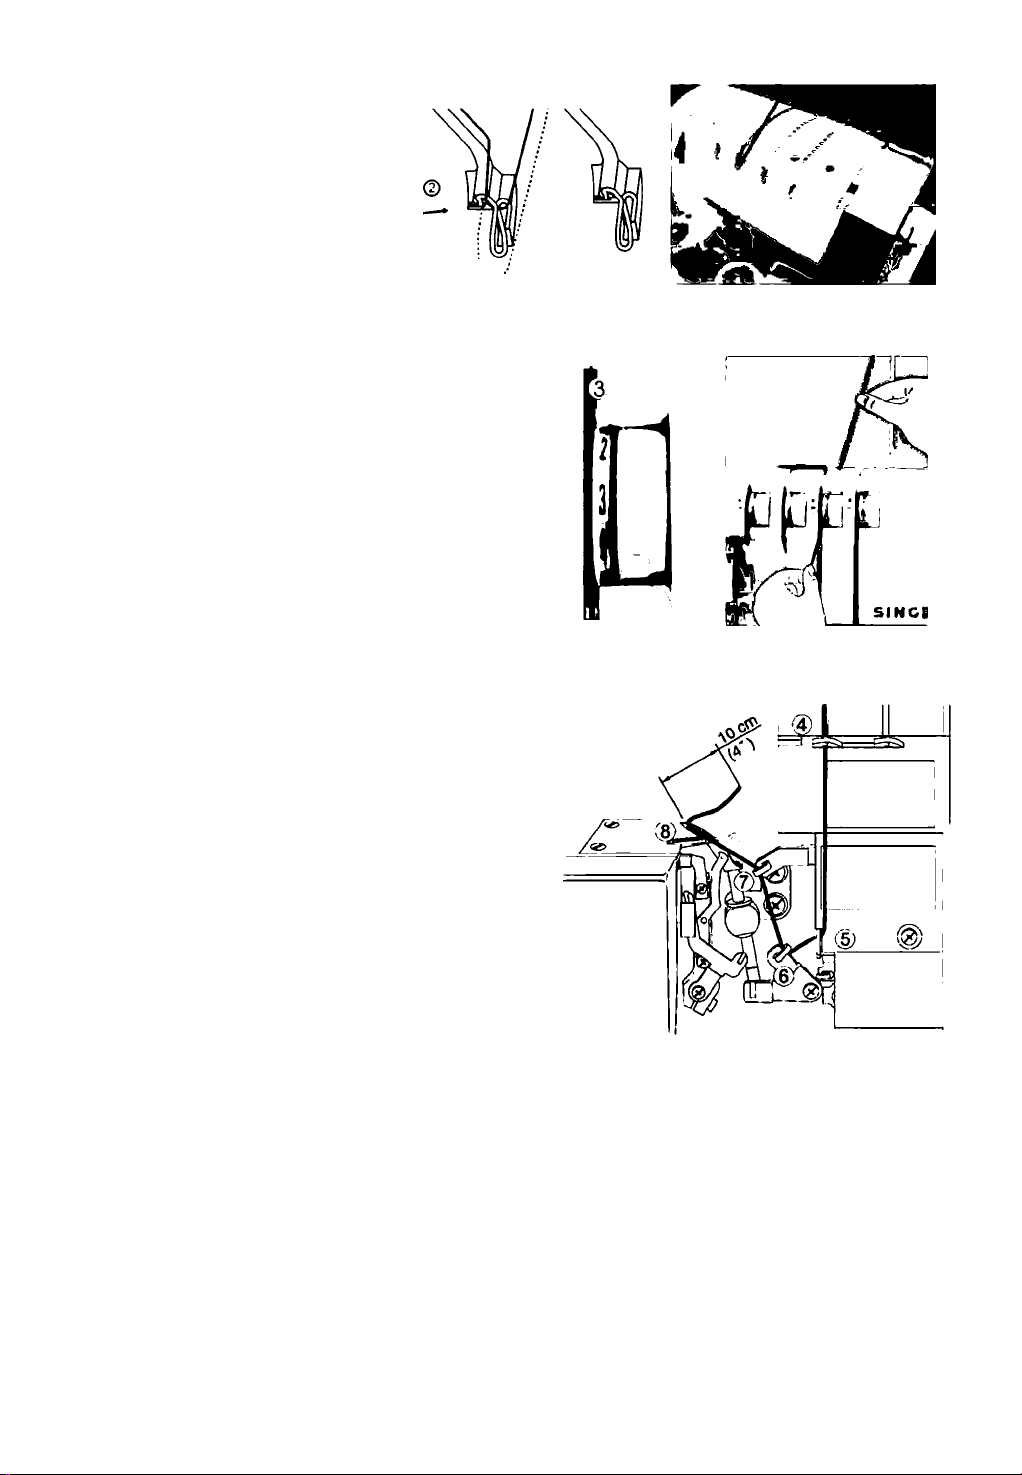
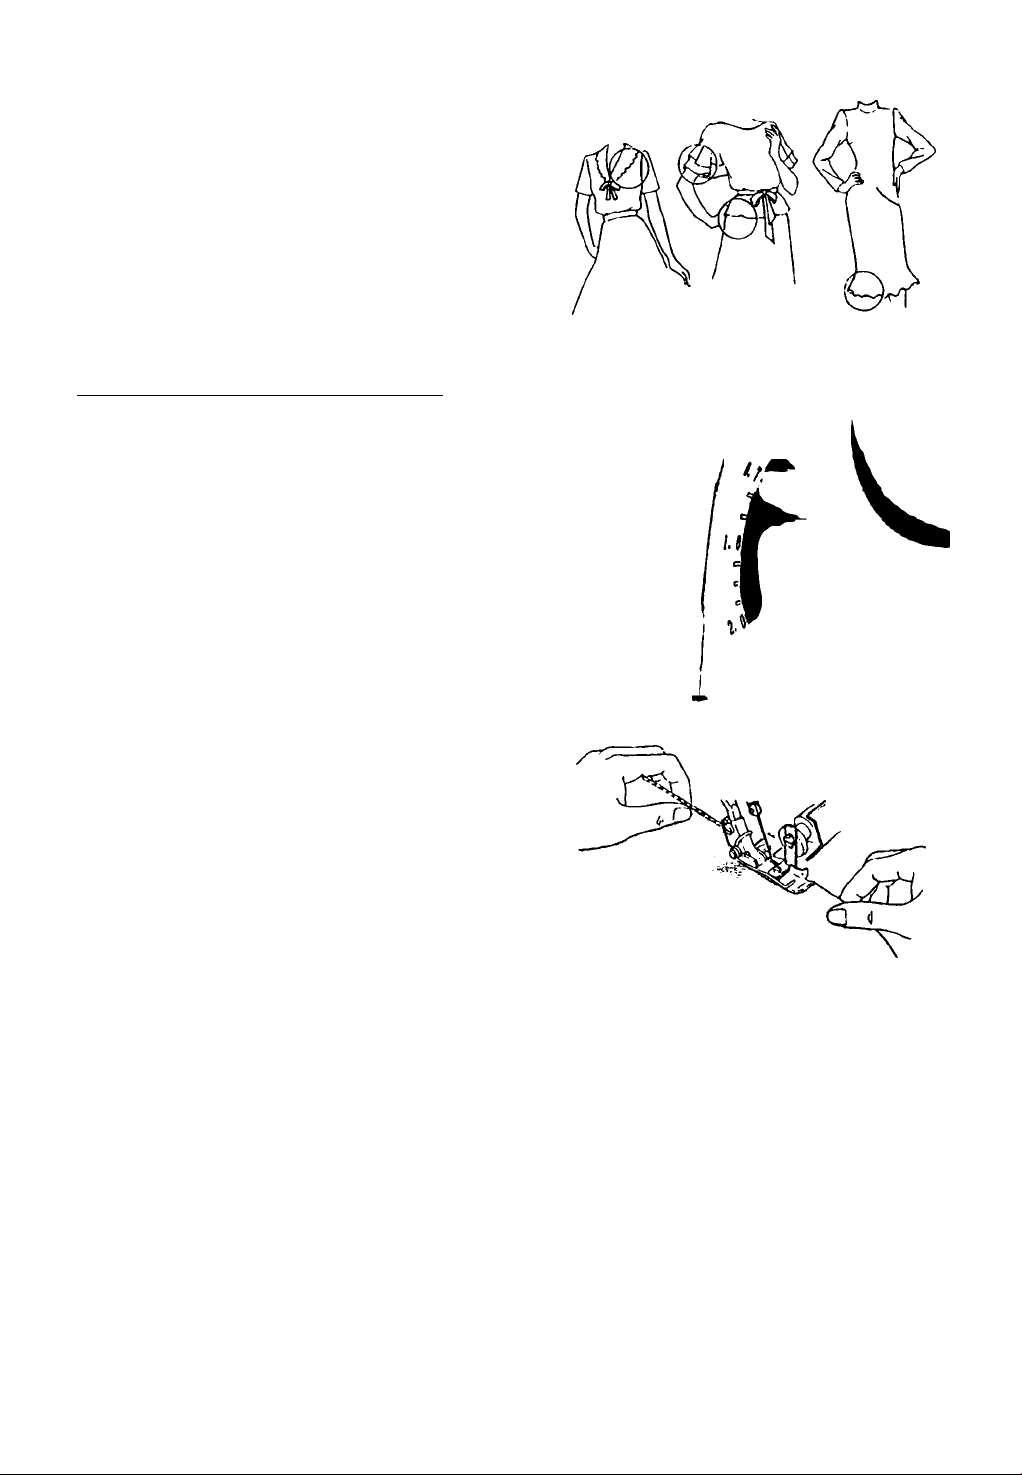
10. HOW TO REMOVE AND INSERT
NEEDLES
To Remove Needle(s)
Caution ;
l\ Be sure to disconnect the machine from the
A
electric outlet before removing needle(s).
Turn the hand wheel toward you until the needle is
at its highest position.
Loosen, but do not remove the needle set screw
with the small screwdriver.
1 Left needle set screw
2 Right needle set screw
3 Left needle
4 Right needle
Remove the needle(s).
To Insert Needle(s)
Caution :
|\ Be sure to disconnect the machine from the
A
• Hold the needle with the flat surface to the back.
• Insert the needle into the needle clamp as far as it
• Securely tighten the needle set screw.
electric outlet before replacing needle(s).
will go.
Note: » This machine uses #2022 needles. Refer
to page 7 lor additional needle information.
* Remove the cloth plate if you find it difficult
to remove and replace the needle.
Page 14
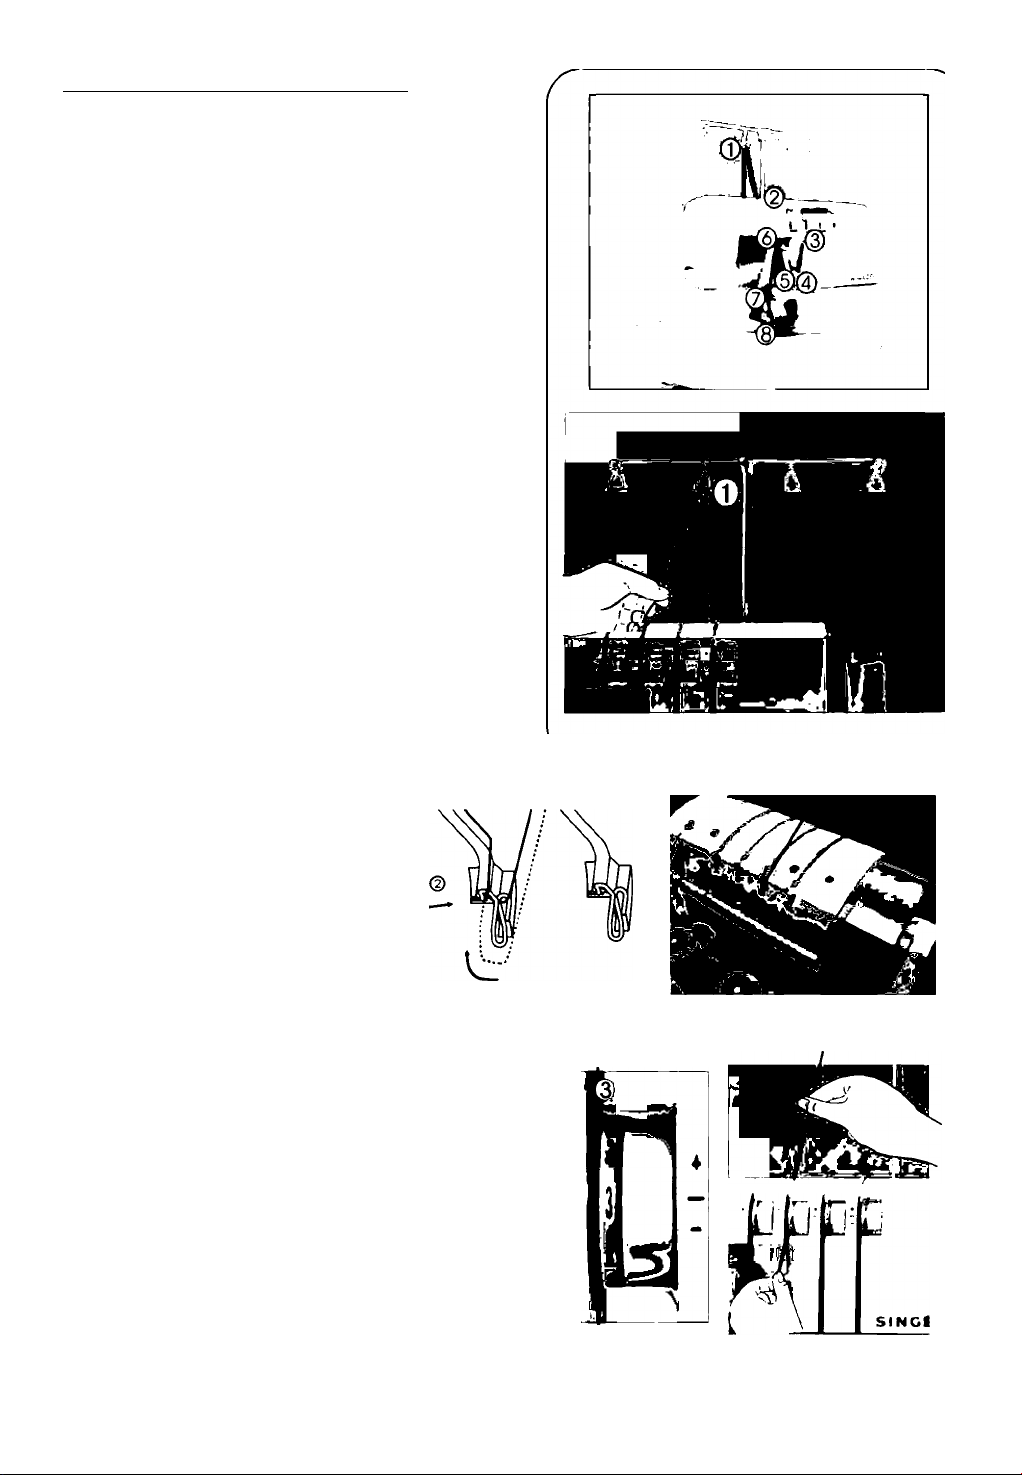
11. THREADING THE MACHINE
Threading Diagram
• A color coded threading diagram is located inside
the looper cover for quick reference.
• Thread the machine in the order 1 to 4 as shown.
Understanding the Color Code
1 Upper looper thread
2 Lower looper thread
3 Right needle thread
4 Left needle thread............................ Blue
................
................
.................
Orange
Yellow
Green
To Thread The Machine Correctly
Caution :
A
Be sure to turn off power switch.
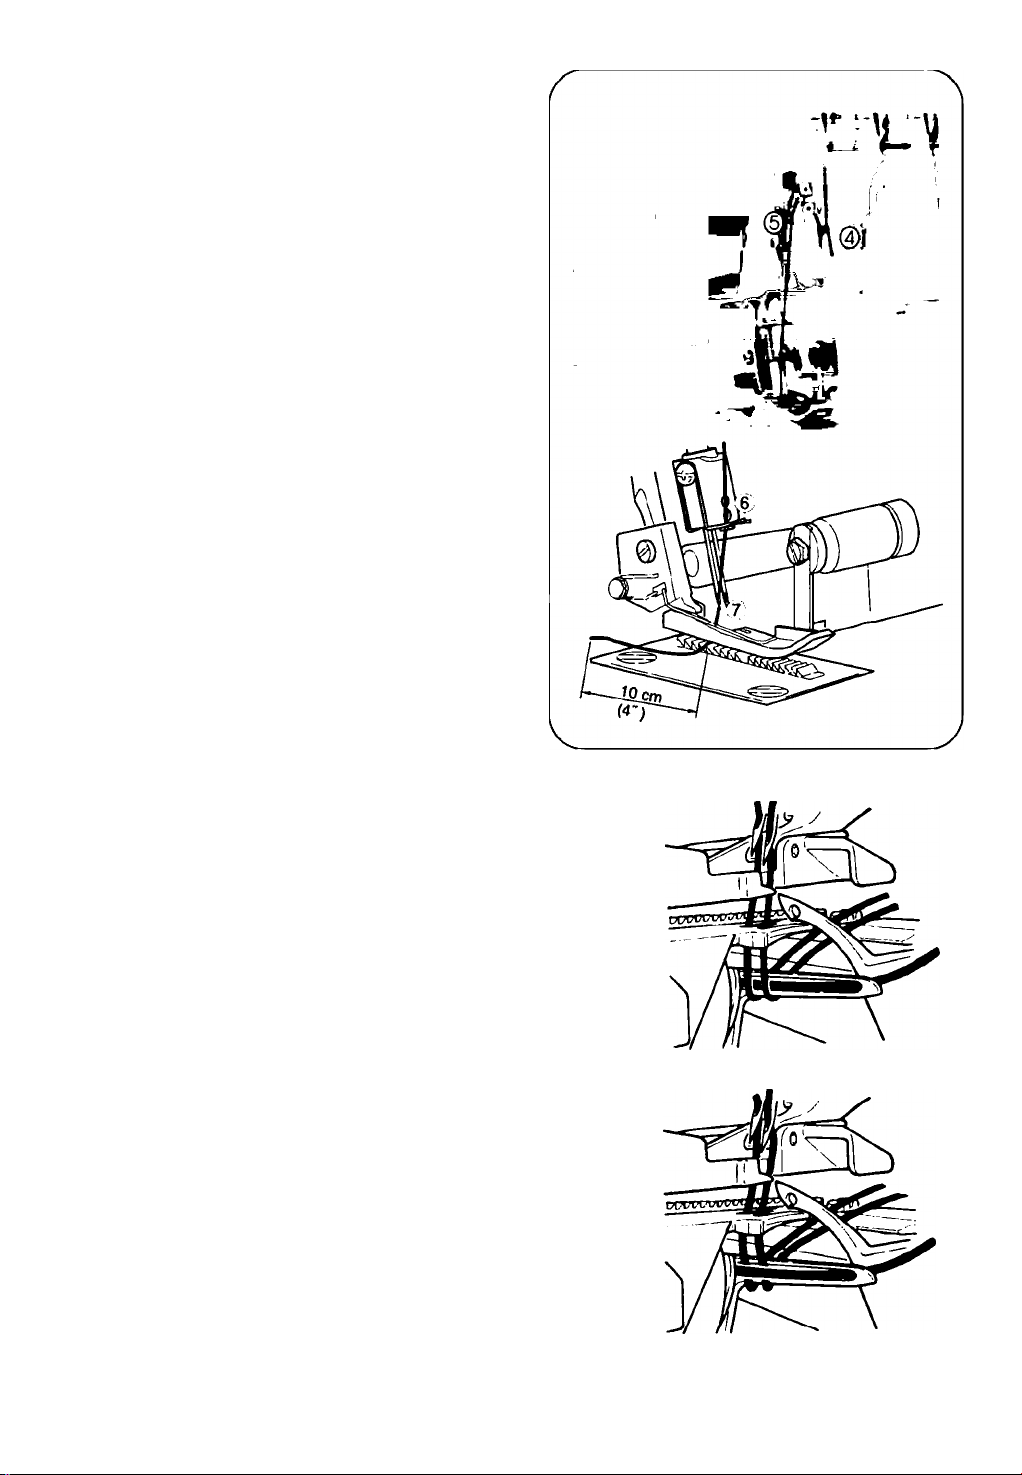
1) Threading the Upper Looper (Orange^______
• Thread the upper looper as indicated 1 ~ 8 .
12
Pass thread from back to the front through the
thread guide 1
Page 15
• Thread the top cover thread
guide by pulling the thread
downward until it slips
under thread guide 2 .
While holding thread with finger, pass it between
the tension discs and pull thread down to make
certain it is properly located in between the
tension discs 3 ,
r
Thread the looper area of the machine following the
orange color coded thread guides ( 4 ~ 7 ).
Thread the hole in the upper looper from front to
back 8 .
Note: Use of tweezers provided in the accessory
set to aid in threading the looper.
Pull about 10cm (4 inches) of thread through the
looper and place to the back of the throat plate.
13
Page 16
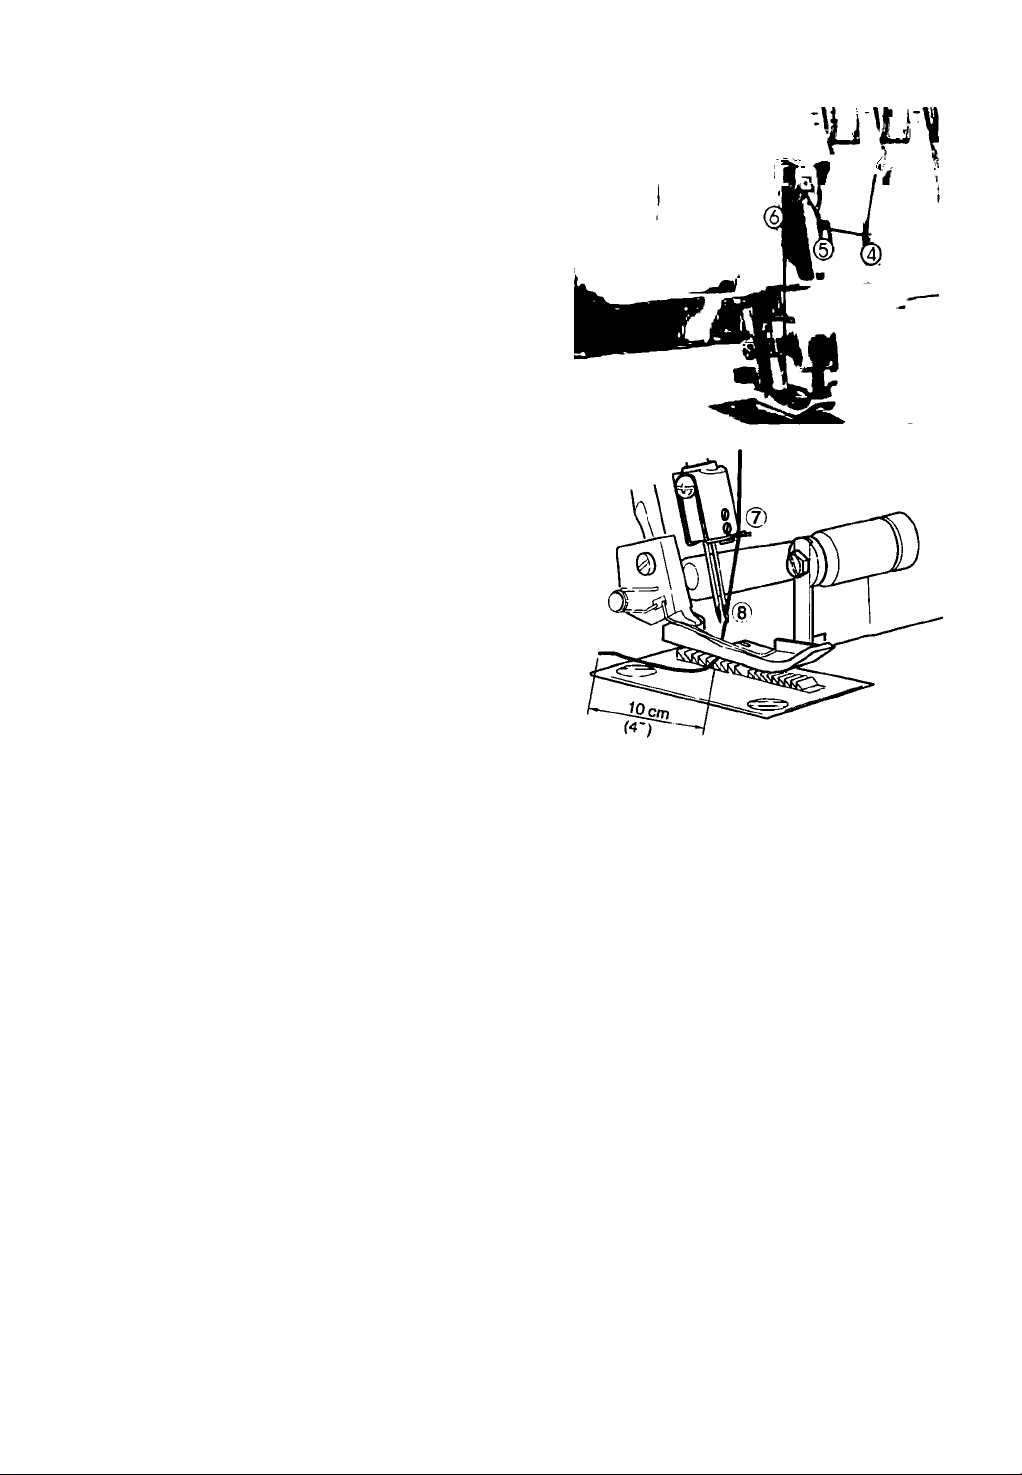
2) Threading the Lower Looper (Yellow)
• Thread the lower looper as indicated 1 ~ 9 .
Pass thread Irom back to the front through the
thread guide 1 .
Thread the top cover thread
guide by pulling the thread
downward until it slips under
thread guide 2 .
While holding thread with finger, pass it between
the tension discs and pull thread down to make
certain it is properly located in between the
tension discs 3 .
14
Page 17
• Turn the hand wheel toward you until the lower
looper is at the far right.
Thread the looper area of the machine following
the yellow color coded thread guides 4 ~ 7 .
Note: Use the tweezers provided in the accessory
set to aid in threading the looper.
Grasp the thread with the tweezers 4 cm (1-1/2
inches) from thread guide 7.
Place the thread with the point of the tweezers
slightly under and to the left of threading guide 8.
Pull the thread up and into thread guide 8.
• Pass the thread behind and over the top end of
left looper 9-A.
♦ Then pull it downward gently so that it will slip
into the slot in the looper 9-B.
Pick up the thread and pass it through the hole in
the end of the looper 10 .
Note : Use the tweezers provided in the
accessory set to aid in threading the
looper.
The thread should be positioned in the groove of
the lower looper.
Pull about 10cm (4 inches) of thread through the
looper and place it over the top of the upper
looper and to the back of the throat plate.
15
Page 18
3) Threading the Right Needle (Green^
• Thread the right needle as indicated 1 ~ 8.
Pass thread from back to the front through the
thread guide 1 .
Thread the top cover
thread guide by pulling the
thread downward until it
slips under thread guide
2.
While holding thread with finger, pass it between
the tension discs and pull thread down to make
certain it is properly located in between the
tension discs 3.
16
Page 19
Continue to thread points 4 ~ 7 .
Note; Be sure to pass the thread through upper
thread path of the thread guide 6.
• Thread the eye of the right needle 8 .
Note; Use of tweezers in the accessory set will
make needle eye threading easy.
• Draw about 10cm (4 inches) of thread through
needle eye to hang free.
• Place the thread to the back, under the presser
foot.
17
Page 20

4) Threading the Left Needle (Blue^
Thread the left needle as indicated 1 - 7.
• Pass thread from back to the front through the
thread guide 1 .
Thread the top cover thread
guide by pulling the thread
downward until it slips
under thread guide 2 .
r
V
While holding thread with finger, pass if between
the tension discs and pull thread down to make
certain It is properly located in between the
tension discs 3.
f j-
L'
Tii
U
T
L
SINCI
18
Page 21
Continue to thread points 4 ~ 6 .
Note: Be sure to pass the thread through lower
thread path of the thread guide 5.
• Thread the eye of the left needle 7 .
Note: Use of tweezers in the accessory set will
make needle eye threading easy.
• Draw about 10cm (4 inches) of thread through
needle eye to hang free.
• Place the thread to the back, under the presser
foot.
Important Threading Information
• Always thread the needle(s) last to prevent
misthreading the lower looper.
• If the lower looper should come unthreaded;
1) Unthread the needle(s)
2) Thread the lower looper
3) Thread the needle(s)
* •
Correct
View
Wrong
View
19
Page 22
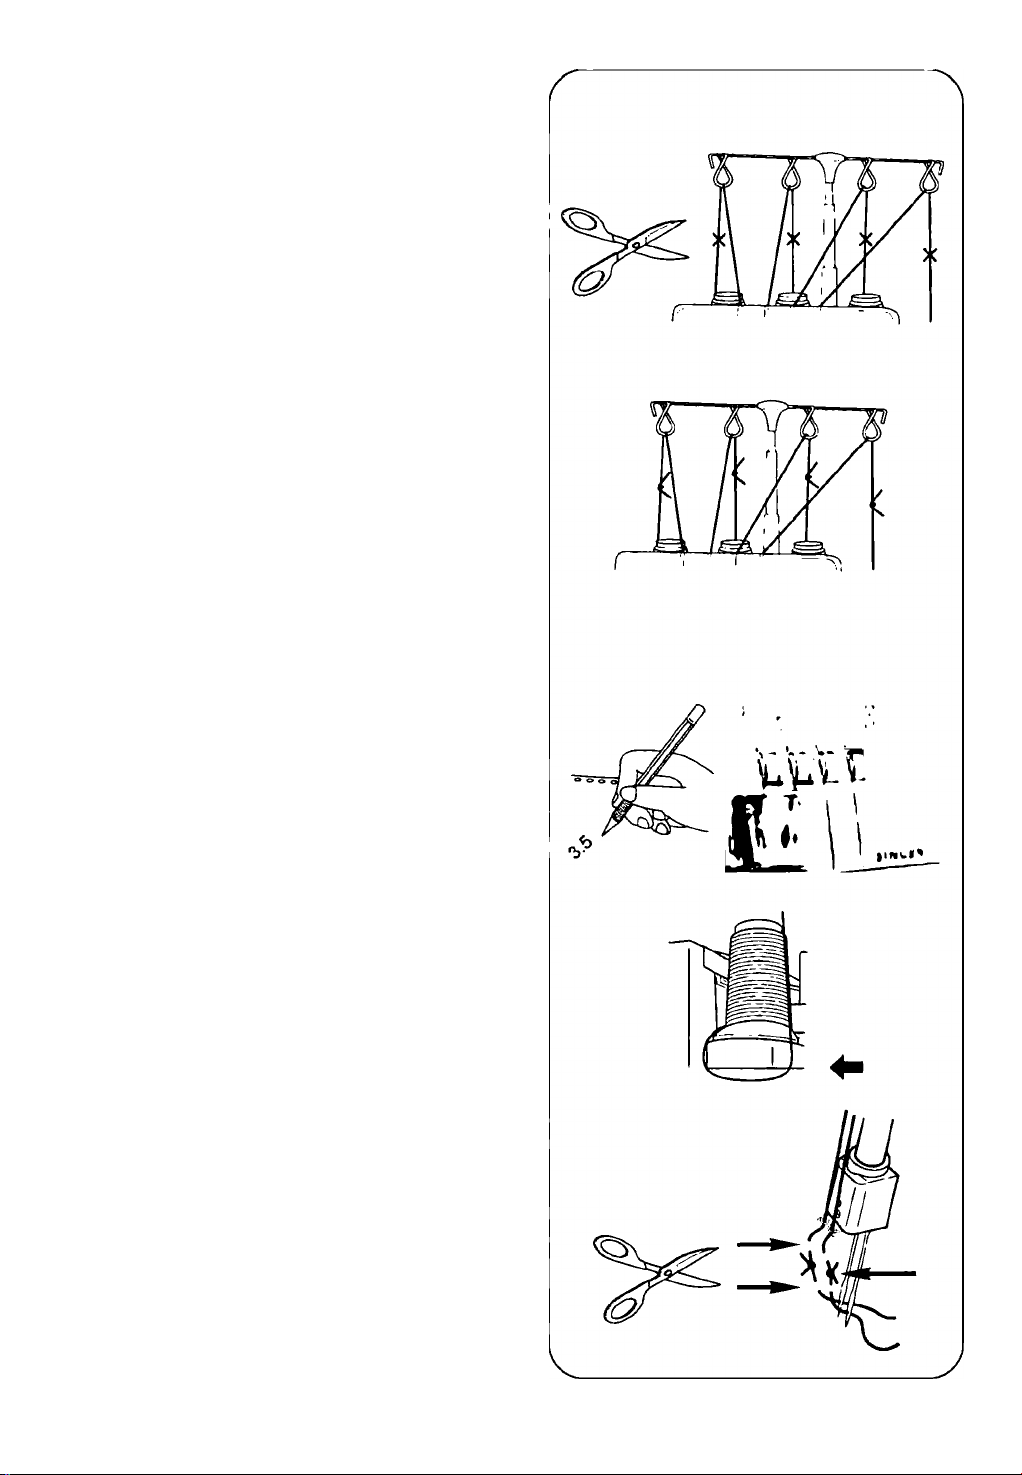
12. HOW TO CHANGE THREADS /
TIE ON METHOD
To change thread type or color, clip thread near the
spool.
Place new thread on stand.
Tie new thread and old thread ends together.
Clip thread tails to 2 ~ 3cm (1 inch) length.
If clipped too short, threads may come untied.
Firmly pull both thread to test knot security.
Note tension dial settings.
Turn the tension dials down until the dial stops.
• Pull the threads through the machine one at a time.
• If threads do not pull easily, check for tangles on
thread guides or looping under thread stand.
• When pulling thread through the needle, STOP when
the knot is in front of the needle.
•
• Cut the thread, and insert it through the needle.
• Return tension dials to previous settings.
20
Page 23
13. HOW то ADJUST THE STITCH
LENGTH
The stitch length dial should be set on the 3 mm
(1/8 inch) setting for most sewing conditions.
Adjust the stitch length to 4mm (5/32 inch) when
sewing heavy weight fabrics.
Adjust the stitch length to 2mm (5/64 inch) when
sewing light weight fabrics to obtain excellent seams
without puckering.
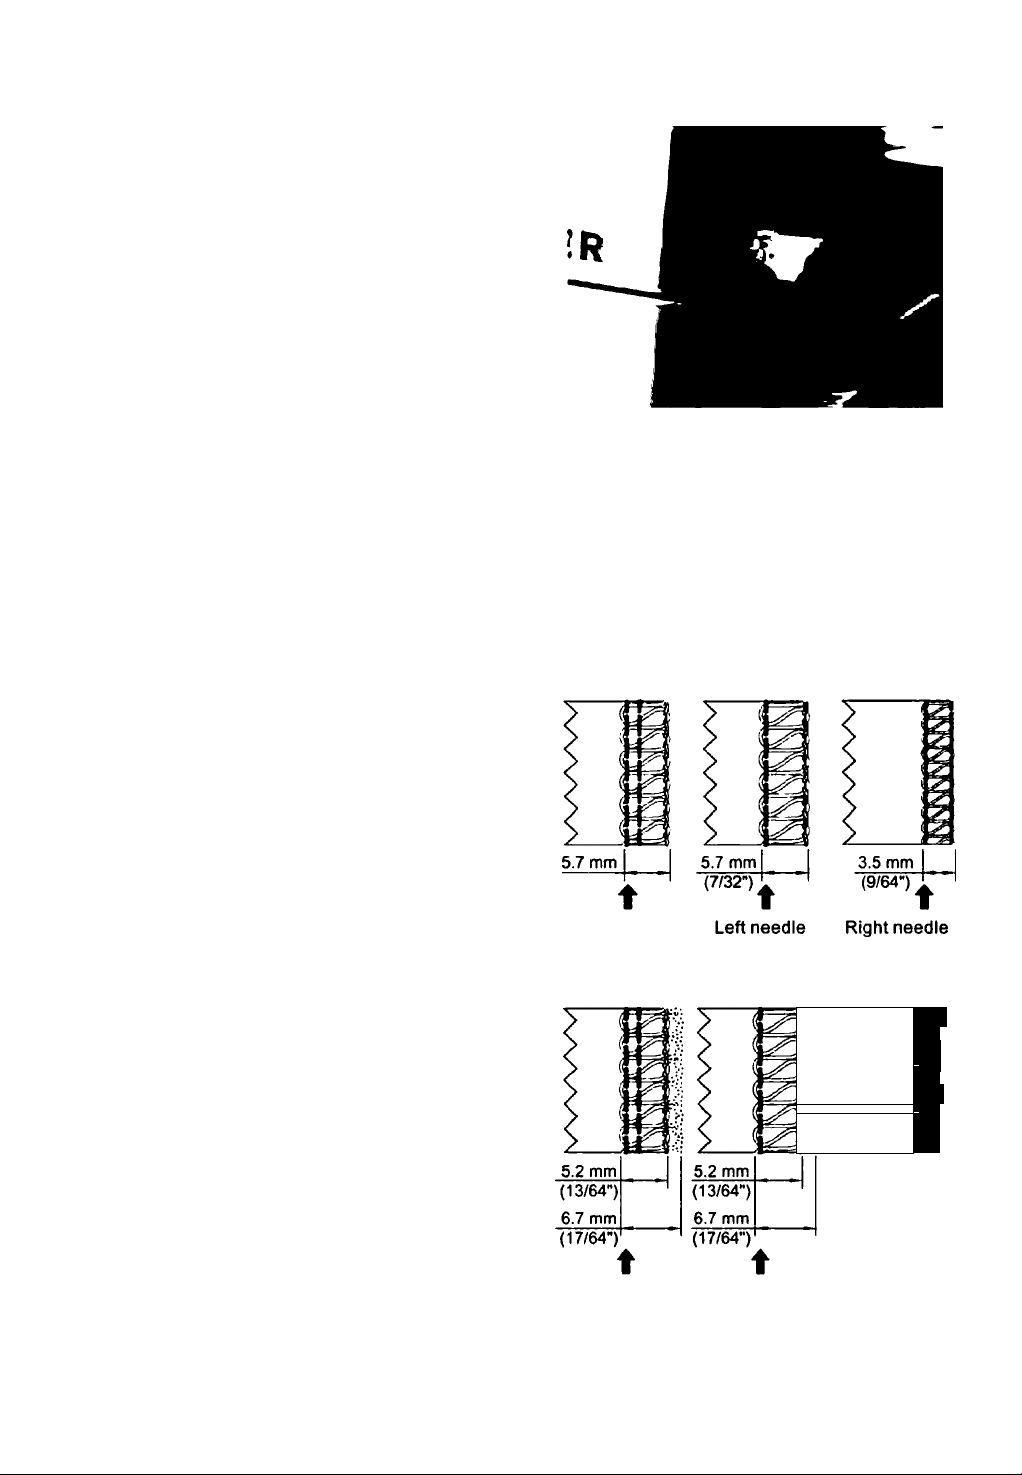
14. HOW TO ADJUST THE SEAM
WIDTH
• Overedge seam width can be achieved by
repositioning the needle position and also with the
width adjustment knob.
Width Adjustment by Changing Needle Position
Overedge seam width can be adjusted by changing
the needie position.
a) When only left needle is used.....................5.7 mm
(7/32 inch)
b) When only right needle is used
..................
3.5 mm
(9/64 inch)
Width Adjustment with Adjustment Knob
• Use of width adjustment knob will permit further
adjustment within the width range shown below,
a) When only left needle is used
b) When only right needle is used... 3.0 ~ 4.5 mm
..........
5.2 ~ 6.7 mm
(13/64 ~ 17/64 inch)
(1/8-11/64 inch)
(7/32")
Left/Right
needle
N 1
Й S !
0 \ %
/ 1
1 < ;
¿ / •
> !
3.0 mm
(1/8")
4.5 mm
(11/64")
t
Ri»
*Sf
Left/Right
needle
Left needle
Right needle
J
21
Page 24
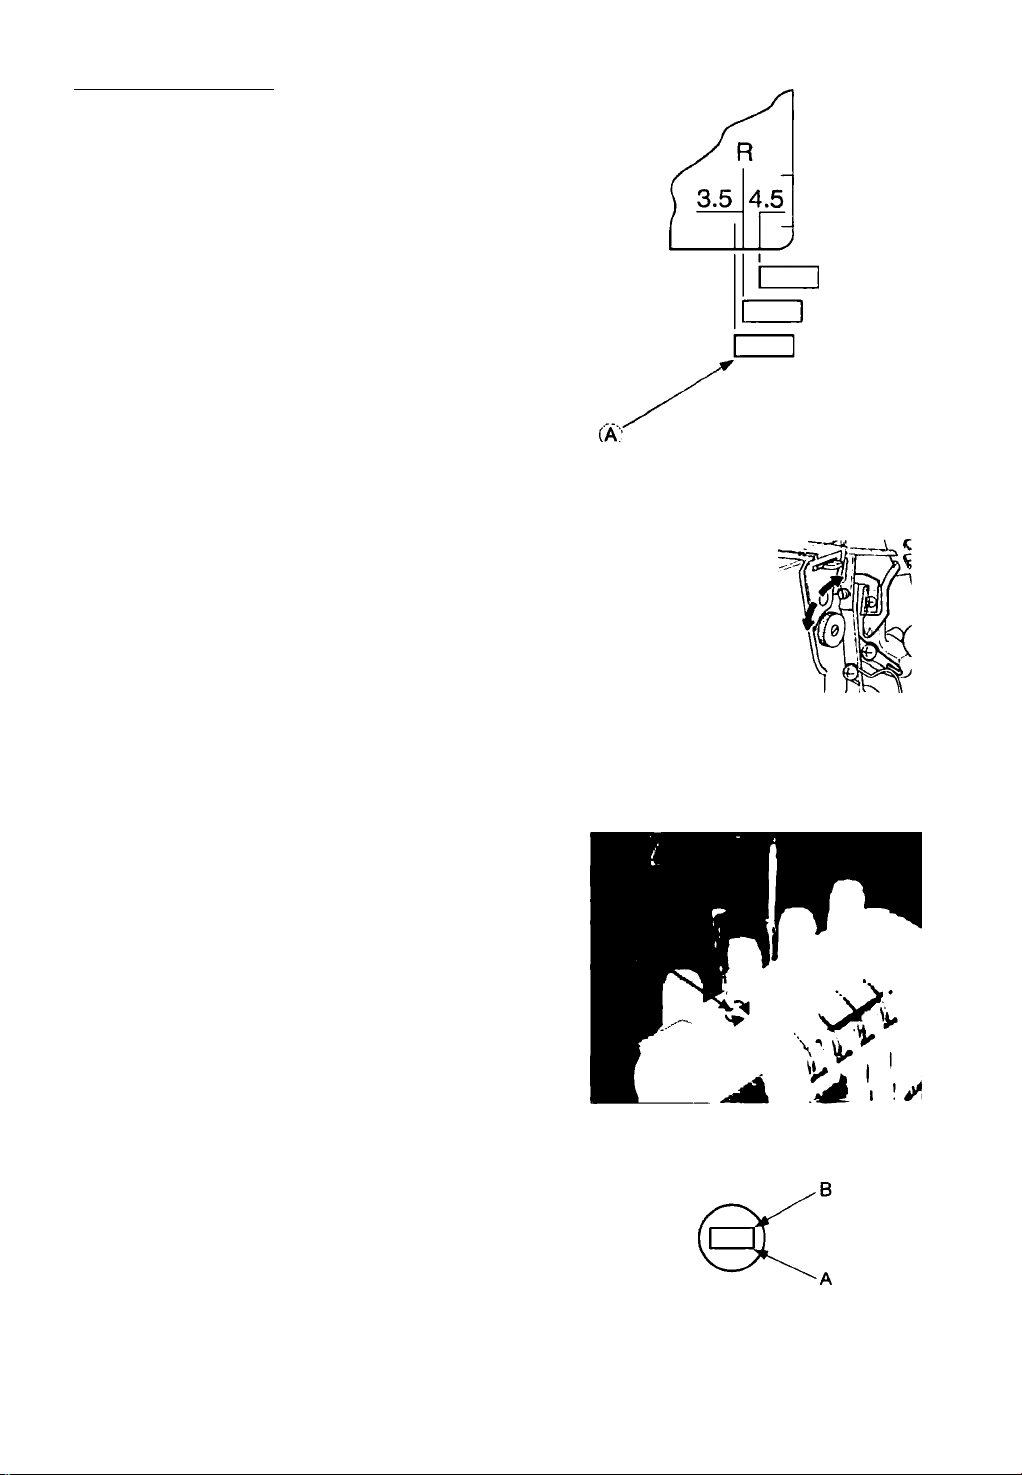
Width adjustment knob
Caulion:
Before making adjustments, be sure to turn off
A
power switch
Opening the looper cover will make adjustment
easier.
Push the upper knife to the right and while maintain
the knife in this position.tum the knob away to adjusts
the desired seam width,using te graduations on the
throat plate as a guideline.
Caution:
A
Always close looper cover before operating
machine.
Push«
4.5
3.5/Rolled hem
(When shipped
from (octoty.)
3.0mm
ÎD
15. HOW TO ADJUST THE PRESSER
FOOT PRESSURE
The presser foot pressure of this machine is
preadjusted at the factory to suit the sewing of
medium weight fabrics.
Most of the materials do not require adjustment of
presser foot pressure however, there are some
instances where adjustment is necessary when
sewing lightweight and heavyweight fabrics.
In such case, insert screwdriver through access hole
(A) in top cover and into slot (B) in pressure
regulating screw and turn regulating screw as
required.
Note: Turn regulating screw counterclockwise until
It stops against the top cover. Then turn
screw clockwise 6 turns which will be the
standard presser bar pressure.
For lightweight fabric ... Decrease the pressure
For heavyweight fabric ... Increase the pressure
s
22
Page 25
16. DIFFERENTIAL FEED
• Differential feed is a system which “stretches" or
"gathers" the fabric, when amount of feed of front
feed dog in relation to the rear feed dog is changed.
• The differential feed ratio ranges from 1 ; 0.7 ~
1 : 2.0. Adjustment is made by means of the
differential feed adjusting lever pictured below.
• Use of differential feed is very effective in overedging
stretch fabrics and fabrics cut on the bias.
• Graduation “1.0" is differential feed adjusting lever
setting for ratio 1:1.
Gathered Overedge
Gathered overedge is most suited for shirring
sleeves, yokes, front and back bodices, skirt hems,
etc. in stretch fabrics such as knits and jersey before
assembling into garment.
To set the differential feed adjusting lever
• Set differential feed adjusting lever knob below
graduation “1.0". Setting of adjusting lever knob
depends on material being sewn as well as the
amount of gather therefore set knob to suit the fabric
and test sew before sewing your garment.
• When feed regulating dial is set at "3" or over, the
amount of feed of the main feed dog will change to
"3“ automatically when adjusting lever knob is set
to 2.0.
Note: For normal overedge stitching, set differential
feed adjusting lever knob to graduation "1.0".
* •
23
Page 26
Stretch Overedge
stretch overedge is ideal for sewing decorative
collars, sleeves, skirt hems, etc. on loosely knit and
woven fabrics.
To set the differential feed adjusting lever
• Set differential feed adjusting lever knob above
graduation "1.0".
To sew a seam, apply gentle tension to the fabric
by holding the seam lightly in front and back of the
presser foot.
Note: * If amount of “stretch" is not correctly set in
relation to the fabric being sewn, the fabric
is apt to shift away from the needle
resulting in improperly sewn overedge
seam. In such case, reset differential feed
adjusting lever closer to the center mark.
* Be sure to reset the differential feed
adjusting lever to graduation "1.0" for
normal overedge stitching.
24
Page 27
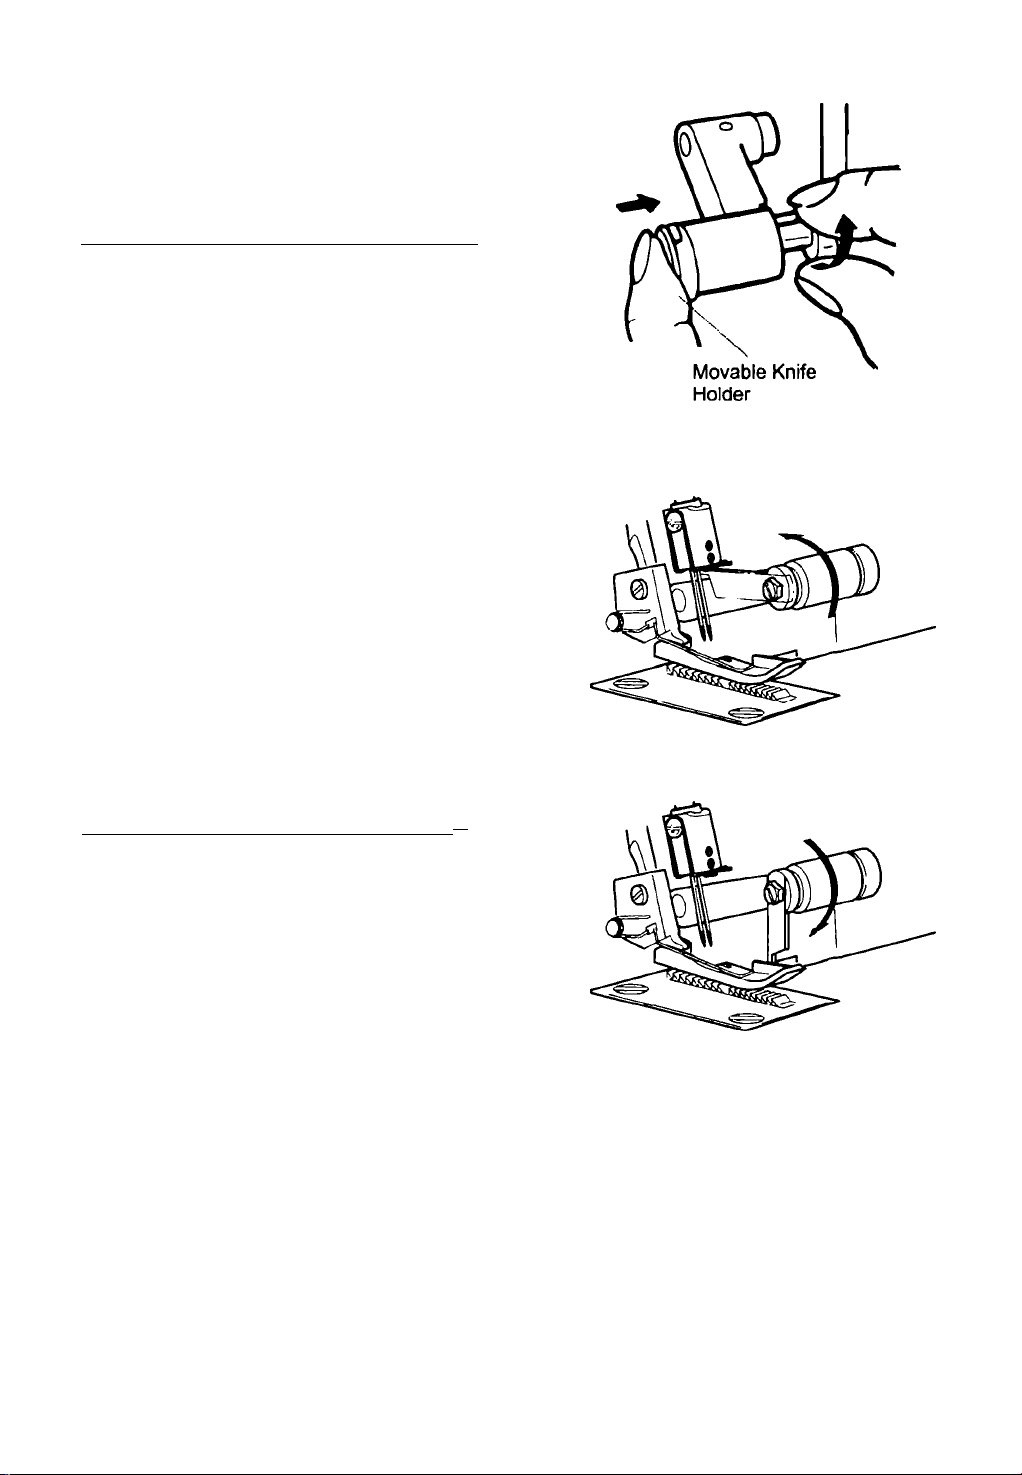
17. HOWTO DISENGAGE MOVABLE
UPPER KNIFE
Caution :
A
To place movable knife in nonworkina position
Be sure to turn off power switch.
• Turn handwheel over toward you and raise upper
knife to its highest position.
Open looper cover (page 9 ).
Push the movable knife holder to the right as far as
it will go.
Turn the knob away from you until the knife clicks
into a horizontal position.
Note: If the knife stops in the up position:
* Turn the hand wheel toward you until the
knife clears the top of the machine.
* Continue to rotate the knife to the horizontal
position.
To place movable knife in working position
• Open looper cover and push the movable knife
holder to the right as far as it will go.
• Turn the knob up and toward you until the knife
clicks into the working position.
Caution :
A
Always close looper cover before operating
machine.
* •
25
Page 28
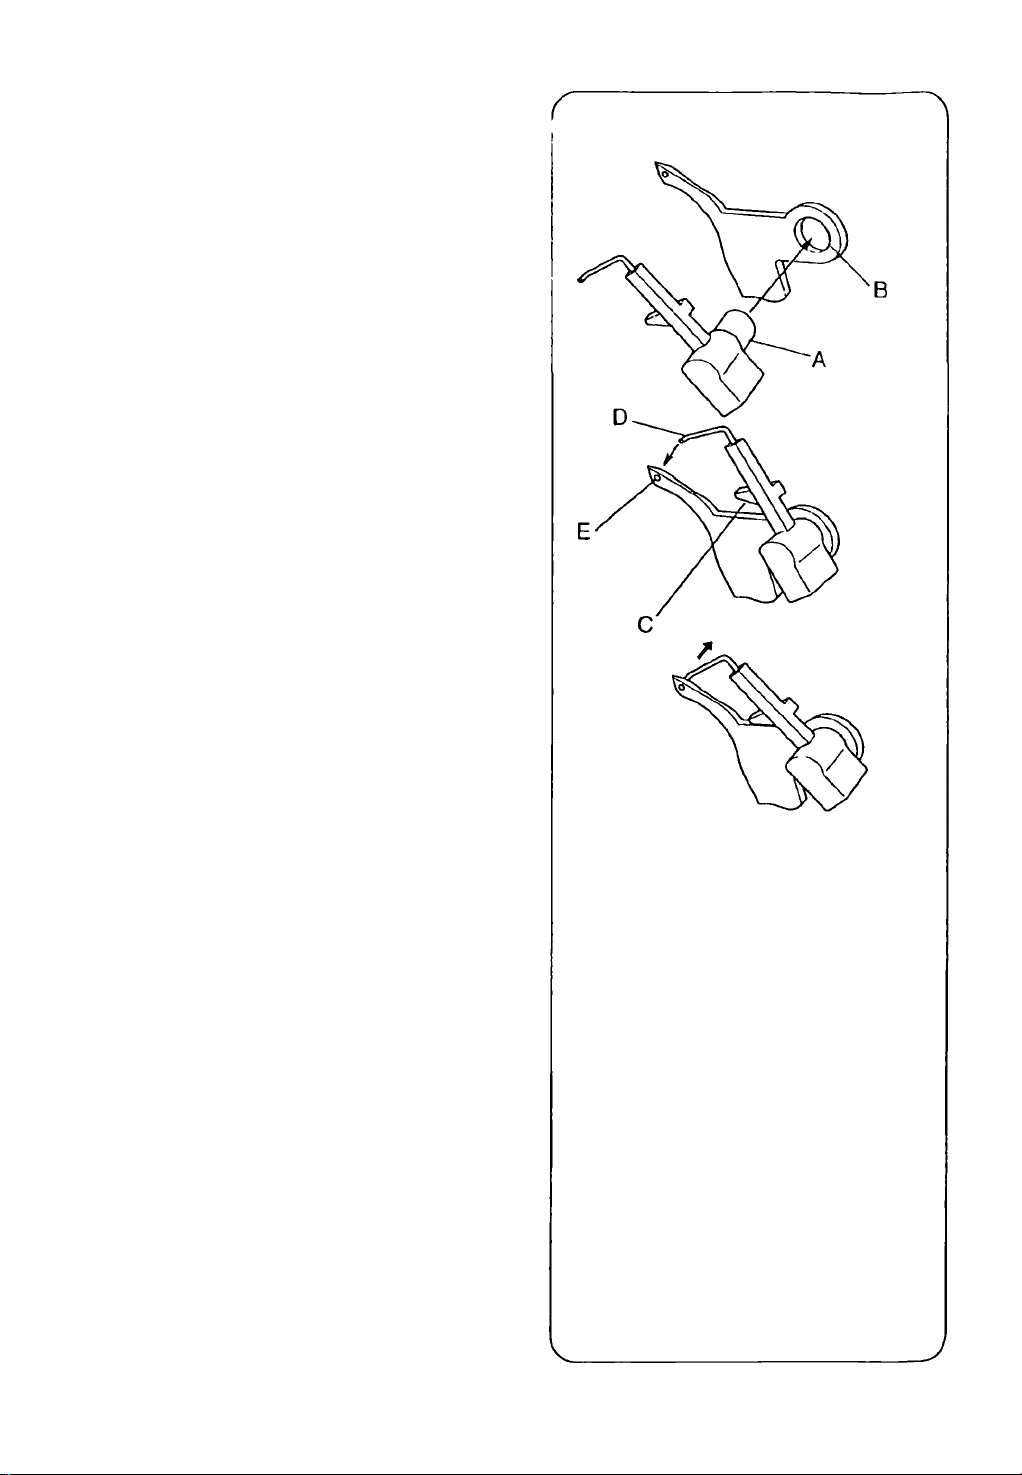
18. CONVERTING THE UPPER
LOOPER INTO SPREADER
Warning:
A
Switch off the machine before installing or removing the spreader.
Installing the spreader
Insert the pin (A) of the spreader in the
hole (B) of the upper looper.
Put the positioning rib (C) in contact
with the upper surface of the looper.
Insert the point (D) in the hole (E)
of the upper looper.
Removing the spreader
• Remove the point (D) of the hole (E)
of the upper looper and take the
spreader off the looper.
Note: Put the spreader back to the
accessory storage.
26
Page 29
19. FREE ARM SEWING
(TUBULAR WORK)
This machine become a free arm machine simply
by removing the cloth plate.
To remove the cloth plate
Slide cloth plate to the left and remove from machine
while pressing button (A) located on the underside.
This is especially suited for sewing hard to reach
garment areas such as armholes and overcasting
trouser cuffs.
Place garment over the free arm and sew.
To replace the cloth plate
Align projection on cloth plate with groove in cylinder
cover and slide to the right until tab on cloth plate
(front) snaps into slot in cylinder cover.
27
Page 30
20. STANDARD OVEREDGE AND
ROLLED HEM STITCHING
To Sew Standard Overedge
Set seam width finger knob to S to move seam
width finger to projected position.
Note: Be sure to push seam width finger knob as
far as it will go in the direction of setting S .
To Sew Rolled Hem
Set seam width finger knob to R to retract the
seam width finger.
Note: Be sure to push seam width finger knob as
far as it will go in the direction of setting R .
28
Page 31

21. CHAINING OFF AND TEST
SEWING
• When the machine is completely threaded, bring all
of the threads over the throat plate and slightly to
the left under the presser foot.
• Hold the threads and apply a slight tension.
• Turn the hand wheel toward you 2 or 3 complete
turns to start the thread chain.
• Lower presser foot.
• Continue holding the chain and press on the foot
controller until the chain is 5 ~ 7.5cm (2-3 inches)
in length.
Place fabric under the front of the presser foot and
sew a test sample.
Note; Do not pull on the fabric while sewing as this
may deflect the needle, causing it to break.
29
Page 32

NEEDLE POSITION
SEAM WIDTH FINGER KNOB
STITCH LENGTH
SPREADER
to o\
2-4
USE
Needle thread
Topside
Fabric
Light weigt
Medium weight
Heavy weight
Fabric
Light weigt
Tension Dial
Green
Blue
2.5
3.5
4.0
Tension Dial
Blue Green Orange Yellow
2.5
Medium weight 4.0
Heavy weight
Needle thread
5.0 Spreader2.0
r looper
thread
Underside (502)
Orange
Yellow
Spreader
Spreader
Spreader
Spreader
Spreader
1.0
1.0
1.0
2.0
2.0
30
Topside
Needle thread
Topside
Lower looper
thread
Underside
r looper
thread
Underside
Page 33

2) 2-Thread standard rolled hem stitching
NEEDLE POSITION
Note; * These are suggested tension settings only.
+ Tension settings are effected by;
1) Type and thickness of fabric
2) Needle size
3) Size, type and fiber content of thread
* See page26 to converting the upper looper
into spreader.
Correct Balance
• Set Each Tension Dial to Settings Shown at Right
and Test Sew on a Sample of Your Fabric
_____________________________
SEAM WIDTH FINGER KNOB
STITCH LENGTH
SPREADER
Lower looper
thread
Topside
Fabric
Light weigt
Medium weight
Heavy weight 1.0
Fabric
Light weigt
Medium weight
Heavy weight 1.0
Tension Dial
Green
Blue
0
0.5
Tension Dial
Blue Green Orange Yellow
0
0.5
2-4
USE
(503)
Orange Yellow
Spreader
Spreader
Spreader
Spreader
Spreader
Spreader
5.0
5.0
5.0
5.0
6.0
6.5
How to Balance
• When the lower looper thread is botton side of the
fabric.
- Turn the lower looper thread tension dial(yellow)
toward a higher number.
- Or, turn the needle thread tension dial (blue or
green) toward a lower number.
• When the needle thread tension is too loose;
- Turn the needle thread tension dial (blue on green)
toward a lower number.
- Or, turn the lower looper thread tension dial (yellow)
toward a lower number.
Lower looper
thread
Topside
Lower looper
thread
Topside
Needia thread
Underside
31
Page 34

3) 3-thread Overlook
Note; * These are suggested tension settings only.
T Tension settings are effected by.
1) Type and thickness of fabric
2) Needle size
3) Size, type and fiber content of thread
Correct Balance
Set Each Tension Dial to Settings Shown at Right
and Test Sew on a Sample of Your Fabric
NEEDLE POSITION
SEAM WIDTH FINGER KNOB S
STITCH LENGTH 2-4
Upper looper thread
___________
•O
/
Needle thread
Topside
Fabric
Light weight 2.5
Medium weight
Heavy weight
Blue Green Orange Yellow
3.0
3.5
Underside
Tension Dial
3.0 3.0
3.0 3.0
3.0
(504)
3.0
How to Balance
When the upper looper thread lies on the underside
of the fabric;
- Turn the upper looper thread tension dial
(orange) to a higher number.
- Or, turn the lower looper thread tension dial
(yellow) to a lower number.
When the lower looper thread appears on the top
of fabric;
- Turn the lower looper thread tension dial (yellow)
toward a higher number.
- Or, turn the upper looper thread tension dial
(orange) to a lower number.
When the needle Ihread is too loose, turn the
needle tension dial (blue or green) to a higher
number.
Fabric
Light weight
Medium weight
Heavy weight
Upper looper thread
Needle thread
Topside
Upper loop>er thread
Needle thread
Topside
Upper looper Ihread
Needle thread
Topside
Tension Dial
Blue Green Orange Yellow
2.5 3.0 3.0
3.0 3.0 3.0
3.0 3.0
3.5
Lower looper
thi^d
Underside
er looper
th(oad
Underside
Lower looper
Ihread
Underside
32
Page 35

4) 3-thread Flatlock
Note; * These are suggested tension settings only
» Tension settings are effected by;
1) Type and thickness of fabric
2) Needle size
3) Size, type and fiber content of thread
Correct Balance
Set Each Tension Dial to Settings Shown at Right
and Test Sew on a Sample of Your Fabric
NEEDLE POSITION •O
SEAM WIDTH FINGER KNOB S
STITCH LENGTH 2-4
Needle thread
Topside
Fabric
Light weight 0.5
Medium weight
Heavy weight
Tension Dial
Blue Green Orange Yellow
0.5 5.0 7.0
0.5
Needle wread
Underside
5.0
5.0
O*
(505)
7.0
7.0
How to Balance
• When the lower looper thread tension is too loose;
- Turn the lower looper thread tension dial (yellow)
toward a higher number.
- Or, turn the needle thread tension dial (blue or
green) toward a lower number.
When the upper looper thread tension is too loose;
- Turn the upper looper thread tension dial
(orange) toward a higher number.
- Or. turn the needle thread tension dial (blue or
green) toward a lower number.
When the needle thread tension is too loose;
- Turn the needle thread tension dial (blue or
green) toward a higher number.
- Or, turn the upper looper thread tension dial
(orange) toward a lower number.
Blue
Tension Dial
Green
Fabric
Light weight 0.5 5.0
Medium weight
Heavy weight
0.5 5.0 7.0
0.5
Needle thread
Upper looper
thread
Topside
Needle thread
Upper looper
thread
Topside
Needle thread
Upper looper
thread
Topside
Orange Yellow
5.0
Needle thread
Lowdr looper
thread
Underside
'Needle thread
Lower looper
thread
Underside
Needle thread
Lower looper
thread
Underside
7.0
7.0
33
Page 36

5) 3-thread Wrapped Edge Overlock
Note: * These are suggested tension settings onl/.
■r Tension settings are effected by;
1) Type and thickness of fabric
2) Needle size
3} Size, type and fiber content of thread.
Correct Balance
Set Each Tension Dial to Settings Shown at Right
and Test Sew on a Sample of Your Fabric
NEEDLE POSITION
SEAM WIDTH FINGER KNOB
STITCH LENGTH
Needle thread
Upper looper
thread
Topside
Fabric
Light weight 4.0 0 8.0
Medium weight
Heavy weight
Tension Dial
Green
Blue
5.0 0 8.5
5.0 0 8.5
»O
2-4
Underside
Orange
Yellow
How to Balance
When the upper looper thread tension is too loose;
- Turn the upper looper thread tension dial
(orange) toward a higher number
When the lower looper thread tension is too loose;
- Turn the lower looper thread tension dial (yellow)
toward a higher number.
- Or, turn the upper looper thread tension dial
(orange) toward a lower number.
When the needle thread tension is too loose;
- Turn the needle thread tension dial (blue or
green) toward a higher number.
- Or, turn the upper looper thread tension dial
(orange) toward a lower number.
Fabric
Light weight
Medium weight
Heavy weight
Needle thread
Upper looper i
thread
Topside
Needle thread
Upper looper
thread
Topside
Needle thread
Upper looper
thread
Topside
Tension Dial
Blue Green Orange Yellow
2.5 1.0
3.0 1.0 7.0
3.5 1.0 7.0
PPPPPP
PPIWP
/
7.0
pwer looper
sad
Underside
iwer looper
tht^d
Needle thread
Underside
.ower looper
'ead
thread
Underside
34
Page 37

6) 4-thread Ultra Stretch Mock Safely Stitch
Note; * These are suggested tension settings only.
* Tension settings are effected by:
1) Type and thickness of fabric
2) Needle size
3) Size, type and fiber content of thread
Correct Balance
Set Each Tension Dial to Settings Shown at Right
and Test Sew on a Sample of Your Fabric
How to Balance
When the upper looper thread lies on the underside
of the fabric;
- Turn the upper looper thread tension dial
(orange) to a higher number.
- Or, turn lower looper thread tension dial (yellow)
to a lower number.
When the lower looper thread appears on the top
of the fabric;
- Turn lower looper thread tension dial (yellow)
toward a higher number
- Or, turn the upper looper thread tension dial
(orange) toward a lower number.
When the left needle thread tension is too loose;
- Turn the left needle thread tension dial (blue)
toward a higher number.
When the right needle thread tension is too loose;
- Turn the right needle thread tension dial (green)
toward a higher number.
NEEDLE POSITION
SEAM WIDTH FINGER KNOB
STITCH LENGTH 2-4
Upper looper thread
Right
needle Left
thread
Topside
Fabric
Light weight
Medium weight
Heavy weight
Upper looper thread
Right /
needle
thread
Topside
Right /
needle
thread
Topside
Right /
needle "
thread Left
Topside
Right
needle . _
Topside
thread
Blue Green
2.5 2.5
3.0 3.0 3.0 3.0
3.5 3.5 3,0
Left
needle
thread
Upper looper thread
Left
needle
thread
Upper looper thread
needle
thread
Upper looper thread
ne^le
Underside
Tension Dial
Orange Yellow
3.0 3.0
Underside
Underside
Lower
looper
thread
(514)
3.0
Lower
looper
thread
Underside
Lower
looper
thread
Underside
Lower
looper
thread
Lower
looper
thread
35
Page 38

23. HOW TO SEW A ROLLED HEM
This machine can sew four types of rolled hems.
Rolled hemming is done by rolling and overedging
the fabric edge.
Light weight fabrics such as lawn, voil, organdy,
crepe, etc. perform the best.
Rolled hemming is not suited for heavy or stiff
fabrics.
Machine Set Up
• Remove the left needle.
• Move seam width finger knob to setting R . (See
page 28)
• Align left face of seam width finger support plate
with R mark on throat plate by turning seam width
finger knob, as required.
• Set stitch length dial to “F ' 2" and a fine seam will
be sewn.
• Needle: Singer Needle it2022 size 80/11 or 90/14
• Thread: A variety of thread combinations can be
used for rolled hemming.
36
Page 39

NEEDLE POSITION
SEAM WIDTH FINGER KNOB
STITCH LENGTH
SPREADER
F~2
USE
r looper
ttnead
(502)
Upper looper
thread
Polyester
Wooly nylon
Lower
thread
Upper looper
thread
Wooly nylon
Tension Dial
Green
Blue
Blue Green Orange Yellow
Orange
3.0 2.0
3.0 2.0
Tension Dial
2 . 0 4 . 0
Yellow
37
Page 40

NEEDLE POSITION
SEAM WIDTH FINGER KNOB
STITCH LENGTH F~2
Upper looper thread
Upper looper
thread
Polyester
Wooly nylon
Upper looper
thread
Topside
Upper looper
thread
Tension Dial
Green
Blue
3 . 0
3 . 0 3 . 5 3 . 5
Needle thread
Tension Dial
Blue Green Orange Yellow
Polyester 2.0
Wooly nylon
2.0
Orange
5 . 0 3 . 0
Underside
5.0
2.0
Yellow
7.0
5.0
38
Page 41

Additional Information About Rolled Hemming
• Hold the thread chain when you begin sewing to
keep it from curling into the seam.
Place a slight tension on the material in the sewing
direction and a finer seam finish can be obtained.
The minimum overedge stitch width that can be
obtained for rolled hemming is approximately 1.
5mm (1/16 inch) since the cutting width cannot be
set below 3.5mm (9/64 inch).
To Secure the Rolled Hem Thread Chain
• Apply a small drop of liquid seam sealant to the
end of the seam. Allow to dry, then cut the chain
close to the stitches.
Note: Test the liquid seam sealant for color
fastness before use.
39
Page 42

24. STITCH VARIATIONS AND
SEWING TECHNIQUES
How to Sew a Flatlock Decorative Seam
A flatlock stitch is achieved by adjusting the tension
of the 3-thread overlock stitch, sewing the seam and
pulling the fabric apart to flatten the seam.
The flatlock stitch can be used as a construction
and decorative stitch or for ornamentation only.
Machine Set Up_________________________________
• Remove the left or right needle.
• Begin with the machine threaded and tension
balanced for the 3-thread overlock stitch
(page 29 ).
• Loosen the needle thread tension (green or blue)
generously.
• Loosen the upper looper thread tension (orange)
slightly.
• Tighten the lower looper thread tension (yellow)
generously.
(2) Flatlockina a Seam
• Place the fabric wrong sides together to sew a
decorative stitch on the right side of the garment.
_
/J—«.
0 0 0 0
Remove
(f
-- -- - --
L
Remove
• Sew the seam, trimming the excess fabric.
The needle thread (green or blue) will form a V
on the underside of the fabric.
The lower looper thread will pull into a straight
line at the fabric edge.
40
Needle thread
Upper looper thread
Topside
Needle thread
Lower looper thread
Underside
Page 43

Pull on opposite sides of the seam to pull th«
stitches flat.
(3) Decorative Flatlocking
Place the movable upper knife in the nonworking
position (page 25). The fabric is not trimmed or
this stitch.
Fold fabric wrong sides together.
Position the fabric so the seam is sewn with par
of the stitch extending off the fabric.
Pull on opposite sides of the stitch to flatten.
(4) Additional Information About Flatlocking
• The tensions must be correctly adjusted for the
fabric to pull flat.
• The upper looper thread is the prominent thread
in the flatlock stitch. Place a decorative thread
in the upper looper and inconspicuous threads
in the lower looper and needle.
• For a ladder stitch, sew seam with right sides
together The needle thread will be the prominent
thread that creates the ladder (A).
41
Page 44

How to Sew an Overlook Blind Hem
• The excess fabric is trimmed and the hem is sewn
and the raw edges are overlooked in one operation.
• The overlook blind hem is best suited for sewing
knit wear. It provides a durable finish that is almost
invisible.
• Remove the left needle and adjust machine for a
narrow 3-thread overlook stitch.
Note; The three-thread flatlock stitch can also be
used.
• Set the stitch length dial at 4.
0 0
• Fold the hem to the wrong side of the fabric, then
back to the right side with 6mm (1/4") beyond the
fold.
• Stitch on the extended hem edge, allowing the
machine needle to barely catch the edge of the fold.
How to Sew Pin Tucks
• Sew decorative pin tucks on the fabric before cutting
out the garment.
• Remove the left needle and adjust machine for a
narrow 3-thread overlook stitch.
Note; The rolled hem stitch can also be used for
this technique.
Remove
• Place the movable upper knife in the nonworking
position (page 25).
• Mark the fabric with the desired number of pin tucks
using a water soluble fabric marker.
42
Page 45

• Fold the fabric with the wrong sides together and ^
sew.
Press the pin tucks in the same direction.
Turning Square Corners
(1) Outside Corner
• Cut out approximately 2 cm (51/64 inch) from the
corner, in line with the overedge seam edge.
• Sew one stitch beyond point (A) and stop.
• Raise needle and presser foot.
• Pull the fabric to the rear of the machine just
enough to release the thread caught on the finger
of the throat plate.
Note: Presser foot has been removed to show
detail.
• Turn the fabric and lower the presser foot so that
the knife is positioned in line with the cut edge.
Cutting line"^
2 cm
12 cm
• Pull slack threads up, then start to sew.
(2) Inside Corner
Cut fabric at seam edge.
/'I
Cuttingi line I
V
Cut Slit
43
Page 46

• Place the movable upper knife in nonworking ^
position (page 25).
• Stitch on cut edge of fabric.
• Stop sewing before you reach the corner and fold
the fabric to the left to straighten the corner.
Continue to sew slowly holding the fabric edge in
a straight line moving the fold as you sew.
[ Pin Placement
Insert pins to the left of the presser foot. The pins
will be easy to remove and are away from the cutting
action of the knives.
Caution:
A
Sewing over pins will damage and/or destroy
the cutting edge of the knives.
[ Securing the Thread Chain
• Thread a large eye, hand sewing needle (such as a
tapestry needle) with the thread chain.
• Insert the needle into the end of the seam to secure
thread.
Note; To secure a rolled hem thread chain, see
page 39-
44
Page 47

How to Reinforce a Seam
• Inserting twill tape while overedge sewing will
stabilize the seam.
• Insert the tape through the hole in the front of the
foot.
• Position the tape under the foot to the back of the
machine and sew the garment seam.
• The tape is attached as the seam is sewn.
Braiding by Chaining Off
• Place the movable upper knife in nonworking
position
• Insert tiller cord such as yarn or twill tape through
the hole in the tront ot the foot.
• Position the filler cord under the toot and chain ott
the desired length.
• Chained oft braids can be used individually or woven
into 3 or 4 ply braids.
•
Page 48

25. MACHINE MAINTENANCE
An overlook requires more maintenance than a
conventional machine mainly due to two reasons.
1 ) A lot of lint is produced due to the cutting action
of the knives.
2) An overlock runs at a very high speed and needs
to be oiled frequently to lubricate the internal
working parts.
Cleaning the Machine
Danger;
Before cleaning your machine, disconnect
A
power line plug from the wall receptacle.
• Clean the lint from the looper and knife area often
with a dry lint brush.
Note: Lint brush is an optional part.
Oiling the Machine
Danger:
A
Before lubricating your machine, disconnect
power line plug from the wall receptacle.
The oiling points shown in the diagram, should be
oiled periodically.
Note: Use sewing machine oil. Do not use any
other oil or damage could result.
46
Page 49

I How to Replace the Stationary Knife
Danger:
A
Before replacing the stationary knife,
disconnect power line plug from the wall
receptacle.
• The stationary knife should be changed when it
becomes dull.
• The stationary knife can be replaced according to
the directions provided, however if there are any
difficulties experienced, consult your Singer
representative to make the adjustments.
• Be sure that the power line plug is disconnected
from the electric source.
• Open the looper cover and set the movable upper
knife 1 in the nonworking position (page 25).
• Loosen the stationary knife set screw 2 and remove
the stationary knife 3 .
A
o
• Place a new stationary knife in the groove of the
stationary knife holder.
• Tighten stationary knife set screw 2 .
• Return the movable upper knife 1 to its working
position.
47
Page 50

26. TROUBLE SHOOTING CHART
Problem Solution
Fabric does not feed
well
Needle breaks
Thread breaks
Stitches skip
- Lengthen stitch length.
- Increase presser foot pressure for heavy weight fabric.
- Decrease presser foot pressure for light weight fabric.
- Insert needle correctly.
- Do not pull fabric while sewing.
- Tighten needle set screw.
- Use a larger needle on heavy fabrics.
- Check threading
- Check for tangled or caught thread
- Insert needle correctly
- Insert new needle, current needle may be bent or have a
blunt point.
- Use a high quality thread. 49
- Loosen thread tension.
- Insert new needle, current needle may be bent or have a
blunt point.
- Tighten needle set screw.
- Insert needle correctly.
- Change type or size of needle.
- Check threading.
- Increase presser foot pressure.
- Use a high quality thread.
Page
21
22
22
11
29
11
7
12-19
20
11
7
30-38
7
11
11
7
12-19
22
49
Irregular stitches
Fabric puckers
Irregular trimming
Fabric jams
Machine does not
operate
- Balance thread tension.
- Check for tangled or caught thread.
- Check threading.
- Loosen thread tension.
- Check for tangled or caught thread
- Use high quality light weight thread.
- Shorten stitch length.
- Decrease presser foot pressure for light weight fabrics.
- Check alignment of knives.
- Replace one or both knives.
- Close looper cover before sewing.
- Check for tangled or caught thread.
- Compress thick layers of fabric with conventional
machine before sewing with overlook.
- Connect machine to power source.
30-38
20
12-19
30-38
20
49
21
22
47
47
9
20
9
48
Page 51

27. RELATIONSHIP BETWEEN CLOTH, THREAD AND NEEDLE
Type of Fabric Type of Thread
Light Weight
Lawn, Organdy,
Voil, Crepe, etc.
Medium Weight
Muslin. Sheersucker,
Satin. Gabardine,
Broadcloth, etc.
Heavy Weight
Oxford, Denim,
Tweed, Corduroy,
Serge
Cotton: #100
Silk: #100
Spun: #80 - #90
Tetron: #80-#100
Cotton: #60-#80
Silk: #50
Spun: #60 - #80
Tetron: #60-#80
Cotton: #40 - #60
Silk: #40 - #60
Spun: #60 - #80
Tetron: #50-#80
Needle
Singer Cat. No. 2022
#11
#11. #14
#14
Knit
Tricot
Jersey
Wool (woven, knit)
Singer needle, Cat. No. 2022 is furnished with the machine however.
It is recommended that you select your needle in accordance with the material you are sewing.
Spun: #80 - #90
Tetron; #60-#80
Spun: #60 - #80
Tetron: #60 - #80
Cotton: #60 - #80
Spun: #60 - #80
Tetron; #50-#60
Woolly nylon
Woolly tetron
#11
#11, #14
#11, #14
49
Page 52

28. SPECIFICATION
Item
Sewing speed
Stitch length (feed amount)
Differential feed ratio
Overedge stitch width
Needle bar stroke
Presser foot rise
Needle
Model
Number of threads
Machine dimensions (mm)
Width
Depth
Height
Weight (Kg)
Specification
1,300 spm maximum
1 - 4mm (standard: rolled hemming F - 2, ordinary overedge 3.0)
1:0.7 ~ 1:2 (with differential feed machine)
Rolled hemming 1.5mm, ordinary overedge 3.0 - 6.7mm
(standard 3.5mm)
27mm
4.5mm
Rolled hemming: Cat. No. 2022 #11
Ordinary overedge: Cat. No. 2022 #11, #14
14SH744/14CG744 14SH754/14CG754/14ET754/14SH764
2,3,4 2,3,4
338 338
280 280
265 265
6.0 6.0
50
Page 53

NOTES
51
Page 54

14SH744/14CG744
(SURJETEUSE 2.3.4 FILS)
14SH754/14CG754/14ET754/14SH764
(SURJETEUSE 2.3.4 FILS ENTRAINEMENT DIFFERNTIEL)
Manual de Instrucciones
Page 55

14SH744/14CG744
14SH754/14CG754/14ET754/14SH764
Introducción
Le agradecemos su compra de esta máquina de coser. Esta máquina destinada para uso doméstico le proporcionará
un excelente rendimiento al coser material desde ligero a pesado (de lino a tela vaquera). Le rogamos consulte
este folleto para un uso adecuado y un servicio óptimo. Para conseguir lo máximo de su máquina de coser, lea todo
este manual del operador antes de manejar la máquina. Después familiarícese por si mismo con la máquina
siguiendo el manual del operador, página a página.
Para asegurarse que siempre dispone de las más modernas capacidades de costura, el fabricante se reserva el
derecho a cambiar el aspecto, el diseño o los accesorios de esta máquina de coser, cuando lo considere necesario,
sin notificación ni obligación por su parte.
IMPORTANTES INSTRUCCIONES DE SEGURIDAD
A
Si el cable de alimentación eléctrica está dañado, deberá sustituirse por el fabricante o su servicio técnico
autorizado o una persona de cualificación similar con el fin de evitar un peligro.
La máquina no está destinada para ser utilizada por niños o personas de avanzada edad, sin supervisión.
Deberá vigilarse a los niños para asegurarse de que no utilizan este aparato como un juguete.
Desconectar o desenchufar la máquina cuando no se utilice.
Antes de proceder a reparar la máquina debe desenchufarla.
Si se funde la lámpara debe ser cambiada por un distribuidor autorizado.
s>Singer es una marca registrada de The Singer Company Limited o sus afiliados.
Copyright © 2005 The Singer Company Limited
Page 56

Al utilizar esta máquina, deberán seguirse unas precauciones de seguridad básicas, incluyendo lo siguiente:
. Lea todas las instrucciones antes de utilizar la máquina.
¿h PELIGRO! -Para reducir el riesgo de descargas eléctricas:
* La máquina nunca deberá dejarse sin vigilancia cuando esté enchutada. Desenchufar siempre de la toma
eléctrica inmediatamente después de utilizarla y antes de limpiarla.
IMPORTANTES INSTRUCCIONES DE SEGURIDAD
i\ ADVERTENCIA!
A
eléctricas o lesiones a personas.
Asegurarse de que la tensión eléctrica de la toma de corriente (receptáculo de pared) es la misma que la
tensión nominal del motor.
Utilizar esta máquina solamente para su uso previsto, tal como se describe en esta Guia del Operador. Utilizar
solamente las conexiones recomendadas como el fabricante, tal como se contiene en la Guía del Operador.
Para desconectar, girar todos los mandos a la posición de apagado ("0") y a continuación, desenchufar de la
toma de corriente.
Desconectar el cable de alimentación desde la toma de corriente o desconecte la máquina al efectuar cualquier
ajuste en la zona de la aguja, tales como enhebrado de aguja y ojo-guía, cambio de aguja, cambio de placa
de aguja o cambio del prénsatelas, etc.
Desenchufar siempre la máquina desde la toma de corriente cuando retire las tapas, al lubricar o cuando
efectúe cualesquiera otros ajustes de revisión mencionados en la Guía del Operador.
No intente ajustar la correa del motor. Póngase en contacto con el Centro de Servicio más cercano si necesita
hacer algún ajuste.
No desenchufe la máquina tirando del cable. Para desenchufar, agarre el enchufe y no el cable.
Maneje el controlador del pedal con cuidado y evite que se caiga al suelo. Asegurarse no colocar nada encima
del mismo
Utilice siempre la placa de aguja adecuada. Una placa gastada puede hacer que la aguja se rompa.
-Para reducir el riesgo de quemaduras, incendio, descargas
No utilizar agujas dobladas.
Al coser, mantenga sus dedos alejados de las piezas en movimiento. Se precisa un cuidado especial sobre la
aguja de la máquina de coser.
No empuje ni tire de la tela mientras realiza puntadas. Puede doblar la aguja haciendo que se rompa.
Utilizar solamente el asa manual para levantar y mover la máquina.
Nunca haga funcionar la máquina si tiene un cable o enchufe dañados, si no funciona adecuadamente, si se
ha caído o dañado o si ha caído dentro del agua. Devuelva la máquina al concesionario autorizado más
cercano o Centro de Sen/lcio Técnico para examen, reparación, ajuste eiéctrico o mecánico.
Nunca haga funcionar la máquina con las salida de aire bloqueadas. Mantenga las aberturas de ventilación
de la máquina y el controlador del pedal, libres de acumulación de hilachas, polvo y ropa suelta
Nunca deje caer ni introduzca objetos en cualquier abertura.
Page 57

No la utilice al aire líbre
No la utilice cuando se estén empleando productos en aerosoles (spray) o cuando se está administrando
oxigeno.
No permita que se utilice como un juguete. Es necesario prestar la máxima atención cuando la máquina se
utilice por o cerca de niños.
No exponga la máquina o su maleta portátil de plástico a la luz directa del sol. Asimismo, no la deje en un lugar
muy caliente o húmedo.
No toque la máquina, el controlador del pedal y el cable de alimentación con manos húmedas, ropas húmedas
o cualquier otra cosa húmeda.
No conecte el cable de alimentación a uno de los muchos cables conectados a una toma de corriente con
adaptadores.
Utilizar la máquina sobre una mesa plana y estable.
Mantener el prénsatelas y las agujas fuera del alcance de los niños.
No desmonte ni modifique la máquina por usted mismo.
Asegúrese de poner en la posición 'off' el interruptor de encendido y desconectar el cable de alimentación
antes de prestar servicio a su máquina, tal como se recomienda en la guia del operador,
GUARDE ESTAS INSTRUCCIONES
El servicio debe realizarse por un servicio técnico autorizado
Este producto no es para uso Industrial
PARA TERRITORIOS EUROPEOS Y SIMILARES
Las máquinas para Gran Bretaña y algunos otros países, que tengan normas de cableado similares, se envían
desde fábrica sin enchufe para conexión a la red principal Los cables en estas redes se colorean de acuerdo con
el siguiente código:
Azul: neutro (N) Marrón: cable con corriente (L)
Puesto que los colores de los cables de conducción do corriente de este equipo puede que no so correspondan
con las marcas coloreadas que identifican los termínales en su enchute, proceda como sigue:
El cable con color azul debe conectarse al terminal que está marcado con la letra N o colorado en negro.. El cable
de color marrón debe conectarse al terminal que está marcado con la letra L o de color rojo. Si se utiliza un enchufe
de 13 Amp. (BS 1363), debe instalarse un fusible o si se utiliza cualquier otro tipo de enchufe, deberá instalarse un
fusible de 3 Amp. en el enchufe o en el adaptador o en el cuadro de distribución.
Ningún cable ha de conectarse a cada terminal de tierra de un enchufe de tres patillas.
Page 58

INDICE
Página
1. Selección de puntadas
2. Tabla de referenciarápida
3. Accesorios...................................................................7
4. Información de agujas................................................7
5. Componentes principales
6. Cómo abrir la tapa del ojo-guia
7. Componentes principales más allá de la tapa
de ojo-gula...................................................................9
8. Preparación antes de coser.......................................9
9. Preparación para el enhebrado...............................10
• Cómo ajustar el soporte del guiahilos
10. Cómo retirar e insertar agujas
• Para retirar agujas................................................. 11
• Para insertar agujas...............................................11
11 .Cómo enhebrar la máquina
• Diagrama de enhebrado
• Entendimiento del código de colores..................12
• Cómo enhebrar correctamente la máquina... 12
1) Enhebrado del ojo-guia superior (naranja).. 12
2) Enhebrado del ojo-guia inferior (amarillo).. 14
3) Enhebrado de la aguja derecha (verde)... 16
4) Enhebrado de la aguja izquierda (azul). 18
• Información importante sobre el enhebrado
12. Como cambiar los hilos/método para atadura... 20
13. Cómo ajustar la longitud de la puntada
14. Cómo ajustar el ancho de lacoslura
• Ajuste del ancho cambiando la posición de aguja... 21
• Ajuste del ancho con el mando de ajuste
15. Como ajustar la presión del prénsatelas...............22
16. Transporte diferencial .............................................23
• Sobreorillado fruncido...........................................23
• Sobreorillado cxtensible
17. Cómo desacoplar la cuchilla superior móvil
IB.Convirtiendo la ancora superior
a un separador..........................................................26
19.Costura de brazo libre (Trabajo tubular)................27
20.Sobreoriilado estándar y puntada de dobladillo
enrollado....................................................................28
• Cómo coser un sobreorillado estándar...............28
• Cómo coser un dobladillo enrollado....................28
21.Cadeneta y costura de prueba
.............................................
..........................................
..........................................
.................................
................
....
..........................
....................................
........................................
......
................
.....................
...........
......................................
........
................................
5
10
11
12
12
19
21
21
24
25
29
22. Mótodo sugerido de montaje de tensión
6
8
9
21
1) Esta puntada de envoltura de ruedo
usa 2 hilos...............................................................30
2) La norma para la puntada del ruedo
enrollado es 2 hilos
3) Sobreorillado de 3hllos
4) Costura plana de 3 hilos
5) Sobreorillado envuelto de 3 hilos
6) Falsa puntada de seguridad ultra elástica de
4 hilos......................................................................35
23. Cómo coser un dobladillo enrollado
1 )Esta puntada de envoltura de ruedo
usa 2 hilos................................................................37
La norma para un ruedo enrollado de 2 hilos
2)Puntada de dobladillo enrollado estándar
de 3 hilos..................................................................38
Puntada de dobladillo enrollado envuelto
de hilo en ojo-guiá superior a 3 hilos
24. Variaciones de puntadas y técnicas para coser... 40
• Cómo coser una costura decorativa plana... 40
• Cómo coser un dobladillo ciego
• Cómo coser pequeños pliegues........................42
• Cómo girar esquinas cuadradas
• Colocación de allileres
• Fijación de la cadena de hilo
• Cómo reforzar una costura
• Trenzado de cadeneta.........................................45
25. Mantenimiento de la máquina
• Limpieza de la máquina
• Aceitado de la máquina
• Cómo sustituir la cuchilla fija
26 Diagrama de localización de averias..................... 48
27. Relación entre tipos de telas, hilos y agujas... 49
28. Especificaciones..................................................... 50
...............................................
.........................................
.......................................
........................
.......................
.......................
.......................................
.............................
................................
...............................
......................................
......................................
...........................
Página
...............
.....................
......
...................
30
31
32
33
34
36
37
38
42
43
44
44
45
46
46
46
47
Page 59

1. SELECCION DE PUNTADAS
Esta máquina es capaz de obtener varios tipos de puntadas de acuerdo con la combinación de las posiciones de
la aguja, métodos de enhebrado y ajuste de la tensión.
Type de point page de reference
Una aguja de dos hilos puntada es
1 .Dos hilos cubrídor
de orilla del
pespunte.
(502)
2.Dos hilos lo
normal para el
dobladillo del
ruedo.
(503)
3. Sobreorillado
de tres hilos
(504)
usada en trabajos con telas livianas
o en tejIdos.Tambíen a 3.5mm y 5.7mm
a lo ancho de la puntada la orilla del
pespunte puede ser cambiada cambiando
la posldon de la aguja.*
Una aguja de dos hilos puntada es usada
para costura de fileteadora, puntada
invisible a la orilla temnlnada. También
a 3.5mm y 5.7mm para hacer la costura
normal para el dobladillo del ruedo, esto
lo puede obtener cambiando la posición
de la aguja. '
Se utiliza una puntada de 3 hilos, con una
aguja, para sobreorillado y costura en
telas normales. También puede obtenerse
una costura de sobreonllado de 3,5 mm y
5,7 mm de ancho cambiando la posición
de la aguja *
30
31
32
4. Costura plana
de tres hilos
Se utiliza una puntada de tres hilos, con
una aguja, para costuras de bordes
33
encarados o cargadas y puntos
decorativos. También puede obtenerse una
costura plana de 3.5 mm y de 5.7 mm
cambiando la posición de la aguja.'
Se utiliza una puntada de 3 hilos, con 1
aguja, para coser dobladillos enrollados
estrechos u orillas decorativas. También
34
5. Sobreorillado
borde envuelto
tres hilos
(505)
mu»
puede obtenerse una costura envuelta con
sobreorillado de 3,5 mrn y 5,7 mm de
ancho cambiarKio la posición de la aguja.*
6. Puntada de
seguridad
falso elástico
cuatro hilos
(514)
Dependiendo de las posiciones de la aguja utilizadas, esta máquina puede coser con .sobreorillado estándar
de 3 hilos con un ancho de 3.5 mm y costuras de sobreorillado de 5.7 mm de ancho.
Puntada de 4 hilos, con 2 agujas, que es
ideal para telas extensibles medias a
pesadas, tales como tejidos de punto
doble y trajes de baño.
35
Page 60

2.TABLA DE REFERENCIA MANUAL
Tipo de puntada
Dos hilos cubridc
de orilla del
1
pespunte.
Dos hilos lo norma
para el dobladillo
2
del ruedo.
Sobreorillado de
tres hilos
3
Costura plana de
tres hilos
4
Sobreorillado
5
envuelto de
tres hilos
Falsa puntada de
seguridad-ultra
6
elastica de cuatr
hilos (514^
Posiciones
de aguja
3.5mm
r ^
5.7mm
(502)
3.5mm
-
5.7mm
(503)
3.5mm
5.7mm
(504)
3.5mm
5.7mm
(505)
3.5mm
5.7mm
3
ko]
Dial de tensTon;log*^numeros mostrados son
ajustes medios en telas de peso medio con hi
de viscosilla con el 80%de poliesteí^estanda
2.0
1.0
7.0
7.0
Separador/
Ojo-guía superio
Separador
Separador
Separador
Separador
Ojo-guía
superior
Ojo-guía
superior
Ojo-guia
superior
Ojo-guía
superior
Ojo-guía
superior
Ojo-guía
superior
Ojo-guía
superior
Azul Verde Naranja Amarillo
4.0
3.5
0.5 6.0
0.5 5.0
3.0
3.0 3.0 3.0
0.5
0.5 5.0 7.0
3.0
3.0 3.0
5.0
1.0
5.0 0 8.5
3.0
3.0 3.0 3.0
Lo
'•Patina
30
31
32
33
34
35
La tension del hilo se hace mayor a medida que los diales se giren a números más altos. Los ajustes de tensión
mostrados en esta página así como a través del manual del operador son guías recomendadas. Hay que ajustar
las tensiones del hilo para adaptarse a la tela y el tamaño del hilo que se utiliza. Para obtener mejores resultados,
hay que efectuar los ajustes de tensión en pequeños incrementos de no más de la mitad de un número a la vez.
Page 61

3.ACCES0RI0S
Los accesorios se encuentran en la caja de
accesorios en la placa de la tela.
1. Juego de agujas
2. Destornillador pequeño
3. Pinzas
4. Separador
754/764
1
1
1
1
4.INFORMACION SOBRE LA AGUJA
Aguja Singer № 2022 tamaño 90/14 se
suministra con la máquina.
En una emergencia, puede utilizarse la
aguja Singer № 2020.
Sin embargo, a menos que se reajuste la
tensión sugerida, puede producirse una
falta de puntadas.
■ 4
n
(4^
^ A
Page 62

5.C0MP0NENTES PRINCIPALES
1. Guías de hilos y portaguías
2. Asa de transporte
3. Dial de tensión del hilo de la aguja izquierda (azul)
4. Dial de tensión del hilo de la aguja derecha (verde)
5. Dial de tensión del hilo del ojo-guía superior (naranja)
6. Dial de tensión del hilo del ojo-guía inferior (amarillo)
7. Placa de agujas
8. Placa de transporte de la tela
9. Tapa del ojo-guía
10. Interruptor de encendido y de la luz
11. Dial de longitud de la puntada
12. Volante de mano
13. Soporte de carretes
14. Portacarretes
15. Pasador portacarrete
16. Elevador de barra de prénsatelas
17. Mando de palanca de ajuste del transporte diferencial
18. Placa de soporte de dedo del ancho de la costura
Page 63

6.C0M0 ABRIR LA ТАРА DEL OJO-GUIA
Precaución:
Asegúrese de desconectar la alimentación de
A
electricidad.
• Empuje la tapa a la derecha de manera que pase a
la posición (1).
• Tire hacia debajo de la tapa en dirección a usted (2).
Precaución:
' ' ^ Asegúrese de que la tapa del ojo-guia está
cerrada cuando cosa.
7.COMPONENTES PRINCIPALES
DETRÁS DE LA TAPA DEL OJO-GUÍA
1. Ojo-guia superior
2. Cuchilla superior móvil
3. Prénsatelas
4. Cuchilla inferior fija
5. Ojo-guía inferior
6. Mando de ancho de costura
7. Mando de ajuste de ancho de costura
8PREPARACION ANTES DE LA COSTURA
• Conecte el controlador/enchufe eléctrico (1) al
receptáculo de la máquina (2).
• Enchufe el cable de alimentación 3 en la toma
eléctrica (4).
• Interruptor de encendido:
Pulse el lado de marca para encender “ON".
Pulse el lado de marca “O" para apagar “OFP.
• Para hacer funcionar la máquina y controlar la
velocidad, presione el controlador.
• Cuando más fuerte presione, tanto más rápida
coserá la máquina
• Para detener la costura de la máquina de coser,
retire los pies del controlador.
W ^ ГЧ
ADVERTENCIA:
Utilice solamente el controlador de pie
suministrado con la máquina (YC-482 para USA
y CANADA solamente). Asegúrese de consultar
la “advertencia' de la página siguiente.
Page 64

INFORMACION SOBRE CONECTOR POLARIZADO (PARA ESTADOS UNIDOS Y CANADÁ SOLAMENTE)
Esta máquina tiene un conector polarizado (una clavija más ancha que la otra). Para reducir el
riesgo de sacudidas eléctricas, este conector está previsto para insertarse en una toma de
corriente polarizada de una sola manera posible. Si el conector no se inserta completamente en
la toma de corriente, hay que invertir el conector. Si todavía no se inserta adecuadamente, hay
que acudir a un electricista autorizado para que instala una toma de corriente apropiada. No
modificar el conector en manera alguna.
Advertencia:
A
• Cerciorarse de que la tensión eléctrica de la toma de corriente (enchufe de pared) es la misma que
la tensión nominal del motor.
• Manejar con cuidado el controlador de pedal y evitar que se caiga al suelo. Asegurarse de no
colocar nada encima cuando no esté en uso.
• Desconectar el conector de la linea de alimentación desde la toma de corriente cuando se cambie
las agujas, el prénsatelas o las placas de agujas o cuando deje la máquina sin nadie quela atienda.
Así se elimina la posibilidad de arrancar la máquina presionando accidentaimenie el controlador.
9.PREPARACION PARA EL ENHEBRADO
[ Ajuste del portaguía-hilo
Esta máquina se envía con el portaguia-hilo en
posición de bajada.
Extienda completamente el portaguia-hilo.
Las dos juntas de la mirilla telescópica encajarán
en su lugar, con un chasquido, cuando están
correctamente situadas.
Centre las guías-hilo por encima del portacarretes.
Coloque el hilo sobre los adaptadores de cono en
el portacarretes.
Nota; Si la máquina está enhebrada, reforzar los
hilos para impedir que se enrede.
10
Page 65

10. CÓMO RETIRAR E INSERTAR
AGUJAS
I Para retirar las agujas
Precaución:
A
Asegúrese de desconectar la máquina desde la
toma eléctrica antes de retirar las agujas.
Gire la manivela hacia usted hasta que la aguja
esté en su posición más elevada,
• Afloje, pero no retire el tomillo de ajuste de la aguja
con el destornillador pequeño.
1. Tomillo de ajuste de aguja, lado izquierdo
2. Tornillo de ajuste de aguja, lado derecho
3. Aguja lado izquierdo
4. Aguja lado derecho
• Retire las agujas.
r Para insertar agujas
Precaución:
w Asegúrese de desconectar la máquina desde la
A
toma eléctrica antes de sustituir las agujas.
Sostenga la aguja con la superficie plana en la
parte posterior.
Inserte la aguja en la abrazadera de aguja tan lejos
como pueda llegar.
Apriete fijamente el tornillo de ajuste de aguja.
Nota: * Esta máquina utiliza agujas del 2022.
Consulte la página 7 para información
adicional sobre las agujas.
’ Retire la placa de la tela si encuentra
difícil retirar y sustituir la aguja.
Superfìcie plana hacia atrás.
/\
11
Page 66

11.ENHEBRAD0 DE l_A MAQUINA
r~biagrama de enhebrado ]
• Dentro de la tapa del ojo-guía se encuentra un
diagrama de enhebrado codificado en colores
para una consulta rápida.
• Enhebre la máquina en el orden del 1 al 4, como
se muestra
[ Entendimiento del código de colores
1. Hilo de ojo-guía superior....Naranja
2. Hilo de ojo-guía Inferior
3. Hilo de aguja derecha
4. Hilo de aguja Izquierda
......
...........
.......
Amarillo
Verde
Azul
í Para enhebrar correctamente la máquina ]
Precaución;
A
Asegurarse de desconectar la alimentación de
corriente.
1) Enhebrado del ojo-guía superior (naranja)
Enhebre el ojo-guía superior como se indica de
las.
Pase el hilo desde atrás a la parte frontal a través
del guíahilos 1.
IM '
12
Page 67

Enhebre el guía hilo de la
tapa superior tirando del
hilo hacia abajo hasta que
se deslice por debajo del
guíahilos 2.
Mientras sujeta el hilo con el dedo, páselo entre
los discos de tensión y tire del hilo hacia abajo
para asegurarse de que está adecuadamente
situado entre los discos de tensión 3.
Enhebre la zona del ojo - hilo de la máquina
siguiendo las guías-hilo codificadas de color
naranja (4 a 7).
Enhebre el orificio en el ojo-guía superior desde
delante hacia atrás 8.
Nota: Utilizar las pinzas incluidas en el juego de
accesorios como ayuda para enhebrar el
ojo-guía.
Saque tirando unos 10 cm (4 pulgadas) de hilo a
través del ojo-guía y colocarlo en la parte poste
rior de la placa de aguja.
13
Page 68

2) Enhebrado del ojo-guía inferior (amarillo)
• Enhebre el ojo-guía inferior como se indica 1 a 9.
Pase el hilo desde atrás hacia delante a través
del guíahílos 1.
Enhebre el guíahilos de la
tapa superior tirando del hilo
hacia abajo hasta que se
deslice por debajo del
guíahilos 2.
Mientras sujeta el hilo con el dedo, páselo entre
los discos de tensión y tire del hilo hacia abajo
para asegurarse de que está adecuadamente
situado entre los discos de tensión 3.
14
Page 69

Gire el volante hacía usted hasta que el ojo-guía
inferior esté en la parte alejada a la derecha.
• Enhebre la zona del ojo-guía de la máquina
siguiendo las guias-hilo codificadas en color
amanllo, 4 a 7.
Nota: Utilizar las pinzas incluidas en el juego de
accesorios para ayudar a enhebrar el ojoguía.
Agarre el hilo con las pinzas 4 cm (1,5 ') desde la
guíahilos 7.
A
Coloque el hilo con la punta de las pinzas
ligeramente por debajo y a la izquierda de la guía
de enhebrado 8.
Tire del hilo hacia arriba y dentro de la guíahilos 8.
Pase el hilo por detrás y por encima del extremo
final del ojo-guia izquierdo 9-A.
A continuación tire suavemente del hilo hacia
debajo de manera que se deslice en la ranura del
ojo-guia 9-B.
Coja el hilo y páselo a través del orificio del extremo
del ojo-guía 10.
Nota: Utilice las pinzas incluidas en el juego de
accesorios para ayudar a enhebrar el ojoguia.
El hilo debe situarse en la ranura del ojo-guía
inferior.
Tire unos 10 cm (4 pulgadas) de hilo a través del
ojo-guia y colóquelo sobre la parte superior del ojoguia superior y en la parte posterior de la placa de
aguja.
15
Page 70

3) Enhebrado de la aguja derecha (verde)
• Enhebre la aguja derecha como se indica 1 a 8.
• Pase el hilo desde atrás hacia delante a través
del guíahilos 1.
Enhebre el guíahilos de la
tapa superior tirando del
hilo hacia abajo hasta que
se deslice por debajo del
guíahilos 2.
Mientras sujeta el hilo con el dedo, páselo entre
los discos de tensión y tire del hilo hacia abajo
para asegurarse de que está adecuadamente
situado entre los discos de tensión 3.
16
Page 71

Continúe a los puntos de hilo 4 a 7.
Nota: Asegurarse de pasar el hilo a través del eco-
rrido del hilo superior de la gu (ahilos 6.
Enhebre el ojo de la aguja derecha 8.
Nota: Utilice las pinzas del juego de accesorios
hará más fácil el enhebrado en el ojo de la
aguja.
Saque tirando unos 10 cm (4 pulgadas) de hilo a
través del ojo de la aguja para que cuelgue libre.
Colocar el hilo en la parte posterior, bajo el
prénsatelas.
17
Page 72

4) Enhebrado de la aguja izquierda (azul)
• Enhebre la aguja izquierda como se indica 1 a 7.
Pase el hilo desde atrás hacia delante a través del
guíahílos 1.
I
L
r—
4
tj
Enhebre el guíahilos de la
tapa superior tirando del
hilo hacia abajo hasta que
se deslice por debajo del
guíahilos 2.
Mientras sujeta el hilo con el dedo, páselo entre
los discos de tensión y tire del hilo hacia abajo
para asegurarse de que está adecuadamente
situado entre los discos de tensión 3.
18
Page 73

Continúe a los puntos de hilo 4 a 6.
Nota; Asegurarse de pasar el hilo a través del
recorrido inferior del hilo de la
guiahilos 5.
Enhebre el ojo de la aguja izquierda 7.
Nota; Utilizar las pinzas del juego de accesorios
hará más fácil el enhebrado en el ojo de I
aguja.
Saque tirando unos 10 cm (4”) de hilo a través del
ojo de la aguja para que cuelgue libre.
Coloque el hilo en la parte posterior, bajo el
prénsatelas.
Información importante sobre el enhebrado
• Enhebre siempre la(s) aguja(s) al final para impedir
un falso enhebrado del ojo-guía inferior.
• Si el ojo-guía inferior estuviere sin enhebrarse;
1) Desenhebre la aguja
2) Enhebre el ojo-guía inferior
3) Enhebre las agujas
Vista
correcta
Vista
incorrecta
19
Page 74

12.C0M0 CAMBIAB LOS HILOS/
PROCEDIMIENTO DE ATADURA
Para cambiar el color o el tipo del hilo, corte el hilo
cerca del carrete.
Coloque un hilo nuevo en el soporte.
Ate conjuntamente el hilo nuevo y el antiguo por
los extremos.
Corte trozos de hilo a 2 - 3 cm (1") de longitud. SI
los hilos se cortan demasiado cortos, pueden
desatarse.
Tire firmemente de ambos hilos para comprobar
la seguridad del nudo.
Observe los ajustes del dial de tensión.
• Gire los diales de tensión hacia abajo hasta que
se detengan.
Tire de los hilos a través de la máquina uno cada
vez.
Si los hilos no salen fácilmente, compruebe sí hay
enredos en las guías-hilo o si se forman bucles
bajo el soporte del hilo.
Al tirar del hilo a través de la aguja, PARE cuando
el nudo esté frente de la aguja.
Corte el hilo e introdúzcalo a través de la aguja.
20
Vuelva los Diales de tensión a los ajustes
anteriores.
Page 75

13.C0M0 AJUSTAR LA LONGITUD
DE LA PUNTADA
El dial de longitud de la puntada debe ajustarse
en los 3 mm (1/8") en la mayoría de las
condiciones de costura.
Ajuste la longitud de la puntada a 4 mm (5/32
pulgadas) al coser telas de gran peso.
Ajuste la longitud de la puntada a 2 mm (5/64
pulgadas) al coser telas de peso ligero para
obtener costuras excelentes sin fruncidos.
14.COMO AJUSTAR EL ANCHO
DE LA COSTURA
• El sobrehilado del ancho de la costura puede
conseguirse reajustando la posición de la aguja y
también con el mando de ajuste del ancho.
Ajuste del ancho cambiando la posición de la aguja
• El sobrehilado del ancho de la costura puede
ajustarse cambiando la posición de la aguja.
a) Cuando se utiliza solamente la aguja izquierda
........................................
b) Cuando se utiliza solamente la aguja derecha
3.5 mm (9/64 pulgadas)
Ajuste del ancho con el mando de ajuste
• El uso del botón de ajuste del ancho permitirá un
ajuste adicional dentro del margen de ancho
mostrada a continuación.
a) Cuando se utiliza solamente la aguja izquierda
..............5,2 a 6,7 mm (13/64 -17/64 pulgadas)
b) Cuando se utiliza solamente la aguja derecha
3,0 a 4,5 mm (1/8 -11/64 pulgadas)
5,7 rrm (7/32 pulgadas)
(7/32")
r .g. (7/32") ^ I ^
Aguja izquierda/ Aguja izquierda Aguja derecha
derecha
> (
> í
> (
1
\ tI*'
5.2 mm
(13/64")
(17/64")
t
Aguja izquierda/
derecha
6.7 mm
t
Aguja izquierda
(9/64")
3.0 mm
(1/8")
4.5 mm
(11/64")
t
Aguja derecha
y
21
Page 76

Mando de ajuste del anchn
Precaución:
A
A
Antes de efectuar ajustes, asegurarse de que
esté apagada la máquina.
• La apertura de la tapa del ojo • hilo facilitará el
ajuste.
Empujando la cuchilla superior hacia la derecha,
mientras mantiene la cuchilla en esta posición,
dele vuelta a la rueda para obtener la anchura de
la costura, usando las lineas en el platillo como
guias.
Precaución:
Cerrar siempre la tapa del ojo-guía antes de
accionar la máquina.
4.5
3.5 / Dobladillo
'enrollado(cuando se
envía desde fabrica)
3.0mm
ffl
15.COMO AJUSTAR LA PRESION DEL
PRENSATELAS
• La presión del prénsatelas de esta máquina está
preajustada en fábrica para adaptar la costura de
telas de peso medio.
• La mayoría de los materiales no requieren ajuste
de la presión del prénsatelas; sin embargo, hay
algunos casos en los que el ajuste es necesario
cuando se cosen telas ligeras y pesadas.
• En tal caso, inserte un destornillador a través del
orificio de acceso (A) en la cubierta superior y en
la ranura (B) del tomillo de regulación de la presión
y gire el tornillo de regulación según se requiera.
Nota: Girar el tornillo de regulación en sentido
contrario a las agujas del reloj hasta que se
detenga contra la cubierta superior. A
continuación, girar el tornillo en el sentido
de las agujas del reloj, 6 vueltas, que será
la presión del prénsatelas estándar.
• Para telas ligeras
• Para telas pesadas...................Aumentar la presión
......................
Disminuir la presión
§
22
Page 77

16.TRANSP0RTE DIFERENCIAL
• El transporte diferencial es un sistema que “estira"
o “frunce” la tela, cuando se cambia la magnitud
de transporte del alimentador delantero al
alimentador trasero.
• La relación del transporte diferencial varía de 1 :
0,7 a 1 ; 2,0. El ajuste se realiza por medio de la
palanca de ajuste del transporte diferencial
ilustrada más adelante.
• El uso del transporte diferencial es muy eficaz al
sobreorillar telas estiradas y telas cortadas al bies.
• La graduación “1.0" es la fijación de la palanca
de ajuste del transpone diterencial para una
relación de 1:1.
Sobreorillado fruncido
El sobreorillado fruncido es más adecuado para
mangas fruncidas, canesúes, corpinos delanteros
y traseros, dobladillos de camisas, etc. en telas
extensibles tales como tejidos de punto y jerseys
antes de montarse en la prenda de vestir.
Para regular la palanca de ajuste del transporte
diferencial
Ajuste la palanca de regulación del transpone
diferencial por debajo de la graduación de “1.0".
La magnitud de este ajuste depende del material
que se cose así como de la cantidad de fruncido,
por lo que hay que regular el mando para
adaptarse a la tela y a la prueba antes de coser
su prenda.
Cuando el dial de regulación del transporte se
establece en “3" o superior, la magnitud del
transporte principal cambiará a “3"
automáticamente cuando el mando de la palanca
de ajuste se fija en 2.0.
Nota: Para puntadas de sobreorillado, hay que
ajustar el mando de la palanca de ajuste del
transporte a la graduación “1.0”.
23
Page 78

Sobreorillado extensible
Es ideal para coser cuellos decorativos, mangas,
dobladillos de camisas, etc., en tejidos
entrecruzados y de punto suelto.
Para fijar la palanca de ajuste del transporte diferencial
• Fije el mando de la palanca de ajuste del
transporte diferencial por encima de la graduación,
“1.0”.
Para coser una costura, aplique una suave tensión
a la tela sujetando la costura ligeramente por
delante y por detrás del prénsatelas.
Nota: *Si la magnitud de la “extensión” no está
correctamente fijada en relación con la tela
que se está cosiendo, la tela será propensa
a alejarse desde la aguja dando lugar a
un sobreorillado inadecuadamente cosido.
En tal caso, reajuste la palanca reguladora
del transporte diferencial lo más cerca de
la marca del centro.
* Asegúrese de reposicionar la palanca de
ajuste del transporte diferencial a la
graduación “1.0” para sobreorillado
normal.
24
Page 79

17.C0M0 DESACOPLAR LA CUCHILLA SUPERIOR MOVIL
Precaución:
A
Asegurarse de desconectar la alimentación
eléctrica.
Para colocar la cxichilla móvil en posición de reposo
Gire el volante hacia su posición y eleve la cuchilla
superior a su posición más alta.
Abra la lapa del ojo-guía (pàgina 9).
Empuje el portacuchilla móvil a la derecha todo lo
que se pueda.
Gire el mando alejándose de la posición en que
usted se encuentra hasta que la cuchilla haga un
chasquido en una posición horizontal.
Nota: Si la cuchilla se para en la posición elevada.
* Gire el volante hacia usted hasta que la
cuchilla se separe de la partesupehor de
la máquina.
* Continué girando la cuchilla a la posición
horizontal.
Para situar la cuchilla móvil en la posición de
trabajo
A
•
• Abra la tapa del ojo-guía y empuje el porta-cuchilla
móvil a la derecha, todo lo posible.
Gire el mando arriba y hacia usted hasta que la ^
cuchilla encaje con un chasquido en la posición
de trabajo.
Precaución:
Cerrar siempre la tapa del ojo-guía antes de
hacer funcionar la máquina.
25
Page 80

18.CONVIRTIENDO LAANCORA
SUPERIOR A UN SEPARADOR.
Aviso:
A
Apague la maquina antes de instalar o quitar el
separador.
Instalando el Separador
Inserte la espiga (A) del separador en el espacio
(B) de la ancora superior.
Poner en la posición al costado (C) haciendo
contacto con la parte superior del ancora.
Inserte la punta (D) en el hueco (E) de la ancora
superior.
Cambiando le Separador
Quite la punta (D) del hueco (E) de la ancora
superior y quite el separador de la ancora.
Nota:Regrese el separado caja de los
accesorios.
26
Page 81

19.C0M0 COSER CON BRAZO LIBRE
(TRABAJO TUBULAR)
Esta máquina se convierte en una máquina de brazo
libre, simplemente quitando la placa de la tela.
Para retirar la placa empújatelas
• Deslice esta placa a la izquierda y retírela de la
máquina mientras presiona el botón de prensado ( A)
situado en la parte inferior.
• Esto es especialmente adecuado para costuras en
que resulte difícil llegar a zonas de la prenda tales
como huecos de las mangas y sobrehilado de las
vueltas de los pantalones.
• Coloque la prenda sobre el brazo libre y proceda a
coser.
_______
r o ^
Cómo sustituir la placa empújatelas
• Alinee el saliente en la placa empújatelas con la
ranura en la tapa del cilindro y deslice a la derecha
hasta que la pestaña en la placa empújatelas (frontal)
encaje en la ranura de la tapa del cilindro.
•
27
Page 82

20.SOBREHILADO ESTANDAR Y PUNTADA DE DOBLADILLO ENROLLADO
Para hacer un sobrehilado estándar
Fije el mando de dedo del ancho de la costura en
la posición S para desplazar el dedo del ancho de
la costura a la posición prevista.
Nota: Asegurarse de empujar el mando de dedo
del ancho de la costura todo lo posible en la
dirección del posicionamiento S.
Cómo coser un dobladillo enrollado
Fije el mando del dedo del ancho de la costura en
la posición R para retraer el dedo del ancho de la
costura.
Nota: Asegurarse de empujar el mando de dedo
del ancho de la costura todo lo posible en
la dirección del posicionamiento R.
28
Page 83

21 .ENCADENADO Y COSIDO DE
PRUEBA
• Cuando la máquina está completamente
enhebrada, lleve todos los hilos sobre la placa
de aguja y ligeramente hacia la izquierda bajo el
prénsatelas.
• Sujete los hilos y aplique una ligera tensión.
• Gire el volante hacia usted 2 63 vueltas completas
para iniciar la cadena del hilo.
• Baje el prénsatelas.
Siga sujetando la cadena y presione sobre el
pedal de control hasta que la cadena tenga de 5
a 7,5 cm (2-3 pulgadas) de longitud.
Coloque la tela bajo la parte frontal del
prénsatelas y cosa una muestra de prueba.
Nota: No tire de la tela mientras está cosiendo ya
que esto puede doblar la aguja, haciendo
que se rompa.
29
Page 84

22. METODO SUGERIDO DE MONTAJE
DE TENSION.
Posicion de la aguja
• O o»
í 1) Esta puntada de envoltura de ruedo usa 2 hilos]
Nota:* Estos son solo métodos sugeridos de Tension.
* Los mátodos de montaje de tensión Son afectados por:
1) Tipo Y densidad de la tela.
2) Tamano de la aguja
3) Tamano, tipo y contenido de fibra de el hilo
* Vea la pagina 26 para convertir el doblador de arriba en
un desenvolvedor.
• Coloque el Dial en los montajes que Están enseñados a la
mano derecha y Ensaye en un retazo de su tela.
Boton dedal de anchura de ruedo
Largo de la puntada
Desenvolvedor (separador)
Hilo de a aguja
Parte de arriba'
BdiaMce Coiiedo
Peso ligero
Peso mediano
Peso pesado
Azul Verde Naranja Amarillo
2.5
3.5
4.0
Parte de abajo
Dial de tension
desenvolvedor
desenvolvedor
desenvolvedor
Dial de tension
Azul Verde Naranja Amarillo
Peso ligero
Peso mediano
Peso pesado
2.5
4.0
5.0
desenvolvedor
desenvolvedor
desenvolvedor
2-4
USE
doblador posterior
(502)
1.0
1.0
1.0
2.0
2.0
2.0
Como Balancear
Cuando el hilo del doblador posterior De tension esta muy
apretado o la aguja de El hilo esta muy suelto
- Cambie el dial de el doblador posterior De tension hacia un
número menor (Amarillo)
- O, cambie el hilo de la aguja de tension (Azul o verde) hacia
un numero mas alto.
Cuando la tension de hilo de el doblador Posterior esta muy
suelto: cambie el dial Hacia (amarillo) un numero mas alto.
30
Hilo de la aguja
Parte de arriba
Hilo de la aguja
Parte de arriba
doblador posterior
Parte de abajo
doblador posterior
Parte de abajo
Page 85

2) La norma para la puntada del ruedo enrollado es 2 hilos.
Posición de la aguja
Nota:* Estos son solo métodos sugeridos de Tensión.
* Los métodos de montaje de tensión Son afectados
por:
1 )Tlpo Y densidad de la tela.
2) Tamaño de la aguja
3) Tamaño. tipo y contenido de fibra de el hilo
* Vea la página 26 para convertir el doblador de
arriba en un desenvolvedor.
Coloque el Dial en los montajes que Están enseñados a la
mano derecha y Ensaye en un retazo de su tela.
Botón dedal de anchura de ruedo
Largo de la puntada
Desenvolvedor (separador)
Hilo de la aguja
Parte de arriba
DUidilUD
Peso ligero
Peso mediano
Peso pesado
Balance Correcto
Peso ligero
Peso mediano
Peso pesado
Azul Verde Naranja Amarillo
0,5
1.0
Azul Verde Naranja Amarillo
Parte de abajo
Dial de tensión
0
Dial de tensión
0
0.5
1.0
2-4
USE
doblador posterior
(503)
desenvolvedor
desenvolvedor
desenvolvedor
desenvolvedor
desenvolvedor
desenvolvedor
5.0
5.0
5.0
5.0
6.0
6.5
Como Balancear
• Cuando el hilo del doblador posterior De tensión está en
la parte debajo de la tela:
- Cambie el dial del doblador posterior De tensión hacia un
número mayor (Amarillo)
- Ó, cambie el hilo de la aguja de tensión (Azul ó verde)
hacia un numero más bajo.
> Cuando la tensión de hilo de el doblador
- Posterior está muy suelto: cambie el dial
- Hacia (amarillo) un numero más alto.
Parte de arriba
Hilo de la aguja
Parte de aniba,
doblador ^sterior
Parte de abajo
doblador postenor
Parte de abajo
J
31
Page 86

3) Sobreorillado 3 hilos
Nota: * Estos ajustes de tensión son
recomendados solamente,
* Los ajustes de tensión se efectúan por:
1) Tipo y grosor de la tela
2) Tamaño de la aguja
3) Tamaño, tipo y contenido en fibra
del hilo
Equilibrio correcto
Fijar cada dial de tensión a los ajustes mostrados
a la derecha y hacer una costura de prueba en
una muestra de su tela.
POSICION DE LA AGUJA
MANDO DEDO ANCHO COSTURA
LONGITUD DE LA PUNTADA
Hilo ojo-guia Superior
/
Hilo de aguja
Lado superior
Balance
Correcto
Dial de tensión
Azul Verde Naranja Amarillo
Peso ligero 2.5
Peso medio 3.0
Peso pesado
3.5
>o
2-4
Lado Inferior
3.0
3.0 3.0
3.0
(504)
3.0
3.0
Cómo equilibrar
• Cuando el hilo del ojo-guia superior se apoya
por debajo de la tela:
- Girar el dial de tensión del hilo del ojo-guia
superior (naranja) a un número mayor.
- O, girar el dial de la tensión de hilo deojoguía
superior (naranja) a un número inferior.
• Cuando el hilo del ojo-guía inferior aparece
por encima de la tela:
- Girar el dial de tensión del hilo del ojo-guía
inferior (amarillo) a un número mayor.
- O, girar el dial de la tensión de hilo de ojoguía
superior (naranja) a un número menor.
• Cuando el hilo en la aguja está demasiado flojo,
girar el dial de tensión(azul o verde) a un número
superior.
Balance
Correcto
Peso ligero
Peso medio
Peso pesado
Hilo ojo-guía Superior
Hilo de aguja
Lado superior
Hilo ojo-guia Superior
Hilo de aguja
Hilo ojo-guía Superior
Hilo de aguja
Lado superior
Dial de tensión
Verde
Azul
NaranjaAmarillo
2.5 3.0 3.0
3.0 3.0
3.0 3.0
3.5
Hild del ojo-guia
InfeH^or
3.0
Lado Inferior
del ojo-guia
rior
Lado inferior
Hilo, del ojo-guia
Infehpr
Lddo Inferior
32
Page 87

4) Costura plana de 3 hilos
Nota: • Estos ajustes de tensión son
recomendados solamente
• Los ajustes de tensión se efectúan por:
1) Tipo y grosor de la tela
2) Tamaño de la aguja
3) Tamaño, tipo y contenido en fibra del
hilo
Equilibrio correcto
fijar cada dial de tensión alosajustes mostrados
a la derecha y coser de prueba sobrenamuestra
de la tela.
POSICION DE LA AGUJA
MANDO DEDO ANCHO COSTURA
LONGITUD DE LA PUNTADA
Hilo de aguja
Hilo ojo-guía Superior
Lado Inferior
Lado superior
Balance
Correcto
Peso ligero
Dial de tensión
Azul Verde Naranja Amarillo
0.5
5.0
Peso medio 0.5 5.0 7.0
Peso pesado
0.5
5.0
>o
2-4
(505)
7.0
7.0
Cómo equilibrar
• Cuando la tensión del hilo del ojoguía inferior
está demasiado flojo:
- Girar el dial de tensión del hilo del ojo-guia
superior (amarillo) a un número mayor.
- O, girar el dial de la tensión de hilo de ojoguía
superior (azul o verde) a un número inferior.
• Cuando el hilo del ojo-guía superior está
demasiado flojo:
- Girar el dial de tensión del hilo del ojo-guía
superior (naranja) a un número mayor.
- O. girar el dial de la tensión de hilo de ojo-guia
superior (azul o verde) a un número inferior.
• Cuando el hito en la aguja está demasiado flojo:
- girar el dial de tensión (azul o verde) a un
número superior.
- O, girar el dial de tensión del hilo del ojo-guía
superior a un número interior.
Balance
Correcto
Poso ligero 0.5
Peso medio
Peso pesado 0.5
Hilo ojo-guia Superior,
Hilo de aguja
Lado superior
Hilo ojo-guia Superlo^
Hilo de aguja
Hilo ojo-guia Superior
Hilo de aguja
Lado superior
Dial de tensión
Verde
Azul
NaranjaAmarillo
5.0
7.0
0.5 5.0 7.0
5.0
^Hllo ojo-guia Superior
Hilo dpi ojo-guía
Inferior
Lado Inferior
Hilo ojo-guia Superior
Hiló del ojo-guia
inferior
Lado Inferior
Hilo ojo-guia Superior
ffllo del ojo-guia
Inferior
7.0
Lado Inferior
33
Page 88

5) Sobreorillado envuelto de 3 hilos
Nota: * Estos ajustes de tensión son recomendados
solamente.
* Los ajustes de tensión se efectúan por:
1 ) Tipo y grosor de la tela
2) Tamaño de la aguja
3) Tamaño, tipo y contenido en fibra del hilo
Equilibrio correcto
Fijar cada dial de tensión a los ajustes mostrados
a la derecha y coser de prueba sobre una
muestra de su tela.
POSICION DE LAAGUJA
MANDO DEDO ANCHO COSTURA
LONGITUD DE [APUNTADA
llwlOT
Hilo de aguja
Hilo ojo-guia Superior
Lado superior
Balance
Correcto
Peso ligero
Peso medio
Peso pesado
Dial de tensión
Azul Verde NaranjaAmarillo
4.0 0 8.0
5.0 0 8.5
5.0 0 8.5
»O
2-4
-guia
Lado inferior
Cómo equilibrar
Cuando la tensión del hilo del ojo-guía superior
está demasiado flojo:
- Girar el dial de tensión del hilo del ojo-guía su
perior (naranja) a un número mayor.
Cuando la tensión del hilo del ojo-guía inferior es
demasiado floja.
- Girar el dial de tensión del hilo del ojo-guía su
perior (amarilla) a un número mayo.r
- O, girar el dial de la tensión de hilo de ojo-guía
superior (naranja) a un número inferior.
Cuando la tensión del hilo en la aguja es
demasiado floja:
- girar el dial de tensión (azul o verde) a un número
superior.
- O, girar el dial de tensión del hilo del ojo-guía
superior (naranja) a un número inferior.
Balance
Correcto
Peso ligero
Peso medio
Peso pesado
Hiio de aguja
Hiio ojo-guia Superior
Lado superior Lado inferior
Hilo de aguja
Hilo ojo-guia Superior
Lado superior
Azul Verde NaranjaAmarillo
IWlWg
Hilo de aguja^
Hilo ojo-guía Superior,
Lado superior
Dial de tensión
2.5 1.0
3.0 1.0 7.0
3.5 1.0 7.0
Hilo del ojo-guia
inferior
\
lio del ojo-guía
inrerior
\ ^
Hilo de aguja
Lado inferior
^.Hilo del ojo-guía
inferior
-Hilo d^guja
Lado inferior
7.0
34
Page 89

6) Falsa puntada de seguridad ultra elástica de 4 hilos
Nota: * Estos ajustes de tensión son recomendados
solamente.
* Los ajustes de tensión se efectúan por:
1 ) Tipo y grosor de la tela
2) Tamaño de la aguja
3) Tamaño, tipo y contenido en fibra del hilo
Equilibrio correcto
• Fijar cada dial de tensión a los ajustes mostrados a
la derecha y coser de prueba sobre una muestra
de su tela
__________________________
POSICION DE LA AGUJA
MANDO DEDO ANCHO COSTURA
LONGITUD DE LA PUNTADA
Hilo ojo-guía Superior
Hilo de la
aguja
derecha
Lado superior
2-4
Hilo del ojoguía
.Inferior
(514)
Cómo equilibrar
Cuando el hilo del ojo-guía superior se apoya
por debajo de la tela:
- Girar el dial de tensión del hilo del ojo-guía
superior (naranja) a un número mayor.
- O, girar el dial de la tensión de hilo de ojo-guía
superior (amarillo) a un número inferior.
Cuando el hilo del ojo-gula inferior se aparece
por encima de la tela:
- Girar el dial de tensión del hilo del ojo-guía
inferior (amarillo) a un número mayor.
- O, girar el dial de la tensión de hilo de ojo-guía
superior (naranja) a un número inferior.
Cuando la tensión del hilo en la aguja Izquierda
es demasiado floja, girar el dial de tensión (azul)
a un número superior.
Cuando la tensión del hilo en la aguja derecha
es demasiado floja, girar el dial de tensión (verde)
a un número superior.
Balance
Correcto
Peso ligero
Peso medio
Peso pesado
Hilo ojo-guía Superior
Hilo de la/
aguja
der¿cha
Lado superior
Hilo de la/
aguja
derecha rlllodi
Lado superior
Hilo de la/
Hilo de li
aguja Hilo da la
derecha aguja
Lado superior
aguja
izquierda
Hilo ojo-guía Superior
aguja
izquierda
Hilo ojo-guía Superior
a."'“
Izquierda
Lado superior Lado inferior
Hilo ojo-guía Superior
izquierda
Dlai defensión
Azul Verde
Naranja
2.5 2.5
3.0 3.0 3.0 3.0
3.5 3.5 3.0
Lado inferior
Amarillo
3.0 3.0
3.0
Hilo del ojoguía
inferior
Lado Inferior
Hilo del ojoguía
inferior
Lado inferior
Hilo del ojoguía
inferior
Hilo del ojoguía
Inferior
_y
35
Page 90

23.COMO COSER UN DOBLADILLO
ENROLLADO
• Esta máquina puede coser cuatro tipos de
dobladillos enrollados.
• El dobladillo enrollado se realiza enrollando y
sobreorillando la tela.
• Con telas ligeras tales como lino, gasa, organdí,
crespón, etc., lo realiza mejor.
• El dobladillo enrollado no es adecuado para telas
pesadas o rígidas.
Puesta a punto de la máquina
Retirar la aguja izquierda.
Desplazar el mando de dedo del ancho de la
costura a la posición R (Ver página 28).
Alinear la cara izquierda de la placa de soporte de
dedo del ancho de costura con la marca R en la
placa de guía girando el mando de dedo de ancho
de costura, según se requiere.
Fijar el dial de longitud de la puntada a “F - 2" y
se coserá un costura fina.
Aguja: Aguja Singer № 2022 tamaño 80/11 ó 90/
14.
Hilo: Pueden utilizarse varias combinaciones de
hilo para dobladillo enrollado.
36
Page 91

Nota: Para un ruedo enrollado de dos hilos que sea bello
ensarte el doblador superior con hilo de nylon y la
aguja con hilo regulas de peso ligero.
Posicion de la aguja
O»
1) Esta puntada de envoltura de ruedo usa 2 hilos.
Balance Correcto
• Coloque el Dial en los montajes que Están ensenados a la
mano derecha y Ensaye en un retazo de su tela.
Boton dedal de anchura de ruedo
Largo de la puntada
Desenvolvedor (separador)
Hilo de la aguja
Parte de arrib;
Hilo del doblador superior
poliester
Hilo nylon (lanilla)
Parte de abajo (502)
AzulVerdeNaranjaAmarillo
s
F~2
USE
doblador posterior
Dial de tension
3.0 2.0
3.0 2.0
La norma para un ruedo enrollado de 2 hilos
Balance Correcto
• Coloque el Dial en los montajes que Estan ensenados a la
mano derecha y Ensaye en un retazo de su tela.
•
doblador posterior
Parte de arriba
Hilo del doblador superior
Hilo nylon (lanilla)
Parte de abajo
(503)
Dial de tension
AzulVerdeNaranjaAmarillo
2.0 4.0
J
37
Page 92

Nota; Para conseguir un mejor dobladillo enrollado,
enhebre el ojo-guía superior con nylon lanoso
y la aguja y el ojo-guía inferior con hilo nor
mal ligero.
POSICION DE LAAGUJA
MANDO DEDO ANCHO COSTURA
LONGITUD DE [APUNTADA
Ot
F-2
2) Puntada de dobladillo enrollado estándar de 3 hilos
Equilibrio correcto
Fijar cada dial de tensión a los ajustes estrados
a la derecha y coser de prueba sobre una estra
de su tela.
Puntada de dobladillo enrollado envuelto de hilo en ojo-guía superior a 3 hilos
Hilo ojo-guia Superior
Hilo de aguja
Lado superior
Hilo ojo-guia
Superior
Polyester
Nylon lanoso
Lado Inferior
(504)
Dial de tensión
Azul Verde NaranjaAmarillo
3.0 5.0 3.0
3.0 3.5 3.5
Equilibrio correcto
Fijar cada dial de tensión a los ajustes estrados
a la derecha y coser de prueba sobre una estra
de su tela.
38
Hilo ojo-guía Superior
Lado superior
Hilo ojo-guia
Superior
Polyester
Nylon lanoso
Hilo del ojcA^uía
inferior
Hilo de aguja
Lado Inferior
Dial de tensión
Azul Verde NaranjaAmarillo
2.0
2.0
5.0
2.0
7.0
5.0
Page 93

Información adicional sobre dobladillo enrollado
• Sujete la cadena de hilo cuando empiece a coser
para impedir que quede ondulado en la costura.
Aplique una ligera tensión sobre el material en
la dirección de la costura y podrá obtenerse un
acabado de costura más fino.
El ancho de puntada de sobreorillado mínima
que puede obtenerse del dobladillo enrollado es
aproximadamente 1,5 mm (1/16") ya que el ancho
de corte no puede estar por debajo de 3,5 mm
(9/64 pulgadas).
Cómo fijar la cadena de hilo de dobladillo enrollado
Aplique una pequeña gota de líquido sellante
de costura al final de la costura. Dejar que se
seque y después corte la cadena cerca de las
puntadas.
Nota: Probar el líquido sellante de costura para
ver la fortaleza del color antes del uso.
J
39
Page 94

24.VARIACIONES DE PUNTADAS
YTECNICAS PARA COSER
Cómo hacer una costura decorativa de doble
pespunte plano____________________________
• Se consigue una puntada de doble pespunte
plano ajustando la tensión de la puntada de
sobreoríllado de 3 hilos, cosiendo la costura y
tirando de la tela hacia fuera para alisar la costura.
• La puntada de costura plana puede utilizarse como
una puntada de construcción y decorativa o a
efectos de adorno solamente.
(1 ) Puesta a punto de la máquina
• Retire la aguja izquierda o derecha.
• Empiece con la máquina enhebrada y una tensión
equilibrada para la puntada de sobreorillado de 3
hilos (página 29),
• Afloje bastante la tensión de hilo de aguja (verde
o azul).
• Afloje ligeramente la tensión de hilo (naranja) del
ojo-guía superior.
• Afloje bastante la tensión de hilo (naranja) del ojoguía inferior.
• Apretar bastante la tensión de hilo (amarillo) del
ojo-guía inferior.
(2) Cómo hacer una costura plana
• Coloque las caras de envés de la tela juntos para
coser una puntada decorativa en el lado derecho
de la prenda.
• Coser la costura, recortando la tela sobrante.
_______________
_______________
f
f
------
L
Retire - Retire
------
0 0
'4 , > i
• ¡ 'V
40
El hilo de la aguja (verde o azul) formará una V en
el lado inferior de la tela.
El hilo del ojo-guia inferior se extraerá en linea
recta en el borde de la tela.
Lado inferior
Page 95

Tire de los lados opuestos de la costura para sacar
las puntadas planas.
(3) Costura decorativa plana
Coloque la cuchilla móvil superior en la posiciór
de reposo (Pag. 25). La tela no es recortada cor
esta puntada.
Pliegue juntas las caras de envés de la tela.
Coloque la tela de manera que la costura S£
obtenga con parte de la puntada que se
extiende desde fuera de la tela.
• Tire de las caras opuestas de la tela pare
alisarla.
(4) Información adicional sobre costura plana
de doble pespunte
Las tensiones deberán estar correctamente
ajustadas para que la tela quede plana.
El hilo del ojo-gula superior es el hilo saliente
en la puntada de costura plana. Coloque un hilo
decorativo en el ojo-guía superior y los hilos
poco decorativos en la aguja y ojo-guía
inferior.
Para una puntada en escalera, haga la costura
con los haces juntos. El hilo de la aguja será el
hilo prominente que crea la escalera (A).
A
41
Page 96

Cómo coser un dobladillo ciego con sobreorillado
Se recorta la tela sobrante y se cose el dobladillo
y las orillas sin coser se sobreorillan en una sola
operación.
El dobladillo ciego de sobreorillado es el más
adecuado para coser ropa de tejido de punto.
Proporciona un acabado duradero que es casi
invisible.
Retire la aguja izquierda y ajuste la máquina a una
puntada estrecha de sobreorillado de 3 hilos.
Nota: Puede utilizarse también la puntada de
costura plana de tres hilos.
Coloque el dial de longitud de la puntada en 4.
0 0
Pliegue el dobladillo por el envés de la tela y
después vuelva al haz con 6 mm {1/4") más allá
del pliegue.
Haga una puntada en la orilla del dobladillo
extendido, dejando que la aguja de la máquina
coja apenas la orilla del pliegue.
Cómo coser pequeños pliegues
Cosa pequeños pliegues decorativos en la tela
antes de cortar la prenda.
Retire la aguja izquierda y ajuste ia máquina para
una puntada estrecha de sobreorillado de 3 hilos.
Nota: La puntada de dobladillo enrollado puede
utilizarse también en esta técnica.
Coloque la cuchilla superior móvil en la posición
de reposo (Pág. 25).
Retire
0 0
Retire
42
Marque la tela con el número deseado de pliegues
utilizando una marcada de tela soluble en agua.
Page 97

Pliegue la tela con los envés juntos y cosa.
Planche los pliegues en la misma dirección.
Cómo girar esquinas cuadradas
(1) Esquina exterior
Corte ■
Corte aproximadamente 2 cm (51/64 “) desde la
esquina, en línea con la orilla de costura de
sobreorillado.
Cosa una puntada más allá del punto (a) y pare.
Eleve la aguja y el prénsatelas.
Tire de la tela hacia la parte posterior de la
máquina lo suficiente para soltar el hilo
enganchado con el dedo de la placa de aguja.
Nota: El prénsatelas ha sido retirado para mostrar
más detalles.
Gire la tela y baje el prénsatelas de manera que la
cuchilla se coloque en línea con la orilla de corte.
Tire de los hilos flojos hacia arriba y luego empiece
a coser.
2 cm
]
2 cm
I
I
(2) Esquina interior
• Corte la tela en la orilla de costura.
Corte ¡
Corte
43
Page 98

Coloque la cuchilla móvil superior en la posición
de reposo (página 25).
Haga una puntada en la orilla cortada de la tela.
Pare la costura antes de llegar a la esquina y
doble la tela a la izquierda para enderezar la
esquina.
Siga cosiendo lentamente manteniendo la orilla
de la tela en una línea recta moviendo la tela a
medida que va cosiendo.
( Colocación de alfileres
Inserte alfileres a la izquierda del prénsatelas. Los
alfileres será fáciles de retirar y están fuera de la
acción de corte de las cuchillas.
Precaución:
A
Coser sobre alfileres dañará y/o destruirá el
borde de corte de las cuchillas.
( Fijación de la cadena de hilo
Enhebre una aguja de ojo grande de coser a
mano (tal como una aguja para tapicería) con la
cadena de hilo.
Introduzca la aguja en el extremo de la costura
para fijar el hilo.
Nota; Para fijar una cadena de hilo de dobladillo
enrollado, vea página 39.
44
Page 99

Cónno reforzar una costura
La inserción de una cinta de sarga, mientras se
cose un sobreorillado, estabilizará la costura.
Inserte la cinta a través del orificio en la parte fron
tal del prénsatelas.
Coloque la cinta bajo el prénsatelas en la parte
posterior de la máquina y cosa la costura de la
prenda.
Esta cinta se unirá a medida quo se hace la
costura.
Trenzado con cadeneta
• Coloque la cuchilla superior móvil en posición de
reposo.
• Inserte un cordón de relleno, tal como un hilo
grueso o una cinta de sarga a través del orificio
de la parte frontal del prénsatelas.
• Coloque el cordón de relleno bajo el prénsatelas
y deshaga la cadeneta a la longitud deseada.
• Los trenzados así obtenidos pueden utilizarse
individualmente o urdidos en trenzas de 3 ó 4
capas.
•
45
Page 100

25.MANTENIMIENTO DE LA MAQUINA
Una máquina de sobreoríllado requiere más
mantenimiento que una máquina convencional
debido principalmente a dos razones:
1) Se produce una gran cantidad de hilachas debido
a la acción de corte de las cuchillas.
2) La máquina de sobreorillado funciona a una gran
velocidad y necesita ser aceitada frecuentemente
para lubricar las piezas de trabajo internas.
I Limpieza de la máquina
f\
Peligro:
A
Antes de limpiar su máquina, desconecte la
alimentación de corriente desde la toma de
pared.
Limpie, a menudo, de hilachas la zona del ojo - guia
y de las cuchillas, con un cepillo quitahilachas seco.
Nota: El cepillo quitahilachas es un elementoopcional.
A
SINO)
[ Aceitado de la máquina
Peligro:
A
Antes de lubricar su máquina desconecte la
alimentación de corriente de la toma de pared.
Los puntos de engrase mostrados en el diagrama,
deberán aceitarse periódicamente
Nota: Utilice aceite especial para máquinas de
coser. No utilice otro tipo de aceite, puesto
quepodría resultar dañada la máquina.
46
 Loading...