


117
Table of contents
 Loading...
SINGER Jeatherweight n
INSTRUCTION MANUAL
MANUAL DE INSTRUCCIONES

"IMPORTANT SAFETY INSTRUCTIONS"
"When using an electrical appliance, basic safety precautions should always be followed, including the following."
"Read all instructions before using this sewing machine."
’’DANGER — To reduce the risk of electric shock:"
1. "This sewing machine should never be left unattended when plugged in. Always unplug this sewing machine from the electric
outlet immediately after using and before cleaning."
2. "Always unplug before replacing light bulb. Replace bulb with same type rated 15 watts."
’’WARNING — To reduce the risk of burns, fire, electric shock, or injury to persons:"
1. "Do not allow to be used as a toy. Close attention is necessary when this sewing machine is used by or near children."
2. "Use this sewing machine only for Its intended use as described in this manual. Use only attachments recommended by the
manufacturer as contained in this manual."
3. "Never operate this sewing machine If it has a damaged cord or plug. If it Is not working properly, if it has been dropped or dam
aged, or dropped Into water. Return the sewing machine to the nearest authorized dealer or service centre for examination, repair,
electrical or mechanical adjustment."
4. "Never operate the sewing machine with any air openings blocked. Keep ventilation openings of the sewing machine and foot
control free from the accumulation of lint, dust, and loose cloth."
5. "Never drop or insert any object into any opening."
6. "Do not use outdoors."
7. "Do not operate where aerosol (spray) products are being used or where oxygen Is being administered."
8. "To disconnect, turn switch to the off ("0") position, then remove plug from outlet."
9. "Do not unplug by pulling on cord. To unplug, grasp the plug, not the cord."
10. "Keep fingers away from all moving parts. Special care is required around the sewing machine needle."
11. "Never sew with a damaged needle plate as this can cause needle to break."
12. "Do not use bent needles."
13. "Do not pull or push fabric while stitching. It may deflect the needle causing it to break."
14. "Switch the sewing machine off ("0") when making any adjustments In the needle area, such as threading needle, changing
needle, threading bobbin, or changing presser foot, etc."
15. "Always unplug sewing machine from the electrical outlet when removing covers, lubricating, or when making any other user
servicing adjustments mentioned in the Instruction manual."
’’CAUTION -
Moving parts - To reduce risk of injury, switch off before servicing.
Close cover before operating machine."
’’SAVE THESE INSTRUCTIONS”
"This product is for household use, or equivalent."

FOOT CONTROL (USA only)
Use Matsushita Electric, Model 4C-316B with this sewing machine.
POLARIZED PLUGS CAUTION
This appliance has a polarized plug (one blade wider than the other). To reduce the risk of electric shock, this plug is intended to fit in a
polarized outlet only one way. If the plug does not fit fully in the outlet, reverse the plug. If it still does not fit, contact a qualified electrician
to install the proper outlet. Do not modify the plug in any way.

IMPORTANTES INSTRUCCIONES DE SEGOURIDAD
Cuando se usa un aparato eléctrico, debe seguirse unas precauciones básicas y que vienen incluidas a continuación.
"Leer las instrucciones antes de usar la máquina de coser."
PELIGRO — Para reducir el riesgo de una descarga eléctrica.
1. La máquina no debe dejarse nunca desatendida mientras esté conectada. Desconectar la máquina de la red eléctrica
inmediatamente después de su uso y antes de limpiarla.
2. Desconectar la máquina de la red antes de cambiar la bombilla.Colocar una bombilla del mismo tipo con una potencia de 15
Watios.
CUIDADO — Para reducir el riesgo de quemaduras, fuego, descargas eléctricas o causar daños a personas.
1. No usar la máquina como un juguete.Prestar atención si fuese necesario cuando la máquina está siendo usada por niños o cerca
de ellos.
2. Usar la máquina de coser solamente como se describe en este manual.Usar únicamente los accesorios recomendados por el
fabricante y que vienen especificados en este manual.
3. No trabajar nunca con la máquina en caso de que tenga el cable o el enchufe en malas condiciones, si no cose correctamente,
en caso de que se haya caído, haya sido dañada o se haya mojado.
4. No usar la máquina con los orificios de ventilación bloqueados. Mantener los orificios de ventilación de la máquina de coser y el
pedal sin acumulació de polvo, suciedad y restos de tejido.
5. No introducir no insertar objetos en los orificios de ventilación.
6. No usar al aire libre.
7. No usar mientras se estén utilizando productos aerosoles (spray) o en lugares donde se esté administrando oxigeno.
8. Para desconectar, girar el interruptor hasta la posición Off ("0"), luego desconectar el enchufe de la red.
9. No desconectar el enchufe tirando del cable. Para desconectar, tirar de la clavija, no del cable.
10. Mantener los dedos alejados de todas las partes movibles de la máuqina. Tener un cuidado especial con la aguja.
11. Usar siempre la placa de agujas apropiada. Una placa de agujas impropia puede producir la rotura de la aguja.
12. No usar agujas despuntadas.
13. No presionar ni tirar del tejido mientras se está cosiendo. Esto podría doblar la aguja y romperla.
14. Situar el interruptor principal de la máuina en posición Off ("0") cuando se realice algún ajuste en el área de la aguja como
enhebrar la aguja, cambiar la aguja, cambiar la canilla, cambiar el pie prénsatelas y similares.
15. Desconectar siempre la máquina de la red eléctrica cuando se retiren las tapas, para lubricar, o cuando se realice algún otro tipo
de ajuste mecánico mencionado en el manual de instrucciones.
CONSERVE ESTE MANUAL DE INSTRUC CIONES
Esta máquina de coser es para uso doméstico

TABLE OF CONTENTS
Machine identification
--------------------------------------------------
4 - 6
Setting up your machine
.........................................................
7
Foot control, Power/light switch
Accessories.....................................
..........................................
- 8
Winding bobbin
...............................................
......................
— 9
Threading the bobbin thread
-------------------------------------------
10
Threading top thread
............
.........
........
..............
-
..........
.........
11
Using automatic needle threader----------------------
--------
—
........
12
Picking up bobbin thread
.........................
-
------------
---------------
13
Changing presser feet............................................................. 14
Converting to free-arm sewing
............................................
.......
15
Machine setting chart
-------------------
----------
-
.....................
16 -17
Straight stitch
............................
-.........................................18-19
Securing seams
...................................................................
20
Inserting zippers and piping
..................................................
20
Adjusting thread tension
.....................................................
21
Needle, thread and fabric chart.............................................22
Zigzag stitch..............................................................................23
Satin stitch-----------------------------------------------------------------23
Blind stitch............................................................................... 24
Shell stitch.................................................................................25
Multi-stitch zigzag......................................................................26
Double-action stitch..........................-.........................................27
Faggoting..................................................................................27
Stretch stitch.........-
.............................................................
28-31
Triple straight stitch
..............................................................
28
RIc-rac stitch
........
.................................................................29
Stretch overlock stitch
...........................................................
29
Overlock stitch.......................................................................29
Feather stitch
........................................................................
30
Elastic overlock stitch............................................................30
Double overlock stitch
.........................................................
31
Herringbone stitch
------------------------------------------------------
31
Buttonhole making
..............................................................
32 - 34
Procedure............................................................................ 33
Corded buttonhole-------------------------------------------------------34
Caring for your machine —
.......................................................
35
Cleaning the feed dogs and hook area,
Changing light bulb
Check chart for performance problems
-------------------------------
36
CONTENIO
Identificación de la máquina.............—-
.................................
4 - 6
Preparación de la máquina
........
.................................................7
Control por pedal. Interruptor corriente/luz
Accesorios................................................................................. 8
Devanado de la canilla
.................
-
...........................................
- 9
Enhebrado del hilo de la canilla
---------------------
--------------------
10
Enhebrado del hilo superior
............
—
.......................................
11
Empleo del enhebrador aguja—
...............................................
12
Recogida del hilo de la canilla —
...........
-
..................................
13
Cambio del pie prénsatelas
...........
......................................
—14
Conversión para la costura con brazo
---------------------------------
15
Esquema de ajuste de la máquina......................................16 -17
Puntada recta---------------------------------------------------------- 18-19
Cómo fijar la costura
............................................................
20
Inserción de cremalleras y vivo —
........................................
20
Ajuste de la tensión del hilo superior....................................21
Tabla de hilo, aguja y material -
.................................
^
--------
22
Puntadas zig-zag -
...........................
.......................
—
..............
23
Puntada de relleno.............................................................. 23
Puntada Invisible................................................................... 24
Puntada de lencería................................................................— 25
Zig-zag de tres puntadas---------------------------------------------------26
Puntada de acción doble------------------------------------------------ 27
Fagoting (Diente de rata)
..........................................................
27
Puntada elásticas------------------------------------------------------28 - 31
Puntada recta triple----------------------------------------------------- 28
Puntada zig-zag a dos agujas----------------------------------------29
Puntada overlock elastica -
...................................................
29
Puntada overlock
..................................................................
29
Puntada pluma..................................................................... 30
Puntada overlock elastico
...................
-
.................................
30
Puntada overlock doble........................................................31
Puntada espiga.....................................................................31
Confección de ojales...........................................................32 - 34
Procedimiento -......................................................................33
Ojales con cordón
.................................................................
34
Cuide su maquina-----------------------------------------------------------35
Limpiar el área del transportador y la lanzadera,
Cambio de la bombilla
Cuadro de examen para los problemas de ejecución--------------36
3
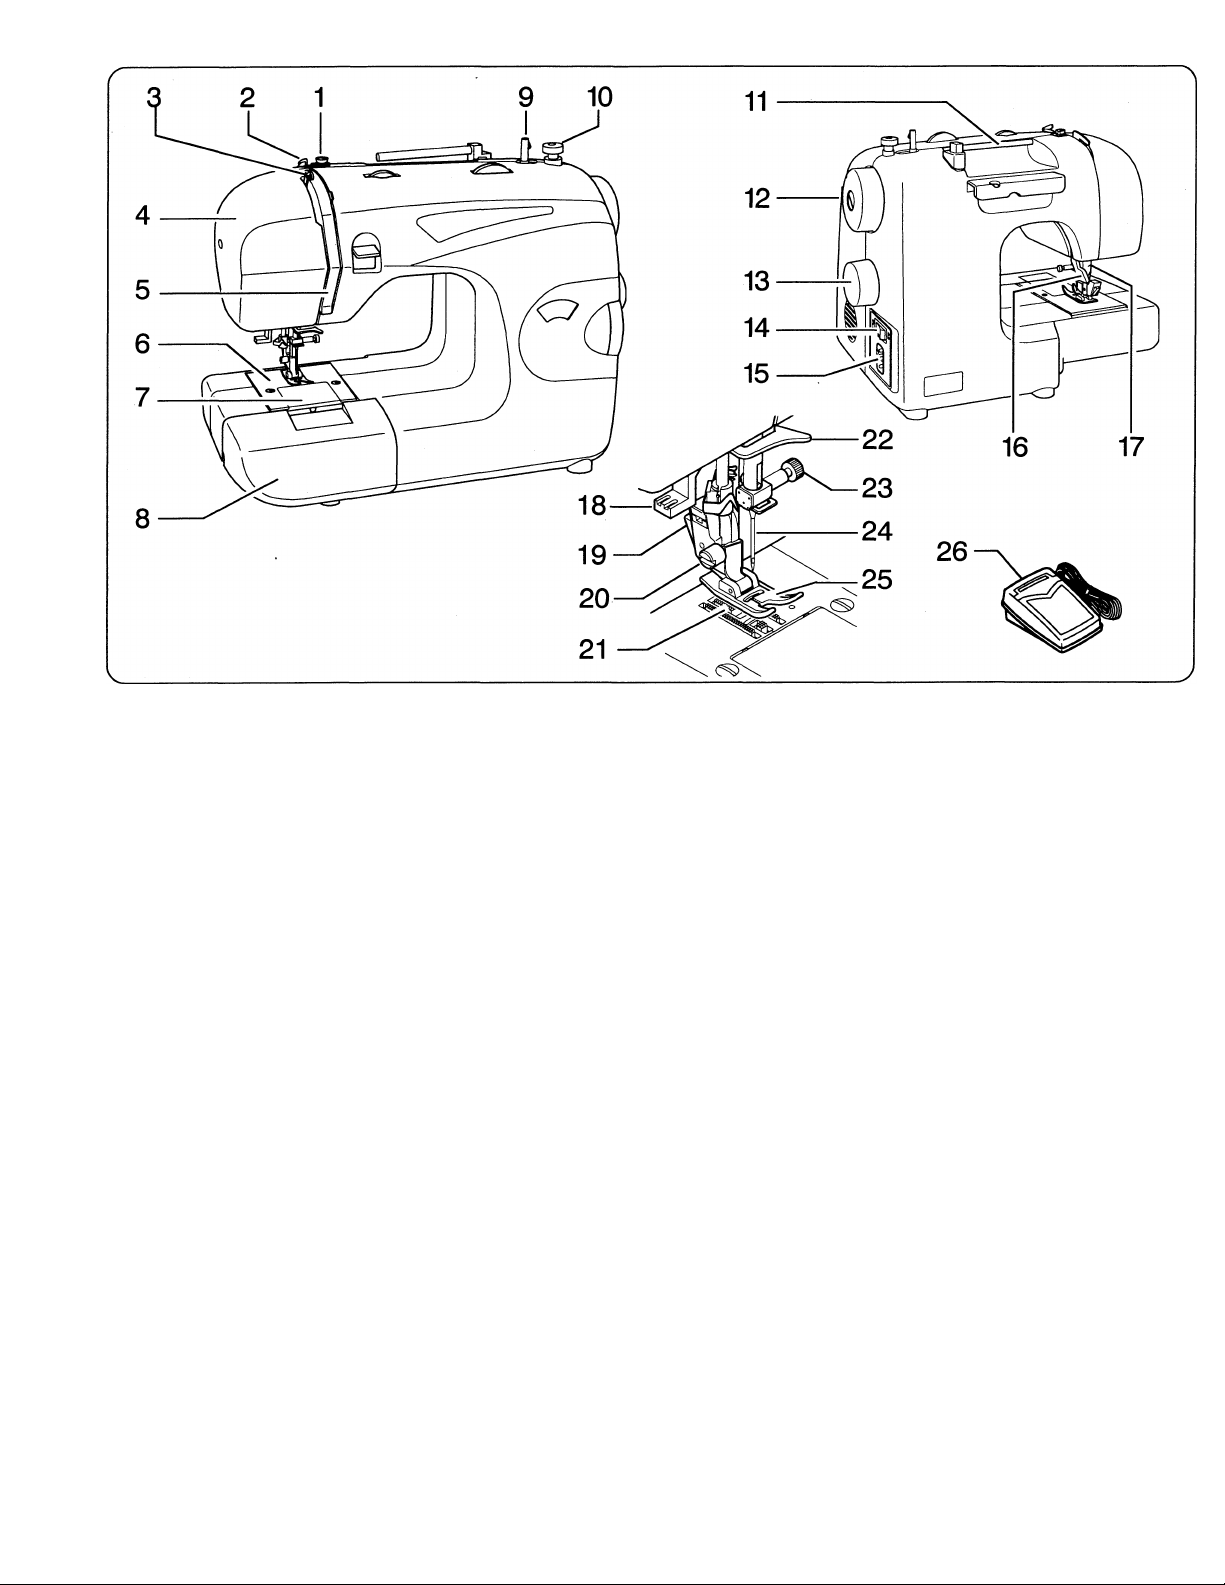
MACHINE IDENTIFICATION
1. Bobbin winder tension disc
8. Extensión table 15. Plug socket
22.
Thread guide
2. Thread guide
9. Bobbin winder shaft
16. Presser foot lever 23.
Needle clamp screw
3. Thread take-up
10. Bobbin winder stop 17. Thread cutter
24.
Needle
4. Face cover
11. Spool pin 18. Automatic needle threader
25.
Presser foot
5. Thread guide
12. Hand wheel 19. Foot release lever
26. Foot control
6. Needle plate
13. Stitch selector 20. Presser foot screw
7. Bobbin cover plate
14. Power/light switch
21. Feed dogs
IDENTIFICATION DE LA
MAQUINA
1. Disco tensor del devanador
7. Тара de canilla
14. Interruptor corriente/luz
20.
Tornillo pie prénsatelas
de canillas
8. Base de extensión
15. Enchufe del control por
21.
Transporte de dientes
2. Guía hilo
9. Eje devanador canilla
pedal
22.
Guía hilo
3. Tria-hilos
10. Tope devanador canilla
16. Palanca pie prénsatelas
23.
Tornillo de sujeción aguja
4. Cubierta frontal
11. Pasador carrete
17. Cortador de hilo
24.
Aguja
5. Guía hilo
12. Volante
18. Enhebrador aguja
25.
Pie prénsatelas
6. Plancha aguja
a
13. Selector de puntadas
19. Palanca de desprendimiento
prénsatelas
26. Transporte de dientes
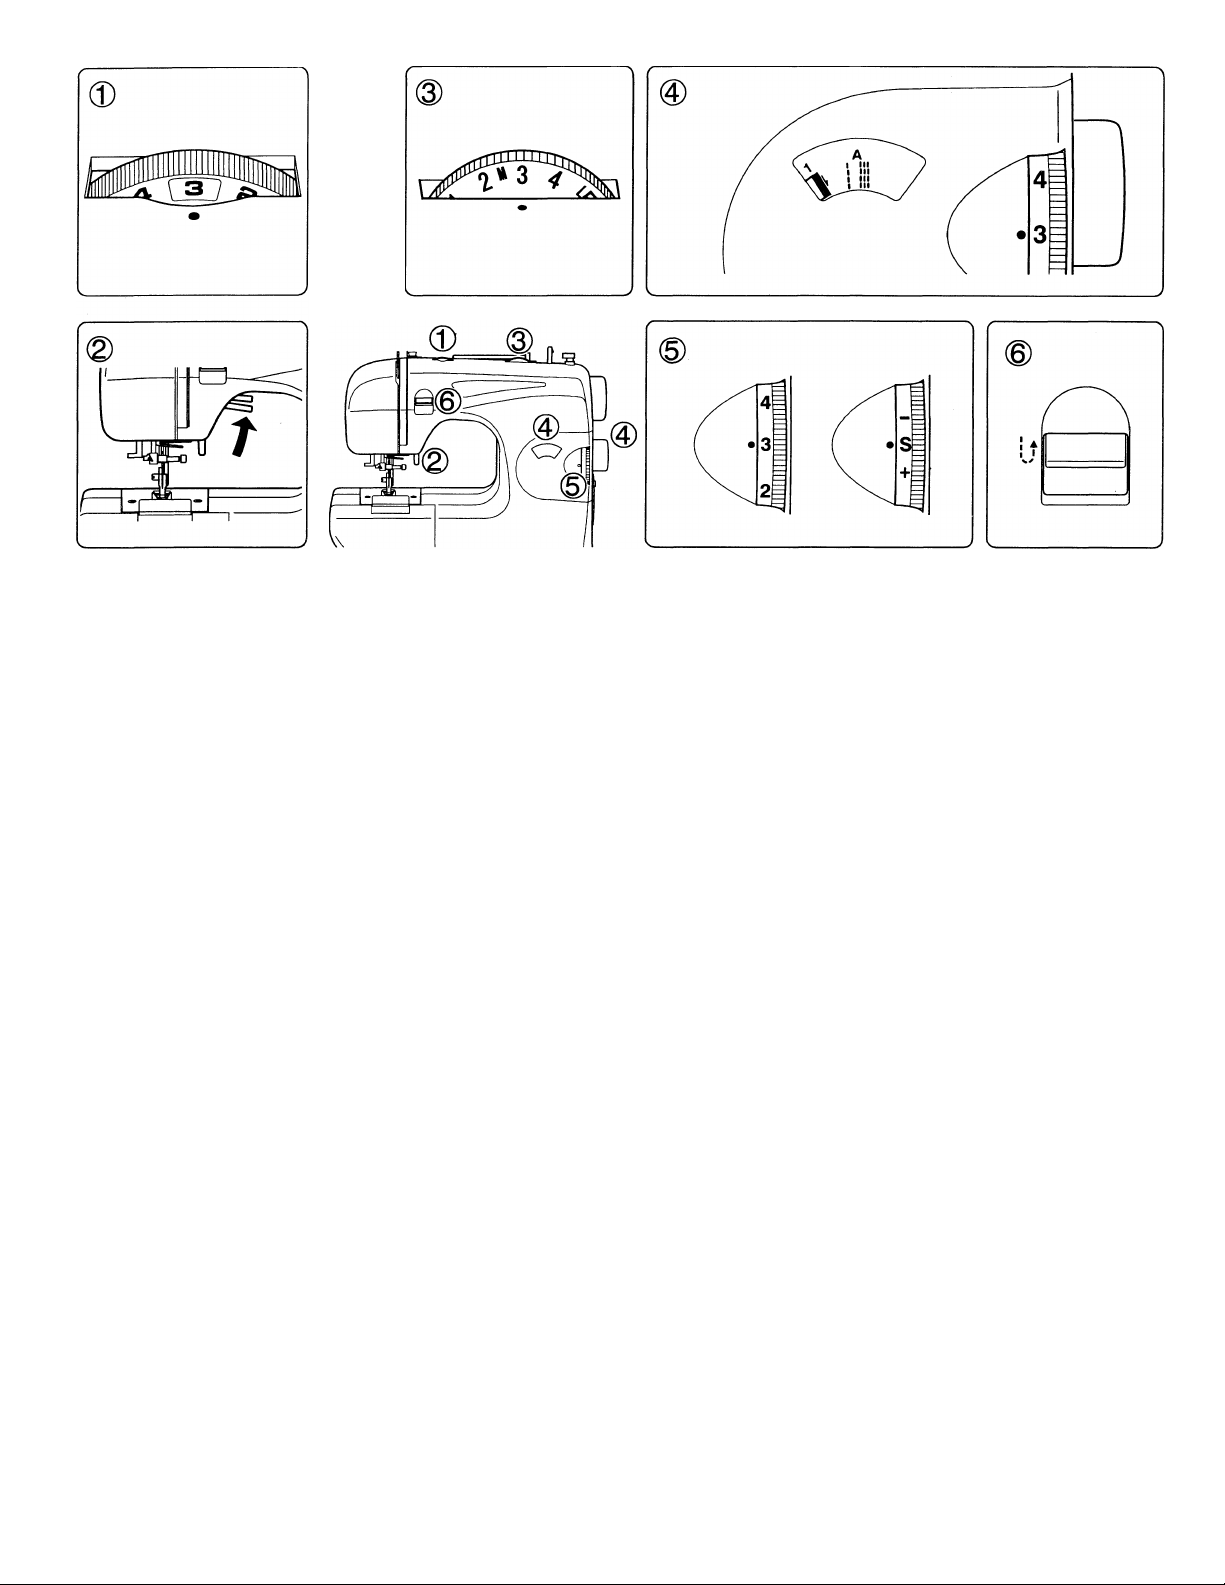
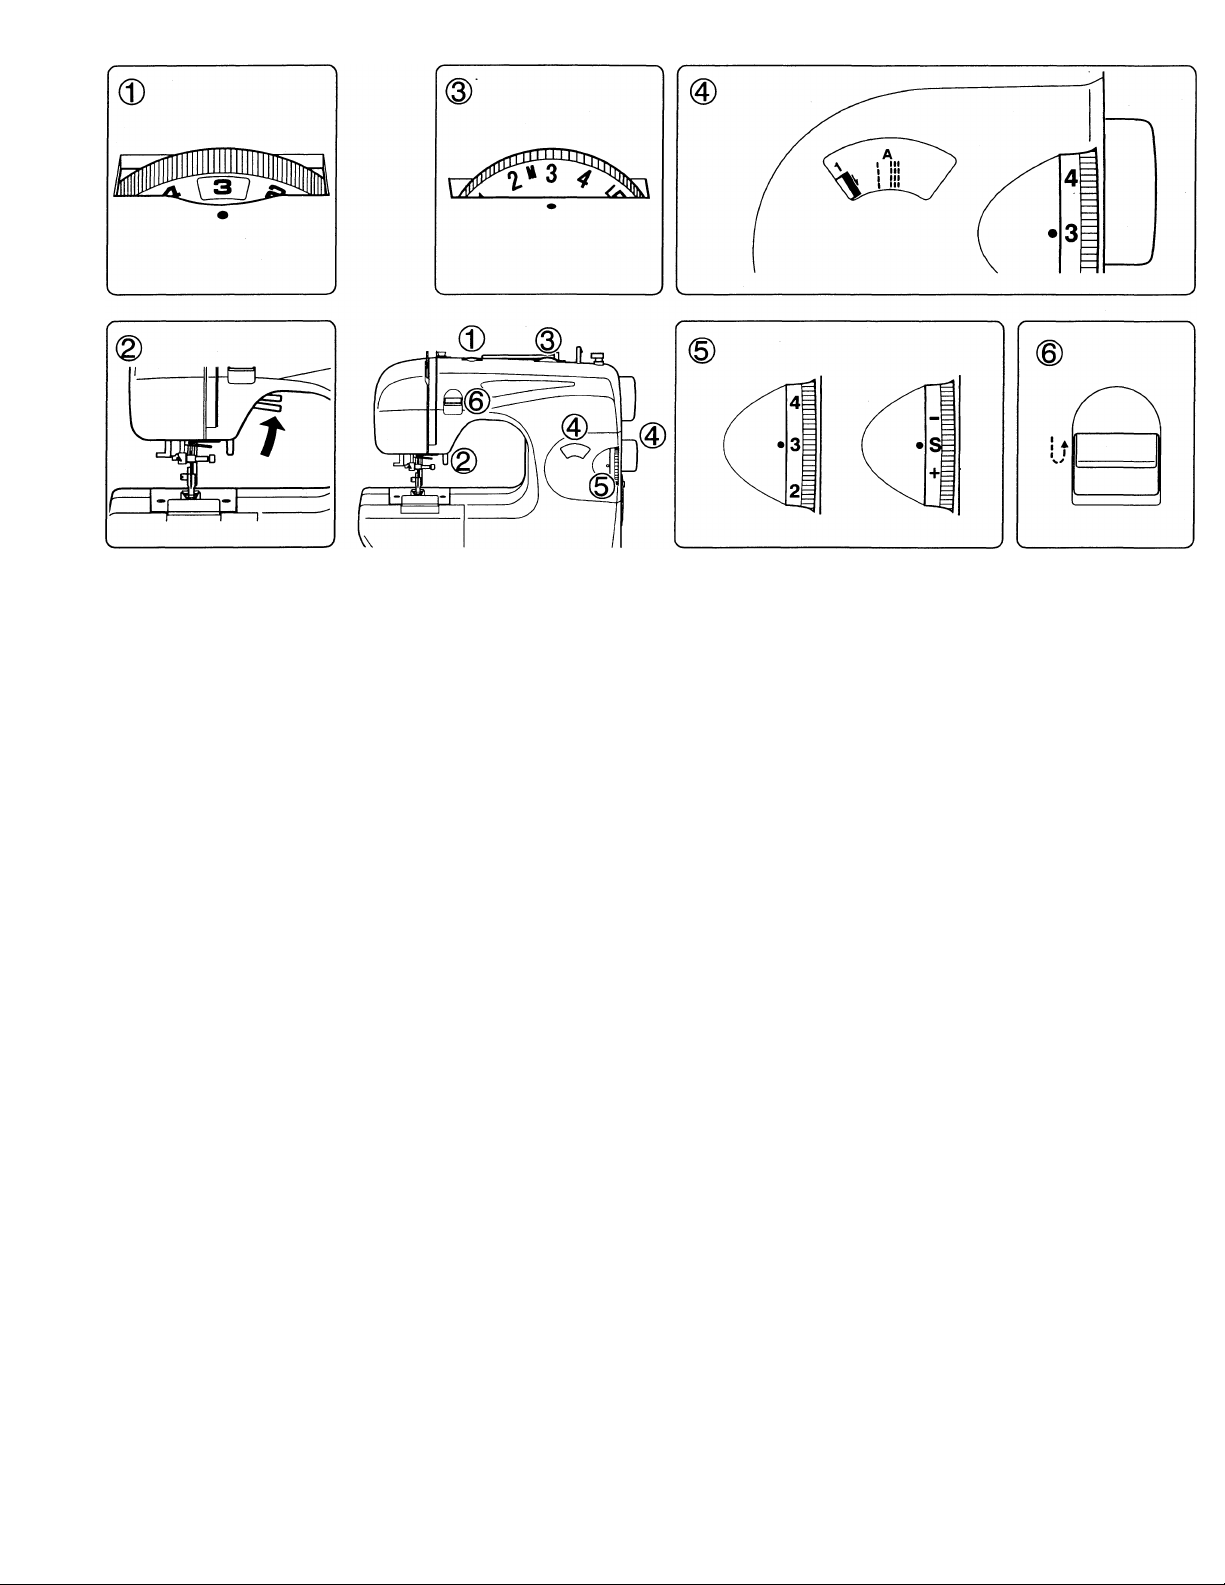
1- ADJUSTING TOP THREAD
TENSION
Decrease or increase the tension of the top
thread by using this control. The higher the
number, the tighter the tension.
2. PRESSER FOOT LEVER
There are three positions for your presser
foot.
1. Lower the presser foot to sew.
2. Raise the lever to the middle position
to insert or remove fabric.
3. Lift it to its highest position to change
the presser foot or to remove thick
fabric.
3. STITCH WIDTH/NEEDLE
POSITION CONTROL
The width of all the stitches produced on
this machine can be made narrower or
wider by adjusting the stitch width control.
When sewing straight stitching, you can
select one of three needle positions - left,
middle or right - with the same control dial.
4. STITCH SELECTOR AND
INDICATOR
1. To select a stitch, be sure needle is out
of fabric at its highest position.
2. Then turn the selector until the required
stitch is indicated on the indicator panel.
5. STITCH LENGTH/SUPER
(STRETCH) STITCH
CONTROL
Stitch length can be selected easily
according to thickness and type of fabric.
Super (stretch) stitch patterns can be
selected by turning the same dial to S mark
where fine adjustment can be made.
6. REVERSE STITCH LEVER
It is recommended to begin, or end seams
with several stitches in reverse for
reinforcement. As long as you are pressing
down this lever while sewing, the machine
will continue to feed the fabric backwards.
1. CONTROLADOR DE LA
TENSION DEL HILO SUPERIOR
Aumentar o disminuir la tensión del hilo
superior usando este controlador. Mayor es
el número, más apretada es la tensión.
2. PALANCA PIE PRENSATELAS
Su prénsatelas tiene tres posiciones.
1. Bajar el prénsatelas para coser.
2. Levantar la palanca a la posición media
para insertar o mover la tela.
3. Levantar a la posición más alta para
cambiar el prénsatelas o para mover el
material grueso.
3. SELECTOR ANCHO PUNTADA
En esta máquina puede regularse el ancho
de puntada ajustando el "selector ancho
puntada".
4. SELECTOR E INDICADOR DE
PUNTADAS
1. Para seleccionar una puntada asegurarse
que la aguja está fuera del tejido y en
su posición más alta.
2. Entonces girar el selector hasta que el
Indicador aparezca en la puntada
requerida.
5. CONTROL LARGO DE
PUNTADA Y PUNTADA
SUPER (ELASTICA)
El largo de puntada puede ser seleccionado
fácilmente de acuerdo con el tipo de
material y su grosor.
El grupo de puntadas super (elásticas)
pueden ser seleccionadas girando el
mismo dial hasta la marca S en donde se
podrá hacer un ajuste más fino.
6. PALANCA DE LA PUNTADA
DE RETROCESO
Al empezar o finalizar las costuras se
recomienda realizar diversas puntadas con
el retroceso para el refuerzo de la costura.
Mientras se está presionando hacia abajo
esta palanca durante la costura, la máquina
seguirá transportando hacia atrás el tejido.
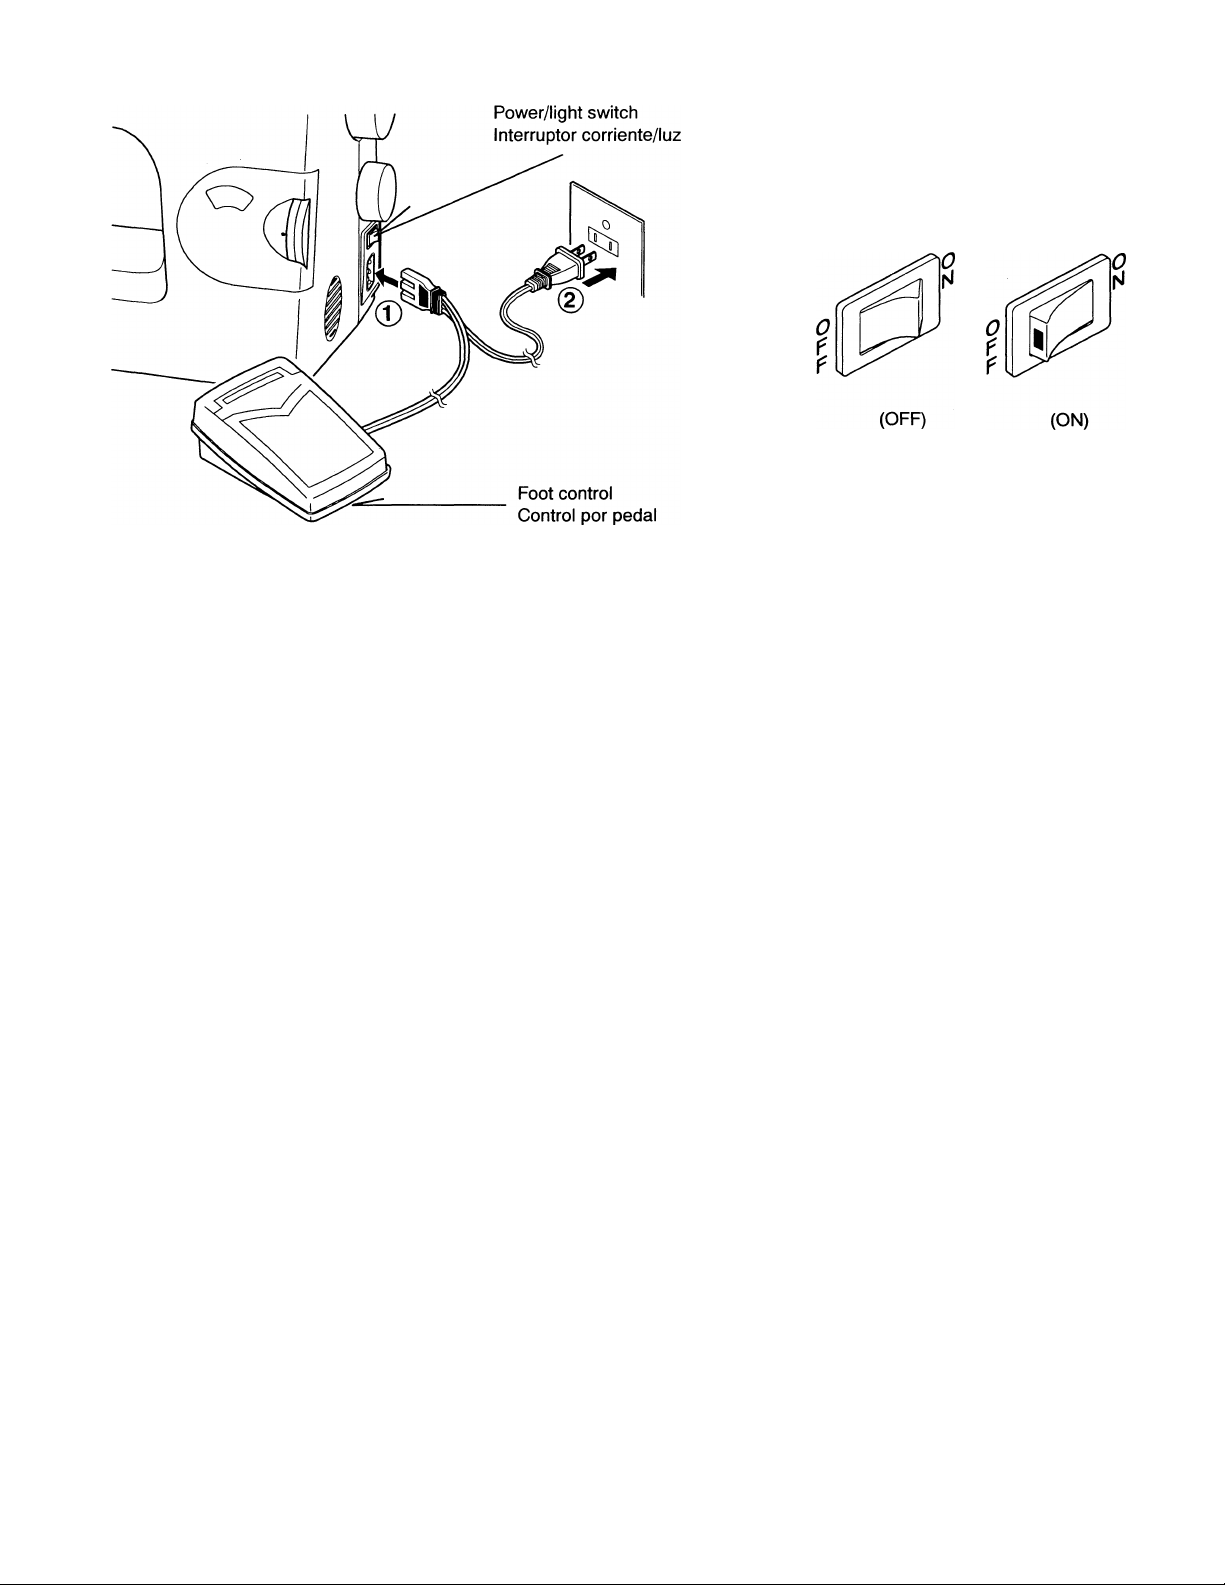
Power/light switch
Interruptor corriente/luz
SETTING UP YOUR MACHINE
Be sure to wipe off any surplus oil from needle plate area before using your machine the first time.
FOOT CONTROL POWER/LIGHT SWITCH
Connect the plug of the foot control Into the machine socket ® and Your machine will not operate until the power/light switch Is turned
your wall outlet (D as illustrated. on. The same switch controls both the power and the light.
When servicing the machine, or changing needles or lamps, etc.,
machine must be disconnected from the wall outlet.
PREPARACION DE LA MAQUINA
Asegurarse de limpiar cualquier aceite sobrante del área de la plancha de aguja, antes de usar, por primera vez, la máquina.
CONTROL POR PEDAL
Conecte el pedal a la máquina ® y el enchufe a la alimentación de
corriente (D tal como se ve en el dibujo.
INTERRUPTOR CORRIENTE/LUZ
La máquina no funcionará hasta que se conecte el interruptor de
corriente/luz. El mismo interruptor controla la corriente y la luz.
Cuando se está utilizando la máquina, o se están cambiando agujas
o bobinas, etc., la máquina se debe desconectar de los suministros
principales.
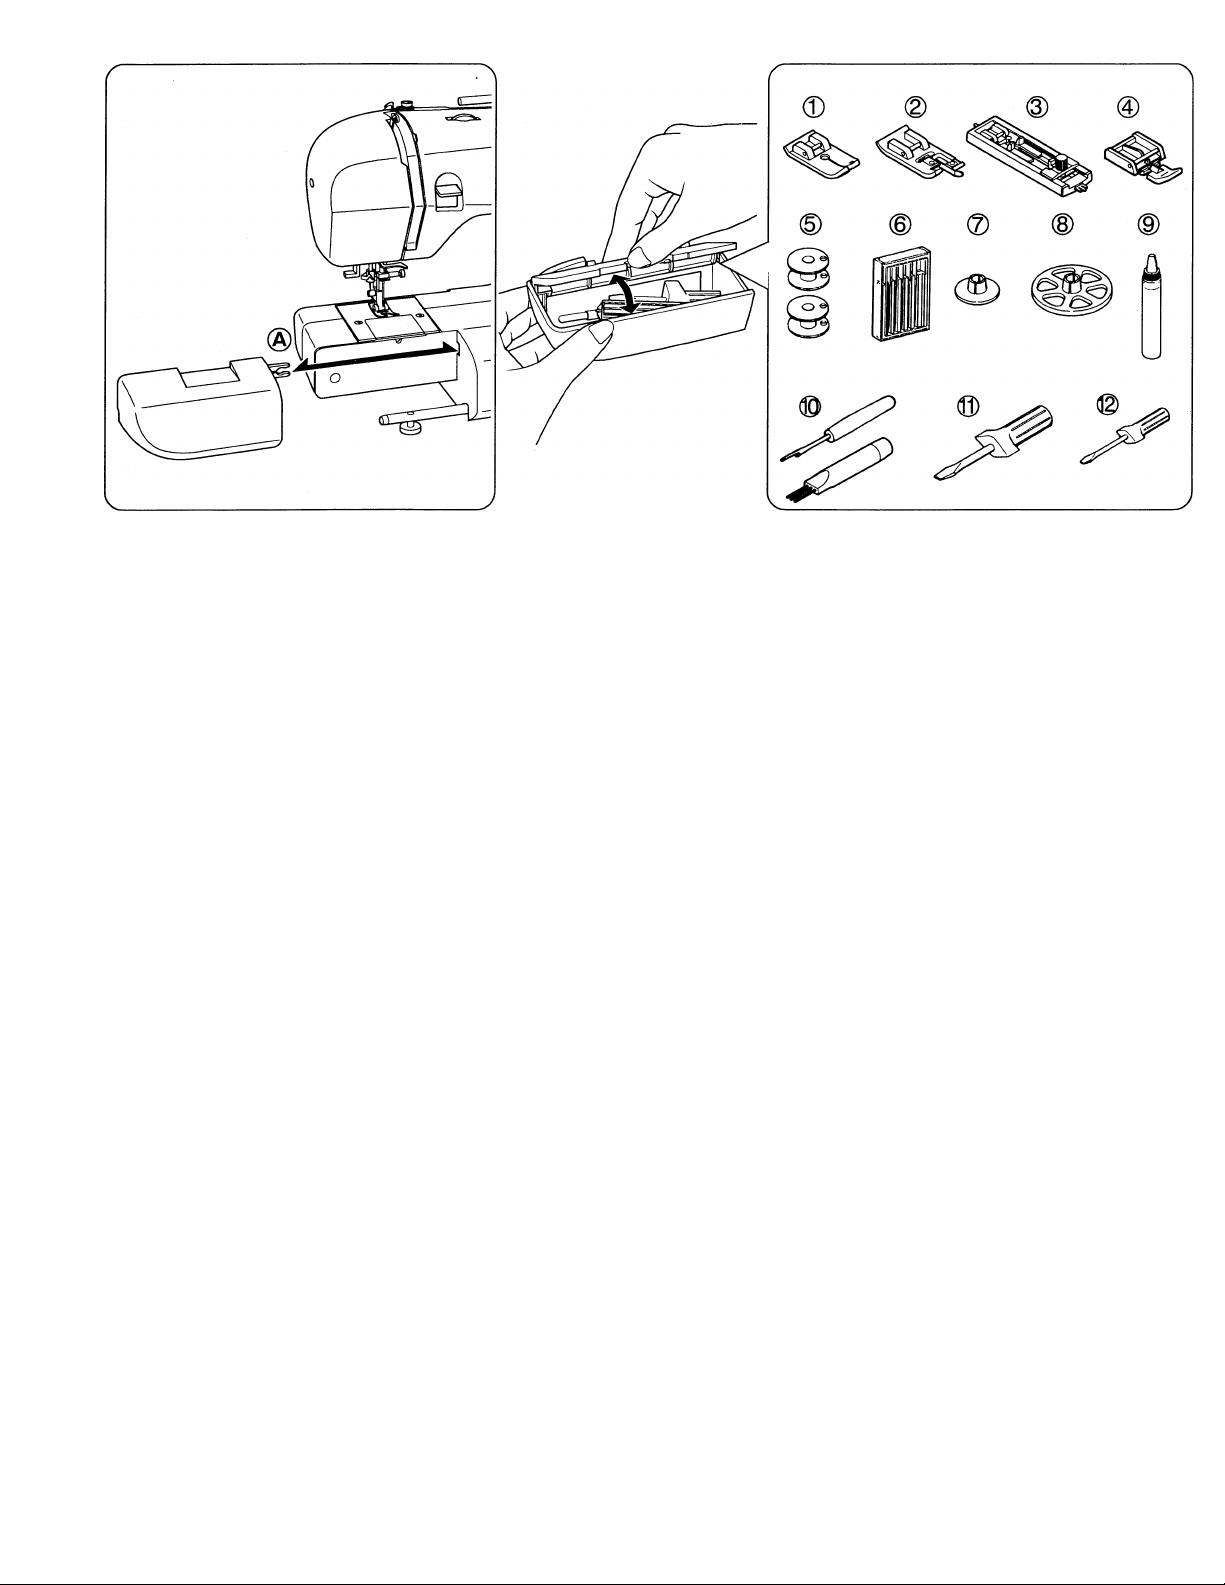
REMOVING THE EXTENSION TABLE/
ACCESSORY BOX
Remove the extension table by pulling it to the left.
To attach, slide the table back until the pin (§) fits into the
hole on the machine.
Open the accessory box by lifting the lid up and backward and you will find
a variety of accessories inside.
1. Straight stitch foot
2. Overcasting foot
3. Buttonhole foot
4. Zipper foot
5. Bobbins
6. Needles
7. Spool pin cap (small)
8. Spool pin cap (large)
9. Oiler
10. Buttonhole opener with brush
11. Screwdriver (large)
12. Screwdriver (small)
COMO QUITAR LA MESITA DE EXTENSION/ Abrir la caja de accesorios levantando la tapa, y encontrará varios
CAJA DE ACCESORIOS
Quitar la mesita de extensión tirándola a la izquierda.
accesorios en el interior.
1. Pata puntada recta 7.
Tapa del pasador carrete (pequeño)
Para fijar, deslizar la mesita a la posición hasta que el perno
2. Pata para overlocado
8.
Tapa del pasador carrete (grande)
@ se ajuste a los agujeros sobre la máquina.
3. Prénsatelas de ojales
9.
Lubrificador
4. Prénsatelas de cremalleras
10.
Abridor de ojales
5. Canillas
11.
Destornillador (grande)
6. Agujas
12.
Destornillador (pequeño)
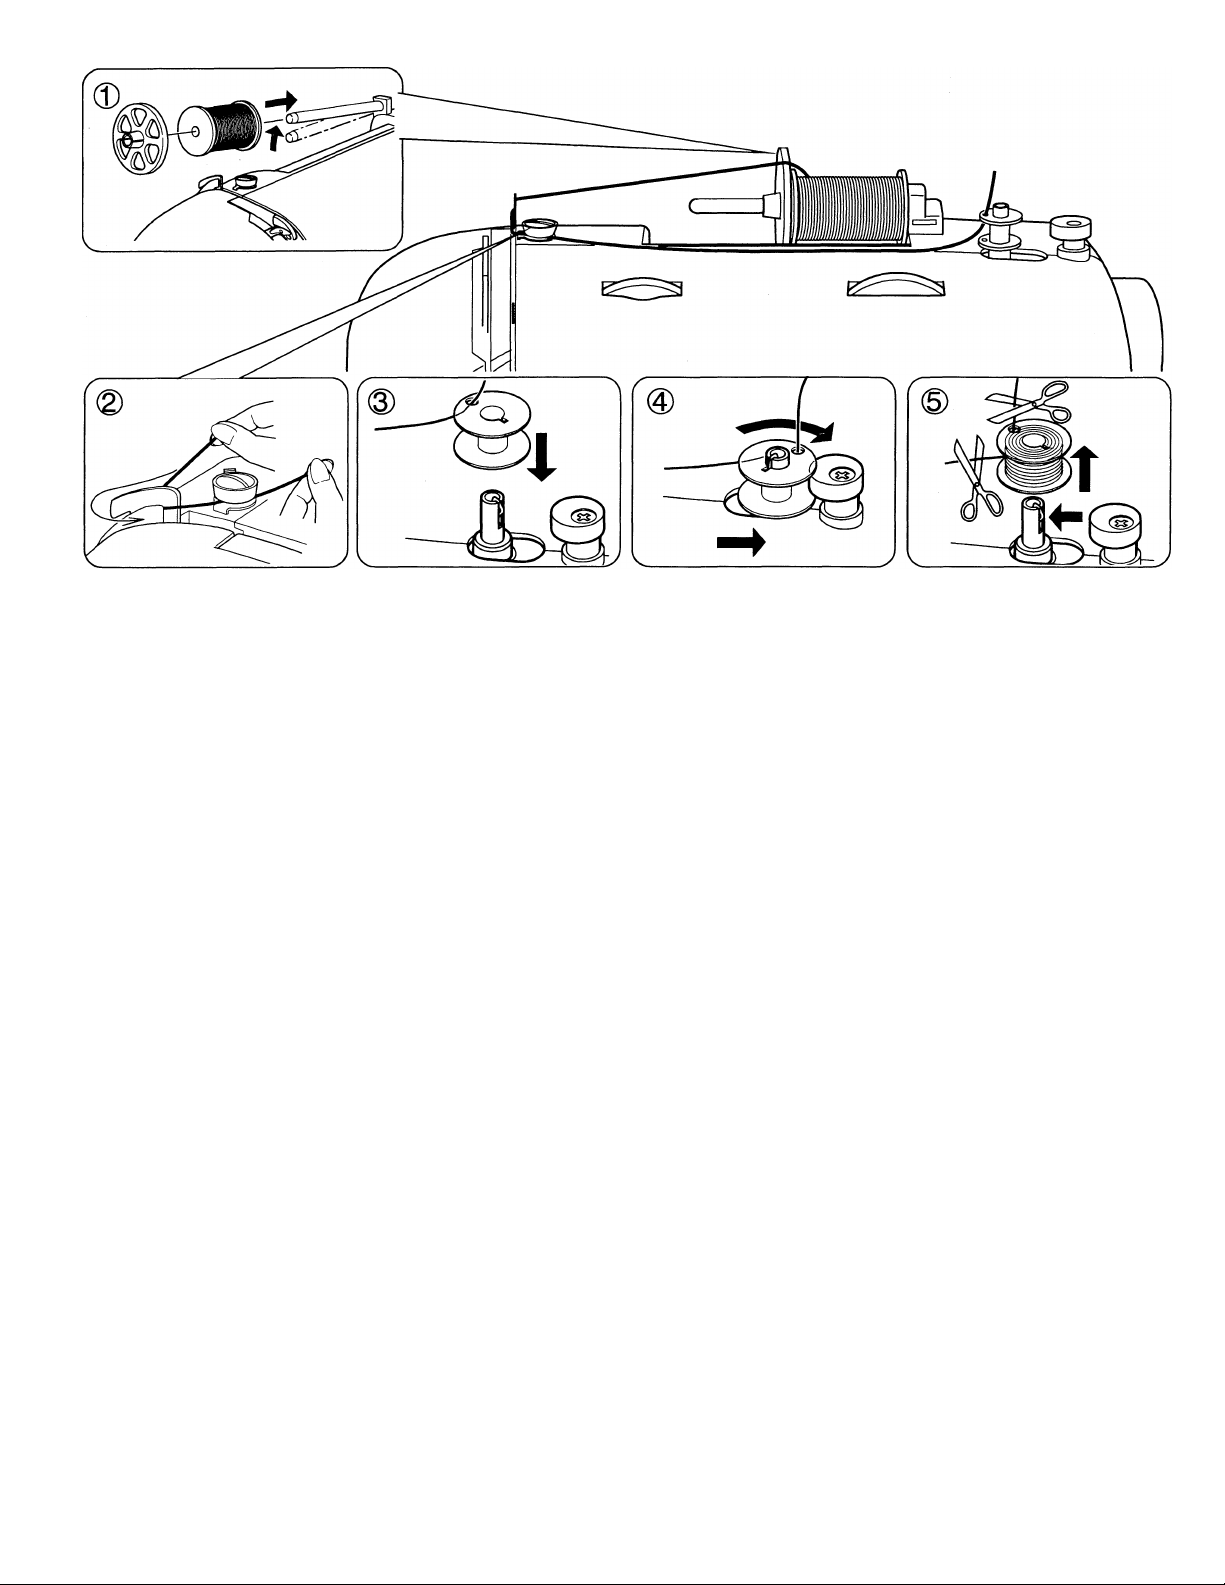
WINDING BOBBIN
1. Place a spool of thread on the spool pin. Secure it with the 4. Push bobbin winder shaft to far left position, if it is not already
there. Place bobbin onto shaft with end of thread conning from
top of bobbin. Push bobbin winder shaft to right until It clicks.
Hold onto end of thread.
spool cap to ensure smooth flow of thread.
2. Pass thread from spool through thread guides as shown.
3. Pull end of thread through hole in bobbin as shown.
5. Start machine. The thread that is held will snap or may be
trimmed with a scissors. Bobbin will cease turning when
completely filled. Push shaft to left to remove bobbin.
DEVANADO DE LA CANILLA
1. Colocar un carrete de hilo en el portacarretes. Asegurarlo con
la tapa portacarretes, para garantizar una salida suave del hilo.
2. Pasar el hilo desde el carrete, a través del guía hilo, tal como
está mostrado.
3. Estirar el extremo del hilo, a través del agujero en la canilla, tal
como está mostrado.
5.
Empujar el eje del devanador canilla hacia la posición maxima
izquierda, si no está ya ahi. Colocar la canilla en el eje, con el
extremo del hilo saliendo por la parte superior de la canilla.
Empujar hacia la derecha el eje del devanador, hasta que se
sienta un golpe seco. Retener el extremo del hilo.
Poner en marcha la máquina. El hilo que está retenido se
soltará. La canilla cesará de girar cuando se haya llenado por
completo. Empujar hacia la izquierda el eje para sacar la canilla.
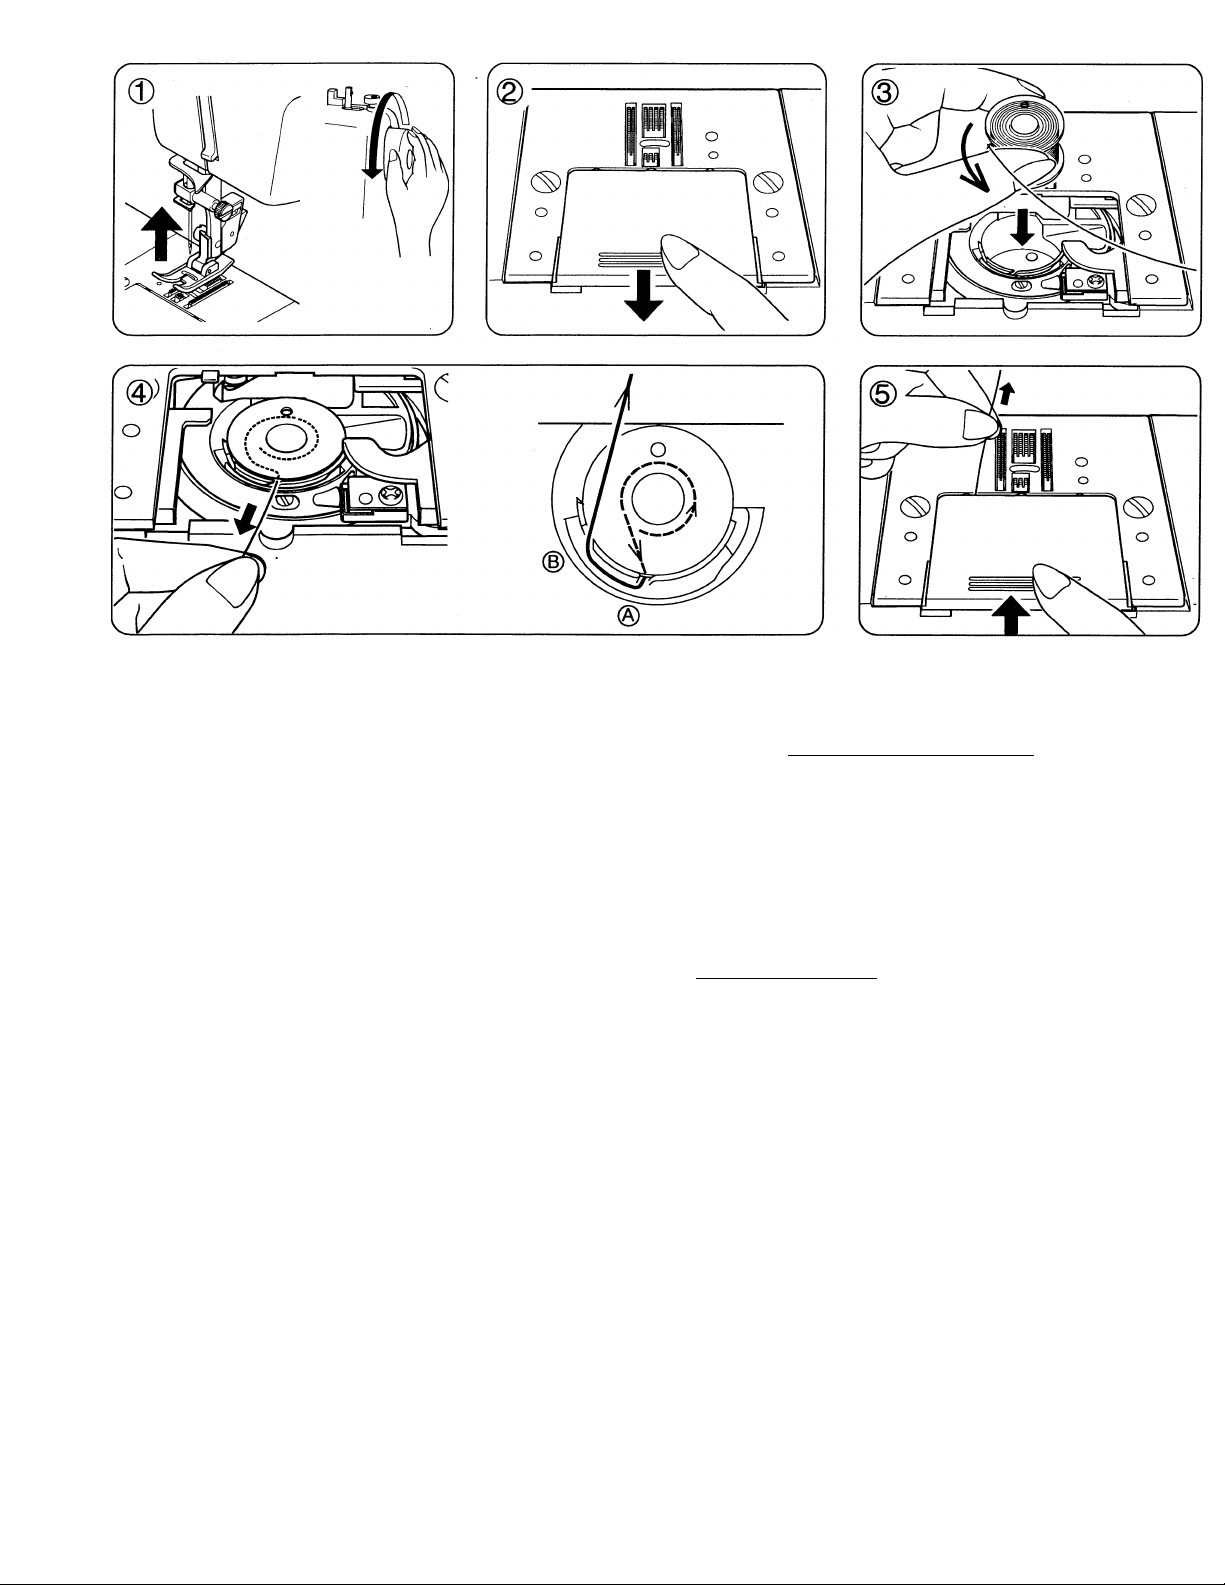
THREADING THE BOBBIN THREAD
1. Raise the needle to its highest position by rotating the hand
wheel towards you.
2. Remove the bobbin cover plate.
3. Insert the bobbin making sure the bobbin rotates counter
clockwise.
4. Pull thread through the slot @ and then to the left.
With a finger held gently on top of the bobbin, pull thread through
the slot (B) until you hear a clicking sound, and then leave about
6" (15 cm) of thread.
5. Replace the bobbin cover plate onto the needle plate.
ENHEBRADO DEL HILO DE LA CANILLA
1. Eleve la aguja hasta su posición más alta girando el volante
hacia Vd.
2. Abra la tapa de la canilla pulsando el botón de apertura que
hay a la derecha.
3. Coloque la bobina, asegurándose que gire en sentido contrario
a las agujas del reloj.
4. Lleve el hilo por la abertura (§) y después hacia la izquierda.
Mientras presiona la bobina pase el hilo por la abertura (B
hasta oir un chasquido y deje entonces unos 15 cm. de hilo.
5. Vuelva a cerrar la tapa.
TO
Loading...