

Page 1
SS 4028 TRAfi MAK‹NASI
KULLANMA KILAVUZU
TR
YIKANAB‹L‹R TASARIM
ISLAK&KURU
EN
FR
AR
HR
ES
RU
Page 2

G‹R‹fi
De¤erli Müflterimiz,
Ürün seçiminde S‹NBO'yu tercih etti¤iniz için teflekkür ederiz.
Uzun ve verimli bir kullan›m için cihaz› kullanmadan önce bu k›lavuzu
özellikle güvenlik talimatlar›na dikkat ederek okuman›z› ve devaml› suretle
saklaman›z› tavsiye ederiz.
Sayg›lar›m›zla,
Sinbo Küçük Ev Aletleri
This appliance is not intended for use by persons (including children) with reduced physical,
sensory or mental capabilities, or lack of experience and knowledge, unless they have
been given supervision or instruction concerning use of the appliances by a person
responsible for their safety. Children should be supervised to ensure that they do not play
with the appliance.
Bu ürün (çocuklar dahil ) fiziksel hassasiyeti az, zihinsel olarak yetersiz, deneyimsiz ve
yeterli bilgiye sahip olmadan yada kendilerinin güvenli¤inden sorumlu olan kifliler tarafından
bu ürünü kullanmak için gerekli talimatlar verilmemifl kiflilerin kullanımına uygun de¤ildir.
- 1 -
Page 3
C‹HAZIN TANITIMI • NAME OF PARTS • NOM DES PIÈCES
•
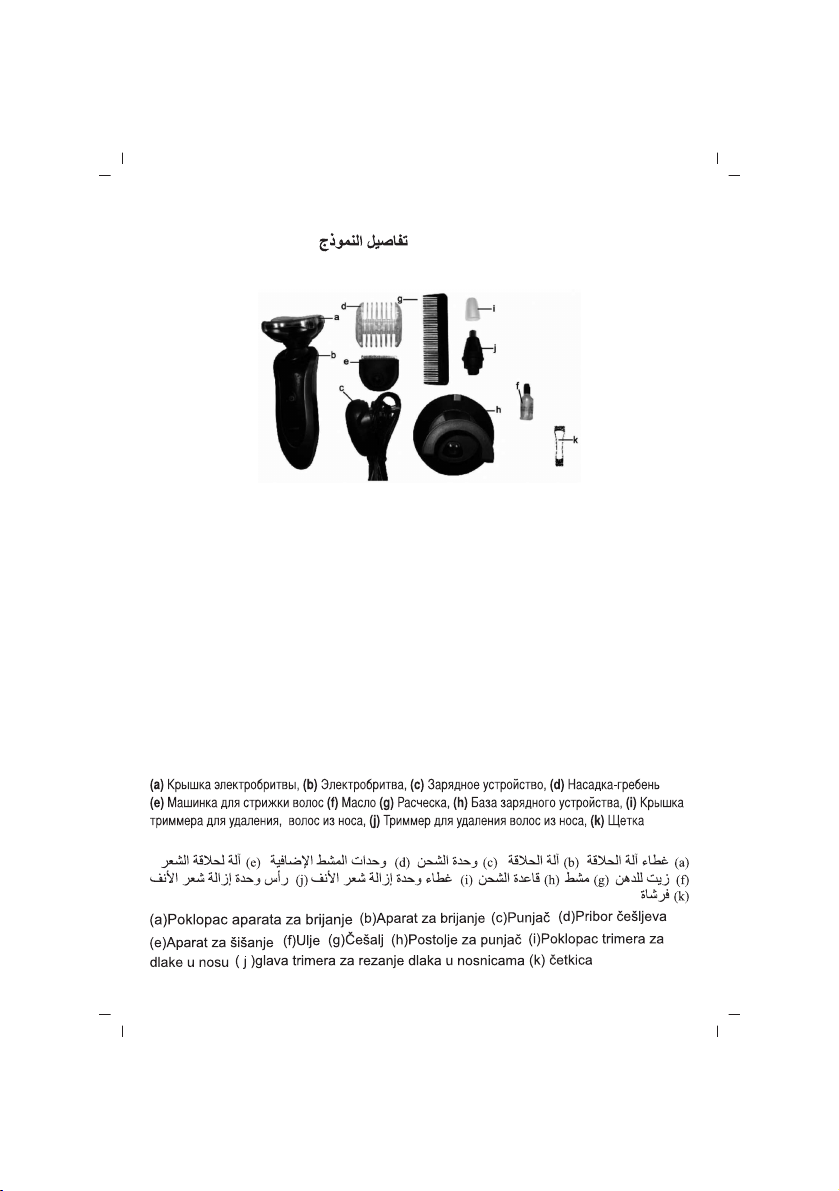
(a) T›rafl Makinesi Kapa¤›, (b) Ana Ünite, (c) fiarj Adaptörü, (d) Tarak Aksesuarlar›, (e)
Saç Kesim Aparatı, (f) Bakım Ya¤ı, (g) Tarak, (h) fiarj Standı, (i) Burun Tüyü Kesici
Kapa¤ı, (j) Burun Tüyü Kesici Aparatı (k) Temizleme F›rça
(a) Shaver Cover, (b) Shaver, (c) Charger, (d) Comb Accssories ,(e) Hair Clipper
(f) Lube, (g) Comb, (h) Charging Pedestal, (i) Nose Trimmer Cover, (j) Nose Trimmer
Head, (k) Brush
(a) Couvercle De Rasoir, (b) Rasoir, (c) Charge, (d) Accessoires De Peigne
(e) Machine Tondeuse, (f) Huile, (g) Peigne, (h) Support De Charge, (i) Clapet Coupe-
Poils Du Nez (j) Tête Pour Trancher Les Poils Du Nez, (k) Brosse
(a) Tapa de la máquina de afeitar, (b) Máquina de afeitar, (c) Carga, (d) Accesorios de
peine, (e) Máquina de cortar el pelo, (f) Aceite, (g) Peine, (h) Base de carga, (i) Tapa del
cortador de pelos de nariz, (j) Cabeza de cortador de pelos de nariz, (k) Cepillo
• OPIS APARATA
- 2 -
Page 4
TEKN‹K ÖZELL‹KLER • TECHNICAL SPECIFICATION • DONNEES TECHNIQUES
• Tehniˇcki Podaci
INPUT:230V/50Hz • OUTPUT: DC 2.4V / 3W
Bu cihaz kalite belgesine haizdir.
EN 55014-1, EN 55014-2
Kullanım Ömrü 7 yıldır.
Made in P.R.C.
D‹KKAT!!
Ürünün üzerinde bulunan iflaretlemelerde veya ürünle verilen di¤er bas›l› dökümanlarda
beyan edilen de¤erler, ilgili standartlara göre laboratuar ortam›nda elde edilen
de¤erlerdir.Bu de¤erler, ürünün kullan›m ve ortam flartlar›na göre de¤iflebilir.
Aksesuarlar
Afla¤›daki aksesuarlar ürün ile birlikte verilir:
fiarj aleti;F›rça;bez çanta.
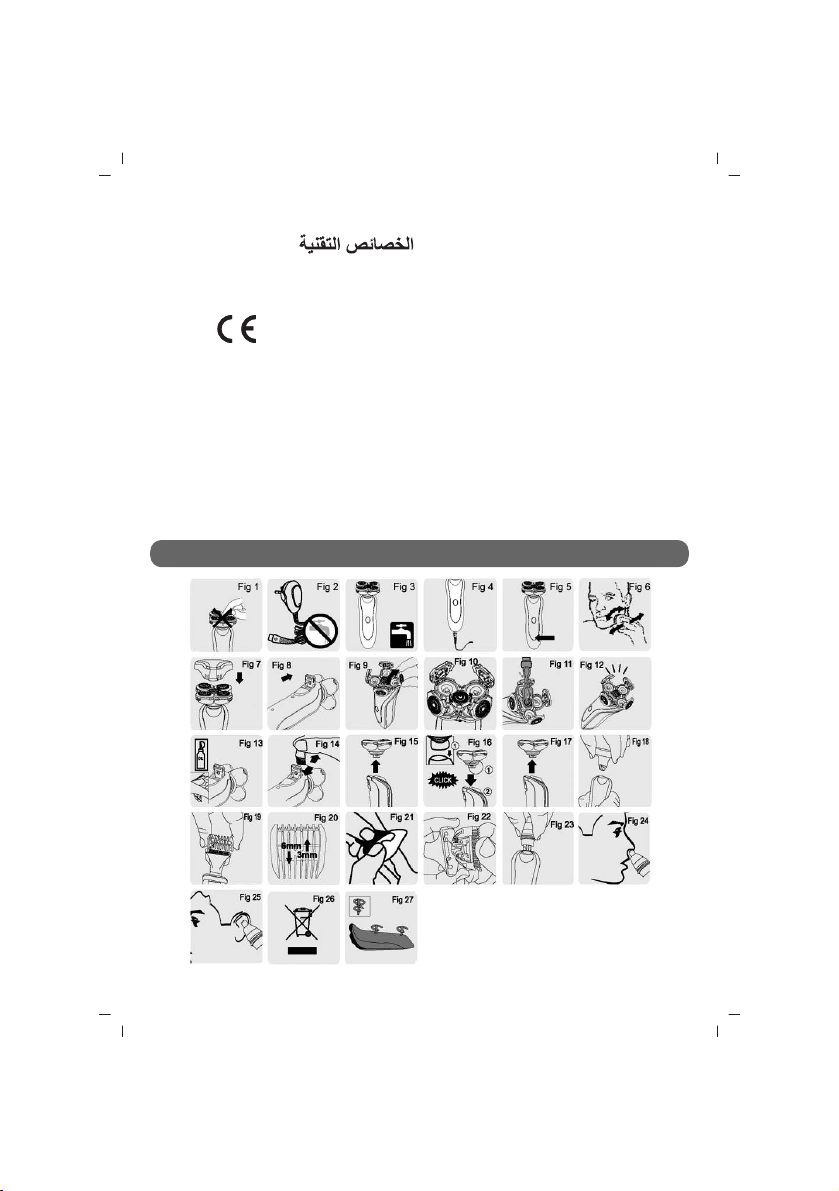
Figürler
- 3 -
Page 5
ÖNEML‹ GÜVENL‹K UYARILARI
Ürünü kullanmadan önce,lütfen kullan›m talimatlar›n› dikkatlice okuyunuz
ve ileride yararlanmak üzere saklay›n›z.
1. Sadece dahil olan flarj kullan›lmal›d›r.
2. fiarj 230V'u güvenli olan 24V’un alt›na dönüfltürebilir.
3. fiarj›n içersinde bulunan çevirici ç›kar›lmamal› ya da baflka bir priz ile
de¤ifltirilmemelidir; aksi takdirde, ciddi sonuçlara sebep verebilir.
4. E¤er flarj hasara u¤rarsa, tehlikeyi önlemek için orijinaliyle de¤ifltirilmelidir
5. D›fl b›çak çok ince alafl›mdan yap›lm›flt›r K›r›lmalar› önlemek için,lütfen
ellinizle bast›rmay›n›z (fiekil-1)
6. Ürün flarj› ve saklama için s›cakl›k 5˚C - 35˚C aral›¤›nda olmal›d›r.
7. fiarj›n ›slanmamas›na dikkat edin(fiekil-2)
8. T›rafl makinesini suda y›kmadan önce flarj›n› ç›kar›n. S›cak su kullan›m›na
dikkat edin Ellerinize zarar gelmemesi için suyun çok s›cak olup olmad›¤›n›
kontrol etmeyi unutmay›n
9. Su geçirmez tabakal› IPX4.sadece t›rafl makinesi bafll›¤› y›kanabilir ve
gövde k›sm› su ile ›slat›lmamal›d›r.
10. Bu ürün,fiziksel engelli,duygusal veya zihinsel olarak rahats›z veya
tecrübesiz kifliler (çocuklar dahil olmak üzere) taraf›ndan kullan›lmamal›d›r.
E¤er güvenliklerinden sorumlu kiflilerin denetimi veya talimat› alt›nda
de¤illerse
Çocuklar› bu üründen uzak tutunuz.
12. E¤er t›rafl makinesi dü¤meye bas›ld›ktan sonra çal›flmazsa için sakallardan
temizleyin.
13. T›rafl makinesi flarj olurken,gösterge ›fl›¤› kapal›d›r fiarj ederken kapamak
için dü¤mesine tekrar bas›n.
14. Seyahat ederken,t›rafl makinesinin bafll›¤›n›n korunmas› için,koruyucu
kaplama ile örtülmesi gereklidir.
fiARJ ETME
fiarj etmeden önce ürünün kapal› durumda oldu¤undan emin olun fiarj ifllemi
yaklafl›k 16 saat sürer. Tamamen flarj ettikten sonra 30 dakika süreyle
kullanabilirsiniz
Ürünün güç kayna¤›na 24 saatten fazla ba¤l› kalmamas› ürün aç›s›ndan daha
iyidir. Alternatif ak›m ile ba¤lanamaz
- 4 -
Page 6
fiARJ ETME
1. Ürün flarj›n› t›rafl makinesine yerlefltirin (fiekil 4)
2. fiarj aletini prize tak›n
3. fiarj göstergesi yanacakt›r.
4. fiarj ifllemi bittikten sonra, flarj aletini prizden ç›kar›n ve ayr›ca ürünün
fiflini flarj makinesinden ç›kar›n
5. fiarj etme altl›¤› ile flarj olabilir.
ÜRÜNÜN KULLANIMI
Trafl Olma
1.T›rafl makinesini çal›flt›rmak için AÇMA/KAPAMA(ON/OFF) dü¤mesine bas›n
2. T›rafl makinesi bafll›¤›n› cildinizde düz çizgiler ve daireler çizerek h›zl›ca
hareket ettirin
3. Hasar› engellemek için her t›rafltan sonra t›rafl makinesi koruyucu kapa¤›n›
kullan›n (fiekil 7)
Düzeltme
fiakak tüylerinizi ve b›y›klar›n›z› keserek düzeltmeniz için kullan›l›r
1. T›rafl makinesi gibi açabilece¤iniz saç kesim makinesini açmak için kaygan
yüzeyi yukar› do¤ru itin.(fiekil 8) Etkili bir t›rafl elde etmek istiyorsan›z,t›rafl
makinesini düzenli olarak temizleyin Ürünü temizlemenin en kolay ve temiz
yolu,t›rafl makinesi bafll›¤›n› ve tüy haznesini her kullan›mdan sonra su ile
y›kamakt›r.
S›cak su kullan›m›na dikkat edin
Ellerinize zarar gelmemesi için suyun çok s›cak olup olmad›¤›n› kontrol
etmeyi unutmay›n
1. T›rafl makinesini durdurun (fiekil 9)
2. Dört t›rafl bafll›¤›n› yüzeyden teker teker ç›kar›n ve orta gövdeyi üzerinde
gösterildi¤i gibi ok yönünde döndürün ve ç›kar›n.
3. Befl t›rafl bafll›kl› parçay› ve tüy haznesini bazen s›cak su ile y›kay›n (fiekil
10) T›rafl bafll›¤› ve tüy haznesinin tamamen temizlendi¤inden emin olun.
4. Ürün yüzeyini y›kay›n (fiekil 11)
5. T›rafl bafll›k k›sm›n› kapat›n ve su art›klar›n› temizleyin.
T›rafl bafll›¤›n› havlu ya da ka¤›t havlu ile kurutmay›n,bu t›rafl bafll›¤›na zarar
verebilir
- 5 -
Page 7

ÜRÜNÜN KULLANIMI
6. T›rafl bafll›¤›n› aç›n ve kurumas› için öyle b›rak›n (fiekil 12)
Tüy haznesini temizlemek için içerikte olan f›rçay› da kullanabilirsiniz Bunu
su kullanmayarak yap›n
Kesici
Kesiciyi her kullan›mdan sonra temizleyin
1. T›rafl makinesinin güç kayna¤›n› kapat›n,flarj aletini fiflten çekin ve ürünün
fiflini t›rafl makinesinden ç›kar›n
2. ‹çerikte olan f›rça ile kesiciyi temizleyin (fiekil 13)
3. Kesici diflini her alt› ayda bir makine ya¤› ile ya¤lay›n (fiekil 14)
De¤iflim
En iyi t›rafl etkisini elde etmek için t›rafl makinesi bafll›¤›n› y›lda bir kez
de¤ifltirin T›rafl makinesi kullan›c› zararlar›na maruz kalmaz ise kullan›m›
uzun ömürlü olur.
Hasarl› ve afl›nm›fl t›rafl bafll›klar› sadece bu ürüne ait t›rafl bafll›¤› ile
de¤ifltirilebilir.
1. Eski t›rafl bafll›¤›n› t›rafl makinesinden ç›kar›n (fiekil 15)
2. Yeni t›rafl b›ça¤› bafll›¤›n›,t›rafl makinesinin üst k›sm›ndaki birleflme
yüzeyinden yerlefltirin (1) ve t›rafl makinesine birlefltirmek için t›rafl bafll›¤›
üzerine bast›r›n (t›k sesi duyulacakt›r) (fiekil 16)
Saç Kesim Makinesi Kullan›m›
T›rafl makinesini kapat›n,t›rafl bafll›¤›n› ç›kar›n,saç kesim makinesinin birleflme
yüzeyini t›rafl makinesinin üzerine yerlefltirin.Daha sonra t›rafl makinesi
gövdesine oturmas› içi saç kesim makinesi bafll›¤›na bast›r›n (“kaca” gibi bir
ses duyulur)
Kesim
NOT: Saç›n›z›n temiz ve kuru oldu¤undan emin olun Ürünü ›slak saç ile
kullanmay›n
1. Saç kesiminden önce saç›n›z› uzama yönüne do¤ru taray›n.
2. Tarak aksesuarlar›n› deli¤in iki taraf›na yerlefltirin,kaca gibi bir ses
duyulacak,tarak aksesuarlar›n›n her iki tarafa da do¤ru flekilde
- 6 -
Page 8
ÜRÜNÜN KULLANIMI
yerlefltirildi¤inden emin olun. (fiekil 19)
3. Tarak aksesuarlar›n›n de¤iflik uzunluklarda saç kesimi için “3mm” ve
“6mm” olmak üzere iki uzunlu¤u vard›r.Tarak aksesuarlar› yönünün uzunlu¤a
göre nas›l de¤ifltirilece¤i afla¤›da belirtilmifltir (fiekil 20) Tarak aksesuarlar›n›
bir taraftaki delikten di¤erine koyun (fiekil 21)
4. Çal›flt›rma dü¤mesine bas›n,ve saç üzerinde yavaflça kullan›n ‹yi bir kesim
için,ürünü saç›n uzama yönünden farkl› yönlerde kullan›n.
TEM‹ZL‹K VE BAKIM
1. Saç kesim bafll›¤›n› ç›kar›n,bafll›¤› temzilemek için f›rça kullan›n ya da
y›kay›n.
2. Ürünü y›kamak için afl›nd›r›c› madde,alkol,gazolin veya aseton v.s gibi
s›v›lar kesinlikle kullanmay›n
3. Ürünün bir kere kulland›ktan sonra hemen y›kamal›s›n›z.
4. En iyi kesim ve kullan›m için,her üç ayda bir ya¤lay›n.
Tarak difllisini ay›r›n,ve ya¤› tarak difllisine uygulay›n. Daha sonra,tarak
difllisini tekrar tak›n (fiekil 22)
BURUN KES‹M MAK‹NES‹ KULLANIMI
T›rafl makinesini kapat›n,t›rafl bafll›¤›n› ç›kar›n,burun kesim makinesinin
birleflme yüzeyini t›rafl makinesinin üzerine yerlefltirin.Daha sonra t›rafl
makinesi gövdesine oturmas› içi burun kesim makinesi bafll›¤›na bast›r›n
(“kanca” gibi bir ses duyulur)
Burun Tüyü Kesme
1. Burnunuzun temiz oldu¤undan emin olun
2. Açma dü¤mesine bas›n,burun kesiciyi burnunuzun içine do¤ru koyun,uzun
burun tüylerini kesmek için burun kesiciyi çevirin (fiekil 24)
Burun kesiciyi 0.5cm’den fazla burnunuzun içine sokmay›n.
Kafl›nmay› azaltmak için,burun kesici ucunun bir taraf›n› cildinize yak›n tutun.
Kulak Tüyü Kesme
1. Kulak d›fl›n› temizleyin,kulak kiri olmad›¤›ndan emin olun.
2. Açma dü¤mesine bas›n,uzun kulak tüylerini kesmek için kesici ucu
- 7 -
Page 9
BURUN KES‹M MAK‹NES‹ KULLANIMI
kula¤›n›za do¤ru döndürün
3. Kesici ucu kulak kepçenizin d›fl›na do¤ru yavaflça koyun. fiekil (25)
Kesiciyi kulak içinize 0.5 cm’den fazla yaklaflt›rmay›n.Aksi takdirde kulak
zar›n›z zarar görebilir.
SATIfi SONRASI SERV‹S
Bu cihaz kullan›c› taraf›ndan de¤ifltirilebilen parçalara sahip de¤ildir. Ünitenin
çal›flmamas› durumunda flu ad›mlar› izleyin.
1. Talimatlar›n do¤ru biçimde izlendi¤ini denetleyin.
2. Ana kayna¤›nda ifllevselli¤ini denetleyin.
Cihaz hâlâ çal›flm›yorsa, sat›n ald›¤›n›z yere geri götürün.
Güç kablosu hasar örmüflse, tehlikeleri önlemek için, cihaz üreticisine iade
edilmelidir.
Kendi kendinize tamir etmeye KALKIfiMAYIN.
fiu talimatlar› izleyin:
1. Dikkatlice, tercihen orijinal kutusuna paketleyin.
Ünitenin temiz oldu¤undan emin olun.
2. Tüm yaz›flmalarda, ad›n›z›, adresinizi ve ürünün model numaras›n› belirtin.
3. ‹ade etme nedeninizi belirtin.
4. Garanti kapsam›ndaysa, nereden, ne zaman al›nd›¤›n› belirtin ve sat›n alma
kan›t›n› ekleyin (örn. kasa fifli).
TAfiIRKEN
• Ürünü düflürmeyiniz,
• Darbelere maruz kalmamas›n› sa¤lay›n›z,
• S›k›flmamas›n›, ezilmemesini sa¤lay›n›z,
• Ambalaj üzerindeki iflaretlemelere uyunuz.
ÇEVRE DOSTU ELDEN ÇIKARMA
Çevre korumas›na siz de katk›da bulunabilirsiniz!
Lütfen yerel düzenlemelere uymay› unutmay›n: Çal›flmayan
elektrikli cihazlar›, uygun elden ç›karma merkezlerine götürün
- 8 -
Page 10
ENGLISH
IMPORTANT SAFEGUARDS
Before using the product, please read carefully the operating instructions and
keep properly for future reference.
1. Only the included charger can be used.
2. The charger can transform 230V to a safe low voltage below 24V.
3. The charger includes a transformer which should not be cut off and replaced
with another plug; otherwise, it will lead to serious results.
4. If the charger is damaged, it should be replaced with a new one with the
original type to avoid the danger.
5. Out blade is made of super thin alloy. To avoid of breakage, please do no
press it by hand (Fig 1).
6. The temperature for the product’s charge and storage should not exceed
5˚C -35˚C.
7. Make sure the charge will not become damp (Fig 2).
8. Do unplug the charger before cleaning the shaver with running water. Do
be careful when using hotwater. Do remember to check the water is not too
hot to avoid doing harm to hands (Fig 3).
9. The waterproof grade IPX4.only the shaver head can be washed and the
body should not be soaked in water.
10.This product cannot be used by physically distempered, sensorially or
mentally disordered, or inexperienced persons (including children), unless
they are under supervision or instruction by people in charge of their security.
11.Take care of children to keep them away from this product.
12. Pis clean inside beard if the shaver can not work after you pressthe switch.
13. When the shaver is charging, the indicator lamp will be off. Press the
switch button back to the off state for charge.
14. It’s necessary to ensure to put the protective cover on the shaver when
you travel to protect the shaver head.
CHARGING
Make sure the product is power-off before the charge. The charge lasts about
16 hours. Keep use about 30 minutes after full charge.
It’s better for the product not to be connected to the power supply for more
than 24 hours. It can not connect with alternating current.
- 9 -
Page 11
CHARGING
1. Insert the product charger into the shaver (Fig 4).
2. Plug in the charger.
3. The charge indicator lights up (Fig 5).
4. After the full charge, unplug the charger and also pull out the product’s
plug from the shaver.
5. It can charge with the charging base.
HOW TO USE PRODUCT
Shaving
1. Press the button ON/OFF to start the shaver.
2. Make the shaver head part move quickly on the skin in straight lines and
circles (Fig 6).
3. Cover the shaver’s protective cover after each use to avoid being damaged
(Fig 7).
Trimming
Used for Trimming Temple and Mustache.
1. Push the slide face upwards to open the hair trimmer, which can be started
as the shaver start (Fig 8). To ensure a better shaving effect, the shaver must
be cleaned regularly. The easiest and most sanitary way to clean the product
is to wash the shaver head part and the whisker storeroom with water each
time after using it.
Do be careful when using hot water.
Do remember to check the water is not too hot to avoid doing harm to hands.
1. Stop the shaver (Fig 9).
2. Pull away the four shaver heads on the side one by one and then rotate and
pull out the middle head in the arrow direction indicated on it.
3. Clean the Five shaver head part and the hair storeroom for some time with
hot running water (Fig 10). Make sure the inside of both the shaver head part
and the hair storeroom has been cleaned thoroughly.
4. Wash the product’s surface (Fig 11).
5. Close the shaver head part and throw off surplus water.
Do not wipe the shaver head part with atowel or paper tissues, which may
cause damages to the shaver head.
- 10 -
Page 12

HOW TO USE PRODUCT
6. Open the shaver head part again and remain so to dry up the product (Fig
12).
You can also use the brush included to clean the hair storeroom. Here water
should not be used.
Trimmer
Clean the Trimmer Each Time After Use
1. Cut off the power supply of the shaver, then unplug the charger and also
pull out the product’s plug from the shaver.
2. Clean the trimmer with the brush included (Fig 13).
3. Lubricate the trimmer teeth with a drop of sewing machine oil once every
six months (Fig 14).
Change
Change the shaver head once a year to get the best shaving effect. The shaver
has a long service life if not damaged for human factors.
The damaged or abraded shaver head can only be replaced with shaver head
of this compang.
1. Pull out the old shaver head assembly out of the shaver (Drawing) (Fig 15).
2. Insert the flange of the new shaver head assembly into the groove (1) on
the shaver’s top and then press down the shaver head assembly (2) to mount
it on the shaver (a click will be heard) (Fig 16).
Hair Clipper Instruction
Turn off the shaver power, remove the shaver head, insert the flange of the
hair clipper into the slot of the top shaver.Then press down the hair clipper
head parts to installed in the shaver body.(hear the sound like “kaca”)
Clip
Note: Make sure your hair is clean and dry. Do not use the product for wet
hair.
1. Take note that comb your hair according hair growth direction before clip
hair.
2. Put on the comb accessories to the slot both sides,the sound like “kaca”
- 11 -
Page 13
HOW TO USE PRODUCT
make sure the comb accessories have already fix on slot both sides in true
ways (Fig 19).
3. The comb accessories have two length “3MM” and “6MM” for clip hair with
different length.Replacing the comb accessories direction according to length
mark in the bottom (Fig 20). Put down the comb accessories from one side
slot to another(Fig21 ).
4. Open the switch, use it above hair slowly. For good clip effect, please use
the product in the differenct direction from hair growth direction.
CLEANING AND MAINTENANCE
1. Take out the hair clipper head, use brush to clean the trimmer or clipper,
or wash the trimmer head.
2. Do not use abrasive,alcohol,gasoline or acetone etc. liquid to wash the
product.
3. You should clean the product immediately after using once.
4. For best using and clip effect,please add some lubricating oil every three
monthes.
Disjoin the comb sawtooth to outside,then add the oil into comb sawtooth.
After, join the comb sawtooth (Fig 22).
NOSE TRIMMER INSTRUCTIONS
Nose Trimmer Instruction
Turn off the shaver power, remove the shaver head, insert the flange of the
nose trimmer into the slot of the top shaver.Then press down the nose trimmer
head parts to installed in the shaver body.(hear the sound like “kaca”) (Fig
23).
Trim Nose Hair
1. Make sure your nose is clean.
2. Open the switch, put the nose trimmer towards your inside nose,turn the
nose trimmer to clip your long nose hair (Fig 24).
Do not exceed 0.5cm for nose trimmer length inside your nose.
To reduce itch, you should put one side of the nose trimmer tip close your
skin.
- 12 -
Page 14
NOSE TRIMMER INSTRUCTIONS
Clip Ear Hair
1. Clean outside ear,make sure no earwax.
2. Open the switch, then turn the trimmer tip towards your ear to clip your
long ear hair.
3. Put the trimmer tip towards your outside earlap slowly. (Fig 25)
Do not exceed 0.5cm for trimmer tip length inside your ear.Otherwise it will
damnify your eardrum.
Accessories
The following accessories are included with the product:
Charger; Brush; Cloth bag.
ENVIRONMENTAL DISPOSING
You can help protect the environment!
Please remember to respect the local regulations, hand in the
non-working electrical equipments to an appropriate waste
disposal center.
- 13 -
Page 15

FRANÇAIS
Remarques
Veuillez lire le manuel d’instructions attentivement avant d’utiliser le produit
et gardez-le afin de disposer au futur.
1. Seul la charge intègre doit être utilisé.
2. La charge peut transformer 230 V en dessous de 24V, ce qui est sûr.
3. Le transformateur situé à l’intérieur du chargeur ne doit pas être enlevé
ou échangé avec une autre prise, si non un tel comportement peut provoquer
des conséquences graves.
4. Si le chargeur est endommagé, il doit être remplacé par son original en
but de prévenir le danger
5. La lame extérieure est fabriquée d’une alliance très fine. Veuillez de ne
pas appuyer pas de votre main afin d’empêcher des ruptures (Figure 1)
6. La température doit être comprise entre l’intervalle de 5C - 35C pour la
charge et l’emmagasinage du produit.
7. Prenez soin de ne pas mouiller le chargeur (Figure 2)
8. Enlevez la charge avant de laver le rasoir. Prêtez attention à l’usage de
l’eau chaude. N’oubliez pas de contrôler si l’eau est trop chaude ou non pour
que vos mains ne souffrent pas.
9. IPX4 avec la couche imperméable. Seul la tête du rasoir peut etre lavée,
la partie d› corps ne d›it pas etre trempée dans l’eau.
10. CE produit ne doit pas etre utilisé par des personnes handicappées du
point de vue physique, psychologique ou mental or des individus inexperimenté
(y compris les enfants).
Mettez les enfants a l’écart de ce produit s’ils ne sont pas sous la garde ou
le guidage des personnes, responsables de leurs sécurité.
12. Si le rasoir ne marche pas apres avoir appuyé sur son bouton, nettoyez
les poils dedans.
13. Le voyant du témoin est inactivé pendant que le rasoir est en charge.
Appuyez sur son bouton de nouveau afin de l’inactiver en rechargeant.
14. Il faut couvrir la tête du rasoir avec une garniture protectrice pendant
le voyage afin qu’elle soit preservée.
- 14 -
Page 16

CHARGE
Soyez certain que le produit est inactive avant de le recharger. L’opération
de charge dure environ 16 heures. Vous pouvez l’utiliser pour un délai de 30
minutes apres l’avoir completement chargé
Il est preferable que le produit ne demeure pas branché sur la source
d’énergie pour plus de 24 heures. Il ne peut pas etre branché sur le courant
alternative
1. Installez le chargeur du produit au rasoir (Figure 4)
2. Branchez le chargeur sur la prise
3. Le voyant du chargeur sera allumé.
4. Débranchez le chargeur de la prise après que l’opération de charge est
finalisée et aussi dégagez la fiche du produit du chargeur.
5. Il est possible de charger avec le piédestal.
UTILISATION DU PRODUIT
Se Raser
1. Appuyez sur le bouton ACT‹VER/FERMER (ON/OFF) pour faire marcher e
rasoir
2. Déplacez la tête du rasoir rapidement en décrivant des traits rectilignes
et des cercles sur votre peau
3. Employez la grille protectrice du rasoir après chaque rasage afin de
prévenir le dégât (Figure 7)
Rajustement
Il est utilisé pour façonner vos poils sur la tempe et vos moustaches en les
découpant
Poussez la surface glissante vers le haut afin d’ouvrir la machine tondeuse
a cheveux que vous pouvez activer comme le rasoir. (Figure 8) Si vous voulez
obtenir un rasage effectif, nettoyez le rasoir régulièrement. La manière la
plus facile et propre de nettoyer le produit est de laver la tête du rasoir et
le réceptacle de poils avec de l’eau après chaque utilisation.
Veillez à l’usage de l’eau chaude
N’oubliez pas de contrôler si l’eau est trop chaude ou non afin que vos mains
n’en souffrent pas
1. Arrêtez le rasoir (Figure 9)
- 15 -
Page 17

UTILISATION DU PRODUIT
2. Enlevez un a un les quatre têtes du rasoir de la surface et pivotez dans la
direction de flèche et enlevez le corps central comme indiqué.
3. Lavez de temps en temps avec de l’eau chaude, la partie a cinq lames de
rasage et le réceptacle de poils (Figure 10). Assurez-vous que la tête rasoir
et le réceptacle de poils soient complètement propres.
4. Lavez la surface du produit (Figure 11)
5. Fermez la partie de tête de rasage et essuyez les traces d’eau.
Ne séchez pas la tête de rasage avec de la serviette ou serviette papier, cela
peut endommager la tête rasoir
6. Ouvrez la tête de rasage et laissez-la sécher (Figure 12)
Vous pouvez aussi utiliser la brosse dans le contenu pour nettoyer le receptacle
de poils. Effectuez-le sans ressortir a l’usage d’eau
Tondeuse
Nettoyez la coupe-poils après chaque utilisation
1. Coupez la source de puissance du rasoir, débranchez le chargeur et
dégagez la fiche du produit du rasoir.
2. Nettoyez la coupe-poils avec la brosse dans le contenu (Figure 13)
3. Lubrifiez la denture du coupe-poils une fois chaque six mois avec de la
graisse a machine (Figure 14)
Remplacement
Remplacez la tête du rasoir une fois par année afin d’obtenir la meilleure
effet de rasage. L’usage sera de longue durée si le rasoir n’est pas assujetti
aux hasards.
Les têtes du rasoir endommagés ou usées peuvent seulement échangées
avec des lames de rasage de la société.
1. Enlevez l’ancienne tête de rasage du rasoir (Figure 15)
2. Placez la nouvelle lame de rasage sur la surface de jonction se trouvant
sur la partie supérieure du rasoir (1) et appuyez sur la tête de rasage pour
l’associer au rasoir (un bruit de click sera entendu) (Figure 16)
Utilisation de la machine tondeuse des cheveux
Enfermez le rasoir, enlevez la tête de rasage, placez la surface de jonction
de la machine tondeuse a cheveux sur le rasoir. Ensuite, appuyez sur la tête
- 16 -
Page 18

UTILISATION DU PRODUIT
de la machine tondeuse a cheveux pour qu’elle vienne a loger dans le corps
du rasoir (un son tel que “crack” sera ressenti)
Coupure
NOTA: Assurez-vous que votre chevelure soit propre et sec. N’utilisez pas
le produit avec des cheveux humides
1. Peignez vos cheveux dansa la direction d’extension avant le découpage.
2. Installez les accessoires de peigne aux deux cotés du trou, un bruit comme
crac sera entendu, assurez-vouz que les accessoires de peigne soient
correctement implantés a tous les deux cotés. (Figure 19)
3. Les accessoires de peigne sont de deux longueurs distinctes, comme « 3
mm » et « 6 mm » pour des coupures de cheveux en longueur différents. La
façon d’altération de la direction des accessoires de peigne en accordance
avec la longueur est indiquée ci-dessous (Figure 20). Déposez les accessoires
de peigne du trou d’un coté a l’autre (Figure 21)
4. Appuyez sur le bouton de fonctionnement et employez-le doucement sur
la chevelure Pour une bonne découpe, utilisez le produit dans des directions
différentes de celle d’expansion des cheveux.
NETTOYAGE/HUILAGE
1. Enlevez la tête de découpage de cheveux, utilisez la brosse pour nettoyer
la tête ou lavez-la.
2. N’utilisez, en aucun cas un matériel abrasif ou des liquides comme alcool,
gazoline ou acétone pour laver le produit
3. Vous devez immédiatement laver le produit, une fois l’avoir utilisé.
4. Lubrifiez-le une fois chaque trois mois pour meilleure coupure et usage.
Ecartez a denture de la peigne et appliquez l’huile sur la denture de peigne.
Ensuite remontez la denture de peigne (Figure 22)
UTILISATION DE LA TONDEUSE NEZ
Fermez le rasoir, enlevez la tête de rasage, installez la surface de jonction
de la tondeuse nez dur le rasoir. Ensuite appuyez sur la tête de la tondeuse
nez pour qu’elle vient a loger dans le corps du rasoir (un bruit de “clack”
sera entendu)
- 17 -
Page 19

COUPURE DES POILS DE NEZ
1. Assurez-vous que votre nez est propre
2. Appuyez sur le bouton de fonctionnement, positionnez la tondeuse nez
vers l’intérieur de votre nez et pivotez la tondeuse nez afin de couper vos
poils du nez longs (Figure 24)
N’introduisez pas la tondeuse nez pur plus de 0.5 cm dans votre nez.
Maintenez une face de la tondeuse nez proche de votre peau afin de réduire
démangeaison.
COUPURE DES POILS D’OREILLE
1. Nettoyez la surface extérieure d’oreille, soyez certain qu’il n y ait pas de
cérumen.
2. Appuyez sur le bouton de fonctionnement, pivotez la pointe coupeuse vers
votre oreille pour découper les poils de nez longs
3. Apposez doucement la pointe coupeuse vers l’extérieur de votre pavillon
d’oreille. Figure (25)
N’approchez pas le coupe-poils pour plus de 0,5 cm dans votre oreille. Si
non, le tympan peut subir de dommage.
Accessoires
Les accessoires ci-dessous sont fournis de concert avec le produit:
Le chargeur; La brosse; le sac en toile.
APPAREIL RESPECTUEUX DE ’ENVIRONNEMENT
Vous pouvez aider à protéger l’environnement !
Veuillez vous rappeler de respecter les régulations locales :
disposez des appareils électriques qui ne fonctionnent plus
dans un centre de tri approprié.
- 18 -
Page 20

- 19 -
Page 21

- 20 -
Page 22

- 21 -
Page 23

- 22 -
Page 24

- 23 -
Page 25

- 24 -
Page 26

HRVATSKI
- 25 -
Page 27

- 26 -
Page 28

- 27 -
Page 29

- 28 -
Page 30

- 29 -
Page 31

ESPANOL
ADVERTENCIAS
Antes de utilizar el producto, por favor lee las instrucciones del uso
cuidadamente y guarde para consultar en el futuro.
1. Solo se debe utilizar la carga que se viene con la máquina.
2. La carga se puede cambiar debajo de 240V como 230V.
3. El cambiador que está dentro del cargador no se debe desmontar o no se
debe cambiar por otra toma, si no, se puede causar resultados graves.
4. Si el cargador se avería, para evitar el peligro tiene que cambiar por su
original.
5. El cuchillo se ha hecho por una aleación fina. Para evitar las roturas, no
empuje por sus manos. (Figura 1)
6. Para la carga del producto y guardo la temperatura tiene que estar dentro
5C-35C.
7. Tenga en cuenta que el cargador no se moja. (Figura 2)
8. Antes de lavar la máquina de afeitado saca la carga. Tenga en cuenta usar
el agua caliente. Para no dañar sus manos controle que el agua está muy
caliente o no.
9. Solo se puede lavar la cabeza que tiene placa de IPX4 de la máquina de
afeitar que es impermeable.
10. Este producto no se debe utilizar por los minusválidos, enfermos
psicológicos o mentales o las personas no tienen experiencia (incluso los
niños).
11. Guarde los niños de este producto si no están bajo vigilancia de responsables
de seguridad o su instrucción.
12. Si la máquina de afeitar no se funciona cuando se pulsa el botón, limpia
los pelos.
13. Cuando la máquina de afeitar está cargándose, la luz de indicador está
apagada. Para apagar cuando está cargando, pulse el botón otra vez.
14. Cuando está viajando, para la protección de la cabeza de la máquina de
afeitar, tiene que cerrar por la tapa protector.
CARGAR
Antes de cargar tiene que estar seguro que el producto está apagado. El
proceso de cargar se finaliza en 16 horas aproximadamente. Después de
- 30 -
Page 32

CARGAR
cargar totalmente puede utilizar por 30 minutos.
Es mejor no dejar el producto conectado a la fuente de energía más de 24
horas para el producto. No se debe conectar por el corriente alterna.
1. Fija la batería del producto a la máquina de afeitar. (Figura 4)
2. Enchufe la máquina de carga.
3. Indicador de la carga se iluminará.
4. Después de finalizo del proceso de cargar, desenchufe la máquina de carga
y además saca el enchufe del producto desde la máquina de carga.
5. Se puede cargar por la base de carga.
USO DEL PRODUCTO
Afeitarse
1. Para funcionar la máquina de afeitar pulse el botón de ABRIR/APAGAR
(ON/OFF).
2. Haga mover la cabeza de la máquina de afeitar rápidamente por hacer
circulares y líneas rectas.
3. Para evitar el daño, utilice la tapa protector de la máquina de afeitar después
de cada afeitado. (Figura 7)
Formar
Se utiliza para formar su bigote y pelos de sien.
1. Para abrir la máquina de cortar el pelo que se puede abrir como la máquina
de afeitar, empuje la parte viscosa (Figura 8). Si quiere un afeitado eficaz,
limpia la máquina de afeitar regularmente. Más fácil y limpio camino para
limpiar el producto es lavar la cabeza de la máquina de afeitar y cisterna de
pelo por agua.
Tener en cuenta el uso del agua caliente.
No olvide controlar que el agua está caliente o no para evitar dañarse su
mano.
1. Pare la máquina de afeitar (Figura 9).
2. Saca cuatro cabezas de afeitar uno a uno y gira el cuerpo medio hacia la
dirección de flecha que se muestra encima del cuerpo y lo saca.
3. A veces lava la parte de cinco cuchillos de afeitar y cisterna de pelo por el
- 31 -
Page 33

USO DEL PRODUCTO
agua caliente (Figura 10). Tiene que estar seguro que la cabeza de afeitar y
cisterna de pelo está limpiado completo.
4. Lava la superficie del producto. (Figura 11)
5. Cierre la parte de la cabeza de afeitar y limpie los residuos del agua.
No seca la cabeza de afeitar por toalla o toalla de papel, este puede dañar
a la cabeza de afeitar.
6. Abre la cabeza de afeitar y deje como así para secar. (Figura 12)
Para limpiar la cisterna de pelo puede utilizar el cepillo que se incluye. Lo
haga sin utilizar agua.
Cortador
Limpie el cortador después de cada uso.
1. Apague la fuente de energía de la máquina de afeitar, desenchufe la máquina
de carga y saca el enchufe del producto desde la máquina de afeitar.
2. Limpie el cortador por el cepillo que se incluye.
3. Aceite la rueda del cortador cada seis meses por el aceite de máquina
(Figura 14).
Cambio
Para el mejor resultado de afeitar cambie la cabeza de la máquina de afeitar
cada año.
Si la máquina de afeitar no se somete a los daños del usuario, su vida de
utilizar será larga.
Los cuchillos dañados y averiados solo se pueden cambiar por el cuchillo de
afeitar de este fabricante.
1. Desmonte el cuchillo viejo de afeitar desde la máquina de afeitar (Figura
15).
2. Fije la cabeza nueva de afeitar a la parte de unir que está encima de la
máquina de afeitar (1) y para unir a la máquina de afeitar empuje a la parte
superior de la cabeza de afeitar (hasta oír un sonido de tik) (Figura 16)
Uso de la máquina de cortar el pelo
Apague la máquina de afeitar, desmonte la cabeza de afeitar, fije la superficie
- 32 -
Page 34

USO DEL PRODUCTO
de unir de la máquina de cortar el pelo encima de la máquina de afeitar. Luego
para situar al cuerpo de la máquina de afeitar empuje a la cabeza de la
máquina de cortar el pelo (oírse un sonido como “cacha”.)
Corte
NOTA: Tenga en cuenta que su pelo está limpio y seco. No utilice el producto
para el pelo mojado.
1. Antes de corte del pelo peine su pelo hacia la dirección de alargamiento.
2. Monte los accesorios del peine a dos lados del hueco, se oye un sonido
como cacha, tenga en cuenta que los accesorios del peine está situado a dos
lados correctamente. (Figura 19).
3. Hay dos longitudes de los accesorios del peine como “3mm” y “6mm” para
los cortes de pelo de distintos longitudes como. Se ha explicado cómo puede
cambiar la dirección de los accesorios del peine según la longitud (Figura 20).
Fije los accesorios del peine desde un hueco al otro hueco del otro lado (Figura
21).
4. Pulse el botón de funcionar y utilice encima del pelo lentamente. Para un
corte bueno, utilice el producto en las direcciones distintas de la dirección de
alargamiento del pelo.
LIMPIAR/ACEITAR
Limpiar/Aceitar
1. Desmonte la cabeza del cortar el pelo, para limpiar la cabeza utilice el
cepillo o lava.
2. Para lavar el producto no utiliza los líquidos como los materiales abrasivos,
alcohol, gasolina o acetona.
3. Después de utilizar el producto una vez, tiene que lavar inmediatamente.
4. Para el corte y uso mejor, aceite cada tres meses.
Separa la rueda del peine y aplica el aceite a la rueda del peine. Luego, monte
la rueda del peine otra vez. (Figura 22)
MÁQUINA DE CORTAR LOS PELOS DE NARIZ
Apague la máquina de afeitar, desmonte la cabeza de afeitar, fije la superficie
de unir de la máquina de cortar los pelos de nariz a la máquina de afeitar.
Luego, para situar a la cuerpo de la máquina de afeitar empuje a la cabeza
de la máquina de cortar los pelos de nariz. (se oye un sonido como cacha).
- 33 -
Page 35

CORTE DE LOS PELOS DE NARIZ
1. Tenga en cuenta que su nariz está limpia.
2. Pulse el botón de abrir, lleve el cortador del pelo de nariz hacia dentro de
su nariz, gire el cortador del pelo de nariz para cortar los pelos largos de
nariz. (Figura 24)
No mete el cortador del pelo de nariz en dentro de su nariz más de 0.5cm.
Para reducir la comezón, ponga un lado del cortador del pelo de nariz cerca
a su piel.
CORTAR EL PELO DE OREJA
1. Limpie la superficie externa de la oreja, tenga en cuenta que no hay suciedad
de oreja.
2. Pulse el botón de abrir, para cortar los pelos largos de la oreja gire el
extremo del cortador hacia su oreja.
3. Haga situar el extremo del cortador hacia la parte exterior de su pabellón.
(Figura 25)
No haga cercar el cortador dentro de su oreja más de 0.5cm. Si no su oreja
se puede dañar.
Protección de Medioambiente
1. Cuando está tirando el producto, no lo ponga cerca de los residuos
domésticos, para la protección del medioambiente lo lleve a un centro de
reciclaje. (Figura 26)
2. La pila recargable se incluye materiales que se pueden ensuciar el
medioambiente, por eso antes de desmontar del producto, tiene que sacar y
enviar a un centro de reciclaje.
Si la pila no está vieja, no se debe sacar.
1. Desenchufe la máquina de carga y además saca el enchufe del producto
desde la máquina de carga.
2. Haga funcionar la máquina de afeitar hasta que se para y abre el dentro de
la máquina de afeitar. (Figura 27)
3. Saca la pila.
Figura 1 Después de sacar la pila no enchufe la máquina de afeitar.
- 34 -
Page 36

RUSSIAN
- 35 -
Page 37

- 36 -
Page 38

- 37 -
Page 39

- 38 -
Page 40

- 39 -
Page 41

ADANA-SEYHAN-DORUK SO⁄UTMA -REfiATBEY MAH. AV. MEHMET ERO⁄LU CAD. NO:8-TEL.:0322 458 55 14 ADANA-KOZAN-DURAN
YETK‹L‹ SERV‹SLER L‹STES‹
SO⁄UTMA-CUMHUR‹YET MH. DEDEO⁄LU SK. S‹S. APT.- TEL.:0322 516 57 78 ADANA-SEYHAN-DÜZOVA ELEKTR‹K - KÜÇÜK SAAT
MEYDANI HILAL HAN IS MRK NO 32 - TEL.:0322 363 67 87 ADANA-SEYHAN-ÖZER ELEKTRON‹K - OBALAR CAD. SAL‹H ZEK‹ BUGAY ‹fi
HANI NO:11 - TEL.:0322 352 25 75 ADANA-SEYHAN-SER‹N ELEKTRON‹K - MAHFESI⁄MAZ MH. KENAN EVREN BULV. 21.SK. KAROL S‹T.
E BLOK NO:2/A - TEL.:0322 233 74 84 ADANA-CEYHAN-URANYUM ELEKTRON‹K - ‹NÖNÜ BULVARI NO: 172 - TEL.:0322 611 29 95
ADANA-CEYHAN-CEYHAN ELEKTRON‹K - BÜYÜKKIRIM MH. MEHMET fiER‹F Y‹⁄‹T CD. 4.SK. NO:3/B TEL. : 0322 613 45 96 ADIYAMANYILDIRIM SERV‹S - BAHÇEL‹EVLER MH. 177 SK. NO:2 - TEL.:0416 214 40 83 ADIYAMAN-KAHTA-ELK. EV ALET. TAM‹RC‹S‹-FAT‹H MH.
ZAFER CD. NO:20 - TEL.:0416 725 99 89 ADIYAMAN-ÜNAL ELEKTRON‹K-BAHÇEL‹EVLER MAH. ESK‹ KAHTA CAD. NO:11/A-TEL.:0416
216 75 56 ADIYAMAN-BEYAZ EfiYA TAM‹R‹-ÇATI MH. BADEM SK. NO:11 BESN‹ TEL.: 0416 318 32 00 AFYON-EM‹N ELEKTRON‹K-ENST‹TÜ
CAD. NO:19-TEL.:0272 215 43 32 AFYON-D‹NAR-GÖKÇEO⁄LU ELEKTR‹K-EMN‹YET MH. YEN‹YOL CD. 146 BLOK NO:4-TEL.: 0272 353 53
44 A⁄RI-PATNOS-ACELE PEfi‹N ELEKTRON‹K-BUHARA SOK. NO:12-TEL.:0472 616 46 08 A⁄RI-ÖZPAK ELEKTRONIK-ESKI VAN CAD
NO: 341 Ömer Hamam Yan›-TEL.:0472 216 53 14 AKSARAY-‹T‹NA ELEKTR‹K-TAfi PAZARI MH. fiEH‹T HAT‹P UÇKUN SK. ESK‹ TERM‹NAL
ÇIKIfiI NO:9/A-TEL.:0382 212 63 99 AMASYA-KUTUP TEKN‹K SO⁄UTMA-GÖKMEDRESE MAH. M.K.P. CAD. HAM‹TBATIR APT. NO:115/ATEL.:0358 212 61 66 AMASYA-SULUOVA-ÇALIfiKAN ELEKTRON‹K-ÖZEL ‹DARE ‹fi HANI NO:121-TEL.:0358 417 18 64 AMASYA-FLAfi
ELEKTRON‹K-YÜZEVLER MAH.TORUMTAY SOK. NO:25 DEM‹RD‹fi APT. ALTI-TEL.:0358 212 33 71 ANKARA-YEN‹MAHALLE-ERDO⁄DU
SO⁄UTMA-ÇARfiI MH. DAMLADOL SK. NO:74/C-TEL.:0312 315 60 25 ANKARA-KEÇ‹ÖREN-VEFA ELEKTRON‹K-PINARBAfiI MH. AfiIK
PAfiA CD. NO: 67/C-TEL.:0312 380 42 30 ANKARA-MAMAK-YÜCEL ELEKTRON‹K-ASIM GÜNDÜZ CD. 20/D-TEL.:0312 365 14 14 ANKARAÇANKAYA-GÖKSEL ELEKTRON‹K-21.CD. KARTAL KAYA APT. NO:29/A KIRKKONAKLAR-TEL.:0312 496 42 53 ANKARA-ÇANKAYA-ATC
‹LET‹fi‹M-SELAN‹K CAD. NO: 31/3-TEL.: 0312 419 82 70 ANKARA-GÖLBAfiI-BEKS SERV‹S H‹ZMETLER‹-SE⁄MENLER MAH. CEMAL
GÜRSEL CAD. NO:51/A-TEL.:0312 484 21 19 ANKARA-BEYPAZARI-DO⁄AN TEKN‹K-KAYHAN GÜVEN CD. NO:22/C-TEL.:0312 762 89 19
ANKARA-S‹NCAN-Y‹⁄‹T TEKN‹K ONARIM-M.Ç.M. 12. CADDE GÜLSUYU SK. NO:5/21-TEL.:0312 264 10 31
ANKARA-KEÇ‹ÖREN-MERT TEKN‹K SERV‹S-ÖZYURT CD. NO:27/A AKTEPE-TEL.: 0312 380 00 22 ANKARA-ERYAMAN-ARSLANLAR
ELEKTRON‹K-GÜZELKENT MAH.ÇARfiI ARYA 511 SK. NO:40-TEL.:0312 279 16 41 ANKARA-KIZILAY-ARTUKLU ELEKTR‹KL‹ EV ALETLER‹-
SAKARYA CD. ÖRNEK ‹fiHANI NO:8/70 TEL. : 0312 435 83 55 ANTALYA-KUMLUCA-AKGÜL TEKN‹K SERV‹S H‹ZMETLER‹-ADNAN
MENDERES BULV.KAVAKLI KUYU CAD. YED‹TEPELER KAR.SULAR APT.NO:9-TEL.:0242 887 53 80 ANTALYA-CANKALP ELEKTRON‹K-
TUZCULAR MAH. ‹MARET SOK. FARAÇLAR PASJ.NO:11-TEL.:0242 242 31 35 ANTALYA-MANAVGAT-ÖNAL ‹LET‹fi‹M-AfiA⁄I PAZARCI
MH. ‹BRAH‹M SÖZEN CD. fiELALE PSJ.NO: 18 1006 SK. TEL.:0242 742 35 36 ANTALYA-ALANYA-Ç‹NTAfi ELEKTRON‹K-SARAY MH.
ATATÜRK CD. HACI HAMD‹ O⁄LU SK.NO: 20/A-TEL.:0242 513 88 85 ANTALYA-MERKEZ-BÜYÜKGEB‹Z ELEKTROMEKAN‹K GÜVENL‹K-
MUSTAFA GÖKSU-KIZILSARAY MH. DOLAPLIDERE CD. 80 SK. ÇAKMAK ‹fi HANI NO: 8/5-6 TEL. :0242 243 33 90 ARDAHAN-YILDIRIM
ELEKTR‹K-ATATÜRK CAD.NO:69-TEL.:0478 211 28 58 ARTV‹N-ARTV‹N ELEKTR‹K-HALKEVI CADDESI NO: 12-TEL.: 0466 212 10 82 AYDINYILMAZ ELEKTRON‹K-KURTULUS MH. GARAJ CD. NO:5/B-TEL.:0256 212 00 35 AYDIN-SÖKE-ÖZLEM ELEKTRON‹K-YEN‹ CAM‹ MH.
SEK‹LER CD. NO: 47-TEL.:0256 518 26 40 AYDIN-NAZ‹LL‹-BARIN ELEKTRON‹K-ALTINTAfi MH. HÜRR‹YET CD. NO:161 B-TEL.: 0256 315
43 21 BALIKES‹R-BANDIRMA-ANIL SO⁄UTMA-GÜNAYDIN MAH. 2.OKUL CAD.NO:16/A-TEL.:0266 713 56 78 BALIKES‹R-EDREM‹T-ÖZER
TEKN‹K-CAM‹ VASAT MH. PARK CD. NO:12/A-TEL.:0266 373 12 44 BALIKES‹R-BURHAN‹YE-U⁄UR TEKN‹K SO⁄UTMA-MAHKEME MH.
M‹THATPAfiA CD. NO: 68-TEL.:0266 412 86 89 BALIKES‹R-KILIÇ ELEKTRON‹K-YEN‹ ÇARfiI BASIN SOK. NO: 4/B-TEL.:0266-241 87 54
BALIKES‹R-GÖNEN-GÜRSES ELEKTRON‹K-MALKOÇ MAH.MÜFTÜ fiEVKET CAD. 76.SOK. NO:2/B-TEL.:0266 762 01 28 BALIKES‹RBANDIRMA-D‹J‹TAL ELEKTRON‹K-17 EYLÜL MAH.HAVUZLU BAHÇE SK.NO:8/A-TEL.:0266 715 16 46 BALIKES‹R-ERDEK-MERT TEKN‹K-
YALI MH. HÜKÜMET CD. NO:55-TEL.:0266 845 61 10-97 BARTIN-MARTI ELEKTRON‹K-HENDEKYANI CAD. ORTA MAH.101/B - BARTINTEL.:0378 228 34 22 BATMAN-fiAH‹NLER ELEKTRON‹K-CUMHUR‹YET CD. NO:20 2000 ‹fi MERKEZ‹ KARfiISI-TEL.:0488 213 17 02 B‹LEC‹K-
EDEBAL‹ TEKN‹K-‹ST‹KLAL MH V.REF‹K A ÖZTÜRK CD NO: 1/A-TEL.:0228 212 46 80 B‹NGÖL-KARLIOVA-MEHMET KARTAL - KARTAL
ELEKTRON‹K-CUMHUR‹YET CD. NO:8-TEL.:0426 511 26 39 B‹NGÖL-S‹MGE ELEKTRON‹K- YEN‹fiEH‹R MH. YEfi‹M SK. BO⁄ATEK‹N APT
ALTI NO:14/C-TEL.:0426 213 77 56 B‹TL‹S-AHLAT-U⁄UR SO⁄UTMA-TOK‹ KONUTLARI YUKARI ÇARfiI-TEL.:0434 412 41 72 B‹TL‹S-D‹ZAYN
ELEKTR‹K-NUR CAD. EREM CENTER ‹fi MERKEZ‹KAT:2 NO:5-TEL.:0434 226 74 43 BOLU-BEST ELEKTRON‹K-TABAKLAR MAH.CUMHUR‹YET
CAD.NO:28/B-TEL.:0374 218 12 25 BURSA-OSMANGAZ‹-AKYÜZ ELEKTRON‹K-ÇIRPAN MH. UYSAL SK. NO:13/B-TEL.:0224 254 60 76
BURSA-GEML‹K-AC‹L TV TAM‹R SERV‹S‹-DEM‹R SUBAfiI MH. FIRIN SK. NO:7-TEL.:0224 514 71 20 BURSA-MUDANYA-ER T‹CARET-
ÖMERBEY MH. CAM‹ SK. SU APT. NO:30-TEL.:0224 544 86 16 BURSA-MUSTAFAKEMALPAfi-AGUfi ELEKTR‹K-HAMZABEY MAHALLESI
PAZARYERI SOKAK NO: 2/A-TEL.:0224 613 19 99 BURSA-‹NEGÖL-S.B.S ELEKTRON‹K-OSMAN‹YE MH.DERE SK. N:25/D-TEL.:0224 715
48 94 BURSA-KARACABEY-GÜRKAN T‹CARET-RUNGUÇPAfiA MH. 14. SK. NO:11-TEL.: 0224 676 66 80 BURSA-N‹LÜFER-ÖZME TEKN‹K-
KARAMAN MH. BAYINDIR SK. NO:4/B CARREFOUR KARfiISI-TEL.: 0224 249 12 48 ÇANAKKALE-ÇAN-TÜRKER ELEKTRON‹K-CUMHUR‹YET
MAH. ÇANAKKALE CAD.NO:41-TEL.:0286 416 13 89 ÇANAKKALE-GEL‹BOLU-GÜVEN ELEKTRON‹K-YAZICIZADE MAH. M‹RALAY fiEF‹K
AKER CAD. 2. SOK NO:4 / A TEL.:0286 566 90 70 ÇANAKKALE-MERKEZ-SAM ELEKTRON‹K-‹SMETPAfiA MH. ARSLANCA SK.-TEL.:0286
212 35 59 ÇANKIRI-B‹LG‹ÇLER ELEKTRON‹K-BUGDAY PAZARI MH. A.TALAT ONAY BULVARI SAIM A⁄A S‹T. B/BLOK TEL.:0376 213 48
19 ÇORUM-H‹T‹T SO⁄UTMA-YEN‹YOL MH. MÜFTÜ AHMET GÖKEfiME SK. NO: 5 / I-TEL.:0364 225 70 58 ÇORUM-U⁄UR ELEKTRON‹K-
ÜÇTUTLAR MAH. FAT‹H CAD. 5.SOK.EYÜP SULTAN APT. NO:1/C-TEL.:0364 227 44 91 ÇORUM-ÖMÜR ELEKTRON‹K-CENG‹ZTOPEL CAD.
NO:2/F-TEL.:0364 224 68 09 ÇORUM-ALACA-EROL ELEKTRON‹K-AYHAN MH. ANKARA CD. NO:18-TEL.:0364 411 42 03 ÇORUM-GÜNDÜZ
BEYAZ EfiYA SERV‹S‹-SUNGURLU-SUNGURO⁄LU MH. ÇANKIRI CD. NO: 46-TEL.:0364 311 31 13 DEN‹ZL‹-KARDELEN SO⁄UTMA-EMEK
CD. NO: 30-TEL.:0258 241 67 31 DEN‹ZL‹-ÖZ ELEKTRON‹K-ÇAYBAfiI CD. ÜNAL APT. NO: 28-TEL.:0258 261 29 25 DEN‹ZL‹-MERKEZ-
ÇA⁄LAYAN SO⁄UTMA-TOPRAKLIK MH. TURAN GÜNEfi CD.NO:34 TEL. : 0258 242 85 86 D‹YARBAKIR-B‹SM‹L-fiIK ELEKTR‹K-KURTULUfi
MH. AHMET AR‹F BULVARI NO: 19/F-TEL.:0412 415 05 94 D‹YARBAKIR-‹LKADIM T‹CARET-BATIKENT S‹T. A/5 BLOK ALTI NO:1 SA⁄LIK
OCA⁄I YANIBA⁄LAR-TEL.:0412 235 70 89 D‹YARBAKIR-AZ‹Z ELEKTRON‹K-HATBOYU CD. 469. SK. GÜNEfi 2 APT. NO:3/B-TEL.:0412 223
33 46 D‹YARBAKIR-S‹LVAN-DIGITAL ELEKTRONIC-KALE MH. SAM‹ SEÇK‹N CD. NO:9/B-TEL.:0412 711 44 14 D‹YARBAKIR-JAPON
- 40 -
Page 42

RECEP-YENI MAH 19 MAYIS CAD NO74-TEL.:0412 511 24 10 D‹YARBAKIR-BA⁄LAR-AZ‹Z ELEKTRON‹K-HATBOYU CD. 469 SK. NO:3/B-
YETK‹L‹ SERV‹SLER L‹STES‹
TEL.: 0412 236 81 10 DÜZCE-ENSAR TEK SU S‹STEMLER‹-AZM‹N‹LL‹ MH. AYDINPINAR CD. SERHAT SK.NO:1/B-TEL.:0380 514 34 12
DÜZCE-BULUfi ELEKTRON‹K-CED‹D‹YE MAH. M‹MAR S‹NAN CAD.-TEL.: 0380 514 66 81 ED‹RNE-UZUNKÖPRÜ-GÜVEN TEKN‹K-GAZ‹
CAD. YUSUF SOK. YURDACAN PASAJI NO:7-TEL.:0284 513 89 66 ED‹RNE-YILDIZ SO⁄UTMA-1.MURAT MH. GÜNGÖR MAZLUM CAD.
SERHAT S‹TES‹ B/BLOK 35/A-TEL.:0284 235 37 63 ED‹RNE-KEfiAN-MUTLU TEKN‹K-YUKARI ZAFER‹YE MH. ‹LYASBEY CD. NO:32/BTEL.:0284 715 22 71ELAZI⁄-ÖZDEV TEKN‹K -‹ZZETPAfiA MAH.KAZIM BAYER CAD.NO:24/A-TEL.:0424 238 51 67 ELAZI⁄-YILMAZ BOB‹NAJ-
YEN‹ MAH. KEMAL fiEDELE CAD. NO: 12/E-TEL.:0424 212 08 96 ELAZI⁄-GÜNEfi ELEKTRON‹K-KÜLTÜR MAH. VAL‹ FAHR‹BEY CAD.NO:113/DTEL.:0424 233 10 18 ERZ‹NCAN-AYDINLAR ELEKTR‹K-‹NÖNÜ MAH. MERKEZ ÇARfiISI 15.SK NO:5 -TEL.:0446 223 59 76 ERZ‹NCAN-
REFAH‹YE-B‹LG‹N ELEKTRON‹K-ERZ‹NCAN CAD. BELED‹YE ‹fi HANI-TEL.:0446 611 26 10 ERZURUM-OLTU-GÜVEN ELEKTRON‹K-
Z‹YABEY CAD. BELED‹YE PSJ. NO:6-TEL.:0442 816 42 23 ERZURUM-AT‹LAY ELEKTRON‹K-KONGRE CAD. HASIRHAN PASJ. NO:87TEL.:0442 213 30 60 ERZURUM-‹SP‹R-YILMAZ ELEKTRON‹K-Z‹YAPAfiA CD. AfiA⁄I MH. NO:186-TEL.:0442 451 40 95 ESK‹fiEH‹R-ARZU
ELEKTRON‹K-DEL‹KL‹TAfi MH. GÜRMAN SOK. NO:37/B-TEL.:0222 234 87 15 ESK‹fiEH‹R-S‹VR‹H‹SAR-DERMAN ELEKTRON‹K-CAM‹KEB‹R
MH. YUNUSEMRE CD. NO:7-TEL.:0222 711 22 60 GAZ‹ANTEP-ELEKTR‹KL‹ EV ALETLER‹ TAM‹RC‹S‹-MÜTERC‹M ASIM CAD. KÖRÜKÇÜ
SOK. NO:8/A-TEL.:0342 231 00 73 GAZ‹ANTEP-ISLAH‹YE-YILMAZ SO⁄UTMA-AYDINLIK MH. GÖZ CAD.ÜNLÜ S‹TES‹ NO: 2-TEL.:0342 862
12 20 GAZ‹ANTEP-‹K‹ZO⁄LU ELEKTRON‹K-BEY MAH. EBLEHAN ÇARfiISI NO:12/A-TEL.:0342 230 71 00 GAZ‹ANTEP-N‹Z‹P-ÇAPAN
TEKN‹K-CUMHUR‹YET MAH. MERMER SOK. NO:10-TEL.:0342 517 51 66 G‹RESUN-BULANCAK-YÜKSEL SO⁄UTMA-‹HSAN‹YE MH. CEMAL
GÜRSEL. CD. NO: 257-TEL.:0454 318 17 28 G‹RESUN-U⁄UR ELEKTRON‹K-HACI HÜSEY‹N MH. GAZ‹ CD. NO: 185 / 1-TEL.:0454 212 00
90 GÜMÜfiHANE-GÜMÜfiHANE SERV‹S‹-HASANBEY MH. HASANBEY CD.NO:17/A-TEL.:0456 213 51 54 HATAY-SAMANDA⁄-GÜNEfi
ELEKTR‹K-ATATÜRK MAH. ‹SKELE CAD. HAYÜK PSJ NO:38-TEL.:0326 512 71 04 HATAY-KIRIKHAN-SEREN MAK‹NA-BARBAROS MAH.
BOZTEPE CAD. NO:23/B-TEL.:0326 344 32 49 HATAY-ANTAKYA-SER‹ SO⁄UTMA-KURTULUfi CD. NO:51/C-TEL.:0326 213 28 32 HATAY-
ERZ‹N-YEL‹Z BOB‹NAJ-MUSTAFAL‹ MH. ‹STASYON CD. NO: 143-TEL.:0326 68148 32 HATAY-REYHANLI-BAfi TEKN‹K SO⁄UTMA-ATATÜRK
CD. DÖ⁄ÜCÜLER ‹fiHANI NO:1 -TEL.:0326 413 44 04 HATAY-REYHANLI-ÖZ ‹fi SO⁄UTMA-CUMHUR‹YET MH. TAYFUR SÖKMEN CD.
NO:26/B TEL. : 0326 413 21 22 HATAY-DÖRTYOL-FAT‹H ELEKTRON‹K-SANAY‹ MH. EVREN CD. YEN‹ S‹NEMA KARfiISI NO:15 - TEL.:0326
712 86 46 HATAY-‹SKENDERUN-GÜL‹STAN ELEKTRON‹K-KURTULUfi MH. fi.O⁄UZ YENER CD. NO:64/C-TEL.:0326 613 50 64 I⁄DIR-
PARLAK TEKN‹K-TOPÇULAR CD. NO:34-TEL.:0476 227 47 51 ISPARTA-ÖZSOYLAR SO⁄UTMA-YAYLA MAH. ‹SMETPAfiA CAD. NO: 60 fi‹FA
TIP MERKEZ‹ ALTI-TEL.:0246 223 13 61 ‹ÇEL-ERDEML‹-ESEN ELEKTR‹K-MERKEZ MAH. ATATÜRK CAD. NO:11-TEL.:0324 515 68 87
‹ÇEL-MEZ‹TL‹-AKN‹SAN SO⁄UTMA&ELEKTRON‹K-GMK.BUL. FAT‹H MH. 18 SK.ÖZÜDO⁄RU S‹T. 3/A-TEL.:0324 359 64 34 ‹ÇEL-PINAR
ELEKTRON‹K-MAHMUD‹YE MH. 108. CD. NO:32/B-TEL.:0324 336 82 98 ‹ÇEL-TARSUS-MERT ELEKTRON‹K-GAZ‹LER MAH. ATATÜRK
BULV. NO:119-TEL.:0324 626 83 98 ‹ÇEL-TARSUS-TEKN‹K ‹fi ELEKTR‹K T‹C.-ATATÜRK CAD. U⁄UR ‹fi HANI NO:1-TEL.:0324 6242797
‹ÇEL-ANAMUR-ÇEL‹K ELEKTRON‹K-BAHÇE MH. ORMAN ‹fiLETMES‹ ALTI NO:61/B-TEL.:0324 814 85 90 ‹ÇEL-HAKAN ELEKTRON‹K-
BAHÇEL‹EVLER MH. 1809 SK. D‹NL‹ APT.ALTI NO:3/B-TEL.:0324 328 03 25 ‹ÇEL-S‹L‹FKE-SADIK ELEKTR‹K-GÖKSU MAH. O⁄UZKAAN
CAD. DERYALAR APT.NO:22/B-TEL.:0324 714 05 54 ‹STANBUL-ATAfiEH‹R-VURAL ELEKTRON‹K-KARAMAN Ç‹FTL‹K YOLU NO:12(ESK‹
PTT HAST. KARfiISI) ‹ÇERENKÖY TEL. : 0216 575 63 35 ‹STANBUL-fi‹fiL‹-YILKA T‹CARET-SEYMEN SOK. NO:27/A KURTULUfi-TEL.:0212233 80 53 ‹STANBUL-KÜÇÜKÇEKMECE-ÇA⁄DAfi SERV‹S-CENNET MAH.Y.KEMAL BEYATLI CAD.NO:14/D-TEL.:0212 579 35 30 ‹STANBUL-
ZEYT‹NBURNU-KARDEfiLER SO⁄UTMA-SEY‹T N‹ZAM MAH. fiEH‹T ERKAN ALYANAK SOK.NO:11-TEL.:0212 546 57 36 ‹STANBULESENLER-YILDIRIM ELEKTRON‹K-KAZIM KARABEK‹R MAH. 2.SOK. NO:10 -TEL.:0212 611 10 76 ‹STANBUL-EM‹NÖNÜ-IRMAK DIfi
T‹CARET-TAHTAKALE CD. TAHTAKALE T‹CARET MERKEZ‹ NO:34 2.BODRUM NO:204 -TEL.:0212 520 55 80 ‹STANBUL-ÜMRAN‹YE-GÜLSER TEKN‹K SERV‹S-NAMIK KEMAL MH. SÜTCÜ ‹MAM CD. SÜTÇÜ ÇIKMAZI NO:6/1- TEL.:0216 335 60 19 ‹STANBUL-ÜMRAN‹YE-GÖZDE
ELEKTRON‹K-ATATÜRK MH. ALEMDA⁄ CD. YILDIZ SK. NO:12/A-TEL.: 0216 329 57 03 ‹STANBUL-MALTEPE-GÜR TEKN‹K SERV‹S-BA⁄DAT
CD. BOLAYIR SK. NO:3/A-TEL.:0216 352 25 20 ‹STANBUL-BEYL‹KDÜZÜ-SC ELEKTRON‹K-GÜZELYURT MH. M‹MAR S‹NAN CD. NO:71TEL.:0212 852 78 50 ‹STANBUL-GAZ‹OSMANPAfiA-DEDEO⁄LU ELEKTR‹K-2124 SOK NO:4 SULTANÇ‹FTL‹⁄‹-TEL.:0212 594 50 91
‹STANBUL-TUZLA-AKIN ISI TEKN‹K SERV‹S-YAYLA MH. F.ÇAKMAK CD. ‹SMA‹L A⁄A SK. NO:11 TEL.:0216 395 66 62 ‹STANBUL-SARIYERH‹SAR SERV‹S 1-NUR‹PAfiA CD NO\48A BA⁄LAR MEVK‹ YEN‹KÖY-TEL.:0212 223 27 96 ‹STANBUL-BÜYÜKÇEKMECE-AYGÜL DEKORASYON-
19 MAYIS MH. OSMAN GAZ‹ CD. NO: 7-TEL.:0212 881 33 18 ‹STANBUL-GAZ‹OSMANPAfiA-ÇAM TEKN‹K-ISLAMBEY MAH NECIP FAZIL
CAD 257 SK NO:25-TEL.:0212 597 86 62 ‹STANBUL-KÜÇÜKÇEKMECE-YILDIZ ELEKTR‹K SO⁄UTMA-HALKALI CD. ANADOLU PSJ. NO:
185-TEL.:0212 580 76 02 ‹STANBUL-KÜÇÜKÇEKMECE-BATI TEKN‹K-GÜLTEPE MH. DEL‹ORMAN CD. NO:75 SEFAKÖY-TEL.:0212 599
36 79 ‹STANBUL-BAYRAMPAfiA-ÖZKAN ELEKTRON‹K-KARTALTEPE MH. B‹LGEHAN CD. NO:36-TEL.:0212 564 33 46 ‹STANBUL-
GAZ‹OSMANPAfiA-TOROS ELEKTRON‹K-MERKEZ MH. BA⁄LAR CD. NO:77-TEL.:0212 563 50 38 ‹STANBUL-fi‹fiL‹-CHIP ELEKTRON‹K-
BOZKURT CAD.NO: 235-TEL.:0212 231 65 43 ‹STANBUL-GÜNGÖREN-YÜKSEL ELEKTRON‹K-M.FEVZ‹ ÇAKMAK MAH.‹NÖNÜ CAD.NO:
138-TEL.:0212-504 61 42 ‹STANBUL-BEYO⁄LU-TOLGA ELEKTRON‹K-CAM‹ KEB‹R MH. DEREBOYU CAD. NO:28 KASIMPAfiA-TEL.:0212
235 65 34 ‹STANBUL-AVCILAR-NUR ELEKTRON‹K-DEN‹ZKÖfiKLER MAH.DERYA SOK. NO:36/1-TEL.:0212 694 12 82 ‹STANBUL-BA⁄CILAR-
ÇA⁄LAYAN ELEKTRON‹K-‹STOÇ 25.ADA NO.:109-TEL.:0212 659 92 49 ‹STANBUL-KADIKÖY-UMUT ELEKTRON‹K-HAL‹TA⁄A CAD. CELAL
MUHTAR SOK. NO:20/2-TEL.:0216 346 39 78 ‹STANBUL-ZEYT‹NBURNU-UZMAN ELEKTRON‹K-YEN‹DO⁄AN MH. 42.SK NO:50-TEL.:0212
582 36 37 ‹STANBUL-KADIKÖY-MICROSYSTEM ELEKTRON‹K-1. ORTA SK. NO:18/1 GÖZTEPE-TEL.:0216 411 91 50 ‹STANBUL-MALTEPE-
BEYDA⁄I TEKN‹K ELEKTRON‹K-BA⁄LARBAfiI MAH. ‹NÖNÜ CAD.-TEL.:0216 457 63 34 ‹STANBUL-BA⁄CILAR-KUMRU ELEKTRON‹K-
KEMALPAfiA MAH. NAMIK KEMAL CAD. NO: 126-TEL.:0212 429 34 19 ‹STANBUL-fi‹fiL‹-KASVA ELEKTRON‹K-MEC‹D‹YE CAD. ‹MAM
FEYZULLAH SOK. NO:2/B -TEL.:0212 211 33 11 ‹STANBUL-BAKIRKÖY-‹K‹ZLER ELEKTRON‹K-SAKIZA⁄A MH. BERR‹NC‹N‹ SK. NO:16/ATEL.:0212 543 85 83 ‹STANBUL-ÜSKÜDAR-KÖYLÜBAY ELEKTRON‹K-ALBAY HÜSAMETT‹N ERTÜRK SK. NO:7/A ÇENGELKÖY TEL.:0216
318 35 13 ‹STANBUL-ÜSKÜDAR-AKÇEL‹K T‹CARET-M‹MAR S‹NAN MH. ‹SMA‹L DÜMBÜLLÜ SK. NO:9/A TEL.:0216 342 99 22 ‹STANBUL-
KADIKÖY-TELV‹D ELEKTRON‹K-MAZHAR OSMAN SOK FERAH APT NO:24/A FENERYOLU-TEL.:0216 414 66 00 ‹STANBUL-‹K‹TELL‹BARIfi TEKN‹K-ATATÜRK MH. ‹K‹TELL‹ CD. DURAK SK. NO:18 TEL. : 0212 471 04 76 ‹STANBUL-K.ÇEKMECE-ENG‹N ELEKTRON‹K-
- 41 -
Page 43

TEVF‹K BEY MH. MERKEZ CD. ORK‹DE SOK. NO: 3 /1-TEL.:0212 598 44 76 ‹STANBUL-BAHÇEL‹EVLER-SEV-CAN DAYANIKLI TÜK.MALLARI.-
YETK‹L‹ SERV‹SLER L‹STES‹
YILDIRIM BEYAZIT CD .ZAFER MH. TÜRKBEY‹ SK. NO:6/2-3-TEL.:0212 552 45 87 ‹STANBUL-fi‹fiL‹-IfiIK ELEKTRON‹K-AYAZA⁄A MASLAK
ATATÜRK CD NO: 25-TEL.:0212 289 76 94 ‹STANBUL-PEND‹K-GÖKHAK ELEKTRON‹K-BATI MH. SABR‹ TAfiKIN CD. SEB‹L SK. NO:4/1
TEL. : 0216 354 07 00 ‹STANBUL-G.O.PAfiA-ATILIM ELEKTRON‹K-CEBEC‹ MAH. 2472 SOK: NO:14/A SULTANÇ‹FTL‹⁄‹- TEL.:0212 475
85 62 ‹STANBUL-GÜNGÖREN-NUR ELEKTR‹K ELEKTRON‹K-MERKEZ MH. ASALET CD. NO: 22/D-TEL.:0212 641 42 09 ‹STANBUL-BEYKOZ-
ULUDO⁄AN ELEKTRON‹K-KAYABAfiI ÇIKMAZI NO: 4/B PAfiABAHÇE-TEL.:0216 322 85 85 ‹STANBUL-KARTAL-ÖZO⁄LU ELEKTRON‹K-
KIZILAY BULVARI CD. BAHADIR SK. 4/A-TEL.:0216 387 18 87 ‹STANBUL-FAT‹H-SOYLU TEKN‹K-HIRKA‹ fiER‹F CAM‹ ARKASI ESK‹ AL‹PAfiA
CD. NO: 26-TEL.:0212 631 85 88 ‹STANBUL-FAT‹H-IRMAK DIfi T‹CARET-HACI KADIN CD. NO:15 K.M. PAfiA TEL.: 0212 589 75 27 ‹STANBUL-
S‹L‹VR‹-PDS ELEKTRON‹K-P.M. PAfiA MH. HACI PERVANE CD. NO:35/B -TEL.:0212 728 76 75 ‹STANBUL-GÜLTEPE-B‹L‹M ELEKTRON‹K-
HARMANTEPE MH. ABD‹ ‹PEKÇ‹ CD. NO:14/D -TEL.:0212 278 72 27 ‹ZM‹R-BERGAMA-GEZG‹N SERV‹S-K.KEMALBEY CAD. NO:82-84TEL.:0232 633 35 15 ‹ZM‹R-KONAK-TUNCA ELEKTR‹K-76 SK 10/A GÜZELYALI-TEL.:0232 246 40 62 ‹ZM‹R-ÇAMD‹B‹-KUDRET ELEKTRON‹K-
BURAK RE‹S CAD. NO: 239/A-TEL.:0232 435 81 36 ‹ZM‹R-MENEMEN-AY ELEKTRON‹K-DR. SELAHATT‹N ÖZKURT CD. NO:22/B-TEL.:0232
832 02 31 ‹ZM‹R-KONAK-S‹STEM ELEKTRON‹K-2414 SK. NO:10 GÜLTEPE-TEL.:0232 469 72 69 ‹ZM‹R-KARfiIYAKA-LEVENT ELEKTR‹K
LABORATUVARI-1710 SK. NO:70/B ESHOT SOKA⁄I-TEL.:0232 381 14 42 ‹ZM‹R-KARfiIYAKA-ASMERKEZ T‹CARET-ESK‹ TRAMVAY CD.
1675. SK. NO:78/1B ALAYBEY-TEL.:0232 364 33 73 ‹ZM‹R-BORNOVA-ACEM ELEKTRON‹K-552/2 SK. NO: 4/A-TEL.:0232 339 73 31 ‹ZM‹R-
KONAK-KILIÇ ELEKTRON‹K-BARBAROS HAYRETT‹N PAfiA CD. NO:62/1 LEVENT-TEL.:0232 433 15 19 ‹ZM‹R-URLA-‹LTER ELEKTRON‹K-
‹ZM‹R 75. YILl CADDES‹NO:81/C-D-TEL.:0232 754 44 44 ‹ZM‹R-BUCA-ÇA⁄LAR ELEKTRON‹K-670/1 SK. NO:57/B-TEL.:0232 276 27 77
‹ZM‹R-YEfi‹LYURT-UMUT ELEKTR‹K & ELEKTRON‹K-YILDIZ CAD. NO: 152/A-TEL.:0232 244 65 77 ‹ZM‹R-ÖDEM‹fi-MURAT ELEKTRON‹K-
UMURBEY MH. SANAY‹ S‹T. 9.SK NO: 10 -TEL.:0232 544 41 98 KAHRAMANMARAfi-AKSUNGUR ELEKTR‹K-UZUNOLUK CAD. 20.SOKAK
NO:20/A-TEL.:0344 212 77 50 KAHRAMANMARAfi-KALE ELEKTRON‹K-FEVZ‹PAfiA MH. UZUNLUK CD.-TEL.: 0344 225 07 94
KAHRAMANMARAfi-ELB‹STAN-DEM‹RO⁄LU SO⁄UTMA-GÜNEfiL‹ MH. TERM‹NAL CD. NO:30-TEL.:0344 413 60 67 KARABÜK-SAFRANBOLUMEHMET SA⁄LAM - GÖKAY TEKN‹K-‹NÖNÜ MH. ESK‹ BA⁄LAR SK. NO:13-TEL.:0370 712 24 97 KARABÜK-ACAR ELEKTRON‹K-VAKIF
‹fi HANI KAT:2 EMN‹YET MÜDÜRLÜ⁄Ü YANI-TEL.:0370 424 32 00 KARAMAN-ÖZ AS SO⁄UTMA-ABBAS MH. MUT CD. NO: 82/A TEL. : 0338
214 56 74 KARS-AYDIN ELEKTRON‹K-KAZIM KARABEK‹R ‹fiHANI KAT:2 NO: 125 -TEL.:0474 212 87 82 KASTAMONU-TAfiKÖPRÜ-DE⁄‹fi‹M
ELEKTR‹K-TABAKHANE MH. ATATÜRK CD. NO:55/A-TEL.:0366 417 42 04 KASTAMONU-TOSYA-DO⁄Ufi ELEKTRON‹K-VAKIF SK. 15/ATEL.:0366 313 42 59 KASTAMONU-HARUN TELEKOMÜN‹KASYON-‹NÖNÜ MAHALLES‹ AFfi‹NBEY SOKAK NO:8/B-TEL.:0366 212 33 66
KAYSER‹-MEL‹KGAZ‹-AKTÜRK BEYAZ EfiYA SERV‹S‹-AYDINLIKEVLER MH.FIRAT CD.KR‹STAL APT.A-B NO.17 TEL.:0352 332 08 25
KAYSER‹-MEL‹KGAZ‹-AKIfi ELEKTRON‹K-ÇORAKÇILAR MH. CENG‹Z TOPEL CD.NO:20/B-TEL.:0352 320 14 00 KAYSER‹-DEVEL‹-U⁄UR
SO⁄UTMA-HARMAN MAHALLES‹ BELED‹YE PASAJ‹ ÜZER‹ NO: 15-TEL.:0352 621 56 31 KAYSER‹-SÖNMEZ ELEKTRON‹K-CAM‹ KEB‹R
MAH. BASMANE SOK. NO:16/A-TEL.:0352 231 69 62 KAYSER‹-ZERO COMPUTER-SAHAB‹YE MH. METE CD. fiAH‹R SATO⁄LU SK. SATO⁄LU
AP D: 1-TEL.:0352 232 15 34 KIRIKKALE-KARDEfiLER ELEKTRON‹K-GÜZELTEPE MH. CELAL AT‹K CD. NO:4/B-TEL.:0318 224 47 42
KIRKLAREL‹-MERKEZ-BUSE ELEKTRON‹K-KARACA ‹BRAH‹M MH. KAPAN CAM‹ SK. ACUN PSJ. NO:23-TEL.:0288 212 73 57 KIRKLAREL‹LÜLEBURGAZ-BUSE ELEKTRON‹K-YILMAZ MH. ESK‹ KIRKLAREL‹ CD. EFSANE DÜ⁄ÜN SALONU YANI NO:36/A TEL.: 0288 412 88 92
KIRfiEH‹R-GARANT‹ ELEKTRON‹K-ANKARA CD. C‹NGÖZ BEBE ARKASI YA⁄MUR ‹fiHANI NO:9/B-TEL.:0386 214 02 18 K‹L‹S-FLAfi
ELEKTRON‹K-fiEH‹TLER PARKI KARfiISI NO:63/1-TEL.: 0348 814 55 28 KOCAEL‹-DORUK TEKN‹K H‹Z. -KARABAfi MH. CENG‹Z TOPEL
CD. MÜNECC‹M AR‹F SK. NO:6/A -TEL.:0262 331 11 66 KOCAEL‹-KARAMÜRSEL-KILINÇ ELEKTRON‹K-‹NÖNÜ CD. M.YASEF SK. NO:10/MTEL.:0262 452 55 55 KOCAEL‹-D‹LOVASI-SAMET ELEKTRON‹K-BA⁄DAT CAD NO: 42/2-TEL.:0262 754 79 86 KOCAEL‹-DARICA-KARDEfiLER
ELEKTRON‹K-KAZIM KARABEK‹R MH. MEVALANA CAD. NO: 1/A-TEL.:0262 656 27 88 KOCAEL‹-GEBZE-YILDIRIM ELEKTRON‹K-H. HAL‹L
MH. 1209 SK. NO:13/C-TEL.:0262 641 35 88KONYA-BEYfiEH‹R-SELV‹ SO⁄UTMA-HACI ARMA⁄AN MH. ANTALYA CD. NO:108/F-TEL.:0332
512 40 10 KONYA-SELÇUKLU-SAF‹R SO⁄UTMA-FER‹T PAfiA MH. GÜNEY SK. NO:3/F KULE S‹TE C‹VARI-TEL.:0332 236 36 75 KONYA-
ERKAM SO⁄UTMA-KARAKURT MH. FURKAN DEDE CD.ASBAfiKAN SK. NO:13/B-TEL.:0332 350 00 32 KONYA-ÖZCAN SO⁄UTMA VE ISITMA
LTD fiT‹-N‹fiANTAfiIMH. HULUS‹ BAYBAL CD. NO:36/A-TEL.:0332 236 33 37 KONYA-SELÇUKLU-KONSEY SOGUTMA VE ISITMA-KÜÇÜK
‹HSAN‹YE MH. fiA‹R GUBAR‹ SK.B‹NSA S‹TES‹ ALTI NO : 15 TEL.:0332 321 21 22 KONYA-AKfiEH‹R-EROL ELEKTRON‹K-MEYDAN MAH.
ÇOCUK PARKI KOD NO:38-TEL.:0332 812 61 12 KONYA-MERAM-GÜRKAN TEKN‹K-‹HT‹YARETT‹N MH.SIRÇALI MEDRESE CAD.‹BN‹B‹B‹
SK. NO:1/B-TEL.:0332-351 02 03 KONYA-SEYD‹fiEH‹R-TUNCER ELEKTRON‹K-KIBRIS CD. NO:26-TEL.:0332 582 93 92 KONYA-DURMAZLAR
ELEKTR‹K-ANKARA-KONYA CAD. NO:67-TEL.:0332 673 28 48 KONYA-ERE⁄L‹-ERDEM‹R TEKN‹K-ÜÇ GÖZ MH. KIBRIS CD.EL‹T APT. NO:3
TEL.: 0332 713 02 53 KÜTAHYA-EL‹FO⁄LU ELEKTR‹K-FAT‹H SULTAN MEHMET BULVARI DUAGÜR CAM‹‹ ALTI 43/B-TEL.:0274 226 32
80 MALATYA-YUVAM ELEKTRON‹K-‹ST‹KLAL MH. FUZUL‹ CD.‹MAMO⁄LU SK. NO:1-TEL.:0422 322 52 88 MALATYA-HAL‹M ELEKTRON‹K-
SARAY MH. DEVECEL SK. NO:3-TEL.:0422 321 86 08MAN‹SA-SOMA-GÜRMAK TEKN‹K-KURTULUfi MH. ‹DMAN SK. NO:47/A-TEL.:0236
613 66 56 MAN‹SA-SAL‹HL‹-AYKAR SO⁄UTMA- BEfiEYLÜL MH. BELED‹YE CD. NO:TEL.:243-0236 714 88 68 MAN‹SA-AY ELEKTRON‹K
MAN‹SA fiB.-YARHASANLAR MAH. ESK‹ HASA⁄A 2306 SOK.NO: 18/A-TEL.:0236 237 30 62-63 MAN‹SA-BURCU ELEKTRON‹K-TUNCA
MAH. KURTULUfi CAD. NO:54-TEL.:0236-234 57 42 MAN‹SA-TURGUTLU-EM‹N ELEKTRON‹K-ALTAY MH. SEV‹NÇ SK. NO:25-TEL.:0236
313 28 35 MAN‹SA-AKH‹SAR-AKIN ELEKTRON‹K-PAfiA MAH. 7.SOK. NO:25BELED‹YE ARKASI-TEL.:0236 413 50 53 MAN‹SA-SARUHANLI-
fiEN SO⁄UTMA-ATATÜRK MH. 7 EYLÜL CD. NO: 21/B-TEL.:0236 357 12 00 MAN‹SA-KULA-ERDAL KARAHAN-TERMO D‹NAM‹K-CAM‹‹
CED‹T MH. 62 SK. NO:67-TEL.:0236 816 70 99 MARD‹N-M‹DYAT-SA⁄LAM ELEKTRON‹K-ESNAF SANATKARLAR KRED‹ KOOP. KARfiISI
2.CD.NO:56-TEL.:0482 462 33 90 MARD‹N-KIZILTEPE-‹BRAH‹MO⁄LU ISITMA-fiANLIURFA CAD. ECE PASAJI NO:7-TEL.:0482 312 55 99
MARD‹N-DER‹K-UZAY ELEKTRON‹K-BELED‹YE MEYDANI NO:36-TEL.:0482 251 34 35 MARD‹N-YEN‹fiEH‹R-MERKEZ TEKN‹K-KARAYOLLARI
ARKASI BARIfi CAD GÜNAYDIN APT ALTI-TEL.:0482 212 83 06 MARD‹N-NUSAYB‹N-BÜDÜN ELEKTRON‹K-ZEYNEL AB‹D‹N MH. Ç‹LEK
SK NO: 1/B-TEL.:0482 415 61 98 MU⁄LA-FETH‹YE-ANADOLU TEKN‹K SERV‹S-ÖLÜDEN‹Z YOLU ÜZER‹ BAHA fiIKMAN CD.NO:157TEL.:0252 611 39 12 MU⁄LA-M‹LAS-AFfi‹N YILDIRIM - TEKN‹K SO⁄UTMA-HACI ‹LYAS MAH. PAZAR SOK.NO:14-TEL.:0252 512 14 45
MU⁄LA-YATA⁄AN-ASTEKN‹K ISITMA SO⁄UTMA SERV‹S‹-YEN‹ MH. 152. SK. NO:8-TEL.:0252 572 56 31 MU⁄LA-DALAMAN-ÖZKAN
- 42 -
Page 44

TEKN‹K SO⁄UTMA-MERKEZ MAHALLES‹ ATATÜRK CD.NO:56-TEL.:0252 692 25 25 MU⁄LA-ELBO ELEKTR‹K ELEKTRON‹K-ORHAN‹YE
YETK‹L‹ SERV‹SLER L‹STES‹
MH. HÜRR‹YET CAD. NO:1/6-TEL.:0252 214 18 84 MU⁄LA-DATÇA-MEL‹H ELEKTRON‹K-‹SKELE MH. AMBARCA CD. NO:17-TEL.:0252 712
02 30 MU⁄LA-MARMAR‹S-‹LKSEL ELEKTRON‹K-YEN‹ YOL CD. N0:51/9-TEL.:0252 412 62 60 MU⁄LA-URLA-STAR ELEKTRON‹K-‹N‹fiD‹B‹
CAD NO 1/C AKYAKA BELDES‹-TEL.:0252 243 40 42 MUfi-HAfi‹MO⁄LU EK‹C‹ ELEKTRON‹K-HAfi‹MO⁄ULLARI EK‹C‹ ‹fi HANI BELED‹YE
CD.NO:20/A-TEL.:0436 212 38 80 N‹⁄DE-HUZUR ELEKTR‹K-ILHANLI MAH ÖZKUL MARKET KARSISI ÖZKILIÇ AP ALTI NO: 43-TEL.:0388
233 54 05 ORDU-TEK ISITMA SO⁄UTMA-SAKARYA MAH YENI KUMRU CAD NO: 111-TEL.:0452 423 84 49 ORDU-HAZAR SO⁄UTMA-YEN‹
MAH. 26.SOK NO:17-TEL.:0452 214 04 49 ORDU-ÜNYE-STAR TEKN‹K-KALEDERE MH. 20TEMMUZ CD. NO:16-TEL.:0452 324 82 51 ORDU-
MERKEZ-M‹KRO ELEKTRON‹K-YEN‹ MH. 319 SK. NO:18 -TEL.: 0452 223 13 49 OSMAN‹YE-MODERN ELEKTRON‹K-ORTAOKUL CD.
K‹fi‹O⁄LU ÇARfiISI NO:15-TEL.:0328 812 82 84 OSMAN‹YE-DÜZ‹Ç‹-TERMO SO⁄UTMA-UZUNBANI MAH. UZUNBANI CAD. NO: 31 / ATEL.:0328 876 25 60 R‹ZE-ÇAYEL‹-ÖZER TEKN‹K- MAKSUT ÖZER-EMNIYET MÜD.KARfiISI fiA‹RLER YOLU ÜZERI NO:3/2B-TEL.:0464 532
63 81 R‹ZE-CEVAH‹R ELEKTRON‹K-TOPHANE MAH. ATATÜRK CAD. ‹fi PASAJI-TEL.:0464 213 16 17 SAKARYA-ADAPAZARI-ÇINAR
ELEKTRON‹K-KÖMÜR PAZARI CAD. NO: 15 A-TEL.:0264 271 39 12 SAMSUN-ÇARfiAMBA-ÖZKAN SO⁄UTMA-ORTA MH. TUNCAY KOCABAfi
SK. NO:85-TEL.:0362 832 28 90 SAMSUN-BAFRA-KARATAfi T‹CARET-KIZILIRMAK MH. F.ÇAKMAK SK. NO:18/A-TEL.: 0362 543 04 91
SAMSUN-GÜLTEK‹N SERV‹S-ATATÜRK BULVARI NO.285-TEL.:0362 437 33 82 SAMSUN-DEN‹Z ELEKTRON‹K-KADIKÖY MH. OSMAN‹YE
CD. NO: 68-TEL.:0362 432 44 80 S‹‹RT-ERYILMAZ ELEKTRON‹K-CUMHUR‹YET CAD. NO:25 ULUCAM‹ KARfiISI-TEL.:0484 224 03 92 S‹NOP-
ADA EV ALETLER‹-CAM‹ KEB‹R MH. TÜTÜNCÜ SK. NO: 16-TEL.:0368 260 12 64 S‹NOP-AYANCIK-YILKAY SO⁄UTMA-YALI MH. DR.AZM‹
HAMZAO⁄LU CD. NO:46-TEL.:0368 613 52 12 S‹NOP-BOYABAT-ÖZTÜRK BEYAZ EfiYA BAKIM SERV‹S-GÖKDERE MH.YUSUF KEMAL BEY
CD.NO:24-TEL.:0368 315 61 21 S‹VAS-EKOL ELEKTRON‹K-H‹KMET IfiIK CD.NALBANTLAR BAfiI KAVfiA⁄I NO:1/D-TEL.:0346 223 44 96
fiANLIURFA-SURUÇ-IfiIK SO⁄UTMA TEKN‹KERL‹⁄‹-D‹K‹L‹ MH. Z‹YARET CD. NO:10-TEL.:0414 612 17 25 fiANLIURFA-AKTAfi ELEKTRON‹K-
ASFALT CD. N0.22/F-TEL.:0414 217 14 87 fiANLIURFA-B‹REC‹K-YARAfiIR SO⁄UTMA-MEYDAN MAH 10 TEMMUZ CAD KÖPRÜ ÇIKIfiI NO
: 9-TEL.:0414 652 36 38 fiIRNAK-S‹LOP‹-ABAY ELEKTRON‹K-2. CADDE S‹EMENS BAY‹‹ KARfiISI-TEL.:0486 518 50 99 fiIRNAK-ULUDERE-
ÜRÜN ELEKTRON‹K-CUMHUR‹YET CD. PTT YANI-TEL.:0486 351 28 22 TEK‹RDA⁄-HAYRABOLU-POYRAZ TEKN‹K-H‹SAR MAH. ADELET
SK. NO:24-TEL.:0282 315 55 48 TEK‹RDA⁄-SARAY-BATI TEKN‹K-YEN‹ MH. TAKS‹M CD. NO:9 TEL.:0282 768 69 34 TEK‹RDA⁄-MURATLI-
AKAN ELEKTRON‹K-MURAD‹YE MH. NAZIM SAV CD. NO:30/A-TEL.:0282 361 28 17 TEK‹RDA⁄-ÇORLU-FULL TEKN‹K-MUH‹TT‹N MH.
F‹K‹R SK. NO:12/B-TEL.:0282 652 28 68 TEK‹RDA⁄-ARI ELEKTRON‹K-AYDO⁄DU MH. fiEH‹TLER CD. NO: 33/A-TEL.:0282 263 40 61
TEK‹RDA⁄-MALKARA-KER‹MO⁄ULLARI T‹CARET-YEN‹MAHALLE GÜLDESTE SOK. NO: 4/B-TEL.:0282 427 16 61 TEK‹RDA⁄-ÇERKEZKÖYÇA⁄RI ELEKTRON‹K-G.O. PAfiA MH. SAYAR SK. KARDEfiLER APT. NO:5 -TEL.:0282 726 02 66 TOKAT-ERBAA-H‹DRO ELEKT‹R‹K-
CUMHUR‹YET MH. GAZ‹ BULVARI NO:144-TEL.:0356 715 56 01 TOKAT-C‹HAN ELEKTRON‹K-G.O.PAfiA BULVARI S‹VAS CAD. NO:290/ATEL.:0356 214 00 74 TOKAT-TURHAL-GÜÇLÜ SO⁄UTMA-CELAL MH. TUNA SK. NO:11-TEL.: 0356 276 39 66 TOKAT-CEM TEKN‹K SO⁄UTMA-
SO⁄UKPINAR MH. GOP BULVARI 241/A GÖKÇE PASAJI NO:14-TEL.:0356 212 37 57 TRABZON-ÇIRAK TEKN‹K-FAT‹H MH. AYASOFYA CD.
NO: 57 MÜZE KARfiISI-TEL.:0462 229 66 44 TRABZON-AKÇAABAT-ATOM ELEKTR‹K-ORTA MH. ERENLER SK. NO:5 -TEL.:0462 228 12
58 TRABZON-YET-SAN ELEKTRON‹K-FAT‹H MH. FAT‹H CD. COfiKUNER PASAJI NO:2/B-TEL.:0462 223 15 04 TRABZON-ARAKLI-fiENGÜL
TEKN‹K-BA⁄KUR ÇARfiISI NO: 10 / A-TEL.:0462 721 74 11 VAN-ERC‹fi-ÖZKANAT TAM‹RAT-EMN‹YET KARAKOL ARKASI NO:3-TEL.:0432
351 95 40 VAN-EB‹NÇ TEKN‹K-SIHKE CAD ATEfi SOK. NO 10-TEL.:0432 214 31 37 VAN-BURHAN AYDIN - ÖZ USTA TAM‹RAT-KÜLTÜR
MERKEZ‹ C‹VARI DEM‹RC‹LER 1. SK. NO:1/C-TEL.:0432 216 34 58 YALOVA-ALTINOVA-DO⁄AN TEKN‹K SO⁄UTMA-CUMHUR‹YET
MH.MERKEZ DURAK KARfiISI NO:29A-TEL.:0226 461 26 21 YALOVA-TINAZTEPE ELEKTR‹K-‹STANBUL CD. BORA SK. NO: 14-TEL.:0226
812 01 60 YOZGAT-AKDA⁄MADEN‹-AYDIN SO⁄UTMA-AHISHAVI MH. 2. HANLAR SK. NO :10-TEL.:0354 314 64 12 YOZGAT-ÖNDER
ELEKTRON‹K-UN PAZARI NO:14-TEL.:0354 212 79 67 YOZGAT-SORGUN-KARDEfiLER ELEKTRON‹K-CUMHUR‹YET CD. NO:29 1/CTEL.:0354 415 45 79 ZONGULDAK-KRD ERE⁄L‹-UZMAN ELEKTRON‹K-ERDEM‹R CAD NO:130-TEL.:0372 316 31 28 ZONGULDAK-MERKEZ-
EMEK ELEKTRON‹K-PAP‹LA ‹fi HANI ZEM‹N KAT NO:9 SO⁄UKSU-TEL.:0372 251 67 31
- ONLINE YETK‹L‹ SERV‹SLER L‹STES‹ -
"Yetkili servislerimizin güncellenmifl haldeki listesine
www.sinbo.com.tr internet adresinden ulaflabilirsiniz."
- 43 -
Page 45

- GARANT‹ fiARTLARI -
1. Garanti süresi, mal›n teslim tarihinden itibaren bafllar ve 2 y›ld›r.
2. Mal›n bütün parçalar› dahil(kullan›m hatalar›ndan kaynaklanan k›r›lmalar hariç) olmak üzere tamam› firmam›z›n
garantisi kapsam›ndad›r.
3. Mal›n garanti süresi içerisinde ar›zalanmas› durumunda, tamirde geçen süre garanti süresine eklenir. Mal›n tamir
süresi en fazla 30 ifl günüdür. Bu süre, mala iliflkin ar›zan›n servis istasyonuna servis istasyonunun olmamas›
durumunda, mal›n sat›c›s›, bayii, acentas›,temsilcili¤i, ithalatç›s› veya imalatç›s›-üreticisinden birisine bildirim tarihinden
itibaren bafllar. Mal›n ar›zas›n›n 15 ifl günü içerisinde giderilmemesi halinde, imalatç›-üretici veya ithalatç›; mal›n
tamiri tamamlan›ncaya kadar, benzer özelliklere sahip baflka mal› tüketicinin kullan›m›na tahsis etmek zorundad›r.
4. Mal›n garanti süresi içerisinde, gerek malzeme ve iflçilik, gerekse montaj hatalar›ndan dolay› ar›zalanmas› halinde,
iflçilik masraf›, de¤ifltirilen parça bedeli ya da baflka herhangi bir ad alt›nda hiçbir ücret talep etmeksizin tamiri
yap›lacakt›r.
5. Tüketicinin onar›m hakk›n› kullanmas›na ra¤men mal›n;
-Tüketiciye teslim edildi¤i tarihten itibaren, belirlenen garanti süresi içinde kalmak kayd›yla,bir y›l içerisinde; ayn›
ar›zan›n ikiden fazla tekrarlanmas› veya farkl› ar›zalar›n dörtten fazla meydan gelmesi veya belirlenen garanti süresi
içerisinde farkl› ar›zalar›n toplam›n›n alt›ndan fazla olması unsurlar›n›n yan›s›ra, bu ar›zalar›n maldan yararlanamamay›
sürekli k›lmas›,
-Tamiri için gereken azami sürenin afl›lmas›,
-Firman›n servis istasyonunun, servis istasyonunun mevcut olmamas› halinde s›rayla sat›c›s›, bayii, acentesi temsilcili¤i,
ithalatç›s› veya imalatç› - üreticisinden birisine düzenleyece¤i raporla ar›zan›n tamirine mümkün bulunmad›¤›n›n
belirlenmesi,durumlar›nda, tüketici mal›n ücretsiz de¤ifltirilmesini, bedel iadesi veya ay›p oran›nda bedel indirimi
talep edebilir.
6. Mal›n kullanma k›lavuzunda yer alan hususlara ayk›r› kullan›lmas›ndan kaynaklanan ar›zalar garanti kapsam›
d›fl›ndad›r.
7. Garanti Belgesi ile ilgili olarak ç›kabilecek sorunlar için Sanayi ve Ticaret Bakanl›¤› Tüketicinin ve Rekabetin
Korunmas› Genel Müdürlü¤ü’ne baflvurulabilir.
‹THALATÇI F‹RMA
DE‹MA ELEKTROMEKAN‹K ÜRÜNLER ‹NfiAAT SPOR MALZEMELER‹ ‹MALAT SAN. VE T‹C. A.fi.
Cihangir Mh. Güvercin Cd. No:4 Haramidere Mevkii Avcılar - ‹stanbul - Türkiye
Tel : (0212) 422 94 94 & Fax : (0212) 422 03 49
www.sinbo.com.tr - info@sinbo.com.tr
- 44 -
Page 46

- SS 4028 TRAfi MAK‹NASI -
- GARANT‹ BELGES‹ -
Garanti Belge No : 79340
SSHY Belge No : 15907
‹THALATÇI F‹RMA
Ünvanı : DE‹MA ELEKTROMEKAN‹K ÜRÜNLER‹ ‹Nfi. SPOR MALZ.
‹MALAT SAN. ve T‹C. A.fi.
Adresi : Cihangir Mah. Güvercin Cad. No:4 Haramidere Mevkii
Avc›lar / ‹STANBUL
Tel. : 0212 422 94 94 & Fax: 0212 422 03 49
Yetkili Kifli :
Yönetim Kurulu Baflkan›
Ürünün Cinsi : TRAfi MAK‹NASI
Markası : S‹NBO
Modeli : SS-4028
Alt Modeli : Bandrol ve Seri No :
Teslim Tarihi ve Yeri :
Garanti Süresi : 2 Yıldır
Azami Tamir Süresi : 30 ‹fl Günü
Kullanım Ömrü : Bakanl›kça belirlenen ve ilan edilen kullan›m ömrü 7 y›ld›r.
(Ürünün fonksiyonlar›n› yerine getirebilmesi için gereken yedek parça temin süresi)
SATICI F‹RMA
Ünvanı :
Adresi :
Tel.Fax :
Fatura Tarihi ve No :
Teslim Tarihi ve Yeri :
‹mza ve Kafle :
Bu bölüm, ürünü sat›n ald›¤›n›z Yetkili Sat›c› taraf›ndan imzalanacak ve kaflelenecektir.
Bu belgenin kullan›lmas›na; 4077 say›l› Tüketicinin Korunması Hakkında Kanun ve bu Kanun’a dayan›larak yürürlü¤e konulan Garanti Belgesi
Uygulama Esaslar›na Dair Tebli¤ uyar›nca, TC Sanayi ve Ticaret Bakanl›¤› Tüketicinin ve Rekabetin Korunmas› Genel Müdürlü¤ü tarafından
izin verilmifltir.
Garanti Belge Onay Tarihi : 22/02/2010
SSHY Belge Onay Tarihi : 12/03/2008
- 45 -
Page 47

MÜfiTER‹ H‹ZMETLER‹
De¤erli Müflterimiz,
En uygun fiyata en iyi ürünü vermenin yan› s›ra; en iyi hizmeti vermenin de
önemli oldu¤una inan›yoruz. Bu nedenle siz bilinçli tüketicilere daha yak›n
olabilmek için, internet adresimizdeki eriflim formlar›n›n yan› s›ra, tüketici
dan›flma hatlar›m›z› da hizmetinize açm›fl durumday›z.
TÜKET‹C‹
DANIfiMA HATTI
444 66 86
MERKEZ
TEKN‹K SERV‹S
(0212) 422 94 94
www.sinbo.com.tr
Dan›flma Hatlar›m›z›,
- Hafta içi her gün 08.30-18.00 saatleri aras›nda arayabilir; istek, öneri ve
flikayetlerinizi firmam›za iletebilirsiniz.
Tüketicinin Dikkatine:
Ürünlerimizle ilgili hizmetleri tam olarak alabilmek için afla¤›daki önerilere
uyman›z› rica ederiz:
1. Ürünü ald›¤›n›zda Garanti Belgesini mutlaka yetkili sat›c›n›za onaylatt›r›n›z.
2. Ürünü kullanma k›lavuzu esaslar›na göre kullan›n›z.
3. Ürününüzle ilgili hizmet talebiniz oldu¤unda yukar›daki telefon
numaralar›ndan, Tüketici ‹liflkileri Merkezi'ne baflvurunuz.
4. Ürünü promosyon arac›l›¤› ile edinmiflseniz, ürüne ait garanti belgesini en
yak›n yetkili servisimize giderek onaylatt›r›n›z.
5. Teknik servisteki ifliniz bitti¤inde "Hizmet Fifli" almay› unutmay›n›z.
Alaca¤›n›z bu fifl, ileride ürününüzde meydana gelebilecek herhangi bir
sorunda size yarar sa¤layacakt›r.
6. Cihaz›n›z ilk çal›flt›rmada çal›flm›yor veya ar›zal› ise, size en yak›n S‹NBO
Yetkili Servisine baflvurabilir veya S‹NBO Dan›flma Hatlar›ndan yard›m
alabilirsiniz.
- 46 -
Page 48

Made in P.R.C.
‹mal Y›l› : 2010
- TEDAR‹KÇ‹ F‹RMA / EXPORTER United Favour Development Limited
Unit B, 10/F Lee May Building 788-790
Nathan Road, Mongkok, Kowloon, HK.
- UYGUNLUK BEYANI / CE SGS-CSTC Standards
No.588 West Jindu Rd. Songjiang
District, Shanghai, China
SHEMO081100457HS01C
EEE Yönetmeli¤ine uygundur.
 Loading...