

Page 1
SMX 2750 KARIfiTIRICI
KULLANMA KILAVUZU
TR
EN
FR
NL
DE
ES
RU
UA
AR
HR
Page 2
- 1 -
Page 3

De¤erli Müflterimiz,
Ürün seçiminde S‹NBO'yu tercih etti¤iniz için teflekkür ederiz.
Uzun ve verimli bir kullan›m için cihaz› kullanmadan önce bu k›lavuzu özellikle güvenlik
talimatlar›na dikkat ederek okuman›z› ve devaml› suretle saklaman›z› tavsiye ederiz.
Sayg›lar›m›zla,
Sinbo Küçük Ev Aletleri
S‹NBO SMX 2750 ÇOK FONKS‹YONLU MUTFAK ROBOTU
KULLANIM KILAVUZU
Lütfen bu talimat› okuyunuz ve saklay›n›z.
Cihazla oynamamalarını güvenceye almak için çocuklar gözetim altında tutulmalıdır.
Bu ürün (çocuklar dahil ) fiziksel hassasiyeti az, zihinsel olarak yetersiz, deneyimsiz ve yeterli bilgiye
sahip olmadan yada kendilerinin güvenli¤inden sorumlu olan kifliler tarafından bu ürünü kullanmak
için gerekli talimatlar verilmemifl kiflilerin kullanımına uygun de¤ildir.
Children being supervised not to play with the appliance.
This appliance is not intended for use by persons (including children) with reduced physical, sensory
or mental capabilities, or lack of experience and knowledge, unless they have been given supervision
or instruction concerning use of the appliances by a person responsible for their safety. Children
should be supervised to ensure that they do not play with the appliance.
- 2 -
Page 4

C‹HAZIN ÖZELL‹KLER‹
* Etkin motor, düflük gürültü.
* Seyyar kar›flt›rma ifllemi
* Tam metal diflli sistemi
* Tutarl› iflletim h›z› sa¤layan ak›ll› devre
* De¤iflken ad›ms›z h›z ve darbe fonksiyonu.
* fieffaf s›çrama korumal› 4.5LT f›rçal› paslanmaz çelik kase.
* 3 kar›flt›rma araçlar›: f›rçalay›c›, ç›rp›c› ve hamur kancas›.
* AC230V 50Hz, 700W (1500W max.)
D‹KKAT!!
Ürünün üzerinde bulunan iflaretlemelerde veya ürünle verilen di¤er bas›l› dökümanlarda
beyan edilen de¤erler, ilgili standartlara göre laboratuar ortam›nda elde edilen
de¤erlerdir.Bu de¤erler, ürünün kullan›m ve ortam flartlar›na göre de¤iflebilir.
ÖNEML‹ GÜVENL‹K UYARILARI
• Bakım, Onarım ve Kullanımda Uyulması Gereken Kurallar
* Cihaz›n›z› kullanmadan önce talimatlar› dikkatlice okuyunuz.
* Cihaz›n ba¤lant›lar›n› takarken ve ç›kart›rken cihaz› kapat›n›z.
* Parmaklar›n›z› hareketli parçalardan ve ba¤lant›lardaki oluklardan uzak tutunuz.
* Cihaz› sadece ev içi amaçlanan kullan›m› için kullan›n›z, e¤er cihaz yanl›fl kullan›ma
maruz kal›rsa veya bu güvenlik talimatlar›na uyulmazsa üretici herhangi bir sorumluluk
kabul etmeyecektir.
* Özellikle çocuklar veya engelle kiflilerin oldu¤u yerlerde cihaz› kesinlikle gözetimsiz
b›rakmay›n›z.
* Cihaz›n voltaj de¤erlendirmesinin elektrik sisteminize uygun oldu¤unu kontrol ediniz.
Herhangi bir ba¤lant› hatas› garantisini geçersiz k›lacakt›r.
* Cihaz toprakl› bir elektrik soketine tak›lmal›d›r.
* E¤er bir elektrik uzatma kablosu kullanman›z gerekirse, toprakl› olmal›d›r ve hiç
kimsenin üzerine bas›p düflmemesini sa¤laman›z gerekir.
* Cihaz›n fiflinin kullanmay› b›rak›r b›rakmaz ve temizlerken çekiniz.
* E¤er zarar görmüflse ba¤lant›n›z› ve/veya cihaz›n›z› kullanmay›n›z. Onayl› bir servis
merkezine baflvurman›z gerekecektir.
* Müflteri taraf›ndan yap›lacak olan normal bak›m ve temizleme d›fl›nda cihaz üzerinde
herhangi bir ifllem onayl› servis merkezi taraf›ndan yap›lmal›d›r.
* Cihaz›, güç kordonunu veya fiflini suya ya da herhangi bir di¤er s›v›ya bat›rmay›n›z.
* Güç kordonun çocuklar›n yan›nda sarkmas›na, cihaz›n›z›n s›cak bölümleriyle, herhangi
bir ›s› kayna¤› veya keskin bir kenar ile temasa geçmesine izin vermeyiniz.
* E¤er güç kordonu veya fifli zarar görmüflse, cihaz›n›z› kullanmay›n›z. Riskten kaç›nmak
için onayl› bir servis merkezi taraf›ndan de¤ifltirilmelidir.
* Mikrodalga f›r›na metal içeren herhangi bir aksesuar koymay›n›z.
* Cihaz› kapat›n›z ve aksesuarlar› de¤ifltirmeden veya kullan›mda olan parçalara
- 3 -
Page 5

ÖNEML‹ GÜVENL‹K UYARILARI
yaklaflmadan önce ba¤lant›s›n› kaynaktan kesiniz.
* ç›rp›c›ya, kar›flt›rma b›ça¤›na veya yo¤urma kancas›na cihaz iflletimdeyken dokunmay›n›z.
* Bir seferde sadece bir ba¤lant› kullan›n›z.
* Cihaz› bir seferde 10 dakikadan fazla kullanmay›n›z. Bir sonraki kullan›m öncesinde
30 dakika cihaz›n dinlenmesini sa¤lay›n›z.
* Bu cihaz e¤er fiziksel, alg›sal ya da zihinsel yeterlilikleri güvenli olarak kullanmalar›na
engel oluyorsa çocuklar veya di¤er kifliler için yard›m veya gözetim olmadan kullan›m
amaçl› de¤ildir.
* Çocuklar›n cihazla oynamamalar›n› sa¤lamak için gözetilmeleri gerekir.
SADECE EV KULLANIMI ‹Ç‹ND‹R
TAfiIMA VE NAKL‹YE ESNASINDA
• Ürünü düflürmeyiniz,
• Darbelere maruz kalmamas›n› sa¤lay›n›z,
• S›k›flmamas›n›, ezilmemesini sa¤lay›n›z,
• Ambalaj üzerindeki iflaretlemelere uyunuz.
• Orjinal ambalajıyla taflımaya özen gösteriniz.
ÇEVRE VE ‹NSAN SA⁄LI⁄I
Çevre korumas›na siz de katk›da bulunabilirsiniz!
Lütfen yerel düzenlemelere uymay› unutmay›n: Çal›flmayan
elektrikli cihazlar›, uygun elden ç›karma merkezlerine götürün.
Kullanım sırasında insan ve çevre sa¤lı¤ına tehlikeli veya zararlı olabilecek bir durum
söz konusu de¤ildir.
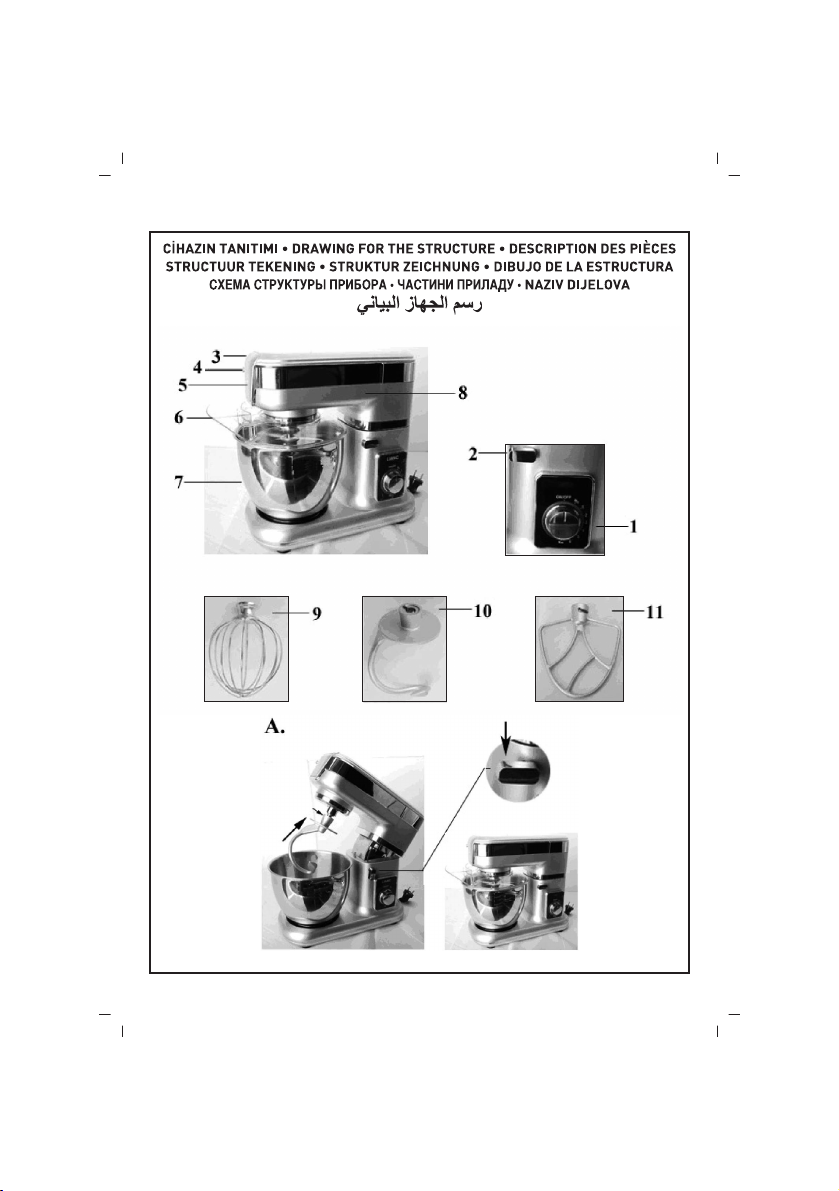
C‹HAZIN TANITIMI
Ürün önceden bildirim olmaks›z›n de¤ifltirilebilir.
1. H›z kontrol anahtar›
2. Çok fonksiyonlu bafll›k için serbest b›rakma butonu
3. K›yma makinesi güç ç›k›fl› için ç›kart›labilir kapak
4. Kesim gövdesi için serbest b›rakma butonu
5. K›yma makinesi için güç ç›k›fl›
6. Kase kapa¤›
7. Paslanmaz çelik kase
8. Çok fonksiyonlu bafll›k
9. Ç›rp›c›
10. Hamur kancas›
11. Kar›flt›rma b›ça¤›
- 4 -
Page 6

C‹HAZIN KULLANIMI
• Ba¤lantı veya Montajın Nasıl Yapılaca¤ını Gösterir fiema ile Ba¤lantı veya Montajın
Kimin Tarafından Yapılaca¤ına (tüketici, yetkili servis) iliflkin bilgiler
YO⁄URMA/DÖVME/ÇIRPMA
(fiekil A'ya bak›n›z)
‹çerik maddelerinin do¤as›na ba¤l› olarak kapa¤›yla birlikte kase (7) 2 kg'a kadar hamur
haz›rlamak için kullan›labilir.
1. ‹lk defa kullanmadan önce sabunlu suyla aksesuarlar›n tüm parçalar›n› temizleyiniz,
durulay›p kurutunuz.
2. Çoklu fonksiyon bafll›¤›n› (8) serbest b›rakmak için buton (2)'ye bas›n›z ve dikey bir
konuma getiriniz.
3. Kaseyi (7) cihaza konumuna oturana kadar döndürerek tak›n›z ve tartma fonksiyonu
alt›nda gösterildi¤i üzere tartarak içerik maddelerini yerlefltiriniz.
4. Kase üzerindeki kapa¤› cihaz›n ön taraf›ndaki doldurma girifliyle konumland›r›n›z.
5. Aksesuar gövdesi flaft›ndan iterek ve konumuna kilitlemek için kendinize do¤ru çeyrek
bir dönüflle istenen aksesuar› (9),(10),(11) güç ç›k›fl›na tak›n›z.
6. Cihaz›n çoklu fonksiyon bafll›¤›n›n alt k›sm›n› yatay bir konuma getiriniz ve tekrar
butona bas›n›z (bir klik sesi duyulacakt›r).
7. Haz›rlama s›ras›nda kapa¤›n giriflinde içerik maddelerini ekleyebilirsiniz.
8. Cihaz› durdurmak için dü¤meyi (1) 0 konumuna geri getiriniz.
9. Cihaz› düz, temiz ve kuru bir yüzeye yerlefltiriniz ve sonra cihaz›n›z› fifle tak›n›z.
KULLANIM HATALARINA ‹L‹fiK‹N B‹LG‹LER
Cihazınızı, beyan edilen voltaj ile çal›flt›r›n›z.Bulundu¤unuz yerin voltaj›n›n uygun olup
olmad›¤›n› kontrol ediniz.
Güç kablosunun ar›zalanmas› durumunda tehlikelerin önlenmesi için kablo üretici, servis
merkezi ya da benzer bir ehliyetli kifli taraf›ndan de¤ifltirilmelidir. Ar›za durumunda cihaz›
kendiniz onarmaya kalk›flmay›n›z. Meydana gelebilecek ar›zalardan firmam›z kesinlikle
sorumlu de¤ildir, ve cihaz›n›z garanti kapsam› d›fl›nda ifllem görecektir.
TEM‹ZL‹K VE BAKIM
• Tüketicinin Kendi Yapabilece¤i Bakım, Onarım veya Ürünün Temizli¤ine ‹liflkin Bilgiler
1. Cihaz›n fiflini çekiniz.
2. Motoru kesinlikle suya girene kadar bat›rmay›n›z veya akan su alt›na koymay›n›z.
Yumuflak kuru bir bezle veya hafif nemli bir bezle siliniz.
3. Daha kolay temizleme için kullan›m sonras›nda h›zl›ca aksesuarlar›n› durulay›n›z.
Kar›flt›r›c› (mikser) ba¤lant›s›n› tamamen sökünüz. Baz› keskin uçlara sahip olmas›ndan
dolay› b›çaklar› dikkatlice tafl›y›n›z.
4. Ö¤ütme diski ve b›ça¤› ya¤l› tutulmal›d›r. Her bir kullan›m sonras›nda bunlar› piflirme
ya¤›yla temizleyiniz.
5. E¤er aksesuarlar›n›z›n rengi yiyecek (havuç, portakal vb) ile de¤iflirse, piflirme ya¤›na
- 5 -
Page 7

TEM‹ZL‹K VE BAKIM
bat›r›lm›fl mutfak havlusuyla hafifçe sürtünüz ve sonra ola¤an flekilde temizleyiniz.
6. Blender grubu: Blender sürahisine birkaç damla y›kama s›v›s›yla birlikte s›cak su
dökünüz. Kapa¤›n› kapat›n›z. Cihaza tak›n›z ve birkaç darbe uygulay›n›z. Blenderi ç›kart›n›z,
akan su alt›nda sürahisini durulay›n›z ve özellikle daha zor olan tortular› temizlemek için
kurumak üzere bafl afla¤› durumda b›rak›n›z. B›çak somun grubu sürahinin alt k›sm›nda
ayr›labilir, bunu yapmak için bofl blenderi düz bir yüzeye bafl afla¤› yerlefltiriniz, çeyrek
bir dönüflle b›çak/somun grubunu serbest b›rak›n›z ve dikkatlice mührünü kald›r›n›z.
D‹KKAT: Pasta ba¤lant›s›n› bulafl›k makinesinde y›kamay›n›z, nemli bir bezle temizleyiniz,
suya bat›rmay›n›z.
Aksesuar Yiyecek Maksimum ‹flletim süresi H›z Haz›rlama
Ç›rpma Krema (%38 ya¤l›) 250ml 10 dakika Min-Maks /
Hamur kancas› Un 1350g 10 dakika Min-Maks /
Kar›flt›r›c› b›ça¤› Un 100g 5 adet Min-Maks /
BAKIM
• Periyodik Bakım Gerektirmesi Durumunda, Periyodik Bakımın Yapılaca¤ı Zaman
Aralıkları ile Kimin Tarafından Yapılması Gerekti¤ine ‹liflkin Bilgiler
Cihaz periyodik bak›m gerektirmez.
Her kullan›mdan sonra temizli¤inin yap›lmas›nda fayda vard›r.
Yumurta ak› 12 adet 3 dakika /
Tuz 15g
Maya 20g
fieker 10g
Su 936g
Kastor ya¤› 100g
Margarin 100g
Yumurta 2 adet
- 6 -
Page 8

ENGLISH
SINBO SMX 2750 MULTIFUNCTIONAL KITCHEN MACHINE
INSTRUCTION MANUAL
SPECIFICATION
* Effective motor, low noise.
* Planetary mixing action.
* Full metal gear system.
* Intelligent circuit ensuring a consistent operating speed
* Variable stepless speed and pulse function.
* 4.5L brushed stainless steel bowl with transparent splash guard.
* 3 mixing tools: whisker, beater & dough hook.
* AC230V 50Hz, 700W(1500W max.)
PARTS DESCRIPTION
DESCRIPTION
1. Speed control switch
2. Release button for multifunction head
3. Removable cover for mincer power outlet
4. Release button for Cutter housing
5. Power outlet for mincer
6. Bowl cover
7. Stainless steel bowl
8. Multifunction head
9. Whisk
10. Dough hook
11. Mixer blade
SAFETY INSTRUCTIONS
* Carefully read the instructions before using your appliance.
* Switch off the appliance before fitting and removing the attachment.
* Keep your fingers away from moving parts and the opening on the attachment.
* Only use the appliance for its intended domestic use, the manufacture will not accept
any liability if the appliance is subject to improper use or failure to comply with these
instructions.
* Never leave the appliance to run unsupervised, especially when young children or
handicapped persons are present.
* Check that the voltage rating of the appliance does in fact match that of your electrical
system.
Any connection error will nullify the guarantee.
* The appliance must be plugged into an earthed electrical socket.
* If you have to use an electrical extension lead, it must be earthed and you should make
- 7 -
Page 9

SAFETY INSTRUCTIONS
sure that no-one can trip over it.
* Unplug the appliance as soon as you have finished using it and when you clean it.
* Don’t use your attachment and/or appliance if it has been damaged. You should contact
an approved service centre.
* Any work on the appliance other than normal care and cleaning by the customer must
be carried out by an approved service centre.
* Do not immerse the appliance, the power cord or the plug in water or in any other
liquid.
* Do not allow the power cord to hang within the reach of children, to come close to or
into contact with the hot parts of your appliance, any other source of heat or any sharp
edge.
* If the power cord or the plug are damaged, don’t use your appliance .To avoid any risk,
these must be replaced by an approved service centre.
* Do not put any accessories containing metal in a microwave oven.
* Switch off the appliance and disconnected from supply before changing accessories
or approaching parts which move in use.
* Do not touch the whisk, mixer blade or kneading hook while the appliance is in operation.
* Only use one attachment at a time.
* Do not operate the appliance for more than 10 minutes at one time. Allow 30 minutes
rest before next use.
* This appliance is not intended for use by children or other persons without assistance
or supervision if their physical, sensory or mental capabilities prevent them form using
it safely.
* Children should be supervised to ensure that they do not play with the appliance.
USING YOUR APPLIANCE
KNEADING/BEATING/WHISKING
(See figure A)
Depending on the nature of the ingredients, the bowl (7) with its cover can be used to
prepare up to 2 kg of dough.
1. Before using for the first time, clean all parts of the accessories with soapy water
.rinse and dry.
2. Press button (2) to the release the multifunction head (8) and raise it to a vertical
position.
3. Fit the bowl(7) onto the appliance by turning until it locks in position and place the
ingredients in it ,weighting them as indicated under the weighing function.
4. Position the cover on the bowl with the filling opening at the front of the appliance.
5. Fit the desired accessory(9),(10),(11) in the power outlet ,pushing the shaft of the
accessory home and turn it a quarter turn towards you to lock it in position.
6. Lower the multifunction head of the appliance to horizontal position and press button
again (a click should be heard ).
- 8 -
Page 10

USING YOUR APPLIANCE
7. During preparation, you can add ingredients through the opening the cover.
8. To stop the appliance, turn the knob (1) back to 0.
9. Place the appliance on a flat, clean and dry surface and then plug in your appliance.
CLEANING
1. Unplug the appliance.
2. Never immerse the motor until in water or put it under running water wipe it with a
soft dry or slight damp cloth.
3. For easier cleaning, quickly rinse the accessories after use. Completely dismantle the
mixer attachment. Handle the blades with care, as some have sharp cutting edges.
4. The grinding disc and the blade must be kept lubricated. Wipe them over with cooking
oil after each use.
5. If your accessories are discoloured by food (carrots, oranges etc), rub them gently
with kitchen towel dipped in cooking oil and then clean in the usual way.
6. Blender assembly: pour hot water with a few drops of washing up liquid into the blender
jug. Close the cover. Fit it on the appliance and give a few pulses. Remove the blender,
rinse the jug under running water and leave it upside down to dry .for cleaning more
difficult residues, especially with thicker preparations. The blade nut assembly can be
detached from the bottom of the jug, to do this, place the empty blender upside down on
a flat surface, release the blade /nut assembly with a quarter turn and lift out the seal
with care.
CAUTION: Don’t wash the pasta attachment in the dishwasher, wipe clean with a damp
cloth do not immerse in water.
Accessory Food Maximum Operation time Speeds Preparation
Whisk Cream(include 38%fat) 250ml 10minutes Min-Max /
Dough hook Flour 1350g 10minutes Min-Max /
Mixer blade Flour 100g 5minutes Min-Max /
Egg white 12pcs 3minutes /
Salt 15g
Yeast 20g
Sugar 10g
Water 936g
Lard 20g
Castor sugar 100g
Margarine 100g
Egg 2pcs
- 9 -
Page 11

FRANÇAIS
SINBO SMX 2750 ROBOT - CUISINE MULTI FONCTIONNEL
MODE D’EMPLOI
SPÉCIFICATIONS
* Moteur puissant, faible bruit
* Fonction de mélange amovible
* Système d’engrenage métallique
* Circuit qui fournit une vitesse de fonctionnement conforme.
* Fonction de vitesse et d’impulsion variable
* 4.5 litres de bol brossé en acier inox avec anti-éclaboussures transparent
* 3 outils de mélange: crochets de mélange, fouet, pétrisseur
* AC230V 50Hz, 700W(1500W max.)
DESCRIPTION DES PIÈCES
DESCRIPTION
1. Interrupteur de vitesse
2. Bouton de déverrouillage pour la tête multi-fonction
3. Couvercle amovible pour la sortie d’alimentation de hachoir à viande
4. Bouton de déverrouillage pour le boitier du hachoir
5. Sortie d’alimentation pour le hachoir à viande
6. Couvercle du bol
7. Bol en acier inox
8. Tête multi-fonctionnelle
9. Fouet
10. Pétrisseur de pâte
11. Couteau -Mélangeur
CONSIGNES DE SÉCURITÉ
* Lisez attentivement toutes les instructions avant d’utiliser l’appareil.
* Éteignez l’appareil en installant et retirant les pièces de l’appareil.
* Gardez vos doigts hors des pièces amovibles et les ouvertures sur les pièces.
* L’appareil est uniquement conçu pour l’usage domestique, n’utilisez pas hors de son
but, si l’appareil est exposé à une mauvaise utilisation ou les consignes de sécurité ne
sont pas suivies , le fabricant n’acceptera aucune responsabilité.
* Ne laissez pas l’appareil sans surveillance à proximité des enfants et des handicapés.
* Avant de brancher votre appareil, assurez-vous que la tension électrique de votre
domicile correspond à celle indiquée sur la plaque signalétique de l’appareil.Toute erreur
de branchement va annuler la garantie.
*L’appareil doit être branché à la prise de courant liée à la terre.
* Si vous avez besoin d’ utiliser une rallonge, elle doit être liée à la terre et vous devez
assurer la sécurité.
- 10 -
Page 12

CONSIGNES DE SÉCURITÉ
* Débranchez la fiche de la prise de courant après chaque utilisation et avant le nettoyage.
* Si l’appareil ou le cordon d’alimentation a été endommagé , ne les utilisez pas.Contactez
votre centre de service agrée.
* Toute action sur l’appareil doit être faite par le centre de service agrée except le
nettoyage et l’entretien régulier fait par le client.
*Ne pas immerger l’appareil , le cordon d’alimentation ou la prise dans l’eau ou tout
autre liquide.
* Ne laissez pas pendre le câble d’alimentation sur le rebord d’une table ou d’un plan
de travail ou à côté des enfants et veillez à ce qu’il n’entre pas en contact avec des
surfaces chaudes.
* Si l’appareil ou le cordon d’alimentation a été endommagé, n’utilisez pas
l’appareil.Contactez le centre de service agrée afin d’éviter toute risque.
* Ne mettez aucune accessoire qui contiennent du métal dans un four à micro-ondes.
* Éteignez l’appareil et débranchez la fiche de la prise de courant avant de retirer ou
changer les accessoires.
* Ne pas toucher la fouet, le couteau-mélangeur ou le pétrisseur lorsque l’appareil est
en marche.
* Utilisez chaque fois une seule accessoire
* Ne pas utiliser l’appareil plus de 10 minutes à la fois. Laisser l’appareil faire un repos
de 30 minutes avant de l’utiliser à nouveau.
* Cet appareil n'est pas prévu pour être utilisé par des personnes (y compris les enfants)
dont les capacités physiques, sensorielles ou mentales sont réduites, ou des personnes
dénuées d'expérience ou de connaissance, sauf si elles ont pu bénéficier, par l'intermédiaire
d'une personne responsable de leur sécurité, d'une surveillance ou d'instructions
préalables concernant l'utilisation de l'appareil.
* Il convient de surveiller les enfants pour s'assurer qu'ils ne jouent pas avec l’appareil.
UTILISATION DE L’APPAREIL
PÉTRIR/MÉLANGER/FOUETTER
(Voir figure A )
En fonction de la nature des ingrédiens, le bol (7) peut être utilisé pour préparer une
pâte jusqu’à 2 kg avec son couvercle
1. Nettoyez toutes les pièces des accessoires avec l’eau savonneuse avant la première
utilisation, rincez et séchez –les.
2. Pour libérer la tête multi-fonctionnelle(8),appuyez sur le bouton(2) et mettez la à la
position verticale.
3. Installez le bol (7) à l’appareil en tournant jusqu’à ce qu’il se verrouille à la position
et mettez les ingrédiens en pesant comme indiqués au tableau de pesage
4. Positionnez le couvercle au dessus du bol devant l’entrée de remplissage sur le côté
avant de l’appareil.
5.En poussant de l’arbre de corps de l’ accessoire et avec un quart de tour vers vous
- 11 -
Page 13

UTILISATION DE L’APPAREIL
pour la verrouiller insérez l’accessoire souhaitée (9),(10),(11) à la sortie d’alimentation
6. Apportez la partie inférieure de la tête multi fonctionnelle à la position horizontale et
appuyez sur le bouton à nouveau ( vous allez entendre un bruit cliquant)
7. Vous pouvez ajouter les ingrédiens à l’entrée du couvercle pendant la préparation.
8. Ramenez le bouton à la position 0 pour arrêter l’appareil.
9. Placez l’appareil sur une surface plane, propre et seche et branchez la fiche à la prise
de courant.
NETTOYAGE
1. Débranchez la fiche de la prise de courant
2. Ne jamais plonger le bloc moteur dans l’eau ou ne pas le mettre sous l’eau
courante.Essuyez avec un chiffon sec ou humide
3. Pour un nettoyage plus facile, rincez rapidement les accessoires.Retirez complètement
l’accessoire de mixeur. Manipulez attentivement les couteaux car certaines ont des
extrémités pointus.
4. La lame et la meule doit être grasse. Nettoyez les avec l’huile de cuisson après chaque
utilisation.
5. Si la couleur des accessoires se change à cause des aliments ( carotte, orange etc ),
frottez –les avec la serviette trempé dans l’huile de cuisson et nettoyez comme d’habitude.
6. Group de blender: Versez l’eau chaude avec quelques gouttes de liquide lavage dans
le bol du blender. Fermez le couvercle.Installez à l’appareil et appliquez quelques impacte
Retirez le blender, rincez le bol sous l’eau courante et laissez –le à l’envers afin de
sécher les résidus plus difficile à nettoyer. Le group de couteau peut être séparé à la
partie inférieure du bol, pour le faire, placez le bol vide à l’envers sur une surface plane
et libérez le group de couteau avec un quart de tour et supprimez soigneusement le joint.
ATTENTION: Ne pas passer l’accessoire de gâteau par la lave-vaisselle, nettoyez avec
un chiffon humide, ne pas plonger dans l’eau.
Accessoires Aliments Maximum Temps de Mélange Vitesse Préparation
Fouetter Crème (huilée 38% ) 250ml 10 minutes Min-Max /
Pétrisseur de Pâte Farine 1350g 10 minutes Min-Max /
Couteau-Mélangeur Farine 100g 5 minutes Min-Max /
Blanc d’oeuf 12 pièces 3 minutes /
Sel 15g
Levure 20g
Sucre 10g
Eau 936g
Graisse de porc 20g
Huile de ricin 100g
Margarine 100g
Oeufs 2 pièces
- 12 -
Page 14

NEDERLANDS
SINBO SMX 2750 KEUKENROBOT MET VEEL FUNCTIE
GEBRUIKSAANWIJZING
SPECIFICATIE
* Krachtige motor, lagere geluid.
* Portable roerprocedure.
* Getand systeem van geheel metaal.
* Intelligente schakeling die verzorgd consequente behandelingssysteem
* Variabele onschrede snelheids- en stootfunctie
* Doorzichtige spatten beschermende 4.5L roestvrije stalen kom.
* 3 roergereedschappen: poets-, roer- en deeghaak
* AC230V 50Hz, 700W (1500W max.)
BESCHRIJVING VAN DE ONDERDELEN
BESCHRIJVING
1. Snelheidscontrole schakelaar
2. Vrijlatingsknop voor het hoofdstel met veel functie
3. De deksel die uitgehaald kan worden voor de krachtuitgang van de gehaktmachine
4. Vrijlatingsknop voor de snijstructuur
5. Krachtuitgang voor de gehaktmachine
6. De deksel van de schaal
7. Roestvrije stalen schaal
8. Hoofdstel met veel functie
9. Roerend
10. Deeghaak
11. Roermes
VEILIGHEIDSRICHTLIJNEN
* De richtlijnen voorzichtig lezen voordat u het apparaat gebruikt.
* Tijdens het monteren en demonteren van de aansluiting van het apparaat het apparaat
uitzetten.
* Uw vingers afhouden van de bewegende onderdelen en van de goten in de aansluitingen.
* Het apparaat alleen gebruiken voor de huiselijke doelstellingen, als het apparaat verkeerd
wordt gebruikt of de richtlijnen niet nagekomen worden zal de producent geen een of andere
verantwoordelijkheid accepteren.
* Het apparaat absoluut niet zonder toezicht laten vooral bij de kinderen of bij de gehandicapte
personen.
* Controleert u of de elektriciteitswaardering van het apparaat geschikt is aan het
elektriciteitssysteem. Zal de garantie van de een of andere verkeerde aansluiting ongeldig
maken.
* Het apparaat moet in een elektriciteitsstopcontact met aarde ingestoken worden.
*Als u een kabel moet gebruiken van elektriciteitsverlenging, moet het een grondkabel zijn
en u moet ervoor zorgen dat niemand omvalt door erop te stappen.
* De stekker van het apparaat eruit trekken direct na het gebruik en tijdens het schoonmaken
- 13 -
Page 15

VEILIGHEIDSRICHTLIJNEN
van het apparaat.
* Als het apparaat beschadigd is uw aansluiting en/of uw apparaat niet gebruiken. U moet zich
dan aanvragen naar een goedgekeurde service centrum.
* Buiten de normale onderhoud en reiniging die door de client moet worden gedaan moet de
een of andere procedure op het apparaat gedaan worden door een goedgekeurde service
centrum.
* Het apparaat, krachtkabel of de stekker niet in water of in de een of andere vloeistof
bedrukken.
* Laat u de krachtkabel niet naar beneden hangen bij de kinderen, en niet de hete onderdelen,
warmtebron of een scherpe rand van uw apparaat laten aanraken.
* Als u krachtkabel of de stekker beschadigd is, uw apparaat niet gebruiken. Om te vermijden
van het risico moet het vervangen worden door een goedgekeurde service centrum.
* In de microgolf oven geen een of andere accessoires inzetten die metaal bevat.
* Het apparaat uitzetten en de aansluiting ervan uit de bron trekken zonder verandering van
de accessoires of voordat u de onderdelen benaderd die in gebruik zijn.
* Tijdens de procedurde van het apparaat niet de mixer, roermes of de knedingshaak aanraken.
* In een keer alleen één aansluiting gebruiken.
* Het apparaat in een keer niet meer dan 10 minuten gebuiken. Voor de volgende gebruik
verzorgd u dat het apparaat 30 minuten uitrust.
* Dit apparaat kan niet gebruikt worden door de kinderen of andere personen zonder hulp of
toezicht als hun lichamelijke, perceptiele of geestelijke genoegzaamheden het veilig gebruiken
voorkomen.
* Er moet toezicht worden gegeven aan de kinderen om hun niet te laten spelen met het
apparaat.
HET GEBRUIK VAN UW APPARAAT
KNEDEN/MALEN/MIXEN
(Kijken naar figuur A)
De schaal kan samen met de deksel ervan gebruikt worden om deeg klaar te maken tot (7)
2 kg als afhankelijk van de natuur van de inhoudsmaterialen .
1. Voordat u het apparaat voor het eerst gebruikt alle onderdelen van de accessoires met
water met zeep schoonmaken, afspoelen en afdrogen.
2. Om het hoofdstel met veel functie (8) vrij te laten drukt u op de knop (2) en houdt het verticaal
vast.
3. De schaal (7) vastmaken aan het apparaat door te draaien totdat het past aan haar positie
en de inhoudsmaterialen vastmaken door te wegen zoals laten zien onder de weegfunctie.
4. De deksel op de schaal postioneren met de aanvullingsingang aan de voorkant van
het apparaat.
5. De gewenste accessoires (9),(10), (11) inzetten in de krachtuitgang met een kwart draai
richting uzelf door te duwen vanaf de drijfas van de structuur van accessoires en zich
vast te maken aan haar positie.
6. De onderkant van het hoofdstel met veel functie van het apparaat op een horizontale
- 14 -
Page 16

HET GEBRUIK VAN UW APPARAAT
positie brengen en opnieuw op de knop drukken (hoort u de geluid als kliek).
7. Tijdens het klaarmaken bij de ingang van de deksel kunt u de inhoudsmaterialen
toevoegen
8. Om het apparaat te laten stoppen kunt u de knop (1) op de positie 0 terugbrengen.
9. Het apparaat op een effen, schoon en droge plaats plaatsen en later de stekker van
uw apparaat in het stopcontact zetten.
REINIGING
1. De stekker van het apparaat eruit trekken.
2. De motor absoluut niet in water bedrukken of niet onder de stromende water zetten.
Uitwissen met een zachte droge doekje of met een beetje vochtige doekje.
3. Voor de eenvoudigere reiniging na het gebruik heel snel de accessoires ervan afspoelen.
De mixer aansluiting helemaal demonteren. De messen voorzichtig dragen omdat zij
sommige snijdende punten hebben.
4. Vermalingsdisc en mes moeten geolied gehouden worden. Na elk gebruik deze met
kookolie schoonmaken.
5. Als de kleur van uw accessoires veranderen met voedsel (wortel, sinasappel enz), met
de handdoek van de keuken die is bedrukt in kookolie zachtjes wrijven en later heel goed
schoonmaken.
6. Blender groep: In de waterkaraf van de Blender warme water gieten met een paar
druppels wasvloeistof. De deksel sluiten. Aan het apparaat vastmaken en een paar stoot
geven. De Blender eruit halen, en vooral om de moeilijkere prutten schoon te maken de
waterkaraf ervan onder de stromende water afspoelen en om het te laten drogen het
omgekeerd laten staan. De mes kan scheidbaar zijn in de onderste kant van de waterkaraf
van de moergroep, om deze te doen de lege blender op een effen plaats omgekeerd.
LET OP: De aansluiting van het gebak niet wassen in de afwasmachine, met een vochtige
doekje schoonmaken, niet in water bedrukken.
Accessoires Voedsel Maximum Behande-lingstijd Snelheid Klaarmaken
Roeren creme (%38 vettig) 250ml 10 minuten Min-Max /
Deeghaak Meel 1350g 10 minuten Min-Max /
Roerende mes Meel 100g 5 stuks Min-Max /
Eiwit 12 stuks 3 minuten /
Zout 15g
Gist 20g
Suiker 10g
Water 936g
Varkensolie 20g
Beverolie 100g
Margarine 100g
ei 2 stuks
- 15 -
Page 17

DEUTSCH
SINBOSMX 2750 MULTIFUNKTIONS-KÜCHENMASCHINE
GEBRAUCHSANWEISUNG
SPEZIFIKATIONEN
* Effektive Motor, geräuscharm
* Portable Mischverfahren
* Voll Metallverzahnte System
* Intelligente Schaltung mit konsistente Arbeitsgeschwindigkeit
* Variable stufenlose Geschwindigkeit und Puls-Funktion.
* Transparente Spritz geschützt, 4,5 LT gebürstetem Edelstahl Schüssel.
* 3 Mischungszeuge: Bürstende, Schläger und Teig-Haken.
* AC230V 50Hz, 700W (1500W max.)
BESCHREIBUNG DER TEILE
BESCHREIBUNG
1. Geschwindigkeitskontrolltaste
2. Entriegelungstaste für den multifunktionalenKopf
3. Abnehmbaren Deckel für Stromausgang des Zerhackers
4. Entriegelungstaste für den Schneidekörper
5. Leistung für Zerhacker
6. Schüssel Deckel
7. Edelstahl Schüssel
8. Multi funktionale Deckel
9. Schläger
10. Knethaken
11. Mixer-Klinge
SICHERHEITSHINWEISE
* Vor der Verwendung Ihr Gerät, lesen Sie Anweisungen sorgfältig durch.
* Schalten Sie das Gerät beim Abziehen und Anstecken der Geräteverbindungen aus.
* Halten Sie Ihre Finger fern von der bewegende Teile und der Rillen der Verbindungen.
* Das Gerät soll nur für Haushalt verwendet werden, falls das Gerät nicht in der richtiger
Weise verwendet, oder die Anweisungen angehalten werden, wird der Hersteller keine
Verantwortung übernehmen.
* Seien Sie besonders vorsichtig wenn Sie das Gerät in der Nähe von Kindern und
Menschen mit Behinderungen verwenden..
* Bitte überprüfen Sie ob die Nennspannung für Ihr Stromsystem geeignet ist.
Jegliche Verbindungsfehlermacht die Garantie ungültig.
* Gerät muss in eine geerdete Steckdose eingesteckt werden.
* Wenn Sie ein Strom-Verlängerungskabel verwenden müssen, diese sollte geerdet
werden und Sie müssenbereitstellen dass niemand auffängt undfällt.
* Ziehen Sie das Netzkabel sofort nach dem Gebrauch und beim Reinigen aus.
- 16 -
Page 18

SICHERHEITSHINWEISE
* Falls beschädigt,verwenden Sie Ihr Gerät und/oder Ihre Verbindung nicht. Sie müssen
an einem zugelassenen Service-Center wenden.
* Außer normale Wartung und Reinigung durch der Kunde, jeder Prozess auf das Gerät
sollte bei einem zugelassenen Service-Centerstattfinden.
* Tauchen Sie das Gerät, Netzkabel oder Netzstecker nicht ins Wasser oder jede andere
Flüssigkeiten.
* Lassen Sie das Netzkabel nicht in der Nähe der Kindern herumhängen oder mit der
heißen Teilen des Gerätsoder irgend eineranderen Wärmequelle oder einer scharfen
Kante in Kontakt zu kommen.
* Wenn das Netzkabel oder der Netzstecker beschädigt ist, verwenden Sie das Gerät
nicht. Diese sollen durch eine zertifizierte Service-Center ersetzt werden um das Risiko
zu vermeiden,.
* Legen Sie kein Metall haltige Zubehörein die Mikrowelle.
* Schalten Sie das Gerät aus und trennen Sie vom Netz bevor Sie die Zubehör austauschen
oder die benutzte Teile berühren.
* Berühren Sie den Schläger, Mixer-Klinge oder Knethaken während das Gerät im Betrieb
ist.
* Verwenden Sie nur eine Verbindung auf einmal.
* Verwenden Sie das Gerät nicht länger als 10 Minuten auf einmal. Warten Sie 30 Minuten
für die nächsteVerwendung.
* Dieses Gerät darf nicht ohne Überwachung oder Anleitung eines verantwortlichen
Person, bei den Benutzern (einschl. Kinder) mit eingeschränkten physischen, sensorischen
oder psychischen Fähigkeiten bzw. ohne jegliche Erfahrung oder Vorwissen verwendet
* Ausreichende Aufsicht ist erforderlich um die Kinder vom Spielen mit dem Gerät zu
vermeiden.
VERWENDUNG DES GERÄTS
KNETEN/SCHLAGEN/SCHÜTTELN
(Siehe Abbildung a.)
Je nach Art der Inhalt, die Schüssel mit dem Deckel (7) kann für die Zubereitung von
Teig bis zu 2 kgverwendet werden.
1. Reinigen Sie alle Teile der Zubehöremit Seifenwasser,spülen Sie ab und trocknen Sie
vor der ersten Verwendung.
2. Um den Multiple-Funktion Kopf (8) zu entriegeln, drücken Sie die Taste (2), und stellen
Sie in einen senkrechten Zustand.
3. Drehen Sie die Schüssel (7) bis sie auf dem Gerät einrastet und wiegen Sie die Materiale
wie unten in der Wiege-Funktiongezeigt.
4. Gleichen Sie den Deckel mit der Einfüllstopfen auf der Vorderseite des Geräts aus.
5. Setzen Sie die gewünschte Zubehöre (9), (10), (11) an die Stromausgang durch Schieben
von der Zubehörkörperwelle und sich selbst bei etwa ein Viertel-Drehung.
6. Stellen Sie den unteren Teil des Multiple-Funktion-Kopf in einem waagerechten
Zustand drücken Sie die Taste erneut (Sie werden ein „Klick“ Ton hören).
- 17 -
Page 19

VERWENDUNG DES GERÄTS
7. Während der Bereitstellung,können Sie Inhaltstoffe am Eingang der Abdeckung
hinzufügen.
8. Um das Gerät wieder auszuschalte, stellen Sie die Taste (1) auf Zustand 0.
9. Legen Sie das Gerät auf eine flache, saubere und trockene Oberfläche und dann
schließen Sie Ihr Gerät.
REINIGUNG
1. Ziehen Sie den Stecker des Geräts aus.
2. Tauchen Sie den Motor nie ins Wasser ein und halten Sie nicht unter fließende
Wasser.Wischen Sie mit einem weichen, trockenen oder einem feuchten Tuch ab.
3. Spülen Sie das Gerät schnell für einfache Reinigung bevor jedem Gebrauch. Bauen
Sie den Mixer (Mischer) völlig ab. Da sie scharfer Spitzen haben,tragen Sie die Klingen
sorgfältig.
4. Die Mahlugsscheibeund Klige müssen geölt aufbewahrt. Reinigen Sie diese mit Koch
Öl nach jedemGebrauch.
5. Falls die Farbe Ihrer Zubehöre durch die Nahrungsmitteln (Karotten, Orangen etc.)
ändert, reiben Sie sanft mit einem Öl getränkte Küchentuch und dann gewöhnlicher
Weise reinigen.
6. Mixer-Gruppe: Gießen Sie ein paar Tropfen von Reinigungsmittel zusammen mit
Warmwasser in die Schüssel. Schließen Sie den Deckel zu. Setzen Sie auf das Gerätund
üben Sie ein paar Schläge. Nehmen Sie den Mixer heraus, spülen Sie die Schüssel unter
fließende Wasserab und vor allem stellen Sie kopfüber um die schwieriger Ablagerungen
zu bereinigen und trocknen zu lassen. Die Klinge Mutter kann von dem Unterteil der
Schüssel abgetrennt werden.Dafür müssen Sie den leeren Mixer auf eine ebene Fläche
kopfüber legen dann können Sie die Klinge/Mutter gruppe mit einer Viertel-Drehung
entriegeln und vorsichtig die Dichtung entfernen.
HINWEIS: Waschen Sie dieKuchenverbindung nicht in der der Spülmaschine;reinigen
Sie mit einem feuchten Tuch;tauchen Sie nicht ins Wasser.
Zubehör Nahrungsmittel Maximum Betriebszeit Geschwindigkeit Vorbereitung
Schlagen Creme (38 % Fett) 250ml 10 Minuten Min-Max /
Knethaken Mehl 1350g 10 Minuten Min-Max /
MischerKlinge Mehl 100g 5 Stücke Min-Max /
Eiweiß 12 Stücke 3 Minuten /
Salz 15g
Hefe 20g
Zucker 10g
Wasser 936g
Schmalz 20g
Kastor Öl 100g
Margarine 100g
Eier 2 Stücke
- 18 -
Page 20

ESPANOL
SINBO SMX 2750 ROBOT DE COCINA MULTIFUNCIONAL
INSTRUCCIÓN DEL USO
ESPECIFICACIÓN:
* Motor eficiente, ruido bajo.
* Proceso de mezcla móvil.
* Sistema de la rueda dentada completa de metálico.
* Circuito inteligente que adquiere velocidad de funcionamiento coherente.
* Funciones de velocidad y golpes sin etapas variables.
* Tazón de acero inoxidable por 4.5Lts con protección transparente de la salpicadura.
* 3 equipos de mezcla: cepillador, batidor y gancho de masa.
* AC230V 50Hz, 700W (1500W max.)
DESCRIPCIÓN DE LAS PARTES:
DESCRIPCIÓN:
1. Interruptor para el control de la velocidad.
2. Botón de la cabecera multifuncional para soltar.
3. Tapa desmontable para la energía de la máquina de picar carne.
4. Botón del cuerpo de picadura para soltar.
5. Salida de la energía para la máquina de picar carne.
6. Tapa de la tazón.
7. Tazón de acero inoxidable.
8. Cabecera multifuncional.
9. Batidor.
10. Gancho de la masa.
11. Cortador de la mezcla.
INSTRUCCIONES DE LA SEGURIDAD:
* Antés de usar su aparato leer las instrucciones.
* Apagar el aparato mientrás montando y desmontando las conecciones del aparato.
* Guardar la distancia entre los dedos y las partes móuiles y canalones de las conecciones.
* Usar el aparato solamente por objetivo doméstico, en caso de ser expuesto el aparato
a un uso erróneo ú no obedecer estas instrucciones de la seguridad, el fabricante no
aceptará alguna responsabilidad.
* Definitivamente no dejar sin vigilancia el aparato en lugares cercas de los niños y las
personas minusválidas particularmente.
* Controlar que el voltaje del aparato es conueniente para su sistema eléctrico. Cualquiere
conección erróneo cancelará la garantía del aparato.
* Debe enchufar a un enchufe con la conección de la tierra.
* En caso de usar un cable eléctrico de la extensión, debe ser conectado con la tierra y
es necesario que usred adquiera que ninguna persona no pisariá sobre el cable y caería.
- 19 -
Page 21

INSTRUCCIONES DE LA SEGURIDAD
* En cuanto a dejar el uso del aparato y limpiarlo, desenchufar su aparato.
* En caso de ser dañado, no usar su aparato y / o su conección. Será necesaria consultar
a un centro del servicio confirmado.
* Un proceso sobre el aparato debe ser realizado por el servicio confirmado fuera del
mantenimiento normal y limpieza hechos por el cliente.
* No sumergir el aparato, el cable de la energía o ficha en agua o en cuelquier otro
líquido.
* No permitir que el cable de energía se colgara cerca de los niños, se tocaran los niños
a las partes del aparato, cualquier fuente de la temperatura o algún borde afilado.
* En caso de ser dañado el cable de la energía no usa el aparato. Para evitar el riesgo
debe recambiar por un servicio confirmado.
* No meter algún acesorio en microhorno.
* Apagar el aparato y desconectar la energía antés de acerca a las piezas usandas o
antés de modificar los acesorios.
* No tocar el batidor, al cortador para la mezcla o al gancho de amazar.
* Usar cada una conección.
* No usar el aparato más de 10 minutos. Antés del uso próximo dejar a descansar el
aparato durante treinta (30) minutos.
* Este aparato no es para el uso por los niños o por otras personas sin ayuda o vigilancia
en caso de ser impedido para que se usen seguramente sus competencias físicas,
perceptivas o mentales.
* Los niños deben ser vigilados para que no jueguen con el aparato.
USO DEL APARATO
AMASAR / GOLPEAR / BATIR
(consultar a la Figura - A)
Puede usar para preparar masa hasta 2 kilogramos el tazón (7) junto con la tapa
dependiente de la naturaleza de los ingredientes.
1. Antés del uso por primera vez limpiar todas las partes con agua jabonosa, aclararlas
y secarlos .
2. Para soltar la cabecera multifuncional (8) pulsar al botón (2) y ajustarla en la posición
vertical.
3. Fijar el tazón (7) girándolo hasta que se coloca en su posición sobre el aparato y colocar
los ingredientes pesándolos como se muestra bajo la función del peso.
4. Posicionar la tapa sobre el tazón, de acuerdo con la entrada para llenar abicado en
la parte delantera del aparato.
5. Empujando del eje del cuerpo de los acesorios, y bloquear en la posición fijar el
acesorio deseado a la salida de energía (9),(10),(11) por medio del giro cuarto hacia
usted.
6. Ajustar la parte inferior de la cabecera multifuncional del aparato en una posición
lateral y pulsar otra vez al botón.
- 20 -
Page 22

USO DEL APARATO
7. Pueden agregar los ingredientes en la entrada de la tapa durante la preparación.
8. Para parar el aparato, girar otra vez hacia la posición “o” el botón (1).
9. Colorca el aparato sobre un superficie plano, limpio y seco y después enchufar el
aparato.
LIMPIEZA:
1. Desenchufar el aparato.
2. Definitivamente no sumergir el motor en agua o ponerlo bajo la agua corriente. Limpiar
con una tela suave y seco ú con una tela mojada un poco.
3. Para hacer una limpieza más facil, aclarar rápidamente los acesorios después del
uso. Desconectar la batidora completamente. Llevar con mucho cuidado los cortadores
por motivo de tener los puntos afilados.
4. El disco de moledor y el cortador deben conservarse en forma libricada. Después de
cada uso limpiar éstos con aceite para cocinar.
5. En caso de ser cambiado el color de sus acesorios con las comidas (zanahoria, naranja
y asimilados), limpiar un poco con una toalla de la cocina sumergida en aceite para
cocinar y después limpiarlos habitualmente.
6. El grupo del batidor: Echar un poco agua calurosa junto con el detergente de unos
goteos en la garrafa de la batidora. Cerrar su tapa. Fijar en el aparato y aplicar unos
golpes. Quitar la batidora, aclarar la garrafa debajo de la agua corriente y dejarlo patas
ariba para que se seque y después limpiar los residuos particularmente que son dificiles
para limpiar. El grupo de las tuercas de los cortadores pueden desmontarse de la parte
inferior de ka garrafa, para hacerlo colocar la batidora vacía sobre un superficie plano
patas arriba, soltar el grupo de los cortadores / las tuercas girándolo cuarto y levantar
con cuidado la cerradura.
OJO: No lavar con lavavajillas la conección de la torta, limpiarla con una tela mojada, no
sumergirla en agua.
Acesorio Comida Máximo Plazo del funcionamiento velocidad Preparación
Bat›r crema (%38 aceite) 250mls 10 minutos Min-Máx /
Gancha de la masa Harina 1350grs 10 minutos Min-Máx /
Cortador de la Mezcladora Harina 100grs 5 unid. Min-Máx /
clara 12unidades 3 minutos /
Sal 15grs
Levadura 20grs
Azúcar 10grs
Agua 936grs
Grasa de cerdo 20grs
Grasa castor 100grs
Margarina 100grs
Huevo 2 unid.
- 21 -
Page 23

Page 24

Page 25

Page 26

No: 1-2750-08062012
- 25 -
Page 27

- 26 -
Page 28

Page 29

Page 30

Page 31

1-2750-08062012
- 30 -
Page 32

- 31 -
Page 33

HRVATSKI
SINBO SMX 2750 VIˇSENAMJENSKI MULTIPRAKTIK
UPUTSTVO ZA UPORABU
SPECIFIKACIJE
* Uˇcinkovit motor, niska buka.
* Funkcija pokretnog mijeˇsanja
* Potpuno metalni zupˇcani sustav
* Inteligentna sklopka koja omogu´cava konzinstentnu operativnu brzinu
* Promjenjiva kontinuirana brzina i pulsna funkcija
* Zdjela od bruˇsenog nehrd¯aju´ceg ˇcelika od 4.5LT sa prozirnom zaˇstitom od prskanja
* 3 pribora za mijeˇsanje: ˇzica za mijeˇsanje, metlica i kuka za tijesto.
* AC230V 50Hz, 700W (1500W max.)
OPIS DIJELOVA
OPIS
1. Prekidaˇc za kontrolu brzine
2. Gumb za otpuˇstanje multifunkcionalne glave
3. Odvojiv poklopac izlaza stroja za mljevenje
4. Gumb za otpuˇstanje ku´ciˇsta za rezanje
5. Izlaz za napajanje stroja za mljevenje mesa
6. Poklopac zdjele
7. Zdjela od nehrd¯aju´ceg ˇcelika
8. Multifunkcionalna glava
9. Metlica za mijeˇsanje
10. Kuka za tijesto
11. Noˇz za mijeˇsanje
SIGURNOSNE UPUTE
* Prije poˇcetka uporabe ured¯aja paˇzljivo proˇcitajte sve upute za uporabu.
* Kada spajate ili odvajate nastavke ili prikljuˇcke obavezno iskljuˇcite ured¯aj.
* Prste drˇzite dalje od dijelova u pokretu i ˇzlijebova ili utora prikljuˇcaka.
* Ured¯aj je namjenjen samo za ku´cansku uporabu i ne treba ga rabiti u neke druge svrhe.
Proizvod¯aˇc ne snosi odgovornost za kvarove izazvane pogreˇsnom uporabom ured¯aja ili
zbog ne pridrˇzavanja uputama navedenim u ovom priruˇcniku za uporabu.
* Ured¯aj nipoˇsto ne ostavljajte bez nadzora u prostorijama u kojima se nalaze djeca i
osobe s posebnim potrebama.
* Provjerite da li vrijednost napona naznaˇcena na ured¯aju odgovara vrijednosti napona
u vaˇsoj strujnoj mreˇzi.
Greˇska zbog pogreˇsnog prikljuˇcivanja ured¯aja nije obuhva´cena jamstvom.
* Ured¯aj treba prikljuˇciti na utiˇcnicu s uzemljenjem.
*U sluˇcaju potrebe koriˇstenja produˇznog kabela, produˇzni kabel mora biti s uzemljenjem
i smjeˇsten tako da niko ne zapinje za njega.
- 32 -
Page 34

SIGURNOSNE UPUTE
* Utikaˇc ured¯aja treba izvu´ci iz utiˇcnice odmah po zavrˇsetku uporabe kao i prije ˇciˇs´cenja.
* Ne rabite ured¯aj s oˇste´cenim prikljuˇckom i/ili ured¯aj na kom postoji bilo koja vrsta
kvara. Kontaktirajte ovlaˇsteni servisni centar.
* U ured¯aju se ne nalazi nijedan dio koji moˇze popraviti ili zamjeniti korisnik. Korisnik
je duˇzan da ured¯aj odrˇzava u ˇcistom stanju. Svaku vrstu popravke ili podeˇsavanja treba
da obavi ovlaˇsteni servisni centar.
* Ured¯aj, kabel za napajanje ili utikaˇc ne uranjajte u vodu ili neke druge teku´cine.
* Kabel za napajanje ne smije visiti preko rubova stola ili radne povrˇsine. Kabel zaˇstite
od kontakta s vru´cim povrˇsinama, bilo kojim izvorom topline i oˇstrih predmeta.
* Ne rabite ured¯aj s oˇste´cenim kabelom za napajanje ili utikaˇcem. Za izbjegavanje svake
vrste opasnosti oˇste´ceni kabel ili utikaˇc treba da zamjeni ovlaˇsteni servisni centar.
* U mikrovalnu pe´cnicu ne stavljajte posud¯e ili pribor sa sadrˇzinom metala.
* Iskljuˇcite ured¯aj kada ˇzelite zamjeniti dijelove ured¯aja. Prije kontakta sa dijelovima u
pokretu obavezno prekinite vezu s napajanjem.
* Ne dodirujte metlicu za mijeˇsanje, noˇz za mijeˇsanje ili kuku za tijesto kada se aparat
nalazi u ukljuˇcenom stanju.
* Kod jedne uporabe rabite samo jedan prikljuˇcak.
* Ured¯aj ne rabite duˇze od 10 minuta u kontinuitetu. Prije ponovne uporabe saˇcekajte da
se ured¯aj ohladi 30 minuta.
* Ovaj ured¯aj ne treba da rabe osobe s fiziˇckim, psihiˇckim ili mentalnim invaliditetom
(ukljuˇcuju´ci i djecu) bez nadzora osobe koja moˇze snositi odgovornost za sigurnu uporabu
ured¯aja.
* Zabranite djeci da se igraju s ured¯ajem i drˇzite ih pod briˇznim nadzorom.
RUKOVANJE URED–AJEM
MIJEˇSANJE/TUˇCENJE/GNJEˇCENJE
(Pogledajte sliku A)
Ovisno o vrsti sastojaka u zdjelu s poklopcem (7) moˇzete pripremiti tijesto oko 2 kg.
1. Prije prve uporabe sve dijelove operite u vodi sa deterdˇzentom, isperite i posuˇsite.
2. Za otpuˇstanje multifunkcionalne glave (8) pritisnite na tipku (2) i podesite u okomit
poloˇzaj.
3. Zdjelu (7) okre´cite sve dok se ne uklopi na ured¯aj i kao ˇsto je prikazano na funkciji za
mjerenje, zdjelu izmjerite i nakon toga ubacite sastojke.
4. Poklopac na zdjeli podesite sa ulazom za punjenje na prednjoj strani ured¯aja.
5. Da bi gurnuli i zakljuˇcali pribor sa osovine na kuˇciˇstu, ˇzeljeni pribor ili nastavak za
mijeˇsanje (9),(10),(11) pomjerite prema sebi za ˇcetvrtinu i postavite na ulaz za napajanje.
6. Donji dio multifunkcionalne glave ured¯aja podesite u horizontalan poloˇzaj i ponovno
pritisnite na gumb (oglasi´ce se zvuk klik).
7. U vrijeme pripreme kroz otvor na poklopcu moˇzete dodavati sastojke u zdjelu.
8. Za zaustavljanje ured¯aja prekidaˇc (1) vratite u poziciju 0.
9. Ured¯aj postavite na ravnu, ˇcistu i suhu povrˇsinu i nakon toga ukljuˇcite u izvor za
napajanje.
- 33 -
Page 35

ˇCIˇS´
CENJE
1. Izvucite utikaˇc iz utiˇcnice.
2. Jedinicu s motorom nipoˇsto ne uranjajte u vodu i ne perite pod vodom. Oˇcistite mekom
suhom krpom ili po potrebi vlaˇznom krpom.
3. Za lakˇse ˇciˇs´cenje ured¯aja odmah nakon uporabe brzo isperite njegove dijelove.
Mijeˇsalicu(mikser) skinite sa ured¯aja i operite. Noˇzeve paˇzljivo nosite jer su neki dijelovi
jako oˇstri.
4. Disk ili ploˇcu i noˇz za mljevenje treba uvijek podmazivati. Nakon svake uporabe ove
dijelove podmaˇzite jestivim uljem.
5. Ukoliko pribor ured¯aja usljed pojedine hrane(mrkva, narandˇza isl.) promjeni boju,
oˇcistite ga krpom umoˇcenom u jestivo ulje i operite na uobiˇcajen naˇcin.
6. Blender grupa: U vrˇc blendera uspite malo vode sa nekoliko kapi deterdˇzenta za sud¯e.
Zatvorite poklopac. Stavite na ured¯aj i dva-tri puta primjenite funkciju pulsnog rada.
Izvadite blender i isperite pod vodom. Okrenite naopako i ostavite da se osuˇsi. Grupa
noˇzeva na blenderu moˇze se odvojiti od vrˇca sa donje strane. Ukoliko to ˇzelite uraditi vrˇc
blendera okrenite naopako i ˇcetvrtinom zaokreta oslobodite maticu sa noˇzevima. Paˇzljivo
izvadite peˇcat.
POZOR: Prikljuˇcak za tortu ne perite u stroju za pranje sud¯a, oˇcistite vlaˇznom krpom, ne
uranjajte u vodu.
Pribor Hrana Maksimalno Vrijeme obrade Brzina Priprema
Mijeˇsanje Krema (masno´ca 38%) 250ml 10 minuta Min-Maks /
Kuka za tijesto Braˇsno 1350g 10 minuta Min-Maks /
Noˇz za mijeˇsanje Braˇsno 100g 5 komada Min-Maks /
Bjelanjak 12 adet 3 minute /
Sol 15g
Kvasac 20g
ˇ
Se´cer 10g
Voda 936g
Svinjska mast 20g
Ricinusovo ulje 100g
Margarin 100g
Jaje 2 adet
- 34 -
Page 36

(max 1500)
- 35 -
Page 37

- 36 -
Page 38

- 37 -
Page 39

- GARANT‹ fiARTLARI -
1) Garanti süresi,mal›n teslim tarihinden itibaren bafllar ve 2 y›ld›r.
2) Mal›n bütün parçalar› dahil olmak üzere tamam› Firmam›z›n garanti kapsam›ndad›r.
3) Mal›n garanti süresi içerisinde ar›zalanmas› durumunda, tamirde geçen süre garanti
süresine eklenir. Mal›n tamir süresi, 20 iflgününü geçemez. Bu süre mala iliflkin ar›zan›n
servis istasyonuna, servis istasyonunun olmamas› durumunda, mal›n sat›c›s›, bayii,
acentesi, temsilcili¤i, ithalatç›s› veya imalatç›s›-üreticisinden birine bildirim tarihinden
itibaren bafllar. Tüketicinin ar›za bildirimini; telefon, faks, e-posta, iadeli taahhütlü mektup
veya benzeri bir yolla yapmas› mümkündür. Ancak, uyuflmazl›k halinde ispat yükümlülü¤ü
tüketiciye aittir. Mal›n ar›zas›n›n 10 ifl günü içerisinde giderilememesi halinde, imalatç›üretici veya ithalatç›; mal›n tamiri tamamlan›ncaya kadar, benzer özelliklere sahip baflka
bir mal› tüketicinin kullan›m›na tahsis etmek zorundad›r.
4) Mal›n garanti süresi içerisinde gerek malzeme ve iflçilik, gerekse montaj hatalar›ndan
dolay› ar›zalanmas› halinde, iflçilik masraf›, de¤ifltirilen parça bedeli ya da baflka herhangi
bir ad alt›nda hiçbir ücret talep etmeksizin tamiri yap›lacakt›r.
5) Tüketicinin onar›m hakk›n› kullanmas›na ra¤men mal›n;
• Tüketiciye teslim edildi¤i tarihten itibaren, garanti süresi içinde kalmak kayd›yla, bir y›l
içerisinde en az dört defa veya imalatç›-üretici ve/veya ithalatç› taraf›ndan belirlenen
garanti süresi içerisinde alt› defa ar›zalanmas›n›n yan› s›ra, bu ar›zalar›n maldan
yararlanamamay› sürekli k›lmas›,
• Tamiri için gereken azami süresinin afl›lmas› ,
• Firman›n servis istasyonunun, servis istasyonunun mevcut olmamas› halinde s›rayla
sat›c›s›, bayii, acentesi temsilcili¤i ithalatç›s› veya imalatç›-üreticisinden birisinin
düzenleyece¤i raporla ar›zan›n tamirini mümkün bulunmad›¤›n›n belirlenmesi, durumlar›nda
tüketici mal›n ücretsiz de¤ifltirilmesini, bedel iadesi veya ay›p oranda bedel indirimi talep
edebilir.
6 ) Mal›n kullanma k›lavuzunda yer alan hususlara ayk›r› kullan›lmas›ndan kaynaklanan
ar›zalar garanti kapsam› d›fl›ndad›r.
7 ) Garanti Belgesi ile ilgili olarak ç›kabilecek sorunlar için Gümrük ve Ticaret Bakanl›¤›
Tüketicinin Korunmas› ve Piyasa Gözetimi Genel Müdürlü¤ü’ne baflvurabilir.
‹THALATÇI F‹RMA
DE‹MA ELEKTROMEKAN‹K ÜRÜNLER ‹NfiAAT SPOR MALZEMELER‹ ‹MALAT SAN. VE T‹C. A.fi.
Cihangir Mh. Güvercin Cd. No:4 Haramidere Mevkii Avcılar - ‹stanbul - Türkiye
Tel : (0212) 422 94 94 & Fax : (0212) 422 03 49
www.sinbo.com.tr - info@sinbo.com.tr
- 38 -
Page 40

- SMX 2750 KARIfiTIRICI -
- GARANT‹ BELGES‹ -
Garanti Belge No : 105029
SSHY Belge No : 35274
‹THALATÇI F‹RMA
Ünvanı : DE‹MA ELEKTROMEKAN‹K ÜRÜNLER‹ ‹Nfi. SPOR MALZ.
‹MALAT SAN. ve T‹C. A.fi.
Adresi : Cihangir Mah. Güvercin Cad. No:4 Haramidere Mevkii
Avc›lar / ‹STANBUL
Tel. : 0212 422 94 94 & Fax: 0212 422 03 49
Yetkili Kifli :
Yönetim Kurulu Baflkan›
Ürünün Cinsi : KARIfiTIRICI
Markası : S‹NBO
Modeli : SMX 2750
Alt Modeli : Bandrol ve Seri No :
Teslim Tarihi ve Yeri :
Garanti Süresi : 2 Yıldır
Azami Tamir Süresi : 20 ‹fl Günü
Kullanım Ömrü : Bakanl›kça belirlenen ve ilan edilen kullan›m ömrü 7 y›ld›r.
(Ürünün fonksiyonlar›n› yerine getirebilmesi için gereken yedek parça temin süresi)
SATICI F‹RMA
Ünvanı :
Adresi :
Tel.Fax :
Fatura Tarihi ve No :
Teslim Tarihi ve Yeri :
‹mza ve Kafle :
Bu bölüm, ürünü sat›n ald›¤›n›z Yetkili Sat›c› taraf›ndan imzalanacak ve kaflelenecektir.
Bu belgenin kullan›lmas›na; 4077 say›l› Tüketicinin Korunması Hakkında Kanun ve bu Kanun’a dayan›larak yürürlü¤e konulan Garanti Belgesi
Uygulama Esaslar›na Dair Yönetmelik uyar›nca, TC Gümrük ve Ticaret Bakanlı¤ı, Tüketicinin Korunması ve Piyasa Gözetimi Genel Müdürlü¤ü
tarafından izin verilmifltir.
Garanti Belge Onay Tarihi : 07/09/2011
SSHY Belge Onay Tarihi : 04/04/2012
- 39 -
Page 41

MÜfiTER‹ H‹ZMETLER‹
De¤erli Müflterimiz,
En uygun fiyata en iyi ürünü vermenin yan› s›ra; en iyi hizmeti vermenin de
önemli oldu¤una inan›yoruz. Bu nedenle siz bilinçli tüketicilere daha yak›n
olabilmek için, internet adresimizdeki eriflim formlar›n›n yan› s›ra, tüketici
dan›flma hattımızı da hizmetinize açm›fl durumday›z.
TÜKET‹C‹
DANIfiMA HATTI
444 66 86
Tüketici Dan›flma Hattımızı,
- Hafta içi her gün 08.00-18.00 saatleri aras›nda arayabilir; istek, öneri ve
flikayetlerinizi firmam›za iletebilirsiniz.
Tüketicinin Dikkatine:
Ürünlerimizle ilgili hizmetleri tam olarak alabilmek için afla¤›daki önerilere
uyman›z› rica ederiz:
1. Ürünü ald›¤›n›zda Garanti Belgesini mutlaka yetkili sat›c›n›za onaylatt›r›n›z.
2. Ürünü kullanma k›lavuzunda belirtilen hususlara göre kullan›n›z.
3. Ürününüzle ilgili hizmet talebiniz oldu¤unda yukar›daki telefon
numaralar›ndan, Tüketici Danıflma Hattına baflvurunuz.
4. Ürünü promosyon arac›l›¤› ile edinmiflseniz, ürüne ait garanti belgesini en
yak›n yetkili servisimize giderek onaylatt›r›n›z.
5. Teknik servisteki ifliniz bitti¤inde "Yetkili Servis Hizmet Fifli" almay›
unutmay›n›z. Alaca¤›n›z bu Hizmet Fifli, ileride ürününüzde meydana
gelebilecek herhangi bir sorunda size yarar sa¤layacakt›r.
KAPIDAN KAPIYA
ÜCRETS‹Z
SERV‹S
Kap›dan Kap›ya Ücretsiz Servis Kampanyam›z dâhilinde Yurtiçi Kargo Firmas› ile iflbirli¤i içerindeyiz. Tüketicimiz
taraf›ndan sat›n al›nan ürünün fiyat› ne olursa olsun, Tüketicimiz ürün ile ilgili garanti kapsam›na giren herhangi
bir problem yaflad›¤›nda, 444 66 86 numaral› Tüketici Danıflma Hattımızı aramas› ve kay›t b›rakmas› yeterlidir.
Bu süreçten sonra Tüketicimizin ürünü ücretsiz olarak Yurtiçi Kargo taraf›ndan Tüketicimizin bulundu¤u adresten
al›n›p, 7* ifl günü içerisinde ürün çal›fl›r bir vaziyette, yine Tüketicimize Yurtiçi Kargo arac›l›¤› ile adresine teslim
edilmektedir. 7 ifl günü içerisinde sorunu çözülemeyen ürünler ise, yenisi ve/veya bir üst modeli ile de¤ifltirilmektedir.
Tüm bu süreçte Tüketicilerimizden hiçbir ücret talep edilmemektedir.
(*Ürünün servis garanti süresi, Yurtiçi Kargo ürünü Sinbo Fabrikas›’na teslim ettikten sonra bafllar.)
MERKEZ
TEKN‹K SERV‹S
(0212) 422 94 94
- 40 -
www.sinbo.com.tr
0800 211 50 21
7 GÜNDE
TESL‹MAT
GARANT‹S‹
(*)
Page 42

- TEDAR‹KÇ‹ F‹RMA / EXPORTER United Favour Development Limited
Unit B, 10/F Lee May Building 788-790
Nathan Road, Mongkok, Kowloon, HK.
- UYGUNLUK BEYANI / CE TÜV Rheinland LGA Products GmbH
Tillystraße 2, 90431 Nürnberg, Germany
AN 50213517 0001
EEE Yönetmeli¤ine uygundur.
Made in P.R.C.
‹mal Y›l› : 2012
 Loading...