

Page 1
SimpleTransfer
Data Transfer and Synchronization Utility
™
User’s Guide
Page 2

The information in this document is subject to change without notice.
SIMPLETECH, INC. PROVIDES NO WARRANTY WITH REGARD TO THIS DOCUMENT OR ANY
OTHER INFORMATION CONTAINED HEREIN AND HEREBY EXPRESSLY DISCLAIMS ANY
IMPLIED WARRANTIES OF MERCHANTABILITY OR FITNESS FOR ANY PARTICULAR
PURPOSE WITH REGARD TO ANY OF THE FOREGOING. SIMPLETECH ASSUMES NO
LIABILITY FOR ANY DAMAGES INCURRED DIRECTLY OR INDIRECTLY FROM ANY
TECHNICAL OR TYPOGRAPHICAL ERRORS OR OMMISSIONS CONTAINED HEREIN. IN NO
EVENT SHALL SIMPLETECH BE LIABLE FOR ANY INCIDENTAL, CONSEQUENTIAL, SPECIAL,
OR EXEMPLARY DAMAGES, WHETHER BASED ON TORT, CONTRACT OR OTHERWISE,
ARISING OUT OF OR IN CONNECTION WITH THIS DOCUMENT OR ANY OTHER INFORMATION
CONTAINED HEREIN OR THE USE THEREOF.
SimpleTech assumes no responsibility for the use or reliability of its software on equipment that
is not furnished by SimpleTech.
Copyright
This document contains proprietary information that is protected by copyright. All rights are
reserved. No part of this document, including but not limited to any instructions, descriptions
and product specifications shall be modified, used, copied, reproduced, translated to another
language or disclosed in whole or in part, in any form or by any means, electronic or
mechanical, for any purpose, without the written consent of SimpleTech.
©2005 by SimpleTech™, Inc. All rights reserved.
Trademark Information
The SimpleTech name, logo and design are registered trademarks of SimpleTech, Inc. No
right, license, or interest to such trademarks is granted hereunder, and you agree that no such
right, license, or interest shall be asserted by you with respect to such trademark.
Other product and corporate names mentioned in this document are used for identification
purposes only and may be trademarks or registered trademarks of their respective companies.
Safety Icons
The following icons are used throughout this document to identify additional information of
which the reader should be aware.
CAUTION: This icon indicates the existence of a hazard that could
result in equipment or property damage or equipment failure if the
safety instruction is not observed.
NOTE: This icon identifies information that relates to the safe
operation of the equipment or related items.
TIP: This icon identifies helpful hints and tips.
ii
Page 3

CONTENTS
Getting Started _____________________________________ 1
Introduction........................................................................................................... 1
What You Should Have .................................................................................. 1
Minimum System Requirements...........................................................................2
Installation Requirements.....................................................................................2
Windows ME, 2000 and XP ............................................................................2
Windows 98SE ...............................................................................................2
Mac OS 9.2 and later......................................................................................2
Safety Precautions ...............................................................................................3
Installation _________________________________________ 5
Installing SimpleTransfer ......................................................................................5
Operation __________________________________________ 7
Introduction........................................................................................................... 7
Multi-Language Support .................................................................................7
About FileManager .........................................................................................7
About SimpleMover ........................................................................................8
About SimpleSync ..........................................................................................8
Identifying the Local Host and Remote Host Computer..................................9
Using FileManager for Windows...........................................................................9
Starting FileManager ......................................................................................9
Setting File Access Security in Windows......................................................10
Copying Files and Folders in Windows.........................................................12
Synchronizing Files and Folders in Windows ...............................................13
iii
Page 4

Using FileManager for Mac OS ..........................................................................17
Starting FileManager in Mac OS...................................................................17
Setting File Access Security in Mac OS .......................................................18
Copying Files and Folders in Mac OS ..........................................................18
Unplugging the SimpleTransfer Cable in Mac OS........................................19
Using SimpleMover ............................................................................................20
Moving Application and System Data...........................................................20
Using SimpleSync ..............................................................................................25
Synchronizing Outlook Data .........................................................................25
iv
Page 5

GETTING STARTED
INTRODUCTION
Congratulations on purchasing SimpleTransfer™ from SimpleTech.
SimpleTransfer is your easy solution for peer-to-peer file transfer on Windows
®
and Apple
that allow you to transfer your system, application, Microsoft
personal data between computers. With SimpleTransfer, you can connect two
computers and instantly transfer files at speeds up to 480 megabits per second.
The SimpleTransfer software suite includes:
What You Should Have
If any item is missing or damaged, contact your local reseller or retailer for
replacement.
Macintosh® computers. SimpleTransfer includes easy-to-use utilities
®
Outlook®, and
FileManager Transfer files from PC to PC, PC to MAC or MAC to MAC
SimpleMover Move system and application data between Windows PCs
SimpleSync Synchronize Outlook data between Windows PCs
• SimpleTransfer module (with integrated USB 2.0 cable)
• SimpleTransfer Quick Start Guide
• SimpleTransfer User’s Guide (this guide)
®
Introduction 1
Page 6

MINIMUM SYSTEM REQUIREMENTS
Windows® Users Mac® Users
• Pentium® II-class, 450 MHz PC or
equivalent
• 128MB RAM
• Available USB port
• iMAC®, G3, G4, G5 or iBook
• 128MB RAM
• Available USB port
• Mac OS 9.2 and later
®
• Windows 98SE, ME, 2000, XP
INSTALLATION REQUIREMENTS
No tools or special equipment are required to install SimpleTransfer.
Windows ME, 2000 and XP
No drivers are required. Plug SimpleTransfer into an available USB and Windows
will automatically detect and install the files needed to use the drive.
Windows 98SE
Go to www.simpletech.com/support and download the SimpleTransfer
Windows 98SE driver to your local computer. To install the driver, double-click on
the downloaded file and follow the on-screen instructions. When installation
completes, restart your computer.
Mac OS 9.2 and later
No drivers are required. Plug SimpleTransfer into an available USB port and Mac
OS will automatically detect and install the files needed to use the drive.
For optimal performance, install the latest updates from Apple onto your
computer. Download the updates from www.apple.com or open the software
update tool located in the Mac OS X system preferences folder. In Mac OS 9,
the software update tool is located in the control panel folder.
2 Minimum System Requirements
Page 7

SAFETY PRECAUTIONS
It is important that basic safety practices are followed when using SimpleTransfer
with your computer equipment. Keep the following safety precautions in mind
when using SimpleTransfer.
• Do not attempt to disassemble or modify the SimpleTransfer module.
• Keep the SimpleTransfer module away from water and other liquids. If the
SimpleTransfer cable comes in contact with water or other liquids,
immediately unplug the cable from the computer. Continued use may result
in fire or electrical shock.
• To avoid electrical shock, do not handle the SimpleTransfer module if your
hands are wet.
• Do not place the SimpleTransfer module near a heat source or expose it to
direct flame or heat.
• Never place the SimpleTransfer module close to equipment generating
strong electromagnetic fields. Exposure to strong magnetic fields may
cause the cable to malfunction or corrupt data.
Safety Precautions 3
Page 8

4
Page 9

INSTALLATION
INSTALLING SIMPLETRANSFER
If you are running Windows 98SE, install the SimpleTransfer Windows 98SE
device driver before connecting the SimpleTransfer to your computer.
SimpleTech recommends that you avoid using the USB port on Macintosh
computer keyboards. This port may not have enough power to adequately
support the USB 2.0 interface.
To install SimpleTransfer, complete the following steps:
1 Remove the protective cap from the SimpleTransfer module.
2 Plug the USB connector on the SimpleTransfer module into the USB port on
one computer and the USB connector on the cable to the USB on the other
computer.
3 Power on both computers.
Desktop PC
Laptop
After connecting the SimpleTransfer module and powering on the computers,
FileManager automatically loads. If FileManager does not load automatically, start
it manually. For instructions see “Starting FileManager” on page 9.
Installing SimpleTransfer 5
Page 10

6
Page 11

OPERATION
INTRODUCTION
SimpleTransfer comes with the following software utilities:
• FileManager
• SimpleMover
• SimpleSync
SimpleTransfer utilities do not transfer files over network
connections. It is designed for peer-to-peer connections only.
Multi-Language Support
In Windows, the SimpleTransfer screens automatically display in the language set
on the computer. Multi-language support is not provided for non-English versions
of Mac OS.
About FileManager
FileManager is the primary interface—providing access to all SimpleTransfer file
transfer and management options, the SimpleMover system data migration utility,
and the SimpleSync utility for Microsoft Outlook data synchronization.
SimpleTransfer runs on both Windows and Mac OS, supporting PC to PC, PC to
Mac and Mac to Mac file transfer. For instructions on using FileManager for
Windows, see page 9. For instructions on using FileManager for Mac OS, see
page 17).
FileManager for Windows FileManager for Mac OS
Introduction 7
Page 12

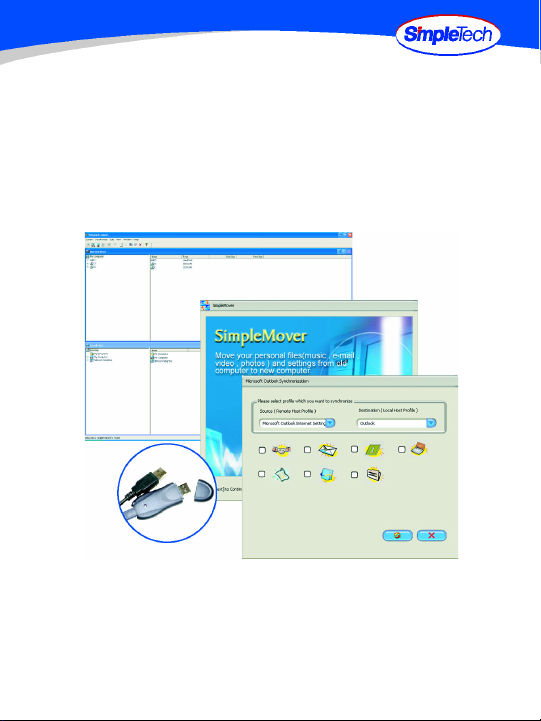
About SimpleMover
SimpleMover allows you to move system and application settings, and personal
files such as music, email, video and photos, and between Windows PCs.
SimpleMover’s easy-to-use interface let’s you to choose the data and file types
you want to transfer from the Local Host to the Remote Host. SimpleMover is a
Windows only utility—supporting only PC to PC file transfers. For instructions on
using SimpleMover, see page 20.
About SimpleSync
SimpleSync is an easy-to-use utility that allows you to synchronize Microsoft
Outlook data. SimpleSync supports a number of Outlook objects, including
Contacts, Mail, Calendar, Tasks, Notes, Journals, and user defined folders.
SimpleMover is a Windows only utility—supporting PC to PC data
synchronization. For instructions on using SimpleSync, see page 25.
8 Introduction
Page 13

Identifying the Local Host and Remote Host Computer
When using any SimpleTransfer utility, it is important to remain aware of which
computer is the Local Host and which one is the Remote Host. As illustrated
below, from the viewpoint of computer A, the Local Host is computer A and the
Remote Host is computer B. However, from the viewpoint of computer B, the Local
Host is computer B and the Remote Host is computer A.
USING FILEMANAGER FOR WINDOWS
Starting FileManager
FileManager automatically loads on the computer to which it is connected. If
FileManager does not load automatically, open Windows Explorer, select the
SimpleTransfer drive (CD-ROM drive), and then double-click
SimpleTransfer.exe. If necessary, repeat this procedure to start FileManager on
the connected computer.
FileManager
application
SimpleTransfer
drive
icon
Using FileManager for Windows 9
Page 14

FileManager displays a split-screen containing two file manager windows—the
Remote Host computer appears in the upper window and the Local Host computer
appears in the lower window.
Setting File Access Security in Windows
SimpleTransfer security allows you to limit access to the files and folders on each
computer during data transfer operations. When “Share as Read Only” is selected
on a computer, the user on the connected computer is prevented from modifying
or deleting files or folders on that computer. All files and folders accessed by the
a remote user are presented as read only. To enable file access security, open the
System menu and click Share as Read Only. When security is enabled, a check
mark appears to the left of the menu option, as shown in the figure below.
10 Using FileManager for Windows
Page 15

Using FileManager for Windows 11
Page 16

Copying Files and Folders in Windows
Using Drag n’ Drop to Copy Files and Folders
FileManager uses file explorer-type windows that allow you to drag and drop files
from the Local Host to the Remote Host computer and vice versa. To copy files or
folders by dragging, locate the file or folder you want to copy. Using your mouse,
select (click on), then drag the file or folder to the destination on the other
connected computer.
Make sure the destination of the file or folder you want to copy is visible. If
necessary, scroll to view the destination before dragging the file or folder.
Using the Edit Menu to Copy Files and Folders
1 Locate, then select (click on) the file or folder you want to copy.
2 Open the Edit menu and click Copy.
3 Locate, then select the destination on the connected computer.
4 Open the Edit menu and click Paste.
12 Using FileManager for Windows
Page 17

Synchronizing Files and Folders in Windows
FileManager does not support folder synchronization on PC to Mac
connections.
The Folder Synchronize menu option allows you to specify a directory on the
Remote Host system (source) and have the files and folders in that directory
mirrored to a specified directory on the Local Host system (target). New files, as
well as changes made to existing files created on the source computer are
duplicated on the target computer. To synchronize files, FileManager must be
running on the both the computers.
Folder synchronization mirrors files selected on the remote computer
(Remote Host) to the local computer (Local Host). Duplicate files are
overwritten. To ensure that the files on the appropriate computer are overwritten, always initiate folder synchronization on the Local Host computer
containing the files you want updated.
1 On the Remote Host, open the Synchronize menu, then click Folder
Synchronize>Allow Remote Synchronize to allow the Local Host remote
access to the data on the Remote Host.
2 On the Local Host, open the Synchronize menu, then click Folder
Synchronize>Start to start Folder Synchronize on the Local Host system.
3 In the Progress Info window that appears, click the Select button next to the
Source (Remote) Folder text box.
Using FileManager for Windows 13
Page 18

4 In the Select Source (Remote) Folder file manager window that appears,
navigate to the folder on the Remote Host containing the original file(s) to you
want synchronized onto the Local Host computer, then click OK to close the
window.
5 In the Progress Info window that appears, click the Select button next to the
Target (Local) Folder text box.
6 In the Select Source (Remote) Folder file manager window that appears,
navigate to the target folder on the Local Host where you want the original files
saved, then click OK to close the window.
7 In the Progress Info window, click Sync to start the synchronization process.
Synchronization may take a while to complete. The amount of time required to
complete a synchronization session depends on the number and size of the
14 Using FileManager for Windows
 Loading...