

Page 1
SimpleSafe
Flash Drive Security Software
User Guide
For SimpleTech flash drives:
®
Bonzai
Xpress (STI-UFDBXA/XXX)
Napster™ (NAP-USB2FD/XXX)
®
SimpleTech
USB 2.0 (STI-USB2FD/XXX)
Page 2

Disclaimers
SimpleTech, Inc. (SimpleTech) does not warrant that the software will work in all
environments and applications, and makes no warranty or representation, either implied or
expressed, with respect to the quality, performance, merchantability, or fitness for a particular
purpose.
SimpleTech
that is not furnished by
The information in this document is subject to change without notice.
Information in this User’s Guide is subject to change without notice and does not represent a
commitment on the part of SimpleTech. SimpleTech. assumes no responsibility for any
inaccuracies that may be contained in this User’s Guide.
SIMPLETECH, INC. PROV IDES NO WARRANTY WITH REGARD TO THIS DOCUMENT OR ANY OTHER
INFORMATION CONTAINED HEREIN AND HEREBY EXPRESSLY DISCLAIMS ANY IMPLIED
WARRANTIES OF MERCHANTABILITY OR FITNESS FOR ANY PARTICULAR PURPOSE WITH REGARD
TO ANY OF THE FOREGOING. SIMPLETECH ASSUMES NO LIABILITY FOR ANY DAMAGES INCURRED
DIRECTLY OR INDIRECTLY FROM ANY TECHNICAL OR TYPOGRAPHICAL ERRORS OR OMMISSIONS
CONTAINED HEREIN. IN NO EVENT SHALL SIMPLETECH BE LIABLE FOR ANY INCIDENTAL,
CONSEQUENTIAL, SPECIAL, OR EXEMPLARY DAMAGES, WHETHER BASED ON TORT, CONTRACT
OR OTHERWISE, ARISING OUT OF OR IN CONNECTION WITH THIS DOCUMENT OR ANY OTHER
INFORMATION CONTAINED HEREIN OR THE USE THEREOF.
assumes no responsibility for the use or reliability of its software on equipment
SimpleTech
.
Copyright
The products and programs described in this User’s Guide are licensed products of
SimpleTech, Inc. This User’s Guide contains proprietary information protected by copyright,
and this User’s Guide and all accompanying software and documentation are
copyright. All rights are reserved.
No part of this document, including but not limited to any instructions, descriptions and product
specifications shall be modified, used, copied, reproduced, translated to another language or
disclosed in whole or in part, in any form or by any means, electronic or mechanical, for any
purpose other than the purchaser’s personal use, without the written consent of SimpleTech.
protected by
©2005 by SimpleTech®, Inc. All rights reserved.
Trademark Information
The SimpleTech name, logo and design are registered trademarks of SimpleTech, Inc. No
right, license, or interest to such trademarks is granted hereunder, and you agree that no such
right, license, or interest shall be asserted by you with respect to such trademark.
Other product and corporate names mentioned in this document are used for identification
purposes only and may be trademarks or registered trademarks of their respective companies.
Page 3

GETTING STARTED
Minimum System Requirements
To ensure that SimpleSafe works properly, the following minimum hardware and
software requirements must be satisfied.
Window® Users Macintosh® Users
®
Pentium
class, 200 MHz PC or compatible Power Macintosh®, PowerBook®, iMac® or
Windows 98, 98SE, ME, 2000, XP Mac OS
USB 2.0 compliant/1.1 compatible connector USB 2.0 compliant/1.1 compatible connector
3 MB of free disk space
Compatibility
SimpleSafe supports with the following SimpleTech flash drives:
®
• Bonzai
Xpress (part: STI-UFDBXA/XXX)
• Napster™ Flash Drive (part: NAP-USB2FD/XXX)
• USB 2.0 Flash Drive (part: STI-USB2FD/XXX)
Installation Requirements
SimpleSafe supports the Windows operating systems listed in “Minimum System
Requirements”, above. To run SimpleSafe, you must be logged onto Windows as
the administrator or a member of the administrator’s group.
Installing SimpleSafe in Windows 98/98SE
To run SimpleSafe under Windows 98/98SE, you must install the Windows 98 or
98SE driver for your flash drive. Go to www.simpletech.com/support and
download the Windows 98/98SE driver to your local computer. To install the
driver, double-click on the downloaded file and follow the on-screen instructions.
When installation completes, restart your computer.
Installing SimpleSafe in Windows ME, 2000 and XP
No additional driver installation or system setup is required.
iBook
®
®
9.0 and later
Getting Started i
Page 4
ABOUT THIS GUIDE
This user guide provides instructions for using SimpleSafe security software with
SimpleTech flash drives.
Typographic Conventions
The following conventions are used throughout this guide:
Bold Used for menu, command and keyboard selections you make and
Currier Identifies screen text.
Safe Use Information
Safe Use information and tips are used throughout this document to identify
additional information of which the reader should be aware. Safe Use information
and must be read carefully and fully understood before using SimpleSafe.
Safe Use information is classified according to the type of information presented.
The following symbols are used throughout this document to identify the type of
Safe Use information.
screens you will see.
CAUTION: This icon indicates the existence of a hazard
that could result in equipment or property damage or
equipment failure if the safety instruction is not observed.
NOTE: This icon identifies information that relates to the
safe operation of the equipment or related items.
TIP: This icon identifies helpful hints and tips.
ii About This Guide
Page 5

CONTENTS
Getting Started.........................................................................................i
Minimum System Requirements .....................................................i
Compatibility ................................................................................... i
Installation Requirements ...............................................................i
About This Guide.................................................................................... ii
Typographic Conventions ..............................................................ii
Safe Use Information ..................................................................... ii
Introduction _______________________________________ 1
About SimpleSafe.................................................................................. 1
SimpleSafe Partitions.................................................................... 1
Using SimpleSafe __________________________________3
Running SimpleSafe.............................................................................. 3
Starting the SimpleSafe Program ................................................. 3
Closing the SimpleSafe Program.................................................. 4
Partitioning Your Flash Drive ................................................................. 5
Creating a Public Area Only (Single Partition) .............................. 5
Creating a Security Area Only (Single Partition)........................... 6
Creating a Public and Security Area (Dual Partition) .................... 8
iii
Page 6

Removing the Security Area ......................................................... 9
Accessing SimpleSafe Partitions ......................................................... 10
Accessing the Public Area .......................................................... 10
Accessing the Security Area ....................................................... 11
Managing Your Login Password.......................................................... 14
Changing Your Login Password or Hint...................................... 14
iv
Page 7

INTRODUCTION
ABOUT SIMPLESAFE
SimpleSafe is an easy to use Windows utility designed to prevent unauthorized
access to sensitive data stored on SimpleTech
you can format your flash drive with up to two logical partitions—one partition for
public access and the other allowing only secure, password protected access.
SimpleSafe supports the following SimpleTech flash drives:
®
• Bonzai
Xpress Flash Drive
• Napster™ Flash Drive
• SimpleTech USB 2.0 Flash Drive
SimpleSafe Partitions
SimpleSafe allows you to partition your flash
drive with a Public Area partition, a Security
Area partition, or both, each mapped to your
computer as individual drives. When creating
multiple partitions on your drive (Public and
Security), SimpleSafe allows you to set the
capacity of each partition to accommodate
your specific storage needs.
Public Area
The Public Area is an unprotected partition accessible to both Mac OS and
Windows users. Password protection is not provided for this partition.
Security Area
The Security Area contains two partitions—a SimpleSafe application partition and
the Security Area partition. Only one partition is accessible at a time. SimpleSafe
closes the application partition when the Security Area is unlocked (accessed).
The Security Area is only accessible on computers running supported Windows
operating systems.
®
flash drives. With SimpleSafe,
Application
partition
About SimpleSafe 1
Page 8

Application Partition. The application partition is a read-only partition containing
the SimpleSafe application and setup files.
Security Area Partition. The Security Area partition is the partition SimpleSafe
safeguards against unauthorized access. Files in the Security Area partition can
only be accessed when the SimpleSafe program is running and the partition is
unlocked.
SimpleSafe encrypts the Security Area using a Windows-based algorithm. The
Security Area on your drive cannot be accessed on Macintosh computers.
The following table describes how SimpleSafe partitions are configured on your
computer.
Partition Option Password Protection Application Partition
Public Area Only
(Single Partition)
Security Area Only
(Single Partition)
Public and Security
Area (Dual Partition)
2 About SimpleSafe
No
Yes Yes 1
Public Area: No
Security Area: Yes
Read-Only
No application partition
created
Yes 2
Number of
Mapped Drives
1
Page 9

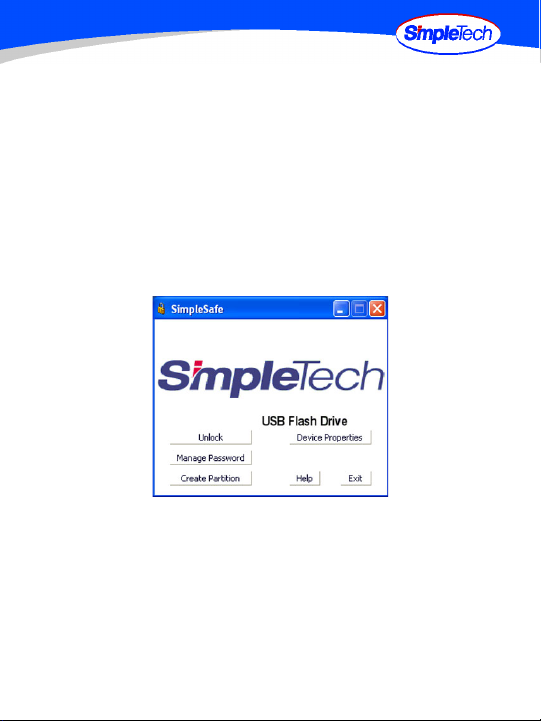
USING SIMPLESAFE
RUNNING SIMPLESAFE
Starting the SimpleSafe Program
To start the SimpleSafe, you must logged onto Windows as the administrator
or a member of the administrator’s group.
1 Plug your flash drive into the computer’s USB port.
2 If you have not already done so, copy the SimpleSafe application file to your
flash drive.
3 Open My Computer and double-click on the SimpleSafe drive you want to
access.
If you are running SimpleSafe for the first time and have not changed the
volume label of your flash drive, the drive appears as a “Removable Disk”,
mapped to your computer. If you have previously partitioned the drive using
SimpleSafe, the drive will appear as a “SimpleSafe” drive mapped to your
computer.
Security Area partition
mapped as a drive to
your computer
Public Area partition
mapped as a drive
to your computer
Running SimpleSafe 3
Page 10

4 In the Explorer window
that appears, doubleclick the SimpleSafe
program icon
(SimpleSafe.exe).
When SimpleSafe starts, the program
searches for supported SimpleTech USB flash
drives connected to your computer. Once the
drive is detected, the SimpleSafe main screen
appears.
The SimpleSafe program can only
access one flash drive at a time. If the
program detects two or more drives
connected to your computer, a warning
appears directing you to disconnect any
additional drives before proceeding.
Closing the SimpleSafe Program
Exiting the SimpleSafe program from the Public Area partition closes the program,
and returns you to the partition.
Exiting the SimpleSafe program from the Security Area, closes the secured
partition on your drive and returns you to the application partition. However, the
SimpleSafe program continues to run in the background—as indicated by the
SimpleSafe disk icon in the System Tray. To close SimpleSafe, bring the
program into the foreground by right-clicking the SimpleSafe disk icon. Then,
on the SimpleSafe main page, click the Exit button.
4 Running SimpleSafe
Page 11

PARTITIONING YOUR FLASH DRIVE
This section contains step-by-step instructions on using SimpleSafe to partition
your SimpleTech flash drive.
Creating a Public Area Only (Single Partition)
Creating a partition erases all existing data on the flash drive. To avoid data
loss, back up your files before partitioning your drive.
On SimpleTech flash drives with write protection, the Write Protect switch
must be in the “unlocked” position to create a partition.
1 Start SimpleSafe (see “Starting the SimpleSafe Program” on page 3).
2 On the SimpleSafe main screen, click the Create Partition button.
3 On the Create Partition screen, choose
Public Area Only (Single Partition).
Partitioning Your Flash Drive 5
Page 12

4 When you are satisfied with your choice, click OK.
After partitioning your flash drive, the
SimpleSafe application and a setup files are
saved to the Public Area partition and the drive
is labeled “SimpleSafe.”
5 Disconnect, then reconnect the flash drive
before using it.
Creating a Security Area Only (Single Partition)
Creating a partition erases all existing data on the flash drive. To
avoid data loss, back up your files before partitioning your drive.
On SimpleTech flash drives with write protection, the Write Protect
switch must be in the “unlocked” position to create a partition.
1 Start SimpleSafe (see “Starting the SimpleSafe Program” on page 3).
2 On the SimpleSafe main screen, click the Create Partition button.
6 Partitioning Your Flash Drive
 Loading...