

Page 1
SIMPLEDRIVE
Designed by
™
USER GUIDE FOR WINDOWS
Congratulations on purchasing SimpleDrive
from SimpleTech.
SimpleDrive is the easiest way to add reliable, high
capacity external storage to your computer. SimpleDrive
works with virtually any PC-compatible computer with a
®
USB port, running Microsoft
Windows® 2000, XP, or Vista™ operating system. SimpleDrive is USB
2.0 compliant/USB 1.1 compatible—delivering data transfer speeds up to 480 megabits per second.
®
In addition to the USB interface, SimpleDrive Deluxe models have an IEEE 1394a/FireWire
400-
compliant interface for even greater flexibility.
What’s Included
• SimpleDrive external disk drive (pre-loaded with ArcSoft® TotalMedia Backup & Record™
software)
• AC adapter and power cord
• USB 2.0 cable
• FireWire 400 cable (SimpleDrive Deluxe only)
• Quick Start guide
• Warranty card
If any item is missing or damaged, contact your local reseller or retailer for replacement.
This user guide includes instructions on connecting and using the SimpleDrive disk drive with Windows
and computers. You may also want to consult your computer’s user manual to determine if there are
additional instructions related to the installation and use of USB and FireWire
®
devices.
Page 2

Copyright
®
© 2007 by SimpleTech
, Inc. All rights reserved.
If this guide is distributed with softwar e that includes an end user a greement, this guide, as well a s the software
described in it, is furnished under license and may be used or copied only in accordance with the terms of such
license. Except as permitted by any such lic ense, no part of this gu ide may be reproduced, s tored in a retrieval
system or transmitted, in any form or by any means, electronic, mechanical, recording, or otherwise, without
the prior written permission of SimpleTech, Incorporated. Please note that this User’s Guide contains
proprietary information protected under copyright law even if it is not distri buted with software that includ es an
end user agreement.
Disclaimers
SimpleTech, Inc. does not warrant that the software will work in all environments and applications, and makes
no warranty or representation, either implied or expressed, with respect to the quality, performance,
merchantability, or fitness for a particular purpose.
Information in this User’s Guide is subject to change without notice an d does not re pre sen t a commitmen t on
the part of SimpleTech. SimpleTech assumes no responsibility for any in accu racies t hat may be c ontained in
this User’s Guide.
SIMPLETECH, INC. PROVIDES NO WARRANTY WITH REGARD TO THIS DOCUMENT OR ANY OTHER
INFORMATION CONTAINED HEREIN AND HEREBY EXPRESSLY DISCLAIMS ANY IMPLIED
WARRANTIES OF MERCHANTABILITY OR FITNESS FOR ANY PARTICULAR PURPOSE WITH REGARD
TO ANY OF THE FOREGOING. SIMPLETECH ASSUMES NO LIABILITY FOR ANY DAMAGES INCURRED
DIRECTLY OR INDIRECTLY FROM ANY TECHNICAL OR TYPOGRAPHICAL ERRORS OR OMISSIONS
CONTAINED HEREIN. IN NO EVENT SHALL SIMPLETECH BE LIABLE FOR ANY INCIDENTAL,
CONSEQUENTIAL, SPECIAL, OR EXEMPLARY DAMAGES, WHETHER BASED ON TORT, CONTRACT
OR OTHERWISE, ARISING OUT OF OR IN CONNECTION WITH THIS DOCUMENT OR ANY OTHER
INFORMATION CONTAINED HEREIN OR THE USE THEREOF.
Trademark Information
The SimpleTech name, logo and design are registered trademarks of SimpleTech, Inc. No right, license, or
interest to such trademarks is granted hereunder, and you agree that no such right, license, or interest shall
be asserted by you with respect to such trademark.
Other product and corporate names mentioned in this docume nt are used for identific ation purposes o nly and
may be trademarks or registered trademarks of their respective companies.
ii
Page 3

CONTENTS
System Requirements.............................................................................................................1
Installation ...............................................................................................................................1
Guides and Additional Information .......................................................................................1
Visual Tour...............................................................................................................................2
Using SimpleDrive...................................................................................................................3
Connecting SimpleDrive ......................................................................................................3
Formatting SimpleDrive .......................................................................................................4
Viewing Files on SimpleDrive ..............................................................................................4
Reading the Capacity Meter ................................................................................................5
Using the One-Click™ Backup Button.................................................................................5
Disconnecting SimpleDrive..................................................................................................6
Using TotalMedia Backup & Record......................................................................................7
Installing TotalMedia Backup & Record...............................................................................7
Starting TotalMedia Backup & Record.................................................................................8
Backing Up Media Files.......................................................................................................9
Backing Up Personal Documents......................................................................................11
Selecting Specific Folders to Back Up...............................................................................13
Scheduling Periodic Backups ............................... ...... ....... ................................................15
iii
Page 4

Restoring Your Data........................................................ ....... ...... ......................................17
Restoring Data From a CD/DVD...................................................................................17
Restoring Data From a Hard Drive................................................................................19
Technical Support From SimpleTech..................................................................................21
Specifications ........................................................................................................................22
iv
Page 5

SYSTEM REQUIREMENTS
• Pentium® III, 800 MHz processor (P4 1.6 GHz or higher recommended)
• Windows 2000, XP or Vista™ operating system
• 50 MB free hard drive space* (700 MB recommended)
• 128 MB RAM or more
• 16-bit color display at 800 x 600 or higher
• Available USB 2.0/1.1 or FireWire 400 port
Up to 8.5 GB additional space is recommended when using TotalMedia Backup & Record for CD/ DVD
burning. Additional space is also required for Windows Media Player and DirectX installation.
INSTALLATION
No tools or special equipment are required to install your SimpleDrive. Just connect the drive to
an available USB or FireWire 400 port on your computer. Windows automatically installs the files
needed to use the drive.
For optimal performance and reliability, install the latest updates and service pack (SP) on your
computer. To download updates, click Start, Help and Sup port Center and select Windows Upd ate .
GUIDES AND ADDITIONAL INFORMATION
This user guide and additional information on SimpleDrive are available online at
www.simpletech.com/support.
®
To view SimpleTech documents, you will need Adobe Acrobat
Reader®.
System Requirements 1
Page 6
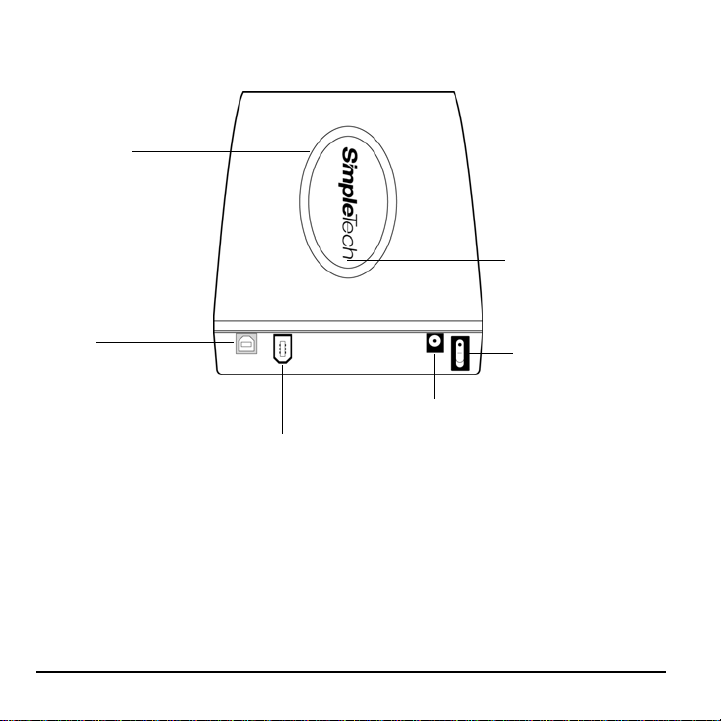
VISUAL TOUR
Capacity Meter
Illuminates to indicate the amount of
available storage on SimpleDrive.
USB Port
Use this port to connect
SimpleDrive to the USB port on
your computer.
One-Click Backup Button
Press this button to launch
TotalMedia Backup & Record
and back up your files to
SimpleDrive.
Power Switch
Turns SimpleDrive on or off.
DC-In Power Port
Use this port to connect the AC power adapter.
FireWire 400 Port (SimpleDrive Deluxe models only)
Use this port to connect SimpleDrive to the high-speed
Firewire 400 port on your computer.
2 Visual Tour
Page 7
USING SIMPLEDRIVE
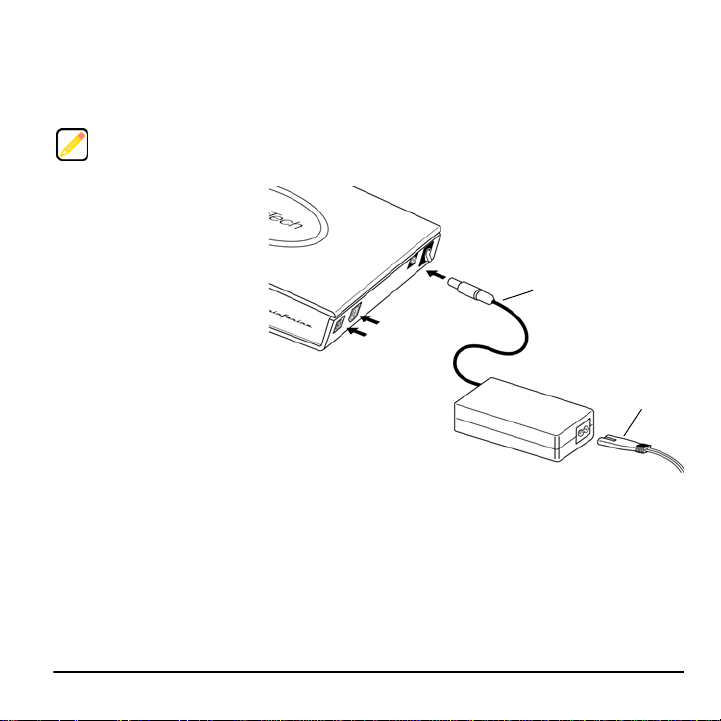
Connecting SimpleDrive
Connect SimpleDrive to your computer using either the USB or FireWire 400 port. SimpleDrive does
not support simultaneous use of both ports.
1
Connect one end of the
provided USB or FireWire
cable to the corresponding
port on the back of
SimpleDrive.
2
Connect the other end of
the USB or FireWire cable
to the corresponding port on
USB 2.0
your computer.
3
Connect the AC adapter
cord to the DC-IN socket on
the back of SimpleDrive.
4
Connect the power cord to
* SimpleDrive Deluxe models only.
the AC adapter.
5
Connect the other end of the power cord to an electrical outlet or power strip.
6
Set the Power switch to the On position.
The Capacity Meter comes on for 10 seconds, providing a visual indication of the available
storage space on the drive.
SimpleDrive is ready to use.
Power Switch
DC-IN
FireWire 400 *
AC Adapter Cord
Power Cord
Using SimpleDrive 3
Page 8
Formatting SimpleDrive
SimpleDrive is preformatted as an NTFS volume. If you plan to use SimpleDrive in Windows 98SE,
Me, 2000, XP and Vista environments, consider creating two partitions on the drive—a FAT 32
volume to support Windows 98SE and Me, and a second larger NTFS partition for Windows 2000,
XP, and Vista.
For instructions on formatting disk drives, refer to your Windows operating system documentation.
Formatting a disk deletes all existing data on the drive. If you have important data that you want to
keep, back it up onto another drive before formatting SimpleDrive.
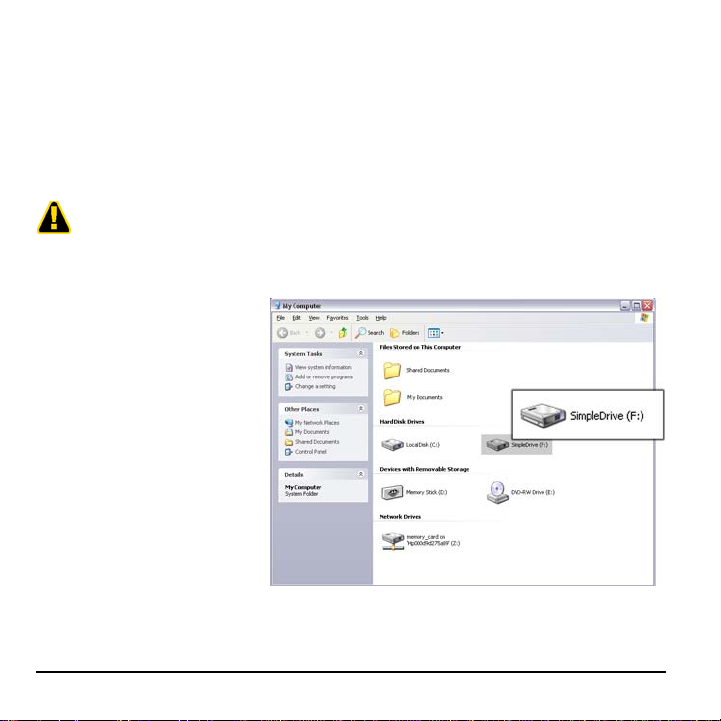
Viewing Files on SimpleDrive
You can save, copy, move and
delete files on SimpleDrive just as
you would on any other drive on
your computer.
SimpleDrive appears as
“SimpleDrive” mapped to a drive
letter in Windows Explorer. To
view the files on the drive, open
My Computer, and then click the
SimpleDrive drive icon (the drive
letter assigned to SimpleDrive
depends on your computer’s
storage configuration).
4 Using SimpleDrive
Page 9
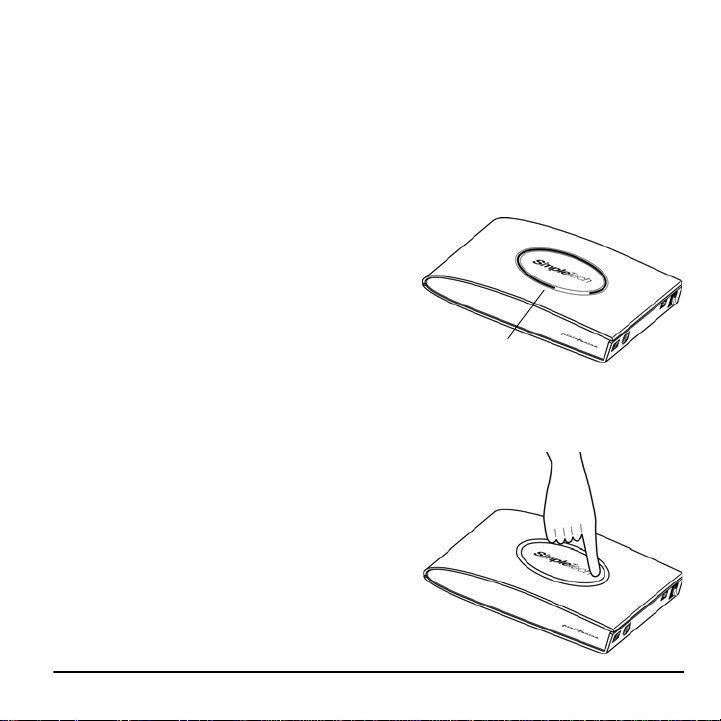
Reading the Capacity Meter
Checking the capacity meter is a quick way to see how much storage space is available on your
SimpleDrive drive. When power is applied to SimpleDrive, the capacity meter illuminates giving
you a visual indication of the amount of available storage on the drive.
The capacity meter contains four sections, which illuminate to indicate the remaining amount of
space on the drive. Each section represents approximately 25 percent of SimpleDrive’s total
storage capacity.
When available storage space falls below 10 percent,
the capacity meter flashes red for 10 seconds, and then
goes off. The capacity meter remains off until you press
the One-Click backup button to back up the data on the
drive.
Whenever SimpleDrive is turned on and available
Capacity Meter
storage is below 10 percent, the capacity meter flashes
red for 10 seconds, and then goes off.
Using the One-Click™ Backup Button
With the push of a button, you can instantly back up
selected files and folders on your computer. Just setup
the TotalMedia Backup & Record applicatio n to perform
a scheduled backup. Then, simply press the One-Click
button anytime you want to back up your computer’s
hard drive.
Using SimpleDrive 5
Page 10

Disconnecting SimpleDrive
One of the great features of USB and FireWire is that you can disconnect SimpleDrive while your
computer is turned on. However, to avoid damaging the files on the drive and other USB or
FireWire devices, you should shut SimpleDrive down before disconnecting it.
Before disconnecting SimpleDrive, close any open files and exit any applications running on the drive.
1
Click (Safely Remove Hardware)
icon in the System Tray.
2
Click the Safely remove USB Mass
Storage Device popup.
3
When Windows notifies you that it is safe to do so, unplug SimpleDrive from the computer’s
USB or FireWire port.
Safely Remove Hardware
6 Using SimpleDrive
Page 11

USING ARCSOFT® TOTALMEDIA BACKUP & RECORD™
Installing TotalMedia Backup & Record
1
Go to the root directory on your SimpleDrive external disk drive, and then double-click
Setup.exe to launch the TotalMedia Backup & Record installation wizard.
2
Open the drop-down box, select
your preferred interface language,
and then click OK.
3
Click Next to begin the installation process.
4
Follow the on screen instructions to install
TotalMedia Backup & Record on your
computer.
Language options
Using ArcSoft® TotalMedia Backup & Record™ 7
Page 12

Starting TotalMedia Backup & Record
To start TotalMedia Backup & Record, click Start, All Programs, ArcSoft TotalMedia Backup &
Record, and then TotalMedia Backup & Record.
TotalMedia Backup & Record allows you t o back up your personal files and folders. It cannot be used
to create a bootable backup of your operating system or to backup system settings, operat ing sys te m
files or programs.
8 Using ArcSoft® TotalMedia Backup & Record™
Page 13

Backing Up Media Files
1 Place the cursor over the Back up option.
3 Select the type of media
files you want to back up.
4 Choose the type of backup
you want to perform.
2 Click Photo, Video, Music.
5 Click Next.
Using ArcSoft® TotalMedia Backup & Record™ 9
Page 14

10 Using ArcSoft® TotalMedia Backup & Record™
6 Specify the backup destination.
• To backup to a CD/DVD,
select your CD/DVD drive.
• To backup to SimpleDrive,
select Hard Drive, and then
click Browse to locate the
drive.
7 Click Back up.
Page 15

Backing Up Personal Documents
1 Place the cursor over the Back up option.
3 Select the type of documents
you want to back up.
4 Choose the type of
backup you want to
perform.
2 Click Personal Documents.
5 Click Next.
Using ArcSoft® TotalMedia Backup & Record™ 11
Page 16

12 Using ArcSoft® TotalMedia Backup & Record™
6 Specify the backup destination.
• To backup to a CD/DVD,
select your CD/DVD drive.
• To backup to SimpleDrive,
select Hard Drive, and then
click Browse to locate the
drive.
7 Click Back up.
Page 17

Selecting Specific Folders to Back Up
1 Place the cursor over the Back up option.
3 Select the files and folders
you want to back up.
2 Click Advanced Backup.
4 Click Next.
Using ArcSoft® TotalMedia Backup & Record™ 13
Page 18

6 Choose the type of
backup you want to
perform.
5 Specify the backup destination.
• To backup to a CD/DVD, select your CD/DVD drive.
• To backup to SimpleDrive, select Hard Drive, and
then click Browse to locate the drive.
7 Click Back up.
14 Using ArcSoft® TotalMedia Backup & Record™
Page 19

Scheduling Periodic Backups
1 Place the cursor over the Back up option.
2 Click Schedule Backup.
3 Select the type of backup you want to
schedule, and then click Next.
4 In the window that appears, select the files and folders you want to backup, then click Next.
Using ArcSoft® TotalMedia Backup & Record™ 15
Page 20

5 Specify the backup destination.
• To backup to a CD/DVD, select your CD/DVD drive.
• To backup to SimpleDrive, select Hard Drive, and
then click Browse to locate the drive.
6 Set the backup schedule.
•How Often
• When
• What Time
16 Using ArcSoft® TotalMedia Backup & Record™
7 Click Schedule It.
Page 21

Restoring Your Data
Restoring Data From a CD/DVD
1 Place the cursor over the Restore option.
3 Insert your backup CD/DVD into the computer’s CD/DVD drive.
4 Click OK.
2 Click Restore From CD/DVD.
Using ArcSoft® TotalMedia Backup & Record™ 17
Page 22

5
Click Next to start the start the TotalMedia
Backup & Record Restore Utility.
6
Follow the on screen instructions to restore
the backup files to your computer.
18 Using ArcSoft® TotalMedia Backup & Record™
Page 23

Restoring Data From a Hard Drive
1 Place the cursor over the Restore option.
2 Click Restore From Hard
Drive.
3 Select the backup containing
the files you want to restore.
4 Click Open.
Using ArcSoft® TotalMedia Backup & Record™ 19
Page 24

5
Click Next to start the start the To talMedi a
Backup & Record Restore Utility.
6
Follow the on screen instructions to restore
the backup files to your computer.
20 Using ArcSoft® TotalMedia Backup & Record™
Page 25
TECHNICAL SUPPORT FROM SIMPLETECH
SimpleTech Technical Support provides customer support for the duration of the warranty period
on this product, Monday through Friday from 6:30 am until 5:30 pm Pacific Standard Time. You
can contact our Technical Support team through our Web site, by e-mail or by phone.
Phone 1-800-945-3444 or 949-476-1180
Request Email Response Go to www.simpletech.com/support and click
Tech Support/RMA Request Form.
Online Chat Go to www.simpletech.com/support, click Contact Support,
and then click
This equipment has been tested and found to comply with the limits for a Class B digital
device, pursuant to Part 15 of the FCC Rules.
This equipment carries the CE marking in accordance with European Directives
EN 55022, EN 55024, EN 61000-3-2, EN 61000-3-3, EN 61000-4-2, EN 61000-4-3,
EN 61000-4-4, EN 61000-4-5, EN 61000-4-6, EN 61000-4-8, EN 61000-4-11.
.
Technical Support From SimpleTech 21
Page 26

SPECIFICATIONS
Hard Drive 3.5 inch, 7200 RPM
Capacity 160 GB, 250 GB, 320GB, 500GB and 750 GB available
Cache Buffer 8 MB (minimum)
Seek Time Less than 10 mSec
Transfer Rate Up to 34 MB/sec
Interface USB 2.0 compliant, 1.1 compatible; FireWire 400, 1394b compliant, 1394a compatible)
Interface Transfer Rate USB 2.0: Up to 480 MB/sec; FireWire 400: Up to 400 MB/sec (SimpleDrive Deluxe only)
Power External AC power adapter; 100/220V, 50/60 Hz AC input, 1.5 Vdc output
Operating Temperature 41° to 95° F (5° to 35° C)
Operating Humidity 5 - 95%, RH non-condensing
Compatibility Windows and Mac users (preformatted for Windows) - Windows 2000, XP, Vista,
Dimensions 8.2 in. x 5.1 in. x 1.5 in. (209 mm x 130 mm x 40 mm)
Weight 2.0 lbs. (0.91kg)
Specifications subject to change without notice.
Mac OSX
22
Page 27

Terms of Limited Warranty
SimpleTech warrants that the Product, in the course of its normal use, will be free from defects in material and wo rkmanship for the Warranty Period indicated below.
This warranty does not cover any damag e to this prod uc t that results from accident, abuse, misuse, natural or personal d isaster, or any un authorized disassembly,
repair, or modification. The Limited Warranty commences from the p urch ase date a ppe aring on the original retail purchase receipt. SimpleDrive 160 GB - 1 year.
SimpleDrive 250 GB, 320 GB, 500 GB and 750 GB - 3 years.
SimpleTech will have no liability for Product returned if SimpleTech determines that the claim e d de fect a) is not pres en t, or b) is attributable to misuse , impro per
installation, alteration (including removing or obliterating labels), or mishan dling after original shipment from Sim pleTech. Also, SimpleTech will not repair or exchange
any product that has a “limited lifetime” which fails solely because it's estimated life has expired. Sim p leTech bears no responsibility for failure or defect caused by
any third party product or components whether authorized or not.
SimpleTech does not recommend the use o f its products in life support applic ations whe re in a failure or malfunc tion, the produc t may d irectly threaten life or injury.
Accordingly, in any use of SimpleTech products in life support systems or other applications where failure could threaten life or injury, the products should only be
incorporated in systems designed with a pp ro priate redu nda nc y, fault tolerant or back-up features. This product is inte nde d for consumer end-use applications only;
it is not intended for nor warranted for industrial applications.
Subject to the preceding limitations, including the warranty period, the sole and exclusive warranty will be only the repair or replacement of the Product for any other
product equivalent in configuration or current market val ue, with remedy and valu e to be determined solely by SimpleTech. The Limited Warranty will extend to
Product which is repaired or replaced by Simp leTech for the balance of the applicable period of the origina l warranty or thirty (30) days from the date of return shipment
from SimpleTech of a repaired or replacement Product, whichever period is longer.
How to Obtain Warranty Service
Most vendors selling SimpleTech p roducts will e xchange defec tive or dead-on -arrival (“DOA”) Product for the first thirty (30) da ys afte r purc hase . With in the fi rst th irty
(30) days after purchase or the exchange period specified by the ven do r, the defective pr odu ct m us t be returned to original place of purcha se with valid proof of
purchase. State and local laws may apply.
Beyond the 30 day period, If SimpleTech Technical Support determines that the Produ ct is DOA or falls within terms of this warranty, and the prod uc t is within the
SimpleTech's warranty period as specified in the above table, SimpleTech will accept the return of the Product for repair or replacement only. SimpleTech does not
offer credit for the returned products. For exchange of RMA (Return Merchandise Authorization) products, Customers shall fill the On-line RMA Request Form an d
fax the proof of original retail purchase invoice. The original retail purchase receipt from the original retail vendor must accompany the return Product to establish the
warranty period. If the product is resold through an on-line auction agency or other channe l, the warranty period will be based upon the original retail purchase receipt
and NOT the resale purchase receipt.
If SimpleTech determines that the Product ma y be de fective in material or w orkmanship, o r DOA, you will be issued a R eturn Material Authorization (“RMA”) nu mber
and instructions for Product return. Authorized returns are to be shipped prepaid and insured, and packag ed properly to prevent damage. The original purchase
receipt must accompany the return Product to establish the Warranty Period . SimpleTech will not be responsible for the lost data, regardless of cause, recovery of
lost data, or data contained in any return Product.
SimpleTech Disk Drive Return Policy
SimpleTech does not perform any data recovery services. If your Sim pleTech Hard drive is defectiv e and you need to recov er data on y our disk d rive, you may find
the following URL useful. The link provides a list of vendors offering data recovery services. How ev er, we neithe r recomm e nd nor guarantee serv ices rend ered b y
any of these companies. The following information is provided for reference on ly.
http://www.google.com/search?q=data+recovery+disk
To return the defective Hard Drive under warranty, please request RMA approval number from SimpleTech technical support department by filling the RMA Request
Form. If SimpleTech determines that your product meets the warranty conditions, we will contact wit h an RMA approval number and provide detailed shipping
instructions.
Return policy about hard drives whose seal has been broken
When shipping the defective hard drive , the disk enc losure s eal m ust be in tact (not broken). If the d rive enclo sure se al h as been b roke n, the wa rranty will be vo ided
and any warranty claims for such drive will not be accepted by SimpleTec h and the prod uct will be returned to the customer. The only exception to this rule is that a
hard drive under warranty may be returned with a broken seal, if the se al was broken by a commercial data rec overy company for the sole purpose of retrieving critical
data. In this case, If the drive is still under warranty period as specified by SimpleTech, SimpleTech will exchange the defect ive product, provided the customer ships
the following items and documents with the RMA approval num ber.
Hard drive with data recovery company's label affixed to it stating the drive was ope ned for data recovery purposes.
Certified written explanation from the data recovery company ex plaining w hy the data recov ery work was necessa ry, description of the work performed o n the Drive,
and description of the conditions under which the work was perform ed.
SIMPLETECH LIMITED WARRANTY
23
Page 28

February 8, 2007
Copyright © 2007 SimpleTech, Inc. All rights reserved.
The SimpleTech name, logo and design are registered trademarks and
SimpleDrive is a trademark of SimpleTech, Inc. All other product and corporate
names are trademarks or registered trademarks of their respective companies.
Worldwide Headquarters
SimpleTech, Inc.
3001 Daimler Street
Santa Ana, California 92705 USA
Tel: (949) 476-1180
Fax: (949) 476-1209
Web: www.simpletech.com
P/N: 60000-00160-001
 Loading...