

Page 1
NAPSTER MUSICVAULT
EXTERNAL USB DISK DRIVE
QUICK START
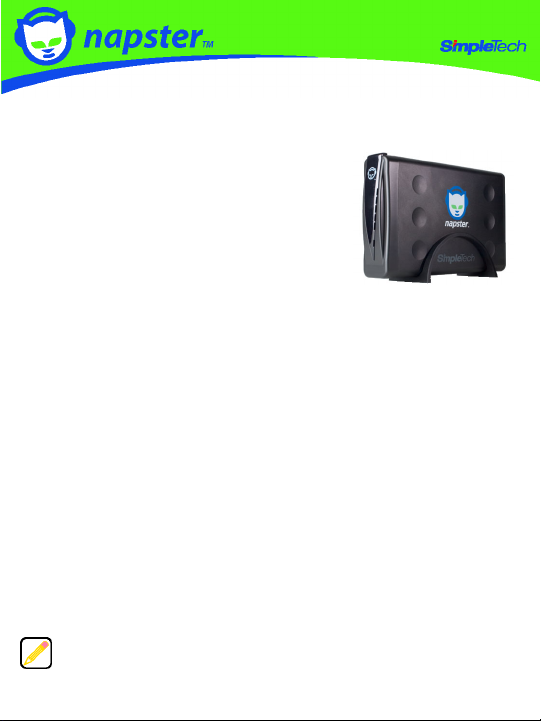
Congratulations on purchasing the Napster™
MusicVault from SimpleTech
®
.
The Napster MusicVault is the easiest way to add
reliable, high-capacity external storage to your
computer. Ideal for storing MP3 music files, digital
photos, MPEG movie clips, and other data, Napster
MusicVault works with virtually any PC-compatible or
®
Apple
Macintosh® computer with a USB port, running running Microsoft® Windows®
ME, 2000, XP, or Mac OS
®
9.2 and later. Napster MusicVault is USB 2.0 compliant/USB
1.1 compatible—delivering data transfer speeds up to 480 megabits per second.
What You Should Have
• MusicVault external disk drive
• 5 free music downloads (see Napster insert)
• Free 2-month Napster-To-Go™ membership (see Napster insert)
• AC adapter
• USB 2.0 cable
• Vertical stand
• StorageSync CD
• Quick Start guide (this guide)
• Warranty card
If any item is missing or damaged, contact your local reseller or retailer for replacement.
This quick start guide includes instructions for and using Napster MusicVault with
Windows and Apple Macintosh computers. You may also want to consult your
computer’s user manual to determine if there are any additional instructions related
to the installation and use of USB devices.
Page 2

SYSTEM REQUIREMENTS
Windows® Users Mac® Users
•
Pentium® class, 200MHz PC or equivalent
•
Windows® 2000, ME, XP
•
32MB RAM (or as required by system)
•
Available USB 2.0/1.1 port
•
iMac®, G3, G4, G5 or iBook
•
Mac OS® 9.2 and later
•
32MB RAM (or as required by system)
•
Available USB 2.0/1.1 port
®
INSTALLATION REQUIREMENTS
No tools or special equipment are required to install MusicVault.
Windows ME, 2000 and XP
No drivers are required. Plug MusicVault into an available USB port and Windows will
install the files needed to use the drive.
Mac OS 9.2 and later
No drivers are required. Plug MusicVault into an available USB port and your computer
will automatically detect the drive.
For optimal performance, install the latest updates fro m Apple® on your computer.
Download the updates from www.apple.com or open the software update tool
located in the Mac OS X system preferences folder. In Mac OS 9, the software
update tool is located in the control panel folder.
PRODUCT GUIDES, DRIVERS AND INFORMATION
This guide, drivers and additional information on the Napster MusicVault are available
online at www.simpletech.com/support. To view SimpleTech downloadable documents,
you will need Adobe Acrobat
®
Reader®.
2
Page 3
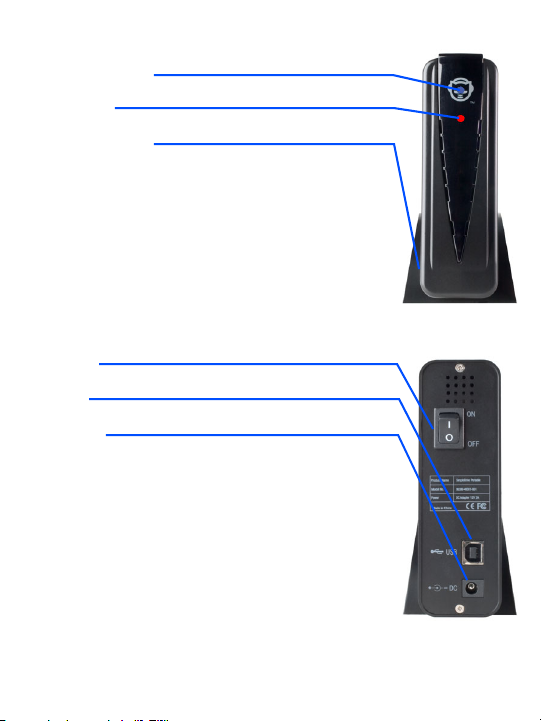
VISUAL TOUR
Front
HDD Activity LED (Blue)
Indicates disk drive read/write activity.
Power LED (Red)
Indicates MusicVault is powered ON.
Security Slot (not shown)
The security slot (center lower edge of case) allows you to attach a
security cable to MusicVault.
Back
Power Switch
Powers Napster MusicVault On or Off.
USB Socket
USB socket for connecting MusicVault to your computer.
DC Power Jack
Power socket for connecting the AC adapter to MusicVault.
3
Page 4

CONNECTING MUSICVAULT
1 Connect the USB cable to MusicVault. Connect the other end of the cable to a USB
socket on your computer.
2 Connect the AC adapter to the DC-IN jack on MusicVault. Connect the adapter’s
power plug to a live AC outlet, power strip or UPS (uninterruptible power supply).
Only use the AC power adapter that came with MusicVault. Using a
different power adapter may damage the drive and voids your warranty.
USB Cable
AC Adapter
After connecting the Napster MusicVault, it is ready to use. You don’t need to restart your
computer or install additional software.
FORMATTING MUSICVAULT
Napster MusicVault is formatted as a NTFS volume at the factory—allowing you to
format the drive and access its files using standard Windows and Mac OS tools.
However, Mac OS cannot write to NTFS formatted disks.
To enable full read/write access to MusicVault from both Windows and Macintosh
computers, reformat the drive using the FAT file system format. For instructions on
formatting disk drives, refer to the documentation provided with your computer’s
operating system.
Formatting Napster MusicVault deletes all existing data on the drive.
4
Page 5

Formatting for Mac Use Only
Mac users get better performance
when Napster MusicVault is
formatted as a Mac OS Extended
Erase button
volume. To format the drive in
Mac OS X, do the following:
1 Open Disk Utility and select
your Napster MusicVault.
2 From the Volume Format list,
choose Mac OS Extended
MusicVault drive
(Journaled).
3 Click the Erase button.
Mac OS Extended volumes cannot
be accessed from Windows.
After formatting MusicVault for Mac OS, you can customize the Finder window for quick
access to the files and folders on the drive.
VIEWING FILES ON MUSICVAULT
Viewing Files in Windows
In Windows Explorer, the Napster MusicVault displays
as a “MusicVault” disk icon, mapped to your computer.
To access files on MusicVault, open My Computer to
view the storage devices attached to your computer.
Then, click on the MusicVault’s disk icon (the drive
letter assigned to MusicVault depends on the
computer’s hardware configuration).
Viewing Files in Mac OS
In the Finder, MusicVault is
represented by a “MusicVault” drive
icon on the desktop. To access files
on MusicVault, double-click the
drive’s desktop icon.
As shipped, MusicVault provides
Read-Only access to Mac users
(see “Formatting MusicVault”).
5
Page 6

DISCONNECTING MUSICVAULT
Repeatedly inserting and removing a USB device may stop the USB port from
responding. Once the port is in this state, it will no longer recognize any USB device.
While the computer is powered on, it is recommended that you stop MusicVault from
running before unplugging it from the computer.
Before disconnecting or powering off the Napster
MusicVault, close any open files and exit any applications
Stopping MusicVault in Windows
1 In the System Tray, double-click
the Safely Remove Hardware
icon. In the Safely Remove
Hardware window that appears,
select MusicVault and then click
Stop.
2 When Windows notifies you that
it is safe to do so, unplug
MusicVault from the computer’s
USB port or power off the drive.
Stopping MusicVault in Mac OS
1 Double-click the
MusicVault desktop icon.
2 In the Finder window that
appears, click
MusicVault’s Eject
button.
3 Unplug MusicVault from
the computer’s USB port
or power off the drive.
You can also stop
MusicVault by dragging the
drive’s desktop icon to the
Trash bin.
Desktop icon
Eject button
6
Page 7

SPECIFICATIONS
Interface USB 2.0 compliant; USB 1.1 compatible
Connector USB 2, 4-pin, B-Type socket
Data Transfer Rate USB 2.0: up to 480 Mb/sec; USB 1.1: up to 12 Mb/sec
Power Supply 12 Vdc, 1.5A
Operating Temperature 41° - 95° F (5° - 35° C)
Relative Humidity 20 - 80%, non condensing
Operating System Windows ME, 2000, XP, and Mac OS 9.2 and later
Dimensions 8.0 in. (203.2 mm) x 1.63 in. (41.28 mm) x 5.25 in. (133.35 mm)
Weight Approximately 2.75 lb. (1.03 kg). Actual weight depends on drive capacity.
Specifications subject to change without notification.
A portion of Napster MusicVault’s listed capacity is used for formatting
and other functions and therefore is not available for data storage.
TECHNICAL SUPPORT FROM SIMPLETECH
SimpleTech Technical Support provides customer support for the duration of the warranty period on
this product, Monday through Friday from 6:30 am until 5:30 pm Pacific Standard Time. You can
contact our Technical Support team through our Web site, by e-mail or by phone.
Phone: 1-800-945-3444 or 949-476-1180
Request Email Response: Go to www.simpletech.com/support, click Return Merchandise
Online Chat: Go to www.simpletech.com/support and click .
This equipment has been tested and found to comply with the limits for a Class B digital device, pursuant to
Part 15 of the FCC Rules. These limits are designed to provide reasonable protection.
This equipment generates, uses and can radiate radio frequency energy and, if not installed and used in accordance
with the instructions, may cause interference to radio communications. However, there is no guarantee that
interference will not occur in a particular installation. If this equipment does cause harmful interference to radio or
television reception, which can be determined by turning the equipment off and on, the user is encouraged to try to
correct the interference by one or more of the following measures:
• Reorient or relocate the receiving antenna.
• Increase the separation between the equipment and receiver.
• Connect the equipment into an outlet on a circuit different from that to which the receiver is connected.
• Consult the dealer or an experienced radio/TV technician for help.
Manufacturer Warranty The 160GB Napster MusicVault is warranted for one year and the 250GB and 400GB
models are warranted for a period of three years from the date of retail purchase. A full text version of the
SimpleTech’s warranty policy is available online at www.simpletech.com/warranty.
(RMA), and then choose Need Technical Support.
Page 8

October 31, 2005
Copyright © 2005 SimpleTech, Inc. All rights reserved.
The SimpleTech name, logo and design are registered trademarks of
SimpleTech, Inc. All other products and corporate names are
trademarks or registered trademarks of their respective companies.
Worldwide Headquarters
SimpleTech, Inc.
Santa Ana, California 92705 USA
3001 Daimler Street
Tel: (949) 476-1180
Fax: (949) 476-1209
Web: www.simpletech.com
P/N: 60000-00134-002
2071r2
 Loading...