


User Manual GB
Руководство по эксплуатации RU
DECORATIVE CHIMNEY HOOD
ДЕКОРАТИВНЫЕ ВЫТЯЖКИ
H10-20-300-045 Rev 002

GB
Dear Customer,
Thank you very much for your preference for Simfer products. Our objective is to ensure that you enjoy this product, manufactured environ- mentally-friendly with a total sense of quality in a precise working environment at our modern facilities, most efficiently.
We recommend you to read the instruction manual carefully and keep it handy before you use this Simfer chimney hood so that it maintains its quality just like the first day you bought it and serves you most efficiently.
NOTE:
This Instruction Manual has been prepared for a variety of models.
Some of the features specified in the Manual may not exist in your device.
These features are marked with *.
Our devices are designed for domestic use. They are not for professional use.
“PLEASE READ THE INSTRUCTIONS BEFORE YOU INSTALL OR USE THIS DEVICE.”
This product has been manufactured in an environmentally-friendly and modern plants without harming the nature.
“Conforms with the AEEE Regulations.”
2

|
GB |
|
CONTENTS |
|
|
1. |
Safety Instructions |
4 |
2. |
Introduction And Technical Drawing |
|
|
Of The Chimney Hood |
7 |
3. |
Installation Of Chimney Hood |
8 |
3.1. Location Of The Chimney Hood |
8 |
|
3.2. Mounting Chimney Hood On The Wall |
8 |
|
3.3. Mounting The Aluminum Pipe |
8 |
|
3.4. Installation Of Outer Duct |
9 |
|
3.5. Installation of Inner Duct Mounting Bracket |
9 |
|
4. |
Functions Of The Chimney Hood |
9 |
4.1. Control Panel |
9 |
|
4.2. Symbols Functions |
9 |
|
5. |
Operating The Chimney Hood |
10 |
5.1. In Ducted Use |
10 |
|
5.2. Round Charcoal Filter |
10 |
|
5.3. Use Of Charcoal Filter |
11 |
|
5.4. Installation Of Charcoal Filter |
11 |
|
5.5. Use Of Aluminum Cartridge Filter |
11 |
|
6. |
Replacing The Bulb |
11 |
7. |
Maintenance Of The Chimney Hood |
12 |
8. |
If Chimney Hood Does Not Work |
13 |
9. |
Environmentally-Friendly Disposal |
14 |
10. Package Information |
14 |
|
3

GB
1. SAFETY INSTRUCTIONS
1.This product is designed for domestic use.
2.Product Voltage is 220-240 Volts 50Hz.
3.Power cord of your product is fitted with grounded plug. This cord must be plugged into a grounding socket.
4.All electrical installation must be done by a qualified electrician.
5.Installation by unqualified persons may lead the product run with lower performance, be damaged or cause accidents.
6.Power supply cord should not be jammed or crushed. Power cord should not be close to hobs, etc, otherwise it may melt and cause fire.
7.Do not plug in the product into a socket before the installation is complete.
8.Make sure the mains switch is easily accessible in order to cut the power of the product in case of any danger.
9.Do not touch the bulbs of your product if used for a long period of time. The bulbs will be hot and may burn your hand.
10.Kitchen chimneys are designed for domestic use. If used for other purposes, it may lead to a failure and not be covered under the warranty.
11.Follow the authorized agencies’ rules and regulations regarding letting out the air. (This warning does not apply to usage with non-ducted chimney hoods.)
4

GB
12.Food that may burst into flames should not be cooked under the device.
13.Turn on the product after you place pots, pans, etc on the hobs. Otherwise excess heat may cause deformation of some parts of your product.
14.Do not leave hot oil on the hobs. Pans with hot oil inside may cause self-ignition.
15.When cooking i.e. deep frying, hot oil may burst into flames. Be careful on your curtains and cloths. 16.Make sure you replace the filters at the recommended intervals. Filters not replaced on time carry fire risk due to increase of grease on them.
17.Do not use non-fire-resistant materials instead of filters.
18.Keep the potentially dangerous packaging materials away from children.
19.Do not use your product without a filter, do not remove filters when the product is operating.
20.In case of start of flames, cut off the power of the chimney fan and cooker.(Cut off the power by unplugging the device).
21.Turn off the hobs before you remove pots, pans, etc.
22.If the cleaning is not done periodically, your product may carry fire risk.
23.Cut off the power supply before any maintenance work. (Cut off the power by unplugging the device.)
5

GB
24.For duct-out chimney hoods, use pipes with a diameter of 150 mm or 120 mm. You should minimize the ducting distance with minimum bends.
25.Make sure your children do not play with the product. Do not let young children operate the product.
26.If the power cord is damaged, the damaged cord should be replaced by the manufacturer or its service agent or similarly specialized personnel in order to avoid a dangerous situation.
27.In case of start of flames, cut off the power of the chimney fan and cooker and cover the flame. Do not use water to extinguish the fire.
28.WARNING: Install “MAX. 6 A” fuse for the extractor fan.
6
GB 
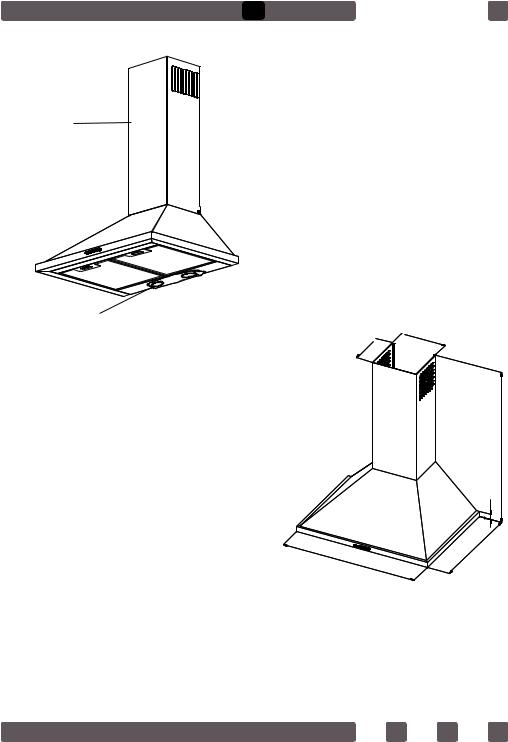
 2. INTRODUCTION AND TECHNICAL DRAWING OF THE CHIMNEY HOOD
1
1. Duct
2. Control panel
3. Filter
4. Lighting
2 

3 
4
A 
 B
B
A |
170 mm |
B |
200 mm |
|
|
C |
700 mm |
|
|
D |
25 mm |
|
|
E |
450 mm |
F |
596 mm / 896 mm |
|
|
F
C
D
E
7


 GB 3. INSTALLATION OF CHIMNEY HOOD 3.1. Location Of The Chimney Hood
Min. 650 mm.
3.2. Mounting Chimney Hood On The Wall
2 drywall (8mm) anchors are nailed into the holes drilled according to installation template (A,B). They are fixed into the wall through 2 key holes by screws as shown in Figure 1.
A |
B |
Installation Template |
|
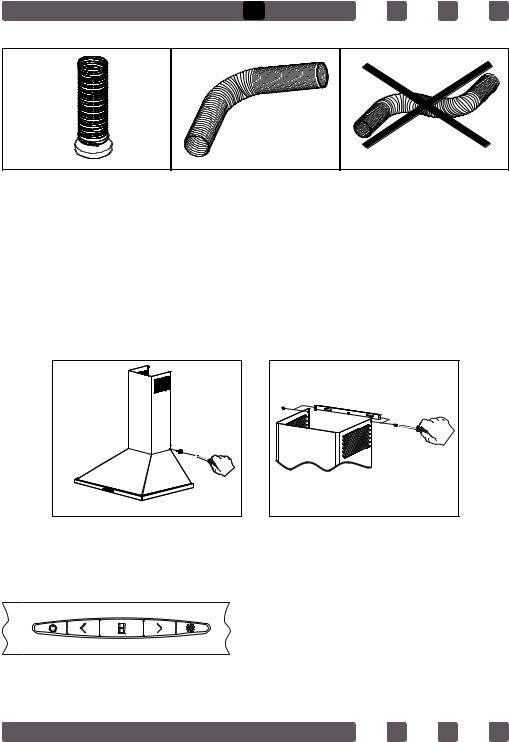
3.3. Mounting The Aluminum Pipe
Figure 1 |
Place the aluminum pipe on the plastic duct. Place the other end of the pipe into the air outlet in the kitchen. (Figure 2)
Twists and bends on the aluminum pipe may cause minimizing the air suction so avoid unnecessary bends and twists as much as possible. (Figure 3-4) Place the inner duct and outer duct carefully on the product.
8
GB
Fix the inner duct to inner duct connection plate with 2 screws.
Figure 2 |
Figure 3 |
3.4. Installation Of Outer Duct
Figure 4 |
Put the outer duct on the chimney hood and fix to it by 2 screws (Figure 5)
3.5. Installation of Inner Duct Mounting Bracket
2 fixing holes are drilled on the wall with Ø 6 mm electric drill at a suitable height and place to fix the inner duct hanger plate onto the wall. 6mm drywall anchors are nailed into those holes and inner duct mounting brackrets are pinned down. (Figure 6)
At the last step of chimney hood installation, the inner duct is screwed on the inner duct mounting brackets.
Figure 5 |
Figure 6 |
Note: Packaging may not include inner duct according to model.
4. FUNCTIONS OF THE CHIMNEY HOOD 4.1. Control Panel
Digital Control: Touch the symbols on the keys. (On/Off function and timer are on the same key; if pressed for 1
sec on-off function will operate. If pressed for 3 sec. 15 minutes timer will operate.
9
 Loading...