

Page 1
3 Year Guarantee
*Register online within 30
days. Terms & Conditions apply
Garantie de 3 ans
*Enregistrez votre produit en ligne
dans les 30 jours. Sous réserve des
termes et conditions appliquées
3 Jahre Garantie
*Registrieren Sie sich innerhalb von 30
Tagen online. Es gelten die allgemeinen
Geschäftsbedingungen
3 años de garantía
*Regístrese online dentro de 30 días.
Se aplican los términos y condiciones
3 anni di garanzia
*Registrarsi on-line entro 30 giorni.
Termini e Condizioni si applicano
3 Jaar Garantie
*Registreer online binnen 30 dagen.
Algemene voorwaarden van toepassing
www.silverlinetools.com
Page 2
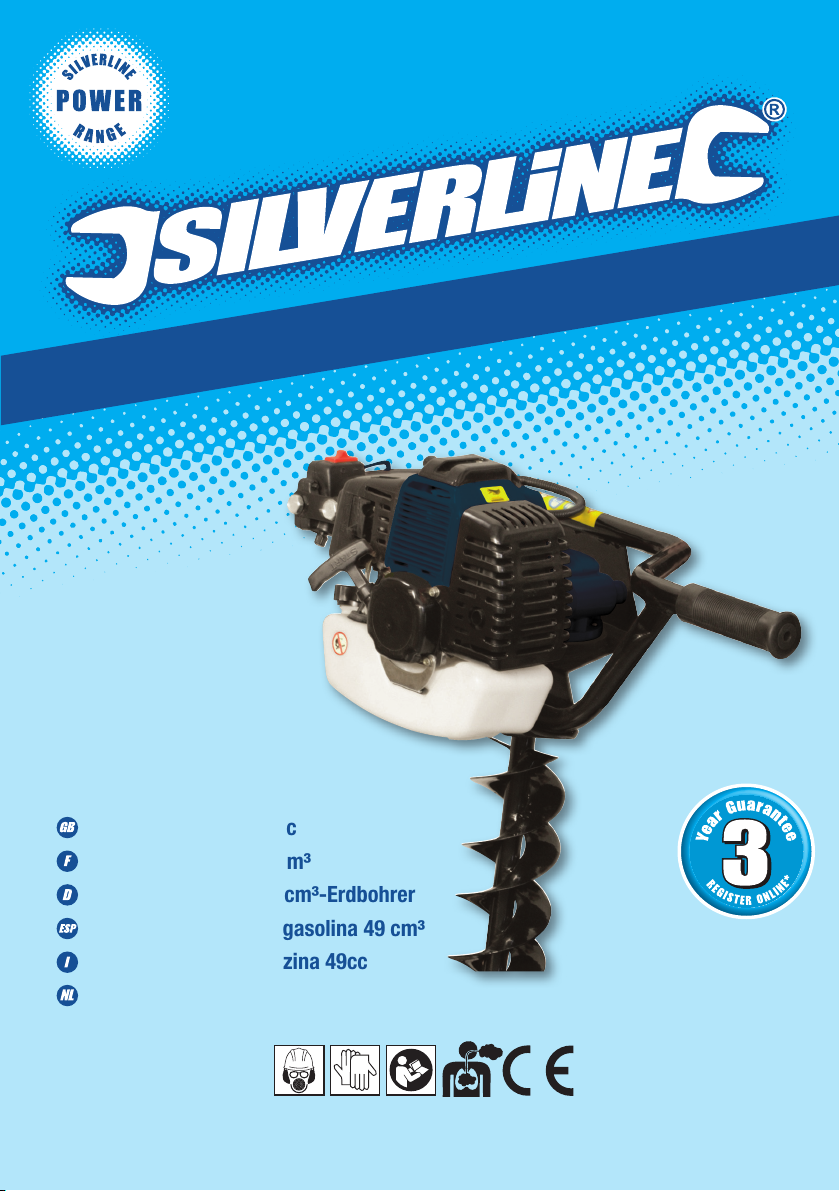
Earth Auger Petrol 49cc
868828
Earth Auger Petrol 49cc
Tarière thermique 49 cm³
Benzinbetriebener 49-cm³-Erdbohrer
Perforador de suelo a gasolina 49 cm³
Trapano Trivella a Benzina 49cc
49 cc benzine grondboor
www.silverlinetools.com
Page 3
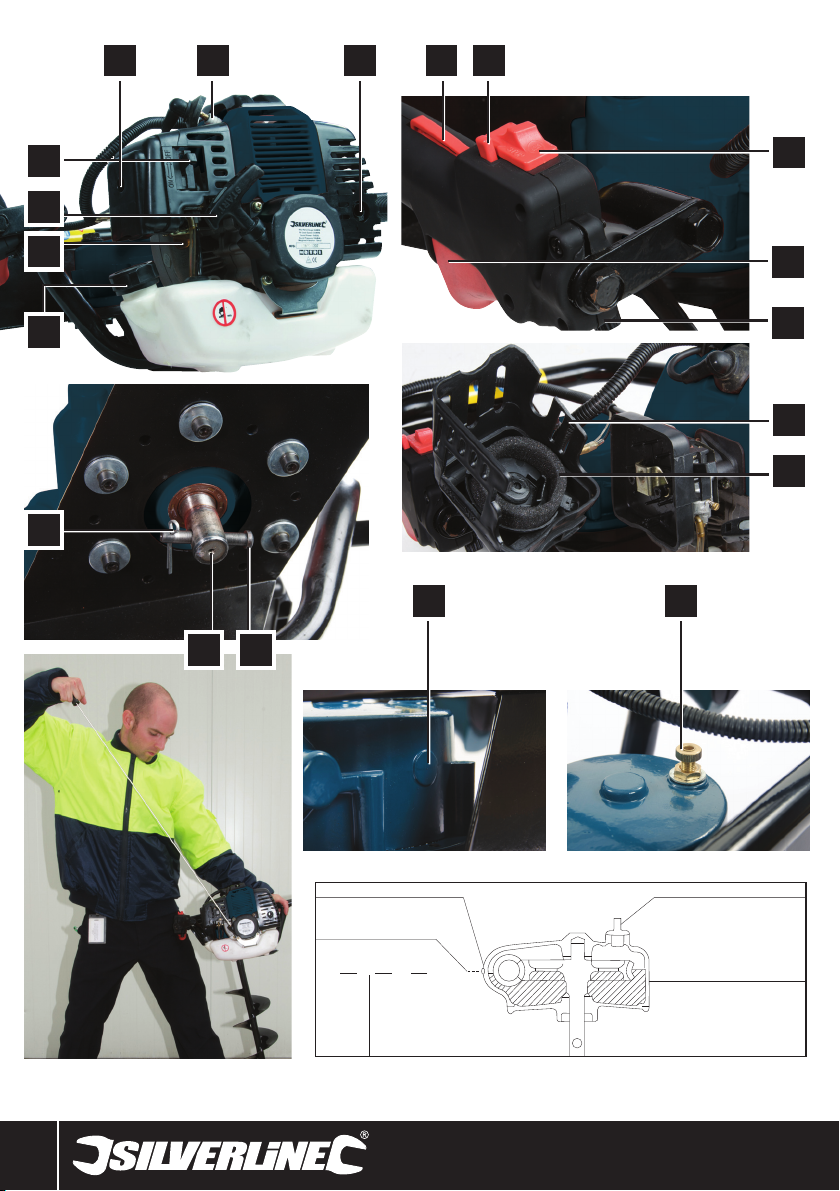
5 7 12 11
6
4
3
2
1
18
10
9
8
13
14
1516
19 17
Fig A.
2
16
Fig B.
Fill Oil Up To Here
15
Gearbox
Fig. B
Page 4

Earth Auger Petrol 49cc
English .................. 4
Français ................ 8
Deutsch ................. 12
®
Español ................. 16
Italiano .................. 20
Nederlands ............ 24
www.silverlinetools.com
3
Page 5
GB
Description of Symbols
The rating plate on your tool may show symbols. These represent important information
about the product or instructions on its use.
Wear hearing protection.
Wear eye protection.
Wear breathing protection.
Wear head protection.
Wear hand protection.
Read instruction Manual.
This product emits poisonous fumes
Conforms to relevant legislation and safety standards.
Recycling and disposal of petrol engine powered
tools, fuel and oil
Tools powered by petrol based internal combustion engines must not be
disposed of with household waste. Such tools should be taken to your local
recycling centre and disposed of according to current environmental protection
requirements in your country.
Specification
Engine size (cc): ..............................................49cc
Fuel type: ........................................................ Unleaded petrol
2 stroke oil fuel mix ratio: ................................ 25:1
Engine power (kW): ......................................... 1.25kW
Output torque (At drive shaft): ......................... 2.25Nm
Idling speed:........................................ ............ 2800rpm
Maximum engine speed: ................................. 8500rpm
Fuel tank capacity: .......................................... 1.2L
Spark plug type: .............................................. BM6A
Spark plug gap: ............................................... 0.6-0.8mm
Gearbox oil type: ............................................. SAE 30
Gearbox oil quantity: ........................................ 200ml
Sound pressure: .............................................. 108dB(A)
Sound power: .................................................. 90dB(A)
Weighted vibration: .........................................15m/s²
Uncertainty: .....................................................2m/s
Weight (without auger bit): ..............................9.3kg
The sound intensity level for the operator may exceed 85dB(A) and
sound protection measures are necessary.
As part of our ongoing product development, specifications of
Silverline products may alter without notice.
2
General Safety Warnings
WARNING Read all safety warnings and all instructions. Failure to follow the warnings
and instructions may result in electric shock, fire and/or serious injury.
Save all warnings and instructions for future reference.
1) Work area safety
a) Keep work area clean and well lit. Cluttered or dark areas invite accidents.
b) Do not operate tools in explosive atmospheres, such as in the presence of
flammable liquids, gases or dust.
c) Keep children and bystanders away while operating a powered tool.
Distractions can cause you to lose control.
2) Personal safety
a) Stay alert, watch what you are doing and use common sense when operating
a powered tool. Do not use a powered tool while you are tired or under
the influence of drugs, alcohol or medication. A moment of inattention while
operating a powered tool may result in serious personal injury.
b) Use personal protective equipment. Always wear eye protection. Protective
equipment such as dust mask, non-skid safety shoes, hard hat, or hearing protection
used for appropriate conditions will reduce personal injuries.
c) Prevent unintentional starting. Ensure the switch is in the off-position when not
operating the tool and make use of other safety features which prevent unintentional
starting
d) Remove any adjusting key or wrench before turning the powered tool on. A
wrench or a key left attached to a rotating part of the tool may result in personal
injury.
e) Do not overreach. Keep proper footing and balance at all times. This enables
better control of the tool in unexpected situations.
f) Dress properly. Do not wear loose clothing or jewelry. Keep your hair, clothing
and gloves away from moving parts. Loose clothes, jewelry or long hair can be
caught in moving parts.
g) If devices are provided for the connection of dust extraction and collection
facilities, ensure these are connected and properly used. Use of dust collection
can reduce dust-related hazards.
WARNING: User exposure to tool vibration can result in loss of sense of touch, numbness,
tingling and reduced ability to grip. Long term exposure can lead to a chronic condition.
If necessary limit the length of time exposed to vibration. Use the figures provided in the
specification relating to vibration if provided to calculate the duration and frequency of
operating the tool. The 2002/44/EC directive relating to vibration in the workplace may
provide useful information even for domestic use of tools. In the first instance of feeling
uncomfortable due to vibration STOP using the tool immediately.
WARNING: Always wear ear protection where the sound level exceeds 85dB(A) and limit the
time of exposure if necessary. If sound levels are uncomfortable even with ear protection stop
using the tool immediately and check the ear protection is correctly fitted and provides the
right level of sound attenuation for the level of sound produced by your tool.
3) Tool use and care
a) Maintain tools. Check for misalignment or binding of moving parts, breakage
of parts and any other condition that may affect the tool’s operation. If
damaged, have the tool repaired before use. Many accidents are caused by
poorly maintained tools.
b) Keep cutting tools sharp and clean. Properly maintained cutting tools with sharp
cutting edges are less likely to bind and are easier to control.
c) Use the tool’s accessories and tool bits etc. in accordance with these
instructions, taking into account the working conditions and the work to be
performed. Use of the tool for operations different from those intended could result
in a hazardous situation.
4) Service
a) Have your tool serviced by a qualified repair person using only identical
replacement parts. This will ensure that the safety of the tool is maintained.
Internal Combustion Safety
Dangerous environment
• Do not use petrol tools in damp or wet conditions, or expose them to rain. Provide
adequate surrounding work space and keep area well lit.
• Do not use petrol tools where there is a risk of explosion or fire from combustible
material, flammable liquids, flammable gases, or dust of an explosive nature
Switch off
• Ensure that the engine has stopped before attaching any accessories to the tool. If the
tool stops unexpectedly ensure that the power is switched off and the engine is not
running before attempting to check the tool
Running-in the engine
• New tools should be used at moderate speed
• Do not maintain high engine speed until the engine is completely run-in
• The engine will not be capable of developing maximum power until the end of the
running-in period
• When first using the tool, periodically stop and check that all nuts and screws are
securely fastened and tighten them as necessary
• Do not use fuels containing methanol or ethanol, as these may cause internal damage
to the fuel tank and fuel lines
4
Page 6

868828 Earth Auger Petrol 49cc
Warning
• Never leave the tool running unattended
• Never leave the machine unattended when parts are still hot
Servicing
• We recommended that your tool is serviced shortly after its first use
• In normal use, have the tool serviced regularly
• Do not modify any of the components of this tool. To do so would invalidate your
guarantee, and could result in injury to yourself or others around you
• Always have your tool serviced at an authorized service centre
Storage
• Clean the tool completely after use
• Be careful not to damage the fuel tank, or fuel lines, when it is placed on the ground
• Ensure that the tool will not be subject to impact damage; any damage could cause the
tool to become unsafe
• Store the tool away from direct sunlight
• Ensure that fuel and oil is stored in a safe place, away from heat, direct sunlight or any
source of ignition
Whenever the machine is likely to be out of use for an extended period of time, proceed
as follows:
• Empty the fuel tank completely
• Protect all metal engine parts from corrosion by coating them with oil
• Remove the spark plug, put a few drops of oil into the cylinder and then pull the recoil
starter 2 to 3 times in order to distribute the oil evenly
• Replace the spark plug
• Never store the machine where children may gain access to it
THIS PRODUCT PRODUCES POISONOUS EXHAUST FUMES AS SOON AS THE ENGINE
IS RUNNING. THESE GASES MAY BE COLOURLESS AND ODOURLESS. TO REDUCE
THE RISK OF SERIOUS OR FATAL INJURY, NEVER R UN THE MACHINE INDOORS, OR IN
POORLY VENTILATED AREAS. ENSURE PROPER VENTILATION WHEN WORKING IN
TRENCHES OR OTHER CONFINED SPACES.
Product Familiarisation
1 Fuel Filler Cap
2 Fuel Priming Bulb
3 Starter Handle
4 Choke Lever
5 Air Filter Housing Screw
6 Spark Plug
7 Exhaust Outlet
8 Max RPM Adjusting Screw
9 Speed Control
10 On/Off Switch
11 Speed Control Lock-On Button
12 Speed Control Safety Catch
13 Air Filter Housing
14 Air Filter Element
15 Gearbox Oil Fill Point
16 Gearbox Oil Level Point
17 Securing Pin
18 Split Pin
19 Output Shaft
*NOTE: The oil fill point assembly is closed when at its maximum height.
Unpacking your Petrol Auger
• Ensure that all parts of your petrol auger are present and in good condition. If any part is
missing, or damaged, contact your retailer and have such parts replaced before
attempting to use this tool.
Assembling your Petrol Auger
• Remove the Split Pin (18) from the Securing Pin (17)
• Remove the Securing Pin (17) from the Output Shaft (19)
• Slide the auger bit (Silverline product codes 633897, 245105, 457044 – not supplied)
over the Output Shaft (19)
• Line up the holes in the auger bit and shaft, then push the Securing Pin (17) through
the hole
• Replace the Split Pin (18) and pull apart its legs, as shown in the main image
Operating the engine
Fuelling
• Always refuel in a safe place, well away from the work area, and any source of heat
or ignition. Avoid any contact with the fuel
• DO NOT SMOKE
• Only add fuel when the engine is stopped and has cooled fully
• Fuel should always be pre-mixed; do not mix fuel in the petrol tank
• Only mix as much fuel as you intend to use
• Always store fuel in a good quality fuel container
• Use the supplied fuel mixing bottle. Fill with petrol until ‘576.92’ on the scale (marked)
and then add 2 stroke oil until level with ‘600’. Replace the lid and shake the bottle
to mix.
NOTE: If you wish to mix a smaller amount of fuel, you will need to carefully manually
measure using the general scale on the bottle. Always try to mix only the amount of fuel
you will actually use.
• Remove the Fuel Filler Cap (1). Fill the tank with fuel mixture to the required level
NOTE: use a funnel such as Silverline code 793799 to avoid spillage
• Replace the Filler Cap (1)
• Make sure that any fuel spillage is properly cleaned up
• Move the petrol auger well away from the fuelling area before starting
the engine
• Keep extra fuel well away from the work area
• The muffler and exhaust will become very hot in operation so ensure inflammable
material doesn’t come into contact with those parts
Priming the engine
• Stand the unit upright on the tip of the auger bit, so that the handles are level with
the ground
• Slowly press and release the Fuel Primer (2)
• Continue until fuel begins to flow down through the clear fuel line and back into the
fuel tank
• Press a few more times until the air bubbles have passed. The fuel system is now
primed and ready
Starting the engine
WARNING: This Petrol Auger will produce toxic fumes from the Exhaust Outlet (7) as
soon as it is running. Never attempt to start the engine indoors, or in any kind of enclosed
space. Always wear proper safety protection: Use of this tool requires goggles, gloves,
ear defenders, face mask, and sturdy clothing. It is also advisable to wear a hard hat and
safety boots
• Set the Choke Lever (4) to the ‘ON’ position if warm
• Set the lever to the ‘OFF’ position if cold
• Set the On/Off Switch (10) to “I”
• Hold the auger as shown in Fig A, ensuring that you have control of the tool
• Pull the Starter Handle (3) firmly, as shown in Fig A
• Pull the starter handle again until the engine runs
IMPORTANT – do not allow the starter handle to snap back into the tool. Return it in a
controlled manner
• Allow the engine to run at idle speed for approx. 30 seconds
• As the engine warms, move the Choke Lever (4) to the ‘ON’ position
IMPORTANT –Allow the engine to warm up slowly for a minimum of 3 minutes before
increasing engine speed. This will improve performance and increase engine life
Running in
• When using the auger for the first time, it is important to run in the engine. This will
improve engine efficiency and performance, and maximise life span
• To run in the engine, leave the engine idling, with minimum use of the throttle, for a
period of approximately 15 minutes on first use. DO NOT INCREASE ENGINE SPEED FOR
THIS PERIOD IF POSSIBLE
NOTE: It is normal to experience distinctive smells during running in, as components heat
up for the first time
Stopping the engine
• Allow the engine to return to idle speed for a minimum of 3 minutes after use before
turning off
• Move the On/Off Switch (10) to the ‘0’ position
www.silverlinetools.com
5
Page 7

GB
Using your Petrol Auger
Controlling the Auger
• Start the engine, as previously described
• To increase the engine speed, press the Safety Catch (12) and then slowly squeeze the
Speed Control (9). Release to slow the engine
NOTE: The output shaft will not rotate when the engine is at idle speed. It begins to rotate
when the engine speed is increased.
• The maximum engine speed can be set by adjusting the Max RPM Adjusting Screw (8).
Turn clockwise to reduce the maximum engine speed
• The Speed Control (9) can be locked on. While holding it in, press the Speed Control
Lock-On Button (11) then release the speed control. Squeeze the Speed Control (9)
again to release
Notes when using the auger
• If possible, maintain a 5m gap between yourself and other people in the work area and
try to work in a way that keeps them in sight while operating
• When operating on an inclined surface, try to work from the side and not below, so if
you lose control of the auger it will not fall towards you
• Ensure the ground is suitable for using an auger and doesn’t contain large rocks or hard
masonry below the surface
Maintenance
Schedule
Replace Check/adjust/clean
Spark Plug 500
Spark Plug 2000
Air filter 50
Gearbox oil 500
WARNING. Before performing any maintenance on this Auger, stop the engine and
allow to cool down fully.
Checking the spark plug (6)
• Pull the spark plug lead off of the Spark Plug (6)
• Unscrew the spark plug using a suitable wrench
NOTE: Turn anticlockwise to remove the spark plug
• Clean and adjust the spark plug, or replace it according to the maintenance schedule
• Refit the spark plug and tighten by hand. NOTE: Take care not to over tighten the
Spark Plug (6)
• Clean the air filter as recommended in the Maintenance schedule
• Undo the Air Filter Housing Screw (5) using a suitable screwdriver
• Lift off the Air Filter Housing (13)
• Remove the foam Air Filter (14)
• Wash the air filter in a suitable fluid, available from most garden machinery retailers
• Allow it to fully dry
• Refit the air filter and air filter housing and replace the air filter housing screw
Gearbox oil (See fig B)
Changing gearbox oil:
NOTE: Change the gearbox oil as recommended in the maintenance schedule
• Support the auger so that it is level, as though drilling a hole vertically into the ground
• Remove the auger bit as described in ‘Assembling your Petrol Auger’
• Place a suitable oil draining bowl underneath the auger – such as Silverline product
675089
• Using a spanner, remove completely the Gearbox Oil Fill Point (15) assembly
• Tilt the auger through 90 degrees or more to drain the oil from the gearbox
• Once completely drained, transfer to a container and dispose of according to regulations
for waste oil. Do not dispose of oil with normal waste or by using water drainage
facilities
• Return the auger to the level position and support it again
• Pour the correct type and quantity (see specification) of oil into the Gearbox Oil Fill Point
(15) until it is approximately level with the Gearbox Oil Level Point (16) as indicated
in Fig B
• Replace the bolt of the gearbox oil fill point . The assembly is closed when at its
maximum height.
Hours run time
Storage
• Be careful not to hit or cut the fuel tank, or fuel lines, when the unit is placed on the
ground
• Do not let the tool fall, or it may be damaged and become unsafe
• When work is complete, clean the unit completely
• Inspect the entire unit and tubes for damage, including loose or missing components
• Store the unit away from direct sunlight
• Do not store in a nylon bag as this can encourage the formation of mould
• Use a small brush to clean off the outside of the unit and keep the air vents free from
obstructions. Do not use water or a hose to clean the unit
• Ensure that fuel and oil is stored in a safe place, away from heat, direct sunlight, any
source of ignition, and out of reach of children
Storage for an extended period:
Whenever the machine is out of use for an extended period of time, proceed as follows:
• Give the unit an overall cleaning and a thorough check
• Empty the fuel tank completely, then clean the carburettor and lines by running the tool
until it stops from lack of fuel
• Protect all metal engine parts from corrosion by coating them with oil
• Remove the spark plug, add several drops of oil into the cylinder through the spark plug
hole and then pull the recoil starter 2 to 3 times in order to distribute the oil evenly.
Replace the spark plug and spark plug lead
• Clean the air filter as described in the air filter section
Troubleshooting
Power loss or sudden stopping of the engine
• Check whether the fuel tank is empty.
• Check if there is water in the mixture. Drain and rinse the fuel system with petrol.
• Check if the air filter is dirty. Clean the air filter.
Starting a flooded engine
• Disconnect the spark plug lead, and use a spark plug wrench to remove the spark plug
by turning it counter-clockwise.
• If the spark plug is fouled or is soaked with fuel, clean or replace the plug as required.
• Clean excess fuel from the combustion chamber by cranking the engine several times
while the spark plug is removed.
• Install the spark plug and firmly tighten it with the spark plug wrench.
• Repeat the starting procedure as if the engine was already warm.
Recycling and disposal of petrol engine
powered tools, fuel and oil
• Tools powered by petrol based internal combustion engines must not be disposed of
with household waste. Such tools should be taken to your local recycling centre and
disposed of according to current environmental protection requirements in your country.
• Petrol, oil and petrol-oil-mixtures are hazardous waste and have to be treated as such.
Oil and fuel must not be disposed of with household waste. Improper disposal may be
regarded a criminal offence in your country. Contact your local authority or dealer for
correct disposal procedures for oil and old fuels.
6
Page 8

Silverline Tools Guarantee
Earth Auger Petrol 49cc868828
This Silverline product comes with a 3 year
guarantee
Register this product at silverlinetools.com within 30 days of purchase
in order to qualify for the 3 year guarantee. Guarantee period begins
according to the date of purchase on your sales receipt.
Terms & Conditions
Guarantee period becomes effective from the date of retail purchase as
detailed on your sales receipt.
PLEASE KEEP YOUR SALES RECEIPT
If this product develops a fault within 30 days of purchase, return it to the
stockiest where it was purchased, with your receipt, stating details of the
fault. You will receive a replacement or refund.
If this product develops a fault after the 30 day period, return it to:
Silverline Tools Service Centre
PO Box 2988
Yeovil
BA21 1WU, UK
The guarantee claim must be submitted during the guarantee period.
You must provide the original sales receipt indicating the purchase date,
your name, address and place of purchase before any work can be
carried out.
You must provide precise details of the fault requiring correction.
Claims made within the guarantee period will be verified by Silverline Tools
to establish if the deficiencies are related to material or manufacturing of
the product.
Carriage will not be refunded. Items for return must be in a suitably clean
and safe state for repair, and should be packaged carefully to prevent
damage or injury during transportation. We may reject unsuitable or
unsafe deliveries.
All work will be carried out by Silverline Tools or its authorized
repair agents.
The repair or replacement of the product will not extend the period
of guarantee
Defects recognised by us as being covered by the guarantee shall be
corrected by means of repair of the tool, free of charge (excluding carriage
charges) or by replacement with a tool in perfect working order.
Retained tools, or parts, for which a replacement has been issued, will
become the property of Silverline Tools.
Registering your purchase
Registration is made at silverlinetools.com by selecting the Guarantee
Registration button. You will need to enter:-
• Your personal details
• Details of the product and purchase information
Once this information is entered your guarantee certificate will be created
in PDF format for you to print out and keep with your purchase.
The repair or replacement of your product under guarantee provides
benefits which are additional to and do not affect your statutory rights as
a consumer.
What is covered:
The repair of the product, if it can be verified to the satisfaction of Silverline
Tools that the deficiencies were due to faulty materials or workmanship
within the guarantee period.
If any part is no longer available or out of manufacture, Silverline Tools will
replace it with a functional replacement part.
Use of this product in the EU.
What is not covered:
Silverline Tools does not guarantee repairs required as a result of:
Normal wear and tear caused by use in accordance with the operating
instructions eg blades, brushes, belts, bulbs, batteries etc.
The replacement of any provided accessories drill bits, blades, sanding
sheets, cutting discs and other related items.
Accidental damage, faults caused by negligent use or care, misuse,
neglect, careless operation or handling of the product.
Use of the product for anything other than normal domestic purposes.
Change or modification of the product in any way.
Use of parts and accessories which are not genuine Silverline Tools
components.
Faulty installation (except installed by Silverline Tools).
Repairs or alterations carried out by parties other than Silverline Tools or its
authorized repair agents.
Claims other than the right to correction of faults on the tool named in
these guarantee conditions are not covered by the guarantee.
EC Declaration of Conformity
The undersigned: Mr Darrell Morris
as authorised by: Silverline Tools
Declares that the
Description: Earth Auger Petrol 49cc
Product Code: 868828
Conforms to the following Directives:
• Non Road Mobile Machinery Directive 2004/108/EC
• Noise Emission In The Environment By Equipment For Use Outdoors
200/14/EC Annex V
• EMC Directive 2004/108/EC
• ISO22868:2003
• EN ISO 12100-1, EN ISO 12100-2:2003
• EN60204-1:1998, EN55012:2007, EN61000-6-1:2007
The technical documentation is kept by: Silverline Tools
Notified body: BVCE Products Testing
Place of declaration: Shanghai, China
Date: 02/01/13
Signed by:
Director
Name and address of Manufacturer or Authorised representative:
Silverline Tools, Boundary Way, Lufton Trading Estate, Yeovil, Somerset,
BA22 8HZ United Kingdom
www.silverlinetools.com
7
Page 9
F
Description des symboles
La plaque de valeur nominale sur votre outil peut afficher des symboles.
Ces symboles constituent des informations importantes concernant le produit ou des
instructions sur son utilisation.
Port de protection anti-bruit.
Port de lunettes de sécurité.
Port de masques respiratoires.
Protection principale d'usage.
Protection de main d'usage.
Lisez le manuel d’instruction.
Ce produit émet des vapeurs toxiques
Conforme à la réglementation et aux normes de sécurité pertinentes.
Protection de l’environnement
Les outils alimentés par combustion interne par essence ne doivent pas être
rejetés avec les ordures ménagères. De tels outils doivent être amenés dans
un centre de recyclage pour y être recyclés selon les lois en vigueur de la
protection environnementale.
Caractéristiques techniques
Moteur : ....................................................49cc
Carburant : ...............................................Essence sans plomb
Huile 2 temps mélange :...........................25:1
Puissance du moteur : ..............................1,25 kW
Couple de sortie : .....................................2,25 Nm
Vitesse au ralenti : ....................................2800 tr/min
Vitesse maximale : ...................................8500 tr/ min
Capacité du réservoir : .............................1,2 L
Type de bougie : .......................................BM6A
Ecartement des électrodes : .....................0,6-0,8 mm
Huile de la boite de vitesse : .....................SAE 30
Quantité d’huile : ......................................200 ml
Pression acoustique : ...............................108 dB(A)
Puissance acoustique : .............................90 dB(A)
Vibration pondérée : .................................15 m/s²
Incertitude : ..............................................2 m/s²
Poids ( sans tarière) : ................................9,3 kg
L’intensité saine pour l’opérateur peut dépasser 85dB(A) et
mesures de protection de bruit sont nécessaires.
Dans le cadre du développement continu de nos produits, les
caractéristiques techniques des produits Silverline peuvent être
modifiées sans préavis.
Consignes générales de sécurité
AVERTISSEMENT Veuillez lire l’intégralité des consignes de sécurité et des
instructions. Le non-respect de ces consignes et instructions peut entraîner un risque de
choc électrique, d’incendie et/ou se traduire par des blessures graves.
Veuillez conserver ces instructions et consignes de sécurité pour référence
ultérieure.
Sécurité sur la zone de travail
a) Maintenir une zone de travail propre et bien éclairée. Des zones encombrées et
mal éclairées sont sources d’accidents.
b) Ne pas utiliser d’outils dans des environnements explosifs, tels qu’à proximité
de liquides, de gaz ou de poussières inflammables.
c) Eloigner les enfants et les passants pendant l’utilisation d’un appareil
électrique. Ceux-ci peuvent provoquer une perte d’attention et faire perdre la
maîtrise de l’appareil.
Sécurité des personnes
a) Rester vigilent et faire preuve de bon sens lors de la manipulation de l’appareil.
Ne pas utiliser un appareil électrique lorsque l’on se trouve dans un état
de fatigue, ou sous l’influence de drogues, d’alcool ou de médicaments. Un
moment d’inattention pendant l’utilisation d’un outil électrique peut se traduire par
des blessures graves.
b) Porter un équipement de protection approprié. Toujours porter une protection
oculaire. Le port de masque à poussières, chaussures de sécurité antidérapantes,
casque de sécurité et protections antibruit adaptés aux différentes conditions de
travail réduit le risque de blessures corporelles.
c) Eviter tout démarrage accidentel ou intempestif. S’assurer que l’interrupteur
marche-arrêt soit en position d’arrêt lorsque l’appareil n’est utilisé.
d) Enlever toute clé et tout instrument de réglage avant de mettre l’appareil en
marche. Une clé ou un instrument de réglage laissé fixé à un élément en rotation de
l’appareil électrique peut entraîner des blessures physiques.
e) Ne pas essayer d’atteindre une zone hors de portée. Se tenir toujours en
position stable permettant de conserver l’équilibre. Cela permet de mieux
contrôler l’appareil électrique dans des situations inattendues.
f) Porter des vêtements appropriés. Ne pas porter de vêtements amples ou
des bijoux pendants. Eloigner cheveux, vêtements et gants des pièces en
mouvement. Les vêtements amples, les bijoux pendants et cheveux longs peuvent
être happés par les pièces en rotation.
g) Si l’appareil est pourvu de dispositifs destinés au raccord d’équipements
d’extraction et de récupération de la poussière/sciure, s’assurer qu’ils soient
bien fixés et utilisés correctement. L’utilisation de ces dispositifs peut réduire les
risques dus à la poussière.
ATTENTION : L’exposition de l’utilisateur aux vibrations d’un outil peut engendrer la perte
de sens du toucher, des engourdissements, picotements et réduire la préhension de
l’appareil. Des expositions prolongées peuvent engendrer l’apparition chronique de ces
symptômes. Si nécessaire, réduisez le temps d’utilisation de l’outil. Utilisez les cas de
figure avec les caractéristiques relatives aux vibrations, si données, pour calculer la durée
et la fréquence de l’utilisation de l’appareil. Les normes directives 2002/44/CE relatives
aux vibrations sur le lieu de travail peuvent fournir des informations pratiques même pour
un usage domestique. Si dans un premier temps vous commencez à sentir inconfortable à
cause des vibrations, ARRÊTER immédiatement l’utilisation de l’appareil.
ATTENTION : Toujours porter des protections auditives lorsque le niveau sonore excède
80 dB et limiter le temps d’exposition. Si les niveaux sonores ne sont pas assez atténués
avec un casque anti-bruit arrêter l’utilisation de l’appareil, et vérifiez bien que la protection
sonore soit bien appropriée par rapport au niveau sonore.
Utilisation et entretien des appareils
a) Entretien des appareils. Vérifier que les éléments rotatifs soient bien alignés
et non grippés. S’assurer de l’absence de pièces cassées ou endommagées
susceptibles de nuire au bon fonctionnement de l'appareil. Si l’appareil est
endommagé, le faire réparer avant toute utilisation. De nombreux accidents sont
dus à un mauvais entretien d’un outil.
b) Veiller à ce que les outils de coupe soient tenus affûtés et propres. Des outils de
coupe bien entretenus, aux tranchants bien affûtés, sont moins susceptibles de se
gripper et sont plus faciles à contrôler.
c) Utiliser l’appareil, les accessoires et outils à monter conformément à ces
instructions, en tenant compte des conditions de travail et de la tâche à
réaliser. Toute utilisa tion d’un appareil autre que celle pour laquelle il a été conçu
peut entraîner des situations à risque.
Révision
a) Ne faire réparer votre appareil électrique que par un réparateur qualifié
utilisant uniquement des pièces de rechange identiques.
Consignes de sécurité relatives aux
appareils à combustion interne
Environnements dangereux
• Ne pas utiliser un outil à moteur à essence dans un environnement humide et ne
pas l’exposer à la pluie. Prévoir un espace de travail adéquat et assurer un éclairage
correct de la zone.
• Ne pas utiliser l’outil à moteur à essence s’il existe un risque d’explosion ou d’incendie
dû à des matières combustibles, des liquides ou des gaz inflammables, ou à de la
poussière de nature explosive.
Eteindre l’outil avant d’installer un accessoire
• Vérifier que le moteur de l’outil soit arrêté avant la pose d’un accessoire.
• Si l’outil cesse de fonctionner de manière inattendue, vérifier que le moteur soit bien
arrêté avant de procéder à son inspection.
Rodage du moteur
• Lorsque l’outil est neuf, prendre soin de faire tourner le moteur à régimes modérés.
• Ne pas conserver un régime élevé tant que le moteur n’est pas rodé.
8
Page 10

868828 Tarière thermique 49 cm³
• Le moteur ne développe sa pleine puissance qu’à la fin de la période de rodage.
• Avant d’utiliser l’outil pour la première fois et après vous être assuré que le moteur est
arrêté, vérifier le serrage des vis et des écrous.
• N’utiliser aucun carburant contenant du méthanol ou de l’éthanol car ils peuvent
endommager le réservoir et les conduites de carburant.
Avertissement
• Attendre que l’outil se soit complètement arrêté avant de vous en éloigner.
• Ne pas s’éloigner de l’outil tant que certaines de ses pièces sont encore chaudes.
Révisions
• Nous vous conseillons de faire réviser l’outil peu après la première utilisation.
• Par la suite, faire réviser l’outil de manière régulière.
• Ne pas modifier pas les composants de l’outil. Ceci invaliderait non seulement votre
garantie mais pourrait également vous faire courir le risque de vous blesser ou de
blesser d’autres personnes autour de vous.
• Ne faire réviser l’outil que par un centre agréé.
Rangement
• Lorsque vous n’avez plus besoin de l’outil, nettoyez-le soigneusement.
• Lorsque vous posez l’outil sur le sol, veiller à ne pas endommager le réservoir et les
conduites de carburant.
• Veiller à ne pas faire tomber l’outil, ce qui pourrait l’endommager et rendre son
utilisation dangereuse.
• Ranger l’outil à l’abri de la lumière directe du soleil.
• Vérifier que le carburant et l’huile soient conservés dans un endroit sûr, éloigné de toute
source de chaleur, à l’abri de la lumière directe du soleil et de toute source d’étincelle.
• Avant de ranger l’outil pour une période prolongée, procéder comme suit :
• Vider complètement le réservoir de carburant.
• Protéger de la corrosion toutes les pièces métalliques du moteur en y appliquant une
couche d’huile.
• Retirer la bougie, introduire quelques gouttes d’huile dans le cylindre puis tirez 2 ou 3
fois sur le lanceur à rappel pour répartir l’huile uniformément.
• Remettre la bougie en place.
• Ranger toujours la machine hors de portée des enfants.
CET OUTIL PRODUIT DES GAZ D’ÉCHAPPEMENT TOXIQUES DÈS QUE LE MOTEUR
TOURNE. CES GAZ PEUVENT ÊTRE INCOLORES ET INODORES. POUR RÉDUIRE LE
RISQUE D’ACCIDENT GRAVE, VOIRE MORTEL, NE PASL’UTILISEZ À L’INTÉRIEUR NI
DANS UN ENDROIT MAL AÉRÉ. VEILLER À CE QUE LA VENTILATION SOIT SUFFISANTE
LORSQUE VOUS TRAVAILLEZ DANS UNE TRANCHÉE, OU TOUT AUTRE LIEU EXIGU.
Se familiariser avec le produit
1 Bouchon de remplissage de carburant
2 Poire d’amorçage du carburant
3 Poignée de démarrage
4 Levier de starter
5 Vis du logement du filtre à air
6 Bougie
7 Sortie des gaz d’échappement
8 Vis de réglage du régime max.
9 Régulateur de vitesse
10 Interrupteur marche/arrêt
11 Bouton de marche continue du régulateur de vitesse
12 Cran de sûreté du régulateur de vitesse
13 Logement du filtre à air
14 Élément de filtre à air
15 Remplissage d’huile de la boîte de vitesses
16 Point de niveau d’huile de la boîte de vitesses
17 Goupille de serrage
18 Goupille fendue
19 Arbre de sortie
* Lorsque le niveau d’huile est à son maximum, l’orifice de remplissage se ferme.
Déballage
• Déballez le produit avec soin. Veillez à retirer tout le matériau d’emballage et
familiarisez-vous avec toutes les caractéristiques du produit.
• Si des pièces sont endommagées ou manquantes, faites-les réparer ou remplacer avant
d’utiliser l’appareil.
Assemblage de la tarière thermique
• Retirez la goupille fendue (18) de la goupille de serrage (17).
• Retirez la goupille de serrage (17) de l’arbre de sortie (19).
• Faites glisser la mèche (numéros de produit Silverline 633897, 245105, 457044,
non fournis) sur l’arbre de sortie (19).
• Alignez les trous présents sur la mèche et sur l’arbre puis insérez-y la goupille de
serrage (17).
• Réintroduisez la goupille fendue (18) et écartez ses deux branches ainsi qu’il est
visible sur l’image fournie plus haut.
Fonctionnement du moteur
Remplissage du réservoir
• Remplissez toujours l’appareil dans un lieu sûr, mais jamais à proximité du lieu de
travail ou près de toute source de chaleur ou d’inflammation.
• NE PAS FUMER.
• Remplissez le réservoir seulement lorsque le moteur est arrêté et complètement
refroidi.
• Utilisez toujours du carburant pré-mélangé ; ne mélangez pas le carburant dans le
réservoir. Mélangez uniquement la quantité de carburant nécessaire sur le moment.
• Utilisez toujours un jerricane de bonne qualité pour entreposer l’essence.
• Utilisez la bouteille de mélange de carburant. Remplissez la d’essence jusqu’à la
marque ‘576,92’ puis ajoutez l’huile 2 temps jusqu’à la marque ‘600’. Remettez le
bouchon et agiter la bouteille pour bien mélanger.
• Remarque : Si vous souhaitez mélanger une plus petite quantité d’essence, utilisez avec
précaution l’échelle de la bouteille. Essayez toujours de ne mélanger que la quantité
nécessaire.
• Enlevez le bouchon de remplissage de carburant (1). Remplissez le réservoir avec le
mélange de carburant jusqu’au niveau requis.
• REMARQUE – Utilisez un entonnoir tel que celui correspondant au numéro de
produit Silverline 793799 pour éviter les déversements accidentels.
• Remettez le bouchon de remplissage (1) en place.
• Assurez-vous de bien nettoyer tout déversement accidentel.
• Ne démarrez pas l’appareil à l’endroit où le remplissage a été effectué.
• Ne laissez pas le restant de carburant près de la zone où vous travaillez.
Amorçage du moteur
• Tenez l’outil verticalement, sur la pointe de la mèche, de sorte que les poignées soient
parallèles au sol.
• Appuyez lentement sur la poire d’amorçage du carburant (2) puis relâchez-la.
• Continuez ainsi jusqu’à ce que le carburant commence à monter dans les conduites
transparentes et à retourner dans le réservoir de carburant.
• Répétez l’opération jusqu’à ce que toutes les bulles d’air soient passées, après quoi le
système de carburant sera amorcé et prêt à fonctionner.
Démarrage du moteur
AVERTISSEMENT : Cette tarière thermique émettra de la fumée toxique par la sortie
des gaz d’échappement (7) dès sa mise en marche. Ne démarrez jamais cet appareil à
l’intérieur ou dans tout type d’espace clos. Portez toujours des vêtements de protection
appropriés ; cet outil demande le port de lunettes de protection, de gants, d’un casque
antibruit, d’un masque à poussières et de vêtements résistants. Il est également conseillé
de porter un casque et des chaussures de sécurité.
• Mettez le levier de starter (4) sur la position "ON" si le moteur est chaud
• Mettez le levier de starter sur la position "OFF" si le moteur est froid
• Faites passer l’interrupteur marche/arrêt (10) en position « I »
• Tenez la tarière comme il est indiqué sur la Fig. A, en veillant à avoir l’outil bien en main.
• Tirez fermement sur la poignée de démarrage, comme il est indiqué sur la Fig. A.
• Tirez de nouveau sur la poignée de démarrage jusqu’à ce que le moteur tourne.
IMPORTANT – Ne laissez pas la poignée (3) revenir brusquement contre l’outil,
ramenez-là soigneusement en position initiale.
• Laissez le moteur tourner au ralenti pendant 30 secondes environ.
• Une fois que le moteur s’est réchauffé, mettez le levier de starter (4) sur la position
"ON".
IMPORTANT – Laissez le moteur se réchauffer peu à peu pendant un minimum de 3
minutes avant de passer à un régime supérieur. Cela favorisera un meilleur rendement et
une plus longue vie utile du moteur.
Rodage
• Il est important de procéder au rodage du moteur de la tarière thermique lors de sa
première utilisation. Cela permettra d’améliorer son rendement et son efficacité et d’en
prolonger la vie utile.
• Pour roder le moteur, laissez-le marcher au ralenti pendant 15 minutes environ lors de
la première utilisation en utilisant au minimum l’accélérateur. DANS LA MESURE DU
POSSIBLE, NE PAS AUGMENTER LA VITESSE DU MOTEUR PENDANT CETTE PERIODE
DE TEMPS.
www.silverlinetools.com
9
Page 11

F
REMARQUE : Il est normal de percevoir des odeurs inhabituelles durant le rodage du fait
de l’échauffement des composants pour la première fois.
Arrêt du moteur
• Avant d’arrêter le moteur, laissez-le tourner au ralenti pendant un minimum de 3
minutes.
• Faites passer l’interrupteur marche/arrêt (10) en position "O".
Utilisation de votre tarière thermique
Régler la tarière
• Faites démarrer le moteur de la manière indiquée ci-dessus.
• Pour augmenter le régime du moteur, appuyez sur le cran de sûreté (12) et exercez une
légère pression sur le régulateur de vitesse (9). Relâchez-le pour diminuer le régime
du moteur.
REMARQUE : L’arbre de sortie ne tourne pas lorsque le moteur fonctionne au ralenti. Il
commencera à tourner avec l’augmentation du régime du moteur.
• Il est possible de fixer la vitesse maximale du moteur au moyen de la vis de réglage du
régime maximum (8). Faites-la tourner dans le sens des aiguilles d’une montre pour
réduire la vitesse maximale du moteur.
• Il est possible de maintenir le régulateur de vitesse (9) en marche continue. Tout en
maintenant celui-ci activé, appuyez sur le bouton de marche continue du régulateur de
vitesse (11) puis relâchez le régulateur de vitesse. Il vous suffira d’appuyer à nouveau
sur le régulateur de vitesse (9) pour annuler l’opération.
Consignes d’utilisation
• Si possible, maintenez un espace d’environ 5 m entre vous et les personnes aux
alentours de la zone de travail, et travaillez de façon à être en contact visuel avec elles.
• Lorsque vous travaillez sur une surface inclinée, évitez de travailler en aval de la
machine pour qu’elle ne puisse pas retombée sur vous.
• Assurez-vous que le sol soit adéquat à l’utilisation de la tarière, et qu’il n’y a pas de
large roc ou éléments de maçonnerie sous la surface.
Entretien
Programme d’entretien
Changer Vérifier/régler/
nettoyer
Bougie 500
Bougie 2000
Filtre à air 50
Huile de la boîte
de vitesses
AVERTISSEMENT. Avant d’effectuer tout travail d’entretien sur votre tarière thermique,
arrêtez toujours le moteur et laissez-le refroidir complètement.
Vérification de la bougie (6)
• Déconnectez le câble de la bougie.
• Dévissez la bougie à l’aide d’une clé adéquate.
REMARQUE : Tournez la clé dans le sens contraire des aiguilles d’une montre pour
dévisser la bougie.
• Nettoyez et réglez la bougie, ou bien procédez à son remplacement en fonction du
programme d’entretien.
• Remettez la bougie en place et serrez-la à la main. REMARQUE : Prenez soin de ne pas
effectuer un serrage excessif
• Nettoyez le filtre à air suivant les indications du programme d’entretien.
• Dévissez la vis du logement du filtre à air (5) à l’aide d’un tournevis adéquat.
• Sortez le logement du filtre à air (13).
• Retirez le filtre à air en mousse (14).
• Lavez-le dans un liquide approprié, disponible auprès de la plupart des distributeurs
d’outillage de jardin.
• Laissez-le sécher complètement.
• Replacez le filtre (14), le logement du filtre (13) et sa vis (5).
Huile de la boîte de vitesses (voir Fig. B)
Remarque : Changez l’huile de la boite de vitesses comme recommandé dans le tableau
du programme d’entretien
• Enfoncez la tarière dans le sol pour qu’elle soit stable et de niveau.
• Retirez la tarière comme indiquée comme décrit dans ‘Assemblage de la tarière’.
• Placez un récipient adéquat pour sous la tarière pour drainer l’huile, comme par
exemple le produit Silverline 675089.
• Utilisez une clé, retirez complètement le boulon pour le remplissage d’huile de la boîte
de vitesses (15).
• Penchez la tarière sur 90° ou plus pour vider l’huile.
Heures de
fonctionnement
500
• Une fois complètement vidée, transférer l’huile usagée dans un container pour la rejeter
en accordance avec les régulations environnementales sur les huiles usagées. Ne pas
jeter les huiles usagées avec les ordures ménagères ou dans les canalisations d’eau.
• Remettez la tarière de niveau et stabilisez-la
• Verser le bon type d’huile et en quantité nécessaire (comme indiquée par les
caractéristiques techniques) par l’orifice de remplissage (15) jusqu’à ce le point de
niveau d’huile de la boîte de vitesses (16) soit atteint, comme indiqué sur la Fig.B.
• Remettez le boulon du remplissage d’huile de la boîte de vitesses.
Rangement
• Lorsque vous posez l’outil au sol, veillez à ne pas donner de coups et à ne pas
endommager le réservoir ou les conduites de carburant.
• Ne faites jamais tomber l’outil sous peine de l’endommager ou de compromettre sa sécurité.
• Une fois le travail fini, nettoyez à fond la machine.
• Inspectez intégralement la machine et ses conduites afin de déceler toute trace de
dommage, y compris tout composant déboîté, dévissé ou perdu.
• Conservez l’outil à l’abri de la lumière directe du soleil.
• Ne rangez pas la tarière dans un sac de nylon car ceci favoriserait la formation de
moisissures.
• Utilisez une petite brosse pour nettoyer l’extérieur de la machine et prévenir toute
obstruction des orifices de ventilation. Ne nettoyez pas la machine à l’eau ou au jet d’eau.
• Veillez à conserver le carburant et l’huile dans un endroit sûr, à l’abri des sources de
chaleur et d’inflammation, de la lumière directe du soleil et hors de portée des enfants.
Rangement pour une période prolongée
Lorsque la machine doit rester inutilisée pendant de longues périodes de temps, procédez
de la manière suivante.
• Nettoyez et inspectez soigneusement votre tarière.
• Videz intégralement le réservoir de carburant et nettoyez le carburateur et toutes
les conduites en faisant tourner le moteur jusqu’à ce qu’il s’arrête de lui-même par
manque de carburant.
• Protégez de la corrosion toutes les pièces de métal du moteur en y appliquant une
couche d’huile.
• Ôtez la bougie, introduisez plusieurs gouttes d’huile dans le cylindre par le trou de
bougie puis tirez sur la poignée de démarrage 2 ou 3 fois pour que l’huile se répartisse
uniformément. Remettez la bougie et son câble en place.
• Nettoyez le filtre à air de la manière indiquée dans la section correspondante ci-dessus.
Résolution des problèmes
Perte de puissance ou arrêt soudain du moteur
• Vérifiez s’il reste du carburant dans le réservoir.
• Vérifiez qu’il n’y a pas d’eau dans le mélange. Vidangez et rincez le système de
carburant avec de l’essence dans le cas contraire.
• Vérifiez que le filtre à air n’est pas encrassé. Nettoyez-le le cas échéant.
Démarrage d’un moteur noyé
• Déconnectez le câble de la bougie et utilisez une clé adéquate pour enlever la bougie en
la faisant tourner dans le sens contraire des aiguilles d’une montre.
• Si la bougie est encrassée ou imbibée de carburant, lavez-la ou changez-la au besoin.
• Lavez l’excédent de carburant de la chambre de combustion en faisant démarrer le
moteur plusieurs fois tandis que la bougie est retirée.
• Installez la bougie et serrez-la fermement à l’aide de la clé.
• Reprenez la procédure de démarrage comme si le moteur était déjà chaud.
Recyclage des outils à essence,
carburant et huile.
• Les outils alimentés par combustion interne par essence ne doivent pas être
rejetés avec les ordures ménagères. De tels outils doivent être amenés dans un
centre de recyclage pour y être recyclés selon les lois en vigueur de la protection
environnementale.
• Essence, huile, et mélanges d’essence et d’huile sont des résidus à risque et doivent
être traités comme produits dangereux. Les carburants et l’huile ne doivent donc
pas être mélangés avec les ordures ménagères. Ne pas rejeter ces substances
correctement ces substances peut être considéré comme un acte criminel. Contactez
votre revendeur ou la collectivité chargée de la collecte des déchets pour de plus
amples informations concernant le recyclage de ce type de déchet.
10
Page 12

868828 Tarière thermique 49 cm³
Garantie Silverline Tools
Ce produit Silverline bénéficie d’une garantie
de 3 ans
Enregistrez ce produit à silverlinetools.com dans les 30 jours suivant
l’achat afin de bénéficier de la garantie de 3 ans. La période de garantie
commence à partir de la date d’achat figurant sur votre facture d’achat.
Conditions de Garantie des Outils Silverline
La période de garantie prend effet à compter de la date de l’achat en
magasin, comme indiqué sur votre facture d’achat.
VEUILLEZ CONSERVER VOTRE FACTURE D’ACHAT.
Si ce produit est défectueux pendant les 30 jours qui suivent l’achat,
retournez-le au magasin où vous l’avez acheté, avec votre facture, en
expliquant en détail le problème. Le produit sera remplacé ou vous serez
remboursé(e).
Si ce produit est défectueux après cette période de 30 jours,
retournez-le à :
Silverline Tools Service Centre
PO Box 2988
Yeovil
BA21 1WU, Royaume Uni
Toute demande de service sous garantie doit être soumise pendant la
période de garantie.
Avant toute intervention sous garantie, vous devez présenter la facture
d’achat originale sur laquelle doivent figurer la date d’achat, votre nom,
votre adresse et le lieu d’achat.
Vous devez expliquer en détail la défaillance nécessitant réparation.
Les demandes de service sous garantie faites pendant la période de
garantie seront vérifiées par Silverline Tools pour établir si la défaillance du
produit est liée à un vice de matériau ou de fabrication.
Les frais de port ne seront pas remboursés. Les articles retournés doivent
être convenablement propres et sûrs pour être réparés et devraient être
emballés soigneusement pour éviter tout dommage ou toute blessure
pendant le transport. Nous pouvons refuser les livraisons qui ne sont pas
convenables ou sûres.
Toute intervention sera effectuée par Silverline Tools ou ses agents de
réparation agréés.
La réparation ou le remplacement du produit ne dépassera pas la période
de garantie.
Les anomalies que nous reconnaissons être couvertes par la garantie
seront rectifiées par la réparation de l’outil, sans frais (hormis les
frais de port) ou par son remplacement par un outil en parfait état de
fonctionnement.
Enregistrement de votre achat
Visitez silverlinetools.com, sélectionnez le bouton d’enregistrement
et saisissez :
• Vosinformationspersonnelles
• Lesinformationsconcernantleproduitetl’achat
Vous recevrez le Certificat de garantie en format PDF. Veuillez l’imprimer et
le conserver avec votre achat.
Les pièces ou les outils remplacés deviendront la propriété de
Silverline Tools.
La réparation ou le remplacement de votre produit sous garantie vous
apporte des avantages ; ces avantages s’ajoutent à vos droits statutaires
en tant que consommateur sans les affecter aucunement.
La présente garantie couvre:
La réparation du produit, s’il peut être vérifié, à la satisfaction de Silverline
Tools, que les défaillances du produit ont été provoquées par un vice de
matériau ou de fabrication au cours de la période de garantie.
Si une pièce n’est plus disponible ou n’est plus fabriquée, Silverline Tools la
remplacera par une pièce de rechange opérationnelle.
Utilisation de ce produit dans l’UE.
La présente garantie ne couvre pas:
Silverline Tools ne garantit pas les réparations nécessaires du produit
engendrées par :
L’usure normale provoquée par l’utilisation conforme aux instructions
d’utilisation, par exemple les lames, les charbons, les courroies, les
ampoules, les batteries, etc.
Le remplacement de tout accessoire fourni tel que les forêts, les lames, les
feuilles abrasives, les outils de coupes et les autres articles associés.
Les dommages et les défaillances accidentels causés par une utilisation ou
un entretien négligent, une mauvaise utilisation, un manque d’entretien ou
une utilisation ou une manipulation imprudente du produit.
L’utilisation du produit à des fins autres que son utilisation domestique
normale.
Le moindre changement ou la moindre modification du produit.
L’utilisation de pièces et d’accessoires qui ne sont pas des composants
véritables de Silverline Tools.
Une installation défectueuse (sauf si l’installation a été réalisée par
Silverline Tools).
Les réparations ou les modifications réalisées par des tiers autres que
Silverline Tools ou ses agents de réparation agréés.
Les demandes de service autres que le droit de rectifier les défaillances
de l’outil indiquées dans ces conditions de garantie ne sont pas couvertes
par cette garantie.
Déclaration de Conformité CE
Le soussigné: Mr Darrell Morris
Autorisé par: Silverline Tools
Déclare que
Nom/modèle: Tarière thermique 49 cm³
Type/série no: 868828
Puissance nette installée: 1.25kW
Se conforme aux directives suivantes:
• Directive sur les émissions des engins mobiles non routiers 2004/108/CE
• Directive sur les émissions sonores dans l’environnement des matériels
destinés à être utilisés à l’extérieur 2000/14/CE Annexe V
• Directive sur la compatibilité électromagnétique 2004/108/CE
• ISO22868:2003
• EN ISO 12100-1, EN ISO 12100-2:2003
• EN60204-1:1998, EN55012:2007, EN61000-6-1:2007
La documentation technique est enregistrée par: Silverline Tools
Organismes notifiés: BVCE Products Testing
Endroit de la déclaration: Shanghai, China
Date : 02/01/13
Signé par :
Position dans la société : Director
Nom et adresse du fabricant ou représentant autorisé
Silverline Tools Ltd, Boundary Way, Lufton Trading Estate, Yeovil, Somerset,
BA22 8HZ United Kingdom
www.silverlinetools.com
11
Page 13

D
Beschreibung der Symbole
Auf dem Leistungsschild des Werkzeugs sind möglicherweise Symbole
abgebildet. Sie vermitteln wichtige Information über das Produkt oder dienen als
Gebrauchsanweisung.
Gehörschutz tragen
Schutzbrille tragen
Atemschutz tragen.
Kopfschutz tragen
Schutzhandschuhe tragen
Lesen Sie die Bedienungsanleitung aufmerksam durch.
Dieses Produkt gibt giftige Dämpfe ab!
Erfüllt die relevanten Gesetze und Sicherheitsnormen.
Umweltschutz
Werkzeuge mit Verbrennungsmotoren dürfen nicht mit dem Hausmüll
entsorgt werden. Bringen Sie diese zu Ihrem lokalen Recycling- oder
Wertstoffhof, und lassen Sie das Gerät dort in Übereinstimmung mit
geltenden Umweltschutzanforderungen und -gesetzen entsorgen.
Technische Daten
Hubraum : ................................................ 49 cm³
Kraftstoffart:............................................. bleifreies Benzin
Mischungsverhältnis
Zweitaktmischung: .................................. 25:1
Motorleistung: .......................................... 1,25 kW
Drehmoment (Antriebswelle): .................. 2,25 Nm
Leerlaufdrehzahl: ..................................... 2.800 min
Max. Motordrehzahl: ................................ 8.500 min
-1
-1
Kraftstoffbehälterinhalt: ........................... 1,2 Liter
Zündkerze: ............................................... Typ BM6A
Elektrodenabstand: .................................. 0,6 – 0,8 mm
Getriebeöl-Typ: ........................................ SAE 30
Getriebeöl-Menge: ................................... 200 ml
Schalldruckpegel: .................................... 108 dB(A)
Schallleistungspegel: ............................... 90 dB(A)
Hand-Arm-Vibration: ................................ 15 m/s
Unsicherheit: ............................................ 2 m/s
2
2
Gewicht (ohne Bohrer): ............................ 9,3 kg
Der Lautstärkepegel könnte für den Bediener des Bohrers 85
dB(A) übersteigen und es müssen Maßnahmen zum Schallschutz
Als Teil unserer fortlaufenden Produktentwicklung können technische
Daten von Silverline-Produkten ohne Vorankündigung geändert
vorgenommen werden.
werden.
Allgemeine Sicherheitshinweise
WARNUNG! Lesen Sie alle Sicherheitshinweise und Anweisungen. Versäumnisse bei
der Einhaltung der Sicherheitshinweise und Anweisungen können elektrischen Schlag,
Brand und/oder schwere Verletzungen verursachen.
Bewahren Sie alle Sicherheitshinweise und Anweisungen für die Zukunft auf.
1) Arbeitsplatzsicherheit
a) Halten Sie Ihren Arbeitsbereich sauber und gut beleuchtet. Unordnung oder
unbeleuchtete Arbeitsbereiche können zu Unfällen führen.
b) Arbeiten Sie mit dem Werkzeug nicht in explosionsgefährdeter Umgebung, in
der sich brennbare Flüssigkeiten, Gase oder Stäube befinden.
c) Halten Sie Kinder und andere Personen während der Benutzung des Werkzeugs
fern. Bei Ablenkung können Sie die Kontrolle über das Gerät verlieren.
2) Sicherheit von Personen
a) Seien Sie aufmerksam, achten Sie darauf, was Sie tun, und gehen Sie mit
Vernunft an die Arbeit mit einem Werkzeug. Benutzen Sie kein Werkzeug,
wenn Sie müde sind oder unter dem Einfluss von Drogen, Alkohol oder
Medikamenten stehen. Ein Moment der Unachtsamkeit beim Gebrauch des
Werkzeuges kann zu ernsthaften Verletzungen führen.
b) Tragen Sie persönliche Schutzausrüstung und immer eine Schutzbrille.
Das Tragen persönlicher Schutzausrüstung, wie Staubmaske, rutschfeste
Sicherheitsschuhe, Schutzhelm oder Gehörschutz, je nach Art und Einsatz des
Werkzeuges, verringert das Risiko von Verletzungen.
c) Vermeiden Sie eine unbeabsichtigte Inbetriebnahme. Vergewissern Sie sich,
dass das Werkzeug ausgeschaltet ist, wenn es nicht verwendet wird, und dass
andere evtl. vorhandene Einschaltsperren aktiviert sind.
d) Entfernen Sie Einstellwerkzeuge oder Schraubenschlüssel, bevor Sie das
Werkzeug einschalten. Ein Werkzeug oder Schlüssel, der sich in einem drehenden
Geräteteil befindet, kann zu Verletzungen führen.
e) Vermeiden Sie eine unnatürliche Körperhaltung. Sorgen Sie für einen sicheren
Stand und halten Sie jederzeit das Gleichgewicht. Auf diese Weise lässt sich das
Elektrowerkzeug in unerwarteten Situationen besser kontrollieren.
f) Tragen Sie geeignete Kleidung. Tragen Sie keine weite Kleidung oder Schmuck.
Halten Sie Haare, Kleidung und Handschuhe fern von sich bewegenden Teilen.
Lockere Kleidung, Schmuck oder lange Haare können von sich bewegenden Teilen
erfasst werden.
g) Wenn Staubabsaug- und -auffangeinrichtungen montiert werden können,
vergewissern Sie sich, dass diese angeschlossen sind und richtig verwendet
werden. Verwendung einer Staubabsaugung kann Gefährdungen durch Staub
verringern.
WARNUNG: Bei der Benutzung mancher Werkzeuge wird der Benutzer Vibrationen
ausgesetzt, welche zum Verlust des Berührungssinnes, zu Taubheitsgefühl, Kribbeln und
zu einer Verminderung der Handgreifkraft führen können. Langfristige Belastung kann zu
chronischen Beschwerden führen. Begrenzen Sie falls nötig die Exposition zu Vibrationen.
Beurteilen Sie die Vibrationsbelastung unter Zuhilfenahme der Technischen Daten des
jeweiligen Werkzeuges, und bestimmen Sie die zulässige Belastungsdauer und –häufigkeit.
Die EU-Direktive 2002/44/EG enthält Informationen über zulässige Vibrationsbelastung
am Arbeitsplatz und kann auch auf Heimarbeiten angewandt werden. Beenden Sie die
Benutzung eines Werkzeuges sofort, wenn Sie in irgendeiner Art und Weise Unbehagen
aufgrund der Vibrationsbelastung fühlen.
WARNUNG: Tragen Sie in Bereichen wo der Lärmpegel 85 dB(A) überschreitet unbedingt
angemessenen Gehörschutz, und begrenzen Sie die Belastungsdauer wo nötig. Sollte trotz
Gehörschutz Unbehagen irgendeiner Art auftreten, beenden Sie die Arbeit unverzüglich
und überprüfen Sie den Gehörschutz auf korrekten Sitz und Funktion, und stellen Sie
sicher, dass dieser einen angemessenen Schutz für den Lärmpegel bietet, der von den
verwendeten Werkzeugen ausgeht.
3) Werkzeugbenutzung und -pflege
a) Pflegen Sie Werkzeuge mit Sorgfalt. Kontrollieren Sie, ob bewegliche Teile
einwandfrei funktionieren und nicht klemmen, ob Teile gebrochen oder so
beschädigt sind, dass die Funktion des Werkzeuges beeinträchtigt ist. Lassen
Sie beschädigte Teile vor dem Einsatz des Gerätes reparieren. Viele Unfälle
haben ihre Ursache in schlecht gewarteten Werkzeugen.
b) Halten Sie Schneidwerkzeuge scharf und sauber. Sorgfältig gepflegte
Schneidwerkzeuge mit scharfen Schneidkanten verklemmen sich weniger und sind
leichter zu führen.
c) Verwenden Sie Werkzeugzubehör, Einsatzwerkzeuge usw. entsprechend
diesen Anweisungen. Berücksichtigen Sie dabei die Arbeitsbedingungen und
die auszuführende Tätigkeit. Der Gebrauch von Werkzeugen für andere als die
vorgesehenen Anwendungen kann zu gefährlichen Situationen führen.
4) Service
a) Lassen Sie Ihr Werkzeug nur von qualifiziertem Fachpersonal und nur mit
Original-Ersatzteilen reparieren. Damit wird sichergestellt, dass die Sicherheit des
Werkzeuges erhalten bleibt.
Sicherheitshinweise für Geräte mit
Verbrennungsmotoren
Gefährliche Umgebung
• Verwenden Sie Benzinmotorgeräte nie in feuchter oder nasser Umgebung und setzen
Sie sie nie dem Regen aus. Sorgen Sie für einen geeigneten und gut ausgeleuchteten
Arbeitsbereich.
• Benutzen Sie Benzinmotorgeräte nicht an Orten, wo ein Explosions- oder Brandgefahr
aufgrund brennbarer Materialien, entflammbarer Flüssigkeiten, entflammbarer Gase
oder entzündbaren Staubs besteht.
Schützen Sie Ihr Gehör
• Tragen Sie immer einen geeigneten Gehörschutz, wenn der Lautstärkepegel des
Werkzeugs 80 dB überschreitet. Es liegt in der Verantwortung des Benutzers
sicherzustellen, dass auch andere Personen die sich in der Nähe des Arbeitsbereichs
aufhalten, ebenfalls ausreichend geschützt sind.
Schützen Sie Ihre Augen
• Verwenden Sie stets einen geeigneten Augenschutz.
Schützen Sie sich vor Vibrationen
• Tragbare Werkzeuge können Vibrationen erzeugen. Diese Vibrationen können
gesundheitsschädigend sein. Wärmende Handschuhe können zu einer guten
12
Page 14

868828 Benzinbetriebener 49-cm³-Erdbohrer
Durchblutung der Finger beitragen. Tragbare Werkzeuge sollten nie über längere
Zeiträume ohne Pausen verwendet werden.
Vor dem Anschließen von Zubehör ausschalten
• Vergewissern Sie sich, dass der Motor ausgeschaltet ist, bevor Sie Zubehör am
Werkzeug anbringen.
• Wenn das Werkzeug unerwartet anhält, vergewissern Sie sich, dass der Motor nicht
läuft, bevor Sie das Werkzeug untersuchen.
Betrieb des Motors
• Lassen Sie den Motor bei neuen Werkzeugen nur mit mäßiger Drehzahl laufen.
• Benutzen Sie erst dann höhere Motordrehzahlen, wenn der Motor vollständig
eingelaufen ist.
• Der Motor kann seine maximale Leistung erst nach Beendigung der Einlaufzeit erreichen.
• Prüfen Sie vor dem ersten Gebrauch des Werkzeugs, dass alle Muttern und Schrauben
sicher befestigt sind, und ziehen Sie diese gegebenenfalls nach.
• Verwenden Sie keine methanol- oder ethanolhaltigen Kraftstoffe, da diese interne
Schäden an Kraftstoffbehälter und -leitungen verursachen können.
Warnhinweis
• Lassen Sie das Gerät niemals unbeaufsichtigt wenn der Motor noch läuft.
• Lassen Sie das Gerät niemals unbeaufsichtigt wenn Teile der Maschine noch heiß sind.
Wartung
• Es wird empfohlen, dass Sie Ihr Werkzeug kurz nach dem ersten Gebrauch warten lassen.
• Bei normalem Gebrauch muss das Werkzeug regelmäßig gewartet werden.
• Versuchen Sie nicht, Komponenten des Werkzeugs zu modifizieren. Der Versuch, das
Werkzeug zu verändern, führt zum Verlust des Garantieanspruchs und kann außerdem
zu ernsthaften Verletzungen der eigenen oder in der Nähe befindlicher Personen führen.
• Lassen Sie Ihr Werkzeug immer bei einer autorisierten Reparaturwerkstatt warten.
Lagerung
• Reinigen Sie das Gerät nach dem Gebrauch gründlich.
• Achten Sie darauf, dass der Kraftstofftank oder die Kraftstoffleitungen nicht beschädigt
werden, wenn das Werkzeug auf den Boden gestellt wird.
• Sorgen Sie dafür, dass das Gerät nicht durch Schläge oder Stöße beschädigt wird, da
das Gerät sonst möglicherweise nicht länger den Sicherheitsansprüchen genügt.
• Gerät vor direkter Sonneneinstrahlung geschützt lagern.
• Sorgen Sie dafür, dass Kraftstoff und Öl an einem sicheren Ort und geschützt vor Hitze,
direkter Sonneneinstrahlung, allen Zündquellen sowie außer Reichweite von Kindern
aufbewahrt werden.
• Wenn das Gerät längere Zeit nicht benutzt werden wird, gehen Sie wie folgt vor:
• Entleeren Sie den Kraftstofftank vollständig.
• Wischen Sie alle Metalloberflächen und Metallkomponenten des Motors zum Schutz vor
Korrosion mit einem geölten Lappen ab.
• Entfernen Sie die Zündkerze und geben Sie einige Tropfen Öl in den Zylinder. Ziehen Sie
den Starthebel zwei bis drei Mal, um das Öl gleichmäßig zu verteilen.
• Setzen Sie die Zündkerze wieder ein.
• Sorgen Sie dafür, dass Kinder sich keinen Zugang zur Maschine verschaffen können.
DIESES PRODUKT ERZEUGT GIFTIGE ABGASE, SOBALD DER MOTOR LÄUFT. DIESE
GASE KÖNNEN FARB- UND GERUCHLOS SEIN. LASSEN SIE DIE MASCHINE NIEMALS
IN GESCHLOSSENEN RÄUMEN ODER IN SCHLECHT BELÜFTETEN BEREICHEN LAUFEN,
UM DAS RISIKO SCHWERER ODER LEBENSGEFÄHRLICHER VERLETZUNGEN ZU
REDUZIEREN. SORGEN SIE FÜR AUSREICHENDE BELÜFTUNG, WENN IN GRÄBEN ODER
IN ANDEREN BEENGTEN RÄUMEN GEARBEITET WIRD.
Produktübersicht
1 Kraftstoffbehälter-Verschluss
2 Kraftstoffpumpe
3 Startergriff
4 Choke-Hebel
5 Schraube des Luftfiltergehäuses
6 Zündkerze
7 Abgasauslass
8 Max-Drehzahl-Einstellschraube
9 Geschwindigkeitsregler
10 Ein-/Ausschalter
11 Dauerlaufknopf des Geschwindigkeitsreglers
12 Sicherungshebel des Geschwindigkeitsreglers
13 Luftfiltergehäuse
14 Schaumstoff-Luftfiltereinsatz
15 Getriebeöl-Einfüllöffnung
16 Getriebeöl-Kontrollbohrung
17 Sicherungsstift
18 Splint
19 Antriebswelle
*Hinweis: Die Getriebeöl-Einfüllöffnung ist geschlossen, wenn die Schraube so weit
wie möglich heraus steht.
Auspacken des Gerätes
• Vergewissern Sie sich, dass sämtliche Teile Ihres Erdbohrers vorhanden und in
einwandfreiem Zustand sind.
• Sollten Teile fehlen oder beschädigt sein, lassen Sie diese ersetzen, bevor Sie das
Werkzeug verwenden.
Zusammenbau Ihres Benzinbetriebenen
Erdbohrers
• Entfernen Sie den Splint (18) aus dem Sicherungsstift (17).
• Entfernen Sie den Sicherungsstift (17) aus der Antriebswelle (19)
• Schieben Sie den Schlangenbohrer (Silverline-Artikelnummern 633897, 245105 oder
457044 – nicht im Lieferumfang enthalten) über die Antriebswelle (19)
• Richten Sie die Bohrung des Schlangenbohrers mit der der Antriebswelle aus
und schieben Sie anschließend den Sicherungsstift (17) durch die Bohrung.
• Setzen Sie den Splint (18) wieder ein und ziehen Sie seine Schenkel, wie in
der Abbildung dargestellt, auseinander.
Betreiben des Motors
Betanken
• Betanken Sie die Maschine immer an einem sicheren Ort, abseits des Arbeitsbereichs
und fernab von jeglicher Hitze- oder Zündquellen.
• Vermeiden Sie jeglichen Kontakt mit dem Kraftstoff.
• RAUCHEN SIE NICHT!
• Füllen Sie erst Kraftstoff nach, wenn der Motor gestoppt und vollständig abgekühlt ist.
• Der Kraftstoff sollte immer vor dem Betanken gemischt werden.
• Mischen Sie den Kraftstoff nicht im Kraftstoffbehälter des Gerätes.
• Mischen Sie nur so viel Kraftstoff, wie Sie auch verwenden möchten.
• Bewahren Sie Kraftstoff ausschließlich in qualitativ hochwertigen Kraftstoffbehältern auf.
• Verwenden Sie das im Lieferumfang enthaltene Mischgefäß. Befüllen Sie diese mit
576,92 ml Benzin und fügen Sie anschließend Zweitaktöl bis zur 600-ml-Markierung
hinzu. Verschließen Sie die Flasche und schütteln Sie diese, um die Komponenten zu
Mischen.
Hinweis: Falls Sie kleinere Mengen an Kraftstoff an mischen möchten, verwenden Sie
zum Abmessen die Skalen auf dem Mischgefäß. Mischen Sie nur so viel Benzin an, wie Sie
auch verwenden werden.
• Entfernen Sie den Kraftstoffbehälter-Verschluss (1). Füllen Sie den Tank bis zur
notwendigen Füllhöhe mit der Kraftstoffmischung.
Hinweis: Verwenden Sie einen Trichter, wie z.B. Silverline-Artikelnummer 793799, um ein
Verschütten zu vermeiden.
• Setzen Sie den Kraftstoffbehälter-Verschluss (1) wieder auf.
• Entfernen Sie eventuell verschütteten Kraftstoff gründlich.
• Bewegen Sie den benzinbetriebenen Erdbohrer ein gutes Stück von der Stelle weg, an
der Sie ihn betankt haben, bevor Sie den Motor anlassen.
• Bewahren Sie übrigen Kraftstoff nicht in der Nähe des Arbeitsbereichs auf.
• Schalldämpfer und Auspuff werden beim Betrieb sehr heiß. Stellen Sie daher sicher,
dass diese Teile nicht mit brennbaren Materialien in Kontakt kommen.
Startvorbereitung des Motors
• Halten Sie die Maschine senkrecht auf der Spitze des Schlangenbohrers, so dass sich
die Griffe parallel zum Boden befinden.
• Drücken Sie die Kraftstoffpumpe (2) langsam hinein und lassen Sie sie wieder los.
• Wiederholen Sie den Vorgang, bis der Kraftstoff beginnt durch die transparente
Kraftstoffleitung und zurück in den Kraftstofftank zu fließen.
• Drücken Sie die Kraftstoffpumpe (2) noch einige Male, bis keine Luftblasen mehr
zu sehen sind. Die Kraftstoffanlage ist nun vollständig mit Kraftstoff befüllt und
betriebsbereit.
Anlassen des Motors
WARNUNG: Dieser benzinbetriebene Erdbohrer produziert giftige Abgase, die durch den
Abgasauslass (7) austreten, sobald die Maschine läuft. Lassen Sie den Motor ausschließlich
im Freien an und niemals in jeglicher Art von geschlossenen Räumen. Tragen Sie zu Ihrer
Sicherheit immer angemessene Schutzkleidung: Die Bedienung dieses Werkzeugs erfordert
das Tragen einer Schutzbrille, von Handschuhen, Gehörschutz, Atemschutz und robuster
Kleidung. Es wird ebenfalls empfohlen einen Schutzhelm und Sicherheitsschuhe zu tragen.
• Stellen Sie den Choke-Hebel (4) auf „ON“ (EIN), wenn der Motor warm ist.
• Stellen Sie den Hebel auf „OFF“ (AUS), wenn der Motor kalt ist.
• Stellen Sie den Ein-/Ausschalter (10) auf „I“
• Halten Sie den Erdbohrer, wie in Abb. A zu sehen, und stellen Sie sicher, dass Sie die
Kontrolle über das Werkzeug haben.
www.silverlinetools.com
13
Page 15

D
• Ziehen Sie kräftig am Startergriff, wie in Abb. A dargestellt.
• Ziehen Sie den Startergriff erneut, bis der Motor startet.
WICHTIG – lassen Sie den Startergriff (3) nicht in das Werkzeug zurückschnappen, sondern
lassen Sie ihn kontrolliert zurückgleiten.
• Lassen Sie den Motor ca. 30 Sekunden im Leerlauf laufen.
• Wenn der Motor warmgelaufen ist, stellen Sie den Choke-Hebel (4) auf die Position „ON“.
WICHTIG – Lassen Sie den Motor langsam für mindestens 3 Minuten warm laufen, bevor Sie
die Motordrehzahl erhöhen. Dies erhöht die Leistungsfähigkeit und die Lebensdauer des Motors.
Einlaufen des Motors
• Es ist wichtig, dass Sie den Motor einlaufen lassen, wenn Sie die Antriebseinheit zum
ersten Mal verwenden. Dies erhöht die Effizienz und Leistungsfähigkeit des Motors und
maximiert die Lebensdauer.
• Um den Motor einlaufen zu lassen, lassen Sie ihn beim ersten Gebrauch für mindestens
15 Minuten im Leerlauf laufen und geben Sie so wenig Gas wie möglich. WENN
MÖGLICH, ERHÖHEN SIE WÄHREND DIESER ZEIT DIE MOTORDREHZAHL NICHT.
HINWEIS: Es ist normal, dass Sie während des Einlaufens starke Gerüche wahrnehmen, da
sich die Teile zum ersten Mal erhitzen.
Anhalten des Motors
• Lassen Sie den Motor nach Gebrauch für mindestens 3 Minuten im Leerlauf laufen,
bevor Sie ihn ausschalten.
• Stellen Sie den Ein-/Ausschalter (10) auf die Position „O“.
Verwenden des Benzinbetriebenen
Erdbohrers
Steuerung des Erdbohrers
• Starten Sie den Motor, wie weiter oben beschrieben.
• Drücken Sie, um die Motordrehzahl zu erhöhen, den Sicherungshebel (12) und
dann langsam den Geschwindigkeitsregler (9) hinunter. Lassen Sie ihn los, um die
Motordrehzahl wieder zu verringern.
HINWEIS: Wenn der Motor im Leerlauf läuft, dreht sich die Antriebswelle nicht. Sie beginnt
sich zu drehen, wenn die Motordrehzahl erhöht wird.
• Die maximale Motordrehzahl kann durch Einstellen der Max-Drehzahl-Einstellschraube
(8) festgelegt werden. Drehen Sie im Uhrzeigersinn, um die maximale Motordrehzahl
zu verringern.
• Der Geschwindigkeitsregler (9) kann arretiert werden. Während Sie diesen gedrückt
halten, betätigen Sie die Dauerbetriebstaste des Geschwindigkeitsreglers (11) und
lassen dann den Geschwindigkeitsregler los. Zum Entriegeln, betätigen Sie den
Geschwindigkeitsregler (9) erneut.
Bedienhinweise
• Halten Sie falls möglich einen Abstand von mindestens 5 m zu Beistehern und arbeiten
Sie in einer Position die es Ihnen erlaubt andere Personen im Auge zu behalten.
• Arbeiten Sie seitlich von einer Position neben der Bohrstelle aus, falls Sie an einem
Abhang arbeiten. Dadurch kann der Erdbohrer nicht auf Sie fallen, falls Sie die Kontrolle
über die Maschine verlieren sollten.
• Vergewissern Sie sich, dass der Untergrund für den Einsatz eines Erdbohrers geeignet
ist und keine großen Steine oder unter der Oberfläche verstecktes Mauerwerk enthält.
Wartung
Wartungsintervalle
Austauschen
Zündkerze 2000
Getriebeöl 500
WARNUNG: Bevor Sie jegliche Art von Wartungsarbeiten am Erdbohrer durchführen,
stoppen Sie den Motor und lassen Sie das Gerät vollständig abkühlen.
Überprüfung der Zündkerze
• Ziehen Sie das Zündkabel von der Zündkerze (6) ab.
• Schrauben Sie die Zündkerze mit einem geeigneten Zündkerzenschlüssel heraus.
• HINWEIS – Drehen Sie gegen den Uhrzeigersinn, um die Zündkerze zu entfernen.
• Reinigen Sie die Zündkerze und, je nach Wartungsplan, korrigieren Sie den
Elektrodenabstand, oder ersetzen Sie die Kerze.
• Setzen Sie die Zündkerze wieder ein, drehen Sie sie zunächst von Hand fest, und ziehen
Sie die Kerze dann vorsichtig mit einem Zündkerzenschlüssel an. HINWEIS – ziehen Sie
die Zündkerze (6) nicht zu fest an.
Überprüfen des Luftfilters
• Reinigen Sie den Luftfilter wie im Wartungsplan empfohlen.
• Lösen Sie die Schraube des Luftfiltergehäuses (5) mit einem geeigneten Schraubendreher.
• Heben Sie das Luftfiltergehäuse (13) ab.
• Entfernen Sie den Schaumstoff-Luftfiltereinsatz (14).
Überprüfen/Anpassen/
Reinigen
Zündkerze 500
Luftfilter 50
Laufzeit in
Stunden
• Säubern Sie den Luftfilter mit einer dafür geeigneten Reinigungsflüssigkeit, welche im
Fachhandel für Gartengeräte erhältlich ist.
• Lassen Sie den Luftfilter vollständig trocknen.
• Setzen Sie den Schaumstoff-Luftfiltereinsatz (14), das Filtergehäuse (13) und die
Schrauben (5) wieder ein und ziehen Sie die Schrauben an.
Getriebeöl (Siehe Abb. B)
HINWEIS: Führen Sie Getriebeöl-Wechsel in Übereinstimmung mit dem abgebildeten
Wartungsplan aus.
• Richten Sie den Erdbohrer waagerecht aus, als ob Sie ein Loch in den Untergrund
bohren würden, und sorgen Sie dafür, dass die Maschine stabil steht.
• Entfernen Sie den Bohrer wie im Abschnitt “Zusammenbau Ihres benzinbetriebenen
Erdbohrers” beschrieben.
• Stellen Sie eine geeignete Ölauffangwanne, wie z.B. Silverline Artikelnummer 675089,
unter die Maschine.
• Benutzen Sie einen passenden Schraubenschlüssel um die Getriebeöl-Einfüllöffnung
(15) zu öffnen.
• Kippen Sie den Erdbohrer um 90° oder mehr, um jegliches Öl aus dem Getriebe zu entfernen.
• Sobald das gesamte Altöl abgelassen worden ist, füllen Sie dieses von der
Auffangwanne in einen geeigneten Behälter um, und führen Sie es dem Recycling für
Altöl zu. Entsorgen Sie Öl keinesfalls mit dem Hausmüll oder über das Abwassersystem!
• Bringen Sie die Maschine wieder in eine stabile horizontale Position.
• Füllen Sie die korrekte Menge eines geeigneten Getriebeöles (siehe Abschnitt “Technische
Daten”) in die Getriebeöl-Einfüllöffnung (15) ein. Dies füllt das Getriebegehäuse ungefähr
bis zur Getriebeöl-Kontrollbohrung (16), wie in Abb. B beschrieben.
• Verschließen Sie die Getriebeöl-Einfüllöffnung. Diese ist verschlossen, wenn die
Rändelschraube so weit wie möglich heraus steht.
Lagerung
• Achten Sie darauf, dass Sie den Kraftstoffbehälter und die Kraftstoffleitungen nicht
stoßen, knicken oder einschneiden, wenn Sie die Maschine auf dem Boden ablegen.
• Lassen Sie das Werkzeug nicht fallen; es könnte beschädigt und dadurch unsicher werden.
• Reinigen Sie die ganze Maschine wenn Sie mit der Arbeit fertig sind.
• Untersuchen Sie die gesamte Maschine und die Schläuche auf Schäden, einschließlich
lockere oder fehlende Teile.
• Lagern Sie die Maschine nicht in direktem Sonnenlicht.
• Lagern Sie die Maschine nicht in einer Plastiktüte, da dies zur Schimmelbildung führen kann.
• Verwenden Sie zur äußeren Reinigung der Maschine eine kleine Bürste und halten Sie
die Abluftstutzen frei von jeglichen Hindernissen. Verwenden Sie zur Reinigung der
Maschine kein Wasser und spritzen Sie sie nicht mit einem Schlauch ab.
• Stellen Sie sicher, dass Kraftstoff und Öl an einem sicheren Ort gelagert werden,
fernab von Hitze, direktem Sonnenlicht, jeglichen Zündungsquellen und außerhalb der
Reichweite von Kindern.
Lagerung über längere Zeiträume hinweg:
Wenn Sie die Maschine über einen längeren Zeitraum nicht benutzen, gehen Sie stets
wie folgt vor:
• Reinigen Sie die Maschine vollständig und überprüfen Sie sie sorgfältig.
• Entleeren Sie den Kraftstoffbehälter vollständig, und entleeren Sie anschließend den
Vergaser und die Kraftstoffleitungen, indem Sie den Motor laufen lassen, bis er durch
den Mangel an Kraftstoff stoppt.
• Schützen Sie alle Metallteile des Motors vor Korrosion, indem Sie diese mit Öl einstreichen.
• Entfernen Sie die Zündkerze, geben Sie einige Tropfen Öl durch die Zündkerzenöffnung
in den Zylinder, und ziehen dann den Rückzugstarter zwei bis drei Mal, um das Öl
gleichmäßig zu verteilen. Bringen Sie die Zündkerze und das Zündkabel wieder an.
• Reinigen Sie den Luftfilter wie im gleichnamigen Abschnitt weiter oben beschrieben.
Fehlerbehebung
Leistungsverlust oder plötzliches Anhalten des Motors
• Überprüfen Sie, ob der Kraftstoffbehälter leer ist.
• Überprüfen Sie, ob Wasser in der Mischung ist. Entleeren Sie die Kraftstoffanlage und
spülen diese mit frischem Kraftstoff durch.
• Überprüfen Sie ob der Luftfilter verschmutzt ist. Reinigen Sie den Luftfilter.
Starten eines mit Benzin gefluteten Motors
• Trennen Sie das Zündkabel und entfernen Sie die Zündkerze, indem Sie diese mit einem
Zündkerzenschlüssel im Gegenuhrzeigersinn drehen.
• Wenn die Zündkerze verschmutzt ist oder Kraftstoff in sie eingedrungen ist, reinigen
oder tauschen Sie die Zündkerze aus.
• Befreien Sie die Verbrennungskammer von überschüssigem Kraftstoff, indem Sie bei
ausgebauter Zündkerze einige Male am Anlasserseil ziehen.
• Setzen Sie die Zündkerze wieder ein und ziehen Sie diese mit dem Zündkerzenschlüssel an.
• Wiederholen Sie den Startvorgang in der Art und Weise, als ob der Motor bereits warm wäre.
Recycling und Entsorgung von Werkzeugen
mit Verbrennungsmotor, Treibstoffen und Öl
• Werkzeuge mit Verbrennungsmotoren dürfen nicht mit dem Hausmüll entsorgt werden.
Bringen Sie diese zu Ihrem lokalen Recycling- oder Wertstoffhof, und lassen Sie
das Gerät dort in Übereinstimmung mit geltenden Umweltschutzanforderungen und
-Gesetzen entsorgen.
• Benzin, Schmiermittel und Benzin-Öl-Gemische sind gefährliche Abfälle und müssen als
Sondermüll behandelt und entsorgt werden. Schmiermittel und Treibstoffe dürfen nicht
mit dem Hausmüll entsorgt werden. Unsachgemäße Entsorgung von Öl und Treibstoffen
könnte in Ihrem Land strafbar sein und als Gesetzesverstoß geahndet werden.
Wenden Sie sich für Informationen zur vorschriftsmäßigen Entsorgung an Ihre lokale
Entsorgungsbehörde oder ihren Fachhändler.
14
Page 16

868828 Benzinbetriebener 49-cm³-Erdbohrer
Garantiebedingungen für Silverline Tools
Dieses Silverline-Produkt ist mit einer 3-JahresGarantie versehen
Registrieren Sie dieses Produkt unter silverlinetools.com innerhalb von
30 Tagen nach dem Kauf, um die 3-Jahres-Garantie zu aktivieren. Der
Garantiezeitraum beginnt mit dem Kaufdatum auf Ihrem Kaufbeleg.
Garantiebedingungen
Der Garantiezeitraum beginnt mit dem Kaufdatum im Einzelhandel, das auf
dem Kaufbeleg angegeben ist.
BITTE BEWAHREN SIE IHREN KAUFBELEG AUF
Falls dieses Produkt innerhalb von 30 Tagen nach dem Kauf einen
Defekt aufweisen sollte, bringen Sie es bitte mit Ihrem Kaufbeleg zu dem
Fachhändler, bei dem es gekauft wurde, und informieren Sie ihn über die
Mängel. Das Gerät wird ersetzt oder der Kaufpreis zurückerstattet.
Falls dieses Produkt nach Ablauf von 30 Tagen nach dem Kauf einen Mangel
aufweist, senden Sie es an:
Silverline Tools Service Centre
PO Box 2988
Yeovil
BA21 1WU, Großbritannien
Der Garantieanspruch muss während der Garantiezeit gestellt werden.
Sie müssen den Originalkaufbeleg mit Angabe des Kaufdatums einreichen
und Ihren Namen und Ihre Adresse sowie den Ort des Kaufs angeben, bevor
etwaige Arbeiten durchgeführt werden können.
Sie müssen genaue Angaben über den zu behebenden Defekt machen.
Alle innerhalb der Garantiefrist gemachten Forderungen werden von
Silverline Tools daraufhin überprüft werden, ob es sich bei den Mängeln um
einen Material- oder Fertigungsfehler handelt.
Versandkosten werden nicht zurückerstattet. Alle Produkte müssen sich
in sauberem und sicherem Zustand befinden und sorgfältig verpackt zur
Reparatur eingeschickt werden, um Schäden oder Verletzungen während
des Transports zu vermeiden. Die Annahme ungeeigneter oder unsicherer
Lieferungen kann von uns verweigert werden.
Alle Arbeiten werden von Silverline Tools oder seinen autorisierten
Reparaturwerkstätten durchgeführt.
Die Reparatur oder der Ersatz des Produkts führt nicht zur Verlängerung des
Garantiezeitraums.
Mängel, bei denen unsere Prüfung ergibt, dass sie unter die Garantie fallen,
werden durch kostenlose Reparatur des Werkzeugs (ohne Versandkosten)
oder Ersatz durch ein Werkzeug in einwandfreiem Zustand behoben.
Registrierung Ihres Kaufs
Gehen Sie auf silverlinetools.com, klicken Sie auf ‚Registrierung’ und
geben Sie Folgendes ein:
• IhrepersönlichenAngaben
• ProduktdetailsundKaunformationen
Sobald dieses Produkt registriert worden ist, wird Ihre
Garantiebescheinigung im PDF-Format erzeugt. Bitte drucken Sie sie aus
und bewahren Sie sie zusammen mit Ihrem Produkt auf.
Einbehaltene Werkzeuge oder Teile, die ersetzt wurden, gehen in den Besitz
von Silverline Tools über.
Die Reparatur bzw. der Ersatz Ihres Produkts unter dieser Garantie erfolgt
zusätzlich zu Ihren gesetzlichen Rechten als Verbraucher und hat keine
nachteiligen Folgen auf diese.
Durch die Garantie abgedeckt ist:
Die Reparatur des Produkts, nachdem zur Zufriedenheit von Silverline Tools
nachgewiesen wurde, dass der Defekt durch fehlerhaftes Material oder
mangelhafte Arbeitsausführung bedingt ist und in den Garantiezeitraum fällt.
Wenn ein Ersatzteil nicht mehr erhältlich ist oder nicht mehr hergestellt
wird, kann Silverline Tools es gegen einen funktionellen Ersatz austauschen.
Verwendung des Produkts innerhalb der EU.
Durch die Garantie nicht abgedeckt ist:
Silverline Tools garantiert keine Reparaturen, die durch Folgendes
erforderlich geworden sind:
Normale Verschleißerscheinungen, die trotz Verwendung entsprechend
der Bedienungsanleitung entstehen, z.B. an Messern, Bürsten, Riemen,
Glühbirnen, Batterien usw.
Ersatz von mitgeliefertem Zubehör wie etwa Bohrspitzen, Klingen,
Sandpapier, Schneidscheiben und anderen zugehörigen Teilen.
Unfallschäden und Fehler, die durch unsachgemäße Verwendung oder
Wartung, Missbrauch, Nachlässigkeit oder fahrlässige Bedienung oder
Handhabung des Produkts entstanden sind.
Verwendung des Produkts für andere als normale Haushaltszwecke.
Jegliche Veränderungen oder Modifikationen des Produkts.
Die Verwendung von Teilen oder Zubehör, die keine Originalkomponenten
von Silverline Tools sind.
Fehlerhafte Montage (außer, wenn von Silverline Tools vorgenommen).
Reparaturen oder Änderungen, die von anderen als Silverline Tools oder
seinen autorisieren Reparaturwerkstätten durchgeführt wurden.
Ansprüche, die über die Rechte zur Behebung von Mängeln an dem in
diesen Garantiebedingungen genannten Werkzeug hinausgehen.
EG-Konformitätserklärung
Name des Unterzeichners: Mr. Darrell Morris
Bevollmächtigt durch: Silverline Tools
Erklärt hiermit, dass das Produkt:
Bezeichnung/Gerätetyp: Benzinbetriebener 49-cm³-Erdbohrer
Bauart./ Seriennummer: 868828
Den folgenden Richtlinien entspricht:
• Richtlinie über Emissionen mobiler Maschinen und Geräte 2004/108/CE
• Richtlinie über umweltbelastende Geräuschemissionen von zur Verwendung
im Freien vorgesehenen Geräten und Maschinen 200/14/EC Annex V
• Elektromagnetische Verträglichkeitsrichtlinie 2004/108/EG
• ISO22868:2003
• EN ISO 12100-1, EN ISO 12100-2:2003
• EN60204-1:1998, EN55012:2007, EN61000-6-1:2007
Techn. Unterlagen bei: Silverline Tools
Bennante Stelle: BVCE Products Testing
Ort: Shanghai, China
Datum: 04.12.2012
Unterzeichnet von:
Geschäftsführender Direktor
Name und Anschrift des Herstellers oder seines niedergelassenen
Bevollmächtigten:
Silverline Tools, Boundary Way, Lufton Trading Estate, Yeovil, Somerset,
BA22 8HZ, Großbritannien
www.silverlinetools.com
15
Page 17

ESP
Descripción de los Símbolos
Los símbolos siguientes pueden aparecer en la placa de características de su herramienta.
Éstos representan información importante sobre el producto o instrucciones relativas a
su uso
Lleve protección auditiva.
Lleve protección ocular.
Lleve protección respiratoria.
Lleve un casco de seguridad
Lleve guantes de seguridad
Lea el manual de instrucciones
Doble aislamiento para mayor protección
Conforme a las normas de seguridad y a la legislación correspondiente.
Protección Medioambiental
Los productos eléctricos usados no se deben mezclar con la basura
convencional. Están sujetos al principio de recogida selectiva. Solicite
información a su ayuntamiento o distribuidor sobre las opciones de reciclaje.
Características técnicas
Cilindrada del motor (cc): ....................................49 cm³
Tipo de combustible: ..........................................Gasolina sin plomo
Mezcla de combustible: ......................................25:1
Potencia del motor (kW): .....................................1,25 kW
Par de torsión de salida (en el eje motor): ..........2,25 Nm
Velocidad a ralentí: .............................................2.800 min
Velocidad máxima del motor:..............................8.500 min
-1
-1
Capacidad del depósito de combustible:.............1,2 litros
Tipo de bujía: .....................................................BM6A
Separación de los electrodos de la bujía: ............0,6-0,8 mm
Tipo de aceite de la caja de cambios: .................(SAE) 30
Cantidad de aceite en la caja de cambios: ..........200ml
Presión acústica: ................................................108 dB(A)
Potencia sonora: .................................................90 dB(A)
Vibración ponderada: ..........................................15 m/s
Incertidumbre: ....................................................2 m/s
2
2
Peso neto: ...........................................................9,3 kg
El nivel de intensidad sonora para el usuario puede exceder de
85 dB(A). Se recomiendan usar medidas de protección sonora.
Como parte de nuestra política de desarrollo de productos, los
datos técnicos de los productos Silverline pueden cambiar sin
previo aviso.
Instrucciones generales de seguridad
ADVERTENCIA Lea todas las advertencias de seguridad e instrucciones. El no respetar
estas advertencias e instrucciones puede causar descargas eléctricas, incendios y/o
lesiones graves.
Conserve estas instrucciones de seguridad para futuras referencias.
Seguridad en el área de trabajo
a) Mantenga el área de trabajo limpia y bien iluminada. Las áreas desordenadas y
oscuras invitan a que se produzcan accidentes.
b) No maneje herramientas eléctricas en atmósferas explosivas, como por
ejemplo en presencia de líquidos, gases o polvos inflamables.
c) Mantenga alejados a los niños y a las personas que estén presentes mientras
esté trabajando con una herramienta eléctrica. Las distracciones pueden hacerle
perder el control de la herramienta.
Seguridad personal
a) Manténgase alerta, fíjese en lo que está haciendo y use el sentido común
cuando esté utilizando una herramienta eléctrica. No use una herramienta
eléctrica si se encuentra cansado o bajo la influencia de drogas, alcohol
o medicamentos. Un momento de distracción mientras esté utilizando una
herramienta eléctrica puede provocar lesiones corporales graves.
b) Use equipo de protección personal. Use siempre protección ocular. El uso de
equipamientos de seguridad tales como máscara antipolvo, calzado de seguridad
antideslizante, casco duro y protecciones auditivas adecuadas reducirá el riesgo de
lesiones corporales.
c) Evite el arranque accidental. Asegúrese de que el interruptor está en la posición de
apagado antes de enchufar la herramienta.
d) Quite toda llave de ajuste o de tuercas antes de encender la herramienta
eléctrica. Una llave de tuercas o de ajuste que se ha dejado colocada en una parte
móvil de la herramienta eléctrica puede causar lesiones corporales.
e) No adopte posturas forzadas. Manténgase en posición firme y en equilibrio en
todo momento. De este modo, podrá controlar mejor la herramienta eléctrica en
situaciones inesperadas.
f) Vístase adecuadamente. No lleve ropa holgada ni joyas. Mantenga el pelo, la
ropa y los guantes alejados de las piezas móviles. La ropa holgada, las joyas o el
pelo largo pueden quedar atrapados en las piezas móviles.
g) Si dispone de conexión a sistemas de extracción y recolección de polvo,
asegúrese de que estén conectados y se usen correctamente. El uso de estos
dispositivos puede reducir los riesgos producidos por la inhalación de polvo.
ADVERTENCIA: La vibración producida al utilizar herramientas eléctricas durante periodos
de tiempo prolongados puede provocar adormecimiento, hormigueo y disminución de
tacto en las manos. Utilizar herramientas continuamente durante largos periodos de
tiempo puede ocasionar lesiones crónicas. Utilice las indicaciones y los datos de vibración
proporcionado por cada fabricante para calcular el tiempo máximo de exposición. De
acuerdo con la directiva 2002/44/CE todas las áreas de trabajo deben disponer de
información relativa a las vibraciones. PARE inmediatamente su herramienta eléctrica en
caso de notar alguna contradicción.
ADVERTENCIA: Se recomiendan usar medidas de protección sonora cuando el nivel de
intensidad sonora exceda de 80 dB(A). Compruebe siempre que la protección auditiva esté
en buen estado y que el nivel de atenuación sea el correcto dependiendo del tipo de tarea
que vaya a realizar.
Uso y mantenimiento
a) Mantenga sus herramientas eléctricas. Revise que no haya piezas en
movimiento mal alineadas o trabadas, piezas rotas o cualquier otra
condición que pueda afectar el funcionamiento de la herramienta eléctrica.
Si encuentra daños, haga reparar la herramienta eléctrica antes de utilizarla.
Muchos accidentes son causados por herramientas eléctricas que carecen de un
mantenimiento adecuado.
b) Mantenga las herramientas de corte siempre afiladas y limpias. Las
herramientas de corte correctamente afiladas son menos propensas a trabarse y son
más fáciles de controlar.
c) Utilice la herramienta eléctrica, los accesorios y las brocas etc. de acuerdo
con estas instrucciones y de la forma prevista para el tipo específico de
herramienta eléctrica, teniendo en cuenta las condiciones de trabajo y el
trabajo a realizar. El uso de la herramienta eléctrica para tareas distintas de
aquellas para las que fue diseñada podría causar una situación peligrosa.
Servicio
a) Lleve siempre su herramienta eléctrica a un servicio técnico cualificado y
utilice únicamente piezas de recambio idénticas.
Aspectos de Seguridad de la
Combustión Interna
Entorno peligroso
• No utilice herramientas de gasolina en condiciones húmedas o mojadas, ni las exponga
a la lluvia. Mantenga el espacio de trabajo adecuado y asegúrese de que el área de
trabajo esté bien iluminada.
• No utilice herramientas de gasolina donde exista un riesgo de explosión o de incendio
debido a materiales combustibles, líquidos inflamables, gases inflamables o polvo de
naturaleza explosiva.
Apague la herramienta antes de instalar accesorios
• Asegúrese de que el motor esté parado antes de conectar accesorios a la herramienta.
• Si la herramienta se detiene de forma imprevista, asegúrese de que el motor no esté
funcionando antes de proceder a verificar la herramienta.
Rodaje del motor
• Si la herramienta es nueva, deje que el motor funcione sólo a velocidad moderada.
• No haga funcionar el motor a alta velocidad hasta que haya finalizado su periodo de
rodaje completo.
• El motor no será capaz de desarrollar su máxima velocidad antes de que se haya
finalizado el periodo de rodaje.
• Cuando use por primera vez la herramienta, tómese el tiempo de verificar que todas las
tuercas y tornillos estén apretados con seguridad y proceda a apretarlos si es preciso.
16
Page 18

868828 Perforador de suelo a gasolina 49 cm³
• No use combustibles que contengan metanol o etanol, ya que éstos pueden causar
daños en el interior del depósito y las tuberías del combustible.
Advertencia
• Espere siempre a que la máquina se detenga por completo antes de dejarla.
• No deje nunca la máquina desatendida mientras las piezas están todavía calientes.
Servicio
• Se recomienda que se realice una revisión de la herramienta poco después de su
primer uso.
• En caso de uso normal, realice el mantenimiento de la herramienta con regularidad.
• No intente modificar ninguno de los componentes de la herramienta. No seguir estas
indicaciones, no sólo invalidaría la garantía, sino que además podría causarle lesiones a
sí mismo o a otras personas que estén a su alrededor.
• Haga siempre que se realice la revisión de la herramienta en un centro de servicio
autorizado.
Almacenamiento
• Cuando haya acabado de utilizar la herramienta, límpiela a fondo.
• Tenga cuidado de no golpear ni cortar el depósito o los tubos de combustible cuando
esté en el suelo.
• No deje que la herramienta se caiga: puede dañarse y su uso podría ser peligroso.
• Guarde la herramienta fuera de la luz directa del sol.
• Asegúrese de guardar el combustible y el aceite en un lugar seguro, alejado de las
fuentes de calor, de la luz directa del sol, de las fuentes de inflamación, y fuera del
alcance de los niños.
• Siempre que no utilice la herramienta durante un periodo prolongado, siga las
siguientes instrucciones:
• Vacíe el depósito de combustible completamente.
• Proteja contra la corrosión todas las piezas de metal del motor recubriéndolas de aceite.
• Retire la bujía de encendido, aplique unas gotas de aceite al cilindro y luego accione el
arrancador de retroceso 2 ó 3 veces para distribuir de modo uniforme el aceite.
• Vuelva a poner la bujía.
• No almacene nunca la herramienta en lugares donde los niños puedan tener acceso.
ESTA HERRAMIENTA PRODUCE GASES DE ESCAPE TÓXICOS TAN PRONTO. ESTOS
GASES PUEDEN SER INCOLOROS E INODOROS. PARA REDUCIR EL RIESGO DE LESIONES
GRAVES O MORTALES, NO PONGA NUNCA EN MARCHA EL MOTOR EN ESPACIOS
INTERIORES O MAL VENTILADOS. ASEGÚRESE DE QUE HAYA UNA VENTILACIÓN
ADECUADA CUANDO TRABAJE EN ZANJAS U OTROS ESPACIOS CERRADOS
Características del producto
1 Tapón de llenado del combustible
2 Cebador del combustible
3 Arranque del motor
4 Palanca del cebador
5 Tornillo de la caja del filtro del aire
6 Bujía
7 Salida de escape
8 Tornillo de ajuste de r/min máx.
9 Control de velocidad
10 Interruptor de encendido/apagado
11 Botón de funcionamiento continuo
12 Retén de control de velocidad
13 Caja del filtro del aire
14 Elemento del filtro del aire
Orificio para llenado de aceite de la caja de
15
engranajes
16 Orificio de nivel del aceite de la caja de engranajes
17 Pasador de seguridad
18 Grupilla
19 Eje
Nota: El orificio para el llenado de aceite permanecerá cerrado cuando esté en su
altura máxima.
Desembalaje
• Desembale e inspeccione la herramienta con cuidado. Familiarícese con todas sus
características y funciones.
• Asegúrese de que el embalaje contiene todas las partes y que están en buenas
condiciones. Si faltan piezas o están dañadas, solicite su sustitución antes de utilizar
esta herramienta.
Montaje
• Retire la grupilla (18) del pasador de seguridad (17).
• Retire el pasador de seguridad (17) del eje (19).
• Deslice una broca (Silverline 633897, 245105, 457044, no incluidos) sobre el eje (19).
• Alinee los agujeros de la broca y del eje, a continuación introduzca el pasador de
seguridad (17) en el agujero.
• Vuelva a a colocar la grupilla (18) y separe las patillas, tal y como se indica en la
imagen.
Funcionamiento del motor
Llenado de combustible
• Llene siempre el combustible en un lugar seguro, bien alejado de la zona de trabajo y
de cualquier fuente inflamable. Evite el contacto con el combustible.
• NO FUME.
• Reponga el combustible sólo cuando el motor esté parado y se haya enfriado
completamente.
• El combustible debe siempre reponerse ya mezclado, no lo mezcle en el depósito de
combustible.
• Mezcle sólo la cantidad de combustible que vaya a utilizar.
• Almacene el combustible sólo en depósitos de combustibles.
• Utilice la botella para combustible suministrada. Llénela de combustible hasta la marca
indicada “576,92”. A continuación añada aceite para motores de 2 tiempos hasta la
marca “600”. Vuelva a colocar el tapón y agite la botella para mezclar el combustible/
aceite.
Nota: Para mezclar pequeñas cantidades de combustible, deberá utilizar las graduaciones
indicadas en la botella. Intente siempre mezclar solamente la cantidad de combustible
que vaya a utilizar.
• Retire el tapón de llenado del combustible (1). Reponga la mezcla de combustible hasta
el nivel deseado.
Nota: Utilice un embudo Silverline 793799 o similar para evitar vertidos.
• Vuelva a poner la tapa de llenado (1).
• Asegúrese de limpiar bien todo el combustible que se vierta.
• Aleje la herramienta de la zona de llenado de combustible antes de arrancar el motor.
• Mantenga el combustible sobrante bien alejado de la zona de trabajo.
• La salida de escape se puede calentarse excesivamente durante el funcionamiento,
asegúrese de que no hayan materiales inflamables en contacto con la salida de escape.
Cebado del motor
• Coloque la herramienta verticalmente sobre la punta de la broca, de forma que las
empuñaduras estén a nivel con el suelo.
• Pulse lentamente y suelte el cebador de combustible (2).
• Continúe hasta que el combustible empiece a pasar por el tubo transparente y vuelva
al depósito de combustible.
• Púlselo varias veces más hasta que hayan pasado. Ahora podrá arrancar el motor.
Arranque del motor
ADVERTENCIA: Esta herramienta produce gases tóxicos a través de la salida de escape (7)
tan pronto como se pone en funcionamiento. Nunca intente arrancar el motor en espacios
interiores o cerrados. Póngase siempre protección adecuada - el uso de esta herramienta
requiere gafas protectoras, guantes, protectores para los oídos, mascarilla y ropa
resistente. Además, es recomendable utilizar casco y botas de seguridad.
• Ponga la palanca la palanca del cebador (4) en la posición ‘ON’ si el motor está caliente.
• Ponga la palanca del cebador en la posición ‘OFF’ si el motor está frío.
• Coloque el interruptor de encendido/apagado (10) en la posición “I”
• Sujete la broca tal y como se indica en la Fig. A, asegurándose de controlar bien la
herramienta.
• Tire de del arranque del motor con firmeza, tal y como se indica en la Fig. A.
• Tire del arranque del motor de nuevo hasta que arranque el motor.
IMPORTANTE: No deje que el arranque del motor (3) salga despedido contra la
herramienta, controle el retroceso.
• Deje que el motor funcione a la velocidad de ralentí durante unos 30 segundos.
• Durante el calentamiento del motor, coloque la palanca del cebador (4) en la posición
ON.
IMPORTANTE: Deje que el motor se caliente lentamente durante por lo menos 3 minutos
antes de aumentar la velocidad. Con ello mejorará el rendimiento del motor y prolongará
su vida útil.
Rodaje
• Al usar el motor la primera vez, es importante realizar su rodaje. Con ello mejorará el
rendimiento y eficiencia del motor, y prolongará su vida útil.
• Para realizar el rodaje del motor por primera vez, ponga el motor a funcionar a velocidad
lenta durante unos 15 minutos. NO AUMENTE LA VELOCIDAD DEL MOTOR DURANTE
ESTE PERIODO.
www.silverlinetools.com
17
Page 19

ESP
NOTA: Es normal notar olores extraños durante el rodaje debido al calentamiento de los
componentes por primera vez.
Parada del motor
• Antes de pararlo, deje que el motor vuelva a la velocidad de ralentí durante por lo
menos 3 minutos.
• Ponga el interruptor de encendido/apagado (10) en la posición “o”.
Instrucciones de funcionamiento
Control de la herramienta
• Arranque el motor, tal y como se ha indicado anteriormente.
• Para aumentar la velocidad del motor, pulse el retén (12) y apriete lentamente el control
de velocidad (9). Suéltelo para disminuir la velocidad del motor.
NOTA: El eje de salida no gira cuando el motor funciona al ralentí. Empieza a girar cuando
la velocidad del motor aumenta.
• La velocidad máxima del motor se puede ajustar con el tornillo Max. RPM (8). Gírelo
hacia la derecha para reducir la velocidad máxima del motor.
• El control de velocidad (9) se puede bloquear. Mientras lo sujeta, pulse el
funcionamiento continuo (11) y a continuación suelte el control de velocidad. Vuelva a
apretar el control de velocidad (9) para soltarlo.
Notas al utilizar el perforador
• Cuando sea posible, manténgase alejado a 5 m de distancia de otras personas de
manera que pueda verlas en todo momento.
• Cuando trabaje en superficies inclinadas, comience trabajando desde uno de los lados y
no por debajo, de esta forma evitará que la herramienta salga dirigida hacia usted.
• Asegúrese de que la superficie a perforar no contenga piedras y rocas de gran tamaño.
Mantenimiento
Tabla de mantenimiento
Cambiar
Comprobar/Ajustar/
Limpiar
Bujía 500
Bujía 2000
Filtro del Aire 50
Aceite de la Caja
de Engranajes
ADVERTENCIA. Antes de realizar cualquier tarea de mantenimiento, pare el motor y deje
que se enfríe completamente.
Comprobación de la bujía (6)
• Desconecte el cable de la bujía.
• Destornille la bujía con una llave adecuada.
NOTA: Gire la llave hacia la izquierda para retirar la bujía.
• Limpie y ajuste la bujía, o cámbiela según se indica en la tabla de mantenimiento.
• Vuelva a poner la bujía (6) y apriétela a mano. NOTA: tenga cuidado de no apretarla
demasiado.
• Limpie el filtro del aire según se indica en la tabla de mantenimiento.
• Retire el tornillo de la caja del filtro del aire (5) con un destornillador adecuado.
• Levante la caja del filtro del aire (13).
• Retire el elemento de espuma del filtro del aire (14).
• Lave el filtro del aire en un líquido adecuado, disponible en la mayoría de los minoristas
de accesorios para jardinería.
• Deje que se seque completamente.
• Vuelva a poner el filtro, la caja del filtro y el tornillo.
Aceite de la caja de engranajes (ver fig. B)
Cambio de aceite:
Nota: Cambie el aceite de la caja de engranajes según se indica en el plan de
mantenimiento.
• Sujete la herramienta de forma como si fuera a hacer un agujero vertical en el suelo.
• Retire la broca según se describe en la sección de “Montaje”.
• Ponga un recipiente adecuado para recoger el aceite adecuadamente, como por
ejemplo el producto de Silverline número 675089.
• Retire el tornillo situado en el nivel del aceite de la caja de engranajes (15).
• Incline la herramienta 900 para vaciar el aceite de la caja de engranajes.
• Una vez vaciado, deberá eliminar el aceite siguiendo las normativas vigentes sobre
eliminación de residuos. Nunca tire el aceite por un desagüe convencional.
• Vuelva a colocar la herramienta en su posición correcta.
Horas de
Funcionamiento
500
• Ponga la cantidad y tipo correcto de aceite (ver especificaciones) en el orificio de
llenado de aceite de la caja de engranajes (15) hasta que empiece a salir por el orificio
de nivel (16). Ver fig. B.
• Vuelva a poner el tornillo del orificio de nivel de aceite. El conjunto está cerrado cuando
está en su máxima altura.
Almacenaje
• Tenga cuidado de no golpear o cortar el depósito o los tubos de combustible al poner la
herramienta en el suelo.
• No deje caer la herramienta para no dañarla.
• Al acabar de trabajar, limpie la herramienta a fondo.
• Inspeccione toda la herramienta y los tubos para comprobar que no tengan daños,
incluyendo componentes flojos o perdidos.
• Guarde la herramienta fuera de la luz directa del sol.
• No la guarde en una bolsa de nilón para evitar la formación de moho.
• Use un cepillo pequeño para limpiar el exterior de la herramienta y mantener los
orificios de ventilación libres de obstrucciones. No use agua ni manguera para limpiar
la herramienta.
• Asegúrese de guardar el combustible y el aceite en un sitio seguro y alejado de fuentes
de calor e inflamables, de la luz directa del sol y fuera del alcance de los niños.
Almacenaje durante periodos prolongados:
Siempre que la herramienta no se utilice durante periodos prolongados, haga lo siguiente:
• Limpie e inspeccione a fondo la herramienta.
• Vacíe completamente el depósito de combustible y limpie el carburador y los tubos
haciendo funcionar el motor hasta que este se pare por falta de combustible.
• Proteja de la corrosión todas las partes de metal del motor recubriéndolas de aceite.
• Quite la bujía, ponga varias gotas de aceite en el cilindro por el agujero de la bujía y a
continuación tire del arrancador 2 ó 3 veces para distribuir uniformemente el aceite.
Vuelva a poner la bujía y su cable.
• Limpie el filtro del aire tal y como se describe en la sección correspondiente.
Localización de Averías
Pérdida de potencia o parada repentina del motor
• Compruebe si hay combustible en el depósito.
• Compruebe si hay agua en la mezcla. Vacíe y enjuague el sistema de combustible
con gasolina.
• Compruebe si el filtro del aire está sucio. Limpie el filtro del aire.
Arranque de un motor ahogado
• Desconecte el cable de la bujía y use una llave adecuada para quitar la bujía
girándola hacia la izquierda.
• Si la bujía está sucia o empapada de combustible, límpiela o cámbiela según
sea necesario.
• Limpie el exceso de combustible de la cámara de combustión haciendo girar el motor
varias veces con la bujía quitada.
• Ponga la bujía y apriétela firmemente con la llave.
• Vuelva a realizar el procedimiento de arranque como si el motor ya estuviera caliente.
Reciclaje y eliminación de herramientas
a gasolina, combustible y aceite.
• Las herramientas a gasolina nunca deben eliminarse junto con la basura convencional.
Póngase en contacto con la autoridad local encargada de la gestión de residuos
si necesita más información sobre cómo eliminar este tipo de herramientas
correctamente.
• Los combustibles, aceites y mezclas compuestas por aceites son residuos peligrosos y
deben tratarse como tales. La eliminación inadecuada puede ser tipificada como delito
en su país. Póngase en contacto con la autoridad local encargada para gestionar la
eliminación de este tipo de residuos adecuadamente.
18
Page 20

868828 Perforador de suelo a gasolina 49 cm³
Garantía de Silverline Tools
Este producto Silverline viene con una garantía de
3 años
Registre el producto en silverlinetools.com antes de que transcurran 30
días a partir de la fecha de compra para poder acogerse a la garantía de 3
años. El periodo de garantía comienza en la fecha de compra que consta
en el comprobante.
Condiciones
El periodo de garantía entra en vigor en la fecha de compra que consta en
el recibo de ventas.
GUARDE EL RECIBO DE VENTAS
En caso de que el producto se averíe antes de que transcurran 30 días
desde la fecha de compra, devuélvalo al distribuidor donde lo compró,
junto con el recibo y los detalles de la avería. Recibirá una sustitución o
un reembolso.
Si el producto se avería después de que transcurran 30 días desde la fecha
de compra, devuélvalo a:
Centro de Servicio de Silverline Tools
PO Box 2988
Yeovil
BA21 1WU, Reino Unido
La reclamación bajo garantía debe presentarse durante el periodo de
garantía.
Antes de poder realizar cualquier trabajo de reparación, deberá entregar
el recibo de compra original en el que se indica la fecha de compra, su
nombre, dirección y el lugar donde lo adquirió.
También deberá indicar claramente los detalles del fallo a reparar.
Las reclamaciones presentadas dentro del periodo de garantía deberán ser
verificadas por Silverline Tools con el fin de establecer si las deficiencias
son consecuencia de los materiales o de la mano de obra del producto.
Los gastos de transporte no son reembolsables. Todo producto a devolver
deberá estar en un estado limpio y seguro para su reparación, debiendo
empaquetarse cuidadosamente con el fin de prevenir daños o lesiones
durante el transporte. Nos reservamos el derecho a rechazar envíos
incorrectos o inseguros.
Todas las reparaciones serán realizadas por Silverline Tools o sus agentes
de reparación autorizados.
La reparación o sustitución del producto no prolongará el periodo de
garantía.
Los defectos reconocidos por nosotros como cubiertos por la garantía
serán corregidos reparando la herramienta, sin cargo alguno (salvo los
gastos de envío), o bien sustituyéndola por una herramienta en perfecto
estado de funcionamiento.
Registro de la compra
Visite: silverlinetools.com y seleccione el botón de registro, introduciendo:
• Susdatospersonales
• Detallesdelproductoeinformacióndecompra
El Certificado de Garantía le será enviado en formato PDF. Imprímalo y
guárdelo con el producto.
Las herramientas o piezas retenidas que hayan sido sustituidas serán
propiedad de Silverline Tools.
La reparación o sustitución del producto bajo garantía aporta beneficios
adicionales a sus derechos legales como consumidor, sin afectarlos.
Qué está cubierto:
La reparación del producto, si se puede comprobar a satisfacción de
Silverline Tools que las deficiencias se deben a materiales o mano de obra
defectuosos dentro del periodo de garantía.
En caso de que cualquier pieza no estuviera disponible o estuviera fuera de
fabricación, Silverline Tools la sustituirá por una pieza funcional.
Uso del producto en la Unión Europea.
Qué no está cubierto:
Silverline Tools no garantiza las reparaciones necesarias como
consecuencia de:
Desgaste normal por uso en cumplimiento de las instrucciones de por
ejemplo hojas, escobillas, correas, bombillas, baterías, etc...
La sustitución de cualquier accesorio suministrado: brocas, hojas, papel de
lija, discos de corte y otras piezas relacionadas.
Daño accidental, averías debidas a uso o cuidado negligente, uso
incorrecto, negligencia, funcionamiento o manejo indebido del producto.
El uso del producto para un fin distinto al normal doméstico.
Cualquier cambio o modificación del producto.
El uso de piezas y accesorios que no sean recambios originales de
Silverline Tools.
Instalación incorrecta (excepto si fue realizada por Silverline Tools).
Reparaciones o alteraciones realizadas por agentes distintos a Silverline
Tools o sus agentes de reparación autorizados.
Las reclamaciones distintas al derecho a corrección de fallos en la
herramienta indicados en las presentes condiciones de garantía no están
cubiertas por ella.
Declaración de conformidad CE
El abajo firmante: Mr Darrell Morris
Autorizad por: Silverline Tools
Declara que el producto:
Modelo/Nombre: Perforador de suelo a gasolina 49 cm³
Tipo y N° de serie: 868828
Está en conformidad con las directivas:
• Emisiones de maquinaria móvil no destinada al tráfico viario 2004/108/CE
• Emisiones sonoras en el entorno debidas a las máquinas de uso al aire libre
200/14/EC Annex V
• Compatibilidad electromagnética 2004/108/CE
• ISO22868:2003
• EN ISO 12100-1, EN ISO 12100-2:2003
• EN60204-1:1998, EN55012:2007, EN61000-6-1:2007
La documentación técnica se conserva en: Silverline Tools
Organismo notificado: BVCE Products Testing
Lugar de declaración: Shanghai, China
Fecha: 02/01/13
Firma:
Director General
Nombre y dirección del fabricante o representante autorizado:
Silverline Tools Ltd, Boundary Way, Lufton Trading Estate, Yeovil, Somerset,
BA22 8HZ Reino Unido.
www.silverlinetools.com
19
Page 21

I
Descrizione dei Simboli
La targhetta identificativa del vostro elettroutensile potrebbe riportare dei simboli. Tali
simboli sono una rappresentazione grafica che mira a evidenziare importanti informazioni
sul prodotto o istruzioni per il suo utilizzo corretto e sicuro.
Indossare protezioni per l’udito.
Indossare protezioni per gli occhi.
Indossare una protezione per le vie respiratorie.
Protezione della testa di usura.
Protezione della mano di usura.
Legga la manuale d’istruzione.
Questo prodotto emette fumi velenosi
Il prodotto è conforme alle vigenti normative e norme di sicurezza applicabili.
Riciclaggio e smaltimento di strumenti alimentati a
benzina, carburanti e lubrificanti
Strumenti alimentati da motori a benzina a base di combustione interna non
devono essere smaltiti insieme ai rifiuti domestici. Tali strumenti devono
essere portati presso un centro di riciclaggio locale e smaltiti secondo le attuali
esigenze di tutela dell'ambiente nel proprio paese.
Specifiche Tecniche
Cilindrata (cc): ............................................49cc
Tipo di carburante: .....................................Benzina senza piombo
& olio a 2 colpi
Proporzione di miscellazione
carburante: ................................................25:1
Potenza del motore (kW): ...........................1.25kW
Coppia di uscita (All’albero motore): ...........2.25NM
Velocita` minima: .......................................2800rpm
Velocità massima del motore: ....................8500rpm
Capacità del serbatoio per carburante: ......1.2L
Tipo di candela: .........................................BM6A
Spazio di Candela: .....................................0,6-0.8mm
Tipo di cambio olio: ...................................(SAE) 30
Cambio quantità di olio: .............................200ml
Pressione sonora: ......................................108dB (A)
Potenza sonora: ........................................90 dB (A)
Vibrazione Ponderata: ...............................15m/s
Incertezza: .................................................2 m/s
Peso: (senza punta a trivella):. ....................9.3kg
Il livello di intensità sonora per l'operatore può superare 85dB (A) e le
misure di protezione sonore sono necessarie. Come parte del nostro
continuo sviluppo dei prodotti, le specifiche dei prodotti Silverline
possono essere modificati senza preavviso
2
2
Norme generali di sicurezza
AVVERTENZA: Leggere ed assimilare tutte le istruzioni. La non osservanza delle
seguenti istruzioni può causare scosse elettriche, incendi e/o lesioni gravi.
Conservare tutte le avvertenze di pericolo e le istruzioni operative per ogni esigenza
futura.
Area di lavoro.
a) Mantenere l’area di lavoro pulita e adeguatamente illuminata. Il disordine e le
zone di lavoro non illuminate possono essere fonte di incidenti.
b) Non usare gli elettroutensili in presenza di atmosfere esplosive, come liquidi,
gas e polveri infiammabili.
c) Tenere altre persone e i bambini a distanza di sicurezza durante l’impiego
dell’utensile elettrico. Eventuali distrazioni potrebbero far perdere il controllo
dell’utensile all’operatore.
Sicurezza elettrica
a) È importante concentrarsi su ciò che si sta facendo e usare il buon senso
quando si utilizza uno strumento alimentato. Non utilizzare uno strumento di
potenza quando si è stanchi o sotto l'effetto di droghe, alcol o medicinali. Un
attimo di distrazione durante la guida di uno strumento alimentato può provocare
gravi lesioni personali.
b) Utilizzare i dispositivi di protezione. Indossare sempre protezioni per gli
occhi. Dispositivi di protezione come la maschera antipolvere, scarpe di sicurezza
anti-scivolo, casco, oppure protezione acustica nelle condizioni appropriate potrà
ridurre il rischio di ferite.
c) Evitare l'accensione involontaria. Assicurarsi che l'interruttore è in posizione OFF
quando non si utilizza lo strumento e fare uso di altre caratteristiche di sicurezza che
impediscono l'avviamento involontario.
d) Rimuovere qualsiasi chiave di regolazione prima di accendere lo strumento.
Una chiave lasciata collegata alla parte sinistra di una parte rotante della macchina
può provocare lesioni personali.
e) Non sbilanciarsi. Tenere i piedi, in equilibrio in ogni momento. Questo consente
un migliore controllo dello strumento in situazioni impreviste.
f) Indossare un abbigliamento adatto. Non indossare abiti larghi o gioielli. Tenere i
capelli, i vestiti ed i guanti lontani da pezzi in movimento. Vestiti larghi, gioielli o
capelli lunghi potranno impigliarsi nelle parti in movimento.
g) Se i dispositivi sono previsti per il collegamento di aspirazione della polvere e
di raccolta, assicurarsi che gli stessi siano collegati e utilizzati correttamente.
L'utilizzo di un’aspirapolvere può ridurre i rischi relativi alla polvere.
ATTENZIONE: l'esposizione dell'utente alle vibrazioni strumento può causare la perdita del
senso del tatto, intorpidimento, formicolio e riduzione della capacità di presa. Esposizione
a lungo termine può portare ad una condizione cronica. Se necessario, limitare il tempo
cui siete esposti a vibrazioni. Utilizzare i dati forniti nella specifica materia di vibrazioni
se previsto per calcolare la durata e la frequenza di funzionamento dello strumento. La
direttiva 2002/44/CE relativa alle vibrazioni nei luoghi di lavoro possono fornire informazioni
utili anche per strumenti di uso domestico. Appena vi iniziate a sentire scomodi a causa
delle vibrazioni SMETTERE di usare immediatamente lo strumento.
ATTENZIONE: Indossare sempre protezioni auricolari, dove il livello sonoro supera i 80
dB e limitare il tempo di esposizione, se necessario. Se i livelli sonori diventano scomodi,
anche con la protezione auricolare smettere di utilizzare lo strumento immediatamente e
controllare la protezione acustica sia montata correttamente e che fornisce il giusto livello
di isolamento acustico per il livello del suono prodotto dal tuo strumento.
l'uso dell’utensile e cura
a) Mantenere gli strumenti. Controllare il funzionamento vincolante delle parti in
movimento, la rottura di parti e di ogni altra condizione che possa influenzare
il funzionamento dello strumento. In caso di danni, riparate lo strumento prima
dell'uso. Molti incidenti vengono causati da una scarsa manutenzione.
b) Mantenere gli utensili da taglio affilati e puliti. Utensili da taglio correttamente
mantenuti con bordi affilati, sono meno soggetti al bloccaggio e sono più facili da
controllare.
c) Utilizzare gli accessori dello strumento, attrezzi, ecc in conformità con le
istruzioni, tenendo conto delle condizioni di lavoro e il lavoro da svolgere.
L'impiego di utensili per usi diversi da quelli consentiti potrà dar luogo a situazioni
pericolosi.
Assistenza
a) Fare controllare lo strumento da personale specializzato utilizzando solo pezzi
di ricambio originali. Ciò assicurerà che la sicurezza dell'utensile viene mantenuta.
Sicurezza combustione interna
Ambiente pericoloso
• Non usare utensili a benzina in ambienti umidi o bagnati, e non esporli alla pioggia.
Accertarsi che lo spazio di lavoro attorno all'utensile sia ben illuminato.
• Non usare gli utensili a benzina in ambienti dove esiste un rischio di esplosione
o incendio da materiali combustibili, liquidi o gas infiammabili o polveri di natura
esplosiva.
Spegnere l'utensile prima di collegare gli accessori
• Accertarsi che il motore sia fermo prima di collegare all'utensile gli accessori.
• Se l'utensile si arresta inaspettatamente, prima di effettuare qualsiasi controllo
accertarsi che il motore non sia ancora in funzione
Rodaggio del motore
• Quando l'utensile è ancora nuovo utilizzare il motore solo a regime ridotto.
• Non utilizzare il motore a regimi elevati fino a quando il motore sarà stato rodato
completamente.
20
Page 22

868828 Trapano Trivella a Benzina 49cc
• Il motore non sarà in grado di sviluppare la massima potenza fino al termine del periodo
di rodaggio.
• Al primo utilizzo dell'utensile spegnere il motore e controllare che tutti i dadi e le viti
siano saldamente fissate e adeguatamente strette.
• Non usare combustibili contenenti metanolo o etanolo perché potrebbero provocare
danni al serbatoio e alle linee di alimentazione.
Avvertenza
• Attendere sempre che l'utensile si arresti completamente prima di allontanarsi.
• Non lasciare mai l'utensile non presidiato quando i suoi componenti sono ancora caldi.
Manutenzione
• Si raccomanda di far eseguire la manutenzione dell'utensile subito dopo il primo utilizzo.
• In condizioni di utilizzo normale far eseguire gli interventi di manutenzione
regolarmente.
• Non modificare i componenti di questo utensile. La modifica non solo renderà nulla la
garanzia, ma potrebbe provocare infortuni e lesioni all'operatore o alle persone che si
trovano nei pressi dell'area di lavoro.
• Eseguire gli interventi di manutenzione solo in un centro di assistenza autorizzato.
Conservazione
• Dopo aver usato l'utensile, pulirlo a fondo.
• Fare attenzione a non colpire, tagliare o danneggiare in alcun modo il serbatoio o le
linee di alimentazione del carburante quando si appoggia l'utensile al suolo.
• Non far cadere l'utensile per evitare che resti danneggiato e che diventi poco sicuro.
• Conservare l'utensile lontano dalla luce diretta del sole.
• Accertarsi che il combustibile e l'olio siano conservati in luogo sicuro, lontano da fonti
di calore, dalla luce diretta del sole e da fonti di scintille o ignizione, e fuori dalla portata
dei bambini.
• Quando l'utensile è a riposo per un lungo periodo di tempo, procedere come segue.
• Svuotare completamente il serbatoio del carburante.
• Proteggere tutte le parti metalliche del motore dalla corrosione con uno strato di olio.
• Rimuovere la candela, versare alcune gocce d'olio nel cilindro e tirare la manopola del
motorino di avviamento 2 o 3 volte per distribuire l'olio in modo uniforme nel cilindro.
• Riavviare la candela.
• Non lasciare mai l'utensile in funzione non presidiato.
QUESTO UTENSILE PRODUCE FUMI DI SCARICO VELENOSI SUBITO DOPO CHE IL
MOTORE È ACCESO. TALI FUMI POTREBBERO ESSERE PRIVI DI COLORE E ODORE. PER
RIDURRE IL RISCHIO DI LESIONI GRAVI O FATALI, NON AVVIARE MAI LA MACCHINA IN
AMBIENTI CHIUSI O SCARSAMENTE VENTILATI. ACCERTARSI CHE LA VENTILAZIONE
SIA ADEGUATA QUANDO SI OPERA IN CANALI O SPAZI CONFINATI.
Familiarizzazione prodotto
1 Tappo del serbatoio del combustibile
2 Lampadina della pompa di adescamento
3 Manovella d'avviamento
4 Leva dell'aria
5 Vite della scatola del filtro d’aria
6 Candela
7 Uscita gas di scarico
8 Vite di regolazione di RPM max
9 Controllo della velocità
10 Interruttore ON/OFF
11 Tasto di blocco del controllo della velocità
12 Fermo di sicurezza del controllo della velocità
13 Scatola del filtro d’aria
14 Filtro d’aria
15 Punto di riempimento dell’olio della trasmissione
16 Punto di livello dell’olio della trasmissione
17 Perno di arresto
18 Coppiglia
19 Albero d’uscita
*Il punto di riempimento si chuide quando il livello del punto di quantita di olio è
massimale
Disimballaggio del trapano trivella a
benzina
• Assicurarsi che l’attrezzo sia completo di tutti i pezzi e che questi siano in
buono stato. Se qualche pezzo manca o è danneggiato, farlo sostituire prima
di cercare di utilizzarel’attrezzo.
Montaggio del trapano trivella a benzina
• Togliere la coppiglia (18) del perno di arresto (17).
• Togliere la spina di arresto (17) dell’ albero d’uscita (19).
• Fare scorrere la punta (codici prodotti Silverline 633897, 245105, 457044 –
non forniti) sull’albero d’uscita (19) della trivella.
• Allineare i fori nella punta a trivella con l’albero ed introdure il perno di arresto
nel foro.
• Ricollocare la coppiglia (18), piegando le gambe della coppiglia, come indicato
nella figura.
Funzionamento del motore
Rifornimento di combustibile
• Effettuare le operazioni di riempimento del serbatoio in luogo sicuro, lontano
dall'area di lavoro e da fonti di calore o di scintille. Evitare il contatto con il
combustibile.
• NON FUMARE
• Rabboccare il combustibile solo dopo aver arrestato e lasciato raffreddare
completamente il motore.
• Il combustibile dovrà essere sempre premiscelato; non miscelare il
combustibile nel serbatoio. Miscelare solo la quantità di combustibile che si
intende usare.
• Utilizzare la bombola del combustibile di miscelazione fornita. Riempire con benzina fino
a “567,92” sulla scala (marcata) e poi aggiungere l’olio a 2 colpi fino al livello con '600'.
Riposizionare il coperchio e agitare il flacone per mescolare.
Nota: Se si desidera mescolare una quantità di combustibile, si dovrà attentamente
misurare manualmente utilizzando la scala generale sulla bottiglia. Cercare sempre di
mescolare solo la quantità di carburante che effettivamente avete intenzione di utilizzare.
• Rimuovere il tappo del serbatoio (1); riempire il serbatoio con la miscela allivello
richiesto.
NOTA: usare un imbuto come prodotto Silverline 793799 per evitare la fuoriuscità.
• Richiudere il tappo del serbatoio (1).
• Pulire accuratamente eventuali perdite di miscela dalle superfici interessate.
• Prima di avviare il motore allontanare la trivella dalla zona in cui è stato effettuato il
riempimento.
• Tenere sempre riserve di combustibile e altri liquidi infiammabili a distanza dalla zona di
lavoro sicurezza dall'area in cui si lavora.
Adescare il motore
• Tenere la trivella in posizione eretta sulla punta della punta, mantenendo le impugnature
della trivella al livello del suolo.
• Premere e rilasciare lentamente il bulbo della pompa di adescamento (2).
• Continuare a far affluire la miscela attraverso il tubo chiaro del combustibile al
serbatoio.
• Premere ancore varie volte fino a quando tutte le bolle d'aria saranno sparite. Ora il
sistema di combustibile è pronta all’uso.
Avviamento del motore
AVVERTENZA: La trivella produrrà fumi tossici immediatamente dopo l'avvio della uscita
gas di scarico (7). Non cercare mai di avviare il motore in interni o in ambienti chiusi.
Indossare sempre i dispositivi per la protezione personale raccomandati. Questo utensile
richiede l'uso di guanti, occhiali di sicurezza, protezione per le orecchie, maschera per
il viso e indumenti resistenti. Si consiglia inoltre l'uso di un casco rigido e di calzature di
sicurezza.
• Spostare la leva dell'aria (4) in posizione "ON" se il motore è già caldo.
• Spostare la leva dell'aria nella posizione "OFF" se il motore è freddo.
• Spostare l'interruttore di accensione (10) nella posizione “I”.
• Sostenere sempre saldamente la trivella , come mostrato nella figura A.
Assicurare che abbia l’utensile sotto controllo.
• Tirare saldamente la manovella d'avviamento, come mostrato nella figura A.
• Tirare la maovella d’avviamento ancora fino all’avviamento del motore.
IMPORTANTE: Non lasciare che la maovella d’avviamento scatti all'indietro, tenere sempre
l’utensile sotto controllo.
• Lasciare funzionare il motore al regime minimo per circa 30 secondi.
• Quando il motore si sarà scaldato spostare la leva dell'aria (4) in posizione“ON”.
IMPORTANTE: Per il primo utilzzo è importante lasciare scaldare il motore per almeno
3 minuti prima di aumentare la velocità del motore per ottenere prestazioni ottimali e la
massima durata.
Il rodaggio
• Effetuare un rodaggio prima di procedere con l'utilizzo di questa macchina utensile per
ottenere prestazioni ottimali e la massima durata.
• Per eseguire un rodaggio lasciare il motore al regime minimo e al minimo numero di giri
per un periodo di 15 minuti per il primo utilizzo. SE È POSSIBILE NON AUMENTARE IL
REGIME DEL MOTORE QUESTA PRIMA VOLTA.
www.silverlinetools.com
21
Page 23

I
NOTA: È normale nel periodo di rodaggio di avvertire delle odore strane a causa dei
componenti che scaldano per la prima volta.
Arresto del motore
• Lasciare il motore al regime del minimo per almeno 3 minuti prima di spegnerlo.
• Spostare l’ interruttore accensione/spegnimento (10) in posizione “ON”.
Come usare il trapano trivella a benzina
• Accendere il motore come precedemente descritto.
• Per aumentare la velocità del motore, premere sul fermo di sicurezza (12) e premere il
controllo della velocità (9).
NOTA: L’albero di uscità non gira quando il motore è al regime minimo.
• Commincia a girare quando la velocità del motore aumenta. Rilasciare il controllo per
rallentare il motore.
• La velocità massima del motore può essere controllato con la vite di regolazione di RPM
max (8).Girare al senso orario per riddure la velocità massima del motore.
• E` possibile bloccare il controllo della velocità (9). Tenerlo premuto, poi premere il tasto
di blocco del controllo della velocità (11) e rilasciare il controllo della velocità. Premere il
controllo della velocità (9) per rilasciarlo.
Manutenzione
Cambiare Controllare/
aggiustare/pulire
Candela 500
Candela 2000
Filtro d’aria 50
Olio della
trasmissione
AVVERTENZA: Arrestare sempre il motore e lasciare che raffreddi completamente prima di
eseguire qualsiasi intervento di manutenzione.
Controllo della candela (6)
• Scollegare il cavo della candela e allentare la candela mediante l’apposita chiave per
candela.
NOTA: Tornare la chiave in senso antiorario per estrarre la candela.
• Pulire e regolare la candela e sostituirla come indicato nella scheda di manutenzione.
• Rimontare la candela, avvitandola a mano. NOTA: Assicurarsi di non serrare troppo.
Filtro d’aria (6)
• Pulire il filtro aria come indicato nella scheda di manutenzione.
• Per accedere al filtro svitare la vite della scatola del filtro d’aria (5) usando un giravite
adatto.
• Sollevare via la scatola del filtro d’aria (13).
• Togliere il filtro d’aria in schiuma (14).
• Pulire il filtro d’aria con del detergente apposito, disponible della maggior parte dei
venditori di macchine per giardinaggio.
• Lasciarlo asciugare completamente.
• Rimontare il filtro e la scatola e sostituire la vite.
Sostituzione olio del cambio:
NOTA: Sostituire l'olio del cambio come raccomandato nel programma di manutenzione
• Sostenere la trivella in modo che sia di livello, come un foro verticalmente nel terreno
• Rimuovere la punta a trivella come descritto in 'Assemblaggio della Trivella a Benzina'
• Porre una ciotola adatta per il drenaggio dell'olio sotto la trivella - come prodotto
Silverline 675089
• Utilizzando una chiave inglese, rimuovere completamente il punto di riempimento
dell'olio del cambio (15) montaggio
• Inclinare la trivella di 90 gradi o più per scaricare l'olio dal cambio
• Una volta svuotato completamente, trasferirla in un contenitore e smaltire secondo i
regolamenti relativi agli oli usati. Non disperdere l'olio con i rifiuti domestici o utilizzando
mezzi di drenaggio delle acque
• Riportare la trivella in posizione di livello e sostenerla di nuovo
• Versare il tipo e la quantità (vedi specifiche) di olio nel cambio dell’olio al punto di
riempimento (15) fino a quando non si trova a circa a livello del punto di quantita di olio
(16) come indicato in Fig
• Sostituire il bullone del punto di riempimento dell'olio del cambio. L'assemblaggio viene
chiuso quando e` alla sua massima altezza.
Conservazione
• Fare attenzione a non colpire o tagliare il serbatoio del combustibile o le tubazioni
mentre l'utensile si trova sul pavimento.
• Non far cadere l'utensile in quanto potrebbe danneggiarsi e risultare non sicuro.
• Dopo avere terminato l'utilizzo dell'utensile è necessario pulirlo con cura.
Ore di
funzionamento
500
• Ispezionare l’intero utensile e i tubi, per verificare l’eventuale presenza di componenti
mancanti o danneggiati.
• Conservare l'utensile lontano dalla luce solare.
• Non conservare l'utensile in un sacchetto di nylon, questo può promuovere la
formazione di muffe.
• Per pulire l’esterno dell’ apparecchio usare uno piccolo pennello e non ostruire le
prese d’aria.
• Non usare dell’acqua o un tubo flessibile per lavare l’apparecchio.
• Conservare il combustibile e l'olio in un luogo sicuro, al riparo dal calore, dalla luce
solare diretta e da sorgenti di accensione; tenere inoltre queste sostanze lontane dalla
portata dei bambini.
Conservazione per lunghi periodi
• Quando l'apparecchio non viene utilizzato per lungo tempo, rispettare le seguenti
norme:
• Pulire accuratamente il filtro d’aria e controllare l’apparecchio con cura.
• Svuotare il serbatoio del combustibile, poi pulire il carburatore e tubi e fare funzionare
l’utensile fino a che il motore non funziona per mancanza di combustibile.
• Proteggere tutti i componenti metallici del motore dalla corrosione applicando sugli
stessi uno strato di olio.
• Togliere la candela, applicare alcune gocce di olio nel cilindro e azionare 2 o 3 volte la
manovella d'avviamento per distribuire uniformemente l'olio. Sostituire la candela e il
cavo della candela.
• Pulire il filtro d’aria, come decritto nella sezione filtro d’aria
Diagnostica
Perdità di potere o arresto improvviso del motore
• Controllare la quantità di olio nel serbatoio.
• Controllare la presenza di acqua nella miscela. Svuotare il serbatoio e lavarlo con
benzina.
• Controllare il filtro d’aria e se à sporco, lavarlo.
Avviamento del motore ingolfato
• Scollegare il cavo della candela e togliere la candela mediante l’apposita chiave per
candela in senso antiorario.
• Se la candela è sporca o bagnata di combustibile, lavarla o sostituilaall’occorrenza.
• Togliere la candela e pulire il combustibile in eccesso del serbatoio ruotando l’albero
motore parecchie volte.
• Rimontare la candela e serrarla saldamente con la candela.
• Seguire ora la procedura di avviamento del motore come se fosse già caldo.
Riciclaggio e smaltimento di strumenti
alimentati a benzina, carburanti e
lubrificanti
• Strumenti alimentati da motori a benzina a base di combustione interna non devono
essere smaltiti insieme ai rifiuti domestici. Tali strumenti devono essere presi e portati
presso un centro di riciclaggio locale e smaltiti secondo le attuali esigenze di tutela
dell'ambiente nel proprio paese.
• Benzina, olio e miscele di benzina-olio sono rifiuti pericolosi e devono essere trattati
come tali. Olio e combustibile non devono essere smaltiti insieme ai rifiuti domestici.
Lo smaltimento non corretto può essere considerato un reato penale nel vostro paese.
Contattare le autorità locali o il rivenditore per le procedure di smaltimento corrette per
olio e combustibili vecchi.
22
Page 24

868828 Trapano Trivella a Benzina 49cc
Garanzia Silverline Tools
Questo prodotto Silverline è protetto da una
garanzia di 3 anni
Per attivare la garanzia di 3 anni è necessario registrate il prodotto sul sito
silverlinetools.com entro 30 giorni dalla data d'acquisto. La data d'inizio
del periodo di garanzia corrisponde alla data d'acquisto riportata sullo
scontrino di vendita.
Condizioni Della Garanzia
Il periodo di garanzia decorre dalla data dell’acquisto presso il rivenditore
indicata sulla ricevuta d’acquisto.
SI PREGA DI CONSERVARE LA RICEVUTA D'ACQUISTO
Nel caso in cui il prodotto risultasse difettoso entro 30 giorni dalla data
d’acquisto, sarà necessario restituirlo al punto vendita presso cui è stato
acquistato, presentando la ricevuta e spiegando chiaramente la natura del
difetto riscontrato. Il prodotto difettoso sarà sostituito o sarà rimborsato
l'importo d'acquisto.
Nel caso in cui il prodotto risultasse difettoso dopo 30 giorni dalla data
d’acquisto, sarà necessario inviare una richiesta di indennizzo in garanzia
a:
Silverline Tools Service Centre
PO Box 2988
Yeovil
BA21 1WU, GB
Le richieste di indennizzo devono essere presentate durante il periodo
della garanzia.
Affinché la richiesta sia approvata, è necessario presentare anche la
ricevuta d’acquisto originale, indicante il luogo e la data dell’acquisto del
prodotto e il proprio nome e indirizzo.
Sarà necessario inoltre fornire una descrizione dettagliata del guasto
riscontrato.
Le richieste effettuate durante il periodo di garanzia saranno verificate da
Silverline Tools per stabilire se il difetto del prodotto è dovuto a problemi di
materiali o di lavorazione.
Le spese di spedizione non saranno rimborsate. Tutti i prodotti devono
essere spediti puliti e in condizioni tali da garantire l'esecuzione della
riparazione in modo sicuro. I prodotti devono essere imballati con cura
per evitare danni o lesioni durante il trasporto. Silverline Tools si riserva
il diritto di non accettare prodotti spediti in condizioni non idonee o non
sicure.
Le riparazioni saranno eseguite da Silverline Tools o da un centro di
riparazione autorizzato.
La riparazione o la sostituzione del prodotto non estende o rinnova il
periodo di garanzia.
Nel caso in cui determini che il prodotto e il difetto riscontrato sono coperti
dalla garanzia, Silverline Tools provvederà a riparare l'utensile
Dichiarazione di Conformità CE
Il sottoscritto: Mr Darrell Morris
come autorizzato di: Silverline Tools
Dichiara che il prodotto
Nome/ Modello: Trapano Trivella a Benzina 49cc
Codice di modello: 868828
Si conforma ai seguenti direttivi:
• Direttiva sulle emissione dei motori delle macchine mobili non stradali
2004/108/CE
• Direttiva sulle emissioni acustica ambientale delle machine ed atrezzature
destinate a funzionare all'aperto 200/14/EC Annex V
• Direttiva sulla compatibilità elettromagnetica 2004/108/CE
• ISO22868:2003
• EN ISO 12100-1, EN ISO 12100-2:2003
• EN60204-1:1998, EN55012:2007, EN61000-6-1:2007
Registrazione dell'acquisto
Accedere al sito: silverlinetools.com e selezionare il tasto Registrazione
per inserire:
• Informazionipersonali
• Dettaglidelprodottoeinformazionisull'acquisto
Il Certificato di Garanzia sarà inviato per posta elettronica nel formato
PDF. Si prega di stampare e conservare il Certificato insieme alla ricevuta
d'acquisto.
gratuitamente (esclusi i costi di spedizione) o, a propria discrezione, a
sostituirlo con un nuovo utensile.
Gli utensili o le parti trattenuti da Silverline Tools in cambio di un prodotto o
componente sostitutivo diventano proprietà di Silverline Tools.
La riparazione o la sostituzione di un prodotto in garanzia estende i diritti
del consumatore previsti per legge, senza modificarli.
Cosa copre la garanzia:
La riparazione del prodotto, nel caso in cui Silverline Tools determini che il
problema sia dovuto a difetti dei materiali o difetti di lavorazione riscontrati
durante il periodo della garanzia.
Nel caso in cui un componente non sia più disponibile o fuori produzione,
Silverline Tools si riserva il diritto di sostituirlo con un componente
adeguato.
Prodotti acquistati e utilizzati all’interno dell’Unione Europea.
Cosa non copre la garanzia:
La Garanzia Silverline Tools non copre le riparazioni se il difetto è stato
causato da:
La normale usura dei componenti per via dell’utilizzo del prodotto come
indicato nelle istruzioni d’uso (ad esempio, lame, spazzole, cinghie,
lampadine, batterie, ecc.).
La sostituzione di accessori forniti a corredo, come ad esempio punte,
lame, fogli abrasivi, dischi di taglio e altri componenti correlati.
I danni accidentali, causati dall'uso improprio, dall'abuso e dalla
manipolazione, conservazione e cura inadeguata dell'utensile da parte del
proprietario.
L’uso del prodotto per fini non domestici.
La modifica o alterazione del prodotto.
Difetti causati dall’uso di parti e accessori che non siano componenti
originali Silverline Tools.
Installazione difettosa (fatto salvo quando l'installazione viene eseguita da
Silverline Tools).
Riparazioni o alterazioni eseguite da terze parti che non siano la Silverline
Tools o i centri di riparazione autorizzati da quest'ultima.
Silverline Tools non fornisce alcuna garanzia per le richieste formulate per
la correzione dei difetti dell'utensile oggetto della garanzia fatto salvo per
quanto previsto nelle condizioni di cui sopra.
La documentazione tecnica è mantenuta da: Silverline Tools
Organismo informato: BVCE Products Testing
Posto di dichiarazione: Shanghai, China
Data: 02/01/13
Firma:
Direttore
Nome e indirizzo di fabbricante oppure persona autorizzata:
Silverline Tools, Boundary Way, Lufton Trading Estate, Yeovil, Somerset,
BA22 8HZ, Regno Unito
www.silverlinetools.com
23
Page 25

NL
Beschrijving symbolen
Op het gegevensplaatje van uw gereedschap kunnen zich symbolen bevinden. Deze
vertegenwoordigen belangrijke informatie over het product of instructies voor het gebruik.
Draag gehoorbescherming.
Draag een veiligheidsbril
Draag een stofmasker
Draag een veiligheidshelm
Draag handschoenen
Lees de handleiding
Gescheiden of veiligheid extra-laag voltage
Voldoet aan de relevante wetgeving en veiligheidsnormen
Het recyclen van benzine motor gereedschap,
brandstof en olie
Gereedschap aangedreven door benzine motoren mogen niet met het
huishoudelijke afval worden weggegooid. Dit soort gereedschap hoort naar
het lokale recyclecenter gebracht te worden waar het in overeenstemming
met de huidige milieubeschermende regels gerecycled kan worden.
Specificaties
Cilinder inhoud: .......................................... 49 cc
Brandsstoftype: .......................................... Ongelode benzine
2-takt-olie brandstof verhouding:............... 25:1
Vermogen: ................................................. 1,25 kW
Uitgaande koppel: ...................................... 2,25 Nm
Maximale motorsnelheid: ........................... 8.500 min
Brandstoftank capaciteit: ........................... 1,2 l
Bougie type: ............................................... BM6A
Bougie gat: ................................................ 0,6-0,8 mm
Versnellingsbak olie type:........................... SAE 30
Versnellingsbak olie kwantiteit: .................. 200 ml
Geluidsdruk: ............................................... 108 dB(A)
Geluidsvermogen: ...................................... 90 dB(A)
Trilling: .......................................................15 m/s
Onzekerheid: .............................................. 2 m/s
Gewicht (zonder slangenboor): ................... 9,3 kg
Het geluidsniveau voor de bediener kan 85 dB(A) overschrijden en er
moeten dus geluidsbeschermende maatregelen worden genomen.
Omdat Silverline producten deel uitmaken van onze voortdurende
productontwikkeling kunnen de specificaties zonder aankondiging
wijzigen.
-1
2
2
Algemene veiligheid
WAARSCHUWING Lees alle bediening- en veiligheidsvoorschriften. Het niet opvolgen
van alle voorschriften die hieronder vermeld staan, kan resulteren in een elektrische schok,
brand en/of ernstig letsel.
Bewaar deze voorschriften voor toekomstig gebruik.
Veiligheid in de werkruimte
a) Houd de werkruimte schoon en zorg voor een goede verlichting. Rommelige en
donkere ruimtes leiden vaak tot ongelukken.
b) Gebruik het gereedschap niet in explosieve atmosferen, als in de aanwezigheid
van vlam bare vloeistoffen, gassen en stof.
c) Houd kinderen en omstanders uit de buurt wanneer u elektrisch gereedschap
bedient. Door afleiding kunt u de controle over het gereedschap verliezen.
Persoonlijke veiligheid
a) Blijf alert en gebruik uw gezonde verstand wanneer u elektrisch gereedschap
bedient. Gebruik het elektrisch gereedschap niet wanneer u vermoeid bent of
onder invloed bent van drugs, alcohol of medicijnen. Onoplettendheid tijdens het
bedienen van elektrisch gereedschap kan leiden tot ernstig letsel.
b) Maak gebruik van persoonlijke bescherming. Draag altijd een veiligheidsbril.
Passende bescherming voor de omstandigheden, zoals een stofmasker, nietslippende veiligheidsschoenen een helm of gehoorbescherming, vermindert het
risico op persoonlijk letsel.
c) Voorkom onopzettelijk starten. Zorg ervoor dat de schakelaar in de uit-stand
staat wanneer het gereedschap niet gebruikt wordt en maak gebruik van andere
voorzorgsmaatregelen om onopzettelijk starten te voorkomen.
d) Verwijder alle stel- of moersleutels voordat u het elektrische gereedschap
inschakelt. Een moer- of stelsleutel die zich op een draaiend onderdeel van het
elektrische gereedschap bevindt, kan leiden tot letsel.
e) Reik niet te ver. Blijf altijd stevig en in balans staan. Zo houdt u meer controle
over het elektrische gereedschap in onverwachte situaties.
f) Draag geschikte kleding. Draag geen loshangende kleding of sieraden.
Houd haren, kleding en handschoenen uit de buurt van bewegende delen.
Loshangende kleding, sieraden en los hangende haren kunnen vast komen te zitten
in bewegende delen.
g) Als er onderdelen voor stofafvoer- en stofverzameling worden meegeleverd,
sluit deze dan aan en gebruik deze op de juiste wijze. Het gebruik van deze
onderdelen kan het risico op stof gerelateerde ongelukken verminderen.
WAARSCHUWING: Bloodstelling aan trilling kan leiden tot gevoelloosheid, tintelen en
verminderde grip bekwaamheid. Op de lange termijn kan het leiden tot chronische
condities. Limiteer de lengte van blootstelling aan trilling. Gebruik de gegevens in de
specificaties van het gereedschap om de gebruiksduur en –frequentie te berekenen. De
2002/44-EEG richtlijn met betrekking tot trilling in de werkruimte bevat mogelijk bruikbare
informatie. Bij een oncomfortabel gebruik ten gevolge van trilling stopt u onmiddellijk met
het gebruik van het gereedschap.
WAARSCHUWING: Wanneer het geluidsniveau boven de 80 dB reikt is het dragen van
gehoorbescherming een must. Wanneer geluidsniveaus, zelfs tijdens het dragen van
gehoorbescherming, oncomfortabel hoog zijn, stop dan met het gebruiken van het
gereedschap en controleer of het juiste dempingsniveau gegeven wordt.
Gebruik en verzorging
a) Het onderhouden van gereedschap. Controleer op een verkeerde uitlijning of
binden van bewegende onderdelen, beschadiging aan onderdelen en andere
condities wat het gebruik beïnvloed. In geval van beschadiging, vervangt u
het gereedschap onmiddellijk. Vele ongelukken worden veroorzaakt door slecht
onderhouden gereedschap.
b) Houd snijwerktuigen scherp en schoon. Goed onderhouden snijwerktuigen met
scherpe messen slaan minder snel vast en zijn gemakkelijker te bedienen.
c) Gebruik de accessoires in overeenstemming met deze instructies, waarbij
rekening gehouden wordt met de werkomstandigheden en het uit te voeren
werk. Het gebruik van het gereedschap voor taken, anders dan waarvoor het
bestemd is, kan resulteren in gevaarlijke situaties.
Onderhoud
a) Laat uw gereedschap onderhouden door een gekwalificeerde vakman en
gebruik alleen identieke vervangstukken.
Veiligheid interne verbranding
Gevaarlijke omgeving
• Gebruik benzinegereedschap niet in vochtige of natte omstandigheden, en stel
het niet bloot aan regen. Zorg voor voldoende werkruimte en verlichting. Gebruik
benzinegereedschap niet op plaatsen met ontploffings- of brandgevaar omwille van
brandbaar materiaal, vloeistoffen, gassen of stof van explosieve aard.
Uitschakelen
• Zorg ervoor dat de motor is uitgeschakeld voordat u accessoires op het gereedschap
bevestigd. Als het gereedschap onverwacht stopt, wacht dan tot de motor gestopt is
met draaien voordat u het gereedschap inspecteert.
Inlopen van de motor
• Laat de motor wanneer het gereedschap nieuw is op een matig toerental draaien.
• Laat de motor pas op volle toeren draaien als hij volledig is ingelopen.
• De motor zal pas aan het eind van de inloopperiode op maximaal vermogen lopen.
24
Page 26

868828 49 cc benzine grondboor
• Wanneer u het gereedschap voor het eerst gebruikt, controleer dan of alle bouten en
moeren goed zijn aangedraaid en draai ze zo nodig alsnog aan.
• Gebruik geen methanol of ethanol bevattende brandstoffen omdat deze de
brandstoftank en de brandstofleidingen intern kan beschadigen.
Waarschuwing
• Laat het gereedschap nooit achter wanneer het ingeschakeld is
• Laat het gereedschap nooit achter wanneer onderdelen heet zijn
Onderhoud
• Wij raden aan om het gereedschap kort na het eerste gebruik een onderhoudsbeurt
te laten geven.
• Zorg bij normaal gebruik regelmatig voor een onderhoudsbeurt.
• Modificeer de onderdelen van dit gereedschap niet. Daarmee vervalt niet alleen de
garantie maar het kan tevens leiden tot letsel aan uzelf of mensen om u heen.
• Onderhoud moet altijd worden uitgevoerd door een bevoegd persoon.
Opbergen
• Maak het gereedschap na gebruik helemaal schoon.
• Zorg ervoor dat u de brandstoftank en de brandstofleidingen niet beschadigd raken als
u het toestel op de grond is geplaatst.
• Laat het gereedschap niet vallen waar schade resulteert in een onveilig gebruik
• Berg het gereedschap buiten bereik van direct zonlicht op.
• Zorg ervoor dat brandstof en olie op een veilige plaats, buiten bereik van hitte, direct
zonlicht, ontstekingsbronnen en kinderen worden opgeborgen.
• Doe het volgende als de machine gedurende langere tijd niet in gebruik is:
• Maak de brandstoftank volledig leeg.
• Bescherm alle metalen motoronderdelen tegen roestvorming door ze in te smeren
met olie.
• Verwijder de bougie, druppel een kleine hoeveelheid olie in de cilinder en trek 2 of 3
maal aan het startkoord om de olie gelijkmatig te distribueren.
• Breng de bougie weer aan.
• Laat de machine nooit onbeheerd achter wanneer er kinderen bij kunnen.
ZODRA DE MOTOR DRAAIT PRODUCEERT DIT PRODUCT GIFTIGE UITLAATGASSEN.
DEZE GASSEN KUNNEN KLEUR- EN GEURLOOS ZIJN. OM HET RISICO OP ERNSTIG
OF DODELIJK LETSEL TE VERMINDEREN MAG DE MACHINE NOOIT BINNEN OF
IN SLECHT GEVENTILEERDE RUIMTEN WORDEN GEBRUIKT. ZORG VOOR GOEDE
VENTILATIE BIJ HET WERKEN IN GREPPELS OF ANDERE BESLOTEN RUIMTEN.
Productbeschrijving
1 Brandstofvuldop
2 Brandstofbubbel
3 Startkoord
4 Chokehendel
5 Luchtfilterbehuizingschroef
6 Bougie
7 Uitlaat
8 Max toeren verstelschroef
9 Snelheidscontrolehendel
10 Aan-/uitschakelaar
11 Snelheidsregelaar aan-stand vergrendelknop
12 Snelheidsregelaar veiligheidspal
13 Luchtfilterbehuizing
14 Luchtfilterelement
15 Versnellingsbakolie vul-punt
16 Versnellingsbakolieniveau
17 Beveiligingspin
18 Splitpen
19 Schachtbevestigingspunt
*Let op: De olie-vul-punt-samenstelling is gesloten wanneer deze op de maximale
hoogte gesteld is
Het uitpakken van uw benzine
grondboor
• Zorg ervoor dat alle delen van uw machine aanwezig zijn en in goede staat verkeren.
Zijn onderdelen beschadigd en/of worden onderdelen vermist, neem dan onmiddellijk
contact op met uw verkoper om de onderdelen te vervangen voordat u de machine
gebruikt.
Het samenstellen van de grondboor
• Haal de splitpen (18) uit beveiligingspen (17)
• Haal de beveiligingspen (17) van het schachtbevestigingspunt (19)
• Schuif de slangenboor (Silverline product code 633897, 245105, 457044 – niet
inbegrepen) over het bevestigingspunt (19)
• Lijn de gaten in de slangenboor uit met die in het bevestigingspunt en duw de
beveiligingspin (17) door de gaten heen
• Plaats de splitpen (18) terug en trek de benen uit elkaar als afgebeeld
Het bedienen van de motor
Voorzien van brandstof
• Vul de machine te allen tijde op een veilige plek, uit de buurt van het werkgebied,
warmte- en ontstekingsbronnen bij. Vermijdt enige aanraking met de brandstof
• Rook niet
• Vul alleen bij met brandstof wanneer de motor volledig tot stilstand is gekomen en
afgekoeld is
• Brandstof hoort vooraf gemengd te worden. Meng niet in de brandstoftank
• Meng alleen de benodigde hoeveelheid brandstof
• Berg brandstof in een kwalitatief goede container op
• Gebruik de verstrekte meng fles. Vul de fles tot de 576,92 markering en voeg olie toe tot
het niveau gelijk is aan de 600 markering. Sluit de fles en schud om te mengen
LET OP: Voor het mengen van een kleinere hoeveelheid brandstof meet u de hoeveelheden
handmatig met behulp van de schaal op de fles. Meng slechts de benodigde hoeveelheid.
• Verwijder de brandstoftankdop (1) en vul de tank met de gemengde brandstof
LET OP: Maak gebruik van een trechter als Silverline’s 793799 om morsen te voorkomen
• Sluit de brandstoftank
• Zorg ervoor dat gemorste brandstof grondig wordt schoongemaakt
• Plaats de machine uit de buurt van het vulgebied voordat de motor gestart wordt
• Berg extra brandstof uit de gebruiksomgeving op
• De geluidsdempers en uitlaat worden tijdens gebruik erg heet. Zorg ervoor dat
ontvlambare materialen niet in aanraking komen me deze onderdelen
De brandstofleidingen/motor voorzien van brandstof
• Zet de machine rechtop neer zodat de handvaten evenwijdig aan de grond staan
• Druk de brandstofbubbel (2) langzaam in en laat deze weer los
• Herhaal deze hantering totdat de brandstof door de leidingen naar beneden en terug in
de tank begint te stromen
• Druk nog een aantal maal tot de luchtbellen uit de leidingen verdwenen zijn. Het
brandstofsysteem is nu klaar voor gebruik
Het starten van de motor
WAARSCHUWING: Zodra de motor gestart wordt produceert de machine giftige gassen uit
de uitlaat (7). Start de motor nooit binnen of in een gesloten ruimte. Draag te allen tijde de
benodigde veiligheidsuitrusting: tijdens het gebruik van de machine is het dragen van een
veiligheidsbril, handschoenen, gehoorbeschermers, een gezichtsmasker en stevige kleding
vereist. Het dragen van een veiligheidshelm en veiligheidsschoenen is aangeraden
• Zet de chokehendel (4) in de aan-stand wanneer de motor warm is
• Zet de chokehendel (4) in de uit-stand wanneer de motor koud is
• Zet de aan-uitschakelaar (10) in de ‘I’ positie
• Houdt de boor als afgebeeld in Fig. A vast zodat u de machine onder controle heeft
• Trek stevig aan het startkoord (3) als afgebeeld in Fig. 4
• Herhaal deze beweging tot de motor start
BELANGRIJK – Laat het koord niet terug in de machine schieten. Geleid het koord
langzaam terug
• Laat de motor voor ongeveer 30 seconden onbelast lopen
• Terwijl de motor warm loopt verzet u de chokehendel (4) in de AAN-positie
BELANGRIJK – Laat de machine langzaam voor minimaal 3 minuten opwarmen voordat
de motorsnelheid wordt opgevoerd. Dit verbeterd de prestatie en verlengt de levensduur
van de motor
Het inlopen van de motor
• Bij het eerste gebruik van de machine is het erg belangrijk de motor in te laten lopen.
Dit verbetert de motor efficiëntie en prestatie en maximaliseert de levensduur
• Bij het eerste gebruik van de machine laat u de motor voor ongeveer 15 minuten
onbelast lopen. TIJDENS DEZE PERIODE MAG DE MOTOR SNELHEID NIET OPGEVOERD
WORDEN
LET OP: Tijdens het inlopen van de motor is het waarnemen van vreemde geuren normaal,
waar onderdelen van de machine voor de eerste keer opwarmen
www.silverlinetools.com
25
Page 27

NL
Het uitzetten van de motor
• Laat de motor voor minimaal 3 minuten onbelast lopen voordat deze wordt
uitgeschakeld
• Zet de aan-/uitschakelaar in de ‘0’ positie
Het gebruik van de grondboor
Houdt de machine onder controle
• Start de motor als hierboven beschreven
• Om de motorsnelheid op te voeren drukt u de veiligheidspal (12) in en knijpt u langzaam
in de snelheidscontrolehendel (9). Laat de hendel los om de snelheid af te voeren
LET OP: Het schachtbevestigingspunt roteert niet wanneer de motor onbelast loopt.
Wanneer de motorsnelheid opgevoerd worde begint het bevestigingspunt te draaien.
• De maximale motorsnelheid kan gesteld worden door het verstellen van de Max toeren
verstelschroef (8). Draai de schroef rechtsom om de maximale snelheid te verlagen
• De snelheidscontrolehendel kan in de aan-stand vergrendeld worden. Houdt de hendel
ingeknepen, druk de snelheidsregelaar aan-stand vergrendelknop (11) en laat de hendel
los. Knijp de hendel nogmaals in om de snelheid te ontgrendelen
Opmerkingen bij het gebruik van de machine
• Houdt omstanders tijdens het gebruik van de machine op een afstand van 5 meter en
probeer omstanders te allen tijde in zicht te houden
• Bij het gebruik op een ongelijke ondergrond bedient u de machine van de zijkant en van
onderen. Wanneer u de controle over de machine verliest valt deze niet in uw richting
• Gebruik de machine alleen op een geschikte ondergrond. De machine is niet geschikt
voor gebruik op ondergronden met grote stenen of hard beton
Onderhoud
Schema
Vervang Check/verstel/maak
schoon
Bougie 500
Bougie 2000
Luchtfilter 50
Versnellingsbakolie 500
WAARSCHUWING: Voordat enig onderhoud wordt uitgevoerd, stopt u de motor en laat u
deze volledig afkoelen
Het controleren van de bougie (6)
• Trek de bougiekabel van de bougie (6) af
• Schroef de bougie met een geschikte sleutel los
LET OP: Draai linksom om de bougie te verwijderen
• Verstel en maak de bougie schoon of vervang deze naar aanleiding van het
onderhoudsschema
• Plaats de bougie terug en draai deze met de hand vast. LET OP: Draai de bougie niet
te strak vast
• Maak de luchtfilter (14) naar aanleiding van het onderhoudsschema schoon
• Draai de luchtfilterbehuizingschroef (5) met behulp van de juiste schroevendraaier los
• Til de behuizing (13) van de machine af
• Verwijder de luchtfilter (14)
• Was de filter in een geschikte vloeistof, verkrijgbaar bij de meeste tuinmachine
verkopers
• Laat de filter volledig opdrogen
• Plaats de filter en de behuizing terug in de machine en draai de behuizingschroef
weer vast
Versnellingsbakolie
Het vervangen van de versnellingsbakolie:
Let op: Vervang de versnellingsbakolie naar aanleiding van het onderhoudsschema
• Houdt de machine vast alsof u een verticaal gat in de grond gaat boren
• Verwijder de slangenboor als beschreven in ‘Het samenstellen van de grondboor’
• Plaats een geschikte olieopvangbak onder de machine – als Silverline product 675089
• Gebruik een moersleutel om de volledige versnellingsbakolie vul-puntsamenstelling
te verwijderen
• Kantel de machine ongeveer 90 graden om de olie uit de versnellingsbak te laten lopen
• Wanneer de olie volledig uit de versnellingsbak gelopen is hoort dit volgens
voorschriften te worden weggegooid. Meng de olie niet met het normale huisvuil
• Plaats de machine terug in de normale positie
Gebruiksuren
• Voorzie de versnellingsbak van het juiste type (zie specificaties) en de juiste hoeveelheid
olie, controleer het olieniveaupunt (15), als afgebeeld in fig. B.
• Plaats de vulpuntbout terug. De samenstelling is gesloten wanneer de schroef op de
hoogst mogelijk positie staat
Opberging
• Zorg ervoor dat de brandstof tank en leidingen bij het neer leggen niet beschadigt
raken
• Laat de machine niet vallen, dit kan de machine beschadigen en onveilig maken
• Wanneer het werk voltooid is maakt u de machine schoon
• Inspecteer de machine op beschadigingen en losse of ontbrekende onderdelen
• Berg de machine buiten het bereik van direct zonlicht op
• Berg de machine niet in een nylon zak op waar dit schimmelvorming kan bemoedigen
• Gebruik een kleine borstel om de behuizing schoon te maken en de
ventilatieopeningen vrij te houden van blokkeringen. Gebruik geen water
• Brandstof en olie horen veilig opgeborgen te worden, buiten het bereik van warmte,
direct zonlicht, ontstekingsbronnen en kinderen
Opberging voor langere periode
Wanneer de machine voor langere tijd niet gebruikt wordt bergt u deze als volgt op:
• Check en maak de machine grondig schoon
• Maak de brandstoftank leeg en maak de carburateur en leidingen schoon door de
machine te starten en te laten lopen tot deze vanzelf uitschakelt vanwege een gebrek
aan brandstof
• Bescherm de metalen onderdelen tegen roest door deze met olie te smeren
• Verwijder de bougie, giet een aantal druppels olie in het bougie-gat en trek 2 of 3 keer
aan het startkoord om de olie te verspreiden. Plaats de bougie en de bougiekabel terug
• Maak de luchtfilter schoon als beschreven in de luchtfilter sectie
Probleemopsporing
Vermogen verlies of het plots stoppen van de motor
• Controleer of de brandstoftank leeg is
• Controleer of het mengsel water bevat. Voer af en spoel het brandstofsysteem met
benzine
• Controleer of de luchtfilter vuil is. Maak de luchtfilter schoon
Het starten van een verzopen motor
• Ontkoppel de bougiekabel en verwijder de bougie door deze met een sleutel linksom
los te draaien
• Wanneer de bougie vuil, of doordrongen is met brandstof, vervangt of maakt u de
bougie schoon
• Verwijder overtollig brandstof in de ontbrandingskamer door de motor een aantal keer
aan te slingeren terwijl de bougie ontkoppeld is
• Draai de bougie stevig met een bougiesleutel vast
• Herhaal de startprocedure alsof de motor warm is
Het recyclen van benzine motor
gereedschap, brandstof en olie
• Gereedschap aangedreven door benzine motoren mogen niet met het huishoudelijke
afval worden weggegooid. Dit soort gereedschap hoort naar het lokale recyclecenter
gebracht te worden waar het in overeenstemming met de huidige milieubeschermende
regels gerecycled kan worden.
• Benzine, olie en mengsels zijn schadelijk, en horen als schadelijk behandeld te worden.
Olie en benzine mogen niet met het huishoudelijke afval worden weggegooid. Het
onjuist ontdoen van, wordt in uw land mogelijk gezien als overtreding. Neem contact op
met uw lokale instantie of verkoper voor ontdoeprocedure informatie.
26
Page 28

868828 49 cc benzine grondboor
Silverline Tools Garantie
Dit Silverline product komt met 3 jaar garantie.
U heeft recht op 3 jaar garantie als u dit product binnen 30 dagen na
aankoop op silverlinetools.com registreert. De garantieperiode gaat in
vanaf de aankoopdatum op het ontvangstbewijs.
Voorwaarden
De garantieperiode gaat in vanaf de aankoopdatum op het ontvangstbewijs.
BEWAAR HET ONTVANGSTBEWIJS OP EEN VEILIGE PLAATS
Als dit product binnen 30 dagen na de aankoopdatum een gebrek vertoont,
breng het dan samen net uw ontvangstbewijs naar de winkel waar u
het heeft gekocht en beschrijf het gebrek in detail. Het product wordt
vervolgens terugbetaald of omgewisseld.
Als dit product na de periode van 30 dagen een gebrek vertoont, stuur het
dan naar:
Silverline Tools Service Centre
PO Box 2988
Yeovil
BA21 1WU, GB
Garantie claims moeten binnen de garantieperiode worden ingediend.
Zonder het originele ontvangstbewijs met de aankoopdatum, uw naam,
adres en plaats van aankoop kan geen werk aan het product uitgevoerd
worden.
Beschrijf het gebrek dat verholpen moet worden in detail.
Bij claims die binnen de garantieperiode worden ingediend, gaat Silverline
Tools na of het een materiaal- of een fabrieksfout betreft.
De verzendkosten worden niet vergoed. Bied de items die u terugstuurt
voor reparatie in een schone en geborgde staat aan. Verpak ze zorgvuldig
om schade en letsel tijdens het vervoer te voorkomen. Ongepaste en
onveilige leveringen kunnen worden afgewezen.
Al het werk wordt uitgevoerd door Silverline Tools of een officiële
reparatiedienst.
De garantieperiode wordt door herstelling of vervanging van het product
niet verlengd.
Defecten waarvan wij beschouwen dat ze onder de garantie vallen, worden
verholpen door middel van een kosteloze herstelling van het gereedschap
(exclusief verzendingskosten) of een vervanging door een gereedschap in
perfecte staat van werking.
Uw product registreren
Ga naar: silverlinetools.com, klik op de ‘Guarantee Registration ‘(registratie)
knop en voer het volgende in:
• Uwpersoonlijkegegevens
• Degegevensvanhetproductendeaankoop
Het garantiebewijs wordt vervolgens in Pdf-formaat aangemaakt. Druk het
af en bewaar het bij het product.
De ingehouden gereedschappen of onderdelen die zijn vervangen, worden
het eigendom van Silverline Tools.
De herstelling of vervanging van het product onder garantie is bijkomstig
aan en heeft geen invloed op uw wettelijke rechten als consument.
Wat is gedekt:
De reparatie van het product, mits naar tevredenheid van Silverline
Tools kan worden vastgesteld dat de gebreken ontstaan zijn tijdens de
garantieperiode en het gevolg zijn van materiaal- of fabrieksfouten.
Voor onderdelen die niet meer verkrijgbaar zijn of niet meer vervaardigd
worden zal Sirverline Tools een functionele vervanging uitvoeren.
Gebruik van dit product binnen de EU.
Wat niet is gedekt:
Silverline Tools geeft geen garantie op herstellingen als gevolg van:
Normale slijtage veroorzaakt door gebruik in overeenstemming met de
handleiding zoals zaagbladen, borstels, riemen, gloeilampen, batterijen enz.
De vervanging van meegeleverd toebehoren zoals boortjes, zaagbladen,
schuurvellen, snijdschrijven en aanverwante producten.
Toevallige schade, gebreken ten gevolge van nalatig gebruik of verzorging,
misbruik, verwaarlozing, achteloze bediening of hantering van het product.
Gebruik van het product voor andere doeleinden dan normaal huishoudelijk
gebruik.
Alle wijzigingen van het product.
Gebruik van andere onderdelen en toebehoren dan de originele onderdelen
van Silverline Tools.
Herstellingen of wijzigingen die zijn uitgevoerd door anderen dan Silverline
Tools of diens officiële reparatiediensten.
Uitgezonderd het recht op het verhelpen van gebreken van het
gereedschap volgens deze garantievoorwaarden worden geen claims
gedekt.
Eg-Verklaring van Overeenstemming
De ondergetekende: Mr. Darrell Morris
Gemachtigd door: Silverline Tools
Verklaart dat
Naam/model: 49 cc benzine grondboor
Type/ serienr: 868828
Voldoet aan de volgende richtlijnen:
• Emmissies van niet voor de weg bestemde mobiele machines 2004/108/CE
• Geluidsemissie van materieel voor gebruik buitenshuis en wijzigingen
200/14/EC Annex V
• Elektromagnetische verenigbaarheid 2004/108/EC
• ISO22868:2003
• EN ISO 12100-1, EN ISO 12100-2:2003
• EN60204-1:1998, EN55012:2007, EN61000-6-1:2007
De technische documentatie wordt bewaard door: Silverline Tools
Keuringsinstantie: BVCE Products Testing
Plaats van afgifte: Shanghai, China
Datum: 02-01-2013
Handtekening:
Director
Naam en adres van fabrikant of gemachtigde:
Silverline Tools Ltd, Boundary Way, Lufton Trading Estate, Yeovil, Somerset, BA22
8HZ, Verenigd Koninkrijk
www.silverlinetools.com
27
 Loading...