

Page 1
3 Year Guarantee
*Register online within 30
days. Terms & Conditions apply
Garantie de 3 ans
*Enregistrez votre produit en ligne
dans les 30 jours. Sous réserve des
termes et conditions appliquées
3 Jahre Garantie
*Innerhalb von 30 Tagen online
registrieren. Es gelten die Allgemeinen
Geschäftsbedingungen
3 años de garantía
*Registre su producto online durante
los primeros 30 días. Se aplican
términos y condiciones
3 anni di garanzia
*Registrarsi on-line entro 30 giorni.
Termini e Condizioni si applicano
3 jaar garantie
*Registreer uw product binnen 30
dagen online. Algemene voorwaarden
zijn van toepassing
www.silverlinetools.com
Page 2
R
E
V
L
I
S
AIR
R
A
N
L
I
N
E
E
G
719770
1
"
2
⁄
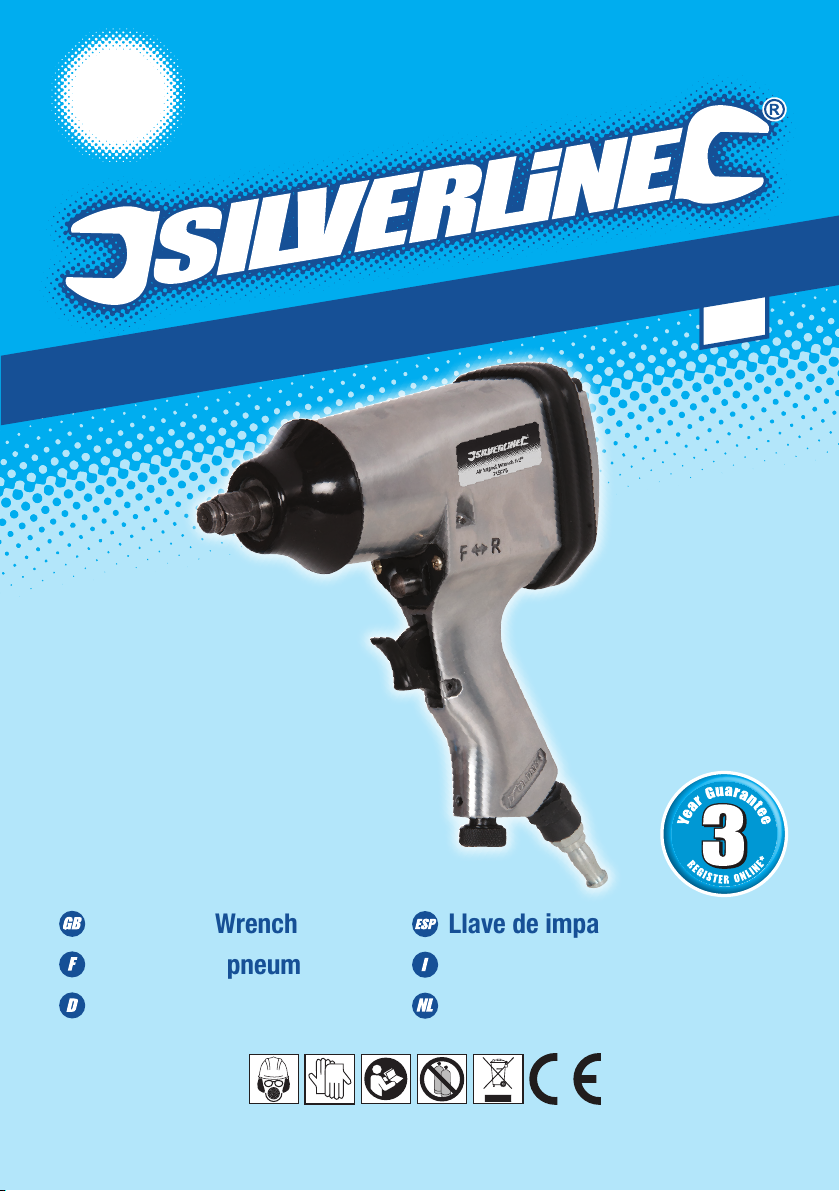
Air Impact Wrench
Air Impact Wrench
Clé à chocs pneumatique
Druckluft-Schlagschrauber
www.silverlinetools.com
Llave de impacto Neumática
Chiave Pneumatica D impatto
Pneumatische moersleutel
Page 3
1
5
2
6
2
4
3
Page 4

R
E
V
L
I
S
AIR
R
A
N
G
L
I
N
E
E
®
1
"
2
⁄
Air Impact Wrench
English .................. 4
Français ................ 10
Deutsch ................. 17
Español ................. 22
Italiano .................. 28
Nederlands ............ 34
www.silverlinetools.com
3
Page 5
GB
Description of Symbols
The rating plate on your tool may show symbols. These represent important
information about the product or instructions on its use.
Wear hearing protection.
Wear eye protection.
Wear breathing protection.
Wear head protection.
Wear hand protection.
Read instruction Manual.
DO NOT use with compressed gas cylinders!
Conforms to relevant legislation and safety standards
Environmental Protection
Air tools must not be disposed of with household waste. Air
tools may contain traces of tool oil and other lubricants and so
must be recycled accordingly
Specification
Maximum operating pressure: ........................... 6.3bar (90psi)
Air consumption: ...............................................113L/min (4cfm)
Air Inlet: .............................................................¼" BSP, supplied with
two male airline quick connectors (EN-6 ‘UK’ and EQ-4 ‘European’
types)
Minimum hose diameter:...................................9.5mm (3⁄8")
Square drive: .....................................................½"
Directions: .........................................................forward & reverse
No load speed: ..................................................max. 7,000min-1
(variable through built-in pressure regulator)
Max. torque: ......................................................312Nm
Max. bolt capacity: ............................................M14
Weight ............................................................... 2.18kg
Noise and vibration information:
Level of sound pressure according to Machinery directive 2006/42/EC:
Sound Pressure ................................................ LPA = 94dB(A)
Sound Power .................................................... LWA = 105dB(A)
Uncertainty ........................................................ K = 3dB
The sound intensity level for the operator may exceed 85dB(A) and
sound protection measures are necessary.
Vibration total values (triax vector sum) according to Machinery directive
2006/42/EC:
Vibration emission value ................................... ah = 5.17m/s
Uncertainty ........................................................ K = 1.5m/s
As part of our ongoing product development, specifications of
Silverline products may alter without notice.
2
2
Noise and Vibration
• Sound and vibration levels in the specification are determined according
to ISO 28927-3. The figures given can be used to compare similar tools
tested to this standard. These figures may be used to assess exposure to
noise and vibration levels.
• The figures represent normal use for the tool in normal working
condition. A poorly maintained, incorrectly assembled or misused tool
may produce increased levels of noise and vibration. The total working
period that you can operate this tool must factor in periods where the
tool is idle or switched off. Allow frequent rest breaks when operating
this tool.
• It is in the interest of users to maximise their safety using the correct
safety equipment, like ear defenders that protect against loud or
repetitive noise, and anti-vibration gloves that minimise vibration.
Do not operate the tool with your hands below a normal comfortable
temperature, as vibration will have a greater effect.
Sound
• The noise directive was introduced to protect against the risk to health
and safety arising or likely to arise from exposure to noise and risk of
hearing. The Directive can be used to define noise exposure and the
physical parameters, such as peak sound pressure and daily and weekly
exposure level. Particular attention should be taken to exposure level
and duration.
• For more information on the Noise Directives 2003/10/EC and 2000/14/
EC, please visit The European Agency for Safety and Health at work -
www.osha.europa.eu.
Vibration
• The European Physical Agents (Vibration) Directive 2002/44/EC was
introduced to control the exposure of vibration at work. The Directive
enables users of tools to make informed decisions on the amount of time
spent working. Those who regularly operate high vibration equipment
over a sustained period of time are at a higher risk of health problems.
ISO 28927-3 measures vibration in three directions which is known as
tri-axial or vector sum measurement. When operating high vibration
equipment, ensure not to exceed exposure levels. For more details on
The Vibration Directive 2002/44/EC please visit The European Agency for
Safety and Health at work -www.osha.europa.eu
General Safety Warnings
• For multiple hazards, read and understand the safety instructions before
installing, operating, repairing, maintaining, changing accessories on, or
working near this tool. Failure to do so can result in serious bodily injury
• Only qualified and trained operators should install, adjust, or use this tool
• Do not modify this tool. Modifications can reduce the effectiveness of
safety measures and increase the risks to the operator
• Do not discard the safety instructions; give them to the operator
• Do not use this tool if it has been damaged
• Tools shall be inspected periodically to verify that the ratings and
markings required by this part of ISO 11148 are legibly marked on
the tool. The employer/user should contact the manufacturer to obtain
replacement marking labels when necessary
WARNING: This appliance is not intended for use by persons (including
children) with reduced, physical or mental capabilities or lack of experience
or knowledge unless they have been given supervision or instruction
concerning use of the appliance by a person responsible for their safety.
Children must be supervised to ensure that they do not play with the
appliance.
Projectile Hazards
• Be aware that failure of the workpiece or accessories, or even of the
inserted tool itself, can generate high-velocity projectiles
• Always wear impact-resistant eye protection during operation of this tool.
The grade of protection required should be assessed for each use
• For overhead work, wear a safety helmet
• The risks to others should also be assessed at this time
• Ensure that the workpiece is securely fixed
4
Page 6

Air Impact Wrench598446
Entanglement Hazards
• Choking, scalping and/or lacerations can occur if loose clothing, personal
jewellery, neck wear, hair or gloves are not kept away from the tool and
its accessories
Operating Hazards
• Use of the tool can expose the operator’s hands to hazards, including
cuts, abrasions and heat
• Wear suitable gloves to protect hands
• Operators and maintenance personnel should be physically able to
handle the bulk, weight and power of the tool
• Hold the tool correctly; be ready to counteract normal or sudden
movements and have both hands available
• Maintain a balanced body position and secure footing
• Release the start-and-stop device in the case of an interruption of the
energy supply
• Use only lubricants recommended by the manufacturer
• Personal protective safety glasses should be used; suitable gloves and
protective clothing are recommended
• Avoid direct contact with moving parts in order to prevent pinching or
cutting of hands or other body parts.
• Wear suitable gloves to protect hands
• There is a risk of electrostatic discharge if used on plastic and other
non-conductive materials
Repetitive Motions Hazards
• When using this tool to perform work-related activities, the operator can
experience discomfort in the hands, arms, shoulders, neck or other parts
of the body
• While using this tool, the operator should adopt a comfortable posture
whilst maintaining secure footing and avoiding awkward or off-balance
postures. The operator should change posture during extended tasks; this
can help avoid discomfort and fatigue
• If the operator experiences symptoms such as persistent or recurring
discomfort, pain, throbbing, aching, tingling, numbness, burning
sensations or stiffness, these warning signs should not be ignored.
The operator should inform the employer and consult a qualified health
professional
Accessory Hazards
• Disconnect the tool from the energy supply before fitting or changing the
inserted tool or accessory
• Avoid direct contact with the inserted tool during and after use, as it can
be hot or sharp
• Use only sizes and types of accessories and consumables that are
recommended by the manufacturer of this tool; do not use other types or
sizes of accessories or consumables
Workplace Hazards
• Slips, trips and falls are major causes of workplace injury. Be aware
of slippery surfaces caused by use of the tool and also of trip hazards
caused by the air line or hydraulic hose
• This tool is not intended for use in potentially explosive atmospheres and
is not insulated against contact with electric power
Dust and Fume Hazards
• Dust and fumes generated when using this tool can cause ill health
(for example cancer, birth defects, asthma and/or dermatitis); risk
assessment and implementation of appropriate controls for these
hazards are essential
• Risk assessment should include dust created by the use of the tool and
the potential for disturbing existing dust
• Direct the exhaust so as to minimise disturbance of dust in a dust-filled
environment
• Where dust or fumes are created, the priority should be to control them
at the point of emission
• Select, maintain and replace the consumable/inserted tool as
recommended in the instruction handbook, to prevent an unnecessary
increase in dust or fumes
• Use respiratory protection in accordance with employer's instructions
and as required by occupational health and safety regulations
Noise Hazards
• Exposure to high noise levels can cause permanent, disabling hearing
loss and other problems, such as tinnitus (ringing, buzzing, whistling or
humming in the ears). Therefore, risk assessment and implementation of
appropriate controls for these hazards are essential
• Appropriate controls to reduce the risk can include actions such as
damping materials to prevent workpieces from ‘ringing’
• Use hearing protection in accordance with employer's instructions and as
required by occupational health and safety regulations
• Operate and maintain this tool as recommended in the instruction
handbook, to prevent an unnecessary increase in the noise level
• Select, maintain and replace the consumable/inserted tool as
recommended in the instruction handbook, to prevent an unnecessary
increase in noise
• If the tool has a silencer, always ensure it is in place and in good working
order when the tool is being operated
Vibration Hazards
This information shall draw attention to vibration hazards that have not been
eliminated by design and construction and remain as residual vibration
risks. It shall enable employers to identify the circumstances in which the
operator is likely to be at risk from vibration exposure If the vibrationemission value obtained using ISO 28927-3 does not adequately represent
the vibration emission in the intended uses (and foreseeable misuses) of the
machine, additional information and/or warnings shall be supplied to enable
the risks arising from vibration to be assessed and managed.
• Exposure to vibration can cause disabling damage to the nerves and
blood supply of the hands and arms
• Wear warm clothing when working in cold conditions and keep your
hands warm and dry
• If you experience numbness, tingling, pain or whitening of the skin in
your fingers or hands, stop using the machine, inform your employer and
consult a physician
• Operate and maintain the sander or polisher as recommended in the
instruction handbook, to prevent an unnecessary increase in vibration
levels
• Hold the tool with a light but safe grip, taking account of the required
hand reaction forces, because the risk from vibration is generally greater
when the grip force is higher
www.silverlinetools.com
5
Page 7

GB
Additional Safety Instructions
for Pneumatic Power Tools
• Air under pressure can cause severe injury:
• Always shut off air supply, drain hose of air pressure and disconnect tool
from air supply when not in use, before changing accessories or when
making repairs
• Never direct air at yourself or anyone else
• Whipping hoses can cause severe injury. Always check for damaged or
loose hoses and fittings
• Whenever universal twist couplings (claw couplings) are used, lock
pins should be installed and whipcheck safety cables should be used
to safeguard against possible hose-to-tool or hose-to-hose connection
failure
• Do not exceed the maximum air pressure stated on the tool
• Never carry an air tool by the hose
Product Familiarisation
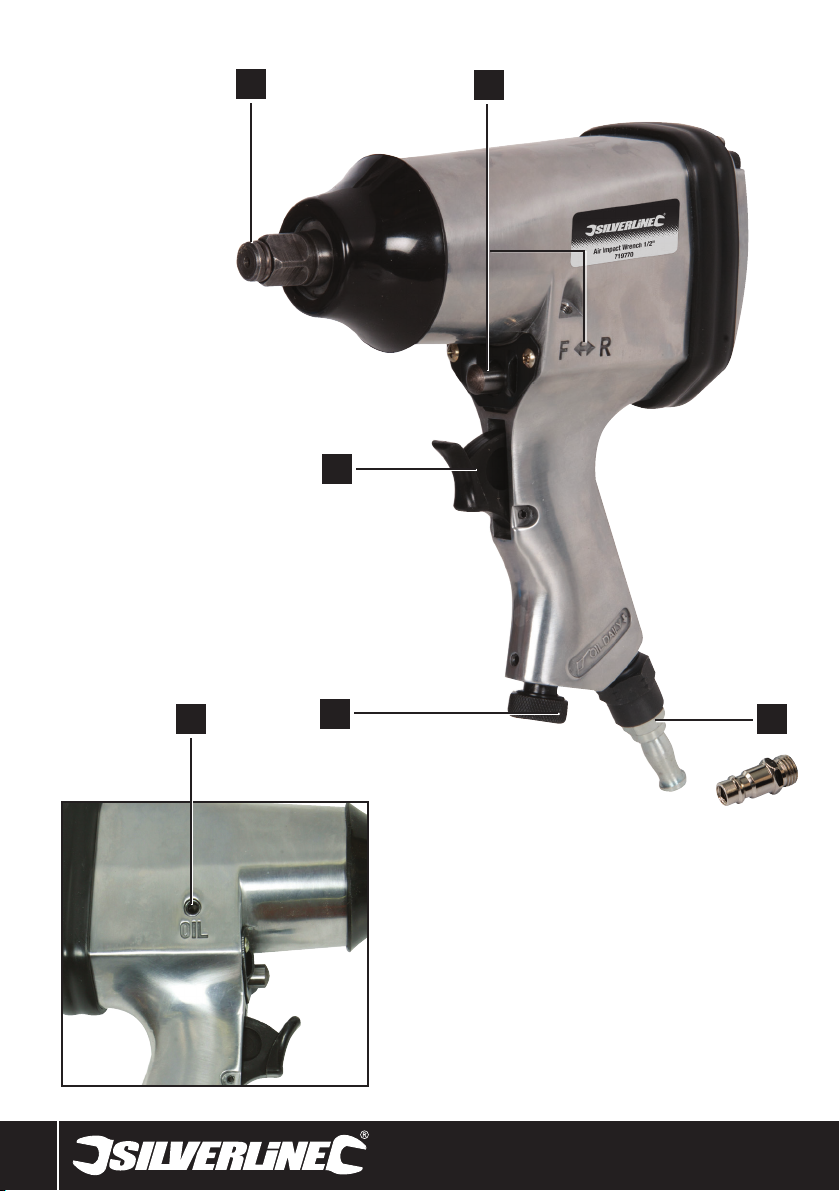
11⁄2" Square Drive
2 Forward/Reverse Switch
3 Quick Connector
4 Air/Torque Control Dial
5 Trigger
6 Oil Point
6
Page 8

719770 Air Impact Wrench
Intended Use
• Air driven impact wrench, for use with standard ½" sockets to loosen
and tighten nuts and bolts.
Note: This device is not a torque wrench. Always torque nuts/bolts with a
calibrated torque wrench.
Unpacking Your Tool
• Carefully unpack and inspect your tool. Fully familiarise yourself with all
its features and functions
• Ensure that all parts of the tool are present and in good condition. If
any parts are missing or damaged, have such parts replaced before
attempting to use this tool
Before Use
Fitting the quick connector
Note: This tool is supplied with two different male airline quick connectors:
EQ-4 – commonly used in Europe
EN-6 – mainly used in the UK
EQ-4
Europe
• Please choose the connector that is compatible with the airline system
you are using, and install as outlined below:
1. Apply some PTFE tape (not included) to the screw threads of the Quick
Connector (3). This will help to maintain an air-tight seal
Note: Apply PTFE tape tightly and in a clockwise direction, so it does not
come off when the thread is screwed into the tool.
2. Remove the protective plug from the air inlet
3. Using a spanner (not included) screw the quick connector into the air
inlet located at the base of the handle
4. Connect to airline, pressurise carefully and carry out a leak check (e.g.
by spraying small amounts of soapy water on to the outside of the
connectors)
• Air lines fitted with matching female quick connectors will now be a push
fit to the tool
Air supply connection
QUICK COUPLER
NIPPLE
TO YOUR
AIR TOOL
LEADER HOSE
• This tool should be connected to a clean, dry air supply with inline oiler
and water separator
• Do not allow supply pressure to exceed the maximum stated (see
“Specifications”)
• Ensure that water is drained from air system daily
• Ensure that all parts of the system (hoses, couplers, etc.) are correctly
rated for the air pressure to be used
RECOIL HOSE
EN-6
UK
WATER SEPARATION
NIPPLE
REGULATOR
OILER
DRAIN DAILY
AIR SUPPLY
Setting tool power
• The tool speed can be adjusted by pressing and turning the Air/Torque
Control Dial (4):
‘1’ = minimum, ‘4’ = maximum
Forward and reverse
This tool features a forward/reverse function. Select the desired direction by
pushing the Forward/Reverse Switch (2). The letters ‘F’ and ‘R’ marked on
the tool indicate the switch position for forward and reverse:
• Bar exposed above trigger = ‘F’ – forward (clockwise rotation)
• Bar exposed at rear of tool = ‘R’ – reverse (anticlockwise rotation)
Note: The terms ‘forward’ and ‘reverse’ refer to right hand threads.
Installing a socket
WARNING: Always disconnect the tool from the air supply before attaching
or removing sockets.
1. Push a suitable socket firmly over to locking ring on to the 1/2” Square
Drive (1)
2. Ensure the locking ring engages and the socket is firmly attached by
trying to pull it off the drive
Note: Firmly pull the socket off the drive to remove.
Operation
Loosening a nut or bolt
1. Place the socket over the nut
2. Hold the tool firmly by the handle. Your thumb should wrap around the
handle and your fingers should sit on the Trigger (5)
3. Brace the machine with your other hand on the back of the tool to
control torque reaction
4. Press the Forward/Reverse Switch (2) inwards until it protrudes out
the back of the housing
5. Press the trigger to start the tool
6. When the nut or bolt starts moving, release the trigger to stop the tool
and remove the socket from the nut or bolt. Remove the nut from the
socket if needed
Note: DO NOT allow the ratchet to run in ‘idle rotation’ for an extended
period of time. This will shorten its life.
WARNING: If the tool cannot loosen the nut, DO NOT raise the outlet
pressure of the air compressor. Use a manual spanner instead to loosen
the nut or bolt.
Tightening a nut or bolt
1. Check the torque setting and ensure the nut or bolt can withstand the
torque selected
2. Tighten the nut or bolt as far as possible by hand
3. Place the socket over the nut
4. Hold the tool firmly by the handle. Your thumb should wrap around the
handle and your fingers should sit on the Trigger (5)
5. Brace the machine with your other hand on the back of the tool to
control torque reaction
6. Press the Forward/Reverse Switch (2) inwards until it protrudes out
the front of the housing
7. Press the trigger to start the tool
8. When the nut has been tightened, remove the tool and socket
WARNING: DO NOT over-tighten. You should use a calibrated torque wrench
to torque the nut to the correct value after using the impact wrench.
WARNING: NEVER increase the air pressure above the maximum operating
pressure stated in ‘Specifications’ if the tool stalls wile tightening or the
torque produced is insufficient.
WARNING: Be aware that air tools may hold residual pressure after use.
Always bleed air pressure from the tool after shutting off air supply.
www.silverlinetools.com
7
Page 9
GB
Accessories
• Accessoriesforthistool,includingsocketsandsocketsets,are
available from your Silverline stockist. Spare parts can be obtained
from your Silverline dealer or www.toolsparesonline.com
Maintenance
WARNING: Always disconnect from the air supply and depressurise before
cleaning or carrying out any maintenance.
Cleaning
• Keep your tool clean at all times. Dirt and dust will cause internal parts
to wear quickly, and shorten the machine’s service life. Clean the body of
your machine with a soft brush, or dry cloth
IMPORTANT: There is very little that can go wrong with your air tool and it
should be noted that when an air tool fails to work it is generally because
the internal workings have corroded due to dirty, wet air and failure to
follow the instructions given below.
Daily maintenance procedure: Disconnect from the air supply, pour the
equivalent of a tablespoon of oil into the air intake. Connect tool to the air
supply and run motor briefly (e.g. 2-4 seconds) at low speed to distribute
the oil.
Once a week: Disconnect tool from the air supply. Remove the hex screw
to open the Oil Point (6) marked ‘OIL’ and pour in a few drops of air tool
oil. Replace the hex screw and tighten to seal the oil point. Connect tool
to the air supply and run motor briefly (e.g. 2-4 seconds) at low speed to
distribute the oil.
• If the machine is in constant use or used for long periods at a time, a
combined filter/lubricator must be fitted. There must be an air filter fitted
at all times
• Use air tool oil. DO NOT UNDER ANY CIRCUMSTANCES USE NORMAL
ENGINE OIL
• Failure to comply with the operating and maintenance instructions may
invalidate the guarantee
Storage
• Store this tool carefully in a secure, dry place out of the reach of children
Disposal
• As with other power tools, air tools should not be disposed of with
household waste
• Air tools may contain traces of tool oil and other lubricants and so must
be recycled accordingly
• Contact your local waste disposal authority for information on the correct
way to dispose of power tools
Troubleshooting
Problem Possible Cause Solution
Tool operating slowly
Tool seized
Normal no load speed but tool
slows down under load
Tool will not stop after trigger is
fully released
8
Pressure incorrect Set the correct air pressure according to the specification
Dirt within the mechanism Pour oil into air inlet as per maintenance instructions
Air blockage Operate tool in short bursts to clear blockage
Air leak Check all fittings and hose for air leaks and correct issue by re-
Blockage in gauze mesh filter Remove quick connector and clean mesh filter
Dirt or rust in mechanism Try ‘Tool operating slowly’ solutions
Dirt or rust in mechanism Tap tool gently with a soft mallet
Dirt or rust in mechanism Free mechanism by rotating drive manually when disconnected from
Worn motor or clutch parts Contact an authorised Silverline service centre
Motor or clutch sticking Pour oil into air inlet as per maintenance instructions and operate tool in
Throttle valve O-ring or valve seat damaged Have the tool repaired at an authorised Silverline service centre
If the above troubleshooting solutions fail, contact your dealer or an authorised Silverline service centre.
tightening, using PTFE tape or replacing
air line
short bursts to lubricate and free up
Page 10

719770
Silverline Tools Guarantee
Silverline Tools Guarantee
This Silverline product comes with a 3 year
guarantee
Register this product at www.silverlinetools.com within 30 days of
purchase in order to qualify for the 3 year guarantee. Guarantee period
begins according to the date of purchase on your sales receipt.
Terms & Conditions
Guarantee period becomes effective from the date of retail purchase as
detailed on your sales receipt.
PLEASE KEEP YOUR SALES RECEIPT
If this product develops a fault within 30 days of purchase, return it to the
stockist where it was purchased, with your receipt, stating details of the
fault. You will receive a replacement or refund.
If this product develops a fault after the 30 day period, return it to:
Silverline Tools Service Centre
PO Box 2988
Yeovil
BA21 1WU, UK
The guarantee claim must be submitted during the guarantee period.
You must provide the original sales receipt indicating the purchase date,
your name, address and place of purchase before any work can be
carried out.
You must provide precise details of the fault requiring correction.
Claims made within the guarantee period will be verified by Silverline Tools
to establish if the deficiencies are related to material or manufacturing of
the product.
Carriage will not be refunded. Items for return must be in a suitably clean
and safe state for repair, and should be packaged carefully to prevent
damage or injury during transportation. We may reject unsuitable or
unsafe deliveries.
All work will be carried out by Silverline Tools or its authorized
repair agents.
The repair or replacement of the product will not extend the period
of guarantee
Defects recognised by us as being covered by the guarantee shall be
corrected by means of repair of the tool, free of charge (excluding carriage
charges) or by replacement with a tool in perfect working order.
Retained tools, or parts, for which a replacement has been issued, will
become the property of Silverline Tools.
Air Impact Wrench
Registering your purchase
Registration is made at silverlinetools.com by selecting the Guarantee
Registration button. You will need to enter:-
• Your personal details
• Details of the product and purchase information
Once this information is entered your guarantee certificate will be created
in PDF format for you to print out and keep with your purchase.
The repair or replacement of your product under guarantee provides
benefits which are additional to and do not affect your statutory rights as
a consumer.
What is covered:
The repair of the product, if it can be verified to the satisfaction of Silverline
Tools that the deficiencies were due to faulty materials or workmanship
within the guarantee period.
If any part is no longer available or out of manufacture, Silverline Tools will
replace it with a functional replacement part.
Use of this product in the EU.
What is not covered:
Silverline Tools does not guarantee repairs required as a result of:
Normal wear and tear caused by use in accordance with the operating
instructions eg blades, brushes, belts, bulbs, batteries etc.
The replacement of any provided accessories drill bits, blades, sanding
sheets, cutting discs and other related items.
Accidental damage, faults caused by negligent use or care, misuse,
neglect, careless operation or handling of the product.
Use of the product for anything other than normal domestic purposes.
Change or modification of the product in any way.
Use of parts and accessories which are not genuine Silverline Tools
components.
Faulty installation (except installed by Silverline Tools).
Repairs or alterations carried out by parties other than Silverline Tools or its
authorized repair agents.
Claims other than the right to correction of faults on the tool named in
these guarantee conditions are not covered by the guarantee.
CE Declaration of Conformity
The undersigned: Mr Darrell Morris
as authorised by: Silverline Tools
Declares that
Identification code: 719770
Description: Air Impact Wrench
Conforms to the following directives and standards:
• Machinery Directive 2006/42/EC
• EN 792-6:2000+A1:2008
Notified body: Intertek Testing Services, Shanghai, China
The technical documentation is kept by: Silverline Tools
Date: 11/06/13
Signed:
Director
Name and address of the manufacturer:
Powerbox International Ltd, Boundary Way, Lufton Trading Estate, Yeovil,
Somerset, BA22 8HZ United Kingdom
www.silverlinetools.com
9
Page 11
F
Description des symboles
La plaque signalétique figurant sur votre outil peut présenter des symboles.
Ces symboles constituent des informations importantes relatives au produit
ou des instructions concernant son utilisation.
Port de protection auditive
Port de lunettes de sécurité
Port de masque respiratoire
Port du casque
Port de gants
Lire le manuel d’instructions
Ne pas utiliser avec des bouteilles à air comprimé
Conforme à la réglementation et aux normes de sécurité en
vigueur
Protection de l’environnement
Les produits à air comprimé usagés ne doivent pas être jetés
avec les ordures ménagères. Veuillez les recycler dans les
centres prévus à cet effet. Pour de plus amples informations,
veuillez contacter votre municipalité ou point de vente.
Caractéristiques techniques
Pression de fonctionnement maximale : .......... 6,3 bars (90 psi)
Consommation d'air : .........................................113L/min (4 cfm)
Entrée d'air : .................................................... ¼" BSP, fourni
avec deux raccords rapides mâles pour conduite d'air (de
type EN-6 pour le Royaume-Uni et EQ-4 pour l'Europe)
Diamètre minimum du tuyau : ......................... 9,5 mm (3⁄8")
Carré d'entraînement : ..................................... ½"
Sens : ................................................................avant et arrière
Vitesse à vide : ................................................. max. 7 000 min
(variable grâce à un régulateur de pression intégré)
Couple maximal : ............................................. 312 Nm
Capacité maximale des boulons : .................... M14
Poids................................................................ 2,18 kg
Informations sur le niveau sonore et vibratoire
Niveau de la pression acoustique en accordance avec la directive sur
les machines 2006/42/CE
Pression acoustique ......................................... LPA = 91 dB(A)
Puissance acoustique ...................................... LWA = 102 dB(A)
Incertitude K : .................................................. 3 dB
L’intensité sonore peut dépasser 85 dB(A) et il est nécessaire que
l’utilisateur prenne des mesures de protection auditive.
Valeur totale des vibrations (somme vectorielle sur trois axes) en
accordance avec la directive sur les machines 2006/42/CE.
Valeur des émissions vibratoires : .................... ah = 5,17 m/s
Incertitude :...................................................... K= 1,5 m/s²
Du fait de l’évolution constante de notre développement produit,
les caractéristiques des produits Silverline peuvent changer sans
notification préalable.
-1
2
Niveau sonore et vibratoire
Les niveaux sonores et vibratoires des caractéristiques techniques sont
déterminés en fonction de la norme ISO 28927 – 3. Ces données peuvent
être utilisées pour comparer des outils similaires et testés selon cette
norme. Ces données peuvent être aussi pour estimer l’exposition aux
niveaux sonores et vibratoires.
Ces données correspondent à un usage normale de l’appareil, et ce
dans des conditions de travail normales. Un appareil mal entretenu, mal
assemblé ou mal utilisé peut augmenter les niveaux sonores et vibratoires.
La durée totale d’utilisation sur laquelle vous utilisez l’appareil doit prendre
en compte les périodes ou l’appareil est éteint ou à l’arrêt. Faites des
pauses régulièrement lorsque vous utilisez cette appareil.
C’est dans l’intérêt de l’utilisateur d’assurer au maximum sa sécurité en
s’équipant de protection de sécurité comme des casques anti- bruit qui
protègent contre les bruits répétitifs et forts, et des gants anti-vibration
pour diminuer les effets vibratoires. Ne pas utilisez cet appareil avec vos
mains sous des conditions en dessous de températures normales, car
l’effet vibratoire en est accentué.
Le niveau sonore
La directive sur les émissions sonores a été introduite pour protéger contre
les risques sur la santé, améliorer la sécurité et prévenir les risques de
pertes auditives par l’exposition aux émissions sonores. Cette directive
peut être utilisée pour définir l’exposition sonore et les paramètres
physiques, tels que les niveaux de pression acoustique, les niveaux
quotidiens et hebdomadaires d’exposition. Une attention particulière doit
être portée au niveau d’exposition et de la durée. Pour plus d’informations
sur la directive des émissions sonores 2003/10/CE et 2000/14/CE, visitez
le site http://osha.europa.eu/fr
Le niveau vibratoire
La directive relative à l’exposition des travailleurs aux risques dus aux
agents physiques 2002/44/CE a été introduite pour contrôler l’exposition
aux vibrations au travail. Cette directive permet aux utilisateurs d’évaluer la
durée d’utilisation de l’appareil. Les personnes utilisant des équipements à
effet vibratoire élevé pendant de longues périodes sont plus exposées aux
risques sur la santé. La norme ISO 28927 – 3 mesure les vibrations selon
trois axe , par la somme vectorielle triaxiale. Lors de l’utilisation d’appareil
à haut effet vibratoire, assurez-vous de ne pas dépasser les niveaux
d’expositions. Pour plus d’informations sur la directive à l’exposition aux
vibrations, consultez le site http://osha.europa.eu/fr.
Consignes générales de sécurité
• En ce qui concerne les risques, lire et comprendre les instructions
de sécurité avant d’installer, utiliser, réparer, entretenir, changer
d’accessoires, ou travailler proche de cet outil. Ne pas respecter les
consignes peut engendrer de sérieuses blessures corporelles.
• Seule une personne qualifiée et formée peut assembler, régler et utiliser
la cet outil.
• N’apporter aucune modification sur cet outil. Des modifications peuvent
diminuer l’efficacité des mesures de sécurité et augmenter les risques
pour l’utilisateur.
• Garder toujours les instructions de sécurité, et les donner à l’utilisateur.
• Ne pas utiliser cet outil si elle est endommagée.
• Les outils doivent être inspectés régulièrement pour vérifier la validité
des données de l’appareil en fonction de la norme ISO 11148-8:2011.
Ces données doivent être lisibles sur l’appareil. Il est de la responsabilité
de ‘employeur/ utilisateur de contacter le fabricant pour obtenir le
remplacement de la plaque signalétique si nécessaire.
Attention : Cet appareil n’est pas conçu pour être utilisé par des personnes
(enfants compris) ayant des capacités physiques ou mentales réduites, ou
n’ayant pas la connaissance ou l’expérience requise, à moins d’être sous la
supervision d’une personne responsable de leur sécurité ou d’avoir reçu les
instructions nécessaires. Les enfants ne doivent pas s’approcher et jouer
avec cet appareil.
Risques de projection
• Il est à savoir qu’un défaut sur la pièce de travail, sur un accessoire
ou sur l’appareil même peut engendrer l’envoi de projectiles avec une
vitesse très importante.
10
Page 12

719770
Clé à chocs pneumatique
• Toujours porter des protections oculaires résistantes aux impacts
pendant toute la durée d’utilisation de cet outil. Le grade de protection
doit être évalué avant chaque utilisation.
• Pour les travaux à effectuer au-dessus de la tête, porter un casque de
sécurité.
• Les risques pour les autres personnes doivent être également évalués.
• Vérifier que la pièce de travail soit convenablement stabilisé pour
travailler en toute sécurité.
Risques d’enchevêtrement
• Etouffements, lacérations et ou déchirures peuvent être provoques avec
le port de vêtements amples, de bijoux, colliers, et si les cheveux ou
des gants ne sont pas maintenus hors de portee de l’appareil et de ses
accessoires.
Risques liés à l’utilisation
• L’utilisation de l’appareil peut exposer les mains à des risques de
coupures, égratignures ou des inflammations.
• Porter des gants de protection adéquats
• Les utilisateurs et le personnel d’entretien doivent être physiquement
capables de manipuler cet appareil de par son volume, poids et
puissance.
• Maintenez l’appareil convenablement de façon à répondre aux
mouvements normaux et d’anticiper les mouvements soudains de
l’outil.
• Travailler avec une posture stable.
• Relâcher le dispositif de marche/arrêt en cas de coupure d’alimentation.
• Utiliser les lubrifiants recommandés par le fabricant.
• Des protections oculaires personnelles doivent être portées. Des gants et
vêtements de protection sont également recommandés.
• Eviter le contact avec l’outil en marche pur éviter des pincements et
coupures sur les mains ou autres parties du corps.
• Porter des gants adéquats
• Des décharges électrostatiques peuvent se produire en cas d’utilisation
sur du plastiques ou d’autres matériaux non conducteurs.
Risques liés aux mouvements répétitifs
• L’utilisation à bon escient de cet outil peut engendrer des sensations de
gêne sur les mains, bras, épaules, cou et autres parties du corps.
• Lors de son utilisation, il est important de garder une posture stable et
d’éviter toute posture pouvant engendrer un déséquilibre. Pour éviter
une sensation de gêne ou de fatigue lors de longues utilisations, changer
de posture.
• Si un utilisateur ressent des symptômes de façon récurrente ou
persistante, comme la gêne, élancement, douleur, picotement,
engourdissement, sensation de brûlure, raideur, ces avertissements
doivent être pris sérieusement. L’utilisateur doit avertir son employeur et
consulter professionnel de la santé qualifié.
Risques liés aux accessoires
• Débrancher toujours l’appareil de sa source d’alimentation avant
d’insérer ou de changer d’accessoire.
• Eviter tout contact direct avec les accessoires insérés sur l’outil car ils
peuvent être chaud ou tranchant.
• Utiliser uniquement les tailles et types d’accessoires recommandés par
le fabricant.
• Risques liés au lieu de travail
• Les causes d’accidents sur le lieu de travail sont souvent dues à des
trébuchements, glissades et chutes. Faites attention sur les surfaces
rendues glissantes par l’utilisation de l’appareil, ainsi que les risques
de trébuchements qui pourraient être occasionnés par le tuyau d’air et
tuyau hydraulique.
• Cet outil n’est pas conçu pour être utilisée en milieu à atmosphère
potentiellement explosif, et n’est pas isolante contre le contact avec une
source électrique.
Risques liés à la poussière et aux émanations.
• La poussière et les émanations produites lors de l’utilisation de la
ponceuse/polisseuse peuvent provoquer des maladies (comme le cancer,
asthme, dermatite et d'anomalies congénitales).
• L’évaluation des risques doit inclure la poussière produite lors de
l’utilisation de l’outil ainsi que le déplacement de la poussière déjà
existant crée par de l’utilisation de l’outil.
• Dirigé la sortie de la poussière de façon à limiter le déplacement de la
poussière dans un milieu poussiéreux.
• Lorsque de la poussière et des émanations sont créés, la priorité doit
être de les contrôler à la source de l’émission.
• Choisir, entretenir et remplacer les accessoires recommandés dans le
manuel d’utilisation pour éviter une augmentation de la production de
poussière et d’émanations.
• Utiliser les protections respiratoires en accordance avec les instructions
de l’employeur ainsi qu’avec la réglementation en matière de santé et
de sécurité.
Risques liés aux émissions sonores
• L’exposition à des niveaux sonores élevés peut entrainer des pertes
auditives permanentes ou autres problèmes, comme l’acouphène
(bourdonnement, sifflement ou grésillement dans les oreilles). Par
conséquent, il est primordial d’évaluer les risques et d’implémenter les
mesures de contrôle nécessaires pour éviter ces risques.
• Une mesure de contrôle pour réduire ces risques peut être d’utiliser
des matériaux amortissants pour atténuer les sons aigus sur la pièce
de travail.
• Porter des protections auditives en accordance avec les instructions de
l’employeur ainsi qu’avec la réglementation en matière de santé et de
sécurité.
• Utiliser et entretenir cet outil comme indiqué dans le manuel d’utilisation
pour éviter une augmentation inutile du niveau sonore.
• Si cet outil possède un silencieux, vérifier qu’il soit en bonne condition et
bien installée sur l’outil pour un bon fonctionnement.
Risques liés aux vibrations
• Les consignes d’utilisation doivent stipuler que la conception et
la fabrication de l’appareil n’élimine pas totalement les risques
vibratoires, et donc qu’il existe toujours des risques. Les données
vibratoires de l’appareil doivent permettre à l’employeur d’évaluer dans
quelles situations l’utilisateur est exposé a des risques vibratoires. Si
les données relatives aux émissions vibratoires lors d’une utilisation
adéquate de l’appareil ne correspondent pas à celles de la norme ISO
28927-3, des informations ou avertissements supplémentaires doivent
être donnés pour que les risques soient évalués et contrôlés.
• L’exposition aux vibrations peut provoquer des lésions nerveuses et des
vaisseaux sanguins des bras et des mains.
• Porter des vêtements chauds lors d’utilisation des conditions de
températures froides et garder vos mains chaudes et sèches.
• En cas d’engourdissement, picotement, douleur ou blanchiment de
la peau sur les doigts ou la main, arrêter l’utilisation de la ponceuse/
polisseuse, prévenir votre employeur et consulter un médecin.
• Utiliser et entretenir la ponceuse/polisseuse comme indiqué dans le
manuel d’utilisation pour éviter une augmentation inutile du niveau
sonore.
• Tenir l’appareil sans trop serrer, mais assez pour travailler en toute
sécurité en fonction de la tâche à effectuer car les risques liés aux
vibrations augmentent plus l’outil est tenu fermement.
www.silverlinetools.com
11
Page 13

F
relatives aux outils pneumatiques
L’air comprimé peut engendre des blessures graves :
• Toujours couper l’alimentation en air, purger le tuyau d’air et débrancher
l’appareil de l’alimentation en air lorsqu’il n’est pas utilisé ou lors d’un
changement d’accessoires ou avant toutes réparations.
• Ne jamais diriger l’air vers vous ou d’autres personnes
• Les tuyaux peuvent être une source de dangers en donnant des coups de
fouets. Toujours vérifier le bon état du tuyau et des raccords.
• Pour toute utilisation de coupleurs universels, utiliser des goupilles
et vérifier les tuyaux pour éviter un mauvais raccord entre le tuyau et
l’appareil.
• Ne jamais dépasser la pression maximale d’air indiquée sur l’appareil.
• Ne jamais porter l’appareil par le tuyau.
• N’entreprenez pas de tronçonner ni de meuler du magnésium ni aucun
alliage contenant une forte proportion de magnésium.
• N’entamez pas de coupe dépassant la profondeur maximale de coupe
du disque.
• Maintenez la machine de façon à éviter de recevoir des débris sur la
peau ou vos vêtements.
• La machine continue à tourner pendant un certain temps après avoir
été éteinte. Laissez la machine s’arrêter d’elle-même. Ne l’arrêtez pas
en calant le disque contre un quelconque objet. NE déposez JAMAIS la
meuleuse avant l’arrêt complet du disque.
• Un disque de meulage s’use à l’usage et sa taille diminue. Une fois que le
disque est trop usé pour pouvoir travailler confortablement, remplacez-le.
Présentation du produitConsignes supplémentaires
1 Carré d'entraînement 1/2"
2 Commutateur de marche avant/arrière
3 Raccord rapide
4 Molette de réglage de l'air/du couple
5 Détente
6 Point d'huile
Utilisation appropriée
• Clé à chocs pneumatique, à utiliser avec des douilles de ½" standard
pour desserrer et serrer des écrous et des boulons.
Remarque : Cet appareil n'est pas une clé dynamométrique. Tournez
toujours les écrous/boulons avec une clé dynamométrique graduée.
Déballage
• Déballez le produit avec soin. Veillez à retirer tout le matériau
d’emballage et familiarisez-vous avec toutes les caractéristiques du
produit.
• Si des pièces sont endommagées ou manquantes, faites-les réparer ou
remplacer avant d’utiliser l’appareil.
Avant utilisation
Montage du raccord rapide
Remarque : Cet outil est fourni avec deux raccords rapides mâles pour la
conduite d’air :
EQ-4 , généralement utilisé en Europe
EN-6 , utilisé principalement au Royaume-Uni
12
EQ-4
Europe
• Choisissez un raccord rapide compatible avec la conduite d’air utilisée, et
montez- le de la façon suivante :
1. Appliquez une bande de PTFE (non fournie) sur le filetage du raccord
pour conserver une meilleure étanchéité. Les conduites d’air pourvues
d’un raccord ¼” coordonné s’emmancheront par simple pression sur
le raccord de l’appareil.
Remarque : appliquez la bande PFTE en la serrant bien et dans le sens
horaire pour que la bande reste bien en place lorsque le raccord sera vissez
sur l’appareil.
2. Retirez le bouchon protecteur de l’arrivée d’air
3. En utilisant une clé (non fournie), vissez le raccord rapide sur l’arrivée
d’air située sur la base de la poignée.
4. Alimentez le circuit d’air en pressurisant avec précaution, et vérifiez
qu’il n’y pas de fuite (par exemple en vaporisant un peu d’eau
savonneuse sur les raccords).
• Les conduites d’air avec des raccords rapides femelles peuvent s’insérer
maintenant sur l’appareil.
EN-6
UK
Page 14

719770
Clé à chocs pneumatique
Connexion de l’air comprimé
SÉPARATION DE L’EAU
RACCORD RAPIDE
COUPLEUR OUTIL
PNEUMATIQUE
• Cet outil doit être branché à une alimentation en air comprimé propre et
sec, pourvue d’un graisseur en ligne et d’un séparateur d’eau.
• Ne laissez pas la pression d’alimentation dépasser la pression maximale
spécifiée. (Voir caractéristiques techniques).
• Vérifiez que l’eau soit drainée quotidiennement
• Vérifiez que toutes les parties du système (tuyaux, coupleurs, etc) soient
adaptés à l’air comprimé utilisé.
RACCORD
TUYAU DE
RACCORDEMENT
FLEXIBLE SERPENTIN
MAMELON
GRAISSEUR
RÉGULATEUR
A PURGER
QUOTIDIENNEMENT
ALIMENTATION EN
AIR COMPRIMÉ
Réglage de la puissance de l'outil
• La vitesse de la clé peut être réglée en appuyant et tournant la molette
de réglage de l'air/du couple (4) :
‘1’ = minimum, ‘4’ = maximum
Avant et arrière
Cette clé est dotée d'une fonction de marche avant/arrière. Sélectionnez
le sens souhaité en appuyant sur le commutateur de marche avant/arrière
(2). Les lettres « F » et « R » signalées sur l'outil indiquent la position du
commutateur :
• Barre vers de la détente = « F » – forward (avant) (rotation dans le sens
des aiguilles d'une montre)
• Barre vers l'arrière de l'outil = « R » – reverse (arrière) (rotation dans le
sens inverse des aiguilles d'une montre)
Remarque : Les termes « avant » et « arrière » se réfèrent aux filetages
à droite.
Installation d'une douille
AVERTISSEMENT : Débranchez toujours votre outil de l'alimentation d'air
avant de fixer ou de retirer des douilles.
1. Enfoncez fermement la douille appropriée de la bague de blocage
dans carré d'entraînement de 1/2" (1).
2. Assurez-vous que la bague de blocage est enclenchée et que la douille
est fermement fixée en essayant de la tirer du carré d'entraînement.
Remarque : Tirez fermement sur la douille pour la retirer du carré
d'entraînement.
Fonctionnement
Desserrage d'un écrou ou d'un boulon
1. Placez la douille sur l'écrou.
2. Tenez fermement l'outil par la poignée. Votre pouce doit faire le tour de
la poignée et vos doigts doivent tenir la détente (5).
3. Tenez la machine en gardant votre autre main à l'arrière de l'outil afin
de contrôler la réaction du couple.
4. Appuyez sur le commutateur de marche avant/arrière (2) vers
l'intérieur jusqu'à ce qu'il ressorte à l'arrière du carter.
5. Appuyez sur la détente pour faire démarrer l'outil.
6. Lorsque l'écrou ou le boulon commence à bouger, relâchez la détente
pour arrêter l'outil et retirer la douille de l'écrou ou du boulon. Retirez
l'écrou de la douille si nécessaire.
Remarque : NE LAISSEZ PAS le cliquet fonctionner en mode « rotation au
ralenti » pendant une période prolongée. Cela raccourcira sa durée de vie.
AVERTISSEMENT : Si l'outil ne peut pas desserrer l'écrou, N'AUGMENTEZ
PAS la pression de sortie du compresseur d'air. Utilisez une clé manuelle à
la place pour desserrer l'écrou ou le boulon.
Serrage d'un écrou ou un boulon
1. Vérifiez le réglage du couple et assurez-vous que l'écrou ou le boulon
peut résister au couple sélectionné.
2. Serrez l'écrou ou le boulon à la main le plus possible.
3. Placez la douille sur l'écrou.
4. Tenez fermement l'outil par la poignée. Votre pouce doit faire le tour de
la poignée et vos doigts doivent tenir la détente (5).
5. Tenez la machine en gardant votre autre main à l'arrière de l'outil afin
de contrôler la réaction du couple.
6. Appuyez sur le commutateur de marche avant/arrière (2) vers
l'intérieur jusqu'à ce qu'il ressorte à l'avant du carter.
7. Appuyez sur la détente pour faire démarrer l'outil.
8. Lorsque l'écrou a été serré, retirez l'outil et la douille.
AVERTISSEMENT : NE SERREZ PAS trop fort. Vous devez utiliser une clé
dynamométrique pour tourner l'écrou sur la bonne valeur après avoir utilisé
la clé à chocs.
AVERTISSEMENT : N'augmentez JAMAIS la pression de l'air au-delà de
la pression de fonctionnement maximale établie dans les « Spécifications
» même si l'outil cale au cours du serrage ou si le couple produit est
insuffisant.
AVERTISSEMENT : Sachez que les outils pneumatiques peuvent garder
de la pression résiduelle après utilisation. Purgez toujours la pression d'air
présente dans l'outil après avoir coupé l'alimentation d'air.
Accessoires
• Les accessoires pour cet outil, y compris les douilles et jeux de douilles,
sont disponibles chez votre distributeur Silverline. Vous pouvez obtenir
des pièces de rechange chez votre revendeur Silverline ou sur www.
toolsparesonline.com
www.silverlinetools.com
13
Page 15

F
Entretien
ATTENTION : Débranchez toujours l’appareil de l’alimentation en air et
purgez l’air avant de le nettoyer ou de l’entretenir.
Important : Il est important d’effectuer l’entretien régulier de l’outil pour
éviter que la saleté, humidité provoque la corrosion des éléments internes,
qui pourrait engendrer un mauvais fonctionnement de votre appareil.
Entretien quotidien : L’outil étant débranché de l’alimentation en air,
verser quelques gouttes d’huile dans la prise d’air. Faites fonctionner l’outil
brièvement à faible vitesse afin de lubrifier tous les éléments internes.
• si l’appareil est utilisé constamment ou pendant de longues périodes
d’affilée, il faut l’équiper d’un filtre/lubrificateur combiné. Un filtre à air
doit être installé en permanence.
• Utiliser de l’huile pour air comprimé : N’UTILISEZ EN AUCUN CAS DE
L’HUILE MOTEUR CLASSIQUE.
• Le non-respect des instructions d’utilisation et d’entretien peut annuler
la garantie.
Rangement
Ranger cet outil dans un endroit sûr, sec et hors portée des enfants
Recyclage
• Comme tous les autres outils électroportatifs, les outils à air comprimé
ne doivent pas être jetés avec les ordures ménagères.
• Les outils à air comprimé contiennent de l’huile et lubrifiants et doivent
donc être recyclés en conséquence.
• Contactez les autorités locales compétentes en matière de gestion des
déchets pour vous informer de la procédure à suivre pour recycler les
outils électriques et à air comprimé
Dépannage
Problème Cause possible Solution
Pression incorrecte Réglez la pression d'air correcte selon les spécifications.
Outil fonctionnant lentement
Outil bloqué
L’appareil a une vitesse à vide
normale, mais ralentit lorsqu’il est
sous charge
Outil qui ne s'arrête pas après
le relâchement complet de la
détente
Si les solutions de dépannage ci-dessus échouent, contactez votre revendeur ou un centre de service agréé Silverline.
Saleté dans le mécanisme Versez de l'huile dans l'entrée d'air conformément aux instructions
Blocage de l'air Actionnez l'outil en lui donnant de brèves pulsations afin d'éliminer le
Fuite d'air Vérifiez tous les raccords et tuyaux à la recherche de fuite et réglez
Blocage du filtre en tamis métallique Retirez le raccord rapide (4) et nettoyez le filtre.
Saleté ou rouille dans le mécanisme Essayez les solutions proposées dans « Outil fonctionnant lentement ».
Saleté ou rouille dans le mécanisme Donnez des petits coups sur l'outil à l'aide d'un maillet doux.
Saleté ou rouille dans le mécanisme Libérez le mécanisme en le faisant tourner manuellement après l'avoir
Pièces du moteur ou de l’embrayage usées Contactez un centre de réparation agréé Silverline
Worn motor or clutch parts Versez de l’huile dans l’entrée d’air selon les consignes d’entretien
Joint torique du pointeau ou siège de vanne
endommagé
d'entretien.
blocage.
les problèmes en les resserrant à l'aide d'un ruban PTFE ou en les
remplaçant.
débranché de la conduite d'air.
et faites fonctionner l’appareil par petits coups pour le lubrifier et le
dégripper
Faites réparer l'outil dans un centre de service agréé Silverline.
14
Page 16

719770
Garantie Silverline Tools
Ce produit Silverline bénéficie d’une garantie
de 3 ans
Enregistrez ce produit à www.silverlinetools.com dans les 30 jours suivant
l’achat afin de bénéficier de la garantie de 3 ans. La période de garantie
commence à partir de la date d’achat figurant sur votre facture d’achat.
Conditions de Garantie des Outils Silverline
La période de garantie prend effet à compter de la date de l’achat en
magasin, comme indiqué sur votre facture d’achat.
VEUILLEZ CONSERVER VOTRE FACTURE D’ACHAT.
Si ce produit est défectueux pendant les 30 jours qui suivent l’achat,
retournez-le au magasin où vous l’avez acheté, avec votre facture, en
expliquant en détail le problème. Le produit sera remplacé ou vous serez
remboursé(e).
Si ce produit est défectueux après cette période de 30 jours,
retournez-le à :
Silverline Tools Service Centre
PO Box 2988
Yeovil
BA21 1WU, Royaume Uni
Toute demande de service sous garantie doit être soumise pendant la
période de garantie.
Avant toute intervention sous garantie, vous devez présenter la facture
d’achat originale sur laquelle doivent figurer la date d’achat, votre nom,
votre adresse et le lieu d’achat.
Vous devez expliquer en détail la défaillance nécessitant réparation.
Les demandes de service sous garantie faites pendant la période de
garantie seront vérifiées par Silverline Tools pour établir si la défaillance du
produit est liée à un vice de matériau ou de fabrication.
Les frais de port ne seront pas remboursés. Les articles retournés doivent
être convenablement propres et sûrs pour être réparés et devraient être
emballés soigneusement pour éviter tout dommage ou toute blessure
pendant le transport. Nous pouvons refuser les livraisons qui ne sont pas
convenables ou sûres.
Toute intervention sera effectuée par Silverline Tools ou ses agents de
réparation agréés.
La réparation ou le remplacement du produit ne dépassera pas la période
de garantie.
Les anomalies que nous reconnaissons être couvertes par la garantie
seront rectifiées par la réparation de l’outil, sans frais (hormis les
frais de port) ou par son remplacement par un outil en parfait état de
fonctionnement.
Clé à chocs pneumatique
Enregistrement de votre achat
Visitez silverlinetools.com, sélectionnez le bouton d’enregistrement
et saisissez :
• Vosinformationspersonnelles
• Lesinformationsconcernantleproduitetl’achat
Vous recevrez le Certificat de garantie en format PDF. Veuillez l’imprimer et
le conserver avec votre achat.
Les pièces ou les outils remplacés deviendront la propriété de
Silverline Tools.
La réparation ou le remplacement de votre produit sous garantie vous
apporte des avantages ; ces avantages s’ajoutent à vos droits statutaires
en tant que consommateur sans les affecter aucunement.
La présente garantie couvre:
La réparation du produit, s’il peut être vérifié, à la satisfaction de Silverline
Tools, que les défaillances du produit ont été provoquées par un vice de
matériau ou de fabrication au cours de la période de garantie.
Si une pièce n’est plus disponible ou n’est plus fabriquée, Silverline Tools la
remplacera par une pièce de rechange opérationnelle.
Utilisation de ce produit dans l’UE.
La présente garantie ne couvre pas:
Silverline Tools ne garantit pas les réparations nécessaires du produit
engendrées par :
L’usure normale provoquée par l’utilisation conforme aux instructions
d’utilisation, par exemple les lames, les charbons, les courroies, les
ampoules, les batteries, etc.
Le remplacement de tout accessoire fourni tel que les forêts, les lames, les
feuilles abrasives, les outils de coupes et les autres articles associés.
Les dommages et les défaillances accidentels causés par une utilisation ou
un entretien négligent, une mauvaise utilisation, un manque d’entretien ou
une utilisation ou une manipulation imprudente du produit.
L’utilisation du produit à des fins autres que son utilisation domestique
normale.
Le moindre changement ou la moindre modification du produit.
L’utilisation de pièces et d’accessoires qui ne sont pas des composants
véritables de Silverline Tools.
Une installation défectueuse (sauf si l’installation a été réalisée par
Silverline Tools).
Les réparations ou les modifications réalisées par des tiers autres que
Silverline Tools ou ses agents de réparation agréés.
Les demandes de service autres que le droit de rectifier les défaillances
de l’outil indiquées dans ces conditions de garantie ne sont pas couvertes
par cette garantie.
Déclaration de conformité CE
Le soussigné : Mr Darrell Morris
Autorisé par : Silverline Tools
Déclare que le produit :
Code d’identification : 719770
Description : Clé à chocs pneumatique
Est conforme aux directives suivantes :
• Directive sur les machines 2006/42/CE
• EN 792-7:2001+A1:2008
Organisme notifié : Intertek Testing Services, Shanghai, China
La documentation technique est conservée par : Silverline Tools
Date : 11/06/13
Signature :
Directeur général
Nom et adresse du fabricant ou de son représentant agréé :
Powerbox International Ltd, Boundary Way, Lufton Trading Estate, Yeovil,
Somerset, BA22 8HZ Royaume-Uni
www.silverlinetools.com
15
Page 17

D
Beschreibung der Symbole
Auf dem Leistungsschild des Werkzeugs sind möglicherweise Symbole
abgebildet. Sie vermitteln wichtige Informationen über das Produkt oder
dienen als Gebrauchsanweisung.
Gehörschutz tragen
Augenschutz tragen
Atemschutz tragen
Kopfschutz tragen
Schutzhandschuhe tragen
Bedienungsanleitung sorgfältig lesen
NICHT mit Pressluftflaschen betreiben
Erfüllt die entsprechenden rechtlichen Vorschriften und
Sicherheitsnormen
Umweltschutz
Druckluftwerkzeuge dürfen nicht über den Haushaltsmüll
entsorgt werden. Geräte enthalten Spuren von Öl und anderen
Schmiermitteln. Nach Möglichkeit bitte über entsprechende
Einrichtungen entsorgen. Lassen Sie sich bezüglich der
sachgemäßen Entsorgung von Druckluftwerkzeugen von der
zuständigen Behörde oder dem Händler beraten.
Technische Daten
Max. Betriebsdruck ...................................... 6,3 bar (90 psi)
Luftverbrauch ..............................................113 l/min
Druckluftanschluss ......................................1⁄4 Zoll BSP mit zwei
Bajonett-Schnellkupplungen (EN-6 für Großbritannien und EQ-4 für
Kontinentaleuropa)
Mindestschlauchdurchmesser .....................9,5 mm
Vierkant-Antrieb...........................................½ Zoll
Antriebsrichtungen ......................................Rechts- und Linkslauf
Leerlaufdrehzahl ..........................................max. 7.000 min
(variabel, am integrierten Druckregler einstellbar)
Max. Drehmoment ....................................... 312 Nm
Max. Schraubendurchmesser ...................... M14
Gewicht .......................................................2,18 kg
Geräusch- und Vibrationsinformationen:
Schalldruckpegel gemäß Maschinenrichtlinie 2006/42/EG:
Schalldruckpegel .........................................LPA = 94 dB(A)
Schallleistungspegel ....................................LWA = 105 dB(A)
Unsicherheit.................................................K = 3 dB
Der Schallintensitätspegel kann für den Bediener 85 dB(A)
übersteigen und Lärmschutzmaßnahmen sind notwendig.
Gesamtvibrationswerte (Triax-Vektorsumme) gemäß
Maschinenrichtlinie 2006/42/EG:
Schwingungsemissionswert ........................ ah = 5,17 m/s
Unsicherheit.................................................K = 1,5 m/s
Aufgrund der fortlaufenden Weiterentwicklung unserer Produkte
können sich die technischen Daten von Silverline-Produkten ohne
vorherige Ankündigung ändern.
-1
2
2
Schall und Vibrationen
Die in den Technischen Daten angegebenen Geräusch- und
Vibrationsinformationen werden nach ISO 28927-3 bestimmt. Diese
Angaben können zum Vergleich ähnlicher Werkzeuge dienen, die nach
demselben Standard geprüft wurden. Die Angaben können auch zur
Beurteilung der Schall- und Vibrationsbelastung verwendet werden.
Die angegebenen Werte entsprechen einer normalen Benutzung des
Werkzeugs unter normalen Arbeitsbedingungen. Schlecht gewartete,
falsch montierte und unsachgemäß verwendete Werkzeuge können
erhöhte Schallpegel und Vibrationswerte aufweisen. Bei der Bestimmung
der Gesamtverwendungsdauer des Werkzeugs müssen Ruhe- und
Stillstandzeiten berücksichtigt werden. Planen Sie regelmäßige
Arbeitspausen bei der Verwendung dieses Werkzeuges ein.
Es liegt im Interesse des Benutzers, seine eigene Sicherheit durch
Tragen angemessener persönlicher Schutzausrüstung zu erhöhen,
einschließlich Gehörschutz gegen lauten und wiederholten Lärm sowie
Anti-Vibrationshandschuhen zur Verringerung der Vibrationsbelastung.
Verwenden Sie dieses Werkzeug nicht mit kalten Händen, da Vibrationen
bei Temperaturen unter dem individuellen Komfortbereich eine stärkere
Wirkung zeigen.
Schall
Die Lärmschutzrichtlinie wurde zur Gewährleistung der Arbeitssicherheit
und zum Schutz der Gesundheit vor Auswirkungen oder wahrscheinlichen
Auswirkungen von Schallbelastung und Hörverlust eingeführt. Diese
Richtlinie definiert Schallbelastung und physikalische Parameter wie
Spitzenschalldruck sowie Tages- und Wochenbelastungswerte. Besondere
Aufmerksamkeit gilt dem Belastungsgrad und der Belastungsdauer. Weitere
Informationen zu den Lärmschutzrichtlinien 2003/10/EG und 2000/14/
EG finden Sie auf den Seiten der Europäischen Agentur für Sicherheit und
Gesundheitsschutz am Arbeitsplatz: www.osha.europa.eu.
Vibrationen
Die EU-Vibrationsrichtlinie 2002/44/EG wurde zur Kontrolle der
Vibrationsbelastung am Arbeitsplatz eingeführt. Die Richtlinie ermöglicht
es dem Werkzeugbenutzer, auf Kenntnis der Sachlage beruhende
Entscheidungen über seine Arbeitsdauer zu treffen. Personen, die
regelmäßig und über längere Zeiträume hinweg mit vibrationsstarken
Geräten arbeiten, sind einem höheren Erkrankungsrisiko ausgesetzt. Nach
ISO 28927-3 werden Vibrationen in drei Raumrichtungen gemessen,
was unter dem Begriff Triax-Vektorsummen-Bestimmung bekannt ist.
Stellen Sie beim Gebrauch von Geräten mit hoher Vibrationsbelastung
sicher, die zulässigen Belastungsgrenzwerte nicht zu überschreiten.
Weitere Informationen zur EU-Vibrationsrichtlinie finden Sie auf den Seiten
der Europäischen Agentur für Sicherheit und Gesundheitsschutz am
Arbeitsplatz: www.osha.europa.eu.
Allgemeine Sicherheitshinweise
• Lesen Sie diese Sicherheitshinweise zur Vermeidung unterschiedlicher
Gefahrenquellen aufmerksam durch, bevor Sie dieses Werkzeug
installieren, bedienen, reparieren, warten, Zubehörteile anbringen oder
in der Nähe dieses Werkzeuges arbeiten. Nichtbeachtung kann zu
schwerwiegenden Verletzungen führen.
• Dieses Werkzeug darf nur von qualifizierten und in der Bedienung
unterwiesenen Personen installiert, eingestellt und benutzt werden.
• Modifizieren Sie dieses Werkzeug in keinster Weise. Modifikationen
können dazu führen, dass Schutzeinrichtungen nicht effektiv
funktionieren, wodurch das Risiko für den Benutzer erhöht wird.
• Werfen Sie diese Sicherheitsanleitung nicht weg, sondern stellen Sie sie
jedem Benutzer zur Verfügung.
• Benutzen Sie dieses Werkzeug nicht, wenn es in irgendeiner Art
beschädigt ist.
• Werkzeuge müssen regelmäßig darauf inspiziert werden, dass von ISO
11148 vorgeschriebene Kennzeichnungen auf dem Werkzeug angebracht
und noch lesbar sind. Der Arbeitgeber/Benutzer ist dafür verantwortlich,
gegebenenfalls Ersatzbeschriftungen über den Gerätehersteller zu
beziehen.
16
Page 18

719770
Druckluft-Schlagschrauber
WARNUNG! Dieses Gerät darf nicht von Personen (wie z.B. Kindern) mit
eingeschränkten körperlichen oder geistigen Fähigkeiten oder von Personen
ohne Erfahrung im Umgang mit einem solchen Gerät betrieben werden,
außer wenn sie von einer für ihre persönliche Sicherheit verantwortlichen
Person in der Benutzung unterwiesen worden sind und dabei beaufsichtigt
werden. Kinder müssen beaufsichtigt werden, um sicherzustellen, dass sie
das Gerät nicht als Spielzeug verwenden.
Risiken durch geschossartige Fragmente
• Seien Sie sich bewusst, dass im Falle eines Versagens des Werkzeugs
oder seines Zubehörs und beim Zerbrechen des Werkstücks
Hochgeschwindigkeitsgeschosse entstehen können.
• Tragen Sie bei der Benutzung des Werkzeugs stets eine geeignete
schlagfeste Schutzbrille. Die Schutzklasse hängt von der jeweiligen
Anwendung ab und muss individuell beurteilt werden.
• Tragen Sie bei Überkopfarbeiten einen Schutzhelm.
• Das Risiko gegenüber dritten Personen und Beistehenden sollte an dieser
Stelle ebenfalls beurteilt werden.
• Vergewissern Sie sich, dass das Werkstück stets sicher befestigt ist.
Risiken des Hängenbleibens
• Erdrosselung, Skalpieren und andere Risswunden können durch lose
Kleidung, Schmuck, Krawatten/Tücher/Halsmode, Haare, Handschuhe
u.ä. verursacht werden, wenn diese nicht ordnungsgemäß vom Werkzeug
ferngehalten werden.
Betriebsrisiken
• Bei der Benutzung dieses Werkzeugs können die Hände des Benutzers
Gefahren, die Schnitt- und Schürfwunden sowie Verbrennungen
hervorrufen können, ausgesetzt sein.
• Schützen Sie Ihre Hände durch Tragen geeigneter Schutzhandschuhe.
• Bediener und Wartungspersonal müssen körperlich in der Lage sein,
die Masse und das Gewicht des Werkzeugs sowie die bei dessen
Verwendung auftretenden Kräfte handhaben zu können.
• Halten Sie das Werkzeug vorschriftsmäßig; seien Sie jederzeit bereit,
plötzliches Ausschlagen abzufangen und haben Sie stets beide Hände
am Werkzeug.
• Achten Sie auf eine gut ausbalancierte Körperposition und sorgen Sie für
einen sicheren Stand.
• Schalten Sie das Werkzeug im Falle eines plötzlichen Ausfalls der
Energieversorgung immer am Schalter aus.
• Verwenden Sie ausschließlich vom Hersteller empfohlene Schmiermittel.
• Das Tragen einer Schutzbrille ist Pflicht; geeignete Schutzhandschuhe
und Arbeitsschutzkleidung werden dringend empfohlen.
• Vermeiden Sie die Berührung mit sich bewegenden Teilen, um Quetschund Schnittwunden an Händen und anderen Körperteilen zu vermeiden.
Tragen Sie geeignete Schutzhandschuhe.
• Bei der Verwendung mit Kunststoffen und anderen elektrisch nichtleitfähigen Materialien kann es zu elektrostatischer Aufladung kommen.
Risiken durch wiederholte Bewegungsabläufe
• Bei der Arbeit mit diesem Werkzeug ist es möglich, dass der Benutzer
Unbehagen in den Händen, Armen, Schultern, im Nacken oder in anderen
Körperteilen verspürt.
• Der Benutzer muss während der Arbeit mit diesen Werkzeug darauf
achten, stets eine bequeme Körperposition mit festem Stand
einzuhalten; unbequeme Positionen und Positionen, die zum Verlust des
Gleichgewichtes führen können, sind zu vermeiden. Der Benutzer sollte
seine Körperposition bei länger andauernden Arbeiten in regelmäßigen
Abständen verändern, um Ermüdung und Unwohlsein vorzubeugen.
• Warnsignale wie bleibendes oder wiederauftretendes Unbehagen, akutes
oder anhaltendes Schmerzgefühl, Pochen, Kribbeln, Taubheit, Brennen
oder Versteifungen dürfen nicht ignoriert werden. Der Arbeitgeber
muss umgehend informiert und ein qualifizierter Arbeitsmediziner
hinzugezogen werden.
Risiken durch Zubehörteile
• Trennen Sie das Gerät stets von der Energieversorgung, bevor Sie
Zubehörteile anbringen oder austauschen.
• Vermeiden Sie während und unmittelbar nach der Verwendung
direkten Kontakt mit dem eingesetzten Werkzeug, da dieses heiß oder
scharfkantig sein kann.
• Verwenden Sie ausschließlich vom Gerätehersteller empfohlenes
Zubehör und kompatible Verbrauchsmaterialien; verwenden Sie keine
Zubehörteile oder Verbrauchsmaterialien in anderen Größen.
Arbeitsplatzgefahren
• Ausrutschen, Stolpern und Fallen sind häufig auftretende Arten von
Arbeitsunfällen. Achten Sie bei der Verwendung dieses Werkzeugs
auf rutschige Untergründe sowie Stolpergefahren, z.B. durch die
Druckluftzuleitung oder Hydraulikschläuche.
• Dieses Gerät ist nicht für den Betrieb in explosionsgefährdeten Bereichen
konzipiert und es ist nicht gegen elektrischen Strom isoliert.
• Vergewissern Sie sich, dass sich keine elektrischen Leitungen,
Gasleitungen usw. in Ihrem Arbeitsbereich befinden, welche durch das
Werkzeug beschädigt werden und eine Gefahr darstellen könnten.
Risiken durch Staub und Rauch
• Durch Benutzung dieses Werkzeugs entstehender Staub und Rauch ist
gesundheitsschädlich (und kann u.a. Krebs, Geburtsschäden, Asthma
und Dermatitis verursachen). Eine Risikoanalyse und die Einführung von
Maßnahmen zur Kontrolle der Gesundheitsbelastung sind unerlässlich.
• In der Risikoanalyse muss sowohl durch die Benutzung des Werkzeuges
erzeugter als auch bestehender Staub berücksichtigt werden.
• Um Staubemissionen möglichst gering zu halten, verwenden Sie
das Gerät wie in dieser Anleitung beschrieben und halten Sie es
entsprechend instand.
• Richten Sie den Staubaustritt so aus, dass bestehender Staub nicht
aufgewirbelt wird.
• Bei Ausführen von stauberzeugenden Arbeiten muss der Staub bereits
bei der Emission kontrolliert werden.
• Tauschen Sie abgenutzte Verbrauchsmaterialien regelmäßig wie
im Handbuch beschrieben aus, um einen unnötigen Anstieg der
Staubbelastung zu verhindern.
• Verwenden Sie Atemschutz in der von Ihrem Arbeitgeber
vorgeschriebenen Art und Weise bzw. in Übereinstimmung mit geltenden
Arbeitsschutzrichtlinien.
Lärmgefährdungen
• Hohe Schallbelastungen können einen bleibenden, schweren
Verlust des Hörvermögens und andere Gesundheitsschäden wie
Tinnitus (Ohrenklingeln, Pfeiftöne, Summen) hervorrufen. Daher
sind Risikobewertung und das Treffen angemessener Kontroll- und
Schutzmaßnahmen unerlässlich.
• Angemessene Kontrollmaßnahmen umfassen z.B. das Anbringen einer
geeigneten Schalldämpfung, welche die Geräuschentwicklung am
Werkstück niedrig hält.
• Verwenden Sie Gehörschutz in der von Ihrem Arbeitgeber
vorgeschriebenen Art und Weise bzw. in Übereinstimmung mit geltenden
Arbeitsschutzrichtlinien.
• Verwenden Sie das Gerät wie in dieser Anleitung beschrieben, um einer
unnötigen Erhöhung des Schallpegels vorzubeugen, und halten Sie es
entsprechend instand.
• Tauschen Sie abgenutzte Verbrauchsmaterialien regelmäßig wie in
dieser Anleitung beschrieben aus, um einen unnötigen Anstieg der
Geräuschbelastung zu verhindern.
• Falls das Gerät über einen Schalldämpfer verfügt, stellen Sie sicher, dass
dieser stets verwendet wird und sich in einwandfreiem Zustand befindet.
www.silverlinetools.com
17
Page 19

D
Vibrationsgefährdungen
• Es ist Aufgabe der Bedienungsanleitung, den Benutzer über die
Vibrationsgefährdung aufzuklären, die nicht durch Gestaltungs- und
Konstruktionsmerkmale beseitigt werden konnte und daher als
Restrisiko bestehen bleibt. Arbeitgeber sind durch diese Angaben
in der Lage, das Risiko und die Belastung durch Vibrationen für den
Bediener einzuschätzen. Falls die durch ISO 28927-3 bestimmten
Vibrationsemissionswerte die tatsächlichen Vibrationswerte bei der
regulären (und voraussehbaren unsachgemäßen) Verwendung des
Werkzeuges nicht angemessen wiedergeben, müssen zusätzliche
Informationen und Warnhinweise zur Verfügung gestellt werden, welche
eine Risikoeinschätzung ermöglichen.
• Exposition gegenüber Vibrationen kann zu bleibenden Nervenschäden
und Schädigung von Blutgefäßen an Händen und Armen führen.
• Tragen Sie bei der Arbeit unter kalten Bedingungen warme Kleidung und
halten Sie Ihre Hände trocken und warm.
• Beenden Sie die Arbeit mit dem Gerät unverzüglich, falls Sie ein
Taubheitsgefühl, Prickeln oder Schmerzen verspüren oder falls Ihre
Haut an Fingern oder Händen aufgrund von Durchblutungsstörungen
weißlich aussieht. Verständigen Sie Ihren Arbeitgeber und suchen Sie
einen Arzt auf.
• Verwenden Sie das Gerät wie in dieser Anleitung beschrieben, um einer
unnötigen Erhöhung der Vibrationsbelastung vorzubeugen, und halten Sie
es entsprechend instand.
• Halten Sie das Werkzeug locker, jedoch sicher in der Hand und seien Sie
bereit, eine der Bewegung des Gerätes entgegenwirkende Handstärke
anzuwenden. Das Risiko von Schäden aufgrund von Vibrationsbelastung
ist im Allgemeinen höher, je stärker die angewandte Griffkraft ist.
Zusätzliche
Sicherheitsanweisungen für
druckluftbetriebene Werkzeuge
Druckluft kann schwerwiegende Verletzungen verursachen:
• Schließen Sie stets die Druckluftversorgung, machen Sie den Schlauch
drucklos und entfernen Sie das Werkzeug von der Druckluftversorgung,
wenn es nicht benutzt wird oder Sie Wartungs- bzw. Reparaturarbeiten
durchführen.
• Richten Sie einen Druckluftstrom niemals auf sich selbst oder auf andere
Personen.
• Umherschlagende Schläuche können zu schwerwiegenden Verletzungen
führen. Überprüfen Sie Schläuche und Verbindungen stets auf
Beschädigungen und auf festen Sitz.
• Wenn Verbindungselemente mit Klauenkupplung verwendet werden,
müssen Sicherungsstifte sowie Sicherheitselemente zur Sicherung
gegen Umherschlagen des Schlauches bei Versagen des schlauch- oder
geräteseitigen Verbinders installiert werden.
• Überschreiten Sie niemals den auf dem Werkzeug angegebenen
maximalen Betriebsdruck.
• Tragen Sie ein Druckluftwerkzeug niemals am Schlauch.
Geräteübersicht
1 ½-Zoll-Vierkantantrieb
2 Drehrichtungswahlschalter
3 Schnellkupplung
4 Druckluftregler
5 Betriebsschalter
6 Schmiermittelöffnung
Bestimmungsgemäße
Verwendung
• Mit Druckluft aus einem Kompressor betriebener Schlagschrauber zur
Verwendung mit konventionellen ½-Zoll-Steckschnüssen, zum Lösen
und Anziehen von Schraubverbindungen.
Hinweis: Dieses Gerät ist kein Drehmomentschlüssel! Ziehen Sie
Schraubverbindungen nach dem groben Anziehen stets mit einem
kalibrierten Drehmomentschlüssel auf das erforderliche Drehmoment nach.
Auspacken des Gerätes
• Packen Sie Ihr Werkzeug vorsichtig aus und überprüfen Sie es. Machen
Sie sich vollständig mit allen seinen Eigenschaften und Funktionen
vertraut.
• Vergewissern Sie sich, dass sämtliche Teile des Werkzeugs vorhanden
und in einwandfreiem Zustand sind. Sollten Teile fehlen oder beschädigt
sein, lassen Sie diese ersetzen, bevor Sie das Werkzeug verwenden.
Vor Inbetriebnahme
Schnellkupplung anbringen
Hinweis: Der Lieferumfang dieses Werkzeugs umfasst zwei verschiedene
Druckluft-Schnellkupplungen:
EQ-4: Verwendung vor allem in Kontinentaleuropa
EN-6: Verwendung vor allem in Großbritannien
EQ-4
Europe
Bitte wählen Sie die mit dem von Ihnen verwendeten Druckluftsystem
kompatible Schnellkupplung und richten Sie sich nach der folgenden
Installationsanleitung:
1. Dichten Sie das Schraubengewinde der Schnellkupplung (10) mit
PTFE-Band (nicht mitgeliefert) ein, um eine luftdichte Verbindung zu
erhalten.
Hinweis: Wickeln Sie das PTFE-Band fest und im Uhrzeigersinn, damit es
sich bei Einschrauben des Gewindes nicht löst.
2. Entfernen Sie den Schutzstopfen aus dem Druckluftanschluss.
3. Schrauben Sie die Schnellkupplung mit einem Gabelschlüssel (nicht
mitgeliefert) in den Druckluftanschluss unten am Handgriff.
4. Verbinden Sie die Schnellkupplung mit der Druckluftversorgung,
bringen Sie sie vorsichtig unter Druck und prüfen Sie die Verbindung
auf Dichtigkeit (z.B., indem Sie die Außenseiten der Verbindungsstücke
mit wenig Seifenwasser besprühen).
• Schnellkupplungen mit passendem Innengewinde lassen sich nun auf
das Werkzeug aufstecken.
EN-6
UK
18
Page 20

DRUCKLUFTZUFUHR
719770
Druckluft-Schlagschrauber
Anschluss an die Druckluftversorgung
ANSCHLUSSSTÜCK FÜR
DRUCKLUFTGERÄT
• Dieses Werkzeug ist zum Anschluss an eine Druckluftversorgung
vorgesehen, die über eine Wartungseinheit mit Wasserabscheider und
Druckluftöler verfügt und saubere, trockene Druckluft liefert.
• Der Druck der Luftversorgung darf den angegebenen maximalen
Arbeitsdruck des Gerätes nicht überschreiten (siehe Abschnitt
„Technische Daten“).
• Sorgen Sie dafür, dass aufgefangene Feuchtigkeit täglich aus dem
Druckluftsystem entleert wird.
• Stellen Sie sicher, dass alle Teile des Druckluftsystems (inkl. Schläuche,
Verbinder usw.) für den angegebenen Betriebsdruck geeignet sind.
SCHNELLKUPPLUNGSADAPTER
NIPPEL
FÜHRUNGSSCHLAUCH
WASSERABSCHEIDUNG
DRUCKLUFTSCHLAUCH
NIPPEL
NEBELÖLER
DRUCKLUFTREGLER
TÄGLICH
ABLASSEN!
Geräteleistung einstellen
• Die Geschwindigkeit des Gerätes last sich am Druckluftregler (4)
einstellen: „1” = Minimum, „4” = Maximum
Rechts-/Linkslauf
Dieses Gerät verfügt über Rechts- und Linkslauf. Die benötigte Drehrichtung
kann über den Drehrichtungswahlschalter (2) eingestellt werden. Die
Drehrichtung ist mit folgenden Abkürzungen auf dem Gerät vermerkt:
• „F“ (engl. „forward“) für Rechtslauf; Schalter tritt über dem
Betriebsschalter aus dem Gerätegehäuse heraus
• „R“ (engl. „reverse“) für Linkslauf; Schalter tritt auf der Geräterückseite
heraus
Steckschlüsseleinsatz anbringen
WARNUNG! Trennen Sie das Gerät stets von der Druckluftversorgung bevor
Sie Zubehör anbringen oder abnehmen.
1. Drücken Sie einen geeigneten Steckschlüsseleinsatz fest über den
Fixierungsring auf den ½-Zoll-Vierkantantrieb (1) hinauf
2. Stellen Sie sicher, dass die Stecknuss fest auf dem Vierkantantrieb
angebracht ist, indem Sie versuchen diese abzuziehen.
Hinweis: Ziehen Sie fest am montierten Steckschlüsseleinsatz, um diesen
zu entfernen.
Bedienung
Schraubverbindungen lösen
1. Stecken Sie die Stecknuss auf die Mutter oder den Schraubenkopf auf.
2. Halten Sie das Gerät gut am Griff fest. Ihr Daumen sollte seitlich am
Griff vorbeiragen und Ihr Zeigefinger sich auf dem Betriebsschalter (5)
befinden.
3. Stützen Sie die Maschine mit der anderen Hand an der
Maschinenrückseite ab, um der Drehung während des Betriebs
entgegenzuwirken.
4. Drücken Sie den Drehrichtungswahlschalter (2), so dass er hinten aus
dem Gerätegehäuse hinausragt.
5. Betätigen Sie den Betriebsschalter um das Gerät einzuschalten.
6. Lassen Sie den Betriebsschalter los, um das Gerät auszuschalten,
sobald sich die Mutter/Schraube gelöst hat. Entnehmen Sie die Mutter
falls nötig aus der Stecknuss.
Hinweis: Lassen Sie das Gerät NICHT längere Zeit im Leerlauf laufen.
Dadurch würde seine Lebensdauer verkürzt.
WARNUNG! Erhöhen Sie den Luftdruck nicht, falls der Schlagschrauber eine
Schraubverbindung nicht lösen kann. Lösen Sie die Verbindung in diesem
Fall mit einem geeigneten manuellen Schraubenschlüssel.
Schraubverbindungen anziehen
1. Prüfen Sie, ob die anzuziehende Schraubverbindung für das
Drehmoment des Gerätes geeignet ist.
2. Schrauben Sie die Muttern bzw. Schrauben so weit wie möglich mit
der Hand fest.
3. Stecken Sie die Stecknuss auf die Mutter oder den Schraubenkopf auf.
4. Halten Sie das Gerät gut am Griff fest. Ihr Daumen sollte seitlich am
Griff vorbeiragen und Ihr Zeigefinger sich auf dem Betriebsschalter (5)
befinden.
5. Stützen Sie die Maschine mit der anderen Hand an der
Maschinenrückseite, um der Drehung entgegenzuwirken.
6. Drücken Sie den Drehrichtungswahlschalter (2) so dass er vorne aus
dem Gerätegehäuse herausragt.
7. Betätigen Sie den Betriebsschalter um das Gerät einzuschalten.
8. Nehmen Sie das Gerät nach dem Anziehen von der Schraube ab.
WARNUNG! Ziehen Sie Verbindungen NIEMALS zu fest an. Ziehen Sie
Schraubverbindungen nach dem groben Anziehen stets mit einem
kalibrierten Drehmomentschlüssel auf das erforderliche Drehmoment nach.
WARNUNG:!Erhöhen Sie den Luftdruck niemals über den in den
technischen Daten angegebenen maximalen Betriebsdruck hinaus,
falls das vom Gerät produzierte Drehmoment zum Anziehen einer
Schraubverbindung nicht ausreichend sein sollte.
WARNUNG! Beachten Sie, dass Druckluftgeräte auch nach Einstellen der
Arbeit noch über Restdruck verfügen können. Lassen Sie die verbleibende
Druckluft nach Trennung von der Druckluftzufuhr stets aus dem Gerät ab.
Zubehör
• ZubehörfürdiesesWerkzeugwiez.B.Steckschlüsseleinsätzekönnen
Sie über Ihren Silverline-Fachhändler beziehen. Ersatzteile sind über Ihren
Silverline-Fachhändler und unter www.toolsparesonline.com erhältlich.
Wartung
WARNUNG! Trennen Sie das Gerät stets von der Druckluftversorgung und
lassen Sie den Druck ab, bevor Sie Wartungs- oder Reinigungsarbeiten
durchführen.
Messerwechsel
Hinweis: Überprüfen Sie die Messer in regelmäßigen Abständen und
ersetzen Sie sie bei Bedarf. Alle drei Messer sind separat erhältlich (siehe
„Zubehör”). Es sollte jedoch bei einem Messerwechsel stets der gesamte
Messersatz ersetzt werden.
www.silverlinetools.com
19
Page 21

D
1. Entfernen Sie mit einem 4-mm-Innensechskantschlüssel (nicht
mitgeliefert) die Messerhalteschrauben.
2. Entnehmen Sie zuerst das Mittelmesser und dann das linke und rechte
Messer sowie die Hülsen.
3. Setzen Sie die neuen Messer ein. Die Hülsen müssen dabei zwischen
dem linken und dem rechten Messer sitzen (siehe Abb. B). Setzen Sie
den Messersatz mit Hülsen dann in den Messerkopf (1) ein.
4. Führen Sie die drei zuvor entnommenen Messerhalteschrauben in den
Messerkopf ein und ziehen Sie anschließend alle drei Schrauben mit
dem Innensechskantschlüssel fest.
Reinigung
Halten Sie Ihr Gerät stets sauber. Durch Schmutz und Staub verschleißen
die Innenteile schnell und die Lebensdauer des Gerätes wird verkürzt.
Säubern Sie das Gerätegehäuse mit einer weichen Bürste oder einem
trockenen Tuch.
WICHTIGER HINWEIS: Ihr Druckluftwerkzeug ist im Allgemeinen sehr
störungsunanfällig. Falls es nicht ordnungsgemäß funktioniert, ist dies in
den meisten Fällen auf die Korrosion von Innenteilen, hervorgerufen durch
verschmutzte feuchte Luft, sowie auf Nichtbeachtung der nachfolgenden
Anweisungen zurückzuführen.
Tägliche Wartung: Trennen Sie das Werkzeug von der Druckluftversorgung
und geben Sie etwa einen Esslöffel Druckluftgeräte-Öl direkt in den
Druckluftanschluss. Lassen Sie die Maschine anschließend bei niedriger
Drehzahl laufen, um alle Innenteile gründlich zu schmieren.
• Bei Dauerbetrieb des Werkzeugs muss eine Druckluftwartungseinheit mit
Filter-/Öler-Kombination verwendet werden. Es ist stets mindestens eine
Filtrationseinheit zu verwenden.
• Verwenden Sie ausschließlich Spezialöl für Druckluftgeräte. BENUTZEN
SIE UNTER KEINEN UMSTÄNDEN NORMALES MOTORENÖL.
• Das Nichtbeachten dieser Anweisungen kann zum Erlöschen der Garantie
führen.
Fehlerbehebung
Lagerung
•BewahrenSiediesesGerätsorgfältiganeinemsicheren,trockenenOrt
außerhalb der Reichweite von Kindern auf.
Entsorgung
• Druckluftwerkzeuge dürfen wie auch Elektrowerkzeuge nicht über den
Hausmüll entsorgt werden.
• Druckluftwerkzeuge können Spuren von Maschinenöl und anderen
Schmierstoffen enthalten und müssen dementsprechend der
Wiederverwertung zugeführt werden.
• Lassen Sie sich von der zuständigen Behörde bezüglich der
ordnungsgemäßen Entsorgung von Druckluftwerkzeugen beraten.
Gerät läuft nur langsam
Gerät festgelaufen
Normale Leerlaufdrehzahl,
allerdings verlangsamter Lauf
unter Last
Gerät hält auch nach vollständiger
Freigabe des Auslösers nicht an
20
Problem Mögliche Ursache Abhilfe
Falscher Luftdruck Korrekten Luftdruck einstellen (siehe „Technische Daten“)
Schmutz im Mechanismus Öl gemäß Wartungsanweisung in Druckluftanschluss träufeln
Luftstau Gerät in kurzen Schüben betreiben, um Blockade zu beseitigen
Luftaustritt Alle Verschraubungen und Schlauch auf Undichtigkeit prüfen und Leckagen durch
Blockade im Siebfilter Schnellkupplung entfernen und Siebfilter reinigen
Schmutz oder Rost im Mechanismus Siehe Abhilfe zu „Gerät läuft nur langsam”
Schmutz oder Rost im Mechanismus Gerät leicht mit einem weichen Gummihammer abklopfen
Schmutz oder Rost im Mechanismus Gerät von Druckluftzufuhr trennen und Mechanismus durch Drehen des Antriebs per
Verschlissener Motor bzw. abgenutzte
Kupplung
Motor oder Kupplung hängt fest Gießen Sie Öl wie unter „Wartung“ beschrieben in den Lufteinlass hinein, und schalten
O-Ring der Drosselklappe oder Ventilsitz
beschädigt
Falls sich das Problem trotz der hier genannten Abhilfemöglichkeiten nicht beheben lässt, wenden Sie sich an Ihren Fachhändler oder einen von Silverline
zugelassenen Kundendienst.
Nachziehen, Verwendung von PTFE-Band oder Ersetzen der Teile beseitigen
Hand lösen
Wenden Sie sich an Ihren Fachhändler oder einen von Silverline zugelassenen
Kundendienst
Sie das Gerät in kurzen Stößen ein, damit der Mechanismus geschmiert wird und sich
frei arbeiten kann
Gerät bei einem von Silverline zugelassenen Kundendienst reparieren lassen
Page 22

719770
Silverline-Tools-Garantie
Dieser Silverline-Artikel wird mit einer
3-Jahres-Garantie angeboten
Registrieren Sie diesen Artikel unter silverlinetools.com innerhalb von 30
Tagen nach dem Kauf, um die 3-Jahres-Garantie zu aktivieren.
Der Garantiezeitraum beginnt mit dem Kaufdatum auf Ihrem Kaufbeleg.
Garantiebedingungen
Der Garantiezeitraum beginnt mit dem Kaufdatum im Einzelhandel, das auf
dem Kaufbeleg angegeben ist.
BITTE BEWAHREN SIE DEN KAUFBELEG AUF!
Falls dieser Artikel innerhalb von 30 Tagen nach dem Kauf einen Defekt
aufweisen sollte, bringen Sie es bitte mit Ihrem Kaufbeleg zu dem
Fachhändler, bei dem es gekauft wurde, und informieren Sie ihn über die
Mängel. Das Gerät wird daraufhin ersetzt oder der Kaufpreis zurückerstattet.
Falls dieser Artikel nach Ablauf von 30 Tagen nach dem Kauf einen Mangel
aufweist, senden Sie es bitte an:
Silverline Tools Service Centre
PO Box 2988
Yeovil
BA21 1WU, Großbritannien
Der Garantieanspruch muss während der Garantiezeit gestellt werden.
Sie müssen den Originalkaufbeleg mit Angabe des Kaufdatums einreichen
und Ihren Namen und Ihre Adresse sowie den Ort des Kaufs angeben, bevor
etwaige Arbeiten durchgeführt werden können.
Sie müssen genaue Angaben über den zu behebenden Defekt machen.
Alle innerhalb der Garantiefrist gemachten Forderungen werden von
Silverline Tools daraufhin überprüft werden, ob es sich bei den Mängeln
um einen Material- oder Fertigungsfehler handelt.
Versandkosten werden nicht zurückerstattet. Alle Artikel sollten sich in
sauberem und sicherem Zustand befinden und sorgfältig verpackt zur
Reparatur eingeschickt werden, um Schäden oder Verletzungen während
des Transports zu vermeiden. Die Annahme unangemessener oder
unsicherer Lieferungen kann von uns verweigert werden.
Alle Arbeiten werden von Silverline Tools oder seinen autorisierten
Reparaturwerkstätten durchgeführt.
Die Reparatur oder der Ersatz des Artikels führt nicht zur Verlängerung
des Garantiezeitraums.
Mängel, bei denen unsere Prüfung ergibt, dass sie unter die Garantie fallen,
werden durch kostenlose Reparatur des Werkzeugs (ohne Versandkosten)
oder Ersatz durch ein Werkzeug in einwandfreiem Zustand behoben.
Druckluft-Schlagschrauber
Registrierung Ihres Kaufs
Gehen Sie auf silverlinetools.com, klicken Sie auf „Registrierung“ und
geben Sie Folgendes ein:
• IhrepersönlichenAngaben
• ProduktdetailsundKaunformationen
Sobald dieses Produkt registriert worden ist, wird Ihre
Garantiebescheinigung im PDF-Format erzeugt. Bitte drucken Sie sie aus
und bewahren Sie sie zusammen mit Ihrem Produkt auf.
Einbehaltene Werkzeuge oder Teile, die ersetzt wurden, gehen in den Besitz
von Silverline Tools über.
Die Reparatur bzw. der Ersatz Ihres Artikels unter dieser Garantie erfolgt
zusätzlich zu Ihren gesetzlichen Rechten als Verbraucher und hat keine
nachteiligen Folgen auf diese.
Durch die Garantie abgedeckt ist:
Die Reparatur des Artikels, nachdem zur Zufriedenheit von Silverline Tools
nachgewiesen wurde, dass der Defekt durch fehlerhaftes Material oder
mangelhafte Arbeitsausführung bedingt ist und in den Garantiezeitraum fällt.
Wenn ein Ersatzteil nicht mehr erhältlich ist oder nicht mehr hergestellt
wird, kann Silverline Tools es gegen einen funktionellen Ersatz austauschen.
Verwendung des Artikels innerhalb der EU.
Durch die Garantie nicht abgedeckt ist:
Silverline Tools garantiert keine Reparaturen, die durch Folgendes
erforderlich geworden sind:
Normale Verschleißerscheinungen, die trotz Verwendung entsprechend
der Bedienungsanleitung entstehen, z.B. an Messern, Bürsten, Riemen,
Glühbirnen, Batterien usw.
Ersatz von mitgeliefertem Zubehör wie etwa Bohrspitzen, Klingen,
Schleifblättern, Schneidscheiben und anderen zugehörigen Teilen.
Unfallschäden und Fehler, die durch unsachgemäße Verwendung oder
Wartung, Missbrauch, Nachlässigkeit oder fahrlässige Bedienung oder
Handhabung des Artikels entstanden sind.
Verwendung des Artikels für andere als normale Haushaltszwecke.
Jegliche Veränderungen oder Modifikationen des Artikels.
Die Verwendung von Teilen oder Zubehör, die keine Originalkomponenten
von Silverline Tools sind.
Fehlerhafte Montage (außer, wenn von Silverline Tools vorgenommen).
Reparaturen oder Änderungen, die von anderen als Silverline Tools oder
seinen autorisierten Reparaturwerkstätten durchgeführt wurden.
Ansprüche, die über die Rechte zur Behebung von Mängeln an dem in
diesen Garantiebedingungen genannten Werkzeug hinausgehen.
EG-Konformitätserklärung
Name des Unterzeichners: Mr. Darrell Morris
Bevollmächtigt durch: Silverline Tools
Erklärt hiermit, dass das Produkt:
Ident.-Nr.: 719770
Produktbeschreibung: Druckluft-Schlagschrauber
Den folgenden Richtlinien entspricht:
• Maschinenrichtlinie 2006/42/EG
• EN 792-7:2001+A1:2008
Benannte Stelle: Intertek Testing Services, Shanghai, China
Techn. Unterlagen bei: Silverline Tools
Datum: 11.06.2013
Unterzeichnet von:
Geschäftsführender Direktor
Name und Anschrift des Herstellers oder seines niedergelassenen
Bevollmächtigten:
Powerbox International Ltd, Boundary Way, Lufton Trading Estate, Yeovil,
Somerset, BA22 8HZ, Großbritannien
www.silverlinetools.com
21
Page 23

ESP
Descripción de los símbolos
Los símbolos siguientes pueden aparecer en la placa de características
de su herramienta. Éstos representan información importante sobre el
producto o instrucciones relativas a su uso.
Lleve protección auditiva.
Lleve protección ocular.
Lleve protección respiratoria.
Lleve un casco de seguridad.
Lleve guantes de seguridad.
Lea el manual de instrucciones.
No utilizar con bombonas de gas comprimido
Conforme a las normas de seguridad y la legislación
correspondientes.
Protección medioambiental
No elimine las herramientas neumáticas junto con la
basura convencional. Recíclelas en puntos de reciclaje. Las
herramientas neumáticas contienen restos de lubricante y
deben ser desechadas en puntos de reciclaje adecuados.
Características técnicas
Presión de trabajo máxima: ........................... 6,3 bar (90 psi)
Consumo de aire: ........................................... 113 l/min (4 cfm)
Entrada de aire: ............................................. Conector rápido
BSP 1⁄4" y dos conectores rápidos macho (GB EN-6 y
europeo EQ-4)
Diámetro mínimo de la manguera: ................. 9,5 mm (3⁄8")
Vástago cuadrado: ......................................... ½"
Rotación:........................................................ avance y retroceso
Velocidad sin carga: ....................................... máximo 7.000 min-1
(variable mediante el uso de un manómetro)
Par de torsión máximo: .................................. 312 Nm
Rosca del husillo: ........................................... M14
Peso: .............................................................. 2,18 kg
Información sobre ruido y vibración:
Nivel de presión acústica de acuerdo con la directiva de máquinas
206/42/CE:
Presión acústica ........................................... LPA = 94 dB(A)
Potencia acústica .......................................... LWA = 105 dB(A)
Incertidumbre ............................................... K = 3 dB
El nivel de intensidad sonora para el usuario puede exceder de 85
dB(A). Se recomienda usar medidas de protección sonora.
Niveles de vibración (suma triaxial) de acuerdo con la directiva de
máquinas 2006/42/CE:
Valor de vibración (ah): ................................. 5,17 m/s
Incertidumbre K: ........................................... 1,5 m/s
Como parte de nuestra política de desarrollo de productos, los datos
técnicos de los productos Silverline pueden cambiar sin previo
aviso.
2
2
Ruido y vibración
Los niveles de vibración y ruido están determinados por la directiva ISO
28297-3. Los datos técnicos pueden utilizarse para comparar herramientas
siguiendo esta directiva estándar. Utilice los datos para evaluar la
exposición y medición de los niveles de ruido y vibración.
Los datos técnicos se refieren al uso normal de la herramienta en
condiciones normales. Una herramienta defectuosa, mal montada o
desgastada puede incrementar los niveles de ruido y vibración. El tiempo
total de trabajo que se puede utilizar esta herramienta debe tener en cuenta
los períodos en que la herramienta está en ralentí o apagada. Tómese
pausas y descansos frecuentemente cuando utilice esta herramienta.
Utilice siempre equipo de protección adecuado como protectores auditivos
para protegerse contra el ruido excesivo o repetitivo y guantes de seguridad
para minimizar las vibraciones. No utilice la herramienta cuando sus manos
estén muy frías, las vibraciones tendrán un mayor efecto.
Ruido
La directiva sobre ruido se introdujo para proteger al usuario sobre los
riesgos derivados de la exposición al ruido excesivo. Esta directiva define
la exposición al ruido y sus valores físicos como el nivel máximo de presión
sonora y el nivel de exposición diario y semanal. Se debe prestar especial
atención al nivel de exposición y la duración. Para obtener más información
acerca de la directiva sobre el ruido 2003/10/CE y 200/14/CE, por favor
visite la página Web de la Agencia Europea para la seguridad y la salud en
el trabajo www.osha.europa.eu.
Vibración
La directiva europea 2002/44/CE se introdujo para controlar la exposición a
las vibraciones en el área de trabajo. Esta directiva permite mantener a los
usuarios informados sobre la cantidad de tiempo que pueden utilizar una
herramienta. Los usuarios que regularmente utilizan herramientas con alto
nivel de vibración durante largos periodos de tiempo tienen un riesgo más
alto de sufrir problemas de salud. ISO 28927-3 mide la vibración en tres
direcciones diferentes conocida como suma de vectores triaxial. Cuando
utilice herramientas de alta vibración debe asegurarse de no sobrepasar el
tiempo de exposición máximo. Para obtener más información acerca de la
directiva 2002/44/CE sobre la vibración, por favor visite la página Web de la
Agencia Europea para la seguridad y la salud en el trabajo
www.osha.europa.eu.
Instrucciones de seguridad
• Lea todas las instrucciones de seguridad e indicaciones antes de
instalar, utilizar, cambiar accesorios o tareas de mantenimiento en esta
herramienta. El no respetar estas advertencias e instrucciones puede
causar lesiones graves.
• Esta herramienta debe ser utilizada, instalada y ajustada únicamente por
personas cualificadas.
• No modifique nunca esta herramienta. Las modificaciones pueden
reducir la eficacia y la seguridad e incrementar el riesgo de sufrir
lesiones personales.
• No tire las instrucciones de funcionamiento, déselas al usuario.
• No utilice esta herramienta si está dañada.
• Las herramientas deben ser inspeccionadas regularmente para
asegurarse de que las marcas inscritas requeridas por la directiva ISO
11148 sean completamente legibles. En el caso de estar dañada, el
usuario deberá ponerse en contacto con el fabricante para su sustitución.
ADVERTENCIA: No permita que los niños, personas discapacitadas
o personas no cualificadas utilicen esta herramienta. Mantenga esta
herramienta fuera del alcance de los niños.
Riesgos de partículas proyectadas
• Tenga en cuenta que las piezas y accesorios que estén dañados o
sueltos pueden proyectarse hacia el usuario a gran velocidad.
• Lleve siempre protección ocular resistente a los impactos cuando utilice
esta herramienta. El grado de protección requerido debe evaluarse
dependiendo de cada uso.
• Para trabajos en altura, lleve siempre casco de seguridad.
• Debe tener en cuenta el riesgo existente para las personas situadas a
su alrededor.
• Asegúrese de que la pieza de trabajo esté sujeta adecuadamente.
22
Page 24

719770
Llave de impacto neumática
Riesgos de atrapamiento
• Llevar ropa holgada, joyas, corbatas, guantes y llevar el cabello suelto
puede provocar ahogo y desgarros. Lleve la vestimenta adecuada
y mantenga el pelo siempre recogido y los guantes alejados de la
herramienta.
Peligros y riesgos operativos
• El uso de esta herramienta puede exponer las manos de los usuarios a
riesgos, incluidos cortes abrasiones y quemaduras.
• Lleve siempre guantes de protección.
• Los usuarios deben de estar físicamente capacitados para manejar esta
herramienta.
• Utilice siempre ambas manos para sujetar la herramienta y evitar la
pérdida de control.
• Mantenga el equilibrio y una posición adecuada en todo momento.
• Suelte el interruptor de funcionamiento en caso de corte de suministro
eléctrico.
• Utilice lubricantes únicamente recomendados por el fabricante.
• Lleve siempre gafas de protección, guantes de protección y vestimenta
adecuada.
• Evite siempre el contacto con el disco en funcionamiento para evitar
cortarse o engancharse. Lleve guantes para protegerse las manos.
• Existe el riesgo de descargas electroestáticas al utilizar esta herramienta
en piezas de plástico o materiales no conductores.
Movimientos repetitivos
• Utilizar esta herramienta puede provocar malestar en manos, brazos,
hombros, cuello y otras partes del cuerpo.
• Mantenga una postura firme y cómoda siempre que utilice esta
herramienta. Evite las posturas incómodas y mantenga siempre el
equilibrio. Intente cambiar de postura regularmente para no fatigarse.
• Si por algún motivo el usuario experimenta síntomas persistentes de
fatiga, dolores, punzadas, hormigueo, entumecimiento, sensación de
ardor o rigidez, deberá comunicárselo inmediatamente a su empresa y
consultar a un médico.
Peligros relativos a los accesorios
• Desconecte siempre la herramienta de la red eléctrica antes de colocar
o sustituir ningún accesorio.
• Evite el contacto directo con los accesorios durante y después de cada
uso, estos pueden estar calientes o extremadamente afilados.
• Utilice sólo piezas y accesorios recomendados por el fabricante.
Área de trabajo
• Tenga cuidado con las superficies resbaladizas para no resbalarse. Tenga
especialmente cuidado en no tropezar con las mangueras hidráulicas.
Los resbalones, tropezones y caídas son las principales causas de
lesiones en el trabajo.
• Esta herramienta no está diseñada para trabajar en atmosferas
explosivas ni aisladas contra contacto eléctrico.
Gases y polvo
• El polvo y los humos generados al utilizar esta herramienta causar
problemas de salud (por ejemplo, cáncer, defectos de genéticos, asma y
dermatitis), la evaluación y los controles apropiados para esos riesgos
son esenciales.
• Evalúe los riesgos analizando la cantidad de polvo generado y la cantidad
de polvo que se pueda expulsar dependiendo del tipo de tarea que vaya
a realizar.
• Utilice sistemas de aspiración y salidas de extracción de polvo para
minimizar el polvo en el área de trabajo.
• Coloque la salida de extracción de polvo adecuadamente para minimizar
la cantidad de polvo concentrada en el área de trabajo.
• Seleccione, mantenga y sustituya los accesorios de esta herramienta tal
como se indica en el manual de instrucciones para evitar un aumento de
polvo y gases.
• Utilice protección respiratoria de acuerdo con las normas de seguridad
indicadas por su empresa.
Ruido
• La exposición a niveles altos de ruido puede provocar pérdida auditiva
y enfermedades como tinnitus (silbidos o zumbido en los oídos). Por
lo tanto, la evaluación de riesgos y la aplicación de controles médicos
apropiados son esenciales.
• Inspeccionar el ruido provocado por la pieza de trabajo puede ayudar a
prevenir enfermedades auditivas.
• Utilice siempre protección auditiva de acuerdo con las normas de
seguridad indicadas por su empresa.
• Mantenga y utilice esta herramienta tal como se indica en el manual de
instrucciones para evitar un aumento de nivel de ruido.
• Seleccione, mantenga y sustituya los accesorios de esta herramienta tal
como se indica en el manual de instrucciones para evitar un aumento
de nivel de ruido.
• Si su herramienta dispone de un silenciador, utilícelo en todo momento.
Compruebe que esté en buenas condiciones antes de cada uso.
Vibración
• Debe prestar atención sobre los peligros de vibración y riesgos residuales
que no han sido eliminados debido al diseño y la construcción de esta
herramienta. Los empresarios deben estar capacitados para identificar
circunstancias en la que el usuario pueda correr algún riesgo debido a
la vibración si el nivel de vibración obtenido mediante la directiva ISO
28927-3. La empresa debe suministrar información adicional y advertir
al usuario sobre el riesgo y los peligros existentes producidos a causa
de la vibración.
• La exposición a la vibración de forma prolongada puede dañar los
nervios y la circulación de la sangre en las manos.
• Lleve siempre ropa de abrigo cuando trabaje en condiciones
extremadamente frías. Mantenga las manos calientes y secas en todo
momento.
• Si experimenta algún entumecimiento, hormigueo, dolor o
blanqueamiento de la piel en los dedos o las manos, deje de usar la
herramienta, informe a su empresa inmediatamente y consulte a un
médico.
• Mantenga y utilice esta herramienta tal como se indica en el manual de
instrucciones para evitar un aumento de nivel de vibración.
• Sujete la herramienta adecuadamente. Tenga en cuenta que las
vibraciones son mayores cuando la fuerza de agarre es superior.r.
www.silverlinetools.com
23
Page 25

ESP
Instrucciones de seguridad
relativas a las herramientas
neumáticas
El aire a presión puede causar lesiones graves:
• Desconecte la herramienta neumática del suministro de aire antes de
proceder a efectuar cualquier trabajo de mantenimiento o instalación
de accesorios.
• No dirija aire a presión hacia usted mismo ni hacia otras personas.
• Los azotes con mangueras neumáticas pueden causar lesiones graves.
Compruebe siempre el estado de las mangueras neumáticas, los
accesorios y acopladores.
• Cuando utilice acoplamientos universales, deberán instalarse cierres de
seguridad para garantizar una conexión correcta entre la manguera y la
herramienta.
• Nunca exceda la presión máxima indicada en la herramienta.
• Nunca transporte la herramienta neumática sujetándola por la manguera.
Características del producto
1 Punta cuadrada de ½”
2 Botón de avance / retroceso
3 Conector rápido
4 Control de par de torsión / aire
5 Gatillo
6 Orificio para aceite
Aplicaciones
• Llave de impacto neumática para utilizar con vasos de ½”. Sirve para
apretar y aflojar tuercas y pernos. Nota: Esta herramienta no es una llave
dinamométrica. Utilice siempre una llave dinamométrica para realizar
ajustes de par de apriete en tuercas y pernos.
Desembalaje
• Desembale e inspeccione la herramienta con cuidado. Familiarícese con
todas sus características y funciones.
• Asegúrese de que el embalaje contiene todas las partes y que están
en buenas condiciones. Si faltan piezas o están dañadas, solicite su
sustitución antes de utilizar esta herramienta.
Antes de usar
Instalación del conector rápido
Nota: Esta herramienta se suministra con dos tipos de conectores machos:
EQ-4 – Utilizado en Europa
EN-6 – Utilizado en Reino Unido
24
EQ-4
Europe
Utilice el conector compatible con el suministro de aire comprimido
que esté utilizando. Instálelo siguiendo las instrucciones indicadas a
continuación:
1. Coloque cinta PTFE (no incluida) en la rosca del conector rápido (10)
para sellarla correctamente.
Nota: Coloque siempre la cinta PTFE en sentido horario para evitar que
pueda soltarse al insertar el conector.
2. Retire el plástico protector de la entrada de aire.
3. Utilice una llave para tuercas (no suministrada) para instalar el
conector en la entrada de aire situada en la parte posterior de la
herramienta.
4. Conecte la herramienta al suministro de aire comprimido, ajuste la
presión y compruebe que no exista ninguna fuga (aplicando una
pequeña cantidad de agua con jabón en la parte exterior de los
conectores).
• Ahora podrá conectar conectores rápidos hembra en la herramienta.
EN-6
UK
Page 26

719770
Llave de impacto neumática
Conexión al suministro de aire comprimido
CONEXIÓN A LA HERRAMIENTRA
NEUMÁTICA
• Esta herramienta debe conectarse a un suministro de aire limpio y seco
con lubricador y separador de agua.
• Nunca sobrepase la presión máxima indicada por el fabricante. Vea
siempre las especificaciones técnicas.
• Asegúrese de drenar el agua diariamente.
• Compruebe que todos los accesorios y componentes de esta herramienta
(acopladores, manguera, etc.) sean compatibles con la presión utilizada.
UNIÓN
MANGUERA DE
CONEXIÓN
SEPARACIÓN DEL AGUA
ACOPLADOR RÁPIDO
MANGUERA
UNIÓN
LUBRICADOR
REGULADOR
DRENAR
DIARIAMENTE
SUMINISTRO DE AIRE
Ajuste de potencia
• La potencia de esta herramienta puede ajustarse mediante el control de
par de torsión /aire (4): 1= ajuste mínimo, 4= ajuste máximo.
Avance y retroceso
Para avanzar o retroceder, pulse el botón de avance / retroceso (2), de
acuerdo con las marcas “F” y “R” que aparecen en la carcasa de la
herramienta:
• Botón expuesto en la parte delantera de la herramienta = Avance (F),
para giro en sentido horario.
• Botón expuesto en la parte trasera de la herramienta = Retroceso (R),
para giro en sentido antihorario.
Nota: Los términos avance y retroceso se refieren al roscado hacia la
derecha.
Instalación de un vaso
ADVERTENCIA: Desconecte la herramienta de la fuente de alimentación
antes de instalar o retirar un vaso.
1. Coloque un vaso firmemente sobre la punta cuadrada de ½”.
2. Compruebe que el vaso esté sujeto correctamente tirando del mismo.
Nota: Para retirar el vaso, tiré firmemente para sacarlo de la punta.
Funcionamiento
Aflojar una tuerca o perno
1. Coloque el vaso sobre la punta.
2. Sujete la herramienta firmemente por la empuñadura. El pulgar debe
quedar alrededor de la empuñadura y los demás dedos deben estar
sobre el gatillo (5).
3. Coloque la otra mano en la parte posterior de la herramienta para
controlar la herramienta en funcionamiento.
4. Seleccione el sentido de rotación con el botón de avance /retroceso
(2).
5. Apriete el gatillo.
6. Una vez que haya aflojado suficientemente la tuerca o perno, suelte el
gatillo y retire la herramienta de la tuerca o perno. Retire la tuerca del
vaso si es necesario.
Nota: NUNCA deje la herramienta funcionando a ralentí durante un largo
periodo de tiempo. Esto podría acortar la vida útil de la herramienta.
ADVERTENCIA: No intente incrementar la presión del compresor si la
herramienta no puede aflojar la tuerca o perno. Utilice una llave y aflójela
manualmente.
Apretar una tuerca o perno
1. Compruebe que el ajuste de par de torsión sea adecuado para la
tuerca o perno que desee apretar.
2. Comience apretando la tuerca o el perno a mano.
3. Coloque el vaso sobre la punta.
4. Sujete la herramienta firmemente por la empuñadura. El pulgar debe
quedar alrededor de la empuñadura y los demás dedos deben estar
sobre el gatillo (5).
5. Coloque la otra mano en la parte posterior de la herramienta para
controlar la herramienta en funcionamiento.
6. Seleccione el sentido de rotación con el botón de avance /retroceso
(2).
7. Apriete el gatillo.
8. Retire la herramienta y el vaso una vez haya acabado de apretar la
tuerca o perno.
ADVERTENCIA: No presione demasiado. Una vez haya apretado el perno o
tuerca, utilice una llave dinamométrica para comprobar el par de apriete.
ADVERTENCIA: NUNCA incremente la presión sobre el límite máximo
permitido especificado en las características técnicas.
ADVERTENCIA: Tenga en cuenta que las herramientas neumáticas pueden
acumular presión después de cada uso. Purgue siempre la herramienta
después de desconectarla del suministro de aire comprimido.
Accesorios
Existen gran variedad de accesorios para esta herramienta disponibles
a través de www.toolsparesonline.com y su distribuidor Silverline más
cercano.
Mantenimiento
ADVERTENCIA: Desconecte siempre la herramienta neumática de la red
eléctrica antes de realizar cualquier tarea de mantenimiento o limpieza.
Limpieza
Mantenga la herramienta siempre limpia. La suciedad y el polvo pueden
dañar y reducir la vida útil su herramienta. Utilice un cepillo suave o un
paño seco para limpiar la herramienta.
IMPORTANTE: Existen muy pocas piezas móviles en la herramienta que
puedan desgastarse. Cuando una herramienta neumática falla, esto se debe
generalmente a que los mecanismos internos se han oxidado debido a la
presencia de aire húmedo y de impurezas, y a que no se han seguido las
instrucciones indicadas a continuación.
Mantenimiento diario: Con la herramienta desconectada del suministro
de aire, ponga el equivalente de una cucharada de lubricante (1,5 ml) en
el conector rápido o en la entrada de aire. Haga funcionar la herramienta
durante 2 – 4 segundos a baja velocidad para lubricar todas las piezas
internas.
Una vez por semana: Con la herramienta desconectada del suministro de
aire, retire el tonillo hexagonal situado en el orificio para aceite (6) “OIL” y
ponga unas gotas de aceite para herramientas neumáticas. Vuelva a colocar
y apretar el tornillo hexagonal. Haga funcionar la herramienta durante 2 – 4
segundos a baja velocidad para lubricar todas las piezas internas.
• Si utiliza la herramienta durante periodos de tiempo prolongados deberá
instalar un filtro / lubricador combinado. Debe tener colocado un filtro de
aire en todo momento.
• Utilice lubricante para herramientas neumáticas. EN NINGÚN CASO
UTILICE ACEITE PARA MOTORES.
• El incumplimiento de las instrucciones de funcionamiento y
mantenimiento puede invalidar la garantía del producto.
www.silverlinetools.com
25
Page 27

ESP
Almacenaje
• Guarde esta herramienta y accesorios en un lugar seco y seguro fuera
del alcance de los niños.
Eliminación
• No elimine sus herramientas u otro equipo eléctrico o electrónico junto
con la basura convencional. Recíclelos si hay puntos de reciclaje.
• Las herramientas neumáticas contienen restos de lubricante y deben ser
desechadas en puntos de reciclaje adecuados.
• Póngase en contacto con la autoridad local encargada de la gestión de
residuos si necesita más información sobre cómo eliminar este tipo de
herramientas correctamente.
Solución de problemas
Problema Causa Solución
La herramienta funciona
lentamente
Herramienta agarrotada
Velocidad sin carga normal pero
lenta bajo carga
La herramienta no se detiene al
soltar el gatillo
Si algunas de las soluciones mostradas anteriormente no funcionan, contacte inmediatamente con un servicio técnico autorizado Silverline
26
Presión incorrecta Ajuste la presión de aire de acuerdo con las especificaciones técnicas
Suciedad acumulada en los mecanismos Aplique lubricante en la entrada de aire siguiendo las instrucciones
Obstrucción del aire Haga funcionar la herramienta durante ciclos cortos para desatascarla
Fuga de aire Compruebe la manguera y los conectores estén en buen estado. Vuelva a
Filtro de malla obstruido Retire el conector rápido (3) y limpie el filtro de malla
Suciedad o corrosión acumulado en los
mecanismos
Suciedad o corrosión acumulado en los
mecanismos
Suciedad o corrosión acumulado en los
mecanismos
Motor o embrague dañado Repare la herramienta en un servicio técnico Silverline
Motor o embrague agarrotado Aplique lubricante en la entrada de aire siguiendo las instrucciones
Junta de sellado de la válvula de aire Repare la herramienta en un servicio técnico Silverline
indicadas en la sección de mantenimiento
colocar cinta PTFE si es necesario.
Utilice alguna de las soluciones anteriores indicadas en “La herramienta
funciona lentamente”
Golpee ligeramente la herramienta con un martillo de goma
Desconecte la herramienta del suministro de aire y rote los mecanismos
con las mano
indicadas en la sección de mantenimiento
Page 28

719770
Garanzia Silverline Tools
Questo prodotto Silverline è protetto da una
garanzia di 3 anni
Per attivare la garanzia di 3 anni è necessario registrate il prodotto sul
sito www.silverlinetools.com entro 30 giorni dalla data d'acquisto. La data
d'inizio del periodo di garanzia corrisponde alla data d'acquisto riportata
sullo scontrino di vendita.
Condizioni Della Garanzia
Il periodo di garanzia decorre dalla data dell’acquisto presso il rivenditore
indicata sulla ricevuta d’acquisto.
SI PREGA DI CONSERVARE LA RICEVUTA D'ACQUISTO
Nel caso in cui il prodotto risultasse difettoso entro 30 giorni dalla data
d’acquisto, sarà necessario restituirlo al punto vendita presso cui è stato
acquistato, presentando la ricevuta e spiegando chiaramente la natura del
difetto riscontrato. Il prodotto difettoso sarà sostituito o sarà rimborsato
l'importo d'acquisto.
Nel caso in cui il prodotto risultasse difettoso dopo 30 giorni dalla data
d’acquisto, sarà necessario inviare una richiesta di indennizzo in garanzia
a:
Silverline Tools Service Centre
PO Box 2988
Yeovil
BA21 1WU, GB
Le richieste di indennizzo devono essere presentate durante il periodo
della garanzia.
Affinché la richiesta sia approvata, è necessario presentare anche la
ricevuta d’acquisto originale, indicante il luogo e la data dell’acquisto del
prodotto e il proprio nome e indirizzo.
Sarà necessario inoltre fornire una descrizione dettagliata del guasto
riscontrato.
Le richieste effettuate durante il periodo di garanzia saranno verificate da
Silverline Tools per stabilire se il difetto del prodotto è dovuto a problemi di
materiali o di lavorazione.
Le spese di spedizione non saranno rimborsate. Tutti i prodotti devono
essere spediti puliti e in condizioni tali da garantire l'esecuzione della
riparazione in modo sicuro. I prodotti devono essere imballati con cura
per evitare danni o lesioni durante il trasporto. Silverline Tools si riserva
il diritto di non accettare prodotti spediti in condizioni non idonee o non
sicure.
Le riparazioni saranno eseguite da Silverline Tools o da un centro di
riparazione autorizzato.
La riparazione o la sostituzione del prodotto non estende o rinnova il
periodo di garanzia.
Nel caso in cui determini che il prodotto e il difetto riscontrato sono coperti
dalla garanzia, Silverline Tools provvederà a riparare l'utensile
Llave de impacto neumática
Registrazione dell'acquisto
Accedere al sito: silverlinetools.com e selezionare il tasto Registrazione
per inserire:
• Informazionipersonali
• Dettaglidelprodottoeinformazionisull'acquisto
Il Certificato di Garanzia sarà inviato per posta elettronica nel formato
PDF. Si prega di stampare e conservare il Certificato insieme alla ricevuta
d'acquisto.
gratuitamente (esclusi i costi di spedizione) o, a propria discrezione, a
sostituirlo con un nuovo utensile.
Gli utensili o le parti trattenuti da Silverline Tools in cambio di un prodotto o
componente sostitutivo diventano proprietà di Silverline Tools.
La riparazione o la sostituzione di un prodotto in garanzia estende i diritti
del consumatore previsti per legge, senza modificarli.
Cosa copre la garanzia:
La riparazione del prodotto, nel caso in cui Silverline Tools determini che il
problema sia dovuto a difetti dei materiali o difetti di lavorazione riscontrati
durante il periodo della garanzia.
Nel caso in cui un componente non sia più disponibile o fuori produzione,
Silverline Tools si riserva il diritto di sostituirlo con un componente
adeguato.
Prodotti acquistati e utilizzati all’interno dell’Unione Europea.
Cosa non copre la garanzia:
La Garanzia Silverline Tools non copre le riparazioni se il difetto è stato
causato da:
La normale usura dei componenti per via dell’utilizzo del prodotto come
indicato nelle istruzioni d’uso (ad esempio, lame, spazzole, cinghie,
lampadine, batterie, ecc.).
La sostituzione di accessori forniti a corredo, come ad esempio punte,
lame, fogli abrasivi, dischi di taglio e altri componenti correlati.
I danni accidentali, causati dall'uso improprio, dall'abuso e dalla
manipolazione, conservazione e cura inadeguata dell'utensile da parte del
proprietario.
L’uso del prodotto per fini non domestici.
La modifica o alterazione del prodotto.
Difetti causati dall’uso di parti e accessori che non siano componenti
originali Silverline Tools.
Installazione difettosa (fatto salvo quando l'installazione viene eseguita da
Silverline Tools).
Riparazioni o alterazioni eseguite da terze parti che non siano la Silverline
Tools o i centri di riparazione autorizzati da quest'ultima.
Silverline Tools non fornisce alcuna garanzia per le richieste formulate per
la correzione dei difetti dell'utensile oggetto della garanzia fatto salvo per
quanto previsto nelle condizioni di cui sopra.
Declaración de conformidad CE
El abajo firmante: Mr Darrell Morris
Autorizado por: Silverline Tools
Declara que el producto:
Código de identificación: 719770
Descripción: Llave de impacto neumática
Está en conformidad con las directivas:
• Directiva de máquinas 2004/108/CE
• EN 792-7:2001+A1:2008
Organismo notificado: Intertek Testing Services, Shanghai, China
La documentación técnica se conserva en: Silverline Tools
Fecha: 11/06/13
Firma:
Director General
Nombre y dirección del fabricante o representante autorizado:
Powerbox International Ltd, Boundary Way, Lufton Trading Estate, Yeovil,
Somerset, BA22 8HZ Reino Unido
www.silverlinetools.com
27
Page 29

I
Descrizione dei Simboli
La targhetta identificativa del vostro elettroutensile potrebbe riportare
dei simboli. Tali simboli sono una rappresentazione grafica che mira a
evidenziare importanti informazioni sul prodotto o istruzioni per il suo
utilizzo corretto e sicuro.
Indossare protezioni per l’udito.
Indossare protezioni per gli occhi.
Indossare una protezione per le vie respiratorie.
Protezione della testa di usura.
Protezione della mano di usura.
Legga la manuale d’istruzione.
NON utilizzare con bombole di gas compresse!
Il prodotto è conforme alle vigenti normative e norme di
sicurezza applicabili
Protezione Ambientale
l simbolo del cestino barrato indica che i prodotti elettrici non
devono essere mischiati con i rifiuti domestici ma conferito
ad un centro di raccolta appropriato. Per ulteriori informazioni
sul riciclaggio si prega di contattare la Sua amministrazione
comune locale o il punto vendita
Specifiche Tecniche
Pressione massima di esercizio: ................. 6,3 bar (90psi)
Consumo d'aria:.......................................... 113L/min (4cfm)
Ingresso aria: .............................................. ¼" BSP, Fornito con
connettori maschili dovuta ad aria rapida
(EN-6 'UK' e-4 Tipi di EQ" Europei ")
Diametro minimo del tubo: ......................... 9,5 mm (3⁄8")
Attacco squadro .......................................... ½"
Direzioni:..................................................... in avanti e indietro
Velocità a vuoto:.......................................... max. 7.000 min
(variabile con regolatore di pressione incorporato)
Max. Coppia: ..................................................312nm
Max. Capacità bullone: ...................................M14
Peso ............................................................... 2,18 kg
Informazioni sul Rumore e Vibrazioni
Livello di pressione sonora secondo alla Direttiva Macchine 2006/42/EC:
Pressione acustica ....................................... LPA = 94dB(A)
Potenza sonora ............................................ LWA = 105dB(A)
Tolleranza .................................................... K = 3dB
Il livello di intensità del suono per l'operatore può superare i 85 dB
(A) e le misure di protezione del suono sono necessari.
Vibrazioni valori totali (somma vettoriale triassiale) secondo la Direttiva
Macchine 2006/42/CE:
Valore di emissione oscillazioni ................... ah = 5.17m/s
Tolleranza ...................................................K = 1.5m/s
Come parte del nostro continuo sviluppo dei prodotti, le specifiche
dei prodotti Silverline possono modificare senza preavviso
-1
2
2
Rumore e vibrazioni
I livelli sonori e vibrazioni nella specifica sono determinate secondo la
norma ISO 28927-3. Le figure date possono essere utilizzati per confrontare
strumenti simili testati a questo standard. Questi dati possono essere
utilizzati per valutare l'esposizione a livelli di rumore e vibrazioni.
Le cifre rappresentano il normale utilizzo per lo strumento in condizioni
normali di lavoro. Un cattivo stato di manutenzione, lo strumento montato in
maniera errata o usata impropriamente può produrre un aumento dei livelli
di rumore e vibrazioni. Il periodo totale di lavoro che è possibile utilizzare
questo strumento dovrà tener conto nei periodi in cui lo strumento è inattivo
o spento. Permettere frequenti pause di riposo durante il funzionamento di
questo strumento.
E 'nell'interesse degli utenti per massimizzare la loro sicurezza usando
l'attrezzatura di sicurezza giusta come protezione per le orecchie che
proteggono contro il rumore forte o ripetitivo e guanti anti-vibrazione che
riducono al minimo le vibrazioni. Non utilizzare lo strumento con le mani al
di sotto di una temperatura normale, siccome vibrazioni avranno un effetto
maggiore.
Suono
La direttiva sonora 2000/14/CE è stata introdotta per la protezione contro
i rischi per la salute e la sicurezza che derivano, o possono derivare,
dall'esposizione al rumore e il rischio di udito. La direttiva può essere
utilizzata per definire esposizione al rumore ed i parametri fisici, quali
la pressione acustica di picco e il livello di esposizione giornaliera e
settimanale. Particolare attenzione dovrebbe essere presa al livello di
esposizione e durata. Per ulteriori informazioni sulla direttiva 2003/10/CE
rumore visita si prega di visitare L'Agenzia europea per la sicurezza e la
salute sul lavoro www.osha.europa.eu
Vibrazione
Gli Agenti Europei Fisici (Vibrazioni) della direttiva 2002/44/CE è stata
introdotta per controllare l'esposizione delle vibrazioni durante il lavoro.
La direttiva consente agli utenti di strumenti di prendere decisioni
informate sulla quantità di tempo impiegato nel lavoro. Coloro che operano
regolarmente apparecchiature ad alta vibrazione per un periodo prolungato
di tempo sono a più alto rischio di problemi di salute. ISO 28927-3 misura
vibrazioni in tre direzioni che è conosciuto come Tri-assiale o somma di
misura vettoriale. Durante il funzionamento di apparecchiature ad alta
vibrazione assicurarsi di non superare i livelli di esposizione. Per maggiori
dettagli su La vibrazione direttiva 2002/44/CE si prega di visitare L'Agenzia
europea per la sicurezza e la salute sul lavoro www.osha.europa.eu
Sicurezza generale
• Per rischi multipli, leggere e capire le istruzioni di sicurezza prima di
installare, utilizzare, riparare, eseguire la manutenzione, sostituire gli
accessori, o lavorare vicino questo utensile. La mancanza di eseguire
queste istruzioni può provocare gravi lesioni.
• Solo gli operatori qualificati e addestrati devono installare, regolare o
utilizzare questo utensile
• Non modificare questo utensile. Le modifiche possono ridurre l'efficacia
delle misure di sicurezza e aumentano i rischi per l'operatore.
• Non gettare le istruzioni di sicurezza, consegnarli all’operatore.
• Non utilizzare questo strumento se lo strumento è stato danneggiato.
• Strumenti sono controllate periodicamente per verificare che i valori ei
marchi richiesti da questa parte della ISO 11148 sono leggibile sullo
strumento. Il datore di lavoro / utente deve contattare il produttore per
ottenere le etichette di marcatura di ricambio in caso di necessità.
ATTENZIONE: Questo apparecchio non è destinato all'uso da parte di
persone (inclusi i bambini) con capacità ridotta, fisici o mentali, o con
mancanza di esperienza o di conoscenza, a meno che non siano controllati
o istruiti all'uso dell'apparecchio da una persona responsabile della loro
sicurezza. I bambini devono essere sorvegliati per assicurarsi che non
giochino con l'apparecchio.
Rischi Proiettabili
• Essere consapevoli del fatto che il fallimento del pezzo o accessori, o
anche lo strumento inserito in sé può generare proiettili ad alta velocità.
28
Page 30

719770
Chiave Pneumatica D'impatto
• Indossare sempre protezione degli occhi resistente agli impatti durante il
funzionamento di questo strumento. Il grado di protezione richiesto deve
essere valutato per ogni uso.
• Per i lavori sopraelevati, indossare un casco protettivo.
• I rischi per gli altri dovrebbero essere valutati anche in questo momento.
• Assicurarsi che il pezzo di lavoro sia fissato saldamente.
Rischi d’impigliamento
• Intasamento e/o lacerazioni possono verificarsi se abiti svolazzanti,
gioielli personali, collane, capelli o guanti non sono tenuti lontani dallo
strumento e i suoi accessori.
Rischi operativi
• Utilizzo dello strumento può esporre le mani degli operatori a rischi,
compresi tagli e abrasioni e al calore.
• Indossare guanti per proteggere le mani.
• Gli operatori e il personale di manutenzione devono essere fisicamente in
grado di gestire il peso, massa e potenza dello strumento.
• Tenere lo strumento correttamente, essere pronti a contrastare i
movimenti normali o improvvisi e avere entrambe le mani a disposizione.
• Mantenere una posizione di equilibrio del corpo e appoggio sicuro.
• Rilasciare il dispositivo d'avvio e di arresto in caso di interruzione della
fornitura di energia.
• Utilizzare solo lubrificanti consigliati dal produttore.
• Occhiali di sicurezza personali di protezione devono essere utilizzati;
guanti e indumenti protettivi sono raccomandati.
• Evitare il contatto diretto con parti in movimento, al fine di evitare di
comprimere o il taglio di mani o altre parti del corpo. Indossare guanti per
proteggere le mani.
• C’è un rischio di scariche elettrostatiche se utilizzato su plastica e altri
materiali non conduttivi.
Rischi di movimento ripetitivi
• Quando si utilizza questo utensile per svolgere attività in relativi al lavoro,
l'operatore può provare scomodità nelle mani, braccia, spalle, collo o
altre parti del corpo.
• Durante l'utilizzo di questo utensile, l'operatore deve adottare una
postura comoda, mantenendo posizione stabile ed evitare posture
scomode o fuori bilancio. L'operatore dovrebbe cambiare postura durante
le attività estese, in quanto possono aiutare ad evitare disagi e fatica.
• Se l'operatore presenta sintomi persistente o ricorrente come scomodità,
spasmi, dolore, formicolio, intorpidimento, sensazione di bruciore o
rigidità, questi segnali di pericolo non dovrebbero essere ignorati.
L'operatore deve dire al datore di lavoro e consultare un professionista
qualificato di salute
Pericolo di accessori
• Scollegare questo utensile dalla fornitura di energia prima di inserire o
modificare lo strumento inserito o accessorio.
• Evitare il contatto diretto con lo strumento inserito durante e dopo l'uso,
in quanto può essere caldo o tagliente.
• Utilizzare solo i formati ei tipi di accessori e materiali di consumo che
sono raccomandati dal produttore di questo utensile, non utilizzare altri
tipi o formati di accessori o materiali di consumo.
Rischi sul luogo di lavoro
• Scivolamento, inciampamento e cadute sono le principali cause di
infortuni sul lavoro. Essere consapevoli di superfici scivolose causati
dall'uso dello strumento e anche di rischi di viaggio causati dalla linea
aerea o tubo idraulico.
• Questo strumento non è destinato ad essere utilizzato in atmosfera
potenzialmente esplosiva e non è isolata dal contatto con la corrente
elettrica.
Pericoli di fumi e polvere
• La polvere e fumi generati quando si utilizza questo utensile possono
causare problemi di salute (ad esempio il cancro, difetti di nascita, asma
e / o dermatite), valutazione del rischio e l'attuazione di controlli adeguati
per questi rischi sono essenziali.
• La valutazione del rischio dovrebbe includere polvere creata mediante
l'uso dello strumento e il potenziale per disturbare polvere esistente.
• Dirigere il gas di scarico in modo da minimizzare il disturbo di polvere in
un ambiente pieno di polvere.
• Se polvere o fumi vengono creati, la priorità è controllarli nel punto di
emissione.
• Selezionare, mantenere e sostituire lo strumento di consumo / inserito
come raccomandato nel manuale di istruzioni, per evitare un inutile
aumento di polveri o fumi.
• Utilizzare una protezione respiratoria secondo le istruzioni del datore di
lavoro e come richiesto dalla salute e norme di sicurezza.
Rischi sonori
• L'esposizione a elevati livelli di rumore può causare danni permanenti,
disabilitare la perdita di udito e di altri problemi, come il tinnito (
scampanellio, fischio o ronzio nelle orecchie). Pertanto, la valutazione
del rischio e l'attuazione di controlli adeguati per questi rischi sono
essenziali.
• Controlli adeguati per ridurre il rischio può includere azioni, come i
materiali di smorzamento per evitare pezzi di "suonare".
• Usare protezioni acustiche in conformità con le istruzioni del datore di
lavoro e come richiesto dalla salute e norme di sicurezza.
• Utilizzare e mantenere questo strumento come raccomandato nel
manuale d'uso, per evitare un inutile aumento del livello di rumore.
• Selezionare, mantenere e sostituire lo strumento di consumo / inserito
come raccomandato nel manuale di istruzioni, per evitare un inutile
aumento del rumore.
• Se questo utensile ha un silenziatore, sempre assicurarsi che sia a posto
e in buono stato di funzionamento quando lo strumento è in funzione.
Rischi da vibrazioni
Le informazioni per l'uso devono richiamare l'attenzione ai rischi delle
vibrazioni che non sono stati eliminati dalla progettazione e costruzione e
rimangono i rischi delle vibrazioni residue. Essa deve consentire i datori di
lavoro di individuare le circostanze in cui l'operatore è probabile che sia a
rischio di esposizione alle vibrazioni se la vibrazione-valore di emissione
ottenuti con ISO 28927-3 non rappresentano adeguatamente l'emissione
di vibrazioni gli usi previsti (e abusi prevedibili) di informazioni aggiuntive
macchina e/o avvertenze sono fornite per consentire ai rischi derivanti da
vibrazioni per essere valutati e gestiti.
• L'esposizione alle vibrazioni possono causare la disattivazione di danni ai
nervi e afflusso di sangue delle mani e delle braccia.
• Indossare indumenti caldi quando si lavora in condizioni freddi e di
mantenere le mani calde e asciutte.
• Se si verificano intorpidimento, formicolio, dolore o lo sbiancamento della
pelle per le dita o le mani, smettere di usare la levigatrice o lucidatrice,
informare il datore di lavoro e consultare un medico.
• Utilizzare e mantenere la levigatrice o lucidatrice come raccomandato nel
manuale d'uso, per evitare un inutile aumento dei livelli di vibrazioni.
• Tenere l'utensile con una presa leggera ma sicura, tenendo conto delle
forze di mano di reazione richieste, perché il rischio di vibrazione è
generalmente maggiore quando la forza di presa è maggiore.
www.silverlinetools.com
29
Page 31

I
Ulteriori istruzioni di sicurezza
per utensili elettrici pneumatici
Aria sotto pressione può causare lesioni gravi:
• Chiudere sempre l'alimentazione dell'aria, il tubo di scarico della
pressione dell'aria e scollegare lo strumento dalla rete di aria quando non
è in uso, prima di cambiare gli accessori o in caso di intervento.
• Non mirare mai l’aria diretta verso se stessi o chiunque altro.
• Tubi sferzati possono causare lesioni gravi. Controllare sempre per tubi o
fissaggi danneggiati o allentati.
• Ogni volta che giunti universali (innesti a denti), vengono usati, perni di
bloccaggio devono essere installati e cavi di sicurezza devono essere
utilizzati per la protezione contro l’errore di attacco con tubo-a-strumento
o attacco tubo-a-tubo.
• Non superare la pressione massima dell'aria indicata sull'apparecchio.
• Non trasportare mai un utensile pneumatico tramite il tubo.
Familiarizzazione prodotto
11⁄2" Mandrino Squadrato
2 Pulsante Avanti/Indietro
3 Connettore Rapido
4 Ghiera di controllo aria/coppia
5 Grilletto
6 Punto d’olio
Uso Previsto
• Chiave ad impatto pneumatica , per l'uso con ½ "bussole standard per
allentare e serrare viti e dadi.
NB: Questo dispositivo non è una chiave dinamometrica. Sempre vitare i
dadi/bulloni di coppia con una chiave dinamometrica calibrata
Disimballaggio
• Disimballare con cura e controllare il tuo strumento. Acquisire familiarità
con tutte le sue caratteristiche e funzioni
• Assicurarsi che tutte le parti dello strumento sono presenti e in buone
condizioni. In caso di parti mancanti o danneggiate, sostituire tali parti
prima di tentare di usare questo strumento
Prima dell’uso
Montaggio del connettore rapido
NB: Questo strumento è fornito con due diversi connettori rapidi ad aria
maschili:
EQ-4 - comunemente usato in Europa
EN-6 - utilizzato principalmente nel Regno Unito
EQ-4
Europe
• Scegliere il connettore che è compatibile con il sistema linea aerea che si
sta utilizzando, e installare come indicato di seguito:
1. Applicare un po’ di nastro in PTFE (non incluso) per le filettature del
connettore rapido (4). Ciò contribuirà a mantenere un completo sigillo
NB: Applicare nastro PTFE ermeticamente e in senso orario, in modo che
non si stacca quando il filo è avvitato nell'utensile.
2. Rimuovere la spina protettiva dalla presa d'aria
3. Con una chiave inglese (non incluso) avvitare il connettore rapido nella
presa d'aria situata alla base del manico
4. Connettersi alla compagnia, pressurizzare accuratamente ed eseguire
un controllo della perdita (ad esempio: spruzzando piccole quantità di
acqua saponata sull'esterno dei connettori)
• Le linee d'aria installati con corrispondenti connettori rapidi femminili
ora sono a montaggio spinta
EN-6
UK
30
Page 32

APPROVVIGIONAMENTO IDRICO
719770
Chiave Pneumatica D'impatto
Connessione all’alimentazione d’aria
SEPARAZIONE ACQUA
RACCORDO
TUBO DI GUIDA
ATTACCO RAPIDO
TUBO A RINCOLO
RACCORDO
INGRASSATORE
REGOLATORE
SCARICA OGNI
GIORNO
AL VOSTRO UTENSILE
PNEUMATICO
• Questo strumento deve essere collegato ad una fonte di aria pulita con
un oliatore in linea e separatore d'acqua
• NON lasciare che la pressione di alimentazione supera il massimo
indicato nelle specifiche tecniche
• Assicurarsi che l’acqua viene drenata dal sistema di aria giornalmente
• Assicurarsi che tutte le parti del sistema (tubi flessibili, attacchi, ecc.)
siano dimensionati per la pressione dell'aria da utilizzare
Impostazione potenza strumento
• La velocità dello strumento può essere regolato premendo e ruotando la
ghiera di controllo Airia / Coppia (4):
'1 '= Minimo, '4' = massimo
Avanti e indietro
Questo strumento dispone di una funzione avanti / indietro. Selezionare la
direzione desiderata premendo l'interruttore avanti / indietro (2). Le lettere
'F' e 'R' segnate sullo strumento indicano la posizione dell'interruttore per la
marcia avanti e indietro:
• Segno esposto sopra grilletto = 'F' - avanti (rotazione in senso orario)
• Segno esposto al retro dello strumento = 'R' - inversa (rotazione
antioraria)
NB: I termini 'avanti' e 'indietro' si riferiscono alle filettature a destra.
Installazione di una presa di corrente
ATTENZIONE: Scollegare sempre l'utensile dalla alimentazione dell'aria
prima di collegare o rimuovere bussole.
1. Spingere una presa adatta saldamente sopra all’anello di fissaggio sul
mandrino squadro di 1/2 "(1)
2. Assicurarsi che l'anello di bloccaggio si innesta e che la presa è
saldamente fissata, cercando di tirare fuori l'unità
NB: Tirare con fermezza la presa fuori l'unità per rimuovere.
Operazione
Allentando un dado o un bullone
1. Posizionare la presa sul dado
2. Tenere saldamente l 'utensile per la maniglia. Il pollice dovrebbe
avvolgere il manico e le dita dovrebbe sedersi sul grilletto (5)
3. Prendere la macchina con l'altra mano sulla parte posteriore dello
strumento per controllare la reazione di coppia
4. Premere l'interruttore avanti / indietro (2) verso l'interno fino a che non
sporge dal retro della custodia
5. Premere il grilletto per avviare lo strumento
6. Quando il dado o il bullone si mette in movimento, rilasciare il grilletto
per fermare lo strumento e togliere la presa dal dado o bullone.
Rimuovere il dado dalla presa se necessario
NB: Non lasciare che il cricchetto corre in 'rotazione al minimo' per un
periodo prolungato di tempo. Ciò riduce la durata.
ATTENZIONE: Se l'utensile non può allentare il dado, non alzare la pressione
di uscita del compressore d'aria. Utilizzare una chiave manuale per allentare
il dado o il bullone.
Serraggio di un dado o bullone
1. Controllare l'impostazione della coppia ed assicurare il dado o il
bullone può sopportare la coppia selezionata
2. Serrare il dado o il bullone per quanto possibile a mano
3. Posizionare la presa sul dado
4. Tenere saldamente l 'utensile per la maniglia. Il pollice dovrebbe
avvolgere il manico e le dita dovrebbero sedersi sul grilletto (5)
5. Prendere la macchina con l'altra mano sulla parte posteriore dello
strumento per controllare la reazione di coppia
6. Premere l'interruttore avanti / indietro (2) verso l'interno finché non
sporge fuori la parte anteriore della custodia
7. Premere il grilletto per avviare lo strumento di
8. Quando il dado è stato serrato, rimuovere lo strumento e la presa
ATTENZIONE: NON serrare eccessivamente. Si consiglia di utilizzare una
chiave dinamometrica calibrata per serrare il dado al valore corretto dopo
aver usato la chiave pneumatica.
ATTENZIONE: Non aumentare mai la pressione dell'aria al di sopra della
pressione massima di funzionamento indicata in 'Specifiche' se l'utensile si
arresta mentre eseguendo il serraggio o la coppia prodotta è insufficiente.
ATTENZIONE: Tenere presente che gli strumenti ad aria possono tenere
pressione residua dopo l'uso. Spurgare sempre la pressione dell'aria
dall'utensile dopo aver spento l'alimentazione dell'aria.
Accessori
• Accessori per questo strumento, tra bussole e set di bussole, sono
disponibili presso il vostro rivenditore Silverline. Pezzi di ricambio sono
disponibili presso il vostro rivenditore Silverline o www.toolsparesonline.
com
Manutenzione
ATTENZIONE: Scollegare sempre dall'alimentazione dell'aria e
depressurizzare prima di pulire o di effettuare qualsiasi intervento di
manutenzione.
Pulizia
Mantenete il vostro strumento pulito in ogni momento. Lo sporco e la
polvere potrebbero indossare velocemente parti interne di, e ridurre la
durata della macchina. Pulire il corpo della macchina con una spazzola
morbida o un panno asciutto
IMPORTANTE: C'è ben poco che può andare male con il tuo strumento
d'aria e si deve rilevare che, quando uno strumento di aria non riesce a
lavorare in genere è perché i meccanismi interni si sono corrosi a causa
dello sporco, l'aria umida e la mancata osservanza delle istruzioni riportate
di seguito .
Procedura di manutenzione giornaliera: Scollegare dall'alimentazione di
aria, versare l'equivalente di un cucchiaio di olio nella presa d'aria. Azionare
la macchina a bassa velocità per lubrificare a fondo tutte le lavorazioni
interne.
• Se la macchina è in uso costante o utilizzato per lunghi periodi alla volta,
una filtro/lubrificatore deve essere montato. Ci deve essere un filtro
dell'aria montato in ogni momento
• Usare olio per strumenti d’aria. NON USARE ASSOLUTAMENTE OLIO
NORMALE DA MOTORE
• La mancata osservanza delle istruzioni operative e di manutenzione può
invalidare la garanzia
www.silverlinetools.com
31
Page 33

I
Conservazione
• Conservare con cura questo strumento in un luogo sicuro, asciutto, fuori
dalla portata dei bambini
Smaltimento
• Come con altri utensili elettrici, utensili pneumatici non devono essere
smaltiti con i rifiuti domestici
• Strumenti di aria possono contenere tracce di olio e altri lubrificanti e
quindi devono essere riciclati di conseguenza
• Contattare l'ente locale per lo smaltimento dei rifiuti per informazioni sul
modo corretto di disporre di strumenti elettrici
Risoluzione Problemi
Problema Possibile Causa Soluzione
Strumento opera lentamente
Strumento sequestrato
Velocità a vuoto normale ma
strumento rallenta sotto carico
Strumento non si fermerà dopo
che il grilletto è completamente
rilasciato
Se le soluzioni di risoluzione dei problemi di cui sopra non riescono, contattare il vostro rivenditore o un centro di assistenza autorizzato Silverline.
32
Pressione scorretta Impostare la corretta pressione dell'aria secondo la specifica
Sporcizia all'interno del meccanismo Versare l'olio nella presa d'aria come da istruzioni di manutenzione
Blocco dell’aria Operare lo strumento in brevi raffiche per cancellare il blocco
Perdita d’aria Controllare tutti i raccordi e tubi per perdite di aria ed emissione corretta
Blocco in garza a filtro rete Rimuovere il connettore rapido (3) e filtro a rete pulito
Sporcizia o ruggine nel meccanismo Prova le soluzioni per ‘Strumento opera lentamente’
Sporcizia o ruggine nel meccanismo Toccare strumento delicatamente con un martello di gomma
Sporcizia o ruggine nel meccanismo Meccanismo libero ruotando manualmente l’unità quando scollegato
Motore o parti della frizione usurati Contattare un centro assistenza autorizzato Silverline
Motore o frizione si attaccano Versare l'olio nella presa d'aria come da istruzioni e la manutenzione e
Valvola a farfalla ad anello o sede della valvola
danneggiata
ri-serrando, utilizzando del nastro PTFE o sostituzione
dalla linea d'aria
far operare lo strumento in brevi raffiche per lubrificare e liberare
Riparate lo strumento presso un centro di assistenza autorizzato
Silverline
Page 34

719770
Garanzia Silverline Tools
Questo prodotto Silverline è protetto da una
garanzia di 3 anni
Per attivare la garanzia di 3 anni è necessario registrate il prodotto sul
sito www.silverlinetools.com entro 30 giorni dalla data d'acquisto. La data
d'inizio del periodo di garanzia corrisponde alla data d'acquisto riportata
sullo scontrino di vendita.
Condizioni Della Garanzia
Il periodo di garanzia decorre dalla data dell’acquisto presso il rivenditore
indicata sulla ricevuta d’acquisto.
SI PREGA DI CONSERVARE LA RICEVUTA D'ACQUISTO
Nel caso in cui il prodotto risultasse difettoso entro 30 giorni dalla data
d’acquisto, sarà necessario restituirlo al punto vendita presso cui è stato
acquistato, presentando la ricevuta e spiegando chiaramente la natura del
difetto riscontrato. Il prodotto difettoso sarà sostituito o sarà rimborsato
l'importo d'acquisto.
Nel caso in cui il prodotto risultasse difettoso dopo 30 giorni dalla data
d’acquisto, sarà necessario inviare una richiesta di indennizzo in garanzia
a:
Silverline Tools Service Centre
PO Box 2988
Yeovil
BA21 1WU, GB
Le richieste di indennizzo devono essere presentate durante il periodo
della garanzia.
Affinché la richiesta sia approvata, è necessario presentare anche la
ricevuta d’acquisto originale, indicante il luogo e la data dell’acquisto del
prodotto e il proprio nome e indirizzo.
Sarà necessario inoltre fornire una descrizione dettagliata del guasto
riscontrato.
Le richieste effettuate durante il periodo di garanzia saranno verificate da
Silverline Tools per stabilire se il difetto del prodotto è dovuto a problemi di
materiali o di lavorazione.
Le spese di spedizione non saranno rimborsate. Tutti i prodotti devono
essere spediti puliti e in condizioni tali da garantire l'esecuzione della
riparazione in modo sicuro. I prodotti devono essere imballati con cura
per evitare danni o lesioni durante il trasporto. Silverline Tools si riserva
il diritto di non accettare prodotti spediti in condizioni non idonee o non
sicure.
Le riparazioni saranno eseguite da Silverline Tools o da un centro di
riparazione autorizzato.
La riparazione o la sostituzione del prodotto non estende o rinnova il
periodo di garanzia.
Nel caso in cui determini che il prodotto e il difetto riscontrato sono coperti
dalla garanzia, Silverline Tools provvederà a riparare l'utensile
Chiave Pneumatica D'impatto
Registrazione dell'acquisto
Accedere al sito: silverlinetools.com e selezionare il tasto Registrazione
per inserire:
• Informazionipersonali
• Dettaglidelprodottoeinformazionisull'acquisto
Il Certificato di Garanzia sarà inviato per posta elettronica nel formato
PDF. Si prega di stampare e conservare il Certificato insieme alla ricevuta
d'acquisto.
gratuitamente (esclusi i costi di spedizione) o, a propria discrezione, a
sostituirlo con un nuovo utensile.
Gli utensili o le parti trattenuti da Silverline Tools in cambio di un prodotto o
componente sostitutivo diventano proprietà di Silverline Tools.
La riparazione o la sostituzione di un prodotto in garanzia estende i diritti
del consumatore previsti per legge, senza modificarli.
Cosa copre la garanzia:
La riparazione del prodotto, nel caso in cui Silverline Tools determini che il
problema sia dovuto a difetti dei materiali o difetti di lavorazione riscontrati
durante il periodo della garanzia.
Nel caso in cui un componente non sia più disponibile o fuori produzione,
Silverline Tools si riserva il diritto di sostituirlo con un componente
adeguato.
Prodotti acquistati e utilizzati all’interno dell’Unione Europea.
Cosa non copre la garanzia:
La Garanzia Silverline Tools non copre le riparazioni se il difetto è stato
causato da:
La normale usura dei componenti per via dell’utilizzo del prodotto come
indicato nelle istruzioni d’uso (ad esempio, lame, spazzole, cinghie,
lampadine, batterie, ecc.).
La sostituzione di accessori forniti a corredo, come ad esempio punte,
lame, fogli abrasivi, dischi di taglio e altri componenti correlati.
I danni accidentali, causati dall'uso improprio, dall'abuso e dalla
manipolazione, conservazione e cura inadeguata dell'utensile da parte del
proprietario.
L’uso del prodotto per fini non domestici.
La modifica o alterazione del prodotto.
Difetti causati dall’uso di parti e accessori che non siano componenti
originali Silverline Tools.
Installazione difettosa (fatto salvo quando l'installazione viene eseguita da
Silverline Tools).
Riparazioni o alterazioni eseguite da terze parti che non siano la Silverline
Tools o i centri di riparazione autorizzati da quest'ultima.
Silverline Tools non fornisce alcuna garanzia per le richieste formulate per
la correzione dei difetti dell'utensile oggetto della garanzia fatto salvo per
quanto previsto nelle condizioni di cui sopra.
Dichiarazione di conformità CE
Il sottoscritto: Mr Darrell Morris
come autorizzato di: Silverline Tools
Dichiara che il prodotto:
Codice di identificazione: 719770
Descrizione: Chiave Pneumatica D'impatto
Si conforma alle seguenti direttive:
• Direttiva macchine 2006/42/CE
• EN 792-7:2001+A1:2008
Organismo informato: Intertek Testing Services, Shanghai, China
La documentazione tecnica è conservata da: Silverline Tools
Data: 11/06/13
Firma:
Direttore
Nome e indirizzo del fabbricante oppure persona autorizzata:
Powerbox International Ltd, Boundary Way, Lufton Trading Estate, Yeovil,
Somerset, BA22 8HZ, Regno Unito
www.silverlinetools.com
33
Page 35

NL
Beschrijving symbolen
Op het gegevensplaatje van uw gereedschap kunnen zich symbolen
bevinden. Deze vertegenwoordigen belangrijke informatie over het product
of instructies voor het gebruik.
Draag gehoorbescherming
Draag een veiligheidsbril
Draag een stofmasker
Draag een veiligheidshelm
Draag handschoenen
Lees de handleiding.
Gebruik NIET met persgascilinders!
Voldoet aan de relevante wetgeving en veiligheidsnormen
Milieubescherming
Pneumatisch gereedschap mag niet met het normale huisvuil
worden weggegooid. De machines bevatten olie en andere
smeermiddelen. Vraag de plaatselijke autoriteiten of winkelier
om advies betreffende recyclen.
Specificaties
Maximale gebruiksdruk: ..................... 6,3 bar
Luchtverbruik: .................................... 113 l/min
Luchtinlaat: ........................................ ¼" BSP met twee
mannelijke luchtslang snelkoppelingen (EN-6 ‘UK’ en
EQ-4 ‘Europese’ typen)
Minimale slang diameter: ................... 9,5 mm
Vierkant aandrijving: ........................... ½"
Richtingen: ......................................... Voor- en achteruit
Onbelaste snelheid: ............................ Max 7000 min
Maximale koppel: ............................... 312 Nm
Maximale boutcapaciteit: ................... M14
Gewicht: ............................................. 2,18 kg
Geluid en trilling
Geluidsdruk niveau volgens de machine richtlijn
2006/42/EG:
Geluidsdruk LPA: .................................. 94 dB(A)
Geluidsvermogen LWA: ........................ 105 dB(A)
Onzekerheid: ...................................... 3 dB
De geluidsintensiteit voor de bediener kan 85
dB(A) overschrijden en de gehoorbescherming is
noodzakelijk.
Trilling waardes volgens de machine richtlijn 2006/42/EG:
Trilling aH: .......................................... 5,17 m/s
Onzekerheid: ...................................... 1,5 m/s
Met het oog op onze aanhoudende productontwikkeling
kunnen de specificaties van Silverline producten
zonder voorafgaande kennisgeving worden gewijzigd.
-1
2
2
Geluid en trilling
• Geluid- en trillingsniveaus in de specificatie zijn vastgesteld volgens ISO
28927-3. De waarden kunnen gebruikt worden voor het vergelijken van
soortgelijk gereedschap, getest naar deze norm en het beoordelen van
de blootstelling aan geluids- en trillingsniveaus.
• De waarden gelden voor een normaal gebruik in normale
werkomstandigheden. Een slecht onderhouden, onjuist samengestelde
of onjuist gebruikte machine produceert mogelijk hogere geluids- en
trillingsniveaus. Las tijdens het gebruik van de machine genoeg
rustpauzes in waarin de machine onbelast draait of uitgeschakeld wordt.
• Maximaliseer de gebruikers veiligheid door het gebruik van de juiste
veiligheidsuitrusting. Gehoorbeschermers en handschoenen beschermen
u tegen het lawaai en de trillingen geproduceerd door de machine.
Gebruik de machine niet onder een normale temperatuur waar trillingen
een groter effect zullen hebben.
Geluid
• De geluidsrichtlijn werd geïntroduceerd voor de bescherming tegen
gezondheids- en veiligheidsrisico door de blootstelling aan geluid
gehoorrisico. De richtlijn kan gebruikt worden voor het bepalen van
geluidsblootstelling en lichamelijke parameters als piek geluidsdruk en
dagelijks en wekelijks blootstellingsniveau. Biedt vooral aandacht aan
blootstellingsniveaus en –duur.
• Voor meer informatie met betrekking tot de richtlijnen 2003/10/EG
en 2000/14/EG gaat u naar de volgende website voor veiligheid en
gezondheid op het werk – www.osha.europa.eu
Trilling
• De trilling richtlijn 2002/44/EG werd geïntroduceerd voor het beheersen
van trillingsniveaus op het werk. De richtlijn geeft machinegebruikers de
macht keuzes te maken met betrekking tot gewerkte uren. Regelmatige
gebruikers van machines met hoge trillingsniveaus lopen een hoger
risico op gezondheidsproblemen. ISO 28927-3 meet trillingen in drie
richtingen wat bekend staat als vector meeting. Let er bij het gebruik
van machines met hoge trillingsniveaus op dat blootstellingsniveaus
niet overschreden worden. . Voor meer informatie met betrekking tot de
richtlijn gaat u naar de volgende website voor veiligheid en gezondheid
op het werk – www.osha.europa.eu
Algemene veiligheid
• Bij de kans op meervoudige gevaren, leest en begrijpt u de
veiligheidsinstructies voor het installeren, gebruiken, repareren,
onderhouden, het verwisselen van accessoires op of het werken in
de buurt van de machine. Doet u dit niet, dan is de kans op serieuze
verwondingen groot.
• De machine hoort alleen door gekwalificeerde/getrainde personen
geïnstalleerd, aangepast of gebruikt worden
• Modificeer de machine niet. Modificaties verminderen de effectiviteit van
veiligheidsmaatregelen en vergroten het risico voor de gebruiker
• Gooi de veiligheidsinstructies niet weg
• Gebruik de machine niet wanneer deze beschadigd is
• Machines horen regelmatig geïnspecteerd te worden om te bevestigen
dat de benodigde markeringen van dit ISO 11148 deel leesbaar op de
machine gemarkeerd zijn. De gebruiker neemt wanneer nodig contact op
met de fabrikant voor het verkrijgen van de juiste markeringslabels .
WAARSCHUWING: De machine is niet geschikt voor gebruik door personen
met een verminderde mentale of fysieke bekwaamheid of een gebrek aan
ervaring, tenzij de persoon wordt begeleid of geïnstrueerd door een persoon
verantwoordelijk voor de veiligheid
Rondvliegende gevaren
• Het falen van het werkstuk, accessoires of de machine zelf kan
resulteren in rondvliegende delen op hoge snelheid
• Draag te allen tijde gezichtsbescherming. De beschermingsgraad hoort
voor elk gebruik vastgesteld worden
• Bij het gebruik boven het hoofd is het dragen van een veiligheidshelm
aanbevolen
• Denk aan de veiligheid van anderen om u heen
34
Page 36

719770
Pneumatische moersleutel
• Zorg ervoor dat het werkstuk goed vastgezet is
Verwikkelingsgevaar
• Stikken, scalperen en verwondingen zijn mogelijk het resultaat wanneer
losse kleding, sieraden, haar en handschoenen niet weggehouden
worden van de machine en de accessoires.
Gebruiksinstructies
• Het gebruik van de machine kan de gebruikers handen blootstellen aan
gevaren als snij-, schuur- en brandwonden
• Draag geschikte handschoenen voor het beschermen van de handen
• Gebruikers horen fysiek in staat te zijn de machine te hanteren
• Houdt de machine juist vast zodat normale en plotselinge bewegingen
met beide handen onder controle gehouden kunnen worden
• Zorg voor een stevige en gebalanceerde houding
• Laat de start-en-stop hendel in het geval van een stroomstoring los
• Gebruik alleen smeermiddelen, aanbevolen door de fabrikant
• Het dragen van een veiligheidsbril is een must. Het dragen van
beschermende handschoenen en kleding is aangeraden
• Vermijdt direct contact met de bewegende schuurschijf om
verwondingen te voorkomen. Draag geschikte handschoenen voor het
beschermen van uw handen
• Draag geschikte handschoenen voor het beschermen van de handen
• Bij het gebruik op plastic of andere niet-geleidende materialen bestaat de
kans op elektrostatische ontlading
Gevaar herhaalde bewegingen
• Bij het gebruik van de machine ervaart de gebruiker mogelijk
ongemakken in de handen, armen, schouders of andere delen van het
lichaam
• De gebruiker hoort tijdens het gebruik van een machine een
comfortabele werkhouding aan te houden en bij langere
gebruiksperiodes regelmatig van houding te wisselen om ongemak en
vermoeidheid te voorkomen
• Het ervaren van de volgende symptomen hoort niet negeert te worden:
terugkerend ongemak, pijn, tinteling, ongevoeligheid, stijfheid en
brandend gevoel. De gebruiker hoort de werkgever te informeren en
gezondheidshulp te raadplegen
Accessoire gevaren
• Ontkoppel de machine van de stroombron voor het verwisselen van
accessoires
• Vermijdt contact met de accessoires tijdens en na gebruik, deze zijn
mogelijk scherp en heet
• Maak enkel gebruik van accessoire maten en typen aanbevolen door de
schuurmachinefabrikant
Werkplaats gevaren
• Misstappen, struikelen en vallen zijn de grootste werkplaatsongelukoorzaken. Ben bewust van gladde oppervlakken en gevaren, veroorzaakt
door het gebruik van de machine en luchtslangen
• De machine is niet ontworpen voor gebruik in potentiëlen explosieve
atmosferen en is niet geïsoleerd tegen contact met stroom
Stof en damp gevaren
• Stoffen en dampen zijn schadelijk voor de gezondheid en leiden
mogelijk tot gezondheidsproblemen als kanker, zwangerschaps-/
geboorteproblemen, astma en/of huidontsteking. Risicoafweging en
bescherming tegen deze gevaren zijn essentieel
• Risicoafweging bevat de stof als resultaat van het gebruik van de
machine en het potentiele gevaar van het bestaande stof
• Richt de uitlaat zo dat de stofstoring in de met stof gevulde omgeving
geminimaliseerd wordt
• De stof- of dampproductie hoort bij het uitstotingspunt aangepakt te
worden
• Om een onnodige verhoging in stof en dampuitstoting te voorkomen
selecteert, onderhoud en vervangt u het gereedschap als aanbevolen
• In overeenstemming met uw werkgever draagt u een geschikt
stofmasker als voorgeschreven door het gezondheids- en
veiligheidsreglement
Geluidsgevaren
• Blootstelling aan hoge geluidsniveaus kan resulteren in piepende en
fluitende geluiden in de oren en tevens permanente gehoorbeschadiging
veroorzaken. Daarvoor horen deze gevaren onder controle gehouden
te worden.
• Denk daarbij aan het dempen van materialen en het voorkomen van het
klinken van het werkstuk
• Gebruik geschikte gehoorbescherming in overeenstemming met de
werkgevers instructies en de gezondheids- en veiligheidsvoorschriften
• Gebruik en onderhoud de machine als voorgeschreven in de handleiding
om onnodige verhoging van geluidsniveaus te voorkomen
• Selecteert, onderhoud en vervangt u het gereedschap als aanbevolen in
de handleiding om onnodige verhoging van geluidsniveaus te voorkomen
• Wanneer de machine is voorzien van een geluidsdemper, zorg er voor dat
deze juist functioneert bij het gebruik van de machine
Trilling gevaren
De trillingen die niet geëlimineerd zijn door het ontwerp en de constructie
blijven risicovol. Werkgevers kunnen zo de werkomstandigheden vaststellen
waarin de werknemer een risico loopt op blootstelling aan trillingen.
Wanneer het trilling niveau, verkregen met behulp van ISO 28927-3,
niet overeenkomt met het werkelijke trilling niveau van de machine zal
bijkomende informatie verstrekt worden zodat de risico’s beoordeeld en
behandeld kunnen worden
• Blootstelling aan trilling kan de zenuwen en bloedtoevoer in de handen
en armen beschadigen
• Draag warme kleding bij het gebruik in koude omstandigheden en houd
uw handen warm en droog
• Bij gevoelloosheid, tintelingen, pijn of wit worden van de huid in uw
vingers of handen stopt u onmiddellijk met het gebruik van de machine,
vertel uw werkgever en raadpleeg een dokter
• Gebruik en onderhoud de machine als voorgeschreven in de handleiding
om onnodige verhoging van trilling niveaus te voorkomen
• Houd de machine met een lichte maar veilige houvast vast waar
trillingsniveaus over het algemeen hoger zijn bij een vaste houvast
www.silverlinetools.com
35
Page 37

NL
Veiligheid pneumatisch
gereedschap
Lucht onder druk kan ernstige verwondingen veroorzaken:
• Schakel de luchttoevoer uit, voer luchtdruk in slangen af en ontkoppel
het gereedschap van de luchttoevoer wanneer deze niet in gebruik is,
voordat accessoires verwisseld worden en reparaties uitgevoerd worden
• Richt de lucht nooit op uzelf of anderen
• Zwepende slangen zijn erg gevaarlijk. Check altijd op beschadigde en
losse slangen en aansluitingen
• Bij het gebruik van klauwkoppelingen horen vergrendelpinnen en
veiligheidskabel gebruikt te worden om slangaansluiting fouten te
voorkomen
• Overschrijdt de maximale luchtdruk, weergegeven op het gereedschap,
niet
• Houdt pneumatisch gereedschap nooit bij de luchtslang vast
Productinformatie
1 ½" vierkant aandrijving
2 Rotatierichting pin
3 Snelkoppeling
4 Lucht/Koppel controle knop
5 Trekker
6 Oliepunt
36
Page 38

719770
Pneumatische moersleutel
Intentioneel gebruik
• Pneumatische moersleutel, aangedreven door een luchtcompressor, voor
het snijden van metaal (bladmetaal, bouten/moeren, autopanelen, etc.)
Let op: De sleutel is geen momentsleutel. Na het aandraaien met de
ratelsleutel gebruikt u een momentsleutel
Hetuitpakken van uw
gereedschap
• Pak uw toestel / gereedschap uit. Inspecteer het en zorg dat u met alle
kenmerken en functies vertrouwd raakt
• Controleer of alle onderdelen aanwezig zijn en in goede staat verkeren.
Als er onderdelen ontbreken of beschadigd zijn, zorg dan dat deze
vervangen worden voor u dit toestel / gereedschap gebruikt
Voor gebruik
Het bevestigen van de snelkoppeling
Let op: De sleutel is voorzien van twee verschillende koppelingen
EQ-4 – gebruikt in Europa
EN-6 – gebruikt in de UK
EQ-4
Europe
• Selecteer de koppeling, passend bij het te gebruiken luchtsysteem en
instaleer als beschreven:
1. Plaats PTFE-tape (niet inbegrepen) op het schroefdraad van de
koppeling (10). Dit zorgt voor een luchtdichte afsluiting
Let op: Plaats de tape strak en met de wijzers van de klok mee zodat deze
niet los raakt wanneer de koppeling op de machine wordt geschroefd
2. Verwijder de beschermende plug van de luchtinlaat
3. Draai de snelkoppeling met behulp van een steeksleutel (niet
inbegrepen) op de luchtinlaat, aan de onderzijde van het handvat
4. Sluit de luchtslang aan, stel de juiste druk in en controleer op lekkages
(bijvoorbeeld door het aanbrengen van een kleine hoeveelheid
zeepwater op de buitenzijde van de koppelingen)
• Luchtslangen met een bijpassende vrouwelijke snelkoppeling zijn op de
machine vast te duwen
Aansluiting van de luchttoevoer
VERBINDINGS-
NIPPEL
HOOFDSLANG
SNELKOPPELING
WATERSLANG
VERBINDING MET
UW GEREEDSCHAP
• Dit gereedschap hoort aangesloten te worden op een schone en droge
luchttoevoer, met een interne olie en water scheider
• Laat de luchtdruk niet boven het maximum reiken (zie specificatie
details)
• Zorg dat het water dagelijks uit de luchttoevoer wordt afgevoerd
• Zorg ervoor dat u de juiste onderdelen (slangen, bevestigingsonderdelen,
etc.) heeft voor het gebruik van de benodigde luchtdruk
Het stellen van de snelheid
• De snelheid van de machine kan versteld worden met behulp van de
lucht/Koppel controle knop (4):
‘1’ = minimum, ‘4’ = maximum
WATERSCHEIDING
VERBINDINGS-
NIPPEL
EN-6
UK
OLIEBUS
REGULATEUR
DAGELIJKS
AFVOEREN
LUCHTTOEVOER
Rotatierichting
De machine is voorzien van een richtingsfunctie. Selecteer de vereiste
richting met behulp van de pin (2). De ‘F’ en ‘R’ markeringen op de machine
geven de positie van de schakelaar aan:
• Staaf steekt aan de voorzijde uit = ‘F’ – voorwaarts (rechtsdraaiend)
• Staaf steekt aan de achterzijde uit = ‘R’ – achterwaarts (linkdraaiend)
Let op: De termen voor- en achteruit verwijzen naar de rechtshandige
schroefdraad
Het bevestigen van doppen
WAARSCHUWING: Ontkoppel de machine van de luchttoevoer voordat u
doppen afhaalt of bevestigd
1. Plaats een geschikte dop op de ½” aandrijving en druk totdat u deze
vast hoort klikken
2. Zorg ervoor dat de vergrendelring inschakelt en trek aan de dop om te
controleren of deze goed vast zit
Let op: Trek de dop simpelweg van de aandrijving af
Gebruik
Het losdraaien van een bout of moer
1. Plaats de dop over de moer
2. Houd de machine stevig bij het handvat vast met uw duim om het
handvat en uw vingers op de trekker schakelaar (5)
3. Houd uw andere hand op de achterzijde van de machine voor extra
kracht
4. Druk de rotatierichting pin (2) in tot deze uit de achterzijde van de
behuizing klikt
5. Knijp in de trekker schakelaar om de machine te starten
6. Wanneer de bout of moer begint te bewegen laat u de trekker
schakelaar los om de machine te stoppen en neemt u de dop van de
bout/moer. Neem de bout wanneer nodig uit de dop
Let op: Laat de machine niet langere tijd onbelast draaien. Dit vermindert
de levensduur aanzienlijk
WAARSCHUWING: Wanneer de moer niet door de machine los gedraaid kan
worden mag de luchtdruk niet verhoogd worden. Gebruik een handsleutel
om de bout of moer los te draaien
Het vastdraaien van een bout of moer
1. Controleer of de bout/moer de geselecteerde koppel kan weerstaan
2. Draai de bout/moer zo ver mogelijk met de hand vast
3. Plaats de dop over de moer
4. Houd de machine stevig bij het handvat vast met uw duim om het
handvat en uw vingers op de trekker schakelaar (5)
5. Houd uw andere hand op de achterzijde van de machine voor extra
kracht
6. Druk de rotatierichting pin (2) in tot deze uit de voorzijde van de
behuizing klikt
7. Knijp in de trekker schakelaar om de machine te starten
8. Wanneer de moer vast gedraaid is neemt u de dop en machine van de
moer af
WAARSCHUWING: Gebruik een gekalibreerde momentsleutel om de
bevestigingsmiddelen tot het juiste punt vast te draaien na het gebruik van
de moersleutel
WAARSCHUWING: Verhoog de luchtdruk nooit boven de maximale
luchtdruk, weergegeven in de specificaties
WAARSCHUWING: Pneumatische machines bevatten na gebruik mogelijk
achtergebleven druk. Tap de luchtdruk na gebruik van de sleutel af
www.silverlinetools.com
37
Page 39

NL
Accessoires
• Accessoires als doppen, doppen sets, verlengstaven, etc. zijn verkrijgbaar
bij uw Silverline handelaar. Reserve onderdelen zijn verkrijgbaar bij uw
Silverline handelaar of via www.toolsparesonline.com
Onderhoud
WAARSCHUWING: Ontkoppel de machine van de luchttoevoer voordat u de
machine schoonmaakt of enig onderhoud uitvoert.
• Houd uw machine schoon. Vuil en stof kan de interne delen sneller doen
slijten en de gebruiksduur aanzienlijk verminderen. Maak de behuizing
met een zachte borstel of droge doek schoon
BELANGRIJK: Er is maar weinig wat fout kan gaan met uw pneumatisch
gereedschap. Wanneer uw machine niet werkt is vieze en natte lucht en het
niet opvolgen van de onderhoud instructies vaak de oorzaak
DAGELIJKS ONDERHOUD: Verwijder het gereedschap van de luchttoevoer,
giet een kleine hoeveelheid olie in de luchtinlaat en laat de machine op lage
snelheid roteren, zodat het interne mechanisme goed wordt gesmeerd
EENS PER WEEK
Verwijder het gereedschap van de luchttoevoer. Verwijder de inbussleutel
om een kleine hoeveelheid olie in het oliepunt (6) te gieten. Draai de schroef
vast om het punt weer te sluiten. Sluit de machine op de luchttoevoer aan
en laat de machine een aantal seconden op lage snelheid draaien om de
olie te verspreiden
• Wanneer de machine in constant gebruik is of wanneer deze in lange
periodes gebruikt wordt, hoort u een combi filter/smeermiddel te
monteren. U hoort te allen tijde een luchtfilter aangesloten te hebben op
de machine
• Gebruik gereedschapsolie. GEBRUIK ONDER GEEN ENKELE
VOORWAARDEN NORMALE MOTOROLIE
• Wanneer u de instructies niet op volgt, kan dit resulteren in een ongeldige
garantie
Opberging
• Berg de machine op een droge en veilige plek, buiten het bereik van
kinderen op.
Verwijdering
• Pneumatische machines mogen niet met uw huishoudelijk afval worden
weggegooid
• Pneumatische machine bevatten mogelijk sporen van olie en andere
smeermiddelen
• Neem contact op met uw gemeente voor informatie betreffende de
verwijdering van pneumatisch gereedschap
Probleemopsporing
Probleem Mogelijke oorzaak Oplossing
Onjuiste druk Stel de juiste luchtdruk in
Vuil in het mechanisme Giet olie in de luchtinlaat als beschreven in de onderhoudsparagraaf
De machine werkt op een lage
snelheid
De machine loopt vast
Normale onbelaste snelheid
maar de snelheid neemt af onder
belasting
De machine stopt niet wanneer
de trekker losgelaten wordt
Wanneer bovenstaande oplossingen niet werken neemt u contact op met de verkoper of een Silverline service center
Lucht verstopping Knijp de trekker in korte stoten in
Lucht lekkage Controleer alle aansluitingen en de slang op lekkages en draai
Verstopping in de luchtfilter Verwijder de snelkoppeling en maak de filter schoon
Vuil of roest in het mechanisme Probeer oplossingen ‘De machine werkt op een lage snelheid’
Vuil of roest in het mechanisme Klop licht op de machine met een zachte hamer
Vuil of roest in het mechanisme Roteer het mechanisme handmatig met de machine ontkoppeld van de
Versleten motor of versnellingsbak onderdelen Neem contact op met een geautoriseerd service center
Motor of versnellingsbak loopt stroef Giet wat olie in de luchtinlaat als beschreven in de onderhoudsparagraaf
Koppelventiel O-ring of zitting beschadigt Laat de machine repareren bij een geautoriseerd service center
koppelingen vast met het gebruik van PTFE-tape
luchttoevoer
en smeer de interne delen van de machine
38
Page 40

598446 Pneumatische moersleutel
Silverline Tools Garantie
Dit Silverline product komt met 3 jaar garantie.
Registreer dit product binnen 30 dagen van aankoop op
www.silverlinetools.com om in aanmerking te komen voor 3 jaar
garantie. De garantieperiode begint op de datum van aankoop op het
ontvangstbewijs.
Het gekochte product registreren
Ga naar: silverlinetools.com, kies Registration (registratie) en voer het
volgende in:
• Uwpersoonlijkegegevens
• Degegevensvanhetproductendeaankoop
U ontvangt het garantiebewijs in PDF-vorm. Druk het af en bewaar het bij
het product.
Voorwaarden
De garantieperiode gaat in vanaf de datum van aankoop op het
ontvangstbewijs.
BEWAAR HET ONTVANGSTBEWIJS OP EEN VEILIGE PLAATS
Als dit product binnen 30 dagen van de aankoopdatum een fout heeft,
breng het dan naar de winkelier waar u het heeft gekocht, met uw
ontvangstbewijs, en met vermelding van de details van de storing. U kunt
om een nieuwe vragen of om uw geld terug.
Als dit product na de periode van 30 dagen een fout heeft, stuur het dan
naar:
Silverline Tools Service Centre
PO Box 2988
Yeovil
BA21 1WU, GB
Alle claims moeten binnen de garantieperiode worden ingediend.
U moet het originele ontvangstbewijs geven met de datum van aankoop,
uw naam, adres en plaats van aankoop voordat er aan kan worden
gewerkt.
U moet nauwkeurige gegevens verschaffen van de fout die verholpen
moet worden.
Claims die binnen de garantieperiode worden ingediend, worden door
Silverline Tools nagelopen om te kijken of het probleem een kwestie is van
de materialen of de fabricage van het product.
De verzendkosten worden niet vergoed. De geretourneerde items moeten
voor de reparatie in een redelijk schone en veilige staat verkeren en
moeten zorgvuldig worden verpakt om schade en letsel tijdens het vervoer
te voorkomen. Ongeschikte en onveilige leveringen kunnen worden
afgewezen.
Al het werk wordt uitgevoerd door Silverline Tools of een officiële
reparatiedienst.
De garantieperiode wordt niet door de reparatie of vervanging van het
product verlengd.
Defecten waarvan wij beschouwen dat ze onder de garantie vallen, worden
verholpen door middel van gratis reparatie van het gereedschap (exclusief
verzendingskosten) of door vervanging door een gereedschap in perfecte
staat van werking.
De ingehouden gereedschappen of onderdelen die zijn vervangen, worden
het eigendom van Silverline Tools.
De reparatie of vervanging van het product onder garantie zijn voordelen
die bijkomstig zijn aan uw wettelijke rechten als consument, en hebben
daar geen invloed op.
Wat is gedekt:
De reparatie van het product, mits naar tevredenheid van Silverline Tools
kan worden vastgesteld dat de gebreken het gevolg zijn van defecte
materialen of fabrieksfouten binnen de garantieperiode.
Onderdelen die niet meer verkrijgbaar zijn en die niet meer worden
vervaardigd worden door Silverline Tools vervangen door een functionele
vervanging.
Gebruik van dit product in de EU.
Wat niet is gedekt:
Silverline Tools geeft geen garantie op reparaties als gevolg van:
Normale slijtage veroorzaakt door gebruik in overeenstemming met de
bedieningsinstructies zoals zaagbladen, borstels, riemen, gloeilampen,
batterijen enz.
De vervanging van geleverde accessoires zoals boortjes, zaagbladen,
schuurvellen, snijschrijven en aanverwante producten.
Accidentele schade, storingen veroorzaakt door nalatigheid in gebruik of
verzorging, misbruik, verwaarlozing, onvoorzichtige bediening en hantering
van het product.
Gebruik van het product voor andere doeleinden dan normaal huishoudelijk
gebruik.
Alle soorten wijzigingen en modificaties van het product.
Gebruik van andere onderdelen en accessoires dan de originele onderdelen
van Silverline Tools.
Defecte installatie (behalve wanneer geïnstalleerd door Silverline Tools).
Reparaties of wijzigingen die zijn uitgevoerd door anderen dan Silverline
Tools of diens officiële reparatiediensten.
Behalve claims voor het recht op correctie van fouten van het gereedschap
volgens de bepalingen van deze garantie zijn geen andere claims gedekt.
EG-verklaring van overeenstemming
De ondergetekende: Mr. Darrell Morris
Gemachtigd door: Silverline Tools
Verklaart dat
Identificatienummer: 719770
Beschrijving: Pneumatische moersleutel
Voldoet aan de volgende richtlijnen:
• Machinerichtlijn 2006/42/EG
• EN 792-7:2001+A1:2008
Keuringsinstantie: Intertek Testing Services, Shanghai, China
De technische documentatie wordt bijgehouden door: Silverline Tools
Datum: 11-06-2013
Handtekening:
Directeur
Naam en adres van fabrikant of gemachtigde:
Powerbox International Ltd, Boundary Way, Lufton Trading Estate, Yeovil,
Somerset, BA22 8HZ Verenigd Koninkrijk
www.silverlinetools.com
39
 Loading...