

Page 1

Introduction
General function ............................................................... Page 6
Intended use ...................................................................... Page 7
Description of parts ........................................................... Page 8
Technical Data .................................................................. Page 9
Scope of delivery .............................................................. Page 10
Safety advice ..................................................................... Page 11
Safety Instructions for batteries ........................................ Page 12
Inserting / replacing batteries ........................................... Page 12
Setting the date and time .............................................. Page 13
Installation on the radiator .......................................... Page 14
Removing the old thermostat head .................................. Page 16
Adapters for Danfoss ........................................................ Page 18
Adapting run ...................................................................... Page 21
Start-up
Setting the weekly program ............................................. Page 22
Operating modes .............................................................. Page 29
Configuration menu .......................................................... Page 29
Display content in normal mode ...................................... Page 31
BOOST function ................................................................ Page 31
Setting the holiday function .............................................. Page 33
Comfortable temperature and reduced temperature ..... Page 34
Child safeguard / operating lock ..................................... Page 35
Activating heating pause (battery saving) ....................... Page 36
Setting the frost protection mode ..................................... Page 36
„Window open“ function ................................................. Page 37
Setting the offset temperature........................................... Page 38
Restoring the factory settings ............................................ Page 39
Troubleshooting and maintenance ........................... Page 40
Cleaning ............................................................................... Page 42
Disposal ................................................................................ Page 42
Warranty ............................................................................. Page 44
Manufacturer..................................................................... Page 46
5 GB
91033_silv_Heizkoerperthermostat_Content_HU-CZ-SK.indd 5 09.07.13 11:07
Page 2
91033_silv_Heizkoerperthermostat_Content_HU-CZ-SK.indd 6 09.07.13 11:07
Programmable Radiator
Thermostat
Introduction
We congratulate you on the purchase of your new device. You
have chosen a high quality product.
Familiarise yourself with the product before
using it for the first time. In addition, please
carefully refer to the operating instructions
and the safety advice below. Only use the
product as instructed and only for the stated
areas of use. You should keep these instructions. If you pass the product on to anyone
else, please ensure that you also pass on all
the documentation with it.
General function
With the programmable Classic Model L
radiator control unit with a pre-programmed
6 GB
Page 3
91033_silv_Heizkoerperthermostat_Content_HU-CZ-SK.indd 7 09.07.13 11:07
heating and temperature reducing program
which can be set individually, it is possible to
control the room temperature in a time-controlled manner. The device moves a valve to
control the flow of heat to the radiator. The
programmable radiator control unit fits all
common radiator valves and is easy to install
- without discharging the heating water or
interfering with the heating system. The additional BOOST function enables the radiator
to be heated up quickly for a brief period of
time by opening the valve for 5 minutes. This
gives an immediate and pleasant feeling of
warmth in the room.
Intended use
The programmable radiator control unit is
used to control a conventional radiator valve.
Only operate the device in inside rooms and
avoid the influence of moisture, dust and sunlight or external heat radiation. Any type of
7 GB
Page 4

91033_silv_Heizkoerperthermostat_Content_HU-CZ-SK.indd 8 09.07.13 11:07
use other than that described in these operating instructions does not comply with the intended use and leads to automatic exclusion
from warranty and liability claims. This also
applies in the case of conversions and modifications. The devices are solely intended for
private use.
Description of parts
1
Union nut for fitting on the heating valve
2
Set switching time periods in the weekly
program
3
Temperature display, time/date display,
menu items, functions
4
-key: switching between reduced
temperature/comfortable temperature
5
BOOST/OK key: in automatic and
manual mode, activation of the BOOST
function; in the holiday function and in
the Confirm/Save menu
8 GB
Page 5
91033_silv_Heizkoerperthermostat_Content_HU-CZ-SK.indd 9 09.07.13 11:07
6
Selector dial: perform settings (e.g.
temperature)
7
MODE/Menu key: press the key briefly
to change between automatic mode,
manual mode and holiday function; press
the key longer than 3 seconds to open
the configuration menu
8
„Window open“ symbol, weekday,
„Battery empty“ symbol
9
Holiday function, reduced temper-
ature/comfortable temperature, (Manu)
manual mode, (Auto) automatic mode
Technical Data
Supply voltage: 3V
Max. current loading: 100 mA
Batteries: 2 x LR6 /
Mignon / AA
Battery life span: approx. 3 years
Display: LC display
9 GB
Page 6
91033_silv_Heizkoerperthermostat_Content_HU-CZ-SK.indd 10 09.07.13 11:07
Housing dimensions: 58 x 71,5 x 90 mm
(width x height x
depth)
Connection: M30 x 1.5
Ambient temperature: +5 to +55 °C
Max.
Surface temperature: +90 °C
(at the radiator)
Linear lift: 4.3 mm
Note: We reserve the right to make technical
changes in the interests of product improvement.
Scope of delivery
Immediately after unpacking, check that the
scope of delivery is complete and that the
device is in faultless condition.
1 Programmable Radiator Thermostat
1 Danfoss RA adapter
1 Danfoss RAV adapter
10 GB
Page 7
91033_silv_Heizkoerperthermostat_Content_HU-CZ-SK.indd 11 09.07.13 11:07
1 Danfoss RAV tappet extension
1 Danfoss RAVL adapter
1 Cylinder head screw M4 x 12
1 Nut M4
1 Retaining ring
1 Set of operating instructions
Safety advice
RISK
OF FATAL INJURY AND
ACCIDENT HAZARD FOR
TODDLERS AND SMALL CHILDREN!
Never leave children unattended with the
packaging material. The packaging material represents a danger of suffocation.
Children often underestimate dangers.
Always keep children away from the packaging material. The product is not a toy.
11 GB
Page 8
91033_silv_Heizkoerperthermostat_Content_HU-CZ-SK.indd 12 09.07.13 11:07
Do not open the device, it does not contain
any parts which require to be maintained
by the user. In the event of a fault, please
send the device to our Service Department.
Safety Instructions for
batteries
Never recharge non-recharge-
able batteries and do not
short-circuit and / or open any
batteries. The battery may overheat, ignite
or explode. Never throw batteries into
fire or water. The batteries may explode.
I
nserting / replacing batteries
Pull off the battery compartment cover on
the underside of the device.
Insert 2 new LR6 (Mignon / A A) batteries
into the battery compartment with the
correct polarity.
Replace the battery cover and latch it in.
12 GB
Page 9

91033_silv_Heizkoerperthermostat_Content_HU-CZ-SK.indd 13 09.07.13 11:07
Note: The life span of new alkaline batteries
is approx. 3 years. A battery symbol
indicates that the batteries should be replaced.
After the batteries have been removed, you
should wait approx. 1 minute before inserting
the new batteries. Operation with rechargeable batteries is not possible.
Setting the date and time
Note: If batteries are inserted or replaced,
the date and time is automatically requested
after a brief display of the firmware version
number.
Set the year, month, day, hour and min-
3
ute
with the selector dial 6 and con-
firm with OK
5
, see fig. A. The motor
moves the control pin backwards during
the setting of the date and time.
13 GB
Page 10
91033_silv_Heizkoerperthermostat_Content_HU-CZ-SK.indd 14 09.07.13 11:07
The display of „INS“ with the rotating
shows that the motor is still travelling back.
As soon as „INS“ is displayed, the programmable radiator control unit can be
installed on the valve.
The weekly program and other settings
can be adjusted before installation. Press
the MODE key
7
for this, while „INS“ is
shown in the display. You can find more
details under „Configuration menu“.
After the programming has been completed, „INS“ is shown again in the display and installation can take place.
Installation on the radiator
The installation of the programmable radiator
control unit is easy and can be performed
without discharging the heating water or interfering with the heating system. Special tools or
switching off the heating are not required. The
14 GB
Page 11

91033_silv_Heizkoerperthermostat_Content_HU-CZ-SK.indd 15 09.07.13 11:07
union nut fitted to the programmable radiator
control unit can be used universally and without accessories for all valves with a thread
dimension of M30 x 1.5 mm from the most
common suppliers, such as for example
- Heimeier
- MNG
- Junkers
- Landis & Gyr (Duodyr)
- Honeywell-Braukmann
- Oventrop, type A; Oventrop AV6
- Schlösser
- Comap D805
- Valf
- Sanayii
- Mertik Maxitrol
- Watts
- Wingenroth (Wiroflex) R.B.M
- Tiemme
- Jaga
15 GB
Page 12
91033_silv_Heizkoerperthermostat_Content_HU-CZ-SK.indd 16 09.07.13 11:07
- Siemens
- Idmar.
The programmable radiator control units can
be installed on Danfoss RA, Danfoss RAV and
Danfoss RAVL valves, by means of the adapters
and extension pins contained in the delivery.
Removing the old
thermostat head
Turn the thermostat head to the maximum
10
value
The thermostat head does not now press
on the valve spindle and it can therefore
be removed more easily (see fig. B).
There can be different types of thermostat
head fixing:
16 GB
in an anticlockwise direction.
Page 13
91033_silv_Heizkoerperthermostat_Content_HU-CZ-SK.indd 17 09.07.13 11:07
Union nut:
Screw the union nut anti-clockwise
you can remove the thermostat head
13
. Then
11
.
Snap-on fastenings:
You can easily release thermostat heads
fastened in this way by turning the closure fastening/union nut a small amount
in an anticlockwise direction
can remove the thermostat head
12
. Then you
11
.
Clamping screw connections:
The thermostat head is held by means of
a fastening ring, which is held together by
a screw. Release this screw and remove
the thermostat head from the valve
11
Screw connection with setscrews:
Release the setscrew and remove the
thermostat head
11
.
.
17 GB
Page 14
Adapters for Danfoss
Take care during installation that you do
not trap your fingers between the two halves
of the adapter!
One of the enclosed adapters is required for
installation on Danfoss valves. The arrangement
of the suitable adapter ring for the appropriate
valve can be found in the figures C–F.
The Danfoss valve bodies have elongated
indentations
13
running all around, which
also ensure better seating of the adapter
after it has been latched into place.
Note: When installing, please ensure that
the spigots inside the adapter
same position as the indentations
14
are in the
13
valve.
Screw the adapter, which fits the valve,
onto the valve until it clicks into place.
18 GB
on the
91033_silv_Heizkoerperthermostat_Content_HU-CZ-SK.indd 18 09.07.13 11:07
Page 15
91033_silv_Heizkoerperthermostat_Content_HU-CZ-SK.indd 19 09.07.13 11:07
The RA and RAV adapters have been produced with pre-tension to aid better seating.
Use a screw driver during installation if necessary and bend these gently upwards in the
area of the screw.
After they have been latched onto the
valve body, fasten the adapters with the
enclosed screw and nut (see fig. C).
Note: When installing, please ensure
that the spigots inside the adapter
in the same position as the indentations
14
are
13
on the valve.
Latch the adapter, which corresponds to
the valve, completely onto the valve body.
With the RAV type of valve, the tappet exten-
15
sion
should be placed on the valve pin
before installation (see fig. D).
Note: When installing, please ensure that the
spigots inside the adapter
position as the indentations
14
are in the same
13
on the valve.
19 GB
Page 16
91033_silv_Heizkoerperthermostat_Content_HU-CZ-SK.indd 20 09.07.13 11:07
Latch the adapter, which corresponds to
the valve, completely onto the valve body.
The RAVL adapter does not have to be screwed
on (see fig. E).
Note: When installing, please ensure that the
spigots inside the adapter
position as the indentations
14
are in the same
13
on the valve.
Latch the adapter, which corresponds to
the valve, completely onto the valve body.
Retaining ring
The valves of a number of suppliers can exhibit tolerance variations, which may lead to
the programmable radiator control unit being
seated too loosely on the valve. The stability
and seating on the valve can be improved by
using the enclosed retaining ring (see fig. F).
Place the retaining ring 16 in the flange
or on the valve connection of the radiator
and screw the thermostat valve on.
20 GB
Page 17
91033_silv_Heizkoerperthermostat_Content_HU-CZ-SK.indd 21 09.07.13 11:07
Note: If the retaining ring can not be fitted, the stability is already sufficient and
the ring is not required for the installation.
Adapting run
After the batteries have been inserted, the
motor first travels back, during which „INS“
and the activity symbol
are displayed. As
soon as „INS“ without the activity symbol
is displayed, the programmable radiator
control unit can be installed. An adapting run
(„AdA“) is performed after installation to
adapt to the valve.
Place the programmable radiator control
unit on the valve.
Tighten the union nut firmly.
Press the BOOST key 5, when „INS“ is
shown in the display.
21 GB
Page 18
91033_silv_Heizkoerperthermostat_Content_HU-CZ-SK.indd 22 09.07.13 11:07
The intelligent radiator control unit carries out
a test run.
During this time „AdA“ and the activity symbol
are shown in the display and operation
is not possible.
Note: If the adapting run is initiated before
installation, the motor similarly travels back to
the „INS“ position. If an error message (F1,
F2, F3) is displayed, press OK and the motor
travels back to the „INS“ position.
Start-up
Setting the weekly program
Up to 3 heating phases (7 switching time points
can be set separately for each weekday in
the weekly program. The programming is done
for the selected days and temperatures must be
stored for a time period from 00:00 to 23:59.
22 GB
)
Page 19
91033_silv_Heizkoerperthermostat_Content_HU-CZ-SK.indd 23 09.07.13 11:07
Press the Menu key 7 longer than
3 seconds. „PRO“ appears in the display.
Confirm with the OK key
5
.
„DAY“ appears in the display. With the se-
lector dial can be selected an individual
weekday, all working days, the weekend or
the whole week (example working days).
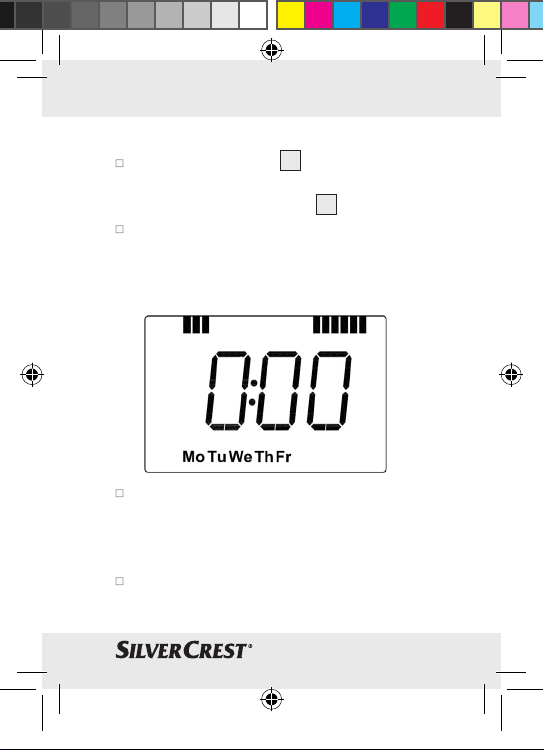
Confirm with the OK key. The first switching
time point is displayed (0:00), this can
not be changed. The heating times are
also displayed as bars.
Confirm with the OK key.
23 GB
Page 20
91033_silv_Heizkoerperthermostat_Content_HU-CZ-SK.indd 24 09.07.13 11:07
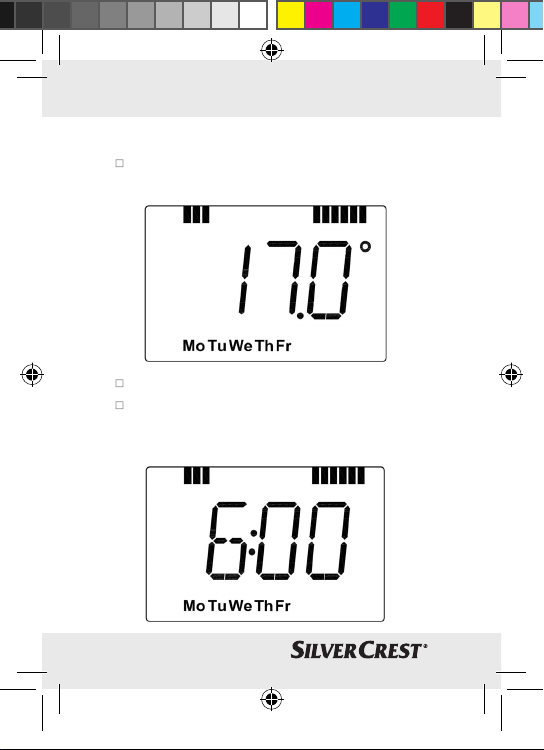
After this you can set the temperature which
is desired from 0:00 (example 17.0 °C).
Confirm with the OK key.
The next switching time point is displayed
(example 6:00). You can adjust this
individually.
24 GB
Page 21

91033_silv_Heizkoerperthermostat_Content_HU-CZ-SK.indd 25 09.07.13 11:07
Finally set the temperature which should
prevail from 6:00.
You can repeat this procedure until all the
other desired temperatures for the time
period from 0:00 to 23:59 have been
stored. If all 7 switching time points have
been allocated, 23:59 is displayed as
the final switching point to be confirmed.
The temperature can also be changed in
Auto mode at any time via the selector dial.
The changed temperature is then retained
until the next switching time point.
Weekly program: examples
Up to 3 heating times (7 switching time points)
with individual temperature setting can be
stored for each weekday with the programmable radiator control unit.
25 GB
Page 22
91033_silv_Heizkoerperthermostat_Content_HU-CZ-SK.indd 26 09.07.13 11:07
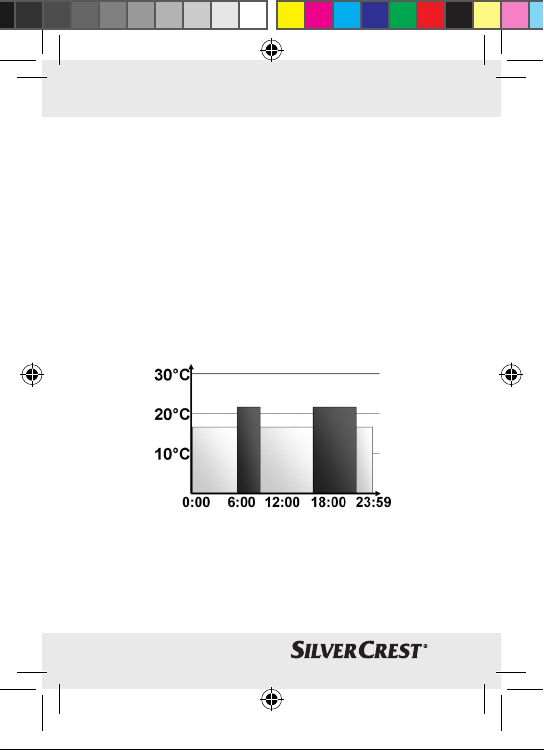
Two heating phases from 6:00 to 9:00 and
from 17:00 to 23:00 for all weekdays alike
are saved as factory settings:
from 00:00 to 06:00 17.0 °C
from 06:00 to 09:00 21.0 °C
from 09:00 to 17:00 17.0 °C
from 17:00 to 23:00 21.0 °C
from 23:00 to 23:59 17.0 °C
Note: Bars for switching time periods for
every second time interval are shown in the
display. With this example no bars for the
interval 0:00 to 6:00 are displayed. The bars
26 GB
Page 23
91033_silv_Heizkoerperthermostat_Content_HU-CZ-SK.indd 27 09.07.13 11:07
only appear in the display for the intervals
6:00 to 9:00 and 17:00 to 23:00.
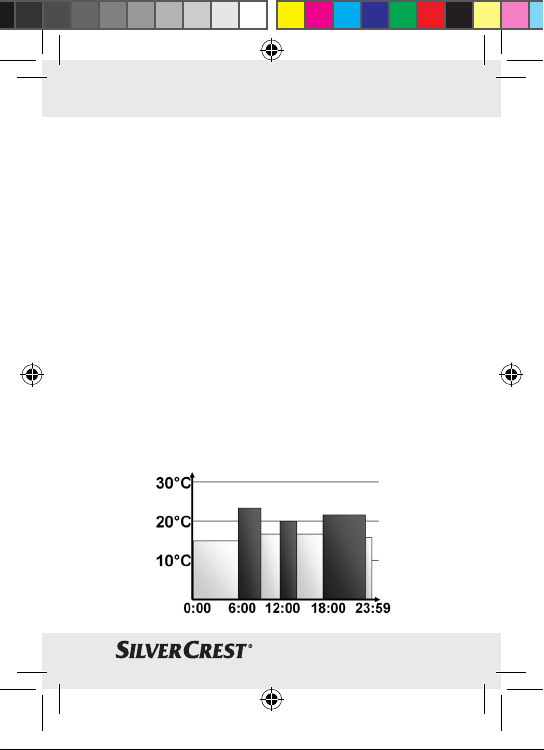
If a room is also to be heated at midday, the
programming can appear as follows:
Monday to Sunday
from 00:00 to 06:00 16.0 °C
from 06:00 to 09:00 22.0 °C
from 09:00 to 12:00 17.0 °C
from 12:00 to 14:00 20.0 °C
from 14:00 to 17:30 17.0 °C
from 17:30 to 23:30 21.0 °C
from 23:30 to 23:59 16.0 °C
27 GB
Page 24
91033_silv_Heizkoerperthermostat_Content_HU-CZ-SK.indd 28 09.07.13 11:07
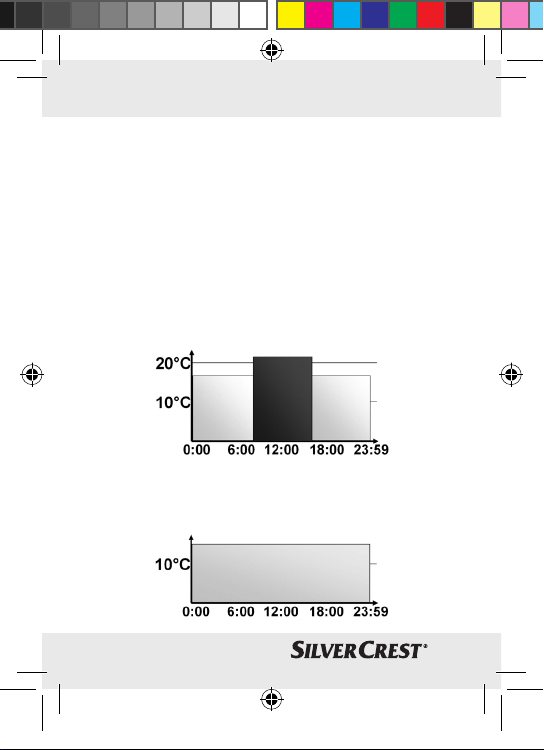
If you have an office at home and only want
to heat this throughout the day on working
days, you could program the following times:
Monday to Friday
from 00:00 to 08:30 17.0 °C
from 08:30 to 17:00 21.0 °C
from 17:00 to 23:59 17.0 °C
Saturday to Sunday
from 00:00 to 23:59 15.0 °C
28 GB
Page 25
Operating modes
By briefly pressing the MODE key 7, you can
change between the following 3 operating
modes (the operating modes can only be selected after installation):
-
Holiday function: Setting a temperature, which has to be maintained until a fixed
point in time.
- Manu: Manual mode - the temperature is
set manually via the selector dial.
- Auto: Weekly program - automatic temper-
ature control corresponding to the saved
weekly program.
Configuration menu
Settings can be changed in the configuration
menu. The menu can be called up by pressing
the Menu key
7
for a longer time (longer
than 3 seconds). Menu items are selected with
the selector dial 6 and confirmed with OK 5.
If you press the Menu key once more, this takes
29 GB
91033_silv_Heizkoerperthermostat_Content_HU-CZ-SK.indd 29 09.07.13 11:07
Page 26
91033_silv_Heizkoerperthermostat_Content_HU-CZ-SK.indd 30 09.07.13 11:07
you back to the previous level. If there is no
further activation of the device for more than
65 seconds, the menu closes automatically.
You can perform the following settings:
PRO: Setting the weekly program (see
section „Setting weekly program“)
DAT: Changing the time and date
POS: Querying the current position of
the intelligent radiator control unit
DST: The automatic switching between
summer time and winter time can
be deactivated.
AER: „Window open“ temperature and
setting the time for the automatic
temperature reduction during
ventilation
TOF: Setting the offset temperature
RES: Restoring the factory settings
30 GB
Page 27
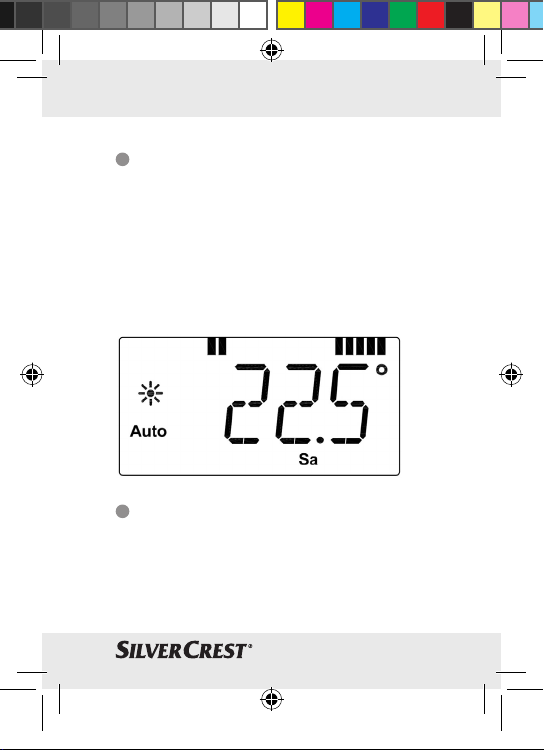
Display content in
normal mode
Switching time periods, operating mode, target temperature and week day are displayed
in normal mode. The bars for the switching
time periods of the weekly program are displayed for every second time interval (see example under „Weekly program: examples“).
BOOST function
The BOOST function uses the human perception of warmth. When activated, the heating
valve is immediately opened to 80% for
5 minutes (factory setting).
31 GB
91033_silv_Heizkoerperthermostat_Content_HU-CZ-SK.indd 31 09.07.13 11:07
Page 28
91033_silv_Heizkoerperthermostat_Content_HU-CZ-SK.indd 32 09.07.13 11:07
The heating of a room takes longer than
5 minutes, but the heat given off by the radiator can be felt immediately. If you are coming
home earlier and want to have heat quickly,
or if you need extra heat in the morning for a
bath, then the BOOST function will help you.
Press the BOOST key 5 to activate the
boost function.
The remaining duration of the function is
counted down in seconds („B299“ to „B000“).
After these 5 minutes have elapsed, the intelligent radiator control unit changes to the mode
which was previously active (Auto/Manu)
with the previously set temperature.
The function can be deactivated early at any
time by pressing the key or activating the selector dial
32 GB
6
.
Page 29
91033_silv_Heizkoerperthermostat_Content_HU-CZ-SK.indd 33 09.07.13 11:07
Note: The BOOST key has an immediate effect if the radiator is covered (e.g. by a sofa).
The „Window open“ detection is deactivated
during the BOOST function.
Setting the holiday function
If a fixed temperature needs to be maintained
during a holiday or a party for a certain period of time, the holiday function can be used.
Press the Menu key 7 briefly as often as
necessary until the Suitcase symbol
appears in the display.
Set the time via the selector dial 6 up to
which the temperature is to be maintained
and then confirm with the OK key
5
.
Then set the date with the selector dial
and confirm with the OK key.
Set the temperature with the selector dial
and confirm with the OK key. The display
flashes as confirmation.
33 GB
Page 30
91033_silv_Heizkoerperthermostat_Content_HU-CZ-SK.indd 34 09.07.13 11:07
The set temperature is maintained until
the time point which has been set.
Then the intelligent radiator control unit
goes to Auto mode.
Comfortable temperature
and reduced temperature
The key for comfortable temperature / reduced
temperature
simple switching between these two temperatures. These have been set at the factory at
21.0 °C (comfortable temperature) and 17.0 °
(reduced temperature). They can be adjusted
as follows:
Hold the key for Comfortable tempera-
ture / reduced temperature
long period. The Sun symbol
currently stored comfortable temperature
appear in the display.
34 GB
provides for a convenient and
4 for a
C
and the
Page 31

91033_silv_Heizkoerperthermostat_Content_HU-CZ-SK.indd 35 09.07.13 11:07
Change the temperature with the selector
6
dial
and confirm with the OK key 5.
The Moon symbol
and the reduced
temperature appear in the display.
Change the temperature with the selector
6
dial
and confirm with the OK key 5.
The temperature can also be changed in Auto
mode at any time via the key. This is then retained until the next switching time point of the
program.
Child safeguard /
operating lock
The operation of the device can be blocked:
To activate/deactivate the operating lock,
press the Menu button
the same time. After it has been successfully
activated, „LOC“ appears in the display.
To deactivate the operating lock, press
both keys again.
7
and keys at
35 GB
Page 32

Activating heating pause
(battery saving)
If the heating is switched off in the summer,
the batteries can be saved. With this the valve
is completely opened. The protection against
calcification continues however to be carried out.
To activate the heating pause proceed as
follows:
Turn the selector dial 6 in manual mode
(Manu) to the right until „ON“ appears
in the display.
Note: The break in the heating period is
now set.
To end it, exit the manual mode (Manu)
or turn the selector dial to the left.
Setting the frost
protection mode
If a room is not to be heated, the valve can
be closed. The valve is only opened if there is
36 GB
91033_silv_Heizkoerperthermostat_Content_HU-CZ-SK.indd 36 09.07.13 11:07
Page 33

91033_silv_Heizkoerperthermostat_Content_HU-CZ-SK.indd 37 09.07.13 11:07
danger of frost. The protection against calcification continues however to be carried out.
To deactivate the frost protection proceed as
follows:
Turn the selector dial 6 in manual mode
(Manu) to the left until „OFF“ appears
in the display.
To end it, exit the manual mode (Manu)
or turn the selector dial to the right.
„Window open“ function
With a rapidly reducing temperature, the intelligent radiator control unit automatically
detects that a room is being ventilated. In order to save heating costs, the temperature is
then regulated down for a certain period of
time (15 minutes, set at the factory). During
this period the „Window open“ symbol
is
shown in the display.
37 GB
Page 34

91033_silv_Heizkoerperthermostat_Content_HU-CZ-SK.indd 38 09.07.13 11:07
To activate this function proceed as follows:
Press the Menu key 7 longer than
3 seconds.
Select the „AER“ menu item with the
selector dial
key
6
and confirm with the OK
5
.
The temperature and time can be set with
the selector dial. The function can be deactivated by selecting „0“ for the time.
Setting the offset
temperature
Since the temperature is measured at the radiator, it can be colder or warmer at another
location in the room. In order to equalise this,
a temperature offset of +/- 3.5 °C can be set.
If for example 18 °C is measured instead of
the set 20 °C, then an offset of -2.0 °C is to
be set.
38 GB
Page 35

91033_silv_Heizkoerperthermostat_Content_HU-CZ-SK.indd 39 09.07.13 11:07
To set the offset temperature proceed as
follows:
Press the Menu key 7 longer than
3 seconds.
Select the „TOF“ menu item with the se-
lector dial
key
6
and confirm with the OK
5
.
Turn the selector dial for as long as
necessary until the desired temperature
appears.
Confirm with the OK key.
Restoring the factory
settings
The status of the programmable radiator control unit can be manually restored by means
of a reset to that when originally supplied.
This means that all the manually performed
settings are lost.
39 GB
Page 36

Follow these steps:
Hold the Menu key 7 pressed down for
longer than 3 seconds.
Select the „RES“ menu item with the
selector dial
key
6
and confirm with the OK
5
. „CFM“ then appears in the
display.
Confirm with the OK key.
Troubleshooting and
maintenance
91033_silv_Heizkoerperthermostat_Content_HU-CZ-SK.indd 40 09.07.13 11:07
40 GB
Error
code in
the
display
Battery
symbol
Problem Rectifica-
tion
Battery output too low
Replace the
batteries
Page 37

91033_silv_Heizkoerperthermostat_Content_HU-CZ-SK.indd 41 09.07.13 11:07
Error
code in
Problem Rectifica-
tion
the
display
F1 Valve drive
is stiff to
move
F2 Actuating
range too
large
Check the installation and
heating valve
Check the
fastening of
the radiator
control unit.
F3 Actuating
range too
Check the
heating valve
small
Note: The programmable radiator control
unit performs a decalcifying run once a week
on Saturday at 12:00 to protect against
calcification of the valve. During this „CAL“
appears in the display.
41 GB
Page 38
91033_silv_Heizkoerperthermostat_Content_HU-CZ-SK.indd 42 09.07.13 11:07
Cleaning
Clean the product regularly with a dry,
lint-free cloth.
Disposal
The packaging is made entirely of
recyclable materials, which you
can dispose of at the local
recycling facilities.
Contact your local authorities for information
on how to dispose of the product at the end
of product life.
To help protect the environment,
please dispose of the product properly, and not in household waste,
when it has reached the end of its
useful life.
42 GB
Page 39

91033_silv_Heizkoerperthermostat_Content_HU-CZ-SK.indd 43 09.07.13 11:07
Information on collection points and their
opening hours can be obtained from your
local authority.
Defective or used batteries must be recycled
in accordance with Directive 2006 / 66 / EC.
Return batteries and / or the device to the
recycling facilities offered.
Improper disposal of
batteries can harm the
Pb
environment!
Never dispose of batteries in your household
waste. They may contain toxic heavy metals
and are subject to hazardous waste regulatio
ns.
The chemical symbols of the heavy metals are:
Cd = cadmium, Hg = mercury, Pb = lead.
Therefore dispose of used batteries through
your municipal collection site.
43 GB
Page 40

91033_silv_Heizkoerperthermostat_Content_HU-CZ-SK.indd 44 09.07.13 11:07
EMC
Warranty
ATTENTION! PLEASE KEEP IMPORTANT
WARRANTY DOCUMENTATION!
Dear Customer,
We are delighted that you have decided on
a quality product. Should an unexpected
technical problem arise with your appliance,
please note the following points:
– The warranty period for your appliance
is 36 months.
– Please keep the receipt and the original
packaging.
– Should a problem arise, please first call
our Hotline:
01805 01 23 70 (Germany)
44 GB
Page 41

91033_silv_Heizkoerperthermostat_Content_HU-CZ-SK.indd 45 09.07.13 11:07
(Costs based on the German landline at
the time of printing:
14 cents/minute, maximum 42 cents/
minute on mobile networks) or
00800 100 22 100 (international)
Our expert advisors can often help on
the phone.
service.gb@gsl-servicenet.de
– If the fault can not be rectified over the
phone, please send the device in the original packaging to the following address:
GSL mbH
Am Weimarer Berg 6
99510 Apolda
Germany
IAN 91033
Warranty repairs can only be carried out if
the receipt is enclosed.
Many thanks for you understanding.
45 GB
Page 42

Manufacturer
Olympia Business Systems Vertriebs GmbH
Zum Kraftwerk 1
45527 Hattingen
www.olympia-vertrieb.de
46 GB
91033_silv_Heizkoerperthermostat_Content_HU-CZ-SK.indd 46 09.07.13 11:07
Page 43

Bevezető
Általános funkciók ............................................................ Oldal 48
Rendeltetésszerű használat ............................................. Oldal 49
A részek ismertetése ........................................................ Oldal 50
Műszaki adatok ............................................................... Oldal 51
A csomagolás tartalma .................................................... Oldal 52
Biztonsági tudnivalók ................................................... Oldal 53
Az elemekre vonatkozó biztonsági tudnivalók .............. Oldal 54
Elemek behelyezése / cserélése ...................................... Oldal 54
Dátum és pontos idő beállítása ................................. Oldal 55
Radiátorra szerelés ........................................................ Oldal 56
Régi termosztátfej leszerelése ......................................... Oldal 58
Danfoss adapter............................................................... Oldal 59
Referencia menet ............................................................ Oldal 63
Üzembevétel
Heti program beállítása ................................................... Oldal 64
Üzemmódok ..................................................................... Oldal 71
Konfigurációs menü ......................................................... Oldal 71
Kijelző tartalma normál üzemben ................................... Oldal 73
BOOST funkció ................................................................ Oldal 73
Szabadság funkció beállítása ......................................... Oldal 75
Komfort és csökkentett hőmérséklet ................................ Oldal 76
Gyermek biztonsági lezárás / kezelés lezárás .............. Oldal 77
Fűtésszünet aktiválása (elemek kímélése) ...................... Oldal 78
Fagyvédelem üzemmód beállítása ................................. Oldal 78
Ablak-nyitva funkció ......................................................... Oldal 79
Hőmérséklet helyesbítés (offset) beállítása .................... Oldal 80
Visszaállítás a gyári beállításokra .................................. Oldal 81
Hibaelhárítás és karbantartás .................................. Oldal 82
Tisztítás ................................................................................ Oldal 83
Megsemmisítés ................................................................. Oldal 84
Garancia ............................................................................. Oldal 86
Gyártó .............................................................................. Oldal 87
47 HU
91033_silv_Heizkoerperthermostat_Content_HU-CZ-SK.indd 47 09.07.13 11:07
Page 44

91033_silv_Heizkoerperthermostat_Content_HU-CZ-SK.indd 48 09.07.13 11:07
Programozható radiátor
termosztát
Bevezető
Gratulálunk új készülékének vásárlásához. Ezzel egy értékes termék
vásdárlása mellett döntött. Az első
üzembevétel előtt ismerkedjen meg a készülékkel. Ehhez figyelmesen olvassa el a következő
használati utasítást és a biztonsági tudnivalókat.
A készüléket csak a leírtaknak megfelelően
és a megadott alkalmazási területeken használja. Őrizze meg jól ezt az útmutatót. A termék
harmadik félnek történő továbbadása esetén
mellékelje annak teljes dokumentációját is.
Általános funkciók
A programozható Classic (L modell) radiátorszabályozóval, melynél individuálisan beállíthatók a fűtő és fűtéscsökkentő programok,
48 HU
Page 45

91033_silv_Heizkoerperthermostat_Content_HU-CZ-SK.indd 49 09.07.13 11:07
célzottan szabályozható a szobahőmérsékletet.
A készülék egy szelepet mozgat a radiátor
hőbeáramlásának vezérlésére. A programozható radiátorszabályozó ráillik minden használatos radiátorszelepre és egyszerűen
felszerelhető - anélkül, hogy le kellene ereszteni
a fűtővizet vagy be kellene avatkozni a fűtőrendszerbe. A kiegészítő BOOST funkció
lehetővé teszi a radiátor gyors, rövid idő alatti
felfűtését azáltal, hogy 5 percre megnyitják a
szelepet. Ennek következtében azonnal kellemes
melegérzet érhető el a helyiségben.
Rendeltetésszerű használat
A programozható radiátorszabályozó a használatos radiátorszelepek szabályozására
szolgál. A készüléket csak belső terekben
üzemeltesse és kerülje el a nedvesség, por és
a nap- és hősugárzás befolyását. Az ebben
a kezelési utasításban megadott alkalmazásoktól eltérő használat rendeltetésellenes és a
49 HU
Page 46

91033_silv_Heizkoerperthermostat_Content_HU-CZ-SK.indd 50 09.07.13 11:07
garancia és a felelősségvállalás elvesztéséhez
vezet. Ez vonatkozik az átalakításokra és a
változtatásokra is. A készülékek kizárólag
magánhasználatra készültek.
A részek ismertetése
1
Hollandianya a fűtőszelep felszereléséhez
2
Beállított bekapcsolási időközök a heti
programban
3
Hőmérséklet kijelző, idő- / dátum kijelző,
menüpontok, funkciók
4
- Gomb: csökkentett / komfort hőmérséklet közötti átkapcsoláshoz
5
BOOST / OK gomb: automatikus és kézi
üzemmódhoz, a Boost funkció aktiválásához, a szabadság funkcióhoz és a
nyugtázás / mentés menüben
6
Állítókerék: beállítások elvégzésére
(pl. hőmérséklet)
7
MODE / menü gomb: a gombot rövid
ideig kell megnyomni az automatikus
50 HU
Page 47
91033_silv_Heizkoerperthermostat_Content_HU-CZ-SK.indd 51 09.07.13 11:07
üzemmód, a kézi üzemmód és a szabadság funkció közötti váltáshoz; a gombot
3 másodpercnél hosszabb ideig kell megnyomni a konfigurációs menü megnyitásához
8
Ablak-nyitva szimbólum, hét napja,
elem üres szimbólum
9
Szabadság funkció, csökkentett /
komfort hőmérséklet, (Manu) kézi üzemmód, (Auto) automatikus üzemmód
Műszaki adatok
Tápfeszültség: 3 V
Max. áramfelvétel: 100 mA
Elem ek: 2x LR6 / mignon / AA
Elem élettartama: kb. 3 év
Kijelző: LC-kijelző
Ház mérete: 58 x 71,5 x 90 mm
(Sz x Ma x Mé)
Csatlakozó mérete: M30 x 1,5
Környezeti hőmérséklet: +5-től +55 °C-ig
51 HU
Page 48

91033_silv_Heizkoerperthermostat_Content_HU-CZ-SK.indd 52 09.07.13 11:07
Max. Felületi
hőmérséklet: +90 °C
(a radiátoron)
Lineáris löket: 4,3 mm
Tudnivaló: a tökéletesítést szolgáló műszaki
változtatások jogát fenntartjuk.
A csomagolás tartalma
Közvetlenül a kicsomagolás után vizsgálja meg
a csomag teljességét, valamint a készülék
kifogástalan állapotát.
1 Programozható radiátor termosztát
1 Danfoss RA adapter
1 Danfoss RAV adapter
1 Danfoss RAV lökőrúd hosszabbító
1 Danfoss RAVL adapter
1 Hengeresfejű csavar M4 x 12
1 Anya M4
52 HU
Page 49

91033_silv_Heizkoerperthermostat_Content_HU-CZ-SK.indd 53 09.07.13 11:07
1 Támasztógyűrű
1 Kezelési utasítás
Biztonsági tudnivalók
ÉLET- ÉS BALESETVESZÉLY
KISGYEREKEK ÉS GYERE-
KEK SZÁMÁRA! Soha ne hagyja a
gyerekeket felügyelet nélkül a csomagolóanyagokkal. A csomagolóanyagok
által fulladásveszély áll fenn. A gyerekek
gyakran alábecsülik a veszélyeket. Tartsa
tehát a gyerekeket távol a csomagolóanyagtól
. Ez a termék nem játékszer.
Ne nyissa ki a készüléket, nem tartalmaz
a felhasználó által karbantartandó részeket.
Meghibásodáskor küldje el a készüléket
a szerviznek.
53 HU
Page 50

Az elemekre vonatkozó
biztonsági tudnivalók
A nem tölthető elemeket sohase
töltse fel, ne zárja azokat rö-
vidre és / vagy ne nyissa fel. A
következmény túlmelegedés, tűzveszély
vagy az elemek felrobbanása lehet. Soha
ne dobja az elemeket tűzbe vagy vízbe.
Az elemek felrobbanhatnak.
Elemek behelyezése /
cserélése
Vegye le a készülék alján lévő elemrekesz
fedelet.
Pólushelyesen helyezzen be 2 új LR6 típusú
(mignon/AA) elemet az elemrekeszbe.
Helyezze fel ismét az elemrekesz fedelet
és pattintsa be.
Tudnivaló: az új alkáli elemek élettartama
kb. 3 év. Az elem szimbólum
54 HU
arra utal,
91033_silv_Heizkoerperthermostat_Content_HU-CZ-SK.indd 54 09.07.13 11:07
Page 51

91033_silv_Heizkoerperthermostat_Content_HU-CZ-SK.indd 55 09.07.13 11:07
hogy az elemeket cserélni kell. Az elemek kiszedése után az új elemek behelyezéséig kb.
1 percet várni kell. Akkumulátoros üzemelés
nem lehetséges.
Dátum és pontos idő
beállítása
Tudnivaló: amikor elemet helyeznek be
vagy cserélnek, a firmware verzió rövid idejű
kijelzése után automatikusan megkérdezi a
rendszer a dátumot és a pontos időt.
Állítsa be az állítókerékkel 6 az évet, a
5
3
(lásd
hónapot, a napot, az órát és a percet
és nyugtázza az OK gombbal
az A ábra szerint). A dátum és az idő bevitele közben a motor már visszamozgatja
a vezérlőcsapot.
Az „INS“ kijelzés a forgó -vel arra
utal, hogy a motor még visszafelé mozog.
55 HU
Page 52

91033_silv_Heizkoerperthermostat_Content_HU-CZ-SK.indd 56 09.07.13 11:07
Amint a programozható radiátorszabályozó felszerelhető, csupán az „INS“ felirat látható a kijelzőn.
A heti program és más beállítások már a
szerelés előtt összehangolhatók. Nyomja
meg ehhez a MODE gombot
ben a kijelzőben az „INS“ látható. Részletesebb információkat a „konfigurációs
menü“ alatt talál.
Befejezett programozás után a kijelzőben ismét „INS“ látható és következhet a szerelés.
Radiátorra szerelés
A programozható radiátorszabályozó felszerelése egyszerű és elvégezhető a fűtővíz
leeresztése nélkül vagy a fűtőrendszerbe
történő beavatkozás nélkül. Nincs szükség
speciális szerszámra vagy a fűtés kikapcsolására. A programozható radiátorszabályozóra
felszerelt hollandianya univerzálisan
56 HU
7
, miköz-
Page 53

91033_silv_Heizkoerperthermostat_Content_HU-CZ-SK.indd 57 09.07.13 11:07
alkalmazható és külön tartozék nélkül illeszkedik az ismert gyártók minden olyan szelepéhe
menetnagysága M30 x 1,5 mm, pl.
- Heimeier
- MNG
- Junkers
- Landis&Gyr (Duodyr)
- Honeywell-Braukmann
- Oventrop Typ A, Oventrop AV6
- Schlösser
- Comap D805
- Valf
- Sanayii
- Mertik Maxitrol
- Watts
- Wingenroth (Wiroflex) R.B.M
- Tiemme
- Jaga
- Siemens
- Idmar.
z,
57 HU
Page 54

91033_silv_Heizkoerperthermostat_Content_HU-CZ-SK.indd 58 09.07.13 11:07
A szállítmányhoz mellékelt adapterrel és a
hosszabbító csapokkal a programozható radiátorszabályozó szelepek felszerelhetők a
Danfoss RA, Danfoss RAV és Danfoss RAVL
szelepekre.
Régi termosztátfej
leszerelése
Tekerje a termosztátfejet a maximális
10
értékre
ellentétesen). A termosztátfej most már nem
nyomja a szeleporsót és így könnyebben
leszerelhető (lásd a B ábra szerint).
A termosztátfej rögzítése különféle kivitelű lehet:
Hollandi-anya:
Csavarja a hollandi anyát az óramutató járásának az irányában szorosra
leveheti a termosztátfejet
58 HU
(az óramutató járásirányával
13
. Ezt követően
11
.
Page 55

91033_silv_Heizkoerperthermostat_Content_HU-CZ-SK.indd 59 09.07.13 11:07
Bepattintható rögzítés:
Az így rögzített termosztátfejet egyszerűen
kioldhatja úgy, hogy a zárat / hollandianyát
egy kissé elforgatja az óramutató járásával
ellentétes irányban
heti a termosztátfejet
12
. Ezt követően leve-
11
.
Szorítócsavaros rögzítés:
A termosztátfejet egy rögzítőgyűrű tartja,
melyet egy csavar fog össze. Lazítsa meg
ezt a csavart és vegye le a szelepről a
termosztátfejet
11
.
Hernyócsavaros csavarrögzítés:
Lazítsa meg a hernyócsavart és vegye le
a termosztátfejet
Danfoss adapter
11
.
Szereléskor ügyeljen arra, hogy ne csípje
be az ujját az adapterfelek közé!
59 HU
Page 56

91033_silv_Heizkoerperthermostat_Content_HU-CZ-SK.indd 60 09.07.13 11:07
A Danfoss szelepekre szereléshez szükséges
az egyik mellékelt adapter. Az adott szelephez
illeszkedő adaptergyűrű besorolását kérjük, a
C–F ábrákról olvassa le.
A Danfoss szeleptestek körben hosszirányú
bemetszéseket
13
tartalmaznak, melyek az
adapter jobb rögzítését biztosítják a bepattintás után.
Tudnivaló: kérjük szereléskor ügyeljen arra,
hogy az adapter belsejében lévő csap
azonos helyzetbe kerüljön a szelepen lévő
bemetszésekkel
13
.
Csúsztassa a szelepre a hozzá illő adap-
tert, míg rá nem kattan.
Az RA és az RAV adapterek a biztonságosabb
helyzetberögzítés céljából előfeszítéssel
készültek. A szereléshez szükség esetén
használjon egy csavarhúzót, és azt a csavar
tartományában hajlítsa meg egy kicsit.
60 HU
14
Page 57

91033_silv_Heizkoerperthermostat_Content_HU-CZ-SK.indd 61 09.07.13 11:07
Miután elvégezte a szeleptestre pattintást
rögzítse az adaptert a mellékelt csavarral
és anyával (lásd a C ábra szerint).
Tudnivaló: kérjük szereléskor ügyeljen
arra, hogy az adapter belsejében lévő
14
csap
azonos helyzetbe kerüljön a
szelepen lévő bemetszésekkel
13
.
A szelephez illeszkedő adaptert teljes
mértékben pattintsa rá.
Az RAV típusú szelepeknél a szerelés előtt a
szelepcsapra fel kell helyezni a lökőrúd hoszszabbítót
15
(lásd a D ábra szerint).
Tudnivaló: kérjük szereléskor ügyeljen arra,
hogy az adapter belsejében lévő csap
14
azonos helyzetbe kerüljön a szelepen lévő
bemetszésekkel
13
.
A szelephez illeszkedő adaptert teljes
mértékben pattintsa rá.
61 HU
Page 58

91033_silv_Heizkoerperthermostat_Content_HU-CZ-SK.indd 62 09.07.13 11:07
Az RAVL adaptert nem kell csavarozni (lásd
az E ábra szerint).
Tudnivaló: kérjük szereléskor ügyeljen arra,
hogy az adapter belsejében lévő csap
azonos helyzetbe kerüljön a szelepen lévő
bemetszésekkel
13
.
A szelephez illeszkedő adaptert teljes
mértékben pattintsa rá.
Támasztógyűrű
A különböző gyártók szelepei bizonyos tűrésingadozást mutathatnak, mely előidézheti,
hogy a programozható radiátorszabályozó
lazán helyezkedik el a szelepen. A mellékelt
támasztógyűrűvel javítható a szelep stabilitása
és elhelyezkedése (lásd az F ábra szerint).
Helyezze el a támasztógyűrűt 16 a
perembe vagy a radiátor szelepcsatlakozójára és csavarozza fel a termosztát
szelepet.
62 HU
14
Page 59

91033_silv_Heizkoerperthermostat_Content_HU-CZ-SK.indd 63 09.07.13 11:07
Tudnivaló: ha nem lehet a támasztógyű-
rűt rádugni, akkor megfelelő a stabilitás és
nincs rá szükség a szereléshez.
Referencia menet
Az elemek behelyezése után a motor először
visszafelé mozog, miközben kijelzésre kerül
az „INS“ és az aktivitás
az „INS“ az aktivitás szimbólum
szimbólum. Amint
nélkül
jelenik meg a kijelzőben, felszerelhető a
programozható radiátorszabályozó. Ehhez a
szeleppel való összehangolás céljából lefuttatásra kerül a referencia menet („AdA“).
Helyezze fel a programozható radiátor-
szabályozót a szelepre.
Húzza meg a hollandianyát.
Nyomja meg a BOOST gombot 5, ha
a kijelzőben megjelenik az „INS“.
63 HU
Page 60
91033_silv_Heizkoerperthermostat_Content_HU-CZ-SK.indd 64 09.07.13 11:07
Az programozható fűtőtest-szabályozó adaptációs menetet hajt végre.
Eközben az „AdA“ és az aktivitás szimbólum
megjelenik a kijelzőben, mialatt a szelep
kezelése nem lehetséges.
Tudnivaló: ha a referencia menetet a felszerelés előtt elindították, akkor a motor szintén
visszaáll az „INS“ helyzetbe. Ha hibaüzenet
(F1, F2, F3) jelenik meg, nyomja meg az OK
gombot és a motor visszamegy az „INS“
helyzetbe.
Üzembevétel
Heti program beállítása
A heti programban a hét mindenegyes napjára
külön beállítható max. 3 fűtési fázis (7 kapcsolási időpont). A programozás a kiválasztott
napra történik, melynek során el kell tárolni a
hőmérsékleteket 00:00-tól 23:59-ig időtartamra.
64 HU
Page 61

91033_silv_Heizkoerperthermostat_Content_HU-CZ-SK.indd 65 09.07.13 11:07
Nyomja meg a menü gombot 7 több
mint 3 másodpercre. A kijelzőben megjelenik a „PRO“.
Nyugtázza az OK gombbal
5
.
A kijelzőben megjelenik a „DAY“. Az állí-
tókerékkel kiválasztható a hét egy napja,
az összes munkanapok, a hétvége vagy
a teljes hét (pl. munkanapok).
Nyugtázza az OK gombbal. Az első
kapcsolási időpont megjelenik (0:00) és
ezt nem lehet megváltoztatni. A fűtési
idők oszlopokkal lesznek jelezve.
Nyugtázza az OK gombbal.
65 HU
Page 62

91033_silv_Heizkoerperthermostat_Content_HU-CZ-SK.indd 66 09.07.13 11:07
Ezt követően beállíthatja a hőmérsékletet,
melyet 0:00 órától kezdődően kíván (pl.
17.0 °C).
Nyugtázza az OK gombbal.
Megjelenik a következő kapcsolási időpont
(pl. 6:00). Ezt már egyénileg beállíthatja.
66 HU
Page 63

91033_silv_Heizkoerperthermostat_Content_HU-CZ-SK.indd 67 09.07.13 11:07
Ezt követően állítsa be a hőmérsékletet,
melyet 6:00 órakor biztosítani kell.
Ezt a műveletet addig ismételheti, míg el
nem tárolja a kívánt hőmérsékleteket a
0:00-tól 23:59-ig óráig terjedő időszakra.
Ha mind a 7 kapcsolási időpont foglalva
van, akkor nyugtázásra, mint befejező
időpont megjelenik a 23:59.
Az „Auto“ üzemmódban a hőmérséklet bármikor megváltoztatható az állítókerékkel. A
megváltoztatott hőmérséklet ekkor megmarad
a következő kapcsolási időpontig.
Heti program: példák
A programozható radiátorszabályozóval a
hét minden napjára eltárolható 3 individuális
hőmérséklet előírás (7 kapcsolási időponttal).
67 HU
Page 64

91033_silv_Heizkoerperthermostat_Content_HU-CZ-SK.indd 68 09.07.13 11:07
Gyárilag a hét minden napjára egyformán
két fűtési fázis van tárolva 6:00 órától 9:00
óráig és 17:00 órától 23:00 óráig.
00:00 órától 06:00 óráig 17.0 °C
06:00 órától 09:00 óráig 21.0 °C
09:00 órától 17:00 óráig 17.0 °C
17:00 órától 23:00 óráig 21.0 °C
23:00 órától 23:59 óráig 17.0 °C
Tudnivaló: a kijelzőben oszlopok jelzik a
kapcsolási időközöket, minden második időintervallum kerül kijelzésre. Ebben a példában
nincsenek oszlopok megjelenítve a 0:00-tól
68 HU
Page 65

91033_silv_Heizkoerperthermostat_Content_HU-CZ-SK.indd 69 09.07.13 11:07
6:00-ig időintervallumhoz. Csak a 6:00-tól
9:00-ig és a 17:00-tól 23:00-ig időintervallumokhoz jelennek meg a kijelzőben az oszlopok.
Ha a helyiséget a déli órák alatt is fűteni kell,
akkor a programozás a következőképpen néz ki:
Hétfőtől vasárnapig
00:00 órától 06:00 óráig 16.0 °C
06:00 órától 09:00 óráig 22.0 °C
09:00 órától 12:00 óráig 17.0 °C
12:00 órától 14:00 óráig 20.0 °C
14:00 órától 17:30 óráig 17.0 °C
17:30 órától 23:30 óráig 21.0 °C
23:30 órától 23:59 óráig 16.0 °C
69 HU
Page 66

91033_silv_Heizkoerperthermostat_Content_HU-CZ-SK.indd 70 09.07.13 11:07
Ha van otthon egy irodája és azt csak napközben akarja fűteni a munkanapokon, akkor
ehhez a következő idők programozhatók be:
Hétfőtől péntekig
00:00 órától 08:30 óráig 17.0 °C
08:30 órától 17:00 óráig 21.0 °C
17:00 órától 23:59 óráig 17.0 °C
Szombattól vasárnapig
00:00 órától 23:59 óráig 15.0 °C
70 HU
Page 67

Üzemmódok
A MODE gomb 7 rövid idejű megnyomásával
a következő 3 üzemmód között lehet váltani
(az üzemmódok csak a szerelés elvégzése
után választhatók):
-
Szabadság funkció: egy hőmérséklet
beállítása, melyet tartani kell egy meghatározott időpontig.
- Manu: kézi üzemmód - a hőmérséklet
kézileg kerül beállításra az állítókerékkel.
- Auto: heti program - automatikus hőmérséklet-
szabályozás a tárolt heti program segítségével.
Konfigurációs menü
A konfigurációs menüben változtathatók a
beállítások. A menü behívható a menü gomb
7
hosszabb idejű megnyomásával (hoszszabb mint 3 másodperc). A menüpontok az
állítókerékkel
gombbal
6
választhatók ki és az OK
5
nyugtázhatók. A menü gomb
71 HU
91033_silv_Heizkoerperthermostat_Content_HU-CZ-SK.indd 71 09.07.13 11:07
Page 68

91033_silv_Heizkoerperthermostat_Content_HU-CZ-SK.indd 72 09.07.13 11:07
ismételt megnyomása visszavisz a korábbi
szintre. Ha a készülék több mint 65 másodpercen keresztül nem lesz működtetve, akkor
a menü automatikusan bezárul. A következő
beállításokat végezheti:
PRO: Heti program beállítása (lásd: „Heti
program beállítása“ c. fejezetet)
DAT: Pontos idő és dátum változtatása
POS: A programozható fűtőtest- szabá-
lyozó aktuális helyzetének a lekér-
dezése
DST: A nyári és a téli időszámítás közötti
automatikus átkapcsolás kikapcsol-
ható.
AER: Ablak-nyitva-hőmérséklet és -idő,
szellőztetésnél az automatikus hő-
mérséklet csökkentés beállításához
TOF: Hőmérséklet helyesbítés (offset)
beállítása
RES: Visszaállítás a gyári beállításokra
72 HU
Page 69

Kijelző tartalma normál
üzemben
Normál üzemben kijelzésre kerülnek a
kapcsolási időközök, az üzemmód, az előírt
hőmérséklet és a hét napja. A heti program
kapcsolási időközeihez tartozó oszlopok
minden második időintervallumban jelződnek
ki (példák a „Heti programok: példa“ alatt).
BOOST funkció
A BOOST funkció az ember hőérzetét használja
ki. Aktiváláskor a fűtőszelep azonnal 5 percre
80 %-ban kinyílik (gyári beállítás).
73 HU
91033_silv_Heizkoerperthermostat_Content_HU-CZ-SK.indd 73 09.07.13 11:07
Page 70

91033_silv_Heizkoerperthermostat_Content_HU-CZ-SK.indd 74 09.07.13 11:07
A helyiség felmelegítése több mint 5 percig
tart, de a radiátor által leadott hő azonnal
érzékelhető. Ha korábban érkezik haza és
gyorsan meleget akar csinálni vagy reggelente
a fürdőben extra melegre van szüksége, akkor
segít Önnek a BOOST funkció.
A Boost funkció aktiválásához nyomja
meg a BOOST gombot
5
.
A hátralévő működési idő másodperces ütemben
kerül visszaszámlálásra („B299“-től „B000“-ig).
5 perc eltelte után a programozható
szabályozó visszavált a korábbi aktív üzemmódba (Auto/Manu) a korábban beállított
hőmérséklettel. A funkció egy gombnyomással
vagy az állítókerék
6
működtetésével bármi-
kor idő előtt kikapcsolható.
Tudnivaló: a Boost gombnak nincs közvetlen
hatása, ha eltakarták a radiátort (pl. egy
74 HU
fűtőtest-
Page 71

91033_silv_Heizkoerperthermostat_Content_HU-CZ-SK.indd 75 09.07.13 11:07
heverővel). Az „Ablak-nyitva-felismerés“ a
Boost funkció alatt ki van kapcsolva.
Szabadság funkció
beállítása
Ha a szabadság alatt vagy például egy öszszejövetelkor egy bizonyos időtartam alatt egy
fix hőmérsékletet kell tartani, akkor ehhez
használható a szabadság funkció.
Rövid időre annyiszor nyomja meg a menü
gombot
jelenik a bőrönd szimbólum
Állítsa be az állítókerékkel 6 a pontos
időt, mely ideig tartani kell a hőmérsékletet és nyugtázza az OK gombbal
Majd állítsa be a dátumot az állítókerékkel
és nyugtázza az OK gombbal.
Állítsa be az állítókerékkel a hőmérsékletet
és nyugtázza az OK gombbal. A nyugtázáshoz villog a kijelző.
7
, míg a kijelzőben meg nem
.
5
.
75 HU
Page 72

91033_silv_Heizkoerperthermostat_Content_HU-CZ-SK.indd 76 09.07.13 11:07
A beállított hőmérséklet az előírt időpontig
marad meg. A programozható fűtőtestszabályozó azután automata üzemmódra vált.
Komfort és csökkentett
hőmérséklet
A komfort / csökkentett hőmérséklet gomb
ezen hőmérsékletek közötti kényelmes és egyszerű átkapcsolásra szolgál. Gyárilag beállítva ez 21.0 °C (komfort hőmérséklet) és a
17.0 °C (csökkentett hőmérséklet) értéket
jelent. Ezt a következőképpen lehet szükség
szerint beállítani:
Tartsa a komfort / csökkentett hőmérséklet
gombot
kijelzőben megjelenik a nap szimbólum
és az aktuálisan tárolt komfort hőmérséklet.
Változtassa meg a hőmérsékletet az
állítókerékkel
76 HU
4 hosszú ideig lenyomva. A
6
és nyugtázza az OK
Page 73

91033_silv_Heizkoerperthermostat_Content_HU-CZ-SK.indd 77 09.07.13 11:07
gombbal 5. A kijelzőben megjelenik a
hold szimbólum
és a csökkentett hőmér-
séklet.
Változtassa meg a hőmérsékletet az
állítókerékkel
gombbal
6
és nyugtázza az OK
5
.
A gombbal az „Auto“ üzemmódban is bármikor megváltoztatható a hőmérséklet. Ez azután
megmarad a program következő bekapcsolási
időpontjáig.
Gyermek biztonsági
lezárás/kezelés lezárás
A készülék kezelése lezárható:
A kezelés- lezárás aktiválásához/deaktivá-
lásához nyomja meg egyszerre a menü
és a
gombot rövid időre. Sikeres aktivá-
lás után a kijelzőben megjelenik az „LOC“.
A kezelés lezárás kikapcsolásához nyomja
meg ismét a két gombot.
7
77 HU
Page 74

Fűtésszünet aktiválása
(elemek kímélése)
Ha a fűtés nyáron ki van kapcsolva, akkor az
elemek megkímélhetők. Ehhez a szelepet teljesen ki kell nyitni. A meszesedés elleni védelem
továbbra is működik.
A fűtésszünet aktiválásához a következőképpen járjon el:
Kézi üzemmódban (Manu) forgassa az
állítókereket
6
mindaddig jobbra, míg a
kijelzőben meg nem jelenik az „ON“ (be).
Tudnivaló: A fűtés- szünet be van állítva.
A befejezéshez hagyja el a kézi üzemmódot
(Manu) vagy forgassa az állítókereket balra.
Fagyvédelem üzemmód
beállítása
Ha egy helyiséget nem akarnak fűteni, akkor
a szelep elzárható. A szelep csak fagyveszély
esetén nyílik. A meszesedés elleni védelem
továbbra is működik.
78 HU
91033_silv_Heizkoerperthermostat_Content_HU-CZ-SK.indd 78 09.07.13 11:07
Page 75

91033_silv_Heizkoerperthermostat_Content_HU-CZ-SK.indd 79 09.07.13 11:07
A fagyvédelem kikapcsolásához a következőképpen járjon el:
Kézi üzemmódban (Manu) forgassa az
állítókereket
6
mindaddig balra, míg a
kijelzőben meg nem jelenik az „OFF“ (ki).
A befejezéshez hagyja el a kézi üzem-
módot (Manu) vagy forgassa jobbra az
állítókereket.
Ablak-nyitva funkció
Erősen csökkenő hőmérsékletnél a programozható fűtőtest- szabályozó automatikusan
felismeri, hogy a helyiséget szellőztetik.
A fűtési költség megtakarítása céljából ekkor
a hőmérséklet egy meghatározott időre lecsökkentésre kerül (gyári beállítás szerint 15
percre). Eközben a kijelzőben megjelenik az
ablak-nyitva szimbólum
.
79 HU
Page 76

91033_silv_Heizkoerperthermostat_Content_HU-CZ-SK.indd 80 09.07.13 11:07
Az aktiválásához járjon el a következőképpen:
Nyomja meg a menü 7 gombot 3 má-
sodpercnél hosszabb időre.
Válassza ki az állítókerékkel 6 az „AER“
menüpontot és nyugtázza az OK gomb-
5
bal
.
A hőmérséklet és az idő az állítókerékkel
beállítható. A „0“ idő kiválasztásával a
funkció kikapcsolható.
Hőmérséklet helyesbítés
(offset) beállítása
Mivel a hőmérséklet a radiátoron kerül
megmérésre, a helyiség másik részében ettől
melegebb vagy hidegebb lehet. Ennek a
kiegyenlítésére beállítható a hőmérséklet
helyesbítés (offset) ± 3.5 °C. Ha például
18 °C kerül mérésre a beállított 20 °C helyett,
akkor az offset értékét -2.0 °C kell beállítani.
80 HU
Page 77

91033_silv_Heizkoerperthermostat_Content_HU-CZ-SK.indd 81 09.07.13 11:07
A hőmérséklet helyesbítés (offset) beállításához
a következőképpen járjon el:
Nyomja meg a menü gombot 7 3 másod-
percnél hosszabb időre.
Válassza ki az állítókerékkel 6 az „TOF“
menüpontot és nyugtázza az OK gomb-
5
bal
.
Forgassa addig az állítókereket, míg meg
nem jelenik a kívánt hőmérséklet.
Nyugtázza az OK gombbal.
Visszaállítás a gyári
beállításokra
A programozható radiátorszabályozó kézileg
visszaállítható a gyárilag kiszállított állapotba
a „reset“ (alaphelyzetbe állítás) segítségével.
Ekkor a végrehajtott összes kézi beállítások
elvesznek.
Járjon el a következőképpen:
Nyomja meg a menü gombot 7 3 másod-
percnél hosszabb időre.
81 HU
Page 78

Válassza ki az állítókerékkel 6 a „RES“
menüpontot és nyugtázza az OK gombbal
5
. Ezt követően a kijelzőben megjelenik a
„CFM“.
Nyugtázza az OK gombbal.
Hibaelhárítás és
karbantartás
91033_silv_Heizkoerperthermostat_Content_HU-CZ-SK.indd 82 09.07.13 11:07
82 HU
Hibakód a
kijelzőben
Elem szim-
bólum
F1 Nehezen
Probléma Elhárítás
Túl kicsi az
elemfeszült-
Cserélje ki
az elemeket
ség
Ellenőrizze a
mozgatható
a szelephaj-
tás
szerelést és
ellenőrizze a
fűtőszelepet
Page 79

91033_silv_Heizkoerperthermostat_Content_HU-CZ-SK.indd 83 09.07.13 11:07
Hibakód a
Probléma Elhárítás
kijelzőben
F2 Túl nagy az
állítási tar-
tomány
Ellenőrizze a
radiátorsz-
abályozó
rögzítését
F3 Túl kicsi az
állítási tar-
Ellenőrizze a
fűtőszelepet
tomány
Tudnivaló: a szelep elmeszedésének megakadályozása céljából a programozható radiátorszabályozó hetente egyszer mésztelenítést
végez szombaton 12:00 órakor. Eközben a
kijelzőben megjelenik a „CAL“.
Tisztítás
Tisztítsa a terméket rendszeresen egy
száraz és szöszmentes kendővel.
83 HU
Page 80

91033_silv_Heizkoerperthermostat_Content_HU-CZ-SK.indd 84 09.07.13 11:07
Megsemmisítés
A csomagolás környezetbarát
anyagokból áll, amelyeket a helyi
újrahasznosítási helyeken semmisíthet meg.
A kiszolgált termék megsemmisítésének
lehetőségeiről tájékozódjon lakóhelye
önkormányzatnál.
A környezetvédelem érdekében,
ne dobja a kiszolgált terméket a
háztartási szemétbe, hanem adja
le szakszerű megsemmisítésre.
A gyűjtőhelyekről és azok nyitvatartási idejéről
az illetékes önkormányzatnál tájékozódhat.
84 HU
Page 81

91033_silv_Heizkoerperthermostat_Content_HU-CZ-SK.indd 85 09.07.13 11:07
A hibás vagy elhasznált elemeket a
2006 / 66 / EK irányelv értelmében újra kell
hasznosítani. Juttassa vissza az elemeket és /
vagy a készüléket az ajánlott gyűjtőállomásokon keresztül.
Az elemek helytelen megsemmisítése miatt környezeti
Pb
károsodások keletkeznek!
Az elemeket tilos a háziszemétbe dobni. Mérgező hatású nehézfémeket tartalmazhatnak
és ezért különleges kezelést igénylő hulladéknak számítanak. A nehézfémek vegyjelei a
következők: Cd = kadmium, Hg = higany, Pb =
ólom. Ezért az elhasznált elemeket mindig közösségi gyűjtőhelyen adja le.
EMC
85 HU
Page 82

Garancia
FIGYELEM! FONTOS GARANCIÁLIS
BIZONYLAT, KÁRJÜK FELTÉTLENÜL
ŐRIZZE MEG!
Kedves vásárló,
örülünk, hogy egy minőségi termék megvásárlása mellett döntött. Ha a készülékén az
elvárásokkal ellentétben mégis műszaki
probléma adódna, akkor vegye figyelembe a
következő pontokat:
– A készülék garanciális ideje 36 hónap.
– Feltétlenül őrizze meg a pénztárblokkot
és az originál csomagolást.
– Ha probléma merülne fel, akkor először
hívja fel a forróvonalat:
00800 100 22 100 (nemzetközi
híváskor)
Szakszemélyzetünk telefonon gyakran
tud segíteni.
86 HU
91033_silv_Heizkoerperthermostat_Content_HU-CZ-SK.indd 86 09.07.13 11:07
Page 83

91033_silv_Heizkoerperthermostat_Content_HU-CZ-SK.indd 87 09.07.13 11:07
service.hu@gsl-servicenet.de
– Ha a hibát mégsem lehet telefon útján el-
hárítani, akkor kérjük, hogy a készüléket
originál csomagolásban küldje el a következő címre:
GSL mbH
Am Weimarer Berg 6
99510 Apolda
Germany
IAN 91033
Garanciális javítást csak mellékelt pénztárblokk
esetében végzünk.
Köszönjük, hogy megért minket.
Gyártó
Olympia Business Systems Vertriebs GmbH
Zum Kraftwerk 1
45527 Hattingen
www.olympia-vertrieb.de
87 HU
Page 84

91033_silv_Heizkoerperthermostat_Content_HU-CZ-SK.indd 88 09.07.13 11:07
88
Page 85

Úvod
Obecná funkce ............................................................. Strana 90
Použití ke stanovenému účelu ...................................... Strana 91
Popis dílů ....................................................................... Strana 92
Technické údaje ............................................................ Strana 93
Rozsah dodávky ........................................................... Strana 94
Bezpečnostní upozornění ......................................... Strana 95
Bezpečnostní pokyny kbateriím .................................. Strana 96
Vložení / výměna baterií ............................................... Strana 96
Nastavení data a času ............................................... Strana 97
Montáž na otopné těleso .......................................... Strana 98
Demontáž staré hlavy termostatu ................................. Strana 100
Adaptéry pro ventily Danfoss ....................................... Strana 101
Adaptační chod ............................................................. Strana 104
Uvedení do provozu
Nastavení týdenního programu ................................... Strana 105
Provozní režimy ............................................................. Strana 112
Konfigurační menu ........................................................ Strana 113
Obsah displeje vnormálním provozu ......................... Strana 114
Funkce BOOST ............................................................. Strana 115
Nastavení funkce Dovolená ......................................... Strana 116
Komfortní a snížená teplota ......................................... Strana 117
Dětská pojistka / blokování ovládání ........................... Strana 118
Aktivace přestávky topení (šetření baterií) .................. Strana 119
Nastavení provozu pro ochranu proti zamrznutí........ Strana 119
Funkce otevřeného okna .............................................. Strana 120
Nastavení offsetu teploty .............................................. Strana 121
Obnovení nastavení zvýroby ...................................... Strana 122
Odstraňování závad a údržba ............................... Strana 123
Čištění ................................................................................ Strana 124
Likvidace .......................................................................... Strana 124
Záruka .............................................................................. Strana 126
Výrobce ......................................................................... Strana 128
89 CZ
91033_silv_Heizkoerperthermostat_Content_HU-CZ-SK.indd 89 09.07.13 11:07
Page 86

91033_silv_Heizkoerperthermostat_Content_HU-CZ-SK.indd 90 09.07.13 11:07
Programovatelný regulátor
topení
Úvod
Blahopřejeme vám ke koupi nového
výrobku. Rozhodli jste se pro kva-
litní výrobek. Před prvním uvedením
do provozu se seznamte s výrobkem. Ktomu
si pozorně přečtěte následující návod kobsluze
a bezpečnostní pokyny. Používejte výrobek jen
popsaným způsobem a pouze pro uvedené
oblasti použití. Tento návod uschovejte. Při
předání výrobku třetí osobě předejte současně
všechny jeho podklady.
Obecná funkce
Programovatelný regulátor pro otopné těleso
Classic Model L snaprogramovatelným, individuálně nastavitelným topným programem a
programem pro snížení teploty umožňuje
90 CZ
Page 87

91033_silv_Heizkoerperthermostat_Content_HU-CZ-SK.indd 91 09.07.13 11:07
časovou regulaci pokojové teploty. Zařízení
pohybuje ventilem za účelem ovládání přílivu
tepla do otopného tělesa. Programovatelný
regulátor pro otopné těleso je vhodný pro
všechny běžné ventily otopných těles a snadno
se montuje – bez nutnosti vypuštění otopné
vody nebo zásahu do otopného systému.
Přídavná funkce BOOST umožňuje rychlé,
krátkodobé ohřátí otopného tělesa prostřednictvím otevření ventilu na 5minut. Tím se vmístnosti
okamžitě dosáhne příjemného pocitu tepla.
Použití ke
stanovenému účelu
Programovatelný regulátor pro otopné těleso
slouží kregulaci běžného ventilu otopného
tělesa. Provozujte zařízení pouze ve vnitřních
prostorách a zabraňte vlivu vlhkosti, prachu a
slunečního a tepelného záření. Jakékoliv jiné
použití než použití popsané vtomto návodu
kobsluze se považuje za použití vrozporu
91 CZ
Page 88

91033_silv_Heizkoerperthermostat_Content_HU-CZ-SK.indd 92 09.07.13 11:07
se stanoveným účelem a vede kvyloučení záruky. To platí i pro přestavby a změny zařízení.
Zařízení jsou určena výhradně pro soukromé
použití.
Popis dílů
1
Převlečná matice pro montáž na ventil
topení
2
Nastavené spínací doby vtýdenním
programu
3
Ukazatel teploty, ukazatel času / data,
body nabídky, funkce
4
Tlačítko : přepínání mezi sníženou /
komfortní teplotou
5
Tlačítko BOOST / OK: vautomatickém a
ručním provozu, aktivace funkce Boost;
ve funkci Dovolená a vnabídce Potvrdit /
uložit
6
Regulační kolečko: provádění nastavení
(např. teplota)
92 CZ
Page 89

91033_silv_Heizkoerperthermostat_Content_HU-CZ-SK.indd 93 09.07.13 11:07
7
Tlačítko MODE / Menu: stiskněte tlačítko
krátce pro přechod mezi automatickým
provozem, ručním provozem a funkcí
Dovolená; stiskněte tlačítko na déle než
3vteřiny pro otevření konfiguračního menu
8
symbol otevřeného okna, den vtýdnu,
symbol prázdné baterie
9
funkce Dovolená, snížená /
komfortní teplota, (Manu) ruční provoz,
(Auto) automatický provoz
Technické údaje
Napájecí napětí: 3V
Max. příkon: 100mA
Baterie: 2x LR6 / mignon / AA
Životnost baterie: cca 3roky
Displej: LCD
Rozměry tělesa: 58 x 71,5 x 90 mm
(š x v x h)
Přípojka: M30 x 1,5
93 CZ
Page 90

91033_silv_Heizkoerperthermostat_Content_HU-CZ-SK.indd 94 09.07.13 11:07
Teplota okolního
prostředí: +5 až +55 °C
Max.
teplota povrchu: +90 °C
(na otopném tělese)
Lineární zdvih: 4,3 mm
Upozornění: Technické změny sloužící ke
zlepšení vyhrazeny.
Rozsah dodávky
Bezprostředně po vybalení zkontrolujte
úplnost dodávky a bezvadný stav výrobku.
1programovatelný regulátor topení
1adaptér Danfoss RA
1adaptér Danfoss RAV
1prodlužovací prvek Danfoss RAV
1adaptér Danfoss RAVL
1šroub sválcovou hlavou M4 x 12
1matice M4
94 CZ
Page 91

91033_silv_Heizkoerperthermostat_Content_HU-CZ-SK.indd 95 09.07.13 11:07
1opěrný kroužek
1návod kobsluze
Bezpečnostní
upozornění
NEBEZ-
PEČÍ OHROŽENÍ ŽIVOTA
A ZRANĚNÍ MALÝCH A
VELKÝCH DĚTÍ! Nikdy nenechávejte
děti bez dozoru sobalovým materiálem.
Hrozí nebezpečí udušení obalovým materiálem. Děti často podceňují nebezpečí.
Udržujte obalový materiál mimo dosah
dětí. Výrobek není hračkou.
Neotevírejte zařízení, neobsahuje žádné
součásti, jejichž údržbu by mohl provádět
uživatel. Vpřípadě poruchy pošlete zařízení do servisu.
95 CZ
Page 92

Bezpečnostní pokyny
kbateriím
Nenabíjejte baterie nevhodné
knabíjení, nezkratujte baterie
ani je neotvírejte. Může dojít
kpřehřátí, požáru nebo prasknutí baterií.
Nikdy neházejte baterie do ohně nebo
vody. Baterie mohou vybuchnout.
Vložení / výměna baterií
Otevřete víko schránky na baterie na
spodní straně zařízení.
Vložte 2nové baterie typu LR6 (mignon /
AA) podle pólování do schránky na baterie.
Opět nasaďte víko schránky na baterie a
nechte je zacvaknout.
Upozornění: Životnost nových alkalických
baterií činí cca 3roky. Symbol baterie
upozorňuje na to, že je baterie třeba vyměnit.
Po vyjmutí baterií by se před vložením nových
96 CZ
91033_silv_Heizkoerperthermostat_Content_HU-CZ-SK.indd 96 09.07.13 11:07
Page 93

91033_silv_Heizkoerperthermostat_Content_HU-CZ-SK.indd 97 09.07.13 11:07
baterií mělo cca 1minutu počkat. Provoz
sakumulátory není možný.
Nastavení data a času
Upozornění: Pokud se vkládají nebo mění
baterie, objeví se po krátkém zobrazení verze
firmwaru automaticky dotaz na datum a čas.
Nastavte rok, měsíc, den, hodinu a minutu
3
pomocí regulačního kolečka 6 a
potvrďte tlačítkem OK
5
(viz obr. A).
Během zadávání data a času najede
motor ovládacím kolíkem zpět.
Zobrazení „INS“ sotáčejícím se
upozorňuje na to, že motor je ještě ve
zpětném pohybu. Jakmile se na displeji
zobrazí „INS“ může se programovatelný
regulátor topení namontovat.
Týdenní program a jiná nastavení lze
upravit před montáží. Stiskněte za tímto
97 CZ
Page 94

91033_silv_Heizkoerperthermostat_Content_HU-CZ-SK.indd 98 09.07.13 11:07
účelem tlačítko MODE 7, zatímco na
displeji svítí „INS“. Více podrobností naleznete voddílu „Konfigurační menu“.
Po dokončení programování se na displeji
znovu objeví „INS“ a může se provést
montáž.
Montáž na otopné těleso
Montáž programovatelného regulátoru pro
otopné těleso je jednoduchá a lze ji provést
bez vypuštění otopné vody nebo zásahu do
otopného systému. Není potřeba speciální
nářadí ani vypnutí topení. Převlečná matice
umístěná na programovatelném regulátoru
otopného tělesa je univerzálně použitelná a
je bez příslušenství vhodná pro všechny ventily se závitem M30 x 1,5mm od běžných
výrobců, jako např.
98 CZ
Page 95

91033_silv_Heizkoerperthermostat_Content_HU-CZ-SK.indd 99 09.07.13 11:07
- Heimeier
- MNG
- Junkers
- Landis&Gyr (Duodyr)
- Honeywell-Braukmann
- Oventrop typ A, Oventrop AV6
- Schlösser
- Comap D805
- Valf
- Sanayii
- Mertik Maxitrol
- Watts
- Wingenroth (Wiroflex) R.B.M
- Tiemme
- Jaga
- Siemens
- Idmar.
Adaptérem a prodlužovacími kolíky obsaženými
v dodávce jsou regulátory topení montovatelné na
ventily Danfoss RA, Danfoss RAV a Danfoss RAVL.
99 CZ
Page 96

Demontáž staré hlavy
termostatu
Otočte hlavu termostatu na maximální
10
hodnotu
ručiček). Hlava termostatu nyní již netlačí
na vřeteno ventilu a může se tedy snáze
demontovat (viz obr. B).
Fixace hlavy termostatu se může provést různě:
Převlečná matice:
Odšroubujte převlečnou matici
žete hlavu termostatu sejmout
Západková upevnění:
Takto upevněné hlavy termostatů můžete
snadno povolit mírným otočením uzávěru/
převlečné matice proti směru chodu hodi-
nových ručiček
termostatu sejmout
100 CZ
(proti směru chodu hodinových
13
11
.
12
. Poté můžete hlavu
11
.
. Poté mů-
91033_silv_Heizkoerperthermostat_Content_HU-CZ-SK.indd 100 09.07.13 11:07
Page 97

91033_silv_Heizkoerperthermostat_Content_HU-CZ-SK.indd 101 09.07.13 11:07
Svěrná šroubení:
Hlavu termostatu drží upevňovací kroužek,
který je spojen šroubem. Povolte šroub a
sejměte hlavu termostatu zventilu
11
.
Spojení stavěcími šroubky:
Povolte stavěcí šroubek a sejměte hlavu
termostatu zventilu
Adaptéry pro ventily
11
.
Danfoss
Dávejte při montáži pozor, abyste si
nepřiskřípli prsty mezi půlky adaptéru!
Pro montáž na ventily Danfoss je nutný jeden
zpřiložených adaptérů. Přiřazení vhodného
kroužku adaptéru k odpovídajícímu ventilu
vidíte na obrázcích C–F.
Tělesa ventilů Danfoss mají na obvodu podélné
13
vruby
adaptéru po zacvaknutí.
, které rovněž zaručují lepší usazení
101 CZ
Page 98

91033_silv_Heizkoerperthermostat_Content_HU-CZ-SK.indd 102 09.07.13 11:07
Upozornění: Dbejte při montáži na to, aby
se čepy uvnitř adaptéru
14
kryly svruby 13
na ventilu.
Nasuňte na ventil příslušný adaptér až
znatelně zaskočí.
Adaptéry RA a RAV byly vyrobeny za účelem
lepšího usazení spředepnutím. Při montáži příp.
použijte šroubovák a rozehněte předepnutí
voblastui šroubu.
Po zacvaknutí na těleso ventilu připevněte
adaptér pomocí přiloženého šroubu a
matice (viz obr. C).
Upozornění: Dbejte při montáži na to,
aby se čepy uvnitř adaptéru
13
svruby
na ventilu.
14
Zacvakněte adaptér vhodný pro příslušný
ventil.
102 CZ
kryly
Page 99

91033_silv_Heizkoerperthermostat_Content_HU-CZ-SK.indd 103 09.07.13 11:07
U ventilů typu RAV se před montáží musí na
kolík ventilu nasadit prodlužovací prvek
15
(viz obr. D).
Upozornění: Dbejte při montáži na to, aby
se čepy uvnitř adaptéru
14
kryly svruby 13
na ventilu.
Zacvakněte adaptér vhodný pro příslušný
ventil.
Adaptér RAVL se nemusí šroubovat (viz obr. E).
Upozornění: Dbejte při montáži na to, aby
se čepy uvnitř adaptéru
14
kryly svruby 13
na ventilu.
Zacvakněte adaptér vhodný pro příslušný
ventil.
Opěrný kroužek
Ventily různých výrobců mohou vykazovat
výkyvy vtolerancích, které vedou kvolnému
usazení programovatelného regulátoru pro
otopné těleso na ventilu. Použitím přiloženého
103 CZ
Page 100

91033_silv_Heizkoerperthermostat_Content_HU-CZ-SK.indd 104 09.07.13 11:07
opěrného kroužku lze zlepšit stabilitu a usazení
na ventilu (viz obr. F).
Vložte opěrný kroužek 16 do příruby
nebo na přípojku ventilu otopného tělesa
a našroubujte termostatický ventil.
Upozornění: Pokud opěrný kroužek
nelze nasadit, je stabilita dostatečná a
opěrný kroužek není pro montáž zapotřebí.
Adaptační chod
Po vložení baterií motor nejprve pojede zpět,
zatímco se na displeji zobrazí „INS“ a symbol aktivity
. Jakmile bude na displeji zobrazeno „INS“ bez symbolu aktivity
se programovatelný regulátor namontovat.
Poté bude za účelem přizpůsobení regulátoru
ventilu proveden adaptační chod („AdA“).
Nasaďte programovatelný regulátor pro
otopné těleso na ventil.
104 CZ
, může
 Loading...