

Page 1
Page 2

Page 3

English ............................................................................ 2
Čeština ......................................................................... 78
Deutsch ....................................................................... 152
V 2.15
Page 4

SilverCrest SCW 5 A2
Contents
Trademarks ................................................................................................ 6
Introduction ................................................................................................ 6
Intended use ............................................................................................... 6
Package contents ....................................................................................... 7
Technical specifications ............................................................................. 10
Safety instructions .................................................................................... 12
Copyright ................................................................................................. 17
Overview ................................................................................................. 18
Before you start ....................................................................................... 19
Inserting/removing a memory card ....................................................................................... 19
Inserting the battery pack ....................................................................................................... 20
Buttons ..................................................................................................................................... 22
LEDs ......................................................................................................................................... 22
Charging the Battery .............................................................................................................. 23
Setting the date and time ....................................................................................................... 24
Getting started ......................................................................................... 26
Powering the camcorder on/off ............................................................................................ 26
The display .............................................................................................................................. 26
Selecting the operating mode ................................................................................................ 28
Recording ................................................................................................. 28
Recording videos .................................................................................................................... 28
2 - English
Page 5

SilverCrest SCW 5 A2
Taking pictures ........................................................................................................................ 29
Burst mode ............................................................................................................................... 29
Time-lapse mode ..................................................................................................................... 29
Self-timer .................................................................................................................................. 30
WiFi mode / Controlling the action camcorder from the App..................... 30
The menu .................................................................................................. 31
Menu icons .............................................................................................................................. 32
Setting the video resolution .................................................................................................... 33
Selecting the camera’s field of view ...................................................................................... 34
Setting the time-lapse options ................................................................................................. 35
Rotating the recording by 180° ............................................................................................ 36
Toggling the loop recording mode on/off ............................................................................ 37
Toggling the diving mode on/off ........................................................................................... 38
Deleting recordings/formatting the memory card ................................................................ 39
Rotating the display image by 180° .................................................................................... 41
Toggling the status LEDs on/off ............................................................................................. 42
Customising the display brightness ........................................................................................ 43
Customising the beeper volume ............................................................................................. 44
Customising the auto power-off delay ................................................................................... 45
Setting the date and time ....................................................................................................... 46
Connecting a remote control (not included in the package) ............................................... 47
Resetting to factory defaults ................................................................................................... 49
Connecting a microphone ......................................................................... 50
English - 3
Page 6

SilverCrest SCW 5 A2
Viewing recordings on a television ........................................................... 50
Transferring recordings to a computer ...................................................... 53
Connecting the camcorder to a computer ............................................................................ 53
Using a card reader ............................................................................................................... 54
Write-protecting the SD card adapter............................................................................... 54
Software .................................................................................................. 55
System Requirements .............................................................................................................. 55
Installing the software ............................................................................................................. 55
Uninstalling the software ........................................................................................................ 55
The main screen ...................................................................................................................... 56
Setting the storage location / Selecting the language .................................................... 56
Editing recordings ................................................................................................................... 57
Viewing recordings ............................................................................................................. 57
Selecting navigation view .................................................................................................. 58
Preview window ................................................................................................................. 58
Toolbar .................................................................................................................................... 59
Importing recordings .......................................................................................................... 59
Merge videos ...................................................................................................................... 60
Creating an AVCHD Disk .................................................................................................. 60
Cutting video clips .............................................................................................................. 61
Upload to YouTube ............................................................................................................ 61
Upload to Facebook .......................................................................................................... 61
Photo album ........................................................................................................................ 62
4 - English
Page 7

SilverCrest SCW 5 A2
Album page ........................................................................................................................ 62
Using the accessories ................................................................................ 63
Water-resistant case ............................................................................................................... 63
Cleaning after using under water ...................................................................................... 65
Replacing the back cover .................................................................................................. 66
Removing / fixing the adapter .......................................................................................... 67
Velcro ....................................................................................................................................... 68
Swivel holder ........................................................................................................................... 69
Replacing the adhesive pad .................................................................................................. 70
Bike holder .............................................................................................................................. 71
Adapter for other mounting systems ...................................................................................... 72
Troubleshooting ....................................................................................... 72
When not using the product ...................................................................... 73
Environmental regulations and disposal information ............................... 74
Conformity notes ...................................................................................... 74
Warranty and Service Information ........................................................... 75
English - 5
Page 8

SilverCrest SCW 5 A2
Trademarks
Apple® is a registered trademark, App Store is a service mark of Apple Inc., registered in the
USA and other countries.
®
Google
HDMI, the HDMI logo and High-Definition Multimedia Interface are trademarks or
registered trademarks of HDMI Licensing, LLC in the USA and other countries.
Microsoft Windows is a registered trademark of Microsoft Corporation, USA.
SD and SDHC are registered trademarks.
USB is a registered trademark.
Other names and products can be the trademarks or registered trademarks of their
respective owners.
is a registered trademark of Google Inc.
Introduction
Thank you for purchasing this SilverCrest SCW 5 A2 action camcorder. The action
camcorder is the ideal companion for your sports activities. Its extensive accessories allow
you to use the action camcorder for the most different scenarios. It allows you to capture
wonderful memories at any time.
Intended use
Your camcorder is a Consumer Electronics device and is designed exclusively for recording
movies and pictures. Any use other than that mentioned above does not correspond to the
intended use. The device may only be used for private purposes, not for industrial or
commercial ones.
This device fulfills all standards and directives listed in the Declaration of Conformity. If any
changes are made to the equipment other than those endorsed by the manufacturer,
compliance with these standards and directives can no longer be guaranteed. Only use
accessories recommended by the manufacturer.
Observe the regulations and laws in the country of use.
6 - English
Page 9

SilverCrest SCW 5 A2
Package contents
Remove the camcorder and all accessories from the package and verify that you have
received all items listed. Remove all package material. If you find anything missing or
damaged, please contact the Customer Service.
SilverCrest SCW 5 A1
action camcorder
4 GB microSD card (incl. SD card adapter) USB cable
HDMI cable Water-resistant case (incl. adapter)
FJ-SLB-10A battery
English - 7
Page 10
SilverCrest SCW 5 A2
Lens cover Water-resistant back cover (incl. adapter)
(mounted on the water-resistant case)
(orange seal)
Open back cover
(yellow seal)
Swivel holder Adapter for other mounting systems
Bike holder
8 - English
Page 11

SilverCrest SCW 5 A2
CD-ROM with software (lineart illustration) User manual (lineart illustration)
Flat adhesive socket Curved adhesive socket
Velcro with latch Velcro without latch
3 x adhesive pads for replacement 6 x anti-mist pads
There is a separate "GNU General Public License" flyer included with the
product. You can also download this flyer at www.lidl-service.com
English - 9
Page 12

SilverCrest SCW 5 A2
Technical specifications
Capture sensor 5-megapixel CMOS sensor
Lens Wide-angle, F2.8, f=2.5mm
Display OLED status indicator
Internal memory 128MB (approx. 89,9MB free / partially used by firmware)
External memory microSD/SDHC (up to 64GB)
Memory card: 4 GB microSD / Speed Class 4
Operating modes Video recording, picture recording
Video Format: H.264 (MP4)
Resolution: 1080p – 1920 x 1080 (30 fps)
960p – 1280 x 960 (30 fps)
720p – 1280 x 720 (60 fps)
Photo Format: JPEG
Resolution: 5 megapixel
Power supply 5V , 0.5A for power supply via PC USB port
5V , 1.0A for power supply via external power adapter
Battery charging time approx. 3.0 hours for power supply via PC USB port
approx. 2.5 hours (for power supply via external power
adapter)
Runtime with fully
charged battery
Battery Li-Ion battery FJ-SLB-10A / 3.7V, 1130mAh
Connectors and sockets USB 2.0
10 - English
approx. 1.5 to 2.0 hours
Manufacturer: FUJI ELECTRONICS(SHENZHEN) CO.,LTD
HDMI
MIC IN (2.5mm jack)
Page 13

SilverCrest SCW 5 A2
Microphone built-in
Built-in wireless receiver Modulation: GFSK
Frequency: 2403MHz to 2477MHz
Data transfer speed: 250kbps / 1Mbps / 2Mbps
Number of channels: 75
WiFi standards 802.11 b, 802.11 g, 802.11 n
Operating temperature * 0 °C to +35 °C
Storage temperature * 0 °C to +45°C
Relative humidity max. 85 % rel. humidity
Dimensions (W x H x D) approx. 60 x 43 x 43 mm
Weight (incl.
approx. 80 g
rechargeable battery)
* Temperatures below 0°C may reduce the battery capacity and/or lifetime. Please have
this in mind when practicing winter sport activities, as the maximum runtime may be
significantly reduced. If you want to use your camcorder at temperatures below 0°C you
should install it in the water-resistant case with the water-resistant back cover. This guarantees
that the heat released from the camcorder operation also heats up the battery. When not
using the camcorder you should store the battery in your pocket, for example.
The technical specifications and design can be changed without prior notice.
English - 11
Page 14

SilverCrest SCW 5 A2
Safety instructions
Before you use this device for the first time, please read the following notes and heed all
warnings, even if you are familiar with handling electronic devices. Keep these operating
instructions in a safe place for future reference. If you sell the device or pass it on, it is
essential that you also hand over this manual, as it is part of the product.
DANGER! This symbol and the word “Danger” alert you to a
potentially dangerous situation. Ignoring it can lead to severe injury or
even death.
WARNING! This symbol and the word “Warning” denote important
information required for the safe operation of the product and for the
safety of its users.
This symbol denotes further information on the topic.
To power the camcorder use the supplied battery pack only
(manufacturer: FUJI ELECTRONICS(SHENZHEN) CO.,LTD / model: FJSLB-10A).
DANGER! Always make sure that
the device is not exposed to direct heat sources (e.g. radiators);
no direct sunlight or bright artificial light reaches the device;
the camcorder is used within the allowed operating temperature range from 0°C to 35°C
only;
contact with spray, dripping water and corrosive liquids is avoided and the device is never
operated near water; in particular the device may never be immersed in liquids (do not
place any objects containing liquids, such as vases or drinks, on or near the device);
12 - English
Page 15

SilverCrest SCW 5 A2
Dripping and sprayed water and immersing the device is allowed only after the camcorder
has been fitted into the protective water-resistant case;
the device is never placed near magnetic fields (e.g. speakers);
no naked flames (e.g. burning candles) are placed on or near the device;
no foreign bodies can penetrate into the device;
the device is not exposed to any extreme temperature fluctuations as this can cause
moisture through condensation and cause short-circuits; if the device has been exposed to
strong temperature variations, wait for it to reach the ambient temperature before switching
it on (about 2 hours);
the device should not be subject to excessive shocks and vibrations;
the device and its accessories are not damaged in order to avoid any further risks.
Therefore you must inspect the device and its accessories regularly for any damage. If you
find any component damaged, it must not be used. Never open the camcorder housing
and have all repairs performed by qualified technical staff only.
Failure to heed the warnings above may result in damage to the device or injury.
WARNING! Recordings (photo/video) of
persons and the right on the own image
Please note that when recording any persons, whether portraits or groups of persons, every
person has the right on her/his own image/recording. Recording underaged people is
subject to the consent of the parents. In order to avoid any legal measures, make sure to
respect the legislation of the country of use.
WARNING! Using on the road
Please note that using the camera on the road, whether driving a car, riding a bicycle or as a
pedestrian may distract you from the traffic resulting in severe accidents. This may harm your
health and/or result in legal actions. Therefore the camera may only be operated while the
vehicle is not running.
In some countries it can even be forbidden to use it in a car and result in legal actions.
Please make sure to respect the legislation of the country of use.
English - 13
Page 16

SilverCrest SCW 5 A2
DANGER! Children and persons with disabilities
Electrical devices are not suitable for children. Also persons with reduced physical, sensory
or mental capabilities should only use electrical devices in appropriate circumstances. Do not
allow children or persons with disabilities to use electrical devices unsupervised, unless they
are instructed accordingly and supervised by a competent person responsible for their
safety. Children should always be supervised to ensure that they do not play with the
product. Small parts can represent choking hazards. Keep the packaging away from
children and persons with disabilities.
DANGER! There is a risk of suffocation!
DANGER! Battery
Always insert the battery pack with the correct polarity. The correct polarity is labelled on the
battery and inside the battery compartment. Never throw a battery into fire. Remove the
battery pack if you do not plan to use the camcorder for a while. Improper use could cause
explosions or leaks.
Batteries must never be opened or deformed. Otherwise any leaking battery fluids may
cause injuries. If the battery fluid becomes in contact with the skin or eyes, rinse immediately
with plenty of water and seek medical aid.
Only operate this device with the battery pack supplied in order to avoid overheating,
deformation of the casing, fire, electric shocks, explosion and other hazards.
Batteries must be disposed of at specific collection points.
14 - English
Page 17

SilverCrest SCW 5 A2
DANGER! risk of explosion!
Improper use of the battery pack may cause explosions or leaks. Never replace the battery
in an explosion-sensitive environment. While inserting or removing the battery a spark may
be produced that could cause an explosion. Please head the usage restrictions of
prohibitions regarding battery-powered devices at dangerous places like fuel storage areas.
Explosion-sensitive areas are normally (but not always) labelled. These include fuel storage
areas such as below deck on a boat, fuel line or tank areas, environments where the air
contains inflammable substances (e.g. cereals dust or metal powder) and any areas where
you should normally switch off your car engine.
Respect the environment. Old batteries must not be disposed of with domestic waste. They
must be handed in at a collection point for waste batteries.
WARNING! Cables
Always hold cables by the plug and never pull on the cable itself. Never place heavy
objects or furniture on the cables and take care that the cord does not become trapped,
especially at the plug and sockets. Never tie knots in a cable and do not tie them to other
cables. All cables must be laid so that nobody can trip over them or be obstructed by them.
English - 15
Page 18

SilverCrest SCW 5 A2
WARNING! Water-resistance
The camcorder itself is not water-resistant. It can only be used under water in combination
with its water-resistant case. The water-resistant case is water-resistant up to a depth of 60 m.
To guarantee its water resistance, do not use the camcorder with the water-resistant case for
longer than 60 minutes under water at a time.
The water resistance of this camcorder applies to salt and fresh water only. It does not apply
to any cleaners, chemicals, solvents or water in public swimming pools. Liquids of this kind
must be wiped off the water-resistant case immediately. Only use the water-resistant case in
water of temperatures between 0° C and 35°C. Avoid excessive vibration or shaking under
water. Otherwise there is a risk that the water-resistant case opens. This can damage the
camcorder and any recordings.
WARNING! Maintenance / cleaning
Maintenance
Repairs are required when the device or its housing has been damaged in any way, for
example, when liquids or objects have entered the product, when the product does not work
normally or when the product has been dropped. If smoke, unusual noises or smells are
noticed, power off the device immediately and remove the battery. If this occurs, do not
continue to use the device and have it checked out by an expert. All repairs must be carried
out by qualified service personnel.
Cleaning
Use a soft, lint-free cloth for cleaning.
Do not use any cleaners, detergents or solvents, as these may enter the housing and cause
permanent damage to the product.
16 - English
Page 19

SilverCrest SCW 5 A2
Please read the notes on “Cleaning after using under water” on page 65.
Copyright
All the contents of this user manual are protected by copyright and provided to the reader
for information only. Copying data and information without the prior explicit written consent
of the author is strictly forbidden. This also applies to any commercial use of the contents and
information. All texts and diagrams are up-to-date as of the date of printing.
English - 17
Page 20
SilverCrest SCW 5 A2
Overview
An additional illustration of the items and controls and their corresponding numbers can be
found on the inner page of the fold-out cover of this user manual. You can keep this page
folded out whilst reading the different chapters of this user manual. This allows you to refer to
the relevant controls at any time.
1 Display
2 On/Off/Mode button
3Status LED
4 Speaker
5Lens
6Status LED
7 microSD card slot
8HDMI output
9 Record button
10 Battery compartment
11 Status LED
12 Microphone
13 USB/charging connector
14 Microphone connector
15 Status LED
18 - English
Page 21
SilverCrest SCW 5 A2
Before you start
Inserting/removing a memory card
You should insert a microSD memory card to record your videos and pictures. If there is no
microSD memory card inserted, all recordings will be stored on the internal camcorder
memory. As the internal memory is very small, only a few recordings may be stored. Insert
the supplied microSD in order to be able to store more recordings. Proceed as follows:
Power the camcorder off before you insert or remove a memory card.
Insert the memory card with the contacts facing towards the front of the device (towards
the lens [5]) into the microSD card slot [7] until it clicks in place. To remove the memory
card, gently press on the inserted card. The memory card will protrude a little so that you
can get a hold of it and remove it.
Only use Speed Class 4 or faster memory cards. Otherwise image
and/or sound distortion may occur during video recording.
If the memory card or the internal memory is full, the message “FULL”
appears on the bottom line of the display [1].
English - 19
Page 22
SilverCrest SCW 5 A2
p
p
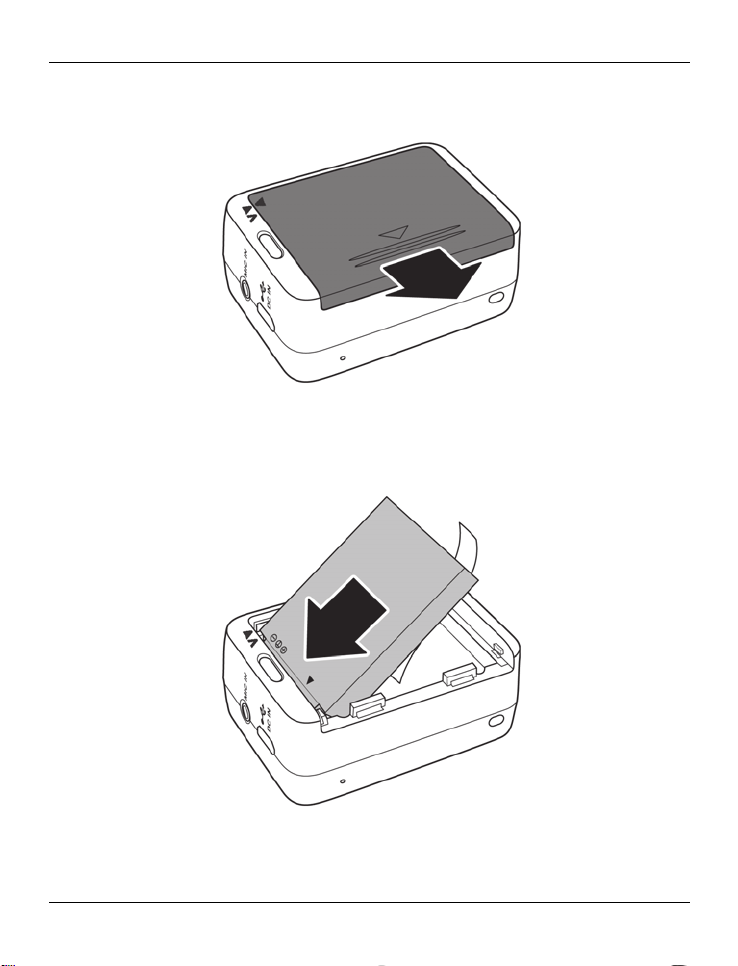
Inserting the battery pack
Insert the battery pack as follows into the camcorder:
Open the battery compartment [10]. To do so, press on the ribbed area of the battery
compartment cover and slide it into the direction of the arrow until the closed arrow on the
cover and the opened arrow on the camera housing are aligned. Next lift the battery
com
artment cover to remove it.
Align the contacts of the battery pack with the contacts in the battery compartment [10].
Make sure that the [+] and [-] contact markings on the battery and in the compartment
[10] match. Next fully insert the battery pack into the battery compartment [10]. Make
sure to
lace the end of the strip over the battery pack.
20 - English
Page 23

SilverCrest SCW 5 A2
Close the battery compartment [10]. To do so, press on the ribbed area of the battery
compartment cover and slide it into the direction of the arrow until the closed arrow on the
cover and the closed arrow on the camera housing are aligned.
To remove the battery pack, open the battery compartment [10] as
described above. Pull the strip to remove the battery.
On delivery, the battery pack is not charged. Please fully charge the
battery before using the product for the first time.
English - 21
Page 24

SilverCrest SCW 5 A2
Buttons
Button Function
On/Off/Mode button [2] Press and hold this button for at least 3 seconds to
switch the camcorder on or off.
Press this button several times while the camcorder is
switched on to toggle between the different operating
modes (Video, Photo, WiFi, Burst, Time-lapse, Selftimer and Menu).
Press this button while the menu is shown to navigate
through the menu items.
Record button [9] Press this button in Video mode to start or stop
recording.
Press this button in Photo mode to take a picture.
Press this button while the menu is shown to select a
menu item.
LEDs
The status LEDs can be found on the top, bottom, front and back panels of the camcorder.
They allow you to monitor the camcorder status under the most different mounting scenarios.
LED Colour Description
Operation: Powering on or photo capture.
USB Mode: Charging battery
Operation: Self-timer enabled
Operation: Recording video or self-timer
enabled
USB Mode: Charging battery
Status LED [3]
Status LED
[3, 11 and 15]
Status LED [6]
Green
Slowly flashing green Operation: WiFi is enabled
Fast flashing green USB Mode: Camcorder powered on
Flashing red Operation: Video recording in progress
Flashing green/orange
or red
Flashing orange
Off USB Mode: Battery is fully charged
22 - English
Page 25
SilverCrest SCW 5 A2
Charging the Battery
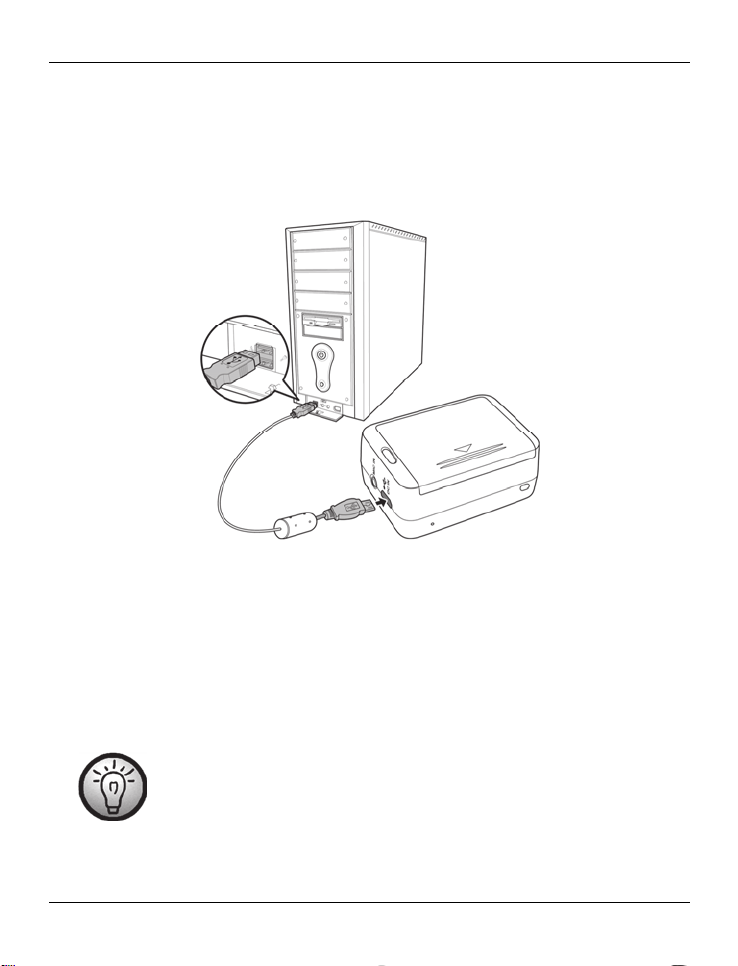
It is possible to recharge the camcorder battery pack via the USB power of a computer. To
do this, you will need the USB cable supplied.
Insert the battery pack as described above into the camcorder.
Use the USB cable to connect the camcorder to an available USB port on a computer. Insert
the small plug of the supplied USB cable into the USB/charge port of your camcorder [13]
and the large plug into a USB port on your computer.
You can keep the camcorder powered off while charging. Press and hold the On/Off/Mode
button [2] for three seconds to switch the camcorder off.
The status LED [6] flashes orange during charging. When the charging process is complete,
the status LED [6] goes out.
Some computers do not supply USB power while they are turned off. If
the camcorder does not charge, make sure your computer is switched on.
English - 23
Page 26
SilverCrest SCW 5 A2
In addition to the option above, you can also connect the camcorder to
an external USB power adapter (not supplied) in order to charge the
battery pack. To do this, you will need the USB cable supplied. You can
purchase a suitable 5V USB power adapter with at least 1A from any
electronics retail outlet.
When using an external power adapter, it must be connected to an
easily accessible wall outlet in order to be able to disconnect it quickly in
case of an emergency.
Setting the date and time
To set the date and time:
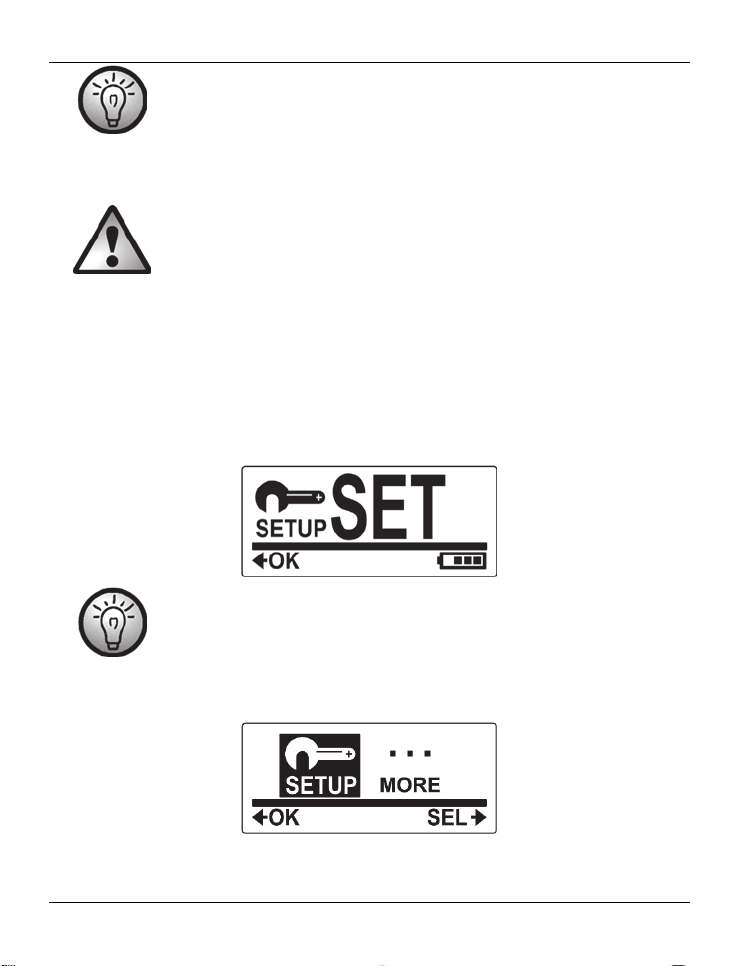
Press and hold the On/Off/Mode button [2] for at least 3 seconds to switch the
camcorder on. The camcorder initialises in Video mode automatically.
To open the menu, press the On/Off/Mode button [2] six times.
If the display is in dimmed power-saving mode, press the On/Off/Mode
button [2] once to toggle to active mode.
Press the record button [9] to open the menu. The following menu is shown:
24 - English
Page 27
SilverCrest SCW 5 A2
The SETUP menu will be highlighted. Press the On/Off/Mode button [2] multiple times
to select the MORE menu and then press the record button [9] to confirm.
Press the On/Off/Mode button [2] multiple times until the TIME menu is highlighted.
Press the record button [9] to open the TIME menu.
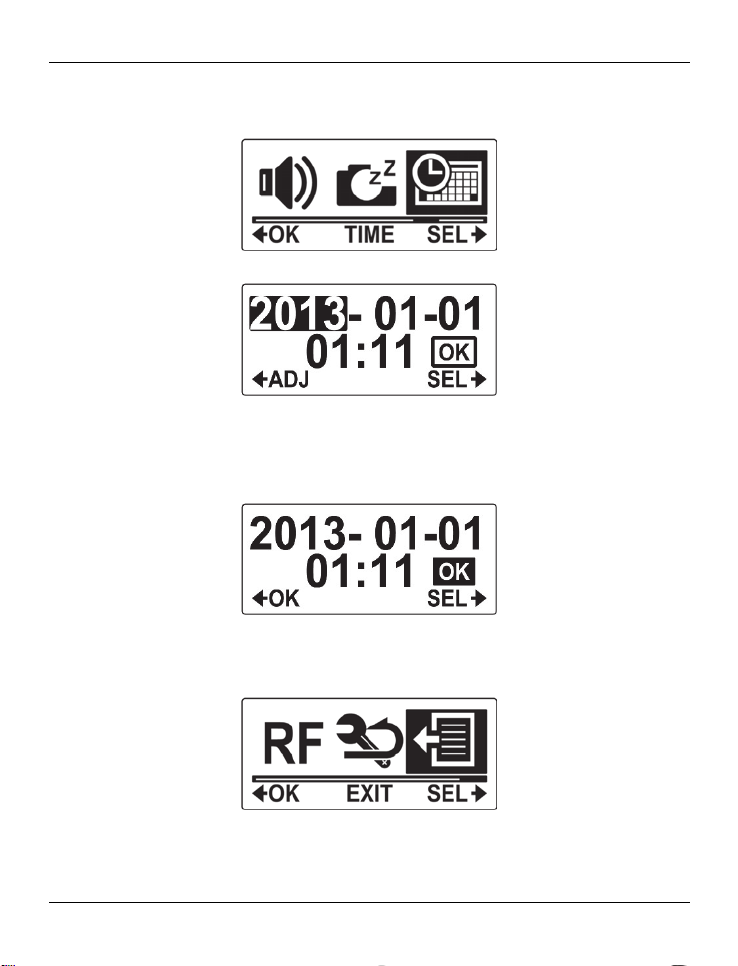
Next you can set the year, month, day, hours and minutes in sequence. Select the
variable that you want to set by pressing the On/Off/Mode button [2]. Press the record
button [9] to increase the value stepwise.
After all settings have been entered, press the On/Off/Mode button [2] to select “OK”.
Press the record button [9] to confirm.
To exit the MORE menu, press the On/Off/Mode button [2] multiple times until the EXIT
item is highlighted and then press the record button [9] to confirm.
Next you can use the On/Off/Mode button [2] to select an operating mode.
English - 25
Page 28
SilverCrest SCW 5 A2
Getting started
Powering the camcorder on/off
Press and hold the On/Off/Mode button [2] for at least 3 seconds to switch the camcorder
on or off. While powering on the status LED [3] goes green.
The display
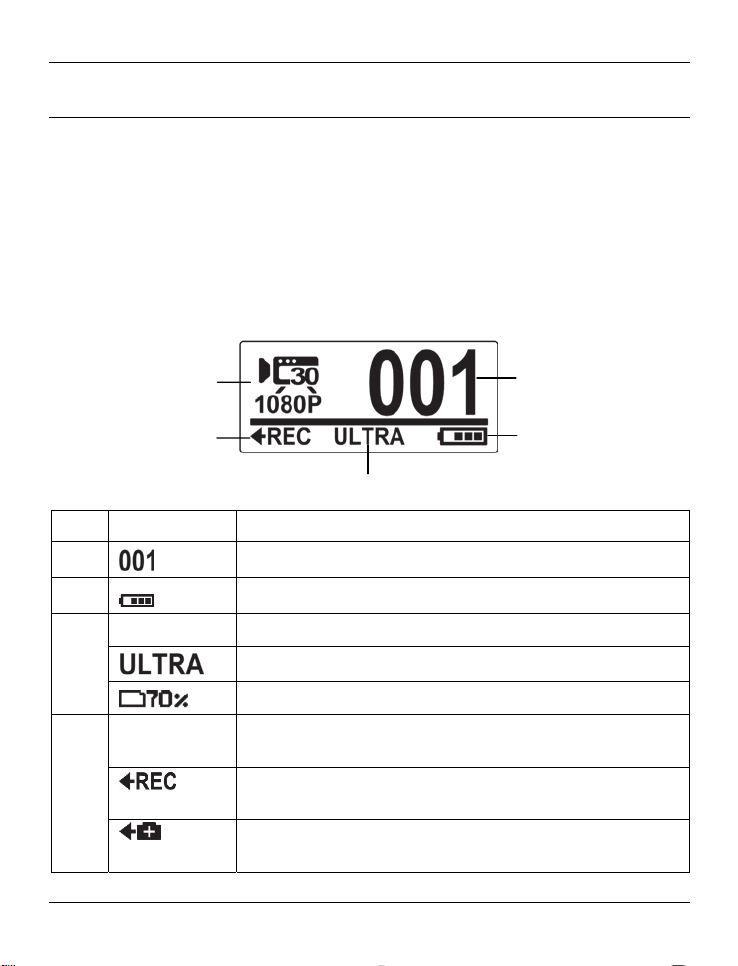
The display [1] shows the following information:
25
24
No. Icon* Description
21
22
23
Number of recordings saved (pictures and videos)
Battery capacity
Alternates between the following:
Displays the field of view of the camera: WIDE or ULTRA
Shows the remaining storage space in percentage.
Displays the option that is executed when pressing the record
button [9].
24
When this icon is shown, pressing the record button [9] starts a
video recording.
When this icon is shown, pressing the record button [9]
captures a picture.
26 - English
23
21
22
Page 29
No. Icon* Description
Shows the operating mode currently selected.
Video mode: Use this mode for video recording. This icon also
resumes the current video recording settings.
SilverCrest SCW 5 A2
Photo mode: Use this mode for taking pictures.
WiFi Mode: In this operating mode you can enable or disable
the WiFi function. While WiFi is enabled, you can control the
camcorder from the SilverCrest Action Camcorder App.
Burst mode: Use this mode to take a series of 10 pictures.
25
Time-lapse mode: Use this mode for time-lapse picture or video
recording. This icon also resumes the current settings.
Self-timer: Use this mode for self-timer shots.
Setup: Use this mode to customise the camcorder settings.
* The icons may vary depending on the selected setting.
English - 27
Page 30

SilverCrest SCW 5 A2
Selecting the operating mode
Press the On/Off/Mode button [2] several times to toggle between the different operating
modes. The currently selected mode is indicated on the top-left corner of the display [1]. The
modes are cycled as follows:
Video mode Photo mode WiFi Mode
Burst mode
Setup Self-timer Time-lapse mode
If the display is in dimmed power-saving mode, press the On/Off/Mode
button [2] once to toggle to active mode.
Recording
Recording videos
Press and hold the On/Off/Mode button [2] for at least 3 seconds to switch the
camcorder on. The camcorder initialises in Video mode automatically.
28 - English
Page 31

SilverCrest SCW 5 A2
Press the record button [9] to start recording. During recording the status LEDs [3, 11
and 15] will flash red and the status LED [6] orange.
Press the record button [9] again to stop recording. The status LEDs [3, 11 and15] go
off.
Taking pictures
Press and hold the On/Off/Mode button [2] for at least 3 seconds to switch the
camcorder on. The camcorder initialises in Video mode automatically.
To switch to Photo mode (PHOTO), press the On/Off/Mode button [2] once.
Press the record button [9] to take a picture. While saving the status LED [3] goes green.
Burst mode
Press and hold the On/Off/Mode button [2] for at least 3 seconds to switch the
camcorder on. The camcorder initialises in Video mode automatically.
To switch to Burst mode (BURST), press the On/Off/Mode button [2] three times.
Press the record button [9] to take a series of 10 pictures. While saving the status LED
[3] goes green.
Time-lapse mode
Press and hold the On/Off/Mode button [2] for at least 3 seconds to switch the
camcorder on. The camcorder initialises in Video mode automatically.
To switch to Time-lapse mode (LAPSE), press the On/Off/Mode button [2] four times.
Press the record button [9] to start recording. During recording the status LEDs [3, 11
and 15] will flash red and the status LED [6] orange.
Press the record button [9] again to stop recording. The status LED [3] goes off.
English - 29
Page 32

SilverCrest SCW 5 A2
Self-timer
Press and hold the On/Off/Mode button [2] for at least 3 seconds to switch the
camcorder on. The camcorder initialises in Video mode automatically.
To switch to Self-timer mode (TIMER), press the On/Off/Mode button [2] five times.
Press the record button [9] to enable the self-timer. After the self-timer has been enabled,
the status LED [3] flashes slowly green/orange and the status LEDs [11, 15 and 6] flash
slowly red or orange. The last seconds of the self-timer countdown the status LEDs [3, 6,
11 and 15] flash faster.
The photo is taken 10 seconds after the self-timer is enabled.
WiFi mode / Controlling the action camcorder from the App
The "SilverCrest Action Camcorder" app lets you control your action camcorder from your
smartphone or tablet PC. Proceed as follows:
First install the "SilverCrest Action Camcorder“ app on your smartphone or tablet PC.
You can download the app from the Apple® App Store and from the Google® Play
Store.
For iOS devices and Android devices up to version 4.x, select the "SilverCrest
Action Camcorder" app; for Android devices version 5.x and above, select the
"SilverCrest Action Camcorder 2" app. In order for the app to be displayed on an
®
Apple
iPad in Apple® App Store, select the "iPhone only" filter.
Enable the action camcorder WiFi mode:
o Press and hold the On/Off/Mode button [2] for at least 3 seconds to switch the
camcorder on. The camcorder initialises in Video mode automatically.
o To switch to WiFi mode, press the On/Off/Mode button [2] twice.
o Press the Record button (9) to enable WiFi. The display [1] reads "ON". To
disable WiFi, press the Record button [9] again. The display [1] reads "OFF".
o Press the On/Off/Mode button [2] to switch to a different operating mode. The
action camcorder starts preparing the WiFi mode. As soon as the status LED [3]
flashes, WiFi is ready. Please note that the WiFi mode is automatically disabled
after switching the camcorder off and back on.
30 - English
Page 33

SilverCrest SCW 5 A2
Enable WiFi on your smartphone or tablet PC. Please also see the User Manual for your
device.
Have the smartphone or tablet PC search for any WiFi devices and select the
"SCW5A1_" followed by a 6-digits number/character combination from the list of found
WiFi devices.
Enter the password "1234567890" and establish the connection.
Next you can launch the "SilverCrest Action Camcorder" app on your smartphone or
tablet PC and use it to control the action camcorder.
You can download the operating instructions for your SilverCrest Action
Camcorder App from the www.lidl-service.com website.
The menu
The menu lets you customise the camcorder settings and record parameters.
Press and hold the On/Off/Mode button [2] for at least 3 seconds to switch the
camcorder on. The camcorder initialises in Video mode automatically.
To open the menu, press the On/Off/Mode button [2] six times.
Press the record button [9] to open the menu. The following menu is shown:
Press the On/Off/Mode button [2] to select the desired icon or option.
Press the record button [9] to confirm your selection.
English - 31
Page 34

SilverCrest SCW 5 A2
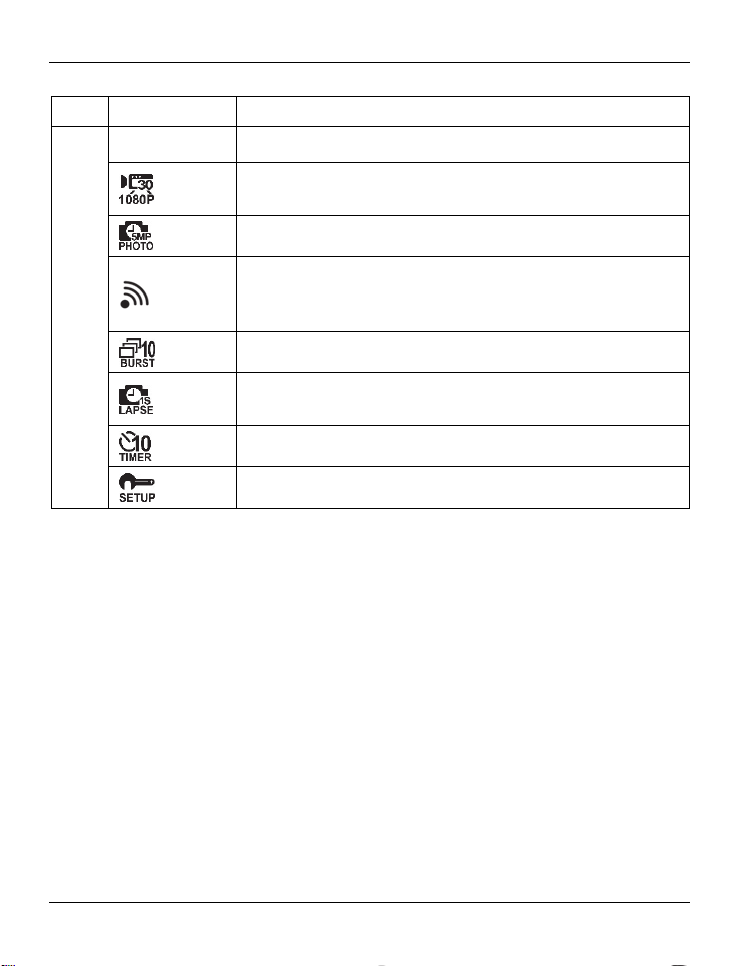
Menu icons
32 - English
Customise recording settings
To set the video resolution
To select the camera’s field of view
To set the time-lapse delay
To rotate the recording by 180°
To toggle the loop recording mode on/off
To toggle the diving mode on/off
To delete recordings/format the memory card
To exit the menu
Customise camcorder settings
To rotate the display image by 180°
To toggle the status LEDs on/off
To customise the display brightness
To customise the beeper volume
To customise the auto power-off delay
To set the date and time
To connect a remote control (not included in the package)
To reset to factory defaults
To exit the menu
Record button [9] to confirm
On/Off/Mode button [2] to select
Page 35

SilverCrest SCW 5 A2
Setting the video resolution
The resolution determines the size of the recording in pixels. As a general rule: the higher the
resolution, the more storage space is required. To set the video resolution, proceed as
follows:
Press the On/Off/Mode button [2] multiple times to select the SETUP menu and then
press the record button [9] to confirm.
The VIDEO menu will be highlighted. Press the record button [9] to open the VIDEO
menu.
Press the On/Off/Mode button [2] to select an option. The following settings are
available:
1080p – 1920 x 1080 (30 fps)
960p – 1280 x 960 (30 fps)
720p – 1280 x 720 (60 fps)
Press the record button [9] to confirm your selection.
To exit the SETUP menu, press the On/Off/Mode button [2] multiple times until the EXIT
item is highlighted and then press the record button [9] to confirm.
English - 33
Page 36

SilverCrest SCW 5 A2
Selecting the camera’s field of view
To select the camera’s field of view, proceed as follows:
Press the On/Off/Mode button [2] multiple times to select the SETUP menu and then
press the record button [9] to confirm.
Press the On/Off/Mode button [2] multiple times until the FOV menu is highlighted.
Press the record button [9] to open the FOV menu.
Press the On/Off/Mode button [2] to select an option. The following settings are
available:
Ultra wide-angle lens
Wide-angle lens
Press the record button [9] to confirm your selection.
To exit the SETUP menu, press the On/Off/Mode button [2] multiple times until the EXIT
item is highlighted and then press the record button [9] to confirm.
The "Ultra" and "Wide" settings only apply to picture recordings. For
video recordings, the setting will always be "Ultra" (independently of the
selection made in the menu).
34 - English
Page 37

SilverCrest SCW 5 A2
Setting the time-lapse options
To set the time-lapse options, proceed as follows:
Press the On/Off/Mode button [2] multiple times to select the SETUP menu and then
press the record button [9] to confirm.
Press the On/Off/Mode button [2] multiple times until the LAPSE menu is highlighted.
Press the record button [9] to open the LAPSE menu.
Press the On/Off/Mode button [2] to select the desired option and then press the
record button [9] to confirm. The following options are available:
Use this menu to select to save the timelapse recording as a video or select to
save it as a pictures series.
Use this menu to select the recording
interval. The following settings are available:
”1 SEC” (not for picture series), “3 SEC”, “5
SEC“, “10 SEC“, “30 SEC“ and “60 SEC“.
Select this option to exit the LAPSE menu
without making any changes.
To exit the SETUP menu, press the On/Off/Mode button [2] multiple times until the EXIT
item is highlighted and then press the record button [9] to confirm.
English - 35
Page 38

SilverCrest SCW 5 A2
Rotating the recording by 180°
In this menu you can have your videos and photos recordings rotated by 180°. To enable it,
proceed as follows:
Press the On/Off/Mode button [2] multiple times to select the SETUP menu and then
press the record button [9] to confirm.
Press the On/Off/Mode button [2] multiple times until the UP/DOWN menu is
highlighted. Press the record button [9] to open the UP/DOWN menu.
Press the On/Off/Mode button [2] to select an option. The following settings are
available: “ON“ and “OFF“.
Select “ON“ to have your recording rotated
by 180°. Select “OFF” if you don’t want to
rotate the recordings.
Press the record button [9] to confirm your selection.
To exit the SETUP menu, press the On/Off/Mode button [2] multiple times until the EXIT
item is highlighted and then press the record button [9] to confirm.
36 - English
Page 39

SilverCrest SCW 5 A2
Toggling the loop recording mode on/off
This menu allows you to enable or disable the loop recording mode. Loop recording is only
possible when storing the recordings on a memory card. Please note that this mode will
overwrite existing data once the memory card is full. The oldest data is overwritten first.
Proceed as follows to toggle this mode on or off:
Press the On/Off/Mode button [2] multiple times to select the SETUP menu and then
press the record button [9] to confirm.
Press the On/Off/Mode button [2] multiple times until the LOOP menu is highlighted.
Press the record button [9] to open the LOOP menu.
Press the On/Off/Mode button [2] to select an option. The following settings are
available: “ON“ and “OFF“.
Select "ON" to enable the loop recording
mode or select "OFF" to disable it.
Press the record button [9] to confirm your selection.
As soon as loop recording has been enabled you can press the
recording button [9] to start or stop recording. During loop recording the
status indicator [15] flashes red. To be able to select a different
recording mode you first have to disable loop recording. Also, in loop
recording there are only a few setup options available.
To exit the SETUP menu, press the On/Off/Mode button [2] multiple times until the EXIT
item is highlighted and then press the record button [9] to confirm.
English - 37
Page 40

SilverCrest SCW 5 A2
Toggling the diving mode on/off
This menu allows you to enable or disable the diving mode. You can enable the diving mode
while using the device underwater in order to obtain optimised image parameters. Proceed
as follows:
Press the On/Off/Mode button [2] multiple times to select the SETUP menu and then
press the record button [9] to confirm.
Press the On/Off/Mode button [2] multiple times until the DIVING menu is highlighted.
Press the record button [9] to open the DIVING menu.
Press the On/Off/Mode button [2] to select an option. The following settings are
available: “ON“ and “OFF“.
Select "ON" to enable the diving mode or
select "OFF" to disable it.
Press the record button [9] to confirm your selection.
Once you have enabled the diving mode, only video and photo
recording is available. To be able to select a different recording mode
you first have to disable the diving mode. Also, in diving mode there are
only a few setup options available.
To exit the SETUP menu, press the On/Off/Mode button [2] multiple times until the EXIT
item is highlighted and then press the record button [9] to confirm.
38 - English
Page 41

SilverCrest SCW 5 A2
Deleting recordings/formatting the memory card
WARNING: During deleting/formatting all movies and pictures saved
will be deleted and cannot be restored. Make sure that all recordings
you want to keep have been backed up to a different medium.
To delete videos or photos from the internal memory or to format the
internal memory, you first have to remove the memory card (if one is
inserted).
This menu lets you delete any recordings or format the memory card or internal memory.
Proceed as follows:
Press the On/Off/Mode button [2] multiple times to select the SETUP menu and then
press the record button [9] to confirm.
Press the On/Off/Mode button [2] multiple times until the DELETE menu is highlighted.
Press the record button [9] to open the DELETE menu.
Press the On/Off/Mode button [2] to select an option. The following options are
available:
Erases the last-recorded video or photo.
Erases all files stored on the memory card or
the internal memory.
English - 39
Page 42

SilverCrest SCW 5 A2
Formats the memory card or internal
memory.
Press the record button [9] to confirm your selection.
You’ll need to confirm the deleting/formatting once again. If you want, you can also
cancel this process. Press the On/Off/Mode button [2] to select an option. The
following options are available:
Confirm (DELETE or FORMAT)
Cancel (EXIT)
Press the record button [9] to confirm your selection.
To exit the DELETE menu, press the On/Off/Mode button [2] multiple times until the EXIT
item is highlighted and then press the record button [9] to confirm.
To exit the SETUP menu, press the On/Off/Mode button [2] multiple times until the EXIT
item is highlighted and then press the record button [9] to confirm.
40 - English
Page 43

SilverCrest SCW 5 A2
Rotating the display image by 180°
This menu allows you to rotate the display image by 180°. Proceed as follows:
Press the On/Off/Mode button [2] multiple times to select the MORE menu and then
press the record button [9] to confirm.
The UP/DOWN menu will be highlighted. Press the record button [9] to open the
UP/DOWN menu.
Press the On/Off/Mode button [2] to select an option. The following settings are
available: and .
Select to restore the default value. Use
the setting to rotate the display image
by 180°.
Press the record button [9] to confirm your selection.
To exit the MORE menu, press the On/Off/Mode button [2] multiple times until the EXIT
item is highlighted and then press the record button [9] to confirm.
English - 41
Page 44

SilverCrest SCW 5 A2
Toggling the status LEDs on/off
This menu allows you to enable or disable the camcorder’s status LEDs. Proceed as follows:
Press the On/Off/Mode button [2] multiple times to select the MORE menu and then
press the record button [9] to confirm.
Press the On/Off/Mode button [2] multiple times until the LED menu is highlighted. Press
the record button [9] to open the LED menu.
Press the On/Off/Mode button [2] to select an option. The following settings are
available: “ON“ and “OFF“.
Selecting “ON” will enable the camcorder’s
status LEDs and selecting “OFF” will disable
them.
Press the record button [9] to confirm your selection.
To exit the MORE menu, press the On/Off/Mode button [2] multiple times until the EXIT
item is highlighted and then press the record button [9] to confirm.
The status LED [6] will flash orange during battery charging even if the
status LEDs have been switched off.
42 - English
Page 45

SilverCrest SCW 5 A2
Customising the display brightness
This menu allows you to customise the display brightness. Proceed as follows:
Press the On/Off/Mode button [2] multiple times to select the MORE menu and then
press the record button [9] to confirm.
Press the On/Off/Mode button [2] multiple times until the BRIGHT menu is highlighted.
Press the record button [9] to open the BRIGHT menu.
Press the On/Off/Mode button [2] to select an option. The following settings are
available: “100 %“, “60 %“ and “30 %“.
You can adjust the display brightness in
three levels (100 % = bright to 30 % =
dark).
Press the record button [9] to confirm your selection.
To exit the MORE menu, press the On/Off/Mode button [2] multiple times until the EXIT
item is highlighted and then press the record button [9] to confirm.
English - 43
Page 46

SilverCrest SCW 5 A2
Customising the beeper volume
This menu allows you to customise the beeper volume. Proceed as follows:
Press the On/Off/Mode button [2] multiple times to select the MORE menu and then
press the record button [9] to confirm.
Press the On/Off/Mode button [2] multiple times until the BEEP menu is highlighted.
Press the record button [9] to open the BEEP menu.
Press the On/Off/Mode button [2] to select an option. The following settings are
available:
Sets the beeper volume to the highest value.
Sets the beeper volume to a middle value.
Disables the beeper.
Press the record button [9] to confirm your selection.
To exit the MORE menu, press the On/Off/Mode button [2] multiple times until the EXIT
item is highlighted and then press the record button [9] to confirm.
44 - English
Page 47

SilverCrest SCW 5 A2
Customising the auto power-off delay
This menu allows you to customise the automatic power-off delay. You can get the
camcorder to power off automatically after a certain time to save battery. If no buttons are
pressed during the preset time, the camcorder powers off automatically. To adjust the
automatic power-off delay, proceed as follows:
Press the On/Off/Mode button [2] multiple times to select the MORE menu and then
press the record button [9] to confirm.
Press the On/Off/Mode button [2] multiple times until the AUTO OFF menu is
highlighted. Press the record button [9] to open the AUTO OFF menu.
Press the On/Off/Mode button [2] to select an option. The following settings are
available: “1 MIN“, “3 MIN“, “5 MIN“, “10 MIN“, “30 MIN“, “60 MIN“ and “OFF“.
Select a delay time after which the
camcorder powers off automatically if no
operation has been made in the meantime.
Select “OFF” to disable the auto power-off
function.
Press the record button [9] to confirm your selection.
To exit the MORE menu, press the On/Off/Mode button [2] multiple times until the EXIT
item is highlighted and then press the record button [9] to confirm.
English - 45
Page 48

SilverCrest SCW 5 A2
Setting the date and time
This lets you set the date and time. Proceed as follows:
Press the On/Off/Mode button [2] multiple times to select the MORE menu and then
press the record button [9] to confirm.
Press the On/Off/Mode button [2] multiple times until the TIME menu is highlighted.
Press the record button [9] to open the TIME menu.
Next you can set the year, month, day, hours and minutes in sequence. Press the record
button [9] to increase the value stepwise. Press the On/Off/Mode button [2] to confirm
each entry.
After all settings have been entered, press the On/Off/Mode button [2] to select “OK”.
Press the record button [9] to confirm.
To exit the MORE menu, press the On/Off/Mode button [2] multiple times until the EXIT
item is highlighted and then press the record button [9] to confirm.
46 - English
Page 49

SilverCrest SCW 5 A2
Connecting a remote control (not included in the package)
This menu lets you connect a remote control (not supplied) to your camcorder. The following
section describes how to establish a connection with the standard remote control. Please also
see the remote control User Manual. A remote control lets you start or stop video recordings
and take pictures.
You can order the remote control and consumables like adhesive pads
from our hotline or by e-mail (see page 77).
To connect the remote control to the camcorder, proceed as follows:
Press the On/Off/Mode button [2] multiple times to select the MORE menu and then
press the record button [9] to confirm.
Press the On/Off/Mode button [2] multiple times until the BINDING menu is
highlighted. Press the record button [9] to open the BINDING menu.
The camcorder will start seeking the remote control for 30 seconds and indicates it on
the display [1] as follows:
Within the next 30 seconds, press both buttons (Video and Photo button) on the remote
control
English - 47
Page 50

SilverCrest SCW 5 A2
After the remote control has been successfully connected to the camcorder the red
remote control LED will light up shortly.
To exit the MORE menu, press the On/Off/Mode button [2] multiple times until the EXIT
item is highlighted and then press the record button [9] to confirm.
You can now control your camcorder via the remote control. Press the [circle icon] button on
the remote control to start or stop a video recording. Press the [camera icon] button on the
remote control to take a picture. You can wear the remote control comfortably like a watch
on your wrist giving you convenience and flexibility for all your activities.
To control photography via the remote control you first have to set the
camcorder to the desired mode (Photo, Burst, Time-lapse or Self-timer). To
use the remote control to record videos, set the camcorder to Video
mode. In Video mode you can even take picture by pressing the [camera
icon] button on the remote control.
The remote control is water-resistant up to a depth of 60 m. To guarantee its waterresistance, do not use the remote control for longer than 60 minutes under water at a time.
The water-resistance applies to salt and fresh water only. It does not apply to any cleaners,
chemicals, solvents or water in public swimming pools. Liquids of this kind must be wiped off
the remote control immediately. Only use the remote control in water of temperatures of
between 0°C and 35°C.
Besides the standard remote control you can also use a remote control
with display and additional features.
48 - English
Page 51

SilverCrest SCW 5 A2
Resetting to factory defaults
In this menu you can restore the factory-default settings of your camcorder. Proceed as
follows:
Press the On/Off/Mode button [2] multiple times to select the MORE menu and then
press the record button [9] to confirm.
Press the On/Off/Mode button [2] multiple times until the DEFAULT menu is highlighted.
Press the record button [9] to open the DEFAULT menu.
You’ll have to confirm the factory reset. If you want, you can also cancel this process.
Press the On/Off/Mode button [2] to select an option. The following options are
available:
Confirm (reset to factory defaults)
Cancel (EXIT)
Press the record button [9] to confirm your selection.
To exit the MORE menu, press the On/Off/Mode button [2] multiple times until the EXIT
item is highlighted and then press the record button [9] to confirm.
English - 49
Page 52

SilverCrest SCW 5 A2
Connecting a microphone
For best-quality audio recording you can connect an external microphone with 2.5mm jacktype connector to the camcorder’s microphone jack [14]. If necessary, you can use an
adapter. The internal microphone of your camcorder will be disabled automatically when
you connect an external microphone.
Viewing recordings on a television
You can view your recordings on a television. The television needs to have an HDMI
connector.
Use the HDMI cable to connect the camcorder to an available HDMI port on a TV. Insert the
small plug of the supplied HDMI cable into the HDMI port [8] of your camcorder and the
large plug into a HDMI port on your TV.
Power on your TV and select the HDMI input where your camcorder is connected to. Press
and hold the On/Off/Mode button [2] for at least 3 seconds to switch the camcorder on.
The camcorder initialises and the display indicates “PLAYBACK”, and after a few seconds
the TV screen will show the following picture:
50 - English
Page 53

Mode
Battery capacity
Memory card Type of recording
Mode
Shows the current operating mode.
SilverCrest SCW 5 A2
Recordings thumbnail view
Shows the recordings in thumbnail view.
Plays back the recording (photo or video).
Battery capacity
Shows the remaining battery level of your camcorder.
English - 51
Page 54

SilverCrest SCW 5 A2
Memory card
This icon indicates whether a memory card has been inserted or not. The icon is white if a
memory card has been inserted and grey if not. If there is no memory card inserted, the
contents of the internal memory is played back.
Type of recording
Here you can select what recordings shall be shown in thumbnail view. Press the
On/Off/Mode button [2] to toggle between the options. The following options are
available:
Show video recordings only
Show photo recordings only
Show loop recordings only
Show all recordings
Press the record button [9] to select a recording type.
Recordings thumbnail view
This displays the recordings in thumbnail view. Press the On/Off/Mode button [2] to
highlight a recording. The highlighted recording appears with a frame in thumbnail view. If
you have highlighted a video, its resolution will also be indicated on the left. Press the record
button [9] to show the highlighted video or picture in full-screen mode.
Press the On/Off/Mode button [2] to toggle between the recordings in fullscreen view. Press
the record button [9] to start playing back a video. Press the record button [9] during video
playback or in picture fullscreen mode to toggle to the video/photo/loop/all selection.
Next you can use the On/Off/Mode button [2] to toggle between video only, photo only or
loop recordings only display mode.
52 - English
Page 55

SilverCrest SCW 5 A2
Transferring recordings to a computer
There are two ways of copying recordings from the camcorder to a computer:
by connecting the camcorder to a computer via the USB cable
by inserting the memory card into a card reader
Be careful when renaming any folders and files. Do NOT try to change
the folder or file names stored on the device from the computer or you
may not be able to read any files contained here on your camcorder.
Once you have copied your files or folders to the computer, you can
rename or edit them on the computer.
Connecting the camcorder to a computer
Use the USB cable to connect the camcorder to an available USB port on a computer. Insert
the small plug of the supplied USB cable into the USB/charge port of your camcorder [13]
and the large plug into a USB port on your computer. Switch the camcorder on (if it is
powered off). The computer will now setup removable drives (or the internal memory and the
memory card) where you can access your recordings. Please note that it's not possible to
make changes to your recording while the device runs in this mode. Therefore it's not
possible to change, delete or rename the files. You will only be able to copy the files.
English - 53
Page 56

SilverCrest SCW 5 A2
Using a card reader
If your computer has a card reader which is compatible with microSD or SD memory cards,
you can read the contents of the memory card directly. Remove the memory card from the
camcorder while it is switched off.
Insert the microSD card directly into the microSD card reader or into the SD card
adapter.
If you are using the SD card adapter, insert it into the SD card reader on your computer
(normally labelled SD/MMC).
The PC will add the memory card contents under the drive letter representing the card
reader in My Computer.
Open My Computer on your PC and double-click on the drive representing the card
reader.
All recorded files can be found in a subfolder of the folder “DCIM” on this drive.
Now you can copy the recorded files from the camcorder into a folder of your choice
on the computer’s hard disk.
Write-protecting the SD card adapter
The SD card adapter comes with a write protection tab. When write-protection is enabled
(see the figure below right) you can only view existing videos and pictures, not delete or edit
them.
Write-protection disabled Write-protection enabled
Disable the write-protection (see the figure above left) if you want to delete or edit any
videos or pictures. Then reinsert the SD card adapter into the SD card reader on your
computer.
54 - English
Page 57

SilverCrest SCW 5 A2
Software
The software supplied allows you to edit and play your recordings.
For more information about using the software you can also use the
software help function. Please note that programme updates may incur
extra costs to you.
System Requirements
Operating system: Windows® XP, Windows Vista®, Windows® 7 or Windows® 8
CPU: Intel/AMD Dual-Core processor or higher
RAM: min. 1GB
Graphics adapter: DirectX 9 or DirectX 10-compatible (recommended)
Interface: USB 1.1 or higher
Memory: 2GB free hard disk space
Installing the software
The software provided is on the CD-ROM supplied. To install the software, you first need to
connect the camcorder to the computer using the USB cable.
Use the USB cable to connect the camcorder to your computer. Then switch the
camcorder on.
Insert the CD-ROM supplied into the CD or DVD drive of your computer.
The CD will launch automatically. Then follow the on-screen instructions to install.
If the setup programme does not start automatically or you have
cancelled it accidentally, you can launch the file “Start
HDCam.exe” manually.
Uninstalling the software
To uninstall the software, please use the Uninstall Wizard found in the Control Panel of your
operating system.
English - 55
Page 58

SilverCrest SCW 5 A2
The main screen
1 Navigation bar with multiple view options
The preview window shows previews and further information like paths
2
etc.
3 Toolbar for accessing the most common functions
Setting the storage location / Selecting the language
You can set the storage location for pictures and videos and change the software language
at any time:
From the main dialog, click: >Options >Preferences
The first field allows you to set the storage location for pictures and videos. Click “OK”
to confirm.
or
Select the language you want from the list and click “OK” to confirm.
A message appears that a program restart is required. Click "OK" to confirm the
message.
Then start the application again.
56 - English
Page 59

SilverCrest SCW 5 A2
Editing recordings
Viewing recordings
Use the USB cable to connect the camcorder to your computer. Then switch the camcorder
on.
4 Drive display and selection
5 Recordings stored on the selected drive
The following options are available:
From the navigation (4), select the drive for which you want to display the contents.
Click on one of the five star icons on the top of the object (film strip) to rate the
current recording.
Click on the info icon to show further information on the current recording. Here you
can insert a comment that can further be used for keyword searches. Video recordings
show a play and a cut icon in the preview window.
To display a recording in a new window, double-click on it. In the display window, click
the arrow icons , or use the "up" and "down" arrow keys on your keyboard to
display the next or prevous recording.
To view a video recording, double-click on it. The video window contains Stop , Play
and Pause icons. Click the arrow icons , or use the arrow keys on your
keyboard to display the previous or next video.
English - 57
Page 60

SilverCrest SCW 5 A2
To delete a recording, click the bin icon . Confirm the prompt which appears by
pressing “OK” in order to delete the recording. Please note that it's not possible to
delete any recordings stored on the internal memory or on the memory card.
Selecting navigation view
There are different options for opening your imported recordings. In the libraries, you can
sort them by folder name or date.
Click on the folder icon to sort by folder name.
Click on the calendar icon . Folders for the different years appear. After double-
clicking on a folder a months view will show. Double-clicking on it will display the days
view of the corresponding month. Click the Up arrow to return to the previous level. Use
the left and right arrows to navigate through the months and years.
To open My Computer, click the button. Here you can find all the drives
installed on your computer. For example, this allows you to access any recordings stored on
a CD-ROM.
Preview window
The preview window gives you various options for filtering and editing your recordings.
Shows all recordings according to their rating.
Shows all recordings that have not been imported
yet.
Here you can filter to display only pictures, only
videos or all recordings. The design of the selection
icon may be different depending on the settings.
Use the slider to adjust the preview image size.
Shows recordings only.
Shows the recordings with more information.
You can enter a keyword to search for here. Please
also note the chapter “Viewing recordings” on 57.
58 - English
Page 61

SilverCrest SCW 5 A2
Toolbar
Import Imports all recordings from any
Merge videos Creates films from your video recordings.
Create AVCHD Burns your video files onto an AVCHD
Upload to YouTube Uploads videos to your YouTube account.
Upload to Facebook Uploads videos to your Facebook
Photo album Creates a photo album from your
Album page Creates a page (e.g. an invitation card)
The icon entitled “YouKu” links to an Asian video portal and is not
suitable for use in European countries.
connected devices.
disk.
account.
pictures.
from your pictures.
Importing recordings
You can use the Import function to archive your recordings. The recordings are copied to
your computer. Once you have imported your recordings, you do not need to connect the
camcorder to view them.
Select all recordings that you want to import from the drive selected and click "Import" on the
bottom toolbar.
A prompt with various selection possibilities will open. To import the selected recordings,
select the "Import selected scenes“ option. You can choose to import all or only all new
recordings.
If necessary, enter a folder name or use the default name.
Click "OK" to confirm.
English - 59
Page 62

SilverCrest SCW 5 A2
Depending on the number of recordings, it can take a while to copy
the files.
After importing the recordings are still stored on the camera – they
are not deleted automatically after the import.
Merge videos
Merge videos lets you merge multiple video clips to make a film. Please note that it's only
possible to merge videos that have the same resolution and bit rate.
Click the merge videos icon to show the video editing timeline.
Drag the video clips you want onto the timeline at the bottom of the window.
Click the "Next" button to start the process.
Enter the storage path on your computer and then click “Save”.
It is still possible to edit any videos that have already placed on the timeline.
Creating an AVCHD Disk
AVCHD (Advanced Video Codec High Definition) is an innovative
digital standard with high resolution and brilliant picture and sound
quality. This format allows you to record onto writeable DVD disks
and play back on suitable DVD players. It is a good addition to an
HDTV television set.
Not all players support playback from self-recorded AVCHD disks.
Insert a DVD±R, DVD±R DL, DVD±RW or DVD-RAM disk into your DVD drive.
Click the Create AVCHD Disk icon to open the disk compilation workspace.
Drag the video clips you want onto the timeline at the bottom of the window.
Click the "Next" button to start the process.
Select the drive and folder from your hard disk and click “OK”.
To use this function your computer must have a DVD drive capable
of writing one of the following media types: DVD±R, DVD±R DL,
DVD±RW or DVD-RAM.
60 - English
Page 63

SilverCrest SCW 5 A2
Cutting video clips
You can remove any unwanted sections from your video clips. From the video recordings
overview, click on the scissors icon . The playback window with the selected video
recording appears and playback starts automatically.
Navigate to the beginning of the scene that you want to cut. Then click . Playback
stops as soon as the first cutting mark is set. To navigate to the end of the cutting area
you can resume playback with the "Play" button.
Navigate to the end of the scene that you wish to cut. Then click . It is possible to
define mutiple cutting areas in the same clip.
Start cutting by clicking the confirmation icon .
The section is cut and a new clip is created without the selection. The new clip will be
saved to the “My Creations” folder.
Upload to YouTube
Click on the YouTube upload icon .
Drag the video recording you want onto the timeline at the bottom of the window.
Click “Next”.
Enter your username and password and then click “Login”.
Follow the YouTube on-screen instructions.
Upload to Facebook
Click on the Facebook upload icon .
Drag the video recording you want onto the timeline at the bottom of the window.
Click “Next”.
Enter your e-mail address and password and click "Login".
Then follow the Facebook on-screen instructions.
English - 61
Page 64

SilverCrest SCW 5 A2
The "Photo album" and "Album pages" features are demo versions only. In
order to obtain the full functionality, an update must be purchased.
Photo album
This option allows you to create an album consisting of multiple photos. There are also
several templates that you can use.
Click the Photo album icon .
Drag the pictures you want onto the bar at the bottom of the window.
Click “Next”.
The programme "ArcSoft Print Creations” launches automatically.
Choose a category and then a template from the application. To do this, double-click
on the template you want.
Album page
This option allows you to create an album page consisting of one or more photos. There are
also several templates that you can use.
Click the Album page icon .
Drag the pictures you want onto the bar at the bottom of the window.
Click “Next”.
The programme "ArcSoft Print Creations” launches automatically.
Choose a category and then a template from the application. To do this, double-click
on the template you want.
62 - English
Page 65

SilverCrest SCW 5 A2
Using the accessories
You can use the supplied accessories to mount your camcorder when practicing the most
different activities.
Water-resistant case
The water-resistant case allows using the camcorder under water or when practicing sports
activities related to water. You can operate the camcorder buttons as usual when it is
installed in the water-resistant case. Remove the lens cover from the water-resistant case
before recording. Insert the camcorder as follows into the water-resistant case:
Open the lock and then open the holding mechanism.
Open the water-resistant case and insert the camcorder into it.
English - 63
Page 66

SilverCrest SCW 5 A2
Place one anti-mist pad each on the left and right between the camcorder
and the water-resistant case. This will prevent from mist forming on the
water-resistant case when using under water.
The anti-mist pads can be reused up to 4 times. You can dry out the antimist pads by placing them into a 150°C hot oven for 5 minutes. When
not using them, store the anti-mist pads in an hermetically sealed
container.
Close the water-resistant case, the holding mechanism and the lock.
Please note the following when using the camcorder under water or
when practicing sports related to water.
Make sure that the water-resistant case shows no signs of damage.
Make sure that the holding mechanism of the water-resistant case is firmly closed and
that no dust or sand is found between the rubber seal and the case. The lock
mechanism needs to click in place, otherwise the case is not properly closed.
Make sure that the water-resistant back cover is being used – the open back panel is
not water-resistant! To replace the back cover, please read the next chapter “Replacing
the back cover”
Water-resistant back cover (incl. adapter)
(orange seal)
64 - English
Open back cover
(yellow seal)
Page 67

SilverCrest SCW 5 A2
Always carry out this check indoors, never at the beach or in the water.
The water-resistant case is water-resistant up to a depth of 60 m.
To guarantee its water-resistance, do not use the water-resistant case for longer than 60
minutes under water at a time.
Only use the water-resistant case in water of temperatures between 0°C and 35°C.
The water-resistance of the water-resistant case applies to salt and fresh water only. It
does not apply to any cleaners, chemicals, solvents or water in public swimming pools.
Liquids of this kind must be wiped off immediately.
Avoid excessive vibration or shaking under water. Otherwise there is a risk that the
water-resistant case opens.
Cleaning after using under water
Clean the water-resistant case after every time it is used under water.
Make sure that the water-resistant case shows no signs of damage.
After using the water-resistant case under water, clean it with tap water. To do this,
submerge in tap water for about 10 minutes to remove, for example salt residues.
Then use a soft cloth to dry the water-resistant case.
Place the water-resistant case in a cool, well-ventilated place to dry. Avoid any direct
sunlight.
Before opening the water-resistant case, wait until it has completely dried out. Have an
absorbent cloth ready when opening the water-resistant case and remove any water
and dirt.
English - 65
Page 68

SilverCrest SCW 5 A2
Replacing the back cover
You can use the water-resistant case with two different back covers. Use the water-resistant
back cover when using the device under water or when practicing water-related sports. The
open back over may be used only if you want to record videos with audio. Please note that
the case is not water-resistant when the open cover is mounted.
Water-resistant back cover (incl. adapter)
(orange seal)
To replace the back cover, proceed as follows:
Open the lock and then open the holding mechanism.
66 - English
Open back cover
(yellow seal)
Page 69

SilverCrest SCW 5 A2
Open the water-resistant case and remove the back cover.
Next mount the desired back cover by inverting the above steps.
Removing / fixing the adapter
By default, an adapter is fixed to the water-resistant case and another adapter to the waterresistant back cover. These adapters allow mounting the water-resistant case and the other
accessories. If you need to mount the adapter on the open back cover, you can remove it
and fix it at the desired position. Proceed as follows:
Remove the desired adapter by untightening the four screws.
English - 67
Page 70

SilverCrest SCW 5 A2
Next mount the adapter at the desired position by using the four screws. You can
mount the adapters on the water-resistant case as well as on the water-resistant and the
open back cover.
Velcro
You can use a Velcro to mount the water-resistant case on uneven surfaces, for example. The
camcorder is supplied with one Velcro with and one Velcro without latch. For instance, you
can mount the Velcro with latch as follows:
Pass the Velcro through the guiding slots of the adapter. Make sure to place the smooth
side of the Velcro inside. Then pass the Velcro through the latch and fix its end as
shown in the following figure:
If the Velcro with latch is not suitable for the current application, you can
also use the Velcro without latch.
68 - English
Page 71

SilverCrest SCW 5 A2
Swivel holder
For instance, you can use the swivel holder together with an adhesive socket to fix the waterresistant case on an even or slightly curved surface. A flat and a curved adhesive socket are
supplied with the camcorder. Fix the swivel holder and the adhesive socket as follows with
the water-resistant case:
Untighten the fixing screw on the swivel holder and remove the unlock catch. Insert the
swivel holder into the adapter until the swivel holder clicks into place. Secure the unlock
catch with the fixing screw. The unlock catch avoids an accidental separation from the
water-resistant case. Then you can fix the swivel holder with an adhesive socket. To do
this, insert the swivel holder into the adhesive socket until the swivel holder clicks into
place.
To fix the adhesive socket on a surface, remove the red film. Next stick the adhesive
socket onto the previously cleaned surface. The adhesive part can be reused several
times and thus can be removed from the mounting surface. Please cover the adhesive
part with the red film when not using the adhesive socket.
English - 69
Page 72

SilverCrest SCW 5 A2
To orientate the camcorder, untighten the fixing screw on the swivel holder. Put the
swivel holder into the desired position and tighten the screw again.
Press the clip on the adhesive socket to remove the swivel holder from the adhesive
socket. You can leave the adhesive socket on the mounting location if you want to use
the camcorder at this location again.
To be able to remove the swivel holder from the water-resistant case you have to
remove the unlock catch first. To do this, fully unscrew the fixing screw and remove the
unlock catch.
Press the clip on the swivel holder to remove the swivel holder from the water-resistant
case.
To guarantee a good adhesive fixation, the cleaned mounting surface
must be free of dust, oil and grease.
Replacing the adhesive pad
The camcorder is supplied with three spare adhesive pads. If the adhesive strength of one
adhesive socket weakens, you can replace the adhesive pad. Proceed as follows:
Fully remove the adhesive pad from the adhesive socket.
Remove the white film from the adhesive pad. This is the side that will be permanently
fixed.
Next put the adhesive pad onto the adhesive socket.
To guarantee a good adhesive fixation, the cleaned mounting surface
must be free of dust, oil and grease.
70 - English
Page 73

SilverCrest SCW 5 A2
Bike holder
You can use the bike holder to mount the water-resistant case on the bike frame or another
tube. To mount the bike holder, proceed as follows:
Open the holder by untightening the screws as far as necessary to be able to remove
the screw located on the side of the clip on the bottom piece.
Rotate the bottom piece aside.
Place the upper piece on a tube and replace the bottom piece.
Reinsert the screw into the bottom piece.
To fix the holder on the tube, tighten the screws.
Next you can fix the camcorder together with its water-resistant case and the swivel
holder on the bike holder. Please see the "Swivel holder" section on page 69.
English - 71
Page 74

SilverCrest SCW 5 A2
Adapter for other mounting systems
The camcorder also includes an adapter for other mounting systems. You can use this
adapter to fix the camcorder with other mounting systems. You can connect this adapter to
the water-resistant case. Proceed as follows:
Slide the adapter for other mounting systems into the adapter of the water-resistant case
until it clicks into place. Then you can use other standard mounting systems.
Press the clip on the adapter for other mounting systems to remove the adapter for other
mounting systems from the water-resistant case.
Troubleshooting
You can solve most common problems yourself using the table below. If the problem persists
after checking the suggested solutions, please contact our Service Hotline (see page 77). Do
not attempt to repair the product yourself. Do not open the housing of the camcorder as it
contains no serviceable parts.
Error Solution
Unable to power the
camcorder on.
The camcorder suddenly
powers off.
The camcorder suddenly
powers off.
The camcorder fails to respond
and cannot be switched off.
The recordings show stains or
shadows.
The battery pack is empty. Recharge the battery.
The battery pack is empty. Recharge the battery.
Auto power-off is enabled. Check the setting (see
page 45).
Remove the battery pack for a few seconds and reinsert it.
Use a dry, soft, line-free cloth and clean the
camcorder lens. Do not use any detergents or
chemicals.
72 - English
Page 75

The recorded video has no
sound.
The sound of the video
recording is too low.
The video recording has
distorted picture and/or sound.
Not all modes are available.
Please make sure to use the latest firmware version. If a new firmware is
available, you will find it on the following website:
www.lidl-service.com
You are using the water-resistant back cover (orange
seal). Use the open back cover (yellow seal).
However, first make sure if the open back cover
(yellow seal) is suitable for the activity you want to
perform.
You are using an external microphone. Orientate the
external microphone properly.
You are using a memory card that is too slow. Only
use Speed Class 4 or faster memory cards.
Probably the camcorder is in WiFi mode or loop
recording mode. Select a different operating mode.
When not using the product
SilverCrest SCW 5 A2
When not using the camcorder for a long time, it is recommended to recharge the battery
from time to time. This ensures a longer battery endurance. After cleaning them, store the
camcorder and its accessories at a clean, dry and cool place. Use the lens cover to protect
the camcorder lens.
English - 73
Page 76

SilverCrest SCW 5 A2
Environmental regulations and disposal information
Devices marked with this symbol are subject to the European Directive
2012/19/EU. All electrical and electronic devices must be disposed of
separately from household waste at official disposal centres.
Avoid damage to the environment and risks to your personal health by
disposing of the device properly. For further information about proper
disposal, contact your local government, disposal bodies or the shop
where you bought the device.
Dispose of all packaging in an environmentally-friendly manner.
Cardboard packaging can be taken to paper recycling centres or public collection points for
recycling. Any film or plastic contained in the packaging should be taken to your public
collection points for disposal.
Respect the environment. Old batteries must not be disposed of with domestic waste. They
must be handed in at a collection point for waste batteries. Please note that batteries must be
disposed of fully discharged at appropriate collection points for old batteries. If disposing of
batteries that are not fully discharged, take precautions to prevent short circuits. To prevent
any short circuits cover the battery poles with insulating tape.
Conformity notes
This device has been approved for compliance with the basic and other
relevant requirements of the EMC Directive 2004/108/EC, the R&TTEDirective 1999/5/EC, the Low-voltage Directive 2006/95/EC and the
RoHS Directive 2011/65/EU. The corresponding Declaration of Conformity
can be found at the end of this User Manual.
74 - English
Page 77

SilverCrest SCW 5 A2
Warranty and Service Information
Warranty of TARGA GmbH
Dear Customer,
This device is sold with three years warranty from the date of purchase. In the event of
product defects, you have legal rights towards the seller. These statutory rights are not
restricted by our warranty as described below.
Warranty conditions
The warranty period commences upon the date of purchase. Please keep the original receipt
in a safe place as it is required as proof of purchase. If any material or manufacturing faults
occur within three years of purchase of this product, we will repair or replace the product
free of charge as we deem appropriate.
Warranty period and legal warranty rights
The warranty period is not extended in the event of a warranty claim. This also applies to
replaced and repaired parts. Any damage or defects discovered upon purchase must be
reported immediately when the product has been unpacked. Any repairs required after the
warranty period will be subject to charge.
Scope of warranty
The device was carefully manufactured in compliance with stringent quality guidelines and
subjected to thorough testing before it left the works. The warranty applies to material and
manufacturing faults. This warranty does not cover product components which are subject to
normal wear and which can therefore be regarded as wearing parts, or damage to fragile
components such as switches, rechargeable batteries or components made of glass. This
warranty is void if the product is damaged, incorrectly used or serviced. To ensure correct
use of the product, always comply fully with all instructions contained in the user manual. The
warnings and recommendations in the user manual regarding correct and incorrect use and
handling of the product must always be observed and complied with.
English - 75
Page 78

SilverCrest SCW 5 A2
The product is solely designed for private use and is not suitable for commercial applications.
The warranty is rendered void in the event of incorrect handling and misuse, if it is subjected
to force, and also if any person other than our authorised service technicians interfere with
the device. No new warranty period commences if the product is repaired or replaced.
Submitting warranty claims
To ensure speedy handling of your complaint, please note the following:
- Before using your product for the first time, please read the enclosed
documentation carefully. Should any problems arise which cannot be solved in
this way, please call our hotline.
- Always have your receipt, the product article number as well as the serial number
(if available) to hand as proof of purchase.
- If it is not possible to solve the problem on the phone, our hotline support staff will
initiate further servicing procedures depending on the fault.
76 - English
Page 79

SilverCrest SCW 5 A2
Service
Phone: 0207 – 36 50 744
E-Mail: service.GB@targa-online.com
Phone: 01 – 242 15 83
E-Mail: service.IE@targa-online.com
Phone: 800 – 62 175
E-Mail: service.MT@targa-online.com
Phone: 800 – 92 496
E-Mail: service.CY@targa-online.com
IAN: 113944
Manufacturer
Please note that the following address is not a service address. First contact the service point
stated above.
TARGA GmbH
Coesterweg 45
59494 SOEST
GERMANY
English - 77
Page 80

SilverCrest SCW 5 A2
Obsah
Ochranné známky .................................................................................... 82
Úvod ........................................................................................................ 82
Určené použití .......................................................................................... 82
Obsah balení ............................................................................................ 83
Technické údaje ........................................................................................ 86
Bezpečnostní pokyny ............................................................................... 88
Ochrana autorských práv......................................................................... 92
Přehled ..................................................................................................... 93
Než začnete ............................................................................................. 94
Vkládání/vyjímání paměťové karty ....................................................................................... 94
Vkládání baterie ...................................................................................................................... 95
Tlačítka..................................................................................................................................... 97
LED indikátory ......................................................................................................................... 97
Nabíjení baterie ...................................................................................................................... 98
Nastavení data a času ........................................................................................................... 99
Začínáme ............................................................................................... 101
Zapnutí a vypnutí videokamery .......................................................................................... 101
Displej ................................................................................................................................... 101
Volba provozního režimu .................................................................................................... 103
Záznam .................................................................................................. 103
Natáčení videozáznamů ..................................................................................................... 103
78 - Čeština
Page 81

SilverCrest SCW 5 A2
Fotografování snímků ........................................................................................................... 104
Sekvenční režim ................................................................................................................... 104
Časosběrný režim ................................................................................................................ 104
Samospoušť .......................................................................................................................... 105
Režim Wi-Fi / Ovládání akční videokamery z aplikace ........................... 105
Nabídka ................................................................................................. 106
Ikony nabídky ....................................................................................................................... 107
Nastavení obrazového rozlišení ......................................................................................... 108
Volba zorného úhlu videokamery....................................................................................... 109
Nastavení možností časosběrného režimu ........................................................................ 110
Natočení záznamu o 180° ................................................................................................ 111
Zapnutí/vypnutí záznamu ve smyčce................................................................................. 112
Zapnutí/vypnutí režimu natáčení pod vodou .................................................................... 113
Odstranění záznamů/formátování paměťové karty ......................................................... 114
Natočení zobrazení o 180° .............................................................................................. 116
Zapnutí/vypnutí stavových LED indikátorů ......................................................................... 117
Úprava jasu displeje ............................................................................................................ 118
Úprava hlasitosti zvukového signálu .................................................................................. 119
Úprava intervalu automatického vypnutí ............................................................................ 120
Nastavení data a času ........................................................................................................ 121
Připojení dálkového ovladače (není součástí balení) ........................................................ 122
Obnovení původního nastavení z výroby .......................................................................... 124
Připojení mikrofonu ............................................................................... 125
Čeština - 79
Page 82

SilverCrest SCW 5 A2
Sledování záznamů na televizní obrazovce ........................................... 125
Přenos záznamů do počítače .................................................................. 128
Připojení videokamery k počítači ........................................................................................ 128
Prostřednictvím čtečky paměťových karet .......................................................................... 129
Ochrana adaptéru na karty SD proti zápisu ................................................................. 129
Software ................................................................................................ 130
Požadavky na systém .......................................................................................................... 130
Instalace softwaru ................................................................................................................ 130
Odinstalování softwaru ....................................................................................................... 130
Hlavní okno .......................................................................................................................... 131
Nastavení úložiště / Volba jazyka ................................................................................ 131
Úpravy záznamů ................................................................................................................. 132
Prohlížení záznamů ......................................................................................................... 132
Výběr zobrazení navigace ............................................................................................. 133
Náhledové okno ............................................................................................................. 133
Panel nástrojů ....................................................................................................................... 134
Import záznamů............................................................................................................... 134
Sloučení videozáznamů .................................................................................................. 135
Vytvoření disku AVCHD .................................................................................................. 135
Střih videoklipů ................................................................................................................ 136
Přenos na YouTube .......................................................................................................... 136
Přenos na Facebook ........................................................................................................ 136
Photo Book (Fotoalbum) ................................................................................................. 137
80 - Čeština
Page 83

SilverCrest SCW 5 A2
Album Page (Stránka alba) ............................................................................................ 137
Využití příslušenství ............................................................................... 138
Vodotěsné pouzdro ............................................................................................................. 138
Čištění po použití pod vodou ......................................................................................... 140
Výměna zadního krytu .................................................................................................... 141
Sejmutí / upevnění redukce ............................................................................................ 142
Suchý zip .............................................................................................................................. 143
Otočný držák ....................................................................................................................... 144
Výměna přilnavé podložky ................................................................................................. 145
Držák na jízdní kolo ............................................................................................................. 146
Redukce na jiné typy upevnění ........................................................................................... 147
Odstraňování problémů ......................................................................... 147
Pokud se výrobek nepoužívá ................................................................. 148
Předpisy na ochranu životního prostředí a informace o likvidaci ........... 149
Prohlášení o shodě ................................................................................. 149
Informace o záruce a servisu .................................................................. 150
Čeština - 81
Page 84

SilverCrest SCW 5 A2
Ochranné známky
Apple® je registrovaná ochranná známka, App Store je servisní značka společnosti Apple
Inc registrované v USA a jiných zemích.
®
Google
HDMI, logo HDMI a název High-Definition Multimedia Interface jsou ochrannými známkami
nebo registrovanými ochrannými známkami společnosti HDMI Licensing, LLC ve Spojených
státech amerických a v dalších zemích.
Microsoft Windows je ochrannou známkou společnosti Microsoft Corporation, USA.
SD a SDHC jsou registrovanými ochrannými známkami.
USB je registrovaná ochranná známka.
Ostatní názvy a výrobky mohou být ochrannými známkami nebo registrovanými ochrannými
známkami příslušných vlastníků.
je registrovanou ochrannou známkou společnosti Google Inc.
Úvod
Děkujeme za nákup této akční videokamery SilverCrest SCW 5 A2. Akční videokamera je
ideálním společníkem pro vaše sportovní aktivity. Díky rozsáhlé nabídce příslušenství ji lze
používat pro nejrůznějších scénáře. Umožní vám kdykoli zachytit báječné vzpomínky.
Určené použití
Vaše videokamera je spotřební elektronické zařízení, které určeno výhradně k natáčení
videozáznamů a snímků. Jiné než výše uvedené použití je v rozporu s určeným použitím.
Zařízení se smí používat pouze k soukromým, nikoli k průmyslovým či komerčním účelům.
Toto zařízení splňuje všechny normy a nařízení uvedené v Prohlášení o shodě. Jakékoli
změny provedené na zařízení, které nejsou doporučeny výrobcem, mohou znamenat, že
zařízení již těmto směrnicím nebude vyhovovat. Používejte pouze příslušenství doporučené
výrobcem.
Dodržujte předpisy a zákony platné v zemi použití.
82 - Čeština
Page 85

SilverCrest SCW 5 A2
Obsah balení
Videokameru a veškeré příslušenství vybalte a ověřte si, zda jste obdrželi všechny uvedené
položky. Odstraňte veškerý obalový materiál. Pokud zjistíte jakoukoli chybějící nebo
poškozenou položku, kontaktujte zákaznický servis.
Akční videokamera
SilverCrest SCW 5 A2
4GB karta microSD
(včetně SD adaptéru)
Kabel HDMI Vodotěsné pouzdro (včetně redukce)
Baterie FJ-SLB-10A
Kabel USB
Čeština - 83
Page 86

SilverCrest SCW 5 A2
Kryt objektivu Vodotěsný zadní kryt (včetně redukce)
(namontován na vodotěsném pouzdře)
(oranžové těsnění)
Otevřený zadní kryt
(žluté těsnění)
Otočný držák Redukce na jiné typy upevnění
Držák na jízdní kolo
84 - Čeština
Page 87

SilverCrest SCW 5 A2
Plochá přilnavá koncovka Oblá přilnavá koncovka
Suchý zip s přezkou Suchý zip bez přezky
3 x přilnavá podložka na výměnu 6 x vložka proti zamlžení
Disk CD-ROM se softwarem (vyobrazení) Uživatelská příručka (vyobrazení)
K produktu je přiložen samostatný leták „GNU General Public License
(Všeobecná veřejná licence GNU)“. Tento leták lze také stáhnout na
adrese www.lidl-service.com
Čeština - 85
Page 88

SilverCrest SCW 5 A2
Technické údaje
Snímač obrazu 5megapixelový snímač CMOS
Objektiv Širokoúhlý, F2,8, f=2,5 mm
Displej Stavový indikátor OLED
Interní paměť 128 MB (volný prostor cca 89,9 MB / částečně využíváno
pro firmware)
Externí paměť karta microSD/SDHC (až 64 GB)
Paměťová karta 4 GB microSD / třída Speed Class 4
Provozní režimy Záznam videosekvencí, záznam snímků
Video Formát: H.264 (MP4)
Rozlišení: 1080p – 1920 x 1080 (30 sn/s)
960p – 1280 x 960 (30 sn/s)
720p – 1280 x 720 (60 sn/s)
Fotografie Formát: JPEG
Rozlišení: 5 megapixelů
Zdroj napájení 5 V , 0,5 A pro napájení z USB portu počítače
5 V , 1,0 A pro napájení z externího adaptéru
Doba nabíjení baterie cca 3 hodiny při napájení z USB portu počítače
cca 2,5 hodiny při napájení z externího adaptéru
Provozní doba s plně
nabitou baterií
Baterie Li-Ion, FJ-SLB-10A / 3,7 V, 1130 mAh
Konektory a patice USB 2.0
86 - Čeština
cca 1,5 až 2 hodiny
Výrobce: FUJI ELECTRONICS(SHENZHEN) CO.,LTD
HDMI
MIC IN (jack 2,5 mm)
Page 89

SilverCrest SCW 5 A2
Mikrofon vestavěný
Vestavěný bezdrátový
přijímač
Modulace: GFSK
Frekvence: 2403 MHz až 2477 MHz
Rychlost přenosu dat: 250 kb/s / 1 Mb/s / 2 Mb/s
Počet kanálů: 75
Wi-Fi norma 802.11 b, 802.11 g, 802.11 n
Provozní teplota * 0 °C až +35 °C
Skladovací teplota * 0 °C až +45 °C
Relativní vlhkost max. 85 %
Rozměry (Š x V x H) cca 60 x 43 x 43 mm
Hmotnost (včetně baterie) přibližně 80 g
* Teploty nižší než 0 °C mohou snížit kapacitu a/nebo životnost baterie. Proto si
zapamatujte, že při zimních sportovních aktivitách se může maximální provozní doba
výrazně snížit. Pokud chcete videokameru používat při teplotách pod 0 °C, měli byste ji
umístit do vodotěsného pouzdra s vodotěsným zadním krytem. Teplo uvolňované při činnosti
videokamery tak bude zahřívat i baterii. V době, kdy videokameru nepoužíváte, byste měli
baterii ukládat třeba do kapsy.
Technická specifikace a vzhled může být předmětem změny bez předchozího upozornění.
Čeština - 87
Page 90

SilverCrest SCW 5 A2
Bezpečnostní pokyny
Před prvním použitím tohoto zařízení si přečtěte níže uvedené poznámky a dbejte na
všechna upozornění, a to i v případě, že máte s používáním elektronických zařízení
zkušenosti. Tyto bezpečnostní a provozní pokyny si uložte na bezpečném místě k pozdějšímu
nahlédnutí. Pokud zařízení prodáte nebo ho předáte dál, předejte současně i tuto příručku.
Uživatelská příručka je součástí dodávky zařízení.
POZOR! Tento symbol a nápis „Pozor“ vás upozorní na potencionálně
nebezpečnou situaci. Pokud ho budete ignorovat, může dojít k vážnému
zranění či dokonce úmrtí.
VAROVÁNÍ! Tento symbol a nápis „Varování“ označuje důležité
informace pro bezpečné používání výrobku a bezpečnost uživatele.
Tento symbol označuje další informaci na dané téma.
K napájení videokamery použijte pouze dodávanou baterii (
FUJI ELECTRONICS(SHENZHEN) CO.,LTD
/ model:
FJ-SLB-10A).
výrobce:
POZOR! Pokaždé se ujistěte, že
přístroj není vystaven přímým zdrojům tepla (např. radiátory);
na přístroj nepůsobí žádné přímé sluneční záření ani jasné umělé světlo;
videokamera se používá pouze za přípustné provozní teploty od 0 °C do 35 °C;
přístroj není vystaven působení stříkající nebo kapající vody či agresivních kapalin a nesmí
se používat v blízkosti vody a především se nikdy nesmí ponořit (do blízkosti přístroje nebo
na něj neumisťujte předměty naplněné vodou, například vázy nebo skleničky); Kapající a
88 - Čeština
Page 91

SilverCrest SCW 5 A2
stříkající voda a ponoření jsou přípustné pouze tehdy, pokud je videokamera umístěna do
ochranného vodotěsného pouzdra;
zařízení není umístěno v blízkosti magnetických polí (např. reproduktorů);
na přístroj nebo do jeho blízkosti nestavte zdroje otevřeného ohně (např. zapálené
svíčky);
do přístroje nebyly vloženy žádné cizí předměty;
přístroj není vystaven větším teplotním rozdílům, které by mohly způsobit vznik kondenzace
a následně zkrat. Pokud byl přístroj vystaven extrémním rozdílům teplot, před jeho
zapnutím vyčkejte, dokud nedosáhne teploty prostředí (asi 2 hodiny).
přístroj nesmí být vystaven prudkým nárazům a vibracím;
přístroj a jeho příslušenství se nesmí poškodit, aby nedošlo k dalšímu nebezpečí. Proto
musíte přístroj a jeho příslušenství pravidelně kontrolovat na případná poškození. Pokud
zjistíte u jakékoli položky poškození, nesmíte ji používat. Kryt videokamery nikdy
neotvírejte a veškeré opravy svěřte pouze kvalifikovaným technikům.
Pokud výše uvedené pokyny nedodržíte, může dojít k poškození přístroje nebo ke zranění.
VAROVÁNÍ! Záznam (fotografie/videozáznam)
osob a právo na vlastní snímek
Mějte na paměti, že při záznamu jakékoli osoby má každá osoba právo na svůj vlastní
snímek/záznam, bez ohledu na, to zda se jedná o portrét nebo skupinu. Natáčení
nezletilých podléhá souhlasu jejich rodičů. Aby nedošlo k právním opatřením, dbejte na
dodržování legislativy v zemi použití.
POZOR! Používání na cestách
Mějte na paměti, že používání videokamery při řízení vozidla, jízdního kola nebo chůzi na
vozovce může způsobit snížení vaší pozornosti během dopravní situace a může dojít k vážné
nehodě. V důsledku toho může dojít k ohrožení vašeho zdraví a/nebo soudnímu stíhání.
Proto lze videokameru obsluhovat pouze tehdy, pokud není vozidlo v pohybu.
V některých zemích je používání ve vozidle zakázáno nebo může být trestně postižitelné.
Dbejte na dodržování legislativy v zemi použití.
Čeština - 89
Page 92

SilverCrest SCW 5 A2
POZOR! Děti a postižené osoby
Elektrická zařízení nejsou určena pro děti. Také osoby se sníženými fyzickými, smyslovými
nebo duševními schopnostmi smí používat elektrická zařízení pouze za odpovídajících
podmínek. Nedovolte dětem nebo postiženým osobám, aby používaly elektrická zařízení
bez dozoru, kromě případů, kdy jsou náležitě poučeny a dohlíží na ně kompetentní osoba
odpovědná za jejich bezpečnost. Děti musí být vždy pod dohledem, aby bylo jisté, že si
s výrobkem nehrají. Malé součásti mohou způsobit udušení. Mimo dosah dětí a
postižených osob uchovávejte také obaly.
POZOR! Hrozí nebezpečí udušení.
POZOR! Baterie
Při vkládání baterie vždy dbejte na správnou polaritu. Správná polarita je vyznačena na
baterii a uvnitř přihrádky na baterii. Baterii nikdy nevhazujte do ohně. Pokud nebudete
videokameru nějakou dobu používat, baterii vyjměte. Nesprávné použití může vést
k výbuchu a ohrožení života.
Baterie se nikdy nesmí otevírat ani deformovat. Všechny baterie s unikajícím elektrolytem
mohou způsobit zranění. V případě kontaktu elektrolytu z baterie s vaší pokožkou nebo
očima si je okamžitě vypláchněte velkým množstvím vody a vyhledejte lékařskou pomoc.
Přístroj používejte pouze s dodávanou baterií, aby nedošlo k přehřátí, deformaci krytu,
vznícení, úrazu elektrickým proudem, explozi nebo jinému nebezpečí.
Baterie je nutno odevzdat k likvidaci na specifikovaných sběrných místech.
90 - Čeština
Page 93

SilverCrest SCW 5 A2
POZOR! Nebezpečí výbuchu
Nesprávné použití baterie může způsobit výbuch nebo únik elektrolytu. Baterii nikdy
nevyměňujte v prostředí náchylném k výbuchu. Při vkládání nebo vyjímání baterie může
vzniknout jiskra, která může způsobit výbuch. Dodržujte omezení používání přístrojů
napájených z baterií na nebezpečných místech, jakými jsou například skladiště paliv.
Prostředí, kde by mohlo dojít k výbuchu, je obvykle (ale ne vždy) označeno. Patří mezi ně
prostory sloužící ke skladování paliva, například podpalubí lodi, čerpací stanice nebo okolí
palivových nádrží a také prostory, v nichž vzduch obsahuje chemické látky nebo částice
(např. obiloviny, prach nebo kovový prach apod.), a všechna místa, v nichž je obvykle
nařízeno vypnutí motoru vozidla.
Chraňte životní prostředí. Staré baterie se nesmí likvidovat jako běžný domácí odpad.
Odevzdejte je na sběrném místě pro použité baterie.
VAROVÁNÍ! Kabely
Při odpojování od zásuvky držte kabel za vidlici, nikdy netahejte za samotný kabel. Na
kabely nikdy nepokládejte kusy nábytku ani jiné těžké předměty a dejte pozor, aby nedošlo
k uvíznutí kabelů, zejména u vidlic a zásuvek. Na kabelu nikdy nedělejte uzly a nesvazujte
je spolu s jinými kabely. Všechny kabely umístěte tak, aby nepřekážely a nehrozilo
nebezpečí zakopnutí.
VAROVÁNÍ! Odolnost vůči vodě
Samotná videokamera není vodotěsná. Pod vodou ji lze používat pouze v kombinaci
s vodotěsným pouzdrem. Vodotěsné pouzdro je odolné vůči vodě až do hloubky 60 m. Aby
byla zaručena její vodotěsnost, videokameru ve vodotěsném pouzdře nepoužívejte pod
vodou déle než 60 minut.
Čeština - 91
Page 94

SilverCrest SCW 5 A2
Vodotěsnost této videokamery platí pouze pro slanou a sladkou vodu. Netýká se čisticích
prostředků, chemikálií, rozpouštědel ani vody ve veřejných bazénech. Tento typ tekutin je
třeba z videokamery okamžitě setřít. Vodotěsné pouzdro používejte pouze ve vodě
s teplotou v rozmezí 0 °C až 35 °C. Pod vodou se vyhněte nadměrným vibracím nebo
otřesům. Jinak existuje nebezpečí, že se vodotěsné pouzdro otevře a videokamera i všechny
záznamy se poškodí.
VAROVÁNÍ! Údržba/čištění
Opravy
Oprava zařízení je potřebná v případě, že došlo k jakémukoli poškození přístroje nebo jeho
krytu, např. pokud do přístroje pronikla tekutina nebo cizí předměty, přístroj nepracuje
správně nebo spadl na zem. Pokud zaznamenáte dým, neobvyklé zvuky nebo zápach,
zařízení okamžitě vypněte a baterii vyjměte. V tomto případě přístroj dále nepoužívejte a
nechte ho zkontrolovat odborníkem. Všechny opravy musí provádět kvalifikovaný servisní
technik.
Čištění
Používejte měkkou bezprašnou tkaninu.
Nepoužívejte žádné čisticí prostředky ani rozpouštědla, neboť by mohly vniknout pod kryt
a způsobit trvalé poškození výrobku.
Čtěte poznámky v odstavci „Čištění po používání pod vodou“ na straně
140.
Ochrana autorských práv
Veškerý obsah tohoto uživatelského návodu je chráněn autorským právem a čtenáři slouží
pouze k informačním účelům. Kopírování dat a informací bez předešlého výslovného
písemného schválení autora je přísně zakázáno. To se týká i komerčního využití tohoto
obsahu a informací. Veškerý text a obrázky jsou aktuální k datu vytištění.
92 - Čeština
Page 95

SilverCrest SCW 5 A2
Přehled
Vyobrazení položek a ovládacích prvků a jejich číselná označení naleznete na vnitřní straně
rozkládací obálky této uživatelské příručky. Tuto stranu můžete při čtení různých kapitol
příručky ponechat rozevřenou. Tak si můžete příslušné prvky kdykoli prohlédnout.
1 Displej
2 Vypínač/přepínač režimu
3 Stavový LED indikátor
4 Reproduktor
5Objektiv
6 Stavový LED indikátor
7 Slot na paměťové karty microSD
8 Výstup HDMI
9 Tlačítko záznamu
10 Přihrádka na baterii
11 Stavový LED indikátor
12 Mikrofon
13 Konektor USB/nabíjení
14 Konektor mikrofonu
15 Stavový LED indikátor
Čeština - 93
Page 96

SilverCrest SCW 5 A2
Než začnete
Vkládání/vyjímání paměťové karty
Před natáčením videozáznamů a fotografií musíte do videokamery vložit paměťovou kartu
microSD. V případě, že nebude žádná paměťová karta microSD vložena, všechny záznamy
se budou ukládat do interní paměti videokamery. Protože je kapacita interní paměti velmi
malá, bude možno uložit pouze několik záznamů. Chcete-li uložit větší počet záznamů,
vložte přiloženou kartu microSD. Postupujte následujícím způsobem:
Před vložením nebo vyjmutím paměťové karty videokameru vypněte.
Do štěrbiny pro paměťovou kartu [7] zasuňte kartu microSD tak, aby její kontakty
směřovaly k přední straně přístroje (směrem k objektivu [5]), dokud nezapadne na místo.
Chcete-li vloženou paměťovou kartu vyjmout, jemně na ni zatlačte. Paměťová karta se
mírně vysune, takže ji můžete uchopit a vytáhnout.
94 - Čeština
Používejte pouze paměťové karty třídy Speed Class 4 nebo rychlejší.
Jinak může během videozáznamu dojít ke zkreslení obrazu nebo zvuku.
Pokud je paměťová karta nebo interní paměť plná, na spodním řádku
displeje [1] se zobrazí zpráva „FULL“.
Page 97

SilverCrest SCW 5 A2
j
p
Vkládání baterie
Baterii vložte do videokamery následujícím způsobem:
Otevřete přihrádku na baterii [10]. Stačí stisknout spodní žebrovaný úsek víčka přihrádky
a posunout ho ve směru šipky, dokud se nesrovná uzavřená šipka na víčku přihrádky
s otevřenou šipkou na krytu videokamery. Poté zvedněte víčko přihrádky pro baterii a
sunde
te ho.
Kontakty na baterii srovnejte s kontakty uvnitř přihrádky na baterie [10]. Ujistěte se, že se
označení kontaktů [+] a [-] na baterii shoduje s označením v přihrádce [10]. Poté baterii
zcela zasuňte do
řihrádky [10]. Nezapomeňte přes baterii položit konec pásku.
Čeština - 95
Page 98

SilverCrest SCW 5 A2
Uzavřete přihrádku pro baterii [10]. Stačí stisknout spodní žebrovaný úsek víčka
přihrádky a posunout ho ve směru šipky, dokud se nesrovná uzavřená šipka na víčku
přihrádky s uzavřenou šipkou na krytu videokamery.
Chcete-li baterii vyjmout, otevřete přihrádku na baterii [10] podle výše
uvedeného popisu. Baterii vyjměte zatažením za pásek.
Při dodání není baterie nabitá. Před prvním použitím přístroje baterii
dobijte.
96 - Čeština
Page 99

SilverCrest SCW 5 A2
Tlačítka
Tlačítko Funkce
Vypínač/přepínač režimu [2] Chcete-li videokameru zapnout či vypnout, stiskněte
toto tlačítko a přidržte ho nejméně na 3 sekundy.
Pokud je videokamera zapnutá, lze stiskem tohoto
tlačítka přepínat mezi nejrůznějšími provozními režimy
(Video, Fotografie, Wi-Fi, Sekvenční režim,
Časosběrný režim, Samospoušť a Nabídka).
Stiskem tohoto tlačítka během zobrazení nabídky lze
procházet položkami nabídky.
Tlačítko záznamu [9] V režimu Video slouží toto tlačítko k zahájení či
zastavení videozáznamu.
V režimu Fotografie slouží k pořízení snímku.
Během zobrazení nabídky lze stiskem tohoto tlačítka
vybírat položky nabídky.
LED indikátory
Stavové LED indikátory jsou umístěny na horním, spodním, předním a zadním panelu
videokamery. Umožňují sledovat stav videokamery během nejrůznějších typů instalace.
LED
indikátor
Stavový LED
indikátor [3]
Stavový LED
indikátor
[3, 11 a 15]
Stavový LED
indikátor [6]
Barva Popis
Funkce: Indikace zapnutí nebo
Zelená
Pomalu blikající zelená Funkce: Zapnuto Wi-Fi
Rychle blikající zelená Režim USB: Videokamera zapnuta
Blikající červená Funkce: Probíhá natáčení videa
Blikající
zelená/oranžová nebo
červená
Blikající oranžová
Nesvítí Režim USB: Baterie je plně nabita
fotografování.
Režim USB: Nabíjení baterie
Funkce: Zapnuta samospoušť
Funkce: Zapnuto natáčení videozáznamu
nebo samospoušť
Režim USB: Nabíjení baterie
Čeština - 97
Page 100

SilverCrest SCW 5 A2
Nabíjení baterie
Baterii videokamery lze nabíjet ze sběrnice USB z počítače. K tomu budete potřebovat
dodávaný kabel USB.
Baterii vložte do videokamery dříve popsaným způsobem.
K připojení videokamery k dostupnému portu USB na počítači použijte kabel USB. Malý
konektor na dodaném kabelu USB zapojíte do portu USB/nabíjení na videokameře [13] a
velký konektor do portu USB na počítači.
Během nabíjení lze nechat videokameru vypnutou. Chcete-li videokameru vypnout, stiskněte
Vypínač/přepínač režimu [2] a přidržte ho na tři sekundy.
Během nabíjení bude stavový LED indikátor oranžově blikat [6]. Až bude nabíjení
dokončeno, stavový LED indikátor [6] zhasne.
98 - Čeština
Některé počítače nedodávají napájení USB, pokud jsou vypnuty. Pokud
se videokamera nenabije, ověřte si, zda je počítač zapnutý.
 Loading...