

Page 1
FOREHEAD & EAR THERMOMETER SSOT 6 B2
FOREHEAD & EAR
THERMOMETER
Operating instructions
TERMOMETER ZA UHO
IN ČELO
Navodila za uporabo
IAN 106635
HOMLOK- ÉS
FÜLHŐMÉRŐ
Használati utasítás
STIRN-UND-OHRTHERMOMETER
Bedienungsanleitung
Page 2
GB Operating instructions Page 5
HU Használati utasítás Oldal 33
SI Navodila za uporabo Stran 61
DE / AT / CH Bedienungsanleitung Seite 89
Before reading, unfold both pages containing illustrations and
familiarise yourself with all functions of the device.
Olvasás előtt kattintson az ábrát tartalmazó oldalra és végezetül
ismerje meg a készülék mindegyik funkcióját.
Pred branjem obe strani s slikami odprite navzven in se nato
seznanite z vsemi funkcijami naprave.
Klappen Sie vor dem Lesen die beiden Seiten mit den Abbildungen
aus und machen Sie sich anschließend mit allen Funktionen des
Gerätes vertraut.
Page 3
B
12
14
16
13
15
17
18
19
21
23 25
20
24
A
4
5
6
7
9
3 81 2
10
11
22
Page 4

SET 12hr
(12/24)
SET 24hr
(12/24) SET hour SET minute
SET Year SET month SET day
SET sleep
disable
C
D E
F
Page 5

5 GB
Introduction
Intended use ..................................................Page 7
Scope of delivery ..........................................Page 8
Description of parts .......................................Page 8
Technical data ...............................................Page 9
Safety
General safety instructions ...........................Page 11
Safety instructions ..........................................Page 14
Safety Instructions for the Battery .................Page 14
Before getting started
Removing the battery fuse ............................Page 16
Operation
Setting the date / time (Fig. C)......................Page 16
Temperature measurements ..........................Page 17
Functions / error analysis
Selecting the temperature unit ......................Page 24
The memory function (memory mode) ........... Page 24
Changing the battery
..................................... Page 25
Problem-solving .............................................Page 26
Cleaning and care ..................................Page 28
Guarantee and Service .......................Page 29
Disposal ........................................................ Page 30
Conformity .................................................. Page 31
Page 6
6 GB
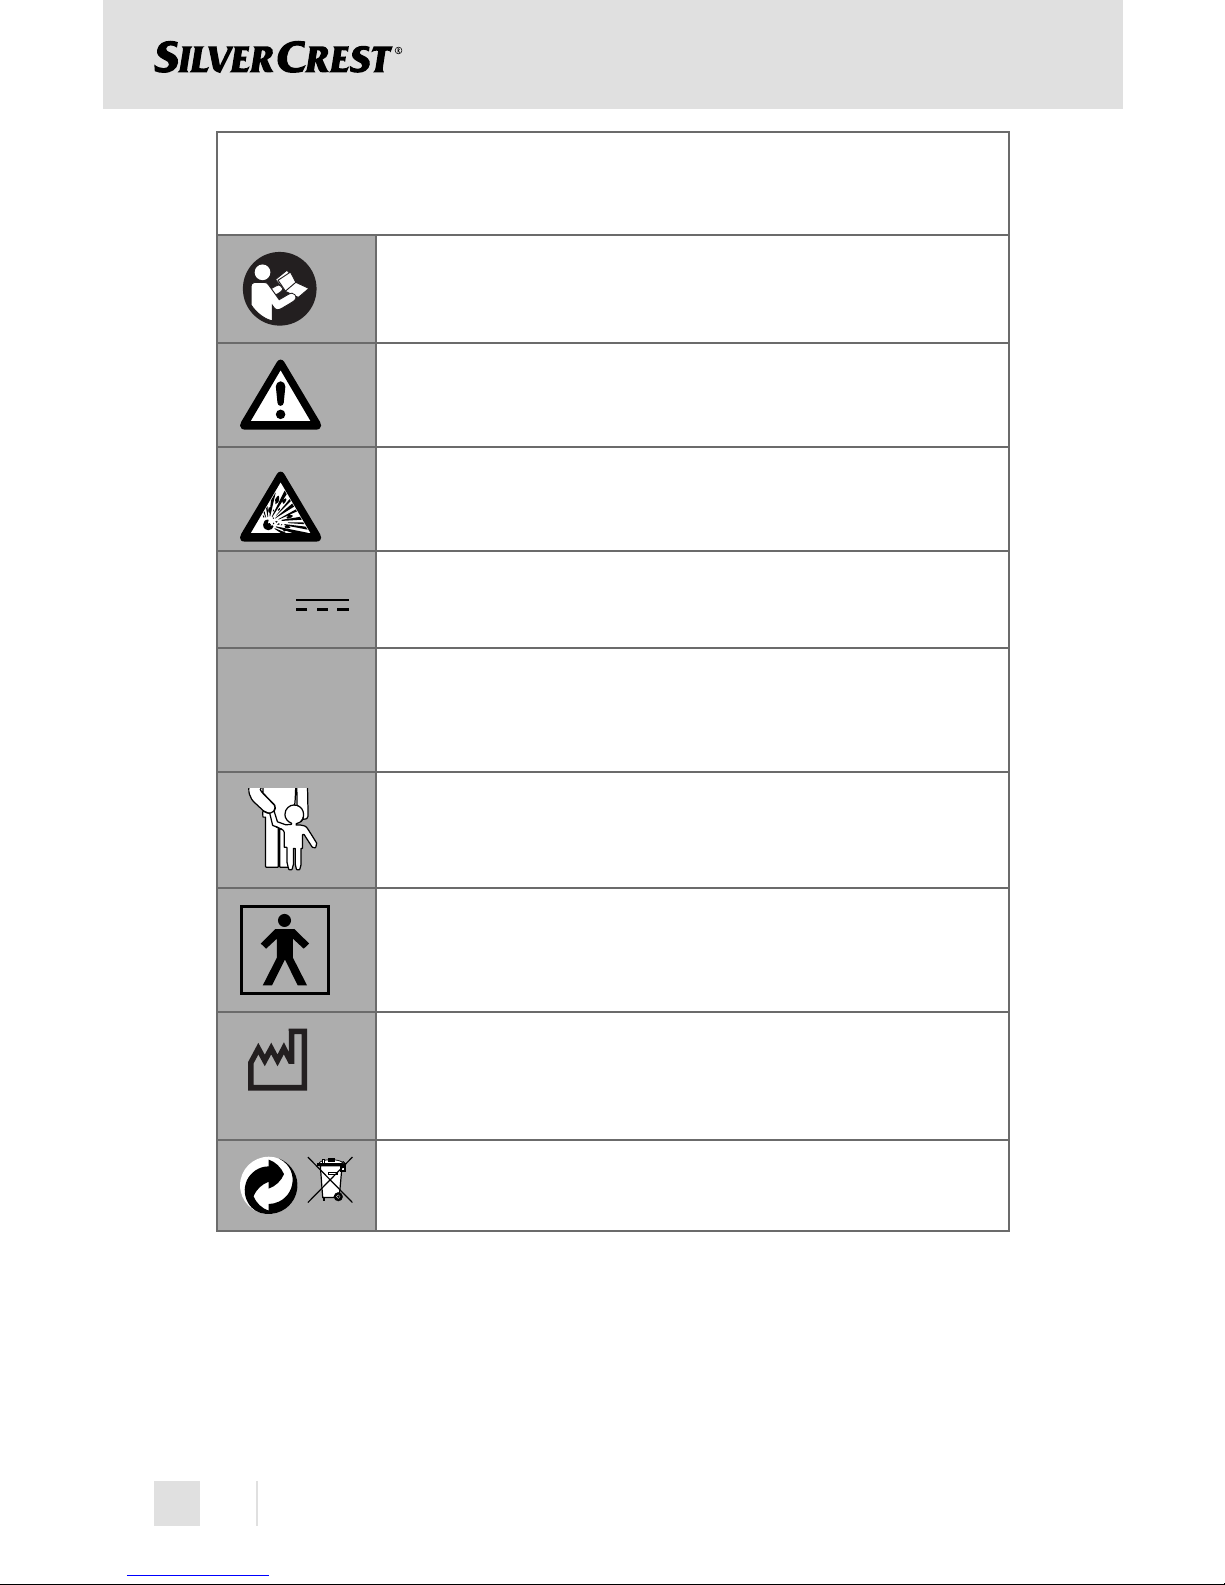
The following pictograms are used in these
directions for use or on the device itself:
Read the directions for use!
Please observe the warning and
safety instructions!
Risk of explosion!
V
Direct current (type of current and voltage)
mA
Milliampere
Danger to life and danger of accidents
for infants and children!
Medical device type BF
2015-01
Year and month of manufacture
Dispose of the packaging and appliance
in an environmentally friendly way!
Page 7
7 GB
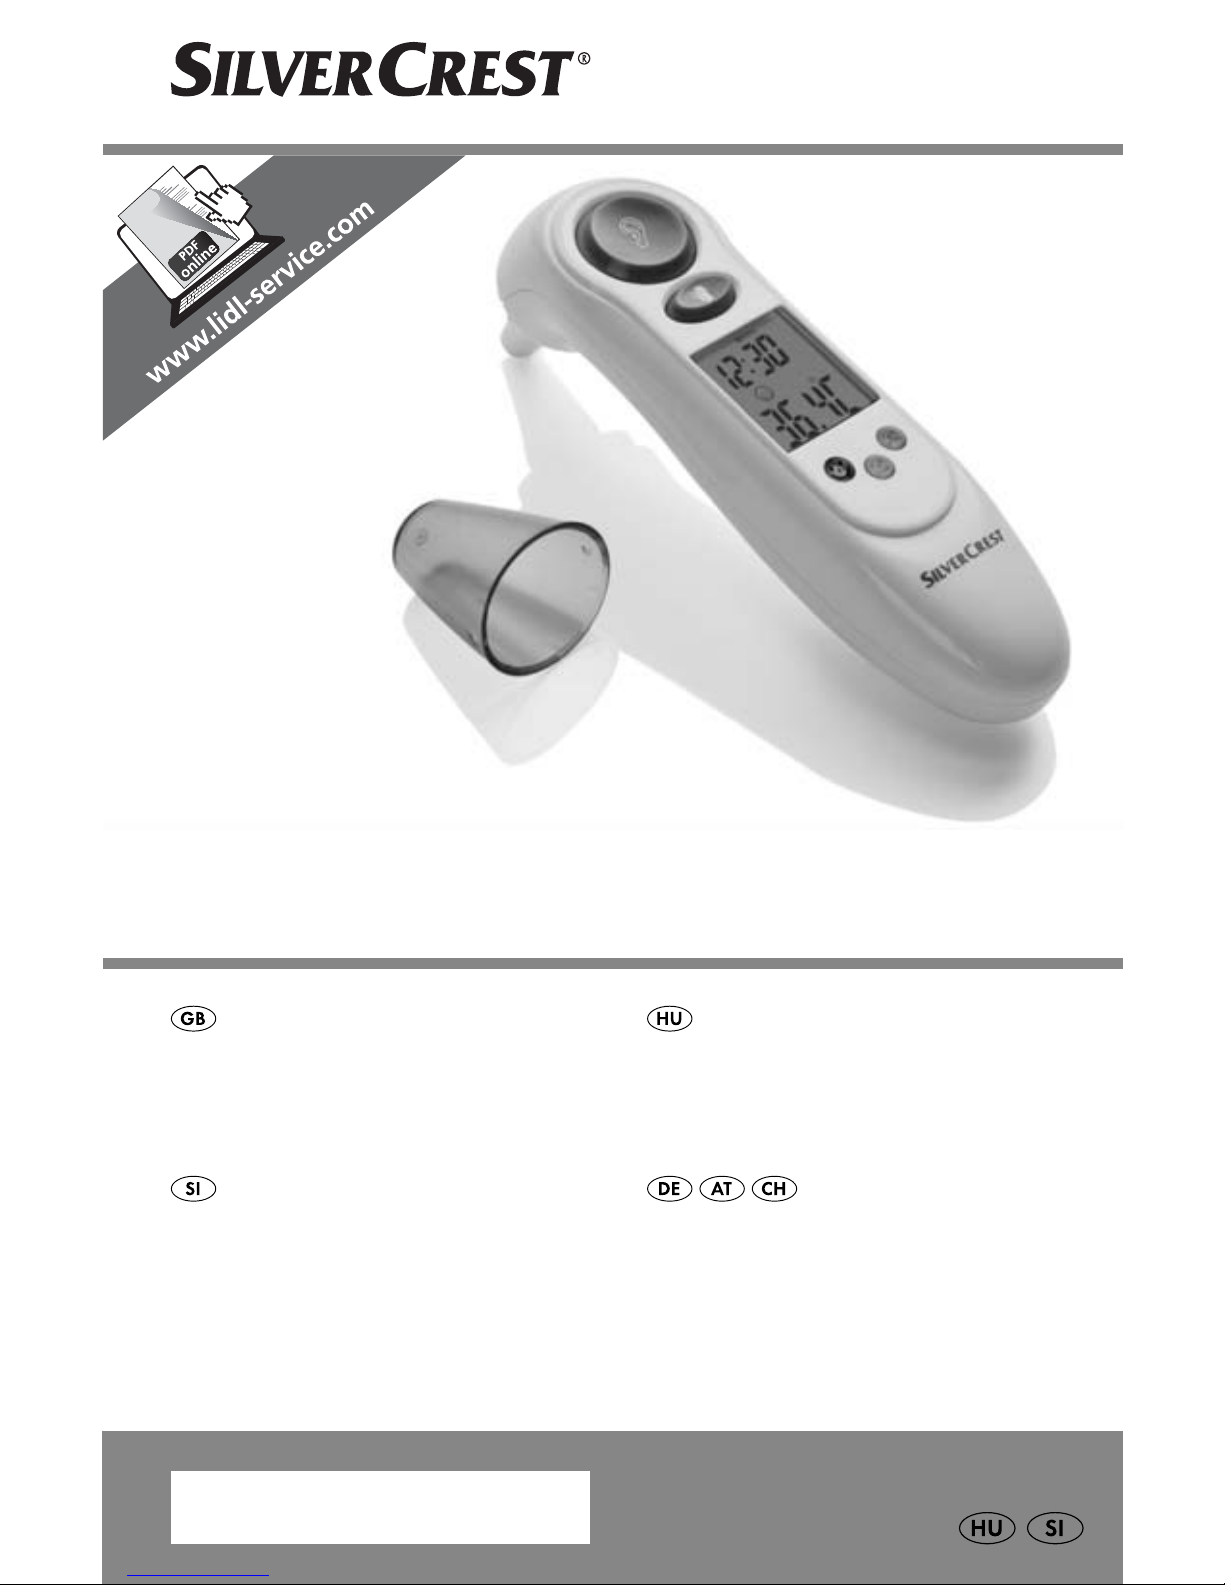
Forehead & Ear Thermometer
Introduction
Congratulations on the purchase of your new
appliance. You have clearly decided in favour
of a quality product.
These operating instructions are a part of this product.
They contain important information in regard to safety,
use and disposal. Before starting the device up for the fi rst
time, familiarise yourself with its functions. Read the following directions for use. Please keep these instructions in a
safe place. When handing the device on to a third party,
hand all instructions on, too.
Intended use
The device is intended for indoor use for measuring the
body temperature at the ear or temple/forehead, measuring the room temperature and measuring surface temperatures in the household. In no way does it replace an examination by a qualifi ed doctor. This appliance is solely
intended for private use. Any use other than that previously described or any change to the product is not permitted
and may lead to injuries and / or damage to the product.
The manufacturer does not assume any liability for damage arising from improper use.
Page 8
8 GB
Scope of delivery
1 x Forehead and ear thermometer
(incl. battery and protective head guard
8
)
1 x Directions for use
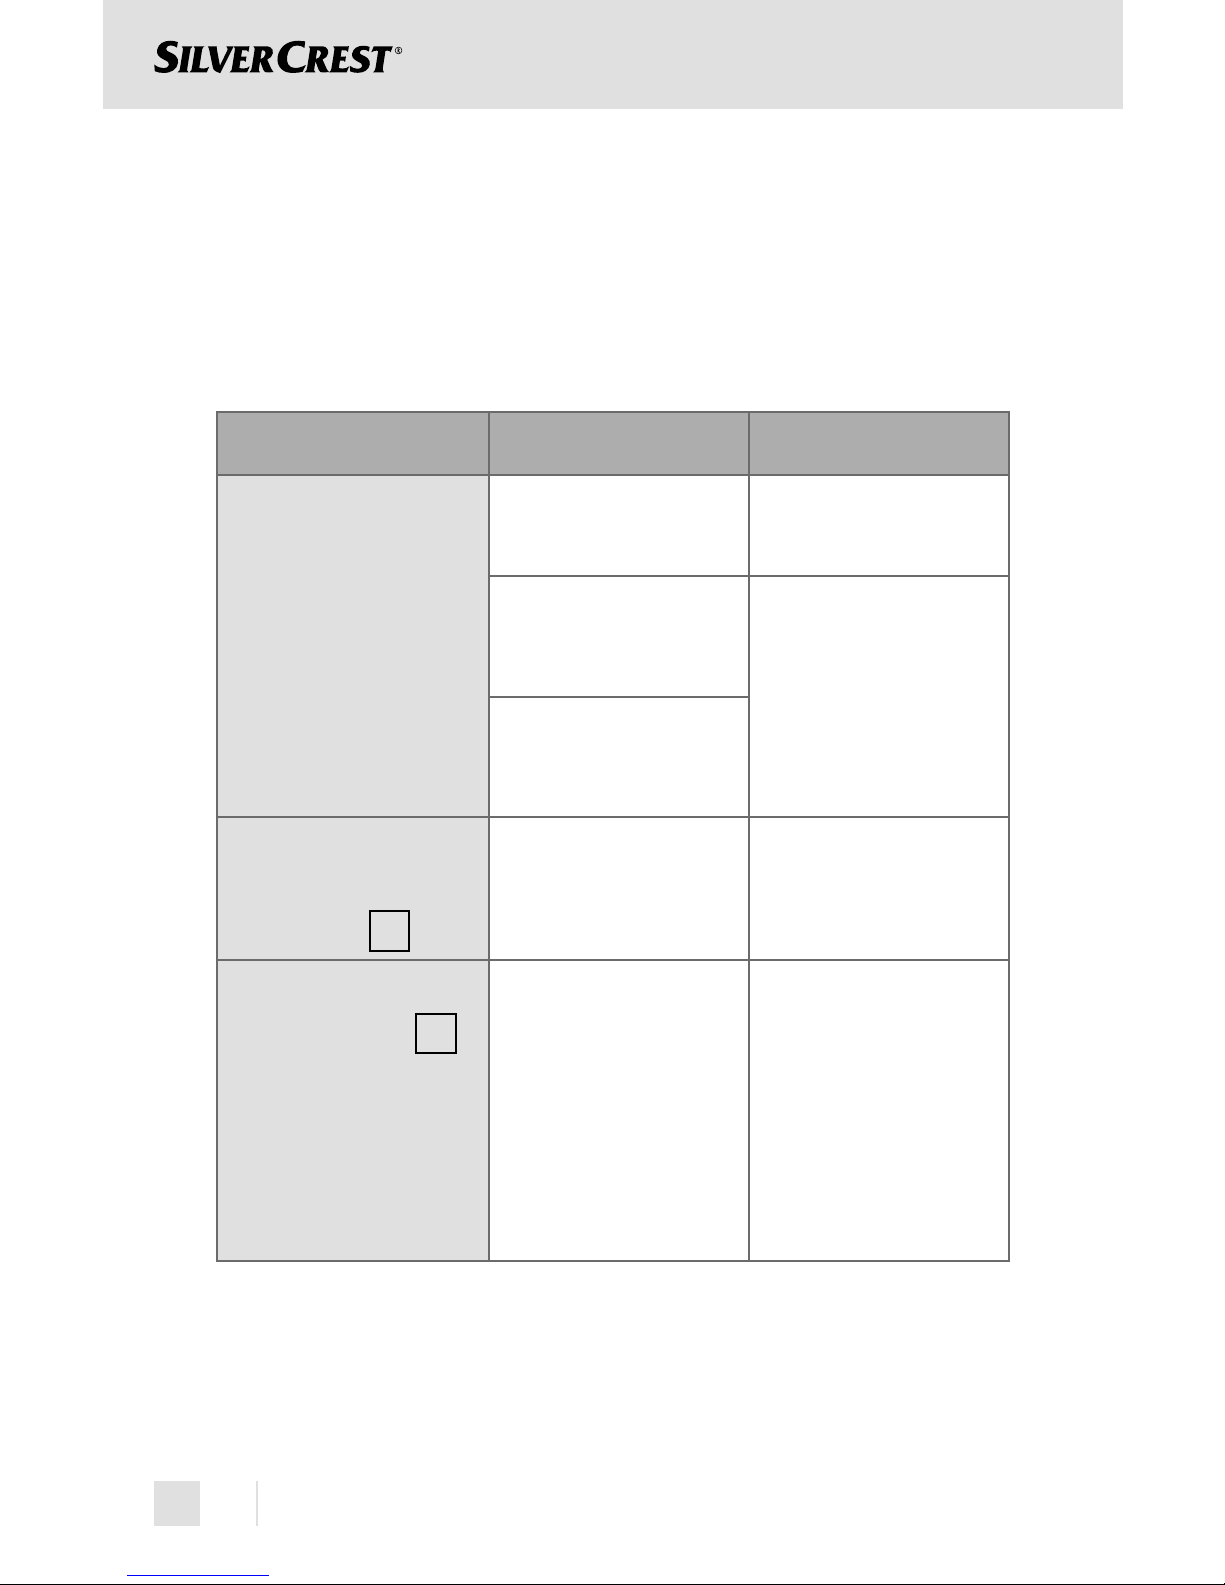
Description of parts
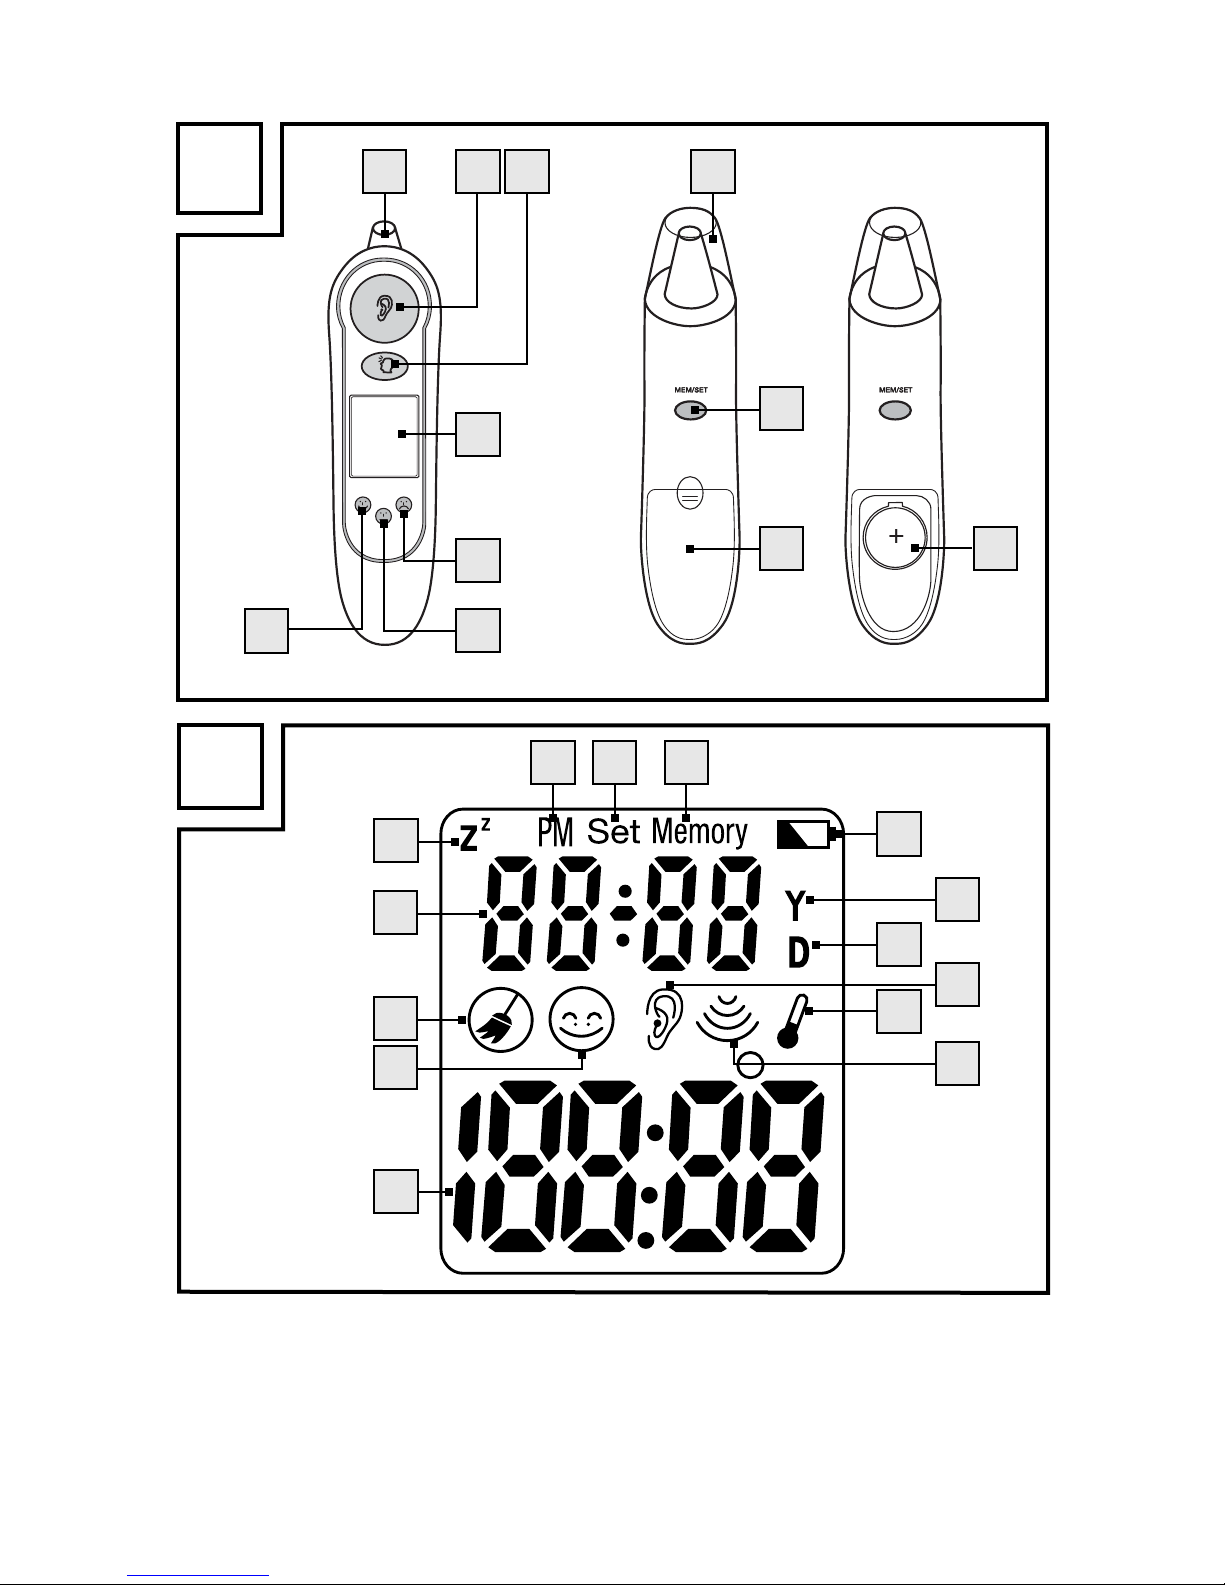
1
Measuring head
2
“EAR” button
(Temperature measurement in the ear / scan mode)
3
“FOREHEAD” button
(Temperature measurement at forehead / temple)
4
LC display
5
Red LED: Fever 38.0 °C - 42.9 °C
(100.4 °F - 109.2 °F)
6
Orange LED: slightly elevated temperature
37.5 °C - 37.9 °C (99.5 °F - 100.3 °F)
7
Green LED: no fever 34.0 °C - 37.4 °C
(93.2 °F - 99.4 °F)
8
Protective cap
9
“MEM / SET” button (Interrogate memory etc.)
10
Battery compartment lid
11
Battery
Page 9
9 GB
LC display
12
Battery change symbol
13
Year display symbol
14
Date display symbol
15
Ear mode symbol
16
Standard mode symbol
17
Scan mode symbol
18
Temperature display
19
Forehead mode symbol
20
Cleaning symbol
21
Date and time in standard mode
22
Sleep mode symbol
23
PM display
24
Setup mode symbol
25
Memory mode symbol
Technical data
Measurement
method: Infrared (non-contact)
Electrical
power supply: Lithium battery 3 V
CR2032
Power consumption: < 15 mA
Memory: 9 temperature measurements with
details of date, time and measurement
method (ear or forehead measurement)
Page 10

10 GB
Temperature scale: °C (°Celsius)
°F (°Fahrenheit)
Time display: 12 / 24-hour format
Automatic switch-off : Automatic switch-off after 1 minute
Measurement range
forehead & ear mode: 32°C - 42.9°C (89.6°F - 109.2°F)
Measurement
accuracies: ± 0.2°C (± 0.4°F) in the range
from 35.5°C - 42.0°C
(95.9°F - 107.8°F)
± 0.3°C (± 0.5°F) in the range from
32.0°C - 35.4°C (89.6°F - 95.8°F)
and in the range from 42.1°C -
42.9°C (107.9°F - 109.2°F)
Measurement range
room temperature: 5.0°C - 59,9°C
(41.0°F - 139.8°F)
Measurement
accuracy: ± 2.0°C (± 4.0°F)
Measurement
range scan mode: –22.0°C - 80.0°C
(–7.6°F - 176°F)
Measurement
accuracy: ± 2.0°C (± 4.0°F)
Ambient temperature
Ear and scan mode: +10.0 °C - +40.0 °C
(50.0 °F - 104.0 °F)
Forehead mode: +15.0 °C - +40.0 °C
(59.0 °F - 104.0 °F)
Page 11
11 GB
Storage temperature: –10.0 °C - +55.0 °C
(14.0°F - 131.0°F) at
20 % RH* - 85 % RH*
Atmospheric pressure: 700 ~ 1060 hPa
Dimensions: approx. 135 x 35 x 58 mm (L x B x H)
Weight: approx. 54 g
*RH = relative humidity
Safety
PLEASE KEEP ALL SAFETY INFORMATION AND INSTRUCTIONS FOR
FUTURE USE!
General safety instructions
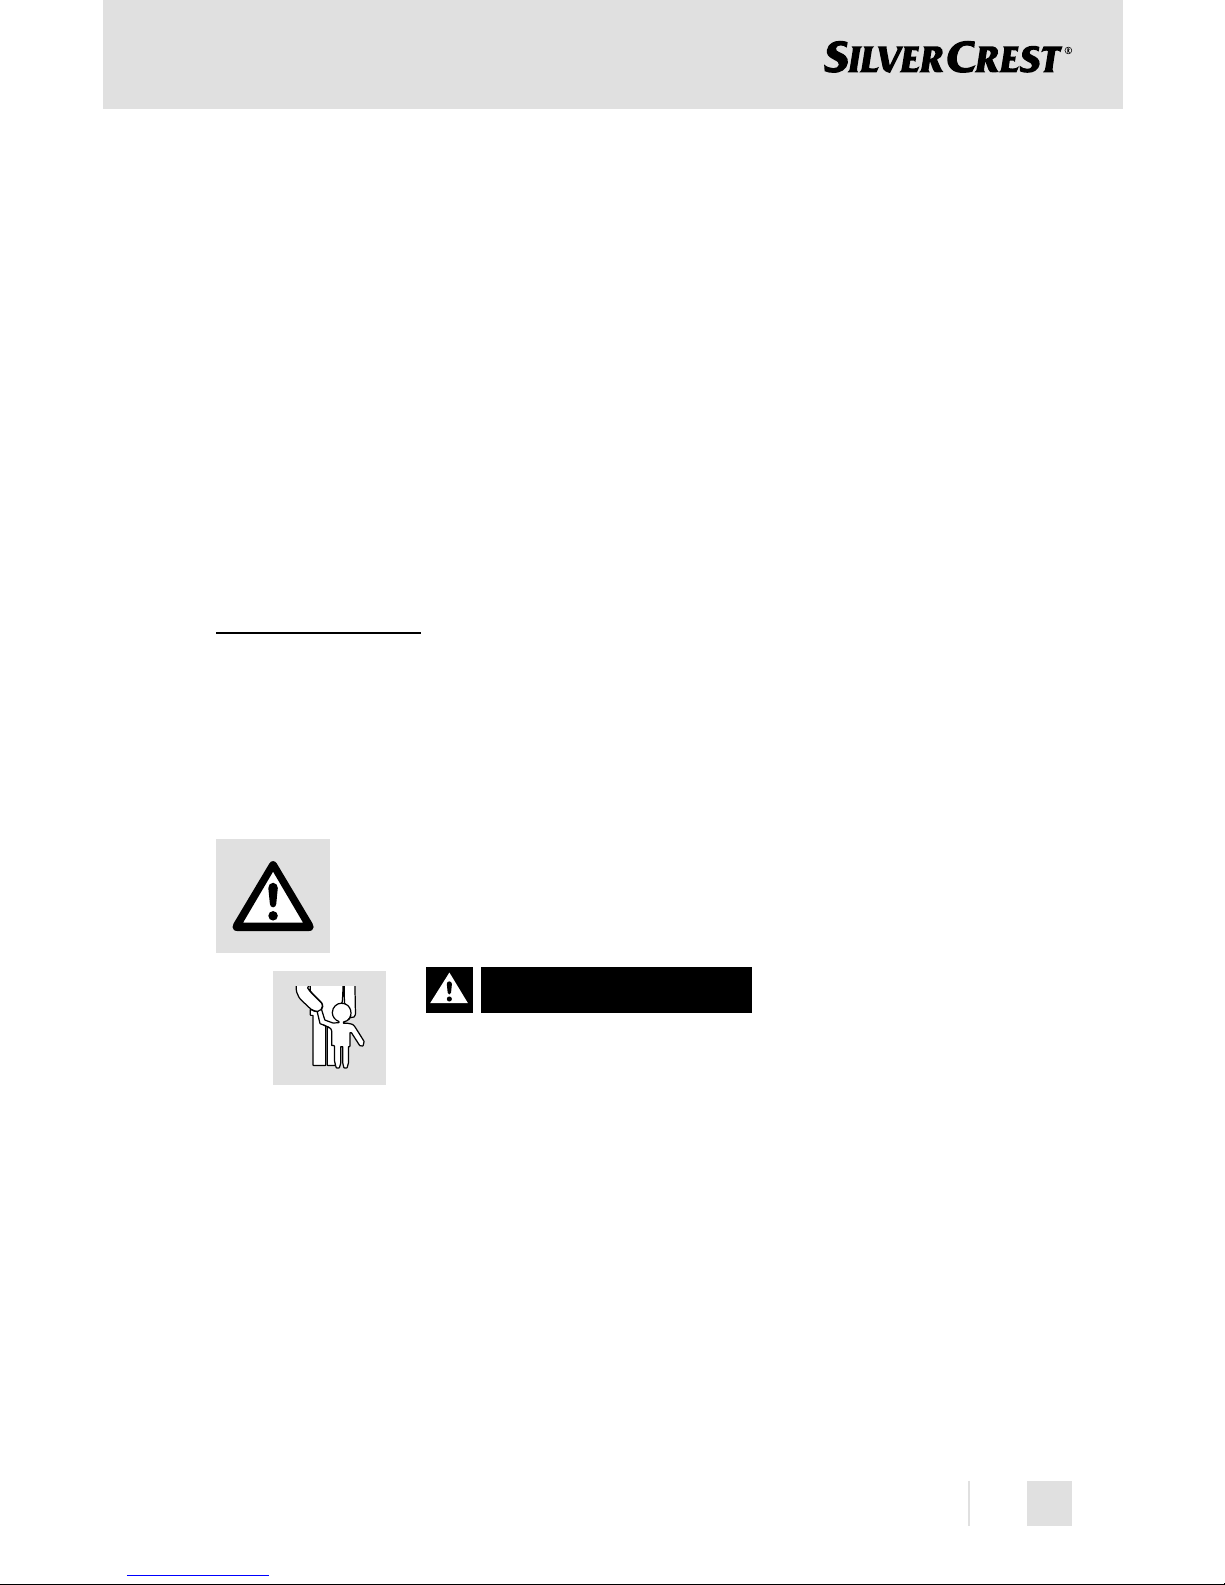
WARNING!
DANGER
TO LIFE AND DANGER OF
ACCIDENTS FOR INFANTS
AND CHILDREN! Never leave
children alone and unsupervised with
the packaging material. Danger of suff ocation. Children often underestimate
risks. Always keep children away
from the product.
Page 12

12 GB
WARNING!
DANGER TO LIFE!
Batteries can be swallowed, which may
represent a danger to life. If a battery
has been swallowed, medical help is
required immediately.
This device may be used by children
aged 8 over and by persons with reduced physical, sensory or mental capabilities or lack of experience and knowledge, provided that they are under
supervision or have been told how to use
the device safely and are aware of the
potential risks. Children must not play
with the device. Cleaning and user maintenance tasks must not be carried out by
children unless they are supervised.
Do not expose the device to
- extreme temperatures,
- strong vibrations,
- heavy mechanical loads,
- direct sunlight.
Otherwise there is a danger that the device will be damaged.
Please note that the guarantee does not
cover damage caused by incorrect handling, non-compliance with the operating
instructions or interference with the device by unauthorised individuals.
Page 13

13 GB
Under no circumstances should you take
the device apart. Improper repairs may
place the user in considerable danger.
Repairs should only be carried out by
specialist personnel.
Do not use the device if it is damaged.
Otherwise the consequence may be injuries and / or inaccurate readings.
Please consult a doctor if the thermome-
ter indicates that the body temperature
measured is high. With this measuring
method, a fever is indicated if the temperature is above 38.0 °C (100.4 °F).
The red LED
5
is a warning. Please take
several measurements at intervals of 0.5
to 1 hour in order to follow the progression of the temperature. The values you
measure will help your doctor make a
diagnosis.
Do not use the temperature under ex-
treme temperature conditions and / or
outdoors. This will result in inaccurate
measuring results. Please observe the details regarding
ambient and storage temperatures (see “Technical data”).
The measurement sensor should not be
touched directly or be blown on. This will
result in inaccurate measuring results.
Page 14
14 GB
Mobile telephones should not be used in
the immediate vicinity when the thermometer is being used. Otherwise the consequence may be inaccurate measurement
results.
Safety instructions
This appliance is solely intended for pri-
vate use. That is why it is not subject to
mandatory verifi cation.
Discontinue using the appliance if it is
damaged or if you feel that the measured values are unrealistic. Consult the
chapter “Functions/Error analysis - Troubleshooting” for advice or contact our
service centre.
Safety Instructions
for the Battery
Remove the battery from the device if it
is not going to be used for a prolonged
period.
CAUTION! DANGER OF EXPLOSION!
The battery must
never be recharged!
Page 15
15 GB
Ensure correct polarity when inserting
the battery! This is indicated in the battery compartment.
If necessary, clean the battery and de-
vice contacts before inserting the battery.
Batteries must not be disposed of in the
normal domestic waste!
Every consumer is legally obliged to dis-
pose of batteries in the proper manner!
CAUTION! RISK OF EX-
PLOSION! Keep batteries
away from children; do not
throw batteries into a fi re; do not
short-circuit the batteries and do
not take them apart.
Avoid contact with the skin, eyes and
mucous membranes. Any parts of the
body coming into contact with battery
acid should be rinsed off with copious
amounts of water and / or a doctor
contacted if necessary!
Avoid contact with skin, eyes and mu-
cous membranes. Upon contact with
battery acid, rinse the aff ected area
with lots of water and / or consult a
doctor!
Page 16
16 GB
Before getting started
Removing the battery fuse
Push the battery compartment lid
10
downwards.
Pull the tab of the protective fi lm out of the battery
compartment.
Push the battery compartment lid
10
onto the battery
compartment until it clicks into place (Fig. A).
– When it is switched on, an internal alignment and a
self-test of the LC display are carried out.
– To verify that all of the bars of the numbers are being
managed correctly, when you switch on check the
display of the LC display
4
on your appliance
against the example (Fig. B).
Operation
Setting the date / time (Fig. C)
You only have to set the date and time when you operate
the appliance for the fi rst time and after you change the
battery.
1. Press and hold the “MEM / SET” button
9
down for
two seconds in standard mode. An acoustic signal
will sound. The device is now in set-up mode.
2. Press the “MEM / SET” button
9
to choose between
the 12-hour or 24-hour format.
3. Press the “FOREHEAD” button
3
. The hours will fl ash
and can be corrected with the “MEM / SET” button
9
.
Page 17
17 GB
4. Press the “FOREHEAD” button
3
again. The minutes
will fl ash and can be corrected with the “MEM / SET”
button
9
.
Repeat steps 3 and 4 to set the values for the year,
month and day or to switch the sleep mode on or off .
Finally, press the “FOREHEAD” button
3
. The settings will
be taken over and the appliance reverts to standard mode.
Temperature measurements
Measuring room temperature (standard mode)
When you have fi nished setting the time and date and do
not carry out any further procedures, the device switches
to sleep mode after 1 minute in order to save the battery.
In the condition as supplied to the customer the sleep
mode is activated, as shown by the
symbol, and the LC
display
4
is completely switched off . When the sleep
mode is deactivated, the device remains switched on,
while the time and room temperature are still shown and
updated once a minute. The LC display
4
shows
the time and date alternately (Illustration D).
Measuring body temperature (ear mode)
IMPORTANT! It is advisable to carry out 3 meas-
urements in a row on the same ear and to take the highest
temperature as the measured value. A new measurement
can be taken when the display “
” goes out.
Do not use the thermometer if pain occurs when the meas-
urement is being taken. This could damage the ear canal.
Page 18
18 GB
Do not use the thermometer with external ear disorders
(e.g. infl ammation of the ear canal, injuries to the outer
ear). The condition of the aff ected areas could worsen.
Do not use the thermometer straight after bathing or
swimming when the ear canal is wet. This could damage the ear canal.
Due to the risk of contamination of the measuring
head
1
, clean the appliance after every use.
In this mode, only measure the temperature in the ear
and at no other place on the body.
1. If the sleep mode has been activated, activate the
thermometer again by pressing any button before
taking the measurement.
2. Carefully press on the protective cap
8
and remove it
with a gentle rotary motion and without using any force.
3. Check that the measuring head
1
and the measuring
sensors are clean.
4. Carefully clean the ear canal with a cotton bud.
5. Pull the outer ear, tilted slightly upwards/to the rear,
towards the back of his head, so that the ear canal is
freely accessible and there are no impediments between the measurement sensor and the eardrum.
6. Please keep the outer ear slightly extended and now
carefully insert the measuring head
1
into the ear canal.
7. Briefl y press the “EAR” button
2
. The symbol will
appear in the LC display
4
and the measurement
will start after an acoustic signal.
8. The end of the measurement is indicated by means of
2 acoustic signals.
Page 19
19 GB
9. Now you can read off the measurement result on the
LC display
4
. At the same time, one of the 3 LEDs
will come on.
Note: LED green
7
: no fever 34.0 °C - 37.4 °C
(93.2 °F - 99.4 °F)
LED orange
6
: slight increase in temperature
37.5 °C - 37.9 °C (99.5 °F - 100.3 °F)
LED red
5
: fever 38.0 °C - 42.9 °C
(100.4 °F - 109.2 °F)
10. Values can be displayed in °C as well as in °F
(see “Functions / error analysis - selecting the
temperature unit”).
11. Wait until the display “
” goes out before you
start taking a new measurement.
Note: The appliance automatically switches off if it is not
operated for longer than 1 minute. When the sleep mode
has been activated, the LC display
4
switches itself off .
When the sleep mode has been deactivated, the appliance
switches to standard mode. If the thermometer has been
operated under normal conditions, the result of the last
measurement taken before the appliance was switched off
is stored. The measured value is available again along
with information on the date, time and measurement mode
when the “MEM / SET” button
9
is pressed again. The
device has 9 storage spaces (see section on “Functions /
error analysis - the memory function”).
Page 20
20 GB
Measuring the body temperature
(forehead mode)
IMPORTANT! It is advisable to carry out 3 meas-
urements in a row at the same place and to take the
highest temperature as the measured value.
With diff erent room temperatures, let the appliance
lie in the room where the temperature is to be taken
for at least 30 minutes to “acclimatise” it.
Before measuring your body temperature, you should
relax for about 5 minutes.
If you have done any physical activity or taken a
bath, wait for at least 30 minutes before taking a
measurement in order to get a measurement that is
as accurate as possible.
Ensure that the forehead or temple is clean, free of
injuries and not covered with sweat, cosmetics or
ointment.
Take a note of what measurement method you used to
measure the temperature and inform your doctor of it.
1. If the sleep mode has been activated, activate the
thermometer again by pressing any button before
taking the measurement.
2. Carefully press on the protective cap
8
and remove it
with a gentle rotary motion and without using any force.
3. Check that the measuring head
1
and the measuring
sensors are clean.
4. Hold the measuring sensor 1 cm away from the
forehead or temple.
Page 21
21 GB
5. To start the measurement, press on the “FOREHEAD”
button
3
. The symbol will appear in the LC display
4
and the measurement will start after an acoustic
signal.
6. The end of the measurement is indicated by 2 acoustic
signals.
7. Now you can read off the measurement result on the
LC display
4
. At the same time, one of the 3 LEDs
will come on.
Note: LED green
7
no fever 34.0 °C - 37.4 °C
(93.2 °F - 99.4 °F)
LED orange
6
slight increase in temperature
37.5 °C - 37.9 °C (99.5 °F - 100.3 °F) LED red fever
5
38.0 °C - 42.9 °C (100.4 °F - 109.2 °F)
8. Values can be displayed in °C as well as in °F
(see “Functions / error analysis - selecting the
temperature unit”).
9. Repeat steps 3 to 6 to carry out further measurements.
Note: The appliance automatically switches off if it is not
operated for longer than 1 minute. When the sleep mode
has been activated, the LC display
4
switches itself off .
When the sleep mode has been deactivated, the appliance
switches to standard mode. If the thermometer has been
operated under normal conditions, the result of the last
measurement taken before the appliance was switched off
is stored. The measured value is available again along
with information on the date, time and measurement mode
when the “MEM / SET” button
9
is pressed again.
Page 22
22 GB
The appliance has 9 storage spaces (see “Functions / error analysis - the memory function”).
Use as a household thermometer (scan mode)
The thermometer can also be used in the house for
non-contact temperature measurements in the range of
–22.0 °C - 80.0 °C (–7.6 °F - 176.0 °F).
Attention! Do not use this mode for measuring
body temperature.
– With this measurement, the current surface temperature
of the object is displayed. It can be diff erent from its
internal temperature, especially if the surface is exposed
to direct sunlight or a draught!
Due to its design, the thermometer measures the precise
value when its casing has adjusted to room temperature.
That is why you should not hold it in the hand for a
long time when you want to take a measurement and
why you should keep it away from direct sunlight!
Do not use the appliance immediately after cleaning
the measuring head
1
. The evaporative cooling eff ect
of the detergent may falsify the measuring result.
Sample applications:
- The temperature of milk in baby bottles
- The temperature of bathwater
1. If the sleep mode has been activated, activate the
thermometer again by pressing any button before
taking a measurement.
Page 23
23 GB
2. Carefully press on the protective cap
8
and remove
it with a gentle rotary motion and without using any
force.
3. Make sure that the measuring head
1
and the
measuring sensor are clean.
4. Press the “FOREHEAD” button
3
and the “EAR”
button
2
repeatedly at the same time until “Food”
is shown in the LC display
4
(Illustration E).
5. Hold the measuring head at a distance of 1 cm from
the liquid and / or surface whose temperature you
want to measure.
6. Press the “EAR” button
2
to start the measurement.
7. Now you can read off the measurement result on the
LC display
4
(Illustration E).
8. Values can be displayed in °C as well as in °F
(see “Functions / error analysis - selecting the
temperature unit”).
9. Press the “EAR” button
2
again to carry out further
measurements.
10. The appliance automatically switches off if it is not
operated for longer than 1 minute. This application is
not stored in the device.
In order to return to standard mode, proceed as follows:
1. Press the “FOREHEAD” button
3
and the “EAR”
button
2
repeatedly at the same time until the LC
display
4
again shows the room temperature, date
and time, as well as the
symbol (Illustration D).
2. You are now back in standard mode.
Page 24
24 GB
Functions / error analysis
Selecting the temperature unit
Press and hold down the “EAR” button
2
and the
“FOREHEAD” button
3
at the same time until “°F”
appears behind the temperature display. Switching
from “°F” to “°C” is possible with the same procedure.
The memory function (memory mode)
IMPORTANT!
The current measurement is always stored in the last storage
space. When all storage spaces have been occupied, the
oldest measurement is always deleted from the memory.
Measurements taken in ear and forehead mode are
automatically stored in the appliance. The measured
values are available again along with information on the
date, time and measurement mode when the “MEM / SET”
button
9
is operated in standard mode. Press the “MEM /
SET” button
9
once to retrieve the value of the last
measurement. The “Memory” symbol (memory mode), the
number of the measurement, date, time and measurement
mode will appear in the LC display
4
(Fig. F). By pressing
the “MEM / SET” button
9
the next storage space along
with its associated measured value will appear. A maximum
of 9 measurements can be stored.
In order to return to standard mode, proceed as follows:
Page 25
25 GB
1. Press the “FOREHEAD” button
3
and the “EAR”
button
2
repeatedly at the same time until the LC
display
4
again shows the room temperature, date
and time, as well as the
symbol (Illustration D).
2. You are now in standard mode again.
Changing the battery
The appliance is fi tted with a lithium battery (CR2032,
3 V
) that allows a lot of measurements to be taken. If
the battery is empty, you will be made aware of that by
means of an appropriate error message (see “Functions /
error analysis - problem-solving”).
Push the battery compartment lid
10
downwards.
Lever the battery
11
out with a small screwdriver.
Avoid short-circuiting the battery at all cost. A short-
circuit can occur if the screwdriver comes into contact
with the battery and the live parts in the battery
compartment at the same time.
Insert the new battery into the battery compartment.
Note: Ensure correct polarity. The plus sign on the
battery must point upwards.
Push the new battery under the metal nose and press
it down until it clicks into place.
Push the battery compartment lid
10
onto the battery
compartment until it clicks into place (Fig. A).
Page 26
26 GB
Problem-solving
If the appliance cannot take a measurement in the
designated range, it will generate an error message.
This message should help to solve the problem.
Error Problem Solution
Appliance
does not react / automatically resets
itself when
protective fi lm
is removed
Empty battery? Insert a new
battery
Wrong battery
polarity?
Removing battery and insert it
correctly
Faulty battery
contact?
Battery symbol on the LC
display
4
Weak battery Insert a new
battery
“Lo” on the
LC display
4
(measured
value below
32.0°C or
89.6°F)
Thermometer
correctly positioned in the ear
or on the forehead/temple?
Pay heed to the
operating in-
structions in re-
gard to position-
ing in the ear or
on the fore-
head/temple.
Page 27

27 GB
Error Problem Solution
“Hi” on the
LC display
4
(measured
value above
42.9°C or
109.2°F)
Check the measurement mode.
Please observe
the directions
for use with re-
gard to taking
correct measure-
ments.
“ErrE” on the
LC display
4
Ambient temperature outside the
range of 15.0 °C
- 40.0 °C /
59.0 °F -
104.0 °F (forehead mode) and
10.0 °C -
40.0 °C /50.0 °F
- 104.0 °F (ear
and scan mode).
Please ensure an
ambient tempera-
ture in the range
of 15.0 °C -
40.0 °C /
59.0 °F -
104.0 °F (fore-
head mode) and
10.0 °C -
40.0 °C/
50.0 °F -
104.0 °F (ear
and scan mode)
“ErrU” on the
LC display
4
No measurement result after
measurement.
Please observe
the directions
for use with re-
gard to taking
correct measure-
ments.
“ErrH” on the
LC display
4
Error detected
during self-test.
Contact the
service centre.
“ErrP” in LC
display
4
Hardware
problem
Contact the
service centre.
Page 28
28 GB
Cleaning and care
The device reminds you to clean the measuring sensor after taking several temperature measurements. When this
occurs, the cleaning symbol
20
appears in the LC display
4
and acoustic signals are heard. In order to avoid contamination with germs, the lens has to be rubbed after
every use with a soft cloth that has been moistened with
70% medical alcohol. The use of hygiene attachments is,
therefore, not necessary. After that, wait for at least
30 minutes before taking another measurement. Please
keep in mind that due to the evaporative cooling eff ect of
the alcohol, even the smallest amounts can falsify the result.
Clean the housing with a soft, slightly damp cloth. In the
case of more severe soiling a mild detergent can also be
added to the water.Keep the appliance in a dry environment and protect from direct sunlight. The appliance can
be stored at temperatures of –10.0 °C - 55.0 °C
(14.0 °F - 131.0 °F). Temperatures over 80.0 °C are to
be avoided! In order to measure with it, however, it is necessary to let the appliance adjust to room temperature for
a suffi cient length of time - otherwise an error message
will be generated (see “Functions / Fault Analysis - Correction of Problems”). A room temperature of 5.0°C - 59.9°C
(41.0°F - 139.8°F) should also be maintained for the purposes of measurement. If the temperature is outside this
range, an error message is shown (see “Functions / Fault
Analysis - Correction of Problems”).
Remove the battery when not using the appliance for any
length of time.
Page 29

29 GB
Guarantee and Service
The warranty for this appliance is for 3 years
from the date of purchase. The appliance has
been manufactured with care and meticulously examined before delivery. Please retain
your receipt as proof of purchase. In the case
of a warranty claim, please make contact by
telephone with our Customer Service Department. Only in this way can a post-free despatch for your goods be assured.
The warranty covers only claims for material and manufacturing defects, but not for transport damage, wearing
parts or for damage to fragile components, e.g. buttons
or batteries. This product is for domestic use only and is
not intended for commercial use. The warranty is void in
the case of abusive and improper handling, use of force
and internal tampering not carried out by our authorised
service branch. Your statutory rights are not restricted
in any way by this warranty. The warranty period is not
extended by repairs made under the warranty. This applies also to replaced and repaired parts. Damages and
defects extant at the time of purchase must be reported
immediately after unpacking, resp. no later than two days
after the date of purchase.Repairs made after the lapse of
the warranty period are subject to charge.
Page 30
30 GB
GB
Service Great Britain
Tel.: 0871 5000 720 (£ 0.10/Min.)
E-Mail: kompernass@lidl.co.uk
IAN 106635
Hotline availability:
Monday to Friday 08:00 - 20:00 (CET)
Disposal
The packaging is made entirely of recyclable
materials, which you may dispose of at local
recycling facilities.
Contact your local refuse disposal authority for more
details of how to dispose of your worn-out product.
The product is subject to Directive 2012 / 19 / EU
(WEEE). In the interests of environmental protection, do not throw the product away with domestic waste when it is worn out, but take it to a
proper disposal facility. Contact your local
authority to fi nd out about collection centres
and their opening times.
Faulty or used batteries must be recycled in accordance with
Council Directive 2006 / 66 / EC. Take used batteries and /
or the appliance itself to the collection facilities provided.
Page 31

31 GB
Batteries should not be disposed of
with domestic waste!
Take batteries and / or the product itself to the collection
facilities provided.
Conformity
The CE Mark 0197 has been attached to this product
in accordance with the following European Directive:
Directive for Medical Products 93/42/EEC,
as amended by Directive 2007/47/EC.
The associated declaration of conformity has been
deposited with the importer:
KOMPERNASS HANDELS GMBH
BURGSTRASSE 21
44867 BOCHUM
GERMANY
www.kompernass.com
Page 32

32 GB
Manufacturer:
Shenzhen Dongdixin
Technology Co., Ltd.
No. 3 Building XiliBaimang
Xusheng Industrial Estate
Nanshan, Shenzhen, China 518108
Tel.: +86 755 27 652 316
E-Mail: service@e-caretalk.com
EU Representative:
Shanghai International
Holding Corp. GmbH (Europe)
Eiff estrasse 80
20537 Hamburg, Germany
Tel.: +49 (0) 40 2513175
Fax: +49 (0) 40 255726
Page 33

33 HU
Bevezető
Rendeltetésszerű alkalmazás ...........................Oldal 35
A szállítmány tartalma ......................................Oldal 36
A részek megnevezése .....................................Oldal 36
Műszaki adatok ................................................Oldal 37
Biztonság
Általános biztonsági tudnivalók .......................Oldal 39
Biztonsági tudnivalók ........................................Oldal 42
Az elemre vonatkozó biztonsági tudnivalók ...Oldal 42
Az üzembevétel előtt
Az elembiztosító eltávolítása ............................Oldal 44
Üzemelés
A dátum / pontos idő beállítása (C ábra) .......Oldal 44
A hőmérséklet mérése .......................................Oldal 45
Funkciók / hibaelemzések
A hőmérséklet-egység kiválasztása .................Oldal 52
A memory-funkció (memory-módus).................Oldal 52
Az elem cseréje .................................................Oldal 53
Problémák elhárítása ........................................Oldal 54
Tisztítás és ápolás ......................................Oldal 56
Garancia és szerviz ...................................Oldal 57
Mentesítés ....................................................... Oldal 58
Konformitás ...................................................Oldal 59
Page 34

34 HU
Ebben a Használati utasításban / a készüléken a
következő piktogrammok kerülnek alkalmazásra:
Olvassa el a Használati utasítást!
Vegye fi gyelembe a fi gyelmeztető- és biztonsági utasításokat!
Robbanásveszély!
V
Egyenáram (elektromos áram és feszültség
fajtája)
mA
Milliampere
Élet- és balesetveszély kisgyerekek és gyerekek számára!
BF típusú egészségügyi termék
2015-01
Gyártási év és hónap
Mentesítse a csomagolást és a készüléket
környezetbarát módon!
Page 35

35 HU
Homlok- és fülhőmérő
Bevezető
Az első üzembevétel előtt ismerkedjen meg a
készülék funkcióival. Olvassa el a következő
Használati utasítást. Őrizze meg jól ezt az
utasítást. A készülék továbbadása esetén harmadiknak
kézbesítse vele annak a teljes dokumentációját is.
Rendeltetésszerű alkalmazás
A készülék belső térben a fülben vagy halántékon/homlokon végzett testhőmérséklet-mérésre, a helyiséghőmérséklet
mérésére, valamint háztartásban a felületi hőmérséklet mérésére készül. Semmiképpen se helyettesíti az orvosi vizsgálatot. A készülék kizárólag privát használatra készült.
Az előbbiekben leírtaktól eltérő alkalmazások vagy a termék megváltoztatása nem megengedett és sérülésekhez
és / vagy a termék megkárosításához vezethetnek. A rendeltetésétől eltérő alkalmazásokból származó károkért a
gyártó nem áll jót.
Page 36

36 HU
A szállítmány tartalma
1 x homlok- és fül-hőmérő (inkl. elem és védősapka
8
)
1 x Használati utasítás
A részek megnevezése
1
mérőfej
2
„EAR”-gomb
(hőmérsékletmérés a fülben/scan-
módus)
3
„FOREHEAD”-gomb
(hőmérsékletmérés a homlo-
kon / hallántékon)
4
LC-diszplé
5
piros LED, láz 38,0 °C - 42,9 °C (100,4 °F - 109,2 °F)
6
narancsszínű LED, enyhe hőemelkedés
37,5 °C - 37,9 °C (99,5 °F - 100,3 °F)
7
zöld LED nincs láz 34,0 °C - 37,4 °C
(93,2 °F - 99,4 °F)
8
védősapka
9
„MEM / SET”-gomb (memória lekérdezése stb.)
10
elemrekesz fedél
11
elem
LC-diszplé
12
elemcsere szimbólum
13
év-kijelzés szimbólum
14
dátum-kijelzés szimbólum
15
fül-módus szimbólum
Page 37

37 HU
16
standard-módus szimbólum
17
scan-módus szimbólum
18
hőmérséklet kijelzés
19
homlok-módus szimbólum
20
tisztítás szimbólum
21
Dátum és idő standard-módus
22
alvás szimbólum
23
PM kijelzés
24
beállítás szimbólum
25
memória-mód szimbólum
Műszaki adatok
Mérési eljárás: infravörös (érintkezés nélküli)
Áramellátás: litium-elem 3 V
CR2032
Áramfogyasztás: < 15 mA
Tároló: 9 hőmérsékletmérés a dátum,
időpont és mérési módszer
(fül- vagy homlok-mérés)
megadásával
Hőmérsékleti skálák: °C (°Celsius)
°F (°Fahrenheit)
Pontos idő kijelzés: 12- / 24-óra-formátum
Automatikus kikapcsolás: automatikus kikapcsolás
1 perc múlva
Mérési tartomány
homlok- és fül- módusnál: 32 °C - 42,9 °C
(89,6 °F - 109,2 °F)
Page 38

38 HU
Mérési pontosság: ± 0,2 °C (± 0,4 °F) a
35,5 °C - 42,0 °C
(95,9 °F - 107,8 °F) tartományban
± 0,3 °C (± 0,5 °F) a
32,0 °C - 35,4 °C (89,6 °F 95,8 °F) tartományban és a
42,1 °C - 42,9 °C (107,9 °F -
109,2 °F) tartományban
Mérési tartomány
helyiség hőmérsékletnél: 5,0 °C - 59,9 °C
(41,0 °F - 139,8 °F)
Mérési pontosság: ± 2,0 °C (± 4,0 °F)
Mérési tartomány
scan-módusnál: –22,0 °C - 80,0 °C
(–7,6 °F - 176 °F)
Mérési pontosság: ± 2,0 °C (± 4,0 °F)
Környezeti hőmérséklet:
Fül- és scan-módusnál: + 10,0 °C - + 40,0 °C
(50,0 °F - 104,0 °F)
Homlok-módusnál: + 15,0 °C - + 40,0 °C
(59,0 °F - 104,0 °F)
Tárolási hőmérséklet: –10,0 °C - + 55,0 °C
(14,0 °F - 131,0 °F)
20%RH* - 85%RH* -nál
Légnyomás: 700
~
1060 hPa
Méretek: kb. 135 x 35 x 58 mm (h x sz x ma)
Súlya: kb. 54 g
*Relative humidity = relative légnedvesség
Page 39

39 HU
Biztonság
ŐRIZZE MEG A JÖVŐ SZÁMÁRA AZ
ÖSSZES BIZTONSÁGI UTALÁST ÉS
UTASÍTÁST!
Általános biztonsági
tudnivalók
FIGYELMEZTETÉS!
LETÉS BALESETVESZÉLY KISGYEREKEK ÉS GYEREKEK
SZÁMÁRA! Sohase hagyja
a gyerekeket felügyelet nélkül a csoma-
golóanyagokkal. Fulladásveszély áll
fenn. A gyerekek gyakran lebecsülik a
veszélyeket. Tartsa a gyerekeket a terméktől mindig távol.
FIGYELMEZTETÉS!
ÉLETVESZÉLY!
Az elemek lenyelhetők, és az életveszé-
lyes lehet. Ha valaki egy elemet lenyelt,
azonnal orvoshoz kell fordulni.
A készüléket 8 éves kor feletti gyerme-
kek és csökkent fi zikai, érzékszervi vagy
mentális képességű vagy tapasztalattal
illetve tudással nem rendelkező személyek felügyelet mellett használhatják,
Page 40

40 HU
vagy ha felvilágosították őket a készülék
biztonságos használatáról és az ebből
eredő veszélyeket megértik. Gyermekek
nem játszhatnak a készülékkel. Tisztítást
és a felhasználó által végzendő karbantartást felügyelet nélküli gyermekek nem
végezhetnek.
Ne tegye ki a készüléket
- szélsőséges hőmérsékleteknek,
- erős rezgéseknek,
- erős mechanikai ígénybevételeknek,
- a napsugarak közvetlen hatásának.
Ellenkező esetben a készülék megkárosodása fenyeget.
Az utasításoknak a fi gyelmen kívül ha-
gyása esetén az elemek a végső feszültségük alá merülhetnek. Ebben az esetben kifutás veszélye áll fenn. Ha az
elemek a készülékben kifutottak, a készülék megkárosodásának az elkerülésére vegye ki azokat azonnal a készülékből!
Kerülje el az elemsavnak a bőrrel, szem-
mel és nyálkahártyával való érintkezését. Ha az elemsavhoz hozzáér, mossa
le az érintett helyet bőven vízzel és /
vagy forduljon orvoshoz!
Page 41

41 HU
Ne vegye a készüléket üzembe, ha azt
károsodás érte. A következmények sérülések és / vagy pontatlan mérési eredmények lehetnek.
Forduljon orvoshoz, ha a hőmérő ma-
gas testhőmérsékleti értékeket jelez ki!
Ennél a mérési módszernél 38,0 °C
(100,4 °F) feletti hőmérsékletek jelentenek lázat. A pirosan világító LED
5
egy
fi gyelmeztetés. A hőmérséklet alakulásának a követése céljából végezzen több
mérést 0,5 - 1 órás időközönként. A mérési értékek megkönnyítik az orvosi számára a diagnózist.
Ne használja a hőmérőt szélsőséges
hőmérsékleti viszonyok és / vagy
kültéren. A következmények pontatlan
mérések lehetnek. Vegye fi gyelembe a
környezeti- és a tárolási hőmérséletek
megadott értékeit (lásd a „Műszaki adatok” fejezetet).
A mérő érzékelőhöz ne érjen hozzá és
ne fújja meg. A következmények pontatlan mérések lehetnek.
A hőmérő használata alkalmával ne
használjon a közvetlen közelben mobil
telefonokat. A következmények pontatlan
mérések lehetnek.
Page 42

42 HU
Biztonsági tudnivalók
A készülék kizárólag privát használatra
készült. Ezért a hitelezési kötelezettség
rá nem vonatkozik.
Ne használja tovább a készüléket, ha
az meg van sérülve, vagy ha a mérési
értékek irreálisnak tűnnek. Nézzen utána a „Funktció / hibaelemzés – Problémák elhárítása” résznél, vagy forduljon
ügyfélszolgálatunkhoz.
Az elemre vonatkozó
biztonsági tudnivalók
Hosszabb ideig való nemhasználás ese-
tén távolítsa el az elemet a készülékből.
VIGYÁZAT! ROBBANÁS-
VESZÉLY! Sohase töltse fel
újra az elemet!
A behelyezés alkalmával ügyeljen a he-
lyes polarításra! Azt az elemrekeszben
megjelölték.
Szükség esetén tisztítsa meg az elem és
a készülék érintkezőit.
Az elemek nem tartoznak a háztartási
szemétbe!
Page 43

43 HU
A törvény minden fogyasztót arra köte-
lez, hogy az elemek szabályszerűen
mentesítse!
VIGYÁZAT! ROBBANÁS-
VESZÉLY! Tartsa az elemeket
a gyerekektől távol, ne dobja
az elemeket tűzbe, ne zárja az
elemeket rövidre és ne szedje
azokat szét.
A lemerült elemeket távolítsa el azonnal
a készülékből. Ennek a fi gyelmen kívül
hagyása esetén az elemek a végső feszültségük alá merülhetnek le. Ebben az
esetben fennáll a kifutás veszélye. Ha
az elem a készülékében kifutna, a készülék megkárosodásának a megelőzésére vegye azt azonnal ki belőle!
Kerülje el az elemsavnak a bőrrel, a
szemekkel és a nyálkahártyákkal való
érintkezését. Elemsavhoz való hozzáérés esetén mossa le vizzel bőven az
érintett helyet és / vagy forduljon orvoshoz!
Page 44

44 HU
Az üzembevétel előtt
Az elembiztosító eltávolítása
Tolja az elemrekesz fedelét
10
lefelé.
Húzza ki a védőfóliát a fülénél fogva az elemrekeszből.
Tolja az elemrekesz fedelét
10
újra az elemrekeszre,
amíg az hallhatóan bepattan (A ábra).
– A bekapcsolás alkalmával a készülék elvégez egy
belső kiegyenlítést és az LC-diszplé öntesztelését.
– Annak ellenőrzésére, hogy a számok valamennyi osz-
lopát helyesen szabályozza-e, vesse össze készüléke
LCD kijelzőjének
4
képét bekapcsoláskor a mintával
(B ábra).
Üzemelés
A dátum / pontos idő
beállítása (C ábra)
Ezt a beállítást csak az első üzembevétel alkalmával és
elemcsere után kell elvégezni.
1. Nyomja le standard-módusban és tartsa két másodpercig
lenyomva a „MEM / SET”-gombot
9
. Egy hangjelzés
hangik el. A készülék a setup-módusban van.
2. A 12- ill, 24-órás formátumok egyikének a kiválasztására
nyomja meg a „MEM / SET”-gombot
9
.
3. Nyomja meg a „FOREHEAD”-gombot
3
. Az óra
kijelzése villog és azt a „MEM / SET”-gombbal
9
beállíthatja.
Page 45

45 HU
4. Nyomja meg újra a „FOREHEAD”-gombot
3
. A
percek kijelzése villog és azt a „MEM / SET”-gombbal
9
beállíthatja.
Ismételje meg a 3. és 4. lépéseket, az év, a hónap, és
a nap beállításához ill. a sleep-módus be- / kikapcsolásához.
Ezután nyomja meg a „FOREHEAD“ gombot
3
. A
készülék átveszi a beállításokat és standard üzemmódba tér vissza.
A hőmérséklet mérése
Helyiségek hőmérsékletének a mérése
(standard-módus)
Ha befejezte a pontos idő és a dátum beállítását és a
továbbiakban semmit sem tesz, akkor a készülék az elem
kimélése végett 1 perc múlva a sleep-módusra vált. Kiszállított állapotban a sleep-módus amelyet a
szimbólum je-
lez, aktiválva van és az LC-diszplé
4
teljesen ki van kapcsolva. Deaktivált sleep-módusban a készülék bekapcsolva
marad és a pontos időt valamint a helyiség hőmérsékletét
továbbra is kijelzi és 1 x percenként aktualizálja. Az LCdiszplé
4
a pontos időt és a dátumot felváltva jelzi ki
(D ábra).
A testhőmérséklet mérése (fül-módus)
FONTOS! Ajánljuk, hogy ugyanannál a fülnél
egymásután 3 mérést végezzen és a legmagasabb mért
hőmérsékletet tekintse mérési értéknek. Az új mérést akkor
lehet elkezdeni, ha a „
” kijelzés kialszik.
Page 46

46 HU
Ne használja a hőmérőt, ha a mérésnél fájdalmak
állnak elő. A hallójárat megsérülhet.
Ne használja a hőmérőt külső fülbetegségek esetén
(pld.: hallójárat gyulladás, fülkagylü sérülés). A beteg
helyek állapota leromolhat.
Ne használja a hőmérőt közvetlenül fürdés, vagy
úszás utánm amikor a hallójárat nedves. A hallójárat
megsérülhet.
Fertőzések veszélyének az elkerülése végett tisztítsa
meg a készülék mérőfejét
1
minden egyes használat
után.
Ebben a módusban a testhőmérséklet mérését csak a
fülben és ne más testrészeken végezze.
1. Ha a sleep-módus aktiv, a mérés előtt aktiválja a
hőmérőt egy tetszőleges gomb megnyomása által.
2. Nyomja meg óvatosan a védősapkát
8
és távolítsa
azt el erő kifejtése nélkül egy könnyed csavarási
mozdulattal.
3. Bizonyosodjon meg róla, hogy a mérőfej
1
és a
mérőérzékelő tiszták.
4. Tisztítsa meg óvatosan a hallójáratot egy vattarúdacskával.
5. Húzza a fülkagylót enyhén a tarkó irányába felfele/
hátrafele, hogy a hallójárat szabadon elérhető legyen és ne legyen akadály a mérőérzékelő és a dobhártya között.
6. Tartsa a fülkagylót enyhén meghúzott állapotban és
vezesse óvatosan a mérőfejet
1
a hallójáratba.
Page 47

47 HU
7. Nyomja meg röviden az „EAR”-gombot
2
. Az
LC-diszplén
4
megjelenik a szimbólum és egy
hangjelzés után elkezdődik a mérés.
8. A mérés befejezését 2 hangjelzés nyugtázza.
9. Most az LC-diszplén
4
leolvashatja a mérés eredmé-
nyét. Ezzel egyidőben egyike a 3 LED-nek világit.
Utalás: Zöld LED
7
, nincs láz, 34,0 °C - 37,4 °C
(93,2 °F - 99,4 °F)
narancsszínű LED
6
, enyhe hőemelkedés,
37,5 °C - 37,9 °C (99,5 °F - 100,3 °F)
piros LED
5
, láz, 38,0 °C - 42,9 °C
(100,4 °F - 109,2 °F)
10. A kijelzés úgy „°C”-ban mint „°F”-ban lehetságes
(lásd „Funkciók / hibaelemzés – hőmérsékletegység
kiválasztása” fejezetet).
11. Egy új mérés elkezdése előtt várja meg, amíg a „
”
kijelzés kialszik.
Utalás: A készülék kikapcsolása automatikusan bekövetkezik, ha több mint 1 percig semmit se működtet. Aktivált
sleep-múdusnál az LC-diszplé
4
kikapcsolódik. Deaktivált
sleep-módusnál a készülék a standard-módusra kapcsol.
Ha a hőmérőt normál feltételek mellett üzemeltették, a
kikapcsolás előtt mindig az utolsó mérés eredményét automatikusan tárolja. A mért érték mindig dátummal, pontos
idővel és mérési módussal áll újra a rendelkezésre, ha
a „MEM / SET”-gombot
9
újra működtetik. A készülék
9 tárolóhellyel rendelkezik (lásd a „Funkciók / hibaelemzés A memory-funkció” fejezetet).
Page 48

48 HU
A testhőmérséklet mérése (homlok-módus)
FONTOS! Ajánljuk, hogy ugyanazonl a helyen
egymásután 3 mérést végezzen és a legmagasabb mért
hőmérsékletet tekintse mérési értéknek.
Külömböző helyiség hőmérsékleteknél tartsa a készü-
léket „akklimatizálás” céljából legalább 20 - 30 percig
abban a helyiségben, amelyben a mérést el fogja
végezni.
Mielőtt a testhőmérsékletét megmérné, lazítson úgy
kb. 5 percen keresztül.
Testi tevékenységek vagy fürdés után legalább
30 percnek kell eltelni ahhoz, hogy egy lehető
legpontosabb mérési eredményt lehessen elérni.
Ügyeljen arra, hogy a homlok ill. hallánték tiszta,
sérülésmentes legyen és hogy rajta izzadság,
kozmetikai szerek vagy kenőcsök ne legyenek.
Jegyezze meg, hogy melyik mérési módszerrel mérte meg
a testhőmérsékletét és közölje azt az orvosával.
1. Ha a sleep-módus aktiv, a mérés előtt aktiválja a
hőmérőt egy tetszőleges gomb megnyomása által.
2. Nyomja meg óvatosan a védősapkát
8
és távolítsa
azt el erő kifejtése nélkül egy könnyed csavarási
mozdulattal.
3. Bizonyosodjon meg róla, hogy a mérőfej
1
és a
mérés érzékelő tiszták.
4. Tartsa a mérőérzékelőt 1 cm távolságra a homloktól
vagy a hallántéktól.
Page 49

49 HU
5. A mérés beindításához nyomja meg a „FOREHEAD”gombot
3
. Az LC diszplén
4
megjelenik a
szimbólum és egy hangjelzés után elkezdődik a mérés.
6. A mérés befejezését 2 hangjelzés nyugtázza.
7. Most az LC-diszplén
4
leolvashatja a mérés eredmé-
nyét. Ezzel egyidőben egyike a 3 LED-nek világit.
Utalás: Zöld LED
7
, nincs láz, 34,0 °C - 37,4 °C
(93,2 °F - 99,4 °F)
narancsszínű LED
6
, enyhe hőemelkedés,
37,5 °C - 37,9 °C (99,5 °F - 100,3 °F)
piros LED
5
, láz, 38,0 °C - 42,9 °C
(100,4 °F - 109,2 °F)
8. A kijelzés úgy °C-ban mint °F-ban történhet,
(lásd „Funkciók / hibaelemzés – hőmérsékletegység
kiválasztása” fejezetet).
9. További mérések elvégzéséhez ismételje meg a
3. - 6. lépéseket.
Utalás: A készülék kikapcsolása automatikusan bekövetkezik, ha több mint 1 percig semmit se működtet. Aktivált
sleep-módusnál az LC-diszplé
4
kikapcsolódik. Deaktivált
sleep-módusnál a készülék a standard-módusra kapcsol.
Ha a hőmérőt normál feltételek mellett üzemeltették, a
kikapcsolás előtt mindig az utolsó mérés eredményét automatikusan tárolja. A mért érték mindig dátummal, pontos
idővel és mérési módussal áll újra a rendelkezésre, ha a
„MEM / SET”-gombot
9
újra működtetik. A készülék
9 tárolóhellyel rendelkezik (lásd a „Funkciók / hibaelemzés A memory-funkció” fejezetet).
Page 50

50 HU
A hőmérőnek a háztartásban történő használata
(scan-módus)
A hőmérőt a háztartásban is használni lehet a –22,0 °C 80,0 °C (–7,6 °F - 176,0 °F) hőmérsékleti tartományban,
érintkezés nélküli hőmérsékletmérésekre.
FIGYELEM! Ne használja ezt a módust testhőmér-
sékletek mérésére.
– Ennél a mérésnél a készülék a tárgy aktuális felületi
hőmérsékletét jelzi ki. Ez eltérhet a tárgy belső
hőmérsékletétől, különösen akkor, ha a felület
napsugarak hatásának vagy léghuzatnak van kitéve!
A hőmérő a felépítésétől függően a hőmérséklet
pontos értéket akkor méri, amikor a készülék háza a
helyiség hőmérsékletét felvette. Ezért a méréshez ne
tartsa azt túl sokáig a kezében és tartsa a közvetlen
napsugaraktól távol!
Ne használja a készüléket közvetlenül a mérőfej
1
megtisztítása után. A tisztítószer párolgási hőelvonása
meghamisíthatja a mérés eredményét.
Alkalmazási példák:
- tejhőmérséklet mérése bébi-palackokban
- fürdővíz hőmérséklet mérése
1. Ha a sleep-módus aktiv, a mérés előtt aktiválja a
hőmérőt egy tetszőleges gomb megnyomása által.
2. Nyomja meg óvatosan a védősapkát
8
és távolítsa azt
el erő kifejtése nélkül egy könnyed csavarási mozdulattal.
Page 51

51 HU
3. Bizonyosodjon meg róla, hogy a mérőfej
1
és a
mérőérzékelő tiszták.
4. Nyomja meg egyszerre a „FOREHEAD”-gombot
3
és az „EAR”-gombot
2
annyiszor, amíg az LC-
diszplén
4
megjelenik a „Food” kijelzés (E ábra).
5. Tartsa a mérőfejet 1 cm távolságra a folyadéktól és /
vagy a felülettől, amelynek a hőmérsékletét megmérni
szeretné.
6. A mérés beindításához nyomja meg az „EAR”-
gombot
2
.
7. Most az LC-diszplén
4
leolvashatja a mérés
eredményét (E ábra).
8. A kijelzés úgy „°C”-ban mint „°F”-ban lehetséges
(lásd „Funkciók / hibaelemzés – A hőmérséklet-egység
kiválasztása” fejezetet).
9. További mérések elvégzéséhez nyomja meg ismét
az „EAR”- gombot
2
.
10. A készülék kikapcsolása automatikusan megtörténik,
ha egy percnél hosszabb ideig azt nem működteti.
Ennél az alkalmazásnál a készülék a mérés eredményét
nem tárolja.
A standard-módusba való visszatéréshez járjon el a
következőképpen:
1. Nyomja meg egyszerre a „FOREHEAD”-gombot
3
és
az „EAR”-gombot
2
annyiszor, amíg az LC-diszplé
4
újra a helyiség hőmérsékletét, a dátumot és a pontos
időt, valamint a
szimbólumot jelzi ki (D ábra).
2. Most újra a standard –módusban van.
Page 52

52 HU
Funkciók / hibaelemzések
A hőmérséklet-egység kiválasztása
Nyomja meg egyszerre az „EAR”-gombot
2
és a
„FOREHEAD”-gombot
3
, amíg a hőmérséklet kijelzés
mögött „°F” jelenik meg. A „°F”-ról a „°C”-ra történő
átkapcsolás ugyanezzel az eljárással lehetséges.
A memory-funkció (memory-módus)
FONTOS!
A készülék az aktuális mérés eredményét mindig az utolsó
tárolóhelyen tárolja. Ha minden tárolóhely foglalt, akkor a
készülék mindig a legrégibb mérési eredményt távolítja el
a tárolóból.
A fül- és homlok-módus mérési eredményeit a készülék
automatikusan tárolja. A mért érték mindig dátummal,
pontos idővel és mérési módussal áll újra a rendelkezésre,
ha a „MEM / SET”-gombot
9
működtetik. Az utolsó mérési érték leolvasásához nyomja meg 1 x a „MEM / SET”gombot
9
. Az LC-diszplén
4
megjelenik a „Memory”
szimbólum (memory-módus), a mérés száma, a dátum, az
időpont és a mérés módusa (F ábra). A „MEM / SET”gomb
9
újonnani megnyomásánál megjelenik a következő
tárolóhely a hozzátartozó mérési értékkel. Maximálisan
9 mérési érték tárolható.
Page 53

53 HU
A standard-módusba való visszatéréshez járjon el a
következőképpen:
1. Nyomja meg egyszerre a „FOREHEAD”-gombot
3
és
az „EAR”-gombot
2
annyiszor, amíg az LC-diszplé
4
újra a helyiség hőmérsékletét, a dátumot és a pontos
időt, valamint a
szimbólumot jelzi ki (D ábra).
2. Most újra a standard –módusban van.
Az elem cseréje
A készülék egy litium-elemmel van ellátva (CR2032, 3 V ),
amely nagyon sok mérést tesz lehetővé. Az elem lemerült
állapotára egy megfelelő hibajelentés fi gyelmezteti (lásd a
„Funkciók / hibaelemzések – Problémák elhárítása” fejezetet).
Tolja az elemrekesz fedelét
10
lefelé. Emelje ki az
elemet
11
egy kis csavarhúzó segítségével.
Feltétlenül kerülje el az elem rövidre zárását. Rövid-
zárlat akkor állhat elő, ha a csavarhúzó egyszerre
ér az elemhez és az elemrekesz vezető részeihez.
Helyezzen az elemrekeszbe egy új elemet.
Utalás: Eközben ügyeljen a helyes polarításra. Az
elem feliratának a plusz jele felfelé kell mutasson.
Tolja az új elemet a fémorr alá és nyomja azt lefelé,
amíg az hallhatóan bepattan.
Tolja az elemrekesz fedelét
10
újra az elemrekeszre,
amíg az hallhatóan bepattan (A ábra).
Page 54

54 HU
Problémák elhárítása
Ha a készülék a megadott mérési tartományban a mérést
nem tudja elvégezni, akkor hibajelentést jelez ki. Ez a
hibajelentés elősegíti a probléma elhárítását.
Hiba Probléma Elhárítás
A készülék
nem reagál / a
védőfólia eltávolításánál
automatikusan visszaáll
Az elem lemerült? Helyezzen be
egy új elemet
Az elem
polarítása hibás?
Távolítsa el az
elemet, és helyezze be azt helyesen.
Az elem pólusai
nem érintkeznek
kielégítően?
Elem-szimbólum kijelzése
az LC-diszplén
4
Gyenge elem Helyezzen be
egy új elemet.
„Lo” kijelzés
az LC-diszplén
4
(a mért érték 32,0°C
vagy 89,6°F
alatti)
Helyesen van a
hőmérő a fülbe
vagy homlokra/
halántékra téve?
Kövesse a használati útmutató
leírását, hogy ott
mi áll a fülbe
vagy homlokra/
halántékra helyezésről.
Page 55

55 HU
Hiba Probléma Elhárítás
„Hi” kijelzés
az LC-diszplén
4
(a mért érték 42,9°C
agy 109,2°F
feletti)
Ellenőrizze a mérési üzemmódot.
Kövesse a
Használai utasításnak a helyes
mérésre vonatkozó utasításait.
„ErrE” kijelzés
az LC-diszplén
4
A környezeti
hőmérséklet nincs a
15,0 °C - 40,0 °C
/ 59,0 °F 104,0 °F (homlokmódusnál) és a
10,0 °C- 40,0 °C
/ 50,0 °F 104,0 °F (fül- és
scan-módusnál) hőmérséklet tartományokban.
Gondoskodjon
róla, hogy a
környezeti hőmérséklet a 15,0 °C 40,0 °C / 59,0 °F
- 104,0 °F (homlokmódusnál) és
10,0 °C - 40,0 °C
/ 50,0 °F 104,0 °F (fül- és
scan-módusnál) hőmérséklet tartományokban legyen.
„ErrU” kijelzés az LCdiszplén
4
Mérés után nincs
mérési eredmény.
Kövesse a
Használai utasításnak a helyes
mérésre vonatkozó utasításait.
„ErrH” kijelzés az LCdiszplén
4
Hiba megállapítása az öntesztelés alatt.
Vegye fel a kapcsolatot a szervizzel.
„ErrP” kijelzés
az LC-diszplén
4
Hardware-probléma
Vegye fel a kapcsolatot a szervizzel.
Page 56

56 HU
Tisztítás és ápolás
Néhány hőmérsékletmérés után a készülék emlékezteti Önt a
mérőszonda megtisztítására. Ehhez megjelenik a tisztítás
szimbólum
20
az LCD-kijelzőn
4
és hangjelzés hallható.
Kórokozók általi fertőzések elkerülése végett a lencsét minden
használat után le kell dörzsölni 70 %-os egészségügyi
szesszel megnedvesített puha kendővel. Ezért higiéniai feltétek használata nem szükséges. A megtisztítás után várjon legalánn 30 percig, mielőtt egy új mérést végezne.
Gondoljon arra, hogy a szesz párolgási hővesztesége
miatt abból a legkisebb mennyiség is meghamisíthatja a
mérés eredményét. Tisztítsa meg a házat egy puha, enyhén megnedvesített kendővel. Erősebb szennyeződések
esetén a tisztító vízhez enyhe tisztítószert is hozzáadhat.
Tárolja a készüléket száraz környezetben és kerülje el a
napfény közvetlen ráhatását. A készülék –10,0 °C - 55,0 °C
(14,0 °F - 131,0 °F) közötti hőmérsékleteken tárolható. A
80,0 °C feletti hőmérsékleteket el kell kerülni! A mérésekhez feltétlenül szükséges, hogy a készülék megfelelően hoszszú időn keresztül a helyiség hőmérsékletét átvehesse, ellenkező esetben a készülék hibajelentést jelez ki (lásd a
„Funkciók / hibaelemzések – Problémák elhárítása” fejezetet). A méréshez ugyanúgy be kell tartani a 5,0 °C - 59,9 °C
(41,0 °F - 139,8 °F) terjedő helyiség hőmérsékletet. Ha a
hőmérséklet ezen a tartományon kívül van, a készülék hibajelentést jelez ki (lásd a „Funkciók / hibaelemzések –
Problémák elhárítása” fejezetet). Távolítsa el a készülékből az elemet, ha azt hosszabb ideig nem használja.
Page 57

57 HU
Garancia és szerviz
A készülékre 3 év garanciát adunk a vásárlás dátumától számítva. A készüléket gondosan gyártottuk,
és szállítás előtt lelkiismeretesen ellenőriztük.
Kérjük, a vásárlás igazolására őrizze meg a pénztári blokkot. Kérjük, garanciaigény esetén vegye
fel a kapcsolatot telefonon az Ön közelében lévő
szervizzel. Csak ebben az esetben garantálhatjuk,
hogy ingyen tudja beküldeni az árut.
A garancia csak anyag- és gyártási hibára vonatkozik,
nem pedig szállítási kárra, kopásra vagy törékeny részek
(pl. kapcsoló vagy elem) sérülésére.
A termék kizárólag magánhasználatra, nem kereskedelmi
használatra készült. A garancia érvényét veszti visszaélésszerű vagy szakavatatlan kezelés, erőszak alkalmazása
vagy olyan beavatkozások esetén, amelyeket nem engedélyeztetett szervizelő üzleteink hajtottak végre.
Az ön törvényes jogait ez a garancia nem korlátozza.
A garancia ideje nem hosszabbodik a jótállással. Ez
érvényes a cserélt és javított alkatrészekre is.
Az esetlegesen már vételkor meglévő károkat és hiányosságokat kicsomagolás után azonnal, de legkésőbb 2
nappal a vásárlás után jelezni kell.
A garancia idejének lejárta után esedékes javítások
költségtérítésesek.
Page 58

58 HU
HU
Szerviz Magyarország
Tel.: 0640 102785
E-Mail: kompernass@lidl.hu
IAN 106635
Az ügyfélszolgálati forródrót elérhetősége:
hétfőtől péntekig 8.00 és 20.00 óra között (közép-európai idő szerint)
Mentesítés
A csomagolás környezetbarát anyagokból
áll, amelyeket a helyi újraértékesítési helyeken
mentesíthet.
A kiszolgált bútordarab mentesítésének a lehetőségeit
községe, vagy városa illetékes hivatalánál tudhatja meg.
A termékre a 2012 / 19 / EU (WEEE) irányelv
vonatkozik. A kiszolgált készüléket, a környezetvédelem érdekében ne dobja a háztartási
szemétbe, hanem juttassa azt el egy szakszerű
mentesítéshez. A gyűjtőhelyeket és azok
nyitvatartási idejét az illetékes hivatalánál
érdeklődheti meg.
Page 59

59 HU
A hibás vagy elhasznált elemeket az 2006 / 66 / EC
irányelv szerint kell újraértékesíteni. Juttassa vissza az elemet
és / vagy készüléket az ajánlott gyűjtőhelyeken keresztül.
Az elemek nem tartoznak
a háztartási szemétbe!
Juttassa vissza az elemet és / vagy készüléket az ajánlott
gyűjtőhelyeken keresztül.
Konformitás
Az alábbi európai irányelveknek megfelelve került a
termékre a CE jelölés
0197:
2007/47/EC irányelvvel módosított orvostechnikai eszközökre vonatkozó 93/42/EEC irányelv.
A hozzátartozó konformitás nyilatkozat letétben
az importörnél található:
KOMPERNASS HANDELS GMBH
BURGSTRASSE 21
44867 BOCHUM
GERMANY
www.kompernass.com
Page 60

60 HU
Gyártó:
Shenzhen Dongdixin
Technology Co., Ltd.
No. 3 Building XiliBaimang
Xusheng Industrial Estate
Nanshan, Shenzhen, China 518108
Tel.: +86 755 27 652 316
E-Mail: service@e-caretalk.com
EU-felhatalmazott:
Shanghai International
Holding Corp. GmbH (Europe)
Eiff estraße 80
20537 Hamburg, Germany
Tel.: +49 (0) 40 2513175
Fax: +49 (0) 40 255726
Page 61

61 SI
Uvod
Namen uporabe ...............................................Stran 63
Obseg dobave ..................................................Stran 64
Opis delov .........................................................Stran 64
Tehnični podatki ................................................Stran 65
Varnost
Splošna varnostna navodila .............................Stran 67
Varnostna navodila ........................................... Stran 70
Varnostna navodila o bateriji ...........................Stran 70
Pred začetkom uporabe
Odstranitev varovala baterije ..........................Stran 72
Uporaba
Nastavljanje datuma / ure (sl. C) .....................Stran 72
Merjenja temperature .......................................Stran 73
Funkcije / analiza napak
Izbiranje temperaturne enote ...........................Stran 80
Funkcija memory (način „memory“) ................Stran 80
Menjavanje baterije ..........................................Stran 81
Odpravljanje problemov ..................................Stran 82
Čiščenje in nega ........................................... Stran 84
Garancijski list ..............................................Stran 85
Odstranjevanje ............................................Stran 86
Skladnost .........................................................Stran 87
Page 62

62 SI
V tem navodilu za uporabo / na napravi so
uporabljeni naslednji piktogrami:
Preberite navodilo za uporabo!
Upoštevajte opozorila in varnostna navodila!
Nevarnost eksplozije!
V
Enosmerni tok (vrsta toka in napetosti)
mA
Miliamper
Življenjska nevarnost in nevarnost nesreč
za malčke in otroke!
Medicinski izdelek tip BF
2015-01
Leto in mesec izdelave
Embalažo in napravo zavrzite na okolju
prijazen način!
Page 63

63 SI
Termometer za uho in čelo
Uvod
Iskrene čestitke ob nakupu vaše nove naprave.
Odločili ste se za kakovosten izdelek. Ta navodi-
la za uporabo so sestavni del vašega izdelka.
Vsebujejo pomembne napotke za njegovo varnost, uporabo in odstranitev. Pred prvim začetkom obratovanja se seznanite s funkcijami naprave. Preberite naslednje navodilo
za uporabo. To navodilo shranite. Če napravo predate
tretjim osebam, jim zraven izročite tudi vse dokumente.
Namen uporabe
Naprava je predvidena za uporabo v notranjih področjih
za merjenje telesne temperature na ušesu ali sencu/čelu,
merjenje temperature v prostoru in za merjenje temperatur
površin v gospodinjstvu. Na noben način ne nadomesti
zdravniškega pregleda. Naprava je namenjena izključno
za privatno uporabo. Kakršnakoli drugačna uporaba, od
zgoraj opisane, ali spreminjanje izdelka ni dovoljeno in
lahko vodi do povzročitve poškodb in / ali škode na izdelku. Za škodo, nastalo pri nestrokovni uporabi, proizvajalec ne prevzame jamstva.
Page 64

64 SI
Obseg dobave
1 x čelni in ušesni termometer (vklj. z baterijo in
zaščitnim pokrovom
8
)
1 x navodilo za uporabo
Opis delov
1
merilna glava
2
tipčka „EAR“
(za merjenje temperature v ušesu,
način „scan“)
3
tipka „FOREHEAD“
(merjenje temperature na
čelu / sencah)
4
LC prikazovalnik
5
rdeča LED, vročina 38,0 °C - 42,9 °C
(100,4 °F - 109,2 °F)
6
oranžna LED, rahlo povišana telesna temperatura
37,5 °C - 37,9 °C (99,5 °F - 100,3 °F)
7
zelena LED, ni vročine 34,0 °C - 37,4 °C
(93,2 °F - 99,4 °F)
8
zaščitni pokrov
9
tipka „MEM / SET“ (priklic pomnilnikov itn.)
10
pokrov predalčka za baterijo
11
baterija
Page 65

65 SI
LC prikazovalnik
12
simbol za menjavanje baterij
13
simbol za prikaz leta
14
simbol za prikaz datuma
15
simbol za način merjenja v ušesu
16
simbol za standardni način
17
simbol za način „scan“
18
prikaz temperature
19
simbol za način merjenja na čelu
20
simbol za čiščenje
21
datum in čas v standardnem načinu
22
simbol za način mirovanja
23
prikaz PM
24
simbol za način nastavitve
25
simbol za način pomnilnika
Tehnični podatki
Merilni postopek: infrardeče (brez dotika)
Napajanje: litijeva baterija 3 V
CR2032
Poraba toka: < 15 mA
Pomnilnik: 9 meritev temperature z navedbo
datuma, časa in merilne metode
(v ušesu ali na čelu)
Temperaturne lestvice: °C (° Celzija)
°F (° Fahrenheita)
Prikaz ure: 12- / 24-urni način prikaza
Avtomatski izklop: avtomatski izklop po 1 minuti
Page 66

66 SI
Merilno območje za način
merjenja na čelu in v ušesu: 32 °C - 42,9 °C
(89,6 °F - 109,2 °F)
Merilne natančnosti: ±0,2 °C (±0,4 °F) v
območju 35,5 °C - 42,0 °C
(95,9 °F - 107,8 °F)
±0,3 °C (±0,5 °F) v
območju 32,0 °C - 35,4 °C
(89,6 °F - 95,8°F) in v
območju 42,1 °C - 42,9 °C
(107,9 °F - 109,2 °F)
Merilno območje za
temperaturo prostora: 5,0 °C - 59,9 °C
(41,0 °F - 139,8 °F)
Merilna natančnost: ± 2,0 °C (± 4,0 °F)
Merilno območje
za način „scan“: –22,0 °C - 80,0 °C
(–7,6 °F - 176 °F)
Merilna natančnost: ± 2,0 °C (± 4,0 °F)
Temperatura okolice:
Način merjenja v ušesu
in način „scan“: +10,0 °C - +40,0 °C
(50,0 °F - 104,0 °F)
Način merjenja na čelu: + 15,0 °C - + 40,0 °C
(59,0 °F - 104,0 °F)
Temperatura skladiščenja: –10,0 °C - + 55,0 °C
(14,0 °F - 131,0 °F) pri
20%RH* - 85%RH*
Page 67

67 SI
Atmosferski tlak: 700 ~ 1060 hPa
Dimenzije: pribl. 135 x 35 x 58 mm (V x Š x D)
Teža: pribl. 54 g
*Relative humidity = relativna vlažnost zraka
Varnost
VSA VARNOSTNA OPOZORILA IN NAVODILA SHRANITE ZA PRIHODNJO
UPORABO!
Splošna varnostna navodila
OPOZORILO!
ŽIVLJENJSKA NEVARNOST IN NEVARNOST NESREČ ZA MALČKE
IN OTROKE!
Otrok z embalažnim materialom nikoli
ne pustite nenadzorovanih. Obstaja nevarnost zadušitve. Otroci pogosto podcenjujejo nevarnosti. Otrokom nikoli ne
dovolite zadrževanja v bližini izdelka.
Page 68

68 SI
OPOZORILO!
ŽIVLJENJSKA
NEVARNOST! Baterije se lahko po-
goltne, kar je lahko življenjsko nevarno.
Če je nekdo pogoltnil baterijo, je treba
takoj poiskati medicinsko pomoč.
Otroci v starosti od 8 let naprej in osebe
z zmanjšanimi telesnimi, zaznavnimi ali
duševnimi sposobnostmi ali s pomanjkanjem izkušenj in znanja lahko napravo
uporabljajo pod nadzorom ali če so bile
poučene o njeni varni uporabi in razumejo nevarnosti, ki izhajajo iz uporabe
naprave.
Naprave ne izpostavljajte
- ekstremnim temperaturam,
- močnim vibracijam,
- močnim mehanskim obremenitvam,
- direktnim sončnim žarkom.
V nasprotnem primeru grozi nevarnost,
da se bo naprava poškodovala.
V primeru neupoštevanja navodil se lah-
ko baterije izpraznijo preko končne napetosti. V tem primeru obstaja nevarnost
iztekanja. Če bi baterije v Vaši napravi
iztekale, jih takoj vzemite ven, da preprečite škodo na napravi!
Izogibajte se stiku s kožo, z očmi in s slu-
znicami.
Page 69

69 SI
Če pridete v stik s kislino iz baterij, prizadeto mesto sperite z veliko vode in / ali
poiščite zdravniško pomoč!
Naprave ne uporabljajte, če je poškodo-
vana. Posledica so lahko poškodbe
in / ali netočne izmerjene vrednosti.
Prosimo, poiščite zdravniško pomoč, ka-
dar termometer kaže visoke vrednosti telesne temperature! Pri tej merilni metodi
gre za vročino pri temperaturah nad
38,0 °C (100,4 °F). LED, ki sveti rdeče
5
, je opozorilo. Merite večkrat v razmaku 0,5 do 1 ure, da sledite poteku temperature. Vaše merilne vrednosti zdravniku olajšajo diagnozo.
Termometra ne uporabljajte pod ekstre-
mnimi temperaturnimi pogoji in / ali v zunanjih prostorih. Posledica so nenatančni rezultati meritev. Upoštevajte določila
za temperaturo okolice in skladiščenja
(glejte poglavje „Tehnični podatki“).
Merilnega tipala se ne smete neposre-
dno dotikati, ravno tako ne pihati nanj.
Posledica so nenatančni rezultati meritev.
Med uporabo termometra se v neposre-
dni bližini ne sme uporabljati mobilnih
telefonov. Posledica so lahko nenatančni
rezultati meritev.
Page 70

70 SI
Varnostna navodila
Naprava je namenjena izključno za pri-
vatno uporabo. Zaradi tega ni podvržena obveznosti za redno umerjanje.
Naprave ne uporabljajte več, če je po-
škodovana ali se vam izmerjene vrednosti
ne zdijo realistične. Preberite si poglavje
„Funkcije / analiza napak - odpravljanje
problemov“ ali pa se obrnite na našo servisno službo.
Varnostna navodila o bateriji
Iz naprave odstranite baterijo, če naprave
dlje časa ne uporabljate.
POZOR! NEVARNOST
EKSPLOZIJE! Baterije nikoli
ponovno ne polnite!
Pri vstavljanju pazite na pravilno polari-
zacijo! Ta je prikazana v predalčku za
baterijo.
Kontakte baterije in naprave pred vstavlja-
njem baterije očistite, če je to potrebno.
Baterije ne sodijo med hišne odpadke!
Vsak uporabnik je zakonsko zavezan,
da baterije odstrani skladno s predpisi!
Page 71

71 SI
POZOR! NEVARNOST
EKSPLOZIJE! Baterije hranite
zunaj dosega otrok, ne mečite
jih v ogenj, ne povzročite kratkega stika baterij in jih ne razstavljajte.
Iztrošeno baterijo takoj odstranite iz na-
prave. V primeru neupoštevanja se lahko
baterija izprazni preko končne napetosti.
V tem primeru obstaja nevarnost iztekanja. Če bi baterija v vaši napravi iztekala, jo takoj vzemite ven, da preprečite
škodo na napravi!
Izogibajte se stiku s kožo, z očmi in s slu-
znicami. Če pridete v stik s kislino iz baterij, prizadeto mesto sperite z veliko
vode in / ali poiščite zdravniško pomoč!
Page 72

72 SI
Pred začetkom uporabe
Odstranitev varovala baterije
Pokrov predalčka za baterijo
10
potisnite navzdol.
Zaščitno folijo primite za zaplato in jo potegnite iz
predalčka za baterijo.
Pokrov predalčka za baterijo
10
zopet potisnite na
predalček za baterijo, da se slišno zaskoči (sl. A).
– Pri vklopu se izvedeta interno usklajevanje in
avtomatski test LC prikazovalnika.
– Da preverite, ali se vse črte številk pravilno zaženejo,
pri vklopu preverite sliko na LC-prikazovalniku
4
svoje naprave v primerjavi z vzorcem (sl. B).
Uporaba
Nastavljanje datuma / ure (sl. C)
Ta nastavitev je potrebna samo pri prvi uporabi in po
menjavanju baterije.
1. Pritisnite tipko „MEM / SET“
9
in jo držite pritisnjeno
dve sekundi v standardnem načinu. Zasliši se signalni
ton. Naprava se nahaja v načinu „setup“.
2. Pritisnite tipko „MEM / SET“
9
, da izbirate med
12- ali 24-urnim načinom prikaza.
3. Pritisnite tipko „FOREHEAD“
3
. Ure utripajo in se jih
lahko s tipko „MEM / SET“
9
popravlja.
Page 73

73 SI
4. Ponovno pritisnite tipko „FOREHEAD“
3
. Minute
utripajo in se jih lahko s tipko „MEM / SET“
9
popravlja.
Ponovite koraka 3 in 4, da nastavite vrednosti za leto,
mesec in dan oz. vklopite / izklopite način „sleep“.
Potem pritisnite tipko za čelo „FOREHEAD“
3
.
Nastavitve se prevzamejo in naprava se povrne v
standardni način.
Merjenja temperature
Merjenje temperature prostora
(standardni način)
Če ste končali nastavljanje časa in datuma in ne storite
ničesar več, naprava po 1 minuti za varovanje baterije
preklopi v način „sleep“. V dobavnem stanju je način
„sleep“, prikazan s simbolom
, aktiviran in LC prikazo-
valnik
4
se kompletno izklopi. Pri deaktiviranem načinu
„sleep“ ostane naprave vklopljena in čas in temperatura
prostora sta še naprej prikazana in se 1 x na minuto aktualizirata. LC prikazovalnik
4
izmenično prikazuje čas in
datum (sl. D).
Merjenje telesne temperature
(način merjenja v ušesu)
POMEMBNO! Priporočljivo je, da na istem ušesu
zaporedoma opravite 3 meritve in pri tem kot izmerjeno
vrednost upoštevate najvišjo temperaturo. Novo merjenje
lahko začnete, ko prikaz „
“ ugasne.
Page 74

74 SI
Termometra ne uporabljajte, če se pri merjenju
pojavijo bolečine. Sluhovod bi se lahko poškodoval.
Termometra ne uporabljajte pri boleznih zunanjega
ušesa (npr. vnetju sluhovoda, poškodbah uhlja).
Stanje obolelih mest bi se lahko poslabšalo.
Termometra ne uporabljajte neposredno po kopanju
ali plavanju, kadar je sluhovod moker. Sluhovod bi
se lahko poškodoval.
Zaradi nevarnosti kontaminacije merilne glave
1
,
napravo po vsaki uporabi očistite.
V tem načinu merite temperaturo samo v ušesu in
ne na nobenem drugem mestu na telesu.
1. Če je aktiven način „sleep“, pred merjenjem termometer
aktivirajte s pritiskom na poljubno tipko.
2. Previdno pritisnite na zaščitni pokrov
8
in ga brez
uporabe sile, z rahlim vrtenjem snemite.
3. Prepričajte se, da sta merilna glava
1
in merilno
tipalo čista.
4. Previdno očistite sluhovod ušesa z vatirano palčko.
5. Potegnite svoj uhelj rahlo poševno navzgor/nazaj v
smeri zadnje strani glave, da sluhovod postane prosto
dostopen in se med merilnim tipalom ter bobnom ne
nahajajo nobene ovire.
6. Uhelj držite v rahlo potegnjenem stanju in merilno
glavo
1
previdno vstavite v sluhovod.
7. Na kratko pritisnite tipko „EAR“
2
. Na LC prikazo-
valniku
4
se prikaže simbol in po signalnem tonu
se začne merjenje.
Page 75

75 SI
8. Konec meritve potrdita 2 signalna tona.
9. Zdaj lahko na LC prikazovalniku
4
razberete rezultat
meritve. Istočasno sveti ena od 3 LED lučk.
Opozorilo: zelena LED
7
, ni vročine
34,0 °C - 37,4 °C (93,2 °F - 99,4 °F)
oranžna LED
6
, rahlo povišana telesna temperatura
37,5 °C - 37,9 °C (99,5 °F - 100,3 °F)
rdeča LED
5
, vročina 38,0 °C - 42,9 °C
(100,4 °F - 109,2 °F)
10. Prikaz lahko poteka tako v „°C“ kot tudi v „°F“
(glejte poglavje „Funkcije / analiza napak – izbiranje
temperaturne enote“).
11. Počakajte, da prikaz „
“ ugasne, preden začnete
z novim merjenjem.
Opozorilo: Izklop naprave poteka avtomatsko, če se je
več kot 1 minuto ne uporablja. Pri aktiviranem načinu
„sleep“ se prepričajte, da se LC prikazovalnik
4
izklopi.
Pri deaktiviranem načinu „sleep“ naprava preklopi v
standardni način. Če je bil termometer uporabljan pod
normalnimi pogoji, se rezultat vsakega zadnjega merjenja
pred izklopom avtomatsko shrani. Izmerjena vrednost je
skupaj z datumom, uro in merilnim načinom zopet na
razpolago, ko ponovno pritisnete tipko „MEM / SET“
9
.
Naprava ima 9 pomnilnih mest (glejte poglavje „Funkcije /
analiza napak – funkcija memory“).
Page 76

76 SI
Merjenje telesne temperature
(način merjenja na čelu)
POMEMBNO! Priporočljivo je, da na istem mestu
zaporedoma opravite 3 meritve in pri tem kot izmerjeno
vrednost upoštevate najvišjo temperaturo.
Pri različnih prostorskih temperaturah napravo za
„aklimatiziranje“ za najmanj 20 do 30 minut položite
v prostor, v katerem nameravate izvajati merjenje.
Preden si merite telesno temperaturo, morate najprej
pribl. 5 minut počivati.
Od telesnih aktivnosti ali kopeli mora miniti vsaj
30 minut, da se lahko doseže čim bolj natančne
rezultate merjenja.
Pazite tudi na to, da so čelo oz. sence čiste, brez
poškodb in se na njih ne nahajajo niti pot niti kozmetika
ali krema.
Zapomnite si, s katerim merilnim postopkom ste merili
temperaturo, in to sporočite tudi vašemu zdravniku.
1. Če je aktiven način „sleep“, pred merjenjem termometer
aktivirajte s pritiskom na poljubno tipko.
2. Previdno pritisnite na zaščitni pokrov
8
in ga brez
uporabe sile, z rahlim vrtenjem snemite.
3. Prepričajte se, da sta merilna glava
1
in merilno
tipalo čista.
4. Merilno tipalo držite na razdalji 1 cm do čela ali senc.
5. Za začetek merjenja pritisnite na tipko „FOREHEAD“
3
.
Na LC prikazovalniku
4
se prikaže simbol in po
signalnem tonu se začne merjenje.
Page 77

77 SI
6. Konec meritve potrdita 2 signalna tona.
7. Zdaj lahko na LC prikazovalniku
4
razberete rezultat
meritve. Istočasno sveti ena od 3 LED lučk.
Opozorilo: zelena LED
7
, ni vročine
34,0 °C - 37,4 °C (93,2 °F - 99,4 °F)
oranžna LED
6
, rahlo povišana telesna temperatura
37,5 °C - 37,9 °C (99,5 °F - 100,3 °F)
rdeča LED
5
, vročina 38,0 °C - 42,9 °C
(100,4 °F - 109,2 °F)
8. Prikaz lahko poteka tako v „°C“ kot tudi v „°F“
(glejte poglavje „Funkcije / analiza napak – izbiranje
temperaturne enote“).
9. Ponovite korake od 3 do 6, da opravite nadaljnje
meritve.
Opozorilo: Izklop naprave poteka avtomatsko, če se
je več kot 1 minuto ne uporablja. Pri aktiviranem načinu
„sleep“ se prepričajte, da se LC prikazovalnik
4
izklopi.
Pri deaktiviranem načinu „sleep“ naprava preklopi v
standardni način. Če je bil termometer uporabljan pod
normalnimi pogoji, se rezultat vsakega zadnjega merjenja
pred izklopom avtomatsko shrani. Izmerjena vrednost
je skupaj z datumom, uro in merilnim načinom zopet na
razpolago, ko ponovno pritisnete tipko „MEM / SET“
9
.
Naprava ima 9 pomnilnih mest (glejte poglavje „Funkcije /
analiza napak – funkcija memory“).
Page 78

78 SI
Uporaba kot termometer v gospodinjstvu
(način „scan“)
Termometer se lahko uporablja tudi v gospodinjstvu za
merjenje temperature brez dotika v območju od
–22,0 °C - 80,0 °C (–7,6 °F - 176,0 °F).
POZOR! Tega načina ne uporabljajte za merjenje
telesne temperature.
– Pri tem merjenju je prikazana aktualna temperatura
površine predmeta. Le-ta se lahko razlikuje od njegove
notranje temperature, še posebno, če je površina
izpostavljena sončnemu sevanju ali prepihu!
Pogojeno z načinom izdelave termometer meri
natančno vrednost, če se je njegovo ohišje navzelo
temperature prostora. Zaradi tega ga pri merjenju
ne držite v roki predolgo in ga hranite zunaj dosega
sončnega sevanja!
Naprave ne uporabljajte takoj po čiščenju merilne
glave
1
. Izparilni mraz čistilnega sredstva lahko
popači merilni rezultat.
Primeri uporabe:
- merjenje temperature mleka v stekleničkah za dojenčke
- merjenje temperature vode v kopalni kadi
1. Če je aktiven način „sleep“, pred merjenjem termometer
aktivirajte s pritiskom na poljubno tipko.
2. Previdno pritisnite na zaščitni pokrov
8
in ga brez
uporabe sile, z rahlim vrtenjem snemite.
Page 79

79 SI
3. Prepričajte se, da sta merilna glava
1
in merilno
tipalo čista.
4. Tolikokrat istočasno pritisnite tipko „FOREHEAD“
3
in tipko „EAR“
2
, da se na LC prikazovalniku
4
prikaže „food“ (sl. E).
5. Merilno glavo držite na razdalji 1 cm od tekočine
in / ali površine, katere temperaturo želite meriti.
6. Pritisnite tipko „EAR“
2
, da začnete merjenje.
7. Zdaj lahko na LC prikazovalniku
4
razberete
rezultat meritve (sl. E).
8. Prikaz lahko poteka tako v „°C“ kot tudi v „°F“
(glejte poglavje „Funkcije / analiza napak – izbiranje
temperaturne enote“).
9. Pritisnite tipko „EAR“
2
, da opravite nadaljnje meritve.
10. Izklop naprave poteka avtomatsko, če se je več kot
1 minuto ne uporablja. Za ta način uporabe se
podatki v pomnilnik ne shranijo.
Če se želite vrniti nazaj v standardni način, ravnajte kot sledi:
1. Tolikokrat istočasno pritisnite tipko „FOREHEAD“
3
in tipko „EAR“
2
, da se na LC prikazovalniku
4
ponovno prikažejo temperatura prostora, datum in
ura kot tudi simbol
(sl. D).
2. Zdaj se nahajate v standardnem načinu.
Page 80

80 SI
Funkcije / analiza napak
Izbiranje temperaturne enote
Istočasno pritisnite tipko „EAR“ 2 in „FOREHEAD“
3
in ju držite pritisnjeni, da se za prikazom temperature
prikaže „°F“. Preklapljanje s „°F“ na „°C“ je možno
po istem postopku.
Funkcija memory (način „memory“)
POMEMBNO!
Aktualna meritev se vedno shrani na zadnjem pomnilnem
mestu. Če so vsa pomnilna mesta zasedena, je iz pomnilnika
vedno odstranjena najstarejša meritev.
Meritve v načinu merjenja v ušesu ali na čelu se v napravi
shranijo avtomatsko. Izmerjene vrednosti so skupaj z datumom, časom in merilnim načinom zopet na razpolago, ko
ponovno pritisnete tipko „MEM / SET“
9
v standardnem
načinu. 1 x pritisnite tipko „MEM / SET“
9
, da prikličete
vrednost zadnje meritve. Na LC prikazovalniku
4
se
prikažejo simbol „memory“ (način „memory“), številka
meritve, datum, ura in merilni način (sl. F). S ponovnim pritiskom na tipko „MEM / SET“
9
se pojavi naslednje mesto pomnilnika s pripadajočo izmerjeno vrednostjo. Shrani
se lahko največ 9 izmerjenih vrednosti.
Page 81

81 SI
Če se želite vrniti nazaj v standardni način, ravnajte kot sledi:
1. Tolikokrat istočasno pritisnite tipko „FOREHEAD“
3
in tipko „EAR“
2
, da se na LC prikazovalniku
4
ponovno prikažejo temperatura prostora, datum in
ura kot tudi simbol
(sl. D).
2. Zdaj se nahajate v standardnem načinu.
Menjavanje baterije
Naprava je opremljena z eno litijevo baterijo (CR2032,
3 V
), ki omogoča zelo veliko meritev. Ko je baterija
prazna, vas na to opozori ustrezno sporočilo o napaki
(glejte poglavje „Funkcije / analiza napak – odpravljanje
problemov“).
Pokrov predalčka za baterijo
10
potisnite navzdol. Z
majhnim izvijačem baterijo
11
dvignite ven iz naprave.
Obvezno preprečite povzročitev kratkega stika baterije.
Kratki stik lahko nastane, če pride izvijač istočasno
v dotik z baterijo in prevodnimi deli v predalčku za
baterijo.
Novo baterijo vstavite v predalček za baterijo.
Opozorilo: Pri tem pazite na pravilno polarizacijo.
Oznaka na bateriji mora biti s plus znakom obrnjena
navzgor.
Novo baterijo potisnite pod kovinski nastavek in jo
pritisnite navzdol, da se slišno zaskoči.
Pokrov predalčka za baterijo
10
zopet potisnite na
predalček za baterijo, da se slišno zaskoči (sl. A).
Page 82

82 SI
Odpravljanje problemov
Če naprava meritve ne more opraviti v predvidenem
območju, se sproži sporočilo o napaki. To sporočilo naj
bi prispevalo k odpravljanju problema.
Napaka Problem Odprava
Naprava ne
reagira / se
pri odstranitvi
zaščitne folije
avtomatsko
ponastavi
Je baterija prazna?
Vstavite novo
baterijo
Je polarizacija baterije napačna?
Odstranite baterijo in jo pravilno
vstavite
Je kontakt z baterijo pomanjkljiv?
Prikaz simbola baterije na
LC prikazovalniku
4
Baterija je šibka. Vstavite novo
baterijo
Prikaz „Lo“ na
LC
prikazoval-
niku
4
(izmerjena vrednost pod
32,0 °C ali
89,6 °F)
Je termometer
pravilno nameščen v ušesu ali
na čelu/senci?
Upoštevajte navodila za uporabo glede nameščanja v ušesih
ali na čelu/sencah.
Page 83

83 SI
Napaka Problem Odprava
Prikaz „Hi“ na
LC
prikazoval-
niku
4
(izmerjena vrednost nad
42,9 °C ali
109,2 °F)
Preverite način
merjenja.
Upoštevajte navodilo za uporabo glede na pravilno merjenje.
Prikaz „ErrE“
na LC prikazovalniku
4
Temperatura okolice zunaj območja
15,0 °C - 40,0 °C
/ 59,0 °F 104,0 °F (način
merjenja na čelu)
in 10,0 °C 40,0 °C / 50,0 °F
- 104,0 °F (način
merjenja v ušesu in
način „scan“).
Poskrbite za temperaturo okolice v
območju 15,0 °C 40,0 °C / 59,0 °F
- 104,0 °F (način
merjenja na čelu)
in 10,0 °C 40,0 °C / 50,0 °F
- 104,0 °F (način
merjenja v ušesu in
način „scan“).
Prikaz „ErrU“
na LC prikazovalniku
4
Po meritvi ni merilnega rezultata.
Upoštevajte navodilo za uporabo glede na pravilno merjenje.
Prikaz „ErrH“
na LC prikazovalniku
4
Med avtomatskim testom je
bila ugotovljena
napaka.
Stopite v stik s
servisno službo.
Prikaz „ErrP“
na LC prikazovalniku
4
Problem strojne
opreme
Stopite v stik s
servisno službo.
Page 84

84 SI
Čiščenje in nega
Po nekaj meritvah temperature vas naprava opomni, da
morate očistiti merilno tipalo. V ta namen se na LC-zaslonu
4
pojavi simbol za čiščenje
20
in zadonijo signalni
zvoki. Za preprečevanje kontaminacije z bolezenskimi klicami je treba lečo po vsaki uporabi zdrgniti s krpo, ki je
navlažena s 70-odstotnim medicinskim alkoholom. Zaradi
tega uporaba higienskih nastavkov ni potrebna. Nato počakajte najmanj 30 minut, preden lahko izvedete novo
merjenje. Upoštevajte, da lahko zaradi izparilnega mraza
alkohola že najmanjše količine popačijo rezultat.
Ohišje čistite z mehko, rahlo navlaženo krpo. V primeru
hujše umazanije lahko vodi za čiščenje dodate tudi blago
čistilno sredstvo.
Napravo hranite v suhem okolju in preprečite direktno
sevanje sončnih žarkov. Napravo se lahko skladišči pri temperaturah od –10,0 °C - 55,0 °C (14,0 °F - 131,0 °F). Temperaturam nad 80 °C se je treba izogibati! Za merjenje pa
je nujno potrebno, da se je naprava dovolj dolgo časa prilagajala na prostorsko temperaturo, v nasprotnem primeru se
sproži sporočilo o napaki (glejte poglavje „Funkcije / analiza
napak - odpravljanje problemov“). Prav tako se je treba za
merjenje držati temperature prostora od 5,0 °C - 59,9 °C
(41,0 °F - 139,8 °F). Če leži zunaj tega območja, se sproži
sporočilo o napaki (glejte „Funkcije / analiza napak – odpravljanje problemov“).Iz naprave odstranite baterijo, če naprave dlje časa ne uporabljate.
Page 85

85 SI
Garancijski list
1. S tem garancijskim listom jamčimo Kompernass Han-
dels GmbH, da bo izdelek v garancijskem roku ob
normalni in pravilni uporabi brezhibno deloval in se
zavezujemo, da bomo ob izpolnjenih spodaj navedenih pogojih odpravili morebitne pomanjkljivosti in
okvare zaradi napak v materialu ali izdelavi oz. po
svoji presoji izdelek zamenjali ali vrnili kupnino.
2. Garancija je veljavna na ozemlju Republike Slovenije.
3. Garancijski rok za proizvod je 3 leta od dneva nabave.
4. Kupec je dolžan okvaro javiti pooblaščenemu servisu
oz. se informirati o nadaljnjih postopkih na zgoraj navedeni telefonski številki. Svetujemo vam, da pred tem
natančno preberete navodila o sestavi in uporabi izdelka.
5. Kupec je dolžan pooblaščenemu servisu predložiti garan-
cijski list in račun, kot potrdilo in dokazilo o nakupu.
6. V primeru, da proizvod popravlja nepooblaščeni ser-
vis ali oseba, kupec ne more uveljavljati zahtevkov iz
te garancije.
7. Vzroki za okvaro oz. nedelovanje izdelka morajo biti
lastnosti stvari same, in ne vzroki, ki so zunaj proizvajalčeve oz. prodajalčeve sfere. Kupec ne more uveljavljati zahtevkov iz te garancije, če se ni držal priloženih
navodil za sestavo in uporabo izdelka ali, če je izdelek
kakorkoli spremenjen ali nepravilno vzdrževan.
8. Jamčimo servisiranje in rezervne dele za minimalno
dobo, ki je zahtevana s strani zakonodaje.
9. Obrabni deli oz. potrošni material so izvzeti iz garancije.
Page 86

86 SI
10. Vsi potrebni podatki za uveljavljanje garancije se naha-
jajo na dveh ločenih dokumentih (garancijski list, račun).
11. Ta garancija proizvajalca ne izključuje pravic potrošnika,
ki izhajajo iz odgovornosti prodajalca za napake na
blagu.
Prodajalec:
Lidl d.o.o.k.d., Pod lipami 1, SI-1218 Komenda
SI
Servis Slovenija
Tel.: 080080917
E-Mail: kompernass@lidl.si
IAN 106635
Dosegljivost telefonske službe za stranke:
Od ponedeljka do petka od 8:00 do 20:00
(po srednjeevropskem času)
Odstranjevanje
Embalaža je sestavljena iz ekoloških materialov,
ki jih lahko odlagate na lokalnim lokacijah za
recikliranjem.
Vse o možnostih za odstranjevanje odsluženega kosa
pohištva boste izvedeli pri Vaši občinski ali mestni upravi.
Page 87

87 SI
Izdelek je v skladu z direktivo 2012 / 19 / EU
(WEEE). V interesu varovanja okolja odslužene
naprave ne odvrzite med hišne odpadke, temveč
jo oddajte v strokovno odstranjevanje. O zbirnih
mestih in njihovem odpiralnem času se lahko
informirate pri pristojni upravi.
Pokvarjene ali iztrošene baterije je potrebno reciklirati v
skladu z direktivo 2006 / 66 / EC. Baterije in / ali napravo
vrnite na ponujenih zbirnih mestih.
Baterije ne sodijo
med hišne odpadke!
Baterije in / ali izdelek oddajte na enem od ponujenih
zbirnih mest.
Skladnost
Na izdelek je bil v skladu z naslednjimi evropskimi direktivami nameščen znak CE
0197:
Direktiva o medicinskih pripomočkih 93/42/EEC,
spremenjena z Direktivo 2007/47/EC.
Page 88

88 SI
Pripadajoča izjava o skladnosti je shranjena pri uvozniku:
KOMPERNASS HANDELS GMBH
BURGSTRASSE 21
44867 BOCHUM
GERMANY
www.kompernass.com
Proizvajalec:
Shenzhen Dongdixin
Technology Co., Ltd.
No. 3 Building XiliBaimang
Xusheng Industrial Estate
Nanshan, Shenzhen, Kitajska 518108
Tel.: +86 755 27 652 316
E-Mail: service@e-caretalk.com
Zastopnik za EU:
Shanghai International
Holding Corp. GmbH (Europe)
Eiff estraße 80
20537 Hamburg, Germany
Tel.: +49 (0) 40 2513175
Faks: +49 (0) 40 255726
Page 89

89 DE/AT/CH
Einleitung
Bestimmungsgemäße Verwendung ..............Seite 91
Lieferumfang .................................................. Seite 92
Teilebeschreibung .........................................Seite 92
Technische Daten ..........................................Seite 93
Sicherheit
Allgemeine Sicherheitshinweise ...................Seite 95
Sicherheitshinweise .......................................Seite 98
Sicherheitshinweise zu Batterien ..................Seite 98
Vor der Inbetriebnahme
Batteriesicherung entfernen ..........................Seite 100
Betrieb
Datum / Uhrzeit einstellen (Abb. C) .............Seite 100
Temperaturmessungen .................................. Seite 101
Funktionen / Fehleranalyse
Temperatureinheit wählen ............................Seite 109
Die Memory-Funktion (Memory-Modus) .....Seite 109
Batteriewechsel .............................................Seite 110
Behebung von Problemen ............................Seite 111
Reinigung und Pflege ...............................Seite 113
Garantie und Service ................................ Seite 114
Entsorgung ....................................................Seite 116
Konformität ..................................................Seite 117
Page 90

90 DE/AT/CH
In dieser Bedienungsanleitung / am Gerät
werden folgende Piktogramme verwendet:
Bedienungsanleitung lesen!
Warn- und Sicherheitshinweise beachten!
Explosionsgefahr!
V
Gleichstrom (Strom- und Spannungsart)
mA
Milliampere
Lebens- und Unfallgefahr für
Kleinkinder und Kinder!
Medizinprodukt Typ BF
2015-01
Fabrikationsjahr und -monat
Entsorgen Sie Verpackung und
Gerät umweltgerecht!
Page 91

91 DE/AT/CH
Stirn-und-Ohr-Thermometer
Einleitung
Herzlichen Glückwunsch zum Kauf Ihres neuen
Gerätes. Sie haben sich damit für ein hochwer-
tiges Produkt entschieden.
Die Bedienungsanleitung ist Bestandteil dieses Produkts.
Sie enthält wichtige Hinweise für Sicherheit, Gebrauch
und Entsorgung. Machen Sie sich vor der ersten Inbetriebnahme mit den Funktionen des Gerätes vertraut. Lesen Sie
die nachfolgende Bedienungsanleitung.
Bewahren Sie diese Anleitung auf. Händigen Sie alle
Unterlagen bei Weitergabe des Gerätes an Dritte mit aus.
Bestimmungsgemäße Verwendung
Das Gerät ist im Innenbereich zur Messung von Körpertemperatur an Ohr oder Schläfe / Stirn, Messung der
Raumtemperatur sowie Messung von Oberfl ächentemperaturen im Haushalt vorgesehen. Es ersetzt keineswegs die
Untersuchungen des Arztes. Das Gerät ist ausschließlich
für den privaten Gebrauch bestimmt. Eine andere Verwendung als zuvor beschrieben oder eine Veränderung des
Produkts ist nicht zulässig und kann zu Verletzungen
und / oder Beschädigungen des Produkts führen. Für aus
bestimmungswidriger Verwendung entstandene Schäden
übernimmt der Hersteller keine Haftung.
Page 92

92 DE/AT/CH
Lieferumfang
1 x Stirn-und-Ohr-Thermometer
(inkl. Batterie und Schutzkappe
8
)
1 x Bedienungsanleitung
Teilebeschreibung
1
Messkopf
2
„EAR”-Taste
(Temperaturmessung im Ohr / Scan-Modus)
3
„FOREHEAD”-Taste
(Temperaturmessung an der Stirn / Schläfe)
4
LC-Display
5
LED rot: Fieber 38,0 °C - 42,9 °C
(100,4 °F - 109,2 °F)
6
LED orange: leichte Temperaturerhöhung
37,5 °C - 37,9 °C (99,5 °F - 100,3 °F)
7
LED grün: kein Fieber 34,0 °C - 37,4 °C
(93,2 °F - 99,4 °F)
8
Schutzkappe
9
„MEM / SET”-Taste (Abfrage der Speicher usw.)
10
Batteriefachdeckel
11
Batterie
Page 93

93 DE/AT/CH
LC-Display
12
Symbol Batteriewechsel
13
Symbol Anzeige Jahr
14
Symbol Anzeige Datum
15
Symbol Ohren-Modus
16
Symbol Standard-Modus
17
Symbol Scan-Modus
18
Temperaturanzeige
19
Symbol Stirn-Modus
20
Symbol Reinigung
21
Datum und Zeit im Standard-Modus
22
Symbol Sleep-Modus
23
Anzeige PM
24
Symbol Setup-Modus
25
Symbol Memory-Modus
Technische Daten
Messverfahren: Infrarot (berührungsfrei)
Stromversorgung: Lithium-Batterie 3 V
CR2032
Stromverbrauch: < 15 mA
Speicher: 9 Temperaturmessungen mit Angabe
von Datum, Uhrzeit und Messmethode
(Ohren- oder Stirnmessung)
Temperaturskalen: °C (°Celsius)
°F (°Fahrenheit)
Uhrzeitanzeige: 12- / 24-Stunden-Format
Automatische
Abschaltung: Automatische Abschaltung
nach 1 Minute
Page 94

94 DE/AT/CH
Messbereich Stirnund Ohren-Modus: 32 °C - 42,9 °C (89,6 °F - 109,2 °F)
Messgenauigkeiten: ± 0,2 °C (± 0,4 °F) im Bereich von
35,5 °C - 42,0 °C (95,9 °F - 107,8 °F)
± 0,3 °C (± 0,5 °F) im Bereich von
32,0 °C - 35,4 °C (89,6 °F - 95,8 °F)
und im Bereich von 42,1 °C - 42,9 °C
(107,9 °F - 109,2 °F)
Messbereich
Raumtemperatur: 5,0 °C - 59,9 °C (41,0 °F - 139,8 °F)
Messgenauigkeit: ± 2,0 °C (± 4,0 °F)
Messbereich
Scan-Modus: –22,0 °C - 80,0 °C (–7,6 °F - 176 °F)
Messgenauigkeit: ± 2,0 °C (± 4,0 °F)
Umgebungstemperatur:
Ohren- und
Scan-Modus: + 10,0 °C - + 40,0 °C
(50,0 °F - 104,0 °F)
Stirn-Modus: + 15,0 °C - + 40,0 °C
(59,0 °F - 104,0 °F)
Lagertemperatur: –10,0 °C - + 55,0 °C
(14,0 °F - 131,0 °F) bei
20%RH* - 85%RH*
Atmosphärendruck: 700 ~ 1060 hPa
Maße: ca. 135 x 35 x 58 mm (L x B x H)
Gewicht: ca. 54 g
*Relative humidity = relative Luftfeuchte
Page 95

95 DE/AT/CH
Sicherheit
BEWAHREN SIE ALLE SICHERHEITSHINWEISE UND ANWEISUNGEN FÜR DIE
ZUKUNFT AUF!
Allgemeine Sicherheitshin-
weise
WARNUNG!
LEBENSUND UNFALLGEFAHR FÜR
KLEINKINDER UND KINDER! Lassen Sie Kinder niemals
unbeaufsichtigt mit dem Verpackungsma-
terial. Es besteht Erstickungsgefahr. Kinder unterschätzen häufi g die Gefahren.
Halten Sie Kinder stets vom Produkt fern.
WARNUNG!
LEBENSGEFAHR!
Batterien können verschluckt werden,
was lebensgefährlich sein kann.
Ist eine Batterie verschluckt worden,
muss sofort medizinische Hilfe in An-
spruch genommen werden.
Dieses Gerät kann von Kindern ab 8 Jah-
ren und darüber sowie von Personen mit
verringerten physischen, sensorischen
oder mentalen Fähigkeiten oder Mangel
Page 96

96 DE/AT/CH
an Erfahrung und Wissen benutzt werden, wenn sie beaufsichtigt oder bezüglich des sicheren Gebrauchs des Gerätes unterwiesen wurden und die daraus
resultierenden Gefahren verstehen. Kinder dürfen nicht mit dem Gerät spielen.
Reinigung und Benutzer-Wartung dürfen
nicht von Kindern ohne Beaufsichtigung
durchgeführt werden.
Setzen Sie das Gerät
- keinen extremen Temperaturen,
- keinen starken Vibrationen,
- keinen starken mechanischen Beanspruchungen,
- keiner direkten Sonneneinstrahlung aus.
Andernfalls droht eine Beschädigung
des Gerätes.
Beachten Sie, dass Beschädigungen
durch unsachgemäße Handhabung,
Nichtbeachtung der Bedienungsanleitung oder Eingriff durch nicht autorisierte
Personen von der Garantie ausgeschlossen sind.
Nehmen Sie das Gerät keinesfalls ausei-
nander.
Durch unsachgemäße Reparaturen können erhebliche Gefahren für den Benutzer
entstehen.
Page 97

97 DE/AT/CH
Lassen Sie Reparaturen nur von Fachkräf ten durchführen.
Nehmen Sie das Gerät nicht in Betrieb,
wenn es beschädigt ist. Verletzungen
und / oder ungenaue Messwerte können
die Folge sein.
Suchen Sie einen Arzt auf, wenn das Ther-
mometer hohe Körpertemperatur-Messwerte
anzeigt! Fieber liegt bei dieser Messmethode oberhalb von 38,0 °C (100,4 °F) vor.
Die rot leuchtende LED
5
ist ein Warnhinweis. Messen Sie mehrmals im Abstand von
jeweils 0,5 bis 1 Stunde, um den Verlauf der
Temperatur zu verfolgen. Ihre Messwerte erleichtern dem Arzt die Diagnose.
Verwenden Sie das Thermometer nicht un-
ter extremen Temperaturbedingunge und /
oder im Außenbereich. Ungenaue Messergebnisse sind die Folge. Beachten Sie die
Vorgaben zu Umgebungs- und Lagertemperaturen (siehe „Technische Daten“).
Der Messfühler sollte weder direkt berührt,
noch angepustet werden. Ungenaue Messergebnisse sind die Folge.
Mobiltelefone sollten nicht in unmittelbarer
Nähe während der Nutzung des Thermometers verwendet werden. Ungenaue Messergebnisse können die Folge sein.
Page 98

98 DE/AT/CH
Sicherheitshinweise
Das Gerät ist ausschließlich für den pri-
vaten Gebrauch bestimmt. Es unterliegt
daher nicht der Eichpfl icht.
Verwenden Sie das Gerät nicht weiter,
wenn es beschädigt ist oder Ihnen die
Messwerte unrealistisch erscheinen. Ziehen Sie das Kapitel „Funktionen /
Fehleranalyse - Behebung von Problemen“ zu Rate bzw. wenden Sie sich an
unsere Servicestelle.
Sicherheitshinweise
zu Batterien
Entfernen Sie die Batterie, wenn sie län-
gere Zeit nicht verwendet worden ist,
aus dem Gerät.
VORSICHT! EXPLOSIONS-
GEFAHR! Laden Sie Batterien
niemals wieder auf!
Achten Sie beim Einlegen auf die richti-
ge Polarität! Diese wird im Batteriefach
angezeigt.
Page 99

99 DE/AT/CH
Reinigen Sie Batterie- und Gerätekontakt
vor dem Einlegen falls erforderlich.
Batterien gehören nicht in den Haus-
müll!
Jeder Verbraucher ist gesetzlich ver-
pfl ichtet, Batterien ordnungsgemäß zu
entsorgen!
VORSICHT! EXPLOSIONS-
GEFAHR! Halten Sie Batterien
von Kindern fern, werfen Sie Batterien nicht ins Feuer, schließen
Sie
Batterien nicht kurz und neh-
men Sie sie nicht auseinander.
Entfernen Sie eine erschöpfte Batterie
umgehend aus dem Gerät. Bei Nichtbeachtung kann die Batterie über ihre Endspannung hinaus entladen werden. Es
besteht dann die Gefahr des Auslaufens. Falls die Batterie in Ihrem Gerät
ausgelaufen sein sollte, entnehmen Sie
diese sofort, um Schäden am Gerät vorzubeugen!
Vermeiden Sie den Kontakt mit Haut,
Augen und Schleimhäuten. Bei Kontakt
mit Batteriesäure spülen Sie die betroff ene Stelle mit reichlich Wasser ab und /
oder suchen Sie einen Arzt auf!
Page 100

100 DE/AT/CH
Vor der Inbetriebnahme
Batteriesicherung entfernen
Schieben Sie den Batteriefachdeckel
10
nach unten.
Ziehen Sie die Schutzfolie an der Lasche aus dem
Batteriefach.
Schieben Sie den Batteriefachdeckel
10
wieder auf
das Batteriefach, bis er hörbar einrastet (Abb. A).
–
Beim Einschalten wird ein interner Abgleich und ein
Selbsttest des LC-Displays durchgeführt.
–
Um nachzuprüfen, ob alle Balken der Ziff ern richtig
angesteuert werden, überprüfen Sie beim Einschalten
das Bild des LC-Displays
4
Ihres Gerätes mit dem
Muster (Abb. B).
Betrieb
Datum / Uhrzeit einstellen (Abb. C)
Diese Einstellung ist nur bei der Erstinbetriebnahme und
nach Batteriewechsel erforderlich.
1.
Drücken und halten Sie die „MEM / SET”-Taste
9
für
zwei Sekunden im Standard-Modus gedrückt. Ein Signalton ertönt. Das Gerät befi ndet sich im Setup-Modus.
2.
Drücken Sie die „MEM / SET”-Taste
9
, um zwischen
dem 12- bzw. 24-Stunden-Format zu wählen.
 Loading...