

Page 1
IAN 106103
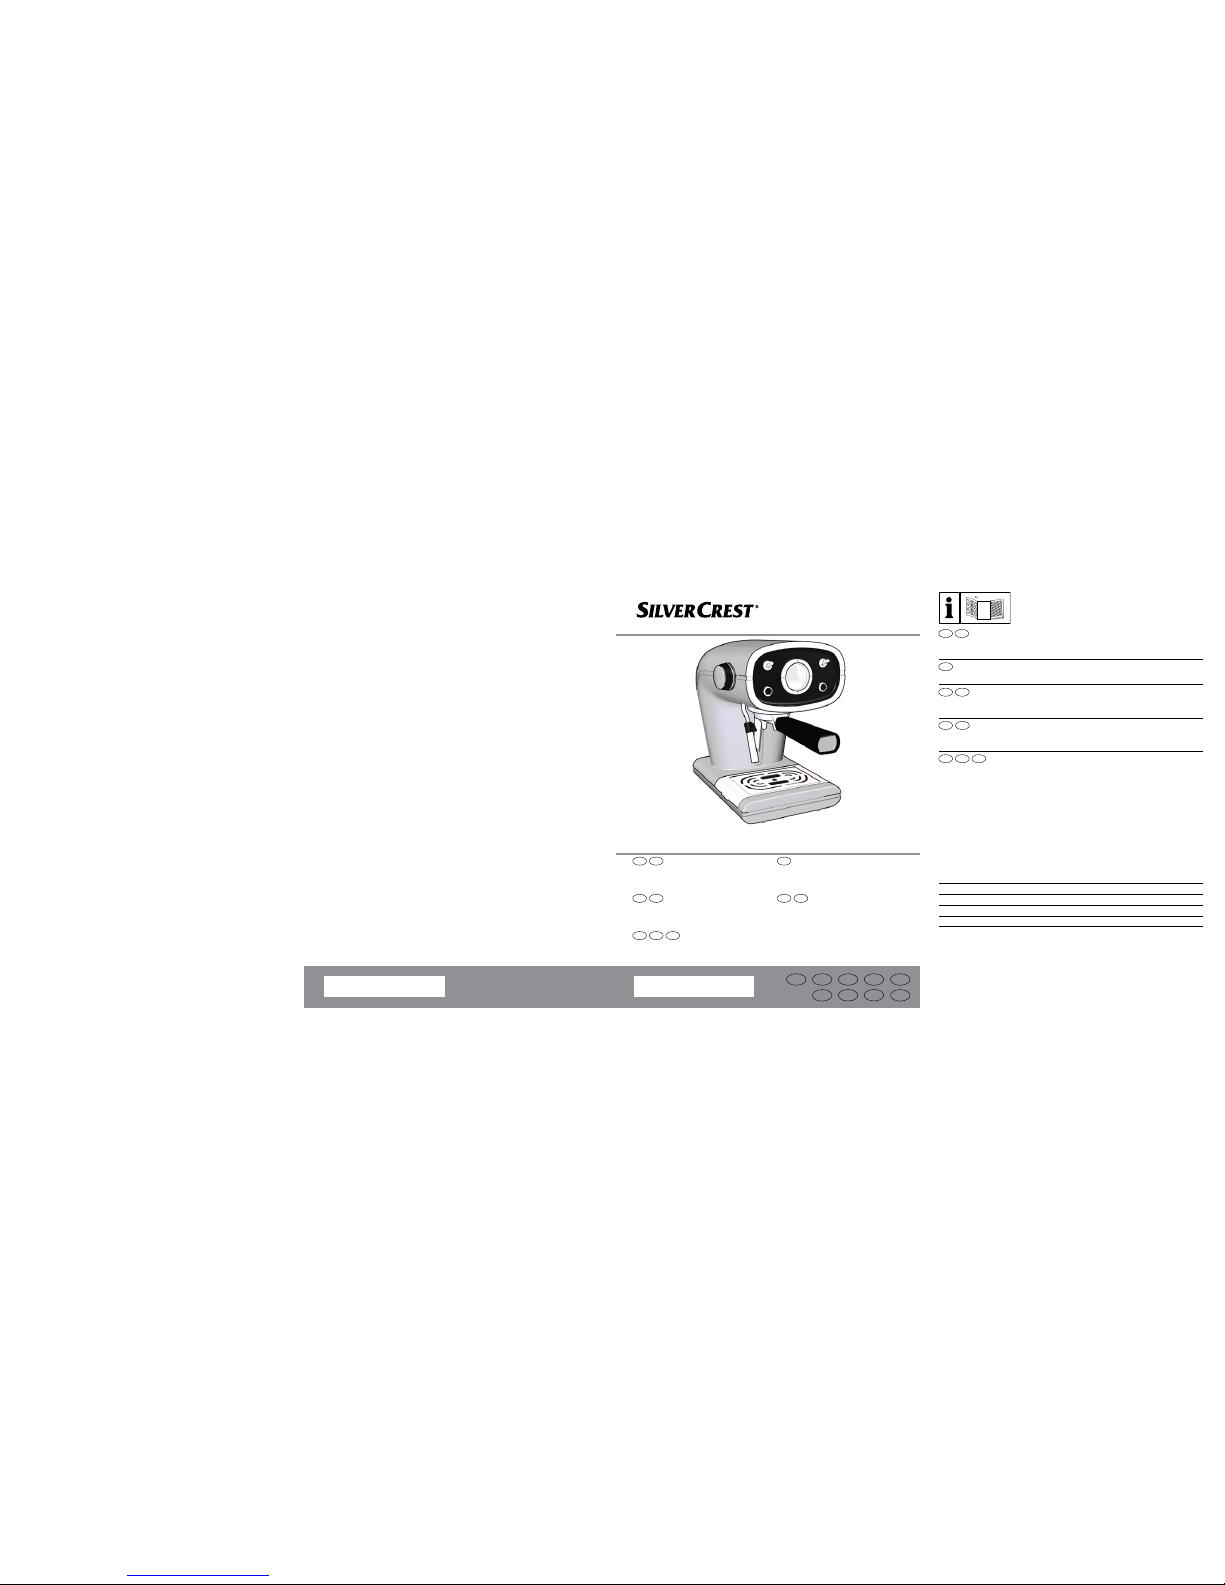
ESPRESSO MACHINE
CH
BEIE
DE’LONGHI APPLIANCES S.r.l.
Via L. Seitz, 47
31100 Treviso, Italy
Tel. +39-0422-4131
Fax +39-0422-413736
Version information · Version av information ·Informatie versie
Version des informations · Stand der Informationen:
12 / 2014 · Ident.-No.: cod. 4055108010 rev. 0
ESPRESSOMASCHINE
SEMR 850 A1
Bedienungsanleitung
DE AT CH
ESPRESSOAPPARAAT
SEMR 850 A1
Informatie versie
NL BE
MACHINE À EXPRESSO
SEMR 850 A1
Instructions d’utilisation
FR BE
AT
NL
GB / IE Operating Instructions Page 3
SE Användnings- och säkerhetsanvisningar Sida 16
NL / BE Aanwijzingen voor het gebruik en de veiligheid Pagina 29
FR / BE Instructions d‘utilisation et consignes de sécurité Page 42
DE / AT / CH Bedienungs- und Sicherheitshinweise Seite 55
GB IE
Before reading, open the page with the images and learn about the different functions of the
appliance.
SE
Slå upp sidan med bilder och lär dig apparatens olika funktioner innan du börjar att läsa.
NL BE
Voordat u begint te lezen, opent u de pagina met de afbeeldingen om vertrouwd te raken met
de verschillende functies van het apparaat.
FR BE
Avant de lire le mode d‘emploi, ouvrez la page contenant les illustrations et familiarisez-vous
ensuite avec toutes les fonctions de l‘appareil.
DE AT CH
Klappen Sie vor dem Lesen die Seite mit den Abbildungen aus und machen Sie sich anschließend mit allen Funktionen des Gerätes vertraut.
DE
IAN 106103
www.lidl-service.com
Typ 1388A
SEGB
FR
ESPRESSOMASKIN
SEMR 850 A1
Bruksanvisning
SE
ESPRESSO MACHINE
SEMR 850 A1
Operating Instructions
GB
IE
Page 2
L M
N
Fig. 4 Fig. 5
F
G1
D
H
G
C
K
A
O P
Fig. 1
Fig. 2 Fig. 3
Fig. 6
B
E
I
Fig. 7
Fig. 10
Fig. 11 Fig. 12
Fig. 13
Fig. 8
Fig. 9
J
Fig. 14
Page 3
IT
GB / IE
3
GB / IE
SYMBOLS
The information in this manual is labelled as follows:
DANGER for children
DANGER from electricity
DANGER from other causes
WARNING: risk of burns from high temperature steam
IMPORTANT possible damage to materials
SYMBOLS 3
IMPORTANT SAFEGUARDS 4
DESCRIPTION OF THE APPLIANCE 7
INTENDED USE 7
PRELIMINARY PHASES FOR USE 7
HOW TO MAKE COFFEE 8
HOW TO MAKE CAPPUCCINO 9
MAKING FURTHER CUPS OF COFFEE 9
USEFUL TIPS FOR OBTAINING A GOOD ITALIAN ESPRESSO 9
CLEANING THE APPLIANCE 10
DECALCIFICATION 11
PUTTING OUT OF SERVICE 11
DISPOSAL 12
TECHNICAL DATA 12
TROUBLESHOOTING 13
WARRANTY 14
CONTENTS
Page 4
4
GB / IE
GB / IE
IMPORTANT SAFEGUARDS
READ THESE INSTRUCTIONS BEFORE USE.
ALWAYS KEEP THESE INSTRUCTIONS.
In case of transfer of the appliance, also hand this manual.
• This appliance is designed only for private use, and is therefore to be
considered unsuitable for commercial or industrial purposes.
• We decline any responsibility resulting from misuse or any use other
than those covered in this booklet.
• We suggest you keep the original box and packaging, as our free-ofcharge service does not cover any damage resulting from inadequate
packaging of the product when this is sent back to an Authorised
Service Centre.
DANGER for children
• The appliance can be used by children aged 8 years and up only if
they are monitored by a responsible person or if they have received
instructions regarding the appliance safe use and if they have understood the dangers which may arise during the appliance use.
• Cleaning and maintenance by the user must not be carried out by
children unless they are older than 8 years and are monitored during
the operation. Children must be supervised at all times to ensure they
do not play with the appliance.
• Do not leave the packaging near children because it is potentially
dangerous.
• In the event that this appliance is to be disposed of, it is suggested that
the power chord is cut off. It is also recommended that all potentially
dangerous components are rendered harmless to prevent children
hurting themselves when playing with the apparatus.
DANGER from electricity
• This appliance can be used by persons who have reduced physical
sensory or mental capabilities, or lack of experience and knowledge,
only if they are monitored by a responsible person or if they have
received and understood instructions regarding the appliance safe
Page 5
IT
GB / IE
5
GB / IE
use and if they have understood the dangers which may arise during
the appliance use.
• Before connecting the appliance to the power supply, make sure that
the voltage indicated on the plate on the bottom of the machine corresponds to the local mains voltage.
• The use of extension leads, which have not been authorised by the
appliance manufacturer, may cause damage and accidents.
• If the electric cable is damaged it must be replaced by the manufacturer or its Technical Assistance Service, or in any case by a person
with similar qualifications, in order to avoid any risk.
• Never let the live parts come into contact with water: this may cause
a short circuit.
• Unplug before any cleaning or maintenance operations.
• Do not immerse the appliance in water or other liquids.
• Always turn off the appliance and remove the power cable plug from
the socket-outlet before filling the tank with water.
DANGER from other causes
• Do not lift the appliance by grasping its water tank or its tray, but only
by grasping its body.
• Choose a sufficiently well lit and clean environment, with an easily
accessible electric socket.
• Avoid putting excessive quantities of water into the tank.
• Never leave the appliance unattended when it is connected to the
power supply.
• The appliance must be used and rested on a stable surface.
• The appliance is not to be used if it has been dropped, if there are
visible sign of damage or if it is leaking. Do not use the appliance if
the power cord or the plug are damaged, or if the appliance is faulty.
To prevent any accident, all repairs, including the replacement of the
power cord, must be carried out by an Authorised Service Centre or,
in any case, by qualified personnel.
Page 6
6
GB / IE
GB / IE
WARNING: risk of burns
from high temperature steam
• Never direct the steam or hot water jet towards parts of the body;
handle the steam/hot water spout with care: risk of scalding!
• The outer metallic parts of the appliance and of the filter holder must
not be touched with the appliance in operation, because it could
cause burns.
• If water does not come out of the filter holder, it may be because the
filter is clogged. Stop the brewing and wait ten seconds. Remove and
disconnect the filter holder because any remaining pressure could
cause splashes or squirts. Then clean as explained in the relevant
paragraph.
IMPORTANT possible damage to materials
• Place the machine on a stable surface where it cannot be knocked
over.
• Never use the machine without water because the pump will burn out.
• Never fill the water tank with hot or boiling water.
• Do not place the machine on very hot surfaces or near open flames
in order to prevent damage to the body.
• The cable must not touch any hot parts of the machine.
• Do not use sparkling (carbonated) water.
• Never put in the filter substances other than coffee powder. They
could cause serious damage to the appliance.
• Do not leave the machine at a room temperature below 0 °C because
the water remaining in the boiler could freeze and cause damage.
• Never use the appliance outdoors.
• Do not expose the appliance to atmospheric agents (rain, sun, etc...).
• Before cleaning the appliance always unplug it and allow it cool
down. Clean only with a non-abrasive cloth that has been slightly
dampened with water, adding a few drops of mild, non-aggressive
detergent (never use solvents that damage plastic).
Page 7

IT
GB / IE
7
GB / IE
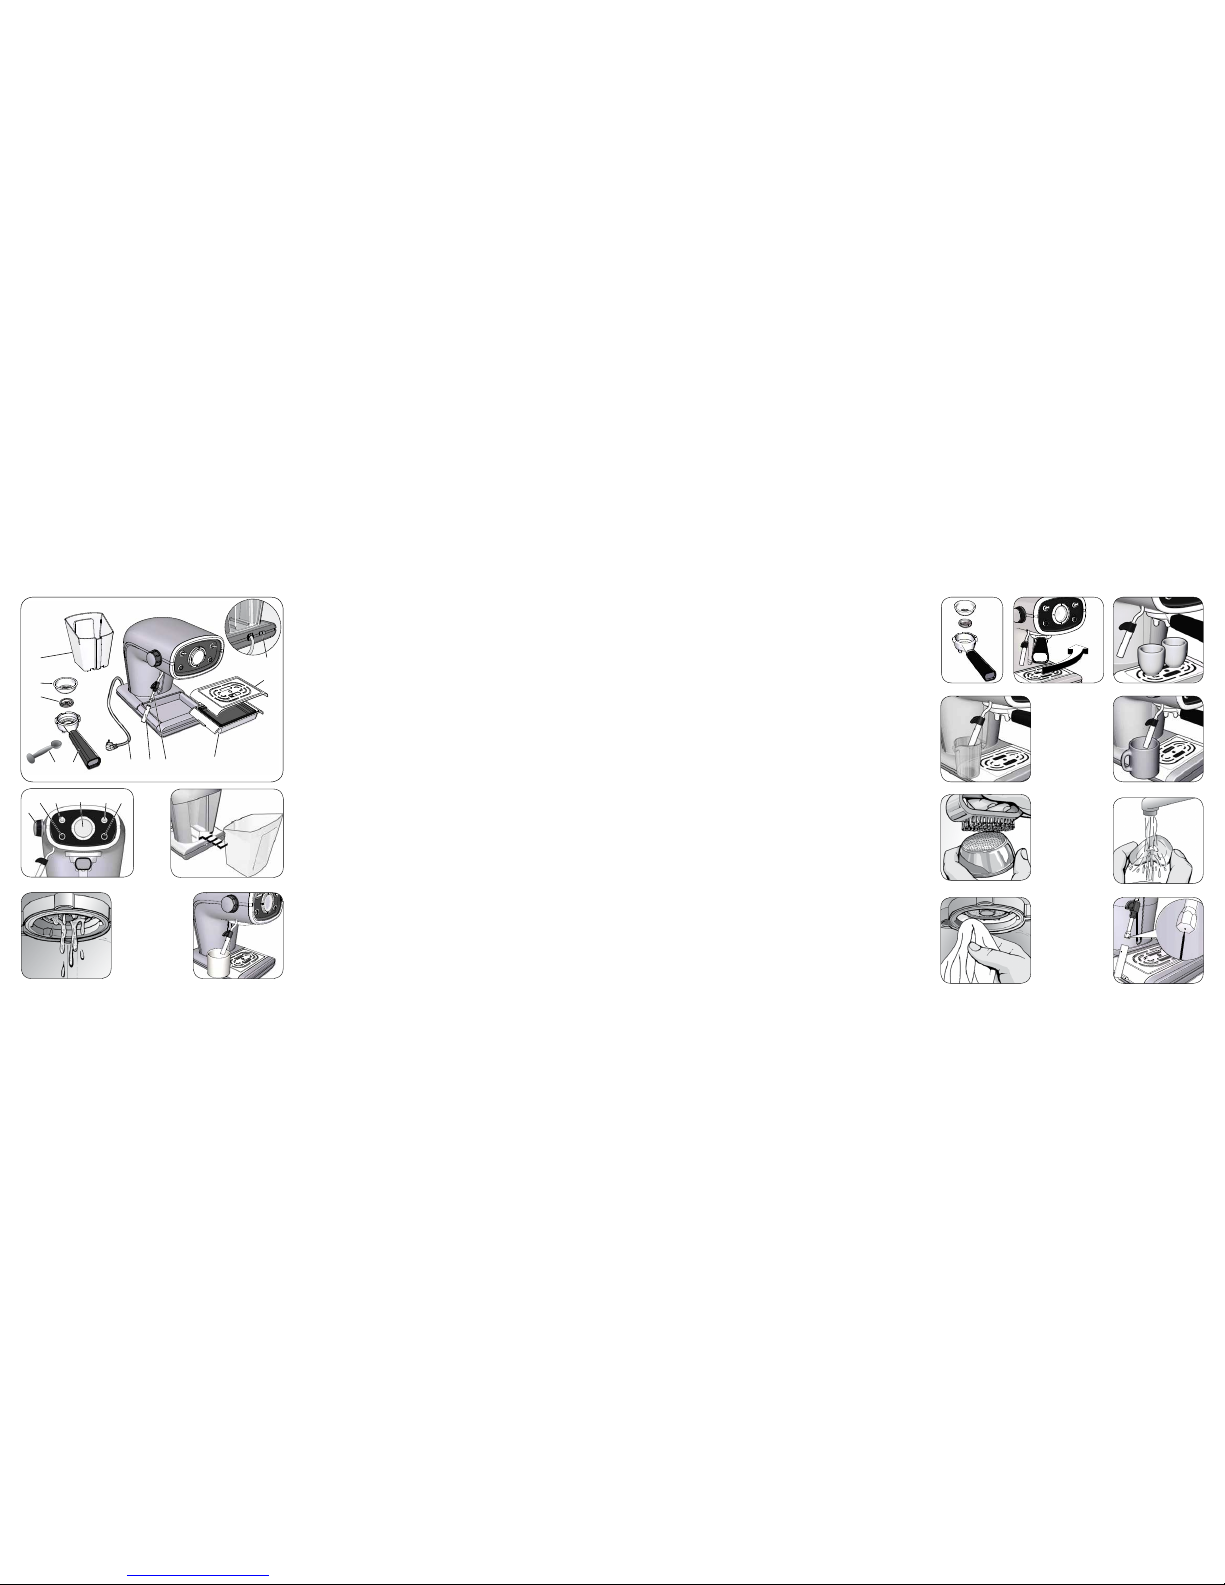
DESCRIPTION OF THE APPLIANCE
A
Filter holder for ground coffee
I
Removable cup grille
B
Coffee measure/presser
J
ON/OFF switch
C
Perforated silicone disc (Thermocream®)
K
Steam dispensing knob
D
Filter for ground coffee
L
Boiler temperature indicator lamp
E
Removable water tank
M
Steam function switch
F
Power cord + Plug
N
Boiler temperature thermometer (C°
and F°)
G
Cappuccino maker
O
Coffee brewing switch
G1
Steam tube
P
“ON” indicator light
H
Drip tray
INTENDED USE
• You can use your appliance to prepare coffee and cappuccino; and
thanks to the possibility of dispensing hot water, you can also prepare
tea and tisanes. This appliance is designed only and solely for private
use, and is therefore to be considered unsuitable for industrial or professional purposes.
• No other use of the machine is contemplated by the manufacturer,
which is exempt from any liability for all types of damages caused by
improper use of the machine. Improper use also results in any form of
warranty being forfeited.
PRELIMINARY PHASES FOR USE
Using the appliance for the first time
Check that the voltage of the domestic network is the same as that indicated on the technical
information plate of the appliance. Place the appliance on a stable surface. When using it
the first time, wash the tank and fill it with cool tap water – (1 liter MAX) – and then carefully
fit it firmly into its seat (Fig. 3).
Check that the tank is properly inserted; otherwise, the machine may not dispense
coffee.
Insert the plug into the socket, which must be earthed.
Starting the first time
After having filled the tank with cool tap water, start the machine. Press the on/off switch (J)
(Fig. 1) for a few seconds. The indicator light (P) will turn on to indicate that the machine is on.
If you are starting the machine for the first time or after a period of time during
which it has not been used, it is recommended that at least one cup of water be
allowed to pass through the boiler’s hydraulic circuit.
Page 8
8
GB / IE
GB / IE
Place a container with a capacity of at least half a litre under the coffee spout and cappuccino
maker (Fig. 5). Put the coffee brewing switch (O) on the coffee position ( ). Wait that water
comes out from the coupling seat of the filter holder. Open the steam dispensing knob (K) and
make water come out of the cappuccino maker.
Stop dispensing by putting the coffee brewing switch (O) in the high position. Close the steam
knob. Wait for the boiler temperature indicator lamp (L) to turn on. At this point the coffee
maker is ready to brew coffee.
HOW TO MAKE COFFEE
Put the perforated silicone disc (C) and the filter for ground coffee (D) into the filter holder (A)
in the order indicated (Fig. 6). Measure out the coffee in the filter and lightly press with the
specially provided presser: completely fill two measures for two cups of coffee, and fill only
one for one cup. Insert the filter holder into its seat.
Tighten well by turning it from left to right while making sure you have hooked it
properly onto the flange (Fig. 7).
Warning!
If too much ground coffee is put inside the filter, turning the filter holder may
prove difficult and/or you may get leaks from the filter holder when the coffee is being dispensed.
The filter ring should be preheated for a few minutes to ensure a nice, hot cup of coffee. This
will not be necessary for the cups of coffee that follow.
Wait for the
boiler temperature indicator lamp
(L) to turn on. Position the coffee brewing switch
(O) to coffee brewing ( ): the coffee will start coming out of the spouts of the filter holder. To
stop the flow move the coffee brewing switch (O) to the high position. The minimum serving of
coffee is 50 ml.
Warning!
Like professional coffee makers, do not remove the filter ring when the coffee
brewing switch is turned on (in coffee brewing position ).
Warning!
Wait about ten seconds after the coffee has been dispensed before removing
the filter holder. To remove it, turn it slowly from right to left so as to prevent
splashes or spurts of water or coffee.
When warming up, your appliance may release small puffs of steam from the filter
holder; this is perfectly normal.
The boiler temperature indicator lamp (L) will go on and off at regular intervals indicating that
the boiler’s thermostat is keeping the water at the right temperature. When using the coffee
maker for the first time and thereafter, it is best to begin brewing coffee only when the boiler
temperature indicator lamp (L) is on.
Auto-off function
If the machine is turned on but not in use, the auto-off function operates after 30 minutes. This
function puts the machine in standby. The ON indicator light (P) is off. To restart the machine
press again the on/off switch (J).
Page 9
IT
GB / IE
9
GB / IE
Filling the water tank during use
No special operation is necessary when the water in the tank runs out as the machine is
equipped with a special self-priming device. Just unplug the machine, pull out the tank and
fill it with fresh cool water again.
HOW TO MAKE CAPPUCCINO
To make cappuccino, hot chocolate or heat any beverage, move the steam function switch
(M) to the steam position ( ) and wait until the boiler temperature indicator lamp (L) goes
on, which indicates that the heating unit has reached the right temperature to produce steam.
When warming up, your appliance may release small puffs of steam from the filter
holder; this is perfectly normal.
Turn the steam dispensing knob (K), having the foresight to position a cup underneath the
cappuccino maker (G): at first a little water will come out, immediately followed by a strong
jet of steam.
Close the steam dispensing knob (K) to stop the jet of steam and put the pot of milk to be
whipped under the cappuccino maker (Fig. 10). Plunge the wand all the way into the pot of
milk and again open the steam dispensing knob (K) until you get the result you want. During
these operations you may notice that the boiler temperature indicator lamp (L) goes on and
off from time to time, indicating that the boiler thermostat is keeping the water required for
the steam supply at the right temperature.
It is opportune you start dispensing the steam only when the lamp is on. Dispense
the steam for a few seconds after every use in order to free the hole of any milk
residue.
Close the steam dispensing knob (K). After the cappuccino is prepared, move the steam function switch (M) to the high position to cut out the steam function.
MAKING FURTHER CUPS OF COFFEE
To prepare a cup of coffee right after making cappuccino, it is necessary to bring the boiler
back to the coffee preparation temperature by performing these operations: put the steam
function switch (M) in the high position to cool down the boiler, wait for the boiler temperature
indicator lamp (L) to turn off and then turn on again. To cool the heating unit more quickly,
proceed as follows: after having placed a container underneath the cappuccino maker (G),
put the coffee brewing switch (O) in position (
); turn the steam dispensing knob (K): this
will cause water to flow out, until the boiler temperature indicator lamp (L) turns back off.
Now close the steam dispensing knob (K) and put the coffee brewing switch (O) in the high
position. Wait until the boiler temperature indicator lamp (L) turns back on. The coffee maker
is now ready to brew coffee again.
USEFUL TIPS FOR OBTAINING A GOOD ITALIAN ESPRESSO
The ground coffee in the filter holder has to be pressed lightly. Whether the coffee is stronger
or weaker depends on the degree the coffee is ground, the quantity put into the filter holder
and the pressing. Just a few seconds are needed for the coffee to flow down into the cups. If
the dispensing time is longer, this means that the coffee is ground too fine or that the coffee
put into the filter holder has been pressed too much.
Page 10
10
GB / IE
GB / IE
CLEANING THE APPLIANCE
Warning!
All cleaning operations described below must be performed with the machine
off and with the electric plug disconnected from the socket-outlet.
Warning!
Regular maintenance and cleaning preserve and keep the machine efficient
for a longer amount of time. Never wash machine components in the dish
-
washer. Do not use direct jets of water.
Warning!
All operations must be performed when the machine is cold.
Cleaning the filter containing the grounds
Check that the holes are not clogged and if so, clean them with a small brush (Fig. 11).
Dispense boiling water from the filter holder with the filter inside, without coffee grounds, after
placing a glass underneath the dispenser in order to dissolve or remove any coffee residue
or impurities.
Warning!
Slowly remove and disconnect the filter holder because any remaining pres-
sure could cause splashes or squirts.
It is advisable to thoroughly clean the filter about every 3 months using detergent tabs, which
can be found at retail stores and the Authorised Service Centres, following the instructions
inside the package. As an alternative, you can use a simple dishwasher detergent tab (without
added rinse aid or other chemical additives) as follows:
• Put a dishwasher detergent tab into the filter (without coffee) when the machine is hot (after
heating for at least five minutes).
• Couple the filter holder to the machine and put a container underneath the filter holder.
• Put the coffee brewing switch (O) in the coffee position (
) to start dispensing water, then
dispense water for 15-20 seconds.
• Stop the water supply and let the tab act for at least 15 minutes while keeping the filter
holder coupled on the machine.
• Repeat the water dispensing operation by operating the pump for about 15-20 seconds,
and then letting it rest for another 15-20 seconds, until two tanks of water are used up.
• Remove the filter holder from the machine, remove the filter and rinse it well under running
tap water.
• Turn off the machine, disconnect the power cable from the socket-outlet and clean the
coupling seat of the filter holder with a sponge in order to remove any detergent residue
from the shower disc.
• Turn the machine back on, couple the filter holder once again and dispense at least 2 cups
of water again to complete the rinsing.
If the coffee machine is used daily, it is advisable to carry out the cleaning operation at least
every three months.
Cleaning the silicone disc
Wash the silicone disc (C) under running water, bending it slightly on the sides in order to
Page 11
IT
GB / IE
11
GB / IE
free the centre hole of any residue of coffee grounds that could clog it (Fig. 12).
Cleaning the filter holder seat
With time, coffee residue may accumulate on the filter holder seat. It can be removed with a
toothpick, a sponge (Fig. 13), or by letting water run through without fitting the filter holder
(Fig. 4).
Cleaning the cappuccino maker
Warning!
Perform this operation when the chrome-plated pipe is cold so as to prevent
burns.
Unscrew the cappuccino maker (G) from the steam tube (G1) (Fig. 14) and wash it with
running water. The steam tube (G1) can be cleaned with a non-abrasive cloth. If necessary,
clean the small steam outlet hole again with a pin (Fig. 14). Screw the cappuccino maker
back on as far as it will go. After use, always let the steam nozzle run for a few seconds so
to free the outlet from any possible residue.
Cleaning the tank
Periodically clean the inside of the tank with a sponge or damp cloth.
Cleaning the grill and the drip tray
Remember to empty the drip tray from time to time (H).
Remove the grill (I) and wash it under running water; remove the drip tray (H) from the
machine, empty it and wash it under running water.
Cleaning the machine body
Warning!
Clean the fixed parts of the machine using only a damp, non-abrasive cloth
so as to not damage the body.
DECALCIFICATION
Good maintenance and regular cleaning preserve and keep the machine efficient for a longer
amount of time, considerably limiting the risks of lime deposits forming inside the appliance.
However, should your coffee machine fail to work properly as a result of the frequent use of
hard, high calcium content water, you may perform a decalcification procedure to restore
its operational efficiency. Should you need to decalcify your appliance, please follow the
instructions which come with the decalcifying product.
PUTTING OUT OF SERVICE
If you want to put the machine out of service, you must disconnect it electrically, empty the
water tank and drip tray and clean it (see the paragraph on “Cleaning the appliance”).
In the case of scrapping, you must separate the various materials used in making the machine
and dispose of them based on their composition and on the legal provisions in force in the
country of use.
Page 12
12
GB / IE
GB / IE
DISPOSAL
Packaging
The product is packaged using recyclable materials, which must be disposed of in the proper
containers.
Electronic equipment
Do not dispose of electronic equipment in normal household waste.
Compliant with EU directive 2012/19/EC, at the end of its useful life, the appliance
must be disposed of in a suitable manner. This will make it possible to re-use recyclable
material, limiting the impact on the environment.
Dispose of the appliance at a collection centre for electrical waste or a recycling centre.
For more information, please contact your local disposal company or local authority.
TECHNICAL DATA
Mains Power: 220-240 V ~ 50/60 Hz
Power: 850 Watt
Page 13
IT
GB / IE
13
GB / IE
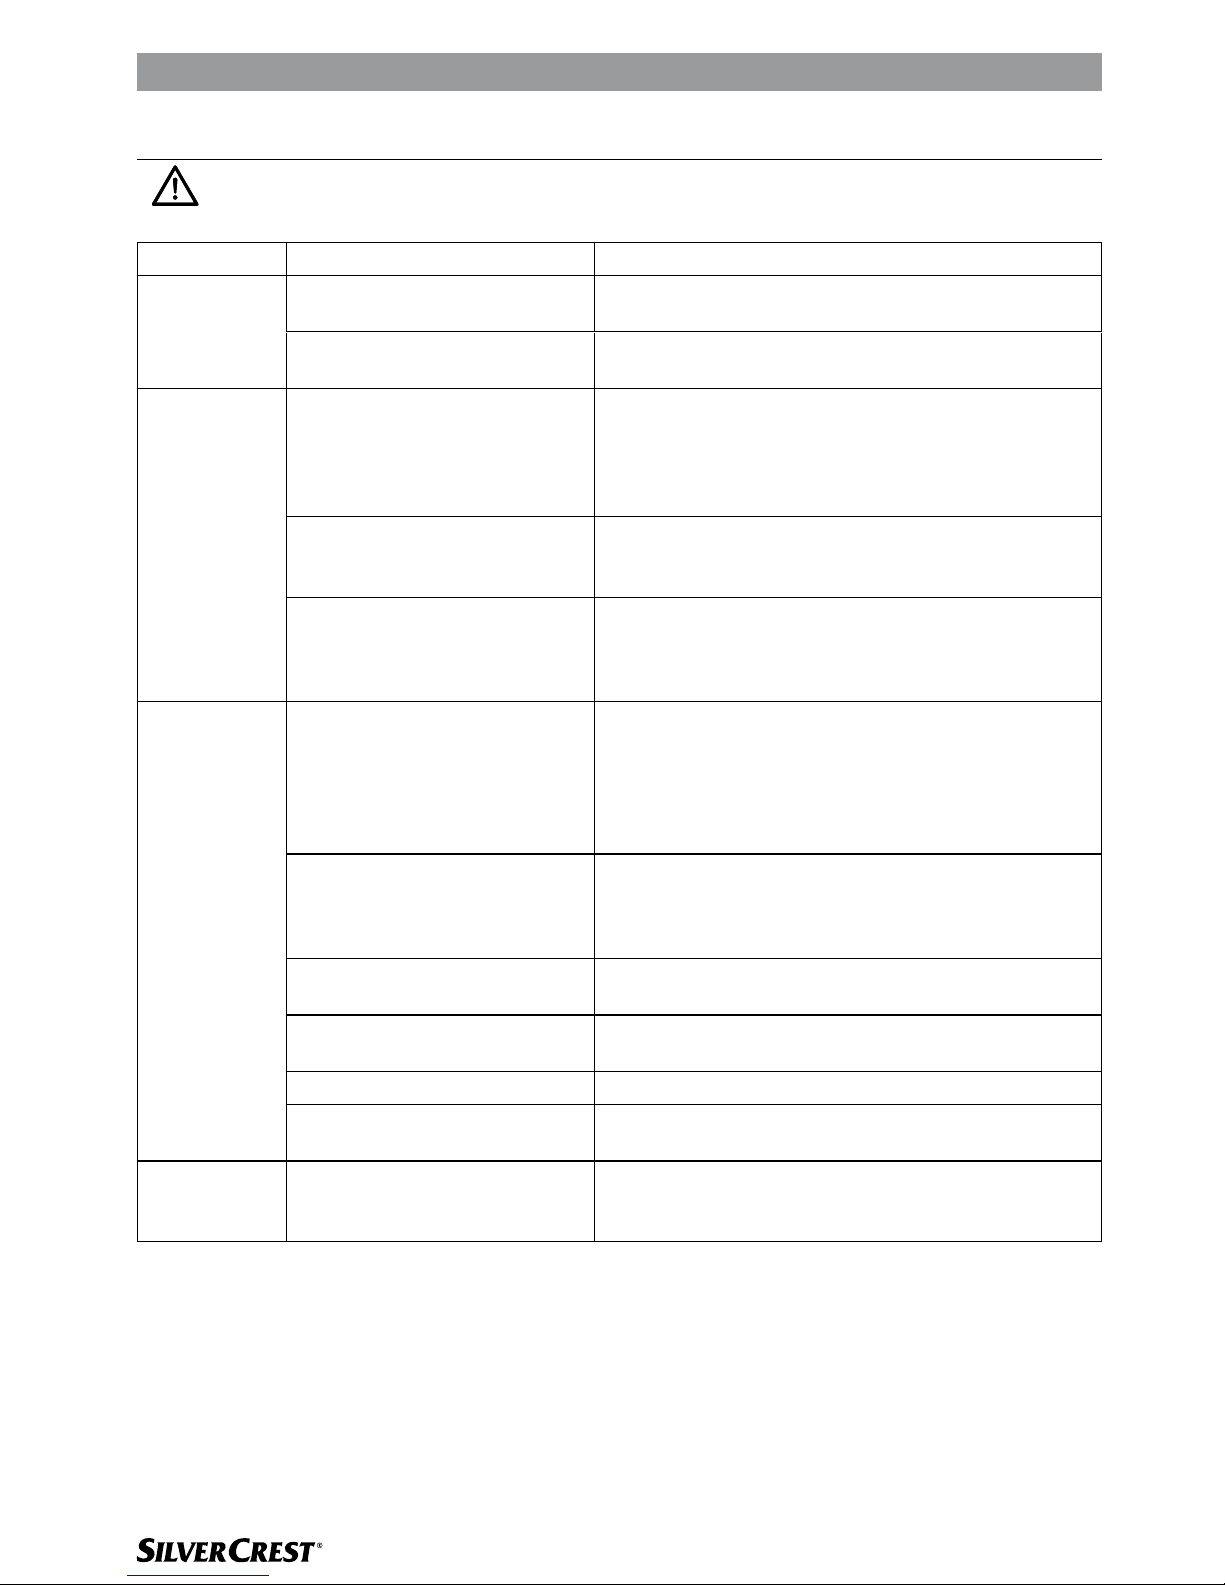
TROUBLESHOOTING
If there are problems with operation, immediately turn off the machine and
unplug it from the socket-outlet.
PROBLEMS CAUSES SOLUTIONS
The coffee
maker does
not supply
steam.
There is little water and the
pump does not suck it up.
Check that the water level in the tank is correct. If
necessary, fill it with cool tap water.
The steam exit hole on the dis
-
penser wand is clogged.
Unclog any deposits that may have formed in the
hole of the steam tube with a pin (Fig. 14).
Coffee over
flowing from
the edges of
the filter ring.
Probably an excess amount of
ground coffee has been placed
in the filter ring preventing the
filter ring from being correctly
tightened into its housing.
Slowly remove and disconnect the filter holder
because any remaining pressure could cause splashes or squirts. Clean the coupling seat with a sponge
(Fig. 13). Repeat the operation placing the correct
quantity of coffee in the filter.
Residues of ground coffee have
remained on the gasket of the
filter holder coupling seat.
Clean the seal with a toothpick or a sponge (Fig.
13).
The exit holes of the filter
containing coffee grounds are
clogged.
Slowly remove and disconnect the filter holder
because any remaining pressure could cause splash
es or squirts. Clean the clogged filter holes with a
small brush or a pin.
The coffee is
not supplied
or flows too
slowly.
The holes of the perforated disc
in the filter holder coupling seat
are clogged.
Turn on the machine without the filter holder, making
the water run. Turn on the machine without the filter
holder, making the water run. If the water still does
not come out from all the holes evenly, carry out the
descaling cleaning operation, following the instruc
-
tions provided in the package.
The exit holes of the filter
containing coffee grounds are
clogged.
Slowly remove and disconnect the filter holder
because any remaining pressure could cause splash
es or squirts. Clean the clogged filter holes with a
small brush or a pin.
The coffee blend is ground too
fine.
Try using coarser coffee blends.
The coffee blend is pressed
down too much.
amper coffee inside the filter using less pressure.
The tanks is not inserted well. Fit the tank securely by pushing it as far as it will go.
There is little water and the
pump does not suck it up.
Check that the water level in the tank is correct. If
necessary, fill it with cool tap water.
The coffee is
too watery
and cold.
The blend has been ground too
coarsely.
A more finely ground blend must be used to obtain a
more concentrated and hotter coffee.
Page 14

14
GB / IE
GB / IE
WARRANTY
Dear Customer,
This appliance is provided with a 3-year warranty (statutory warranty) from the date of purchase.
In case of a faulty product, the purchaser is covered by statutory consumer rights, which are not
limited by the following warranty.
Warranty conditions
The warranty period commences at the date of purchase. Keep the original receipt as proof of
purchase.
In case of defects in material or workmanship found within three years (statutory warranty) from the
date of purchase of the product, we will, at our discretion, repair or replace the appliance free of
charge. This intervention, under warranty requires that within the period of three years (statutory
warranty), that the faulty appliance and proof of purchase (receipt) be presented together with a
short description of the fault, including the date on which the problem was found.
In the event that the fault is covered by warranty, the appliance will be repaired or replaced. The
repair or replacement of the product does not imply the start of a new warranty period.
Warranty period and legal right to complaint due to fault
The warranty period is not extended by the legal warranty. The above also refers to parts that are
replaced or repaired. Report damage or any faults found at the time of purchase immediately after
unpacking. Repairs requested after the warranty period has expired will be charged.
Warranty application
This product has been made with care and according to strict quality standards; it is also scrupulously inspected before delivery.
The warranty applies to defects in material and workmanship. The warranty does not extend to
parts of the product that are subject to normal wear and tear and which, as a result, can be considered wear parts; it also does not cover fragile parts such as switches, breakers and accumulators
in glass, or damage caused during transport.
This warranty will become null and void in the event that the product is damaged or not used or
subjected to maintenance as appropriate. For suitable product use, abide by the guidelines in the
instructions for use. Avoid all use or operations that are advised against in the instructions for use
or which are the subject of warnings.
This product is destined exclusively for private use and not for business purposes. The warranty
will become null and void in the event of abuse, improper use, use of force or interventions carried
out by persons other than our authorised assistance services.
Warranty procedures
To allow rapid processing of the problem, please proceed as follows:
• Any request must be accompanied by a receipt and by the code no. (IAN 106103) as proof
of purchase
• The code number is shown on the rating plate or front of the instructions for use (bottom left).
• In case of operating errors or other faults, contact the following assistance service by tele-
phone or email.
• If the product is found to be faulty, it can be sent, carriage paid, to the address provided by
the assistance centre, attaching proof of purchase (receipt), a description of the fault and the
date on which the problem was found.
• Package the faulty appliance with care before sending it to the assistance service.
Page 15

IT
GB / IE
15
GB / IE
Company and seller‘s headquarters:
LIDL
Service address:
GB
Jaleno Europe Limited
Roe Head House
Far Common Road
Mirfield
West Yorkshire
WF14 0DQ
England
IE
Kenilworth Electrical
Electrolux Complex
Longmile road
Dublin 12
Phone hotline:
01924 481053 (GB)
014508703 / 014508705 (IE)
E-mail:
-
Name of manufacturer/importer:
De‘Longhi Appliances S.r.l.
Via L. Seitz, 47
31100 Treviso - Italy
Tel. +39-0422-4131
Fax +39-0422-413736
Product name:
Espresso Machine IAN 106103
Product/manufacturer ID no.:
SEMR 850 A1
Buyer’s name:
..............................................................
Postal Code/City:
..............................................................
Street:
..............................................................
Phone/E-mail:
..............................................................
Signature:
..............................................................
Fault description:
..............................................................
..............................................................
..............................................................
..............................................................
..............................................................
..............................................................
Warranty card
Page 16
16
SE
SE
SYMBOLER
Informationen i denna bruksanvisning är märkt på följande sätt:
FARA för barn.
FARA p.g.a. elektricitet.
FARA p.g.a. andra orsaker.
VARNING!: Risk för brännskada p.g.a. ånga med hög temperatur.
OBSERVERA! Möjliga materiella skador.
SYMBOLER 16
VIKTIGA ANVISNINGAR 17
BESKRIVNING AV APPARATEN 20
AVSEDD ANVÄNDNING 20
INLEDANDE STEG FÖR ANVÄNDNING 20
KAFFEBRYGGNING 21
CAPPUCCINOBRYGGNING 22
ÅTERUPPTAGNING AV KAFFEBRYGGNING 22
ANVÄNDBARA TIPS FÖR EN GOD ITALIENSK ESPRESSO 22
RENGÖRING AV APPARATEN 23
AVKALKNING 24
NÄR MASKINEN TAS UR BRUK 24
AVFALLSHANTERING 25
TEKNISKA DATA 25
LÖSNING FÖR FÖLJANDE PROBLEM 26
GARANTI 27
INNEHÅLL
Page 17
IT
SE
17
SE
VIKTIGA ANVISNINGAR
LÄS DENNA BRUKSANVISNING FÖRE ANVÄNDNING.
SPARA ALLTID BRUKSANVISNINGEN.
Vid ägarbyte av apparaten ska även denna bruksanvisning medfölja.
• Apparaten är endast avsedd för hushållsbruk och får inte användas
för kommersiellt eller industriellt bruk.
• Tillverkaren ansvarar inte för felaktig användning eller andra användningsområden än de som beskrivs i denna bruksanvisning.
• Det rekommenderas att spara originalförpackningen eftersom gratis
service inte gäller för de defekter som orsakas av att produkten inte
har förpackats på ett lämpligt sätt när den skickas till en auktoriserad
serviceverkstad.
FARA för barn
• Apparaten får användas av barn över 8 år endast om det sker under
uppsikt av en ansvarsfull person eller om de har fått lära sig hur
apparaten används på ett säkert sätt och har förstått vilka risker som
är förknippade med användningen.
• De rengörings- och underhållsmoment som ska utföras av användaren
får inte utföras av barn om de inte är över 8 år och hålls under uppsikt. Se till att inga barn leker med apparaten.
• Förpackningsmaterialet får inte lämnas inom räckhåll för barn eftersom det utgör en potentiell fara.
• Skär av elsladden för att göra apparaten obrukbar om den ska bortskaffas som avfall. Det rekommenderas dessutom att göra de delar
av apparaten obrukbara som kan utgöra en fara, i synnerhet för barn
som kan få för sig att leka med apparaten.
FARA p.g.a. elektricitet
• Apparaten får användas av personer med nedsatt fysik, sensorisk eller
mental funktionsförmåga, eller som saknar nödvändig erfarenhet och
kunskap, endast om det sker under uppsikt av en ansvarsfull person
eller om de har fått lära sig hur apparaten används på ett säkert sätt
och har förstått vilka risker som är förknippade med användningen.
Page 18
18
SE
SE
• Innan apparaten ansluts till elnätet ska du kontrollera att spänningen
som anges på typskylten i botten av maskinen överensstämmer med
det lokala elnätets spänning.
• Användning av förlängningssladdar som inte har godkänts av apparatens tillverkare kan orsaka skador och olyckor.
• En skadad elsladd ska bytas ut av tillverkaren, en serviceverkstad eller
en behörig fackman för att förebygga alla risker.
• Spänningssatta delar får aldrig komma i kontakt med vatten: Det kan
bli kortslutning!
• Dra ut stickkontakten ur eluttaget före samtliga rengörings- eller underhållsmoment.
• Sänk inte ned apparaten i vatten eller andra vätskor.
• Stäng alltid av apparaten och dra ut stickkontakten ur eluttaget innan
vattenbehållaren fylls på.
FARA p.g.a. andra orsaker
• Lyft inte apparaten genom att ta tag om vattenbehållaren eller dropptråget utan ta tag om stommen.
• Välj en tillräckligt belyst och ren miljö där eluttaget är lättillgängligt.
• Undvik att överfylla vattenbehållaren.
• Lämna inte apparaten utan uppsikt när den är ansluten till elnätet.
• Apparaten ska placeras och användas på en stabil yta.
• Apparaten får inte användas om någon har tappat den, om det finns
synliga tecken på skador eller om den läcker vatten. Använd inte
apparaten om elsladden eller stickkontakten är skadad eller om apparaten är behäftad med fel. Samtliga reparationer, inklusive byte av
elsladd, får endast utföras av en serviceverkstad eller auktoriserade
tekniker för att förebygga alla risker.
VARNING!: Risk för brännskada
p.g.a.ånga med hög temperatur
• Rikta aldrig strålen med ånga eller hetvatten mot delar av kroppen;
Hantera ång-/hetvattenröret försiktigt: Fara för brännskador!
• Apparatens och filterhållarens utvändiga metalldelar ska inte vidröras
Page 19
IT
SE
19
SE
när apparaten är påslagen eftersom de kan orsaka brännskador.
• Kommer det inget vatten från filterhållaren kan det bero på att filtret
är tilltäppt. Avbryt utmatningen och vänta i ca 10 sekunder. Ta därefter bort och haka långsamt loss filterhållaren eftersom ett eventuellt
resttryck kan orsaka sprut eller stänk. Utför därefter rengöringen enligt
anvisningarna i motsvarande avsnitt.
OBSERVERA! Möjliga materiella skador
• Placera maskinen på en stabil yta där den inte kan vältas omkull.
• Använd inte maskinen utan vatten eftersom pumpen i detta fall bränner.
• Fyll aldrig på vattenbehållaren med varmt eller kokande vatten.
• Placera inte maskinen på mycket varma ytor eller i närheten av öppna
lågor för att förhindra att stommen blir skadad.
• Elsladden får inte röra vid maskinens varma delar.
• Använd inte kolsyrat vatten (tillsatt kolsyra).
• Fyll aldrig filtret med något annat än malt kaffe. Apparaten kan få
allvarliga skador.
• Förvara inte maskinen vid lägre rumstemperatur än 0 °C eftersom det
vatten som finns kvar i värmesystemet kan frysa och orsaka skador.
• Använd inte apparaten utomhus.
• Utsätt inte apparaten för väder och vind (regn, sol o.s.v.).
• Efter att stickkontakten har dragits ut ur eluttaget och de varma
delarna har svalnat ska apparaten rengöras. Använd en lätt fuktad
mjuk trasa och några droppar milt rengöringsmedel (använd aldrig
lösningsmedel som skadar plasten).
Page 20
20
SE
SE
BESKRIVNING AV APPARATEN
A
Filterhållare för malt kaffe
I
Utdragbart koppgaller
B
Kaffemått/-press
J
På/av-brytare
C
Hålförsedd siklikonskiva
(Thermocream®).
K
Vred för utmatning av ånga
D
Filter för malt kaffe
L
Kontrollampa för värmesystemets
temperatur
E
Utdragbar vattenbehållare
M
Brytare för ångfunktion
F
Elsladd + stickkontakt
N
Termometer för värmesystemets temperatur
(°C och °F).
G
Anordningen för cappuccino
O
Brytare för kaffebryggning
G1
Utmatningsrör för vatten/ånga
P
Kontrollampa för påslagning
H
Dropptråg
AVSEDD ANVÄNDNING
• Maskinen kan användas för att göra i ordning kaffe och cappuccino;
Tack vare att det går att mata ut hetvatten går det även att göra i
ordning te och andra drycker. Denna apparat är endast utformad för
privat bruk. Användning för industriella eller professionella ändamål
anses därför vara olämplig.
• Tillverkaren avråder från all annan användning av maskinen.
Tillverkaren frånsäger sig allt ansvar för alla slags skador som orsakas
av en felaktig användning av maskinen. Felaktig användning medför
dessutom bortfall av all form av garanti.
INLEDANDE STEG FÖR ANVÄNDNING
Förberedelser inför användning
Kontrollera att det lokala elnätets spänning överensstämmer med spänningen som anges på
apparatens typskylt. Placera därefter maskinen på en plan yta. Diska vattenbehållaren vid
det första användningstillfället och fyll på den med ej kolsyrat färskt vatten (MAX 1 L). Sätt
därefter i den korrekt (Fig. 3).
Kontrollera att vattenbehållaren är korrekt isatt, annars kan maskinen inte brygga
kaffe.
Sätt i stickkontakten i eluttaget som ska vara jordat.
Första användningstillfället
När vattenbehållaren har fyllts på med färskt vatten kan maskinen slås på. Tryck i några
sekunder på knappen (J) (Fig. 1). Kontrollampan (P) tänds som tecken på att maskinen är
påslagen.
Vid det första användningstillfället, eller om maskinen har stått oanvänd en tid,
Page 21
IT
SE
21
SE
rekommenderas det att låta minst en kopp vatten rinna ut från värmesystemets
vattenkrets.
Placera ett uppsamlingskärl men minst 1 L volym under bryggenheten och under anordningen
för cappuccino (Fig. 5). Sätt brytaren (O) i läget för kaffe ( ). Vänta tills det rinner ut vatten
från filterhållarens säte. Öppna vredet för utmatning av ånga (K) och låt det rinna ut vatten
från anordningen för cappuccino.
Avbryt utmatningen genom att föra brytaren (O) uppåt. Stäng vredet för utmatning av ånga.
Vänta tills kontrollampan (L) tänds. Maskinen är nu klar för att göra i ordning kaffet.
KAFFEBRYGGNING
Sätt i den hålförsedda silikonskivan (C) och filtret för malt kaffe (D) i filterhållaren (A) i den
angivna ordningsföljden (Fig. 6). Dosera kaffet i filtret och pressa lätt med pressen: Två fulla
mått för två kaffe. Endast ett mått för en kaffe. Haka fast filterhållaren i sitt säte. Dra åt den
ordentligt genom att vrida den från vänster till höger och se till att den är ordentligt fasthakad
på flänsen (Fig. 7).
Observera!
Om det fylls på för mycket malt kaffe i filtret kan det vara svårt att dra åt fil-
terhållaren helt i sitt säte och/eller så kan det läcka från filterhållaren under
kaffebryggningen.
Det rekommenderas att låta filterhållaren värmas upp, isatt i sitt säte, i några minuter så att
även det första kaffet blir riktigt varmt. Detta är inte nödvändigt vid påföljande kaffebryggningar.
Vänta tills kontrollampan (L) tänds. Sätt brytaren (O) i läget för kaffe ( ): Det börjar rinna
kaffe från filterhållarens munstycken. Avbryt utmatningen genom att föra brytaren (O) uppåt.
Max. dosen för en kaffe är 50 ml.
Observera!
På samma sätt som på professionella kaffemaskiner ska filterhållaren inte
tas bort när brytaren för bryggning är intryckt (i läget för kaffe ).
Observera!
Vänta i ca 10 sekunder innan du tar bort filterhållaren efter att kaffebryggningen är klar. Ta bort filterhållaren genom att vrida den lätt från höger till
vänster för att undvika sprut eller stänk av vatten eller kaffe.
Det är helt normalt om det småpyser ånga från filterhållarens säte.
Kontrollampan (L) släcks och tänds med jämna mellanrum vilket indikerar ingreppet av värmesystemets termostat som upprätthåller optimal vattentemperatur.
Kaffebryggningen ska påbörjas först när kontrollampan (L) lyser, både vid den första kaffebryggningen och påföljande.
Självavstängningsfunktion
Om maskinen är påslagen men inte används aktiveras självavstängningsfunktionen efter ca
30 minuter. Denna funktion sätter maskinen i standby. Kontrollampan (P) är släckt. Slå på
maskinen igen genom att åter trycka på på/av-brytaren (J).
Page 22

22
SE
SE
Påfyllning av vattenbehållaren under användningen
Det krävs ingen speciell åtgärd när vattnet tar slut i vattenbehållaren eftersom maskinen har
en speciell självfyllningsventil. Det räcker att dra ut stickkontakten ur eluttaget, dra ut vattenbehållaren och fylla på den.
CAPPUCCINOBRYGGNING
Gör i ordning en cappuccino eller en varm choklad, eller värm andra drycker, genom att
sätta brytaren (M) i läget för ånga ( ) och vänta tills kontrollampan (L) tänds vilket indikerar
att värmesystemet har rätt temperatur för att mata ut ånga.
Det är helt normalt om det småpyser ånga från filterhållarens säte.
Placera ett glas under anordningen för cappuccino (G) och vrid vredet för utmatning av ånga
(K): Först kommer det ut lite vatten och direkt efter en kraftig stråle med ånga.
Stäng vredet för utmatning av ånga (K) för att avbryta strålen med ånga och placera kannan
med mjölk som ska skummas under anordningen för cappuccino (Fig. 10). Sänk ned utmatningsröret helt i mjölkkannan och öppna åter vredet för utmatning av ånga (K) tills önskat
resultat uppnås. I samband med dessa moment kan det hända att kontrollampan (L) släcks och
tänds igen med jämna mellanrum vilket indikerar ingreppen av termostaten som upprätthåller
värmesystemet vid rätt temperatur för utmatning av ånga.
Utmatningen av ånga ska påbörjas först när kontrollampan lyser. Mata ut ånga
i några sekunder efter varje användning för att göra rent hålet från eventuella
mjölkrester.
Stäng vredet för utmatning av ånga (K). När cappuccinobryggningen är klar ska brytaren (M)
åter föras uppåt för att utesluta ångfunktionen.
ÅTERUPPTAGNING AV KAFFEBRYGGNING
För att brygga en kaffe direkt efter att ha gjort i ordning en cappuccino är det nödvändigt
att se till att värmesystemet åter har rätt temperatur för kaffebryggning genom att utföra
följande moment: För åter brytaren (M) uppåt så att värmesystemet svalnar och vänta tills
kontrollampan (L) släcks och tänds på nytt. Det går att göra följande för att värmesystemet
ska svalna fortare: Placera ett uppsamlingskärl under utmatningsröret (G) och sätt brytaren
(O) i läge (
); Vrid vredet för utmatning av ånga (K): Det rinner ut vatten tills kontrollampan
(L) släcks. Stäng nu vredet för utmatning av ånga (K) och för åter brytaren (O) uppåt. Vänta
tills kontrollampan (L) tänds. Maskinen är åter klar för att göra i ordning kaffet.
ANVÄNDBARA TIPS FÖR EN GOD ITALIENSK ESPRESSO
Det malda kaffet i filterhållaren ska pressas samman lätt. Ett starkare eller mindre starkt kaffe
beror på kaffets malningsgrad, mängden som doseras i filterhållaren och pressningen. Det
räcker med några sekunder för att kaffet ska rinna ned i kopparna. Om utmatningen tar
längre tid betyder det att kaffet är alltför finmalet eller att det malda kaffet som har doserats
i filterhållaren är för hårt pressat.
Page 23

IT
SE
23
SE
RENGÖRING AV APPARATEN
Observera!
Samtliga nedanstående rengöringsmoment ska utföras med avstängd ma-
skin och stickkontakten utdragen ur eluttaget.
Observera!
Genom att utföra underhåll och rengöring regelbundet fortsätter maskinen
att fungera effektivt längre tid. Maskindiska aldrig maskinens delar. Använd
aldrig direkta vattenstrålar.
Observera!
Samtliga moment ska utföras när maskinen har svalnat.
Rengöring av filtret för malt kaffe
Kontrollera att underliggande hål inte täpps till. Rengör dem i sådana fall med en borste (Fig.
11). Mata ut kokande vatten från filterhållaren med isatt filter utan malet kaffe för att spola
genom eller ta bort eventuella kafferester eller orenheter.
Observera!
Ta bort och haka långsamt loss filterhållaren eftersom ett eventuellt resttryck
kan orsaka sprut eller stänk.
Det rekommenderas att rengöra filtret noggrant ca var tredje månad med hjälp av de rengöringstabletter som finns i handeln och hos auktoriserade serviceverkstäder. Följ anvisningarna
i förpackningen eller använd alternativt en tablett med vanligt maskindiskmedel (utan spolglansmedel eller andra kemiska tillsatser) på följande sätt:
• Lägg en tablett med maskindiskmedel i filtret (utan kaffe) när maskinen är ordentligt varm
(efter minst 5 minuters uppvärmning).
• Haka fast filterhållaren på maskinen och placera ett uppsamlingskärl under filterhållaren.
• Sätt brytaren (O) i läget för kaffe (
) för att börja utmatningen av vatten och mata ut
vatten i 15 - 20 sekunder.
• Avbryt utmatningen och låt tabletten verka i minst 15 minuter medan filterhållaren fortfarande är isatt i maskinen.
• Upprepa utmatningen av vatten och låt pumpen vara igång i ca 15 - 20 sekunder och
därefter omväxlande vila i ytterligare 15 - 20 sekunder tills två vattenbehållare har tömts.
• Ta bort maskinens filterhållare, dra ut filtret och skölj det noggrant under rinnande kranvatten.
• Stäng av maskinen, dra ut stickkontakten ur eluttaget och rengör filterhållarens säte med
en svamp för att ta bort eventuella rester av diskmedel från silen.
• Slå på maskinen igen, haka åter fast filterhållaren och mata ut minst två koppar vatten för
att avsluta genomspolningen.
Det rekommenderas att utföra rengöringen var tredje månad om kaffemaskinen används
dagligen.
Rengöring av silikonskivan
Diska silikonskivan (C) under rinnande vatten och böj den lätt åt sidorna så att mitthålet rensas
från eventuella rester av malt kaffe som kan täppa till det (Fig. 12).
Page 24

24
SE
SE
Rengöring av filterhållarens säte
Efter en tids användning kan det ha samlats kaffesump i filterhållarens säte. Den går att ta
bort med en tandpetare eller en svamp (Fig. 13), eller genom att det får rinna vatten utan att
filterhållaren är isatt (Fig. 4).
Rengöring av anordningen för cappuccino
Observera!
Utför momentet när det kromade röret har svalnat för att undvika bränn-
skador.
Skruva loss anordningen för cappuccino (G) från röret (G1) och diska den under rinnande
vatten (Fig. 14). Röret (G1) kan rengöras med en mjuk trasa. Rengör vid behov hålet för
utmatning av ånga med en nål (Fig. 14). Dra åt anordningen för cappuccino helt. Mata ut
ånga i några sekunder efter varje användning för att göra rent hålet från eventuella rester.
Rengöring av vattenbehållaren
Det rekommenderas att rengöra vattenbehållaren regelbundet inuti med en fuktad svamp eller
trasa.
Rengöring av gallret och dropptråget
Kom ihåg att tömma dropptråget (H) med jämna mellanrum.
Ta bort gallret (I) och diska det under rinnande vatten; Dra ut dropptråget (H) från maskinen,
töm det och diska det under rinnande vatten.
Rengöring av maskinstommen
Observera!
Rengör maskinens fasta delar med en fuktad och mjuk trasa så att stommen
inte blir skadad.
AVKALKNING
Genom att utföra ett korrekt underhåll och en regelbunden rengöring fortsätter maskinen att
fungera effektivt längre tid och riskerna för att det ska bildas kalkbeläggningar i apparaten
minskar anmärkningsvärt. Om apparatens funktion trots detta försämras efter en tid till följd
av att det ofta används hårt och mycket kalkhaltigt vatten går det att utföra en avkalkning för
att åtgärda felfunktionen. Följ anvisningarna på avkalkningsproduktens instruktionsblad om
det krävs en avkalkning.
NÄR MASKINEN TAS UR BRUK
Om maskinen tas ur bruk ska du frånkoppla den från elnätet, tömma vattenbehållaren och
dropptråget samt rengöra den (se avsnitt Rengöring av apparaten). Om maskinen kasseras
ska de olika konstruktionsmaterialen källsorteras och bortskaffas utifrån sin sammansättning
och gällande miljölagstiftning i användningslandet.
Page 25

IT
SE
25
SE
AVFALLSHANTERING
Förpackning
Produktens förpackning består av återvinningsbara material. Avfallshanteringen ska ske i
behållare för återvinning.
Elektronisk utrustning
Kasta inte elektronisk utrustning i hushållssoporna.
Bortskaffa den förbrukade apparaten korrekt enligt direktiv 2012/19/EG. På detta
sätt kan det återvinningsbara materialet i apparaten återanvändas vilket begränsar
miljöpåverkan. Bortskaffa den förbrukade apparaten hos en återvinningscentral för
elektriskt avfall. För ytterligare information, kontakta din återvinningscentral eller kommunen.
TEKNISKA DATA
Nätspänning: 220 - 240 V ~ 50/60 Hz
Effekt: 850 W
Page 26

26
SE
SE
LÖSNING FÖR FÖLJANDE PROBLEM
Stäng omedelbart av maskinen och dra ut stickkontakten ur eluttaget i händelse av felfunktioner.
PROBLEM ORSAKER ÅTGÄRDER
Maskinen matar inte
ut ånga.
Det finns för lite vatten och
pumpen suger inte.
Kontrollera att vattennivån i vattenbehållaren är
korrekt. Fyll vid behov på ej kolsyrat färskt vatten.
Utmatningsrörets hål för
utmatning av ånga är
tilltäppt.
Rensa bort eventuella beläggningar som har
bildats i utmatningsrörets hål med hjälp av en nål
(Fig. 14).
Kaffespill från
filterhållarens
kanter.
Det har förmodligen fyllts
på för mycket malt kaffe i
filterhållaren vilket har gjort
att det inte går att dra åt
filterhållaren helt i sitt säte.
Ta bort och haka långsamt loss filterhållaren
eftersom ett eventuellt resttryck kan orsaka sprut
eller stänk. Rengör filterhållarens säte med en
svamp (Fig. 13). Upprepa momentet och dosera
rätt mängd kaffe i filtret.
Det finns kvar rester av malt
kaffe på packningen till
filterhållarens säte.
Rengör packningen med en tandpetare eller en
svamp (Fig. 13).
Filtret för malt kaffe har
tilltäppta utmatningshål.
Ta bort och haka långsamt loss filterhållaren
eftersom ett eventuellt resttryck kan orsaka sprut
eller stänk. Rengör de tilltäppta hålen på filtret med
en borste eller en nål.
Kaffebryggningen
utförs inte eller
utförs för långsamt.
Filterhållarens säte har
tilltäppta hål.
Kör maskinen utan filterhållare så att vattnet kan
rinna fritt. Om vattnet fortfarande inte rinner ut
jämnt från samtliga hål ska du utföra en avkalkning
enligt anvisningarna i förpackningen.
Filtret för malt kaffe har
tilltäppta utmatningshål.
Ta bort och haka långsamt loss filterhållaren
eftersom ett eventuellt resttryck kan orsaka sprut
eller stänk. Rengör de tilltäppta hålen på filtret med
en borste eller en nål.
Blandning med alltför
finmalet kaffe.
Försök att använda en blandning med mer
grovmalet kaffe.
För hårt pressad
kaffeblandning.
Pressa kaffet mindre i filtret.
Vattenbehållaren är inte
korrekt isatt.
Sätt i vattenbehållaren korrekt och tryck fast den
ordentligt.
Det finns för lite vatten och
pumpen suger inte.
Kontrollera att vattennivån i vattenbehållaren är
korrekt. Fyll vid behov på ej kolsyrat färskt vatten.
Kaffet är blaskigt
och kallt.
Blandningen har malts alltför
grovt.
Det måste användas en mer finmald blandning för
att få ett mer koncentrerat och varmare kaffe.
Page 27

IT
SE
27
SE
GARANTI
Bäste kund,
Apparaten levereras med en 3 års garanti (rättslig garanti) från inköpsdatum.
Om produkten skulle visa sig felaktig, täcks köparen av konsumentskyddet, som inte är begränsat
till följande garantivillkor.
Garantivillkor
Garantiperioden börjar vid inköpsdatum. Originalkvittot ska bevaras som inköpsbevis.
Vid material- eller tillverkningsfel som upptäcks inom 3 år (rättslig garanti) från produktens inköpsdatum, kommer tillverkaren, efter eget val, att gratis reparera eller byta ut apparaten. För detta
ingrepp under garanti krävs att den trasiga apparaten och inköpsbeviset (kvittot) inom en tidsfrist
på tre år (rättslig garanti) uppvisas tillsammans med en kort beskrivning av felet, inklusive det datum
då problemet påvisats.
Om felet täcks av garantin kommer apparaten att repareras eller bytas ut. Reparation eller byte av
apparaten medför inte att en ny garantiperiod påbörjas.
Garantiperiod och reklamationsrätt beroende på fel
Garantiperioden förlängs inte av den rättsliga garantin. Ovanstående gäller även för delar som
bytts ut eller reparerats. Skador eller fel som upptäckts vid inköp ska meddelas omedelbart efter
förpackningens öppnande. Reparationer som krävs efter att garantiperioden gått ut, ska betalas
av konsumenten.
Garantins tillämpning
Denna produkt har tillverkats med omsorg och enligt gällande kvalitetsnormer samt har noggrannt
kontrollerats före leverans.
Garantin gäller för material- och tillverkningsfel. Garantin täcker inte de delar av produkten som
utsätts för normalt slitage och heller inte ömtåliga delar som strömbrytare, delar i glas eller skador
som orsakats under transport.
Garantin förfaller om produkten skadats, använts på olämpligt sätt eller utsatts för felaktigt underhåll. För korrekt användning av produkten måste anvisningarna i bruksanvisningen noga följas.
Undvik all form av användning eller ingrepp från vilka det avrådes i bruksanvisningen eller som
är föremål för varning.
Produkten är endast avsedd för privatbruk och ej för kommerciellt syfte. Garantin förfaller vid
missbruk, oriktig användning, våldshandling eller om ingrepp utförts av andra personer än de som
auktoriserats av våra serviceverkstäder.
Garantiprocedurer
För en snabb lösning av problemet, gör som följer:
• Varje krav ska följas av ett kvitto och av produktens kod (IAN 106103) som inköpsbevis.
• Kodnumret sitter på etiketten över tekniska data eller på omslaget till bruksanvisningen (nere till
vänster).
• Vid funktionsproblem eller andra fel, kontakta per telefon eller e-post den serviceverkstad som
anges på nästa sida.
• Om produkten visar sig vara felaktig, kan den sändas till den adress som angivits av service-
verkstaden (mottagaren betalar frakten), tillsammans med inköpsbeviset (kvittot), en beskrivning
av felet och det datum då problemet påvisats.
• Packa den trasiga apparaten noga innan den skickas till serviceverkstaden.
Page 28

28
SE
SE
Försäljarens firma och säte:
LIDL
Serviceverkstadens adress:
CENTRALSERVICE i Osby AB
Tegvägen 4, 283 44 Osby
Box 141, 283 23 Osby
Fax 0 479 10990
Telefon hotline:
0 479 13048
E-post::
-
Tillverkarens /Importörens namn:
De‘Longhi Appliances S.r.l.
Via L. Seitz, 47
31100 Treviso - Italy
Tel. +39-0422-4131
Fax +39-0422-413736
Produktens namn:
Espressomaskin IAN 106103
Produktens / tillverkarens
ID-nummer:
SEMR 850 A1
Köparens namn:
..............................................................
Postkod/Ort:
..............................................................
Adress:
..............................................................
Telefon/E-post:
..............................................................
Underskrift:
..............................................................
Beskrivning av felet:
..............................................................
..............................................................
..............................................................
..............................................................
..............................................................
..............................................................
Garantibevis
Page 29

IT
NL / BE
29
NL / BE
SYMBOLEN
De informatie in deze handleiding is als volgt geëtiketteerd:
GEVAAR voor kinderen
GEVAAR door elektriciteit
GEVAAR door andere oorzaken
WAARSCHUWING: gevaar voor brandwonden veroorzaakt door hete
stoom
LET OP mogelijke materiaalschade
SYMBOLEN 29
BELANGRIJKE WAARSCHUWINGEN 30
BESCHRIJVING VAN HET APPARAAT 33
BEDOELD GEBRUIK 33
VOORBEREIDING OP HET GEBRUIK 34
KOFFIE MAKEN 34
CAPPUCCINO MAKEN 35
DE MACHINE WEER GEBRUIKEN VOOR KOFFIE 36
HANDIGE TIPS OM EEN GOEDE ITALIAANSE ESPRESSO TE ZETTEN 36
REINIGING VAN HET APPARAAT 36
ONTKALKEN 38
BUITENWERKINGSTELLING 38
AFDANKEN 38
TECHNISCHE GEGEVENS 38
PROBLEEMOPLOSSINGEN 39
GARANTIE 40
INHOUDSOPGAVE
Page 30

30
NL / BE
NL / BE
BELANGRIJKE WAARSCHUWINGEN
LEES DEZE INSTRUCTIES VOOR HET GEBRUIK.
BEWAAR DEZE INSTRUCTIES ALTIJD.
Wanneer het apparaat aan anderen wordt overgedragen, moet ook
deze handleiding worden meegegeven.
• Dit apparaat is uitsluitend voor privégebruik ontworpen, en moet
dus als ongeschikt worden geacht voor commerciële of industrieel
gebruik.
• Wij wijzen iedere verantwoordelijkheid af voor een onjuist gebruik of
gebruik voor andere doeleinden dan die zijn voorzien in dit boekje.
• Het wordt aangeraden de originele verpakking te bewaren, aangezien geen gratis assistentie wordt verleend als het product defect
raakt bij het versturen naar een erkend Service Centrum doordat het
niet goed is verpakt.
GEVAAR voor kinderen
• Het apparaat kan worden gebruikt door kinderen die ouder zijn dan
8 jaar, maar uitsluitend als ze door een verantwoordelijke persoon
worden gevolgd of als ze goede instructies hebben gekregen over
een veilig gebruik van het apparaat en ze de gevaren bij het gebruik
ervan hebben begrepen.
• Reinigings- en onderhoudswerkzaamheden door de gebruiker mogen
niet door kinderen worden verricht, tenzij ze ouder zijn dan 8 jaar
en dit onder toezicht gebeurt. Er moet toezicht worden gehouden op
kinderen om ervoor te zorgen dat ze niet met het apparaat spelen.
• Houd de verpakkingsmaterialen buiten het bereik van kinderen, aangezien deze een bron van gevaar kunnen vormen.
• Mocht u dit apparaat willen weggooien, dan bevelen wij aan om het
onbruikbaar te maken door het stroomsnoer door te snijden. Verder
bevelen wij aan om de delen van het apparaat die gevaar kunnen
opleveren onschadelijk te maken, met name voor kinderen die het
apparaat kunnen gebruiken om ermee te spelen.
Page 31

IT
NL / BE
31
NL / BE
GEVAAR door elektriciteit
• Het apparaat kan worden gebruikt door personen met beperkte
lichamelijke, zintuiglijke of geestelijke vermogens, of personen zonder
ervaring en kennis, maar uitsluitend als ze door een verantwoordelijke persoon worden gevolgd of als ze goede instructies over een veilig
gebruik van het apparaat hebben gekregen, en deze en de gevaren
bij het gebruik ervan hebben begrepen.
• Voordat u het apparaat op het elektriciteitsnet aansluit, controleert u
of de spanning die op het plaatje onder de machine is aangegeven,
overeenkomt met die van het plaatselijke elektriciteitsnet.
• Het gebruik van niet door de fabrikant van het apparaat goedgekeurde verlengsnoeren, kan schade en ongelukken veroorzaken.
• Voordat u het reservoir met water vult, trekt u de stekker van het apparaat uit het stopcontact.
• Als de stroomkabel beschadigd is, moet hij, om ieder risico te voorkomen, worden vervangen door de fabrikant of door diens servicecentrum, of in ieder geval door een persoon met een vergelijkbare
kwalificatie.
• Zorg dat de onderdelen die onder spanning staan nooit in aanraking
komen met water: hierdoor kan kortsluiting ontstaan!
• Trek de stekker uit het stopcontact alvorens het apparaat te reinigen of
er onderhoud op te plegen.
• Dompel het apparaat niet in water of andere vloeistoffen.
• Schakel het apparaat altijd uit en haal de stekker van de stroomkabel
uit het stopcontact, voordat u het waterreservoir met water vult.
GEVAAR door andere oorzaken
• Til het apparaat niet op aan het waterreservoir of het bakje, maar
pak het hele apparaat vast.
• Kies een goed verlichte en schone ruimte met een makkelijk te bereiken stopcontact.
• Doe niet te veel water in het reservoir.
• Trek de stekker niet uit het stopcontact door aan de kabel te trekken.
Page 32

32
NL / BE
NL / BE
• Het apparaat moet op een stevige ondergrond worden gebruikt en
ook als het niet wordt gebruikt moet het op een stevige ondergrond
staan.
• Het apparaat mag niet worden gebruikt als het is gevallen, als er
zichtbare schade is of als het lekt. Gebruik het apparaat niet als de
stroomkabel of de stekker beschadigd zijn, of als het apparaat zelf
defect is. Om iedere vorm van gevaar te voorkomen dienen alle reparaties, waaronder ook de vervanging van de stroomkabel, uitsluitend
te worden verricht door een servicedienst of door vakmensen.
WAARSCHUWING: gevaar voor
brandwonden veroorzaakt door hete stoom
• Richt de stoomstraal of het hete water nooit op lichaamsdelen; wees
altijd voorzichtig wanneer u het stoom-/heetwaterpijpje gebruikt: verbrandingsgevaar!
• Vanwege verbrandingsgevaar mogen de externe metalen delen van
het apparaat en de filterhouder niet worden aangeraakt wanneer het
apparaat in werking is.
• Als er geen water uit de filterhouder komt, kan dit komen doordat het
filter verstopt zit. Onderbreek de afgifte en wacht een tiental seconden. Neem de filterhouder vervolgens langzaam weg aangezien er
door eventuele restdruk spetters uit kunnen komen. Maak de machine
vervolgens schoon, zoals in de hiervoor bestemde paragraaf wordt
beschreven.
LET OP mogelijke materiaalschade
• Zet de machine op een stevige ondergrond waar zij niet kan omvallen.
• Gebruik de machine niet zonder water, omdat de pomp dan kan
doorbranden.
• Vul het reservoir nooit met warm of kokend water.
• Zet de machine niet op hete oppervlakken of in de buurt van open
vlammen, om te voorkomen dat de behuizing beschadigd raakt.
• De kabel mag niet in aanraking komen met de hete delen van de
machine.
Page 33

IT
NL / BE
33
NL / BE
• Gebruik geen koolzuurhoudend water.
• Doe nooit iets anders in het filter dan gemalen koffie. Het apparaat
zou hierdoor zwaar beschadigd kunnen raken.
• Zet de machine niet in een omgeving met een omgevingstemperatuur
die lager is dan 0 °C, aangezien het in de ketel achtergebleven water
zou kunnen bevriezen en schade zou kunnen veroorzaken.
• Gebruik het apparaat niet in de open lucht.
• Stel het apparaat niet bloot aan weersinvloeden (regen, zon enz.).
• Na de stekker uit het stopcontact te hebben getrokken en nadat de
hete onderdelen zijn afgekoeld, mag het apparaat uitsluitend worden
gereinigd met een niet-schurend, iets bevochtigd doekje met een paar
druppels neutraal, niet agressief reinigingsmiddel (gebruik nooit oplosmiddelen, omdat die de kunststof kunnen beschadigen).
BESCHRIJVING VAN HET APPARAAT
A
Filterhouder voor gemalen koffie
I
Verwijderbaar kopjesrooster
B
Maatbekertje/ koffiepers
J
Aan/uitknop
C
Geperforeerde siliconenschijf
(Thermocream®)
K
Stoomregelknop
D
Filter voor gemalen koffie
L
Indicatielampje temperatuur ketel
E
Verwijderbaar waterreservoir
M
Schakelaar stoomfunctie
F
Toevoerkabel – Stekker
N
Thermometer temperatuur in de ketel (°C
en °F)
G
Cappuccinomaker
O
Koffieschakelaar
G1
Stoombuisje
P
Aan/uit-lampje
H
Druppelopvanglade
BEDOELD GEBRUIK
• U kunt de machine gebruiken om koffie en cappuccino te maken;
daarnaast is het mogelijk, dankzij de mogelijkheid heet water te af te
geven, (kruiden) thee te zetten. Dit apparaat is uitsluitend ontworpen
voor privégebruik, en moet dus als ongeschikt worden beschouwd
voor industriële of professionele doeleinden.
• De fabrikant heeft geen enkel ander gebruik voorzien, en wijst dus
iedere aansprakelijkheid af voor schade die wordt veroorzaakt door
oneigenlijk gebruik van de machine. Bovendien heeft oneigenlijk
gebruik tot gevolg dat iedere garantie komt te vervallen.
Page 34

34
NL / BE
NL / BE
VOORBEREIDING OP HET GEBRUIK
Inbedrijfstelling
Controleer of de netspanning in huis dezelfde is als die op het plaatje met technische gegevens van het apparaat. Zet de machine vervolgens op een vlak oppervlak. Was het reservoir
alvorens het te gebruiken, vul het met vers water (MAX. 1 liter) en zorg er vervolgens voor
dat het goed op zijn plaats zit (Fig. 3).
Controleer of het waterreservoir goed is aangebracht, anders kan het apparaat
geen koffie afgeven.
Steek de stekker in een geaard stopcontact.
Eerste inschakeling
Na het reservoir met vers water te hebben gevuld, zet u de machine aan. Druk enkele
seconden op knop (J) (Fig. 1). Het controlelampje (P) gaat branden om aan te geven dat de
machine ingeschakeld is.
Als het apparaat voor het eerst wordt aangezet, of als hij lange tijd niet is gebruikt,
wordt aangeraden minstens een kop water uit het hydraulische circuit van de ketel
te laten lopen.
Zet een houder met een inhoud van minstens een halve liter (Fig. 5) onder het koffieschenktuitje en onder het cappuccinomaker. Zet de schakelaar (O) op koffiezetten ( ). Wacht tot
er water uit de plaats komt, waarin de filterhouder wordt vastgedraaid. Open de stoomregelknop (K) en laat water uit het cappuccinomaker stromen.
Beëindig de afgifte door de schakelaar (O) omhoog te zetten. Draai de stoomregelknop dicht.
Wacht tot het controlelampje (L) gaat branden. Het apparaat is nu gereed om koffie te zetten.
KOFFIE MAKEN
Doe de geperforeerde siliconenschijf (C) en het filter voor gemalen koffie (D) in de aangegeven volgorde in de filterhouder (Fig. 6). Doseer de koffie in het filter en druk hem zachtjes aan
met het speciale aandrukplaatje: voor twee kopjes koffie vult u twee maatschepjes helemaal
en voor één kopje koffie vult u er slechts één. Zet de filterhouder op zijn plaats. Zet hem goed
vast door hem van links naar rechts te draaien, en zorg er daarbij voor dat hij goed op de
flens is vastgezet (Fig. 7).
Let op!
Als er te veel gemalen koffie in het filter wordt gedaan, kan het zijn dat de
filterhouder moeilijk kan worden gedraaid en/of het filterhouder lekt tijdens
het koffiezetten.
Het is raadzaam de filterhouder te laten opwarmen door hem een aantal minuten op zijn
plaats te laten zitten alvorens koffie te zetten, zodat ook het eerste kopje koffie goed warm
is. Dit is niet nodig bij de volgende kopjes koffie.
Wacht tot het controlelampje (L) gaat branden. Zet de schakelaar (O) op de stand voor koffiezetten (
): er begint koffie uit het tuitje van de filterhouder te komen. Beëindig de afgifte
door de schakelaar (O) omhoog te zetten. De maximale dosis voor een kopje koffie is 50 ml.
Let op!
Net als bij professionele koffiezetapparaten mag de filterhouder niet worden
Page 35

IT
NL / BE
35
NL / BE
verwijderd als de schakelaar op koffiezetten staat (op de koffiestand ).
Let op!
Na de koffieafgifte wacht u zo'n tien seconden voordat u de filterhouder losdraait. De filterhouder wordt verwijderd door hem langzaam van rechts naar
links te draaien, waardoor wordt voorkomen dat er water of koffie uitschiet.
Als er in ruststand wolkjes stoom uit de plek waar de filterhouder wordt vastge
-
houden komen, dan is dat volkomen normaal.
Het lampje (L) zal regelmatig aan- en uitgaan, waarmee wordt aangegeven dat de thermostaat van de ketel ingrijpt, om het water op een optimale temperatuur te houden.
Het is het beste om, zowel bij het eerste kopje koffie als bij de volgende, pas met koffiezetten
te beginnen wanneer het lampje (L) brandt.
Automatische uitschakelfunctie
Als het apparaat is ingeschakeld, maar niet wordt gebruikt, grijpt na ongeveer 30 minuten
de automatische uitschakelfunctie in. Deze functie zet het apparaat op stand-by. Het controlelampje (P) is uit. Om het apparaat weer in te schakelen, drukt u opnieuw op de aan/uit
knop (J).
Het reservoir met water vullen tijdens gebruik
Er hoeven geen speciale handelingen te worden verricht wanneer het water in het reservoir
op is, aangezien de machine een speciale automatische inschakelingsklep heeft. U hoeft
enkel, na de stekker uit het stopcontact te hebben getrokken, het reservoir eruit te trekken en
hem opnieuw met vers water te vullen.
CAPPUCCINO MAKEN
Om een cappuccino of warme chocolademelk te maken of een andere drank te verwarmen,
moet u de schakelaar (M) op de stoomstand ( ) zetten en wachten tot het lampje (L) gaat
branden, waarmee wordt aangegeven dat de ketel de juiste temperatuur heeft bereikt om
stoom af te geven.
Als er in ruststand wolkjes stoom uit de plek waar de filterhouder wordt vastgehouden komen, dan is dat volkomen normaal.
Draai aan de stoomregelknop (K) en zorg ervoor dat er een glas onder het cappuccinomaker
(G) staat: er zal eerst wat water uitkomen, en vervolgens een sterke stoomstoot.
Sluit de stoomregelknop (K) weer om de stoomstoot de stoppen, en zet het kannetje met de
melk, die moet worden opgeschuimd, onder het cappuccinomaker (Fig. 10). Dompel het buisje helemaal in het melkkannetje en draai de stoomregelknop (K) weer open tot het gewenste
resultaat is bereikt. Tijdens deze handelingen ziet u dat het lampje (L) regelmatig aan- en
uitgaat, waarmee wordt aangegeven dat de thermostaat wordt in- en uitgeschakeld om de
ketel op de juiste temperatuur te houden voor stoomafgifte.
Het is het beste om alleen stoom af te geven wanneer dit lampje brandt. Geef na
ieder gebruik een aantal seconden stoom af om eventuele melkresten uit de ope
-
ning te verwijderen.
Draai de stoomregelknop (K) dicht. Als de cappuccino klaar is, zet u de schakelaar (M)
omhoog om de stoomfunctie uit te zetten.
Page 36

36
NL / BE
NL / BE
DE MACHINE WEER GEBRUIKEN VOOR KOFFIE
Om meteen na een cappuccino te hebben gemaakt weer koffie te zetten moet de ketel op de
temperatuur voor koffiezetten worden gebracht door als volgt te handelen: zet de schakelaar
(M) omhoog om de ketel af te laten koelen en wacht tot het controlelampje (L) uitgaat en
weer gaat branden. Als u het afkoelen wilt versnellen, kunt u als volgt handelen: Nadat u een
houder onder het buisje (G) heeft gezet, zet u de schakelaar (O) op stand (
); draai aan
de stoomregelknop (K): hierdoor zal er water uitlopen tot het controlelampje (L) uitgaat. Draai
de stoomregelknop (K) nu dicht en zet de koffieafgifteknop (O) weer omhoog. Wacht tot het
controlelampje (L) gaat branden. De machine is nu gereed om koffie te zetten.
HANDIGE TIPS OM EEN GOEDE ITALIAANSE ESPRESSO TE ZETTEN
De gemalen koffie in de filterhouder moet zachtjes worden aangedrukt. Hoe sterk de koffie is
hangt af van de maalfijnheid van de koffie, van de hoeveelheid koffie in de filterhouder en
van het aandrukken van de koffie. Na slechts enkele seconden loopt de koffie in de kopjes.
Als er meer tijd nodig is voor de afgifte, dan betekent dit dat de koffie te fijn is gemalen of
te stevig is aangedrukt.
REINIGING VAN HET APPARAAT
Let op!
Alle hieronder beschreven reinigingshandelingen moeten worden uitgevoerd
bij uitgeschakelde machine en met de stekker uit het stopcontact.
Let op!
Regelmatig onderhoud en een regelmatige reiniging maken dat de machine
behouden blijft en langer goed blijft werken. Was de onderdelen van de
machine nooit in de afwasmachine. Houd de machine nooit onder stromend
water.
Let op!
Iedere ingreep moet bij koude machine worden verricht.
Het filter schoonmaken waar de gemalen koffie in zit
Controleer of de gaatjes niet verstopt zitten, en als dat wel het geval is, maak ze dan schoon
met een borsteltje (Fig. 11). Laat kokend water door de filterhouder met filter zonder koffie
lopen, om eventuele koffieresten of verontreinigingen op te lossen en te verwijderen.
Let op!
Draai de filterhouder langzaam los, aangezien de eventuele restdruk spetters
kan veroorzaken, en verwijder hem.
Het wordt aanbevolen het filter ongeveer om de 3 maanden goed schoon te maken met
reinigingstabletten, die bij de verkooppunten en de erkende servicecentra verkrijgbaar zijn.
Volg hierbij de aanwijzingen op de verpakking. Gebruik anders als volgt een gewoon vaatwastablet (zonder glansmiddel of andere chemische additieven)::
• Doe een vaatwastablet in het filter (zonder koffie) wanneer de machine goed heet is (na
minstens 5 minuten te zijn opgewarmd).
• Haak de filterhouder vast in de machine en zet een bak onder de filterhouder.
Page 37

IT
NL / BE
37
NL / BE
• Zet de schakelaar (O) op de stand voor koffiezetten ( ) om het doorlopen van water te
starten, en laat 15-20 seconden lang water doorlopen.
• Stop de waterdoorloop en laat het tablet minstens 15 minuten inwerken met de filterhouder
in de machine.
• Herhaal deze handeling, d.w.z. laat water doorlopen door de pomp ongeveer 15-20
seconden te laten werken en stop hem vervolgens 15-20 seconden. Doe dit tot er twee
reservoirs water verbruikt zijn.
• Verwijder de filterhouder uit de machine, haal het filter eruit en spoel hem goed onder de
kraan af.
• Zet de machine uit, haal de stekker uit het stopcontact en maak de plaats van de filterhouder met een sponsje schoon om eventuele resten van het reinigingsmiddel uit het geperforeerde plaatje te verwijderen.
• Zet de machine weer aan, draai de filterhouder er weer in vast en tap nog minstens 2
kopjes water af om hem goed te spoelen.
Als het koffiezetapparaat dagelijks wordt gebruikt wordt aangeraden de machine minimaal
om de drie maanden schoon te maken.
Reiniging van de siliconenring
Was de schijf van siliconen (C) onder de kraan door zachtjes de randen te buigen om eventuele
koffieresten uit het centrale gat te verwijderen (Fig. 12).
De plaats van de filterhouder schoonmaken
Tijdens het gebruik kunt u controleren of er op de plaats van de filterhouder resten koffiedik
zitten, die kunnen worden verwijderd met een tandenstoker, met een doekje (Fig 13), of door
het water te laten stromen zonder dat de filterhouder is aangebracht (Fig 4).
Schoonmaak van het cappuccinomaker
Let op!
Voer deze handeling uit wanneer het chromen pijpje is afgekoeld, om te
voorkomen dat u zich brandt.
Draai het cappuccinomaker (G) van het buisje (G1) en was deze met stromend water (Fig.
14). Het buisje (G1) mag met een niet schurende doek worden schoongemaakt. Indien nodig,
maak de uitgang van het stoombuisje met een speld schoon (Fig. 14). Draai de ‘melkklopper’
er weer helemaal op. Geef na ieder gebruik een aantal seconden stoom af om eventuele
resten uit de opening te verwijderen.
Het reservoir reinigen
Het wordt aanbevolen de binnenkant van het reservoir regelmatig met een spons of een vochtig
doekje schoon te maken.
Reiniging van het rooster en van het druppelopvangbakje
Denk eraan af en toe het druppelopvangbakje (H) leeg te gooien.
Verwijder het rooster (I) en was hem onder de kraan; Trek het druppelopvangbakje (H) uit de
machine, gooi hem leeg en was hem onder de kraan.
Page 38

38
NL / BE
NL / BE
De behuizing van de machine schoonmaken
Let op!
Maak de vaste onderdelen van de machine met een niet-schurend, vochtig
doekje schoon om de behuizing niet te beschadigen.
ONTKALKEN
Goed onderhoud en een regelmatige schoonmaakbeurt beschermen de machine en maken
dat ze langer goed blijft werken, doordat er een aanzienlijk kleiner risico is dat er zich kalkaanslag in het apparaat vormt. Als het apparaat echter na verloop van tijd minder goed
blijkt te werken doordat er vaak hard en kalkrijk water wordt gebruikt, moet de machine
worden ontkalkt om de storingen te verhelpen. Als ontkalking noodzakelijk is, volg dan de
aanwijzingen op de gebruiksaanwijzing van het ontkalkingsproduct.
BUITENWERKINGSTELLING
Als de machine buiten werking wordt gesteld moet de stekker uit het stopcontact worden
getrokken, moeten het waterreservoir en de druppelopvangbak worden geleegd en schoongemaakt (zie paragraaf “Reiniging van het apparaat”). Als de machine wordt gesloopt
moeten de verschillende materialen die bij de vervaardiging van de machine zijn gebruikt
worden gescheiden en worden verwijderd op grond van hun samenstelling en de toepasselijke wetgeving in het land waar zij wordt gebruikt.
AFDANKEN
Verpakking
De verpakking van het product bestaat uit recycleerbare materialen. Zorg ervoor dat ze in de
juiste containers worden weggegooid.
Elektronische apparatuur
Gooi elektronische apparatuur niet met het gewone huisvuil weg.
Conform de EU-richtlijn 2012/19/EG ontdoet u zich aan het einde van zijn levensduur op de juiste manier van het apparaat. Op die manier kan het recyclebare
materiaal dat zich in het apparaat bevindt worden hergebruikt, waardoor de impact
op het milieu wordt beperkt. Breng het gebruikte apparaat naar een centrum voor elektrisch
afval of een centrum voor de recycling van elektronica. Wend u voor meer informatie tot de
plaatselijke afvalverwerkingsdienst of tot het bestuur van uw eigen gemeente.
TECHNISCHE GEGEVENS
Voeding: 220-240 V ~ 50/60 Hz
Vermogen: 850 Watt
Page 39

IT
NL / BE
39
NL / BE
PROBLEEMOPLOSSINGEN
Als de machine niet goed werkt, zet haar dan onmiddellijk uit en trek de
stekker uit het stopcontact.
PROBLEMEN OORZAKEN OPLOSSINGEN
De machine
geeft geen stoom
af.
Er is weinig water en de
pomp zuigt niet aan.
Controleer of het waterpeil in het reservoir hoog
genoeg is, en vul indien nodig vers water bij.
Uitgang van het stoombuisje
verstopt.
Verwijder met een naald eventuele aanslag die zich in
het gat van het stoompijpje heeft gevormd (Fig. 14).
Er lekt koffie uit
de randen van
de filterhouder.
Waarschijnlijk zit er te
veel gemalen koffie in de
filterhouder waardoor deze
niet goed vast kan worden
gedraaid.
Draai de filterhouder langzaam los, aangezien de
eventuele restdruk spetters kan veroorzaken, en
verwijder hem. Maak het leertje met een tandenstoker
of een sponsje schoon (Fig. 13). Herhaal de handeling
met de juiste hoeveelheid koffie in het filter.
Er zijn koffieresten
achtergebleven op de
dichting van de houder
waarin de filterhouder wordt
vastgedraaid.
Maak de dichting schoon met een tandenstoker of een
sponsje (Fig. 13).
De gaten van het filter
waar de maling in zit, zijn
verstopt.
Draai de filterhouder langzaam los, aangezien de
eventuele restdruk spetters kan veroorzaken, en
verwijder hem. Maak de verstopte gaatjes schoon met
een borsteltje of een naald.
Er komt geen
koffie uit het
apparaat, of de
koffie loopt te
langzaam door.
De gaatjes van de
geperforeerde schijf
in de houder waarin
de filterhouder wordt
vastgedraaid zijn verstopt.
Zet de machine aan zonder filterhouder en laat er
water doorstromen. Als het water nog steeds niet
gelijkmatig uit alle openingen stroomt, moet de
machine worden ontkalkt. Volg hierbij de instructies op
de verpakking.
De gaten van het filter
waar de maling in zit, zijn
verstopt.
Draai de filterhouder langzaam los, aangezien de
eventuele restdruk spetters kan veroorzaken, en
verwijder hem. Maak de verstopte gaatjes schoon met
een borsteltje of een naald.
Te fijne koffiemaling. Probeer een grovere koffiemaling te gebruiken.
Koffiemaling te hard
aangedrukt.
Druk de koffie in het filter minder hard aan.
Het reservoir is niet goed
aangebracht.
Zet het reservoir er goed in door het helemaal aan te
drukken.
Er is weinig water en de
pomp zuigt niet aan.
Controleer of het waterpeil in het reservoir hoog
genoeg is, en vul indien nodig vers water bij.
De koffie is te
waterig en koud.
De koffie is te grof gemalen. Voor sterkere en warmere koffie moet een fijnere
maling worden gebruikt.
Page 40

40
NL / BE
NL / BE
GARANTIE
Vriendelijke klant,
Op dit apparaat geven wij u 3 jaar garantie (conventionele garantie) vanaf de verkoopdatum. Als
het product defect is heeftbeschikt u overde rechten ten opzichte van de verkoper zoals vastgesteld
door de wet. De wettelijke rechten worden niet gelimiteerd door onze garantie die hieronder wordt
beschreven.
Garantievoorwaardes
De garantieperiode gaat in vanaf de verkoopdatum. Bewaar de originele kassabon. Deze kassabon is het bewijs dat u het product heeft aangeschaft. Bij een defect van het materiaal of de
productie dat zich voordoet binnen drie jaar (conventionele garantie) vanaf de verkoopdatum van
het product heeft u recht, naar onze keuze, op gratis reparatie of vervanging van het product.
Deze garantieinterventie houdt in dat, binnen de termijn van drie jaar (conventionele garantie), het
defecte apparaat en de kwitantie (kassabon) worden afgelevert samen met een korte beschrijving
van het defect en de datum waarop het probleem zich heeft voorgedaan.
Als het defect onder de garantie valt wordt het product gerepareerd of vervangen. de reparatie of
de vervanging van het product beginnen niet een nieuwe garantieperiode.
Garantieperiode of wettelijk recht en bezwaar op fabricatiefouten
De garantieperiode wordt niet verlengt door de wettelijke garantie. Zoals hierboven vermeld geldt
dit ook voor de onderdelen die worden vervangen en gerepareert. Meldt de schade en defecten
die bij de aankoop worden waargenomen onmiddelijk nadat het product is uitgepakt. De reparaties die worden gevraagt na het vervallen van de garantieperiode zijn onderhevig aan betaling.
Garantiegebied
Het product is vervaardigt met zorg en in overeenkomst met de kwaliteitsnormen en is goed gecontroleert voordat het wordt geleverd.
De garantie wordt toegepast op defecten van het materiaal of de productie. De garantie wordt niet
uitgebreid tot de onderelen van het product die onderhevig zijn aan de normale verslijting en die
daarom vallen onder de onderdelen die onderhevig zijn aan normale verslijting en de breekbare
onderdelen zoals bijvoorbeeld schakelaars, glazen reservoirs en schade die is veroorzaakt door
het transport. Deze garantie vervalt als het product wordt beschadigt of niet op de juiste manier
wordt gebruikt of wordt onderhouden. Voor het correcte gebruik van het product houdt u zicht aan
de aanwijzingen in de gebruiksaanwijzingen. Absoluut de gebruikshandelingen niet uitvoeren die
worden afgeraden in de gebruiksaanwijzingen of waarbij een waarschuwing staat.
Het product is alleen exclusief bestemd voor privégebruik en niet voor commercieel gebruik. De
garantie vervals bij misbruik, fout gebruik, forceringen of interventies die niet worden uitgevoerd
door onze geautoriseerde centra voor klantenassistentie.
Aanvragen van interventies onder garantie
Om het probleem snel op te lossn moeten de volgende aanwijzingen opgevolgt worden:
• Voor iedere aanvraag, geef de kassabon en de code (IAN 106103) als bewijs dat het product
is angeschaft.
• De code staat op het plaatje of op de eerste pagina van de gebruikshandleiding (links onderaan).
• Bij functiestoringen of andere defecten neem eerst telefonisch of per e-mail contact op met
de hieronder genoemde assitetsentieservice.
• Als het product defect is gebleken kan het franco vrij opgestuurt worden naar het adres van de
assistentieservice samen met de kwitantie (kassabon) en de beschrijving van het defect en de
datum waarop het probleem zich heeft voorgedaan.
• Pak het apparaat met zorg in voordat het naar de assistentieservice wordt opgestuurd.
Page 41

IT
NL / BE
41
NL / BE
Firma en vestiging van de verkoper:
LIDL
Serviceadres:
NL
ESPRESSOSERVICE IL CAFFE’
Veldweg, 6-R
5321 JE Hedel
Fax: +31 (0)73 599 2768
BE
De’Longhi Group Service
Avenue du Marquis 32
6220 Fleurus
Fax: + 32 (0) 15 270092
Telefoon hotline:
+ 31 (0)73 594 9764 (NL)
+ 32 (0) 15 280840 (BE)
E-mail:
-
Naam fabrikant / importeur:
De‘Longhi Appliances S.r.l.
Via L. Seitz, 47
31100 Treviso - Italy
Tel. +39-0422-4131
Fax +39-0422-413736
Productbenaming:
Espressoapparaat IAN 106103
Identificatienummer product / fabrikant:
SEMR 850 A1
Naam van de koper:
...........................................................
Postcode / plaats:
...........................................................
Straat:
...........................................................
Tel.nr. / e-mail:
...........................................................
Handtekening:
...........................................................
Foutbeschrijving:
...........................................................
...........................................................
...........................................................
...........................................................
...........................................................
...........................................................
Page 42

42
FR / BE
FR / BE
SYMBOLES
Les informations contenues dans ce manuel sont étiquetées de la façon suivante:
DANGER pour les enfants
DANGER dû à l’électricité
DANGER dérivant d’autres causes
NOTE: risque de brûlure causé par la vapeur à haute température
ATTENTION possibilité de dommages matériels
SYMBOLES 42
REMARQUES IMPORTANTES 43
DESCRIPTION DE L’APPAREIL 46
USAGE PRÉVU 46
OPERATIONS AVANT L’EMPLOI 46
COMMENT FAIRE LE CAFÉ 47
COMMENT FAIRE LE CAPPUCCINO 48
REUTILISATION DU CAFE 48
CONSEILS UTILES POUR OBTENIR UN BON CAFE ESPRESSO A L’ITALIENNE 49
NETTOYAGE DE L’APPAREIL 49
DÉCALCIFICATION 50
MISE HORS SERVICE 51
ELIMINATION DU PRODUIT 51
DONNEES TECHNIQUES 51
COMMENT REMEDIER AUX INCONVENIENTS SUIVANTS 52
GARANTIE 53
TABLE DES MATIERES
Page 43

IT
FR / BE
43
FR / BE
REMARQUES IMPORTANTES
LIRE CES INSTRUCTIONS AVANT L’EMPLOI.
CONSERVER TOUJOURS CES INSTRUCTIONS.
Si l’appareil est transféré à d’autres personnes, remettre également ce
manuel.
• L’appareil est destiné seulement à une utilisation domestique et ne doit
en aucun cas être servir à des fins commerciales ou industrielles.
• Le constructeur décline toute responsabilité pour une utilisation erronée ou pour des emplois autres que ceux prévus par ce livret.
• Il est conseillé de conserver l’emballage d’origine vu que l’assistance
gratuite ne joue pas pour les dommages causés par un emballage
du produit non adéquat lors de l’expédition à un service après-vente
agréé.
DANGER POUR LES ENFANTS
• L’appareil peut être utilisé par les enfants de plus de 8 ans à condition
qu’ils soient suivis par un adulte responsable ou qu’ils aient été informés du fonctionnement de l’appareil pour l’utiliser en toute sécurité
et en toute conscience face aux dangers pouvant découler de son
utilisation.
• Le nettoyage et l’entretien effectués par l’utilisateur ne doivent pas
être délégués aux enfants, à moins qu’ils aient plus de 8 ans et soient
surveillés par un adulte. Il faut surveiller les enfants pour être certain
qu’ils ne jouent pas avec l’appareil.
• Les éléments de l’emballage ne doivent pas être laissés à la portée
des enfants car ils représentent une source de danger.
• Lorsqu’on décidera de jeter cet appareil, il est recommandé de le
mettre hors d’usage en coupant le câble d’alimentation. Il est également recommandé de protéger les parties susceptibles de constituer
un danger spécialement pour les enfants qui pourraient se servir de
l’appareil pour jouer.
DANGER DÛ À L’ÉLECTRICITÉ
• L’appareil peut être utilisé par des personnes ayant des capacités
Page 44

44
FR / BE
FR / BE
physiques, sensorielles ou mentales réduites, ou dépourvues d’expérience, de connaissance, à condition qu’elles soient suivies par un
adulte responsable ou qu’elles aient compris les instructions fournies
concernant l’utilisation en toute sécurité et des dangers pouvant
découler de l’utilisation.
• Avant de brancher l’appareil au réseau d’alimentation, contrôler que
la tension indiquée sur la plaquette placée sous la machine corresponde bien à celle du réseau local.
• L’utilisation de rallonges électriques non autorisées par le fabricant de
l’appareil peut causer des dommages et provoquer également des
accidents.
• Le cordon d’alimentation endommagé doit être remplacé par le
constructeur ou par son service Après-vente ou dans tous les cas par
une personne ayant une qualification équivalente, de manière à éviter
tous les risques.
• Ne jamais mettre les parties sous tension en contact avec l’eau: cela
pourrait engendrer un court-circuit!
• Débrancher la prise de courant avant chaque intervention de nettoyage ou d’entretien.
• Ne trempez pas l’appareil dans l’eau ni dans tout autre liquide.
• Toujours éteindre l’appareil et débrancher la prise du cordon d’alimentation électrique avant de remplir le réservoir d’eau.
DANGER DÉRIVANT D’AUTRES CAUSES
• Ne pas soulever l’appareil en le prenant par le réservoir d’eau ou par
la cuvette mais en le prenant par le corps.
• Choisir un endroit assez éclairé, propre et avec une prise de courant
facilement accessible.
• Eviter de verser dans le réservoir une quantité excessive d’eau.
• Ne laissez pas l’appareil sans surveillance lorsqu’il est branché.
• L’appareil doit être utilisé et laissé au repos sur une surface stable.
• L’appareil ne doit pas être utilisé si il est tombé, s’il présente des signes
visibles de détérioration ou s’il perd de l’eau. Ne pas utiliser l’appareil
si le câble électrique ou la fiche sont endommagés ou si l’appareil
est défectueux. Toutes les réparations, y compris le remplacement du
Page 45

IT
FR / BE
45
FR / BE
cordon d’alimentation, doivent exclusivement être effectuées dans un
centres d’assistance après-vente ou par des techniciens agréés, de
façon à prévenir les risques éventuels.
DANGER: RISQUE DE BRÛLURE CAUSÉ
PAR LA VAPEUR À HAUTE TEMPÉRATURE
• Ne jamais diriger le jet de vapeur ou d’eau chaude vers les parties
du corps; manipuler avec précaution le tube vapeur: il y a risque de
brûlures!
• Ne pas toucher les parties métalliques extérieures de l’appareil et du
porte-filtre lorsque l’appareil est en marche car on pourrait se brûler.
• Si l’eau ne sort pas par le porte-filtre, cela pourrait être parce que
le filtre est bouché. Interrompre l’écoulement et attendre une dizaine
de secondes. Retirer et extraire lentement le porte-filtre: le résidu de
pression éventuelle pourrait en effet provoquer un jet ou giclement.
Nettoyer donc comme indiqué dans le paragraphe correspondant.
ATTENTION POSSIBILITÉ DE DOMMAGES MATÉRIELS
• Placer la machine sur un plan stable où il n’y a pas risque de la renverser.
• Ne pas utiliser la machine sans eau pour ne pas griller la pompe.
• Ne jamais remplir le réservoir d’eau à l’eau chaude ou bouillante.
• Ne pas positionner la machine sur des superficies très chaudes ou
près de flammes libres pour éviter ainsi que la carrosserie puisse être
endommagée.
• Le cordon ne doit pas toucher les parties chaudes de la machine.
• N’utilisez jamais d’eau gazeuse (additionnée d’anhydride de carbone).
• Ne jamais introduire des substances autres que le café en poudre
dans le filtre. Cela pourrait endommager gravement l’appareil.
• Ne pas stocker la machine à une température inférieure à 0 °C,
car l’eau restante dans la chaudière pourrait geler et provoquer des
dégâts.
• Ne pas utiliser l’appareil en plein air.
Page 46

46
FR / BE
FR / BE
• Ne pas laisser l’appareil exposé aux agents atmosphériques (pluie,
soleil, etc...).
• Après avoir débranché la prise d’alimentation et lorsque les parties
chaudes ont refroidi, l’appareil doit être nettoyé exclusivement avec
un linge non abrasif à peine humide et seulement quelques gouttes
de détergents neutres non agressifs (ne pas utiliser de solvants qui
détériorent le plastique).
DESCRIPTION DE L’APPAREIL
A
Porte-filtre pour café moulu
I
Grille de support des tasses amovible
B
Presse doseuse pour café
J
Bouton d’allumage
C
Disque perforé en silicone
(Thermocream®)
K
Bouton rotatif vapeur
D
Filtre à café en poudre
L
Voyant température chaudière
E
Réservoir de l’eau extractible
M
Interrupteur vapeur
F
Cordon d’alimentation + Prise
N
Thermomètre température chaudière
(°C e °F)
G
Dispositif vaporisateur
O
Interrupteur café
G1
Tuyau vapeur
P
Voyant d’allumage
H
Récipient de récupération des gouttes
USAGE PRÉVU
• On pourra utiliser la machine pour préparer des cafés et des cappuccino; de plus, grâce à la possibilité de faire couler de l’eau chaude,
vous pourrez aussi préparer du thé et des infusions. Cet appareil a été
conçu pour un usage exclusivement privé et il est donc à considérer
inapproprié pour l’usage à but industriel ou professionnel.
• Le constructeur n’a prévu aucun autre usage de l’appareil et il se
dégage de toute responsabilité pour les dégâts de toute nature, générés d’une utilisation inappropriée. Un usage inapproprié déterminerait
également l’annulation de toute forme de garantie.
OPERATIONS AVANT L’EMPLOI
Mise en marche
Contrôler que la tension du réseau soit identique à celle qui figure sur la plaquette des caractéristiques techniques de l’appareil. Placer la machine sur une surface horizontale. Remplir le
réservoir avec de l’eau froide, (1 litre maximum), en ayant bien soin de l’introduire convena-
Page 47

IT
FR / BE
47
FR / BE
blement dans son siège (Fig. 3).
Vérifier que le réservoir soit correctement introduit car dans le cas contraire le café
ne pourra s’écouler.
Brancher l’appareil à la prise de courant qui doit être munie d’une prise de terre.
Premier allumage
Après avoir rempli le réservoir d’eau fraiche plate, mettre la machine en marche. Appuyer
sur le bouton d‘allumage (J) pendant quelques secondes (Fig. 1). Le voyant d’allumage (P)
s’allume pour indiquer que la machine est allumée.
Lors du premier allumage ou après une longue période d’inutilisation, il est recommandé de faire couler au moins une tasse d’eau par le circuit hydraulique de la
chaudière.
Placer un récipient d’une capacité d’au moins un demi-litre sous le distributeur du café et sous le
dispositif
vaporisateur
(Fig. 5). Pousser l’interrupteur
café
(O) sur la position café ( ). Attendre
que l’eau ressorte à travers le logement où est accroché le porte-filtre. Tourner le bouton rotatif
vapeur (K) et faire sortir l’eau par le dispositif
vaporisateur
. Arrêter l’écoulement en poussant
interrupteur
café
(O) vers le haut. Tourner le bouton rotatif vapeur pour arrêter. Attendre que le
voyant température chaudière (L) s’allume. A ce moment-là, la machine est prête pour préparer
le café.
COMMENT FAIRE LE CAFÉ
Introduire le disque perforé en silicone (C) dans le porte-filtre (A) ainsi que le filtre à café en
poudre (D) en suivant l’ordre indiqué (Fig. 6). Doser le café dans le filtre et presser légèrement
à l’aide de la petite presse appropriée: pour faire deux cafés, remplir complètement deux
mesures, et n’en remplir qu’une pour un café. Engager le porte-filtre dans le siège approprié.
Bien l’insérer en tournant de gauche à droite, et s’assurer de bien l’avoir accroché à la
flasque (Fig. 7).
Attention!
Si une quantité excessive de poudre à café est introduite à l’intérieur du filtre,
la rotation du porte-filtre pourra apparaitre difficile et/ou on pourra avoir
des fuites au porte-filtre pendant l’écoulement du café.
Il est conseillé de laisser chauffer le porte-filtre, inséré dans son siège, pendant quelques
minutes de façon à obtenir le premier café bien chaud. Cela ne sera pas nécessaire pour les
cafés suivants. Attendre que le
voyant température chaudière
(L) s’allume. Positionner
interrup-
teur
café (O) sur la position café ( ): le café commence à sortir par les becs du porte-filtre.
Arrêter l’écoulement en poussant
interrupteur
café (O) vers le haut. La dose maximale de café
est de 50 ml.
Attention!
Comme dans le cas des machines professionnelles, ne pas enlever le porte-
filtre quand l’interrupteur café est inséré (en position café
).
Attention!
Une fois le café écoulé, attendre une dizaine de secondes avant d’enlever
le porte-filtre. Pour retirer ce dernier, le faire tourner lentement de droite à
gauche afin d’éviter que l’eau ou le café ne gicle.
Page 48

48
FR / BE
FR / BE
Si on remarque de petites bouffées de vapeur provenant du porte-filtre durant la
phase d’attente de la vapeur, considérer le phénomène comme absolument normal.
Le
voyant température chaudière
(L) s’éteindra et s’allumera périodiquement, en montrant
l’intervention du thermostat du chauffe-eau qui sert à maintenir à un niveau optimal la température de l’eau.
Il est opportun, aussi bien pour le premier café que pour les successifs, de commencer la
distribution du café seulement quand le
voyant température chaudière
(L) est allumé.
Fonction extinction automatique
Si la machine est allumée sans être utilisée, l’extinction automatique se déclenche automatiquement au bout de 30 minutes. Cette fonction met la machine en stand-by. Le voyant d’allumage
(P) est éteint. Pour rallumer la machine appuyer à nouveau sur le bouton d’allumage (J).
Remplissage du réservoir d’eau durant l’utilisation
Aucune opération particulière n’est nécessaire lorsque l’eau du réservoir est épuisée, car la
machine possède une soupape d’autoamorçage spéciale. Il suffit de débrancher l’appareil,
de sortir le réservoir et de le remplir à nouveau avec de l’eau fraiche plate.
COMMENT FAIRE LE CAPPUCCINO
Afin de préparer un cappuccino, un chocolat chaud ou réchauffer n’importe quelle autre boisson, porter l’interrupteur vapeur (M) en position vapeur ( ) et attendre que le voyant température chaudière (L) s’allume, ce qui veut dire que la chaudière est arrivée à température pour
débiter la vapeur.
Si on remarque de petites bouffées de vapeur provenant du porte-filtre durant la
phase d’attente de la vapeur, considérer le phénomène comme absolument normal.
Tourner le bouton rotatif vapeur (K), après avoir pris soin de placer un verre sous le
dispositif
vaporisateur (G): au début, il sort un peu d’eau et immédiatement, suit un fort jet de vapeur.
Arrêter le bouton rotatif vapeur (K) pour interrompre le débit et placer le pot de lait à faire
mousser sous le
dispositif
vaporisateur (Fig. 10). Plonger complètement la buse dans le lait et
tourner une nouvelle fois le bouton rotatif vapeur (K) dans le sens de la marche pour obtenir
le résultat voulu. Au cours de ces opérations, on remarquera que le
voyant température chau-
dière
(L) s’éteint et se rallume périodiquement pour signaler les interventions du thermostat qui
régule la température de la chaudière pour la distribution de vapeur.
Il est opportun de ne faire partir le débit de vapeur qu’une fois le voyant est allumé.
Après chaque utilisation, laisser sortir la vapeur pendant quelques secondes afin de
libérer la cavité des éventuels résidus de lait.
Tourner le bouton rotatif vapeur (K) pour arrêter. Une fois le cappuccino préparé, pousser
l’interrupteur
vapeur
(M) vers le haut afin d’annuler la fonction vapeur.
REUTILISATION DU CAFE
Pour préparer un café immédiatement après le cappuccino, il faudra ramener la chaudière à
la température de préparation du café en accomplissant les opérations suivantes: pousser l’interrupteur vapeur (M) vers le haut pour laisser la chaudière refroidir et attendre que le voyant
température chaudière (L) s’éteigne et s’allume à nouveau. Si l’on veut accélérer le refroidissement du chauffe eau, il est possible d’agir comme suit: après avoir disposé un récipient sous
le dispositif vaporisateur (G), amener l’interrupteur café (O) sur la position ( ); tourner le
Page 49

IT
FR / BE
49
FR / BE
bouton rotatif vapeur (K): L’eau sortira tant que le
voyant température chaudière
(L) ne sera pas
éteint. A ce stade, bloquer le bouton rotatif vapeur (K) et pousser l’interrupteur café (O) vers
le haut. Attendre que le
voyant température chaudière
(L) s’allume. La machine est de nouveau
prête pour faire le café.
CONSEILS UTILES POUR OBTENIR UN BON CAFE ESPRESSO A
L’ITALIENNE
Un café plus ou moins fort dépend du degré de mouture, de la quantité mise dans le portefiltre et de la façon dont il a été pressé. Le café moulu doit être légèrement pressé dans le
porte-filtre. Il suffit de quelques secondes pour que le café descende dans les tasses. La vitesse
d’écoulement du café change lorsqu’on varie la quantité de café dans le porte-filtre ou si on
utilise une mouture différente.
NETTOYAGE DE L’APPAREIL
Attention!
Toutes les opérations de nettoyage indiquées ci-dessous doivent être effec-
tuées à machine éteinte et avec la prise électrique débranchée.
Attention!
Un entretien et un nettoyage réguliers préservent la machine et prolongent
son efficacité. Ne jamais laver les pièces de la machine au lave-vaisselle. Ne
pas utiliser de jet d’eau direct.
Attention!
Chaque intervention doit être effectué à machine froide.
Nettoyage du filtre contenant la mouture
Vérifier que les perforations ne se bouchent pas, sinon les nettoyer avec une brosse à dents
(Fig. 11). Faire couler l’eau bouillante par le porte-filtre avec filtre inséré, sans poudre, après
avoir placé un verre sous le tuyau de débit, afin de dissoudre et éliminer les éventuels résidus
de café ou impuretés.
Attention!
Retirer lentement le porte-filtre car la pression pourrait être encore présente
et provoquer un jet ou des éclaboussures.
Il est conseillé de bien nettoyer le filtre tous les 3 mois environ avec les pastilles de détergent,
vendues dans les points de vente et les Service Après-Vente agréés; suivre les instructions
figurant dans la boîte, sinon, utiliser une pastille de détergent simple (sans liquide de rinçage
ou autre additif chimique) pour lave-vaisselle en procédant de la manière suivante:
• Introduire une pastille de détergent pour lave-vaisselle dans le filtre (sans café) quand la
machine est bien chaude (après environ 5 minutes de réchauffement).
• Accrocher le porte-filtre à la machine et mettre un récipient sous le porte-filtre.
• Placer l’interrupteur café (O) sur la position café (
) pour mettre l’écoulement de l’eau en
route et faire couler 15- 20 secondes.
• Interrompre l’écoulement et laisser agir la pastille pendant au moins 15 minutes en main-
tenant le porte-filtre inséré sur la machine.
• Refaire couler l’eau en faisant fonctionner la pompe pendant environ 15-20 secondes, puis
Page 50

50
FR / BE
FR / BE
laisser reposer encore 15-20 secondes, jusqu’à remplir de deux réservoirs d’eau.
• Enlever le porte-filtre de la machine, extraire le filtre et bien le rincer sous l’eau courante
du robinet.
• Eteindre la machine, débrancher le câble d’alimentation de la prise de courant et nettoyer
le siège de l’accrochage du porte-filtre à l’aide d’une éponge, afin d’enlever les éventuels
résidus de détergent de la gouttière.
• Rallumer la machine, accrocher une nouvelle fois le porte-filtre et faire couler encore au
moins 2 tasses d’eau pour compléter le rinçage.
Si la machine à café est utilisée tous les jours, il est conseillé d’effectuer l’opération de nettoyage au moins tous les trois mois.
Nettoyage du disque en silicone
Laver le disque en silicone (C) sous l’eau courante en le pliant légèrement sur les côtés de façon
à libérer le trou central des éventuels résidus de poudre à café pouvant le boucher (Fig. 12).
Nettoyage du siège du porte-filtre
Après diverses utilisations, on pourrait voir apparaître la sédimentation de marc de café dans
le siège d’accrochage du porte-filtre. On peut l’enlever à l’aide d’un cure-dent, d’une petite
éponge (Fig. 13) ou en laissant couler l’eau sans avoir introduit le porte-filtre (Fig. 4).
Nettoyage du dispositif vaporisateur
Attention!
Effectuer l’opération lorsque le tube chromé est froid pour éviter les brûlures.
Dévisser le
dispositif
vaporisateur (G) du tuyau vapeur (G1) (Fig. 14) et le laver à l’eau cou-
rante. Le tuyan vapeur (G1) peut être nettoyé avec un linge non abrasif. Revisser le
dispositif
vaporisateur at le tuyau vapeur jusqu’au bout. Nettoyer si nécessaire le trou de sortie de la
vapeur avec une aiguille (Fig. 14). Après chaque utilisation, laisser évacuer de la vapeur
pendant quelques secondes afin de libérer le trou d’éventuels résidus.
Nettoyage du réservoir
Il est conseillé de nettoyer périodiquement l’intérieur du réservoir à l’aide d’une éponge ou
d’un linge humide.
Nettoyage de la grille et du bac de recueil des gouttes
Se rappeler de vider le bac de recueil des gouttes (H) de temps à autres.
Enlever la grille (I) et la laver sous l’eau courante; extraire le bac de recueil des gouttes (H)
de la machine, le vider et le laver sous l’eau courante.
Nettoyage du corps de la machine
Attention!
Nettoyer les parties fixes de la machine à l’aide d’un linge humidifié non
abrasif afin de ne pas endommager la carrosserie.
DÉCALCIFICATION
Un entretien et un nettoyage réguliers préservent la machine et prolongent son efficacité,
limitant remarquablement les risques de formation de dépôts de calcaire dans l’appareil. Si,
Page 51

IT
FR / BE
51
FR / BE
malgré tout, après un certain temps, le fonctionnement de l’appareil devait être compromis
suite à l’utilisation fréquente d’eau dure et très calcaire, on peut procéder à la décalcification de la machine pour résorber le disfonctionnement. En cas de besoin de décalcification,
observer les indications de la feuille d’instructions du produit décalcifiant.
MISE HORS SERVICE
En cas de mise hors-service de la machine, il faut la débrancher électriquement, vider le
réservoir d’eau et le bac recueille-gouttes puis la renettoyer (voir paragraphe “Nettoyage de
l’appareil”). En cas de mise à la casse, il faudra procéder au tri des différents matériaux de
construction utilisés et pourvoir à la mise en déchetterie en base à leur composition et selon
les dispositions des lois en vigueur du pays d’utilisation.
ELIMINATION DU PRODUIT
Emballage
L’emballage du produit est composé de matériaux recyclables. Pourvoyez à son élimination
correcte dans les points de récolte appropriés.
Composants électroniques
Ne jetez jamais les composants électroniques parmi les déchets domestiques ordinaires.
A la fin de sa durée de vie, éliminez l’appareil de façon conforme à la directive CE
2012/19/CE. De cette façon, il sera possible de réutiliser les matériaux recyclables
contenus dans l’appareil en limitant l’impact sur l’environnement. Eliminez l’appareil
usé auprès d’un centre de récolte pour déchets électriques ou auprès d’un centre de recyclage.
Pour d’autres informations, adressez-vous à la société de récolte locale ou à votre administra
-
tion municipale.
DONNEES TECHNIQUES
Alimentation: 220-240 V ~ 50/60 Hz
Puissance: 850 Watt
Page 52

52
FR / BE
FR / BE
COMMENT REMEDIER AUX INCONVENIENTS SUIVANTS
En cas de fonctionnement anormal, éteindre immédiatement la machine et
débrancher la prise de courant.
PROBLÈMES CAUSES SOLUTIONS
La machine ne
débite pas de
vapeur.
Il y a peu d’eau et la
pompe n’aspire pas.
Contrôler que le niveau d’eau dans le réservoir est régulier
et le remplir avec de l’eau fraiche plate au cas échéant.
Trou de sortie de la vapeur
du tuyau bouché.
Déboucher avec une aiguille les éventuelles incrustations qui
se seraient formées dans le trou du tuyau vapeur (Fig. 14).
Ecoulement de
café des bords
du porte filtre.
Il est probable que l’on ait
versé une quantité excessive de café moulu dans le
porte-filtre, ce qui a empêché de serrer à fond le
porte-filtre dans son siège.
Retirer lentement le porte-filtre car la pression pourrait être
encore présente et provoquer un jet ou des éclaboussures.
Nettoyer le logement avec une éponge (Fig. 13). Répéter
l’opération, en versant dans le filtre la quantité correcte
de café.
Des résidus de café moulu
sont restés sur le joint de
garniture du siège du
porte-filtre.
Nettoyer le joint avec un cure-dent ou une petite éponge
(Fig. 13).
Les perforations du filtre de
la mouture sont bouchées.
Retirer lentement le porte-filtre car la pression pourrait être
encore présente et provoquer un jet ou des éclaboussures.
Renettoyer les perforations du filtre à l’aide d’une brosse à
dents ou d’une aiguille.
La distribution
du café n’a pas
lieu ou a lieu trop
lentement.
Le disque perforé sur le
siège du porte-filtre a ses
perforations bouchées.
Mettre la machine en marche sans porte-filtre en faisant
écouler l’eau. Si l’eau continue à ne pas sortir de façon
uniforme par tous les trous, effectuer un nettoyage antical
-
caire.
Les perforations du filtre de
la mouture sont bouchées.
Retirer lentement le porte-filtre car la pression pourrait être
encore présente et provoquer un jet ou des éclaboussures.
Renettoyer les perforations du filtre à l’aide d’une brosse à
dents ou d’une aiguille.
Mouture du café trop fine. Essayer d’utiliser un café à plus gros grains.
Mouture du café trop
pressée.
Presser le café dans le filtre en exerçant une pression plus
faible.
Le réservoir n’est pas bien
inséré.
Introduire convenablement le réservoir en le poussant à
fond.
Il y a peu d’eau et la
pompe n’aspire pas.
Contrôler que le niveau d’eau dans le réservoir est régulier
et le remplir avec de l’eau fraiche plate au cas échéant.
Le café est trop
aqueux et froid.
Le grain de la mouture est
trop gros.
Pour obtenir un café plus concentré et plus chaud, utiliser
un mélange de grain fin.
Page 53

IT
FR / BE
53
FR / BE
GARANTIE
Cher client,
Cet appareil est couvert par une garantie de 3 ans (garantie conventionnelle) à partir de sa date
d’achat. En cas de vice de fonctionnement du produit, vous pourrez jouir des droits établis par la
loi envers le vendeur. Les droits juridiques ne sont pas limités par notre garantie décrite ci-après.
Conditions de garantie
La période de garantie est valable à partir de la date d’achat du produit. Conservez votre bon
d’achat original. Ce bon d’achat représente la preuve de l’achat effectif du produit.
En cas de vice de matériau ou de fabrication relevé dans les trois ans (garantie conventionnelle)
suivant la date d’achat du produit, nous pourvoirons, selon notre estimation, à la réparation ou
à la substitution gratuite. Cette intervention sous garantie prévoit que, dans la limite des trois ans
(garantie conventionnelle), l’appareil défectueux et le bon d’achat (ticket de caisse) soient présentés, accompagnés d’une brève description du défaut avec la date de vérification du problème.
Dans le cas où le défaut seraitcouvert par notre garantie, le produit serait réparé ou remplacé. La
réparation ou substitution du produit n’impliquent pas le commencement d’une nouvelle période
de garantie.
Période garantie et droit juridique de réclamation pour vices de fabrication
La période de garantie n’est pas prorogée par la garantie légale. Les clausesci-avant se réfèrent
aussi aux parties remplacées et réparées. Notifiez les dommages et les défauts éventuellement
relevés au moment de l’achat immédiatement après le désemballage. Les demandes de réparation
effectuées après l’échéance de la période de garantie sont sujettes à paiement.
Domaine de la garantie
Le produit a été réalisé dans le respect de normes sévères sur la qualitéet méticuleusement contrôlé
avant sa livraison.
La garantie s’applique aux vices de matériaux ou de fabrication. La garantie n’est pas étendue aux
composants du produit sujets à l’usure normale, ni aux dommages sur les parties fragiles comme,
par exemple, les interrupteurs, les accumulateurs ou sur les parties en verre, ni aux dommages
causés durant le transport.
Cette garantie cesse si le produit est endommagé ou s’il est utilisé de façon incorrecte ou soumis à
un entretien inadéquat. Pour l’utilisation correcte du produit, suivre les indications reportées dans
les instructions d’emploi. Eviter absolument l’utilisation et les opérations déconseillées dans les
instructions d’emploi ou faisant objet d’un avertissement.
Le produit est exclusivement destinéà un usage privé et non pas à l’usage commercial. La garantie
cesse en cas d’abus, d’usage impropre, d’usage de force ou d’interventions non effectuées par nos
centres agréés de service après-vente.
Gestion des cas en garantie
Pour permettre une gestion rapide du problème, suivre les indications suivantes:
• Pour toute demande, présenter le ticket d’achat et le code (IAN 106103) comme preuve de
l’achat effectif.
• Le code est indiqué sur la plaquette ou sur la page de titre de la notice d’instructions (en bas,
à gauche).
• En cas d’erreurs de fonctionnement ou d’autres défauts, contacter par téléphone ou par mail
le service d’après-vente mentionné ci-après.
• Le produit jugé défectueux peut être envoyé en port payé à l’adresse communiquée par le
service après-vente, en joignant le bon d’achat (ticket de caisse) accompagné de la description
du défaut et de l’indication de la date de vérification du problème.
• Emballer l’appareil défectueux avec soin avant de l’envoyer au service après-vente.
Page 54

54
FR / BE
FR / BE
Carte de garantie
Société et siège du vendeur :
LIDL
Adresse du service :
FR
Sarl Thomas
42, Rue Baptiste Marcel BP7462
37074 Tours Cedex 2
Fax 02 47545915
BE
De’Longhi Group Service
Avenue du Marquis 32
6220 Fleurus
Fax: + 32 (0) 15 270092
Téléphone du support technique :
0892 707110 (0,45 • TTC/Minute Max) (FR)
+ 32 (0) 15 280840 (BE)
Courriel :
-
Désignation du fabricant / importateur :
De‘Longhi Appliances S.r.l.
Via L. Seitz, 47
31100 Treviso - Italy
Fon +39-0422-4131
Fax +39-0422-413736
Désignation du produit :
Machine à expresso IAN 106103
Code du produit / fabricant :
SEMR 850 A1
Nom du vendeur :
..............................................................
NPA/Ville :
..............................................................
Rue :
..............................................................
N° tél. / courriel :
..............................................................
Signature :
..............................................................
Description du défaut :
..............................................................
..............................................................
..............................................................
..............................................................
..............................................................
..............................................................
Page 55

IT
DE / AT / CH
55
DE / AT / CH
SYMBOLE
Die in diesem Handbuch enthaltenen Informationen sind wie folgt gekennzeichnet:
GEFAHR für Kinder
GEFAHR wegen Strom
Auf andere Ursachen rückführbare Gefahr
Hinweise zu Verbrühungsgefahr
ACHTUNG - Sachschäden
SYMBOLE 55
WICHTIGE SICHERHEITSHINWEISE 56
TEILEBEZEICHNUNG UND LIEFERUMFANG 59
BESTIMMUNGSGEMÄSSE VERWENDUNG 59
BENUTZUNGANLEITUNG 59
ZUBEREITUNG EINES ESPRESSOS 60
MILCHSCHAUM-ZUBEREITUNG 61
WIEDEREINSTELLEN AUF KAFFEEZUBEREITUNG 61
WIE SIE EINEN GUTEN ITALIENISCHEN ESPRESSO ZUBEREITEN 62
REINIGUNG DES FILTERS 62
ENTKALKUNG 64
AUSSBETRIEBNAHME 64
ENTSORGUNG 64
TECHNISCHE DATEN 64
WAS TUN, WENN ES PROBLEME GIBT 65
GARANTIE 66
INHALTVERZEICHNIS
Page 56

56
DE / AT / CH
DE / AT / CH
WICHTIGE SICHERHEITSHINWEISE
BITTE LESEN SIE DIESE BEDIENUNGSANLEITUNG, BEVOR SIE
DAS GERÄT VERWENDEN.
BEWAHREN SIE DIESE ANLEITUNG AUF.
• Das Gerät ist nur für den Hausgebrauch vorgesehen und darf nicht für
gewerbliche oder industrielle Zwecke verwendet werden.
• Wir übernehmen keine Haftung bei einem falschen oder in dieser
Anleitung nicht vorgesehenen Einsatz.
• Wir empfehlen die Originalverpackungen aufzubewahren, da ein
Gratis-Kundendienst nicht für Schäden vorgesehen ist, die durch falsche Verpackung bei der Spedition zum Kundendienst entstehen.
GEFAHR für Kinder
• Das Gerät darf von Kindern ab dem 8. Lebensjahr nur unter der
Aufsicht einer verantwortlichen Person verwendet werden oder wenn
sie Anweisungen über die sichere Bedienung des Geräts erhalten
haben und die während der Bedienung vorhandenen Gefahren verstanden haben.
• Die Kindern ab dem 8. Jahr dürfen Reinigungs- und Wartungseingriffe
nur unter Aufsicht von Erwachsenen ausüben. Kinder dürfen nicht mit
dem Gerät spielen.
• Die Verpackungsteile von Kindern fernhalten, da diese eine mögliche
Gefahrenquelle bilden.
• Soll das Gerät als Abfall entsorgt werden, empfehlen wir es durch
Abschneiden des Netzkabels unbrauchbar zu machen. Wir empfehlen außerdem die Geräteteile unschädlich zu machen, die besonders
für Kinder beim Spielen mit dem Gerät gefährlich sein könnten.
Gefahr wegen Strom
• Dieses Gerät kann von Personen mit reduzierten physischen, sonsorischen oder mentalen Fähigkeiten oder Mangel an Erfahrung und/
oder Wissen benutzt werden, wenn sie beaufsichtigt oder bezüglich
des sicheren Gebrauchs des Gerätes unterwiesen wurden und die
daraus resultierenden Gefahren verstanden haben.
Page 57

IT
DE / AT / CH
57
DE / AT / CH
• Bevor das Gerät an das Stromnetz angeschlossen wird, muss kontrolliert werden, ob die Netzspannung den Angaben auf dem Typenschild
des Geräts entspricht.
• Der Einsatz von nicht vom Hersteller zugelassenen Verlängerungskabeln
kann Schäden und Unfälle verursachen.
• Ist das Netzkabels beschädigt, muss es ausgetauscht werden. Um
jedes Risiko zu vermeiden, bringen Sie in diesem Fall das Gerät zum
Hersteller, zum Kundendienst oder zu einem Fachelektriker.
• Die unter Spannung stehenden Geräteteile dürfen nicht in Kontakt mit
Wasser kommen: es besteht Kurzschlussgefahr!
• Vor Reinigungs- oder Wartungsarbeiten stets den Stecker aus der
Steckdose ziehen.
• Das Gerät nie in Wasser oder andere Flüssigkeiten tauchen.
• Vorm Füllen des Wassertanks das Gerät immer ausschalten und den
Stecker aus der Steckdose ziehen.
Auf andere Ursachen rückführbare Gefahr
• Zum Aufheben des Gerätes, das Gerät nicht am Wassertank oder am
Sammelbehälter, sondern am Körper greifen.
• Zum Aufstellen einen ausreichend beleuchteten und sauberen Platz
mit einer leicht zugänglichen Steckdose wählen.
• Niemals zuviel Wasser in den Wassertank füllen.
• Das Gerät nie unbeaufsichtigt lassen solange es am Stromnetz angeschlossen ist.
• Das Gerät muss auf einer festen Unterlage benutzt und abgestellt werden.
• Das Gerät darf nicht benutzt werden, wenn es runtergefallen ist, wenn
es sichtbare Schäden aufweist oder wenn Wasser austritt. Das Gerät
darf nicht benutzt werden, wenn das Netzkabels, der Stecker oder das
Gerät beschädigt sind. Um jegliches Risiko vorzubeugen, dürfen alle
Reparaturen, einschließlich des Netzkabelswechsels, nur durch das
Service-Center bzw. autorisierte Fachtechniker durchgeführt werden.
Page 58

58
DE / AT / CH
DE / AT / CH
Hinweise zu Verbrühungsgefahr
• Den Dampfstrahl oder das heiße Wasser nie auf Körperteile richten;
Vorsicht beim Umgang mit dem Dampfröhrchen/ Heißwasserröhrchen:
Verbrühungsgefahr!
• Die äußeren Metallteile des Gerätes und des Filterhalters dürfen während des Gerätebetriebs nicht angefasst werden, weil sie Verbrennungen
verursachen können.
• Tritt kein Wasser aus dem Filterhalter aus, kann es sein, dass der Filter
verstopft ist. Die Abgabe unterbrechen und etwa zehn Sekunden warten. Anschließend den Filterhalter langsam entfernen, weil ein eventueller Restdruck zu einem Herausspritzen von Wasser führen könnte.
Anschließend wie im entsprechenden Abschnitt angegeben reinigen.
Achtung - Sachschäden
• Das Gerät auf einer festen Unterlage aufstellen, wo es nicht kippen kann.
• Die Maschine nie ohne Wasser verwenden, da sonst die Pumpe
durchbrennen könnte.
• Den Wassertank nie mit heißem oder kochendem Wasser auffüllen.
• Um zu vermeiden, dass das Gehäuse beschädigt wird, das Gerät nie
auf heiße Flächen oder in der Nähe von offenen Flammen aufstellen.
• Das Netzkabels darf nicht mit heißen Flächen der Maschine in Berührung
kommen.
• Kein Sprudelwasser verwenden (mit hinzugefügtem Kohlendioxyd).
• Den Filter darf man ausschließlich mit Pulverkaffee auffüllen. Andernfalls
könnte das Gerät schwer beschädigt werden.
• Nie die Maschine in Räumen mit Temperaturen unter 0° C aufstellen.
Das Restwasser im Heizsystem könnte gefrieren und Schäden verursa
-
chen.
• Das Gerät darf nicht im Freien benutzt werden.
• Das Gerät nicht im Freien stehen lassen (Regen, Sonne usw...).
• Nachdem der Stecker aus der Steckdose gezogen worden ist und
die heißen Teile abgekühlt sind, kann die Maschine mit einem weichen, nicht kratzenden und leicht feuchtem Tuch gereinigt werden.
Page 59

IT
DE / AT / CH
59
DE / AT / CH
Es können einige Tropfen mildes Spülmittel verwendet werden (nie
Lösungsmittel benutzen, die Plastikteile beschädigen können).
TEILEBEZEICHNUNG UND LIEFERUMFANG
A
Filterhalter für Kaffeepulver
I
Abtropfgitter
B
Messlöffel/ Kaffeedrücker
J
Einschalttaste
C
Silikon-Lochscheibe Thermocream®
K
Dampfregler
D
Filter für Kaffeepulver
L
Temperaturkontrollleuchte
E
Herausnehmbarer Wassertank
M
Schalter Dampffunktion
F
Netzkabel + Stecker
N
Heizkessel-Thermometer (°C und °F)
G
Dampröhrchen
O
Schalter zum Kaffee
G1
Schwenkbare Aufschäumdüse
P
Kontrollleuchte Betrieb
H
Auffangschale
BESTIMMUNGSGEMÄSSE VERWENDUNG
• Das Gerät ist zur Vorbereitung von Kaffee und Cappuccino bestimmt;
außerdem können wegen der Möglichkeit zur Heißwasserabgabe
auch Tee und Aufgüsse zubereitet werden. Das Gerät ist ausschließlich für den privaten Gebrauch vorgesehen.
• Jeder andere Einsatz ist nicht vom Hersteller vorgesehen. Der Hersteller
übernimmt daher keinerlei Haftung für jegliche Art von Schäden, die
durch einen ungeeigneten Einsatz des Gerätes verursacht werden. Bei
einem ungeeigneten Einsatz verfallen alle Garantieansprüche.
BENUTZUNGANLEITUNG
Inbetriebnahme
Überprüfen ob die Netzspannung den Angaben auf dem Typenschild am Gerät entspricht.
Das Gerät auf einer ebenen, stabilen und rutschfesten Fläche stellen. Den Wassertank vor der
erstmaligen Benutzung spülen und mit 1 Liter kaltem, stillem Wasser bis zum MAX-Füllstand
füllen, überfüllen Sie den Wassertank nicht. Anschließend darauf achten, dass er richtig in
seinen Sitz eingesetzt wird (Fig. 3).
Das korrekte Einfügen des Wassertank überprüfen, weil das Gerät sonst keinen
Kaffee abgeben könnte. Verbinden Sie anschließend den Stecker mit einer geerdeten Steckdose.
Erstes Einschalten
Nach dem Auffüllen des Wassertanks mit kaltem stillem Wasser, das Gerät mit dem
Einschlattaste (J) einschalten. Den Einschalttaste (J) (Fig. 1) einige Sekunden lang drücken. Die
Kontrollleuchte (P) leuchtet auf und signalisiert, dass das Gerät eingeschaltet ist.
Page 60

60
DE / AT / CH
DE / AT / CH
Bei erstmaliger Inbetriebnahme oder nach längerem Stillstand empfehlen wir Ihnen
mindestens eine Tasse Wasser aus dem Wasserkreislauf austreten zu lassen.
Unter der Aufschäumdüse einen Halben-Liter-Behälter stellen (Fig. 5). Den Schalter zum Kaffee
(O) auf Kaffee-Position ( ) stellen. Warten, bis das Wasser aus der Filterhalter austritt.
Den Dampfregler (K) öffnen und das Wasser aus der Aufschäumdüse ausfließen lassen.
Um die Abgabe zu beenden, den Schalter zum Kaffee (O) wieder nach oben drücken. Den
Dampfregler schließen. Warten bis die Temperaturkontrollleuchte (L) sich einschaltet. Das
Gerät ist jetzt für die Kaffeezubereitung bereit.
ZUBEREITUNG EINES ESPRESSOS
Den Filterhalter (A), die Silikon-Lochscheibe Thermocream® (C) und den Filter für Kaffeepulver
(D) in der angegebenen Reihenfolge einsetzen (Fig. 6). Den Kaffee in den Filter geben, und
leicht mit dem Kaffeepresser festdrücken. Für einen Espresso nehmen Sie einen Dosierlöffel
Kaffee. Für zwei Espresso nehmen Sie zwei Dosierlöffel Kaffee. Um den Filterhalter an dem
Gerät einzuhaken, bringen Sie ihn unter die Austrittsstelle am Heizkessel. Dann drücken Sie
den Filterhalter nach oben und drehen den Filterhalter von links nach rechts drehen, bis er
blockiert (Fig. 7). Der Griff des Filterhalters muß nicht unbedingt zentral zur Maschine stehen.
Es ist vielmehr erforderlich, daß der Filterhalter richtig in seiner Aufnahme eingesetzt ist.
WICHTIG!
Wird zuviel Kaffeepulver in den Filter eingefüllt, kann es sein, dass sich der
Filterhalter nur schwer drehen lässt bzw. bei der Kaffeeabgabe Kaffee aus
dem Filterhalter austritt. Entfernen Sie das eventuell überschüssige Kaffee
-
pulver.
Der Filterhalter sollte vor der Kaffeezubereitung in seiner Aufnahme einige Minuten fixiert
damit mit aufgewärmt wird, so dass bereits der Espresso richtig heiß ist. Für den anschließenden Kaffee ist das nicht nötig.
Warten bis die Kontrollleuchte (L) sich einschaltet. Den
Schalter zum Kaffee
(O) auf Kaffee-
Position (
) stellen: der Kaffee fängt an aus den Öffnungen des Filterhalters auszutreten. Um
die Abgabe zu beenden, den
Schalter zum Kaffee
(O) wieder nach oben drücken. Die maxi-
male Menge für einen Kaffee ist 50 ml.
WICHTIG!
Wie bei professionellen Espressomaschinen darf der Filterhalter nicht abge-
nommen werden, solange der Schalter zum Kaffee (O) (auf Kaffee-Position)
eingeschaltet ist.
WICHTIG!
Vor dem Lösen des Filterhalters, einge Sekunden warten, um ein Heraussprit-
zen von Wasser oder Kaffee zu vermeiden, den Filterhalter zum Entfernen
langsam gegen den Uhrzeigersinn drehen.
Es ist normal, dass beim Warten auf den Dampf kleine Dampfstöße aus dem Filter
-
halter austreten können.
Die Temperaturkontrollleuchte (L) schaltet sich regelmäßig ein und aus, damit wird das Einund Ausschalten des Thermostats angezeigt, der dafür sorgt, dass die Wassertemperatur stets
konstant bleibt.
Für die Zubereitung des ersten und der nachfolgenden Kaffee sollte bei der Kaffeeausgabe
Page 61

IT
DE / AT / CH
61
DE / AT / CH
die Temperaturkontrollleuchte (L) stets eingeschaltet sein.
Funktion für das automatische Ausschalten
Ist das Gerät eingeschaltet, wird aber nicht gebraucht, so aktiviert sich, nach 30 Minuten
von der letzten Kaffeeproduktion oder Dampfbenutzung, die Funktion für automatisches
Ausschalten. Diese Funktion aktiviert den Standby-Zustand für das Gerät. Die Kontrollleuchte
Betrieb (P) ausgeschaltet ist. Um die Maschine wieder einzuschalten, den Einschalttaste wieder drücken (J).
Auffüllen des Wassertanks bei Gebrauch
Wenn das Wasser im Wassertank aufgebraucht worden ist, sind keine besonderen
Aufmerksamkeiten nötig, weil die Kaffeemaschine mit einem speziellen Ventil ausgestattet ist,
das verhindert, dass Luft in den Wasserkreislauf eintreten kann. Einfach den Stecker aus der
Steckdose ziehen, den Wassertank herausnehmen und mit kaltem, stillem Wasser auffüllen.
MILCHSCHAUM-ZUBEREITUNG
Zum Zubereiten von Capuccino oder heißer Schokolade mit Milchschaum oder zum
Aufwärmen jedes anderen Getränkes, den Schalter (M) auf Position Dampf ( ) stellen
und warten bis die Temperaturkontrollleuchte (L) sich einschaltet. Dies zeigt an, dass der
Heizkessel die richtige Temperatur zur Dampfabgabe erreicht hat.
Es ist normal, dass beim Warten auf den Dampf kleine Dampfstöße aus dem Filterhalter austreten können!
Den Dampfregler (K) drehen, dabei jedoch ein Glas unter der Aufschäumdüse (G1) stellen: Zuerst tritt etwas heißes Wasser aus, anschließend erhalten Sie sofort einen starken
Dampfstrahl.
Den Dampfregler (K) schließen, um den Dampfstrahl zu unterbrechen und die Milchkanne mit
der aufzuschäumenden Milch (Fig. 10) unter die Aufschäumdüse stellen. Die Aufschäumdüse
tief in die Milchkanne eintauchen und den Dampfregler (K) bis zur Erreichung des gewünschten Ergebnisses wieder öffnen. Die Temperaturkontrollleuchte (L) schaltet sich regelmäßig ein
und aus. Ein Thermostat hält das Wasser auf optimaler Temperatur für die Dampferzeugung.
Die Dampfabgabe sollte nur bei eingeschalteter Temperaturkontrollleuchte gestartet werden. Nach jedem Gebrauch für einige Sekunden Dampf austreten lassen, so
dass eventuelle Milchreste aus der Aufschäumdüse beseitigt werden.
Den Dampfregler (K) schließen. Nach der Vorbereitung des Cappuccinos, den Schalter (M)
wieder nach oben drücken, um die Dampffunktion auszuschalten.
WIEDEREINSTELLEN AUF KAFFEEZUBEREITUNG
Soll direkt nach der Zubereitung eines Cappuccino ein Kaffee zubereitet werden, muss der
Heizkessel auf Temperatur zur Kaffeezubereitung gebracht werden, wie folgt vorgehen:
Den Schalter (M) nach oben schieben, um den Heizkessel abkühlen zu lassen und warten
bis die Kontrollleuchte (L) sich ausschaltet und wieder einschaltet. Soll das Abkühlen des
Heizkessels beschleunigt werden, kann wie folgt vorgegangen werden:
Nach dem Einstellen
eines Behälters unter dem Dampfröhrchen (G), den Schalter zum Kaffee (O) in Position ( )
bringen.
Den Dampfregler (K) drehen: Dadurch tritt Wasser aus, bis die Kontrollleuchte (L)
sich ausschaltet. Jetzt den Dampfregler (K) schließen und den Schalter zum Kaffee (O) wieder
nach oben drücken. Warten bis die Kontrollleuchte (L) sich einschaltet. Die Kaffeemaschine
Page 62

62
DE / AT / CH
DE / AT / CH
ist jetzt wieder für die Kaffeezubereitung bereit.
WIE SIE EINEN GUTEN ITALIENISCHEN ESPRESSO ZUBEREITEN
Für optimale Ergebnisse empfehlen wir, nur ausdrücklich für die Zubereitung in
Espressomaschinen zusammengestellte Mischungen zu verwenden. Das Kaffeepulver im
Filterhalter leicht andrücken. Nach wenigen Sekunden fließt der Kaffee bereits in die Tasse.
Die Geschwindigkeit des Austritts des Kaffees kann geändert werden, indem der Umfang
der Kaffeeportion im Filter leicht variiert und/oder ein Kaffee mit einem anderen Mahlgrad
verwendet wird.
REINIGUNG DES FILTERS
WICHTIG!
Bei allen nachstehend aufgeführten Reinigungs- und Pflegearbeiten muss das
Gerät ausgeschaltet und der Stecker aus der Steckdose gezogen sein.
WICHTIG!
Eine gute Pflege und regelmäßige Reinigung schützen das Gerät und garantieren eine lange Lebensdauer. Die Geräteteile niemals in der Geschirrspülmaschine spülen und nicht in Wasser tauchen. Keinen direkten Wasserstrahl
verwenden.
WICHTIG!
Alle Reinigungsarbeiten müssen bei kaltem Gerät vorgenommen werden.
Reinigung des Filters
Um eventuelle Kaffeereste oder Verunreinigungen aus den Öffnungen des Filters zu lösen,
verwenden sie eventuell eine kleine Bürste (Fig. 11). Sie können auch Wasser durch den
Filterhalter (ohne Kaffee) ausströmen lassen, und somit Verunreinigungen lösen.
WICHTIG!
Den Filterhalter langsam entfernen, weil ein eventueller Restdruck zu einem
Herausspritzen von Wasser führen kann. Verbrennungsgefahr!
Der Filter kann sich mit der Zeit nach mehrmaligem Gebrauch möglicherweise verstopfen.
Um seine Haltbarkeit zu verlängern und ein vollständiges Verstopfen zu vermeiden, wird
empfohlen folgende Anweisungen auszuführen, die zur normalen Gerätewartung gehören:
1) Am Ende des Tages den Heizkessel mit heißem Wasser ausspülen. Folgende Anweisungen
beachten:
• Den Filterhalter am Gerät anhängen, sicherstellen, dass sich kein Kaffeepulver / Kaffeesatz
im Filter befindet, und dass das Gerät richtig heiß ist. Einen Behälter unter dem Filterhalter
aufstellen.
• Den Schalter zum Kaffee (O) in die Position Kaffeeabgabe stellen, um die Wasserabgabe
einzuschalten und für ca. 15 – 20 Sekunden Wasser abzugeben.
• Die Wasserabgabe unterbrechen.
• Den Filterhalter aus dem Gerät entfernen. Indem Sie ihn gegen den Uhrzeigersinn vom
Gerät drehen.
2) Alle 2 – 3 Monate eine handelsübliche Geschirr-spülmittel Tablette, für die Reinigung des
Filters verwenden. Folgende Anweisungen beachten:
Page 63

IT
DE / AT / CH
63
DE / AT / CH
• In den Filter (ohne Kaffee) eine Geschirr-spülmittel Tablette einlegen.
• Abwarten, bis das Gerät richtig heiß ist (mindestens 5 Minuten Aufheizzeit).
• Den Filterhalter am Gerät befestigen und einen Behälter unter dem Filterhalter aufstellen.
• Den Schalter zum Kaffee (O) in die Position Kaffeeabgabe stellen, um die Wasserabgabe
für ca. 15 – 20 Sekunden einzuschalten.
• Die Wasserabgabe unterbrechen und die Tablette mindestens 15 Minuten wirken lassen.
Während dieser Zeit muss der Filterhalter am Gerät befestigt bleiben.
• Jetzt erneut Wasser abgeben. Die Pumpe jeweils ca. 15 – 20 Sekunden einschalten und
dann ca. 15 – 20 Sekunden ruhen lassen. Dieser Vorgang muss solange wiederholt werden, bis die Wassermenge zweier Wassertanks verbraucht ist.
• Den Filterhalter vom Gerät abnehmen, den Filter ausbauen und gründlich unter fließendem
Wasser ausspülen.
• Das Gerät ausschalten, das Netzkabel aus der Steckdose ziehen und abkühlen lassen.
Danach die Aufnahme des Filterhalters von eventuellen Spülmittelresten reinigen.
• Das Gerät wieder mit einer Steckdose verbinden und einschalten, den Filter erneut ohne
Kaffeepulver einsetzen und nochmals mindestens zwei Tassen Wasser durchlaufen lassen,
um das Nachspülen zu beenden.
Wird die Kaffeemaschine täglich benutzt, wird empfohlen den Reinigungsvorgang mindestens
alle drei Monate auszuführen.
Reinigung der Silikon-Lochscheibe Thermocream®
Die Silikon-Lochscheibe Thermocream® (C) unter fließendem Wasser spülen, dabei die
Scheibe seitlich leicht biegen, so dass die mittlere Öffnung von eventuellen Kaffeeresten
befreit werden kann, die sonst die Silikon-Lochscheibe Thermocream® verstopfen würden
(Fig. 12).
Reinigung der Aufnahme des Filters
Wenn das Gerät längere Zeit benutzt worden ist oder falls zuviel Kaffeepulver im Filter gewesen ist, kann sich Kaffeesatz auf der Aufnahme des Filterhalters absetzen. Der Kaffeesatz kann
mit einem Zahnstocher, einem kleinen Schwamm oder durch Durchlaufen von Wasser (Fig.
13), ohne den Filterhalter in die Aufnahme einzusetzen, entfernt werden (Fig. 4).
Reinigen der Aufschäumdüse
WICHTIG!
Heiße Oberflächen. Um Verbrennungen zu vermeiden, muss die verchromte
Düse bei der Reinigung kalt sein.
Die Dampfröhrchen (G) von der Aufschäumdüse (G1) ziehen (Fig. 14) und mit fließendem
Wasser spülen. Die Aufschäumdüse (G1) kann mit einem nicht scheuernden Lappen gereinigt werden. Gegebenenfalls die Aufschäumdüse mit einer Nadel reinigen (Fig. 14). Das
Dampfröhrchen wieder bis zum Anschlag festschrauben. Nach jedem Gebrauch, um eventuelle Reste aus der Austrittsöffnung zu beseitigen, einige Sekunden Dampf austreten lassen.
Reinigung des Wassertanks
Es wird angeraten das Innere des Behälters regelmäßig mit einem Schwamm oder einem
feuchten Tuch zu reinigen. Wenn nötig verwenden Sie ein mildes Spülmittel.
Page 64

64
DE / AT / CH
DE / AT / CH
Reinigung des Abtropfgitters und der Auffangschale
Beachten Sie, dass die Auffangschale (H) von Zeit zu Zeit entleert werden muss.
Das Abtropfgitter (I) entfernen und unter fließendem Wasser spülen; die Auffangschale (H) aus
dem Gerät ziehen und unter fließendem Wasser spülen.
Reinigung des Gerätegehäuses
WICHTIG!
Um das Gehäuse nicht zu beschädigen, müssen alle festen Geräteteile mit
einem feuchten, nicht scheuernden Lappen gereinigt werden.
ENTKALKUNG
Eine gute Pflege und eine regelmäßige Reinigung schützen das Gerät, lassen es längere
Zeit funktionieren und verringern die Gefahr der Bildung von Kalkablagerungen im Gerät.
Sollte trotzdem die Gerätefunktion nach einiger Zeit beeinträchtigt sein, weil häufig hartes
und sehr kalkhaltiges Wasser verwendet wurde, kann das Gerät zur Behebung der Störung
entkalkt werden. Befolgen Sie bei einer notwendigen Entkalkung die Anweisungen auf dem
Beipackzettel des Entkalkungsmittels.
AUSSBETRIEBNAHME
Bei einer Außerbetriebnahme des Geräts muss es von der Stromversorgung getrennt werden.
Den Wassertank und die Auffangschale entleeren und reinigen (siehe Abschnitt “Reinigung
und Pflege”).
Soll das Gerät als Abfall entsorgt werden, müssen die einzelnen Materialien, aus denen das
Gerät besteht, sortiert und entsprechend der im Einsatzland geltenden Gesetzesvorschriften
nach ihrer Zusammensetzung getrennt entsorgt werden.
ENTSORGUNG
Verpackung
Die Produktverpackung besteht aus recyclingfähigen Materialien. Entsorgen Sie diese umweltgerecht und sortenrein in den bereitgestellten Sammelbehältern.
Elektrogerät
Altgeräte dürfen nicht im normalen Hausmüll entsorgt werden.
Entsprechend EG-Richtlinie 2012/19/EG ist das Gerät am Ende seiner Lebensdauer
einer geordneten Entsorgung zuzuführen. Dabei werden im Gerät enthaltene
Wertstoffe der Wiederverwertung zugeführt und die Belastung der Umwelt vermieden.
Geben Sie das Altgerät an einer Sammelstelle für Elektroschrott oder einem Wertstoffhof ab.
Wenden Sie sich für nähere Auskünfte an Ihr örtliches Entsorgungsunternehmen oder Ihre
kommunale Verwaltung.
TECHNISCHE DATEN
Stromversorgung: 220-240 V ~ 50/60 Hz
Leistung: 850 Watt
Page 65

IT
DE / AT / CH
65
DE / AT / CH
WAS TUN, WENN ES PROBLEME GIBT
Bei Betriebsstörungen sofort das Gerät ausschalten und den Stecker aus der
Steckdose ziehen.
Probleme Ursachen Abhilfe
Es kommt kein
Dampf.
Zu wenig Wasser im
Wassertank und die Pumpe
kann nicht ansaugen.
Kontrollieren, ob der Wassertank richtig eingesetzt
ist und den richtigen Wasser-Füllstand im Wassertank
überprüfen. Mit kaltem stillem Wasser bis zum
angegebenen MAX-Füllstand auffüllen.
Dampföffnung an der
Aufschäumdüse ist verstopft.
Mit einer Nadel eventuelle Kesselsteinbildung aus den
Löchern der Aufschäumdüse entfernen (Fig. 14).
Es tritt Wasser
an der Seite des
Filterhalters aus.
Es befindet sich zuviel
Kaffeepulver im Filter.
Den Filterhalter entfernen und die Aufnahme mit einem
kleinen Schwamm reinigen (Fig. 13). Nochmals mit der
richtigen Kaffeemenge versuchen.
Es befinden sich Reste von
gemahlenem Kaffee auf der
Dichtung der KaffeefilterAufnahme.
Nochmals mit der richtigen Kaffeemenge versuchen.
Die Öffnung am Auslass
des Kaffeepulversiebs ist
verstopft.
Den Filterhalter langsam entfernen, weil ein eventueller
Restdruck zu einem Herausspritzen von Wasser führen
kann.Gegebenfalls den Filter mit einer Bürste reinigen.
Der Kaffee
kommt zu
langsam oder
kommt überhaupt
nicht.
Die Löcher an der
Lochscheibe an der
Aufnahme des Filterhalters
sind verstopft.
Lassen Sie Wasser aus der Maschine fließen, ohne
dabei den Filterhalter einzusetzen. Fließt das Wasser
weiterhin ungleichmäßig aus allen Löchern aus, muss
eine Entkalkung vorgenommen werden.
Die Öffnungen am Auslass
des Kaffeepulver-Filters sind
verstopft.
Den Filterhalter langsam entfernen, weil ein eventueller
Restdruck zu einem Herausspritzen von Wasser führen
kann. Gegebenfalls den Filter mit einer Bürste reinigen.
Zu fein gemahlene
Kaffeemischung.
Eventuell grobe gemahlene Kaffeemischung
verwenden. Den Filterhalter langsam entfernen, weil
ein eventueller Restdruck zu einem Herausspritzen von
Wasser führen kann. Gegebenfalls den Filter mit einer
Bürste reinigen.
Zu stark angedrückte
Kaffeemischung.
Den Kaffee mit weniger Druck in den Filter drücken.
Der Wassertank ist nicht
richtig eingesetzt.
Den Wassertank richtig bis zum Anschlag einsetzen.
Zu wenig Wasser im
Behälter und die Pumpe
kann nicht ansaugen.
Kontrollieren, ob der Wassertank richtig eingesetzt
ist und den richtigen Wasser-Füllstand im Wassertank
überprüfen. Mit kalten stillem Wasser bis zum
angegebenen MAX-Füllstand auffüllen.
Der Kaffee ist
nicht stark genug
und kalt.
Das Kaffeepulver ist zu grob
gemahlen.
Um einen stärkeren und heißeren Kaffee zu erhalten,
sollte ein feineres Kaffeepulver benutzt werden.
Page 66

66
DE / AT / CH
DE / AT / CH
GARANTIE
Sehr geehrte Kundin, sehr geehrter Kunde,
Sie erhalten auf dieses Gerät 3 Jahre Garantie [bzw. wie vereinbarte Garantie] ab Kaufdatum.
Im Falle von Mängeln dieses Produkts stehen Ihnen gegen den Verkäufer des Produkts gesetzliche
Rechte zu. Diese gesetzlichen Rechte werden durch unsere im Folgenden dargestellte Garantie
nicht eingeschränkt.
Garantiebedingungen
Die Garantiefrist beginnt mit dem Kaufdatum. Bitte bewahren Sie den Original Kassenbon gut auf.
Diese Unterlage wird als Nachweis für den Kauf benötigt. Tritt innerhalb von drei Jahren [bzw.
wie vereinbarte Garantie] ab dem Kaufdatum dieses Produkts ein Material- oder Fabrikationsfehler
auf, wird das Produkt von uns – nach unserer Wahl – für Sie kostenlos repariert oder ersetzt. Diese
Garantieleistung setzt voraus, dass innerhalb der Drei-Jahres-Frist [bzw. wie vereinbarte Garantie]
das defekte Gerät und der Kaufbeleg (Kassenbon) vorgelegt und schriftlich kurz beschrieben wird,
worin der Mangel besteht und wann er aufgetreten ist. Wenn der Defekt von unserer Garantie
gedeckt ist, erhalten Sie das reparierte oder ein neues Produkt zurück. Mit Reparatur oder
Austausch des Produkts beginnt kein neuer Garantiezeitraum.
Garantiezeit und gesetzliche Mängelansprüche
Die Garantiezeit wird durch die Gewährleistung nicht verlängert. Dies gilt auch für ersetzte und
reparierte Teile. Eventuell schon beim Kauf vorhandene Schäden und Mängel müssen sofort nach
dem Auspacken gemeldet werden. Nach Ablauf der Garantiezeit anfallende Reparaturen sind
kostenpflichtig.
Garantieumfang
Das Gerät wurde nach strengen Qualitätsrichtlinien sorgfältig produziert und vor Anlieferung
gewissenhaft geprüft. Die Garantieleistung gilt für Material- oder Fabrikationsfehler. Diese
Garantie erstreckt sich nicht auf Produktteile, die normaler Abnutzung ausgesetzt sind und daher
als Verschleissteile angesehen werden können oder für Beschädigungen an zerbrechlichen Teilen,
z. B. Schalter, Akkus oder die aus Glas gefertigt sind oder wegen Transportschäden. Diese
Garantie verfällt, wenn das Produkt beschädigt, nicht sachgemäß benutzt oder gewartet wurde.
Für eine sachgemäße Benutzung des Produkts sind alle in der Bedienungsanleitung aufgeführten
Anweisungen genau einzuhalten. Verwendungszwecke und Handlungen, von denen in der
Bedienungsanleitung abgeraten oder vor denen gewarnt wird, sind unbedingt zu vermeiden. Das
Produkt ist lediglich für den privaten und nicht für den gewerblichen Gebrauch bestimmt. Bei missbräuchlicher und unsachgemäßer Behandlung, Gewaltanwendung und bei Eingriffen, die nicht von
unserer autorisierten Service-Niederlassung vorgenommen wurden, erlischt die Garantie.
Abwicklung im Garantiefall
Um eine schnelle Bearbeitung ihres Anliegens zu gewährleisten, folgen Sie bitte den
folgenden Hinweisen:
• Bitte halten Sie für alle Anfragen den Kassenbon und die Artikelnummer (IAN 106103) als
Nachweis für den Kauf bereit.
• Die Artikelnummer entnehmen Sie auch dem Typenschild oder auf den Titelblatt Ihrer Anleitung
(unten links).
• Sollten Funktionsfehler oder sonstige Mängel auftreten, kontaktieren Sie zunächst die benannte
Servicestelle telefonisch oder per E-Mail.
• Ein als defekt erfasstes Produkt können Sie dann unter Beifügung des Kaufbelegs (Kassenbon)
und der Angabe, worin der Mangel besteht und wann er aufgetreten ist, für Sie portofrei an
die Ihnen mitgeteilte Service Anschrift übersenden.
• Verpacken Sie Ihr defektes Gerät sorgfältig, bevor Sie es an die Servicestelle einsenden.
Page 67

IT
DE / AT / CH
67
DE / AT / CH
Garantiekarte
Firma und Sitz des Verkäufers:
LIDL
Serviceadresse:
DE
NETSEND GmbH
Nachtwaid 8
D-79206 Breisach
CH
M+R Spedag Group
c/o Netsend GmbH
Hirsrütiweg
CH4303 Kaiseraugst
AT
Zeitlos Service
Paketfach 90
AT-4005 Linz
Telefon Hotline:
+49 (0) 7667 - 9069493 (DE)
00800 09348567 (CH / AT)
E-Mail:
service@mynetsend.de (DE/AT/CH)
Hersteller- / Importeurbezeichnung:
De‘Longhi Appliances S.r.l.
Via L. Seitz, 47
31100 Treviso - Italy
Tel. +39-0422-4131
Fax +39-0422-413736
Produktbezeichnung:
Espressomaschine IAN 106103
Produkt- /
Herstellerkennzeichnungsnummer:
SEMR 850 A1
Name des Käufers:
..............................................................
PLZ/Ort:
..............................................................
Straße:
..............................................................
Tel.-Nr. / E-Mail:
..............................................................
Unterschrift:
..............................................................
Fehlerbeschreibung:
..............................................................
..............................................................
..............................................................
..............................................................
..............................................................
..............................................................
 Loading...