

Page 1
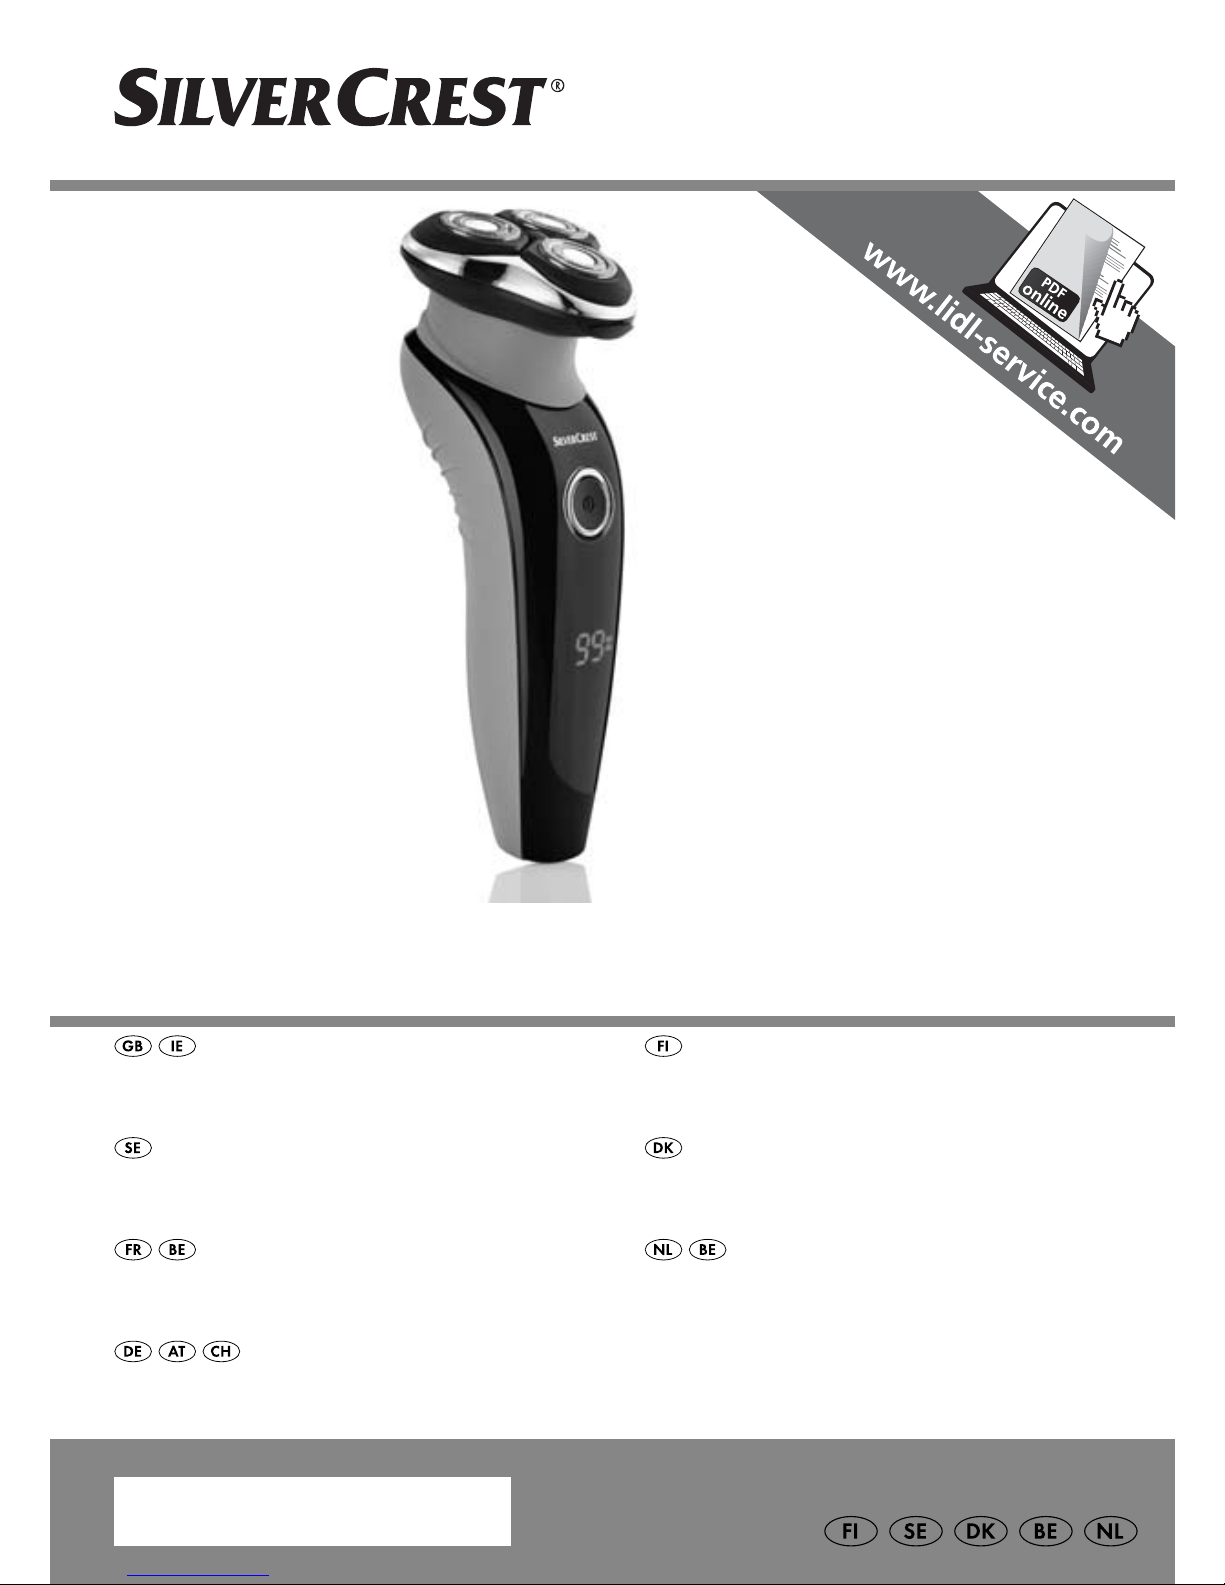
ROTARY SHAVER SRR 3.7 A1
IAN 102881
ROTARY SHAVER
Operating instructions
ROTATIONSSHAVER
Betjeningsvejledning
ROTATIONSRAKAPPARAT
Bruksanvisning
PARRANAJOKONE
Käyttöohje
ROTEREND SCHEERAPPARAAT
Gebruiksaanwijzing
RASOIR À TÊTES ROTATIVES
Mode d'emploi
ROTATIONSRASIERER
Bedienungsanleitung
Page 2
GB / IE Operating instructions Page 1
FI Käyttöohje Sivu 21
SE Bruksanvisning Sidan 41
DK Betjeningsvejledning Side 61
FR / BE Mode d'emploi Page 81
NL / BE Gebruiksaanwijzing Pagina 101
DE / AT / CH Bedienungsanleitung Seite 121
Before reading, unfold the page containing the illustrations and familiarise
yourself with all functions of the device.
Käännä ennen lukemista kuvallinen sivu esiin ja tutustu seuraavaksi laitteen
kaikkiin toimintoihin.
Vik ut bildsidan och ha den till hands när du läser igenom anvisningarna och
gör dig bekant med apparatens / maskinens funktioner.
Før du læser, vend siden med billeder frem og bliv bekendt med alle apparatets funktioner.
Avant de lire le mode d'emploi, ouvrez la page contenant les illustrations et
familiarisez-vous ensuite avec toutes les fonctions de l'appareil.
Vouw vóór het lezen de pagina met de afbeeldingen open en maak u
vertrouwd met alle functies van het apparaat.
Klappen Sie vor dem Lesen die Seite mit den Abbildungen aus und machen
Sie sich anschließend mit allen Funktionen des Gerätes vertraut.
Page 3
A
Page 4

B
Page 5

1
SRR 3.7 A1
GB
IE
Contents
Introduction . . . . . . . . . . . . . . . . . . . . . . . . . . . . . . . . . . . 2
Intended use . . . . . . . . . . . . . . . . . . . . . . . . . . . . . . . . . . 2
Package contents . . . . . . . . . . . . . . . . . . . . . . . . . . . . . . 2
Description of the appliance . . . . . . . . . . . . . . . . . . . . . . 3
Technical data . . . . . . . . . . . . . . . . . . . . . . . . . . . . . . . . . 4
Safety guidelines . . . . . . . . . . . . . . . . . . . . . . . . . . . . . . 5
Charging the batteries . . . . . . . . . . . . . . . . . . . . . . . . . . 9
Cordless shaving . . . . . . . . . . . . . . . . . . . . . . . . . . . . . . 10
Shaving using the mains adapter . . . . . . . . . . . . . . . .11
Trimmer/long hair trimmer . . . . . . . . . . . . . . . . . . . . . 11
Travel lock . . . . . . . . . . . . . . . . . . . . . . . . . . . . . . . . . . . 12
Cleaning and care . . . . . . . . . . . . . . . . . . . . . . . . . . . . .13
Cleaning with the brush . . . . . . . . . . . . . . . . . . . . . . . . . . . . . . . . .13
Cleaning under running water . . . . . . . . . . . . . . . . . . . . . . . . . . . .14
Thorough cleaning . . . . . . . . . . . . . . . . . . . . . . . . . . . . . . . . . . . . .15
Storage . . . . . . . . . . . . . . . . . . . . . . . . . . . . . . . . . . . . . 16
Warranty and service . . . . . . . . . . . . . . . . . . . . . . . . . . 17
Disposal . . . . . . . . . . . . . . . . . . . . . . . . . . . . . . . . . . . . . 18
Importer . . . . . . . . . . . . . . . . . . . . . . . . . . . . . . . . . . . . . 19
Page 6

GB
IE
2
SRR 3.7 A1
Introduction
Congratulations on the purchase of your new appliance.
You have selected a high-quality product. The operating instructions
are part of this product. They contain important information on safety,
usage and disposal. Before using the product, familiarise yourself
with all handling and safety guidelines. Use the product only as
described and for the range of applications specifi ed. Please also
pass these operating instructions on to any future owner(s).
Intended use
This appliance is intended exclusively for shaving and trimming
human hair.
This appliance is intended solely for use in private households.
Do not use it for commercial applications.
All other uses are deemed to be improper and may result in property
damage or even in personal injury.
Package contents
♦ Shaver with shaver unit
♦ Power adapter
♦ Trimmer unit
♦ Protective cap
♦ Brush
♦ Case
♦ Order card
♦ Operating instructions
Page 7

3
SRR 3.7 A1
GB
IE
NOTE
Check contents for completeness and damage immediately
after unpacking. Contact Customer Services if necessary.
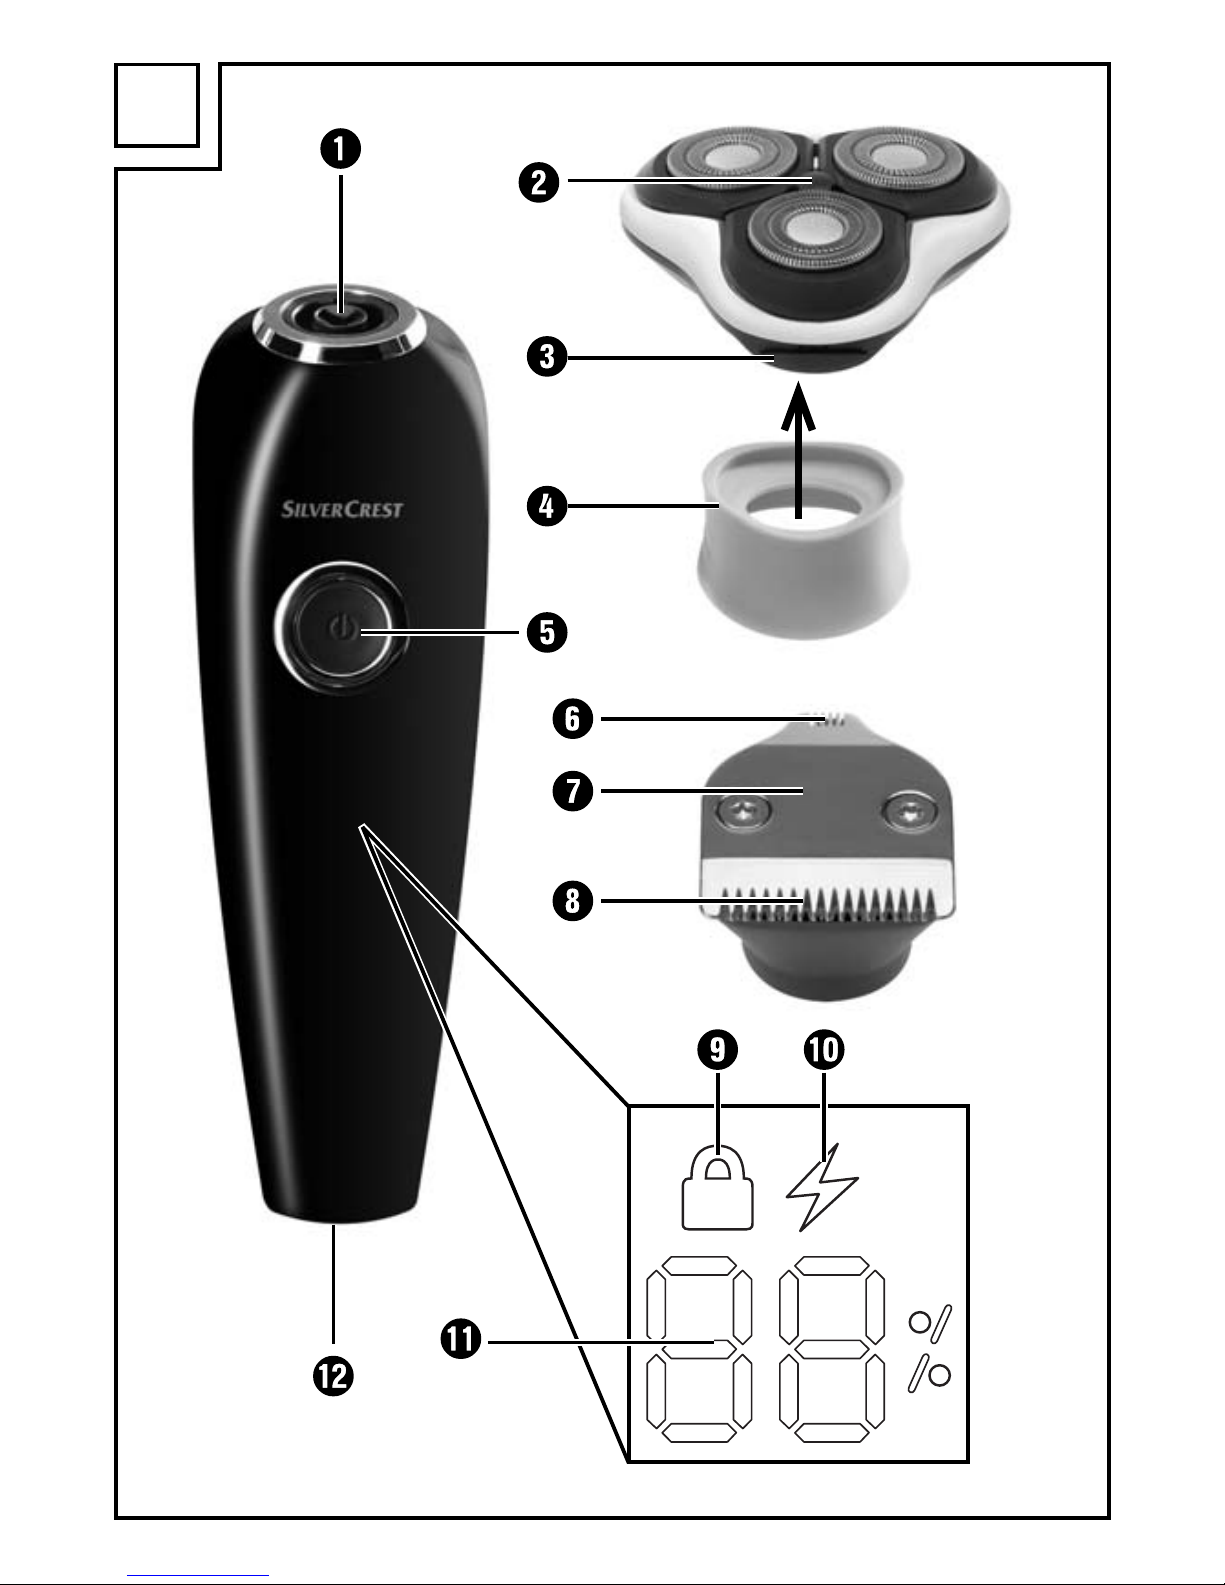
Description of the appliance
Figure A (front fold-out page):
1 Drive shaft
2 Shaver unit
3 Release button
4 Protective collar
5
On/off button
6 Narrow long-hair trimmer
7 Trimmer unit
8 Broad long-hair trimmer
9
symbol (lock)
0 symbol (charge)
q Battery charge level indicator
w Charging socket
Figure B (rear fold-out page):
e Connection plug
r Mains adapter
t Brush
z Protective cap
u Case
Page 8
GB
IE
4
SRR 3.7 A1
Technical data
Appliance
Input voltage: 5 V
Input current: 1000 mA
Battery: 3.7 V / 700 mAh Li-ion battery
Environmental temperature: 5°C up to 35°C
Protection class: III/
Charging time: approx. 90 minutes
Operating time with fully
charged battery: approx. 60 minutes
Protection rating: IPX 4
Power adapter (type PTB-050100EU)
Input voltage: 100 - 240 V ∼
50/60 Hz
Output voltage: 5 V
Output power: 1000 mA
Protection class: II /
Page 9

5
SRR 3.7 A1
GB
IE
Safety guidelines
DANGER – RISK OF ELECTRIC SHOCK!
► Prior to use, check the appliance for visible
external damage. Never operate an appliance
that is damaged. There is a risk of electrocution.
► The appliance may no longer be used if there
is any damage to the cable, to the mains power
adapter, the housing or any other components.
► Remove the mains adapter from the power
socket
— if a defect occurs,
— before cleaning the appliance,
— if you do not intend using the appliance
for long periods,
— after every use.
Pull the mains power adapter itself and not the
cable.
► Never submerge the appliance or the cable
with mains adapter in water or other liquids.
Page 10

GB
IE
6
SRR 3.7 A1
DANGER – RISK OF ELECTRIC SHOCK!
► If the appliance falls into water, it is imperative
that you pull the mains adapter out of the power
socket before you reach into the water.
► Never touch the mains adapter with wet hands,
especially when plugging it in or unplugging it.
Risk of electrocution!
► Check mains adapter and appliance regularly
for possible mechanical damage.
► Ensure that the cable does not get jammed in
cupboard doors or pulled over hot surfaces.
If this occurs, the cable insulation may be
damaged.
► The installation of a residual current circuit breaker
with a rated tripping current of no more than
30 mA off ers further protection from electric
shocks. Have the installation carried out only
by a qualifi ed electrician.
Page 11

7
SRR 3.7 A1
GB
IE
DANGER – RISK OF ELECTRIC SHOCK!
► WARNING! Keep the appliance dry.
► WARNING! Disconnect the mains adapter
from the handset when you clean it with water.
WARNING – RISK OF INJURY!
► This appliance may be used by children aged
8 years and above and by persons with limited
physical, sensory or mental capabilities or lack
of experience and knowledge, provided that
they are under supervision or have been told
how to use the appliance safely and are aware
of the potential risks.
► Children must not use the appliance as a play-
thing.
► Cleaning and user maintenance tasks may not
be carried out by children unless they are supervised.
Page 12
GB
IE
8
SRR 3.7 A1
WARNING – RISK OF INJURY!
► All repairs must be carried out by authorised
specialist companies or by the Customer Service
department. Improper repairs can pose signifi cant risks to the user. They will also invalidate
any warranty claim.
► Do not use the appliance with a defective cutter
attachment or cutting length attachment, since
these may have sharp edges. There is a risk of
personal injury!
► Defective components must always be replaced
with original replacement parts. Compliance
with safety requirements can only be guaranteed if original replacement parts are used.
► Only plug the mains adapter into an easily
reachable power socket so that you can pull
the mains adapter out of the power socket
quickly in an emergency.
Page 13
9
SRR 3.7 A1
GB
IE
CAUTION – PROPERTY DAMAGE!
► Never operate the appliance unsupervised,
and only in accordance with the information
on the nameplate.
► Use only the supplied mains adapter (type
PTB-050100EU) to power your appliance.
► To avoid damage caused by overheating, do
not cover the mains power adapter.
Charging the batteries
The battery should be charged for at least 90 minutes before fi rst use.
NOTE
► Ensure that the appliance is switched off before charging the
batter
y.
1) Plug the connection plug e into the charging socket w on the
shaver.
Ensure the +/- terminals are correctly aligned: the guide rod
in the charging socket w must be in the guide groove on the
connection plug e. Otherwise the connection plug e cannot
be plugged in.
2) Plug the mains adapter r into a mains socket that complies with
the appliance specifi cations.
The battery charge level is shown in percent (%) on the display
(battery charge level indicator q). The
symbol 0 appears
on the display.
Page 14

GB
IE
10
SRR 3.7 A1
♦ As soon as the battery is fully charged, the
symbol 0 appears
permanently on the display and the battery charge level indicator q shows 99%.
♦ Once the battery is fully charged, you can use the appliance for
ar
ound 60 minutes without connecting it to the power supply.
Cordless shaving
CAUTION! MATERIAL DAMAGE!
► This appliance is not suitable for wet shaving!
Y
ou can use the shaver without the cable. In this case, you must charge
the appliance before fi rst use (see section "Charging the batteries").
1) If it is not already attached, push the protective collar 4 from
below onto the shaver unit 2 (see fold-out page).
2) Attach the shaver unit 2 with the fi tted protective collar 4 onto
the drive shaft 1. Ensure that the protective collar 4 is sitting
correctly on the handset.
3) Remove the protective cap z.
4) Press the on/off button 5. The battery charge level indicator q
shows the current charge level and the shaver starts.
NOTE
► The best results are achieved if used on dry skin.
► It can take 2 to 3 weeks until the skin is accustomed to the
dr
y shaving system.
5) Move the shaving heads with straight and circular motions over
the skin.
6) When you have covered all the areas that you want to shave,
press the on/off button 5. The appliance stops. After approx.
3 seconds, the display will switch off .
Page 15

11
SRR 3.7 A1
GB
IE
7) Clean the shaver after every use with the supplied brush t.
F
or a more thorough cleaning, read the section "Cleaning and
care".
Shaving using the mains adapter
CAUTION! MATERIAL DAMAGE!
► This appliance is not suitable for wet shaving!
If y
ou want to use the shaver to load without charging it, you can
also use it directly with the mains adapter r:
1) Plug the connection plug e into the charging socket w on the
shaver.
Ensure the +/- terminals are correctly aligned. The guide rod
in the charging socket w must be in the guide groove on the
connection plug e. Otherwise the connection plug e cannot
be plugged in.
2) Insert the plug into a mains power socket.
Now you can use the shaver.
Trimmer/long hair trimmer
To shape your beard, form sideburns or shave eyebrows, use the
trimmer unit 7.
1) Pull the shaver unit 2 off the handset (if attached).
2) Attach the trimmer unit 7 to the drive shaft 1. Depending on
whether you want to use the broad 8 or narrow long hair
trimmer 6, change the direction of attachment.
Page 16
GB
IE
12
SRR 3.7 A1
– If you want to use the broad long hair trimmer 8, attach the
trimmer unit 7 so that the broad long hair trimmer 8 is facing
towards you.
– If you want to use the narrow long hair trimmer 6, attach the
trimmer unit 7 so that the narrow long hair trimmer 6 is facing
towards you.
3) Press the on/off button 5. The battery charge level indicator q
shows the current charge level and the appliance starts.
4) When you are fi nished trimming, press the on/off switch 5 again.
5) Clean the trimmer unit 7 with the supplied brush t. For a more
thorough cleaning, read the section "Cleaning and care".
Travel lock
To ensure that the appliance cannot switch on accidentally, you can
lock the on/off button 5.
■ Press and hold the on/off button 5 until the
symbol 9 appears
on the display.
If you now press the on/off button 5, the
symbol 9 and the
battery charge level indicator q appear. The appliance will,
however, not switch on.
■ If you want to release the lock, press and hold the on/off button 5:
– the
symbol 9 appears and starts to fl ash.
The appliance can now be switched on.
Page 17
13
SRR 3.7 A1
GB
IE
Cleaning and care
DANGER – ELECTRIC SHOCK!
► Before cleaning the appliance, disconnect the power plug
fr
om the mains power socket! There is a risk of electric shock!
CAUTION! MATERIAL DAMAGE!
► Do not use abrasive, chemical or caustic cleaning agents to
clean this appliance. This will irr
eparably damage the appliance.
Cleaning with the brush
Shaver unit
Clean the 3 shaving heads in the shaver unit 2 after every shave
using the brush t.
1) Press the release button 3 so that the shaver unit 2 pops open.
2) Tap the shaver unit 2 on a fl at surface or blow off the hair
cuttings.
3) Use the brush t to remove any remaining hair cuttings.
Trimmer unit
■ Clean the trimmer unit after every use with the supplied brush t.
■ Oil the long hair trimmers 6/8 ar
ound every 6 months with a
drop of sewing machine oil.
Page 18

GB
IE
14
SRR 3.7 A1
Cleaning under running water
The shaver unit 2 is suitable for cleaning under running
water.
1) Press the release button 3 so that the shaver unit 2 pops open.
2) Hold the shaver unit 2 under the running water so that the water
fl ows through the shaving heads from the inside to the outside.
CAUTION! MATERIAL DAMAGE!
Ensure that only the shaver unit 2 is under the str
eam of water!
The shaver handset is only protected against water splashes and
can be irreparably damaged if it is held under running water.
3) Allow the shaver unit 2 to dry before you use the shaver again.
Page 19

15
SRR 3.7 A1
GB
IE
Thorough cleaning
For a more thorough cleaning, remove the shaving heads:
1) Press the release button 3. The shaver unit 2 pops up.
2) Overstretch the shaver unit 2 a little so it can be pulled upwards
and off .
3) Carefully turn the catch marked with arrows in the direction of
the arrows until the mounting of the shaving heads can be lifted
of (see fi gure).
4) Clean all parts under running water and then allow them to dry
fully.
Page 20

GB
IE
16
SRR 3.7 A1
5) Replace the shaver unit 2.
6) To attach it, turn the catch marked with arrows in the opposite
direction to the arrow markings so that the shaving head mounting can no longer be removed.
7) Remove loose hairs from the shaver with the brush t.
8) Replace the shaver unit 2 on the shaver. Ensure that it snaps
into place and is seated fi rmly.
■ Clean the housing and the mains adapter r with a damp cloth.
NOTE
If ...
– ... the shaving result is noticeably poorer, ...
– ... you have to the shave the same spot repeatedly to
achie
ve a good result, ...
– ... the shave takes much longer than usual, ...
– ... there is visible damage to the shaving heads, ...
... the shaving heads should be changed.
Please contact the Service Centre if you want to order shaving
heads.
Storage
CAUTION! MATERIAL DAMAGE!
Never store the shaver in the case u while the appliance is
char
ging. Risk of overheating!
■ Always replace the protective cap z on the shav
er unit 2 when
you are not using the appliance.
■ Store the cleaned and dried appliance and its accessories in the
supplied case u.
■ Store everything in a clean, dust-free and dry place.
Page 21
17
SRR 3.7 A1
GB
IE
Warranty and service
You are provided a 3-year warranty on this appliance, valid from
the date of purchase. This appliance has been manufactured with
care and inspected meticulously prior to delivery. Please retain
your receipt as proof of purchase. In the event of a warranty claim,
please contact your Customer Service unit by telephone.
This is the only way to guarantee free return of your goods.
The warranty only covers claims for material and manufacturing defects,
not for damage sustained during carriage, components subject to wear
and tear or damage to fragile components such as switches or batteries. This appliance is intended solely for private use and not for
commercial purposes.
The warranty shall be deemed void in cases of misuse or improper
handling, use of force and modifi cation which have not been carried
out by one of our authorised Service centres.
Your statutory rights are not restricted by this warranty.
The warranty period is not prolonged by repairs eff ected under the
warranty. This also applies to replaced and repaired components. Any
damage and defects present at the time of purchase must be reported
immediately after unpacking, but no later than two days after the
date of purchase. Repairs carried out after expiry of the warranty
period shall be subject to charge.
Service Great Britain
Tel.: 0871 5000 720 (£ 0.10/Min.)
E-Mail: kompernass@lidl.co.uk
IAN 102881
Service Ireland
Tel.: 1890 930 034
(0,08 EUR/Min., (peak))
(0,06 EUR/Min., (off peak))
E-Mail: kompernass@lidl.ie
IAN 102881
Hotline availability: Monday to Friday 08:00 - 20:00 (CET)
Page 22

GB
IE
18
SRR 3.7 A1
Disposal
Never dispose of the appliance in the
normal domestic waste. This product is
subject to the provisions of European
Directive 2012/19/EU.
Dispose of the appliance via an approved waste disposal company
or your municipal waste disposal facility. Please observe applicable
regulations. Please contact your waste disposal facility if you are in
any doubt.
Disposal of (rechargeable) batteries
To dispose of the appliance in an environmentally friendly way, you
must remove the battery from the appliance:
CAUTION – PROPERTY DAMAGE!
► Remove the battery from the appliance only if you want to
scr
ap/dispose of the appliance! The appliance is perman-
ently defective after you have removed the battery!
1) To remove the battery from the handset, remove the small screw
from the rear of the handset with a Phillips screwdriver.
2) Remove the rear cover of the handset.
3) Lever out the black inner housing, for instance with a screwdriver.
Before you remove the inner housing, you may need to break off
the side and bottom brackets or bend them outwards. Preferably,
use a fl at-blade screwdriver to do this.
4) Once you have removed the inner housing:
Break the brackets on the transparent plastic cover on the sides.
Press the lower lock slightly inwards so that the clear plastic
cover can be folded upwards.
Page 23
19
SRR 3.7 A1
GB
IE
5) Lift the board slightly so you can get under the battery with a
fl
at-blade screwdriver.
6) Lever the batteries out.
7) Dispose of the battery in an environmentally friendly manner.
Used batteries may not be disposed of in household waste.
Consumers are legally obliged to dispose of (rechargeable)
batteries at a collection point in their community/city district
or at a retail store. The purpose of this obligation is to ensure
that batteries are disposed of in an environmentally congruent manner. Only dispose of batteries when they are fully
discharged.
The packaging is made of environmentally friendly
materials which you can dispose of at your local recycling
centre.
Importer
KOMPERNASS HANDELS GMBH
BURGSTRASSE 21
44867 BOCHUM
GERMANY
www.kompernass.com
Page 24

20
SRR 3.7 A1
Page 25

21
SRR 3.7 A1
FI
Sisällysluettelo
Johdanto . . . . . . . . . . . . . . . . . . . . . . . . . . . . . . . . . . . . 22
Määräystenmukainen käyttö . . . . . . . . . . . . . . . . . . . 22
Toimitussisältö . . . . . . . . . . . . . . . . . . . . . . . . . . . . . . . . 22
Laitteen kuvaus . . . . . . . . . . . . . . . . . . . . . . . . . . . . . . . 23
Tekniset tiedot . . . . . . . . . . . . . . . . . . . . . . . . . . . . . . . . 24
Turvallisuusohjeet . . . . . . . . . . . . . . . . . . . . . . . . . . . . .25
Akkujen lataaminen . . . . . . . . . . . . . . . . . . . . . . . . . . .29
Parranajokoneen langaton käyttö . . . . . . . . . . . . . . . 30
Parranajo verkkoadapterilla . . . . . . . . . . . . . . . . . . . . 31
Trimmeri . . . . . . . . . . . . . . . . . . . . . . . . . . . . . . . . . . . . . 31
Kuljetusvarmistus . . . . . . . . . . . . . . . . . . . . . . . . . . . . .32
Puhdistus ja hoito . . . . . . . . . . . . . . . . . . . . . . . . . . . . . 33
Puhdistaminen sudilla . . . . . . . . . . . . . . . . . . . . . . . . . . . . . . . . . . .33
Puhdistaminen juoksevan veden alla . . . . . . . . . . . . . . . . . . . . . . .34
Perusteellinen puhdistus . . . . . . . . . . . . . . . . . . . . . . . . . . . . . . . . .35
Säilytys . . . . . . . . . . . . . . . . . . . . . . . . . . . . . . . . . . . . .36
Takuu ja huolto . . . . . . . . . . . . . . . . . . . . . . . . . . . . . . .37
Hävittäminen . . . . . . . . . . . . . . . . . . . . . . . . . . . . . . . . . 38
Maahantuoja . . . . . . . . . . . . . . . . . . . . . . . . . . . . . . . . . 39
Page 26

FI
22
SRR 3.7 A1
Johdanto
Onnittelut uuden laitteen hankinnasta.
Olet valinnut laadukkaan tuotteen. Käyttöohje on osa tätä tuotetta.
Se sisältää tärkeitä turvallisuutta, käyttöä ja hävittämistä koskevia
ohjeita. Tutustu ennen tuotteen käyttöä kaikkiin käyttö- ja turvallisuusohjeisiin. Käytä tuotetta vain kuvatulla tavalla ja vain mainittuihin
käyttötarkoituksiin. Kun luovutat tuotteen eteenpäin, liitä mukaan
kaikki tuotetta koskevat asiakirjat.
Määräystenmukainen käyttö
Tämä laite on tarkoitettu yksinomaan ihmishiusten ajamiseen ja
leikkaamiseen.
Tämä laite on tarkoitettu ainoastaan yksityiskäyttöön. Älä käytä sitä
ammattitarkoituksessa.
Muunlainen käyttö on määräystenvastaista ja voi aiheuttaa esinetai jopa henkilövahinkoja.
Toimitussisältö
♦ Parranajokone, jossa ajopää
♦ Verkkoadapteri
♦ Trimmeriyksikkö
♦ Suojus
♦ Suti
♦ Laukku
♦ Tilauskortti
♦ Käyttöohje
Page 27
23
SRR 3.7 A1
FI
OHJE
Tarkista toimituksen täydellisyys ja mahdolliset vauriot heti,
kun olet poistanut laitteen pakkauksesta. Käänny tarvittaessa
huollon puoleen.
Laitteen kuvaus
Kuva A (etummainen kääntösivu):
1 Käyttöakseli
2 Ajopääyksikkö
3 Vapautuspainike
4 Suojarengas
5
Käynnistyspainike
6 Kapea trimmeri
7 Trimmeriyksikkö
8 Leveä trimmeri
9 Symboli
(Lukitus)
0 Symboli
(Lataus)
q Lataustilan näyttö
w Latausliitäntä
Kuva B (takimmainen kääntösivu):
e Liitäntäpistoke
r Verkkoadapteri
t Suti
z Suojus
u Laukku
Page 28

FI
24
SRR 3.7 A1
Tekniset tiedot
Laite
Tulojännite: 5 V
Tulovirta: 1000 mA
Akku: Litiumioniakku 3,7 V, 700 mAh
Ympäristön lämpötila: 5°C ... 35°C
Suojaluokka: III/
Latausaika: n. 90 minuuttia
Käyttöaika täyteen
ladatulla akulla: n. 60 minuuttia
Kotelointiluokitus: IPX 4
Verkkoadapteri (Tyyppi PTB-050100EU)
Tulojännite: 100 - 240 V ∼
50/60 Hz
Lähtöjännite: 5 V
Lähtövirta: 1000 mA
Suojaluokka: II /
Page 29
25
SRR 3.7 A1
FI
Turvallisuusohjeet
VAARA – SÄHKÖISKU!
► Tarkista laite ennen käyttöä ulkoisten, näkyvien
vaurioiden varalta. Älä ota vaurioitunutta laitetta
käyttöön. On olemassa sähköiskun vaara.
► Jos havaitset vaurioita virtajohdossa, verkko-
adapterissa, kotelossa tai muissa osissa, älä
jatka laitteen käyttöä.
► Irrota verkkoadapteri pistorasiasta
— jos laitteen toiminnassa ilmenee häiriöitä,
— ennen laitteen puhdistamista,
— jos laite on pidemmän aikaa käyttämättä,
— jokaisen käytön jälkeen.
Irrota laite sähköverkosta vetämällä verkkoadapterista, älä johdosta.
► Älä koskaan upota laitetta, sen virtajohtoa äläkä
verkkoadapteria veteen tai muihin nesteisiin.
Page 30

FI
26
SRR 3.7 A1
VAARA – SÄHKÖISKU!
► Jos laite on pudonnut veteen, irrota verkko-
adapteri pistorasiasta, ennen kuin nostat
laitteen vedestä.
► Älä koskaan koske verkkoadapteriin märin
käsin, etenkään, kun työnnät sitä pistorasiaan
tai vedät sitä pistorasiasta. On olemassa
sähköiskun vaara!
► Tarkista verkkoadapteri ja laite säännöllisesti
mahdollisten mekaanisten vikojen varalta.
► Varmista, ettei johto jää kaapin ovien väliin, tai
ettei sitä vedetä kuumien pintojen yli. Muuten
johdon eristys saattaa vahingoittua.
► Lisäturvaa sähköiskua vastaan saadaan asenta-
malla vikavirtasuojalaitejonka laukaisuvirta on
korkeintaan 30 mA. Anna asennus ainoastaan
sähköalan ammattilaisen tehtäväksi.
Page 31

27
SRR 3.7 A1
FI
VAARA – SÄHKÖISKU!
► HUOMIO! Pidä laite kuivana!
► HUOMIO! Irrota verkkoadapteri kädessä pidet-
tävästä osasta, kun puhdistat sitä vedellä!
VAROITUS –
LOUKKAANTUMISVAARA!
► Kahdeksan vuotta täyttäneet lapset sekä henkilöt,
joiden fyysiset, aistimukselliset tai henkiset kyvyt
ovat rajalliset, tai joilla ei ole riittävää kokemusta
tai tietoa laitteen käytöstä, saavat käyttää
laitetta vain valvonnan alaisena, tai jos heitä
on opastettu laitteen turvalliseen käyttöön, ja
he ovat ymmärtäneet laitteen käyttöön liittyvät
vaarat.
► Lapset eivät saa leikkiä laitteella.
► Lapset eivät saa suorittaa puhdistusta ja käyttä-
jähuoltoa ilman valvontaa.
Page 32

FI
28
SRR 3.7 A1
VAROITUS –
LOUKKAANTUMISVAARA!
► Korjauta laite ainoastaan valtuutetussa alan
liikkeessä tai asiakashuollossa. Virheelliset korjaukset voivat aiheuttaa huomattavan vaaran
käyttäjälle. Tällöin myös laitteen takuu raukeaa.
► Älä käytä laitetta, jos teräpää tai leikkuupituu-
den säätökampa on vaurioitunut, sillä niissä
saattaa olla teräviä reunoja. On olemassa
loukkaantumisvaara!
► Laitteen vialliset osat saa vaihtaa vain alkupe-
räisvaraosiin. Voimme taata turvallisuusvaatimusten täyttymisen vain näiden osien kohdalla.
► Liitä verkkoadapteri ainoastaan helppopääsyi-
seen pistorasiaan, jotta voit häiriön sattuessa
irrottaa sen nopeasti pistorasiasta.
Page 33

29
SRR 3.7 A1
FI
HUOMIO – AINEELLISET VAHINGOT!
► Älä käytä laitetta ilman valvontaa ja ainoastaan
tyyppikilven tietojen mukaisesti.
► Käytä verkkokäytössä vain mukana tulevaa
verkkoadapteria (Tyyppi PTB-050100EU).
► Älä peitä verkkoadapteria, jottei laite lämpene.
Akkujen lataaminen
Akun on latauduttava ennen ensimmäistä käyttökertaa 90 minuuttia.
OHJE
► Varmista ennen akun lataamista, että laite on kytketty pois
päältä.
1) T
yönnä liitäntäpistoke e parranajokoneen latausliitäntään w.
Tarkista oikeanapaisuus: Latausliitännässä w olevien tappien on
osuttava liitäntäpistokkeen e uriin. Muuten liitäntäpistoke e ei
asetu liitäntään.
2) Työnnä verkkoadapteri r laitteen määräysten mukaiseen
pistorasiaan:
Akun lataustila näkyy näytössä prosentteina (%) (Lataustilan
näyttö q). Näyttöön ilmestyy symboli
0.
Page 34

FI
30
SRR 3.7 A1
♦ Kun akku on latautunut, symboli
0 näkyy näytössä jatkuvasti
ja lataustilan näytössä q on lukema 99 %.
♦ Täyteen ladatulla akulla laitetta voidaan käyttää n. 60 minuuttia
sitä sähk
överkkoon liittämättä.
Parranajokoneen langaton käyttö
HUOMIO! AINEELLISET VAHINGOT!
► Laite ei sovellu märkäajoon!
V
oit käyttää parranajokonetta langattomasti. Tässä tapauksessa laite
on ladattava ennen ensimmäistä käyttökertaa (ks. kappale "Akkujen
lataaminen").
1) Työnnä suojarengas 4 alakautta ajopäähän 2 (ks. sivun
kääntöpuoli).
2) Työnnä ajopää 2 paikalleen asetetun suojarenkaan 4 kanssa
käyttöakselille 1. Varmista, että suojarengas 4 on asetettu oikein
paikoilleen.
3) Poista suojus z.
4) Paina käynnistyspainiketta 5. Lataustilan näytössä q näkyy
senhetkinen lataustila, ja parranajokone käynnistyy.
OHJE
► Saat parasta jälkeä, kun iho on kuiva.
► Ihon tottuminen parranajokoneeseen voi kestää 2–3 viikkoa.
5)
Liikuta ajopääyksikköä iholla suoraan ja pyörivin liikkein.
6) Kun olet ajanut kaikki ajettavat kohdat, paina käynnistyspainiketta 5.
Laite pysähtyy. Näyttö sammuu n. 3 sekunnin jälkeen.
Page 35

31
SRR 3.7 A1
FI
7) Puhdista parranajokone jokaisen parranajon jälkeen mukana
toimitettav
alla sudilla t.
Lue perusteelliset puhdistusohjeet kappaleesta "Puhdistus ja
hoito".
Parranajo verkkoadapterilla
HUOMIO! AINEELLISET VAHINGOT!
► Laite ei sovellu märkäajoon!
Jos haluat k
äyttää parranajokonetta lataamatta sitä etukäteen, voit
käyttää sitä myös verkkoadapterilla r:
1) Työnnä liitäntäpistoke e parranajokoneen latausliitäntään w.
Tarkista oikeanapaisuus: Latausliitännässä w olevien tappien on
osuttava liitäntäpistokkeen e uriin. Muuten liitäntäpistoke e ei
asetu liitäntään.
2) Yhdistä pistoke pistorasiaan.
Tämän jälkeen voit aloittaa laitteen käytön.
Trimmeri
Parran tai pulisonkien muotoiluun tai kulmakarvojen leikkaamiseen
tarvitset trimmerin 7.
1) Irrota ajopääyksikkö 2, jos se on käytössä, kädessä pidettävästä
osasta.
2) Aseta trimmeriyksikkö 7 käyttöakselille 1. Vaihda asetussuuntaa
sen mukaan, haluatko käyttää leveää 8 vai kapeaa trimmeriä 6:
Page 36

FI
32
SRR 3.7 A1
– Jos haluat käyttää leveää trimmeriä 8, aseta trimmeriyksikkö 7
paikoilleen siten, että leveä trimmeri 8 osoittaa sinua kohti.
– Jos haluat käyttää kapeaa trimmeriä 6, aseta trimmeri 7
paikoilleen siten, että kapea trimmeri 6 osoittaa sinua kohti.
3) Paina käynnistyspainiketta 5. Lataustilan näytössä q näkyy
senhetkinen lataustila, ja laite käynnistyy.
4) Kun olet tyytyväinen trimmauksen lopputulokseen, paina käynnistyskytkintä 5 vielä kerran.
5) Puhdista trimmeriyksikkö 7 mukana toimitetulla sudilla t.
Lue perusteelliset puhdistusohjeet kappaleesta "Puhdistus ja
hoito".
Kuljetusvarmistus
Jos haluat varmistaa laitteen tahattoman käynnistymisen varalta,
lukitse käynnistyskytkin 5.
■ Paina ja pidä käynnistyskytkintä 5 painettuna niin k
auan, että
näyttöön ilmestyy symboli
9.
Kun painat nyt käynnistyskytkintä 5, näyttöön ilmestyy symboli
9 ja lataustilan näyttö q. Laite ei kuitenkaan käynnisty.
■ Kun haluat jälleen vapauttaa lukituksen, paina ja pidä käynnistys-
painik
etta 5 painettuna:
– symboli
9 ilmestyy näyttöön ja alkaa vilkkua.
Voit nyt käynnistää laitteen.
Page 37

33
SRR 3.7 A1
FI
Puhdistus ja hoito
VAARA - SÄHKÖISKU!
► Irrota pistoke pistorasiasta aina ennen puhdistusta!
On olemassa sähk
öiskun vaara!
HUOMIO! AINEELLISET VAHINGOT!
► Älä käytä hankaavia, kemiallisia tai syövyttäviä puhdistusai-
neita laitteen puhdistamiseen. Tämä v
oi vaurioittaa laitteen
korjauskelvottomaksi.
Puhdistaminen sudilla
Ajopääyksikkö
Puhdista ajopääyksikön 2 3 ajopäätä sudilla t jokaisen parranajon
jälkeen.
1) Paina vapautuspainiketta 3 niin, että ajopääyksikkö 2 ponnah-
taa ylös.
2) Kopauta ajopääyksikköä 2 varovasti tasaiselle tasolle ja puhalla
partakarvat pois.
3) Käytä sutia t jäljelle jääneiden partakarvojen poistamiseen.
Trimmeri
■ Puhdista trimmeri jokaisen parranajon jälkeen sudilla t.
■ Öljyä trimmeri 6/8 n. 6 kuukauden välein pisaralla ompeluko-
neöljyä.
Page 38

FI
34
SRR 3.7 A1
Puhdistaminen juoksevan veden alla
Ajopääyksikkö 2 voidaan puhdistaa juoksevan veden alla.
1) Paina vapautuspainiketta 3 niin, että ajopääyksikkö 2 ponnahtaa
ylös.
2) Pidä ajopääyksikköä 2 juoksevan veden alla siten, että vesi
juoksee sisäkautta ajopäiden läpi.
HUOMIO! AINEELLISET VAHINGOT!
Varmista, että vain ajopääyksikkö 2 on juok
sevan veden
alla! Parranajokoneen kädessä pidettävä osa on vain
roiskevesitiivis ja voi vaurioitua korjauskelvottomaksi, jos sitä
pidetään juoksevan veden alla.
3) Anna ajopääyksikön 2 kuivua, ennen kuin käytät parranajoko-
netta uudelleen.
Page 39

35
SRR 3.7 A1
FI
Perusteellinen puhdistus
Puhdista ajopääyksikkö perusteellisesti irrottamalla ajopäät:
1) Paina vapautuspainiketta 3. Ajopääyksikkö 2 ponnahtaa ylös.
2) Vedä ajopääyksikköä 2 hieman niin, että saat vedettyä sen
yläkautta pois.
3) Pyöritä varovasti nuolin merkittyä lukitusta niin pitkälle nuolen
suuntaan, että voit irrottaa ajopäiden pidikkeen (ks. kuva).
4) Puhdista kaikki osat juoksevan veden alla ja anna niiden kuivua
täysin.
Page 40

FI
36
SRR 3.7 A1
5) Kokoa ajopääyksikkö 2 jälleen.
6) Kiinnitä osat paikoilleen pyörittämällä nuolin merkittyä lukitusta
niin pitkälle nuolen vastaiseen suuntaan, ettei ajopäiden pidike
ole enää nostettavissa paikoiltaan.
7) Poista irtonaiset partakarvat sudilla t parranajokoneesta.
8) Aseta ajopääyksikkö 2 jälleen parranajokoneeseen.
Varmista, että se lukittuu kunnolla kiinni paikoilleen.
■ Puhdista kotelo ja verkkoadapteri r k
ostealla liinalla.
OHJE
Jos...
– ... parranajojälki on huomattavasti tavallista huonompi,...
– ... sinun on liikutettava parranajokonetta useamman kerran
saman k
ohdan yli hyvän lopputuloksen saamiseksi,...
– ... parranajo kestää huomattavasti tavallista kauemmin,...
– ... Ajopäissä on näkyviä vaurioita,...
... vaihda ajopäät .
Voit tilata uusia ajopäitä ottamalla yhteyttä huoltoon.
Säilytys
HUOMIO! AINEELLISET VAHINGOT!
Älä koskaan säilytä parranajokonetta laukussa u, k
un laite
latautuu! Ylikuumenemisvaara!
■ Aseta suojus z ajopääyk
sikköön 2, kun et käytä laitetta.
■ Säilytä puhdistettu ja kuiva laite ja varaosat mukana tulevassa
laukussa u.
■ Säilytä laite puhtaassa, pölyttömässä ja kuivassa paikassa.
Page 41

37
SRR 3.7 A1
FI
Takuu ja huolto
Laitteen takuu on 3 vuotta ostopäivästä. Laite on valmistettu
huolella ja tarkastettu perusteellisesti ennen toimitusta. Säilytä
ostokuitti todisteeksi ostosta. Ota takuutapauksessa puhelimitse
yhteyttä lähimpään huoltopisteeseen. Vain näin voimme taata,
että tuotteesi toimittaminen huoltoon on maksutonta.
Takuu koskee ainoastaan materiaali- ja valmistusvirheitä, ei kuljetusvaurioita, kuluvia osia tai herkästi vaurioituvien osien, kuten kytkinten
tai akkujen vaurioita. Tuote on tarkoitettu ainoastaan yksityiskäyttöön,
ei kaupalliseen käyttötarkoitukseen.
Laitteen vääränlainen tai asiaton käsittely, väkivallan käyttö ja muut
kuin valtuutetun huoltopisteen suorittamat korjaukset aiheuttavat
takuun raukeamisen.
Tämä takuu ei rajoita kuluttajan lakisääteisiä oikeuksia.
Takuukorjaus ei pidennä takuuaikaa. Tämä koskee myös vaihdettuja
ja korjattuja osia. Mahdollisesti jo ostettaessa olemassa olevista
vaurioista ja puutteista on ilmoitettava välittömästi pakkauksen avaamisen jälkeen, viimeistään kuitenkin kahden päivän sisällä ostopäiväyksestä. Takuuajan päättymisen jälkeen suoritettavat korjaukset
ovat maksullisia.
Huolto Suomi
Tel.: 010309 3582
E-Mail: kompernass@lidl.fi
IAN 102881
Palvelupuhelin: Maanantaista perjantaihin klo 8:00–20:00 (CET)
Page 42

FI
38
SRR 3.7 A1
Hävittäminen
Älä missään nimessä hävitä laitetta tavalli-
sen kotitalousjätteen mukana. Tämä tuote
on sähkö- ja elektroniikkaromusta annetun
direktiivin 2012/19/EU alainen.
Anna laite valtuutetun jätehuoltoyrityksen tai kunnallisen jätehuoltolaitoksen hävitettäväksi. Noudata voimassa olevia määräyksiä. Ota
epäselvissä tapauksissa yhteyttä paikalliseen jätehuoltolaitokseen.
Paristojen/akkujen hävittäminen
Laitteen ympäristöystävällistä hävittämistä varten akku on poistettava
laitteesta.
HUOMIO - AINEELLISET VAHINGOT!
► Poista akku laitteesta vain, jos haluat hävittää/romuttaa
laitteen! Laite on viallinen, k
un akku on irrotettu laitteesta!
1) Poista akku kädessä pidettävästä osasta poistamalla pieni ruuvi
kädessä pidettävän osan takapuolelta ristipääruuvimeisselillä.
2) Irrota kädessä pidettävän osan takimmainen suojus.
3) Nosta musta sisäkotelo irti esimerkiksi ruuvitaltalla. Ennen kuin
voit irrottaa sisäkotelon, sinun on mahdollisesti katkaistava tai
taitettava ulospäin sivuttaiset ja alimmat pidikkeet. Tähän tarkoitukseen soveltuu parhaiten ruuvitaltta.
4) Kun olet irrottanut sisäkotelon:
Katkaise läpinäkyvän muovisuojan pidikkeet sivuilta. Paina alimmaista lukitusta hieman sisäänpäin niin, että voit avata läpinäkyvän
muovisuojan.
5) Nosta piirilevyä hieman niin, että pääset ruuvitaltalla akun alle.
6) Nosta akku pois paikoiltaan.
7) Hävitä akku ympäristöystävällisesti.
Page 43

39
SRR 3.7 A1
FI
Paristoja/akkuja ei saa hävittää kotitalousjätteen seassa.
Jok
aisella käyttäjällä on lakisääteinen velvollisuus luovuttaa
paristot/akut kuntansa/kaupunginosansa tai kaupan keräyspisteeseen. Näin varmistetaan, että paristot/akut hävitetään
ympäristöystävällisellä tavalla. Palauta akut/paristot kierrätyspisteeseen aina tyhjinä.
Pakkaus on valmistettu ympäristöystävällisistä materiaaleis-
ta, jotka voidaan toimittaa paikallisiin kierrätyspisteisiin.
Maahantuoja
KOMPERNASS HANDELS GMBH
BURGSTRASSE 21
44867 BOCHUM
GERMANY
www.kompernass.com
Page 44

40
SRR 3.7 A1
Page 45

41
SRR 3.7 A1
SE
Innehållsförteckning
Inledning . . . . . . . . . . . . . . . . . . . . . . . . . . . . . . . . . . . .42
Föreskriven användning . . . . . . . . . . . . . . . . . . . . . . . . 42
Leveransens innehåll . . . . . . . . . . . . . . . . . . . . . . . . . .42
Beskrivning . . . . . . . . . . . . . . . . . . . . . . . . . . . . . . . . . . 43
Tekniska data . . . . . . . . . . . . . . . . . . . . . . . . . . . . . . . . 44
Säkerhetsanvisningar . . . . . . . . . . . . . . . . . . . . . . . . . . 45
Ladda upp batterierna . . . . . . . . . . . . . . . . . . . . . . . . . 49
Sladdlös rakning . . . . . . . . . . . . . . . . . . . . . . . . . . . . . . 50
Raka med strömadaptern . . . . . . . . . . . . . . . . . . . . . . 51
Trimmer/Sax för långt hår . . . . . . . . . . . . . . . . . . . . . . 51
Knapplås . . . . . . . . . . . . . . . . . . . . . . . . . . . . . . . . . . . .52
Rengöring och skötsel . . . . . . . . . . . . . . . . . . . . . . . . . . 53
Rengöra med penseln. . . . . . . . . . . . . . . . . . . . . . . . . . . . . . . . . . .53
Rengöra under rinnande vatten . . . . . . . . . . . . . . . . . . . . . . . . . . .54
Grundlig rengöring . . . . . . . . . . . . . . . . . . . . . . . . . . . . . . . . . . . . .55
Förvaring . . . . . . . . . . . . . . . . . . . . . . . . . . . . . . . . . . . .56
Garanti och service . . . . . . . . . . . . . . . . . . . . . . . . . . . . 57
Kassering . . . . . . . . . . . . . . . . . . . . . . . . . . . . . . . . . . . . 58
Importör . . . . . . . . . . . . . . . . . . . . . . . . . . . . . . . . . . . . . 59
Page 46

SE
42
SRR 3.7 A1
Inledning
Ett stort grattis till din nyinköpta produkt.
Du har valt en produkt med hög kvalitet. Bruksanvisningen ingår som
en del av leveransen. Den innehåller viktig information om säkerhet,
användning och återvinning. Läs noga igenom alla användar- och
säkerhetsanvisningar innan du börjar använda produkten. Använd
endast produkten enligt beskrivningarna och i de syften som anges
här. Lämna över all dokumentation tillsammans med produkten om
du överlåter den till någon annan person.
Föreskriven användning
Den här produkten ska bara användas för att raka och klippa hår
på människor.
Produkten är endast avsedd för privat bruk i hemmet. Använd den
inte i yrkesmässigt syfte.
All annan form av användning strider mot föreskrifterna och kan
leda till sak- och i värsta fall personskador.
Leveransens innehåll
♦ Rakapparat med rakenhet
♦ Strömadapter
♦ Trimmerenhet
♦ Skyddshätta
♦ Pensel
♦ Väska
♦ Beställningskort
♦ Bruksanvisning
Page 47

43
SRR 3.7 A1
SE
OBSERVERA
Kontrollera att leveransen är komplett och inte har några skador
så snart du packat upp produkten. Kontakta kundservice om så
inte är fallet.
Beskrivning
Bild A (främre uppfällbar sida):
1 Drivaxel
2 Rakenhet
3 Öppna-knapp
4 Skyddskrage
5
På/Av-knapp
6 Smal sax för långt hår
7 Trimmerenhet
8 Bred sax för långt hår
9 Symbol
(spärr)
0 Symbol
(ladda)
q Laddningsnivåindikator
w Laddningsuttag
Bild B (bakre uppfällbar sida):
e Anslutningskontakt
r Strömadapter
t Pensel
z Skyddshätta
u Väska
Page 48

SE
44
SRR 3.7 A1
Tekniska data
Produkt
Ingångsspänning: 5 V
Ingångsström 1000 mA
Batteri: Litiumjonbatteri 3,7 V, 700 mAh
Omgivningstemperatur: 5°C till 35°C
Skyddsklass: III/
Laddningstid: ca 90 minuter
Drifttid med fullt
uppladdat batteri: ca 60 minuter
Skyddstyp: IPX 4
Strömadapter (typ PTB-050100EU)
Ingångsspänning: 100 - 240 V ∼
50/60 Hz
Utgångsspänning: 5 V
Utgångsström: 1000 mA
Skyddsklass: II /
Page 49

45
SRR 3.7 A1
SE
Säkerhetsanvisningar
FARA - RISK FÖR ELCHOCK!
► Kontrollera om produkten har några yttre, synliga
skador innan du använder den. Om produkten
är skadad får du inte ta den i bruk. Annars fi nns
risk för elchocker.
► Om skador konstateras på kabeln, strömadap-
tern, höljet eller några andra delar får produkten
inte användas längre.
► Dra ut strömadaptern ur uttaget
— vid störningar
— när du ska rengöra produkten
— när du inte ska använda produkten på länge
— efter varje användning.
Fatta då alltid tag i själva strömadaptern, dra
inte i kabeln.
► Doppa aldrig ner produkten eller strömadaptern
i vatten eller andra vätskor.
Page 50

SE
46
SRR 3.7 A1
FARA - RISK FÖR ELCHOCK!
► Om produkten faller i vatten måste du alltid
först dra ut strömadaptern ur uttaget innan du
försöker ta upp den.
► Ta aldrig i strömadaptern med våta händer,
särskilt inte när du sätter in den eller drar ut
den ur uttaget. Risk för elchocker!
► Kontrollera om det fi nns några mekaniska fel
på strömadaptern och produkten med jämna
mellanrum.
► Akta så att kabeln inte kläms fast i skåpdörrar
eller ligger över heta ytor. Då kan kabelns
isolering skadas.
► En jordfelsbrytare med en nominell utlösnings-
ström på högst 30 mA ger ytterligare skydd mot
elchocker. Låt endast en elektriker installera
skyddet.
Page 51

47
SRR 3.7 A1
SE
FARA - RISK FÖR ELCHOCK!
► AKTA! Håll produkten torr!
► AKTA! Ta bort strömadaptern från handenheten
när du ska rengöra den med vatten!
VARNING -
RISK FÖR PERSONSKADOR!
► Den här produkten kan användas av barn som
är minst 8 år och av personer med begränsad
fysisk, sensorisk eller mental förmåga eller
bristande erfarenhet och/eller kunskap om de
hålls under uppsikt eller har instruerats i hur
produkten används på ett säkert sätt och inser
vilka risker det innebär.
► Barn får inte leka med produkten.
► Rengöring och allmän service får bara göras
av barn om någon vuxen håller uppsikt.
Page 52

SE
48
SRR 3.7 A1
VARNING -
RISK FÖR PERSONSKADOR!
► Låt endast en auktoriserad fackverkstad eller
vår kundtjänst reparera produkten. Felaktigt
utförda reparationer utgör en avsevärd risk för
användaren. Dessutom upphör garantin att
gälla.
► Använd inte produkten om skären eller klipp-
längdtillsatsen är defekta, eftersom kanterna
kan vara vassa. Risk för personskador!
► Defekta delar får endast bytas ut mot reserv-
delar i original. Det är endast originaldelarna
som uppfyller säkerhetskraven.
► Anslut bara strömadaptern till ett lättåtkomligt
eluttag så att det går snabbt att dra ut den vid
störningar.
Page 53

49
SRR 3.7 A1
SE
AKTA – RISK FÖR MATERIALSKADOR!
► Lämna aldrig produkten utan uppsikt när den
är påkopplad och använd den endast enligt
anvisningarna på typskylten.
► Använd endast bifogade strömadapter
(typ PTB-050100EU).
► Täck inte över strömadpatern, då kan den bli
för varm.
Ladda upp batterierna
Innan du använder produkten första gången måste batterierna laddas
upp i minst 90 minuter.
OBSERVERA
► Försäkra dig om att produkten är avstängd innan du laddar
batteriet.
1) Sätt
anslutningskontakten e i rakapparatens laddningsuttag w.
Se till så att polerna hamnar rätt: Stickan i laddningsuttaget w
måste gripa tag i styrskenan på anslutningskontakten e.
Annars går det inte att sticka in anslutningskontakten e
2) Sätt strömadaptern r i ett uttag som överensstämmer med
produktens specifi kationer:
Batteriets laddningsnivå visas i procent (%) på displayen (laddningsnivåindikatorn q). Symbolen
0 kommer upp på
displayen.
Page 54

SE
50
SRR 3.7 A1
♦ Så snart batteriet är fullt uppladdat syns symbolen
0 hela
tiden på displayen och laddningsnivåindikatorn q visar 99%.
♦ Med ett fullt uppladdat batteri kan produkten användas i upp till
60 minuter utan att anslutas till ett eluttag.
Sladdlös rakning
AKTA! RISK FÖR MATERIALSKADOR!
► Produkten är inte lämplig för våtrakning!
R
akapparaten kan användas utan kabel. Då måste man ladda upp
produkten innan den används första gången (se kapitel Ladda batterier).
1) Om inte skyddskragen 4 redan sitter på sätter du på den
underifrån på rakenheten 2 (se uppfällbar sida).
2) Sätt rakenheten 2 med monterad skyddskrage 4 på drivaxeln 1.
Kontrollera att skyddskragen 4 sitter rätt på handenheten.
3) Ta av skyddshättan z.
4) Tryck på På/Av-knappen 5. Laddningsnivåindikatorn q visar
aktuell laddningsnivå och rakapparaten startar.
OBSERVERA
► Bäst resultat får man på torr hud
► Det kan ta upp till 2 - 3 veckor innan huden vant sig vid det
här sättet att r
aka.
5) För skärhuvudena rakt och i cirklar över huden.
6) Tryck på På/Av-knappen 5 när du rakat dig färdigt. Produkten
stannar. Efter ca 3 sekunder slocknar displayen.
Page 55

51
SRR 3.7 A1
SE
7) Rengör rakapparaten med bifogade pensel t ef
ter varje
användning.
Följ anvisningarna i kapitel Rengöring och skötsel för en grundligare rengöring.
Raka med strömadaptern
AKTA! RISK FÖR MATERIALSKADOR!
► Produkten är inte lämplig för våtrakning!
Om du vill an
vända rakapparaten utan att ladda upp den först kan
du koppla den direkt till strömadaptern r:
1) Sätt anslutningskontakten e i rakapparatens laddningsuttag w.
Se till så att polerna hamnar rätt: Stickan i laddningsuttaget w
måste gripa tag i styrskenan på anslutningskontakten e.
Annars går det inte att sticka in anslutningskontakten e.
2) Sätt strömkontakten i ett eluttag.
Sedan kan du använda rakapparaten.
Trimmer/Sax för långt hår
För att forma skägget, polisongerna eller ögonbrynen ska du
använda trimmerenheten 7.
1) Dra loss rakenheten 2 om den sitter på handenheten.
2) Sätt trimmerenheten 7 på drivaxeln 1. Den sätts på från olika
håll, beroende på om du vill arbeta med den breda 8 eller den
smala saxen 6:
Page 56

SE
52
SRR 3.7 A1
– Om du vill arbeta med den breda saxen 8 sätter du på
trimmerenheten 7 så att den breda saxen 8 pekar mot dig.
– Om du vill jobba med den smala saxen 6 sätter du på
trimmerenheten 7 så att den smala saxen 6 pekar mot dig.
3) Tryck på På/Av-knappen 5. Laddningsnivåindikatorn q visar
aktuell laddningsnivå och produkten startar.
4) När du arbetet färdigt med trimningen färdigt trycker du på På/
Av-knappen 5 igen.
5) Rengör trimmerenheten 7 med bifogad pensel t. Följ anvisning-
arna i kapitel Rengöring och skötsel för en grundligare rengöring.
Knapplås
För att produkten inte ska sättas på av misstag när du t ex är ute och
reser kan du låsa På/Av-knappen 5.
■ Håll På/Av-knappen 5 inne tills symbolen
9 kommer upp
på displayen.
Om du sedan trycker på På/Av-knappen 5 visas symbolen
9
och laddningsnivåindikatorn q. Produkten kopplas inte på.
■ För att ta bort knapplåset håller du På/Av-knappen 5 inne igen:
– Symbolen
9 kommer upp och börjar blinka.
Sedan kan produkten kopplas på igen.
Page 57

53
SRR 3.7 A1
SE
Rengöring och skötsel
FARA - RISK FÖR ELCHOCK!
► Dra alltid ut kontakten ur eluttaget innan du rengör produkten!
Annar
s fi nns risk för elchocker!
AKTA! RISK FÖR MATERIALSKADOR!
► Använd inga slipande, kemiska eller frätande medel för att
r
engöra produkten. Då blir produkten totalförstörd!
Rengöra med penseln
Rakenhet
Rengör de 3 skärhuvudena på rakenheten 2 med penseln t efter
varje användning.
1) Tryck på Öppna-knappen 3, så att rakenheten 2 åker ut.
2) Banka ur rakenheten 2 försiktigt mot en jämn yta eller blås bort
hårstråna.
3) Använd penseln t för att ta bort kvarvarande hår.
Trimmerenhet
■ Rengör trimmerenheten med penseln t ef
ter varje användning.
■ Smörj saxarna för långt hår 6/8 med några droppar syma-
skinsolja ungefär var sjätte månad.
Page 58

SE
54
SRR 3.7 A1
Rengöra under rinnande vatten
Rakenheten 2 kan rengöras under rinnande vatten.
1) Tryck på Öppna-knappen 3 så att rakenheten 2 åker ut.
2) Håll rakenheten 2 under vattenstrålen så att vattnet rinner
inifrån och ut genom skärhuvudena.
AKTA! RISK FÖR MATERIALSKADOR!
Bara själva rakenheten 2 får sk
öljas under vattnet!
Rakapparatens handenhet är bara stänkvattenskyddad och
kan totalförstöras om den hålls under rinnande vatten.
3) Låt rakenheten 2 torka innan du använder rakapparaten igen.
Page 59

55
SRR 3.7 A1
SE
Grundlig rengöring
Ta av skärhuvudena innan du rengör produkten grundligt:
1) Tryck på Öppna-knappen 3. Rakenheten 2 åker ut.
2) Dra lite i rakenheten 2 så att det går att dra av den uppåt.
3) Vrid försiktigt låsanordningarna i pilarnas riktning tills det går
att lyfta av hållaren till skärhuvudena (se bilden).
4) Rengör alla delar under rinnande vatten och låt dem bli helt
torra.
Page 60

SE
56
SRR 3.7 A1
5) Sätt ihop rakenheten 2 igen.
6) För att fästa den vrider du låsanordningarna i motsatt pilriktning
tills det inte går att lyfta av hållaren till skärhuvudena längre.
7) Ta ut lösa hårstrån ur rakapparaten med penseln t.
8) Sätt tillbaka rakenheten 2 på rakapparaten. Kontrollera att
den sitter fast.
■ Rengör ytterhöljet och strömadaptern r med en fuktig tr
asa.
OBSERVERA
När...
– du märker att rakningen blir sämre...
– ... du måste föra rakapparaten fl era gånger över
samma ställe för att få ett br
a resultat...
– ...det tar mycket längre tid att raka sig...
– ... du märker att skärhuvudena är skadade...
... måste du b
yta skärhuvuden .
Vänd dig till kundtjänst för att beställa nya skärhuvuden.
Förvaring
AKTA! RISK FÖR MATERIALSKADOR!
Låt aldrig rakapparaten ligga i väskan u när den laddas!
Då k
an den överhettas!
■ Sätt alltid på skyddshättan z på r
akenheten 2 när du inte ska
använda produkten.
■ Förvara den rena, torra produkten och tillbehören i medföljande
väska u.
■ Förvara alla delar på ett rent, dammfritt och torrt ställe.
Page 61

57
SRR 3.7 A1
SE
Garanti och service
För den här produkten lämnar vi 3 års garanti från och med
inköpsdatum. Produkten har tillverkats med omsorg och testats
noga innan leveransen. Spara kassakvittot som köpbevis. För
garantiärenden ber vi dig kontakta vår kundtjänst per telefon.
Bara då kan du skicka in produkten utan kostnad.
Garantin gäller endast för material- eller fabrikationsfel, den täcker
inte transportskador, förslitningsdelar eller skador på ömtåliga delar,
tex knappar och batterier. Produkten är endast avsedd för privat
bruk och ska inte användas yrkesmässigt.
Garantin gäller inte vid missbruk och felaktig behandling, användande
av våld och vid ingrepp som inte gjorts av vår auktoriserade servicefi lial.
Dina lagstadgade rättigheter begränsas inte av denna garanti.
Garantitiden förlängs inte för att man utnyttjat garantin. Det gäller
även för utbytta och reparerade delar. Eventuella skador och brister
som existerar redan vid köpet måste rapporteras så snart produkten
packats upp, dock senast två dagar efter inköpsdatum. När garantitiden är slut måste man själv betala för eventuella reparationer.
Service Sverige
Tel.: 0770 930739
E-Mail: kompernass@lidl.se
IAN 102881
Service Suomi
Tel.: 010309 3582
E-Mail: kompernass@lidl.fi
IAN 102881
Tillgänglighet Hotline:
Måndag till fredag kl. 08.00 – 20.00 (CET)
Page 62

SE
58
SRR 3.7 A1
Kassering
Produkten får absolut inte kastas bland
hushållssoporna. Den här produkten faller
under det europeiska direktivet 2012/19/EU.
Lämna in produkten till ett godkänt återvinningsföretag eller din
kommunala avfallsanläggning. Följ gällande föreskrifter.
Kontakta din avfallsanläggning om du har några frågor.
Återvinning av batterier
För att produkten ska kunna kasseras utan att skada miljön måste du
ta ut batteriet:
AKTA - RISK FÖR MATERIALSKADOR!
► Ta bara ut batteriet ur produkten när den ska kasseras!
Pr
odukten blir defekt när batteriet tas ut!
1) För att ta bort batteriet ur handenheten lossar du den lilla skruven
på handenhetens baksida med en stjärnkruvmejsel.
2) Dra av den bakre delen av ytterhöljet från handenheten.
3) Lyft ut det inre, svarta höljet, t ex med en skruvmejsel. Eventuellt
måste du bryta av eller böja ut hållarna nertill och på sidan för
att få ut det inre höljet. Använd då helst en spårskruvmejsel.
4) När du har tagit ut det inre höljet:
Bryt av hållarna till den genomskinliga plastkåpan på sidorna.
Tryck in den undre arreteringen lite så att den genomskinliga
plastkåpan kan fällas ut.
5) Lyft upp kretskortet en aning så att det går att sticka in skruvmejseln
under batteriet.
6) Lyft ut batteriet.
7) Kassera batteriet på ett miljövänligt sätt.
Page 63

59
SRR 3.7 A1
SE
Vanliga och uppladdningsbara batterier får inte kastas
bland hushållssopor
na . Den som använder någon typ av
batterier är skyldig enligt lag att lämna in dem till ett insamlingsställe i sin kommun eller stadsdel eller lämna tillbaka
dem till återförsäljaren. Den här bestämmelsen är till för att
batterier ska kunna avfallshanteras utan att skada miljön.
Lämna bara in urladdade batterier för återvinning/destruktion.
Förpackningen består av miljövänligt material som kan
lämnas in till den lokala återvinningen.
Importör
KOMPERNASS HANDELS GMBH
BURGSTRASSE 21
44867 BOCHUM
GERMANY
www.kompernass.com
Page 64

60
SRR 3.7 A1
Page 65

61
SRR 3.7 A1
DK
Indholdsfortegnelse
Indledning . . . . . . . . . . . . . . . . . . . . . . . . . . . . . . . . . . .62
Anvendelsesområde . . . . . . . . . . . . . . . . . . . . . . . . . . . 62
Pakkens indhold . . . . . . . . . . . . . . . . . . . . . . . . . . . . . . 62
Beskrivelse af produktet . . . . . . . . . . . . . . . . . . . . . . .63
Tekniske data . . . . . . . . . . . . . . . . . . . . . . . . . . . . . . . . 64
Sikkerhedsanvisninger . . . . . . . . . . . . . . . . . . . . . . . . . 65
Opladning af det genopladelige batteri . . . . . . . . . . . 69
Barbering uden ledning . . . . . . . . . . . . . . . . . . . . . . . . 70
Barbering med netadapter . . . . . . . . . . . . . . . . . . . . . 71
Trimmer/lLanghårstrimmer . . . . . . . . . . . . . . . . . . . . . 71
Rejsesikring . . . . . . . . . . . . . . . . . . . . . . . . . . . . . . . . . .72
Rengøring og vedligeholdelse . . . . . . . . . . . . . . . . . . . 73
Rengøring med børsten . . . . . . . . . . . . . . . . . . . . . . . . . . . . . . . . .73
Rengøring under rindende vand . . . . . . . . . . . . . . . . . . . . . . . . . . .74
Grundig rengøring . . . . . . . . . . . . . . . . . . . . . . . . . . . . . . . . . . . . .75
Opbevaring . . . . . . . . . . . . . . . . . . . . . . . . . . . . . . . . . .76
Garanti og service . . . . . . . . . . . . . . . . . . . . . . . . . . . . . 77
Bortskaff else . . . . . . . . . . . . . . . . . . . . . . . . . . . . . . . . . 78
Importør . . . . . . . . . . . . . . . . . . . . . . . . . . . . . . . . . . . . . 79
Page 66

DK
62
SRR 3.7 A1
Indledning
Tillykke med købet af dit nye produkt.
Du har valgt et produkt af høj kvalitet. Betjeningsvejledningen er en del
af dette produkt. Den indeholder vigtige informationer om sikkerhed,
anvendelse og bortskaff else. Du bedes sætte dig ind i alle produktets
betjenings- og sikkerhedsanvisninger før brug. Brug kun produktet som
beskrevet og kun til de angivne anvendelsesområder. Lad vejledningen
følge med produktet, hvis du giver det videre til andre.
Anvendelsesområde
Dette produkt er udelukkende beregnet til barbering og trimning af
hår og skæg på mennesker.
Dette produkt er udelukkende beregnet til anvendelse i private husholdninger. Det må ikke anvendes i erhvervsmæssig sammenhæng.
Enhver anden anvendelse regnes som ikke-forskriftsmæssig og kan
føre til materielle og/eller personskader.
Pakkens indhold
♦ Barbermaskine med skæreenhed
♦ Netadapter
♦ Trimmerenhed
♦ Beskyttelseskappe
♦ Børste
♦ Etui
♦ Bestillingskort
♦ Betjeningsvejledning
Page 67

63
SRR 3.7 A1
DK
BEMÆRK
Kontrollér umiddelbart efter udpakningen, at alle dele er leveret
med og ikke er beskadigede. Henvend dig til service ved behov.
Beskrivelse af produktet
Figur A (forreste fold-ud-side):
1 Drivaksel
2 Skæreenhed
3 Oplukningsknap
4 Beskyttelseskrave
5
Tænd-/sluk-knap
6 Smal langhårstrimmer
7 Trimmerenhed
8 Bred langhårstrimmer
9 Symbol
(låsning)
0 Symbol
(oplader)
q Indikator for opladningstilstand
w Ladestik
Figur B (bageste fold-ud-side):
e Tilslutningsstik
r Netadapter
t Børste
z Beskyttelseskappe
u Etui
Page 68

DK
64
SRR 3.7 A1
Tekniske data
Produkt
Indgangsspænding: 5 V
Indgangsstrøm: 1000 mA
Genopladeligt batteri: Genopladeligt Li-ion-batteri 3,7 V,
700 mAh
Omgivelsestemperatur: 5°C til 35°C
Beskyttelsesklasse: III/
Opladningstid: ca. 90 minutter
Driftstid ved fuldt
opladet batteri: ca. 60 minutter
Kapslingsklasse: IPX 4
Netadapter (type PTB-050100EU)
Indgangsspænding: 100 - 240 V ∼
50/60 Hz
Udgangsspænding: 5 V
Udgangsstrøm: 1000 mA
Beskyttelsesklasse: II /
Page 69

65
SRR 3.7 A1
DK
Sikkerhedsanvisninger
FARE – ELEKTRISK STØD!
► Kontrollér produktet for udvendige, synlige
skader før brug. Brug aldrig produktet, hvis det
er beskadiget. Der er risiko for elektrisk stød.
► Hvis kablet, netadapteren, kabinettet eller andre
dele er beskadigede, må produktet ikke anvendes længere.
► Træk netadapteren ud af stikket
— hvis der opstår en fejl,
— før du rengør produktet,
— hvis produktet ikke skal bruges i længere tid,
— hver gang, du har brugt produktet.
Hold i selve netadapteren og ikke i kablet,
når du trækker den ud.
► Læg aldrig produktet eller kablet med netadap-
teren ned i vand eller andre væsker.
Page 70

DK
66
SRR 3.7 A1
FARE – ELEKTRISK STØD!
► Hvis produktet falder ned i vand, skal netadap-
teren altid først tages ud af stikkontakten, før du
stikker fi ngrene ned i vandet.
► Hold aldrig på netadapteren med våde hænder
og særligt ikke, når du sætter den i stikkontakten
eller tager den ud. Der er fare for elektrisk
stød!
► Kontrollér jævnligt netadapteren og produktet
for eventuelle mekaniske defekter.
► Sørg for, at kablet ikke kommer i klemme i skabs-
døre eller trækkes hen over varme overfl ader.
Derved kan kablets isolering beskadiges.
► Installation af et fejlstrømsrelæ med en mærke-
udløsestrøm på maks. 30mA giver endnu bedre
beskyttelse mod elektriske stød. Installationen
må kun udføres af en autoriseret elektriker.
Page 71

67
SRR 3.7 A1
DK
FARE – ELEKTRISK STØD!
► OBS! Hold produktet tørt!
► OBS! Afbryd netadapteren fra motordelen,
hvis du vil rengøre den med vand!
ADVARSEL –
FARE FOR PERSONSKADER!
► Dette produkt kan bruges af børn fra 8år og
derover og af personer med nedsatte fysiske,
motoriske eller mentale evner eller manglende
erfaring og/eller viden, hvis de er under opsyn
eller undervises i sikker brug af produktet og
de farer, der kan være forbundet med det.
► Børn må ikke lege med produktet.
► Rengøring og brugervedligeholdelse må ikke
udføres af børn uden opsyn.
Page 72

DK
68
SRR 3.7 A1
ADVARSEL –
FARE FOR PERSONSKADER!
► Lad kun autoriserede specialforretninger eller
kundeservice reparere produktet. Forkert
udførte reparationer kan medføre betydelige
farer for brugeren. Desuden bortfalder alle
garantikrav.
► Brug ikke produktet med defekt skæresæt eller
kam, da de kan have meget skarpe kanter.
Der er fare for personskader!
► Defekte komponenter må kun udskiftes med
originale reservedele. Overholdelse af sikkerhedskravene kan kun garanteres, hvis der anvendes originale dele.
► Slut kun netadapteren til en stikkontakt, der er
nem at få adgang til, så den hurtigt kan trækkes
ud i tilfælde af en fejl.
Page 73

69
SRR 3.7 A1
DK
OBS – MATERIELLE SKADER!
► Lad aldrig produktet være uden opsyn, og brug
det kun i henhold til dataene på typeskiltet.
► Brug kun den medfølgende netadapter (type
PTB-050100EU) til netdrift.
► Dæk ikke netadapteren til, da den ellers
opvarmes for meget.
Opladning af det genopladelige batteri
Før produktet bruges første gang, skal det genopladelige batteri
oplades i mindst 90 minutter.
BEMÆRK
► Sørg for, at produktet er slukket, før du oplader det genopla-
delige batteri.
1) Sæt
tilslutningsstikket e i ladestikket w på barbermaskinen. Sørg
for, at polerne vender rigtigt.
Styrenoten i ladestikket w skal gå i indgreb med styreskinnen på
tilslutningsstikket e. Ellers kan tilslutningsstikket e ikke sættes i.
2) Sæt netadapteren r i en stikkontakt, der passer til produkt-
forskrifterne.
Det genopladelige batteris opladningstilstand vises i procent (%)
på displayet (Indikator for opladningstilstand q). Symbolet
0
vises på displayet.
Page 74

DK
70
SRR 3.7 A1
♦ Så snart det genopladelige batteri er fuldt opladet, vises symbo-
let
0 permanent på displayet, og indikatoren for opladnings-
tilstand q viser 99%.
♦ Når det genopladelige batteri er ladet helt op, kan produktet
an
vendes i ca. 60 minutter uden tilslutning til strømforsyningen.
Barbering uden ledning
OBS! MATERIELLE SKADER!
► Dette produkt er ikke egnet til vådbarbering!
Du k
an bruge barbermaskinen uden ledningstilslutning. I så tilfælde
skal produktet oplades før ibrugtagning (se kapitlet „Opladning af
genopladeligt batteri“).
1) Sæt beskyttelseskraven 4 på skæreenheden 2 nedefra, hvis
den ikke allerede er sat på (se fold-ud-side).
2) Sæt nu skæreenheden 2 med monteret beskyttelseskrave 4 på
drivakslen 1. Sørg for, at beskyttelseskraven 4 sidder korrekt
på motordelen.
3) Tag beskyttelseskappen z af.
4) Tryk på tænd-/sluk-knappen 5. Indikatoren for opladningstilstand q
viser den aktuelle opladningstilstand, og barbermaskinen starter.
BEMÆRK
► Det bedste resultat opnås med tør hud.
► Det kan vare 2 til 3 uger, før huden har vænnet sig til skære-
sy
stemet.
5) Før skærehovederne hen over huden i lige og roterende bevæ-
gelser.
6) Når du har været over alle de steder, som skal barberes, trykker
du på tænd-/sluk-knappen 5. Derefter stopper produktet. Efter
ca. 3 sekunder slukkes displayet.
Page 75

71
SRR 3.7 A1
DK
7) Efter hver barbering rengøres barbermaskinen med den medføl-
gende bør
ste t.
Anvisninger på grundig rengøring fi nder du i kapitlet „Rengøring
og pleje“.
Barbering med netadapter
OBS! MATERIELLE SKADER!
► Dette produkt er ikke egnet til vådbarbering!
Hvis du ønsk
er at benytte produktet uden først at oplade det, kan du
anvende barbermaskinen direkte ved hjælp af netadapteren r:
1) Sæt tilslutningsstikket e i ladestikket w på barbermaskinen.
Sørg for, at polerne vender rigtigt. Styrestangen i ladestikket w
skal gå i indgreb med styreskinnen på tilslutningsstikket e.
Ellers kan tilslutningsstikket e ikke sættes i.
2) Sæt strømstikket i en stikkontakt.
Du kan derefter anvende barbermaskinen.
Trimmer/lLanghårstrimmer
Når du vil trimme overskæg, bakkenbarter eller øjenbryn, skal du
bruge trimmerenheden 7.
1) Tag skæreenheden 2 af motordelen, hvis den er monteret.
2) Sæt trimmerenheden 7 på drivakslen 1. Skift retning ved på-
sætning afhængigt af, om du ønsker at bruge den brede 8
eller smalle langhårstrimmer 6:
Page 76

DK
72
SRR 3.7 A1
– Hvis du vil bruge den brede langhårstrimmer 8, skal du mon-
tere trimmerenheden 7 så den brede langhårstrimmer 8
vender mod dig.
– Hvis du vil bruge den smalle langhårstrimmer 6, skal du mon-
tere trimmerenheden 7, så den smalle langhårstrimmer 6
vender mod dig.
3) Tryk på tænd-/sluk-knappen 5. Indikatoren for opladningstilstand q viser den aktuelle opladningstilstand, og produktet
starter.
4) Når du er færdig med at trimme, skal du trykke endnu engang
på tænd-/sluk-knappen 5.
5) Rengør trimmerenheden 7 med den medfølgende børste t.
Anvisninger på grundig rengøring fi nder du i kapitlet „Rengøring
og pleje“.
Rejsesikring
For at beskytte produktet mod utilsigtet aktivering kan tænd-/slukknappen 5 blokeres.
■ Tryk og hold tænd-/sluk-knappen 5 nede, indtil display
et viser
symbolet
9.
Hvis du nu trykker på tænd-/sluk-knappen 5, vises symbolet
9,
og indikatoren for opladningstilstand q. Men produktet tænder ikke.
■ Du ophæver blokeringen ved at trykke på og holde tænd-/
sluk
-knappen 5 nede:
– symbolet
9 vises og begynder at blinke.
Produktet kan nu igen aktiveres.
Page 77

73
SRR 3.7 A1
DK
Rengøring og vedligeholdelse
FARE - ELEKTRISK STØD!
► Tag altid stikket ud af stikkontakten før rengøring! Der er fare
for elektrisk stød!
OBS! MATERIELLE SKADER!
► Brug ikke skurende, kemiske eller ætsende rengøringsmidler
til r
engøring af produktet. Det vil medføre uoprettelige skader
på produktet.
Rengøring med børsten
Skæreenhed
Efter hver barbering rengøres de 3 skærehoveder på skæreenheden 2
med børsten t.
1) Tryk på oplukningsknappen 3, så skæreenheden 2 springer op.
2) Bank forsigtigt skæreenheden 2 mod en fast overfl ade, eller
blæs hårresterne ud.
3) Brug børsten t til at fjerne resterende hårrester med.
Trimmerenhed
■ Efter hver barbering rengøres trimmerenheden med børsten t.
■ Langhårstrimmer ne 6/8 sk
al hver 6. måned smøres med en
dråbe symaskineolie.
Page 78

DK
74
SRR 3.7 A1
Rengøring under rindende vand
Skæreenheden 2 er velegnet til rengøring under rindende
vand.
1) Tryk på oplukningsknappen 3, så skæreenheden 2 springer op.
2) Hold skæreenheden 2 under vandstrålen, så vandet løber
indefra og ud ad skærehovederne.
OBS! MATERIELLE SKADER!
Sørg for, at kun skæreenheden 2 holdes under rindende v
and!
Barbermaskinens motordel er kun beskyttet mod vandstænk og
kan lide uoprettelig skade, hvis den holdes under rindende
vand.
3) Lad skæreenheden 2 tørre, før du bruger barbermaskinen igen.
Page 79

75
SRR 3.7 A1
DK
Grundig rengøring
For grundig rengøring skal skærehovederne afmonteres:
1) Tryk på oplukningsknappen 3. Skæreenheden 2 springer op.
2) Træk en smule i skæreenheden 2, så den kan tages ud oppefra.
3) Drej forsigtigt den pilmarkerede lås i pilens retning, indtil holderen
til skærehovederne kan løftes af (se fi gur ).
4) Rengør alle dele under rindende vand og lad dem tørre fuldstændigt.
Page 80

DK
76
SRR 3.7 A1
5) Derefter samles skæreenheden 2 igen.
6) Ved samling drejes den pilmarkerede lås mod pilens retning,
indtil holderen til skærehovederne ikke længere kan løftes af.
7) Med børsten t fjernes løse hår fra barbermaskinen.
8) Sæt skæreenheden 2 på barbermaskinen igen.
Sørg for, at den klikker på plads og sidder fast.
■ Rengør huset og netadapteren r med en fugtig klud.
BEMÆRK
Hvis...
– ... barberingen bliver markant ringere,...
– ... du er nødt til at føre barbermaskinen over det samme
sted fl
ere gange for at opnå et godt resultat,...
– ... barberingen tager betydelig længere tid,...
– ... der er synlige skader på skærehovederne,...
... sk
al skærehovederne udskiftes.
Henvend dig til serviceafdelingen, når du ønsker at bestille
nye skærehoveder.
Opbevaring
OBS! MATERIELLE SKADER!
Opbevar aldrig barbermaskinen i etuiet u, mens pr
oduktet
oplades! Risiko for overophedning!
■ Sæt altid beskyttelseskappen z på sk
æreenheden 2, når du
ikke benytter produktet.
■ Opbevar det rengjorte og tørre produkt og dets tilbehørsdele i
det medfølgende etui u.
■ Opbevar det hele på et rent, støvfrit og tørt sted.
Page 81

77
SRR 3.7 A1
DK
Garanti og service
På dette produkt får du 3 års garanti fra købsdatoen. Produktet
er produceret omhyggeligt og inden levering afprøvet samvittighedsfuldt. Opbevar kassebonen som bevis for købet. Kontakt
venligst serviceafdelingen telefonisk, hvis du ønsker at gøre brug af
garantien. Derved garanteres det, at forsendelsen af varen er gratis.
Garantien gælder kun for materiale- og fabrikationsfejl og ikke for
transportskader, sliddele eller beskadigelser på skrøbelige dele som
f.eks. kontakter eller batterier. Produktet er kun beregnet til privat og
ikke til erhvervsmæssig brug.
Ved misbrug og uhensigtsmæssig brug, anvendelse af vold og ved
indgreb, som ikke er foretaget af vores autoriserede serviceafdeling,
bortfalder garantien.
Dine juridiske rettigheder forringes ikke af denne garanti.
Garantiperioden forlænges ikke, hvis der gøres brug af garantien. Det
gælder også for udskiftede og reparerede dele. Skader og mangler,
som eventuelt forefi ndes allerede ved køb, skal straks anmeldes efter
udpakning og senest to dage efter købsdatoen. Når garantiperioden
er udløbet, er reparation af skader betalingspligtig.
Service Danmark
Tel.: 32 710005
E-Mail: kompernass@lidl.dk
IAN 102881
Åbningstid for hotline: Mandag til fredag fra kl. 8:00 – 20:00 (MET)
Page 82

DK
78
SRR 3.7 A1
Bortskaff else
Bortskaf ikke produktet sammen med
det almindelige husholdningsaff ald.
Dette produkt er underlagt det
europæiske direktiv 2012/19/EU.
Bortskaf produktet via en godkendt bortskaff elsesvirksomhed eller
den kommunale genbrugsplads. Følg de aktuelt gældende regler.
Henvend dig i tvivlstilfælde til den lokale genbrugsplads.
Bortskaff else af batterier/genopladelige batterier
For at bortskaff e produktet miljøvenligt skal det genopladelige batteri
tages ud af produktet:
OBS – MATERIELLE SKADER!
► Tag kun det genopladelige batteri ud, hvis produktet skal
bor
tskaff es/skrottes! Produktet er defekt, hvis det genoplade-
lige batteri tages ud!
1) For at fjerne det genopladelige batteri fra motordelen skrues den
lille skrue på bagsiden af motordelen ud med en stjerneskruetrækker.
2) Tag bagkappen på motordelen af.
3) Vip det sorte indvendige kabinet ud, f.eks. med en skruetrækker.
Før du kan få det indvendige kabinet løs, kan du blive nødt til at
knække holderne i siden og forneden af eller bøje dem udad.
Det er bedst at bruge en kærvskruetrækker til dette formål.
4) Når du har taget det indvendige kabinet ud:
Knæk holderne på siden af den gennemsigtige plastafskærmning
af. Tryk den nederste fi ksering en anelse indad, så den gennemsigtige plastafskærmning kan vippes op.
5) Vip printkortet en smule op, så du kan komme ned under det
genopladelige batteri med en kærvskruetrækker.
Page 83

79
SRR 3.7 A1
DK
6) Vip nu det genopladelige batteri ud.
7)
Bortskaf det genopladelige batteri miljørigtigt.
Batterier/genopladelige batterier må ikke smides ud med
husholdningsaff aldet. Alle forbrugere er lovmæssigt forpligtede til at afl evere batterier/genopladelige batterier på det
kommunale indsamlingssted eller i de respektive forretninger.
Denne forpligtelse hjælper med til, at batterier/genopladelige
batterier kan afl everes til miljøskånsom destruktion. Levér kun
batterier/genopladelige batterier tilbage i afl adet tilstand.
Emballagen består af miljøvenlige materialer, som kan
bortskaff es på de lokale genbrugspladser.
Importør
KOMPERNASS HANDELS GMBH
BURGSTRASSE 21
44867 BOCHUM
GERMANY
www.kompernass.com
Page 84

80
SRR 3.7 A1
Page 85

81
SRR 3.7 A1
FR
BE
Table des matières
Introduction . . . . . . . . . . . . . . . . . . . . . . . . . . . . . . . . . .82
Usage conforme . . . . . . . . . . . . . . . . . . . . . . . . . . . . . . 82
Matériel livré . . . . . . . . . . . . . . . . . . . . . . . . . . . . . . . . . 82
Description de l'appareil . . . . . . . . . . . . . . . . . . . . . . . . 83
Caractéristiques techniques . . . . . . . . . . . . . . . . . . . . . 84
Consignes de sécurité . . . . . . . . . . . . . . . . . . . . . . . . . . 85
Chargement des accus . . . . . . . . . . . . . . . . . . . . . . . . .89
Rasage sans fi l . . . . . . . . . . . . . . . . . . . . . . . . . . . . . . . . 90
Rasage avec l'adaptateur secteur . . . . . . . . . . . . . . . .91
Trimmer/tondeuse pour poils longs . . . . . . . . . . . . . . 91
Sécurité voyage . . . . . . . . . . . . . . . . . . . . . . . . . . . . . . .92
Nettoyage et entretien . . . . . . . . . . . . . . . . . . . . . . . . . 93
Nettoyage avec le pinceau . . . . . . . . . . . . . . . . . . . . . . . . . . . . . .93
Nettoyage à l'eau courante . . . . . . . . . . . . . . . . . . . . . . . . . . . . . .94
Nettoyage complet . . . . . . . . . . . . . . . . . . . . . . . . . . . . . . . . . . . . .95
Entreposage . . . . . . . . . . . . . . . . . . . . . . . . . . . . . . . . . .96
Garantie et service . . . . . . . . . . . . . . . . . . . . . . . . . . . . 97
Mise au rebut . . . . . . . . . . . . . . . . . . . . . . . . . . . . . . . . . 98
Importateur . . . . . . . . . . . . . . . . . . . . . . . . . . . . . . . . .100
Page 86

FR
BE
82
SRR 3.7 A1
Introduction
Toutes nos félicitations pour l'achat de votre nouvel appareil.
Ainsi, vous venez d'opter pour un produit de grande qualité. Le mode
d'emploi fait partie de ce produit. Il contient des remarques importantes
concernant la sécurité, l'usage et la mise au rebut. Avant d'utiliser le
produit, veuillez vous familiariser avec toutes les consignes d'utilisation
et de sécurité. N'utilisez le produit que conformément aux consignes
et pour les domaines d'utilisation prévus. Si vous cédez le produit à
un tiers, remettez-lui également tous les documents.
Usage conforme
Cet appareil est exclusivement destiné à raser et à couper les poils
humains.
Cet appareil est exclusivement réservé à un usage domestique.
Évitez de l'utiliser à des fi ns professionnelles.
Toute autre utilisation est considérée comme non conforme et peut
entraîner des dommages matériels, voire des accidents pour les
personnes.
Matériel livré
♦ Rasoir avec unité de coupe
♦ Adaptateur secteur
♦ Trimmer
♦ Cache de protection
♦ Pinceau
♦ Étui
♦ Carte de commande
♦ Mode d'emploi
Page 87

83
SRR 3.7 A1
FR
BE
REMARQUE
Contrôlez le matériel livré directement après avoir procédé au
déballage afi n de vous assurer que tout est complet et que rien
n'a été endommagé. Si nécessaire, veuillez vous adresser au
service après-vente.
Description de l'appareil
Figure A (page dépliante avant) :
1 Arbre d'entraînement
2 Unité de coupe
3 Touche de déverrouillage
4 Collerette de protection
5
Bouton Marche/Arrêt
6 Tondeuse étroite pour poils longs
7 Trimmer
8 Tondeuse large pour poils longs
9 Symbole
(verrouillage)
0 Symbole
(chargement)
q Indicateur de niveau de charge
w Prise de charge
Figure B (page dépliante dos) :
e Fiche de connexion
r Adaptateur secteur
t Pinceau
z Cache de protection
u Étui
Page 88

FR
BE
84
SRR 3.7 A1
Caractéristiques techniques
Appareil
Tension d'entrée : 5 V
Intensité d'entrée : 1000 mA
Accu: accu Li-Ion (3,7 V) 700 mAh
Température ambiante : 5°C à 35°C
Classe de protection: III/
Temps de charge : env. 90 minutes
Temps de charge pour
un accu entièrement chargé : env. 60 minutes
Indice de protection : IPX 4
Adaptateur secteur (type PTB-050100EU)
Tension d'entrée : 100 - 240 V ∼
50/60 Hz
Tension de sortie: 5 V
Intensité de sortie : 1000 mA
Classe de protection: II /
Page 89

85
SRR 3.7 A1
FR
BE
Consignes de sécurité
DANGER - RISQUE D'ÉLECTROCUTION!
► Avant d'utiliser l'appareil, vérifi ez que celui-ci
ne présente aucun dégât extérieur visible. Ne
mettez pas en service un appareil endommagé.
Il y a risque de choc électrique.
► Ne plus utiliser l'appareil si le fi l électrique,
l'adaptateur secteur, le boîtier ou toute autre
pièce présente un dommage.
► Débranchez l'adaptateur secteur de la prise
— en présence d'un dysfonctionnement,
— avant de nettoyer l'appareil,
— lorsque vous n'utilisez pas l'appareil
pendant une période prolongée,
— après chaque utilisation.
Pour cela, ne pas tirer sur l'adaptateur secteur
ni sur le fi l.
► Ne plongez jamais l'appareil ou le fi l électrique
avec l'adaptateur secteur dans l'eau ou d'autres
liquides.
Page 90

FR
BE
86
SRR 3.7 A1
DANGER - RISQUE D'ÉLECTROCUTION!
► Si l'appareil tombe dans l'eau, débranchez
impérativement d'abord l'adaptateur secteur
de la prise électrique avant de mettre les mains
dans l'eau.
► Ne touchez jamais l'adaptateur secteur si vous
avez les mains mouillées, notamment lorsque
vous branchez ou débranchez celui-ci de la
prise électrique. Risque d'électrocution!
► Contrôlez régulièrement l'adaptateur secteur
et l'appareil pour détecter d'éventuels défauts
mécaniques.
► Veillez à ce que le fi l électrique ne soit pas
coincé dans des portes d'armoire ni traîné
sur des surfaces chaudes. Vous risquez sinon
d'endommager l'isolation du fi l électrique.
► L'installation d'un dispositif de courant de fuite
avec un courant de déclenchement de la mesure
ne dépassant pas 30 mA off re une protection
supplémentaire contre les chocs électriques.
Confi ez le montage exclusivement à un électricien qualifi é.
Page 91

87
SRR 3.7 A1
FR
BE
DANGER - RISQUE D'ÉLECTROCUTION!
► ATTENTION! Maintenir l'appareil au sec !
► ATTENTION! Débranchez l'adaptateur secteur
du corps lorsque vous le nettoyez sous l'eau !
AVERTISSEMENT –
RISQUE DE BLESSURE!
► Cet appareil peut être utilisé par des enfants
à partir de 8 ans et plus et par des personnes
ayant des capacités physiques, sensorielles ou
mentales réduites ou un manque d'expérience
et de connaissances à condition qu'ils aient reçu
une supervision ou des instructions concernant
I'utilisation de I'appareil en toute sécurité et
qu'ils comprennent les dangers encourus.
► Ne pas laisser les enfants jouer avec l'appareil.
► Il est interdit aux enfants de nettoyer ou d'entre-
tenir l'appareil sans surveillance.
Page 92

FR
BE
88
SRR 3.7 A1
AVERTISSEMENT –
RISQUE DE BLESSURE!
► Confi ez les réparations de l'appareil exclusive-
ment à des entreprises agréées ou au service
après-vente. Toute réparation non conforme peut
entraîner des risques importants pour l'utilisateur.
À cela s'ajoute l'annulation de la garantie.
► Ne pas utiliser l'appareil avec un jeu de coupe
ou un sabot de coupe défectueux, car ceux-ci
peuvent comporter des arêtes vives.
Il y a risque de blessures !
► Les pièces défectueuses doivent être remplacées
impérativement par des pièces de rechange
d'origine. Seules ces pièces permettent de
répondre aux critères de sécurité requis.
► Branchez l'adaptateur secteur uniquement dans
une prise secteur aisément accessible, afi n de
pouvoir le retirer rapidement de la prise électrique
en cas de dysfonctionnement.
Page 93

89
SRR 3.7 A1
FR
BE
ATTENTION – DÉGÂTS MATÉRIELS!
► Utiliser l'appareil uniquement conformément
aux indications fi gurant sur la plaque signalétique et ne le laissez jamais fonctionner sans
surveillance.
► Pour le fonctionnement sur secteur, n'utilisez que
l'adaptateur secteur (type PTB-050100EU) livré.
► Ne pas couvrir l'adaptateur secteur afi n d'éviter
un échauff ement excessif.
Chargement des accus
Avant la première utilisation, il convient de charger l'accu pendant
au moins 90 minutes.
REMARQUE
► Assurez-vous que l'appareil est arrêté avant de charger l'accu.
1)
Branchez la fi che de connexion e dans la prise de charge w
sur le rasoir.
Veillez à ne pas permuter les polarités : La tige de guidage dans
la prise de charge w doit s'enclencher dans la glissière sur la
fi che de connexion e. Sinon la fi che de connexion e ne
s'enfi che pas.
2) Branchez l'adaptateur secteur r dans une prise de secteur
adaptée aux spécifi cations de l'appareil :
Le chargement de l'accu s'affi che en pourcent (%) sur l'indicateur
(indicateur de niveau de charge q). Le symbole
0 apparait
sur l'indicateur.
Page 94

FR
BE
90
SRR 3.7 A1
♦ Dès que l'accu est entièrement chargé, le symbole
0 apparait
durablement sur l'indicateur et l'indicateur de niveau de charge q
affi che 99%.
♦ Avec un accu complètement chargé, vous pouvez utiliser l'appareil
p
endant 60 minutes sans raccordement au réseau électrique.
Rasage sans fi l
ATTENTION! RISQUE DE DÉGÂTS MATÉRIELS!
► Cet appareil ne convient pas au rasage humide !
V
ous pouvez utiliser le rasoir sans fi l. Dans ce cas, vous devez charger
l'appareil avant la première utilisation (voir le chapitre "Chargement
des accus").
1) Si elle n'est pas en place, enfi chez la collerette de protection 4
en partant du bas sur l'unité de coupe 2 (voir page dépliante).
2) Enfi chez l'unité de coupe 2 avec la collerette de protection 4 en
place sur l'arbre d'entraînement 1. Veillez à ce que la collerette
de protection 4 soit correctement positionnée sur le corps.
3) Retirez le cache de protection z.
4) Appuyez sur le bouton Marche/Arrêt 5. L'indicateur de niveau de
charge q indique le niveau de charge actuel et le rasoir démarre.
REMARQUE
► Vous obtiendrez les meilleurs résultats sur peau sèche.
► La durée d'adaptation de la peau au système de coupe peut
êtr
e de 2 à 3 semaines.
5) Glissez les têtes de coupe sur la peau en eff ectuant des mouve-
ments circulaires et droits.
6) Une fois tous les endroits à raser traités, appuyez sur le bouton
Marche/Arrêt 5. L'appareil s'arrête. L'indicateur s'éteint au bout
de 3 secondes.
Page 95

91
SRR 3.7 A1
FR
BE
7) Nettoyez le rasoir après chaque rasage avec le pinceau t livré.
Pour un nettoyage complet, lisez le chapitre "Nettoyage et
entretien".
Rasage avec l'adaptateur secteur
ATTENTION! RISQUE DE DÉGÂTS MATÉRIELS!
►
Cet appareil ne convient pas au rasage humide !
Si v
ous souhaitez utiliser le rasoir sans l'avoir chargé au préalable,
vous pouvez également utiliser le rasoir directement avec l'adaptateur secteur r :
1) Branchez la fi che de connexion e dans la prise de charge w
sur le rasoir.
Veillez à une bonne polarité : La tige de guidage dans la prise
de charge w doit s'enclencher dans la glissière sur la fi che de
connexion e. Sinon la fi che de connexion e ne s'enfi che pas.
2) Branchez la fi che secteur dans une prise secteur.
Vous pouvez alors utiliser le rasoir.
Trimmer/tondeuse pour poils longs
Pour mettre en forme une barbe, former des pattes ou raser des
sourcils, utilisez le trimmer 7.
1) Retirez l'unité de coupe 2 de l'appareil si elle est en place.
2) Insérez le trimmer 7 sur l'arbre d'entraînement 1. Selon que vous
souhaitiez travailler avec la tondeuse large pour poils longs 8
ou la tondeuse étroite pour poils longs 6, changez de sens
d'insertion :
Page 96

FR
BE
92
SRR 3.7 A1
– Si vous souhaitez travailler avec la tondeuse large pour poils
longs 8 insérez le trimmer 7 de manière à ce que la tondeuse large pour poils longs 8 pointe vers vous.
– Si vous souhaitez travailler avec la tondeuse étroite pour
poils longs 6 insérez le trimmer 7 de manière à ce que la
tondeuse de poils longs étroite 6 pointe vers vous.
3) Appuyez sur le bouton Marche/Arrêt 5. L'indicateur de niveau
de charge q indique le niveau de charge actuel et l'appareil
démarre.
4) Après avoir terminé de travailler avec le trimmer, appuyez à
nouveau sur le bouton Marche/Arrêt 5.
5) Nettoyez le trimmer 7 avec le pinceau livré t. Pour un nettoyage
complet, lisez le chapitre "Nettoyage et entretien".
Sécurité voyage
Pour protéger l'appareil de toute mise en marche involontaire, vous
pouvez verrouiller le bouton Marche/Arrêt 5.
■ Appuyez et maintenez le bouton Marche/Arrêt 5 appuy
é jusqu'à
ce que le symbole
9 apparaisse.
Si vous appuyez à présent sur le bouton Marche/Arrêt 5, le
symbole
9 apparait ainsi que l'indicateur de niveau de
charge q. L'appareil ne se met cependant pas en route.
■ Si vous souhaitez lever le verrouillage, appuyez sur le bouton
Mar
che/Arrêt 5 et maintenez-le appuyé :
– le symbole
9 apparait et se met à clignoter.
L'appareil s'allume à présent à nouveau.
Page 97

93
SRR 3.7 A1
FR
BE
Nettoyage et entretien
DANGER - RISQUE D'ÉLECTROCUTION!
► Avant chaque nettoyage, retirez la fi che secteur de la prise
secteur! Risque d'électr
ocution!
ATTENTION! RISQUE DE DÉGÂTS MATÉRIELS!
► N'utilisez pas de produits de nettoyage abrasifs, chimiques ou
corr
osifs pour nettoyer l'appareil. Ceci risque d'endommager
l'appareil de manière irréversible.
Nettoyage avec le pinceau
Unité de coupe
Après chaque rasage, nettoyez les 3 têtes de coupe de l'unité de
coupe 2 avec le pinceau t.
1) Appuyez sur la touche de déverrouillage 3, de manière à ce
que l'unité de coupe 2 sorte.
2) Tapotez l'unité de coupe 2 avec précaution sur une surface
plate ou éliminez les petits poils en souffl ant.
3) Utilisez le pinceau t, pour éliminer les restes de poils.
Trimmer
■ Nettoyez le trimmer après chaque rasage avec le pinceau t
livr
é.
■ Huilez les tondeuses pour poils longs 6/8 tous les 6 mois
environ avec une goutte d'huile pour machines à coudre.
Page 98

FR
BE
94
SRR 3.7 A1
Nettoyage à l'eau courante
L'unité de coupe 2 peut être nettoyée à l'eau courante.
1) Appuyez sur la touche de déverrouillage 3, de manière à ce
que l'unité de coupe 2 sorte.
2) Tenez l'unité de coupe 2 sous le jet d'eau de manière à ce que
l'eau s'écoule de l'intérieur vers l'extérieur au travers des têtes de
coupe.
ATTENTION! RISQUE DE DÉGÂTS MATÉRIELS!
Veillez à tenir uniquement l'unité de coupe 2 sous le jet
d'eau ! Le cor
ps du rasoir est uniquement protégé contre
les projections d'eau et peut être endommagé de manière
irréparable s'il est maintenu sous l'eau courante.
3) Laissez sécher l'unité de coupe 2 avant de réutiliser le rasoir.
Page 99

95
SRR 3.7 A1
FR
BE
Nettoyage complet
Pour le nettoyage complet, retirez les têtes de coupe :
1) appuyez sur la tête de déverrouillage 3. L'unité de coupe 2 sort.
2) Tirez un peu l'unité de coupe 2 de manière à pouvoir la retirer
par le haut.
3) Tournez avec précaution le verrouillage marqué de fl èches dans
le sens des fl èches jusqu'à ce que le support des têtes de coupe
puisse être levé (voir fi gure).
4) Nettoyez toutes les pièces à l'eau courante et laissez-les entièrement sécher.
Page 100

FR
BE
96
SRR 3.7 A1
5) Remettez l'unité de coupe 2 en place:
6) Pour la fi xation, tourner le verrouillage marqué avec les fl èches
dans le sens contraire aux fl èches, de manière à ce que le support
des têtes de coupe ne puisse plus être levé.
7) Éliminez les poils coupés à l'aide du pinceau t du rasoir.
8) Repositionnez l'unité de coupe 2 sur le rasoir. Assurez-vous qu'il
soit fermement enclenché.
■ Nettoyez le boîtier et l'adaptateur secteur r av
ec un chiff on
humide.
REMARQUE
Si .....
– ....le rasage devient nettement moins précis....
– ... vous devez passer le rasoir plusieurs fois sur le même
endr
oit, pour obtenir un bon résultat ....
– .... le rasage dure nettement plus longtemps,....
– ... Des dommages sont visibles sur les têtes de coupe, ...
... les têtes de coupes doivent alors être remplacées.
Veuillez vous adresser au service après-vente si vous souhaitez
commander des têtes de coupe.
Entreposage
ATTENTION! RISQUE DE DÉGÂTS MATÉRIELS!
Ne conservez jamais le rasoir dans l'étui u pendant qu'il est
en cour
s de chargement ! Risque de surchauff e !
■ Placez toujours le cache de protection z sur l'unité de coupe 2
lor
sque vous n'utilisez pas l'appareil.
■ Conservez l'appareil nettoyé et sec et ses accessoires dans l'étui u livré.
■ Conservez le tout dans un endroit sec, propre et exempt de
poussièr
es.
 Loading...