

Sigma dp0 Quattro User Manual

C83EN1572
ENGLISH
E
USER’S MANUAL

Thank you for purchasing the Sigma dp0 Quattro
Digital Compact Camera
You will get the greatest performance and enjoyment from your new dp0
Quattro camera’s features by reading this instruction manual carefully
before operating it. Enjoy your new Sigma camera!
Please keep this instruction booklet handy for future reference. Doing
so will allow you to understand and take advantage of the camera’s
unique features at any time.
The warranty of this product is one year from the date of purchase.
Warranty terms and warranty card are on a separate sheet, attached.
Please refer to these materials for details.
NOTES ON COPYRIGHT
This camera is intended only for personal use and should never be used in
a way that infringes upon or contravenes international or domestic
copyright laws and regulations. In addition, although it is intended purely for
personal use, some restrictions may be applied to the photographing of
demonstrations, performances, shows, exhibitions, or commercial
properties, etc. Copyright or other legal rights should not be contravened.
FOVEON is a registered trademark of Foveon, Inc. X3, and the X3 Logos
are trademarks of Foveon, Inc.
IBM PC/AT series computer is a trademark or registered trademark of
International Business Machines Corporation (IBM) in the U.S.A.
Microsoft and Windows are either registered trademarks or trademarks of
Microsoft Corporation in the United States and/or other countries.
Macintosh and MAC OS are registered trademarks or trademarks of
Apple Inc. in the U.S.A. and /or other countries.
Adobe and Photoshop are trademarks of Adobe Systems Incorporated.
Eye-Fi, the Eye-Fi logo and Eye-Fi connected are trademarks of Eye-Fi,
Inc.
All other company or product names used in documents are trademarks
or registered trademarks of their respective holders.
Element font designed by Ricoh CO., Ltd. is used for the display of the
menu window of this camera.
2

Disposal of Electric and Electronic Equipment in Private Households
Disposal of used Electrical & Electronic Equipment (Applicable in the
European Union and other European countries with separate collection
systems)
This symbol indicates that this product shall not be treated as household waste.
Instead it shall be collected separately for the recycling of electrical and
electronic equipment. If the new products are purchased, this product might be
handed over to the distributor or the collection system of waste electrical and
electronic equipment eventually. By ensuring this product is disposed of correctly,
you will help prevent potential negative consequences for the environment and
human health, which could otherwise be caused by inappropriate waste handling
of this product or components of this product. If this product is disposed illegally,
it might cause a possibility of penalties. For more detailed information about
recycling of this product, please contact your local city office, your household
waste disposal service or the shop where you have purchased the product.
PACKAGE CONTENTS / ACCESSORIES
Please make sure that following standard accessories are included with
your camera. If any of them is missing, contact the retailer from which you
purchased your camera immediately.
1. Camera Body (dp0 Quattro)
2. Lens Cap (on the camera)
3. Hot Shoe Cover (on the camera)
4. Lens Hood
5. St rap
6. Battery Case
7. Li-ion Battery BP-51 (2 pieces)
8. Battery Charger BC-51
9. Battery Charger Cable
10. USB Cable
11. Instruction Manual
12. Limited Warranty
13. Warranty Sticker
14. Battery Marking Sticker
No memory card is included with this camera. Please purchase this
separately.
3

TABLE OF CONTENTS
PACKAGE CONTENTS / ACCESSORIES .............................................. 3
TABLE OF CONTENTS ........................................................................... 4
SAFETY PRECAUTIONS ........................................................................ 7
HANDLING PRECAUTIONS ................................................................. 10
SD MEMORY CARD .......................................................................... 11
DESCRIPTION OF THE PARTS ........................................................... 12
COLOR LCD MONITOR INDICATION................................................... 14
BASIC OPERATION AND QUICK REFERENCE .................................. 15
PREPARATION ........................................................................... 18
ATTACHING THE CARRY STRAP ........................................................ 19
LENS CAP ............................................................................................. 19
LENS HOOD ......................................................................................... 20
LOADING THE BATTERY ..................................................................... 21
TO CHARGE THE BATTERY ............................................................. 21
LOADING THE BATTERY .................................................................. 23
SETTING THE LANGUAGE .................................................................. 25
SETTING THE TIME AND DAT E ........................................................... 26
CAMERA SET-UP MENU ...................................................................... 28
QUICK SET MENU ................................................................................ 35
CHANGING THE COLOR LCD MONITOR DISPLAY ............................ 36
INSERTING AND REMOVING THE CARD ........................................... 38
FORMATTING THE CARD .................................................................... 40
SHUTTER BUTTON .............................................................................. 41
QUICK PREVIEW .................................................................................. 42
BASIC OPERATION ................................................................... 43
SELECTING THE EXPOSURE MODE .................................................. 44
SELECTING THE EXPOSURE MODE .............................................. 44
P PROGRAM AE ............................................................................. 45
A APERTURE PRIORITY AE .......................................................... 46
S SHUTTER SPEED PRIORITY AE ................................................ 47
M MANUAL EXPOSURE ................................................................. 48
FOCUSING ............................................................................................ 50
FOCUS MODE ................................................................................... 50
HOW TO USE AUTOFOCUS ............................................................. 50
4

SETTING THE FOCUS FRAME ........................................................ 51
FOCUS LOCK ................................................................................... 52
AF+MF MODE ................................................................................... 52
AF LIMIT MODE ................................................................................ 53
FACE DETECTION AF MODE .......................................................... 55
SPEED PRIORITY AF ....................................................................... 56
HALF-PRESSED AF-ON ................................................................... 56
MANUAL FOCUS .............................................................................. 57
OPERATION OF THE DRIVE MODE ................................................... 59
SINGLE FRAME SHOOTING ............................................................ 59
CONTINUOUS SHOOTING .............................................................. 59
SELF TIMER ..................................................................................... 60
INTERVAL TIMER ............................................................................. 61
ADVANCED OPERATION ........................................................... 63
SETTING THE WHITE BALANCE (WB) ............................................... 64
SETTING THE SENSITIVITY (ISO EQUIVALENCY) ............................ 69
IMAGE FILE SETTING ......................................................................... 71
SELECTING THE METERING MODE .................................................. 75
AE LOCK .............................................................................................. 76
EXPOSURE COMPENSATION ............................................................ 78
AUTO BRACKETING ............................................................................ 78
COLOR MODE ..................................................................................... 81
OVEREXPOSURE CORRECTION ....................................................... 84
TONE CONTROL ................................................................................. 85
COLOR SPACE .................................................................................... 85
AUTO ROTATE ..................................................................................... 86
CUSTOM MODE ................................................................................... 86
USING THE EXTERNAL FLASH .......................................................... 88
TTL AUTO FLASH ............................................................................. 89
SETTING THE FLASH MODE .......................................................... 90
FLASH EXPOSURE COMPENSATION ............................................ 91
USING Eye-Fi CARD (Eye-Fi Connected) ............................................ 92
REVIEWING AND DELETING IMAGES ...................................... 95
REVIEWING IMAGES .......................................................................... 96
VIEWING ONE IMAGE AT A TIME .................................................... 97
MAGNIFYING IMAGES (ZOOMED-IN VIEW) ................................ 98
5

VIEWING NINE IMAGES AT A TIME (CONTACT SHEET VIEW) ...... 99
VIEWING IMAGE INFORMATIO N ....................................................... 100
HISTOGRAM ................................................................................... 102
DELETING FILES ................................................................................ 103
DELETE A FILE WITH THE DELETE BUTTON ............................... 103
DELETE FILES FROM THE DELETE MENU .................................. 104
OTHER REVIEWING FEATURES ............................................ 105
LOCKING FILES ................................................................................. 106
MARKING IMAGES ............................................................................. 108
ROTATING IMAGES ............................................................................ 110
EXPOSURE WARNING ....................................................................... 11 2
OK BUTTON SHORTCUT ................................................................... 11 3
RECORDING SOUND MEMO ............................................................. 114
SHOWING A SLIDESHOW .................................................................. 116
DPOF (DIGITAL PRINT ORDER FORMAT) ........................................ 118
DEVELOPING RAW DATA INSIDE THE CAMERA ............................. 11 9
CHANGING OTHER SETTINGS .............................................. 121
FILE NUMBERING SYSTEM .............................................................. 122
TO CHANGE FILE NAMES ................................................................. 123
ATTACH COPYRIGHT INFORMATION ............................................... 124
CUSTOMIZE THE DISPLAY OF LCD MONITOR ................................ 126
CUSTOMIZING THE DIAL ................................................................... 129
LCD OFF AND AUTO POWER OFF .................................................... 130
ECO MODE ......................................................................................... 131
SOUND SETTINGS ............................................................................. 132
RESET TO THE DEFAULTS ................................................................ 133
CONNECTING TO A COMPUTER ........................................... 134
REFERENCE ............................................................................. 136
OPTIONAL ACCESSORIES ................................................................ 137
USING A HOME POWER SUPPLY ..................................................... 138
MAINTENANCE .................................................................................. 140
TROUBLESHOOTING ......................................................................... 141
SPECIFICATIONS ............................................................................... 144
6
SAFETY PRECAUTIONS
To avoid causing damage or injury, please read this instruction manual
Please take special note of the following two cautionary symbols.
Using the product and disregarding this warning sign may
cause serious injury or other dangerous results.
Using the product disregarding this caution sign may
cause injury or damage.
WARNING (BATT ERY)
Keep batteries in a safe place out of children’s reach. If a battery is
swallowed, call for emergency medical aid immediately.
Do not use any battery other than the designated battery types. Doing
so may cause battery explosion, battery leakage, camera damage,
injury or fire.
Do not use any battery other than that specified in this booklet.
Otherwise, it might cause battery explosion, battery leakage, camera
damage, injury or fire.
Avoid any shock, shake and drop. Ignoring this warning may cause
battery explosion, or battery leakage, resulting in injury or fire.
Never disassemble, short circuit, heat, or put batteries into fire.
Ignoring this warning may cause battery explosion, battery leakage,
injury or fire.
Please only use charger with the dedicated battery. Charging other
battery types causes battery explosion, battery leakage, camera
damage, injury or fire.
If for some reason, the camera or batteries emit smoke, or if
overheating or the smell of burning is detected, remove the batteries,
taking care to avoid being burned. Take the camera to the retailer
where you bought it, or to an authorized Sigma service station.
Please follow all guidelines, rules and regulations of your community
regarding the disposal of batteries. If you do not use the camera for a
long period of time, remove the battery.
Do not use any AC adapter other than the one provided with your
camera. Using other brands may cause electrical shock and fire
Keep batteries in a safe place out of children’s reach. If a battery is
swallowed, call for emergency medical aid immediately.
carefully, before using the camera.
Warning !!
Caution !!
This symbol denotes a warning or point, where caution is required.
This Symbol contains information regarding the actions that must be avoided.
7
WARNING (BATTERY CHARGER AND AC ADAPTER)
The battery charger is for indoor use only. Do not store the charger in
humid or dusty locations.
Use it within the 0°C
The AC Adapter is designed for use with this product only. Do not use
it with any other appliance. Doing so may cause overheating, fire,
electric shock or injury.
If the adapter is emitting smoke, generating a strange odor or making
an abnormal noise, while in use, disconnect the power plug from the
outlet immediately. Otherwise, fire or electric shock may result.
If water or a foreign object gets into the adapter, unplug from the AC
outlet immediately. It could cause fire or electric shock.
Do not attempt to modify or disassemble this product. Doing so can
cause fire or electric shock.
Do not place any heavy objects on the power cord, or pull it, bend it
unduly, or heat it. It could damage the cord, and could cause fire or
electric shock.
Do not use this product with AC voltage other than the specified
power supply voltage AC110V - 240V (120V in U.S.A. and CANADA).
Doing so could cause fire or electric shock.
Use a safety approved AC power cord as is specified by each
country.
WARNING (CAMERA)
Never use your camera in an environment where flammable or
burnable, gas, liquids or chemicals, such as Propane, Gasoline, etc.,
are present.
Keep the camera in a safe place that children cannot reach. Playing
with the camera strap around one’s neck can cause strangulation.
Do not disassemble the camera; Doing so can cause electric shocks
and burns.
Do not touch internal parts of the camera that become exposed as a
result of damage, it could cause fire or electric shock. Remove the
batteries and contact an authorized Sigma service station.
Keep the camera away from moisture or water. If you drop your
camera/lens in water, please contact the retailer where you
purchased the camera, or a service station immediately. If you use
the camera with this condition it can cause electric shock or fire.
- 40°C temperature range only.
8
Prevent water, or metallic and other conductive objects from coming
into contact with the terminals of the camera body. This can result in
electric shock, overheating and fire.
Do not fire the flash close to eyes, otherwise the bright light could
damage the eye. Keep at least 1m/3feet distance between the face
and the camera when taking a picture with flash.
Do not cover the flash with your finger or hand, it can cause skin burn.
CAUTION (BATTERY CHARGER AND AC ADAPTER)
Do not pull the Battery Charger or the AC power cord, when
disconnecting the AC adapter from the AC outlet. It could cause fire
or electric shock due to damaged cord. Always take hold of the
molded AC plug, when unplugging it from the outlet.
Do not cover the Battery Charger or the AC adapter with cloth,
cushions, etc. It could cause excessive heat, deform the case, and
cause fire.
When Battery Charger is not used unplug it from the outlet.
CAUTION (CAMERA)
Do not leave the camera without the lens cap in place. Light entering
through the lens for long periods of time could cause damage to the
camera.
Please do not carry your camera while a tripod is attached, as this
could result in injury or a fall.
Please do not grasp the camera with wet hand, as it might cause
electric shock
Do not leave the camera in a hot place or in a car parked in the sun. If
the camera becomes hot, it might cause burns to the skin.
If the liquid crystal display (LCD) monitor becomes damaged, be
careful of the fragments of glass, which can cause injury. If the liquid
inside the LCD monitor leaks out, and you are faced with the following
situations, please do as follows.
If the liquid adheres to clothes or the skin, wash it away with soap
If the liquid enters the eye, flush the affected eye with clean water
If the liquid is swallowed, drink a large quantity of water, induce
vomiting and seek medical assistance.
immediately.
immediately for 15 minutes, and seek medical assistance.
9

HANDLING PRECAUTIONS
Please read this section before using the camera.
on a field trip, or when taking many pictures at one time.
Study and familiarize yourself with the functions of your camera before
using it. No compensation or guarantee is provided for unsatisfactory
pictures or loss of profit, etc.
Carry spare batteries when you use the camera in a cold environment,
ENVIRONMENT
Your camera is a precision instrument. Do not drop it or subject it to
physical shock.
This camera is not waterproof, and cannot be used underwater. Wipe off
any water droplets with a dry cloth as soon as possible. If the camera gets
really wet, promptly consult your nearest Sigma Service Center.
Do not leave the camera in a dusty, hot, or highly humid environment for
a long period of time.
If the camera is moved from a cold place to a warm room, water droplets
may appear on the camera. Please keep the camera in a bag until it is
acclimatized to the ambient room temperature.
The camera will work within a temperature range between 0˚C/32˚F and
+40˚C/104˚F and humidity less than 85% (no condensation). However, in
cold temperatures below 0˚C, the power performance of the battery is
reduced. Please carry a spare battery in these circumstances, and keep
the batteries warm.
Static electricity or magnetic fields may affect the operation of the camera.
If such exposure occurs, please remove the battery from the camera and
re-insert it, to reset the camera’s microprocessors.
DURING PROLONGED USE
Although there are cases where the surface of camera gets hot, this is not
a malfunction.
If you use the camera for an extended period of time, the camera may get
hot and the warning mark ( ) will be displayed. If the camera gets too
heat, a warning message will be displayed and the camera will turn off
automatically.
10
If the camera turns off, please leave it switched off for more than ten
minutes to lower its temperature.
Image quality may lower when the camera gets hot. If the warning mark
( ) is displayed, we recommend turning off the camera and wait until the
temperature of the camera becomes lower.
SD MEMORY CARD
(sold separately)
The dp0 Quattro camera uses a SD memory card, SDHC memory card*
and SDXC memory card*.
* UHS-1 standard memory card can also be used.
In this instruction manual, SD memory card, SDHC memory card and
SDXC memory card are referred to as the ‘Card’.
We recommend using the SDHC memory card or SDXC memory card to
store images.
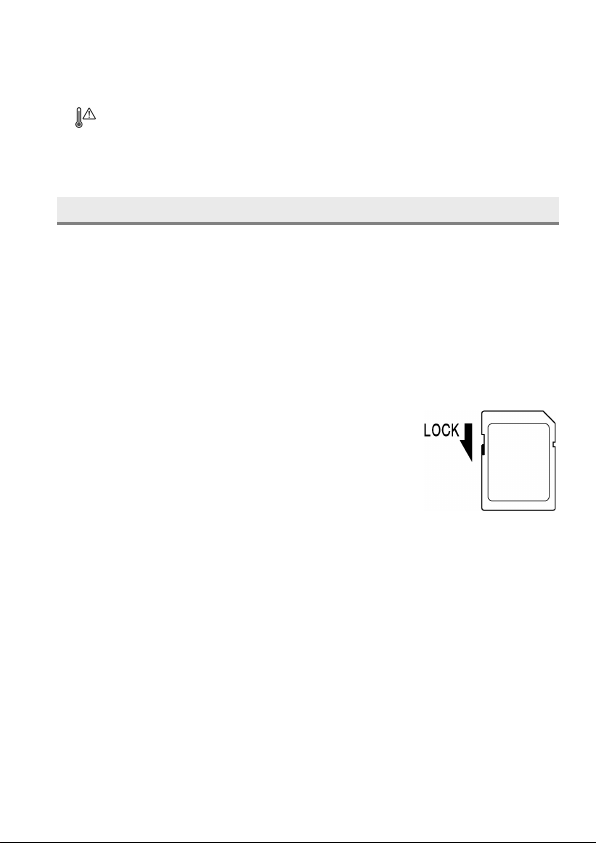
SD memory card, SDHC memory card or SDXC
memory card incorporate the write protection switch,
which prevents writing or formatting the card
accidentally. If the switch is placed in the ‘LOCK’
position, it is not possible to overwrite or erase your
data accidentally.
It is also possible to use an Eye-Fi card that has a Wi-Fi communication
function. (P.92)
Do not leave the card in direct sunlight or near a heating device.
Avoid storing cards in environments of high temperature and humidity or
where static electricity or electromagnetic fields may be generated.
For proper usage of the card, please refer to their instruction manuals.
The “Delete” feature of the Camera and PC may not delete the data in the
memory card completely. Some data might still remain. If you wish to
remove all data from card securely, please use third party software.
11
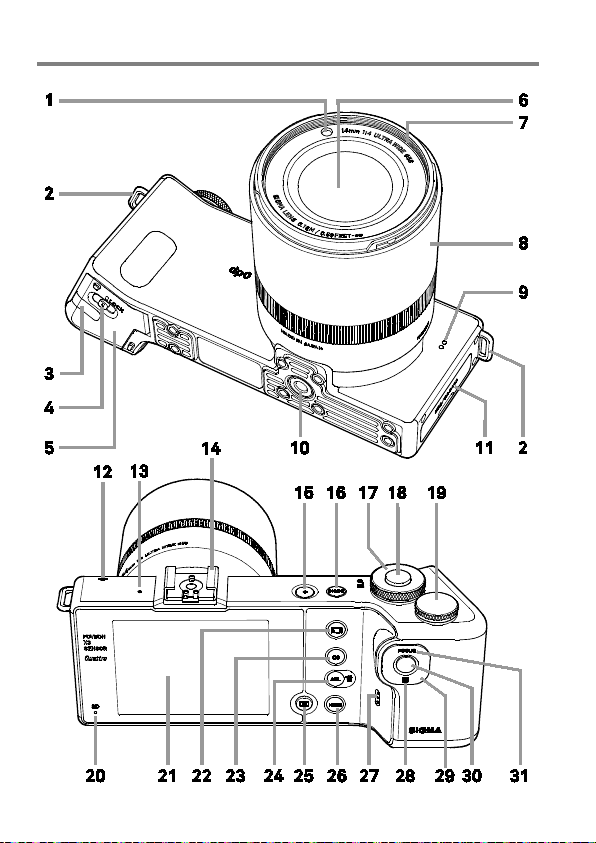
DESCRIPTION OF THE PARTS
12
1
AF AUXILIARY LIGHT
20
BUSY LAMP
2
CAMERA STRAP EYELET
21
COLOR LCD MONITOR
3
DC CONNECTOR COVER
4
RELEASE LEVER
5
BATTERY COVER
6
LENS
7
FILTER ATTACHMENT THREAD
(AE LOCK / DELETE) BUTTON
8
FOCUS RING
9
MICROPHONE
(VIEW) BUTTON
10
TRIPOD SOCKET
11
CARD / USB COVER
(MENU) BUTTON
12
FOCAL PLANE MARK
27
SPEAKER
13
AUTO FOCUS LAMP
14
HOT SHOE
15
POWER SWITCH
29
SELECTOR
16
MODE BUTTON
(OK) BUTTON
17
FRONT DIAL
18
SHUTTER BUTTON
19
REAR DIAL
(Up button)
(Left button)
button
22
(DISPLAY) BUTTON
23
(QUICK SET) BUTTON
/
24
25
26
28
30
31
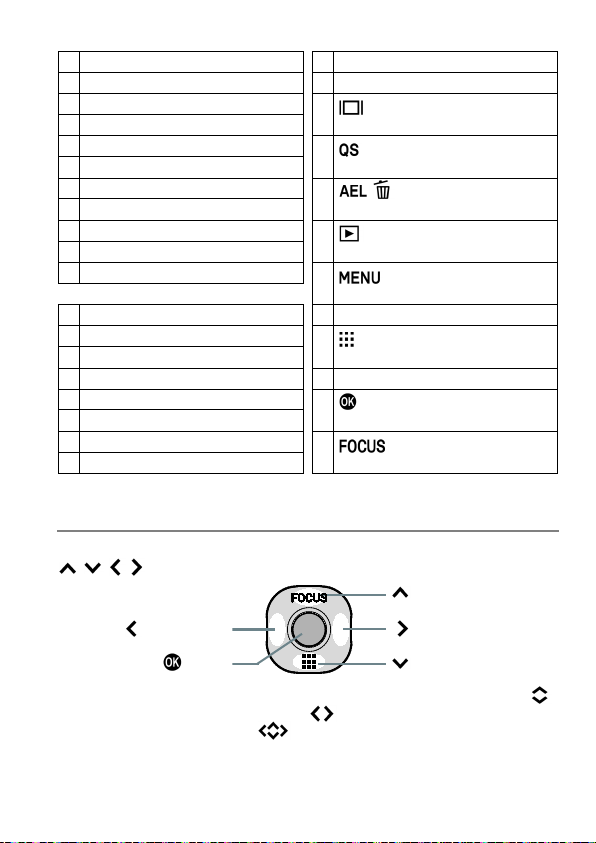
(FOCUSING POINT) BUTTON
(FOCUS MODE) BUTTON
SELECTOR (29)
In this instruction manual, each position of selector is shown as
/ / / .
(Right button)
(Down button)
The buttons are used as follows: To operate Up and Down buttons:
To operate Left and Right buttons: . To operate both Up and Down,
and Left and Right buttons: .
.
13
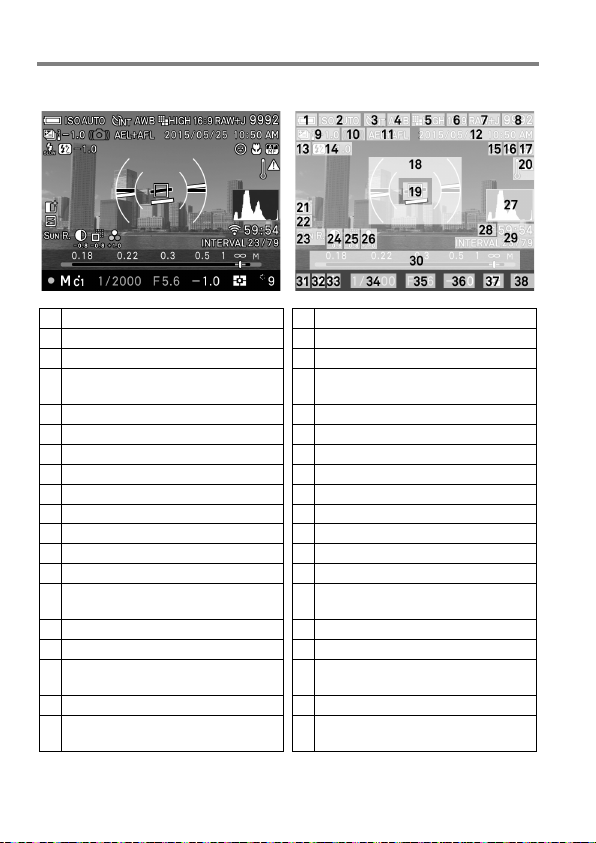
COLOR LCD MONITOR INDICATION
1
Battery Level Indicator
20
Temperature rise caution mark
2
ISO Sensitivity
21
Overexposure Correction *
3
Drive Mode
22
Tone Control
White Balance
(Filtering Effect)
23
Color Mode
(Toning Effect)
5
Image Size
24
Contrast *
6
Aspect Ratio
25
Sharpness *
7
Image Quality
26
Saturation *
8
Number of shots remaining
27
Histogram *
9
Auto Bracket *
28
Eye-Fi Communication Icon *
10
Camera Shake Warning
29
Interval timer *
11
AE Lock *
30
Scale Bar *
12
Date / Time *
31
Focus Indicator
13
Flash Mode *
32
Exposure Mode
Flash Exposure Compensation
value *
33
15
Face detection AF *
34
Shutter Speed
16
AF Limit Mode *
35
F Number
36
Exposure Compensation Val ue /
Exposure Meter
18
Electronic Level *
37
Metering Mode
38
Number of shots remaining
before memory buffer full
Explanation of the icons displayed in still image shooting.
4
14
17 Focus Mode *
19 Focusing Frame
* Displayed only during setting.
14
Custom Mode *
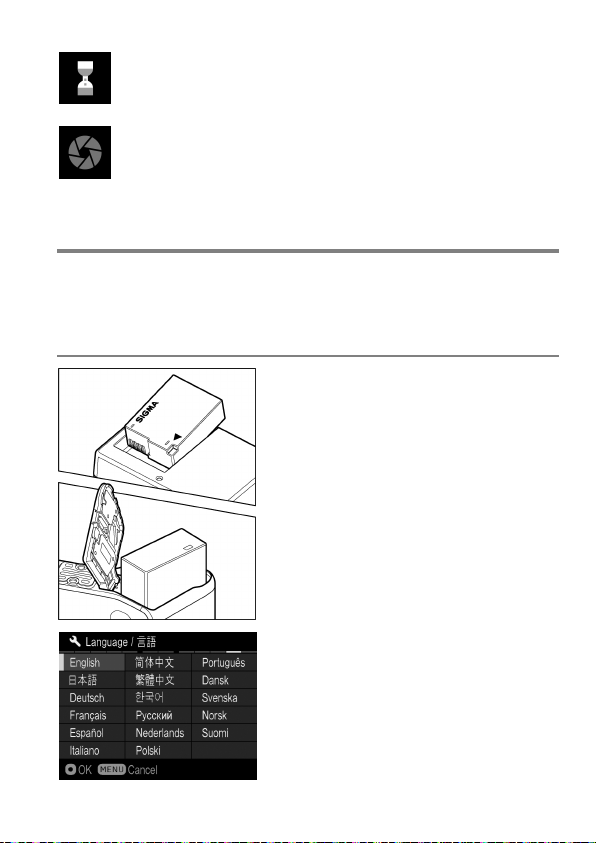
This mark shows that the image is being processed in camera
after shooting. While this mark is displayed, it is not possible to
operate the camera.
This mark shows that the camera is still shooting with a slow
shutter speed.
BASIC OPERATION AND QUICK REFERENCE
The dp0 Quattro camera has many advanced features. This section,
describes basic camera operation. You can find more details in later
sections.
PREPARATION
Charging the battery ( P. 2 1)
Charge the supplied lithium-ion battery
with the provided battery charger.
To insert the battery (P. 23)
Set the language ( P. 2 5)
15
TAKING THE PICTURE
Set the date and time ( P. 2 6)
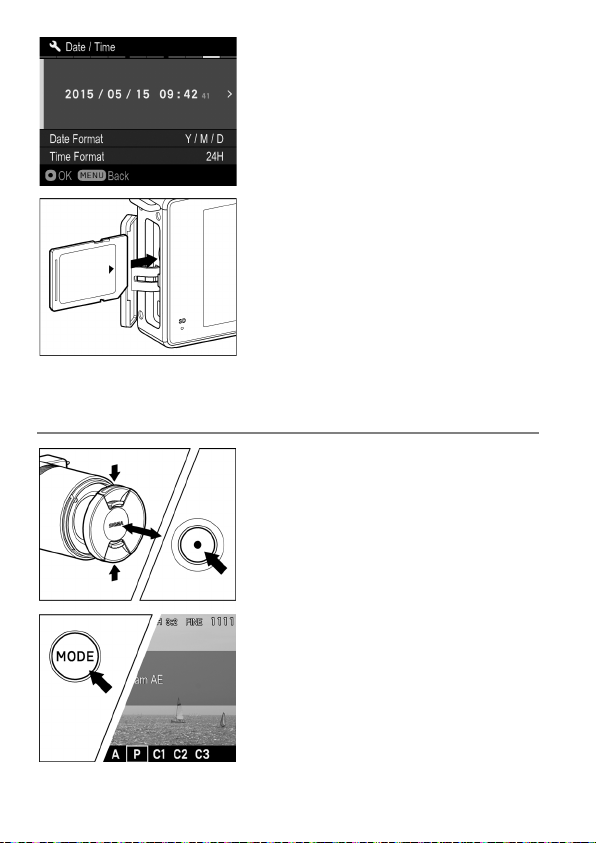
Loading the card ( P. 3 8)
Turn the camera body on.
Remove the lens cap and press the Power
switch.
Select the exposure mode ( P. 4 4)
Press the ‘Mode’ button in P (Program AE)
position
16
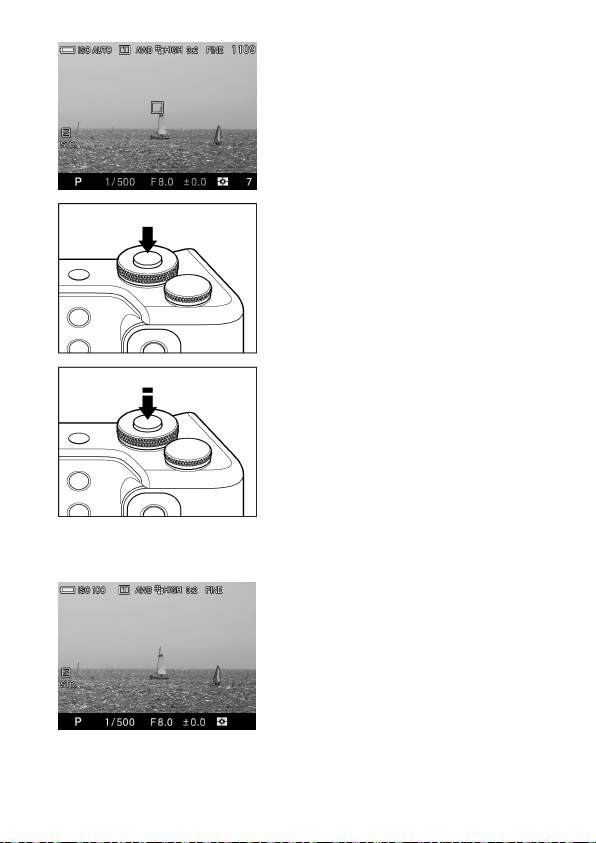
Focus ( P. 50)
Compose your image with the color LCD
monitor and press the shutter button
“half-way” to activate exposure metering
and autofocus.
Take a picture
Fully press the shutter button to take the
picture.
Review the image. ( P. 4 2)
The image is displayed for 2 seconds on
the LCD monitor.
17

PREPARATION
This section describes necessary preparations before using the
camera.
18
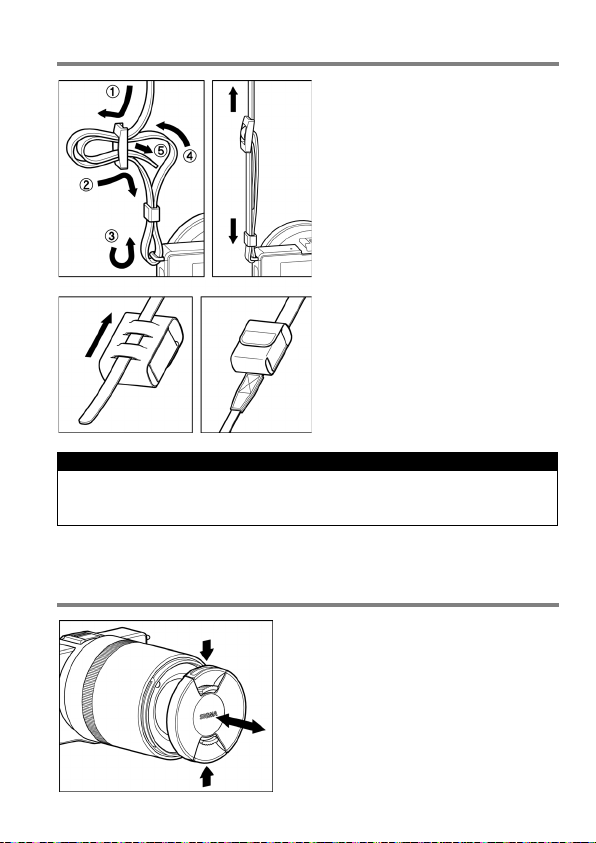
ATTACHING THE CARRY STRAP
1
Undo the strap end.
2
Attach the carry strap as shown.
This strap can be attached to a
battery case that is convenient for
carrying a spare batter y.
CAUTION !!
The battery and battery case are not water-proof. Be sure not to get
water on them.
LENS CAP
To preserve the lens, the lens cap is
attached. If you do not use the camera,
please keep the lens cap attached.
Attach or remove the lens cap as shown
in the illustration.
19
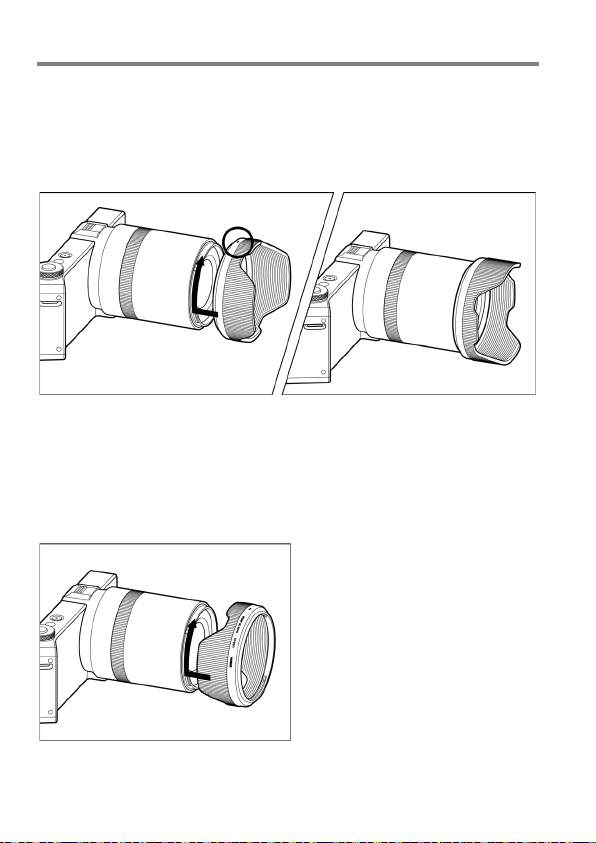
LENS HOOD
While shooting images, it is recommended to attach the lens hood all the
time as it blocks out extraneous light and reduces flare and ghosting.
HOW TO ATTACH
Turn the indicator on the lens hood upwards and then attached it to the tip
of lens. Turn the lens hood to the right until it clicks into position.
HOW TO DETACH
Rotate the lens hood anti-clockwise respectively.
In order to place the lens and hood into the storage case, you must first
remove the hood, then replace it on the lens in the reverse position.
20
LOADING THE BATTERY
A lithium-ion battery, BP-51, is provided with the dp0 Quattro camera.
Charge the battery before using the camera for the first time. Charge the
battery by the supplied battery charger, BC-51, when the battery is empty.
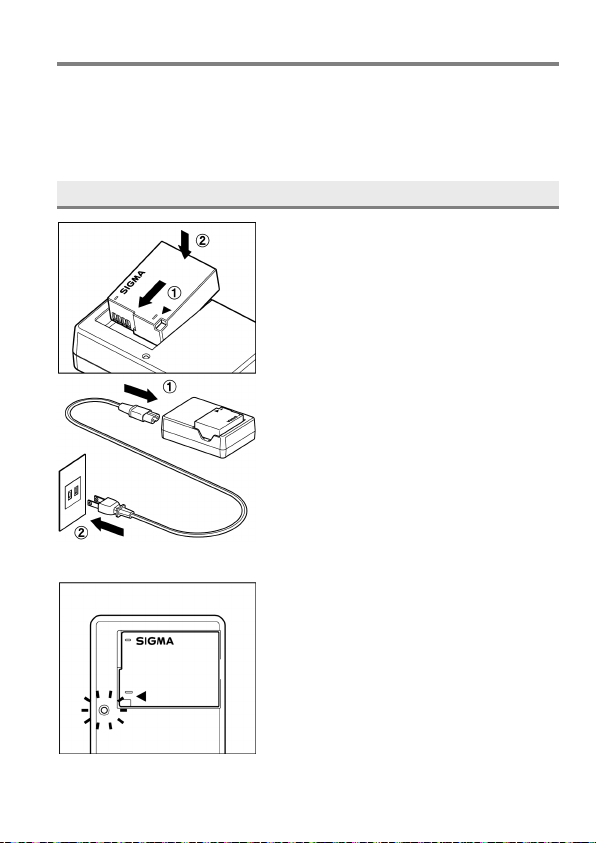
TO CHARGE THE BATTERY
1
Attach the battery by sliding it in the direction
of the arrow, as shown in the diagram.
2
Connect the power cable to the charger
and insert the plug into the wall outlet.
The charge lamp will be green whilst the
battery is charging
It takes about 140 minutes to recharge
the battery.
Required time for recharging the battery
depends on the ambient temperature and
status of recharge level.
21

3
When the charge lamp goes out, charging is completed. Remove the
battery from the charger and remove the charger from the wall outlet.
CAUTION !!
We recommend charging the battery before using the camera again. If it
is not used for several days, the battery performance decreases.
If the number of possible images from one charge of the battery
considerably decreases, it may indicate the end of battery’s life. In this
case, please purchase a new battery.
22
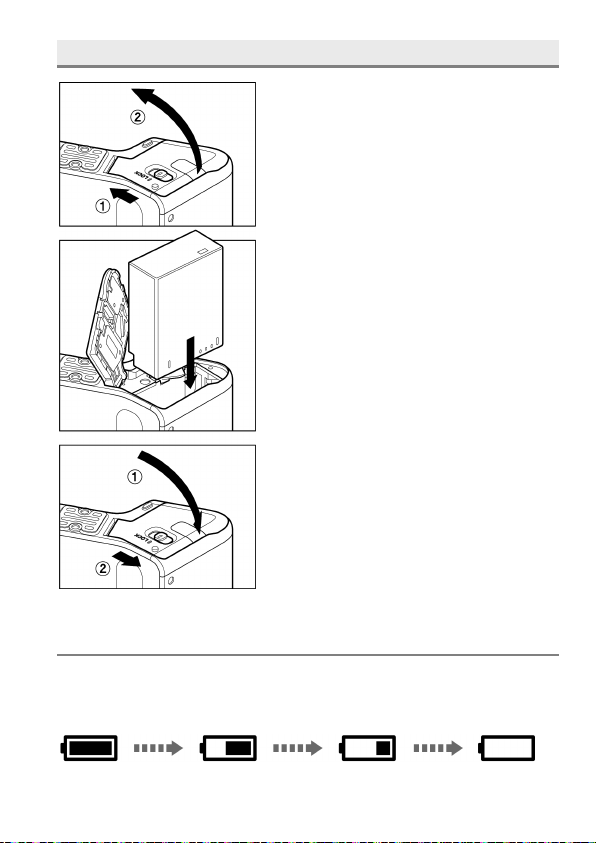
LOADING THE BATTERY
1
Slide the Release lever to the OPEN
position, and open the Battery Cover as
shown in the illustration.
2
Insert the battery until it locks into place.
3
Close the Battery Cover and Slide the
Release lever to the LOCK position as
shown in the illustration.
CHECKING THE BATTERY STATUS
The battery icon, which shows the capacity of the battery, is shown on the
left corner on the color LCD panel. Please take notice of the battery status
before and when in use.
23

The power of the battery is insufficient, replace or recharge
the battery immediately.
(Red)
The power of the battery is empty; the camera will no longer
The battery is working with the connected AC adapter.
( P. 1 38)
work. Replace or recharge the battery immediately.
TO REMOVE THE BATTERY
1
Slide the Release lever to the OPEN
position, and open the Battery Cover as
shown in the illustration.
2
Eject the battery by sliding the battery
compartment cover latch in the direction of
the arrow, as shown in the illustration.
WARNING!!
Busy Lamp is on or flashing, do not remove the battery or memory card.
By doing so, it may result in data loss. This could also cause damage to
the camera and/or memory card.
24
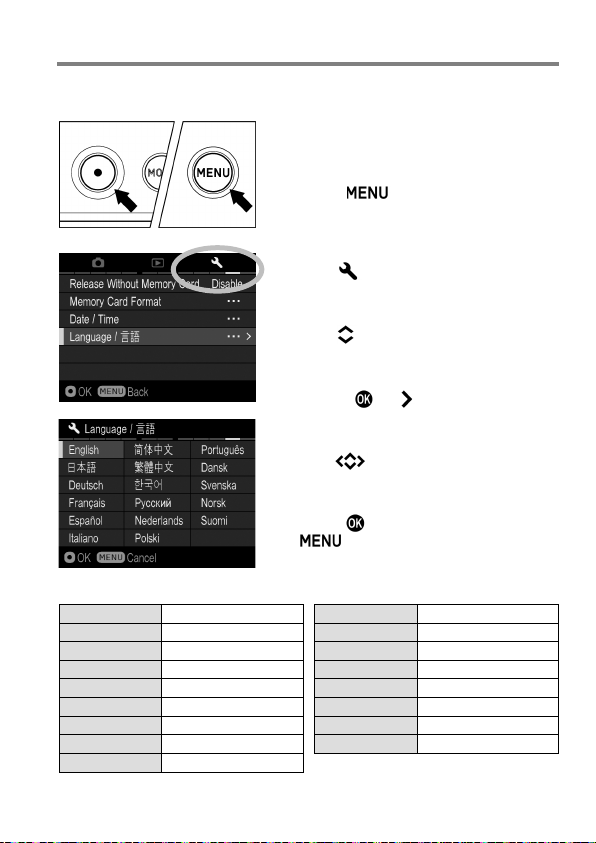
SETTING THE LANGUAGE
English
English (Default)
Русский
Russian
Japanese
Nederlands
Dutch
Deutsch
German
Polski
Polish
Français
French
Português
Portuguese
Español
Spanish
Dansk
Danish
Italiano
Italian
Svenska
Swedish
简体中文
Simplified Chinese
Norsk
Norwegian
繁體中文
Traditional Chinese
Suomi
Finnish
한국어
Korean
You should receive the dp0 Quattro camera pre-set to English, however, if
necessary, you can change the camera language yourself.
1
Turn the camera on.
2
Press the button on the back of the
camera to display the Camera Set-up
Menu. (See P.28)
3
Select [ Camera Settings (4)] by
rotating the Front Dial or the Rear Dial.
4
Use the buttons to select [Language/
言語].
5
Press the or button to open the
language set-up page.
6
Use the buttons to select the desired
language.
7
Press the button to apply the setting or
the
set-up page without making any changes.
Selectable languages
button to return to the language
日本語
25
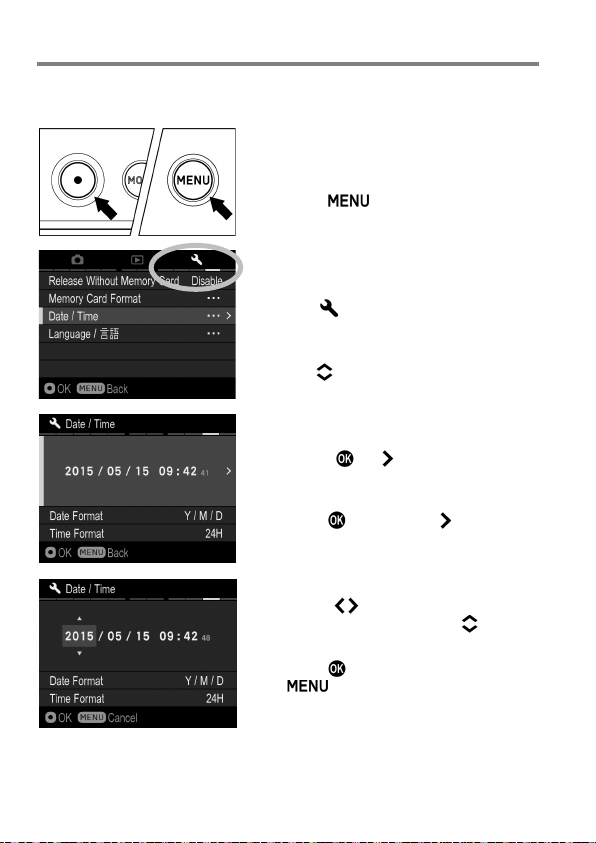
SETTING THE TIME AND DAT E
Please set the camera’s internal clock, before using the camera for the first
time or after extended periods of disuse.
1
Turn the camera on.
2
Press the button on the back of the
camera to display the Camera Set-up
Menu. (See P.28)
3
Select [ Camera Settings (4)] by
rotating the Front Dial or the Rear Dial.
4
Use the buttons to select [Date/Time].
5
Press the or button to open the
date/time set-up page.
6
Press the button or the button again
to set the Date / Time.
7
Press the button to select an item
and change it by pressing the button.
8
Press the button to apply the setting or
the button to return to the date/
time set-up page without making any
changes.
26
CAUTION !!
The camera’s internal clock is powered by a capacitor that receives its
charge from camera’s battery. If the camera is without battery for an
extended period of time, such as after prolonged storage, the internal
clock will need to be reset.
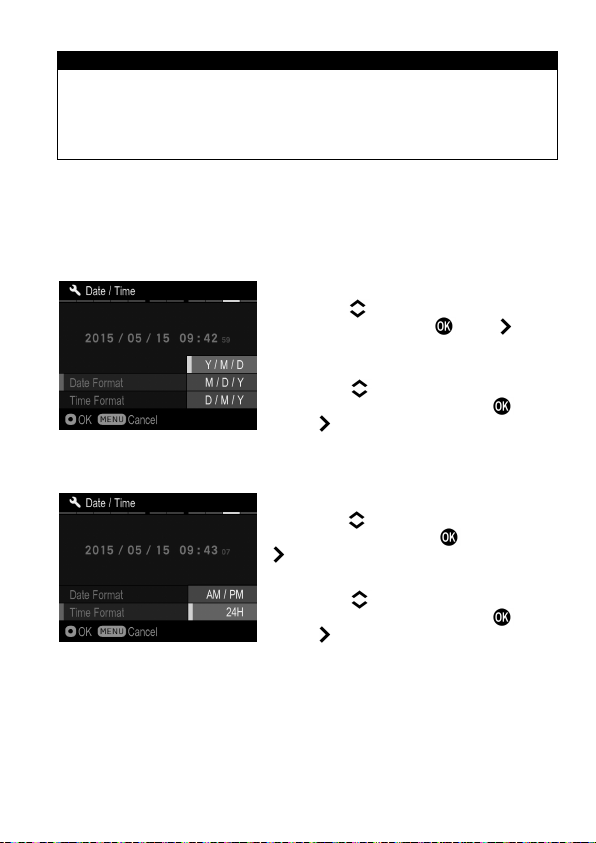
TO CHANGE THE ORDER OF THE DATE
The date can be displayed in one of three formats: M/D/Y (month/day/
year), D/M/Y (day/month/year), or Y/M/D (year/month/day).
1
Use the buttons to select [Date
Format], and press the or the button
to open the sub menu.
2
Use the buttons to select your
preferred format, and press the button
TO SWITCH 24 HOUR AND 12 HOUR (AM/PM) DISPLAY
or the button to confirm.
1
Use the buttons to select [Time
Format], and press the button or the
button to open the sub menu.
2
Use the buttons to select your
preferred format and press the button
or the button to confirm.
27
CAMERA SET-UP MENU
Tab area
This section describes the various settings in the Camera Set-up menu. It
is possible to set the camera functions from the Camera Set-up menu
display.
28
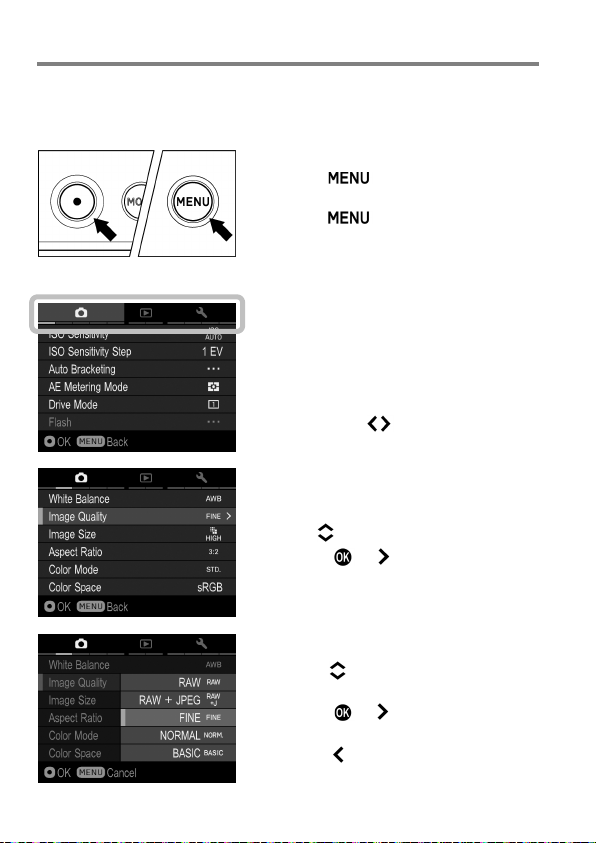
TO DISPLAY THE SET-UP MENU
Press the button on the back of the
camera.
Press the button again to close the
Set-up Menu and the camera will be
shooting mode. (If you reviewed images
( P. 9 6), it will return to the last previewed
image.)
Move to any other tab
Each time the Front Dial or the Rear Dial
is rotated, it will move to the next tab.
(When the icon in the tab area is selected,
it is possible to change the setting menu
by pressing the buttons as well.)
While in the Set-up Menu:
Use the buttons to select menu items.
Press the or button to open submenus or dialogs.
While in set-up sub-menus:
Use the buttons to select setting
options.
Press the or button to apply new
settings.
Press the button to close sub-menus
without applying changes.
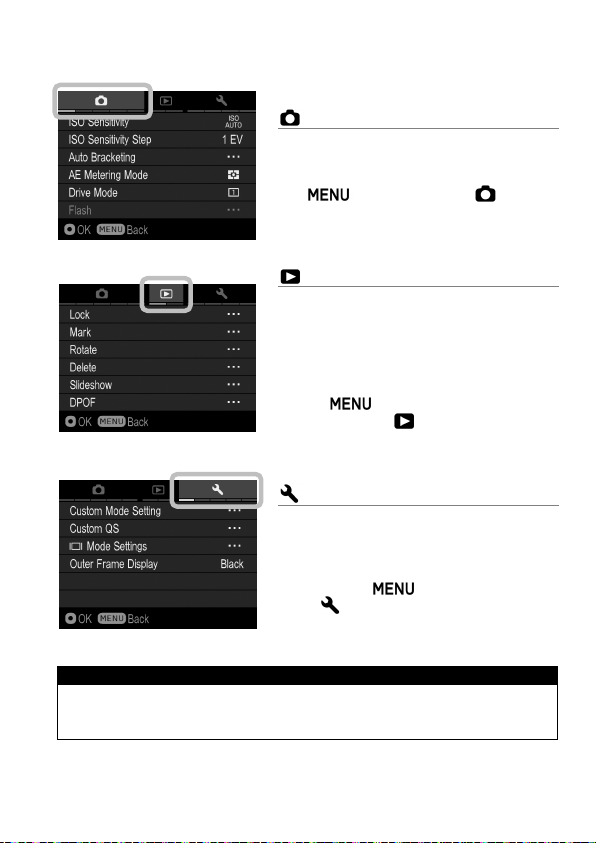
The Camera Set-up menu is divided into three groups.
CAPTURE SETTINGS
(Blue Tab)
This menu relates to shooting settings.
When an exposure mode is selected and
the button is pressed [ Capture
Settings] will be displayed.
PLAYBACK MENU
(Red Tab)
This menu is for setting the playback
related functions of the still images. The
settings for printing, such as DPOF
setting, is included in the Playback
Settings menu.
If the button is pressed during
playback mode, [ Playback Menu] will
be displayed.
CAMERA SETTINGS
(Yellow Tab)
This menu is used for camera setup such
as date and language selection.
Open the Camera Set-up menu by
pressing the button and move to
the [ Camera Settings] menu by
rotating the Front Dial or the Rear Dial.
TIP
Depending on the settings of the camera, some menu items and setting
options cannot be seletced. They will be displayed with a gray color.
29
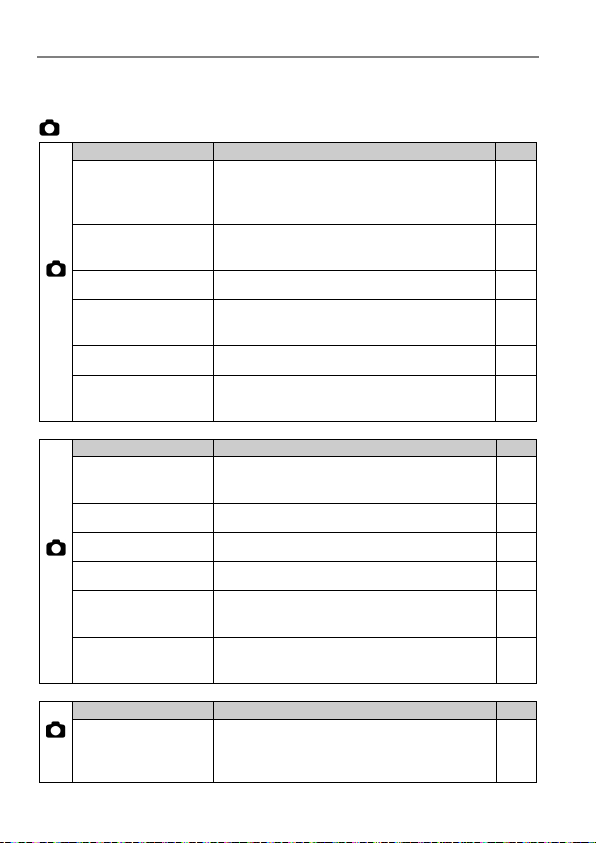
LIST OF MENU FUNCTIONS
Menu Item
Description
Page
The higher value indicates a higher
“noise” with higher sensitivities.)
ISO Sensitivity
Step
Sets the ISO Sensitivity in steps of 1EV
or 1/3EV.
Auto Bracketing
Sets the steps and order of Auto Bracketing.
78
Selects the Metering Mode depending
on the shooting conditions.
Drive Mode
Selects the Drive Mode such as Self-Timer.
59
Sets the mode of flash setting and Flash
Exposure Compensation.
Menu Item
Description
Page
Selects the White Balance Mode
depending on the shooting conditions.
Image Quality
Selects the quality of image to record.
71
Image Size
Selects recording Image Size.
72
Aspect Ratio
Sets the aspect ratio of the image.
73
Selects the desired Color mode
depending on the shooting conditions.
Sets the color space to [sRGB] or [Adobe
RGB].
Menu Item
Description
Page
Sets or cancels the [Overexposure
highlights at the time of overexposure.
For more detailed information about each function, please refer to the
individual pages.
CAPTURE SETTINGS
ISO Sensitivity
(1)
AE Metering Mode
Flash
White Balance
(2)
Color Mode
Color space
Overexposure
(3)
Correction
sensitivity. (The Image may have more
Correction] that minimizes blown out
69
70
75
88
64
81
85
84
30
 Loading...