

Page 1

Issued by
Information and Communication mobile
Haidenauplatz 1, D-81667 Munich, Germany
Ref. No: A31008-H9230-A1-3-7619
© AG 2003
All rights reserved. Subject to availability.
Rights of modification reserved.
WWW.XELIBRI.COM
Contains all you need to know
to get the best from your XELIBRI!
THIS IS YOUR GUIDE TO THE COMMUNICATION OF THE FUTURE!
THIS IS YOUR GUIDE TO THE COMMUNICATION OF THE FUTURE!
Somebody is waiting for
you to call!
USER GUIDE
1
Page 2

Contents
Overview..................................... 2
Getting Started ........................... 3
Inserting SIM card.........................3
Charging ......................................3
Switching on ................................4
Setting the time and date ..............4
Standby display.............................4
Switching off.................................4
Mobile phone precautions ..............4
Making and Taking Calls ............. 5
Making a call.................................5
Adjusting call volume.....................5
Ending a call .................................5
Taking a call .................................5
More Ways to Call ....................... 6
Dialling internationally ...................6
Phonebook ...................................6
Voice dialling ................................6
Redialling numbers........................6
Retrying a busy number ................6
Call Features ............................... 7
Voice mail.....................................7
Using the phone hands-free ...........7
Noting a telephone number............7
Talking privately............................7
Making/handling more calls............7
Receiving a second call..................8
Phonebook .................................. 9
About the Phonebook ....................9
Saving Phonebook entries ............. 9
Typing in the Phonebook .............. 9
Phonebook tips ............................ 9
Updating Phonebook entries.........10
Voice dialling...............................10
Text Messages........................... 11
Receiving a text message.............11
Deleting messages ......................11
Writing a text message ................11
Writing other characters ..............12
Sending a message .....................13
Sending messages to a group.......13
Ready messages .........................13
Managing messages ....................13
Telephone numbers.....................14
Multimedia (EMS) messages ..... 15
Cards .........................................15
Inserting media...........................15
Saving media ..............................15
Longer messages ........................15
Features and Settings ...............16
Key lock......................................16
Ring tones ..................................16
Using the alarm clock ..................16
Using the calendar.......................17
Using a screensaver.....................17
Setting up voice mail ...................17
Divert (call forwarding) ................17
Setting up favourites ...................18
Menus ........................................19
Display Symbols ......................... 19
Menu commands ........................ 19
What if ......................................23
Precautions/Maintenance ......... 25
Xelibri Service/Accessories .......26
Specifications ............................27
Guarantee certificate ................28
Index ......................................... 29
1
Page 3
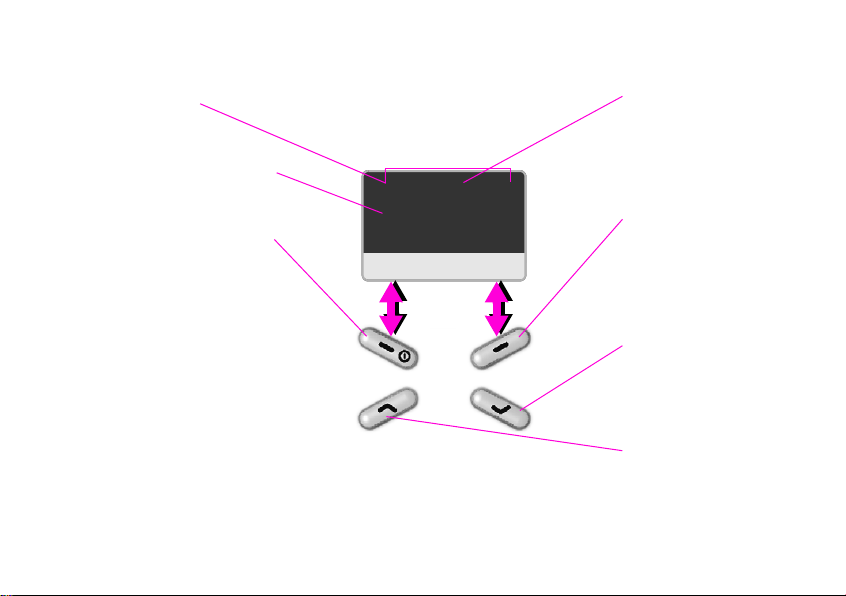
Overview
Reception strength/battery –
the whiter the better
Network name – indicates your
phone is ready to make and receive
calls (standby)
Back key
displayed above, except:
• Hold down to switch on or off.
In most cases it offers “clear” or
“back” (a long press goes back to
standby).
Click (in standby) to set up or use
favourite function.
Announcements – Your favourite
key may be temporarily labelled
with an event, e.g.:
]
Press for details. See p 19 for
symbols.
Additionally, your time and date
display may temporarily be replaced
by network announcements.
2
– current function is
– New text message
^ j d
Service Provider
15 Oct 12:30
Maria
Special keys
1 – hold down to call your voice mailbox
* – hold down to switch all tones off
# – hold down to lock keypad
Menu
Reminder symbols –
Symbols here confirm settings
you have made, e.g.:
j
– Silent: all tones off
See p 19.
Go key
– current
function is displayed above.
Click to open menu, select
and confirm. Double-click for
most common function, e.g.,
call when a number is
displayed.
Down key
click to open your Phonebook.
Use to scroll forward through
displays and lists, whenever
is displayed.
Up key
click to see last dialled
number. Hold down to use
voice dialling.
Use to scroll backwards
through displays and lists.
– in standby,
– in standby,
Page 4

Getting Started
Inserting SIM card
Your service provider provides you with a SIM card. If it
is delivered credit card size, snap out the smaller
segment and remove any rough edges.
1. Simultaneously squeeze opposite sides of the phone
firmly at points shown whilst lifting top end of cover
slightly.
1
2
1
2. Slide cover towards bottom of phone and remove.
3. If battery is fitted, remove by lifting tab at bottom.
3
4. Insert your SIM card, securing its bottom edge in the
slot. Ensure cut-off corner is positioned as shown.
4
To replace the battery and cover, reverse the previous
steps, ensuring bottom of cover is engaged before
swinging top into place.
Charging
When delivered, your battery will not be fully charged.
Allow 2-3 hours for a full charge.
Insert the charger in a suitable mains socket and plug
into the base of phone with the metal plate to the rear.
While it charges, you’ll see this symbol:
If you don’t see the symbol, see What if ... on p 23.
h
3
Page 5

Getting Started
Switching on
To switch on your phone
Hold down .
Enter your PIN number (if required).
Entering a PIN
A PIN number protects your phone against unauthorised
use. Most service providers supply a new SIM card with
PIN protection switched on; see your documentation for
the number.
Please enter
×
your PIN:
****
<C OK
Type the PIN number on the keypad. Click
correct, if necessary.
Click
to confirm.
You have three tries at entering the right PIN. If there’s
a problem, see What if ... on p 23.
You may b e a bl e t o switch off PIN control. See Security
on p 21.
4
to
Setting the time and date
When you first use your phone, you are prompted to set
the time and date.
Type the time (using 24 hour clock) and date (using
day.month.year digits: dd.mm.yy), preceding a number
with a zero if it is less than 10.
Click
to set.
Standby display
Once your network has been found and its name
displayed, your phone is said to be in standby.
If you can’t see the network name, please see What if
... on p 23.
Switching off
From standby, hold down .
Mobile phone precautions
All mobile phones are radio transmitters; switch off in
prohibited areas, e.g. aircraft.
To ensure legal, secure and efficient use, please read
Precautions/Maintenance on p 25.
Page 6

Making and Taking Calls
Making a call
To make a call
From standby (network name displayed), type the
telephone number, always including area code.
^ d
012345|
<C
Double-click
To correct a number
Click to delete the previous digit. Hold down to
delete all preceding digits.
Click
number. Hold to go to the start or end.
.
to move back and forward in the telephone
Adjusting call volume
During a call, click .
Ending a call
To end a call
Click to choose End.
Options
Always end a call this way, even if you think the other
person has hung up.
Your phone tells you how long the call lasted.
Taking a call
Who’s calling?
When you receive a call, your phone may show:
• the caller’s telephone number (if available), or
• their name (if their number is in your Phonebook).
You can use a special ring tone for callers you recognise.
See Ring tones on p 16.
To answer a call
Click to choose Answer.
To reject a call
Click to choose either:
• Reject to hang up the call immediately
• Divert (offered if divert is switched on – see p 17) to
divert the call to your voice mail or alternative number.
5
Page 7

More Ways to Call
Dialling internationally
For an international prefix that works from any country,
hold down the 0 key to enter “+” and either:
• type the country code on the keypad, or
•choose +List and select the country from those
shown.
Type the telephone number and double-click
In many countries you omit the first digit (e.g., “0”) of
the area code when calling from abroad.
Phonebook
To save numbers in the Phonebook, see p 9.
To call someone in your Phonebook
From standby, click to show the first entry.
Type the first letter of the name (press the
corresponding number key the correct number of times)
and/or click
Double-click
6
to see previous/next name.
to dial the number shown.
.
Voice dialling
To save voice dial entries, see p 10.
To call someone by speaking their name
From standby, hold . Speak the name at the tone.
Note that a noisy environment may affect the
phone’s ability to recognise what you said.
Redialling numbers
To redial a number you called earlier
From standby, click to display the last number
called. Click
required. Double-click
Returning received or missed calls
Choose Menu, Recent calls and select the list you
want. Click
double-click
to see previous/next number, if
to call the number shown.
to display the correct number and
.
Retrying a busy number
If a number is busy
Click to choose Auto dial. Your phone redials at
increasing intervals for 15 minutes.
Your phone alerts you when the call succeeds. Click
to make the call.
Page 8

Call Features
Voice mail
Your network answering service may be preset, or you
may need to set it – see p 17.
To listen to voice mails
Service providers have different ways of alerting you
when a new voice mail is received:
•] – click
• a recorded announcement.
Hold down the 1 key to hear your messages.
Alternatively, you may see \. Click
messages.
to read message
to hear your
Using the phone hands-free
During a call, choose Options and Handsfree. Click
to adjust volume.
Caution: the loudspeaker may damage hearing if
you hold the phone to your ear.
Noting a telephone number
To take down a telephone number during a call, type it
on the keypad. After the call, choose Options and Call
or Save (to put the number in your Phonebook). Your
caller will hear the key tones as you type.
Tip: use the phone hands-free (above) so you can hear
a dictated telephone number with the phone away from
your ear.
Talking privately
Choose Options and Mute so that you can talk
privately to a companion. Repeat to return to the call.
Making/handling more calls
During a call, choose Options and Additional call. Dial
a number (or choose Options, Phonebook) and call as
usual. When connected, you have the following options:
• Swap – switch between calls. Ending one call enables
you to return to the other.
• Transfer – connect the calls and exit (limited
availability).
• Join – connect the calls. You can add up to five
additional calls to a conference by repeating the steps
above. Clicking
concludes the call for all parties.
7
Page 9

Call Features
Receiving a second call
If you subscribe to your service provider’s call waiting
service, you may be alerted to an incoming call while
you are using the phone. To set call waiting, see p 21.
To accept an additional call
Click to choose Swap. This holds your current call
and answers the new one. Choose Options and Swap
to switch between calls.
Ending one call enables you to return to the other.
To end your current call and accept a new one
Click to end your current call and answer the new
call as normal.
If you ignore a new call, it will be diverted if answering/
forwarding is switched on (p 17).
8
Page 10

Phonebook
About the Phonebook
The Phonebook makes it simple to dial your most
frequently-used numbers.
To select a Phonebook entry
From standby, click to show the first entry.
Type the first letter of the name (press the
corresponding number key the correct number of times)
and/or click
Double-click
to see previous/next name.
to dial the number shown.
Saving Phonebook entries
To save a new entry in your Phonebook
From standby, type the number on the keypad.
Choose Options and Save. Type the name (see below)
and choose OK.
Typing in the Phonebook
To type a name in the Phonebook
Press the number key that shows the letter you want the
correct number of times. For example, press 2 once for
“a” and twice for “b”.
Keep pressing for characters with accents.
Leave a short pause between letters that appear on the
same key.
To correct a name
Click to delete the previous letter. Hold down to
delete all preceding text.
Click
to move back and forward in a name. Hold
down to go to the start or end.
To include spaces/punctuation
• For a space, press 1.
• For punctuation, press * and click
highlight the mark you want. After a short pause, your
phone writes the character on the display.
or to
Phonebook tips
You may save numbers from your list of calls dialled,
received or missed (Call Records menu), or from text
messages. With a number on your display, choose
Options, Save.
Include the international prefix before a telephone
number (Dialling internationally, p 6) so you can use
it from any country.
Enter more than one number for a person by adding a
letter at the end of their name: “H” for a home number,
“M” for a mobile number, etc.
9
Page 11

Phonebook
Further Phonebook features
Depending on your SIM, the following may be offered:
Own number – display or record your own phone
number. You may also record other useful personal
numbers.
Service/Information numbers – provides lists of
useful phone numbers.
Updating Phonebook entries
From standby, click to open the Phonebook. Select
the entry to change. From the Options menu, you can
choose Edit, Delete, etc.
Voice dialling
You can call people in your Phonebook by saying their
name (Voice dialling, p 6).
When you voice dial, your phone matches your words
with a recording. You may save recordings for up to 10
Phonebook entries.
To make a voice dial recording
Open the Phonebook and select the entry that you want
to record.
Choose Options and Voicedial. Choose Record new
and, at the tone, say the name. Repeat the name at the
second tone.
10
This is also available when you choose Add ° having
just saved a new Phonebook entry.
To update a voice dial recording
Open the Phonebook and select the entry. Entries with
recordings display the ° icon.
From the Options menu you can play, re-record or
remove the recording. Choose Options, Check all to
play or remove every recording.
Page 12

Text Messages
Receiving a text message
Your phone can send and receive multimedia messages
(EMS) including text, pictures and sound.
To view/play a message
When you receive a message, your phone displays the
]
symbol or if it contains a sound.
Click
.
to move up and down in a text message.
Click
15 Oct 18:40
Maria
Can we meet this
evening?
Back
Options
To reply to a message
Choose Options and Reply and select a reply as
follows:
• New reply – start a new message.
• Edit reply – start a new message based on the one
you’re looking at.
• Answer is YES/NO, Please call back, I’ll be late,
Thank you – send the selected phrase in reply.
sender’s name or
number
Deleting messages
You r p ho ne automat ic al ly saves incoming messages on
your SIM card, which has limited capacity. ] will flash
on the display when it is full, and you can receive no
new messages.
Make a habit of deleting messages: choose Options and
Delete.
Writing a text message
Starting a new message
From Menu, Messages, choose Write new.
You can also choose Options, Send SMS whenever you
have a phone number or Phonebook entry on your
display.
™
Hi Peter. Please
give of
<C
1 137
»
text format
“1” - number of SMS
messages used (p 15)
“137” - characters
remaining in current
message
11
Page 13

Text Messages
Using “T9” to type
T9 enables you to write text messages by pressing each
number key just once (e.g., 4, 6, 8, 3, 5 for “hotel”).
To type, press the number key that shows the letter you
want once then repeat for next letter, ignoring
incorrectly displayed letters.
At the end of the word, check it is correct and press the
1 key for a space.
T9 Suggestions
If you reach the end of a word and it’s not correct, then
click
to choose
right suggestion or your phone asks you to spell the
word.
»
and repeat until you reach the
To spell a word
Press the number key that shows the letter you want the
correct number of times as in the Phonebook. For
example, press 2 once for “a” and twice for “b”.
Keep pressing for characters with accents.
Leave a short pause between letters that appear on the
same key.
When the word is correct, click
to choose Save.
To correct a message
Click to delete the previous letter. Hold down to
delete all preceding text.
Click
to move back and forward in a message. Hold
down to go to the start or end.
12
To insert a telephone number
Following a space, choose Options and Insert from .
Select the entry to insert and choose Select.
Writing other characters
For spaces, punctuation and numbers
space press 1
full stop press 0
punctuation press *. Click
new line press 1 twice
number hold down the correct key
highlight the required mark.
To switch T9 on or off, or type in capitals or
lower case letters
For an unfamiliar word or a name, you may want to
switch T9 off. You may also want to type capitals, lower
case letters or a long number.
Click the # key repeatedly to select the option you want.
Without T9 you must press each number key the correct
number of times for the letter you want.
or to
Page 14

Text Messages
Sending a message
Choose Options and Send and then, unless replying,
either:
• type the number, or
•choose to select a name.
Choose Send (or hold
Your message is sent to your service provider’s SMS
service centre for onward transmission. They may be
able to provide confirmation of receipt. Consult your
documentation.
to cancel).
Sending messages to a group
To prepare your group
Choose Options and Send to group.
Choose Options, Insert from to select someone
from your Phonebook (or type a number), choosing
Send each time.
Your phone saves the names to which you last sent a
message, so you can send a later message to the same
people. When you choose Send to group the next
time:
•choose Send to send the message to the number
shown
•choose Skip to omit the number
add any new numbers after sending to the current list.
Ready messages
From the Messages menu, you can send a variety of
quick messages. Choose Ready messages and select
as required.
Your first ready message is the last one you wrote. You
may edit and send this as usual.
Managing messages
Use the Messages menu to manage messages you
have:
• received (Inbox)
•sent (Outbox).
each message gives you the option to View or Delete.
To edit a message, choose View and then Edit.
Service centre
If your service provider’s SMS service centre is not
preset, then you’ll be prompted for it the first time you
send a message. Use the Service center menu option
to update the number when necessary.
13
Page 15

Text Messages
Telephone numbers
To save (or dial) a telephone number in a
message
Numbers that you can call are underlined. Click to
highlight one. Choose Options and Save in
(Phonebook) or Call.
T9® Text Input is licensed under one or more of the following: U.S. Pat.
Nos. 5, 818, 437, 5, 953, 541, 5, 187, 480, 5, 945, 928, and 6, 011, 554;
Canadian Pat. No. 1,331,057; United Kingdom Pat. No. 2238414B; Hong
Kong Standard Pat. No. HK0940329; Republic of Singapore Pat. No.
51383; Euro.Pat. No. 0 842 463 (96927260.8) DE/DK, FI, FR, IT, NL, PT,
ES, SE, GB; and additional patents are pending worldwide.
14
Page 16

Multimedia (EMS) messages
Cards
On special occasions, you can send your friends
greetings cards that include a picture and melody, and in
which you can add a personal message.
These can be received on the latest models from most
prestige phone manufacturers.
From the Messages menu, choose Cards and click
to preview the different cards. Click
to choose Edit. You may add a personal
Click
message and/or choose Send.
to select.
–
–
–
Ö
Happy Birthday
Inserting media
To insert an icon, a sound or animation
Choose Options and Insert and select the type of
media to insert.
Click
to highlight the item you want (your phone will
preview it) and click
A symbol represents the item in a message. You can
remove it by clicking
to insert it.
.
Saving media
To save a ringer melody
Choose Options, Set ringer to save the melody and
use it as a ring tone. See Ring tones on p 16 for more
details.
Choose Options, Save to use the melody later.
To save a picture or sound
Choose Options, Save media. Each item is shown in
turn. Choose Save (or Skip).
Use the Multimedia menu to manage melodies,
pictures or sounds (p 20).
Longer messages
Your phone enables you to send a message up to 760
characters long, but your service provider may charge
you for each standard SMS (160 characters) that this
involves.
When writing a message, the numbers at the top right of
the display (p 11) show how many standard SMS
messages you have used, followed by the number of
characters remaining per standard message.
15
Page 17

Features and Settings
Key lock
Prevent accidental calls by locking the keypad.
In standby, hold down the # key to lock.
From the Keys menu, choose Auto key lock to have
your phone automatically lock the keypad when it is idle.
With the key lock on, you can still answer calls and if
necessary dial the emergency services.
Ring tones
To switch off ring tones
In standby, hold down the * key.
Ring tones will be switched off until you:
• hold down the * key to switch them back on, or
• switch your phone off.
Switching off ring tones won’t affect the vibrating alarm
(p 20) or alarm clock (below).
To change ring tones
You can use different ring tones for callers you recognise
and for messages.
From the Audio menu, choose Ringer melodies.
Choose the type of call you want to modify:
• General calls – new or unknown numbers
• Phonebook callers – numbers that appear in your
Phonebook
16
• Individual callers – choose a ring tone for a specific
person in your Phonebook. Select the required name.
• Messages – incoming text messages.
Click
to choose the melody and choose Select.
You can also save ringer melodies from EMS messages
(p 15).
Modify ringer volume using the Audio menu (p 20).
Using the alarm clock
Your phone provides a daily alarm that works even with
the phone switched off.
To set the alarm
From the Clock menu, choose Alarm clock.
Choose Change and either:
• confirm the time (if shown) by clicking
• enter the time (24 hour clock) at which you want to be
alerted. Click
the alarm.
To switch off the alarm, choose Change again.
When the alarm’s set, you’ll see y next to the time.
to delete a digit. Choose OK to set
When you hear the alarm…
Click to cancel. The alarm will sound at the same
time tomorrow unless you switch it off (above).
Switching off ring tones won’t affect the alarm.
, or
Page 18

Features and Settings
Using the calendar
As an aid to planning, your phone provides a calendar.
Choose the Calendar menu and click
different months.
to see
Using a screensaver
Your phone displays an image (e.g., a clock) when it has
been idle for a couple of minutes. To change the image,
from the Display menu choose Screensaver and
select the image you want.
this icon on the
screensaver display
indicates you have a
new message, missed
call, etc.
Ò
Network
Ô
Setting up voice mail
Voice mail
If you subscribe to your service provider’s answering
service (voice mail), they will usually have set it up
automatically. If not, you may need to enter your voice
mailbox number.
Your phone prompts you for your mailbox number the
first time you hold down the 1 key to retrieve your voice
µ
mail. Alternatively, from the Setup menu, choose Voice
mailbox.
You may additionally need to switch on divert (see
below).
Divert (call forwarding)
Divert must be switched on to use Voice Mail, but you
can also divert calls to other numbers.
From the Setup menu, choose Divert and select:
• Unanswered – forward calls when your phone is off
or out of coverage or when you’re busy or don’t
answer. This is the usual setting.
• All calls – forward every call (useful if you’re abroad
and don’t want to be charged for incoming calls).
• Off – don’t forward any calls.
If you elect to forward calls, then enter (or confirm) the
telephone number to which you want calls redirected.
This is either your service provider voice mail divert
number or an alternative number of your choice.
17
Page 19

Features and Settings
Setting up favourites
To set up your Display key
^ d
Service Provider
Display key
You can program the key with your favourite
number or feature.
From standby, click
feature you want, or Phone number (in which case,
choose the required Phonebook entry). Click
To program the 2 to 9 keys
You can program keys 2 to 9 so that holding down the
key in standby makes a call or offers a feature.
From standby, hold down the required number key and
then click
Select a feature or number as above.
Changing favourites
From the Keys menu, choose Favourites, Change.
Select a key, then a feature or number as above.
18
. Choose Change and select the
.
15 Oct 12:30
Set
Menu
to set.
Page 20

Menus
Display Symbols
Your phone may display the following information:
Reminders
y
Alarm clock on
(p 16)
All calls diverted
n
(p 17)
*!* Ciphering off
(privacy risk in
some networks)
²
Calls not possible
Back key
]
New text message
(p 11)
Missed call (p 6)
Text message with
ring tone
j
Ringer off: hold * to
switch on
±
Autoanswer on (with
headset)
Home zone (special tariff
in some networks)
\
New voice mail
(depending on network,
p7)
Missed announcement
(when screensaver on)
Go key
µ
Click
to unlock
keypad
Menu commands
This section of the manual summarises the menu
options on your phone.
Messages
See p 11.
Recent calls
View, redial, delete or save telephone numbers from
calls you have missed, received or dialled.
Clock
Alarm clock Set the alarm (p 16).
Time Set the time.
Date Set the date.
Calendar
See p 17.
19
Page 21

Menus
Audio
Ringer
melodies
Ringer
setting
Volume Set ringer volume (click
Info tones Switch non-ringer sounds (network events,
Silent alert Switch your phone’s vibrate alert on or off,
All quiet Switch info tones off and set ringer to
All loud Play all sounds at highest volume.
If either All quiet or All loud are on, you are prompted
to switch them off before modifying any other setting.
Select ringer melodies (p 16).
Switch ringer tones on or off.
).
etc.) on or off.
independently of the ringer.
quietest volume.
Display
Language Choose the language in which to display
20
your phone’s menus and options.
If you can’t understand the language on
your phone’s display, call
*#0000#
to reset to your network’s language.
Screensaver Choose an image to display when your
Welcome
text
Contrast Adjust the contrast of your display (click
phone has been idle for a time (p 17).
Write a message to display when you
switch your phone on.
).
Keys
Favourites Program favourite keys (p 18).
Key sound Change or turn off the sound that
Auto key lockAutomatically disable the keypad (p 16).
Multimedia
Icons View/delete icons, or use an icon as a
Pictures View/delete pictures, or use a picture as a
Animations View/delete animations.
Ringer
melodies
Sounds Listen to/delete sounds.
accompanies a key press.
screensaver.
screensaver.
Listen to/delete ringer melodies, or use a
melody as a ring tone.
Page 22

Menus
Setup
Voice
mailbox
Divert Turn call forwarding/voice mail on or off
Hide ID Enables you to withhold your telephone
Security PIN control – Enable or disable PIN
Enter the number you call to retrieve voice
messages (p 17).
(p 17).
number when you make a call.
number checking when you switch on the
phone (if possible: your service provider
may require you to use a PIN).
Change PIN – to choose a different PIN
number.
Phone identity – to view your phone’s
unique identifier (IMEI) – useful for
customer service. Click
Info, giving further technical details.
Alternatively, call *#06#.
to choose
Network Choose network – You can change from
Car kit Set auto-answering: your phone answers
Headset Set auto-answering: your phone answers
Cell
Broadcast
your current network by choosing manually
from a list of networks that are in range.
Networks marked ² are not allowed by
your home service provider (or SIM).
Auto network search – Normally the
network selection is automatic. If you
switch this off, you must choose from the
list of available networks when you move
outside coverage of your current network.
Call waiting – Switch on or off the service
that alerts you when you receive a second
call. You may need to register to use this
service. To use call waiting, see p 8.
calls automatically after a few rings.
calls automatically after a few rings.
Limited availability – please contact your
service provider.
Receive – switch receipt of local
information on or off. Cell broadcasts
reduce the standby time of your phone.
Set channel – type the number of a
channel you wish to receive, or remove
existing channels.
21
Page 23

Menus
Phonebook
See p 9.
SIM Toolkit
This submenu will be offered if supported by your SIM
card. The content will be defined by your service
provider.
22
Page 24

What if ...
If you have any questions about using your phone, visit us at
www.xelibri.com any time. In add ition we hav e list ed som e
frequently asked questions and answers below.
Problem Possible Causes Possible Solution
Phone cannot be
switched on.
Charging error
(charge icon not
displayed).
On/Off key not pressed
long enough.
Flat battery. Charge battery. Check
Battery contacts dirty. Clean contacts.
See also below under:
"Charging error".
Extreme temperature
(outside 5 to 40 °C)
Contact problem. Check power supply and
No mains voltage. Use different mains power
Wrong charger. Only use original Siemens
Press On/Off key for 2 to 5
seconds.
charging indicator in the
display.
Make sure the ambient
temperature is right, wait a
while, then recharge.
connection to the phone.
Check battery and phone
contacts, clean them if
necessary, then insert
battery again.
socket, check mains voltage.
accessories.
Problem Possible Causes Possible Solution
Battery faulty. Replace battery.
SIM error. SIM card not correctly
No connection to
network.
Phone loses
network.
Calls not possible. New SIM card inserted. Check for new restrictions.
inserted.
SIM card contacts dirty. Clean the SIM card with a dry
SIM card with wrong
voltage.
SIM card damaged (e.g.
broken).
Signal weak. Move higher, to a window or
Outside GSM range. Check service provider
SIM card not valid. Contact the service provider.
New network not
authorised.
Network barring is set. Contact the service provider.
Signal too weak. Switching the phone off and
Credit used up. Load credit.
Check (p 3).
cloth.
Use1.8/ 3 V SIM cards only.
Inspect the damage. Return
the SIM card to service
provider.
open space.
coverage map.
Try manual selection or
select a different network
(p 21).
on may speed up reconnection.
23
Page 25

What if ...
Problem Possible Causes Possible Solution
Poor sound
quality
No entries
possible in Phonebook.
Phonebook
entries missing
Voice mail does
not work
Call waiting does
not work
SMS (message)
…
flashes.
Function cannot
be set.
Message cannot
be sent.
24
Signal too weak. Avoid covering the internal
Phonebook is full. Delete entries in Phonebook
Changing SIM from
another phone.
Call divert to the
mailbox not set.
Not set up in network. Set Call waiting (p 21)
SMS memory full. Delete messages, (p 13).
Not supported by
service provider or
registration required.
Some service providers
do not support this
service.
Phone number of the
service centre is not set
or is wrong.
Service centre overloaded.
antenna (top rear of phone)
with your hand.
(p 6).
Entries may be in phone
memory
Set call divert to the mailbox
(p 17).
Contact your service
provider.
Check with your service
provider.
Set service centre (p 13).
Repeat message.
Problem Possible Causes Possible Solution
Recipient does not have
a compatible phone.
EMS pictures and
sounds are not
displayed at the
destination phone
PIN error Three wrong entries. Enter the PUK (master PIN)
The destination phone
does not support the
EMS standard.
Check.
provided with the SIM card
according to the instructions.
If you have lost the PUK,
contact your service
provider.
Damage
Severe shock. Remove battery and SIM and insert them
Phone became wet. Remove battery and SIM card. Dry immedi-
To reset your phone to the factory settings, dial *#9999#
and press
files.
. Note that this will delete any downloaded
again. Do not dismantle phone!
ately with cloth, do not heat. Dry connector
contacts thoroughly. Stand unit upright in an
air cur rent. Do not dismantle phone!
Page 26

Precautions/Maintenance
Precautions
Interference
Like any radio transmitter, a mobile
phone can interfere with electrical
equipment. You must always
switch off your phone:
•in hospitals and near medical
equipment. If you have a heart
pacemaker, keep the phone a
minimum of 20 cm from it and
hold it to the ear furthest away.
•on aircraft.
For safety
Switch off your phone near petrol
stations, fuel or chemical plants or
blasting operations.
Driving
Driving while holding a mobile
phone is dangerous and illegal in
many countries. Please use headset
or car kit accessory and then only
when it is safe to do so.
Heat and moisture
Avoid moisture, shock or
extreme heat (for instance,
leaving the phone in a car in hot
sun).
Other precautions
Take care, particularly overseas,
that you charge the phone using
the correct voltage.
Do not open the phone, except
to change the SIM card or replace
the battery. Tampering with the
phone or battery invalidates your
warranty and may result in your
network refusing service.
To ensure that you don’t damage
your phone, use only accessories –
particularly chargers and batteries –
supplied by Xelibri or Siemens.
The battery is 100% mercury free,
but take care to dispose of
batteries legally. Check with your
retailer.
For optimum performance, avoid
covering the antenna (top rear of
phone) whilst using it.
Maintenance
The SIM card should be treated with
the same care as a cheque
guarantee card. Do not bend or
scratch it or expose it to static
electricity.
Clean the card with a damp cloth or
an antistatic wipe without chemical
cleaning agents.
Remove the battery if you are not
going to use the phone for
extended periods of time (more
than one month)
Lost phone
If you lose your phone or SIM card
contact your service provider
immediately to prevent misuse.
25
Page 27

Xelibri Service/Accessories
Service
Please refer to section “What if ...” on
page 23, or our web site at
www.xelibri.com. If repair work is
necessary please contact:
+800 4 9354274
(+800 4 XELIBRI)
Note When calling customer service,
please have ready your receipt and the
phone identity number (IMEI, visible
beneath the battery). To display the
IMEI, press *#06#. When displayed,
choose Info for further service
information.
26
Approved accessories
The following Xelibri and Siemens
accessories will enhance use of your
phone. Use of other non-approved
accessories, especially batteries and
chargers, may damage it.
Basics
Li-Ion Battery (630 mAh)
EBA-580
Spare battery.
Travel Charger
ETC-500 (Euro)
ETC-510 (UK)
Travel charger with an extended
input voltage rate of 100-240V.
In your car
Basic Car Pack
HKB-500
Allows hands-free talking and
simultaneously charges your phone
in the car. Features a car charger
and headset with special connector.
Car Charger
ECC-500
Charger for the cigarette lighter
socket in your car.
Car Kit Portable
HKP-500
Handsfree kit with integrated
loudspeaker and microphone and
auto answer feature. Also charges
your phone: simply plug into the
cigarette lighter socket. Ideal for
mobility between vehicles.
Headset
Headset PTT
HHS-510
Enables convenient and safe hands-
free use. It includes a button in the
microphone for handling calls.
Products can be obtained in
specialist shops. Visit our online
shop under:
Original Siemens Accessories
www.siemens.com/
mobilestore
Page 28

Specifications
Declaration of
conformity
Siemens Information and
Communication mobile hereby declares
that the phone described in this user
guide is in compliance with the essential
requirements and other relevant
provisions of European Directive 1999/5/
EC (R&TTE).
The declaration of conformity (DoC)
concerned has been signed. Please call
the company hotline if you require a
copy of the original.
Technical data
GSM class 4 (2 Watt)
Frequency range: 880-960 MHz
GSM class: 1 (1 Watt)
Frequency range: 1,710-1,880 MHz
Weight: 7 3 g
Dimensions: 101 x 4.6 x 18.5 mm
Li-Ion battery: 610 mAh
Operating
temperature:
Standby time: up to 200 h*
Talk time: up to 240 min*
SIM card: 1.8/3.0 V
* subject to network conditions
(71 ccm)
-10 °C to 55 °C
SAR
THIS MODEL PHONE MEETS
REQUIREMENTS FOR EXPOSURE TO
RADIO WAVES
Mobile phones are radio transmitters and
receivers.
Limits for radio frequency exposure are
defined in international guidelines
(ICNIRP), developed by independent
scientific organisaions.
The international recommended upper
limit for exposure, and that
recommended by The Council of the
European Union, is a Specific Absorption
Rate (SAR) of 2.0 watts/
kilogram (W/kg).
Tests on this phone, conducted at
maximum transmitting power, produced
an SAR no greater than 0.67 W/kg.
In areas of typical network coverage,
your phone transmits on lower power,
resulting in a reduced SAR.
For more information on this issue, see
www.my-siemens.com.
27
Page 29

Guarantee certificate
Without prejudice to any claim the user
(customer) may have in relation to the
dealer or retailer, the customer shall be
granted a manufacturer's Guarantee
under the conditions set out below:
• In the case of new devices and their
components exhibiting defects
resulting from manufacturing and/or
material faults within 24 months of
purchase, Siemens shall, at its own
option and free of charge, either
replace the device with another device
reflecting the current state of the art,
or repair the said device. In respect of
parts subject to wear and tear
(including but not limited to, batteries,
keypads, casing), this warranty shall
be valid for six months from the date
of purchase.
• This Guarantee shall be invalid if the
device defect is attributable to
improper treatment and/or failure to
comply with information contained in
the user manuals.
• This Guarantee shall not apply to or
extend to services performed by the
authorised dealer or the customer
themselves (e.g. installation,
configuration, software downloads).
28
User manuals and any software
supplied on a separate data medium
shall be excluded from the Guarantee.
• The purchase receipt, together with
the date of purchase, shall be required
as evidence for invoking the
Guarantee. Claims under the
Guarantee must be submitted within
two months of the Guarantee default
becoming evident.
• Ownership of devices or components
replaced by and returned to Siemens
shall vest in Siemens.
• This Guarantee shall apply to new
devices purchased in the European
Union. The Guarantee is issued by
Siemens plc, Siemens House, Oldbury,
Bracknell, Berkshire, RG12 8FZ.
• Any other claims resulting out of or in
connection with the device shall be
excluded from this Guarantee. Nothing
in this Guarantee shall attempt to limit
or exclude a Customers Statutory
Rights, nor the manufacturer's liability
for death or personal injury resulting
from its negligence.
• The duration of the Guarantee shall
not be extended by services rendered
under the terms of the Guarantee.
• Insofar as no Guarantee default exists,
Siemens reserves the right to charge
the customer for replacement or
repair.
• The above provisions does not imply a
change in the burden of proof to the
detriment of the customer.
To invoke this Guarantee, please contact
the Xelibri telephone service. The
relevant number is to be found on
page 26.
Page 30

Index
A
additional calls ............................. 7
alarm clock ................................ 16
animations
inserting in text messages .... 15
saving from text messages ... 15
audio menu ................................ 20
C
calendar .................................... 17
call forwarding/divert .................. 17
call records ................................ 19
call waiting ........................ 8, 21, 24
calls
ending .................................. 5
from Phonebook .................... 6
holding ................................. 7
international .......................... 6
making .................................. 5
multiple ................................. 7
receiving ............................... 5
redialling ............................... 6
rejecting ............................... 5
using voice dialling ................. 6
cards ......................................... 15
clock
alarm .................................. 16
clock menu ................................ 19
conference calls ............................ 7
D
deleting text messages ................ 13
dialling ......................................... 5
internationally ........................ 6
recent numbers ..................... 6
Display key ................................ 18
display menu .............................. 20
divert ......................................... 17
E
EMS, see text messages
ending calls .................................. 5
F
favourites
setting up ............................ 18
forwarding ................................. 17
G
greetings cards ........................... 15
H
hands-free ................................... 7
holding calls ................................. 7
hotkeys ...................................... 18
I
icons
inserting in text messages .... 15
saving from text messages ... 15
inbox ......................................... 13
incoming calls ............................... 5
K
keypad
locking ................................ 16
keys menu ................................. 20
L
loudspeaker ..................................7
M
media
inserting in text messages .... 15
saving from text messages ... 15
messages, see text messages or voice
mail
multimedia menu ........................ 20
multiple calls ................................7
O
outbox ....................................... 13
P
phone numbers
inserting in text messages .... 12
making a note of .................... 7
saving/calling from text messages
14
Phonebook
29
Page 31

Index
making calls .......................... 6
saving entries ........................ 9
tips ....................................... 9
typing ................................... 9
updating ............................. 10
pictures
saving from text messages ... 15
R
ready made messages ................ 13
receiving calls .............................. 5
recent calls ................................ 19
rejecting calls ............................... 5
ringer melodies
saving from text messages ... 15
switching off ........................ 16
S
screensaver ................................ 17
sending text messages ................ 13
sending text messages to a group 13
setup menu ................................ 21
SMS, see text messages
sounds
inserting in text messages .... 15
saving from text messages ... 15
speed dial .................................. 18
spelling ...................................... 12
switching off ringer melodies ....... 16
30
T
T9 ............................................. 12
text messages
deleting ..........................11, 13
inserting media .................... 15
inserting phone numbers ...... 12
length ................................. 15
multimedia (EMS) ................ 15
ready made ......................... 13
receiving ............................. 11
replying to ........................... 11
reviewing ............................ 13
saving media ....................... 15
saving ringer melodies .......... 15
saving/calling phone numbers 14
sending ............................... 13
sending to group .................. 13
special characters ................ 12
writing ................................ 11
troubleshooting .......................... 23
V
voice dialling
calls ...................................... 6
making recordings ................ 10
voice mail
listening to messages ............. 7
setting up ............................ 17
volume
hands-free .............................7
in calls ................................... 5
W
what if ....................................... 23
 Loading...