siemens VersiCharge Quick Setup Guide

VersiCharge

Quick Setup Mobile Application Guide FAQs

usa.siemens.com/versicharge

Table of Contents

1.

How to Set Up an Account

4


1.1.

I do not have an account

4


1.1.1.

Install the VersiCharge Mobile Application from Google Play Store or Apple App Store

4


1.1.2.

View End User License Agreement and Terms of Use

4


1.2.

I have an account

5


2.

How do I add a charger to my account (see also Connect Your Charger and the Table Below):

6


2.1. Android – Connect Your Charger

9


2.2.

iOS - Connect Your Charger

10


3.

How to use your VersiCharge Mobile App

13


3.1.

VersiCharge Mobile App Screens

13


3.1.1.

Home Page

14


3.1.2.

Edit charger name

14


3.1.3.

View state of Charger and plug state

15


3.1.4.

Set delay time

15


3.1.5.

Stop a charging session in process

16


3.1.6.

Usage

16


3.1.7.

Account

17


3.1.8.

Profile

17


3.1.9.

My Charger

19


3.1.10.

Push Notification

19


3.1.11.

About VersiCharge

20


3.1.12.

Contact Us

20


3.1.13.

Corporate Information

21


3.2.

Forgot My Password

21


3.3.

Locked Out of My Account

22


4.

SIM Card Registration (Already Registered)

23


5.

SIM Card Registration (Not Registered)/Troubleshoot (for more information see Android/iOS

24


– Connect Your Charger)


2

siemens VersiCharge Quick Setup Guide


6.

Manual Setup of Ethernet – Android/iOS

26


7.

Troubleshooting Manual Setup of Ethernet – Android/iOS

27


8.

Troubleshooting Android – Connect Charger

28


8.1.

Wi-Fi Light Not Slowly Blinking White(stopped at Step 1)

28


8.2.

Could not find a chargerAndroid Only - (Stopped at Step 2)

28


8.3.

Connection Failed -Could not Connect charger to mobile app (Stopped at Step 2)

30


8.4.

Connection Failed During - Couldn’t connect to Wi-Fi – SSID and password don’t match

31


(Stopped at Step 5)


8.5.

Connection Failed – Couldn’t connect the charger to the Siemens cloud (Stopped at Step 5)

32


8.6.

Connection Failed – Charger already registered (Stopped at Step 5)

32


8.7.

Connection Failed - Lost connection to charger

34


8.8.

No Internet Connection

34


9.

Troubleshooting iOS - Connect Charger

35


9.1.

Wi-Fi Light Not Slowly Blinking White (stopped at Step 1)

35


9.2.

Wi-Fi Not Turned On (stopped at Step 2)

36


9.3.

Connection Failed – Couldn’t connect to Wi-Fi - SSID and password don’t match

37


(Stopped at Step 5)


9.4.

Connection Failed - Couldn’t connect to Wi-Fi (Stopped at Step 5)

38


9.5.

Connection Failed – Couldn’t connect the charger to the Siemens cloud (Stopped at Step 5)

39


9.6.

Connection Failed – charger already registered (Stopped at Step 5)

40


9.7.

Connection Failed – Technical Problem Occurred

41


9.8.

Connection Failed - Lost connection to charger

41


9.9.

No Internet Connection/Internet Connection Has Been Lost

42


10.

How do I Register my VersiCharge – usa.siemens.com/versicharge

42


11.

Where is the VersiCharge Configuration Tool download – usa.siemens.com/versicharge

42


12.

Where is the VersiCharge Configurator Tool Manual – usa.siemens.com/versicharge

42


13.

Where is the VersiCharge Configuration Tool Installation Manual – usa.siemens.com/versicharge

42


14.

How do I Configure my VersiCharge – usa.siemens.com/versicharge

42


3

VersiCharge™ | Quick Setup Mobile Application Guide FAQs

1.How to Set Up an Account

1.1I do not have an account.

NOTE: only one charger may be added per mobile app account.

1.1.1.Install the VersiCharge Mobile Application from Google Play Store or Apple App Store.

1.1.2.View End User License Agreement and Terms of Use

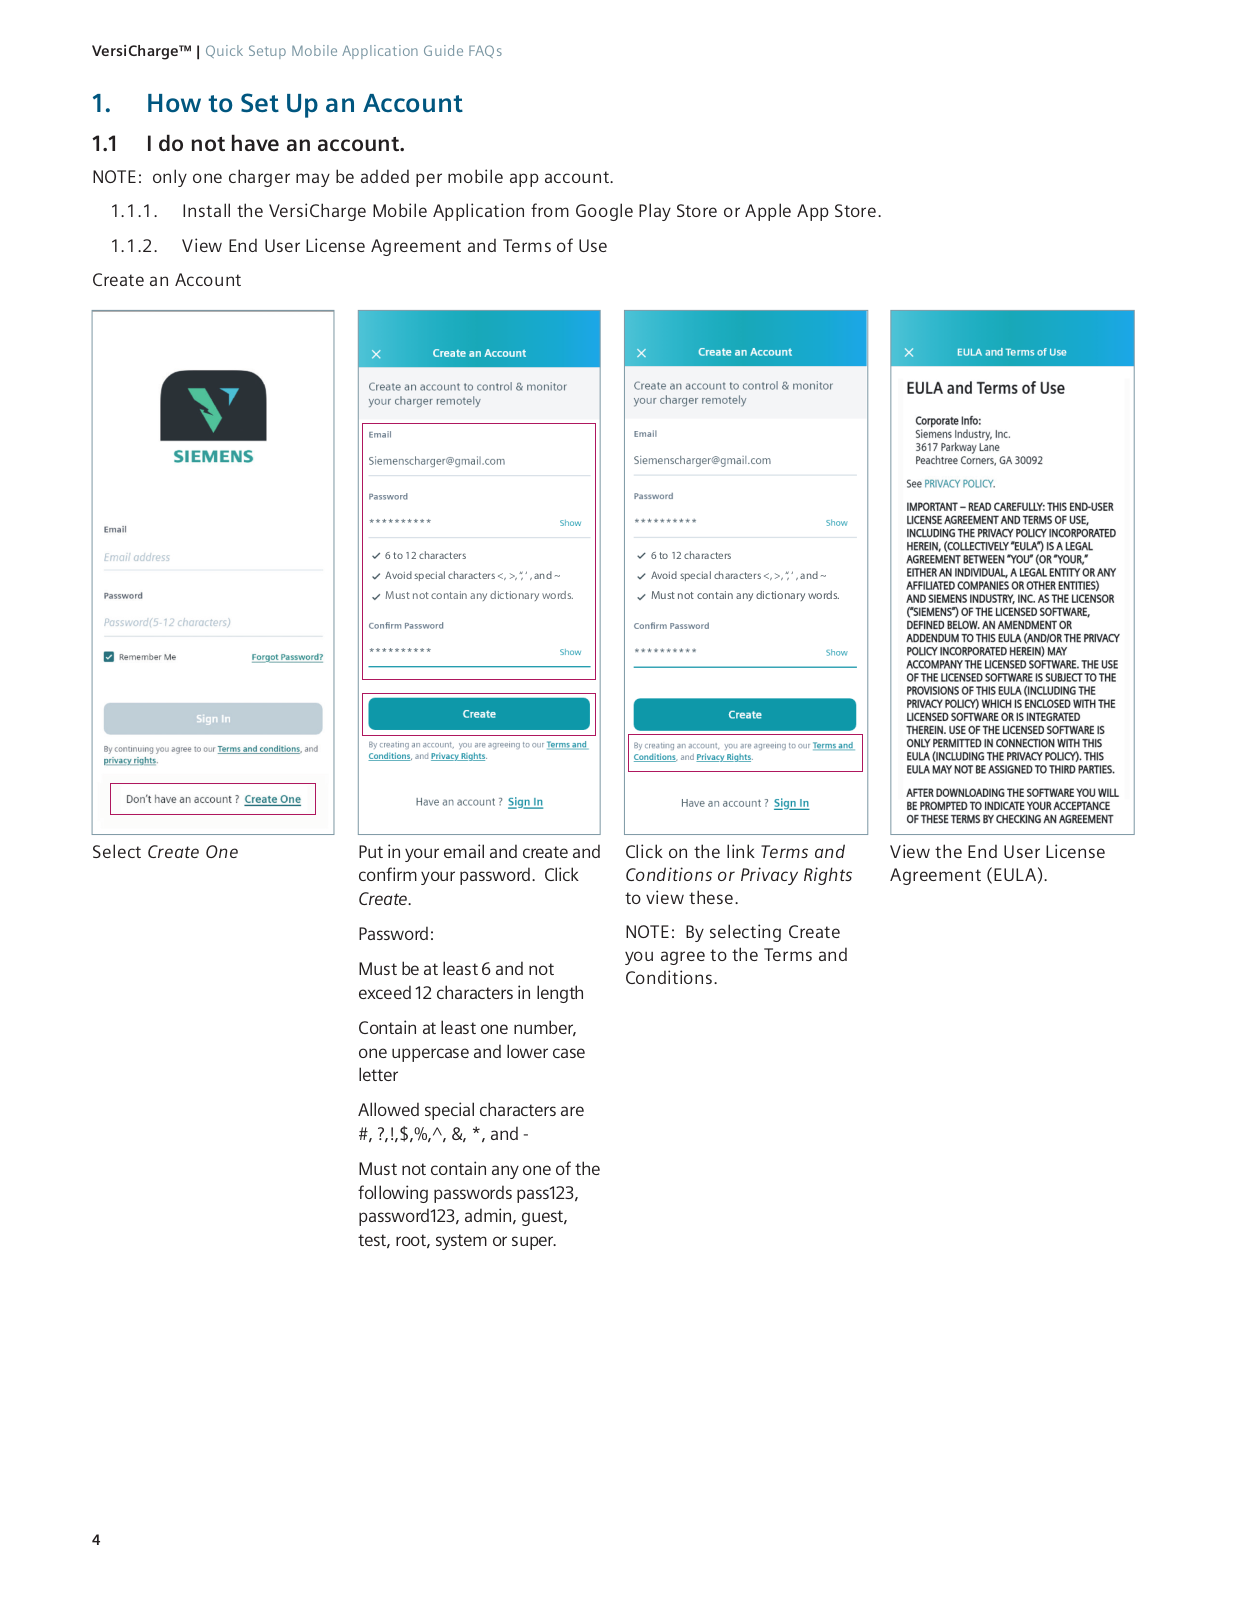
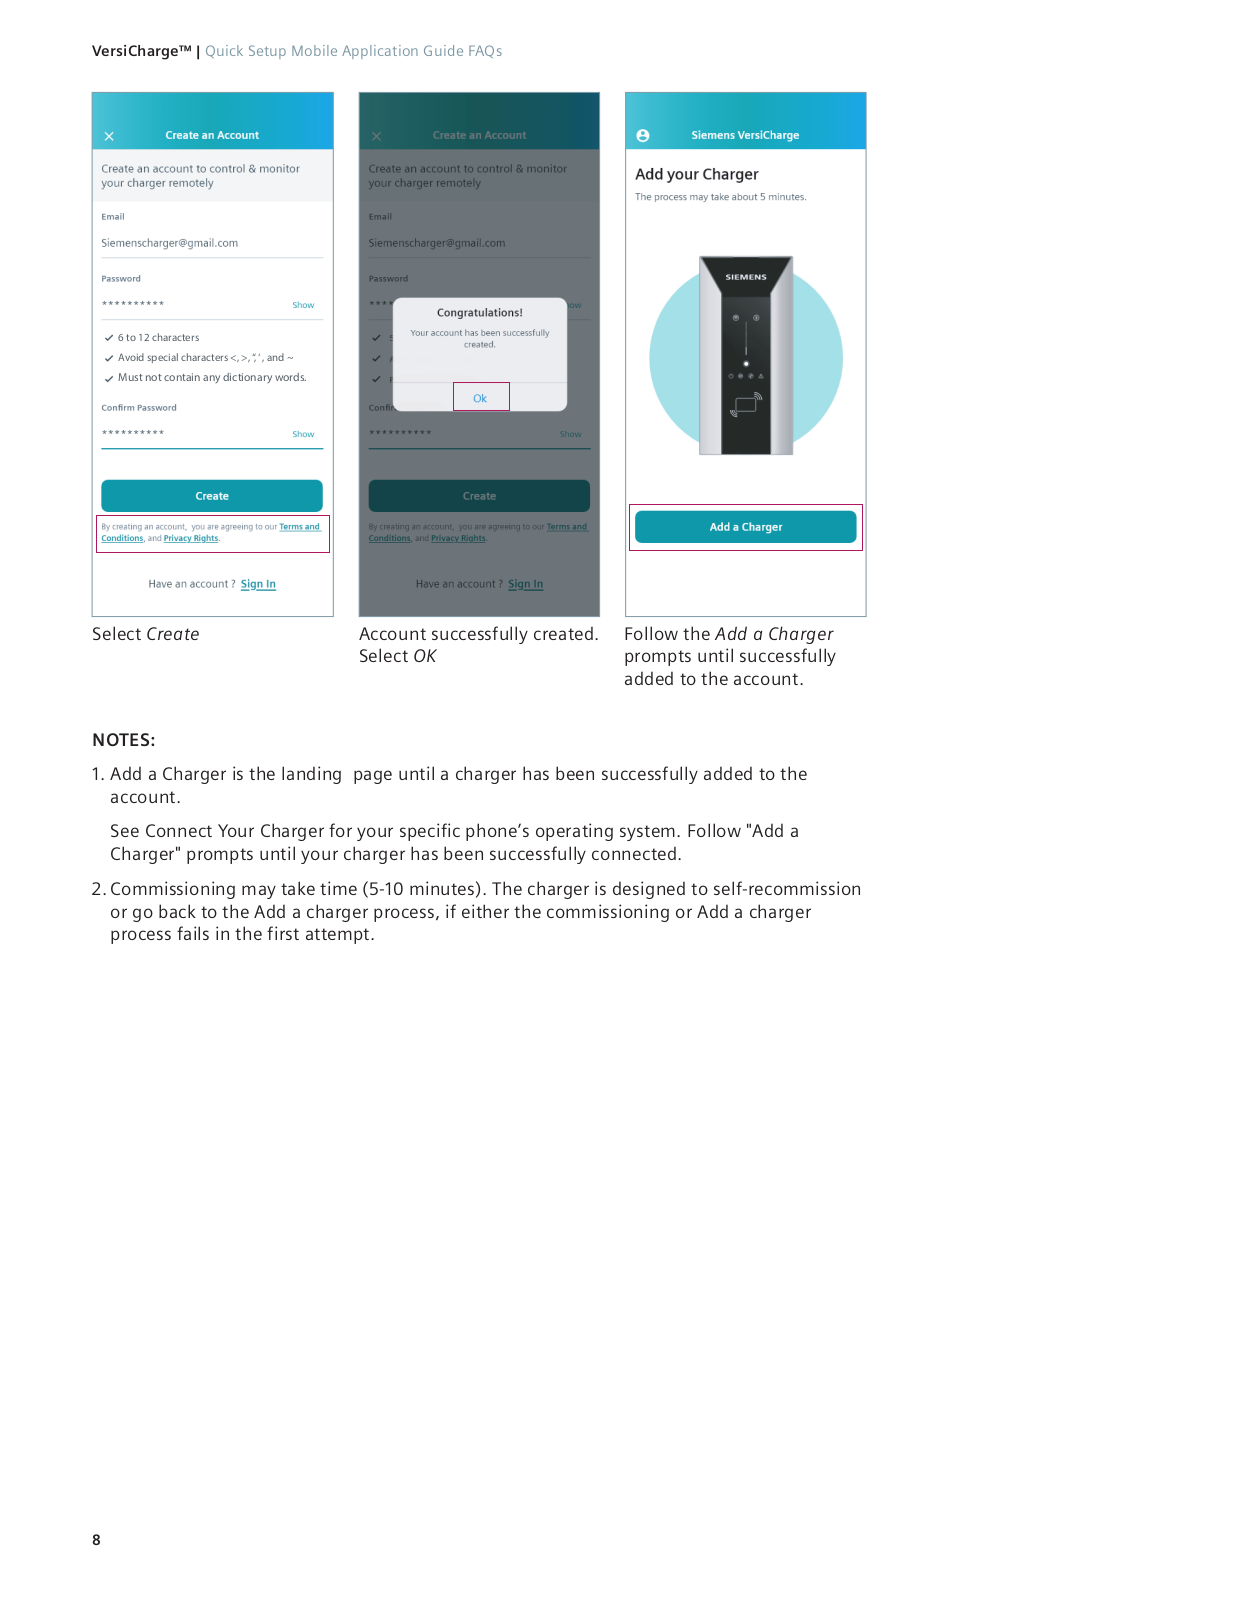
Create an Account

6 to 12 characters

Avoid special characters <, >, “, ‘ , and ~

Must not contain any dictionary words.

6 to 12 characters

Avoid special characters <, >, “, ‘ , and ~

Must not contain any dictionary words.

Select Create One

Put in your email and create and


confirm your password. Click


Create.


Password:


Must be at least 6 and not


exceed 12 characters in length


Contain at least one number,


one uppercase and lower case


letter


Allowed special characters are


#, ?,!,$,%,^, &, *, and -


Must not contain any one of the


following passwords pass123,


password123, admin, guest,


test, root, system or super.

Click on the link Terms and Conditions or Privacy Rights to view these.

NOTE: By selecting Create you agree to the Terms and Conditions.

View the End User License

Agreement (EULA).

4

Quick Setup Mobile Application Guide FAQs | VersiCharge™

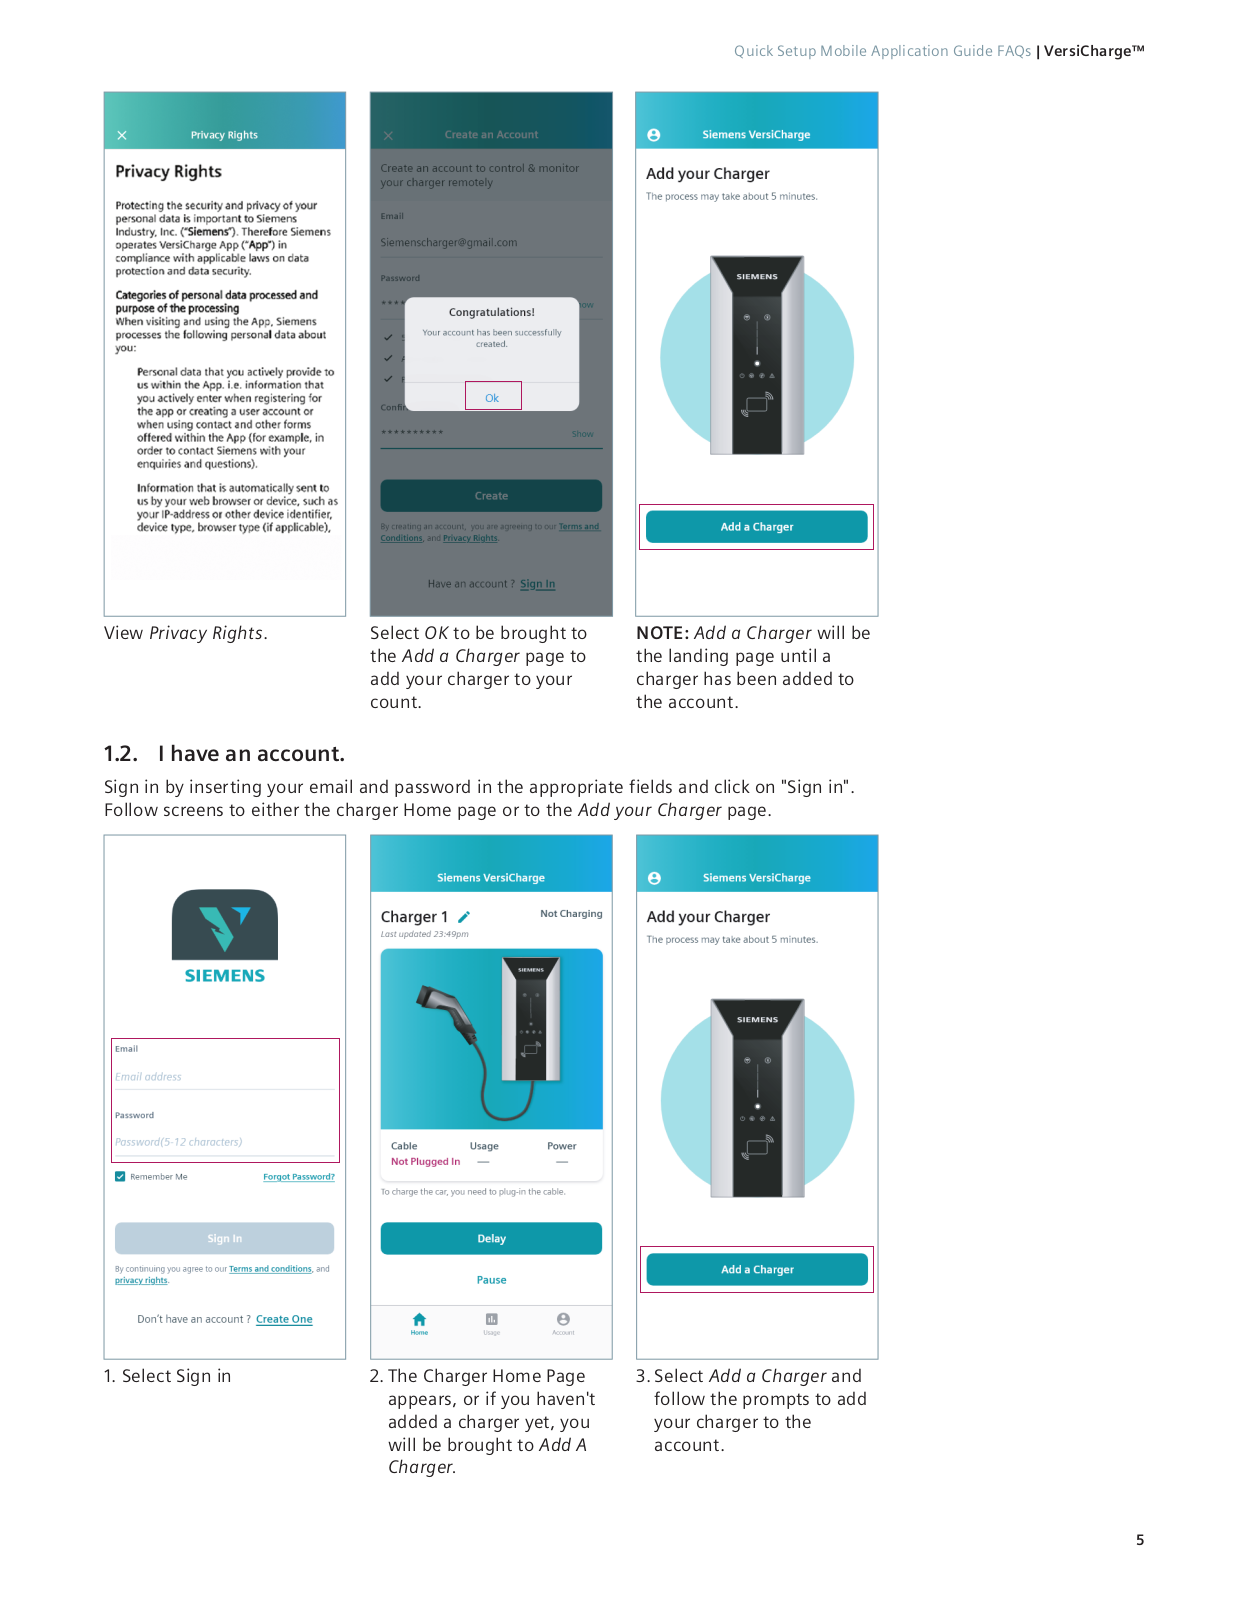
View Privacy Rights.

Select OK to be brought to


the Add a Charger page to


add your charger to your


count.

NOTE: Add a Charger will be the landing page until a charger has been added to the account.

1.2. I have an account.

Sign in by inserting your email and password in the appropriate fields and click on "Sign in". Follow screens to either the charger Home page or to the Add your Charger page.

1. Select Sign in

2.The Charger Home Page appears, or if you haven't added a charger yet, you will be brought to Add A Charger.

3.Select Add a Charger and follow the prompts to add your charger to the account.

5

VersiCharge™ | Quick Setup Mobile Application Guide FAQs

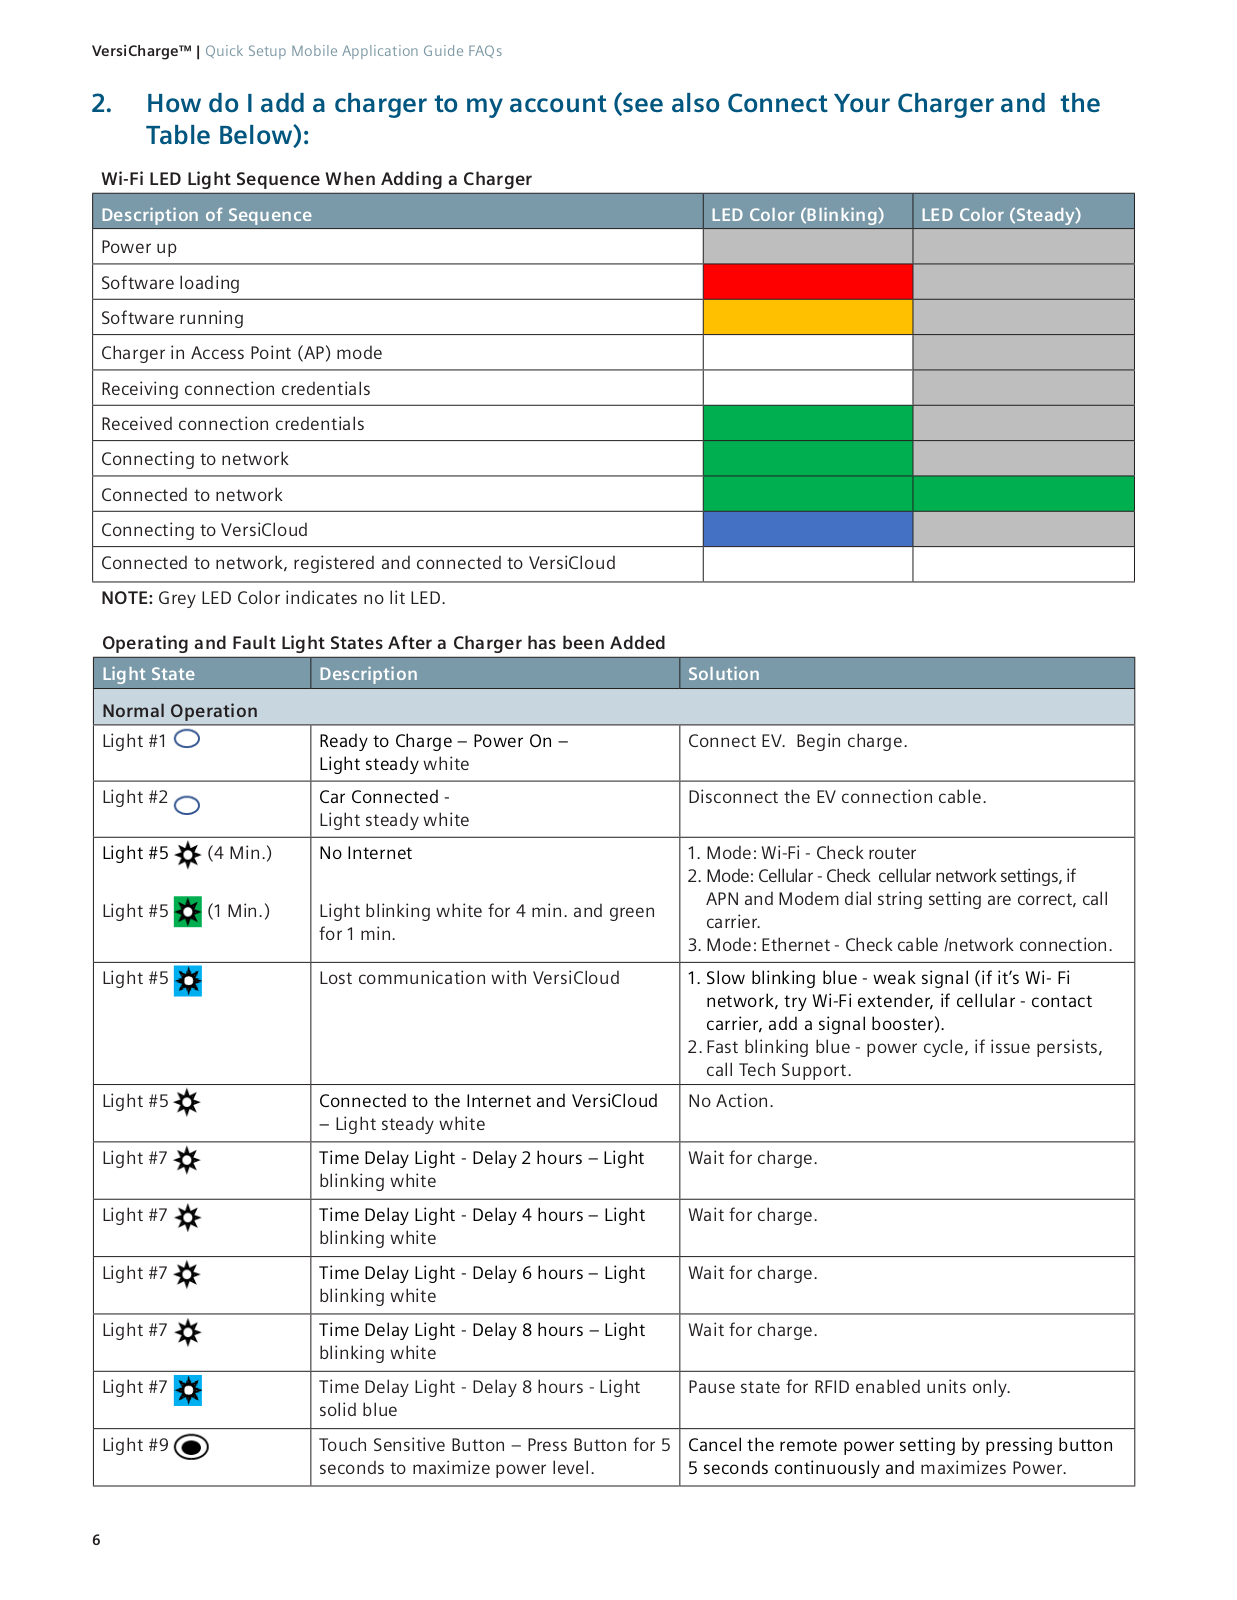
2.How do I add a charger to my account (see also Connect Your Charger and the Table Below):

Wi-Fi LED Light Sequence When Adding a Charger

Description of Sequence

LED Color (Blinking)

LED Color (Steady)

Power up

Software loading

Software running

Charger in Access Point (AP) mode

Receiving connection credentials

Received connection credentials

Connecting to network

Connected to network

Connecting to VersiCloud

Connected to network, registered and connected to VersiCloud

NOTE: Grey LED Color indicates no lit LED.

Operating and Fault Light States After a Charger has been Added

Light State


Description

Solution


Normal Operation


Light #1


Ready to Charge – Power On –

Connect EV. Begin charge.


Light steady white


Light #2


Car Connected -

Disconnect the EV connection cable.


Light steady white


Light #5

(4 Min.)

No Internet

1. Mode: Wi-Fi - Check router


2. Mode: Cellular - Check cellular network settings, if

Light #5


(1 Min.)

Light blinking white for 4 min. and green

APN and Modem dial string setting are correct, call


carrier.


for 1 min.


3. Mode: Ethernet - Check cable /network connection.


Light #5


Lost communication with VersiCloud

1. Slow blinking blue - weak signal (if it’s WiFi


network, try Wi-Fi extender, if cellular - contact


carrier, add a signal booster).


2. Fast blinking blue - power cycle, if issue persists,


call Tech Support.


Light #5


Connected to the Internet and VersiCloud

No Action.


– Light steady white


Light #7


Time Delay Light - Delay 2 hours – Light

Wait for charge.


blinking white


Light #7


Time Delay Light - Delay 4 hours – Light

Wait for charge.


blinking white


Light #7


Time Delay Light - Delay 6 hours – Light

Wait for charge.


blinking white


Light #7


Time Delay Light - Delay 8 hours – Light

Wait for charge.


blinking white


Light #7


Time Delay Light - Delay 8 hours - Light

Pause state for RFID enabled units only.


solid blue


Light #9


Touch Sensitive Button – Press Button for 5

Cancel the remote power setting by pressing button


seconds to maximize power level.

5 seconds continuously and maximizes Power.


6

Quick Setup Mobile Application Guide FAQs | VersiCharge™

Light State

Description

Solution


Faults


Light #9

#9 – Touch Sensitive Button – Reset Ground Fault – Press once to

The unit is in a fault state. Press

reset the unit.

one time to reset the ground


fault.


Light #4

#4 Fault occurring –

Power cycle/turn breaker off

Light flashing red

and then on


Light # 4

#4 + #7 (4 hr. delay light) –

Call Tech Support

Lights steady red


Light # 7


Light # 4

#4 + #7 (2 hr.+4 hr. delay light) –

Call Tech Support

Both lights are steady red


Light #7


Light #4

#4+ #7 (2 hr. delay light) –

Call Tech Support

Fault occurring


Light # 7


Light # 4

#4+ #7 (2 hr. + 6 hr. delay light) –

Call Tech Support

Fault occurring


Light # 7


Light # 4

#4+ #7 (2 hr.+ 8 hr. delay light) –

Call Tech Support

Fault occurring


Light #7


Light # 4

#4+ #7 (2 hr. + 4 hr. + 6 hr. +8 hr. delay light) –

Call Tech Support

Fault occurring


Light #7


Light #4

#4+ #7 (4 hr. delay light) –

Call Tech Support

Fault occurring


Light # 7


Light #4

#4+ #7 (4 hr. + 6 hr. delay light) –

Call Tech Support

Fault occurring


Light #7


Light #4

#4+ #7 (6 hr. delay light) –

Call Tech Support

Fault occurring


Light #7


Light #4

#4+ #7 (8 hr. delay light) –

Call Tech Support

Fault occurring


Light #7


Light # 4

#4+ #7 (4 hr. + 6 hr. +8 hr. delay light) –

Call Tech Support

Fault occurring


Light # 7


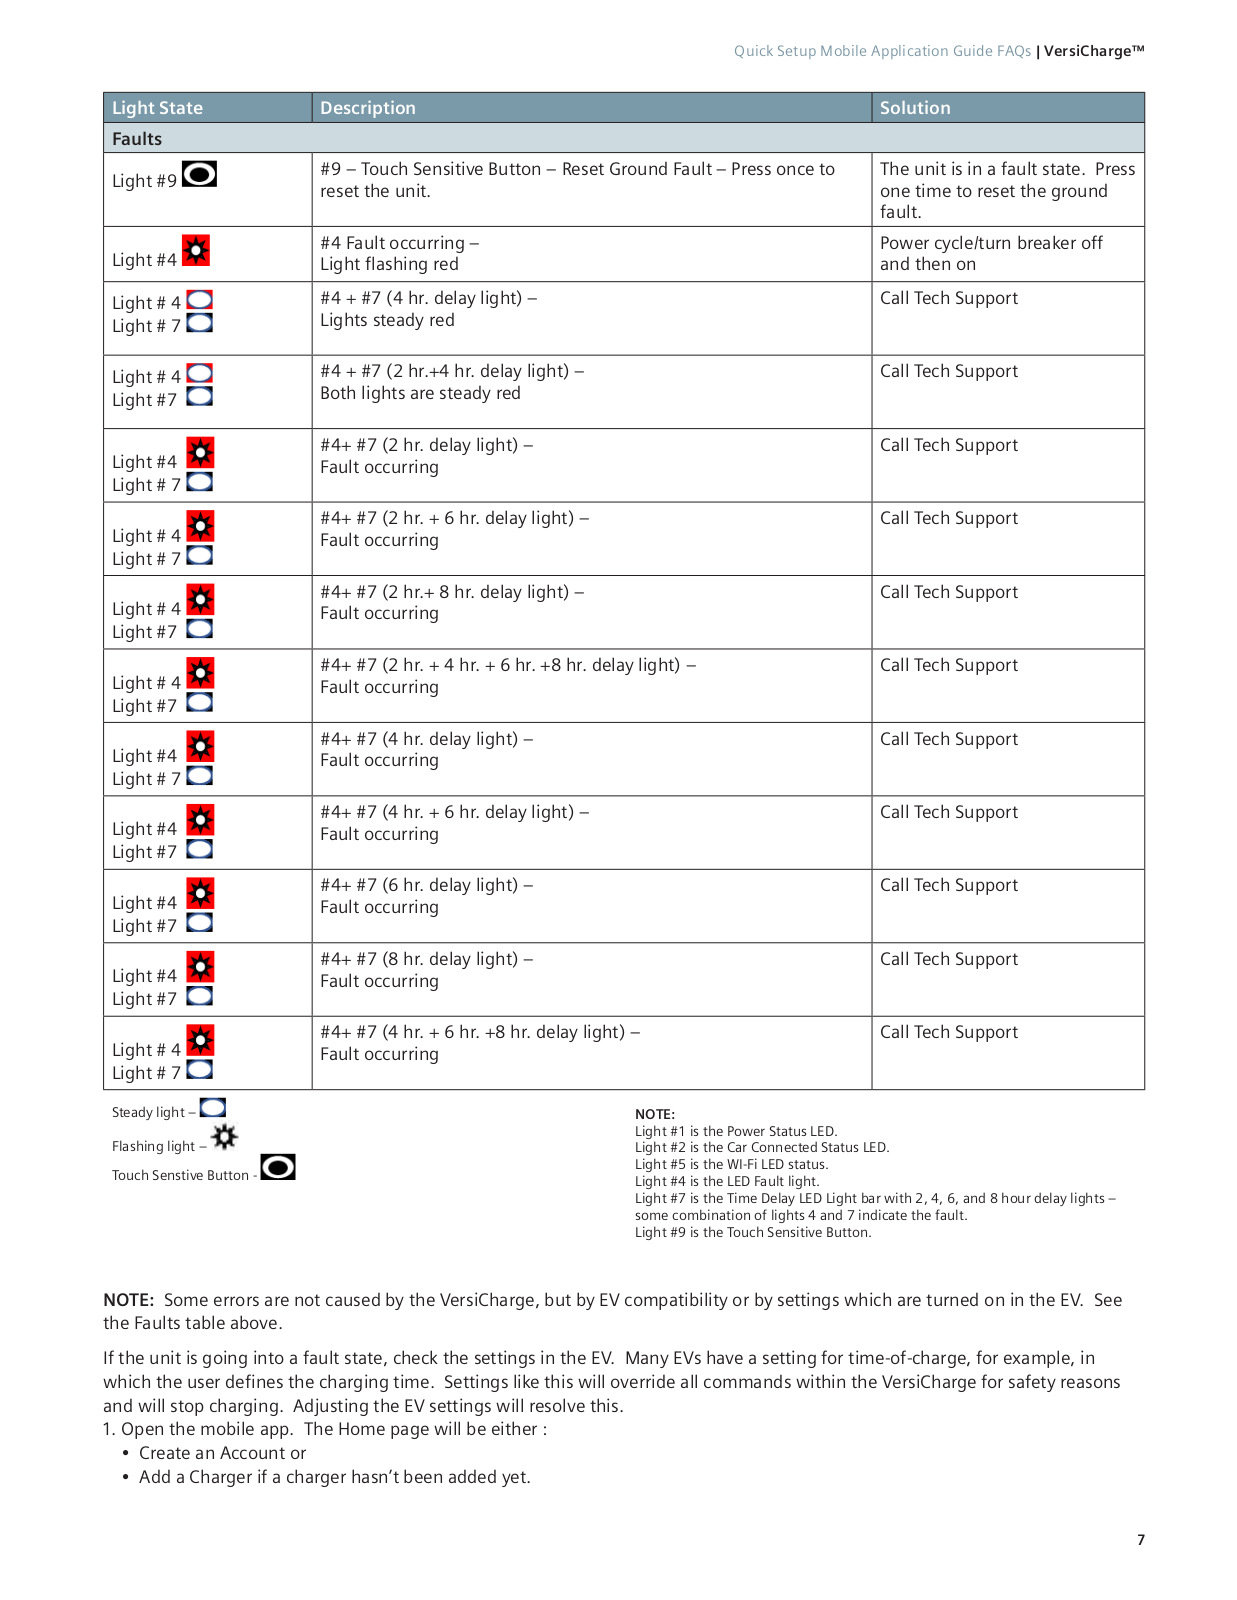
Steady light – Flashing light – Touch Senstive Button -

NOTE:

Light #1 is the Power Status LED.

Light #2 is the Car Connected Status LED. Light #5 is the WI-Fi LED status.

Light #4 is the LED Fault light.

Light #7 is the Time Delay LED Light bar with 2, 4, 6, and 8 hour delay lights – some combination of lights 4 and 7 indicate the fault.

Light #9 is the Touch Sensitive Button.

NOTE: Some errors are not caused by the VersiCharge, but by EV compatibility or by settings which are turned on in the EV. See the Faults table above.

If the unit is going into a fault state, check the settings in the EV. Many EVs have a setting for time-of-charge, for example, in which the user defines the charging time. Settings like this will override all commands within the VersiCharge for safety reasons and will stop charging. Adjusting the EV settings will resolve this.

1.Open the mobile app. The Home page will be either :

Create an Account or

Add a Charger if a charger hasn’t been added yet.

7

VersiCharge™ | Quick Setup Mobile Application Guide FAQs

6 to 12 characters

Avoid special characters <, >, “, ‘ , and ~

Must not contain any dictionary words.

Select Create

NOTES:

Account successfully created. Follow the Add a Charger Select OK prompts until successfully

added to the account.

1.Add a Charger is the landing page until a charger has been successfully added to the account.

See Connect Your Charger for your specific phone’s operating system. Follow "Add a Charger" prompts until your charger has been successfully connected.

2.Commissioning may take time (5-10 minutes). The charger is designed to self-recommission or go back to the Add a charger process, if either the commissioning or Add a charger process fails in the first attempt.

8

Quick Setup Mobile Application Guide FAQs | VersiCharge™

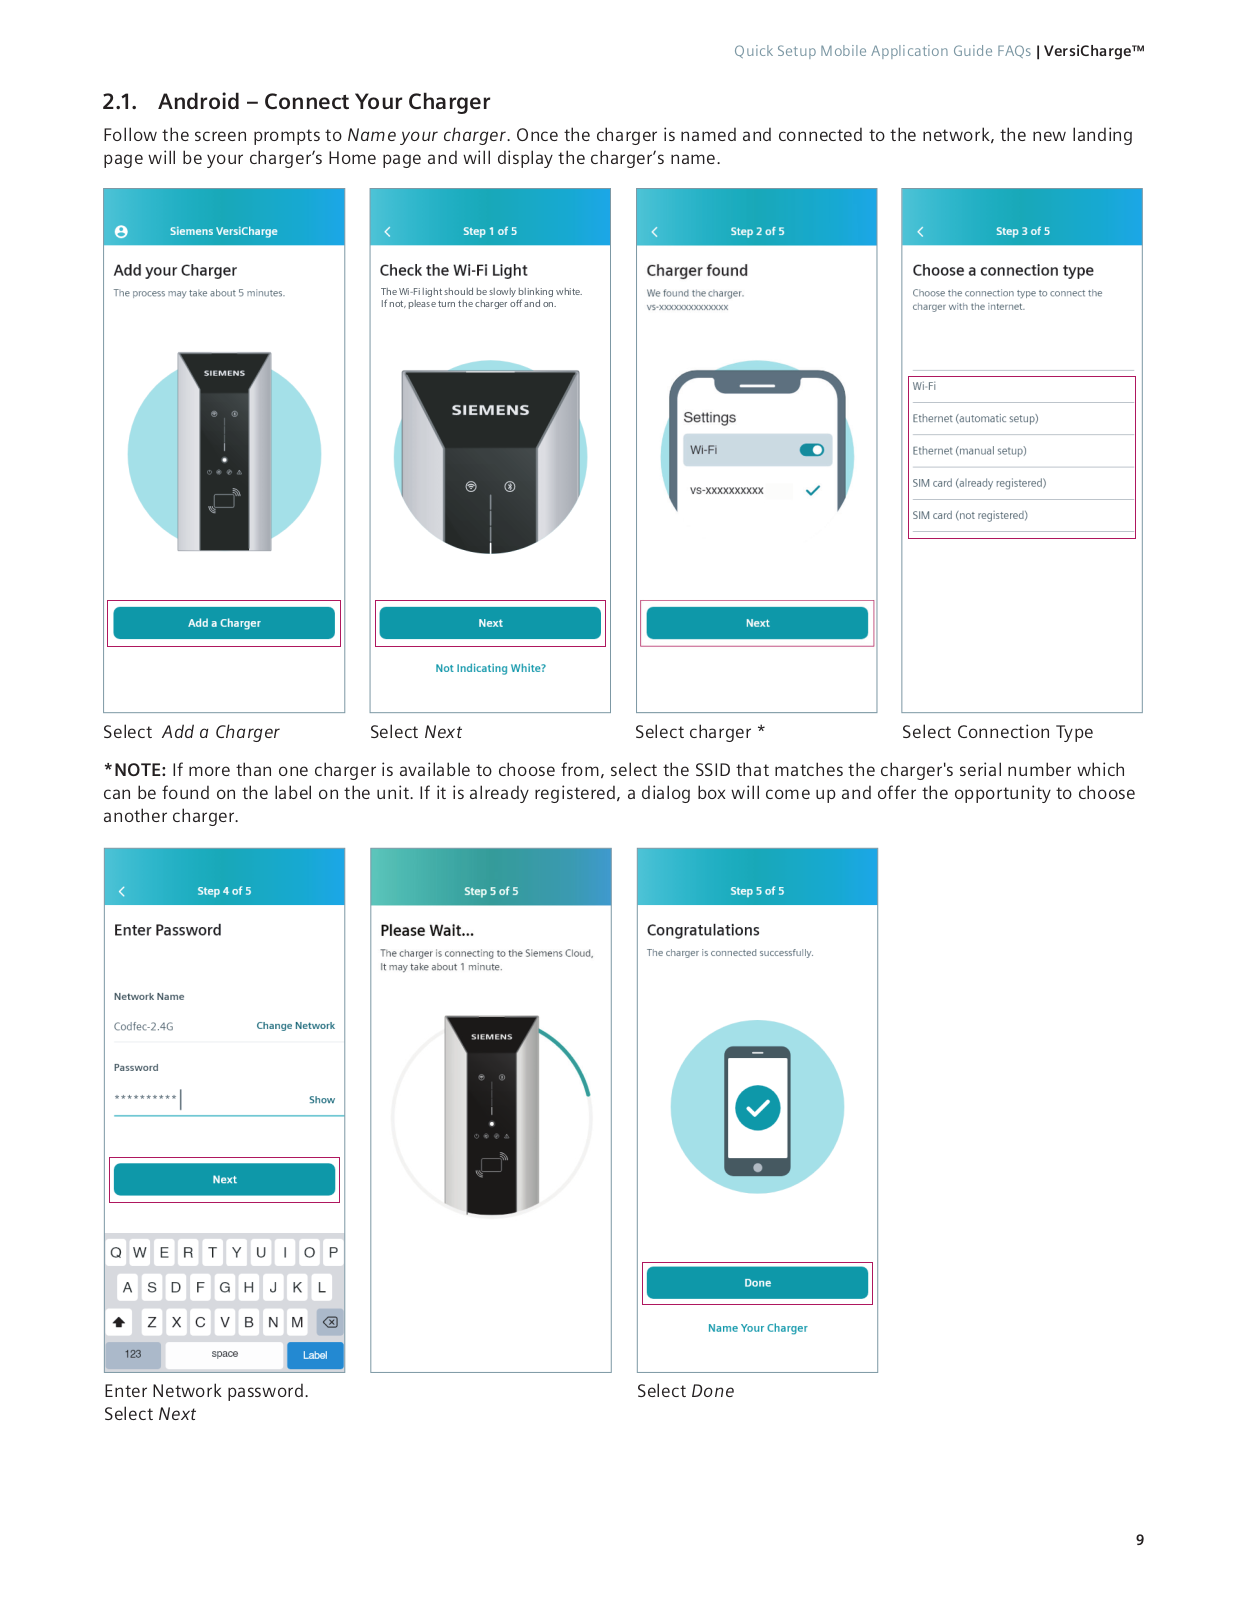
2.1. Android – Connect Your Charger

Follow the screen prompts to Name your charger. Once the charger is named and connected to the network, the new landing page will be your charger’s Home page and will display the charger’s name.

The Wi-Fi light should be slowly blinking white.

If not, please turn the charger o and on.

Select Add a Charger

Select Next

Select charger *

Select Connection Type

*NOTE: If more than one charger is available to choose from, select the SSID that matches the charger's serial number which can be found on the label on the unit. If it is already registered, a dialog box will come up and offer the opportunity to choose another charger.

Enter Network password.

Select Done

Select Next


9

VersiCharge™ | Quick Setup Mobile Application Guide FAQs

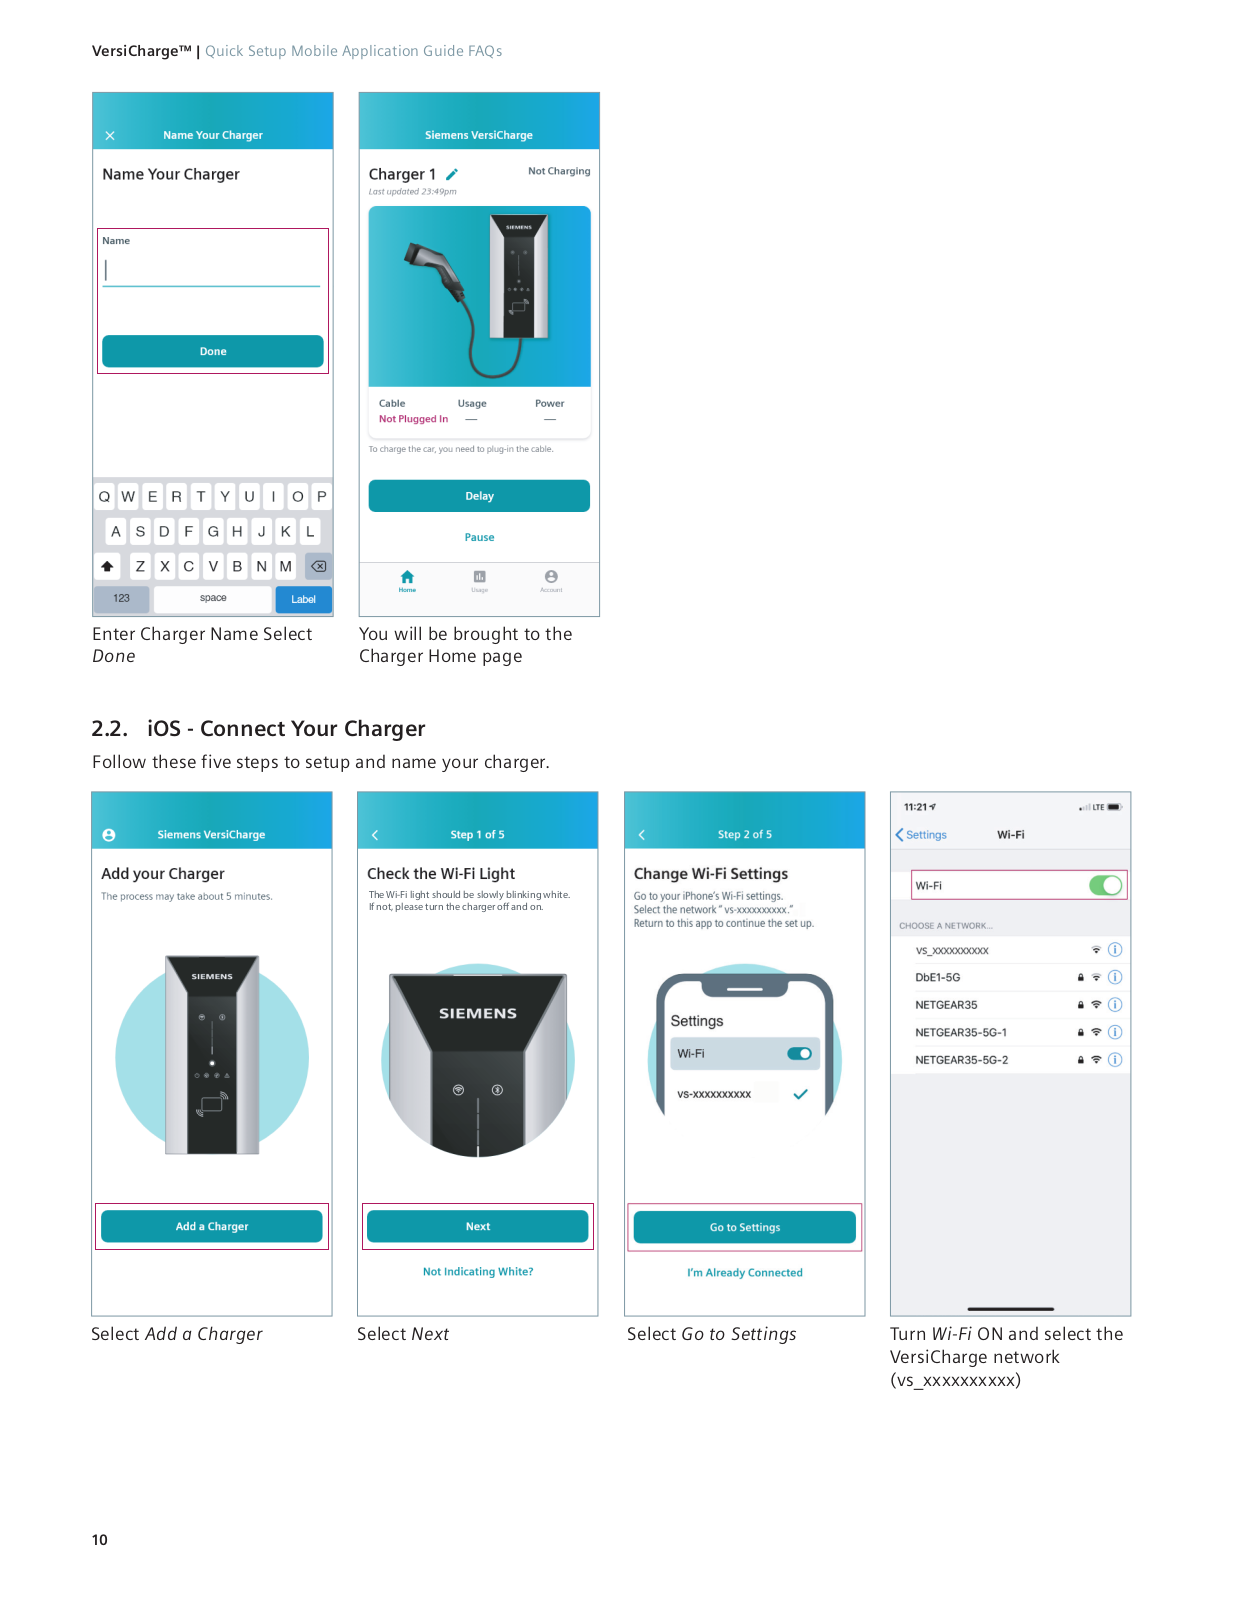
Enter Charger Name Select

Done

You will be brought to the Charger Home page

2.2. iOS - Connect Your Charger

Follow these five steps to setup and name your charger.

The Wi-Fi light should be slowly blinking white.

If not, please turn the charger o and on.

Select Add a Charger

Select Next

Select Go to Settings

Turn Wi-Fi ON and select the


VersiCharge network


(vs_xxxxxxxxxx)

10

Quick Setup Mobile Application Guide FAQs | VersiCharge™


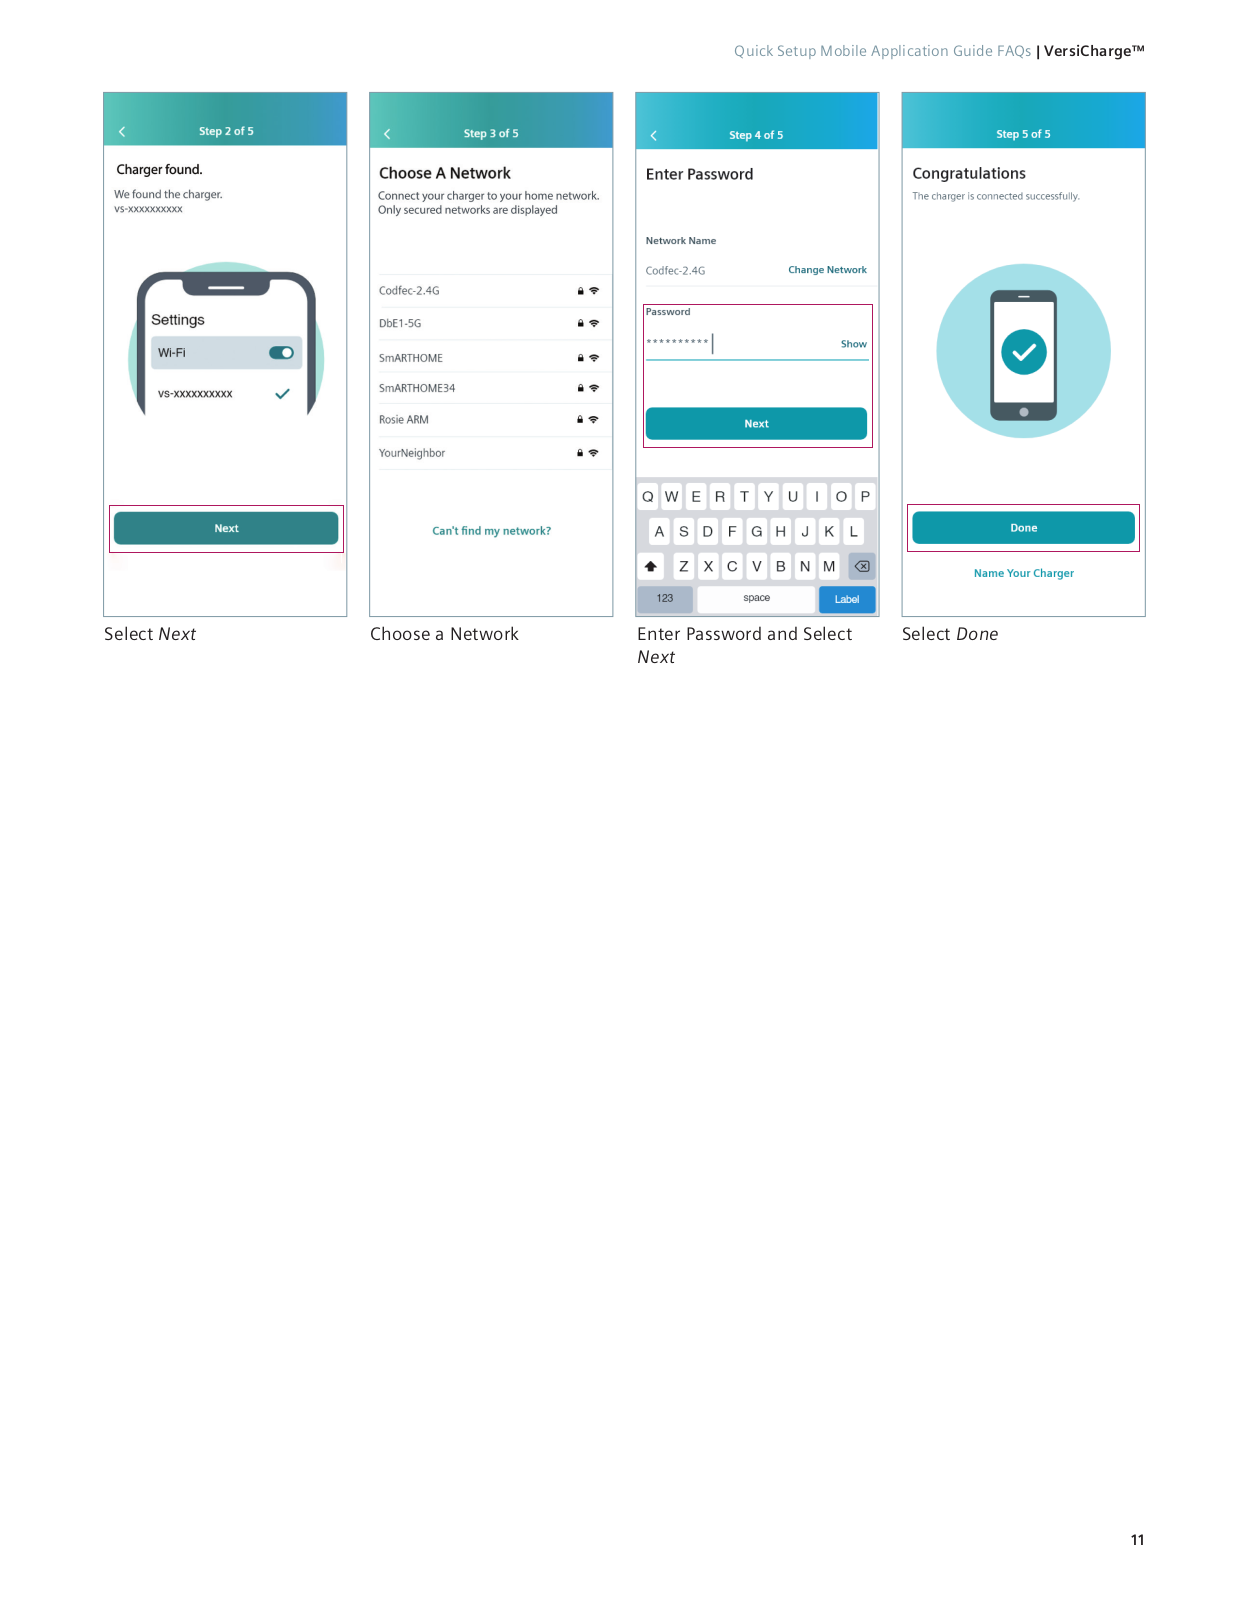
Select Next


Choose a Network

Enter Password and Select


Select Done


Next


11

VersiCharge™ | Quick Setup Mobile Application Guide FAQs

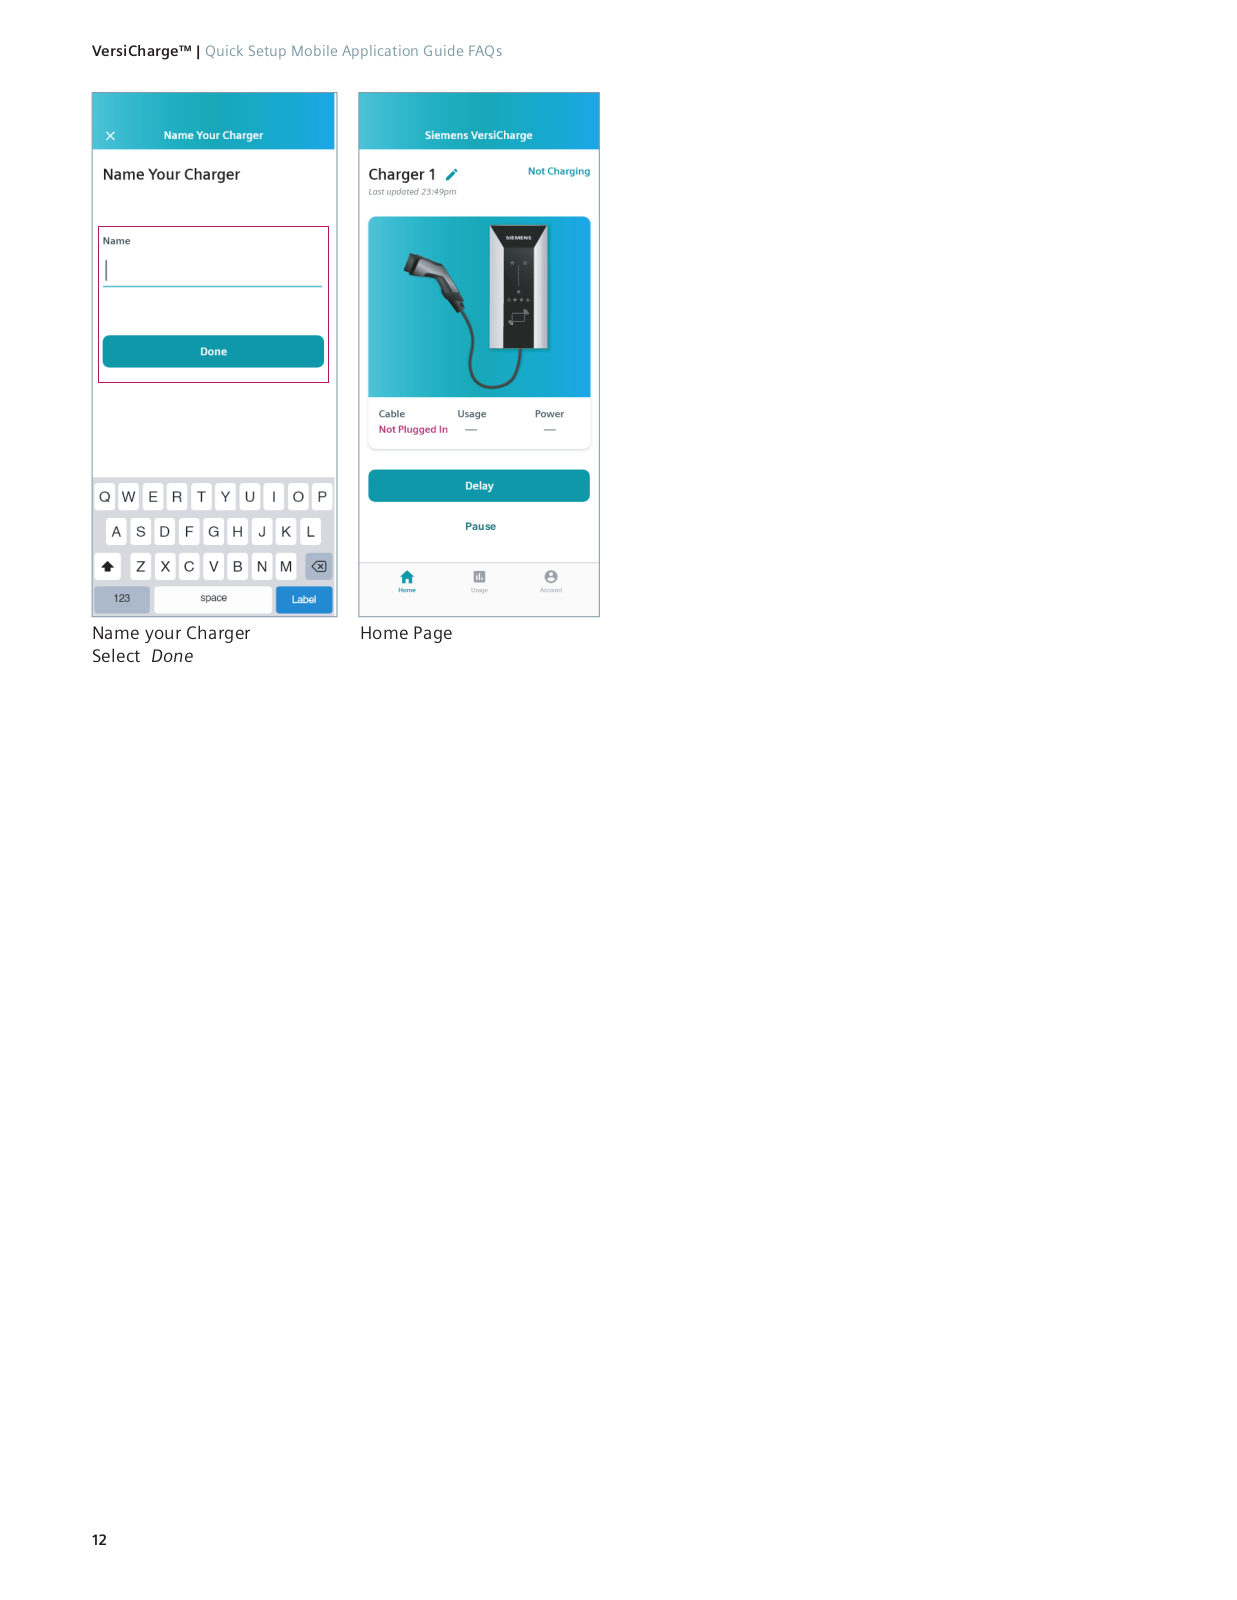
Name your Charger

Home Page

Select Done


12

Quick Setup Mobile Application Guide FAQs | VersiCharge™

3.How to use your VersiCharge Mobile App

Find the VersiCharge Mobile App on your phone by looking for the VersiCharge Logo on your phone.

3.1 VersiCharge Mobile App Screens

1.Home – Charger Page – see the charger name, charger status, cable state, usage, power, and set Delay times here.

2.Usage – See the power usage by Week, Month, or Previous Year.

3.Account – Navigate to Profile, My Charger, Push Notification, Contact Us, VersiCharge, Corporate Information and Usage from page. The bottom navigation menu is always available to navigate to Home (charger page), Usage, and Account information.

4.Profile – edit and update account email or password here.

5.My Charger – update your email account, view power level, and view the serial number and firmware version.

6.Push Notification (note this should be on to receive alerts for the charger and charging sessions) – this is either on or off. On is the desired setting.

7.Contact Us – view Siemens phone and email should you need to contact someone for help with your VersiCharge.

8.VersiCharge – find all the information about your VersiCharge unit.

9.Corporate Information– find the corporate address, all legal information, Terms and Conditions here.

13

VersiCharge™ | Quick Setup Mobile Application Guide FAQs

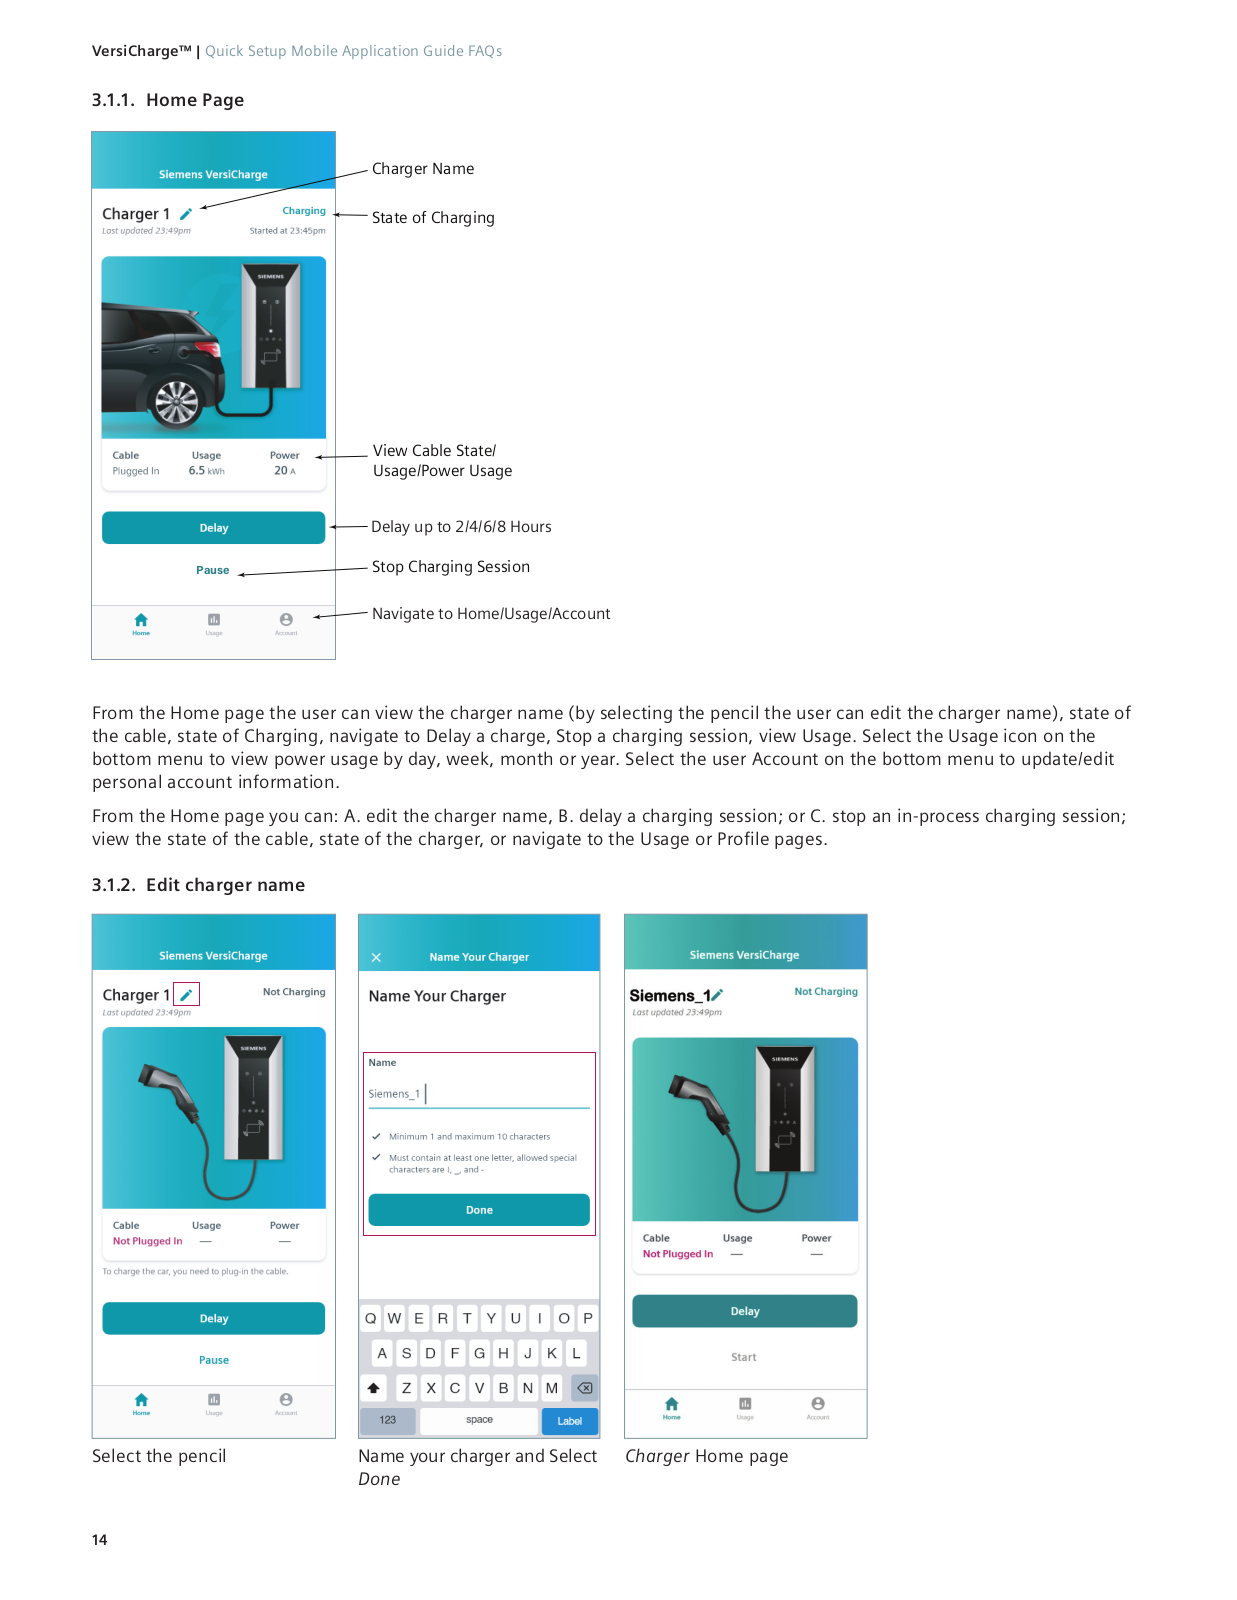
3.1.1. Home Page

Charger Name

State of Charging

View Cable State/

Usage/Power Usage

Delay up to 2/4/6/8 Hours

Stop Charging Session

Navigate to Home/Usage/Account

From the Home page the user can view the charger name (by selecting the pencil the user can edit the charger name), state of the cable, state of Charging, navigate to Delay a charge, Stop a charging session, view Usage. Select the Usage icon on the bottom menu to view power usage by day, week, month or year. Select the user Account on the bottom menu to update/edit personal account information.

From the Home page you can: A. edit the charger name, B. delay a charging session; or C. stop an in-process charging session; view the state of the cable, state of the charger, or navigate to the Usage or Profile pages.

3.1.2. Edit charger name

Select the pencil

Name your charger and Select Charger Home page


Done

14

Loading...
+ 30 hidden pages