

Page 1
å
EQ.7
TK7
Page 2

en
. ........................................................2
fr
. ......................................................22
it
. ......................................................42
nl
. ......................................................62
ru
. ......................................................83
Page 3
A
5a
5b
5c
2
3 4 5 6 4 7 8
15 16 17
12
11
10
18
19
20
9
21
22
1
32
26-30
Page 4
B
13
14
11
31
10.a
. b
. c.
. d
DC
27 26
30
2928
Page 5
E
I
24
25
II
23b......23a23
III IV
Page 6

deen
Table of Contents
Overview...................................................23
Before using for the rst time....................24
Controls. ....................................................25
−.Power.on/off.switch.O./.I. .......................25
−.a.button. ................................................25
−.Rotary.knob. ...........................................25
−.Selection.buttons.<.and.>. ..................25
−.Display. ..................................................26
−.
start
.button. ............................................28
−.°C.button................................................28
−.j.button.and.settings. .............................29
−.Adjusting.the.grinding.unit. .....................29
−.Cup.warming. .........................................29
Menu.settings. ...........................................30
− Language. ..............................................30
− Water hardness. .....................................30
−.Descale. .................................................30
−.Clean. .....................................................30
−.Calc‘n‘Clean. ..........................................30
−.Cup.warmer.off.in. ..................................30
− Auto.off.after. ..........................................31
− Water lter. .............................................31
−.Contrast.................................................31
−.Factory.settings. .....................................31
Preparation.using.coffee.beans. ................32
Preparation.using.ground.coffee...............33
Preparing.milk.froth.and.warm.milk. ..........33
Dispensing.hot.water. ................................34
Maintenance.and.daily.cleaning. ...............34
−.Cleaning.the.milk.system. ......................34
−.Cleaning.the.brewing.unit......................35
Storing.accessories. ..................................35
Tips.on.energy.saving...............................35
Service.Programmes.. ...............................36
−.Descaling. ..............................................36
−.Cleaning. ................................................37
−.Calc‘n‘Clean. ..........................................38
Frost.protection.........................................39
Disposal.. ...................................................39
Accessories. ..............................................39
Guarantee.................................................39
Simple.troubleshooting. .............................40
Safety instructions
Please read the operating instructions
carefully and keep them for future
reference.
This automatic espresso machine is
designed for domestic use and not
commercial use.
! Risk of electric shock
Connect.and.operate.the.appliance.only.in.
accordance with the specications on the
rating.label..
Do.not.use.if.either.the.power.cord.or.the.
appliance.is.damaged..
Use.indoors.at.room.temperature.only..
This.appliance.is.not.intended.for.use.by.
persons.(including.children).with.reduced.
physical,.sensory.or.mental.capabilities,.or.
lack.of.experience.and.knowledge,.unless.
they.have.been.given.supervision.or.
instruction.concerning.use.of.the.appliance.
by.a.person.responsible.for.their.safety.
Keep.children.away.from.the.appliance..
Children.should.be.supervised.to.ensure.
that.they.do.not.play.with.the.appliance.
In.the.event.of.malfunction,.unplug.the.
appliance.immediately..
To.avoid.potential.hazards,.repairs.such.as.
replacing.a.damaged.cord.should.only.be.
performed.by.our.service.personnel..
Never.immerse.the.appliance.or.power.cord.
in.water..
Do.not.reach.into.the.grinding.unit.
! Risk of scalding
The.milk.frother.for.milk.and.hot.water.gets.
very hot. After use, allow to cool down rst
before.touching.
2
Page 7

deen
Dear.Coffee.Connoisseur,.
Congratulations.on.purchasing.this.fully.
automatic.espresso.machine.from.Siemens.
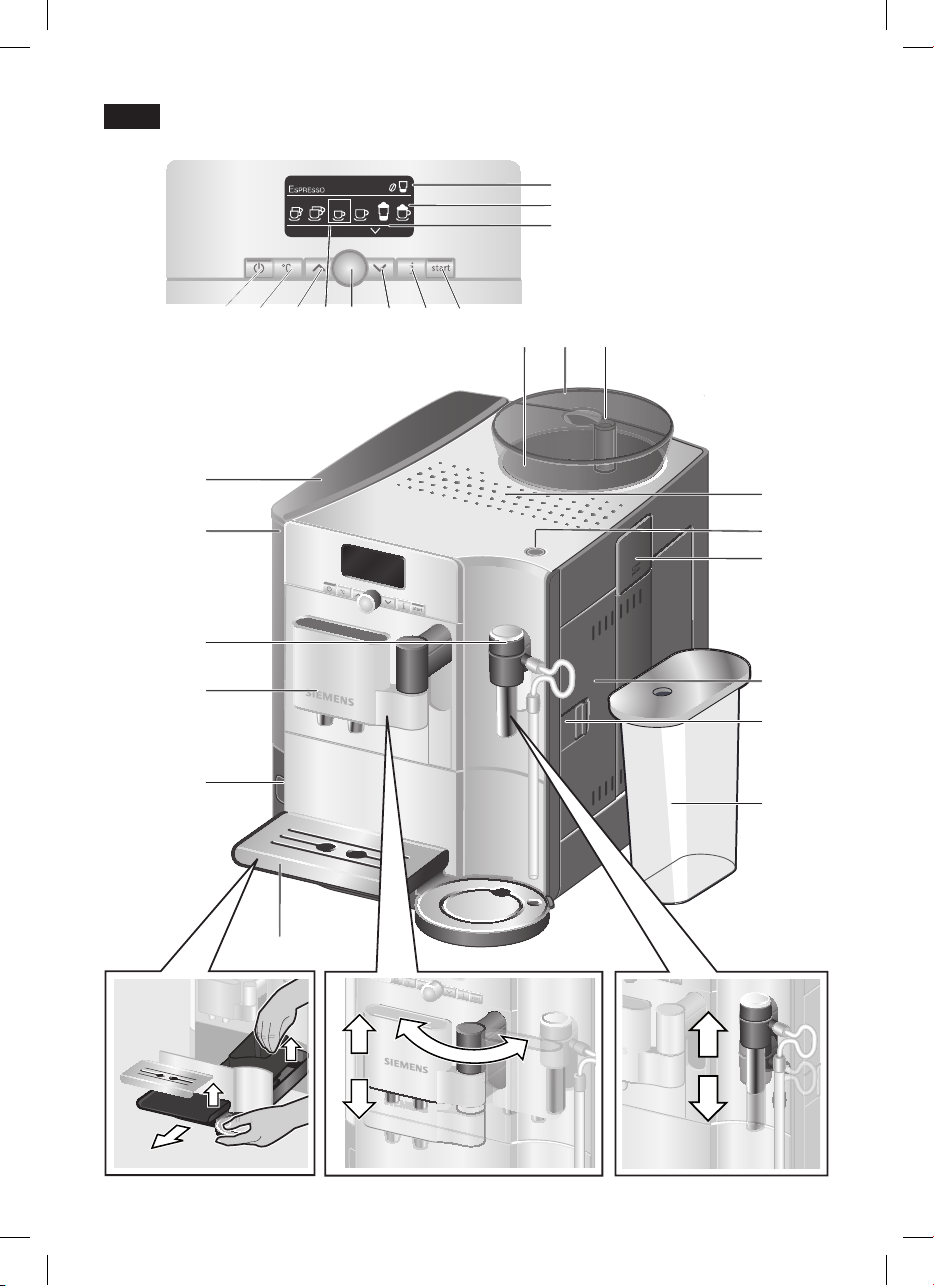
Overview
Figures A, B, C, D and E
. 1.Power.on/off.switch.O./.I
a.button
2.
. 3.
°C
.button.(temperature./.child-proof.lock).
. 4.Selection.buttons.<.>
5.Display
. .a).Status.line
. .b).Selection.line
. .c).Navigation.line
. 6 Rotary.knob.for.display.settings
. 7..Info.menu.button.j
. 8. .
start
button.(drinks./.programs)
. 9. .Coffee.outlet,.height-adjustable.and.
swivelling
.10. .Milk.frother,.height-adjustable..
(milk./.hot.water)
. .a).Upper.part
. .b) Lower part
. .c).Tube
. .d).Milk.pipe
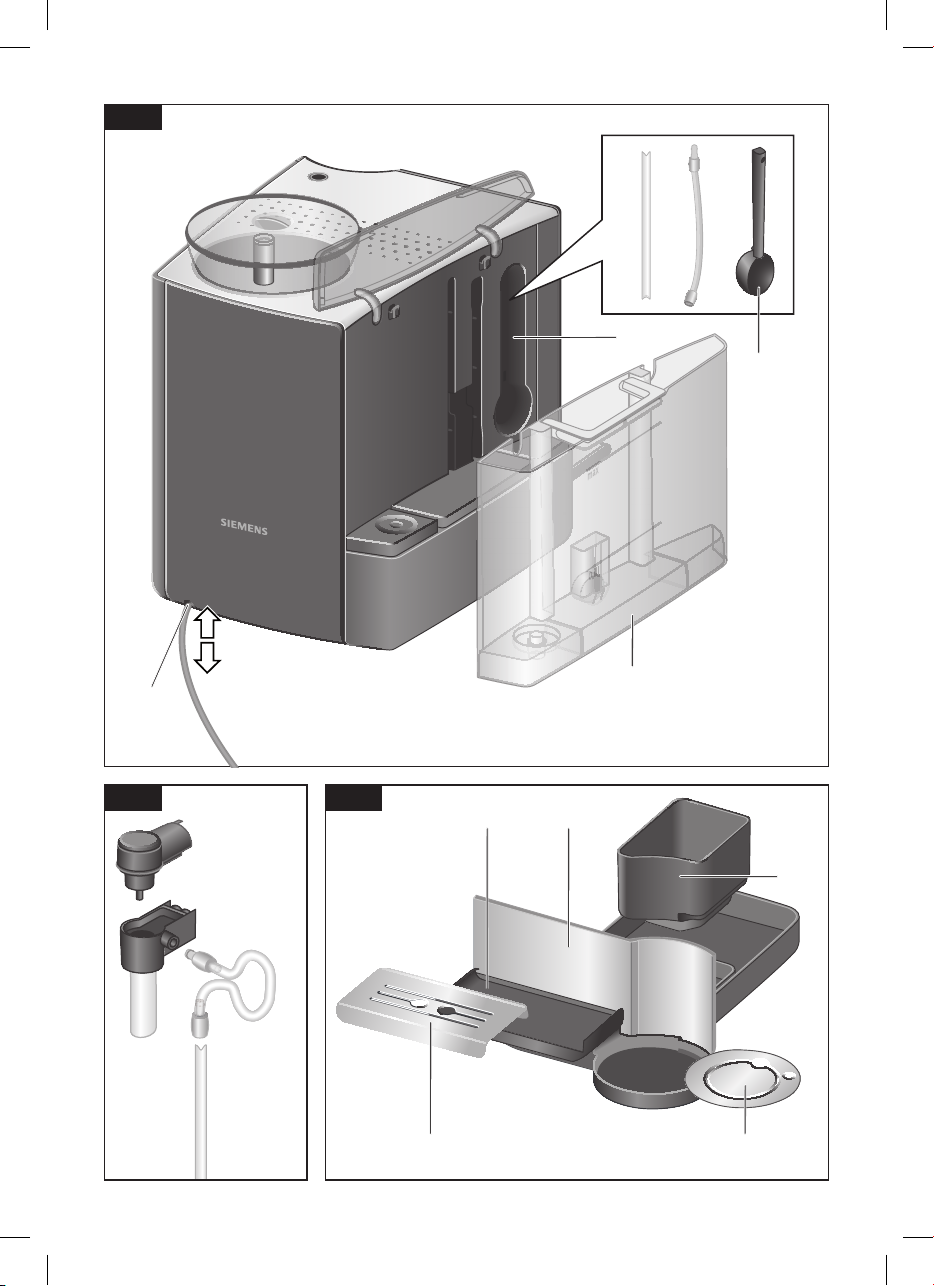
.11.Removable.water.tank
12 Lid for water tank
13. .Storage.compartments.
(measuring.spoon.and.milk.frother.
accessories)
.14. .Measuring.spoon..
(insertion aid for water lter)
.15.Bean.container
.16.Aroma.cover
.17.Selector.for.grind.setting
18.Cup.warming
These.instructions.describe.various.models.
with.different.features.
Please.also.note.the.enclosed.quick.
reference.guide..It.can.be.kept.in.the.
special.storage.compartment.24.until.it.is.
needed.
19. .Button.for.cup.warming.function,.
illuminated
20. .Drawer..
(ground.coffee./.cleaning.tablet)
21.Door.to.brewing.unit
22.Door.opener.
23.Brewing.unit.
. .a).Sliding.button.
. .b) Lock
24. .Storage.compartment.for.quick.
reference.guide
25.Cover.of.storage.compartment
26.Drip.tray.panel
27.Drip.tray.for.coffee.outlet
2
8.Grate.for.coffee.outlet
29.Grate.for.milk.frother
30.Coffee.grounds.container
31.Cable.storage.compartment
32.Milk.container
3
Page 8

deen
Before using
for the rst time
General
Fill.the.water.tank.with.fresh,.uncarbonated.
water.only,.and.preferably.use.only.beans.
for.fully.automatic.coffee.and.espresso.
machines..Do.not.use.coffee.beans.that.
have.been.glazed,.caramelized.or.treated.
with.other.additives.containing.sugar,.since.
they.will.block.the.brewing.unit..
The.water.hardness.setting.can.be.adjusted.
on.this.appliance..The.factory.default.setting.
for.the.water.hardness.is.4..Check.the.
water.hardness.with.the.enclosed.test.strip..
If.a.value.other.than.water.hardness.4.is.
displayed,.change.the.setting.on.the.
appliance.accordingly.after.switching.on.
(see.“Menu.settings.Water hardness”).
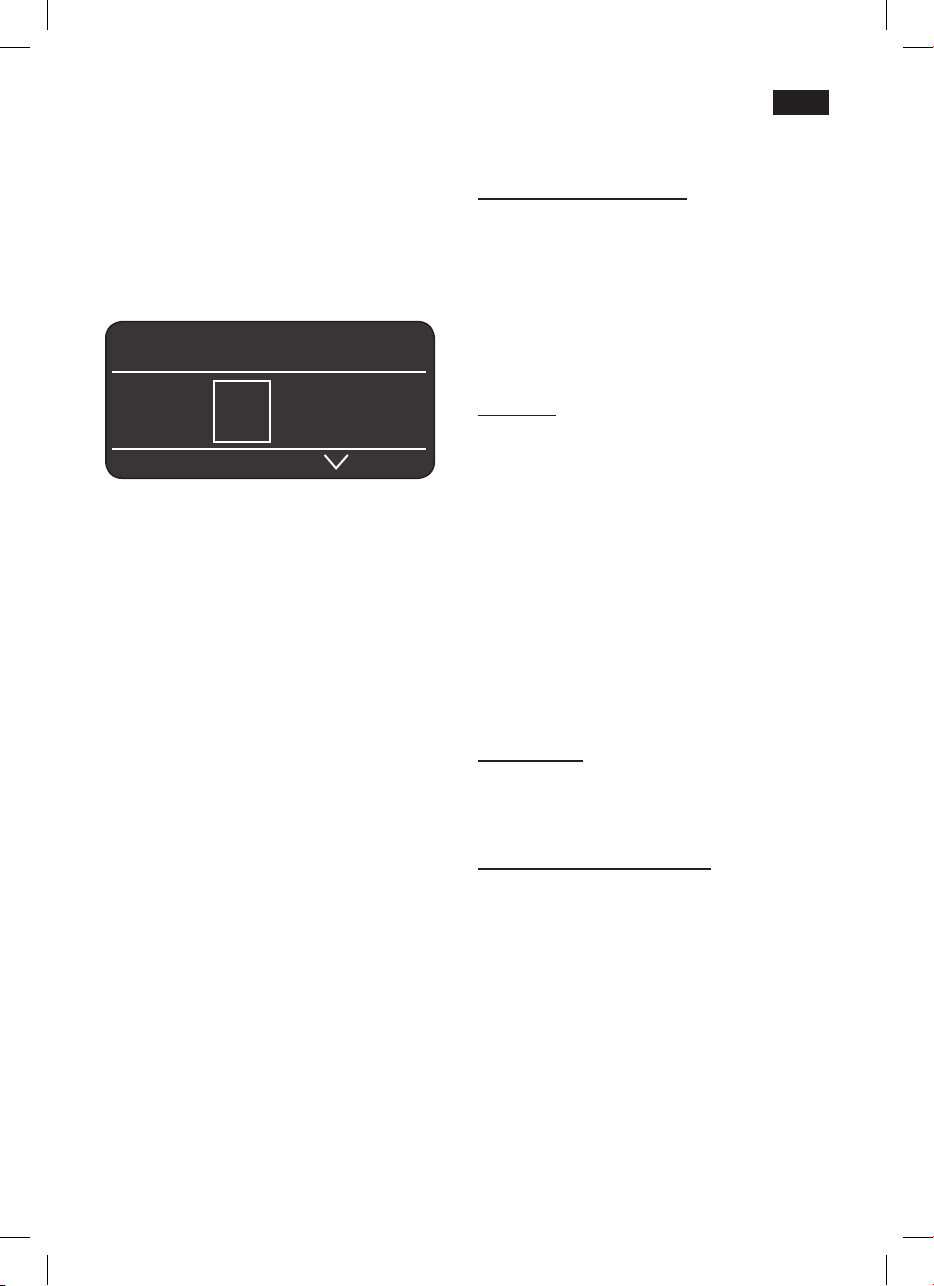
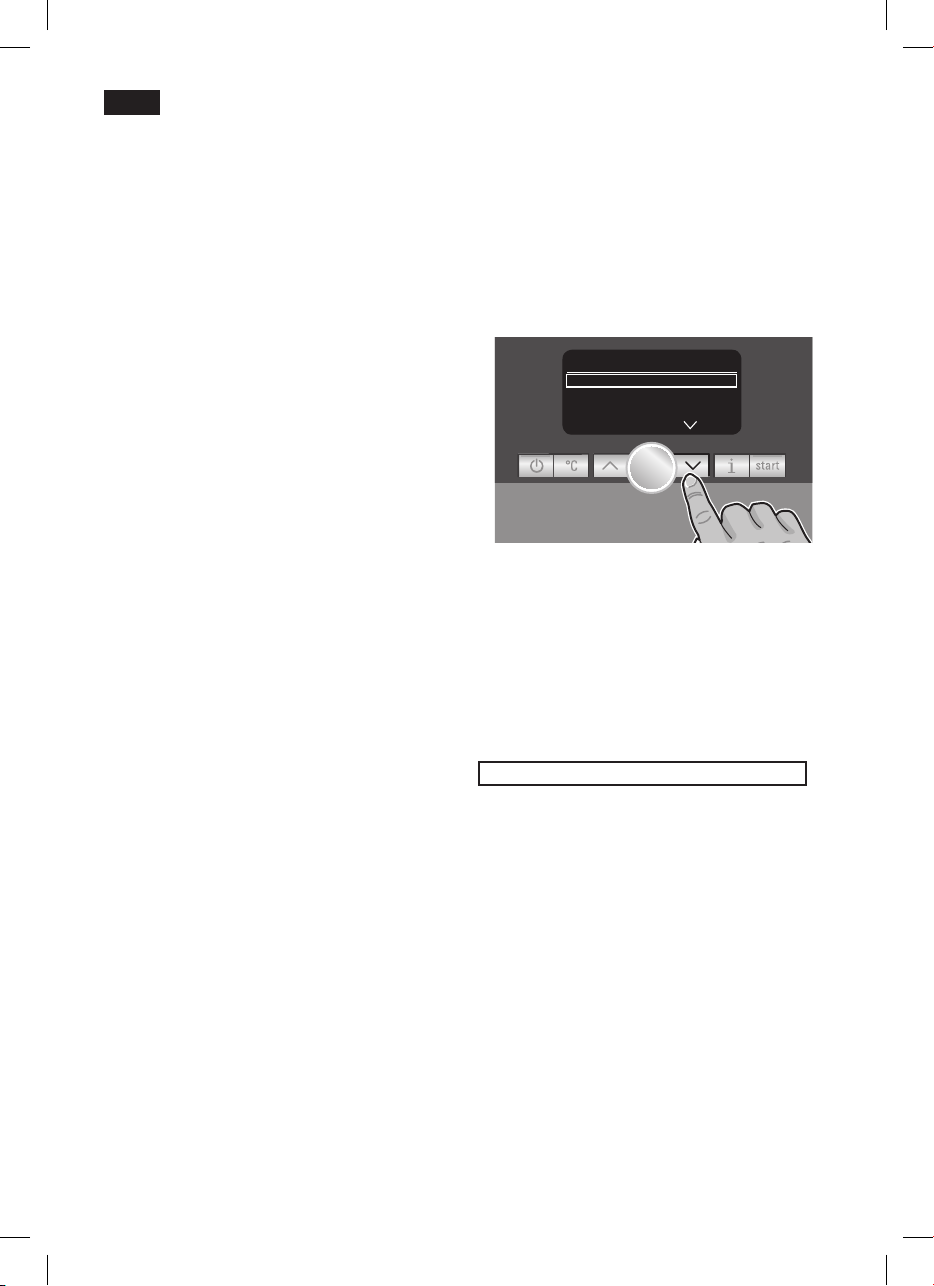
●
Press.the.power.switch.1.O./.I..The.
button.8.lights.up.and.the.different.
languages.appear.in.the.display.5.
Use.the.buttons.4.
●
language.in.which.you.want.the.display.5.
texts.to.appear...
.
.
.
.
.
.
.
.
.
. The.selected.language.is.highlighted.by.a.
frame..The.following.languages.can.be.
selected:.
Language
engLish
Pycckий
nederLands
<.and.>.to.select.the.
star t
start
.
Switching on the appliance
Place.the.fully.automatic.espresso.
●
machine on a at surface that can take its
weight..
Note: The.appliance.has.four.runners.under.
its.base.and.can.be.moved.sideways.in.an.
arc.to.make.operation.and.positioning.
easier.
Pull.the.power.cord.out.of.the.storage.
●
compartment.31.and.plug.in..Adjust.the.
length.of.the.cable.by.pushing.it.back.in.
or.pulling.it.out..The.easiest.way.to.do.
this.is.to.place.the.appliance.so.that.its.
back is ush with the edge of the counter
and.either.pull.the.cable.downward.or.
push.it.upward.
Lift the lid of the water tank 12.
●
Remove.and.rinse.the.water.tank.11.and.
●
ll it with fresh cold water. .
Do not ll above the “max”.mark.
Replace.the.water.tank.11 and.push.it.
●
rmly downward into place.
Close.the.lid.of.the.water.tank.12.again.
●
Fill.the.bean.container.15.with.coffee.
●
beans.
engLish
P
ycckий
n
ederLands
F
rançais
i
taLiano
s
venska
e
sPañoL
P
oLski
● Press the
you.selected.is.saved.and.the.
lights.up.
start
.button.8..The.language.
a.button.2.
4
Page 9
deen
● Press the
lights.up.in.the.display.5..The.appliance.
now.heats.up.and.rinses..Some.water.will.
run.out.of.the.coffee.outlet.9..The.
appliance.is.ready.for.use.when.the.
symbols.for.selecting.the.type.of.coffee.
preparation.appear.in.the.display.5..
a.button.2..The.brand.logo.
esPresso Ë Í
 à À Á Å Æ
Note: The.factory.settings.of.the.fully.
automatic.espresso.machine.are.
programmed.for.optimal.performance..The.
appliance.switches.to.“energy.saving.mode”.
automatically.after.1.hour.(see.“Menu.
settings.auto oFF aFter”).
Tip: If.the.appliance.is.being.used.for.the.
rst time or has not been operated for a
long period, the rst cup of coffee will not
have.the.full.aroma.
When using the espresso machine for the
first.time,.you.will.achieve.a.suitably.thick.
and.stable.“crema”.only.after.the.first.few.
cups.have.been.dispensed.
Controls
Power on/off switch O / I
The.power.switch.1.O./.I is.used.to.switch.
the.appliance.to.“energy.saving.mode”.or.to.
switch.it.off.completely..In.“energy.saving.
mode”.only.the.a.button.2.lights.up.
Important: Do not switch the appliance off
at the power on/off switch 1 until it is in
energy saving mode, so that the automatic
rinse process can take place.
a button
The.appliance.is.switched.on.(ready.for.
use).or.put.into.“energy.saving.mode”.with.
the.a.button.2.
The.
a.button.2 ashes while the appliance
is.rinsing..
The.appliance.does.not.rinse.if:
it.is.still.warm.when.switched.on.
●
no.coffee.was.dispensed.before.it.was.
●
switched.to.“energy.saving.mode”.
The.appliance.is.ready.for.use.when.the.
start
symbols.for.drink.selection.and.the.
button.8.light.up.on.the.display.5.
Rotary knob
Turn.the.knob.6.to.the.left.or.right.to.
navigate.through.the.display.5,.or.to.adjust.
parameters.in.the.menu.
Selection buttons
Press.the.selection.buttons.<.and.>.4.to.
navigate.up.and.down.through.the.menu.
levels.(navigation.line.5c).
< and >
.
5
Page 10
deen
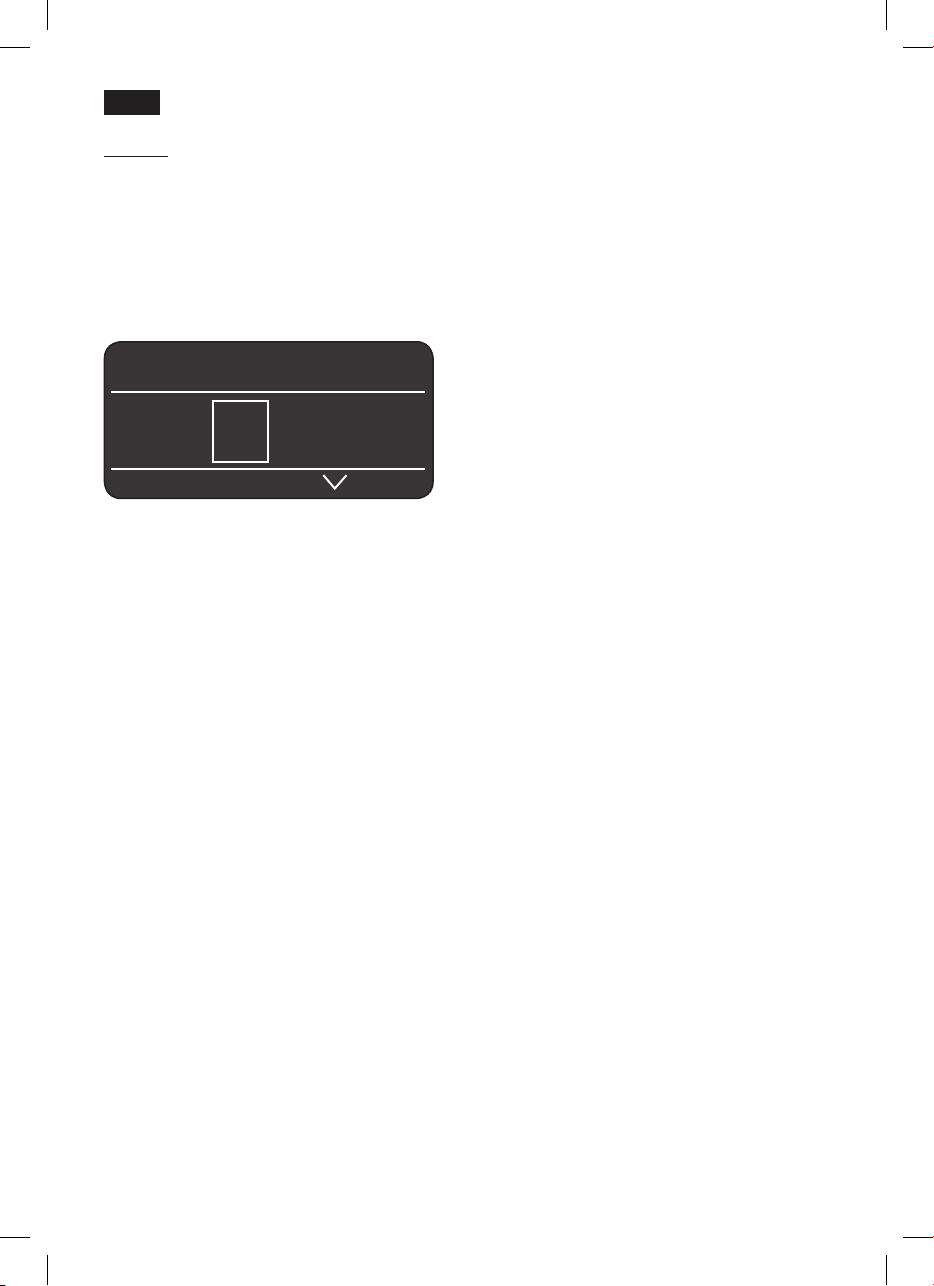
Display
The.display.5.uses.symbols.to.indicate.the.
selection.options,.coffee.strength.and.percup.quantity,.and.uses.texts.to.indicate.
settings,.ongoing.processes.and.messages..
The.rotary.knob.6.and.selection.buttons.4.
can.be.used.to.change.settings..The.
selected.setting.is.highlighted.by.a.frame.
esPresso Ë Í
5a
 à À Á Å Æ
The.status.line.5a.in.the.display.shows.the.
name.of.the.type.of.drink,.along.with.the.
strength.setting,.e.g..
quantity,.e.g..
shows.symbols.for.the.drink.selection.
The.arrows.in.the.navigation.line.5c.indicate.
the.direction.in.which.more.menu.levels.can.
be.found.
�
55.and.per-cup.
..The.selection.line.5b.
Display messages
Various.messages.are.shown.on.the.
display.5.
Information:.
PLease Wait
Prompts:
reFiLL Water tank
check Water tank
rePLace driP tray
emPty driP tray
b
reFiLL bean container
Position sWiveL arm
c
set uP miLk Frother
rePLace breWing unit
c
Lose door
PLease check breWing unit
FiLL draWer With PoWder
cLose draWer
service - change FiLter
service - descaLe
service - cLean
service - caLc‘n‘cLean
insuFFicient temPerature
PLease Wait
high or LoW voLtage
6
Page 11
esPresso ËË Í
Å Æ È É Ê
Á
Selection options
. 2 x esPresso.
Â
. esPresso. Á.coFFee
À
Ã
deen
.2 x coFFee
esPresso Ë Í
5 55 555
. .
esPresso Ë Í
� Ð Ò
miLk system
Coffee strength
(only for coffee drinks)
. macchiato
Å
. miLk F roth.
È
. hot Water.
Ê
.caPPuccino
Æ
Warm miL k
É
Ì
s
hort rinse For
5 5 5 5 5 5
. mild. regular. strong
Per-cup quantity
(only for coffee drinks)
� Ð Ò
. small. medium. large
7
Page 12
deen
Start button
Press.the.
preparation.or.to.start.a.service.program..
Press.the.
preparation.to.cut.the.dispensing.process.
short.
°C button
Use.the.°C.button.3.to.set.the.temperature.
for coffee and tea water (press briey) and
to.switch.the.child-proof lock.on.or.off.
(hold.down.for.at.least.3.seconds).
Setting the temperature:
Press.the.°C.button.3 briey and enter the
settings.with.the.<.and.>.buttons.4.and.
the.rotary.knob.6.
start
.button.8.to.begin.drink.
start
.button.8.again.during.drink.
temPerature
coFFee
normaL
hot Water
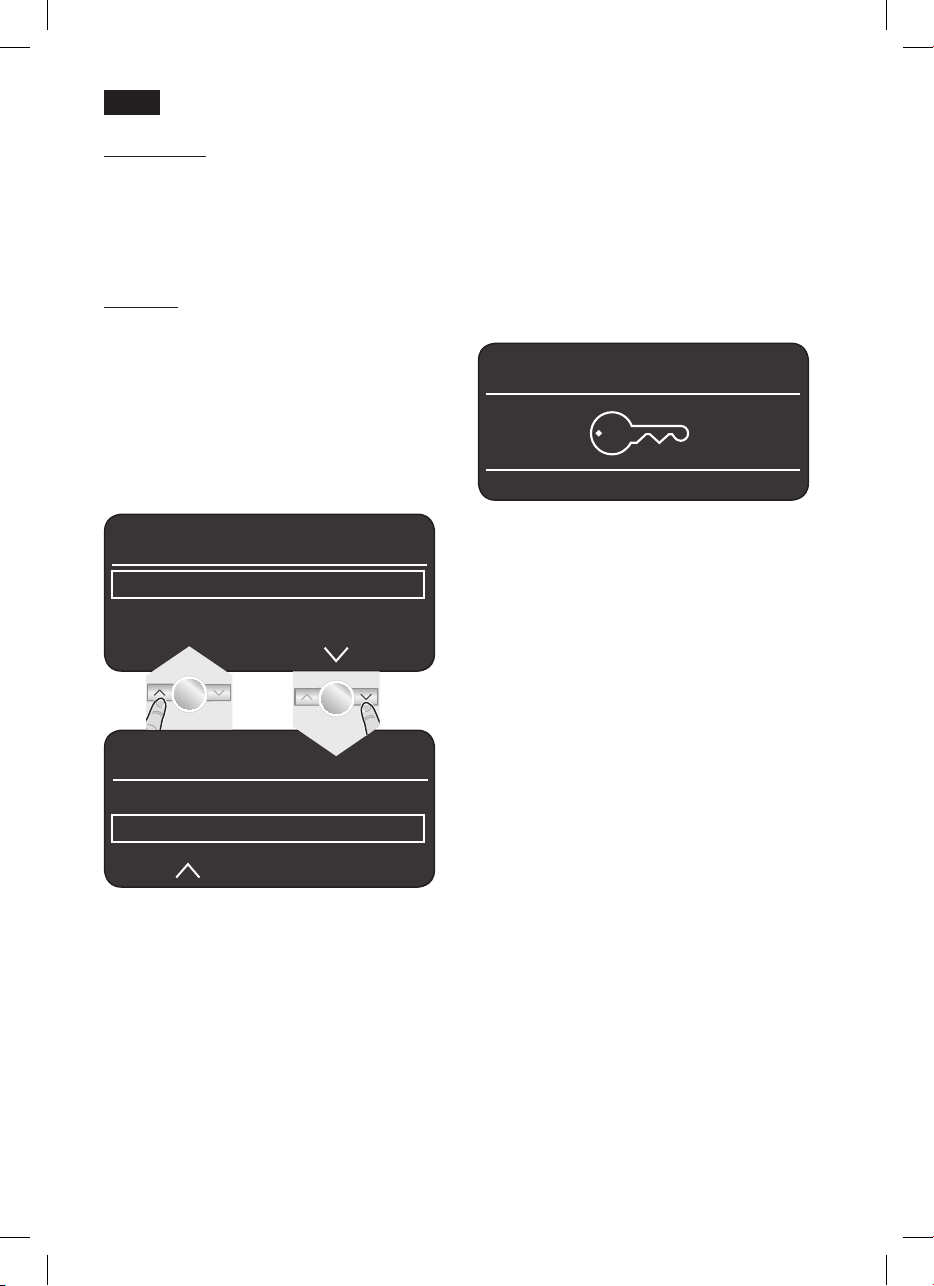
Child-proof lock
The.appliance.can.be.locked.to.protect.
children.from.scalding.and.burning.
● Hold down the
seconds..The.display.5.shows.a.key:.the.
child-proof.lock.is.activated..
It.is.no.longer.possible.to.operate.the.
appliance.and.the.cup.warmer.18.is.
switched.off.
°C
.button.3.for.at.least.3.
esPresso Ë Í
● To deactivate the child-proof lock, hold
down.the.°C.button.3.for.at.least.5.
seconds..The.key.disappears.from.the.
display.5.
temPerature
coFFee
hot Water
Press.the.C°.button.3.again.to.save.the.
settings.and.return.to.drink.selection.
These.settings.are.automatically.effective.
for.all.types.of.coffee.preparation.
8
<90°c
Page 13

deen
j button and settings
Use.the.j.button.7.to.display information.
(press briey) and adjust settings.(hold.
down.for.at.least.3.seconds).
Displaying information
The.following.information.can.be.displayed.
in.the.Info.menu:
–
how.many.drinks.have.been.dispensed.
since.the.espresso.machine.was.switched.
on
–
when.should.the.next.service.be.
completed.
● Press the
with.the.<.and.>.buttons.4.
j.button.7 briey and navigate
inFo
descaLe aFter xxx cuPs
cLean aFter xxx cuPs
no FiLter
change FiLter in xxx cuPs *
inFo
no. oF coFFees xx
no. oF miLk mixes xx
amount hot Water xL
Adjusting the grinding unit
The.rotary.selector.17.adjusts.the.grind.
settings from coarse to ne.
Warning
Adjust the grinding unit only while it is
running! Otherwise the appliance may be
damaged.
● While the grinding unit is running, adjust
the.rotary.selector.17 from ne • • • to
coarse ● ● ● as required.
Note: The.new.setting.will.not.become.
apparent.until.after.the.second.cup.of.
coffee.
Tip:.For.dark.roast.coffee.beans,.choose.a.
finer.grind,.for.lighter.beans.a.coarser.grind.
Cup warming
! Warning:.The cup warmer 18
becomes very hot.
The.fully.automatic.espresso.machine.has.a.
cup.warmer.18.that.can.be.switched.on.or.
off.manually.with.button.19. When the cup
warmer.18.is.on,.the.button.19.lights.up.
Tip:.For.optimal.cup.warming,.place.the.
base.of.the.cups.on.the.cup.warmer.18.
*appears only if the lter is activated.
Press.the.j.button.7 again briey to return
to.drink.selection..If.no.button.is.pressed.for.
about.10.seconds.the.appliance.
automatically.switches.back.to.drink.
selection.mode.
Adjusting settings
(see.“Menu.settings”).
9
Page 14

deen
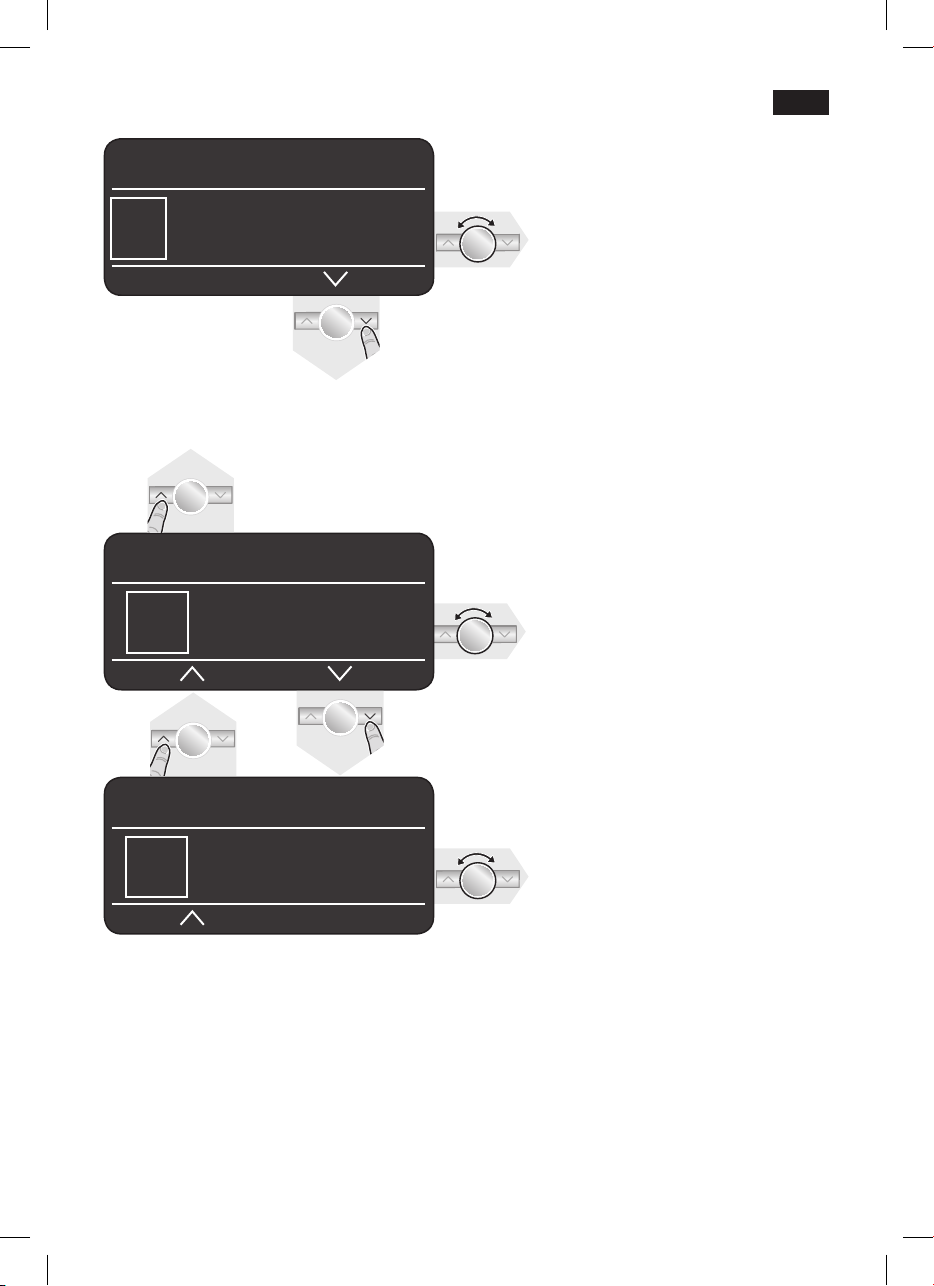
Menu settings
● Hold the j.button.down.for.at.least.3.
seconds.
The.different.setting.options.are.now.
displayed.
settings
Language engLish
Water hardness
descaLe
In.the.following.operating.instructions,.each.
new.setting.begins.with..
followed.by.an.exact.description.
The.different.setting.options.can.be.
selected.with.the.<.and.>.buttons.4.
settin gs
Water hardness
descaLe
cLean
N.B.:.The.changes.you.have.made.are.
saved.automatically..
It is not necessary to conrm them
additionally.
.
j 3.sec. + >
star t
j 3.sec. + >
● Turn the knob 6.to.select.the.required.
language
j 3.sec. + >
● Turn the knob 6.to.select.the.required.
water.hardness.1,2,3.or.4.
Note: It.is.important.to.set.the.water.
hardness.correctly,.so.that.the.appliance.
indicates.accurately.when.the.descaling.
program.should.be.run..The.factory.setting.
for.the.water.hardness.is.4..
You.can.check.the.water.hardness.using.
the.enclosed.test.strip.or.by.asking.your.
local.water.supplier..
● Dip the test strip in the water briey and
check.the.result.after.1.minute.
Level Water hardness
1
2
3
4
j 3.sec. + >
● If you want to descale the appliance,
press.the.
descaling.program.(see.“Descaling”).
j 3.sec. + >
● If you want to clean the appliance, press
the.
start
program.(see.“Cleaning”).
Language.
Water hardness
German (°dH) French (°fH)
1-7
8-14
15-21
22-30
descaLe
start
.button.8.and.run.the.
cLean
.button.8.and.run.the.cleaning.
1-13
14-25
26-38
39-54
10
j 3.sec. + >
● If you want to descale and clean the
appliance,.press.the.
run.the.Calc‘n‘Clean.program.(see.
“Calc‘n‘Clean”).
j 3.sec. + >
Here you can set the time span after which
the.cup.warmer.18.function.switches.off.
again.automatically.
Set.the.required.time.by.turning.the..
●
knob.6.
caLc‘n‘cLean
start
.button.8.and.
cuP Warmer oFF in
Page 15
deen
j 3.sec. + >
Turn.the.knob.6.to.enter.the.time.span.
●
after.which.the.appliance.should.
automatically.switch.to.“energy.saving.
mode”.following.drink.preparation.
A.time.between.5.minutes.and.8.hours.can.
be.set.
j 3.sec. + >
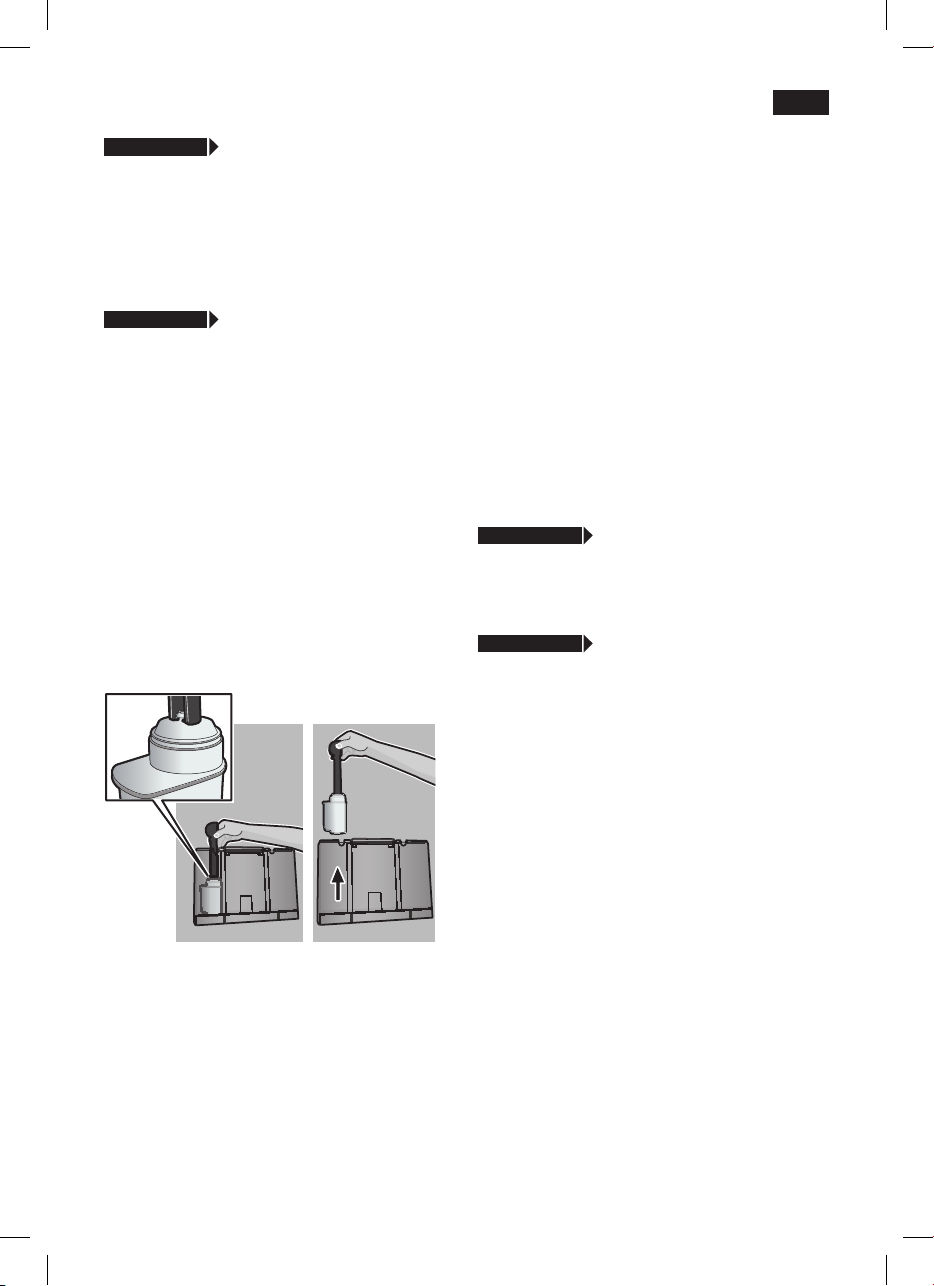
Before a new water lter is used, it must be
rinsed..
To do this, place the water lter rmly into
●
the.water.tank.11.with.the.aid.of.the.
measuring.spoon.14..Fill.the.water.tank.
with.water.up.to.the.“max”.mark..
Turn.the.knob.6.to.select.start.and.
●
press.the.
● PLace 0.5 L container under miLk
Frother
Place.a.container.with.a.capacity.of.0.5.
●
litres.under.the.milk.frother.10.
Press.the.
●
ow through the lter to rinse it.
Next,.empty.the.container..The.appliance.
●
is.ready.to.use.once.more.
auto oFF aFter.
Water FiLter
start
.button.8.
start
start
.button.8. Water will now
The lter is no longer effective when the
change FiLter display.appears,.or.at.the.
latest.after.2.months..It.needs.to.be.
replaced.for.reasons.of.hygiene.and.so.that.
there.is.no.build-up.of.limescale.(this.could.
damage.the.appliance).
Replacement lters can be obtained from
retailers.(TZ70003).or.from.customer.
service (467873). If no new lter is.used,.
turn.the.Water FiLter.setting.to.no.
Note: If.the.appliance.has.not.been.used.
for.a.prolonged.period.(e.g..vacation).the.
lter should be rinsed before the appliance
is.used.again..To.do.this,.simply.dispense.a.
cup.of.hot.water.
j 3.sec. + >
The.display.5.contrast.can.be.set.from.–20.
to.+20..The.factory.setting.is.+0.
Enter.the.required.setting.with.the.knob.6.
●
j 3.sec. + >
You.can.cancel.your.own.settings.and.
reactivate.the.factory.settings.
To.activate.the.factory.settings,.press.the.
●
start
.button.8.
contrast
Factory settings
Note: Rinsing the lter simultaneously
activates the setting for the “change lter”
display..
You can nd detailed information about the
water lter in the enclosed lter instructions.
Note:.The.appliance.can.also.be.reset.to.
the.factory.settings.using.a.combination.of.
buttons..The.appliance.must.be.switched.off.
fully.
Hold down the <.and.>.buttons.4.and.
●
the.on/off.switch.1.O./.I.at.the.same.time.
for.at.least.5.seconds..Press.the.
button.8 The.factory.settings.are.now.
reactivated.
start
.
11
Page 16

deen
Preparation
using coffee beans
This.fully.automatic.espresso.machine.
grinds.beans.freshly.for.each.brew..If.
possible,.use.only.beans.for.fully.automatic.
coffee.and.espresso.machines..For.optimal.
quality,.deep-freeze.the.beans.or.store.in.a.
cool.place.in.sealed.containers..Coffee.
beans.can.be.ground.while.frozen.
Important:.Fill.the.water.tank.11.with.fresh.
water.every.day..The.tank.should.always.
contain sufcient water for operating the
appliance.
Tip:.Pre-warm.cups,.especially.small,.thick.
espresso.cups,.on.the.cup.warmer.18.
Different.coffee.drinks.can.be.prepared.
quite.simply.at.the.press.of.a.button..
Drink preparation without milk
The.appliance.must.be.ready.for.use.
Place.the.pre-warmed.cup(s).under.the.
●
coffee.outlet.9..
Select.the.required.espresso.or.coffee.by.
●
turning.the.knob.6..The.display.5.shows.
the.selected.drink.along.with.the.setting.
for.coffee.strength.and.the.per-cup.
quantity.for.this.drink.
Drink preparation with milk
The.appliance.must.be.ready.for.use.
● Place the pipe 10d.of.the.milk.frother.10.
deep.in.the.milk.container.32.
Swivel.the.coffee.outlet.9.to.the.right.until.
●
it.clicks.into.place.
Place.the.pre-warmed.cup.or.glass.under.
●
the.coffee.outlet.9.and.milk.frother.10.
Select.the.required.Macchiato.Å.or.
●
Cappuccino.Æ.by.turning.the.knob.6..The.
display.5.shows.the.selected.drink.along.
with.the.setting.for.coffee.strength.and.
the.per-cup.quantity.for.this.drink..
caPPuccino Ë Í
À Á Å Æ È É
The.settings.can.be.altered.(see.“Controls”).
Press.the.
●
delivered.into.the.cup.or.glass..Then.the.
coffee.is.brewed.and.dispensed.into.the.
cup.or.glass.
Important: Dried milk residue is difcult to
remove,.so.clean.the.milk.frother.10.with.
lukewarm.water.immediately.after.use.
(see.“Cleaning.the.milk.system”).
start
.button.8..First.milk.is.
esPresso Ë Í
 à À Á Å Æ
The.settings.can.be.altered.(see.“Controls”).
Press.the.
●
The.coffee.is.brewed.and.then.dispensed.
into.the.cup(s).
12
start
.button.8.
Page 17

deen
Preparation using
ground coffee
This.fully.automatic.espresso.machine.can.
also.be.operated.with.ground.coffee.(not.
instant.coffee.powder).
Drink preparation without milk
Select.À.or.Á.by.turning.the.knob.6.
●
Place.the.pre-warmed.cup(s).under.the.
●
coffee.outlet.9..
Open.the.drawer.20.by.pressing.
●
Pour.in.no.more.than.2.level.measuring.
●
spoons.14.of.ground.coffee.
Warning:.Do.not.use.whole.beans.or.
instant.coffee.
Close.the.drawer.20.
●
Press.the.
●
The.coffee.is.brewed.and.then.dispensed.
into.the.cup(s)..
.
N.B.:.Repeat.the.procedure.for.another.cup.
of.coffee..If.no.coffee.is.taken.within.90.
seconds,.the.brewing.chamber.empties.
automatically to avoid overlling. The appliance.rinses..
Drink preparation with milk
Turn.the.knob.6.to.select.Macchiato.Å.or.
●
Cappuccino.Æ.
Place.the.pipe.10d.of.the.milk.frother.10.
●
in.the.milk.container.32.
Swivel.the.coffee.outlet.9.to.the.right.until.
●
it.clicks.into.place.
Place.the.pre-warmed.cup.or.glass.under.
●
the.coffee.outlet.9.and.milk.frother.10..
Open.the.drawer.20.by.pressing.
●
Pour.in.no.more.than.2.level.measuring.
●
spoons.14.of.ground.coffee.
Warning:.Do.not.use.whole.beans.or.
instant.coffee.
Close.the.drawer.20.
●
Press.the.
●
delivered.into.the.cup.or.glass..After.that.
the.ground.coffee.is.brewed.and.
dispensed.into.the.cup.or.glass.
start
.button.8.
start
.button.8..First.milk.is.
Important: Dried milk residue is difcult to
remove,.so.clean.the.milk.frother.10.with.
lukewarm.water.immediately.after.use.(see.
“Cleaning.the.milk.system”).
N.B.:.Repeat.the.procedure.for.another.
coffee./.milk.drink..If.no.coffee.is.taken.
within.90.seconds,.the.brewing.chamber.
empties automatically to avoid overlling.
The.appliance.rinses..
Preparing milk froth
and warm milk
! Risk of burns
The.milk.frother.10.gets.very.hot..After.use,.
allow to cool down rst before touching.
The.appliance.must.be.ready.for.use.
Place.the.pipe.10d.of.the.milk.frother.10.
●
in.the.milk.container.32..
Place.the.pre-warmed.cup.or.glass.under.
●
the.outlet.of.the.milk.frother.10..
Select.the.required.setting..
●
“Milk.froth”.
turning.the.knob.6..
Press.the.
●
warm milk ows from the outlet of the milk
frother.10 for.about.40.or.60.seconds.
respectively..
Press.the.
●
process.short.
Note: When preparing warm milk you may
hear.a.whistling.sound..This.is.caused.by.
the.milk.frother.10.for.technical.reasons.
Tip: For.optimal.milk.froth.quality,.use.cold.
low-fat.milk.(1.5%.fat).if.possible.
Important: Dried milk residue is difcult to
remove,.so.clean.the.milk.frother.10.with.
lukewarm.water.immediately.after.use.(see.
“Cleaning.the.milk.system”).
or “Warm milk”
È
start
.button.8..Milk.froth.or.
start
.button.8.again.to.cut.the.
É
.by.
13
Page 18

deen
Dispensing hot water
!...Risk of burns
The.milk.frother.10.gets.very.hot..After.use,.
allow to cool down rst before touching.
The.appliance.must.be.ready.for.use.
Place.the.pre-warmed.cup.or.glass.under.
●
the.outlet.of.the.milk.frother.10..
Select.the.required.setting.for.hot.water.
●
.by.turning.the.knob.6..
Ê
Press.the.
●
out.of.the.milk.frother.outlet.10.for.about.
40.seconds.
Press.the.
●
process.short.
N.B.:.It.is.possible.to.set.the.temperature.of.
the.hot.water.(see.“Controls,.°C.button”).
start
.button.8. Hot water runs
start
.button.8.again.to.cut.the.
Maintenance and daily
cleaning
! Risk of electric shock
Unplug the appliance before cleaning it.
Never immerse the appliance in water.
Do not use a steam cleaner.
Wipe the outside of the appliance with a
●
soft,.damp.cloth..Do.not.use.abrasive.
cloths.or.cleaning.agents.
Rinse.the.water.tank.11.and.the.brewing.
●
unit.23.with.water.only.
The.cover.of.the.storage.compartment.25.
●
and.the.drip.tray.panel.26.should.only.be.
wiped.gently.with.a.damp.cloth..Do not
put them in the dish washer.
Remove.grate.for.coffee.outlet.28.and.the.
●
grate.for.the.milk.frother.29..Take.out.the.
drip.tray.for.coffee.outlet.27.with.the.
coffee.grounds.container.30.by.pulling.
them.out.forward,.empty.and.clean..All
these parts can also be cleaned in the
dish washer.
Clean.the.measuring.spoon.14,.aroma.
●
cover.16.and.the.milk.container.32.by.
hand.or.in.the.dish.washer.
Wipe out or vacuum the inside of the
●
appliance.(tray.holders).
Important: Drip.tray.27.should.be.emptied.
and.cleaned.daily.to.prevent.mould.from.
developing.
N.B.:.If.the.appliance.is.cold.when.switched.
on.with.the.a.button.2,.or.if.it.is.set.to.a.
mode.after.brewing.coffee,.it.rinses.
automatically,.in.other.words.the.system.
cleans.itself.
Cleaning the milk system
Clean the milk system 10 immediately after
use!
The.milk.system.10.can.be.pre-cleaned.
automatically.
Select.the.Ì.symbol.in.the.display.5.and.
●
press.the.
start
.button.8.
PLace emPty gLass under Frother,
P
Lace suction PiPe in gLass.
Place.an.empty.glass.under.the.milk.
●
system.10.and.put.the.end.of.the.pipe.
10d.in.the.glass.
Press.the.
●
now lls the glass automatically with wa-
ter.and.draws.it.in.again.through.the.pipe.
10d.for.cleaning..The.rinse.procedure.
stops.automatically.after.about.1.minute.
Now.empty.the.glass.and.clean.the.pipe.
●
10d.
In.addition.to.this,.clean.the.milk.system.
thoroughly.at.regular.intervals.(by.hand.or.
in.the.dishwasher).
Dismantling the milk system 10 for cleaning:
Pull.the.milk.system.10.forward.out.of.the.
●
appliance.
Clean.the.individual.parts.(Fig. C).with.a.
●
detergent.solution.and.a.soft.brush.
Rinse.all.parts.with.clear.water.and.dry.them.
●
Reassemble.all.the.parts.and.replace.fully.
●
in.the.appliance.
Note: All.the.parts.of.the.milk.frother.10.can.
also.be.put.in.the.dishwasher.
start
.button.8..The.appliance.
.start
14
Page 19

deen
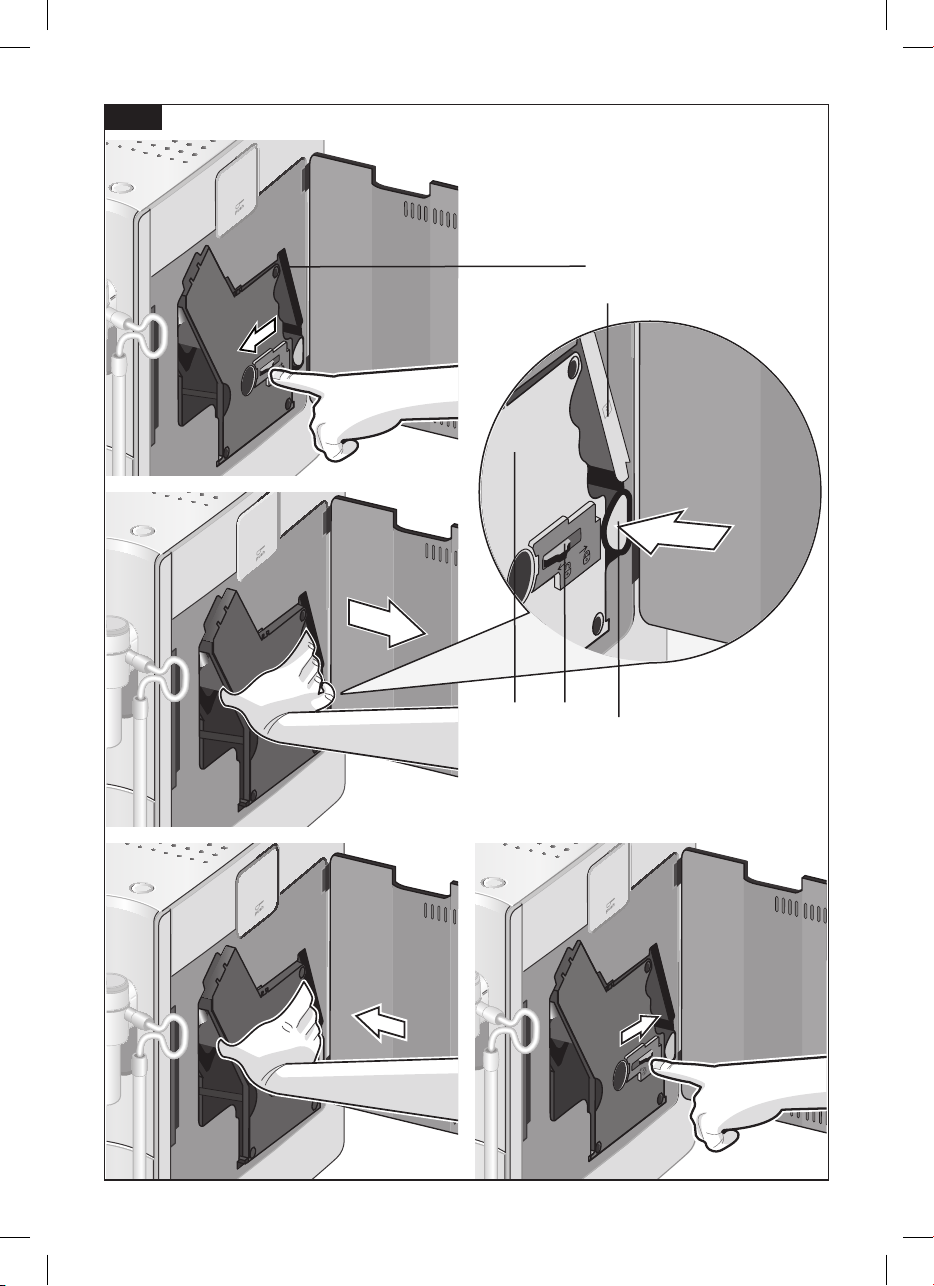
Cleaning the brewing unit
(refer also to the quick reference guide)
In.addition.to.the.automatic.cleaning.programme,.the.brewing.unit.23.should.be.
removed.regularly.for.cleaning.
●
Switch.to.the.“energy.saving.mode”.with.
a.button.2.
the.
Switch.the.appliance.off.completely.at.the.
●
power.on/off.switch.1 O./.I;.no.buttons..
are.lit.
Slide.the.door.opener.22.to.the.right.and.
●
open.the.door.21.to.the.brewing.unit.23.
Slide.the.red.lock.23b.on.the.brewing.unit.
●
23.completely.to.the.left.
Press.the.red.button.23a,.grasp.the.
●
brewing.unit.23.by.the.recessed.grips.
(Fig. E).and.remove.carefully.
Rinse.the.brewing.unit.23.under.running.
●
water.
Important: Clean.without.detergent.and.do.
not.place.in.the.dishwasher.
Wipe out the inside of the appliance with
●
a.damp.cloth.
Allow.the.brewing.unit.23.and.the.inside.
●
of.the.appliance.to.dry.
Reinsert.the.brewing.unit.23.fully.into.the.
●
appliance.
Slide.the.red.lock.23b.fully.to.the.right.
●
and.close.the.door.21.
Tips on energy saving
The.fully.automatic.espresso.machine.
–
switches.to.“energy.saving.mode”.
automatically.after.one.hour.(factory.
setting)..The.appliance.uses.very.little.
power.in.“energy.saving.mode”..The.
default.time.of.one.hour.can.be.altered:.
(see.Menu.settings,.“auto oFF aFter”)...
If.the.appliance.is.not.being.used,.switch.
–
it.off.at.the.power.on/off.switch.1.O./.I on.
the.front.
If.possible,.do.not.interrupt.coffee.or.milk.
–
froth.dispensing..Cutting.the.coffee.or.
milk.froth.dispensing.process.short.
results.in.higher.energy.consumption.and.
in.more.residual.water.collecting.in.the.
drip.tray.
Descale.the.appliance.regularly.to.avoid.a.
–
build-up of limescale. Limescale residue
results.in.higher.energy.consumption.
Storing accessories
The.espresso.machine.has.special.compartments.for.storing.the.accessories.and.
quick.reference.guide.inside.the.appliance.
To.store.the.measuring.spoon.14,.milk.
●
pipe.10d.and.tube.10c,.remove.the.water.
.tank.11.and.insert.the.parts.in.the.shaped.
recesses.13.
The.quick.reference.guide.has.its.own.
compartment.by.the.brewing.unit.23.
Open.the.door.21.to.the.brewing.unit.
●
Grasp.the.red.cover.25.to.the.storage.
●
compartment.24.by.the.tab.and.remove.
Stow.away.the.quick.reference.guide,.
●
replace.the.cover.25.and.close.the.door.
to.the.brewing.unit.21.
15
Page 20

deen
Service Programmes
Tip:.Refer.also.to.the.quick.reference.guide.
in.the.storage.compartment 24.
At.regular.intervals,.the.display.5.shows.the.
following.texts:.
service - descaLe or
s
ervice - cLean.or..
service - caLc‘n‘cLean..
The.appliance.should.be.cleaned.or.
descaled.immediately.using.the.
corresponding.program..You.also.have.the.
option.of.combining.both.processes.with.the.
Calc‘n‘Clean.function.(see.“Calc‘n‘Clean”)..
If.the.service.program.is.not.run.as.
instructed,.the.appliance.may.be.damaged.
Warning
Each time you run the service program,
you should follow the instructions for using
the descaling and cleaning agents.
Never interrupt the service program!
Do not drink the liquids!
Never use vinegar, vinegar-based products,
citric acid or citric acid-based products!
Never put descaling tablets or other descaling agents in the ground coffee drawer or
the drawer for cleaning tablets 20!
For descaling, use only the descaling
tablets included with the appliance. They
have been developed specially for this coffee
machine to optimize the descaling process.
Specially developed descaling and
cleaning tablets are available from
retailers or customer service.
Order.number Retail Customer.
service
Cleaning..
tablets
Descaling.
tablets
Important: If there is a lter in the water
tank.11,.it.needs.to.be.removed.before.the.
service.program.is.run.
TZ60001 310575
TZ60002 310967
Descaling
esPresso Ë Í
service - descaLe
i - button 3 sec.
The.
start
.button.8 ashes while the different
descaling.processes.are.running.
The gures on the top right indicate the
progress.of.the.program.
Hold the j.button.7.down.for.at.least.3.
●
seconds.
descaLestart
Press.the.
●
guide.you.through.the.program.
emPty driP tray
r
ePLace driP tr ay
Empty.drip.tray.27.and.replace.them.
●
PLace 0.5 L container under miLk
Frother
Place.a.container.with.a.capacity.of.0.5.
●
litres.under.the.milk.frother.10.
Press.the.
●
Note: If the water lter is activated, the
display will prompt you to remove the lter,
then.press.the.
remove FiLter start
add 0.5 L Water and descaLer
start
Pour.lukewarm.water.into.the.empty.
●
water.tank.11.up.to.the.“0.5”.litre.mark.
and.dissolve.2.Siemens.descaling.tablets.
in.it.
Press.the.
●
program.will.now.run.for.about.20.
minutes.
descaLing
start
.button.8;.the.display.5.will.
start
start
.button.8..
start
.button.8.again.
start
.button.8..The.descaling.
16
Page 21

deen
not enough descaLing
FLuid. reFiLL FLuid
Note: If.there.is.not.enough.descaling.
solution.in.the.water.tank.11,.the.
corresponding.prompt.is.displayed..Pour.in.
descaling.solution.and.press.
start
8.again.
cLean and reFiLL Water tank start
Rinse.the.water.tank.11 and rell it with
●
fresh.water.up.to.the.“max”.mark.
Press.the.
●
program.now.runs.for.about.1.minute.and.
rinses.the.appliance.
start
.button.8..The.descaling.
descaLing
e
mPty driP t ray.
rePLace driP tray
Empty.drip.tray.27.and.replace.them.
●
The.appliance.has.completed.descaling.and.
is.ready.for.use.again.
Cleaning
esPresso Ë Í
service - cLean
i - button 3 sec.
The.
start
.button.8 ashes while the different
cleaning.processes.are.running.
The gures on the top right indicate the
progress.of.the.program.
Fill.the.water.tank.11.up.to.the.“max”.
●
mark.
Hold the j.button.7.down.for.at.least.3.
●
seconds.
cLeanstart
Press.the.
●
guide.you.through.the.program.
emPty driP tray
r
ePLace driP tr ay
Empty.drip.tray.27.and.replace.them..The.
●
appliance.rinses.twice.
start
.button.8;.the.display.5.will.
Position sWiveL arm
Swivel.the.coffee.outlet.9.to.the.left.until.it.
●
clicks.into.place.
cLeaning
oPen draWer
Open.the.drawer.20.by.pressing.
●
insert siemens cLeaning tabLet and
cLose draWer
Drop.a.Siemens.cleaning.tablet.in.the.
●
drawer.20 and.close.
Press s tart
Press.the.
●
program.will.now.run.for.about.7.minutes.
start
.button.8..The.cleaning.
cLeaning
e
mPty driP t ray
r
ePLace driP tr ay
17
Page 22

deen
●
Empty.drip.tray.27.and.replace.them.
The.appliance.is.ready.for.use.again.
Calc‘n‘Clean
Calc‘n‘Clean.combines.the.separate.
functions.of.descaling.and.cleaning..If.both.
programs.are.due.to.be.run.soon,.the.
espresso.machine.automatically.suggests.
this.service.program.
esPresso Ë Í
service - caLc‘n‘cLean
i - button 3 sec.
The.
start
.button.8 ashes while the different
Calc‘n‘Clean.processes.are.running..The.
gures on the top right indicate the progress
of.the.program.
Hold the j.button.7.down.for.at.least.3.
●
seconds.
caLc‘n‘cLean start
Press.the.
●
guide.you.through.the.program.
emPty driP tray
rePLace driP tray
Empty.drip.tray.27.and.replace.them.
●
Swivel.the.coffee.outlet.9.to.the.right.until.
●
it.clicks.into.place.
Place.a.container.with.a.capacity.of.at.
●
least.1.litre.under.the.milk.frother.10.
Press.the.
●
rinses.twice.
cLeaning
o
Pen draWer
Open.the.drawer.20.by.pressing.
●
start
.button.8;.the.display.will.
start
.button..The.appliance.
insert siemens cLeaning tabLet and
cLose draWer
Drop.a.Siemens.cleaning.tablet.in.the.
●
drawer.20.and.close.
Note: If the water lter is activated, the
display.5 will prompt you to remove the lter
and.press.the.
start
.button.8.again.
remove FiLterstart
add 0.5 L Water and descaLer
start
Pour.lukewarm.water.into.the.empty.
●
water.tank.11.up.to.the.“0.5”.litre.mark.
and.dissolve.2.Siemens.descaling.tablets.
in.it.
Press.the.
●
program.now.runs.for.about.20.minutes.
start
.button.8..The.descaling.
descaLing
not enough descaLing
FLuid. reFiLL FLuid
Note: If.there.is.not.enough.descaling.
solution.in.the.water.tank.11,.the.
corresponding.prompt.is.displayed..Pour.in.
descaling.solution.and.press.
start
.8.again.
cLean and reFiLL Water tank
start
Rinse.the.water.tank.11 and rell it with
●
fresh.water.up.to.the.“max”.mark.
Press.the.
●
program.now.runs.for.about.1.minute.
more,.followed.by.the.cleaning.program.
for.about.7.minutes,.and.rinses.the.
appliance.
start
.button.8..The.descaling.
descaLing
cLeaning
emPty driP tray
r
ePLace driP tr ay
Empty.drip.tray.27.and.replace.them.
●
The.appliance.has.completed.descaling.and.
cleaning.and.is.ready.for.use.again.
18
Page 23
deen
Important:.If.one.of.the.service.programs.is.
interrupted,.e.g..by.a.power.outage,.
proceed.as.follows:
●
Rinse.the.water.tank.11 and rell it with
fresh.water.up.to.the.“max”.mark.
start
●
Press.the.
program.now.runs.for.about.3.minutes,.
and.rinses.the.appliance.
.button.8..The.cleaning.
cLeaning
emPty driP tray
r
ePLace driP tr ay
Empty.drip.tray.27.and.replace.them.
●
The.appliance.is.ready.for.use.again.
Frost protection
! .To avoid damage from low tempera-
tures during transport and storage, the
appliance must be completely emptied
rst.
Note:.The.appliance.must.be.ready.for.use.
and.the.water.tank.11 lled.
Place.a.large,.narrow.receptacle.under.
●
the.milk.frother.10.
Select.the.“Milk.froth”.È.setting,.start.and.
●
release.steam.for.about.15.seconds.
Switch.the.appliance.off.at.the.power.on/
●
off.switch.1.O./.I..
Empty.the.water.tank.11.and.the.drip.tray.
●
27.
Disposal
This.appliance.is.labelled.in.accordance.
with.the.European.Directive.2002/96/EG.
relating.to.waste.electrical.and.electronic.
equipment – WEEE. The directive provides
the.framework.for.the.EU-wide.take-back.
and.disposal.of.end-of-life.appliances.
Please.ask.your.specialist.retailer.about.
current.disposal.facilities.
A
Accessories
The.following.accessories.can.be.obtained.
from.retailers.and.customer.service.
Order..
number
Cleaning.
tablets
Descaling.
tablets
Water filters TZ70003 467873
Retail Customer.
service
TZ60001 310575
TZ60002 310967
Guarantee
The.guarantee.conditions.for.this.appliance.
are as dened by our representative in the
country.in.which.it.is.sold..Details.regarding.
these.conditions.can.be.obtained.from.the.
dealer.from.whom.the.appliance.was.purchased..The.bill.of.sale.or.receipt.must.be.
produced.when.making.any.claim.under.the.
terms.of.this.guarantee.
Right of modication reserved.
19
Page 24

deen
Simple troubleshooting
Problem Cause Solution
Display.shows
reFiLL bean container.
although.the.bean.container.
15.is.full,.or.the.grinding.unit.
does.not.grind.the.beans.
No.hot.water.dispensed. The.milk.frother.10.or.its.
Too.little.or.no.milk.froth.
or.
The.milk.frother.10.does.not.
draw.the.milk.in.
Coffee.dispensing.slows.to.
a.trickle.or.stops.completely.
Beans.are.not.falling.into.
the.grinding.unit.
(beans.too.oily).
holder.is.soiled.
The.milk.frother.10.or.its.
holder.is.soiled.
Milk.unsuitable.for.frothing. Use.low-fat.milk.(1.5.%.fat).
The.milk.frother.10.is.not.
correctly.assembled.
Coffee is ground too nely.
Pre-ground.coffee.is.too.
ne.
Build-up.of.limescale.in.the.
appliance.
Gently.tap.the.bean.
container.15.
Change.the.type.of.coffee.if.
necessary.
When the bean container 15.
is.empty,.wipe.it.with.a.dry.
cloth.
Clean.the.milk.frother.10.or.
its.holder.
Clean.the.milk.frother.10.or.
its.holder.
Assemble.the.milk.frother.10.
correctly.
Adjust.the.grinding.unit.to.a.
coarser.setting..Use.coarser.
pre-ground.coffee.
Descale.the.appliance.
Coffee.has.no.“crema”. Unsuitable.type.of.coffee. Change.type.of.coffee.used.
The.beans.are.no.longer.
fresh.
The.grinding.setting.is.not.
suitable.for.the.beans.
Coffee.is.too.“acidic”. The
Coffee.is.too.“bitter”. The.grinding.setting.is.too.
Display.shows.
P
Lease contact hotLine.
If you are unable to solve the problem, please call the hotline.
20
error
.grinding.setting.is.too.
.or.the.pre-ground.
coarse
coffee.is.too.coarse.
Unsuitable.type.of.coffee Use.a.darker.roast.
ne or the pre-ground.
coffee is too ne.
Unsuitable.type.of.coffee. Change.type.of.coffee.used.
The.appliance.has.a.fault. Please.call.the.hotline.
Use.fresh.beans.
Adjust.grinding.setting.to.
ne.
Adjust.the.grinding.unit.to.a.
ner setting or use ner pre-
ground.coffee.
Adjust.the.grinding.unit.to.a.
coarser.setting.or.use.
coarser.pre-ground.coffee.
Page 25
Simple troubleshooting
Problem Cause Solution
The.water.filter.does.not.
stay.in.position.in.the.water.
tank.11.
The.coffee.grounds.are.not.
compact.and.are.too.wet.
Display.shows..
PLease check breWing
unit
Coffee.or.milk.froth.quality.
varies.considerably..
Water dripped onto the inner
floor.of.the.appliance.when.
the.drip.tray.was.removed.
If you are unable to solve the problem, please call the hotline.
The.water.filter.is.not.
correctly.engaged.
The.grind.setting.is.too.fine.
or.too.coarse,.or.you.are.
not.using.enough.preground.coffee.
Brewing.unit.is.soiled. Clean.brewing.unit.
Too.much.pre-ground.
coffee.in.the.brewing.unit.
Build-up.of.limescale.in.the.
appliance.
Drip.tray.removed.too.early. Wait a few seconds after
Press.the.water.filter.firmly.
into.the.tank.attachment.
until.you.feel.it.engage.
Adjust.the.grinding.unit.to.a.
coarser.or.finer.setting,.or.
use.2.level.measuring.
spoons.of.ground.coffee.
Clean.brewing.unit..
(Pour.in.no.more.than.2.
level.measuring.spoons.of.
ground.coffee).
Descale.the.appliance.with.
two.descaling.tablets.as.
described.in.the.instructions.
the.last.drink.was.dispensed.
before.removing.the.drip.
tray.
deen
21
Page 26

defr
Sommaire
Présentation..............................................43
Avant.la.première.utilisation......................44
Eléments.de.commande. ...........................45
−.Interrupteur.électrique.O./.I. ...................45
−.Touche.a. ...............................................45
−.Bouton.rotatif. .........................................45
−.Touches.de.sélection.<.et.>................45
−.Ecran. .....................................................46
−.Touche.
−.Touche.°C. ..............................................48
−.Touche.j.réglages. .................................49
− Régler la nesse de la mouture. ............49
−.Chauffe-tasses. ......................................49
Réglages.menu.........................................50
− Langue. ..................................................50
− Dureté eau. ............................................50
−.Détartrage. .............................................50
−.Nettoyage. ..............................................50
−.Calc‘n‘Clean. ..........................................50
−.AR.chauf-tasse......................................51
− AR auto dans. ........................................51
−.Filtre.eau. ...............................................51
−.Contraste...............................................51
−.Réglage.usine. .......................................51
Préparation.avec.du.café.en.grains. ..........52
Préparation.à.partir.de.café.moulu.. ..........53
Préparer.de.la.mousse.de.lait.et..
du.lait.chaud. .............................................53
Préparer.de.l’eau.chaude. .........................54
Entretien.et.nettoyage.quotidien. ...............54
−.Nettoyage.du.mousseur.de.lait. .............55
−.Nettoyer.l‘unité.de.percolation...............55
Rangement.des.accessoires. ....................55
Conseils.pour.économiser.l’énergie..........56
Programmes.de.maintenance...................56
−.Détartrage. .............................................56
−.Nettoyage. ..............................................57
−.Calc‘n‘Clean. ..........................................58
Protection.contre.le.gel. .............................59
Mise.au.rebut. ............................................59
Accessoires. ..............................................59
Garantie. ....................................................59
Eliminer soi-même les problèmes simples.60
start
. ..........................................48
Consignes de sécurité
Lire attentivement le mode d’emploi,
se conformer à ses indications et le
conserver à portée de la main !
Cette machine à café est destinée à un
usage ménager, dans des quantités
généralement consommées à domicile
et en aucun cas pour une utilisation
commerciale.
! Risque de choc électrique !
Pour.le.raccordement.et.l‘utilisation.de.la.
machine,.respecter.impérativement.les.
indications gurant sur la plaque signaléti-
que..N’utiliser.la.machine.que.si.le.cordon.
électrique.et.la.machine.ne.présentent.
aucun.dommage..
N’utiliser.la.machine.qu’à.l’intérieur.de.locaux,.à.température.ambiante..
Ne pas coner l’appareil à des enfants ou à
des.personnes.aux.capacités.sensorielles.
ou.intellectuelles.diminuées.ou.ne.disposant.pas.d’une.expérience.ou.d’une.
connaissance sufsante, sauf si elles le font
sous surveillance ou si elles ont bénécié
préalablement.d’une.information.à.propos.
de.la.manipulation.de.l’appareil.de.la.part.
de.la.personne.responsable.de.leur.sécurité.
Bien surveiller les enfants an de les empêcher.de.jouer.avec.l’appareil.
En.cas.de.défaut,.débrancher.immédiate-
ment le cordon électrique. Les réparations
sur.la.machine,.par.ex..le.remplacement.du.
cordon électrique, doivent être effectuées
uniquement.par.notre.Service.après-vente.
an d‘éliminer tous les risques. Ne jamais
plonger.la.machine.ou.le.cordon.électrique.
dans.l’eau..
Ne.pas.glisser.les.doigts.à.l’intérieur.du.
moulin.
! Risque de brûlure !
La buse Eau chaude / Vapeur devient
brûlante..Après.utilisation,.bien.laisser.
refroidir.la.buse.avant.de.la.saisir.
22
Page 27

defr
chère.amatrice.de.café,..
cher.amateur.de.café,
.
Félicitation.pour.avoir.choisi.la.cafetière.
Siemens.
Présentation
Figures A, B, C, D et E
. 1.Interrupteur.électrique.O./.I
2.Touche.a
. 3.Touche.°C.(température./.sécurité..
. .enfants).
. 4.Touches.de.sélection.<.>
5.Ecran
. .a) Ligne d‘état
. .b) Ligne de sélection
. .c) Ligne de navigation
. 6 Bouton.rotatif.pour.réglages.à.l’écran
. 7..Touche.j.(menu.Info)
. 8.Touche.
. 9. .Bec.verseur.du.café,.réglable.en.
hauteur.et.pivotant
.10. .Mousseur.lait,.réglable.en.hauteur..
(production.de.mousse.de.lait./.eau.
chaude)
. .a).partie.supérieure
. .b).partie.inférieure
. .c) exible
. .d).tube.mousseur
.11 Réservoir.d’eau.amovible
12.Couvercle.du.réservoir.d’eau
13 Logements.
(cuillère-dose.et.accessoire.mousseur.
lait)
.14.Cuillère-dose.(sert.de.poignée.pour..
placer le ltre d‘eau)
.15.Bac.à.café
.16.Couvercle.préservateur.d’arôme
17 Sélecteur de réglage de nesse de
. .mouture.
start
(boissons./.programmes)
Ce.mode.d’emploi.décrit.différents.modèles.
qui.se.différencient.par.leur.niveau.
d’équipement.
Veuillez.également.tenir.compte.du.
Mémento.fourni..
Un.logement.24.a.été.prévu.pour.le.
conserver.à.portée.de.main.dans.la.
machine.
18.Chauffe-tasses
19.Bouton.de.commande.pour.chauffe-.
. .tasses.éclairé
20. .Tiroir.à.café..
(café.en.poudre./.pastille.de.nettoyage)
21.Volet.de.la.chambre.de.percolation
22..Ouvre-volet.
.23..Unité.de.percolation.
. .a).Bouton.poussoir.
. .b).Verrouillage
24 Logement du Mémento
25.Verrouillage.logement
26.Panneau.des.bacs.collecteurs
27.Bac.collecteur.du.bec.verseur.du.café
28.Grille.bec.verseur.du.café
29.Grille.mousseur.de.lait
30.Récipient.pour.marc.de.café
31 Logement du cordon électrique
32.Réservoir.de.lait.
23
Page 28
defr
Avant la première
utilisation
Généralités
Utiliser.uniquement.de.l’eau.pure,.sans.gaz.
carbonique.et.de.préférence.du.café.en.
grain.pour.espresso.ou.pour.percolateur..
Ne.pas.employer.des.grains.de.café.avec.
glaçage,.des.grains.caramélisés.ou.enrobés.d’une.substance.sucrée.quelconque.;.
ils.encrassent.et.obturent.l’unité.de.
.passage..
Sur.cette.machine,.il.existe.un.réglage.de.la.
dureté.de.l’eau..En.usine,.la.machine.est.
réglée.sur.la.dureté.4..Se.servir.de.la.bandelette.fournie.pour.déterminer.la.dureté.de.
l’eau.
Si.la.dureté.est.différente.de.la.valeur.4,.
programmer.la.machine.en.conséquence.
après.la.mise.en.route.(voir.point.
«. . Réglages.menu.dureté eau »).
Mise en service de la machine
Placer.la.machine.sur.une.surface.plane.
●
et.capable.de.supporter.son.poids..
Info : la.machine.à.café.est.équipée.de.
quatre roulettes en dessous ; elle peut être
positionnée en forme d’arc an de faciliter
la.commande.et.l’accès.
Extraire.du.logement.31.la.longueur.de.
●
cordon.électrique.nécessaire.et.brancher.
dans.une.prise..Pour.ajuster.la.longueur.
du cordon, il suft de le tirer ou de le
repousser.à.l’intérieur..Pour.cela,.placer.
la.machine.sur.un.bord.de.table,.par.ex.,.
et.tirer.le.câble.vers le bas.ou.le.pousser.
vers le haut..
Rabattre.vers.le.haut.le.couvercle.du.
●
réservoir.d'eau.12.
Retirer.le.réservoir.d'eau.11,.le.rincer.et.le.
●
remplir.d’eau.froide..Ne.pas.dépasser.le.
repère.«. . max ».
Placer.le.réservoir.d'eau.11 bien.vertical.
●
et.appuyer.pour.le.faire.descendre.
Refermer.le.couvercle.du.réservoir..
●
d'eau.12.
Remplir.de.café.en.grains.le.bac..
●
à.café.15.
Appuyer.sur.l'interrupteur.électrique.1
●
O./.I,.la.touche.8.
l’écran.5, s’afchent différentes langues.
A.l’aide.des.touches.de.sélection.4..
●
start
.s’allume.et,.à.
<.et.>.choisir.la.langue.souhaitée.;.tous.
les textes écrans s’afcheront ensuite
dans.cette.langue...
.
.
.
.
.
.
.
.
.
La langue sélectionnée est identiée par
un.cadre..Vous.avez.le.choix.entre.les.
langues.suivantes.:.
Language
engLish
Pycckий
nederLands
star t
engLish
P
ycckий
n
ederLands
F
rançais
i
taLiano
s
venska
e
sPañoL
P
oLski
● Appuyer sur la touche 8
sélectionnée.est.enregistrée,.la.touche.2.
start
,.la.langue.
a.s’allume.
.
24
Page 29

defr
● Appuyer sur la touche 2
marque.s’allume.à.l’écran.5. La machine
se.met.à.chauffer.et.à.effectuer.un.
rinçage.;.un.peu.d’eau.s’écoule.du.bec.
verseur.du.café.9. Lorsque les symboles
de.sélection.de.la.préparation.apparaissent.à.l’écran.5 la machine est prête à
fonctionner..
a,.le.logo.de.la.
esPresso Ë Í
 à À Á Å Æ
Info : la.machine.à.café.est.programmée.en.
usine.de.manière.à.fonctionner.de.manière.
optimale..Au.bout.de.1.heure,.la.machine.se.
place.automatiquement.en.«. . mode.Eco. . ».
(voir.point.«. . Réglages.menu.ar auto
dans. . »).
Conseil pratique : lors.de.la.première.
utilisation ou après une période d’arrêt
prolongée,.la.première.tasse.de.café.n’a.
pas.tout.l’arôme.désiré.
Eléments de commande
Interrupteur électrique O / I
L’interrupteur électrique 1.O / I permet.
d‘activer.ou.de.désactiver.entièrement.le.
«. . mode.Eco. . ».de.la.machine..En.«. . mode.
Eco. . »,.seule.la.touche.2.a.est.allumée.
Important : ne couper l’alimentation que
lorsque la machine est en « mode Eco »
afin que le rinçage automatique soit
effectué.
Touche a
La touche 2.a.place.la.machine.en.position.
marche (prête à fonctionner) ou la replace
en.«. . mode.Eco. . ».
La touche 2.a.clignote.tant.que.la.machine.
effectue.son.rinçage..
La machine n’effectue pas de rinçage
lorsque.:
elle.est.encore.chaude.au.moment.de.la.
●
mise.en.marche.
il.n’a.pas.été.préparé.de.café.avant.le.
●
passage.en.«. . mode.Eco. . ».
La machine est prête à fonctionner lorsque
les.symboles.de.sélection.de.boisson.et.la.
touche.8
start
sont.allumés.à.l’écran.5..
Une.fois.effectuée.la.mise.en.service.de.la.
machine,.la.présence.d‘une.mousse.dense.
et ne sur le café n‘est obtenue qu‘après
avoir.préparé.plusieurs.tasses.
Bouton rotatif
Le bouton rotatif 6.sert.à.naviguer.dans.
l‘écran.5.en.tournant.vers.la.gauche.et.la.
droite ; il permet aussi de modier certains
paramètres.dans.le.menu.
Touches de sélection < et >
L’activation des touches de sélection 4.<.et.
> permet de naviguer à l’écran (Ligne de
navigation.5c).vers.le.bas.et.vers.le.haut.
25
Page 30

defr
Ecran
A.l‘aide.des.symboles.Boissons.au.café,.
Arôme.et.Quantité.ainsi.que.des.textes.de.
réglage,.l‘écran.5 afche en permanence
les opérations en cours et les messages. Le
bouton.rotatif.6.et.les.touches.de.sélection.
4 servent à effectuer les réglages. Le
réglage sélectionné est identié par un
cadre.
esPresso ËË Í
5a
 à À Á Å Æ
La ligne d‘état 5a.de.l‘écran.5.indique.le.
nom.de.la.boisson,.ainsi.que,.pour.les.
boissons.au.café,.l‘arôme.réglé,.par.ex..55.
et.la.quantité,.par.ex..�..Sur.la.ligne.de.
sélection.5b gurent les symboles pour le
choix.des.boissons.
Les èches de la ligne de navigation 5c.
indiquent.la.direction.où.se.trouvent.encore.
des.niveaux.de.menu.
Messages à l’écran :
L’écran 5 afche différents messages.
Informations :.
Patientez svP
Invitations à agir :
remPLir Le réservoir d‘eau
contrôLer Le réservoir d‘eau
PLacer Le bac coLLecteur
vider Le bac coLLecteur
remPLir Le bac à caFé
b
P
ivoter Le bec verseur
PLacer L‘ embout Pour mousse
remPLacer L‘unité de Passage
c
Femer Le voLet
contrôLer L‘unité de Passage
mettre du caFé
Fermer Le tiroir
changer Le FiLtre
détartrer svP
n
ettoyer svP
c
aLc‘n‘cLean
temPérat ur e troP basse
Patientez svP
s
urtension ou sous-tension
26
Page 31

esPresso ËË Í
Å Æ È É Ê
Á
Sélections possibles
.2 x esPresso.
Â
.esPresso. Á.caFé
À
.
.macchiato
Å
Ã
Æ
defr
.2 x caFé
.caPPuccino
esPresso Ë Í
5 55 555
esPresso Ë Í
� Ð Ò
mousseur de Lait
Arôme du café (uniquement pour les
boissons au café)
.mousse Lait.
È
.eau chaude.
Ê
Lait chaud
É
r
incer brièvement
Ì
5 5 5 5 5 5
. Doux. Normal. Fort
Quantité (uniquement pour les
boissons au café)
� Ð Ò
. réduite. moyenne. importante
27
Page 32

defr
Touche start
Appuyer.sur.la.touche.8.
préparation.d‘une.boisson.ou.pour.effectuer.
un.programme.de.Service.
Pour.réduire.la.quantité.de.boisson.appuyer.
de.nouveau.sur.la.touche.8.
de.préparation.
Touche °C
La touche 3.°C.assure.le.réglage.de.la.
température.du.café.et.de.l‘eau.chaude.
(appui.bref).ainsi.que.l‘activation.et.la.
désactivation.de.la.sécurité enfants.
(maintenir.appuyée.durant.3.s.mini.).
Régler la température :
Appuyer.brièvement.sur.la.touche.3.°C.et.à.
l’aide.des.touches.4.<.et.>.ainsi.que.du..
bouton.rotatif,.effectuer.les.réglages.
start
.pour.lancer.la.
start
.en.cours.
temPérature
caFé
normaL
eau chaude
Sécurité enfants
An d’éviter que les enfants ne se brûlent
ou.s’ébouillantent,.il.est.possible.de.
verrouiller.la.machine.
● Maintenir appuyée la touche 3 °C.durant.
au.moins.3.secondes.;.l’écran.5 afche
une.clé,.la.sécurité.enfants.est.activée.
Aucune.commande.n’est.plus.possible,.le.
chauffe-tasses.18.est.désactivé.
esPresso Ë Í
● Pour désactiver la sécurité enfants,
maintenir.appuyée.la.touche.3.°C.durant.
3 secondes au moins, la clé gurant à
l’écran.5.disparaît.
temPérature
caFé
eau chaude
Appuyer.de.nouveau.sur.la.touche.3.°C.
pour.enregistrer.et.revenir.à.la.sélection.des.
boissons.
Les réglages s’appliquent automatiquement
à.tous.les.modes.de.préparation.
28
<90°c
Page 33

defr
Touche j réglages
La touche 7.
informations.(appui.bref).et.à.effectuer
des réglages (maintenir.appuyée.durant.3.s.
au.moins).
Appeler des informations
Dans.le.menu.Info,.il.est.possible.d‘appeler.
les.informations.suivantes.:
–
nom.de.boissons.préparées.depuis.la.
mise.en.service.de.la.machine.à.café
–
date.de.la.prochaine.maintenance.
●
appuyer.brièvement.sur.la.touche.7.j.et.
naviguer.à.l’aide.des.touches.4.<.et.>.
j.sert.à.appeler des
menu inFo
détartrage
nettoyer
FiLtre non PLacé
changer FiLtre
xxx tasses
xxx tasses
xxx tasses *
menu inFo
nbre caFés xx
n
bre boissons Lait xx
Q
té eau bouiLLante x L
* apparaît uniquement lorsque le ltre est
activé.
Appuyer.brièvement.sur.la.touche.7.j.pour.
revenir.à.la.sélection.de.boissons..Après.
env. 10 secondes sans conrmation, la
machine.se.replace.automatiquement.en.
mode.de.sélection.des.boissons.
Régler la nesse de la mouture
Le sélecteur 17.de.réglage.de.la.mouture.
du café permet de régler la nesse de
mouture.souhaitée.du.café.
Attention
Modifier le réglage de la mouture
uniquement lorsque le broyeur fonctionne.
Sinon la machine peut être endommagée.
● Lorsque le broyeur fonctionne, régler le
sélecteur.17 entre une mouture ne • • •.
et une mouture plus grossière ● ● ●.
Info : le.nouveau.réglage.n’est.perceptible.
qu’à.la.seconde.ou.la.troisième.tasse.
Conseil pratique :.régler.une.mouture.plus.
fine.pour.les.grains.torréfiés.foncés.et.un.
pouture.plus.grossière.pour.les.grains.torréfiés.clairs.
Chauffe-tasses
! Attention, le chauffe-tasses 18
devient très brûlant !
La machine à café est équipée d‘un
chauffe-tasses.18 qui peut être activé ou
désactivé.manuellement.à.l‘aide.du.bouton.
19. Lorsque le chauffe-tasses 18.est.
allumé,.le.bouton.19.est.éclairé.
Conseil pratique : Pour.réchauffer.de.
manière.optimale.les.tasses,.les.poser.sur.
le.chauffe-tasses.18.ouverture.dirigée.vers.
le.haut.
Effectuer les réglages
(voir.point.«. . Réglages.menu. . »).
29
Page 34

defr
Réglages menu
● Maintenir appuyée durant 3 s au moins la
touche.7.j.
Les différentes possibilités de réglage
s’afchent.
régLages
Langue Français
dureté eau
détartrage
Dans.la.suite.du.texte.de.ce.mode.d’emploi,.
chaque.nouveau.réglage.commence.par..
j 3.s + >
précise.
Les touches 4.
sélectionner.les.différentes.possibilités.de.
réglage.
suivi.d'une.description.
.
<.et.>.permettent.de.
régLages
dureté e au
détartrage
nettoyage
star t
j 3.s + >
● Tourner le bouton rotatif 6.pour.
sélectionner.la.langue.souhaitée
j 3.s + >
● Tourner le bouton rotatif 6.pour.sélection-
ner.la.dureté.de.l’eau.:.
Info : le.réglage.correct.de.la.dureté.de.
l’eau.est.important.car.il.permet.à.la.machine.d’indiquer.le.moment.où.un.détartrage.est.nécessaire..Par.défaut,.la.dureté.
de.l’eau.est.réglée.sur.4..
La dureté de l’eau peut être déterminée à
l’aide de la bandelette fournie ou être
demandée.au.Service.des.Eaux.local..
● Plonger brièvement la bandelette de test
dans.l‘eau.et.lire.le.résultat.qui.apparaît.
au.bout.de.1.minute.
Niveau Dureté.de.l’eau
1
2
3
4
Langue.
dureté eau
Allemagne.
(°dH)
1-7
8-14
15-21
22-30
1,2,3.et.4.
France (°fH)
1-13
14-25
26-38
39-54
Remarque : les modications effectuées
sont.automatiquement.enregistrées..
Aucune.manipulation.supplémentaire.n‘est.
nécessaire.
.
30
j 3.s + >
● Si la machine a besoin d’un détartrage,
appuyer.sur.la.touche.8.
le.programme.de.détartrage.(voir.point.
«. . Détartrage. . »).
j 3.s + >
● Si la machine a besoin d’un nettoyage,
appuyer.sur.la.touche.8.
le.programme.de.nettoyage.(voir.point.
«. . Nettoyage. . »).
j 3.s + >
● Si la machine a besoin d’être détartrée et
nettoyée,.appuyer.sur.la.touche.8.
effectuer.le.programme.Calc‘n‘Clean..
(voir.point.«. . Calc‘n‘Clean. . »).
détartrage
start
nettoyage
start
caLc‘n‘cLean
.et.effectuer.
.et.effectuer.
start
.et.
Page 35

defr
j 3.s + >
Cela.permet.de.régler.l`intervalle.de.temps.
à.l‘issue.duquel.le.chauffe-tasses.18.se.
désactive.automatiquement.après.la.mise.
en.marche.
Régler.l‘intervalle.de.temps.en.tournant.le.
●
bouton.rotatif.6.
j 3.s + >
Tourner.le.bouton.rotatif.6 pour dénir
●
l’intervalle.de.temps.à.l’issue.duquel.la.
machine.se.place.en.mode.Eco.après.la.
dernière.préparation.de.boisson.
Le réglage possible est situé entre 5
minutes.et.8.heures.
j 3.s + >
Avant d‘utiliser un nouveau ltre à eau il
faut.tout.d‘abord.effectuer.un.rinçage..
Pour cela, enfoncer fermement le ltre à
●
eau.dans.le.réservoir.d‘eau.11..à.l‘aide.de.
la.cuillère.dose.14..Remplir.d‘eau.le.
réservoir.jusqu‘au.repère.«. . max »..
Tourner.le.bouton.rotatif.6.pour.
●
sélectionner.start.et.appuyer.sur.la.
touche.8.
● PLacer réciPient 0,5 L sous
mousseur Lait
Placer.un.récipient.d'une.capacité.de.0,5l.
●
sous.le.mousseur.lait.
Appuyer.sur.la.touche.8.
●
traverse le ltre pour le rincer.
Ensuite, vider le récipient. La machine est
●
de nouveau prête à fonctionner.
ar chauF-tasse
ar auto dans.
FiLtre eau
start
.
start
start
. L‘eau
Info : le rinçage du ltre a activé le réglage
pour l’afchage du changement de ltre.
Vous.trouverez.des.informations.détaillées.
sur le ltre d’eau dans les Instructions
relatives au ltre ci-jointes.
Au moment où s’afche changer Le
FiLtre.ou.bien.au.bout.de.2.mois,.au.plus.
tard, le ltre n’est plus efcace. Pour des
raisons.d’hygiène.et.pour.éviter.l’entartrage.
de.la.machine.(ce.qui.provoque.des.
dommages), il faut remplacer le ltre.
Les ltres de rechange sont disponibles
dans.le.commerce.(TZ70003).ou.peuvent.
être commandés auprès du Service Clientèle
(467873)..Si.l‘on.n‘utilise.pas.un.nouveau.
ltre, il faut régler FiLtre eau.sur.non.
Info : si.la.machine.n’est.pas.utilisée.durant.
une.période.prolongée.(par.ex..congés),.il.
faut que le ltre utilisé soit rincé avant
utilisation.;.pour.cela.verser.tout.simplement.
une.tasse.d’eau.chaude.
j 3.s + >
Le contraste de l’écran peut être réglé entre
contraste
−20.et.+20.;.le.réglage.usine.est.+0.
Le bouton rotatif 6.permet.de.choisir.le.
●
réglage.souhaité.
j 3.s + >
Il.est.possible.d’effacer.ses.propres.
réglages.et.de.rétablir.les.réglages.usine.
Pour.rétablir.les.réglages.usine,.appuyer.
●
sur.la.touche.8.
régLages usine
start
.
Info : La machine peut à tout moment être
replacée.manuellement.sur.les.réglages.
usine.à.l‘aide.d‘une.combinaison.de.tou-
ches. La machine doit être entièrement
désactivée.
Maintenir.appuyés.simultanément.durant.
●
5.secondes.au.moins.les.touches.4.<.et.
>.ainsi.que.l‘interrupteur.électrique.1.
O./.I..Appuyer.sur.la.touche.8.
réglages.usine.sont.rétablis.
start
,.les.
31
Page 36

defr
Préparation avec du café
en grains
Cette.machine.à.espresso./.café.entièrement.automatique.moud.du.café.frais.lors.
de.chaque.préparation..Utiliser.de.préférence.du.café.pour.espresso/pour.percolateur..Conserver.le.café.au.froid.dans.un.
récipient.hermétiquement.fermé.ou.le.
congeler..Il.est.possible.de.broyer.les.grains.
de.café.congelés.
Important :.mettre.tous.les.jours.de.l’eau.
fraîche.dans.le.réservoir.d’eau.11..Celui-ci.
doit toujours contenir sufsamment d’eau
pour.assurer.le.fonctionnement.de.la.
machine.
Conseil :.Placer.les.tasses,.en.particulier.
les.petites.tasses.épaisses.pour.espresso,.
sur.le.chauffe-tasses.18 an de les
préchauffer.
Il.est.possible.de.préparer.différents.cafés.
très.simplement,.en.appuyant.sur.un.
bouton..
Les réglages peuvent être modiés (voir
point.«. . Eléments.de.commande. . »).
Appuyer.sur.la.touche.8.
●
La machine effectue la percolation du café
qui.s’écoule.dans.la.tasse/les.tasses..
Préparation d‘une boisson avec du lait
La machine doit être prête à fonctionner.
Plonger.profondément.dans.le.récipient.
●
du.lait.32.le.tube.mousseur.10d.du.
mousseur.de.lait.10.
Basculer.le.bec.verseur.du.café.9.vers.la.
●
droite.jusqu‘à.ce.qu‘il.s‘enclipse.(bruit.
caractéristique).
Placer.la.tasse.préchauffée.ou.le.verre.
●
sous.le.bec.verseur.du.café.9.et.
mousseur.lait.10.
Sélectionner.la.boisson.:.macchiato.Å.ou.
●
cappuccino.Æ.en.tournant.le.bouton.
rotatif.6. L‘écran 5 afche la boisson
choisie.ainsi.que.l‘arôme.du.café.et.la.
quantité.correspondant.à.la.boisson..
start
.
caPPuccino Ë Í
Préparation d’un espresso et d’un café
sans lait
La machine doit être prête à fonctionner.
Placer.la(les).tasse(s).sous.le.bec.verseur.
●
du.café.9..
Sélectionner.l’espresso.ou.le.café.
●
souhaité.en.tournant.le.bouton.rotatif.6..
L’écran 5 afche la boisson choisie ainsi
que.l’arôme.du.café.et.la.quantité.
correspondant.à.la.boisson.
esPresso Ë Í
 à À Á Å Æ
32
À Á Å Æ È É
Les réglages peuvent être modiés (voir
point.«. . Eléments.de.commande. . »).
Appuyer.sur.la.touche.8.
●
d‘abord.le.lait.est.pompé.dans.la.tasse.ou.
le.verre..Ensuite,.la.machine.effectue.la.
percolation.du.café.qui.s‘écoule.dans.la.
tasse.ou.le.verre.
Important :.les.restes.de.lait.séchés.sont.
difciles à retirer ; après chaque utilisation,
nettoyer.le.mousseur.lait.10.à.l’eau.tiède.
(voir.point.«. . Nettoyage.du.mousseur.de.
lait. . »).
start
..Tout.
Page 37

Préparation à partir
de café moulu
La machine peut aussi préparer un café à
partir.de.café.moulu.(pas.du.café.soluble).
Préparation d‘une boisson sans lait
A.l’aide.du.bouton.rotatif.6, sélectionner.
●
À.ou.Á.
Placer.la.tasse/les.tasses.préchauffée(s).
●
sous.le.bec.verseur.du.café.9..
Ouvrir.le.tiroir.à.café.20.en.appuyant.
●
Verser.au.maximum.2.cuillères-dose.14.
●
rases.de.café.moulu.
Attention :.ne.pas.verser.de.café.en.grains.
ou.de.café.soluble.
Fermer.le.tiroir.à.café.20..
●
Appuyer.sur.la.touche.8.
●
La machine effectue la percolation du café
moulu.qui.s’écoule.dans.la.tasse/les.tasses..
start
.
defr
Refermer.le.tiroir.à.café.20..
●
Appuyer.sur.la.touche.8.
●
d‘abord.le.lait.est.pompé.dans.la.tasse.ou.
le.verre..Ensuite,.la.machine.effectue.la.
percolation.du.café.en.poudre.qui.s‘écoule.dans.la.tasse.ou.le.verre.
Important :.les.restes.de.lait.séchés.sont.
difciles à retirer ; après chaque utilisation,
nettoyer.le.mousseur.lait.10.à.l’eau.tiède.
(voir.point.«. . Nettoyage.du.mousseur..
de.lait. . »).
Remarque :.pour.préparer.une.autre.tasse.
à.partir.de.café.moulu./.lait,.répéter.l’opération..Si.vous.ne.versez.pas.de.café.dans.un.
délai.de.90.s,.la.chambre.de.percolation.se.
vide automatiquement an d’empêcher un
débordement. La machine effectue un rin-
çage..
start
..Tout.
Remarque :.pour.préparer.une.autre.tasse.
de.café.moulu,.répéter.l’opération..Si.vous.
ne.versez.pas.de.café.dans.un.délai.de.90.s,.
la.chambre.de.percolation.se.vide.automati-
quement an d’empêcher un débordement.
La machine effectue un rinçage.
Préparation d‘une boisson avec lait
A.l’aide.du.bouton.rotatif.6, sélectionner
●
une.boisson :.Macchiato.Å.ou.
Cappuccino.Æ.
Introduire.le.tube.mousseur.10d.du.
●
mousseur.de.lait.10.dans.le.récipient.de.
lait.32.
Faire.pivoter.le.bec.verseur.du.café.9.
●
vers.la.droite jusqu’à.ce.qu’il.s’enclipse.
(bruit.caractéristique).
Placer.la.tasse.préchauffée.ou.le.verre.
●
sous.le.bec.verseur.du.café.9.et.le.
mousseur.lait.10..
Ouvrir.le.tiroir.à.café.20.en.appuyant.
●
Remplir.avec.2.cuillères-dose.14.rases.
●
maxi..de.café.en.poudre.
Attention :.ne.jamais.remplir.avec.du.café.
en.grains.ou.du.café.soluble.
Préparer de la mousse
de lait et du lait chaud
! Risque de brûlure
Le mousseur lait 10.devient.brûlant..Après.
utilisation,.bien.laisser.refroidir.avant.de.le.
saisir.
La machine doit être prête à fonctionner.
Plonger.le.tube.mousseur.10d.du.
●
mousseur.10.dans.le.réservoir.de.lait.32..
Placer.la.tasse.préchauffée.ou.le.verre.
●
sous.le.mousseur.lait.10..
Sélectionner.«. . Mousse.lait. . ».È ou « Lait
●
chaud. . ».É.en.tournant.le.bouton.rotatif.6..
Appuyer.sur.la.touche.8.
●
mousse.de.lait.(durant.40.s.env.).ou.du.
lait.chaud.(durant.60.s.env.).s‘écoule.du.
mousseur.de.lait.10..
Appuyer.de.nouveau.sur.la.touche.8.
●
pour.interrompre.l’opération.
start
,.de.la.
start
.
33
Page 38

defr
Info :.lors.de.la.préparation.du.lait.chaud,.il.
peut se produire des bruits de sifement.
Ceux-ci.sont.dus.à.la.technologie.du.
mousseur.de.lait.10.
Conseil : pour.obtenir.une.mousse.de.lait.
optimale,.utiliser.de.préférence.du.lait.froid.
d’une.teneur.en.matières.grasses.de.1,5%.
Important : Les restes de lait séchés sont
difciles à retirer ; après chaque utilisation,
nettoyer.le.mousseur.lait.10.à.l’eau.tiède.
(voir.point.«. . Nettoyage.du.mousseur.de.
lait. . »).
Préparer de l’eau chaude
!...Risque de brûlure
Le mousseur lait 10.devient.très.brûlant..
Après.utilisation,.bien.laisser.refroidir.avant.
de.le.saisir.
La machine doit être prête à fonctionner.
Placer.la.tasse.préchauffée.ou.le.verre.
●
sous.le.bec.du.mousseur.de.lait.10..
Sélectionner.le.réglage.souhaité.Eau.
●
chaude.Ê.en.tournant.le.bouton.rotatif.6..
Appuyer.sur.la.touche.8.
●
chaude.s’écoule.durant.env..40.s.du.
mousseur.de.lait.10.
Il.est.possible.d’interrompre.
●
prématurément.cette.opération.en.
appuyant.de.nouveau.sur.la.touche.8.
start
.
Remarque :.il.est.possible.de.régler.la.
température.de.l‘eau.chaude.(voir.point..
«. . Eléments.de.commande.Touche.
start
,.l’eau.
°C
»).
Entretien et nettoyage
quotidien
! Risque de choc électrique!
Avant tout nettoyage, débrancher le cordon
électrique. Ne jamais plonger la machine
dans l’eau. Ne pas utiliser de nettoyeur à
vapeur.
Nettoyer.le.boîtier.de.la.machine.à.l’aide.
●
d’un.chiffon.doux.humide..Ne.pas.utiliser.
de.tissus.ou.de.produits.nettoyants.abrasifs.
Rincer.le.réservoir.d‘eau.11.et.l‘unité.de.
●
percolation.23.uniquement.avec.de.l‘eau.
Pour.le.nettoyage,.essuyer.avec.un.
●
chiffon.humide.le.couvercle.préservateur.
d‘arôme.25.le.panneau.des.bacs.
collecteurs.26..Ne pas passer au lave-
vaisselle.
Retirer.la.grille.du.bec.verseur.du.café.28.
●
er.la.grille.du.mousseur.de.lait.29..Retirer.
vers.l‘avant.le.bac.collecteur.du.bec.
verseur.de.café.27.avec.le.récipient.pour.
marc.de.café.30,.les.vider.et.les.nettoyer..
Tous ces éléments peuvent passer en
lave-vaisselle.
Nettoyer.à.la.main.la.cuillère-dose.14,.le.
●
couvercle.préservateur.d‘arôme.16.ainsi.
que.le.réservoir.de.lait.32.ou.bien.les.
passer.en.machine.
Essuyer.ou.aspirer.l‘intérieur.de.la.
●
machine.(bacs.de.collecte).
Important : Il.convient.de.vider.et.nettoyer.
tous.les.jours.le.bac.collecteur.27 an
d’éviter.les.moisissures.
Remarque :.lorsque.la.machine.froide.est.
allumée.à.l’aide.de.la.touche.2.a.ou.bien.
placée.en.position.a.après.un.prélèvement.
de.café,.la.machine.réalise.un.rinçage.
automatique. Le système est donc
autonettoyant.
34
Page 39

Nettoyage du mousseur de lait
Nettoyer le mousseur de lait 10 après
chaque utilisation!
Il.est.possible.d‘effectuer.un.pré-nettoyage.
automatique.du.mousseur.de.lait.10..
●
A.l‘écran.5,.sélectionnez.le.symbole.
appuyer.sur.la.touche.8.
start
Ì.et.
.
PLacer un verre vide sous Le
mousseur, PLacer L‘embout Pour
mousse dans Le verre
start
Placer.un.verre.vide.sous.le.mousseur.de.
●
lait.10.et.introduire.l‘extrémité.du.tube.
mousseur.10d.dans.le.verre.
Appuyer.sur.la.touche.8.
●
remplit.automatiquement.le.verre.d‘eau.
puis.l‘aspire.par.le.tube.mousseur.10d.
pour.rincer.le.dispositif..Au.bout.de.1.min.
environ, l‘opération de nettoyage s‘arrête
automatiquement.
Vider.le.verre.et.nettoyer.le.tube.
●
mousseur.10d.
De.plus,.nettoyer.régulièrement.et.très.
soigneusement.le.mousseur.de.lait.(en.
lave-vaisselle.ou.à.la.main).
start
. La machine
defr
Arrêter entièrement la machine à l’aide de
●
l’interrupteur.électrique.1 O / I,.aucune.
touche.n’est.allumée.
Faire.glisser.l'ouvre-volet.22.vers.la.droite.
●
et.ouvrir.le.volet.21.de.l’unité.de..
passage.23.
Faire.glisser.le.verrouillage.rouge.23b.de.
●
l‘unité.de.percolation.23.vers.la.gauche.
Appuyer.sur.le.bouton.poussoir.rouge.
●
23a.et.saisir.l‘unité.de.percolation.23.par.
les.évidements.(gure E).et.la.retirer.
avec.précaution.
Nettoyer.l‘unité.de.percolation.23.sous.un.
●
jet.d‘eau.claire.
Important : ne.pas.ajouter.de.détergent,.ne.
pas.laver.en.machine.
Essuyer.l‘intérieur.de.la.machine.avec.un.
●
chiffon.humide.
Laisser sécher l‘unité de percolation 23.et.
●
l‘intérieur.de.la.machine.
Replacer.l‘unité.de.percolation.23.et.
●
pousser.jusqu‘en.butée.
Faire.glisser.vers.la.droite.le.verrouillage.
●
rouge.23b.et.fermer.le.volet.21.
Démonter le mousseur de lait 10 pour le
nettoyer :
Extraire.le.mousseur.de.lait.10.de.la.
●
machine.en.le.tirant.vers.l‘avant.
Nettoyer.les.différents.éléments.(gure
●
C).à.l‘eau.savonneuse,.avec.une.brosse.
douce.
Bien.rincer.tous.les.éléments.à.l‘eau.
●
courante.et.les.sécher.
Remonter.tous.les.éléments.et.les.
●
remplacer.jusqu‘en.butée.
Info : tous.les.éléments.du.mousseur.lait.10
peuvent être lavés en machine.
Nettoyer l‘unité de percolation
(voir aussi Mémento)
En.plus.du.programme.de.nettoyage.automatique,.il.convient.de.retirer.régulièrement.
l’unité.de.percolation.23 an de la nettoyer.
Appuyer.sur.la.touche.2.a.pour.placer.la.
●
machine.en.«. . mode.Eco. . ».
Rangement des
accessoires
La machine est dotée de logements
spéciaux.pour.les.accessoires.et.le.
Mémento.
Pour.ranger.la.cuillère-dose.14,.le.tube.
●
mousseur.10d et le exible 10c,.retirer.le.
réservoir.d‘eau.11.et.placer.les.éléments.
dans.les.évidements.13.
Le Mémento possède son propre logement
à.côté.de.l‘unité.de.percolation.23.
Ouvrir.le.volet.21.de.l‘unité.de.
●
percolation.
Saisir.par.la.languette.la.fermeture.rouge.
●
25.du.logement.24.et.la.retirer.
Ranger.le.Mémento,.replacer.la.fermeture.
●
25.et.refermer.le.volet.de.l‘unité.de.
percolation.21.
35
Page 40

defr
Conseils pour économiser
l’énergie
La machine se place automatiquement en
–
«. . mode.Eco. . ».au.bout.d’une.heure.
(réglage.usine)..Dans.ce.mode,.la.
machine.consomme.très.peu.d’électricité..
La valeur par défaut de une heure peut
être modiée, (voir point « Réglages
menu.ar auto dans »).
Lorsque la machine n’est pas utilisée,
–
l’arrêter au moyen de l’interrupteur
électrique.1 O / I placé.à.l’avant.
Autant.que.possible.ne.jamais.interrom-
–
pre.la.production.de.café.ou.de.mousse.
de.lait..Une.interruption.provoque.en.effet.
une.consommation.d’énergie.supérieure.
ainsi.que.le.remplissage.plus.rapide.des.
bacs.collecteurs.
Détartrer régulièrement la machine an
–
d’éviter les dépôts de calcaire. Les dépôts.de.calcaire.provoquent.en.effet.une.
consommation.électrique.plus.élevée.
Programmes de
maintenance
Conseil :.voir.aussi.le.Mémento.placé.dans.
son.logement.24.
Attention
Lors de chaque programme de maintenance, utiliser le produit détartrant et le produit
nettoyant conformément aux indications.
Ne jamais interrompre le programme de
maintenance !
Ne jamais boire les liquides !
Ne jamais utiliser de vinaigre, de produits à
base de vinaigre, d‘acide citrique ou de
produits à base d‘acide citrique !
Ne jamais déposer de pastilles de
détartrage ou autres produits de détartrage
dans le tiroir du café moulu 20 !
Pour le détartrage et le nettoyage, utiliser
exclusivement les pastilles de détartrage
fournies. Elles ont été spécialement
conçues pour la machine à café.
Des pastilles de détartrage et de nettoyage spécialement développées sont
disponibles dans le commerce et auprès
du Service Clientèle.
Service.
N°.commande Commerce
Pastilles.de.
nettoyage
Pastilles.de.
détartrage.
TZ60001 310575
TZ60002 310967
Clientèle
A.certains.intervalles.de.temps,.l‘écran.5.
afche différents messages :
détartrer svP
n
ettoyer svP.ou..
caLc‘n‘cLean..
La machine doit alors être nettoyée ou détartrée.sans.délai.avec.le.programme.correspondant..Il.est.également.possible.d‘effectuer.les.deux.opérations.simultanément.
avec.la.fonction.Calc‘n‘Clean.(voir.point.
«. . Calc‘n‘Clean. . »)..Si.le.programme.de.
maintenance.n‘est.pas.réalisé.conformément.aux.indications,.cela.peut.détériorer.la.
.machine.
36
Important : si un ltre d‘eau est placé dans
le.réservoir.d‘eau.11.le.retirer.
impérativement.avant.de.lancer.le.
programme.de.maintenance.
Détartrage
esPresso Ë Í
détartrer svP
touche i 3 s
Durant.les.différentes.opérations.de.
détartrage,.la.touche.8
start
.clignote.
Page 41

defr
Les chiffres en haut à droite indiquent la
progression.de.l‘opération.
●
Maintenir.appuyée.la.touche.7.
3.secondes.
j.au.moins.
détartragestart
Appuyer.sur.la.touche.8.
●
programme déle à l’écran 5.
start
,.le.
vider Le bac coLLecteur
P
Lacer Le bac coLLecteur
Vider.le.bac.collecteur.27.et.le.replacer.
●
PLacer réciPient 0,5 L sous
mousseur Lait
Placer.un.récipient.d'une.capacité.de.0,5l.
●
sous.le.mousseur.lait.10.
Appuyer.sur.la.touche.8.
●
Info : si le ltre à eau est activé, l’utilisateur
est invité à retirer le ltre et à appuyer de
nouveau.sur.la.touche.8.
start
start
start
.
.
retirer Le FiLtre eau start
0,5 L eau + détartrant remPLir
start
Verser.de.l‘eau.tiède.dans.le.réservoir.
●
d‘eau.11.jusqu‘au.repère.«. . 0,5 l ».et.
dissoudre.2.pastilles.de.détartrage.
Siemens.
Appuyer.sur.la.touche.8.
●
programme.de.détartrage.se.déroule.
maintenant.durant.20.minutes.environ
start
,.le.
détartrage en cours
détartrant insuFFis.
r
ajouter détartrant
Info : s‘il.n‘y.a.pas.assez.de.solution.de.
détartrage.dans.le.réservoir.d‘eau.11,.le.
message.demandant.de.rajouter.de.la.
solution de détartrage s‘afche ; appuyer de
nouveau.sur.la.touche.8.
start
.
rincer Le réservoir d’eau et remPLir
start
Rincer.le.réservoir.d’eau.11.et.le.remplir.
●
d’eau.fraîche.jusqu’au.repère.«. . max ».
Appuyer.sur.la.touche.8.
●
programme.de.détartrage.se.déroule.
durant.env..1.minute.et.effectue.un.
rinçage.de.la.machine.
start
,.le.
détartrage en cours
v
ider Le bac coLLecteur.
PLacer Le bac coLLecteur
Vider.le.bac.collecteur.27.et.le.replacer.
●
La machine est maintenant détartrée et de
nouveau prête à fonctionner.
Nettoyage
esPresso Ë Í
nettoyer svP
touche i 3 s
Durant.les.différentes.opérations.de.
nettoyage,.la.touche.8.
Les chiffres en haut à droite indiquent les
progrès.de.l‘opération.
Remplir.le.réservoir.d‘eau.11.jusqu‘à.
●
«. . max ».
Maintenir.appuyée.la.touche.7.j.au.moins.
●
3.secondes.
nettoyagestart
Appuyer.sur.la.touche.8.
●
programme.se.déroule.à.l’écran.5.
vider Le bac coLLecteur
P
Lacer Le bac coLLecteur
Vider.le.bac.collecteur.27.et.le.replacer,.la.
●
machine.réalise.deux.rinçages.
Pivoter Le bec verseur
Faire.pivoter.le.bec.verseur.du.café.9.
●
vers.la.gauche.dans.la.position.café.
jusqu’à.ce.qu’il.s’enclipse.(bruit.
caractéristique).
nettoyage en cours
start
.clignote.
start
,.le.
37
Page 42

defr
ouvrir tiroir
Ouvrir.le.tiroir.à.café.20.en.appuyant.
●
PLacer une PastiLLe de nettoyage
s
iemens dans Le tiroir et reFermer
Placer.une.pastille.de.nettoyage.Siemens.
●
dans.le.tiroir.20.et.refermer.
aPPuyer sur start
Appuyer.sur.la.touche.8.
●
nettoyage.est.activé.pour.une.durée.de.7.
minutes.env.
start
,.le.
nettoyage en cours
v
ider Le bac coLLecteur
P
Lacer Le bac coLLecteur
Vider.le.bac.collecteur.27.et.le.replacer.
●
La machine est maintenant nettoyée et de
nouveau prête à fonctionner.
Calc‘n‘Clean
Calc‘n‘Clean.combine.les.fonctions.
Détartrage.et.Nettoyage..Si.le.moment.de.
réaliser.chacun.des.deux.programmes.est.
proche,.la.machine.propose.
automatiquement.ce.programme.
esPresso Ë Í
caLc‘n‘cLean
touche i 3 s
vider Le bac coLLecteur
P
Lacer Le bac coLLecteur
Vider.le.bac.collecteur.27.et.le.replacer.
●
Basculer.le.bec.verseur.du.café.9.vers.la.
●
droite.jusqu‘à.ce.qu‘il.s‘enclipse.(bruit.
caractéristique).
Placer.un.récipient.d'une.capacité.de.1.l.
●
au.moins.sous.le.mousseur.lait.10.
Appuyer.sur.la.touche.8.
●
effectue.deux.rinçages.
start
,.la.machine.
nettoyage en cours
o
uvrir tiroir
Appuyer.sur.le.tiroir.à.café.20.pour.
●
l’ouvrir.
PLacer une PastiLLe de nettoyage
s
iemens dans Le tiroir et reFermer
Placer.une.pastille.de.nettoyage.Siemens.
●
dans.le.tiroir.20.et.refermer.
Info : si le ltre à eau est activé, l’utilisateur
est invité à retirer le ltre et à appuyer de
nouveau.sur.la.touche.8.
start
.
retirer Le FiLtre eau start
0,5 L eau + détartrant remPLir
start
Verser.de.l‘eau.tiède.dans.le.réservoir.
●
d‘eau.11.jusqu‘au.repère.«. . 0,5 l ».et.
dissoudre.2.pastilles.de.détartrage.
Siemens.
Appuyer.sur.la.touche.8.
●
programme.de.détartrage.se.déroule.
durant.20.minutes.env.
start
,.le.
détartrage en cours
Durant.les.différentes.opérations.du.
programme.Calc‘n‘Clean, la toucheCalc‘n‘Clean, la touche,.la.touche.8.
clignote. Les chiffres en haut à droite
indiquent.l’avancement.de.l’opération.
Maintenir.appuyée.la.touche.7.j.durant.3.
●
secondes.au.moins.
caLc‘n‘cLeanstart
Appuyer.sur.la.touche.8.
●
programme déle à l’écran.
38
start
,.le.
start
détartrant insuFFis.
r
.
ajouter détartrant
Info : s‘il.n‘y.a.pas.assez.de.solution.de.
détartrage.dans.le.réservoir.d‘eau.11,.le.
message.demandant.de.rajouter.de.la.solu-
tion de détartrage s‘afche ; appuyer de
nouveau.sur.la.touche.8.
start
.
Page 43

defr
rincer Le réservoir d’eau et remPLir
start
Rincer.le.réservoir.d’eau.11.et.remplir.
●
d’eau.fraîche.jusqu’au.repère.«. . max ».
Appuyer.sur.la.touche.8.
●
programme.de.détartrage.se.déroule.
durant.1.minute.environ,.puis.le.
programme.de.nettoyage.rince.la.
machine.durant.7.minutes.environ.
start
,.le.
détartrage en cours
nettoyage en cours
vider Le bac coLLecteur
P
Lacer Le bac coLLecteur
Vider.le.bac.collecteur.27.et.le.replacer.
●
La machine est nettoyée et détartrée et de
nouveau prête à fonctionner.
Important :.si.l’un.des.programmes.de.
maintenance.a.été.interrompu,.par.ex..par.
une.coupure.de.courant,.procéder.comme.
indiqué.ci-après.:
Rincer.le.réservoir.d’eau.11.et.remplir.
●
d’eau.fraîche.jusqu’au.repère.«. . max ».
Appuyer.sur.la.touche.8.
●
me.de.nettoyage.se.déroule.durant.3.
minutes.environ.et.rince.la.machine.
start
,.le.program-
nettoyage en cours
vider Le bac coLLecteur
P
Lacer Le bac coLLecteur
Vider.le.bac.collecteur.27.et.le.replacer.
●
La machine est de nouveau prête à
fonctionner.
Protection contre le gel
! .An d’éviter les dommages provo-
qués par le gel lors du transport et du
stockage, il faut préalablement vider
entièrement la machine.
Info : la machine doit être prête à fonction-
ner.et.le.réservoir.d‘eau.11 doit être rempli.
Placer.un.grand.récipient.étroit.sous.le.
●
mousseur.lait.10..
Sélectionner.le.réglage.«. . Mousse.lait. . ».
●
È,.et.envoyer.de.la.vapeur.durant.15.
secondes.env.
Arrêter la machine à l’aide de
●
l’interrupteur.électrique.1 O / I..
Vider.le.réservoir.d’eau.11.et.le.bac.
●
collecteur.27.
Mise au rebut A
Cet appareil est identié selon la Directive
européenne.2002/96/CE.relative.aux.
déchets.d‘équipements.électriques.et.
électroniques (DEEE). Cette directive dénit
les.conditions.de.collecte.et.de.recyclage.
des.anciens.appareils.à.l’intérieur.de.
l’Union.Européenne..S‘informer.auprès.du.
revendeur.sur.la.procédure.actuelle.de.
recyclage.
Accessoires
Les accessoires suivants sont disponibles
dans.le.commerce.ou.auprès.du.service.
Clientèle.
Service.
N°.commande Commerce
Pastilles.de.
nettoyage
Pastilles.de.
détartrage.
Filtre.d‘eau TZ70003 467873
TZ60001 310575
TZ60002 310967
Clientèle
Garantie
Les conditions de garantie applicables sont
celles.publiées.par.notre.distributeur.dans.
le pays où a été effectué l’achat. Le reven-
deur chez qui vous vous êtes procuré
l’appareil.fournira.les.modalités.de.garantie.
sur.simple.demande.de.votre.part..En.cas.
de.recours.en.garantie,.veuillez.toujours.
vous.munir.de.la.preuve.d’achat.
Sous réserve de modications.
39
Page 44

defr
Eliminer soi-même les problèmes simples
Problème Cause Remède
Afchage de.
remPLir Le bac à caFé.
bien.que.le.bac.à.café.15.
soit.rempli,.ou.bien.le.
moulin.ne.parvient.pas.à.
moudre.
Impossible.de.produire.de.
l’eau.chaude.
Trop.peu.de.mousse.ou.pas.
de.mousse
ou.
le.mousseur.de.lait.10.
n’aspire.pas.le.lait.
Le café s’écoule goutte à
goutte.ou.ne.s’écoule.plus.
Les grains ne tombent pas
dans.le.broyeur.(grains.trop.
gras).
Le mousseur lait 10.ou.le.
support.du.mousseur.lait.10.
est.obturé.
Le mousseur lait 10.ou.le.
support.du.mousseur.lait.10.
est.obturé.
Lait non adapté. Utiliser.du.lait.à.une.teneur.
Le mousseur de lait 10.n’est.
pas.correctement.monté.
Mouture trop ne, café
moulu trop n.
La machine est fortement
entartrée.
Frapper.légèrement.le.bac.à.
café.15..
Changer.éventuellement.de.
café.
Une.fois.que.le.bac.à.café.
15.est.vide,.l’essuyer.avec.
un.chiffon.sec..
Nettoyer.le.mousseur.lait.10.
ou.son.support.
Nettoyer.le.mousseur.de.lait.
10.ou.le.support.du.
mousseur.de.lait.10.
de.1,5.%.de.matières.
grasses.
Monter.correctement.le.
mousseur.de.lait.10.
Régler.une.mouture.moins.
ne. Utiliser du café moulu
moins n.
Détartrer.la.machine.
Le café ne présente pas de
«. . crème. . ».
Le café est trop « acide ». La mouture n’est pas assez
S’il n’est pas possible de résoudre les problèmes, appeler impérativement le
Service Clientèle!
40
Qualité.du.café.ne.convient.
pas.
Les grains ne sont pas
fraîchement torréés.
La mouture n’est.pas.
adaptée.aux.grains.de.café.
ne ou bien le café moulu
n’est pas assez n.
Qualité.de.café.non.
adaptée.
Changer.de.qualité.de.café.
Les grains ne sont pas
fraîchement torréés.
Optimiser la nesse de la
mouture.
Régler.une.mouture.plus.
ne ou acheter du café
moulu plus n.
Utiliser un café torréé plus
foncé.
Page 45

Eliminer soi-même les problèmes simples
Problème Cause Remède
Le café est trop «. . amer. . ». La mouture est trop ne ou
le café moulu est trop n.
Qualité.du.café.ne.convient.
pas.
Afchage à l’écran
deFaiLLance
a
PPeLer service
c
LientèLe.
Le ltre à eau ne tient pas
dans.le.réservoir..
d’eau.11.
Le marc de café n’est pas
compact.et.il.est.trop.
humide.
Affichage.du.message..
contrôLer L’unité de
Passage
Qualité.de.la.mousse.de.
café.ou.de.lait.variable.
Présence.d’eau.sur.le.fond.
interne.de.la.machine.une.
fois.que.l’on.a.retiré.le.bac.
collecteur.
S’il n’est pas possible de résoudre les problèmes, appeler impérativement le
Service Clientèle!
Une.défaillance.s’est.
produite.dans.la.machine.
Le ltre à eau n’est pas
enclipsé.
La mouture est réglée trop
fine.ou.trop.grossière.ou.la.
quantité.de.café.moulu.est.
trop.faible.
Unité.de.passage.
encrassée.
Trop.de.café.moulu.dans.
l’unité.de.passage.
La machine est entartrée. Détartrer.la.machine.en.
Bac.collecteur.retiré.trop.
tôt.
Régler.une.mouture.moins.
ne ou acheter du café
moulu moins n.
Changer.de.qualité.de.café.
Appeler.le.Service.Clientèle.
Bien appuyer le ltre .
à.eau.dans.le.réservoir.
jusqu’à.ce.qu’il.s’enclipse.
(bruit.caractéristique).
Régler.la.mouture.plus.
grossière.ou.plus.fine.ou.
bien.utiliser.2.cuillèresdoses.de.café.moulu.bien.
rases.
Nettoyer.l’unité.de.passage.
Nettoyer.l’unité.de.passage.
(remplir.au.maximum.2.
cuillères-doses.de.café.
moulu.bien.rases).
utilisant.deux.pastilles.de.
détartrage.et.en.respectant.
les.instructions.
Retirer.le.bac.collecteur.en.
attendant.quelques.
secondes.après.la.dernière.
boisson.préparée.
defr
41
Page 46

deit
Sommario
Riepilogo.delle.parti.e.degli.elementi.di.
comando. ...................................................63
Al.primo.impiego. .......................................64
Elementi.di.comando. ................................65
−.Interruttore.di.rete.O./.I. ..........................65
−.Tasto.a. ..................................................65
−.Pulsante.girevole...................................65
−.Tasti.selettori.<.e.>. .............................65
−.Display. ..................................................66
−.Tasto.
−.Tasto.
−.Impostazioni.del.tasto.j. .........................69
−.Regolare.il.grado.di.macinatura. ............69
−.Riscaldamento.tazze. .............................69
Impostazioni.del.menu..............................70
− Lingua. ...................................................70
− Durezza acqua. ......................................70
− Decalcicare..........................................70
−.Pulire. .....................................................70
−.Calc‘n‘Clean. ..........................................70
−.Riscald..tazza.OFF.tra. ..........................70
− Auto spegnimento in. .............................71
−.Filtro.acqua. ...........................................71
−.Contrasto...............................................71
− Imp.predenita. ......................................71
Preparazione.con.chicchi.di.caffè. .............72
Preparazione.con.caffè.macinato.. ............73
Preparazione.di.schiuma.di.latte.e..
di.latte.caldo..............................................73
Prelievo.di.acqua.per.il.thè. .......................74
Cura.e.pulizia.quotidiana. ..........................74
−.Pulire.la.linea.del.latte. ...........................74
−.Pulire.il.bollitore. .....................................75
Accessori.per.la.conservazione. ................75
Consigli.per.risparmiare.energia...............75
Programmi.di.assistenza.. .........................76
−.Decalcicare..........................................76
−.Pulire. .....................................................77
−.Calc‘n‘Clean. ..........................................78
Protezione.dal.gelo. ...................................79
Accessori. ..................................................79
Smaltimento..............................................79
Garanzia. ...................................................79.
Soluzione.di.piccoli.guasti.........................80
start
. .............................................68
°C
. .................................................68
Istruzioni di sicurezza
Leggere con attenzione interamente,
osservare e conservare le istruzioni per
l’uso!
Questa macchina automatica per
espresso è destinata all’uso domestico e
alla preparazione di quantità tipiche per
questo impiego e non all’attività
professionale.
! Pericolo di scarica elettrica!
Nel.collegamento.e.nell’uso.
dell’apparecchio.rispettare.i.dati.della.
targhetta di identicazione.
Usare.solo.se.il.cavo.di.alimentazione.e.
l’apparecchio.non.presentano.danni.
Usare.l’apparecchio.solo.in.ambienti.interni.
a.temperatura.ambientale.
Non.permettere.l’uso.dell’apparecchio.ai.
bambini.o.a.soggetti.con.ridotte.capacità.
siche o psichiche o comunque non dotati
di sufciente esperienza e conoscenza, a
meno.che.non.siano.sorvegliati.o.non.
abbiano.ricevuto.istruzioni.sull’uso.
dell’apparecchio.da.una.persona.che.sia.
responsabile.della.loro.sicurezza.
Tenere.i.bambini.lontani.dall’apparecchio..
Sorvegliare.i.bambini,.per.evitare.che.
giochino.con.l’apparecchio.
In.caso.di.guasto,.estrarre.immediatamente.
la.spina.di.alimentazione.
Per.evitare.rischi,.le.riparazioni.
all’apparecchio,.quali.ad.esempio.la.
sostituzione.di.un.cavo.di.alimentazione.
danneggiato,.devono.essere.eseguite.solo.
dal.nostro.servizio.di.assistenza.clienti.
Non.immergere.mai.l’apparecchio.o.il.cavo.
di.alimentazione.in.acqua.
Non.toccare.i.dispositivi.di.macinazione.
! Pericolo di scottature!
L’inserto schiuma per latte / acqua calda si
riscalda.molto..Prima.di.toccarlo,.dopo.
l’uso,.è.necessario.lasciarlo.raffreddare.
42
Page 47

deit
Gentili.amanti.del.caffè,.
congratulazioni.per.aver.acquistato.questa.
macchina.automatica.per.espresso.della.
società.Siemens.
Riepilogo delle parti e
degli elementi di comando
Figure A, B, C, D ed E
. 1.Interruttore.di.rete.O./.I
2.Tasto.a
. 3. .Tasto.°C..
(temperatura./.sicurezza.bambini)
4.Tasti.selettori.<.>
5.Display
. .a).Riga.di.stato.
. .b).Riga.di.selezione..
. .c).Riga.di.navigazione.
. 6. .Pulsante.girevole.per.le.impostazioni.del.
display
. 7..Tasto.j.(menu.informativo)
...8.Tasto.
. 9. .Uscita.caffè.regolabile.in.altezza.e.
.10. .Inserto.schiuma.regolabile.in.altezza.
. .a).Elemento.superiore.
. .b).Elemento.inferiore
. .c).Flessibile
. .d).Tubicino.del.latte
.11.Serbatoio.acqua.rimovibile
12.Coperchio.del.serbatoio.per.l’acqua
13. .Vano.per.riporre.il.dosatore.del.caffè..
.14. .Dosatore.del.caffè.macinato.(guida.di.
.15.Serbatoio.chicchi
.16.Coperchio.salva-aroma
.17. .Selettore.della.regolazione.del.grado.di.
start
.(Bevande./.Programmi)
orientabile
(prelievo.latte./.acqua.calda)
macinato.e.gli.accessori.dell’inserto.
schiuma
inserimento per il ltro dell’acqua)
macinatura
ll.presente.manuale.d’uso.descrive.diversi.
modelli.con.dotazioni.diverse..
Si.prega.di.osservare.anche.le.istruzioni.
brevi..Queste.si.possono.inserire.in.un.
apposito.scomparto.24,.che.consente.di.
tenerle.sempre.a.portata.di.mano.per.la.
consultazione.durante.l’uso.
18. .Vassoio.tazze.con.funzione.di.
riscaldamento
19. .Tasto.per.l’accensione.del.vassoio.
scaldatazze
20. .Cassetto.per.caffè.macinato./..
pastiglie.di.pulizia
21.Sportelli.del.bollitore
22.Interruttore.aprisportello
23.Bollitore
. .a).Pulsante.scorrevole.
. .b).Dispositivo.di.blocco
24.Scomparto.per.riporre.le.istruzioni.brevi
25. .Chiusura.dello.scomparto.per.la.
conservazione.delle.istruzioni.brevi
26.Pannello.raccogligocce
27.Raccogligocce.uscita.caffè
28.Griglia.di.sgocciolamento.uscita.caffè
29.Griglia.di.sgocciolamento.inserto..
. .schiuma
30.Contenitore.per.fondi.di.caffè
31.Vano.portacavo
32.Recipiente.per.il.latte
43
Page 48

deit
Al primo impiego
Informazioni generali
Versare.nei.corrispondenti.serbatoi.solo.
acqua.pulita.non.addizionata.con.anidride.
carbonica.e.preferibilmente.miscele.di.caffè.
per.macchine.automatiche.per.espresso.e.
caffè..Non.usare.chicchi.di.caffè.glassati,.
caramellati.o.trattati.con.altri.additivi.
contenenti.zucchero,.in.quanto.otturano..
il.bollitore..
In.questo.apparecchio.è.possibile.regolare.
la.durezza.dell’acqua..Il.valore.preimpostato.
è.4..Determinare.la.durezza.dell’acqua.con.
le.apposite.striscie.fornite.in.dotazione..Se.
la.durezza.indicata.è.diversa.da.4,.programmare.di.conseguenza.l’apparecchio.(vedere.
il.capitolo.“Menu.impostazioni.durezza
acQua”)..
Richiudere.il.coperchio.del.serbatoio.per.
●
l’acqua.12.
Riempire.l’apposito.serbatoio.15.con.i.
●
chicchi.di.caffè.
Premere.l’interruttore.di.rete.1 O./.I,.il.
●
tasto.8.start.si.accende.e.sul.display.5.
vengono.visualizzate.diverse.lingue..
Ora.scegliere.la.lingua.di.visualizzazione.
●
degli.altri.testi.del.display.con.i.tasti.
selettori.4.
.
.
.
.
.
.
.
.
.
<.e.>...
Language
engLish
Pycckий
nederLands
star t
Mettere l’apparecchio in funzione
Posizionare.la.macchina.per.il.caffè.
●
espresso su una supercie piana, in
grado.di.sostenere.il.suo.peso.
Informazione: l’apparecchio.è.dotato,.sul.
fondo,.di.quattro.rotelle,.che.permettono.di.
spostarlo su una linea ad arco al ne di
facilitarne.l’uso.e.la.collocazione.
Estrarre.il.cavo.dal.vano.portacavo.31.e.
●
inserire.la.spina..Per.regolare.la.lunghezza,.estrarre.il.cavo.spostandolo.verso.il.
basso.oppure.reinserirlo.spostandolo.
verso.l’alto..Per.eseguire.questa.operazione,.posizionare.l’apparecchio.ad.
esempio.al.bordo.del.tavolo.
Sollevare.il.coperchio.del.serbatoio.per.
●
l’acqua.12.
Estrarre.il.serbatoio.per.l’acqua.11,.
●
sciacquarlo.e.riempirlo.con.acqua.pulita.
fredda..Non.superare.il.livello.indicato.
come.“max“.
Posizionare.il.serbatoio.dell’acqua.11.
●
diritto.e.spingerlo.completamente.verso.il.
basso.
La lingua selezionata viene
contrassegnata.con.una.cornice..Sono.
disponibili.le.seguenti.lingue:.
engLish
P
ycckий
n
ederLands
F
rançais
i
taLiano
s
venska
e
sPañoL
P
oLski
● Premere il tasto 8.
selezionata.viene.memorizzata,.il.tasto.2.
start
,.la.lingua.
a.si.accende.
44
Page 49

deit
● Premere il tasto 2.
compare.il.logo.del.marchio..Ora.
l’apparecchio.si.riscalda.ed.esegue.un.
risciacquo, un po’ di acqua uisce
dall’uscita.caffè.9..Quando.sul.display.5.
compaiono.i.simboli.per.la.preparazione,.
l’apparecchio.è.pronto.per.l’uso..
a,.sul.display.5.
esPresso Ë Í
 à À Á Å Æ
Informazione: la.macchina.per.il.caffè.
espresso.è.preprogrammata.con.impostazioni.standard.per.un.funzionamento.ottimale..Dopo.1.ora.l’apparecchio.passa.automaticamente.alla.“modalità.di.risparmio”.(vedere.capitolo.“Impostazioni.di.menu.auto
sPegnimento in”).
Consiglio: al.primo.utilizzo.o.quando.l’apparecchio.resta.inutilizzato.per.un.periodo.
più.lungo,.la.prima.tazza.non.ha.un.aroma.
pieno.
Dopo.la.prima.messa.in.funzione.della.
macchina.automatica.per.espresso,.si.
otterrà.una.crema.consistente.e.densa.solo.
dopo.aver.prodotto.alcune.tazze.
Elementi di comando
Interruttore di rete O / I
L’interruttore di rete 1 O./.I.attiva.o.disattiva.
completamente.la.“modalità.di.risparmio”.
dell’apparecchio..Nella.“modalità.di.
risparmio”.è.acceso.solo.il.tasto.2.
Importante: spegnere l’apparecchio con
l’interruttore di esercizio solo quando è
attiva la “modalità di risparmio”, affinché
venga eseguito il risciacquo automatico.
Tasto
a
Con.il.tasto.2.a.l’apparecchio.si.accende.
(pronto.per.l’uso).o.si.ripristina.la.“modalità.
di.risparmio”.
Il.tasto.2.a lampeggia no a quando
l’apparecchio.esegue.il.risciacquo..
L’apparecchio non esegue il risciacquo
quando:
è.ancora.caldo.all’accensione;
●
non.è.avvenuto.alcun.prelievo.di.caffè.
●
prima.del.passaggio.alla.“modalità.di.
risparmio”.
L’apparecchio è pronto.per.l’uso.quando.i.
simboli.per.la.selezione.delle.bevande.e.il.
tasto.8.
start
.lampeggiano..
Pulsante girevole
Il.pulsante.girevole.6.permette.di.navigare.
nel.display.ruotandolo.verso.sinistra.o.verso.
destra oppure di modicare i parametri nel
menu.
a.
Tasti selettori <.e.>
Con.i.tasti.selettori.4.<.e.>.è.possibile.
navigare.verso.il.basso.o.verso.l’alto.
all’interno.dei.livelli.di.menu.(riga.di.
navigazione.5c).
45
Page 50

deit
Display
Il.display.5.visualizza,.mediante.simboli,.
possibilità.di.selezione,.intensità.del.caffè.e.
quantità,.e,.mediante.testi,.impostazioni,.
processi in corso e messaggi. Le impostazioni.si.eseguono.qui.mediante.il.pulsante.
girevole.6.e.i.tasti.selettori.4..
L’impostazione selezionata viene contrassegnata.con.una.cornice.
esPresso ËË Í
 à À Á Å Æ
Nella.riga.di.stato.5a.del.display.5.viene.
visualizzato.il.nome.del.tipo.di.bevanda.e.il.
valore.impostato.per.l’intensità,.ad.esempio.
55.e.per.la.quantità,.ad.esempio.
riga.di.selezione.5b.rappresenta.i.simboli.
per.la.selezione.delle.bevande.
Le frecce nella riga di navigazione 5c.
indicano.in.quale.direzione.sono.disponibili.
ulteriori.livelli.di.menu..
�
. La
Messaggi sul display
Sul.display.5.vengono.visualizzati.diversi.
messaggi.
Informazioni:
si Prega di attendere
Azioni:
riemPire serbatoio acQua
controLLare serbat. acQua
inserire raccogLigocce
5a
vuo tare raccogLigocce
b
riemPire serbatoio chicchi
Posizionare uscita caFFè
inserire innesto schiuma
c
inserire unità di inFusione caFFè.
c
hiudere sPorteLLo
controLLare unità di inFusione
caFFè
versare L a PoLvere
c
hiudere iL cassetto
cambiare FiLtro
decaLciFicare
eseguire PuLizia
caLc‘n‘cLean
46
temP. troPPo bassa
s
i Prega di attendere
aLto – basso voLtaggio
Page 51

esPresso ËË Í
Å Æ È É Ê
Á
Possibilità di selezione
. 2 esP resso.
Â
. esPresso. Á.caFFè
À
Ã
deit
.2x caFFè
esPresso Ë Í
5 55 555
esPresso Ë Í
� Ð Ò
.
sistema L att e
Intensità del caffè
. macchiato
Å
. schiuma Latte.
È
. .acQua caLda.
Ê
(solo per bevande a base di caffè)
.caPPuccino
Æ
Latte caL do
É
L
Ì
avaggio raPido
5 5 5 5 5 5
. Media. Normale. Forte
Quantità
(solo per bevande a base di caffè)
� Ð Ò
. piccola. media. grande
47
Page 52

deit
Tasto
start
Premento.il.tasto.8.
preparazione.della.bevanda.e.un.
programma.di.assistenza.
Premendo.nuovamente.il.tasto.8.
durante.la.preparazione.della.bevanda.è.
possibile.interrompere.anticipatamente.il.
prelievo.
Tasto °C
Con.il.tasto.3
del.caffè.e.dell’acqua.per.il.thè.(premendo.
per.breve.tempo).e.si.attiva.o.disattiva.la.
sicurezza bambini.(tenere.il.tasto.premuto.
per.almeno.3.secondi).
Regolazione della temperatura
Premere.brevemente.il.tasto.3
eseguire.le.impostazioni.con.i.tasti.4.
e.il.pulsante.girevole.
start
.si.avvia.la.
start
°C
.si.imposta.la.temperatura.
°C
.ed.
<.e.>.
.
temPeratura
caFFè
normaLe
acQua caLda
Sicurezza bambini
Esiste.la.possibilità.di.bloccare.l’apparecchio.per.proteggere.i.bambini.da.ustioni.e.
scottature.
● Tenere premuto il tasto 3
secondi,.sul.display.viene.visualizzato.il.
simbolo.di.una.chiave..A.questo.punto.la.
sicurezza.bambini.è.attiva.
In.questo.stato.la.macchina.non.può.essere.
utilizzata..Il.vassoio.scaldatazze.è.spento.
°C
.per.almeno.3.
esPresso Ë Í
● Per disattivare la sicurezza bambini
tenere.premuto.il.tasto.3.C°.per.almeno.3.
secondi;.sul.display.5.il.simbolo.della.
chiave.scompare.
temPeratura
caFFè
acQua caLda
Premendo.nuovamente.il.tasto.3 C°.e.
ritornare.alla.selezione.della.bevanda.
Queste impostazioni sono efcaci
automaticamente.per.tutti.i.tipi.di.
preparazione.
48
<90°c
Page 53

deit
Impostazioni del tasto j
Con.il.tasto.7.j.è.possibile.richiamare delle
informazioni (premere.brevemente).ed.
eseguire le impostazioni (tenere.il.tasto.
premuto.per.almeno.3.secondi).
Richiamare informazioni
Nel.menu.Info.si.possono.richiamare.le.
seguenti.informazioni:
–..il.numero.di.bevande.prelevate.dalla.
messa.in.funzione.della.macchina.per.
caffè.espresso
– il periodo che deve trascorrere no al
prossimo.intervento.di.assistenza
● Premere brevemente il tasto 7.j.e.
navigare.con.i.tasti.4.<.e.>.
menu inFo
decaLc. tra ca. xxx tazze
PuLire tra ca. xxx taz ze
manca FiLtro
cambio FiLtro tra xxx taz ze *
menu inFo
numero di ta zze xx
numero di mix Lat te xx
Quantità di acQua caLda xL
Regolare il grado di macinatura
Con.il.selettore.17.è.possibile.regolare.il.
grado.di.macinatura.desiderato.per.il.caffè.
Attenzione
Regolare il grado di macinatura solo con il
macinacaffè in funzione! In caso contrario
l’apparecchio potrebbe subire danni.
● Con il macinacaffè in funzione,
posizionare.il.selettore.17.su.un.valore.
compreso tra caffè macinato ne • • • è
caffè macinato grosso ● ● ●.
Informazione: la.nuova.regolazione.risulta.
effettiva.solo.a.partire.dalla.seconda.tazza.
Consiglio: per.chicchi.più.tostati.scegliere.
un grado di macinatura più ne, per chicchi
meno.tostati.scegliere.un.grado.di.
macinatura.più.grosso.
Riscaldamento tazze
! Attenzione! Il dispositivo di
riscaldamento tazze 18 si riscalda molto!
La macchina automatica per espresso è
dotata.di.una.funzione.per.il.riscalda-mento.
delle.tazze.18,.che.può.essere.attivata.o.
disattivata.manualmente.con.il.tasto.19..Se.
il.riscaldamento.tazze.18.è.attivo,.il.tasto.19.
si.accende.
*compare solo se il ltro è attivo.
Premendo.di.nuovo.il.tasto.j.per.breve.
tempo.si.ritorna.alla.selezione.delle.bevande..Dopo.circa.10.secondi.di.inattività,.
l’apparecchio.passa.automaticamente.alla.
modalità.di.selezione.delle.bevande.
Eseguire le impostazioni
(vedere.capitolo.“Impostazioni.del.menu”)..
Consiglio:.per.un.riscaldamento.ottimale.
delle.tazze,.posizionarle.sul.dispositivo.con.
la.base.a.contatto.con.il.riscaldamento.18.
49
Page 54

deit
Impostazioni del menu
● Tenere premuto il tasto 7.j.per.almeno.3.
secondi.
Compaiono.le.diverse.possibilità.di.
impostazione..
imPostazioni
Lingua itaLiano
durezza acQua
decaLciFicare
Nel.testo.che.segue.ogni.nuova.
impostazione.inizia.con...
j 3.sec. + >
descrizione.precisa.
Con.i.tasti.4.<.e.>.è.possibile.selezionare.
le.diverse.possibilità.di.impostazione.
Nota: le modiche eseguite vengono
salvate.automaticamente,.senza.la.
necessità.di.un’ulteriore.conferma..
j 3.sec. + >
● Ruotando il pulsante girevole 6.è.
possibile.selezionare.la.lingua.desiderata.
.ed.è.seguita.da.una.
imPostazioni
durezza acQua
decaLciFica re
PuLire
Lingua.
star t
Informazione: l’impostazione.della.corretta.
durezza dell’acqua è importante afnché
l’apparecchio venga decalcicato negli
intervalli.dovuti..Il.valore.preimpostato.per.la.
durezza.dell’acqua.è.4. La durezza
dell’acqua.si.può.determinare.con.la.strisce.
di.test.fornite.in.dotazione.oppure.si.può.
richiedere.alla.società.locale.di.distribuzione.
dell’acqua..
● Immergere in acqua per breve tempo la
striscia.di.test.e.leggere.il.risultato.dopo.1.
minuto.
Grado Grado.di.durezza.dell’acqua
Tedesco (°dH) Francese (°fH)
1
2
3
4
j 3.sec. + >
● Per eseguire la decalcicazione dell’apparecchio,.premere.il.tasto.8.
eseguire il programma di decalcicazione
(vedere Capitolo “Decalcicare”).
j 3.sec. + >
● Per eseguire la pulizia dell’apparecchio,
premere.il.tasto.8.
programma.di.pulizia.(vedere.Capitolo.
“Pulire”).
j 3.sec. + >
● Per eseguire contemporaneamente la
Decalcicazione e la Pulizia
dell’apparecchio,.premere.il.tasto.8.
ed.eseguire.il.programma.Calc‘n‘Clean.
(vedere.Capitolo.“Calc‘n‘Clean“).
1-7
8-14
15-21
22-30
decaLciFicare
PuLire
start
caLc‘n‘cLean
1-13
14-25
26-38
39-54
start
.e.ed.
.e.ed.eseguire.il.
start
.
j 3.sec. + >
● Ruotando il pulsante girevole 6.è.
possibile.selezionare.la.durezza.
dell’acqua.desiderata.sui.valori..
durezza acQua
1,2,3.e.4.
50
j 3.sec. + >
Questa.impostazione.permette.di.impostare.
l’ora.di.disattivazione.automatica.della.
funzione.per.il.riscaldamento.delle.tazze.
dopo.la.riaccensione.
Impostare.l’intervallo.di.tempo.desiderato.
●
ruotando.il.pulsante.girevole.6..
riscaLd. tazza oFF tra
Page 55

deit
j 3.sec. + >
Ruotando.il.pulsante.girevole.6.è.possibi-
●
le.inserire.il.tempo.che.deve.trascorrere.
dall’ultimo.prelievo,.prima.che.l’apparecchio.passi.alla.“modalità.di.risparmio”.
È.possibile.impostare.un.intervallo.minimo.
di.5.minuti.ed.un.intervalli.massimo.di.8.ore.
j 3.sec. + >
Ogni volta che si inserisce un nuovo ltro
acqua.nel.serbatoio.acqua.11,.è.necessario.
eseguire un risciacquo del nuovo ltro.
Per.eseguire.questa.operazione.spingere.
●
saldamente il ltro dell’acqua nel
serbatoio.dell’acqua.11.aiutandosi.con.il.
dosatore.14..Riempiere.poi.il.serbatoio.
con acqua no al contrassegno “
Ruotando.il.pulsante.girevole.6.scegliere.
●
start.e.premere.il.tasto.8.
● Posizionare reciP.da 0,5 L sotto
inserto schiuma
Posizionare.un.recipiente.con.una.
●
capacità.da.0,5.l.sotto.l’inserto.schiuma.
Premere.il.tasto.8
●
scorre attraverso il ltro per sciacquarlo.
Quindi vuotare il recipiente. L’apparecchio
●
è.nuovamente.pronto.per.l’uso.
auto sPegnimento in.
FiLtro acQua
max
start
.
start
start
..Ora.l’acqua.
”.
L’effetto del ltro è esaurito quando
compare.l’indicazione.cambio FiLtro
oppure.al.massimo.dopo.2.mesi.dalla.
sostituzione. Il ltro deve essere sostituito
per ragioni igieniche e afnché
l’apparecchio.non.presenti.un.eccesso.di.
calcare.(che.può.danneggiare.l’apparecchio.
stesso).
Filtri.di.ricambio.sono.disponibili.persso.i.
rivenditori.(TZ70003).o.presso.il.servizio.di.
assistenza.clienti.(467873)..Se.non.viene.
inserito alcun nuovo ltro, posizionare
l’impostazione.FiLtro acQua su.no.
Informazione: Se.l’apparecchio.resta.
inattivo.per.un.periodo.prolungato.(ad.
esempio.durante.le.vacanze),.prima.
dell’uso.si.dovrebbe.eseguire.il.risciacquo.
del ltro inserito, semplicemente prelevando
una.tazza.di.acqua.calda..
j 3.sec. + >
Il.contrasto.del.display.può.essere.
impostato.da.–20.a.+20. Il.valore.
predenito è +0.
Eseguire.l’impostazione.desiderata.con.il.
●
pulsante.girevole.6.
contrasto
Informazione: contemporaneamente.al.
risciacquo del ltro viene attivata l’imposta-
zione di visualizzazione del cambio ltro.
Per informazioni dettagliate sul ltro
dell‘acqua,.consultare.le.istruzioni.allegate.
al ltro.
j 3.sec. + >
È.possibile.eliminare.le.impostazioni.
personali.e.riattivare.le.impostazioni.
predenite.
Per attivare l’impostazione predenita,
●
premere.il.tasto.8.
Informazione: È.possibile.ripristinare.
manualmente le impostazioni predenite
dell’apparecchio.mediante.una.
combinazione.di.tasti.
L’apparecchio deve essere completamente
spento.
Premere.contemporaneamente.i.tasti.4..
●
imP.PredeFinita
start
.
<.e.>.e.l’interruttore.di.rete.1.O./.I.per.
almeno.5.secondi;.le.impostazioni.
predenite sono nuovamente attive.
51
Page 56

deit
Preparazione con chicchi
di caffè
Questa.macchina.automatico.per.espresso.
macina.automaticamente.i.chicchi.freschi.
prima.di.ogni.preparazione..Usare.
preferibilmente.miscele.di.caffè.o.espresso.
appositamente.preparate.per.l’uso.con.
macchine.da.caffè..Per.garantire.una.qualità.
ottimale,.conservare.i.chicchi.di.caffè.in.
luogo.fresco.e.chiuso.oppure.congelarli..È.
possibile.macinare.anche.chicchi.congelati.
Importante:.l’acqua.del.serbatoio.
dell’acqua.11.deve.essere.sempre.fresca..Il.
serbatoio.dovrebbe.contenere.sempre.una.
quantità di acqua sufciente per garantire il
funzionamento.dell’apparecchio.
Consiglio:.Preriscaldare.la.o.le.tazze,.in.
particolare.le.piccole.e.grosse.tazze.da.
espresso,.sul.vassoio.portatazze.18.
È.possibile.preparare.diverse.bevande.a.
base.di.caffè.in.modo.molto.semplice.
semplicemente.agendo.sui.tasti..
Preparazione di bevande senza latte
L’apparecchio deve essere pronto per l’uso.
Posizionare.la.o.le.tazze.preriscaldate.
●
sotto.l’uscita.caffè.9..
Selezionare.l’espresso.o.il.caffè.desiderato.
●
ruotando.il.pulsante.girevole.6..SuldisplaySul.display.
5.viene.visualizzata.la.bevanda.seleziona-
ta.e.l’impostazione.per.l’intensità.e.la.
quantità.di.caffè.per.questa.bevanda.
esPresso Ë Í
 à À Á Å Æ
Premere.il.tasto.8.
●
Il caffè viene preriscaldato e poi uisce nella
o.nelle.tazze..
Preparazione di bevande con latte
L’apparecchio deve essere pronto per l’uso.
● Inserire nel recipiente per il latte 32.il.
tubicino.del.latte.10d.dell’inserto..
schiuma.10.
Spingere.l’uscita.caffè.9.verso.destra no
●
a.quando.si.sente.uno.scatto.
Posizionare.la.tazza.o.il.bicchiere.
●
preriscaldato.sotto.l’uscita.caffè.9.e.
inserto.schiuma.10.
Selezionare.la.funzione.desiderata,.
●
ovvero.Macchiato.Å.oppure..
Cappuccino.
girevole.6..Sul.display.5.viene.
visualizzata.la.bevanda.selezionata.e.
l’impostazione.per.l’intensità.e.la.quantità.
di.caffè.per.questa.bevanda..
start
.
Æ.ruotando.il.pulsante.
caPPuccino Ë Í
À Á Å Æ È É
Queste.impostazioni.possono.essere.
modicate (vedere capitolo “Elementi di
comando”).
Premere.il.tasto.8.
●
Dapprima.il.latte.viene.immesso.nella.
tazza.o.nel.bicchiere..Quindi.il.caffè.viene.
preriscaldato.e.versato.nella.tazza.o.nel.
bicchiere.
Importante:.I.resti.secchi.di.latte.sono.
difcili da rimuovere, per questa ragione si
consiglia.di.pulire.l’inserto.schiuma.10.con.
acqua.tiepida.dopo.ogni.uso.(vedere.
capitolo.“Pulire.la.linea.del.latte”).
start
...
Queste.impostazioni.possono.essere.
modicate (vedere capitolo “Elementi di
comando”).
52
Page 57

deit
Preparazione con caffè
macinato
Questa.macchina.automatica.per.caffè.
espresso.può.funzionare.anche.con.caffè.
macinato.(non.con.caffè.solubile)..
Preparazione di bevande senza latte
Con.il.pulsante.girevole.6,.selezionare.À.
●
oppure.Á.
Posizionare.la.o.le.tazze.preriscaldate.
●
sotto.l’uscita.caffè.9..
Aprire.il.cassetto.per.il.caffè.macinato.20.
●
esercitando.una.pressione.
Versare.2.dosatori.di.caffè.14.pieni.
●
Attenzione:.non.versare.nel.cassetto.
chicchi.interi.o.caffè.solubile.
Chiudere.il.cassetto.del.caffè..
●
macinato.20.
Premere.il.tasto.8.
●
Il caffè viene preriscaldato e poi uisce nella
o.nelle.tazze..
Nota:.per.preparare.un’altra.tazza.con.
caffè,.ripetere.l’operazione..Se.entro.90.
secondi.non.viene.prelevato.caffè,.il.
bollitore.si.vuota.automaticamente.per.
prevenire.che.l’acqua.trabordi..
L’apparecchio esegue un risciacquo.
Preparazione di bevande con latte
Con.il.pulsante.6.selezionare..
●
Macchiato.Å.oppure.Cappuccino.Æ.
Inserire.nel.recipiente.del.latte.32.il.
●
tubicino.10d.dell’inserto.schiuma.10..
Spingere.l’uscita.caffè.9.verso.destra no
●
a.quando.si.sente.lo.scatto.
Posizionare.la.tazza.o.il.bicchiere.sotto.
●
l’uscita.caffè.9.e.inserto.schiuma.10..
Aprire.il.cassetto.per.il.caffè.macinato.20.
●
esercitando.una.pressione.
Versare.2.dosatori.di.caffè.14.pieni.
●
start
.
Premere.il.tasto.8.
●
Dapprima.il.latte.viene.aspirato,.preparato.
e.pompato.nella.tazza.o.nel.bicchiere..
Quindi.il.caffè.macinato.viene.
preriscaldato e poi uisce nella tazza o
nel.bicchiere.
Importante:.I.resti.secchi.di.latte.sono.
difcili da rimuovere, per questa ragione si
consiglia.di.pulire.l’inserto.schiuma.10.con.
acqua.tiepida.dopo.ogni.uso.(vedere.
capitolo.“Pulire.la.linea.del.latte”).
Nota:.per.preparare.un’altra.tazza.con.caffè.
macinato./.mix..latte,.ripetere.l’operazione..
Se.entro.90.secondi.non.viene.prelevato.
caffè,.il.bollitore.si.vuota.automaticamente.
per.prevenire.che.l’acqua.trabordi..
L’apparecchio esegue un risciacquo.
start
...
Preparazione di schiuma
di latte e di latte caldo
! Pericolo di ustioni
L’inserto schiuma 10.si.riscalda.molto..Dopo.
l’uso,.prima.di.afferrarlo,.aspettare.che.si.
raffreddi.
L’apparecchio deve essere pronto per l’uso.
Inserire.il.tubicino.del.latte.10d.dell’inserto.
●
schiuma.10.nel.recipiente.del.latte.32..
Posizionare.la.tazza.o.il.bicchiere.sotto.
●
l’uscita.dell’inserto.schiuma.10..
Selezionare.l’impostazione..
●
“Schiuma.latte”.
ruotando.il.pulsante.girevole.6..
Premere.il.tasto.8.
●
circa.40.secondi).o.il.latte.caldo.(per.circa. .
60.secondi).fuoriescono.dall’uscita.
dell’inserto.schiuma.10.
Premendo.nuovamente.il.tasto.8.
●
possibile.interrompere.anticipatamente.
l’operazione..
oppure “Latte caldo”
È
start
,.la.schiuma.(per.
start
É
.è.
.
Attenzione:.non.versare.nel.cassetto.
chicchi.interi.o.caffè.solubile.
Chiudere.il.cassetto.del.caffè..
●
macinato.20.
Informazione:.durante.la.preparazione.del.
latte.caldo,.è.possibile.che.la.macchina.
emetta dei schi. Questi sono dovuti alla
struttura.dell’inserto.schiuma.10.
53
Page 58

deit
Consiglio: per.una.schiuma.di.latte.di.
qualità.ottimale,.usare.preferibilmente.latte.
freddo.con.una.percentuale.di.grasso.del.
1,5%..
Importante:.I.resti.secchi.di.latte.sono.
difcili da rimuovere, per questa ragione si
consiglia.di.pulire.l’inserto.schiuma.10.con.
acqua.tiepida.dopo.ogni.uso.(vedere.
capitolo.“Pulire.la.linea.del.latte”).
Prelievo di acqua
per il thè
! Pericolo di ustioni
L’inserto schiuma 10.si.riscalda.molto..Dopo.
l’uso,.prima.di.afferrarlo,.aspettare.che.si.
raffreddi.
L’apparecchio deve essere pronto per l’uso.
Posizionare.la.tazza.o.il.bicchiere.sotto.
●
l’uscita.dell’inserto.schiuma.10..
Selezionare.l’impostazione.desiderata.
●
Acqua.thè.Ê.ruotando.il.pulsante..
girevole.6..
Premere.il.tasto 8.
●
fuoriesce.per.circa.40.secondi.dall’uscita.
dell’inserto.schiuma 10.
Premendo.nuovamente.il.tasto.8.
●
possibile.interrompere.anticipatamente.
l’operazione.
start
,.l’acqua.calda.
start
.è.
La chiusura dello scomparto per la
●
conservazione.delle.istruzioni.brevi.25.e.il.
pannello.delle.vasche.raccogligocce.26.si.
possono.lavare.esclusivamente.con.un.
panno.umido..Non mettere in
lavastoviglie.
Togliere.la.griglia.di.sgocciolamento.
●
uscita.caffè.28.e.la.griglia.di.
sgocciolamento.inserto.schiuma.29..
Estrarre.la.vasca.raccogligocce.dell’uscita.
caffè.27.insieme.con.il.contenitore.per.i.
fondi.di.caffè.30.tirando.in.avanti,.pulire.
tutti.gli.elementi.e.reinserirli..Tutti questi
pezzi possono essere lavati anche in
lavastoviglie..
Lavare a mano, o mettere in lavastoviglie
●
il.dosatore.14,.il.coperchio.salva-aroma.
16 e.il.recipiente.del.latte.32.
Pulire.con.un.panno.l’interno.
●
dell’apparecchio.(alloggiamento.delle.
vasche).
Importante: Il.raccogligocce.27.dovrebbe.
venir.svuotato.e.pulito.quotidianamente,.per.
prevenire.la.formazione.di.muffe.
Nota:.se.l’apparecchio.viene.acceso.con.il.
tasto.2.a.a.freddo.oppure.viene.messo.in.
funzione.dopo.il.prelievo.di.caffè,.viene.
eseguito.un.risciacquo.automatico..Il.
sistema.è.quindi.autopulente.
Nota:.è.possibile.regolare.la.temperatura.
dell’acqua.calda.(vedere.capitolo.“Elementi.
di.comando.Tasto.3.°C”).
Cura e pulizia quotidiana
! Pericolo di scarica elettrica!
Prima della pulizia, staccare la spina di
rete.
Non immergere mai l’apparecchio in acqua.
Non usare dispositivi di pulizia a vapore.
Pulire.l‘esterno.con.un.panno.morbido.e.
●
umido..Non.usare.panni.o.detergenti.
abrasivi.
Lavare il serbatoio 11.e.il.bollitore.23.solo.
●
con.acqua.
54
Pulire la linea del latte
Pulire la linea del latte 10 dopo ogni
utilizzo!
È.possibile.eseguire.una.pulizia.preven-tiva.
automatica.della.linea.del.latte.10.
Scegliere.sul.display.5.il.simbolo.Ì.e.
●
premere.il.tasto.8.
start
.
inserire un bicchiere vuoto sotto
L’inserto schiuma, immergere iL tubo
di asPirazione neL bicchiere..
Inserire.un.bicchiere.vuoto.sotto.la.linea.
●
del.latte.10.e.immergere.l’estremità.del.
tubicino.del.latte.nel.bicchiere.10d.
start
Page 59

start
●
Premere.il.tasto.8.
versa.automaticamente.acqua.nel.
bicchiere.e.la.riaspira.per.il.lavaggio.
attraverso.il.tubicino.del.latte.10d. La
procedura.di.lavaggio.si.conclude.
automaticamente.dopo.circa.1.minuto.
Svuotare.il.bicchiere.e.pulire.il.tubicino.
●
del.latte.10d.
Inoltre.pulire.a.fondo.regolarmente.anche.il.
sistema.del.latte.(in.lavastoviglie.oppure.a.
mano).
Smontare la linea del latte 10 per pulirla:
Estrarre.la.linea.schiuma.10.
●
dall’apparecchio.tirandola.diritta.verso.il.
lato.anteriore.
Pulire.i.singoli.pezzi.(gura C).con.una.
●
soluzione.di.acqua.e.detersivo).e.con.uno.
spazzolino.morbido.
Sciacquare.ed.asciugare.tutte.le.parti.
●
Rimontare tutti i pezzi, inserendoli no in
●
fondo.nelle.loro.posizioni.
..Ora.l’apparecchio.
deit
Importante: non.usare.detersivi.e.non.
lavare.in.lavastoviglie;
passare.l’interno.dell’apparecchio.con.un.
●
panno.umido;
lasciar.asciugare.il.bollitore.23.e.l’interno.
●
dell’apparecchio;
inserire.il.bollitore.23 no in fondo;
●
spingere.completamente.verso.destra..
●
il.blocco.rosso.23b.e.chiudere..
lo.sportello.21.
Accessori per la
conservazione
La macchina automatica per espresso è
dotata.di.appositi.scomparti.per.riporre.
accessori.e.istruzioni.brevi.al.suo.interno.
Per.riporre.il.dosatore.del.caffè.macinato.
●
14,.il.tubicino.del.latte.10d e il essibile
10c,.togliere.il.serbatoio.dell’acqua.11.e.
inserire.i.pezzi.negli.appositi.spazi.
preformati.13.
Informazione: tutti.i.pezzi.dell’inserto.
schiuma.10.possono.essere.lavati.in.
lavastoviglie.
Pulire il bollitore
(vedere anche le Istruzioni brevi)
Oltre.al.programma.di.pulizia.automatica,.
l‘unità.di.infusione.23.dovrebbe.venir.tolta.
regolarmente.per.poterla.pulire.
Attivare.il.modo.di.risparmio.energia.con.il.
●
tasto 2.a.
Disattivare.completamente.l’apparecchio.
●
con.l’interruttore.di.rete.1 O./.I..Non.è.
illuminato.nessun.tasto.
Spingere.verso.destra.l’interruttore.
●
aprisportello.22.e.aprire.lo.sportello.21.
del.bollitore.23.
Spingere.completamente.verso.sinistra.il.
●
blocco.rosso.23b.sul.bollitore.23.
Premere.il.pulsante.23a,.afferrare.il.
●
bollitore.23.per.le.apposite.maniglie.
sagomate.(gura E).ed.estrarlo.con.
cautela.
Pulire.il.bollitore.23.sotto.l’acqua.corrente.
●
Le istruzioni brevi hanno uno scomparto
apposito.vicino.al.bollitore.23.
Aprire.lo.sportello.21.del.bollitore.
●
Afferrare.la.linguetta.della.chiusura.25.per.
●
lo.scomparto.24.e.togliere.la.chiusura.
Inlare le istruzioni brevi, reinserire la
●
chiusura.25.e.chiudere.lo.sportello.21.del.
bollitore.
Consigli per risparmiare
energia
La macchina automatica per espresso,
–
dopo un’ora (impostazione predenita),
passa.automaticamente.alla.modalità.di.
risparmio,.nella.quale.il.consumo.di.energia.è.molto.ridotto..Il.tempo.reimpostato,.
di un’ora, può essere modicato (vedere il
capitolo.“Impostazioni.del.menu.auto
sPegnimento in”)..
Se.la.macchina.non.viene.utilizzata,.spe-
–
gnerla.con.il.tasto.1.O./.I.di.alimentazione.
posizionato.sul.lato.anteriore.
55
Page 60

deit
–
Se.possibile.non.interrompere.mai.il.
prelievo di caffè o di latte. L’arresto
anticipato.del.prelievo.di.latte.o.di.caffè.
provoca.un.consumo.maggiorato.di.
energia.e.un.eccessivo.livello.di.acqua.
residua.nel.raccogligocce.
–
Decalcicare regolarmente l’apparecchio,
per.evitare.eccessivi.depositi.di.calcare..
La presenza di residui di calcare provoca
un.maggior.consumo.di.energia.
Programmi di assistenza
Consiglio:.vedere.anche.Istruzioni.brevi.
nello.scomparto.per.la.conservazione.24.
A.determinati.intervalli.di.tempo.sul..
display.5.compare.
decaLciFicare oppure
e
seguire PuLizia oppure..
caLc‘n‘cLean..
In.questo.caso.l’apparecchio.deve.essere.
immediatamente pulito o decalcicato
utilizzando.il.corrispondente.programma..A.
scelta.le.due.procedure.si.possono.riunire.
nella.funzione.Calc‘n‘Clean.(vedere.
Capitolo.“Calc‘n‘Clean”)..Se.il.programma.di.
assistenza.non.viene.utilizzato.correttamente.secondo.le.istruzioni,.esiste.il.
rischio.di.provocare.dei.danni.
all’apparecchio.
Attenzione
Per ogni programma di assistenza,
utilizzare i decalcificanti e i detergenti
seguendo le istruzioni.
Non interrompere mai il programma di
assistenza.
Non ingerire i liquidi utilizzati!
Non utilizzare mai aceto, sostanze a base
di aceto, acido citrico o sostanze a base di
acido citrico!
Non mettere mai le pastiglie di
decalcificante o altri decalcificanti nel
cassetto del caffè macinato 20!
Per decalcificare usare esclusivamente le
pastiglie di decalcificante fornite in dotazione, che sono state prodotte appositamente
per questo apparecchio.
Presso i rivenditori autorizzati e il
servizio clienti sono disponibili speci-
che pastiglie decalcicanti e deter-
genti.
Codice.ordine Riven-.
ditore
Pastiglie.di.
detersivo
Pastiglie.
decalcicanti
Importante:.se.nel.serbatoio.per.l’acqua.11.
è inserito un ltro per l’acqua, è
assolutamente.necessario.toglierlo.prima.di.
iniziare.il.programma.di.assistenza.
TZ60001 310575
TZ60002 310967
Servizio.
clienti
Decalcicare
esPresso Ë Í
decaLciFicare
tasto i Per 3 sec.
Il.tasto 8.
fasi di decalcicazione.
I.numeri.indicati.in.alto.a.destra.indicano.
l’avanzamento.della.procedura.
●
decaLciFicare start
●
vuo tare raccogLigocce
i
nserire raccogLigocce
●
Posizionare reciP. da 0,5 L sotto
inserto schiuma
●
●
start
.lampeggia.durante.le.singole.
Tenere.premuto.il.tasto.7.j.per.almeno.3.
secondi.
Premere.il.tasto.8.
nelle.fasi.del.programma.
Svuotare.il.raccogligocce.27.e.reinserirlo.
Posizionare.un.recipiente.con.una.
capacità.da.0,5.l.sotto.l’inserto.schiuma.
10.
Premere.il.tasto.8.
start
..Il.display.5.guida.
start
start
.
56
Page 61

deit
Informazione: se il ltro dell’acqua è attivo,
compare l’invito a togliere il ltro e a
start
premere.nuovamente.il.tasto.8.
.
eLiminare FiLtro acQua start
versare 0,5 L acQua +
decaLciFicante
Riempire.il.serbatoio.dell’acqua.11.con.
●
acqua tiepida no al contrassegno “0,5 l”.
e sciogliervi 2 pastiglie decalcicanti
Siemens.
Premere.il.tasto 8.
●
decalcicazione dura circa 20 minuti.
start
start
..Il.programma.di.
decaLciFicazione in corso
manca decaLciFicante
a
ggiung. decaLciFicante
Informazione: se.il.serbatoio.dell’acqua.11.
contiene troppo poco decalcicante,
compare.il.messaggio.corrispondente..
Aggiungere decalcicante e premere
nuovamente.il.tasto.8.
start
.
sciacQuare e riemPire
serbatoio acQua
Sciacquare.il.serbatoio.dell’acqua.11.e.
●
riempirlo con acqua pulita no al
contrassegno.“max”.
Premere.il.tasto.8.start..Il.programma.di.
●
decalcicazione dura circa 1 minuto e poi
esegue.il.risciacquo.
start
decaLciFicazione in corso
v
uotare raccogLigocce.
inserire roccogLigocce
Svuotare.il.raccogligocce.27.e.reinserirlo.
●
L’apparecchio è di nuovo pronto per l’uso.
Pulire
esPresso Ë Í
eseguire PuLizia
tasto i Per 3 sec.
Durante.le.fasi.del.processo.di.pulizia,.il.
tasto.8.start.lampeggia.
I.numeri.in.alto.a.destra.indicano.lo.stato.di.
avanzamento.della.procedura.
Riempire.il.serbatoio.dell’acqua.11 no al
●
contrassegno.“max”.
Tenere.premuto.il.tasto.7.j.per.almeno.3.
●
secondi.
PuLire start
Premere.il.tasto.8.
●
nelle.fasi.del.programma.
vuo tare raccogLigocce
i
nserire raccogLigocce
Svuotare.il.raccogligocce.27.e.reinserirlo;.
●
l‘apparecchio.esegue.un.doppio.ciclo.di.
lavaggio.
Posizionare uscita caFFè
Posizionare.l’uscita.caffè.9.verso.sinistra,.
●
no a sentire lo scatto.
PuLizia in corso
aPrire cassetto PoLvere
Aprire.il.cassetto.polvere.20.esercitando.
●
una.certa.pressione.
start
..Il.display.5.guida.
inserire PastigLia PuLizia siemens e
chiudere cassetto
Inserire.una.pastiglia.di.pulizia.Siemens.e.
●
chiudere.il.cassetto.20.
Premere start.
Premere.il.tasto.8.start..Il.programma.di.
●
pulizia.dura.circa.7.minuti.
PuLizia in corso
57
Page 62

deit
vuo tare raccogLigocce
i
nserire roccogLigocce
Svuotare.il.raccogligocce.27.e.reinserirlo.
●
L’apparecchio è di nuovo pronto per l’uso.
Calc‘n‘Clean
La funzione Calc‘n‘Clean combina le due
operazioni di decalcicazione e di pulizia.
Se.la.scadenza.delle.due.procedure.è.
ravvicinata,.la.macchina.automatica.per.
caffè.espresso.propone.questo.programma.
di.servizio.
esPresso Ë Í
caLc‘n‘cLean
tasto i Per 3 sec.
Durante.le.fasi.del.processo.Calc‘n‘Clean,.il.
tasto.8.
start
.lampeggia..I.numeri.in.alto.a.
destra.indicano.lo.stato.di.avanzamento.
della.procedura.
Tenere.premuto.il.tasto.7.j..per.almeno.3.
●
secondi.
caLc‘n‘cLean start
Premere.il.tasto.8.
●
nelle.fasi.del.programma.
vuo tare raccogLigocce
i
nserire raccogLigocce
Svuotare.il.raccogligocce.27.e.reinserirlo.
●
Spingere.l’uscita.caffè.9 verso destra no
●
a.quando.si.scatta.
Posizionare.un.recipiente.con.una.
●
capacità.minima.di.1.litro.sotto.l’inserto.
schiuma.10..
Premere.il.tasto.8.
●
esegue.il.risciacquo.due.volte.
PuLizia in corso
a
Prire cassetto PoLvere
Aprire.il.cassetto.polvere.20.esercitando.
●
una.certa.pressione.
start
..Il.display.5.guida.
start
;.l’apparecchio.
inserire PastigLia PuLizia siemens e
chiudere cassetto
Inserire.una.pastiglia.di.pulizia.Siemens.e.
●
chiudere.il.cassetto.20.
Informazione: se il ltro dell’acqua è attivo,
compare l’invito a togliere il ltro e a
premere.nuovamente.il.tasto.8.
start
eLiminare FiLtro acQua start
versare 0,5 L acQua +
decaLciFicante
Riempire.il.serbatoio.dell’acqua.11.con.
●
acqua tiepida no al contrassegno “0,5 l”.
e sciogliervi 2 pastiglie decalcicanti
Siemens.
Premere.il.tasto.8.
●
decalcicazione dura circa 20 minuti.
start
start
..Il.programma.di.
decaLciFicazione in corso
manca decaLciFicante
a
ggiung. decaLciFicante
Informazione: se.il.serbatoio.dell’acqua.11.
contiene troppo poco decalcicante,
compare.il.messaggio.corrispondente..
Aggiungere decalcicante e premere
nuovamente.il.tasto.8.
start
.
sciacQuare e riemPire
serbatoio acQua
Sciacquare.il.serbatoio.dell’acqua.11.e.
●
riempirlo con acqua pulita no al
contrassegno.“max”.
Premere.il.tasto.8.
●
decalcicazione dura circa 1 minuto,
segue.per.circa.7.minuti.il.programma.di.
pulizia.e.quindi.il.risciacquo.
start
start
..Il.programma.di.
decaLciFicazione in corso
PuLizia in corso
vuo tare raccogLigocce
i
nserire raccogLigocce
Svuotare.il.raccogligocce.27.e.reinserirlo.
●
L’apparecchio è di nuovo pronto per l’uso.
Importante:.se.il.programma.di.assistenza.
viene.interrotto,.ad.esempio.a.causa.di.
un’interruzione.di.corrente,.procedere.come.
indicato.qui.di.seguito.
58
Page 63

●
Sciacquare.il.serbatoio.dell’acqua.11.e.
riempirlo con acqua pulita no al
contrassegno.“max”.
start
●
Premere.il.tasto.8.
pulizia.viene.eseguito.ora.per.circa.3.
minuti.per.risciacquare.l’apparecchio.
,.il.programma.di.
PuLizia in corso
vuo tare raccogLigocce
i
nserire raccogLigocce
Svuotare.il.raccogligocce.27.e.reinserirlo.
●
L’apparecchio è di nuovo pronto per l’uso.
Protezione dal gelo
! .Per evitare danni provocati
dall’azione del gelo durante il trasporto o
il deposito, è necessario svuotare
completamente l’apparecchio.
Informazione:.l’apparecchio.deve.essere.
pronto.per.l’uso.e.il.serbatoio.dell’acqua.11.
deve.essere.pieno.
Posizionare.un.recipiente.alto.e.stretto.
●
sotto.l’inserto.schiuma.10..
Selezionare.l’impostazione.“inserto.
●
schiuma”.È,.avviare.e.lasciare.che.
fuoriesca.vapore.per.circa.15.secondi.
Spegnere.l’apparecchio.con.l’interruttore.
●
di.rete.1.O./.I.
Svuotare.il.serbatoio.dell‘acqua.11.ed.il.
●
raccogligocce.27.
deit
Accessori
I.seguenti.accessori.generalmente.sono.
disponibile.presso.i.rivenditore.e.presso.il.
servizio.clienti.
Codice.
ordinazione
Pastiglie.di..
pulizia
Pastiglie
decalcificanti
Filtro.acqua TZ70003 467873
Smaltimento
Questo.apparecchio.è.contrassegnato.conformemente.alla.Direttiva.europea.2002/96/
CE Riuti di apparecchiature elettriche ed
elettroniche.(waste.electrical.and.electronic.
equipement-WEEE). La direttiva stabilisce il
quadro.generale.per.un.ritiro.e.recupero.
valido.in.tutta.I‘UE..Informarsi.presso.il.rivenditore.specializzato.sulle.attuali.disposizioni.per.la.rottamazione.
Riven-.
ditori
TZ60001 310575
TZ60002 310967
A
Servizio.
clienti
Garanzia
Per.questo.apparecchio.sono.valide.le.condizioni.di.garanzia.pubblicate.dal.nostro.
rappresentante.nel.paese.di.vendita..Il.
rivenditore,.presso.il.quale.è.stato.
acquistato.l’apparecchio,.è.sempre.ben.
disposto.a.fornire.a.richiesta.informazioni.a.
proposito..Per.l’esercizio.del.diritto.di.
garanzia.è.comunque.necessario.
presentare.il.documento.di.acquisto..
Con riserva di modica.
59
Page 64

it
Soluzione di piccoli guasti
Guasto Causa Rimedio
Sul.display.compare.il.
messaggio..
riemPire serbatoio
chicchi 15
anche.se.il.serbatoio.chicchi.
è.pieno.o.se.il.macinacaffè.
non.macina.chicchi.
Prelievo.acqua.calda.
impossibile.
Troppo.poco.o.troppa.
schiuma
oppure
L’inserto schiuma 10.non.
aspira.il.latte.
I.chicchi.non.ricadono.nel.
macinacaffè.(chicchi.troppo.
oleosi).
L’inserto schiuma 10.o.
l’alloggiamento.dell’inserto.
schiuma.è.otturato.
L’inserto schiuma 10.o.
l’alloggiamento.dell’inserto.
schiuma.è.sporco.
Latte non adatto. Usare.latte.con.una.
L’inserto schiuma 10.non.è.
montato.correttamente
Battere.leggermente.il.
serbatoio.chicchi.15..
Eventualmente.cambiare.il.
tipo.di.caffè..
Quando.il.serbatoio.chicchi.
15.è.vuoto,.pulirlo.con.un.
panno.asciutto.
Pulire.l’inserto.schiuma.10.o.
il.suo.alloggiamento.
Pulire.l’inserto.schiuma.10.o.
il.suo.alloggiamento.
percentuale.di.grasso.del.
1,5%.
Montare.correttamente.
l’inserto.schiuma.10.
Il.caffè.scende.solo.a.gocce.
oppure.non.è.possibile.più.
alcun.prelievo.di.caffè.
Il.caffè.non.ha.nessuna.
crema.
Il.caffè.è.
Se non è possibile risolvere un problema, chiamare la hotline!
60
“acido”. Il.grado.di.macinatura.è.
troppo.
Grado.di.macinatura.troppo.
fine..Caffè.macinato.troppo.
fine.
L’apparecchio ha troppi
depositi.di.calcare.
Tipo.di.caffè.non.adatto. Cambiare.il.tipo.di.caffè.
I.chicchi.non.sono.freschi.di.
tostatura.
Il.grado.di.macinatura.non.è.
adeguato.ai.chicchi.di.caffè.
troppo.grosso.oppure.il.
caffè.è.macinato.troppo.
grosso.
Tipo.di.caffè.non.adatto. Utilizzare.un.caffè.più.
Aumentare.il.grado.di.
macinatura..Usare.caffè.
macinato.più.grosso.
Decalcificare.l’apparecchio.
Utilizzare.chicchi.freschi.
Impostare.il.grado.di.
macinatura.fine.
Impostare.il.grado.di.
macinatura.su.un.valore.più.
fine.oppure.utilizzare.un.
caffè.macinato.più.fine.
tostato.
Page 65

Guasto Causa Rimedio
Il.caffè.è.troppo.“amaro”. Il.grado.di.macinatura.è.
troppo.fine.oppure.il.caffè.è.
macinato.troppo.fine.
Tipo.di.caffè.non.adatto. Cambiare.il.tipo.di.caffè.
Messaggio.sul.display.5.
errore
c
hiamare L’assistenza.
Il.filtro.dell’acqua.non.resta.
incastrato.nel.serbatoio.
dell’acqua.11..
I.fondi.di.caffè.non.sono.
compatti.e.sono.troppo.
bagnati.
Messaggi.a.display..
controLLare unità di
inFusione caFFè
Forti.differenze.nella.qualità.
del.caffè.o.della.schiuma.del.
latte.
Presenza.di.gocce.d‘acqua.
sul.fondo.interno.
dell‘apparecchio.dopo.aver.
tolto.il.raccogligocce.
Se non è possibile risolvere un problema, chiamare la hotline!
Si.è.verificato.un.errore.
nell’apparecchio.
Il.filtro.dell’acqua.non.è.
incastrato.
Il.grado.di.macinatura.è.
troppo.fine.o.troppo.grosso.
oppure.è.stato.inserito.
troppo.poco.caffè.macinato.
Unità.di.infusione.sporca. Pulire.l‘unità.di.infusione.
Troppo.caffè.macinato.
nell‘unità.di.infusione.
L‘apparecchio presenta
incrostazioni.di.calcare.
Il.raccogligocce.è.stato.
estratto.troppo.presto.
Impostare.il.grado.di.
macinatura.su.un.valore.più.
grosso.oppure.utilizzare.un.
caffè.macinato.più.grosso.
Chiamare.l’assistenza.
Spingere.saldamente.il.filtro.
dell’acqua.nel.punto.di.
inserimento.sul.serbatoio.
fino.a.quando.si.incastra..
Impostare.un.grado.di.
macinatura.più.grosso.o.più.
fine.oppure.utilizzare.2.
dosatori.rasi.di.caffè.
macinato.
Pulire.l‘unità.di.infusione.
(usare.al.massimo.2.
dosatori.rasi.di.caffè.
macinato).
Procedere.alla.decalcificazione.dell‘apparecchio,.
.secondo.le.istruzioni,.con.
due.compresse.
ante.
c
Estrarre.il.raccogligocce.
solo.alcuni.secondi.dopo.
l‘ultimo.prelievo.
it
di.decalcifi-
61
Page 66

denl
Inhoudsopgave
De.onderdelen. ..........................................83
Voor.het.eerste.gebruik. ............................84
Bedieningselementen. ...............................85
−.Netschakelaar.O./.I. ...............................85
−.Toets.a. ..................................................85
−.Draaiknop. ..............................................85
−.Keuzetoetsen.<.en.>. ..........................85
−.Display. ..................................................86
−.Toets.
−.Toets.°C. .................................................88
−.Toets.j.instellingen. ................................89
−.Maalgraad.instellen. ...............................89
−.Kopjeswarmer. .......................................89
Menu-instellingen......................................90
− Taal........................................................90
− Waterhardheid. .......................................90
−.Ontkalken. ..............................................90
−.Reinigen. ................................................90
−.Calc‘n‘Clean. ..........................................90
−.Kopjeswarmer.uit.na. .............................90
− Auto off na. .............................................90
− Waterlter. ..............................................91
−.Contrast.................................................91
−.Fabrieksinstelling. ..................................91
Kofezetten met kofebonen. ....................92
Kofezetten met gemalen kofe . ..............93
Melkschuim.en.warme.melk.bereiden. ......93
Warm water nemen. ..................................94
Onderhoud.en.dagelijkse.reiniging. ...........94
−.Melksysteem.reinigen. ...........................94
−.Zetgroep.reinigen. ..................................95
Opberging.toebehoren..............................95
Tips.om.energie.te.besparen. ....................96
Serviceprogramma’s.. ................................96
−.Ontkalken. ..............................................97
−.Reinigen. ................................................98
−.Calc‘n‘Clean. ..........................................98
Vorstbescherming.. ....................................99
Toebehoren.............................................100
Afval........................................................100
Garantie. ..................................................100
Eenvoudige.problemen.zelf.oplossen.....101
start
. .............................................88
Veiligheidsinstructies
Lees de handleiding zorgvuldig door,
neem ze in acht en bewaar ze!
Deze espresso-automaat is voor
huishoudelijk gebruik en de verwerking
van normale huishoudelijke
hoeveelheden bedoeld, niet voor
bedrijfsmatig gebruik.
! .Gevaar van elektrische schok!
Het apparaat uitsluitend aansluiten en
gebruiken.volgens.de.gegevens.op.het.
typeplaatje..Gebruik.het.apparaat.uitsluitend.
indien.het.aansluitsnoer.en.het.apparaat.
geen beschadigingen vertonen. Het
apparaat.uitsluitend.binnenshuis.bij.
kamertemperatuur.gebruiken..
Personen.(ook.kinderen).met.fysieke,.
zintuiglijke.of.geestelijke.beperkingen.of.
met.een.gebrek.aan.ervaring.en.kennis.
mogen.het.apparaat.niet.gebruiken,.tenzij.
ze.daarbij.onder.toezicht.staan.of.worden.
begeleid.door.een.persoon.die.voor.hun.
veiligheid.verantwoordelijk.is..
Houd het apparaat buiten het bereik van
kinderen..Let erop dat kinderen niet met het
apparaat.spelen.
In.geval.van.storing.onmiddellijk.de.stekker.
uit.het.stopcontact.trekken..
Om.gevaren.te.vermijden,.mogen.reparaties.aan.het.apparaat.–.bijvoorbeeld.het.
vervangen.van.een.beschadigd.aansluitsnoer.–.uitsluitend.worden.uitgevoerd.door.
onze.klantenservice..
Het apparaat en het aansluitsnoer niet
onderdompelen.in.water..
Niet.in.het.maalwerk.grijpen.
! Risico op brandwonden!
De.melkschuimer.voor.melk./.warm.water.
wordt.zeer.heet..Na.gebruik.eerst.laten.
afkoelen.en.pas.daarna.aanraken.
62
Page 67

denl
Beste kofeliefhebber,
Gefeliciteerd.met.uw.nieuwe.espressoautomaat.van.Siemens.
De onderdelen
Afbeeldingen A, B, C, D en E
. 1.Netschakelaar.O/I
2.Toets.a
. 3. .Toets.°C..
(temperatuur./.kinderbeveiliging)
. 4.Keuzetoetsen.<.>
5.Display
. .a).Status
. .b).Keuze
. .c).Navigatie
. 6.Draaiknop.voor.instellingen.display
. 7..Toets.j.(infomenu)
. 8.Toets.
. 9 Kofe-uitloop in hoogte verstelbaar .
.10. .Melkschuimer,.in.hoogte.
. .a).Bovenstuk
. .b).Onderstuk
. .c).Slang
. .d).Melkpijpje
.11.Afneembaar.waterreservoir
12.Deksel.waterreservoir
13. .Opbergvakken.
.14 Maatlepel (handvat voor waterlter)
.15.Bonenreservoir
.16.Aromadeksel
start
(bereiding./.programma)
en.draaibaar
verstelbaar(melk./.warm.water)
(maatlepel.en.toebehoren.
melkschuimer)
Deze.handleiding.beschrijft.verschillende.
modellen,.die.anders.zijn.uitgerust.
Lees ook de beknopte handleiding.
Ze.kan.in.een.speciaal.opbergvak.24.
worden.bewaard,.zodat.ze.altijd.binnen.
handbereik.is.
.17.Draaiknop.voor.maalgraadinstelling
18.Kopjeswarmer
19.Knop.voor.kopjeswarmer.verlicht
20. .Poederlade.
(gemalen kofe / reinigingstablet)
21.Deur.van.de.zetgroep.
22.Deuropener.
23.Zetgroep.
. .a).Drukknop.
. .b).Vergrendeling
24.Opbergvak.beknopte.handleiding
25.Afsluiting.opbergvak
26.Scherm.lekschalen
27 Lekschaal kofe-uitloop
28 Lekplaat kofe-uitloop
29 Lekplaat melkschuimer
30 Kofedikreservoir
31.Snoervak
32.Melkreservoir
63
Page 68

denl
Voor het eerste gebruik
Algemeen
Doe.alleen.schoon.en.koolzuurvrij.water.en.
bij.voorkeur.espresso-.of.bonenmelanges.
voor.volautomatische.apparaten.in.de.overeenkomstige.reservoirs..Gebruik.geen.geglaceerde,.gekaramelliseerde.of.met.andere.suikerhoudende.additieven.behan-
delde kofebonen, want deze verstoppen
de.zetgroep..
Bij.dit.apparaat.is.de.waterhardheid.
instelbaar..In.de.fabriek.is.de.waterhardheid.
ingesteld.op.4..Bepaal.de.hardheid.van.het.
gebruikte.water.met.het.bijgevoegde.
teststrookje. Wordt een andere waarde dan
hardheid.4.aangegeven,.dan.dient.het.
apparaat.na.de.ingebruikname.aangepast.
te.worden.geprogrammeerd.(zie.onder.
hoofdstuk.‘Menu-instellingen.
Waterhardheid’)..
Het apparaat in gebruik nemen
Plaats.de.espresso-automaat.op.een.
●
vlakke.ondergrond.met.voldoende.draagvermogen..
Info: Het apparaat heeft aan de onderkant
vier.wielen.en.kan.in.een.boogvorm.zijwaarts.worden.verschoven,.om.de.bediening.en.plaatsing.te.vergemakkelijken.
Trek.het.netsnoer.uit.het.snoervak.31.en.
●
steek.de.stekker.in..De.gepaste.lengte.
kan.worden.ingesteld.door.het.snoer.naar.
boven.terug.te.schuiven.of.naar.beneden.
uit.te.trekken..Zet.het.apparaat.daarvoor.
met.de.achterzijde.aan.bijv..de.tafelrand.
en.trek.het.snoer.naar.beneden.of.schuif.
het.terug.naar.boven.
Klap.het.deksel.van.het.waterreservoir.12.
●
omhoog.
Neem.het.waterreservoir.11.weg,.spoel.
●
het.uit.en.vul.het.met.vers,.koud.water..
Neem.hierbij.de.markering.‘max’.in.acht.
Zet.het.waterreservoir.11.rechtop.in.het.
●
apparaat.zetten.en.druk.het.helemaal.
naar.onderen.
Sluit.het.deksel.van.het.waterreservoir.12.
●
weer.
Vul.het.bonenreservoir.15.met.
●
kofebonen.
Druk.op.de.netschakelaar.1 O / I,.de.toets.
●
8.
start
.licht.op.en.op.het.display.5.
verschijnen.verschillende.talen.
Selecteer.nu.met.de.keuzetoetsen.4.<.
●
en.>.de.gewenste.taal.waarin.de.
displayteksten.moeten.verschijnen...
.
.
.
.
.
.
.
.
.
. De.geselecteerde.taal.wordt.met.een.
kader.gemarkeerd..Volgende.talen.zijn.
beschikbaar:.
Language
engLish
Pycckий
nederLands
star t
engLish
P
ycckий
n
ederLands
F
rançais
i
taLiano
s
venska
e
sPañoL
P
oLski
● Druk op de toets 8.
geselecteerde.taal.is.opgeslagen,.de.
toets.2.a.licht.op.
start
,.de.
64
Page 69

denl
● Druk op de toets 2.
verschijnt.op.het.display.5. Het apparaat
warmt.nu.op.en.spoelt,.er.loopt.wat.water.
uit de kofe-uitloop 9..Als.op.het.display.5.
de.symbolen.voor.het.kiezen.van.de.
bereiding.verschijnen,.is.het.apparaat.
klaar.voor.gebruik..
a,.het.merklogo.
esPresso Ë Í
 à À Á Å Æ
Info: De.espresso-automaat.is.in.de.fabriek.
geprogrammeerd.met.standaardinstellingen.
voor een optimale werking. Het apparaat
schakelt.na.1.uur.automatisch.in.de.
‘spaarmodus’.(zie.hoofdstuk.‘Menuinstellingen.auto oFF na’).
Opmerking: Bij.het.eerste.gebruik.of.als.
het.apparaat.gedurende.lange.tijd.niet.is.
gebruikt, heeft de eerste kop kofe nog niet
het.volle.aroma.
Als.u.de.espressomachine.voor.het.eerst.
gebruikt,.krijgt.u.pas.een.voldoend.dikke.en.
stabiele.laag.‘crema’.nadat.u.de.eerste.paar.
kopje.hebt.getapt..
Bedieningselementen
Netschakelaar O / I
Met.de.netschakelaar.1.O / I wordt.het.
apparaat.in.de.‘spaarmodus’.geschakeld.of.
volledig.uitgeschakeld..In.de.‘spaarmodus’.
brandt.alleen.de.toets.2.a..
Belangrijk: Schakel het apparaat pas uit
met de netschakelaar, als het zich in de
‘spaarmodus’ bevindt, zodat het
automatische spoelproces plaatsvindt.
Toets a
Met.de.toets.2.a.wordt.het.apparaat.
ingeschakeld.(gebruiksklaar).of.opnieuw.in.
de.‘spaarmodus’.geschakeld.
Toets.2.a.knippert,.zolang.het.apparaat.
spoelt..
Het apparaat spoelt niet, als:
het.bij.het.inschakelen.nog.warm.is;
●
er.voor.het.overschakelen.naar.de.
●
‘spaarmodus’ geen kofe werd gezet.
Het apparaat is gebruiksklaar, als op het
display.5.de.symbolen.voor.de.drankkeuze.
en.de.toets.8.
Draaiknop
Met.de.draaiknop.6.kan.op.het.display.5.
naar.links.en.rechts.worden.genavigeerd..
Met.deze.knop.kunnen.ook.in.het.menu.
parameters.worden.versteld.
Keuzetoetsen <.en >
Met.behulp.van.de.keuzetoetsen.4.<.en.>.
kunnen.de.menuniveaus.(navigatie.5c).
omhoog.en.omlaag.doorbladerd.worden.
start
.branden..
65
Page 70

denl
Display
Op.het.display.5.verschijnen.symbolen.voor.
keuzemogelijkheden, kofesterkte en -hoeveelheid.alsmede.teksten.voor.de.instellingen,.lopende.processen.en.meldingen..Met.
behulp.van.de.draaiknop.6.en.keuzetoetsen.
4.kunnen.hier.instellingen.worden.gewij-
zigd..De.geselecteerde.instelling.wordt.met.
een.kader.gemarkeerd.
esPresso ËË Í
 à À Á Å Æ
In.de.regel.‘status’.5a.van.het.display.wordt.
de.naam.van.de.drank.en.de.ingestelde.
sterkte,.bijv..55,.en.hoeveelheid,.bijv..�,.
vermeld..In.de.regel.‘keuze’.5b.verschijnen.
symbolen.voor.de.drankkeuze.
De.pijltjes.in.de.regel.‘navigatie’.5c.geven.
aan.in.welke.richting.er.zich.nog.menuniveaus.bevinden.
Displaymeldingen
Op.het.display.5.worden.verschillende.
meldingen.getoond.
Informatie.
even geduLd
Instructies
Waterreservoir vuLLen
Waterreservoir checken
5a
LekschaaL PLaat sen
LekschaaL Legen
b
bonenreservoir vuLLen
koFFie-uitLooP draaien
c
meLkschuimer PLa atsen
zetgroeP PLaats en
d
eur sLuiten
zetgroeP controLeren a.u.b.
P
oedere bijvuLLen
Lade sLuiten
FiLter vervangen
ontkaLken
reinigen a.u.b.
c
aLc‘n‘cLean
66
temPerat uu r te Laag
even geduLd
sPanning te hoog/Laag
Page 71
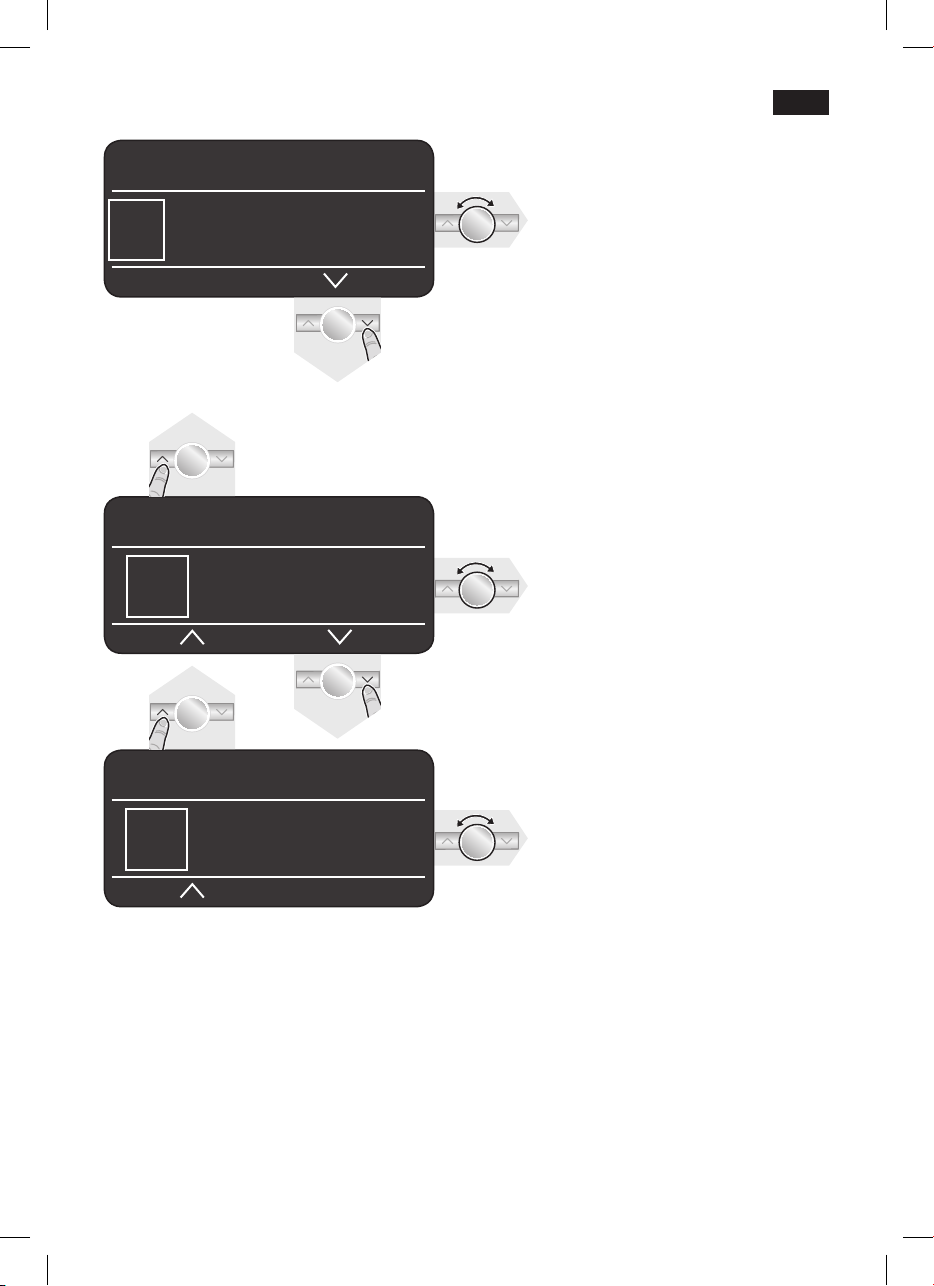
esPresso ËË Í
Å Æ È É Ê
Á
Keuzemogelijkheden
. 2 x esPresso.
Â
. esP resso. Á.koFFie
À
Ã
denl
.2 x koFFie
esPresso Ë Í
5 55 555
esPresso Ë Í
� Ð Ò
meLksyst.
. Kofesterkte
(alleen voor kofedranken)
. macchiato.
Å
. meLkschuim.
È
. Warm Water.
Ê
.caPPuccino.
Æ
Warme meLk
É
k
ort sPoeLen
Ì
5 5 5 5 5 5
. mild. normaal. sterk
Hoeveelheid
(alleen voor kofedranken)
� Ð Ò
. klein. normaal. groot
67
Page 72

denl
Toets start
start
Met.een.druk.op.de.toets.8.
bereiding.gestart.of.een.serviceprogramma.
uitgevoerd.
Door.tijdens.de.bereiding.nogmaals.op.de.
toets.8.
start
.te.drukken,.kan.het.proces.
vroegtijdig.worden.afgebroken.
Toets
°C
Met.deze.toets.3 °C.kan.de.temperatuur.
voor kofe en warm water worden ingesteld
(kort.indrukken).en.kan.de.kinderbeveiliging worden.in-.of.uitgeschakeld.(min..3.s.
ingedrukt.houden).
Temperatuur instellen
C
Druk.de.toets.3.°
vervolgens.met.de.toetsen.4.
draaiknop.6.de.instellingen.
.kort.in.en.wijzig.
.wordt.de.
<.en.>.en.de.
temPeratuur
koFFie
normaaL
Warm Water
Kinderbeveiliging
Om.kinderen.tegen.brandwonden.te.
beschermen,.kan.het.apparaat.worden.
vergrendeld.
● Houd de toets 3.°C.ten.minste.3.
seconden.ingedrukt..Op.het.display.5.
verschijnt.een.sleutel,.de.
kinderbeveiliging.is.geactiveerd..
Nu.is.er.geen.bediening.meer.mogelijk,.de.
kopjeswarmer.18.is.uitgeschakeld.
esPresso Ë Í
● Om de kinderbeveiliging te deactiveren,
dient.u.de.toets.3.°C.ten.minste.3.
seconden.ingedrukt.te.houden..De.sleutel.
op.het.display.5.verdwijnt.weer.
temPeratuur
koFFie
Warm Water
Door.de.toets.3.°C.in.te.drukken,.worden.de.
wijzigingen.bewaard.en.keert.u.naar.de.
drankkeuze.terug.
Deze.instellingen.gelden.automatisch.voor.
alle.bereidingswijzen.
68
<90°c
Page 73

denl
Toets j instellingen
Met.de.toets.
opvragen.(kort.indrukken).en.instellingen
aanpassen.(ten.minste.3.s.ingedrukt.
houden).
Informatie opvragen
In.het.infomenu.kan.de.volgende.informatie.
worden.opgevraagd:
–
hoeveel.dranken.sinds.de.ingebruikname.
van.de.espresso-automaat.werden.
bereid;
–
wanneer.de.volgende.service.nodig.is.
● Druk de toets
toetsen.4.<.en.>.
j.7.kunt.u.informatie
j.7.kort.in.en.blader.met.de.
inFo-menu
ontkaLken na xxx koPjes
reinigen na xxx koPjes
geen FiLter ingezet
FiLt. verv. na xxx koPjes *
inFo-menu
aantaL koFFie xx
aantaL koFFie+meLk xx
voL. Warm Water xL
Maalgraad instellen
Met.de.draaiknop.17.voor.de.
maalgraadinstelling.kan.de.gewenste.
jnheid van de gemalen kofe worden
ingesteld.
Let op!
Stel de maalgraad alleen bij draaiend
maalwerk in! Anders kan het apparaat
worden beschadigd.
● Stel, terwijl het maalwerk draait, de draaiknop.17 in van jn gemalen kofe • • • tot
grof gemalen kofe ● ● ●.
Opmerking: De.nieuwe.instelling.wordt.pas.
bij het tweede kopje kofe merkbaar.
Opmerking: Kies een jnere maalgraad
voor.donker.gebrande.bonen.en.een.
grovere.voor.lichtere.bonen.
Kopjeswarmer
! Let op, de kopjeswarmer 18 wordtLet op, de kopjeswarmer 18 wordt
heel heet!
De.espresso-automaat.beschikt.over.een.
kopjeswarmer.18.die.met.toets.19.
handmatig.kan.worden.in-.en.uitgeschakeld..
Is.de.kopjeswarmer.18.ingeschakeld,.dan.
brandt.de.toets.19.
*Verschijnt alleen als het lter geactiveerd
Door.de.toets.j.7 nogmaals.kort.in.te.drukken,.keert.u.terug.naar.de.drankkeuze..
Wordt gedurende ca. 10 seconden geen
toets.bediend,.dan.keert.het.apparaat.automatisch.weer.naar.de.drankkeuze.terug.
Instellingen aanpassen
(Zie.hoofdstuk.‘Menu-instellingen’.)
Opmerking:..Voor.een.optimale.
verwarming.van.de.kopjes,.dienen.deze.
met.de.onderzijde.op.de.kopjeswarmer.18.
te.worden.geplaatst.
69
Page 74

denl
Menu-instellingen
● Houd de toets j.7.minstens.3.s.ingedrukt.
Nu.verschijnen.de.verschillende.
instelmogelijkheden...
insteLLingen
taaL nederLands
Waterhardheid
ontkaLken
In.het.vervolg.van.deze.handleiding.begint.
elke.nieuwe.instelling.met.
gevolgd.door.een.beschrijving.
Met.de.toetsen.4.<.en.>.kunnen.de.
verschillende.instelmogelijkheden.worden.
geselecteerd.
insteLLingen
Waterhardheid
ontkaLken
reinigen
Opmerking:.De.uitgevoerde.wijzigingen.
worden.automatisch.bewaard..
Een.extra.bevestiging.is.niet.nodig.
j 3.sec + >
● Door de draaiknop 6.te.verdraaien,.kan.
de.gewenste.taal.worden.geselecteerd.
j 3.sec + >
● Door de draaiknop 6.te.verdraaien,.kan.
de.gewenste.waterhardheid.1, 2, 3.en.4.
worden.ingesteld.
Opmerking: De.juiste.instelling.van.de.
waterhardheid.is.belangrijk,.opdat.het.
apparaat.tijdig.zou.aangeven.dat.het.moet.
worden.ontkalkt..De.vooringestelde.
waterhardheid.is.4..
taaL.
Waterhardheid
j 3.sec + >
star t
,.
De.waterhardheid.kan.met.het.bijgevoegde.
teststrookje.worden.vastgesteld.of.bij.uw.
waterleidingbedrijf.worden.nagevraagd..
● Dompel het teststrookje kort in het water
en.lees.na.ca..1.minuut.het.resultaat.af.
Stand Waterhardheid
Duits (°dH) Frans (°fH)
1
2
3
4
j 3.sec + >
● Dient het apparaat te worden ontkalkt,
druk.dan.op.de.toets.8.
ontkalkingsprogramma.uit.(zie.hoofdstuk.
‘Ontkalken’).
j 3.sec + >
● Dient het apparaat te worden gereinigd,
druk.dan.op.de.toets.8.
reinigingsprogramma.uit.(zie.hoofdstuk.
‘Reinigen’).
j 3.sec + >
● Dient het apparaat tegelijkertijd te worden
ontkalkt.en.gereinigd,.druk.dan.op.de.
toets.8.
Calc‘n‘Clean.uit.(zie.hoofdstuk.
‘Calc‘n‘Clean’).
j 3.sec + >
Hiermee kan de tijdspanne worden
ingesteld,.waarna.de.kopjeswarmer.18.na.
het.inschakelen.automatisch.weer.wordt.
uitgeschakeld.
Door.aan.de.draaiknop.6.te.draaien,.
●
wordt.de.gewenste.tijdspanne.ingesteld.
j 3.sec + >
Door.aan.de.draaiknop.6.te.draaien,.kan.
●
de.tijdspanne.worden.ingesteld,.waarna.
het.apparaat.automatisch.na.de.laatste.
bereiding.in.de.‘spaarmodus’.wordt.ge-
schakeld.
De.instelling.is.mogelijk.van.5.minuten.tot.8.
uur.
1-7
8-14
15-21
22-30
ontkaLken
start
reinigen
start
caLc‘n‘cLean
start
.en.voer.het.programma.
koPjesWarmer uit na
auto oFF na.
1-13
14-25
26-38
39-54
.en.voer.het.
.en.voer.het.
70
Page 75

denl
j 3.sec + >
Alvorens een nieuw waterlter kan worden
gebruikt,.moet.dit.gespoeld.worden..
Daarvoor het waterlter met behulp van
●
de.maatlepel.14.in.het.waterreservoir.11.
vastduwen. Het waterreservoir tot aan de
markering.‘max’.met.water.vullen..
Door.de.draaiknop.6.te.verdraaien.start.
●
kiezen.en.op.de.toets.8.
● 0,5L-reservoir onder meLkschuimer
PLa atsen
Plaats.een.reservoir.met.een.inhoud.van.
●
0,5.liter.onder.de.melkschuimer.10.
Druk.op.de.toets.8.
●
water door het lter, om dit te spoelen.
Giet vervolgens het reservoir leeg. Het
●
apparaat.is.weer.klaar.voor.gebruik.
Opmerking: Door het lter te spoelen, is
tegelijk.ook.de.instelling.voor.de.indicatie.
van de ltervervanging geactiveerd.
WaterFiLter
start
start
start
.drukken.
..Er.loopt.nu.
Opmerking: Wordt het apparaat langere
tijd.niet.gebruikt.(bijv..vakantie),.dan.dient.
het geplaatste lter te worden gespoeld,
alvorens.het.apparaat.opnieuw.wordt.
gebruikt. Laat het apparaat daarvoor
gewoon.een.kop.warm.water.bereiden.
j 3.sec + >
Het contrast van het display 5.kan.tussen..
contrast
–20.en.+20.worden.ingesteld...
De.fabrieksinstelling.is.+0.
Stel.met.de.draaiknop.6.de.gewenste.
●
waarde.in.
j 3.sec + >
Het is mogelijk de eigen instellingen
ongedaan.te.maken.en.de.
fabrieksinstellingen.weer.te.activeren.
Om.de.fabrieksinstelling.te.activeren,.
●
drukt.u.op.de.toets.8.
Opmerking:.De.fabrieksinstellingen.in.het.
apparaat.ook.handmatig.met.een.bepaalde.
toetsencombinatie worden hersteld. Het
apparaat.moet.hiervoor.compleet.
uitgeschakeld.zijn.
Houd de toetsen 4.<.en.>.en.de.net-
●
schakelaar.1.O /.I.tegelijk.ten.minste.5.
seconden.ingedrukt..Druk.vervolgens.op.
de.toets.8.
zijn.weer.geactiveerd.
FabrieksinsteLLing
start
.
start
.en.de.fabrieksinstellingen.
Uitvoerige informatie over het waterlter
vindt u in de bijgevoegde lterhandleiding.
Als.FiLter vervangen.verschijnt,.of.na.
maximaal.2.maanden.is.de.werking.van.het.
lter uitgeput. Het dient om hygiënische
redenen.en.opdat.het.apparaat.niet.zou.
verkalken.(het.apparaat.kan.schade.
oplopen).te.worden.vervangen.
Reservelters zijn in de handel (TZ70003) of
via.de.klantenservice.(467873).verkrijgbaar..
Wordt er geen nieuw lter geplaatst, draai de
instelling.WaterFiLter.dan.op.nee.
71
Page 76

denl
Kofezetten
met kofebonen
Deze.espresso-automaat.maalt.voor.elke.
bereiding verse kofe. Gebruik bij voorkeur
espresso-.of.bonenmelanges.voor.
volautomatische.apparaten.gebruiken..Voor.
een.optimale.kwaliteit.dienen.de.bonen.koel.
en.afgesloten.te.worden.bewaard.of.te.
worden diepgevroren. De kofebonen
kunnen.ook.diepgevroren.worden.gemalen.
Belangrijk:.Vul.het.waterreservoir.11.
dagelijks.met.vers.water..In.het.
waterreservoir.11.dient.zich.altijd.voldoende.
water.te.bevinden.voor.de.werking.van.het.
apparaat.
Opmerking:.Verwarm.de.kopjes,.vooral.
kleine.espressokopjes.met.een.dikke.wand,.
voor.op.de.kopjeswarmer.18.
Met.een.eenvoudige.druk.op.een.toets.
kunnen verschillende kofedranken worden
bereid..
Kofedranken zonder melk
Het apparaat moet gebruiksklaar zijn.
●
Plaats.de.voorverwarmde.kop(pen).onder.
de kofe-uitloop 9..
●
Selecteer.met.de.draaiknop.6.de.
gewenste espresso of kofe. Op het
display.5.verschijnt.de.gekozen.drank.en.
de.voor.deze.drank.ingestelde.sterkte.en.
hoeveelheid.
De.instellingen.kunnen.worden.veranderd.
(zie.hoofdstuk.‘Bedieningselementen’).
Druk.op.de.toets.8.
●
De kofe wordt bereid en loopt vervolgens
in.de.kop(pen)..
Kofedranken met melk
Het apparaat moet gebruiksklaar zijn.
● Steek het melkpijpje 10d.van.de.melk-
schuimer.10.diep.in.het.melkreservoir.32.
Draai de kofe-uitloop 9.naar.rechts.tot.
●
hij.hoorbaar.vastklikt.
Plaats.een.voorverwarmd.kopje.of.glas.
●
onder de kofe-uitloop 9.en..
melkschuimer.10.
Kies.met.behulp.van.de.draaiknop.6.de.
●
gewenste.macchiato.Å.of.cappuccino.Æ..
Op.het.display.5.verschijnt.de.gekozen.
drank.en.de.voor.deze.drank.ingestelde.
sterkte.en.hoeveelheid..
start
.
caPPuccino Ë Í
À Á Å Æ È É
De.instellingen.kunnen.worden.veranderd.
(zie.hoofdstuk.‘Bedieningselementen’).
Druk.op.de.toets.8.
●
melk.in.het.kopje.of.glas.gepompt..Direct.
daarna wordt de kofe bereid, die
vervolgens.in.het.kopje.of.glas.loopt.
start
..Eerst.wordt.de.
esPresso Ë Í
 à À Á Å Æ
72
Belangrijk:.Gedroogde.melkresten.zijn.
moeilijk.te.verwijderen..Reinig.de.
melkschuimer.10.daarom.na.elk.gebruik.
met.lauw.water.(zie.hoofdstuk.‘Melksysteem.
reinigen’).
Page 77

denl
Kofezetten
met gemalen kofe
Met.deze.espressoautomaat.kan.ook.met.
gemalen kofe (geen oploskofe) kofe
worden.gezet.
Kofedranken zonder melk
Selecteer.met.de.draaiknop.6.À.of.Á..
●
Plaats.de.voorverwarmde.kop(pen).onder.
●
de kofe-uitloop 9..
Open.de.poederlade.20.met.een.druk.
●
Doe.er.maximaal.2.afgestreken.
●
maatlepels.14 gemalen kofe in.
Let op! Doe geen hele bonen of oploskofe
in.de.poederlade!
Sluit.de.poederlade.20.
●
Druk.op.de.toets.8.
●
De kofe wordt bereid en loopt vervolgens
in.de.kop(pen)..
Opmerking: Voor een volgende kop kofe
dient.deze.werkwijze.te.worden.herhaald..
Als binnen 90 seconden geen kofe wordt
genomen,.wordt.het.bereidingscompartiment.automatisch.leeggemaakt,.om.overla-
ding te voorkomen. Het apparaat spoelt.
Kofedranken met melk
Kies.met.behulp.van.de.draaiknop 6.
●
macchiato.Å.of.cappuccino.Æ..
Steek.het.melkpijpje.10d.van.de.melk-
●
schuimer.10.in.het.melkreservoir.32.
Draai de kofe-uitloop 9.naar.rechts,.tot.
●
hij.hoorbaar.vastklikt.
Plaats.een.voorverwarmd.kopje.of.glas.
●
onder de kofe-uitloop 9.en..
melkschuimer.10..
Open.de.poederlade.20.met.een.druk.
●
Doe.er.maximaal.2.afgestreken.
●
maatlepels.14 gemalen kofe in.
start
.
Let op! Doe geen hele bonen of oploskofe
in.de.poederlade!
Sluit.de.poederlade.20.
●
Druk.op.de.toets.8.
●
melk.in.het.kopje.of.glas.gepompt..
Aansluitend wordt de kofe bereid, die
vervolgens.in.het.kopje.of.glas.loopt.
Belangrijk:.Gedroogde.melkresten.zijn.
moeilijk.te.verwijderen..Reinig.de.
melkschuimer.10.daarom.na.elk.gebruik.
met.lauw.water.(zie.hoofdstuk.‘Melksysteem.
reinigen’).
Opmerking: Voor een tweede kop kofe-
melkdrank.dient.deze.werkwijze.te.worden.
herhaald..Als.binnen.90.seconden.geen.
kofe wordt genomen, wordt het
bereidingscompartiment.automatisch.
leeggemaakt,.om.overlading.te.voorkomen..
Het apparaat spoelt.
start
..Eerst.wordt.de.
Melkschuim en
warme melk bereiden
! Risico op brandwonden
De.melkschuimer.10.wordt.heel.heet..Na.
gebruik.eerst.laten.afkoelen.en.pas.daarna.
aanraken.
Het apparaat moet gebruiksklaar zijn.
Steek.het.melkpijpje.10d.van.de.
●
melkschuimer.10.diep.in.het..
melkreservoir.32..
Plaats.een.voorverwarmd.kopje.of.glas.
●
onder.de.uitloop.van.de.melkschuimer.10..
Kies.met.de.draaiknop.6.de.gewenste.
●
instelling.‘Melkschuim’.È.of..
‘Warme melk’
Druk.op.de.toets.8.
●
melkschuim.(ca..40.s.lang).of.warme.
melk.(ca..60.s.lang).uit.de.uitloop.van.de.
melkschuimer.10..
Door.nogmaals.op.de.toets.8.
●
drukken,.kan.het.proces.vroegtijdig.
worden.afgebroken.
É
..
start
..Nu.stroomt.er.
start
.te.
73
Page 78

denl
Opmerking:.Tijdens.de.bereiding.van.
warme melk zijn soms uitende geluiden
hoorbaar..Die.zijn.eigen.aan.de.constructie.
van.de.melkschuimer.10.
Opmerking: Voor.optimale.melkschuim.
gebruikt.u.bij.voorkeur.koude.melk.met.een.
vetgehalte.van.1,5%.
Belangrijk:.Gedroogde.melkresten.zijn.
moeilijk.te.verwijderen..Reinig.de.melkschuimer.10.daarom.na.elk.gebruik.met.
lauw.water.(zie.hoofdstuk.‘Melksysteem.
reinigen’).
Warm water nemen
! Risico op brandwonden
De.melkschuimer.10.wordt.heel.heet..Na.
gebruik.eerst.laten.afkoelen.en.pas.daarna.
aanraken.
Het apparaat moet gebruiksklaar zijn.
Plaats.een.voorverwarmd.kopje.of.glas.
●
onder.de.uitloop.van.de.melkschuimer.10..
Kies.met.behulp.van.de.draaiknop.6.de.
●
gewenste.instelling.warm.water.Ê..
Druk.op.de.toets.8.
●
ca..40.s.lang.warm.water.uit.de.uitloop.
van.de.melkschuimer.10.
Door.nogmaals.op.de.toets.8.
●
drukken,.kan.het.proces.vroegtijdig.
worden.afgebroken.
start
..Nu.stroomt.er.
start
.te.
Onderhoud en dagelijkse
reiniging
! Risico op elektrische schokken!
Trek vóór het reinigen de netstekker uit.
Dompel het apparaat nooit in water.
Gebruik geen stoomreiniger.
Veeg.de.buitenzijde.met.een.zachte,.
●
vochtige.doek.af..Gebruik.geen.
schurende.doeken.of.reinigingsmiddelen.
Spoel.het.waterreservoir.11.en.de.
●
zetgroep.23.alleen.met.water.
Het slot van het opbergvak 25.en.het.
●
scherm.van.de.lekschalen.26.mogen.
slechts.voorzichtig.worden.schoongeveegd.met.een.vochtige.doek..
Niet in de vaatwasser afwassen.
Verwijder de lekplaat kofe-uitloop 28.en.
●
lekplaat.melkschuimer.29..Trek.de.
lekschaal van de kofe-uitloop 27.met.het.
kofedikreservoir 30.naar.voren.uit,.maak.
de.onderdelen.leeg.en.reinig.ze..Deze
onderdelen kunnen ook in de
vaatwasser worden gereinigd.
Spoel.de.maatlepel.14,.het.aromadeksel.
●
16.en.het.melkreservoir.32.handmatig.af.
of.was.ze.af.in.de.vaatwasser.
Veeg.en.zuig.de.binnenkant.van.het.
●
apparaat.(houders.van.de.schalen).uit.
Belangrijk:.De.lekschaal.27.dient.dagelijks.
te.worden.leeggegoten.en.gereinigd,.om.
schimmelvorming.te.voorkomen.
Opmerking:.De.temperatuur.voor.warm.
water.kan.worden.ingesteld.(zie.hoofdstuk.
‘Bedieningselementen.toets.°C’).
74
Opmerking:.Als.het.apparaat.met.de.toets.
2 a.in.koude.toestand.wordt.ingeschakeld.
of na het kofezetten in de a-modus.wordt.
gezet,.spoelt.het.automatisch..Zo.reinigt.het.
systeem.zichzelf.
Melksysteem reinigen
Reinig de melksysteem 10 na elk gebruik!
Het melksysteem 10.kan.automatisch.
worden.voorgespoeld.
Selecteer.op.het.display.5.het.symbool.Ì.
●
en.druk.op.de.toets.8.
start
.
Page 79

denl
gLas onder schuimer PLa atse n,
a
anzuigPijPje in gLas steken
start
Plaats.een.leeg.glas.onder.het.
●
melksysteem.10.en.steek.het.uiteinde.
van.het.melkpijpje.10d.in.het.glas.
Druk.op.toets.8.
●
het.glas.nu.automatisch.met.water.en.
zuigt.dit.vervolgens.via.het.melkpijpje.10d.
weer.op,.om.dat.te.spoelen..Na.ca..1.min.
stopt.het.spoelproces.automatisch.
Giet.nu.het.glas.leeg.en.reinig.het.
●
melkpijpje.10d.
Daarnaast.dient.het.melksysteem.
regelmatig.grondig.te.worden.gereinigd.(in.
de.vaatwasser.of.met.de.hand).
Melksysteem 10 voor de reiniging
demonteren
Trek.het.melksysteem.10.recht.naar.
●
voren.uit.het.apparaat.
Demonteer.alle.onderdelen.(afb. C)..
●
Reinig.deze.met.een.sopje.en.een.zachte.
borstel.
Spoel.alle.onderdelen.met.helder.water.af.
●
en.droog.ze.af.
Zet.de.afzonderlijke.onderdelen.ineen.en.
●
duw.de.melkschuimer.10.tot.aan.de.
aanslag.in.het.apparaat.
Opmerking: Alle.onderdelen.van.de.
melkschuimer.10.kunnen.ook.in.de.
vaatwasser.worden.gereinigd.
Zetgroep reinigen
(zie ook beknopte handleiding)
Aanvullend.bij.het.automatische.reinigingsprogramma.dient.de.maalunit.23.regelmatig.
te.worden.verwijderd.en.gereinigd.
Schakel.het.apparaat.met.de.toets.2.a.in.
●
de.‘spaarmodus’.
Schakel.het.met.de.netschakelaar.1.O / I
●
volledig.uit..Er.brandt.geen.enkele.toets.
meer.
start.
Het apparaat vult
Schuif.de.deuropener.22.naar.rechts.en.
●
open.de.deur.21.van.de.zetgroep.23.
Schuif.de.rode.vergrendeling.23b.aan.de.
●
zetgroep.23.helemaal.naar.links.
Druk.op.de.rode.drukknop.23a, neem.de.
●
zetgroep.23 aan.de.handvatten.(afb. E).
vast.en.trek.hem.voorzichtig.uit.het.
apparaat.
Reinig.de.zetgroep.23.onder.stromend.
●
water.
Belangrijk: Zonder.afwasmiddel.reinigen.
en.niet.in.de.vaatwasser.plaatsen.
Veeg.het.apparaat.aan.de.binnenkant.
●
schoon.met.een.vochtige.doek.
Laat de zetgroep 23.en.de.binnenkant.
●
van.het.apparaat.drogen.
Plaats.de.zetgroep.23.tot.aan.de.aanslag.
●
in.het.apparaat.
Schuif.de.rode.vergrendeling.23b.
●
helemaal.naar.rechts.en.sluit.de.deur.21.
Opberging toebehoren
De.espresso-automaat.heeft.speciale.
vakken.om.accessoires.en.de.beknopte.
handleiding.in.het.apparaat.op.te.bergen.
Om.de.maatlepel.14,.het.melkpijpje.10d.
●
en.de.slang.10c.op.te.bergen,.verwijdert.
u.het.waterreservoir.11.en.plaatst.u.de.
onderdelen.in.de.voorgevormde.
uitsparingen.13.
De.beknopte.handleiding.heeft.een.eigen.
vak.aan.de.zetgroep.23.
Open.de.deur.21.van.de.zetgroep.
●
Verwijder.de.rode.afsluiting.25.van.het.
●
opbergvak.24.door.aan.de.lip.te.trekken.
Berg.de.beknopte.handleiding.erin.op,.
●
breng.de.afsluiting.25.weer.aan.en.sluit.
de.deur.van.de.zetgroep.21.
75
Page 80

denl
Tips om energie
te besparen
De.espresso-automaat.schakelt.na.een.
–
uur.(fabrieksinstelling).automatisch.in.de.
spaarmodus..In.de.spaarmodus.verbruikt.
het.apparaat.zeer.weinig.elektriciteit..De.
vooringestelde.tijd.van.een.uur.kan.
worden.gewijzigd.(zie.hoofdstuk.‘Menuinstellingen.onder.auto oFF na’)..
Wordt de espresso-automaat niet
–
gebruikt,.schakel.het.apparaat.dan.uit.
met.de.netschakelaar.1 O / I aan.de.
voorzijde.van.het.apparaat.
Onderbreek de kofe- of melkschuim-
–
bereiding.indien.mogelijk.niet..Een.
voortijdig stoppen van de kofe- of
melkschuimbereiding.leidt.tot.een.
verhoogd.energieverbruik.en.tevens.tot.
meer.restwater.in.de.lekschaal.
Ontkalk.het.apparaat.regelmatig,.om.
–
kalkafzettingen.te.voorkomen..Kalkresten.
leiden.tot.een.hoger.energieverbruik.
Serviceprogramma’s
Opmerking:.Zie.ook.de.beknopte.
handleiding.in.het.opbergvak.24.
Na.een.bepaalde.periode.verschijnt.op.het.
display.5.ofwel
ontkaLken of
reinigen of
caLc‘n‘cLean..
Dan.moet.het.apparaat.onverwijld.met.het.
betreffende.programma.worden.gereinigd.of.
ontkalkt..Indien.nodig.kunnen.beide.
processen.worden.gecombineerd.met.
behulp.van.de.functie.Calc‘n‘Clean.(zie.
hoofdstuk.‘Calc‘n‘Clean’)..Als.het.
serviceprogramma.niet.volgens.de.
instructies.plaatsvindt,.kan.het.apparaat.
worden.beschadigd.
Let op!
Wanneer u het serviceprogramma laat
lopen, dient u altijd ontkalkings- en
reinigingsmiddel volgens de handleiding te
gebruiken.
Onderbreek het serviceprogramma in geen
geval!
De vloeistoffen niet opdrinken!
Gebruik nooit azijn, middelen op basis van
azijn, citroenzuur of middelen op basis van
citroenzuur!
Doe in geen geval ontkalkingstabletten of
andere ontkalkingsmiddelen in de
poederlader 20!
Gebruik voor het ontkalken en het reinigen
uitsluitend de bijgeleverde tabletten. Deze
werden speciaal voor deze espressoautomaten ontwikkeld.
Speciaal ontwikkelde en geschikte
ontkalkings- en reinigingstabletten zijn
in de handel of via de klantenservice
verkrijgbaar.
Bestelnr. Handel Klantenservice
Reinigings-
tabletten
Ontkalkings-
tabletten
Belangrijk: Als er zich een waterlter in het
waterreservoir.11.bevindt,.dient.dit.in.elk.
geval.te.worden.verwijderd,.voor.het.
serviceprogramma.wordt.gestart.
TZ60001 310575
TZ60002 310967
76
Page 81

denl
Ontkalken
esPresso Ë Í
ontkaLken
i-knoP 3 sec indrukken
Tijdens.de.verschillende.ontkalkingsstappen.
knippert.de.toets.8.
De.cijfers.rechtsboven.geven.aan.hoever.
het.proces.gevorderd.is.
Houd de toets j.7.minstens.3.s.ingedrukt.
●
ontkaLken start
Druk.op.de.toets.8.
●
leidt.u.door.het.programma.
LekschaaL Legen
L
ekschaaL PLa atsen
Lekschaal 27.leeggieten.en.weer.
●
terugplaatsen.
0,5L- reservoir onder meLkschuimer
PLa atsen
Plaats.een.reservoir.met.een.inhoud.van.
●
0,5.liter.onder.de.melkschuimer.10.
Druk.op.de.toets.8.
●
start
start
start
start
.
,.het.display.5.
.
te Weinig ontkaLker
o
ntkaLker bijvuLLen
Opmerking: Is.er.te.weinig.ontkalkingsoplossing.in.het.waterreservoir.11,.dan.verschijnt.deze.instructie..Vul.de.ontkalkingoplossing.bij.en.druk.opnieuw.op.de.toets.8.
start
.
Waterreservoir sPoeLen en vuLLen
start
Spoel.het.waterreservoir.11.en.vul.het.tot.
●
de.markering.‘max’.met.vers.water.
Druk.op.de.toets.8.
●
ontkalkingsprogramma.loopt.nu.
gedurende.ca..1.minuut.en.spoelt.het.
apparaat.
start
. Het
ontkaLkingsPr. LooPt
L
ekschaaL Legen.
LekschaaL PLaat sen
Lekschaal 27.leeggieten.en.weer.
●
terugplaatsen.
Het apparaat is ontkalkt en weer klaar voor
gebruik.
Opmerking: Is het waterlter geactiveerd,
dan verschijnt de instructie om het lter te
verwijderen.en.nogmaals.op.de.toets.8.
te.drukken..
start
WaterFiLter Wegnemen start
0,5 L Water + ontkaLker toevoegen
start
Giet.lauw.water.in.het.lege.waterreservoir.
●
11,.tot.aan.de.markering.‘0,5 l’.en.los.
daarin.2.Siemens-ontkalkingstabletten.
op.
Druk.op.de.toets.8.
●
programma.loopt.nu.gedurende.ca...
20.minuten.
start
. Het ontkalkings-
ontkaLkingsProgr. LooPt
.
77
Page 82

denl
Reinigen
esPresso Ë Í
reinigen a.u.b.
i -knoP 3 sec indrukken
Tijdens.de.verschillende.reinigingsstappen.
knippert.de.toets.8.
rechtsboven.geven.aan.hoever.het.proces.
gevorderd.is.
Vul.het.waterreservoir.11.tot.‘max’.
●
Houd de toets j.7.minstens.3.s.ingedrukt.
●
reinigen start
Druk.op.de.toets.8.
●
leidt.u.door.het.programma.
LekschaaL Legen
L
ekschaaL PLa atsen
Lekschaal 27.leeggieten.en.weer.
●
terugplaatsen. Het apparaat spoelt
tweemaal.
koFFie-uitLooP draaien
Draai de kofe-uitloop 9.naar.links,.tot.hij.
●
hoorbaar.vastklikt.
reinigingsProgr. LooPt
PoederLade oPenen
Open.de.poederlade.20.met.een.druk.
●
start
start
..De.cijfers.
,.het.display.5.
reinigingsProgr. LooPt
L
ekschaaL Legen
L
ekschaaL PLa atsen
Lekschaal 27.leeggieten.en.weer.
●
terugplaatsen.
Het apparaat is gereinigd en weer klaar
voor.gebruik.
Calc‘n‘Clean
Calc‘n‘Clean combineert de functies voor.combineert.de.functies.voor.
ontkalking.en.reiniging..Als.het.apparaat.
ongeveer.op.hetzelfde.moment.beide.
functies.vereist,.stelt.de.espresso-automaat.
automatisch.dit.serviceprogramma.voor.
esPresso Ë Í
caLc‘n‘cLean
i-knoP 3 sec indrukken
Tijdens.de.verschillende.Calc‘n‘Clean-Calc‘n‘Clean-stappen.knippert.de.toets.8.
rechtsboven.geven.aan.hoever.het.proces.
gevorderd.is.
Houd de toets j.7.minstens.3.s.ingedrukt.
●
caLc‘n‘cLean start
Druk.op.de.toets.8.
●
leidt.u.door.het.programma.
start
start
,.het.display.5.
..De.cijfers.
siemens-reinigingstabLet inLeggen en
Lade sLuiten
Leg een Siemens-reinigstablet in de lade
●
20.en.sluit.deze.
oP s tart drukken
Druk.op.de.toets.8.
●
programma.loopt.nu.gedurende.ca..7.
minuten.
78
start
. Het reinigings-
LekschaaL Legen
L
ekschaaL PLa atsen
Lekschaal 27.leeggieten.en.weer.
●
terugplaatsen.
Draai de kofe-uitloop 9.naar.rechts,.tot.
●
hij.hoorbaar.vastklikt.
Plaats.een.reservoir.met.een.inhoud.van.
●
ten.minste.1.liter.onder.de..
melkschuimer.10.
Druk.op.de.toets.8.
●
spoelt.tweemaal.
start
. Het apparaat
Page 83

denl
reinigingsProgr. LooPt
P
oederLade oPenen
Open.de.poederlade.20.met.een.druk.
●
siemens-reinigingstabLet inLeggen en
Lade sLuiten
Leg een Siemens-reinigstablet in de lade
●
20.en.sluit.deze.
Opmerking: Is het waterlter geactiveerd,
dan verschijnt de instructie om het lter te
verwijderen.en.nogmaals.op.de.toets.8.
te.drukken.
start
WaterFiLter Wegnemen start
0,5 L Water + ontkaLker toevoegen
start
Giet.lauw.water.in.het.lege.waterreservoir.
●
11,.tot.aan.de.markering.‘0,5 l’.en.los.
daarin.2.Siemens-ontkalkingstabletten.
op.
Druk.op.de.toets.8.
●
programma.loopt.nu.gedurende.ca..20.
minuten.
start
. Het ontkalkings-
ontkaLkingsPr. LooPt
te Weinig ontkaLker
o
ntkaLker bijvuLLen
Opmerking: Is.er.te.weinig.ontkalkingsoplossing.in.het.waterreservoir.11,.dan.verschijnt.deze.instructie..Vul.de.ontkalkingsoplossing.bij.en.druk.opnieuw.op.de.toets.8.
start
.
Waterreservoir sPoeLen en vuLLen
start
Spoel.het.waterreservoir.11.en.vul.het.tot.
●
de.markering.‘max’.met.vers.water.
Druk.op.de.toets.8.
●
programma.loopt.nu.nog.gedurende.ca..1.
minuut,.aansluitend.loopt.het.reinigingsprogramma.ca..7.minuten.en.spoelt.het.
apparaat.
start
. Het ontkalkings-
ontkaLkingsPr. LooPt
reinigingsProgr. LooPt
LekschaaL Legen
L
ekschaaL PLa atsen
Lekschaal 27.leeggieten.en.weer.
●
terugplaatsen.
Het apparaat is gereinigd en ontkalkt en
weer.klaar.voor.gebruik.
Belangrijk: Werd een van de service-
programma’s.bijv..door.een.stroomuitval.
onderbroken,.ga.dan.als.volgt.te.werk:
.
Spoel.het.waterreservoir.11.en.vul.het.tot.
●
de.markering.‘max’.met.vers.water.
Druk.op.de.toets.8.
●
programma.loopt.nu.gedurende.ca..3.
minuten.en.spoelt.het.apparaat.
start
. Het reinigings-
reinigingsProgr. LooPt
LekschaaL Legen
L
ekschaaL PLa atsen
Lekschaal 27.leeggieten.en.weer.
●
terugplaatsen.
Het apparaat is weer klaar voor gebruik.
Vorstbescherming
! .Om vorstschade bij het transport en
de opslag te voorkomen, dient het
apparaat vooraf volledig te worden
leeggemaakt.
Opmerking: Het apparaat moet gebruiks-
klaar.zijn,.het.waterreservoir.11.gevuld.
Plaats.een.grote,.smalle.kan.onder.de.
●
melkschuimer.10.
Selecteer.de.instelling.‘melkschuim’.È.,.
●
start.het.apparaat.en.laat.het.ca..15.seconden.stomen.
Schakel.het.apparaat.met.de.
●
netschakelaar.1 O / I uit.
Het waterreservoir 11.en.de.lekschaal.27.
●
leeggieten.
79
Page 84

denl
Toebehoren
Onderstaand.toebehoren.is.in.de.handel.of.
bij.de.klantenservice.verkrijgbaar.
Bestelnr. Handel Klantenservice
Reinigings-.
tabletten
Ontkalkings-
tabletten
Waterfilter TZ70003 467873
TZ60001 310575
TZ60002 310967
Afval.A
Dit.apparaat.is.gemarkeerd.volgens.de.
Europese.richtlijn.betreffende.afgedankte.
elektrische.en.elektronische.apparatuur.
(AEEA).2002/96/EG..Deze.richtlijn.bepaalt.
het.kader.voor.de.terugname.en.verwerking.
van.afgedankte.apparatuur,.dat.over.heel.
Europa.wordt.toegepast..
Raadpleeg.uw.gespecialiseerde.handelaar.
voor.de.geldende.voorschriften.inzake.
afvalverwijdering.
Garantie
Voor.dit.apparaat.gelden.de.garantievoorwaarden.die.worden.uitgegeven.door.de.
vertegenwoordiging.van.ons.bedrijf.in.het.
land.van.aankoop..De.leverancier,.bij.wie.u.
het.apparaat.heeft.gekocht,.geeft.u.hierover.
graag.meer.informatie..Om.aanspraak.te.
maken.op.de.garantie.heeft.u.altijd.uw.
aankoopbewijs.nodig.
Wijzigingen voorbehouden.
80
Page 85

Eenvoudige problemen zelf oplossen
Probleem Oorzaak Oplossing
Op.het.display.verschijnt..
bonenreservoir vuLLen,.
hoewel.het.bonenreservoir.
15.gevuld.is,.of.het.
maalwerk.maalt.geen.
koffiebonen.
Er.kan.geen.warm.water.
worden.genomen.
Te.weinig.of.geen.
melkschuim,
of
de.melkschuimer.10.zuigt.
geen.melk.aan.
De.bonen.vallen.niet.in.het.
maalwerk.(bonen.zijn.te.
olieachtig).
De.melkschuimer.10.of.de.
houder.van.de.
melkschuimer.10.is.vuil.
De.melkschuimer.10.of.de.
houder.van.de.
melkschuimer.10.is.vuil.
Ongeschikte.melk. Gebruik.melk.met.een.
Klop.zachtjes.tegen.het.
bonenreservoir.15...
Gebruik.eventueel.een.
andere.koffiesoort...
Maak.het.bonenreservoir.15.
leeg.en.veeg.het.uit.met.een.
droge.doek.
Reinig.de.melkschuimer.10.
of.de.houder.van.de.
melkschuimer.10.
Reinig.de.melkschuimer.10.
of.de.houder.van.de.
melkschuimer.10.
vetgehalte.van.1,5%.
denl
De.melkschuimer.10.is.niet.
correct.gemonteerd.
De kofe loopt slechts
druppelsgewijs.of.er.loopt.
helemaal geen kofe meer.
De.koffie.heeft.geen.
‘crema’.
De.koffie.is.te.‘zuur’. De.maalgraad.
Als de storing niet kan worden verholpen, neem dan in elk geval contact op met
de hotline!
De.maalgraad.is.te.fijn..De.
gemalen.koffie.is.te.fijn.
Het apparaat is sterk
verkalkt.
Ongeschikte.koffiesoort. Gebruik.een.andere.
De.bonen.niet.meer.vers. Gebruik.verse.bonen.
De.maalgraad.is.niet.op.de.
koffiebonen.afgestemd.
is.te.grof.
ingesteld.of.de.gemalen.
koffie.is.te.grof.
Ongeschikte.koffiesoort. Gebruik.een.donkerder.
Monteer.de.melkschuimer.
10.correct.
Stel.de.maalgraad.grover.in..
Gebruik.grover.gemalen.
koffie.
Ontkalk.het.apparaat.
koffiesoort.
Stel.de.maalgraad.fijn.in.
Stel.de.maalgraad.fijner.in.
of.gebruik.fijner.gemalen.
koffie.
gebrande.soort.
81
Page 86

denl
Eenvoudige problemen zelf oplossen
Probleem Oorzaak Oplossing
De.koffie.is.te.‘bitter’. De.maalgraad.is.te.grof.
ingesteld.of.de.gemalen.
koffie.is.te.grof.
Ongeschikte.koffiesoort. Gebruik.een.andere.
Op.het.display.verschijnt.
storing
beL de hotLine a.u.b.
Het waterfilter blijft niet
vastzitten.in.het.
waterreservoir.11.
Het koffiedik is niet compact
en.te.nat.
Op.het.display.verschijnt.
zetgroeP controLeren
a.u.b.
Sterk.wisselende.koffie-.of.
melkschuimkwaliteit..
Lekwater op binnenzijde
apparaatbodem.bij.
verwijderde.lekschaal.
Als de storing niet kan worden verholpen, neem dan in elk geval contact op met
de hotline!
In.het.apparaat.is.een.
storing.opgetreden.
Het waterfilter is niet
vastgeklikt.
De.maalgraad.is.te.fijn.of.te.
grof.ingesteld.of.er.wordt.te.
weinig.gemalen.koffie.
gebruikt.
Verontreinigde.zetgroep. Zetgroep.reinigen.
Te.veel.gemalen.koffie.in.de.
zetgroep.
Het apparaat is verkalkt. Het apparaat volgens de
Lekschaal te vroeg
verwijderd.
Stel.de.maalgraad.grover.in.
of.gebruik.grover.gemalen.
koffie.
koffiesoort.
Bel.de.hotline.op.
Het waterfilter in het
reservoir.drukken,.tot.het.
voelbaar.vastklikt.
Stel.de.maalgraad.grover.of.
fijner.in,.of.gebruik.2.
afgestreken.maatlepels.
gemalen.koffie.
Zetgroep.reinigen..(Gebruik.
maximaal.2.afgestreken.
maatlepels.gemalen.koffie).
handleiding.met.twee.ontkalkingstabletten.ontkalken.
Lekschaal pas enkele
seconden.na.de.laatste.
drankbereiding.wegnemen.
82
Page 87

ru
Содержание
Обзор. .....................................................104
Перед первым использованием. ..........105
Элементы управления. ..........................106
− Сетевой выключатель O./.I. ...............106
− Кнопка a.............................................106
− Поворотный переключатель. .............106
− Кнопки выбора < и >. .......................106
− Дисплей. ..............................................107
− Кнопка
− Кнопка
− Кнопка j Настройки. ...........................110
− Установка степени помола................110
− Подогрев чашек. .................................110
Установки меню..................................... 111
− Язык. ....................................................111
− Жесткость воды. ................................. 111
− Декальцинация. ..................................111
− Очистка. ..............................................111
−.Calc‘n‘Clean. ........................................111
− Подогр. выкл. ......................................112
− Автооткл. через. ..................................112
− Фильтр воды. .......................................112
− Контраст. .............................................112
− Фабр. настройки. ................................112
Приготовление кофейных напитков из
кофейных зерен. ....................................113
Приготовление кофейных напитков из
молотого кофе. .......................................114
Приготовление молочной пены и .
теплого молока......................................115
Приготовление горячей воды. ...............115
Уход и ежедневная очистка..................116
− Очистка устройства приготовления .
молочной пены. ..................................116
−.Очистка блока заваривания. .............117
Хранение принадлежностей. ................117
Советы по экономии энергии. ...............117
Сервисные программы. .........................118
− Удаление накипи................................118
− Очистка. ..............................................119
− Calc‘n‘Clean. ........................................120
Защита от замерзания .........................121
Принадлежности/Утилизация. ..............121
Условия гарантийного обслуживания. ..121
Самостоятельное устранение .
небольших проблем..............................122
start
. ........................................109
°C
. ............................................109
Указания по технике
безопасности
Внимательно ознакомьтесь с инструкцией по эксплуатации, при
работе руководствуйтесь указаниями
данной инструкции и сохраняйте ее
для дальнейшего использования!
Данная полностью автоматическая
кофе-машина эспрессо предназначена
для бытового использования и рассчитана на соответствующую
производительность; она не предназначена для промышленного применения.
! Опасность поражения током!
При подключении прибора и при работе
соблюдать данные, приведенные на
типовой табличке.
Пользоваться прибором допускается
только при отсутствии повреждений
кабеля и прибора.
Пользоваться прибором только внутри
помещений при комнатной температуре.
Не допускается пользование прибором
лицами (включая детей) с пониженным
уровнем физического, психического или
умственного развития или недостаточны-
ми опытом и знаниями, за исключением
случаев, в которых пользование прибо-
ром производится под присмотром лица,
ответственного за их безопасность, или
данные лица получили от него соответс-
твующие инструкции.
Хранить прибор в недоступном для детей
месте. Следить за тем, чтобы дети не
использовали прибор как игрушку.
В случае сбоя в работе немедленно из-
влечь из розетки вилку сетевого кабеля.
Для предотвращения опасных ситуаций
ремонт прибора (например, замена
поврежденного сетевого кабеля) может
выполняться только нашей сервисной
службой.
Запрещается погружать в воду прибор
или сетевой кабель.
Не суйте руки в кофемолку.
83
Page 88

ru
! Опасность ожога горячей
жидкостью!
Насадка для приготовления молочной
пены / горячей воды 10 сильно на-
гревается. После использования дож-
даться охлаждения, только после этого
прикасаться.
Обзор
Рисунки A, B, C, D и E
. 1 Сетевой выключатель O / I
2 Кнопка a.
3 Кнопка
детей)
4 Кнопки выбора
5 Дисплей.
. .a) Строка статуса
. .b) Строка выбора
. .c) Строка навигации
. 6 Поворотный переключатель для
установок на дисплее
7 Кнопка j (меню информации)
. 8 Кнопка
. 9 Устройство разлива кофе
регулируемое по высоте, поворотное
.10 Насадка для приготовления молочной
пены, регулируемая по высоте
(молоко / горячая вода).
a) Верхняя часть.
b) Нижняя часть.
c) Гибкая трубка.
d) Трубка для молока
11 Съемная емкость для воды
12 Крышка емкости для воды
13 Отсеки для хранения (ложка для
молотого кофе, насадка для
приготовления молочной пены)
.14 Мерная ложка для молотого кофе
(приспособление для установки
фильтра для воды)
.15 Емкость для кофейных зерен
.16 Крышка, сохраняющая аромат
°C
(температура / защита от
<.>
start
(напитки / программа)
Уважаемые любители кофе!
Поздравляем Вас с покупкой этой полностью автоматической кофе-машины эс-
прессо фирмы Siemens.
В данной инструкции по эксплуатации
описываются различные модели,
отличающиеся по оснащению.
Просьба также учитывать прилагаемую
краткую инструкцию.
Ее можно хранить в специальном отсеке
25 до дальнейшего использования.
.17 Поворотный регулятор степени
помола
18 Подогрев чашек
19 Кнопка включения подогрева чашек, с
подсветкой
20 Выдвижной отсек для молотого кофе
(молотый кофе / таблетка для
очистки)
21 Дверца блока заваривания
22 Кнопка для открывания дверцы
23 Блок заваривания.
a) Нажимная клавиша.
b) Фиксатор
24 Отсек для хранения краткой
инструкции
25 Крышка отсека для хранения
26 Заслонка поддонов для капель
27 Поддон для капель под устройством
разлива кофе
28 Решетка-подставка под устройством
разлива кофе
29 Решетка-подставка под насадкой для
приготовления молочной пены
30 Емкость для кофейной гущи
31 Отсек для хранения кабеля
.32 Емкость для молока
84
Page 89

Перед первым
использованием
Общие сведения
В соответствующие емкости заливать
только чистую, не газированную воду;
рекомендуется засыпать специальные
смеси кофейных зерен, предназначенные для кофеварок эспрессо и
полностью автоматических кофе-машин
эспрессо. Не использовать кофейные
зерна, покрытые глазурью, карамелью
или обработанные другими
сахаросодержащими добавками - они
засоряют блок заваривания.
В этом приборе можно устанавливать
жесткость воды. На заводе установлена
степень жесткости воды 4. Жесткость
используемой воды определить с помощью прилагаемой индикаторной
полоски. Если по результатам теста
степень жесткости отличается от 4, после
включения запрограммировать прибор
соответствующим образом (см. раздел
“Установки меню. Жесткость воды”).
Снять емкость для воды 11, промыть
●
ее и заполнить свежей, холодной
водой. Уровень заполнения не должен
превышать отметку “max”.(макс.).
Ровно установить емкость для воды 11.
●
и, надавив на нее, вставить до упора.
Закрыть крышку емкости для воды 12.
●
Заполнить кофейными зернами
●
емкость для зерен 15.
Нажать сетевой выключатель.1 O / I,.
●
загорится кнопка 8.
появится список языков.
Кнопками выбора 4.< и > выбрать
●
необходимый язык, на котором будут
появляться дальнейшие сообщения на
дисплее. .
.
.
.
.
.
.
.
.
.
Language
engLish
Pycckий
nederLands
start
, и на дисплее 5.
star t
ru
Начало работы с прибором
Установить полностью автоматическую
●
кофе-машину эспрессо на ровную
поверхность, достаточно прочную для
веса прибора.
К сведению: Прибор имеет на нижней
стороне четыре ролика, его можно
смещать в сторону по дугообразной
траектории для облегчения процесса
эксплуатации и размещения.
Сетевой кабель вытянуть из отсека 31,.
●
вставить штекер в розетку.
Необходимую длину можно отрегулировать, убирая кабель вверх или
вытягивая его вниз. Для этого прибор
задней стороной поставить, например,
к кромке стола и вытянуть кабель вниз,
или задвинуть вверх.
Поднять крышку емкости для воды 12.
●
Выбранный язык выделяется рамкой.
Можно выбрать один из следующих
языковl:.
engLish
P
ycckий
n
ederLands
F
rançais
i
taLiano
s
venska
e
sPañoL
P
oLski
85
Page 90

ru
start
●
Нажать кнопку 8.
сохраняется в памяти, загорается
кнопка 2.a.
Нажать кнопку 2.a, на дисплее 5.
●
появится логотип торговой марки.
Прибор производит нагрев и промывку;
из устройства разлива кофе 9 вытекает
небольшое количество воды. Когда на
дисплее 5 появятся символы для
выбора режима приготовления, прибор
готов к работе.
, выбранный язык
Элементы управления
Сетевой выключатель O / I
Сетевой выключатель 1.O / I служит для
переключения прибора в “экономичный
режим” или его полного отключения. В
“экономичном режиме” светится только
кнопка 2.a.
Важно:.Отключать прибор при помо-
щи сетевого выключателя 1 только
тогда, когда он находится в “эконо-
мичном режиме”, чтобы выполнялась
автоматическая промывка.
Эспрессо Ë Í
 à À Á Å Æ
К сведению: На заводе запрограммированы стандартные настройки, обеспечи-
вающие оптимальный режим работы
полностью автоматической кофе-машины эспрессо. Спустя 1 час прибор автоматически переключается в “экономич-
ный режим” (см. раздел “Установки меню.
Автооткл. через”)
Совет: При первом использовании при-
бора или после длительного перерыва в
работе аромат кофе в первой чашке не
раскрывается в полной мере.
Если машина для приготовления
эспрессо не использовалась ранее, вы
начнете получать стабильную пену
необходимой толщины только после
приготовления нескольких чашек кофе.
Кнопка.a
Кнопкой 2.a.прибор включается (готов к
работе) или возвращается в
“экономичный режим”.
Кнопка 2.a мигает, пока прибор
производит промывку.
Промывка прибора не производится,
если:
в момент включения прибор еще
●
горячий.
перед переключением в “экономичный
●
режим” кофе не готовился.
Прибор готов к работе, если на дисплее
5 светятся символы для выбора напитков
и кнопка 8.
Поворотный переключатель
Поворотом переключателя 6 влево или
вправо можно перемещаться по пунктам
на дисплее 5 или изменять значения
параметров в меню.
Кнопки выбора < и >
Нажимая на кнопки выбора 4.< и >,.
можно переходить на верхние и нижние
уровни меню (строка навигации 5c).
start
.
86
Page 91

ru
Дисплей
На дисплее 5 при помощи символов
показываются:
возможности выбора, крепость и
количество кофе, а также текстовая
информация о настройках, текущих
процессах и сообщениях. Поворотным
переключателем 6 и кнопками выбора 4.
можно выполнять настройки. Выбранная
настройка выделяется рамкой.
Эспрессо ËË Í
5a
 à À Á Å Æ
В строке статуса 5a на дисплее показывается название напитка, а для кофей-
ных напитков также установка крепости,
например, 55, и количества, например,
На строке выбора 5b показываются
�
символы для выбора напитка.
Стрелки в строке навигации 5c показыва-
ют, в каком направлении есть еще уровни
меню.
Сообщения на дисплее
На дисплее 5 появляются различные
сообщения.
Информация:
подоЖдите
Указания к действию:
зАполнить контейнер для воды
пров. конт-р для воды
УстАновить поддон для к Апель
опУстошить поддон для кАпель
b
зАполнить отсек
для кофейных зерен
повернУ ть блок подАчи кофе
c
УстАновить Устройство
вспенивАния молокА
УстАн. зАвАрочный блок
зАкрыть дверцУ
проверить зАвАрочный блок
добАвить порошок
зАкрыть лоток
зАменить фильтр
провести декАльцинАцию
необходимА чисткА
зАпУстить caLc‘n‘cLean
темперАтУ рА ниЖ е нормы
п
одоЖдите
высокое или
низкое нАпряЖение
87
Page 92

ru
Эспрессо ËË Í
Возможности выбора
.2 x Эспрессо.
Â
Ã
.2 x ко фе
Å Æ È É Ê
Á
Эспрессо Ë Í
5 55 555
Эспрессо Ë Í
пенА молоко
.Эспрессо. Á.кофе
À
. мАккиАто
Å
.молочнА я
È
Æ
É
.кАпУ чино
теплое
Ê.ГорячА я водА. Ì быстр.
промывкА
молочн.
системы
Крепость кофе (только для
кофейных напитков)
5 5 5 5 5 5
Слабый Нормальный Крепкий
Количество (только для кофейных
напитков)
� Ð Ò
88
� Ð Ò
малое среднее большое
Page 93

ru
Кнопка
При нажатии на кнопку 8.
процесс приготовления или выполняется
сервисная программа.
Повторным нажатием кнопки 8.
время приготовления напитка можно
досрочно остановить процесс.
Кнопка
Кнопкой 3 °C можно устанавливать температуру для кофе и воды (коротким
нажатием), а также включать или выключать защиту от детей (удерживать нажа-
той мин. 3 секунды).
Установка температуры:
Один раз нажать на кнопку 3.
выполнить настройки кнопками 4.
и поворотным переключателем 6.
start
°C
start
начинается
start
°C
и
во
< и >.
темперАтУрА
кофе
нормАльн.
ГорячАя водА
Защита от детей
Чтобы предотвратить травмы и ожоги у
детей, прибор можно заблокировать.
● Кнопку 3
минимум 3 секунды, на дисплее 5.
появится ключик: защита от детей
активирована.
Теперь работа с прибором невозможна,
подогрев чашек 18 отключен.
°C
удерживать нажатой
Эспрессо Ë Í
● Для отключения защиты от детей
кнопку 3.
минимум 3 секунды: ключик на дисплее
5 снова исчезнет.
°C
удерживать нажатой
темперАтУрА
кофе
ГорячАя водА
Сохранить настройки повторным
нажатием кнопки 3.
пункту выбора напитка. Данные настройки автоматически вступают в силу
для всех способов приготовления.
°C
и вернуться к
<90°c
89
Page 94

ru
Кнопка j Настройки
Кнопкой 7.
информацию (короткое нажатие) и
выполнять настройки (удерживать
нажатой минимум 3 с).
Запрос информации
В меню информации можно просмотреть
следующие данные:
– какое количество напитка было
приготовлено с момента начала
эксплуатации прибора.
– когда необходимы ближайшие
сервисные работы.
● Один раз коротко нажать на кнопку 7.
переходить к пунктам меню кнопками 4.
j можно запрашивать
j,.
< и >.
инфо-меню
декАльц.: xxx чАшек
очисткА: xxx чАшек
не УстАновлен фи льт р
зАменА фил ьтрА: xxx чш. *
Установка степени помола
Поворотным регулятором степени помола 17 можно установить необходимую
степень помола кофе.
Внимание
Степень помола регулировать только
при работающей кофемолке! В про-
тивном случае возможно повреждение
прибора.
● При работающей кофемолке поворот-
ным регулятором 17 отрегулировать
помол кофе в диапазоне от тонкого • • •.
до более грубого ● ● ●.
К сведению: Действие новой настройки
будет заметно только начиная со второй
чашки кофе.
Совет: Для темных обжаренных зернах
устанавливайте более мелкий помол, для
светлых обжаренных зернах более
грубый помол.
инфо-меню
кол-во кофе xx
молочные нАпитки xx
объем Горяч. воды xл
* появляется только при активном
фильтре.
При повторном коротком нажатии кнопки
7.j происходит возврат к выбору напитка.
После 10 секунд бездействия прибор
автоматически возвращается в режим
выбора напитка.
Выполнение настроек
(см. главу “Установки меню”)
90
Подогрев чашек
! Внимание: устройство подогрева
чашек 18 сильно нагревается!
Автомат для приготовления эспрессо
имеет функцию подогрева чашек 18,.
которую можно вручную включать или
отключать кнопкой 19. Если подогрев
чашек 18 включен, кнопка 19 светится.
Совет: Для оптимального подогрева
чашек, ставьте их дном на поверхность
для подогрева 18.
.
Page 95

ru
Установки меню
● Кнопку 7.j удерживать нажатой
минимум 3 секунды.
Появятся различные возможности для
настройки.
нАстройки
язык PУсский
Жесткость воды
декАльцинАция
Все последующие настройки в данной
инструкции по эксплуатации отмечаются
значком
следует подробное описание.
Кнопками 4.< и > можно выбирать
различные возможности для настройки.
j 3 сек + >
нАст ройки
Жесткость воды
декА льцинАция star t
очистк А
, за которым
j 3 сек + >
● Вращая поворотный переключатель 6,.
можно выбрать необходимый язык.
j 3 сек + >
● Вращая поворотный переключатель 6,.
можно выбрать необходимую
жесткость воды – 1,2,3 и 4.
К сведению: Правильная установка
жесткости воды важна для обеспечения
своевременного напоминания о
необходимости удаления накипи.
Предварительно установлена степень
жесткости воды 4.
Жесткость воды можно определить при
помощи прилагаемой индикаторной
полоски или узнать ее в местной
водоснабжающей организации.
● Индикаторную полоску ненадолго
опустить в воду и спустя примерно 1
минуту посмотреть результат.
Степень
1
2
3
4
язык.
Жесткость воды
Градусы жесткости воды
Нем. (°dH) Франц. (°fH)
1-7
8-14
15-21
22-30
1-13
14-25
26-38
39-54
Указание: Выполненные изменения
сохраняются автоматически.
Дополнительных действий не требуется.
j 3 сек + >
● Если необходима декальцинация
(удаление накипи), нажать кнопку 8.
start
и выполнить программу по
удалению накипи (см. раздел
“Удаление накипи”).
j 3 сек + >
● Если необходима очистка прибора,
нажать кнопку 8.
программу по очистке (см. раздел
“Очистка”).
j 3 сек + >
● Если одновременно необходимы
декальцинация (удаление накипи) и
очистка прибора, нажать кнопку 8.
и выполнить программу Calc‘n‘Clean
(см. раздел “Calc‘n‘Clean”).
декАльцинАция
очисткА
start
и выполнить
caLc‘n‘cLean
start
.
91
Page 96

ru
j 3 сек + >
Здесь можно установить время для автоматического отключения подогрева чашек 18 после включения Можно устано-
вить время от 5 минут до 8 часов.
Поворотным регулятором 6 установить
●
необходимое время.
j 3 сек + >
Вращая поворотный переключатель 6,.
●
можно задать промежуток времени
после последнего приготовления, когда
прибор будет автоматически переклю-
чаться в “экономичный режим”.
Можно установить время от 5 минут до 8
часов.
j 3 сек + >
Каждый раз при установке в емкость для
воды нового фильтра необходима его
промывка.
Для этого с помощью мерной ложки
●
для кофе 14 установить фильтр для
воды в емкость 11, крепко нажав на
него. Емкость заполнить водой до
отметки “max”..
Вращая поворотный переключатель 6,.
●
выбрать start и нажать кнопку 8.
● УстАновить ёмкость 0,5 л под
вспенивАтель молокА
Установить емкость объемом 0,5 л под
●
насадку для приготовления молочной
пены 10.
Нажать кнопку 8.
●
через фильтр, промывая его.
После этого опорожнить емкость.
●
Прибор снова готов к работе.
подоГр. выкл
Автооткл. через
ильтр воды
ф
start
. Вода проходит
start
start
К сведению: При промывке фильтра для
воды одновременно была активирована
настройка для индикации времени для
замены фильтра.
Подробную информацию о фильтре для
воды см. в прилагаемом руководстве по
фильтру.
После указания на дисплее зАменить
фи льт р или макс. через 2 месяца резерв
фильтра для воды выработан. Замена
необходима по соображениям гигиены и
с целью предотвращения образования
известковых отложений (возможны
повреждения прибора).
Сменные фильтры можно приобрести
через торговую сеть (TZ70003) или
сервисную службу (467873).
Если новый фильтр для воды не
устанавливается, для позиции фи льт р
воды задать нет.
К сведению: Если прибором длительное
время не пользуются (например, в
отпуске), перед использованием прибора
.
следует промыть уже установленный
фильтр для воды, для этого нужно просто
приготовить чашку горячей воды.
j 3 сек + >
Контраст дисплея 5 можно регулировать
от -20 до +20, заводская настройка
соответствует +0.
Поворотным переключателем 6.
●
установить необходимое значение.
контрАст
92
j 3 сек + >
Собственные настройки можно удалить и
снова активировать заводские настройки.
Для активизации заводских настроек
●
нажать кнопку 8.
фАбр. нАстройки
start
.
Page 97

ru
К сведению: В любое время нажатием
комбинации кнопок можно вернуть
заводские настройки. Прибор должен
быть полностью отключен.
Кнопки 4.< и > и сетевой выключатель
●
1.O./.I удерживать нажатыми не менее
5 секунд. Нажать кнопку 8.
заводские настройки вновь активны.
start,
.
Приготовление
кофейных напитков из
кофейных зерен
Данная полностью автоматическая кофе-
машина эспрессо производит помол свежего кофе отдельно для каждого заваривания. Рекомендуется использовать специальные смеси кофейных зерен, пред-
назначенные для кофеварок эспрессо и
полностью автоматических кофе-машин
эспрессо. Для достижения оптимального
качества, зерна следует хранить в прохладном месте, в плотно закрытой упаковке или использовать глубокую заморозку. Размалывать можно и заморожен-
ные кофейные зерна.
Важно: В емкость для воды 11 еже-
дневно заливать свежую воду. В емкости
для воды 11 постоянно должно быть
количество воды, достаточное для
работы прибора.
Совет: Чашку (чашки), особенно
маленькие толстостенные чашки для
эспрессо, предварительно подогревать
на подставке для чашек 18.
Простым нажатием кнопки можно
готовить различные кофейные напитки.
Приготовление напитков без молока
Прибор должен быть готов к работе.
Под устройство разлива кофе 9.
●
поставить предварительно подогретую
чашку (чашки).
Поворотным переключателем 6.
●
выбрать необходимый тип эспрессо
или кофе. На дисплее 5 показывается
выбранный напиток, а также установки
крепости и количества кофе для
данного напитка.
Эспрессо Ë Í
 à À Á Å Æ
Настройки можно менять (см. раздел
“Элементы управления”).
Нажать кнопку 8.
●
Кофе заваривается и затем наливается в
чашку (чашки).
Приготовление напитков с молоком
Прибор должен быть готов к работе.
Погрузить трубку для молока 10d.
●
насадки для приготовления молочной
пены 10 в емкость для молока 32.
Устройство разлива кофе 9 отвести
●
вправо, чтобы был слышен щелчок
при фиксации.
Предварительно подогретую чашку или
●
стакан поставить под устройство разлива кофе 9 и насадку для приготовления молочной пены 10.
Выбрать маккиато
●
вращая поворотный переключатель 6..
На дисплее 5 показывается выбранный
напиток, а также установки крепости и
количества кофе для данного напитка.
start
.
.или капучино Æ,.
Å
кАпУчино Ë Í
À Á Å Æ È É
Настройки можно менять (см. раздел
“Элементы управления”).
93
Page 98

ru
Нажать кнопку 8.
●
или стакан подается молоко. После
этого заваривается кофе, который на-
ливается в чашку или стакан.
Важно: Засохшие остатки молока
удаляются с трудом, поэтому после
каждого использования промывать
насадку для приготовления молочной 10.
теплой водой (см. раздел “Очистка
устройства приготовления молочной
пены”).
start
. Сначала в чашку
Приготовление
кофейных напитков из
молотого кофе
Данная полностью автоматическая кофемашина эспрессо может работать с
молотым (но не растворимым) кофе.
Приготовление напитков без молока
Поворотным переключателем 6.
●
установить À или Á.
Под устройство разлива кофе 9.
●
поставить предварительно подогретую
чашку (чашки).
Открыть выдвижной отсек для
●
молотого кофе 20, нажав на него.
Засыпать не более двух мерных ложек
●
14 молотого кофе (без “горки”).
Внимание: Не засыпать немолотые
зерна или растворимый кофе.
Закрыть выдвижной отсек для
●
молотого кофе 20.
Нажать кнопку 8.
●
Кофе заваривается и затем наливается в
чашку (чашки).
Указание: Для приготовления еще одной
чашки кофе повторить процесс. Если в
течение 90 секунд кофе не приготовляет-
ся, камера заваривания автоматически
опорожняется во избежание переполнения. Проводится промывка прибора.
start
.
Приготовление напитков с молоком
Выбрать кофе с молоком Ä.или
●
маккиато Å, вращая поворотный
переключатель 6.
Погрузить трубку для молока 10d.
●
насадки для приготовления молочной
пены 10 в емкость для молока 32.
Устройство разлива кофе 9 отвести
●
вправо, чтобы был слышен щелчок
при фиксации.
Предварительно подогретую чашку или
●
стакан поставить под устройство
разлива кофе 9 и насадку для
приготовления молочной пены 10..
Открыть выдвижной отсек для
●
молотого кофе 20, нажав на него.
Засыпать не более двух мерных ложек
●
14 молотого кофе (без “горки”).
Внимание: Не засыпать немолотые
зерна или растворимый кофе.
Закрыть выдвижной отсек для
●
молотого кофе 20.
Нажать кнопку 8.
●
исходит забор молока, оно приготовляется и подается в чашку или
стакан. После этого заваривается
молотый кофе, который затем
наливается в чашку или стакан.
Важно: Засохшие остатки молока удаля-
ются с трудом, поэтому после каждого
использования промывать насадку для
приготовления молочной пены 10 теплой
водой (см. раздел “Очистка устройства
приготовления молочной пены”).
Указание: Для приготовления еще одной
чашки из молотого кофе / с использова-
нием молока повторить процесс. Если в
течение 90 секунд кофе не приготовляет-
ся, камера заваривания автоматически
опорожняется во избежание переполне-
ния. Проводится промывка прибора.
start
. Сначала про-
94
Page 99

ru
Приготовление
молочной пены и
теплого молока
! Опасность ожога
Насадка для приготовления молочной
пены 10 сильно нагревается. После
использования дождаться охлаждения,
только после этого прикасаться.
Прибор должен быть готов к работе.
Погрузить трубку для молока 10d.
●
насадки для приготовления молочной
пены 10 в емкость для молока 32.
Под отверстие насадки для приготов-
●
ления молочной пены 10 поставить
предварительно подогретую чашку или
стакан.
Поворотным переключателем 6 вы-
●
брать необходимую функцию: молочная пена È или теплое молоко É..
Нажмите кнопку 8 start, при этом из
●
отверстия вспенивателя молока 10.
потечет молочная пена (при нажатии
около 40 секунд) или теплое молоко
(при нажатии около 60 секунд).
Повторным нажатием кнопки 8.
●
можно досрочно остановить процесс.
start
.
Приготовление горячей
воды
! Опасность ожога
Насадка для приготовления молочной
пены 10 сильно нагревается. После
использования дождаться охлаждения,
только после этого прикасаться.
Прибор должен быть готов к работе.
Под отверстие насадки для
●
приготовления молочной пены 10
поставить предварительно подогретую
чашку или стакан.
Поворотным переключателем 6.
●
выбрать функцию приготовления
горячей воды (воды для чая)
Нажать кнопку 8.
●
примерно 40 секунд горячая вода
поступает из отверстия насадки для
приготовления молочной пены 10.
Повторным нажатием кнопки 8.
●
можно досрочно остановить процесс.
Указание: Температуру горячей воды
можно устанавливать (см. раздел
“Элементы управления. Кнопка
start
, в течение
Ê
start
°C
..
.
”).
К сведению: При приготовлении теплого
молока может раздаваться свистящий
звук. Они обусловлены техническими
особенностями насадки для
приготовления молочной пены 10.
Совет: Для достижения оптимального
качества молочной пены рекомендуется
использовать холодное молоко с
жирностью 1,5%.
Важно: Засохшие остатки молока удаля-
ются с трудом, поэтому после каждого
использования промывать насадку для
приготовления молочной пены 10 теплой
водой (см. раздел “Очистка устройства
приготовления молочной пены”).
95
Page 100

ru
Уход и ежедневная
очистка
! Опасность поражения током!
Перед очисткой отсоединить сетевой
кабель от сети. Запрещается
погружать прибор в воду. Не
использовать паровые очистители.
Протрите корпус мягкой влажной тка-
●
нью. Запрещается использование гру-
бой ткани или чистящих средств.
Емкость для воды 11 и блок заварива-
●
ния 23 промывать только водой.
Крышку отсека для хранения 25 и
●
заслонку поддонов для капель 26.
разрешается протирать только слегка
влажной салфеткой. Не мыть в
посудомоечной машине.
Снять решетку под устройством разли-
●
ва кофе 28 и решетку под насадкой для
приготовления молочной пены 29..
Поддон для капель под устройством
разлива кофе 27 и емкость для
кофейной гущи 30 вытянуть вперед,
опорожнить и очистить. Все детали
можно также мыть в посудомоечной
машине.
Мерную ложку 14, сохраняющую аро-
●
мат крышку 16 и емкости для молока
32 мыть вручную или в посудомоечной
машине.
Внутреннее пространство прибора
●
(ниши для поддонов) протереть или
пропылесосить.
Важно: Поддон для сбора капель 27.
необходимо ежедневно опорожнять и
промывать для предотвращения
образования плесени.
Указание: Если прибор в холодном
состоянии включается кнопкой 2.a или
после приготовления кофе переводится в
режим a, промывка прибора выполняет-
ся автоматически. Таким образом,
система очищается самостоятельно.
Очистка устройства приготовления
молочной пены
Устройство приготовления молочной
пены 10 очищать после каждого
использования!
Возможна предварительная
автоматическая очистка устройства
приготовления молочной пены 10.
На дисплее 5 выбрать символ
●
нажать кнопку 8.
start
.
и
Ì
под вспенивАтель постАвить
пУстой стАкА н, опУстить в неГо
всАсывАющУю трУбкУ
Поставить пустой стакан под
●
устройство приготовления молочной
пены 10 и конец трубки для молока 10d.
опустить в стакан.
Нажать кнопку 8.
●
тически наполняет стакан водой и за-
тем всасывает воду через трубку для
молока 10d для промывки устройства.
Процесс промывки автоматически за-
вершается примерно через 1 минуту.
Опорожнить стакан и очистить трубку
●
для молока 10d.
Кроме того, следует регулярно
тщательно промывать систему подачи
молока (в посудомоечной машине или
вручную).
Разборка устройства приготовления
молочной пены 10 для очистки:
Устройство приготовления молочной
●
пены 10 вытянуть из прибора вперед.
Отдельные детали (рис. С) очистить
●
мягкой щеткой с использованием
щелочного моющего раствора.
Все детали промыть чистой водой и
●
просушить.
Опять собрать все детали и вставить
●
до упора.
К сведению: Все детали насадки для
приготовления молочной пены 10 можно
также мыть в посудомоечной машине.
start
start
. Автомат автома-
96
 Loading...