

Page 1
Fully automatic espresso machine
Machine à expresso automatique
Volautomatische espressomachine
Ekspres do kawy
Plně automatický kávovar
Автоматическая кофемашина
TI 905.., TI 907.., TI 909..
en Instruction manual ....................................................................... 6
fr Mode d’emploi ...........................................................................37
nl Gebruiksaanwijzing .................................................................... 70
pl Instrukcja obsługi ..................................................................... 101
cs Návod k použití ........................................................................ 133
ru ǪȋǻǽȃȆǻȊȉȆȗȂȉǽǻȈȃȚ ............................................................ 163
Page 2
&
!
"
(1U«««)'« «
Page 3
*
*** *7
9
*
**
**
#
DMJDL
***
*7
Page 4
$
* ** ***
DMJDL
*
** ***
%
Page 5
&
'
* **
*** *7
SUHVV
PD[
7
(
Page 6

en
Table of contents
enInstruction manual
8 Intended use . . . . . . . . . . . . . . . . 7
( Important safety information . . . 7
Q Menu settings . . . . . . . . . . . . . . .23
Changing settings . . . . . . . . . . . . . . 23
Start the "Water filter" or "frost
protection" programme. . . . . . . . . . . 25
7 Environmental protection . . . . . 9
Saving energy . . . . . . . . . . . . . . . . . . . 9
Environmentally-friendly disposal . . . . . 9
* Getting to know your appliance 9
Included in delivery . . . . . . . . . . . . . . . 9
Assembly and components . . . . . . . .10
Controls . . . . . . . . . . . . . . . . . . . . . . .10
_ Accessories. . . . . . . . . . . . . . . . 11
K Before using for the first time . 12
Installing and connecting the
appliance. . . . . . . . . . . . . . . . . . . . . .12
Commissioning the appliance . . . . . .12
1 Operating the appliance. . . . . . 14
Selecting a drink . . . . . . . . . . . . . . . .14
Preparing coffee using freshly
ground beans . . . . . . . . . . . . . . . . . . 15
Preparing coffee using ground
coffee. . . . . . . . . . . . . . . . . . . . . . . . .15
Preparing drinks with milk . . . . . . . . .16
Dispensing hot water . . . . . . . . . . . . .17
Adjusting beverage settings . . . . . . .18
Setting the grinding level . . . . . . . . . .20
Cup warmer. . . . . . . . . . . . . . . . . . . .20
D Daily care and cleaning . . . . . . .27
Cleaning agent . . . . . . . . . . . . . . . . . 27
Cleaning the appliance. . . . . . . . . . . 28
Cleaning the milk system . . . . . . . . . 28
Cleaning the brewing unit. . . . . . . . . 29
. Service programmes . . . . . . . . .30
Rinse milk system . . . . . . . . . . . . . . 31
Descaling . . . . . . . . . . . . . . . . . . . . . 31
Cleaning . . . . . . . . . . . . . . . . . . . . . . 32
calc’nClean. . . . . . . . . . . . . . . . . . . . 32
3 Trouble shooting . . . . . . . . . . . .33
4 Customer service . . . . . . . . . . . .36
Technical data . . . . . . . . . . . . . . . . . 36
E number and FD number. . . . . . . . 36
Guarantee . . . . . . . . . . . . . . . . . . . . 36
P Customising . . . . . . . . . . . . . . . 21
Creating a user profile . . . . . . . . . . . . 21
Editing or deleting user profile. . . . . .21
Saving individual drinks . . . . . . . . . . . 22
A Childproof lock . . . . . . . . . . . . . 22
Activating the child-proof lock . . . . . .22
Deactivating the child-proof lock . . . .22
6
Page 7

Intended use en
8 Intended use
Intended use
Check the appliance for
damage after unpacking it. Do
not connect the appliance if it
has been damaged in
transport.
This appliance is designed for
processing normal household
quantities in the home or similar
quantities in non-industrial
applications. Non-industrial
applications include, for
example, use in employee
kitchens in shops, offices,
agricultural and other
commercial businesses, as well
as use by guests in boarding
houses, small hotels and
similar dwellings.
( Important safety
information
Important safety information
Please read carefully, follow
and retain the operating
instructions. When passing on
the appliance, enclose these
instructions.
This appliance may be used by
children aged 8 or over and by
people who have reduced
physical, sensory or mental
abilities or inadequate
experience and/or knowledge,
provided they are supervised or
have been instructed on how to
use the appliance safely and
have understood the resulting
dangers. Children under 8
years of age must be kept away
from the appliance and the
power cord and must not
operate the appliance. Children
must not play with the
appliance. Cleaning and user
maintenance may not be
carried out by children, unless
they are aged 8 years or older
and are supervised.
7
Page 8

en Important safety information
:Warning
Risk of electric shock!
■ The appliance may only be
connected to a power supply
via a correctly installed
socket with earthing. Ensure
that the protective conductor
system of the domestic
electricity supply has been
correctly installed.
Risk of electric shock!
■ Connect and operate the
appliance only in
accordance with the
specifications on the rating
plate. If the power cord of
this appliance is damaged, it
must be replaced by
customer service.
Risk of electric shock!
■ Do not use if the power
cable or appliance is
damaged. If a fault occurs,
pull the mains plug or switch
off the mains voltage
immediately.
Risk of electric shock!
■ To prevent hazards, the
appliance may be repaired
by our customer service
only.
Risk of electric shock!
■ Never immerse the
appliance or mains cord in
water.
:Warning
Hazard due to magnetism!
The appliance contains
permanent magnets which may
affect electronic implants, e.g.
heart pacemakers or insulin
pumps. Persons wearing
electronic implants must
maintain a minimum distance of
10 cm from the appliance and
from the following parts upon
removal: milk container, milk
system, water tank and brewing
unit.
:Warning
Risk of suffocation!
Do not let children play with
packaging material. Store small
parts safely as they can be
easily swallowed.
:Warning
Risk of burns!
■ The milk system becomes
very hot. After use, allow it to
cool down first before
touching it.
Risk of burns!
■ After use, surfaces such as
the cup warmer may still be
hot for a certain period.
:Warning
Risk of injury!
■ Improper use of this
appliance may result in
injury.
Risk of injury!
■ Do not reach into the
grinding unit.
8
Page 9
Environmental protection en
7 Environmental
protection
Environmental protection
Saving energy
■ If the appliance is not being used,
switch it off.
■ Set the interval for automatic
switch-off to the smallest value.
■ If possible, do not interrupt coffee or
milk froth dispensing. Stopping a
process prematurely results in
higher energy consumption and the
drip tray fills up more quickly.
■ Descale the appliance regularly to
avoid a build-up of limescale.
Limescale residue results in higher
energy consumption.
Environmentally-friendly disposal
Dispose of packaging in an
environmentally-friendly manner.
This appliance is labelled in
accordance with European
Directive 2012/19/EU
concerning used electrical and
electronic appliances (waste
electrical and electronic
equipment - WEEE). The
guideline determines the
framework for the return and
recycling of used appliances
as applicable throughout the
EU.
Please ask your dealer about current
disposal routes.
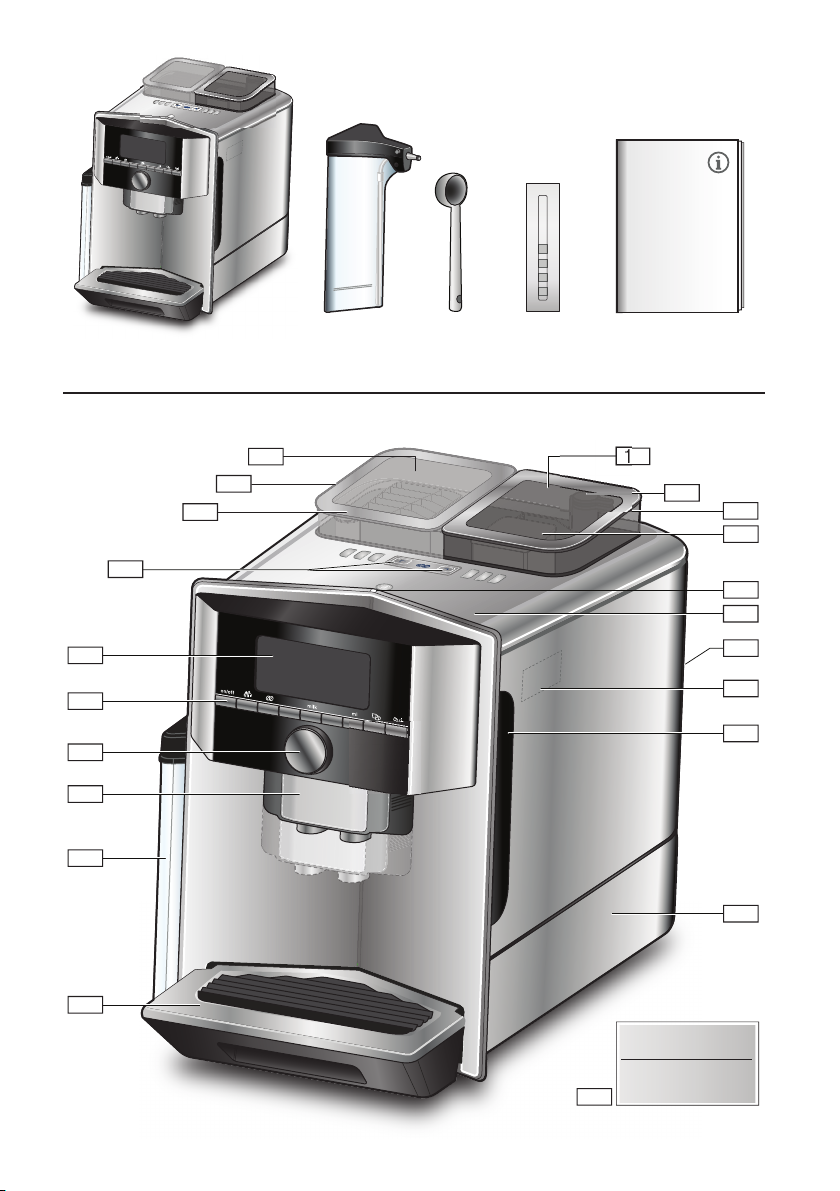
* Getting to know your
appliance
Getting to know your appliance
This section provides an overview of the
scope of delivery, the assembly and the
components of your appliance. It also
introduces you to the different controls.
Note: Depending on the appliance
model, individual details and colours
may differ.
The operating instructions refer to two
product variants:
■ Appliance with one bean container
■ Appliance with two bean containers
How to use these instructions:
The cover pages of the operating
instructions can be folded out towards
the front. The illustrations are identified
using numbers that are referred to in the
operating instructions.
Example: ~ Fig. !
Included in delivery
~ Fig. !
# Fully automatic coffee machine
+ Milk container (container, lid, riser,
connection hose)
3 Measuring spoon
; Water hardness testing strip
C Operating instructions
9
Page 10

en Getting to know your appliance
Assembly and components
)* Cup warmer
)2 Cup warmer LED display
~ Fig. "
( Display
0 Control panel
8 Rotary selector/start- stop
(rotate and press to navigate)
@ Outlet system (coffee, milk, hot
water), height adjustable
H Milk container (container, lid, riser,
connection hose)
P Drip tray (coffee grounds
container, drip plate)
X Brewing chamber cover
` Water tank
h Rating plate
)" Recessed grip on water tank
): Grind compartment (ground
coffee/cleaning tablet)
)B Bean container
)J Rotary selector for grinding level
setting
)R Aroma lid
)Z* Aroma lid
)b* Bean container
)j* Rotary selector for grinding level
setting
1"* Bean container selector buttons,
illuminated
Depending on the model:
Items marked with * are only present in
the appliance with two bean containers.
Controls
Button Meaning
on/off Switches the appliance on and off
! Customising
" Coffee strength
milk Briefly press:
ml Drink quantity in millilitres. ~ "Adjusting beverage settings" on page 18
# Two drinks
The appliance rinses automatically when it is switched on and off.
The appliance is not rinsed if:
■ it is still warm when switched on, or
■ coffee was not dispensed before the appliance was switched off.
The appliance is ready for use when the symbols for drink selection and the on/off button
light up on the display.
The appliance provides the option of saving and calling up customised settings for coffee
drinks. ~ "Customising" on page 21
Adjusting the coffee strength. ~ "Adjusting beverage settings" on page 18
Milk
As a drink or as an ingredient in certain coffee drinks. ~ "Adjusting beverage settings"
on page 18
Press and hold for at least 4 seconds:
Child-proof lock ~ "Childproof lock" on page 22
Preparation of two drinks simultaneously. Position cups next to one another under the coffee dispenser. ~ "Adjusting beverage settings" on page 18
10
Page 11

Accessories en
$/± Menu settings/service programmes
Briefly press the $/± button in order to call up the menu settings and service programmes. Briefly press the $/± button again to return to the drink selection. If no selection is made within approx. 10 seconds, the appliance will automatically return to the drink
selection.
Note: Press and hold the $/± button for at least 5 seconds to call up the menu settings
directly.
Navigation buttons
For navigating in the display.
The buttons can be set to "barista mode" in the menu settings. In this setting, further
adjustments can be made to the drink. ~ "Adjusting beverage settings" on page 18
--------
Display
The display ( shows the selected
drinks, settings and setting options, as
well as messages about the appliance’s
operating status.
Additional information is shown in the
display; this is hidden after a short
period of time or once the information is
confirmed by pressing a button.
The display also prompts the user to
perform certain actions.
The individual steps for performing the
action are shown in the display.
If the action required was carried out,
e.g. "Fill water tank", the corresponding
message will disappear.
Rotary selector
The rotary selector 8 has a range of
different functions.
■ Rotation: navigate in the display and
change settings.
■ Pressing: start beverage preparation
or service programme, confirm
menu selection.
■ Pressing while drink is being
dispensed: prematurely stop
dispensing.
_ Accessories
Accessories
The following accessories are available
from retailers or from customer service:
Accessory Order number
Retail Customer ser-
Cleaning tablets TZ80001 00311807
Descaling tablets TZ80002 00576693
Water filter TZ70003 00575491
Care set TZ80004 00576330
Adapter for milk con-
TZ90008 00577862
tainers
--------
The contact data for customer service in
all countries can be found at the back of
these instructions.
vice
11
Page 12

en Before using for the first time
K Before using for the
first time
Before using for the first time
In this section, you will learn how to
commission your appliance. Before you
can use your new appliance, you must
make some settings.
Note: Only use the appliance in
frost-free areas. If the appliance was
transported or stored at temperatures
below 0 °C, you must wait for at least 3
hours before using it.
Installing and connecting the appliance
1. Remove any protective plastic film.
2. Place the appliance on a level,
water-resistant surface which can
bear the weight.
3. Using the mains plug, connect the
appliance to an earthed socket that
has been correctly installed.
Commissioning the appliance
Setting the language
Notes
■ The language selection appears
automatically when the appliance is
switched on for the first time.
■ You can change the language at any
time. ~ "Menu settings"
on page 23
1. Switch on the appliance with the
on/off button.
The preset language appears in the
display.
2. Use the rotary selector to select the
desired display language.
3. Confirm with the right navigation
button.
The setting has been saved.
Setting the water hardness
It is important to set the water hardness
correctly, so that the appliance indicates
accurately when the descaling
programme should be run. The preset
water hardness is level 4.
You can check the water hardness
using the enclosed test strip or by
asking your local water supplier.
If a water softening system is installed in
the house, please select the "Water
softening system" setting.
1. Briefly immerse the enclosed test
strip in fresh tap water, leave it to
drip off and read off the result after 1
minute.
2. Use the rotary selector to set the
water hardness determined.
3. Confirm with the right navigation
button.
The "Fill bean container" reminder lights
up briefly.
4. Either confirm with the right
navigation button or wait a few
seconds.
Notes
■ When the appliance is used for the
first time after running a service
program, or if it has not been
operated for a long period, the first
beverage will not have the full aroma
and should not be consumed.
■ After commissioning the appliance,
you will achieve a suitably thick and
stable "crema" only after the first few
cups have been dispensed.
■ If the appliance is in use for a long
period of time, water droplets will
form on the ventilation slots. This is
normal.
12
Page 13

Before using for the first time en
The table shows the allocation of the
levels to the different degrees of water
hardness:
Level Degree of water hardness
German (°dH) French (°fH)
1 1-7 1-13
2 8-14 14-25
3 15-21 26-38
4 22-30 39-54
Subsequent changes to the water
hardness can be made at any time.
~ "Menu settings" on page 23
Filling the bean container
This appliance can be used to prepare
coffee drinks from coffee beans or
ground coffee (not instant coffee).
1. Open the lid )R of the bean
container )B.
2. Pour in the beans.
3. Close the lid again.
Notes
■ The coffee beans are freshly ground
for each brewing.
■ The coffee beans must be sealed
and stored in a cool place to retain
optimum quality.
■ Coffee beans can be stored in the
bean container for a number of days
without losing their aroma. Always
add the ground coffee first prior to
beverage preparation. ~ "Preparing
coffee using ground coffee"
on page 15
The appliance memorises the most
recently used bean container for each
drink. This presetting can be modified.
~ "Menu settings" on page 23
Filling the water tank
Important: Fill the water tank with fresh,
cold, still water on a daily basis. Prior to
operation, check whether the water tank
has been sufficiently filled.
1. Hold the recessed grip )" on the
side of the water tank `and gently
tilt out the water tank to the side.
2. Use the handle to remove the water
tank.
3. Insert the water filter. ~ "Inserting
or replacing a water filter"
on page 25
4. Fill the water tank with water up to
the "max" marking.
5. Re-insert the water tank into the
holder and tilt back to the starting
position.
The brand logo lights up in the display.
The appliance heats up and rinses.
Some water will run out of the outlet
system.
The appliance is ready for use when the
symbols for the drinks and the on/off
button light up on the display.
In models with two bean containers )B
, )b* you can pour in two different
types of coffee beans. Select the
desired bean container using the
selection button 1"*. The LED of the
active bean container lights up.
13
Page 14
en Operating the appliance
1 Operating the
appliance
Operating the appliance
In this section, you will learn how to
prepare your appliance for beverage
preparation and how to prepare hot
drinks. It features information on
adjusting the beverage settings and
adjusting the grinding level.
Selecting a drink
■ Use the rotary selector to select the
desired drink.
■ The display shows the name of the
drink and the currently active values
(e.g. strength or cup size).
■ The drink selected can be prepared
with the pre-set values or first
adjusted to individual taste.
~ "Adjusting beverage settings"
on page 18
■ If no controls are activated for a
period of one minute the appliance
will exit settings mode. The settings
made will be automatically stored.
You can choose from the following
drinks:
Coffee
Cappuccino
Latte Macchiato
Caffe Latte
Milk froth
Jug function
(not available in all product
variants)
Warm milk
14
Espresso Macchiato
Ristretto
Espresso
Espresso Doppio
Hot water
--------
Note: For a number of settings, coffee
is prepared in two steps
("aromaDoubleShot"). Wait until the
procedure is fully completed.
Tip: Cups, particularly small, thick
espresso cups, should be placed with
their base on the cup warmer. ~ "Cup
warmer" on page 20
Page 15

Operating the appliance en
Preparing coffee using freshly ground beans
You can choose between Ristretto,
Espresso Doppio, Espresso and Coffee.
The preparation of coffee drinks with
milk is explained in a separate section.
~ "Preparing drinks with milk"
on page 16
The appliance is switched on. The water
tank and bean container have been
filled.
1. Place a cup under the outlet system.
2. Use the rotary selector to select the
desired drink.
The name of the drink and the currently
active values are shown on the display.
3. To change the settings for the
selected drink
~ "Adjusting beverage settings"
on page 18
4. To begin dispensing the drink, press
the rotary selector.
The coffee is brewed and then
dispensed into the cup.
Note: To prematurely stop dispensing
the drink, press the rotary selector
again.
The appliance is switched on. The water
tank has been filled.
1. Place a cup under the outlet system.
2. Use the rotary selector to select the
desired drink.
3. Press the " button.
4. Use the rotary selector to select
"Ground coffee".
5. Press the " button.
6. Remove the aroma lid )R of the
bean container )B and open the
grounds compartment ):.
7. Add the ground coffee; do not press
firmly. Add no more than two level
measuring spoons.
Caution!
Do not place coffee beans or instant
coffee in the grounds compartment.
8. Close the grounds compartment and
the aroma lid.
The name of the drink and the currently
active values are shown on the display.
9. To change the settings for the
selected drink
~ "Adjusting beverage settings"
on page 18
10. To begin dispensing the drink, press
the rotary selector.
The coffee is brewed and then
dispensed into the cup.
Preparing coffee using ground coffee
You can also operate this appliance
using ground coffee. Do not use instant
coffee. The preparation of coffee drinks
with milk is explained in a separate
section. ~ "Preparing drinks with milk"
on page 16
Notes
■ Any grounds residue in the grounds
shaft should be directed down the
shaft using a soft brush.
■ To prematurely stop dispensing the
drink, press the rotary selector
again.
■ For another drink with ground coffee,
repeat the procedure.
■ When ground coffee is used, the
aromaDoubleShot function is not
available.
15
Page 16

en Operating the appliance
Preparing drinks with milk
This appliance features an integrated
milk system. The milk system can be
used to prepare coffee drinks with milk,
as well as milk froth and warm milk.
You can choose between Espresso
Macchiato, Cappuccino,
Latte Macchiato and Caffe Latte.
Notes
■ While milk is being prepared, you
may hear a whistling sound. These
noises are emitted for technical
reasons and are normal.
■ Dried milk residues are difficult to
remove, therefore always perform
cleaning. ~ "Cleaning the milk
system" on page 28
:Warning
Risk of burns!
The milk system becomes very hot.
After use, always let it cool down before
you touch it.
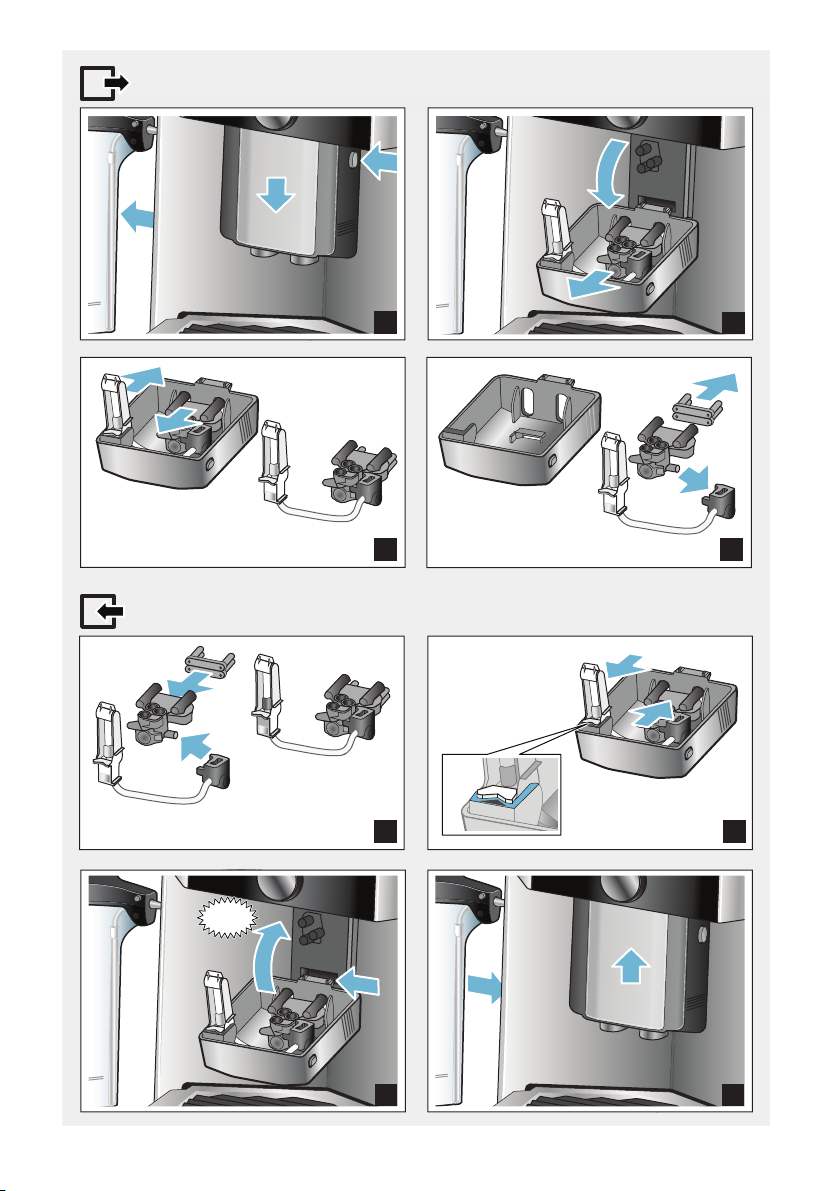
Using the milk container
The milk container H has been
designed especially for use together
with this appliance. It is intended solely
for use in the household and for storing
milk in the refrigerator.
Important: The milk container can only
be connected if the milk system is
installed in the outlet system with an
adapter and hose. (~ Fig. #)
Coffee drinks with milk
The appliance is switched on. The water
tank and bean container have been
filled.
The milk container filled with milk is
connected.
1. Place a cup or a glass under the
outlet system.
2. Use the rotary selector to select the
desired drink.
The name of the drink and the currently
active values are shown on the display.
3. To change the settings for the
selected drink
~ "Adjusting beverage settings"
on page 18
4. To begin dispensing the drink, press
the rotary selector.
The milk is dispensed into the cup or
glass first. The coffee is then brewed
and dispensed into the cup or the glass.
Note: Pressing the rotary selector once
can prematurely stop the dispensing of
milk or coffee; pressing the rotary
selector twice stops the drink
dispensing completely.
1. To remove the lid, press the marking
and remove the lid. (~ Fig. ')
2. Pour in the milk.
3. Press the lid onto the milk container
until it engages.
4. Connect the milk container on the
left of the appliance. The milk
container must engage.
16
Page 17

Operating the appliance en
Milk froth or warm milk
The appliance is switched on. The water
tank has been filled.
The milk container filled with milk is
connected.
1. Place a cup or a glass under the
outlet system.
2. Select "Milk froth" or "Warm milk"
with the rotary selector.
The name of the drink and the currently
active values are shown on the display.
3. To change the settings for the
selected drink
~ "Adjusting beverage settings"
on page 18
4. To begin dispensing the drink, press
the rotary selector.
Milk froth or warm milk is dispensed
into the cup or glass.
Note: To prematurely stop dispensing
the drink, press the rotary selector
again.
Dispensing hot water
Note: Before dispensing hot water,
clean the milk system and remove the
milk container. If the milk system is not
cleaned, the dispensed water may
contain small quantities of milk.
~ "Cleaning the milk system"
on page 28
:Warning
Risk of burns!
The outlet system becomes very hot.
After use, always let the outlet system
cool down before you touch it.
The appliance is switched on. The water
tank has been filled.
1. Place a cup under the outlet system.
2. Remove the milk container, if
connected.
3. Select "Hot water" with the rotary
selector.
4. To change the settings for the
selected drink
~ "Adjusting beverage settings"
on page 18
5. To begin dispensing the drink, press
the rotary selector.
Hot water is dispensed into the cup.
Note: To prematurely stop dispensing
the drink, press the rotary selector
again.
17
Page 18

en Operating the appliance
Adjusting beverage settings
the drink. To do so, please use the
following buttons and the rotary
Once you have selected a drink, you
selector:
can adjust certain values depending on
Button Function Selection
" Selecting the coffee
strength, ground coffee
■ very mild*
■ mild
■ mild +*
■ normal
■ normal +*
■ strong
■ strong +*
■ very strong
■ very strong +*
■ extra strong
■ aromaDoubleShot
strong
■ aromaDoubleShot
strong +
■ aromaDoubleShot
strong ++*
■ Ground coffee
milk Milk/coffee mixing ratio Setting share of milk in %
(only for coffee drinks with milk)
ml Cup size Adjustment of the volume in ml increments.
Not available for ristretto.
# Two cups at once Place two cups under the outlet.
Navigation
button, left
Navigation
button, right
Water temperature* e.g. for tea drinks:
■ > 70°C (white tea)
■ > 80°C (green tea)
aromaIntense* ■ normal
■ intense
■ > 85°C (rooibos tea)
■ > 90°C (black tea)
■ > 97°C (fruit tea)
■ intense +
* Only available in "barista mode"
The appliance is set to "barista mode"
by default. Additional values can
therefore be set using the two
navigation buttons. "Barista mode" can
also be switched off. ~ "Menu
settings" on page 23
The factory settings are shown in blue
on the display. The currently selected
settings are backlit.
18
Adjusting the coffee strength or selecting ground coffee
A coffee drink is selected.
1. Press the " button.
2. Use the rotary selector to set the
coffee strength or select ground
coffee.
3. Press the "button or the rotary
selector to confirm.
Page 19

Operating the appliance en
aromaDoubleShot function
The longer the coffee is brewed, the
more bitter substances and undesired
aromas are released. This has a
negative effect on the taste and makes
the coffee less easily digestible. For
extra strong coffee, the appliance
therefore has a special
aromaDoubleShot function. When half
the volume has been prepared, a
second portion of coffee beans is
ground and a second brew made so
that in each case only the pleasant and
beneficial flavours and aromas are
released.
Note: The aromaDoubleShot function
can be selected for all coffee drinks
except for:
■ drinks with a small volume of coffee,
e.g. ristretto
■ a small volume of coffee, e.g. setting
a 200 ml "Caffe Latte" with a 90%
share of milk (10% share of coffee)
■ preparation with ground coffee
Adjusting the milk/coffee mixing ratio
A coffee drink with milk is selected.
1. Press the milk button.
2. Use the rotary selector to set the
share of milk in %.
Example: When a value of 30% is
configured, 30% milk and 70%
coffee will be dispensed.
3. Press the milk button or the rotary
selector to confirm.
Selecting cup size
A drink is selected.
1. Press the ml button. The preset
volume depends on the type of
beverage.
2. Use the rotary selector to adjust the
desired volume in ml increments.
3. Press the ml button or the rotary
selector to confirm.
Notes
■ The volume cannot be changed for
ristretto.
■ The volume dispensed can fluctuate
depending on the quality of the milk.
Preparing two cups at once
A coffee drink or a coffee drink with milk
is selected.
1. Press the # button.
2. Place two pre-heated cups on the
left and right below the outlet
system.
3. To begin dispensing the drink, press
the rotary selector.
The selected drink will be brewed and
will then be dispensed into the two
cups.
Notes
■ The drink is prepared in two steps
(two grinding operations). Please
wait until the process is fully
completed.
■ The aromaDoubleShot function is
not possible in the # selection.
Adjusting the drink temperature
Only available in "barista mode".
~ "Menu settings" on page 23
A drink of your choice is selected.
1. Use the left navigation button to call
up the temperature setting.
2. Turn the rotary selector to set the
desired temperature.
3. Press the left navigation button or
the rotary selector to confirm.
19
Page 20
en Operating the appliance
Setting aromaIntense
Only available in "barista mode".
~ "Menu settings" on page 23
The intensity of the taste of a coffee
drink can be individually adjusted using
the aromaIntense setting. When milk is
dispensed, this selection does not
influence the warm milk or the milk
froth.
A coffee drink is selected.
1. Use the right navigation button to
call up the menu.
2. Make the desired setting using the
rotary selector.
3. Press the right navigation button or
the rotary selector to confirm.
Setting the grinding level
This appliance features an adjustable
grinder. This enables the grinding level
of the coffee to be individually changed.
:Warning
Risk of injury!
Do not reach into the grinding unit.
Caution!
The appliance may be damaged! Only
adjust the grinding level when the
grinder is running!
When the grinder is in operation, use
the rotary selector )J, )j* to set the
grinding level.
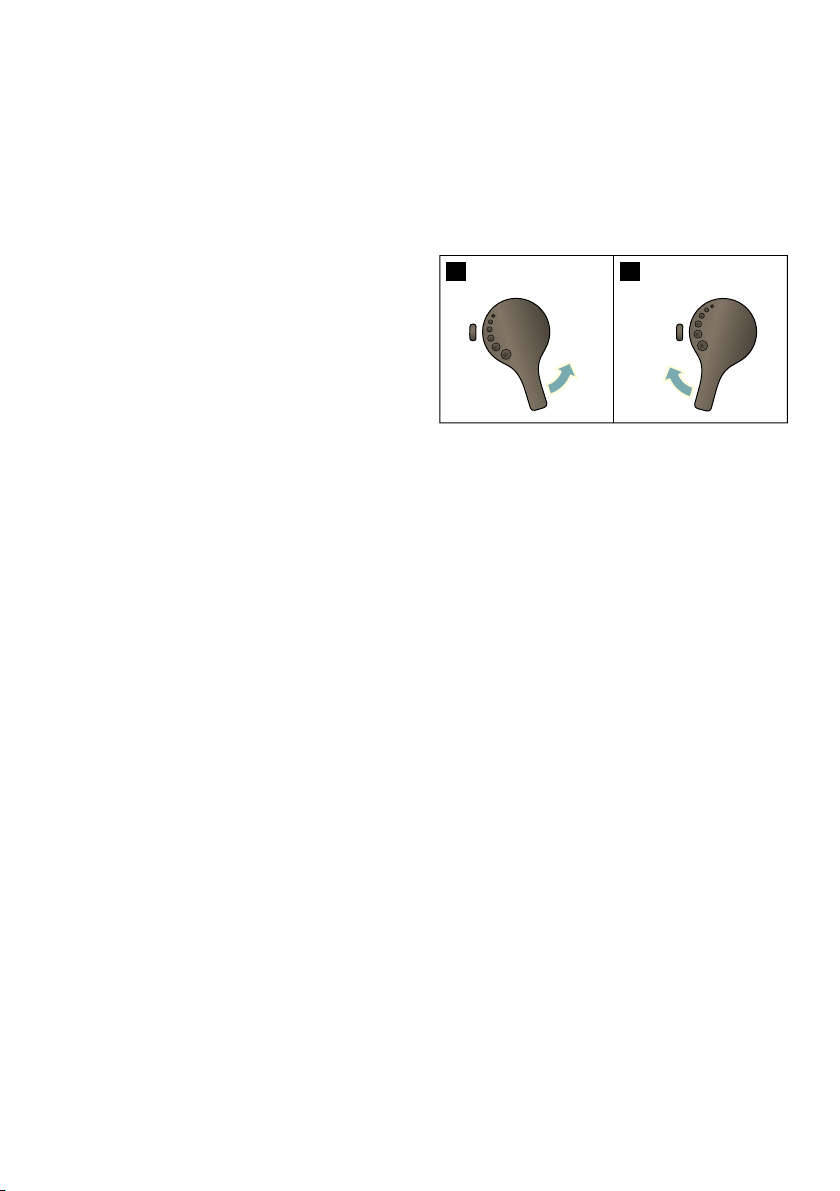
■ Finer grinding level: turn
anticlockwise. (Fig. a)
■ Coarser grinding level: turn
clockwise. (Fig. b)
D E
Notes
■ The new setting will not become
apparent until the second cup of
coffee.
■ For dark roast coffee beans, choose
a finer grinding level; for lighter
beans, choose a coarser grinding
level.
Cup warmer
Caution!
The cup warmer becomes very hot!
The fully automatic coffee machine
features a cup warmer )*. If the cup
warmer is switched on, the cup warmer
LED display )2 lights up.
20
Tip: For optimal cup heating, position
the cups with the base of the cup on the
cup warmer.
Note: This function can be activated
and deactivated in the "Menu settings".
~ "Menu settings" on page 23
Page 21

Customising en
P Customising
Customising
User profiles can be created in the
customising menu. In the user profiles,
individual beverages can be stored
under names of your choice.
Creating a user profile
1. Press the ! button. The menu
appears.
2. Use the rotary selector to select a
new profile.
3. Press the right navigation button to
confirm the selection.
The user name can be entered.
4. Use the rotary selector to select the
desired letters. Press the rotary
selector to confirm the letters.
The letter is saved.
Once the user name has been fully
entered:
5. Press the right navigation button to
save the user name.
6. Use the rotary selector to select a
background picture.
7. Press the right navigation button to
confirm the selection.
8. Use the rotary selector to select
"default mode" or "barista mode".
9. Press the right navigation button to
confirm the selection.
The selection prompt appears.
10. Press the right navigation button
again to save the profile.
The user profile picture appears.
An individual drink can then be saved
immediately for the user created.
Saving individual drinks:
1. Press the rotary selector.
The display "change beverages"
appears.
2. Use the rotary selector to select the
desired drink.
The selected drink can be adjusted in
line with personal preference.
~ "Adjusting beverage settings"
on page 18
3. Press the rotary selector.
A prompt appears for you to confirm
the selection.
4. Press the right navigation button to
confirm the selection.
5. Press the ! button.
The settings are completed.
The appliance is ready for use again.
Note: Up to 10 personal drinks can be
saved in one profile.
Editing or deleting user profile
1. Press the ! button. The menu
appears.
2. Use the rotary selector to select the
desired profile.
3. Press the left navigation button to
delete the profile.
- or -
Press the right navigation button to
edit the settings in the profile.
The settings in the profile can be
changed as described. ~ "Creating a
user profile" on page 21
4. Press the ! button.
The appliance is ready for use again.
21
Page 22

en Childproof lock
Saving individual drinks
A drink that is currently being dispensed
can be saved directly in a new or
existing profile using the individual
settings.
1. Press and hold the ! button for at
least 5 seconds.
If no profiles have yet been saved, a
new profile appears automatically.
2. If profiles are already saved and if
the individual drink should be saved
in a new profile, use the rotary
selector to select a new profile.
- or -
If the individual drink should be
saved in an existing profile, use the
rotary selector to select the desired
profile.
3. Press the rotary selector to confirm
the selection.
If a new profile is created, enter name
and select background picture. Confirm
the entries.
If a profile is already available, select
this and save the drink.
4. Press the ! button.
The appliance is ready for use again.
A Childproof lock
Childproof lock
The appliance can be locked to protect
children against scalding and burns.
Activating the child-proof lock
Press and hold the milk button for at
least 4 seconds.
"Child-proof lock activated" appears in
the display.
It is no longer possible to operate the
appliance.
Deactivating the child-proof lock
Press and hold the milk button for at
least 4 seconds.
"Child-proof lock deactivated" appears
in the display.
The appliance can be used in the usual
way.
Note: To exit the menu automatically,
set "Leave profiles automatically" under
"User profiles". ~ "Menu settings"
on page 23
22
Page 23

Menu settings en
Q Menu settings
5. Press the navigation button under
"confirm".
The setting has been saved.
Menu settings
This menu is used for changing settings
individually, accessing information and
starting a programme.
6. Press the $/± button to exit the
"Menu".
The drink selection appears on the
display.
Changing settings
1. Press and hold the $/± button for at
least 5 seconds to open the "Menu".
The different setting options will
appear in the display.
2. Make the desired setting using the
rotary selector.
The current setting is highlighted in
colour on the display.
3. Press the navigation button under
"select".
4. Use the rotary selector to change the
setting.
Notes
■ You can switch to the previous level
by pressing the navigation button
under "back".
■ The setting procedure can be
aborted by pressing the navigation
button under "abort".
■ Press the $/± button to exit the
menu at any time.
■ If no entry is made within approx. 2
minutes, the menu closes
automatically and the settings are
not saved.
The following settings are available:
Settings Possible settings Explanation
Language Different languages Setting the language to be used for display texts.
Water hardness ■ 1 (soft)
■ 2 (medium)
■ 3 (hard)
■ 4 (very hard)
■ Water softening system
Setting in line with the hardness of the local
water supply.
The preset water hardness is level 4 (very hard).
The water hardness can, for example, be
requested from your local water supplier.
It is important to set the water hardness correctly, so that the appliance indicates accurately
when the descaling programme should be run.
If a water softening system is installed in the
house, please select the "Water softening system" setting.
Switch off after 15 minutes
up to
8 hours
Setting that governs how long the appliance
should wait after the last beverage preparation
before it automatically switches itself off.
The factory setting is 30 minutes.
Brightness display Level 1 up to level 10
Standard setting 7
Setting that governs the brightness of the display
23
Page 24

en Menu settings
Select usermode ■ default mode
■ barista mode
In the "barista mode" setting, the following can
be performed directly in the display:
■ The temperature can be set by pressing the
left navigation button.
■ The aromaIntense (brew speed) can be set
in three levels by pressing the right navigation button.
Beverage info Shows the volume of drinks dispensed since the appliance was commissioned.
For technical reasons, the counter does not represent a precise number of cups.
Factory settings Appliance reset to factory set-
tings
Demo mode ■ on
■ off
Resets all your own settings to the condition
when delivered.
For presentation purposes only. The setting "off"
must be activated for normal operation. The setting is only possible in the first 3 minutes after
switching on the appliance.
Beverage settings
Espresso / Coffeetemperature
Hot water temperature
Order coffee/milk ■ first milk
User profiles ■ Leave profiles automati-
Cupwarmer ■ on
■ 88 °C
■ 90 °C
■ 92 °C
■ 94 °C
■ 95 °C
■ 96 °C
■ > 70 °C
■ > 80 °C
■ > 85 °C
■ > 90 °C
■ > 97 °C
■ first coffee
cally
■ Delete all profiles
■ off
Setting the temperature for coffee drinks.
The setting is effective for all preparation types.
Setting the temperature for hot water.
The setting is effective for all preparation types.
Setting that governs whether milk or coffee
should be brewed and dispensed first.
Setting that governs whether the user profile is
automatically exited or deleted.
If the cup warmer is switched on, the cup
warmer LED lights up.
Bean container Setting that governs which bean container is automatically active.
The bean container can be selected directly prior to each dispensing operation
using the "Bean container" selection buttons.
■ Default container right Each time a drink is dispensed, the appliance
automatically returns to the right bean container.
24
Page 25
Menu settings en
■ Default container left Each time a drink is dispensed, the appliance
■ Most recently selected
bean container
--------
Start the "Water filter" or "frost protection" programme
1. Briefly press the $/±button.
2. The rotary selector can be used to
select the "Water filter" or "frost
protection" programme. The current
setting is highlighted in colour on the
display.
Note: The rotary selector can also be
used to select a service programme.
~ "Service programmes" on page 30
Water filter
A water filter lessens limescale
deposits, reduces impurities in water
and improves the taste of the coffee.
Water filters are available from retailers
or from customer service.
~ "Accessories" on page 11
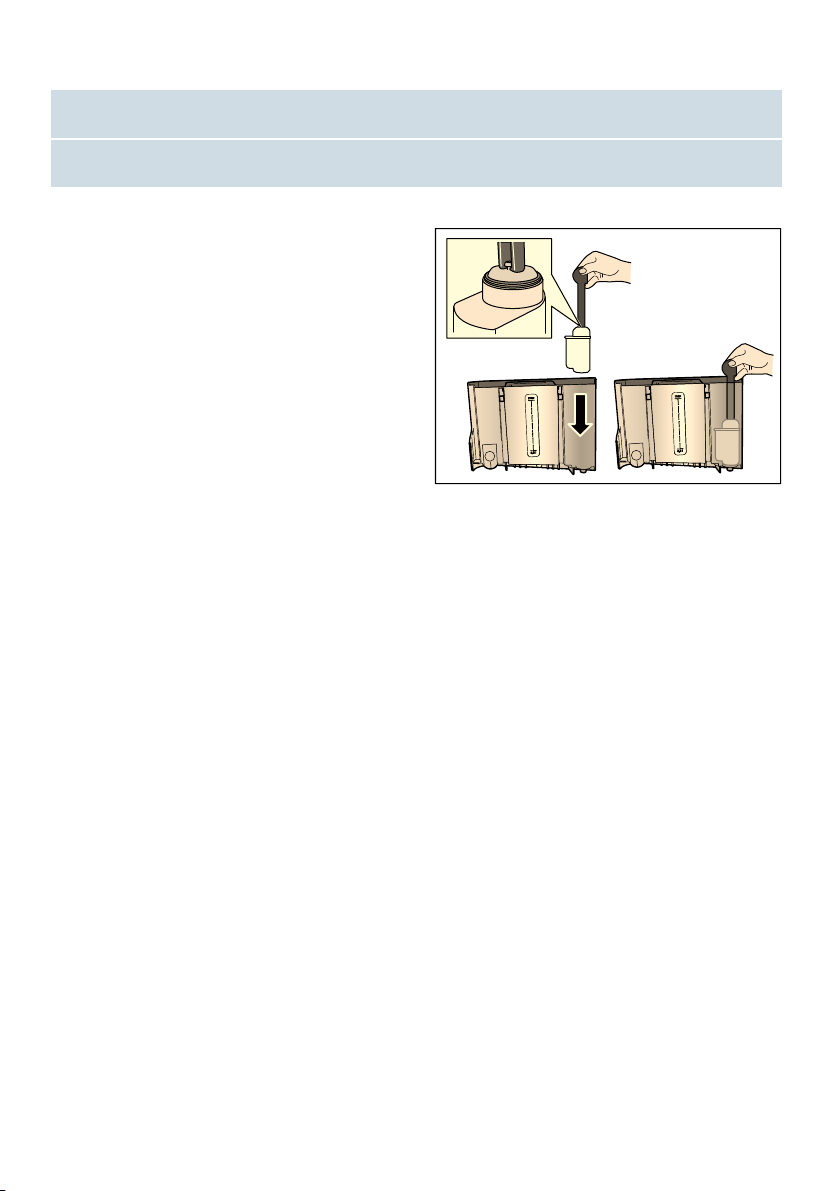
Inserting or replacing a water filter
A new water filter must be rinsed before
it can be used.
1. Select "Water filter" in the menu
settings.
2. Use the navigation button to select
"insert" or "replace".
3. Use the measuring spoon to press
the water filter firmly into the water
tank.
automatically returns to the left bean container.
The appliance memorises the most recently
used bean container.
4. Fill the water tank with water up to
the "max" marking.
5. Place a container with a capacity of
1.0 l under the outlet and confirm.
Water will now flow through the filter.
The filter is rinsed.
6. Subsequently empty the container.
The appliance is ready for use again.
Notes
■ The rinsing of the filter automatically
activates the interval for the display
of the filter change. After this interval
or after 2 months at the latest, the
filter will no longer be effective. It
needs to be replaced for reasons of
hygiene and to prevent a build-up of
limescale (which could damage the
appliance).
■ If the appliance has not been used
for a prolonged period (for example,
while you are on holiday), the
existing filter should be rinsed before
the first time the appliance is used
again. To do this, simply dispense a
cup of hot water.
25
Page 26

en Menu settings
Removing the water filter
If a new water filter is not inserted, the
"Water filter" function must be
deactivated.
1. Select "Water filter" in the menu
settings.
2. Select and confirm the "remove"
setting.
3. Remove the water filter from the
water tank.
4. Re-insert the water tank.
The appliance is ready for use again.
Frost protection
A service programme to prevent frost
damage during transportation and
storage. This programme completely
empties the appliance. The appliance
must be ready for use and the water
tank filled.
1. Press the rotary selector to start the
programme.
2. Empty the water tank and re-insert;
the appliance performs rinsing.
3. Empty the drip tray and thoroughly
clean the appliance.
The appliance can now be transported
or stored.
26
Page 27
Daily care and cleaning en
D Daily care and
cleaning
Daily care and cleaning
With good care and cleaning, your
appliance will remain fully functioning
for a long time to come. In this section,
you will learn how to correctly clean and
care for your appliance.
:Warning
Risk of electric shock!
Before cleaning the appliance, pull out
the mains plug. Never immerse the
appliance in water. Do not use a steam
cleaner.
Cleaning agent
Please observe the following
information to ensure that the different
surfaces are not damaged by using the
wrong type of cleaning agent.
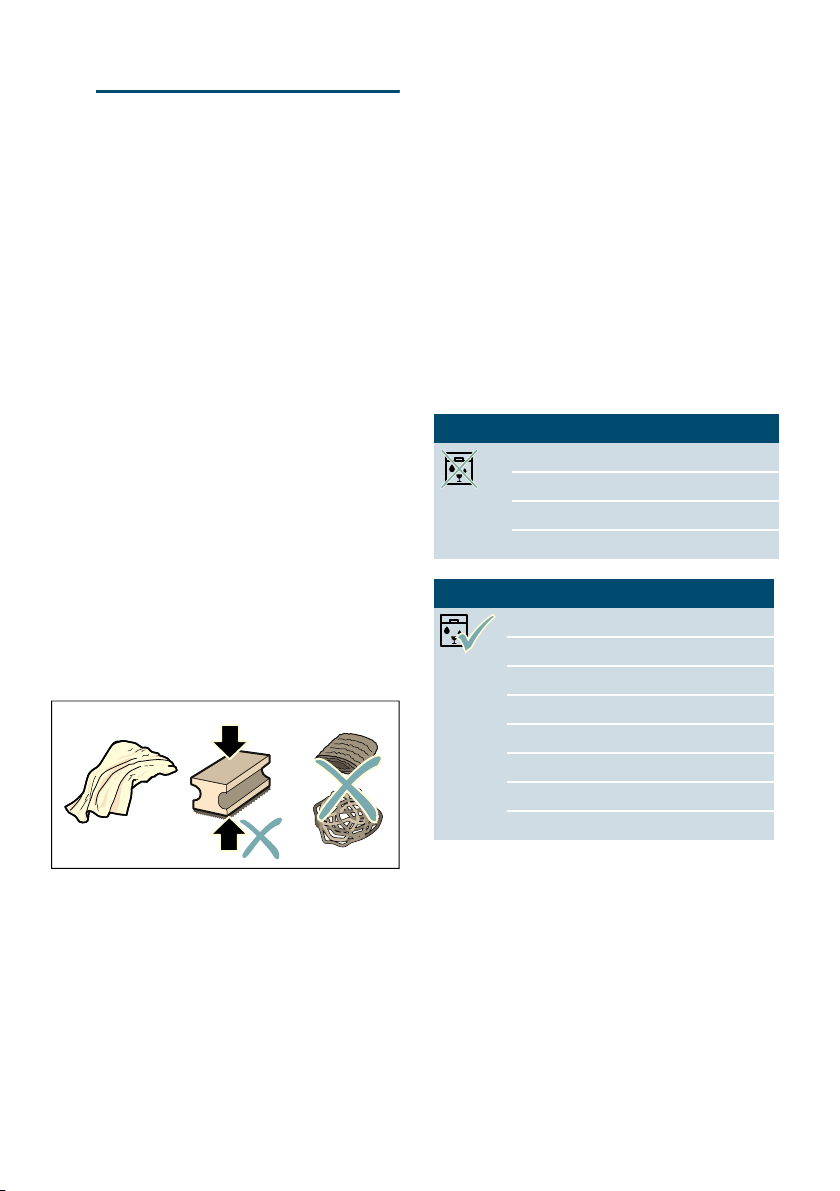
Do not use:
■ Harsh or abrasive cleaning agents.
■ Any cleaning agents containing
alcohol or spirits.
■ Hard scouring pads or sponges.
9
Notes
■ New sponge cloths may contain
salts. Salts can cause rust film on
stainless steel. Wash new sponge
cloths thoroughly before use.
■ Always remove any limescale,
residues of coffee or milk, cleaning
or descaling solution immediately.
This residue may cause corrosion to
form.
Caution!
Not all of the appliance's components
can be cleaned in the dishwasher.
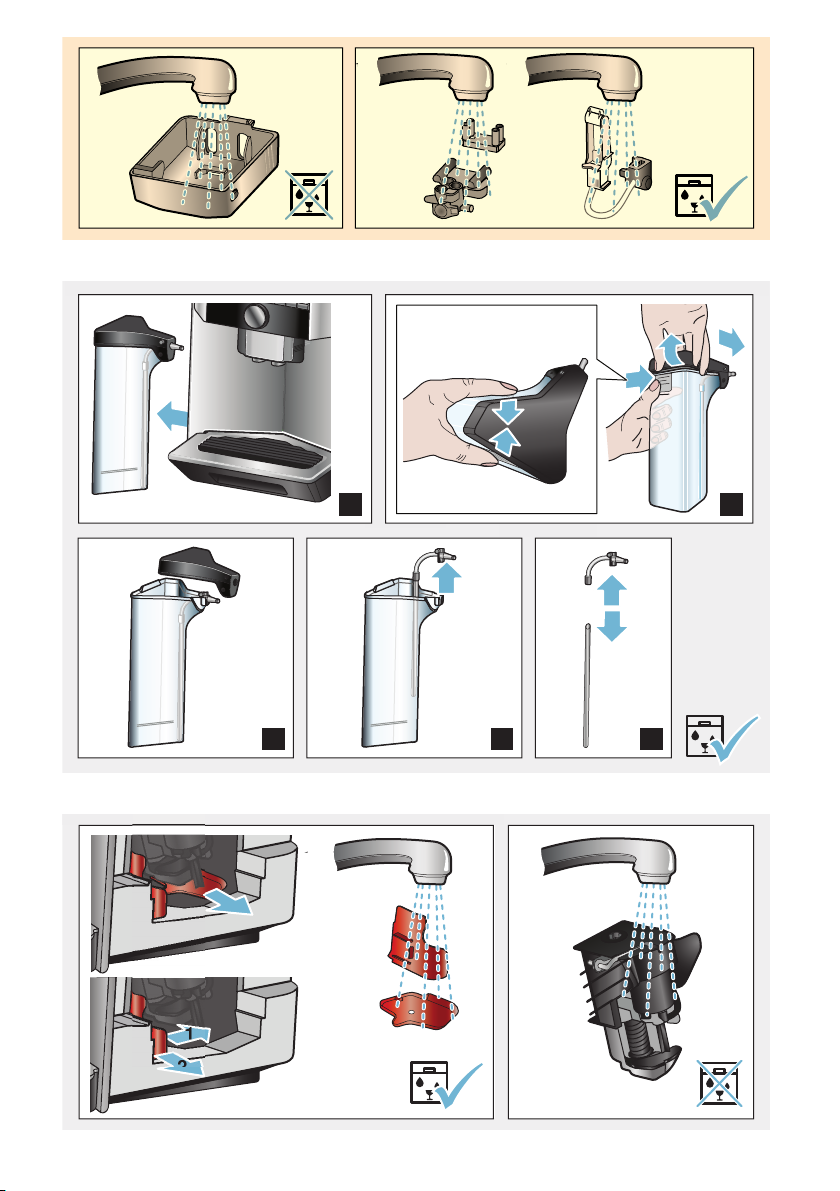
~ Fig. % - (
Not dishwasher-safe:
Brewing chamber cover
Brewing unit
Water tank
Aroma lid
Dishwasher- safe:
Drip plate
Drip tray
Coffee grounds container
max.
60°C
Coffee grounds slider, red
Brewing unit cover, red
Measuring spoon
Milk system, all parts
Milk container, all parts
9
27
Page 28

en Daily care and cleaning
Cleaning the appliance
1. Wipe the outside of the appliance
with a soft, damp cloth.
2. Clean the display using a micro-fibre
cloth.
3. Any grounds residue in the grounds
shaft should be directed down the
shaft using a soft brush.
Notes
■ If the appliance is cold when
switched on, or if it is switched off
after dispensing coffee, it rinses
automatically. The system is
therefore self-cleaning.
■ If the appliance has not been used
for a prolonged period of time (e.g.
while you are on holiday), clean the
entire appliance thoroughly,
including the milk system and
brewing unit.
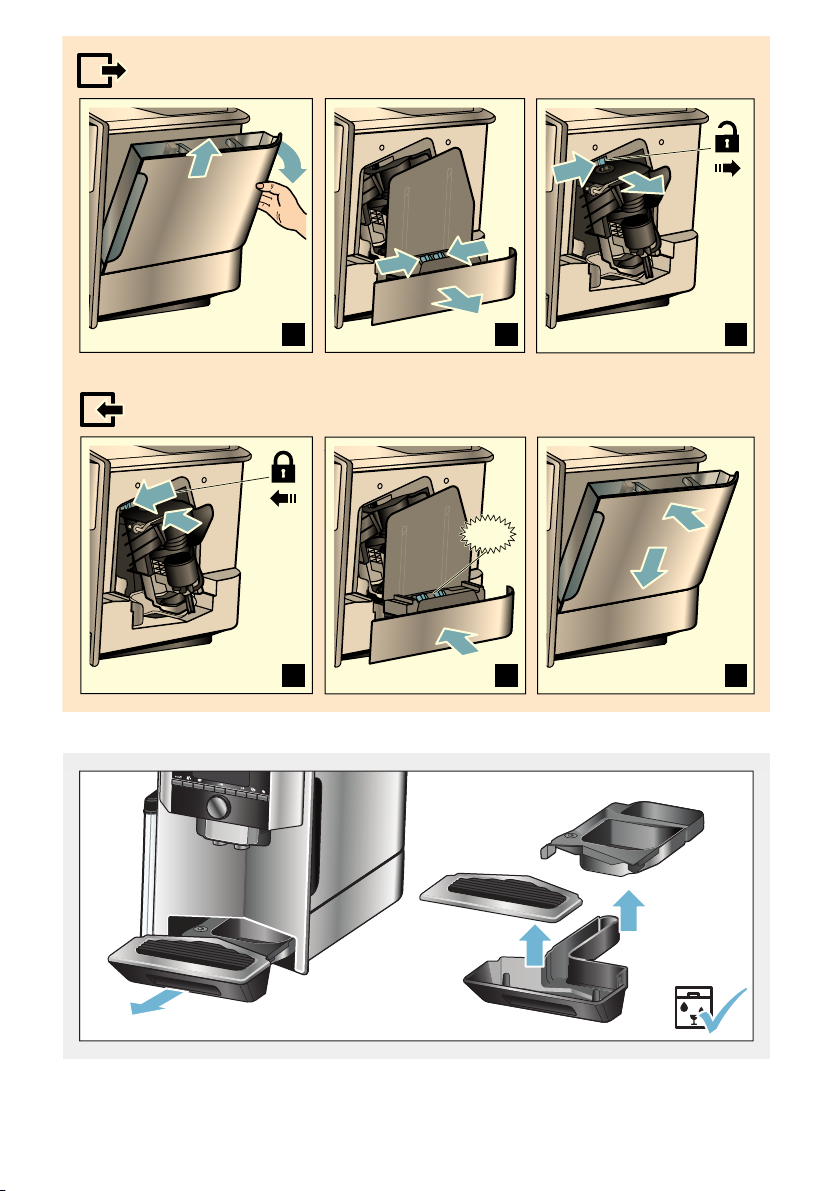
Cleaning the drip tray and the coffee grounds container
~ Fig. %
Note: The drip tray and coffee grounds
container should be emptied and
cleaned every day in order to prevent
deposits.
1. Pull the drip tray with the coffee
grounds container forwards and out.
2. Remove the drip plate.
3. Empty and clean the drip tray and
coffee grounds container.
4. Wipe out the interior of the appliance
(intake trays).
Cleaning the milk container
~ Fig. '
Note: For reasons of hygiene, the milk
container should be cleaned regularly
1. Dismantle the milk container into its
individual parts.
2. Clean all parts of the milk container
or put them in the dishwasher.
Cleaning the milk system
The milk system is automatically
cleaned with a short jet of steam directly
after preparing a milk drink.
:Warning
Risk of burns!
The outlet system becomes very hot.
After use, always let the outlet system
cool down before you touch it.
~ Fig. #, ~ Fig. &
Manually clean the milk system on a
weekly basis, or more frequently if
required. For particularly thorough
cleaning, the milk system can be
additionally rinsed with water. ~ "Rinse
milk system" on page 31
Remove the milk system:
1. Remove the milk container from the
appliance.
2. Slide the outlet system to the bottom
position.
3. Press the unlocking mechanism at
the top right.
4. Fold the cover down towards the
front and remove.
5. Remove the milk system and
dismantle into individual parts.
6. Clean the individual parts with
detergent solution and a soft cloth.
7. Rinse all parts with clean water and
leave to dry.
Note: All parts of the milk system can
be cleaned in the dishwasher.
Detergent residues in the milk system
must be thoroughly removed following
the rinsing process.
Inserting the milk system:
1. Assemble the individual parts of the
milk system.
2. Insert the milk system into the cover.
3. Position the cover at the bottom and
pivot upwards until it engages.
28
Page 29

Cleaning the brewing unit
~ Fig. $, ~ Fig. (
In addition to the automatic cleaning
programme, the brewing unit should be
removed regularly for cleaning.
Caution!
Clean the brewing unit without detergent
and do not put it in the dishwasher.
Remove the brewing unit:
1. Switch off the appliance.
2. Remove the water tank.
3. Slide both red locking sliders
towards one another and remove the
cover.
4. Remove, clean and dry the coffee
grounds slider (red) and the brewing
unit cover (red).
5. Slide the red lock to the right across
the brewing unit.
6. Carefully remove the brewing unit
and clean thoroughly under running
water.
7. Clean the interior of the appliance
thoroughly with a moist cloth,
removing any coffee residues.
8. Allow the brewing unit and the
interior of the appliance to dry.
Daily care and cleaning en
Insert the brewing unit:
1. Push the brewing unit into the
appliance in the direction of the
arrow. The arrow is located on the
top of the brewing unit.
Position the brewing unit from
above, suspend on the guide rails
and push into the appliance.
2. Slide the red lock to the left across
the brewing unit.
3. Insert the coffee grounds slider (red)
and the brewing unit cover (red).
4. Insert the cover until it engages.
5. Insert the water tank.
29
Page 30

en Service programmes
. Service programmes
Service programmes
Every so often – the exact frequency
depends on usage and water hardness
– one of the following messages will
appear in the display in place of the
coffee selection:
■ Rinse milk system
■ Run descaling program urgently!
■ Run cleaning program urgently!
■ Run calc'nClean program urgently!
The appliance should immediately be
cleaned or descaled using the
appropriate programme. Alternatively,
the two processes Descale and Clean
can be carried out together using the
calc’nClean function. Failure to carry out
the service programme according to the
instructions may damage the appliance.
You can also start the service
programmes at any time without having
to wait for a reminder to appear in the
display. Press the $/± button, select the
desired programme and run it.
Notes
■ Important: If the appliance is not
descaled in good time, the message
"Descaling required, appliance will
shortly be locked" will appear.
Immediately perform the descaling
process in accordance with the
instructions. If the appliance is
locked, it can only be operated
again once the descaling process
has been carried out.
■ Do not drink the liquids.
■ Never use vinegar, vinegar-based
products, citric acid or citric
acid-based products for descaling.
■ For cleaning and descaling only use
the tablets intended for such. The
tablets were specially developed for
this appliance and new stocks can
be ordered through customer
service. ~ "Accessories"
on page 11
■ Never insert descaling tablets or
other media into the grounds
compartment.
■ Never interrupt the service
programme.
■ Prior to starting a service
programme, remove, clean and
re-insert the brewing unit. Rinse the
milk system.
■ At the end of a service programme,
wipe down the appliance using a
soft, damp cloth to immediately
remove any descaler residue. This
residue may cause corrosion to
form.
■ New sponge cloths may contain
salts. Salts can cause rust film on
stainless steel and must therefore be
washed out thoroughly before use.
■ If one of the service programs is
interrupted, e.g. by a power outage,
proceed as follows:
1. Rinse out the water tank.
2. Pour in fresh still water up to the
"max" marking and confirm.
The programme starts and rinses the
appliance. Duration: approx.
2 minutes.
3. Empty, clean and re-insert the drip
tray.
4. Empty, clean and re-insert the milk
container.
The programme has finished. The
appliance is ready for use again.
5. Press the $/± button to exit the
programme.
30
Page 31

Service programmes en
Rinse milk system
The milk system is automatically
cleaned with a short jet of steam directly
after preparing a milk drink.
For particularly thorough cleaning, the
milk system can be additionally rinsed
with water.
Duration: approx. 2 minutes
1. Press the $/± button to open the
menu.
2. Use the rotary selector to select
"Rinse milk system".
3. Press the rotary selector to start the
programme.
4. Empty, clean and re-connect the milk
container.
5. Place an empty glass under the
outlet system and confirm.
The programme runs.
6. Empty, clean and re-connect the milk
container.
7. Empty the glass.
The programme has finished. The
appliance is ready for use again.
8. Press the $/± button to exit the
programme.
The milk system should also be subject
to thorough manual cleaning at regular
intervals. ~ "Cleaning the milk system"
on page 28
Descaling
Duration: approx. 21 minutes
The line at the bottom of the display
indicates in how many minutes the
water tank will need to be rinsed and
refilled with water, for example.
The instructions in the display guide you
through the programme.
4. Empty the drip tray and re-insert.
5. Empty, clean and re-connect the milk
container.
6. Remove the water filter (if present)
and confirm.
7. Fill the empty water tank with
lukewarm water up to the marking
"0.5 l". Release one descaling
tablet TZ80002 in the water.
8. Place a container with a capacity of
1.0 l under the outlet system and
confirm.
9. Press the rotary selector.
The programme runs.
Duration: approx. 19 minutes
Info: If there is not enough descaling
solution in the water tank, you will be
asked to: Refill with still water and
confirm.
10. Rinse out the water tank and (if
removed) re-insert the water filter.
11. Pour in fresh still water up to the
"max" marking and re-insert the
water tank.
The programme runs.
Duration: approx. 2 minutes
12. Empty the container and confirm.
13. Empty the drip tray and re-insert.
14. Empty, clean and re-connect the milk
container.
The programme has finished. The
appliance is ready for use again.
15. Press the $/± button to exit the
programme.
1. Press the $/± button to open the
menu.
2. Use the rotary selector to select
"Descale".
3. Press the rotary selector to start the
programme.
31
Page 32

en Service programmes
Cleaning
Duration: approx. 6 minutes
1. Press the $/± button to open the
menu.
2. Use the rotary selector to select
"Clean".
3. Press the rotary selector to start the
programme.
The instructions in the display guide you
through the programme.
4. Empty the drip tray and re-insert.
5. Open the grounds compartment,
add a cleaning tablet, close the
grounds compartment and confirm.
6. Place a container with a capacity of
1.0 l under the outlet system and
confirm.
The programme runs.
Duration: approx. 5 minutes
7. Empty the container and confirm.
The programme has finished. The
appliance is ready for use again.
8. Press the $/± button to exit the
programme.
calc’nClean
Duration: approx. 26 minutes
calc’nClean combines the functions
"Descale" and "Clean". If the two
programmes are due close together,
the appliance suggests this service
programme automatically.
The line at the bottom of the display
indicates in how many minutes the
water tank will need to be rinsed and
refilled with water, for example.
5. Empty, clean and re-connect the milk
container.
6. Open the grounds compartment,
add a cleaning tablet, close the
grounds compartment and confirm.
7. Remove the water filter (if present)
and confirm.
8. Fill the empty water tank with
lukewarm water up to the marking
"0.5 l". Release one descaling
tablet TZ80002 in the water.
9. Place a container with a capacity of
1.0 l under the outlet system and
confirm.
The programme runs.
Duration: approx. 19 minutes
Info: If there is not enough descaling
solution in the water tank, you will be
asked to: Refill with still water and
confirm.
10. Rinse out the water tank and (if
removed) re-insert the water filter.
11. Pour in fresh still water up to the
"max" marking and re-insert the
water tank.
The programme runs.
Duration: approx. 7 minutes
12. Empty the container and confirm.
13. Empty the drip tray and re-insert.
14. Empty, clean and re-connect the milk
container.
The programme has finished. The
appliance is ready for use again.
15. Press the $/± button to exit the
programme.
1. Press the $/± button to open the
menu.
2. Use the rotary selector to select
"calc’nClean".
3. Press the rotary selector to start the
programme.
The instructions in the display guide you
through the programme.
4. Empty the drip tray and re-insert.
32
Page 33

Trouble shooting en
3 Trouble shooting
Trouble shooting
Faults often have simple explanations.
Before calling the customer service,
attempt to correct the fault yourself.
Please read through the safety
information at the beginning of these
instructions.
Fault table
Problem Cause Remedial action
please refer to the fault table and
Coffee or milk froth quality varies considerably.
No hot water dispensed. The milk system or the intake
Build-up of limescale in the
appliance.
of the milk system is soiled.
Descale the appliance in accordance
with the instructions.
Clean the milk system or the intake.
~ "Cleaning the milk system"
on page 28
Too little or no milk froth. The milk system or the intake
of the milk system is soiled.
Clean the milk system or the intake.
~ "Cleaning the milk system"
on page 28
Unsuitable milk. Do not use milk that has already been
boiled. Use cold milk with a fat content
of at least 1.5%.
No intake of milk is performed
by the milk system.
The personally selected
per-cup quantity is not reached.
Coffee dispensing slows to a
trickle or stops completely
Build-up of limescale in the
appliance.
The milk system is incorrectly
assembled.
Incorrect connection sequence
for milk container and milk system.
Grinding level is too fine.
The ground coffee is too fine.
Heavy build-up of limescale in
the appliance.
Descale the appliance as described in
the instructions.
Correctly assemble all parts.
~ Fig. #
Connect the milk system to the outlet
system first, then connect the milk container.
Set a coarser grinding level.
Use coarser ground coffee.
Descale the appliance as described in
the instructions.
Air in the water filter. Immerse the water filter into water until
no more air bubbles escape; insert the
filter again.
No coffee flows out, only water. An empty bean container is not
detected by the appliance.
Pour in coffee beans
Note: The appliance will adjust to the
coffee beans upon the next dispensing
process.
The coffee shaft on the brewing
unit is blocked.
Clean the brewing unit. ~ "Cleaning
the brewing unit" on page 29
33
Page 34

en Trouble shooting
Coffee has no “crema”. Unsuitable type of coffee. Use a type of coffee with a higher pro-
The beans are no longer freshly
roasted.
The grinding level is not suitable for the coffee beans.
The coffee is too “acidic”. The grinding level is too coarse
The coffee is too “bitter”. The set grinding level is too fine
The coffee tastes “burnt”. The brewing temperature is too
The water filter does not stay in
position in the water tank.
The coffee grounds are not
compact and are too wet.
Water dripped onto the inner
floor of the appliance when the
drip tray was removed.
The drip tray cannot be
removed.
The outlet system cannot be
assembled or disassembled.
or the ground coffee is too
coarse.
Unsuitable type of coffee. Use a darker roast.
or the ground coffee is too fine.
Unsuitable type of coffee. Change the type of coffee.
high
The set grinding level is too fine
or the ground coffee is too fine.
Unsuitable type of coffee. Change the type of coffee.
The water filter is not mounted
correctly.
The set grinding level is too fine
or too coarse, or not enough
ground coffee has been used.
Drip tray removed too early. Wait a few seconds after the last drink
The coffee grounds container is
very full.
The coffee grounds slider
becomes stuck.
Incorrect sequence Connect the outlet system (with milk
portion of robusta beans.
Use fresh beans.
Set a finer grinding level.
Set a finer grinding level or use finer
ground coffee.
Set a coarser grinding level or use
coarser ground coffee.
Reduce the temperature.
~ "Adjusting beverage settings"
on page 18
Set a coarser grinding level or use
coarser ground coffee.
Immerse the water filter into water until
no more air bubbles escape; insert the
filter again.
Firmly press the water filter straight
down into the tank connection.
Set a coarser or finer grinding level or
use two level measuring spoons of
ground coffee.
was dispensed before removing the
drip tray.
Clean the interior of the brewing unit.
~ "Cleaning the brewing unit"
on page 29
Correctly insert the coffee grounds
slider.
system) first, then connect the milk system; alternatively, in the case of disassembly, first remove the milk container
and then remove the outlet system.
34
Page 35

Trouble shooting en
Display shows "Fill bean container". Display appears
Beans are not falling into the
grinding unit (beans too oily).
although the bean container
)B is already full, or the
grinder is not grinding any coffee beans.
Display shows "Empty drip tray"
despite the drip tray being
empty.
Display shows "Refill with still
water or remove filter"
Emptying is not detected when
the appliance is switched off.
The drip tray is soiled. Clean the drip tray thoroughly.
Water tank wrongly inserted. Insert water tank correctly.
Carbonated water in the water
tank.
Float is stuck in the water tank. Remove the water tank and clean thor-
New water filter not rinsed
according to the instructions.
Air in the water filter. Immerse the water filter in water until
Water filter is old. Insert a new water filter.
Display shows "Clean brewing
unit".
Brewing unit is soiled. Clean the brewing unit.
Too much ground coffee in the
brewing unit.
The brewing unit’s mechanism
is stiff.
If you are unable to solve the problem, always call the hotline.
You will find the telephone numbers at the back of these instructions
--------
Gently tap the bean container. Change
the type of coffee if necessary. When
the bean container is empty, wipe it
with a dry cloth.
When the appliance is switched on,
remove and re-insert the drip tray.
Fill the water tank with fresh tap water.
oughly.
Rinse the water filter according to the
instructions and then switch on.
no more air bubbles escape; insert the
filter again.
Clean the brewing unit. Add no more
than two level measuring spoons of
ground coffee.
Clean the brewing unit. ~ "Daily care
and cleaning" on page 27
35
Page 36

en Customer service
4 Customer service
Customer service
Technical data
Electrical connection (voltage – frequency) 220–240 V ∼, 50/60 Hz
Heater wattage 1500 W
Maximum static pump pressure 19 bar
Maximum volume capacity of the water tank (without filter) 2.3 l
Maximum volume capacity of the right/left bean container ≈ 200/235 g
Length of power cable 100 cm
Dimensions (H x W x D) 38.5 x 30.1 x 47.0 cm
Weight, empty 10–12 kg
Type of grinding unit Ceramic
E number and FD number
When calling us, please give the full
product number (E no.) and the
production number (FD no.) so that we
can provide you with the correct advice.
These numbers can be found on the
rating plate h. (~ Fig. ")
To save time, you can make a note of
the data for your appliance and the
telephone number for customer service
here, should this be required.
E no.
Customer service O
The contact data for customer service in
all countries can be found at the back of
these instructions.
FD
Number
Guarantee
The guarantee conditions for this
appliance are as defined by our
representative in the country in which it
is sold. Details regarding these
conditions can be obtained from the
dealer from whom the appliance was
purchased. The bill of sale or receipt
must be produced when making any
claim under the terms of this guarantee.
Changes reserved.
36
Page 37

Table des matières
frMode d’emploi
8 Utilisation conforme . . . . . . . . . 38
( Précautions de sécurité
importantes . . . . . . . . . . . . . . . .38
A Sécurité-enfants . . . . . . . . . . . . 55
Activation de la sécurité enfants . . . . 55
Désactivation de la sécurité enfants . 55
Q Réglages du menu . . . . . . . . . . 56
7 Protection de l'environnement .40
Économie d'énergie . . . . . . . . . . . . . 40
Elimination écologique . . . . . . . . . . . 40
Modifier les réglages. . . . . . . . . . . . . 56
Démarrage du programme « Filtre à
eau » ou « Protection contre le gel ». 58
fr
* Présentation de l'appareil . . . . .41
Contenu de l’emballage . . . . . . . . . . 41
Configuration et éléments. . . . . . . . . 41
Eléments de commande. . . . . . . . . . 42
_ Accessoires . . . . . . . . . . . . . . . . 43
K Avant la première utilisation. . . 44
Installation et raccordement de
l’appareil. . . . . . . . . . . . . . . . . . . . . . 44
Mise en service de l’appareil . . . . . . 44
1 Utilisation de l’appareil . . . . . . . 46
Sélection de la boisson . . . . . . . . . . 46
Préparer une boisson à base
de café en grains fraîchement
moulus . . . . . . . . . . . . . . . . . . . . . . . 47
Préparation d'une boisson à base de
café moulu . . . . . . . . . . . . . . . . . . . . 47
Préparation de boissons lactées . . . 48
Distribution d'eau chaude . . . . . . . . . 49
Ajustage des réglages des boissons 50
Régler le degré de mouture . . . . . . . 52
Chauffe-tasses . . . . . . . . . . . . . . . . . 53
P Personnalisation . . . . . . . . . . . . 54
Création d'un profil d’utilisateur . . . . 54
Édition ou suppression d'un profil
d'utilisateur . . . . . . . . . . . . . . . . . . . . 54
Enregistrement des boissons
individuelles . . . . . . . . . . . . . . . . . . . 55
D Entretien et nettoyage
quotidiens . . . . . . . . . . . . . . . . . 60
Nettoyants . . . . . . . . . . . . . . . . . . . . . 60
Nettoyage de l'appareil . . . . . . . . . . . 60
Nettoyage du système à lait . . . . . . . 61
Nettoyer l’unité de percolation. . . . . . 62
. Programme de service . . . . . . . 63
Rincer le système de lait . . . . . . . . . . 64
Détartrage . . . . . . . . . . . . . . . . . . . . . 64
Nettoyage . . . . . . . . . . . . . . . . . . . . . 65
calc’nClean . . . . . . . . . . . . . . . . . . . . 65
3 Anomalies, que faire ? . . . . . . . 66
4 Service après-vente . . . . . . . . . 69
Données techniques . . . . . . . . . . . . . 69
Numéro E et numéro FD . . . . . . . . . . 69
Garantie. . . . . . . . . . . . . . . . . . . . . . . 69
37
Page 38

fr Utilisation conforme
8 Utilisation conforme
Utilisation conforme
Contrôler l'état de l'appareil
après l'avoir déballé. Ne pas le
raccorder s'il présente des
avaries de transport.
Cet appareil est destiné à la
préparation de quantités
habituellement nécessaires
dans un foyer, ou dans des
applications non
professionnelles similaires à
celles d'un foyer. Les
applications similaires à celles
d'un foyer comprennent par
exemple l'utilisation dans les
coins-cuisine du personnel de
magasins, de bureaux,
d'entreprises agricoles et
autres entreprises
commerciales et industrielles,
ainsi que l'utilisation par les
clients de pensions, petits
hôtels et immeubles
d'habitation similaire.
( Précautions de
sécurité importantes
Précautions de sécurité importantes
Veuillez lire attentivement la
notice d’utilisation, suivre les
instructions qu’elle contient et
conserver la notice. Si l’appareil
change de propriétaire,
remettez-lui cette notice.
L'appareil peut être utilisé par
des enfants à partir de 8 ans et
par des personnes ayant des
capacités physiques,
sensorielles ou mentales
restreintes ou ayant un manque
d'expérience et/ou de
connaissances s'ils sont sous
surveillance ou ont été informés
de la manipulation sûre de
l'appareil et ont compris les
dangers qui en résultent. Il faut
maintenir les enfants de moins
de 8 ans à l’écart de l’appareil
et du cordon de branchement
et ne pas leur permettre
d’utiliser l’appareil. Ne jamais
permettre aux enfants de jouer
avec l’appareil. Le nettoyage et
l’entretien incombant à
l’utilisateur ne doivent pas être
effectués par des enfants sauf
s’ils ont 8 ans ou plus et sont
surveillés.
38
Page 39

Précautions de sécurité importantes fr
:Mise en garde
Risque d’électrocution !
■ L'appareil doit être raccordé
impérativement à une prise
de courant de sécurité
installée de manière
réglementaire. S'assurer
que le système à conducteur
de protection de l’installation
électrique de la maison est
conforme.
Risque d’électrocution !
■ Ne brancher et faire
fonctionner l’appareil que
conformément aux
indications figurant sur la
plaque signalétique. En cas
d'endommagement du
cordon d'alimentation
secteur, celui-ci doit être
remplacé par le service
après-vente.
Risque d’électrocution !
■ Ne l’utiliser que si le cordon
d’alimentation et l’appareil
ne présentent aucun dégât.
En cas de défaut,
débrancher immédiatement
la fiche secteur ou coupez la
tension du réseau.
Risque d’électrocution !
■ Pour éviter tous risques, les
réparations de l’appareil sont
réservées à notre service
après-vente.
Risque d’électrocution !
■ Ne plongez jamais l’appareil
ou le cordon d’alimentation
dans l’eau.
:Mise en garde
Danger par magnétisme !
L'appareil contient des aimants
permanents qui peuvent
exercer une influence sur les
implants électroniques tels que
les stimulateurs cardiaques ou
les pompes à insuline. Les
personnes portant des implants
électroniques sont priées de
rester à 10 cm de l'appareil et
des pièces suivantes, lors de
leur retrait : réservoir à lait,
système de lait, réservoir d'eau
et unité de percolation.
:Mise en garde
Risque d'étouffement !
Ne permettez jamais aux
enfants de jouer avec les
matériaux d’emballage. Rangez
les petites pièces de manière
sûre, elles pourraient être
avalées.
:Mise en garde
Risque de brûlures !
■ Le système à lait devient très
chaud. Après utilisation,
laisser refroidir avant de le
toucher.
Risque de brûlure !
■ Les surfaces (celle du
chauffe-tasses par ex.)
peuvent rester chaudes
pendant un certain temps
après l'utilisation de
l'appareil.
39
Page 40

fr Protection de l'environnement
:Mise en garde
Risque de blessure !
■ L’utilisation inappropriée de
l'appareil peut entraîner des
blessures.
Risque de blessure !
■ Ne pas glisser les doigts à
l’intérieur du broyeur.
7 Protection de
l'environnement
Protection de l'environnement
Économie d'énergie
■ Éteindre l'appareil quand celui-ci
n'est pas utilisé.
■ Régler l'intervalle d'arrêt
automatique sur la plus petite valeur.
■ Dans la mesure du possible, ne
jamais interrompre la distribution de
café ou de mousse de lait. Une
interruption conduit à une hausse de
la consommation énergétique et à
un remplissage accéléré des bacs
collecteurs.
■ Détartrer régulièrement l’appareil
pour prévenir les dépôts de tartre.
Les dépôts de tartre conduisent à
une hausse de la consommation
énergétique.
Elimination écologique
Eliminez l'emballage en
respectant l'environnement.
Cet appareil est marqué selon
la directive européenne
2012/19/UE relative aux
appareils électriques et
électroniques usagés (waste
electrical and electronic
equipment - WEEE).
La directive définit le cadre
pour une reprise et une
récupération des appareils
usagés applicables dans les
pays de la CE.
S’informer auprès du revendeur sur la
procédure actuelle de recyclage.
40
Page 41

Présentation de l'appareil fr
* Présentation de
l'appareil
Présentation de l'appareil
Ce chapitre vous offre un aperçu des
éléments livrés, de l'assemblage et des
composants de votre appareil. Il vous
fait également découvrir les différents
éléments de commande.
Remarque : Certains détails ou
certaines couleurs peuvent varier selon
le modèle d'appareil.
La notice d'utilisation décrit deux
variantes de l'appareil :
■ Appareil avec un réservoir pour café
en grains
■ Appareil avec deux réservoirs pour
café en grains
Comment utiliser ce mode d’emploi :
Vous pouvez déplier les pages de la
couverture de la notice d'utilisation. Les
illustrations comportent des numéros
auxquels renvoie la notice d'utilisation.
Exemple : ~ figure !
Contenu de l’emballage
~ Figure !
# Machine à expresso automatique
+ Réservoir à lait (récipient,
couvercle, tube de pompage,
tuyau de raccordement)
3 Cuillère doseuse
; Bandelette pour déterminer la
dureté de l’eau
C Notice d'utilisation
Configuration et éléments
~ Figure "
( Écran
0 Bandeau de commande
8 Sélecteur rotatif/start stop
(navigation possible en tournant le
sélecteur et en appuyant dessus)
@ Système d’écoulement (café, lait,
eau chaude) réglable en hauteur
H Réservoir à lait (récipient,
couvercle, tube de pompage,
tuyau de raccordement)
P Bac collecteur (bac à marc de
café, égouttoir)
X Cache de la chambre de
percolation
` Réservoir d'eau
h Plaque signalétique
)" Poignée encastrée du réservoir
d'eau
)* Chauffe-tasses
)2 Voyant à LED du chauffe-tasses
): Compartiment spécial poudre
(café moulu/pastille de nettoyage)
)B Réservoir à grains
)J Sélecteur rotatif pour régler le
degré de mouture
)R Couvercle préservateur d’arôme
)Z* Couvercle préservateur d’arôme
)b* Réservoir à grains
)j* Sélecteur rotatif pour régler le
degré de mouture
1"* Touches de sélection du réservoir
pour café en grains, éclairées
Selon le modèle :
Les éléments marqués d'une * ne sont
disponibles que sur le modèle doté de
deux réservoirs pour café en grains.
41
Page 42

fr Présentation de l'appareil
Eléments de commande
Touche Signification
on/off Mettre l'appareil sous et hors tension
! Personnalisation
" Intensité du café
milk Appuyer brièvement sur :
ml Volume de boisson en millilitres. ~ "Ajustage des réglages des boissons" à la page 50
# 2 boissons
$/± Réglages du menu/programmes de service
--------
L'appareil effectue automatiquement un rinçage lorsqu’il est mis en marche et arrêté.
L’appareil ne rince pas dans les cas suivants :
■ Il est encore chaud au moment de la mise en marche.
■ Vous n’avez pas prélevé de café avant de l’éteindre.
L'appareil est prêt à fonctionner lorsque les symboles de sélection des boissons sont allumés à l'écran et que la touche on/off brille.
L'appareil permet d'enregistrer et d'activer des réglages personnalisés pour les boissons à
base de café. ~ "Personnalisation" à la page 54
Réglage de l'intensité du café. ~ "Ajustage des réglages des boissons" à la page 50
Lait
Comme boisson ou ingrédient dans les mélanges spéciaux à base de café. ~ "Ajustage
des réglages des boissons" à la page 50
Maintenir enfoncée au moins 4 secondes :
Sécurité enfants ~ "Sécurité-enfants" à la page 55
Préparation simultanée de deux boissons. Placer les tasses l'une à côté de l'autre sous la
buse d'écoulement du café. ~ "Ajustage des réglages des boissons" à la page 50
Appuyer brièvement sur la touche $/± pour consulter les réglages du menu et les programmes de service. Appuyer à nouveau brièvement sur la touche $/± pour retourner au
choix des boissons. En cas d'absence de validation, l'appareil repasse automatiquement
au choix des boissons au bout de 10 secondes.
Remarque : Maintenir la touche $/± enfoncée au moins 5 secondes pour afficher direc-
tement les réglages du menu.
Touches de navigation
Pour se déplacer dans l'écran.
Les touches peuvent être réglées sur le « Mode Barista » dans les réglages du menu. Ces
réglages permettent de changer d'autres paramètres des boissons. ~ "Ajustage des
réglages des boissons" à la page 50
42
Page 43

Accessoires fr
Écran
L'écran ( affiche non seulement les
boissons sélectionnées, les réglages
effectués et les paramètres possibles,
mais aussi des messages concernant
l'état de fonctionnement.
Des informations supplémentaires
apparaissent également à l'écran. Elles
disparaissent automatiquement après
quelques instants ou si vous les validez
en appuyant sur la touche
correspondante.
L'écran peut également vous demander
de réaliser certaines opérations.
Les différentes étapes de ces
opérations s'affichent à l'écran.
Une fois que les opérations nécessaires
(« Remplir le réservoir d’eau » par ex.)
ont été effectuées, le message
correspondant disparaît de l’écran.
Sélecteur rotatif
Le sélecteur rotatif 8 possède
différentes fonctions.
■ Le tourner permet de se déplacer
dans l'écran et de modifier les
réglages.
■ Appuyer dessus permet de lancer la
préparation de boissons ou le
programme de service et de valider
la sélection.
■ Appuyer dessus pendant la
distribution de la boisson permet
d'interrompre la distribution.
_ Accessoires
Accessoires
Les accessoires suivants sont
disponibles dans le commerce ou
auprès du service après-vente :
Accessoires Référence
Com-
merce
Pastilles de nettoyage TZ80001 00311807
Pastilles de détartrage TZ80002 00576693
Filtre à eau TZ70003 00575491
Kit d'entretien TZ80004 00576330
Adaptateur pour
TZ90008 00577862
réservoir à lait
--------
Vous trouverez les coordonnées du
service après-vente dans chaque pays
sur les dernières pages de la présente
notice.
Service
après-vente
43
Page 44

fr Avant la première utilisation
K Avant la première
utilisation
Avant la première utilisation
Ce chapitre vous explique comment
mettre en service votre appareil. Avant
de pouvoir utiliser l'appareil, vous devez
procéder à quelques réglages.
Remarque : Utiliser l'appareil
uniquement dans des locaux hors gel.
Si l'appareil a été transporté ou
entreposé à des températures
inférieures à 0°C, vous devez attendre
au moins 3 heures avant de le mettre
en service.
Installation et raccordement de l’appareil
1. Retirer les films protecteurs.
2. Poser l'appareil sur une surface
plane, résistante à l'eau et pouvant
supporter son poids.
3. Raccorder la fiche secteur de
l'appareil à une prise femelle à
contacts de terre installée de
manière règlementaire.
Mise en service de l’appareil
Réglage de la langue
Remarques
■ La sélection de la langue apparaît
automatiquement lors de la première
mise en marche.
■ Vous pouvez modifier la langue à
tout moment. ~ "Réglages du
menu" à la page 56
1. Mettre l'appareil en marche en
appuyant sur la touche on/off.
La langue préréglée s’affiche à
l'écran.
2. Sélectionner la langue souhaitée à
l'aide du sélecteur rotatif.
3. Valider la sélection avec la touche
de navigation droite.
Le réglage est mémorisé.
Réglage de la dureté de l'eau
Le réglage correct de la dureté de l’eau
est important car il permet à l'appareil
d’indiquer le moment où un détartrage
est nécessaire. L’appareil a été préréglé
sur une dureté d’eau de 4.
La dureté de l'eau peut être déterminée
à l'aide de la bandelette de test fournie
ou être demandée à la compagnie
locale de distribution d'eau.
Dans le cas où un adoucisseur d’eau
est installé dans la maison, veuillez
choisir le réglage « Adoucisseur ».
1. Tremper brièvement la bande de test
fournie dans l'eau fraîche du robinet,
laisser égoutter, puis lire le résultat
au bout d'une minute.
2. Régler la dureté de l'eau mesurée à
l'aide du sélecteur rotatif.
3. Valider la sélection avec la touche
de navigation droite.
L'indication rappelant de remplir le
réservoir pour café en grains apparaît
brièvement.
4. Valider avec la touche de navigation
droite ou attendre quelques
secondes.
Remarques
■ Lors de la première utilisation de
l'appareil ou après un programme
de service ou encore après une
longue période d’inutilisation, la
première boisson servie n’a pas
encore développé son plein arôme.
Il ne faut donc pas la boire.
■ Après la mise en service de
l'appareil, plusieurs tasses doivent
avoir été préparées avant d’avoir
une « crème » fine et consistante.
■ La formation de gouttes d’eau sur
les fentes d’aération est normale en
cas d’utilisation prolongée.
44
Page 45

Avant la première utilisation fr
Le tableau ci-après présente les
équivalences entre les niveaux et les
différents degrés de dureté de l'eau :
Niveau Degré de dureté de l’eau
Allemagne (°dH) France (°fH)
1 1-7 1-13
2 8-14 14-25
3 15-21 26-38
4 22-30 39-54
Une modification ultérieure de la dureté
de l'eau est possible à tout moment.
~ "Réglages du menu" à la page 56
Remplir le réservoir pour café en grains
Cet appareil vous permet de préparer
des boissons à base de café en grains
ou de café moulu (mais pas de café
soluble).
1. Ouvrir le couvercle )R du réservoir
pour café en grains )B.
2. Y verser le café en grains.
3. Refermer le couvercle.
Remarques
■ Les grains de café sont fraîchement
moulus avant chaque percolation.
■ Ranger le café en grains dans un
endroit frais, à l'abri de l'air pour
conserver tout son arôme.
■ Vous pouvez laisser le café en
grains dans le réservoir pour café en
grains plusieurs jours sans que le
café ne perde son arôme. Il est en
revanche préférable de ne mettre le
café moulu que juste avant la
préparation de boissons.
~ "Préparation d'une boisson à
base de café moulu" à la page 47
Sur les modèles disposant de deux
réservoirs pour café en grains )B
, )b* vous avez la possibilité de mettre
une variété de café en grains différente
dans chaque réservoir. Sélectionner le
réservoir pour café en grains souhaité à
l'aide de la touche de sélection 1"*. La
LED du réservoir pour café en grains
sélectionné s'allume.
L'appareil mémorise pour chaque
boisson le dernier réservoir pour café
en grains à avoir été sélectionné. Il est
possible de modifier ce préréglage.
~ "Réglages du menu" à la page 56
Remplir le réservoir d’eau
Important : verser chaque jour de l'eau
fraîche non gazeuse dans le réservoir
d'eau. Avant de faire fonctionner
l'appareil, vérifier qu'il y a suffisamment
d'eau dans le réservoir.
1. Saisir la poignée encastrée )"
située sur le côté du réservoir
d'eau ` et inclinez légèrement le
réservoir d'eau sur le côté.
2. Retirer le réservoir d’eau par la
poignée.
3. Mettre en place le filtre à eau.
~ "Insertion ou renouvellement
d’un filtre à eau" à la page 58
4. Remplir le réservoir d’eau jusqu’au
repère « max ».
5. Replacer le réservoir d'eau dans le
support et le ramener dans sa
position initiale.
Le logo de la marque s’allume à l’écran.
L'appareil chauffe et effectue un
rinçage, un peu d’eau s’écoule du
système verseur.
L'appareil est prêt à fonctionner lorsque
les symboles de sélection des boissons
sont allumés à l'écran et que la
touche on/off brille.
45
Page 46

fr Utilisation de l’appareil
1 Utilisation de l’appareil
Utilisation de l’appareil
Vous apprendrez, dans ce chapitre,
comment préparer votre appareil pour
la préparation de boissons et comment
préparer des boissons chaudes. Vous
obtiendrez des informations sur
l'ajustage des réglages des boissons et
du degré de mouture.
Sélection de la boisson
■ Sélectionner la boisson souhaitée en
utilisant le sélecteur rotatif.
■ L'écran affiche le nom de la boisson
choisie, ainsi que les valeurs réglées
telles que l'intensité ou la taille de la
tasse.
■ La boisson sélectionnée peut être
préparée avec les valeurs
préréglées ou être adaptée
préalablement au goût individuel de
l’utilisateur. ~ "Ajustage des
réglages des boissons" à la page 50
■ Si aucune action n'est effectuée
dans la minute qui suit, l'appareil
quitte automatiquement le mode
réglage. Les réglages effectués sont
mémorisés automatiquement.
Café Crème
Cappuccino
Latte Macchiato
Café au lait
Mousse de lait
Fonction verseuse
(n'est pas disponible sur tous
les modèles)
Lait chaud
Vous avez le choix parmi les boissons
suivantes :
Espresso Macchiato
Ristretto
Expresso
Espresso Doppio
46
Eau chaude
--------
Remarque : Avec certains réglages, le
café est préparé en deux étapes
(« aromaDouble Shot »). Attendre que
l’opération soit entièrement terminée.
Conseil : Placer les tasses à l'endroit
sur le chauffe-tasses. Utiliser de
préférence de petites tasses expresso
aux parois épaisses.
~ "Chauffe-tasses" à la page 53
Page 47

Utilisation de l’appareil fr
Préparer une boisson à base de café en grains fraîchement moulus
Vous pouvez faire votre choix entre
Ristretto, Espresso Doppio, Expresso et
Café Crème. La préparation de
boissons à base de café et lait fait
l'objet d'un autre chapitre.
~ "Préparation de boissons lactées"
à la page 48
L’appareil est allumé. Le réservoir d'eau
et le réservoir pour café en grains sont
remplis.
1. Placer une tasse sous le système
verseur.
2. Sélectionner la boisson souhaitée en
utilisant le sélecteur rotatif.
L'écran affiche le nom de la boisson
choisie, ainsi que les valeurs réglées.
3. Pour modifier les réglages de la
boisson sélectionnée.
~ "Ajustage des réglages des
boissons" à la page 50
4. Appuyer sur le sélecteur rotatif pour
lancer la distribution de la boisson.
L'appareil effectue la percolation et le
café s’écoule ensuite dans la tasse.
Remarque : Appuyer à nouveau sur le
sélecteur rotatif pour interrompre la
distribution de la boisson.
Préparation d'une boisson à base de café moulu
Vous pouvez également mettre du café
moulu dans cet appareil. N'utilisez pas
de café soluble. La préparation de
boissons à base de café et lait fait
l'objet d'un autre chapitre.
~ "Préparation de boissons lactées"
à la page 48
L’appareil est allumé. Le réservoir d’eau
est rempli.
1. Placer une tasse sous le système
verseur.
2. Sélectionner la boisson souhaitée en
utilisant le sélecteur rotatif.
3. Appuyer sur la touche ".
4. Sélectionner « Café moulu » avec le
sélecteur rotatif.
5. Appuyer sur la touche ".
6. Retirer le couvercle préservateur
d’arôme )R du réservoir pour café
en grains )B et ouvrir le
compartiment spécial poudre ):.
7. Mettre du café moulu, ne pas tasser.
Verser au maximum 2 cuillères à
café rases.
Attention !
Ne jamais mettre de café en grains
ou de café soluble dans le
compartiment spécial poudre.
8. Refermer le compartiment spécial
poudre et le couvercle préservateur
d’arôme.
L'écran affiche le nom de la boisson
choisie, ainsi que les valeurs réglées.
9. Pour modifier les réglages de la
boisson sélectionnée.
~ "Ajustage des réglages des
boissons" à la page 50
10. Appuyer sur le sélecteur rotatif pour
lancer la distribution de la boisson.
L'appareil effectue la percolation et le
café s’écoule ensuite dans la tasse.
Remarques
■ Se servir d'un pinceau doux pour
pousser les restes de poudre
accumulés dans le compartiment
spécial poudre et les faire tomber
dans la cuve.
■ Appuyer à nouveau sur le sélecteur
rotatif pour interrompre la
distribution de la boisson.
■ Pour obtenir une autre boisson avec
du café moulu, répéter la procédure.
■ En cas de préparation avec du café
moulu, la fonction aromaDouble
Shot n'est pas disponible.
47
Page 48

fr Utilisation de l’appareil
Préparation de boissons lactées
Cet appareil possède un système de lait
intégré. Le système de lait vous permet
de préparer des boissons à base de
café avec lait ou mousse de lait et lait
chaud.
Vous avez le choix entre Expresso
Macchiato, Cappuccino,
Latte Macchiato et café au lait.
Remarques
■ Lors de la préparation de lait,
l'appareil peut émettre un sifflement.
Ces bruits résultent de la technique
utilisée et sont normaux.
■ Une fois secs, les résidus de lait
sont difficiles à nettoyer, il est donc
impératif de les nettoyer rapidement.
~ "Nettoyage du système à lait"
à la page 61
:Mise en garde
Risque de brûlure !
Le système de lait devient très chaud.
Après utilisation, laisser refroidir avant
de le toucher.
Utilisation du réservoir à lait
Le réservoir à lait H est conçu
spécialement pour être utilisé en
combinaison avec cet appareil. Destiné
uniquement à un usage domestique, il
sert à conserver le lait au réfrigérateur.
Important : le réservoir à lait ne peut
être raccordé que si le système de lait
équipé de l'adaptateur et du tuyau a été
monté dans le système verseur.
(~ Figure #)
4. Raccorder le réservoir à lait sur le
côté gauche de l'appareil. Le
réservoir à lait doit s'enclencher.
Boissons à base de café et lait
L’appareil est allumé. Le réservoir d'eau
et le réservoir pour café en grains sont
remplis.
Le réservoir à lait rempli est raccordé.
1. Placer une tasse ou un verre sous le
système verseur.
2. Sélectionner la boisson souhaitée en
utilisant le sélecteur rotatif.
L'écran affiche le nom de la boisson
choisie, ainsi que les valeurs réglées.
3. Pour modifier les réglages de la
boisson sélectionnée.
~ "Ajustage des réglages des
boissons" à la page 50
4. Appuyer sur le sélecteur rotatif pour
lancer la distribution de la boisson.
L'appareil verse tout d’abord le lait dans
la tasse ou le verre. Puis, l'appareil
effectue la percolation et le café
s’écoule dans la tasse ou le verre.
Remarque : Une pression sur le
sélecteur rotatif permet d'interrompre la
distribution du lait ou du café ; deux
pressions sur le sélecteur rotatif arrête
complètement la distribution de
boisson.
1. Pour retirer le couvercle, appuyer sur
le repère et enlever le couvercle.
(~ Figure ')
2. Remplir de lait.
3. Presser le couvercle sur le réservoir
à lait jusqu'à ce qu'il s'enclenche.
48
Page 49

Utilisation de l’appareil fr
Mousse de lait ou lait chaud
L’appareil est allumé. Le réservoir d’eau
est rempli.
Le réservoir à lait rempli est raccordé.
1. Placer une tasse ou un verre sous le
système verseur.
2. Sélectionner « Mousse de lait » ou
« Lait chaud » avec le sélecteur
rotatif.
L'écran affiche le nom de la boisson
choisie, ainsi que les valeurs réglées.
3. Pour modifier les réglages de la
boisson sélectionnée.
~ "Ajustage des réglages des
boissons" à la page 50
4. Appuyer sur le sélecteur rotatif pour
lancer la distribution de la boisson.
De la mousse de lait ou du lait chaud
s'écoule dans la tasse ou le verre.
Remarque : Appuyer à nouveau sur le
sélecteur rotatif pour interrompre la
distribution de la boisson.
Distribution d'eau chaude
Remarque : Avant de prendre de l'eau
chaude, nettoyer le système de lait et
retirer le réservoir à lait. Il est possible
que l'eau distribuée contienne un peu
de lait si le système de lait n'a pas été
nettoyé. ~ "Nettoyage du système à
lait" à la page 61
:Mise en garde
Risque de brûlure !
Le système verseur devient très chaud.
Après utilisation, laisser refroidir le
système verseur avant de le toucher.
L’appareil est allumé. Le réservoir d’eau
est rempli.
1. Placer une tasse sous le système
verseur.
2. Retirer le réservoir à lait s'il est
raccordé.
3. Sélectionner « Eau chaude » avec le
sélecteur rotatif.
4. Pour modifier les réglages de la
boisson sélectionnée.
~ "Ajustage des réglages des
boissons" à la page 50
5. Appuyer sur le sélecteur rotatif pour
lancer la distribution de la boisson.
De l'eau chaude s'écoule dans la tasse.
Remarque : Appuyer à nouveau sur le
sélecteur rotatif pour interrompre la
distribution de la boisson.
49
Page 50

fr Utilisation de l’appareil
Ajustage des réglages des boissons
selon la boisson choisie. Servez-vous
pour cela des touches suivantes et du
sélecteur rotatif :
Après avoir sélectionné une boisson,
vous pouvez ajuster diverses valeurs
Touche Fonction Sélection
" Sélectionner l'intensité du
café et le café moulu
■ très doux*
■ doux
■ doux +*
■ normal
■ normal +*
■ fort
■ fort +*
■ très fort
■ très fort +*
■ extra fort
■ aromaDouble Shot fort
■ aromaDouble Shot
fort +
■ aromaDouble Shot
fort ++*
■ Café moulu
milk Proportion lait/café Réglage de la part de lait en %
(uniquement pour les boissons à base de café et lait)
ml Taille de la tasse Ajustage de la quantité de ml en ml.
Non disponible pour Ristretto.
# Deux tasses à la fois Placer deux tasses sous la buse d'écoulement.
Touche de
navigation
gauche
Touche de
navigation
Température de l’eau* par ex. pour le thé :
■ > 70 °C (thé blanc)
■ > 80 °C (thé vert)
aromaIntense* ■ normal
■ intensif
■ > 85 °C (thé rooibos)
■ > 90 °C (thé noir)
■ > 97 °C (tisane aux
fruits)
■ intensif +
droite
* Seulement disponible en « mode Barista »
L'appareil est réglé par défaut sur le
« Mode barista ». Ce mode permet de
régler d'autres valeurs à l'aide des deux
touches de navigation. Il est également
possible de désactiver « Mode
Barista ». ~ "Réglages du menu"
à la page 56
Les réglages usine sont marqués en
bleu à l'écran. Les réglages actuels sont
rétroéclairés.
50
Régler l'intensité du café ou sélectionner le café moulu
Une boisson à base de café est
sélectionnée.
1. Appuyer sur la touche ".
2. Régler l'intensité du café ou
sélectionner le café moulu avec le
sélecteur rotatif.
3. Appuyer sur la touche " ou le
sélecteur rotatif pour valider.
Page 51

Utilisation de l’appareil fr
Fonction aromaDouble Shot
Plus la percolation du café dure
longtemps, plus les substances amères
et les arômes indésirables sont
prononcés. Cela a un effet négatif sur le
goût et rend le café moins digeste. Pour
éviter cela et obtenir tout de même un
café très fort, l'appareil dispose d'une
fonction spéciale appelée
aromaDouble Shot. Une fois que la
moitié de la quantité a été préparée,
l'appareil moud de nouveau du café et
effectue une percolation. Cela permet
de ne développer que les arômes
parfumés et très digestes du café.
Remarque : La fonction aromaDouble
Shot peut être sélectionnée pour toutes
les boissons à base de café sauf pour :
■ les boissons ne contenant que de
faibles quantités de café comme le
Ristretto ;
■ les petites quantités de café, par ex.
pour un réglage « Café au lait »
200 ml avec 90 % de lait (part de
café de 10 %) ;
■ Préparation avec du café moulu
Ajustage des proportions lait/café
Une boisson à base de café et lait a été
sélectionnée.
1. Appuyer sur la touche milk.
2. Régler la part de lait en % au moyen
du sélecteur rotatif.
Exemple : si la valeur est réglée sur
30 %, 30 % de lait et 70 % de café
sont versés.
3. Appuyer sur la touche milk ou le
sélecteur rotatif pour valider.
Sélectionner la taille de tasse
Une boisson est sélectionnée.
1. Appuyer sur la touche ml. La
quantité préréglée varie d'un type de
boisson à l'autre.
2. Sélectionner la quantité souhaitée de
ml en ml à l'aide du sélecteur rotatif.
3. Appuyer sur la touche ml ou le
sélecteur rotatif pour valider.
Remarques
■ Il est impossible de changer la
quantité pour le Ristretto.
■ La quantité versée peut varier en
fonction de la qualité du lait.
Préparation de deux tasses à la fois
Une boisson à base de café ou une
boisson à base de café et lait a été
sélectionnée.
1. Appuyer sur la touche #.
2. Placer à gauche et à droite sous le
système verseur deux tasses
préchauffées.
3. Appuyer sur le sélecteur rotatif pour
lancer la distribution de la boisson.
L'appareil effectue la percolation et la
boisson sélectionnée s'écoule ensuite
dans les deux tasses.
Remarques
■ La boisson est préparée en deux
étapes (deux cycles de mouture).
Attendre que l’opération soit
entièrement terminée.
■ Avec la sélection #, la fonction
aromaDouble Shot n'est pas
disponible.
51
Page 52

fr Utilisation de l’appareil
Ajustage de la température de la boisson
Seulement disponible en « Mode
Barista ». ~ "Réglages du menu"
à la page 56
Une boisson de votre choix est
sélectionnée.
1. Consulter le réglage de la
température avec la touche de
navigation gauche.
2. Au moyen du sélecteur rotatif, régler
la température désirée.
3. Appuyer sur la touche de navigation
gauche ou le sélecteur rotatif pour
valider.
Réglage de la fonction aromaIntense
Seulement disponible en « Mode
Barista ». ~ "Réglages du menu"
à la page 56
L'intensité de l'arôme d'une boisson à
base de café peut être ajustée en
fonction des goûts personnels à l'aide
du réglage aromaIntense. En cas de
prélèvement de lait, cette sélection n'a
aucun effet sur le lait chaud ou la
mousse de lait.
Une boisson à base de café est
sélectionnée.
Régler le degré de mouture
Cet appareil est équipé d'un moulin
réglable. Celui-ci permet de varier
individuellement le degré de mouture
du café.
:Mise en garde
Risque de blessure !
Ne pas glisser les doigts à l’intérieur du
broyeur.
Attention !
L'appareil risque d'être endommagé !
Ne modifier le réglage du degré de
mouture que pendant que le moulin
tourne !
Régler le degré de mouture à l'aide du
sélecteur rotatif )J, )j* lorsque le
moulin est en marche.
■ Degré de mouture fin : tourner dans
le sens inverse des aiguilles d’une
montre. (fig. a)
■ Degré de mouture grossier : tourner
dans le sens des aiguilles d’une
montre. (fig. b)
D E
1. Consulter le menu avec la touche de
navigation droite.
2. Procéder au réglage désiré à l'aide
du sélecteur rotatif.
3. Appuyer sur la touche de navigation
droite ou le sélecteur rotatif pour
valider.
52
Remarques
■ Le nouveau réglage n’est
perceptible qu’à partir de la seconde
tasse de café.
■ Pour les grains torréfiés de couleur
foncée, choisir un degré de mouture
plus fin, pour les grains torréfiés de
couleur claire, régler un degré de
mouture plus grossier.
Page 53

Chauffe-tasses
Attention !
Le chauffe-tasses est très chaud !
La machine à expresso automatique est
dotée d'un chauffe-tasses )*. Le
voyant à LED )2 du chauffe-tasses
s'allume quand le chauffe-tasses est
activé.
Conseil : Pour permettre un chauffage
optimal des tasses, les placer à l'endroit
sur le chauffe-tasses.
Remarque : Cette fonction peut être
activée ou désactivée dans les réglages
du menu. ~ "Réglages du menu"
à la page 56
Utilisation de l’appareil fr
53
Page 54

fr Personnalisation
P Personnalisation
Personnalisation
Le menu Personnalisation permet de
créer des profils d’utilisateurs. Des
boissons individuelles peuvent être
enregistrées avec leur nom dans les
profils d'utilisateurs.
Création d'un profil d’utilisateur
1. Appuyer sur la touche !. Le menu
apparaît alors.
2. Sélectionner un nouveau profil avec
le sélecteur rotatif.
3. Appuyer sur la touche de navigation
droite pour valider la sélection.
Il est maintenant possible de saisir le
nom de l'utilisateur.
4. Sélectionner les lettres souhaitées
en utilisant le sélecteur rotatif.
Appuyer le sélecteur rotatif pour
valider les lettres.
La lettre est alors enregistrée.
Une fois que le nom de l'utilisateur a été
entièrement saisi :
5. Appuyer sur la touche de navigation
droite pour enregistrer le nom de
l'utilisateur.
6. Sélectionner une image avec le
sélecteur rotatif.
7. Appuyer sur la touche de navigation
droite pour valider la sélection.
8. Sélectionner « Mode standard » ou
« Mode Barista » avec le sélecteur
rotatif.
9. Appuyer sur la touche de navigation
droite pour valider la sélection.
Le système demande votre
sélection.
10. Appuyer à nouveau sur la touche de
navigation droite pour enregistrer le
profil.
L'image du profil d'utilisateur
apparaît.
Il est possible d'enregistrer
immédiatement ensuite une boisson
individuelle pour l'utilisateur créé.
Enregistrer des boissons individuelles :
1. Appuyer sur le sélecteur rotatif.
« Éditer les boissons » apparaît à
l'écran.
2. Sélectionner la boisson souhaitée en
utilisant le sélecteur rotatif.
La boisson sélectionnée peut être
adaptée aux goûts personnels.
~ "Ajustage des réglages des
boissons" à la page 50
3. Appuyer sur le sélecteur rotatif.
Le système demande de valider la
sélection.
4. Appuyer sur la touche de navigation
droite pour valider la sélection.
5. Appuyer sur la touche !.
Les réglages son terminés.
L’appareil est de nouveau prêt à
fonctionner.
Remarque : Il est possible d'enregistrer
jusqu'à 10 boissons personnalisées
dans un profil.
Édition ou suppression d'un profil d'utilisateur
1. Appuyer sur la touche !. Le menu
apparaît alors.
2. Sélectionner le profil souhaité en
utilisant le sélecteur rotatif.
3. Appuyer sur la touche de navigation
gauche pour supprimer le profil.
- ou -
Appuyer sur la touche de navigation
droite pour éditer les réglages du
profil.
Modifier les réglages du profil comme
cela a été décrit précédemment.
~ "Création d'un profil d’utilisateur"
à la page 54
4. Appuyer sur la touche !.
L’appareil est de nouveau prêt à
fonctionner.
54
Page 55

Sécurité-enfants fr
Enregistrement des boissons individuelles
Une boisson venant d'être distribuée
peut être enregistrée, avec tous les
réglages personnalisés, dans un
nouveau profil ou dans un profil déjà
créé.
1. Maintenir la touche ! enfoncée au
moins 5 secondes.
S'il n'existe encore aucun profil
enregistré, un nouveau profil
apparaît alors.
2. Si des profils ont déjà été
enregistrés mais que la boisson
individuelle doit être enregistrée
dans un nouveau profil, sélectionner
un nouveau profil avec le sélecteur
rotatif.
- ou -
Si la boisson individuelle doit être
enregistrée dans un profil déjà
existant, sélectionner le profil
souhaité avec le sélecteur rotatif.
3. Appuyer sur le sélecteur rotatif pour
valider la sélection.
Si un nouveau profil est créé, saisir le
nom et sélectionner une image. Valider
les saisies.
S'il existe déjà un profil, le sélectionner
et enregistrer la boisson.
4. Appuyer sur la touche !.
L’appareil est de nouveau prêt à
fonctionner.
A Sécurité-enfants
Sécurité-enfants
Afin d’éviter que les enfants se brûlent
ou s’ébouillantent, il est possible de
verrouiller l'appareil.
Activation de la sécurité enfants
Maintenir la touche milk enfoncée au
moins 4 secondes.
Le message « Sécurité enfants activée »
apparaît à l’écran.
Une commande n'est alors plus
possible.
Désactivation de la sécurité enfants
Maintenir la touche milk enfoncée au
moins 4 secondes.
Le message « Sécurité enfants
désactivée » apparaît à l’écran.
L'appareil peut être commandé de la
manière habituelle.
Remarque : Pour quitter
automatiquement le menu, régler
« Quitter automatiquement le profil »
dans « Profil d'utilisateur ».
~ "Réglages du menu" à la page 56
55
Page 56

fr Réglages du menu
Q Réglages du menu
5. Appuyer sur la touche de navigation
en dessous de « Confirmer ».
Le réglage est mémorisé.
Réglages du menu
Le menu permet de modifier des
réglages, de consulter des informations
ou encore de lancer un programme.
6. Appuyer sur le touche $/± pour
quitter le menu.
La sélection des boissons apparaît
maintenant à l’écran.
Modifier les réglages
1. Maintenir la touche $/± enfoncée au
moins 5 secondes pour ouvrir le
menu.
Les différentes possibilités de
réglage apparaissent à l’écran.
2. Procéder au réglage désiré à l'aide
du sélecteur rotatif.
Le réglage actuel apparaît en
couleur à l'écran.
3. Appuyer sur la touche de navigation
en-dessous de « Sélectionner ».
4. Modifier le réglage à l'aide du
sélecteur rotatif.
Remarques
■ Il est possible de retourner au niveau
précédent en appuyant sur la touche
de navigation en dessous de
« Retour ».
■ Il est possible de retourner au niveau
précédent en appuyant sur la touche
de navigation en dessous de
« Annuler ».
■ Il est possible, à tout moment, de
quitter le menu. Pour cela, appuyer
sur la touche $/±.
■ Si aucune saisie n’est effectuée
dans les 2 minutes qui suivent, le
menu se referme automatiquement
sans enregistrer les réglages.
Les réglages suivants sont disponibles :
Réglages Réglages possibles Explication
Langue Différentes langues Réglage de la langue d'affichage des textes de
l'écran.
Dureté de l’eau ■ 1 (douce)
■ 2 (moyenne)
■ 3 (dure)
■ 4 (très dure)
■ Adoucisseur d’eau
Éteindre après 15 minutes
à
8 heures
Luminosité de l'écran Niveau 1 à niveau 10
Réglage par défaut 7
56
Réglage de la dureté de l'eau locale.
L’appareil a été préréglé sur une dureté d’eau
de 4 (très dure). Il est possible de demander la
dureté de l’eau auprès de la compagnie locale
de distribution d’eau.
Le réglage correct de la dureté de l’eau est
important car il permet à l'appareil d’indiquer le
moment où un détartrage est nécessaire.
Dans le cas où un adoucisseur d’eau est installé
dans la maison, veuillez choisir le réglage
« Adoucisseur ».
Réglage de la durée après laquelle l'appareil
s'éteint automatiquement une fois la dernière
préparation de boisson terminée.
Elle est réglée par défaut sur 30 minutes.
Réglage de la luminosité de l’écran
Page 57

Réglages du menu fr
Mode commande ■ Mode standard
■ Mode Barista
Le réglage « Mode Barista » permet de régler
directement à l'écran
■ la température en appuyant sur la touche de
navigation gauche ;
■ aromaIntense (vitesse de percolation) sur
un des 3 niveaux possibles en appuyant sur
la touche de navigation droite.
Info boisson Affiche le nombre de boissons préparées depuis la mise en service. Pour des rai-
sons techniques, le compteur n'est pas « à la tasse près ».
Réglages usine Réinitialiser l'appareil aux
réglages usine
Mode démonstration ■ allumé
■ éteint
Restaure tous les réglages de l'appareil tels
qu’ils étaient à la livraison.
Uniquement à des fins de présentation. Le
réglage « éteint » doit être activé pour le mode
normal. Le réglage n'est possible que les 3 premières minutes suivant la mise en marche de
l'appareil.
Réglages des boissons
Expresso / Température du café
Température de
l'eau chaude
Ordre café / lait ■ Lait en premier
■ 88 °C
■ 90 °C
■ 92 °C
■ 94 °C
■ 95 °C
■ 96 °C
■ > 70 °C
■ > 80 °C
■ > 85 °C
■ > 90 °C
■ > 97 °C
■ Café en premier
Réglage de la température pour les boissons à
base de café.
Le réglage s'applique à toutes les préparations.
Réglage de température de l'eau chaude.
Le réglage s'applique à toutes les préparations.
Réglage déterminant si le lait doit être versé en
premier ou si au contraire c'est le café qui doit
être percolé et versé en premier.
Profil d'utilisateur ■ Quitter automatiquement le
profil
■ Supprimer tous les profils
Chauffe-tasses ■ allumé
■ éteint
Réglage déterminant si l'appareil doit quitter
automatiquement le profil utilisateur ou si le profil doit être supprimé.
Le voyant à LED du chauffe-tasses s'allume
quand le chauffe-tasses est activé.
Réservoir à grains Réglage déterminant quel réservoir pour café en grains doit être activé automati-
quement.
Les touches de sélection « Réservoir à grains » permettent de sélectionner le
réservoir pour café en grains avant chaque distribution.
■ Réservoir standard à droite L'appareil repasse automatiquement au réser-
voir pour café en grains droit après chaque distribution.
57
Page 58

fr Réglages du menu
■ Réservoir standard à
gauche
■ Dernier réservoir à grains
sélectionné
--------
Démarrage du programme « Filtre à eau » ou « Protection contre le gel ».
1. Appuyer brièvement sur la
touche $/±.
2. Le sélecteur rotatif permet de
sélectionner le programme « Filtre à
eau » ou « Protection contre le gel ».
Le réglage actuel apparaît en
couleur à l'écran.
Remarque : Le sélecteur rotatif permet
également de sélectionner un
programme de service. ~ "Programme
de service" à la page 63
Filtre à eau
Un filtre à eau permet de prévenir les
dépôts de tartre, de réduire les
salissures dans l’eau et d’améliorer le
goût du café. Les filtres à eau sont
disponibles dans le commerce ou
peuvent être commandés auprès du
service après-vente. ~ "Accessoires"
à la page 43
Insertion ou renouvellement d’un filtre à eau
Un filtre à eau neuf doit être rincé avant
de pouvoir être utilisé.
1. Sélectionner « Filtre à eau » dans les
réglages du menu.
2. Sélectionner « insérer » ou
« renouveler » avec la touche de
navigation.
3. Enfoncer fermement le filtre à eau
dans le réservoir d'eau à l’aide de la
cuillère doseuse.
L'appareil repasse automatiquement au réservoir pour café en grains gauche après chaque
distribution.
L'appareil mémorise le dernier réservoir pour
café en grains à avoir été sélectionné.
4. Remplir le réservoir d’eau jusqu’au
repère « max ».
5. Placer un récipient d’une
contenance de 1,0 litre sous la buse
d’écoulement et valider.
L’eau coule à travers le filtre. Le filtre
est ainsi rincé.
6. Vider ensuite le réservoir.
L’appareil est de nouveau prêt à
fonctionner.
Remarques
■ Le rinçage du filtre active
automatiquement l'intervalle pour
l'indication de changement de filtre.
Une fois cet intervalle écoulé ou au
bout de 2 mois au plus tard, le filtre
n'est plus efficace. Il faut alors le
remplacer pour des raisons
d'hygiène et afin que l’appareil ne
s'entartre pas (risque
d'endommagement de l'appareil).
■ Si l'appareil n’a pas été utilisé durant
une période prolongée (vacances,
par ex.), rincer le filtre en place avant
d’utiliser à nouveau l'appareil. Pour
cela, préparer tout simplement une
tasse d’eau chaude.
58
Page 59

Retrait du filtre à eau
La fonction « Filtre à eau » est
désactivée si un nouveau filtre à eau
n'est pas installé.
1. Sélectionner « Filtre à eau » dans les
réglages du menu.
2. Sélectionner le réglage « Retirer » et
valider.
3. Retirer le filtre à eau du réservoir
d’eau.
4. Remettre en place le réservoir d'eau.
L’appareil est de nouveau prêt à
fonctionner.
Protection contre le gel
Programme de service visant à éviter
les dommages provoqués par le gel
durant le transport et le stockage. Lors
de ce programme, l'appareil est vidé
entièrement. Pour cela, l’appareil doit
être prêt à fonctionner et le réservoir
d'eau doit être rempli.
1. Appuyer sur le sélecteur rotatif pour
démarrer le programme.
2. Vider le réservoir d’eau et le remettre
en place, l'appareil est rincé.
3. Vider les bacs collecteurs et nettoyer
minutieusement l'appareil.
L'appareil peut maintenant être
transporté ou stocké.
Réglages du menu fr
59
Page 60

fr Entretien et nettoyage quotidiens
D Entretien et nettoyage
quotidiens
Entretien et nettoyage quotidiens
Si vous entretenez et nettoyez
soigneusement votre appareil, il restera
longtemps opérationnel. Ce chapitre
vous explique comment bien entretenir
et nettoyer votre appareil.
:Mise en garde
Risque d’électrocution !
Avant de nettoyer l’appareil, débrancher
la fiche secteur. Ne jamais plonger
l’appareil dans l’eau. Ne jamais utiliser
de nettoyeur à vapeur.
Nettoyants
Afin de ne pas endommager les
différentes surfaces par des nettoyants
inappropriés, veuillez respecter les
indications suivantes.
N'utilisez pas
■ de produits agressifs ou à récurer,
■ de détergent contenant de l’alcool
ou de l’alcool à brûler,
■ de tampons à récurer ni d'éponges à
dos récurant.
9
■ Toujours nettoyer immédiatement les
résidus de tartre, de café, de lait, de
produit nettoyant ou de solution
détartrante. Les surfaces situées
sous de tels résidus risquent de se
corroder.
Attention !
Certains composants de l'appareil ne
conviennent pas à un lavage en
lave-vaisselle.
~ Figure % - (
Ne conviennent pas au lave-vaisselle :
Cache de la chambre de percolation
Unité de percolation
Réservoir d'eau
Couvercle préservateur d’arôme
Conviennent au lave-vaisselle :
Égouttoir
Cuvette d'égouttage
Bac à marc de café
60 °C
max.
Racleur de marc de café, rouge
Cache de l'unité de percolation,
rouge
Cuillère doseuse
Système à lait, toutes les pièces
Réservoir à lait, toutes les pièces
9
Remarques
■ Les lavettes éponges neuves
peuvent contenir des sels. Les sels
peuvent conduire à une rouille
superficielle de l’inox. Avant d'utiliser
des lavettes éponges neuves, les
rincer soigneusement.
60
Nettoyage de l'appareil
1. Essuyer le corps de l'appareil avec
un chiffon doux et humide.
2. Nettoyer l'écran avec un chiffon en
microfibres.
3. Se servir d'un pinceau doux pour
pousser les restes de poudre
accumulés dans le compartiment
spécial poudre et les faire tomber
dans la cuve.
Page 61

Entretien et nettoyage quotidiens fr
Remarques
■ Si l'appareil est mis en marche à
froid ou arrêté après la distribution
de café, il se rince automatiquement.
L’appareil se nettoie donc de
lui-même.
■ Si l’appareil reste inutilisé pendant
une durée prolongée (par ex. durant
les vacances), nettoyer
soigneusement l’ensemble de
l’appareil, y compris le système de
lait et l'unité de percolation.
Nettoyer les bacs collecteurs et le bac à marc de café.
~ Figure %
Remarque : Vider et nettoyer tous les
jours les bacs collecteurs et le bac à
marc de café afin d’éviter la formation
de dépôts.
1. Retirer les bacs collecteurs avec le
bac à marc de café en tirant vers
l’avant.
2. Retirer l'égouttoir.
3. Vider et nettoyer les bacs collecteurs
et le bac à marc de café.
4. Essuyer l’intérieur de l'appareil (bacs
collecteurs).
Nettoyage du réservoir à lait
~ Figure '
Remarque : Pour des raisons
d’hygiène, le réservoir à lait doit être
nettoyé régulièrement.
1. Démonter les différentes pièces du
réservoir à lait.
2. Nettoyer toutes les pièces du
réservoir à lait ou les mettre au
lave-vaisselle.
Nettoyage du système à lait
Le système de lait est nettoyé
automatiquement par un bref jet de
vapeur, immédiatement près la
préparation d’une boisson à base de
lait.
:Mise en garde
Risque de brûlure !
Le système verseur devient très chaud.
Après utilisation, laisser refroidir le
système verseur avant de le toucher.
~ Figure #, ~ Figure &
Nettoyer toutes les semaines le système
de lait à la main ou plus souvent, si
besoin. Pour assurer un nettoyage
particulièrement minutieux, le système
de lait peut être, en outre, rincé à l’eau
courante. ~ "Rincer le système de lait"
à la page 64
Retirer le système de lait :
1. Retirer le réservoir à lait de
l'appareil.
2. Faire coulisser le système verseur
sur la position inférieure.
3. Presser le verrouillage en haut à
droite.
4. Rabattre le cache vers l'avant et le
retirer.
5. Retirer le système de lait et
démonter les différentes pièces.
6. Nettoyer les différentes pièces avec
de l'eau additionnée de produit à
vaisselle et un chiffon doux.
7. Rincer toutes les pièces à l'eau
claire et les laisser sécher.
Remarque : Tous les éléments du
système de lait conviennent à un lavage
en lave-vaisselle. Rincer soigneusement
tous les restes de produit à vaisselle
après le nettoyage.
Mettre en place le système de lait :
1. Assembler les différentes pièces du
système de lait.
2. Mettre en place le système de lait
dans le cache.
3. Positionner le cache en bas et le
faire pivoter vers le haut jusqu'à ce
qu'il s'enclenche.
61
Page 62

fr Entretien et nettoyage quotidiens
Nettoyer l’unité de percolation
~ Figure $, ~ Figure (
En plus du programme de nettoyage
automatique, il est recommandé de
retirer régulièrement l’unité de
percolation pour la nettoyer.
Attention !
Nettoyer l’unité de percolation sans
produit à vaisselle et ne pas la mettre
au lave-vaisselle.
Retirer l'unité de percolation :
1. Éteindre l’appareil.
2. Enlever le réservoir d'eau.
3. Rapprocher les deux verrouillages
coulissants l'un de l'autre et retirer le
cache.
4. Retirer le racleur (rouge) et le cache
de l'unité de percolation (rouge), les
nettoyer et les sécher.
5. Faire glisser vers la droite le verrou
rouge de l’unité de percolation.
6. Retirer l'unité de percolation avec
précaution et la rincer
soigneusement à l'eau courante.
7. Nettoyer soigneusement l’intérieur
de l’appareil avec un chiffon humide,
éliminer les éventuels restes de café.
8. Laisser sécher l’intérieur de l’unité
de percolation et de l'appareil.
Mettre en place l'unité de percolation :
1. Insérer l'unité de percolation dans
l'appareil, dans le sens de la flèche.
La flèche se situe sur la partie
supérieure de l'unité de percolation.
Partir d'en haut pour insérer l'unité
de percolation dans les rails de
guidage et faire glisser l'appareil.
2. Faire glisser vers la gauche le verrou
rouge situé au-dessus l’unité de
percolation.
3. Mettre en place le racleur (rouge) de
marc de café et le cache de l'unité
de percolation (rouge).
4. Mettre en place le cache et
l'enclencher.
5. Mettre en place le réservoir d’eau.
62
Page 63

Programme de service fr
. Programme de service
Programme de service
Périodiquement, en fonction de la
dureté de l'eau et de la fréquence
d’utilisation de l'appareil, l’écran affiche
à la place de la sélection de boisson,
un des messages suivants :
■ Rincer le système de lait
■ Effectuer immédiatement le
programme de détartrage !
■ Effectuer immédiatement le
programme de nettoyage !
■ Effectuer immédiatement le
programme calc'nClean !
L'appareil doit alors être nettoyé ou
détartré sans tarder avec le programme
correspondant. Les opérations de
détartrage et de nettoyage peuvent être
effectuées de manière combinée à
l’aide de la fonction Calc’nClean.
L'appareil risque d’être endommagé si
le programme de service n’est pas
réalisé conformément aux instructions.
Les programmes de service peuvent
aussi être lancés à tout moment à
l'écran sans que l'appareil ne le
demande. Appuyer sur la touche $/±,
sélectionner le programme désiré et
l'exécuter.
Remarques
■ Important : si l'appareil n'est pas
détartré à temps, le message
« Détartrage nécessaire, l'appareil
sera bientôt bloqué » apparaît.
Effectuer le processus de détartrage
immédiatement après l'apparition de
la consigne. Si l'appareil est
verrouillé, il peut être réutilisé une
fois le processus de détartrage
terminé.
■ Ne jamais boire les liquides.
■ Pour le détartrage, ne jamais utiliser
de vinaigre, de produit à base de
vinaigre, d’acide citrique ou de
produit à base d’acide citrique.
■ Pour le détartrage et le nettoyage,
utiliser exclusivement les pastilles
adaptées. Elles ont été conçues
spécialement pour cet appareil et
peuvent être achetées auprès du
service après-vente.
~ "Accessoires" à la page 43
■ Ne jamais mettre de pastilles de
détartrage ou d'autres produits dans
le compartiment spécial poudre.
■ Ne jamais interrompre le programme
de service.
■ Retirer l'unité de percolation, la
nettoyer et la remettre en place
avant de lancer le programme de
service. Rincer le système de lait.
■ Une fois le programme de service
terminé, essuyer l‘appareil avec un
chiffon doux et humide pour éliminer
immédiatement les résidus de
solution détartrante. Les surfaces
situées sous de tels résidus risquent
de se corroder.
■ Les lavettes éponges neuves
peuvent contenir des sels. Les sels
peuvent conduire à une rouille
superficielle de l’inox ; un rinçage
méticuleux est par conséquent
indispensable avant l’emploi.
■ Si l’un des programmes de service a
été interrompu, par ex. par une
coupure de courant, procéder
comme suit :
1. Rincer le réservoir d’eau.
2. Remplir d'eau non gazeuse jusqu'au
repère « max » et valider.
Le programme démarre et l'appareil
est rincé. Durée : 2 minutes env.
3. Vider les bacs collecteurs et les
remettre en place.
4. Vider le réservoir à lait, le nettoyer et
le remettre en place.
Le programme est terminé.
L’appareil est de nouveau prêt à
fonctionner.
5. Appuyer sur le touche $/± pour
quitter le programme.
63
Page 64

fr Programme de service
Rincer le système de lait
Le système de lait est nettoyé
automatiquement par un bref jet de
vapeur, immédiatement près la
préparation d’une boisson à base de
lait.
Pour assurer un nettoyage
particulièrement minutieux, le système
de lait peut être, en outre, rincé à l’eau
courante.
Durée : 2 minutes env.
1. Appuyer sur la touche $/± pour
ouvrir le menu.
2. Sélectionner « Rincer le système de
lait » à l'aide du sélecteur rotatif.
3. Appuyer sur le sélecteur rotatif pour
démarrer le programme.
4. Vider le réservoir à lait, le nettoyer et
le raccorder.
5. Placer un verre vide sous le système
verseur et valider.
Le programme est en cours.
6. Vider le réservoir à lait, le nettoyer et
le raccorder.
7. Vider le verre.
Le programme est terminé. L’appareil
est de nouveau prêt à fonctionner.
8. Appuyer sur le touche $/± pour
quitter le programme.
De plus, nettoyer régulièrement et très
soigneusement le système de lait à la
main. ~ "Nettoyage du système à lait"
à la page 61
Détartrage
Durée : 21 minutes env.
La ligne en bas de l'écran indique dans
combien de minutes le réservoir d'eau
par ex. doit être rincé et rempli d'eau.
3. Appuyer sur le sélecteur rotatif pour
démarrer le programme.
Les instructions à l'écran vous guident
tout au long du programme.
4. Vider les bacs collecteurs et les
remettre en place.
5. Vider le réservoir à lait, le nettoyer et
le raccorder.
6. Le cas échéant, retirer le filtre à eau
et valider.
7. Remplir d'eau tiède le réservoir
d’eau vide jusqu’au repère « 0,5 l ».
Y faire se dissoudre 1 pastille de
détartrage TZ80002.
8. Placer un récipient d’une
contenance de 1,0 litre sous la buse
d’écoulement et valider.
9. Appuyer sur le sélecteur rotatif.
Le programme est en cours.
Durée : 19 minutes env.
Information : si la solution de
détartrage se trouvant dans le réservoir
d’eau est insuffisante, un message
correspondant est émis. Remplir d'eau
non gazeuse et valider.
10. Rincer le réservoir d’eau et remettre
le filtre à eau en place (s’il a été
préalablement retiré).
11. Remplir d'eau fraîche non gazeuse
jusqu'au repère « max » et remettre
en place le réservoir d'eau.
Le programme est en cours.
Durée : 2 minutes env.
12. Vider le réservoir et valider.
13. Vider les bacs collecteurs et les
remettre en place.
14. Vider le réservoir à lait, le nettoyer et
le raccorder.
Le programme est terminé. L’appareil
est de nouveau prêt à fonctionner.
15. Appuyer sur le touche $/± pour
quitter le programme.
1. Appuyer sur la touche $/± pour
ouvrir le menu.
2. Sélectionner « Détartrer » avec le
sélecteur rotatif.
64
Page 65

Programme de service fr
Nettoyage
Durée : 6 minutes env.
1. Appuyer sur la touche $/± pour
ouvrir le menu.
2. Sélectionner « Nettoyer » avec le
sélecteur rotatif.
3. Appuyer sur le sélecteur rotatif pour
démarrer le programme.
Les instructions à l'écran vous guident
tout au long du programme.
4. Vider les bacs collecteurs et les
remettre en place.
5. Ouvrir le compartiment spécial
poudre, y mettre une pastille de
nettoyage et valider.
6. Placer un récipient d’une
contenance de 1,0 litre sous la buse
d’écoulement et valider.
Le programme est en cours.
Durée : 5 minutes env.
7. Vider le réservoir et valider.
Le programme est terminé. L’appareil
est de nouveau prêt à fonctionner.
8. Appuyer sur le touche $/± pour
quitter le programme.
calc’nClean
Durée : 26 minutes env.
Le programme calc’n’Clean combine
les fonctions individuelles « Détartrer »
et « Nettoyer ». Si les échéances de
chaque programme sont proches l’une
de l’autre, l'appareil propose
automatiquement ce programme de
service.
La ligne en bas de l'écran indique dans
combien de minutes le réservoir d'eau
par ex. doit être rincé et rempli d'eau.
4. Vider les bacs collecteurs et les
remettre en place.
5. Vider le réservoir à lait, le nettoyer et
le raccorder.
6. Ouvrir le compartiment spécial
poudre, y mettre une pastille de
nettoyage et valider.
7. Le cas échéant, retirer le filtre à eau
et valider.
8. Remplir d'eau tiède le réservoir
d’eau vide jusqu’au repère « 0,5 l ».
Y faire se dissoudre 1 pastille de
détartrage TZ80002.
9. Placer un récipient d’une
contenance de 1,0 litre sous la buse
d’écoulement et valider.
Le programme est en cours.
Durée : 19 minutes env.
Information : si la solution de
détartrage se trouvant dans le réservoir
d’eau est insuffisante, un message
correspondant est émis. Remplir d'eau
non gazeuse et valider.
10. Rincer le réservoir d’eau et remettre
le filtre à eau en place (s’il a été
préalablement retiré).
11. Remplir d'eau fraîche non gazeuse
jusqu'au repère « max » et remettre
en place le réservoir d'eau.
Le programme est en cours.
Durée : 7 minutes env.
12. Vider le réservoir et valider.
13. Vider les bacs collecteurs et les
remettre en place.
14. Vider le réservoir à lait, le nettoyer et
le raccorder.
Le programme est terminé. L’appareil
est de nouveau prêt à fonctionner.
15. Appuyer sur le touche $/± pour
quitter le programme.
1. Appuyer sur la touche $/± pour
ouvrir le menu.
2. Sélectionner « calc'Clean » avec le
sélecteur rotatif.
3. Appuyer sur le sélecteur rotatif pour
démarrer le programme.
Les instructions à l'écran vous guident
tout au long du programme.
65
Page 66

fr Anomalies, que faire ?
3 Anomalies, que faire ?
vous-même à la panne à l'aide du
tableau.
veuillez essayer de remédier par
Anomalies, que faire ?
Une anomalie de fonctionnement n'est
souvent due qu'à un problème simple.
Avant d'appeler le service après-vente,
Veuillez lire les consignes de sécurité
figurant au début de la présente notice.
Tableau de dérangements
Problème Cause Solution
Qualité de la mousse de café ou
de lait très variable.
Impossible de prélever de l’eau
chaude.
L'appareil est entartré. Détartrer l'appareil en suivant les ins-
tructions.
Le système de lait ou son support est encrassé.
Nettoyer le système de lait ou son support. ~ "Nettoyage du système à lait"
à la page 61
Trop peu ou pas de mousse de
lait.
Le système de lait ou son support est encrassé.
Nettoyer le système de lait ou son support. ~ "Nettoyage du système à lait"
à la page 61
Le lait ne convient pas. Ne pas utiliser du lait déjà chaud. Utili-
ser de préférence du lait froid avec au
minimum 1,5 % de matières grasses.
L'appareil est entartré. Détartrer l'appareil en suivant la notice.
Le système de lait n'aspire pas
de lait.
Le système de lait n’est pas
correctement monté.
Raccordement réservoir à lait
et système de lait effectué dans
Remonter correctement toutes les
pièces. ~ Figure #
Raccorder tout d'abord le système de
lait, puis le réservoir à lait.
le mauvais ordre.
L'appareil n'a pas versé la
quantité réglée pour la tasse, le
café ne coule que goutte à
goutte ou ne coule plus.
La mouture est trop fine.
Le café moulu est trop fin.
L'appareil est fortement entar-
Régler un degré de mouture plus grossier.
Utiliser un café moulu plus grossier.
Détartrer l'appareil en suivant la notice.
tré.
De l'air se trouve dans le filtre à
eau.
Plonger le filtre à eau dans l'eau
jusqu'à ce que plus aucune bulle ne se
dégage et remettre le filtre en place.
De l'eau coule mais pas de
café.
L'appareil ne détecte pas que
le réservoir pour café en grains
est vide.
Remplir de café en grains
Remarque : l'appareil se réglera sur le
café en grains lors des prochaines distributions.
La cuve à café de l'unité de percolation est obstruée.
Nettoyer l'unité de percolation.
~ "Nettoyer l’unité de percolation"
à la page 62
66
Page 67

Anomalies, que faire ? fr
Le café ne présente pas de
« crème ».
Le café est trop « acide ». La mouture n’est pas assez fine
Le café est trop « amer ». La mouture est trop fine ou le
Le café a un goût de « brûlé ». Température de percolation
Le filtre à eau ne tient pas dans
le réservoir d’eau.
Le marc de café n’est pas compact et il est trop humide.
Présence d’eau sur le fond
interne de l'appareil une fois
que l’on a retiré les bacs collecteurs.
Impossible de retirer les bacs
collecteurs.
Impossible de monter ou de
démonter le système verseur.
Variété de café inadéquate. Utiliser un café avec une proportion
Les grains ne sont pas fraîchement torréfiés.
Le degré de mouture n’est pas
adapté aux grains de café.
ou bien le café moulu est trop
grossier.
Variété de café inadéquate. Utiliser un café torréfié plus foncé.
café moulu est trop fin.
Variété de café inadéquate. Changer de variété de café.
trop élevée
La mouture est trop fine ou le
café moulu est trop fin.
Variété de café inadéquate. Changer de variété de café.
Le filtre d’eau n’est pas correc-
tement fixé.
La mouture est trop fine ou trop
grossière ou bien la quantité de
café moulu utilisée est insuffisante.
Cuvette d'égouttage retirée
trop tôt.
Le bac à marc de café est extrêmement plein.
Le racleur de marc de café est
coincé.
Mauvais ordre Raccorder tout d'abord le système ver-
plus importante de Robusta.
Utiliser des grains frais.
Régler un degré de mouture plus fin.
Régler un degré de mouture plus fin ou
utiliser un café moulu plus fin.
Régler un degré de mouture moins fin
ou utiliser un café moulu moins fin.
Réduire la température. ~ "Ajustage
des réglages des boissons"
à la page 50
Régler un degré de mouture moins fin
ou utiliser un café moulu moins fin.
Plonger le filtre à eau dans l'eau
jusqu'à ce que plus aucune bulle ne se
dégage et remettre le filtre en place.
Placer le filtre d’eau bien droit et
appuyer fortement pour l’enfoncer
dans le raccordement au réservoir.
Régler un degré de mouture moins fin
ou moins grossier ou utiliser 2 cuillères
rases de café moulu.
Retirer les bacs collecteurs quelques
secondes après la distribution de la
dernière boisson.
Nettoyer l'intérieur de l'unité de percolation. ~ "Nettoyer l’unité de
percolation" à la page 62
Positionner correctement le racleur de
marc de café.
seur (ou système de lait), puis le réservoir à lait. Pour le démontage, retirer
tout d'abord le réservoir à lait, puis le
système verseur.
67
Page 68

fr Anomalies, que faire ?
Affichage à l’écran « Remplir le
bac à café ». Alors que le réservoir pour café en grains )B
est plein ou que le moulin ne
parvient pas à moudre les
Les grains ne tombent pas
dans le moulin (grains trop
gras).
Taper légèrement sur le réservoir pour
café en grains. Changer éventuellement de variété de café. Une fois le
réservoir pour café en grains vidé,
l'essuyer avec un chiffon sec.
grains.
Le message « Vider les bacs
collecteurs » apparaît à l'écran
alors que les bacs collecteurs
sont vides.
Lorsque l'appareil est éteint,
l'opération de vidage n'est pas
détectée.
Une fois l'appareil allumé, retirer les
bacs collecteurs et les remettre en
place.
Les bacs collecteurs sont sales. Nettoyer soigneusement les bacs col-
lecteurs.
Affichage à l'écran « Veuillez
remplir avec de l'eau non
gazeuse » ou « « Retirer le
filtre »
Le réservoir d'eau est mal
inséré.
Le réservoir d'eau contient de
l'eau gazeuse.
Le flotteur qui se trouve dans le
réservoir d'eau est grippé.
Le filtre à eau neuf n'a pas été
rincé conformément aux ins-
Mettre le réservoir d'eau correctement
en place.
Remplir le réservoir d'eau avec de l'eau
fraîche du robinet.
Retirer le réservoir d'eau et le nettoyer
minutieusement.
Rincer le filtre à eau conformément aux
instructions et le remettre en service.
tructions.
De l'air se trouve dans le filtre à
eau.
Plonger le filtre à eau dans l'eau
jusqu'à ce que plus aucune bulle ne se
dégage et remettre le filtre en place.
Le filtre à eau est trop vieux. Mettre en place un nouveau filtre à
eau.
Affichage à l’écran « Nettoyer
l’unité de percolation ».
L'unité de percolation est
encrassée.
Il y a trop de café dans l'unité
de percolation.
Nettoyer l'unité de percolation.
Nettoyer l'unité de percolation. Mettre
au maximum 2 cuillères rases de café
moulu.
Le mécanisme de l’unité de
percolation ne fonctionne pas
aisément.
Nettoyer l'unité de percolation.
~ "Entretien et nettoyage quotidiens"
à la page 60
Appeler impérativement la hotline si les problèmes ne peuvent pas être résolus !
Les numéros de téléphone se trouvent aux dernières pages de la notice.
--------
68
Page 69

Service après-vente fr
4 Service après-vente
Service après-vente
Données techniques
Raccordement électrique (tension – fréquence) 220 – 240 V ~, 50/60 Hz
Puissance de chauffe 1 500 W
Pression statique maximale de la pompe 19 bar
Contenance maximale du réservoir d’eau (sans filtre) 2,3 l
Contenance maximal du réservoir pour café en grains droit/gauche ≈ 200/235 g
Longueur du cordon d’alimentation 100 cm
Dimensions (h x l x p) 38,5 x 30,1 x 47,0 cm
Poids, à vide 10 – 12 kg
Type de moulin Céramique
Numéro E et numéro FD
Lors de votre appel, veuillez indiquer le
numéro de produit (E-Nr.) complet et le
numéro de fabrication (FD-Nr.), afin de
nous permettre de mieux vous aider.
Vous trouverez ces numéros sur la
plaque signalétique h. (~ Figure ")
Vous pouvez inscrire ici les données de
votre appareil et le numéro de
téléphone du service après-vente pour
éviter d'avoir à les rechercher en cas de
besoin.
E-Nr.
Service après-vente
O
Vous trouverez les coordonnées du
service après-vente dans chaque pays
sur les dernières pages de la présente
notice.
FD-Nr.
Garantie
Les conditions de garantie applicables
sont celles publiées par notre
distributeur dans le pays où a été
effectué l’achat. Le revendeur chez qui
vous vous êtes procuré l’appareil
fournira les modalités de garantie sur
simple demande de votre part. En cas
de recours en garantie, veuillez toujours
vous munir de la preuve d’achat.
Sous réserve de modifi cations.
69
Page 70

nl
Inhoudsopgave
nlGebruiksaanwijzing
8 Gebruik volgens de
voorschriften. . . . . . . . . . . . . . . 71
( Belangrijke
veiligheidsvoorschriften . . . . . 71
7 Milieubescherming . . . . . . . . . . 73
Energiebesparing . . . . . . . . . . . . . . .73
Milieuvriendelijk afvoeren. . . . . . . . . . 73
* Het apparaat leren kennen. . . . 73
Standaarduitvoering. . . . . . . . . . . . . .73
Montage en onderdelen. . . . . . . . . . .74
Bedieningselementen . . . . . . . . . . . .74
_ Toebehoren . . . . . . . . . . . . . . . . 75
K Voor het eerste gebruik . . . . . . 76
Apparaat installeren en aansluiten. . . 76
Apparaat in gebruik nemen . . . . . . . .76
1 Apparaat bedienen . . . . . . . . . . 78
Drank selecteren . . . . . . . . . . . . . . . .78
Koffiedrank van versgemalen bonen
zetten. . . . . . . . . . . . . . . . . . . . . . . . .79
Koffiedrank klaarmaken met
behulp van de koffiepoeder. . . . . . . .79
Dranken met melk bereiden . . . . . . .80
Warm water afnemen. . . . . . . . . . . . .81
Drankinstellingen aanpassen. . . . . . .82
Instellen van de maalfijnheid . . . . . . .84
Kopjeswarmer . . . . . . . . . . . . . . . . . .84
Q Menu-instellingen. . . . . . . . . . . .87
Instellingen veranderen . . . . . . . . . . 87
Programma "Waterfilter" of
"Vorstbeveiliging" starten . . . . . . . . . 89
D Dagelijks onderhoud en
reiniging . . . . . . . . . . . . . . . . . . .91
Schoonmaakmiddelen . . . . . . . . . . . 91
Apparaat reinigen. . . . . . . . . . . . . . . 92
Melksysteem reinigen. . . . . . . . . . . . 92
Zetgroep reinigen. . . . . . . . . . . . . . . 93
. Serviceprogramma's . . . . . . . . .94
Melksysteem spoelen. . . . . . . . . . . . 95
Ontkalken . . . . . . . . . . . . . . . . . . . . . 95
Reinigen . . . . . . . . . . . . . . . . . . . . . . 96
calc’nClean. . . . . . . . . . . . . . . . . . . . 96
3 Wat te doen bij storingen? . . . .97
4 Servicedienst . . . . . . . . . . . . . .100
Technische gegevens. . . . . . . . . . . 100
E-nummer en FD-nummer . . . . . . . 100
Garantievoorwaarden . . . . . . . . . . . 100
P Personalisering. . . . . . . . . . . . . 85
Gebruikersprofiel aanmaken . . . . . . .85
Gebruikersprofiel bewerken of
wissen . . . . . . . . . . . . . . . . . . . . . . . .85
Individuele dranken opslaan: . . . . . . . 86
A Kinderslot . . . . . . . . . . . . . . . . . 86
Kinderslot activeren . . . . . . . . . . . . . .86
Kinderslot deactiveren . . . . . . . . . . . .86
70
Page 71

Gebruik volgens de voorschriften nl
8 Gebruik volgens de
voorschriften
Gebruik volgens de voorschriften
Controleer het apparaat na het
uitpakken. Niet aansluiten in
geval van transportschade.
Dit apparaat is bedoeld voor
hoeveelheden die gebruikelijk
zijn in het huishouden en voor
huishoudelijke en
gelijksoortige, niet-zakelijke
toepassingen. Bij gelijksoortige
toepassingen gaat het bijv. om
gebruik in kantines van winkels,
kantoren, agrarische en
industriële bedrijven, en het
gebruik door gasten van
pensions, kleine hotels en
overeenkomstige
woonvoorzieningen.
( Belangrijke
veiligheidsvoorschrifte
n
Belangrijke veiligheidsvoorschriften
Lees de gebruiksaanwijzing
zorgvuldig door, houd u eraan
en bewaar hem goed. Geeft u
het apparaat door aan derden,
voeg deze gebruiksaanwijzing
er dan bij.
Dit apparaat kan worden
bediend door kinderen vanaf 8
jaar en door personen met
fysieke, sensorische of
geestelijke beperkingen of met
gebrekkige ervaring en/of
kennis, indien zij onder toezicht
staan of zijn geïnstrueerd in het
veilige gebruik van het
apparaat en de daaruit
resulterende gevaren hebben
begrepen. Kinderen jonger dan
8 jaar dienen uit de buurt van
het apparaat en het
aansluitsnoer te worden
gehouden en mogen het
apparaat niet bedienen.
Kinderen mogen niet met het
apparaat spelen. Reiniging en
gebruikersonderhoud mogen
niet door kinderen worden
uitgevoerd, tenzij de kinderen 8
jaar of ouder zijn en zij deze
werkzaamheden onder toezicht
uitvoeren.
71
Page 72

nl Belangrijke veiligheidsvoorschriften
:Waarschuwing
Risico van een elektrische schok!
■ Het apparaat mag uitsluitend
via een conform de
voorschriften geïnstalleerd
stopcontact met randaarde
op het stroomnet worden
aangesloten. Overtuig u
ervan dat het
randaardesysteem van de
elektrische huisinstallatie
conform de
elektrotechnische
voorschriften is geïnstalleerd.
Risico van een elektrische schok!
■ Het apparaat uitsluitend
aansluiten en gebruiken
volgens de gegevens op het
typeplaatje. Wanneer de
netaansluiting van dit
apparaat wordt beschadigd,
moet dit door de
servicedienst worden
vervangen.
Risico van een elektrische schok!
■ Gebruik het apparaat
uitsluitend indien
aansluitsnoer en apparaat
geen beschadigingen
vertonen. Trek bij storingen
direct de stekker uit het
stopcontact of schakel de
netspanning uit.
Risico van een elektrische schok!
■ Om gevaren te voorkomen
mogen reparaties aan het
apparaat uitsluitend worden
uitgevoerd door onze
klantenservice.
Risico van een elektrische schok!
■ Het apparaat en het
aansluitsnoer nooit
onderdompelen in water.
:Waarschuwing
Gevaar door magnetisme!
Het apparaat bevat
permanentmagneten die
elektronische implantaten,
zoals pacemakers of
insulinepompen, kunnen
beïnvloeden. Dragers van
elektronische implantaten
dienen een minimumafstand
van 10 cm tot het apparaat en
bij het wegnemen to de
volgende delen aan te houden:
melkreservoir, melksysteem,
watertank en zetgroep.
:Waarschuwing
Kans op stikken!
Laat kinderen niet met
verpakkingsmateriaal spelen.
Bewaar kleine onderdelen op
een veilige plaats, deze kunnen
ingeslikt worden.
:Waarschuwing
Risico van verbranding!
■ Het melksysteem wordt zeer
heet. De melkschuimer mag
na gebruik pas worden
aangeraakt wanneer hij is
afgekoeld.
Gevaar voor verbranding!
■ Na het gebruik kunnen de
oppervlakken zoals bijv.
kopjeswarmer nog enige tijd
heet zijn.
:Waarschuwing
Risico van letsel!
■ Onjuist gebruik van het
apparaat kan letsel tot
gevolg hebben.
Risico van letsel!
■ Grijp niet in de maler.
72
Page 73

Milieubescherming nl
7 Milieubescherming
Milieubescherming
Energiebesparing
■ Als het apparaat niet wordt gebruikt,
schakel het dan uit.
■ Het interval voor de automatische
uitschakeling op de kleinste waarde
instellen.
■ Onderbreek, indien mogelijk niet het
tappen van koffie of melkschuim. Het
voortijdig onderbreken leidt tot een
verhoogd energieverbruik en tot
sneller vollopen van de lekschaal.
■ Ontkalk het apparaat regelmatig om
kalkafzettingen te voorkomen.
Kalkresten leiden tot een hoger
energieverbruik.
Milieuvriendelijk afvoeren
Voer de verpakking op een
milieuvriendelijke manier af.
Dit apparaat is gekenmerkt in
overeenstemming met de
Europese richtlijn 2012/19/EU
betreffende afgedankte
elektrische en elektronische
apparatuur (waste electrical
and electronic equipment WEEE).
De richtlijn geeft het kader aan
voor de in de EU geldige
terugneming en verwerking van
oude apparaten.
Vraag bij uw speciaalzaak om actuele
informatie over het afvoeren van afval.
* Het apparaat leren
kennen
Het apparaat leren kennen
In dit hoofdstuk vindt u een overzicht
van de omvang van de levering, de
opbouw en de bestanddelen van het
apparaat. Bovendien leert u de
verschillende bedieningselementen
kennen.
Aanwijzing: Afhankelijk van het
apparaattype zijn kleur- en
detailafwijkingen mogelijk.
De gebruiksaanwijzing beschrijft twee
apparaatvarianten.
■ Apparaat met een bonenreservoir
■ Apparaat met twee bonenreservoirs
Voor het gebruik van deze
gebruiksaanwijzing:
De omslagpagina's van de
gebruiksaanwijzing kunt u aan de
voorzijde uitklappen. De illustraties zijn
van nummers voorzien waarnaar in de
gebruiksaanwijzing wordt verwezen.
Voorbeeld: ~ afb. !
Standaarduitvoering
~ Afb. !
# Volautomatische
espressomachine
+ Melkreservoir (reservoir, deksel,
stijgbuis, aansluitslang)
3 Maatlepel
; Teststrip voor de hardheid van het
water
C Gebruiksaanwijzing
73
Page 74

nl Het apparaat leren kennen
Montage en onderdelen
)* Kopjeswarmer
)2 LED-indicatie kopjeswarmer
~ Afb. "
( Display
0 Bedieningspaneel
8 Draaiknop/start stop
(Navigatie door draaien en
indrukken)
@ Uitloopsysteem (koffie, melk, heet
water) in hoogte verstelbaar
H Melkreservoir (reservoir, deksel,
stijgbuis, aansluitslang)
P Lekschaal (koffiedikreservoir,
lekrooster)
X Afdekking zetkamer
` Watertank
h Typeplaatje
)" Geïntegreerde greep watertank
): Poedervak (gem. koffie,
reinigingstablet)
)B Bonenreservoir
)J Draaiknop voor instelling
maalfijnheid
)R Aromadeksel
)Z* Aromadeksel
)b* Bonenreservoir
)j* Draaiknop voor instelling
maalfijnheid
1"* Keuzetoetsen bonenreservoir,
verlicht
Afhankelijk van het model:
Met * gekenmerkte posities zijn alleen
aanwezig in een apparaat met twee
bonenreservoirs.
Bedieningselementen
Toets Betekenis
on/off Apparaat in- en uitschakelen
! Personalisering
" Koffiesterkte
milk Kort indrukken:
ml Drankhoeveelheid in milliliters. ~ "Drankinstellingen aanpassen" op pagina 82
# 2 Dranken
De machine spoelt automatisch als deze wordt in- en uitgeschakeld.
Het apparaat spoelt niet wanneer:
■ het bij het inschakelen nog warm is.
■ er voor het uitschakelen geen koffie werd gezet.
Het apparaat is gebruiksklaar wanneer in het display de symbolen voor de drankselectie
en de toets on/off branden.
Het apparaat biedt de mogelijkheid persoonlijke instellingen voor koffiedranken op te
slaan en op te roepen. ~ "Personalisering" op pagina 85
Aanpassen van de koffiesterkte. ~ "Drankinstellingen aanpassen" op pagina 82
Melk
Als drank of als ingrediënt van speciale koffiedranken. ~ "Drankinstellingen aanpassen"
op pagina 82
Ten minste 4 seconden ingedrukt houden:
Kinderbeveiliging ~ "Kinderslot" op pagina 86
Bereiden van twee dranken gelijktijdig. Kopjes naast elkaar onder de koffie-uitloop plaatsen. ~ "Drankinstellingen aanpassen" op pagina 82
74
Page 75

Toebehoren nl
$/± Menu-instellingen/serviceprogramma's
Kort op de toets $/±drukken om menu-instellingen en serviceprogramma's op te roepen.
Opnieuw kort op de toets $/± drukken om terug te keren naar de drankselectie. Na
ca. 10 seconden zonder bediening schakelt het apparaat automatisch terug in de drankselectie.
Aanwijzing: De toets $/± ten minste 5 seconden ingedrukt houden om de menu-instel-
lingen direct op te roepen.
Navigatietoetsen
Om in het display te navigeren.
De toetsen kunnen in de menu-instellingen op “Barista-modus” worden ingesteld. In deze
instellingen kunnen nog verdere drankaanpassingen worden uitgevoerd.
~ "Drankinstellingen aanpassen" op pagina 82
--------
Display
Op het display (worden de
geselecteerde dranken, instellingen en
instelmogelijkheden, evenals meldingen
over de bedrijfstoestand weergegeven.
Op het display wordt extra informatie
weergegeven, deze wordt ‒ na korte tijd
of nadat deze door een toetsbediening
werd bevestigd ‒ uitgeschakeld.
In het display wordt ook tot handelingen
opgeroepen.
De afzonderlijke handelingsstappen
worden op het display weergegeven.
Nadat de gevraagde handeling is
uitgevoerd, bijv. "Waterreservoir vullen",
verdwijnt de desbetreffende melding.
Draaiknop
De draaiknop 8 heeft verschillende
functies.
■ Draaien: in het display navigeren en
instellingen wijzigen.
■ Indrukken: drankbereiding of
serviceprogramma starten,
menukeuze bevestigen.
■ Indrukken tijdens de drankbereiding:
drankafgifte vroegtijdig stoppen.
_ Toebehoren
Toebehoren
Onderstaand toebehoren is in de
handel en via de servicedienst
verkrijgbaar:
Toebehoren Bestelnummer
Handel Klantenser-
Reinigingstabletten TZ80001 00311807
Ontkalkingstabletten TZ80002 00576693
Waterfilter TZ70003 00575491
Onderhoudsset TZ80004 00576330
Adapter voor het
TZ90008 00577862
melkreservoir
--------
De contactgegevens voor de
servicedienst van alle landen vindt u op
de laatste pagina van deze handleiding.
vice
75
Page 76

nl Voor het eerste gebruik
K Voor het eerste
gebruik
Voor het eerste gebruik
In dit hoofdstuk leest u hoe u het
apparaat in gebruikt neemt. Voordat u
uw nieuwe apparaat kunt gebruiken
moet u enkele instellingen uitvoeren:
Aanwijzing: Machine alleen gebruiken
in vorstvrije ruimtes. Is de machine bij
temperaturen onder de 0 °C
getransporteerd of opgeslagen, dan
dient u minstens 3 uur te wachten
alvorens hem weer in gebruik te nemen.
Apparaat installeren en aansluiten
1. Verwijder de beschermende folie.
2. Zet het apparaat neer op een vlak en
voor het gewicht geschikt, watervast
oppervlak.
3. Het apparaat met de stekker in een
volgens de voorschriften
geïnstalleerd geaard stopcontact
steken.
Apparaat in gebruik nemen
Taal instellen
Aanwijzingen
■ De taalselectie verschijnt
automatisch bij de eerste
inschakeling.
■ U kunt de taal op elk moment
wijzigen. ~ "Menu-instellingen"
op pagina 87
1. Apparaat met de toets on/off
inschakelen.
In het display verschijnt de
vooringestelde taal.
2. Met de draaiknop de gewenste
displaytaal kiezen.
3. Met de rechter navigatietoets
bevestigen.
De instelling is opgeslagen.
Waterhardheid instellen
De juiste instelling van de
waterhardheid is van belang, opdat het
apparaat tijdig meldt, dat het moet
worden ontkalkt. De vooraf ingestelde
waterhardheid is niveau 4.
De waterhardheid kan bij het
plaatselijke waterbedrijf worden
nagevraagd of met de bijgevoegde
teststrook worden vastgesteld.
Stel "Onthardingssysteem" in als er in
het huis een wateronthardingsinrichting
is geïnstalleerd.
1. De bijgevoegde teststrook kort in
vers leidingwater onderdompelen,
laten afdruipen en na een minuut het
resultaat aflezen.
2. Stel met de draaiknop de
vastgestelde waterhardheid in.
3. Met de rechter navigatietoets
bevestigen.
De herinnering voor bonenreservoir
vullen gaat kort branden.
4. Of met de rechter navigatietoets
bevestigen of enkele seconden
wachten.
Aanwijzingen
■ Als u de machine voor de eerste
keer gebruikt, nadat er een
onderhoudsprogramma is
uitgevoerd of nadat de machine
langere tijd niet is gebruikt, dient u
de eerste drank niet te drinken
aangezien deze nog niet het volle
aroma bezit.
■ Na de ingebruikname van het
apparaat, krijgt u pas een voldoend
dikke en stabiele laag ‘crema’ nadat
u de eerste paar kopjes hebt getapt.
■ Bij langdurig gebruik kunnen er zich
waterdruppels bij de
ventilatiesleuven voordoen. Dit is
een normaal verschijnsel.
76
Page 77

Voor het eerste gebruik nl
De tabel toont de toekenning van de
standen aan de verschillende graden
van de waterhardheid:
Stand Waterhardheid
Duits (°dH) Frans (°fH)
1 1-7 1-13
2 8-14 14-25
3 15-21 26-38
4 22-30 39-54
Het is op ieder moment mogelijk de
waterhardheid achteraf te wijzigen.
~ "Menu-instellingen" op pagina 87
Bonenreservoir vullen
Met dit apparaat kunt u koffiedranken
uit koffiebonen of gemalen koffie (geen
oploskoffie) bereiden.
1. Deksel )R van het
bonenreservoir )B openen.
2. Vul de bonen erin.
3. Deksel weer sluiten.
Aanwijzingen
■ De koffiebonen worden deze voor
elk zetproces vers gemalen.
■ De koffiebonen koel en gesloten
bewaren, zo blijft de kwaliteit
optimaal behouden.
■ U kunt koffiebonen meerdere dagen
in het bonenreservoir bewaren
zonder dat het aroma verloren gaat.
Vul gemalen koffie altijd pas kort
voor de drankbereiding bij.
~ "Koffiedrank klaarmaken met
behulp van de koffiepoeder"
op pagina 79
Bij modellen met twee
bonenreservoirs )B , )b* kunt u twee
verschillende soorten koffiebonen
gebruiken. Het gewenste
bonenreservoir met de keuzetoets 1"*
selecteren. De LED van het actieve
bonenreservoir brandt.
Het apparaat onthoudt voor elke drank
het laatst geselecteerde bonenreservoir.
Deze voorinstelling kan worden
veranderd. ~ "Menu-instellingen"
op pagina 87
Watertank vullen.
Belangrijk: vul de watertank dagelijks
met vers, koud water zonder koolzuur.
Controleer voor de werking, of de
watertank voldoende is gevuld.
1. Grijp in de geïntegreerde greep )"
aan de zijkant van de
watertank `en kantel de
waterkant er licht opzij uit.
2. Til de watertank er aan de greep uit.
3. Plaats een waterfilter. ~ "Waterfilter
aanbrengen of vervangen:"
op pagina 89
4. De watertank tot de markering "max"
met water vullen.
5. De watertank weer in de houder
plaatsen en in de uitgangspositie
terug kantelen.
Het merklogo op het display licht op.
Het warmt nu op en spoelt, er loopt wat
water uit het uitloopsysteem.
Het apparaat is gebruiksklaar wanneer
in het display de symbolen voor de
dranken en de toets on/off branden.
77
Page 78

nl Apparaat bedienen
1 Apparaat bedienen
Apparaat bedienen
In dit hoofdstuk leest u hoe u uw
apparaat voor de drankbereiding kunt
voorbereiden en hoe u warme dranken
bereidt. U krijgt informatie over de
aanpassing van drankinstellingen en
voor de aanpassing van de
maalfijnheid.
Drank selecteren
■ Selecteer met de draaiknop de
gewenste drank.
■ Op het display worden de naam van
de drank en de actueel ingestelde
waarden (bijv. koffiesterkte of maat
van het kopje) weergegeven.
■ De geselecteerde drank kan met de
vooraf ingestelde waarden worden
bereid of eerst aan de individuele
smaak worden aangepast.
~ "Drankinstellingen aanpassen"
op pagina 82
■ Als de machine binnen een minuut
niet wordt bediend, verlaat de
machine de instelmodus. De
opgegeven instellingen worden
automatisch opgeslagen.
Caffe crema
Cappuccino
Latte macchiato
Koffie verkeerd
Melkschuim
Kanfunctie
(niet beschikbaar bij alle varianten van het apparaat)
Warme melk
De volgende dranken kunnen
geselecteerd worden:
Espresso macchiato
Ristretto
Espresso
Espresso doppio
78
Heet water
--------
Aanwijzing: Bij enkele instellingen
wordt de koffie in twee stappen
toebereid (zie „aromaDouble Shot“).
Wacht tot de bereiding helemaal is
voltooid.
Tip: Kopjes, vooral kleine, dikke
espressokopjes, met de bodem op de
kopjeswarmer plaatsen.
~ "Kopjeswarmer" op pagina 84
Page 79

Apparaat bedienen nl
Koffiedrank van versgemalen bonen zetten
U kunt kiezen uit Ristretto, Espresso
Doppio, Espresso en Caffe Crema. Hoe
u koffiedranken met melk bereidt, wordt
beschreven in een eigen hoofdstuk.
~ "Dranken met melk bereiden"
op pagina 80
Het apparaat is ingeschakeld. De
watertank en het bonenreservoir zijn
gevuld.
1. Plaats een kopje onder het
uitloopsysteem.
2. Selecteer met de draaiknop het
gewenste recept.
Op het display worden de naam van de
drank en de actueel ingestelde waarden
weergegeven.
3. Om de instellingen van de
geselecteerde drank te wijzigen.
~ "Drankinstellingen aanpassen"
op pagina 82
4. Druk op de draaiknop om de
drankbereiding te starten.
Nu wordt de koffie gezet en aansluitend
wordt het kopje gevuld.
Aanwijzing: Druk opnieuw op de
draaiknop om de drankbereiding
voortijdig te starten.
Koffiedrank klaarmaken met behulp van de koffiepoeder
U kunt dit apparaat ook met vooraf
gemalen koffie gebruiken. Gebruik geen
oploskoffie. Hoe u koffiedranken met
melk bereidt, wordt beschreven in een
eigen hoofdstuk. ~ "Dranken met melk
bereiden" op pagina 80
4. Met de draaiknop “Gem. koffie” voor
gemalen koffie selecteren.
5. Toets " indrukken.
6. Het aromadeksel )R van het
bonenreservoir )B verwijderen en
het val voor gemalen koffie ):
openen.
7. Doe de gemalen koffie erin, maar
druk deze niet aan. Gebruik
maximaal 2 afgestreken maatlepels
gemalen koffie.
Attentie!
Vul geen koffiebonen of oploskoffie
in het vak voor gemalen koffie.
8. Het vak voor gemalen koffie en het
aromadeksel sluiten.
Op het display worden de naam van de
drank en de actueel ingestelde waarden
weergegeven.
9. Om de instellingen van de
geselecteerde drank te wijzigen.
~ "Drankinstellingen aanpassen"
op pagina 82
10. Druk op de draaiknop om de
drankbereiding te starten.
Nu wordt de koffie gezet en aansluitend
wordt het kopje gevuld.
Aanwijzingen
■ Eventuele resten gemalen koffie in
de poederschacht met een zacht
penseel in de schacht vegen.
■ Druk opnieuw op de draaiknop om
de drankbereiding voortijdig te
starten.
■ Herhaal het proces als u nog een
drank met gemalen koffie wilt.
■ Bij de bereiding met gemalen koffie
is de aromaDouble Shot-functie niet
beschikbaar.
Het apparaat is ingeschakeld. De
watertank is gevuld.
1. Plaats een kopje onder het
uitloopsysteem.
2. Selecteer met de draaiknop het
gewenste recept.
3. Toets " indrukken.
79
Page 80

nl Apparaat bedienen
Dranken met melk bereiden
Het apparaat heeft een geïntegreerd
melksysteem. Met het melksysteem
kunt u koffiedranken met melk evenals
melkschuim en warme melk bereiden.
U kunt kiezen uit espresso macchiato,
cappuccino, latte macchiato en koffie
verkeerd.
Aanwijzingen
■ Bij de bereiding met melk kunnen
fluitende geluiden ontstaan. Deze
geluiden ontstaan door de techniek
en zijn normaal.
■ Opgedroogde melkresten zijn
moeilijk te verwijderen, daarom
moeten eventuele melkresten altijd
worden verwijderd.
~ "Melksysteem reinigen"
op pagina 92
:Waarschuwing
Gevaar voor verbranding!
Het melksysteem wordt zeer heet. De
melkschuimer mag na gebruik pas
worden aangeraakt wanneer hij is
afgekoeld.
Melkreservoir gebruiken
Het melkreservoir H is speciaal
ontwikkeld voor gebruik in combinatie
met dit apparaat. Het is uitsluitend
bedoeld voor huishoudelijk gebruik en
voor het bewaren van melk in de
koelkast.
Belangrijk: Het melkreservoir kan
alleen worden aangesloten wanneer het
melksysteem met adapter en slang in
het uitloopsysteem is gemonteerd.
(~ Afb #)
4. Sluit het melkreservoir links op het
apparaat aan. Het melkreservoir
moet vastklikken.
Dranken met koffie en melk
Het apparaat is ingeschakeld. De
watertank en het bonenreservoir zijn
gevuld.
Het met melk gevulde melkreservoir is
aangesloten.
1. Plaats een kopje of een glas onder
het uitloopsysteem.
2. Selecteer met de draaiknop het
gewenste recept.
Op het display worden de naam van de
drank en de actueel ingestelde waarden
weergegeven.
3. Om de instellingen van de
geselecteerde drank te wijzigen.
~ "Drankinstellingen aanpassen"
op pagina 82
4. Druk op de draaiknop om de
drankbereiding te starten.
Eerst wordt er melk in het kopje of het
glas gegoten. Vervolgens wordt de
koffie gezet en stroomt deze in het
kopje of het glas.
Aanwijzing: Door eenmaal op de
draaiknop te drukken, kan de melk- of
koffiebereiding voortijdig worden
gestopt; door de draaiknop twee maal
in te drukken, stopt de gehele
drankbereiding.
1. Om het deksel eraf te nemen, op de
markering drukken en het deksel
verwijderen. (~ Afb. ')
2. Vul de melk erin.
3. Druk het deksel op het melkreservoir
tot het vastklikt.
80
Page 81

Apparaat bedienen nl
Melkschuim of warme melk
Het apparaat is ingeschakeld. De
watertank is gevuld.
Het met melk gevulde melkreservoir is
aangesloten.
1. Plaats een kopje of een glas onder
het uitloopsysteem.
2. Selecteer "melkschuim" of "warme
melk" met de draaiknop.
Op het display worden de naam van de
drank en de actueel ingestelde waarden
weergegeven.
3. Om de instellingen van de
geselecteerde drank te wijzigen.
~ "Drankinstellingen aanpassen"
op pagina 82
4. Druk op de draaiknop om de
drankbereiding te starten.
Er stroomt melkschuim of warme melk
in het kopje of het glas.
Aanwijzing: Druk opnieuw op de
draaiknop om de drankbereiding
voortijdig te starten.
Warm water afnemen
Aanwijzing: Reinig voor het afnemen
van heet water het melksysteem en
verwijder het melkreservoir. Wanneer
het melksysteem niet is gereinigd, kan
het afgegeven water kleine
hoeveelheden melk bevatten.
~ "Melksysteem reinigen"
op pagina 92
:Waarschuwing
Gevaar voor verbranding!
Het uitloopsysteem wordt zeer heet. Het
uitloopsysteem mag na gebruik pas
worden aangeraakt wanneer het is
afgekoeld.
Het apparaat is ingeschakeld. De
watertank is gevuld.
1. Plaats een kopje onder het
uitloopsysteem.
2. Verwijder het melkreservoir, indien
aangesloten.
3. Selecteer „Heet water“ met de
draaiknop.
4. Om de instellingen van de
geselecteerde drank te wijzigen.
~ "Drankinstellingen aanpassen"
op pagina 82
5. Druk op de draaiknop om de
drankbereiding te starten.
Er loopt heet water in het kopje.
Aanwijzing: Druk opnieuw op de
draaiknop om de drankbereiding
voortijdig te starten.
81
Page 82

nl Apparaat bedienen
Drankinstellingen aanpassen
verschillende waarden aanpassen.
Gebruik hiervoor de volgende toetsen
Nadat u een drank heeft geselecteerd,
en de draaiknop:
kunt u afhankelijk van de drank
Toets Functie Keuze
" Koffiesterkte, koffiemaling
selecteren
milk Mengverhouding melk/kof-
fie
■ zeer mild*
■ mild
■ mild +*
■ normaal
■ normaal +*
■ sterk
■ sterk +*
■ zeer sterk
■ zeer sterk +*
■ extra sterk
■ aromaDouble Shot
sterk
■ aromaDouble Shot
sterk +
■ aromaDouble Shot
sterk ++*
■ Gemalen koffie
Instelling van het melkaandeel in %
(alleen voor dranken met koffie en melk)
ml Maat kopje Aanpassing van de inhoud in ml-stappen.
Niet beschikbaar voor Ristretto.
# Twee kopjes tegelijk Twee kopjes onder de uitloop plaatsen.
Navigatie-
toets links
Navigatietoets rechts
Watertemperatuur* Bijv. voor thee:
■ > 70 °C (witte thee)
■ > 80 °C (groene thee)
aromaIntense* ■ normaal
■ intensief
■ > 85 °C (rooibosthee)
■ > 90 °C (zwarte thee)
■ > 97 °C (vruchtenthee)
■ intensief +
* alleen beschikbaar in de “Barista-modus”
Het apparaat is in de fabriek op
“Barista-modus” ingesteld. Daardoor
kunnen met de beide navigatietoetsen
nog meer waarden worden ingesteld.
De “Barista-modus” kan ook worden
uitgeschakeld. ~ "Menu-instellingen"
op pagina 87
De fabrieksinstellingen zijn in het
display blauw gemarkeerd. De actueel
geselecteerde instellingen hebben een
verlichte achtergrond.
82
Koffiesterkte aanpassen of koffiemaling selecteren
Er is een koffiedrank geselecteerd.
1. Toets " indrukken.
2. Met de draaiknop de koffiesterkte
instellen of gemalen koffie
selecteren.
3. Om te bevestigend de toets " of
de draaiknop indrukken.
Page 83

Apparaat bedienen nl
aromaDouble Shot-functie
Hoe langer het koffiezetten duurt, des te
meer bittere stoffen en ongewenste
aroma's vrijkomen. Dit heeft een
negatieve invloed op de smaak en
verteerbaarheid van de koffie. Voor
extra sterke koffie beschikt de machine
daarom over een speciale
aromaDouble Shot-functie. Nadat de
helft van de koffie is gezet, worden er
opnieuw koffiebonen gemalen en
bereid, zodat alleen de lekkere en
maagvriendelijke aroma's vrijkomen.
Aanwijzing: De functie aromaDouble
Shot kan voor alle koffiedranken worden
geselecteerd, behalve voor:
■ dranken met een kleine
koffie-inhoud, bijv. Ristretto
■ kleine koffie- inhoud bijv. bij instelling
"Koffie verkeerd" 200 ml met 90 %
melkaandeel (koffiepercentage
10 %)
■ Bereiding met gemalen koffie
Mengverhouding melk/koffie aanpassen
Er is een koffiedrank met melk
geselecteerd.
1. Toets milk indrukken.
2. Met de draaiknop het melkaandeel
in % instellen.
Voorbeeld: bij een ingestelde
waarde van 30 % wordt 30 % melk
en 70 % koffie afgegeven.
3. Om te bevestigen de toets milk of
de draaiknop indrukken.
Maat kopje selecteren
Er is een drank geselecteerd.
1. Toets ml indrukken. De
vooringestelde inhoud verschilt
afhankelijk van de soort drank.
2. Met de draaiknop de gewenste
inhoud in ml-stappen aanpassen.
3. Om te bevestigen de toets ml of de
draaiknop indrukken.
Aanwijzingen
■ Bij Ristretto kan de inhoud niet
worden veranderd.
■ De afgegeven vulhoeveelheid kan
variëren afhankelijk van de
melkkwaliteit.
Twee kopjes tegelijk bereiden
Er is een koffiedrank of een koffiedrank
met melk geselecteerd.
1. Toets # indrukken.
2. Twee voorverwarmde kopjes links en
rechts onder het uitloopsysteem
plaatsen.
3. Druk op de draaiknop om de
drankbereiding te starten.
De geselecteerde drank wordt
toebereid en stroomt vervolgens in de
beide kopjes.
Aanwijzingen
■ De drank wordt in twee stappen
(twee maalprocessen) bereid. Wacht
tot het proces volledig is afgesloten.
■ Bij de keuze # is de aromaDouble
Shot-functie niet mogelijk.
83
Page 84

nl Apparaat bedienen
Dranktemperatuur aanpassen
Alleen beschikbaar in de
“Barista-modus” ~ "Menu-instellingen"
op pagina 87
Er is een willekeurige drank
geselecteerd.
1. Met de linker navigatietoets de
temperatuurinstelling oproepen.
2. Met de draaiknop de gewenste
temperatuur instellen.
3. Om te bevestigen de linker
navigatietoets of de draaiknop
indrukken.
aromaIntense instellen
Alleen beschikbaar in de
“Barista-modus” ~ "Menu-instellingen"
op pagina 87
De smaakintensiteit voor een
koffiedrank kan door de instelling van
aromaIntense individueel worden
aangepast. De selectie heeft bij
bereiding met melk geen invloed op de
warme melk of het melkschuim.
Er is een koffiedrank geselecteerd.
1. Met de rechter navigatietoets het
menu oproepen.
2. Met de draaiknop de gewenste
instelling uitvoeren.
3. Om te bevestigen de rechter
navigatietoets of de draaiknop
indrukken.
Instellen van de maalfijnheid
Dit apparaat heeft een instelbaar
maalwerk. Hiermee kan de maalfijnheid
van de koffie individueel worden
veranderd.
:Waarschuwing
Risico van letsel!
Grijp niet in de maler.
Attentie!
Het apparaat kan beschadigd worden!
De maalfijnheid uitsluitend wijzigen bij
lopend maalwerk!
Bij lopend maalwerk de maalgraad met
de draaiknop )J, )j* instellen.
■ Fijne maalfijnheid: tegen de klok in
draaien. (Afb. a)
■ Grovere maalfijnheid: met de klok
mee draaien. (Afb. b)
D E
Aanwijzingen
■ De nieuwe instelling is pas merkbaar
vanaf de tweede kop koffie.
■ Stel bij donker gebrande bonen een
fijnere, en bij lichtere bonen een
grovere maalfijnheid in.
Kopjeswarmer
Attentie!
De kopjeswarmer wordt erg heet!
De volautomatische espressomachine
beschikt over een kopjeswarmer )*.
Als de kopjeswarmer ingeschakeld is,
brandt de LED-indicatie )2
kopjeswarmer.
Tip: Voor een optimale verwarming de
kopjes met de bodem op de
kopjeswarmer plaatsen.
Aanwijzing: Deze functie kan in de
“Menu-instellingen” worden in- en
uitgeschakeld. ~ "Menu-instellingen"
op pagina 87
84
Page 85

Personalisering nl
P Personalisering
Personalisering
In het menu Personalisering kunnen
gebruikersprofielen worden
aangemaakt. In de gebruikersprofielen
kunnen individuele dranken onder eigen
namen worden opgeslagen.
Gebruikersprofiel aanmaken
1. De toets ! indrukken, het menu
verschijnt.
2. Met de draaiknop een nieuw profiel
selecteren.
3. De rechter navigatietoets indrukken
om de selectie te bevestigen.
De gebruikersnaam kan worden
ingevoerd.
4. Selecteer met de draaiknop de
gewenste letters. De draaiknop
indrukken om de letters te
bevestigen.
De letter wordt opgeslagen.
Als de gebruikersnaam volledig is
ingevoerd:
5. De rechter navigatietoets indrukken
om de gebruikersnaam op te slaan.
6. Met de draaiknop een
achtergrondbeeld selecteren.
7. De rechter navigatietoets indrukken
om de selectie te bevestigen.
8. Met de draaiknop "Standaardmodus"
of "Barista-modus" selecteren.
9. De rechter navigatietoets indrukken
om de selectie te bevestigen.
De vraag voor de selectie verschijnt.
10. De rechter navigatietoets nogmaals
indrukken om het profiel op te slaan.
Het scherm met het
gebruikersprofiel verschijnt.
Voor de aangemaakte gebruiker kan
direct daarna een individuele drank
worden opgeslagen.
Individuele dranken opslaan:
1. De draaiknop indrukken.
“Dranken bewerken” verschijnt.
2. Selecteer met de draaiknop de
gewenste drank.
De geselecteerde drank kan op de
persoonlijke voorkeur worden ingesteld.
~ "Drankinstellingen aanpassen"
op pagina 82
3. De draaiknop indrukken.
Er verschijnt een oproep om de
selectie te bevestigen.
4. De rechter navigatietoets indrukken
om de selectie te bevestigen.
5. Toets ! indrukken.
De instellingen zijn afgerond.
Het apparaat is weer klaar voor gebruik.
Aanwijzing: In een profiel kunnen tot
en met 10 eigen dranken worden
opgeslagen.
Gebruikersprofiel bewerken of wissen
1. De toets ! indrukken, het menu
verschijnt.
2. Met de draaiknop het gewenste
profiel kiezen.
3. De linker navigatietoets indrukken
om het profiel te wissen.
- of -
De rechter navigatietoets indrukken
om de instellingen in het profiel te
bewerken.
De instellingen in het profiel kunnen op
de beschreven wijze worden veranderd.
~ "Gebruikersprofiel aanmaken"
op pagina 85
4. Toets ! indrukken.
Het apparaat is weer klaar voor gebruik.
85
Page 86

nl Kinderslot
Individuele dranken opslaan:
Een actueel bereide drank kan met de
individuele instellingen, direct in een
nieuw of aanwezig profiel worden
opgeslagen.
1. De toets ! ten minste 5 seconden
ingedrukt houden.
Als er nog geen profiel is
opgeslagen, verschijnt direct een
nieuw profiel.
2. Indien er al profielen zijn opgeslagen
en als de individuele drank in een
nieuw profiel moet worden
opgeslagen, dan met de draaiknop
een nieuw profiel selecteren.
- of -
Indien de individuele drank in een
bestaand profiel moet worden
opgeslagen, met de draaiknop het
gewenste profiel selecteren.
3. De draaiknop indrukken om de
selectie te bevestigen.
Wanneer een nieuw profiel wordt
aangemaakt, de naam invoeren en een
achtergrondbeeld kiezen. De invoer
bevestigen.
Als er al een profiel aanwezig is, dit
selecteren en de drank opslaan.
4. Toets ! indrukken.
Het apparaat is weer klaar voor gebruik.
A Kinderslot
Kinderslot
Om kinderen tegen verbrandingen te
beschermen, kan de machine worden
geblokkeerd.
Kinderslot activeren
De toetsmilk ten minste 4 seconden
ingedrukt houden.
Op het display verschijnt
„Kinderbeveiliging geactiveerd“.
Nu is er geen bediening meer mogelijk.
Kinderslot deactiveren
De toetsmilk ten minste 4 seconden
ingedrukt houden.
Op het display verschijnt
„Kinderbeveiliging gedeactiveerd“.
De machine kan weer als gebruikelijk
worden bediend.
Aanwijzing: Om het menu automatisch
te verlaten, onder “Gebruikersprofielen”
- “Profielen automatisch verlaten”
instellen. ~ "Menu-instellingen"
op pagina 87
86
Page 87

Menu-instellingen nl
Q Menu-instellingen
5. De navigatietoets onder
“Bevestigen” indrukken.
De instelling is opgeslagen.
Menu-instellingen
Het menu is bedoeld voor het
individueel wijzigen van instellingen, het
oproepen van informatie en het starten
van een programma.
Instellingen veranderen
1. De toets $/± ten minste 5 seconden
ingedrukt houden om het "Menu" te
openen.
Op het display verschijnen de
verschillende instelmogelijkheden.
2. Met de draaiknop de gewenste
instelling selecteren.
De actuele instelling wordt op het
display met een kleur gemarkeerd.
3. De navigatietoets onder “Selecteren”
indrukken.
4. Met de draaiknop de instelling
6. De toets $/± indrukken om het
"Menu" te verlaten.
Op het display verschijnt de
drankselectie.
Aanwijzingen
■ Door het indrukken van de
navigatietoets onder “Terug” kan in
het vorige niveau worden gewisseld.
■ Door het indrukken van de
navigatietoets onder “annuleren” kan
het instellen worden afgebroken.
■ Door de toets $/± in te drukken, kan
het menu op elk gewenst moment
worden verlaten.
■ Als ca. 2 minuten geen invoer heeft
plaatsgevonden, wordt het menu
automatisch gesloten en worden de
instellingen niet opgeslagen.
veranderen.
De volgende instellingen zijn beschikbaar:
Instellingen Mogelijke instellingen Toelichting
Taal Verschillende talen Instelling van de taal waarin de displayteksten
worden weergegeven.
Waterhardheid ■ 1 (zacht)
■ 2 (gemiddeld)
■ 3 (hard)
■ 4 (zeer hard)
■ Onthardingsinstallatie
Uitschakelen na 15 minuten
tot en met dicht
8 uur
Helderheid display Stand 1 tot en met stand 10
Standaardinstelling 7
Instelling op de plaatselijke waterhardheid.
De vooraf ingestelde waterhardheid is niveau 4
(zeer hard). De waterhardheid kan bij uw waterleidingbedrijf worden opgevraagd.
De juiste instelling van de waterhardheid is van
belang, opdat het apparaat tijdig meldt, dat het
moet worden ontkalkt.
Stel "Onthardingssysteem" in als er in het huis
een wateronthardingsinrichting is geïnstalleerd.
Instelling van de tijdsperiode waarna de
machine na de laatste drankbereiding automatisch wordt uitgeschakeld.
De vooraf ingestelde tijd is 30 minuten.
Instelling van de helderheid van het display.
87
Page 88

nl Menu-instellingen
Bedieningsmodus ■ Standaardmodus
■ Barista-modus
Bij de instelling "Barista-modus" kan in het display direct
■ door het indrukken van de linker navigatie-
toets de temperatuur worden ingesteld.
■ door het indrukken van de rechter navigatie-
toets kan aromaIntense (zetsnelheid) in 3
standen worden ingesteld.
Drankinfo Weergave van het aantal dranken dat sinds de ingebruikname is bereid. De teller
loopt om technische redenen niet precies „op het kopje af“.
Fabrieksinstelling Apparaat terugzetten naar de
fabrieksinstellingen
Demomodus ■ Aan
■ uit
Terugzetten van alle eigen instellingen op de uitleveringstoestand.
Alleen voor presentatiedoeleinden. De instelling
"uit" moet voor de normale werking zijn geactiveerd. De instelling is alleen in de eerste
3 minuten na het inschakelen van het apparaat
mogelijk.
Drankinstellingen
Espresso- / Koffietemperatuur
Temperatuur heet
water
Volgorde koffie/melk
Gebruikersprofielen ■ Profielen automatisch ver-
Kopjeswarmer ■ Aan
■ 88°C
■ 90°C
■ 92°C
■ 94°C
■ 95°C
■ 96°C
■ > 70°C
■ > 80°C
■ > 85°C
■ > 90°C
■ > 97°C
■ eerst melk
■ eerst koffie
laten
■ Alle profielen wissen
■ uit
Instelling van de temperatuur voor koffiedranken.
De instelling geldt voor alle soorten bereiding.
Instelling van de temperatuur voor heet water.
De instelling geldt voor alle soorten bereiding.
Instelling of eerst melk of koffie wordt gezet en
getapt.
Instelling of het gebruikersprofiel automatisch
wordt verlaten of gewist.
Als de kopjeswarmer is ingeschakeld, brandt de
LED kopjeswarmer.
Bonenreservoir Instelling, welk bonenreservoir automatisch actief is.
Met de keuzetoetsen “Bonenreservoir” kan voor elke bereiding het bonenreservoir direct worden geselecteerd.
■ Standaardreservoir rechts Na iedere drankbereiding springt het apparaat
automatisch terug op het rechter bonenreservoir.
88
Page 89

Menu-instellingen nl
■ Standaardreservoir links Na iedere drankbereiding springt het apparaat
■ Laatst geselecteerde
bonenreservoir
--------
Programma "Waterfilter" of "Vorstbeveiliging" starten
1. De toets $/± kort indrukken.
2. Met de draaiknop kan het
programma "Waterfilter" of
"Vorstbeveiliging" worden
geselecteerd. De actuele instelling
wordt op het display met een kleur
gemarkeerd.
Aanwijzing: Met de draaiknop kan ook
een serviceprogramma worden
geselecteerd. ~ "Serviceprogramma's"
op pagina 94
Waterfilter
Een waterfilter vermindert de
kalkafzettingen, reduceert de
verontreinigingen in het water en
verbetert de koffiesmaak. Waterfilters
zijn verkrijgbaar in de handel of via de
servicedienst. ~ "Toebehoren"
op pagina 75
Waterfilter aanbrengen of vervangen:
Voordat u een nieuw waterfilter kunt
gebruiken, dient u het filter te spoelen.
1. In de menu-instellingen “Waterfilter”
selecteren.
2. Met de navigatietoets "inzetten" of
"vervangen" selecteren.
3. Druk het waterfilter met behulp van
het maatschepje stevig in de
watertank vast.
automatisch terug op het linker bonenreservoir.
Het apparaat onthoudt het laatst geselecteerde
bonenreservoir.
4. De watertank tot de markering "max"
met water vullen.
5. Plaats een kom met een capaciteit
van 1,0 l onder de uitloop en
bevestig dit.
Er stroomt water door het filter. Het
filter wordt gespoeld.
6. Vervolgens de tank legen.
Het apparaat is weer klaar voor gebruik.
Aanwijzingen
■ Door het spoelen van het filter werd
automatisch het interval voor de
indicatie voor de filterwissel
geactiveerd. Na dit interval of uiterlijk
na 2 maanden is het filter verbruikt.
Om hygiënische redenen en om
verkalking (en schade aan de
machine) te voorkomen, dient u het
filter te vervangen.
■ Als de machine langere tijd niet is
gebruikt (bijv. tijdens een vakantie),
moet het ingezette filter voor het
eerste gebruik van de machine
worden gespoeld. Neem hiervoor
een kopje heet water af.
89
Page 90

nl Menu-instellingen
Waterfilter wegnemen
Wanneer geen nieuw waterfilter is
geplaatst, moet de functie “Waterfilter”
worden uitgeschakeld.
1. In de menu-instellingen “Waterfilter”
selecteren.
2. De instelling “verwijderen”
selecteren en bevestigen.
3. Het waterfilter uit de watertank
nemen.
4. Plaat de watertank weer terug.
Het apparaat is weer klaar voor gebruik.
Vorstbeveiliging
Een serviceprogramma om
beschadiging door vorst tijdens
transport en opslag te voorkomen. Het
apparaat wordt hierbij volledig geleegd.
Het apparaat moet klaar zijn voor
gebruik zijn en de watertank moet
gevuld zijn.
1. De draaiknop indrukken om het
programma te starten.
2. Leeg de watertank, plaats het weer
terug, het apparaat spoelt.
3. De lekschaal leegmaken en het
apparaat grondig reinigen.
Het apparaat kan nu worden
getransporteerd of opgeslagen.
90
Page 91

Dagelijks onderhoud en reiniging nl
D Dagelijks onderhoud
en reiniging
Dagelijks onderhoud en reiniging
Wanneer uw apparaat goed wordt
onderhouden en schoongemaakt blijft
het lang goed functioneren.In dit
hoofdstuk leest u hoe u het apparaat
goed kunt onderhouden en reinigen.
:Waarschuwing
Risico van een elektrische schok!
Voor het reinigen de stekker uit het
stopcontact trekken. Het apparaat niet
onderdompelen in water. Geen
stoomreiniger gebruiken.
Schoonmaakmiddelen
Om te voorkomen dat de verschillende
oppervlakken door verkeerde
schoonmaakmiddelen beschadigd
worden, dient u zich te houden aan de
volgende aanwijzingen.
Gebruik
■ geen scherpe of schurende
schoonmaakmiddelen.
■ geen reinigingsmiddelen die alcohol
of spiritus bevatten.
■ geen harde schuur- en
schoonmaaksponsjes.
■ Verwijder resten van kalk, koffie,
melk, reinigings- en
ontkalkingsoplossingen altijd
onmiddellijk. Onder dergelijke
omstandigheden kan er corrosie
optreden.
Attentie!
Niet alle componenten van het apparaat
kunnen in de vaatwasser worden
gereinigd.
~ Afb. % - (
Niet geschikt voor de vaatwasser:
Afdekking zetkamer
Zetgroep
Watertank
Aromadeksel
Geschikt voor de vaatwasser
Lekrooster
Lekschaal
Koffiedikhouder
max.
60°C
Koffiedik-afstrijker, rood
Afdekking zetgroep, rood
Maatlepel
Melksysteem, alle delen
Melkreservoir, alle delen
9
9
Aanwijzingen
■ Nieuwe sponsdoekjes kunnen
zouten bevatten. Deze zouten
kunnen een roestlaagje op het
roestvrij staal veroorzaken. Was
nieuwe vaatdoekjes voor gebruik
grondig uit.
91
Page 92

nl Dagelijks onderhoud en reiniging
Apparaat reinigen
1. Veeg de buitenzijde met een zachte,
vochtige doek af.
2. Reinig het display met een
microvezeldoekje.
3. Eventuele resten gemalen koffie in
de poederschacht met een zacht
penseel in de schacht vegen.
Aanwijzingen
■ Als het apparaat in koude toestand
wordt ingeschakeld of na afname
van koffie wordt uitgeschakeld,
wordt het apparaat automatisch
gespoeld. Zo reinigt het systeem
zichzelf.
■ Als het apparaat langere tijd niet is
gebruikt (bijv. na een vakantie),
maak het hele apparaat dan grondig
schoon, inclusief het melksysteem
en de zetgroep.
Reinig de lekschaal en de koffiedikhouder.
~ Afb. %
Aanwijzing: De lekschaal en de
koffiedikhouder moeten dagelijks
worden geleegd en schoongemaakt om
afzettingen te voorkomen.
1. Trek de lekschaal en de
koffiedikhouder in voorwaartse
richting uit het apparaat.
2. Neem het lekrooster eraf.
3. Maak de lekschaal en de
koffiedikhouder leeg en reinig deze.
4. Veeg de binnenzijde van het
apparaat (houders van de schalen)
uit.
Melkreservoir reinigen
~ Afb. '
Aanwijzing: Om hygiënische redenen
moet het melkreservoir regelmatig
worden gereinigd.
1. Demonteer het melkreservoir in de
afzonderlijke delen.
2. Alle delen van het melkreservoir
reinigen of in de vaatwasser doen.
Melksysteem reinigen
Het melksysteem wordt direct na de
bereiding van een melkhoudende drank
automatisch gereinigd met een korte
straal stoom.
:Waarschuwing
Gevaar voor verbranding!
Het uitloopsysteem wordt zeer heet. Het
uitloopsysteem mag na gebruik pas
worden aangeraakt wanneer het is
afgekoeld.
~ Afb. #, ~ Afb. &
Het melksysteem wekelijks handmatig
reinigen, desgewenst ook vaker. Voor
een bijzonder grondige reiniging kan
het melksysteem aanvullend met water
worden gespoeld. ~ "Melksysteem
spoelen" op pagina 95
92
Page 93

Dagelijks onderhoud en reiniging nl
Melksysteem eruit nemen:
1. Melkreservoir uit het apparaat
verwijderen.
2. Het uitloopsysteem in de onderste
positie schuiven.
3. De ontgrendeling rechts boven
indrukken.
4. De afdekking naar voren klappen en
eruit trekken.
5. Het melksysteem verwijderen en in
de afzonderlijke delen demonteren.
6. Reinig de afzonderlijke onderdelen
met zeepsop en een zachte doek.
7. Alle delen met helder water spoelen
en laten drogen.
Aanwijzing: Alle delen van het
melksysteem kunnen in de vaatwasser
worden gereinigd. Loogresten in het
melksysteem na het spoelen grondig
verwijderen.
Melksysteem plaatsen:
1. De afzonderlijke delen van het
melksysteem monteren.
2. Het melksysteem in de afdekking
plaatsen.
3. De afdekking onder aanzetten en
omhoog zwenken tot hij vastklikt.
Zetgroep reinigen
~ Afb.$, ~ Afb. (
Aanvullend bij het automatische
reinigingsprogramma dient de zetgroep
regelmatig te worden verwijderd en
gereinigd.
Zetgroep eruit nemen:
1. Apparaat uitschakelen.
2. De watertank eruit nemen.
3. De beide rode
vergrendelingsschuiven naar elkaar
toe schuiven en de afdekking
verwijderen.
4. De koffiedik-afstrijker (rood) en de
afdekking zetgroep (rood) eruit
nemen, reinigen en afdrogen.
5. De rode vergrendeling boven de
zetgroep naar rechts schuiven.
6. Neem de zetgroep er voorzichtig uit
en reinig hem grondig onder
stromend water.
7. Reinig de binnenkant van de
machine grondig met een vochtige
doek, verwijder eventueel aanwezige
koffieresten.
8. Laat de zetgroep en de binnenkant
van het apparaat drogen.
Zetgroep plaatsen:
1. De zetgroep in pijlrichting in het
apparaat schuiven. De pijl bevindt
zich aan de bovenkant van de
zetgroep.
De zetgroep boven aanzetten, in de
geleidingsrails ophangen en in het
apparaat schuiven.
2. De rode vergrendeling boven de
zetgroep naar links schuiven.
3. De koffiedik-afstrijker (rood) en de
afdekking zetgroep (rood) plaatsen.
4. De afdekking erin zetten en laten
vastklikken.
5. De watertank plaatsen.
Attentie!
Maak de zetgroep zonder spoelmiddel
schoon en doe hem niet in de
vaatwasser.
93
Page 94

nl Serviceprogramma's
. Serviceprogramma's
Serviceprogramma's
Periodiek verschijnt afhankelijk van de
waterhardheid en gebruiksintensiteit van
het apparaat één van de volgende
meldingen op het scherm in plaats van
de koffiekeuze:
■ Melksysteem spoelen
■ Ontkalkingsprogramma dringend
uitvoeren
■ Reinigingsprogramma dringend
uitvoeren
■ calc'nClean programma dringend
uitvoeren
De machine moet onmiddellijk met het
desbetreffende programma gereinigd of
ontkalkt worden. Naar keuze kunnen de
processen Ontkalken en Reinigen door
de functie calc‘nCleanworden
samengevoegd. Als het
serviceprogramma niet volgens de
aanwijzingen wordt uitgevoerd, kan de
machine beschadigd raken.
De serviceprogramma's kunnen ook op
ieder moment zonder oproep in het
display worden gestart. De toets $/±
indrukken, het gewenste programma
selecteren en uitvoeren.
Aanwijzingen
■ Belangrijk: wanneer het apparaat
niet tijdig wordt ontkalkt, verschijnt
“Ontkalken vereist, het apparaat
wordt binnenkort geblokkeerd”. Voer
het ontkalken onmiddellijk volgens
de instructies uit. Als het apparaat
geblokkeerd is, kan het pas na het
ontkalken weer worden bediend.
■ Drink geen vloeistoffen.
■ Gebruik voor het ontkalken nooit
azijn, middelen op basis van azijn,
citroenzuur of middelen op basis van
citroenzuur.
■ Gebruik voor het ontkalken en
schoonmaken uitsluitend de
daarvoor bedoelde tabletten. Deze
werden speciaal voor het apparaat
ontwikkeld en kunnen via de
servicedienst worden gekocht.
~ "Toebehoren" op pagina 75
■ Die in geen geval
ontkalkingstabletten of andere
middelen in het poedervak.
■ Onderbreek het serviceprogramma
in geen geval!
■ Voor de start van een
serviceprogramma de zetgroep
verwijderen, reinigen en weer
terugzetten. Het melksysteem
spoelen.
■ Na beëindiging van een
serviceprogramma het apparaat met
een zachte vochtige doek afvegen,
om resten van de
ontkalkingsoplossing onmiddellijk te
verwijderen. Onder dergelijke resten
kan corrosie worden gevormd.
■ Nieuwe sponsdoekjes kunnen
zouten bevatten. Zouten kunnen
roest aan het edelstaal veroorzaken.
Was de doekjes daarom vóór
gebruik grondig uit.
■ Ga bij onderbreking van een
serviceprogramma, bijv. door
stroomuitval, als volgt te werk:
1. De watertank uitspoelen.
2. Vers water zonder koolzuur tot de
markering “max” vullen en
bevestigen.
Het programma start en spoelt het
apparaat. Duur ca. 2 minuten.
3. De lekschaal legen, reinigen en weer
plaatsen.
4. Het melkreservoir legen, reinigen en
weer plaatsen.
Het programma is beëindigd. Het
apparaat is weer klaar voor gebruik.
5. De toets $/± indrukken om het
programma te verlaten.
94
Page 95

Serviceprogramma's nl
Melksysteem spoelen
Het melksysteem wordt direct na de
bereiding van een melkhoudende drank
automatisch gereinigd met een korte
straal stoom.
Voor een bijzonder grondige reiniging
kan het melksysteem aanvullend met
water worden gespoeld.
Duur: ca. 2 minuten
1. De toets $/± indrukken, om het
menu te openen.
2. Met de draaiknop "Melksysteem
spoelen" kiezen.
3. De draaiknop indrukken om het
programma te starten.
4. Het melkreservoir legen, reinigen en
weer aansluiten.
5. Plaats een leeg glas onder het
uitloopsysteem en bevestig dit.
Het programma loopt af.
6. Het melkreservoir legen, reinigen en
weer aansluiten.
7. Het glas leegmaken.
Het programma is beëindigd. Het
apparaat is weer klaar voor gebruik.
8. De toets $/± indrukken om het
programma te verlaten.
Bovendien het melksysteem regelmatig
grondig handmatig reinigen.
~ "Melksysteem reinigen"
op pagina 92
Ontkalken
Duur: ca. 21 minuten
De regel onder in het display geeft aan
over hoeveel minuten bijv. de watertank
gespoeld en water bijgevuld moet
worden.
De aanwijzingen in het display
begeleiden u door het programma.
4. Maak de lekschaal leeg en plaats
deze terug.
5. Het melkreservoir legen, reinigen en
weer aansluiten.
6. Verwijder het waterfilter (indien
aanwezig) en bevestig dit.
7. De lege watertank tot de markering
“0,5 l” met lauwwarm water vullen.
Daarin 1 ontkalkingstablet TZ80002
oplossen.
8. Plaats een kom met een capaciteit
van 1,0 l onder het uitloopsysteem
en bevestig dit.
9. De draaiknop indrukken.
Het programma loopt af.
Duur: ca. 19 minuten
Info: als er te weinig
ontkalkingsoplossing in de watertank
zit, verschijnt er een overeenkomstige
melding. Water zonder koolzuur
bijvullen en bevestigen.
10. Spoel het waterreservoir en breng
het waterfilter opnieuw aan (indien u
dit had verwijderd).
11. Vers water zonder koolzuur tot aan
de markering “max” vullen en de
watertank weer plaatsen.
Het programma loopt af.
Duur: ca. 2 minuten
12. De kom legen en bevestigen.
13. Maak de lekschaal leeg en plaats
deze terug.
14. Het melkreservoir legen, reinigen en
weer aansluiten.
Het programma is beëindigd. Het
apparaat is weer klaar voor gebruik.
15. De toets $/± indrukken om het
programma te verlaten.
1. De toets $/± indrukken, om het
menu te openen.
2. Met de draaiknop "Ontkalken"
selecteren.
3. De draaiknop indrukken om het
programma te starten.
95
Page 96

nl Serviceprogramma's
Reinigen
Duur: ca. 6 minuten
1. De toets $/± indrukken, om het
menu te openen.
2. Met de draaiknop "Reinigen"
selecteren.
3. De draaiknop indrukken om het
programma te starten.
De aanwijzingen in het display
begeleiden u door het programma.
4. Maak de lekschaal leeg en plaats
deze terug.
5. Open het poedervak, werp er een
reinigingstablet in, sluit het
poedervak en bevestig dit.
6. Plaats een kom met een capaciteit
van 1,0 l onder het uitloopsysteem
en bevestig dit.
Het programma loopt af.
Duur: ca. 5 minuten
7. De kom legen en bevestigen.
Het programma is beëindigd. Het
apparaat is weer klaar voor gebruik.
8. De toets $/± indrukken om het
programma te verlaten.
calc’nClean
Duur: ca. 26 minuten
calc‘nClean combineert de afzonderlijke
functies "Ontkalken" en "Reinigen". Als
de beide programma's vlak na elkaar
moeten worden uitgevoerd, stelt het
apparaat automatisch dit
serviceprogramma voor.
De regel onder in het display geeft aan
over hoeveel minuten bijv. de watertank
gespoeld en water bijgevuld moet
worden.
4. Maak de lekschaal leeg en plaats
deze terug.
5. Het melkreservoir legen, reinigen en
weer aansluiten.
6. Open het poedervak, werp er een
reinigingstablet in, sluit het
poedervak en bevestig dit.
7. Verwijder het waterfilter (indien
aanwezig) en bevestig dit.
8. De lege watertank tot de markering
“0,5 l” met lauwwarm water vullen.
Daarin 1 ontkalkingstablet TZ80002
oplossen.
9. Plaats een kom met een capaciteit
van 1,0 l onder het uitloopsysteem
en bevestig dit.
Het programma loopt af.
Duur: ca. 19 minuten
Info: als er te weinig
ontkalkingsoplossing in de watertank
zit, verschijnt er een overeenkomstige
melding. Water zonder koolzuur
bijvullen en bevestigen.
10. Spoel het waterreservoir en breng
het waterfilter opnieuw aan (indien u
dit had verwijderd).
11. Vers water zonder koolzuur tot aan
de markering “max” vullen en de
watertank weer plaatsen.
Het programma loopt af.
Duur: ca. 7 minuten
12. De kom legen en bevestigen.
13. Maak de lekschaal leeg en plaats
deze terug.
14. Het melkreservoir legen, reinigen en
weer aansluiten.
Het programma is beëindigd. Het
apparaat is weer klaar voor gebruik.
15. De toets $/± indrukken om het
programma te verlaten.
1. De toets $/± indrukken, om het
menu te openen.
2. Met de draaiknop "calc’nClean"
selecteren.
3. De draaiknop indrukken om het
programma te starten.
De aanwijzingen in het display
begeleiden u door het programma.
96
Page 97

Wat te doen bij storingen? nl
3 Wat te doen bij
storingen?
Wat te doen bij storingen?
Storingen worden vaak veroorzaakt
door een kleinigheid. Probeer voordat u
Storingentabel
Probleem Oorzaak Oplossing
Sterk wisselende koffie- of
melkschuimkwaliteit.
Er kan geen heet water worden
afgenomen.
Onvoldoende of geen melkschuim.
Het melksysteem zuigt geen
melk aan.
De persoonlijk ingestelde vulhoeveelheid wordt niet bereikt,
de koffie druppelt alleen maar
of stroomt helemaal niet meer.
Er stroomt alleen water, geen
koffie.
Het apparaat is verkalkt. Het apparaat ontkalken volgens de
Het melksysteem of de opname
van het melksysteem is verontreinigd.
Het melksysteem of de opname
van het melksysteem is verontreinigd.
Melk niet geschikt. Gebruik geen gekookte melk. Bij voor-
Het apparaat is verkalkt. Het apparaat conform de instructies
Het melksysteem is niet juist in
elkaar gezet.
Verkeerde volgorde aansluiting melkreservoir en
melksysteem.
De maalfijnheid is te fijn.
De gemalen koffie is te fijn.
Het apparaat is sterk verkalkt. Het apparaat conform de instructies
Er zit lucht in het waterfilter. Dompel het waterfilter zo lang onder in
Een leeg bonenreservoir wordt
niet door het apparaat herkend.
De koffieschacht op de zetgroep is verstopt.
contact opneemt met de servicedienst
de storing zelf op te lossen met behulp
van de tabel.
Lees de veiligheidsaanwijzingen aan het
begin van deze handleiding.
handleiding.
Het melksysteem of de opname reini-
gen. ~ "Melksysteem reinigen"
op pagina 92
Het melksysteem of de opname reinigen. ~ "Melksysteem reinigen"
op pagina 92
keur koude melk met een vetgehalte
van minstens 1,5% gebruiken.
ontkalken.
Alle delen correct in elkaar zetten. ~
Afb. #
Eerst het melksysteem in het uit-
loopsysteem aansluiten en vervolgens
het melkreservoir.
Stel de maalfijnheid grover in.
Grover gemalen koffie gebruiken.
ontkalken.
water tot er geen luchtbellen meer ontsnappen. Breng het filter hierna weer
aan.
Koffiebonen vullen
Aanwijzing: het apparaat stelt zich bij
de volgende bereidingen op de koffiebonen in.
Zetgroep reinigen ~ "Zetgroep
reinigen" op pagina 93
97
Page 98

nl Wat te doen bij storingen?
Koffie heeft geen "crème"
(schuimlaag).
De koffie is te “zuur”. De maalgraad is te grof inge-
De koffie is te “bitter”. De maalfijnheid is te fijn inge-
De koffie smaakt „verbrand“. Te hoge bereidingstempera-
Het waterfilter blijft niet vastzitten in de watertank.
Het koffiedik is niet compact en
te nat.
Lekwater op binnenzijde apparaatbodem bij verwijderde lekschaal.
De lekschaal kan niet worden
verwijderd.
Koffiesoort niet geschikt. Gebruik een koffiesoort met een hoger
De bonen zijn niet meer brandvers.
De maalfijnheid is niet afgestemd op de koffiebonen.
steld of de gemalen koffie is te
grof.
Koffiesoort niet geschikt. Gebruik een donkerder gebrande
steld of de voorgemalen koffie
is te fijnkorrelig.
Koffiesoort niet geschikt. Andere koffiesoort gebruiken.
tuur
De maalfijnheid is te fijn ingesteld of de voorgemalen koffie
is te fijnkorrelig.
Koffiesoort niet geschikt. Andere koffiesoort gebruiken.
Het waterfilter is niet correct
bevestigd.
De maalfijnheid is te fijn of te
grof ingesteld, of er is niet
genoeg gemalen koffie
gebruikt.
Lekschaal te vroeg verwijderd. Lekschaal pas enkele seconden na de
De koffiedikhouder is zeer vol.
De koffiedik- afstrijker klemt.
percentage robustabonen.
Verse bonen gebruiken.
De maalfijnheid fijner instellen.
Stel de maalgraad fijner in of gebruik
fijner gemalen koffie.
soort.
Stel de maalfijnheid grover in of
gebruik grover gemalen koffie.
Temperatuur verlagen.
~ "Drankinstellingen aanpassen"
op pagina 82
Stel de maalfijnheid grover in of
gebruik grover gemalen koffie.
Dompel het waterfilter zo lang onder in
water tot er geen luchtbellen meer ontsnappen. Breng het filter hierna weer
aan.
Druk het waterfilter stevig en recht in
de tankaansluiting.
Stel de maalfijnheid grover of fijner in
of gebruik 2 afgestreken maatlepels
gemalen koffie.
laatste drankbereiding wegnemen.
Binnenruimte van de zetgroep reinigen. ~ "Zetgroep reinigen"
op pagina 93
Koffiedik-afstrijker correct inzetten.
98
Page 99

Wat te doen bij storingen? nl
Het uitloopsysteem kan niet
Verkeerde volgorde Eerst het uitloopsysteem (met
worden gemonteerd of gedemonteerd.
Displaymelding "Bonenreservoir vullen". Ondanks gevuld
De bonen vallen niet in het
maalwerk (te vette bonen).
bonenreservoir )B of het
maalwerk maalt geen koffiebonen.
Display-indicatie "Lekschalen
legen." ondanks lege lekschaal.
Bij een uitgeschakeld apparaat
wordt het legen niet herkend.
De lekschaal is verontreinigd. Reinig de lekschaal grondig.
Displayweergave “Water zon-
der koolzuur bijvullen” of “Filter verwijderen”
Waterreservoir is onjuist aange-
bracht.
Koolzuurhoudend water in de
watertank.
Vlotter in de watertank zit vast. Watertank verwijderen en grondig rei-
Nieuw waterfilter niet volgens
de gebruiksaanwijzing
gespoeld.
Er zit lucht in het waterfilter. Dompel het waterfilter zo lang onder in
Waterfilter oud. Plaats een nieuw waterfilter.
Displaymelding "Zetgroep reini-
gen"
Verontreinigde zetgroep. Zetgroep reinigen
Te veel gemalen koffie in de
zetgroep.
Het mechanisme van de zet-
groep beweegt stroef.
Bel de hotline als u de problemen niet kunt verhelpen!
De telefoonnummers staan op de laatste pagina's van de handleiding.
--------
melksysteem) aansluiten vervolgens
het melkreservoir of bij demontage
eerst het melksysteem verwijderen en
dan het uitloopsysteem.
Licht tegen het bonenreservoir tikken.
Eventueel een ander soort koffie
gebruiken. Maak het bonenreservoir
leeg en veeg dit schoon met een droge
doek.
Schakel het apparaat in, verwijder de
lekschaal en plaats deze terug.
Breng de watertank juist aan.
Vul de watertank met schoon leidingwater.
nigen.
Spoel het waterfilter volgens de
gebruiksaanwijzing en neem het in
gebruik.
water tot er geen luchtbellen meer ontsnappen. Breng het filter hierna weer
aan.
Zetgroep reinigen Gebruik maximaal 2
afgestreken maatlepels gemalen koffie.
Zetgroep reinigen ~ "Dagelijks
onderhoud en reiniging" op pagina 91
99
Page 100

nl Servicedienst
4 Servicedienst
Servicedienst
Technische gegevens
Elektrische aansluiting (spanning – frequentie) 220–240 V ∼, 50 / 60 Hz
Verwarmingsvermogen 1500 W
Maximaler pompdruk, statisch 19 bar
Maximale capaciteit waterreservoir (zonder filter) 2,3 l
Maximale capaciteit rechter/linker bonenreservoir ≈ 200/235 g
Lengte netsnoer 100 cm
Afmetingen (H x B x D) 38,5 x 30,1 x 47,0 cm
Gewicht, leeg 10–12 kg
Type maalwerk Keramisch
E-nummer en FD-nummer
Geef tijdens het telefoongesprek altijd
het volledige productnummer (E-nr.) en
het fabricagenummer (FD-nr.) van uw
apparaat op, zodat wij u goed van
dienst kunnen zijn. U vindt de nummers
op het typeplaatje h. (~ Afb. ")
Om niet te lang te hoeven zoeken
wanneer u de servicedienst nodig heeft,
kunt u hier direct de gegevens van uw
apparaat en het telefoonnummer van de
servicedienst invullen.
E-nr.
Servicedienst O
De contactgegevens voor de
servicedienst van alle landen vindt u op
de laatste pagina van deze handleiding.
FD-nr.
Garantievoorwaarden
Voor dit apparaat gelden de
garantievoorwaarden die worden
uitgegeven door de vertegenwoordiging
van ons bedrijf in het land van aankoop.
De leverancier, bij wie u het apparaat
heeft gekocht, geeft u hierover graag
meer informatie. Om aanspraak te
maken op de garantie heeft u altijd uw
aankoopbewijs nodig.
Wijzigingen voorbehouden.
100
 Loading...