

Page 1
Page 2
f
r
Safety Precautions
Switch off in hospitals or in the
vicinity of medical devices (e.g.,
pacemakers or hearing aids).
Mobile phones can interfere with
the function of these devices.
Always use the hands-free kit for
calls while driving! Use of both
earpieces of the headset while
driving is not recommended, and
may create hazardous and/or illegal
travel conditions.
FCC and Airline Regulations
prohibit using your phone while in
the air. Turn your phone OFF
before boarding an airplane.
Check and comply with the policy
of your airline regarding the use o
your phone while the airplane is on
the ground.
Switch off near gas stations, fuel
depots, chemical plants or blasting
operations. Wireless phones can
interfere with the operation of
technical installations.
The ring tone and hands-free
speaker are reproduced through the
earpiece. Never hold the handset to
your ear when the handset is
ringing or when using the
hands-free speaker mode. Serious
and permanent damage could occu
to your hearing.
This product contains sound files
with pre-set volume limits. These
limits prevent these sounds from
exceeding recommended decibel
levels to avoid hearing loss and/or
damage (max. 140dB SPL). Sound
files created by the user do not,
however, contain these pre-set
volume limits. The user should take
care that user –created sound files
used with this product do not
exceed these recommended decibel
levels.
Do not use optic magnification
devices to examine the active
infrared interface [Class 1 LED
product (classified according to
IEC 60825-1)].
Page 3
Safety Precautions
SIM card, MultiMediaCard™ and
stylus may be removed. Caution:
small parts could be swallowed by
children.
In the unlikely event of a crack in
the silver-colored outer housing of
this product, exposure to Nickel
may occur. Nickel is a chemical
known to the State of California to
cause cancer and/or reproductive
toxicity.
The voltage specified on the power
supply must not be exceeded.
Neither the phone nor the battery
(100% mercury-free) should be
opened under any circumstances.
Changes to this device are strictly
prohibited, as they will invalidate
the type approval criteria required
for operation of the unit.
Make sure that you keep separate copies
of all important data by saving it on a
computer hard disk or other medium. Note
that all data stored in the unit’s memory is
deleted whenever batteries go dead.
Memory contents can also become lost or
corrupted due to malfunction and repair
of the unit.
Page 4
t
Safety Precautions
Please observe:
Dispose of used batteries and
phones according to the legal
regulations.
Wireless phones can interfere with
the operation of nearby TVs,
radios, and PCs.
We recommend you use only
original accessories to avoid
possible damage and ensure that
the phone complies with all
relevant regulations.
Improper use invalidates the warranty!
Battery warning:
Your Pocket PC contains a lithium
polymer battery pack. There is a
risk of fire and burns if the battery
pack is handled improperly. Do no
disassemble, crush, puncture, short
external contacts, or dispose of in
fire or water. Do not attempt to
open or service the battery pack.
Replace only with the battery pack
designated for this product.
Dispose of used batteries properly.
Page 5
Precautions during use
Safety Information
Disassembly
Warning
Abnormal conditions
Continued use of the unit while it
is emitting smoke or a strange
odor may result in fire and
electrical shock. Immediately
turn off the power, unplug the
AC adapter from the wall outlet,
remove the batteries and contact
your original dealer to request
servicing.
Water and foreign matter
Should any foreign matter
(metal, water or other liquid)
ever get into the unit,
immediately turn off the power,
unplug the AC adapter from
the wall outlet, remove the
batteries and contact your
original dealer to request
servicing.
Dropping and damage
Should the unit ever fall or
otherwise become damaged,
unplug the AC adapter from
the power outlet and contact your
original dealer. Continued use
may result in fire and electrical
shock.
Never try to take the unit apart or
modify it in any way. Doing so
may result in fire and electrical
shock.
Magnetic force
If you are fitted with a
pacemaker, keep the unit away
from your chest area. In
particular, do not carry the unit in
your breast pocket. The magnetic
force generated by the speaker
built into the unit could possibly
affect the operation of a
pacemaker. Should you ever
suspect a problem, immediately
move away from the unit and
seek medical advice.
Caution
Memory protection
Make sure that you keep separate
copies of all important data by
saving it on a computer hard disk
or other medium. Note that all
data stored in the unit’s memory
is deleted whenever batteries go
dead. Memory contents can also
become lost or corrupted due to
malfunction of the unit, servicing
of the unit, or when downloading
data or software updates onto the
unit. Under no circumstances is
Siemens responsible for lost data.
Page 6
Safety Information
Location
Do not locate the unit in an area
subject to large amounts of
humidity or dust. Doing so
may result in fire and electrical
shock.
Keep the unit away from food
preparation areas, cooking
equipment and anywhere else it
might be exposed to oil, smoke
or steam. Such conditions may
result in fire and electrical shock.
Avoid unstable surfaces
Never place the unit on an
unstable surface, on a high shelf
or in any other unstable location.
Doing so may cause the unit to
fall and may result in personal
injury.
Magnetic force
Cards and other small items
Keep SD cards, MultiMedia
cards, SIM cards and other small
objects out of the reach of small
children.
Handling the stylus
Never insert the stylus into your
ear or eye.
Keep the unit away from ATM
cards, credit cards and any other
magnetic cards during transport
and storage. The magnetic force
generated by its speaker can
render magnetic cards unusable.
Keep the unit away from
televisions and other radio wave
receivers. The magnetic force
generated by its speaker can
cause interference with radio
wave reception.
Page 7
AC adapter
Safety Information
Warning
Never use a voltage other than
that for which the AC adapter is
rated. Do not plug the unit into a
power outlet that is shared by
other devices. This may result in
fire and electrical shock.
Never modify the power cord or
excessively bend, twist, or pull it.
This may result in fire and
electrical shock.
Do not allow the power cord to
become damaged. Do not place
heavy objects on the power cord
or expose it to heat. A damaged
power cord may result in fire and
electrical shock.
Never touch the AC adapter
while your hands are wet. Doing
so may result in electrical shock.
Caution
Unplug the AC adapter from the
wall outlet whenever you leave
the unit unattended for long
periods.
At least once a year, unplug the
AC adapter from the power
outlet and clean the area around
the prongs of the plug. Dust
accumulated around the prongs
can result in fire.
Make sure that you unplug the
AC adapter from the wall outlet
before attempting to move the
unit to another location.
Always grasp the AC adapter
when unplugging it from a wall
outlet. Pulling on the power cord
can damage it and may result in
fire and electrical shock.
Should the power cord ever
become seriously damaged
(internal wiring exposed or
shorted), contact your original
dealer to request servicing.
Continued use of a seriously
damaged power cord may result
in fire and electrical shock.
Use only the AC adapter
specified for this unit. Use of
another type of AC adapter can
damage the battery pack and may
result in fire and personal injury.
Keep the power cord away from
cooking equipment and other
sources of heat. Heat can melt the
insulation of the power cord and
may result in fire and electrical
shock.
Page 8
Safety Information
Display screen precautions
Caution
Never apply strong pressure to
the LCD screen or subject it to
strong impact. Doing so can
cause the LCD panel glass to
crack or break.
Should the LCD panel glass ever
crack or break, never touch the
liquid inside the panel. LCD
liquid can cause skin irritation.
Should LCD panel liquid ever
get into your mouth, gargle with
water and seek medical advice
immediately.
Should LCD panel liquid ever
get into your eyes or onto your
skin, flush the exposed area with
clean water for at least 15
minutes and then seek medical
advice.
Data and telephone
communications
When walking
Never operate or use the unit for
data or telephone communications while walking. Doing so
may result in a fall or road
accident.
When operating a motor vehicle
Never operate or use the unit for
data communications while
operating a car, motorcycle or
any other vehicle. Doing so may
result in a road accident.
Never stop or park in illegal or
unsafe areas in order to operate
or use the unit for data or
telephone communications.
Doing so may result in a road
accident.
Using the unit for data or
telephone communications can
affect the operation of electronic
devices of certain automotive
vehicles.
Page 9
Safety Information
Use near medical equipment
Make sure that you turn off the
unit in the vicinity of electronic
medical equipment (in an
operating theatre, intensive care
unit, etc.) in hospitals or other
medical facilities. Signals
emitted from the unit can affect
the operation of such equipment.
Medical device wearers
Wearers of electronic medical
devices should check with and
receive the approval of their
doctor or main health care
provider before operating or
using the unit for data or
telephone communications.
Wearers of pacemakers or
similar devices should keep this
unit away from the chest area
when using it. Affected users
should not carry the unit in their
breast pocket. Signals emitted
from the unit can affect pacemakers and other electronic
devices. Should you suspect that
use of this unit causes some
abnormality with your device,
immediately move the unit away
from your body and seek medical
advice.
Precision machinery
Whenever you are in the vicinity
of industrial robots or other
precision machinery, make sure
that you comply with local rules
and regulations governing the
use of radio wave-emitting
devices such as this unit.
Other precautions
Switch off the unit near gasoline
stations, fuel depots, chemical
plants or blasting operations.
Make sure that you turn off the
unit on a crowded train or at any
other time you might be in close
physical contact with the wearer
of a pacemaker or other medical
device.
Page 10

Safety Information
Important:
using your mobile phone.
As this mobile phone is equipped with a fixed
(non-retractable) antenna, some paragraphs in
the below text may not be applicable.
Read this information before
Antenna care
Use only the supplied or an approved
replacement antenna. Unauthorized antennas,
modifications, or attachments could damage
the phone and may violate FCC regulations.
Phone operation
Normal position
Hold the phone as you would any other
telephone with the antenna pointed up and
over your shoulder.
Tips on efficient operation
For your phone to operate most efficiently:
• Extend your antenna fully
(if applicable).
phones while driving is permitted, Siemens
encourages persons to use their phones
responsibly and to employ hands-free devices.
Also, if using your phone while driving,
please:
• Give full attention to driving – driving
safely is your first responsibility;
• Use hands-free operation, if available;
•
Pull off the road and park before making or
answering a call, if driving conditions so
require.
For vehicles equipped with Air Bags
An air bag inflates with great force.
place objects, including either installed or
portable wireless equipment, in the area over
the air bag or in the air bag deployment area.
If in-vehicle wireless equipment is improperly
installed and the air bag inflates, serious
injury could result.
DO NOT
• Do not touch the antenna unnecessarily
when the phone is in use. Contact with the
antenna affects call quality and may cause
the phone to operate at a higher power
level than otherwise needed.
Driving
Laws pertaining to the use of mobile phones
while driving vary significantly from
state-to-state and sometimes even from
locality-to-locality within states. For example,
some areas may allow persons to use their
mobile phones only if they employ a
hands-free device, and some areas may
prohibit the use of mobile phones entirely.
Accordingly, Siemens recommends that
persons check the laws for the areas in which
they drive or will be driving. For areas where
the use of mobile
Electronic devices
Most modern electronic equipment is shielded
from radiofrequency (RF) signals. However,
certain electronic equipment may not be
shielded against the RF signals from your
wireless phone.
Pacemakers
The Health Industry Manufacturer’s
Association recommends that a minimum
separation of six inches (6”) be maintained
between a handheld wireless phone and a
pacemaker to avoid potential interference
with the pacemaker. These recommendations
are consistent with the independent research
by and recommendations of Wireless
Technology Research.
Page 11

Safety Information
Persons with pacemakers:
• should ALWAYS keep the phone more
than six inches from their pacemaker when
the phone is turned ON;
• should not carry the phone in a breast
pocket;
•
should use the ear opposite the pacemaker
to minimize the potential for interference;
• should turn the phone OFF immediately if
there is any reason to suspect that
interference is taking place.
Hearing Aids
Some digital wireless phones may interfere
with some hearing aids. In the event of such
interference, you may want to consult your
service provider or your hearing aid
manufacturer to discuss alternatives.
Other Medical Devices
If you use any other personal medical devices,
consult the manufacturers of your devices to
determine if they are adequately shielded
from external RF energy. Your physician may
be able to assist you in obtaining this
information.
Turn your phone OFF in health care facilities
when any regulations posted in these areas
instruct you to do so. Hospitals or health care
facilities may be using equipment that could
be sensitive to external RF energy.
Vehicles
RF signals may affect improperly installed or
inadequately shielded electronic systems in
motor vehicles. Check with the manufacturer
or its representative regarding your vehicle.
You should also consult the manufacturer of
any equipment that has been added to your
vehicle.
Posted Facilities
Turn your phone OFF in any facility where
posted notices so require.
Blasting areas
To avoid interfering with blasting operations,
turn your phone OFF when in a “blasting
area” or in areas posted: “Turn off two-way
radio.” Obey all signs and instructions.
Potentially explosive atmospheres
Turn your phone OFF when in any area with a
potentially explosive atmosphere and obey all
signs and instructions. Sparks in such areas
could cause an explosion or fire resulting in
bodily injury or even death.
Page 12

Safety Information
Areas with a potentially explosive atmosphere
are often but not always clearly marked. They
include: fueling areas such as gasoline
stations; below deck on boats; fuel or
chemical transfer or storage facilities;
vehicles using liquefied petroleum gas (such
as propane or butane); areas where the air
contains chemicals or particles, such as grain,
dust or metal powders; and any other area
where you would normally be advised to turn
off your vehicle engine.
Emergency Calls
Your wireless phone can be used to make
emergency calls. Check to ensure you have a
strong enough signal and that the battery has
enough available charge.
You can enter the local emergency number
such as 911 and then press the
(talk) key.
Page 13

Table of Contents
1. Getting Started .................................................................................................. 7
1.1 Welcome ...........................................................................................................................7
1.2 Where to Find Information ............................................................................................ 7
Hardware Features.............................................................................................. 7
2.
2.1 Front Panel Components ................................................................................................ 8
2.2 Back Panel Components .................................................................................................9
2.3 Bottom Edge Components .............................................................................................. 9
2.4 Accessories...................................................................................................................... 10
2.4.1 USB Cradle .............................................................................................................................................10
2.4.2 SD and MMC Cards ................................................................................................................................10
2.4.3 External Battery.......................................................................................................................................11
2.4.4 USB cable................................................................................................................................................12
2.4.5 Cradle-less Charging Adapter .................................................................................................................12
2.4.6 Serial Cable .............................................................................................................................................13
2.5 Battery Information and Life....................................................................................... 13
2.5.1 Recharging the Battery ...........................................................................................................................13
2.5.2 When Your Battery Is Low .....................................................................................................................14
3. Understanding Your Device ........................................................................... 15
3.1 How to Reset the Device and Clear Its Memory......................................................... 15
3.1.1 To perform a soft reset ............................................................................................................................15
3.1.2 To perform a full reset.............................................................................................................................15
3.2 Backing Up Files ............................................................................................................16
3.2.1 To save Word or Excel files to a memory card:......................................................................................16
3.2.2 Backup or restore your system using SD Backup: ..................................................................................17
3.2.3 To backup to FlashROM: ........................................................................................................................17
3.3 Calibrating Your Screen ............................................................................................... 18
3.4 Understanding the Today Screen................................................................................. 18
3.5 Opening and Switching Between Programs................................................................ 19
3.6 Understanding the Navigation Command Bars .........................................................21
3.7 Pop up Menus ................................................................................................................21
3.8 Notifications ................................................................................................................... 22
3.9 Different Ways to Enter Information on Your Device............................................... 22
3.9.1 Entering Text Using the Input Panel .......................................................................................................22
3.9.2 To type with the soft keyboard:...............................................................................................................23
3.9.3 To use Letter Recognizer: .......................................................................................................................23
3.9.4 To use Block Recognizer: .......................................................................................................................24
3.9.5 Using the Script Transcriber....................................................................................................................25
3.9.6 Selecting Text That Has Been Entered....................................................................................................26
3.9.7 Editing Text That Has Been Entered.......................................................................................................26
3.10 Writing on the Screen ................................................................................................... 26
3.10.1 To write on the screen:............................................................................................................................27
3.10.2 To select writing:.....................................................................................................................................27
3.10.3 To convert writing to text:.......................................................................................................................28
3.10.4 Tips for getting good recognition:...........................................................................................................28
3.11 Drawing on the Screen ..................................................................................................28
3.11.1 To create a drawing:................................................................................................................................29
1
Page 14

3.11.2
To select a drawing: ................................................................................................................................29
3.12 Creating an Audio or Written Note............................................................................. 29
3.12.1 To create an audio recording:..................................................................................................................30
3.12.2 Using My Text ........................................................................................................................................30
3.13 Find and Organize Information................................................................................... 30
3.14 Managing Memory ........................................................................................................ 31
3.14.1 To view memory allocation and availability:..........................................................................................31
3.14.2 To make available storage memory:........................................................................................................32
3.15 Customizing Your Device ............................................................................................. 32
3.16 Changing the Default Button Settings ......................................................................... 34
3.17 Adding or Removing Programs ................................................................................... 35
3.17.1 To add programs using ActiveSync: .......................................................................................................35
3.17.2 To add a program directly from the Internet: ..........................................................................................36
3.17.3 To add a program to the Start menu:.......................................................................................................36
3.17.4 To remove programs: ..............................................................................................................................37
Chapter 4: Phone .................................................................................................... 37
4.1 About Your Phone ......................................................................................................... 37
4.2 Installing The SIM Card............................................................................................... 37
4.3 Removing the SIM card ................................................................................................ 38
4.4 About The Dialer Screen ..............................................................................................39
4.5 The Navigation Pad and Dialing .................................................................................. 40
4.6 Checking Your Connection to a Wireless Network ...................................................41
4.7 Turning The Phone On and Off................................................................................... 42
4.7.1 Turning The Phone Off ...........................................................................................................................42
4.7.2 Turning The Phone On ............................................................................................................................42
4.8 Adjusting The Phone Volume ...................................................................................... 42
4.9 Back Spacing and Deleting in the Phone Dialer ......................................................... 42
4.9.1 Back Spacing Over Numbers ..................................................................................................................43
4.9.2 Deleting Numbers ...................................................................................................................................43
4.10 Saving Personal Numbers to the SIM Card................................................................ 43
4.11 Basic Dialing Features................................................................................................... 43
4.11.1 Making a call...........................................................................................................................................43
4.11.2 Enabling the Speakerphone.....................................................................................................................47
4.11.3 Answering or Rejecting a Call ................................................................................................................48
4.11.4 Ending a Call...........................................................................................................................................49
4.11.5 Managing More Than One Call...............................................................................................................49
4.11.6 Making a Note.........................................................................................................................................51
4.12 Call Related Features.................................................................................................... 52
4.12.1 Checking Your Voice Mail .....................................................................................................................52
4.13 Adding and Transferring Contact Information .........................................................52
4.13.1 Storage Locations for Contacts ...............................................................................................................52
4.13.2 The Importance of Storing Contacts in Multiple Locations ....................................................................53
4.13.3 Mechanics of Adding and Transferring Contacts....................................................................................53
4.13.4 Adding and Transferring Contacts to your SIM Card.............................................................................54
4.13.5 To transfer contacts from SIM to Microsoft Contacts:............................................................................54
4.13.6 To Add a Phone Number to Speed Dial ..................................................................................................55
4.13.7 To Add a Contact From the Call Log......................................................................................................55
4.14 Managing Your Call Log .............................................................................................. 55
4.14.1 The Different Types of Call Logs ...........................................................................................................56
4.14.2 Viewing Durations of Past Calls .............................................................................................................56
4.14.3 Deleting Individual Calls From the Call Log..........................................................................................56
4.14.4 Deleting All Calls From the Call Log .....................................................................................................57
2
Page 15

4.14.5
Setting Call Log Size Limits ...................................................................................................................57
4.15 Customizing Your Phone.............................................................................................. 57
4.15.1 Selecting Ring Types and Ring Tones ....................................................................................................57
4.15.2 Downloading Ring Tones........................................................................................................................57
4.15.3 Managing Ring Tones .............................................................................................................................58
4.15.4 Displaying All Ring Tones on Your Device ...........................................................................................58
4.15.5 Testing Ring Tones .................................................................................................................................58
4.15.6 Adding A New Ring Tone.......................................................................................................................59
4.16 Your Phone’s PIN Function ......................................................................................... 59
4.16.1 Enabling Your Phone’s PIN....................................................................................................................59
4.16.2 Changing Your Phone’s PIN...................................................................................................................59
4.17 Enabling Caller ID ........................................................................................................ 60
4.18 Enabling Call Forwarding............................................................................................ 60
4.19 Call waiting .................................................................................................................... 61
4.19.2 To view your voice and SMS access numbers: .......................................................................................62
4.19.3 To view the network that has been selected:...........................................................................................62
4.19.4 To select a different network:..................................................................................................................62
4.19.5 To set preferred networks:.......................................................................................................................63
4.19.6 Band Reselection When Traveling Outside the United States ................................................................63
4.19.7 To establish automatic call answering ....................................................................................................63
4.19.8 To enable Key Lock: ...............................................................................................................................64
4.20 Enabling Broadcast Channels......................................................................................64
4.21 Additional Dialing Information ................................................................................... 66
4.21.1 Making Emergency Calls ........................................................................................................................66
4.21.2 Making International Calls......................................................................................................................66
5. Getting Connected .......................................................................................... 66
5.1 Connecting to an E-Mail Server................................................................................... 67
5.2 Getting More Help on Connecting............................................................................... 68
6. Wireless Data Programs................................................................................. 69
6.1 Pocket Internet Explorer: Browsing Web and WAP pages........................................ 69
6.1.1 Using Pocket Internet Explorer ...............................................................................................................69
6.1.2 Viewing Mobile Favorites and Channels ................................................................................................70
6.1.3 Browsing the Internet ..............................................................................................................................70
6.1.4 Synchronizing Mobile Favorites To Your PC.........................................................................................70
6.1.5 Creating a Mobile Favorite on Your PC..................................................................................................70
6.1.6 Optimizing Internet-Related Memory Usage on Your Device................................................................71
6.1.7 Using AvantGo Channels ........................................................................................................................71
6.2 MSN Messenger: Instant Messaging ........................................................................... 71
6.2.1 Opening MSN Messenger .......................................................................................................................72
6.2.2 Configuring MSN Messenger..................................................................................................................72
6.2.3 Working with Contacts in MSN Messenger............................................................................................73
6.2.4 Chatting with Contacts in MSN Messenger ............................................................................................73
6.3
Inbox: Sending and Receiving E-mail or SMS .......................................................... 74
6.3.1 Synchronizing E-mail Messages .............................................................................................................74
6.3.2 Using the Message List ...........................................................................................................................75
6.3.3 Creating an SMS or E-mail .....................................................................................................................76
6.3.4 Managing Messages and Folders.............................................................................................................76
6.3.5 Folder behavior with a direct connection to an e-mail server..................................................................76
6.3.6 Transferring Items Using Infrared...........................................................................................................77
3
Page 16
6.4 Terminal Services Client .................................................................................... 77
6.4.1 Connecting to a Terminal Server.............................................................................................................77
6.4.2 Disconnecting from a Terminal Server Without Ending Session............................................................78
6.4.3 Disconnecting from a Terminal Server By Ending a Session .................................................................78
6.4.4 Navigating Within a Terminal Server Connection ..................................................................................78
6.5 Tips and Tricks When Connected ............................................................................... 78
6.5.1 Improving Display Performance .............................................................................................................78
6.5.2 Improving Browser Performance ............................................................................................................78
7. Microsoft ActiveSync...................................................................................... 79
7.1 Synchronizing Files Between Your Device and Your PC .......................................... 80
8. Microsoft Pocket Outlook............................................................................... 80
8.1
Calendar: Scheduling Appointments and Meetings ................................................... 81
8.1.1 Creating an Appointment ...............................................................................................................................81
8.1.2 Using the Summary Screen .....................................................................................................................82
8.1.3 Creating Meeting Requests......................................................................................................................82
8.2 Contacts: Keeping Track of Friends and Colleagues ........................................82
8.2.1 Creating a Contact ...................................................................................................................................83
8.2.2 Finding a Contact in Your Device...........................................................................................................84
8.2.3 Using the Summary Screen .....................................................................................................................84
8.3
8.3.1 Creating a Task........................................................................................................................................85
8.3.2 Using the Summary Screen .....................................................................................................................86
Tasks: Keeping a To Do List ............................................................................... 85
8.4 Notes: Capturing Thoughts and Ideas ............................................................... 86
9. Companion Programs..................................................................................... 87
9.1
9.4.1 About Typing Modes in Pocket Word.....................................................................................................89
9.4.2 About Writing Modes in Pocket Word....................................................................................................89
9.4.3 About the Drawing Mode in Pocket Word..............................................................................................90
9.4.4 About the Recording Mode in Pocket Word ...........................................................................................90
9.5
9.6
9.7
9.7.1 Loading Books onto Your Device...........................................................................................................93
9.7.2 Using the Library ....................................................................................................................................93
9.7.3 Reading a Book .......................................................................................................................................94
9.7.4 Using Reader Features.............................................................................................................................94
9.7.5 Removing a Book....................................................................................................................................95
9.8 Image Viewer........................................................................................................ 95
9.8.1 Transferring Images to your Siemens SX56 Wireless PDA Phone.........................................................95
9.8.2 Changing your Image List Layout...........................................................................................................95
Pocket Word ......................................................................................................... 87
Pocket Excel ..........................................................................................................91
Windows Media Player....................................................................................... 92
Microsoft Reader................................................................................................. 92
4
Page 17

9.8.3
9.8.4 Deleting an Image ...................................................................................................................................96
9.8.5 Refreshing all Images..............................................................................................................................96
9.8.6 Arranging the Order of Images................................................................................................................96
Viewing Images.......................................................................................................................................96
9.9 Office Online .................................................................................................................. 96
9.9.1 To install Office Online...........................................................................................................................96
9.9.2 Starting the Application...........................................................................................................................97
9.10 Wireless Tools................................................................................................................ 98
9.10.1 Optimization Settings..............................................................................................................................98
9.10.2 Enabling and Disabling the Optimization Feature...................................................................................98
9.10.3 Optimization Status Settings ...................................................................................................................99
9.10.4 To enable and disable Optimization........................................................................................................99
9.10.5 Setting the Image Quality Feature...........................................................................................................99
9.10.6 Blocking Content...................................................................................................................................100
9.10.7 Connecting to POP3 and IMAP4 Mail..................................................................................................100
9.10.8 Maintaining Your GPRS Connection....................................................................................................101
9.10.9 Pocket Guide .........................................................................................................................................101
10. Where to get More Help..............................................................................................102
Appendix A: Letter Recognizer............................................................................. 103
Appendix B: Troubleshooting............................................................................... 104
Resetting the Device and Clearing Its Memory ..................................................................... 104
To perform a soft reset:.........................................................................................................................................104
To perform a full reset:..........................................................................................................................................104
If the Battery Runs Low........................................................................................................... 105
Immediately Plug Into an External Power Source.................................................................................................105
Shorten Your Auto-Suspend Time........................................................................................................................105
Turn Off Sounds You Don’t Need ........................................................................................................................105
Turn Off Notification Lights.................................................................................................................................105
If You Set a Password, and Then Forget What It Is ............................................................. 105
If You Run Out of Memory ..................................................................................................... 105
Clear Some Space in Your Device’s Storage Memory .........................................................................................105
Clear Space in Program Memory by Closing Programs........................................................................................106
If Your Screen Freezes or Responds Slowly........................................................................... 106
If Your Screen is Blank ............................................................................................................ 106
If Your Screen Appears Dark and You Are Outside ............................................................106
If Items Display Incompletely On Your Screen..................................................................... 107
If Your Device Responds Inaccurately to Screen Taps ......................................................... 107
If Your Devices Responds Slowly or Not At All..................................................................... 107
If You Have Trouble Transferring Information via Infrared.............................................. 107
If You Have Trouble Using Your Phone To Make Calls ...................................................... 107
If You Have Trouble Connecting to the Internet .................................................................. 107
If You Have Trouble Connecting to a Particular Network .................................................. 108
If You Have Trouble With A Cable or Cradle Connection to Your PC ............................. 108
Appendix C: Regulatory Notices........................................................................... 109
Regulatory Agency Identification Numbers........................................................................... 109
European Union Notice ............................................................................................................ 109
Important Safety Information................................................................................................. 109
General Precautions ................................................................................................................. 110
Safety Precautions for Power Supply Unit............................................................................. 110
5
Page 18

Appendix D: Hardware Specifications ................................................................. 111
Appendix E: Icons................................................................................................. 112
Phone Icons................................................................................................................................ 112
PDA Icons .................................................................................................................................. 112
6
Page 19
1. Getting Started
1.1 Welcome
Congratulations on purchasing a Siemens SX56 Wireless PDA Phone. The integrated wireless voice and data capabilities mean
that as well as keeping your important PIM information up-to-date and close at hand, you can make calls, send and receive email,
and look up valuable information from the Internet or your company’s network anytime, anywhere. Also, with Microsoft
ActiveSync, the power of your device is increased by allowing you to synchronize the information on your PC with your device.
Picture yourself in the following situations:
x
While walking with a colleague, your SX56 rings. You look at the caller ID and see it’s your manager who is calling. She
asks if you two are free this afternoon for an emergency meeting. While your colleague fumbles through his paper organizer,
you press a button on your device and instantly see a list of today’s appointments and meetings. You are quickly able to tell
your manager your available times, and make a note of the new meeting while on the call. You hang up; send e-mail with a
schedule request for the three of you at the desired location.
x
You are meeting your friends tonight for dinner and a movie. You download the latest movie information from the Internet to
your PC and then synchronize it with your device. At dinner, you pull out your SX56 and review your movie options with
your friends.
x
A Calendar reminder alerts you that it is time to catch the bus. You grab your Siemens SX56 Wireless PDA Phone and catch
the bus just in time. Because ActiveSync keeps the information on your device up-to-date, you leisurely review your task list,
make notes about the new books and CDs you want to buy, and read and respond to e-mail messages. When you get back to
the office, ActiveSync transfers any task changes you made, your notes, and your e-mail message responses to your PC.
1.2 Where to Find Information
This user manual describes your device hardware, provides an overview of the programs on your device, and explains how to
connect your device to a PC, a network, or the Internet. For instructions on setting up your device, see the Quick Start Guide.
The following table is a guide to additional information to help you use your device.
For information on: See this source:
Programs on your device
Additional programs that can be installed on the
device
Connecting to and synchronizing with a PC The Quick Start Guide or ActiveSync Help on your PC. To
This User’s Guide and device Help. To view Help, tap
then Help.
The Siemens SX56 Wireless PDA Phone Companion CD.
view Help, click Help and then Microsoft ActiveSync Help.
and
Last-minute updates and detailed technical
information
Up-to-date information on your device http://www.microsoft.com/mobile/pocketpc
The Read Me files, located in the Microsoft ActiveSync folder
on the PC and on the Siemens SX56 Wireless PDA Phone
Companion CD.
2. Hardware Features
Your device has hardware buttons, and a stylus for selecting items and entering information.
7
Page 20
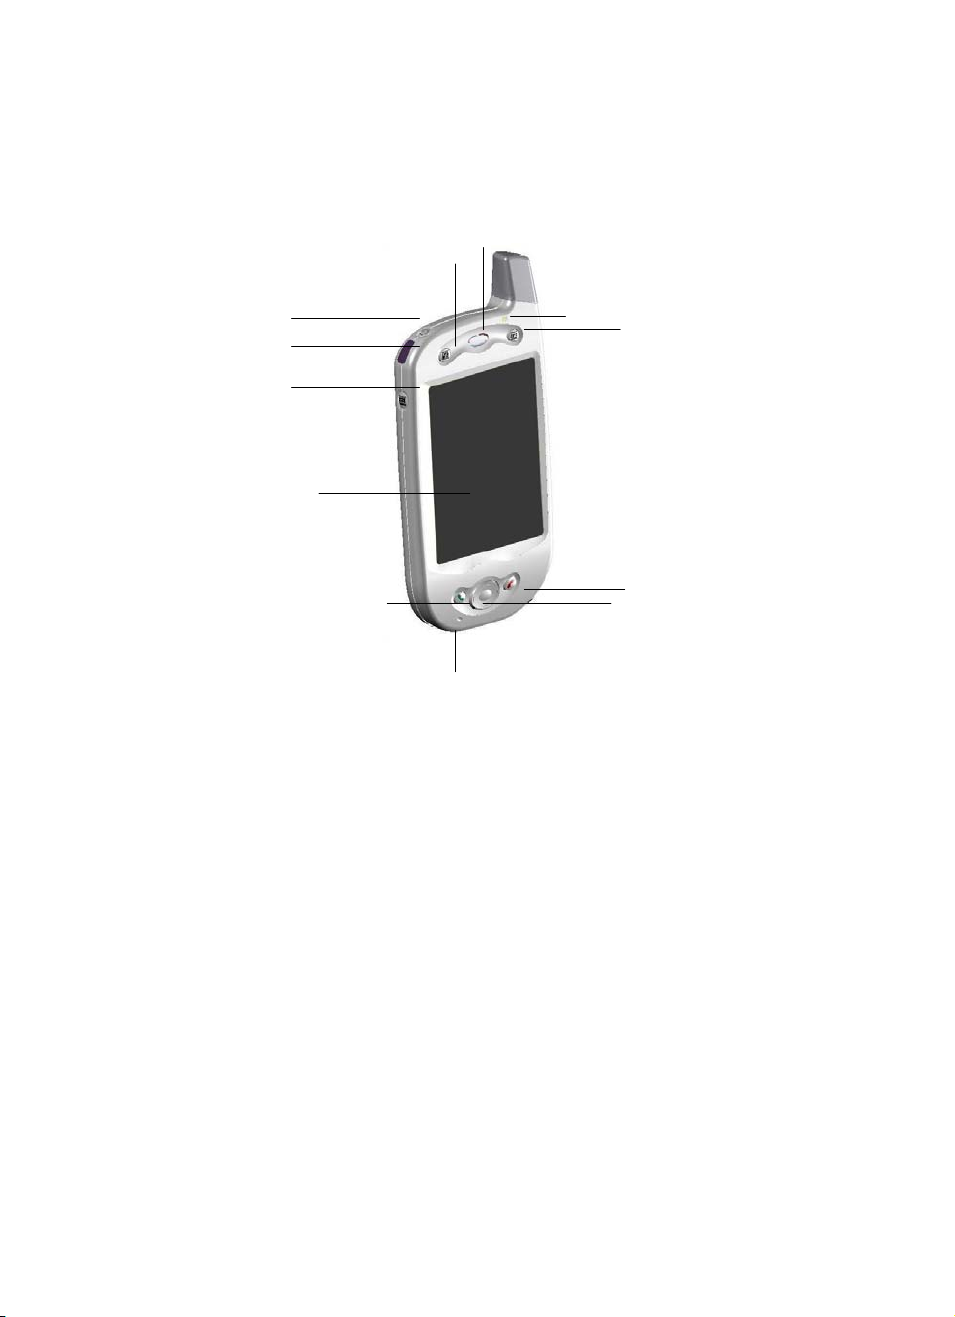
2.1 Front Panel Components
4.
3.
2.
1.
12.
11.
Volume: Allows you to adjust the device volume.
1
Infrared port: Allows the wireless exchange of data
2
with similarly equipped devices.
Power: Press to turn your device on and off. Can also
3
be used to activate the device’s backlight.
Contacts: Press for quick access to your Contacts.
4
Speaker: Audio output for phone calls and sounds.
5
Notification LED:
6
a) Flashing green every 3 seconds: Indicates GSM
network signal.
b) Flashing green every 1 second: Indicates a
notification or alarm reminder.
c) Steady red: Indicates that the battery is empty.
d) Flashing red: Indicates that the battery is almost
empty.
e) Steady amber: Indicates that the battery is
charging.
f) Steady green: Indicates that the battery is fully
charged.
7.
8.
9.
10
Calendar: Press for quick access to your Calendar.
7
End: Press to end a phone call. Can also be used to
8
turn off your device’s network signal.
Navigation pad: Press to move directionally through
9
drop-down menus and applications. Press the
center to select an option, just like clicking a mouse
button.
When in the phone dialer, press left to access the
speed dial feature, and press right to access the call
log feature.
Microphone: Audio input for phone calls.
10
Send: Press to dial a number that you have entered,
11
or press to receive an incoming call. Press and hold
this key while in a call to activate the speakerphone.
Touch screen: Written input source for notes,
12
applications, and contact information. Use the stylus
for best results!
8
Page 21
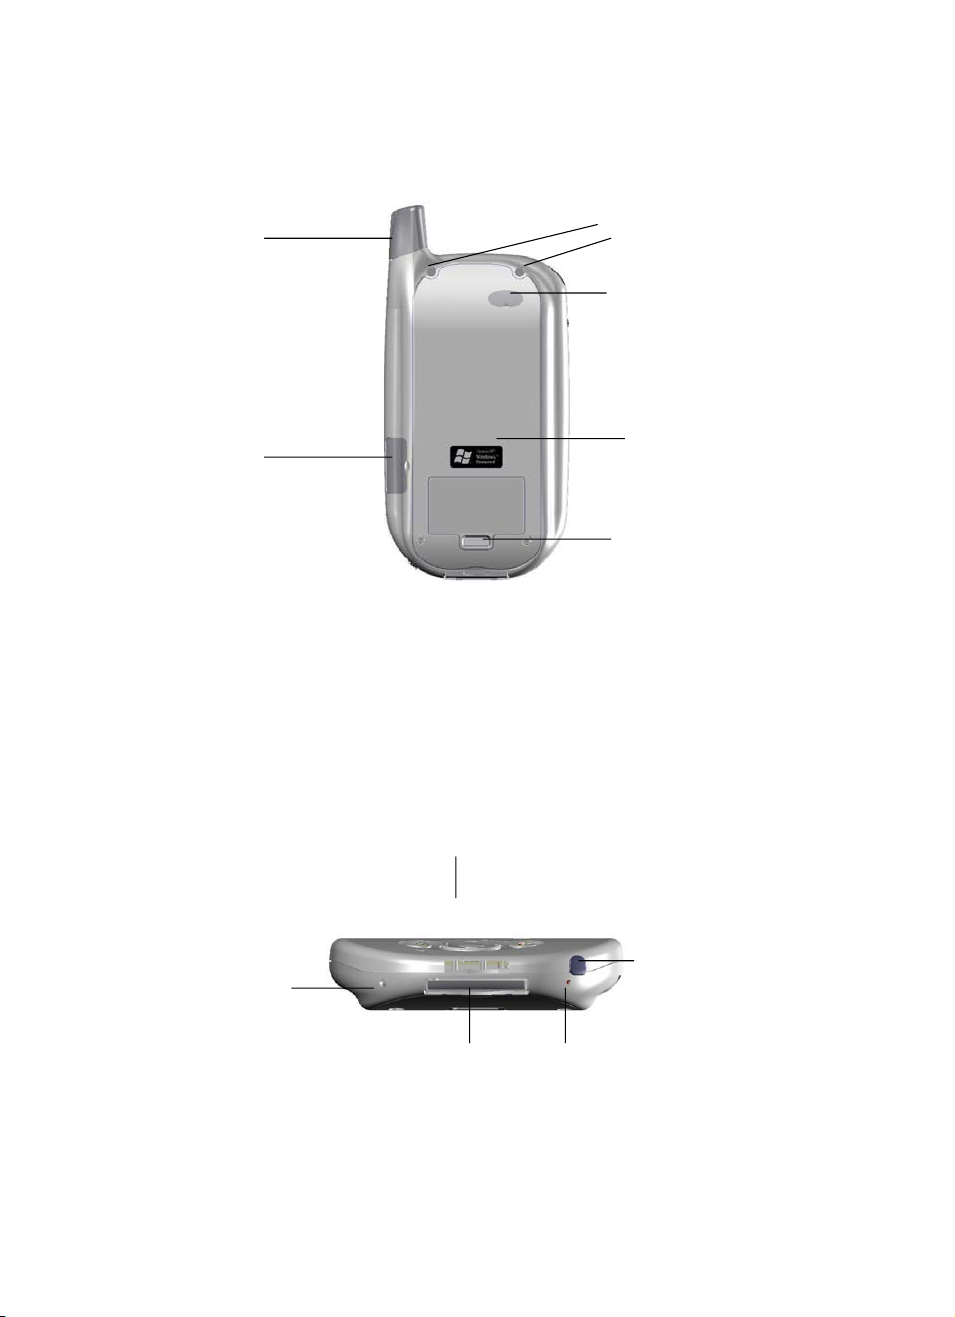
2.2 Back Panel Components
3.
4.
5.
6.
SIM card door: Protects the SIM card while the device is in operation. Use the stylus carefully to open this door.
1
Antenna and stylus: The stylus fits neatly into the antenna compartment.
2
External battery fastening points: The screws on the optional extended battery should be fastened here.
3
External battery connection point: Use the stylus carefully to remove the rubber cover. The extended battery, available as
4
an optional accessory for separate purchase, plugs into this connection point.
Main battery unit: The main battery is under this cover, and can be changed only by an authorized service provider.
5
External battery clip point: The tab on the optional extended battery should be inserted into the clip point before fastening
6
the screws.
2.3 Bottom Edge Components
2.
1.
5.
Soft Reset: Press gently with your stylus to reset the device. Similar to CTRL+ALT+DEL on your PC.
1
Synchronization connector: This connector permits the exchange of data between your device and your PC.
2
9
4.
3.
Page 22
Earphone jack: Allows you to listen to audio media or to use the included headset for hands-free calling.
3
Battery on/off switch: Press once to turn your battery off. This will erase all memory in the device. Press again to turn your
4
battery back on. This switch should be pressed only after speaking with an authorized service provider.
MMC/SD card slot: Insert either MMC or SD cards in this slot to expand your device’s memory capacity.
5
2.4 Accessories
This section describes some of the accessories that are available for use with the Siemens SX56 Wireless PDA Phone.
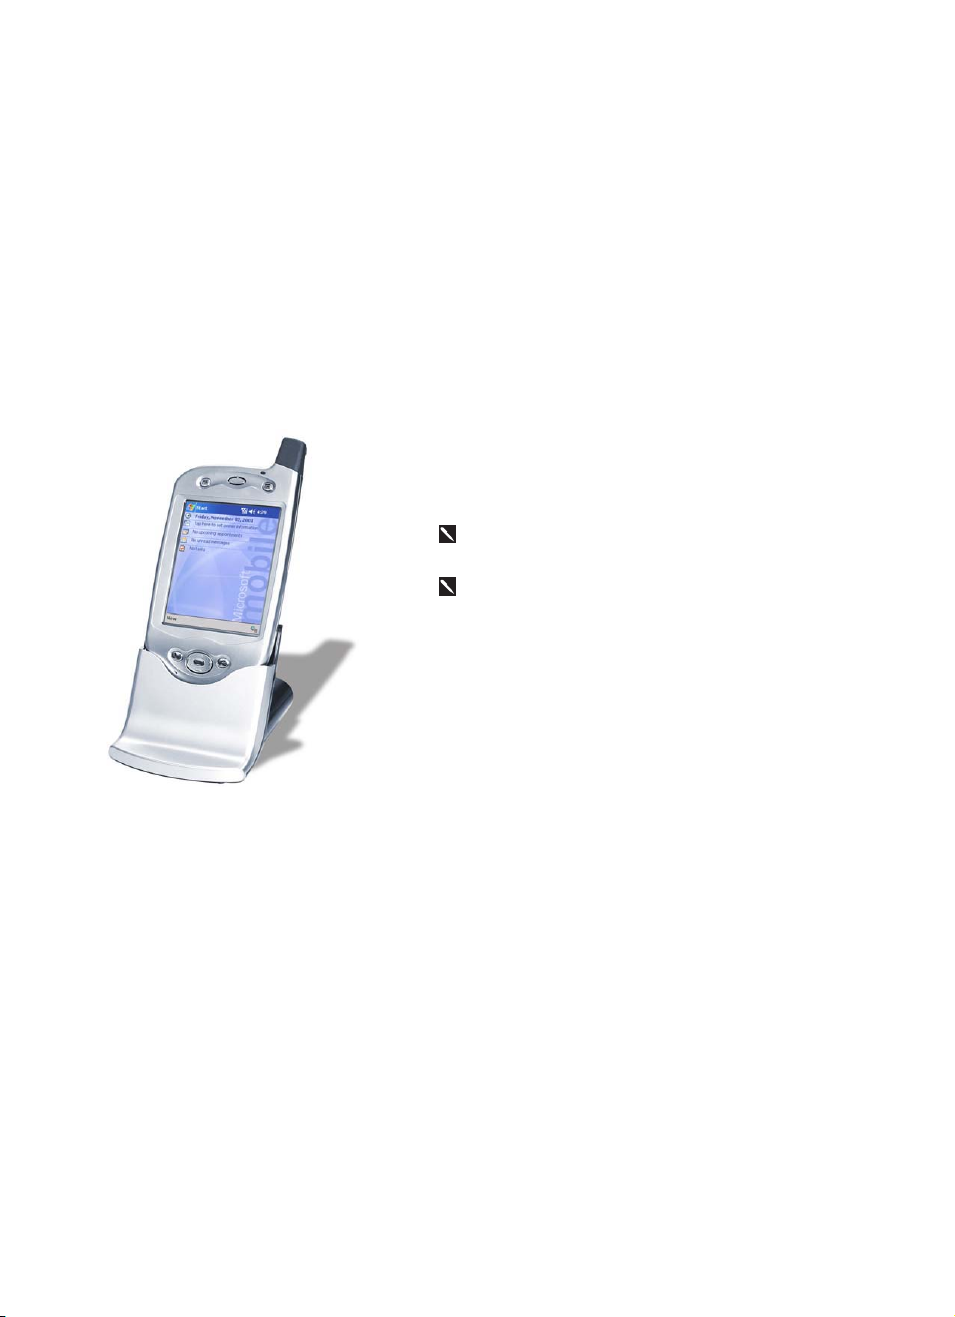
2.4.1 USB Cradle
x The Siemens SX56 Wireless PDA Phone comes with a USB cradle.
This cradle allows you to recharge your device, as well as synchronize
information between your device and a PC using ActiveSync.
It is not possible to establish a connection to the wireless
internet when your device is docked in the USB cradle.
To synchronize the Siemens SX56 Wireless PDA Phone to your
PC please ensure that the USB Cradle cord is plugged into an available
USB port on your PC.
2.4.2 SD and MMC Cards
Your device has an expansion slot compatible with a range of SD (Secure Digital) and MMC (Multi-Media Card) Memory cards.
These cards can be used to backup or transfer files and data. These cards are available for purchase separately.
10
Page 23
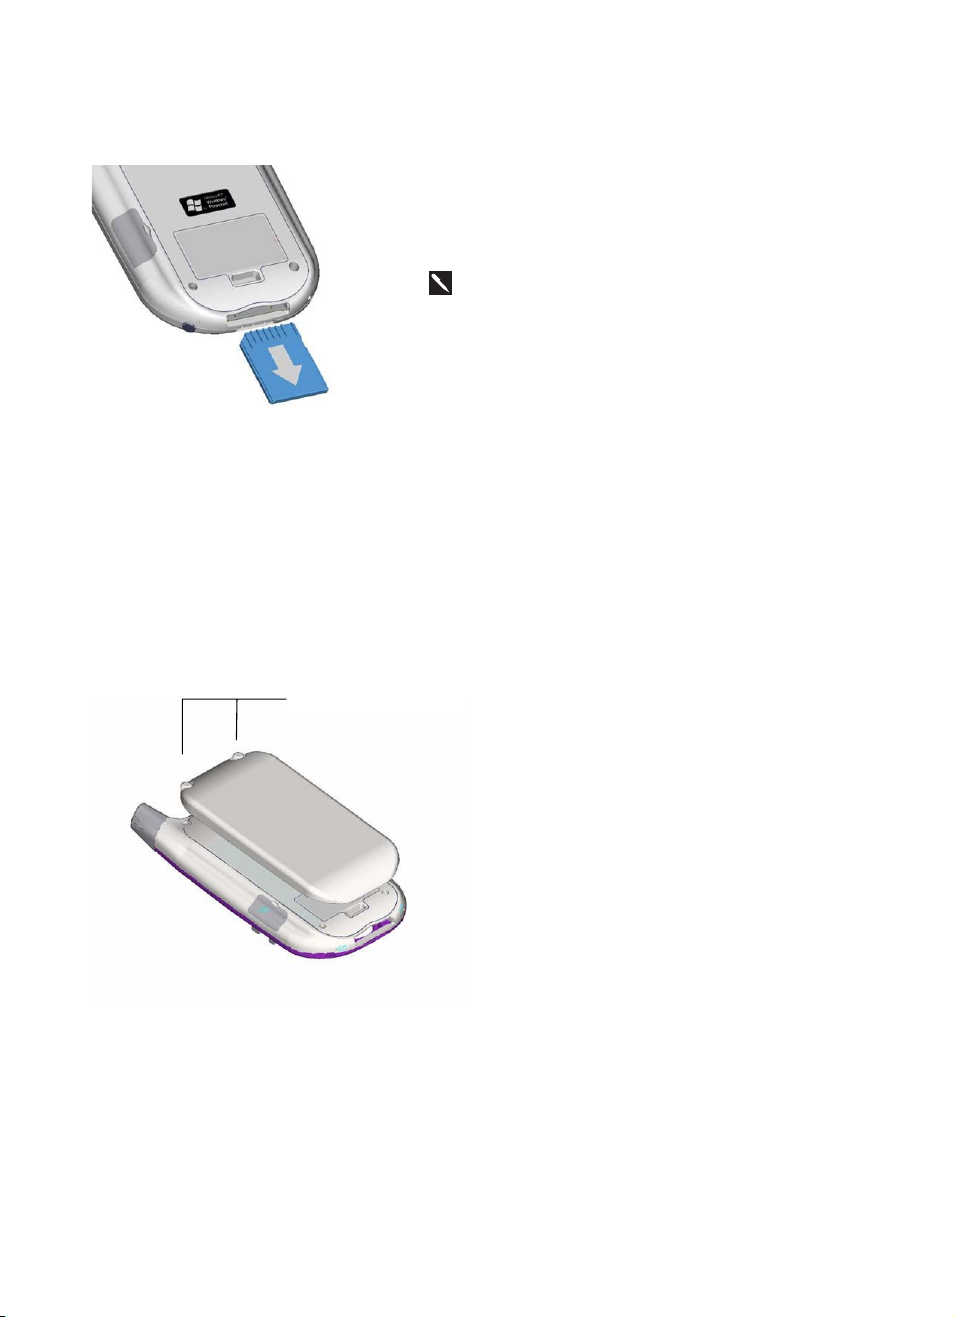
To insert or remove a memory card:
f
1. Push the memory card into slot (see above) until it clicks into
place. The card is secure only when it does not protrude from
the bottom of the device.
2. To remove the card push it in and then release. The card will
spring out.
Note: When you receive your device there will be a piece o
plastic in the slot; remove as described in step 2 above.
2.4.3 External Battery
You can purchase an optional external battery that attaches securely to the rear of your device. This external battery effectively
doubles the usage time of your device when fully charged.
The external battery can be charged while attached to your device, by using the cradle or by using the cradle-less charger adapter.
A full charging cycle, from empty to full, of the external battery and device combination, will require less than 5 hours.
To attach the External Battery:
External Battery Screws
1. Remove the rubber cover protecting the device connector
for the external battery - The cap is situated just below the
right screw on the back of the device.
2. Hook the external battery into the embedded slot near the
base of the back of your device (see picture to the left).
3. Tighten the screws situated in the top of the external battery
into your device.
11
Page 24
YOUR SX56 CONTAINS A LITHIUM POLYMER BATTERY PACK. THERE IS A RISK OF
FIRE AND BURNS IF THE BATTERY PACK IS HANDLED IMPROPERLY. DO NOT
DISASSEMBLE, CRUSH, PUNCTURE, SHORT EXTERNAL CONTACTS, OR DISPOSE
OF IN FIRE OR WATER. DO NOT ATTEMPT TO OPEN OR SERVICE THE BATTERY
PACK. REPLACE ONLY WITH THE BATTERY PACK DESIGNATED FOR THIS
PRODUCT. DISPOSE OF BATTERIES PROPERLY.
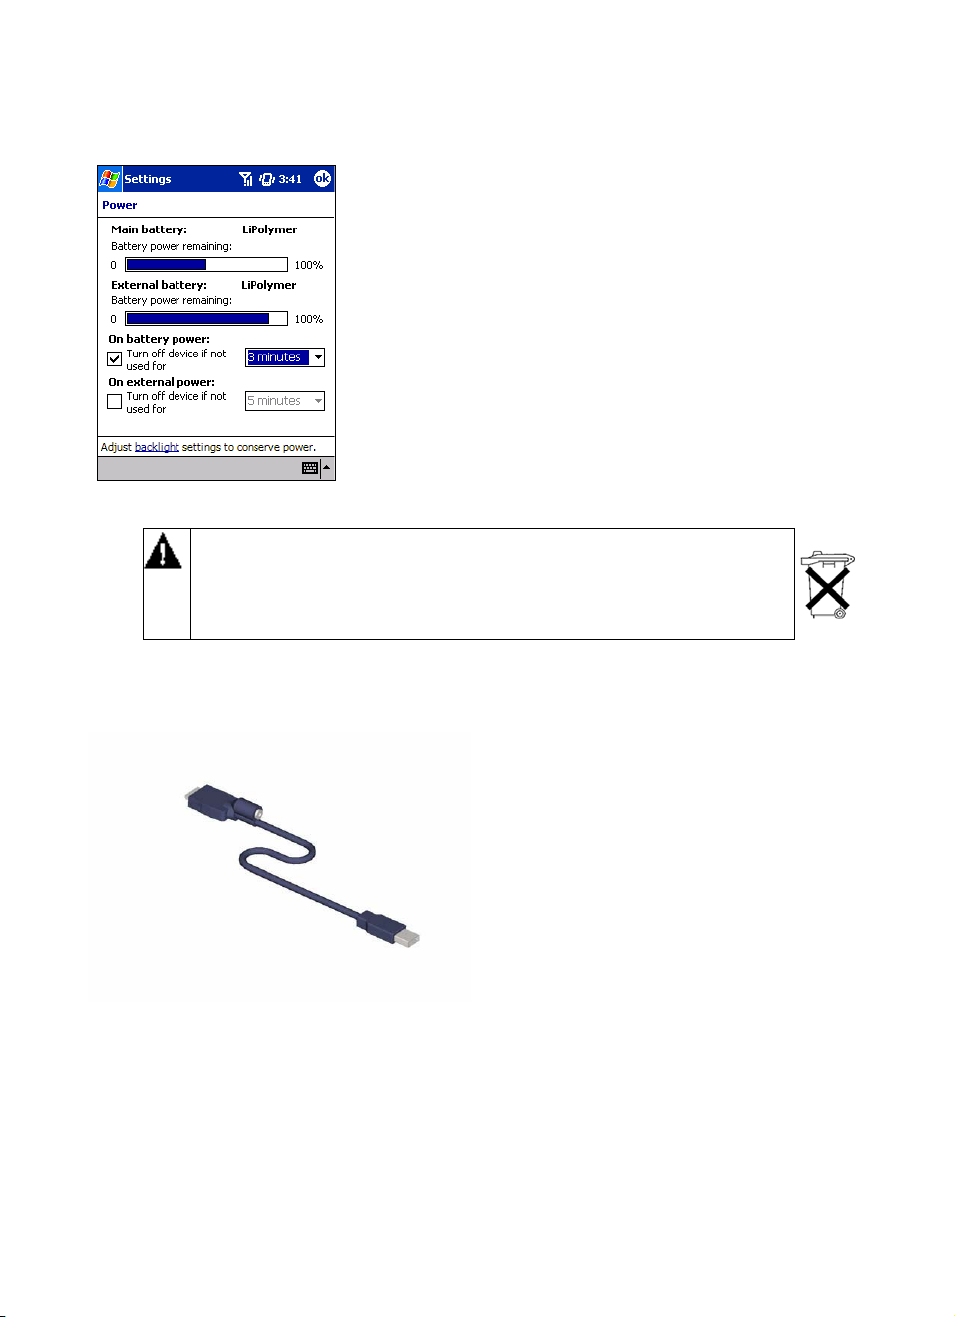
2.4.4 USB cable
To view the charge remaining on your external battery:
When you attach the external battery an extra indicator will
be added to the Power screen.
To view this indicator tap Start, Settings, System and then
Power.
x
The USB cable allows you to synchronize data and files
between your PC and your device without using the cradle.
x
The USB cable is available for purchase separately.
2.4.5 Cradle-less Charging Adapter
12
Page 25
x
The cradle-less charging adapter, in combination with the
AC adapter, allows you to recharge your device without
the cradle.
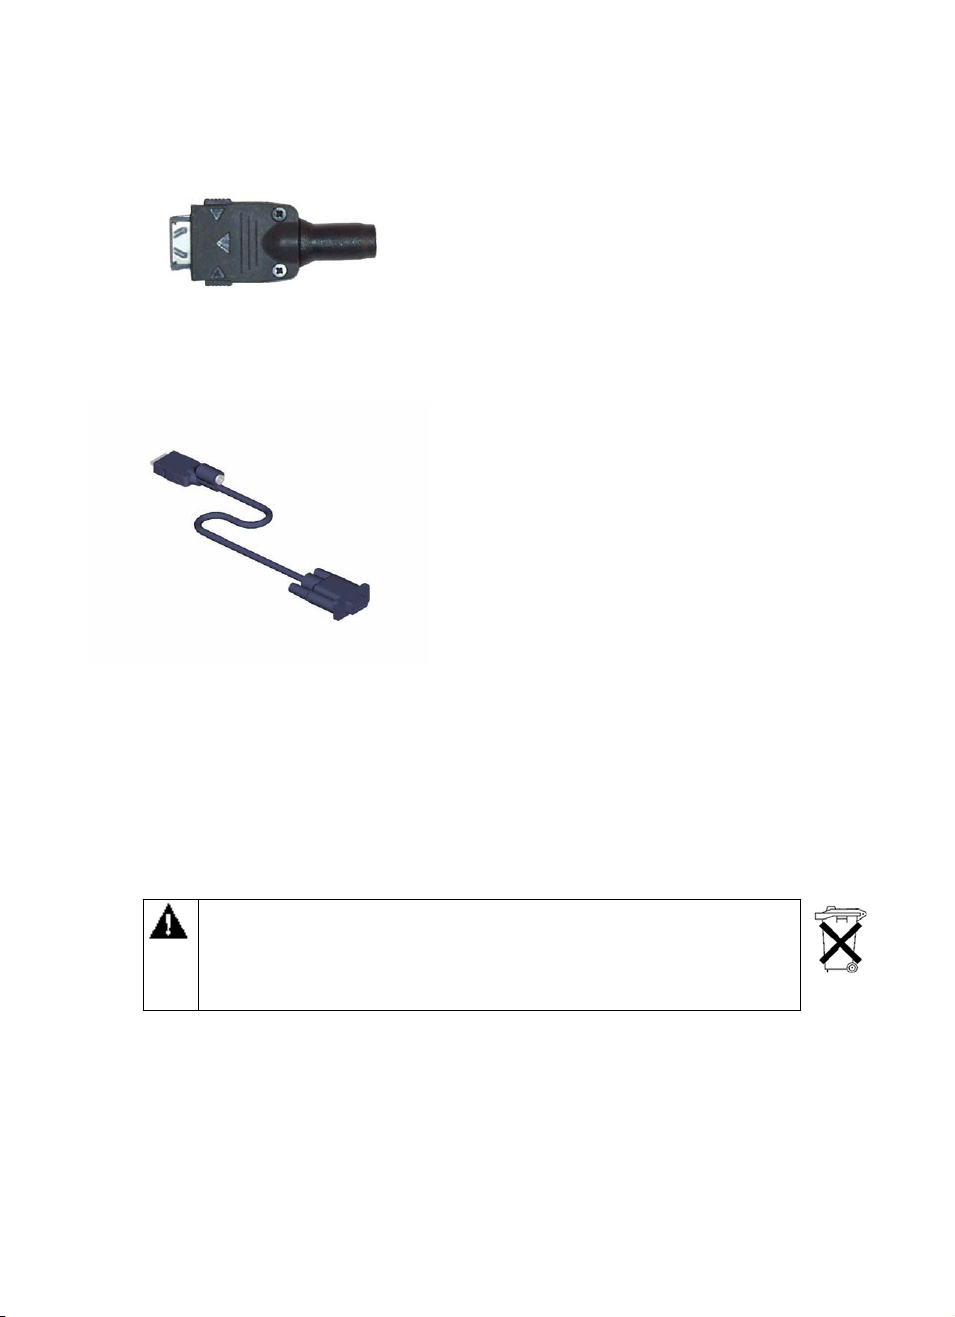
2.4.6 Serial Cable
x The serial cable offers another opportunity to synchronize
data and files between your PC and your device without
using the cradle. The serial cable must be used if your PC
does not support a USB connection.
2.5 Battery Information and Life
Your SX56 contains a rechargeable Lithium-ion polymer battery, which is housed permanently in your device. Under no
circumstances should you attempt to open the device to inspect the battery. Only an authorized service provider should service
the battery.
While you are using the Siemens SX56 Wireless PDA Phone the amount of power consumed depends on whether you are talking
on the phone, using the PDA functions or the device is on standby. If you use only the phone, you can expect a talk time of at least
3 hours on one charge. If you use only the PDA functions, you can expect at least 15 hours of PDA usage on one charge. If your
device is on standby, you can expect at least 150 hours on one charge.
YOUR SX56
FIRE AND BURNS IF THE BATTERY PACK IS HANDLED IMPROPERLY. DO NOT
DISASSEMBLE, CRUSH, PUNCTURE, SHORT EXTERNAL CONTACTS, OR DISPOSE
OF IN FIRE OR WATER. DO NOT ATTEMPT TO OPEN OR SERVICE THE BATTERY
PACK. REPLACE ONLY WITH THE BATTERY PACK DESIGNATED FOR THIS
PRODUCT. DISPOSE OF BATTERIES PROPERLY.
CONTAINS A LITHIUM POLYMER BATTERY PACK. THERE IS A RISK OF
2.5.1 Recharging the Battery
It is extremely important to keep your battery charged, since all data on the device is maintained only if the battery has some
charge remaining. If the battery becomes completely drained, all data on the device above will be erased, and only the programs
installed when you purchased the device will remain. Backing up the data on your device regularly will reduce the negative
effects of losing all battery power. To learn how to back up the data on your device, please refer to Section 3.2.
You can recharge your device in the following ways:
13
Page 26
AC Adapter plugs into the
b
ack of the cradle
How to Charge Using the Cradle
x Place your SX56 in the cradle and
connect the cradle to an external power
source. A complete charging cycle will
required less than 3 hours. The
notification LED will show a steady
green light when the battery is fully
charged.
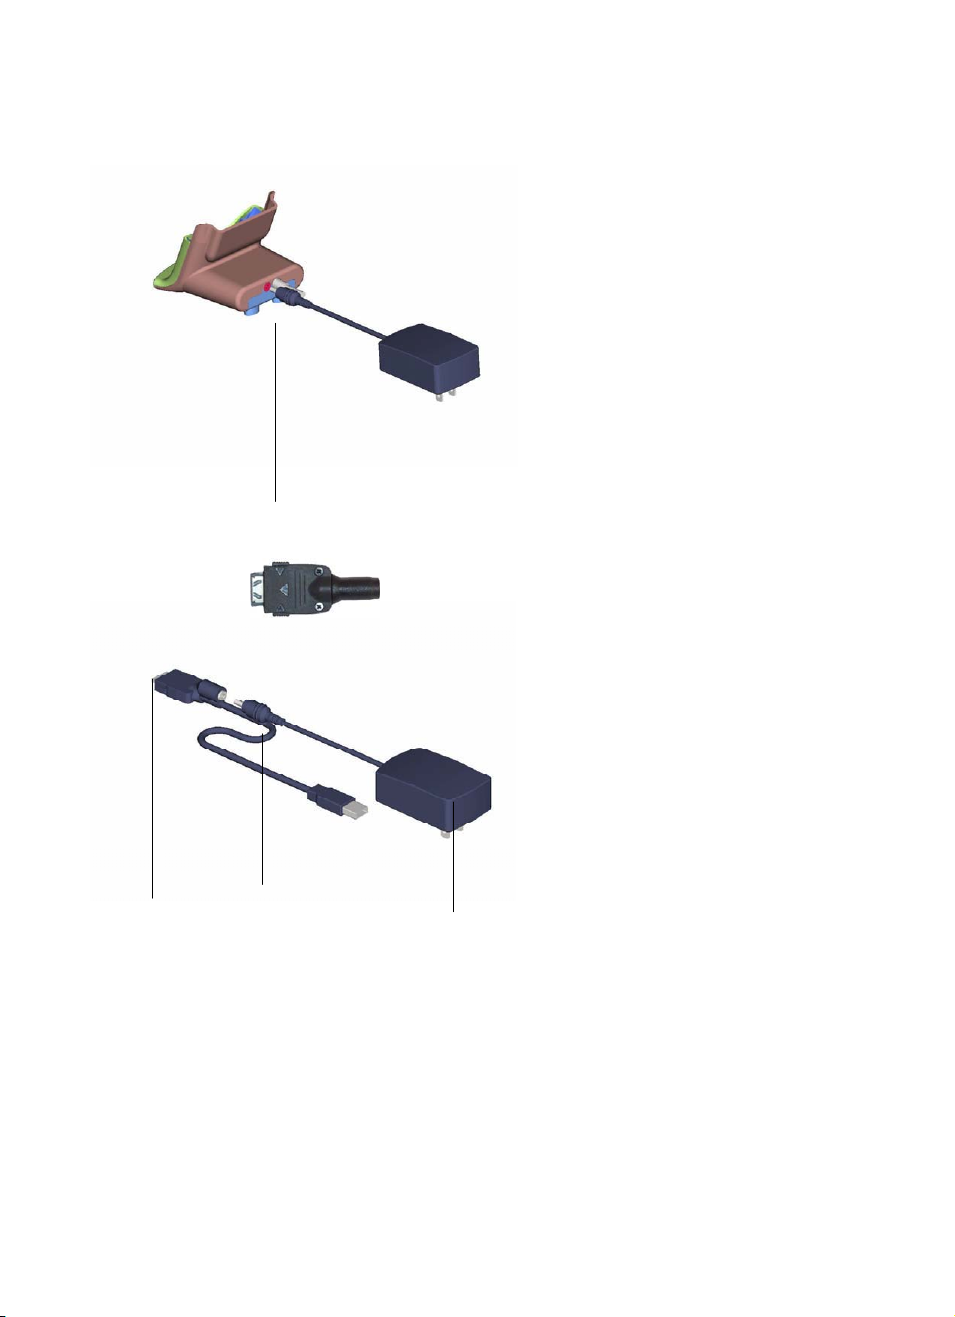
How to Charge Without the Cradle
x Plug the AC adapter cord into the
cradle-less charging adapter (included in
the box) and then connect the cradle-less
charging adapter to the Siemens SX56
Wireless PDA Phone. Then plug the AC
adapter into an electrical outlet.
To your device
USB synchronization
cable
Plug the AC adapter
into a socket
2.5.2 When Your Battery Is Low
If the battery gets very low, your SX56 displays a warning message that directs you to charge the battery. If this occurs, save data
in any applications that are presently open, synchronize your device to your PC, and turn off your device. Then connect your
device to an external power source to begin recharging the battery.
A portion of your battery is saved as backup. If the battery becomes completely drained, the backup portion of your battery will
14
Page 27
protect your data for about 72 hours, even though the device will not switch on without being recharged. You must recharge your
device within this time period to avoid losing your data completely.
3. Understanding Your Device
3.1 How to Reset the Device and Clear Its Memory
There are two options available to you if you need to reset your device. We recommend, in either case, the complete backup of all
data on your device to your PC by using ActiveSync or to a Secure Digital (SD) memory expansion card. More information
about the use of SD cards can be found in the user manual on your companion product CD.
A soft reset is similar to pressing CTRL+ATL+DEL on your PC – some data in open programs may be lost, but most memory is
left intact. A soft reset can be performed by gently pressing the button referenced with the number 1 in Section 2.3 “Bottom Panel
Feature Map” above.
A hard reset erases all memory on the device. Follow the picture instructions below to perform a hard reset.
3.1.1 To perform a soft reset
If your SX56 responds slowly, stops responding, or freezes, try a soft reset. A soft reset causes the device to restart and re-adjust
memory allocation. Unsaved data in open windows may be lost.
x Use the stylus to press and hold the Reset button. (For details on finding soft reset, see, “Chapter 2, Bottom Edge
Features.”)
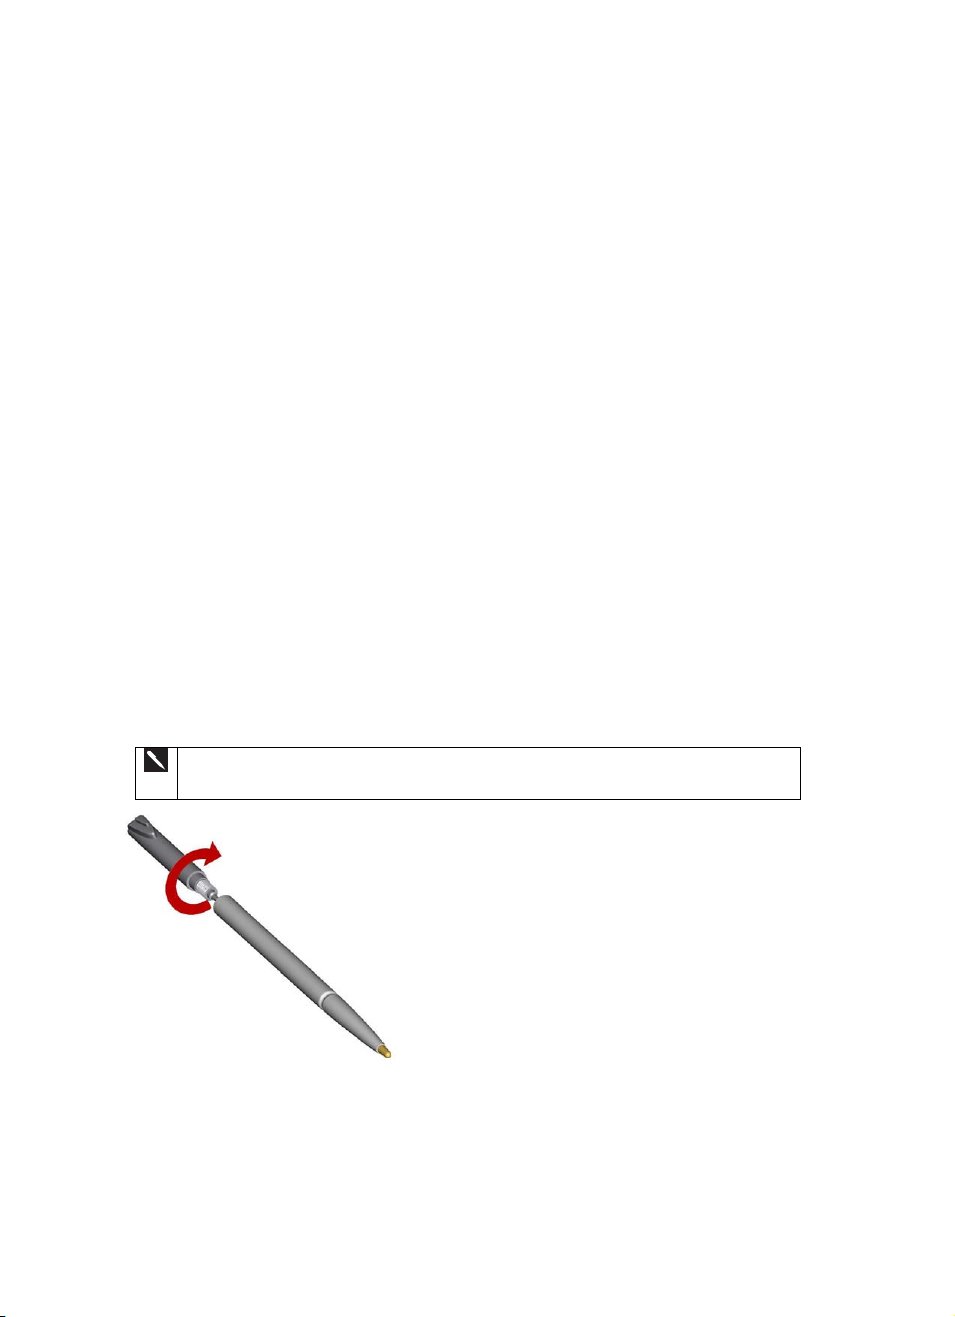
3.1.2 To perform a full reset
A full device reset clears memory, deletes all data and restores your device to its default settings.
Programs installed at the factory remain, while data you have created and programs you have
installed are erased.
1. Unscrew the stylus and use the smaller point of the top-half.
15
Page 28
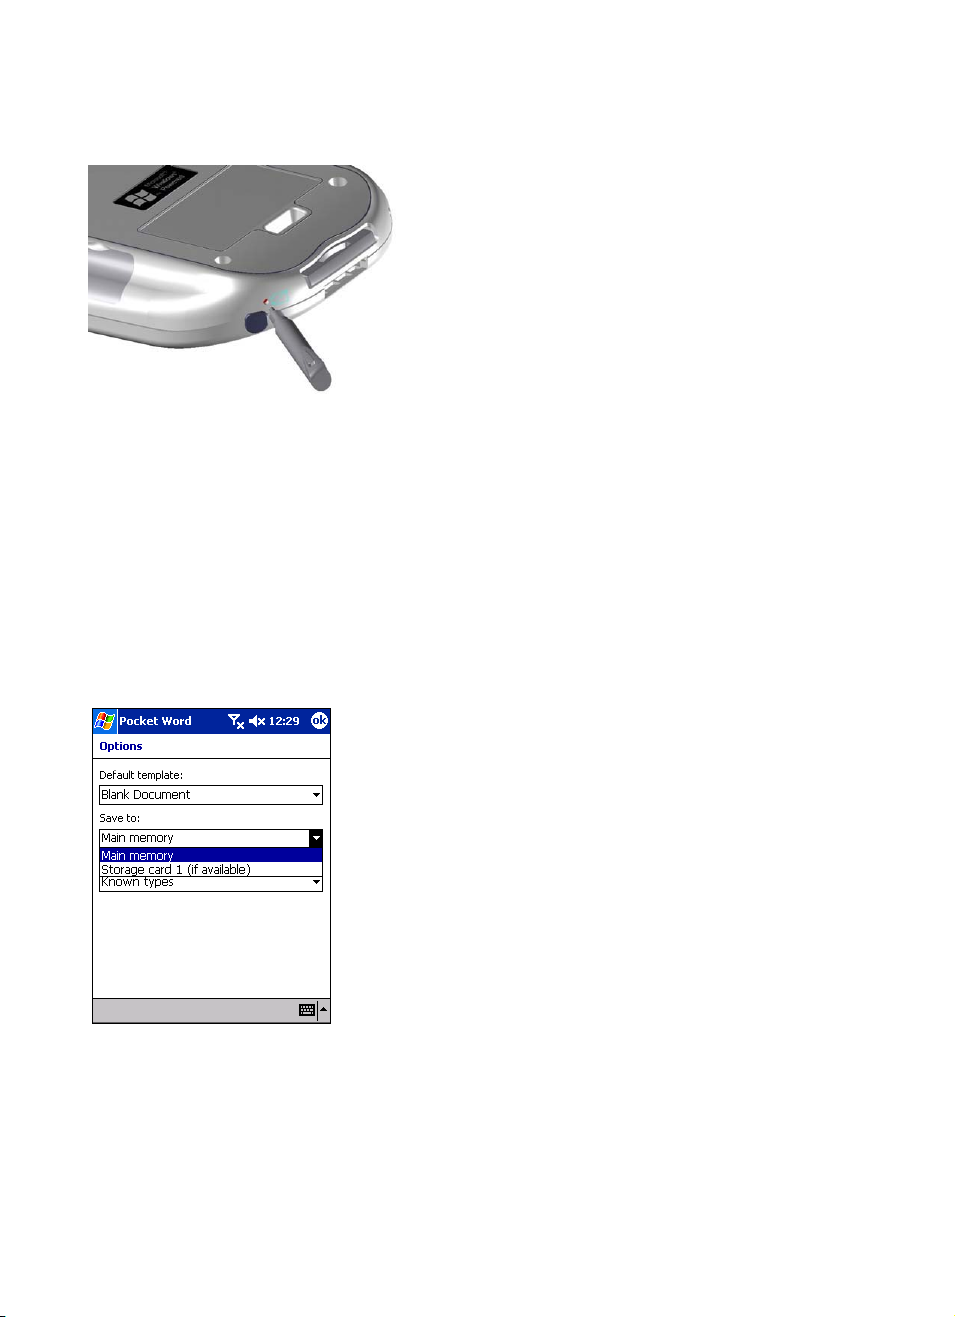
2. Press the battery switch once to turn it off, and then once
more to turn it back on.
3.2 Backing Up Files
It is important to back-up the data on your Siemens SX56 Wireless PDA Phone, since this data can be erased permanently if your
battery becomes completely drained.
There are a number of options available to you to perform this back-up:
x When you are at your desktop you can synchronize with your computer to backup files
x
When you are away from your desktop you can backup to an SD card, MMC card or FlashROM.
x Backup individual files in Word or Excel or all files to a SD card.
3.2.1 To save Word or Excel files to a memory card:
1. In application programs (e.g. Pocket Word or Excel), press To o ls ,
Options.
2. Tap the drop down menu box under Save To and select Storage Card
16
Page 29
3.2.2 Backup or restore your system using SD Backup:
1. Push the memory card into slot (see above) until it clicks into place.
The card is secure when it is not protruding from the base.
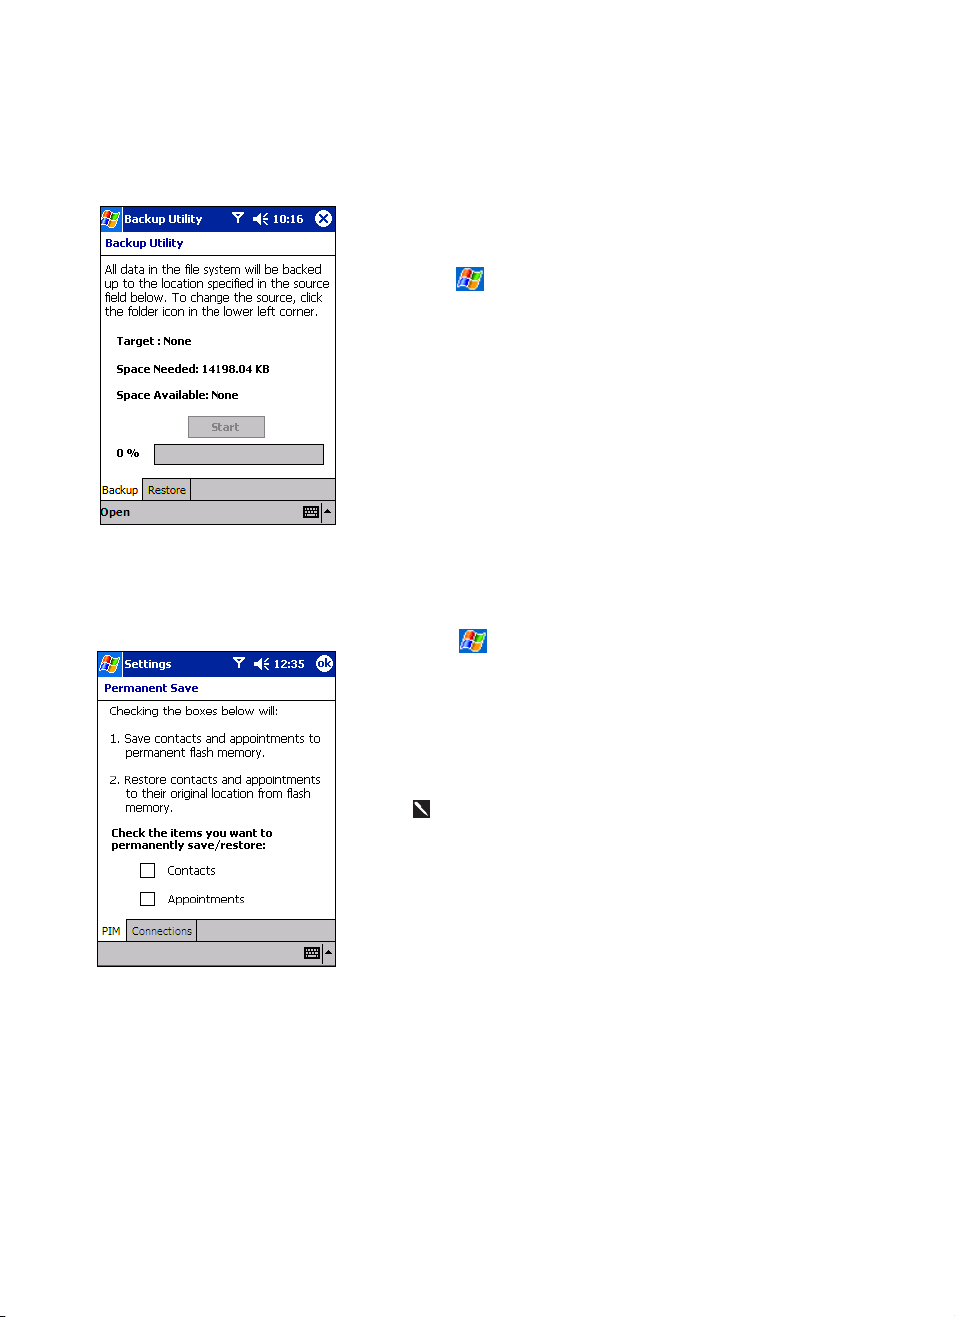
3.2.3 To backup to FlashROM:
2. Tap
3. If you have inserted the SD card properly it will appear next to Target.
4. Make sure there are no application programs running in the
1. Tap , Settings, System and then Permanent Save.
2. To backup Contacts or Calendar tap the PIM tab, and then check one
3. To backup Inbox and Internet settings tap the Connections tab and
will automatically backup newly added contacts and appointments. This
will not happen for connections: if you add another connection you will
need to back it up manually.
,
Programs,SD Backup
background, then tap Start.
or both of the boxes.
then Backup to Flash.
When you select to backup Contacts and Appointments, your device
then the
Backup or Restore
tab.
17
Page 30
To restore memory from your device’s Flash ROM:
1. Tap
2. To restore Contacts or Calendar tap the PIM tab, and then check one or
3. To restore Inbox and Internet settings tap the
, Settings, System and then Permanent Save.
both of the boxes.
Restore from Flash.
Connections
tab and then
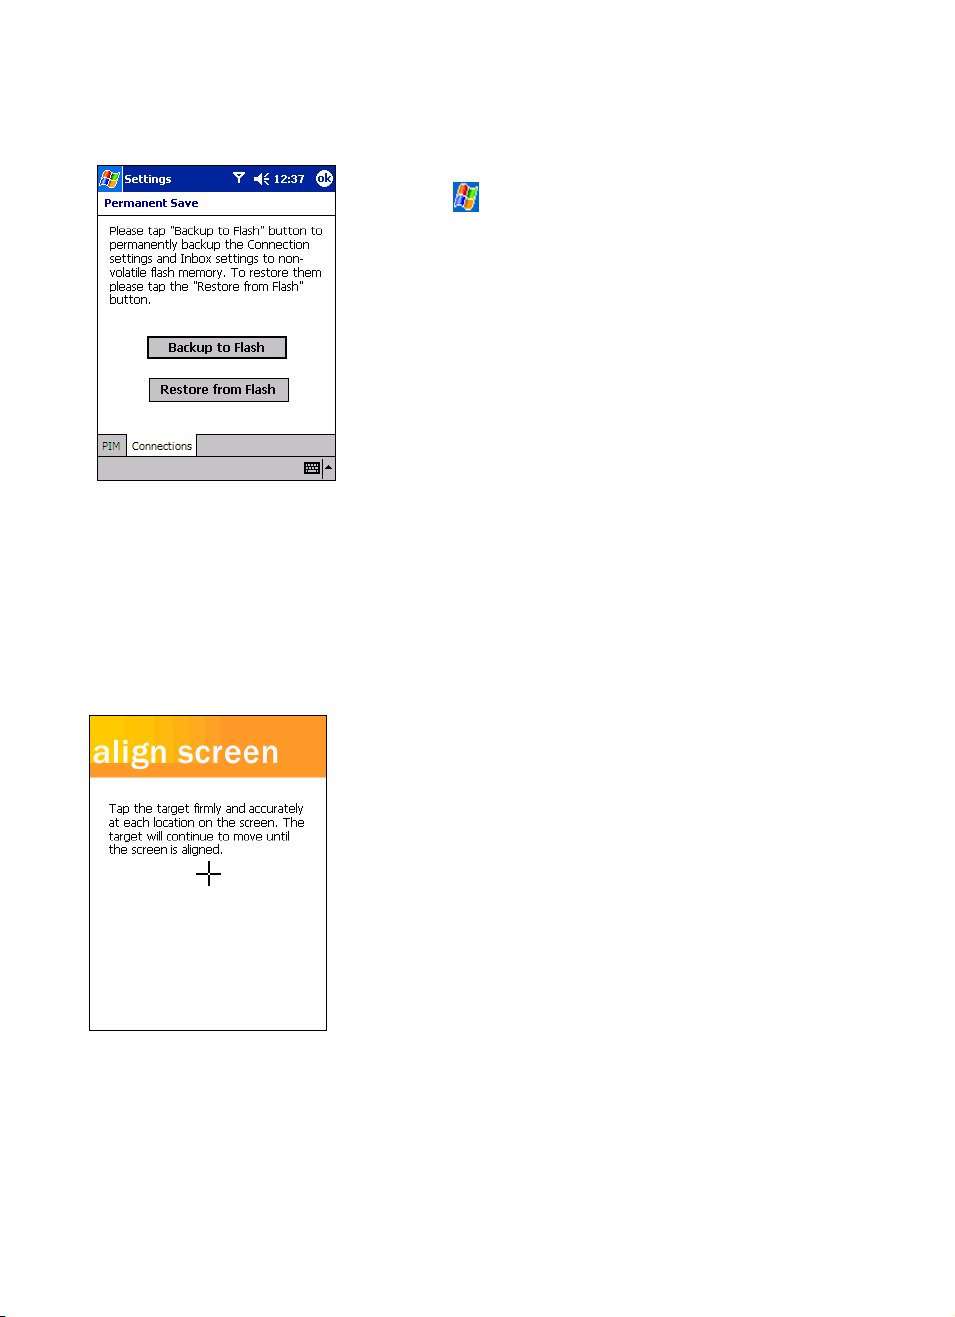
3.3 Calibrating Your Screen
When you first startup your SX56, you will be asked to calibrate the screen by tapping the center of a cross with your stylus as it
moves around the screen. This process ensures when you tap the screen with your stylus the item tapped is activated.
If, however, when you are using your SX56, you discover tapping an item doesn’t bring up the appropriate response, it means
your device has lost calibration. You can recalibrate your screen by following the picture instructions below.
To recalibrate your screen:
1. Tap Settings, System and then Screen.
2. As described above, tap the center of the cross to with your stylus
as it moves around the screen.
3.4 Understanding the Today Screen
The Today screen appears when you turn on your device for the first time each day. It also appears when you turn on your device
18
Page 31

after 4 hours of inactivity. You can also display it by tapping
The Today screen presents all the day’s important information at a glance.
and then selecting To da y from the menu items.
Following are some of the status icons you may see.
Status Ic on
Meaning
Turns all sounds on and off
Main battery low
Main battery very low
Data connection is active
Synchronization is beginning or ending
Synchronization is in progress
Notification that one or more instant messages were
received
Notification that one or more e-mail, SMS, or voicemail
messages were received
Shows that your device is connected to a wireless
network and the strength of the signal.
Indicates your phone is switched off.
Indicates that your phone is in speakerphone mode.
If more notification icons need to be displayed than there is room to
display them, the Notification icon,
view all notification icons.
, will display. Tap this icon to
3.5 Opening and Switching Between Programs
You can switch from one program to another simply by selecting a new program from the menu. To access some programs,
you’ll need to tap
You can also switch to your Contacts, your Calendar, or the Phone Dialer by pressing the appropriate button on the front of your
device. See the section above titled “Front Panel Components”
, Programs, and then the program name.
Some programs have abbreviated labels for check boxes and drop down
19
Page 32

menus. To see the full spelling of an abbreviated label, tap and hold the
stylus on the label. Drag the stylus off the label so that the command is not
carried out.
The following table contains a partial list of programs that are on your device. Look on the Siemens SX56 Wireless PDA Phone
Companion CD for additional programs that you can install onto your device.
Application How To Start Benefit and Use
1. Today
2. ActiveSync
3. Calendar
4. Contacts
5. Inbox
6. Internet Explorer
7. Notes
8. Phone
9. Tasks
10. Windows Media
11. Games
12. Calculator
13. File Explorer
14. Image Viewer
15. Infrared Receive
16. Microsoft Reader
17. MSN Messenger
18. Pocket Excel
19. Pocket Word
20. SD Backup
21. SIM Manager
22. Terminal Services
Tap
, To da y
Tap
, ActiveSync
, Calendar
Tap
, Contacts
Tap
, Inbox
Tap
Tap
, Internet Explorer
Tap
, Notes
Tap
, Phone
, Ta sk s
Tap
Tap
, Windows Media
, Programs, Games
Tap
, Programs, Calculator
Tap
Tap
, Programs, File Explorer
Tap
, Programs, Image Viewer
, Programs, Infrared Receive
Tap
Tap
, Programs, Microsoft Reader
Tap
, Programs, MSN Messenger
Tap
, Programs, Pocket Excel
Tap
, Programs, Pocket Word
, Programs, SD Backup
Tap
, Programs, SIM Manager
Tap
, Programs, Terminal Services
Tap
All the day’s important information at
a glance.
Check readiness to transfer
information between your device and
your PC.
View your calendar entries.
View your contact information.
View your e-mail and SMS inboxes.
Browse the internet wirelessly.
Enter electronically-transcribed
handwritten notes.
View the phone dialer.
Manage your active and completed
tasks.
Listen to audio files on your device.
Play a game of Solitaire.
Access an easy-to-use calculator.
Manage the files on your device.
View pictures on your device.
Make your device ready to receive an
incoming infrared data stream.
Read premium book titles available
after purchase of your device.
Send MSN instant messages.
View and create spreadsheets.
View and create documents.
Backup the data on your device to an
optional SD card.
Manage the data on your SIM card.
Configure the server information to
which your device connects.
20
Page 33

3.6 Understanding the Navigation Command Bars
x The navigation bar is located at the top of the screen. It
displays the active program and current time, and allows you
to switch to programs and close screens.
x Use the command bar at the bottom of the screen to perform
tasks in programs. The command bar includes menu names,
buttons, and the Input Panel button. To create a new item in
the current program, tap New. To see the name of a button,
tap and hold the stylus on the button. Drag the stylus off the
button so that the command is not carried out.
3.7 Pop up Menus
x With pop up menus, you can quickly choose an action
for an item. For example, you can use the pop up menu
in the contact list to quickly delete a contact, make a
copy of a contact, or send an e-mail message to a
contact. The actions in the pop up menus vary from
program to program.
x
To access a pop up menu, tap and hold the stylus on the
item name that you want to perform the action on. When
the menu appears, lift the stylus, and tap the action you
want to perform. Or tap anywhere outside the menu to
close the menu without performing an action.
21
Page 34

3.8 Notifications
The Siemens SX56 Wireless PDA Phone has many different capabilities to notify you of an event. For example, if you’ve set up
an appointment in Calendar, a task with a due date in Tasks, or an alarm in Clock, you may be modified in one of the following
ways:
x A message box may appear on the screen OR
x A sound, which you can specify, may be played OR
x
A light may flash on your device OR
x
The device may vibrate
To choose reminder types and sounds for your device, tap
Notifications
. The options you choose here apply throughout the device.
and then Settings. In the Personal tab, tap Sounds &
3.9 Different Ways to Enter Information on Your Device
You have several options for entering new information:
x
Use the input panel to enter typed text by using the on-screen soft keyboard, Letter Recognizer, or Block Recognizer.
x Write directly on the screen.
x Draw pictures on the screen.
x Speak into your device microphone to record a message.
x Use Microsoft ActiveSync to synchronize or copy information from your PC to your device. For more information on
ActiveSync, see ActiveSync Help on your PC, or Chapter 7 in this User Manual.
3.9.1 Entering Text Using the Input Panel
x
Use the input panel to enter information in any program on
your device. You can either type using the soft keyboard or
write using Letter Recognizer, Block Recognizer, or
Transcriber. In either case, the characters appear as typed text
on the screen.
x To show or hide the input panel, tap the Input Panel button.
Tap the arrow next to the Input Panel button to see your
choices.
22
Page 35

3.9.2 To type with the soft keyboard:
x When you use the input panel, your device anticipates the
word you are typing or writing and displays it above the input
panel. When you tap the displayed word, it is inserted into
your text at the insertion point. The more you use your device,
the more words it learns to anticipate.
1. Tap the arrow next to the Input Panel button and then
Keyboard.
2. On the soft keyboard that is displayed, tap the key with your
stylus
3.9.3 To use Letter Recognizer:
23
Page 36

With Letter Recognizer you can write letters using the stylus just as you would on
paper.
1. Tap the arrow next to the Input Panel button and then Letter Recognizer.
2. Write a letter in the box.
When you write a letter, it is converted to typed text that appears on the screen. For
specific instructions on using Letter Recognizer, with Letter Recognizer open, tap
the question mark next to the writing area.
3.9.4 To use Block Recognizer:
With Block Recognizer you can input character strokes using the stylus that are
similar to those used on other devices.
1. Tap the arrow next to the Input Panel button and then Block Recognizer.
2. Write a letter in the box.
When you write a letter, it is converted to typed text that appears on the screen. For
specific instructions on using Block
Recognizer, with Block Recognizer open, taps the question mark next to the
writing area.
24
Page 37

3.9.5 Using the Script Transcriber
With Transcriber you can write anywhere on the screen using the stylus just as
you would on paper. Unlike Letter Recognizer and Block Recognizer, you can
write a sentence or more of information. Then, pause and let Transcriber change
the written characters to typed characters.
1. Tap the arrow next to the Input Panel button and then Transcriber.
2. Write anywhere on the screen.
For specific instructions on using Transcriber, with Transcriber open, tap the
question mark in the lower right hand corner of the screen.
To enter punctuation using the input panel:
1. Tap the keyboard on the toolbar.
2. Tap OK to hide the keyboard.
25
Page 38

To learn how to enter a specific letter using the Script Transcriber:
1. Tap “a” on the toolbar.
2. In the screen that appears, select the letter you want to learn about, and then tap
on one of the examples given above.
For specific instructions on using Transcriber, with Transcriber open, tap the
question mark in the lower right hand corner of the screen.
The user must ensure that characters entered using the script transcriber
appear as intended after they are converted to screen text. Siemens and
AT&T Wireless cannot accept responsibility for any errors that may occur
during text conversion.
3.9.6 Selecting Text That Has Been Entered
If you want to edit or format typed text, you must select it first. To do so:
x Drag the stylus across the text you want to select. You can cut, copy, and paste
text by tapping and holding the selected words and then tapping an editing
command on the pop up menu, or by tapping the command on the Edit menu
.
To change word suggestion options, such as the number of words suggested at one time, tap
, Settings, Personal tab, Input, and then the Word Completion tab.
3.9.7 Editing Text That Has Been Entered
Each input program provides cursor keys to move through text and backspace so that you can correct spelling, grammar or insert
additional information. Alternatively, you can use your stylus to make an insert.
After you have made an insert, you can use any of the input methods described above to add additional text at the insertion point.
3.10 Writing on the Screen
In any program that accepts writing, such as the Notes program, and in the Notes tab in Calendar, Contacts, and Tasks, you can
use your stylus to write directly on the screen. Write as if you are writing on paper. You can edit and format what you have written
26
Page 39

and convert the information to text at a later time.
b
3.10.1 To write on the screen:
Some programs that accept writing may not have the Pen button. See the documentation for that
program to find out how to switch to writing mode.
3.10.2 To select writing:
x
Tap the P en
the screen to help you write.
If you want to edit or format writing, you must select it first.
1. Tap and hold the stylus next to the text you want to select until the insertion
point appears.
2. Without lifting, drag the stylus across the text you want to select.
utton to switch to writing mode. This action displays lines on
If you accidentally write on the screen, tap Tools, then Undo and try again. You
can also select text by tapping the Pen button to deselect it and then dragging the
stylus across the screen.
You can cut, copy, and paste written text in the same way you work with typed
text: tap and hold the selected words and then tap an editing command on the pop
up menu, or tap the command on the Edit menu.
27
Page 40

3.10.3 To convert writing to text:
1. Tap Tools and then Recognize.
2. If you want to convert only certain words, select them
before tapping Recognize on the Too l s menu (or tap and
hold the selected words and then tap Recognize on the pop
up menu). If a word is not recognized, it is left as writing.
3. If the conversion is incorrect, you can select different
words from a list of alternates or return to the original
writing. To do so, tap and hold the incorrect word (tap one
word at a time). On the pop up menu, tap
menu with a list of alternate words appears. Tap the word
you want to use, or tap the writing at the top of the menu to
return to the original writing.
3.10.4 Tips for getting good
recognition:
1. Write neatly.
2. Write on the lines and draw descanters below the line.
Write the cross of the “t” and apostrophes below the top
line so that they are not confused with the word above.
Write periods and commas above the line.
3. For better recognition, try increasing the zoom level to
300% using the Tools menu.
4. Write the letters of a word closely and leave big gaps
between words so that the device can easily tell where
words begin and end.
5. Hyphenated words, foreign words that use special
characters such as accents, and some punctuation cannot
be converted.
6. If you add writing to a word to change it (such as changing
a “3” to an “8”) after you attempt to recognize the word,
the writing you add will not be included if you attempt to
recognize the writing again.
Alternates
. A
3.11 Drawing on the Screen
You can draw on the screen in the same way that you write on the screen. The difference between writing and drawing on the
screen is how you select items and how they can be edited. For example, selected drawings can be resized, while writing cannot.
28
Page 41

3.11.1 To create a drawing:
b
3.11.2 To select a drawing:
x
Cross three ruled lines on your first stroke. A
drawing box appears. Subsequent strokes that are
within the drawing box or that touch the drawing
ox become part of the drawing. Drawings that do
not cross three ruled lines will be treated as
writing.
If you want to edit or format a drawing, you must select it
first.
x Tap and hold the stylus on the drawing until the
selection handle appears. To select multiple drawings,
de-select the Pen button and then drag to select the
drawings you want.
x You can cut, copy, and paste selected drawings by
tapping and holding the selected drawing and then
tapping an editing command on the pop up menu, or by
tapping the command on the Edit menu. To resize a
drawing, make sure the Pen button is not selected, and
drag a selection handle.
You may want to change the zoom level so that you can more
easily work on or view your drawing. Tap Tools and then a zoom
level.
3.12 Creating an Audio or Written Note
The Siemens SX56 Wireless PDA Phone offers you a number of ways to create audio or written notes. Notes can be created
within many applications on your device through the Notes menu. You can also create Notes by selecting the Notes item from the
Start pull-down menu.
When entering written notes, it is possible to quickly enter frequently-used strings of text using the My Text feature.
29
Page 42

3.12.1 To create an audio recording:
1. Hold your device’s microphone near your mouth or other
source of sound.
You can also make a recording by tapping the Record button on the Recording toolbar.
3.12.2 Using My Text
2. Tap
3. Tap
4. Tap
new recording appears in the note list or as an embedded icon.
x When using Inbox or MSN Messenger, use
x To edit a My Text message, go to the Tools menu, tap Edit
, and then Notes.
to make your recording. Meanwhile a beep will
sound in the beginning of the recording.
to stop recording. Two beeps will sound. The
to
quickly insert preset or frequently used messages into the
text entry area. To insert a message, tap My Text and tap a
message.
and then tap My Text Messages. Select the message you
wish to edit and make desired changes.
My Text
You can add text after inserting a My Text message before sending it.
3.13 Find and Organize Information
The Find feature helps you quickly locate information and files that are stored on your device.
30
Page 43

x On the
type, and then tap Go to start the search.
To quickly find information that is taking up storage space on your device,
select Larger than 64 KB in Typ e.
To find a specific file, tap in the file name, select the file type, and press Go.
menu, tap Find. Enter the text you want to find, select a data
3.14 Managing Memory
There are two types of memory within the Siemens SX56 Wireless PDA Phone: Storage memory and program memory.
x
Storage memory is used to store the information you create and programs you install.
x Program memory is used to run programs on your device.
Your device will usually manage the amount of memory used for storage and the amount used for programs. When all memory is
full, however, you will need to reduce the amount of storage memory used in order to restore the device’s ability to allocate
memory automatically. You can reduce the amount of storage memory used by following the picture instructions below.
3.14.1 To view memory allocation and availability:
Tap , Settings, System and then Memory.
31
Page 44

3.14.2 To make available storage memory:
There are a number of ways to reduce the amount of storage memory used on your device.
x
First, you can elect to move data to a SD storage card. To do this, make sure than an SD storage card is properly inserted in
the slot at the bottom of your device. There are a number of ways in which data can be transferred to a SD storage card.
x Tap
x
x
x If you are copying files from your PC or another device to your SX56, try adjusting the slider in the Memory
x Another option for freeing storage memory space is to delete unnecessary files.
x Tap
x
x
, Programs, and then tap File Explorer. Tap and hold the file you want to move and tap Cut. Browse to
the My Documents folder in the storage card folder, tap Edit, and then tap Paste. Files stored in folders other than
My Documents or stored in folders within subfolders in My Documents may not show up in the list view of some
programs. When using Notes, Pocket Word, or Pocket Excel, you can also move files by opening the item and
tapping Tools or Edit and then Rename/Move.
Move e-mail attachments. In Inbox, tap Tools and then Options. On the Storage tab, select Store attachments
on storage card
the storage card.
Set programs such as Notes, Pocket Word, and Pocket Excel to automatically save new items on the storage card.
In the program, tap Tools and then Options.
setting. Tap
manually before copying files.
To find your largest files, tap
You can delete Internet Explorer pages stored in your device’s memory by opening Internet Explorer, tapping
Tools
. All attachments are moved to the storage card, and new attachments are automatically stored on
and then Settings. On the System tab, tap Memory and check whether the slider can be adjusted
,
Programs
and then
, and then
Options
File Explorer
. Then tap
. Tap and hold the file, and then tap
and then Find. In the Type list, tap Larger than 64 KB, and then tap Go.
Delete Files
and
Clear History
.
on the pop up menu.
Delete
3.15 Customizing Your Device
You can customize your device by adjusting device settings and installing additional software.
3.15.1 Customizing the Today Screen
You can customize the Today screen in a number of ways that will enrich your experience with the Siemens SX56 Wireless PDA
Phone.
For example, you can change the background picture, select the information you want displayed and in what order, and change
the conditions under which future appointments are displayed on the Today screen.
32
Page 45

To Change the Background of the Today Screen:
1. Tap Start, Settings, Personal and then Today.
2. On the Appearance tab, select the desired theme for the
background. To use your own background, select Use
this picture as the background and tap Browse to
locate the desired file.
3. Choose a folder and type and then tap find.
4. Tap the picture you want to use and then tap OK.
To Select the Information Displayed on the Today Screen:
1. Tap Start, Settings, Personal and then Today.
2. On the Items tab:
x
Uncheck a box to remove its information.
x
Select an item and tap Move Up or Move Down to
change its position.
x Choose to select or deselect Display Today screen
if device is not used for, and then select a number
of hours from the box below.
To Customize Task or Calendar Display Options:
1. Select Tasks or Calendar, and then Options to further
customize.
3.15.2 Adjusting Settings
You can adjust device settings to suit the way you work. To see available options, tap , Settings, then tap the Personal or
System tab located at the bottom of the screen.
33
Page 46

x
You might want to adjust the following:
Icon Program Description
Buttons
Input
Menu
Owner Information
Password
Phone
Sound and notification
To da y
Backlight
Clock
Microphone AGC
Power
Regional settings
Remove programs
Screen
Assign a particular application to start when you press one of the buttons on
the front of your device.
Customize the way in which the device recognizes the text inputs that you
provide.
Customize the items that appear on the
from the New button.
Enter your personal information, such as your name, phone number, and
address.
Prevent access to your device by people who do not know your selected
password.
Configure the phone functions of the Siemens SX56 Wireless PDA Phone.
Set up notification sounds and volumes.
Customize the look and information displayed on the Today screen.
Customize backlight settings to help extend battery life.
Change your time zone and set alarms.
To enable/disable the microphone’s automatic volume control.
View remaining battery life, and configure automatic shut-off options to
maximize battery life.
Customize the appearance of times, dates, numbers, currencies to correspond
with your selected geographic region.
Remove applications to help reduce memory usage.
Re-calibrate the screen tap accuracy and enable/disable the Clear Type
feature. The Clear Type feature smoothes the edges of screen fonts in some
programs on your device.
menu, and enable a pop up menu
You can extend the period of time before your device reduces power due to inactivity. To do so, tap , Settings, and Power.
Please note that extending the period of time before your device reduces power will negatively impact your battery life for each
charge.
3.16 Changing the Default Button Settings
The buttons on your device are default set for Calendar, Contacts and Phone. See the section above titled “Front Panel
Components” for the locations of these buttons.
You can change the Calendar and Contacts buttons to open other programs of your choice, rather than the Calendar and Contacts
applications. Simply follow the picture instructions below. The Phone buttons cannot be changed to start other applications.
34
Page 47

To change a button assignment:
1. Tap St art, Settings, Personal and then Buttons.
2. Select a button, a program in
Button Assignment,
and then tap OK.
3.17 Adding or Removing Programs
Programs added to your device at the factory are stored in a type of memory that cannot be erased. This memory is called ROM
(read only memory). You cannot remove the programs installed at the factory, and you will never accidentally lose these
programs, even if your battery becomes completely drained. It is important to remember that files associated with these programs
can be erased if you choose, or if your battery becomes completely drained.
You can add programs to your device through the ActiveSync function, or directly from the internet.
3.17.1 To add programs using ActiveSync:
1. Ensure that the program that you have selected matches the operating system and processor contained within your Siemens
SX56 Wireless PDA Phone. To check this information, follow the picture instructions below:
and then Settings. On the System tab, tap About. In the Version tab, make a note of the information in
Tap
Processor
2. Download the program to your PC (or insert the CD or disk that contains the program into your PC). You may see a single
*.xip, *.exe, or *.zip file, a Setup.exe file, or several versions of files for different device types and processors. Be sure to
select the program designed for the Pocket PC 2002 Phone Edition operating system and your device processor type.
3. Read any installation instructions, Read Me files, or documentation that comes with the program. Many programs provide
special installation instructions.
4. Connect your device and PC.
5. Double click the *.exe file.
.
x
If the file is an installer, the installation wizard will begin. Follow the directions on the screen. Once the software has
been installed on your PC, the installer will automatically transfer the software to your device.
x If the file is not an installer, you will see an error message stating that the program is valid but it is designed for a
different type of PC. You will need to move this file to your device. If you cannot find any installation instructions for
the program in the Read Me file or documentation, use ActiveSync Explore to copy the program file to the Program
Files folder on your device. For more information on copying files using ActiveSync, see ActiveSync Help.
Once installation is complete, tap
, Programs, and then the program icon to switch to it.
35
Page 48

3.17.2 To add a program directly from the Internet:
1. Ensure that the program that you have selected matches the operating system and processor contained within your Siemens
SX56 Wireless PDA Phone. To check this information, tap
Version tab, make a note of the information in Processor.
2. Download the program to your device straight from the Internet using Pocket Internet Explorer. You may see a single *.xip,
*.exe or *.zip file, a Setup.exe file, or several versions of files for different device types and processors. Be sure to select the
program designed for the SX56 and your device processor type.
3. Read any installation instructions, Read Me files, or documentation that comes with the program. Many programs provide
special installation instructions.
4. Tap the file, such as a *.xip or *.exe file. The installation wizard will begin. Follow the directions on the screen.
and then Settings. On the System tab, tap About. In the
3.17.3 To add a program to the Start menu:
Tap , Settings, Menus, the Sta rt Me nu tab, and then the check box for the program.
If you do not see the program listed, you can either use File Explorer on the device to move the program to the Start Menu folder,
or use ActiveSync on the PC to create a shortcut to the program and place the shortcut in the Start Menu folder.
To use File Explorer to move a program to the Start Menu folder:
, Programs, File Explorer, and locate the program (tap the folder list, labeled My Documents by default, and then My
Tap
Device to see a list of all folders on the device). Tap and hold the program and tap Cut on the pop up menu. Open the Start Menu
folder located in the Windows folder, tap and hold a blank area of the window, and tap Paste on the pop up menu.
The program will now appear on the
Information,” earlier in this chapter.
To use ActiveSync on the PC to move a program to the Start Menu folder:
Use the Explorer in ActiveSync to explore your device files and locate the program. Right click with your PC mouse on the
program file name, and then click Create Shortcut. Move the shortcut to the Start Menu folder in the Windows folder. The
shortcut now appears on the
menu. For more information on using File Explorer, see “Find and Organize
menu. For more information, see ActiveSync Help.
36
Page 49

3.17.4 To remove programs:
x
Tap
and then Settings.
On the System tab, tap
Remove Programs.
x If the program does not appear
in the list of installed
programs, use File Explorer on
your device to locate the
program, tap and hold the
program, and then tap Delete
on the pop up menu.
Chapter 4: Phone
4.1 About Your Phone
As well all the standard features of a mobile phone - such as mailbox and call log – there are several dialing features unique to
your SX56. For example, you can take notes while talking, dial directly from Microsoft Contacts and easily transfer contacts
between your SIM card and the RAM of your device.
Additionally, as with a conventional mobile phone, you can conveniently access and navigate the important features of your
device and make calls.
4.2 Installing The SIM Card
This phone requires a SIM card to interact with AT&T Wireless’s network. The SIM card has already been inserted at the factory;
so there is no need for you to do anything in this step. If you wish, follow the picture instructions below to see how the SIM card
has been inserted. After following the picture instructions, please ensure that the SIM door is completely closed. Your device
will not operate if the SIM door is not closed completely.
37
Page 50

i
Remove the stylus.
DON’T FORGET TO CLOSE THE SIM DOOR BEFORE TRYING TO OPERATE THE
PHONE. IT WILL NOT OPERATE UNLESS THE SIM DOOR IS FULLY CLOSED.
i
Turn over your device and open
the SIM door with the stylus.
i
Slide the SIM card into the slot until it
clicks into place.
4.3 Removing the SIM card
The SIM card can be removed from the phone if necessary. Follow the picture instructions below to see how to remove the SIM
card.
MAKE SURE YOU HAVE SAVED ANY DATA IN OPEN PROGRAMS: OPENING THE
SIM DOOR WILL TURN YOUR DEVICE OFF
i
Remove the stylus.
i
Turn over your device and open the SIM
door with the stylus.
38
x
Press the point of your stylus into the hole until
the SIM card springs out; then use your fingers
to finish removing.
Page 51

DO NOT PUT THE STYLUS IN THE HOLE IN THE
PICTURE TO THE RIGHT: IT WILL CAUSE IRREPARABLE
DAMAGE TO YOUR DEVICE.
SUCH DAMAGE CAN BE CONSIDERED MISUSE AND
MAY INVALIDATE WARRANTY COVERAGE.
4.4 About The Dialer Screen
You may be required to enter a 4-digit PIN for security reasons. If this PIN is required, AT&T Wireless will provide it to you.
1. Enter the preset PIN from AT&T Wireless.
2. Tap .
If your PIN is entered incorrectly three times, then your
SIM card will be blocked. If it happens, you can unblock it
with the PIN Unblocking Key from AT&T Wireless.
The screen below shows your PC Phone dialer interface.
39
Page 52

g
This icon indicates a call is being made and the strength of the signal.
play
Last number details are
dis
ed here
See all calls received, made and
missed.
Keypad for inputtin
For numbers you call often
Click Tools, Options to
access phone settings.
The icons listed below may be seen in the top bar of the screen:
Phone off or out of network service, tap this icon to turn on the phone.
Data connection is established, the icon will disappear when you are connected.
The icon indicates that you are connected to a wireless network. Tap it with the stylus to view the name of the
network to which you are connected. If it reads “AT&T Wireless”, you know that you are on your home
network. Other network names indicate that you are roaming off of the AT&T Wireless network.
Shows signal is at full strength.
- Phone off or out of network service, tap this icon to turn on the phone.
- In network service, tap this icon to turn off the phone.
- Call Missed, tap this icon to view the call(s) you missed.
- Unread E-mail or SMS, tap the icon to view unread SMS or E-mail.
- Indicates that a data connection is being established.
- Shows that your connection is at full strength.
4.5 The Navigation Pad and Dialing
The Navigation Pad offers a number of options that can assist you in dialing rapidly and consistently. The picture below
describes these options.
2.
40
Page 53

1.
7.
4.
6.
Take Call – Press to take an incoming call.
1.
Dialer Screen – Press to activate the dialer screen.
Speakerphone – Press and hold to turn on or off the speakerphone.
Dial – Press to dial a number.
Scroll Up – Press to scroll up through a list.
2.
End Call
3.
4.
5.
6.
7.
– Press to end a call.
Phone On/Off - Press and hold to turn your phone on or off your phone. Check to ensure that the phone
status icon at the top of the screen changes when you use this key.
Call Log – After launching the dialer screen, press to enter the Call Log feature.
Scroll Down – Press to scroll down through a list.
Center
– Press to select.
Speed Dial
– After launching the dialer screen, press to enter the Speed Dial feature.
The icons listed below may be seen in the top bar of the screen:
4.6 Checking Your Connection to a Wireless Network
The default settings for your device are programmed to automatically connect to AT&T Wireless’s network when your SIM card
is inserted.
The icon
A full strength signal is indicated by
with no bars indicating no signal.
indicates that you are connected to a wireless network.
and as the strength of the signal diminishes so will the number of vertical bars in the icon,
41
Page 54

4.7 Turning The Phone On and Off
As indicated above, when you insert a SIM card, your phone will be automatically activated. You can, however, choose to turn
off your phone and just use the PDA features on the Siemens SX56 Wireless PDA Phone.
IN MANY COUNTRIES YOU ARE REQUIRED BY LAW TO TURN OFF YOUR
PHONE WHEN YOU FLY. TURNING OFF YOUR SX56 DOES NOT TURN OFF YOUR
PHONE; YOU MUST TURN OFF YOUR WIRELESS CONNECTION TO YOUR
OPERATOR’S NETWORK.
4.7.1 Turning The Phone Off
To turn the phone off, simply press and hold the button until appears in the navigation bar. Alternatively, just tap the
icon at the top of the screen and then press Turn phone off from the pop-up menu.
4.7.2 Turning The Phone On
To turn on the phone when it is off, simply press and hold until appears in the top toolbar. Alternatively, just tap the
icon at the top of the screen and then press Turn phone on from the pop-up menu.
4.8 Adjusting The Phone Volume
1. You can tap the speaker icon at the top of your screen or press the
volume button on the side panel of your device during a call.
To adjust the conversation phone volume, you must do it during a
call. If you adjust the volume at another time it will affect the ring and
notification levels, and playback volumes for .mp3 files.
4.9 Back Spacing and Deleting in the Phone Dialer
If you tap a wrong number when you are keying in, you can back space to erase individual numbers one at a time or you can delete
all the numbers in the window.
42
Page 55

4.9.1 Back Spacing Over Numbers
4.9.2 Deleting Numbers
Tap here to back space and
erase numbers individually.
4.10 Saving Personal Numbers to the SIM Card
You can choose to save your personal phone numbers in a separate screen in SIM Manager.
4.11 Basic Dialing Features
In this section you can find information on the basic features of your phone: making or answering a call, using the speakerphone,
making notes during a call, putting a call on hold, and using the conferencing facility. You can also send SMS from the Dialer
screen.
4.11.1 Making a call
There are five different ways to make a voice call with the Siemens SX56 Wireless PDA Phone.
First, to make a call from the Dialer:
1. Press
2. Tap the number into the keypad and then tap
to bring up the dialer screen.
or press button.
43
Page 56

The number
will appear
here.
Tap t he
number here
you wish to
Second, to make a call directly from a Contact record:
A phone, like this, will appear in the
signal icon when you are making a
call.
1. Press the Microsoft Contacts Button, find the contact and then tap
once to send to the dialer screen and once to call.
The pop up menu and
button will by default display Call Work Tel.
However, you can customize so that the mobile number or email is displayed
instead:
44
twice –
Page 57

Either:
1. Select a contact in the contacts list and then press left or right on the
navigation pad – the number on the screen will change.
:
Or
1. In the contacts list tap the “w” in the right column next to the number you want
to customize. A pop-up menu will display the phone numbers and email
addresses for this contact with a dot next to the priority number.
2. In the pop-up menu select a priority – If you selected mobile number, “m”
should now be in the right column next to the contact.
Third, to make a call directly from a Speed Dial entry:
Speed dial is a list you can create of often-dialed numbers. Information on adding a
number to Speed Dial is detailed below.
By memorizing the position in the Speed Dial list of a number, you can dial the
number by entering its position number. For example:
In the picture on the left John Fredericks is at position 4. To dial his number
simply tap and hold 4 on the dialer keypad; if the number holds a position of 10
or more tap the first number, and then tap and hold the second to dial.
45
Page 58

Alternatively, if you don’t remember the position of a number in the Speed Dial list
use the method below:
Fourth, to make a call from the call log:
1. Go to Phone, press once the left side of navigation pad, or tap
.
2. In Speed Dial use the navigation pad to find the number you want to dial, and
then press
.
1. Go to Phone, press the right-side of the navigation pad or tap
.
2. Find the call details by first selecting the category it is filed under. For
example, if it is in All calls select All calls from the drop down menu in
the top-left corner.
3. Use the navigation pad to find the number and then tap
or the icon to
the left of the number you wish to call.
Icon is for incoming calls; icon is for outgoing calls and icon is for missed
calls.
Finally, to make a call from the SIM Manager:
46
Page 59

1. Tap , Programs, and then tap SIM Manager – wait for your SIM card
contents to load.
2. Tap and hold the name or phone number of the person you wish to call, and
then select Call from the pop-up menu.
4.11.2 Enabling the Speakerphone
Your device has a speakerphone allowing you to talk hands-free and/or let other people to listen to the caller.
1. Wait until the phone is ringing.
2. Hold down
the top toolbar.
3. To turn off the speakerphone hold down
Do not leave the phone in speakerphone mode and hold it on
your ear; the sound will damage your ear.
until the speakerphone comes on and the icon appears in
47
again.
Page 60

4.11.3 Answering or Rejecting a Call
x
Tap Answer, or press
on your device.
x
Tap Ignore or press
to reject the call.
If you reject a call the busy tone will be sent out.
x Once an incoming or outgoing call is proceeding, you can press
to end the call.
or tap
48
Page 61

4.11.4 Ending a Call
x During an incoming or outgoing call, you can press
to end the call.
or tap
4.11.5 Managing More Than One Call
Your device will notify you when you have another caller and you have the choice of rejecting or accepting incoming call. You
have multiple options for managing these multiple calls.
First, you can choose to swap between the new caller and the original caller by placing the original caller on hold.
To Place a Call on Hold:
If another person is trying to call you when you are talking on the phone the screen
to the left will pop out.
Tap
Answer
To end the 2
to the take the 2
nd
call and go back to the 1st, tap
nd
call and put the 1st on hold.
or .
End
49
Page 62

Indicates
You can choose to swap backwards and forwards between 2
callers by pressing Swap.
which
number is on
hold
To change to
the other
caller tap here
Alternatively, you can set up a conference call between all 3 parties. You can, of course, also initiate the situation above – with
conference calling you can create a conversation between up to 6 people. Check to ensure that this feature is enabled on your
account with AT&T Wireless.
Either put a call on hold, dial a 2
picked up. Or, accept a 2nd incoming call when you already
have one in progress.
In the screen that appears tap Conference.
nd
number and wait for it to be
50
Page 63

If the conference connection is successful the word Conference
will appear at the top of the phone dialer screen (see left).
To add additional people to your conference call tap Hold, key
in the number, and then Resume to return and continue.
4.11.6 Making a Note
Regardless of whether you call from the Dialer, Contacts, Call Log, Speed Dial or SIM Manager, you can take a note during a
call. After you have finished the note it will be saved as an attachment to your call in one of the Call Log folders.
To Make a Note During a Call
1. After you have entered a number and tapped
icon situated at the bottom of the screen.
2. Use any of the input methods to record your note and then tap OK. You can
finish your note during or after the call.
or , tap the
51
Page 64

To View a Note Made Previously
1. Press the right-side of the navigation pad or tap
call, and then from the pop up menu tap view note. (The icon
note).
2. Or, go to Notes, and then tap the name of the file from the list.
If you decide to create a contact for this caller – see “Adding and
Transferring Contacts information” – the call and file names will
be amended to the name of the new contact; the file will be
unaffected.
For more information on advanced features and customizing your phone, see the User Manual,
“Chapter 4: Your Phone”.
4.12 Call Related Features
4.12.1 Checking Your Voice Mail
The first speed dial location defaults as your voice mailbox. While the SIM is
inserted in the device, your device will automatically detect and set as default the
voice mailbox number of your mobile service provider.
To retrieve your voice mail:
x Press
and then press
on the left side of the navigation pad, and then select Voice Mail
.
, tap and hold the
indicates a
4.13 Adding and Transferring Contact Information
As there is a number of ways in which telephone numbers and contacts can enter and then be stored on your device and a number
of ways to make a phone call, it is important to be able transfer those contacts between the programs used to make a call.
4.13.1 Storage Locations for Contacts
i Your SIM card - You interchange your SIM card between your SX56 and another device. While using the other device you
52
Page 65

create one or more new contacts on the SIM card.
i Microsoft Contacts.
i Call Log – New contact numbers can be found in incoming or missed calls.
4.13.2 The Importance of Storing Contacts in Multiple Locations
i
In the event you lose your SIM card while using it with another device your SIM numbers will be backed up to your device.
i
If you want to transfer a number to Speed Dial it must be in Contacts, not on the SIM card.
i
If you are using your SIM with another device, you may need the numbers stored in Microsoft Contacts.
i Transferring numbers to Microsoft Contacts allows you to create a more detailed record.
4.13.3 Mechanics of Adding and Transferring Contacts
1. To create a contact, see creating a contact in Chapter 4.
2. To transfer a contact to SIM, press and hold the center of the navigation pad or tap and hold the contact - and then select Save to SIM from the pop up
menu.
3. To transfer a contact to Speed Dial, press and hold the center of the navigation
pad – or tap and hold the contact - and then select Add Speed Dial Work Tel
from the pop up menu.
4. In the next screen add the contact details, select a location and tap OK.
By default, the Location function will give you the next available position in
the
Speed Dial
occupied, the new number will replace that existing number.
list. If you want to put a number in a position that is already
53
Page 66

4.13.4 Adding and Transferring Contacts to your SIM Card
1. Tap SIM Manager (wait for SIM contents to load), then tap New.
2. Fill in the Name and Phone details and tap Add.
4.13.5 To transfer contacts from SIM to Microsoft Contacts:
To transfer a contact from your SIM Card to your device:
1. Tap SIM Manager (wait for SIM contents to load), then
Either:
Tap
To ol s,Select All
Or:
Press and hold the center of the navigation pad – or tap and hold a contact from the
list - and then select Save to Contacts from the pop up menu.
, and then
54
Save to Contacts
.
Page 67

4.13.6 To Add a Phone Number to Speed Dial
1. Press on left side of the navigation pad or Speed Dial, and then New.
2. Find the contact you want to add, and then press the navigation pad center.
3. When the contact name and number appears in the screen – as left - select an
available location using the arrow keys.
By default, the Location function will give you the next available position
in the Speed Dial list. If you want to put a number in a position that is already
occupied, the new number will replace that number already there.
4.13.7 To Add a Contact From the Call Log
1. Press , and then tap Call Log.
2. Find the call details by first selecting the category it is filed under. For
example, if it is a missed call select Missed from the drop down menu in the
top-left corner.
3. Press and hold the navigation pad center; select New Contact in the pop-up
menu that appears.
4. In the New Contact screen, add additional contact details and press the
navigation pad center or tap OK.
5. The call details in the Call Log will then be amended and displayed under the
name of the contact, not telephone number.
4.14 Managing Your Call Log
The Call Log details all incoming, outgoing, and missed calls and also provides a summary of total calls. The Call Log can
also tell you when a call was initiated, how long it lasted, and provides easy access to any notes taken during the call.
55
Page 68

N
r
Tap here to select All Calls,
Missed, Outgoing,
Incoming or By Caller
Time of call
umbe
4.14.1 The Different Types of Call Logs
Tap on the top left corner of the screen and then select a category from the drop down menu.
Calls are categorized as below:
x
All Calls - shows all calls made to and from the phone in chronological order.
x
x
x
x By Caller - categorizes calls alphabetically according to caller.
Missed - only shows calls that were not answered.
Outgoing - only shows calls made from the phone.
Incoming - only shows calls made to the phone.
4.14.2 Viewing Durations of Past Calls
x Go to Call Log, find the call you are interested in, and then tap it once.
4.14.3 Deleting Individual Calls From the Call Log
x Press and hold the center of the navigation pad, and then select delete from the pop up menu.
56
Page 69

4.14.4 Deleting All Calls From the Call Log
x Ta p
while the Phone Dialer is showing, and then tap
To ol s
Delete all Calls.
4.14.5 Setting Call Log Size Limits
x Ta p Call Log, To ol s, Options and then the box under Delete call log items
older than.
x In the drop down menu choose a period of time and then tap OK.
4.15 Customizing Your Phone
You can personalize the setting of your phone, the services you have and the network you are connected to.
4.15.1 Selecting Ring Types and Ring Tones
1. In phone dialer, tap Too ls , Options and then Phone.
2. Tap to see the drop-down menu choices below.
Ring Type Ring Tone Keypad Sound
4.15.2 Downloading Ring Tones
You can make a connection to the Internet and then download ring tones in the .wav format.
57
Page 70

4.15.3 Managing Ring Tones
Add Ring Tone allows you to quickly find and display all the ring tones stored on your device, gives you the option to listen, and
then add or remove them from the Phone Settings list mentioned above.
4.15.4 Displaying All Ring Tones on Your Device
Tap , Settings, System and then Add Ring Tone – the program will
automatically list and display all the .wav files on your device.
4.15.5 Testing Ring Tones
x
After the ring tones have been loaded, select one by tapping it, and then tap play.
If you don’t like the ring tone de-select it.
58
Page 71

4.15.6 Adding A New Ring Tone
1. When the ring tones have loaded, you will see that some are already selected;
these are presently listed in phone settings.
2. Tap the name of any ring tone, then to add or remove from the list in phone
settings.
4.16 Your Phone’s PIN Function
4.16.1 Enabling Your Phone’s PIN
1. In phone dialer, tap Tools, Options and then Phone.
2.
Under Security, tap the option Require PIN when phone is used.
4.16.2 Changing Your Phone’s PIN
1. Under Security, tap Change PIN.
2. Follow the instructions – enter the old pin, then a new one, and reenter for
confirmation.
59
Page 72

4.17 Enabling Caller ID
When you place a call, your phone number will be revealed to the person that you are
calling. To enable or disable this function:
1. In phone dialer, tap Too ls , Options and then Services.
2. In Services, tap Caller ID, and then Get Settings (retrieving settings may take a
3. In the next screen, mark either Everyone I call (Enable) or Never provide caller
few minutes).
ID (Disable) and then OK.
4.18 Enabling Call Forwarding
This service allows you to forward your incoming calls to another phone number. You can choose to forward all calls to the same
number or specify a number based on the following conditions:
Unavailable: When your phone is turned off or out of the network service.
Busy: When you are on the phone.
No answer: If you do not answer your phone.
60
Page 73

To activate or deactivate call forwarding:
1. In phone dialer, tap Too ls , Options and then Services.
2. In Services, tap Call Forwarding and then Get Settings (retrieving settings
may take a few minutes).
3. In Call forwarding either tick Forward all incoming phone calls and then
enter a number in the box below – or, according to circumstance, select one
or all of the other categories and enter numbers.
4.19 Call waiting
This service allows you to receive another call during an active call. You can also turn this option off by selecting Do not notify
me.
To activate or deactivate call waiting
1. In phone dialer, tap Too ls , Options and then Services.
2. In Services, tap Call waiting and then Get Settings (retrieving settings may take
a few minutes).
3. Then in Call waiting select Notify me or Do not notify me and tap OK.
4.19.1 Voice mail and SMS
Your device will automatically detect and set your voice mail and SMS access numbers when your SIM card is inserted. Your
device will also automatically search for a wireless network. You can view these numbers, and the network that has been selected,
by following the picture instructions below:
61
Page 74

4.19.2 To view your voice and SMS access numbers:
1. In phone dialer, tap Too ls , Options and then Services.
2. In Services, Voice mail and SMS, and then Get Settings (retrieving settings
may take a few minutes).
3. Then in Voice mail and SMS type in the access numbers and tap OK.
4.19.3 To view the network that has been selected:
1. In phone dialer, tap Too ls ,
Options and then Network.
2. Tap
Find Network
settings may take a few
minutes).
(retrieving
You can enable this function when the network status is currently out of network service and you
want to conduct a search
4.19.4 To select a different network:
62
Page 75

1. In phone dialer, tap Too ls , Options and then Network.
2. Select either Automatic or Manual in Network selection (retrieving settings
may take a few minutes when you select Manual).
4.19.5 To set preferred networks:
1. In phone dialer, tap Too ls , Options and then Network.
2. To select Set Preferred Networks (retrieving settings may take a few minutes).
3. To select either networks and re-prioritize the order for network usage.
If there are many mobile phone service providers available to you, enable this
function to select a lower fee network
4.19.6 Band Reselection When Traveling Outside the United States
When traveling outside the United States or Canada, you must manually reselect your
device’s transmission frequency band to connect to a wireless network.
To do so, tap
left.
When on AT&T Wireless’s network, ensure that GSM 1900 is selected. When traveling
outside the United States or Canada, ensure that GSM 900 is selected.
, Settings, Phone, and then Band to reach the screen that is displayed at
63
Page 76

4.19.7 To establish automatic call answering:
This feature, which instructs your phone to pick up the call automatically, is particularly helpful when you are in a hands-free
environment. For example, if you are driving and using the single earbud included in the box, the call will be picked up after a
designated number of rings and your hands never have to leave the steering wheel.
1. In phone dialer, tap Too ls , Options and then More.
2. To be able to answer incoming calls without pressing Ta lk , set the “Talk after _
rings” feature.
4.19.8 Using Key Lock
Key Lock enables you to lock the buttons on your device so that only the On/Off button will turn your device on. Locking your
device in this way ensures you can’t switch the device on by accident and consume power unnecessarily.
Enabling Key Lock when you are using your phone features will slow down your ability to answer a
call.
4.19.9 To enable Key Lock:
1. Tap Phone, To ol s, Options, and then More.
2. Under Hardware Key Lock, select Lock all buttons except power button, and then OK.
4.20 Enabling Broadcast Channels
You can choose to receive real-time news and information, such as traffic news and weather reports.
64
Page 77

To enable Broadcast Channels:
1. Tap Phone, To ol s , Options, and then More.
2. Under Broadcast Channels tick Enable, and then tap Settings.
3. Tap Receive Channel list – the list will appear in your Inbox.
4. After retrieving the list and deciding which channels you want, return to this
page and tap New.
5. In the next screen, enter a channel name and number, and tap OK – the channel
name will appear in the box under Select Items to Receive.
6. Tick the box next to the channel name to select it.
7. Repeat the process for all channels you want to add.
65
Page 78

4.21 Additional Dialing Information
4.21.1 Making Emergency Calls
Enter the US emergency number 911 then
1. The Siemens SX56 Wireless PDA Phone is loaded at the factory with the US
emergency number 911. This number can be used to make an emergency call
in the US, with or without a SIM card inserted, if your phone is connected to a
wireless network.
2. Some mobile phone service providers may require that a SIM card is inserted,
and in some cases that the PIN has been entered as well.
4.21.2 Making International Calls
1. Tap and hold the 0 key until the + sign appears. The + replaces the international
prefix of the country from where you are calling.
2. Enter the full phone number you want to dial. It includes the country code, area
code (without the leading zero) and phone number.
3. Tap
or press button.
or press button.
5. Getting Connected
The Siemens SX56 Wireless PDA Phone provides you with many options for exchanging data with your other computing devices,
computers on your corporation’s network, or the Internet and the World Wide Web. For example, you can:
x Use the infrared (IR) port on your device to exchange data with another similarly equipped computer.
66
Page 79

x
Connect to your wireless service provider.
Once connected, you can send and receive e-mail messages by using Inbox and view Web or WAP pages by using Microsoft
Pocket Internet Explorer. The communication software for creating wireless data connections is already installed on your
device.
x Connect wirelessly to the network at your company or organization where you work. Please note that your corporate
Information Technology department may need to enable functionality in their network to support this type of wireless
connection.
Once connected, you can send and receive e-mail messages by using Inbox, view Web or WAP pages by using Pocket Internet
Explorer, and synchronize with your PC.
x Connect to a virtual private network (VPN) of the company or organization where you work. Please note that your corporate
Information Technology department will need to enable functionality in their network to support this type of connection.
Once connected, the added security of a VPN means that you can access the full resources of your company’s network. For
example, you can use File Explorer to access the files of computers on that network.
5.1 Connecting to an E-Mail Server
One powerful data connection that you can set up with the Siemens SX56 Wireless PDA Phone is a connection between your
device and an e-mail server. This type of connection will allow you to send and receive e-mail messages with the Inbox on your
device. The e-mail server that you choose must support POP3 or IMAP4 and an SMTP gateway, and you must know the server
addresses and port settings to configure your device.
1. In Inbox on
your device,
tap
Services
and then New
Service.
Follow the
directions in
the New
Service
wizard.
,
2. To fill you e-mail
address in the field,
and then tap
Next will initiate
auto-configuration –
which attempts to
connect your phone to
your email server and
automatically download
the necessary email
connection settings.
Next
.
If auto-configuration is
unsuccessful you will need
to enter the settings
manually (please see
screens 4. and 5.).
67
Page 80

3. Enter “Your
name”, your
“User name”
and
“Password”
then tap Next..
6. Enter the your email provider’s server name information for Incoming mail and Outgoing
mail.
For an explanation of a screen, tap
e-mail server, tap Services and then Connect.
7. Tap Options. Then select "GPRS Connection" as your default connection. Tap OK and
then tap Finish.
and then
. When finished, to connect to your
Help
4. From the drop down
menu select the
“Service type” that
your email provider
supports (POP3 or
IMAP4).
5. Enter a “Name” for
your email account
then tap Next.
5.2 Getting More Help on Connecting
More information on creating a connection to a computer at your workplace or to the Internet, as well as information on
additional procedures, can be found in the following locations:
x Inbox: Sending and Receiving E-mail Messages or short messages in Chapter 6.
x
Online Help on the device. Tap
x
ActiveSync Help on the desktop computer. In ActiveSync, click Microsoft ActiveSync Help on the Help menu.
For troubleshooting information, see the Pocket PC Web site at: http://www.microsoft.com/mobile/pocketpc
and then Help. Tap View, All Installed Help, and then Inbox or Connections.
68
Page 81

6. Wireless Data Programs
As well as wireless voice communication, your device has built in support for a range of wireless data communication methods.
You are able to:
1. Browse the Web and view WAP-enabled sites
2. Send SMS
3. Send and receive email
4. Synchronize with your PC remotely
5. Send and receive information via infrared from another infrared-equipped Windows-powered device
Except in the case of infrared communication, in order to use these features the following conditions must be met:
x
Your account with AT&T Wireless must be enabled for data transmission.
x You have an account for Web and email access with an internet service provider or at a network through your company or
another organization.
x
You have set up a connection to this ISP or corporate network on the Siemens SX56 Wireless PDA Phone.
6.1 Pocket Internet Explorer: Browsing Web and WAP pages
Use Microsoft Pocket Internet Explorer to view HTML, cHTML and WAP pages on the Internet. You can browse in either of
these ways
x
During synchronization with your PC, download your favorite links and mobile favorites that are stored in the Mobile
Favorites folder in Internet Explorer on the PC.
x Browse the Web by entering addresses on your device.
6.1.1 Using Pocket Internet Explorer
To switch to Pocket Internet Explorer:
x
You can use Pocket Internet Explorer to browse mobile favorites
and channels that have been downloaded to your device without
connecting to the Internet. You can also connect to the Internet
through an ISP or a network connection and browse the Web/
WAP page(s).
69
and then Internet Explorer.
Tap
Page 82

6.1.2 Viewing Mobile Favorites and Channels
1. Tap the Favorites button to display your list of
favorites.
2. Tap the page you want to view.
3. You’ll see the page that was downloaded the last
time you synchronized with your PC. If the page is
not on your device, the favorite will be dimmed. You
will need to synchronize with your PC again to
download the page to your device, or connect to the
Internet to view the page.
6.1.3 Browsing the Internet
1. Set up a connection to your ISP or corporate network using Connections.
2. To connect and start browsing, do one of the following:
x
Tap the Favorites button, and then tap the favorite you want to view.
x
Tap View and then Address Bar. In the address bar that appears at the top of the screen, enter the Web address you want
to visit and then tap Go. Tap the arrow to choose from previously entered addresses.
To add a favorite link while using the device, go to the page you want to add,
tap and hold on the page, and tap Add to Favorites.
6.1.4 Synchronizing Mobile Favorites To Your PC
Only items stored in the Mobile Favorites folder in the Favorites folder in Internet Explorer on your PC will be synchronized with
your device. This folder was created automatically when you installed ActiveSync.
During synchronization, the list of favorite links in the Mobile Favorites folder on your PC is synchronized with Pocket Internet
Explorer on your device. Both PC and your device are updated with changes made to either list each time you synchronize.
Unless you mark the favorite link as a mobile favorite, only the link will be downloaded to your device, and you will need to
connect to your ISP or network to view the content. For more information on synchronization, see ActiveSync Help on the PC.
If you are using Microsoft Internet Explorer 5.0 or later on your PC, you can download mobile favorites to your device.
Synchronizing mobile favorites downloads Web content to your device so that you can view pages while you are disconnected
from your ISP and PC.
Use the Internet Explorer plug in installed with ActiveSync to create mobile favorites quickly.
6.1.5 Creating a Mobile Favorite on Your PC
1. In Internet Explorer on your desktop computer, click Tools and then Create Mobile Favorite.
2. To change the link name, enter a new name in the Name box.
3. Optionally, in
, select a desired update schedule.
Update
70
Page 83

4. Click OK. Internet Explorer downloads the latest version of the page to your desktop computer.
5. Limit the number of downloaded linked pages. In Internet Explorer on the desktop computer, click Favorites; then move
your mouse through Mobile Favorites to the mobile favorite you want to change. Finally, right-click the mobile favorite and
then
Properties;
6. Synchronize your device and desktop computer. Mobile favorites that are stored in the Mobile Favorites folder in Internet
Explorer are downloaded to your device.
You can add a button to the Internet Explorer toolbar for creating mobile favorites. In Internet
in the
Download
If you did not specify an update schedule in step 3, you will need to manually download content to
keep the information updated on your desktop computer and device. Before synchronizing with
your device, in Internet Explorer on your desktop computer, click Too ls and then Synchronize.
You will see the last time content was downloaded to the desktop computer, and you can manually
download content if needed.
Explorer on your desktop computer, click View , To ol ba rs , and then Customize.
tab, specify 0 or 1 for the number of linked pages you want to download.
6.1.6 Optimizing Internet-Related Memory Usage on Your Device
Mobile favorites take up storage memory on your device. To minimize the amount of memory used:
x
In ActiveSync on your desktop, click Options, select Favorites/Internet Explorer, tap Settings and then Customize. You
can then deselect Synchronize Images, Synchronize Sound and/or Synchronize offline content pages, to stop pictures
and sounds, or some mobile favorites from being downloaded to the device. For more information, see ActiveSync Help.
x
Limit the number of downloaded linked pages. In Internet Explorer on the desktop computer, click Favorites; then move
your mouse through Mobile Favorites to the mobile favorite you want to change. Finally, right-click the mobile favorite and
then Properties. In the Download tab, specify 0 or 1 for the number of linked pages you want to download.
6.1.7 Using AvantGo Channels
AvantGo is a free interactive service that gives you access to personalized content and thousands of popular Web sites. You
subscribe to AvantGo channels directly from your device. Then, you synchronize your device and PC, or connect to the Internet
to download the content. For more information, visit the AvantGo Web site.
To sign up for AvantGo:
1. In ActiveSync options on the desktop computer, turn on synchronization for the AvantGo information type.
2. In Pocket Internet Explorer on your device, tap the Favorites button to display your list of favorites.
3. Tap the AvantGo Channels link.
4. Follow the directions on the screen. You will need to synchronize your device with your desktop computer and then tap the
My Channels button to complete the AvantGo setup.
When synchronization is complete, tap the AvantGo Channels link in your list of favorites to see a few of the most popular
channels. To add or remove channels, tap the Add or Remove link.
6.2 MSN Messenger: Instant Messaging
MSN Messenger on your mobile device is an instant messaging program that lets you:
x See who is online.
x
Send and receive instant messages.
x Have instant message conversations with groups of contacts.
71
Page 84

To use MSN Messenger, you must have a Microsoft Passport™ account or a Microsoft Exchange e-mail account. You must have
a Passport to use MSN Messenger Service. If you have a Hotmail or MSN account, you already have a Passport. Once you have
obtained either a Microsoft Passport or a Microsoft Exchange account, you are ready to set up your account.
Sign up for a Microsoft Passport account at http://www.passport.com. Get a
free Microsoft Hotmail e-mail address at http://www.hotmail.com.
Prior to signing in to MSN Messenger you will need to disable optimization in the Wireless Tools application (refer to section
9.10.4 for further details on how to perform this task). Remember to re-enable optimization after logging off MSN Messenger to
allow you too enhance your browsing experience.
You can increase the stability of MSN Messenger sessions by configuring your device's power settings to extend the period of
time before your device reduces power due to inactivity.
6.2.1 Opening MSN Messenger
Tap , Programs, and then tap MSN Messenger.
6.2.2 Configuring MSN Messenger
Before you can connect, you must enter Passport or Exchange account information.
To set up an account and sign in:
1. In the
2. In the Accounts tab, enter your Passport or Exchange account information.
3. To sign in, tap the sign in screen and enter your e-mail address and password.
To change from your Exchange account to your Passport account, and sign in:
4. In the
5. In the Accounts tab, tick Enable Passport account, enter your Passport
account information, under Sign in using this account first tick Passport
account, and then tap OK.
6. To sign in, tap the sign-in screen and enter your e-mail address and password.
To ol s
Too l s
menu, tap
menu, tap
Options
Options
.
.
If you already use MSN Messenger on your PC, your contacts will show up on your device
without being added again.
72
Page 85

6.2.3 Working with Contacts in MSN Messenger
x
The MSN Messenger window shows all of your
messenger contacts at a glance, divided into Online
and Not Online categories. From this view, while
connected, you can chat, send e-mail, block the
contact from chatting with you, or delete contacts
from your list using the pop up menu.
To see others online without being seen, in the Too ls menu, tap My Status and select Appear
Offline. If you block a contact, you will appear offline but will remain on the blocked contact’s list.
To unblock a contact, tap and hold the contact, then tap
Unblock
6.2.4 Chatting with Contacts in MSN Messenger
x Tap a contact name to open a chat window. Enter your
message in the text entry area at the bottom of the
screen, or tap My Text to enter a preset message, and
tap Send. To invite another contact to a multi user chat,
in the Too l s menu, tap Invite and tap the contact you
want to invite.
on the pop up menu.
To switch back to the main window without closing a chat, tap the Contacts button. To revert
back to your chat window, tap Chats and select the person whom you were chatting with.
73
Page 86

x To know if the contact you are chatting with is
responding, look for the message under the text entry
area.
x For more information on using MSN Messenger, tap
and then Help.
6.2.5 MSN Messenger Stability
You can increase the stability of MSN Messenger sessions by configuring your device's power settings to extend the
period of time before your device reduces power due to inactivity. To do so, tap
note that extending the period of time before your device reduces power will negatively impact your battery life for
each charge.
, Settings, and Power. Please
6.3 Inbox: Sending and Receiving E-mail or SMS
Use Inbox to send and receive e-mail messages in either of these ways:
x
Synchronize e-mail messages with Microsoft Exchange or Microsoft Outlook on your PC.
x Send and receive e-mail messages by connecting directly to an e-mail server through an Internet service provider (ISP) or a
network.
You also can use Inbox to send and receive SMS; it supports 8 bits data with class 0, 1, 2, 3. And Unstructured Supplementary
Service Data (
USSD) as well.
6.3.1 Synchronizing E-mail Messages
E-mail messages can be synchronized as part of the general synchronization process. You will need to enable Inbox
synchronization in ActiveSync. For information on enabling Inbox synchronization, see ActiveSync Help on the PC.
During synchronization:
x
Messages are copied from the mail folders of Exchange or Outlook on your PC to the ActiveSync folder in Inbox on your
device. By default, you will receive messages from the past five days and only the first 100 lines of each message.
74
Page 87

x
E-mail messages in the Outbox folder on your device are transferred to Exchange or Outlook, and then sent from those
programs.
x
E-mail messages in folders must be selected in ActiveSync on your PC in order to be transferred.
6.3.2 Using the Message List
x
Messages you receive are displayed in the message list.
By default, the most recently received messages are
displayed first in the list.
x When you receive a message, tap it to open it. Unread
messages are displayed in bold.
When you connect to your e-mail server or synchronize with your PC, by default, you’ll receive messages from the last five days
and only the first 100 lines of each new message. The original messages remain on the e-mail server or your PC.
75
Page 88

You can mark the messages that you want to retrieve in full during your next synchronization or e-mail server connection. In the
message list, tap and hold the message you want to retrieve. On the pop up menu, tap Mark for Download. The icons in the
Inbox message list give you a visual indication of message status.
You specify your downloading preferences when you set up the service or select your synchronization options. You can change
them at any time:
x
Change options for Inbox synchronization using ActiveSync options. For more information, see ActiveSync Help.
x
Change options for direct e-mail server connections in Inbox on your device. Tap Tools and then tap Options. On the
Service tab, tap the service you want to change. Tap and hold the service and select Delete to remove a service.
6.3.3 Creating an SMS or E-mail
1. Tap New.
2. In the To field, enter either e-mail address or SMS
number of one or more recipients, separating them with a
semicolon, or select a name from the contact list by
tapping the Address Book button. All e-mail addresses
entered in the e-mail fields in Contacts appear in the
Address Book.
3. Compose your message. To enter preset or frequently
used messages, tap My Text and select a message.
4. Tap Send when you’ve finished the message. If you are
working offline, the message is moved to the Outbox
folder and will be sent the next time you connect.
1. Whether you want to send or read E-mail or a SMS, you
can swap it by tapping Services then choose what service
you want.
2. If you are sending an SMS message and want to know if it
was received, tap Edit, Options, and select Request SMS
text message delivery notification before sending the
message.
6.3.4 Managing Messages and Folders
By default, messages are displayed in one of five folders for each service you have created: Inbox, Deleted Items, Drafts, Outbox,
and Sent Items. The Deleted Items folder contains messages that have been deleted on the device. The behavior of the Deleted
and Sent Items folders depends on the options you have chosen. In the message list, tap Too ls and then Options. On the Message
tab, select your options.
If you want to organize messages into additional folders, tap Too ls , and then Manage Folders to create new folders. To move a
message to another folder, in the message list, tap and hold the message and then tap Move to on the pop up menu.
6.3.5 Folder behavior with a direct connection to an e-mail server
The behavior of the folders you create depends on whether you are using ActiveSync, SMS, POP3, or IMAP4.
1. If you use ActiveSync, e-mail messages in the Inbox folder in Outlook will automatically be synchronized with your device.
76
Page 89

You can select to synchronize additional folders by designating them for ActiveSync. The folders you created and the
messages you moved will then be mirrored on the server. For example, if you move two messages from the Inbox folder to a
folder named ‘Family’, and you have designated ‘Family’ for synchronization, the server creates a copy of the ‘Family’
folder and copies the messages into that folder. You can then read the messages while away from your PC.
2. If you use SMS, messages are stored in the Inbox folder of SMS category.
3. If you use POP3 and you move e-mail messages to a folder you created, the link is broken between the messages on the
device and their copies on the mail server. The next time you connect, the mail server will see that the messages are missing
from the device Inbox and delete them from the server. This prevents you from having duplicate copies of a message, but it
also means that you will no longer have access to messages that you moved to folders created from anywhere except the
device.
4. If you use IMAP4, the folders you created and the e-mail messages you moved are mirrored on the server. Therefore,
messages are available to you anytime you connect to your mail server, whether it is from your device or PC. This
synchronization of folders occurs whenever you connect to your mail server; create new folders, or rename/delete folders
when connected.
6.3.6 Transferring Items Using Infrared
Using infrared (IR), you can send and receive information, such as contacts and appointments, between two devices.
To send information:
1. Switch to the program where you created the item you want to send, and locate this item in the list.
2. Align the IR ports of the two devices so that they are unobstructed and within a close range.
3. Tap and hold the item, and tap Beam Item on the pop up menu.
You can also send items, but not folders, from File Explorer. Tap and hold the item
you want to send, and then tap Beam File on the pop up menu.
To receive information:
1. Align the IR ports of the two devices so that they are unobstructed and within a close range.
2. Have the owner of the other device send the information to you. Your device will automatically receive it.
6.4 Terminal Services Client
Using the Terminal Services Client, you can log onto a Windows NT server type PC that is running Terminal Services software
and use all of the programs that are available on that PC from your mobile device. For example, instead of running Microsoft
Pocket Word, you can run the PC version of Microsoft Word and access all of the .doc files on that PC from your device.
You cannot use Tra ns cr ibe r when entering information in Terminal Services. You
must use Keyboard, Block Recognizer, or Letter Recognizer.
6.4.1 Connecting to a Terminal Server
Start a remote connection to the server via your wireless modem connection.
1. Tap
2. To connect to a server you have previously connected to, in Recent Servers, tap a server.
, Programs, and then Terminal Services Client.
77
Page 90

3. To connect to a new server, enter the server’s name in the Server box. Select the limit size of desktop to fit on the screen
check box only when using applications that have been specifically sized for use with the Pocket PC 2002 Phone Edition
operating system.
4. Tap Connect.
If the network administrator has configured Terminal Services Client to reconnect
to disconnected sessions, and you previously disconnected from a Terminal Server
without ending the session, the Terminal Services Client reconnects to that
session.
6.4.2 Disconnecting from a Terminal Server Without Ending Session
The following commands must be accessed from the Start menu in the Terminal Services window used to access the PC’s
commands. Do not use the Start menu on your mobile device.
1. In the Terminal Services Client window, tap
2. Tap Disconnect.
If the network administrator has configured Terminal Services Client to reconnect
to disconnected sessions, you will be reconnected to this session the next time you
connect to this server.
, and then Shutdown.
6.4.3 Disconnecting from a Terminal Server By Ending a Session
1. In the Terminal Services Client window, tap and then Shutdown.
2. Tap
Log Off
.
6.4.4 Navigating Within a Terminal Server Connection
Once connected to the server, the PC’s screen may more than fill your mobile device’s screen. If scroll bars are displayed on the
server’s screen, you will see more than one set of scroll bars on your mobile device:
x
One to scroll information on the PC, and one to scroll the PC display through the Terminal Services window in Terminal
Services Client.
x
To ensure you are scrolling the PC display through Terminal Services Client, use the four directional buttons at the
bottom of the Terminal Services Client screen.
x
To better-fit information on your mobile device’s screen, select Limit size of server desktop to fit on this screen. For
best effect, programs on the PC should be maximized.
6.5 Tips and Tricks When Connected
6.5.1 Improving Display Performance
Display performance is improved by decreasing the time it takes for the screen to be refreshed on the PC.
1. On your PC, select
2. Click
3. Clear the Transition effects for menus and tool tips check box.
Display
.
6.5.2 Improving Browser Performance
Performance with Internet Explorer on the PC is improved by decreasing the time it takes for Web pages to be refreshed.
In Internet Explorer on your PC, select Tools, Internet Options, Advanced, and then clear the Use smooth scrolling check box.
, Settings and Control Panel.
78
Page 91

7. Microsoft ActiveSync
Using Microsoft ActiveSync, you can synchronize the information on your PC with the information on your device.
Synchronization compares the data on your device with your PC and updates both with the most recent information. For example:
x Keep Pocket Outlook data up-to-date by synchronizing your device with Microsoft Outlook data on your PC.
x
Synchronize Microsoft Word and Microsoft Excel files between your device and PC. Your files are automatically converted
to the correct format
By default, ActiveSync does not automatically synchronize all types of
information. Use ActiveSync options to turn synchronization on and off for
specific information types.
With ActiveSync, you can also:
x
Back up and restore your device data.
x Copy (rather than synchronize) files between your device and PC.
x Control when synchronization occurs by selecting a synchronization mode. For example, you can synchronize continually
while connected to your PC or only when you choose the synchronize command.
x
Select which information types are synchronized and control how much data is synchronized. For example, you can choose
how many weeks of past appointments you want synchronized.
After installation is complete, the ActiveSync Setup Wizard helps you to connect your device to your PC, set up a partnership so
you can synchronize information between your device and your PC, and customize your synchronization settings. Your first
synchronization process will automatically begin when you finish using the wizard.
After your first synchronization, take a look at Calendar, Contacts, and Tasks on your device. You’ll notice that information
you’ve stored in Microsoft Outlook on your PC has been copied to your device, and you didn’t have to type a word. Disconnect
your device from your PC and you’re ready to go!
Once you have set up ActiveSync and completed the first synchronization process, you can initiate synchronization from your
device. To switch to ActiveSync on your device, tap
you can synchronize remotely from your device.
, and then tap ActiveSync. Note that if you have a wireless LAN card,
For information about using ActiveSync on your PC, start ActiveSync on your PC, and then see ActiveSync Help.
79
Page 92

x For more information about ActiveSync on your
device, switch to ActiveSync, tap
Help.
, and then tap
7.1 Synchronizing Files Between Your Device and Your PC
When you first setup a connection, or by tapping Options in ActiveSync on your desktop, you can see, under Mobile Device, the
list of programs that may be synchronized - this list includes: Calendar, Contacts, Tas k s, Inbox, Files, Pocket Access,
Favorites and Ava nt Go channels. Files is a specially created folder on your desktop in My Documents into which you must
place all files (Word, Excel etc) you wish to synchronize.
How to Synchronize Files
1. Select Files in ActiveSync, and then OK to creating a new folder.
2. Use Windows Explorer on your desktop to find this folder – usually called My Documents pre-fixed by the name you gave
to your connection – then copy files you want to synchronize into this folder.
3. Tap Synchronize in ActiveSync.
For more information about ActiveSync on your device, switch to ActiveSync, tap
, and then tap Help.
8. Microsoft Pocket Outlook
Microsoft Pocket Outlook includes Calendar, Contacts, Tasks, Inbox, and Notes. You can use these programs individually or
simultaneously. For example, e-mail addresses stored in Contacts can be used to address e-mail messages in Inbox.
Using ActiveSync, you can synchronize information in Microsoft Outlook or Microsoft Exchange on your PC with your device.
You can also synchronize this information directly with a Microsoft Exchange server. Each time you synchronize, ActiveSync
compares the changes you made on your device and PC or server, and updates both PC with the latest information.
For information on using ActiveSync, see ActiveSync Help on the PC.
You can switch to any of these programs by tapping them on the
menu.
80
Page 93

8.1 Calendar: Scheduling Appointments and Meetings
x
Use Calendar to schedule appointments, including
meetings and other events. You can check your
appointments in one of several views (Agenda, Day,
Week, Month, and Year) and easily switch views by
using the View menu.
You can customize the Calendar display, such as changing the first day of the week, by tapping
Options on the Too l s menu.
8.1.1 Creating an Appointment
1. If you are in Day or Week view, tap the desired date and time
for the appointment.
2. Tap New.
3. Using the input panel, enter a description and a location. Tap
first to select the field.
4. If needed, tap the date and time to change them.
5. Enter other desired information. You will need to minimize
the input panel to see all available fields.
6. To add notes, tap the Notes tab. You can enter text, draw, or
create a recording. For more information on creating notes,
see Notes: Capturing Thoughts and Ideas later in this
chapter.
7. When finished, tap OK to return to the calendar.
If you select
options set in
Remind me
in an appointment, your device will remind you according to the
, Settings, Personal tab, Sounds & Notifications.
81
Page 94

8.1.2 Using the Summary Screen
x
When you tap an appointment in Calendar, a summary
screen is displayed. To change the appointment, tap Edit.
8.1.3 Creating Meeting Requests
You can use Calendar to set up meetings with users of Outlook or Pocket Outlook. The meeting request will be created
automatically and sent either when you synchronize Inbox or when you connect to your e-mail server. Indicate how you want
meeting requests sent by tapping Too ls and then Options. If you send and receive e-mail messages through ActiveSync, select
ActiveSync.
To schedule a meeting:
1. Create an appointment.
2. In the appointment details, hide the input panel, and then tap
Attendees.
3. From the list of e-mail addresses you’ve entered in Contacts,
select the meeting attendees.
4. The meeting notice is created automatically and placed in
the Outbox folder.
For more information on sending and receiving meeting requests,
see Calendar Help and Inbox Help on the device.
8.2 Contacts: Keeping Track of Friends and Colleagues
82
Page 95

To change the way information is displayed in the list, tap Too l s and then Options.
8.2.1 Creating a Contact
x Contacts maintains a list of your friends and
colleagues that you can easily find whether you
are at home or on the road. Using the device
infrared (IR) port, you can quickly share Contacts
information with other device users.
1. Tap New.
2. Using the input panel, enter a name and other contact
information. You will need to scroll down to see all
available fields.
3. To assign the contact to a category, scroll to and tap
Categories and select a category from the list. In the
contact list, you can display contacts by category.
4. To add notes, tap the Notes tab. You can enter text,
draw, or create a recording. For more information on
creating notes, see
Ideas later in this chapter.
5. When finished, tap OK to return to the contact list.
Notes: Capturing Thoughts and
83
Page 96

8.2.2 Finding a Contact in Your Device
8.2.3 Using the Summary Screen
There are six ways to find a contact:
1. Press and hold the top directional button on the
navigation pad until alphabetical letters appear on the
screen in large type. Then use the navigation pad to
scroll through the alphabet and select a letter.
2. Tap one of the groups of letters displayed across the top
of the screen.
3. In the contact list, enter a contact name in the box under
the navigation bar. To show all contacts again, clear text
from the box or tap the button to the right of the box.
4. In the contact list, tap the category list (labeled All
Contacts by default) and select the type of contact that
you want displayed. To show all contacts again, select
All Contacts
category, select None.
5. To view the names of companies your contacts work
for, in the contact list, tap View > By Company. The
number of contacts that work for that company will be
displayed to the right of the company name.
6. Tap
for the type, and then tap Go.
x When you tap a contact in the contact list, a summary
screen is displayed. To change the contact information,
tap Edit.
. To view a contact not assigned to a
, Find, enter the contact name, select Contacts
84
Page 97

8.3 Tasks: Keeping a To Do List
g
To change the way information is displayed in the list, tap Tools and then Options.
8.3.1 Creating a Task
x Use Tasks to keep track of what you have to do.
1. Tap New.
2. Using the input panel, enter a description.
3. You can enter a start date and due date or enter other
information by first tapping the field. If the input
panel is open, you will need to hide it to see all
available fields.
4. To assign the task to a category, tap
select a category from the list. In the task list, you can
display tasks by category.
5. To add notes, tap the Notes tab. You can enter text,
draw, or create a recording. For more information on
creating notes, see
Ideas later in this chapter.
6. When finished, tap OK to return to the task list.
Notes: Capturin
Categories
Thoughts and
and
To quickly create a task with only a subject, tap Entry Bar on the Too ls menu. Then,
tap Tap here to add a new task and enter your task information.
85
Page 98

8.3.2 Using the Summary Screen
x
When you tap a task in the task list, a summary screen
is displayed. To change the task, tap Edit.
8.4 Notes: Capturing Thoughts and Ideas
x
Quickly capture thoughts, reminders, ideas, drawings,
and phone numbers with Notes. You can create a written
note or a recording. You can also include a recording in a
note. If a note is open when you create the recording, it
will be included in the note as an icon. If the note list is
displayed, it will be created as a stand-alone recording.
86
Page 99

How to create a Note:
1. Tap New.
2. Create your note by writing, drawing, typing, and
recording. For more information about using the input
panel, writing and drawing on the screen, and creating
recordings, see Chapter 3.
9. Companion Programs
The companion programs on the Siemens SX56 Wireless PDA Phone consist of Microsoft Pocket Word, Microsoft Pocket
Excel, Windows Media™ Player, Microsoft Reader, and Image Viewer.
To switch to a companion program on your device, tap Programs on the
menu, and then tap the program name.
9.1 Pocket Word
Pocket Word works with Microsoft Word on your PC to give you easy access to copies of your documents. You can create new
documents on your device, or you can copy documents from your PC to your device. Synchronize documents between your PC
and your device so that you have the most up-to-date content in both locations.
Use Pocket Word to create documents, such as letters, meeting minutes, and trip reports. To create a new file, tap
Pocket Word, and then New. A blank document appears. Or, if you have selected a template for new documents in the Options
dialog box, that template appears with appropriate text and formatting already provided. Only one document may be opened at a
time. When you open a second document, you’ll be asked to save the first. You can save a document you create or edit in a
variety of formats, including Word (.doc), Pocket Word (.psw), Rich Text Format (.rtf), and Plain Text (.txt).
Pocket Word contains a list of the files stored on your device. Tap a file in the list to open it. To delete, make copies of, and send
files, tap and hold a file in the list. Then, select the appropriate action on the pop up menu.
87
, Programs,
Page 100

You can change the zoom magnification by tapping View and then Zoom. Then
select the percentage you want. Select a higher percentage to enter text and a lower
one to see more of your document.
If you are opening a Word document created on a PC, select Wrap to Window on
the View menu so that you can see the entire document.
You can enter information in Pocket Word in one of four modes (typing, writing, drawing, and recording), which are displayed on
the View menu. Each mode has its own toolbar, which you can show and hide by tapping the Show/Hide Toolbar button on the
command bar.
88
 Loading...