

Page 1
Issued by
Information and Communication mobile
Haidenauplatz 1
D-81667 Munich
© Siemens AG 2003
All rights reserved. Subject to availability.
Rights of modification reserved.
Siemens Aktiengesellschaft
www.my-siemens.com
s
Be inspired
SX1
Page 2

Contents
1
Safety precautions ..................... 3
Overview of the phone .............. 4
Getting Started .......................... 6
Insert SIM card/battery ............. 6
Emergency number (SOS) ........ 7
Charge battery ......................... 7
User guide ............................... 8
Navigation ............................... 8
Menu ....................................... 9
Searching ................................. 9
Switch on, off / PIN entry ......... 10
Standby mode ........................ 10
Security .................................... 11
Making a phone call ................. 12
Dialling with number keys ...... 12
Dialling using Contacts ........... 12
Accept call ............................. 12
End call .................................. 12
Dialling Options ..................... 12
Reject call .............................. 13
Call waiting ............................ 13
Conference ............................ 13
Options during a call .............. 14
Volume control ...................... 15
Handsfree .............................. 15
Writing Text ............................. 16
Contacts ................................... 19
Open the Contacts ................. 19
Insert SIM card entries ............ 19
Call an entry ........................... 21
View an entry ......................... 21
Groups ................................... 22
Voice Dialling .........................23
Add a ringtone .......................24
Business Card .........................25
Records .....................................26
Recent calls ............................ 26
Records list .............................26
Call duration ........................... 26
Call costs ................................ 27
GPRS data counter ..................27
Records options ...................... 27
Messages ..................................28
Message options ..................... 28
New messages .......................28
Inbox ......................................32
Viewing a message ................. 32
View options .......................... 32
My folders ..............................34
Mailbox ..................................35
Drafts ..................................... 36
Sent .......................................36
Outbox ...................................37
Reports ...................................37
Settings ..................................37
SIM messages ......................... 43
Service commands ..................43
Internet .....................................44
Settings ..................................44
Bookmarks view ..................... 44
WAP connection ..................... 46
WAP browser settings .............47
Connection security ................48
See also Index at the end of this User Guide
Page 3

2
Contents
Camera ..................................... 49
Snapshot ............................... 49
Images ................................... 51
Music ........................................ 55
Radio ..................................... 55
MP3 Player ............................. 56
Organiser ................................. 57
Calendar ................................ 57
Tasks ..................................... 59
Today .................................... 60
Notes ..................................... 60
Voice memo ........................... 60
Calculator .............................. 61
Converter ............................... 62
Extras ....................................... 64
File Manager .......................... 64
MultiMediaCard ..................... 65
Java applications .................... 66
Alarm clock ............................ 69
Favourites .............................. 69
SIM Phonebook ...................... 70
SIM fixed dial ......................... 70
Service numbers .................... 70
SIM services ........................... 70
Profiles ..................................... 71
Activate ................................. 71
Setup ..................................... 71
Setup ........................................ 73
Phone .................................... 73
Screensaver ........................... 74
Call ........................................ 75
Connection .............................76
Date and time settings ............ 78
Security ..................................79
Call barring ............................. 80
Network ................................. 81
Accessory settings ..................82
Call divert ...............................83
Bluetooth™ ............................84
Infrared ..................................87
Modem ..................................87
Audio .....................................88
Voice mailbox .........................88
Manager .................................90
Shortcut .................................92
Questions & Answers ................93
Customer Care ..........................96
Care and maintenance .............98
Product data ............................. 99
SAR – European Union
(RTTE) .....................................100
SAR – International
(ICNIRP) ...................................102
Accessories .............................103
Quality Statements ................. 104
Battery quality statement ...... 104
Display quality statement ...... 104
Guarantee certificate (UK) .....105
Guarantee certificate (IRL) .....106
Index .......................................107
See also Index at the end of this User Guide
Page 4
Safety precautions
Information for parents
Please read the operating instructions and safety precautions carefully before use.
Explain the content and the hazards associated with using the phone to your children.
Remember to comply with legal
requirements and local restrictions when using the phone. For
example in aeroplanes, petrol
stations, hospitals or while
driving.
Mobile phones can interfere
with the functioning of medical
devices such as hearing aids or
pacemakers. Keep at least
20 cm/9 inches between phone
and pacemaker. When using
the mobile phone hold it to the
ear which is further away from
the pacemaker. For more information consult your doctor.
The SIM card and
MultiMediaCard may be removed. Caution! Small parts like
this could be swallowed by
young children.
The mains voltage specified on
the power supply unit (Volt)
must not be exceeded. Otherwise the charging device may
be destroyed.
The ringtone (S. 88), info tones
(S. 88) and handsfree talking
are reproduced through the
loudspeaker. Do not hold the
phone to your ear when it rings
or when you have switched on
the handsfree function (p. 15).
Otherwise you risk serious
permanent damage to your
hearing.
Important:
Improper use will invalidate the guarantee!
For software installation see important
warning message on p. 68.
Do not use an optical magnifier
to look at the activated infrared
interface [Class 1 LED product
(classification as per
IEC 60825-1)].
Only use original Siemens batteries (100 % mercury-free) and
– charging devices. Otherwise
you risk serious damage to
health and property. The battery
could explode, for instance.
You may only open the phone to
replace the battery (100 % mercury-free), or SIM card or
MultiMediaCard. You must not
open the battery under any
circumstances. All other changes to this device are strictly prohibited and will invalidate the
guarantee.
Please dispose of unwanted
batteries and phones as permitted by the laws in your country.
The phone may cause interference in the vicinity of TV sets,
radios and PCs.
Use only Siemens original accessories. This will avoid potential risks to health or property
and ensure compliance with all
relevant regulations.
3
Page 5
4
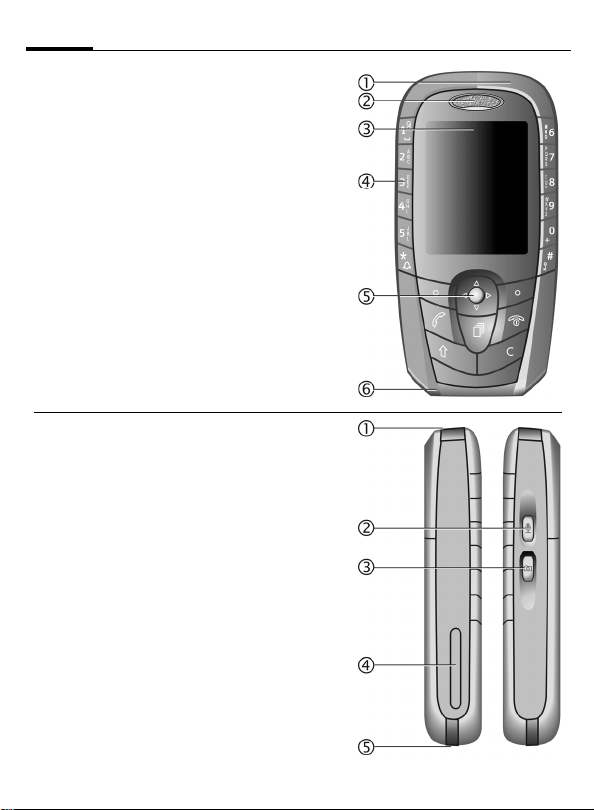
Overview of the phone
c Integrated antenna
Do not interfere with the phone above the
battery cover unnecessarily. This reduces
the signal strength.
d Loudspeaker
e Displays
Signal strength/GPRS available/
battery level
f Number keys
Digits, letters.
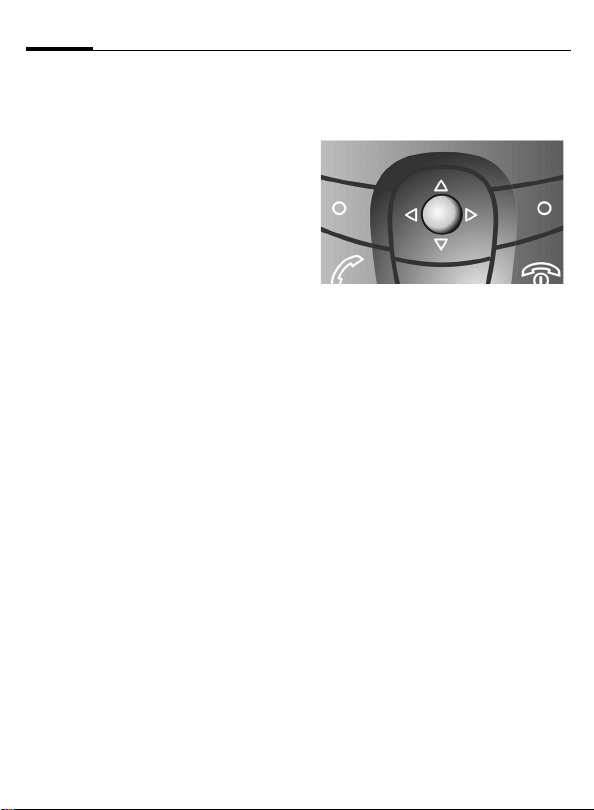
g Joystick/Other keys
See next page.
h Microphone
c Infrared interface
(IrDA, e.g. for communication between PC/
PDA and mobile phone)
d Push-to-talk key
• In standby mode: start voice control,
• In voice control mode: start recording,
• In voice record mode: start recording.
e Snapshot key
• In standby mode:
start snapshot application,
• Snapshot mode: take a photo.
f MultiMediaCard insertion
g Device interface
Connection for charger, headset etc.
Page 6
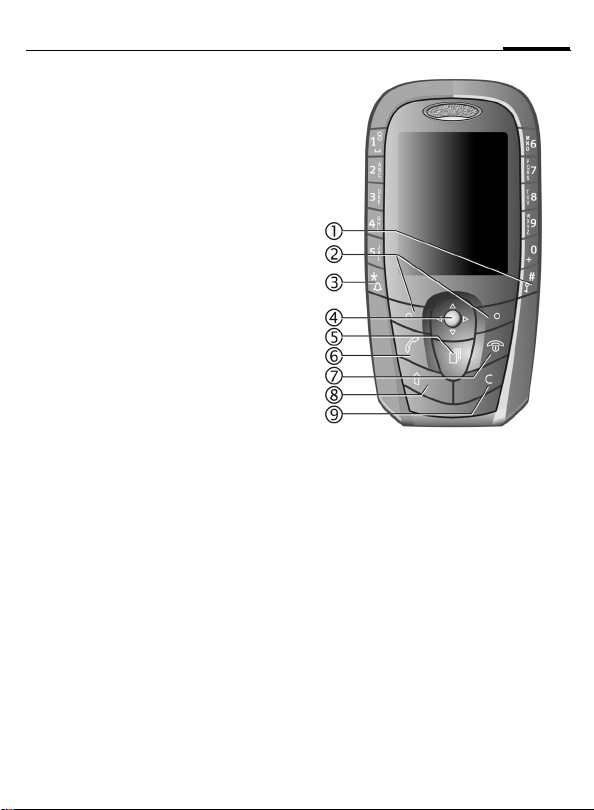
Overview of the phone
c # key Hold down
In standby mode: switch key lock on/off.
d Soft keys
The current functions of these keys are displayed in the lowest display line as text or
icons.
key Hold down
e
*
In standby mode: Switch on/off the profile
"Mute" (p. 71).
f Joystick
Move the joystick left, right, up down for
navigation on the display.
Press the joystick to open folders or start
applications.
g Menu key
Press to display the main menu. Hold down
to switch between applications (p. 9).
h Call key
Dial displayed phone number or name,
accept calls.
In standby mode: display the last calls.
In call mode: Hold/unhold function
i On/Off/End key
Press: end call/function/application and
return to Idle mode.
In menus: one menu level back.
Hold down:
Switch phone on/off. From menus: return to
standby mode.
j Shift key
Opens the text menu with editing functions.
In lists: while holding, press/move the joy-
stick to mark/unmark items.
In edit mode: while holding, press/move the
joystick to mark/unmark characters.
k Clear key
Deletes selected items in edit mode or usercreated lists.
5
Page 7
6
Getting Started
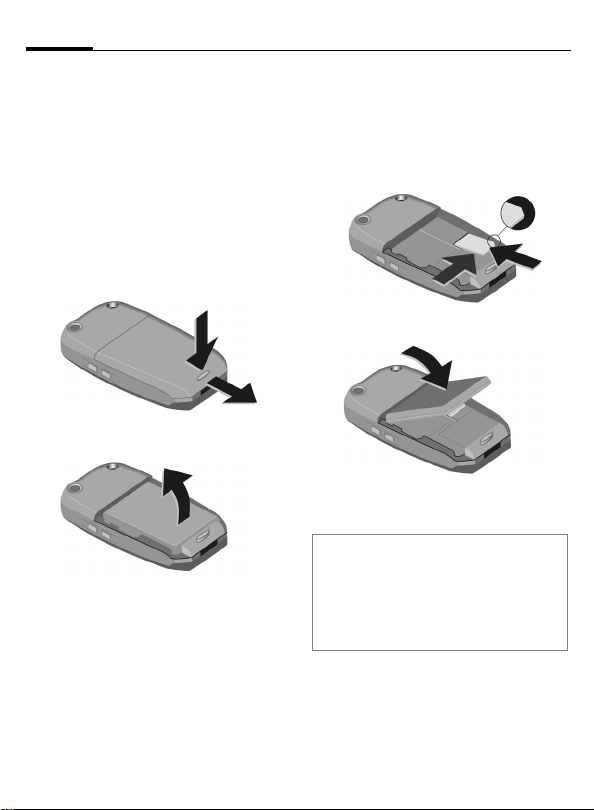
Insert SIM card/battery
The service provider supplies you
with a SIM card on which all the important data for your line is stored.
If the SIM card has been delivered
in credit card size, snap the smaller
segment out and remove any rough
edges.
• Press the lock
lid in the direction indicated by
the arrow
• Remove the battery upwards
n and remove the
.
o
n
n
p
o
p.
• Insert SIM card in the opening
with contacts pointing downwards.
First push at the phones edge
than push gently until it engages
q
r (make sure the angled corner is
in the correct position).
r
q
• Insert battery into phone
s.
p
s
• Close the lid in reverse way as described in
Note
Always switch off phone before removing
the battery!
Only 3-Volt SIM cards are supported.
Please contact your service provider if you
have an older card.
o
.
,
Page 8

Getting Started
7
Emergency number
(SOS)
Must only be used in real emergencies!
Switch the phone on and check for
adequate signal strength.
E
M
D
You can make an emergency call on
any network without a SIM card and
without entering a PIN (not available
in all countries).
Press to go to standby if in
a menu or application.
Key in the emergency
number (e.g. 112 or
other official emergency
numbers).
Press to call the number.
Charge battery
The battery is not fully charged
when delivered. Plug in the charger
cable at the bottom of the phone,
plug in the power supply unit to the
mains power socket and charge for
at least two hours.
Display when charging is in
progress
h
During charging.
Charging time
An empty battery is fully charged
after about 1 - 1.5 hours. Charging is
only possible in an ambient temperature of 5 °C to 40 °C (the ch arge ic on
flashes as a warning when the temperature is 5 °C above/below this
range). The mains voltage specified
on the power supply unit must not
be exceeded.
Charge icon not visible
If the battery is totally discharged
no charge icon is displayed when
the charger is plugged in. It will appear after two hours at most. In this
case the battery is fully charged after
1.5-2hours.
Only use the charger provided!
Display while in service
Charge level display during operation (empty-full):
adg
A beep sounds when the battery is
nearly empty.
Note
The charger heats up when used for long
periods. This is normal and not dangerous.
Operating times
Standby time up to 200 hours, and up to
240 minutes talk time, depended on the
operating conditions.
Page 9
8
Getting Started
User guide
The following symbols are used to
explain operation:
M
Enter numbers or letters.
E
D
A B
F
G
C
K
L
On/Off/End key.
Call key.
Soft keys.
Shift key.
Clear key.
Menu key.
Use joystick for navigation
on display, and for open
folders and applications.
Function depends on the
service provider, special
registration may be
necessary.
Navigation
Joystick
Move the cursor in menus, and lists
by moving the joystick to the left,
right, up, and down.
Open selected folders or start
applications by a short press on
the joystick.
Page 10

Getting Started
9
Menu
In the Menu you can access all main
applications.
C
Personalise your Menu
Organise all applications and folders
in any order you like. Select the required item, then:
OptionsKMove
A check mark is placed beside the selection. Move with the cursor to the
new position and press OK.
To move items to a folder, select the
required item:
OptionsKMove to folder
A list of available folders is shown as
possible destinations (function is not
shown if there is no folder available).
You can also choose the root level
when moving an item out of a folder. Select the new location for the
item and press OK.
Menu Options
Open, List view, Move, Move to folder,
New folder, Exit.
Press the menu key to
display the Menu.
Switching between
applications
If there is more than one application
running you can switch between
them.
C
A list with all active applications appears on the display. Scroll to the required one and press the joystick to
switch the active one.
Note
If too many applications are open, some
may be closed by the phone to save memory. Unsaved data will be saved automatically before an application is closed.
Press and hold down the
Menu key.
Searching
Your phone has one search field for
all purposes. Usually the search field
is indicated as such by a magnifying
glass to the left of the text-field.
In other cases you may have to
activate it:
OptionsKFind
To search for an item, key in letters
in the search field. The phone starts
searching automatically and shows
the matches for selection. To optimise the search, key in more letters.
To open the found item, press the
joystick.
Page 11
10
Switch on, off / PIN entry
Switch on, off
E
To switch on, hold down
On/Off/End key.
To switch off, hold down
On/Off/End key in standby
mode.
Enter PIN
The SIM card can be protected with a
4-8 digit PIN.
M
B
Enter your PIN code using
the number keys (shown
as a series of asterisks.
If you make a mistake
press
G.
Press OK to confirm the input. Logging on to the
network will take a few
seconds.
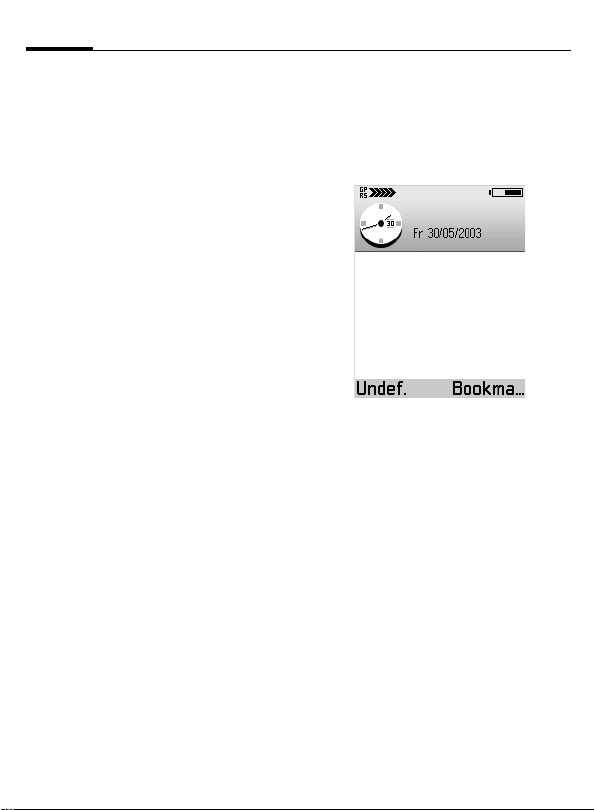
Standby mode
When the name of the service
provider appears at the top of the
display, the phone is in standby mode
and ready for use.
The following indicators are shown
on the display:
Signal strength
_ Strong signal.
^ A weak signal reduces the call
Battery charge level
Shows the power of the battery in 7 steps,
e.g.:
d
g
quality and may lead to loss of
the connection. Change your
location.
Half full.
Full.
Page 12
Security
11
General
The phone and SIM card are protected against misuse by several security
codes.
Keep these confidential numbers in a
safe place where you can access them
again if required.
PIN
code
PIN2
code
PUK
PUK2
Security
code
To access code administration:
Protects your SIM card (personal identification number).
This is needed to set the charge
detail display and to access additional functions on special
SIM cards.
Key code. Used to unlock SIM
cards after the wrong PIN has
been entered.
Protects your phone. The default code number is 12345.
You can change the security
code to any number.
C KSetupKSettingsKSecurity
KPhone and SIM
KSelect a function:
PIN code request
The PIN is usually requested each
time the phone is switched on. You
can deactivate this feature but you
risk unauthorised use of the phone.
PIN code
You can change the PIN to any
4-8 digit number you may fi nd easier
to remember.
PIN2 code
(displayed only if PIN 2 is available)
Change PIN2 proceed as with PIN
code.
Security code
You can change the security code to
any number (exactly 5 digits). The
default code number is 12345.
If it is entered incorrectly three
times, the phone will be blocked. In
this case, please contact Siemens
Service (p. 96).
Clear SIM card barring
If the PIN is entered incorrectly three
times, the SIM card is barred. Enter
the PUK (MASTER PIN), provided by
your service provider with the SIM
card, according to instructions. If the
PUK (MASTER PIN) has been lost,
please contact your service provider.
Note
See p. 79 for more functions.
Page 13

12
Making a phone call
Dialling with number
keys
The phone must be switched on
(standby mode).
M
Enter the number (always
with prefix).
0 Press to set the inter-
national prefix +.
G A short press clears
the last digit, a long press
clears the entire number.
D
Press the Call key. The displayed phone number is
dialled.
Dialling using Contacts
Press the joystick or move it down to
open Contacts (in standby mode)
or
C KContacts
Select required entry.
D
For further information see p. 21.
Note
You can also make calls from numbers
found within SMS, MMS, E-mail messages
and other texts, from the SIM Phonebook or
by using shortcuts (p. 75).
Press the Call key to start
the call.
Accept call
The phone must be switched on
(standby mode).
D
or
Press.
A Press Answer.
If the phone number has been transmitted by the network, it is displayed. If it is stored in the Contacts,
the corresponding name/picture is
displayed.
End call
E
Note
End an active call even if the person on the
other end of the line has hung up first.
Dialling Options
Add to Contacts (Create new, Update
existing), Call, Send (SMS, MMS).
Press the End key.
Page 14
Making a phone call
13
Reject call
E
Press the end key. The
caller will hear a "line
busy" tone.
The call may be diverted if
this has been set previously (p. 83).
Call waiting
You may need to register for this
service with your service provider
and set your phone accordingly
(p. 75).
During a call, you may be advised
that there is another call waiting.
You will hear a special tone during
the call.
You have the following options:
D
E
OptionsKEnd all calls
If a second call is on hold:
B
Press Call during the call
to answer the waiting call.
The first call is put on
hold.
Press briefly to end the active call or hold down to
end both calls. Also:
Press Swap to switch between the calls.
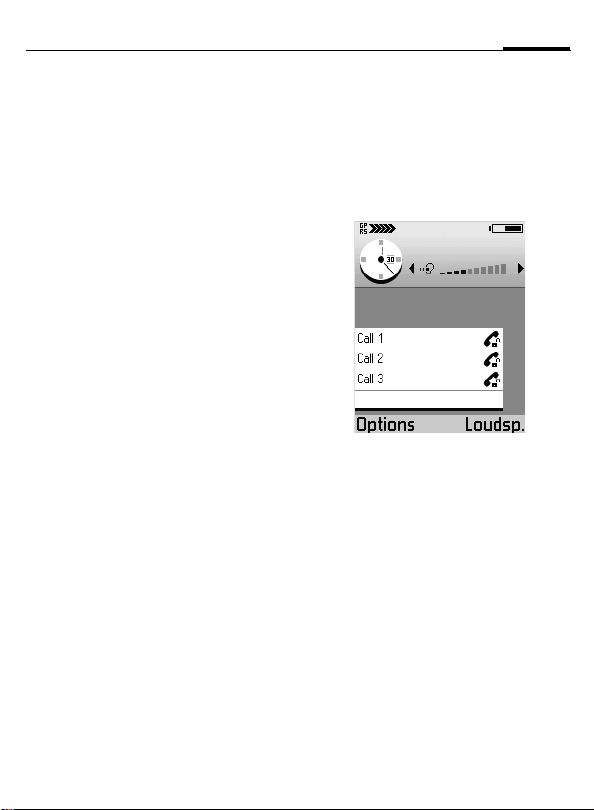
Conference
Call up to 5 parties one by one and
link them together in a phone conference. Some of the functions described may not be supported by
your service provider or may have to
be enabled specially.
You have established a connection:
M
D
Enter the new number, or
use Contacts (p. 21).
Press the Call key.
The first call is automatically put on hold. When
the new connection is
established, add the first
participant:
Page 15

14
Making a phone call
OptionsKConference
To add another person to
the conference, repeat
procedure and then
select:
OptionsKAdd to conference
Private
You can have a private conversation
with one of the conference participants:
OptionsKConferenceKPrivate
Select participant.
B Press Private.
You can now have a private discussion, while the rest of the conference participants continue talking.
To end the private conversation and
go back to the conference:
OptionsKConference
Drop
To remove one participant from the
conference:
OptionsKConference
KDrop participant
Select participant.
B Press Drop.
Options during a call
BT handsfree on, End active call, Hold/
Unhold, Mute/Unmute, New call, Add to
conference, Send DTMF, Answer, Reject,
Mute
Most relevant functions:
Mute/Unmute
Switch microphone on/off.
If switched off, the person on the
other end of the line cannot hear you
(muting)
Transfer
The original call is joined to the second one. For you, both calls are now
ended
Send DTMF
You can enter control codes (digits)
during a call so that an answering
machine can be controlled remotely.
These digits are directly transmitted
as DTMF tones (control codes).
* Press to produce a *.
#
*
B
Press to produce a #.
Press twice to produce "p"
for a pause of approx.
2 seconds, and press
3 times to produce "w" if
you want the remaining
sequence not to be sent
until you press Send again
during the call.
Press OK to send the tone.
Page 16

Making a phone call
15
Note
To store DTMF tones as an Contacts
entry, see p. 21.
Volume control
Move the joystick left/right to decrease/increase volume when a call
is active or a sound plays.
Do the same if a headset is
connected.
Handsfree
To activate/deactivate the loudspeaker during a call:
Press sidekey
or
OptionsKBT handsfree on/
You can hear the caller via the builtin loudspeaker. Also useful when using an application during a call, e.g.
calendar or notes.
Activate handset
Page 17

16
Writing Text
General
Your phone offers two ways of
writing text:
• The conventional method. You
press a number key repeatedly
until the required character
appears.
• The T9 method. You write a word,
pressing each number key only
once.
Conventional writing
To switch to conventional writing:
F Press.
Alpha mode
Select.
Press a number key repeatedly until
the required character appears.
Make a pause until the cursor
appears to the right of the written
character. Write next character and
so on.
After the characters of a key its
number is written, followed by
similar characters used in foreign
languages.
T9 writing
To switch to T9 writing:
F Press.
T9 input on
If T9 text input is switched on this
icon is shown:
T9 deduces the correct word from
the individual key entries by making
comparisons with an extensive
dictionary. Since the display changes
as you proceed ...
... it is best if you finish a word without
looking at the display.
You simply press the keys where the
relevant letter is located once only.
For "hotel", for example, type:
Select.
4 6 8 3 5
While you write a word it is underlined. If it is correct move the cursor
to the right or insert a space.
If the word is incorrect and the cursor marks the word:
B
Press >>T9>> repeatedly to
view matching words
stored in the dictionary.
If the last match is
reached, you can add the
word as a new entry to
the dictionary.
Page 18

Writing Text
17
A
Press Spell to write the
new word. Press OK to
save it to the dictionary.
General rules
For writing text, several modes are
available. For changing mode, use
the
# key. The status indicator is
shown at the top line of the display.
#
#
1
1
Long press switches to:
123 – Number mode. For
leaving number mode,
long press the key again –
you cannot change between the other modes
when 123 is activated.
Short press switches
between:
abc/T9 abc – All lower case.
Abc/T9 Abc – First letter
upper case, following letters lower case.
ABC/T9 ABC – All upper
case.
Entering 1 opens a small
pop up menu. *
Short press once writes a
blank and ends the word.
Short press twice for line
feed.
Short press three times for
entering 1. *
0
0
*
G
* Long press on any number key
writes the number.
Writes a dot.
Multiple short press
inserts punctuation
marks. *
Shows a table with special
characters (symbols) for
selection.
Navigate to the desired
character by using the
joystick.
Deletes the character left
of the cursor.
Page 19

18
Writing Text
Text options
During writing text, T9 options, other mode options, and writing language can be changed. Depending
on the current situation not all functions are visible.
F
T9 input Select.
Alpha mode
Number mode
Press.
Matches
View a list of matching
words for selection.
Insert word
Add a word to the dictionary (max. 32 letters). If
the dictionary becomes
full, a new word replaces
the oldest one.
Edit word
Edit word in abc/ABC
mode.
Off
Ends T9 mode.
Switches to lower case
mode. The status indicator shows abc.
Switch to number input
mode. The status indicator shows 123.
Insert symbol
Writing language
Copy Selected text will be
Shows a table with special
characters for selection.
Change the T9 input language. If the required dictionary is not available,
see Writing language, p. 73.
copied into the clipboard.
To select text:
F Press and hold,
while moving the joystick
left/right to select words
or up/down to select lines.
F Still hold and
press Copy.
Cut
Paste To insert text from the
Short press to open
F
the menu, select Cut to
cut and copy the selected
text into the clipboard.
clipboard:
F Press and hold, then
press Paste.
G
Press to remove the selected
text from the document.
Page 20

Contacts
19
General
In Contacts you can store and
manage entries with names, phone
numbers and additional address information. Add voice dialling, a personal ringtone or a thumbnail image
to an entry.
Open the Contacts
C KContacts
It is also possible to open contacts by
pressing joystick downwards, or to assign
one of the softkeys in idle mode a shortcut
to contacts.
New entry
C KContactsKOptions
KNew contact
M
B
Enter at least a name and
a phone number. To write
text, see, p. 16.
Press Done to store the
new entry.
Insert SIM card
entries
You can copy entries from the SIM
card to the Contacts on the phone.
Further data can be added to them
subsequently.
C KExtrasKSIM
Open SIM phonebook and select the
name(s) you want to copy by marking.
OptionsKCopy to Contacts
To copy an entry from Contacts to SIM,
open the entry and select the required
number:
OptionsKCopy to SIM ph.book
Contacts Options main menu
Open, Call, Create message (SMS, MMS,
E-mail), New contact, Edit, Delete, Duplicate, Add to group, Belongs to groups,
Mark/Unmark, (Mark, Mark all, Unmark
all), Send business card (via SMS, via email, via Bluetooth, via infrared), Contacts info (Memory, Voice tags) Exit.
Contacts Options
By opening a contact the following
functions are available.
Call, Create message (SMS, MMS, Email), Edit, Delete, Defaults, Add voice
tag, Ringtone, Copy to SIM ph.book,
Send business card (via SMS, via e-mail,
via Bluetooth, via infrared), Ringtone,
Send business card (via SMS, via e-mail,
via Bluetooth, via infrared), Exit.
Page 21

20
Contacts
Edit an entry
Select required entry.
OptionsKEdit
M
B
Make the required
changes.
Press Done, to save the
setting.
Delete an entry
Select required entry.
OptionsKDelete
or
G
button.
press
Delete multiple entries
Select required entries.
OptionsKMark
or
OptionsKMark all
The entries are indicated by a check
mark. Mark further entries if required. To delete all marked entries
select:
OptionsKDelete
or
G
button.
press
Add and remove fields
There are additional fields available
for an entry. To add/delete an extra
field open the entry, then:
OptionsKEdit
Then in edit mode:
OptionsKAdd detail/Delete detail
select to edit, complete or delete
informations of a contact entry.
or
OptionsKEdit label select to rename
a field.
Add a picture
There are two different types of picture you can add to an contacts entry. See also Camera, p. 49.
Thumbnail
This image is shown in the display
when the entry calls you. To open
the required entry:
OptionsKEdit
Then in edit mode:
OptionsKAdd thumbnail
Select a thumbnail.
Image
Attach an image to an entry. Open
the required entry, move the joystick
to the right to open the image view,
then:
OptionsKAdd image
Page 22

Contacts
21
Add DTMF tones
In editing mode add the field DTMF
to the entry:
OptionsKAdd detailKDTMF
M
To use it, make a call. Once the connection is established, select the
DTMF field and press OK.
Key in the DTMF tone
string.
Editing Options
Add thumbnail/Remove thumbnail, Add
detail/Delete detail,Edit label, Exit.
Call an entry
C KContacts
Select required entry and press
joystick.
If there is more than one number
available select the required number
from the list.
D
Press.
View an entry
The view mode shows all fields with
information contained in the entry.
Select the required entry and press
the joystick
or
OptionsKOpen
Move the joystick to the right to
open the image view.
View Mode Options
Call, Create message (SMS, MMS, Email), Edit, Delete, Defaults, Add voice
tag/Voice tags, Assign shortcut:/Remove
shortcut, Ringtone, Copy to SIM ph.book,
Send business card (via SMS, via e-mail,
via Bluetooth, via infrared), Exit.
Assign default numbers and
addresses
If an entry has several phone numbers or e-mail addresses, to speed up
calling and sending messages, you
can define certain numbers and addresses to be used as default.
Open the entry.
OptionsKDefaults
Page 23

22
Contacts
In a pop-up window the following
options are displayed:
• Phone number
•SMS number
•MMS number/address
• E-mail address
Select an option, then
A
Press Assign. All assigned
numbers/addresses are
displayed. Select the one
you want to have as the
default.
Groups
For better handling of large numbers
of Contacts entries you can assign
them to groups. These can also be
used as distribution lists for sending
short messages or e-mails.
New group
Open Contacts:
C KContacts
Move the joystick to the right to
open the Groups list.
OptionsKNew group
M
A
Write a name for the
group.
Press OK.
Add members
Open Contacts:
C KContacts
Select required entry.
OptionsKAdd to group
Select required group (if more than
one available).
A
Add to group: press.
Add multiple members
Open Contacts
C KContacts
Move the joystick to the right to
open the Groups list. Select and
open required group.
OptionsKAdd members
Select an entry and press the joystick
to mark it. Repeat on all entries you
want to add.
A
Press OK to add all marked
entries to the group.
Page 24

Contacts
23
Remove members
Open Contacts:
C KContacts
Move the joystick to the right to
open the Groups list. Select and
open required group. Then select
required entry;
OptionsKRemove from group
G
Press Yes
button.
A
or
press
Groups Options
Open, New group, Delete, Rename,
Ringtone, Contacts info (Memory, Voice
tags), Exit
Most relevant functions:
Ringtone
Assign an individual ringtone to the
selected group.
Contacts infoKMemory
No. of contacts/groups
Contacts infoKVoice tags
List of all entries with voice tags.
Press Options to edit.
Voice Dialling
30 phone numbers can be dialled by simply saying a word e.g.
the name of an entry. Voice dialling
entries must be stored in the phone’s
memory (not on the SIM card!).
Some useful hints before using voice
dialling:
• Voice tags depend only on the
speaker’s voice, not a language.
• Beware of loud background noise,
voice tags are sensitive to it.
• Use long names for better recognition and differentiation between similar names.
• When using voice dialling, the
loudspeaker is in use.
Record
Open Contacts and select the
required entry.
Open the entry and select the
required number.
OptionsKAdd voice tag
A
Say the name after the starting tone.
There are two times training to enter
a voice tag. Wait until the name is repeated and automatically saved by
the phone.
Press Start.
Page 25

24
Contacts
B
Press Quit if you don’t
want to save recording.
When the voice tag is
saved, a symbol can be
seen next to the number
in the addressbook entry.
Apply
Long press Voice Dialling key on the
side of the phone.
A short signal sounds. Now say the
name. The phone answers with the
original voice tag and displays the
number and name. The number will
be dialled after 1.5 seconds.
A
Press End call if you don’t
want to make this call.
Editing Options
Playback, Delete, Change
Note
To view the list of all defined voice tags:
Open Contacts:
OptionsKContacts infoKVoice tags
To hear a voice tag, select it:
OptionsKPlayback
Add a ringtone
You can set a specific ringtone for
each entry or group. When that entry
or group member calls you, this ringtone will be played.
Note
The phone number of the caller must be
sent with the call to become recognised
(see also Send my caller ID, p. 75).
Open Contacts and select the
required entry. Open the entry
or
move the joystick to the right to
open the Groups list.
then
OptionsKRingtone
Select required tone.
B Press Select.
Note
All entries in a group get the same ringtone
you assign to the group, even if they had
their own one before.
Page 26

Contacts
Business Card
You can create an entry as your own
business card and transmit it as a
message in vCard format via SMS
and e-mail or you may transmit it
to another device with IrDA or
Bluetooth capability.
Open Contacts and select your entry.
OptionsKSend business card
Then select the method:
via SMS, p. 29
via Bluetooth, p. 84
via infrared, p. 87
25
Page 27
26
Records
General
Your phone stores numbers
of phone calls for convenient
redialling and registers all traffic
such as short messages, packet data
connections and fax/data calls.
Recent calls
C KRecordsK Recent calls
Select required list:
Calls missed
Up to 20 phone numbers of calls that
you have received but not answered
are stored for call back purposes.
Requirement: The network supports
the "Caller Identity" feature
Calls received
Up to 20 phone numbers, or names
of the most recently accepted calls
are listed.
Requirement: The network supports
the "Caller Identity" feature
Dialled numbers
Access to the last 20 numbers you
dialled or attempted to call.
Editing Options
After selecting the call list, the following options are available:
Call, Use number, Delete, Clear list, Add
to Contacts (Create new, Update existing), Exit
L
L
Records list
C KRecords
Move to right to show the total
records list.
Icons in the list:
Missed calls.
Received calls.
Dialled numbers.
Records list options
View details, Clear records, Filter, Add to
Contacts (Create new, Update existing),
Settings, Exit.
Most relevant function:
Use the Filter for a customized view
of the list.
Call duration
Displays the duration of incoming
and outgoing calls.
Available lists:
Last call, Dialled numbers, Calls received, All calls
Note
You can see the call duration during an
active call:
OptionsKSettings
KShow call durationKYes
Page 28

Records
27
Call costs
Call costs allows you to check the
cost of the last call or all calls.
Call costs limit set by a service
provider
Special SIM cards allow the service
provider to define a credit or a period
after which the phone is barred for
outgoing calls.
The number of remaining units is
shown during a call and in standby
mode. The display of prepaid cards
may vary depending on the service
provider.
Call costs limit set by yourself
(PIN 2 query)
C KRecordsK
KLast call units/All calls' cost
Mark one of them. For activating
select:
OptionsKSettings
KCall cost limitKOnKOK
Enter the limit in units or currency
depending on the setting Show costs
in above.
GPRS data counter
C KRecordsK GPRS counter
Allows you to check the amount of
data sent and received during packet
data (GPRS) connections.
Records options
The offered functions depend on the
current situation/position:
Open, Clear timers, Clear counters,
Clear recent calls, Settings, Exit
Most relevant functions:
Clear recent calls:
You can clear all recent calls lists.
Settings:
• Records duration: No, 1,10 or 30
days.
• Show call duration during an active
call: Yes/No
• Show costs in (PIN 2 query):
Currency/Units
• Call cost limit (PIN 2 query): Off, On
(see above).
Page 29

28
Messages
General
C KMessages
Transmit and receive messages via:
•SMS,
• Smart message,
•MMS,
• E-mail,
• Bluetooth or infrared.
Additionally you may receive cell
broadcast messages or WAP service
messages.
Message options
The offered functions depend on the
current situation/position.
Open, Create message (SMS, MMS, Email), Connect, SIM messages, Cell
broadcast, Service commands, Settings,
Exit
New messages
SMS (Short message)
You may transmit and receive very
long SMS (up to 760 characters) on
your phone, which are automatically
composed from several "normal"
SMS messages (note the accruing
charges).
Depending on the service provider,
e-mails and faxes can also be sent or
e-mails can be received via SMS
(change setting if necessary, p. 37).
Create a short message
MessagesKCreate message
To insert recipient in the field To:
• Press joystick to open contacts,
• Write the phone number
• Copy the recipient from another
Move down to the text field and
write text (p. 16).
In the top of the display the message
length indicator will show you the
number of used characters and SMS.
K SMS
mark/unmark recipient(s).
Press OK to return to message.
If a recipient offers multiple
phone numbers, select one.
application (Copy, see p. 18).
Page 30

Messages
29
Send the message:
OptionsKSend
Save the message (to send it later):
B
SMS Options
Send, Add recipient, Insert (Picture,
Template), Delete, Message details,
Sending options (p. 28), Exit.
Press Close to save message to Drafts.
Smart message
Smart messages are special short
messages that can contain data.
You can send a business card (vCard,
p. 25) or a calendar note (vCalendar,
p. 59). You may receive e.g. WAP
Service setting informations, a ringing tone or an operator logo.
MMS
The Multimedia Messaging Service
enables you to send texts, pictures,
sounds and video clips in a combined message to another mobile
phone or to an e-mail address.
Depending on the setting of your
phone, you will automatically
receive the complete message or
you will receive a notification for a
few seconds that shows that a new
message is on the server. User has to
change the settings to Retrieve immediately to receive the message.
Ask your service provider whether
this service is available. You may
need to register for this service
separately.
Note
Only devices that offer Multimedia Messaging Service can receive multimedia
messages.
A multimedia message can have
several pages with text, music or
pictures included in each page.
Text can be composed using T9
support (p. 16).
An Image that has been produced
with Snapshot or received in a message can be attached. The maximum
size of 640x480 pixels is reduced to
the size of the display.
A Sound clip is sent and received as a
AMR file.
A Video clip can be recorded with the
Camcorder application, located at:
C KCameraKVideo
Further informations about camcorder see: www.my-siemens.com/sx1
All items in an MMS are combined in
the form of a slide show.
Page 31

30
Messages
Create a multimedia message
MessagesKNew messageKMMS
To insert recipient in the field To:
• Press joystick to open contacts,
mark/unmark recipient(s). Press
OK to return to message.
If a recipient offers multiple phone
numbers or e-mail addresses,
select one.
• Write the phone number
• Copy the recipient from another
application (Copy, see p. 18).
Move down to the text field and
write text (p. 16).
To add an image, a sound clip, a
video clip and templates to the
message:
OptionsKInsert (Image, Sound clip,
To remove the image, the sound clip
or video clip from the message:
OptionsKRemove
To see the complete multimedia
message before sending:
OptionsKPreview message
Video clip, New image, New
sound clip, Template)
(Image, Sound clip, Video
clip)
To see/hear the single objects of the
message:
OptionsKObjects
(In the Objects view you are offered
other Options to arrange, open and
remove objects).
Save the message (to send it later):
B
Send the multimedia message:
OptionsKSend
or
press call creation key to send the
message
MMS Options
Send, Add recipient, Insert, Preview
message, Objects, Remove, Delete,
Message details, Sending options, Exit.
Press Close to save message to Drafts.
Page 32

Messages
31
E-mail
Your phone has its own e-mail client.
You can use it to create and receive
e-mails. A file from the file system
(e.g. ringtone) can be inserted in an
e-mail as an attachment.
Create an e-mail
MessagesKNew messageKE-mail
To insert recipient in the field To:
• Press joystick to open contacts,
mark/unmark recipient(s). Press
OK to return to message.
If a recipient offers multiple e-mail
addresses, select one,
• Write the e-mail address(es).
Note
*
#
• To send a copy of the e-mail to
someone, insert the address in
the field Cc:
• In the field Subject, enter the
header of the e-mail.
Move down to the text field and
write text (p. 16).
To add attachments like images,
sound clips, video clips, notes and
templates to the message:
Press for @.
Press to separate several
recipients with a semicolon.
OptionsKInsert (Image, Sound clip,
To see/hear the single objects of the
e-mail:
OptionsKAttachments
(In the Attachments view you are
offered other Options to open, insert
and remove objects)
Send the e-mail:
OptionsKSend
(E-mails are automatically transmitted to the Outbox before sending).
Save the message (to send it later):
B
E-mail Options
Send, Add recipient, Insert, Attachments,
Delete, Message details, Sending
options, Exit.
Video clip, Note, Template)
Press Close to save message to Drafts.
Page 33

32
Messages
Inbox
All received messages are stored in
the Inbox (except e-mails, see Mailbox (p. 35) and cell broadcasts
(p. 41).
MessagesKInbox
Unread messages are written in
bold. The following icons may
appear for
new/read short messages
new/read smart messages
new/read multimedia
messages
new/read WAP service
messages
data received via
Bluetooth
data received via infrared
unknown type
Inbox options
Open, Create message (SMS, MMS, Email), Delete, Message details, Move to
folder, Mark/Unmark, (Mark, Mark all, Unmark all), Exit.
Viewing a message
Select the required message in the
Inbox and press the joystick to open
it. Use the joystick to scroll through
the message line by line. Move the
joystick left/right to show the previous/next message.
View options
The functions offered depend on the
opened message type.
SMS and others
Reply
Open the message in the editor with
the sender’s address in the field To:
Forward
Open the message in the editor.
Call
Call the sender (or press
Delete
Delete message.
Message details
Check detailed information about
the message.
Move to folder
Move the message to another folder.
D
)
Page 34

Messages
33
Add to Contacts
With the sender’s address, update an
existing address entry or create a
new one.
Find
Search message for phone numbers,
e-mail addresses and Internet
addresses (URL).
Exit
Leaves the message menu and goes
back to main menu.
Smart messages only
Picture message
Save the picture in a smart message
to Images. Other objects to save
may be:
Ringtone, Operator logo, Calen. entry
Business card
Save the data to Addresses. If a picture is attached, it will be saved to
Addresses as well.
Save to bookmarks
Save a bookmark to the list:
Bookmark:
E-mail notification
Tells you the number of new e-mails
in your remote mailbox. For how to
read an e-mail, see Mailbox.
Service data
If service data are received, copy
them with the relevant function:
Save to e-mail sett., Save to SMS sett.,
Save to Voice mail, etc.
Multimedia messages only
View image
Shows an attached image.
Play sound clip
While playing, move joystick right/
left to increase/decrease volume.
Press Stop to stop the audio
playback.
Play video clip
Plays an attached video clip.
Objects
List all the different multimedia objects in a multimedia message. In the
Objects view you are offered more
Options to open, save and send
objects.
Note
Beware of viruses and harmful software.
Do not open attachments from dubious
senders. See also Certificate management
(p. 79).
Page 35

34
Messages
WAP messages
The message may contain bookmarks and/or access point information. To save both, select Save all.
To save them separately, select View
details. Then select Save to bookmarks
or Save to Settings.
WAP service messages
Your provider may offer "push
messages" which are notifications of
news headlines or services. For availability and subscription details, ask
your service provider.
A WAP service message may contain
text or addresses. To view or download the service select Download
message. If necessary, the phone
makes a data connection.
My folders
MessagesKMy folders
Organise your messages in folders.
You may create new folders, rename
or delete old ones.
Templates is a special kind of folder
which contains fixed phrases. There
you can add new templates for later
use in your messages.
Note
When you are looking inside a folder, you
can simply change to other folders by moving the joystick left/right.
My folders options
Open, Create message (SMS, MMS,
E-mail), Delete, New folder, Rename folder*, Exit.
* Not available for Templates folder.
Page 36

Messages
35
Mailbox
MessagesKMailbox
Connecting to the mailbox
OptionsKConnect
If you have not set up your e-mail
account, you will be prompted to
do so; see Settings (p. 40).
Yes Connect to your mailbox.
No Read the e-mails stored in
Disconnect from the mailbox
After retrieving your e-mail you
should disconnect and read your
messages off-line to save connection
costs.
Mailbox options
The functions offered depend on
your on-line or offline status.
Open, Create message (SMS, MMS, E-mail),
Connect/Disconnect, Retrieve e-mail
(New, Selected, All), Delete, Message
details, Copy to folder, Mark/Unmark,
(Mark, Mark all, Unmark all), Exit.
your phone off-line.
Read new e-mail
Before an e-mail can be read, it
should be retrieved from the server.
The service provider is dialled with
the set access profile and all/new
e-mails are transmitted to the mailbox list in your phone.
OptionsKRetrieve e-mail
New Retrieve only new unread
All Retrieve all e-mails from
Selected Use the Mark/Unmark
To read an e-mail, select the required
message in the list and press the joystick to open it.
Note
Before getting the latest e-mail you must
always reconnect to your mailbox.
Delete e-mail
You may delete e-mail from the
phone only or from the phone and
the remote mailbox on the server:
OptionsKDeleteKPhone only
or
OptionsKDeleteKPhone and server
View e-mail options
Reply (To sender, To all), Forward, Delete, Attachments, Message details, Move
to folder, Add to Contacts (Create new,
Update existing), Find, Exit.
e-mails.
your remote mailbox.
function to select the
required e-mails.
Page 37

36
Messages
E-mail attachments
If an e-mail has indicated
this attachment sign,
select.
OptionsKAttachments
In the attachment view, you may
retrieve, open or save attachments
separately, if any corresponding
application is available.
Note
Beware of viruses and harmful software.
Do not open attachments from suspicious
senders. See also Certificate management
(p. 79).
Retrieve attachments
Your mailbox may be setup not to receive attachments automatically.
This is indicated by a dimmed attachment indicator in the e-mail.
To receive the attachment:
OptionsKRetrieve e-mail
Open attachments
In the attachment view, select the
required attachment and press the
joystick to open it.
On-line
The attachment is retrieved from the
server and opened by the corresponding application.
Off-line
You can decide whether to connect
to retrieve the attachment.
Note
If using the
• IMAP 4 protocol, you may receive e-mail
headers, messages or messages with
attachments separately,
• POP 3 protocol, you may decide to receive headers only, or messages with
attachments included.
Save attachments
You can save attachments separately
from the e-mail in the corresponding
application:
OptionsKSave
View attachment options
Open, Retrieve, Save, Send (via Bluetooth, via infrared), Remove, Exit.
Drafts
MessagesKDrafts
This folder contains messages which
have not yet been sent.
Sent
MessagesKSent
This folder contains the last 15 messages which have been sent (to
change no. of stored messages,
see p. 42).
Page 38

Messages
37
Outbox
MessagesKOutbox
Messages are temporarily stored in
this folder until they are sent.
Status of the messages:
Sending
The message is being sent.
Waiting
This message is waiting, if there are
two similar message types in the
Outbox for sending.
Resend at ...
If transmission has failed, the procedure will be repeated after a timeout period.
Deferred
This message is on hold.
Failed
If the maximum number of unsuccessful transmission attempts has
been reached, transmission has
failed. You can try to send the message again by selecting OptionsK
Send.
Queued
Happens when user sends an email
and is not online at this time.
Outbox options
Create message (SMS, MMS, E-mail), Deferred, Delete, Message details, Send,
Move to Drafts, Exit.
Reports
MessagesKReports
All messages required for status information are collected in this folder,
e.g. a confirmation required by
Receive report (p. 37). Each recipient
has his own report.
Settings
Select required message type and
press the joystick.
SMS
MessagesKOptionsKSettings
Message centres
Shows a list of all defined message
centres (to add a new entry see
p. 38).
Msg. centre in use
Select the message centre you will
use for messaging.
Receive report
You are given confirmation of the
successful or unsuccessful delivery
of a sent message in the Records.
This service may be subject to a
charge.
KSMS
Page 39

38
Messages
Message validity
Select the period in which the service centre tries to deliver the message:
1 hour, 6 hours, 24 hours, 3 days, 1 week,
Maximum time *
*) Maximum period that the service
provider permits.
Message sent as
Make sure that your service provider
supports the conversion formats (for
information please contact your
service provider).
Text
Normal SMS message.
Fax
Transmission via SMS.
Paging
You may need to obtain
the required code number
from your service
provider.
E-mail
Transmission via SMS.
Preferred connection
You can choose between GSM or
GPRS as default, if supported by the
used network.
Reply via same ctr.
The reply to your message is handled
via your service centre (for information please contact your service provider).
SMS options
Message centre, Edit, Delete, Exit.
Add recipient, Insert (Picture, Template),
Delete, Message details, Sending options, Exit.
Most relevant functions:
Message centresKOptions
Press the joystick, write a name
for the new service centre, then
press OK.
Move joystick down and press it.
Write the number of the new short
message centre, then press OK (get
the number from your provider).
To use the new service centre go to
Msg. centre in use and select it.
KNew msg. centre
MMS
MessagesKOptionsKSettings
Preferred connection
Select the access point to be used as
the preferred connection. To define
a new access point, see Settings
p. 76.
KMMS
Page 40

Messages
39
Secondary conn.
Select the access point to be used as
the secondary connection.
Note
Both connections (preferred and secondary) refer to the same Internet settings.
Only the data connection is different, e.g.
GSM data call as preferred and GPRS as
secondary. For further information please
contact your service provider.
MMS reception
Only in home net.
You will receive multimedia messages only
when you are in your
home network.
Always on
You will always receive
multimedia messages.
Off
Select if you never want
to receive multimedia
messages.
Note
Sending and receiving multimedia messages outside your home network may incur
higher connection costs.
With settings Only in home net. and
Always on your phone can make connec-
tions in the background without your knowledge!
For minimize the risk you can modify the receiving functions, see below.
On receiving msg.
Retr. immediately
Multimedia messages will
be retrieved instantly,
even those with the
Deferred status.
Defer retrieval
Multimedia messages will
be saved in the service
centre for later transfer
(see Retr. immediately).
Reject message
All saved multimedia messages will be deleted by
the service centre.
Allow anon. messages
Select No: Reject all messages from
an anonymous sender.
Receive adverts
Receive all multimedia message
advertisements.
Receive report
If this function is activated, the status of a sent message is shown in the
Records as Pending, Failed or Delivered.
Otherwise only Delivered is shown.
Deny report sending
Your phone will not send delivery
reports of received multimedia
messages.
Page 41

40
Messages
Message validity
Select the period in which the service centre tries to deliver the multimedia message:
1 hour, 6 hours, 24 hours, 3 days, 1 week,
Maximum time *
*) Maximum period that the service
provider permits.
Image size
You can define the image size in a
multimedia message:
Large (640 x 480 pixels, VGA)
Small (160 x 120 pixels)
Default speaker
Handsfree
Sounds are played over
the built-in loudspeaker,
p. 15.
Handset
Sounds are played over
the earpiece.
E-mail
MessagesKOptionsKSettings
KE-mail
To show the list of all mailboxes:
Mailboxes Press.
To define a new mailbox:
OptionsKNew mailbox
Mailbox name
Write a name for the new mailbox.
Access point in use
Choose an Internet access point
from the list (to create an access
point, see p. 76).
My mail address
Write the e-mail address given to you
by your provider (
Outgoing mail server
Write the host name or the IP
address of the server that sends your
e-mail.
Send message
During next conn.
The e-mail will be sent the
next time you connect to
your remote mailbox.
Immediately
If you select Send message
after writing your e-mail,
a connection will be established to send the
e-mail instantly.
Send copy to self
You will get a copy of every sent
e-mail on your mail address as defined above.
Press for @).
*
Page 42

Messages
41
Include signature
Write the signature after pressing
Yes. In future a signature will be at-
tached to each mail you send.
User name
Write the user name given to you by
your provider.
Password
Key in your password. If you don’t do
so, you will be prompted for it every
time you want to connect to your
remote mailbox.
Incoming mail server
Write the host name or the IP address of the server that receives your
e-mail.
Mailbox type
POP3 or IMAP4.
Note
The mailbox type cannot be changed after
the e-mail settings are saved.
Security
On or Off. Secure the connection to
your remote mailbox with protocols
POP3, IMAP4 and SMTP.
Retrieve attachment
You can retrieve an e-mail with or
without an attachment (not shown if
e-mail protocol POP3 is set).
Retrieve headers
You can limit the number of headers
you want to retrieve. Select All or define by yourself (max. 999).
WAP service message
MessagesKOptionsKSettings
Service messages
On or Off. Receive WAP service mes-
sages or not.
Authentic. needed
You will receive WAP service messages only from authorised sources
(p. 79).
KService msg.
Cell broadcast
MessagesKOptions
Some service providers offer information services (info channels). If reception is activated, your "Topic list"
will supply you with messages on
the activated topics.
In the main view the following is
displayed:
• Unread, subscribed message.
•Unread, unsubscribed message.
• Topic number
• Topic name
KCell broadcast
Note
If GPRS connection is set to When availa-
ble, cell broadcast messages cannot be re-
ceived. To receive them, change settings to
When needed.
Page 43

42
Messages
Settings
Reception
On/Off You can activate and de-
Language
All You receive messages in
Selected You can choose in which
Other Choose if the required
Topic detection
On/Off Save/do not save topic
activate the CB service. If
the CB service is activated,
the standby time of the
phone will be reduced.
all possible languages
languages you want to receive messages.
language is not in the list.
numbers automatically to
the topic list.
Cell broadcast options
Open, Subscribe/Unsubscribe, Hotmark/
Unhotmark, Topic (Add manually, Delete
all), Settings, Exit.
Other
Save sent messages
A copy of a sent short message, multimedia message or e-mail is stored
in the Sent folder.
No. of saved msgs.
Key in a number defining how many
messages will be stored in the Sent
folder (max. 999). When the limit is
reached, the oldest message is
deleted.
Page 44

Messages
43
SIM messages
MessagesKOptionsKSIM messages
To view SIM messages on the phone,
they must be copied from the SIM
card into a folder.
OptionsKMark/Unmark
K(Mark, Mark all, Unmark all)
then
OptionsKCopy
Select the required folder and
press OK.
Afterwards you can view the
messages in this folder p. 32.
OptionsKDelete
Delete message(s) from the
SIM card.
Service commands
You may send service commands
(known as USSD commands), to
your service provider.
To send a request in standby mode
or when you have an active call:
Key in the command number (s) and
press Send
or
to enter letters also select
MessagesKOptions
KService commands
Your service provider will supply you
with further information about this.
Page 45

44
Internet
General
C KInternet
Get the latest information from the
Internet that is specifically adapted
to the display options of your phone.
In addition you can download games
and applications to your phone.
Internet access may require registration with the service provider.
Settings
Default settings
The settings have already been
made by your service provider. Then
you may begin immediately.
Setup via short message
You may request and receive settings in a short message from your
provider (p. 35, p. 76). Save the
short message (smart message) to
prepare the phone for Internet access, after which an access bookmark will be created in Internet K
Bookmarks.
Manual setup
The access point can be set
manually.
• Define a WAP access point
(see p. 76 for further
information):
SettingsKSettingsKAccess points
• Add a bookmark for the website.
Open Internet, then
OptionsKAdd bookmark
Write name and address of the website and select the access point.
If necessary, check with your service
provider for details.
Bookmarks view
This list contains bookmarks which
allow fast access to the relevant URLs
(Uniform Resource Locator).
Bookmarks may be indicated by the
following icons:
Home page. This is displayed first after connection is established.
Depends on the access
point used (p. 76).
Last visited page. The last
page displayed before
disconnection is kept in
memory.
Title or Internet address of
the bookmark.
Page 46

Internet
45
Adding a bookmark manually
OptionsKAdd bookmark
Fill in the fields:
Name Describing name of URL.
Address Internet address. Press
for special characters.
Access point
Default access point is assigned if no other one is
selected.
User name Enter your user name
Password Enter your password
OptionsKSave as bookmark
*
Bookmark view options
Main view
Download, Back to page, Send (via SMS,
via Bluetooth, via infrared), Find bookmark, Add bookmark, Disconnect, New
folder, Mark/Unmark (Mark, Mark all, Unmark all), Clear cache, Details (Session,
Security), Settings, Exit.
Within a bookmark
Open, Bookmarks, History, Go to URL
address, Save as bookmark, Back to
page, Save as bookmark (via SMS),
Reload, Disconnect, Clear cache, Save
page, Find (Phone number, E-mail
address, URL address), Details (Session,
Security), Settings, Exit.
Most relevant functions:
Back to page
To open the Bookmarks view while
browsing, press and hold down the
joystick. To return to the browser
view again:
Back to page
Select.
Send
Send a selected bookmark as short
message.
Clear cache
All the information you have accessed during browsing is stored in
the cache memory. This includes
passwords and other confidential
data. So clear the cache after you
have accessed confidential information.
Page 47

46
Internet
WAP connection
C KInternet
Starting
If all required settings are entered,
you can start browsing:
• Select the Homepage of your
provider or a bookmark from the
bookmarks view
or
• enter a WAP address using keys
2to 9. The Go to field is immediately activated to take your
entries.
Press the joystick to start downloading the selected/written WAP page.
Browser
Keys and commands
• To scroll the view, move the joystick up and down
• To open a link, press the joystick.
New links appear underlined in
blue, visited links in purple. Links
as an image have a border.
• To enter letters and numbers use
keys 0 to 9. For special characters
use the
• To show the previous page press
Back.
• To show a list of the visited pages
of the current session:
OptionsKHistory
• To check boxes and make selections, press joystick.
• To open the contents of a cell in a
table, press joystick.
• To retrieve the latest contents
from the server:
OptionsKReload
• To open an additional command
list for the current WAP page:
OptionsKInternet options
E press, to disconnect from a
•
WAP service.
*
key.
Page 48

Internet
47
View new WAP service messages
To view new messages while
browsing:
OptionsKNew service msgs:
Scroll to the required message and
press the joystick to download and
open it.
Save bookmarks
To save the current WAP page as a
bookmark:
OptionsKSave as bookmark
Save WAP pages
To view a WAP page off-line, you can
save it to the phone memory.
OptionsKSave page
To open the Saved pages list, move
the joystick right in the Bookmarks
view. To open a saved page, select
the required page and press the
joystick. If you want to retrieve the
page on-line again, e.g. to refresh
the content:
OptionsKReload
Note
You stay on-line after retrieving a page.
You can arrange saved WAP pages into
folders.
End
To end a WAP session and
disconnect:
OptionsKDisconnect
or
E
Press.
WAP browser settings
C KInternetKOptionsKSettings
Default access point
Press the joystick to get a
list of available access
points. See also Settings,
p. 76.
Show images
Show images during
browsing or not. If No is
selected, you can view images during browsing by
Options KShow images.
Text wrapping
If On is set long text will be
continued in the next line,
otherwise it will be truncated at the end.
Font size
Choose between Large,
Normal and Small.
Cookies
Allow or Reject the sending
and receiving of cookies.
Page 49

48
Conf. DTMF sending
Choose between Always
and First time only.
The WAP browser allows
you to let a call include
sending DTMF tones during browsing. Choose if
you want to confirm before the phone sends DTMF tones during a voice
call.
Save receipt
Digitally signed documents can be saved to the
phone.
Internet
Connection security
If the security indicator is
displayed during a WAP
session, data transmission
between phone and WAP
gateway is secure and
encrypted.
Note
This does not mean that communication
between phone and content server (where
the requested resource is stored) is secure.
It’s up to the service provider to secure the
path between gateway and content server.
Page 50

Camera
49
Snapshot
C KCameraKSnapshot
You can take photographs with the
integrated digital camera in the
phone.
The camera uses JPEG as standardised image format, which can be
viewed with most available image
viewers.
Press the Snapshot key on the side
of the phone to start the Snapshot
application. The display shows the
current view.
Take a snapshot
Press the camera key or the joystick
to take a picture of the current view.
It will be saved automatically in the
Images application, p. 51.
To prepare the next shot, wait until
the last picture is stored. This takes a
few seconds.
A
Press OptionsKDelete
or
if the picture does not
G
match your intentions.
Snapshot modes
The camera supports three modes.
Move the joystick left/right to toggle
between them.
Miniature
Standard
Full screen
Miniature
Small icon-sized picture, which can
be added to an addressbook entry.
Shown resolution 80 x 96 pixels,
storage format 80 x 96 pixels.
Page 51

50
Camera
Standard
Normal landscape mode. Shown resolution 160 x 120 pixels, storage format 160 x 120 pixels.
Full screen
Advanced landscape without panes
around the picture.
Shown resolution 160 x 208 pixels,
storage format 480 x 640 pixels.
Snapshot options
The offered functions depend on the
current situation.
After taking a picture (camera never
enters standby in this mode):
New image, Delete, Send (via MMS, via email, via Bluetooth, via infrared), Rename
image, Image fun, Go to Images, Settings,
Exit.
Before taking a picture:
Capture, Go to Images, Settings, Exit.
Before taking a picture, with camera
in standby mode:
Continue, Go to Images, Settings, Exit.
Most relevant functions:
OptionsKGo to Images
Opens the Images application,
where you can view your photos.
Images are scaled to the phone’s
display resolution (max. 208 x
160 pixels in full screen mode).
For further information about viewing pictures, see p. 51.
OptionsKSettings
KImage quality
The camera supports three modes:
High, Normal, Basic.
OptionsKSettings
KDefault image name
You can set a standard name for taken pictures to which a serial number
is added for each new snapshot. The
default name is "Image".
Rename the images later in the
Images application as you like.
OptionsKSettings
KMemory in use
Store taken pictures in the phone’s
memory or on an optional MultiMediaCard (p. 65).
Page 52

Camera
51
Images
C KCameraKImages
You can view, organise and send
pictures or animations stored in your
phone.
This includes pictures
• made by the Camera application,
• received in your inbox via multimedia/picture message, as an
e-mail attachment or via infrared
or Bluetooth connection. In these
cases you must save the picture
after receiving it,
• Support for jpg, BMP, animated
GIF's and other popular formats.
In the Images main view, you can
see a list of pictures and folders with
• the date and time of shot or
storage,
• a thumbnail picture as preview,
• the number of images inside a
folder.
View the other images in the list by
moving the joystick left/right when
an image is open.
View images
You can store pictures in your phone
memory or on an optional
MultiMediaCard. To toggle between
the two memory storage spaces,
turn the joystick left or right.
Select the required image in the image list by moving the joystick up
and down.
Open an image by pressing the
joystick.
Receive images
Images can be received via multimedia/picture message, as an e-mail
attachment or via infrared or Bluetooth connection.
When saved, they are stored in the
phone memory and appear in the
Images list.
Page 53

52
Camera
Send images
OptionsKSend
Send the selected image with one of
the following messaging services:
via MMS, p. 29
via e-mail, p. 31
via Bluetooth, p. 84
via infrared, p. 87
Rotate
OptionsKRotateKLeft/Right
Rotates the image 90 degrees to the
left or to the right.
To save last view:
B
Press Back and confirm
with Yes.
Zoom
OptionsKZoom in/Zoom out
When an image is displayed you can
zoom in up to 800 percent.
B
The zoom factor is not stored
permanently.
Press Back, to return
to normal size.
Full screen
OptionsKFull screen
The whole display is used to show
the image.
Press the joystick to return to normal
view.
Focus
When an image is zoomed or shown
in full screen mode, you can move
the focus with the joystick to left/
right and up/down.
Press the joystick to return to normal
view.
Black & white
OptionsKBlack & white
Displays the opened image only in
black and white to use it for picture
messages (p. 53).
Edit with Image fun
OptionsKImage fun
Opens the Image fun application
with additional functionality for editing the image. For further information about Image fun see:
www.my-siemens.com/sx1
Delete images
OptionsKDelete
Delete the selected image(s).
Page 54

Camera
53
Wallpaper
OptionsKWallpaper
Set the current image as background
image for the idle state.
Rename images
OptionsKRename
Give the selected image a new
name.
View details
OptionsKView details
Shows detailed information about
the current image.
Images list options
Open, Send (via MMS, via e-mail, via
Bluetooth, via infrared), Image uploader
(Settings), Delete, Move to folder, New
folder, Mark/Unmark, (Mark, Mark all, Unmark all), Rename, Receive via infrared,
View details, Add to Favourites, Update
thumbnails, Exit.
Most relevant function:
Receive via infrared
Only from a digital camera that supports the IrTran-P protocol, otherwise use the infrared application,
p. 87.
Note
You may use an optional MultiMediaCard
as a supplementary storage area (p. 65).
Viewing the memory consumption,
see p. 91.
Shortcuts
Use these shortcuts for work with
images:
27 Rotate left/right 90 degrees
38 Scroll left and right
9 0 Scroll up and down
4 5 Zoom in and out
* Toggle between full screen
and normal view.
Picture message folder
Pictures which are sent to you in a
picture message are stored in the
folder Picture msgs..
The stored black & white pictures are
displayed in grid form. They are sorted in the order of time when received, then alphabetically.
Select the required image in the image list by moving the joystick up/
down and left/right.
Open an image by pressing the
joystick.
View the other images in the list by
moving the joystick left/right when
an image is open.
Page 55

54
To save a received image go to
C KMessages
open the message, then
OptionsKSave
See also Smart messages (p. 33).
Send picture messages
To send a picture message, select
the required image and open it:
D
Press and enter the recipient’s number, or use the
addresses.
D Press again.
Camera
 Loading...