

Page 1
5HJLVWHU
\RXU
SURGXFW
RQOLQH
VLHPHQVKRPHFRPZHOFRPH
HQ
'LVKZDVKHU
%JTIXBTIFS
2SHUDWLQJLQVWUXFWLRQV
SN…
SX…
Page 2
6WDUW
5HVHWVHF
K
KPLQ
$ %&
5HVHWVHF
Page 3
Table of contents
0
0
Additional options . . . . . . . . . . 20
Additional options . . . . . . . . . . 20
en
8Intended use . . . . . . . . . . . . . . . 4
(Safety instructions . . . . . . . . . . 4
Before you switch ON the appliance . 4
Delivery . . . . . . . . . . . . . . . . . . . . . . . . 5
Installation. . . . . . . . . . . . . . . . . . . . . . 5
In daily use . . . . . . . . . . . . . . . . . . . . . 6
Door lock . . . . . . . . . . . . . . . . . . . . . . 6
Button lock . . . . . . . . . . . . . . . . . . . . . 6
Damage . . . . . . . . . . . . . . . . . . . . . . . 6
Disposal . . . . . . . . . . . . . . . . . . . . . . . 7
7Protection of the environment . 8
Packaging. . . . . . . . . . . . . . . . . . . . . . 8
Old appliances . . . . . . . . . . . . . . . . . . 8
*Getting to know your appliance 9
Control panel . . . . . . . . . . . . . . . . . . . 9
Appliance interior . . . . . . . . . . . . . . . . 9
Overview of menu. . . . . . . . . . . . . . . . 9
+Water softening system/
Special salt . . . . . . . . . . . . . . . 10
Setting . . . . . . . . . . . . . . . . . . . . . . . 10
Water hardness table . . . . . . . . . . . . 10
Using special salt . . . . . . . . . . . . . . . 10
Detergents with salt component . . . . 11
Switching off water softening system 11
,Rinse aid . . . . . . . . . . . . . . . . . 11
Setting amount of rinse aid. . . . . . . . 12
Switching off rinse aid refill
indicator . . . . . . . . . . . . . . . . . . . . . . 12
-Utensils . . . . . . . . . . . . . . . . . . 12
Not suitable . . . . . . . . . . . . . . . . . . . 12
Glass and utensil damage . . . . . . . . 13
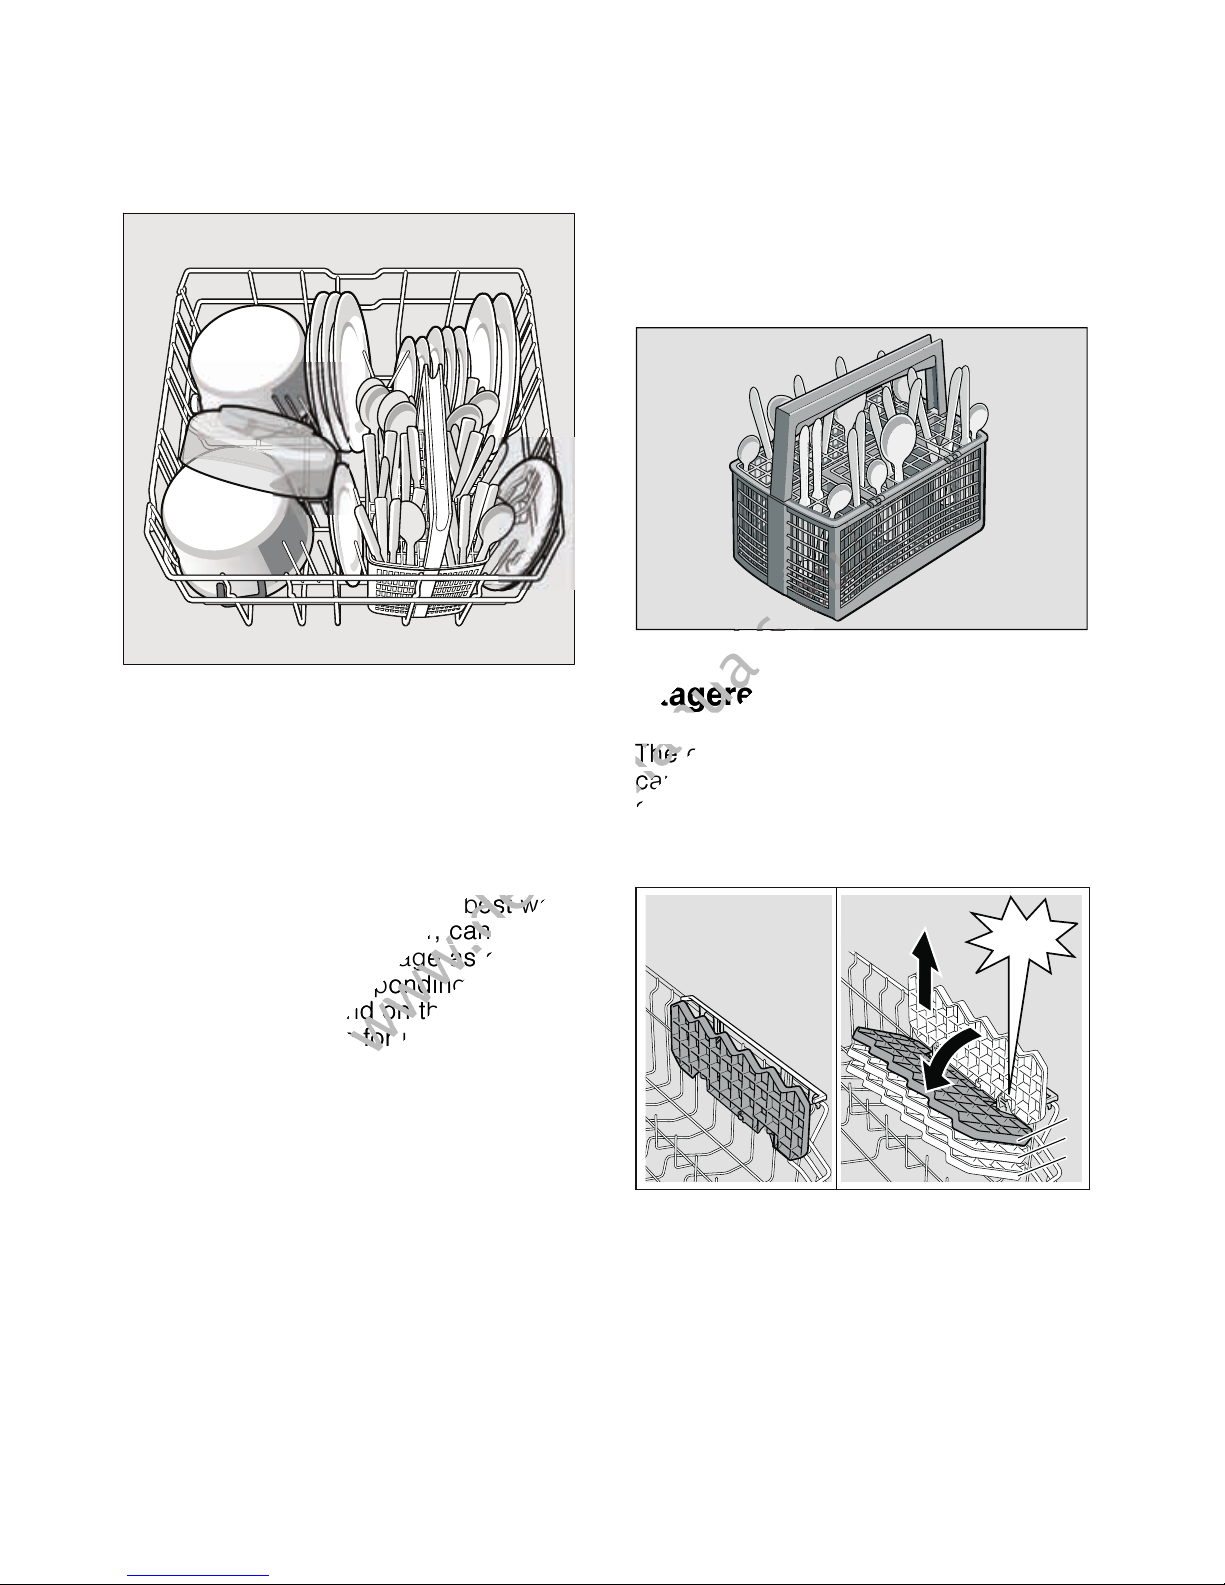
Loading the dishwasher . . . . . . . . . . 13
Unloading the dishwasher . . . . . . . . 13
Cups and glasses. . . . . . . . . . . . . . . 13
Pans . . . . . . . . . . . . . . . . . . . . . . . . . 14
Cutlery basket. . . . . . . . . . . . . . . . . . 14
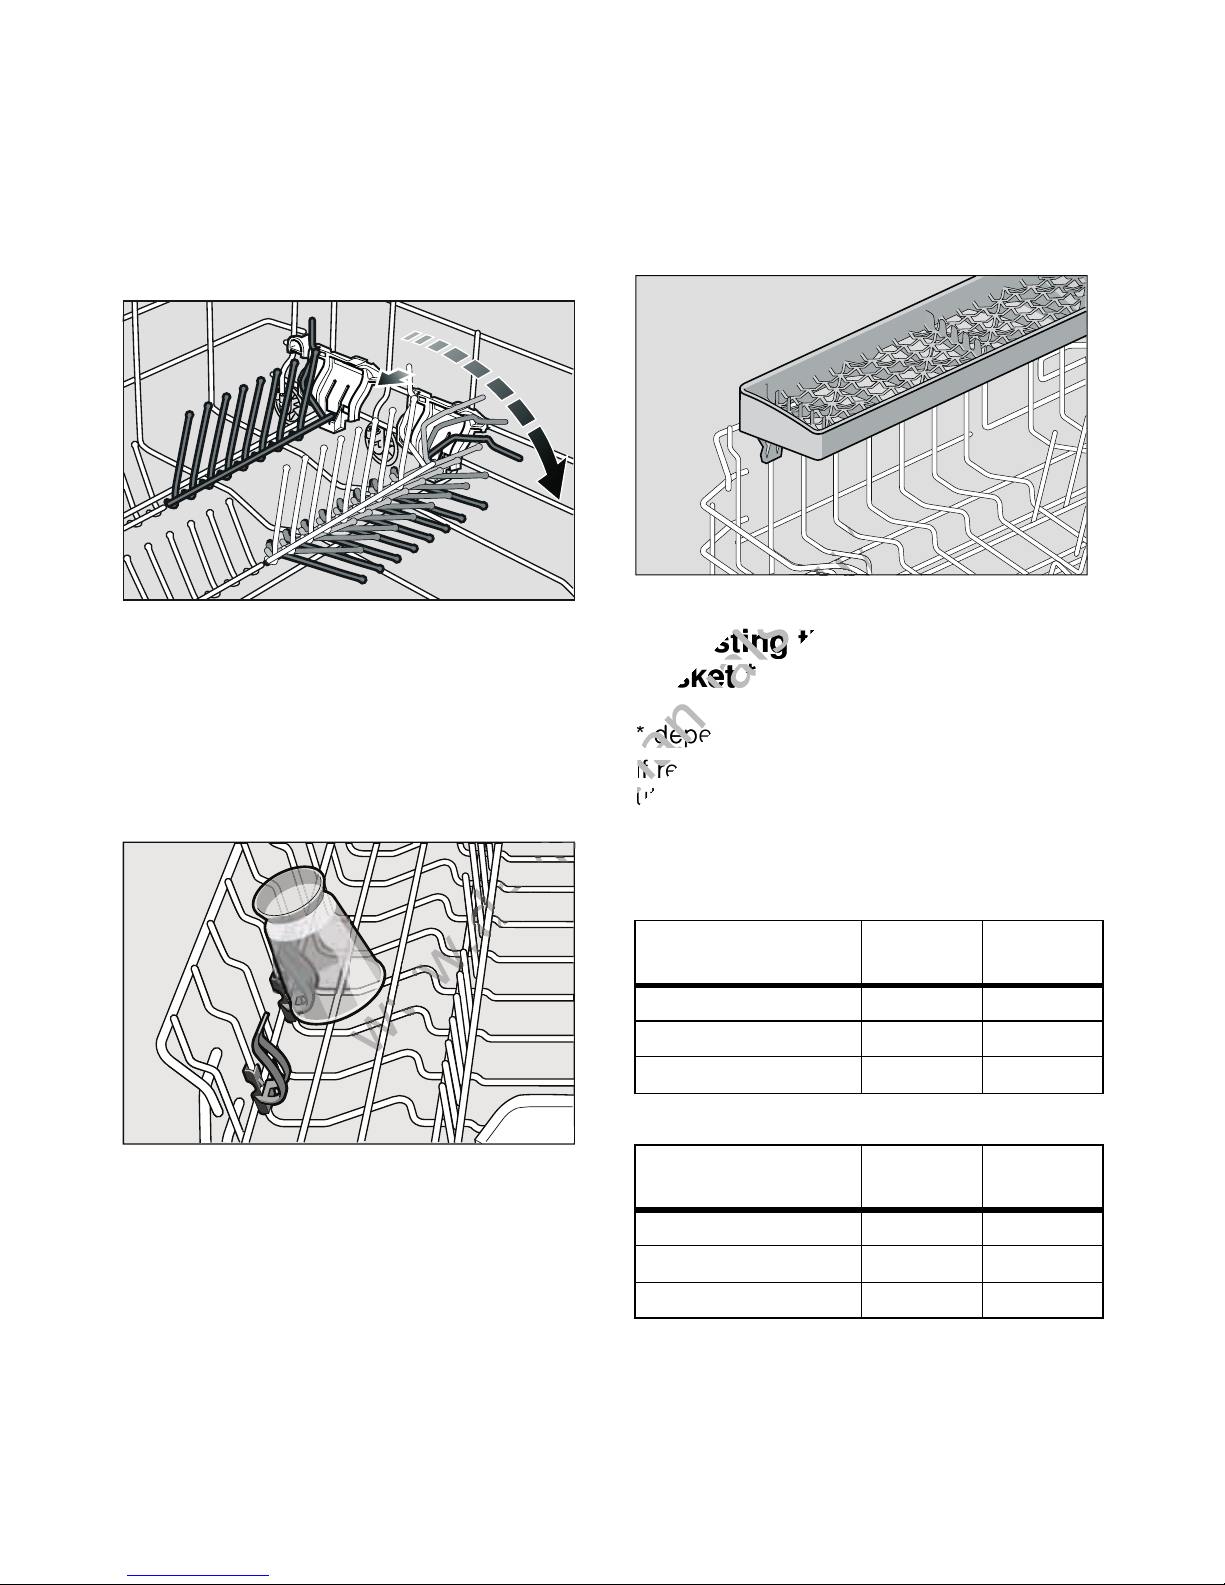
Etagere . . . . . . . . . . . . . . . . . . . . . . . 14
Folding spikes . . . . . . . . . . . . . . . . . 15
Small accessories holder . . . . . . . . . 15
Knife shelf . . . . . . . . . . . . . . . . . . . . . 15
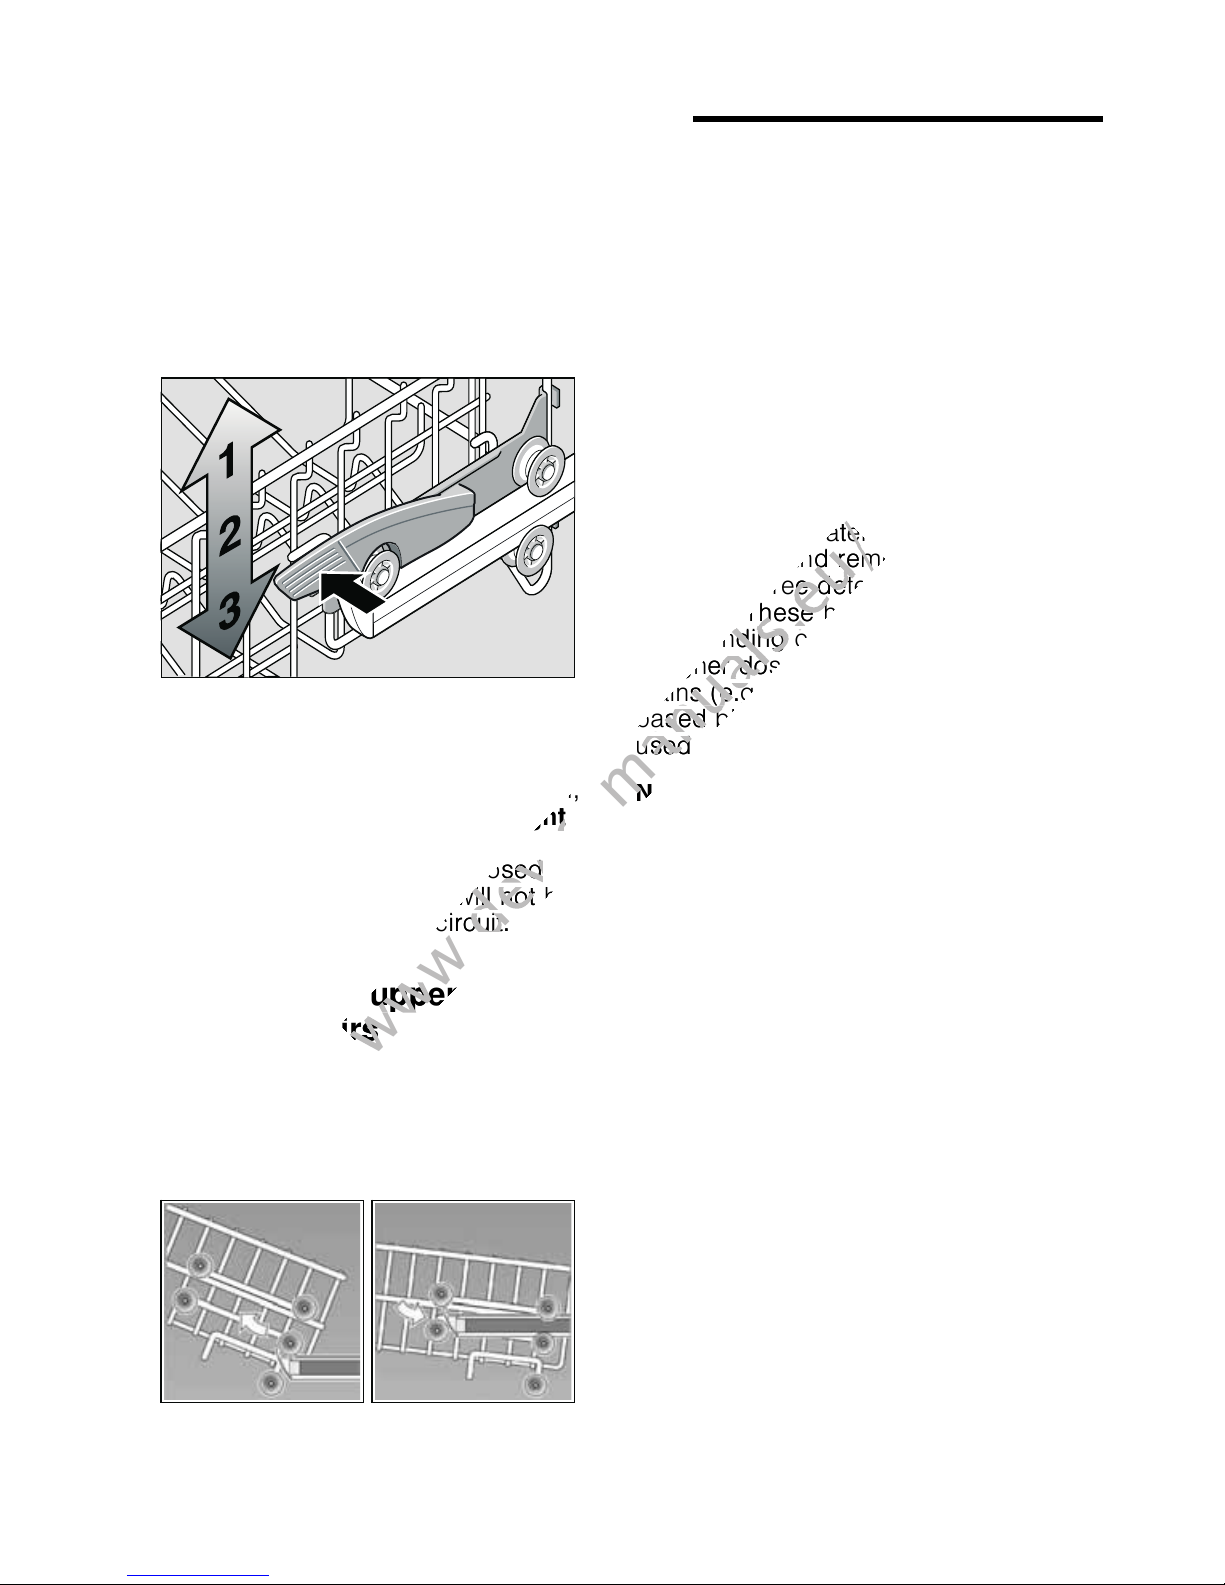
Adjusting the height of the basket . . 15
.Detergent . . . . . . . . . . . . . . . . . 16
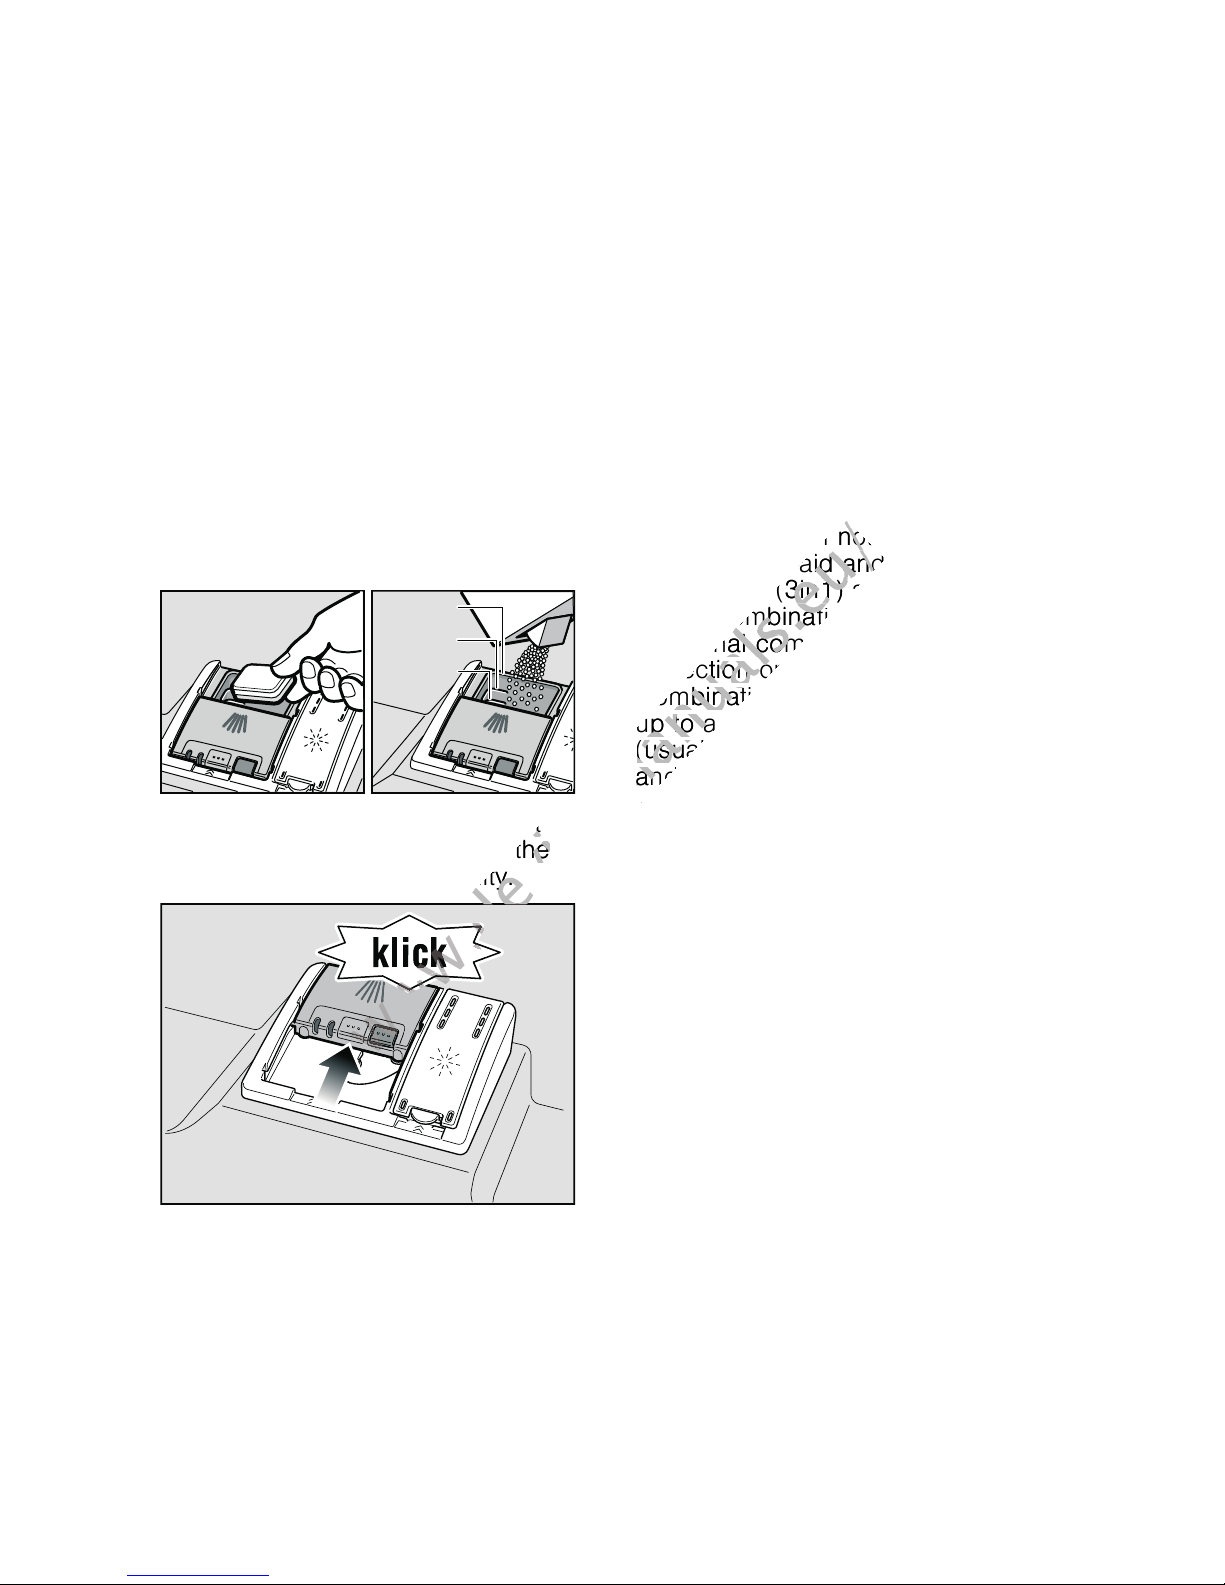
Adding detergent . . . . . . . . . . . . . . . 17
Combination detergent . . . . . . . . . . . 17
/Overview of programmes . . . . 19
Programme selection . . . . . . . . . . . . 20
Information for test institutes . . . . . . . 20
0Additional options . . . . . . . . . . 20
Express Wash+/Speed Perfect+
(VarioSpeed+). . . . . . . . . . . . . . . . . . 20
Half load . . . . . . . . . . . . . . . . . . . . . . 20
HygienePlus . . . . . . . . . . . . . . . . . . . 20
Intensive zone . . . . . . . . . . . . . . . . . . 21
Extra drying. . . . . . . . . . . . . . . . . . . . 21
1Operating the appliance . . . . . 21
Programme data . . . . . . . . . . . . . . . . 21
Aqua sensor . . . . . . . . . . . . . . . . . . . 21
Switching on the appliance . . . . . . . . 21
Programme sequence indicator . . . . 22
Remaining running time display . . . . 22
Timer programming . . . . . . . . . . . . . 22
End of programme . . . . . . . . . . . . . . 22
Automatic switch off / interior light . . 23
Switching off the appliance . . . . . . . . 23
Interrupting the programme . . . . . . . 23
Terminating the programme . . . . . . . 24
Changing the programme. . . . . . . . . 24
Intensive drying. . . . . . . . . . . . . . . . . 24
3
Page 4

en Intended use
2Cleaning and maintenance . . . 24
Overall condition of the machine . . . 24
Special salt and rinse aid . . . . . . . . . 25
Filters . . . . . . . . . . . . . . . . . . . . . . . . 25
Spray arms . . . . . . . . . . . . . . . . . . . . 26
3Fault, what to do? . . . . . . . . . . 27
Waste water pump . . . . . . . . . . . . . . 27
Fault table . . . . . . . . . . . . . . . . . . . . . 28
4Customer service . . . . . . . . . . 36
5Installation and connection . . 36
Product package . . . . . . . . . . . . . . . 36
Safety instructions. . . . . . . . . . . . . . . 36
Delivery . . . . . . . . . . . . . . . . . . . . . . . 37
Technical specifications . . . . . . . . . . 37
Installation. . . . . . . . . . . . . . . . . . . . . 37
Waste-water connection . . . . . . . . . . 37
Fresh water connection . . . . . . . . . . 37
Warm water connection . . . . . . . . . . 38
Electrical connection. . . . . . . . . . . . . 38
Removing the appliance . . . . . . . . . . 39
Transportation. . . . . . . . . . . . . . . . . . 39
Protection against frost
(Emptying the appliance) . . . . . . . . . 39
8 Intended use
Intended use
This appliance is intended for
use in the home and
the home environment.
Use the dishwasher
only in the household
and only for its designed
purpose: for washing
domestic dishes.
( Safety instructions
Safety in structions
Children from 8 years of age
or people whose physical,
sensory or mental abilities
or their lack of experience
or knowledge prevent them
from using the appliance safely
must not use this appliance
without supervision
or instruction by a responsible
person.
Before you switch ON
the appliance
Please read the operating
and installation instructions
carefully. They contain
important information on how to
install, use and maintain
the appliance.
Retain all documents for
subsequent use or for the next
owner.
4
Page 5
Safety instructions en
Delivery
1. Check the packaging and
dishwasher immediately for
damage caused in transit. Do
not switch on a damaged
appliance, but contact your
supplier.
2. Please dispose of the
packaging material in an
environmentally friendly
manner.
3. Do not let children play with
packaging and its parts.
There is a risk of suffocation
from collapsible boxes and
film.
Installation
Ensure that the protective
conductor system
of the domestic supply has
been correctly installed.
The electrical connection
conditions must correspond
with the specifications
on the dishwasher rating
plate 9:.
If the power cord of this
appliance is damaged,
it must be replaced with
a particular power cord.
To prevent injury, the power
cord may be replaced
by customer service only.
If the dishwasher is installed
in a high-sided unit, the unit
must be secured properly.
Following installation, ensure
that the back
of the dishwasher is not
freely accessible (protection
against contact due to hot
surface).
Install and connect
the appliance according
to the installation
and assembly instructions.
Prior to installation,
disconnect the dishwasher
from the power supply.
If you install a microwave
oven above the dishwasher,
the microwave oven may be
damaged.
Install built-under
or integratable appliances
only under continuous
worktops which have been
screwed to adjacent
cupboards to ensure stability.
Do not install the appliance
near heat sources (radiators,
heat storage tanks, cookers
or other appliances which
generate heat) and do not
install under a hob.
5
Page 6
en Safety instructions
DoDoDoorDo
DoorDo
lo
lo
DoorDo loDoorDo
DoorDo loDoorDo
lock lo
lock lo
When the programme ends
When the programme ends
‹
‹
After installing the appliance,
ensure that the plug is easily
accessible.
(See Electrical connection)
Some models:
The plastic housing on the
water connection contains
an electric valve,
the connecting cables
are in the supply hose.
Do not cut through this hose,
do not immerse the plastic
housing in water.
In daily use
Read and observe the safety
information and instructions
for use on the packaging
for cleaning and rinsing agents.
Door lock
Childproof lock (door lock)
*
The description of the
childproof lock is at the back in
the envelope.
Activating the button lock:
1. Start the required
programme.
2. Hold down the button + for
approx. 4 sec. until this ’– is
indicated on the digital
display.
If any button is pressed while
the programme is running,
this ’– is indicated on the
digital display. It is not possible
to end (Reset) the programme.
Deactivating the button lock:
Hold down the button + for
approx. 4 sec. until the
display ’– goes out.
When the programme ends
(‹:‹‹ on the digital display), the
button lock is cancelled. If there
is a power failure, the button
lock is retained. Whenever a
programme is restarted, the
button lock must be reactivated.
* depending on model
Childproof lock (button lock)
Button lock
Damage
The appliance may be
repaired and opened up by a
You can secure your appliance
from being unintentionally the
programme terminated (e.g.
improper operation by children).
technician only. To do this,
disconnect the appliance
from the power supply. Pull
out the mains plug or switch
off the fuse. Turn off the tap.
6
Page 7
Safety instructions en
Warning
Warning
If the fascia is damaged
(cracks, holes, broken
buttons), do not operate the
appliance. Pull out the mains
plug or switch off the fuse.
Turn off the tap, call
customer service.
Disposal
1. Make redundant appliances
unusable to prevent
subsequent accidents.
2. Dispose of the appliance in a
n environmentally friendly
manner.
ã=Warning
If the appliance
is not in a cavity and a side
panel is accessible, the door
hinge area must be covered
at the side
for reasons of safety
(risk of injury). The covers
are available as optional
accessories from customer
service or specialist outlets.
* depending on model
ã=Warning
Risk of explosion!
Do not add any solvents
to the washing chamber.
Danger of explosion!
Risk of injury!
To prevent injuries, e.g.
caused by stumbling, open
the dishwasher only briefly
in order to load and unload
the dishwasher.
Knives and other utensils
with sharp points must be
placed in the cutlery basket
with the points
downwards or horizontally on
the knife shelf*.
Do not lean or sit
on the open door.
In the case of free-standing
appliances, ensure that the
baskets are not overloaded.
ã=Warning
Risk of scalding!
Open the door carefully when
the programme is still running.
There is a risk of hot water
spraying out of the appliance.
ã=Warning
Risks to children!
If fitted, use the childproof
lock. An exact description
can be
found in the back of the enve
lope.
Do not allow children to play
with or operate
the appliance.
7
Page 8
en Protection of the environment
Keep children away from
detergents and rinse aid.
These may cause chemical
burns in the mouth, throat
and eyes or asphyxiation.
Keep children away from
open dishwasher.
The water in the rinsing
compartment is not drinking
water and could contain
detergent residue.
Ensure that children do not
place fingers in the tablet
collecting tray 1:. Small
fingers could become
caught in the slots.
When opening and closing
the door on an eye-level
appliance, ensure that
children do not become
jammed or crushed between
the appliance door and the
cupboard door below.
7 Protection of the
environment
Protection of the environment
Both the packaging of new appliances
and the old appliances themselves
contain valuable raw materials
and recyclable materials.
Please dispose of the individual parts
separated according to type.
Please ask your dealer or inquire at your
local authority about current means
of disposal.
Packaging
All plastic parts of the appliance are
identified with internationally
standardised abbreviations (e.g. >PS<
polystyrene). Therefore, plastic waste
can be sorted out when the appliance is
being disposed of.
Please follow the safety instructions
under “Delivery”.
Children could become
locked in the appliance
(danger of suffocation) or get
into another dangerous
situation.
Redundant appliances: Pull
out the mains plug, sever
and dispose of the power
cord. Destroy the door lock
so that the door can no
longer be closed.
Old appliances
Please follow the safety instructions
under “Disposal of your appliance”.
This appliance is identified
according to the European
guideline 2002/96/EC on waste
electrical and electronic
equipment – WEEE. The
guideline specifies the
framework for an EU-wide valid
return and re-use of old
appliances.
8
Page 9
Getting to know your appliance en
The settings can be found in the
The settings can be found in the
* Getting to know your
appliance
Getting to know your appliance
Diagrams of the control panel
and the interior of the appliance can be
found in the envelope at the front.
Individual positions are referred
to in the text.
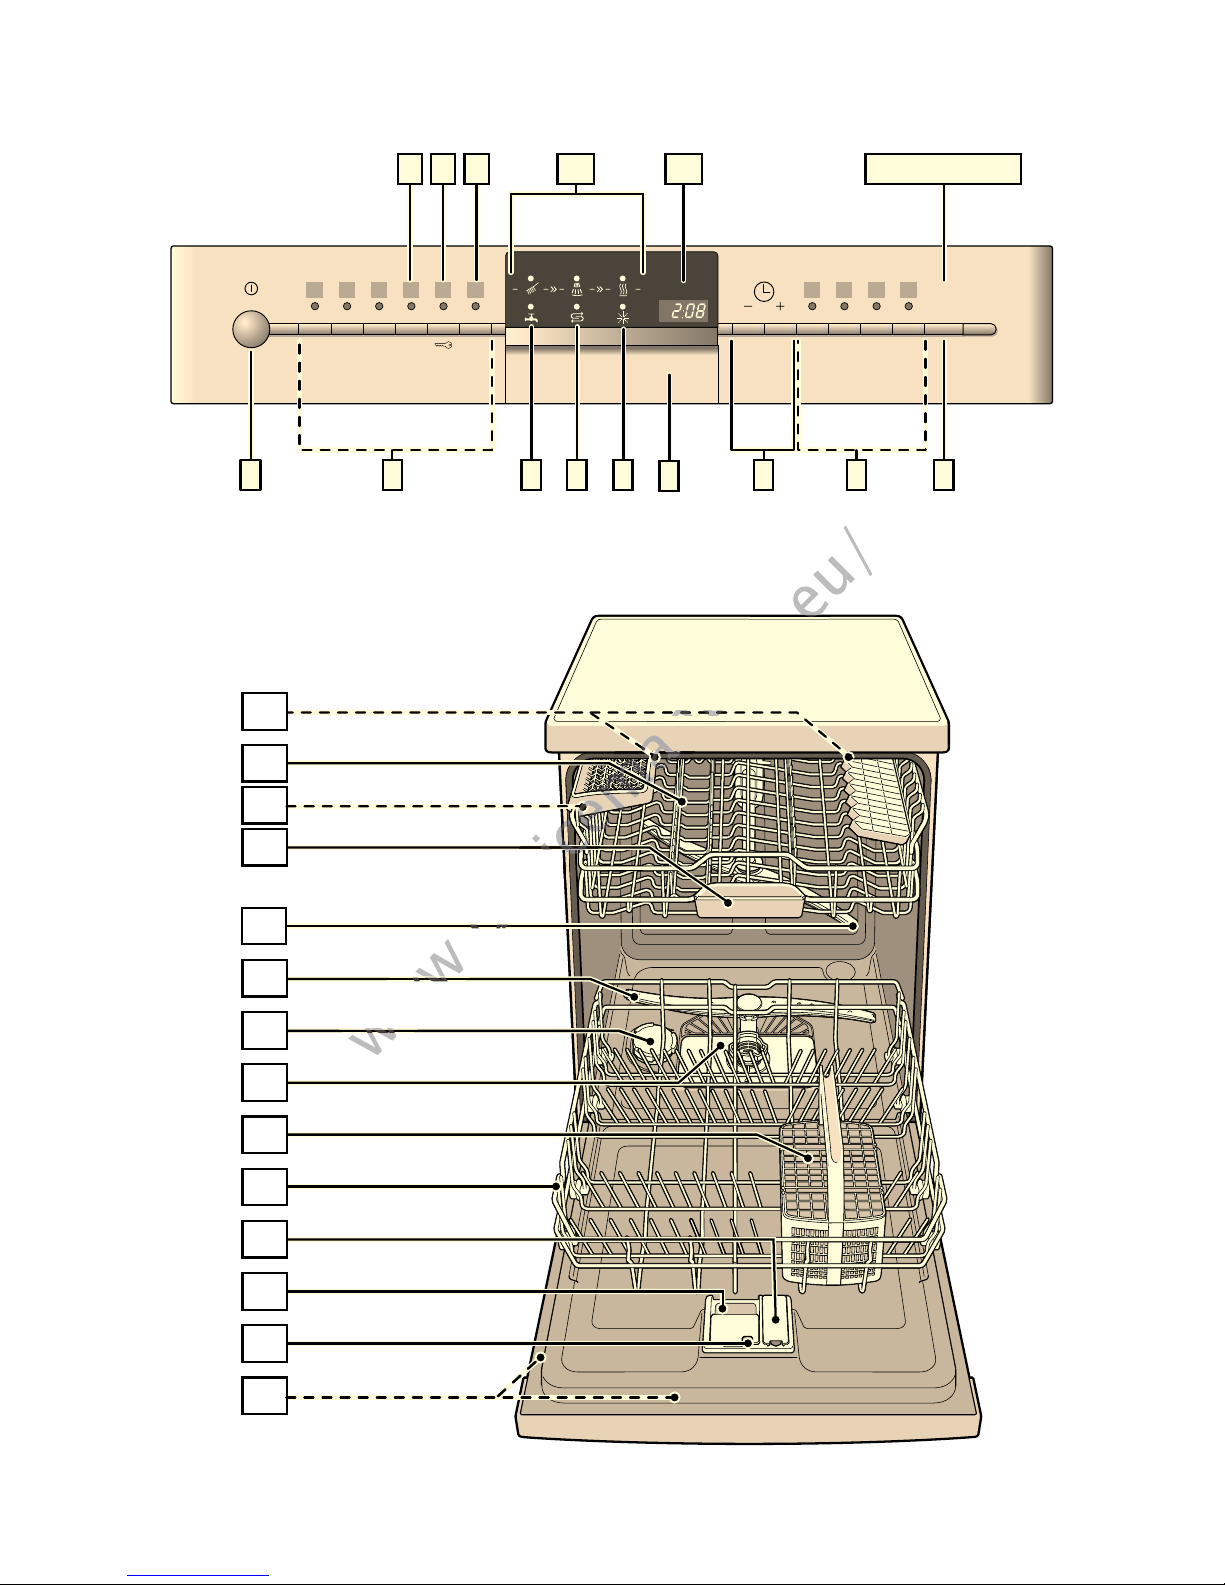
Control panel
( ON/OFF switch
0 Programme buttons **
8 Display “Check water supply”
@ Salt refill indicator
H Rinse aid refill indicator
P Door opener
X Timer programming *
` Additional options **
h START button
)" Programme sequence indicator
)* Digital display
* depending on model
** Number depending on model
Appliance interior
1" Interior light *
1* Top basket
12 Knife shelf *
1: Tablet collecting tray
1B Top spray arm
1J Bottom spray arm
1R Dispenser for special salt
1Z Filters
1b Cutlery basket
1j Bottom basket
9" Dispenser for rinse aid
9* Detergent dispenser
92 Lock for detergent dispenser
9: Rating plate
* depending on model
Overview of menu
The settings can be found in the
individual chapters.
• Water Hardness •:‹‹ - •:‹ˆ
š Intensive drying š:‹‹ - š:‹‚
§ Rinse aid §:‹‹ - §:‹‡
‘ Hot water ‘:‹‹ - ‘:‹‚
˜ Automatic disconnection ˜:‹‹ - ˜:‹ƒ
9
Page 10
en Water softening system/Special salt
VRIW
VRIW
+ Water softening
system/Special salt
Water soft ening system/Sp ecial salt
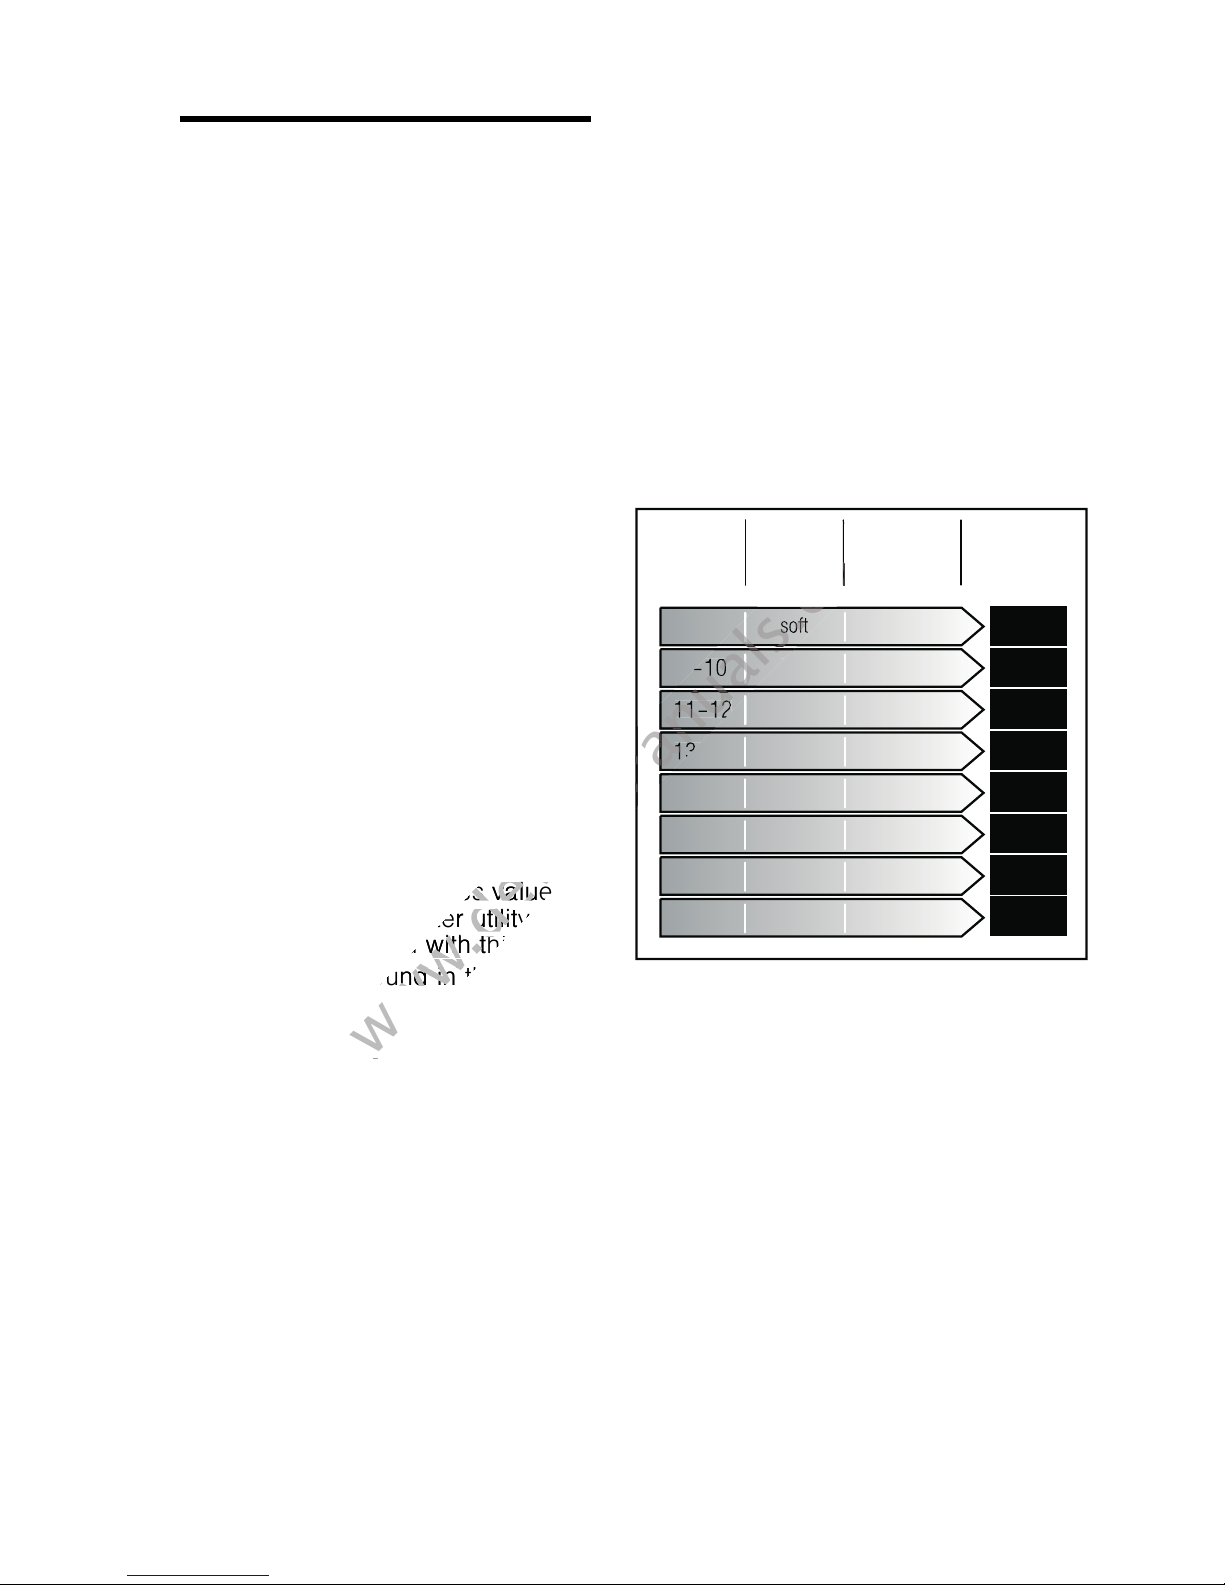
To ensure good washing results,
the dishwasher requires soft water, i.e.
containing low amounts of lime,
otherwise white limescale will be
deposited on the utensils and inner
container.
Tap water above 1.2 mmol/l must be
softened. The water is softened with
special salt (regeneration
salt) in the water softening
system of the dishwasher.
The setting and therefore the required
amount of salt
depends on the degree of hardness of
your tap water (see table).
To change the setting:
1. Press programme button 3.
Each time the button is pressed, the
set value increases by one level;
when the value of •:‹ˆ has been
reached, the display jumps back
to •:‹‹ (off).
2. Press START button h.
The chosen setting has now been
stored.
Water hardness table
:DWHU
KDUGQHVV
YDOXH
&ODUNH
Ȣ
Ȣ
+DUGQHVV
UDQJH
VRIW
VRIW
PPROO
Ȣ
Ȣ
6HWYDOXH
RQWKH
PDFKLQH
¯¯
¯³
Setting
The amount of salt dispensed can be
set from •:‹‹ to •:‹ˆ.
Salt is not required at the set value
•:‹‹.
1. Find out about the hardness value of
your tap water. Your water utility
company will help you with this.
2. Set value can be found in the water
hardness table.
3. Close the door.
4. Switch on ON/OFF switch (.
5. Hold down programme button #
and press START button h until
•:‹.... is indicated on the digital
display.
6. Release both buttons.
The LED for button # flashes and
the digital display )* displays the
factory setting •:‹….
Ȣ
Ȣ
Ȣ
Ȣ
Ȣ
Ȣ
PHGLXP
PHGLXP
PHGLXP
KDUG
KDUG
KDUG
Ȣ
Ȣ
Ȣ
Ȣ
Ȣ
Ȣ
¯
¯´
¯
¯
¯±
¯Å
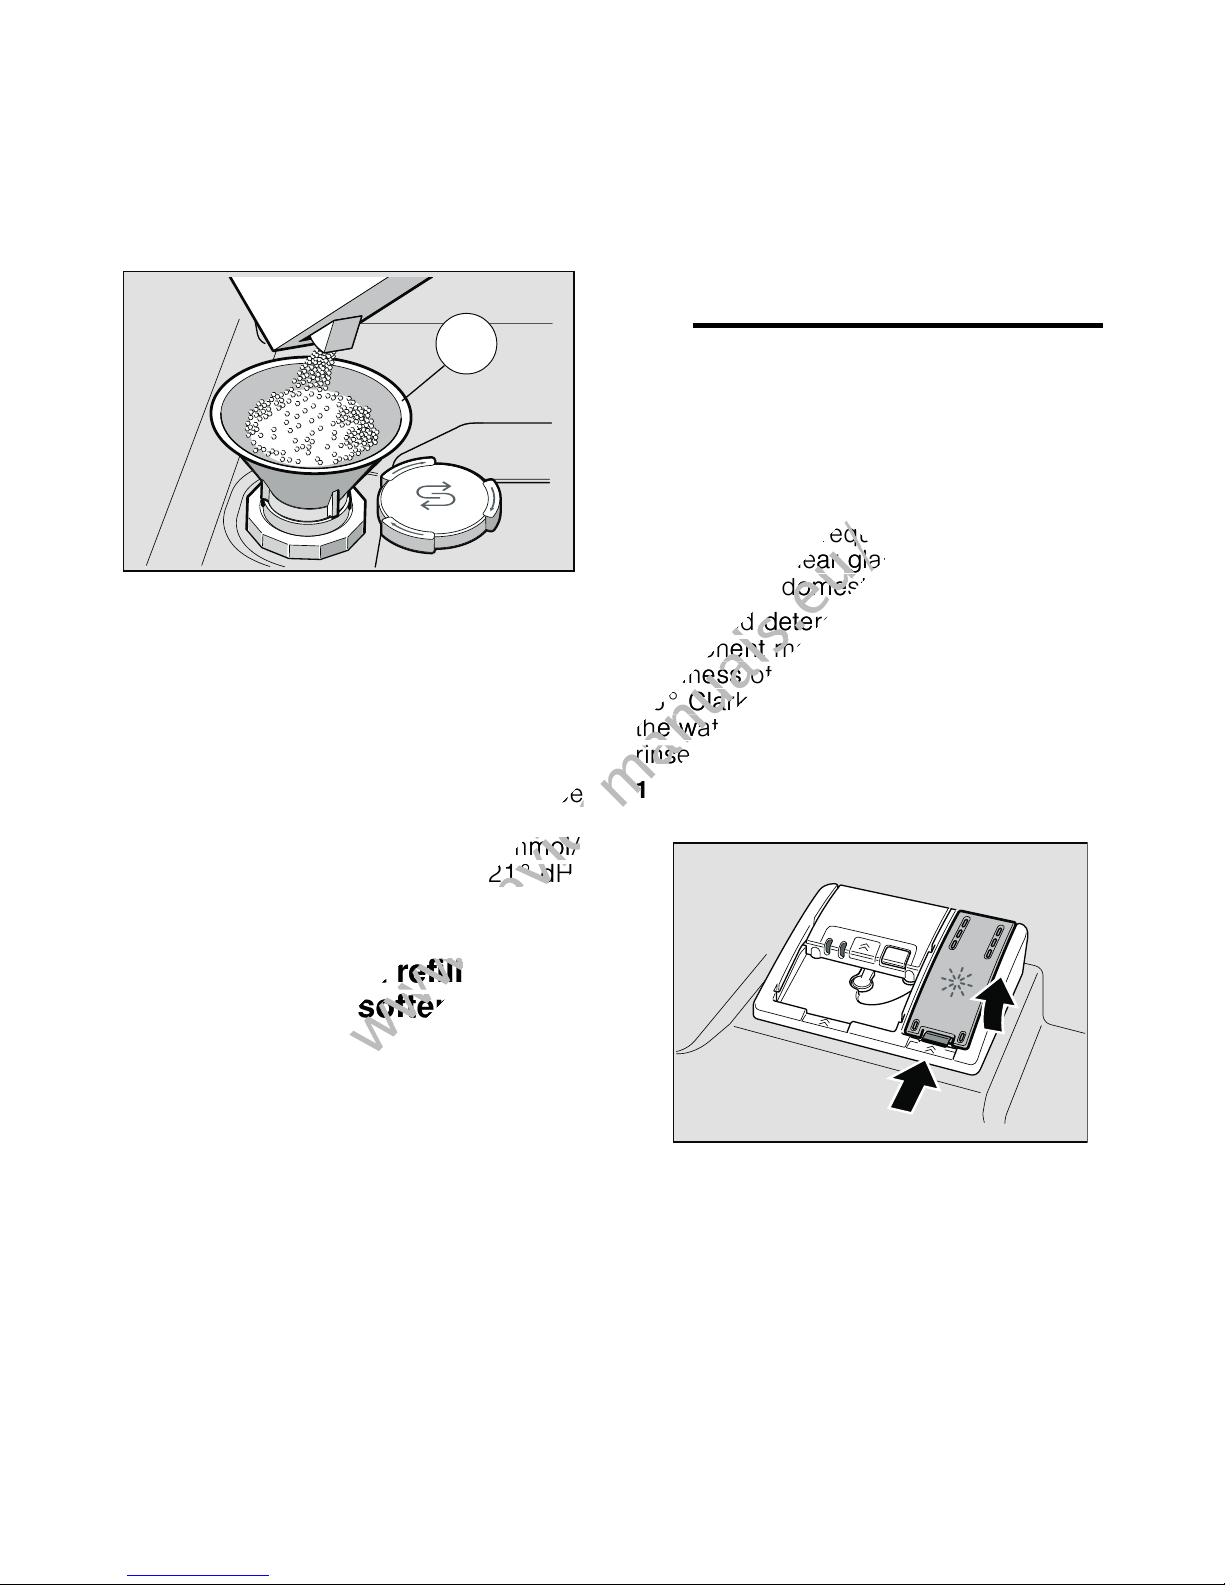
Using special salt
Always refill with special salt
immediately before switching on the
appliance. This ensures that overrun
special salt solution is immediately
washed out and does not corrode the
rinsing tank.
1. Open the screw-type cap of the
compartment 1R.
2. Fill the tank with water (only required
when switching on the appliance for
the first time).
10
Page 11
Rinse aid en
the water hardness is over 21° dH,
the water hardness is over 21° dH,
3. Then add dishwasher salt (not table
salt or tablets).
The water is displaced and runs out.
As soon as the salt refill indicator @
on the fascia is lit, top up the salt.
* depending on model
Using detergents with salt
component
If combined detergents with a salt
component are used, salt can usually be
omitted up to a water hardness of
21° dH (37° fH, 26° Clarke, 3.7 mmol/
l). If the water hardness is over 21° dH,
special salt must be used.
Detergents with salt component
ã Caution
Never fill the salt dispenser with
detergent. You will destroy the water
softening system.
, Rinse aid
Rinse a id
As soon as the rinse-aid refill
indicator H is lit on the fascia, there
is still a rinse-aid reserve of 1-2 rinsing
processes. Refill with rinse aid.
The rinse aid is required for stain-free
utensils and clear glasses. Use only
rinse aid for domestic dishwashers.
Combined detergents with rinse-aid
component may be used up to a water
hardness of 21° dH (37° fH,
26° Clarke, 3.7 mmol/l) only. If
the water hardness is over 21° dH,
rinse aid must be used.
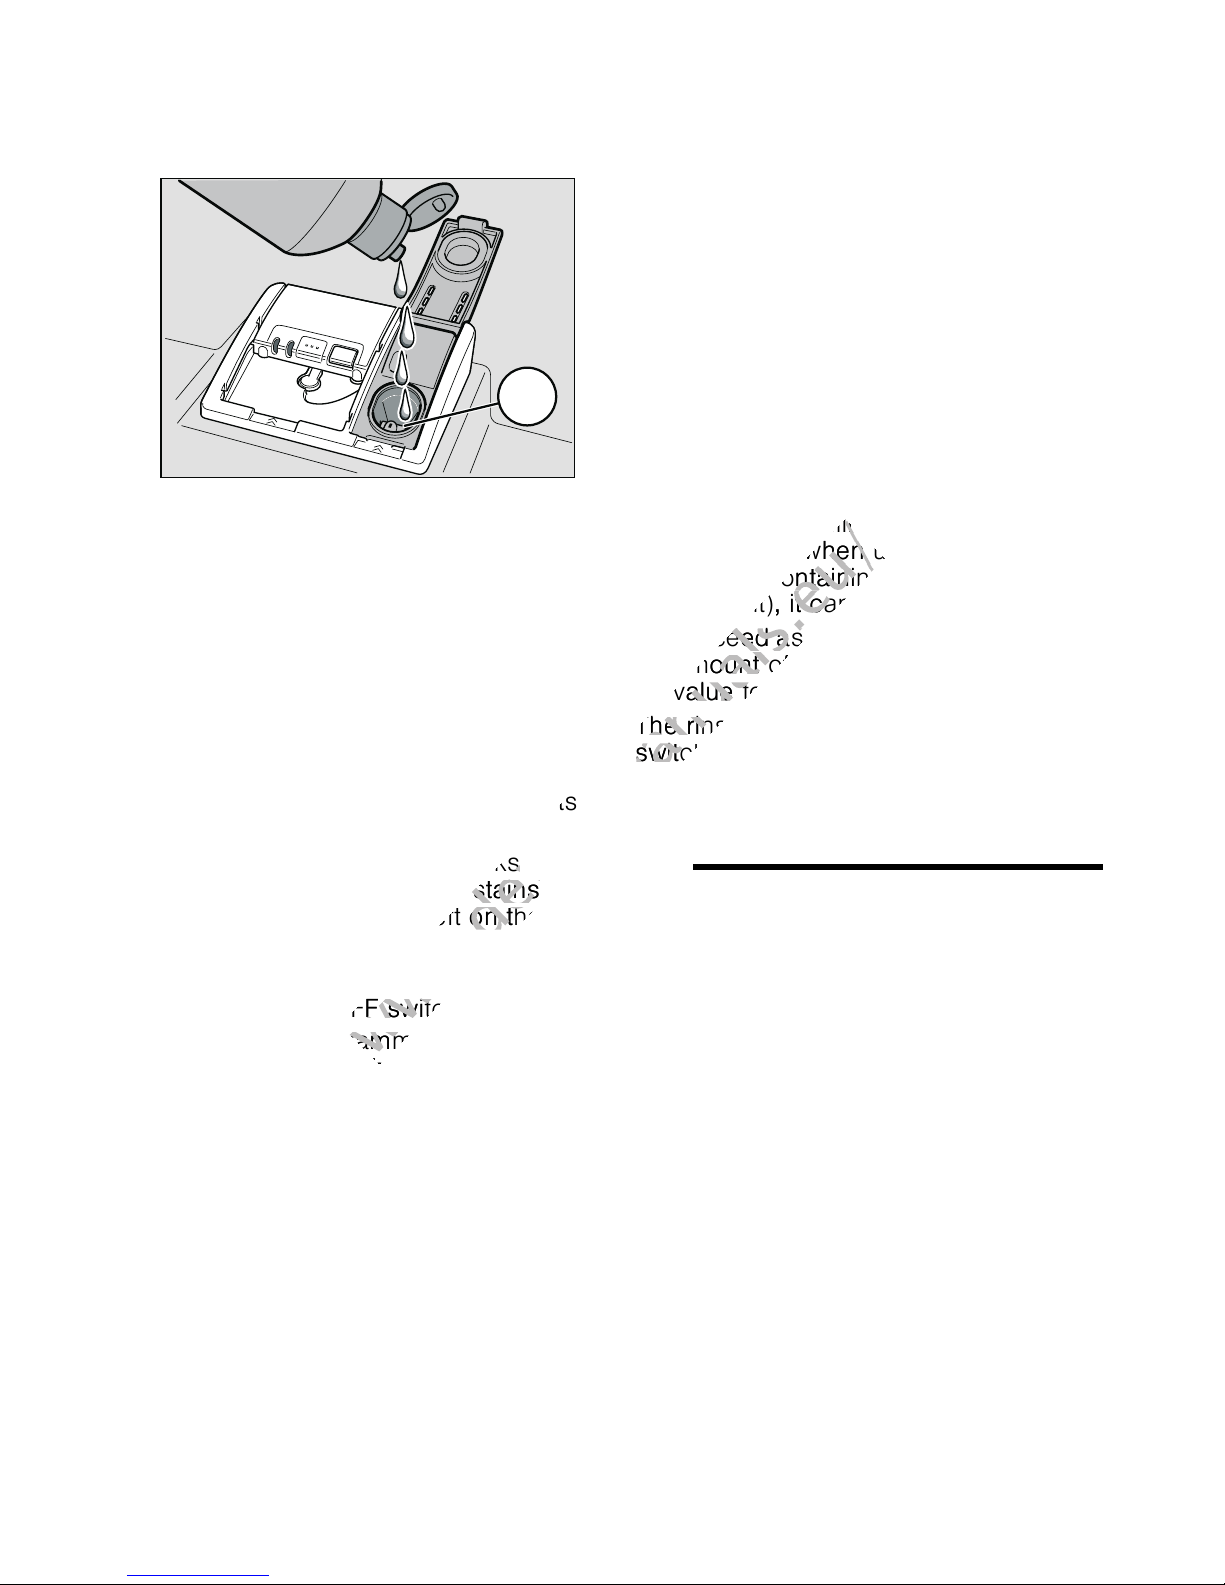
1. Open the dispenser 9" by pressing
and lifting the plate on the cover.
Switching off salt refill
indicator/water softening
system
If the salt refill indicator @ is impaired
(e.g. when using combined detergents
containing salt component), it can be
switched off.
Proceed as described under
“Adjusting the water softening
system” and set the value to •:‹‹.
The water softening system and salt
refill indicator are now switched off.
Switching off water softening system
11
Page 12
en Utensils
value to
value to
The rinse aid refill indicator
The rinse aid refill indicator
2. Carefully pour rinse aid up
to the max. mark in the filler opening.
PD[
3. Close cover until it clicks shut.
4. To prevent excessive foam formation
during the next rinse cycle, remove
any rinse aid which has run over with
a cloth.
Setting amount of rinse aid
The amount of rinse aid can be set from
§:‹‹ to §:‹‡. Please set rinse aid on
§:‹† to obtain very good drying results
(§:‹† is already set in factory).
To change the setting:
1. Press programme button 3.
Each time the button is pressed, the
set value increases by one level;
when the value of §:‹‡ has been
reached, the display jumps back
to §:‹‹ (off).
2. Press START button h.
The set value is saved.
Switching off rinse aid refill
indicator
If the rinse-aid refill indicator H is
impaired (e.g. when using combined
detergents containing rinse aid
component), it can be switched off.
Proceed as described under “Setting
mount of rinse aid” and set the
a
value to §:‹‹.
The rinse aid refill indicator H is now
switched off.
Change this setting, only if streaks
(select lower setting) or water stains
(select higher setting) are left on the
utensils.
1. Close the door.
2. Switch on ON/OFF switch (.
3. Hold down programme button #
and press START button h until
•:‹.... is indicated on the digital
display.
4. Release both buttons.
The LED for button # flashes and
the digital display )* displays the
factory setting •:‹….
5. Press programme button # until
the factory set value §:‹† is
indicated on the digital display )*.
- Utensils
Utensils
Not suitable
Cutlery and utensils made of wood.
Delicate decorative glasses, craft
and antique utensils. These decors
are not dishwasher-proof.
Plastic parts not resistant to heat.
Copper and tin utensils.
Utensils which are soiled with ash,
wax, lubricating grease or ink.
Aluminium and silver parts have a
tendency to discolour and fade during
the wash cycle. Even some types of
glass (e.g. crystal glass objects) may
turn cloudy after many wash cycles.
12
Page 13
Utensils en
Glass and utensil damage
Causes:
Glass type and glass production
process.
Chemical composition of the
detergent.
Water temperature of the wash
programme.
Recommendation:
Use only glasses and porcelain
which the manufacturer designates
as dishwasher-proof.
Use a detergent which protects
utensils.
Take glass and cutlery out of the
dishwasher as soon as possible after
the programme ends.
Loading the dishwasher
Unloading the dishwasher
To prevent water from dripping off the
upper basket onto the utensils in the
lower basket, it is recommended
to empty the appliance from the bottom
up.
Hot utensils are sensitive to shock!
Therefore, when the programme ends,
leave the utensils to cool down in the
dishwasher until they can be handled.
Note
When the programme ends, water
droplets can still be seen inside
the appliance. This does not affect
the drying of the utensils.
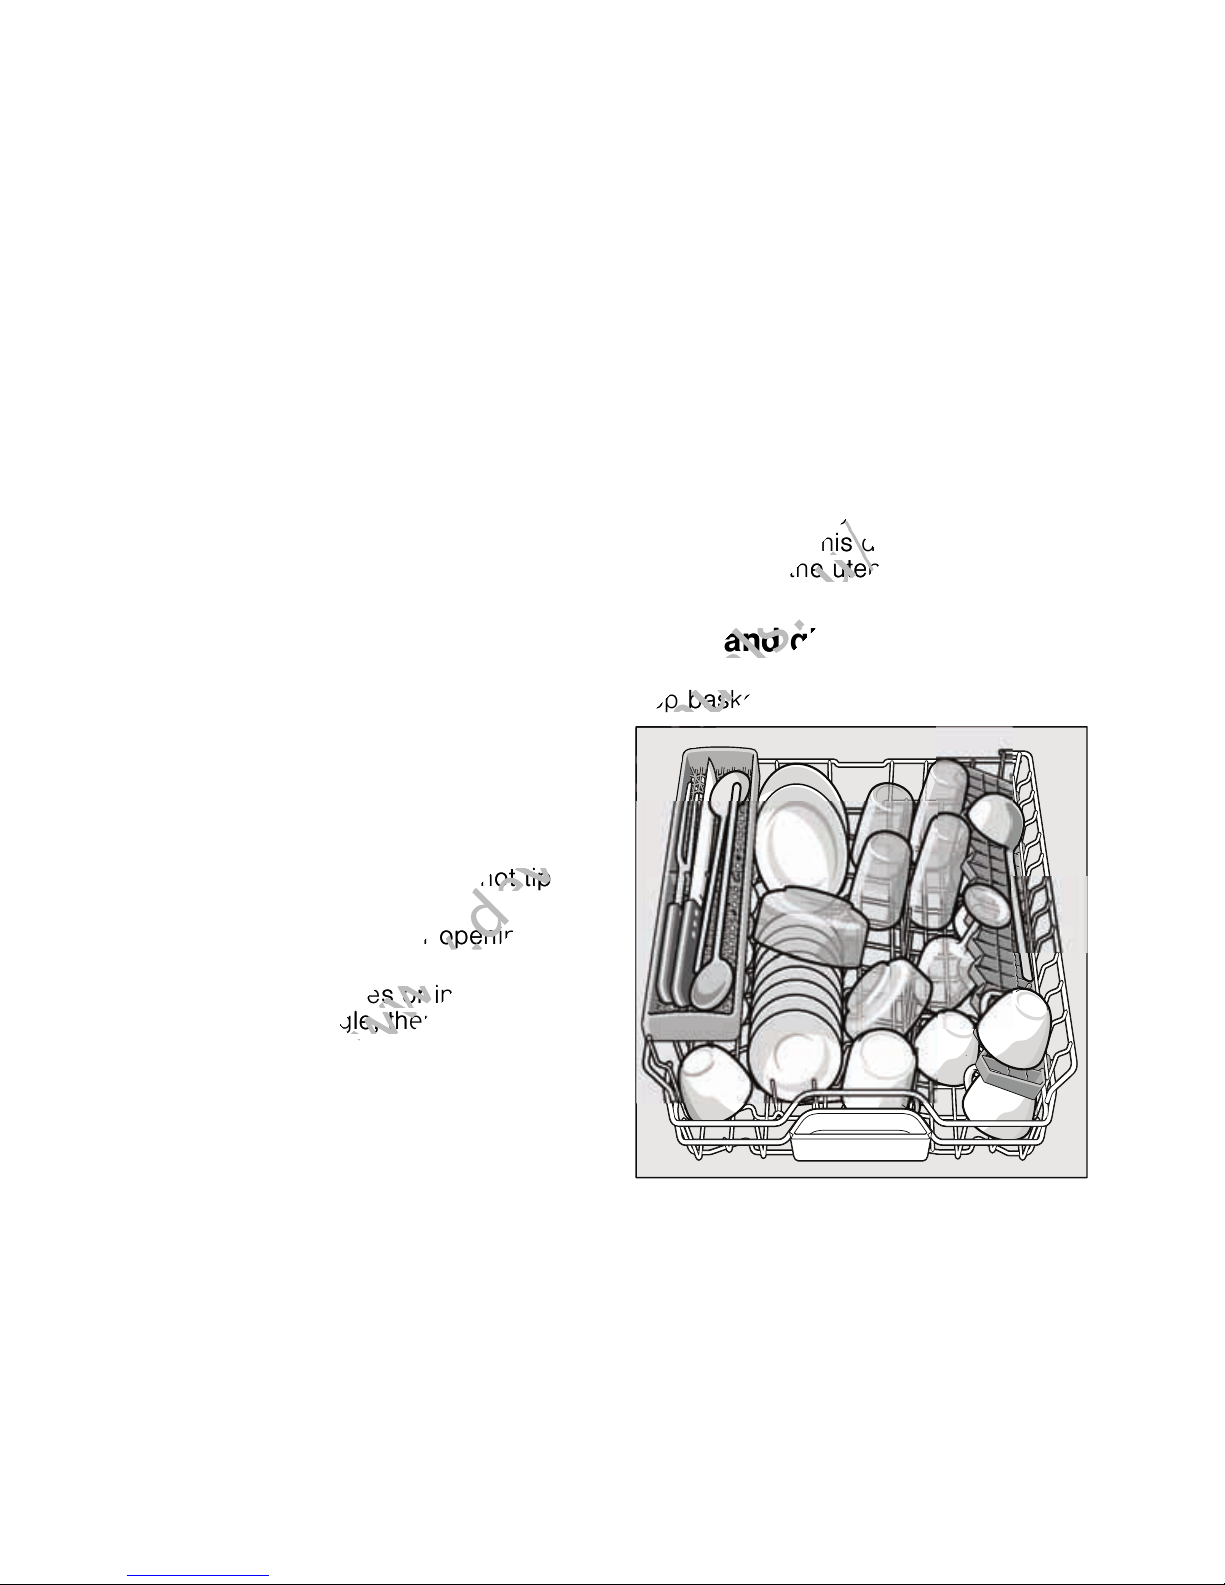
Cups and glasses
Top basket 1*
1. Remove large food remnants. It is
not necessary to prerinse utensils
under running water.
2. Place the utensils so that
– they are secure and cannot tip
over.
– all utensils with their openings
face down.
– parts with curves or indentations
are at an angle, thereby allowing
water to drain.
– does not obstruct rotation of the
two spray arms 1B and 1J.
Very small utensils should not be
washed in the machine, as they may fall
out of the baskets.
13
Page 14
en Utensils
The etagere and the space underneath
The etagere and the space underneath
Pans
Bottom basket 1j
Tip
Cutlery basket
You should always place cutlery
unsorted with the points downwards.
To prevent injuries, place long, pointed
implements and knives on the knife
shelf.
Etagere
Etagere *
Heavily soiled utensils (pans) should
be placed in the bottom basket. The
more powerful spray jet provides
a better dishwashing result.
Tip
Other examples, such as the best way
of loading your dishwasher, can
be found on our homepage as a free
download. The corresponding Internet
address can be found on the back page
of these instructions for use.
The etagere and the space underneath
can be used for small cups and glasses
or for larger items of cutlery, such as
wooden spoons or serving cutlery. The
etagere can be folded up if not required.
&/,&.
* Depending on the model, a 3-fold
height adjustment is possible. To do
this, first place the etagere vertically
and pull up, then place at a slight angle,
push down to the required height (1, 2,
or 3) and snap into place.
14
Page 15
Folding spikes
Folding spikes *
Knife shelf *
Utensils en
Kn ife shelf
* depending on model
The spikes can be folded down to
improve arrangement of pans, bowls
and glasses.
Small accessories holder *
Sma ll accessories holder
* depending on model
Light-weight plastic accessories, e.g.
cups, lids, etc. can be held securely in
the small accessories holder.
* depending on model
Long knives and other utensils can be
arranged horizontally.
Adju sting the height of the basket
Adjusting the height of the
basket *
* depending on model
If required, the height of the upper
utensils basket 1* can be adjusted to
provide more space for tall utensils
either in the upper or lower basket.
Appliance height 81.5 cm
Top basket Bottom
basket
Setting 1 max. ø 22 cm 30 cm
Setting 2 max. ø 24.5 cm 27.5 cm
Setting 3 max. ø 27 cm 25 cm
Appliance height 86.5 cm
Top basket Bottom
basket
Setting 1 max. ø 24 cm 33 cm
Setting 2 max. ø 26.5 cm 30.5 cm
Setting 3 max. ø 29 cm 28 cm
Select one of the two following
procedures according to the design of
the top basket for your appliance model:
15
Page 16
en Detergent
Top basket with side levers
1. Pull out the top basket 1* out.
2. To lower the basket, press in the left
and then the right lever on the
outside of the basket. In doing so,
hold the sides of the basket along
the upper edge to prevent it from
suddenly dropping.
3. To raise the basket, hold the basket
on the sides of the upper edge and
lift it up.
4. Before re-inserting the basket again,
ensure that it is at the same height
on both sides. Otherwise, the
appliance door cannot be closed
and the upper spray arm will not be
connected to the water circuit.
. Detergent
Detergent
You can use tablets as well as powder
or liquid detergents for dishwashers, but
never use washing up liquid.
The dosage can be individually adjusted
with powder or a liquid detergent
according to the degree of soiling.
Tablets contain an adequately large
amount of active ingredients
for all cleaning tasks. Modern, powerful
detergents predominantly use a lowalkaline formulation with phosphate
and enzymes. Phosphates bond
the lime in the water. Enzymes break
down starch and remove protein.
Phosphate-free detergents are less
frequent. These have a slightly weaker
lime bonding capacity and require
a higher dosage. To remove coloured
stains (e.g. tea, tomato sauce), oxygenbased bleaching agents are usually
used.
Note
To ensure a good washing result,
always follow the instructions
on the detergent packaging!
If you have further questions,
we recommend that you contact
the detergent manufacturers’ helpline.
Top basket with upper and
ã Warning – Read and observe the
lower roller pairs
1. Pull out the top basket 1* out.
2. Remove the upper basket and re-
attach it to the upper (stage 3) or
lower (stage 1) rollers.
16
safety information and instructions for
use on the packaging for cleaning and
rinsing agents.
Page 17
Detergent en
Adding detergent
1. If the detergent dispenser 9* is still
closed, press the lock 92 to open
the detergent dispenser.
Pour detergent into the dry detergent
dispenser 9* only (insert tablet flat,
not on its edge).
Dosage: see manufacturer’s
instructions on the packaging.
The graduated detergent
dispenser 9* helps you add the
correct amount of powder or liquid
detergent.
Usually 20 ml–25 ml are adequate
for normal soiling. If using tablets,
one tablet is adequate.
PO
PO
PO
Tip
If the utensils are only lightly soiled,
slightly less than the indicated amount
of detergent is usually adequate.
Suitable detergents and care products
can be purchased online
via our website or via customer service
(see back page).
Combination detergent
Apart from conventional detergents
(Solo), a number of products are offered
with additional functions. These
products contain not only the detergent
but also rinse-aid and salt replacement
substances (3in1) and, depending
on the combination (4in1, 5in1, etc.),
additional components such as glass
protection or stainless steel cleaner.
Combination detergents function only
up to a specific degree of hardness
(usually 21°dH). Over this limit salt
and rinse-aid must be added.
2. Close the cover on the detergent
dispenser by sliding it up until the
lock engages without difficulty.
The detergent dispenser opens
automatically at the optimum time
depending on the programme.
The powder or liquid detergent
is distributed in the appliance and is
dissolved, the tablet falls into
the tablet collecting tray where it
dissolves in doses.
As soon as combined detergents
are used, the rinse programme
is adjusted automatically to ensure
the best possible rinsing and drying
result.
ã Warning – Do not place small parts
for washing in the tablet collecting tray
1:; this prevents the tablet from
dissolving evenly.
ã Warning – If you want to add more
utensils after the programme
has started, do not use the tablet
collecting tray 1: as a handle
for the upper basket. The tablet could
already be there and you will touch
the partially dissolved tablet.
17
Page 18

en Detergent
Notes
You will obtain optimum rinsing
and drying results by using solo
detergents and applying salt
and rinse aid separately.
If programmes are short, tablets
may not have full cleaning effect
due to different dissolving properties
and there may even be undissolved
detergent residue. It is
recommended to use washing
powder for these programmes.
The Intensive programme (on some
models) requires one tab only. When
using washing powder, you can
apply some of this cleaning agent
to the inside of the appliance’s door.
Even if the rinse-aid and/or salt refill
indicator is lit, the rinse programme
will run correctly with combined
detergents.
If using detergents in a water-soluble
protective cover: Take hold of the
cover with dry hands only and put
the detergent into an absolutely
dry detergent dispenser only,
otherwise the detergent may stick.
If you switch from combined
detergents to solo detergents,
ensure that the water softening
system and amount of rinse aid have
been set to the correct value.
18
Page 19
Overview of programmes en
Auto 45° - 65°
Auto 45° - 65°
/ Overview of programmes
Overviewofprogrammes
The max. possible number of programmes is illustrated in this overview.
The corresponding programmes and their arrangement can be found on the
fascia.
Type of utensils Type of soiling Programme Possible
additional
options
pots and pans,
non-sensitive
utensils
and cutlery
mixed utensils
and cutlery
very adhesive burnedin or dried-on food
remnants containing
starch or protein
part dried, common
household food
remnants
± / °
Intensive 70°
Ó
* Intensive
Smart 45°
Á
Auto 45° - 65°
Á
Auto 45° - 65°
â / à
Eco 50°
all
all
all
all
all
Programme sequence
Pre-rinse
Clean 70°
Intermediate rinse
Final rinse 65°
Drying
Pre-rinse
Clean 45°
Intermediate rinse
Final rinse 69°
Drying
Is optimised according
to the soiling with the aid
of sensors.
Is optimised according
to the soiling with the aid
of sensors.
Prerinse
Clean 50°
Intermediate rinse
Final rinse 65°
Drying
sensitive utensils,
cutlery,
temperaturesensitive plastic
and glasses
all types
of utensils
slightly adhesive,
fresh food remnants
cold rinsing,
intermediate cleaning
ñ / ð
Quick 45°
ù / ø
Prerinse
Clean 45°
Extra drying
none Prerinse
Intermediate rinse
Final rinse 55°
19
Page 20
en Additional options
Half load *
Half load *
* The Intensive Smart 45° programme
offers outstanding cleaning results even
if utensils are heavily soiled. And this
with an energy saving of up to 25%
compared with the Intensive 70°
programme.
To benefit from these advantages,
please use modern detergents which
deploy their full cleaning power
from 45 °C. These detergents are
identified by the manufacturers
accordingly.
Programme selection
You can select a suitable programme
according to the type of utensils and
degree of soiling.
0 Additional options
Additional options
* depending on model
Additional options can be set with
the buttons `.
Å Express Wash+/Speed
Perfect+ (VarioSpeed+) *
This function can reduce the running
time by approx. 20% to 66%
depending on the selected rinse
programme. To obtain optimum
cleaning and drying results at a reduced
running time, water and energy
consumption are increased.
Half load
§ Half load *
Express Wash+ /Speed Perfect+ (VarioSpeed+)
Information for test institutes
Test institutes receive the information for
comparability tests (e.g. according to
EN60436).
These are the conditions for conducting
the tests, however these are not the
results or consumption values.
Request by e-mail to:
dishwasher@test-appliances.com
The product number (E no.) and the
production number (FD) are required
which you can find on the rating plate
9: on the appliance door.
If you have only a few items to wash
(e.g. glasses, cups, plates), you can
switch to “half load”. This will save
water, energy and time. It is
recommended to put a little less
detergent in the detergent dispenser
than for a full load.
μ HygienePlus *
This function increases the temperatures
and retains them for an extra long time
to obtain a defined disinfection
performance. This increases the hygiene
status. This additional option is ideal
for cleaning e.g. chopping boards
and baby bottles.
HygieneP lus
20
Page 21
Operating the appliance en
water.
water.
The Aqua sensor is used according to
The Aqua sensor is used according to
the programme. If the Aqua sensor is
the programme. If the Aqua sensor is
Ï Intensive zone *
Perfect for a mixed load. You can wash
very soiled pots and pans in the lower
basket together with normally soiled
utensils in the upper basket. The spray
pressure in the lower basket is
intensified, the rinsing temperature is
increased slightly.
¿ Extra drying *
An increased temperature during the
final rinse and an extended drying
phase ensure that even plastic parts dry
better. There is a slight increase in the
energy consumption.
Intens ive zone
Extra drying
1 Operating
the appliance
Operating thea ppliance
Programme data
The programme data (consumption
values) can be found in the summary of
instructions. They refer to normal
conditions and the water hardness set
value •:‹…. Different influencing factors
such as e.g. water temperature or line
pressure may result in deviations.
Aqua sensor
Aqua sensor *
* depending on model
The Aqua sensor is an optical
measuring device (light barrier) which
measures the turbidity of the rinsing
water.
The Aqua sensor is used according to
the programme. If the Aqua sensor is
active, “clean” rinsing water can be
transferred to the next rinse bath and
water consumption can be reduced by
3–6 litres. If the turbidity is greater, the
water is drained and is replaced with
fresh water. In the automatic
programmes the temperature and
running time can also be adjusted to the
degree of soiling.
Switching on the appliance
1. Turn on the tap fully.
2. Switch on ON/OFF switch (.
The Eco 50° programme display
flashes. This programme remains
selected if no other programme
button 0 is pressed. The expected
programme duration
flashes on the digital display )*.
3. Press the START button h.
The programme starts running.
21
Page 22
en Operating the appliance
+ or – button until
+ or – button until
Note
- for environmentally friendly operation
of the dishwasher:
For ecological reasons the Eco 50°
programme is preset whenever the
appliance starts. This conserves
environmental resources and not least
saves you money.
The Eco 50° programme is a
particularly environmentally friendly
programme. According to EU
regulation 1016/2010 it is the
“Standard programme” which is the
most efficient standard cleaning cycle
for cleaning normally soiled utensils in
terms of the combined energy and
water consumption for cleaning these
types of utensils.
Programme sequence indicator
Programme sequence
indicator )"
Timer programming
Timer programming *
* depending on model
You can delay the start of the
programme in 1-hour steps up to
24 hours.
1. Close the door.
2. Switch on ON/OFF switch (.
3. Press button X + until the digital
display )* jumps to œ:‹‚.
4. Press X + or – button until the
displayed time corresponds with your
requirements.
5. Press START button h, timer
programming is activated.
6. To delete timer programming, press
the X + or – button until )* œ:‹‹
is indicated on the digital display.
You can change your programme
selection at any time until the
programme starts.
-/,
5/%
=/<
Your dishes are being
cleaned.
Your dishes are being rinsed.
Your dishes are being dried.
Remaining running time
display
When the programme is selected, the
remaining running time of the
programme is indicated on the digital
display )*.
The running time is determined during
the programme by the water
temperature, the number of utensils as
well as the degree of soiling and may
vary (depending on the selected
programme).
End of programme
The programme has ended when the
value ‹:‹‹ is indicated on the numerical
display )*.
22
Page 23
Operating the appliance en
(
(
h
h
When the programme ends, leave
When the programme ends, leave
the appliance to cool down a while
the appliance to cool down a while
Automatic switch off after end
of programme or interior light*
* depending on model
To save energy, the dishwasher can be
automatically switched off 1 min or 120
min after the programme ends.
The setting can be selected from ˜:‹‹
to ˜:‹ƒ.
˜:‹‹ Appliance does not
switch off automatically.
The interior light 1"
comes on when the door
is opened irrespective of whether
the ON/OFF switch (
is switched on or off. When
the door is closed the light is off. If
the door is open for longer than 60
min., the light switches off
automatically. The interior light 1"
is lit only when the set value ˜:‹‹
is selected.
˜:‹‚ Appliance switches off after 1 min.
˜:‹ƒ Appliance switches off after 120
min.
1. Close the door.
2. Switch on ON/OFF switch (.
3. Hold down programme button #
and press START button h
until •:‹... is indicated on the digital
display.
4. Release both buttons.
The LED for button # flashes
and the digital display )* displays
the factory setting •:‹….
5. Keep pressing programme
button # until the value ˜:‹... is
indicated on the numerical display
)*.
To change the setting:
1. Press programme button 3.
Automatic switch off / i nterior lig ht
Each time the button is pressed,
the set value increases by one level;
when the value of ˜:‹ƒ has been
reached, the display jumps back
to ˜:‹‹.
2. Press START button h.
The set value is saved.
Switching off the appliance
Short time after the end of the
programme:
1. Switch off ON/OFF switch (.
2. Turn off the tap (not applicable if
Aqua-Stop fitted).
3. Remove the utensils when they have
cooled down.
Note
When the programme ends, leave
the appliance to cool down a while
before opening it. This will prevent
steam from escaping and causing longterm damage to your built-in furniture.
Interrupting the programme
1. Switch off ON/OFF switch (.
The LEDs go out. The programme is
saved.
If the door was opened on an
appliance which has a warm water
connection or is heated, first leave
the door ajar for several minutes and
then close. Otherwise, expansion
(pressure) may cause the appliance
door to spring open or water to run
out of the appliance.
2. To continue the programme, switch
on the ON/OFF switch ( again.
23
Page 24
en Cleaning and maintenance
•
•
‹…
‹…
2.
2.
Terminating the programme
Terminating the programme
(Reset)
1. Press START button h for
approx. 3 sec.
The numerical display )*
indicates ‹:‹‚.
2. The programme sequence lasts
approx. 1 min. On the digital
display )* is indicated ‹:‹‹.
3. Switch off ON/OFF switch (.
Changing the programme
When the START button h has been
pressed, the programme cannot be
changed.
The only way a programme can be
changed is by Cancel programme
(Reset).
Intensive drying
The final rinse uses a higher
temperature which improves the drying
result. The running time may increase
slightly. (Caution if utensils are delicate!)
1. Close the door.
2. Switch on ON/OFF switch (.
3. Hold down programme button #
and press START button h until
the digital display )* •:‹... is
indicated.
4. Release both buttons.
The LED for button # flashes and
the digital display )* displays the
factory setting •:‹….
5. Press programme button # until
the factory set value š:‹‹ is
indicated on the digital display )*.
To change the setting,
1. Press the button 3 to switch the
Intensive drying on š:‹‚ or off š:‹‹.
2. Press START button h.
The set value is saved.
24
2 Cleaning and
maintenance
Cleaning and maintenance
A regular inspection and maintenance
of your machine will help to prevent
faults. This saves time and prevents
problems.
Overall condition
of the machine
Check spray arm for grease
and limescale deposits.
If you find such deposits:
Page 25
Cleaning and maintenance en
Fill detergent dispenser with
detergent. Start the appliance without
utensils in the programme with
the highest rinsing temperature.
Clean the appliance with detergents/
appliance cleaners which
are particularly suitable for use with
dishwashers.
To ensure that the door seal always
remains clean and hygienic, regularly
clean it with a damp cloth and a little
washing-up liquid.
If the appliance is switched off for
a prolonged period, leave the door
ajar to prevent the formation of
an unpleasant odour.
Never use a steam cleaner to clean your
dishwasher. The manufacturer is not
liable for any consequential damage.
Regularly wipe the front of the appliance
and fascia with a damp cloth; water
and a little washing up liquid
are adequate. Do not use sponges with
a rough surface or abrasive detergents,
as these could scratch the surfaces.
Filters
The filters 1Z keep large foreign
objects in the rinsing water away from
the pump. These foreign objects may
occasionally block the filters.
The filter system consists of a coarse
filter, a flat fine filter and a microfilter.
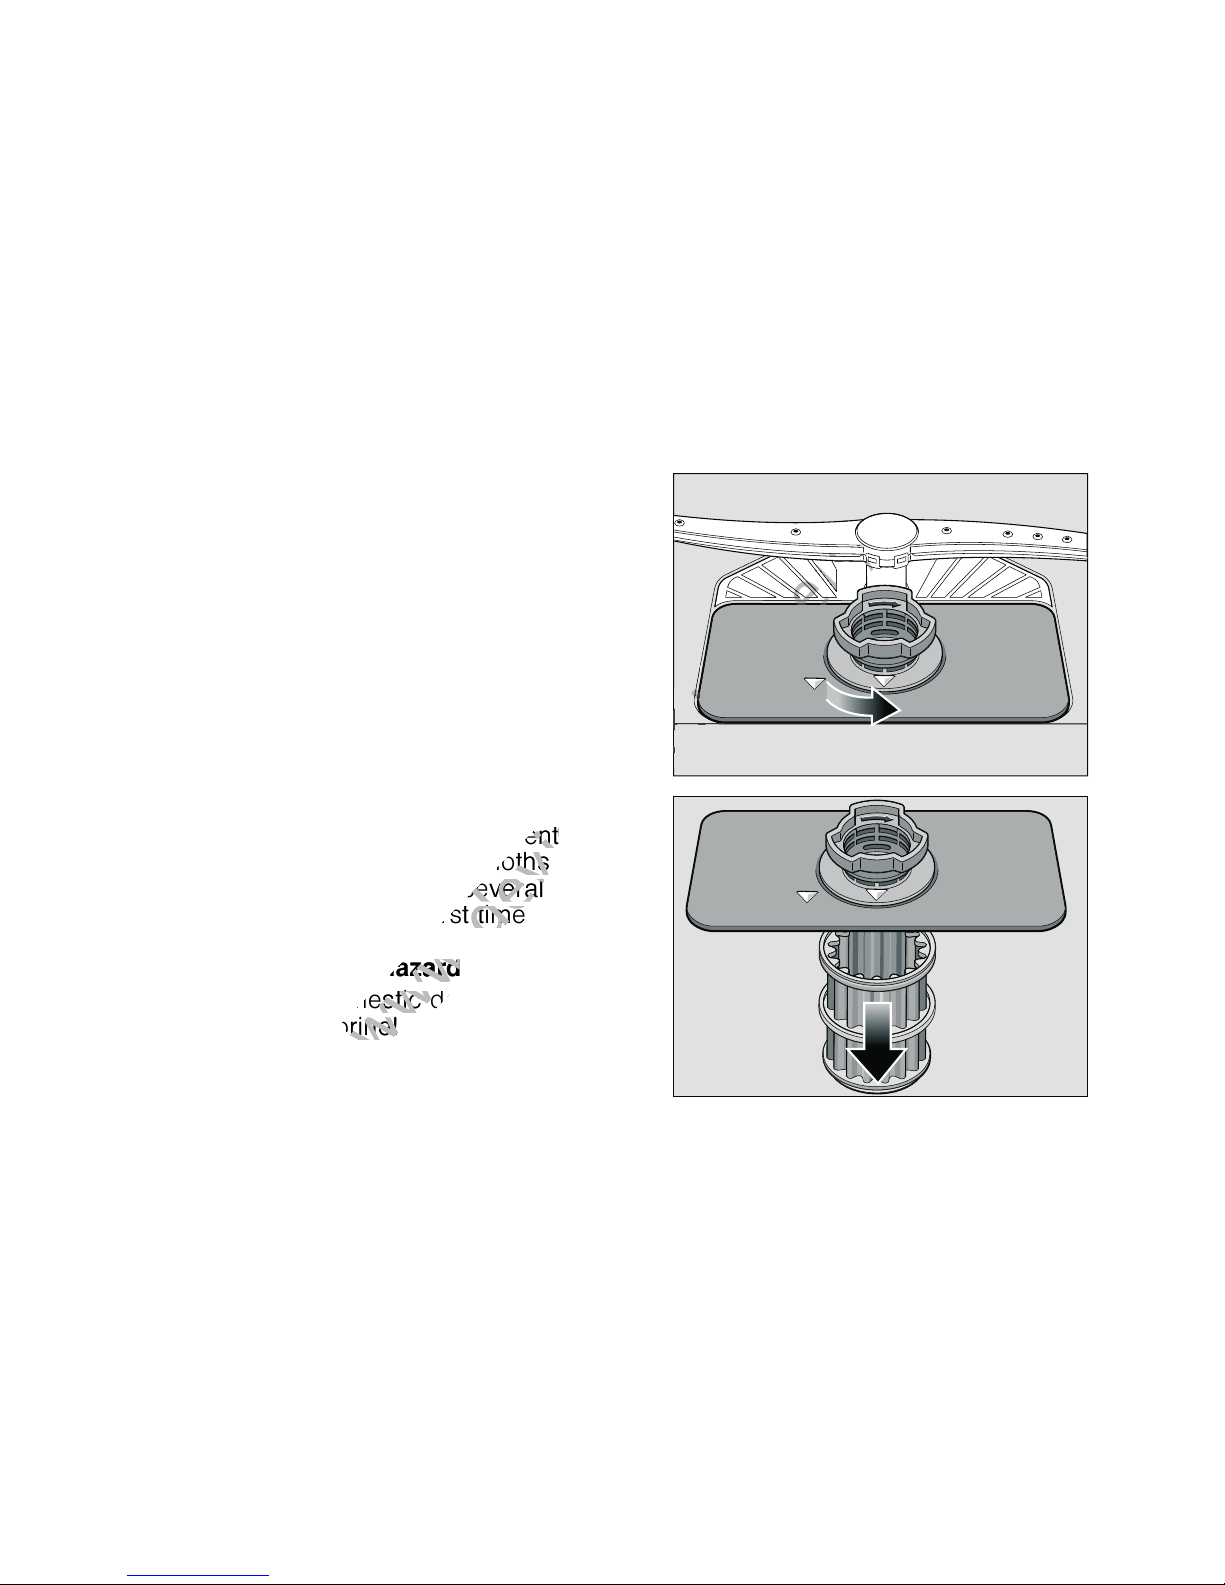
1. After each washing cycle check the
filters for residue.
2. Unscrew filter cylinder as illustrated
and take out filter system.
Stainless steel appliances: To prevent
corrosion, avoid using sponge cloths
or wash them out thoroughly several
times before using for the first time.
ã Warning – Health hazard
Never use other domestic detergents,
e.g. containing chlorine!
Special salt and rinse aid
Check the refill indicators @ and
H. If required, refill salt and/or
rinse aid.
3. Remove any residue and clean filters
under running water.
4. Re-install filter system in reverse
sequence and ensure that the arrow
marks are opposite each other after
closing the filter system.
25
Page 26
en Cleaning and maintenance
Spray arms
Limescale and contaminants in the
rinsing water may block nozzles and
bearings on the spray arms 1B and
1J.
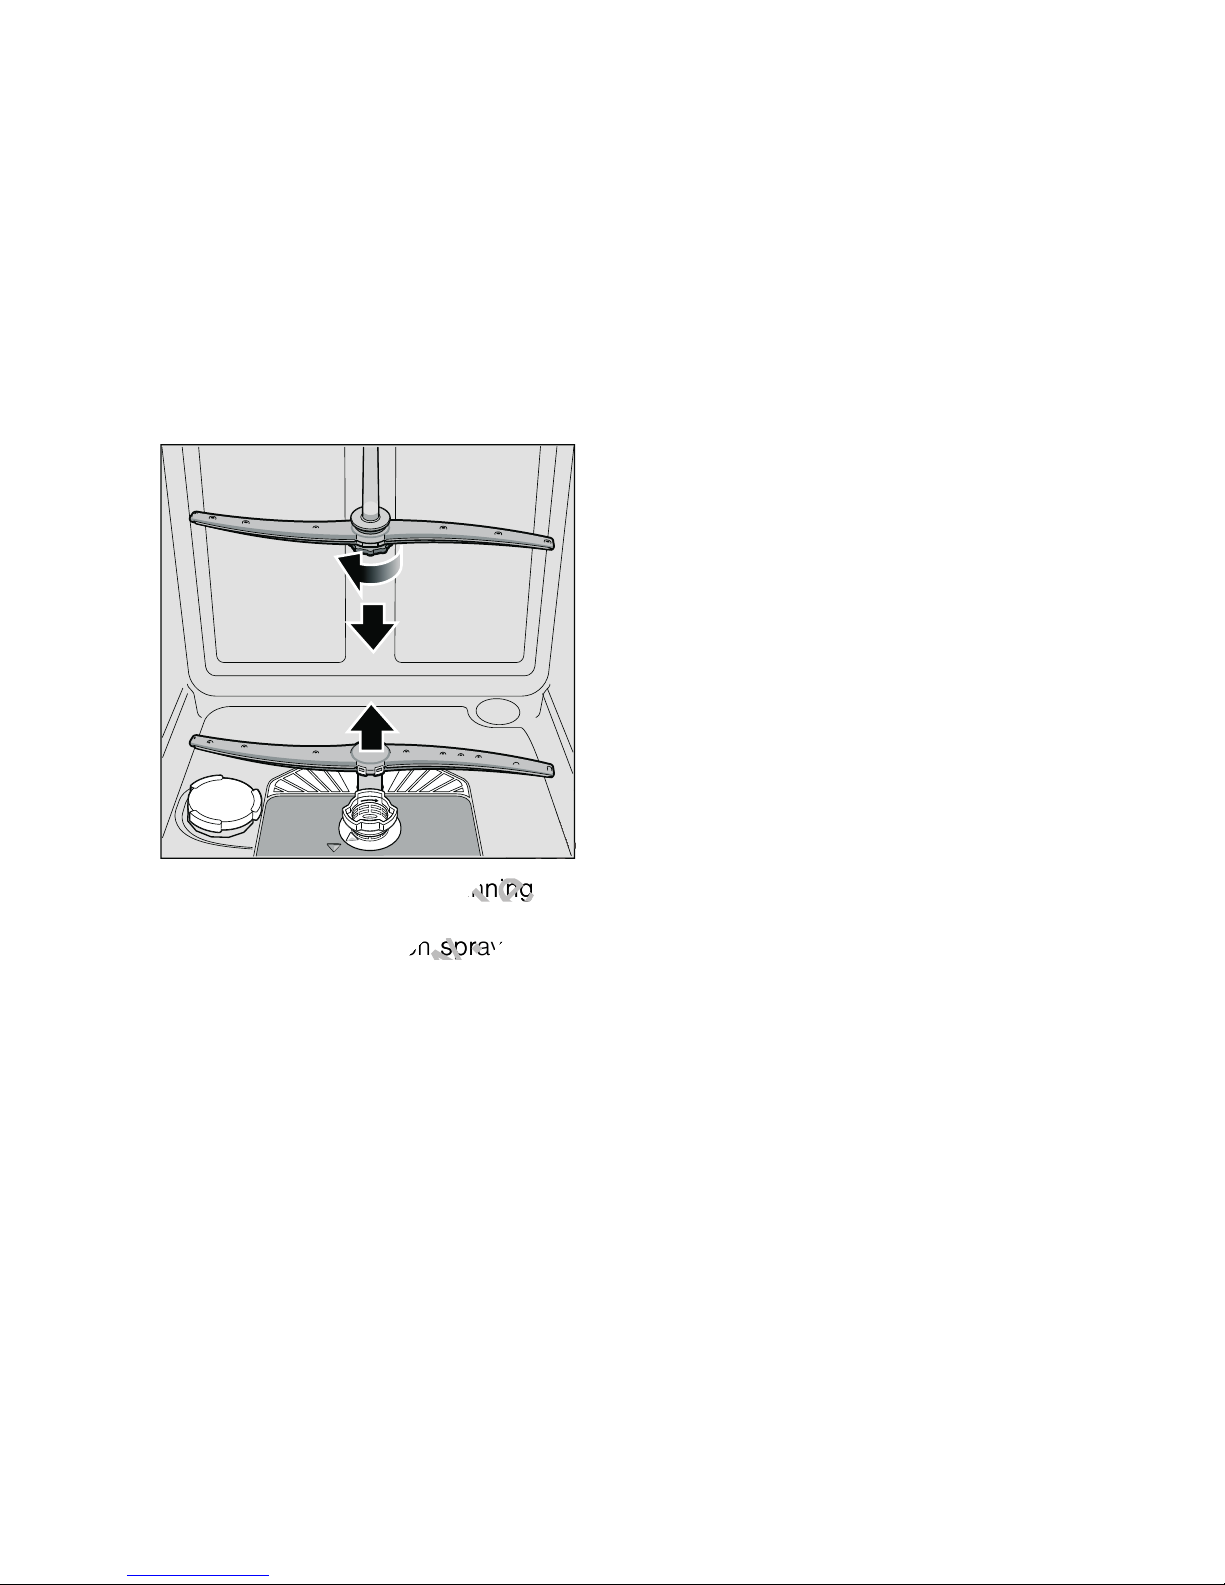
1. Check outlet nozzles on the spray
arms for blockages.
2. Unscrew the upper spray arm 1B.
3. Remove the lower spray arm 1J
upwards.
4. Clean spray arms under running
water.
5. Re-engage or screw on spray arms.
26
Page 27
3 Fault, what to do?
Fault, what to do?
Experience has shown that you can
rectify most faults which occur in daily
operation yourself. This ensures that
the machine is quickly available to you
again. In the following overview you can
find possible causes of malfunctions
and helpful information for rectifying
them.
Note
If the appliance stops during
dishwashing or does not start for no
obvious reason, first run the Abort
programme function (Reset).
(See chapter entitled “Operating
the appliance”)
ã Warning – Don’t forget: Repairs may
be carried out by technicians only. If a
component has to be replaced, ensure
that only original spare parts are used.
Improper repairs or use of non-original
spare parts may cause considerable
damage and put the user at
considerable risk.
Fault, what to do? en
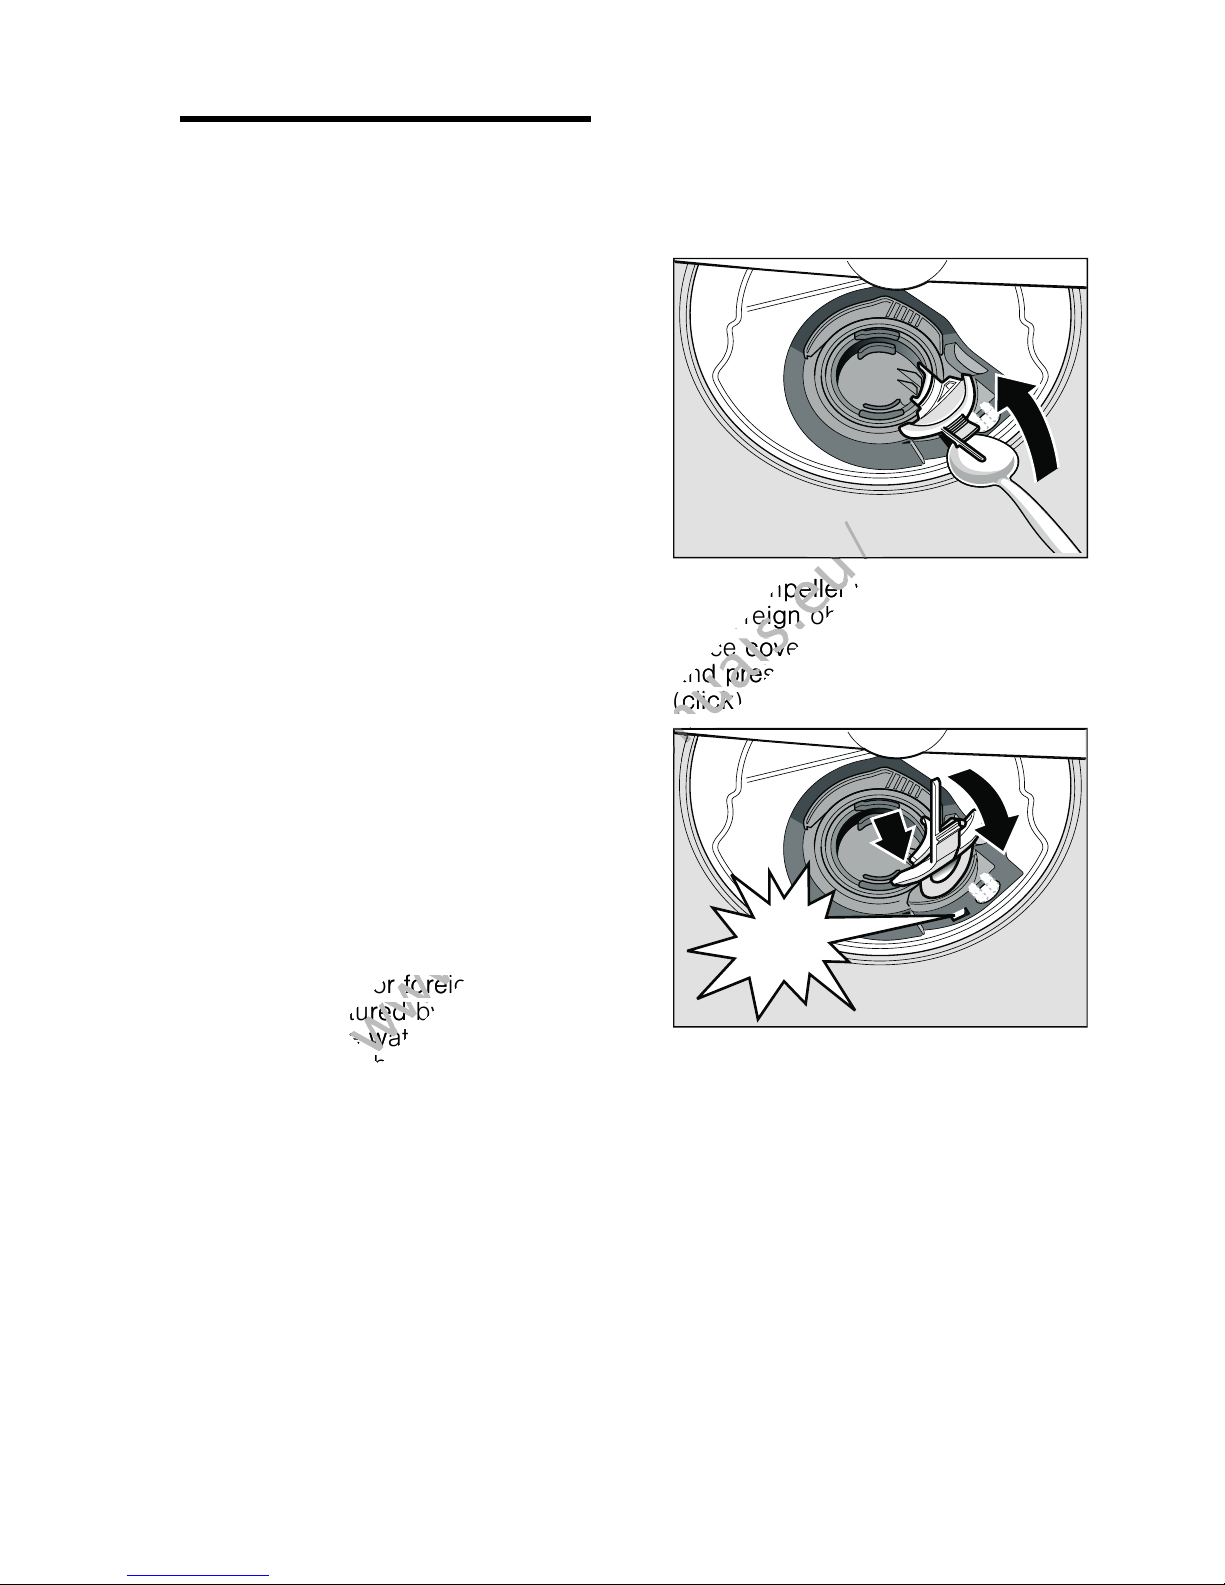
5. Prise out the white pump cover
(as illustrated) using a spoon. Grip
the cover on the crosspiece and lift
diagonally inwards. Remove cover
completely.
6. Check impeller wheel and remove
any foreign objects.
7. Place cover in the original position
and press down until it engages
(click).
Waste water pump
Large food remnants or foreign objects
which were not captured by the filters
may block the waste water pump. The
rinsing water will then be above the filter.
In this case:
1. First always disconnect the
appliance from the power supply.
2. Take out top basket 1* and bottom
basket 1j.
3. Remove the filters 1Z.
4. Scoop out water, use a sponge if
required.
.OLFN
8. Install filters.
9. Re-insert baskets.
27
Page 28
en Fault, what to do?
Fault table
Fault Cause Remedial action
“Check water supply”
display 8 lights up.
Supply hose kinked. Install supply hose without kinks.
Tap turned off. Turn on the tap.
Tap jammed or calcified. Turn on the tap.
Flow rate must be min. 10 l/min.
when water supply is open.
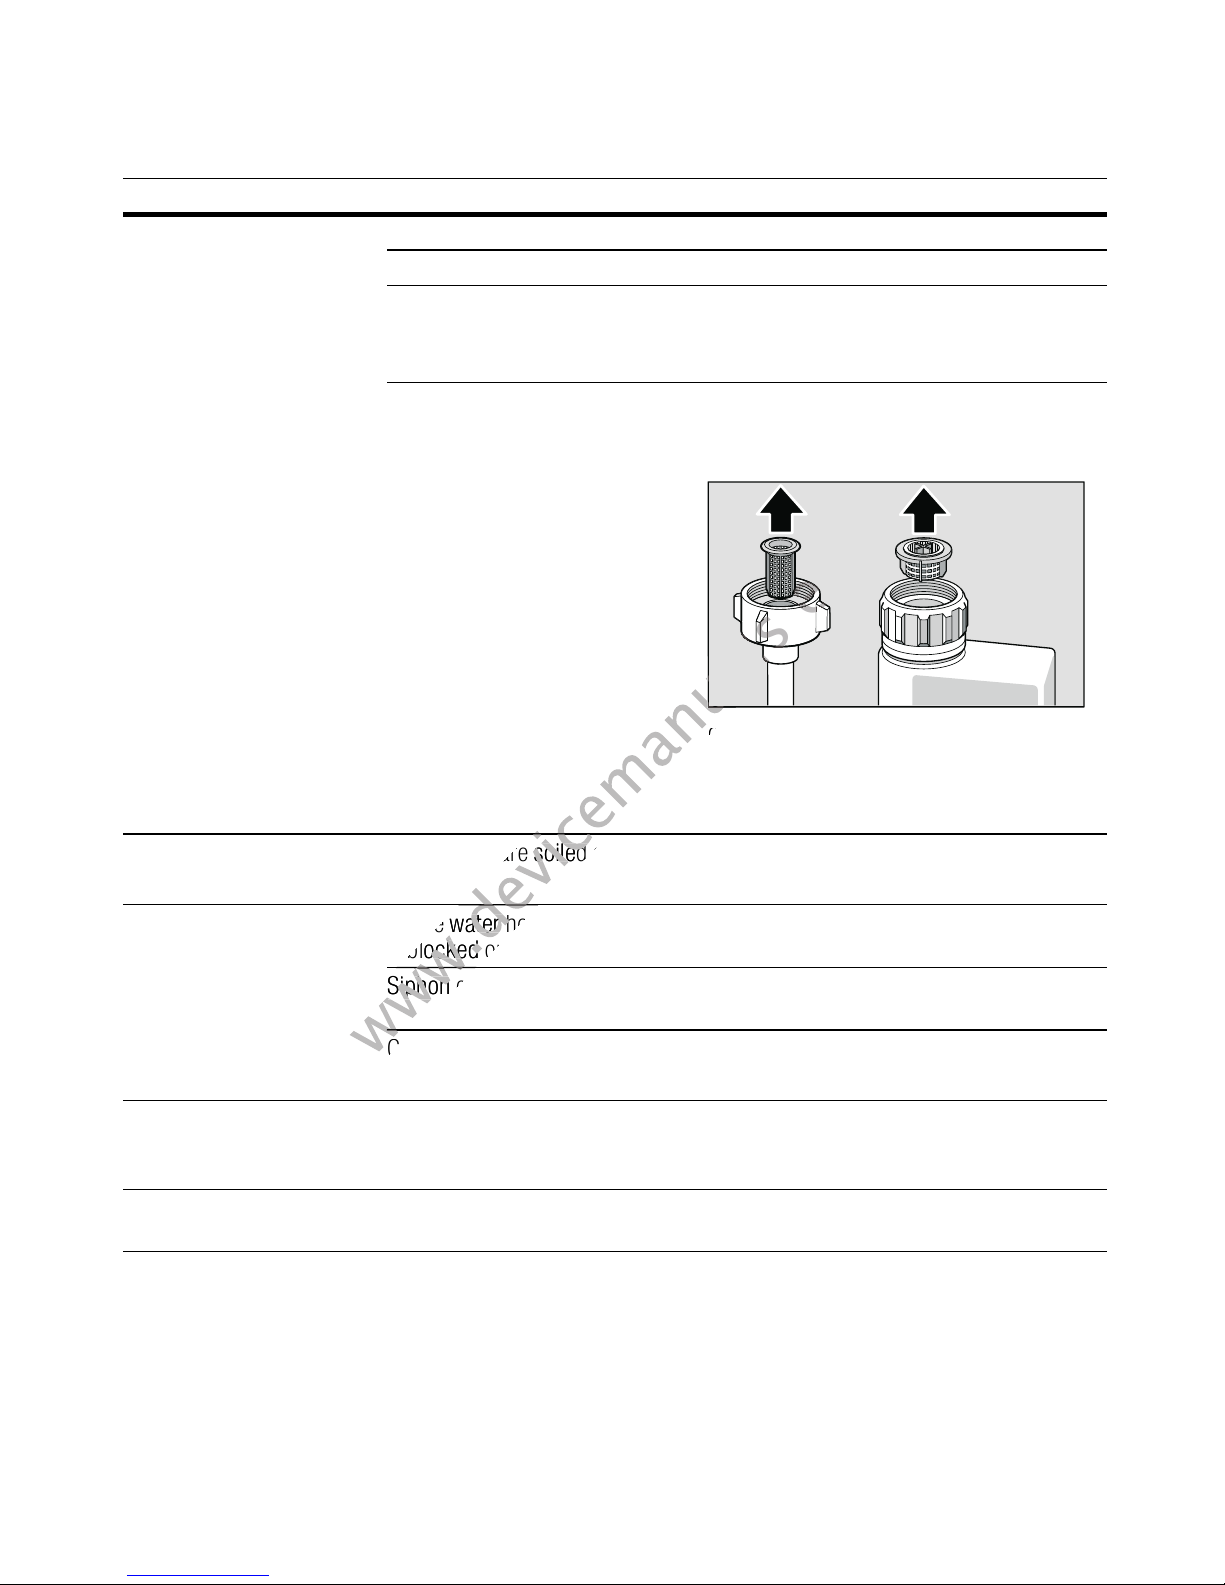
Filter in the water supply blocked. Switch off the appliance and pull out
the mains plug. Turn off the tap. Unscrew
water connection.
Clean filter in the supply hose. Screw water
connection on again. Check for leaks.
Reconnect power supply. Switch on
the appliance.
Error code “:ƒƒ is lit. Filters 1Z are soiled or
blocked.
Error code “:ƒ… is lit. Waste water hose
is blocked or kinked.
Siphon connection still sealed. Check connection to siphon and open if
Cover on the waste water pump
loose.
Error code “:ƒ† is lit. Waste water pump blocked
or cover on the waste water
pump is not locked in position.
Error code “:ƒˆ is lit. Mains voltage too low. Not an appliance fault, have the mains
Clean filters.
(See Cleaning and maintenance)
Install hose without kinks, remove any
residue.
required.
Lock cover correctly.
(See Waste water pump)
Clean pump and lock cover correctly. (See
Waste water pump)
voltage and electrical installation checked.
28
Page 29
Fault, what to do? en
Fault Cause Remedial action
A different error code is
indicated on the digital
display.
(“:‹‚ to “:„‹)
Display flashes Door not closed properly. Close the door. Ensure that no objects
Refill indicator for salt @
and/or rinse-aid H is lit.
Refill indicator for salt @
and/or rinse-aid H
is not lit.
A technical fault has probably
occurred.
No rinse aid. Refill rinse aid.
No salt. Refill with special salt.
Sensor does not detect salt
tablets.
Refill indicator switched off. Activation/deactivation (see chapter Water
There is still enough special salt/
rinse aid available.
Switch off appliances with the ON/OFF
switch (. After a short time restart
the appliance.
If the problem recurs, turn off the tap and
pull out the mains plug.
Call customer service and mention the error
code.
(utensil, fragrance dispenser) are protruding
over the basket and preventing the door
from closing.
Use different special salt.
softening system/Special salt or Rinse aid).
Check refill indicator, levels.
Water is left
in the appliance at the end
of the programme.
Filter system or area under
the filters 1Z is blocked.
The programme has not yet
ended.
Clean filters and area underneath (see
Waste water pump).
Wait until programme ends or reset (see
Terminating the programme).
29
Page 30
en Fault, what to do?
Activate intensive drying (see Operating
Activate intensive drying (see Operating
the appliance)
the appliance)
Fault Cause Remedial action
Utensils not dry. No or too little rinse aid
in the dispenser.
Programme selected without
drying.
Water collecting in depressions
on the utensils and cutlery.
The combined detergent used
has a poor drying performance.
Intensive drying to increase
drying not activated.
Utensils were removed too early
or drying process had not ended
yet.
Refill rinse aid.
Select programme with drying (see
Overview of programmes, Programme
sequence).
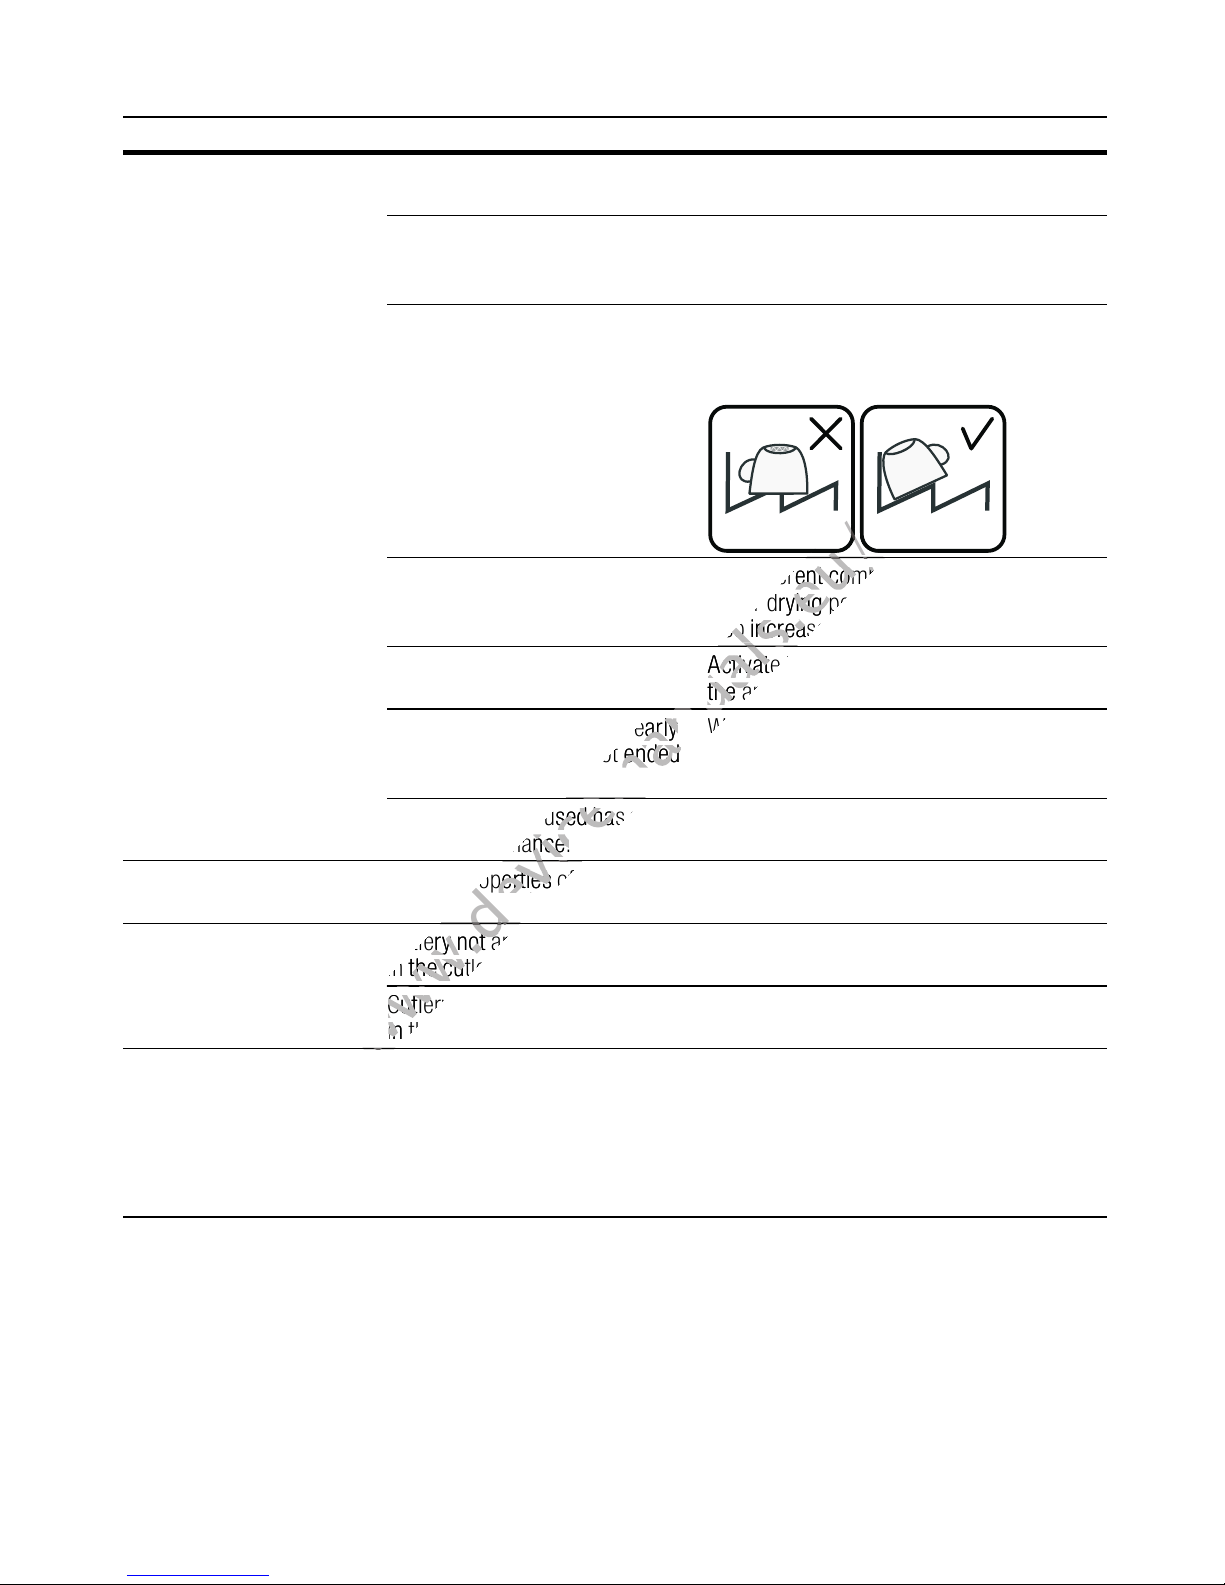
Arrange utensils in a sloping position,
arrange affected utensils as sloping
as possible.
Use different combination detergent with
better drying performance. Use of rinse aid
also increases the drying performance.
Activate intensive drying (see Operating
the appliance)
Wait until program ends or wait until 30 min
after program ends before removing
utensils.
The eco rinse aid used has a poor
drying performance.
Plastic utensils not dry. Special properties of plastic. Plastic has a lower heat storage capacity
Cutlery not dry. Cutlery not arranged properly
in the cutlery basket.
Cutlery not arranged properly
in the cutlery drawer.
Appliance interior wet after
rinse cycle.
No appliance fault. On account of the “Condensation drying”
Use a proprietary rinse aid. Eco products are
much less effective.
and therefore dries less well.
Separate cutlery if possible, prevent contact
points.
Arrange cutlery properly and separate if
possible.
principle, water droplets are physically
induced and required in the container. The
humidity in the air condenses on the inner
walls of the dishwasher, drains and is
pumped out.
30
Page 31
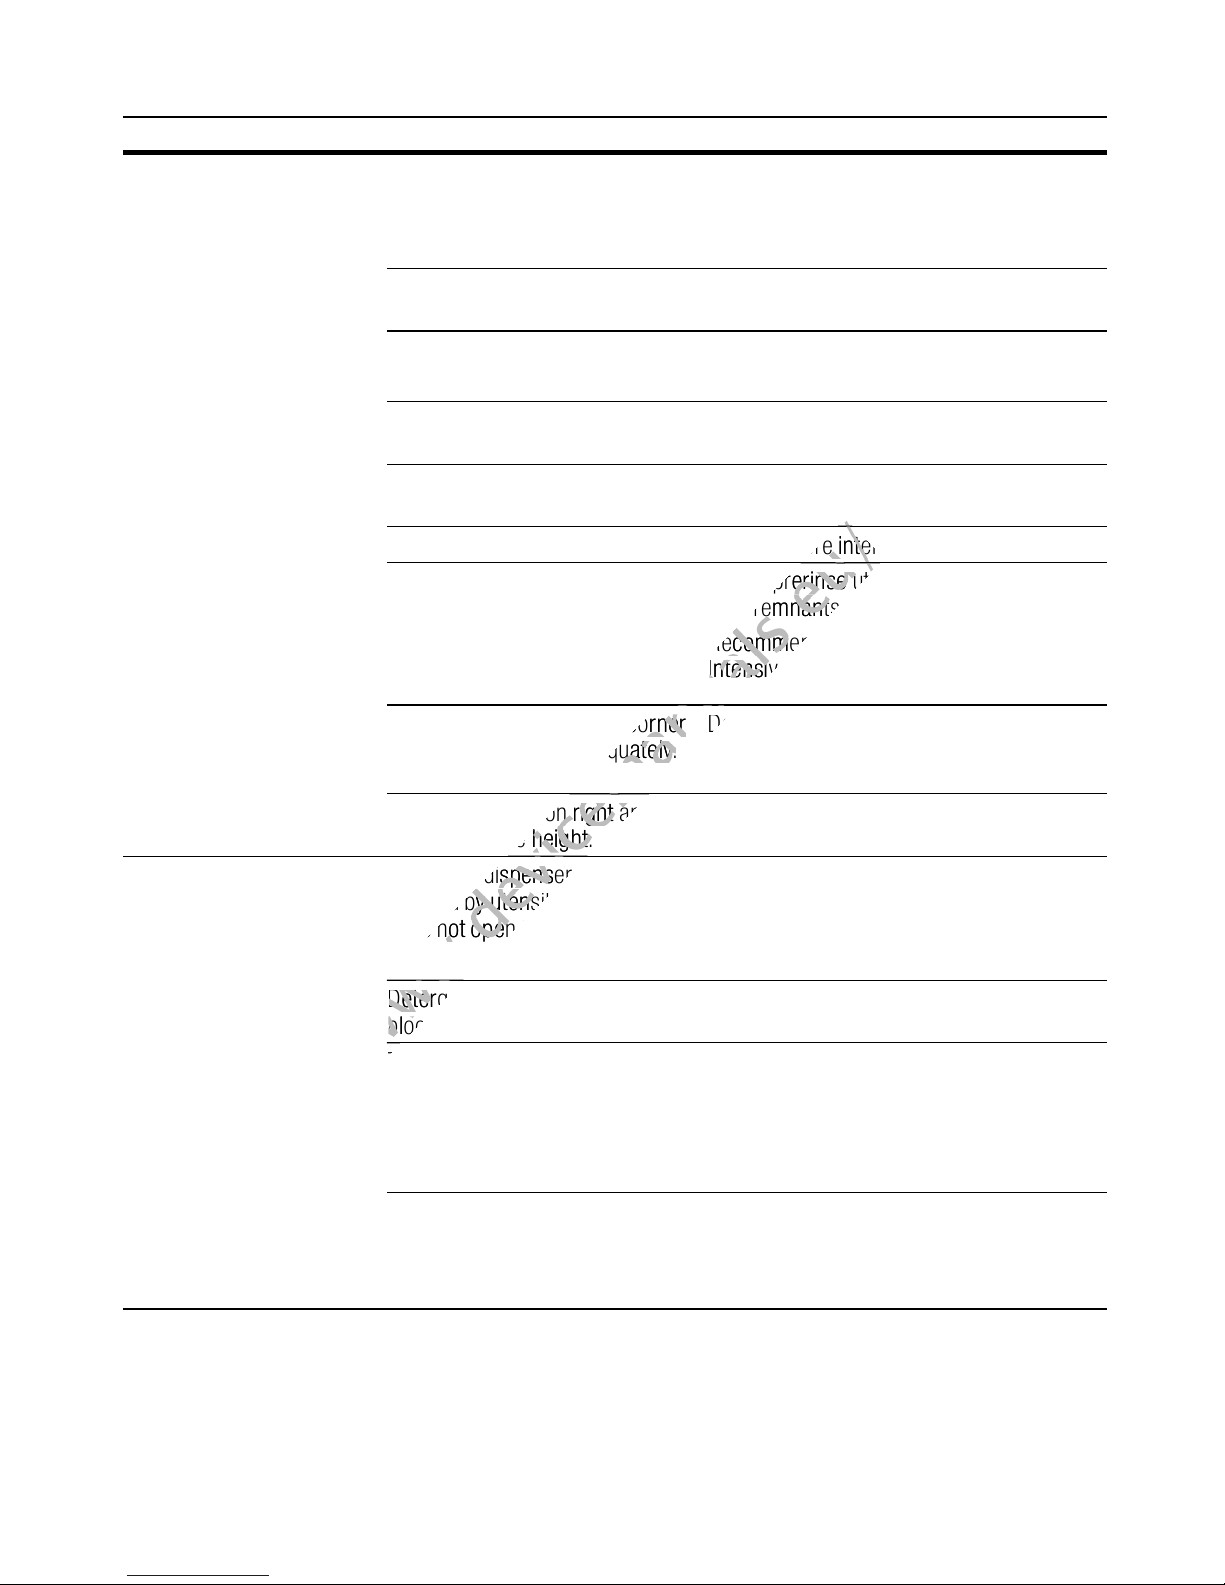
Fault, what to do? en
on right and left
on right and left
Fault Cause Remedial action
Food remnants
on the utensils.
Utensils placed too closely
together, utensils basket
overfilled.
Spray arm rotation obstructed. Arrange utensils so that the spray arm can
Spray arm nozzles blocked. Clean the spray arm nozzles,
Filters 1Z dirty. Clean filters, (see Cleaning and
Filters 1Z inserted incorrectly
and/or not engaged.
Rinse programme too weak. Select a more intensive rinse programme.
Utensils precleaned too intensely;
sensors therefore decide on
weak programme sequence.
Stubborn soiling cannot be
completely removed.
Tall narrow receptacles in corner
areas are not rinsed adequately.
Arrange utensils with adequate clearance
between them ensuring that the spray jets
can reach the surface of the utensils.
Prevent contact points.
rotate without obstruction.
(See Cleaning and maintenance).
maintenance).
Insert and engage filters correctly.
Do not prerinse utensils. Remove only large
food remnants.
Recommended programme Eco 50° or
Intensive.
Do not place hollow receptacles too
obliquely and do not place in the corner
area.
Top basket 1* on right and left
not set to same height.
Detergent residue Detergent dispenser cover
blocked by utensils and therefore
does not open fully.
Detergent dispenser cover
blocked by the tablet.
Tablets used in the quick or short
programme.
Dissolving time of the detergent
is not reached in the selected
short programme.
Washing effect and dissolving
performance are reduced after
a prolonged storage time or
detergent is very lumpy.
Set top basket to same height using side
levers.
Detergent dispenser cover must not be
obstructed by utensils.
Do not place utensils or fragrance dispenser
in the tablet collecting tray.
Tablet must be inserted flat and not upright.
Dissolving time of tablets too long for
a quick or short programme.
Use a detergent powder or select a more
intensive programme.
Change detergent.
31
Page 32
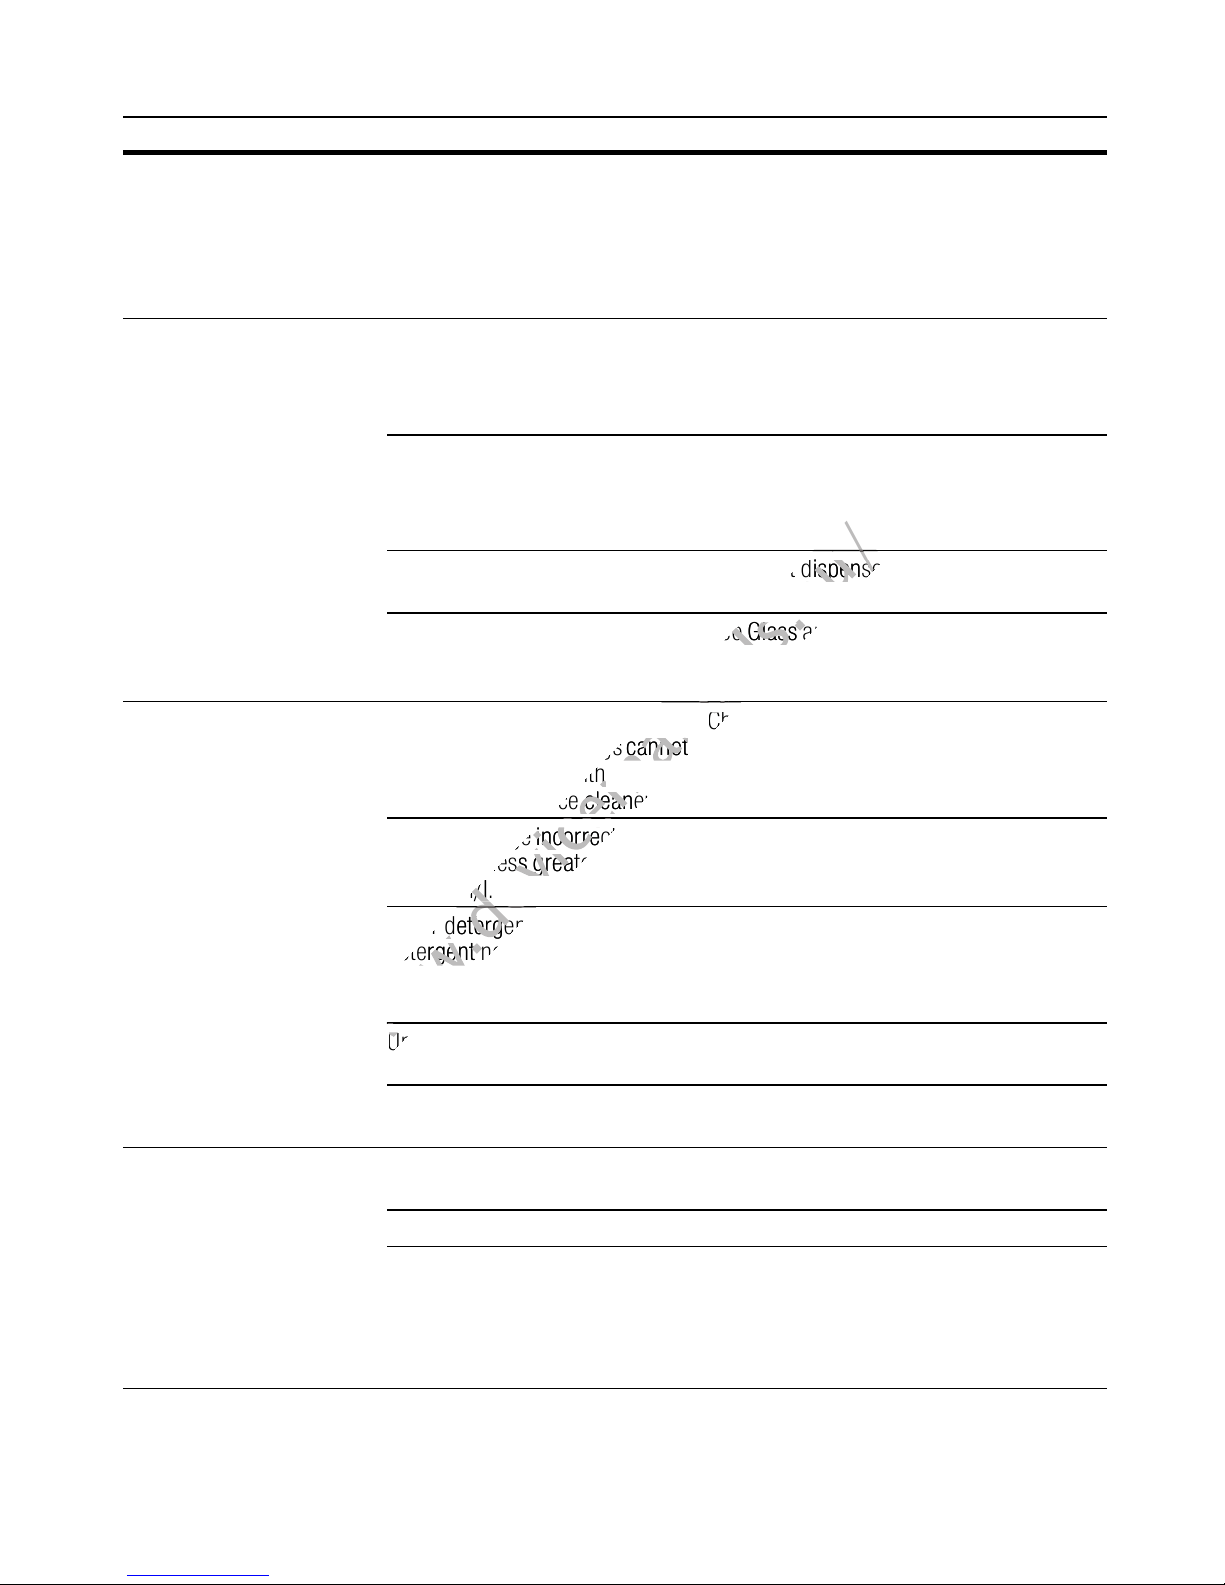
en Fault, what to do?
Fault Cause Remedial action
Water stains on plastic
parts
Washable or water-soluble
coatings in the container or
on the door.
White, stubborn coatings;
limescale on the utensils,
container or door.
Droplet formation on plastic
surface is physically unavoidable.
After drying, water stains are
visible.
Detergent substances are
deposited. These coatings cannot
usually be removed with
chemicals (appliance cleaner, ...).
If there is a “white coating” on
the container floor, the water
softening system has been set
marginally.
Salt dispenser cover 1R not
closed.
Only for glasses: Initial glass
corrosion – can only apparently
be wiped off.
Detergent substances are
deposited. These coatings cannot
usually be removed with
chemicals (appliance cleaner, ...).
Use a more intensive programme (more
water changes).
Arrange utensils in a sloping position.
Use rinse aid.
If required, increase softening setting.
Change detergent brand.
Clean appliance mechanically.
Increase softening setting and change
detergent if required.
Close salt dispenser cover correctly.
See Glass and utensil damage.
Change detergent brand.
Clean appliance mechanically.
Tea or lipstick residue on
the utensils.
Hardness range incorrectly set or
water hardness greater than
8.9 mmol/l.
3 in 1 detergent or bio/eco
detergent not effective enough.
Underdosing of detergent. Increase detergent dosage or change
Too weak rinse programme
selected.
Too low rinsing temperature. Select programme with higher washing
Too little or unsuitable detergent. Use suitable detergent at correct dosage.
Utensils precleaned too intensely;
sensors therefore decide on
weak programme sequence.
Stubborn soiling cannot be
completely removed.
Set water softening system according
to instructions for use or top up salt.
Set water softening system according
to instructions for use or use separate
detergents (proprietary detergent, salt, rinse
aid).
detergent.
Select a more intensive rinse programme.
temperature.
Do not prerinse utensils. Remove only large
food remnants.
Recommended programme Eco 50°
32
Page 33
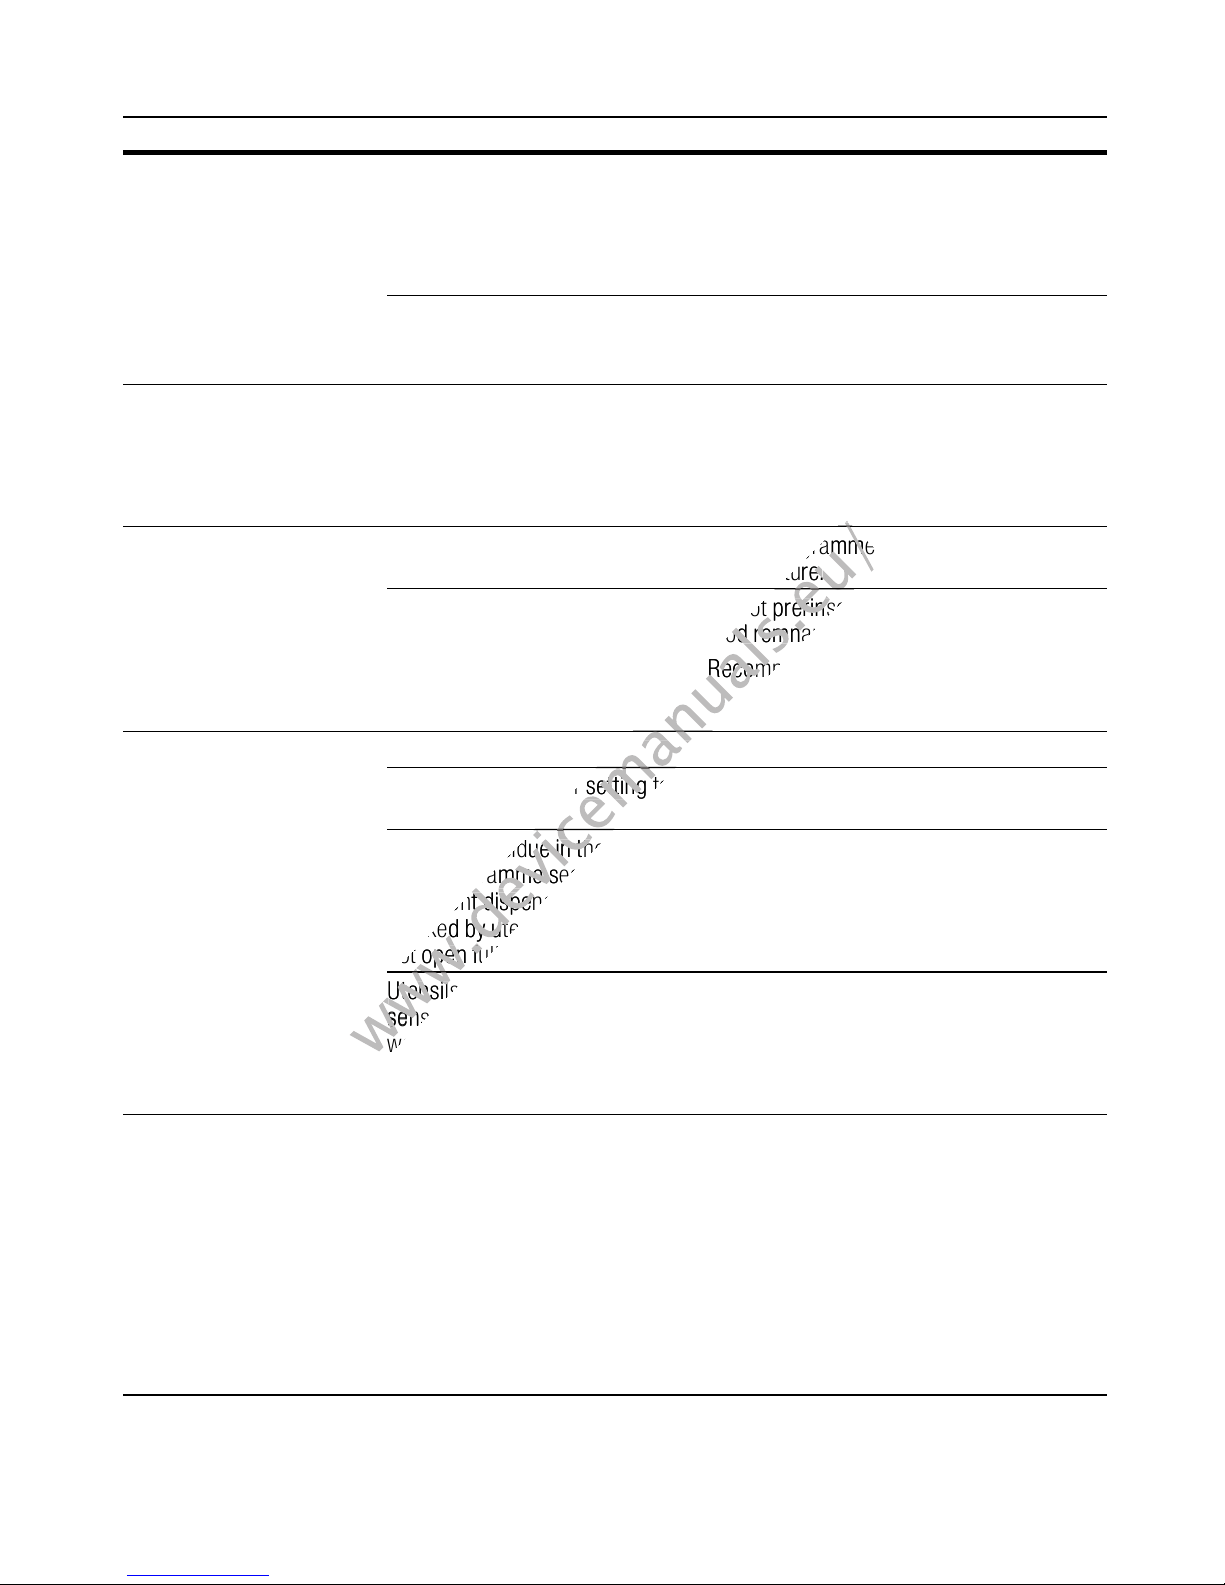
Fault, what to do? en
weak programme sequence.
weak programme sequence.
Fault Cause Remedial action
Coloured (blue, yellow,
brown), difficult to remove
to non-removable coatings
in the appliance or on
stainless steel utensils.
Coloured (yellow, orange,
brown), easily removable
deposits inside
the appliance (mainly
in the floor area)
Plastic parts discoloured. Too low rinsing temperature. Select programme with higher washing
Removable streaks on
glasses, glasses with
metallic appearance and
cutlery.
Film formation consisting
of ingredients from vegetables
(e.g. cabbage, celery, potatoes,
noodles, ...) or the tap water (e.g.
manganese).
Film formation caused by metallic
components on silver or
aluminium utensils.
Film formation consisting
of ingredients from food
remnants and substances from
the tap water (limescale), “soapy”
Utensils precleaned too intensely;
sensors therefore decide on
weak programme sequence.
Stubborn soiling cannot be
completely removed.
Too much rinse aid. Set rinse aid amount to lower setting.
No rinse aid added or setting too
low.
Detergent residue in the final
rinse programme section.
Detergent dispenser cover
blocked by utensils (cover does
not open fully).
Can be partly removed with machine
cleaner or by mechanical cleaning. Coatings
are harmless.
Can be partly removed with machine
cleaner or by mechanical cleaning.
Check function of the water softening
system (refill with salt) or, if using combined
detergents (tablets), activate water
softening system (see chapter Water
softening system/Special salt)
temperature.
Do not prerinse utensils. Remove only large
food remnants.
Recommended programme Eco 50°
Add rinse aid and check dosage
(recommended setting 4-5).
Detergent dispenser cover must not be
obstructed by utensils.
Do not place utensils or fragrance dispenser
in the tablet collecting tray.
Utensils precleaned too intensely;
sensors therefore decide on
weak programme sequence.
Stubborn soiling cannot be
completely removed.
Initial or existing,
irreversible clouding
of glass.
Glasses not dishwasher-proof,
only suitable for dishwasher.
Do not prerinse utensils. Remove only large
food remnants.
Recommended programme Eco 50°
Use dishwasher-proof glasses.
Avoid long steam phase (standing time after
wash cycle ends).
Use wash cycle at lower temperature.
Set water softening system according to the
water hardness (if required one setting
lower).
Use detergent with glass protection
component.
33
Page 34
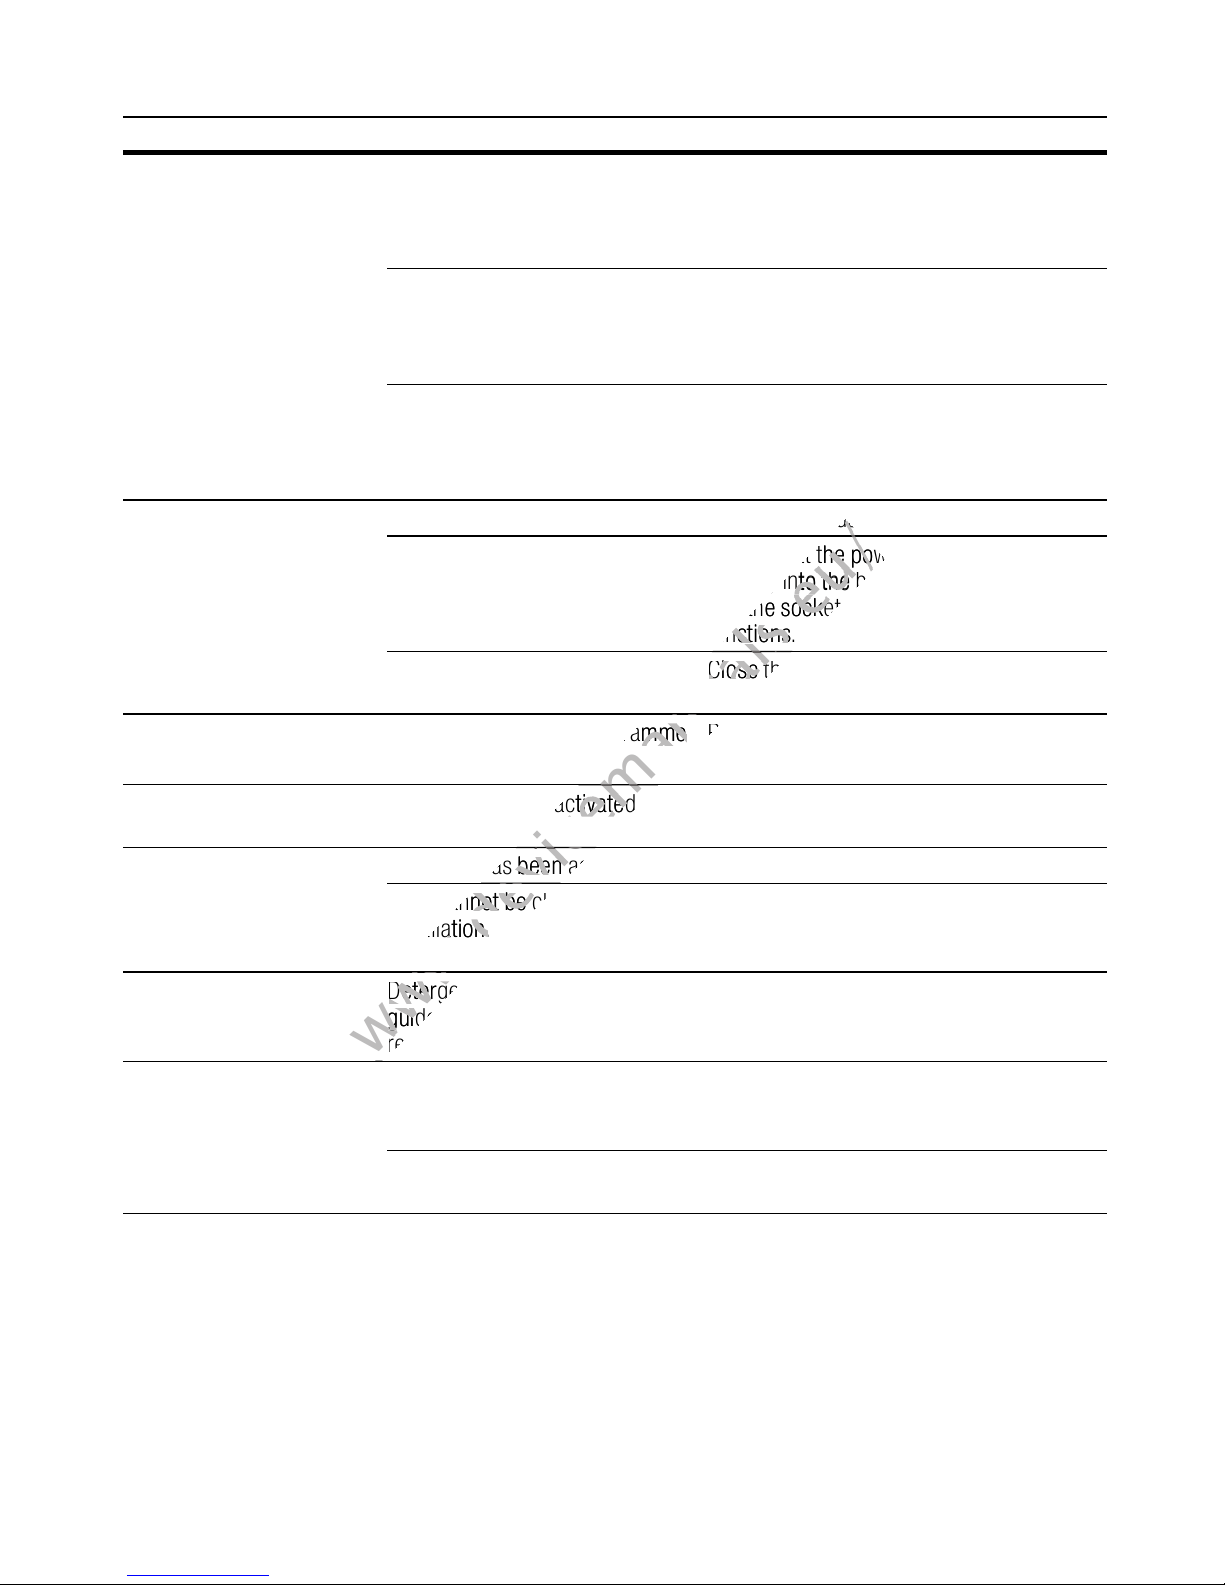
en Fault, what to do?
Fault Cause Remedial action
Rust spots on the cutlery. Cutlery not adequately rust-
resistant. Knife blades are
frequently more severely
affected.
Cutlery will also rust if rusting
parts are rinsed at the same time
(pan handles, damaged utensil
baskets, etc.).
Salt content in the rinsing water
too high, as salt dispenser lock
not fastened firmly or salt was
spilled while being refilled.
The appliance does not
start.
Programme starts
automatically.
The mains fuse has tripped. Check mains fuse.
Power cord not inserted. Ensure that the power cord is plugged all
The appliance door has not been
shut properly.
You did not wait until programme
ended.
Use corrosion-resistant cutlery.
Do not wash rusting parts.
Fasten salt dispenser lock firmly or remove
spilled salt.
the way into the back of the appliance and
into the socket. Check that the socket
functions.
Close the door.
Perform reset.
(See Terminating the programme).
The door is difficult
to open.
Door cannot be closed. Door lock has been activated. Close door with increased force.
Cover on the detergent
dispenser cannot be
closed.
Detergent residue
in the detergent dispenser
or in the tablet collecting
tray.
Child-proof lock is activated. Deactivate childproof lock. (See instructions
for use at the back)
Door cannot be closed due to
installation.
Detergent dispenser or cover
guide blocked by sticky detergent
residue.
Spray arms blocked by utensils,
therefore detergent is not rinsed
out.
The detergent dispenser was
damp when filled.
Check appliance installation: Door or
attached parts must close without
obstruction.
Remove detergent residue.
Ensure that the spray arms can rotate freely.
Pour detergent into the dry detergent
dispenser only.
34
Page 35
Fault, what to do? en
Arrange light utensils securely.
Arrange light utensils securely.
Fault Cause Remedial action
Appliance stops
in the programme or
programme is interrupted.
Filling valves making
striking noises.
Knocking or rattling noise. Spray arm strikes the utensils,
Unusual foam formation. Handwash liquid in the rinse aid
Door not closed properly. Close the door.
Do not place utensils or fragrance
dispenser in the tablet collecting
tray.
Top basket presses against inner
door and prevents door from
being closed securely.
Power and/or water supply
interrupted.
Depends on domestic installation,
as appliance is not defective. No
effect on appliance function.
utensils not positioned correctly.
If there is a low load, the water
jets strike the washing tank
directly.
Light utensils move during
the wash cycle.
dispenser.
Check whether rear panel is being pressed
in, e.g. by socket or by hose holder which
has not been removed.
Restore power and/or water supply.
No remedial action possible.
Position utensils so that the spray arms do
not strike the utensils.
Load the appliance with more utensils or
distribute the utensils more evenly
in the dishwasher.
Arrange light utensils securely.
Immediately refill rinse aid dispenser with
rinse aid.
Rinse aid spilled. Remove rinse aid with a cloth.
35
Page 36
en Customer service
4 Customer service
Cus tome r serv ice
If you are unable to rectify the fault,
please contact your customer service.
We always find a suitable solution, even
to avoid unnecessary visits
by technicians. Contact information
for your nearest customer service can
be found on the back of these
instructions for use or on the enclosed
customer service list. When calling,
please state the appliance number (ENr. = 1) and the production number
(FD = 2) which can be found on the
rating plate 9: on the appliance door.
(1U
)'
5 Installation and
connection
Installation and connection
The dishwasher must be connected
correctly, otherwise it will not function
properly. The specifications for the inlet
and outlet as well as the electrical
connected loads must correspond with
the required criteria as
specified in the following paragraphs
or in the installation instructions.
Install the appliance in the correct
sequence:
1. Checking appliance on delivery
2. Installing the appliance
3. Waste water connection
4. Fresh water connection
5. Electrical connection
Rely on the competence of the manufa
cturer. Contact us. You can therefore be
sure that the repair is carried out
by trained service technicians who carry
original spare parts for your domestic
appliances.
Product package
If you have any complaints, contact
the dealer where you purchased
the appliance or our customer service.
Dishwasher
Instructions for use
Installation instructions
Warranty*
Installation materials
Steam guard plate*
Rubber apron*
Power cord
* depending on model
Safety instructions
Please follow the safety instructions
under “Installation”.
36
Page 37
Installation and connection en
The required work sequence can be
The required work sequence can be
Delivery
Your dishwasher has been checked
thoroughly in the factory to ensure that it
is in working order. This may cause
small water stains. These will disappear
after the first wash cycle.
Technical specifications
Weight:
max. 60 kg
Voltage:
220–240 V, 50 Hz or 60 Hz
Connected load:
2.0–2.4 kW
Fuse:
10/16 A (UK 13A)
Power input:
Installation
The required installation dimensions can
be found in the installation instructions.
Level the appliance with the aid of the
height-adjustable feet. Ensure that the
appliance is situated securely on the
floor.
A built-under or integrated appliance
which is installed subsequently as a
free-standing appliance must be
secured to prevent it from
overturning, e.g. by screwing it to the
wall or by installing it under
a continuous worktop which is
screwed to adjacent cupboards.
The appliance can easily be
installed in a fitted kitchen between
wooden and plastic walls.
Waste-water connection
switched off 0.1 W
not switched off 0.1 W
Water pressure:
at least 0.05 MPa (0.5 bar), maximum
1 MPa (10 bar). At a higher water
pressure: connect pressure-reducing
valve ahead.
Inlet rate:
minimum 10 litres/minute
Water temperature:
cold water; hot water max. temperature
60 °C.
1. The required work sequence can be
found in the installation instructions.
If required, fit a siphon with an
drainage connection.
2. Connect the waste-water hose to the
drainage connection of the siphon
with the enclosed parts.
Ensure that the drainage hose is not
kinked, crushed or twisted and that
there is no cover plate in the
drainage to prevent the waste water
from flowing out!
Fresh water connection
1. Connect the fresh-water connection
to the tap according to the
installation instructions with the
enclosed parts.
Ensure that the fresh-water
connection is not kinked, crushed or
twisted.
2. When replacing the appliance,
always use a new water supply hose.
37
Page 38

en Installation and connection
The socket must be near
The socket must be near
t
t
following installation.
following installation.
Water pressure:
at least 0.05 MPa (0.5 bar), maximum
1 MPa (10 bar). At a higher water
pressure: connect pressure-reducing
valve ahead.
Inlet rate:
minimum 10 litres/minute
Water temperature:
cold water; hot water max. temperature
60 °C.
Warm water connection *
Warm water connection
* depending on model
The dishwasher can be connected
to cold or hot water up to max. 60 °C.
Connection to hot water
is recommended if the hot water can be
supplied by energetically favourable
means and from a suitable installation,
e.g. solar heating system with circulation
line.
This will save energy and time.
The hot water setting ‘:‹‚ allows you
to adjust your appliance optimally
to operation with hot water.
It is recommended to have a water
temperature (temperature of the
incoming water) of at least 40 °C
and no more than 60 °C.
It is not recommended to connect
the appliance to hot water if the water
is supplied from an electric boiler.
Setting hot water:
1. Close the door.
2. Switch on ON/OFF switch (.
3. Hold down programme button #
and press START button h
until •:‹... is indicated on the digital
display.
4. Release both buttons.
The LED for button # flashes and
the digital display )* displays the
factory setting •:‹….
5. Press programme button # until
the factory set value ‘:‹‹
is indicated on the digital
display )*.
To change the setting:
1. By pressing the 3 button, you can
switch the hot water setting off ‘:‹‹
or on ‘:‹‚.
2. Press START button h.
The set value is saved.
Electrical connection
Connect the appliance to an
lternating current only, ranging from
a
220 V to 240 V and 50 Hz or 60 Hz
via a correctly installed socket with
protective earth conductor. See
rating plate for required fusing 9:.
The socket must be near
the appliance and freely accessible
following installation.
If the plug is not freely accessible, an
allpole disconnector with a contact
opening of at least 3 mm must be
fitted on the installation side
to satisfy the relevant safety
instructions.
The connection may be modified by
technicians only.
A power cord extension may be
purchased from customer service
only.
Use only a residual current operated
circuit-breaker which features
the symbol ‚. Only this extension
guarantees compliance with
the currently valid regulations.
The appliance features a water
damage protection system. Please
note the system will not function
unless the power supply
is connected.
38
Page 39
Installation and connection en
h
h
Removing the appliance
Also observe
the sequence of worksteps here.
1. Disconnect the appliance from
the power supply.
2. Turn off the water supply.
3. Disconnect the waste water
and fresh water connections.
4. Loosen fastening screws for the
furniture parts.
5. If fitted, remove the base panel.
6. Pull out the appliance, carefully
pulling the hose behind.
Transportation
Empty the dishwasher and secure loose
parts.
Drain the appliance according to the
following steps:
1. Turn on the tap.
2. Close the door.
3. Switch on ON/OFF switch (.
4. Select programme with the highest
temperature.
The expected programme duration is
indicated on the numerical display
)*.
5. Press START button h.
Programme sequence starts.
6. After approx. 4 minutes press the
START button h until ‹:‹‚ is
indicated on the digital display.
After approx. 1 min ‹:‹‹ is indicated
on the digital display .
7. Switch off ON/OFF switch (.
8. Turn off the tap, disconnect supply
hose and drain water.
Protection against frost
If the appliance is in a room where there
is a risk of frost (e.g. holiday home),
empty the appliance completely (see
Transportation).
Protection against frost (Emptying the appliance)
Transport appliance upright only.
(This prevents residual water from
running into the machine control and
damaging the programme sequence.)
6XEMHFWWRFKDQJHV
39
Page 40

Page 41
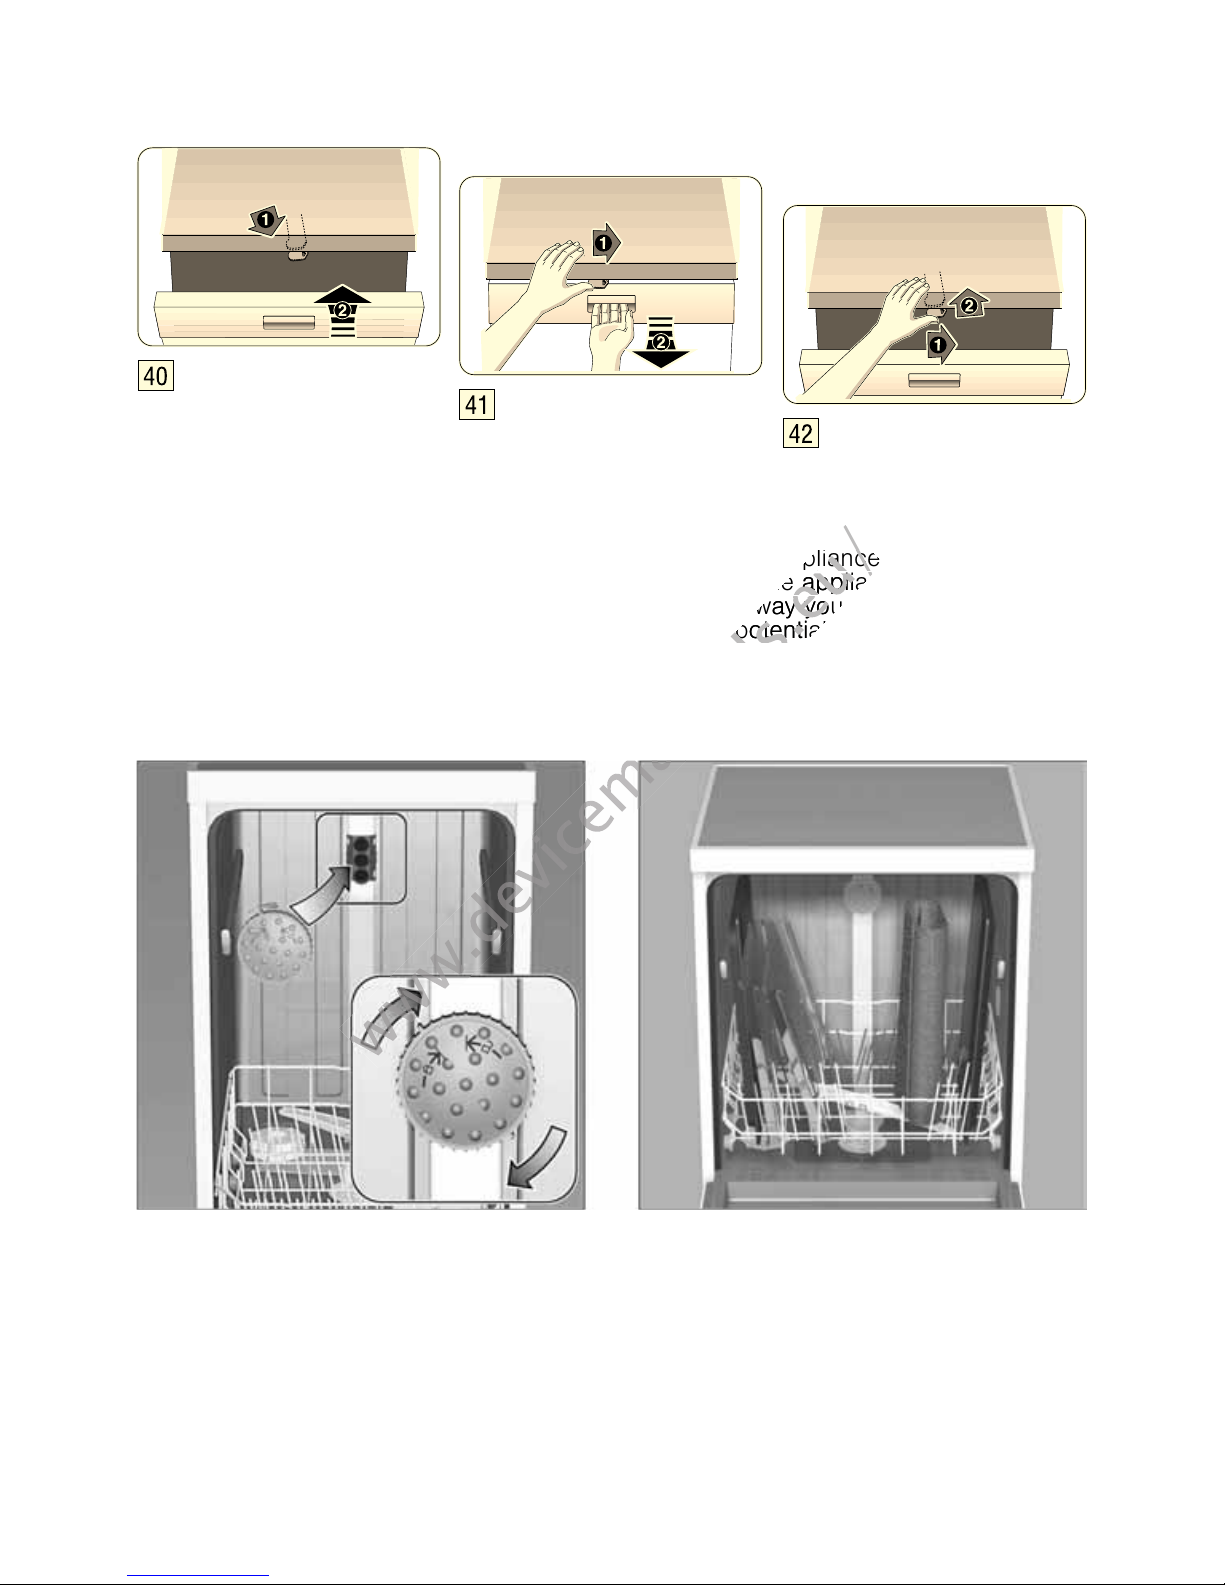
&KLOGSURRIORFNGRRUORFN
$FWLYDWHWKHFKLOGSURRIORFN
2SHQWKHGRRUZLWKDFWLYDWHG
FKLOGSURRIORFN
'HDFWLYDWHFKLOGSURRIORFN
$OZD\VFORVHWKHDSSOLDQFHGRRUFRPSOHWHO\
ZKHQ\RXOHDYHWKHDSSOLDQFH
7KLVLVWKHRQO\ZD\\RXFDQSURWHFW\RXU
FKLOGUHQIURPSRWHQWLDOGDQJHUV
:DUQLQJ
%DNLQJVKHHWVSUD\KHDG
/DUJHVKHHWVRUJULOOHVDQGSODWHVZKLFKKDYHDGLDPHWHUJUHDWHUWKDQFPJRXUPHW
SODWHVSDVWDSODWHVGLQQHUSODWHVFDQEHFOHDQHGZLWKWKHDLGRIWKHVSUD\KHDG
7RGRWKLVUHPRYHWKHWRSEDVNHWDQGLQVHUWWKHVSUD\KHDGDVLOOXVWUDWHGLQWKHGLDJUDP
VRPHPRGHOV
1HYHURSHUDWHWKHGLVKZDVKHUZLWKRXWWKHWRSEDVNHWRUEDNLQJVKHHWVSUD\KHDG
7RHQVXUHWKDWWKHVSUD\MHWFDQUHDFKDOOSDUWVDUUDQJHWKHEDNLQJVKHHWVDVLOOXVWUDWHG
PD[âEDNLQJVKHHWVDQGâJULOOHV
Page 42
,QDGGLWLRQWRZDUUDQW\FODLPVDJDLQVWWKHVHOOHUEDVHGRQWKH
SXUFKDVHFRQWUDFWDQGLQDGGLWLRQWRRXUDSSOLDQFHZDUUDQW\
ZHZLOOSD\GDPDJHVXQGHUWKHIROORZLQJFRQGLWLRQV
,IRXU$TXD6WRSV\VWHPLVGHIHFWLYHDQGFDXVHVZDWHU
GDPDJHZHZLOOPDNHJRRGWKHGDPDJHIRUSULYDWHXVHUV
7RHQVXUHZDWHUGDPDJHSURWHFWLRQWKHDSSOLDQFHPXVWEH
FRQQHFWHGWRWKHSRZHUVXSSO\
7KLVOLDELOLW\JXDUDQWHHLVYDOLGIRUWKHVHUYLFHOLIH
RIWKHDSSOLDQFH
$SUHUHTXLVLWHIRUWKHZDUUDQW\FODLPLVWKDWWKHDSSOLDQFH
KDVEHHQFRUUHFWO\LQVWDOOHGDQGFRQQHFWHGZLWK$TXD6WRS
DFFRUGLQJWRRXULQVWUXFWLRQV7KLVDOVRLQFOXGHVWKHFRUUHFW
LQVWDOODWLRQRIWKH$TXD6WRSH[WHQVLRQRULJLQDODFFHVVRU\
2XUZDUUDQW\GRHVQRWH[WHQGWRGHIHFWLYHIHHGOLQHV
RUILWWLQJVXSWRWKH$TXD6WRSFRQQHFWLRQRQWKHWDS
,I\RXUDSSOLDQFHLVILWWHGZLWK$TXD6WRS\RXFDQOHDYH
\RXUDSSOLDQFHXQDWWHQGHGGXULQJRSHUDWLRQDQGOHDYH
WKHWDSWXUQHGRQDIWHUZDUGV7KHWDSVKRXOGRQO\
EHWXUQHGRIILI\RXDUHDEVHQWIURPKRPHIRUDSURORQJHG
SHULRGHJVHYHUDOZHHNVKROLGD\
$48$6723JXDUDQWHH
GRHVQRWDSSO\WRDSSOLDQFHVZLWKRXW$TXD6WRS
HQ
*%
3OHDVHILQGWKHFRQWDFWGDWDRIDOOFRXQWULHV
LQWKHHQFORVHGFXVWRPHUVHUYLFHOLVW
,QWHUQHWZZZVLHPHQVKRPHFRP
6LHPHQV(OHFWURJHUlWH*PE+
&DUO:HU\6WUDH0QFKHQ
7RERRNDQHQJLQHHUYLVLWDQGSURGXFWDGYLFH
,(
&DOOVIURPD%7ODQGOLQHZLOOEHFKDUJHGDWXS
W
RSHQFHSHUPLQXWH
$FDOOVHWXSIUHHRIXSWRSHQFHPD\DSSO\
ƌSHUPLQXWHDWSHDN
2IISHDNƌSHUPLQXWH
86
WROOIUHH
*9000843617*
9000843617
en (9210-1) 640MG
 Loading...