

Siemens SLI-5300-I Quick Start Manual
Quick Start Guide
SIEMENS SLI-5300-I
Wireless IAD Router
• Do never open the housing!
• Use only the power supply provided with this device.
• Use only the cables provided with this device and do not
perform any modifications on them.
06-20080428
2
Before you begin
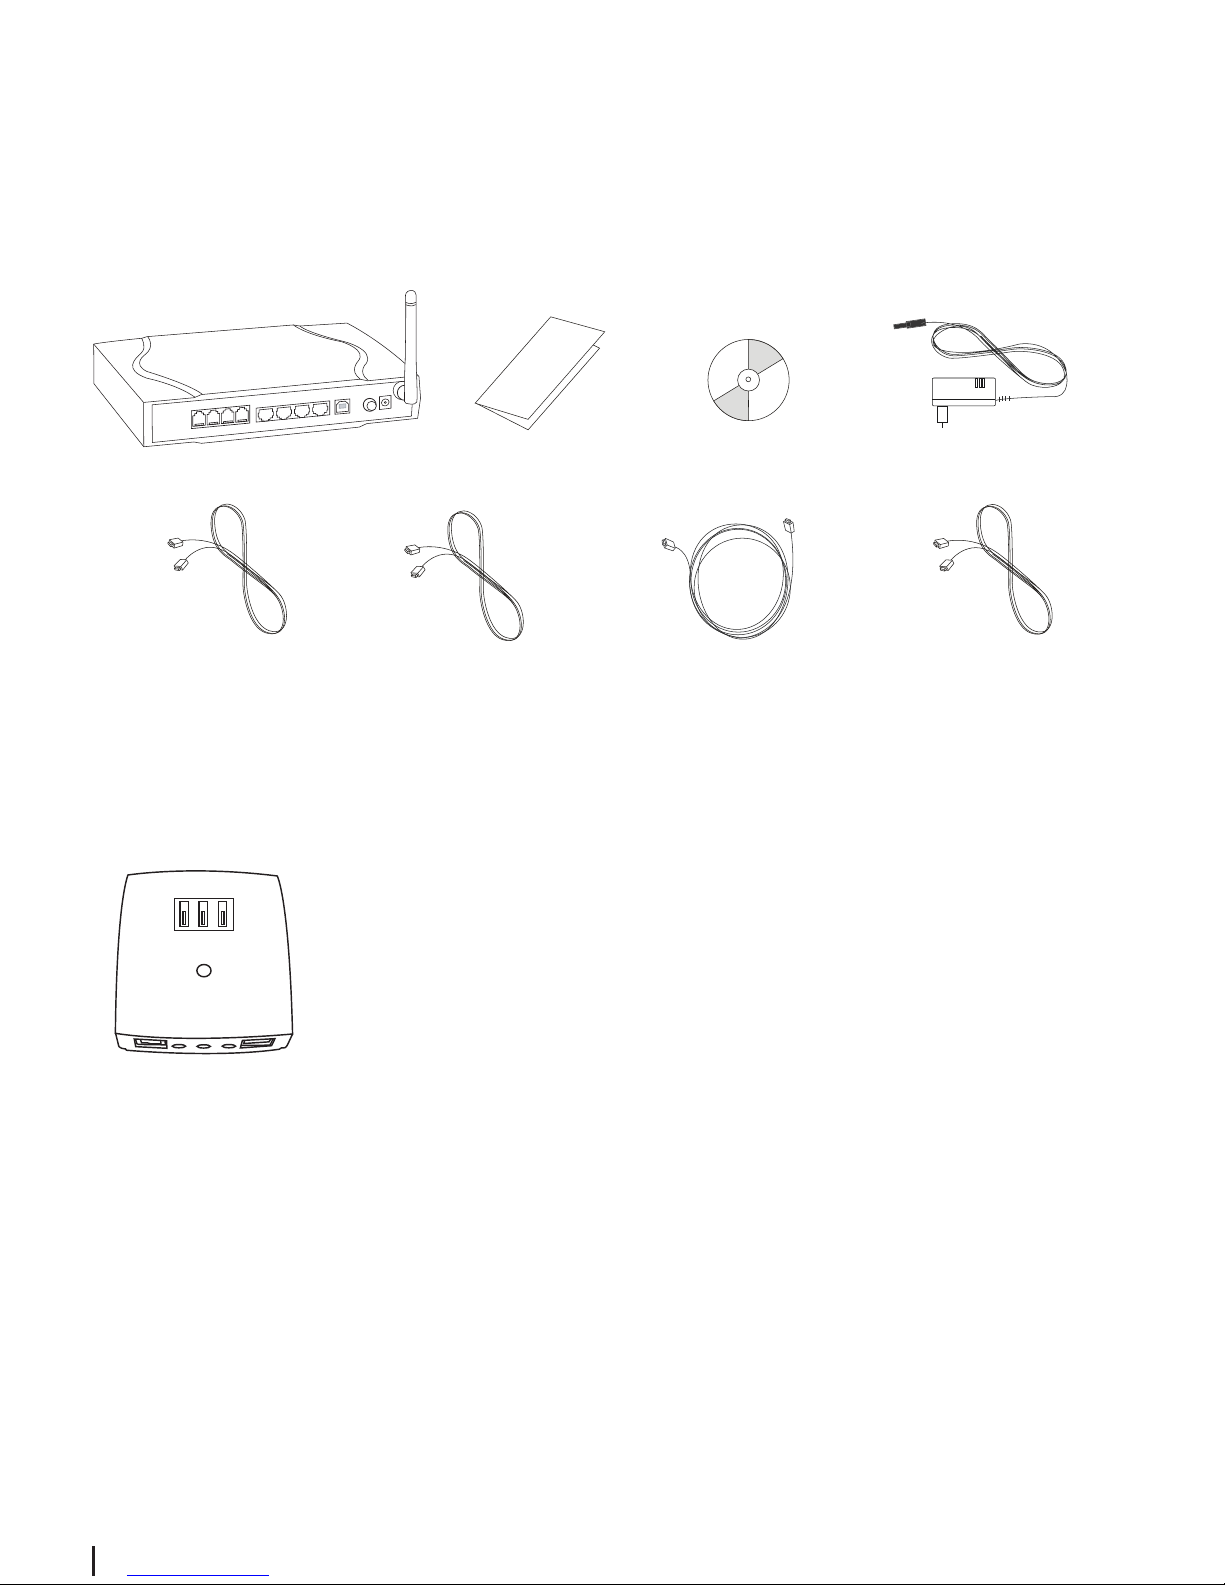
Verify that the following items came with your SIEMENS SLI-5300-I Wireless IAD Router kit:
System Requirements
Before starting the installation of the ADSL WLAN Router, make sure your computer is
equipped with:
• LAN interface (Ethernet) with RJ45 socket
(Windows 98, ME, NT4, 2000, XP, Vista, Mac OS 9.x, 10.x).
SIEMENS SLI-5300-I Quick Start Guide CD-ROM Power supply
ADSL cable Ethernet cable Phone cable
(gray) (yellow) (black)
USB cable
(blue)
Optional:
If your service provider include an ISDN ADSL-Splitter, follow the instructions in section “Step 1:
Install the ISDN ADSL-Splitter”. If you need further assistance installing the filter, please contact
your service provider.
ISDN ADSL-Splitter
3
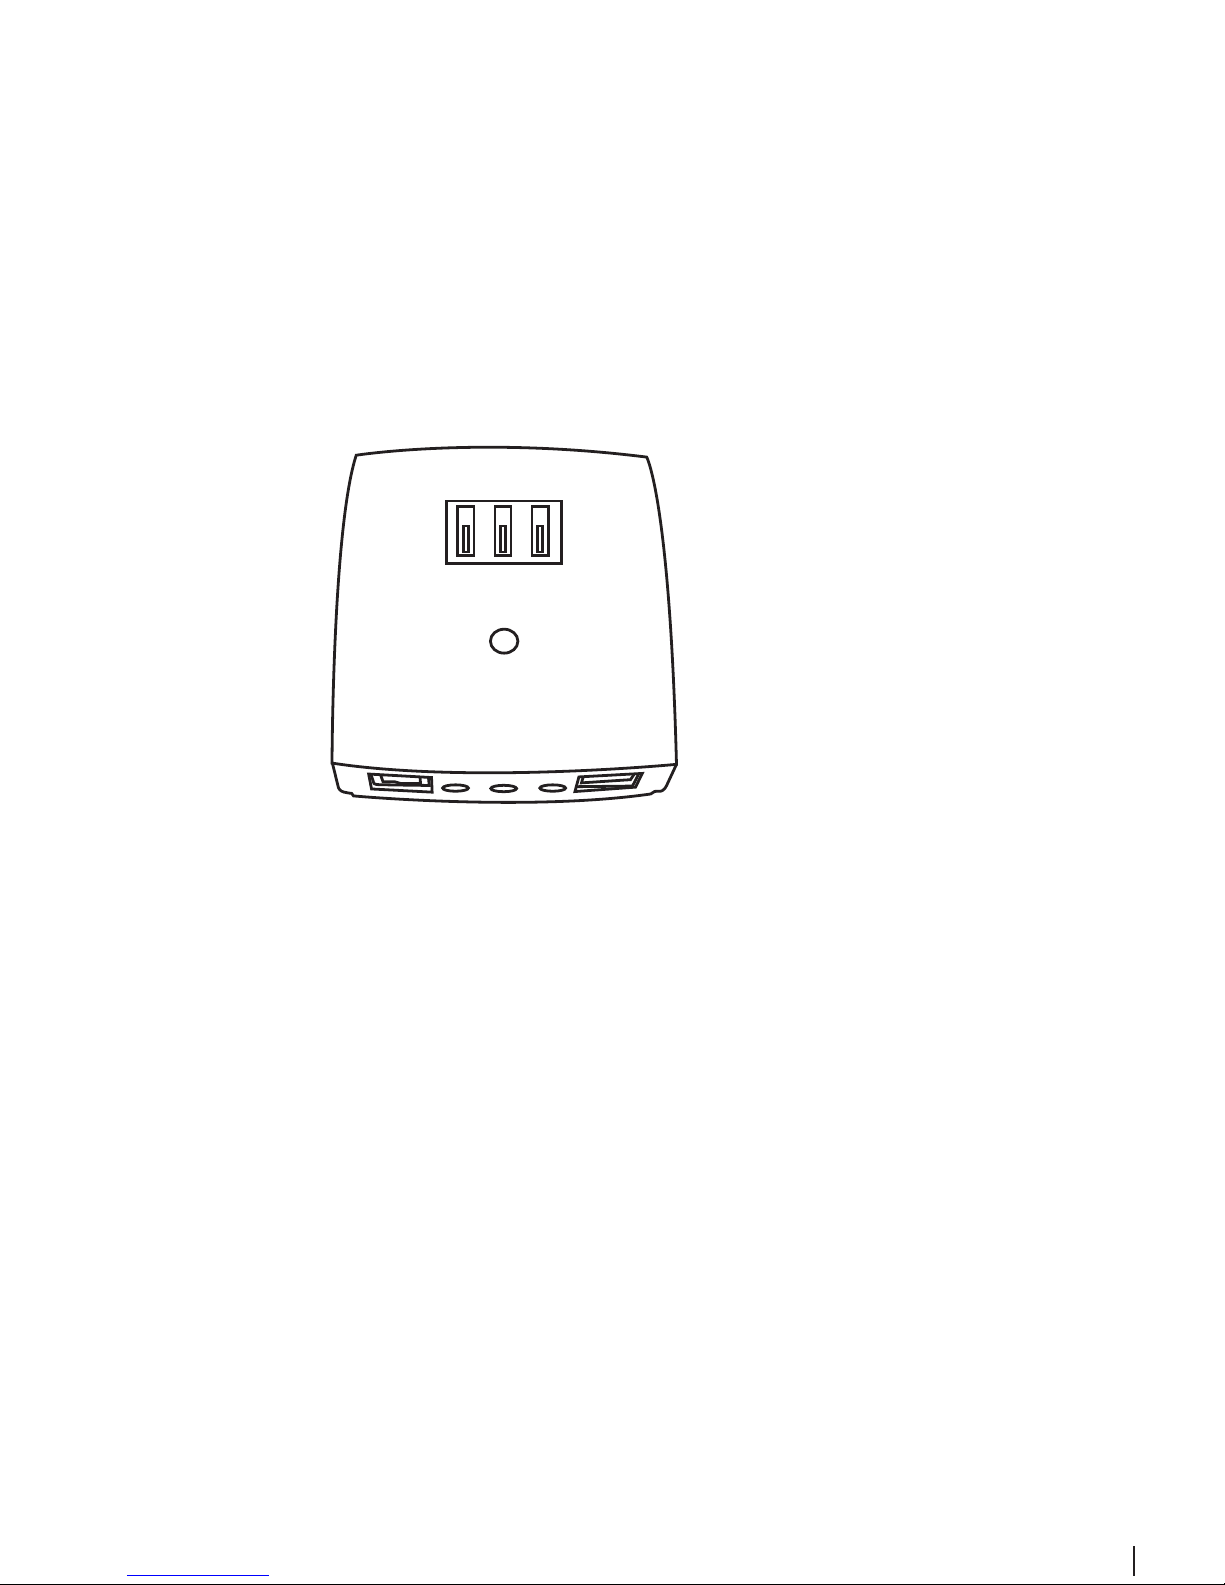
Step 1:
Install the ISDN ADSL Splitter
The ADSL technology uses the existing telephone line for the broadband entrance. With the
ISDN installation a ISDN ADSL-Splitter must be installed to separate the frequency ranges of
ADSL and ISDN and to prevent disturbances at ISDN phones or fax machines. Use for installation the provided ISDN ADSL-Splitter.
Important note:
- With an ISDN installation only one ISDN ADSL-Splitter is needed for the entire ISDN
installation.
- For Phones or fax machines with ADSL and ISDN there is no Line-Filter needed.
- Please contact your support-technician if your ISDN-NT (ISDN Networkterminator) is
not equipped with a plugged incoming line.
ISDN ADSL-Splitter
4
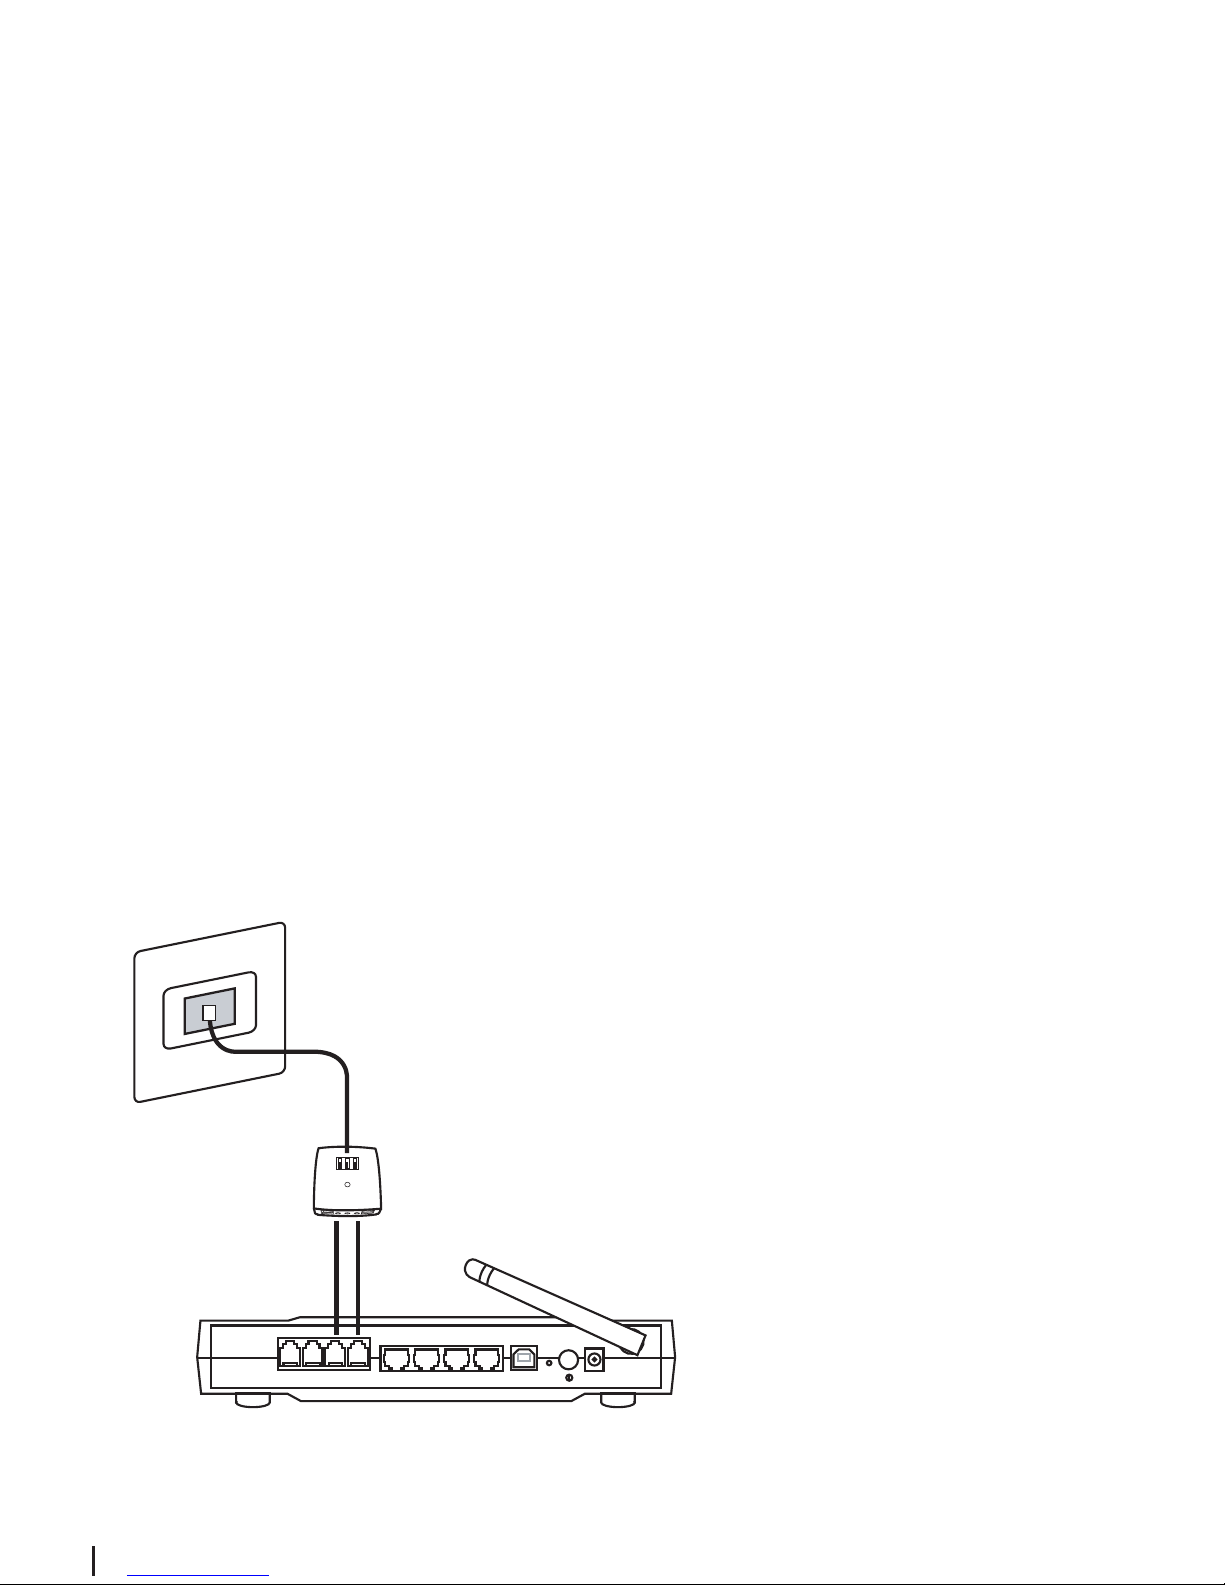
Step 2a: Connecting the IAD Router to the exchange connection
1. Remove the plug on the telephone or the fax machine from the telephone socket.
2. Insert the ADSL-Splitter into the telephone socket. Plug the plug of the ADSL-Splitter cable
(enclosed, mostly black) into the “Phone” (F) plug of the telephone socket and the other
plug into the “Line” (Amt) plug of the ADSL-Splitter.
3. Set up the connection between the ADSL-Splitter and the ADSL IAD Router. To do this, insert the end of the ADSL cable (gray) into the socket of the ADSL-Splitter with the "DSL"
(Modem) symbol.
Insert the other end of the ADSL cable (gray) into the socket on your ADSL IAD Router marked "DSL".
4. Then remove the cable from your telephone. Insert one end of the telephone cable supplied (black) into the socket of the ADSL-Splitter, and the other end into the socket on your
ADSL IAD Router marked "PSTN". This connection ensures that even if the DSL link fails (so
that you are without VoIP functionality) you can still make calls.
Take the phone cable (black) connecting the telphone to the ADSL IAD Router, follow the
instructions in section “Step 2c”.
Step 2:
Connection of the Wireless IAD Router
21
Phone PSTN DSL Ethernet USB Power
1324
2.
2.
3.
4.
Telephone socket
ADSL-Splitter
SIEMENS SLI-5300-I Wireless IAD Router
5
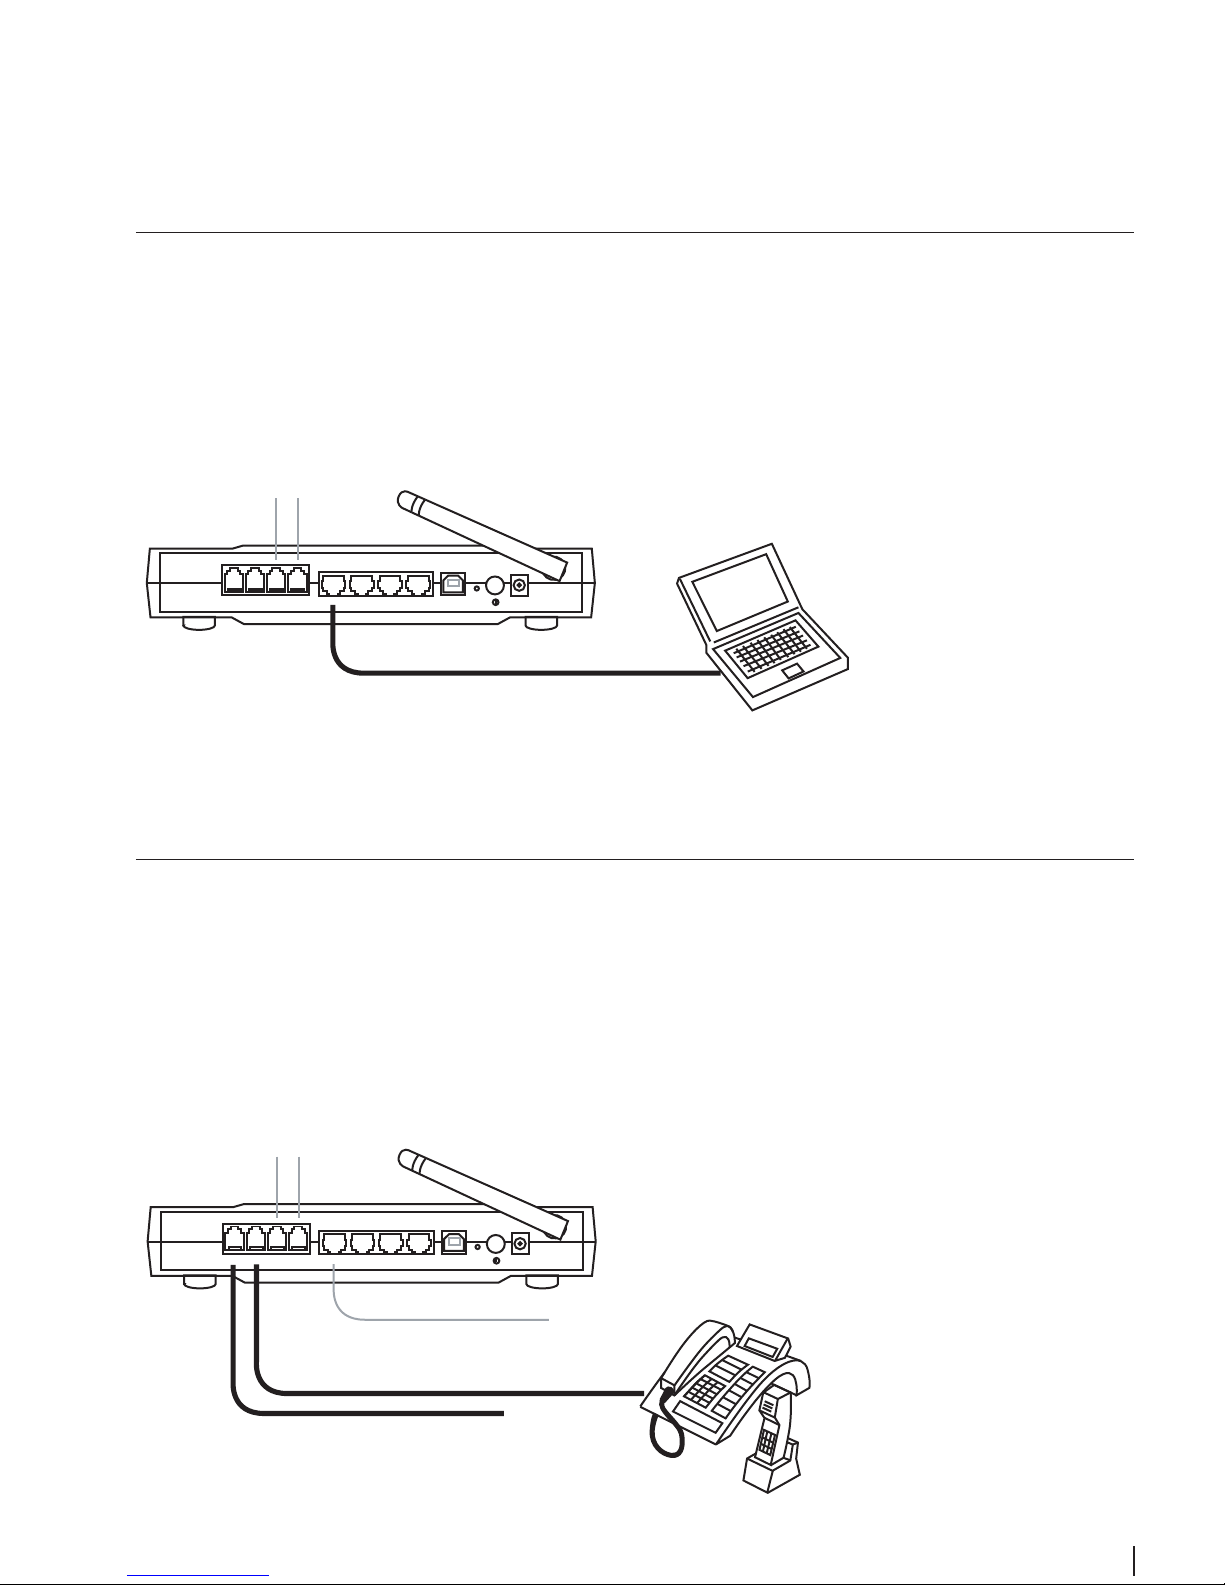
Step 2b: Connecting the Wireless IAD Router to your computer
1. Connect the Ethernet cable (yellow) to a free LAN interface on your Wireless IAD Router.
2. Connect the other end of the Ethernet cable to the LAN interface of your computer.
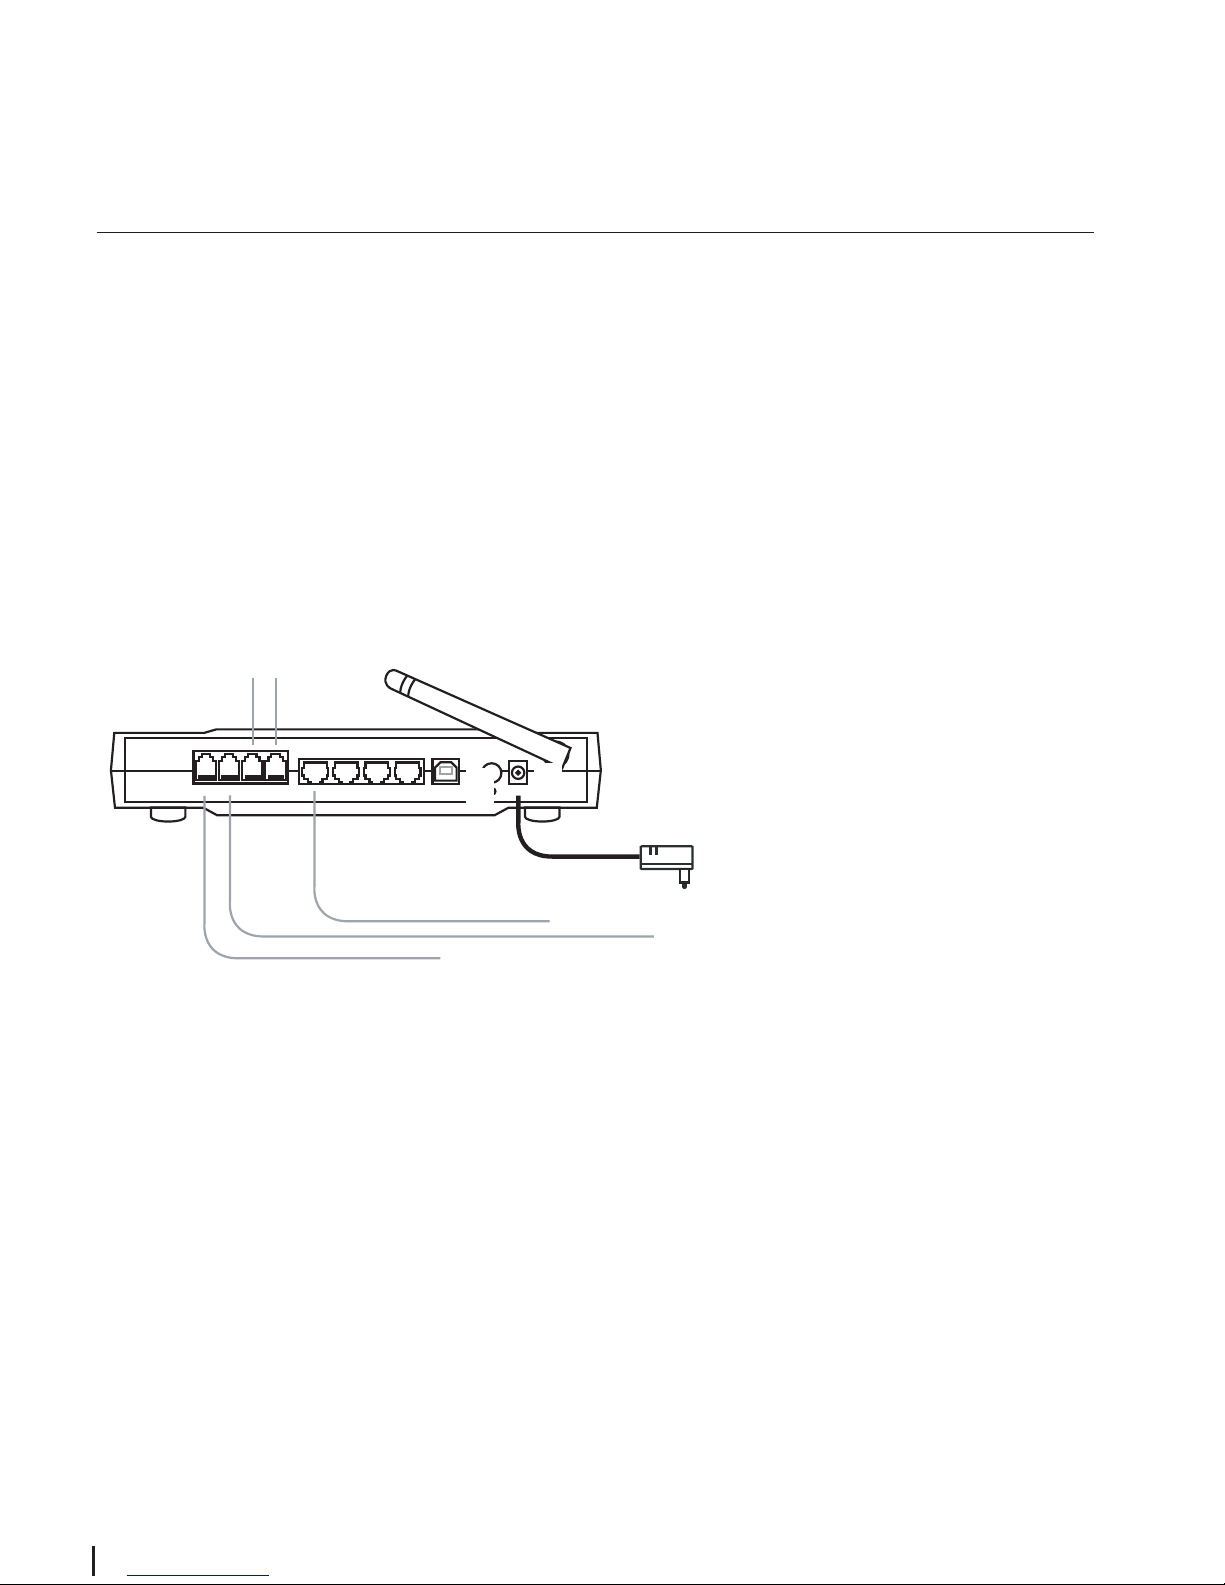
Step 2c: Connecting the telephone/fax machine to your Wireless IAD Router
1. Insert the telephone cable into the socket on the back of the device marked "Phone 1".
2. If desired, insert the cable of a second telephone or a fax machine into the socket on the
back of the device marked "Phone2".
21
Phone PSTN DSL Ethernet USB Power
1324
to the ADSL-Splitter (DSL)
Ethernet cable (yellow)
21
Phone PSTN DSL Ethernet USB Power
1324
to the ADSL-Splitter (DSL)
Ethernet cable (yellow)
Phone cable (Phone 1)
Phone 2 or Fax machine
2.
1.
2.
PC or Notebook
6
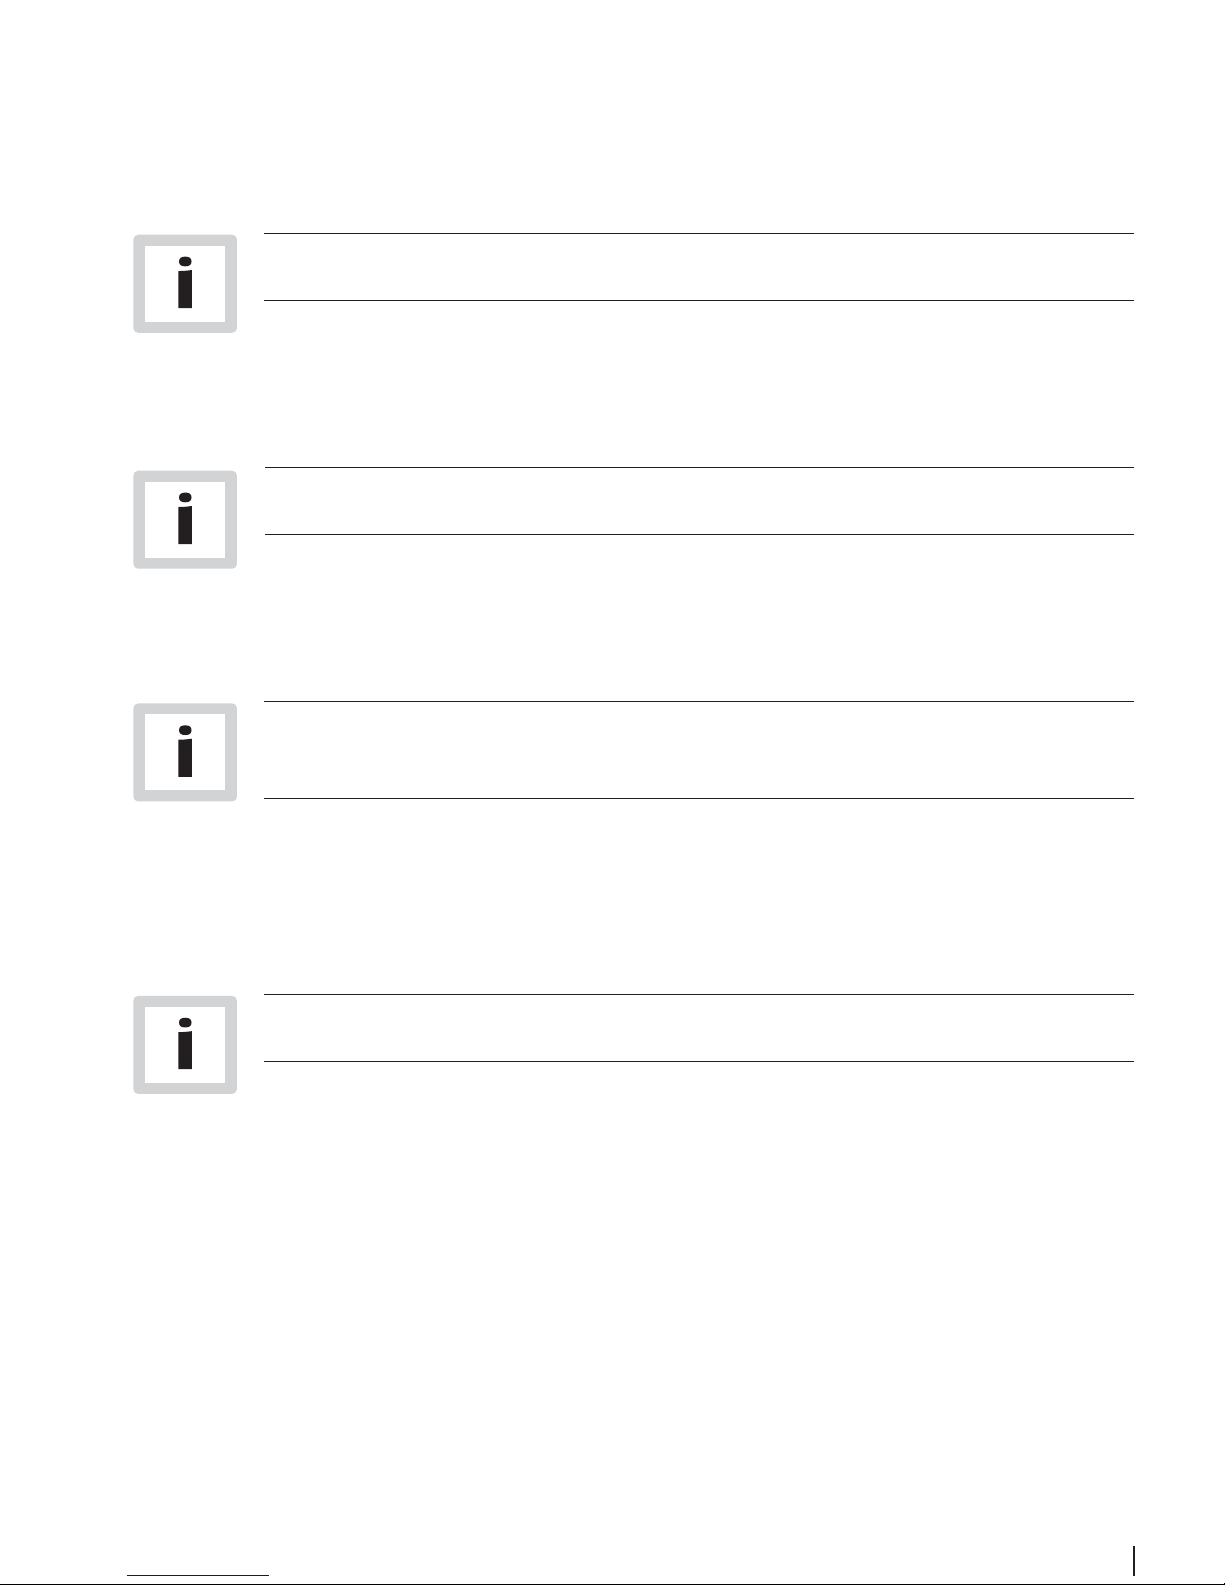
Step 2d:
Connecting the mains unit for the power supply and switching on the Wireless
IAD Router
1. Connect the plug on the power cable to the Wireless IAD Router's power supply socket.
2. Insert the other end of the cable into a convenient mains socket.
3. Switch on the Wireless IAD Router using the switch on the back of the device.
After a brief powering-up period, the device's operational readiness is indicated by the
power LED (green) and the DSL LED (green) lighting up.
21
Phone PSTN DSL Ethernet USB Power
1324
to the ADSL-Splitter (DSL)
Ethernet cable (yellow)
Phone 2 or Fax machine
1.
2.
3.
7
Step 3:
USB driver installation
The USB driver is only working on the following operating system (OS):
Windows 98, Windows 98SE, Windows ME, Windows 2000 and Windows XP.
If your computer is NOT equipped with an Ehternet interface you have to install first the USB
driver in order to be able to configure your Wireless IAD Router. For the USB driver installation
proceed as follows:
Windows 98 users need the Windows 98 CD-ROM to complete the
installation.
1. Insert the SIEMENS installation CD-ROM in your CD-ROM drive.
The CD will be startet automatically.
In case the “setup wizard” does not start automatically, open a Run window via
Start --> Run and enter the path x:\USB_Driver\windows\setup.exe, where x repre-
sents the drive letter of the CD drive.
2. Click on Run or Setup.
3. Connect the USB cable to your Wireless IAD Router. The driver will be installed auto-
matically.
Note for Windows 98 users: If prompted, you need to insert the Windows 98 CDROM in your CD-ROM drive to complete the installation.
4. You will be asked whether the PC should be restarted. Click on Close.
5. Click on Finish.

8
Step 4:
Configure the PC (TCP/IP settings)
Introduction
In step 4, you will learn how to configure your computer to communicate with the Wireless IAD
Router.
To do this, you will need to configure your PC’s network settings to obtain an IP address auto-
matically. Computers use IP addresses to communicate with each other across a network or
the Internet.
Find out which operating system your computer is running, such as Windows 98, Windows Me,
Windows NT4, Windows 2000, Windows XP, Windows Vista or Macintosh OS 9.x, 10.x.
You will need to know which operating system your computer is running. You can find out by
clicking on Start -> Settings. (If your Start menu doesn’t have a Settings option, you are running Windows XP or Windows Vista. You can select the Control Panel directly from the Start
menu.) Then, click on Control Panel and double-click on the System icon.
Click the Cancel button when done.
Once you know which operating system you are running, follow the directions in this step for
your computer’s operating system.
9
1)
Choose a TCP/IP entry whose name contains Ethernet adapter. Do not choose
a TCP/IP entry whose name is PPPoE, VPN or other.
2)
If there is no TCP/IP line listed, refer to the User Manual on your Aethra CD-ROM
to install TCP/IP now.
Windows 98 users need the Windows 98 Installation CD to complete the installation.
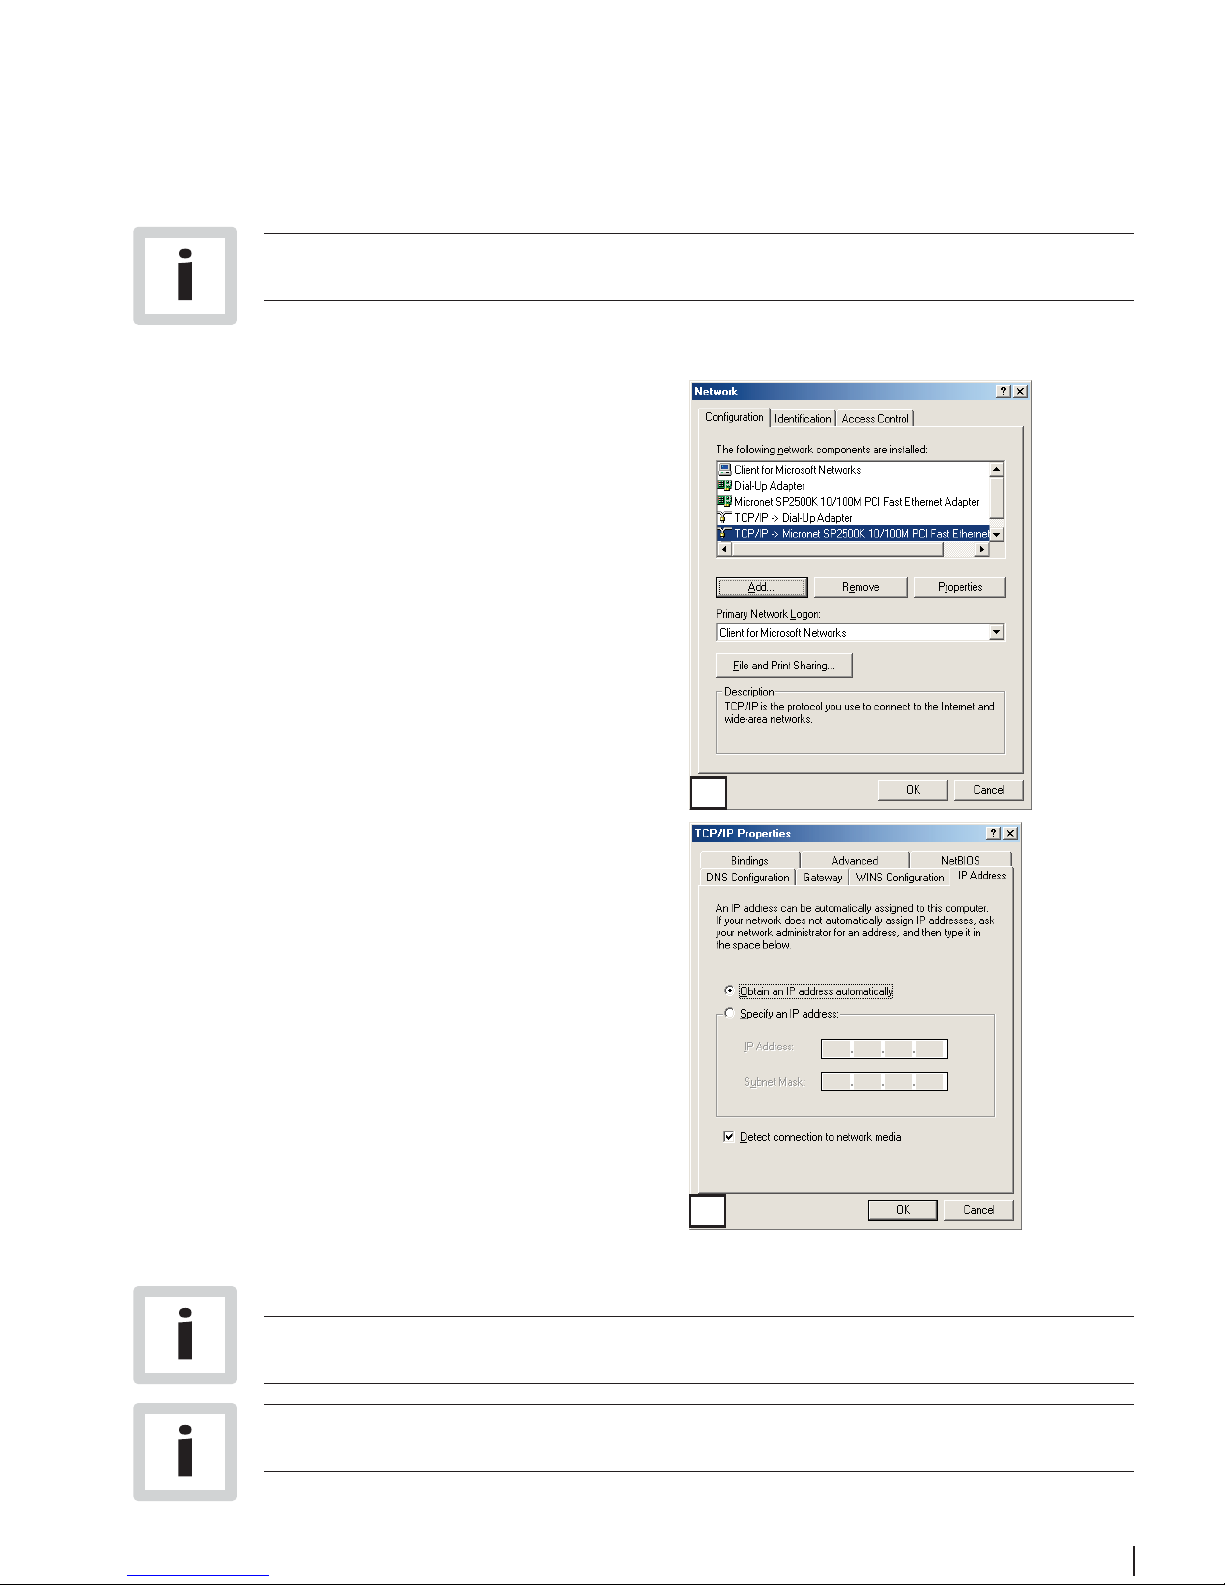
1. Click on Start -> Settings -> Control Panel.
Double-click on the Network icon to open the
Network screen.
2. Select the Configuration tab and highlight the
TCP/IP line for the applicable Ethernet
adapter
1)
. If the word TCP/IP appears by itself,
select that line
2)
. Click on Properties.
3. Click the IP Address tab and select Obtain an
IP address automatically.
4. Click on the Gateway tab and verify that the
Installed Gateway field is blank. Click on OK.
5. Click again on OK. Windows may ask you for
the original Windows Installation disk or additional files. Supply them by pointing to the correct location, e.g. D:\win98, where “D” represents the letter of your CD-ROM drive.
6. If Windows asks you to restart your PC, click on
Yes. If Windows does not ask, restart your com-
puter anyway.
Step 4a:
Configure the PC (TCP/IP settings)
for Windows 98 and Windows ME
2
3
 Loading...