

Siemens HiPath 3000, HiPath 5000, optiPoint 420 economy, optiPoint 420 economy plus, optiPoint 420 standard Operating Instructions Manual
...
HiPath 3000
HiPath 5000
optiPoint 420 economy
optiPoint 420 economy plus
optiPoint 420 standard
optiPoint
self labeling key module
Operating Instructions

Before You Begin
Before You Begin
These operating instructions describe the optiPoint 410 economy/economy plus/standard
telephone on your HiPath 3000 / 5000.
They describe all functions you can use from your telephone. You may find that some functions you wish to use are not available on your telephone. This may be due to one of the
following reasons:
• The function has not been configured for your telephone - address any questions to
your service personnel.
• Your communications platform does not support this function - contact your service
personnel to upgrade your system.
Important Notes
Do not operate the telephone in environments where there is a danger of
explosions.
Use only original Siemens accessories . Using other accessories may cause
a hazard and will invalidate the warranty and the CE mark.
Never open the telephone or a key module. If you encounter any problems,
contact your service personnel.
CE (customer equipment) does not continue to support emergency dialing after loss of
mains power, if battery back up and power fail switchover to emergency analogue phones
is not available.
Never allow the telephone to come into contact with staining or aggressive liquids such as
coffee, tea, juice, or soft drinks. For information on telephone maintenance Æ Page 121.
The information provided in this document contains merely general descriptions or characteristics of performance which in case of actual use do not always apply as described or
which may change as a result of further development of the products.
An obligation to provide the respective characteristics shall only exist if expressly agreed
in the terms of contract.
The trademarks used are owned by Siemens AG or their respective owners.
2

Marks
Before You Begin
The device conforms to the EU guideline 1999/5/EG, as attested by the CE
mark.
This device has been manufactured in accordance with our certified environmental management system (ISO 14001). This process ensures that energy
consumption and the use of primary raw materials are kept to a minimum,
thus reducing waste production.
All electrical and electronic products should be disposed of separately from
the municipal waste stream via designated collection facilities appointed by
the government or the local authorities.
The correct disposal and separate collection of your old appliance will help
prevent potential negative consequences for the environment and human
health. It is a precondition for reuse and recycling of used electrical and electronic equipment.
For more detailed information about disposal of your old appliance, please
contact your city office, waste disposal service, the shop where you purchased the product or your sales representative.
The statements quoted above are only fully valid for equipment which is installed and sold in the countries of the European Union and is covered by
the directive 2002/96/EC. Countries outside the European Union may have
other regulations regarding the disposal of electrical and electronic equipment.
3

Contents
Contents
Before You Begin . . . . . . . . . . . . . . . . . . . . . . . . . . . . . .2
Important Notes . . . . . . . . . . . . . . . . . . . . . . . . . . . . . . . . . . . . . . . . . . . 2
Marks . . . . . . . . . . . . . . . . . . . . . . . . . . . . . . . . . . . . . . . . . . . . . . . . . . . 3
Basic operating instructions . . . . . . . . . . . . . . . . . . . .9
optiPoint 420 economy/economy plus/standard and
optiPoint self labeling key module control panel . . . . . . . . . . . . . . . . . . 9
How to Use these Operating Instructions. . . . . . . . . . . . . . . . . . . . . . . 10
Screen Displays . . . . . . . . . . . . . . . . . . . . . . . . . . . . . . . . . . . . . . . . 10
Accessing Functions . . . . . . . . . . . . . . . . . . . . . . . . . . . . . . . . . . . . . . . 11
... Interactively . . . . . . . . . . . . . . . . . . . . . . . . . . . . . . . . . . . . . . . . . 11
... Via the Program/Service Menu . . . . . . . . . . . . . . . . . . . . . . . . . . 11
... With Function Keys . . . . . . . . . . . . . . . . . . . . . . . . . . . . . . . . . . . 11
Functions You Can Use . . . . . . . . . . . . . . . . . . . . . . . . . . . . . . . . . . . . . 12
SLK Functions . . . . . . . . . . . . . . . . . . . . . . . . . . . . . . . . . . . . . . . . . 12
Basic and Enhanced Functions . . . . . . . . . . . . . . . . . . . . . . . . . . . . 12
Additional Team and Executive/Secretary Functions. . . . . . . . . . . . 12
Using the Telephone Efficiently. . . . . . . . . . . . . . . . . . . . . . . . . . . . . . . 13
Making Calls – Basic Functions . . . . . . . . . . . . . . . .14
Answering Calls. . . . . . . . . . . . . . . . . . . . . . . . . . . . . . . . . . . . . . . . . . . 14
Answering a Call With the Handset. . . . . . . . . . . . . . . . . . . . . . . . . 14
Answering a Call with the Speaker (Speakerphone Mode) . . . . . . . 14
Switching to Speakerphone Mode . . . . . . . . . . . . . . . . . . . . . . . . . . . . 15
Switching to the Handset . . . . . . . . . . . . . . . . . . . . . . . . . . . . . . . . 15
Open Listening in the Room During a Call . . . . . . . . . . . . . . . . . . . . . . 16
Making Calls . . . . . . . . . . . . . . . . . . . . . . . . . . . . . . . . . . . . . . . . . . . . . 16
Off-Hook Dialing . . . . . . . . . . . . . . . . . . . . . . . . . . . . . . . . . . . . . . . 16
On-Hook Dialing. . . . . . . . . . . . . . . . . . . . . . . . . . . . . . . . . . . . . . . . 16
Ending the call . . . . . . . . . . . . . . . . . . . . . . . . . . . . . . . . . . . . . . . . . . . . 17
Redialing a Number . . . . . . . . . . . . . . . . . . . . . . . . . . . . . . . . . . . . . . . . 18
Turning the Microphone On and Off . . . . . . . . . . . . . . . . . . . . . . . . . . . 19
Calling a Second Party (Consultation Hold) . . . . . . . . . . . . . . . . . . . . . . 20
Switching to the Party on Hold (Toggle) . . . . . . . . . . . . . . . . . . . . . 20
Transferring a Call . . . . . . . . . . . . . . . . . . . . . . . . . . . . . . . . . . . . . . 21
Call Forwarding . . . . . . . . . . . . . . . . . . . . . . . . . . . . . . . . . . . . . . . . . . . 22
Using Variable Call Forwarding . . . . . . . . . . . . . . . . . . . . . . . . . . . . 22
Call Forwarding in the Carrier Network
and Forwarding Multiple Subscriber Numbers (MSN) (Not for U.S.) 24
Call Forwarding in the Event of a Telephone Malfunction . . . . . . . . 25
4

Contents
Using Callback . . . . . . . . . . . . . . . . . . . . . . . . . . . . . . . . . . . . . . . . . . . . 26
Storing a Callback. . . . . . . . . . . . . . . . . . . . . . . . . . . . . . . . . . . . . . . 26
Answering a Callback. . . . . . . . . . . . . . . . . . . . . . . . . . . . . . . . . . . . 26
Checking and Canceling a Saved Callback. . . . . . . . . . . . . . . . . . . . 26
Saving Repertory Dialing Numbers on a Key. . . . . . . . . . . . . . . . . . . . . 28
Using Repertory Dialing Keys . . . . . . . . . . . . . . . . . . . . . . . . . . . . . 30
Telephone Settings . . . . . . . . . . . . . . . . . . . . . . . . . . . . . . . . . . . . . . . . 31
Adjusting the Ring Volume . . . . . . . . . . . . . . . . . . . . . . . . . . . . . . . 31
Adjusting the Ring Tone. . . . . . . . . . . . . . . . . . . . . . . . . . . . . . . . . . 31
Adjusting the Attention Ring Volume. . . . . . . . . . . . . . . . . . . . . . . . 31
Adjusting the display contrast . . . . . . . . . . . . . . . . . . . . . . . . . . . . . 32
Adjusting the key label contrast. . . . . . . . . . . . . . . . . . . . . . . . . . . . 32
Adjusting the Speakerphone to the Room Acoustics . . . . . . . . . . . 32
Adjusting the Receiving Volume During a Call. . . . . . . . . . . . . . . . . 33
Adjusting the Display to a Comfortable Reading Angle . . . . . . . . . . 33
Display backlight . . . . . . . . . . . . . . . . . . . . . . . . . . . . . . . . . . . . . . . 33
Selecting the Language of Screen Prompts . . . . . . . . . . . . . . . . . . 33
Making Calls – Convenience Functions . . . . . . . . . 34
Answering Calls. . . . . . . . . . . . . . . . . . . . . . . . . . . . . . . . . . . . . . . . . . . 34
Accepting a Specific Call for Your Colleague . . . . . . . . . . . . . . . . . . 34
Rejecting Calls . . . . . . . . . . . . . . . . . . . . . . . . . . . . . . . . . . . . . . . . . 35
Using the Speakerphone . . . . . . . . . . . . . . . . . . . . . . . . . . . . . . . . . 35
Answering a Call With a Headset . . . . . . . . . . . . . . . . . . . . . . . . . . 37
Answering Calls from the
Entrance Telephone and Opening the Door. . . . . . . . . . . . . . . . . . . 38
Accepting a Call From an Answering Machine . . . . . . . . . . . . . . . . 39
Dialing/Making Calls . . . . . . . . . . . . . . . . . . . . . . . . . . . . . . . . . . . . . . . 40
En-Bloc Sending / Correcting Numbers . . . . . . . . . . . . . . . . . . . . . . 40
Using a Caller List . . . . . . . . . . . . . . . . . . . . . . . . . . . . . . . . . . . . . . 41
Speed-dial . . . . . . . . . . . . . . . . . . . . . . . . . . . . . . . . . . . . . . . . . . . . 43
Dialing a Number From the Internal Directory . . . . . . . . . . . . . . . . . 45
Dialing from the Telephone Database (LDAP) . . . . . . . . . . . . . . . . . 47
Using Mailboxes . . . . . . . . . . . . . . . . . . . . . . . . . . . . . . . . . . . . . . . 49
Talking to Your Colleague With a Speaker Call . . . . . . . . . . . . . . . . 49
Automatic Connection Setup (Hotline). . . . . . . . . . . . . . . . . . . . . . . 50
Reserve Trunk . . . . . . . . . . . . . . . . . . . . . . . . . . . . . . . . . . . . . . . . . 50
Assigning a Station Number (Not for U.S.) . . . . . . . . . . . . . . . . . . . 50
Associated Dialing/Dialing Aid . . . . . . . . . . . . . . . . . . . . . . . . . . . . . 51
During a Call . . . . . . . . . . . . . . . . . . . . . . . . . . . . . . . . . . . . . . . . . . . . . 52
Using Call Waiting . . . . . . . . . . . . . . . . . . . . . . . . . . . . . . . . . . . . . . 52
Accepting a Waiting Call (Camp-On) . . . . . . . . . . . . . . . . . . . . . . . . 52
Preventing and Allowing Call Waiting (Automatic Camp-On). . . . . . 53
Turning the Call Waiting Tone On and Off. . . . . . . . . . . . . . . . . . . . 53
Parking a Call . . . . . . . . . . . . . . . . . . . . . . . . . . . . . . . . . . . . . . . . . . 54
Placing External Calls on Hold . . . . . . . . . . . . . . . . . . . . . . . . . . . . . 55
5

Contents
Conducting a Conference . . . . . . . . . . . . . . . . . . . . . . . . . . . . . . . . 56
Ending a Conference (Initiator Only) . . . . . . . . . . . . . . . . . . . . . . . . 57
Activating Tone Dialing/DTMF Suffix-Dialing . . . . . . . . . . . . . . . . . . 58
Transferring a Call after a Speaker Call (Announcement) in a Group 59
Trunk Flash . . . . . . . . . . . . . . . . . . . . . . . . . . . . . . . . . . . . . . . . . . . 60
If You Cannot Reach a Destination ... . . . . . . . . . . . . . . . . . . . . . . . . . . 61
Call Waiting (Camp-On) . . . . . . . . . . . . . . . . . . . . . . . . . . . . . . . . . . 61
Busy Override - Joining a Call in Progress . . . . . . . . . . . . . . . . . . . . 61
Using Night Answer . . . . . . . . . . . . . . . . . . . . . . . . . . . . . . . . . . . . . . . 62
Saving Functions, Procedures and Appointments.63
Assigning Functions to Keys . . . . . . . . . . . . . . . . . . . . . . . . . . . . . . . . . 63
Assigning a Procedure (Operating Steps) to a Key . . . . . . . . . . . . . . . . 67
Appointments Function . . . . . . . . . . . . . . . . . . . . . . . . . . . . . . . . . . . . . 69
Saving Appointments. . . . . . . . . . . . . . . . . . . . . . . . . . . . . . . . . . . . 69
Using Timed Reminders . . . . . . . . . . . . . . . . . . . . . . . . . . . . . . . . . 70
Displaying and Assigning Call Charges. . . . . . . . . .71
Displaying Call Charges (Not for U.S.) . . . . . . . . . . . . . . . . . . . . . . . . . . 71
Displaying Call Charges for Another Telephone (Not for U.S.) . . . . . . . 72
Dialing with Call Charge Assignment . . . . . . . . . . . . . . . . . . . . . . . . . . 73
Private Sphere/Security . . . . . . . . . . . . . . . . . . . . . . .74
Turning Ringer Cutoff On and Off . . . . . . . . . . . . . . . . . . . . . . . . . . . . . 74
Turning Do Not Disturb On and Off. . . . . . . . . . . . . . . . . . . . . . . . . . . . 74
Caller ID Suppression . . . . . . . . . . . . . . . . . . . . . . . . . . . . . . . . . . . . . . 75
Monitoring a Room . . . . . . . . . . . . . . . . . . . . . . . . . . . . . . . . . . . . . . . . 76
Trace Call: Identifying Anonymous Callers (Not for U.S.) . . . . . . . . . . . 77
Locking the Telephone to Prevent Unauthorized Use . . . . . . . . . . . . . . 78
Locking Another Telephone to Prevent Unauthorized Use . . . . . . . . . . 79
Saving Your PIN. . . . . . . . . . . . . . . . . . . . . . . . . . . . . . . . . . . . . . . . . . . 80
Using Other Functions. . . . . . . . . . . . . . . . . . . . . . . . .81
Sending a Message. . . . . . . . . . . . . . . . . . . . . . . . . . . . . . . . . . . . . . . . 81
Creating and Sending a Message . . . . . . . . . . . . . . . . . . . . . . . . . . 81
Displaying and Deleting Messages You Have Sent . . . . . . . . . . . . . 82
Answering Messages . . . . . . . . . . . . . . . . . . . . . . . . . . . . . . . . . . . 82
Leaving an Advisory Message . . . . . . . . . . . . . . . . . . . . . . . . . . . . . 83
Deleting Advisory Messages . . . . . . . . . . . . . . . . . . . . . . . . . . . . . . 83
Display Number of Waiting Calls and Overload Indication . . . . . . . . . . 84
Using Another Telephone Like Your Own for a Call . . . . . . . . . . . . . . . 84
Using Another Telephone Like your Own for an Extended Period
of Time (Mobility). . . . . . . . . . . . . . . . . . . . . . . . . . . . . . . . . . . . . . . . . . 85
6

Contents
Fax Details and Message on Answering Machine . . . . . . . . . . . . . . . . 86
Resetting Services and Functions
(System-Wide Cancellation for a Telephone). . . . . . . . . . . . . . . . . . . . . 86
Activating Functions for Another Telephone . . . . . . . . . . . . . . . . . . . . . 87
Using System Functions from the Outside
(DISA: Direct Inward System Access) . . . . . . . . . . . . . . . . . . . . . . . . . . 88
Using functions in ISDN via code dialing (keypad dialing) . . . . . . . . . . . 90
Controlling Connected Computers or Other Programs
and Telephone Data Service
(HiPath 3500/3550/3700/3750/3800 Only). . . . . . . . . . . . . . . . . . . . . . . 91
Controlling Relays . . . . . . . . . . . . . . . . . . . . . . . . . . . . . . . . . . . . . . . . . 92
Sensors (HiPath 3300/3350/3500/3550 Only) . . . . . . . . . . . . . . . . . . . . 92
Radio Paging (Not for U.S.) . . . . . . . . . . . . . . . . . . . . . . . . . . . . . . . . . . 93
Simple Paging Equipment . . . . . . . . . . . . . . . . . . . . . . . . . . . . . . . . 93
Enhanced Paging Equipment (Hipath 3700/3750/3800 Only) . . . . . 93
Using Other Team Functions . . . . . . . . . . . . . . . . . . .95
Turning Group Call On and Off . . . . . . . . . . . . . . . . . . . . . . . . . . . . . . . 95
Accepting a Call for Another Member of Your Team . . . . . . . . . . . . . . 97
Activating and Deactivating a Ringing Group. . . . . . . . . . . . . . . . . . . . . 98
Uniform Call Distribution (UCD). . . . . . . . . . . . . . . . . . . . . . . . . . . . . . . 99
Team and Executive/Secretary
Functions With Trunk Keys . . . . . . . . . . . . . . . . . . . 101
Using Trunk Keys. . . . . . . . . . . . . . . . . . . . . . . . . . . . . . . . . . . . . . . . . 101
Answering Calls With Trunk Keys . . . . . . . . . . . . . . . . . . . . . . . . . 102
Making Calls with Trunk Keys . . . . . . . . . . . . . . . . . . . . . . . . . . . . 102
Using a Trunk Key to Place a Call on Hold and Retrieve It Again . . 102
Switching Between Phone Calls on Multiple Trunks . . . . . . . . . . . 103
Forwarding Calls on Lines . . . . . . . . . . . . . . . . . . . . . . . . . . . . . . . . . . 103
Using DSS Keys. . . . . . . . . . . . . . . . . . . . . . . . . . . . . . . . . . . . . . . . . . 105
Using DSS Keys to Answer Calls. . . . . . . . . . . . . . . . . . . . . . . . . . 105
Calling a Team Member Directly . . . . . . . . . . . . . . . . . . . . . . . . . . 105
Transferring a Call in Progress. . . . . . . . . . . . . . . . . . . . . . . . . . . . . . . 106
Accepting a Call for Another Team Member. . . . . . . . . . . . . . . . . . . . 106
Joining or Leaving a Group Call
(Not for the Executive Telephone in an Executive/Secretary Team) . . 106
Transferring Calls Directly to the Executive
(Only in an Executive/Secretary Group). . . . . . . . . . . . . . . . . . . . . . . . 107
Testing the Telephone . . . . . . . . . . . . . . . . . . . . . . . 108
Testing the Telephone Functions . . . . . . . . . . . . . . . . . . . . . . . . . . . . 108
Checking the Key Assignment . . . . . . . . . . . . . . . . . . . . . . . . . . . . . . 108
7

Contents
Special Functions in the LAN (PC Network). . . . .109
Leaving a Hunt Group/Group Call . . . . . . . . . . . . . . . . . . . . . . . . . . . . 109
Transferring Call Forwarding . . . . . . . . . . . . . . . . . . . . . . . . . . . . . . . . 110
Using Night Answer . . . . . . . . . . . . . . . . . . . . . . . . . . . . . . . . . . . . . . 111
Activating and Deactivating a Ringing Group. . . . . . . . . . . . . . . . . . . . 112
Controlling Relays . . . . . . . . . . . . . . . . . . . . . . . . . . . . . . . . . . . . . . . . 113
Opening the Door . . . . . . . . . . . . . . . . . . . . . . . . . . . . . . . . . . . . . . . . 114
Different Displays (HiPath 4000 Environment) . . .115
Changing Key Labels . . . . . . . . . . . . . . . . . . . . . . . . .117
Entering Text on the Telephone . . . . . . . . . . . . . . .118
Labeling, Documentation and Accessories . . . . .119
Labeling Key Fields . . . . . . . . . . . . . . . . . . . . . . . . . . . . . . . . . . . . . . . 119
Attaching a Station Number Label. . . . . . . . . . . . . . . . . . . . . . . . . . . . 119
Documentation . . . . . . . . . . . . . . . . . . . . . . . . . . . . . . . . . . . . . . . . . . 119
Accessories . . . . . . . . . . . . . . . . . . . . . . . . . . . . . . . . . . . . . . . . . . . . . 120
Fixing Problems . . . . . . . . . . . . . . . . . . . . . . . . . . . . .121
Telephone Maintenance . . . . . . . . . . . . . . . . . . . . . . . . . . . . . . . . . . . 121
Echo Effect . . . . . . . . . . . . . . . . . . . . . . . . . . . . . . . . . . . . . . . . . . . . . 121
Troubleshooting. . . . . . . . . . . . . . . . . . . . . . . . . . . . . . . . . . . . . . . . . . 121
Responding to Error Messages on the Screen . . . . . . . . . . . . . . . . . . 122
Contacts for Resolving Problems . . . . . . . . . . . . . . . . . . . . . . . . . . . . 123
Index. . . . . . . . . . . . . . . . . . . . . . . . . . . . . . . . . . . . . . .124
Overview of Functions/Codes (Alphabetical). . . .129
FCC and Industry Canada Compliance. . . . . . . . . .134
FCC Certification and Requirements . . . . . . . . . . . . . . . . . . . . . . . . . . 134
Equipment Attachment Limitations. . . . . . . . . . . . . . . . . . . . . . . . . . . 136
8
Basic operating instructions
Basic operating instructions
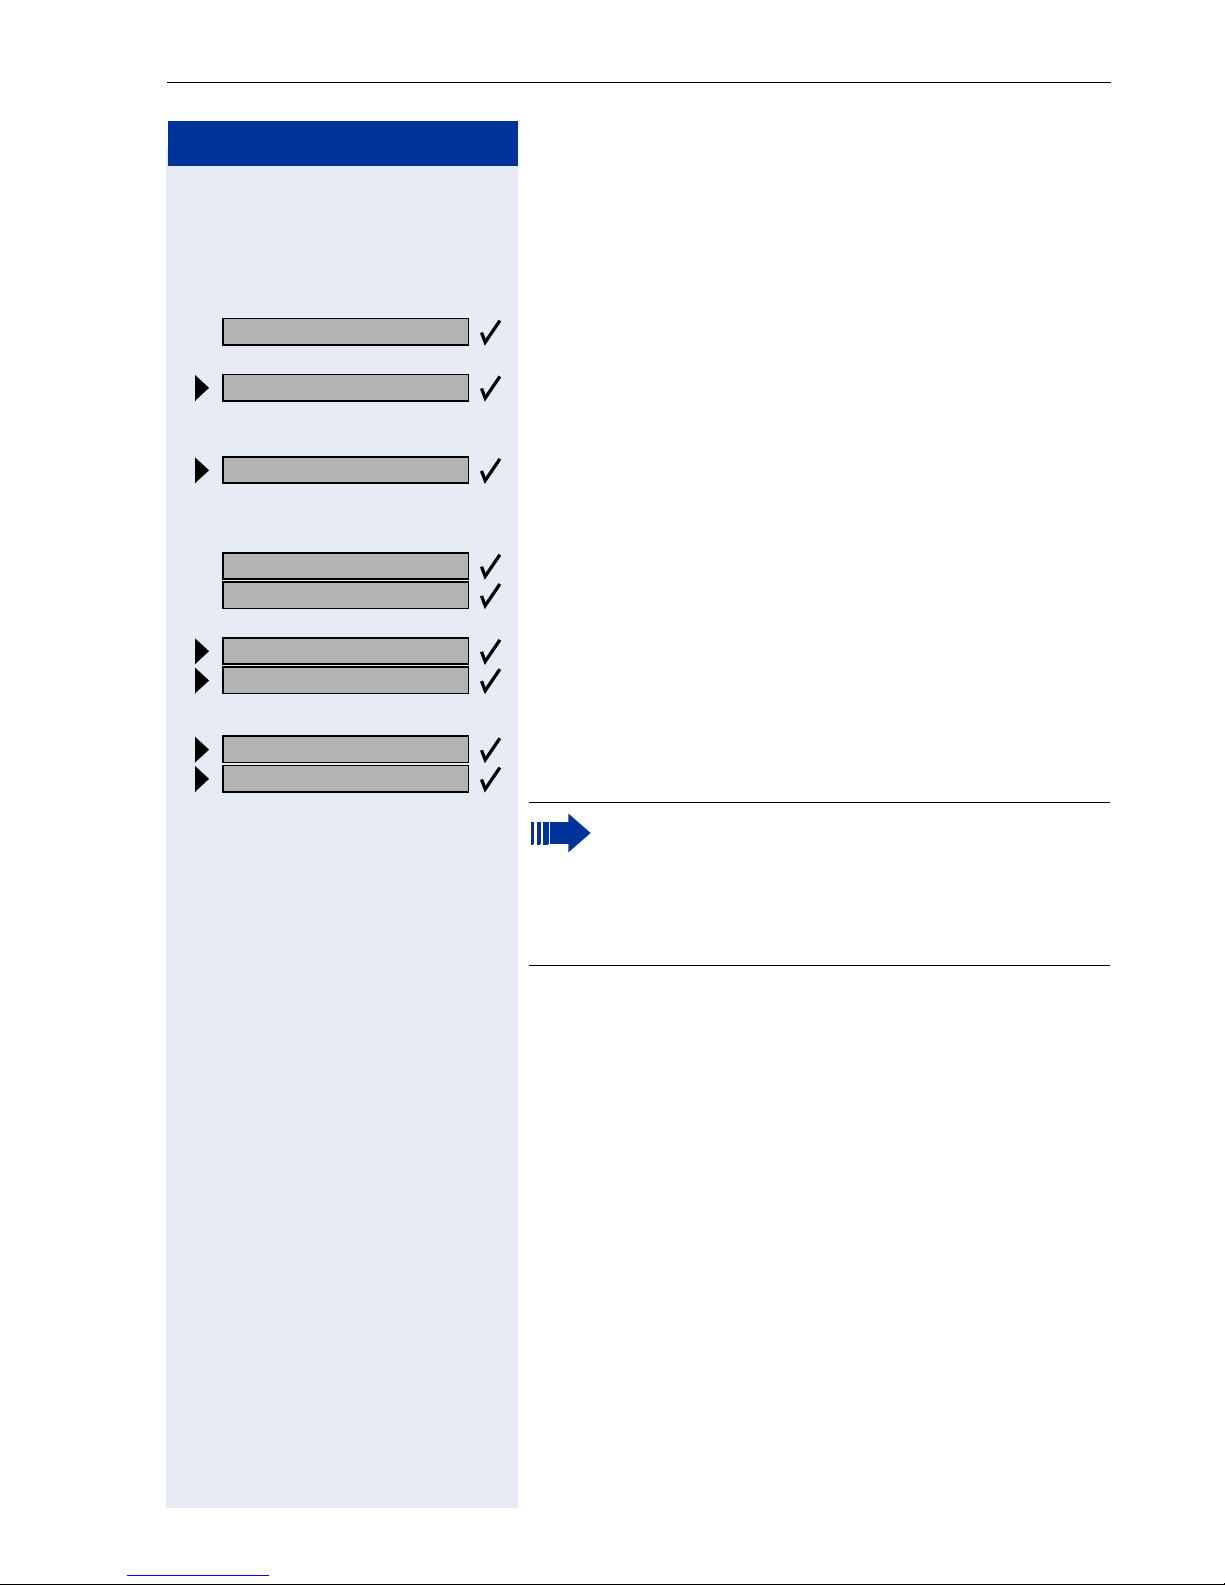
optiPoint 420
Full-duplex speakerphone feature - -
Illuminated display - -
Headset port -
2. LAN-Schnittstelle -
Interface for add-on equipment - -
Option bays 0 0 2
[1] The name and model of your telephone are printed on the base.
1
economy economy plus standard
;;
;;
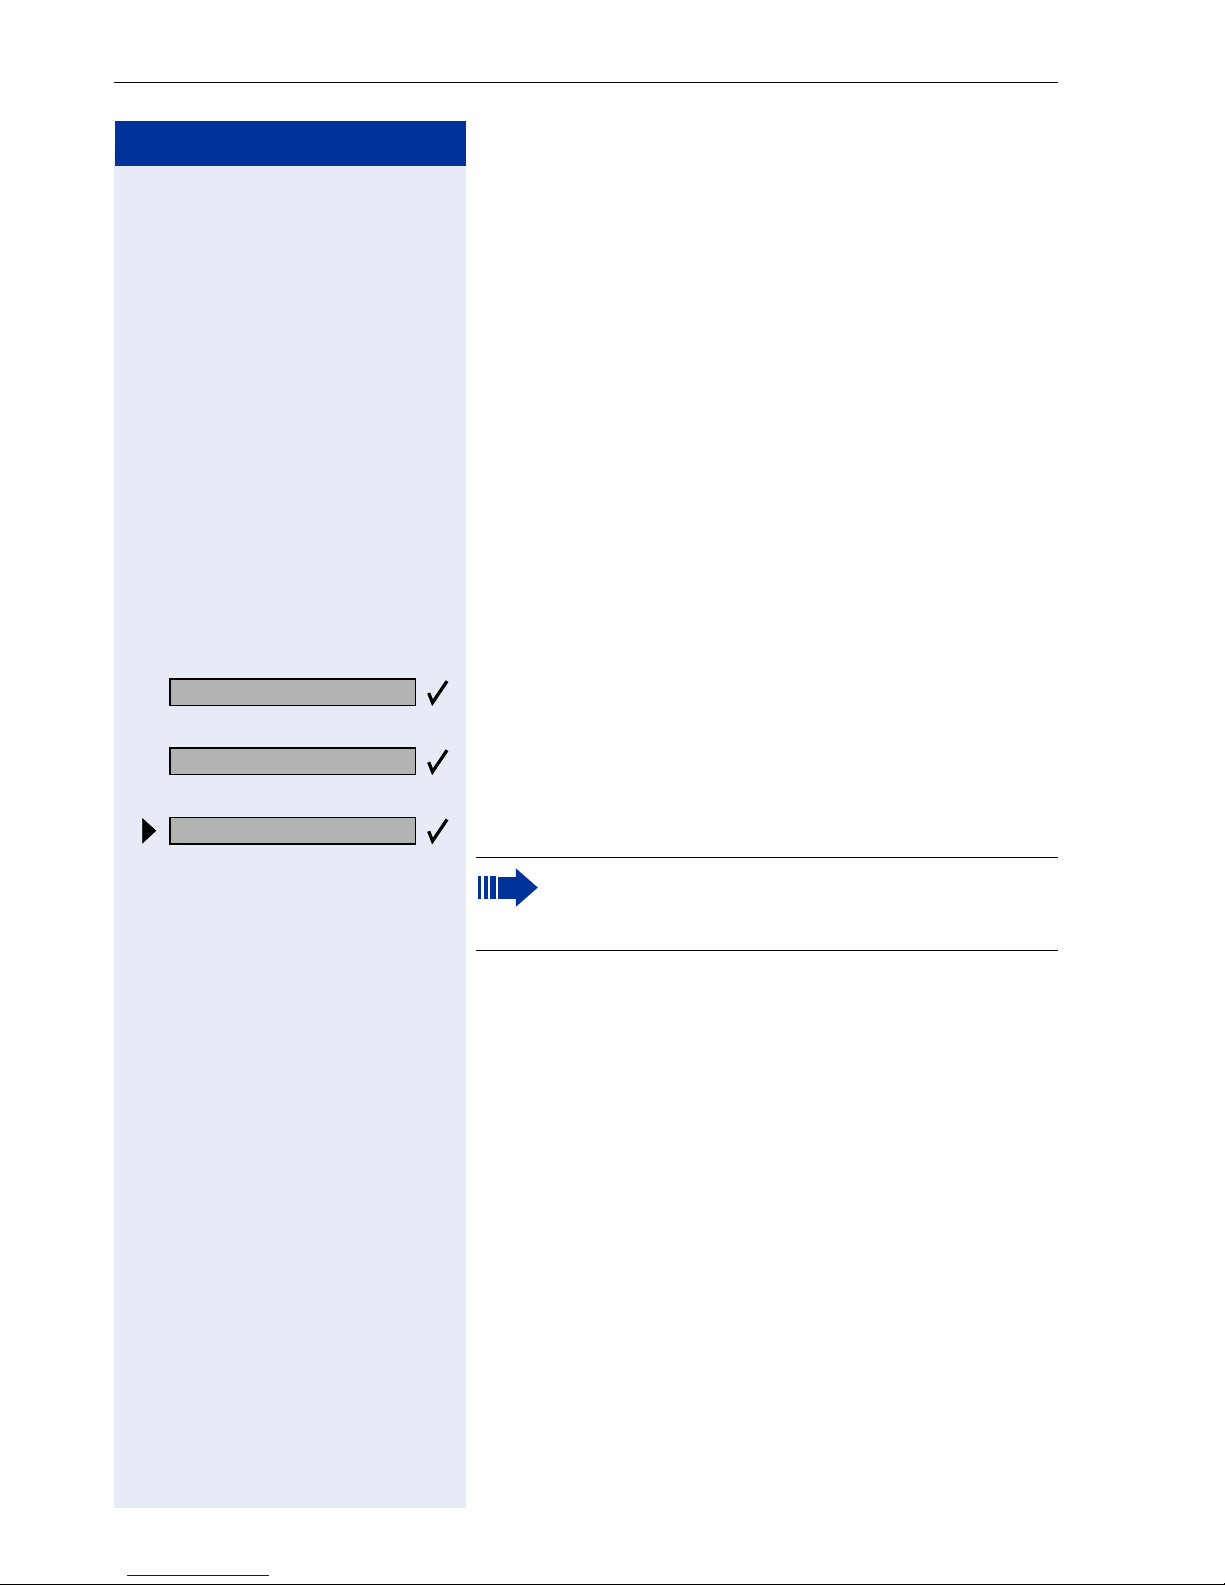
optiPoint 420 economy/economy plus/standard and
optiPoint self labeling key module control panel
Speaker for open listening
and ring tones
Handset
Backlight1 graphics
display, 2 lines with
24 chars
Key field –
fixed function keys
Program/Service
Redial
Mailbox
Mute or Internal
Speaker
3
3
;
;
;
2
:
3
Keys for scrolling to functions
Key for confirming a function
Keys for telephone settings
[1] optiPoint 420 standard only
[2] With automatic key labeling
[3] Cannot be changed on optiPoint 420
Key field
freely programmable
keys
optiPoint self labeling
key module
Keypad
Microphone for
speakerphone mode
–
2
1
1
9

Basic operating instructions
Step by Step
How to Use these Operating Instructions
You will find a graphic representation of the steps in logical sequence in the left column. Below is an explanation of the symbols:
Start conference?
Display contrast?
n
t
s
o
dd
u or v
Lift the handset (off-hook).
Replace the handset (on-hook).
Conduct a call.
Enter a telephone number or code.
Enter the code.
Press volume controls on the telephone.
Press the key.
Press the illuminated key.
Press the flashing key.
The option appears on the screen.
Press the
Search for an option.
Press the
until the option appears on the screen.
Then press the :
key to confirm your selection.
:
< >
keys,
key to confirm your selection
.
Please dial
Return to held call? >
10
Screen Displays
Line 1 displays prompts or acknowledgment
messages, depending on the situation.
Line 2 displays functions that you can confirm by pressing :. If the symbol ">" appears on the right, you can
press
< >
to access further options.

Step by Step
Basic operating instructions
Accessing Functions
... Interactively
You can select some functions while the telephone is
idle, for example:
Forwarding on
Callback
Send message
#0=Reset services?
< >
Use
execute it.
You can select other functions directly depending on
the situation. Example: you call a number, but the line
is busy:
Press
or
Use < > to scroll to a function and press : to
execute it.
:
to scroll to a function and press : to
to confirm.
... Via the Program/Service Menu
First press the "Program/Service" key. You then see a list
of selection options, such as: "#0=Reset services"
Æ Page 86.
Press the key
Use
< >
execute it.
to scroll to a function and press : to
or
rd
Enter the code directly.
The Quick-Reference Operating Instructions contain a
list of codes. However, they are also displayed on
screen along with the corresponding function.
... With Function Keys
If you saved a function on a key Æ Page 63, you can access it directly as follows:
Press the Mute key to execute the function.
11

Basic operating instructions
Step by Step
Functions You Can Use
SLK Functions
„SLK“ means „Self-Labeling Key“. That means you usu-
ally won’t need to worry about manually labeling the
keys on your telephone.
If you want to, you can still specify your own text for labeling the function keys Æ Page 117.
Basic and Enhanced Functions
You can use all basic and enhanced communications
platform functions that appear interactively on the
screen, in the Program/Service menu, and when you
press function keys.
Additional Team and Executive/Secretary
Functions
Æ Page 101f.
To help working and project groups work together more
efficiently, the service personnel can configure a variety
of team functions, depending on your preferences
when working in the team. You can use these team
functions in addition to the basic and enhanced functions.
In addition to call pickup, hunting groups (group call),
and call distribution groups, you can also set up teams
with multiple lines per telephone.
You can tell if a telephone has trunk keys if your station
number and the numbers of your colleagues are programmed on trunk keys. You can access all lines and
can also conduct different calls simultaneously on multiple lines.
Another team function category includes the executive/
secretary
functions, which are configured by the service personnel. You can use executive and secretary functions in
addition to the basic and enhanced functions as well as
other team functions.
An executive/secretary telephone has DSS keys for the
executive or secretary, trunk keys for the executive and
secretary, as well as ring transfer keys.
12

Step by Step
Basic operating instructions
Using the Telephone Efficiently
• You probably have certain colleagues or external parties with whom you talk on the phone especially frequently. To dial these numbers faster and more conveniently, you can save them on keys
(Saving station numbers for repertory dialing on
keys Æ Page 28).
• All too often you reach a busy line when dialing a
number. Amid the confusion of your working day,
it’s easy to forget to try the number again later on.
To avoid this, make it a habit to use the "Callback"
Æ Page 26 function.
13

Making Calls – Basic Functions
Step by Step
Making Calls – Basic Functions
Answering Calls
Special default ring signaling is set for your telephone:
• When you receive an internal call, your telephone
rings once every four seconds (single-tone sequence).
• When you receive an external call, your telephone
rings twice in rapid succession every four seconds
(dual-tone sequence).
• When you receive a call from the entrance telephone,
your telephone rings three times in rapid succession
every four seconds (triple-tone sequence).
• If a call is waiting, you hear a short tone (beep) every
six seconds.
n
u or v
The number or the name of the caller appears on the
display.
Answering a Call With the Handset
The telephone rings. The caller appears on the screen.
Lift the handset.
Raise or lower the volume. Keep pressing the key until
the desired volume is set.
Answering a Call with the Speaker
(Speakerphone Mode)
This function is not available with
optiPoint 420 economy/economy plus.
The telephone rings. The caller appears on the screen.
Press the key. The LED lights up.
Speakerphone mode.
u or v
14
Raise or lower the volume. Keep pressing the key until
the desired volume is set.
Ending the call:
Press the key. The LED goes out.

Step by Step
Making Calls – Basic Functions
or
Press the key.
Notes on speakerphone mode:
• Tell the other party that you are using speakerphone
mode.
• The speakerphone works bests at a low receiving
volume.
• The ideal distance between the user and the telephone set in speakerphone mode is about 50 cm
(approx. 20 inches).
Switching to Speakerphone Mode
This function is not available with
optiPoint 420 economy/economy plus.
n
and
and
t
s
Precondition: You are conducting a call with the handset.
Hold down the key and replace the handset.
(in the U.S.: press the key once and replace the handset). Then release the key and continue the call.
Switching to the Handset
This function is not available with
optiPoint 420 economy/economy plus.
Precondition: You are engaged in a call in speakerphone mode.
Lift the handset. Continue the call.
15

Making Calls – Basic Functions
Step by Step
Open Listening in the Room During a
Call
You can let other people in the room join in on the call.
Let the other party know that you have turned on the
speaker.
Precondition: You are conducting a call with the handset.
Activating ring transfer:
Press the key. The LED lights up.
Deactivating this function:
Press the key. The LED goes out.
n
o
t
o
Making Calls
Off-Hook Dialing
Lift the handset.
Internal calls: Enter the station number.
External calls: Enter the external code and the station
number.
The called party does not answer or is busy:
Replace the handset.
On-Hook Dialing
Internal calls: Enter the station number.
External calls: Enter the external code and the station
number.
16
The other party answers with speaker:
n
Lift the handset.
or On-hook: Use speakerphone mode (not available with
optiPoint 420 economy/economy plus).

Step by Step
Making Calls – Basic Functions
The called party does not answer or is busy:
Press the key. The LED goes out.
Your system may also be programmed so that
you have to press the Internal key before you dial
an internal number.
To call an external party, you have to enter an external code before dialing the party’s telephone
number (Prime Line is not active; contact your
service personnel).
Ending the call
t
or
Replace the handset.
Press the key.
17
Making Calls – Basic Functions
Step by Step
Redialing a Number
The last three external telephone numbers dialed are
stored automatically.
You can redial them simply by pressing a key.
The station number appears on your screen for two seconds and is then dialed.
Press the key once to dial the number last dialed.
Press the key twice to dial the next to the last number
dialed.
Press the key three times to dial the third-to-the-last
number dialed.
Displaying and dialing saved station numbers
Next?
Next?
Call?
Press the key.
Press the "OK" dialog key within two seconds to confirm
your choice.
The next stored number is displayed. Press the "OK" dialog key to confirm four selection.
Select and confirm.
If this feature is configured (contact your service
personnel), account codes entered are also
saved Æ Page 73.
18

Step by Step
Making Calls – Basic Functions
Turning the Microphone On and Off
To prevent the other party from listening in while you
consult with someone in your office, you can temporarily switch off the handset microphone or the handsfree
microphone. You can also switch on the handsfree microphone to answer an announcement via the telephone speaker (speaker call, Æ Page 35).
Speakerphone mode is not available with
optiPoint 420 economy/economy plus.
Precondition: You are conducting a call. The microphone is switched on.
Press the key. The LED lights up.
or
Press the illuminated key. The LED goes out.
Mute on?
Mute off?
qif
rif
or
or
Select and confirm.
or
or
Press the key. The LED lights up
Enter the code for "on" or "off".
19
Making Calls – Basic Functions
Step by Step
Calling a Second Party
(Consultation Hold)
You can call a second party while engaged in a call. The
first party is placed on hold.
US: Consult?
UK: Enquiry?
Return to held call?
Quit and return?
Toggle/Connect?
o
q d
q f
Confirm.
Call the second party.
Return to the first party:
Confirm.
or
or
Press the key. The LED lights up. Enter the code. The
LED goes out.
Switching to the Party on Hold (Toggle)
Select and confirm.
or
Press the key. The LED lights up. Enter the code. The
LED goes out.
Combine the calling parties into a three-party conference
Conference?
q g
Tr a n s f e r ?
20
Select and confirm.
or
Press the key. The LED lights up. Enter the code. The
LED goes out.
Connecting the other parties to each other
Select and confirm.

Step by Step
Making Calls – Basic Functions
Transferring a Call
If the person you are speaking to wants to talk to
another colleague of yours, you can transfer the call that
colleague.
US: Consult?
UK: Enquiry?
Tr a n s f e r ?
o
s
t
or
Confirm.
Enter the number of the party to which you want to
transfer the call.
Announce the call, if necessary.
Replace the handset.
Select and confirm.
21
Making Calls – Basic Functions
Step by Step
Call Forwarding
Using Variable Call Forwarding
You can immediately forward internal or external calls to
different internal or external telephones (destinations).
(External destinations require special configuration in
the system.)
Special features must be taken into consideration if
your telephone operates with HiPath 5000 (system
networking via PC network) Æ Page 110!
Forwarding on?
1=all calls?
2=external calls only?
3=internal calls only?
e
or f or
US: Save?
UK: Save entry?
Forwarding off?
or
qe
or
or
or
g
o
or
Select and confirm.
Enter the code.
Select and confirm.
Enter the code.
Enter the number of the telephone that is ringing.
Confirm.
Deactivating call forwarding:
Select and confirm.
re
22
Enter the code.

Step by Step
Making Calls – Basic Functions
When call forwarding is active, a special dial tone
sounds when you lift the handset.
If DID DTMF is active (contact your service personnel), you can also forward calls to this destination. Destinations: fax = 870, DID = 871,
fax DID = 872.
If you are a call forwarding destination, your display will show the station number or the name of
the originator on the upper line and that of the
caller on the lower line.
23

Making Calls – Basic Functions
Step by Step
Call Forwarding in the Carrier Network
and Forwarding Multiple Subscriber Numbers (MSN) (Not for U.S.)
If this function has been configured (contact your service personnel), you can forward calls to your assigned
multiple subscriber number (MSN) (DID number) directly within the carrier network.
For example, you can forward your phone line to your
home phone after business hours.
Tr u n k F W D o n ?
1=immediate?
2=on no answer?
3= on busy?
e
or f or
Save?
or
qjh
or
or
or
g
o
o
Select and confirm.
Enter the code.
Select and confirm the line type you wish to use.
Enter the code.
Enter your DID number.
Enter the destination number (without the external
code).
Confirm.
Forwarding - trunk off
rjh
e
or f or
24
or
or
g
o
Deactivating call forwarding:
Select and confirm.
Enter the code.
Confirm the displayed call forwarding type.
Enter the activated call forwarding type.
Enter your DID number.
Step by Step
Making Calls – Basic Functions
Call Forwarding in the Event of a Telephone
Malfunction
If this feature is configured (ask the service personnel),
you can define an internal or external call forwarding
destination that becomes effective when your telephone is not working.
Program/Service
*9411=CFSS on
qmhee
US: Save entry?
UK: Save?
Program/Service
#9411=CFSS off
rmhee
Press the key. The LED lights up.
Select and confirm.
or
Enter the code.
Enter the station number of the destination.
o
Confirm.
Deactivating call forwarding/deleting a destination:
Press the key. The LED lights up.
Select and confirm.
or
Enter the code.
Delete?
Delete?
Program/Service
qmhee
US: Change?
UK: Change entry?
US: Save entry?
UK: Save?
Confirm to deactivate call forwarding and delete the forwarding destination.
or
Select and confirm to deactivate call forwarding without
deleting the forwarding destination.
Changing the call forwarding destination (if forwarding is active):
Press the key. The LED lights up.
Enter the code.
Confirm.
Change the station number of the destination.
o
Confirm.
25

Making Calls – Basic Functions
Step by Step
Using Callback
If a user is busy or is not answering, you can store an
automatic callback. This feature saves you from having
to make repeated attempts to reach the user.
You receive a callback,
• When the other party is no longer busy
• When the user who did not answer has conducted
another call.
Storing a Callback
Precondition: You have reached a busy line or no one
answers.
US: Callback
UK: Set Callback
View callbacks?
or
qil
n
or
or
Confirm.
Enter the code.
Answering a Callback
Precondition: A callback was saved. Your telephone
rings. "Callback: ..." appears on the display.
Lift the handset.
Press the key. The LED lights up.
You hear a ring tone.
Checking and Canceling a Saved Callback
Select and confirm1.
ril
US: Next callback?
UK: Display next?
26
Enter the code.
Select the displayed function and press the "OK" dialog
key to display additional entries.
[1] ”Different Displays (HiPath 4000 Environment)” ÆPage 115)

Step by Step
Making Calls – Basic Functions
Deleting a displayed entry:
Delete?
US: Exit?
UK: End?
Press the "OK" dialog key to confirm your selection.
Ending callback display:
Select and confirm.
or
Press the key. The LED goes out.
or
Press the key. The LED goes out.
27
Making Calls – Basic Functions
Step by Step
Saving Repertory Dialing Numbers on
a Key
You can save frequently-dialed station numbers on programmable keys that are unassigned by default. The
keys can be programmed on two separate levels
(switching levels, saving the Shift key Æ Page 63) if a
LED display is not saved for either station number
(=Save without LED).
If you save internal station numbers, you can save a
LED display (=Save with LED) that signals various
states Æ Page 65, Æ Page 105. You cannot program
the second level if you saved a station number with LED
display.
Press the key. The LED lights up.
91=Prog. feature key?
*
If applicable
+=Next layer?
US: Change key?
UK: Change feature?
Repdial key?
Previous?
or
qme
o
Select and confirm.
Enter the code.
Press the key. If the key is already in use, its assignment
appears on the screen.
Select and confirm to save the station number on the
second layer.
Confirm.
Confirm.
Enter the station number.
If you make a mistake:
Select and confirm. This deletes all digits entered.
28
Step by Step
Making Calls – Basic Functions
The system telephone automatically recognizes if you
want to save an internal or an external station number.
The options "Save without LED" or "Save with LED" are
only available for internal station numbers.
Save with LED?
Save without LED?
If applicable
Key label?
US: Exit?
UK: End?
US: Another key?
UK: Program another key?
US: Clear key?
UK: Delete feature?
Confirm.
or
Select and confirm to save the repdial key without LED
display.
Select and confirm to update automatic key labeling.
For more information, see Æ Page 117.
Confirm.
or
Select and confirm.
or
Select and confirm.
Simply press the key to dial a stored telephone
number Æ Page 30.
You can do this while a call is in progress.
For information on display messages when sav-
ing station numbers Æ Page 122.
29

Making Calls – Basic Functions
Step by Step
Using Repertory Dialing Keys
Precondition: You have saved a station number on a
repertory dialing key Æ Page 28.
Press the key on which the number is saved.
If the station number is located on the second level, first
press "Shift".
You can also press the repertory dial key during a
call. This automatically sets up a consultation
Æ Page 20.
30
 Loading...