

Page 1

Motion 701, 501, 301,
101 BTE
User Guide • Használati útmutató • Ghidul
utilizatorului • Guide d'utilisation • Gebrauchsanweisung • مﺪﺨﺘﺴﻤﻟا ﻞﻴﻟد
English
Magyar
Română
Français
Deutsch
ﻲﺑﺮﻋ
Page 2

2
English 3
Magyar 31
Română 59
Français 87
Deutsch 115
ﻲﺑﺮﻋ 166
Page 3

3
Content
EN
HU
RO
FR
DE
AR
Content
Your Motion BTE hearing instrument 4
Intended use 7
General notes on safety 8
Handling of standard and rechargeable batteries 11
Inserting and removing your hearing instrument 14
Turning your hearing instrument on and off 15
Changing the hearing program 17
Changing the volume 18
Functionalities 19
Maintenance and care 22
Accessories 23
Troubleshooting tips 25
Technical information 26
Disposal information 28
Your hearing instrument configuration 29
Page 4
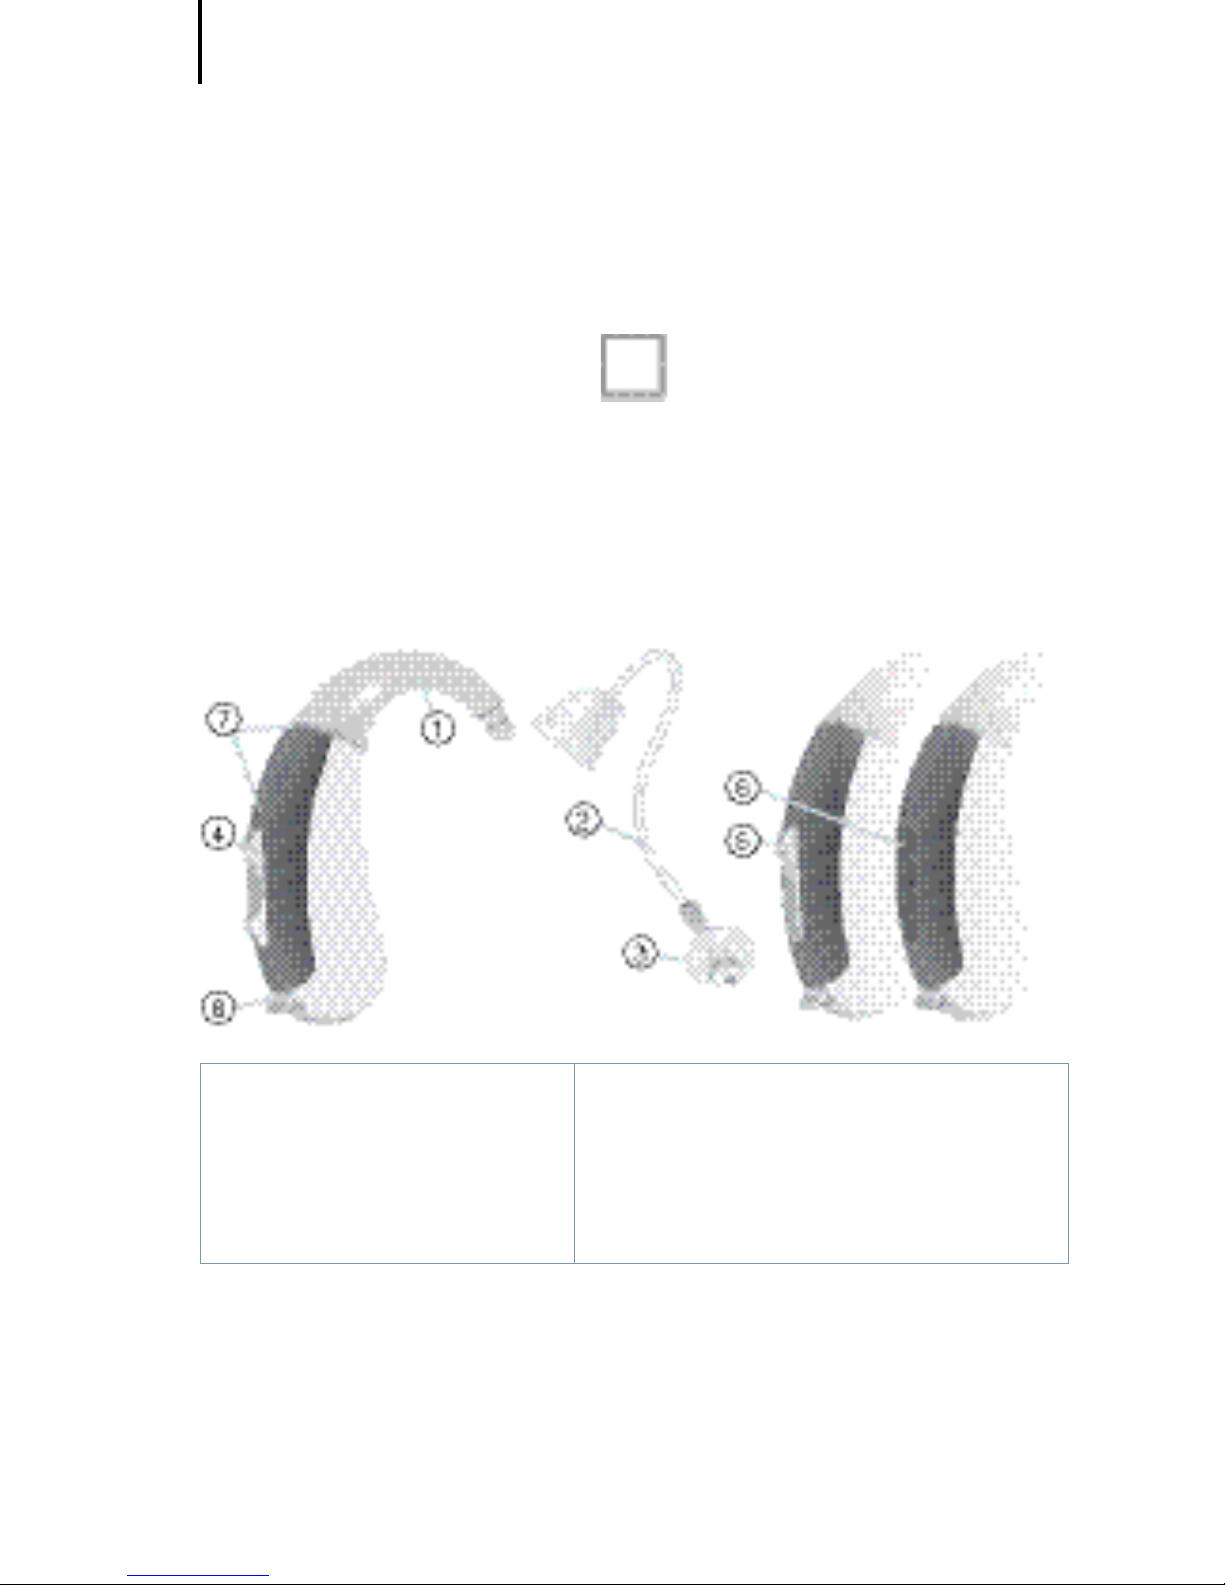
Your Motion BTE hearing instrument
4
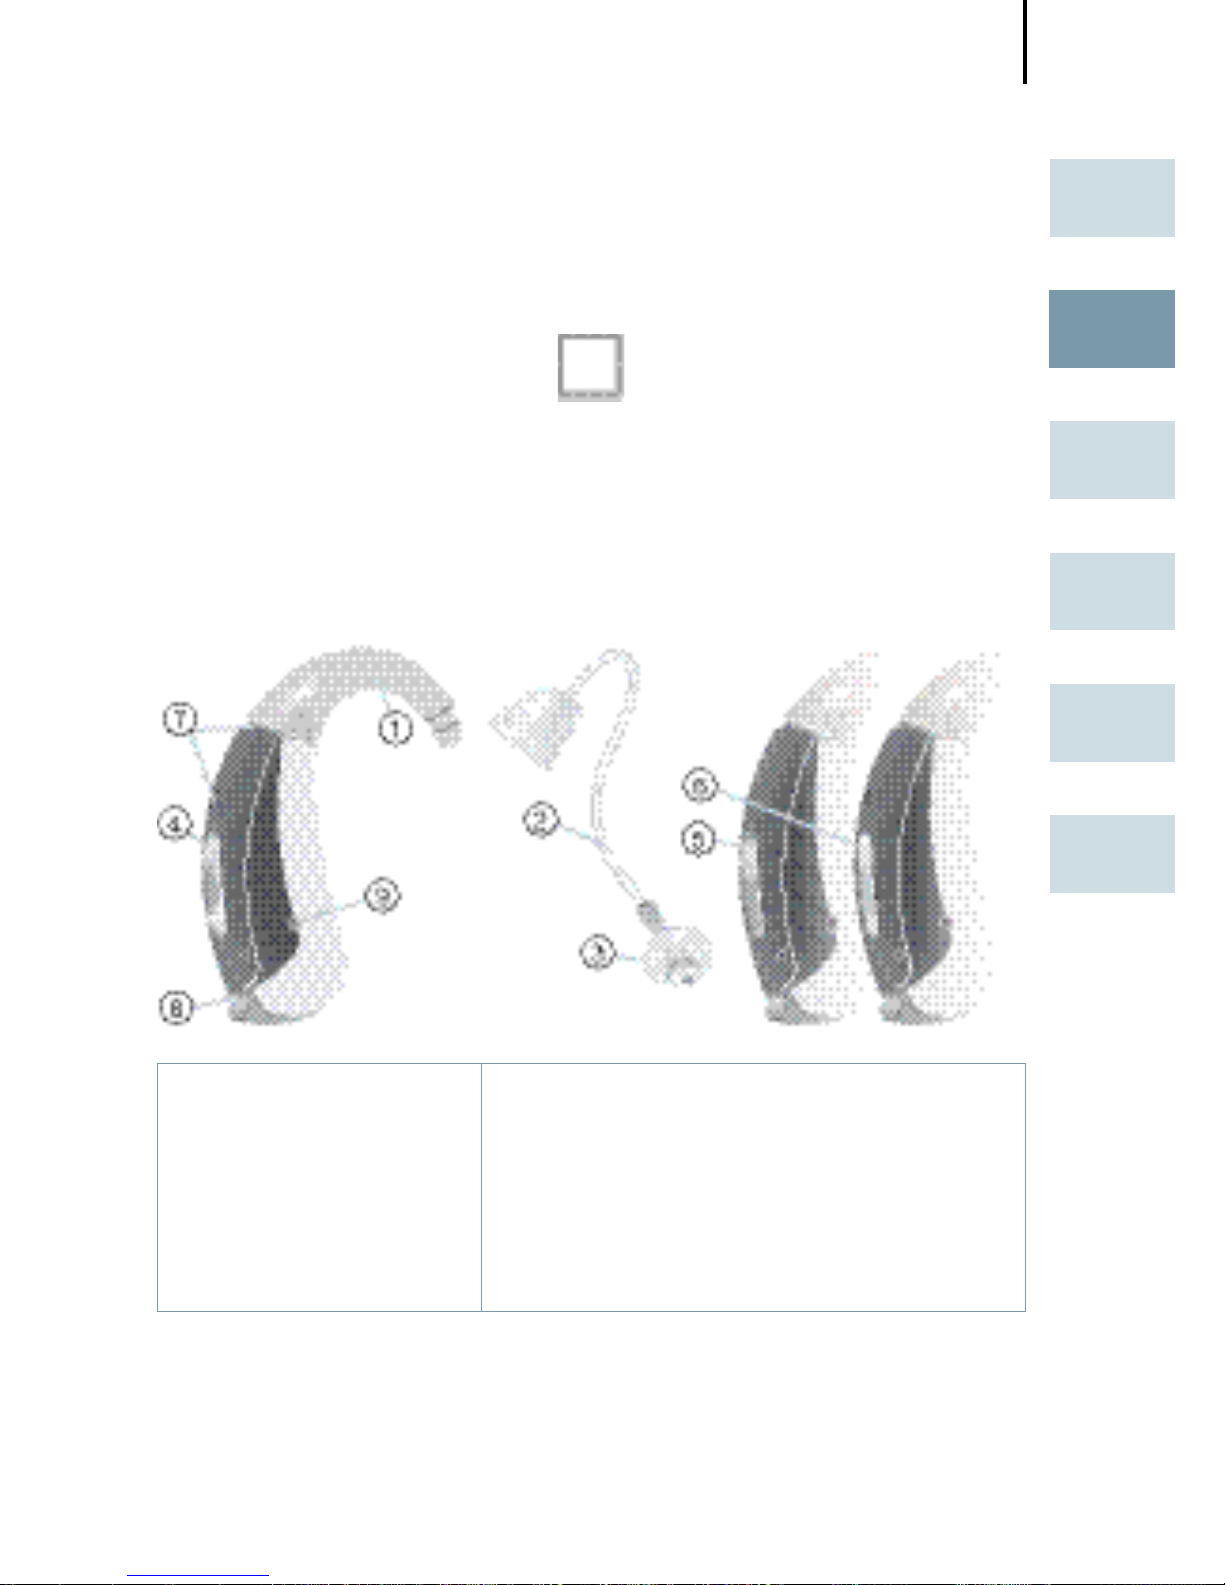
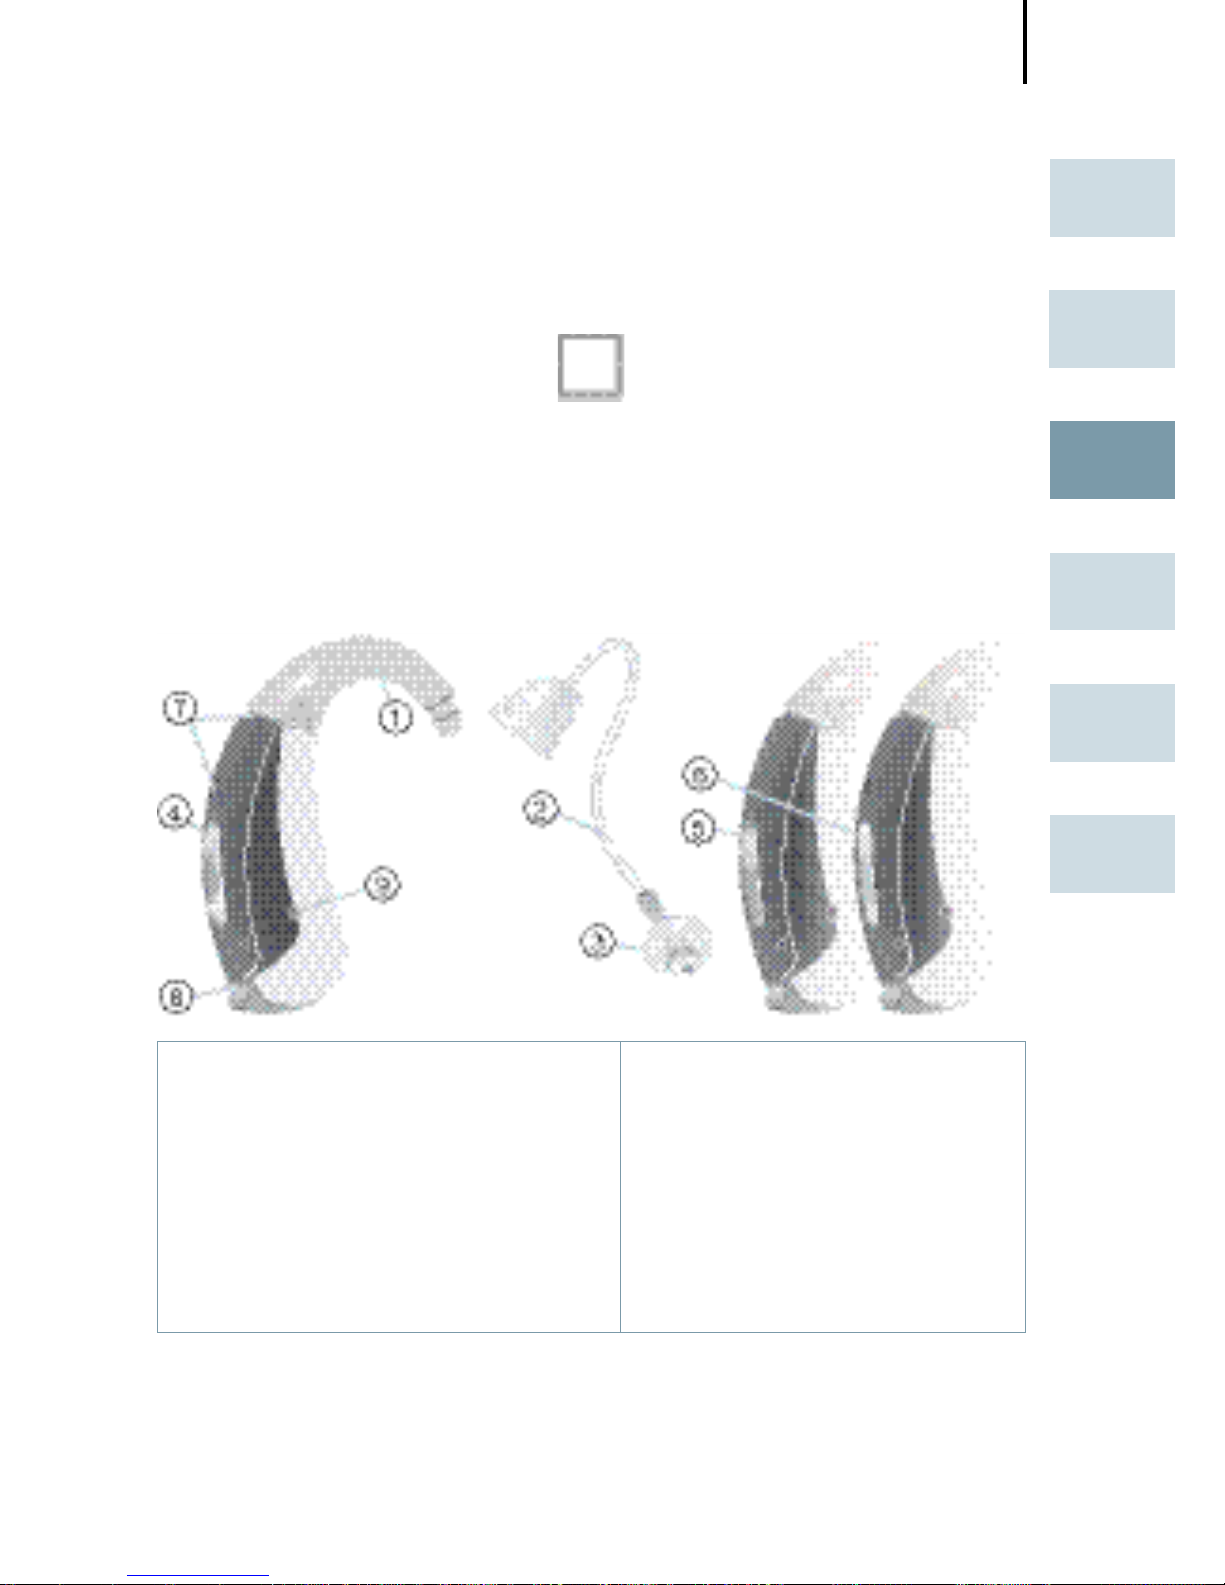
Motion S
optional with LifeTube
battery type: 312
always non-rechargeable
① Earhook
② LifeTube
③ LifeTip
④ Rocker switch*
⑤ Push button*
⑥ Flat cover*
⑦ Microphone openings
⑧ Battery compartment
* Alternative to a rocker switch your Hearing Care Professional can fit your hearing instrument with a push button
or without control (flat cover).
Your Motion BTE hearing
instrument
Page 5
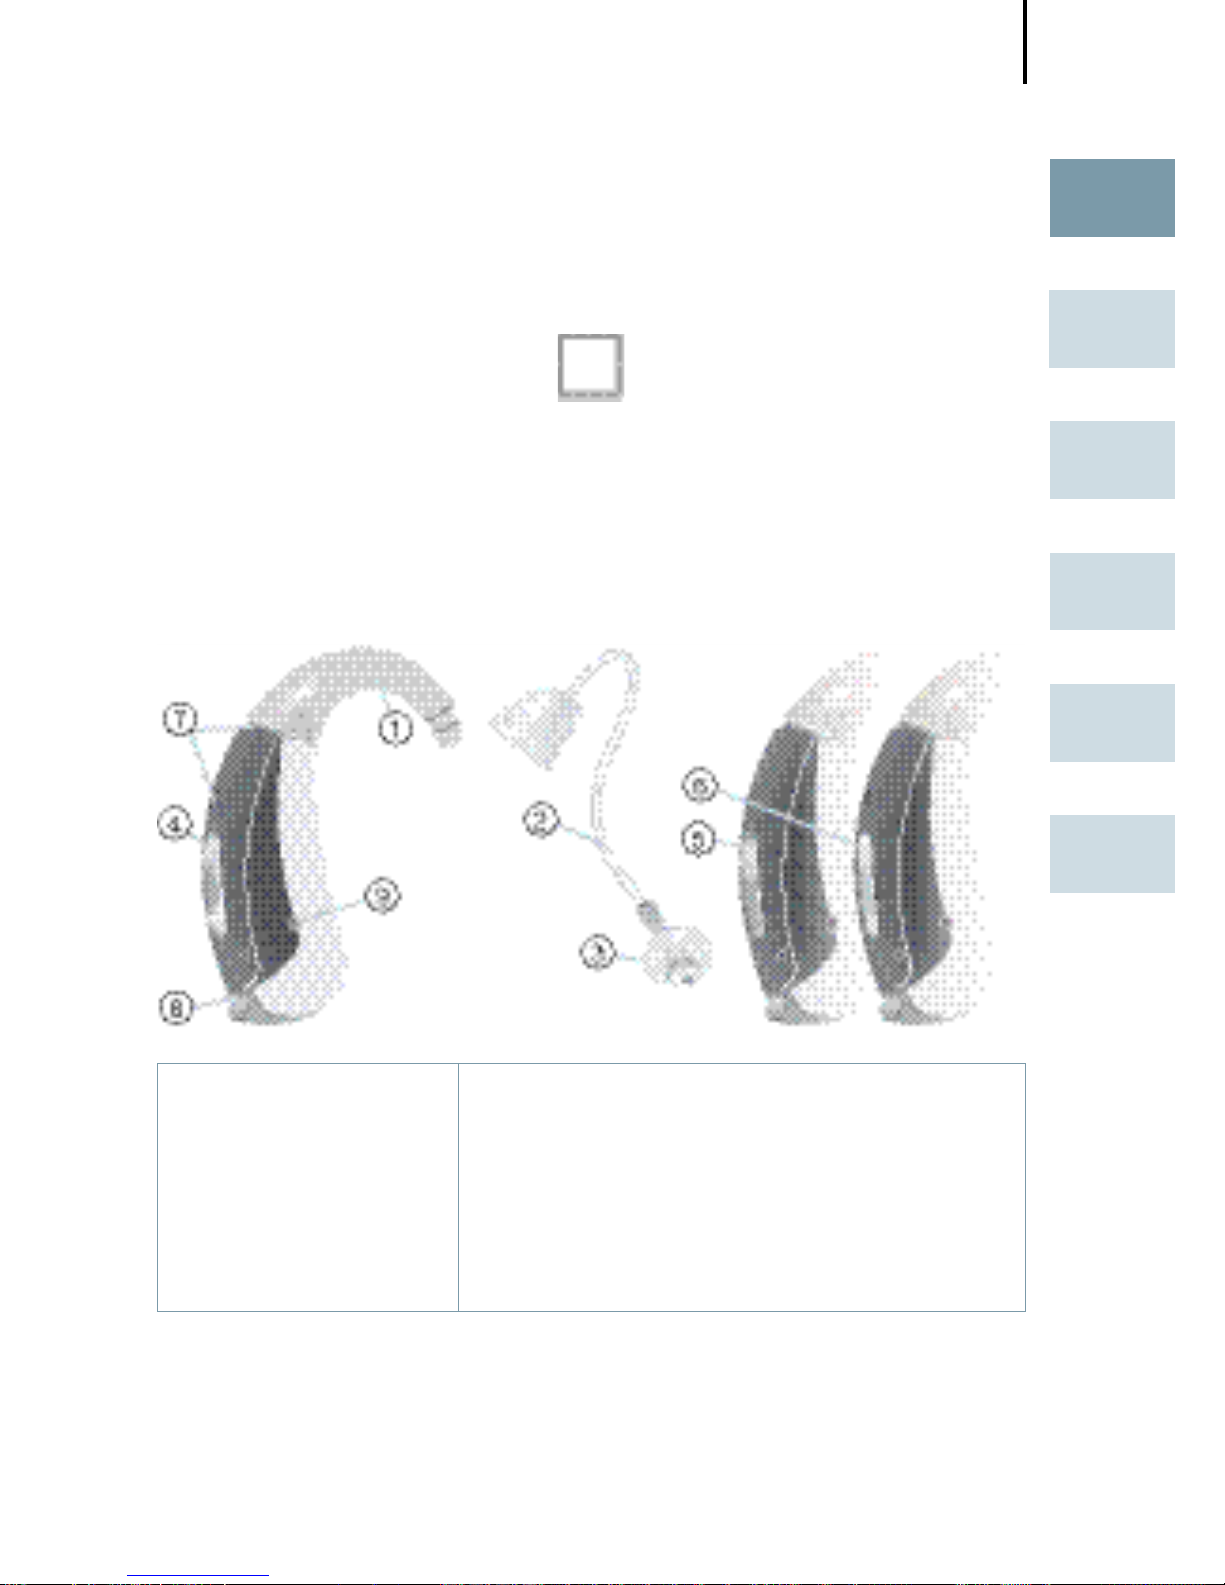
Your Motion BTE hearing instrument
5
EN
HU
RO
FR
DE
AR
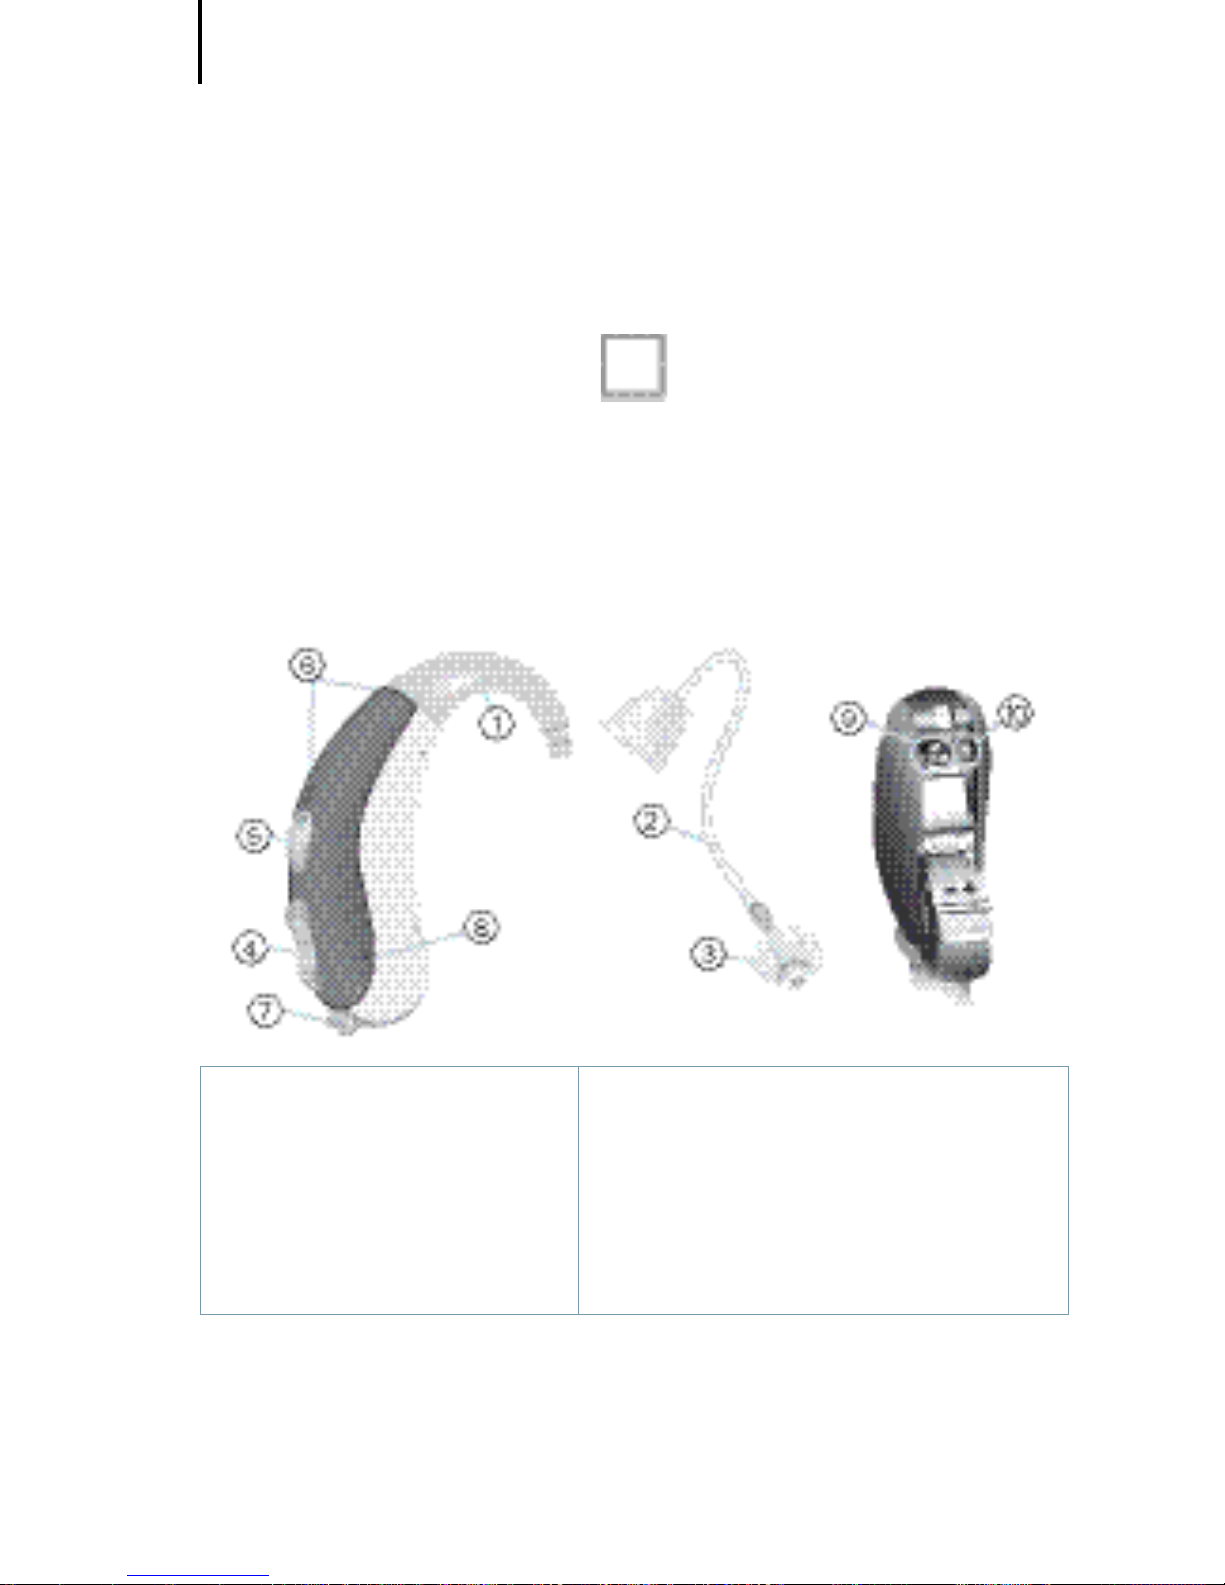
Motion SX
optional with LifeTube
battery type: 13
rechargeable or non-rechargeable
① Earhook
② LifeTube
③ LifeTip
④ Rocker switch*
⑤ Push button*
⑥ Flat cover*
⑦ Microphone openings
⑧ Battery compartment
⑨ Charging contacts
* Alternative to a rocker switch your Hearing Care Professional can fit your hearing instrument with a push button
or without control (flat cover).
Page 6
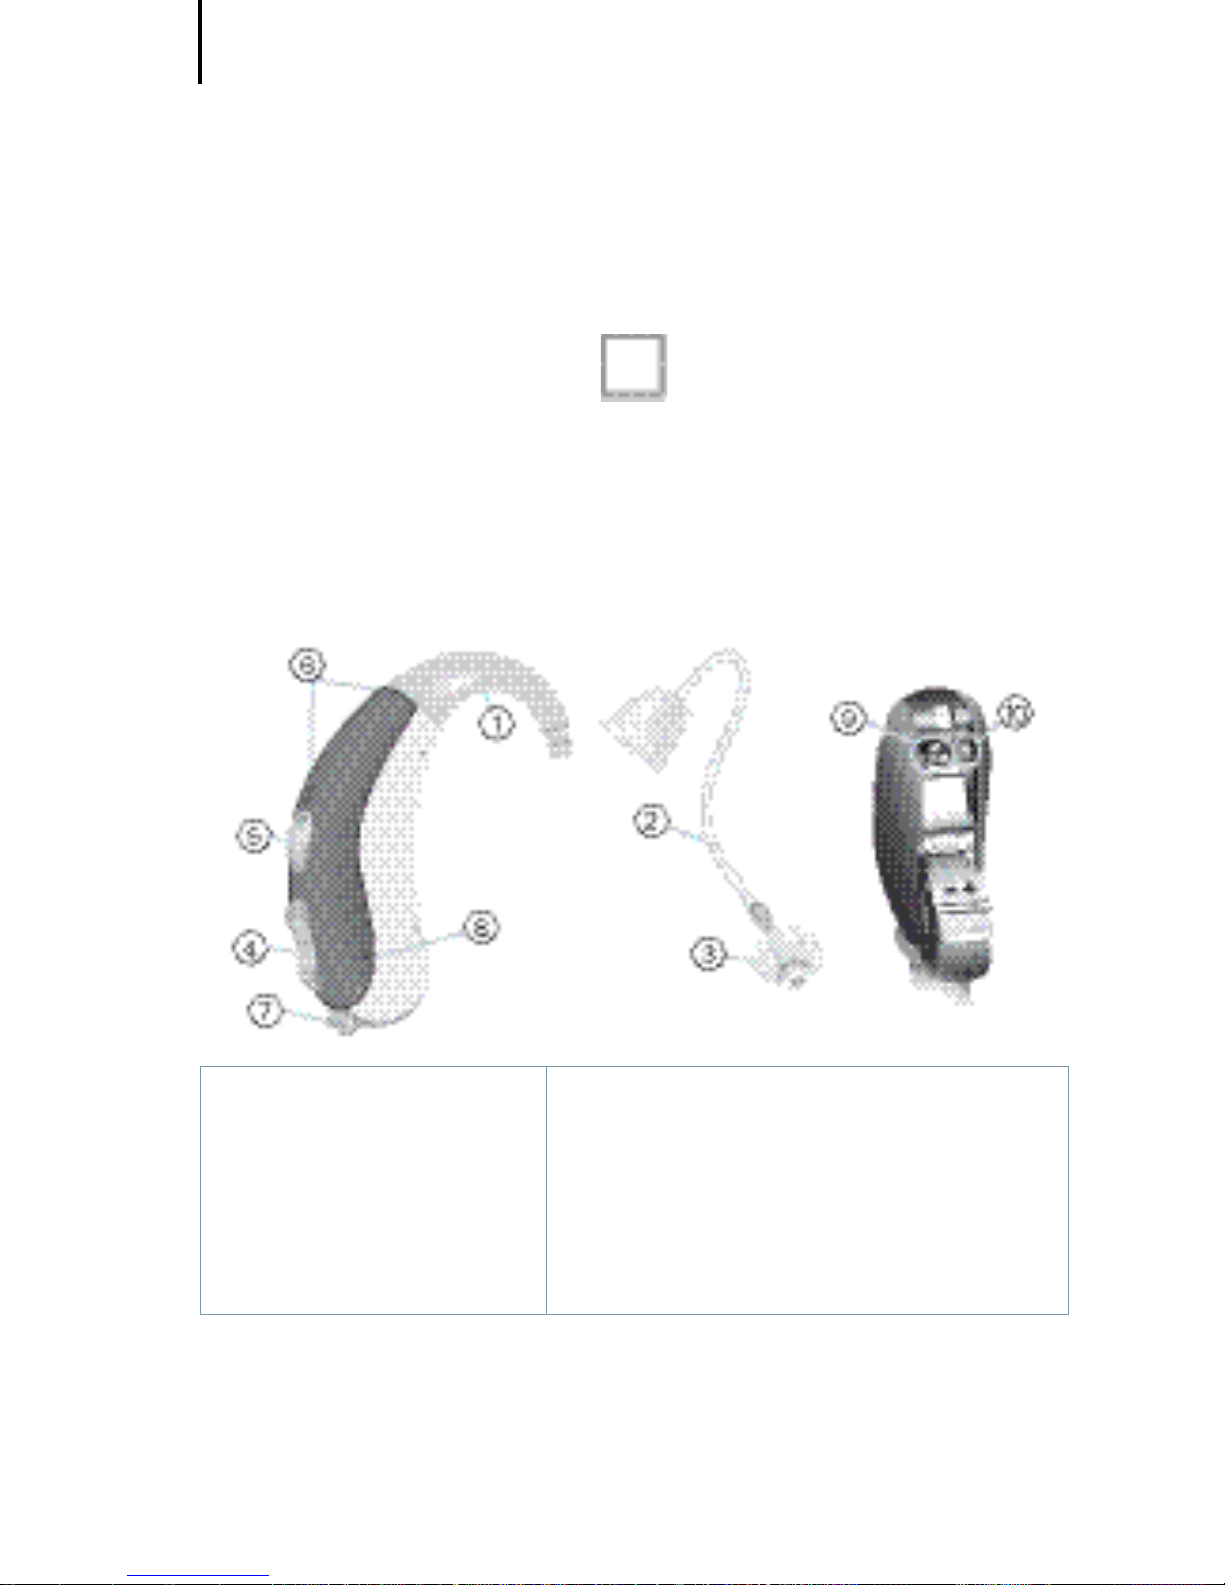
Your Motion BTE hearing instrument
6
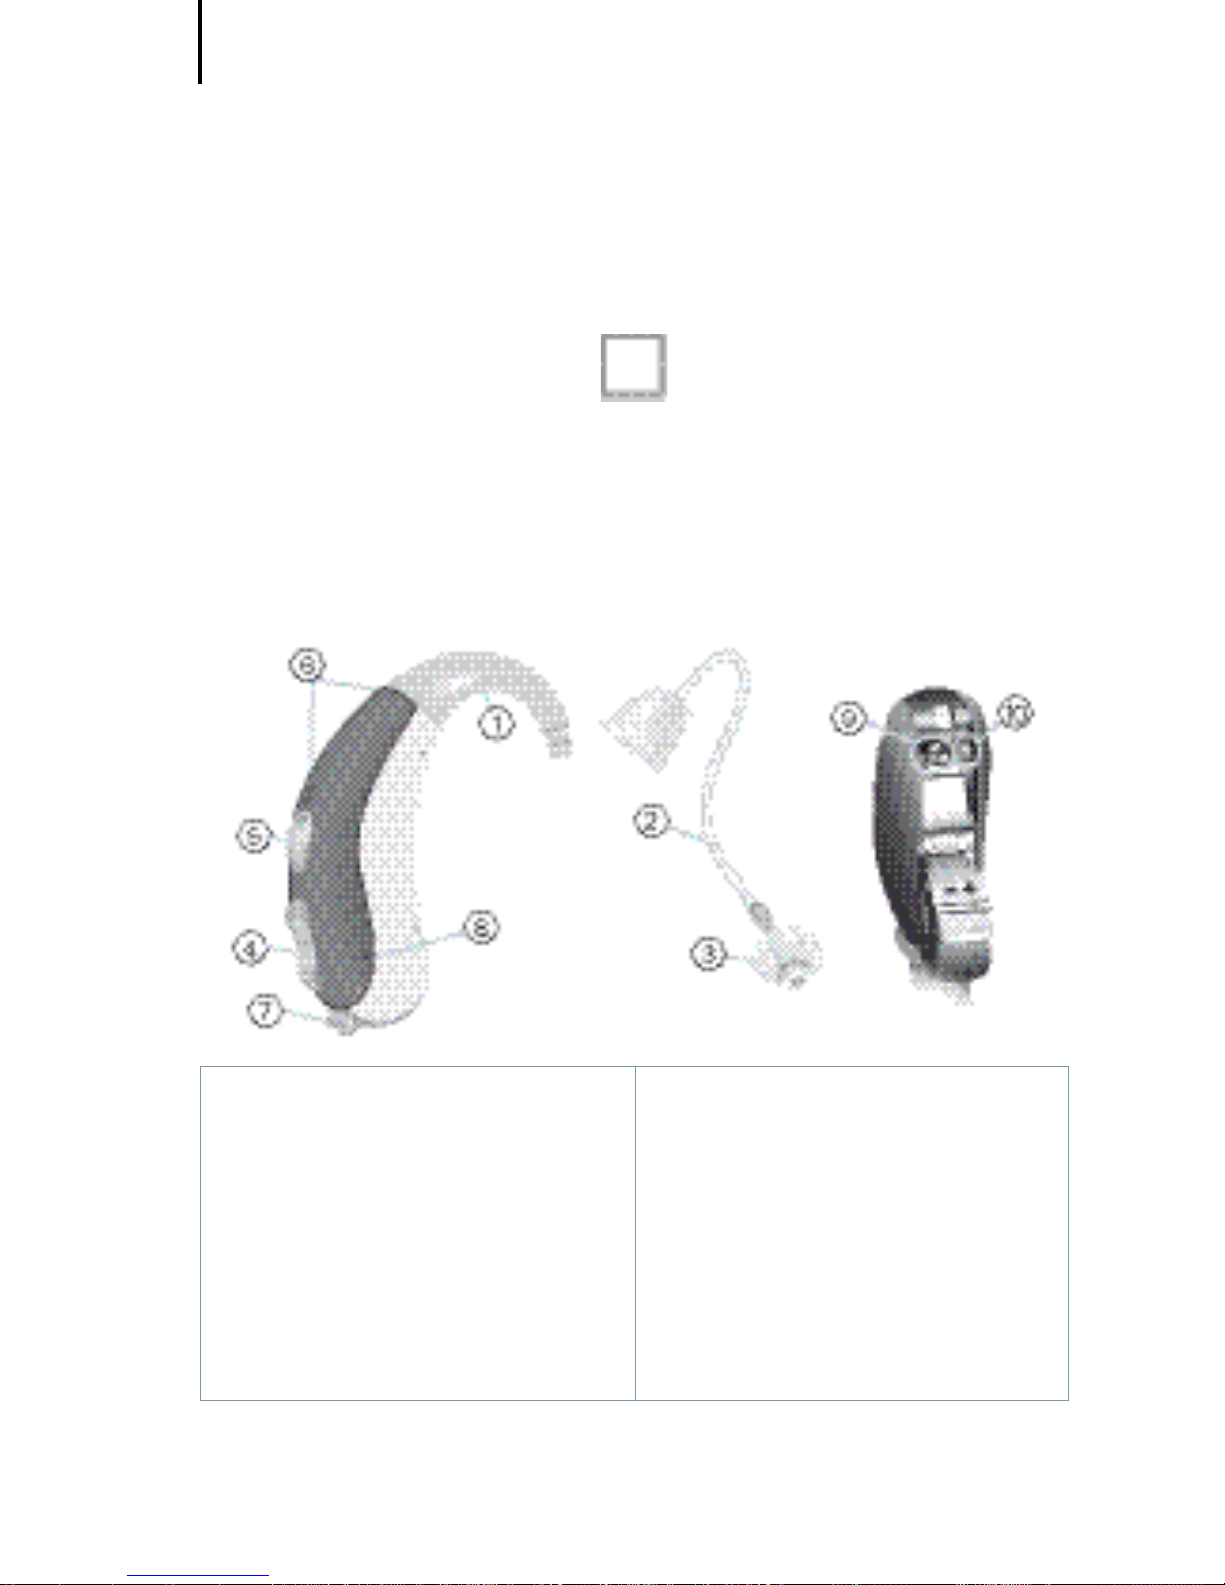
Motion P
optional with LifeTube
battery type: 13
rechargeable or non-rechargeable
① Earhook
② LifeTube
③ LifeTip
④ Rocker switch
⑤ Push button
⑥ Microphone openings
⑦ Battery compartment
⑧ Charging contacts
⑨ Serial number
⑩ Type of hearing instrument
Page 7
Intended use
7
EN
HU
RO
FR
DE
AR
Hearing instruments are intended to improve the hearing
of hearing impaired persons. Diagnosis and prescription
of a hearing instrument must be performed by hearing
health specialists, e.g. ENT doctors, audiologists or
acousticians.
Read and follow the instructions of this user guide to
avoid injuries or damage to the hearing instruments.
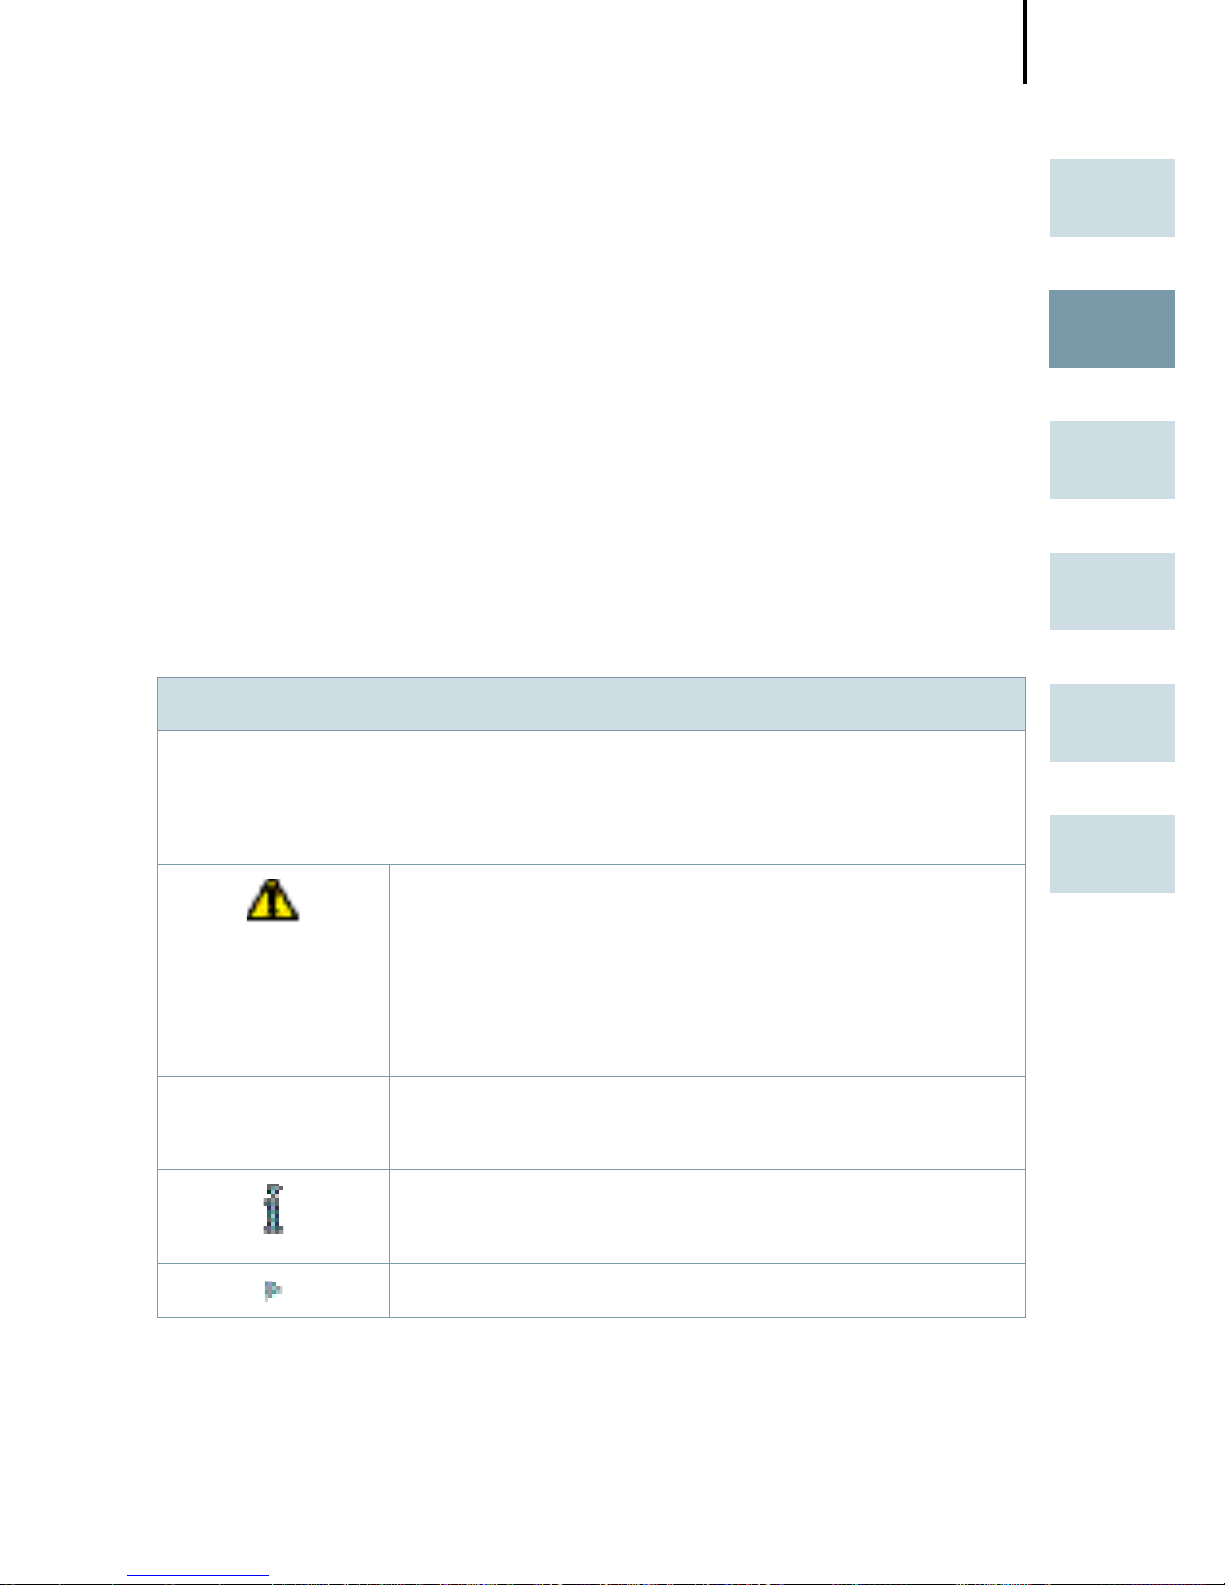
Symbols:
Be aware of information marked with the warning symbol
WARNING, CAUTION or NOTICE!
WARNING points out a situation that could
lead to serious injuries, CAUTION indicates a
situation that could lead to minor and moderate injuries.
NOTICE NOTICE indicates possible property damage.
Advice and tips on how to handle your device
better.
Instruction. Indicates that something has to be
done.
Intended use
Page 8

General notes on safety
8
NOTICE
Your hearing instruments are sensitive to extreme
heat, high humidity, strong magnetic fields
(> 0.1T), X-rays and mechanical stress.
Do not expose your hearing instruments to
extreme temperature or high humidity.
Do not leave them in direct sunlight.
Do not wear them in the shower or when you
apply make-up, perfume, aftershave, hairspray
or suntan lotion.
Do not wear your hearing instruments when
you are exposed to short-waves, a strong magnetic field, a high frequency field or X-rays.
Do not place your hearing instruments in a
microwave oven.
WARNING
Hazard of explosion!
Do not use your hearing instruments in areas
where there is a danger of explosions
(e.g. mining).
General notes on safety
Page 9
General notes on safety
9
EN
HU
RO
FR
DE
AR
WARNING
Choking hazard posed by small parts.
Keep hearing instruments, batteries and acces-
sories out of children‘s reach.
If swallowed consult a physician or hospital im-
mediately.
If infants, small children or mentally disabled
persons need to wear hearing instruments
ensure adequate supervision.
Siemens offers special hearing instruments for the
fitting of infants and small children.
Ask your Hearing Care Professional for further
information.
NOTICE
Batteries contain harmful substances that pollute
the environment.
Do not throw used batteries into household
trash.
Dispose batteries according to national regu-
lations or return them to your Hearing Care
Professional.
Page 10
General notes on safety
10
CAUTION
Risk of injury caused by incorrect use of LifeTip.
Always wear the LifeTube with the LifeTip.
Make sure that the LifeTip is completely at-
tached to the LifeTip adapter.
Change the LifeTube or LifeTip when they are
cracked.
Put the LifeTube with the LifeTip carefully and
not too deep into the ear.
Use the LifeTube and LifeTip only in the way
described in this user guide.
If the LifeTip remains in the ear, have it re-
moved by a medical professional.
In some countries restrictions for the usage of
wireless equipment exist.
Refer to local authorities for further informa-
tion.
NOTICE
Leaking batteries damage the hearing instruments.
Turn the hearing instruments off when not in
use to preserve the battery.
Remove batteries when the instruments are not
in use for a prolonged period of time.
Page 11
Handling of standard and rechargeable batteries
11
EN
HU
RO
FR
DE
AR
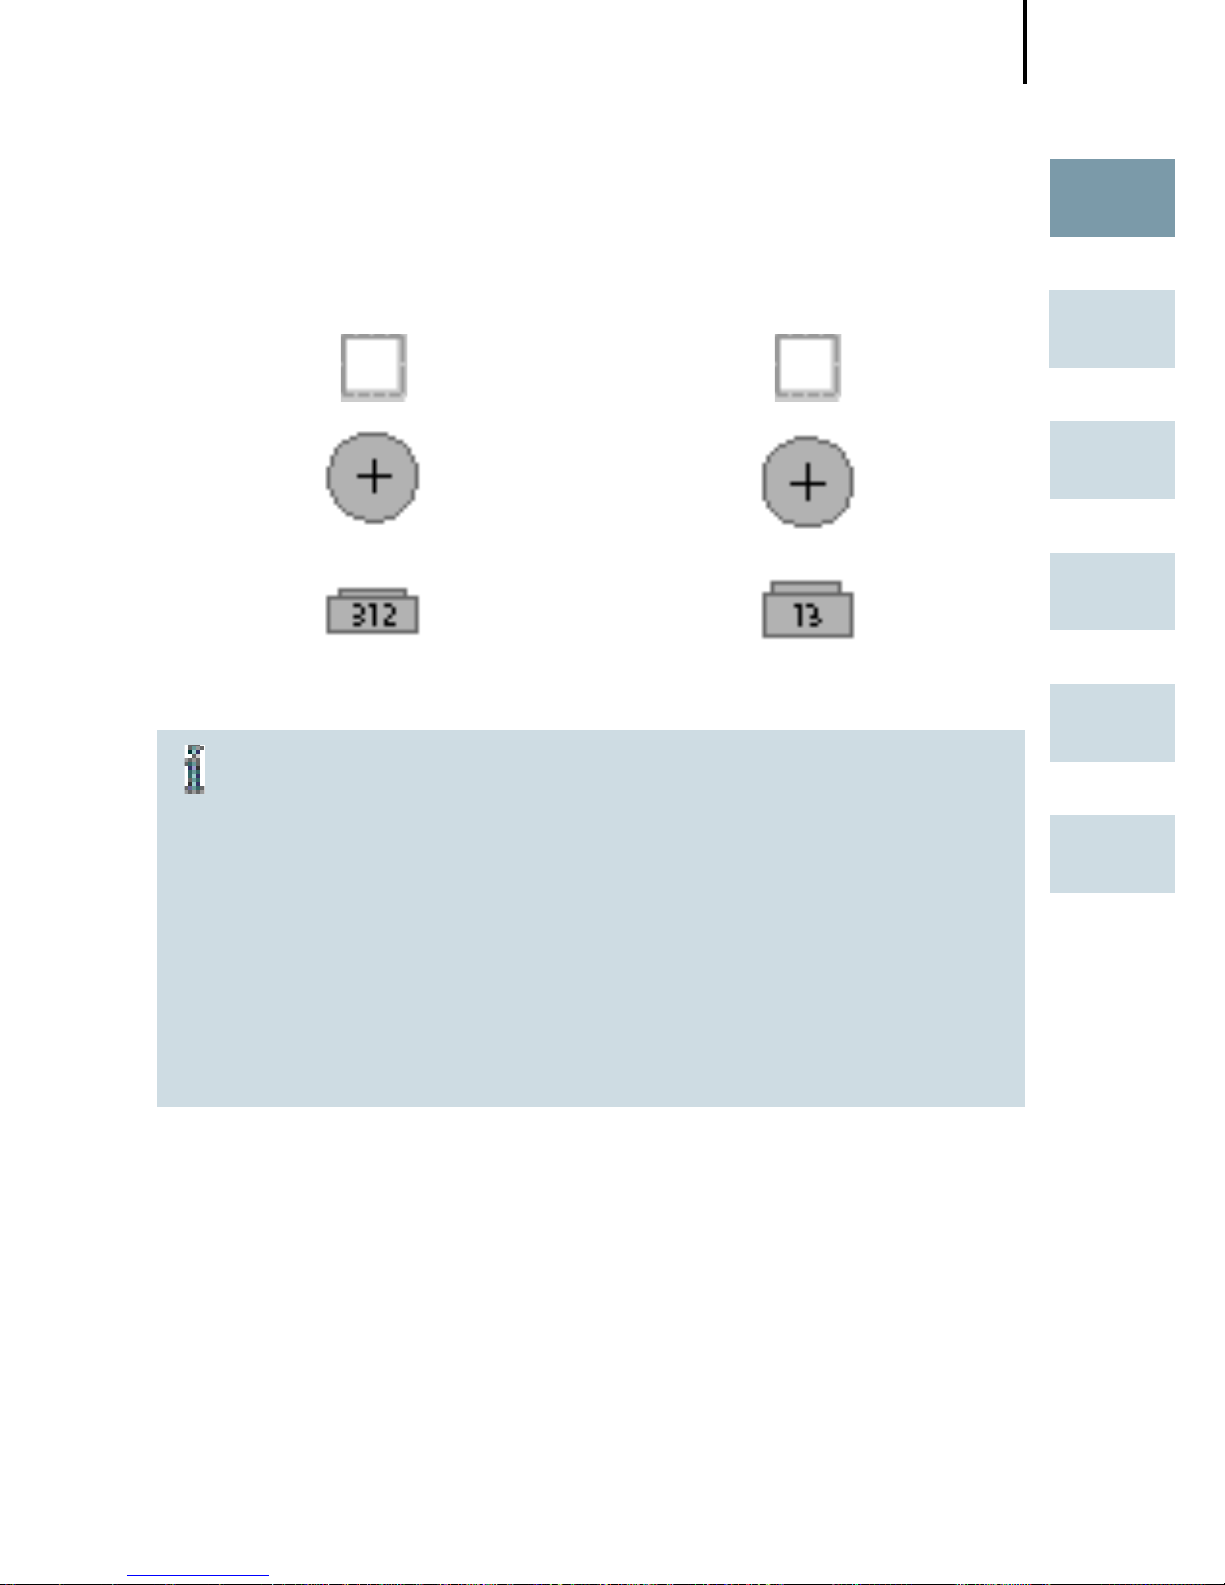
original size
Always use the right size of batteries.
Charge the rechargeable batteries before first
use.
Remove the tab on standard batteries only
when you are ready to use them.
The positive (+) side of the batteries is always
the smooth side.
Always keep spare batteries with you.
Low battery indicator
Your Hearing Care Professional can activate an acoustic
signal to inform you when the battery is nearly empty. If
you hear an acoustic signal or experience low amplification power, replace the battery.
Handling of standard and
rechargeable batteries
Page 12
Handling of standard and rechargeable batteries
12
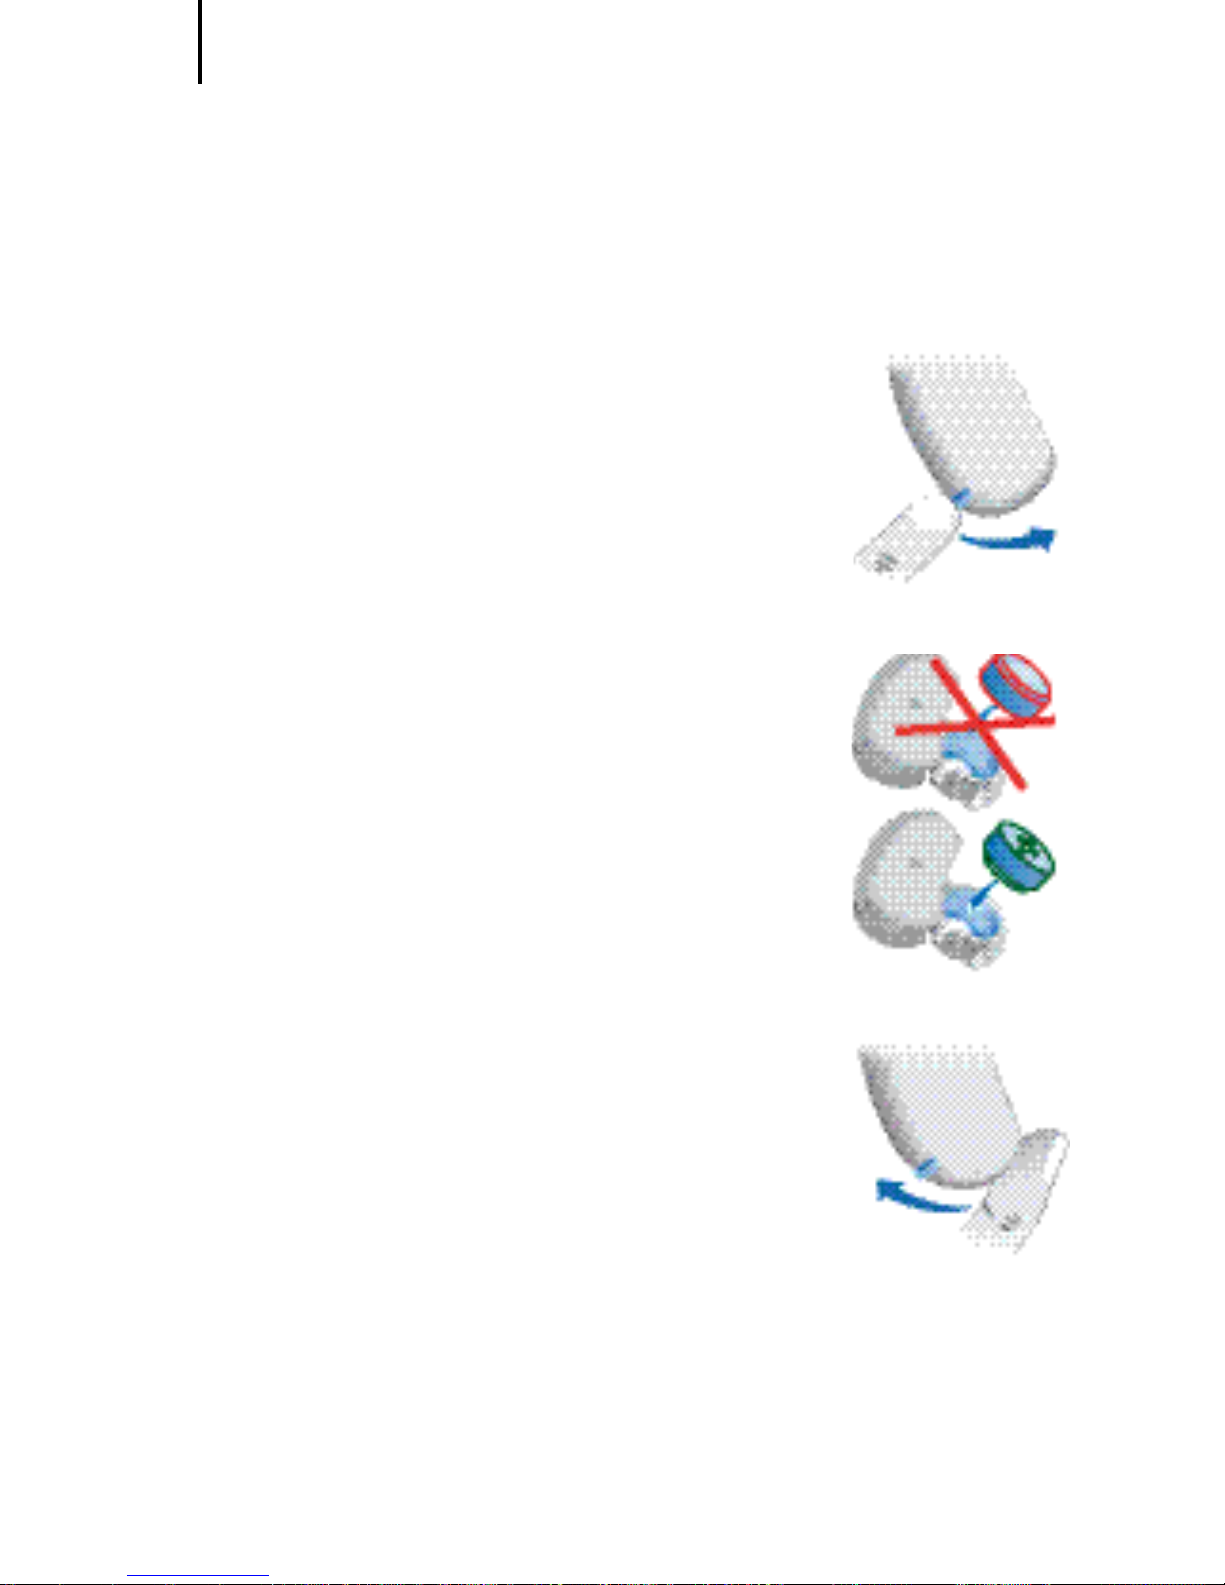
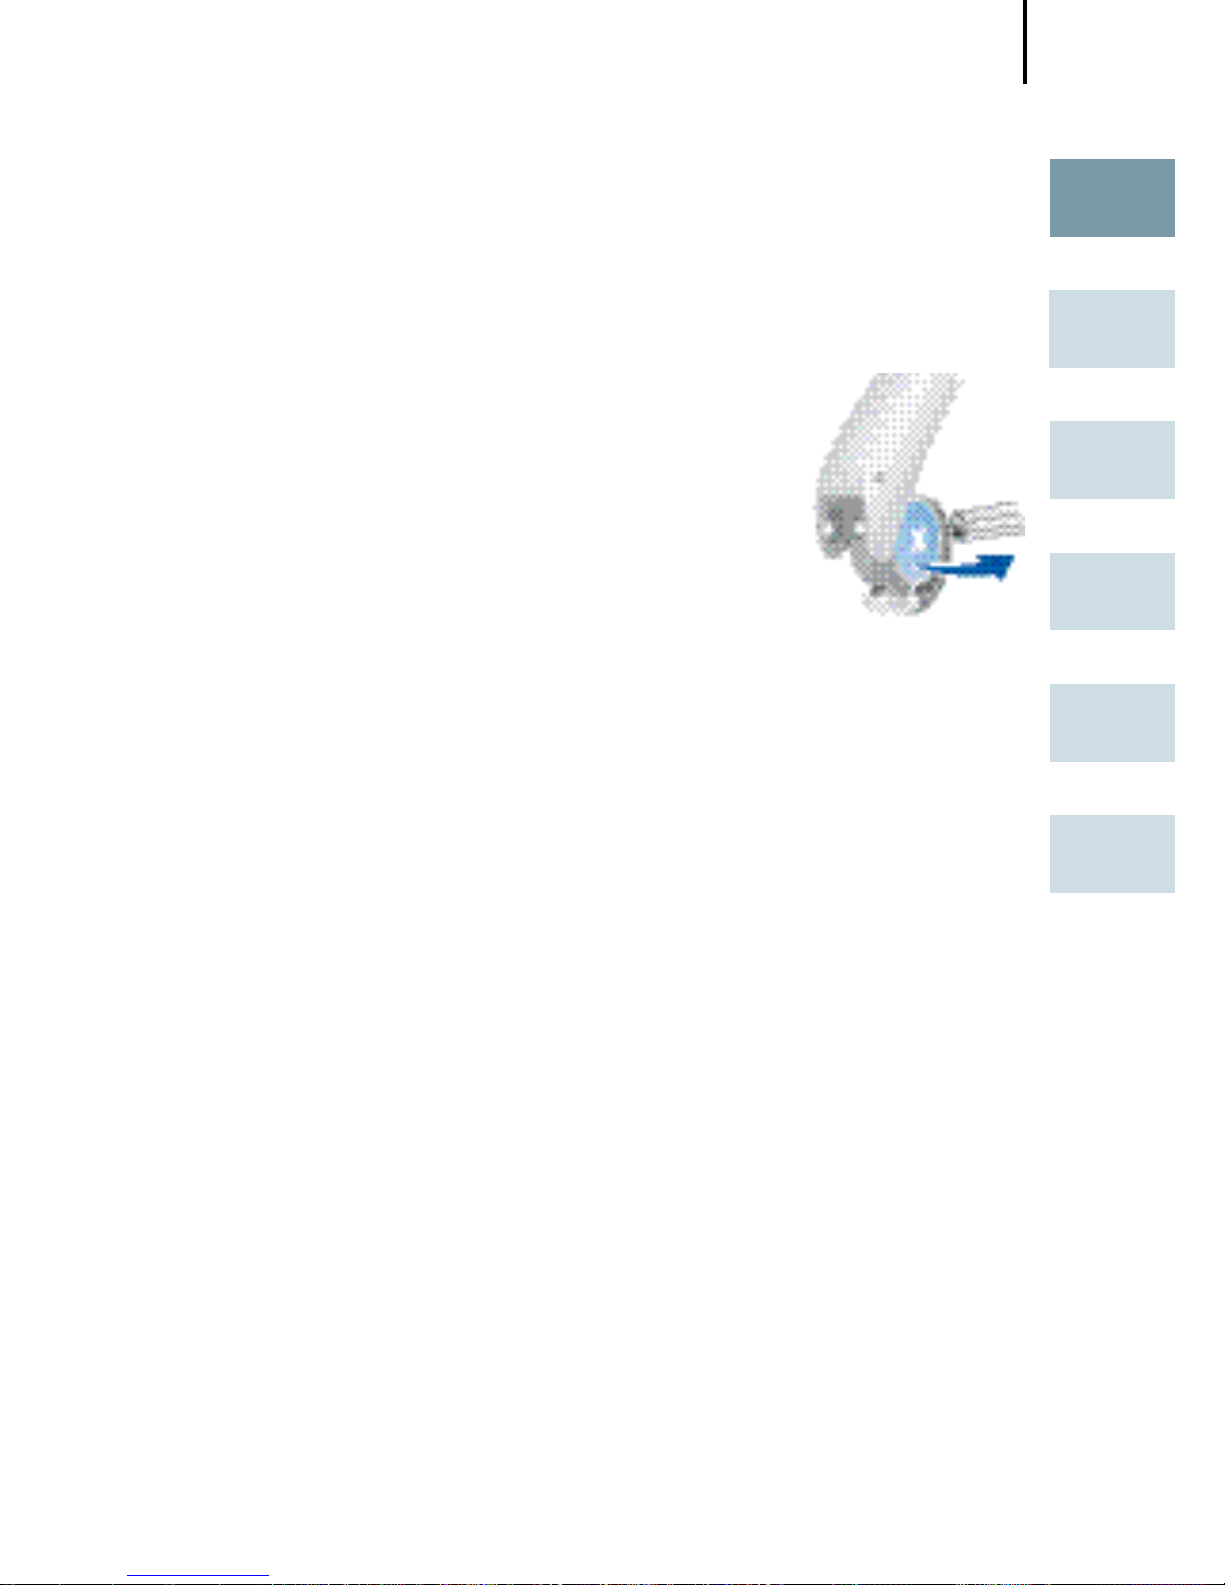
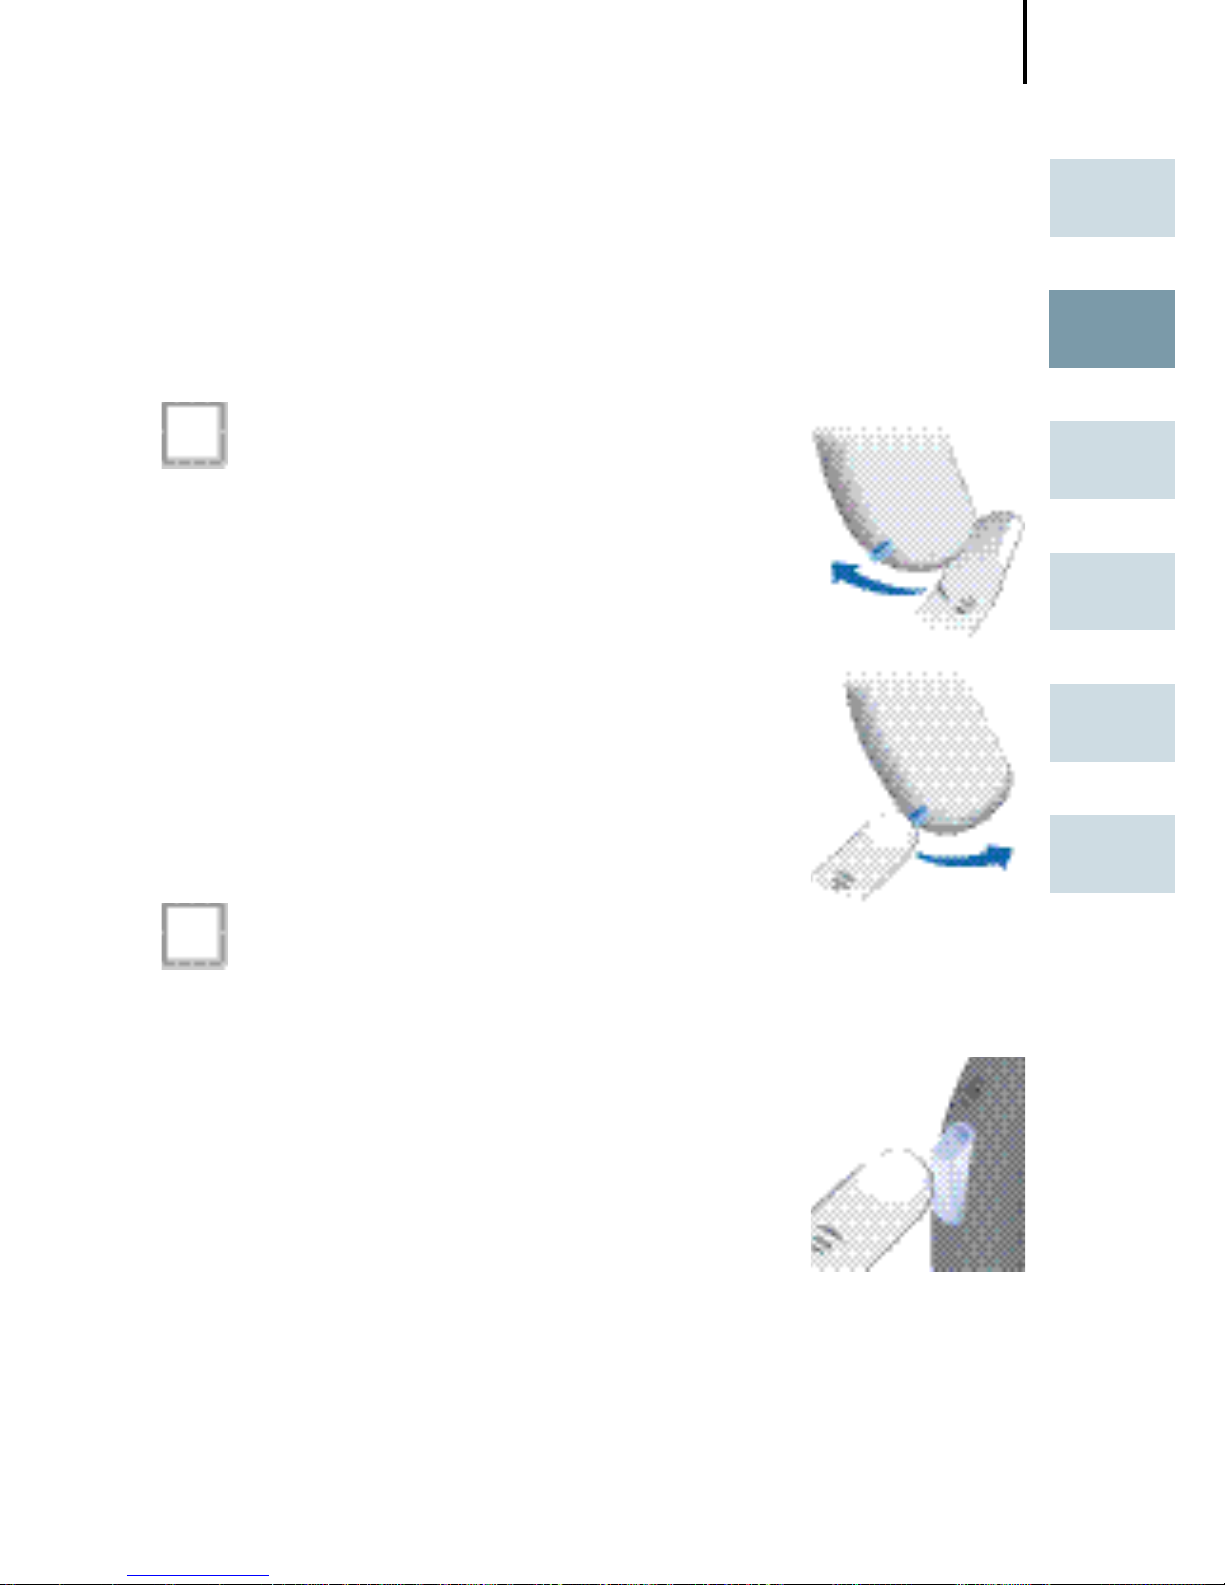
Inserting the battery
Open the battery compartment com-
pletely using your fingernail as shown in
the illustration.
Insert the proper size battery.
Make sure that the "+" symbol on the
battery points up as shown in the picture
Close the battery compartment.
Do not force the door shut. If it does not
close easily, check to see if the battery
was inserted properly.
When the battery door is completely closed, your hearing
instrument is ready for use.
Page 13
Handling of standard and rechargeable batteries
13
EN
HU
RO
FR
DE
AR
Removing the battery
Open the battery compartment com-
pletely.
Normally the battery drops out when
the compartment is completely open.
If the battery does not come out, lightly
tap the instrument or use the magnet
stick available as accessory to remove
the battery.
Page 14
Inserting and removing your hearing instrument
14
For side recognition ask your Hearing Care
Professional to apply colored markers in the battery compartment. If the marker in the battery
compartment is in red, the hearing instrument is
intended for the right ear. If the marker is in blue,
the hearing instrument is for the left ear.
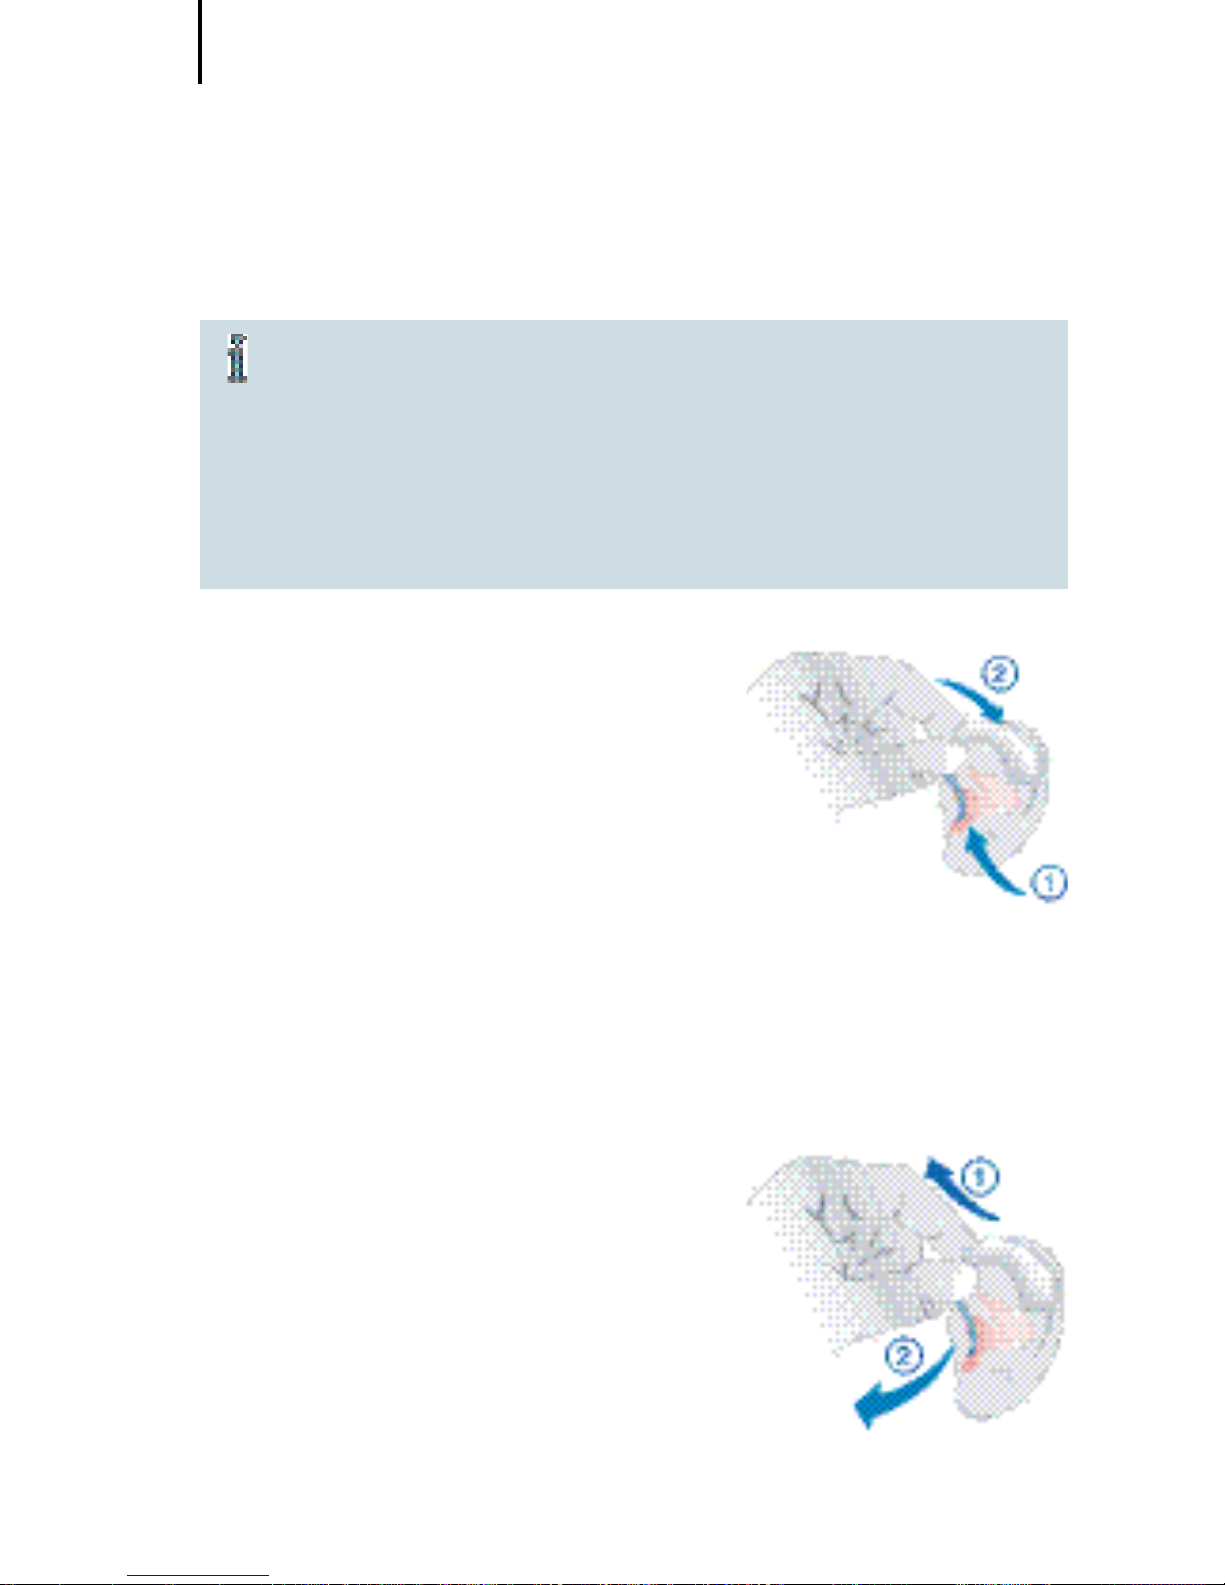
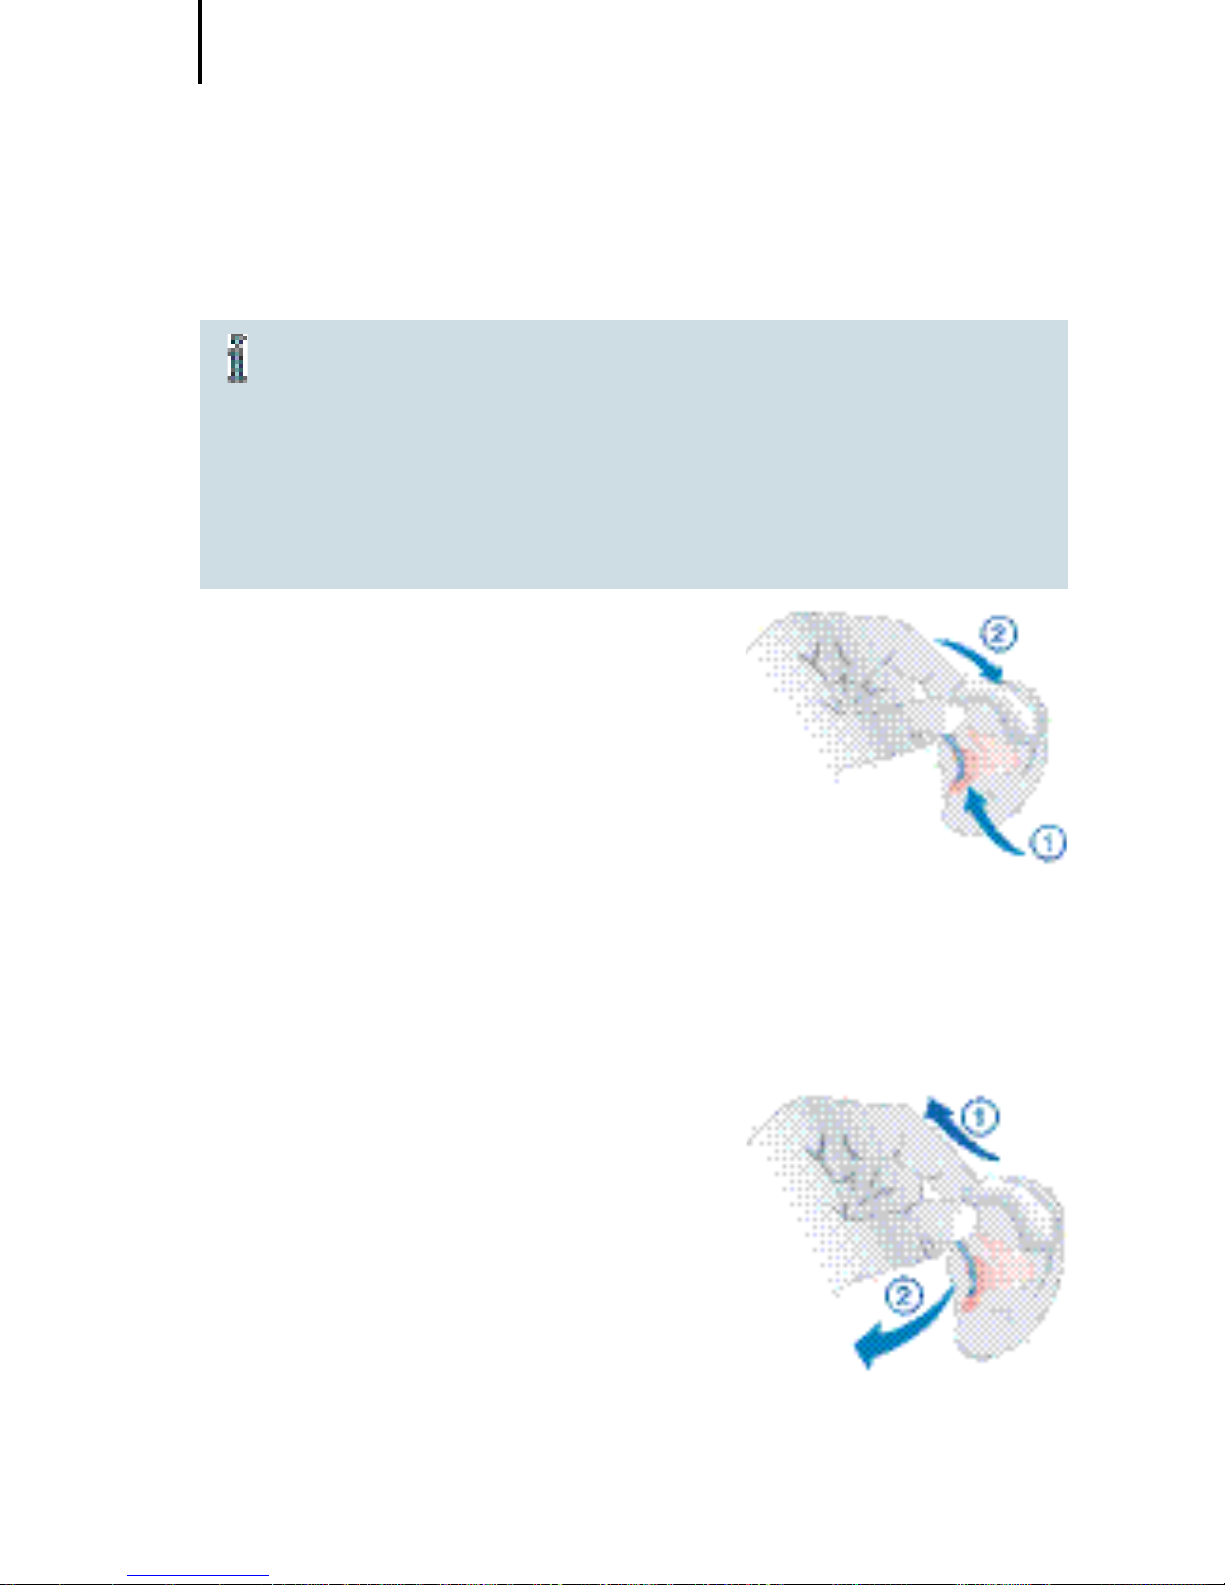
Inserting your hearing instrument
Turn your hearing instrument off.
Hold the earmold/LifeTip be-
tween your thumb and index
finger and insert it carefully into
the ear canal.
You may find it helpful to pull
your ear slightly upward or to the
back.
Place your hearing instrument behind your ear.
Turn your hearing instrument on.
Removing your hearing instrument
Hold the earmold /LifeTube
between your thumb and index
finger and carefully pull it out.
You may find it helpful to lightly
push your ear from the back.
Inserting and removing your
hearing instrument
Page 15
Turning your hearing instrument on and off
15
EN
HU
RO
FR
DE
AR
Ask your Hearing Care Professional to check off the
relevant information.
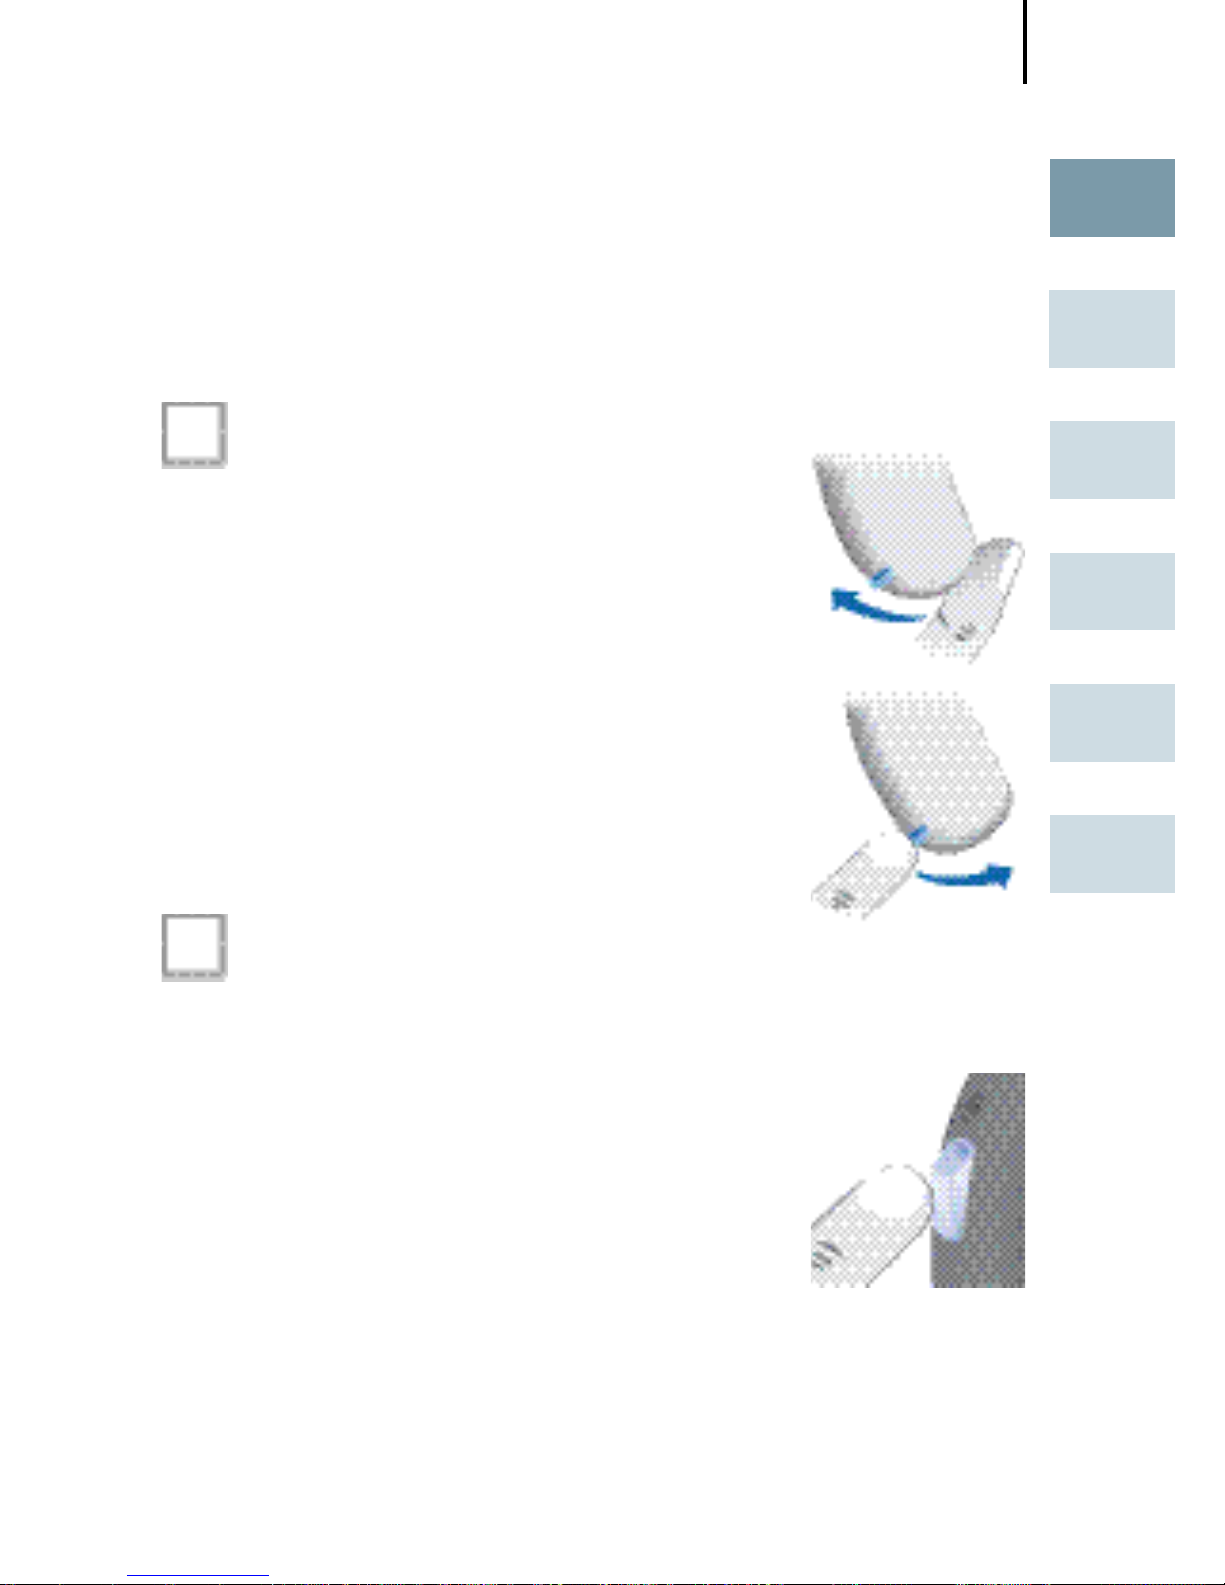
Via battery compartment
O n
Close the battery compartment.
Off
Open the battery compartment.
Via push button
O n
Press the push button for
2 seconds.
Off
Press the push button for
2 seconds.
Turning your hearing instrument
on and off
Page 16

Turning your hearing instrument on and off
16
Via remote control
Refer to the remote control user guide.
Power-on delay
Your hearing instrument is equipped with a "power-on delay" feature which can be activated by your Hearing Care
Professional. This allows you to turn the hearing instrument on with an automatic delay of 6/12/18 seconds, so
that you may insert the hearing instrument into your ear
without experiencing unpleasant feedback (whistling).
Page 17
Changing the hearing program
17
EN
HU
RO
FR
DE
AR
Ask your Hearing Care Professional to check off the
relevant information.
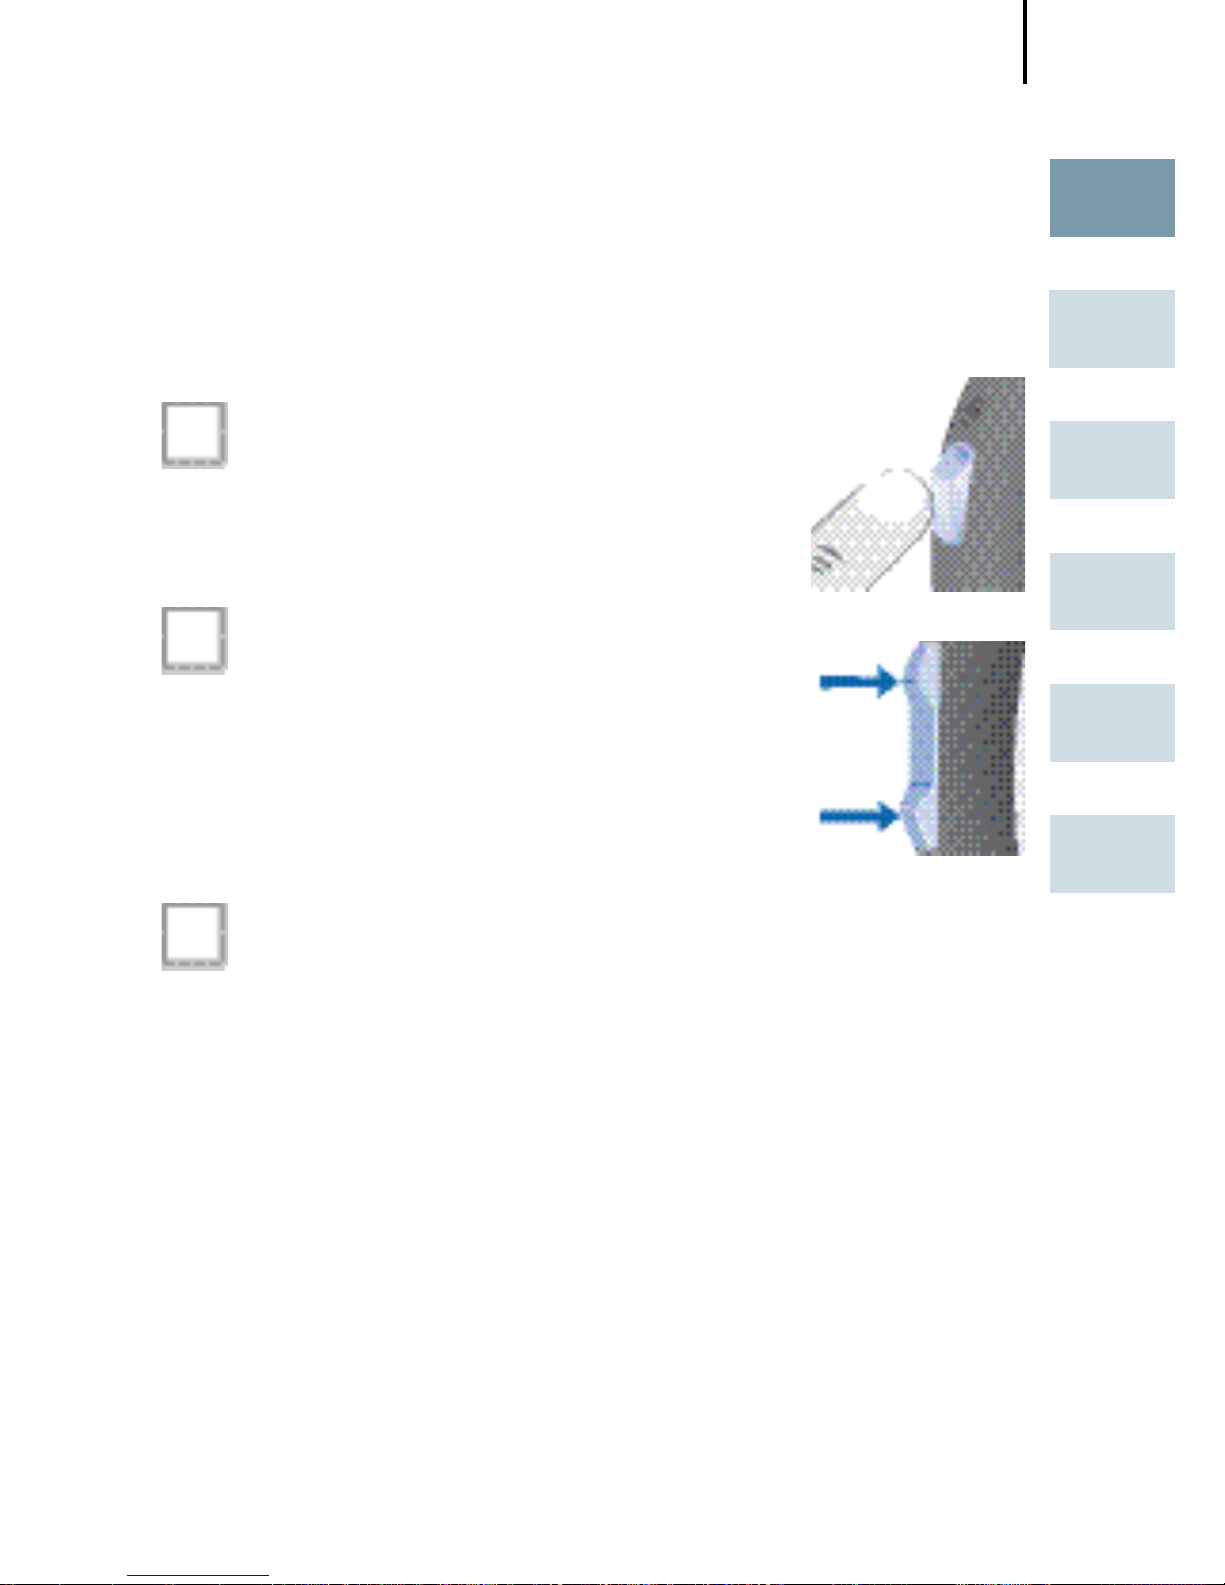
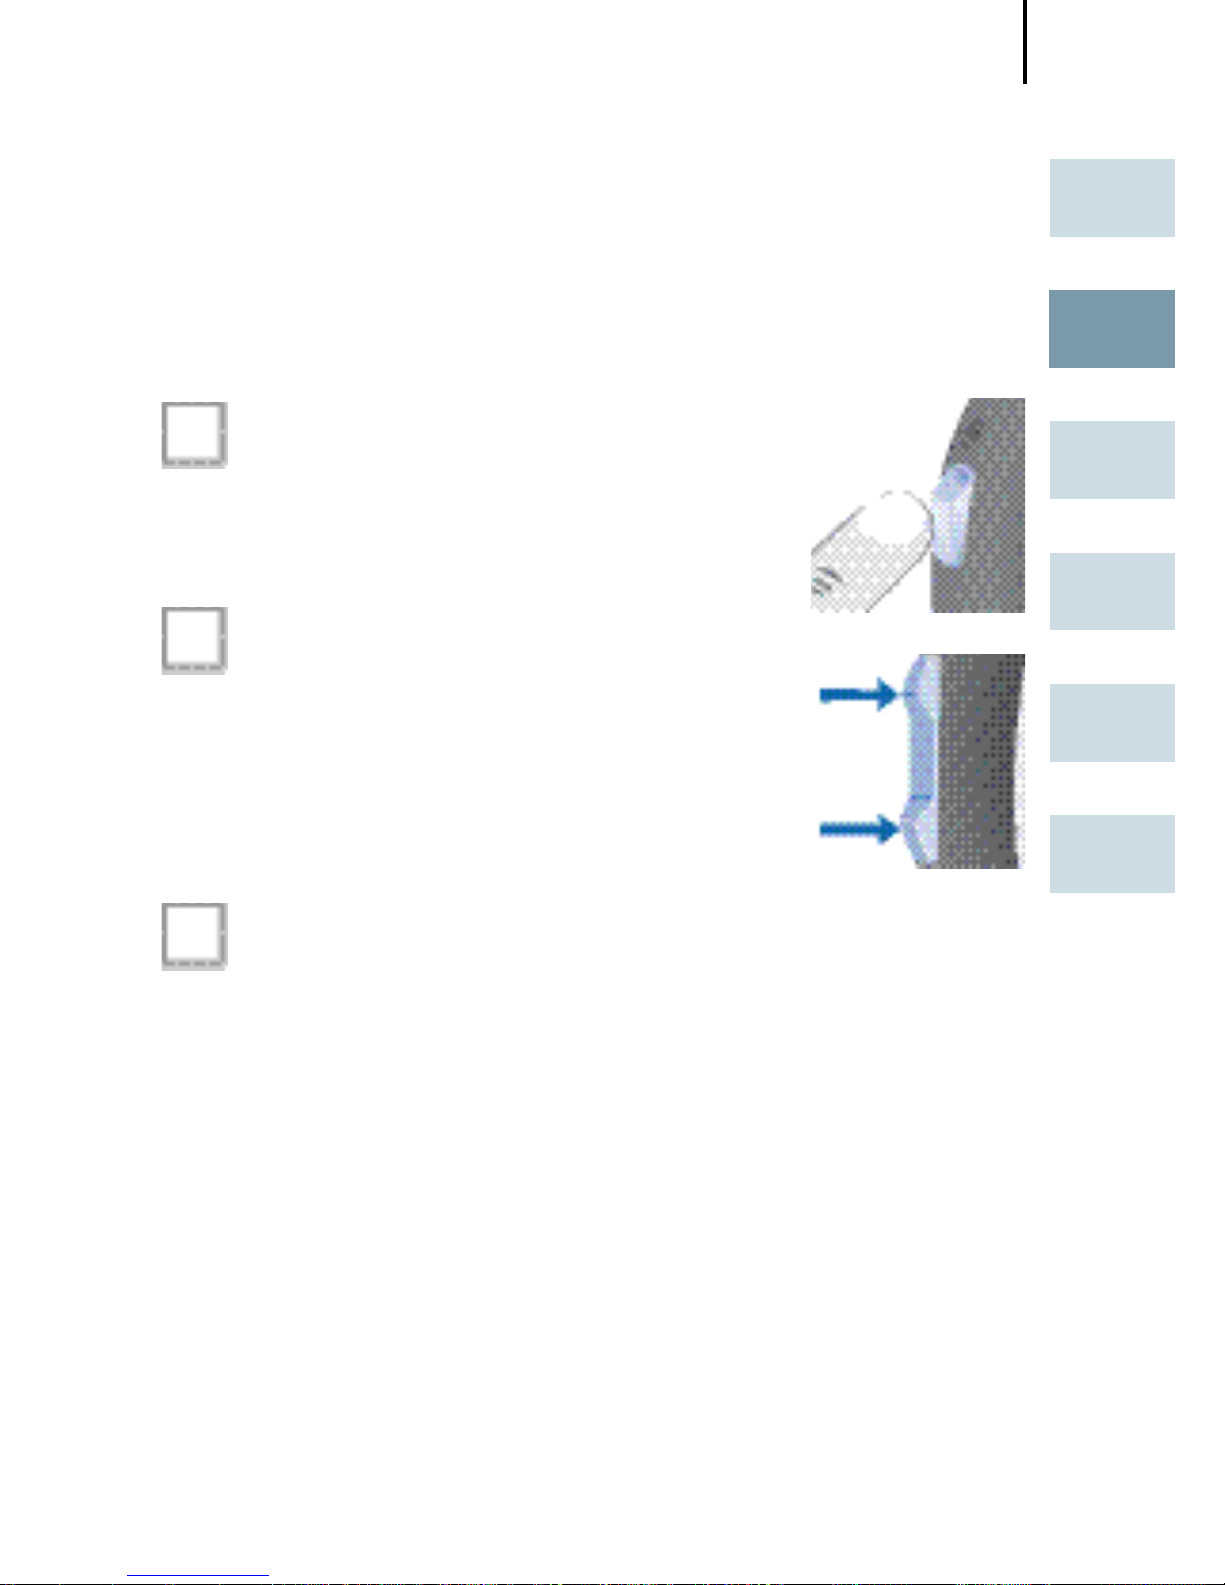
Via push button
Press the push button to switch
to the next program.
Via rocker switch
Press up to switch to the next
program.
Press down to switch to the
previous program.
Via remote control
Refer to the remote control user guide.
Changing the hearing program
Page 18
Changing the volume
18
The volume of your hearing instruments is controlled
automatically and there is no need to manually adjust it.
Should you prefer manual volume control, your Hearing
Care Professional can program the hearing instrument for
manual adjustment.
Automatic
The volume is adjusted automatically when in use.
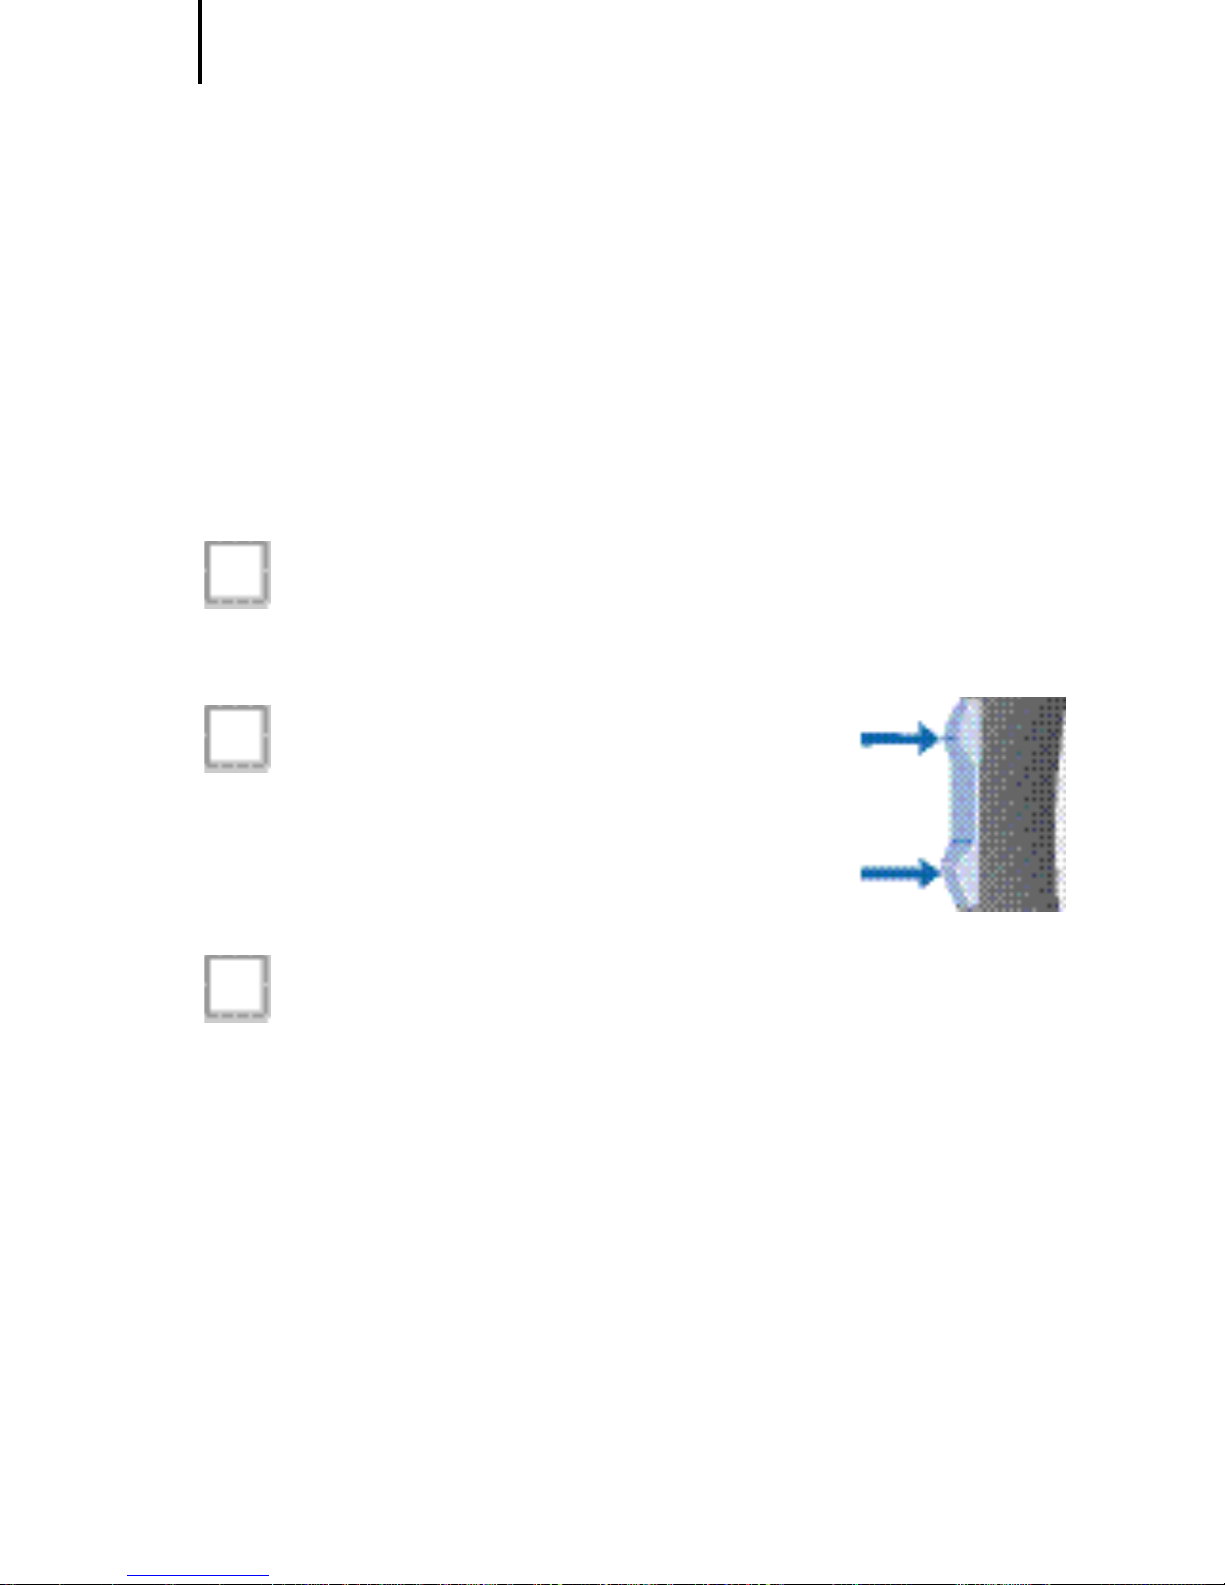
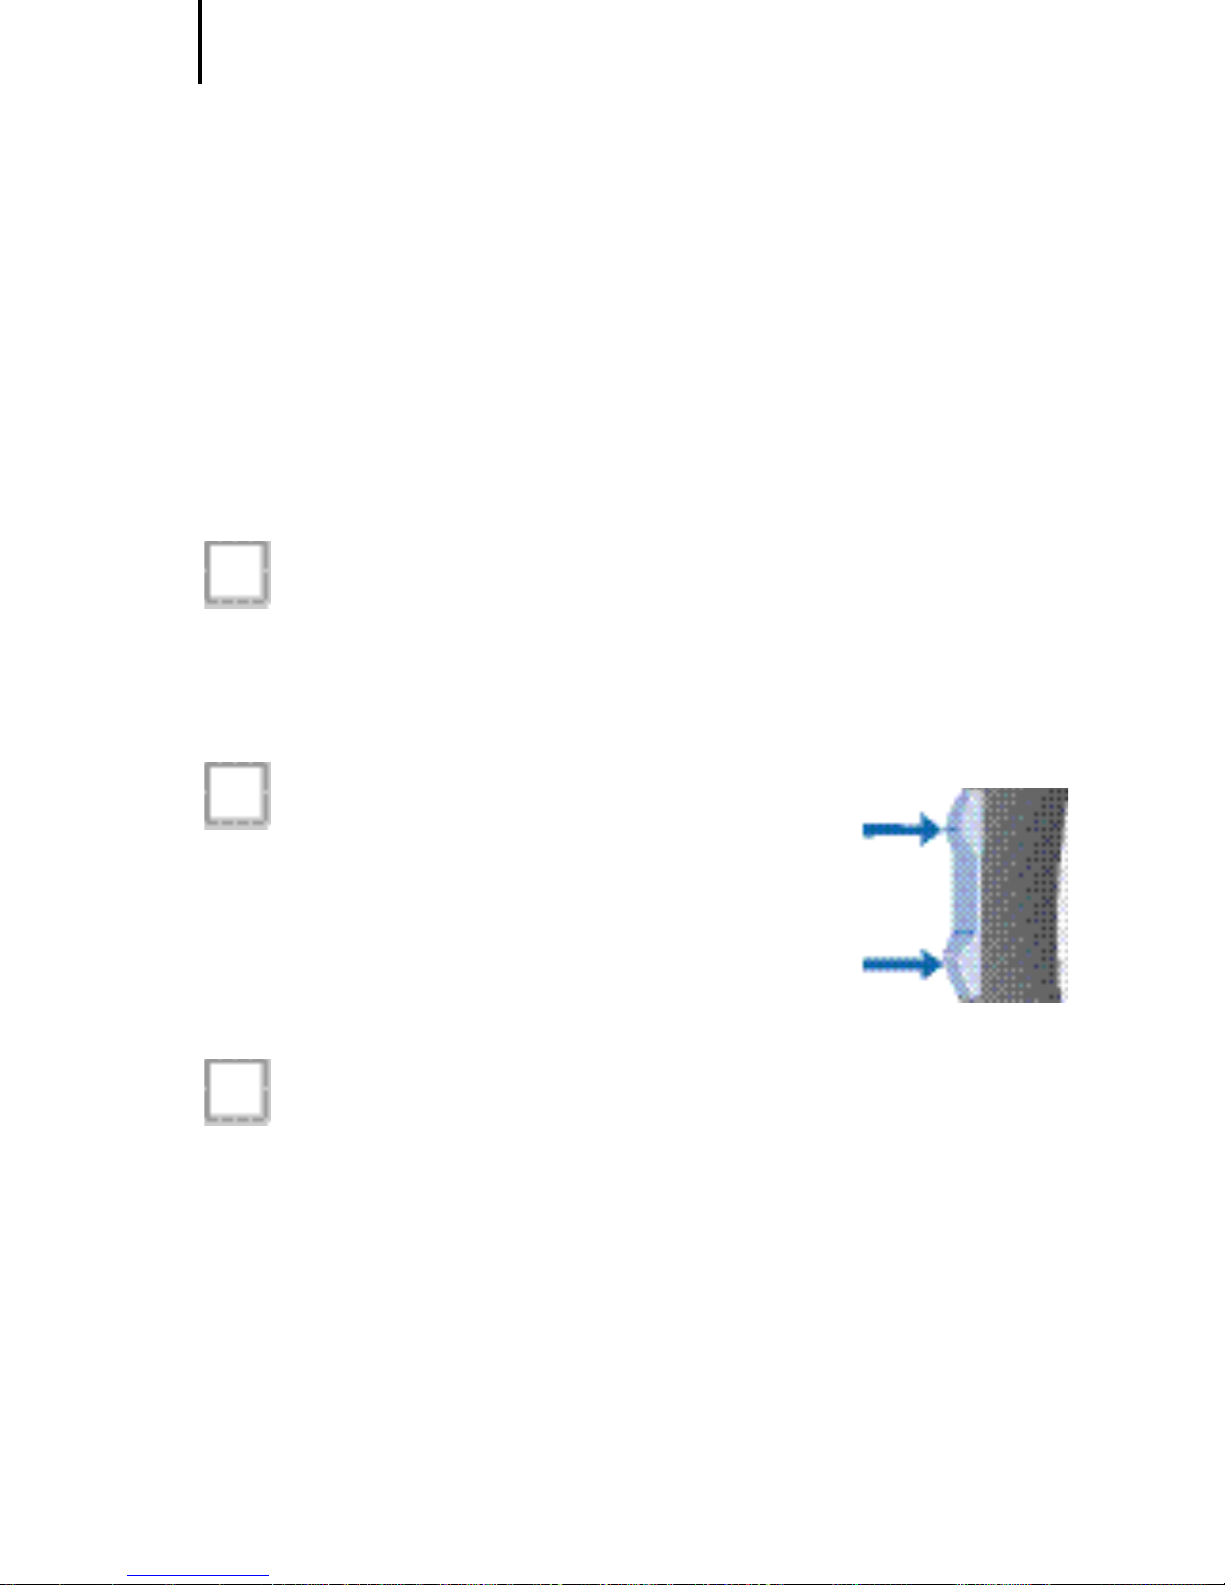
Rocker switch
Press up to increase the volume.
Press down to decrease the
volume.
Via remote control
Refer to the remote control user guide.
Changing the volume
Page 19
Functionalities
19
EN
HU
RO
FR
DE
AR
Your Hearing Care Professional can activate the following
functionalities.
e2e wireless
■ Allows the use of a remote control.
■ Automatically adjusts both hearing instruments
simultaneously to change the instrument settings, e.g. volume or program.
The performance of the e2e wireless function may be affected by electromagnetic
interference – e.g. from a computer monitor
or fluorescent lamp system.
Move away from the source of interfer-
ence if you experience difficulty.
Automatic telephone program
Hold a telephone near your hearing instru-
ment (*).
The hearing instrument automatically switches
to the telephone program.
Move the telephone away from your hearing
instrument.
The hearing instrument switches back to the
previously used program.
Functionalities
Page 20

Functionalities
20
You can also select the telephone program
manually by using the program button.
When operating the hearing instrument in
telecoil mode, the wireless function may cause
a pulsing noise. This is due to the pick-up of the
transmission signal. When your hearing instrument is in telecoil mode please use the remote
control only with a distance greater than 10 cm
(4 inches).
(*) AutoPhone magnet accessory
Not all telephones produce a magnetic field strong
enough to activate the AutoPhone function. In this case,
use the Siemens AutoPhone magnet, which is available
as accessory, and attach it to the telephone receiver to
activate the AutoPhone function.
See the AutoPhone magnet user guide for
instructions on how to position the magnet.
Use only the Siemens magnet. Ask your Hearing
Care Professional for this accessory.
Page 21

Functionalities
21
EN
HU
RO
FR
DE
AR
NOTICE
Magnets can disturb electrical devices and delete
stored data.
Keep magnets away from computers, color
monitors, television sets, floppy discs, videoand audio discs and other electronic equipment/
devices.
WARNING
Magnets may interfere with the operation of life
supporting systems (e. g. pacemakers, magnetic
valves).
Use a magnet only if not in doubt about the
safe distance. The safe distance between pacemaker and magnet should be at least 10 cm
(4 inches).
Page 22
Maintenance and care
22
Your hearing instruments are highly sensitive systems.
Proper care and handling will ensure the best possible
performance.
Clean instruments regularly to prevent damage to the
hearing instruments and to avoid health problems.
NOTICE
Do not put the hearing
instruments in water.
Clean your hearing instruments with a soft, dry tissue,
as necessary.
Place your hearing instruments in a "dry aid kit" with a
special moisture-attracting capsule overnight.
Ask your Hearing Care Professional for special care sets
and further information on how to keep your hearing
instruments in good condition.
For instruments with LifeTube
Regulary clean LifeTubes with a cleaning wire.
Ask your Hearing Care Professional to exchange
LifeTubes and LifeTips approximately every 3 to
6 months or as needed.
Maintenance and care
Page 23
Accessories
23
EN
HU
RO
FR
DE
AR
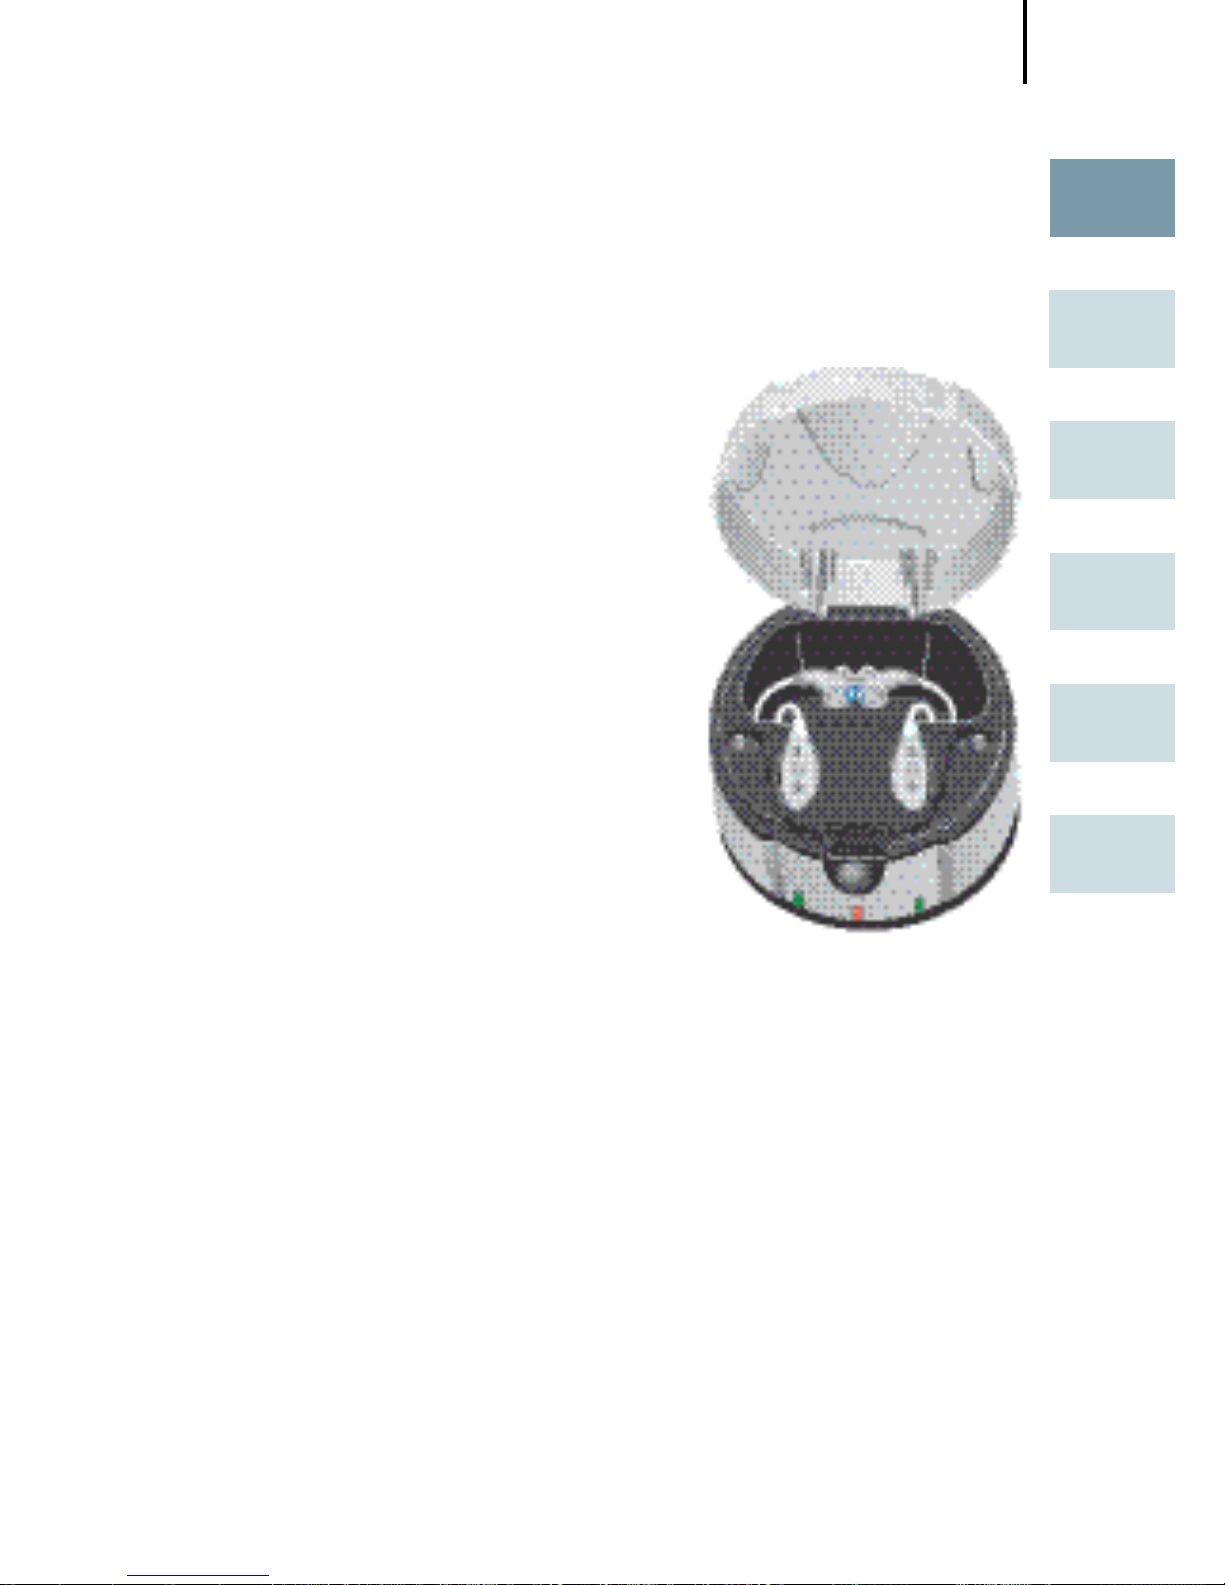
Charger (Motion SX and Motion P)
Your hearing instruments work with
standard or rechargeable batteries.
With the easy-to-use charger you
can charge the rechargeable batteries for one or two hearing instruments. After just 6 hours of charging, the charger shuts itself off and
the hearing instruments are ready to
run for a day.
For detailed information and
instructions refer to the charger
user guide or ask your Hearing Care
Professional.
Accessories
Page 24
Accessories
24
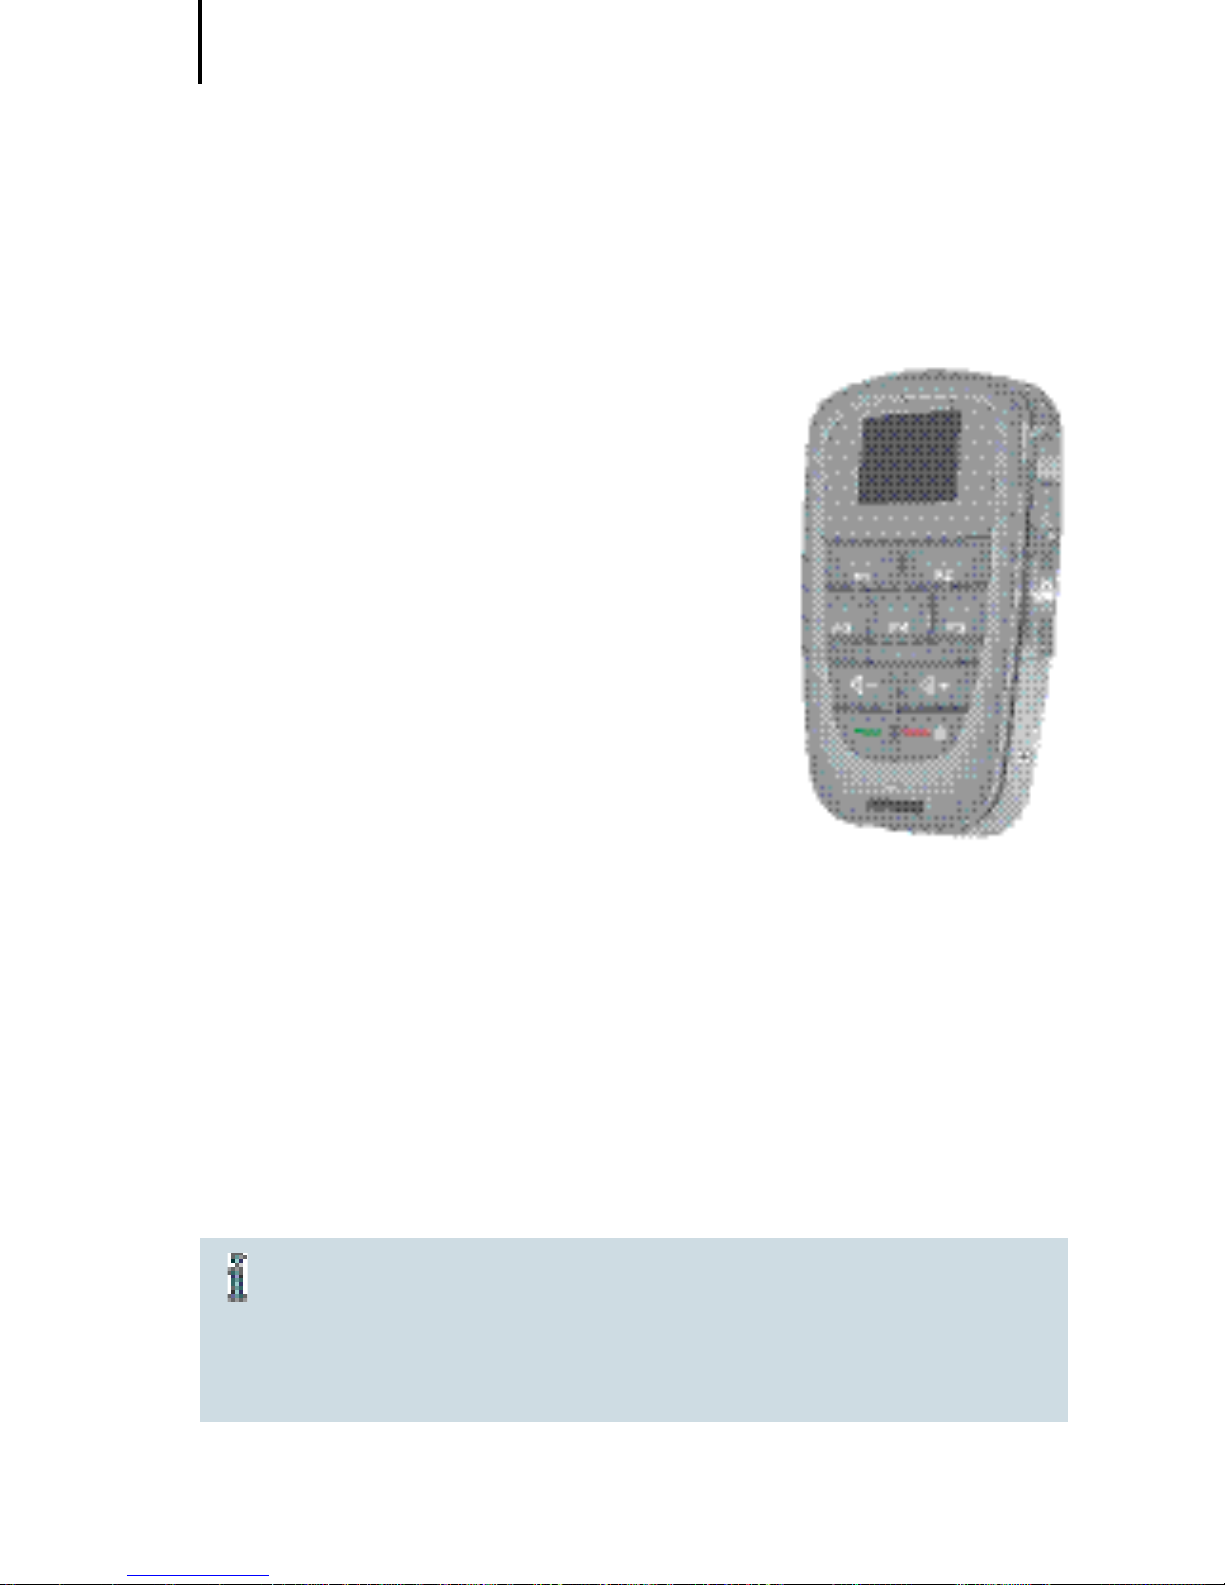
Tek wireless enhancement
Your hearing instruments together
with the Tek Connect remote control
will allow you to connect your hearing instruments to the growing world
of technology. Via a special Bluetooth
connection it is possible to receive
audio signals from your mobile, your
television or your mp3-player.
For detailed information and instructions refer to the Tek user guide or ask
your Hearing Care Professional.
Remote control
The wireless function of your hearing instruments allows
you to use a remote control to change the program and
volume of your hearing instruments.
For further information about the remote control, contact
your Hearing Care Professional or refer to the remote
control user guide.
In the event your hearing instruments can be
controlled by another person's remote control,
return hearing instruments and remote control
to your Hearing Care Professional.
Page 25
Troubleshooting tips
25
EN
HU
RO
FR
DE
AR
Your hearing instruments are extremely reliable devices.
Should a problem occur, it can usually be corrected
quickly. Use these troubleshooting tips to resolve simple
issues.
Problem Possible solution
Sound is weak. Replace / recharge empty battery.
Clean earmold.
Increase volume.
Hearing instrument emits whistling sounds.
Reinsert the earmold until it fits
securely.
Decrease volume.
Clean earmold.
Sound is distorted. Decrease volume.
Replace / recharge empty battery.
Clean earmold / LifeTip.
Hearing instrument emits signal
tones.
Gently close battery compartment
completely.
Replace / recharge empty battery.
Hearing instrument does not
work.
Check if the hearing instrument is
turned on.
Gently close battery compartment
completely.
Replace / recharge empty battery.
Make sure battery is inserted correctly.
Power-on delay is active. Wait 18 seconds and check again.
Consult your Hearing Care Professional if you encounter
further problems.
Troubleshooting tips
Page 26

Technical information
26
Siemens Motion 701, Motion 501, Motion 301
FCC ID: SGI-WL002BTE
IC: 267AB-WL002
Operating frequencies: F
c
=3.28 MHz
N14203
This Class B digital apparatus complies with Canadian
ICES-003.
Changes or modifications not expressly approved by
SAT GmbH for compliance could void the users authority
to operate the equipment.
Technical information
Page 27

Technical information
27
EN
HU
RO
FR
DE
AR
FCC compliance
This device complies with Part 15 of the FCC Rules and with
RSS-210 of Industry Canada.
Operation is subject to the following conditions:
■ this device may not cause harmful interference, and
■ this device must accept any interference received, includ-
ing interference that may cause undesired operation.
This equipment has been tested and found to comply with
the limits for a Class B digital device, pursuant to Part 15 of
the FCC Rules. These limits are designed to provide reasonable protection against harmful interference in a residential
installation. This equipment generates, uses and can radiate radio frequency energy and, if not installed and used
in accordance with the instructions, may cause harmful
interference to radio communications. However, there is no
guarantee that interference will not occur in a particular installation. If this equipment does cause harmful interference
to radio or television reception, which can be determined by
turning the equipment off and on, the user is encouraged to
try to correct the interference by one or more of the following measures:
■ Reorient or relocate the receiving antenna.
■ Increase the separation between the equipment and
receiver.
■ Connect the equipment to an outlet on a circuit different
from that to which the receiver is connected.
■ Consult the dealer or an experienced radio/TV technician
for help.
Page 28
Disposal information
28
Within the European Union, the marked
equipment is covered by "Directive 2002/96/EC
of the European Paliament and of the Council
of 27 January 2003 on waste electrical and
electronical equipment."
Amended by "Directive 2003/108/EC" (WEEE).
Recycle hearing instruments, batteries and ac-
cessories according to national regulations.
With the CE marking Siemens confirms compliance
with the European Directive 93/42/EEC concerning
medical devices.
For the products with e2e wireless 2.0 Siemens additionally confirms compliance with the European Directive
99/5/EC (R&TTE) concerning radio and telecommunications terminal equipment.
Disposal information
Page 29

Your hearing instrument configuration
29
EN
HU
RO
FR
DE
AR
Hearing instrument
LEFT RIGHT
Model
Serial number
Battery
□ yes □ no Power-on delay □ yes □ no
□ yes □ no Push button □ yes □ no
□ yes □ no Rocker switch □ yes □ no
Signal tones
□ on □ off Program change □ on □ off
□ on □ off Low battery warning □ on □ off
□ on □ off Volume control limit □ on □ off
□ on □ off volume control change □ on □ off
Program Description of the program
1
2
3
4
5
Remote control
Model
Serial number
Your hearing instrument
configuration
Page 30

30
Page 31

31
Tartalom
EN
HU
RO
FR
DE
AR
Tartalom
Az Ön Motion BTE hallókészüléke 32
Felhasználási terület 35
Általános biztonsági megjegyzések 36
Normál elemek és újratölthető akkumulátorok
kezelése 39
Hallókészülékének behelyezése és eltávolítása 42
A hallókészülék be- és kikapcsolása 43
Hallóprogram-váltás 45
A hangerő megváltoztatása 46
Funkciók 47
Karbantartás és ápolás 50
Accessories (Tartozékok) 51
Hibaelhárítási tanácsok 53
Hulladékelhelyezési tudnivalók 55
Az Ön által vásárolt hallókészülék konfigurációja 56
Page 32
Az Ön Motion BTE hallókészüléke
32
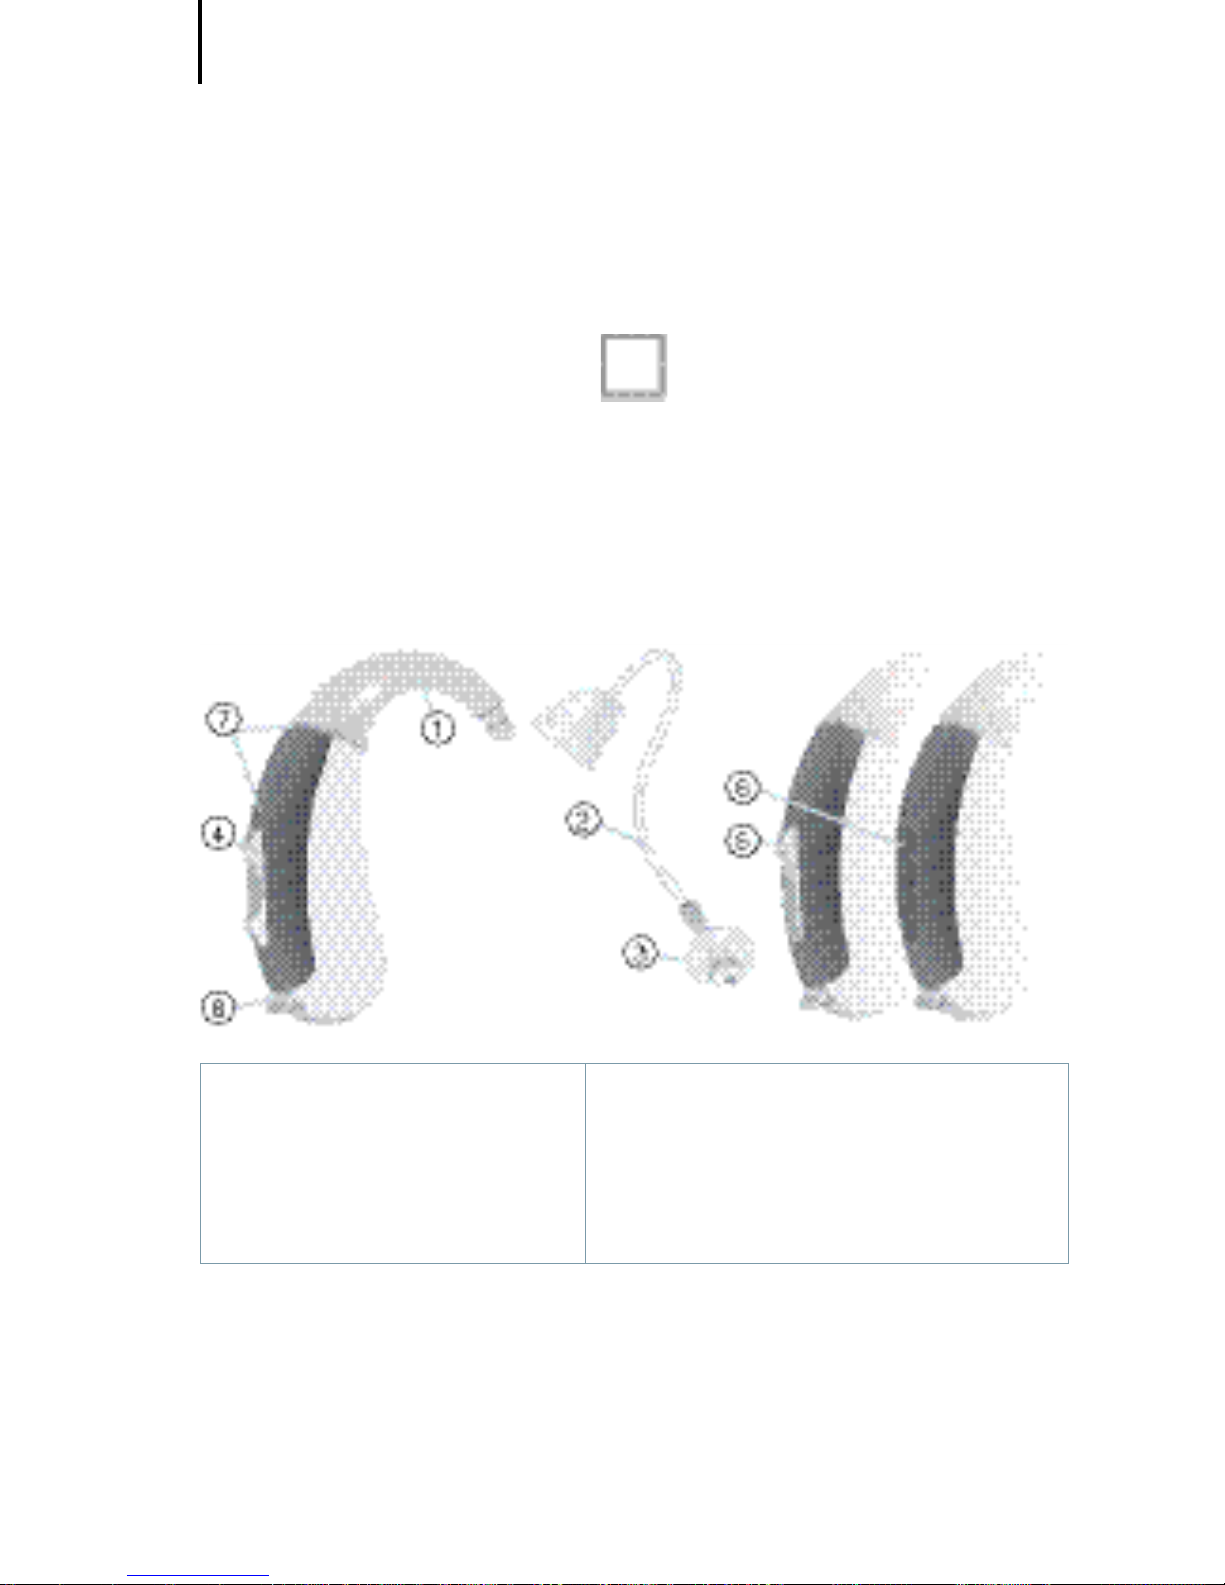
Motion S
LifeTube-bal (nyitott illesztéssel) is kapható
elemtípus: 312
csak nem újratölthető
① Könyök
② LifeTube
③ LifeTip
④ Billenőkapcsoló*
⑤ Nyomógomb*
⑥ Sima burkolat*
⑦ Mikrofonnyílások
⑧ Elemtartó rekesz
* A billenőkapcsoló helyett hallókészülék-specialistája
egy nyomógombbal is elláthatja a hallókészülékét, vagy
hagyhatja kezelőszerv nélkül (sima burkolat).
Az Ön Motion BTE hallókészüléke
Page 33
Az Ön Motion BTE hallókészüléke
33
EN
HU
RO
FR
DE
AR
Motion SX
LifeTube-bal (nyitott illesztéssel) is kapható
elemtípus: 13
újratölthető vagy nem újratölthető
① Könyök
② LifeTube
③ LifeTip
④ Billenőkapcsoló*
⑤ Nyomógomb*
⑥ Sima burkolat*
⑦ Mikrofonnyílások
⑧ Elemtartó rekesz
⑨ Töltőcsatlakozók
* A billenőkapcsoló helyett hallókészülék-specialistája
egy nyomógombbal is elláthatja a hallókészülékét, vagy
hagyhatja kezelőszerv nélkül (sima burkolat).
Page 34
Az Ön Motion BTE hallókészüléke
34
Motion P
LifeTube-bal (nyitott illesztéssel) is kapható
elemtípus: 13
újratölthető vagy nem újratölthető
① Könyök
② LifeTube
③ LifeTip
④ Billenőkapcsoló
⑤ Nyomógomb
⑥ Mikrofonnyílások
⑦ Elemtartó rekesz
⑧ Töltőcsatlakozók
⑨ Sorozatszám
⑩ A hallókészülék típusa
Page 35
Felhasználási terület
35
EN
HU
RO
FR
DE
AR
A hallókészülékek a hallássérült személyek hallásának
javítására szolgálnak. A diagnózis felállítását és a hallókészülék felírását fülspecialistának, pl. fül-orr-gégésznek,
syakorvosnak vagy akusztikusnak kell végeznie.
A sérülések és a hallókészülék károsodásának elkerülése
érdekében olvassa el és kövesse a jelen használati útmutató utasításait.
Szimbólumok:
Mindenképpen olvassa el a következő figyelmeztető
jelekkel ellátott információkat: VIGYÁZAT, FIGYELEM és
MEGJEGYZÉS.
A VIGYÁZAT jelzés olyan helyzetekre hívja
fel a figyelmet, amelyek súlyos sérülésekhez, a FIGYELEM pedig olyanokra,
amelyek kisebb vagy mérsékelten súlyos
sérülésekhez vezethetnek.
MEGJEGYZÉS A MEGJEGYZÉS felirat lehetséges anyagi
kárt jelez.
Az eszköz jobb kezelését elősegítő taná-
csok és tippek.
Utasítás. Valamilyen tennivalót jelez.
Felhasználási terület
Page 36

Általános biztonsági megjegyzések
36
MEGJEGYZÉS
A hallókészülék érzékeny a nagy hőre, a magas páratartalomra, az erős mágneses mezőkre (> 0,1 T),
a röntgensugarakra és a mechanikai behatásokra.
Ne tegye ki a hallókészüléket szélsőséges hő-
mérséklet vagy magas páratartalom hatásának.
Ne hagyja tűző napon.
Ne viselje zuhanyozáskor, sminkeléskor, illetve
parfüm, borotválkozás utáni arcszesz, hajlakk
vagy naptej használata közben.
Ne hordja a hallókészülékét, ha rövidhullámú
sugárzásnak, erős mágneses mezőnek, nagy
frekvenciájú mezőnek vagy röntgensugaraknak
van kitéve.
Ne helyezze a hallókészüléket mikrohullámú
sütőbe.
VIGYÁZAT
Robbanásveszély!
Ne használja a hallókészüléket robbanásveszé-
lyes területen (pl. bányában).
Általános biztonsági
megjegyzések
Page 37
Általános biztonsági megjegyzések
37
EN
HU
RO
FR
DE
AR
VIGYÁZAT
A kis alkatrészek fulladást okozhatnak.
A hallókészülék, az elemek és a tartozékok gyer-
mekektől elzárva tartandók.
Lenyelés esetén azonnal forduljon orvoshoz,
vagy keressen fel egy kórházat.
Ha csecsemő, kisgyermek vagy szellemi fogyaté-
kos személy kényszerül a hallókészülék használatára, gondoskodjon megfelelő felügyeletről.
A Siemens kínálatában speciális, kifejezetten a
csecsemők és kisgyermekek füléhez illeszkedő
hallókészülékek is megtalálhatók.
A további tudnivalókkal kapcsolatban forduljon
hallókészülék-specialistájához.
MEGJEGYZÉS
Az akkumulátorok környezetszennyező, káros
anyagokat tartalmaznak.
A használt akkumulátorokat ne dobja a háztar-
tási hulladékok közé!
Az elemeket az országában érvényes rende-
leteknek megfelelően ártalmatlanítsa, vagy
juttassa vissza a hallókészülék-specialistának.
Page 38
Általános biztonsági megjegyzések
38
FIGYELEM
A LifeTip helytelen használata sérülést okozhat.
A LifeTube-ot mindig felszerelt LifeTippel viselje.
Ügyeljen arra, hogy a LifeTip megfelelően rög-
zítve legyen a LifeTip adapterhez.
Cserélje ki a LifeTube-ot vagy a LifeTipet, ha
megrepedtek.
A LifeTube-ot a LifeTippel együtt óvatosan, ne
túl mélyre helyezze a fülbe.
A LifeTube-ot és a LifeTipet kizárólag a jelen
használati útmutatóban leírt módon használja.
Ha a LifeTip a fülében marad, egészségügyi
szakemberrel távolíttassa el.
Egyes országokban korlátozások vannak érvényben
a vezeték nélküli készülékek használatára vonatkozóan.
A további részletekről tájékozódjon a helyi ható-
ságoknál.
MEGJEGYZÉS
A szivárgó elemek károsíthatják a hallókészüléket.
Az elemek kímélése céljából kapcsolja ki a halló-
készüléket, ha használaton kívül van.
Ha hosszabb ideig nem használja a készüléket,
vegye ki belőle az elemeket.
Page 39
Normál elemek és újratölthető akkumulátorok kezelése
39
EN
HU
RO
FR
DE
AR
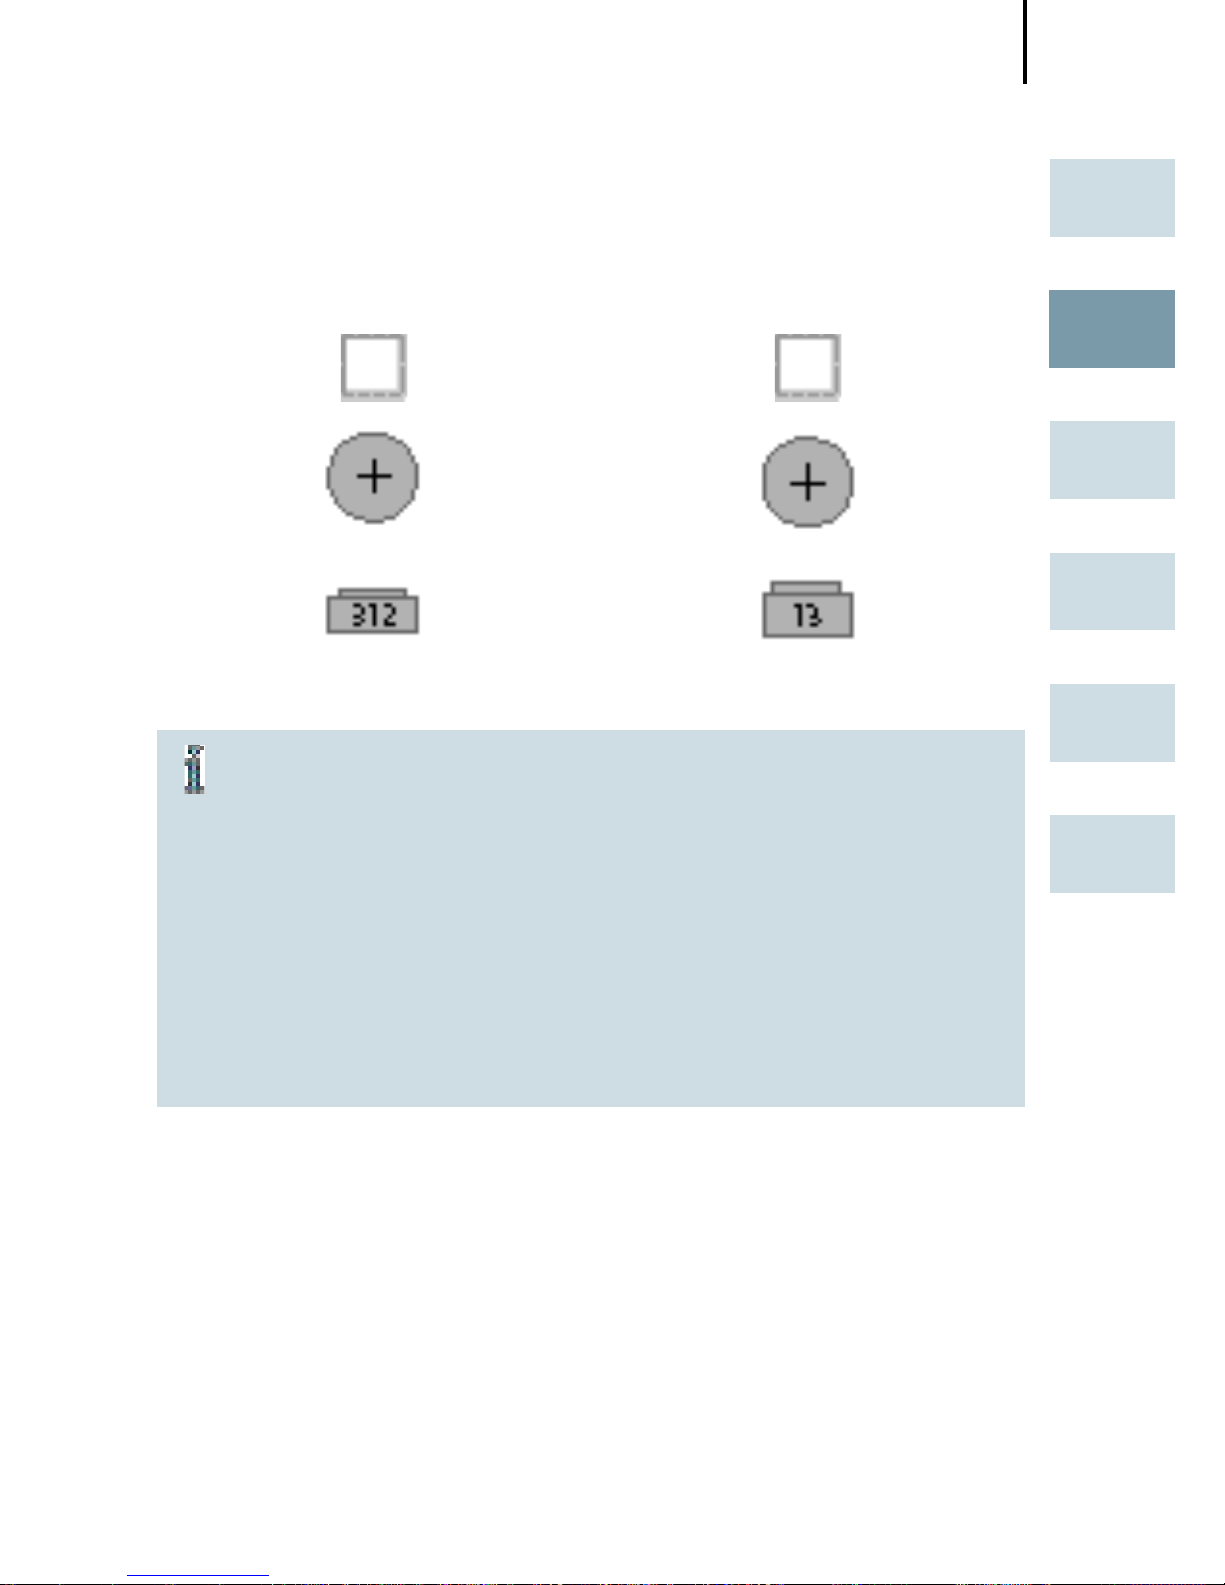
valós méret
Mindig megfelelő méretű elemet használjon.
Az első használat előtt töltse fel az újratölthető
akkumulátort.
A normál elemen található fület csak az elem
használatba vétele előtt távolítsa el.
Az elem pozitív (+) pólusa mindig a sima olda-
lon van.
Mindig tartson magánál tartalék elemet.
Elemkimerülés-jelző
Hallókészülék-specialistája aktiválhat egy hangjelzést,
amely tájékoztatja Önt, ha az elem majdnem üres. Ha
hangjelzést hall, vagy gyenge erősítést észlel, cserélje ki
az elemet.
Normál elemek és újratölthető
akkumulátorok kezelése
Page 40
Normál elemek és újratölthető akkumulátorok kezelése
40
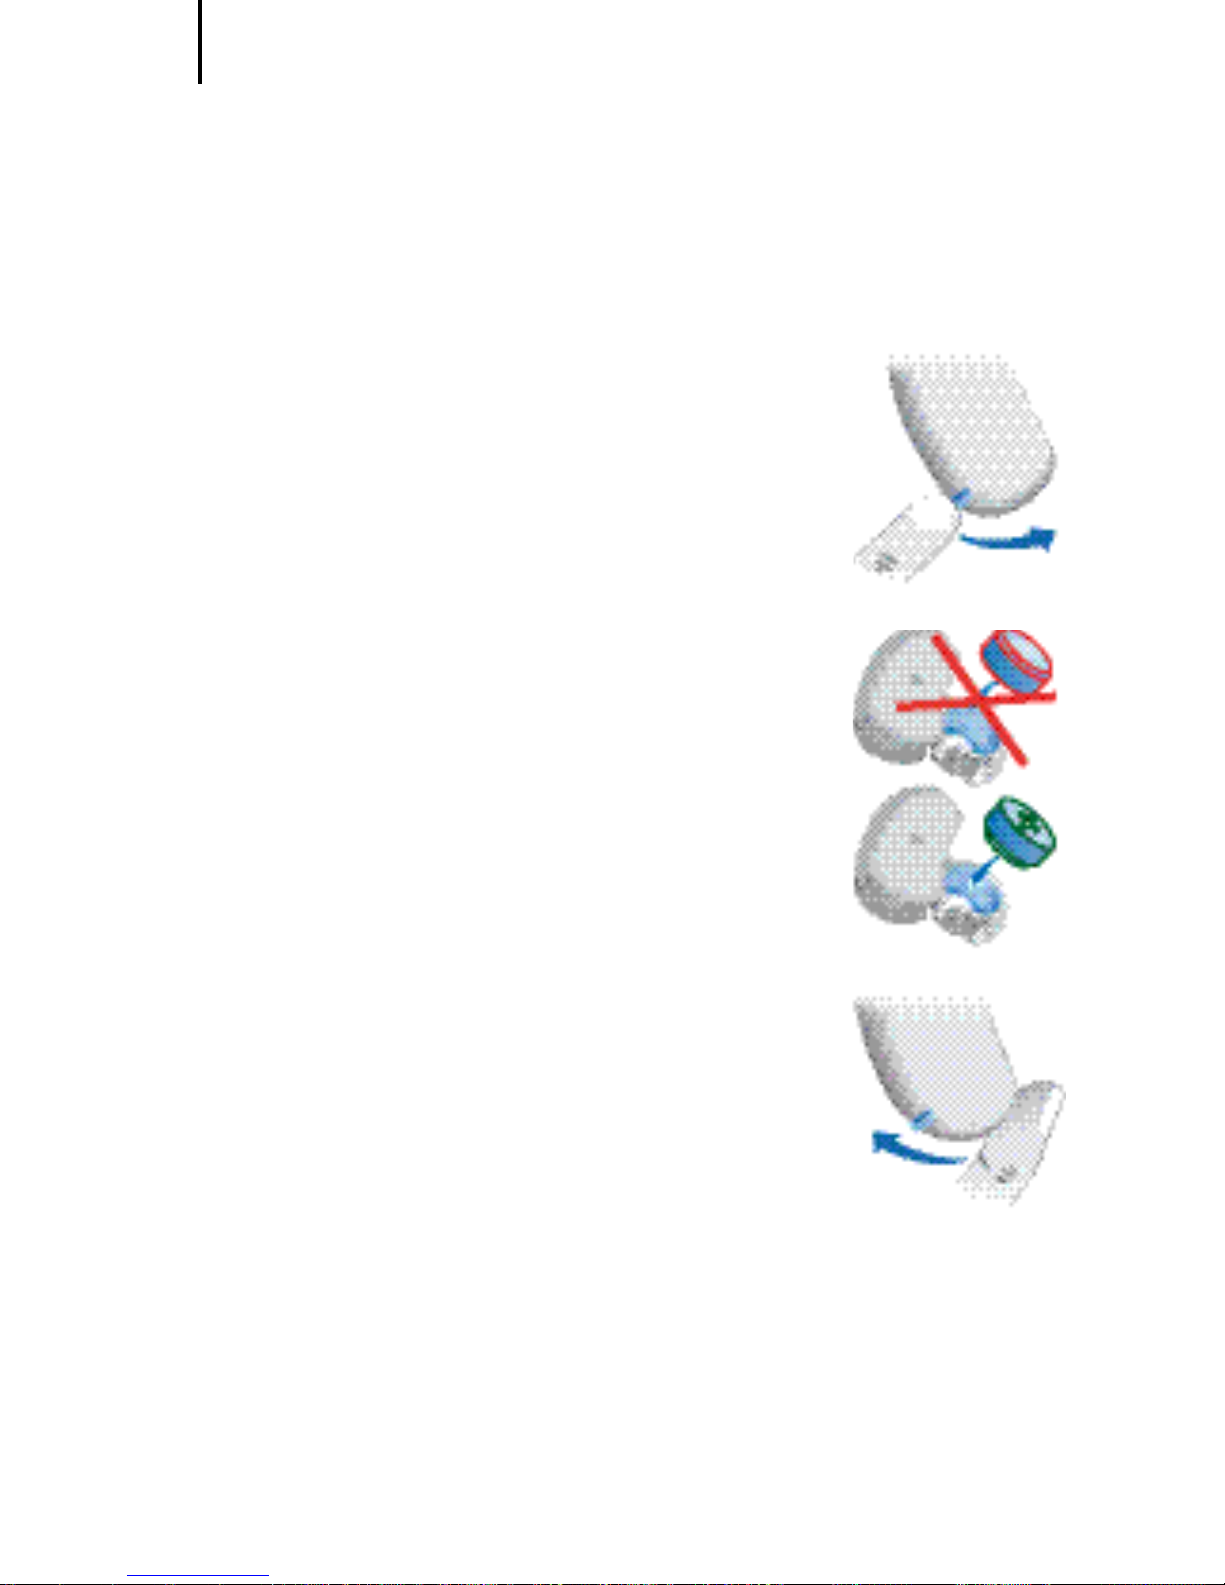
Az elem behelyezése.
Az ábrán látható módon a körmével
nyissa ki teljesen az elemtartó rekeszt.
Helyezzen be egy megfelelő méretű
elemet.
Ügyeljen arra, hogy az akkumulátoron
található „+” jel felfelé álljon, a képen
látható módon.
Zárja be az elemtartót.
Ne erőltesse a fedél bezárását. Ha nem
záródik be könnyedén, nézze meg, hogy
jól van-e behelyezve az elem.
Amikor az elemtartó fedele teljesen bezáródott, a hallókészülék készen áll a használatra.
Page 41
Normál elemek és újratölthető akkumulátorok kezelése
41
EN
HU
RO
FR
DE
AR
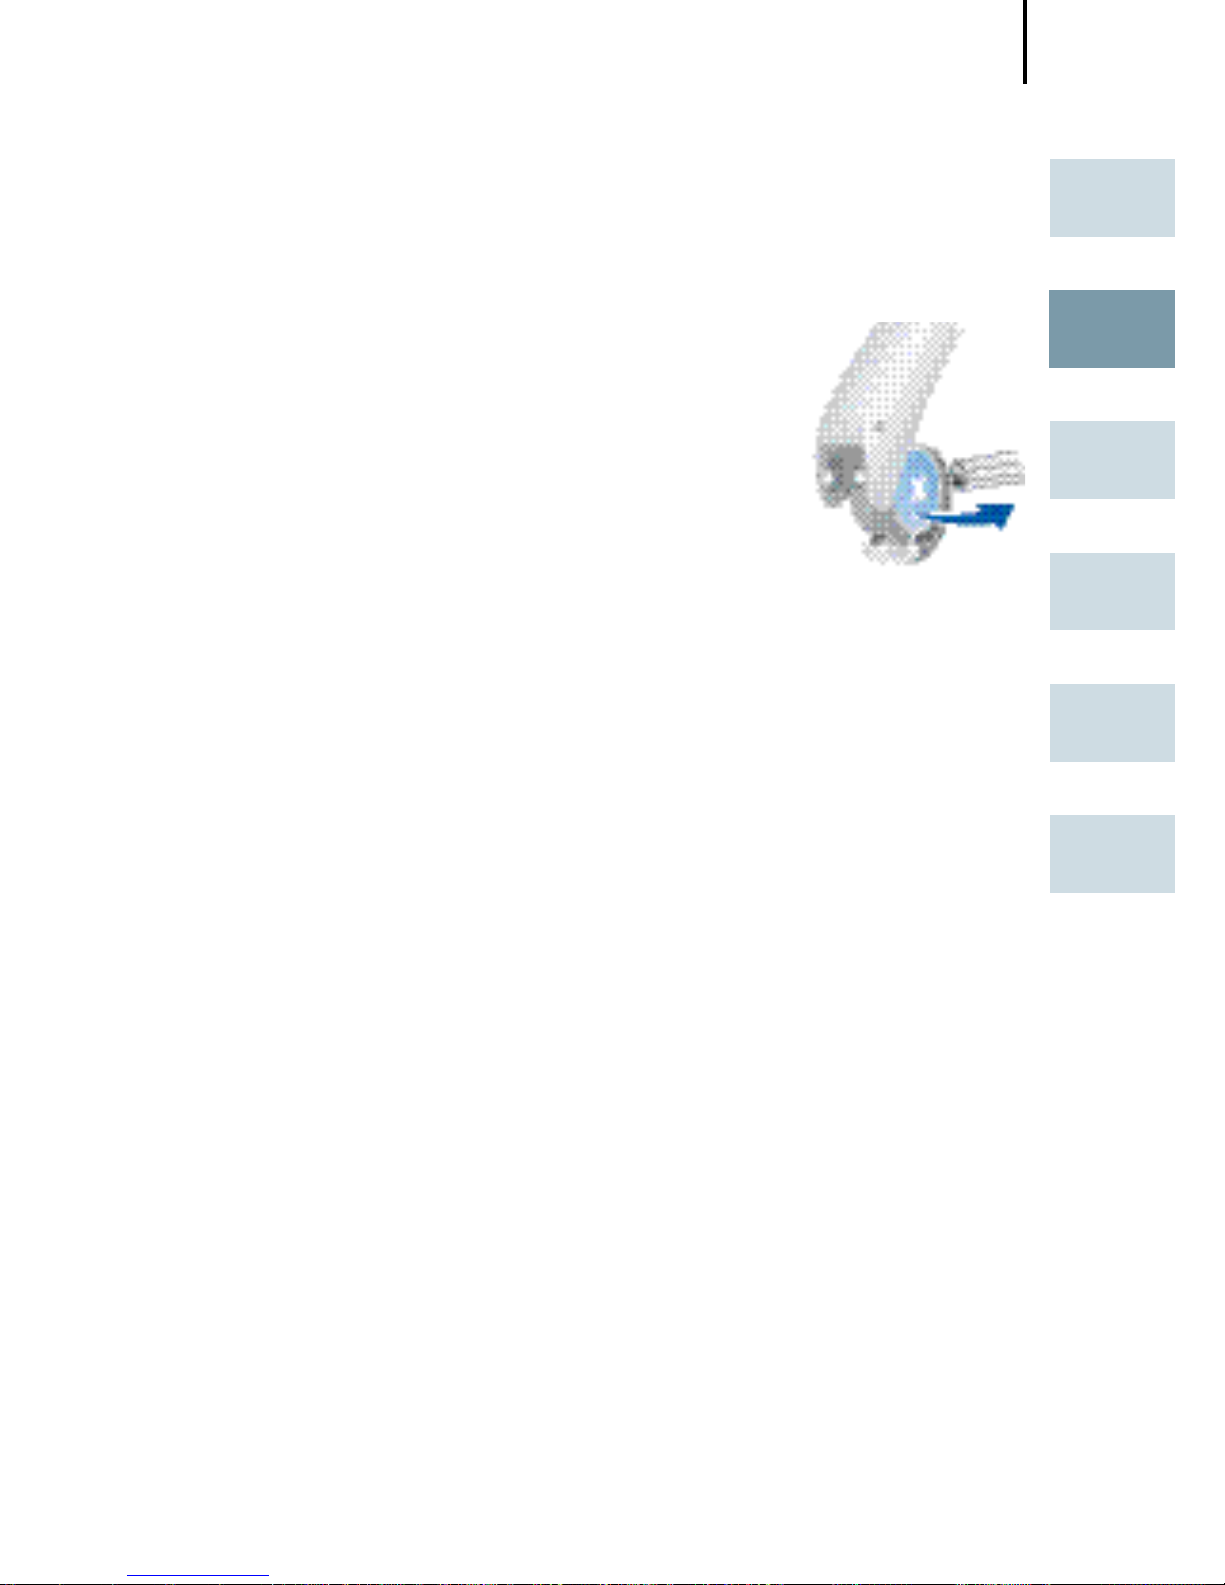
Az akkumulátor eltávolítása
Teljesen nyissa ki az akkumulátortartót.
Normális esetben az akkumulátor kiesik,
amikor a rekesz teljesen nyitva van.
Ha az akkumulátor nem jön ki, finoman
ütögesse meg a készüléket, vagy használja a tartozékként kapható mágneses pálcát az elem
eltávolításához.
Page 42
Hallókészülékének behelyezése és eltávolítása
42
Az oldalak felismerése érdekében kérje meg hallókészülék-specialistáját, hogy helyezzen el színes
jelzéseket az elemtartóban. Ha a jelzés az elemtartóban piros, akkor a hallókészülék a jobb fülhöz
való. Ha a jelzés kék, akkor a hallókészülék a bal
fülhöz való.
A hallókészülék felhelyezése
Kapcsolja ki a hallókészüléket.
Tartsa a hallójárati egységet/
LifeTipet a hüvelyk- és mutatóujja
között, és óvatosan helyezze be a
hallójáratba.
Lehet, hogy segítségére lesz, ha a fület kissé fel- vagy
hátrahúzza.
Helyezze a hallókészüléket a fül mögé.
Kapcsolja be a hallókészüléket.
A hallókészülék eltávolítása
Tartsa a hallójárati egységet /
LifeTube-ot a hüvelyk- és mutatóujja között, majd óvatosan húzza
ki.
Lehet, hogy a segítségére lesz, ha
a fület kissé megnyomja hátulról.
Hallókészülékének behelyezése és
eltávolítása
Page 43
A hallókészülék be- és kikapcsolása
43
EN
HU
RO
FR
DE
AR
Kérdezze meg hallókészülék-specialistáját, hogy az Ön
készülékére vonatkozik-e az adott információ.
Az elemtartóval
B e
Zárja be az elemtartót.
K i
Nyissa ki az elemtartót.
A nyomógombbal
B e
Nyomja meg és tartsa lenyomva
a gombot 2 másodpercig.
K i
Nyomja meg és tartsa lenyomva
a gombot 2 másodpercig.
A hallókészülék be- és
kikapcsolása
Page 44

A hallókészülék be- és kikapcsolása
44
A távirányítóval
Lásd a távirányító használati útmutatóját.
Késleltetett bekapcsolás
Hallókészüléke késleltetett bekapcsolási funkcióval rendelkezik, amelyet hallókészülék-specialistája aktiválhat.
Ez lehetővé teszi a hallókészülék 6/12/18 másodperces
automatikus késleltetéssel történő bekapcsolását, így a
hallókészüléket a kellemetlen visszacsatolást (sípolást)
elkerülve helyezheti fülébe.
Page 45
Hallóprogram-váltás
45
EN
HU
RO
FR
DE
AR
Kérdezze meg hallókészülék-specialistáját, hogy az Ön
készülékére vonatkozik-e az adott információ.
A nyomógombbal
A következő programra váltáshoz
nyomja meg a nyomógombot.
A billenőkapcsolóval
A következő programra váltáshoz
nyomja felfelé a kapcsolót.
Az előző programra váltáshoz
nyomja lefelé a kapcsolót.
A távirányítóval
Lásd a távirányító használati útmutatóját.
Hallóprogram-váltás
Page 46
A hangerő megváltoztatása
46
A hallókészülék hangerő-szabályozása automatikus, így
nincs szükség kézi beállításra.
Ha mégis szeretné kézzel beállítani, kérje meg hallókészülék-specialistáját, hogy kézi beállításhoz programozza a
készüléket.
Automatikus
A készülék a hangerőt a használat közben automatikusan beállítja.
Billenőkapcsoló
A hangerő növeléséhez nyomja
felfelé.
A hangerő csökkentéséhez nyomja
lefelé.
A távirányítóval
Lásd a távirányító használati útmutatóját.
A hangerő megváltoztatása
Page 47
Funkciók
47
EN
HU
RO
FR
DE
AR
A hallókészülék-specialista a következő funkciókat
engedélyezheti.
e2e wireless
■ Lehetővé teszi távvezérlő használatát.
■ Mindkét készülék beállításait egyszerre, auto-
matikusan módosítja, például a hangerő vagy a
program módosításakor.
A e2e wireless működés teljesítményét
befolyásolhatja az elektromágneses – például számítógép-monitorból vagy fénycsöves
lámpákból származó – interferencia.
Ha zavart észlel, távolodjon el a zavarfor-
rástól.
Automatikus telefonos program
Tartson közel egy telefonkészüléket a hallókészü-
lékhez (*).
A hallókészülék automatikusan átvált a telefonos
programra.
Távolítsa el a telefont a hallókészüléktől.
A hallókészülék automatikusan visszavált a korábban használt programra.
Funkciók
Page 48

Funkciók
48
A telefonos program manuálisan, a program-
gomb használatával is kiválasztható.
Ha a hallókészüléket telefontekercs üzemmód-
ban működteti, akkor a vezeték nélküli funkció
pulzáló zajt okozhat. Ez az átviteli jel érzékelése
miatt van. Ha a hallókészüléket telefontekercs
üzemmódban működteti, akkor csak 10 cm-nél
(4 hüvelyknél) nagyobb távolságban használja a
távvezérlőt.
(*) AutoPhone mágneses tartozék
Nem minden telefon generál olyan mágneses teret, amely
elég erős az AutoPhone funkció bekapcsolásához. Ilyen
esetekben használja a tartozékként kapható Siemens
AutoPhone mágnest, és az AutoPhone funkció bekapcsolásához csatlakoztassa a telefonkagylóhoz.
A mágnes elhelyezésével kapcsolatban lásd az
AutoPhone mágnes használati útmutatóját.
Kizárólag Siemens típusú mágnest használjon. A
tartozékot kérje hallókészülék-specialistájától.
Page 49
Funkciók
49
EN
HU
RO
FR
DE
AR
MEGJEGYZÉS
A mágnesek megzavarhatják az elektronikus
eszközök működését, és a tárolt adatok törlését
okozhatják.
Tartsa távol a mágnest számítógépektől, színes
monitoroktól, televízióktól, hajlékonylemezektől, videó- vagy hangkazettáktól, illetve egyéb
elektronikus eszközöktől.
VIGYÁZAT
A mágnesek zavarhatják az életfenntartó rendszerek (szívritmus-szabályozók, mágneses billentyűk
stb.) működését.
A mágnest csak akkor használja, ha nem kétsé-
ges a biztonságos távolság. A szívritmus-szabályozó és a mágnes közötti távolságnak legalább
10 cm-nek (4 hüvelyknek) kell lennie.
Page 50
Karbantartás és ápolás
50
A hallókészülék rendkívül érzékeny rendszer. A megfelelő
gondozás és kezelés biztosítja a lehető legjobb teljesítményt.
A készülék károsodásának és az egészségügyi problémáknak az elkerülése érdekében rendszeresen tisztítsa a
készüléket.
MEGJEGYZÉS
A hallókészüléket ne tegye vízbe.
Szükség szerint tisztítsa meg a hallókészü-
léket puha, száraz papírtörlővel.
Helyezze a hallókészüléket egy éjszakára a szárító
csomagba a speciális, nedvességelnyelő kapszulával
együtt.
Kérjen a hallókészülék-specialistától speciális ápoló
készleteket, és érdeklődjön a hallókészülék jó állapotának megőrzésével kapcsolatos tudnivalókról.
LifeTube-bal rendelkező készülékekhez
Egy tisztítódróttal rendszeresen tisztítsa a LifeTube
csöveket.
Kérje hallókészülék-specialistájától a LifeTube csövek
és a LifeTip fejek cseréjét körülbelül 3–6 havonta vagy
szükség szerint.
Karbantartás és ápolás
Page 51
(Accessories (Tartozékok
51
EN
HU
RO
FR
DE
AR
Accessories (Tartozékok)
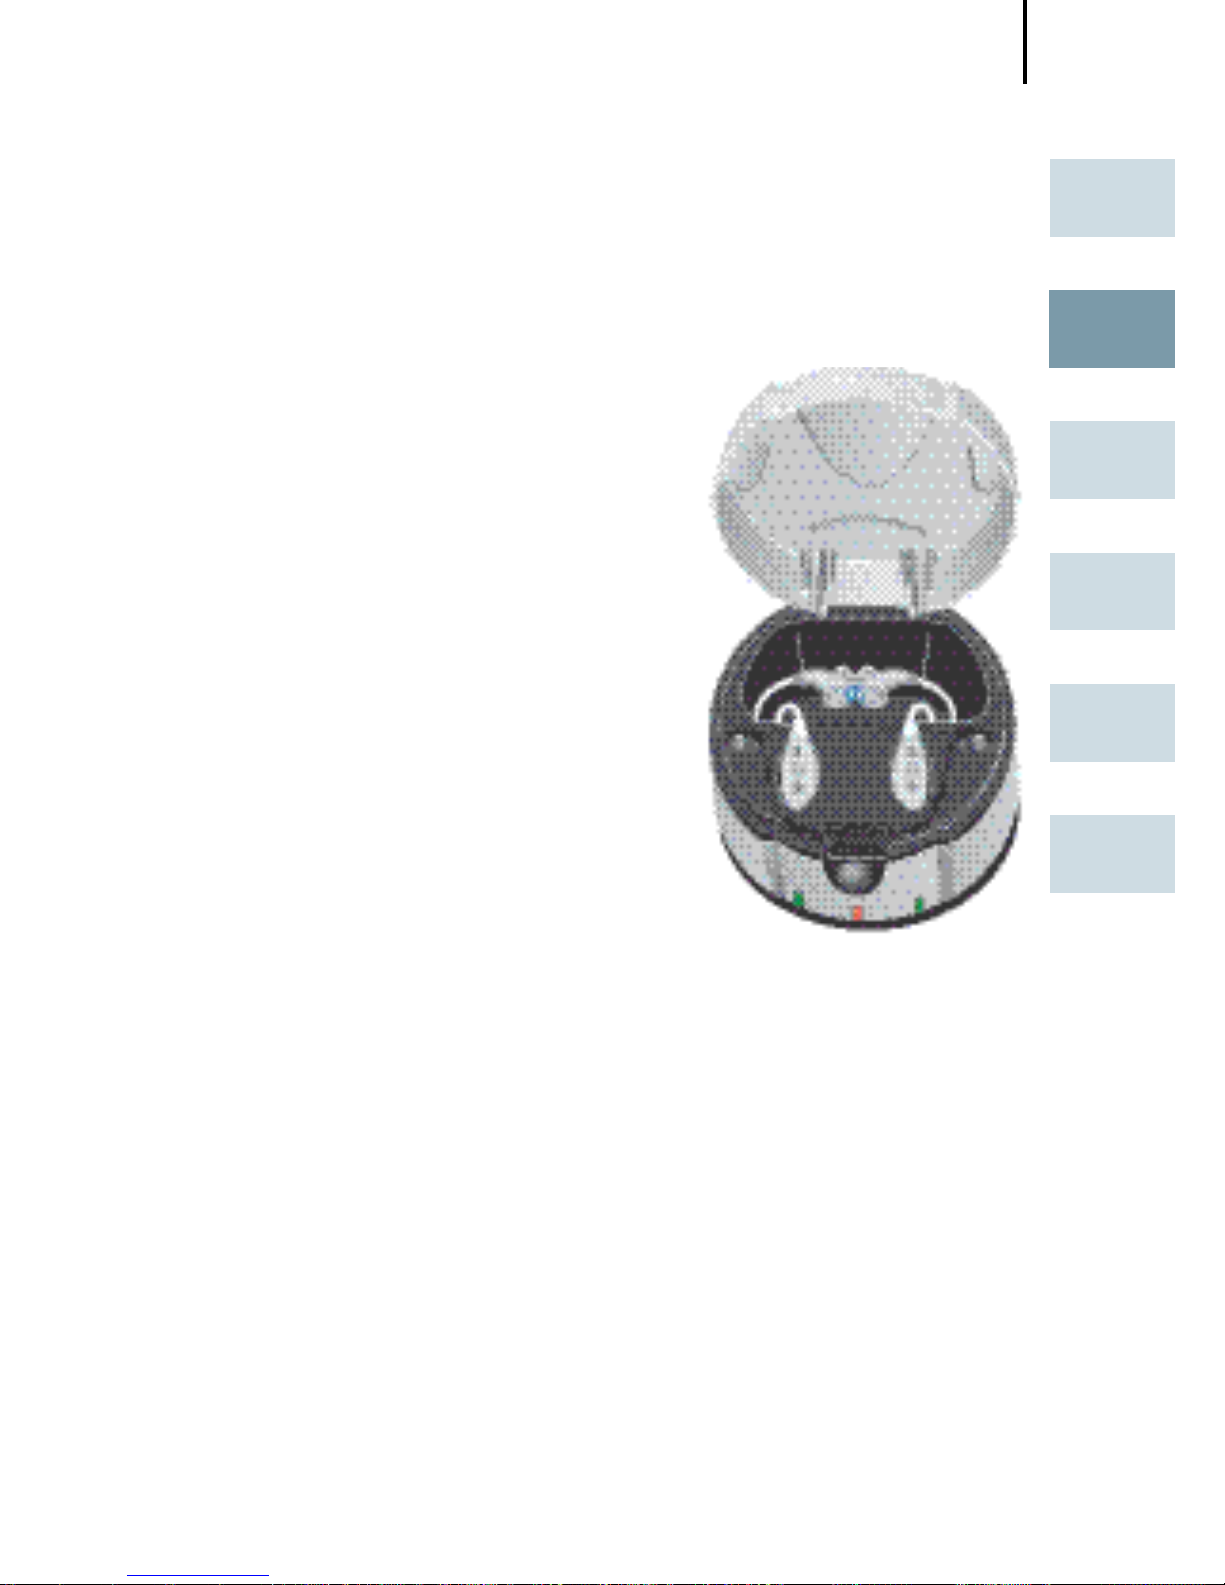
Töltő (csak Motion SX, Motion P)
A hallókészülék normál elemmel
vagy újratölthető akkumulátorral
működik. A könnyen használható
töltővel egy vagy két hallókészülék
újratölthető akkumulátorát töltheti
fel. Mindössze 6 óra töltés után a
töltő magától kikapcsol, és a hallókészülék készen áll az egész napos
működésre.
A részletes információkat és utasításokat olvassa el a töltő használati
útmutatójában, vagy érdeklődjön
hallókészülék-specialistájánál.
Accessories (Tartozékok)
Page 52
(Accessories (Tartozékok
52
Accessories (Tartozékok)
Tek wireless enhancement
A hallókészülék a Tek Connect távvezérlővel lehetővé teszi, hogy hallókészülékét a technológia egyre bővülő
világához csatlakoztassa. Egy speciális Bluetooth-kapcsolaton keresztül
lehetősége van audiojel fogadására
mobiljáról, tévékészülékéből vagy mp3lejátszójáról.
A részletes információkkal és utasításokkal kapcsolatban olvassa el a Tek
használati útmutatóját, vagy érdeklődjön hallókészülék-specialistájánál.
Távvezérlő
A hallókészülék vezeték nélküli funkciója lehetővé teszi,
hogy távirányítóval állítsa be a programot és a hangerőt a
hallókészüléken.
A távvezérlővel kapcsolatos további tudnivalókról érdeklődjön hallókészülék-specialistájánál, vagy olvassa el a
távvezérlő használati útmutatóját.
Ha a hallókészülék egy másik személy távve-
zérlőjével is irányítható, kérjük, vigye vissza a
hallókészülékeket és a távvezérlőt a hallókészülék-specialistájához.
Page 53
Hibaelhárítási tanácsok
53
EN
HU
RO
FR
DE
AR
Hallókészüléke rendkívül megbízható eszköz. Ha probléma merül fel, akkor általában gyorsan megoldható. Az
egyszerű problémák megoldásához alkalmazza az alábbi,
hibaelhárítással kapcsolatos tanácsokat.
Probléma Lehetséges megoldás
Gyenge hang. Cserélje ki/töltse fel a lemerült akkumu-
látort.
Tisztítsa meg a hallójárati egységet.
Növelje a hangerőt.
A hallókészülék sípoló
hangot ad ki.
Próbálja meg újra felhelyezni a hallójárati egységet, amíg biztonságosan nem
illeszkedik.
Csökkentse a hangerőt.
Tisztítsa meg a hallójárati egységet.
Szakadozó
hang.
Csökkentse a hangerőt.
Cserélje ki/töltse fel a lemerült akkumulátort.
Tisztítsa meg a hallójárati egységet/Life
Tipet.
A hallókészülék hangjelzéseket ad ki.
Óvatosan, teljesen zárja be az elemtartót.
Cserélje ki/töltse fel a lemerült akkumulátort.
Hibaelhárítási tanácsok
Page 54

Hibaelhárítási tanácsok
54
A hallókészülék nem
működik
Ellenőrizze, hogy a hallókészülék be van-e
kapcsolva.
Óvatosan, teljesen zárja be az elemtartót.
Cserélje ki/töltse fel a lemerült akkumulátort.
Győződjön meg arról, hogy helyesen
helyezte be az elemet.
A késleltetett bekapcsolás aktív. Várjon
18 másodpercet, majd ellenőrizze ismét.
Ha további problémák merülnének fel, forduljon hallókészülék-specialistájához.
Page 55
Hulladékelhelyezési tudnivalók
55
EN
HU
RO
FR
DE
AR
Az Európai Unión belül a jelzéssel ellátott
készülékekre az „Európai Parlament és a Tanács
2002/96/EK jelű, 2003. január 27-én kiadott,
elektromos és elektronikus készülékek hulladék-elhelyezésére vonatkozó,
a 2003/108/EK jelű direktívával módosított irányelv”
(WEEE) vonatkozik.
A hallókészüléket, az elemeket és a tartozékokat
az országában érvényes rendelkezések szerint
hasznosítsa újra.
A CE-jelöléssel a Siemens igazolja, hogy a készülék
megfelel az orvosi készülékekre vonatkozó,
93/42/EEK jelű irányelv követelményeinek.
Az e2e wireless 2.0 technológiával rendelkező termékek
esetében a Siemens emellett igazolja a 99/5/EK jelű, rádió- és távközlési végberendezésekre vonatkozó (R&TTE)
európai irányelvnek való megfelelőséget.
Hulladékelhelyezési tudnivalók
Page 56

Az Ön által vásárolt hallókészülék konfigurációja
56
Hallókészülék
BAL JOBB
Modell
Sorozatszám
Akkumulátor
□ igen □ nem Késleltetett bekapcsolás □ igen □ nem
□ igen □ nem Nyomógomb □ igen □ nem
□ igen □ nem Billenőkapcsoló □ igen □ nem
Hangjelzések
□ be □ ki Program váltása □ be □ ki
□ be □ ki Alacsony akkufeszültség-
re való figyelmeztetés
□ be □ ki
□ be □ ki Hangerő-szabályozó
korlátozása
□ be □ ki
□ be □ ki Hangerő-szabályozó
átállítása
□ be □ ki
Program A program leírása
1
2
3
4
5
Az Ön által vásárolt hallókészülék
konfigurációja
Page 57

Az Ön által vásárolt hallókészülék konfigurációja
57
EN
HU
RO
FR
DE
AR
Távvezérlő
Modell
Sorozatszám
Page 58

58
Page 59

59
Cuprins
EN
HU
RO
FR
DE
AR
Cuprins
Instrumentul dumneavoastră auditiv Motion BTE 60
Destinaţie de utilizare 63
Note generale privind siguranţa 64
Manipularea bateriilor standard sau reîncărcabile 67
Introducerea şi scoaterea instrumentului
dumneavoastră auditiv 70
Pornirea şi oprirea instrumentului dumneavoastră
auditiv 71
Modificarea programului auditiv 73
Modificarea volumului 74
Funcţionalităţi 75
Întreţinere şi îngrijire 78
Accesorii 79
Sfaturi privind identificarea şi remedierea
problemelor 81
Informaţii privind depunerea la deşeuri 83
Configuraţia instrumentului dumneavoastră auditiv 84
Page 60
Instrumentul dumneavoastră auditiv Motion BTE
60
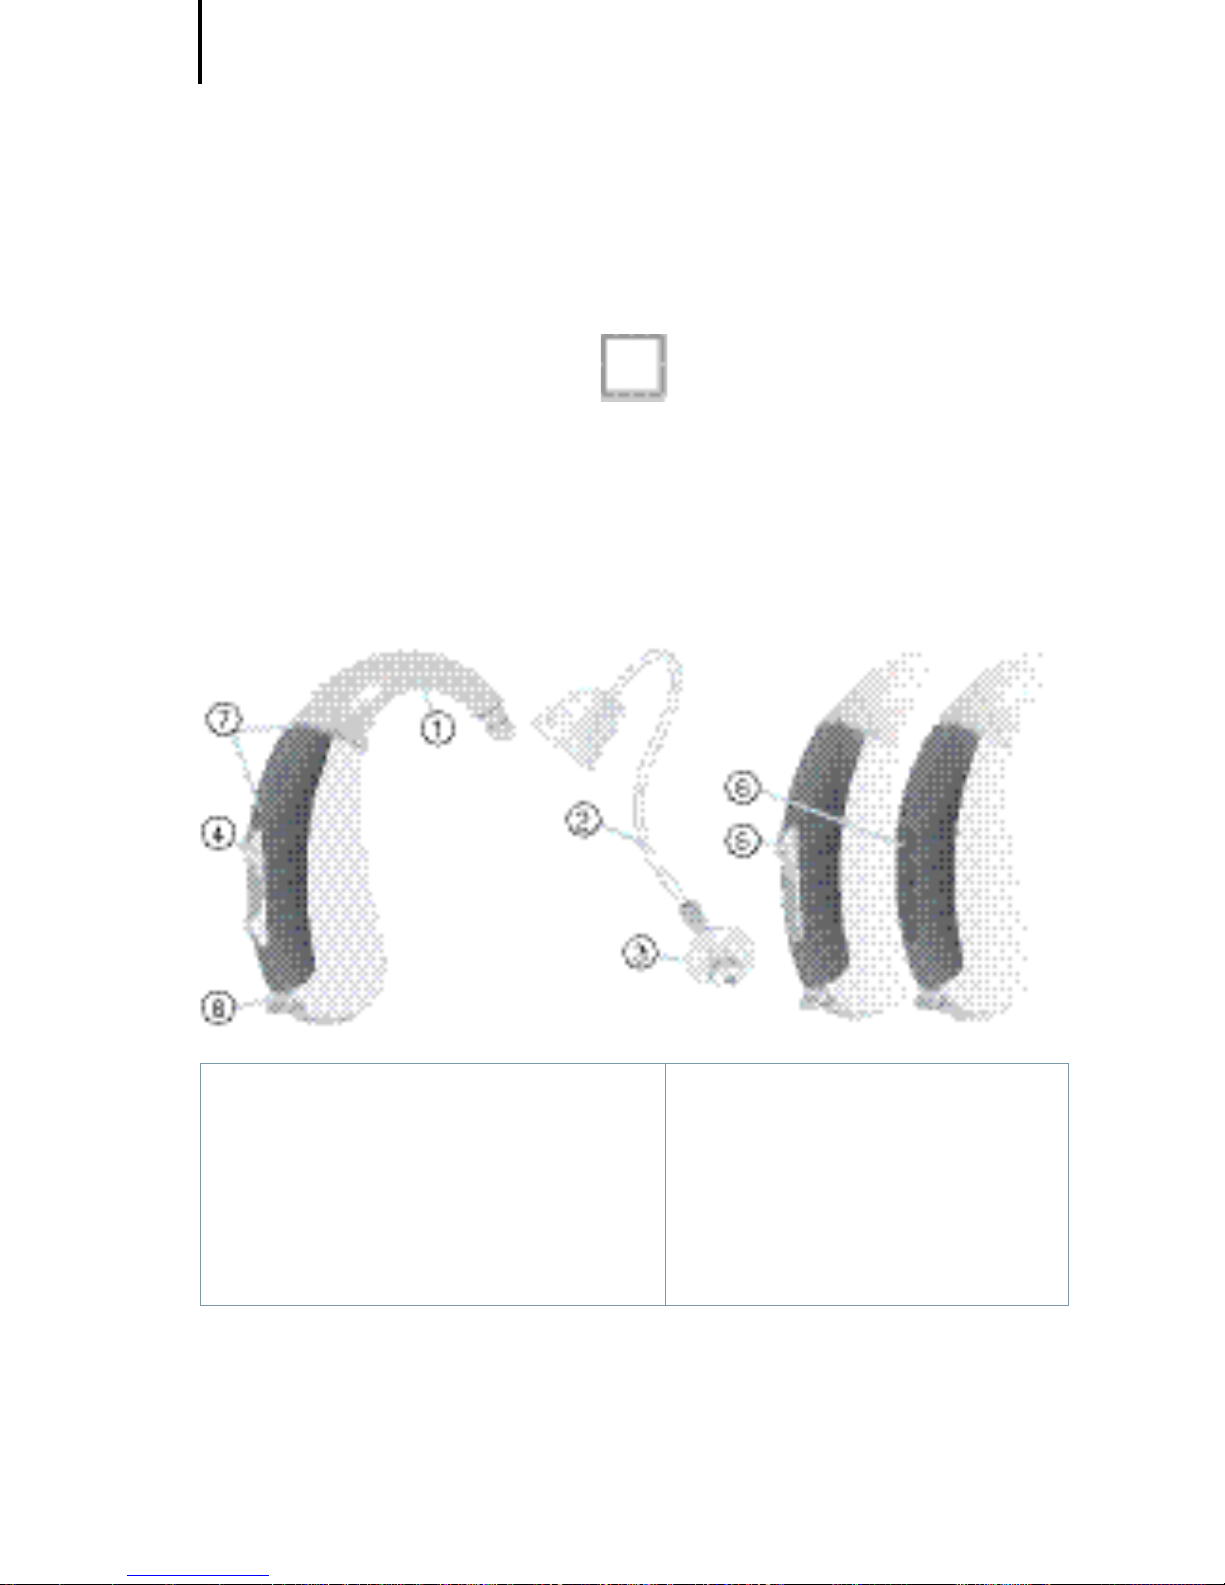
Motion S
opţional cu LifeTube
tip baterie: 312
întotdeauna standard
① Dispozitiv de fixare în
ureche
② LifeTube
③ LifeTip
④ Întrerupător rectangular*
⑤ Buton*
⑥ Capac plat*
⑦ Orificii microfon
⑧ Compartimentul bate-
riei
* Ca alternativă la întrerupătorul rectangular, audiologul
dumneavoastră poate monta pe instrument un buton sau
poate demonta orice buton de comandă (capac plat).
Instrumentul dumneavoastră
auditiv Motion BTE
Page 61
Instrumentul dumneavoastră auditiv Motion BTE
61
EN
HU
RO
FR
DE
AR
Motion SX
opţional cu LifeTube
tip baterie: 13
reîncărcabilă sau standard
① Dispozitiv de fixare în
ureche
② LifeTube
③ LifeTip
④ Întrerupător rectangular*
⑤ Buton*
⑥ Capac plat*
⑦ Orificii microfon
⑧ Compartimentul bate-
riei
⑨ Contacte de încărcare
* Ca alternativă la întrerupătorul rectangular, audiologul
dumneavoastră poate monta pe instrument un buton sau
poate demonta orice buton de comandă (capac plat).
Page 62
Instrumentul dumneavoastră auditiv Motion BTE
62
Motion P
opţional cu LifeTube
tip baterie: 13
reîncărcabilă sau standard
① Dispozitiv de fixare în
ureche
② LifeTube
③ LifeTip
④ Întrerupător rectangular
⑤ Buton
⑥ Orificii microfon
⑦ Compartimentul bateri-
ei
⑧ Contacte de încărcare
⑨ Număr de serie
⑩ Tip al instrumentului
auditiv
Page 63
Destinaţie de utilizare
63
EN
HU
RO
FR
DE
AR
Instrumentele auditive sunt destinate îmbunătăţirii
auzului persoanelor cu deficienţe auditive. Diagnosticarea
şi prescrierea unui instrument auditiv trebuie efectuate de
specialişti în probleme auditive, de exemplu, medici
specialişti în ORL, audiologi sau acusticieni.
Citiţi şi respectaţi instrucţiunile din acest ghid de utilizare
pentru a evita vătămările sau deteriorarea instrumentelor
auditive.
Simboluri:
Acordaţi atenţie informaţiilor marcate cu simbolul de aver-
tizare AVERTISMENT, ATENŢIE sau NOTĂ!
AVERTISMENT indică o situaţie care ar putea
duce la accidentări serioase, ATENŢIE indică o
situaţie care ar putea duce la accidentări minore.
NOTĂ NOTĂ indică posibile daune materiale.
Recomandări şi sfaturi despre o mai bun manevrare a dispozitivului dumneavoastră.
Instrucţiuni. Indică faptul că trebuie întreprinsă o
acţiune.
Destinaţie de utilizare
Page 64

Note generale privind siguranţa
64
NOTĂ
Instrumentele dumneavoastră auditive sunt
sensibile la căldură extremă, umiditate ridicată,
câmpuri magnetice puternice (> 0,1 T), raze X şi
efort mecanic.
Nu expuneţi instrumentele auditive la tempera-
turi extreme sau umiditate ridicată.
Nu le lăsaţi în lumina directă a soarelui.
Nu le purtaţi la duş sau când aplicaţi machiaj,
parfum, aftershave, fixativ de păr sau loţiune de
bronzat.
Nu purtaţi instrumentul auditiv când sunteţi ex-
puşi la unde scurte, un câmp magnetic puternic,
un câmp de înaltă frecvenţă sau raze X.
Nu introduceţi instrumentele dumneavoastră
auditive într-un cuptor cu microunde.
AVERTISMENT
Pericol de explozie!
Nu utilizaţi instrumentele auditive în zone în
care există pericol de explozii (de ex. exploatări
miniere).
Note generale privind siguranţa
Page 65
Note generale privind siguranţa
65
EN
HU
RO
FR
DE
AR
AVERTISMENT
Pericol de sufocare cauzat de componente mici.
Nu lăsaţi instrumentele auditive, bateriile şi
accesoriile la îndemâna copiilor.
În cazul ingerării, adresaţi-vă imediat unui me-
dic sau unui spital.
Dacă sugarii, copiii mici sau personale cu
handicap psihic trebuie să poarte instrumente
auditive, asiguraţi o supraveghere adecvată.
Siemens oferă instrumente auditive speciale pentru a fi montate la bebeluşi şi copii mici.
Solicitaţi audiologului dumneavoastră informaţii
suplimentare.
NOTĂ
Bateriile conţin substanţe nocive care poluează
mediul înconjurător.
Nu aruncaţi bateriile uzate la coşul de gunoi
menajer.
Eliminaţi bateriile conform reglementărilor
naţionale sau returnaţi-le audiologului dumneavoastră.
Page 66

Note generale privind siguranţa
66
ATENŢIE
Risc de rănire cauzat de utilizarea incorectă aLifeTip.
Purtaţi întotdeauna LifeTube cu LifeTip.
Asiguraţi-vă că LifeTip este ataşat complet la
adaptorul LifeTip.
Înlocuiţi LifeTube sau LifeTip dacă acestea sunt
fisurate.
Introduceţi LifeTube cu LifeTip cu atenţie şi nu
prea adânc în ureche.
Utilizaţi LifeTube şi LifeTip doar în modul descris
în acest ghid al utilizatorului.
Dacă LifeTip rămâne în urechea dumneavoastră,
apelaţi la un cadru medical pentru a vi-l scoate.
În unele ţări există restricţii privind utilizarea echipamentelor fără fir (wireless).
Consultaţi autorităţile locale pentru informaţii
suplimentare.
NOTĂ
Bateriile conţin substanţe nocive care poluează
mediul înconjurător.
Nu aruncaţi bateriile uzate la coşul de gunoi
menajer.
Eliminaţi bateriile conform reglementărilor
naţionale sau returnaţi-le audiologului dumneavoastră.
Page 67
Manipularea bateriilor standard sau reîncărcabile
67
EN
HU
RO
FR
DE
AR
dimensiune originală
Utilizaţi întotdeauna baterii de mărimea potrivi-
tă.
Încărcaţi bateriile reîncărcabile înainte de prima
utilizare.
Îndepărtaţi elementul de protecţie de pe baterii-
le standard doar înaintea utilizării acestora.
Polul pozitiv (+) al bateriilor se află întotdeauna
la partea netedă.
Luaţi întotdeauna baterii de rezervă cu dumnea-
voastră.
Indicator de baterie consumată
Audiologul dumneavoastră poate activa un semnal acustic pentru a vă informa în momentul în care bateria este
aproape consumată. Dacă auziţi un semnal acustic sau
dacă volumul sonor al instrumentului este redus, înlocuiţi
bateria.
Manipularea bateriilor standard
sau reîncărcabile
Page 68
Manipularea bateriilor standard sau reîncărcabile
68
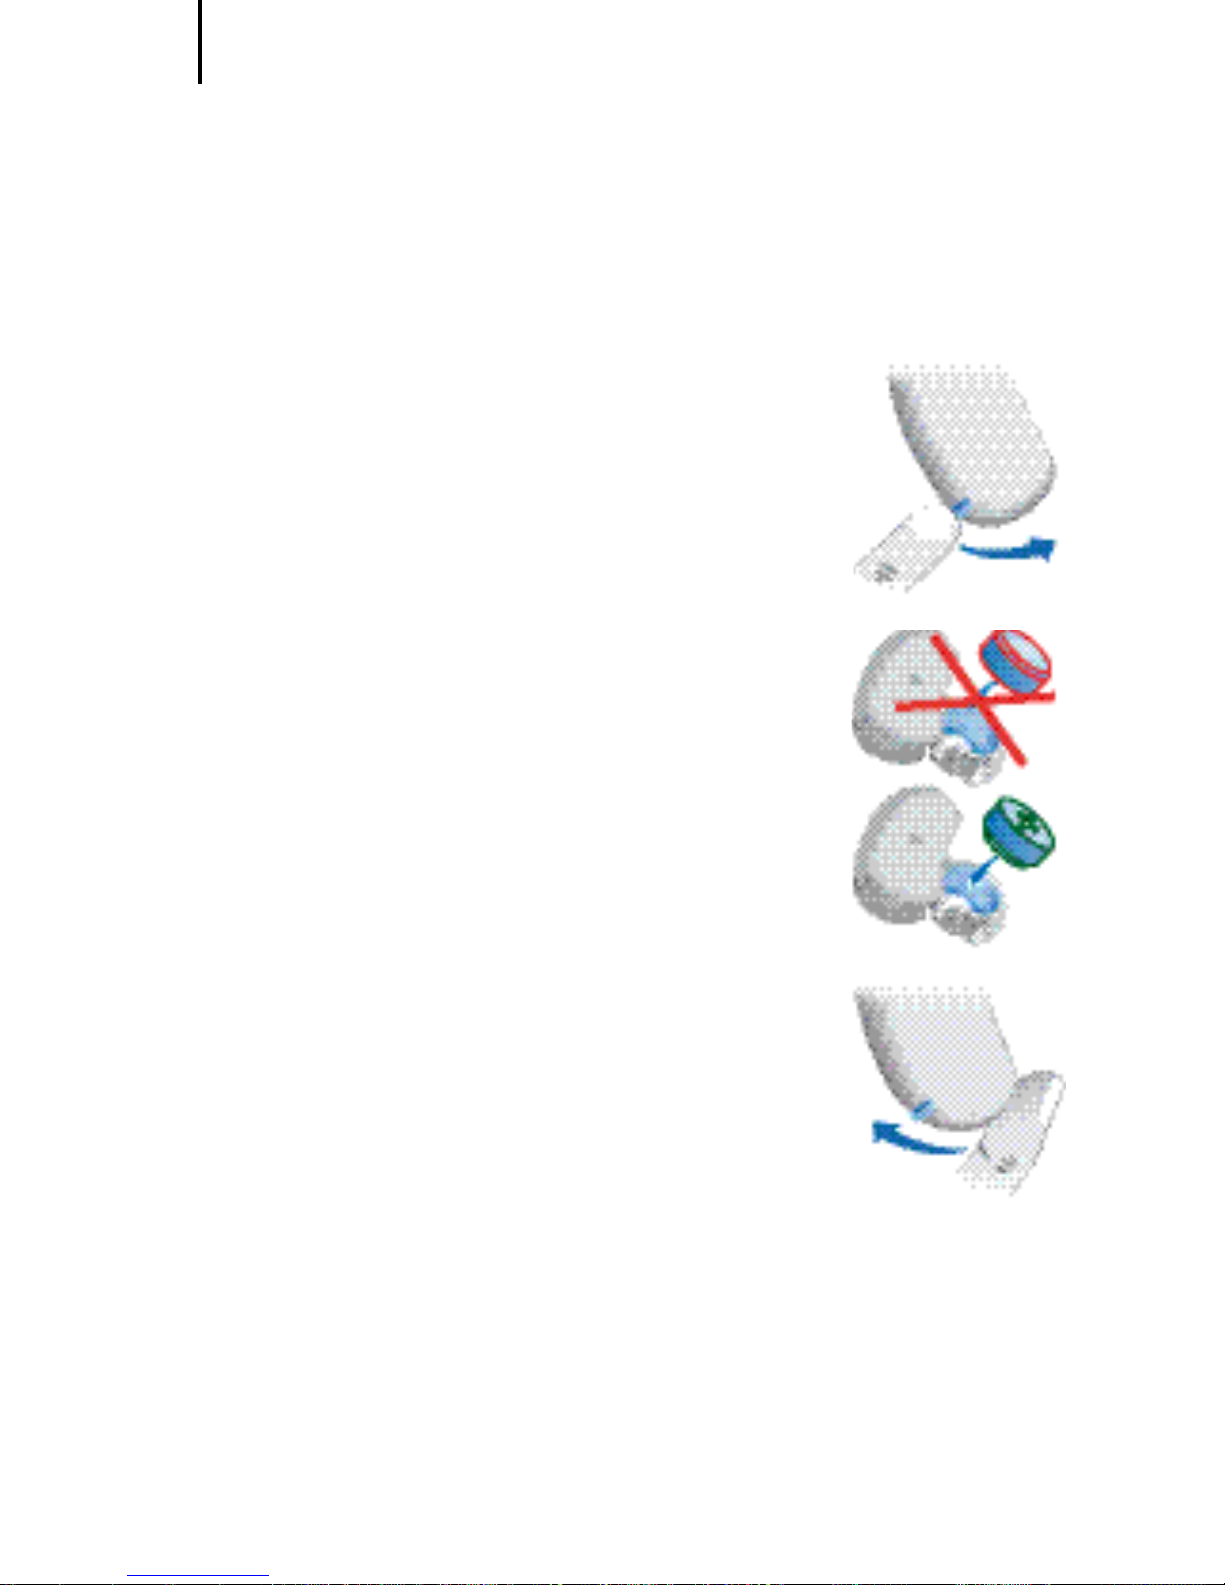
Introducerea bateriei
Deschideţi complet compartimentul
bateriei cu degetul, în modul indicat în
figură.
Introduceţi o baterie de dimensiune
corespunzătoare.
Asiguraţi-vă că simbolul "+" de pe
baterie este orientat în sus, conform
imaginii.
Închideţi compartimentul bateriei.
Nu forţaţi închiderea uşii. Dacă aceasta
nu se închide uşor, verificaţi dacă bateria a fost introdusă corect.
Când uşa bateriei este complet închisă, instrumentul auditiv este pregătit pentru utilizare.
Page 69
Manipularea bateriilor standard sau reîncărcabile
69
EN
HU
RO
FR
DE
AR
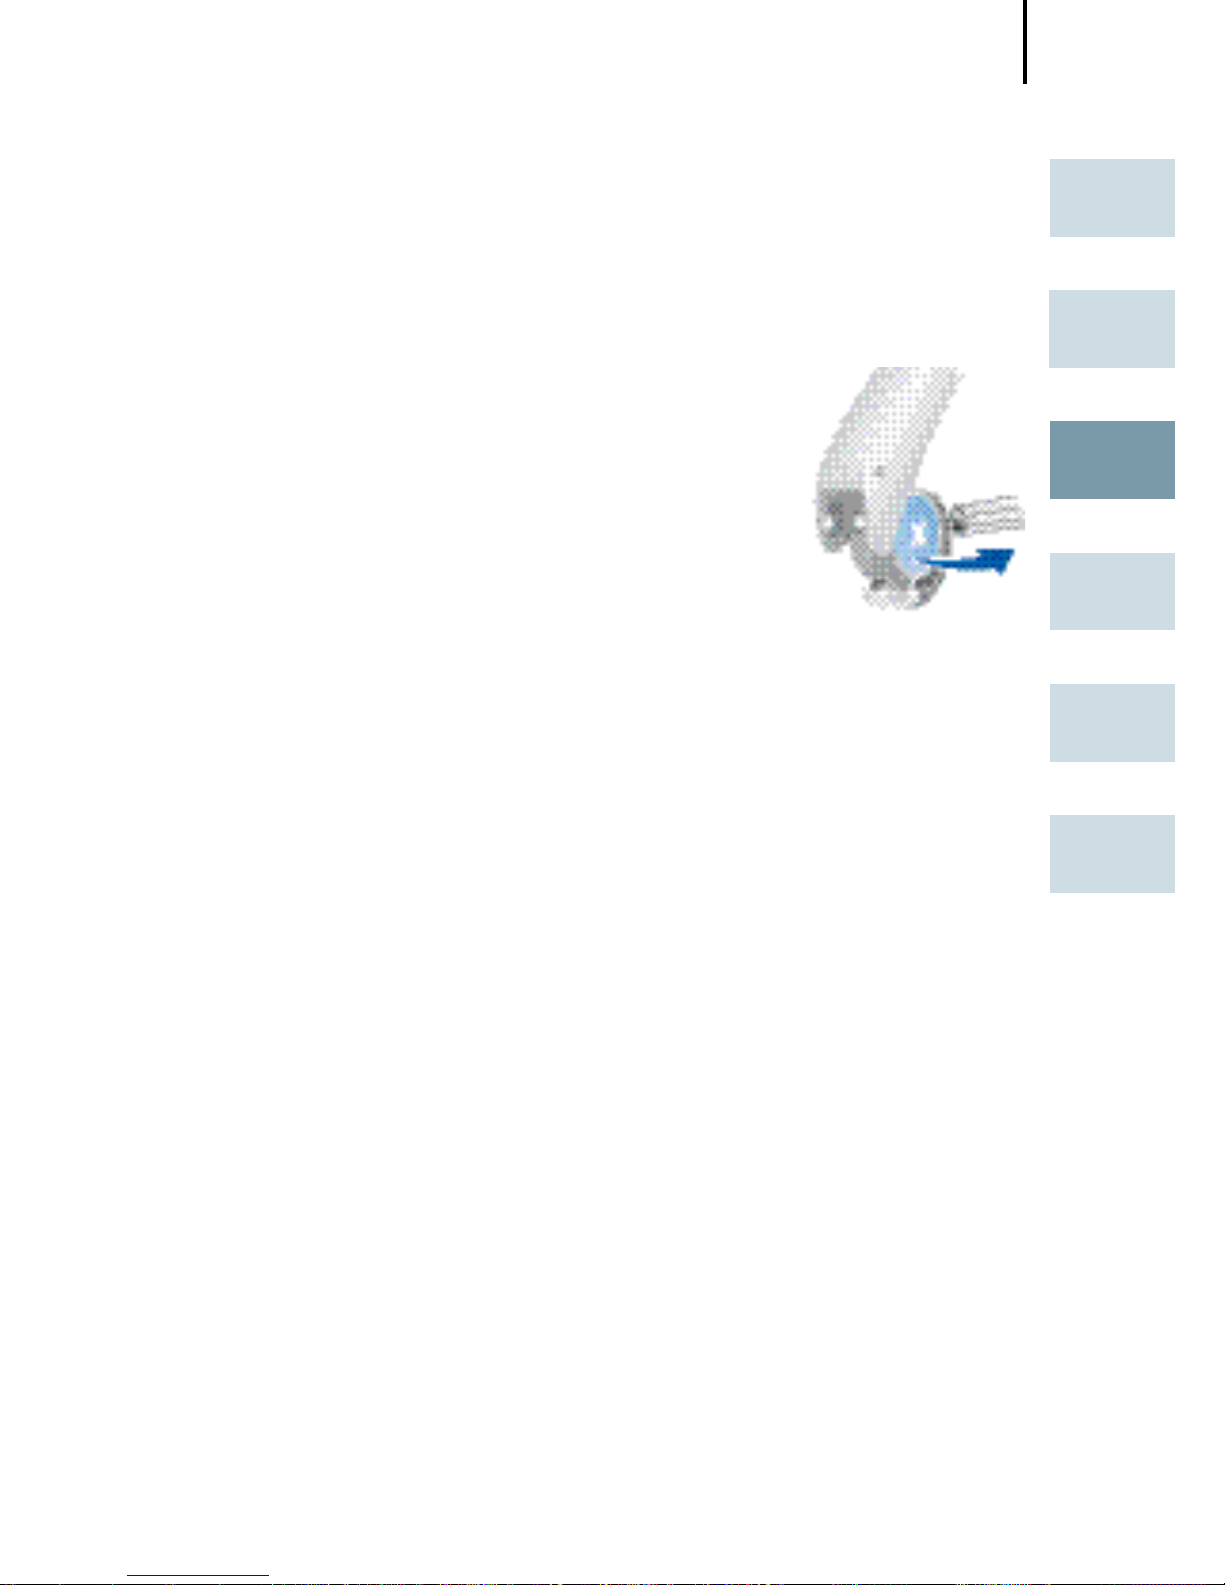
Scoaterea bateriei
Deschideţi complet compartimentul
bateriei.
În mod normal, bateriile cad din compar-
timent când acesta este complet deschis.
Dacă bateria nu iese din compartiment,
loviţi uşor instrumentul sau utilizaţi magnetul disponibil ca accesoriu pentru scoaterea bateriei.
Page 70
Introducerea şi scoaterea instrumentului dumneavoastră auditiv
70
Pentru recunoaştere laterală, solicitaţi audiologului dumneavoastră să aplice marcatoare colorate
în compartimentul bateriei. Dacă marcatorul din
compartimentul bateriei are culoarea roşie, instrumentul auditiv este destinat urechii drepte. Dacă
marcatorul este de culoare albastră, instrumentul
auditiv este destinat urechii stângi.
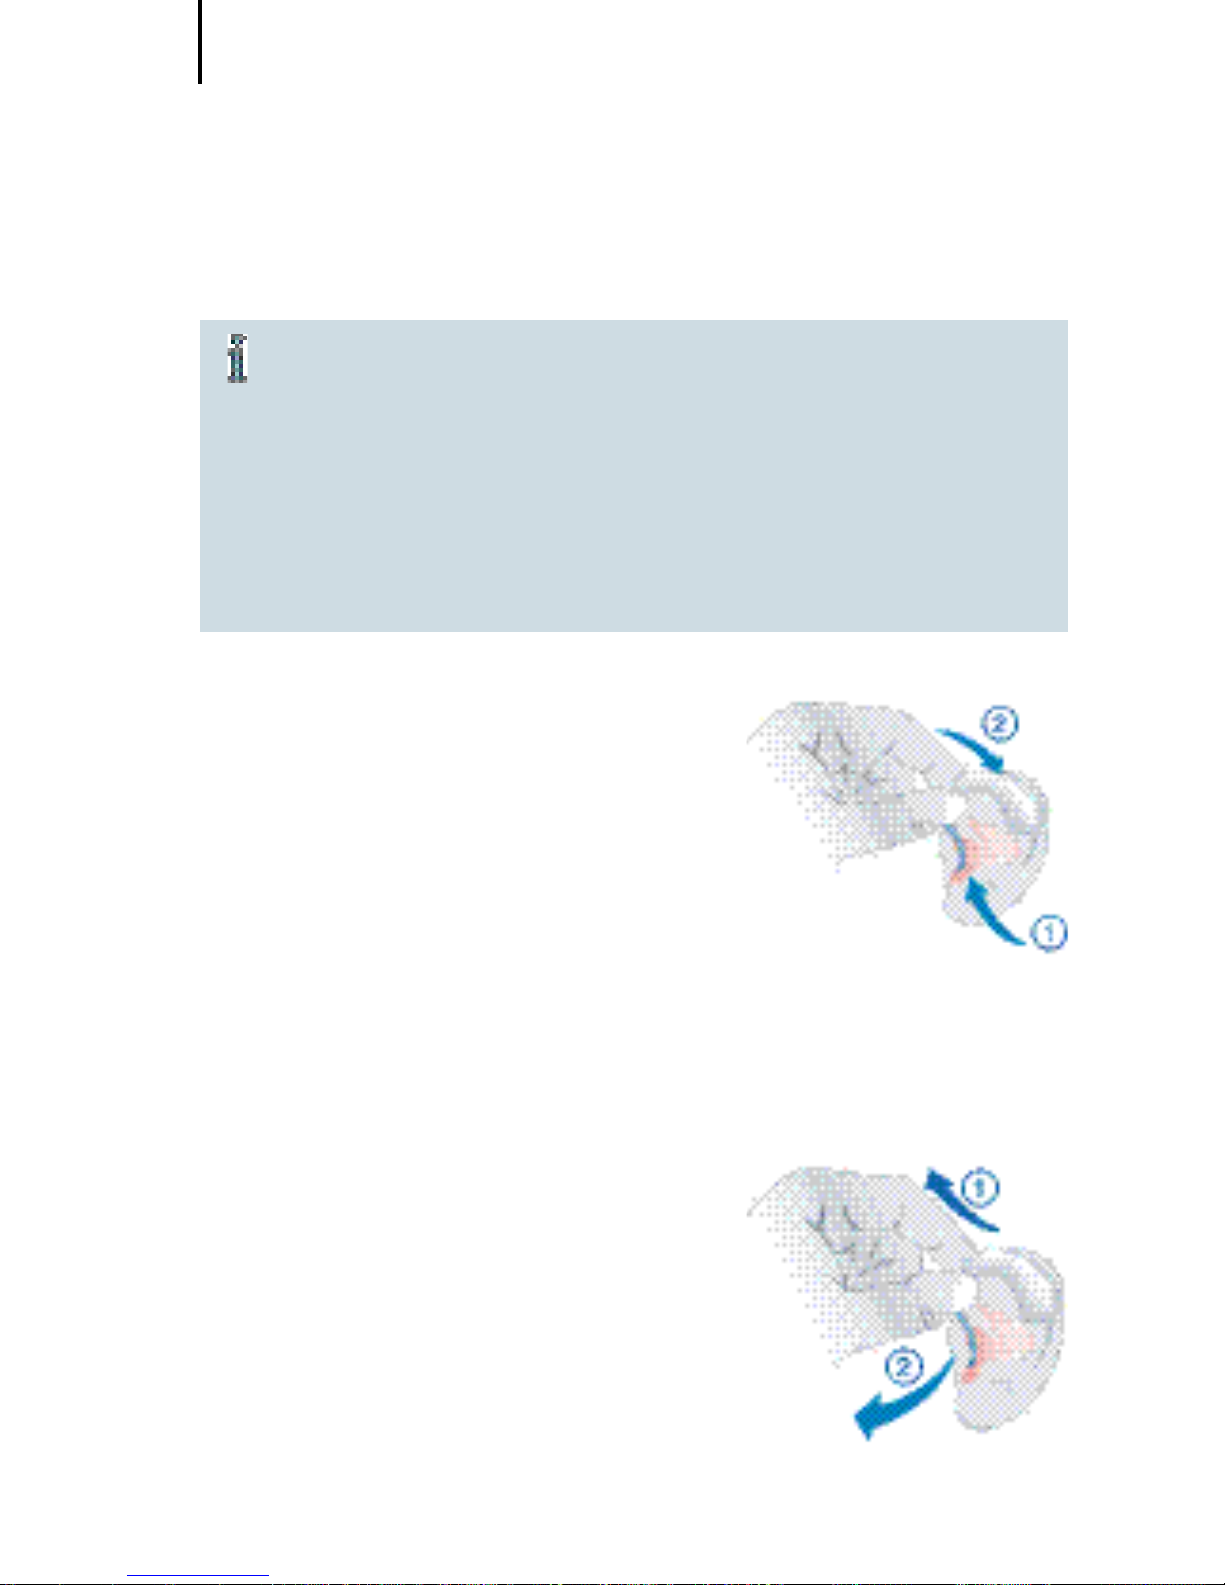
Introducerea instrumentului dumneavoastră auditiv
Opriţi instrumentul auditiv.
Ţineţi mulajul pentru ureche/Life-
Tip între degetul mare şi degetul
arătător şi introduceţi-l cu atenţie
în canalul urechii.
Ar putea fi de ajutor să trageţi de
ureche uşor în sus sau spre spate.
Amplasaţi instrumentul auditiv în spatele urechii.
Porniţi instrumentul auditiv.
Scoaterea instrumentului auditiv
Ţineţi mulajul pentru ureche/
LifeTube între degetul mare şi
degetul arătător şi scoateţi-l cu
atenţie.
Poate fi de ajutor să apăsaţi uşor
urechea din spate.
Introducerea şi scoaterea instrumentului dumneavoastră auditiv
Page 71
Pornirea şi oprirea instrumentului dumneavoastră auditiv
71
EN
HU
RO
FR
DE
AR
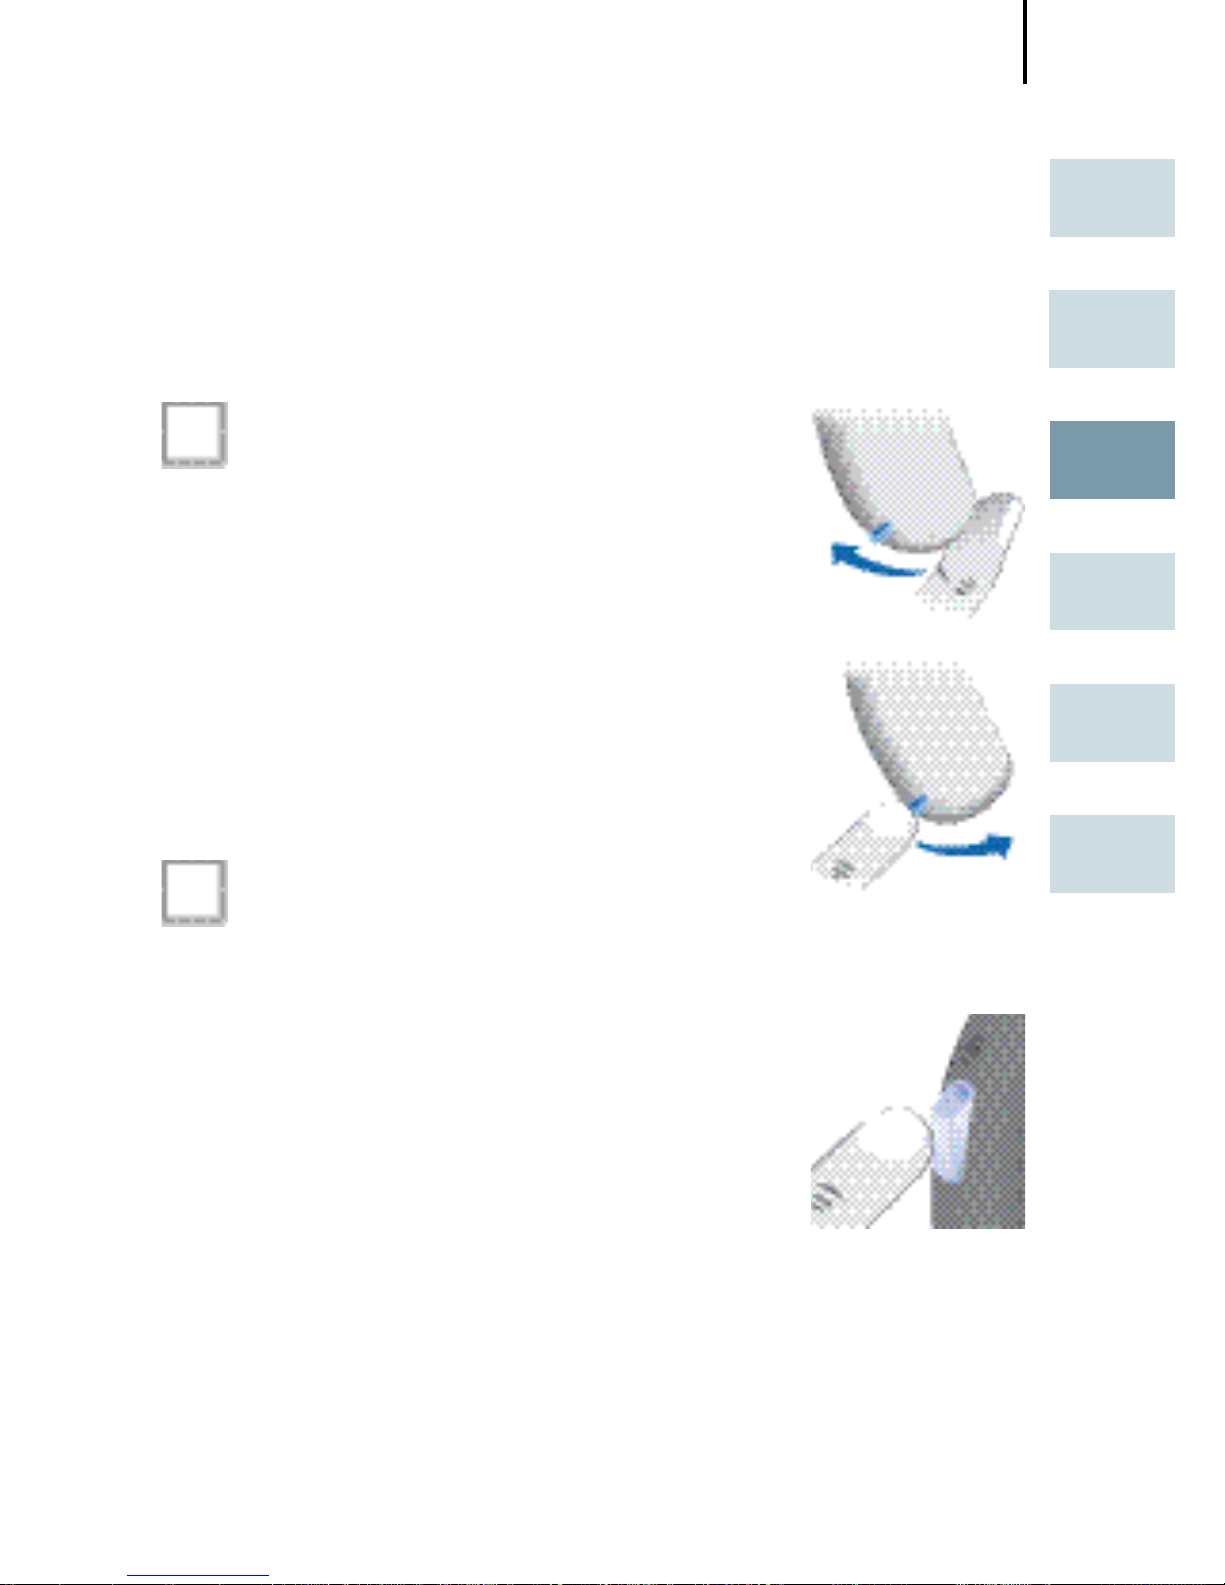
Solicitaţi audiologului dumneavoastră să bifeze
informaţiile relevante.
De la compartimentul bateriei
On (Pornire)
Închideţi compartimentul bateriei.
Off (Oprire)
Deschideţi compartimentul
bateriei.
De la butonul de comandă
On (Pornire)
Apăsaţi butonul de comandă timp
de 2 secunde.
Off (Oprire)
Apăsaţi butonul de comandă timp
de 2 secunde.
Pornirea şi oprirea instrumentului dumneavoastră auditiv
Page 72

Pornirea şi oprirea instrumentului dumneavoastră auditiv
72
De la telecomandă
Consultaţi ghidul utilizatorului telecomenzii.
Pornire cu întârziere
Instrumentul dumneavoastră auditiv poate fi prevăzut
cu o funcţie "pornire cu întârziere" care poate fi activată
de către audiologul dumneavoastră. Aceasta vă permite
pornirea instrumentului auditiv cu o întârziere automată
de 6/12/18 secunde, astfel încât să puteţi introduce instrumentul în ureche fără a experimenta reacţii neplăcute
(fluierat).
Page 73
Modificarea programului auditiv
73
EN
HU
RO
FR
DE
AR
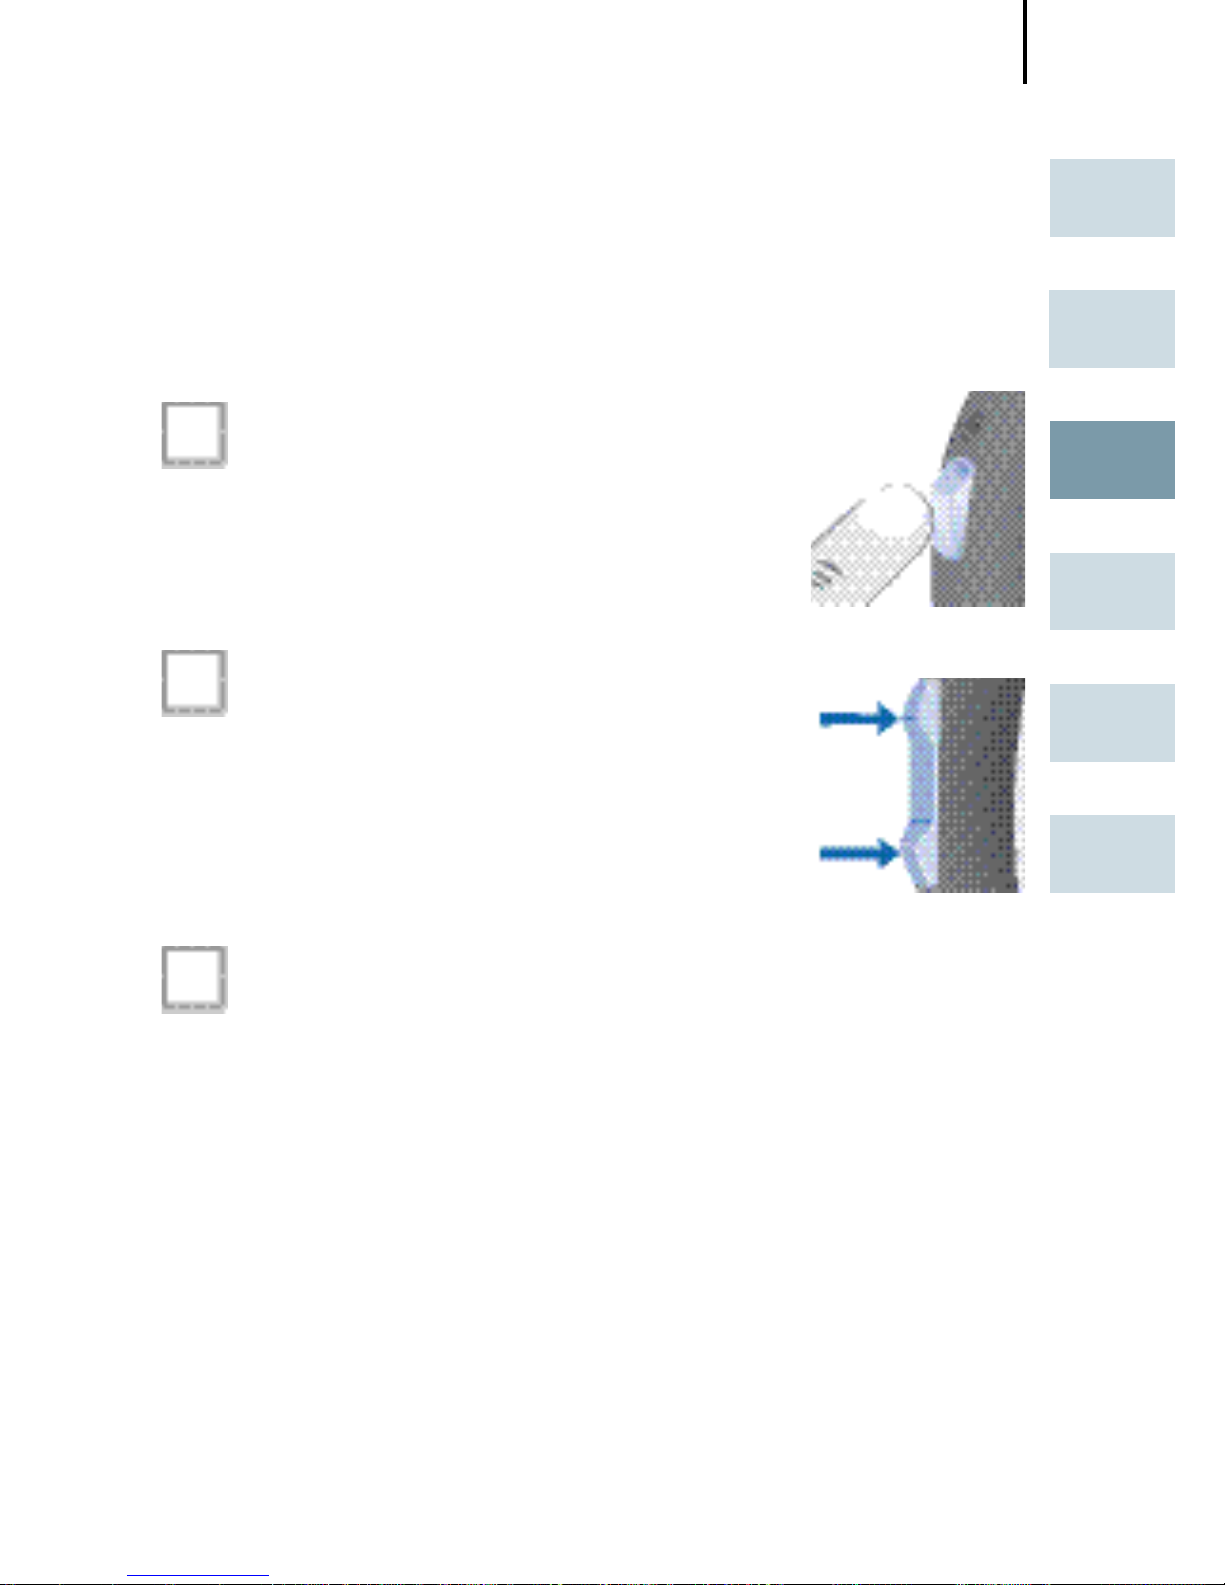
Solicitaţi audiologului dumneavoastră să bifeze
informaţiile relevante.
De la butonul de comandă
Apăsaţi butonul pentru a trece la
următorul program.
De la întrerupătorul rectangular
Apăsaţi în sus pentru a trece la
următorul program.
Apăsaţi în jos pentru a reveni la
programul anterior.
De la telecomandă
Consultaţi ghidul utilizatorului telecomenzii.
Modificarea programului auditiv
Page 74
Modificarea volumului
74
Volumul instrumentelor auditive este controlat automat şi
nu este necesar controlul manual al acestuia.
Dacă preferaţi controlul manual al volumului, solicitaţi
audiologului dumneavoastră să programeze instrumentul
auditiv pentru reglare manuală.
Automatic (Automat)
Volumul este reglat automat în timpul utilizării.
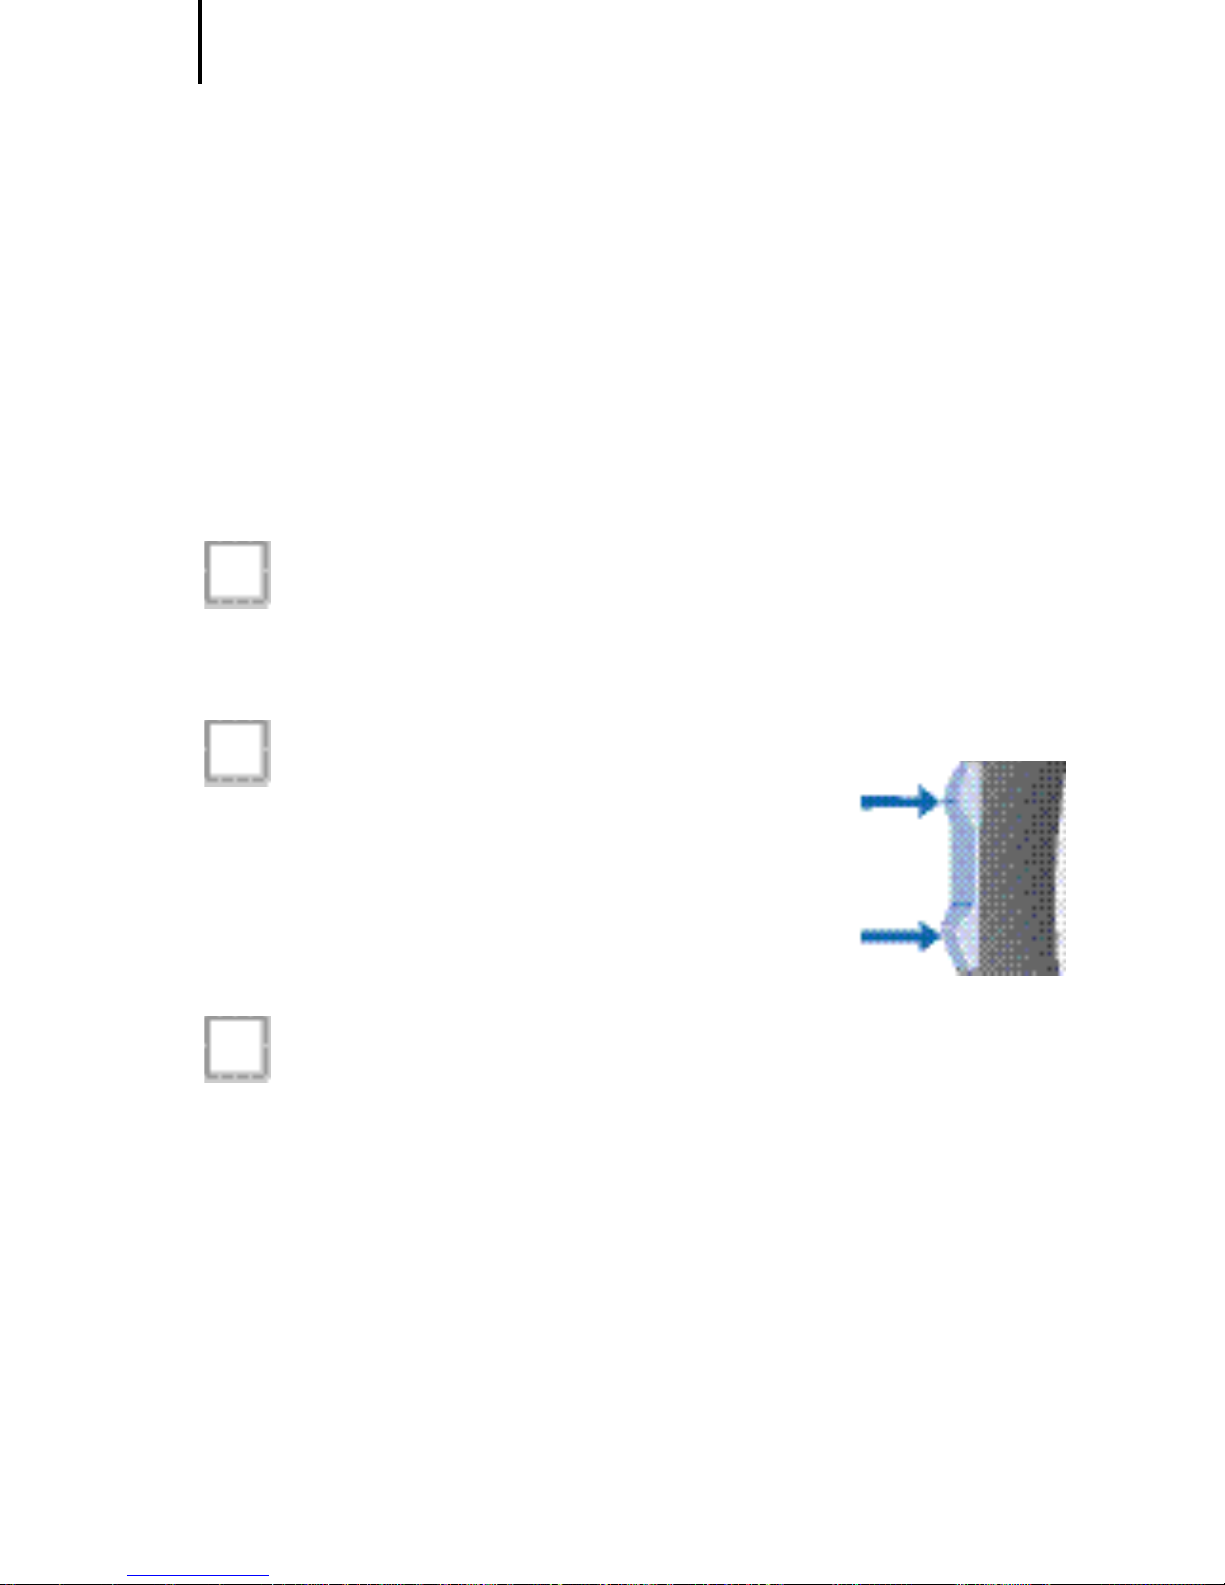
Întrerupător rectangular
Apăsaţi în sus pentru a mări
volumul.
Apăsaţi în jos pentru a reduce
volumul.
De la telecomandă
Consultaţi ghidul utilizatorului telecomenzii.
Modificarea volumului
Page 75
Funcţionalităţi
75
EN
HU
RO
FR
DE
AR
Audiologul dumneavoastră poate activa următoarele
funcţionalităţi.
e2e wireless
■ Permite utilizarea unei telecomenzi.
■ Ajustează automat şi simultan ambele instru-
mente auditive pentru a modifica setările de
instrument, de exemplu volumul sau programul.
Operarea funcţiei e2e wireless poate fi afectată de interferenţe electromagnetice – de
exemplu de la monitorul unui computer sau
un sistem cu bec fluorescent.
Îndepărtaţi-vă de sursa de interferenţe,
dacă experimentaţi dificultăţi.
Program de telefon automat
Ţineţi un telefon lângă instrumentul dumnea-
voastră auditiv (*).
Instrumentul auditiv se comută automat la pro-
gramul de telefon.
Îndepărtaţi telefonul de instrumentul auditiv.
Instrumentul auditiv se comută înapoi la programul utilizat anterior.
Funcţionalităţi
Page 76

Funcţionalităţi
76
De asemenea, puteţi selecta manual programul
de telefon utilizând butonul de program.
Prin operarea instrumentului auditiv în modul
telebobină, funcţia wireless poate cauza un
sunet intermitent. Acest lucru se datorează
recepţiilor din semnalul de transmisie. Când
instrumentul dumneavoastră auditiv este în
modul telebobină, vă rugăm utilizaţi telecomanda doar de la o distanţă mai mare de 10 cm (4
inci).
(*) Accesoriu magnet AutoPhone
Nu toate telefoanele produc un câmp magnetic suficient
de puternic pentru a activa funcţia AutoPhone. În acest
caz, utilizaţi magnetul Siemens AutoPhone, disponibil ca
accesoriu, şi ataşaţi-l la receptorul telefonului pentru a
activa funcţia AutoPhone.
Consultaţi ghidul utilizatorului magnetului
AutoPhone pentru instrucţiuni privind modul de
poziţionare al magnetului.
Utilizaţi doar magnetul Siemens. Solicitaţi audi-
ologului dumneavoastră acest accesoriu.
Page 77

Funcţionalităţi
77
EN
HU
RO
FR
DE
AR
NOTĂ
Magneţii pot perturba dispozitivele electrice şi pot
duce la ştergerea datelor stocate.
Ţineţi magneţii la distanţă de computere, moni-
toare color, televizoare, dischete floppy, discuri
audio-video şi alte echipamente / dispozitive
electronice.
AVERTISMENT
Magneţii pot interfera cu aparatele de asistare medicală (de exemplu stimulatoare cardiace, ventile
magnetice, etc).
Utilizaţi magneţii numai dacă nu aveţi dubii
privind distanţa sigură. Distanţa sigură dintre un
stimulator cardiac şi un magnet trebuie să fie de
cel puţin 10 cm (4 inci).
Page 78
Întreţinere şi îngrijire
78
Instrumentele auditive sunt sisteme extrem de sensibile.
O îngrijire şi manipulare adecvate vor asigura cele mai
bune performanţe posibile.
Curăţaţi în mod regulat instrumentele pentru a preveni
deteriorarea instrumentelor auditive şi evita problemele
de sănătate.
NOTĂ
Nu introduceţi instrumentele
auditive în apă.
Curăţaţi-vă instrumentele auditive cu un
şerveţel moale şi uscat, după cum este necesar.
Aşezaţi-vă instrumentele auditive într-o "trusă de ajutor
uscată" cu o capsulă specială de absorbţie a umidităţii
peste noapte.
Solicitaţi audiologului dumneavoastră seturi speciale
de îngrijire şi informaţii suplimentare privind modul de
păstrare a instrumentelor dumneavoastră auditive în
bună stare.
Pentru instrumente cu LifeTube
Curăţaţi în mod regulat LifeTube cu o sârmă curată.
Solicitaţi audiologului dumneavoastră schimbarea
LifeTube şi LifeTips aproximativ la fiecare 3 - 6 luni, sau
după cum este necesar.
Întreţinere şi îngrijire
Page 79
Accesorii
79
EN
HU
RO
FR
DE
AR
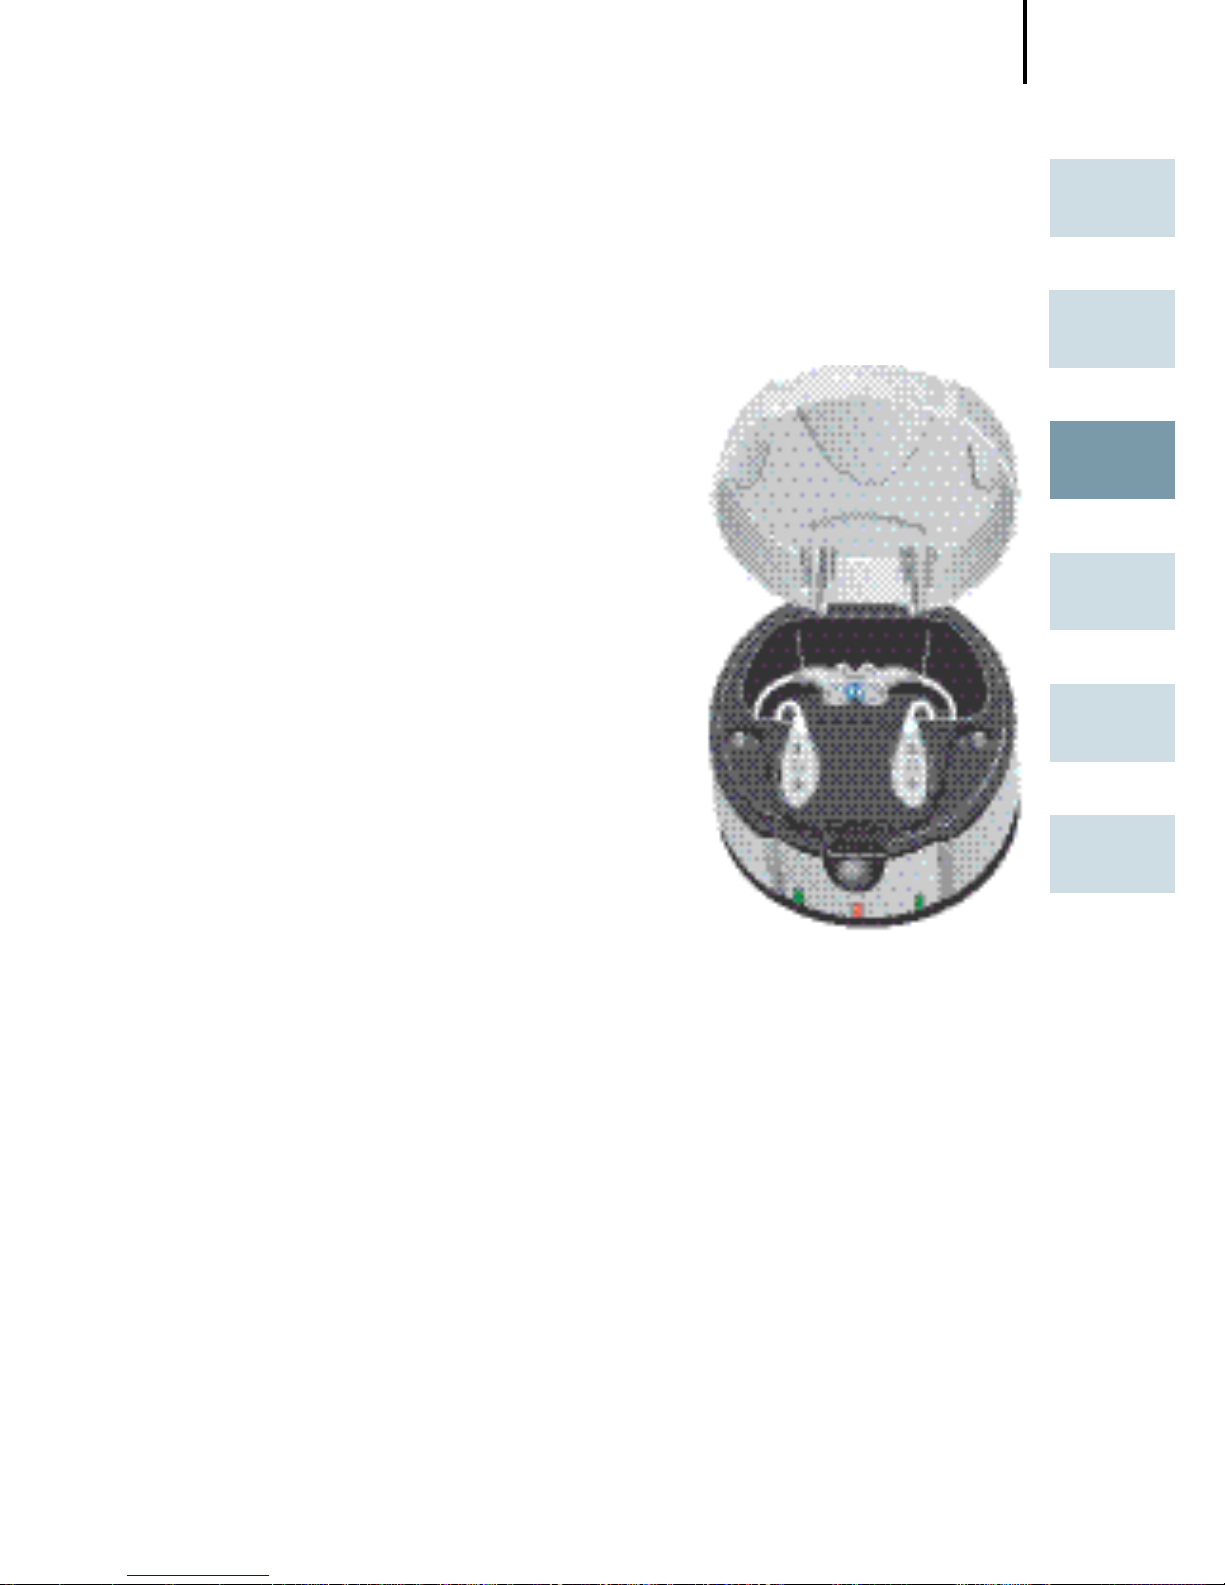
Încărcător (doar Motion SX, Motion P)
Instrumentele dumneavoastră auditive funcţionează cu baterii standard sau reîncărcabile. Cu ajutorul
încărcătorului uşor de utilizat, puteţi
încărca bateriile reîncărcabile pentru
unul sau două instrumente auditive. După doar 6 ore de reîncărcare,
încărcătorul se opreşte automat, iar
instrumentele auditive sunt pregătite pentru a fi utilizate pe parcursului
unei zile întregi.
Pentru informaţii detaliate şi instrucţiuni, consultaţi ghidul utilizatorului
încărcătorului sau solicitaţi ajutorul audiologului dumneavoastră.
Accesorii
Page 80
Accesorii
80
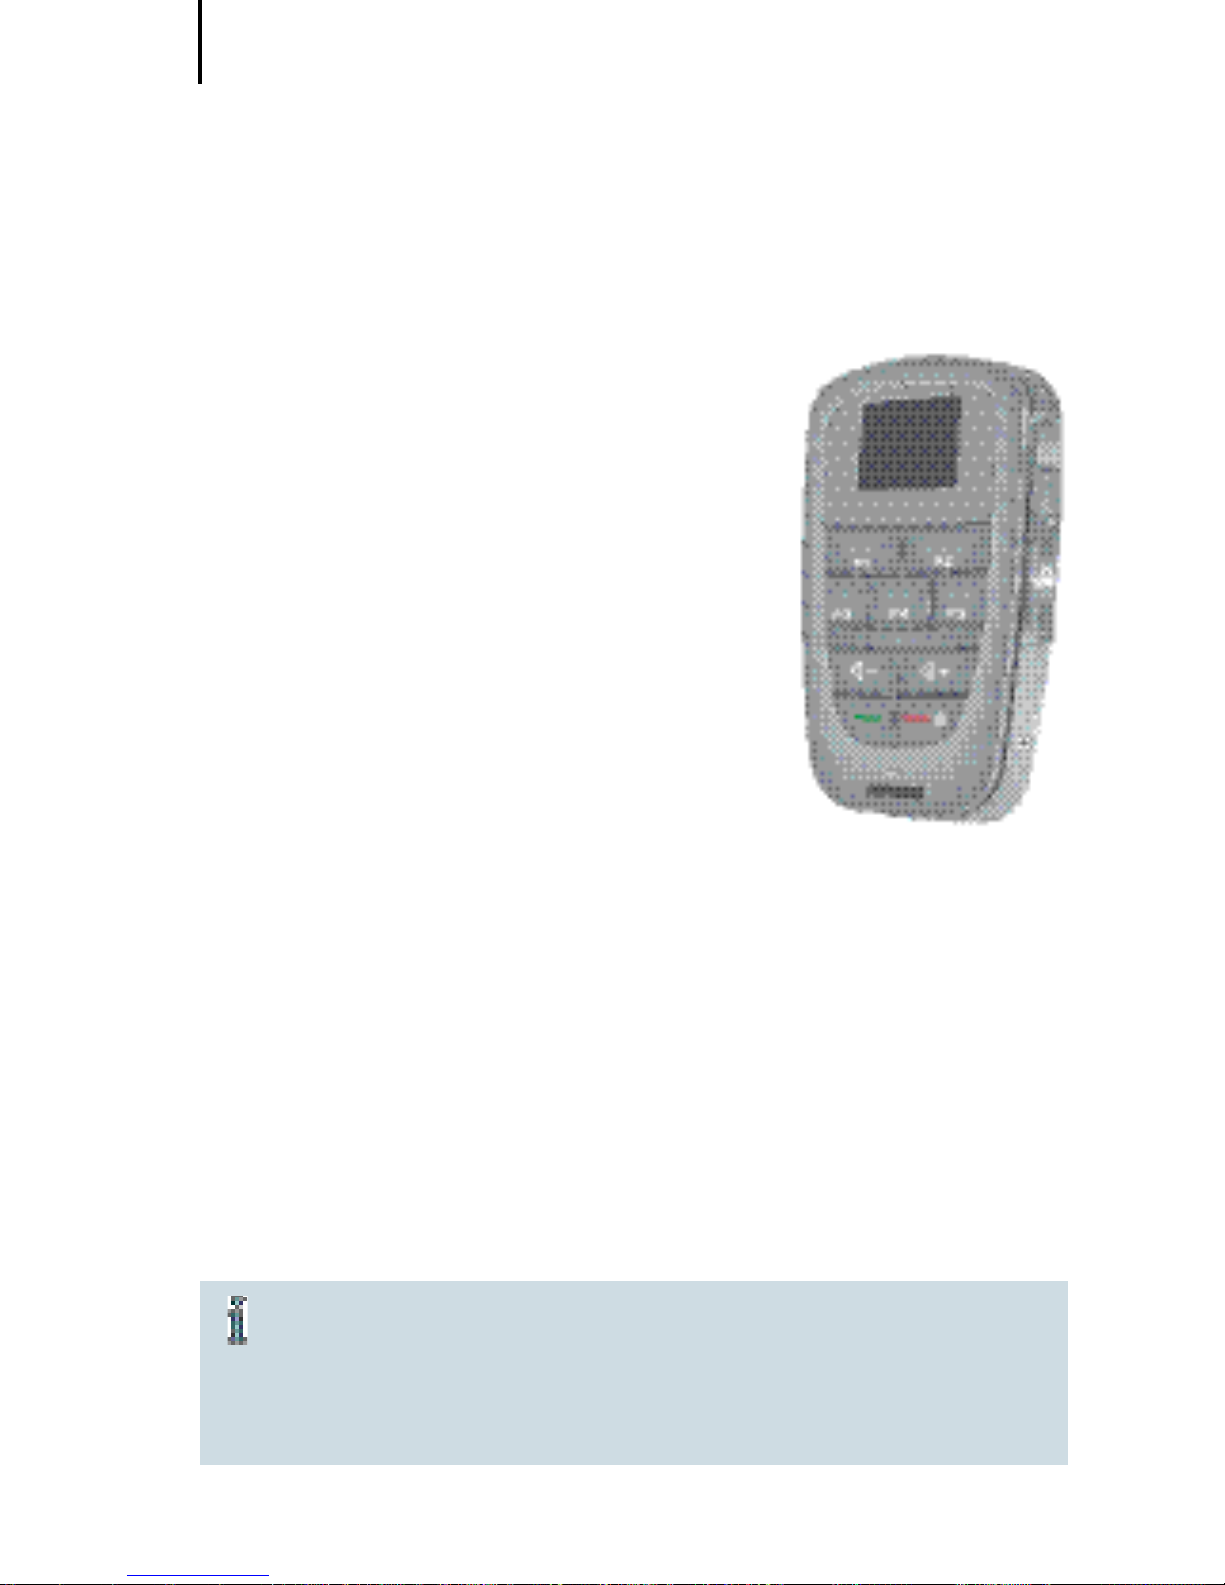
Tek wireless enhancement
Instrumentele dumneavoastră auditive,
împreună cu telecomanda Tek Connect,
vă vor permite să vă conectaţi instrumentul auditiv la lumea în continuă
expansiune a tehnologiei. Cu ajutorul
unei conexiuni speciale Bluetooth, este
posibil să recepţionaţi semnale audio de
la telefonul dumneavoastră mobil, de la
televizor sau de la mp3-player.
Pentru informaţii detaliate şi instrucţiuni, consultaţi ghidul utilizatorului Tek
sau solicitaţi ajutorul audiologului dumneavoastră.
Telecomandă
Funcţia wireless a instrumentelor dumneavoastră auditive
vă permite să utilizaţi o telecomandă pentru a schimba
programul şi volumul sonor al instrumentelor.
Pentru mai multe informaţii privind telecomanda, contactaţi-vă audiologul sau consultaţi ghidul utilizatorului
telecomenzii.
În cazul în care instrumentele auditive pot fi
controlate de telecomanda unei alte persoane,
vă rugăm returnaţi telecomanda şi instrumentele auditive audiologului dumneavoastră.
Page 81
Sfaturi privind identificarea şi remedierea problemelor
81
EN
HU
RO
FR
DE
AR
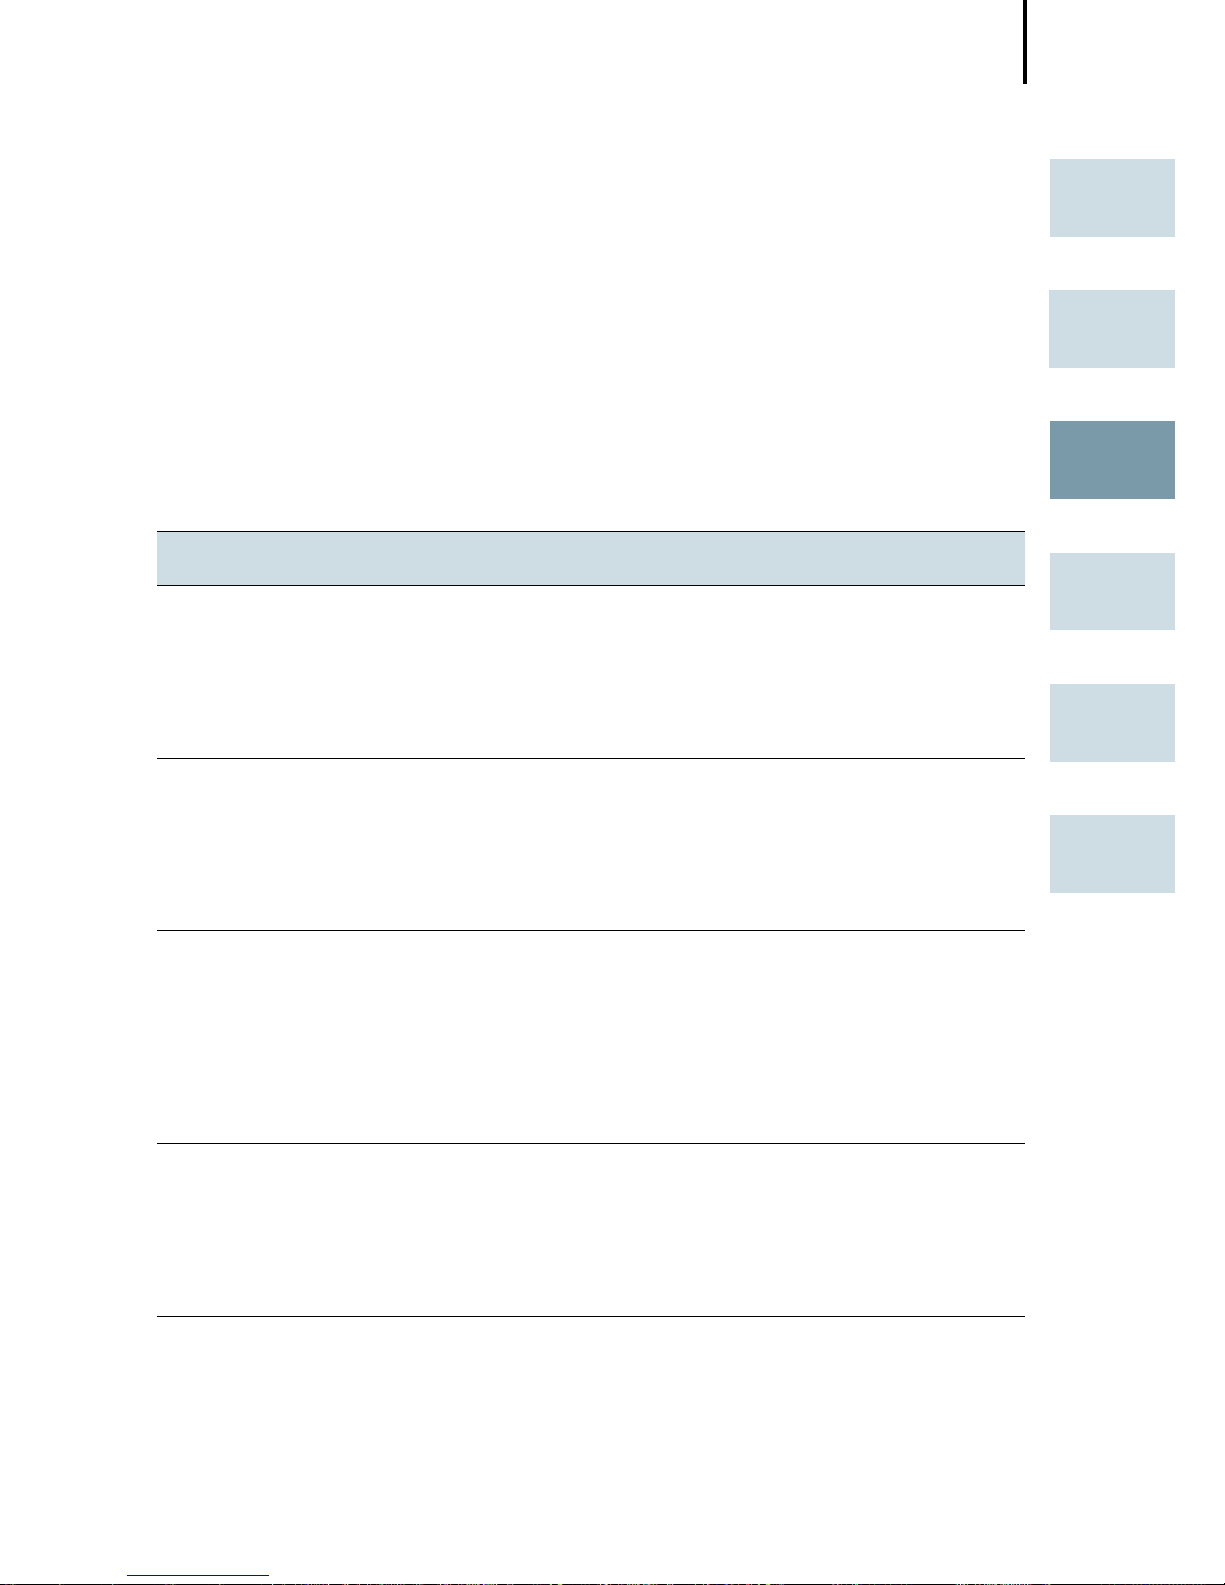
Instrumentele auditive sunt dispozitive extrem de fiabile.
În cazul în care apare o problemă, aceasta poate fi, de
obicei, remediată rapid. Utilizaţi aceste sfaturi privind
identificarea şi remedierea problemelor pentru a rezolva
probleme simple.
Problemă Soluţie posibilă
Sunetul este slab. Înlocuiţi / încărcaţi bateria consu-
mată.
Curăţaţi mulajul pentru ureche.
Măriţi volumul.
Instrumentul auditiv
emite un sunet
fluierat.
Reintroduceţi mulajul până la fixarea
sigură a acestuia.
Reduceţi volumul.
Curăţaţi mulajul pentru ureche.
Sunetul este distorsionat.
Reduceţi volumul.
Înlocuiţi / încărcaţi bateria consumată.
Curăţaţi mulajul pentru ureche/Life
Tip.
Instrumentul auditiv
emite tonuri de
semnal.
Închideţi complet compartimentul
bateriei, cu atenţie.
Înlocuiţi / încărcaţi bateria consumată.
Sfaturi privind identificarea şi
remedierea problemelor
Page 82

Sfaturi privind identificarea şi remedierea problemelor
82
Instrumentul auditiv
nu funcţionează.
Verificaţi dacă instrumentul auditiv
este pornit.
Închideţi complet compartimentul
bateriei, cu atenţie.
Înlocuiţi / încărcaţi bateria consumată.
Asiguraţi-vă că bateria este introdusă
corect.
Funcţia de pornire cu întârziere este
activă. Aşteptaţi 18 secunde şi verificaţi din nou.
Consultaţi-vă audiologul dacă întâmpinaţi alte probleme.
Page 83
Informaţii privind depunerea la deşeuri
83
EN
HU
RO
FR
DE
AR
În Uniunea Europeană, echipamentele marcate
intră sub incidenţa "Directivei 2002/96/CE a
Parlamentului European şi a Consiliului, din 27
ianuarie 2003, privind deşeurile de echipamente electrice şi electronice".
Modificată prin "Directiva 2003/108/CE" (DEEE).
Reciclaţi instrumentele auditive, bateriile şi
accesoriile conform reglementărilor naţionale.
Prin marcajul CE, Siemens confirmă conformitatea aparatului cu Directiva Europeană 93/42/CEE
privind dispozitivele de uz medical.
Pentru produse cu e2e wireless 2.0, Siemens confirmă
adiţional conformitatea acestora cu Directiva Europeană
99/5/EC (R&TTE) privind echipamentele terminale radio şi
de telecomunicaţii.
Informaţii privind depunerea la
deşeuri
Page 84

Configuraţia instrumentului dumneavoastră auditiv
84
Instrument auditiv
STÂNGA DREAPTA
Model
Număr de serie
Baterie
□ da □ nu Pornire cu întârziere □ da □ nu
□ da □ nu Buton □ da □ nu
□ da □ nu Întrerupător rectangular □ da □ nu
Tonuri de semnal
□ activare
□ dezactivare
Schimbare program □ activare
□ dezactivare
□ activare
□ dezactivare
Avertisment de descărcare
a bateriei
□ activare
□ dezactivare
□ activare
□ dezactivare
Limită de control volum □ activare
□ dezactivare
□ activare
□ dezactivare
schimbare control volum □ activare
□ dezactivare
Program Descrierea programului
1
2
3
4
5
Configuraţia instrumentului
dumneavoastră auditiv
Page 85

Configuraţia instrumentului dumneavoastră auditiv
85
EN
HU
RO
FR
DE
AR
Telecomandă
Model
Număr de
serie
Page 86

86
Page 87

87
Sommaire
EN
HU
RO
FR
DE
AR
Sommaire
Votre contour d'oreille Motion 88
Utilisation prévue 91
Consignes générales de sécurité 92
Manipulation des piles standard ou rechargeables 95
Mise en place et retrait de votre aide auditive 98
Mise en marche et arrêt de votre aide auditive 99
Changement de programme d'écoute 101
Réglage du volume 102
Fonctionnalités 103
Maintenance et entretien 106
Accessoires 107
Conseils de dépannage 109
Informations techniques 111
Informations relatives à la mise au rebut 113
Configuration de vos aides auditives 114
Page 88
Votre contour d'oreille Motion
88
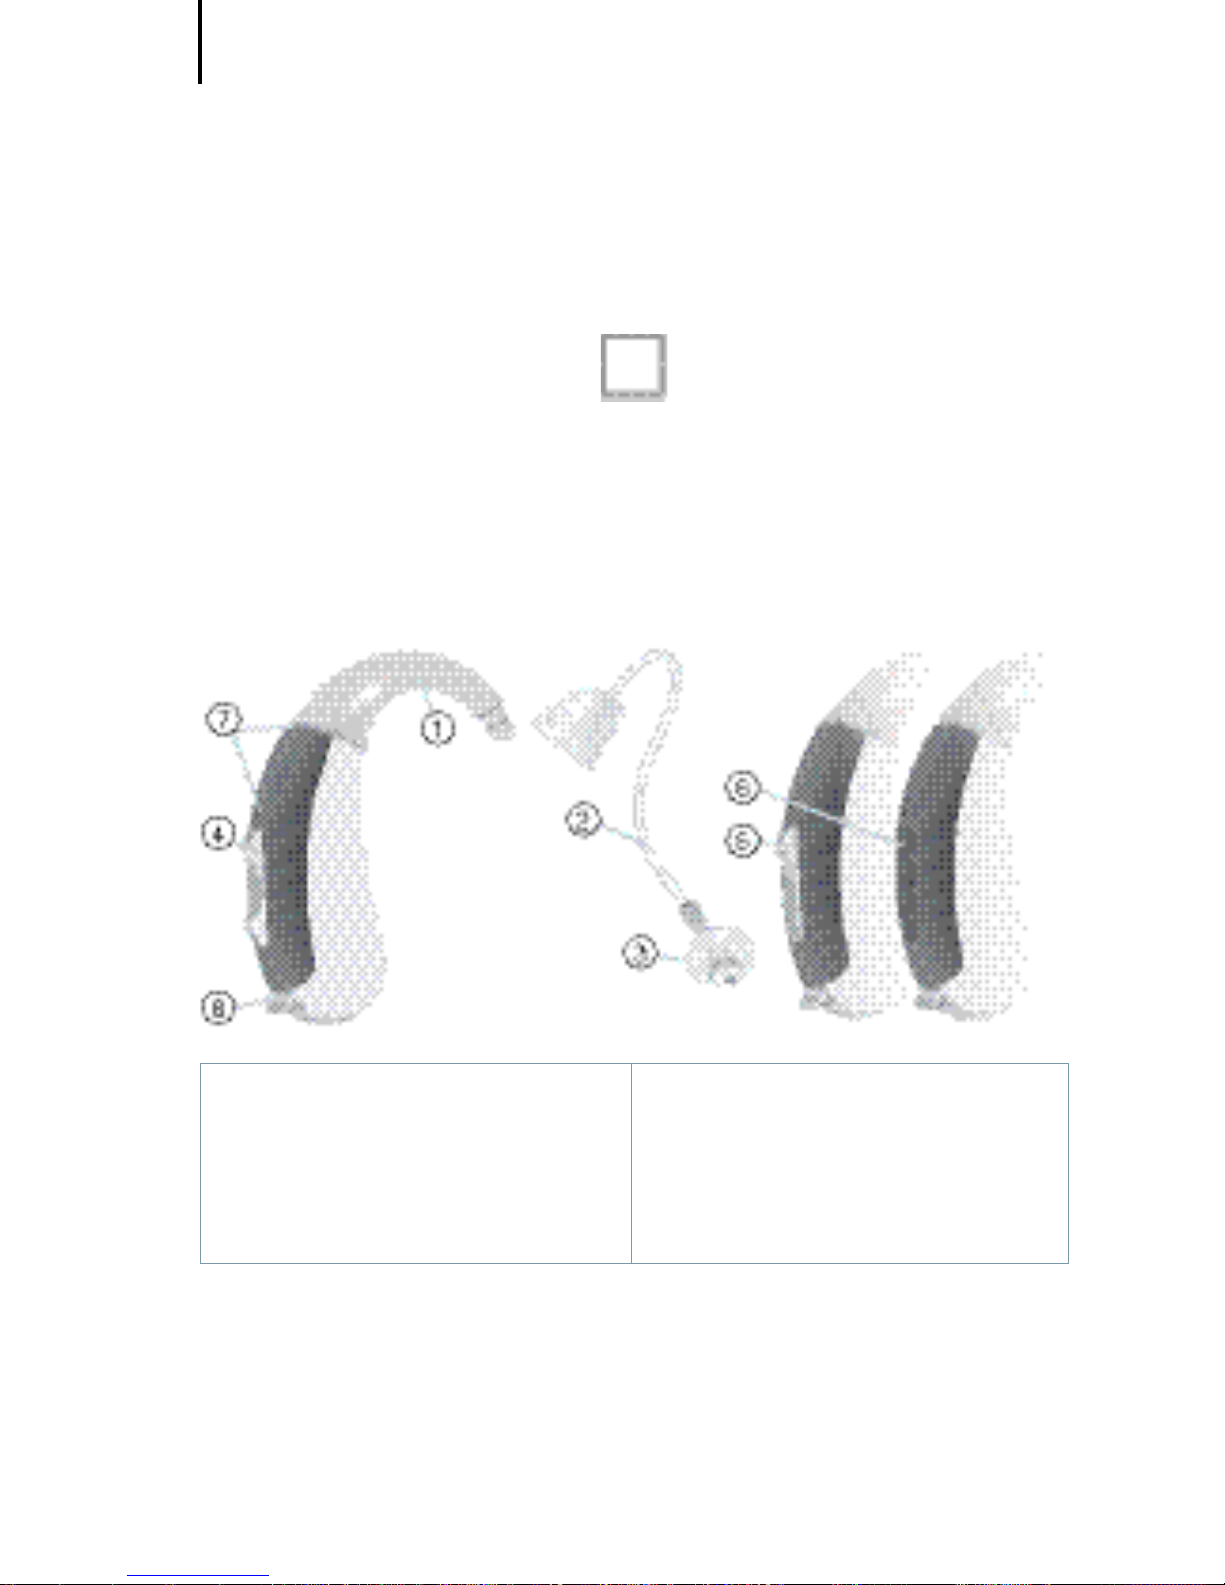
Motion S
option LifeTube
type de pile : 312
non rechargeable
① Coude
② LifeTube
③ LifeTip
④ Interrupteur à bascule*
⑤ Bouton-poussoir*
⑥ Cache*
⑦ Entrées du microphone
⑧ Tiroir pile avec sécurité
* Au lieu d'un interrupteur à bascule, votre audioprothésiste peut équiper votre aide auditive d'un bouton-poussoir ou d'un cache (sans élément de commande).
Votre contour d'oreille Motion
Page 89
Votre contour d'oreille Motion
89
EN
HU
RO
FR
DE
AR
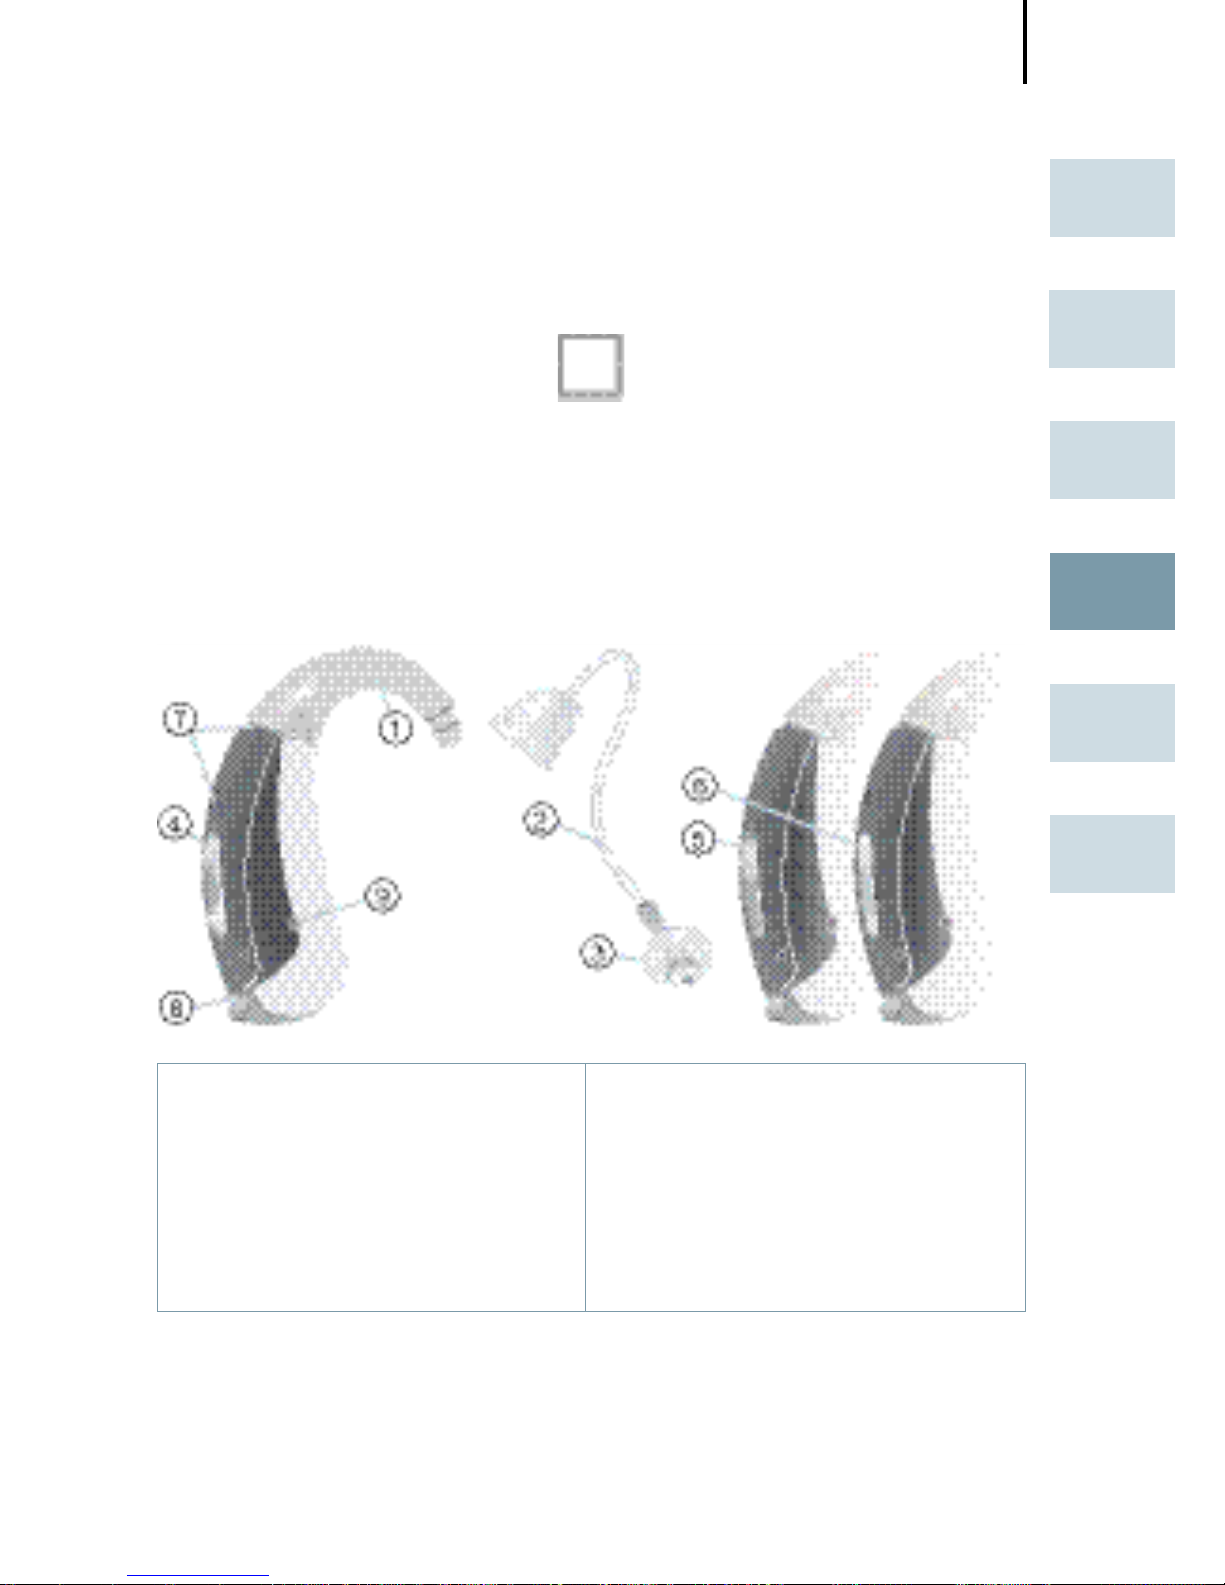
Motion SX
option LifeTube
type de pile : 13
rechargeable ou non rechargeable
① Coude
② LifeTube
③ LifeTip
④ Interrupteur à bascule*
⑤ Bouton-poussoir*
⑥ Cache*
⑦ Entrées du microphone
⑧ Tiroir pile avec sécurité
⑨ Contacts de charge
* Au lieu d'un interrupteur à bascule, votre audioprothésiste peut équiper votre aide auditive d'un bouton-poussoir ou d'un cache (sans élément de commande).
Page 90
Votre contour d'oreille Motion
90
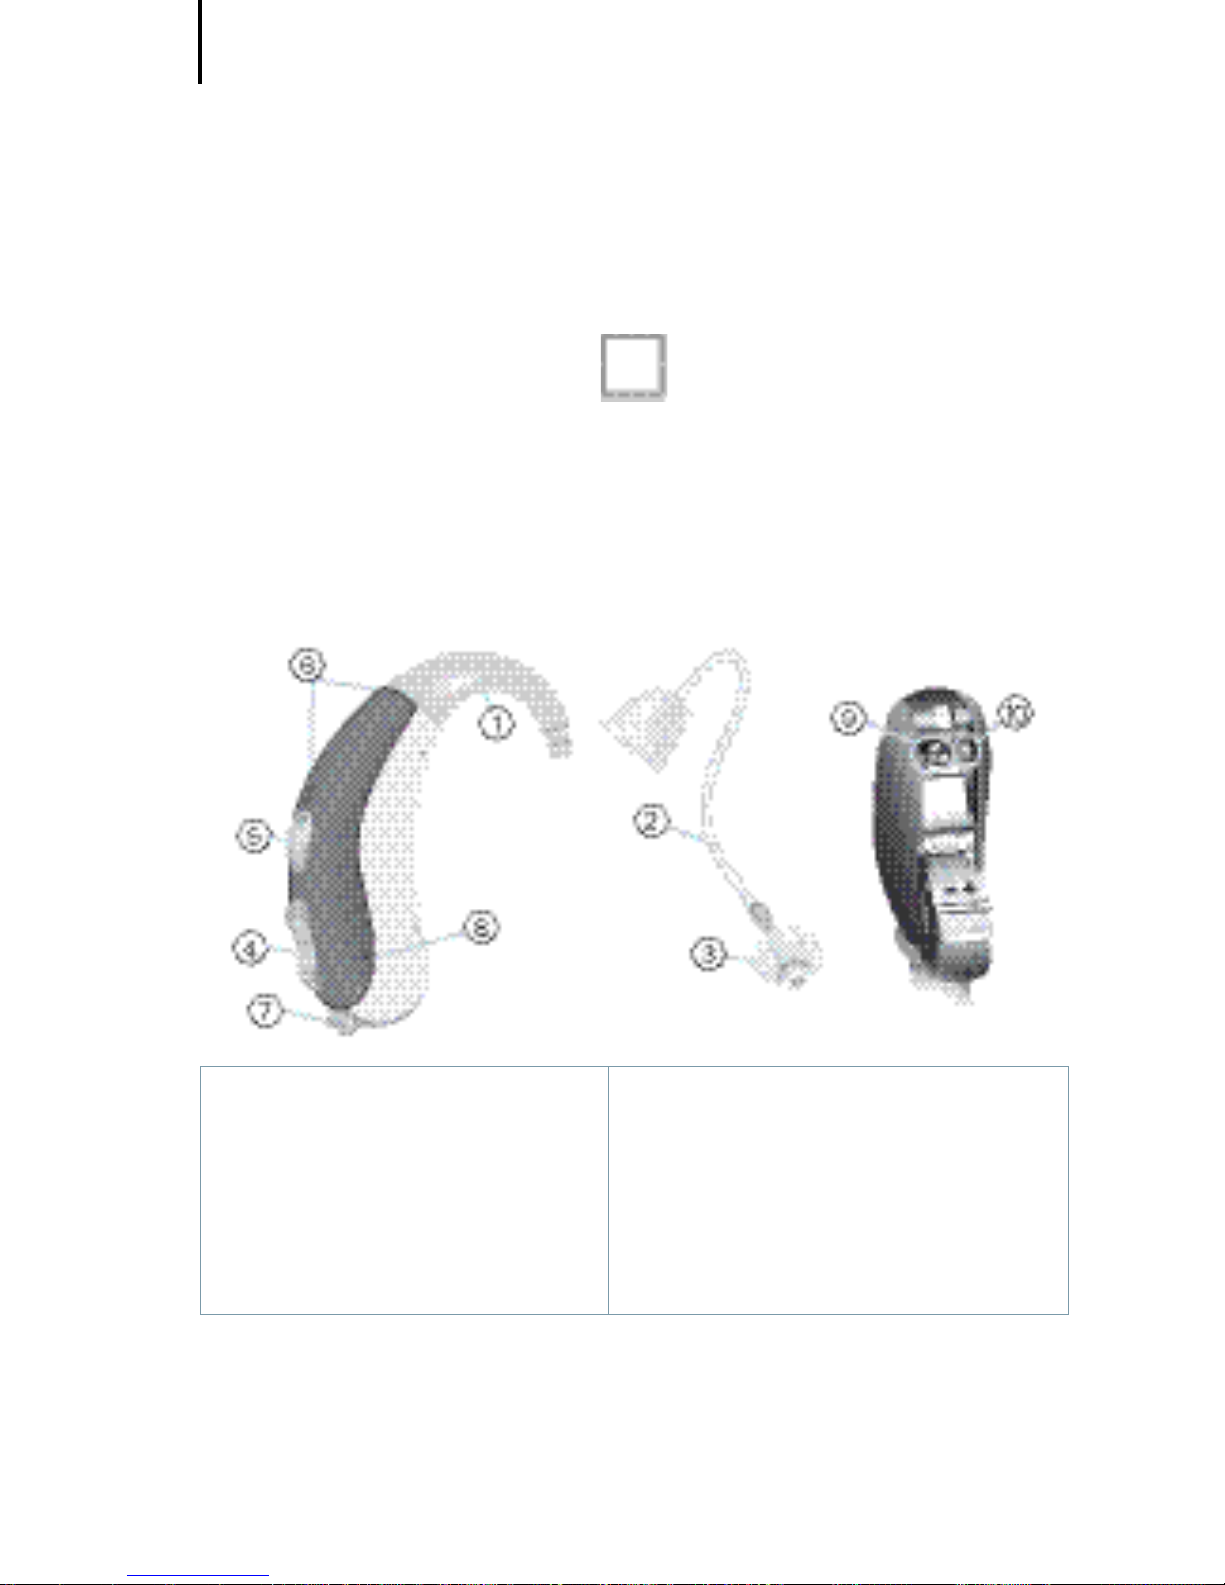
Motion P
option LifeTube
type de pile : 13
rechargeable ou non rechargeable
① Coude
② LifeTube
③ LifeTip
④ Interrupteur à bascule
⑤ Bouton-poussoir
⑥ Entrées du microphone
⑦ Tiroir pile avec sécurité
⑧ Contacts de charge
⑨ Numéro de série
⑩ Type d'aide auditive
Page 91
Utilisation prévue
91
EN
HU
RO
FR
DE
AR
Les aides auditives sont conçues pour améliorer l'audition
des personnes malentendantes. Seuls des spécialistes de
l'audition (médecins ou audioprothésistes par exemple)
sont habilités à établir un diagnostic et à prescrire le port
d'une aide auditive.
Lisez et observez les instructions de ce guide d'utilisation
afin d'éviter tout risque de blessure ou d'endommagement des aides auditives.
Symboles :
Soyez attentif aux informations signalées par les symboles
AVERTISSEMENT, ATTENTION ou REMARQUE !
AVERTISSEMENT indique une situation
pouvant entraîner des blessures graves,
ATTENTION indique une situation pouvant
entraîner des blessures mineures à modérées.
REMARQUE REMARQUE indique un risque d'endomma-
gement du matériel.
Conseils et astuces pour une meilleure utili-
sation de votre appareil.
Instructions. Indique qu'une action doit être
effectuée.
Utilisation prévue
Page 92

Consignes générales de sécurité
92
REMARQUE
Vos aides auditives sont sensibles à une chaleur
extrême, à une forte humidité, à des champs
magnétiques élevés (> 0,1 T), aux rayons X et à la
pression mécanique.
N'exposez pas vos aides auditives à une tempé-
rature extrême ou à une forte humidité.
Rangez-les à l'abri des rayons directs du soleil.
Ne les portez pas sous la douche ni lorsque vous
utilisez des produits cosmétiques, du parfum,
de l'après-rasage, de la laque ou de la lotion
solaire.
Ne portez pas vos aides auditives en cas d'ex-
position à des ondes courtes, à des champs
magnétiques ou électriques à haute fréquence
ou à des rayons X.
Ne mettez pas vos aides auditives dans un four
à micro-ondes.
AVERTISSEMENT
Risque d'explosion !
N'utilisez pas vos aides auditives dans des zones
à risque explosif (par ex. une mine).
Consignes générales de sécurité
Page 93

Consignes générales de sécurité
93
EN
HU
RO
FR
DE
AR
AVERTISSEMENT
Risque d'étouffement par les petites pièces.
Tenez les aides auditives, piles et accessoires
hors de portée des enfants.
En cas d'ingestion, consultez un médecin ou
rendez-vous immédiatement à l'hôpital.
Le port des aides auditives par des nourrissons,
des enfants en bas âge ou des personnes ayant
une déficience mentale doit s’effectuer dans le
cadre d’une surveillance adaptée.
Siemens propose des aides auditives spécialement
adaptées aux bébés et aux jeunes enfants.
Renseignez-vous auprès de votre audioprothé-
siste.
REMARQUE
Les piles contiennent des substances nocives et
polluantes pour l'environnement.
Ne jetez pas vos piles usagées avec les ordures
ménagères.
Eliminez les piles conformément aux régle-
mentations nationales ou rapportez-les à votre
audioprothésiste.
Page 94

Consignes générales de sécurité
94
ATTENTION
Risque de blessure causée par une utilisation incorrecte du LifeTip.
Portez toujours le LifeTube avec le LifeTip.
Assurez-vous que le LifeTip est correctement
fixé à l'adaptateur LifeTip.
Changez le LifeTube ou le LifeTip s'ils sont abî-
més.
Introduisez le LifeTube muni du LifeTip avec
précaution et sans l'enfoncer trop profondément dans l'oreille.
Utilisez toujours le LifeTube et le LifeTip confor-
mément aux instructions fournies dans ce guide
d'utilisation.
Au cas où le LifeTip resterait dans votre conduit
auditif, faites-le enlever par un médecin.
Certains pays imposent des restrictions à l'utilisation d'un équipement sans fil.
Renseignez-vous auprès des administrations
locales.
REMARQUE
Si les piles présentent une fuite, elles risquent
d'endommager vos aides auditives.
Lorsque vous ne l'utilisez pas, éteignez votre
aide auditive afin de préserver la pile.
Retirez les piles si vous n'utilisez pas vos aides
auditives pendant une période prolongée.
Page 95
Manipulation des piles standard ou rechargeables
95
EN
HU
RO
FR
DE
AR
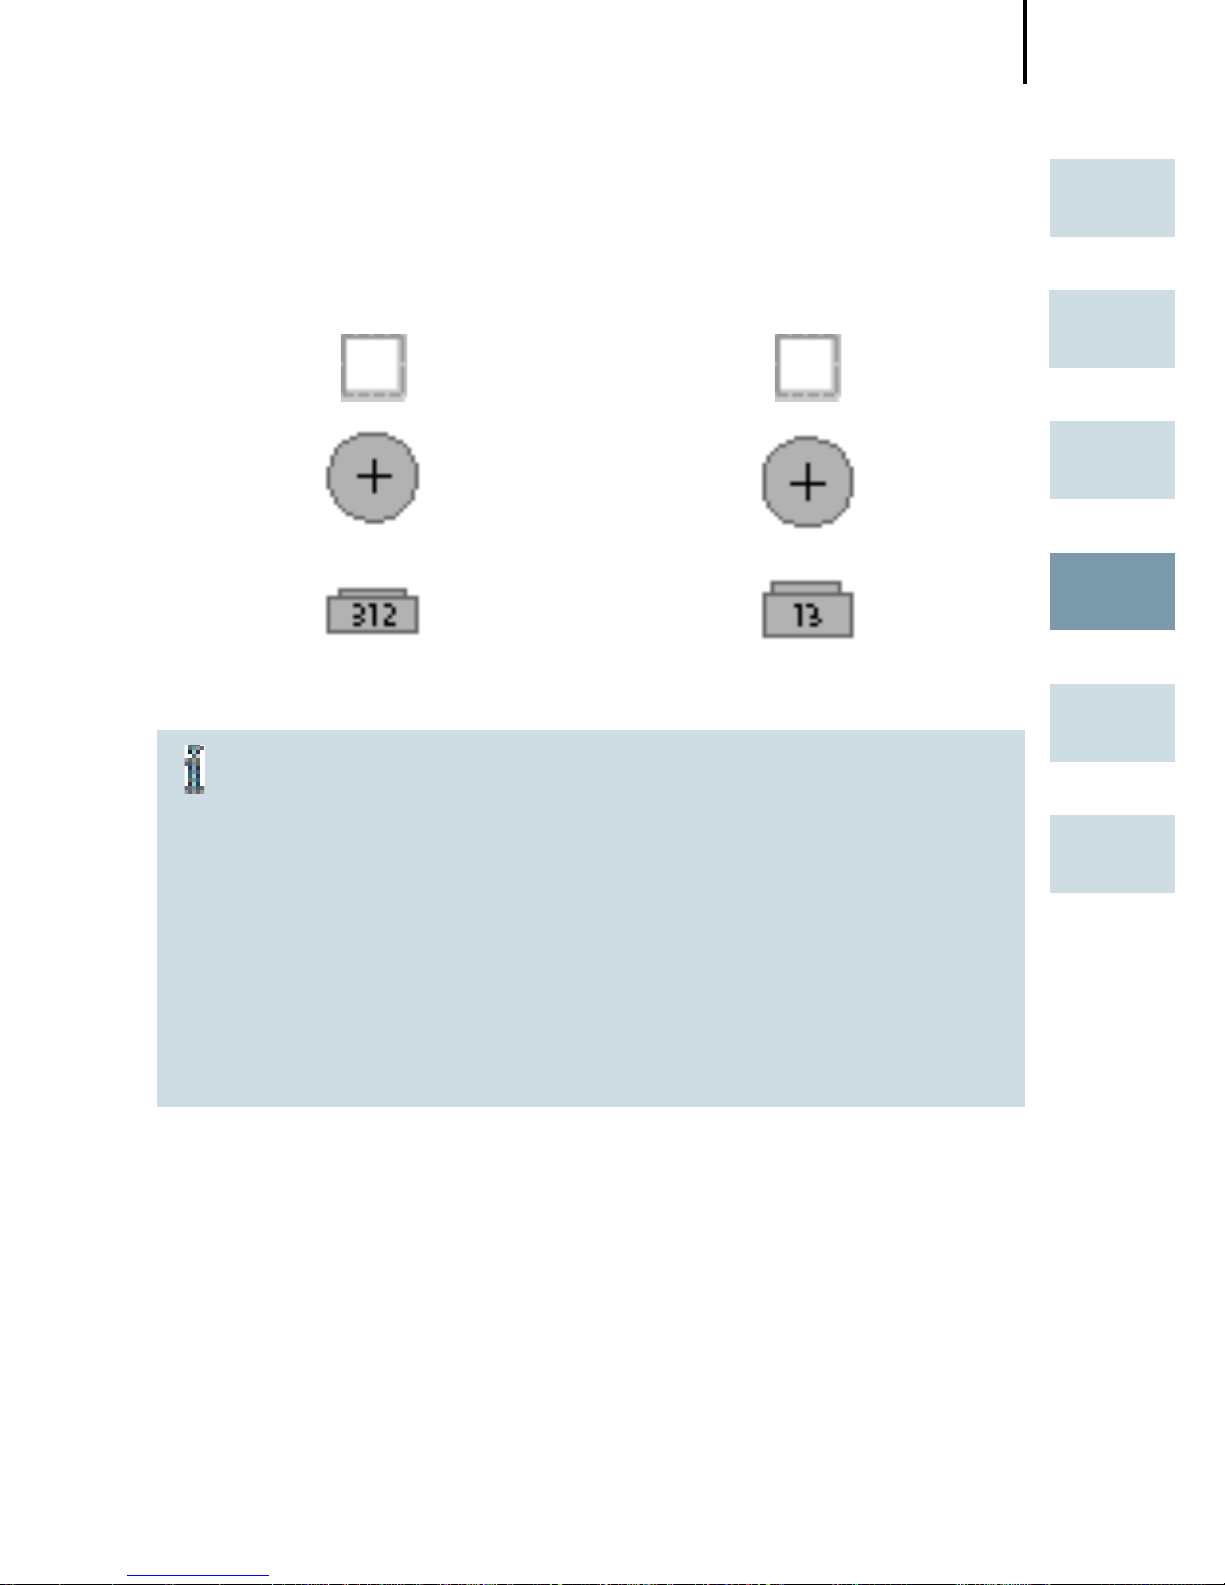
grandeur nature
Utilisez toujours la taille de pile appropriée.
Chargez les piles rechargeables avant la pre-
mière utilisation.
Retirez la languette de protection des piles stan-
dard lorsque vous êtes prêt à les utiliser.
La face positive (+) des piles est toujours la plus
lisse.
Ayez toujours avec vous des piles de rechange.
Indicateur de pile faible
Votre audioprothésiste peut activer un signal sonore
destiné à vous indiquer quand la pile est presque vide. Si
vous entendez un signal sonore ou remarquez une baisse
d'amplification, remplacez la pile.
Manipulation des piles standard
ou rechargeables
Page 96
Manipulation des piles standard ou rechargeables
96
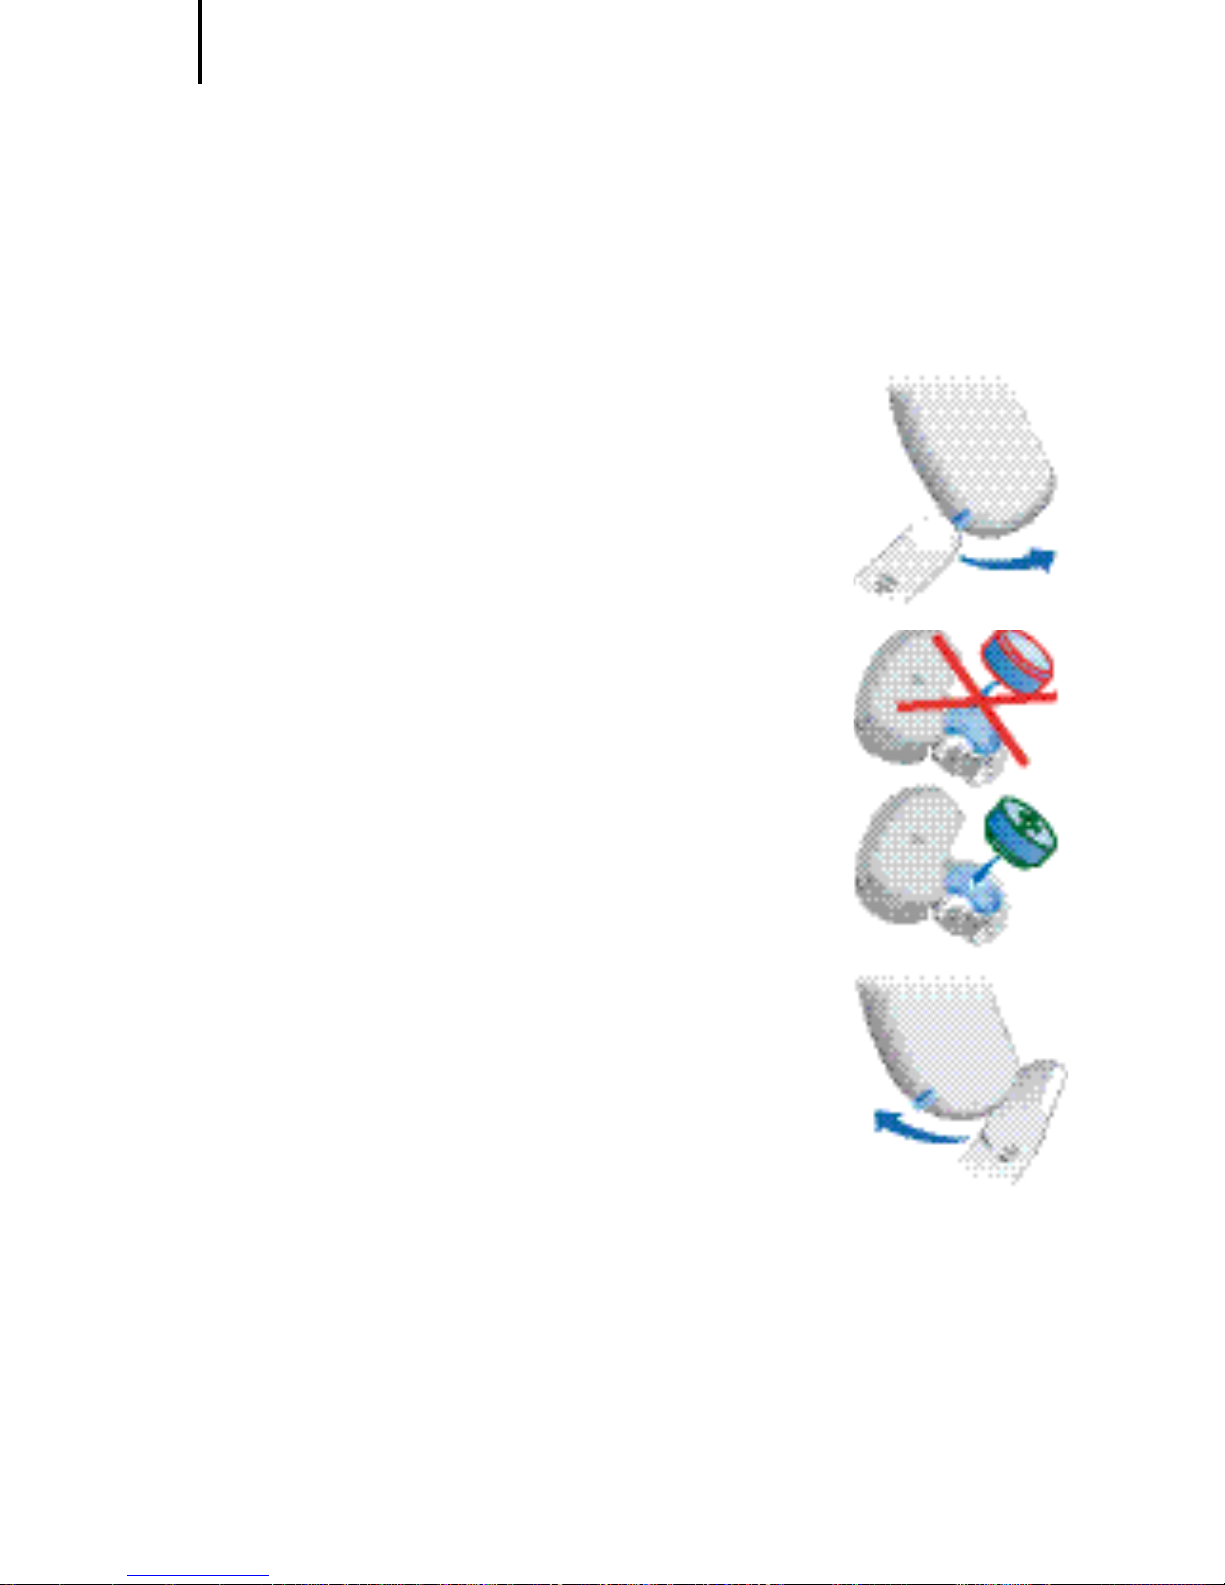
Mise en place de la pile
Ouvrez entièrement le tiroir pile avec
votre ongle comme illustré ci-contre.
Introduisez une pile de taille appropriée.
Veillez à ce que le symbole "+" de la pile
soit dirigé vers le haut comme indiqué
sur le schéma.
Fermez le tiroir pile.
Ne forcez pas la fermeture. Si le tiroir
pile est difficile à refermer, vérifiez que
la pile a été insérée correctement.
Quand le tiroir pile est bien refermé, votre aide auditive
est prête à fonctionner.
Page 97
Manipulation des piles standard ou rechargeables
97
EN
HU
RO
FR
DE
AR
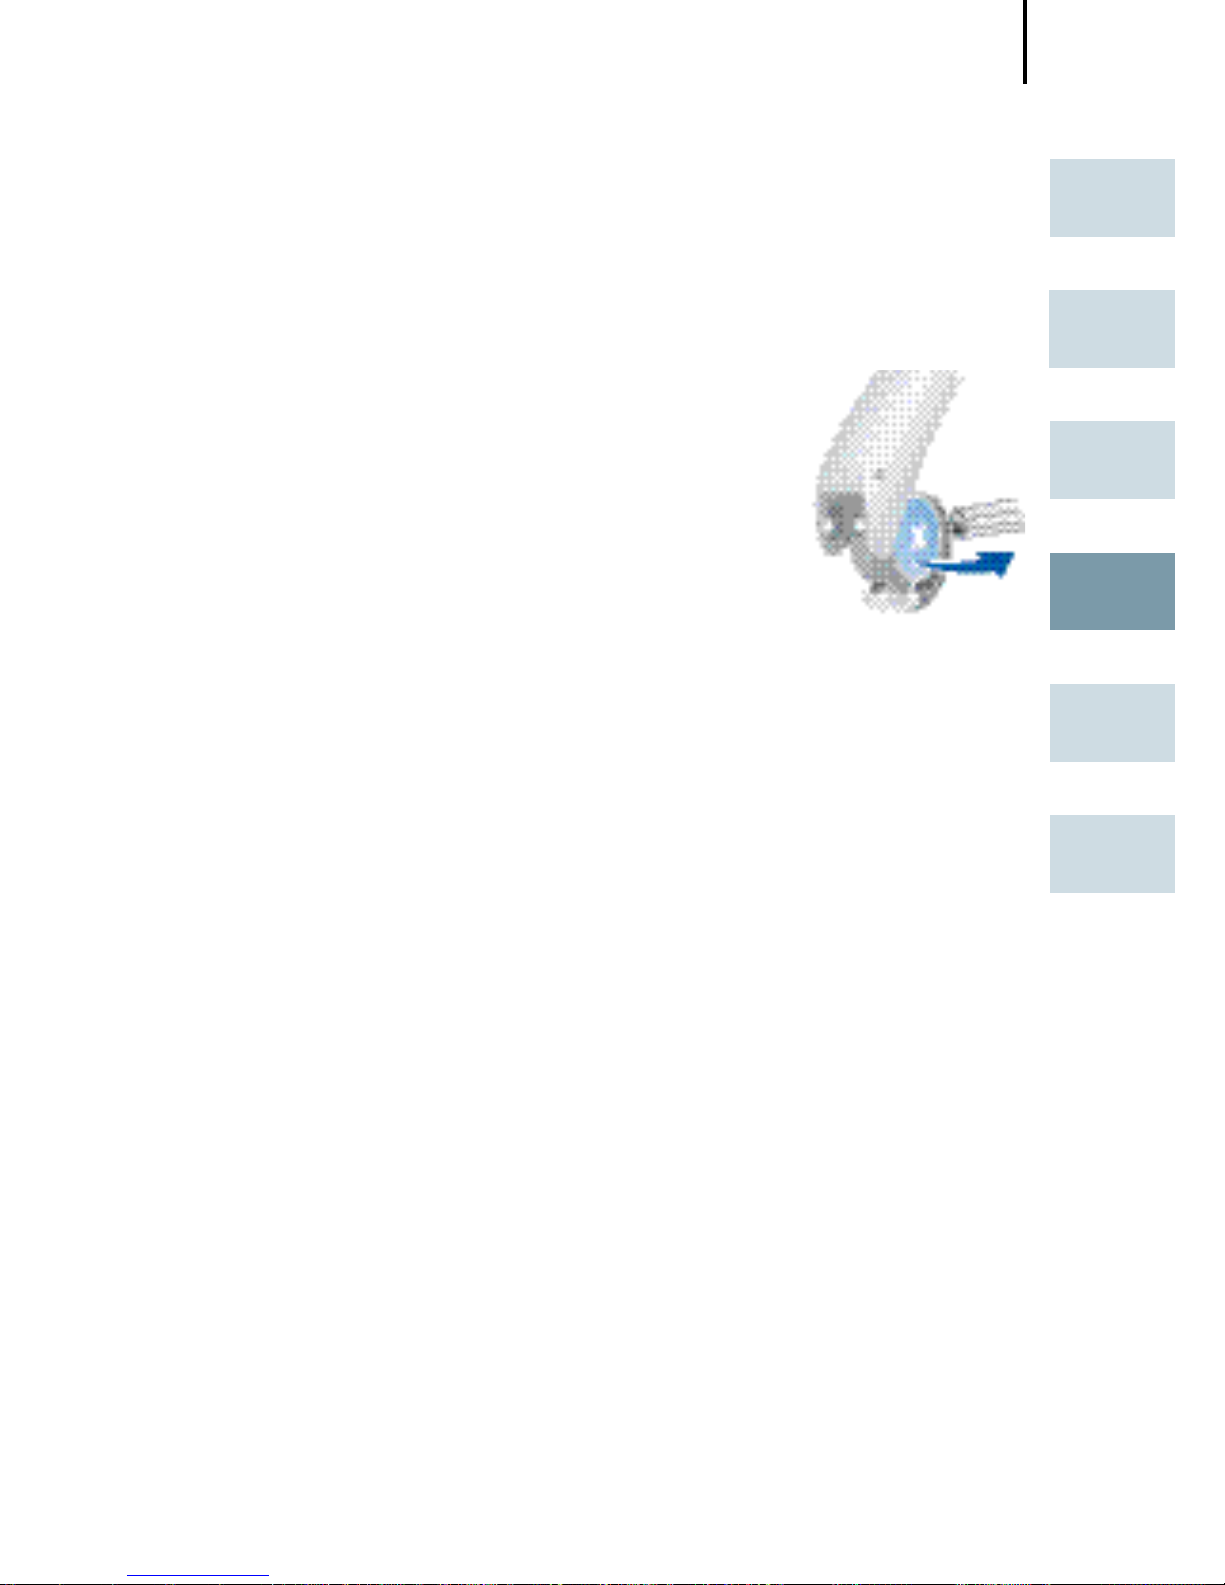
Retrait de la pile
Ouvrez entièrement le tiroir pile.
Normalement, la pile tombe quand le
tiroir pile est grand ouvert.
Si ce n'est pas le cas, tapotez légèrement
l'appareil ou utilisez la petite tige aimantée disponible comme accessoire.
Page 98
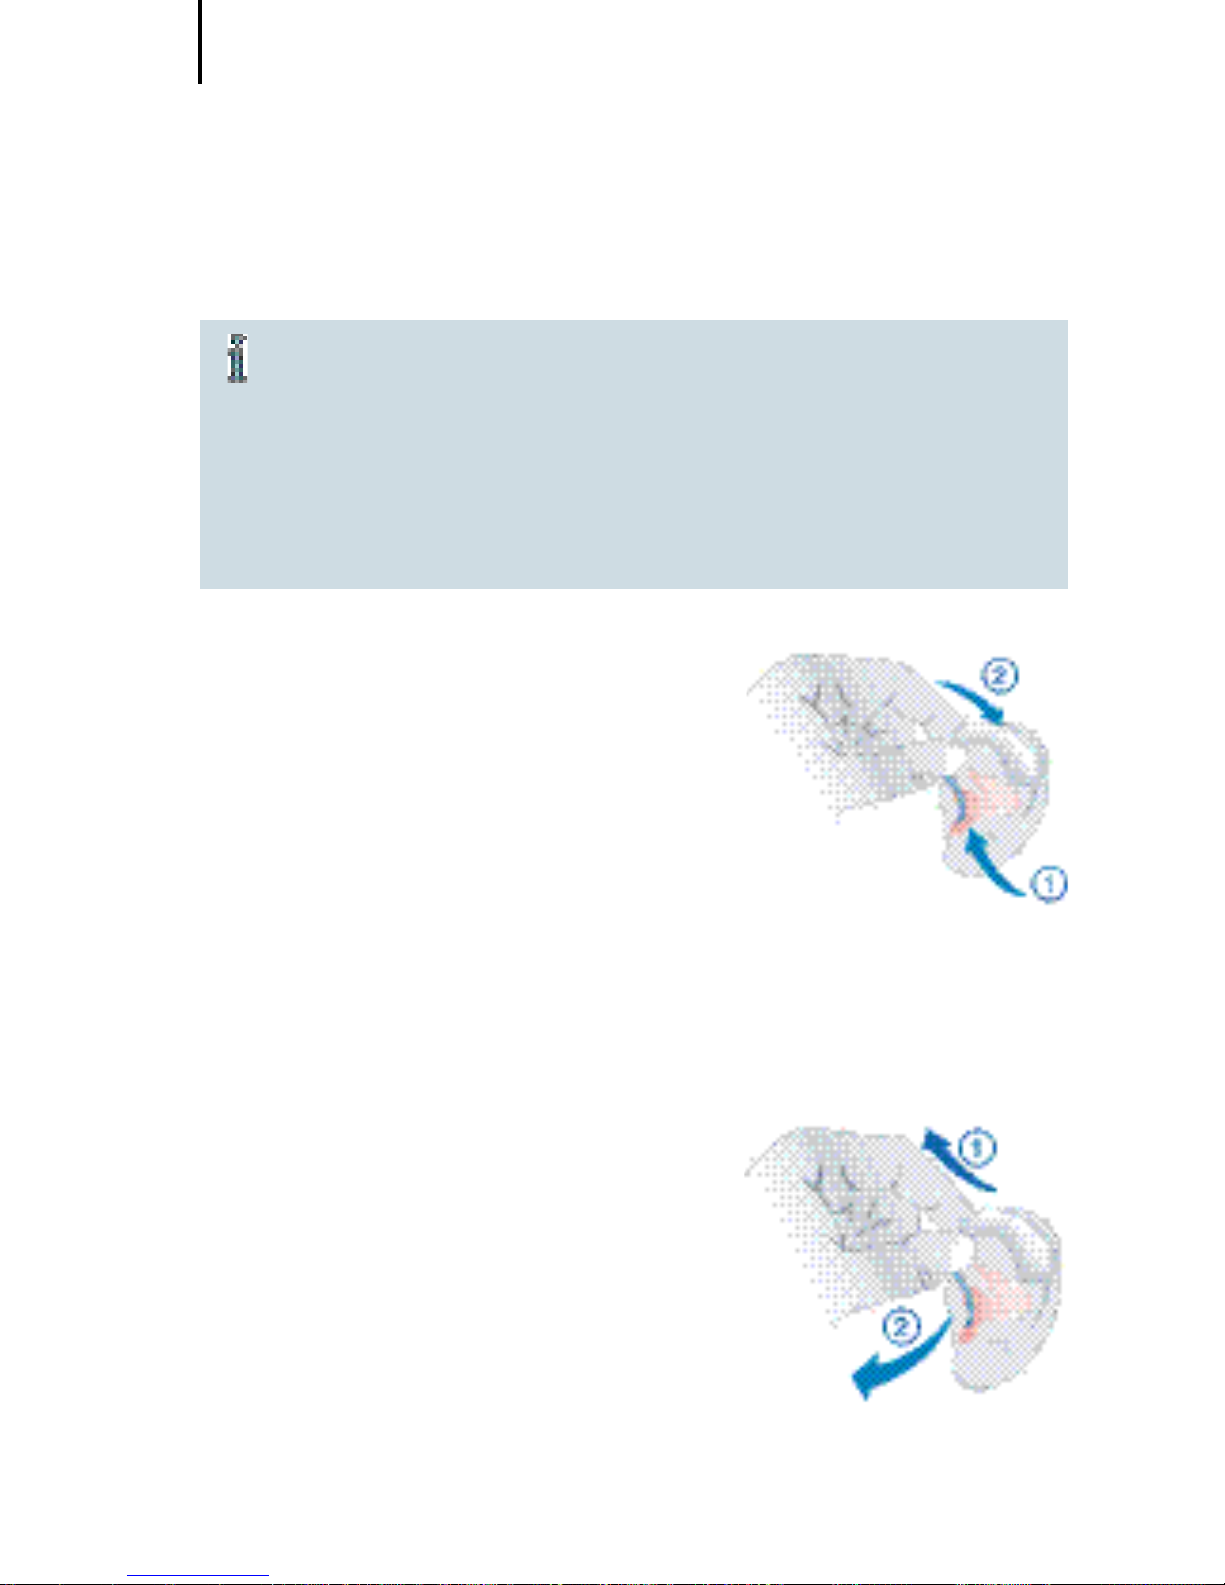
Mise en place et retrait de votre aide auditive
98
Pour identifier les côtés, demandez à votre audioprothésiste d'apposer des repères de couleur
dans le tiroir pile. Si le repère dans le tiroir pile est
rouge, l'aide auditive est destinée à l'oreille droite.
Si le repère est bleu, l'aide auditive est pour l'oreille
gauche.
Mise en place de votre aide auditive
Eteignez votre aide auditive.
Tenez l'embout auriculaire/le
LifeTip entre le pouce et l'index
et introduisez-le avec précaution
dans le conduit auditif.
Pour vous aider, vous pouvez tirer
légèrement votre oreille vers le haut ou vers l'arrière.
Placez votre aide auditive derrière votre oreille.
Allumez votre aide auditive.
Retrait de votre aide auditive
Tenez l'embout auriculaire / le
LifeTube entre le pouce et l'index
et retirez-le avec précaution.
Pour vous aider, vous pouvez
pousser légèrement votre oreille
par l'arrière.
Mise en place et retrait de votre
aide auditive
Page 99
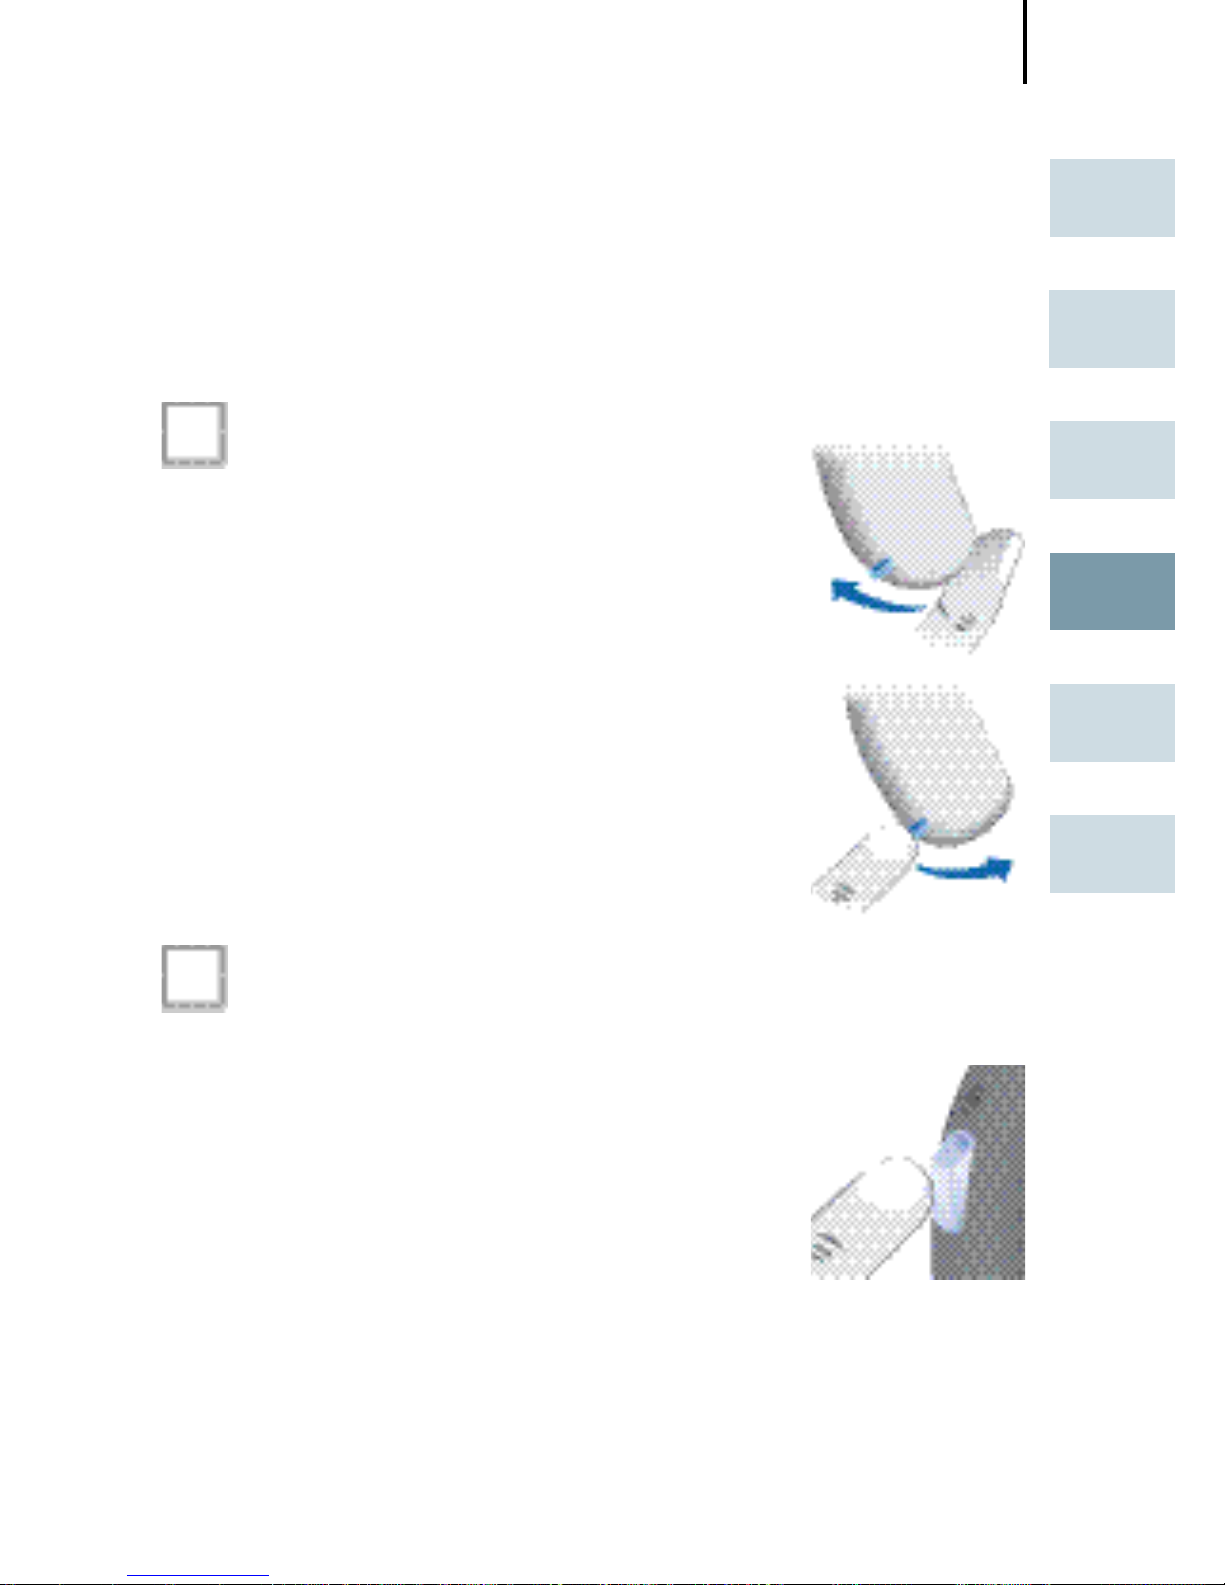
Mise en marche et arrêt de votre aide auditive
99
EN
HU
RO
FR
DE
AR
Consultez votre audioprothésiste pour obtenir les
informations correspondantes.
Par le tiroir pile
Marche
Fermez le tiroir pile.
Arrêt
Ouvrez le tiroir pile.
Par le bouton-poussoir
Marche
Appuyez sur le bouton pendant
2 secondes.
Arrêt
Appuyez sur le bouton pendant
2 secondes.
Mise en marche et arrêt de votre
aide auditive
Page 100

Mise en marche et arrêt de votre aide auditive
100
Par la télécommande
Reportez-vous au guide d'utilisation de la télé-
commande.
Mise en route retardée
Votre aide auditive est équipée de la fonction "Mise en
route retardée" qui peut être activée par votre audioprothésiste. Ce dispositif vous permet d'allumer vos aides auditives avec un retard automatique de 6/12/18 secondes.
Vous pouvez ainsi mettre en place votre aide auditive
sans sifflement désagréable.
 Loading...