

Page 1
KG..S...
9000013435
Gebrauchsanweisung
Instructions for use
Notice d'utilisation
de
en
fr
Page 2
4
5
6
7
11
8
9
1
A
B
1-9
10
21
15
22
23
14
13
18
16
19
20
17
12
11
17
2 3
9
6
3
8
1
2
4
5
7
Page 3
16
11
17
10
11
12
13
14
220-240V
A
B
C
15
Page 4
Änderungen vorbehalten
Subject to modification
Tous droits de modification réservés
Siemens-Electrogeräte GmbH
Carl-Wery-Str. 34,
81739 München 9000013435 de/en/fr (8409)
18
Page 5

de Inhaltsverzeichnis
Hinweise zur Entsorgung und Sicherheit 4, 5
Bestimmungen 5
Umgebungstemperatur beachten 5
Gerät aufstellen 6
Gerät kennenlernen 7, 8
Einschalten und Temperaturwahl 8, 9
Ausschalten, Gerät stillegen 10
Lebensmittel einordnen 10, 11
Gefrieren und Lagern 12-14
Abtauen 14, 15
Reinigen 15, 16
Energiespartips 16
Hinweise zu Betriebsgeräuschen 17
Kleine Störungen selbst beheben 17, 18
Kundendienst 18
en Index
Disposal and safety information 19, 20
Regulations 20
Observe ambient temperature 20
Installation 21
Getting to know your appliance 22, 23
Switching ON and setting temperatures 23, 24
Switching OFF and longer periods of disuse 25
Food arrangement 25, 26
Freezing and storing 26-28
Defrosting 29
Cleaning 30
Power saving tips 31
Information about operating noises 31
Minor problems and how to rectify them yourself 32
Customer Service 33
fr Sommaire
Mise au rebut, conseils de sécurité et consignes 34, 35
Conditions 35
Consignes relative à la tempéreture ambiante 35
Installation de l'appareil 36
Faire la connaissance de l’appareil 37, 38
Mise en service et sélection de la température 38, 39
Coupure et mise hors service de l’appareil 40
Rangement des aliments 40, 41
Congélation et stockage 41–43
Dégivrage 44
Nettoyage 45
Economies d'énergie 46
Remarques sur les bruits de fonctionnement 46
Réparer soi-même les petites pannes 47
Service après-vente 48
Page 6

4
de
Hinweise zur Entsorgung und Sicherheit
Hinweise zur Entsorgung
Altgeräte sind kein wertloser Abfall! Durch
umweltgerechte Entsorgung können
wertvolle Rohstoffe wiedergewonnen
werden.
Bei ausgedienten Geräten Netzstecker
ziehen. Netzkabel durchtrennen und mit
dem Stecker entfernen.
Schloß entfernen. Sie verhindern damit,
daß sich spielende Kinder einsperren und in
Lebensgefahr kommen.
Kältegeräte enthalten Kältemittel und in der
Isolierung Gase, die eine fachgerechte
Entsorgung erfordern. Achten Sie darauf,
daß die Rohre bis zur Entsorgung nicht
beschädigt werden.
Ihr neues Gerät wurde auf dem Weg zu Ihnen
durch die Verpackung geschützt. Alle eingesetzten Materialien sind umweltverträglich
und wieder verwertbar. Bitte helfen Sie mit
und entsorgen Sie die Verpackung
umweltgerecht.
Verpackung und ihre Teile nicht spielenden
Kindern überlassen. Erstickungsgefahr
durch Faltkartons und Folien.
Über aktuelle Entsorgungswege informieren
Sie sich bitte bei Ihrem Fachhändler oder bei
Ihrer Gemeindeverwaltung.
Hinweise zur Sicherheit
Lesen Sie bitte vor Inbetriebnahme des
Gerätes die in der Gebrauchs- und Montageanweisung aufgeführten Informationen
sorgfältig durch. Sie enthalten wichtige
Hinweise für die Installation, den Gebrauch
und die Wartung des Gerätes.
Gebrauchs- und Montageanweisung ggf. für
Nachbesitzer sorgfältig aufbewahren.
Der Hersteller haftet nicht, wenn die
nachstehenden Hinweise nicht beachtet
werden:
Ein Beitrag zum Umweltschutz –
wir verwenden Recyclingpapier.
l Beschädigtes Gerät nicht in Betrieb
nehmen, im Zweifel beim Lieferanten
rückfragen.
l Anschluß und Aufstellung nach der
Montageanweisung vornehmen.
Elektrische Anschlußbedingungen und
Angaben auf dem Typenschild müssen
übereinstimmen.
l Verwenden Sie zum Reinigen auf keinen
Fall ein Dampfreinigungsgerät. Der
Dampf kann an spannungsführende Teile
des Gerätes gelangen und einen
Kurzschluß oder Stromschlag
verursachen.
l Die elektrische Sicherheit des Gerätes ist
nur gewährleistet, wenn das Erdungssystem der Hausinstallation
vorschriftsmäßig installiert ist.
l Im Fehlerfall, bei Wartung und bei der
Reinigung Gerät vom Netz trennen.
Netzstecker ziehen oder Sicherung
ausschalten. Am Netzstecker ziehen,
nicht am Anschlußkabel.
l Reparaturen an Elektrogeräten dürfen nur
von Fachkräften durchgeführt werden.
Durch unsachgemäße Reparaturen
können erhebliche Gefahren für den
Benutzer entstehen.
l Flaschen mit hochprozentigem Alkohol
nur dicht verschlossen und stehend
lagern.
Erzeugnisse mit brennbaren Treibgasen
(z. B. Sahnespender, Spraydosen) und
explosive Stoffe nicht im Gerät lagern –
Explosionsgefahr!
l Flüssigkeit in Flaschen und Dosen, im
besonderen kohlensäurehaltige Getränke,
nicht im Gefrierraum lagern. Flaschen
und Dosen platzen.
l Be- und Entlüftungsöffnungen für das
Gerät nicht abdecken oder zustellen.
l Sockel, Auszüge, Türen usw. nicht als
Trittbrett oder zum Abstützen mißbrauchen.
Page 7
Gerät aufstellen
56
de
Umgebungstemperatur
beachten
Abhängig von der „Klimaklasse“ (siehe
Typenschild) kann Ihr Gerät bei folgenden
Umgebungstemperaturen betrieben werden:
(Das Typenschild befindet sich links unten
im Gerät. Bild F)
Klimaklasse Umgebungstemperatur
von ... bis
SN +10 °C bis 32 °C
N +16 °C bis 32 °C
ST +18 °C bis 38 °C
T +18 °C bis 43 °C
Beim Unterschreiten des
Umgebungstemperaturbereiches wird es im
Kühlraum zu kalt, beim Überschreiten im
Gefrierraum zu warm.
Sinkt die Umgebungstemperatur unter die
eingestellte Temperatur im Kühlraum ab,
wird der Kühlraum genauso kalt wie die
Umgebungstemperatur.
Bei Umgebungstemperaturen unter +10 °C
kann es zu Störungen beim
vollautomatischen Abtauen kommen.
Aufstellort
Als Aufstellort eignet sich ein trockener,
belüftbarer Raum. Der Aufstellplatz sollte
nicht direkter Sonneneinstrahlung
ausgesetzt und nicht in der Nähe einer
Wärmequelle wie Herd, Heizkörper etc. sein.
Wenn das Aufstellen neben einer
Wärmequelle unvermeidbar ist, verwenden
Sie eine geeignete Isolierplatte oder halten
Sie folgende Mindestabstände zur
Wärmequelle ein.
Zu Elektroherden 3 cm.
Zu Öl- oder Kohleanstellherden 30 cm.
Beim Aufstellen neben einem anderen Kühloder Gefriergerät ist ein seitlicher Mindestabstand von 2 cm erforderlich, um
Schwitzwasserbildung zu vermeiden.
l Kinder nicht mit dem Gerät spielen
lassen.
l Bei Gerät mit Schloß, Schlüssel außer
Reichweite von Kindern aufbewahren.
l Eis am Stiel und Eiswürfel nicht direkt
vom Gefrierraum in den Mund nehmen
(Verbrennungsgefahr durch sehr tiefe
Temperaturen).
l Gefriergut nicht mit nassen Händen
berühren, die Hände könnten daran
festfrieren.
Dieses Gerät enthält in
geringer Menge das Kältemittel
Isobutan (R 600a), ein Naturgas
mit hoher
Umweltverträglichkeit aber brennbar.
Beim Transportieren und Aufstellen des
Gerätes darauf achten, daß keine Teile
des Kältemittelkreislaufes beschädigt
werden. Bei Bechädigungen offenes
Feuer oder Zündquellen vermeiden und
den Raum, in dem das Gerät steht, für
einige Minuten durchlüften
Warnung: Zum Beschleunigen der
Abtauung keine anderen mechanischen
Einrichtungen oder sonstige künstlichen
Hilfsmittel als die vom Hersteller
empfohlenen benutzen.
Bestimmungen
Das Gerät eignet sich zum Kühlen und
Gefrieren von Lebensmitteln und zur Eisbereitung.
Es ist für die Verwendung im Haushalt
bestimmt.
Bei Einsatz im gewerblichen Bereich sind die
für das Gewerbe gültigen Bestimmungen zu
beachten.
Es entspricht der Unfallverhütungsvorschrift
für Kälteanlagen (VBG 20).
Es entspricht den einschlägigen
Sicherheitsbestimmungen für Elektrogeräte.
Der Kältekreislauf ist auf Dichtheit geprüft.
Das Gerät muß fest und eben stehen.
Unebenheiten des Bodens durch die beiden
Schraubfüße an der Vorderkante
ausgleichen, Bild G.
Zwei Rollen auf der Rückseite erleichtern
das Einschieben in eine Nische.
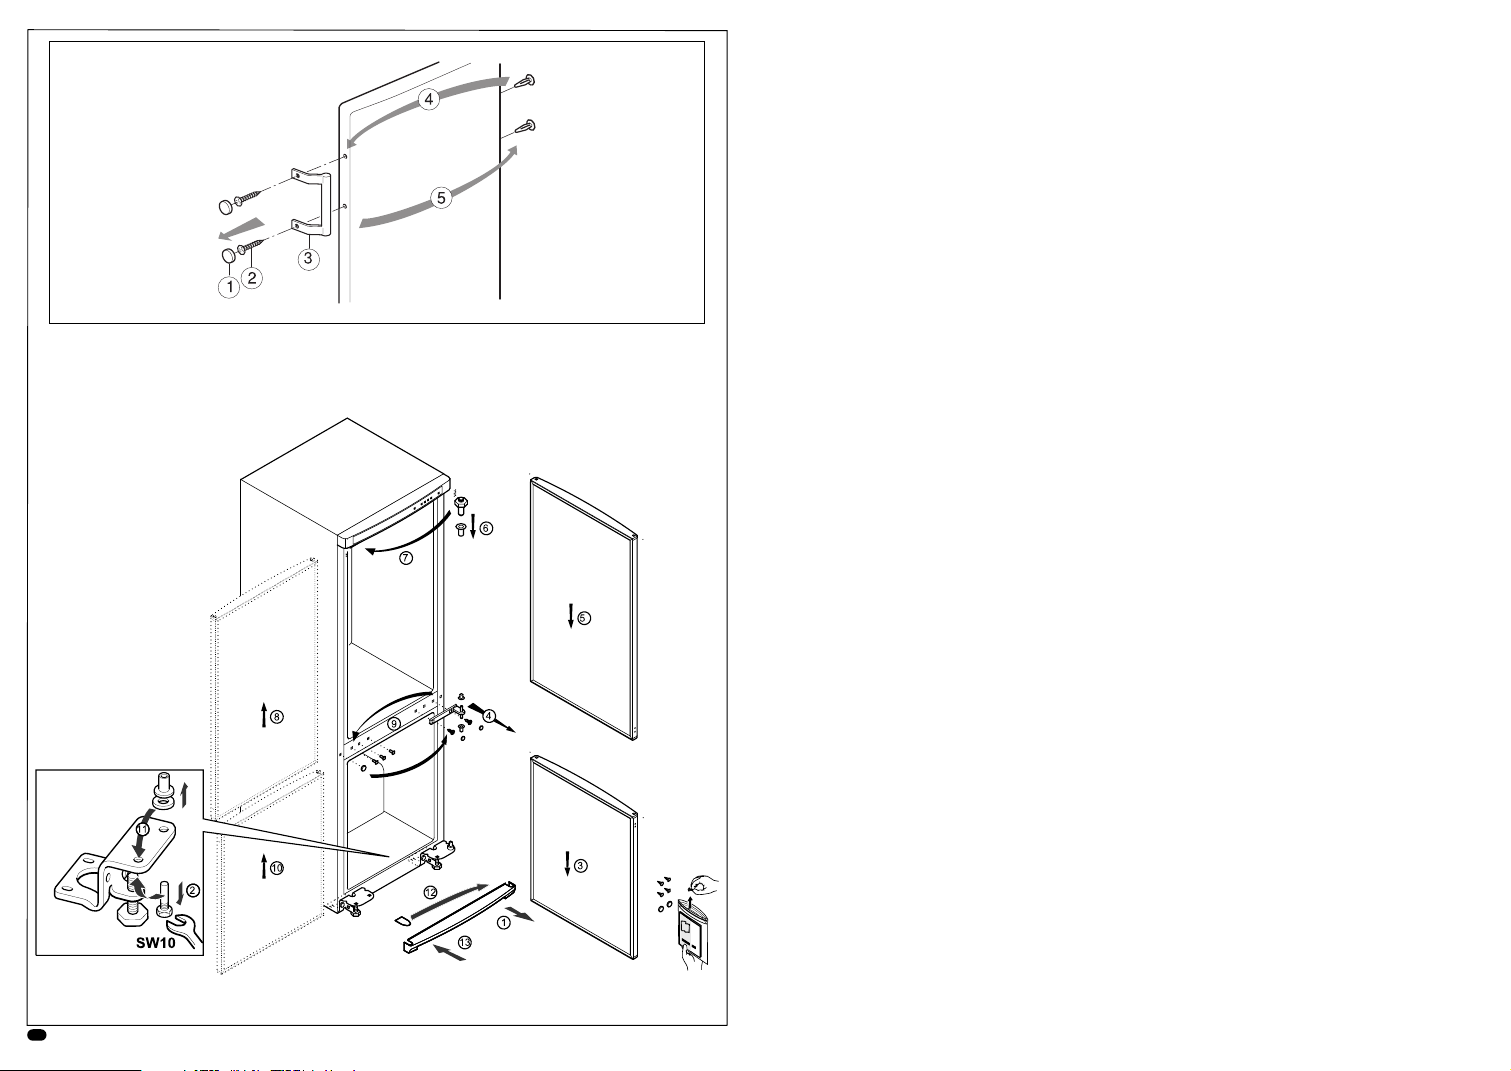
Wechsel des Türanschlages
Arbeitsschritte in der Reihenfolge der Zahlen
(Bild H).
Elektrischer Anschluß
Geräte nur an 220–240 V/50 Hz
Wechselspannung über eine
vorschriftsmäßig installierte
Schutzkontaktsteckdose anschließen. Die
Steckdose muß mit einer 10-A-Sicherung
oder höher abgesichert sein.
Bei Geräten für nichteuropäische Länder
ist auf dem Typenschild zu überprüfen, ob
die Anschlußspannung und Stromart mit den
Werten Ihres Stromnetzes übereinstimmt.
Das Typenschild befindet sich im Kühlraum
links unten. (Bild F).
Ein eventuell notwendiger Austausch der
Netzanschlußleitung darf nur durch den
Service des Herstellers erfolgen.
Warnung! Auf keinen Fall darf das Gerät
an elektronische „Energiesparstecker“
(z. B. Sava Plug) und an Wechselrichter,
die Gleichstrom in 230 V Wechselstrom
umwandeln, angeschlossen werden
(z. B. Solaranlagen, Schiffsnetze).
de
Hinweise zur Entsorgung und Sicherheit
Belüftung
Bild
3
Die an der Rückwand des Gerätes erwärmte
Luft muß ungehindert abziehen können.
Die Kühlmaschine muß sonst mehr leisten,
und das erhöht den Stromverbrauch.
Deshalb auf keinen Fall die Belüftungs- und
Entlüftungsöffnungen abdecken.
Nach dem Transport ...
Vor dem ersten Einschalten, Gerät ca. 1/2
Stunde senkrecht lassen.
Page 8
78
de de
Gerät kennenlernen Gerät kennenlernen
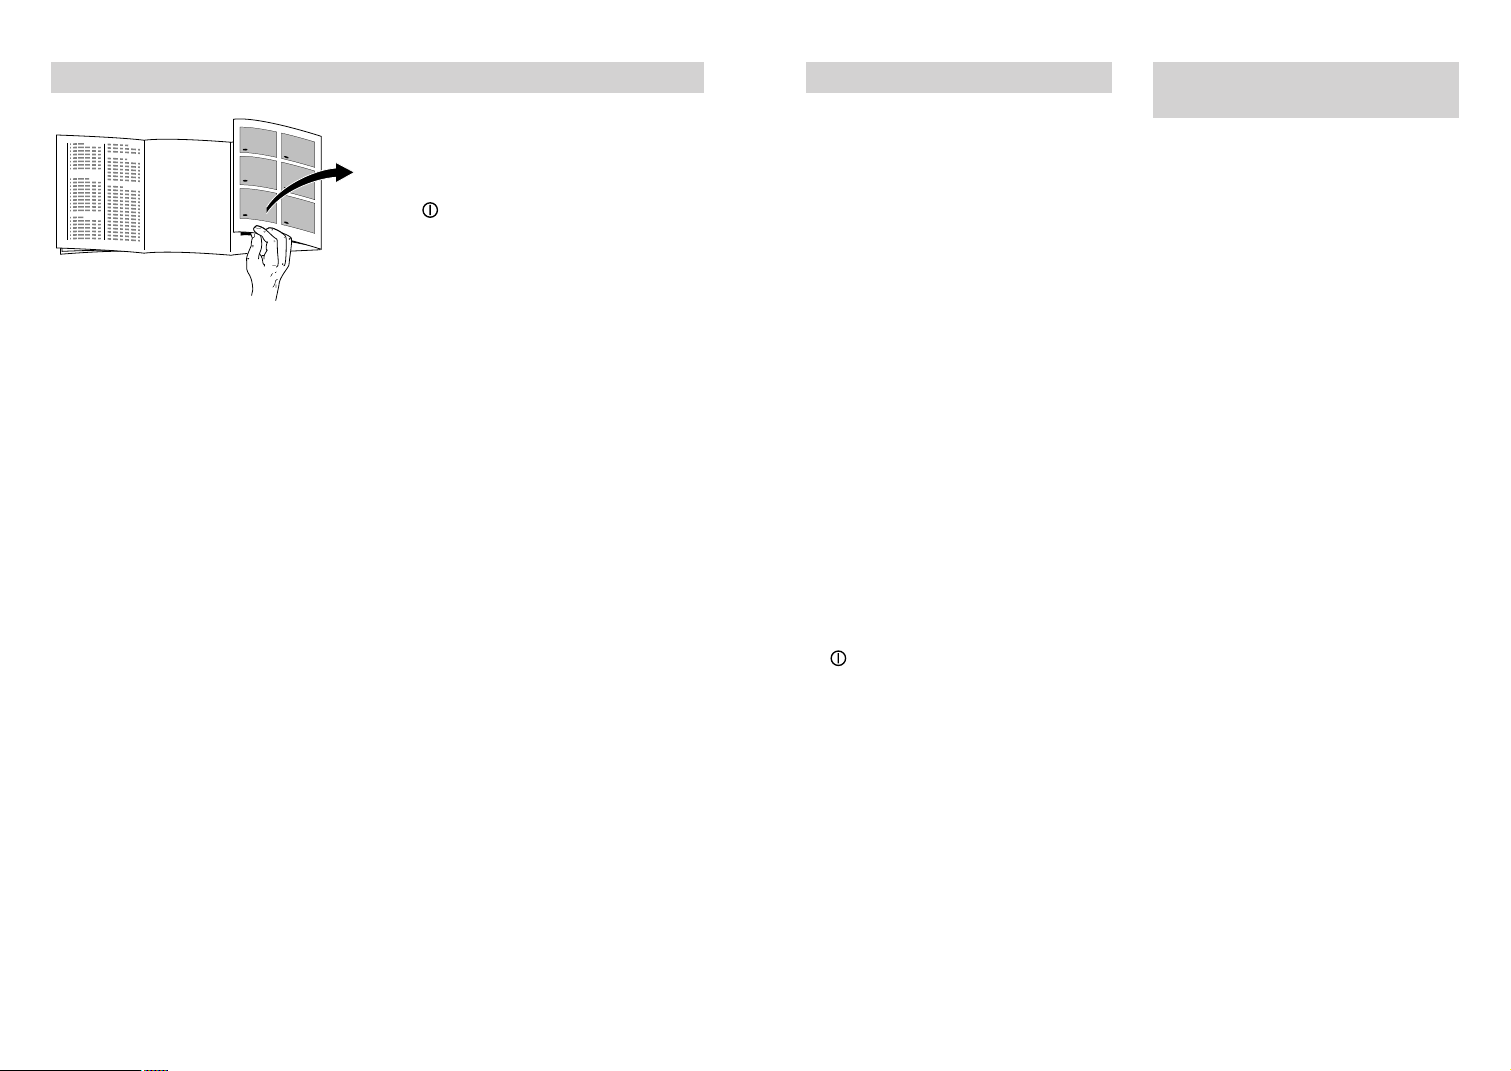
Bitte klappen Sie vor dem Lesen die
letzten Seiten mit den Abbildungen aus.
Die Gebrauchsanweisung gilt für mehrere
Modelle, Ausstattungs- und
Detailabweichungen bei den Abbildungen
sind möglich.
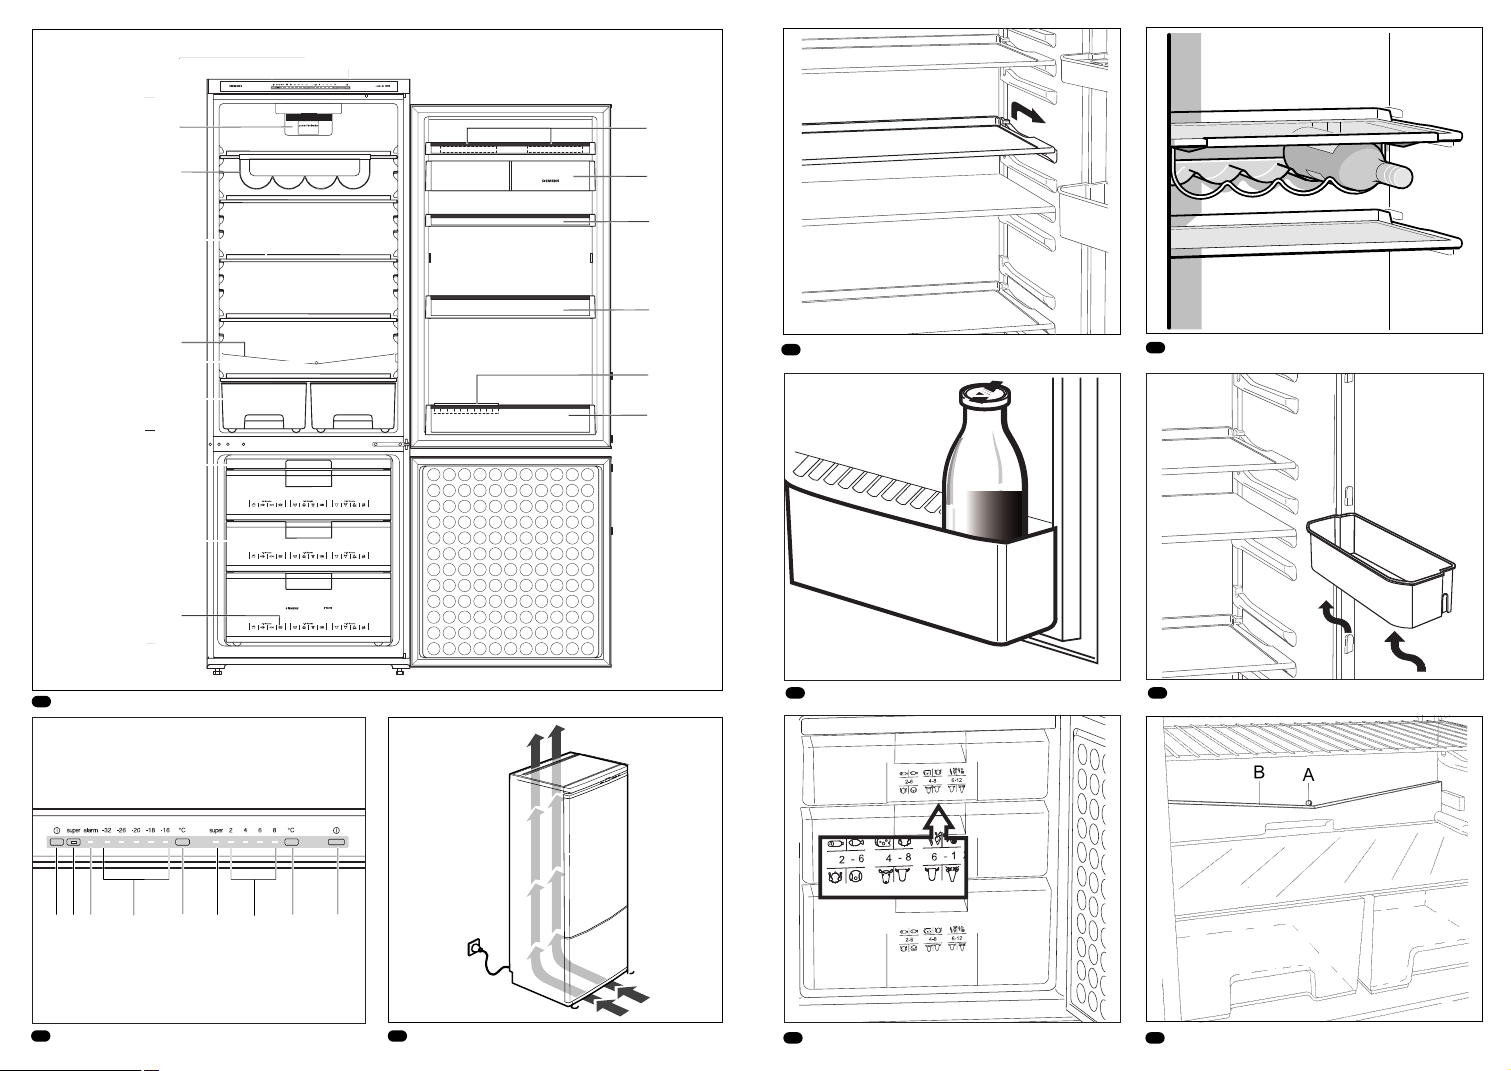
Gesamtansicht
Bild
1
1-9 Bedienblende
10 Kühlgebläse / Innenbeleuchtung
11 Glasboden (Ablagerost)
12 Flaschenablage
13 Ablauf für Abtauwasser
14 Ablauföffnung
15 Obst- und Gemüsebehälter
16 Butter- und Käsefach
17 Absteller für kleine Dosen, Tuben
18 Eierablage
19 Flaschenhalter
20 Flaschenabsteller
21 Gefriertablett
22 Gefriergutbehälter
23 Gefrierkalender
A Kühlraum
B Gefrierraum
Bedienelemente für
den Kühlraum
Bild
2
1 -Taste Kühlraum
EIN/AUS Schalter für den Kühlraum
2 Temperatur-Einstelltaste Kühlraum
Taste ständing oder solange drücken bis
gewünschtes Temperaturlämpchen
leuchtet.
3 Temperatur-Lämpchen
Die Zahlen bei den TemperaturLämpchen bedeuten Temperaturen in
0
C.
Das leuchtende Lämpchen zeigt die
eingestellte Temperature an.
4 super-cooling
Das leuchtende Lämpchen zeigt die
Inbetriebnahme an. Beim super-cooling
wird der Kühlraum 6 Stunden lang auf
eine tiefere Temperatur abgesenkt.
Danach wird automatisch auf die vor dem
super-cooling eingestellte Temperatur
umgestellt.
Das super-cooling verwenden:
- Beim Einlegen grosser Mengen frischer
Lebensmittel
- Zum Schnellkühlen von Getränken
Bedienelemente für den
Gefrierraum
Bild
2
5 Temperatur-Einstelltaste Gefrierraum
Taste standing oder solange drücken bis
gewünschtes Temperaturlämpchen
leuchtet.
6 Temperatur-Lämpchen
Die Zahlen bei den TemperaturLämpchen bedeuten Temperaturen in
0
C.
Das leuchtende Lämpchen zeigt die
eingestellte Temperatur an.
7 "alarm" - Lämpchen
leuchtet wenn es im Gefrierraum zu
warm, also das Gefriergut gefährdet ist.
Ohne Gefahr für das Gefriergut kann das
Lämpchen leuchten:
- bei Inbetriebnahme des Gerätes
- beim Einlegen grosser Mengen frischer
Lebensmittel
oder
- wenn beim Einlegen oder Entnehmen
von Lebensmitteln die Tür zu lange
geöffnet bleibt.
Erlischt wenn der Gefrierraum seine
Betriebstemperatur erreicht hat.
8 "super"-Taste Gefrierraum
Dient zum Ein- und Ausschalten des
Supergefrierens. Die Inbetriebnahme wird
durch Leuchten der Taste angezeigt. Das
Supergefrieren dient zum Eingefrieren
grosser Mengen frischer Lebensmittel
und ist je nach Menge bis zu 24 Stunden
vor dem Einlegen einzuschalten. Nach
dem Einschalten wird im Gefrierraum
eine sehr tiefe Temperatur erreicht.
Das Supergefrieren schaltet sich
50 Stunden nach dem Einschalten ab.
9 -Taste Gefrierraum
EIN/AUS Schalter für den Gefrierraum
Vor der ersten Inbetriebnahme den
Innenraum reinigen (siehe Reinigen). Der
Kühl-und Gefrierraum können unabhängig
voreinander betrieben werden.
Kühlraum einschalten
Stecker in der Steckdose stecken. EIN/AUS
Schalter für den Kühlraum drücken (Bild
2/1). Das Temperatur-Lämpchen +6
0
C
leuchtet. Das Gerät beginnt zu kühlen, die
Innenbeleuchtung ist bei geöffneter Tür
eingeschaltet.
Kühlraum-Temperatur
einstellen
Dazu die Temperatur-Einstelltaste 0C (Bild
2/2) mehrmals oder solange drücken, bis
gewünschtes Temperaturlämpchen leuchtet
(Bild 2/3).Wir empfehlen Ihnen eine
Einstellung der Kühlraumtemperatur
auf +6
0
C.
Super-Cooling einschalten
Die Temperatur-Einstelltaste 0C (Bild 2/2)
mehrmals oder solange drücken, bis das
Lämpchen auf "super-cooling" steht
(Bild 2/4).
Gefrierraum einschalten
EIN/AUS Schalter für den Gefrierraum (Bild
2/9) drücken. Das Temperatur-Lämpchen
-18
0
C und das “alarm” - Lämpchen
leuchten (Bild 2/7). Die rote Kontrolleuchte
erlischt, wenn der Gefrierraum die
Betriebstemperatur erreicht hat.
Gefrierraum-Temperatur
einstellen
Dazu die Temperatur-Einstelltaste 0C (Bild
2/5) mehrmals oder solange drücken, bis
gewünschtes Temperaturlämpchen leuchtet
(Bild 2/6). Wir empfehlen Ihnen eine
Einstellung der Gefrierraumtemperatur auf
-18
0
C.
Einschalten und
Temperaturwahl
Page 9

Kühlraum stillegen
EIN/AUS Schalter für Kühlraum (Bild 2/1)
drücken, das Temperatur-Lämpchen
(Bild 2/3) erlischt, damit ist der Kühlraum
ausgeschaltet. Um Geruchsbildung zu
vermeiden, Innenraum reinigen und Tür offen
lassen.
Gefrierraum stillegen
EIN/AUS Schalter für Gefrierraum (Bild 2/9)
drücken, das Temperatur-Lämpchen
(Bild 2/6) erlischt. Gefrierraum abtauen und
reinigen. Wir empfehlen Ihnen den
Innenraum und die Gefrieroste
trockenzureiben und die Tür offenzulassen.
910
de de
Hinweise
l Wenn die Einstelltaste des Kühl- oder
Gefrierraumes 5 Sek. nicht mehr betädigt
wird, so wird die aktuelle
Einstelltemperatur gespeichert.
l Zu warme Temperaturen im Kühl- oder
Gefrierraum können auftreten, wenn…
- die Tür nicht richtig geschlossen ist
- grössere Mengen von warmen
Lebensmitteln eingelegt wurden
- die Temperaturwähler auf + 8
0
C bzw.
auf -16
0
C eingestellt sind.
- die Luftzirkulation im Kühl- oder
Gefrierraum durch eingelagerte
Lebensmittel stark beeinträchtigt ist.
- bei hohen Umgebungstemperaturen die
Türen häufig geöffnet wurden.
l Zu kalte Temperaturen im Kühl- oder
Gefrierraum können auftreten, wenn…
- das "super-cooling" - oder
Supergefrieren eingeschaltet ist
- die Temperaturwähler auf + 2
0
C bzw.
auf -32
0
C (max.) eingestellt sind.
l Die Stirnseiten des Gehäuses werden
teilweise beheizt, dies verhindert
Schwitzwasserbildung im Bereich der
Türdichtung.
l Während die Kühlmaschine läuft, bilden
sich Wasserperlen oder Reif an der
Rückwand des Kühlraumes, dieses ist
funktionsbedingt. Ein Abschaben der
Reifschicht oder Abwischen der
Wasserperlen ist nicht notwendig. Die
Rückwand taut automatisch ab. Das
Tauwasser wird in der Ablaufrinne (Bild
9/B) aufgefangen, zur Kühlmaschine
gegleitet und dort verdunstet.
l Sollte sich nach dem Schliessen des
Gefrierraumes die Tür nicht sofort wieder
öffnen lassen, warten Sie bitte zwei bis
drei Minuten, bis sich der enstandene
Unterdruck ausgeglichen hat.
l Bedingt durch das Kältesystem können
die Gefrierroste an manchen Stellen
schnell bereifen. Dies hat keinen Einfluss
auf Funktion oder Stromverbrauch.
Abtauen wird erst erforderlich, wenn sich
auf der gesamten Oberfläche des
Gefrierrostes Reif oder Eis in einer Stärke
von mehr als 5 mm gebildet hat.
Einschalten und Temperaturwahl
Ausschalten, Gerät stillegen
Lebensmittel einordnen
Gebläse im Kühlfach
Bild 1/10
Das Gebläse in der Decke des Kühlfachs
erhöht die Geschwindigkeit, mit der die Luft
zirkuliert.
Das Ergebnis:
l Eine gleichmässige Temperaturverteilung
im gesamten Kühlfach
l Nachdem die Tür geöffnet wurde, wird
die ursprüngliche Temperatur rasch
wieder erreicht
l Nach einer Änderung der
Temperatureinstellung wird die neue
Temperatur rasch wieder erreicht
l Frische Lebensmittel können aufgrund
der niedrigen Luftfeuchtigkeit länger
aufbewahrt werden.
Beim Einordnen beachten
l Warme Speisen und Getränke außerhalb
des Gerätes abkühlen lassen.
l Lebensmittel möglichst verpackt oder gut
abgedeckt einordnen. Dadurch bleiben
Aroma, Farbe, Feuchtigkeit und Frische
erhalten, außerdem werden Geschmacksübertragungen vermieden. Unverpackt
sollten nur Gemüse, Obst und Salat in
den Gemüsebehältern gelagert werden.
l Öl und Fett nicht mit den Kunststoffteilen
und der Türdichtung in Berührung
bringen (diese könnten sonst porös
werden).
l Im Gerät keine explosiblen Stoffe auf-
bewahren und hochprozentigen Alkohol
nur verschlossen, stehend lagern.
– Explosionsgefahr!
l Flaschen mit Flüssigkeiten, die gefrieren
können, nicht im Gefrierraum lagern.
Beim Gefrieren platzen die Flaschen.
Page 10

11 12
de de
Lebensmittel einordnen
Einordnungsbeispiel
Bild
1
Kühlraum (A)
Auf den Ablagen (11) von oben nach unten
Backwaren, fertige Speisen, Molkereiprodukte.
In der Gemüseschale (15) Gemüse, Obst,
Salat.
In dem Fach (16) Butter und Käse.
In dem Absteller (17) kleine Flaschen,
Dosen.
In dem Flaschenabsteller (20) große
Flaschen.
Gefrierraum (B)
Auf dem Gefriertablett (21) kleines
Gefriergut lagern, Eis bereiten.
In den oberen Gefriergutschalen (22)
Gefriergut lagern.
Die Inneneinrichtung
Die Ablagen im Kühlraum können auch bei
90°-geöffneter Tür umgesetzt werden. Zum
Umsetzen Ablage nach vorne ziehen,
absenken, herausnehmen und an
gewünschter Stelle neu einsetzen (Bild
4
).
Flaschenablage
In den Mulden lassen sich die Flaschen sicher
ablegen und stapeln (Bild
5
).
Damit die Flaschen beim Öffnen und
Schließen der Tür nicht umfallen können,
kann man sie mit dem Flaschenhalter sichern.
Bild 6/A.
Alle Absteller und Behälter in der Tür können
zum Reinigen herausgenommen werden.
Zum Herausnehmen Behälter und Absteller
anheben. (Bild 7).
Die Eiereinsätze in den Behältern können
hochgeklappt werden, dadurch können
Tuben, kleine Dosen usw. gelagert werden.
Portionen frieren schneller durch und die
Qualität bleibt beim Auftauen und
Zubereiten so am besten erhalten.
Die Lebensmittel luftdicht verpacken, damit
sie nicht ihren Geschmack verlieren oder
austrocknen.
Zum Verpacken geeignet sind:
Kunststoff-Folien, Schlauchfolien aus
Polyäthylen, Alu-Folien und Gefrierdosen.
Diese Produkte finden Sie im Fachhandel.
Ungeeignet sind:
Packpapier, Pergamentpapier, Cellophan,
Müllbeutel und gebrauchte Einkaufstüten.
Die Lebensmittel in die Verpackung einlegen. Luft völlig herausdrücken und
Packung dicht verschließen.
Zum Verschließen eignen sich:
Gummiringe, Kunststoffklipse, Bindfäden,
kältebeständige Klebebänder oder
ähnliches. Beutel und Schlauchfolien aus
Polyäthylen können mit einem
Folienschweißgerät verschweißt werden.
Vor dem Einlegen in den Gefrierraum den
Inhalt der Gefrierpakete kennzeichnen
und mit dem Einlegedatum versehen.
Max. Gefriervermögen
Lebensmittel sollen möglichst schnell bis
zum Kern durchgefroren werden. Nur so
bleiben Vitamine, Nährwerte, Aussehen und
Geschmack erhalten. Das max. Gefriervermögen Ihres Gerätes deshalb nicht
überschreiten.
Folgende Mengen an Lebensmitteln können
innerhalb von 24 Stunden in der oberen
Gefriergutschale eingefroren werden:
Bei Geräten mit 70 cm Breite max. 15 kg
Bei Geräten mit 60 cm Breite max. 12 kg
Bereits gefrorene Lebensmittel dürfen nicht
mit den frisch einzufrierenden Lebensmitteln
in Berührung kommen.
Heiße Speisen und Getränke vor dem
Einlegen in den Gefrierraum auf Zimmertemperatur abkühlen lassen.
Gefrieren und Lagern
Beim Einkauf von
Tiefkühlkost beachten
l Achten Sie auf die Verpackung, sie sollte
nicht beschädigt sein.
l Das Haltbarkeitsdatum darf nicht
überschritten sein.
l Die Temperaturanzeige der Verkaufstruhe
sollte –18 °C oder kälter anzeigen.
l Tiefkühlkost ganz zum Schluß einkaufen
und gut eingepackt in Zeitungspapier
oder in einer Kühltasche schnell nach
Hause transportieren und in den
Gefrierraum legen.
Lebensmittel selbst
eingefrieren
Werden Lebensmittel selbst eingefroren,
nur frische, einwandfreie Lebensmittel
verwenden.
Zum Eingefrieren geeignet sind
Fleisch- und Wurstwaren, Geflügel und Wild,
Fisch, Gemüse, Kräuter, Obst, Backwaren,
Pizza, fertige Speisen, Speisereste, Eigelb
und Eiweiß.
Zum Eingefrieren nicht geeignet sind
Ganze Eier in der Schale, Sauerrahm und
Mayonnaise, Blattsalate, Radieschen,
Rettiche und Zwiebeln.
Blanchieren von Gemüse und Obst
Damit Farbe, Geschmack, Aroma und Vitamin
„C“ erhalten bleiben, sollte Gemüse und Obst
vor dem Eingefrieren blanchiert werden.
(Beim Blanchieren wird das Gemüse und
Obst kurzzeitig in kochendes Wasser
getaucht – Literatur über das Eingefrieren, in
der auch das Blanchieren beschrieben wird,
gibt es im Buchhandel.)
Lebensmittel verpacken
Die Waren portionsgerecht für Ihren Haushalt
abpacken.
Gemüse und Obst nicht schwerer als 1 kg,
Fleisch bis zu 2,5 kg portionieren. Kleinere
Page 11

13 14
de de
Gefrieren und Lagern
Super-cooling
Bevor Sie einkaufen gehen, sollten Sie 3-4
Stunden oder spätestens beim Einlegen
frischer Lebensmittel das super-cooling
einschalten. Zum Einschalten des supercooling die Taste
0
C (Bild 2/2) ständig oder
solange drücken bis das Lämpchen "supercooling" (Bild 2/4) leuchtet. Beim supercooling wird der Kühlraum 6 Stunden lang
auf eine tiefere Temperature abgesenkt.
Danach wird automatisch auf die vor dem
super-cooling eingestellte Temperatur
umgestellt.
Supergefrieren
Lagern bereits Lebensmittel in dem
Gefrierraum, ist einige Stunden vor dem
Einlegen frischer Ware das Supergefrieren
einzuschalten.
Im allgemeinen genügen 4–6 Stunden. Soll
das max. Gefriervermögen genutzt werden,
benötigt man 24 Stunden. Kleinere Mengen
Lebensmittel (bis zu 2 kg) können ohne
Supergefrieren eingefroren werden. Zum
Einschalten des Supergefrierens einfach die
Supergefriertaste Bild 2/8 drücken.
Die “super”-Anzeige (orange Kontrolleuchte)
zeigt die Inbetriebnahme an. Nach dem
Einschalten wird im Gefrierraum eine sehr
tiefe Temperatur erreicht. Das Supergefrieren
schaltet sich ca. 50 Std. nach dem
Einschalten automatisch ab.
Lebensmittel lagern
Sind sehr viele Lebensmittel unterzubringen,
kann man alle Gefriergutschalen bis auf die
unterste aus dem Gerät herausnehmen und
die Lebensmittel direkt auf den Gefrierrosten
stapeln. Zum Herausnehmen
Gefriergutschalen bis zum Anschlag
herausziehen, nach oben kippen und
herausnehmen.
Damit die Luftzirkulation im Gerät nicht
beeinträchtigt wird, die Lebensmittel nicht
über die Stapelgrenze (Bild C/A) hinaus
stapeln.
Gefrierkalender
Bild
8
Um Qualitätsminderungen des Gefriergutes
zu vermeiden, ist es wichtig, daß die
zulässige Lagerdauer nicht überschritten
wird. Die Lagerdauer hängt von der Art des
Gefriergutes ab. Die Zahlen bei den
Symbolen geben die zulässige Lagerdauer in
Monaten für das Gefriergut an. Bei fertiger
Tiefkühlkost, die im Handel erhältlich ist, ist
das Herstellungsdatum oder
Haltbarkeitsdatum zu beachten.
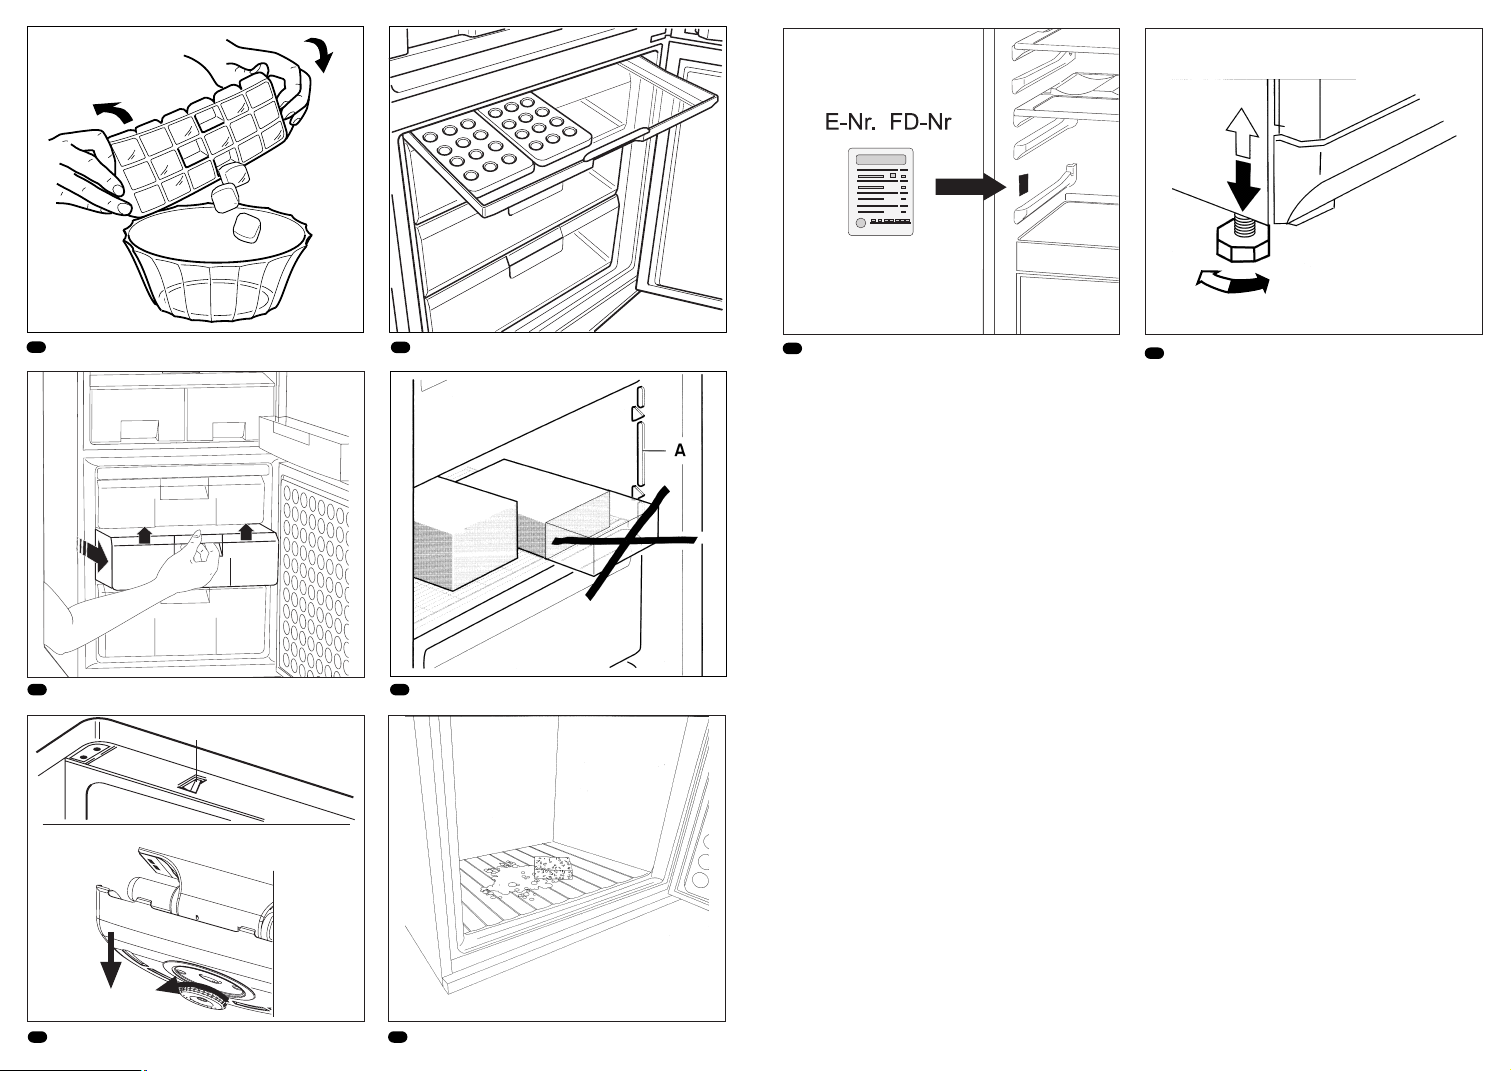
Gefriertablett
Bild
A
Das Gefriertablett eignet sich zum Aufbewahren der Eisschalen und zum einzelnen
Eingefrieren von Beeren, Obststücken,
Kräutern und Gemüse.
Zum einzelnen Eingefrieren Gefriergut auf
dem Gefriertablett gleichmäßig verteilen und
ca. 10 bis 12 Stunden durchfrieren lassen.
Danach in Gefrierbeutel oder Behälter umfüllen.
Zum Auftauen Gefriergut wieder einzeln
nebeneinander ausbreiten.
Auftauen von Gefriergut
Je nach Art und Verwendungszweck kann
zwischen folgenden Möglichkeiten gewählt
werden:
Bei Raumtemperatur,
im Kühlschrank,
im elektrischen Backofen,
mit/ohne Heißluftventilator,
im Mikrowellengerät.
An- und aufgetautes Gefriergut kann erneut
eingefroren werden, wenn Fleisch und Fisch
nicht länger als einen Tag, anderes
Gefriergut nicht länger als drei Tage bei
Temperaturen unter +3 °C gelagert wurden.
Andernfalls, wenn Geschmack, Geruch und
Aussehen unverändert sind, durch Kochen,
Braten oder zu einem Fertiggericht
weiterverarbeiten und erneut eingefrieren.
Die max. Lagerdauer nicht mehr voll nutzen.
Gefrieren und Lagern
Eis bereiten
Die Eisschale zu 3/4 mit Wasser füllen und in
den Gefrierraum stellen.
Zum Herausnehmen der gefrorenen Würfel
aus der Eisschale Schale leicht verwinden
(Bild <).
Abtauen
Kühlraum abtauen
Der Kühlraum taut automatisch ab. Dabei
läuft das Tauwasser über eine Sammelrinne
(Bild 9/B) durch das Ablaufrohr (Bild 9/A),
wird auf der Rückseite des Gerätes in der
Verdunstungsschale aufgefangen und
verdunstet dort.
Bitte achten Sie darauf, dass das Tauwasser
immer ungehindert abfliessen kann (siehe
Hinweise bei "Reinigen").
Gefrierraum abtauen
Grössere Reif- oder Eisenhäufungen auf den
Gefrierrosten beeinträchtigen die Leistung
des Gerätes und lassen den Stromverbrauch
ansteigen.
Ist die Reifschicht ca. 1/2 cm dick, muss
abgetaut werden. Mindestens jedoch einbis zweimal im Jahr. Am zweckmässigsten
dann, wenn wenig oder kein Gefriergut im
Gerät lagert. Wenn noch Gefriergut im Gerät
lagert, ist ca. 4 Stunden vor dem Abtauen
das Supergefrieren einzuschalten, damit die
Lebensmittel eine sehr tiefe Temperatur
erreichen und somit längere Zeit bei
Raumtemperatur gelagert werden können.
Danach die Gefriergutschalen mit den
Lebensmitteln herausnehmen. Die Schalen
in mehrere Lagen Zeitungspapier oder eine
Decke einwickeln und an einem kühlen Ort
aufbewahren. EIN/AUS Schalter für
Gefrierraum (Bild 2/9) ausschalten und den
Gerätetür offenlassen.
Zum Auffangen des Abtauwassers die leere
unterste Gefriergutschale unter den
Tauwasserablauf stellen und
Tauwasserablaufrinne ausklappen (Bild E).
Das Abtauen rasch durchführen (die
Haltbarkeit des Gefriergutes wird verkürzt, je
länger das Gefriergut bei Raumtemperatur
lagert). Nach dem Abtauen den Innenraum
reiningen.
Page 12

16
de
15
de
l Gerät in einem kühlen, gut belüfteten
Raum aufstellen, vor direkter
Sonnenbestrahlung schützen und nicht
im Bereich einer Wärmequelle
(Heizkörper etc.) anordnen.
l Die Be- und Entlüftungsöffnungen des
Gerätes nicht zustellen.
l Warme Speisen erst nach dem Abkühlen
in den Gefrierschrank geben.
l Zum Auftauen Gefrierwaren in den
Kühlraum legen. Sie nutzen damit die
Kälte, die in der Gefrierware steckt, zur
Kühlung der Lebensmittel im Kühlraum.
l Gefrierraum bei Eisbildung abtauen. Eine
dicke Eisschicht verschlechtert die
Kälteabgabe an das Gefriergut und lässt
den Stromverbrauch ansteigen.
l Zum Be- oder Entladen Gerätetüren so
kurz wie möglich öffnen.
Je kürzer die Gerätetür offensteht, um so
geringer ist die Eisbildung an den
Gefrierrosten.
l Wärmetauscher (schwarzes Gitter) auf
der Geräterückseite alle zwei Jahre
reinigen.
EnergiespartipsReinigen
Vor dem Reinigen grundsätzlich
Netzstecker ziehen bzw. Sicherung
abschalten oder herausschrauben.
Keinen Dampf- oder Dampfdruckreiniger
verwenden. Der heiße Dampf kann die
Oberflächen und die Elektrik beschädigen
– Stromschlaggefahr!
Den Kühlraum monatlich einmal reinigen.
Das Reinigen des Gefrierraumes sollte
zweckmässigerweise nach jedem Abtauen
erfolgen.
Reinigungswasser darf nicht in die
Kontrollarmatur und Beleuchtung gelangen.
Zur Reinigung des gesamten Gerätes ausser
der Türdichtung eignet sich lauwarmes
Wasser mit milden, leicht desinfizierenden
Reinigungsmittel, z.B. Handspülmittel.
Ungeeignet sind sand-, scheuermittel- oder
säurehaltige Putzmittel bzw. chem.
Lösungsmittel.
Um Mattstellen zu vermeiden, sollten auch
"scheuermittelfrei" bezeichnete Putzmittel
nicht verwendet werden.
Die Türdichtung nur mit klarem Wasser
abwischen und dann gründlich
trockenreiben.
Zum Reinigen der Gefrierroste keine
Metallbürste, Scheuermittel oder
scharfkantige Gegenstände benutzen, die
Schutzschicht kann beschädigt werden.Beschädigte Oberflächen rosten.
Sammelrinne (Bild 9/B) und Ablaufloch (Bild
9/A) im Kühlraum häufiger reinigen, damit
das Tauwasser ungehindert ablaufen kann.
Die Gefrierraumbehälter lassen sich
einfacher reinigen, wenn sie zuvor aus dem
Gerät genommen werden (Bild B). Zum
Herausnehmen, Behälter nach vorne bis
zum Anschlag ziehen, nach oben drücken
und herausnehmen.
*Wichtige Pflegehinweise für
die Edelstahloberflächen
Dem Gerät liegt eine Probepackung des
Pflegemittels „Chromol“ bei.
UM DAS HOCHWERTIGE AUSSEHEN
IHRES GERÄTES DAUERHAFT ZU
ERHALTEN, BEHANDELN SIE DIE
EDELSTAHLOBERFLÄCHEN DES GERÄTES
SOFORT NACH DEM AUFSTELLEN MIT
DEM FLÜSSIGEN PFLEGEMITTEL
"CHROMOL". WIEDERHOLEN SIE DIESE
PFLEGE IN REGELMÄSSIGEN
ABSTÄNDEN.
Das Mittel ist im Handel unter dem Namen
„Chromol“ oder bei Ihrem Kundendienst
unter der
Ident-Nr. 310359 als 500 ml Sprühflasche
Um die Oberflächen nicht zu beschädigen,
auf keinen Fall kratzende Schwämme,
Metallbürsten, scharfkantige Gegenstände
oder Scheuermittel benutzen. Auch
chemisch aggressive Reinigungsmittel wie
Abtausprays, Backofensprays,
Lösungsmittel oder Fleckenentferner dürfen
Sie nicht verwenden.
* nicht bei allen Modellen
ReinigenAbtauen
Hinweis
Wir empfehlen Ihnen während der Abtauens
des Gefrierraumes die Gefrierwaren in den
Kühlschrank zu legen. Bitte achten Sie
darauf, dass die gefrorene Lebensmittel
nicht mit den Lebensmitteln ,die bereits im
Kühlraum lagern, in Berührung kommen.
Abtauhilfen
Zum Beschleunigen des Abtauvorganges
am besten einen Topf mit heissem Wasser
auf einen Gefrierrost stellen.
Auf keinen Fall elektrische Heizgeräte,
Kerzen oder Petroleumlampen zum
Abtauen in das Gerät stellen.
Vorsicht bei Verwendung von Abtausprays,
diese können explosible Gase bilden,
kunstoffschädigende Lösungs- oder
Treibmittel enthalten, gesundheitsschädlich
sein oder Korrosion verursachen.
Reif oder Eis nicht mit scharfkantigen
Metallgegenständen abschaben, die
beschädigte Oberfläche der Gefrierroste
kann rosten. Werden die Rohre
aufgestochen, kann das herausspritzende
Kältemittel zu Augenverletzungen führen
oder sich entzünden.
Page 13

18
de
17
de
KundendienstKleine Störungen selbst
beheben
– die Gefrierraumtür ist nicht richtig
geschlossen,
– es wurden frische Lebensmittel ohne
Supergefrieren eingefroren,
– es wurden zu viele frische Lebensmittel auf
einmal zum Gefrieren eingelagert,
– hohe Umgebungstemperatur.
Nach Beheben der Störung erlischt das
"alarm"-Lämpchen, wenn der Gefrierraum
seine Betriebstemperatur wieder erreicht
hat.
Wenn die Gefrierraumtür bei hoher
Umgebungstemperatur lange Zeit offen
war, ist es möglich dass der Verdampfer
(Kälteerzeuger) so stark vereist ist, dass eine
Abtaung des Gefrierfachs nötig ist (siehe
"Gefrierraum abtauen").
Kann die Störung anhand der zuvor aufgeführten Hinweise nicht beseitigt werden,
rufen Sie bitte in jedem Fall den
Kundendienst.
Öffnen Sie die Türen nicht unnötig oft, damit
Kälteverlust vermieden wird.
Führen Sie keine weiteren Arbeiten, vor
allem an den elektrischen Teilen des
Gerätes, selbst aus.
Typenschild
Bild
F
Bitte geben Sie bei der Anforderung des
Kundendienstes die E-Nummer und die
FD-Nummer an.
Beide Ziffern finden Sie im schwarzumrandeten Feld des Typenschildes unten
links im Kühlraum neben der Gemüseschale.
Die Anschrift und die Telefonnummer des
Kundendienstes finden Sie im
Kundendienststellen-Verzeichnis oder im
amtlichen Telefonbuch.
Kleine Störungen selbst
beheben
Nicht jede Störung ist ein Fall für den
Kundendienst. Oft ist nur eine Kleinigkeit
zu beheben. Prüfen Sie deshalb bitte,
bevor Sie den Kundendienst rufen, ob Sie
auf selbst beheben können.
In solchen Fällen muß nämlich auch
während der Garantiezeit der volle Aufwand
des Monteureinsatzes berechnet werden.
Wenn die Lämpchen zur Temperaturwahl
(Bild
2
/3 und 6) nicht leuchten:
Prüfen Sie bitte, ob Strom vorhanden ist, der
Stecker richtig in der Steckdose sitzt und ob
das Gerät eingeschaltet ist.
Wenn die Kühlraumbeleuchtung nicht
funktioniert:
– Die Glühlampe ist defect. Glühlampe
austauschen (Bild D): Netzstecker ziehen
bzw. Sicherung ausschalten. Scheibe (C)
an der Innenbeleuchtung gegen den
Uhrzeigersinn drehen und Abdeckung (B)
abnehmen. Glühlampe austauschen; 220240 V Wechselstrom, Sockel E14,
Wattangabe siehe defekte Lampe.
– Der Lichtschalter klemmt (Bild
D
/A).
Prüfen Sie, ob er sich bewegen läßt. Wenn
nicht, rufen Sie bitte den Kundendienst.
Wenn der Kühlraum seine eingestellte
Temperaturen nicht erreicht:
- Das Lüftungsgitter oben am Gerät bzw.
der Luftspalt im Sockel ist verdeckt.
- Ein Fremdekörper ist zwischen der
Kühlmaschine und der Wand
eingeklemmt.
- Die Tür wurde häufig geöffnet oder es
wurden grosse Mengen von Lebensmittel
frisch eingelagert.
Wenn nach längerem Betrieb das
"alarm"-Lämpchen leuchtet:
Störung, im Gefrierraum ist es zu warm!
Mögliche Ursachen der Störung:
– Der Luftspalt oben am Gerät bzw. im
Sockel ist verdeckt,
Hinweise zu
Betriebsgeräuschen
Betriebsgeräusche
Um die gewählte Temperatur konstant zu
halten, schaltet Ihr Gerät von Zeit zu Zeit
den einen oder beide Kompressoren ein.
Die dabei entstehenden Geräusche sind
funktionsbedingt.
Sie verringern sich automatisch, sobald das
Gerät die Betriebstemperatur erreicht hat.
Das Brummen kommt vom Motor
(Kompressor). Es kann kurzfristig etwas
lauter werden, wenn sich der Motor
einschaltet.
Das Blubbern, Gurgeln oder Surren kommt
vom Kältemittel, das durch die Rohre fließt.
Das Klicken ist immer dann zu hören, wenn
der Thermostat den Motor ein- oder
ausschaltet.
Das Gerät steht uneben
Bitte richten Sie das Gerät mit Hilfe einer
Wasserwaage eben ein. Verwenden Sie dazu
die Schraubfüße oder legen Sie etwas unter.
Das Gerät „steht an“
Bitte rücken Sie das Gerät von anstehenden
Möbeln oder Geräten weg.
Schubladen, Körbe oder Abstellflächen
wackeln oder klemmen
Prüfen Sie bitte die herausnehmbaren Teile
und setzen Sie sie eventuell neu ein.
Flaschen oder Gefäße berühren sich
Rücken Sie bitte die Flaschen oder Gefäße
leicht auseinander.
Page 14

19
en
Disposal and safety information
Notes on disposal
Old appliances still have some residual
value. An environment-friendly method
of disposal will ensure that valuable raw
materials can be recovered and used again.
Unplug your old appliance, cut through the
mains cable and throw away cable and plug
together.
Remove the door lock so that children at
play cannot become trapped inside and risk
suffocation.
The refrigerant used in fridge/freezers and
the gases in the insulation material require
special disposal procedures. Ensure that
none of the pipes on the back of the
appliance are damaged prior to disposal.
Your new appliance was protected by
adequate packaging while it was on its way
to you. All materials used for this purpose
are environment-friendly and suitable for
recycling. Please contribute to protecting the
environment by disposing of the packaging
appropriately.
Do not allow children to play with any
parts of the packaging. There is a risk of
suffocation by the cardboard boxes and
plastic wrapping.
Up-to-date information concerning options
for disposing of your old appliance and the
packaging from the new one can be obtained
from your retailer or local council office.
Safety information
Before starting the appliance for the first
time, you should read the information
contained in the operating and installation
instructions carefully. This information is vital
for the installation, operation and servicing
of the appliance.
Keep the operating and installation
instructions in a safe place and remember to
hand them over to any subsequent owner.
The manufacturer shall not be liable if the
following instructions are not observed:
l Never start up an appliance showing any
signs of damage. If in doubt, consult your
dealer.
l Installation and connection of the
appliance must be carried out according
to the installation instructions. Supply
conditions and data must coincide with
the data on the rating plate.
l Do not under any circumstances use
a steam cleaner on this appliance. The
steam could come into contact with live
parts of the appliance and cause a shortcircuit or electric shock.
l Electrical safety of the appliance is only
guaranteed if the household earthing
system has been installed in compliance
with regulations.
l Disconnect appliance from the mains in
case of malfunction and when cleaning or
servicing the appliance. Either withdraw
the plug or turn off at the fuse. Pull the
plug itself and not the cable.
l Repairs and maintenance of the appliance
should only be performed by a qualified
technician. Incorrect repairs carried out
by someone unqualified are a potential
source of danger that may have critical
consequences for the user of the
appliance.
l Bottles containing high-proof alcoholic
drinks should be properly sealed and
stored standing up.
Products that make use of a flammable
propellant gas (e.g. whipped cream
sprays, aerosols) and explosive
substances should not be stored inside
this appliance – explosion hazard!
l Liquids in bottles and cans, in particular
carbonated drinks, should never be stored
in the freezer as the bottles and cans will
burst.
l Do not cover or block the vents or grilles
of your appliance.
l Do not use the base panel, pull-out parts,
doors etc. to stand or lean on.
Page 15

21
en
20
en
Installation
Siting
A dry and adequately ventilated room is the
best location for installing the appliance.
Remember that the appliance should not be
exposed to direct sunlight, nor should it be
close to a direct source of heat such as a
cooker, radiator, etc. Where installation close
to a heat source is unavoidable, ensure
that a suitable insulating panel is used or
maintain the following minimum clearances
between the appliance and the heat source:
3 cm clearance (electric cookers)
30 cm clearance (oil or coal-fired stoves).
If the appliance is placed next to another
refrigerator or freezer, keep a minimum 2 cm
clearance at the side in order to prevent
condensation.
The appliance must be stable and level. To
compensate for an uneven floor, use the two
height-adjustable feet at the front of the
appliance, (Fig. G).
Two castors at the rear of the appliance
facilitate installation into a recess.
Changing over door hinges
Proceed in numerical sequence (Fig. H).
Electrical connection
Only connect appliances to a 220–240 V/
50 Hz a.c. supply by means of a safety
socket installed in accordance with
regulations.
Make sure that the socket is protected by
a 10 amp fuse or higher.
With appliances destined for non-European
countries, check the rating plate to make
sure that supply voltage and type of current
indicated coincide with the values of your
power supply. The rating plate is located at
the bottom left of the refrigerator. (Figure F).
In the event that the mains cable needs to
be replaced, this must only be carried out by
a service technician of the manufacturer.
Warning! NEVER connect the appliance to
electronic energy saver plugs (e.g. Sava
plug) or to power inverters which convert
the direct current to 230 V alternating
current (e.g. solar equipment, power
supplies on ships).
Ventilation
Figure
3
The warm air generated at the back of
the appliance must be allowed to escape
unhindered. Otherwise the refrigerating
machine will have to work harder which in
turn increases energy consumption. For this
reason, never cover up the vents and grilles.
After shipping ...
Before switching on for the first time, allow
the appliance to set vertically for
approximately 1/2 hour.
l Do not allow children to play with this
appliance.
l If the appliance is fitted with a lock, keep
the key in a safe place out of the reach of
children.
l Never put ice cubes or ice lollies straight
from the freezer into your mouth. (The low
temperature may cause “freezer burns”.)
l Never touch any frozen food if your hands
are wet, as they may stick to it.
This unit contains the coolant
isobutane (R 600a), a natural
gas which is very
environmentally friendly but
also combustible. When transporting and
installing the unit care must be taken to
ensure that none of the refrigeration
circuit components become damaged. In
the event of damage avoid naked flames
or ignition sources and ventilate the room
in which the unit is placed for a few
minutes.
Warning - Do not use mechanical devices
or other artificial means to accelerate the
defrosting process, other than those
recommended dy the manufacturer.
Regulations
The appliance is suitable for refrigerating
and freezing food, and making ice cubes.
It is designed for domestic use.
If using the appliance for commercial
purposes, please observe the statutory
regulations applicable for the trade sector in
question.
The appliance adheres to current German
regulations for the prevention of accidents
caused by refrigerating equipment (VBG 20).
This product meets all the relevant safety
regulations applicable to electrical appliances.
The refrigerating circuit has been leak-tested.
Disposal and safety information
Observe ambient
temperature
Depending on the “climatic category” (see
rating plate), the appliance can be operated
at the following ambient temperatures.
(The rating plate can be found inside the
appliance at the bottom left-hand side.
Fig.
F
).
Climatic Ambient temperature
category from ... to
SN +10 °C to 32 °C
N +16 °C to 32 °C
ST +18 °C to 38 °C
T +18 °C to 43 °C
If the temperature drops below the ambienttemperature range, the refrigerator compartment will become too cold. If the temperature
exceeds the ambient-temperature range, the
freezer compartment will become too warm.
If the ambient temperature drops below the
set temperature in the refrigerator, the latter
will drop to the ambient temperature.
At ambient temperatures below +10 °C,
functional irregularities may occur during
automatic defrosting of the refrigerator
interior.
As a contribution to environmental
protection, we use recycled paper.
Page 16

23
en
22
en
Getting to know your
appliance
7 "alarm" light
Illuminates if the freezer compartment
becomes too warm, i.e. the frozen food is
at risk of thawing. The light may illuminate
without any risk to the frozen food: when
the appliance is switched on, if large
amounts of fresh food are placed in the
freezer compartment, if the door is left
open too long when food is put in or taken
out of the freezer compartment.
The light goes out when the freezer
compartment has reached its operating
temperature.
8 "super" button, freezer compartment
Used for switching "fast freeze" on and
off. The illuminated button indicates that
"fast freeze" is on. "Fast freeze" is used
for freezing large quantities of fresh food
and, depending on the amount of food,
should be switch on up to 24 hours before
the food is placed in the freezer
compartment. When "fast freeze" has
been switched on, the freezer
compartment drops to a very low
temperature.
"Fast freezing" switches off 50 hours after it
was switched on.
9 button
ON/OFF switch for freezer.
Before starting up for the first time, clean the
interior (see section on “Cleaning”). The
refrigerator and freezer can be operated
independently of each other.
Switching on the
refrigerator
Put the plug in the socket. Press the
ON/OFF switch for the refrigerator (Fig. 2/1).
The preselected temperature +6
0
C are
displayed. The appliance starts refrigerating
and the interior light comes on as soon as
the door is opened.
Setting refrigerator
temperature
To do this, hold down or repeatedly press
the temperature selection button
0
C
(Fig. 2/2) until the desired temperature is
set (Fig. 2/3). We recommend setting the
temperature of the refrigerator compartment
at +6
0
C.
Switching on super cooling
Hold down or repeatedly press the
temperature selection button
0
C (Fig. 2/2)
until the indicator illuminates at “supercooling” (Fig. 2/4).
Switching on the freezer
Press the ON/OFF switch for the freezer
(Fig. 2/9). “alarm” indicator (Fig. 2/7)
illuminates and the preset temperature
-18
0
C is displayed. The red warning light
goes out as soon as the freezer has reached
its normal operating temperature.
Getting to know your appliance
Before reading on, please unfold the pages
at the back of this manual featuring the
illustrations.
These operating instructions apply to
various models. It is possible that some
details of the illustrations do not coincide
exactly with the particular characteristics
of your appliance.
General view
Figure
1
1-9 Control panel
10 Fridge fan / Interior light
11 Crystal shelf (wire grid)
12 Bottle rack
13 Discharge gutter for fridge
defrosting water
14 Discharge outlet
15 Vegetable and fruit container
16 Butter and cheese compartment
17 Tray for small cans, tubes
18 Egg rack
19 Bottle holder
20 Bottle shelf
21 Freezer tray
22 Frozen food container
23 Freezer calender
A Fridge section
B Freezer section
Refrigerator controls
Figure
2
1 button
ON/OFF switch for refrigerator
2 Temperature selection button for
refrigerator compartment
Hold down or repeatedly press button
until desired temperature light illuminates.
3 Temperature indicators, refrigerator
compartment
The numerals on the temperature light
indicate temperatures in
0
C. The
illuminated light indicates the selected
temperature.
4 super cooling
The illuminated lights indicates that "super
cooling" is on. "Super cooling" reduces
the temperature in the refrigerator
compartment for 6 hours. Then the
appliance automatically switches to the
temperature which was selected prior to
"super cooling".
Use "super cooling":
l when placing large amounts of fresh food
in the refrigerator compartment
l if rapidly cooling drinks
Freezer controls
Figure
2
5 Temperature selection button, freezer
compartment
Hold down or repeatedly press button
until desired temperature light illuminates.
6 Temperature light
The numerals on the temperature light
indicate temperatures in
0
C. The
illuminated light indicates the selected
temperature.
Switching ON and setting
temperatures
Page 17

25
en
24
en
Setting freezer
temperature
To do this, hold down or repeatedly press
the temperature selection button
0
C
(Fig. 2/5) until the desired temperature is
set. The corresponding temperature is
lightened (Fig. 2/6). We recommend setting
the temperature of the freezer compartment
at -18
0
C.
Please note:
l If the temperature selection button of the
refrigerator or the freezer compartment is
not pressed for 5 seconds, the currently
selected temperature is saved.
l Excessively warm temperatures in the
refrigerator or freezer compartment
may occur if...
- the doors has not been closed property
- fairly large quantities of warm food
have been placed in the appliance.
- the temperature selectors have been
set to +8
0
C and -16 0C.
- the air circulation in the refrigerator or
freezer compartment is severely
impeded by the stored food.
- the doors have been opened frequently
at high ambient temperatures.
l Excessively cold temperatures in the
refrigerator or freezer compartment
may occur if...
- “super-cooling” or “fast freezing” has
been switched on.
- the temperature selectors have been set
to +2
0
C or -32 0C.
l To prevent condensation in the area of
the door seal, the sides of the housing
are partially heated.
l While the refrigerating machine is running,
water droplets of frost will form on the rear
panel of the refrigerator, simply caused by
the refrigerating machine functioning. It is
not necessary to scrape off the frost or
wipe off the water. The rear panel defrosts
automatically. The defrosting water
collects in the gutter (Fig. 9/B), and then
routed to the refrigerating machine where
it evaporates.
l You may notice that the door of the
freezer sometimes refuses to open again
directly after having been closed. If this
does happen, wait two or three minutes
for the vacuum to equilibrate.
l The refrigerating system may causes
some areas of the freezer grids to ice up
quickly. This, however, does not affect the
functioning efficiency of the appliance or
power consumption. Defrosting is only
necessary once over 5 mm of frost or ice
has built up over the entire area of the
freezing grid.
Putting the refrigerator out
of use
Press the refrigerator ON/OFF switch
(Fig. 2/1). The temperature light (Fig. 2/3)
will go out, indicating that the refrigerator
and lighting of the entire appliance has been
switched off. Clean the interior and leave the
door open to prevent any unpleasant smell.
Putting the freezer out of
use
Press the freezer ON/OFF switch (Fig. 2/9).
The temperature light (Fig. 2/6) will go out.
Defrost and clean the freezer.
We recommend wiping the interior dry as
well as the freezing grids and leaving the
door open.
Fan inside refrigerator
compartment
Fig. 1/10
The fan at the top of the refrigerator
compartment increases the speed at which
air circulates.
The results are...
l a uniform temperature throughout the
refrigerator compartment
l after the door has been opened, the
original temperature is restored rapidly
l when the temperature setting is altered,
the new level is reached more quickly
l fresh food can be kept for a longer period
of time due to decreased air humidity.
Switching ON and setting temperatures Switching OFF and longer
periods of disuse
Food arrangement
When loading the food,
note the following:
l Allow warm food and beverages to cool
down before storing inside the appliance.
l Ensure that food is well wrapped or
covered before it is stored. This will prevent food from dehydrating, deteriorating
in colour or losing in taste and will help
maintain freshness. It will also prevent
cross-flavouring. Vegetables, fruit and
salad need not be wrapped provided they
are stored in the vegetable bins of the
refrigerator.
l Never let any oil or grease come into
contact with plastic fittings or the door
seal as these materials easily become
porous.
l Never store any explosive substances
inside the appliance. High-proof alcohol
should only be stored upright in tightly
sealed containers.
Danger of explosion!
l Glass bottles containing liquid that can
freeze should never be stored in the
freezer as the glass bursts when the
contents freeze.
Example of food
arrangement
Fig.
1
Refrigerator compartment (A)
Bread, cakes and pastries, ready-made
meals and dairy products, from top to
bottom on the shelves (11).
Fruit, vegetables and salads in the
vegetable container (15).
Butter and cheese in the compartment (16).
Small bottles and cans on the shelf (17).
Large bottles on the bottle shelf (20).
Page 18

27
en
26
en
Food arrangement
Freezer compartment (B)
Use the freezer tray (21) to store small
frozen goods and make ice cubes.
Use the top frozen goods containers (22)
to store frozen foods.
Interior fittings
The shelves in the refrigerator compartment
can be re-arranged when the door is opened
at a 90° angle. Pull the shelf forwards, lower,
pull out and re-insert in the desired position
(Fig.
4
).
Bottle rack
Bottles can be placed and stacked securely in
the recesses (Fig.
5
).
The bottle shelf is provided with a retainer to
prevent bottles from falling over when the
door is opened or closed, (Figure6/A).
All trays, racks and containers attached
to the door can be removed for cleaning
purposes.
To remove, simply lift them up, (Fig. 7).
The egg racks inserted into the door shelves
can be folded up to enable tubes, small tins,
etc. to be stacked in their place.
Freezing and storing
Note the following when
buying frozen food
l Inspect packaging: it should not be
damaged in any way.
l Make sure the “Best before ...” date has
not expired.
l Check thermometer of the vendor's
freezer. It should read –18 °C or colder.
l Ensure that the frozen foods are the last
items to be bought. Wrap in several layers
of newspaper or place in a thermoinsulated bag and take home at once.
Store frozen products in the freezer without delay.
Freezing at home
If freezing at home, use only foodstuffs which
are absolutely fresh and in perfect condition.
Foodstuffs that freeze well
Meat, cold slices and sausage, poultry and
game, fish, vegetables, aromatic herbs, fruit,
bread and pastries, pizza, precooked meals,
leftovers, egg yolks and whites.
Foodstuffs not suitable for freezing
Whole eggs in their shells, soured cream
and mayonnaise, lettuces, radishes,
horseradish and onions.
Blanching vegetables and fruit
It is advisable to blanch vegetables and fruit
before freezing in order to preserve colour,
flavour, aroma and vitamin C.
(To blanch, bring a large saucepan of water
to a fast boil and completely immerse fruit or
vegetables briefly. Most book stores offer a
wide selection of literature on freezing which
will also deal with blanching.)
Wrapping food
Pack the food in portions suitable for your
household.
Vegetable and fruit portions should be no
heavier than 1 kg, while meat portions can
Freezing and storing
be up to 2.5 kg. Smaller portions freeze
through more quickly and the quality is
thereby maintained better when defrosting
and preparing the food.
It is important to seal food airtight before
freezing to prevent it from losing its taste
or dehydrating.
Suitable wrapping materials:
plastic foil, polyethylene tubular film,
aluminium foil and freezing containers.
These items are available from any dealer.
Unsuitable wrapping materials:
wrapping paper, greaseproof paper, cellophane, bin bags or used carrier bags.
Place food in the wrapping, press out any
air and seal it airtight.
Suitable sealing materials:
rubber bands, plastic clips, string, freezer
tape or similar. Polyethylene tubular film and
bags may be heat-sealed using a special
sealing iron or press.
Before placing in the freezer, each
package should be clearly labelled
with the contents and date of freezing.
Maximum freezing
capacity
Foodstuffs should be frozen right through
as quickly as possible. Only in this way it
is possible to retain vitamins, nutrients,
appearance and taste. You should therefore
never exceed your appliance's maximum
freezing capacity.
Within 24 h a max 15 kg of food for 70 cm
and 12 kg for 60 cm width appliances, can
be frozen at once in the upper compartments.
Food that is already frozen should never
come into contact with fresh food about
to be frozen.
Allow hot food and drinks to cool down
to room temperature before placing in the
freezer.
Super-cooling
If you are going to buy fresh food you should
switch on super-cooling 3-4 hours before or
at the latest when placing fresh food in the
refrigerator. To switch on super-cooling,
repeatedly press or hold down the
temperature selection button
0
C (Fig. 2/2)
until the indicator illuminates at “supercooling” (Fig. 2/4). "Super cooling" reduces
the temperature in the refrigerator
compartment for 6 hours. Then the
appliance automatically switches to the
temperature which was selected prior to
"super cooling".
Fast freezing
If frozen food is already being stored in the
freezer, you should switch on fast freeze
several hours before putting in fresh food
to freeze.
Normally, it will suffice to switch on fast
freeze 4–6 hours ahead. If you are planning
to make full use of maximum freezing
capacity, switch on 24 hours in advance.
Smaller quantities of food (up to 2 kg) can
be frozen without the fast freeze facility. To
switch on "super" freeze, simply press the
"super" freeze button, (Fig. 2/8).
The “super” indicator (orange light) lights up
to show that the fast freeze function is
operating.
After switching on, a very low temperature is
achieved in the freezer compartment.
Fast freezing switches off automatically
approximately 50 hours after being
switched on.
Storage of food
If you need to freeze very large quantities of
food, you may find it convenient to remove
the frozen food containers except for the
bottom container and to stack your products
directly on the freezing grids. To remove
containers, pull out as far as they will go, tilt
upwards and remove.
Page 19

29
en
28
en
Observe that food should not project over
the stacking limit (Figure C/A) otherwise air
circulation within the appliance will be
obstructed.
Frozen food calendar
Figure
8
It is important not to exceed maximum
permissible storage times in order to avoid
impairing the quality of the frozen goods.
The actual storage time depends on the type
of food. The numbers next to the symbols
indicate the permissible storage time in
months. In the case of frozen goods
purchased from a shop, observe the
production date or ‘Best before …’ date.
Freezer tray
Fig.
A
The freezer tray is suitable for storing ice
cube trays and for freezing individual berries,
pieces of fruit, herbs and vegetables.
To freeze individual items of food, distribute
the produce uniformly on the freezer tray
and leave to freeze for approx. 10–12 hours.
Then transfer the produce into freezer bags
or containers.
To thaw, spread out the individual items of
food.
Thawing frozen food
Depending on the nature of the food and
the preparation or cooking method you are
going to employ, you may choose one of
the following thawing methods:
at room temperature,
in the refrigerator,
in an electric oven,
fan-assisted or not,
in the microwave oven.
Food that has been partially or completely
defrosted can be refrozen provided that
these items are stored at temperatures
below +3 °C and for no longer than one day
Freezing and storing
where meat and fish is involved, or no longer
than 3 days for other items.
Otherwise, provided that taste, smell and
appearance remain unchanged, you can
boil, fry or process the food further into
a ready-made dish and then refreeze.
Observe that in this case the admissible
shelf-life will be shorter than normal.
Making ice-cubes
Fill the ice-cube tray three-quarters full with
water and place it in the freezer.
Twist the tray slightly to remove the ice-cubes
(Figure =).
Defrosting
How to defrost the
refrigerator
The refrigerator defrosts automatically.
Defrosting water collects in a gutter, (Fig.
9
/B) before flowing through the drainage
outlet, (Fig. 9/A) to the evaporating tray at
the back of the appliance where it
evaporates. Make sure that there is never
any blockage in defrosting water flow (see
instructions under “Cleaning”).
How to defrost the freezer
Large accumulations of frost or ice on the
freezer grids have an adverse effect on the
efficiency of the appliance and increase
energy consumption.
When the frost is approx. 1/2 cm thick, the
freezer should be defrosted. It should,
however, be defrosted at least once or twice
a year, preferably when the freezer is totally
or nearly empty. Remember to switch on
fast-freezing approximately four hours
before defrosting if you still have food stored
in the freezer. This will cause the
temperature of the food to drop to an
extremely low degree and ensure that it can
be kept safely at room temperature for a
longer period. Then remove the drawers with
their contents, wrap in several layers of
newspaper or a blanket and store in a cool
place. Press the ON/OFF freezer switch (Fig.
2
/9) to switch off the freezer compartment.
Then leave the freezer door open.
To collect the defrosting water, leave the
second frozen food container empty in
place. Use a sponge to remove the thaw
water from the bottom surface of the freezer
(Fig. E).
Defrost as quickly as possible (the longer
the products are kept at room temperature,
the shorter their shelf-life will be
subsequently).
Clean the interior of the freezer thoroughly
after defrosting.
Note
We recommend putting the frozen foods into
the refrigerator during the defrost of the
freezer. Please ensure that the frozen foods
should not come into contact with foods
which are already in the fridge.
Defrosting advice
To speed up defrosting, it is best to place a
saucepan with hot water on one of the
freezer grids.
Under no circumstances should an
electric heater, a petroleum lamb or
candles be used to defrost the freezer.
Caution when using defrosting sprays as
these may form explosive gases or else
contain solvents or propellants which can
damage the plastic fittings inside the
appliance. They can also be a potential
hazard to your health or cause corrosion.
Never scrape off ice or frost with any
sharp metal objects as this can damage
the surface of the freezer grids which will
then rust. If any pipework is pierced,
refrigerating spurting out may cause eye
injuries or else it may ignite.
Page 20

31
en
30
en
Information about
operating noises
Operating noises
In order to maintain the pre-set temperature
at a constant level, one or both appliance
compressor switches on from time to time.
The noises that can be heard while it is
running are perfectly normal.
The noise reduces automatically when the
appliance reaches its operating temperature.
The humming noise is emitted by the motor
(compressor). When the motor switches ON,
the noise may briefly increase in volume.
The bubbling, gurgling or whirring noise is
emitted by the refrigerant as it flows through
the pipes.
The clicking noise can always be heard
when the thermostat switches ON/OFF the
motor.
The appliance is not level
Please level the appliance with the aid of
a spirit level. Use the height-adjustable feet
or place packing under the feet.
The appliance is not free-standing
Please move the appliance away from
kitchen units or other appliances.
Drawers, baskets or shelves are loose or
stick
Please check the detachable components
and, if required, refit them.
Bottles and/or receptacles are touching
each other
Please move bottles and/or receptacles
away from each other.
l Install the appliance in a cool, dry room with
adequate ventilation. Ensure that it is not
exposed to direct sunlight and never put it
near a direct source of heat (radiator, etc.).
l Never block any vents or grilles on the
appliance.
l Allow warm food to cool down before
placing in the appliance.
l Put frozen food in the refrigerator to thaw.
You can then use the low temperatures
of the frozen products to cool food in the
refrigerator.
l Defrost the freezer when ice builds up. A
thick coat of ice will impair transfer of cold
to the frozen products, thereby increasing
power consumption.
l Do not keep the door of the appliance
open for too long when loading or taking
out food.
The shorter the time that the door is
opened, the less ice will form on the
freezer grids.
l Clean the heat exchanger (black grid) at
the back of the appliance every two years.
Power saving tips
Before cleaning, you should always
unplug the appliance and/or switch off
or disengage the household fuse.
Do not use a steam cleaner. The hot
steam could damage the surface of the
appliance or the electrical components
– electric shock hazard!
It is available to clean the refrigerator once a
month. The freezer should be cleaned every
time it is defrosted.
Ensure that cleaning water does not get into
the control panel or any of the lights. Lukewarm water with the a little mildly
disinfectant detergent such as washing-up
liquid is ideal for cleaning the entire
appliance, except the door seal. Never use
cleaning agents containing abrasives, acids,
chemical solvents or polishers.
In order to avoid dull areas, you should also
never use cleaners claimed to be without
scouring agents.
Simply clean the door seal with clear water
and dry thoroughly afterwards.
Never clean the freezer grids with any metal
brushes, abrasives or sharp objects as the
protective layer become damaged and
damaged surfaces will rust.
Clean the refrigerator gutter (Fig. 9/B) and
drainage outlet (Fig. 9/A) more frequently to
ensure that defrosting water can always
drain.
To clean frozen food containers, it is easier
to remove them from the appliance (Fig. B).
To remove, pull container outwards until it
stops, push upwards and then remove.
Cleaning
*Important information for
the care of stainless steel
surfaces
A trial pack of “Chromol” cleaning agent is
enclosed with the appliance.
TO RETAIN THE HIGH-QUALITY
APPEARANCE OF YOUR APPLIANCE,
TREAT THE STAINLESS STEEL SURFACES
OF THE APPLIANCE IMMEDIATELY AFTER
INSTALLATION WITH THE LIQUID
CLEANING AGENT "CHROMOL". REPEAT
THIS TREATMENT AT REGULAR
INTERVALS.
This cleaning agent is available on the
market under the name “Chromol” or from
your customer service under
Ident. no. 310359 as a 500 ml spray can
To prevent damage to surfaces, under no
circumstances use abrasive sponges, metal
brushes, sharp-edged implements or
scouring agents. Chemically aggressive
cleaning agents, such as defrosting sprays,
oven sprays, solvents or stain removers
must not be used either.
* not on all models
Page 21

33
en
Customer Service
Rating plate
Figure
F
When you call Customer Service you will be
asked for the ‘E’ number and ‘FD’ number
for your appliance.
Both numbers are shown in a box with
a black border on the rating plate. This is
located inside the fridge section, at the
bottom left-hand side next to the vegetable
container.
The address and telephone number of your
nearest Customer Service is listed in the
customer service directory or else in any
telephone directory.
32
en
If the “alarm” indicator illuminates after a
prolonged period of operation:
Fault, it is still too warm in the freezer
compartment!
Possible causes of the fault:
– The clearance at the top of the appliance
or in the base is blocked,
– The freezer-compartment door has not
been closed correctly,
– Fresh food was frozen without Fast freeze,
– Too much fresh food was frozen at once,
– High ambient temperature.
The “alarm” indicator goes off after
elimination of the fault, if the freezer
compartment has reached its normal
operating temperature again.
If the freezer section door has been kept
open for a long time and the room
temperature was high, so much ice has
formed on the evaporator. In this case the
freezer should be defrosted (see instructions
under “How to defrost the freezer”).
If you are not able to rectify the problem
with the help of the suggestions listed here,
please call Customer Service.
Do not open the door more often than
necessary, so that the cold temperature
inside is retained for as long as possible.
Do not take any further action, especially
with regard to the electrical parts of the
appliance.
Minor problems and how to rectify them yourself
Customer service should NOT be
contacted for every fault. Most faults
are minor. Therefore, before you call
customer service, please check whether
you can eliminate the fault yourself based
on the following information.
A technician who is called out to rectify
a minor fault will charge the customer, even
if the appliance is still under guarantee.
If the indicators for temperature selection
(fig.
2
/3 and 6), do not illuminate:
check that the power is ON, that the plug is
correctly inserted in the socket and that the
appliance is switched ON.
If the refrigerator-compartment light does
not function:
– The bulb is defective. Change the bulb
(Fig.D): Pull out the mains plug or switch
off the fuse. Rotate dial (C) on the interior
light in an anti-clockwise direction and
remove the cover (B). Change the bulb;
220-240 V a.c., E14 lamp holder, see
defective bulb for wattage.
– The light switch is sticking (Fig.
D
/A).
Check whether it can be moved. If not,
please call customer service.
If the refrigerator does not reach the set
temperature:
- The ventilation grid at the top of the
appliance or the air vent in the base panel
may be covered over.
- A foreign object may be trapped between
the refrigerating machine and the wall.
- The door may have been opened
frequently or large amounts of unfrozen
food may have been recently loaded.
Page 22

34
Mise au rebut, conseils de sécurité et consignes
Conseils pour la mise au
rebut
Les appareils usagés ne sont pas des
déchets sans valeur. Leur élimination dans
le respect de l’environnement permet d’en
récupérer de précieuses matières premières.
Une fois que l’ancien appareil a fini de servir,
débranchez la fiche mâle de la prise de
courant, sectionnez le câble puis enlevez-le
avec la fiche mâle.
Démontez la serrure. Vous empêcherez
ainsi que des enfants ne s’enferment dans
l’appareil et risquent leur vie.
Les réfrigérateurs et congélateurs
contiennent des gaz isolants et des fluides
réfrigérants à éliminer dans les règles de
l’art. Jusqu’à l’enlèvement de l’appareil,
veillez bien à ce que son circuit frigorifique
ne soit pas endommagé.
Pour vous parvenir, votre nouvel appareil
a été conditionné dans un emballage
protecteur. Tous les matériaux qui le
constituent sont compatibles avec
l’environnement et recyclables. Aidez-nous
à recycler l’emballage en respectant
l’environnement.
Ne permettez pas aux enfants de jouer avec
les emballages et ses pièces constitutives.
Ils risquent de s’étouffer avec les cartons
pliants et les feuilles de plastique.
Pour savoir comment vous débarrasser
de l’emballage, veuillez consulter votre
revendeur ou les services administratifs
de votre mairie.
Consignes de sécurité
Avant la mise en service de l’appareil,
veuillez lire attentivement et de bout en bout
les informations exposées dans les notices
d’utilisation et de montage. Elles contiennent
des remarques importantes concernant
l’installation, l’utilisation et l’entretien de
l’appareil.
Conservez les notices d’utilisation et
de montage. Elles pourraient servir
ultérieurement à un autre utilisateur.
Le fabricant décline toute responsabilité si
les consignes et mises en garde ci-après ne
sont pas respectées:
l Ne pas mettre en service un appareil
endommagé. Dans le doute, se renseigner
auprès du revendeur.
l Brancher et monter l’appareil
conformément à la notice de montage.
Les conditions de branchement doivent
être conformes aux indications figurant
sur la plaque signalétique.
l N’utilisez jamais de nettoyeur à vapeur
pour nettoyer votre appareil. Si la vapeur
entre en contact avec des pièces
électroconductrices de l’appareil, elle
peut provoquer un court-circuit ou vous
exposer à un risque d’électrocution.
l La sécurité électrique de l’appareil est
garantie uniquement si le circuit de mise
à la terre de votre maison a été posé
conformément aux prescriptions en
vigueur.
l En cas de panne, lors de l’entretien et
du nettoyage, débranchez l’appareil du
secteur. Débranchez la fiche mâle de la
prise de courant ou coupez le fusible.
Tirez sur la fiche et non pas sur le câble
d’alimentation.
l Les réparations des appareils électriques
doivent être effectuées uniquement par
des spécialistes. Des réparations
inexpertes engendrent de graves risques
pour l’utilisateur.
l Les boissons fortement alcoolisées
doivent être fermées hermétiquement et
stockées verticalement.
Ne stockez dans l’appareil ni produits
contenant des gaz propulseurs
inflammables (par ex. bombes de crème
Chantilly et bombes aérosols) ni produits
explosifs – Risque d’explosion!
l Dans le compartiment congélateur, ne
stockez pas de boissons, gazeuses en
particulier, en bouteilles ou en boîtes car
elles éclateraient.
l Ne couvrez et ne bouchez pas les grilles
d’aération de l’appareil.
l Ne vous appuyez pas sur le socle, les
clayettes, les portes, etc. et ne vous en
servez pas comme marche pied.
fr
Page 23

Installation de l’appareil
35 36
fr fr
Lieu d’installation
Pour installer votre appareil, choisissez un
endroit sec et bien aéré. Evitez de placer
l’appareil à un endroit directement exposé
aux rayons solaires ou à proximité d’une
source de chaleur telle une cuisinière, un
radiateur, etc. Si l’installation près d’une
source de chaleur est inévitable, utilisez une
plaque isolante appropriée ou respectez les
distances minimales suivantes:
3 cm par rapport à une cuisinière électrique,
30 cm par rapport à un appareil de
chauffage au fuel ou au charbon.
Si vous placez votre appareil à côté d’un
autre réfrigérateur ou congélateur, laissez
obligatoirement un espace entre eux d’au
moins 2 cm afin d’éviter la formation de
condensation.
Veillez à ce que l'appareil repose
parfaitement d'aplomb sur un sol plan. Si le
sol présente des inégalités, compensez-les
à l'aide des deux pieds à vis situés à l'avant
de l'appareil (Fig.
G
).Les deux roulettes à
l'arrière de l'appareil permettent de le glisser
facilement dans une niche.
Inversion du sens
d'ouverture de porte
Suivez les étapes de travail dans l'ordre
indiqué par les chiffres (Fig. H).
Raccordement électrique
Raccordez l’appareil uniquement au secteur
alternatif de 220–240 V/50 Hz au moyen d’une
prise secteur à contacts de protection installée
conforme. La prise doit être protégée par un
fusible/disjoncteur de 10 A minimum.
Si l’appareil est utilisé dans un pays non
européen, vérifiez si la tension de
branchement et ses caractéristiques indiquées
sur la plaque signalétique concordent avec
celles du secteur. Vous trouverez la plaque
signalétique dans
le compartiment réfrigérateur en bas à gauche
(voir fig. F)
.
l Ne laissez pas jouer les enfants avec
l’appareil.
l Si l’appareil est équipé d’une serrure,
rangez la clé hors de portée des enfants.
l Ne portez pas directement à la bouche
les esquimaux ou les glaçons qui sortent
du compartiment congélateur (risque de
brûlures dû à la température très basse).
l Ne touchez pas les aliments congelés
avec les mains mouillées car elles risqueraient de rester collées.
Dans son circuit frigorifiqur, cet
appareil contient de l’isobutane (R
600a), un gaz naturel qui ne
présente pas de risques pour
l’environnement mais qui est inflammable.
Veillez à ce qu’aucune partie du circuit
frigorifique ne soit endommagée lors du
transport et de l’installation. Si l’appareil est
endommagé, évitez les flammes et les
sources d’embrasement. Aérez pendant
quelques minutes la piéce das laquelle se
trouve l’appareil.
Mise en garde: pour raccourcir la duree de
dégivrage, n’utilisez aucun dispositif
mécanique ni accélérateur artificiel de
dégivrage autres que ceux recommandés pae
le fabricant
Conditions
L’appareil est conçu pour refroidir et congeler
les aliments et pour préparer des glaçons.
Il est destiné à un usage exclusivement
domestique.
En cas d’utilisation commerciale, vérifier les
directives régissant le commerce en question.
Cet appareil est conforme aux dispositions
de sécurité régissant les appareils
électriques.
Il satisfait aux consignes de prévention des
accidents applicables aux installations
frigorifiques (VBG 20).
L’étanchéité du circuit frigorifique a été
contrôlée.
Consignes relatives à la
température ambiante
Suivant sa «catégorie climatique» (voir la
plaque signalétique), votre appareil peut
fonctionner dans les températures
ambiantes énoncées ci-après (la plaque
signalétique se trouve en bas à gauche dans
l’appareil. Fig.
F
)
Catégorie Température ambiante
climatique de ... à
SN +10 °C à 32 °C
N +16 °C à 32 °C
ST +18 °C à 38 °C
T +18 °C à 43 °C
Si la température ambiante descend endessous de la plage pour laquelle votre
appareil a été conçu, le compartiment
réfrigérateur devient trop froid. Si elle monte
au-dessus de cette plage, le compartiment
congélateur devient trop chaud.
Si la température ambiante est inférieure à la
température du compartiment réfrigérateur,
ce dernier s’alignera sur la température
ambiante.
En présence de températures ambiantes au
voisinage de +10 °C, la décongélation
automatique du compartiment réfrigérateur
risque d’être perturbée.
Nous aussi, nous respectons l’environnement: nous utilisons du papier recyclé.
Mise au rebut, conseils de sécurité et consignes
S’il faut changer le cordon de branchement
électrique au secteur, ne confiez cette
opération qu’au service après-vente du
fabricant.
Attention! Ne branchez en aucun
cas l’appareil à une «prise économie
d’énergie» électronique (par ex. une Sava
Plug) et à un ondulateur qui convertit le
courant continu en courant alternatif de
230 V (par ex. installations solaires,
installations électriques des bateaux).
Ventilation
Fig. 3
L’air entrant en contact avec la paroi
arrière de l’appareil se réchauffe et doit
pouvoir s’évacuer librement. Sinon le
groupe frigorifique se trouverait sollicité
plus fortement, ce qui augmenterait la
consommation de courant. Pour cette
raison, ne recouvrez en aucun cas les
orifices d’aération.
Une fois le transport
terminé ...
Avant d'allumer l'appareil pour la première
fois, laissez-le reposer à la verticale pendant
une environ une demi-heure.
Page 24

37 38
fr fr
Faire la connaissance de l’appareil Faire la connaissance de
l’appareil
Avant de continuer votre lecture, veuillez
déplier les dernières pages de la présente
notice pour avoir les illustrations sous les
yeux.
La notice d’utilisation est valable pour
plusieurs modèles. Il est donc possible
que vous trouviez de légères différences
entre les illustrations et votre propre
appareil.
Vue générale
Fig.
1
1-9 Bandeau de commande
10 Ventilateur de refroidissement /
Eclairage intérieur
11 Clayette en verre
12 Clayette à bouteilles
13 Ecoulement de l’eau de dégivrage
14 Orifice d’écoulement
15 Bac à légume
16 Casier à beurre et fromage
17 Balconnet pour tubes et petites
boîtes
18 Insert à oeufs
19 Porte-bouteilles
20 Rangement de bouteilles
21 Tablette de congélation
22 Bac à produits surgelés
23 Calendrier de congélation
A Compartiment réfrigérateur
B Compartiment congélateur
Eléments de commande du
compartiment réfrigérateur
Fig.
2
1 Touche
Interrupteur du compartiment
réfrigérateur.
2 Sélecteur de température pour le
compartiment réfrigérateur
Appuyez constamment ou à plusieurs
reprises sur la touche, jusqu’à ce que le
voyant de la température voulue s’allume.
3 Voyants de la température régnant
dans le compartiment réfrigérateur
Les chiffres près des voyants de
température représentent les
températures du compartiment
réfrigérateur en
0
C.
Le voyant allumé indique sur quelle
température l’appareil est réglé.
4 super-cooling
Le voyant allumé indique que la superréfrigération est entrée en service.
Pendant la super-réfrigération, la
température baisse au maximum
possible, pendant 6 heures, dans le
compartiment réfrigérateur.
Ensuite, l’appareil revient
automatiquement sur la température
réglée avant la super-réfrigération.
Enclenchez la super- réfrigération par ex.
dans les cas suivants:
- Avant de ranger de grandes quantités
d’alliments frais.
- Pour refroidir des boissons rapidement.
Eléments de commande du
compartiment congélateur
Fig. 2
5 Sélecteur de température pour le
compartiment congélateur
Appuyez constamment ou à plusieurs
reprises sur la touche, jusqu’à ce que le
voyant de la température voulue s’allume
une température très basse dans le
compartiment congélateur.
6 Voyants de la température régnant
dans le compartiment
Les chiffres près des voyants de
teméprature représentent les
tempèratures du compartiment
congélateur en
0
C.
Le voyant allumé indique sur quelle
température l’appareil est réglé.
7 Voyant “alarm”
Il s’allume lorsque la température a
excessivement monté dans le
compartiment congélateur et que les
produits congelés risquent de s’abîmer.
Dans les cas ci-après également, il peut
s’ allumer sans que cela signifie qu’il y a
risque pour les aliments surgelés:
- Vous venez juste de brancher l’appareil,
- Vous venez de ranger une grande
quantité de produits frais,
- La porte est restée ouvert trop
longtemps pendant que vous sortiez ou
rentriez des aliments.
Le voyant s’éteint une fois que le
compartiment congélateur a atteint sa
température de service.
8 Touche “super” (avec voyant de
fonctionnement orange)
Cette touche sert à enclencher et couper
la supercongélation. L’enclenchement est
matérialisé par l’allumage du voyant
orange dans la touche. La
supercongélation sert à congeler de
grandes quantités d’aliments frais.
Suivant ces quantités, il faudra
enclencher la supercongélation jusqu’à
24 heures avant leur rangement. Après
l’enclenchement, le compresseur (groupe
frigorifique) fonctionne en permanence.
Le compartiment congélateur atteint une
température très basse.
La supercongélation s’éteint
automatiquement 50 heures après
l’enclenchement.
9 Touche
Interrupteur du compartiment
congélateur.
Mise en service et
sélection de la température
Avant la première mise en service, nettoyez
l’intérieur des compartiments (voir la section
consacrée à l’entretien).
Les compartiments réfrigérateur et
congélateur fonctionnent de façon
indépendante.
Mise en marche du
compartiment réfrigérateur
Brancher la fiche mâle dans la prise de
courant. Appuyez sur l’interrupteur du
compartiment réfrigérateur (Fig.2/1). Le
voyant de température + 6
0
C s’allume.
L’interieur de l’appareil commence à
refroidir. L’éclairage intérieur s’allume à
l’ouverture de la porte.
Réglage de la température
du compartiment
réfrigérateur
Pour ce faire, appuyez constamment ou
plusieurs fois sur la touche
0
C (fig.2/2) de
réglage de la température, jusqu’à ce que la
température voulue s’affiche (fig.2/3). Nous
recommandos de régler le compartiment
réfrigérateur sur + 6
0
C.
Enclenchement de la
super-cooling
Appuyez constamment ou plusieurs fois sur
la touche
0
C (fig.2/2) jusqu’à ce que le
voyant “super-cooling” s’allume (fig.2/4).
Mise en marche du
compartiment congélateur
Appuyez sur l’interrupteur du compartiment
congélateur (fig.2/9). Le voyant “alarm”
(fig.2/7) et le voyant de température - 18
0
C
s’allument.
Le voyant rouge s’éteint une fois que la
température de fonctionnement du
compartiment congélateur est atteinte.
Page 25

39 40
fr fr
Mise en service et sélection de la température
Réglage de la température
du compartiment
congélateur
Pour ce faire, appuyez constamment ou
plusieurs fois sur la touche
0
C (fig. 2/5) de
réglage de la température, jusqu’à ce que la
température voulue s’affiche. Nous
recommandons de régler le compartiment
réfrigérateur sur -18
0
C.
Remarques
l Si vous restez plus de 5 secondes sans
appuyer sur la touche de réglage du
compartiment réfrigérateur ou
congélateur, l’appareil mémorise la
température actuellement réglée.
l Les compartiments réfrigérateur ou
congélateur peuvent présenter des
températures trop élevées dans les
cas suivants:
- La porte n’est pas correctement fermée.
- Vous avez rangé de grandes quantités
d’aliments chauds.
- Vous avez réglé le thermostat sur une
température de + 8
0
C et/ou de -16 0C.
- Les aliments rangés gênent
sérieusement la circulation de l’air dans
le compartiment réfrigérateur ou
congélateur.
- Vous avez fréquemment ouvert les
portes alors que la température
ambiante était élevée.
l Les compartiments réfrigérateur ou
congélateur peuvent présenter des
températures trop basses dans les cas
suivants:
- Vous avez enclenché la “super-cooling”
ou la supercongélation.
- Vous avez réglé le thermostat sur une
température de + 2
0
C et/ou - 32 0C
(max).
l Les parois frontales capotant le
réfrigérateur sont légèrement
chauffées pour empêcher l’apparition
de condensation près du joint de
porte.
l Pendant le fonctionnement du groupe
frigorifique, des gouttelettes d’eau ou du
givre se forment sur la paroi arrière du
compartiment réfrigérateur. Ce
phénomène est le résultat du
fonctionnement de l’appareil. Inutile de
gratter le givre ou d’essuyer les gouttes
d’eau. La paroi arrière se dégivre
automatiquement. L’eau de dégivrage est
récupérée dans la rigole d’écoulement
(fig. 9/B), puis coule jusqu’au groupe
frigorifique où elle s’évapore.
l Si après avoir fermé la porte du
compartiment congélateur vous n’arrivez
pas tout de suite à l’ouvrir de nouveau,
veuillez attendre 2 ou 3 minutes afin que
le léger vide qui s’est formé à l’intérieur
du congélateur ait le temps de se
combler.
l De par le système de réfrigération utilisé,
les grilles de décongélation peuvent
givrer rapidement à certains endroits. Ce
phénomène n’a aucune répercussion sur
le fonctionnement ou sur la
consommation de courant de l’appareil.
Le dégivrage devient nécessaire
uniquement lorsque la surface entière
des grilles est recouverte d’une couche
de givre ou de glace de plus de 5 mm
d’épaisseur.
Coupure et mise hors
service de l’appareil
Arrêt du compartiment
réfrigérateur
Appuyez sur l'interrupteur du compartiment
réfrigérateur (fig. 2/1). Le voyant de
température s'éteint (fig. 2/3). Ce geste met
le groupe frigorifique et l'éclairage du
compartiment réfrigérateur hors tension.
Pour éviter les odeurs, nettoyez l’intérieur et
laissez la porte ouverte.
Arrêt du compartiment
congélateur
Appuyez sur l'interrupteur du compartiment
congélateur (fig.2/9). Le voyant de
température s'éteint (fig.2/6). Nettoyez et
dégivrez le compartiment congélateur. Nous
vous recommandons d'essuyer le
compartiment intérieur et les grilles de
congélation avec un chiffon sec et de laisser
la porte ouverte.
Ventilateur du
compartiment réfrigérateur
Fig. 1/10
Le ventilateur se trouvant dans le plafond du
compartiment réfrigérateur accélère la
circulation de l’air.
Résultat:
l La température se répartit de façon
régulière dans l’ensemble du
compartiment réfrigérateur.
l Une fois la porte refermée, la température
d’origine se rétablit rapidement.
l Une fois modifié le réglare de la
température, la nouvelle température
s’instaure rapidement.
l Vu l'humidité réduite de l'air, les aliments
frais peuvent se conserver plus
longtemps.
Consignes de rangement
l Laissez refroidir les mets et boissons
chaudes à l’extérieur de l’appareil.
l Rangez les aliments si possible bien
emballés ou bien couverts. Ils garderont
ainsi arôme, couleur, teneur en humidité
et fraîcheur. Vous évitez également de
cette manière que le goût de certains
aliment ne se transmette à d’autres. Seul
les légumes, fruits et salades peuvent
être stockés sans emballage dans le bac
à légumes.
l L’huile et la graisse ne doivent pas entrer
en contact avec les parties en matières
plastiques et le joint de porte (ces
derniers pourraient sinon devenir poreux).
l N’entreposez pas de matières explosives
dans l’appareil. Stockez les boissons
fortement alcoolisées en position
verticale dans des récipients bien fermés.
Risque d’explosion!
l N’entreposez pas dans le compartiment
congélateur des bouteilles remplies de
liquide susceptible de geler. Les bouteilles
éclateraient sous l’effet du gel.
Exemple de rangement
Fig.
1
Compartiment réfrigérateur (A)
Sur les clayettes (11) de haut en bas:
pâtisseries, plats précuisinés, produits
laitiers.
Dans le bac à légumes (15): fruits et
légumes, salades.
Dans le casier (16): beurre et fromage.
Dans le support (17): petites bouteilles,
boîtes.
Dans le porte-bouteilles (20): les grandes
bouteilles.
Rangement des aliments
Page 26

41 42
fr fr
Rangement des aliments
Compartiment congélateur (B)
Sur la tablette de congélation (21):
rangement de petits produits congelés,
préparation de la glace.
Dans les tiroirs supérieurs (22): rangement
des produits congelés.
La disposition intérieure
Dans le compartiment réfrigérateur, vous
pouvez changer les clayettes de place même
lorsque la porte est ouverte à 90°. Pour les
changer de place, tirez-les à vous, abaissezles, extrayez-les puis remettez-les en place
ailleurs (Fig. 4).
Clayette à bouteilles
Les cavités permettent de déposer et empiler
les bouteilles de manière sûre (Fig. 5).
Pour empêcher que les bouteilles ne
basculent à l’ouverture ou à la fermeture de
la porte, utilisez l’étrier de maintien prévu
à cet effet, (Fig. 6/A).
Vous pouvez retirer tous les supports et
bacs qui se trouvent dans la porte pour les
nettoyer.
Pour retirer les supports et bacs, soulevezles, (fig. 7).
Pour entreposer des tubes, des petites
boîtes, etc, vous pouvez relever les supports
à œufs fixés sur les bacs.
Congélation et stockage
Attention lors de l’achat
de produits surgelés
l Vérifiez que l’emballage n’est pas abîmé.
l La date de conservation ne doit pas être
dépassée.
l La température indiquée par le thermo-
mètre du congélateur commercial ne doit
pas être supérieure à –18 °C.
l Achetez les produits surgelés en dernier.
Emballez-les dans du papier journal ou
utilisez un sac isotherme pour le transport.
Rangez-les le plus rapidement possible
dans votre compartiment congélateur.
Procéder soi-même à la
congélation de produits
frais
Si vous désirez congeler des aliments,
n’utilisez que des produits frais de première
qualité.
Se prêtent à la congélation:
La viande et les saucisses, les volailles et
le gibier, le poisson, les légumes, les herbes
aromatiques, les fruits, les pâtisseries, les
pizzas, les plat cuisinés, les restes de plat,
le jaune d’œuf, le blanc d’œuf.
Ne se prêtent pas à la congélation:
Les œufs entiers dans leur coquille, la crème
fraîche et la mayonnaise, la salade verte, les
radis, les radis noirs et les oignons.
Le blanchiment des fruits et légumes
Blanchir les fruits et légumes avant la
congélation afin qu’ils conservent couleur,
arôme, goût, et vitamine «C».
(Pour cela, plongez les fruits et légumes
quelques instants dans l’eau bouillante.
Vous trouverez des livres sur la congélation
et le blanchiment dans le commerce.)
Congélation et stockage
Emballage des produits
frais
Répartissez les aliments en portions
adaptées à votre ménage puis emballez-les.
Le poids de chaque portion ne doit pas
dépasser 1 kg pour les fruits et légumes et
2,5 kg pour la viande. Les petites portions
congèlent plus rapidement et les aliments
gardent leur qualité après décongélation et
préparation.
Emballez les aliments hermétiquement pour
éviter qu’ils perdent leur saveur ou se
dessèchent.
Se prêtent à l’emballage:
Films plastiques, films polyéthylène, feuilles
aluminium et boîtes hermétiques. Vous
trouverez tous ces articles dans le commerce.
N’utilisez pas:
Le papier d’emballage, le papier sulfurisé,
les feuilles de cellophane, les sacs poubelle
et les sacs en plastiques ayant déjà servi.
Placez les aliments frais dans l’emballage,
extrayez l’air et fermez hermétiquement.
Pour fermer l’emballage, vous pouvez
utiliser:
Des élastiques, des clips en plastique, des
ficelles, des rubans adhésifs résistant au
froid. Les sachets et les feuilles en polyéthylène peuvent être fermés à l’aide d’une
thermosoudeuse.
Avant de ranger les sacs dans le
congélateur, collez sur chaque paquet
une étiquette indiquant le contenu et
la date de congélation.
Capacité de congélation
maxi.
Les aliments doivent congeler à coeur aussi
vite que possible pour qu’ils conservent
vitamines, valeur nutritive, aspect et goût.
Pour cette raison, ne dépassez pas la
capacité de congélation maximale de votre
appareil.
Vous pouvez congeler les quantités
suivantes d'aliments en 24 heures, à
condition de les ranger dans le tiroir
supérieur de congélation.
Appareil en 70 cm de large: 15 kg maxi.
Appareil en 60 cm de large: 12 kg maxi.
Ne mettez pas de produits déjà congelés en
contact avec des produits frais.
Laissez refroidir les mets et boissons
chaudes à température ambiante avant de
les placer dans le compartiment
congélateur.
Super-cooling
Avant d'aller faire vos courses, nous
recommandons de mettre en marche le
"super-cooling" pendant 3-4 heures ou au
plus tard au moment de ranger les produits
frais.
Pour mettre en marche le "super-cooling"
appuyez longtemps ou ˛ plusieurs reprises
sur la touche
0
C (fig. 2/2), jusqu'˛ ce que le
voyant "super-cooling" (fig. 2/4) s'allume.
Pendant la super-réfrigération, la
température baisse au maximum possible,
pendant 6 heures, dans le compartiment
réfrigérateur. Ensuite, l’appareil revient
automatiquement sur la température
réfrigération.
Supercongélation
S’il y a déjà des denrées dans le
compartiment congélateur, il faut mettre en
marche le dispositif de «supercongélation»
quelques heures avant de déposer les
denrées fraîches.
En général, 4 à 6 heures suffisent. Si vous
utilisez la capacité de congélation maxi.,
il faut compter 24 heures. Vous pouvez
congeler les petites quantités d’aliments
(jusqu’à 2 kg) sans supercongélation.
Appuyez simplement sur la touche
«Supercongélation», (fig. 2/8).
Page 27

43 44
fr fr
Congélation et stockage
La mention “super” s’allume pour signaler
que la supercongélation s’est activée. Après
l’enclenchement de la supercongélation, le
compartiment congélateur atteint une
température très basse. La supercongélation
se désactive automatiquement, env. 50
heures après son enclenchement.
Stockage des aliments
Si vous devez stocker beaucoup d’aliments,
sortez tous les tiroirs de congélation de
l’appareil sauf le plus bas et entreposez les
aliments directement sur les grilles. Pour
retirer les tiroirs, tirez-les jusqu’à la butée;
levez-les puis sortez-les.
Pour ne pas gêner la circulation d’air dans
l’appareil, n’entreposez pas d’aliments
audessus de la limite (fig. C/A).
Calendrier de congélation
Fig.
8
Pour empêcher que les aliments surgelés
diminuent de qualité, il importe de ne pas
dépasser la durée de stockage admissible.
La durée de stockage dépend de la nature
du produit surgelé. Les nombres juxtaposés
aux symboles indiquent la durée admissible
en mois. Sur les emballages des produits
vendus surgelés dans le commerce figurent
la date de fabrication ou la date-limite de
conservation. Vous devrez les respecter.
Tablette de congélation
Fig.
A
La tablette de congélation est conçue pour
ranger les bacs à glaçons et pour congeler
séparément les baies, les fruits en
morceaux, les herbes aromatiques et les
légumes.
Pour congeler les produits, répartissez-les
uniformément sur la tablette puis laissez-les
entièrement congeler pendant 10 à 12
heures env.
Transférez ensuite les produits dans des
sacs de congélation ou dans des récipients.
Pour les décongeler, étalez-les à nouveau
les uns à côté des autres.
Décongélation de produits
surgelés
Selon la nature et l’utilisation des produits
surgelés, vous pouvez choisir entre plusieurs
possibilités:
A température ambiante,
Dans la réfrigérateur,
Dans le four électrique,
Avec/sans chaleur tournante,
Dans le micro-ondes.
Vous pouvez recongeler les produits
partiellement ou totalement décongelés
à condition que leur température n’ait pas
monté au-dessus de 3°C plus d’un jour
(viande, poisson) ou plus de trois jours pour
les autres denrées.
Si le goût, l’odeur et l’aspect sont inchangés,
faites cuire ou rôtir les aliments et congelez
à nouveau les mets cuisinés.
Dans ce cas, consommez-les nettement
avant la date limite de conservation.
Préparation de glaçons
Remplissez d’eau le bac à glaçons aux 3/4 et
posez-le dans le congélateur.
Les glaçons se démoulent facilement par
simple torsion du bac.
Le réservoir à glaçons (si fourni) vous permet
d’avoir toujours des glaçons à portée de
main.
Le bac à glaçons sert également de
couvercle au réservoir (fig. @).
Dégivrage
Compartiment
réfrigérateur
Le compartiment réfrigérateur se dégivre
automatiquement. L’eau passe dans un
collecteur (fig. 9/B), puis dans une goulotte
collectrice (fig. 9/A). Elle est récupérée
dans un bac situé à l’arrière de l’appareil où
elle s’évapore.
Vérifiez bien que l’eau s’écoule toujours
librement (voir les remarques au chapitre
intitulé «Nettoyage»).
Compartiment congélateur
Une épaisse couche de givre ou de glace
sur les grilles de congélation peut nuire au
rendement de l’appareil et augmenter la
consommation d’énergie.
Si la couche de givre est épaisse d 1/2 cm
env., il faut dégivrer l’appareil. Dégivrez-le au
moins une à deux fois par an.
Profitez de dégivrer le compartiment lorsqu’il
y a très peu ou pas d’aliments à l’intérieur.
S’il reste des aliments dans le
compartiment, enclenchez la
supercongélation env. 4 heures avant de
procéder au dégivrage pour que les aliments
atteignnt une température très basse et
puissent rester un certain temps à
température ambiante sans décongeler.
Sortez ensuite les tiroirs contenant les
aliments. Enveloppez les tiroirs dans
plusieurs feuilles de papier journal ou dans
une couverture et déposez-les à un endroit
frais. Laissez la porte de l’appareil ouverte
puis coupez l’interrupteur principal du
compartiment congélateur.
Pour récupérer l’eau de dégivrage, posez le
tiroir de congélation inférieur vide sous la
sortie de l’eau et ouvrez la goulotte
collectrice (fig. E).
Effectuez le dégivrage rapidement (plus les
aliments restent à température ambiante et
plus leur durée de stockage diminue).
Nettoyez les parois internes après le
dégivrage.
Remarques
Pendant le dégivrage du compartiment
congélateur, nous vous conseillons de
placer les produits congelés dans le
réfrigérateur. Veillez bien cependant à ce
que les produits congelés n'entrent pas en
contact avec les aliments qui se trouvent
déjà dans le compartiment réfrigérateur.
Accélération du dégivrage
Pour accélérer le processus de dégivrage,
placez une casserole d’eau chaude sur
une grille de congélation.
Pour dégivrer le congélateur, ne mettez
jamais à l’intérieur d’appareil chauffant
électrique, de bougie ou de lampe à
pétrole.
Une grande prudence est recommandée lors
de l’utilisation de bombes aérosol
dégivrantes. Elles peuvent former des gaz
explosifs ou contenir des solvants ou gaz
propulseurs qui abîmeraient le plastique,
pourraient nuire à la santé et favoriseraient
la corrosion.
Ne pas râcler le givre ou la glace avec
des objets métalliques tranchants car la
surface abîmée des grilles de congélation
pourrait rouiller. Si vous perforez le circuit
frigorifique, les projections de produit
réfrigérant pourraient provoquer des
lésions oculaires ou s’enflammer.
Page 28

45 46
fr fr
l Placez votre appareil dans un endroit frais
et bien aéré. Veillez à ce qu’il ne soit pas
exposé aux rayons solaires et qu’il ne se
trouve pas à proximité d’une source de
chaleur (radiateur etc.).
l N’obstruez pas les grilles d’aération de
l’appareil.
l Laissez refroidir les aliments chauds hors
de l’appareil.
l Placez les produits à décongeler dans le
compartiment réfrigérateur. Vous pouvez
utiliser le froid qu’ils ont emmagasiné pour
refroidir les aliments stockés dans le
réfrigérateur.
l Dégivrez le compartiment congélateur dès
la formation d’une couche de glace.
Celleci gêne l’arrivêe du froid sur les
produits et augmente la consommation de
courant.
l Pour remplir ou vider l’appareil, laissez le
moins longtemps possible les portes
ouvertes.
Moins la porte du congélateur restera
ouverte, moins il y aura formation de givre
sur les grilles de congélation.
l Tous les deux ans, nettoyez l’échangeur
thermique (grille noire) situé contre la paroi
arrière de l’appareil.
Economie d’énergie Remarques sur les bruits
de fonctionnement
Bruits de fonctionnement
Pour que la température sélectionnée reste
constante, votre appareil enclenche de
temps à autre l'un des compresseurs ou
bien les deux.
Les bruits qui en résultent proviennent du
fonctionnement de l’appareil.
Ils diminuent automatiquement dès que
l’appareil a atteint la température de service.
Bourdonnements étouffés
Ces bruits normaux proviennent du moteur
du compresseur. Ils s’intensifient un peut
lorsque le moteur s’enclenche.
Gargouillis et clapotis légers
Ils proviennent de la circulation du fluide
réfrigérant dans les serpentins.
Déclics
Ces déclics sont audibles chaque fois que le
thermostat ordonne l’enclenchement ou la
coupure du moteur.
L’appareil n’est pas d’aplomb
Veuillez ajuster l’aplomb de l’appareil à l’aide
d’un niveau à eau. Pour cela, utilisez les
pieds à vis ou placez quelque chose sous
l’appareil pour le caler.
Les parois de l’appareil appuient contre
quelque chose
Veuillez éloigner l’appareil des meubles ou
appareils qu’il touche.
Les tiroirs, paniers ou clayettes ne sont
pas bien fixés ou au contraire coincés
Vérifiez le bon positionnement des pièces
amovibles et remettez-les correctement en
place si nécessaire.
Des bouteilles ou récipients placés dans
l’appareil se touchent
Dans ce cas, éloignez les bouteilles et
récipients légèrement les uns des autres.
Nettoyage
Avant de procéder au nettoyage,
débranchez la fiche mâle de la prise
secteur et coupez le fusible.
N’utilisez jamais de nettoyeur à vapeur
ou de nettoyeur haute pression. La
vapeur chaude pourrait endommager
les surfaces et les circuits électriques.
Risque d’électrocution.
Nettoyez le compartiment réfrigérateur au
moins une fois par mois.
Nettoyez le compartiment congélateur après
chaque dégivrage.
Pendant le nettoyage veillez à ce que l’eau
de nettoyage ne s’infiltre pas dans les
éléments de contrôle ou l’éclairage. Pour
nettoyer l’appareil entier (à l’exception du
joint de porte), utilisez de l’eau tiède
additionnée d’un produit de nettoyage doux,
légèrement désinfectant, comme du liquide
pour la vaisselle. N’utilisez pas de poudres
abrasives, récurantes, ni de produits
contenant un acide ou des solvants
chimiques.
Pour éviter de laisser des traces mates,
n’utilisez pas de produits d’entretien dits
«sans agent récurant».
Nettoyez le joint de porte exclusivement
avec de l’eau claire et essuyez-le bien.
Pour nettoyer les grilles de congélation,
n’employez pas de brosses métalliques, de
produits récurants ou d’objets tranchants
car vous abîmeriez la couche protectrice et
les grilles rouilleraient.
Nettoyez fréquemment le collecteur
(fig. 9/B) et la goulotte collectrice (fig. 9/A)
pour que l’eau de dégivrage puisse
s’ecouler librement.
Les bacs du compartiment congélateur se
nettoient plus facilement si vous les sortez
auparavant de l’appareil (fig.B).
Pour enlever les bacs, tirez-les vers l’avant
jusqu’à la butée, poussez vers le haut puis
retirez-les.
*Consignes importantes
relatives à l'entretien des
surfaces en acier inox
Un échantillon gratuit du produit d'entretien
«Chromol» a été livré d'origine avec cet
appareil.
POUR QUE VOTRE APPAREIL CONSERVE
EN PERMANENCE L'ELEGANCE QUI LE
DISTINGUE, VEUILLEZ TRAITER SES
SURFACES EN ACIER INOX AVEC LE
PRODUIT D'ENTRETIEN LIQUIDE
«CHROMOL», CECI IMMEDIATEMENT
APRES AVOIR FINI DE L'INSTALLER.
REPETEZ LES SEANCES D'APPLICATION A
INTERVALLES REGULIERS.
Vous trouverez ce produit en vente dans le
commerce sous la marque «Chromol», ou
auprès de votre service après-vente, auquel
cas il porte les numéros de référence
suivants:
N° 310359: flacon pulvérisateur de 500 ml,
Pour ne pas endommager les surfaces,
n'utilisez jamais d'éponges à dos abrasif,
brosses métalliques, objets à arêtes vives ou
produits récurants. N'employez jamais non
plus de détergents corrosifs tels que les
aérosols de dégivrage, nettoyants pour fours
en aérosol, solvants et produits détachants.
*selon le modèle
Page 29

48
fr
47
fr
Réparer soi-même les petites pannes
Toutes les pannes ne nécessitent pas
obligatoirement l’intervention du service
après-vente. Il s’agit souvent d’un
problème mineur. Avant d’appeler le
service après-vente, nous vous
conseillons de lire attentivement les
conseils suivants qui vous permettront
peut-être de remédier au problème.
En effet, si vous faites appel à un technicien
pour le résoudre, sa visite vous sera
facturée au plein tarif même pendant la
période de garantie.
Si les voyants de sélection de température
(fig. 2/3 et 6) ne s’allument pas:
Vérifiez si une coupure d’électricité s’est
produite, si la fiche mâle est bien branchée
dans la prise de courant et si l’appareil est
enclenché.
L’éclairage du compartiment réfrigérateur
ne fonctionne pas:
– L’ampoule est grillée. Changez l’ampoule
(Fig. D): Débranchez la fiche male de la
prise de courant et/ou ramenez le
disjoncteur en position éteinte. Tournez le
bandeau (C) de l’éclairage intérieur en
sens inverse des aiguilles d’une montre,
puis retirez le couvercle (B). Changez
l’ampoule; montez ampoule de rechange
en 220-240 V alternatif, culot E14.
Puissance: voir l’inscription sur l’ampoule
défectueuse.
– L’interrupteur de l’éclairage est coincé
(fig. D/A). Vérifiez s’il se déplace
facilement. Si cel n’est pas le cas,
prévenez le service après-vente.
Le compartiment réfrigérateur n’a pas
atteint la température sélectionnée:
- La grille d’aération en haut de l’appareil
(ou la fente ménagée dans le socle) est
obstrutée.
- Un corps étranger est coincé entre le
groupe frigorifique et le mur.
- La porte a été souvent ouverte ou vous
avez entreposé une quantité importante
d’aliments frais.
Si le voyant d’alarm s’allume après une
période de fonctionnement assez longue:
Un dérangement s'est produit.
Cause possible du dérangement:
– La fente ménagée au sommet et dans le
socle de l’appareil et servant à la
circulation de l’air est obturée.
– La porte du compartiment congélateur
n’est pas correctement fermée.
– Des aliments frais ont été mis à congeler
sans la supercongélation.
– Vous avez rangé d’une seul coup une
trop grande quantité d’aliments à
congeler.
– Température ambiante élevée.
Une fois le dérangement supprimé, le voyant
d’alarme s’éteint une fois le compartiment
congélateur revenu à sa température de
service.
Si la porte du compartiment congélateur
est restée longtemps ouverte, en
présence d'une température ambiante
élevée, l'évaporateur (générateur de froid)
se couvre d'une couche de givre tellement
épaisse qu'il faudra dégivrer le
compartiment congélateur (voir Dégivrage
du compartiment congélateur).
Si les conseils qui précèdent ne suffisent
pas à supprimer la panne, appelez le service
après-vente.
N’ouvrez pas la porte inutilement pour éviter
toute déperdition de froid.
Ne tentez jamais de réparer vous-même en
particulier les circuits électriques de
l’appareil.
Service après-vente
Plaque signalétique
Fig.
F
Indiquez au technicien du SAV, sur sa
demande, les numéros E et FD de l’appareil.
Vous trouverez ces numéros dans l’encadré
noir de la plaque signalétique se trouvant en
bas à gauche dans le compartiment
réfrigérateur, à côté du bac à légumes.
Vous trouverez l’adresse et le numéro de
téléphone du service après-vente dans le
répertoire d’agences du SAV ou dans
l’annuaire.
 Loading...