

Page 1

Standgerät
Free-standing appliance
Appareil indépendant
Apparecchio indipendente
Vrijstaand apparaat
KA..D..
de Montage- und Gebrauchsanleitung
en Installation instructions and instructions for use
fr Notice de montage et d’utilisation
it Istruzioni per il montaggio e l’uso
nl Montage- en gebruiksaanwijzing
Page 2

de Inhaltsverzeichnis ................................... 3
en Table of Contents .................................. 26
fr Table des matières ................................ 48
it Indice ...................................................... 72
nl Inhoud ..................................................... 95
2
Page 3

de
de Inhaltsverzeichnis
deMontage- und Gebrauchsanleitung
Sicherheits- und Warnhinweise .......................... 4
Hinweise zur Entsorgung .................................... 6
Lieferumfang ......................................................... 6
Gerät aufstellen ..................................................... 6
Aufstellmaße .......................................................... 7
Türöffnungswinkel ................................................ 8
Gerät ausrichten ................................................... 9
Gerät anschließen ................................................ 9
Gerätetüren demontieren .................................... 9
Gerät kennenlernen .......................................... 10
Gerät einschalten .............................................. 12
Temperatureinheit einstellen ........................... 12
Temperatur einstellen ....................................... 12
Alarmfunktion ..................................................... 13
Nutzinhalt ............................................................ 13
Der Gefrierraum ................................................. 13
Max. Gefriervermögen ...................................... 13
Frische Lebensmittel einfrieren ....................... 14
Super-Gefrieren .................................................. 14
Gefriergut auftauen ........................................... 15
Der Kühlraum ..................................................... 15
Super-Kühlen ...................................................... 16
Eis- und Wasserausgabe ................................. 16
Eis- und Wasserausgabe aus- und
einschalten ......................................................... 17
Wasserfilter ......................................................... 18
Spezifikations- und Leistungsdatenblatt ........ 19
Ausstattung des Gefrierraums ........................ 20
Variable Gestaltung des Innenraums ............ 20
Gerät ausschalten und stilllegen .................... 20
Abtauen ............................................................... 20
Gerät reinigen .................................................... 21
Beleuchtung (LED) ............................................ 22
Energie sparen .................................................. 22
Betriebsgeräusche ............................................ 22
Kleine Störungen selbst beheben .................. 23
Geräte-Selbsttest ............................................... 25
Kundendienst ..................................................... 25
3
Page 4

de
m Sicherheits-
und Warnhinweise
Bevor Sie das Gerät in Betrieb nehmen
Lesen Sie Gebrauchs- und
Montageanleitung aufmerksam durch!
Sie enthalten wichtige Informationen über
Aufstellen, Gebrauch und Wartung
des Gerätes.
Der Hersteller haftet nicht, wenn Sie
die Hinweise und Warnungen der
Gebrauchsanleitung missachten. Bewahren
Sie alle Unterlagen für späteren Gebrauch
oder für Nachbesitzer auf.
Technische Sicherheit
Das Gerät enthält in geringer Menge das
umweltfreundliche, aber brennbare
Kältemittel R600a. Achten Sie darauf, dass
die Rohre des Kältemittel-Kreislaufes bei
Transport oder Montage nicht beschädigt
werden. Herausspritzendes Kältemittel kann
zu Augenverletzungen führen oder sich
entzünden.
Bei Beschädigung
■ offenes Feuer oder Zündquellen vom
Gerät fernhalten,
■ Raum für einige Minuten gut durchlüften,
■ Gerät ausschalten und Netzstecker
ziehen,
■ Kundendienst benachrichtigen.
Je mehr Kältemittel in einem Gerät ist,
umso größer muss der Raum sein, in dem
das Gerät steht. In zu kleinen Räumen kann
bei einem Leck ein brennbares Gas-LuftGemisch entstehen.
Pro 8 g Kältemittel muss der Raum
mindestens 1 m³ groß sein. Die Menge des
Kältemittels Ihres Gerätes steht auf dem
Typenschild im Inneren des Gerätes.
Wenn die Netzanschlussleitung dieses
Gerätes beschädigt wird, muss sie durch
den Hersteller, Kundendienst oder eine
ähnlich qualifizierte Person ersetzt werden.
Unsachgemäße Installationen und
Reparaturen können den Benutzer
erheblich gefährden.
Reparaturen dürfen nur durch den
Hersteller, Kundendienst oder eine ähnlich
qualifizierte Person durchgeführt werden.
Es dürfen nur Originalteile des Herstellers
benutzt werden. Nur bei diesen Teilen
gewährleistet der Hersteller, dass sie die
Sicherheitsanforderungen erfüllen.
Eine Verlängerung der
Netzanschlussleitung darf nur über den
Kundendienst bezogen werden.
Beim Gebrauch
■ Nie elektrische Geräte innerhalb des
Gerätes verwenden (z. B. Heizgeräte,
elektrische Eisbereiter usw.).
Explosionsgefahr!
■ Nie das Gerät mit einem
Dampfreinigungsgerät abtauen oder
reinigen! Der Dampf kann an elektrische
Teile gelangen und einen Kurzschluss
auslösen. Stromschlaggefahr!
■ Keine spitzen und scharfkantigen
Gegenstände verwenden, um Reif- und
Eisschichten zu entfernen. Sie könnten
damit die Kältemittel-Rohre beschädigen.
Herausspritzendes Kältemittel kann sich
entzünden oder zu Augenverletzungen
führen.
■ Keine Produkte mit brennbaren
Treibgasen (z. B. Spraydosen) und keine
explosiven Stoffe lagern.
Explosionsgefahr!
■ Sockel, Auszüge, Türen usw. nicht als
Trittbrett oder zum Abstützen
missbrauchen.
■ Zum Reinigen Netzstecker ziehen oder
Sicherung ausschalten. Am Netzstecker
ziehen, nicht am Anschlusskabel.
■ Hochprozentigen Alkohol nur dicht
verschlossen und stehend lagern.
■ Kunststoffteile und Türdichtung nicht mit
Öl oder Fett verschmutzen. Kunststoffteile
und Türdichtung werden sonst porös.
■ Be- und Entlüftungsöffnungen für das
Gerät nie abdecken oder zustellen.
4
Page 5

de
■ Vermeidung von Risiken für Kinder und
gefährdete Personen:
Gefährdet sind Kinder, Personen, die
körperlich, psychisch oder in ihrer
Wahrnehmung eingeschränkt sind sowie
Personen, die nicht genügend Wissen
über die sichere Bedienung des Gerätes
haben.
Stellen Sie sicher, dass Kinder und
gefährdete Personen die Gefahren
verstanden haben.
Eine für die Sicherheit verantwortliche
Person muss Kinder und gefährdete
Personen am Gerät beaufsichtigen oder
anleiten.
Nur Kinder ab 8 Jahren das Gerät
benutzen lassen.
Bei Reinigung und Wartung Kinder
beaufsichtigen.
Niemals Kinder mit dem Gerät spielen
lassen.
■ Im Gefrierraum keine Flüssigkeiten
in Flaschen und Dosen lagern
(besonders kohlensäurehaltige
Getränke). Flaschen und Dosen können
platzen!
■ Nie Gefriergut sofort, nachdem es aus
dem Gefrierraum genommen wird,
in den Mund nehmen.
Gefrierverbrennungsgefahr!
■ Vermeiden Sie längeren Kontakt der
Hände mit dem Gefriergut, Eis oder den
Verdampferrohren usw.
Gefrierverbrennungsgefahr!
Kinder im Haushalt
■ Verpackung und deren Teile nicht
Kindern überlassen.
Erstickungsgefahr durch Faltkartons und
Folien!
■ Das Gerät ist kein Spielzeug für Kinder!
■ Bei Gerät mit Türschloss:
Schlüssel außer Reichweite von Kindern
aufbewahren!
Allgemeine Bestimmungen
Das Gerät eignet sich
■ zum Kühlen und Gefrieren
von Lebensmitteln,
■ zur Eisbereitung,
■ zur Trinkwasserausgabe.
Dieses Gerät ist für den häuslichen
Gebrauch im Privathaushalt und das
häusliche Umfeld bestimmt.
Das Gerät ist funkentstört nach EURichtlinie 2004/108/EC.
Der Kältekreislauf ist auf Dichtheit geprüft.
Dieses Erzeugnis entspricht den
einschlägigen Sicherheitsbestimmungen
für Elektrogeräte (EN 60335-2-24).
Dieses Gerät ist für eine Nutzung bis zu
einer Höhe von maximal 2000 Metern über
dem Meeresspiegel bestimmt.
5
Page 6

de
Hinweise zur Entsorgung
* Verpackung entsorgen
Die Verpackung schützt Ihr Gerät vor
Transportschäden. Alle eingesetzten Materialien sind
umweltverträglich und wieder verwertbar. Bitte helfen
Sie mit: Entsorgen Sie die Verpackung umweltgerecht.
Über aktuelle Entsorgungswege informieren Sie sich
bitte bei Ihrem Fachhändler oder bei
der Gemeindeverwaltung.
* Altgerät entsorgen
Altgeräte sind kein wertloser Abfall!
Durch umweltgerechte Entsorgung können wertvolle
Rohstoffe wiedergewonnen werden.
Dieses Gerät ist entsprechend der
europäischen Richtlinie 2012/19/EU über
Elektro- und Elektronikaltgeräte (waste
electrical and electronic equipment - WEEE)
gekennzeichnet.
Die Richtlinie gibt den Rahmen für eine EUweit gültige Rücknahme und Verwertung der
Altgeräte vor.
m Warnung
Bei ausgedienten Geräten
1. Netzstecker ziehen.
2. Anschlusskabel durchtrennen und mit dem
Netzstecker entfernen.
3. Ablagen und Behälter nicht herausnehmen,
um Kindern das Hineinklettern zu erschweren!
4. Kinder nicht mit dem ausgedienten Gerät spielen
lassen. Erstickungsgefahr!
Kältegeräte enthalten Kältemittel und in der Isolierung
Gase. Kältemittel und Gase müssen fachgerecht
entsorgt werden. Rohre des Kältemittel-Kreislaufes bis
zur fachgerechten Entsorgung nicht beschädigen.
Lieferumfang
Prüfen Sie nach dem Auspacken alle Teile auf
eventuelle Transportschäden.
Wenden Sie sich bei Beanstandungen an den Händler,
bei dem Sie das Gerät erworben haben oder an
unseren Kundendienst.
Die Lieferung besteht aus folgenden Teilen:
■ Standgerät
■ Beutel mit Montagematerial
■ Ausstattung (modellabhängig)
■ Gebrauchsanleitung
■ Kundendienstheft
■ Garantiebeilage
■ Informationen zu Energieverbrauch und Geräuschen
Gerät aufstellen
Transport
Das Gerät ist schwer. Beim Transport und bei der
Montage sichern!.
Auf Grund des Gewichts und der Abmessungen des
Gerätes und um das Risiko von Verletzungen oder
Schäden am Gerät zu minimieren, sind mindestens
zwei Personen für die sichere Aufstellung des Gerätes
erforderlich.
Aufstellort
Zum Aufstellen eignet sich ein trockener, belüftbarer
Raum. Der Aufstellplatz sollte nicht direkter
Sonnenbestrahlung ausgesetzt und nicht in der Nähe
einer Wärmequelle wie Herd, Heizkörper etc. sein.
Wenn das Aufstellen neben einer Wärmequelle
unvermeidbar ist, verwenden Sie eine geeignete
Isolierplatte oder halten Sie folgende Mindestabstände
zur Wärmequelle ein:
■ Zu Elektro- oder Gasherden 3 cm.
■ Zu Öl- oder Kohleanstellherden 30 cm.
Beim Aufstellen neben einem anderen Kühl- oder
Gefriergerät ist ein seitlicher Mindestabstand von
25 mm erforderlich, um Schwitzwasserbildung zu
vermeiden.
Wird das Gerät oben mit einer Blende oder einem
Schrank überbaut, ist ein Spalt von 30 mm vorzusehen,
damit das Gerät bei Bedarf aus der Nische
herausgezogen werden kann.
Die erwärmte Luft an der Rückseite des Gerätes, muss
ungehindert abziehen können.
6
Page 7
de
Untergrund
m Achtung
Das Gerät ist sehr schwer.
Ausführung mit Dispenser: 143 kg
Der Boden am Aufstellort darf nicht nachgeben, Boden
eventuell verstärken.
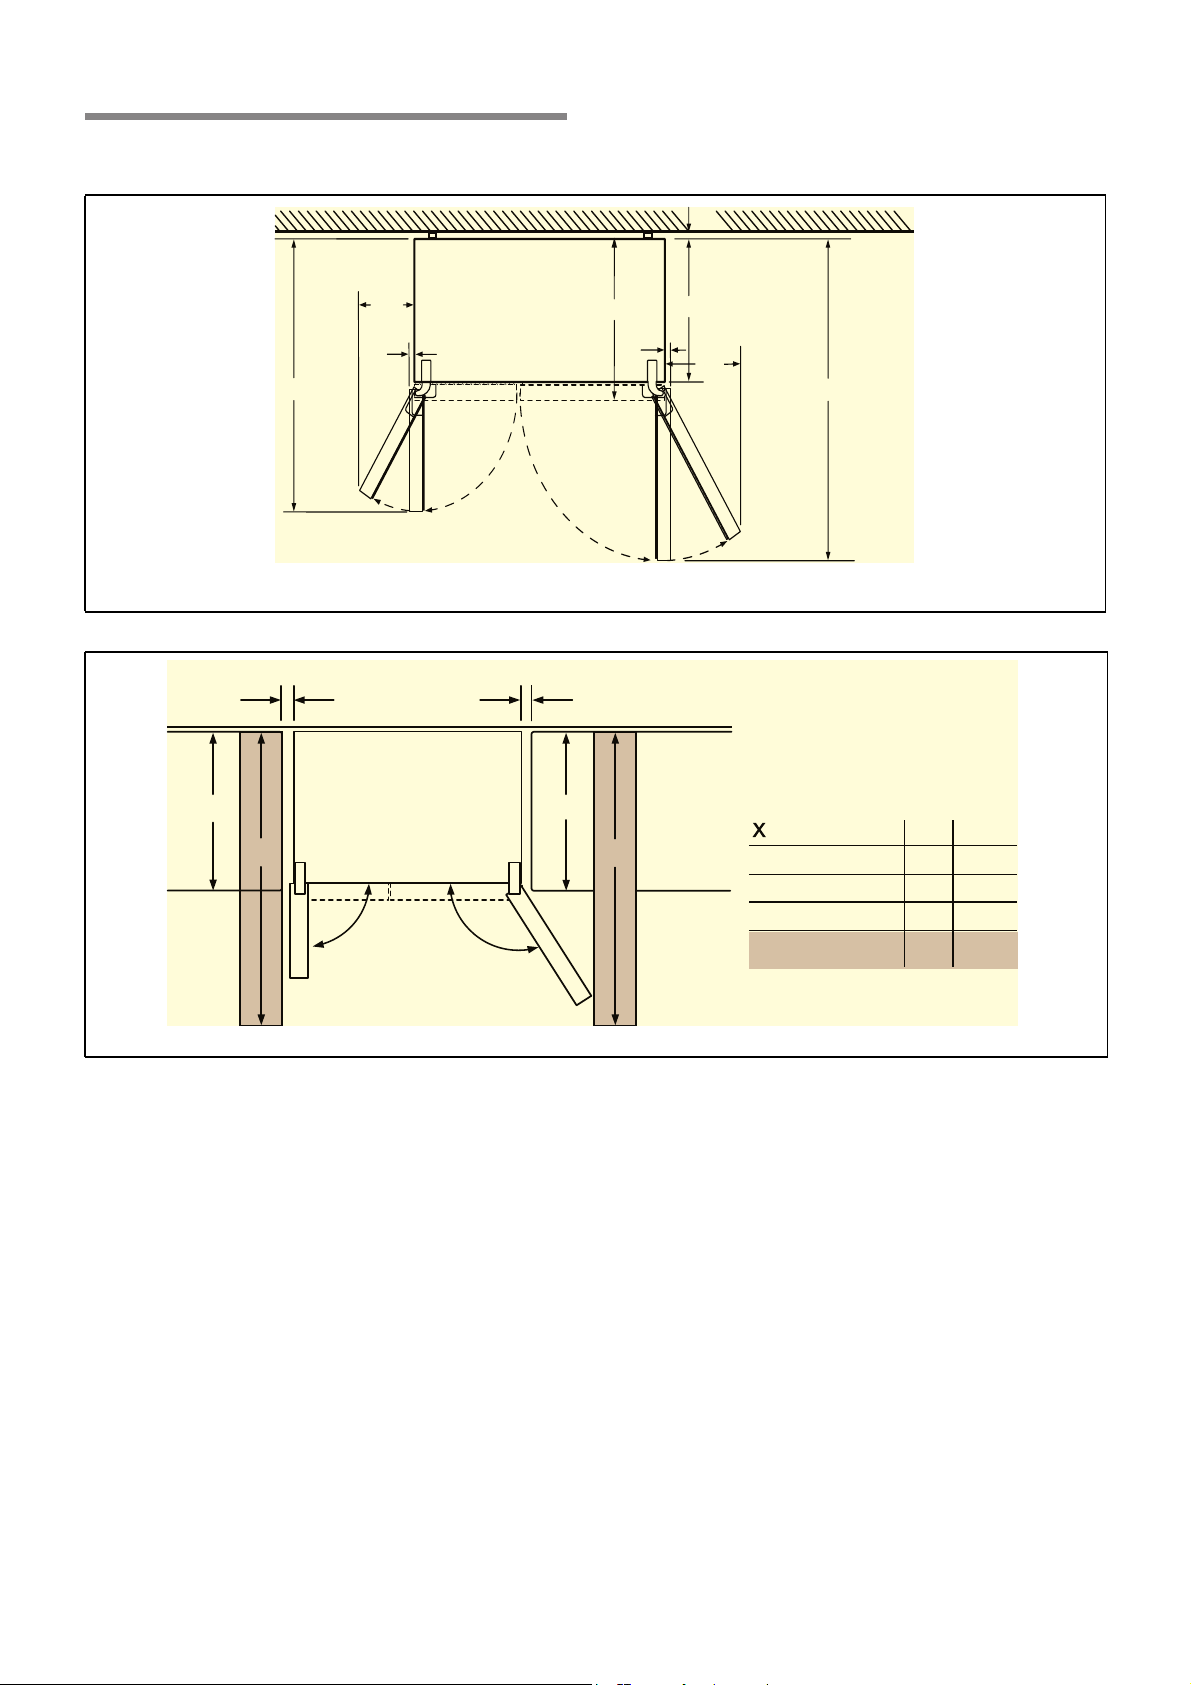
Damit die Türen bis zum Anschlag geöffnet werden
können, sind beim Aufstellen in einer Raumecke oder
Nische seitliche Mindestabstände einzuhalten (siehe
Kapitel Aufstellmaße).
Übersteigt die Tiefe der benachbarten
Kücheneinrichtung 60 cm, sind seitliche
Mindestabstände einzuhalten, um den vollen
Türöffnungswinkel auszunutzen (siehe Kapitel
Türöffnungswinkel).
Raumtemperatur und Belüftung beachten
Raumtemperatur
Die Klimaklasse steht auf dem Typenschild. Sie gibt an,
innerhalb welcher Raumtemperaturen das Gerät
betrieben werden kann. Das Typenschild befindet sich
rechts unten im Kühlraum.
Belüftung
Auf keinen Fall Belüftungs- und Entlüftungsöffnungen
an der Rückwand des Gerätes abdecken. Die erwärmte
Luft muss ungehindert abziehen können. Die
Kühlmaschine muss sonst mehr leisten. Dies erhöht
den Stromverbrauch.
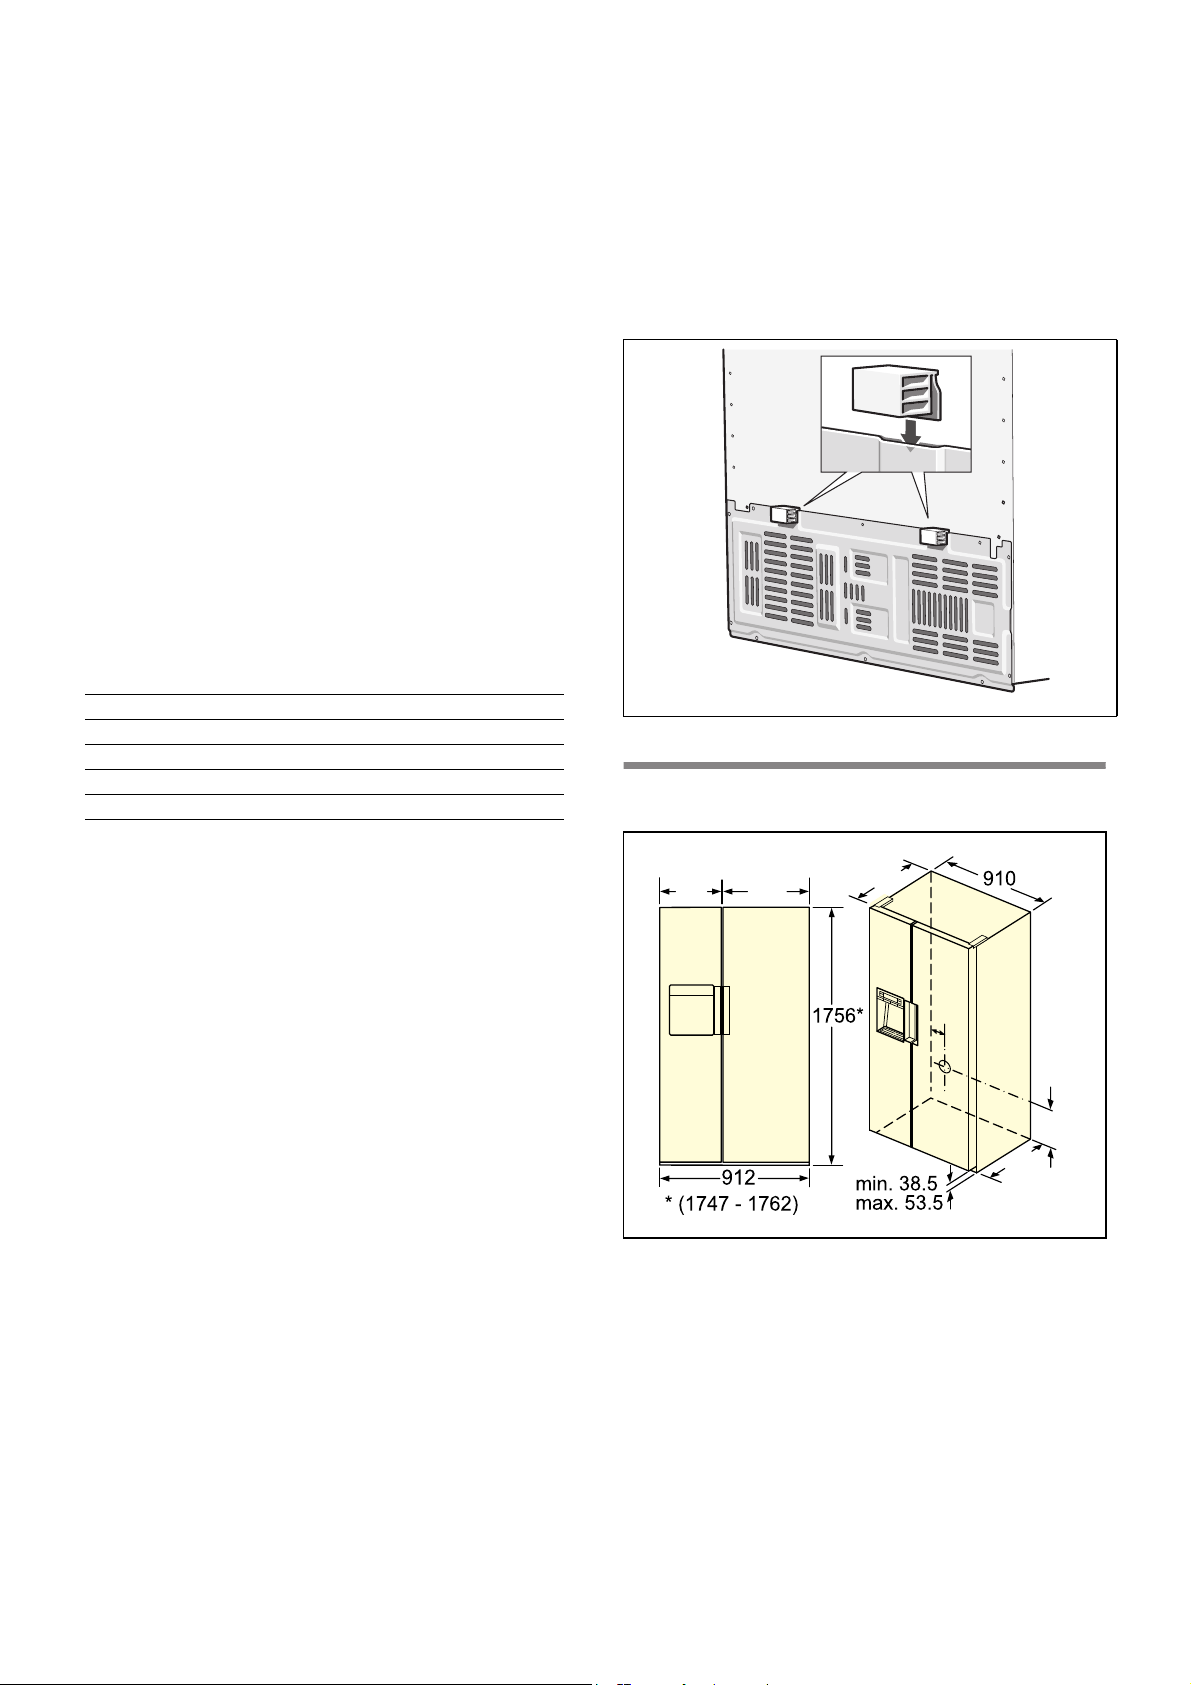
Stecken Sie die beiliegenden Abstandshalter auf die
vorgesehene Halterung der Geräterückseite. Dadurch
wird der Mindestabstand zur Wand eingehalten.
Klimaklasse zulässige Raumtemperatur
SN +10 °C bis 32 °C
N +16 °C bis 32 °C
ST +16 °C bis 38 °C
T +16 °C bis 43 °C
Hinweis
Das Gerät ist innerhalb der Raumtemperaturgrenzen
der angegebenen Klimaklasse voll funktionsfähig. Wird
ein Gerät der Klimaklasse SN bei kälteren
Raumtemperaturen betrieben, können Beschädigungen
am Gerät bis zu einer Temperatur von +5 °C
ausgeschlossen werden.
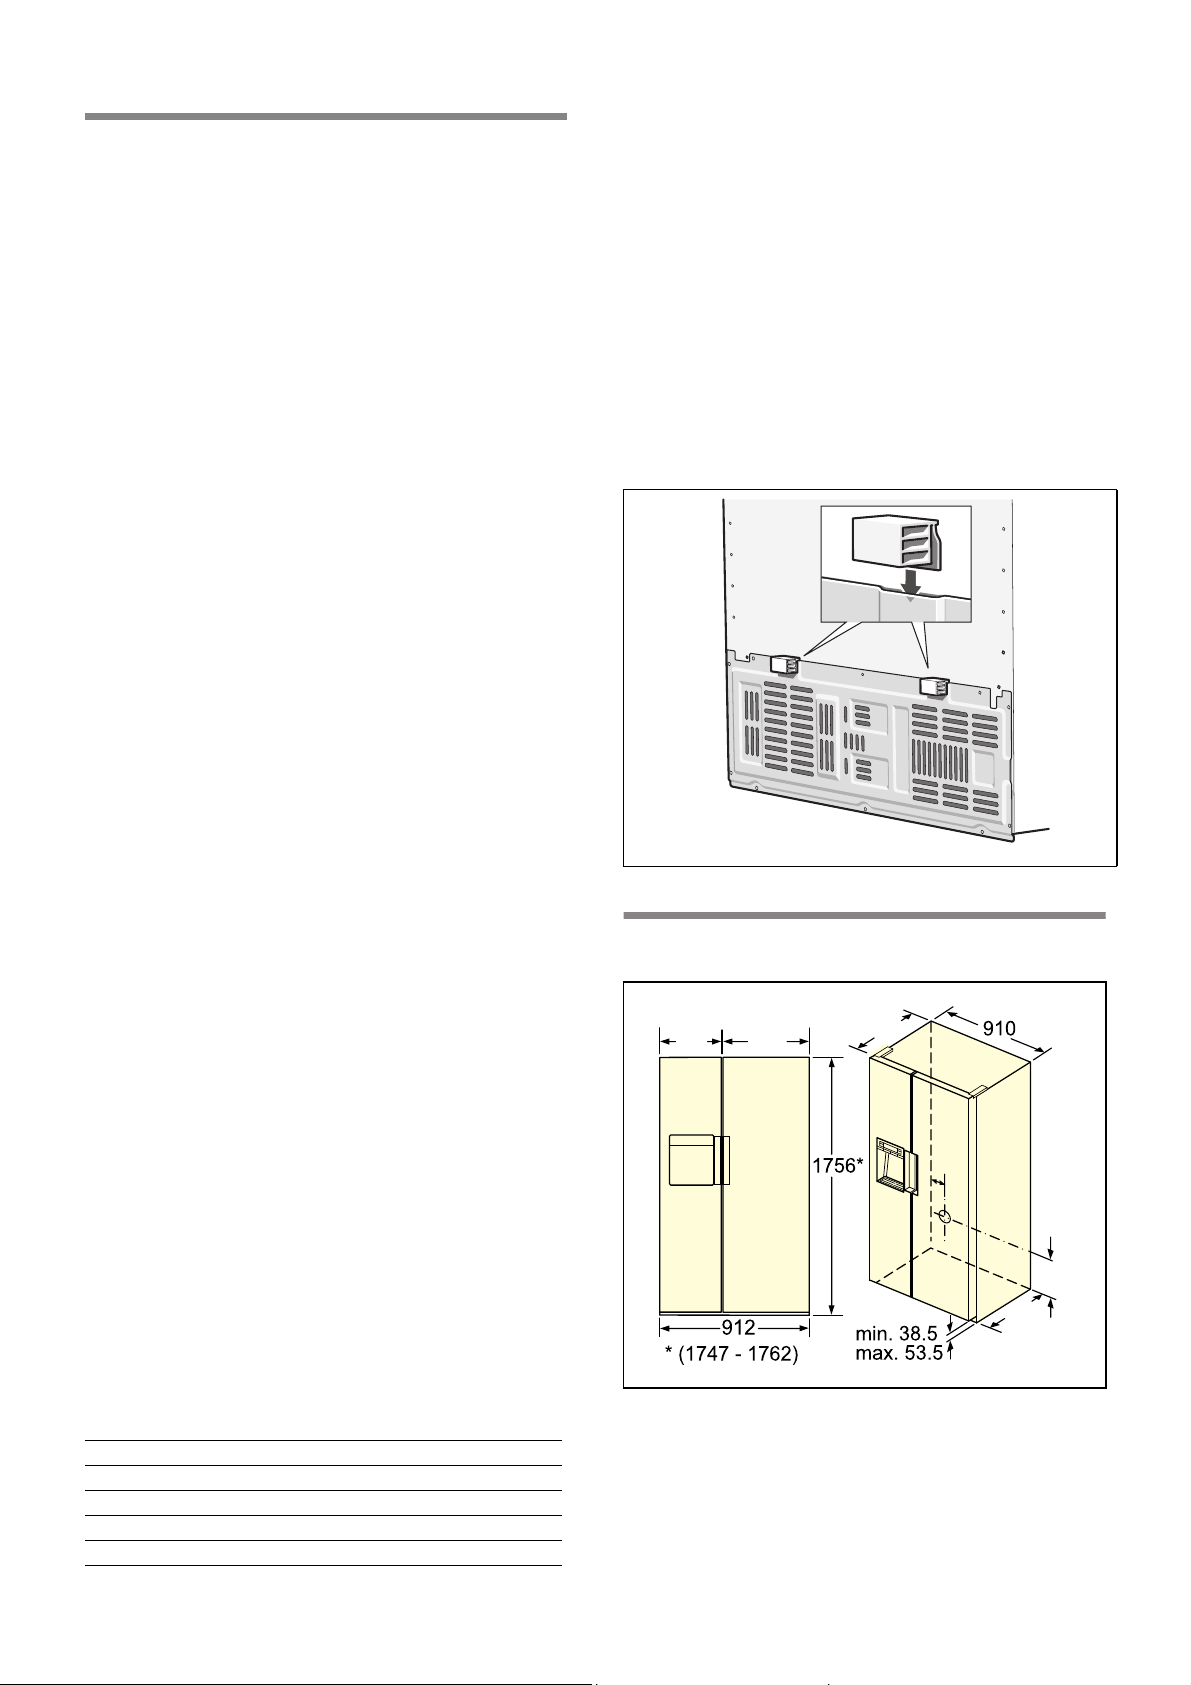
Aufstellmaße
7
Page 8
de
Türöffnungswinkel
D
[
[
E
[
[
[
DE
8
Page 9
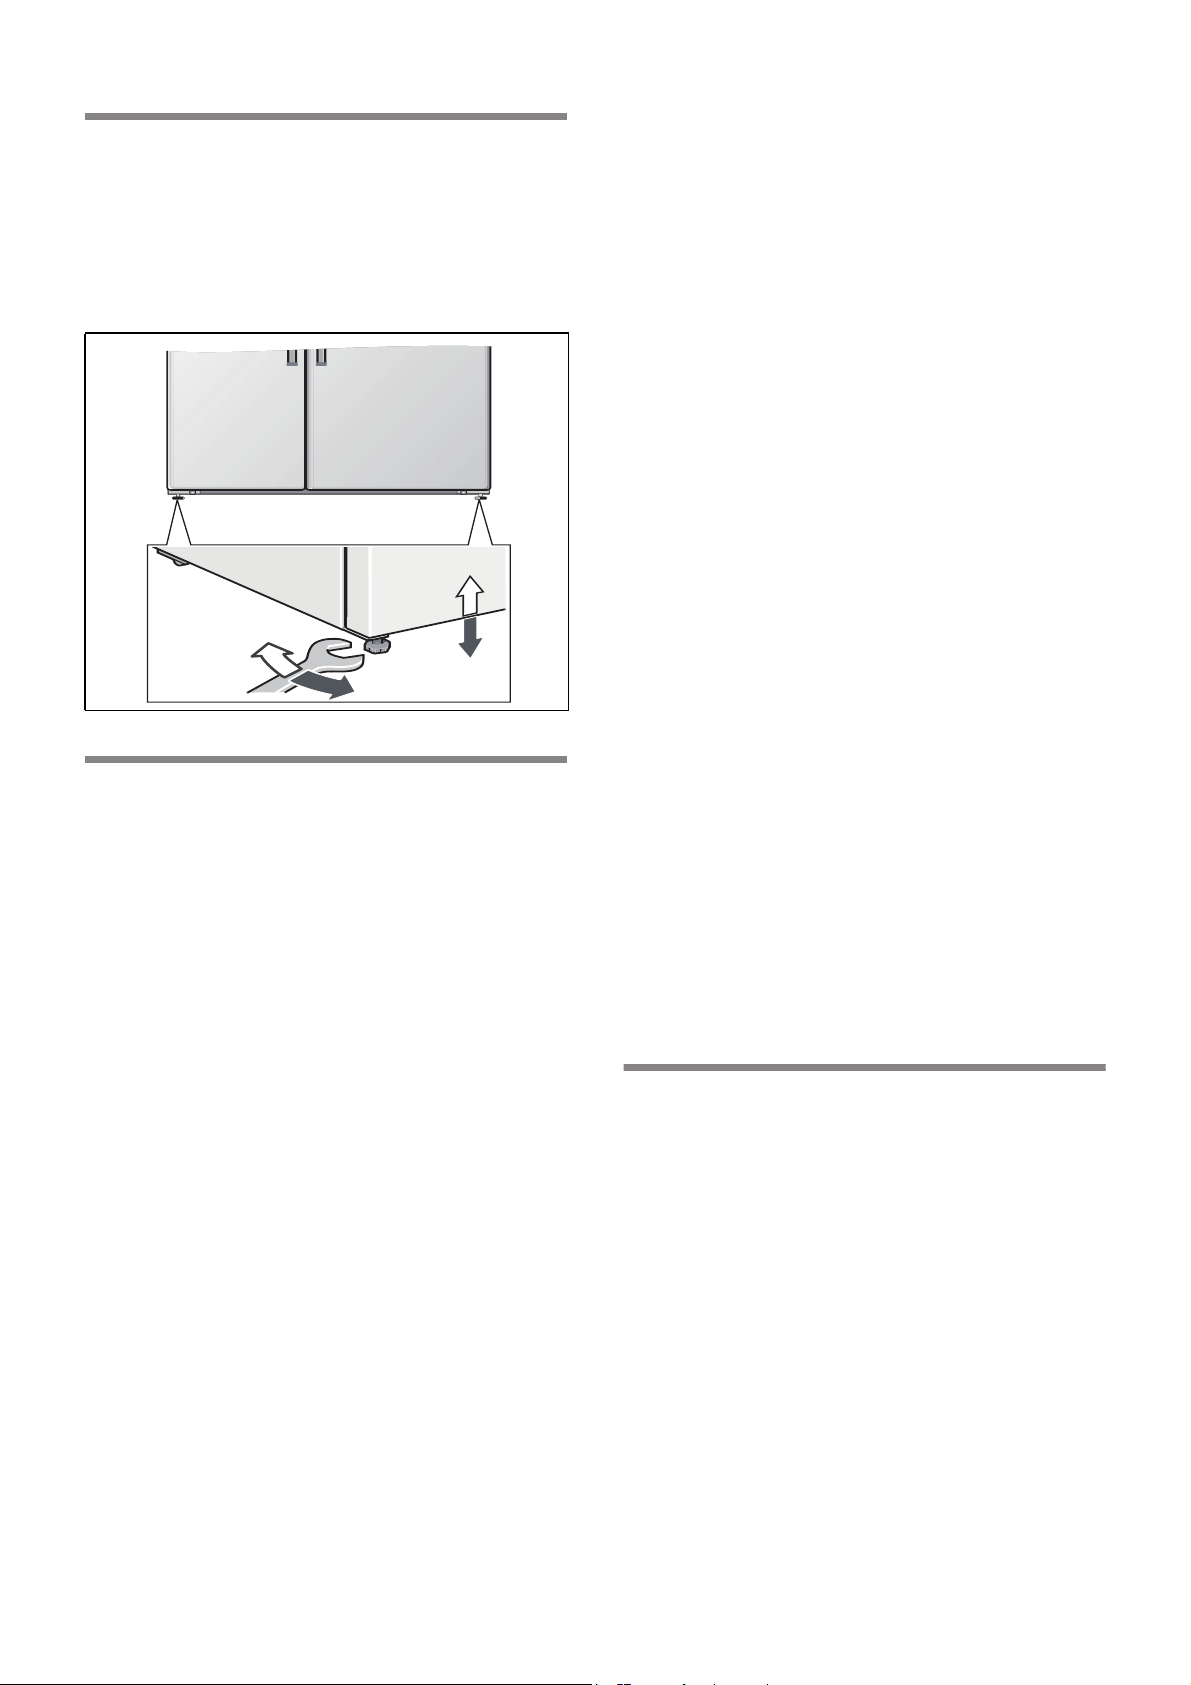
Gerät ausrichten
Damit das Gerät einwandfrei funktioniert, muss es mit
einer Wasserwaage eben ausgerichtet sein.
Steht das Gerät schief, kann dies dazu führen, dass
das Wasser aus dem Eisbereiter läuft, ungleiche
Eiswürfel hergestellt werden oder die Türen nicht richtig
schließen.
de
■ Wenn Druck über 0,8 MPa (8 bar): Druckbegrenzer
zwischen Trinkwasseranschluss und Schlauch-Set
installieren
Hinweis
Der maximale Außendurchmesser der Wasserleitung
(ohne Verbindungsstücke) beträgt 10 mm.
Elektrischer Anschluss
Keine Verlängerungskabel oder Verteiler benutzen.
Zum Anschluss des Gerätes ist eine fest installierte
Steckdose erforderlich.
Die Steckdose muss nahe dem Gerät und auch nach
dem Aufstellen des Gerätes frei zugänglich sein.
Das Gerät entspricht der Schutzklasse I. Über eine
vorschriftsmäßig installierte Steckdose mit Schutzleiter
das Gerät an 220-240 V/50 Hz Wechselstrom
anschließen. Die Steckdose muss mit einer 10 A bis
16 A Sicherung oder höher abgesichert sein.
Bei Geräten, die in nicht-europäischen Ländern
betrieben werden, ist auf dem Typenschild zu
überprüfen, ob die angegebene Spannung und
Stromart mit den Werten Ihres Stromnetzes
übereinstimmt. Das Typenschild befindet sich im Gerät
rechts unten. Ein eventuell notwendiger Austausch der
Netzanschlussleitung darf nur durch einen Fachmann
erfolgen.
Gerät anschließen
Das Gerät von einem Fachmann nach beiliegender
Montageanleitung aufstellen und anschließen lassen.
Die Transportsicherungen der Ablagen und Absteller
erst nach dem Aufstellen entfernen.
Wasseranschluss unbedingt vor dem elektrischen
Anschluss durchführen.
Neben den gesetzlich vorgeschriebenen nationalen
Vorschriften sind die Anschlussbedingungen der
örtlichen Elektrizitäts- und Wasserwerke einzuhalten.
Nach dem Aufstellen des Gerätes mindestens 1 Stunde
warten, bis das Gerät in Betrieb genommen wird.
Während des Transports kann es vorkommen, dass
sich das im Verdichter enthaltene Öl im Kältesystem
verlagert.
Vor der ersten Inbetriebnahme den Innenraum des
Gerätes reinigen (siehe Kapitel Gerät reinigen).
Wasseranschluss
Der Wasseranschluss darf nur von einem
sachkundigen Installateur nach den örtlichen
Vorschriften des zuständigen Wasserwerkes
vorgenommen werden.
m Warnung
Das Gerät darf auf keinen Fall an elektronische
Energiesparstecker angeschlossen werden.
Zum Gebrauch unserer Geräte können sinus- und
netzgeführte Wechselrichter verwendet werden.
Netzgeführte Wechselrichter werden bei
Photovoltaikanlagen verwendet, die direkt ans
öffentliche Stromnetz angeschlossen werden. Bei
Insellösungen (z. B. bei Schiffen oder Gebirgshütten),
die keinen direkten Anschluss ans öffentliche
Stromnetz haben, müssen sinusgeführte Wechselrichter
verwendet werden.
Gerätetüren demontieren
Wenn das Gerät nicht durch die Wohnungstür passt,
können die Gerätetüren abgeschraubt werden.
m Achtung
Das Abschrauben der Gerätetüren darf nur durch den
Kundendienst erfolgen.
m Achtung
Nur das beigelegte Schlauch-Set zum Anschluss an
das Trinkwassernetz verwenden. Vorhandene oder
bereits benutzte Schlauchsätze auf keinen Fall
verwenden.
Das Gerät nur an eine Trinkwasserleitung anschließen:
■ Min. Druck: 0,2 MPa (2 bar)
■ Max. Druck: 0,8 MPa (8 bar)
9
Page 10
de
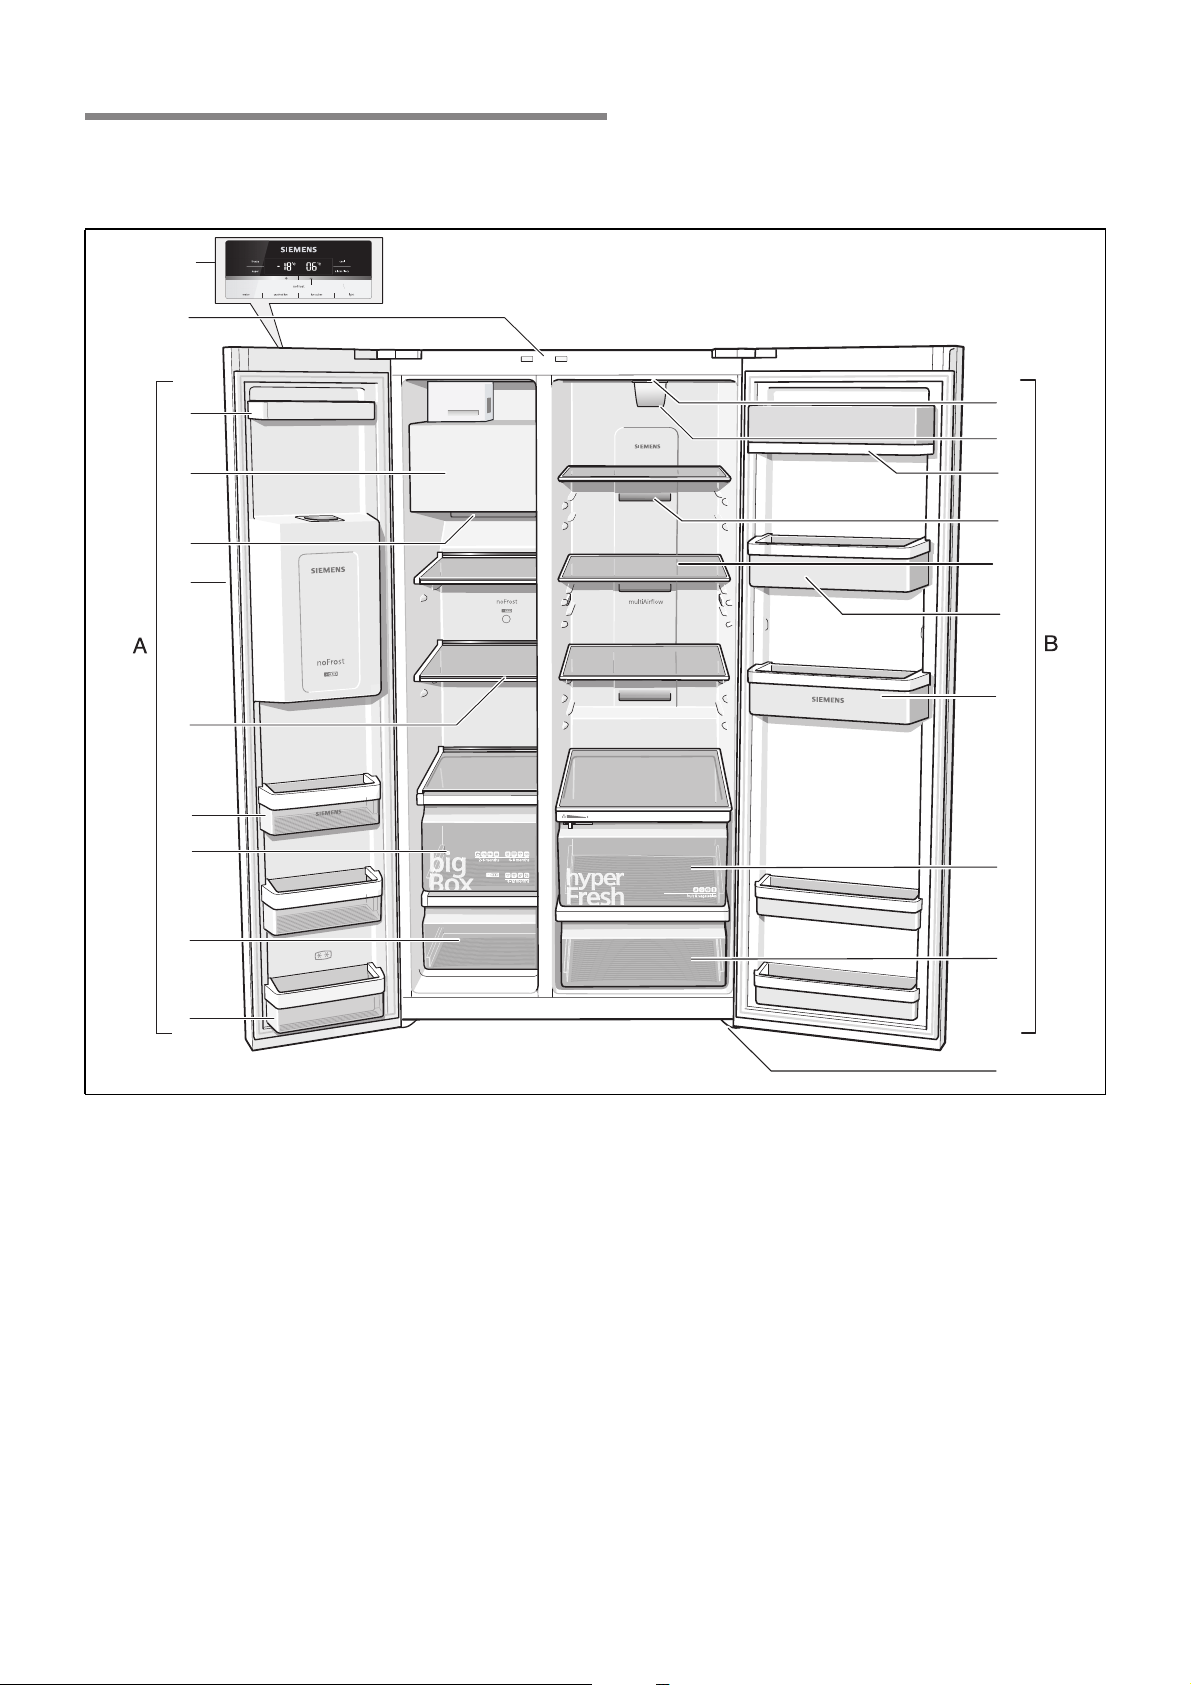
Gerät kennenlernen
Diese Gebrauchsanleitung gilt für mehrere Modelle. Abweichungen bei den Abbildungen sind möglich.
1
2
10
3
12
13
4
14
15
5
16
6
17
18
7
8
9
19
20
11
* Nicht bei allen Modellen.
A Gefrierraum
B Kühlraum
1 Bedien- und Anzeigefeld
2 Lichtschalter Kühl- und Gefrierraum
3 Türablage
4 Eisbereiter/Eiswürfelbehälter
5 Luftaustrittsöffnung
6 Eis- und Wasserausgabe
7 Glasablage im Gefrierraum
8 Türablage
9 Gefrierkalender
10 Gefriergutbehälter
21
11 Türablage (2-Sterne-Fach) zur kurzfristigen
Lagerung von Lebensmitteln und Speiseeis.
12 Beleuchtung
13 Partikelfilter/Wasserfilter
14 Butter- und Käsefach
15 Luftaustrittsöffnung
16 Glasablage im Kühlraum
17 Türablage
18 Ablage für große Flaschen
19 Gemüsebehälter mit Feuchtefilter
20 Gemüsebehälter
21 Schraubfüße
10
Page 11
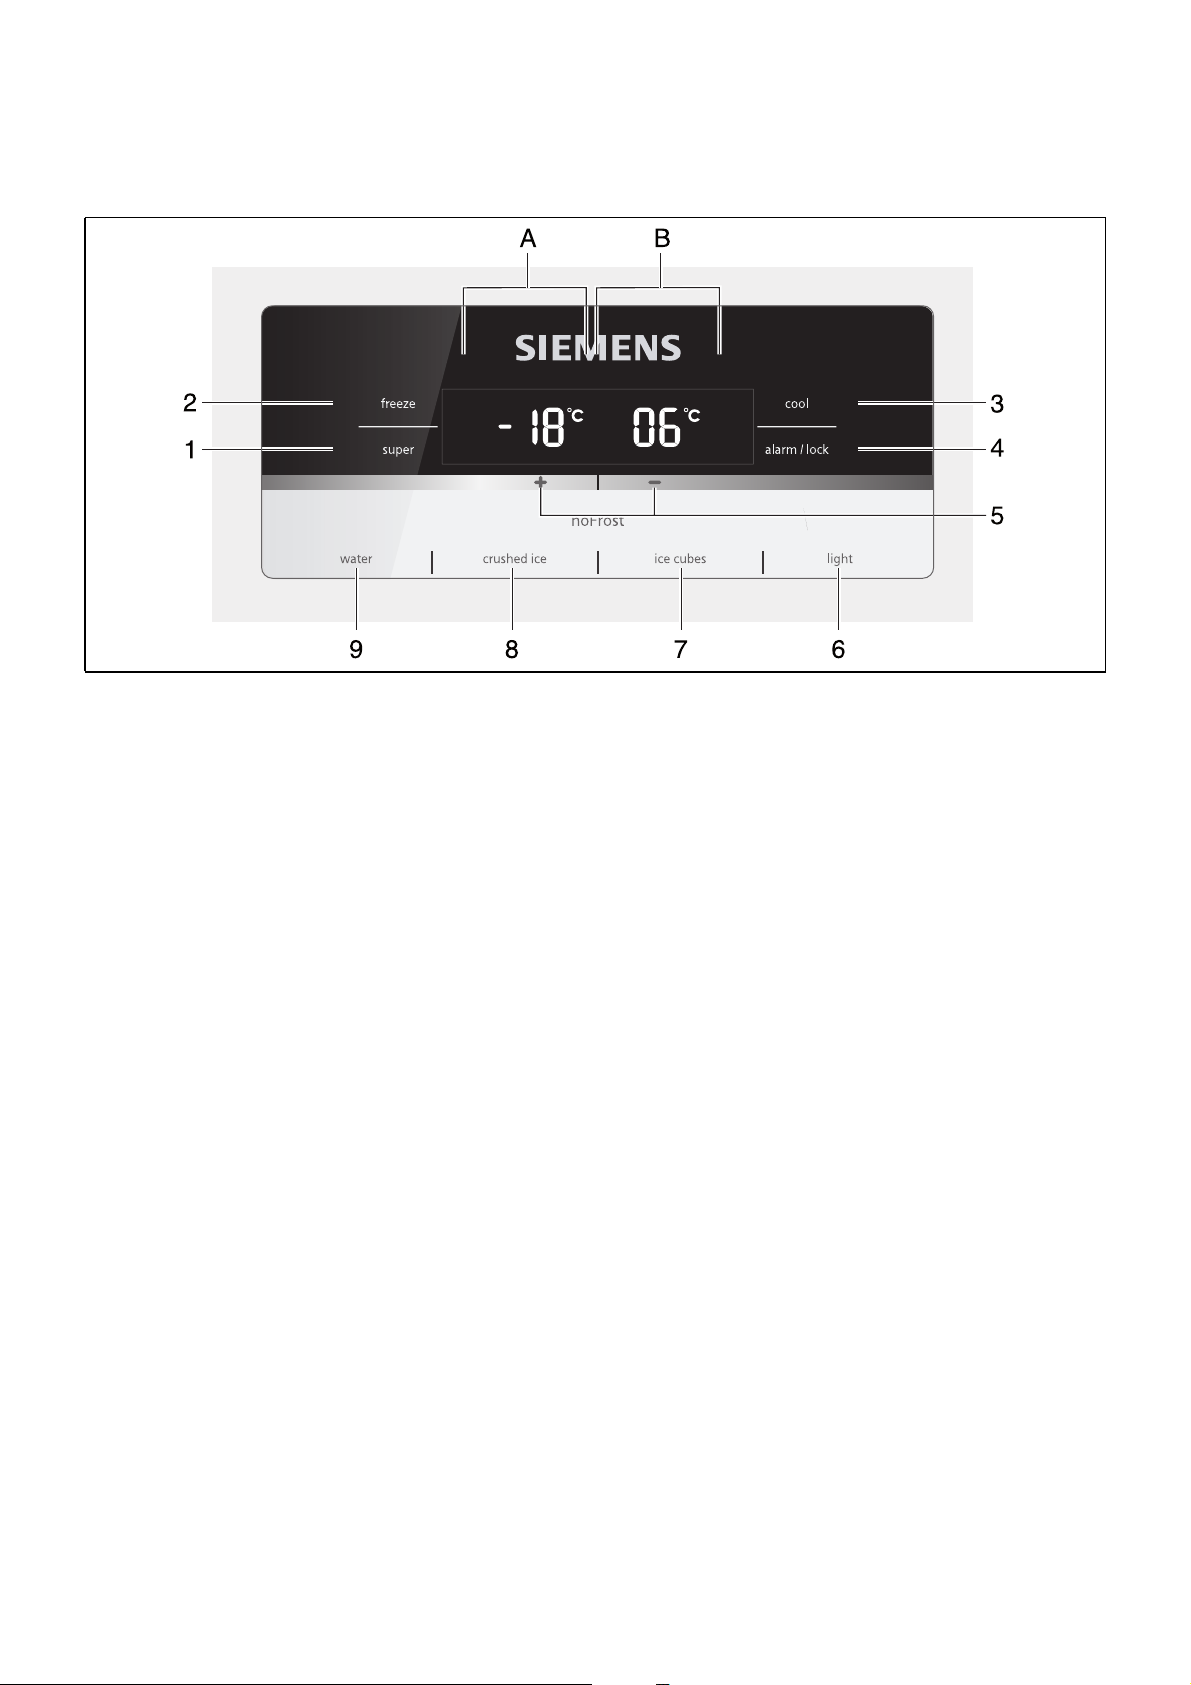
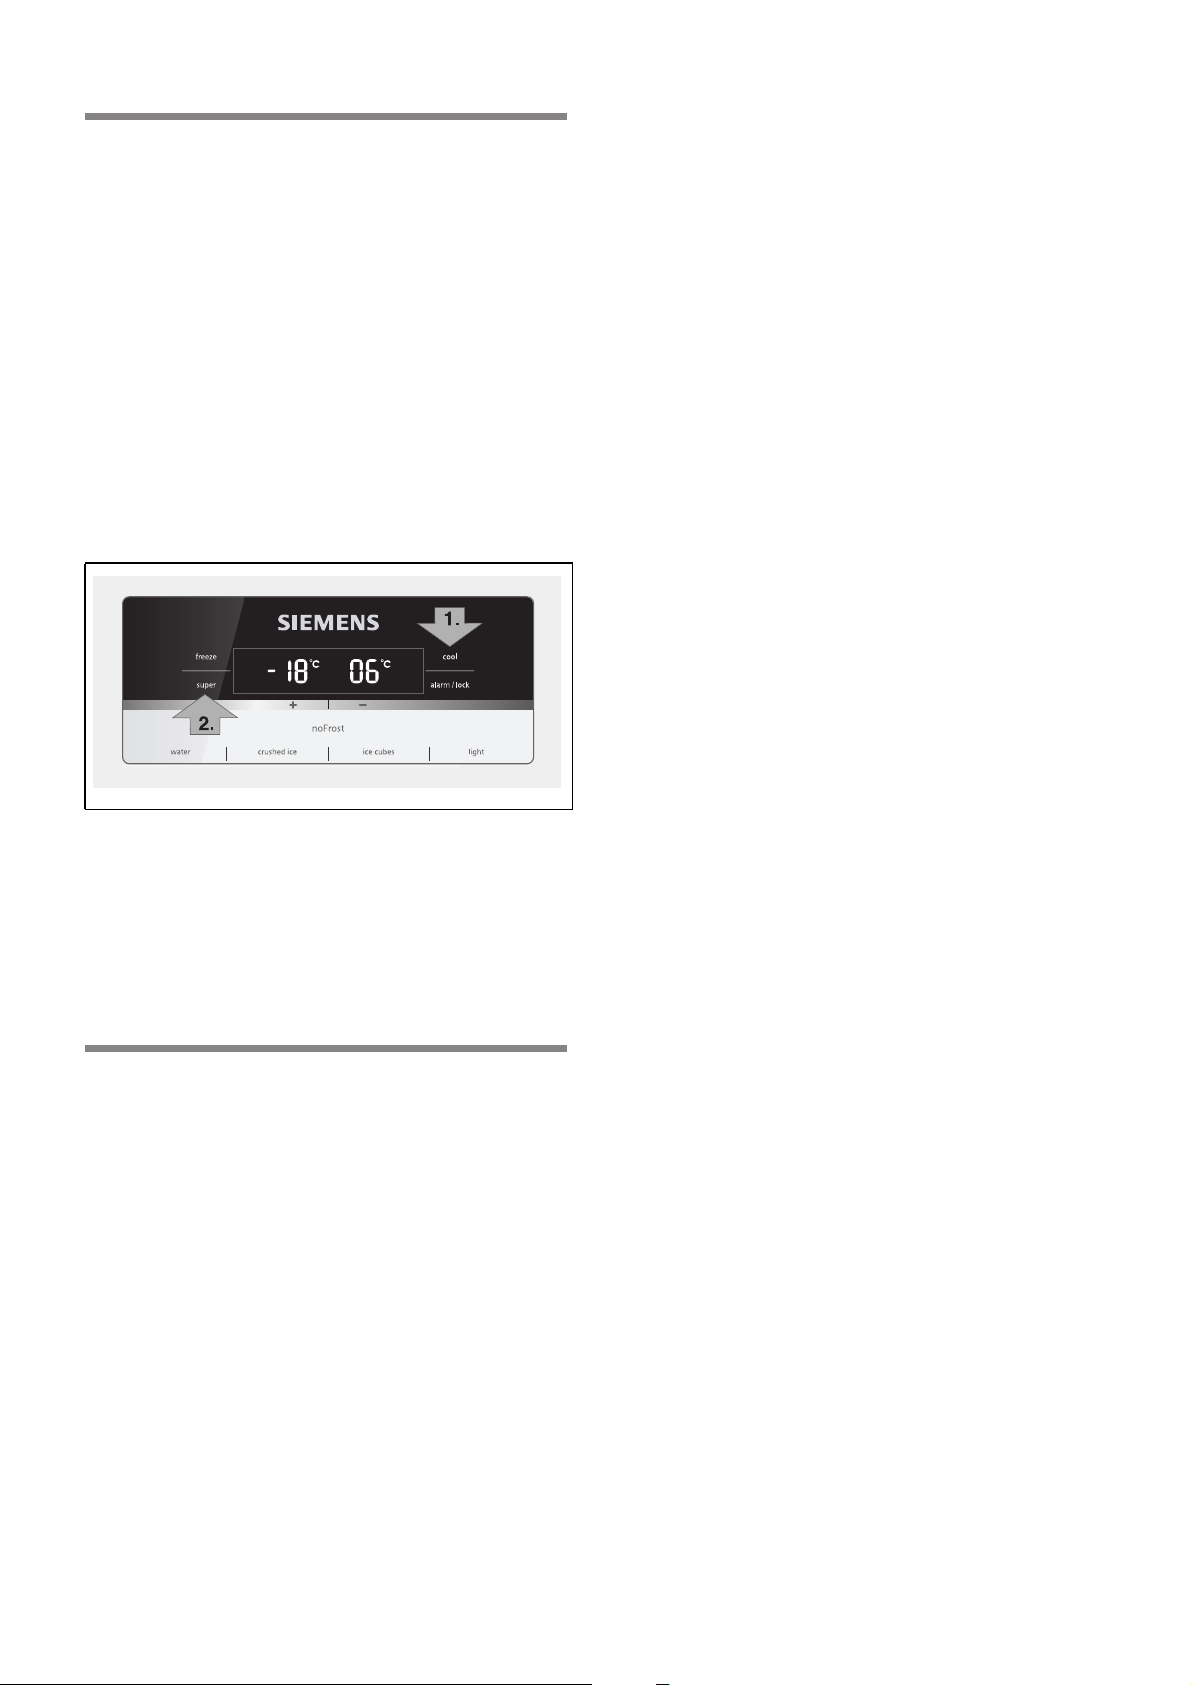
Bedien- und Anzeigefeld
Das Bedien- und Anzeigefeld an der Türe besteht aus einem Berührungsfeld.
Durch Berühren eines Tastenfeldes wird die entsprechende Funktion ausgelöst.
de
A Anzeigefeld Gefrierraum
B Anzeigefeld Kühlraum
1 Super-Taste
Zum Einschalten der Funktionen Super-Kühlen
(Kühlraum) oder Super-Gefrieren (Gefrierraum)
(siehe Kapitel Super-Kühlen bzw. siehe Kapitel
Super-Gefrieren).
2 freeze-Taste
Um Einstellungen für den Bereich Gefrierraum
vornehmen zu können, Taste so lange drücken,
bis im Anzeigefeld Gefrierraum „freeze“ leuchtet.
3 cool-Taste
Um Einstellungen für den Bereich Kühlraum
vornehmen zu können, Taste so lange drücken,
bis im Anzeigefeld Kühlraum „cool“ leuchtet.
4 Alarm/lock-Taste
Die Taste dient zum
■ Abschalten des Warntons (siehe Kapitel
Alarmfunktion)
■ Ein- und Ausschalten der Tastensperre.
Zum Ein- und Ausschalten der Tastensperre, die
Taste 5 Sekunden lang drücken. Bei
eingeschalteter Funktion leuchtet im Anzeigefeld
„lock“.
Ausnahme der Tastensperre:
Bei einem Warnton kann die Alarm/lock-Taste
gedrückt werden.
5 Einstell-Tasten +/-
Die Tasten dienen zum Einstellen der
Temperaturen des Kühl- und Gefrierraums.
6 Ein-/Aus-Taste Beleuchtung Eis- und
Wasserausgabe
7 Ausgabetaste Eis
8 Ausgabetaste zerkleinertes Eis
9 Ausgabetaste Wasser
11
Page 12
de
Gerät einschalten
Mit dem Anschließen ist das Gerät eingeschaltet. Es
ertönt ein Warnton.
Drücken Sie die “alarm/lock” Taste. Der Warnton
schaltet ab.
Die Anzeige „alarm“ erlischt, sobald das Gerät die
eingestellte Temperatur erreicht hat.
Die voreingestellten Temperaturen werden nach
mehreren Stunden erreicht. Vorher keine Lebensmittel
in das Gerät legen.
Vom Werk aus sind folgende Temperaturen empfohlen:
■ Gefrierraum: -18 °C
■ Kühlraum: +4 °C
Temperatureinheit einstellen
Die Temperatur kann in Grad Celsius (°C) oder Grad
Fahrenheit (°F) angezeigt werden.
Temperatureinheit einstellen
Zum Einstellen der Temperatureinheit die freeze-Taste
und die cool-Taste für 5 Sekunden gleichzeitig drücken.
Je nach vorheriger Einstellung wird auf die andere
Temperatureinheit umgeschaltet.
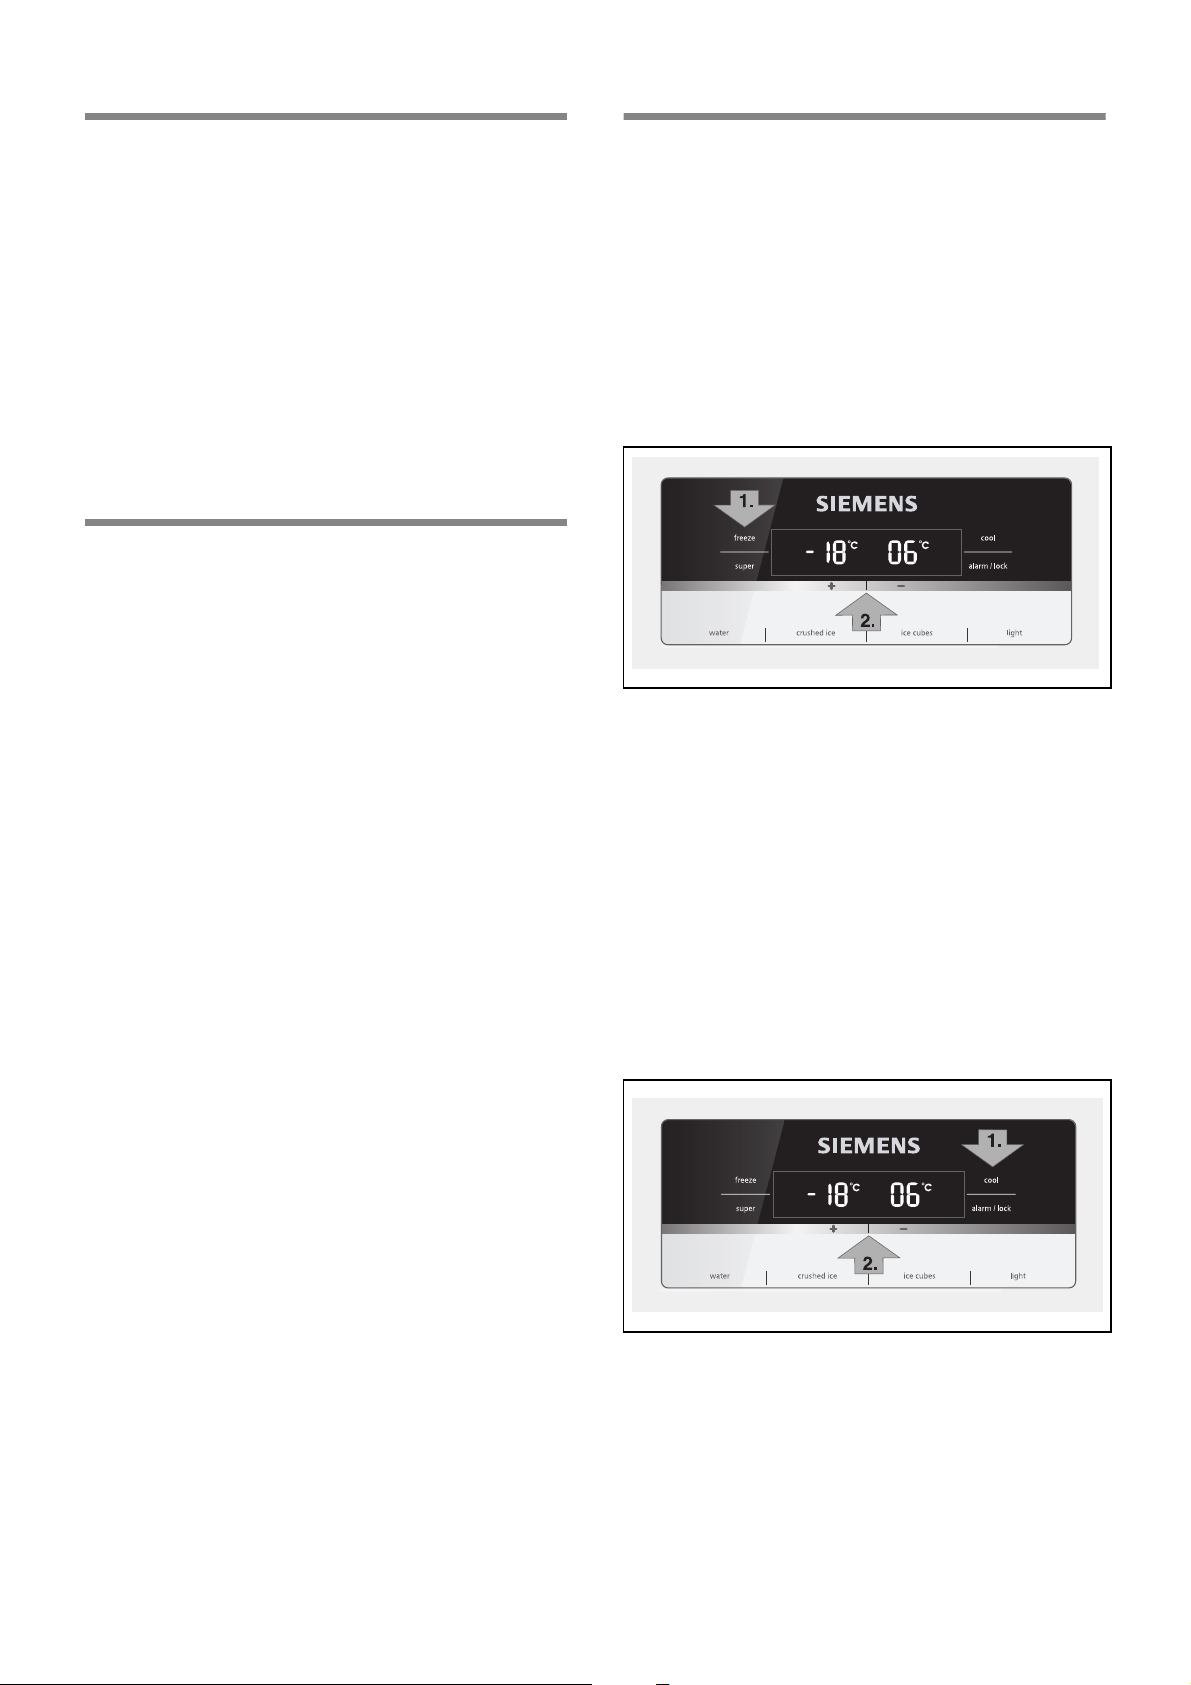
Temperatur einstellen
Gefrierraum
Der Gefrierraum ist von -14 °C bis -24 °C einstellbar.
Wir empfehlen eine Einstellung von -18 °C.
Der zuletzt angezeigte Wert wird vom System
gespeichert.
1. Die freeze-Taste so lange drücken, bis auf dem
Anzeigefeld Gefrierraum „freeze“ leuchtet.
2. Mit den Einstell-Tasten + (wärmer) oder - (kühler) die
Temperatur einstellen.
Kühlraum
Der Kühlraum ist von +2 °C bis +8 °C einstellbar.
Die Temperatur lässt sich in Schritten von 1 °C
einstellen.
Der zuletzt angezeigte Wert wird vom System
gespeichert.
Wir empfehlen eine Einstellung von +4 °C.
Empfindliche Lebensmittel sollten nicht wärmer als
+4 °C gelagert werden.
1. Die cool-Taste so lange drücken, bis auf dem
Anzeigefeld Kühlraum „cool“ leuchtet.
2. Mit den Einstell-Tasten + (wärmer) oder - (kühler) die
Temperatur einstellen.
12
Page 13
de
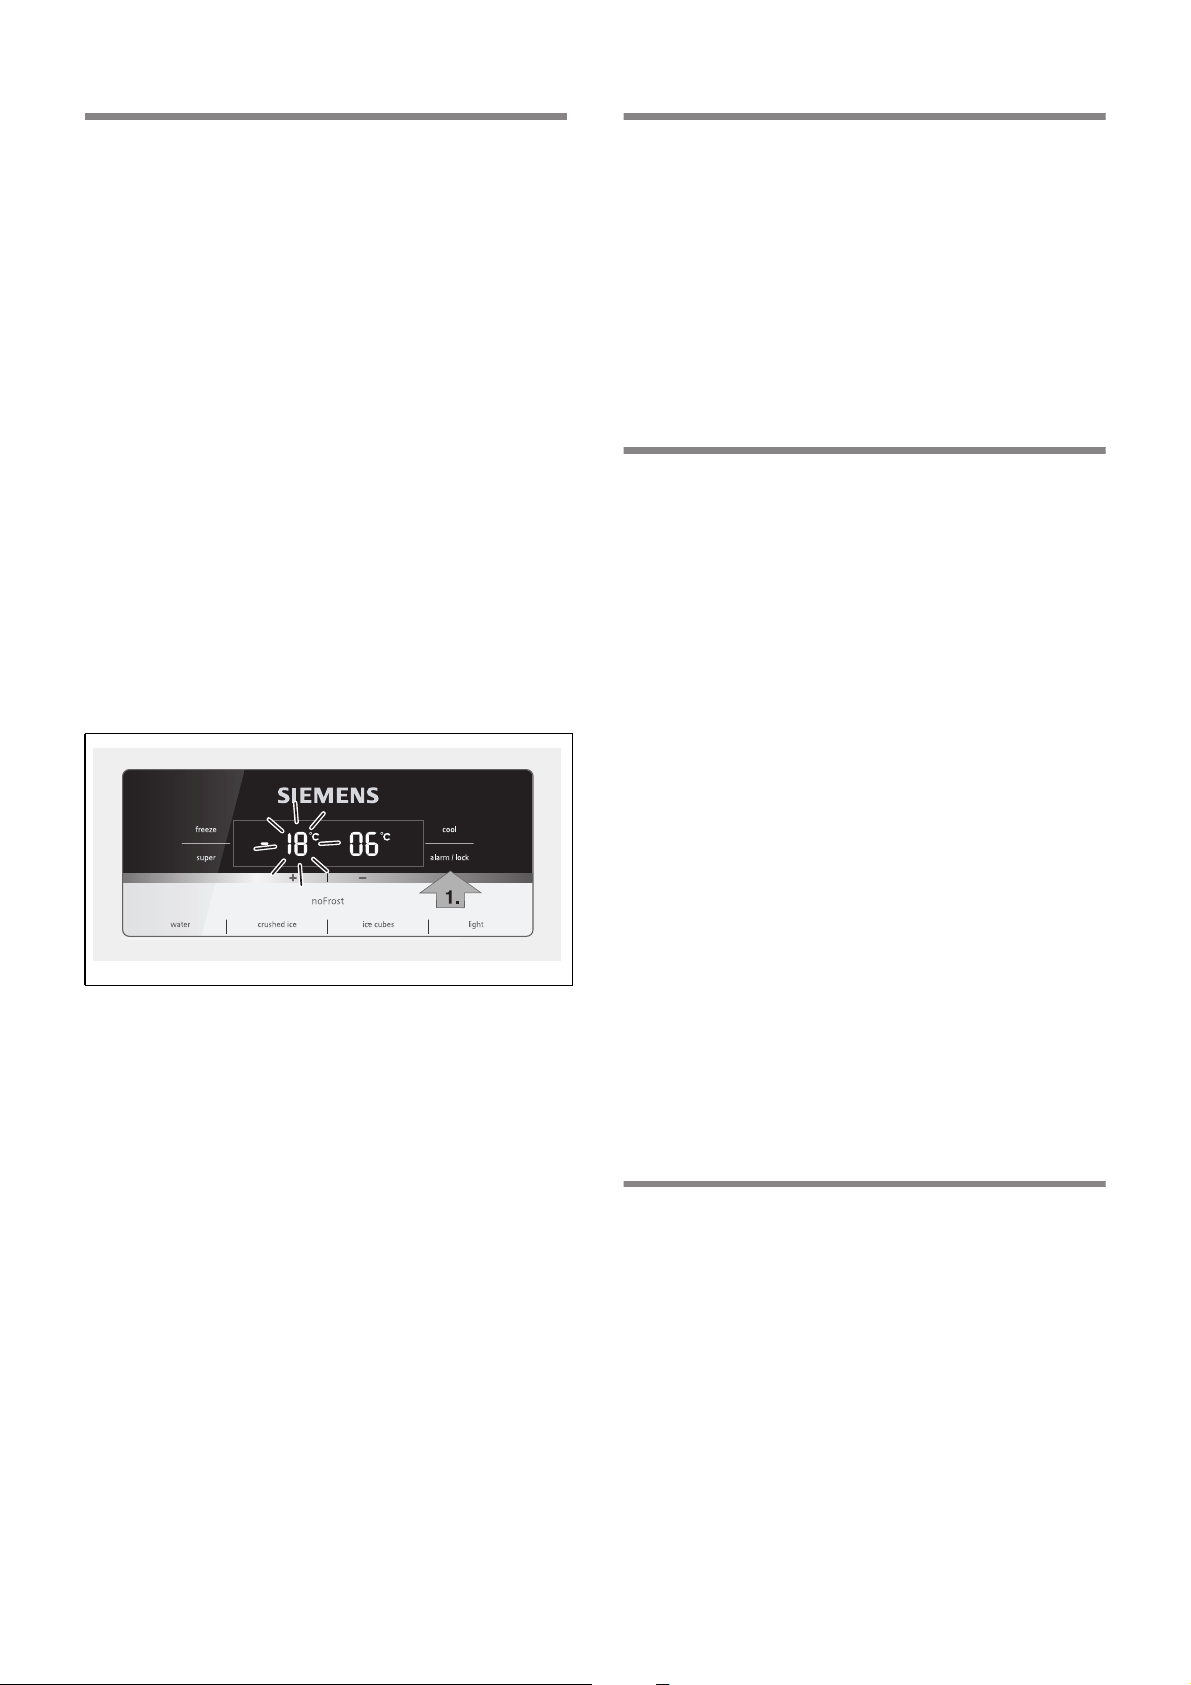
Alarmfunktion
Durch Drücken der Alarm/lock-Taste schaltet sich der
Warnton ab.
In folgenden Fällen kann ein Alarm ausgelöst werden:
Türalarm
Wenn das Gerät länger als eine Minute offen steht,
schaltet sich der Türalarm (Dauerton) ein. Durch
Schließen der Tür oder Drücken der Alarm-Taste 4
schaltet sich der Warnton wieder ab.
Temperaturalarm
Der Temperaturalarm schaltet sich ein, wenn es im
Gefrier- und Kühlraum zu warm ist und die Lebensmittel
gefährdet sind.
Ohne Gefahr für das Gefriergut kann das akustische
und optische Signal erfolgen bei:
■ Inbetriebnahme des Gerätes.
■ Einlegen großer Mengen frischer Lebensmittel.
Gefrierraum
Auf dem Anzeigefeld blinkt die eingestellte Temperatur
des Gefrierraums und „alarm“ wird angezeigt.
Nutzinhalt
Die Angaben zum Nutzinhalt finden Sie in Ihrem Gerät
auf dem Typenschild (siehe Bild im Kapitel
Kundendienst).
Gefriervolumen vollständig nutzen
Um die maximale Menge an Gefriergut unterzubringen,
können Sie den obersten Gefriergutbehälter aus dem
Gerät herausnehmen. Die Lebensmittel können Sie
dann direkt auf den Ablagen und im unteren
Gefriergutbehälter stapeln.
Der Gefrierraum
Den Gefrierraum verwenden
■ Zum Lagern von Tiefkühlkost.
■ Zum Herstellen von Eiswürfeln.
■ Zum Einfrieren von Lebensmitteln.
Hinweis
Achten Sie darauf, dass die Gefrierraum-Tür immer
geschlossen ist! Bei offener Tür taut das Gefriergut auf
und der Gefrierraum vereist stark. Außerdem:
Energieverschwendung durch hohen Stromverbrauch!
Nach dem Schließen der Gefrierraum-Tür entsteht ein
Unterdruck, dadurch entsteht ein saugendes Geräusch.
Warten Sie zwei bis drei Minuten, bis sich der
Unterdruck ausgeglichen hat.
Wir empfehlen, den Eiswürfelbehälter im Gerät zu
belassen. Damit ist eine optimale Temperaturverteilung
im Gefrierraum gewährleistet.
Die Temperaturanzeige zeigt für 10 Sekunden die
wärmste Temperatur an, die im Gefrierraum geherrscht
hat. Danach wird wieder die eingestellte Temperatur
angezeigt.
Die Anzeige „alarm“ erlischt, sobald die eingestellte
Temperatur wieder erreicht ist.
Hinweis
An- oder aufgetautes Gefriergut nicht wieder einfrieren.
Erst nach dem Verarbeiten zu einem Fertiggericht
(gekocht oder gebraten) kann es erneut eingefroren
werden.
Die maximale Lagerdauer nicht mehr voll nutzen.
Kühlraum
Auf dem Anzeigefeld wird „alarm“ angezeigt.
m Achtung
Wenn es im Kühlraum zu warm geworden ist,
erwärmtes Kühlgut vor dem Verzehr erhitzen. Rohe
Lebensmittel im Zweifel nicht mehr verwenden.
Tiefkühlkost einkaufen
■ Verpackung darf nicht beschädigt sein.
■ Haltbarkeitsdatum beachten.
■ Temperatur in der Verkaufstruhe muss -18 °C oder
kälter sein.
■ Tiefkühlkost möglichst in einer Isoliertasche
transportieren und schnell in den Gefrierraum legen.
Max. Gefriervermögen
Angaben über das max. Gefriervermögen in
24 Stunden finden Sie auf dem Typenschild (siehe Bild
im Kapitel Kundendienst)
13
Page 14

de
Frische Lebensmittel einfrieren
Verwenden Sie zum Einfrieren nur frische und
einwandfreie Lebensmittel.
Um Nährwert, Aroma und Farbe möglichst gut zu
erhalten, sollte Gemüse vor dem Einfrieren blanchiert
werden. Bei Auberginen, Paprika, Zucchini und Spargel
ist das Blanchieren nicht erforderlich.
Literatur über das Einfrieren und Blanchieren finden Sie
im Buchhandel.
Hinweis
Einzufrierende Lebensmittel nicht mit bereits gefrorenen
in Berührung bringen.
■ Zum Einfrieren geeignet sind:
Backwaren, Fisch und Meeresfrüchte, Fleisch, Wild,
Geflügel, Gemüse, Obst, Kräuter, Eier ohne Schale,
Milchprodukte wie Käse, Butter und Quark, fertige
Gerichte und Speisereste wie Suppen, Eintöpfe,
gegartes Fleisch und Fisch, Kartoffelspeisen,
Aufläufe und Süßspeisen.
■ Zum Einfrieren nicht geeignet sind:
Gemüsesorten, die üblicherweise roh verzehrt
werden, wie Blattsalate oder Radieschen, Eier in der
Schale, Weintrauben, ganze Äpfel, Birnen und
Pfirsiche, hartgekochte Eier, Joghurt, Dickmilch,
saure Sahne, Creme Fraiche und Mayonnaise.
Super-Gefrieren
Lebensmittel sollen möglichst schnell bis zum Kern
durchgefroren werden, damit Vitamine, Nährwerte,
Aussehen und Geschmack erhalten bleiben.
Schalten Sie einige Stunden vor dem Einlegen der
frischen Lebensmittel das Super-Gefrieren ein, um
einen unerwünschten Temperaturanstieg zu vermeiden.
Im Allgemeinen genügen 4–6 Stunden.
Das Gerät arbeitet nach dem Einschalten ständig, im
Gefrierraum wird eine sehr kalte Temperatur erreicht.
Soll das max. Gefriervermögen genutzt werden, ist das
Super-Gefrieren 24 Stunden vor dem Einlegen der
frischen Ware einzuschalten.
Kleinere Mengen Lebensmittel (bis zu 2 kg) können Sie
ohne Super-Gefrieren einfrieren.
Super-Gefrieren einschalten
1. Die freeze-Taste so lange drücken, bis auf dem
Anzeigefeld Gefrierraum „freeze“ leuchtet.
2. Super-Taste drücken.
Ist das Super-Gefrieren eingeschaltet, wird auf dem
Anzeigefeld „super“ angezeigt.
Gefriergut verpacken
Lebensmittel luftdicht verpacken, damit sie den
Geschmack nicht verlieren oder austrocknen.
1. Lebensmittel in die Verpackung einlegen.
2. Luft herausdrücken.
3. Verpackung dicht verschließen.
4. Verpackung mit Inhalt und Einfrierdatum beschriften.
Als Verpackung geeignet:
Kunststoff-Folie, Schlauch-Folie aus Polyethylen, AluFolie, Gefrierdosen.
Diese Produkte finden Sie im Fachhandel.
Als Verpackung ungeeignet:
Packpapier, Pergamentpapier, Cellophan, Müllbeutel
und gebrauchte Einkaufstüten.
Zum Verschließen geeignet:
Gummiringe, Kunststoff-Klipse, Bindfäden,
kältebeständige Klebebänder, o. ä.
Beutel und Schlauch-Folien aus Polyethylen können mit
einem Folienschweißgerät verschweißt werden.
Haltbarkeit des Gefriergutes
Die Haltbarkeit ist abhängig von der Art der
Lebensmittel.
Super-Gefrieren ausschalten
1. Die Freeze-Taste so lange drücken, bis auf dem
Anzeigefeld Gefrierraum „freeze“ leuchtet.
2. Super-Taste drücken.
Ist das Super-Gefrieren ausgeschaltet, erlischt die
Anzeige „super“ auf dem Anzeigefeld.
Hinweis
Das Super-Gefrieren schaltet nach ca. 2^ Tagen
automatisch ab.
Bei einer Temperatur von -18 °C:
■ Fisch, Wurst, fertige Speisen, Backwaren:
bis zu 6 Monate
■ Käse, Geflügel, Fleisch:
bis zu 8 Monate
■ Gemüse, Obst:
bis zu 12 Monate
14
Page 15
Gefriergut auftauen
Je nach Art und Verwendungszweck können Sie
zwischen folgenden Möglichkeiten wählen:
■ bei Raumtemperatur
■ im Kühlschrank
■ im elektrischen Backofen, mit/ohne Heißluftventilator
■ im Mikrowellengerät
m Achtung
An- oder aufgetautes Gefriergut nicht wieder einfrieren.
Erst nach dem Verarbeiten zu einem Fertiggericht
(gekocht oder gebraten) kann es erneut eingefroren
werden.
Die max. Lagerdauer des Gefriergutes nicht mehr voll
nutzen.
Der Kühlraum
Der Kühlraum ist der ideale Aufbewahrungsort für
Fleisch, Wurst, Fisch, Milchprodukte, Eier, fertige
Speisen und Backwaren.
de
Gemüsebehälter mit Feuchtigkeitsregler
Um das optimale Lagerklima für Obst und Gemüse zu
schaffen, können Sie die Luftfeuchtigkeit in dem
Gemüsebehälter je nach Einlagerungsmenge
einstellen:
■ kleine Mengen Obst und Gemüse – hohe
Luftfeuchtigkeit
■ große Mengen Obst und Gemüse – niedrige
Luftfeuchtigkeit
Beim Einlagern beachten
■ Lagern Sie frische, unversehrte Lebensmittel ein. So
bleibt Qualität und Frische länger erhalten.
■ Bei Fertigprodukten und abgefüllten Waren das vom
Hersteller angegebene Mindesthaltbarkeits- oder
Verbrauchsdatum beachten.
■ Um Aroma, Farbe und Frische zu erhalten,
Lebensmittel gut verpackt oder abgedeckt
einordnen. Geschmacksübertragungen und
Verfärbungen der Kunststoffteile im Kühlraum
werden dadurch vermieden.
■ Warme Speisen und Getränke erst abkühlen lassen,
dann ins Gerät stellen.
Hinweis
Vermeiden Sie Kontakt zwischen Lebensmitteln und
Rückwand. Die Luftzirkulation wird sonst beeinträchtigt.
Lebensmittel oder Verpackungen könnten an der
Rückwand festfrieren.
Kältezonen im Kühlraum beachten
Durch die Luftzirkulation im Kühlraum entstehen Zonen
unterschiedlicher Kälte:
■ Kälteste Zone ist zwischen dem Gemüsebehälter
und der darüberliegenden Glasablage.
Hinweise
■ Kälteempfindliches Obst (z. B. Ananas, Banane,
Papaya und Zitrusfrüchte) und Gemüse (z. B.
Auberginen, Gurken, Zucchini, Paprika, Tomaten und
Kartoffeln) sollten für den optimalen Erhalt von
Qualität und Aroma außerhalb des Kühlschrankes
bei Temperaturen von circa +8 °C bis +12 °C
gelagert werden.
■ Je nach Lagermenge und Lagergut kann sich im
Gemüsebehälter Kondenswasser bilden.
Kondenswasser mit einem trockenen Tuch entfernen
und Luftfeuchtigkeit im Gemüsebehälter über den
Feuchtigkeitsregler anpassen.
Hinweis
Lagern Sie in der kältesten Zone oberhalb des
Gemüsebehälters empfindliche Lebensmittel
(z. B. Fisch, Wurst, Fleisch).
■ Wärmste Zone ist an der Tür ganz oben.
Hinweis
Lagern Sie in der wärmsten Zone z. B. Hartkäse und
Butter. Käse kann so sein Aroma weiter entfalten, die
Butter bleibt streichfähig.
15
Page 16
de
Super-Kühlen
Beim Super-Kühlen wird der Kühlraum ca. 6 Stunden
lang so kalt wie möglich gekühlt. Danach wird
automatisch auf die vor dem Super-Kühlen eingestellte
Temperatur umgestellt.
Das Super-Kühlen einschalten z. B.
■ vor dem Einlegen großer Mengen Lebensmittel.
■ zum Schnellkühlen von Getränken.
Super-Kühlen einschalten
1. Die cool-Taste so lange drücken, bis auf dem
Anzeigefeld Kühlraum „cool“ leuchtet.
2. Super-Taste drücken.
Ist das Super-Kühlen eingeschaltet, wird auf dem
Anzeigefeld „super“ angezeigt.
Bei Inbetriebnahme beachten
Die Eis- und Wasserausgabe funktioniert nur, wenn das
Gerät an das Wassernetz angeschlossen ist.
Nach der Inbetriebnahme des Gerätes dauert es
ca. 24 Stunden, bis die erste Portion Eiswürfel
hergestellt ist.
Nach dem Anschließen befinden sich noch Luftblasen
in den Leitungen.
Trinkwasser so lange zapfen und wegschütten, bis
Wasser blasenfrei gezapft werden kann. Die ersten
5 Gläser wegschütten.
Wenn der Eiswürfelbereiter zum ersten Mal benutzt
wird, die ersten 30-40 Eiswürfel aus Hygienegründen
nicht benutzen.
Hinweise zum Betrieb des Eisbereiters
Sobald der Gefrierraum seine Gefriertemperatur
erreicht hat, startet die Eiswürfelproduktion. Nach 2–
3 Stunden werden die fertigen Eiswürfel automatisch in
den Eiswürfelbehälter geschüttet.
Hinweis
Das Gerät produziert mehr Eis, wenn Sie die
Gefrierraumtemperatur kälter einstellen. Dadurch
erhöht sich die Energieaufnahme Ihres Gerätes etwas.
Gelegentlich frieren Eiswürfel zusammen und
blockieren die Ausgabe:
Super-Kühlen ausschalten
1. Die cool-Taste so lange drücken, bis auf dem
Anzeigefeld Kühlraum „cool“ leuchtet.
2. Super-Taste drücken.
Ist das Super-Kühlen ausgeschaltet, erlischt die
Anzeige „super“ auf dem Anzeigefeld.
Eis- und Wasserausgabe
Je nach Bedarf können entnommen werden:
■ gekühltes Wasser,
■ zerkleinertes Eis,
■ Eiswürfel.
m Warnung
Nie in die Eiswürfelausgabeöffnung greifen!
Verletzungsgefahr!
m Achtung
Keine Flaschen oder Lebensmittel zum Schnellkühlen
in den Eiswürfelbehälter legen. Der Eisbereiter kann
blockieren und Schaden nehmen.
1. Tür öffnen und innen nachschauen, ob Eiswürfel in
der Eis- und Wasserausgabe festhängen.
2. Falls die Eis- und Wasserausgabe nicht blockiert ist:
m Achtung
Ein gefüllter Eiswürfelbehälter ist schwer!
■ Eiswürfelbehälter vorsichtig herausziehen und
zusammengefrorene Eiswürfel entnehmen.
Wenn der Eiswürfelbehälter voll ist, schaltet die
Eisbereitung automatisch ab.
Bei der Herstellung der Eiswürfel ist das Summen des
Wasserventils, das Einströmen des Wassers in die
Eisschale und das Fallen der Eiswürfel hörbar.
Trinkwasserqualität beachten
Alle verwendeten Materialien des Getränkespenders
sind geruchs- und geschmacksneutral.
Sollte Wasser einen Beigeschmack haben, kann es
folgende Ursachen haben:
■ Mineral- und Chlorgehalt des Trinkwassers.
■ Material der Hauswasser- und Anschlussleitung.
■ Frische des Trinkwassers. Wenn lange Zeit kein
Wasser entnommen wurde, kann das Wasser
„abgestanden“ schmecken. In diesem Fall ca.
15 Gläser Wasser abfüllen und wegschütten.
Wir empfehlen dem Wasserbereiter regelmäßig etwas
Frischwasser zu entnehmen und das Gerät nicht
auszuschalten. Dadurch wird die beste Wasserqualität
erhalten.
Der beigefügte Wasserfilter filtert ausschließlich Partikel
aus dem zugeführten Wasser, keine Bakterien oder
Mikroben.
16
Page 17
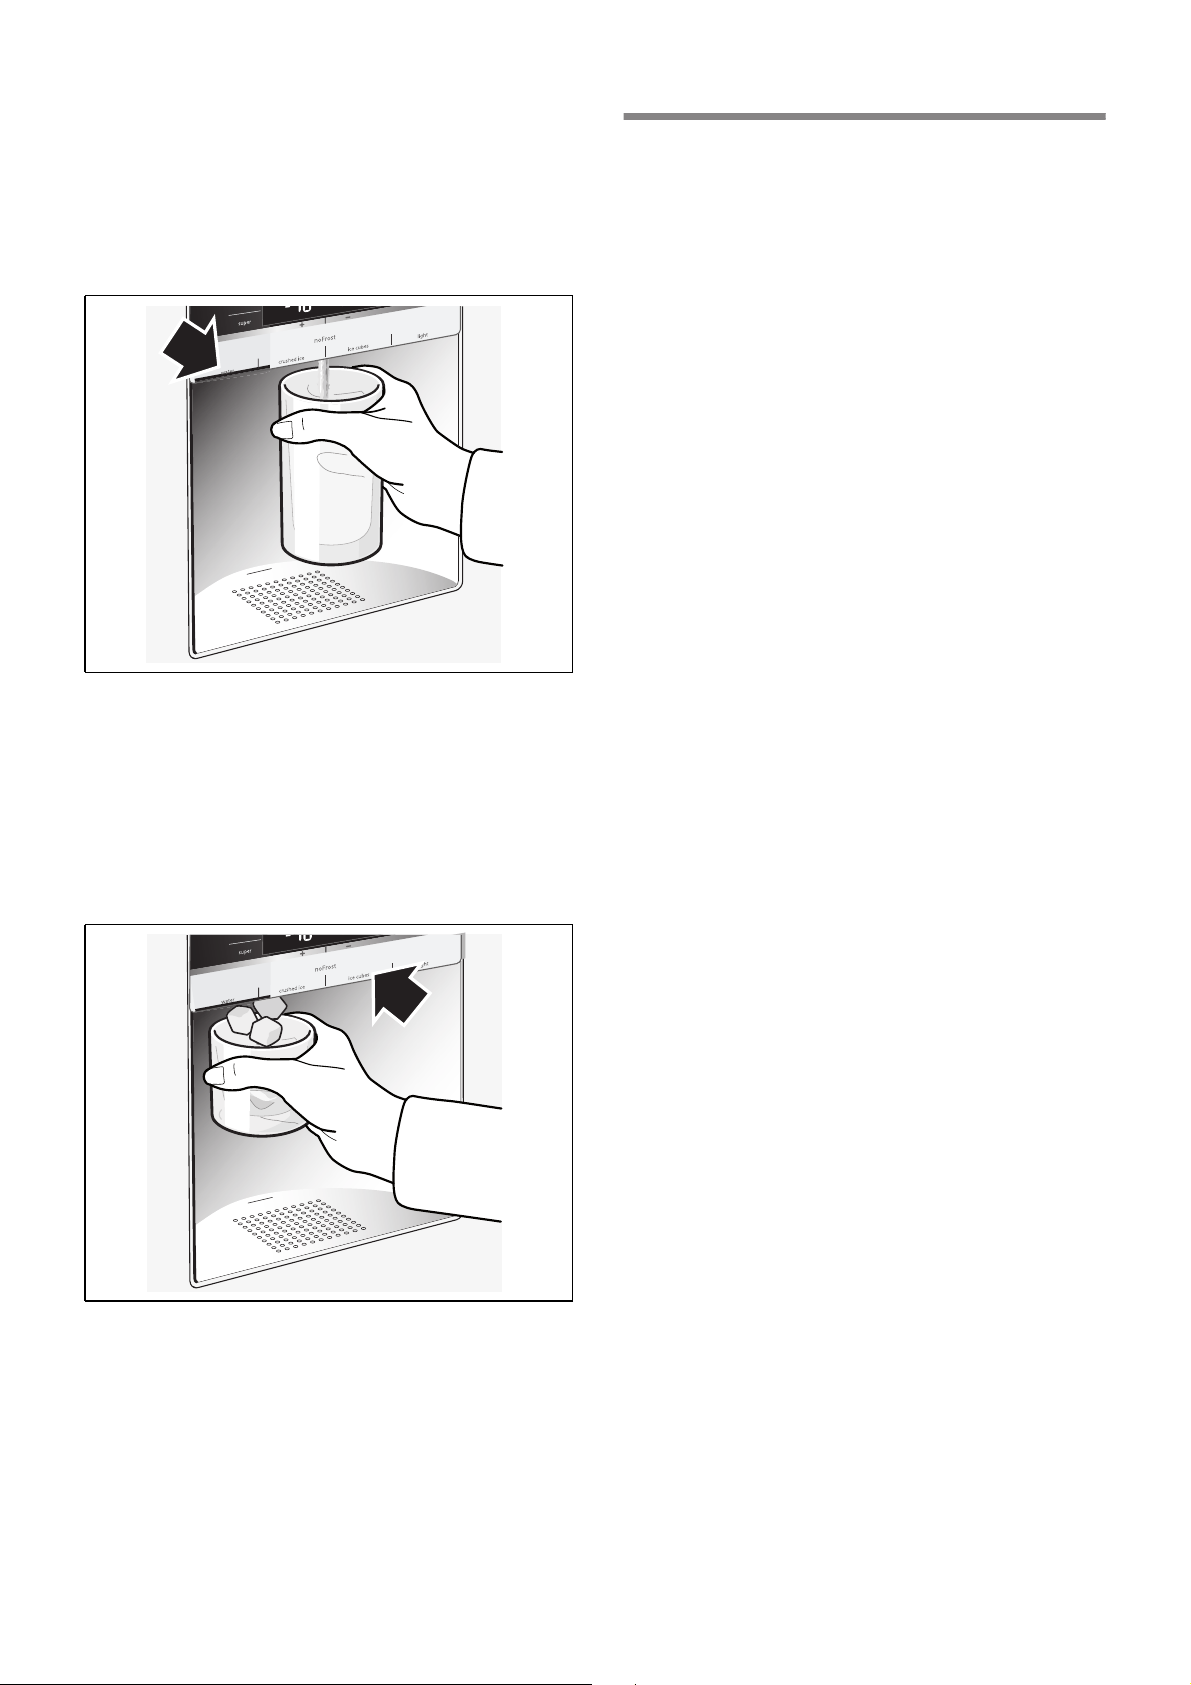
Eis/Wasser entnehmen
■ Taste der Eis- und Wasserausgabe (Wasser,
zerkleinertes Eis oder Eiswürfel) auswählen.
■ Taste so lange drücken, bis die gewünschte Menge
im Glas ist.
Wasser entnehmen
de
Eis- und Wasserausgabe ausund einschalten
m Achtung
■ Wasserzufuhr zum Gerät unbedingt einige Stunden
vor dem Ausschalten des Eisbereiters unterbrechen.
■ Eiswürfelbehälter entleeren und reinigen. Behälter
wieder einsetzen. Darauf achten, dass der
Eiswürfelbehälter auf der Auflage einrastet.
Eis- und Wasserausgabe ausschalten
Freezer-Taste und Super-Taste gleichzeitig für
5 Sekunden drücken. Auf dem Anzeigefeld erscheint
„IWD off“.
Eis- und Wasserausgabe einschalten
Freezer-Taste und Super-Taste gleichzeitig für
5 Sekunden drücken. Die Anzeige „IWD off“ erlischt auf
dem Anzeigefeld.
Hinweis
Das Wasser vom Wasserspender ist mundgerecht
gekühlt. Wenn das Wasser kälter gewünscht wird, vor
dem Zapfen zusätzlich Eiswürfel ins Glas geben.
Hinweis
Bei Entnahme größerer Mengen Wasser kann das
entnommene Wasser wärmer werden.
Eis entnehmen
17
Page 18
de
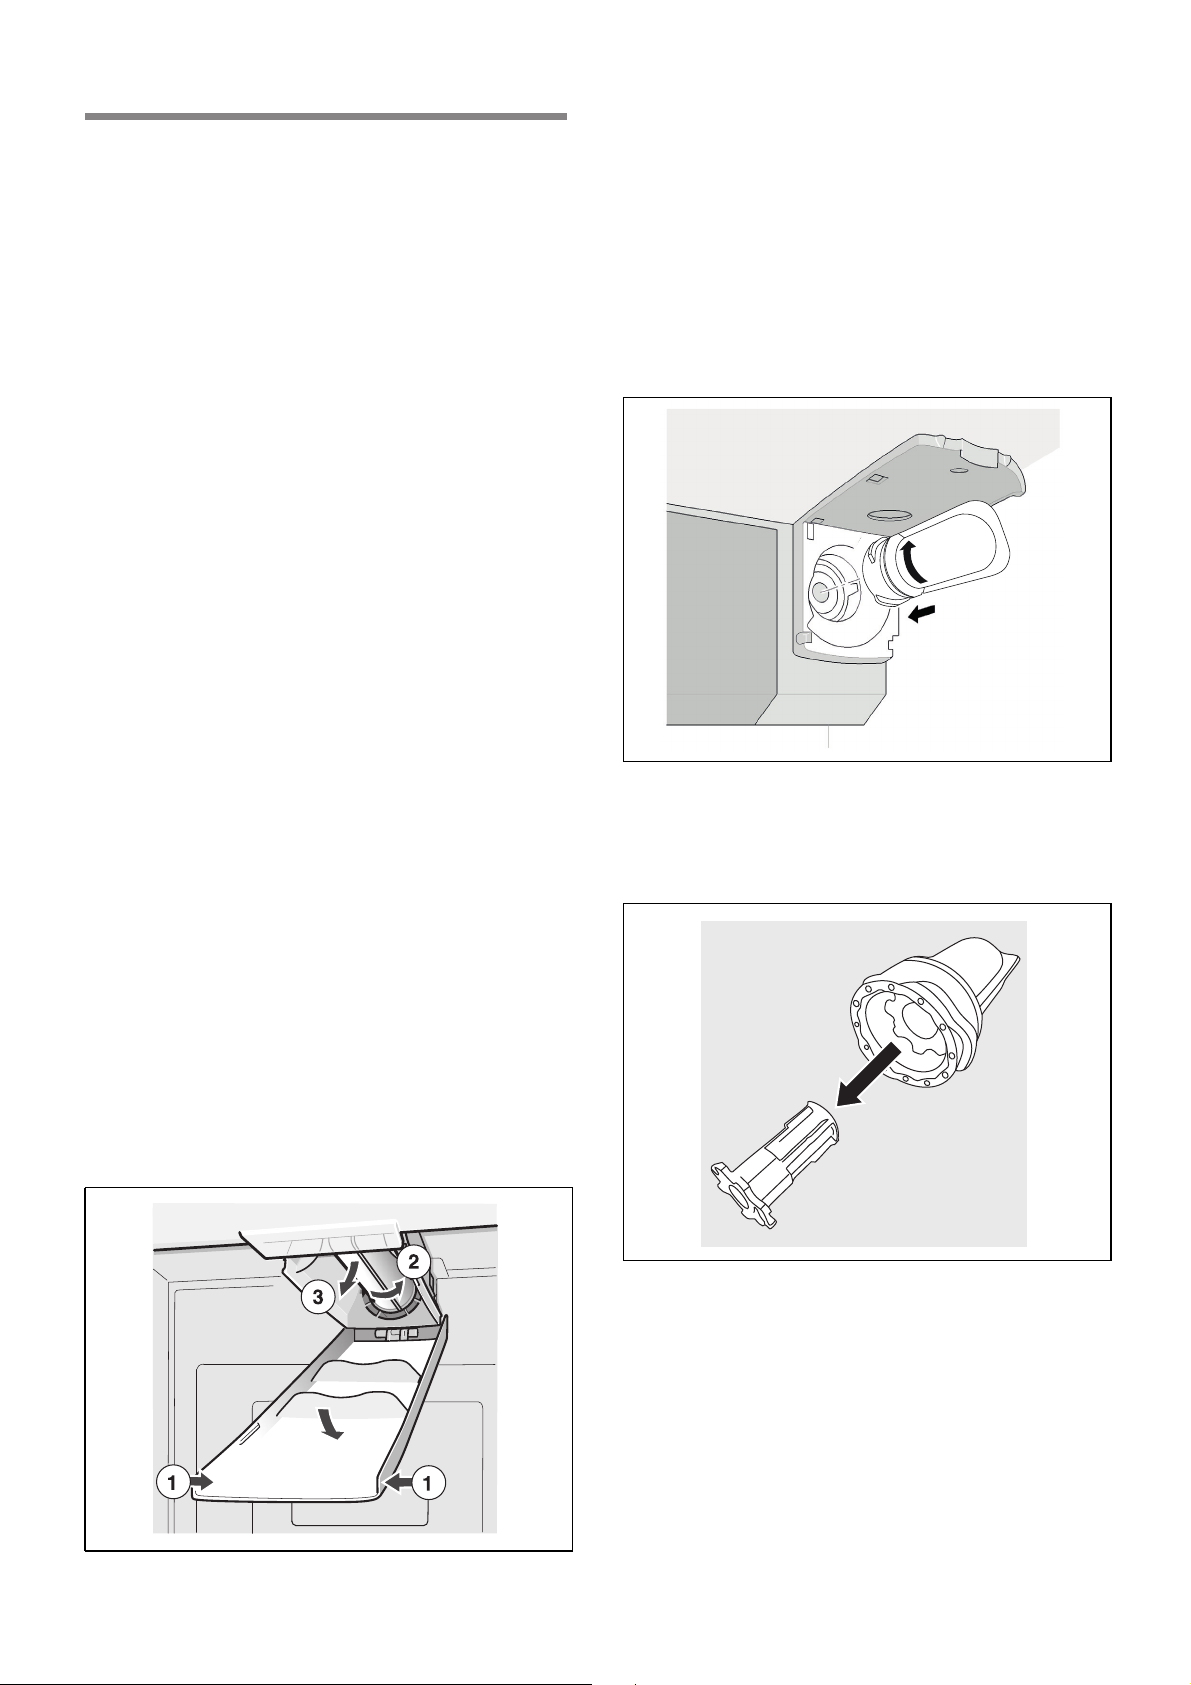
Wasserfilter
Das Gerät kann in Abhängigkeit von der verfügbaren
Wasserqualität sowohl mit als auch ohne Wasserfilter
betrieben werden. Bei Betrieb ohne Wasserfilter ist die
dafür vorgesehene Verschlusskappe zu benutzen.
■ Neue Filterpatrone einsetzen.
■ Einige Liter Wasser über den Wasserspender
beziehen. Die Luft aus dem Wassersystem wird
dadurch entfernt.
■ Wasser aus der alten Filterpatrone ausgießen.
Filterpatrone kann im Hausmüll entsorgt werden.
m Warnung
Gerät an Orten, wo die Wasserqualität bedenklich oder
nicht ausreichend bekannt ist, nicht ohne
angemessene Desinfektion vor und nach der Filterung
benutzen.
Eine Filterpatrone für den Partikelfilter kann über den
Kundendienst oder einen Fachhändler bezogen
werden.
m Achtung
■ Nach dem Einbau eines neuen Filters die
Eisproduktion der ersten 24 Stunden nach
Einschalten des Eisbereiters immer wegschütten.
■ Wenn das Eis für längere Zeit nicht genutzt wurde,
alle Eiswürfel aus dem Behälter wegschütten und
ebenso die Eisproduktion der nächsten 24 Stunden.
■ Wenn das Gerät oder das Eis für mehrere Wochen
oder Monate nicht aktiv genutzt wurde oder die
Eiswürfel einen unangenehmen Geschmack oder
Geruch haben, den Wasserfilter wechseln.
■ Lufteinschlüsse im System können Wasseraustritt
und das Auswerfen der Filterpatrone verursachen.
Vorsicht beim Entfernen.
■ Der Filter muss mindestens alle 6 Monate
gewechselt werden.
Verschlusskappe benutzen
Die Eis- und Wasserausgabe kann auch ohne
Wasserfilter benutzt werden. In diesem Fall die
Verschlusskappe einsetzen.
Hinweis
Die Verschlusskappe und das darin befindliche
Filtersieb sollten in regelmässigen Abständen unter
fließendem Wasser ausgewaschen werden.
Wichtige Hinweise zum Wasserfilter
■ Wassersystem steht nach Benutzung unter geringem
Druck. Vorsicht beim Abnehmen des Filters.
■ Wenn das Gerät längere Zeit nicht benutzt wurde
oder das Wasser unangenehm schmeckt oder
riecht, das Wassersystem durchspülen. Dazu
mehrere Minuten Wasser aus dem Wasserspender
beziehen. Wenn der unangenehme Geschmack oder
Geruch weiterbesteht, Filter auswechseln.
Filterpatrone wechseln
18
Page 19
Spezifikations- und
Leistungsdatenblatt
de
Die Konzentration der angegebenen in Wasser
gelösten Substanzen, die in das System eindringen,
wurde auf einen Wert unterhalb oder gleich dem
zulässigen Grenzwert gemäß ANSI/NSF 42 und 53 für
aus dem Gerät abgeleitetes Wasser gesenkt.
Für Filter-Modell: 9000 225 170
Hinweis
Obwohl die Tests unter standardmäßigen
Unter Verwendung von Ersatzkartusche:
9000 077 104
Das Modell wurde von NSF International auf ANSI/NSFStandards 42 und 53 geprüft und zur Reduzierung der
nachfolgend angeführten Substanzen zertifiziert.
Laborbedingungen durchgeführt wurden, kann die
tatsächliche Leistung hiervon abweichen.
Das System wurde in Modell 9000 225 170 von NSF
International in Bezug auf ANSI/NSF-Standard 53
zur Reduzierung von Zysten und Trübungen, sowie
in Bezug auf ANSI/NSF-Standard 42 zur
Reduzierung von Chlorgeschmack und -geruch
geprüft und zertifiziert.
Nennpartikelklasse: l
Nominelle Nutzdauer: 2.800 Liter
Substanz Durchschnitt im
Zysten* 166.500 Min. 50.000/l 1 99,99 99,95 1 99,99 511077-03
Trübung 10,7 11 x 1 NTU 0,3 l 97,10 0,5 NTU 0,49 95,42 511078-03
Partikel Klasse
1 Partikelgröße
> 0,5 bis <1,0
μm
Chlorgeschmack &
Trübung
Zufluss
5.700.000 Mind. 10.000
1,9 2,0 mg/l + - 10% 0,05 97,3 > 50% 0,06 96,84 511081-03
* Auf Grundlage der Verwendung von Cryptosporium
parvum -- Oozysten.
Anwendungsrichtlinien/
Wasserversorgungsparameter:
Zufluss-konzentration Abwasser-
konzentration
30.583 99,52 > 85% 69.000 98,9 511079-03
Partikel/ml
Durchschnittl.
Reduzierung in %
Für das gesamte System (außer der Einwegkartusche)
wird eine Gewährleistung von einem Jahr erteilt. In
Bezug auf Einwegkartuschen wird eine Gewährleistung
nur für Material- und Verarbeitungsfehler erteilt. Die
Max. zulässige
Konzentration im
Abwasser
Max. Abwasser Min. Reduzierung in %NSF -Test
Betriebsdauer von Einwegkartuschen hängt von den
örtlichen Wassergegebenheiten ab, so dass für diese
Wasserdruck 207 - 827 kPa
Wassertemperatur* 0,6°C - 38°C
Fließgeschwindigkeit 2,83 l/min.
■ Das System ist gemäß den vom Hersteller
empfohlenen Richtlinien zu installieren und zu
betreiben.
■ Der Filter ist alle 6-9 Monate zu wechseln.
■ Neuen Filter 5 Minuten durchspülen.
■ Nähere Einzelheiten finden sich auf der
keine Gewährleistung erteilt wird.
Nähere Informationen zu den Preisen von Ersatzteilen
finden Sie bei Ihrem Gerätehändler oder Teilevertreter
vor Ort.
Hergestellt von:
3 M Material Technology (Guangzhou) Ltd.
9 Nanxiang Er road, Science City,
Guangzhou, 510663, P.R. China
Garantiekarte.
Dieses Produkt sollte NICHT benutzt werden, wenn
das Wasser mikrobiologisch schädlich oder von
unbekannter Qualität ist, ohne angemessene
Desinfizierung vor oder nach Anschluss an das
System. Ein für Zystenreduktion zertifiziertes System
darf für desinfiziertes Wasser benutzt werden, das
u.U. filterbare Zysten enthält.
19
Page 20
de
Ausstattung des Gefrierraums
(nicht bei allen Modellen)
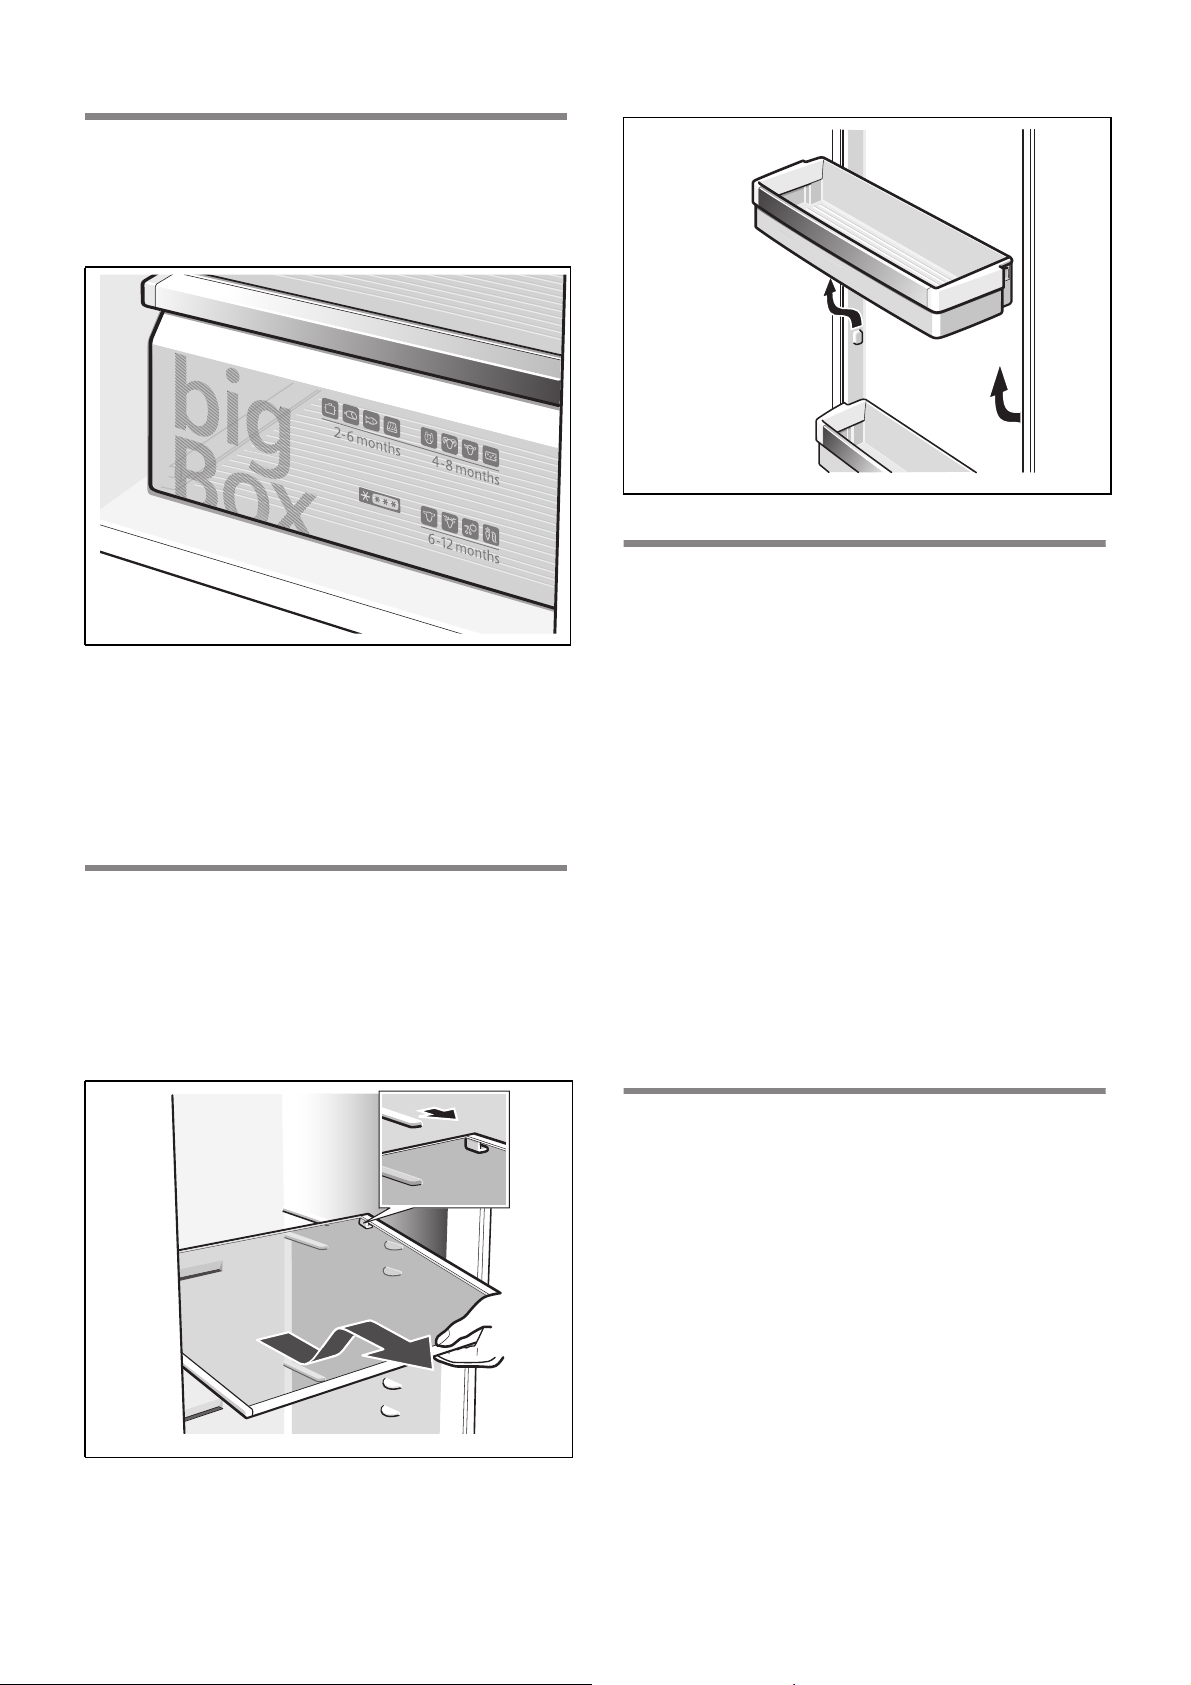
Gefrierkalender
Gerät ausschalten
und stilllegen
Um Qualitätsminderungen des Gefriergutes zu
vermeiden, überschreiten Sie die Lagerdauer nicht. Die
Lagerdauer hängt von der Art des Gefriergutes ab. Die
Zahlen bei den Symbolen geben die zulässige
Lagerdauer in Monaten für das Gefriergut an. Beachten
Sie bei handelsüblicher Tiefkühlkost das Herstellungsoder Haltbarkeitsdatum.
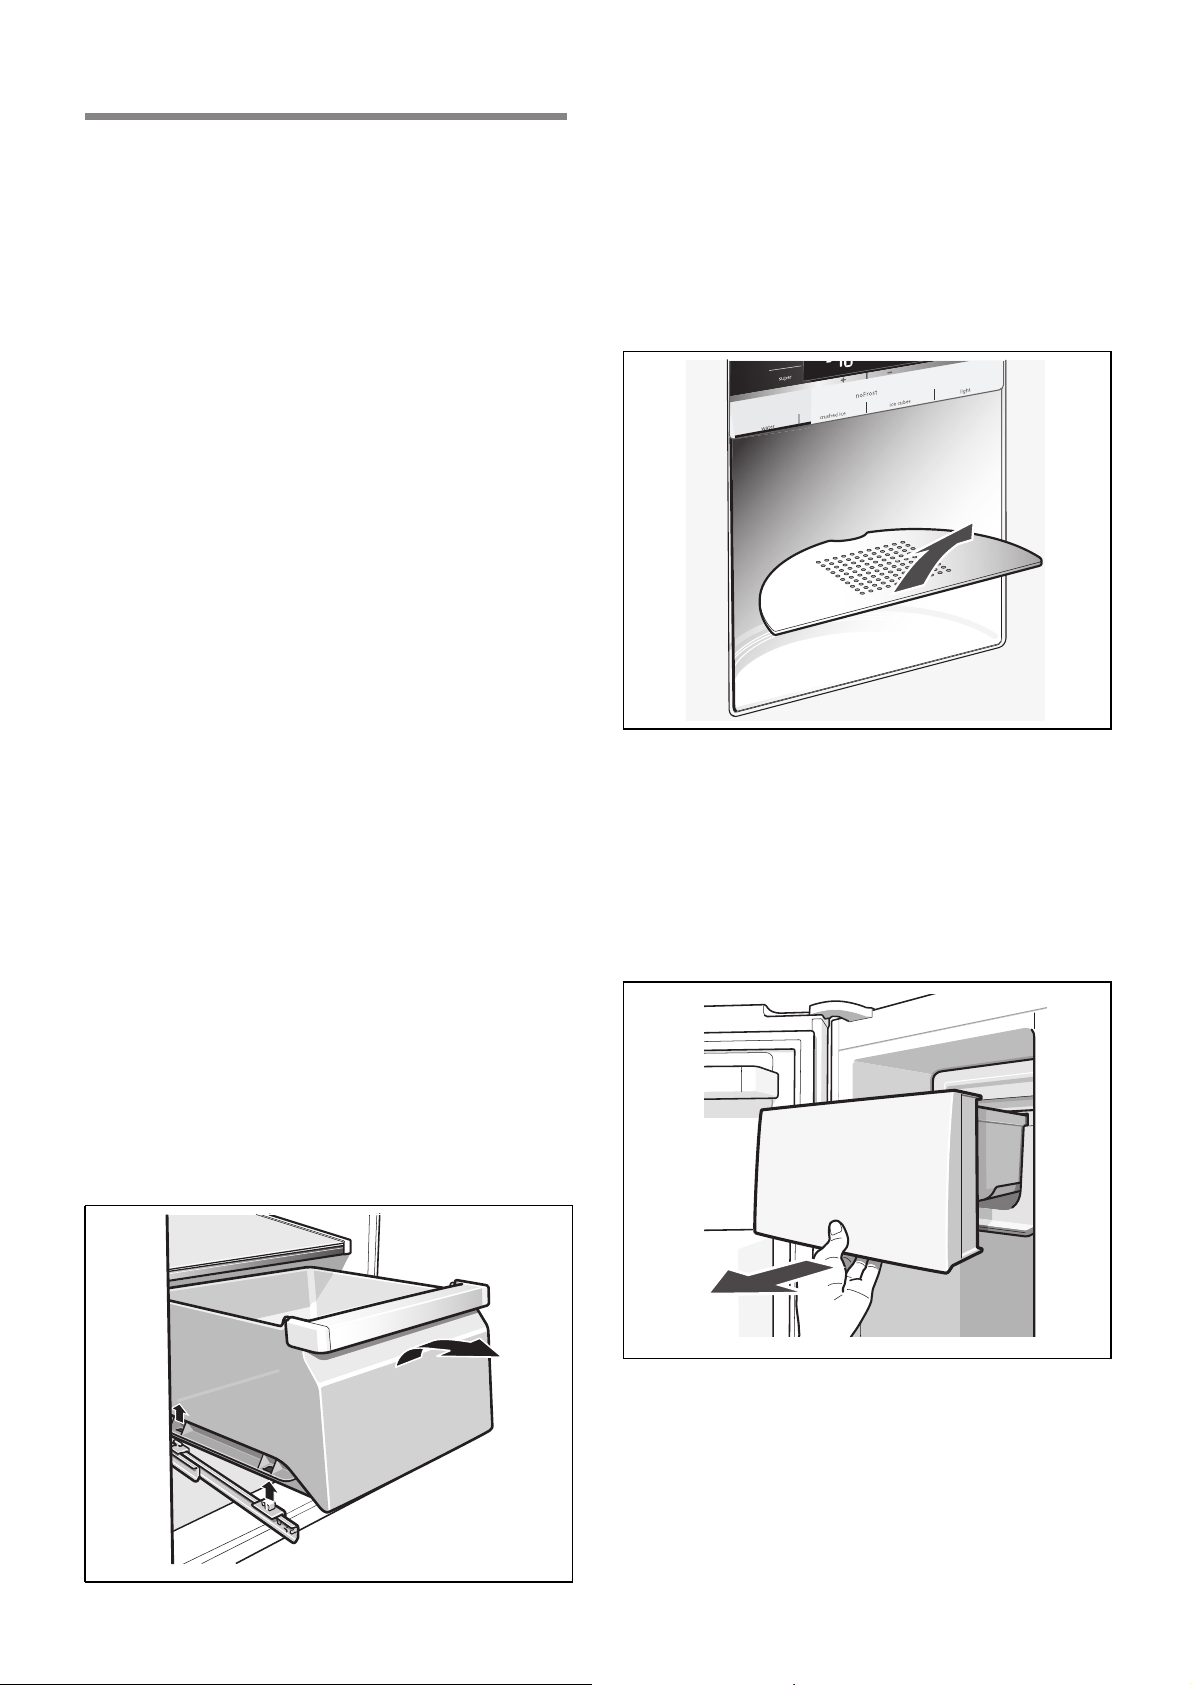
Variable Gestaltung des
Innenraums
Sie können die Ablagen des Innenraums und die
Türablagen nach Bedarf variieren.
■ Ablage nach vorne ziehen, absenken und seitlich
herausschwenken.
Gerät ausschalten
Netzstecker ziehen oder Sicherung ausschalten.
Kühlmaschine schaltet ab.
Gerät stilllegen
Wenn Sie das Gerät längere Zeit nicht benutzen:
1. Wasserzufuhr zum Gerät unbedingt einige Stunden
vor dem Ausschalten unterbrechen.
2. Alle Lebensmittel aus dem Gerät herausnehmen.
3. Netzstecker ziehen oder Sicherung ausschalten.
4. Eiswürfelbehälter leeren und reinigen
(siehe Kapitel Gerät reinigen).
5. Gerät innen reinigen (siehe Kapitel Gerät reinigen).
6. Gerätetüren offen lassen, um Geruchsbildung zu
vermeiden.
Abtauen
Gefrierraum
Durch das vollautomatische NoFrost-System bleibt der
Gefrierraum eisfrei. Ein Abtauen ist nicht mehr
notwendig.
■ Türablage anheben und herausnehmen.
20
Kühlraum
Das Abtauen wird automatisch ausgeführt.
Das Tauwasser läuft über das Ablaufloch in eine
Verdunstungsschale an der Rückseite des Gerätes.
Page 21
Gerät reinigen
m Warnung
Nie das Gerät mit einem Dampfreinigungsgerät
reinigen!
m Achtung
Keine sand-, chlorid- oder säurehaltigen Putz- und
Lösungsmittel verwenden.
de
Beim Einsetzen den Behälter auf die Auszugsschienen
legen und in den Innenraum schieben. Behälter rastet
durch Niederdrücken ein.
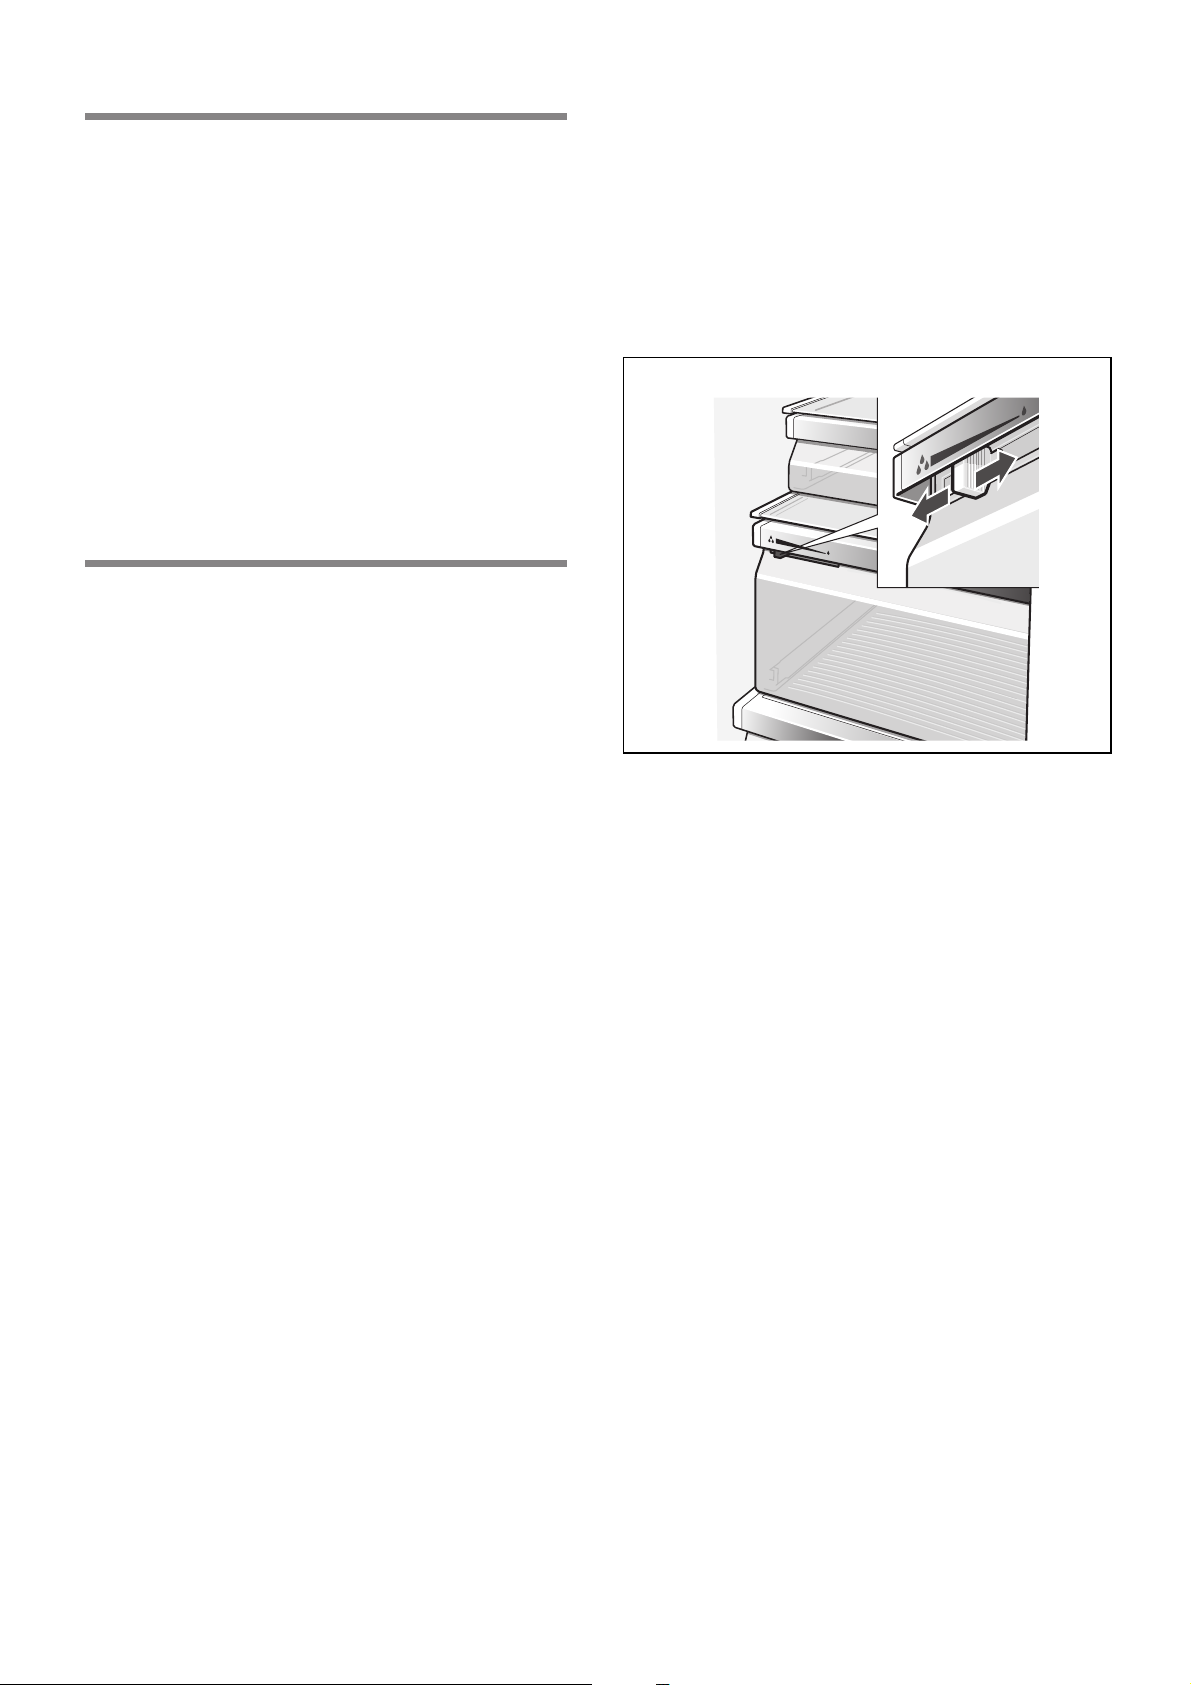
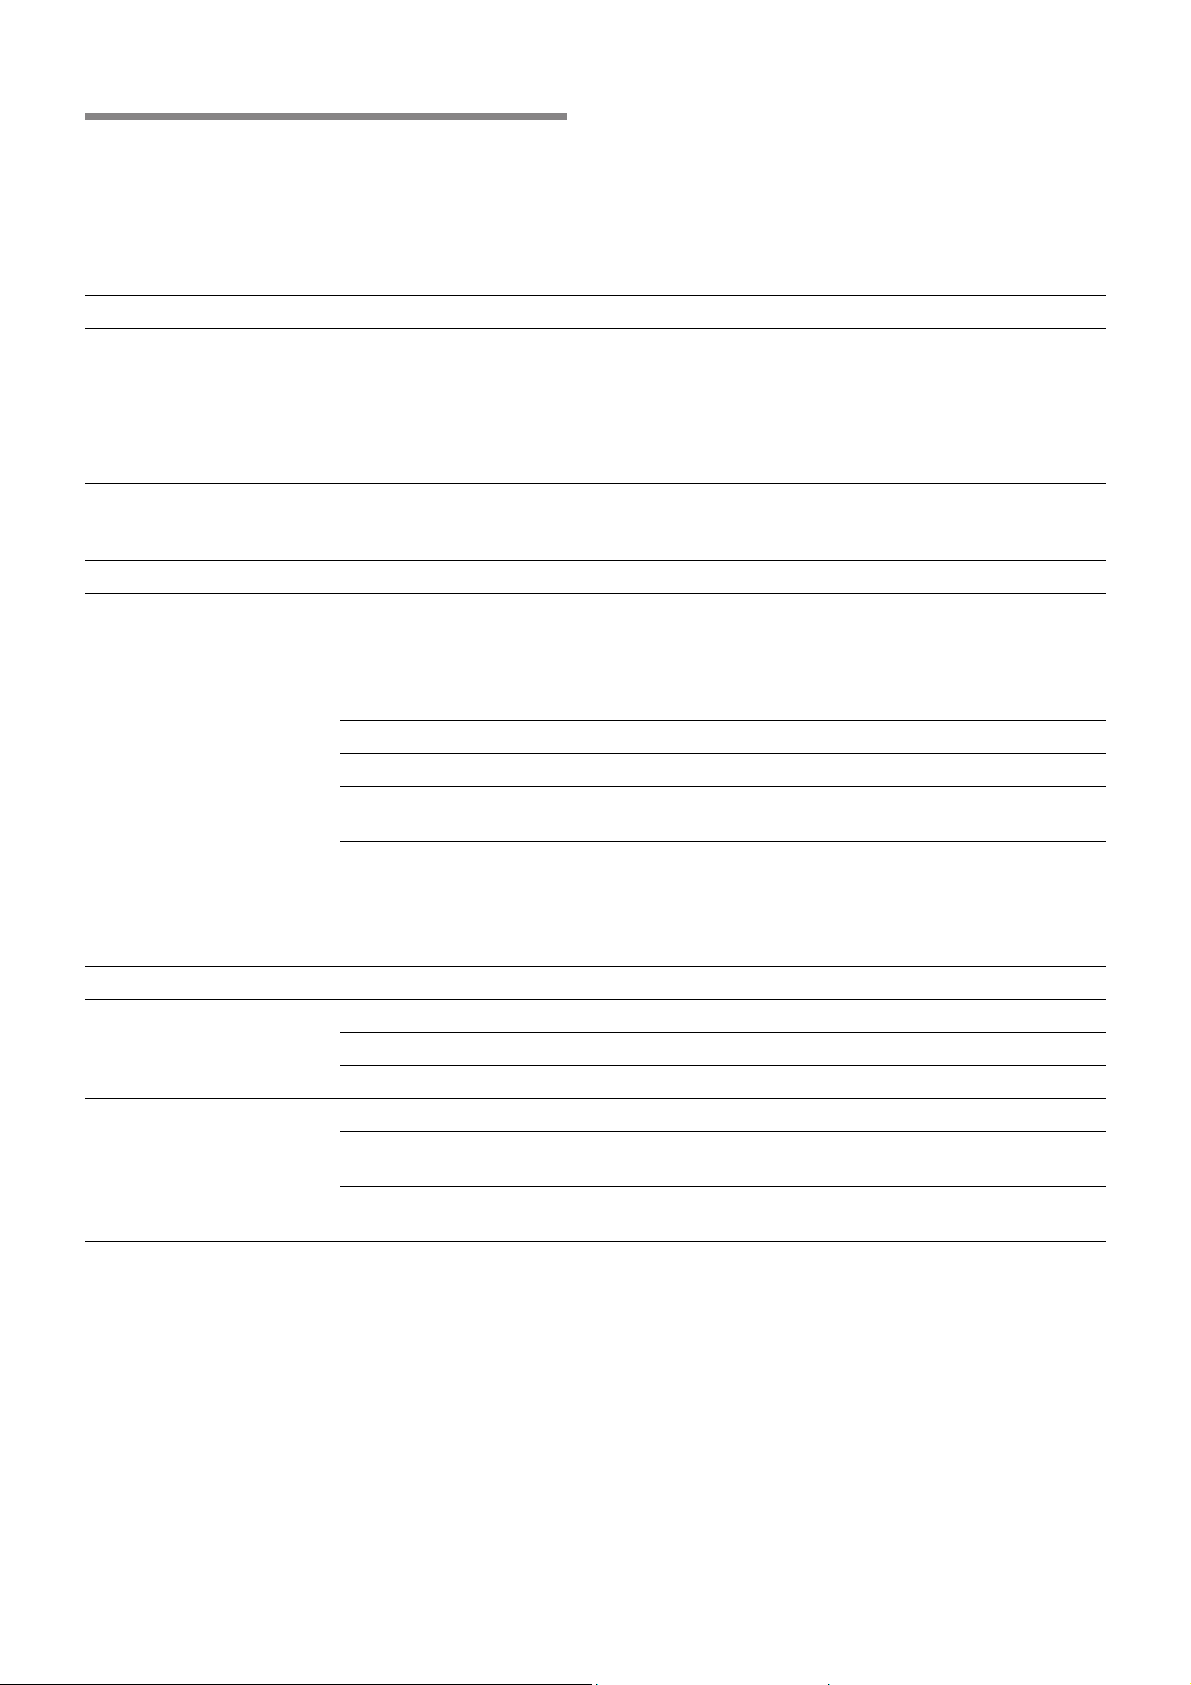
Wasserauffangschale reinigen
Verschüttetes Wasser sammelt sich in der
Wasserauffangschale.
Zum Entleeren und Reinigen das Sieb abnehmen.
Wasserauffangschale mit Schwamm oder saugfähigem
Tuch auswischen.
m Achtung
Keine scheuernden oder kratzenden Schwämme
verwenden. Auf den metallischen Oberflächen könnte
Korrosion entstehen.
m Achtung
Nie Ablagen und Behälter im Geschirrspüler reinigen.
Die Teile können sich verformen!
Gehen Sie wie folgt vor:
1. Netzstecker ziehen oder Sicherung ausschalten.
2. Gefriergut herausnehmen und an einem kühlen Ort
lagern.
3. Warten, bis die Reifschicht abgetaut ist.
4. Gerät mit einem weichen Tuch, lauwarmem Wasser
und etwas pH-neutralem Spülmittel reinigen. Das
Spülwasser darf nicht in die Beleuchtung gelangen.
5. Die Türdichtung nur mit klarem Wasser abwischen
und danach gründlich trocken reiben.
6. Nach dem Reinigen Gerät wieder anschließen.
7. Gefriergut wieder einlegen.
Ausstattung
Zum Reinigen lassen sich alle variablen Teile des
Gerätes herausnehmen (siehe Kapitel Variable
Gestaltung des Innenraums).
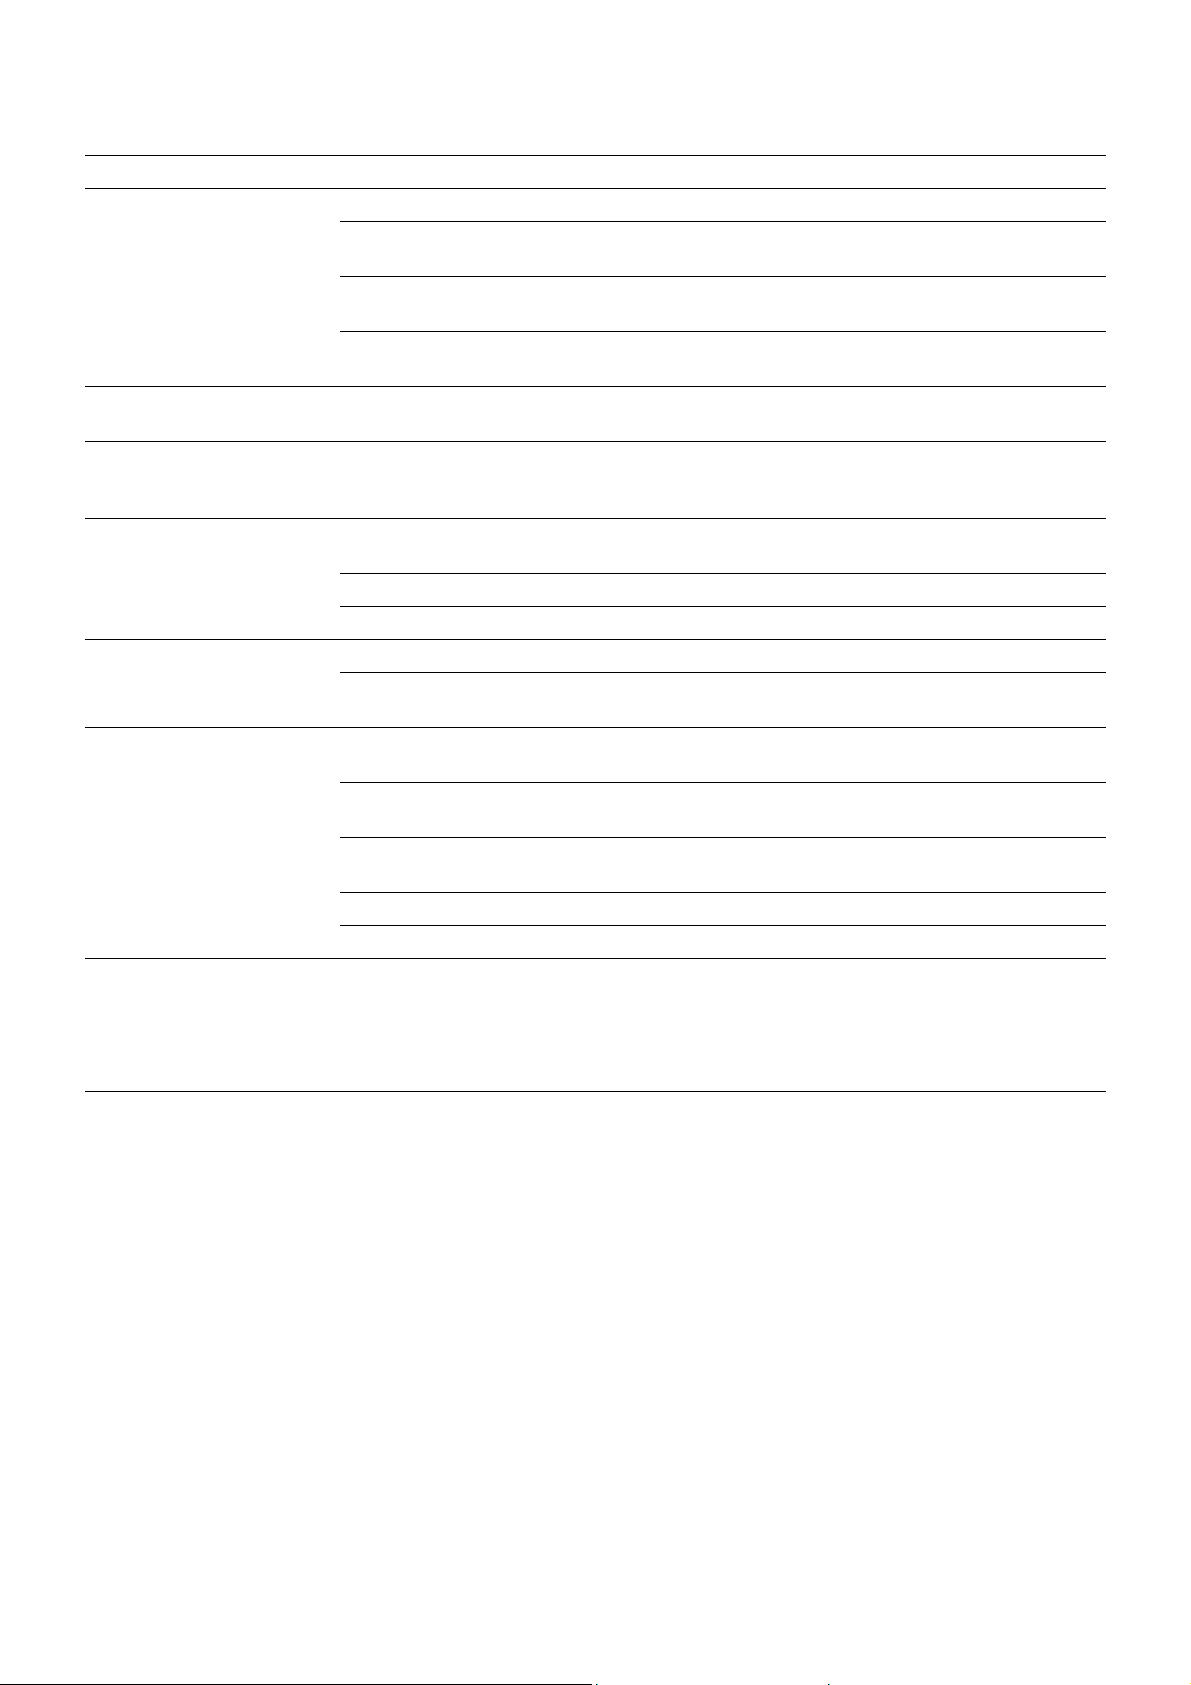
Eiswürfelbehälter reinigen
Wenn längere Zeit keine Eiswürfel entnommen wurden,
schrumpfen die bereits hergestellten Eiswürfel,
schmecken abgestanden und kleben zusammen.
Behälter herausziehen, entleeren und mit lauwarmem
Wasser reinigen.
m Achtung
Ein gefüllter Eiswürfelbehälter ist schwer!
Hinweis
Zum Herausnehmen und Reinigen der Behälter, die
Türen vollständig über 90° öffnen.
Herausnehmen des Behälters
Behälter ganz herausziehen, durch Hochheben aus der
Halterung lösen und herausnehmen.
Nach dem Reinigen Behälter und Transportschnecke
gut trocken reiben, damit die neuen Eiswürfel nicht
festgefrieren können.
Eiswürfelbehälter einsetzen
Eiswürfelbehälter auf den Auflagen ganz nach hinten
schieben, bis er einrastet. Die Eiswürfelproduktion läuft
weiter.
21
Page 22

de
Hinweis
Sollte sich der Behälter nicht ganz nach hinten
schieben lassen, Transportschnecke im Behälter etwas
drehen oder festgefrorene Eiswürfel am
Einschubbereich entfernen.
Betriebsgeräusche
Ganz normale Geräusche
Brummen
Motoren laufen (z. B. Kälteaggregate, Ventilator).
Beleuchtung (LED)
Ihr Gerät ist mit einer wartungsfreien LED-Beleuchtung
ausgestattet.
Reparaturen an dieser Beleuchtung dürfen nur vom
Kundendienst oder autorisierten Fachkräften ausgeführt
werden.
Energie sparen
■ Gerät in einem trockenen, belüftbaren Raum
aufstellen. Das Gerät soll nicht direkt in der Sonne
oder in der Nähe einer Wärmequelle stehen (z. B.
Heizkörper, Herd).
Verwenden Sie ggf. eine Isolierplatte.
■ Die Be- und Entlüftungsöffnungen des Gerätes nicht
zustellen.
■ Warme Lebensmittel und Getränke erst abkühlen
lassen, dann ins Gerät stellen.
■ Gefriergut zum Auftauen in den Kühlraum legen und
die Kälte des Gefriergutes zur Kühlung von
Lebensmitteln nutzen.
■ Gerät so kurz wie möglich öffnen.
■ Darauf achten, dass die Gefrierraum-Tür immer
geschlossen ist.
■ Falls vorhanden:
Wandabstandshalter montieren, um die
ausgewiesene Energieaufnahme des Gerätes zu
erreichen (siehe Kapitel Gerät aufstellen, Abschnitt
Belüftung). Ein reduzierter Wandabstand schränkt
das Gerät in seiner Funktion nicht ein. Die
Energieaufnahme kann sich dann geringfügig
erhöhen.
■ Die Anordnung der Ausstattungsteile hat keinen
Einfluss auf die Energieaufnahme des Gerätes.
Blubbernde, surrende oder gurgelnde Geräusche
Kältemittel fließt durch die Rohre oder Wasser in den
Eisbereiter.
Klicken
Motor, Schalter oder Magnetventile schalten ein/aus.
Poltern
Fertige Eiswürfel vom Eisbereiter fallen in den
Eiswürfelbehälter.
Geräusche vermeiden
Das Gerät steht uneben
Richten Sie das Gerät mit Hilfe einer Wasserwaage aus.
Verwenden Sie dazu die Schraubfüße oder legen Sie
etwas unter.
Das Gerät “steht an”
Rücken Sie das Gerät von anstehenden Möbeln oder
Geräten weg.
Behälter oder Abstellflächen wackeln oder klemmen
Prüfen Sie die herausnehmbaren Teile und setzen Sie
sie eventuell neu ein.
Flaschen oder Gefäße berühren sich
Rücken Sie die Flaschen oder Gefäße leicht
auseinander.
22
Page 23
Überprüfen Sie, ob Sie die Störung aufgrund der
Kleine Störungen selbst
beheben
Bevor Sie den Kundendienst rufen:
Störung Mögliche Ursache Abhilfe
Temperatur weicht stark von der
Einstellung ab.
Keine Anzeige leuchtet. Stromausfall;
die Sicherung hat ausgelöst; der Netzstecker
sitzt nicht fest.
Anzeigefeld zeigt „E..“ an. Elektronik hat einen Fehler erkannt. Kundendienst rufen.
Warnton ertönt, Temperaturanzeige
des Gefrierraums blinkt.
Im Gefrierraum ist es zu warm!
Gefahr für das Gefriergut!
Gefrierraum-Tür ist geöffnet. Türe schließen.
Be- und Entlüftungsöffnungen sind verdeckt. Hindernisse entfernen.
Es wurden zu viele Lebensmittel auf einmal
zum Gefrieren eingelegt.
Die Beleuchtung funktioniert nicht. Die Beleuchtung ist defekt. (Siehe Kapitel Beleuchtung.)
Das Gerät hat keine Kühlleistung.
Die Beleuchtung funktioniert nicht.
Die Anzeige leuchtet nicht.
Die Kältemaschine schaltet immer
häufiger und länger ein.
Stromausfall Prüfen, ob Strom vorhanden ist.
Sicherung ist ausgeschaltet. Sicherung überprüfen.
Netzstecker sitzt nicht fest. Prüfen, ob Netzstecker fest sitzt.
Häufiges Öffnen des Gerätes. Gerät nicht unnötig öffnen.
Die Be- und Entlüftungsöffnungen sind
verdeckt.
Einfrieren größerer Mengen frischer
Lebensmittel.
folgenden Hinweise selbst beheben können.
Führen Sie einen Geräte-Selbsttest durch (siehe Kapitel
Geräte-Selbsttest).
Sie müssen die Kosten für Beratung durch den
Kundendienst selbst übernehmen – auch während der
Garantiezeit!
In einigen Fällen reicht es, wenn Sie das Gerät für 5 Minuten
ausschalten.
Ist die Temperatur zu warm, prüfen Sie nach wenigen Stunden,
ob eine Temperaturannäherung erfolgt ist.
Ist die Temperatur zu kalt, prüfen Sie am nächsten Tag
die Temperatur nochmal.
Netzstecker anschließen. Prüfen, ob Strom vorhanden ist,
Sicherungen überprüfen.
Zum Abschalten des Warntones Alarm/lock-Taste drücken.
Das Blinken der Anzeige schaltet ab.
Es wird auf der Temperaturanzeige 10 Sekunden lang die
wärmste Temperatur angezeigt, die im Gefrierraum geherrscht
hat.
Max. Gefriervermögen nicht überschreiten.
Hinweis
An- und aufgetautes Gefriergut kann erneut eingefroren
werden, wenn Fleisch und Fisch nicht länger als einen Tag,
anderes Gefriergut nicht länger als drei Tage über +3 °C warm
waren.
Hindernisse entfernen.
Max. Gefriervermögen nicht überschreiten.
de
23
Page 24
de
Wasser- und Eisspender
Störung Mögliche Ursache Abhilfe
Trotz längerer Betriebszeit werden
keine Eiswürfel gespendet.
Eiswürfel sind im Eiswürfelbehälter,
werden aber nicht ausgeschüttet.
Eiswürfel haben sich im Ausgang
des Eiswürfelbehälters oder im
Eiszerkleinerer verklemmt.
Eiswürfel sind wässrig.
Eiswürfel wurden aufgetaut.
Wasserspender funktioniert nicht. Wasserhahn geschlossen. Wasserhahn öffnen.
Eisbereiter stellt nicht genug Eis her
oder das Eis ist deformiert.
Blubbernde, gurgelnde Geräusche
der Wasserleitung.
Wasserhahn geschlossen. Wasserhahn öffnen.
Wasserversorgung ist unterbrochen.
Wasserdruck zu niedrig.
Eis- und Wasserausgabe ist ausgeschaltet. Auf
dem Anzeigefeld leuchtet „IWD off“.
Gefrierraum zu warm. Temperatur im Gefrierraum kälter einstellen (siehe Kapitel
Eiswürfel sind zusammengefroren. Eiswürfelbehälter herausnehmen und entleeren.
Gefrierraum-Tür geöffnet. Türe schließen.
Stromausfall Prüfen, ob Strom vorhanden ist.
Wasserversorgung ist unterbrochen.
Wasserdruck zu niedrig.
Gerät oder Eisbereiter wurde erst vor kurzem
eingeschaltet.
Es wurde eine große Eismenge entnommen. Es dauert ca. 24 Stunden, bis der Eiswürfelbehälter wieder
Niedriger Wasserdruck. Gerät nur an den vorgeschriebenen Wasserdruck anschließen
Wasserfilter verstopft oder verbraucht. Wasserfilter wechseln.
Temperatur im Gefrierraum zu warm. Temperatur im Gefrierraum etwas kälter einstellen.
Wasserzufuhr ist unterbrochen oder
Wasserleitung ist verstopft.
Installateur informieren.
Eis- und Wasserausgabe einschalten (siehe Kapitel Eis- und
Wasserausgabe aus- und einschalten).
Temperatur einstellen).
Eiswürfelbehälter herausnehmen und Transportschnecke von
Hand drehen. Eventuell verklemmte Eisbrocken mit
Holzstäbchen lösen.
Eiswürfelbehälter herausnehmen, entleeren und trocken
reiben.
Installateur informieren.
Es dauert ca. 24 Stunden, bis die Eisproduktion beginnt.
gefüllt ist.
(siehe Kapitel Gerät anschließen, Abschnitt Wasseranschluss).
1. Wasserzufuhr überprüfen.
2. Prüfen, ob die Wasserleitung verstopft ist.
3. In einigen Fällen reicht es, die Eis- und Wasserausgabe
kurz auszuschalten (siehe Kapitel Eis- und Wasserausgabe
aus- und einschalten).
24
Page 25

de
Geräte-Selbsttest
Ihr Gerät verfügt über ein automatisches
Selbsttestprogramm, das Ihnen Fehlerquellen anzeigt,
die nur von Ihrem Kundendienst behoben werden
können.
Geräte-Selbsttest starten
1. Gerät ausschalten und 5 Minuten warten.
2. Gerät wieder einschalten.
3. Die Einstell-Tasten + und - für 5 Sekunden
gleichzeitig drücken.
Das Selbsttest-Programm startet. Erscheint auf dem
Anzeigefeld „E..“, handelt es sich um einen Fehler.
Benachrichtigen Sie bei dieser Fehleranzeige den
Kundendienst.
Geräte-Selbsttest beenden
Die Einstell-Tasten + und - erneut für 5 Sekunden
gleichzeitig drücken.
Kundendienst
Einen Kundendienst in Ihrer Nähe finden Sie im
Telefonbuch oder im Kundendienst-Verzeichnis. Geben
Sie bitte dem Kundendienst die Erzeugnisnummer
(E-Nr.) und die Fertigungsnummer (FD-Nr.) des Gerätes
an.
Sie finden diese Angaben auf dem Typenschild.
Bitte helfen Sie durch Nennung der Erzeugnis- und
Fertigungsnummer mit, unnötige Anfahrten zu
vermeiden. Sie sparen die damit verbundenen
Mehrkosten.
Reparaturauftrag und Beratung bei
Störungen
Die Kontaktdaten aller Länder finden Sie im
beiliegenden Kundendienst-Verzeichnis.
D 089 21 751 751
A 0810 550 522
CH 0848 840 040
25
Page 26

en
en Table of Contents
enInstallation instructions and instructions for use
Safety and warning information ...................... 27
Information concerning disposal .................... 28
Scope of delivery ............................................... 28
Installing the appliance .................................... 29
Installation dimensions ..................................... 29
Door opening angle .......................................... 30
Aligning the appliance ...................................... 31
Connecting the appliance ................................ 31
Removing the appliance door ........................ 31
Getting to know your appliance ..................... 32
Switching on the appliance ............................. 34
Setting the temperature unit ............................ 34
Setting the temperature .................................... 34
Alarm function .................................................... 35
Usable capacity ................................................. 35
Freezer compartment ....................................... 35
Max. freezing capacity ...................................... 35
Freezing fresh food ........................................... 36
Super freezing .................................................... 36
Thawing frozen food ......................................... 37
Refrigerator compartment ............................... 37
Super cooling ..................................................... 38
Ice and water dispenser .................................. 38
Switching on and off the ice and water
dispenser ............................................................ 39
Water filter ........................................................... 40
Specification and performance data sheet .. 41
Features of the freezer compartment ............ 42
Variable interior design .................................... 42
Switching off and disconnecting the
appliance ............................................................ 42
Defrosting ........................................................... 42
Cleaning the appliance .................................... 43
Light (LED) .......................................................... 44
Tips for saving energy ...................................... 44
Operating noises ............................................... 44
Eliminating minor faults yourself ..................... 45
Appliance self-test ............................................. 47
Customer service .............................................. 47
26
Page 27

m Safety and warning
information
Before you switch ON the appliance
Please read the operating and installation
instructions carefully! They contain
important information on how to install, use
and maintain the appliance.
The manufacturer is not liable if you fail to
comply with the instructions and warnings.
Retain all documents for subsequent use or
for the next owner.
Technical safety
The appliance contains a small quantity of
environmentally friendly but flammable
refrigerant R600a. Ensure that the tubing of
the refrigerant circuit is not damaged during
transportation and installation. Leaking
refrigerant may cause eye injuries or ignite.
If damage has occurred
■ Keep naked flames and/or ignition
sources away from the appliance,
■ thoroughly ventilate the room for several
minutes,
■ switch off the appliance and pull out the
mains plug,
■ inform customer service.
The more refrigerant an appliance contains,
the larger the room must be in which the
appliance is situated. Leaking refrigerant
can form a flammable gas-air mixture in
rooms which are too small.
The room must be at least 1 m³ per 8 g
of refrigerant. The amount of refrigerant in
your appliance is indicated on the rating
plate inside the appliance.
If the power cord of this appliance is
damaged, it must be replaced by the
manufacturer, customer service or a
similarly qualified person. Improper
installations and repairs may put the user
at considerable risk.
Repairs may be performed by the
manufacturer, customer service or a
similarly qualified person only.
Only original parts supplied by the
manufacturer may be used. The
manufacturer guarantees that only these
parts satisfy the safety requirements.
A extension cable may be purchased from
customer service only.
en
Important information when using the
appliance
■ Never use electrical appliances inside the
appliance (e.g. heater, electric ice maker,
etc.). Explosion hazard!
■ Never defrost or clean the appliance with
a steam cleaner! The steam may
penetrate electrical parts and cause
a short-circuit. Risk of electric shock!
■ Do not use pointed and sharp-edged
implements to remove frost or layers of
ice. You could damage the refrigerant
tubes. Leaking refrigerant may cause eye
injuries or ignite.
■ Do not store products which contain
flammable propellants (e.g. spray cans)
or explosive substances in the appliance.
Explosion hazard!
■ Do not stand on or lean heavily against
base of appliance, drawers or doors, etc
■ For cleaning pull out mains plug or switch
off fuse. Do not pull out the mains plug by
tugging on the power cord.
■ Store high-percentage alcohol tightly
closed and standing up.
■ Keep plastic parts and the door seal free
of oil and grease. Otherwise, parts and
door seal will become porous.
■ Never cover or block the ventilation
openings of the appliance!
■ Avoiding placing children and
vulnerable people at risk:
At risk are children, people who have
limited physical, mental or sensory
abilities, as well as people who have
inadequate knowledge concerning safe
operation of the appliance.
Ensure that children and vulnerable
people have understood the hazards.
A person responsible for safety must
supervise or instruct children and
vulnerable people who are using the
appliance.
Only children from 8 years and above
may use the appliance.
Supervise children who are cleaning and
maintaining the appliance.
Never allow children to play with the
appliance.
■ Do not store bottled or canned drinks
(especially carbonated drinks) in the
freezer compartment. Bottles and cans
may burst!
27
Page 28

en
■ Never put frozen food straight from the
freezer compartment into your mouth.
Risk of low-temperature burns!
■ Avoid prolonged touching of frozen food,
ice or the evaporator pipes, etc.
Risk of low-temperature burns!
Children in the household
■ Keep children away from packaging and
its parts.
Danger of suffocation from folding
cartons and plastic film!
■ Do not allow children to play with the
appliance!
■ If the appliance features a lock:
keep the key out of the reach of children!
General regulations
The appliance is suitable
■ for refrigerating and freezing food,
■ for making ice,
■ for dispensing drinking water.
This appliance is intended for use in
the home and the home environment.
The appliance is suppressed according to
EU Directive 2004/108/EC.
The refrigeration circuit has been checked
for leaks.
This product complies with the relevant
safety regulations for electrical appliances
(EN 60335-2-24).
This appliance is intended for use up to a
maximum height of 2000 metres above sea
level.
Information concerning
disposal
* Disposal of packaging
The packaging protects your appliance from damage
during transit. All utilised materials are environmentally
safe and recyclable. Please help us by disposing of the
packaging in an environmentally friendly manner.
Please ask your dealer or inquire at your local authority
about current means of disposal.
* Disposal of your old appliance
Old appliances are not worthless rubbish! Valuable raw
materials can be reclaimed by recycling old appliances.
This appliance is labelled in accordance with
European Directive 2012/19/EU concerning
used electrical and electronic appliances (waste
electrical and electronic equipment - WEEE).
The guideline determines the framework for the
return and recycling of used appliances as
applicable throughout the EU.
m Warning
Redundant appliances
1. Pull out the mains plug.
2. Cut off the power cord and discard with the mains
plug.
3. Do not take out the trays and receptacles: children
are therefore prevented from climbing in!
4. Do not allow children to play with the appliance once
it has spent its useful life. Danger of suffocation!
Refrigerators contain refrigerant and gases
in the insulation. Refrigerant and gases must be
disposed of professionally. Ensure that tubing
of the refrigerant circuit is not damaged prior to proper
disposal.
Scope of delivery
After unpacking all parts, check for any damage in
transit.
If you have any complaints, please contact the dealer
from whom you purchased the appliance or our
customer service.
The delivery consists of the following parts:
■ Free-standing appliance
■ Bag containing installation materials
■ Interior fittings (depending on model)
■ Operating instructions
■ Customer service booklet
■ Warranty enclosure
■ Information on the energy consumption and noises
28
Page 29
Installing the appliance
Transporting
The appliance is heavy. Secure in position during
transportation and installation.
Due to the weight/dimensions of the appliance and to
minimise the risk of injury and damage to the appliance
at least two persons are necessary to set-up the
appliance safely.
Installation location
Install the appliance in a dry, well ventilated room.
The installation location should neither be exposed
to direct sunlight nor near a heat source, e.g. a cooker,
radiator, etc. If installation next to a heat source is
unavoidable, use a suitable insulating plate or observe
the following minimum distances to a heat source:
■ 3 cm to electric or gas cookers.
■ 30 cm to an oil or coal-fired cooker.
If installing the appliance next to another refrigerator
or freezer, ensure a minimum lateral distance of 25 mm
to prevent the formation of condensation.
If a panel or cupboard is installed above the appliance,
ensure that a gap of 30 mm is left so that the appliance
can be pulled out of the recess if required.
The air heated on the rear side of the appliance must
be allowed to escape unhindered.
en
Note
The appliance is fully functional within the room
temperature limits of the indicated climatic class. If
an appliance of climatic class SN is operated at colder
room temperatures, the appliance will not be damaged
up to a temperature of +5 °C.
Ventilation
Never cover the ventilation openings on the rear
of the appliance. Conduction of the heated air must not
be obstructed. Otherwise, the refrigeration unit must
work harder. This increases power consumption.
Place the enclosed spacers in the designated holders
on the back of the appliance. This ensures that there is
a minimum distance between the appliance and
the wall.
Subsurface
m Caution
The appliance is very heavy.
Model with dispenser: 143 kg
The floor of the installation location must not give way;
if required, reinforce floor.
To ensure that the doors can open all the way, observe
lateral minimum distances when installing
the appliance in a corner or recess (see chapter
“Installation dimensions”).
If the depth of the adjacent kitchen equipment is more
than 60 cm, observe lateral minimum distances
in order to utilise the full door opening angle (see
chapter “Door opening angle“).
Observe ambient temperature
and ventilation
Ambient temperature
The climate class can be found on the rating plate.
The climate class indicates within which ambient
temperatures the appliance can be operated.
The rating plate is located in the refrigerator
compartment at the bottom right side.
Installation dimensions
Climate class Permitted ambient temperature
SN +10 °C to 32 °C
N +16 °C to 32 °C
ST +16 °C to 38 °C
T +16 °C to 43 °C
29
Page 30

en
Door opening angle
D
[
[
E
[
[
[
DE
30
Page 31

Aligning the appliance
To ensure that the appliance functions correctly, it must
be set level with a spirit level.
If the appliance is not level, water may flow out
of the ice maker, ice cubes may be irregular
or the doors may not close properly.
Connecting the appliance
Have a technician install and connect the appliance
according to the enclosed installation instructions.
Do not remove the transportation protection devices
from the shelves and storage compartments until
the appliance has been installed.
Always connect the water before the power.
Apart from statutory national regulations, you should
stick to the connection terms relating to the local
electricity and water companies.
After installing the appliance, wait at least 1 hour until
the appliance starts up. During transportation the oil
in the compressor may have flowed into
the refrigeration system.
Before switching on the appliance for the first time,
clean the interior of the appliance (see chapter
“Cleaning the appliance”).
en
Note
The maximum outside diameter of the water mains
(without connecting pieces) is 10 mm.
Electrical connection
Do not use extension cables or distributors. This
appliance must be connected to a permanently
installed socket.
The socket must be near the appliance and also freely
accessible following installation of the appliance.
The appliance complies with the protection class I.
Connect the appliance to 220-240 V/50 Hz alternating
current via a correctly installed socket with protective
conductor. The socket must be fused with a 10 A to
16 A fuse or higher.
For appliances operated in non-European countries,
the identification plate should be checked whether
the electric supply and the current model stated match
the values of your mains supply. The rating plate is
situated in the bottom right-hand side of the appliance.
The power cord may be replaced by a technician only.
m Warning
Never connect the appliance to electronic energy saver
plugs.
Our appliances can be used with mains and sinecontrolled inverters. Mains-controlled inverters are used
for photovoltaic systems which are connected directly
to the national grid. Sine-controlled inverters must be
used for isolated applications (e.g. on ships or in
mountain lodges) which are not connected directly to
the national grid.
Removing the appliance door
If the appliance will not fit through the house door,
the appliance doors can be unscrewed.
m Caution
Only customer service may unscrew the appliance
doors.
Water connection
The water may be connected only by a competent fitter
according to the local regulations of the appropriate
water supply company.
m Caution
Use only the enclosed hose set for connection to the
drinking water mains. Do not use existing or already
used hose sets.
Connect the appliance to a drinking water line only:
■ Minimum pressure: 0.2 Mpa (2 bar)
■ Maximum pressure: 0.8 Mpa (8 bar)
■ Pressure over 0.8 MPa (8 bar): install a pressure
limiter between drinking water connection and hose
set
31
Page 32

en
Getting to know your appliance
These operating instructions refer to several models. The diagrams may differ.
1
2
10
3
12
13
4
14
15
5
16
6
17
18
7
8
9
19
20
11
* Not all models.
A Freezer compartment
B Refrigerator compartment
1 Control and display panel
2 Light switch for refrigerator and freezer
compartments
3 Door shelf
4 Ice maker/Ice cube container
5 Air outlet opening
6 Ice and water dispenser
7 Glass shelf in the freezer compartment
8 Door shelf
9 Freezer calendar
10 Frozen food container
21
11 Door shelf (2 star compartment) for short-term
storage of food and ice cream
12 Light
13 Particle filter/Water filter
14 Butter and cheese compartment
15 Air outlet opening
16 Glass shelf in the refrigerator compartment
17 Door shelf
18 Shelf for large bottles
19 Vegetable container with humidity filter
20 Vegetable container
21 Height-adjustable feet
32
Page 33

Control and display panel
The display panel and display panel on the door consists of a touch pad.
Touch the keypad to actuate the corresponding function.
en
A Freezer compartment display panel
B Refrigerator compartment display panel
1 “super” button
For switching on the Super cooling (refrigerator
compartment) function or Super freezing (freezer
compartment) function.
See chapter entitled “Super cooling” or “Super
freezing”.
2 “freeze” button
To implement settings for the freezer
compartment area, press button until “freeze” is
lit on the freezer compartment display panel.
3 “cool” button
To implement settings for the refrigerator
compartment area, press button until “cool” is lit
in the display panel.
4 “alarm/lock” button
The button is used to
■ switch off the warning signal (see chapter
Alarm function),
■ switch the button lock on and off.
To switch the button lock on and off, press
button for 5 seconds. When the function is
switched on, “lock” is indicated on the display
panel.
Except the button lock:
If a warning signal sounds, the “alarm/lock”
button can be pressed.
5 Setting buttons +/-
The buttons are used to set the temperatures of
the refrigerator and freezer compartment.
6 On/Off “light” button for ice and water
dispenser
7 Ice dispenser button
8 Dispenser button for crushed ice
9 Water dispenser button
33
Page 34

en
Switching on the appliance
When connected, the appliance is switched on. A
warning signal sounds.
Press the “alarm/lock” button. The warning signal
switches off.
Display “alarm” goes out when the appliance has
reached the set temperature.
The preset temperatures are reached after several
hours. Do not put any food in the appliance
beforehand.
The factory has recommended the following
temperatures:
■ Freezer compartment: -18 °C
■ Refrigerator compartment: +4 °C
Setting the temperature unit
The temperature can be displayed in degrees Celsius
(°C) or degrees Fahrenheit (°F).
Setting the temperature unit
To set the temperature unit, simultaneously press
the “freeze” button and the “cool” button for
5 seconds.
Depending on the previous setting, the display
switches to the other temperature unit.
Setting the temperature
Freezer compartment
The freezer compartment can be set from -14 °C to
-24 °C.
We recommend a setting of -18 °C.
The value last indicated is saved by the system.
1. Press the “freeze” button until “freeze” is lit on the
freezer compartment display panel.
2. Set the temperature with the + (warmer) or - (cooler)
setting buttons.
Refrigerator compartment
The refrigerator compartment can be set from +2 °C
to +8 °C.
The temperature can be set at 1 °C intervals.
The value last indicated is saved by the system.
We recommend a setting of +4 °C.
Perishable food should not be stored above +4 °C.
1. Press the “cool” button until “cool” is lit on the
refrigerator compartment display panel.
2. Set the temperature with the + (warmer) or - (cooler)
setting buttons.
34
Page 35

en
Alarm function
Press the “alarm/lock” button to switch off the warning
signal.
In the following cases an alarm may be actuated:
Door opening alarm
If the appliance is left open for longer than one minute,
the door alarm (continuous sound) switches on. Close
the door or press the Alarm button 4 to switch the
warning signal off again.
Temperature alarm
The temperature alarm switches on if the freezer
and refrigerator compartment is too warm and the food
is at risk of thawing.
The acoustic and optical signals may be actuated
without risk to the frozen food when:
■ The appliance is switched on.
■ Large quantities of fresh food are placed
in the freezer.
Freezer compartment
The set temperature of the freezer compartment flashes
and “alarm” is displayed on the display panel.
Usable capacity
Information on the usable capacity can be found inside
your appliance on the rating plate (see diagram at
chapter “Customer service”).
Fully utilising the freezer volume
To place the maximum amount of food in the freezer,
the top frozen food container can be taken out of
the appliance. The food can then be placed directly on
the shelves and stacked in the lower frozen food
container.
Freezer compartment
Use the freezer compartment
■ To store deep-frozen food.
■ To make ice cubes.
■ To freeze food.
Note
Ensure that the freezer compartment door has been
closed properly. If the door is open, the frozen food will
thaw. The freezer compartment will become covered in
thick ice. Also: waste of energy due to high power
consumption!
When the freezer compartment door is closed, a low
pressure occurs, causing a sucking noise. Wait two
to three minutes until the low pressure has adjusted
itself.
We recommend leaving the ice cube container
in the appliance. This ensures optimum temperature
distribution in the freezer compartment.
The temperature display indicates for 10 seconds
the warmest temperature which was reached
in the freezer compartment. Then the set temperature is
displayed again.
The alarm display goes out as soon as the set
temperature has been reached again.
Note
Do not refreeze thawing or thawed food. Only ready
meals (boiled or fried) may be refrozen.
No longer store the frozen produce for the max.
storage period.
Refrigerator compartment
“alarm” is indicated on the display panel.
m Caution
If the refrigerator compartment has become too warm,
cook warmed refrigerated food before consumption. If
in doubt, do not use raw food.
Purchasing frozen food
■ Packaging must not be damaged.
■ Use by the “use by” date.
■ Temperature in the supermarket freezer must be
-18 °C or lower.
■ If possible, transport deep-frozen food in an
insulated bag and place quickly in the freezer
compartment.
Max. freezing capacity
Information about the max. freezing capacity within
24 hours can be found on the rating plate (see diagram
at chapter “Customer service”).
35
Page 36

en
Freezing fresh food
Freeze fresh and undamaged food only.
To retain the best possible nutritional value, flavour and
colour, vegetables should be blanched before freezing.
Aubergines, peppers, zucchini and asparagus do not
require blanching.
Literature on freezing and blanching can be found
in bookshops.
Note
Keep food which is to be frozen away from food which
is already frozen.
■ The following foods are suitable for freezing:
Cakes and pastries, fish and seafood, meat, game,
poultry, vegetables, fruit, herbs, eggs without shells,
dairy products such as cheese, butter and quark,
ready meals and leftovers such as soups, stews,
cooked meat and fish, potato dishes, soufflés and
desserts.
■ The following foods are not suitable for freezing:
Types of vegetables, which are usually consumed
raw, such as lettuce or radishes, eggs in shells,
grapes, whole apples, pears and peaches, hardboiled eggs, yoghurt, soured milk, sour cream,
crème fraîche and mayonnaise.
Super freezing
Food should be frozen solid as quickly as possible
in order to retain vitamins, nutritional value, appearance
and flavour.
Several hours before placing fresh food in the freezer
compartment, switch on super freezing to prevent
an unwanted temperature rise.
As a rule, 4–6 hours is adequate.
This appliance runs constantly and the freezer
compartment drops to a very low temperature.
If the max. freezing capacity is to be used, super
freezing must be switched on for 24 hours before the
fresh produce is placed in the freezer compartment.
Smaller quantities of food (up to 2 kg) can be frozen
without “super freezing”.
Switching on Super freezing
1. Press the “freeze” button until “freeze” is lit on the
freezer compartment display panel.
2. Press “super” button.
If super freezing is switched on, “super” is indicated on
the display panel.
Packing frozen food
To prevent food from losing its flavour or drying out,
place in airtight containers.
1. Place food in packaging.
2. Remove air.
3. Seal the wrapping.
4. Label packaging with contents and date of freezing.
Suitable packaging:
Cling wrap, tubular film made of polyethylene,
aluminium foil, freezer containers.
These products are available from specialist outlets.
Unsuitable packaging:
Wrapping paper, greaseproof paper, cellophane, bin
liners and used shopping bags.
Items suitable for sealing packaged food:
Rubber bands, plastic clips, string, cold-resistant
adhesive tape, etc.
Bags and tubular film made of polyethylene (PE) can
be sealed with a film heat sealer.
Shelf life of frozen food
Storage duration depends on the type of food.
Switching off Super freezing
1. Press the “freeze” button until “freeze” is lit on the
freezer compartment display panel.
2. Press “super” button.
If Super freezing is switched off, the “super” display
goes out on the display panel.
Note
Super freezing automatically switches off after
approx. 2^ days.
At a temperature of -18 °C:
■ Fish, sausage, ready meals and cakes and pastries:
up to 6 months
■ Cheese, poultry and meat:
up to 8 months
■ Vegetables and fruit:
up to 12 months
36
Page 37

Thawing frozen food
Depending on the type and application, select one
of the following options:
■ at room temperature
■ in the refrigerator
■ in an electric oven, with/without fan assisted hot-air
■ in the microwave
m Caution
Do not refreeze thawing or thawed food. Only ready
meals (boiled or fried) may be refrozen.
No longer store the frozen produce for the max.
storage period.
Refrigerator compartment
The refrigerator compartment is the ideal storage
location for meat, sausage, fish, dairy products, eggs,
ready meals and pastries.
en
Vegetable container with humidity
controller
To create the optimum storage climate for fruit and
vegetables, you can set the air humidity in the
vegetable container depending on the quantity stored:
■ smaller quantities of fruit and vegetables – high air
humidity
■ large quantities of fruit and vegetables – low air
humidity
Storing food
■ Store fresh, undamaged food. The quality and
freshness will then be retained for longer.
■ In the case of ready-made products and bottled
goods, observe the best-before date or use-by date
specified by the manufacturer.
■ To retain aroma, colour and freshness, pack
or cover food well before placing in the appliance.
This will prevent the transfer of flavours and the
discolouration of plastic parts in the refrigerator
compartment.
■ Allow warm food and drinks to cool down before
placing in the appliance.
Note
Avoid contact between food and rear panel. Otherwise
the air circulation will be impaired.
Food or packaging could freeze to the rear panel.
Note the chill zones in the refrigerator
compartment
The air circulation in the refrigerator compartment
creates different chill zones:
■ Coldest zone is between the vegetable container and
the glass shelf situated above.
Notes
■ Fruit sensitive to cold (e.g. pineapple, banana,
papaya and citrus fruit) and vegetables sensitive
to cold (e.g. aubergines, cucumbers, zucchini,
peppers, tomatoes and potatoes) should be stored
outside the refrigerator at temperatures of approx.
+8 °C to +12 °C for optimum preservation of quality
and flavour.
■ Condensation may form in the vegetable container
depending on the type and quantity of products
stored. Remove condensation with a dry cloth and
adjust air humidity in the vegetable container with
the humidity controller.
Note
Store perishable food (e.g. fish, sausage, meat)
in the coldest zone above the vegetable container.
■ Warmest zone is at the very top of the door.
Note
Store e.g. hard cheese and butter in the warmest
zone. Cheese can then continue to release its flavour
and the butter will still be easy to spread.
37
Page 38

en
Super cooling
Super cooling sets the refrigerator temperature
to the coldest temperature setting for approx. 6 hours.
Then the appliance automatically switches
to the temperature set prior to super cooling mode.
Switch on super cooling mode, e.g.
■ before placing large quantities of food
in the refrigerator compartment.
■ for the fast cooling of drinks.
Switching on Super cooling
1. Press the “cool” button until “cool” is lit on the
refrigerator compartment display panel.
2. Press “super” button.
If super cooling is switched on, “super” is indicated on
the display panel.
Ice and water dispenser
The following can be dispensed as required:
■ cooled water,
■ crushed ice,
■ ice cubes.
m Warning
Never reach into the ice cube dispenser opening! Risk
of injury!
m Caution
Do not place bottles or food in the cube container
in order to cool them quickly. The ice maker may block
and be damaged.
Using the ice and water dispenser
The ice and water dispenser only works when
the appliance is connected to the water mains.
When the appliance has been switched on, it takes
approx. 24 hours until the first batch of ice cubes are
ready.
When the appliance has been connected, there are still
air bubbles in the lines.
Run off drinking water and pour away until water can be
dispensed without bubbles. Pour away the first 5
glasses.
When using the ice maker for the first time, do not use
the first 30-40 ice cubes for reasons of hygiene.
Switching off Super cooling
1. Press the “cool” button until “cool” is lit on the
refrigerator compartment display panel.
2. Press “super” button.
If super cooling is switched off, “super” goes out on
the display panel.
Operating the ice maker
As soon as the freezer compartment has reached its
freezing temperature, ice cube production starts. After
2–3 hours the ready ice cubes are automatically
discharged into the ice cube container.
Note
The appliance produces more ice if you lower the
freezer compartment temperature. This will slightly
increase the energy consumption of your appliance.
Occasionally ice cubes will freeze together and block
the dispenser:
1. Open the door and check inside whether ice cubes
are sticking to the ice and water dispenser.
2. If the ice and water dispenser is not blocked:
m Caution
A full ice cube container is heavy!
■ Carefully pull out ice cube container and remove ice
cubes which are frozen together.
When the ice cube container is full, ice making
switches off automatically.
When ice cubes are being made, the buzzing water
valve, the water flowing into the ice cube tray and
the falling ice cubes can be heard.
38
Page 39

en
Observing drinking water quality
All materials used in the drinks dispenser are odourless
and tasteless.
If the water has an aftertaste, this may be caused by:
■ Mineral and chlorine content of the drinking water.
■ Material of the domestic water line and connection
line.
■ Freshness of the drinking water. If water has not
been dispensed for a long time, the water may have
a “stale” taste. In this case fill approx. 15 glasses
of water and throw away.
We recommend that you regularly dispense a little
fresh water from the water maker and that you do not
switch off the appliance. This will ensure that the best
water quality is retained.
The enclosed water filter will filter only particles out
of the supply water, not bacteria or microbes.
Dispensing ice/water
■ Select the ice and water dispenser button (water,
crushed ice or ice cubes).
■ Keep pressing the button until the required quantity
is in the glass.
Dispensing water
Dispensing ice
Switching on and off the ice
and water dispenser
m Caution
■ Before switching off the ice maker, it is most
important that you switch the water supply
to the appliance off for a few hours.
■ Empty and clean ice cube container. Re-attach
the ice cube container. Ensure that the ice cube
container engages with the support.
Note
The water from the water dispenser is cooled
to a palatable temperature. If you would like the water
colder, place ice cubes in the glass before dispensing
the water.
Note
When dispensing fairly large amounts of water, the
dispensed water may become warmer.
Switching the ice and water dispenser off
Simultaneously press “freezer” and “super” buttons
for 5 seconds. “IWD off” is indicated on the display
panel.
Switching on ice and water dispenser
Simultaneously press “freezer” and “super” buttons
for 5 seconds. The “IWD off” display goes out on the
display panel.
39
Page 40

en
Water filter
The appliance can be operated with or without a water
filter depending on the water quality. When operating
without a water filter use the locking cap provided for
this purpose.
m Warning
Do not use the appliance in locations which have a
questionable or inadequate water quality without
appropriate disinfection before and after filtration.
A filter cartridge for filtering particles can be obtained
from customer service or a specialist dealer.
m Caution
■ After installing a new filter, always discard the ice
produced within the first 24 hours after switching on
the ice maker.
■ If the ice has not been used for a prolonged period,
pour all ice cubes out of the container and also
discard the ice produced during the next 24 hours.
■ If the appliance or the ice has not been used actively
for several weeks or months or if the ice cubes have
an unpleasant taste or odour, change the water filter.
■ Air trapped in the system may cause water to escape
and the filter cartridge to be ejected. Caution when
removing.
■ The filter must be changed at least every 6 months.
■ Pour water out of the used filter cartridge. The filter
cartridge can be disposed of in the household
rubbish.
Use locking cap
The ice and water dispenser can also be used without
a water filter. In this case, fit the locking cap.
Note
The locking cap and the filter screen inside should be
rinsed out under running water at regular intervals.
Important information concerning
the water filter
■ After use, the water system is subject to low
pressure. Be careful when removing the filter!
■ Rinse the water system through if the appliance has
not been used for a long period, or if the water
tastes or smells unpleasant. In addition to this, draw
water from the water dispenser for several minutes. If
the unpleasant taste or smell persists exchange
the filter.
Exchanging the filter cartridge
■ Insert new filter cartridge.
■ Draw a few litres of water from the water dispenser.
Doing this removes air from the water system.
40
Page 41

Specification and performance
data sheet
en
The concentration of the indicated substances which
are dissolved in water and penetrate the system was
reduced to a value below or equal to the permitted limit
value in accordance with ANSI/NSF 42 and 53
for water discharged out of the appliance.
For filter model: 9000 225 170
Note
Even though the tests were conducted under standard
Using replacement cartridge: 9000 077 104
laboratory conditions, the actual performance may
deviate from these tests.
The model was tested by NSF International with
reference to ANSI/NSF Standards 42 & 53
and certified for a reduction in the substances cited
below.
The system was tested and certified on model
9000 225 170 by NSF International with reference
to ANSI/NSF Standard 53 for a reduction in cysts
and turbidity, as well as with reference to ANSI/NSF
Standard 42 for a reduction in the taste and odour
of chlorine.
Nominal particle class: I
Nominal service life: 2.800 litres
Substance Average in inflow Inflow concentration Waste water
Cysts * 166.500 Min. 50.000/l 1 99.99 99.95 1 99.99 511077-03
Turbidity 10.7 11 x 1 NTU 0.3 l 97.10 0.5 NTU 0.49 95.42 511078-03
Particle class I
Particle size
> 0.5
to < 1.0 μm
Taste
of chlorine and
turbidity
5.700.000 At least 10.000
particles/ml
1.9 2.0 mg/l + -10% 0.05 97.3 > 50% 0.06 96.84 511081-03
concentration
30.583 99.52 > 85% 69.000 98.9 511079-03
* Based on the use of Cryptosporium parvum ocysts.
Application guidelines / Water supply parameters:
Average reduction as %Max. permitted
concentration in waste
water
A one-year warranty is issued for the entire system
(except disposable cartridge). With reference
Max. waste
water
Min. reduction as % NSF test
to disposable cartridges a warranty is issued for
material and processing faults only. As the service life
Water pressure 207 - 827 kPa
Water temperature * 0.6 °C - 38 °C
Flow rate 2.83 l/min.
■ The system is to be installed and operated
according to the guidelines recommended by
the manufacturer.
■ The filter is to be changed every 6-9 months.
■ Rinse new filter thoroughly for 5 minutes.
■ More detailed information can be found on
of disposable cartridges depends on the local water
conditions, no warranty is issued for them.
More detailed information on the prices of spare parts
is available from your appliance dealer or parts
salesman on site.
Manufactured by:
3 M Material Technology (Guangzhou) Ltd.
9 Nanxiang Er road, Science City,
Guangzhou, 510663, P.R. China
the warranty card.
Without appropriate disinfection before and after
connecting it to the system, this product should NOT
be used if the water is microbiologically
contaminated or if the quality has not been
ascertained. A system certified for cyst reduction
should be used for disinfected water which possibly
contains filterable cysts.
41
Page 42

en
Features of the freezer
compartment
(not all models)
Freezer calendar
Switching off and
disconnecting the appliance
To prevent the quality of the frozen food from
deteriorating, do not exceed the storage
duration.The storage period depends on the type
of produce. The figures next to the symbols indicate
the permitted storage period of the produce in months.
In the case of commercially available frozen food
observe the date of manufacture or use-by date.
Variable interior design
You can vary the shelves inside the appliance
and the door shelves as required.
■ Pull shelf forwards, lower and swing out to the side.
Switching off the appliance
Pull out mains plug or switch off fuse.
Refrigerating unit switches off.
Disconnecting the appliance
If you do not use the appliance for a prolonged period:
1. Before switching off, it is most important that you
switch the water supply to the appliance off for a few
hours.
2. Take all food out of the appliance.
3. Pull out mains plug or switch off fuse.
4. Empty and clean the ice cube container (see chapter
Cleaning the appliance).
5. Clean the appliance interior (see chapter Cleaning
the appliance).
6. Leave the appliance doors open to prevent odours
from forming.
Defrosting
Freezer compartment
The fully automatic NoFrost system ensures
that the freezer compartment remains free of ice.
Defrosting is no longer required.
■ Lift the door shelf and remove.
42
Refrigerator compartment
Defrosting is actuated automatically.
The condensation runs through the drainage hole into
an evaporation pan on the rear of the appliance.
Page 43

Cleaning the appliance
m Warning
Never clean the appliance with a steam cleaner!
en
Cleaning the water collection tray
Spilled water collects in the water collecting tray.
To empty and clean, remove the filter. Wipe out water
collecting tray with a sponge or absorbent cloth.
m Caution
Do not use abrasive, chloride or acidic cleaning agents
or solvents.
m Caution
Do not use scouring or abrasive sponges. The metallic
surfaces could corrode.
m Caution
Never clean shelves and containers in the dishwasher.
The parts may become deformed!
Proceed as follows:
1. Pull out the mains plug or switch off the fuse.
2. Take out the frozen food and store in a cool location.
3. Wait until the layer of frost has thawed.
4. Clean the appliance with a soft cloth, lukewarm water
and a little pH-neutral washing-up liquid. The rinsing
water must not run into the light.
5. Wipe the door seal with clear water only and then
wipe dry thoroughly.
6. After cleaning reconnect the appliance.
7. Put the frozen food back into the appliance.
Cleaning the ice cube container
If ice cubes have not been dispensed for a prolonged
period, they will shrink, have a stale taste and stick
together.
Pull out the container, empty and clean with lukewarm
water.
m Caution
A full ice cube container is heavy!
Interior fittings
To clean the equipment, all variable parts of
the appliance can be taken out (see chapter Variable
interior design).
Note
To take out and clean the containers, open the doors
fully beyond 90°.
Removing the container
Pull out container all the way, lift to detach it from
the holder and take out.
After cleaning, dry the container and feed screw
thoroughly to prevent the new ice cubes from sticking.
Inserting the ice cube container
Push the ice cube container all the way back onto
the supports until it locks into position. Ice cube
production continues.
Note
If the container cannot be pushed all the way back,
twist the screw conveyor in the container or remove
frozen ice cubes from the area of the shelf.
To insert the container, place on the telescopic rails
and push into the appliance. Attach the container by
pressing it down.
43
Page 44

en
Light (LED)
Your appliance features a maintenance-free LED light.
These lights may be repaired by customer service
or authorised technicians only.
Tips for saving energy
■ Install the appliance in a dry, well ventilated room!
The appliance should not be installed in direct
sunlight or near a heat source (e.g. radiator, cooker).
If required, use an insulating plate.
■ Do not block the ventilation openings in
the appliance.
■ Allow warm food and drinks to cool down before
placing in the appliance.
■ Thaw frozen food in the refrigerator compartment
and use the low temperature of the frozen food
to cool refrigerated food.
■ Open the appliance as briefly as possible.
■ Ensure that the freezer compartment door is always
closed properly.
■ If available:
Fit wall spacers to obtain the indicated energy rating
of the appliance (see “Installing the appliance”,
section “Ventilation”). A reduced wall gap will not
restrict the function of the appliance. The energy
rating may then increase slightly.
■ The arrangement of the fittings does not affect the
energy rating of the appliance.
Operating noises
Quite normal noises
Droning
Motors are running (e.g. refrigerating units, fan).
Bubbling, humming or gurgling noises
Refrigerant is flowing through the tubing or water is
flowing into the ice maker.
Clicking
Motor, switches or solenoid valves are switching on/off.
Rumbling
Ready ice cubes from the ice maker are falling
into the ice cube container.
Preventing noises
The appliance is not level
Please align the appliance with a spirit level. Use
the height-adjustable feet or place packing underneath
them.
The appliance is not free-standing
Please move the appliance away from adjacent units
or appliances.
Containers or storage areas wobble or stick
Please check the removable parts and re-insert them
correctly if required.
Bottles or receptacles are touching each other
Move the bottles or receptacles slightly away
from each other.
44
Page 45

Eliminating minor faults yourself
Before you call customer service:
Please check whether you can eliminate the fault yourself based on the following information.
Run an appliance self-test (see chapter “Appliance self-test”).
Customer service will charge you for advice even if the appliance is still under guarantee!
Fault Possible cause Remedial action
Temperature differs greatly
from the set value.
Displays do not illuminate. Power failure; the fuse has been switched off;
the mains plug has not been inserted properly.
Display indicates “E..”. Electronics have detected a fault. Call customer service.
Warning signal sounds and
the temperature display
on the freezer compartment
flashes.
The freezer compartment is too
warm! Frozen food is at risk!
The light does not work. The light is defective. (See chapter “Light”.)
Appliance has no refrigeration
capacity.
The light does not work.
The display does not illuminate.
The refrigerating unit
is switching on more frequently
and for longer.
Freezer compartment door is open. Close the door.
Ventilation openings have been covered. Remove obstacles.
Too much food was placed in the freezer
compartment at once.
Power failure. Check whether the power is on.
The fuse has been switched off. Check the fuse.
The mains plug has not been inserted properly. Check whether the mains plug is secure.
Appliance opened frequently. Do not open the appliance unnecessarily.
The ventilation openings have been covered. Remove obstacles.
Large quantities of fresh food are being frozen. Do not exceed max. freezing capacity.
In some cases it is adequate to switch off the appliance
for 5 minutes.
If the temperature is too high wait a few hours and check
whether the temperature has approached the set value.
If the temperature is too low check the temperature again
the next day.
Connect mains plug. Check whether the power is on, check
the fuses.
To switch off the warning signal, press the “alarm/lock”
button. The display stops flashing.
The warmest temperature reached in the freezer compartment
is indicated on the temperature display for 10 seconds.
Do not exceed max. freezing capacity.
Note
Frozen food which has started thawing or which has thawed
can be refrozen if meat and fish were above +3 °C for not
more than one day or other frozen food for not more than three
days.
en
45
Page 46

en
Water and ice dispenser
Fault Possible cause Remedial action
Despite prolonged operating time,
ice cubes are not being dispensed.
Ice cubes are in the ice cube
container but are not being
dispensed.
Ice cubes are jammed in the outlet
of the ice cube container
or in the ice crusher.
Ice cubes are watery.
Ice cubes have melted.
Water dispenser is not functioning. Tap turned off. Turn on tap.
The ice maker does not make
enough ice or the ice is deformed.
Bubbling, gurgling noises in the
water line.
Tap turned off. Turn on tap.
Water supply is interrupted. Water pressure
too low.
Ice and water dispenser is switched off. “IWD
off” is lit on the display panel.
Freezer compartment too warm. Lower temperature in the freezer compartment (see chapter
Ice cubes are frozen together. Remove and empty the ice cube container.
Freezer compartment door is open. Close the door.
Power failure. Check whether the power is on.
Water supply is interrupted. Water pressure
too low.
The appliance or ice maker has only just been
switched on.
A lot of ice has been taken. Approx. 24 hours is needed until the ice cube container is filled
Low water pressure. Connect the appliance to the stipulated water pressure only
The water filter is bunged up or used. Change the water filter.
Temperature in the freezer compartment is too
warm.
Water supply is interrupted or water line
is blocked.
Inform plumber.
Switch on ice and water dispenser (see “Switching on and off
the ice and water dispenser”).
“Setting the temperature”).
Remove the ice cube container and rotate the screw conveyor
by hand. Loosen any jammed chunks of ice with a wooden
chopstick.
Remove the ice cube maker, empty and rub dry.
Inform plumber.
Approx. 24 hours is needed until ice production starts.
again.
(see chapter Connecting the appliance, section Water
connection).
Set temperature slightly colder in the freezer compartment.
1. Check water supply.
2. Check whether the water line is blocked.
3. In some cases it is adequate to switch off the ice and water
dispenser briefly (see chapter “Switching on and off the ice
and water dispenser”).
46
Page 47

en
Appliance self-test
Your appliance features an automatic self-test program
which shows you sources of faults which
may be repaired by customer service only.
Starting the appliance self-test
1. Switch off the appliance and wait 5 minutes.
2. Switch the appliance on again.
3. Simultaneously press the setting buttons + and - for
5 seconds.
The self-test programme starts. If “E..” is indicated on
the display panel, an error has occurred. If this fault is
displayed, inform customer service.
Ending the appliance self-test
Simultaneously press the setting buttons + and - again
for 5 seconds.
Customer service
Your local customer service can be found
in the telephone directory or in the customer-service
index. Please provide customer service with
the appliance product number (E-Nr.) and production
number (FD-Nr.).
These specifications can be found on the rating plate.
To prevent unnecessary call-outs, please assist
customer service by quoting the product
and production numbers. This will save you additional
costs.
Repair order and advice on faults
Contact information for all countries can be found
on the enclosed customer service list.
GB 0344 892 8999 Calls charged at local or
mobile rate.
IE 01450 2655 0.03 € per minute at peak.
Off peak 0.0088 € per
minute.
US 866 447 4363 toll-free
47
Page 48

fr
fr Table des matières
frNotice de montage et d’utilisation
Consignes de sécurité et avertissements .... 49
Conseil pour la mise au rebut ........................ 51
Étendue des fournitures ................................... 51
Installation de l’appareil ................................... 51
Cotes d’encombrement ................................... 52
Angle d’ouverture des portes ......................... 53
Ajuster l’appareil ................................................ 54
Branchement de l’appareil .............................. 54
Démonter les portes de l'appareil .................. 54
Présentation de l’appareil ................................ 55
Mettre l’appareil sous tension ......................... 57
Régler l’unité de température ......................... 57
Réglage de la température ............................. 57
Fonction alarme ................................................. 58
Contenance utile ............................................... 58
Le compartiment congélateur ......................... 58
Capacité de congélation maximale ............... 59
Congélation de produits frais .......................... 59
Supercongélation .............................................. 60
Décongélation des produits ............................ 60
Le compartiment réfrigérateur ........................ 60
Super-réfrigération ............................................. 61
Distribution de glaçons et d’eau .................... 62
Allumer et éteindre le distributeur de
glaçons et d'eau ................................................ 63
Filtre à eau .......................................................... 63
Fiche des caractéristiques et performances 65
Équipement du compartiment congélateur .. 66
Agencement variable du compartiment
intérieur ............................................................... 66
Arrêt et remisage de l'appareil ....................... 66
Si vous dégivrez l'appareil ............................... 66
Nettoyage de l’appareil .................................... 67
Éclairage (LED) .................................................. 68
Economies d’énergie ........................................ 68
Bruits de fonctionnement ................................. 68
Remédier soi même aux petites pannes ...... 69
Autodiagnostic de l’appareil ........................... 71
Service après-vente .......................................... 71
48
Page 49

m Consignes de sécurité
et avertissements
Avant de mettre l'appareil en service
Veuillez lire attentivement et entièrement les
informations figurant dans les notices
d'utilisation et de montage. Elle contiennent
des remarques importantes concernant
l'installation, l'utilisation et l'entretien
de l'appareil.
Le fabricant décline toute responsabilité si
les consignes et mises en garde contenues
dans la notice d'utilisation ne sont pas
respectées. Veuillez conserver ces
documents en vue d’une réutilisation
ultérieure ou pour le cas où l’appareil
changerait de propriétaire.
Sécurité technique
fr
Si le cordon d’alimentation électrique de cet
appareil a été endommagé, il faut confier
son remplacement au fabricant, au service
après-vente ou à une personne détenant
des qualifications similaires. Les
installations et réparations inexpertes
peuvent engendrer des risques
considérables pour l’utilisateur.
Les réparations ne pourront être réalisées
que par le fabricant, le service après-vente
ou une personne détenant des
qualifications similaires.
Il ne faut utiliser que les pièces d'origine du
fabricant. Le fabricant ne garantit que les
pièces d'origine car elles seules
remplissent les exigences de sécurité.
S’il faut allonger le cordon de raccordement
au secteur avec un prolongateur, procurezvous-le exclusivement auprès du service
après-vente.
L'appareil contient une petite quantité
de R600a, un fluide réfrigérant respectueux
de l'environnement, mais inflammable.
Pendant le transport et la mise en place de
l'appareil, veillez à ne pas endommager les
tuyauteries du circuit frigorifique. Le fluide
réfrigérant peut s’enflammer en jaillissant
ou provoquer des blessures oculaires.
Si l'appareil est endommagé
■ éloignez de l'appareil toute flamme nue
ou source d'inflammation,
■ aérez bien la pièce pendant quelques
minutes,
■ éteignez l'appareil puis débranchez la
fiche mâle de la prise de courant,
■ prévenez le service après-vente.
Plus l'appareil contient du fluide réfrigérant
et plus grande doit être la pièce dans
laquelle il se trouve. Dans les pièces trop
petites, un mélange gaz-air inflammable
peut se former en cas de fuite.
Comptez 1 m³ de volume minimum de la
pièce pour 8 g de fluide réfrigérant. La
quantité de fluide présente dans l'appareil
est indiquée sur la plaque signalétique
située à l'intérieur de ce dernier.
Pendant l’utilisation
■ N’utilisez pas d’appareils électriques à
l’intérieur de l’appareil (par ex. appareils
de chauffage, machine à glaçons, etc.).
Risque d’explosion !
■ Ne nettoyez jamais l’intérieur de l’appareil
avec un nettoyeur à vapeur ! La vapeur
risque d’atteindre des pièces électriques
et de provoquer un court-circuit. Risque
d’électrocution !
■ Pour détacher le givre ou les couches de
glace, n’utilisez jamais d’objets pointus
ou présentant des arêtes vives. Vous
risqueriez d’endommager les tubulures
dans lesquelles circule le produit
réfrigérant. Si le fluide réfrigérant jaillit, il
peut provoquer des lésions oculaires ou
s’enflammer.
■ Ne stockez dans l’appareil ni produits
contenant des gaz propulseurs
inflammables (par ex. bombes aérosols)
ni produits explosifs. Risque d’explosion !
■ Ne vous servez pas des socles, clayettes
et portes comme marchepieds ou pour
vous appuyer.
■ Pour nettoyer l’appareil, débranchez la
fiche mâle de la prise de courant ou
retirez le fusible / désarmez le
disjoncteur. Pour débrancher l’appareil,
tirez sur la fiche mâle et non pas sur son
cordon.
49
Page 50

fr
■ Stockez les boissons fortement
alcoolisées en position verticale dans des
récipients bien fermés.
■ L’huile et la graisse ne doivent pas entrer
en contact avec les parties en matières
plastiques et le joint de porte. Ces
derniers pourraient sinon devenir poreux.
■ Ne recouvrez et n’obstruez jamais les
orifices de ventilation de l’appareil.
■ Évitez des risques pour les enfants et
les personnes en danger :
Sont en danger les enfants et les
personnes dont les capacités physiques,
psychiques ou de perception sont
restreintes, ainsi que les personnes ne
détenant pas suffisamment de
connaissances sur l’utilisation sûre de
l’appareil.
Assurez-vous que les enfants et les
personnes en danger ont bien compris la
nature des dangers.
Une personne responsable de la sécurité
doit surveiller ou guider les enfants et les
personnes en danger lorsqu’elles se
trouvent près de l’appareil.
Ne permettez l’utilisation de l’appareil
qu’aux enfants à partir de 8 ans.
Surveillez les enfants pendant le
nettoyage et la maintenance.
Ne jamais laisser des enfants jouer avec
l'appareil.
■ Dans compartiment congélateur, ne
stockez pas de liquides en bouteilles ou
en boîtes (en particulier les boissons
gazeuses). Les bouteilles et les boîtes
pourraient éclater !
■ Ne portez jamais des produits surgelés à
la bouche immédiatement après les avoir
sortis du compartiment congélateur.
Risque d’engelures !
■ Évitez tout contact prolongé des mains
avec les produits congelés, la glace ou
les tubes de l’évaporateur, etc.
Risque d’engelures !
Les enfants et l’appareil
■ Ne confiez jamais l’emballage et ses
pièces constitutives aux enfants.
Ils risquent de s'étouffer avec les cartons
pliants et les feuilles de plastique !
■ L’appareil n’est pas un jouet pour
enfants !
■ Appareils équipés d’une serrure :
rangez la clé hors de portée des enfants !
Dispositions générales
L’appareil convient pour
■ réfrigérer et congeler des aliments,
■ préparer des glaçons,
■ la distribution d’eau potable.
Cet appareil est destiné à un usage
domestique dans un foyer privé,
et à l’environnement domestique.
L’appareil a été antiparasité conformément
à la directive UE 2004 / 108 / EC.
Le circuit frigorifique a subi un contrôle
d’étanchéité.
Ce produit est conforme aux dispositions
de sécurité applicables visant les appareils
électriques (EN 60335-2-24).
Cet appareil est conçu pour une utilisation
jusqu'à une altitude maximale de 2 000 m.
50
Page 51

fr
Conseil pour la mise au rebut
* Mise au rebut de l'emballage
L’emballage protège votre appareil contre les
dommages susceptibles de survenir en cours de
transport. Tous les matériaux qui le composent sont
compatibles avec l’environnement et recyclables.
Aidez-nous : à éliminer l’emballage dans le respect
de l’environnement.
Pour connaître les circuits actuels de mise au rebut,
adressez-vous s.v.p. à votre revendeur ou
à l’administration de votre commune.
Eliminez l'emballage en respectant
l'environnement.
* Mise au rebut de l'ancien appareil
Les appareils usagés ne sont pas des déchets dénués
de valeur ! Leur élimination dans le respect de
l'environnement permet d'en récupérer de précieuses
matières premières.
Cet appareil est marqué selon la directive
européenne 2012/19/UE relative aux
appareils électriques et électroniques usagés
(waste electrical and electronic equipment WEEE).
La directive définit le cadre pour une reprise
et une récupération des appareils usagés
applicables dans les pays de la CE.
m Mise en garde
Avant de mettre au rebut l'appareil qui ne sert plus :
1. Débranchez sa fiche mâle.
2. Sectionnez son câble d’alimentation et retirez-le avec
la fiche mâle.
3. Pour dissuader les enfants de grimper dans
l’appareil, ne retirez pas les clayettes et les bacs !
4. Ne permettez pas aux enfants de jouer avec
l’appareil lorsqu’il ne sert plus. Risque
d’étouffement !
Les appareils réfrigérants contiennent du fluide
réfrigérant. L’isolant contient des gaz. Il faut que le
fluide réfrigérant et les gaz soient éliminés dans les
règles de l’art. Jusqu'à l'enlèvement de l'appareil,
veillez bien à ce que son circuit frigorifique ne soit pas
endommagé.
Étendue des fournitures
Après avoir déballé, vérifiez toutes les pièces pour
détecter d’éventuels dégâts dus au transport.
En cas de réclamation, veuillez vous adresser au
revendeur auprès duquel vous avez acquis l’appareil
ou auprès de notre service après-vente.
La livraison comprend les pièces suivantes :
■ Appareil indépendant
■ Sachet avec visserie de montage
■ Équipement (selon le modèle)
■ Notice d’utilisation
■ Carnet de service après-vente
■ Pièce annexe de la garantie
■ Informations relatives à la consommation d’énergie
et aux bruits
Installation de l’appareil
Transport
L'appareil est lourd. Lors du transport et du montage,
sécuriser l'appareil !
Comme l'appareil est lourd et encombrant, au moins
deux personnes sont nécessaires pour mettre en place
l'appareil tout en réduisant le risque de blessure ou
d'endommagement de l'appareil.
Lieu d’installation
Un local sec et aérable convient pour installer
l’appareil. Evitez de placer l’appareil à un endroit
directement exposé aux rayons solaires ou à proximité
d’une source de chaleur telle une cuisinière, un
radiateur, etc. Si l’installation près d’une source
de chaleur est inévitable, utilisez une plaque isolante
appropriée ou respectez les distances minimales
suivantes :
■ 3 cm par rapport aux cuisinières électriques ou
à gaz.
■ 30 cm par rapport à un appareil de chauffage
au fuel ou au charbon.
Si vous placez votre appareil à côté d’un autre
réfrigérateur ou congélateur, laissez obligatoirement
un espace d’au moins 25 mm entre eux afin d’éviter
la formation de condensation.
Si vous montez un cache ou un placard au-dessus
de l’appareil, il faudra prévoir un espace libre
de 30 mm pour pouvoir si nécessaire sortir l’appareil
de la cavité.
L’air qui s’est échauffé au dos de l’appareil doit pouvoir
s’échapper sans rencontrer d’obstacle.
51
Page 52

fr
Surface porteuse
m Attention
L’appareil est très lourd.
Version à distributeur : 143 kg
Sur l’emplacement, le sol ne doit pas s’affaisser.
Renforcez-le le cas échéant.
Si l’appareil a été installé dans une niche ou dans un
coin de la pièce, maintenez un écart minimum pour
pouvoir ouvrir les portes jusqu’à la butée (voir
le chapitre « Cotes d’encombrement »).
Si la profondeur des équipements de cuisine voisins
dépasse 60 cm, il faudra respecter des écarts latéraux
minimum afin de profiter de l’angle complet d’ouverture
des portes (voir le chapitre « Angle d’ouverture
de porte »).
Contrôler la température ambiante
et l’aération
Température ambiante
La catégorie climatique à laquelle appartient l’appareil
figure sur sa plaque signalétique. Elle indique dans
quelles plages de température il est possible de faire
fonctionner l’appareil. La plaque signalétique se trouve
en bas à droite dans le compartiment réfrigérateur.
Aération
Ne recouvrez en aucun cas les orifices d’entrée
et de sortie d’air situés contre la paroi arrière
de l’appareil. L’air chaud doit pouvoir s’échapper sans
obstacle. S’il ne le peut pas, le groupe frigorifique doit
fonctionner plus longtemps, ce qui augmente
la consommation de courant.
Montez les écarteurs ci-joints sur les fixations prévues
au dos de l'appareil. Ceci permet de respecter l’écart
minimum requis par rapport au mur.
Catégorie
climatique
SN +10 °C à 32 °C
N +16 °C à 32 °C
ST +16 °C à 38 °C
T +16 °C à 43 °C
Remarque
L’appareil est entièrement fonctionnel à l’intérieur
des limites de température ambiante prévues dans
la catégorie climatique indiquée. Si un appareil de la
catégorie climatique SN est utilisé à des températures
ambiantes plus basses, il est possible d’exclure que
l’appareil s’endommage jusqu'à une température
de +5 °C.
Température ambiante
admissible
Cotes d’encombrement
52
Page 53

Angle d’ouverture des portes
fr
D
[
[
E
[
[
[
DE
53
Page 54

fr
Ajuster l’appareil
Afin que l’appareil fonctionne impeccablement, il faut
l’horizontaliser à l’aide d’un niveau à bulle.
S’il n’est pas d’aplomb, l’eau risque de fuir
du distributeur de glaçons, qui va produire des glaçons
difformes, ou les portes risquent de ne pas bien fermer.
Branchement de l’appareil
Faites installer et raccorder l’appareil par un spécialiste
qui procèdera selon la notice de montage ci-jointe.
N’enlevez les cales de transport retenant les clayettes
et balconnets qu’après l’installation.
Réalisez le raccordement de l’eau impérativement
avant celui de l’électricité.
Outre les prescriptions légales en vigueur dans votre
pays, veuillez aussi respecter les règlements publiés
par les compagnies distribuant l’électricité et l’eau dans
votre localité.
Après l’installation de l’appareil en position verticale,
attendez au moins une heure avant de le mettre
en service. Il peut en effet arriver, pendant le transport,
que l’huile présente dans le compresseur se déplace
vers le circuit frigorifique.
Avant la première mise en service, nettoyez
le compartiment intérieur de l’appareil. (Voir le chapitre
« Nettoyage de l’appareil ».)
Branchement de l’eau
Le raccordement de l’eau est une opération
exclusivement réservée à un installateur professionnel
qui respectera ce faisant les prescriptions publiées par
la compagnie distributrice d’eau dans votre localité.
■ Pression maximum : 0,8 Mpa (8 bar)
■ Pression supérieure à 0,8 MPa (8 bar) : installez
un limiteur de pression entre le raccord d'eau
potable et le kit flexible
Remarque
La conduite d’eau (sans les pièces de jonctions) doit
faire au maximum 10 mm de diamètre extérieur.
Branchement électrique
N’utilisez ni prolongateur ni dispositif multiprises. Le
raccordement de cet appareil demande la présence
d’une prise femelle fixe.
La prise doit être proche de l’appareil et demeurer
librement accessibles même après avoir installé ce
dernier.
L’appareil est conforme à la classe de protection I.
Raccordez l’appareil au courant alternatif 220-240 V /
50 Hz, via une prise femelle installée
réglementairement et comportant un fil de terre. La
prise doit être protégée par un fusible / disjoncteur
supportant de 10 à 16 A ou plus.
Sur les appareils destinés aux pays non européens,
vérifiez si la tension de branchement et le type
de courant spécifiés sur la plaque signalétique
concordent bien avec ceux offerts par le secteur du
pays concerné. La plaque signalétique se trouve en
bas à droite dans l’appareil. Si un changement
de cordon d’alimentation électrique s’impose, cette
opération est réservée à un spécialiste.
m Mise en garde
Il ne faut en aucun cas raccorder l’appareil à des fiches
électroniques d’économie d’énergie.
Nos appareils peuvent être alimentés via des onduleurs
pilotés par le secteur ou à pilotage sinusoïdal.
Directement raccordées au réseau public,
les installations photovoltaïques font appel à des
onduleurs pilotés par le secteur. Dans les solutions en
îlots (p. ex. sur les bateaux ou les refuges
de montagne), ne disposant pas d’un raccordement
direct au réseau électrique public, il faut utiliser
des onduleurs à pilotage sinusoïdal.
Démonter les portes de
l'appareil
Il est possible de dévisser les portes de l'appareil s'il ne
passe pas par la porte du logement.
m Attention
Seul le service après-vente est autorisé à dévisser les
portes de l’appareil.
m Attention
Pour effectuer le raccordement au réseau d’eau
potable, n’utilisez que le flexible en kit livré d’origine.
N’utilisez en aucun cas les kits flexibles préexistants ou
d’autres déjà utilisés.
Ne raccordez l’appareil qu’à une conduite d’eau
potable :
■ Pression minimum : 0,2 Mpa (2 bar)
54
Page 55

fr
Présentation de l’appareil
La présente notice d’utilisation vaut pour plusieurs modèles. Selon le modèle, l’appareil peut différer du contenu des
illustrations.
1
2
10
3
12
13
4
14
15
5
16
6
17
18
7
8
9
19
20
11
* Selon le modèle.
A Compartiment congélateur
B Compartiment réfrigérateur
1 Bandeau de commande et d’affichage
2 Interrupteur d’éclairage, compartiment
réfrigérateur et compartiment congélateur
3 Rangement en contre-porte
4 Distributeur de glaçons / Bac à glaçons
5 Orifice de sortie d’air
6 Distribution de glaçons et d’eau
7 Clayette en verre dans
le compartiment congélateur
8 Rangement en contre-porte
9 Calendrier de congélation
21
10 Bac à produits surgelés
11 Rangement en contre-porte (compartiment
2 étoiles) pour ranger brièvement des produits
et glaces alimentaires.
12 Eclairage
13 Filtre à particules / Filtre à eau
14 Casier à beurre et à fromage
15 Orifice de sortie d’air
16 Clayette en verre dans le compartiment
réfrigérateur
17 Rangement en contre-porte
18 Clayette à grandes bouteilles
19 Bac à légumes avec filtre à humidité
20 Bac à légumes
21 Pied à vis
55
Page 56

fr
Bandeau de commande et d’affichage
Le bandeau de commande et d’affichage contre la porte comprend un champ tactile.
Le fait d’effleurer une touche tactile déclenche la fonction correspondante.
A Champ d’affichage du compartiment
congélateur
B Champ d’affichage du compartiment
réfrigérateur
1 Touche « super »
A allumer les fonction super-réfrigération
(compartiment réfrigérateur)
ou supercongélation (compartiment
congélateur).
Voir la section « Super-réfrigération »
ou « Supercongélation ».
2 Touche « freeze »
Pour pouvoir effectuer des réglages dans
le compartiment congélateur, appuyez sur
la touche jusqu’à ce que la mention « freeze »
apparaisse dans le champ d’affichage
du compartiment congélateur.
3 Touche « cool »
Pour pouvoir effectuer des réglages dans
le compartiment réfrigérateur, appuyez sur
la touche jusqu’à ce que la mention « cool »
apparaisse dans le champ d’affichage
du compartiment réfrigérateur.
4 Touche « alarm / lock »
Cette touche sert à
■ désactiver l’alarme sonore (voir le chapitre
« Fonction alarme »),
■ activer et désactiver le blocage des touches.
Pour activer et désactiver le blocage des
touches, appuyez 5 secondes sur la touche. Si
la fonction a été activée, le champ « lock »
s’allume.
Exception visant le verrouillage des touches :
En cas d’alarme sonore, il est possible
d’appuyer sur la touche « alarm/lock ».
5 Touches de réglage + / -
Les touches servent à régler les températures
dans les compartiments réfrigérateur et
congélateur.
6 Touche Marche / Arrêt commandant l’éclairage
du distributeur de glaçons et d’eau
7 Touche du distributeur de glaçons
8 Touche de distribution de glace pilée
9 Touche de distribution d’eau
56
Page 57

fr
Mettre l’appareil sous tension
Le fait de brancher l’appareil l’allume. Une alarme
sonore retentit.
Appuyez sur la touche « alarm/lock ». L’alarme sonore
s’éteint.
Le voyant « alarm » s’éteint une fois que l’appareil a
atteint la température réglée.
Les températures préréglées sont atteintes au bout
de plusieurs heures. Pendant cette période, ne rangez
pas de produits alimentaires dans l’appareil.
Le fabricant recommande les températures suivantes :
■ Compartiment congélateur : -18 °C
■ Compartiment réfrigérateur : +4 °C
Régler l’unité de température
L’affichage de la température peut avoir lieu en degrés
Celsius (°C) ou en degrés Fahrenheit (°F).
Régler l’unité de température
Pour régler l'unité de température, appuyez
simultanément et pendant 5 secondes sur la touche
« freeze » et la touche « cool ».
L’appareil commute sur l’unité de température autre
que celle qui était affichée.
Réglage de la température
Compartiment congélateur
La température dans le compartiment congélateur
est réglable entre -14 °C et -24 °C.
Nous vous recommandons de régler la température sur
-18 °C.
Le système mémorise la valeur affichée en dernier.
1. Appuyez répétitivement sur la touche « freeze »
jusqu'à ce que la mention « freeze » apparaisse
dans la zone d’affichage du compartiment
congélateur.
2. Réglez la température par les touches
de réglage « + » ou « - ».
Compartiment réfrigérateur
La température dans le compartiment réfrigérateur
est réglable entre +2 °C et +8 °C.
La température se laisse régler par pas de 1 °C.
Le système mémorise la valeur affichée en dernier.
Nous vous recommandons de régler la température sur
+4 °C.
Evitez de stocker les produits alimentaires délicats
à une température supérieure à +4 °C.
1. Appuyez répétitivement sur la touche « cool »
jusqu'à ce que la mention « cool » apparaisse dans
la zone d’affichage du compartiment réfrigérateur.
2. Réglez la température par les touches
de réglage « + » ou « - ».
57
Page 58

fr
Fonction alarme
Le fait d’appuyer sur la touche « alarm / lock » éteint
l’alarme sonore.
Une alarme sonore peut se déclencher dans les cas
suivants :
m Attention
Si la température a trop monté dans le compartiment
réfrigérateur, faites cuire les produits réfrigérés avant
de les consommer. Si vous avez des doutes quant aux
produits alimentaires crus, ne les utilisez pas.
Alarme de porte
Si l'appareil reste ouvert plus d'une minute, l'alarme de
porte s'allume (tonalité permanente). Le fait de fermer
la porte ou d'appuyer sur la touche d’alarme 4
désactive l'alarme.
Alarme de température
L’alarme de température s’enclenche si la température
a trop monté dans le compartiment congélateur
ou réfrigérateur, donc si les produits risquent
de s’abîmer.
Le signal sonore et optique peut se manifester dans les
cas suivants, sans que cela signifie que les produits
congelés risquent de s’abîmer :
■ à la mise en service de l’appareil.
■ si Vous venez de ranger de grandes quantités
de produits alimentaires frais.
Compartiment congélateur
Dans le champ d’affichage clignote la température sur
laquelle le compartiment congélateur a été réglé, et la
mention « alarm » s’affiche.
A l’affichage de température la température la plus
élevée qui a régné dans le compartiment congélateur
s’affiche pendant 10 secondes. Ensuite la température
réglée se réaffiche.
La mention « alarm » s’éteint dès que la température
réglée est à nouveau atteinte.
Remarque
Ne remettez pas à congeler des produits alimentaires
partiellement ou entièrement décongelés. Vous pourrez
les recongeler uniquement après les avoir transformés
en plats pré-cuisinés (par cuisson ou rôtissage).
N’utilisez pas la durée de conservation dans son
intégralité.
Compartiment réfrigérateur
La mention « alarm » s’affiche.
Contenance utile
Sur la plaque signalétique (voir la figure au chapitre
« Service après-vente ») vous trouverez des indications
sur le volume utile.
Utiliser l’intégralité du volume
de congélation
Pour pouvoir ranger la quantité maximale de produits
congelés, il est possible de retirer de l’appareil le bac
à produits congelés du haut. Ensuite, il devient
possible d'empiler les produits alimentaires
directement sur les clayettes et dans le bac à produits
congelés du bas.
Le compartiment congélateur
Utilisation du compartiment congélateur
■ Sert à ranger des produits surgelés.
■ Sert à confectionner des glaçons.
■ Pur congeler des produits alimentaires.
Remarque
Veillez à ce que la porte du compartiment congélateur
soit correctement fermée ! Si cette porte reste ouverte,
les produits surgelés dégèleront. Le compartiment
congélateur se givre fortement. En outre : gaspillage
d’énergie dû à une consommation élevée d’électricité !
Le fait de refermer la porte du compartiment
congélateur engendre une dépression dedans, avec un
bruit d’aspiration perceptible. Attendez deux à trois
minutes, temps nécessaire à la dépression pour se
résorber.
Nous recommandons de laisser le bac à glaçons dans
l’appareil. Ceci garantit une répartition optimale
de la température dans le compartiment congélateur.
Achats de produits surgelés
■ Leur emballage doit être intact.
■ Ne dépassez pas la date-limite de conservation.
■ Il faut que la température dans le congélateur bahut
du supermarché soit de -18 °C ou encore plus
basse.
■ Utilisez de préférence un sac isotherme pour
le transport puis rangez les produits le plus
rapidement possible dans le compartiment
congélateur.
58
Page 59

Capacité de congélation
maximale
Sur la plaquette signalétique, vous trouverez
des indications concernant la capacité de congélation
maximale en 24 heures (voir la Fig. dans le chapitre
« Service après-vente »).
fr
Emballer les surgelés
L’air ne doit pas pénétrer dans l’emballage pour
que les aliments ne perdent pas leur goût
ni ne sèchent pas.
1. Placez les aliments dans l’emballage.
2. Presser pour chasser l’air.
3. Obturez l’emballage hermétiquement.
4. Indiquez sur l’emballage le contenu et la date
de congélation.
Congélation de produits frais
Pour congeler les aliments, n’utilisez que des aliments
frais et d’un aspect impeccable.
Il faudrait blanchir les légumes avant de les congeler,
pour préserver le mieux possible leur valeur nutritive,
leur arôme et leur teinte. Il n’est pas nécessaire de
blanchir les aubergines, poivrons, courgettes et
asperges.
Vous trouverez en librairie toute une bibliographie sur
la congélation et le blanchissement.
Remarque
Veillez à ce que les produits alimentaires à congeler
n’entrent pas en contact avec des produits déjà
congelés.
■ Se prêtent à la congélation :
Pâtisseries, poissons et fruits de mer, viande de
boucherie et gibier, volaille, fruits, légumes, herbes
culinaires, œufs sans la coque, produits laitiers
comme le fromage, le beurre et le fromage blanc,
plats précuisinés et restes de plats tels que les
soupes, ragouts, la viande et le poisson cuits, les
plats aux pommes de terre, les soufflés et mets
sucrés.
■ Ne se prêtent pas à la congélation :
Variétés de légumes habituellement dégustées crues
telles que la salade ou les radis, œufs dans leur
coque, raisins, pommes, poires et pêches entières,
œufs cuits durs, yaourt, lait caillé, crème acidulée,
crème fraîche et mayonnaise.
Emballages adaptés :
Film en plastique, feuilles en polyéthylène, feuilles
d’aluminium, boîtes de congélation.
Vous trouverez ces produits dans le commerce
spécialisé.
Emballages inadaptés :
Papier d’emballage, papier sulfurisé, cellophane, sacspoubelles et sachets d’achat déjà utilisés.
Moyens d’obturation adaptés :
Caoutchoucs, clips en plastique, ficelles, rubans
adhésifs résistants au froid, ou assimilés.
Vous pouvez sceller les sachets ou boudins en
polyéthylèneavec une thermosoudeuse.
Durée de conservation des produits
surgelés
La durée de conservation dépend de la nature des
produits alimentaires.
Si la température a été réglée sur -18 °C :
■ Poisson, charcuterie, plats pré-cuisinés, pâtisseries :
jusqu’à 6 mois
■ Fromage, volaille, viande :
jusqu’à 8 mois
■ Fruits et légumes :
jusqu’à 12 mois
59
Page 60

fr
Supercongélation
Il faudrait congeler les produits alimentaires à cœur
le plus rapidement possible afin de préserver leurs
vitamines, leur valeur nutritive, leur aspect et leur goût.
Pour empêcher une hausse indésirable de la
température, allumez la supercongélation quelques
heures avant de ranger des produits alimentaires frais.
4 à 6 heures suffisent généralement.
L’appareil fonctionne désormais en permanence.
Le compartiment congélateur atteint une température
très basse.
S’il faut utiliser la capacité de congélation maximale, il
faut enclencher la supercongélation 24 heures avant
de ranger des produits frais.
Si vous ne voulez congeler que de petites quantités
d’aliments (jusqu’à 2 kg), vous n’avez pas besoin
d’enclencher la supercongélation.
Activer la supercongélation
1. Appuyez répétitivement sur la touche « freeze »
jusqu'à ce que la mention « freeze » apparaisse
dans la zone d’affichage du compartiment
congélateur.
2. Appuyez sur la touche « super ».
Décongélation des produits
Selon la nature et l’utilisation des produits surgelés,
vous pouvez choisir entre plusieurs possibilités :
■ à la température ambiante,
■ dans le réfrigérateur,
■ dans le four électrique, avec / sans ventilateur à air
chaud,
■ dans le micro-ondes.
m Attention
Ne remettez pas à congeler des produits alimentaires
partiellement ou entièrement décongelés. Vous pourrez
les recongeler uniquement après les avoir transformés
en plats pré-cuisinés (par cuisson ou rôtissage).
Dans ce cas, consommez-les nettement avant la date
limite de conservation.
Le compartiment réfrigérateur
Le compartiment réfrigérateur est l’endroit idéal
où ranger la viande, la charcuterie, le poisson, les
produits laitiers, les œufs, les plats précuisinés et les
pâtisseries.
Si la supercongélation est activée, « super » s’affiche.
Désactiver la supercongélation
1. Appuyez répétitivement sur la touche « freeze »
jusqu'à ce que la mention « freeze » apparaisse
dans la zone d’affichage du compartiment
congélateur.
2. Appuyez sur la touche « super ».
Si la supercongélation est éteinte, la mention « super »
s’éteint dans la zone d’affichage.
Remarque
La supercongélation se désactive automatiquement
au bout de 2^ jours.
Consignes de rangement
■ Rangez des produits alimentaires frais et intacts. Ils
conserveront ainsi plus longtemps leur qualité et leur
fraîcheur.
■ Produits tout prêts et liquides conditionnés :
respectez la date de conservation minimum
ou la date de consommation indiquée par
le fabricant.
■ Pour préserver l'arôme, la teinte et la fraîcheur,
rangez les produits alimentaires bien emballés ou
couverts. Vous éviterez de la sorte que des pièces
en plastique transmettent le goût ou se décolorent
dans le compartiment réfrigérateur.
■ Attendez que les boissons et aliments chauds aient
refroidi à la température de la pièce avant de les
ranger dans l’appareil.
Remarque
Évitez que les produits alimentaires entrent en contact
avec la paroi arrière. Cela gênerait sinon la circulation
de l’air.
Les produits alimentaires ou les emballages pourraient
rester collés, par congélation, contre la paroi arrière.
60
Page 61

Tenez compte des différentes zones
froides dans le compartiment
réfrigérateur
L’air circulant dans le compartiment réfrigérateur fait
que des zones différemment froides apparaissent :
■ La zone la plus froide se trouve entre le bac
à légumes et la clayette en verre située au dessus.
Remarque
Dans la zone la plus froide située au dessus du bac
à légumes, rangez les produits alimentaires délicats
(p. ex. le poisson, la charcuterie, la viande).
■ Zone la moins froide elle se trouve complètement
en haut, contre la porte.
Remarque
Rangez dans la zone la moins froide par ex.
le fromage dur et le beurre. De la sorte, le fromage
peut continuer de développer son arôme et le beurre
demeure tartinable.
Bac à légumes avec régulateur d’humidité
Pour créer un climat de stockage optimal pour les
légumes et les fruits, vous pouvez, en fonction
de la quantité rangée, régler l’humidité de l’air qui
règnera dans le bac à légumes:
■ petites quantités des fruits et légumes – humidité
de l’air élevée
■ grandes quantités des fruits et légumes – humidité
de l’air réduite
fr
Super-réfrigération
Pendant la super-réfrigération, la température dans
le compartiment réfrigérateur descend le plus bas
possible pendant env. 6 heures. Ensuite, l’appareil
commute sur la température réglée avant que vous
n’activiez la super-réfrigération.
Activez la super-réfrigération par exemple
■ avant de ranger de grandes quantités d’aliments.
■ avant de réfrigérer rapidement des boissons.
Activer la super-réfrigération
1. Appuyez répétitivement sur la touche « cool »
jusqu'à ce que la mention « cool » apparaisse dans
la zone d’affichage du compartiment réfrigérateur.
2. Appuyez sur la touche « super ».
Si la super-réfrigération est activée, « super » s’affiche.
Remarques
■ Il est recommandé de ranger les fruits (par
exemple ananas, bananes, papayes, agrumes)
et légumes (par exemple les aubergines,
concombres, courgettes, poivrons, tomates et
pommes de terre) qui craignent le froid hors
du réfrigérateur à des températures entre +8 °C
à +12 °C pour en préserver la qualité et l’arôme.
■ Suivant la quantité et la nature des produits stockés,
de l’eau peu se condenser dans le bac à légumes.
Retirez l’eau condensée avec un essuie-tout sec
et ajustez l'humidité de l’air dans le bac à légumes
via le régulateur d’humidité.
Désactiver la super-réfrigération
1. Appuyez répétitivement sur la touche « cool »
jusqu'à ce que la mention « cool » apparaisse dans
la zone d’affichage du compartiment réfrigérateur.
2. Appuyez sur la touche « super ».
Si la super-réfrigération est éteinte, la mention « super »
s’éteint dans la zone d’affichage.
61
Page 62

fr
Distribution de glaçons
et d’eau
Vous pouvez prélever, suivant besoins :
■ de l’eau réfrigérée,
■ de la glace pilée,
■ des glaçons.
m Mise en garde
N’introduisez jamais les doigts dans l’orifice
de distribution des glaçons ! Risque de blessures.
m Attention
Ne mettez jamais de bouteilles ou produits alimentaires
dans le distributeur de glaçons pour les faires refroidir
rapidement. Il risquerait de se bloquer
et de s’endommager.
Consignes pour la mise en service
La distribution de glaçons et d’eau ne fonctionne que si
l’appareil a été raccordé au secteur d’eau.
Après la mise en service de l’appareil, il faut
env. 24 heures pour que les premiers glaçons soient
prêts.
Après le raccordement, les conduites contiennent
encore des bulles d’air.
Prélevez de l’eau et jetez-la jusqu’à ce qu’elle sorte
sans bulles. Jetez le contenu des 5 premiers verres.
Si vous utilisez le distributeur de glaçons pour
la première fois, n’utilisez pas, pour des motifs
d’hygiène, les 30 à 40 premiers glaçons.
Surveiller la qualité de l’eau potable
Tous les matériaux utilisés dans le distributeur
de boisson sont inodores et sans saveur.
Si l’eau devait avoir un goût, les raisons peuvent être
les suivantes :
■ Teneur de l’eau potable en sels minéraux et en
chlore.
■ Matériau de la conduite d’adduction d’eau
à la maison et de raccordement.
■ Fraîcheur de l’eau potable. Si aucune eau n’a été
prélevée pendant longtemps, elle peut prendre
un goût « pas frais ». Dans ce cas-là, prélevez
l’équivalent d’env. 15 verres d’eau et jetez-le.
Nous recommandons de prélever régulièrement
de l’eau fraîche du distributeur d’eau, et de ne pas
éteindre l’appareil. Ceci permet d’obtenir la meilleure
qualité d’eau possible.
Le filtre à eau ci-joint filtre exclusivement les particules
en suspension dans l’eau entrante, mais il ne retient
pas les bactéries ni les microbes.
Prélever des glaçons / de l’eau
■ Appuyez sur la touche distribution de glace et d’eau
(eau, glace pilée ou glaçons).
■ Appuyez sur la touche jusqu’à ce que la quantité
souhaitée soit dans le verre.
Prélèvement d’eau
Remarques concernant le fonctionnement
du distributeur de glaçons
La production de glaçons commence dès que le
compartiment congélateur a atteint sa température de
congélation. Au bout de 2-3 heures, les glaçons prêts
descendent automatiquement dans le bac à glaçons.
Remarque
L'appareil produit plus de glace si vous abaissez la
température du compartiment congélateur. Cela
augmente un peu l'énergie consommée par votre
appareil.
Il arrive que des glaçons se soudent en gelant et qu'ils
obstruent le distributeur :
1. Ouvrez la porte et vérifier si des glaçons sont restés
coincés dans le distributeur de glace et d'eau.
2. Si le distributeur d'eau et de glace n'est pas obstrué :
m Attention
Un bac rempli de glaçons est lourd !
■ Extrayez prudemment le bac à glaçons et retirez les
glaçons qui se sont soudés en gelant.
Une fois que le bac à glaçons est plein, la préparation
de glaçons cesse automatiquement.
Lors de la confection des glaçons, on entend
le bourdonnement de l’électrovanne à eau, l’afflux
d’eau dans le bac à glaçons et la chute des glaçons.
Remarque
L’eau sortant du distributeur d’eau se trouve à une
température fraîche adaptée à sa dégustation. Si vous
voulez de l’eau plus froide, mettez quelques glaçons
dans le verre avant d’en prélever.
Remarque
En cas de prélèvement de grandes quantités d'eau, la
température de l'eau prélevée risque d'augmenter.
62
Page 63

Prélèvement de glaçons
Allumer et éteindre le
distributeur de glaçons et d'eau
m Attention
■ Coupez impérativement l’arrivée d’eau à l’appareil
quelques heures avant d’éteindre le distributeur
de glaçons.
■ Videz le bac à glaçons et nettoyez-le. Remettez
le bac en place. Veillez à ce que le bac encoche
bien sur sa surface d’appui.
Désactiver la distribution de glaçons
et d’eau
Appuyez simultanément et pendant 5 secondes sur
la touche « freezer » et la touche « super ». La mention
« IWD off » apparaît dans la zone d’affichage.
Allumer le distributeur de glaçons et d'eau
Appuyez simultanément et pendant 5 secondes sur
la touche « freezer » et la touche « super ». La mention
« IWD off » s’éteint dans la zone d’affichage.
fr
Filtre à eau
L'appareil peut être utilisé avec ou sans filtre à eau, en
fonction de la qualité de l'eau disponible. En cas
d'utilisation sans filtre à eau, positionnez le bouchon de
fermeture prévu à cet effet.
m Mise en garde
Sur les sites où la qualité de l'eau est douteuse ou
insuffisamment connue, n'utilisez pas l'appareil sans
désinfection appropriée avant et après la filtration.
Vous pouvez, via le service après-vente ou un
revendeur spécialisé, vous procurer une cartouche
filtrante pour le filtre à particules.
m Attention
■ Après l’incorporation d’un nouveau filtre, jetez
toujours la glace produite au cours des 24
premières heures consécutives à l’allumage du
distributeur de glaçons.
■ Si les glaçons n’ont pas été utilisés pendant une
période prolongée, jetez tous les glaçons présents
dans le récipient et faites de même avec les glaçons
produits au cours des 24 heures suivantes.
■ Si l’appareil ou les glaçons n’ont pas été utilisés
activement pendant plusieurs semaines ou plusieurs
mois, ou si les glaçons ont un goût ou une odeur
désagréable, changez le filtre à eau.
■ Les inclusions d’eau dans le système peuvent
provoquer une sortie d’eau et l’éjection de la
cartouche filtrante. Prudence au moment de
l’enlever.
■ Il faut changer le filtre au moins tous les 6 mois.
Consignes importantes concernant
le filtre à eau
■ Après utilisation, le circuit d’eau se trouve
légèrement sous pression. Prudence lorsque vous
retirez le filtre !
■ Si l’appareil est resté assez longtemps sans servir
ou si l’eau a un goût ou une odeur désagréable,
rincez le circuit d’eau. Pour ce faire, prélevez
de l’eau pendant plusieurs minutes au distributeur
d’eau. Si le goût ou l’odeur désagréable persiste,
changez le filtre.
63
Page 64

fr
Changement de cartouche filtrante
■ Mettez une cartouche filtrante neuve en place.
■ Soutirez quelques litres d’eau par le biais
du distributeur d’eau. Cette précaution chasse l’air
du circuit d’eau.
■ Videz l’eau encore présente dans l’ancienne
cartouche filtrante. Vous pouvez ensuite la mettre
à la poubelle des déchets domestiques.
Utilisation du bouchon de fermeture
Le distributeur de glace et d'eau fraîche peut
également être utilisé sans filtre à eau. Dans ce cas,
positionnez le bouchon de fermeture.
Remarque
Le bouchon de fermeture, ainsi que le filtre qu'il
contient, doivent être régulièrement rincés sous un filet
d'eau.
64
Page 65

Fiche des caractéristiques
et performances
fr
La teneur de l’eau en substances indiquées, dissoutes
dedans et capables de pénétrer dans le circuit, a été
abaissée à une valeur inférieure ou égale au seuil
admis par ANSI / NSF 42 et 53 pour l’eau sortant
de l’appareil.
Pour le modèle de filtre : 9000 225 170
Remarque
Bien que les tests se déroulent dans des conditions
Si utilisation de la cartouche de rechange :
9000 077 104
La conformité de ce modèle avec les normes ANSI /
NSF 42 & 53 a été vérifiée par NSF International ; il
a été certifié capable de réduire les teneurs en
substances indiquées ci-après.
de laboratoire standard, le rendement réel peut différer.
L’aptitude du système à réduire la teneur en cystes
et en agents de turbidité conformément à la norme
ANSI / NSF 53, et à réduire le goût et l’odeur
de chlore conformément à la norme ANSI / NSF 42,
a été testée sur le modèle 9000 225 170 par NSF
International ; le système a été certifié.
Classe nominale de particules : I
Durée nominale d’utilisation : 2 800 litres
Substance Moyenne dans le flux
Cystes * 166.500 Min. 50.000/l 1 99,99 99,95 1 99,99 511077-03
Turbidité 10,7 11 x 1 NTU 0,3 l 97,10 0,5 NTU 0,49 95,42 511078-03
Classe
de particules 1
Taille des
particules > 0,5
à < 1 μm
Goût de chlore
et turbidité
entrant
5.700.000 Au minimum 10 000
1,9 2,0 mg / l + - 10% 0,05 97,3 > 50% 0,06 96,84 511081-03
* Sur la base d’une utilisation d’oocystes
de cryptosporium parvum.
Directives d’utilisation / paramètres de l’alimentation
en eau :
Concentration dans
le flux entrant
particules / ml
Concentration dans
les eaux usées
30.583 99,52 > 85% 69.000 98,9 511079-03
Réduction moyenne
en %
Concentration max.
admissible dans les
eaux usées
L’ensemble du système (sauf la cartouche à jeter) est
couvert par une garantie d’un an. La garantie offerte
sur les cartouches à jeter ne couvre que les vices
de matière et de fabrication. La durée d’exploitation
des cartouches à jeter dépendant des paramètres
Max. dans les
eaux usées
Réduction min. en % Test NSF
de l’eau dans votre localité, nous ne pouvons pas
Pression de l’eau 207 - 827 kPa
Température de l’eau * 0,6 °C - 38 °C
Vitesse d’écoulement 2,83 l / min.
■ Il faut installer et exploiter le système conformément
aux directives recommandées par le fabricant.
■ Il faut changer le filtre tous les 6 à 9 mois.
■ Rincez un filtre neuf de part en part pendant
5 minutes.
■ Des détails avancés se trouvent sur la carte
la garantir.
Vous trouverez des informations avancées sur les prix
des pièces de rechange auprès du revendeur de votre
appareil, ou du représentant vendant de telles pièces.
Fabriqué par
3 M Material Technology (Guangzhou) Ltd.
9 Nanxiang Er road, Science City,
Guangzhou, 510663, P.R. China
de garantie.
Si l’eau de votre localité est nocive au plan
microbiologique ou si vous n’en connaissez pas
la qualité, IL NE FAUT pas utiliser ce produit sans
procéder à une désinfection appropriée en amont
et en aval du raccordement du système. Il est permis
d’utiliser un circuit certifié réducteur de kystes pour
traiter l’eau désinfectée contenant des kystes
filtrables dans certaines circonstances.
65
Page 66

fr
Équipement du compartiment
congélateur
(selon le modèle)
Calendrier de congélation
■ Soulevez le rangement en contre-porte puis extrayez-
le.
Arrêt et remisage de l'appareil
Pour que la qualité des produits congelés ne diminue
pas, ne dépassez pas la durée de stockage. La durée
de stockage dépend de la nature de l’aliment. Les
chiffres à côté des symboles indiquent en mois
la durée de conservation permise pour le produit
concerné. Produits surgelés en vente habituelle dans
le commerce : vérifiez la date de fabrication ou la date
limite de conservation.
Agencement variable
du compartiment intérieur
Vous pouvez modifier suivant besoin l’agencement des
clayettes du compartiment intérieur et l’agencement
des récipients en contre-porte.
■ Tirez la clayette en avant, abaissez-la et faites-la
basculer latéralement pour l’extraire.
Coupure de l'appareil
Débranchez la fiche mâle du secteur ou ramenez
le disjoncteur en position éteinte.
Le groupe frigorifique s'éteint.
Remisage de l’appareil
Si l’appareil doit rester longtemps sans servir :
1. Coupez impérativement l’arrivée d’eau à l’appareil
quelques heures avant de l’éteindre.
2. Sortez tous les produits alimentaires de l’appareil.
3. Débranchez la fiche mâle du secteur ou ramenez
le disjoncteur en position éteinte.
4. Videz le bac à glaçons et nettoyez-le (voir le chapitre
« Nettoyage de l’appareil »).
5. Nettoyez l’intérieur de l’appareil (voir le chapitre
« Nettoyage de l’appareil »).
6. Laissez les portes de l’appareil ouvertes pour
empêcher l’apparition d’odeurs.
Si vous dégivrez l'appareil
Compartiment congélateur
Grâce au système NoFrost entièrement automatique,
le compartiment congélateur
ne se couvre pas de givre. La nécessité de dégivrer
disparaît.
66
Compartiment réfrigérateur
La décongélation a lieu automatiquement.
L’eau de condensation sort par l’orifice d’écoulement
puis gagne le bac d’évaporation au dos de l’appareil.
Page 67

Nettoyage de l’appareil
m Mise en garde
Ne nettoyez jamais l’intérieur de l’appareil avec
un nettoyeur à vapeur !
m Attention
N’utilisez aucun produit de nettoyage contenant
du sable, du chlorure ou de l’acide, ni aucun solvant.
m Attention
N’utilisez jamais d’éponges abrasives ou susceptibles
de rayer. Des zones corrodées pourraient apparaître
sur les surfaces métalliques.
m Attention
Ne nettoyez jamais les clayettes et les bacs au lavevaisselle. Ces pièces pourraient se déformer !
Procédez comme suit :
1. Débranchez la fiche mâle du secteur ou ramenez le
disjoncteur en position éteinte.
2. Retirez les produits surgelés et stockez-les dans un
endroit frais.
3. Attendez que la couche de givre ait fondu.
4. Ne nettoyez l’appareil qu’avec un chiffon doux, de
l’eau tiède et du produit à vaisselle présentant un pH
neutre. L’eau de nettoyage ne doit pas pénétrer dans
l’éclairage.
5. N’essuyez le joint de porte qu’avec un chiffon
et de l’eau propre ; ensuite, séchez-le
soigneusement.
6. Après le nettoyage, rebranchez l’appareil.
7. Rangez à nouveau les produits congelés.
fr
Pour remettre le bac en place, posez-le sur les rails
de sortie et poussez-le dans le compartiment. Le fait
de pousser le bac vers le bas le fait encranter.
Nettoyage du bac récupérateur d’eau
L’eau renversée afflue dans le bac de récupération.
Pour le vider et le nettoyer, retirez le crible. Essuyez
le bac récupérateur d’eau avec une éponge
ou un essuie-tout absorbant.
Equipement
Pour les nettoyer, toutes les pièces réglables du
l’appareil peuvent être extraites (voir le chapitre
« Agencement variable du volume intérieur »).
Remarque
Pour extraire et nettoyer les bacs, ouvrez les portes en
grand, à plus de 90°.
Extraire le bac
Sortez complètement le bac : soulevez-le pour
le détacher de sa fixation puis extrayez-le.
Nettoyer le bac à glaçons
Si vous n’avez pas prélevé de glaçons pendant une
période prolongée, ceux déjà confectionnés
rapetissent, perdent leur fraîcheur et collent entre eux.
Sortez le bac, videz-le et nettoyez-le à l’eau tiède.
m Attention
Un bac rempli de glaçons est lourd !
67
Page 68

fr
Après le nettoyage, essuyez bien le bac et la vis sans
fin de transport pour les sécher et empêcher les
glaçons de coller dessus.
Mis en place du bac à glaçons
Poussez le bac à glaçons complètement à l’arrière sur
les surfaces, jusqu’à ce qu’il encoche. La production
de glaçons continue.
Remarque
Si le bac ne se laisse pas déplacer complètement
jusqu’en arrière, tournez un peu la vis sans fin dans
le bac et retirez les glaçons soudés dans la zone
d’introduction.
■ Si présent :
Montez les écarteurs muraux pour parvenir
à la quantité mentionnée d’énergie absorbée par
l’appareil (voir « Installation de l’appareil », section
« Aération »). Un écart moins élevé par rapport
au mur ne restreint pas le fonctionnement
de l’appareil. Dans ce cas, l’énergie absorbée peut
augmenter légèrement.
■ L'agencement des pièces d'équipement n'influe pas
sur l'énergie absorbée par l'appareil.
Bruits de fonctionnement
Bruits parfaitement normaux
Bourdonnement sourd
Les moteurs tournent (par ex. groupes frigorifiques,
ventilateur).
Clapotis, sifflement léger ou gargouillis
Le fluide frigorigène circule dans les tubulures, ou
présence d’eau dans le distributeur de glaçons.
Cliquetis
Le moteur, les interrupteurs ou les électrovannes
s’allument / s’éteignent.
Bruit de chute
Les glaçons finis de se solidifier chutent du distributeur
dans le bac.
Éclairage (LED)
Votre appareil est équipé d’un éclairage par LED
ne demandant pas d’entretien.
Les réparations de cet éclairage sont exclusivement
réservées au service après-vente ou à des spécialistes
autorisés.
Economies d’énergie
■ Placez l’appareil dans un local sec et aérable. Veillez
à ce que l’appareil ne soit pas directement exposé
aux rayons solaires et qu’il ne se trouve pas
à proximité d’une source de chaleur (par ex.
radiateur, cuisinière).
Utilisez le cas échéant une plaque isolante.
■ N’obstruez pas les grilles d’aération de l’appareil.
■ Attendez que les plats chauds aient refroidi avant
de les ranger dans le compartiment congélateur.
■ Déposez le produit congelé dans le compartiment
réfrigérateur et profitez de son froid pour refroidir les
produits alimentaires.
■ N’ouvrez la porte de l’appareil que le plus
brièvement possible.
■ Veillez à ce que la porte du compartiment
congélateur soit correctement fermée.
Éviter la génération de bruits
L'appareil ne repose pas d'aplomb
Veuillez mettre l’appareil d’aplomb à l’aide d’un
niveau à bulle. Ajustez ensuite l'horizontalité par les
pieds à vis ou placez un objet dessous.
L'appareil touche quelque chose
Eloignez l'appareil de meubles ou d'appareils voisins.
Les bacs ou surfaces de rangement vacillent ou se
coincent
Vérifiez les pièces amovibles puis remettez-les en place
correctement.
Des bouteilles ou récipients se touchent
Eloignez légèrement les bouteilles ou récipients les uns
des autres.
68
Page 69

Remédier soi même aux petites pannes
Avant d’appeler le service après-vente (SAV) :
Vérifiez svp si vous ne pouvez pas remédier vous-même au dérangement à l’aide des instructions qui suivent.
Soumettez l’appareil à un autodiagnostic (voir le chapitre « Autodiagnostic de l’appareil »).
Vous éviterez des dépenses inutiles car le déplacement du technicien du SAV vous sera facturé même pendant
la période de garantie.
Dérangement Cause possible Remède
La température dévie
fortement par rapport au réglage.
Aucun voyant ne s'allume. Coupure de courant ; disjoncteur disjoncté ;
fiche mâle pas complètement branchée
dans la prise.
La zone d’affichage contient
un « E.. ».
L’alarme sonore retentit, l’affichage
de température du compartiment
congélateur clignote.
La température est trop élevée
dans le compartiment congélateur !
Les produits surgelés risquent
de s’abîmer !
L’éclairage ne fonctionne pas. L’éclairage est défectueux. (Voir le chapitre « Éclairage ».)
L’appareil ne refroidit pas.
L’éclairage ne fonctionne pas.
Affichage éteint.
Le groupe frigorifique s'enclenche
de plus en plus souvent
et longtemps.
L’électronique a détecté un défaut. Appelez le service après-vente.
La porte du compartiment congélateur est
ouverte.
Orifices d’entrée et de sortie d’air recouverts. Enlevez ces obstacles.
Vous avez mis d’un coup trop de produits
à congeler.
Coupure de courant. Vérifiez la présence de courant.
Le fusible / disjoncteur a été retiré / se trouve
en position éteinte.
Fiche mâle incorrectement branchée dans la
prise de courant.
Vous avez ouvert fréquemment l'appareil. N'ouvrez pas l'appareil inutilement.
Les orifices d'apport et d'évacuation d'air sont
recouverts par des objets faisant obstacle.
Vous avez mis une assez grande quantité
d'aliments à congeler.
Dans certains cas, il suffira d'éteindre l'appareil pendant 5
minutes.
Si la température est trop élevée, vérifiez au bout
de seulement quelques heures si un rapprochement
de la température a eu lieu.
Si la température est trop basse, vérifiez à nouveau
la température le lendemain.
Branchez la fiche mâle dans la prise de courant. Vérifiez s'il y a
du courant, vérifiez les fusibles / disjoncteurs.
Pour désactiver l’alarme sonore, appuyez sur la touche
« alarm / lock ». L’affichage clignotant s’éteint.
La température la plus élevée qui a régné dans
le compartiment congélateur s’affiche pendant 10 secondes.
Fermez la porte.
Ne dépassez pas la capacité de congélation maximale.
Remarque
Vous pouvez remettre à congeler les produits en partie
ou intégralement dégelés à condition qu’ils ne soient pas
restés dégelés à +3 °C plus d’un jour s’il s’agit de viande ou de
poisson, ou plus de trois jours s’il s’agit d’autres produits.
Vérifiez le fusible / disjoncteur.
Vérifiez si la fiche mâle est bien branchée dans la prise
de courant.
Enlevez ces obstacles.
Ne dépassez pas la capacité de congélation maximale.
fr
69
Page 70

fr
Distributeur d’eau et de glaçons
Dérangement Cause possible Remède
Bien que l’appareil fonctionne déjà
depuis longtemps, il n’a produit
encore aucun glaçon.
Il y a des glaçons dans le bac
à glaçons mais ils ne descendent
pas.
Les glaçons se sont coincés
à la sortie du bac à glaçons ou dans
le broyeur de glace.
Les glaçons sont à moitié dégelés.
Les glaçons ont dégelé.
Le distributeur d’eau ne fonctionne
pas.
Le distributeur de glaçons n’en
fabrique pas suffisamment ou les
glaçons sont difformes.
Gargouillis, clapotis dans
la conduite d’eau.
Robinet d’eau fermé. Ouvrez le robinet d’eau.
Alimentation en eau coupée. Pression de l’eau
trop faible.
La distribution de glaçons et d’eau est
désactivée. La mention « IWD off » s’affiche
Température trop élevée dans
le compartiment congélateur.
Les glaçons se sont soudés entre eux. Retirez le bac à glaçons et videz-le.
La porte du compartiment congélateur est
ouverte.
Coupure de courant. Vérifiez la présence de courant.
Robinet d’eau fermé. Ouvrez le robinet d’eau.
Alimentation en eau coupée. Pression de l’eau
trop faible.
Il y a peu de temps que vous avez allumé
l’appareil ou le distributeur de glaçons.
Vous venez de prélever une grande quantité
de glaçons.
La pression de l’eau est basse. Ne raccordez l’appareil qu’à de l’eau débitée à la pression
Filtre à eau bouché ou épuisé. Changez le filtre à eau.
La température régnant dans le compartiment
congélateur est trop élevée.
L’arrivée d’eau est interrompue ou bouchée. 1. Vérifiez l’arrivée d’eau.
Prévenez l’installateur.
Activez la distribution de glace et d’eau (voir le chapitre
« Allumer le distributeur de glaçons et d'eau »).
Réglez le compartiment congélateur sur une température plus
basse (voir le chapitre « Réglage de la température »).
Retirez le bac à glaçons et faites tourner la vis sans fin
de transport à la main. Avec un bâtonnet en bois, détachez les
glaçons éventuellement coincés.
Retirez le bac à glaçons, videz-le puis essuyez-le bien pour
le sécher.
Fermez la porte.
Prévenez l’installateur.
Il faut environ 24 heures pour que la production de glaçons
commence.
Le bac à glaçons tarde environ 24 heures à se remplir
de nouveau.
prescrite (voir le chapitre Branchement de l’appareil, rubrique
Branchement de l’eau).
Réglez le compartiment congélateur sur un froid un peu plus
intense.
2. Vérifiez si la conduite d’eau est bouchée.
3. Dans certains cas, il suffira d’éteindre brièvement
le distributeur de glace et d’eau (voir le chapitre « Allumer
et éteindre le distributeur de glace et d’eau »).
70
Page 71

fr
Autodiagnostic de l’appareil
Votre appareil est équipé d’un programme automatique
d’autodiagnostic qui vous affiche les sources
de défauts ; seul le service après-vente est en mesure
de les supprimer.
Lancer l’autodiagnostic de l’appareil
1. Éteignez l’appareil et attendez 5 minutes.
2. Remettez l’appareil en marche.
3. Appuyez simultanément pendant 5 secondes sur
les touches de réglage « + » et « - ».
Le programme d’auto-test démarre. Si la mention
« E.. » s’affiche, il s’agit d’un défaut. Si ce défaut
s'affiche, prévenez le service après-vente.
Terminer l’autodiagnostic de l’appareil
Appuyez à nouveau simultanément sur les touches de
réglage « + » et « - » pendant 5 secondes.
Service après-vente
Pour connaître le service après-vente situé le plus près
de chez vous, consultez l’annuaire téléphonique ou le
répertoire des services après-vente (SAV). Veuillez
indiquer au SAV le numéro de série (E-Nr.)
de l’appareil et son numéro de fabrication (FD-Nr.).
Vous trouverez ces indications sur la plaque
signalétique.
Aidez-nous à éviter des déplacements inutiles :
indiquez les numéros de série et de fabrication. Vous
économiserez ainsi des suppléments de frais inutiles.
Commande de réparation et conseils
en cas de dérangements
Vous trouverez les données de contact pour tous
les pays dans l’annuaire ci-joint du service après-vente.
FR 01 40 10 12 00
B 070 222 142
CH 0848 840 040
71
Page 72

it
it Indice
itIstruzioni per il montaggio e l’uso
Avvertenze di sicurezza e potenziale
pericolo ............................................................... 73
Avvertenze per lo smaltimento ....................... 75
Dotazione ............................................................ 75
Installare l’apparecchio .................................... 75
Misure d’installazione ....................................... 76
Angolo di aperatura della porta ..................... 77
Livellare l’apparecchio ..................................... 78
Collegare l’apparecchio ................................... 78
Smontaggio delle porte dell'apparecchio ..... 78
Conoscere l’apparecchio ................................. 79
Accensione dell’apparecchio .......................... 81
Impostare l’unità di temperatura .................... 81
Regolare la temperatura .................................. 81
Funzione di allarme ........................................... 82
Capacità utile totale .......................................... 82
Il congelatore ..................................................... 82
Max. capacità di congelamento ..................... 82
Congelamento di alimenti freschi .................. 83
Super-congelamento ........................................ 83
Decongelare surgelati ...................................... 84
Il frigorifero .......................................................... 84
Super-raffreddamento ....................................... 85
Dispenser del ghiaccio e dell’acqua ............. 85
Accendere e spegnere il dispenser di
ghiaccio e acqua ............................................... 86
Filtro dell'acqua ................................................. 87
Foglio specifiche e prestazioni ....................... 88
Dotazione del congelatore .............................. 89
Disposizione variabile dell’attrezzatura
interna .................................................................. 89
Spegnere e mettere fuori servizio
l'apparecchio ...................................................... 89
Scongelamento .................................................. 90
Pulizia dell’apparecchio ................................... 90
Illuminazione (LED) ........................................... 91
Risparmiare energia ......................................... 91
Rumori di funzionamento ................................. 91
Eliminare piccoli guasti .................................... 92
Autotest dell’apparecchio ................................ 94
Servizio Assistenza Clienti ............................... 94
72
Page 73

m Avvertenze di sicurezza
e potenziale pericolo
Prima di mettere in funzione l'apparecchio
Leggere attentamente tutte le istruzioni per
l'uso ed il montaggio. Esse contengono
importanti informazioni per l'installazione,
l'uso e la manutenzione dell'apparecchio.
Il produttore non è responsabile se voi
trascurate le indicazioni ed avvertenze
del libretto d’istruzioni per l’uso. Conservare
tutta la documentazione per l'uso futuro
oppure per eventuali successivi proprietari.
Elementi tecnici di sicurezza
Questo apparecchio contiene una piccola
quantità di gas refrigerante (R600a), un gas
Eco-Compatibile, ma infiammabile.
Prevenire danneggiamenti ai raccordi del
circuito refrigerante durante il trasporto o
l’installazione dell’apparecchio. Il gas
fuoriuscendo per effetto della pressione,
può provocare irritazioni agli occhi.
In caso di danni:
■ tenere lontano dall'apparecchio fiamme
o fonti di accensione,
■ ventilare l'ambiente per alcuni minuti,
■ spegnere l’apparecchio ed estrarre
la spina di alimentazione elettrica,
■ informare il Servizio Assistenza Clienti
autorizzato.
La quantità di gas refrigerante contenuta
nel vostro apparecchio, circa 8 gr.
è indicata nella targhetta d'identificazione
posta all'interno dell'apparecchio. Nel caso
in cui il cavo di collegamento elettrico
dovesse subire danni, è necessario
sostituirlo,
coinvolgere il servizio assistenza clienti
autorizzato o un elettricista qualificato ad
eseguire questa operazione.
Installazioni o riparazioni eseguite da
personale non autorizzato, possono
potenzialmente creare pericolo per l’utente
e danni all’apparecchio. Le riparazioni
vanno eseguite dal servizio assistenza
clienti autorizzato
Le riparazioni vanno eseguite dal servizio
assistenza clienti autorizzato o da
personale qualificato ad eseguire questa
operazione.
it
È consentito usare solo parti di ricambio
originali del costruttore. Solo con l’impiego
di detti componenti il costruttore garantisce
che i requisiti di sicurezza del prodotto
siano rispettati.
Il prolungamento del cavo elettrico
di alimentazione deve essere eseguito dal
servizio assistenza clienti autorizzato.
Nell’impiego quotidiano
■ Non introdurre mai apparecchi elettrici
nell’interno di questo elettrodomestico
(es. apparecchi di riscaldamento,
produttori di ghiaccio elettrici ecc.).
Pericolo di esplosione!
■ Non sbrinare o pulire mai l’apparecchio
con una pulitrice a vapore. Il vapore può
raggiungere parti elettriche e provocare
un cortocircuito. Pericolo di scarica
elettrica!
■ Non utilizzare oggetti appuntiti o affilati
per rimuovere gli strati di brina o
ghiaccio. E’ possibile danneggiare i
raccordi del circuito refrigerante, che
rende inservibile l’apparecchio. Il gas
fuoriuscendo per effetto della pressione,
può provocare irritazioni agli occhi.
■ Non conservare nell’apparecchio prodotti
contenenti propellenti gassosi
combustibili (per es. bombolette spray) e
sostanze infiammabili. Pericolo di
esplosione!
■ Non usare impropriamente lo zoccolo, i
cassetti estraibili, le porte ecc. quale
punto di appoggio o come sostegno.
■ Per la pulizia estrarre la spina
d’alimentazione o disinserire l’interruttore
di sicurezza. Evitare di esercitare trazioni
sul cordone elettrico, ma impugnare
correttamente la spina.
■ Conservare alcool ad alta gradazione in
un contenitore ermeticamente chiuso,
e posto in posizione verticale.
■ Evitare che olii o grassi imbrattino parti
plastiche o le guarnizioni delle porte. I
grassi aggrediscono il materiale plastico
e la guarnizione della porta diventano
fragili e porose.
■ Non ostruire le aperture di passaggio
dell’aria di aereazione dell’apparercchio.
73
Page 74

it
■ Evitare pericoli a bambini e persone a
rischio:
Sono esposti a pericolo i bambini e le
persone con limiti fisici, psichici o
percettivi ed altresì persone, sprovviste di
sufficiente conoscenza del sicuro
funzionamento dell'apparecchio.
Accertarsi che i bambini e le persone a
rischio abbiano ben compreso i pericoli.
Una persona responsabile della sicurezza
è tenuto a sorvegliare o istruire i bambini
e le persone a rischio in rapporto con
l'apparecchio.
Permettere l’uso dell’apparecchio solo a
bambini in età di 8 anni o superiore.
Sorvegliare i bambini durante la pulizia e
la manutenzione.
Non permettere che i bambini giochino
con l'apparecchio.
■ Non conservare nel congelatore liquidi
inbottiglia e lattine (specialmente le
bevande contenenti anidride carbonica).
Bottiglie e lattine possono rompersi!
■ Non mettere in bocca alimenti congelati
appena presi dal congelatore.
Pericolo di ustioni!
■ Evitare il contatto prolungato delle mani
con alimenti congelati, ghiaccio o i
raccordi dell’evaporatore ecc.
Pericolo di ustioni!
Bambini in casa
■ Non abbandonare parti dell'imballaggio
che possano essere fonte di gioco per
i bambini.
Pericolo di soffocamento causato
da scatole di cartone, fogli di plastica,
polistirolo!
■ L'apparecchio non è un giocattolo per
bambini!
■ Per apparecchi con serratura della porta:
conservare la chiave fuori della portata
dei bambini!
Norme generali
L’apparecchio è idoneo
■ per raffreddare e congelare alimenti,
■ per preparare ghiaccio,
■ per l’erogazione di acqua potabile.
Questo apparecchio è destinato all’uso
domestico privato nelle famiglie ed
all’ambiente domestico.
L’apparecchio è schermato contro
i radiodisturbi secondo la direttiva
UE 2004/108/EC.
La tenuta ermetica del circuito del freddo
è stata controllata.
Questo prodotto è conforme alle pertinenti
norme di sicurezza per gli apparecchi
elettrici (EN 60335-2-24).
Questo apparecchio è progettato solo per
l'utilizzo fino ad un'altezza di massimo 2000
metri sul livello del mare.
74
Page 75

it
Avvertenze per lo smaltimento
* Smaltimento dell'imballaggio
L'imballaggio ha protetto l'apparecchio da eventuali
danni da trasporto. Tutti i materiali impiegati sono EcoCompatibili e riciclabili. Il Vostro contributo: smaltite
l'imballaggio secondo la vigenti norme.
Chiedere informazioni circa le piattaforme
di smaltimento locale alla propria amministrazione
comunale.
* Rottamazione di un apparecchio
dismesso
Gli apparecchi dismessi dispongono ancora
di un valore residuo! Un corretto smaltimento nel
rispetto dell’ecologia, permette di recuperare materie
prime pregiate.
Questo apparecchio dispone di contrassegno
ai sensi della direttiva europea 2012/19/UE in
materia di apparecchi elettrici ed elettronici
(waste electrical and electronic equipment WEEE).
Questa direttiva definisce le norme per la
raccolta e il riciclaggio degli apparecchi
dismessi valide su tutto il territorio dell’Unione
Europea.
m Avviso
In caso di apparecchi fuori uso
1. Estrarre la spina di alimentazione.
2. Troncare il cavo elettrico di collegamento
e rimuoverlo unitamente alla spina.
3. Non estrarre i ripiani e i contenitori, questo rende più
difficile ai bambini di entrare nel vano frigo
dell'apparecchio!
4. Vietare ai bambini di giocare con un apparecchio
dismesso. Pericolo di asfissia!
I frigoriferi contengono gas nel circuito refrigerante
e gas nell'isolamento. Refrigerante e gas devono
essere smaltiti in modo appropriato. Evitare
di danneggiare i raccordi del circuito refrigerante,
durante il conferimento dell’apparecchio alla
piattaforma di riciclaggio.
Dotazione
Dopo il disimballo controllare l’apparecchio per
accertare eventuali danni di trasporto.
In caso di contestazioni rivolgersi al Vs. fornitore,
presso il quale l’apparecchio è stato acquistato.
La dotazione comprende i seguenti componenti:
■ Apparecchio
■ Busta con il materiale utile al montaggio
■ Accessori (a secondo del modello)
■ Istruzioni per l’uso
■ Libretto del servizio assistenza clienti autorizzato
■ Allegato di garanzia convenzionale
■ Informazioni sul consumo energetico e sui possibili
rumori
Installare l’apparecchio
Trasporto
L'apparecchio è pesante. Fissarlo durante il trasporto e
il montaggio!
A causa del peso e delle dimensioni dell'apparecchio e
per ridurre al minimo il rischio di lesioni o danni
all'apparecchio, sono necessarie almeno due persone
per l'installazione sicura dell'apparecchio.
Luogo d’installazione
Per l’installazione è idoneo un ambiente asciutto
ventilato. Il luogo d’installazione non deve essere
esposto all’irradiazione solare diretta e non essere
vicino ad una fonte di calore, come stufa, calorifero
ecc. Se è inevitabile l’installazione accanto
ad una fonte di calore, utilizzare un idoneo pannello
isolante, oppure rispettate le seguenti distanze minime
dalla fonte di calore.
■ Da cucine elettriche o a gas: 3 cm.
■ Da stufe ad olio o a carbone: 30 cm.
In caso d’installazione in affiancamento
ad un frigorifero o congelatore, è necessario rispettare
una distanza di minimo 25 mm, per evitare
la formazione di condensa.
Se sopra l’apparecchio si monta un pannello oppure un
pensile, prevedere una fessura di 30 mm per
permettere, in caso di necessità, di estrarre
l’apparecchio dalla nicchia.
L’aria calda prodotta posteriormente dall’apparecchio
deve poter liberamente fuoriuscire.
75
Page 76

it
Fondo d’appoggio
m Attenzione
L’apparecchio è molto pesante.
Versione con distributore: 143 kg
Il pavimento nel luogo d’installazione non deve cedere,
rinforzarlo se necessario.
Per permettere un’apertura completa delle porte,
rispettare le distanze minime laterali in caso
d’installazione in prossimità di un parete o dell’angolo
della cucina (vedi capitolo «Misure di installazione»).
Se la profondità dei mobili posti a lato
dell’apparecchio, supera i 60 cm, rispettare le distanze
minime laterali, per permettere una completa apertura
della porta (vedi capitolo «Angolo di apertura
della porta»).
Osservare la temperatura ambiente
e la ventilazione
Temperatura ambiente
La classe climatica è indicata nella targhetta porta-dati.
Essa indica i limiti di temperatura entro i quali
l’apparecchio può funzionare correttamente.
La targhetta porta-dati si trova in basso a destra
nel vano frigorifero.
Misure d’installazione
Classe climatica Temperatura ambiente
ammessa
SN da +10 °C a 32 °C
N da +16 °C a 32 °C
ST da +16 °C a 38 °C
T da +16 °C a 43 °C
Avvertenza
L’apparecchio è perfettamente efficiente nei limiti
di temperatura ambiente della classe climatica indicata.
Se un apparecchio della classe climatica SN viene
messo in funzione a temperature ambiente inferiori,
possono essere esclusi danni all’apparecchio fino
ad una temperatura di +5 °C.
Ventilazione
Evitare assolutamente di coprire le aperture di afflusso
e deflusso dell’aria sulla parete posteriore
dell’apparecchio. L’aria riscaldata deve poter defluire
liberamente. In caso contrario il refrigeratore deve
lavorare di più. Questo aumenta il consumo di energia
elettrica.
Inserire gli acclusi distanziatori sull’apposito supporto
sul lato posteriore dell’apparecchio. Viene garantita
la distanza minima dalla parete.
76
Page 77

Angolo di aperatura della porta
it
D
[
[
E
[
[
[
DE
77
Page 78

it
Livellare l’apparecchio
Affinché l’apparecchio possa funzionare perfettamente,
deve essere livellato con una livella a bolla d’aria.
La posizione inclinata dell’apparecchio può comportare
la fuoruscita di acqua dal produttore di ghiaccio,
la formazione di cubetti di ghiaccio disuguali oppure
la non corretta chiusura delle porte.
■ Pressione oltre 0,8 MPa (8 bar): installare un
limitatore di pressione fra raccordo dell'acqua
potabile e kit del tubo flessibile
Avvertenza
Il raccordo acqua ha un diametro di 10 mm (senza
elementi di congiunzione).
Allacciamento elettrico
Non usare cavi di prolunga o ripartitori. Per
il collegamento di questo apparecchio è necessaria
una presa di corrente murale fissa.
La presa deve essere vicino all’apparecchio ed
accessibile anche dopo l’installazione dell’apparecchio.
L’apparecchio è conforme alla classe di isolamento I.
Collegare l’apparecchio alla corrente alternata
a 220-240 V/50 Hz tramite una presa installata
a norma con conduttore di terra. La presa deve essere
protetta con un dispositivo elettrico di sicurezza da
10-16 A o superiore.
Apparecchi che vengono impiegati in paesi
extraeuropei, controllare la targhetta porta-dati se
la tensione ed il tipo di corrente indicati corrispondono
ai valori della propria rete elettrica. La targhetta portadati si trova in basso a destra nell’apparecchio.
La sostituzione del cavo di alimentazione, se
necessaria, deve essere eseguita solo da un tecnico
specializzato.
Collegare l’apparecchio
L’installazione e il collegamento dell’apparecchio
devono essere eseguiti da un tecnico specializzato
secondo le istruzioni di installazione.
Rimuovere i fermi di trasporto dei ripiani e balconcini
solo dopo l’installazione.
Eseguire l’allacciamento idraulico assolutamente prima
di quello elettrico.
Oltre alla norme nazionali prescritte dalla legge,
rispettare le condizioni di allacciamento della locale
azienda di distribuzione dell’elettricità e dell’acqua.
Dopo avere collocato l’apparecchio, attendere almeno
1 ora prima di metterlo in funzione. Questo assicura
che l’olio lubrificante si raccolga nella parte bassa del
motore e non penetri nel circuito di raffreddamento.
Pulire l’interno dell’apparecchio prima di attivarne
la funzione (vedi capitolo «Pulizia dell’apparecchio»).
Allacciamento idrico
L’allacciamento idrico deve essere eseguito solo da
un installatore competente, secondo le norme locali
del pertinente ente municipale acquedotto.
m Attenzione
Per il collegamento alla rete dell’acqua potabile
utilizzare solo l’accluso kit del tubo. Non utilizzare mai
kit di tubo disponibili o già usati.
Collegare l’apparecchio solo ad una tubazione
di acqua potabile:
■ Pressione minima 0,2 MPa (2 bar)
■ Pressione massima: 0,8 MPa (8 bar)
m Avviso
I nostri apparecchi possono essere collegati ad
un inverter sinusoidale di rete.
Gli inverter di rete vengono utilizzati in abbinamento
a impianti fotovoltaici e collegati direttamente alla rete
elettrica pubblica. Usare inverter sinusoidali nel caso
di soluzioni speciali (es. imbarcazioni oppure nelle
baite in montagna), laddove non sia disponibile
un collegamento elettrico diretto alla rete pubblica.
Smontaggio delle porte
dell'apparecchio
Se l'apparecchio non passa attraverso la porta
dell'abitazione, le porte dell'apparecchio possono
essere svitate.
m Attenzione
Lo smontaggio delle porte dell’apparecchio deve
essere eseguito solo dal Servizio Assistenza Clienti.
78
Page 79

Conoscere l’apparecchio
Questo libretto d’istruzioni per l’uso è valido per diversi modelli. Nelle illustrazioni sono possibili differenze.
1
2
it
10
3
12
13
4
14
15
5
16
6
17
18
7
8
9
19
20
11
* Non in tutti i modelli.
A Congelatore
B Frigorifero
1 Pannello comandi e visualizzazione
2 Interruttore luce frigorifero e congelatore
3 Balconcino della porta
4 Produttore di ghiaccio/contenitore cubetti
di ghiaccio
5 Apertura di uscita dell'aria
6 Dispenser del ghiaccio e dell’acqua
7 Ripiano di vetro nel congelatore
8 Balconcino della porta
9 Calendario di congelamento
10 Cassetto surgelati
21
11 Balconcino della porta (vano a 2 stelle) per
la conservazione di breve durata di alimenti
e gelato.
12 Illuminazione
13 Filtro delle impurità/Filtro acqua
14 Scomparto per burro e formaggio
15 Apertura di uscita dell’aria
16 Ripiano di vetro nel frigorifero
17 Balconcino della porta
18 Ripiano per bottiglie grandi
19 Cassetto verdura con filtro umidità
20 Cassetto per verdure
21 Piedini regolabili
79
Page 80

it
Pannello comandi e visualizzazione
Il pannello dei comandi integrato nella porta è a sensori sensibili al tatto.
Toccando un pulsante si attiva la corrispondente funzione.
A L’indicazione Congelatore
B L’indicazione Frigorifero
1 Pulsante «super»
Per attivare le funzioni di super-raffreddamento
(frigorifero) o super-congelamento
(congelatore).
Vedi capitolo «Super-raffreddamento» o «Supercongelamento».
2 Pulsante «freeze»
Per eseguire regolazioni per la zona
congelatore, premere il pulsante finché
nel display del congelatore non appare
«freeze».
3 Pulsante «cool»
Per eseguire regolazioni per la zona frigorifero,
premere il pulsante finché nel display
del frigorifero non appare «cool».
4 Pulsante «alarm/lock»
Il pulsante serve per
■ la disattivazione del segnale acustico di
allarme (vedi capitolo «Funzione di allarme»),
■ l’attivazione e disattivazione del bloccaggio
tasti.
Per attivare e disattivare il bloccaggio tasti,
premere il pulsante per 5 secondi. Quando
la funzione è attivata, nel dispay appare «lock».
Eccezione del bloccaggio tasti:
Ad un segnale acustico può essere premuto
il pulsante «alarm/ock».
5 Pulsanti di regolazione +/-
I pulsanti servono per regolare le temperature
del frigorifero e del congelatore.
6 Pulsante Acceso/Spento per illuminare
il dispenser di ghiaccio e acqua
7 Pulsante dispenser del ghiaccio
8 Pulsante di prelievo del ghiaccio tritato
9 Pulsante di distribuzione acqua
80
Page 81

it
Accensione dell’apparecchio
L'apparecchio si accende al collegamento. Viene
emesso un segnale acustico.
Premere il pulsante «alarm/lock». Il segnale acustico
si disattiva.
La spia «alarm» si spegne quando l’apparecchio ha
raggiunto la temperatura regolata.
Le temperature predefinite vengono raggiunte dopo
diverse ore. Durante questo periodo vi invitiamo a non
introdurre alimenti nell’apparecchio.
All’origine sono consigliate le seguenti temperature:
■ Congelatore: -18 °C
■ Frigorifero: +4 °C
Impostare l’unità
di temperatura
La temperatura può essere visualizzata in gradi Celsius
(°C) oppure in gradi Fahrenheit (°F).
Impostare l’unità di temperatura
Per impostare l’unità di temperatura premere
contemporaneamente per 5 secondi il pulsante
«freeze» ed il pulsante «cool».
A seconda della regolazione pregressa, viene
commutata l’altra unità di temperatura.
Regolare la temperatura
Congelatore
La temperatura nel congelatore può essere regolata da
-14 °C a -24 °C.
Consigliamo una regolazione di -18 °C.
L’ultimo valore visualizzato viene memorizzato dal
sistema.
1. Premere il pulsante «freeze» finché nel display del
congelatore non appare «freeze».
2. Con i pulsanti di regolazione «+» (più caldo) oppure
«-» (più freddo) regolare la temperatura.
Frigorifero
Il frigorifero può essere regolata da +2 °C a +8 °C.
La temperatura può essere regolata in unità di 1 °C.
L’ultimo valore visualizzato viene memorizzato dal
sistema.
Consigliamo una regolazione di +4 °C.
Gli alimenti delicati non devono essere conservati
a temperatura superiore +4 °C.
1. Premere il pulsante «cool» finché nel display del
frigorifero non appare «cool».
2. Con i pulsanti di regolazione «+» (più caldo)
oppure «-» (più freddo) regolare la temperatura.
81
Page 82

it
Funzione di allarme
Premendo il pulsante «alarm/lock» il segnale acustico
si disattiva.
Un segnale acustico di allarme può essere emesso nei
casi seguenti:
Allarme porta
Se l'apparecchio resta aperto per oltre un minuto scatta
un allarme porta (segnale acustico continuo). Il segnale
acustico si disattiva chiudendo la porta o premendo il
pulsante di allarme 4.
Allarme temperatura
Il segnale acustico di allarme temperatura si attiva se
nel congelatore o nel frigorifero la temperatura
aumenta troppo ed i prodotti congelati sono in pericolo.
Senza rischi pericolo per gli alimenti congelati,
il segnale acustico ed ottico di allarme può inserirsi:
■ alla messa in funzione dell’apparecchio.
■ all’introduzione di grandi quantità di alimenti freschi.
Congelatore
Nel display lampeggia la temperatura del congelatore
regolata e viene visualizzato «alarm».
Capacità utile totale
Trovate i dati circa la capienza utile dell’apparecchio
sulla targhetta porta-dati (vedi figura nel capitolo
«Servizio Assistenza Clienti»).
Sfruttare interamente il volume utile
Per sistemare la massima quantità di alimenti surgelati,
il cassetto superiore può essere rimosso
dall’apparecchio. Gli alimenti possono essere allora
accatastati direttamente sui ripiani e nel cassetto
inferiore del congelatore.
Il congelatore
Usare il congelatore
■ Per conservare alimenti surgelati.
■ Per produrre cubetti di ghiaccio.
■ Per il congelamento di alimenti.
Avvertenza
Attenzione che la porta del congelatore sia chiusa
correttamente! Se la porta è aperta gli alimenti surgelati
si scongelano. Il congelatore forma molto ghiaccio.
Inoltre: spreco di energia a causa di alto consumo
di corrente elettrica!
Alla chiusura della porta del congelatore si forma
un pseudo-vuoto, il sibilo che si udirà è l’effeto
di compensazione delle pressioni. Attendere 2-3 minuti,
affinché la pressione si equlibri.
Consigliamo di lasciare il contenitore di cubetti di
ghiaccio nell’apparecchio. Con ciò è garantita una
distribuzione ottimale della temperatura nel
congelatore.
Il display della temperatura indica per 10 secondi
la temperatura più alta raggiunta nel congelatore. Al
termine viene visualizzata la temperatura regolata.
La spia «alarm» si spegne quando la temperatura
regolata è stata di nuovo raggiunta.
Avvertenza
Non ricongelare gli alimenti parzialmente
o completamente decongelati. Questi possono essere
di nuovo congelati solo dopo avere preparato
(mediante qualsiasi tipo di cottura) pietanze pronte
all’uso.
Non utilizzare più interamente la durata max.
di conservazione
Frigorifero
Nel display appare «alarm».
m Attenzione
Se nel frigorifero la temperatura è troppo calda, prima
di consumare gli alimenti, che si sono riscaldati,
cuocerli a temperatura elevata. Nel dubbio si consiglia
di non consumare gli alimenti crudi.
Acquisto di alimenti surgelati
■ La confezione non deve essere danneggiata.
■ Rispettare la data di conservazione.
■ La temperatura nell’espositore-congelatore
di vendita deve essere -18 °C o inferiore.
■ Trasportare gli alimenti surgelati possibilmente
in una borsa termica e conservarli poi al più presto
possibile nel congelatore.
Max. capacità di congelamento
Indicazioni sulla max. possibilità di congelamento
in 24 ore sono riportate sulla targhetta d’identificazione
(vedi figura nel capitolo «Servizio Assistenza Clienti»).
82
Page 83

Congelamento di alimenti
freschi
Per il congelamento utilizzare solo alimenti freschi
ed integri.
Per conservare al meglio valore nutritivo, aroma
e colore, sbollentare la verdura prima di congelarla.
Non è necessario sbollentare melanzane, peperoni,
zucchine ed asparagi.
In libreria sono reperibili pubblicazioni sul
congelamento e la sbollentatura.
Avvertenza
Non mettere gli alimenti da congelare in contatto
con quelli congelati.
■ Sono idonei per il congelamento:
Prodotti da forno, pesce e frutti di mare, carne,
selvaggina, pollame, verdura, frutta, erbe
aromatiche, uova senza guscio, latticini, come
formaggio, burro e ricotta, pietanze pronte e residui
vivande, come minestre, piatti unici, carne e pesce
cotti a fuoco lento, vivande di patate, sformati
e dolciumi.
■ Non sono idonei per il congelamento:
Tipi di ortaggi, che solitamente si consumano crudi,
come insalate in foglia o ravanelli, uova nel guscio,
uva, mele intere, pere e pesche, uova sode, yogurt,
latte cagliato, panna acida, crème fraîche
e maionese.
Confezionamento di alimenti surgelati
Conservare gli alimenti in confezioni ermetiche,
per evitare che perdano il loro gusto o possano
essiccarsi.
1. Introdurre l’alimento nella confezione.
2. Fare uscire l’aria.
3. Chiudere la confezione ermeticamente.
4. Scrivere sulla confezione il contenuto e la data
di congelamento.
it
■ Pesce, salsiccia, pietanze pronte, prodotti da forno:
fino a 6 mesi
■ Formaggio, pollame, carne:
fino a 8 mesi
■ Verdura, frutta:
fino a 12 mesi
Super-congelamento
Per conservare vitamine, valori nutritivi, aspetto e gusto,
gli alimenti devono essere congelati completamente,
anche nell’interno, nel tempo più breve possibile.
Per evitare un indesiderato aumento della temperatura,
inserire il super-congelamento alcune ore prima di
introdurre alimenti freschi.
In linea di massima sono sufficenti 4–6 ore.
Dopo l’inserimento l’apparecchio funziona
costantemente, nel congelatore si raggiunge
una temperatura molto bassa.
Se si vuole utilizzare la max. possibilità di
congelamento, il super-congelamento deve essere
attivato 24 ore prima di introdurre gli alimenti freschi.
Le quantità di alimenti più piccole (fino ad 2 kg)
possono essere congelate senza super-congelamento.
Inserire il super-congelamento
1. Premere il pulsante «freeze» finché nel display del
congelatore non appare «freeze».
2. Premere il pulsante «super».
Se è attivato il super-congelamento, nel display
è visualizzato «super».
Imballaggio idoneo:
pellicola di plastica, pellicola tubolare di polietilene,
fogli di alluminio, contenitori per surgelati.
Questi prodotti sono in vendita nel commercio
specializzato.
Imballaggio non idoneo:
carta per imballaggio, carta pergamena, cellofan,
sacchetti per rifiuti e sacchetti per la spesa usati.
Sono idonei per chiudere le confezioni:
anelli di gomma, clip di plastica, fili per legare, nastri
adesivi resistenti al freddo e simili.
I sacchetti e la pellicola tubolare di polietilene possono
essere sigillati mediante saldatura con un apposito
apparecchio.
Durata di conservazione dei surgelati
La durata di conservazione dipende dal tipo
di alimento.
Ad una di temperatura di -18 °C:
Disinserire il super-congelamento
1. Premere il pulsante «freeze» finché nel display del
congelatore non appare «freeze».
2. Premere il pulsante «super».
Se il super-congelamento è disattivato, l’indicazione
«super» nel display scompare.
Avvertenza
Dopo 2^ giorni il super-congelamento si disinserisce
automaticamente.
83
Page 84

it
Decongelare surgelati
A seconda del genere e dell’uso, utilizzare una delle
seguenti possibilità:
■ a temperatura ambiente
■ nel frigorifero
■ nel forno elettrico, con/senza ventola aria calda
■ nel forno a microonde
m Attenzione
Non ricongelare gli alimenti parzialmente
o completamente decongelati. Questi possono essere
di nuovo congelati solo dopo avere preparato
(mediante qualsiasi tipo di cottura) pietanze pronte
all’uso.
Non utilizzare più la durata max. di conservazione.
Il frigorifero
Il frigorifero è il luogo di conservazione ideale per
carne, salumi, pesce, latticini, uova, alimenti pronti
e prodotti da forno.
Avvertenza
Conservare nelle zone meno fredde ad es.
formaggio duro e burro. Il formaggio può così
continuare a diffondere il suo aroma e il burro resta
spalmabile.
Cassetto per verdure con regolatore
di umidità
Per creare il clima di conservazione ottimale per
verdura e frutta, a seconda della quantità conservata,
dal cassetto per verdure si può regolare l’umidità
dell’aria:
■ piccole quantità di frutta e verdura – alta umidità
dell’aria
■ grandi quantità di frutta e verdura – minore umidità
dell’aria
Tenere presente nella conservazione
■ Conservare alimenti freschi, integri. Così la qualità
e la freschezza si conservano più a lungo.
■ Per i prodotti pronti ed alimenti confezionati
osservare la data minima di conservazione o la data
di consumo indicata dal produttore.
■ Sistemare gli alimenti ben confezionati o coperti, per
conservare aroma, colore e freschezza. Si evitano
così contaminazioni di gusto e alterazioni di colore
delle parti di plastica nel frigorifero.
■ Fare prima raffreddare gli alimenti e le bevande
caldi, poi metterli nell’apparecchio.
Avvertenza
Evitare gli alimenti vengano a contatto con la parete
di fondo. In tal caso la circolazione dell’aria viene
impedita.
Durante il congelamento, le confezioni degli alimenti
possono attaccarsi alla parete di fondo.
Considerare le zone più fredde nel
frigorifero
La circolazione dell’aria nel frigorifero, genera delle
zone con temperature differenti:
■ La zona più fredda si trova fra il cassetto verdura
ed il sovrastante ripiano in vetro.
Avvertenze
■ Per la conservazione ottimale della qualità
e dell’aroma di frutta (ad es. ananas, banane, papaie
ed agrumi) e verdura (ad es. melanzane, cetrioli,
zucchine, peperoni, pomodori e patate) che temono
il freddo, conservarle fuori del frigorifero a
temperature di +8 °C a +12 °C circa.
■ A seconda della quantità e del tipo del prodotto
conservato, nel cassetto per verdure può formarsi
condensa. Rimuovere la condensa con un panno
asciutto e adattare l’umidità dell’aria nel cassetto per
verdure con il regolatore di umidità.
Avvertenza
Conservare nella zona più fredda sul cassetto
verdura gli alimenti delicati (ad es. pesce, salumi,
carne).
■ La zona meno fredda è nella parte più alta della
porta.
84
Page 85

it
Super-raffreddamento
Durante il super-raffreddamento il vano frigorifero viene
raffreddato quanto più possibile per ca. 6 ore.
In seguito viene regolato automaticamente alla
temperatura impostata prima del super-raffreddamento.
Inserire il super-raffreddamento per es.
■ prima d’introdurre grandi quantità di alimenti.
■ per il raffreddamento rapido di bevande.
Inserire il super-raffreddamento
1. Premere il pulsante «cool» finché nel display del
frigorifero non appare «cool».
2. Premere il pulsante «super».
Se è attivato il super-raffreddamento, nel display
è visualizzato «super».
Disinserire il super-raffreddamento
1. Premere il pulsante «cool» finché nel display del
frigorifero non appare «cool».
2. Premere il pulsante «super».
Se il super-raffreddamento è disattivato, l’indicazione
«super» nel display scompare.
Dispenser del ghiaccio
e dell’acqua
A seconda della necessità, possono essere prelevati:
■ acqua fredda,
■ ghiaccio tritato,
■ cubetti di ghiaccio.
m Avviso
Non introdurre mai le dita nell’apertura di erogazione
dei cubetti di ghiaccio. Pericolo di ferite!
m Attenzione
Non mettere bottiglie o alimenti nel contenitore
di cubetti di ghiaccio, per un raffreddamento rapido.
Il produttore di ghiaccio si può bloccare
e danneggiare.
Osservare le informazioni relative alla
prima messa in funzione
L’erogazione del ghiaccio e dell’acqua funziona solo se
l’apparecchio è collegato alla rete idrica.
Dopo la messa in funzione dell’apparecchio passano
ca. 24 ore prima che la prima porzione di cubetti
di ghiaccio sia pronta.
Dopo il collegamento nelle tubazioni sono ancora
presenti bolle d’aria.
Spillare e gettare via acqua potabile finché l’acqua non
esce priva di bolle d’aria. Gettare i primi 5 bicchieri.
Se si utilizza il produttore di ghiaccio per la prima volta,
per motivi d’igiene non usare i primi 30-40 cubetti
di ghiaccio.
Avvertenze per il funzionamento del
produttore di ghiaccio
La produzione di cubetti di ghiaccio inizia non appena il
congelatore raggiunge la sua temperatura di
congelamento. Dopo 2–3 ore i cubetti di ghiaccio
pronti vengono rovesciati automaticamente nel
contenitore del ghiaccio.
Avvertenza
L’apparecchio produce una maggiore quantità di
ghiaccio se si regola ad un valore più basso la
temperatura del congelatore. Questo fa aumentare un
poco l’assorbimento di energia elettrica
dell’apparecchio.
Talvolta i cubetti di ghiaccio si attaccano tra loro e
bloccano l’uscita:
1. Aprire la porta e verificare nell'interno se nel
dispenser di ghiaccio e acqua vi sono cubetti di
ghiaccio bloccati.
2. Se il dispenser di ghiaccio e acqua non è bloccato:
m Attenzione
Un contenitore pieno di cubetti di ghiaccio è
particolarmente pesante!
■ Estrarre con precauzione il contenitore di cubetti di
ghiaccio e prelevare i cubetti attaccati.
85
Page 86

it
Quando il contenitore di cubetti di ghiaccio è pieno,
la preparazione di ghiaccio s’interrompe
automaticamente.
Nella produzione dei cubetti di ghiaccio sono
percettibili il ronzio della valvola dell’acqua, l’afflusso
dell’acqua nella vaschetta dell’acqua e la caduta dei
cubetti di ghiaccio.
Attenzione alla qualità dell’acqua
Tutti i materiali impiegati del distributore di bevante
sono inodori ed insapori.
Se l’acqua dovesse avere un sapore insolito, le cause
possono essere le seguenti:
■ Contenuto di minerali e cloro dell’acqua potabile.
■ Materiale delle tubazioni domestiche e del tubo
di collegamento.
■ Freschezza dell’acqua potabile. Se da molto tempo
non è stata prelevata acqua, questo può avere
un sapore di mancanza di freschezza. In questo
caso prelevare e gettare via ca. 15 bicchieri
di acqua.
Consigliamo di prelevare regolarmente un poco
di acqua fredda dal produttore di acqua fredda
e di non spegner l’apparecchio. Con ciò si conserva
la migliore qualità dell’acqua.
L’accluso filtro dell’acqua filtra esclusivamente
particelle dell’acqua alimentata, non batteri o microbi.
Prelevare ghiaccio/acqua
■ Selezionare il pulsante dispenser del ghiaccio
o dell’acqua (acqua, ghiaccio tritato o in cubetti).
■ Premere il pulsante sintanto nel bicchiere non si sia
raggiunta la quantità desiderata.
Prelevare acqua
Prelevare ghiaccio
Accendere e spegnere il
dispenser di ghiaccio e acqua
m Attenzione
■ Chiudere la valvola di arresto dell’acqua
dell’apparecchio qualche ora prima di spegnere
il produttore.
■ Vuotare e pulire il contenitore di cubetti di ghiaccio.
Inserire di nuovo il contenitore. Prestare attenzione
che il contenitore di cubetti di ghiaccio s’innesti
sull’appoggio.
Disinserire il dispenser di ghiaccio
e acqua
Premere contemporaneamente per 5 secondi il
pulsante «freezer» e il pulsante «super». Nel display
appare «IWD off».
Avvertenza
L’acqua del distributore è raffreddata alla giusta
temperatura di consumazione. Se si desidera un’acqua
più fredda, prima del prelievo mettere nel bicchiere
cubetti di ghiaccio.
Avvertenza
Con il prelievo di maggiori quantità di acqua, l'acqua
prelevata può diventare più calda.
Accendere il dispenser di ghiaccio
e acqua
Premere contemporaneamente per 5 secondi il
pulsante «freezer» e il pulsante «super». La spia
«IWD off» nel display si spegne.
86
Page 87

Filtro dell'acqua
A seconda della qualità dell'acqua disponibile,
l'apparecchio può essere utilizzato sia con sia senza
filtro dell'acqua. Se non si utilizza il filtro dell'acqua,
applicare l'apposita copertura.
m Avviso
In luoghi nei quali la qualità dell’acqua è dubbia o
insufficientemente nota, non usare l’apparecchio senza
adeguata disinfezione prima e dopo il filtraggio.
La cartuccia del filtro contro le impurità può essere
acquistata presso il Servizio di Assistenza Clienti
oppure dal rivenditore specializzato.
m Attenzione
■ Dopo il montaggio di un filtro nuovo gettare sempre
via la produzione di ghiaccio delle prime 24 ore
dopo l’attivazione del produttore di ghiaccio.
■ Se il ghiaccio non è stato utilizzato per lungo tempo,
vuotare il contenitore e gettare via tutti i cubetti di
ghiaccio ed anche la produzione di ghiaccio delle 24
ore seguenti.
■ Se l’apparecchio oppure il ghiaccio non sono stati
usati per diverse settimane o mesi oppure i cubetti di
ghiaccio hanno un odore o sapore sgradevole,
sostituire il filtro dell’acqua.
■ Bolle d’aria nel sistema possono causare un
versamento di acqua e l’espulsione della cartuccia
filtrante. Attenzione durante la rimozione.
■ Il filtro deve essere sostituito almeno ogni 6 mesi.
Avvertenze importanti per il filtro acqua
it
■ Inserire la cartuccia filtrante nuova.
■ Fare scorrere qualche litro d’acqua attraverso
il distributore di acqua. Con ciò si elimina l’aria dal
sistema idraulico.
■ Svuotare l’acqua dalla vecchia cartuccia.
La cartuccia può essere smaltita con i rifiuti
domestici.
Utilizzo della copertura
Il dispenser acqua e ghiaccio può essere utilizzato
anche senza filtro dell'acqua. In questo caso applicare
la copertura.
Avvertenza
La copertura e il filtro contenuto devono essere lavati
regolarmente sotto acqua corrente.
■ Dopo l’uso il sistema idraulico è sotto una leggera
pressione. Attenzione quando si smonta il filtro.
■ Se l’apparecchio non è stato usato per molto tempo
o se l’acqua ha un gusto sgradevole o emette
odore, lavare il sistema idraulico. A tal fine fare
scorrere per diversi minuti l’acqua dal distributore
di acqua. Se il gusto o l’odore sgradevole
persistono, sostituire il filtro.
Sostituire la cartuccia filtro
87
Page 88

it
Foglio specifiche e prestazioni
Per filtro: Modello 9000 225 170
Con impiego della cartuccia di ricambio: 9000 077
104
Il modello di cartuccia è stato controllato da NSFInternational in riferimento agli standard ANSI/NSF 42
& 53 e certificato per la riduzione delle sostanze
in seguito indicate.
Conformemente a ANSI/NSF 42 e 53, per l’acqua
erogata dall’apparecchio, la concentrazione delle
sostanze indicate, sciolte in acqua, che penetrano
nel sistema, è stata ridotta ad un valore inferiore
o uguale al valore limite ammesso.
Avvertenza
Sebbene i test sono stati eseguiti in condizioni
di laboratorio standard, la prestazione effettiva può
differire da quella indicata.
Nel modello 9000 225 170 il sistema è stato testato
e certificato da NSF-International in riferimento allo
standard ANSI/NSF 53, per la riduzione di infezioni
e torbidità, ed altresì in riferimento allo standard
ANSI/NSF 42, per la riduzione del gusto sgradevole
e dell’odore di cloro.
Classe nominale di particelle: I
Durata utile nominale: 2.800 litri
Sostanza Media nell’entrata Concentrazione
Cisti * 166.500 min. 50.000/L 1 99,99 99,95 1 99,99 511077-03
Intorbidamento 10,7 11 x 1 NTU 0,3 l 97,10 0,5 NTU 0,49 95,42 511078-03
Classe
particelle 1
Grandezza
particelle da >
0,5 a < 1,0 μm
Gusto di cloro
e torbidità
5.700.000 Min.
1,9 2,0 mg/l + - 10% 0,05 97,3 > 50% 0,06 96,84 511081-03
di afflusso
10.000 Particelle/ml
* In base all’impiego di Cryptosporidium parvumOozysten.
Direttive per l’uso/parametri dell’approvvigionamento
idrico:
Concentrazione
dell’acqua di scarico
30.583 99,52 > 85% 69.000 98,9 511079-03
Riduzione media in % Concentrazione max.
ammessa nell’acqua
di scarico
Max. acqua
scarico
Riduzione min. in % Test NSF
Per l’intero sistema (esclusa la cartuccia monouso)
si concede la garanzia di un anno. Per le cartucce
monouso, una garanzia è concessa solo per difetti
del materiale o di lavorazione. La durata delle cartucce
monouso dipende dalle locali condizioni dell’acqua,
perciò per queste non viene concessa una garanzia.
Pressione dell’acqua 207 - 827 kPa
Temperatura dell’acqua * 0,6 °C - 38 °C
Velocità di scorrimento 2,83 l/min.
■ Il sistema deve essere installato e fatto funzionare
secondo le direttive raccomandate dalla casa
produttrice.
■ Il filtro deve essere sostituito ogni 6-9 mesi.
■ Sciacquare il filtro nuovo per 5 minuti.
■ Trovate ulteriori dettagli nel certificato di garanzia.
Trovate in loco ulteriori informazioni circa il costo dei
ricambi presso il vostro Servizio di Assistenza Tecnica.
Prodotto da:
3 M Material Technology (Guangzhou) Ltd.
9 Nanxiang Er road, Science City,
Guangzhou, 510663, P.R. China
NON impiegare questo prodotto se l’acqua è dannosa
dal punto di vista microbiologico oppure è di qualità
sconosciuta, priva di adeguata disinfezione prima
oppure dopo il collegamento al sistema. Un sistema
certificato per la riduzione di cisti può essere
impiegato per acqua disinfettata, che contiene tra
l’altro cisti filtrabili.
88
Page 89

Dotazione del congelatore
(non in tutti i modelli)
Calendario di congelamento
it
Spegnere e mettere fuori
servizio l'apparecchio
Per evitare perdite di qualità degli alimenti surgelati,
non superare la durata di conservazione. La durata
di conservazione dipende dal tipo di alimento
surgelato. I numeri accanto ai simboli indicano in mesi
la durata di conservazione consentita per l’alimento
congelato. In caso di comuni alimenti surgelati
commerciali osservare la data di produzione
o di scadenza.
Disposizione variabile
dell’attrezzatura interna
I ripiani interni ed i balconcini della porta possono
essere spostati secondo la necessità.
■ Tirare i ripiani in avanti, abbassarli e ruotarli
lateralmente.
Spegnere l'apparecchio
Estrarre la spina di alimentazione o disinserire
il dispositivo elettrico di sicurezza.
Il refrigeratore si spegne.
Mettere fuori servizio l’apparecchio
Quando non si usa l’apparecchio per un lungo periodo:
1. Chiudere l’alimentazione dell’acqua dell’apparecchio
qualche ora prima di spegnerlo.
2. Estrarre tutti gli alimenti dall’apparecchio.
3. Estrarre la spina di alimentazione o disinserire
il dispositivo elettrico di sicurezza.
4. Vuotare e pulire il contenitore di cubetti di ghiaccio
(vedi capitolo «Pulizia dell'apparecchio»).
5. Pulire l’interno dell’apparecchio (vedi il capitolo
«Pulizia dell’apparecchio»).
6. Lasciare le porte dell’apparecchio aperta, per evitare
la formazione di odore.
■ Sollevare il balconcino o ripiano ed estrarlo.
89
Page 90

it
Scongelamento
Congelatore
Grazie al sistema automatico NoFrost nel congelatore
non si forma mai ghiaccio. Uno sbrinamento non è più
necessario.
Frigorifero
Lo sbrinamento è automatico.
L’acqua di sbrinamento scorre attraverso il foro
di drenaggio in una vaschetta di evaporazione,
posizionata nel lato posteriore dell’apparecchio.
Pulizia dell’apparecchio
m Avviso
Non pulire mai l’apparecchio con una pulitrice
a vapore!
m Attenzione
Per la pulizia non utilizzare prodotti abrasivi, solventi
o acidi.
m Attenzione
Non usare spugne abrasive o spugne che graffiano.
Sulle superfici metalliche potrebbe formarsi macchie da
corrosione.
m Attenzione
Non lavare mai in lavastoviglie i ripiani ed i contenitori.
Questi elementi si possono deformare!
Procedere come segue:
1. Estrarre la spina di alimentazione o disinserire il
dispositivo di sicurezza.
2. Estrarre gli alimenti surgelati e depositarli in un luogo
fresco.
3. Attendere lo sbrinamento dello strato di brina.
4. Pulire l’apparecchio con un panno morbido e acqua
tiepida leggermente saponata. Evitare che l’acqua
penetri nell’unità di illuminazione.
5. Lavare la guarnizione della porta solo con acqua
pulita e poi asciugarla con cura.
6. Dopo la pulizia: ricollegare l’apparecchio.
7. Introdurre di nuovo i surgelati.
Per inserire il contenitore deporlo sulle guide di
estrazione e spingerlo nell’interno. Il cassetto si arresta
premendolo in basso.
Pulire la vaschetta di raccolta acqua di sbrinamento
L’acqua versata si raccoglie nella vaschetta di raccolta
acqua.
Per svuotare e pulire rimuovere il filtro. Pulire
la vaschetta di raccolta acqua con una spugna o un
panno assorbente.
Pulire il contenitore del ghiaccio
Se per molto tempo non sono stati prelevati cubetti
di ghiaccio, i cubetti già prodotti diventano più piccoli,
cambiano gusto e si attaccano in blocco.
Estrarre il contenitore, vuotarlo e lavarlo con acqua
tiepida.
Dotazione
Per permettere la pulizia, è possibile rimuovere tutti
i componenti estraibili dell’apparecchio (vedi il capitolo
«Posizione variabile dei componenti di dotazione
interna»).
Avvertenza
Per estrarre e pulire i cassetti, aprire completamente le
porte oltre 90°.
Estrazione del contenitore
Estrarre completamente il contenitore, sollevarlo per
staccarlo dal supporto e rimuoverlo.
90
m Attenzione
Un contenitore pieno di cubetti di ghiaccio
è particolarmente pesante!
Page 91

Dopo la pulizia, per evitare che i nuovi cubetti di
ghiaccio possano attaccarsi, asciugare bene il
contenitore e la coclea di trasporto.
Inserire il contenitore di cubetti di ghiaccio
Spingere il contenitore di cubetti di ghiaccio
completamente indietro sugli appoggi, fino all’arresto.
La produzione di cubetti di ghiaccio continua.
Avvertenza
Se non fosse possibile inserire completamente
il contenitore, ruotare un poco la coclea posizionata
all’interno del contenitore o rimuovere i cubetti
di ghiaccio incollati nella zona di raccolta.
it
■ Se disponibile:
Per evitare sprechi di energia, applicare
i distanziatori dal muro (vedi capitolo «Installare
l’apparecchio», «Ventilazione»). Una minore distanza
dal muro non influisce sulla funzionalità
dell’apparecchio. Può tuttavia causare una piccola
aumentazione di assorbimento di energia.
■ La disposizione delle parti dell'attrezzatura non ha
influenza sull'assorbimento di energia
dell'apparecchio.
Rumori di funzionamento
Rumori normali
Ronzio
Motori in funzione (ad es. gruppi frigoriferi, ventilatore).
Gorgoglìo, scroscio o fruscìo
Il refrigerante scorre attraverso i tubi oppure l'acqua
scorre nel produttore di ghiaccio.
Breve scatto
Motore, interruttori ed elettrovalvole s'inseriscono/
disinseriscono.
Fragore
Cubetti di ghiaccio pronti cadono dal produttore
di ghiaccio nel contenitore di cubetti.
Illuminazione (LED)
L’apparecchio è dotato di un’illuminazione a LED
esente da manutenzione.
Riparazioni a questa illuminazione deve essere
eseguite solo dal Servizio Assistenza Clienti autorizzato.
Risparmiare energia
■ Installare l’apparecchio un in ambiente asciutto
ventilabile. L’apparecchio non deve essere esposto
direttamente al sole o vicino ad una fonte di calore
(per es. calorifero, stufa).
Altrimenti usare un pannello isolante.
■ Non ostruire le aperture di afflusso e deflusso
dell’aria dell’apparecchio.
■ Lasciare raffreddare gli alimenti e le bevande,
se caldi, prima di introdurli nell’apparecchio.
■ Per scongelare un alimento surgelato metterlo nel
frigorifero, si utilizza così il freddo del surgelato per il
raffreddamento degli alimenti.
■ Aprire la porta dell’apparecchio il tempo più breve
possibile.
■ Attenzione che la porta del congelatore sia chiusa
correttamente.
Evitare i rumori
L'apparecchio non è correttamente livellato
Livellare l'apparecchio con una livella a bolla d'aria.
A tal fine utilizzare i piedini a vite o inserire uno
spessore.
L'apparecchio è in contatto laterale
Allontanare l'apparecchio dai mobili o apparecchi con
i quali è in contatto.
I contenitori o i ripiani traballano o non sono
correttamente inseriti
Controllare le parti estraibili ed eventualmente inserirle
di nuovo correttamente.
I contenitori all’interno dell’apparecchio si toccano
tra loro
Allontanare un poco le bottiglie o i contenitori.
91
Page 92

it
Eliminare piccoli guasti
Prima di rivolgersi al Servizio Assistenza Clienti:
provare ad eliminare autonomamente l’inconveniente con l’aiuto delle seguenti istruzioni.
Eseguire il programma di autotest dell’apparecchio (vedi capitolo «Autotest dell’apparecchio»).
L’intervento del Servizio Assistenza Clienti in caso di corretto funzionamento del prodotto, è a carico
del consumatore.
Guasto Causa possibile Rimedio
La temperatura si discosta
notevolmente dalle impostazioni
iniziali.
Tutte le spie spente. Interruzione dell’energia elettrica;
è scattato il dispositivo elettrico di sicurezza;
la spina d’alimentazione non è inserita
correttamente.
Il display indica «E..». Il sistema elettronico ha riconosciuto un
errore.
Il segnale acustico di allarme
è attivo, l’indicazione
di temperatura del congelatore
lampeggia.
La temperatura nel congelatore
è troppo alta! Pericolo per gli
alimenti!
L’illuminazione non funziona. L’illuminazione è difettosa. (Vedi capitolo «Illuminazione».)
L’apparecchio non ha potenza
di raffreddamento.
L’illuminazione non funziona.
Il display è spento.
Il refrigeratore si accende sempre
più spesso e più a lungo.
La porta del congelatore è aperta. Chiudere la porta.
I passaggi dell’aria per l’aerazione sono
ostruiti.
Sono stati inseriti troppi alimenti freschi
da congelare in una sola volta.
Interruzione dell’energia elettrica. Controllare se vi è energia elettrica.
L’interruttore di sicurezza è scattato. Controllare il dispositivo elettrico di sicurezza.
La spina d’alimentazione non è inserita
correttamente.
Frequente apertura della porta
dell'apparecchio.
I passaggi dell'aria per l'areazione sono
ostruiti.
Congelamento di grandi quantità di alimenti
freschi.
In alcuni casi basta spegnere l'apparecchio per 5 minuti.
Se la temperatura è troppo alta, controllare dopo qualche ora
se vi è stata una normalizzazione della temperatura.
Se la temperatura è troppo bassa, ricontrollare la temperatura
il giorno seguente.
Collegare la spina di alimentazione. Controllare se vi è energia
elettrica e controllare il dispositivo elettrico di sicurezza.
Rivolgersi al Servizio Tecnico Clienti.
Per disattivare il segnale acustico, premere il pulsante «alarm/
lock». L’intermittenza del display si disattiva.
Nel display della temperatura viene visualizzata
per 10 secondi la temperatura più alta raggiunta nel vano
congelatore.
Liberare le aperture.
Non superare la quantità massima di congelamento.
Avvertenza
Gli alimenti semiscongelati e scongelati possono essere
di nuovo congelati se carne e pesce non sono stati
a temperature superiori a +3 °C per oltre un giorno e gli altri
alimenti per non oltre tre giorni.
Controllare se la spina di alimentazione è inserita
correttamente.
Non aprire inutilmente la porta.
Liberare le aperture.
Non superare la quantità massima di congelamento.
92
Page 93

Distributore di acqua e ghiaccio
Guasto Causa possibile Rimedio
Nonostante il lungo funzionamento
non vi è erogazione di cubetti
di ghiaccio.
Nel contenitore di cubetti
di ghiaccio vi sono cubetti, ma non
vengono distribuiti.
I cubetti di ghiaccio si sono
incastrati all’uscita del contenitore
cubetti oppure nel tritaghiaccio.
I cubetti di ghiaccio sono acquosi.
I cubetti si sono scongelati.
Il distributore di acqua non
funziona.
Il produttore di ghiaccio non
produce abbastanza ghiaccio
o il ghiaccio è deformato.
Gorgoglio, ribollire nella conduttura
dell’acqua.
Rubinetto dell’acqua chiuso. Aprire il rubinetto dell’acqua.
L’alimentazione dell’acqua è interrotta.
Pressione dell’acqua troppo bassa.
Il dispenser di ghiaccio e acqua è spento. Nel
display appare «IWD off».
Temperatura troppo alta nel congelatore. Regolare la temperatura nel congelatore un poco più bassa
I cubetti di ghiaccio si sono congelati
in blocco.
Chiudere la porta del congelatore. Chiudere la porta.
Interruzione dell’energia elettrica. Controllare se vi è energia elettrica.
Rubinetto dell’acqua chiuso. Aprire il rubinetto dell’acqua.
L’alimentazione dell’acqua è interrotta.
Pressione dell’acqua troppo bassa.
L’apparecchio o il produttore di ghiaccio
è stato acceso solo poco tempo prima.
È stata prelevata una grande quantità
di ghiaccio.
La pressione dell’acqua è bassa. Allacciare l’apparecchio solo alla pressione dell’acqua
Filtro dell’acqua otturato o esaurito. Sostituire il filtro dell’acqua.
Temperatura nel congelatore troppo alta. Regolare la temperatura nel congelatore un poco più bassa.
L’afflusso dell’acqua è interrotta oppure
otturata.
Informare l’installatore.
Attivare il dispenser di ghiaccio e acqua (vedi il capitolo
«Accendere e spegnere il dispenser di ghiaccio e acqua»).
(vedi il capitolo «Regolare la temperatura»).
Estrarre e vuotare il contenitore di cubetti di ghiaccio.
Estrarre il contenitore di cubetti di ghiaccio e ruotare
con la mano la coclea di trasporto. Staccare eventuali blocchi
di ghiaccio bloccati con bastoncini di legno.
Estrarre il contenitore di cubetti di ghiaccio vuotarlo
ed asciugarlo.
Informare l’installatore.
Occorrono ca. 24 ore prima che inizi la produzione di ghiaccio.
Occorrono ca. 24 ore prima che il contenitore di cubetti
di ghiaccio sia di nuovo pieno.
prescritta (vedi il capitolo Collegare l’apparecchio, paragrafo
Allacciamento idrico).
1. Controllare l’afflusso dell’acqua.
2. Controllare se la conduttura dell’acqua è otturata.
3. In alcuni casi è sufficiente disinserire brevemente
il dispenser di ghiaccio e acqua (vedi il capitolo «Accendere
e spegnere il dispenser di ghiaccio e acqua»).
it
93
Page 94

it
Autotest dell’apparecchio
Questo apparecchio dispone di un programma
automatico di autotest che individua cause
ed inconvenienti che possono essere eliminati solo dal
Servizio Assistenza Clienti.
Avviare l’autotest dell’apparecchio
1. Spegnere l’apparecchio ed attendere 5 minuti.
2. Accendere di nuovo l’apparecchio.
3. Premere contemporaneamente per 5 secondi
i pulsanti di regolazione «+» e «-».
Il programma di autodiagnosi ha inizio. Se nel display
appare «E..» è presente un guasto. Con questo
messaggio di guasto informare il Servizio Assistenza
Clienti.
Terminare l’autotest dell’apparecchio
Premere di nuovo contemporaneamente per 5 secondi
i pulsanti di regolazione «+» e «-».
Servizio Assistenza Clienti
Trovate un centro d’assistenza clienti autorizzato a voi
vicino tramite i numeri verdi (800…) in Internet oppure
nell’elenco del Servizio Assistenza Clienti in dotazione
all’apparecchio. Indicate al Servizio Assistenza Clienti
autorizzato la sigla del prodotto (E-Nr.) e il numero
di fabbricazione (FD-Nr.) dell’apparecchio.
Trovate questi dati sulla targhetta d’identificazione.
Indicando la sigla del prodotto ed il numero
di fabbricazione contribuite ad evitarci interventi inutili.
Risparmiate così la relativa spesa.
Ordine di riparazione e consulenza
in caso di guasti
Trovate i dati di contatto di tutti i paesi nell’accluso
elenco dei centri di assistenza clienti.
I 800-018346 Linea verde
CH 0848 840 040
94
Page 95

nl
nl Inhoud
nlMontage- en gebruiksaanwijzing
Veiligheidsbepalingen en waarschuwingen . 96
Aanwijzingen over de afvoer ........................... 98
Omvang van de levering .................................. 98
Opstellen van het apparaat ............................. 98
Opstellingsafmetingen ...................................... 99
Openingshoek deur ........................................ 100
Apparaat horizontaal zetten .......................... 101
Apparaat aansluiten ........................................ 101
Apparaatdeuren demonteren ........................ 101
Kennismaking met het apparaat .................. 102
Apparaat inschakelen ..................................... 104
Temperatuureenheid instellen ....................... 104
Instellen van de temperatuur ........................ 104
Alarm function .................................................. 105
Netto-inhoud ..................................................... 105
De diepvriesruimte .......................................... 105
Maximale invriescapaciteit ............................. 105
Verse levensmiddelen invriezen ................... 106
Supervriezen ..................................................... 106
Ontdooien van diepvrieswaren ..................... 107
De koelruimte ................................................... 107
Superkoelen ..................................................... 108
IJs- en waterdispenser ................................... 108
IJs- en waterafgifte uit- en inschakelen ....... 109
Waterfilter .......................................................... 110
Specificatie- en vermogensgegevens ......... 111
Uitvoering van de diepvriesruimte ............... 112
Variabele indeling van de binnenruimte ..... 112
Apparaat uitschakelen en buiten werking
stellen ................................................................ 112
Ontdooien ......................................................... 113
Schoonmaken van het apparaat .................. 113
Verlichting (LED) .............................................. 114
Energie besparen ............................................ 114
Bedrijfsgeluiden ............................................... 114
Kleine storingen zelf verhelpen .................... 115
Zelftest apparaat ............................................. 117
Servicedienst .................................................... 117
95
Page 96

nl
m Veiligheidsbepalingen
en waarschuwingen
Voordat u het apparaat in gebruik neemt
Lees de gebruiksaanwijzing en het
installatievoorschrift nauwkeurig door.
U vindt daarin belangrijke informatie over
plaatsing, gebruik en onderhoud van het
apparaat.
De fabrikant aanvaardt geen
aansprakelijkheid als de aanwijzingen
en waarschuwingen
in de gebruiksaanwijzing niet in acht
worden genomen. Bewaar
de gebruiksaanwijzing en het
montagevoorschrift voor later gebruik
of voor een eventuele latere bezitter.
Technische veiligheid
Het apparaat bevat een geringe
hoeveelheid van het milieuvriendelijke maar
brandbare koelmiddel R600a. Let erop dat
de leidingen van het koelcircuit bij het
transport of de installatie niet beschadigd
worden. Koelmiddel dat naar buiten spuit
kan vlam vatten of zich ontsteken.
Bij beschadiging
■ Open vuur of andere ontstekingsbronnen
uit de buurt van het apparaat houden;
■ Ruimte gedurende een paar minuten
goed luchten;
■ Apparaat uitschakelen en de stekker uit
het stopcontact trekken;
■ Contact opnemen met de Servicedienst.
Hoe meer koelmiddel het apparaat bevat,
des te groter moet de ruimte zijn waarin het
apparaat wordt opgesteld. In een te kleine
ruimte kan bij een lek een ontvlambaar
mengsel van gas en lucht ontstaan.
Per 8 g koelmiddel moet het vertrek
minstens 1 m³ groot zijn. De hoeveelheid
koelmiddel in uw apparaat vindt u op het
typeplaatje aan de binnenkant van het
apparaat.
Als de aansluitkabel van het apparaat
beschadigd raakt, moet deze worden
vervangen door de fabrikant, de
klantenservice of een andere
gekwalificeerde persoon. Onvakkundige
installatie en reparaties kunnen groot
gevaar opleveren voor de bezitter.
Reparaties mogen uitsluitend worden
uitgevoerd door de fabrikant, de
klantenservice of een andere
gekwalificeerde persoon.
Er mogen alleen originele onderdelen van
de fabrikant gebruikt worden. Alleen bij
deze onderdelen garandeert de fabrikant
dat ze aan de veiligheidseisen voldoen.
Een verlengsnoer voor de aansluitkabel
mag uitsluitend via de klantenservice
worden aangeschaft.
Bij het gebruik
■ Nooit elektrische apparaten in het
apparaat gebruiken (bijv.
verwarmingsapparaten, elektrische
ijsmaker etc.). Explosiegevaar!
■ Het apparaat nooit met een stoomreiniger
ontdooien of schoonmaken! De hete
stoom kan in de elektrische onderdelen
terechtkomen en kortsluiting veroorzaken.
Gevaar van elektrische schok!
■ Gebruik geen puntige en scherpe
voorwerpen om een laag ijs of rijp te
verwijderen. U kunt hierdoor de
koelleidingen beschadigen. Koelmiddel
dat naar buiten spuit kan vlam vatten oftot
oogletsel leiden.
■ Geen producten met brandbare
drijfgassen (bijv. spuitbussen) en geen
explosieve stoffen in het apparaat
opslaan. Explosiegevaar!
■ Plint, uittrekbare manden of laden, deuren
etc. niet als opstapje gebruiken of om op
te leunen.
■ Voor het reinigen de stekker uit het
stopcontact trekken of de zekering
uitschakelen. Altijd aan de stekker
trekken, nooit aan de aansluitkabel.
■ Dranken met een hoog
alcoholpercentage altijd goed afgesloten
en staand bewaren.
■ Geen olie of vet gebruiken op kunststof
onderdelen en deurdichtingen. Ze kunnen
poreus worden.
■ De be- en ontluchtingsopeningen van het
apparaat nooit afdekken.
96
Page 97

nl
■ Vermijden van risico's voor kinderen en
kwetsbare personen:
Kwetsbaar zijn kinderen/personen met
lichamelijke, geestelijke of zintuigelijk
beperkingen, evenals personen die
onvoldoende kennis hebben over de
veilige bediening van het apparaat.
Zorg ervoor dat kinderen en kwetsbare
personen begrijpen wat de gevaren zijn.
Een voor de veiligheid verantwoordelijke
persoon moet toezicht houden op
kinderen en kwetsbare personen bij het
apparaat of hen instrueren.
Alleen kinderen vanaf 8 jaar het apparaat
laten gebruiken.
Bij reiniging en onderhoud toezicht
houden op kinderen.
Laat kinderen nooit met het apparaat
spelen.
■ Flessen en blikjes met vloeistoffen –
vooral koolzuurhoudende dranken – niet
in de diepvriesruimte opslaan. Flessen en
potten kunnen barsten!
■ Diepvrieswaren nadat u ze uit de
diepvriesruimte hebt gehaald, nooit
onmiddellijk in de mond nemen.
Kans op vrieswonden!
■ Vermijd langdurig contact van uw handen
met de diepvrieswaren, ijs of de
verdamperbuizen enz.
Kans op vrieswonden!
Kinderen in het huishouden
■ Verpakkingsmateriaal en onderdelen
ervan zijn geen speelgoed voor kinderen.
Verstikkingsgevaar door opvouwbare
kartonnen dozen en folie!
■ Het apparaat is geen speelgoed voor
kinderen!
■ Bij een apparaat met deurslot:
sleutel buiten het bereik van kinderen
bewaren!
Algemene bepalingen
Het apparaat is geschikt
■ voor het koelen en invriezen van
levensmiddelen,
■ voor het bereiden van ijs,
■ om drinkwater te tappen.
Dit apparaat is bestemd voor privégebruik
in het huishouden en de huiselijke
omgeving.
Het apparaat is ontstoord volgens EU
richtlijn 2004/108/EC.
Het koelcircuit is op dichtheid
gecontroleerd.
Dit apparaat voldoet aan
de veiligheidsbepalingen voor elektrische
apparaten (EN 60335-2-24).
Dit apparaat is bestemd voor gebruik tot op
hoogten van maximaal 2.000 meter boven
zeeniveau.
97
Page 98

nl
Aanwijzingen over de afvoer
* Afvoeren van de verpakking van
uw nieuwe apparaat
De verpakking beschermt uw apparaat tegen
transportschade. De gebruikte materialen zijn
onschadelijk voor het milieu en kunnen opnieuw
worden gebruikt. Help daarom mee en zorg
dat de verpakking milieuvriendelijk wordt afgevoerd.
U kunt bij uw leverancier of bij de reinigingsdienst
in uw gemeente informeren hoe u uw oude apparaat
en het verpakkingsmateriaal van het nieuwe apparaat
kunt (laten) afvoeren voor een milieuvriendelijke
verwerking.
* Afvoeren van uw oude apparaat
Oude apparaten zijn geen waardeloos afval! Door
een milieuvriendelijke afvoer kunnen waardevolle
grondstoffen worden teruggewonnen.
Dit apparaat is gekenmerkt in
overeenstemming met de Europese richtlijn
2012/19/EU betreffende afgedankte
elektrische en elektronische apparatuur
(waste electrical and electronic equipment WEEE).
De richtlijn geeft het kader aan voor de in de
EU geldige terugneming en verwerking van
oude apparaten.
m Waarschuwing
Bij afgedankte apparaten
1. Stekker uit het stopcontact trekken.
2. Aansluitkabel doorknippen en samen met de stekker
verwijderen.
3. Legplateaus en voorraadvakken niet eruit halen
om het kinderen moeilijk te maken erin te klimmen!
4. Laat kinderen niet met het afgedankte apparaat
spelen. Verstikkingsgevaar!
Koelapparaten bevatten koelmiddel en in de isolatie
gas. Die zorgvuldig moeten worden afgevoerd. Met het
oog op een doelmatige en milieuvriendelijke afvoer
mogen de leidingen van het koelcircuit tot het moment
van transport niet beschadigd worden.
Omvang van de levering
Controleer na het uitpakken alle onderdelen op
eventuele transportschade.
Voor klachten kunt u terecht bij de winkel waar u het
apparaat hebt aangeschaft of bij onze klantenservice.
De levering bestaat uit de volgende onderdelen:
■ Vrijstaand apparaat
■ Zakje met montagemateriaal
■ Uitrusting (modelafhankelijk)
■ Gebruiksaanwijzing
■ Klantenserviceboekje
■ Garantiebijlage
■ Informatie over energieverbruik en geluiden
Opstellen van het apparaat
Transport
Het toestel is zwaar. Bij het transport en bij de montage
beveiligen!.
Op grond van het gewicht en de afmetingen van het
apparaat en om het risico van letsel of schade aan het
apparaat te minimaliseren, zijn ten minste twee
personen nodig voor de veilige opstelling van het
apparaat.
De juiste plaats
Geschikt voor het opstellen zijn droge, ventileerbare
vertrekken. Het apparaat liefst niet in de zon of naast
een fornuis, verwarmingsradiator of een andere
warmtebron plaatsen. Is plaatsing naast een
warmtebron niet te vermijden, maak dan gebruik van
een isolerende plaat of neem de volgende
minimumafstanden in acht:
■ Naast elektrische- of gasfornuizen: 3 cm.
■ Naast een CV-installatie 30 cm.
Bij plaatsing naast een ander koel- of vriesapparaat
moet aan de zijkant ten minste 25 mm ruimte worden
opengelaten om het ontstaan van condenswater te
vermijden.
Wanneer er boven het apparaat een plank of een kast
wordt gemonteerd, dient men een opening van 30 mm
aan te houden, zodat het apparaat desgewenst uit de
nis kan worden getrokken.
De verwarmde lucht aan de achterkant van
het apparaat moet ongehinderd afgevoerd kunnen
worden.
98
Page 99

Ondergrond
m Attentie
Het apparaat is zwaar.
Uitvoering met dispenser: 143 kg
De vloer op de plaats van opstelling mag niet
meegeven, vloer eventueel verstevigen.
Bij het plaatsen in een hoek of nis
de minimumafstanden aan de zijkanten in acht nemen
(zie Afmetingen van het apparaat) zodat de deuren tot
de aanslag geopend kunnen worden (zie het hoofdstuk
„Opstellingsafmetingen”).
Als de keukenmeubelen ernaast dieper zijn dan 60 cm,
dan moeten aan de zijkant minimumafstanden in acht
worden genomen om de openingshoek van de deur
ten volle te benutten (zie hoofdstuk „Openingshoek
deur”).
nl
Let op de omgevingstemperatuur en de
beluchting
Omgevingstemperatuur
De klimaatklasse vindt u op het typeplaatje. Deze geeft
aan binnen welke omgevingstemperaturen het
apparaat gebruikt kan worden. Het typeplaatje bevindt
zich rechts onderaan in de koelruimte.
Klimaatklasse Toelaatbare
omgevingstemperatuur
SN +10 °C tot 32 °C
N +16 °C tot 32 °C
ST +16 °C tot 38 °C
T +16 °C tot 43 °C
Aanwijzing
Het apparaat is volledig functioneel binnen
de binnentemperatuurgrenzen van de aangegeven
klimaatklasse. Wanneer een apparaat uit klimaatklasse
SN wordt gebruikt bij een lagere binnentemperatuur,
kunnen beschadigingen aan het apparaat worden
uitgesloten tot een temperatuur van +5 °C.
Beluchting
De beluchtings- en ontluchtingsopeningen in de
achterzijde van het apparaat in geen geval afdekken.
De verwarmde lucht moet ongehinderd afgevoerd
kunnen worden. Anders moet de koelmachine meer
presteren. Waardoor het energieverbruik toeneemt.
Steek de afstandshouder op de daartoe bestemde
houder op de achterzijde van het apparaat. Hierdoor
wordt de minimumafstand tot de wand in acht
genomen.
Opstellingsafmetingen
99
Page 100

nl
Openingshoek deur
D
[
[
E
[
[
[
DE
100
 Loading...