

Using this combined microwave appliance will make cooking a real pleasure.
Please read these operating instructions carefully, so as to make use of all the technical advantages provided by the appliance.
The start of the operating instructions contains a number of important instructions with regard to safety. You will then be introduced to the individual components of your new appliance. This section will tell you all you need to know about the cooker functions and operation.
The tables have been structured in such a way as to provide a step-by-step guide to the cooker settings. They contain useful information about the appropriate cookware, insertion level, and the optimum settings, all of which have, of course, been carefully tested in our cooking studio.
To ensure the long-lasting attractiveness of your appliance, we also provide you with a number of tips on care and cleaning. And, in the unlikely event of a malfunction, the last pages of the instructions contain information on how to rectify minor faults yourself.
Any questions? You can always refer to the detailed table of contents, enabling you to find your way around quickly.
We hope that you will enjoy cooking with your new combined microwave appliance.
Instruction for use

900000 7002
S190184
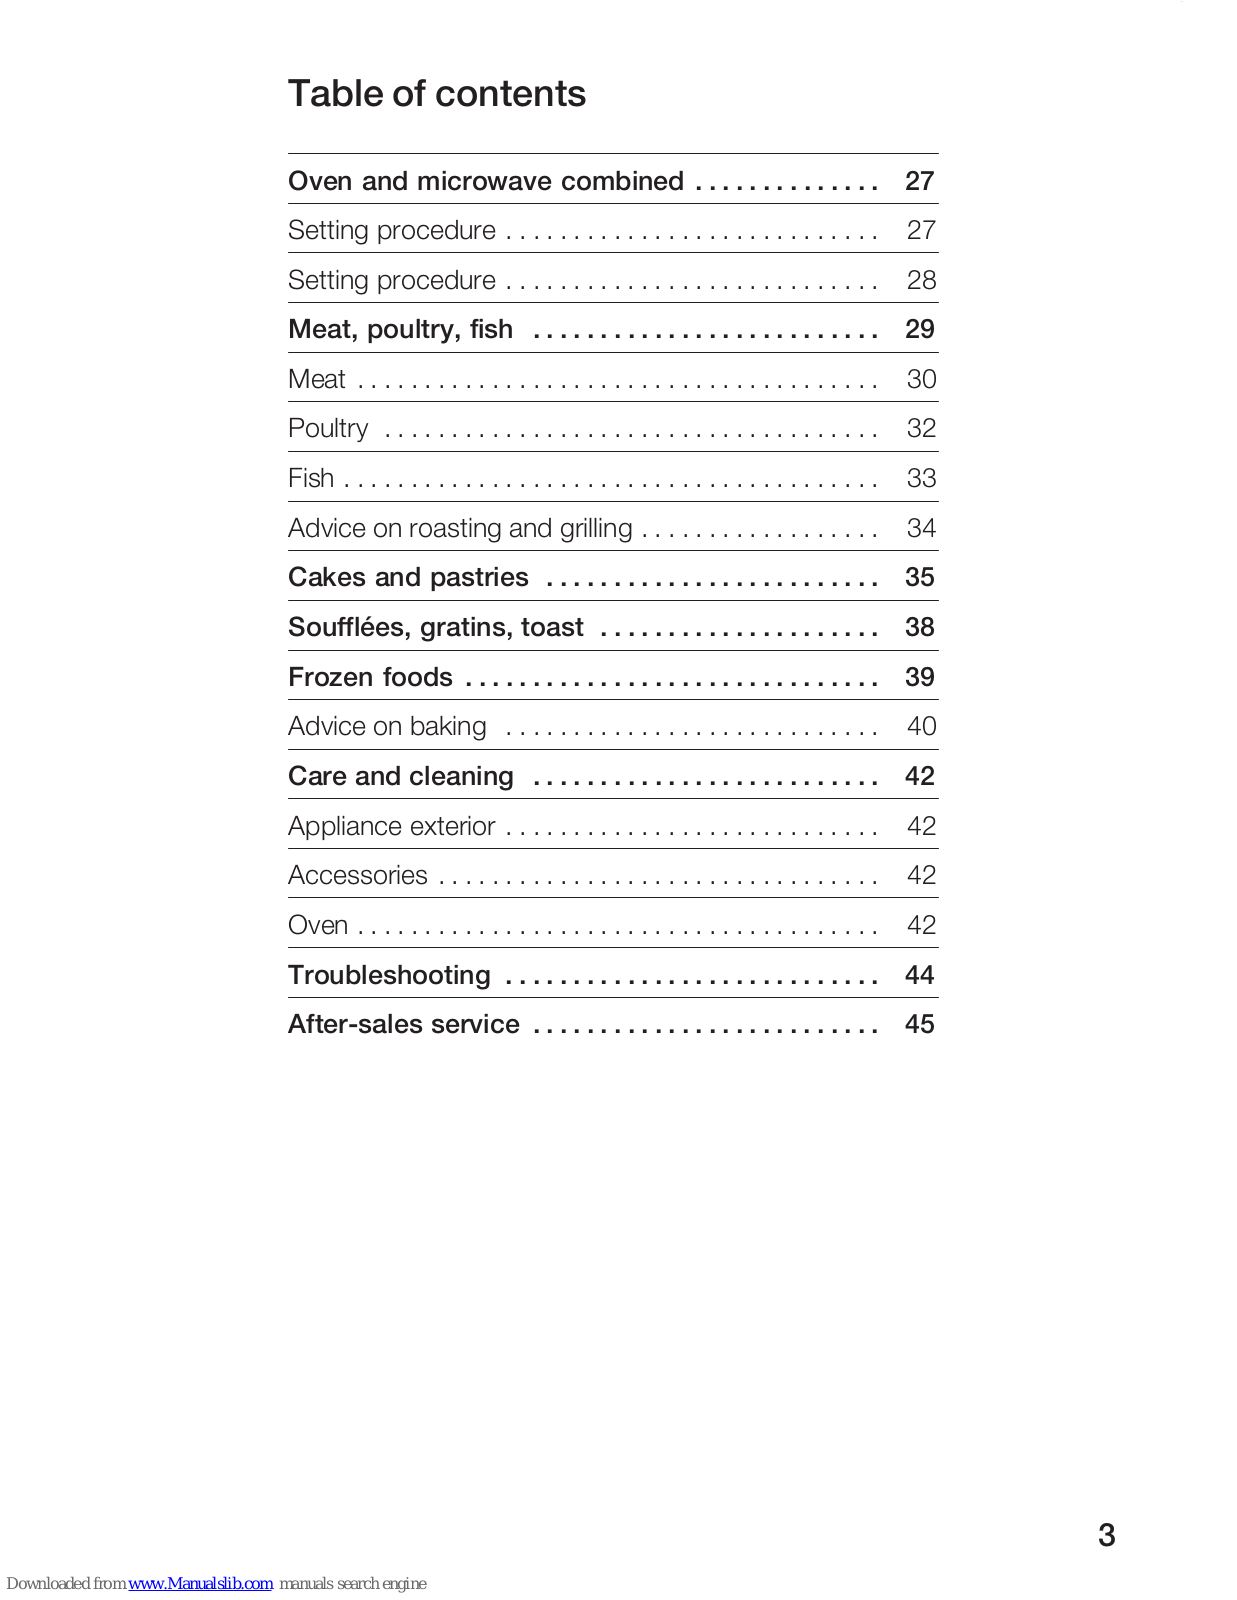
Table of contents
| Protection of the Environment | 4 |
|---|---|
| Notes on disposal | 4 |
| How to save energy | 4 |
| Before connecting your new appliance | 5 |
| Important information | 6 |
| Safety information | 6 |
| Safety information for microwave operation | 7 |
| How to prevent damage to your appliance | 9 |
| Installation and connection | 10 |
| How to connect the appliance | 11 |
| The control panel | 12 |
| Types of heating | 13 |
| Oven and accessories | 14 |
| Before using for the first time | 16 |
| Heat up the oven | 16 |
| Heat up the oven The microwave |
16
17 |
| Heat up the oven The microwave Cookware/ bakeware |
16
17 18 |
| Heat up the oven The microwave Cookware/ bakeware Microwave power settings |
16
17 18 18 |
| Heat up the oven The microwave Cookware/ bakeware Microwave power settings Setting procedure |
16
17 18 18 19 |
| Heat up the oven |
16
17 18 18 19 20 |
| Heat up the oven |
16
17 18 18 19 20 20 |
| Heat up the oven |
16
17 18 18 19 20 20 21 |
| Heat up the oven |
16
17 18 18 19 20 20 21 21 24 |
| Heat up the oven |
16
17 18 19 20 20 21 21 24 25 |
| Heat up the oven |
16
17 18 18 19 20 20 20 21 24 25 26 |
Table of contents
| Oven and microwave combined | 27 |
|---|---|
| Setting procedure | 27 |
| Setting procedure | 28 |
| Meat, poultry, fish | 29 |
| Meat | 30 |
| Poultry | 32 |
| Fish | 33 |
| Advice on roasting and grilling | 34 |
| Cakes and pastries | 35 |
| Soufflées, gratins, toast | 38 |
| Frozen foods | 39 |
| Advice on baking | 40 |
| Care and cleaning | 42 |
| Appliance exterior | 42 |
| Accessories | 42 |
| Oven | 42 |
| Troubleshooting | 44 |
| After-sales service | 45 |
Protection of the Environment
Notes on disposal
Your new appliance was protected by suitable packaging while it was on its way to you. All materials used for this purpose are environment-friendly and suitable for recycling. Please make a contribution to protecting the environment by disposing of the packaging appropriately.
Old appliances are not worthless rubbish! Environment-conscious recycling can reclaim valuable raw materials.
Before disposing of your old appliance, please make sure that it is unusable, or label it with a sticker stating "Caution: This appliance is defective!"
Up-to-date information concerning options for disposing of your old appliance and the packaging from the new one can be obtained from your retailer or local municipal office.
How to save energy
- The oven should only be preheated if recommended in the cooking instructions or the applications table in the instruction manual.
- Use dark, black-finish or enamelled baking tins, as these are particularly good conductors of heat.
- When baking several cakes, it is best to bake them one after the other. The oven will still be warm, meaning that the baking time for the second cake will be reduced.
- For long cooking times, it is possible to switch off the oven 10 minutes before the end of the cooking time and thus use the residual heat to finish off the cooking.
- □ Use the microwave in combination with one type of heating. This is quicker and saves energy.
4
Before connecting your new appliance
Important safty instructions
Please read this instruction manual carefully before using the appliance for the first time. The instructions contain important information regarding appliance use and care.
- Please keep the operating and installation instructions in a safe place ready to pass on in the event of change of ownership.
- Do not start up the appliance if transport damage is apparent.
Important information
Safety information
This appliance complies with all relevant safety regulations for electrical appliances. Repairs should only be carried out by a fully trained authorised engineer otherwise there could be risk of serious injury to the user.
The surfaces of heating and cooking appliances become hot during operation. The interior surfaces of the oven and the heating elements become particularly hot. Keep children at a safe distance. Risk of scalding!
- The connecting cords of electric appliances must not become trapped in the hot oven door, otherwise the insulating jacket could be damaged. Short-circuit, lightning strike!
- If the oven door or door seal is damaged, you must not use the oven until it has been repaired by an after-sales service technician. Otherwise microwave energy could escape.
- Never store combustible items in the oven cavity. These could ignite if the oven is switched on. Fire hazard!
- If the appliance is defective, remove the mains plug or switch off the fuse in the fuse box. Call the After-sales Service.
- This appliance must be used for the preparation of food only.
- □ The appliance is not intended for use by young children or infirm persons without supervision.
Safety information for microwave operation
- □ The microwave must only be switched on when there is food in the cooking compartment.
- The microwave should only be used for heating food and drinks. Using the microwave for other purposes may be dangerous and may result in damage e.g. grains or cereals could catch fire when heated.
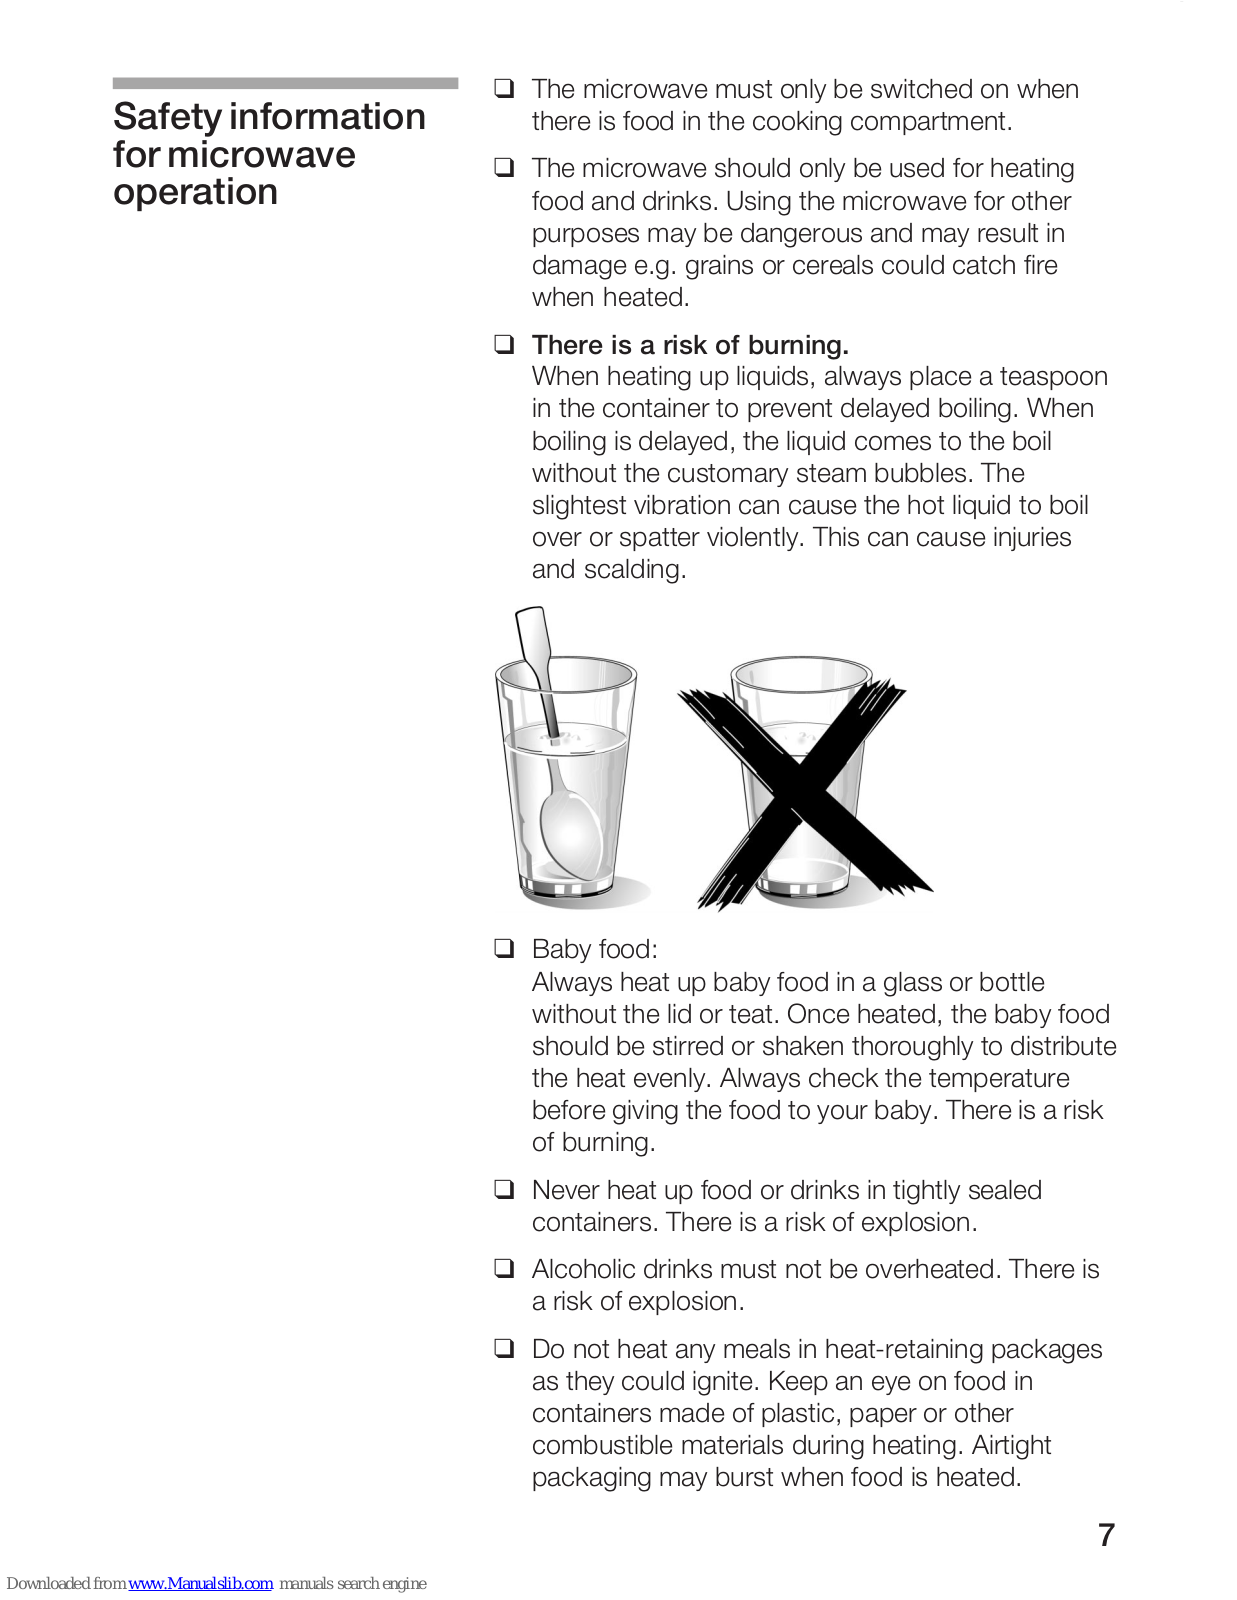
□ There is a risk of burning.
When heating up liquids, always place a teaspoon in the container to prevent delayed boiling. When boiling is delayed, the liquid comes to the boil without the customary steam bubbles. The slightest vibration can cause the hot liquid to boil over or spatter violently. This can cause injuries and scalding.

Baby food:
Always heat up baby food in a glass or bottle without the lid or teat. Once heated, the baby food should be stirred or shaken thoroughly to distribute the heat evenly. Always check the temperature before giving the food to your baby. There is a risk of burning.
- Never heat up food or drinks in tightly sealed containers. There is a risk of explosion.
- Alcoholic drinks must not be overheated. There is a risk of explosion.
- Do not heat any meals in heat-retaining packages as they could ignite. Keep an eye on food in containers made of plastic, paper or other combustible materials during heating. Airtight packaging may burst when food is heated.
- The oven door must not be opened if smoke is visible inside the oven. Should this happen, switch off the appliance and isolate the cooker from the power supply at the fuse box.
- Never cook eggs in their shells nor heat up hard-boiled eggs, as they may crack or explode. The same applies to shellfish and crustaceans. Always prick the yoke first for fried or poached eggs.
- Always prick the skin of foodstuffs with hard crusts or skins such as apples, tomatoes, potatoes and sausages before cooking to prevent the skin from bursting.
- Keep a close eye on the oven when you are defrosting or heating foods such as herbs, fruit or mushrooms or foods with a low water content such as bread as overdrying can result in a fire hazard.
- Never heat up cooking oil in a microwave as it could ignite.
- Porcelain or ceramic ovenware can have small perforations in the handles or lid. These perforations conceal a cavity below. Any liquid that penetrates this cavity may cause the ovenware to crack.
- Always use the microwave settings and cooking times specified in the instruction manual. If you select a heat setting that is too high or a cooking time that is too long, this may cause the food to ignite and the appliance to be damaged.
- The microwave must only be switched on when there is food in the cooking compartment. The appliance may overload if it is switched on without any food in it. An exception to this rule is for short-term testing of ovenware (see notes on ovenware).
- Children must only be allowed to use the microwave if they have been properly instructed. They must be in a position to operate the appliance correctly and understand the risks outlined in these operating instructions.
- □ Keep the microwave combination oven away from excessive heat and from moisture.
How to prevent damage to your appliance
- Never place a baking tray or aluminium foil on the oven cavity floor, as this would result in the oven heat being trapped. The baking and roasting times would no longer be maintained and the enamel could be damaged.
- Never pour water into the hot oven. It could damage the enamel.
- Fruit juice that drips from the baking tray will leave stubborn stains that can no longer be removed. When baking very juicy fruit flans, it is best to use the deeper glass dish or universal pan (special accessory).
- The oven door must always close properly. Keep the door seal areas clean.
Installation and connection
- Please observe the special installation instructions.
- □ The appliance can be installed in a 60 cm wide high-sided unit (at least 85 cm above the floor).
- The lead must be protected by a 16 A A-type fuse (L-type/B-type MCB). The mains voltage must correspond to that specified on the rating plate.
- The socket must only be installed and changes to the connection may only be made by a qualified electrician. If the connection is no longer accessible once installation is complete, an all-pole isolator with an "air gap contact separation" must be fitted for insulation purposes.
- Multiway adaptors, free connectors and extension cables may not be used. These could lead to overloading and cause a fire.
Electrical connection.
Caution!
All appliances with a three-core cable must be earthed.
Ensure that the currents and voltages indicated on the rating plate conform with that of the connection. 220/240 V AC i.e. 220/240 volt alternating current.
How to connect the appliance
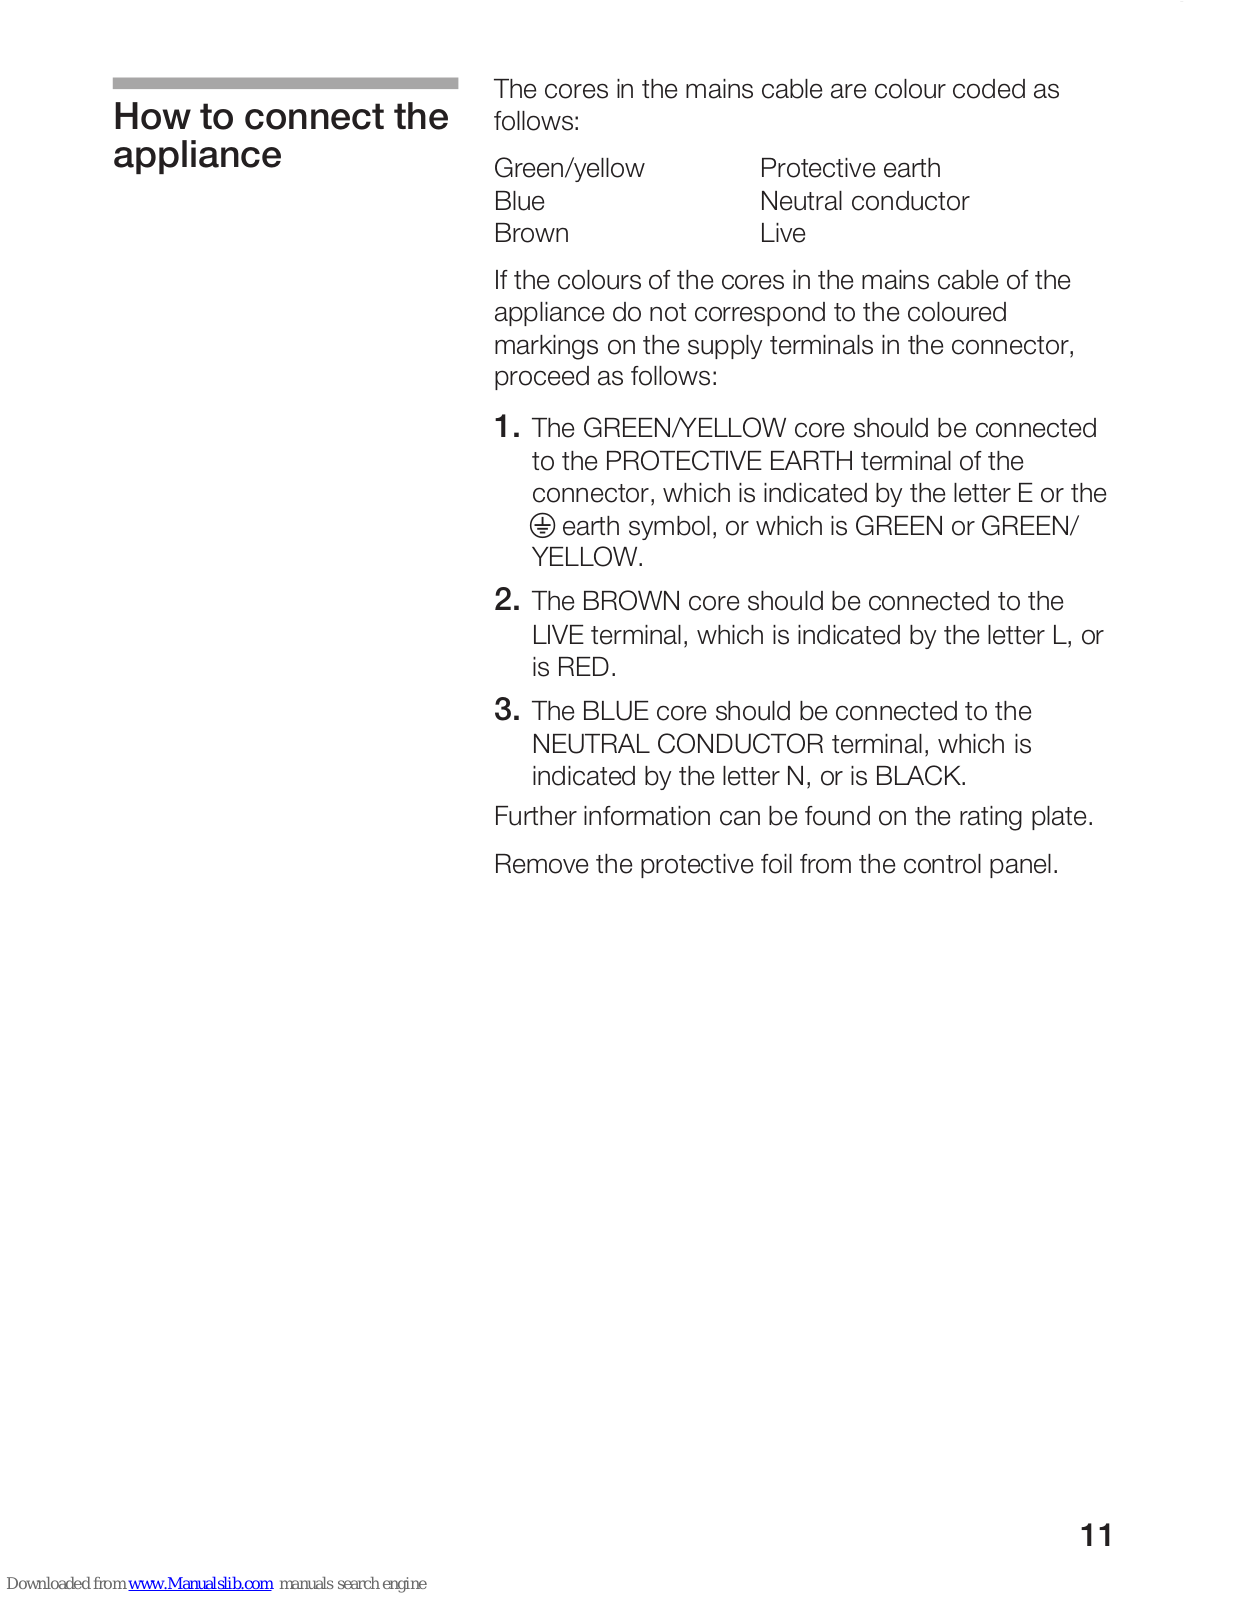
The cores in the mains cable are colour coded as follows:
Green/yellow Blue Brown
Protective earth Neutral conductor Live
If the colours of the cores in the mains cable of the appliance do not correspond to the coloured markings on the supply terminals in the connector, proceed as follows:
- The GREEN/YELLOW core should be connected to the PROTECTIVE EARTH terminal of the connector, which is indicated by the letter E or the earth symbol, or which is GREEN or GREEN/ YELLOW.
- 2. The BROWN core should be connected to the LIVE terminal, which is indicated by the letter L, or is RED.
- 3. The BLUE core should be connected to the NEUTRAL CONDUCTOR terminal, which is indicated by the letter N, or is BLACK.
Further information can be found on the rating plate.
Remove the protective foil from the control panel.
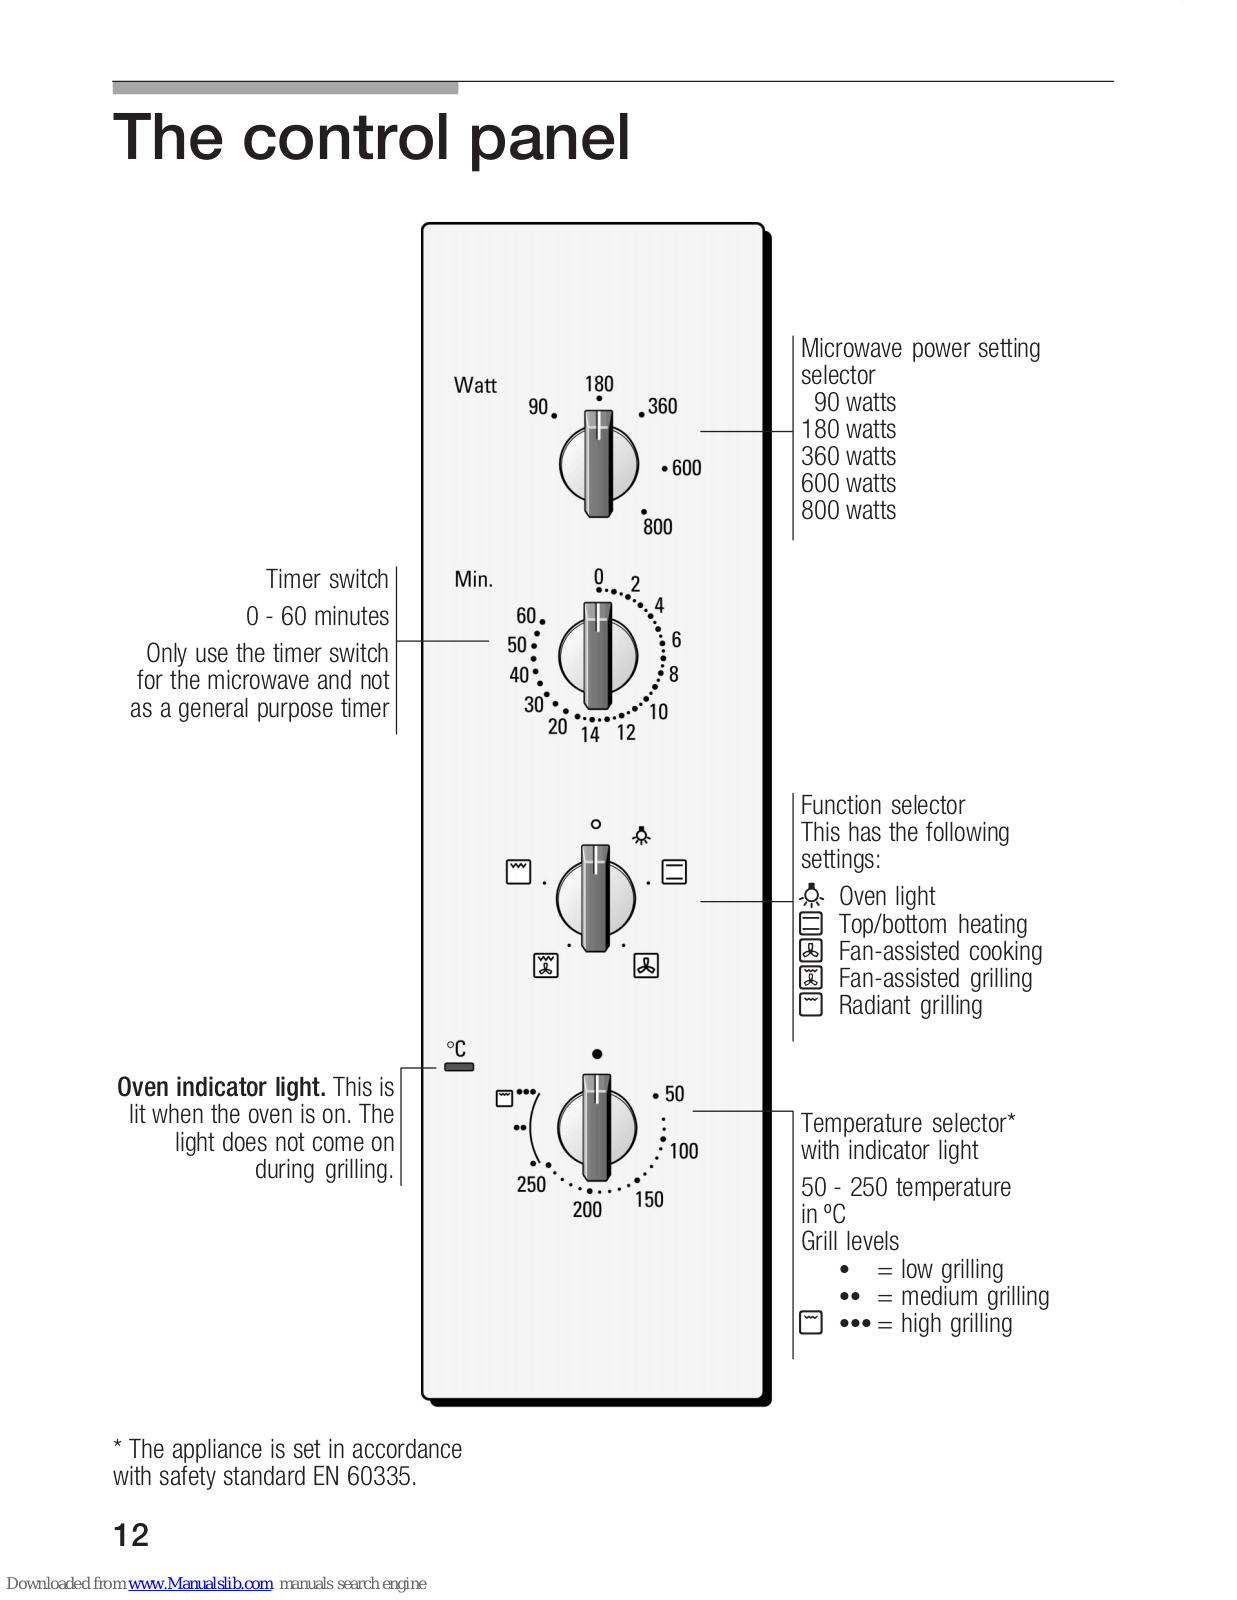
The control panel Microwave power setting coloctor Watt .360 90 watts 90. 180 watts 360 watts 600 watts 800 watts Timer switch Min. 0 - 60 minutes 60. Only use the timer switch for the microwave and not as a general purpose timer 20 14 12 Function selector This has the following settinas: S- Oven light Top/bottom heating Fan-assisted cooking Fan-assisted grilling Radiant grilling Oven indicator light. This is lit when the oven is on. The Temperature selector* light does not come on 100 with indicator light durina arillina. 50 - 250 temperature 150 200 in °C
Grill levels
= low grilling = medium grilling = high grilling
* The appliance is set in accordance with safety standard EN 60335.
Types of heating
Different types of heating modes are available for the oven, enabling you to select the best method for cooking.
Microwaves
They are converted to heat when coming into contact with food. Microwave operation is ideal for rapid defrosting, warming, melting and cooking.
Microwave power settings:
- 800 W For heating up liquids.
- 600 W For heating up and cooking food.
- 360 W For cooking meat and for warming sensitive food.
- 180 W For defrosting and continued cooking.
- 90 W For defrosting sensitive food.
Microwave combined with one type of heating.
This involves the simultaneous operation of the microwave and one type of heating. The food will become just as crispy and brown as before, albeit in much less time and using less energy. The combined operation of microwave and one type of heating is suitable only for cooking on one level.
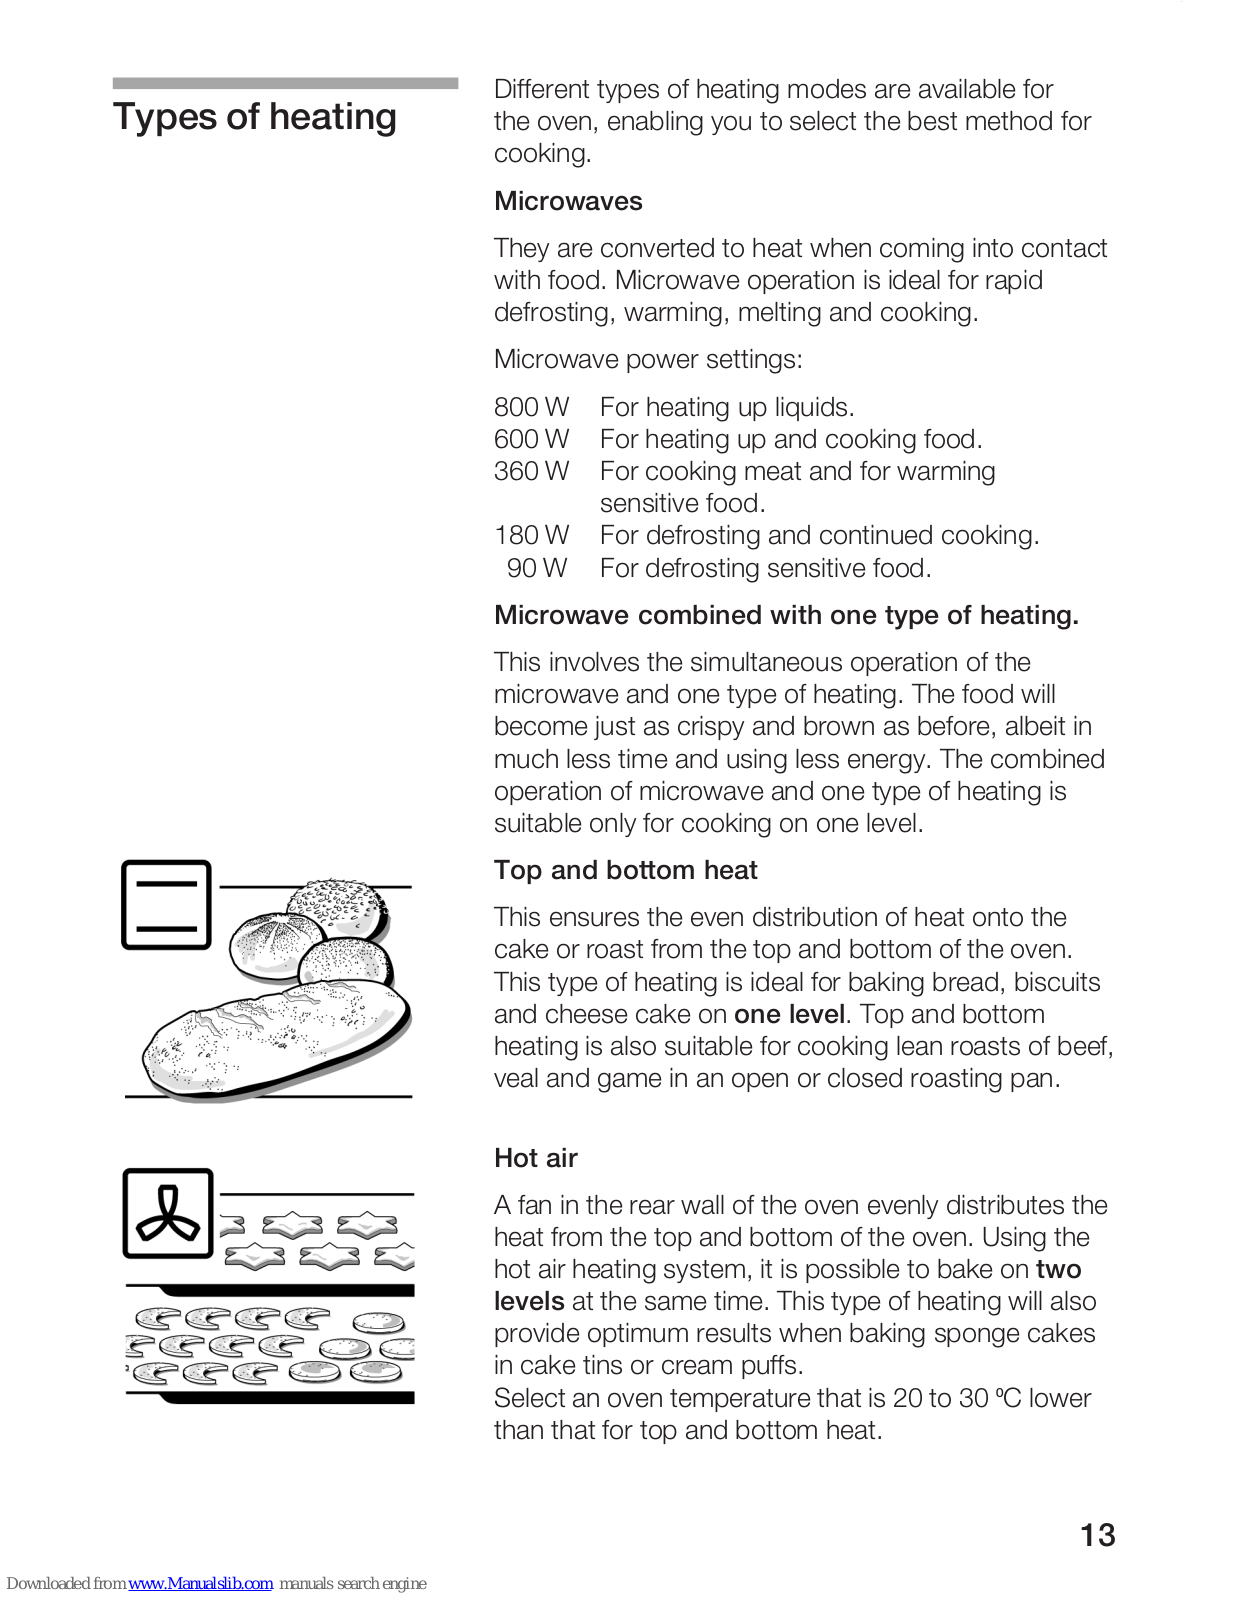
Top and bottom heat
This ensures the even distribution of heat onto the cake or roast from the top and bottom of the oven. This type of heating is ideal for baking bread, biscuits and cheese cake on one level . Top and bottom heating is also suitable for cooking lean roasts of beef, veal and game in an open or closed roasting pan.
Hot air
A fan in the rear wall of the oven evenly distributes the heat from the top and bottom of the oven. Using the hot air heating system, it is possible to bake on two levels at the same time. This type of heating will also provide optimum results when baking sponge cakes in cake tins or cream puffs.
Select an oven temperature that is 20 to 30 °C lower than that for top and bottom heat.


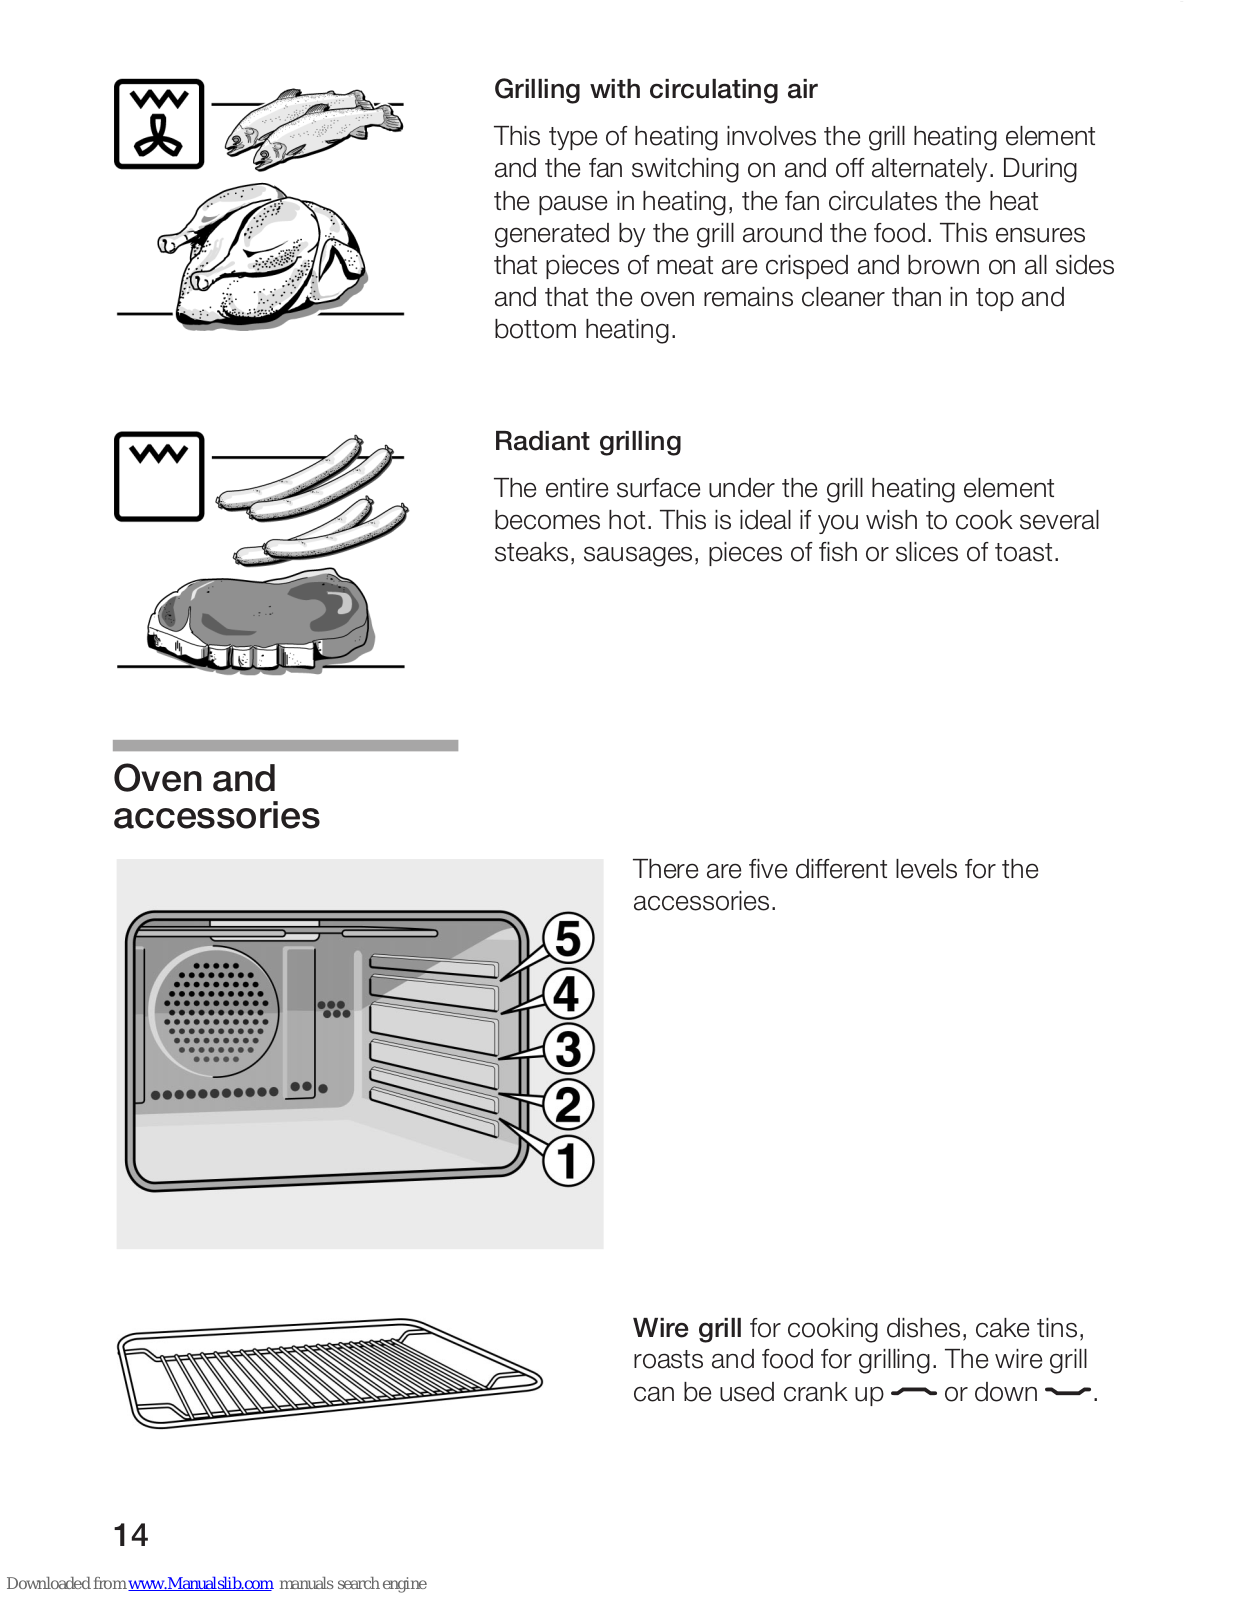
Grilling with circulating air
This type of heating involves the grill heating element and the fan switching on and off alternately. During the pause in heating, the fan circulates the heat generated by the grill around the food. This ensures that pieces of meat are crisped and brown on all sides and that the oven remains cleaner than in top and bottom heating.
Radiant grilling
The entire surface under the grill heating element becomes hot. This is ideal if you wish to cook several steaks, sausages, pieces of fish or slices of toast.
Oven and accessories

There are five different levels for the accessories.

Wire grill for cooking dishes, cake tins, roasts and food for grilling. The wire grill can be used crank up — or down —.

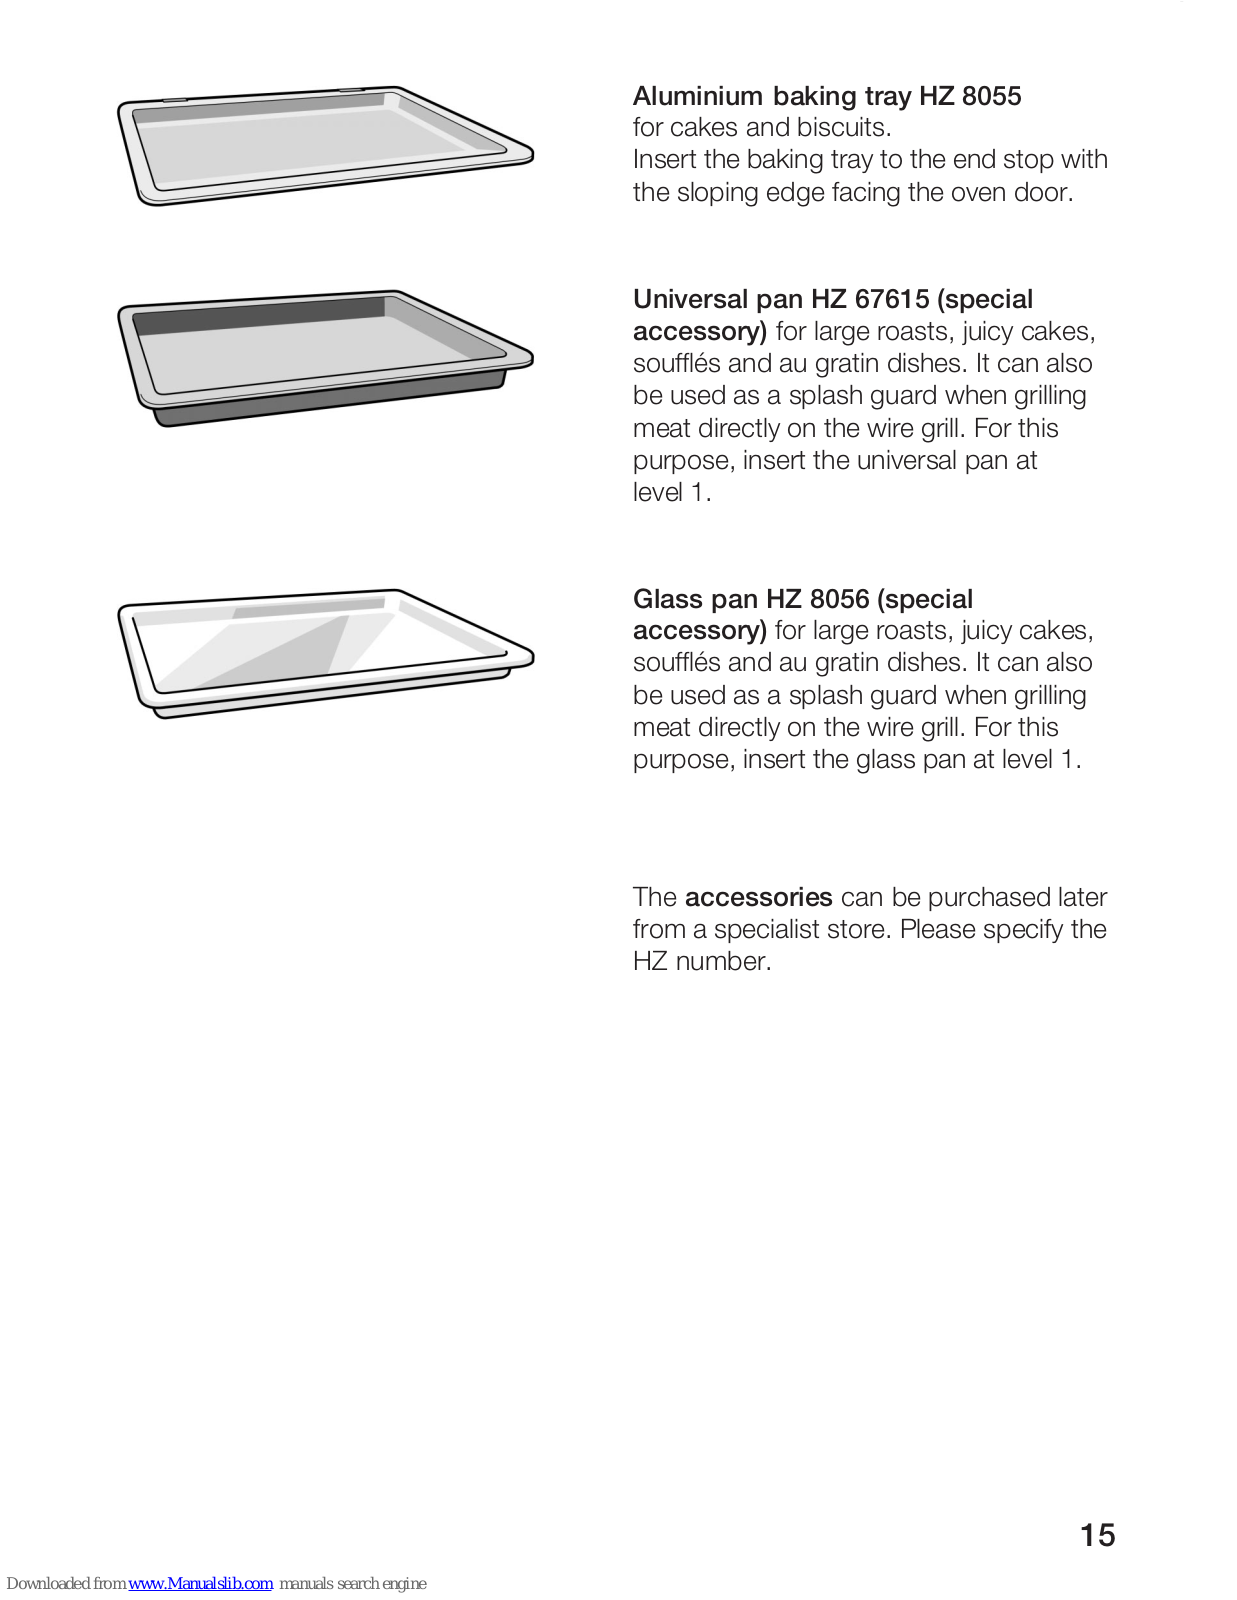
Aluminium baking tray HZ 8055
for cakes and biscuits.
Insert the baking tray to the end stop with the sloping edge facing the oven door.

Universal pan HZ 67615 (special
accessory) for large roasts, juicy cakes, soufflés and au gratin dishes. It can also be used as a splash guard when grilling meat directly on the wire grill. For this purpose, insert the universal pan at level 1.

Glass pan HZ 8056 (special
accessory) for large roasts, juicy cakes, soufflés and au gratin dishes. It can also be used as a splash guard when grilling meat directly on the wire grill. For this purpose, insert the glass pan at level 1.
The accessories can be purchased later from a specialist store. Please specify the HZ number.
Before using for the first time
| Heat up the oven | In order to eliminate the "new appliance" smell, preheat the closed, empty oven for 60 minutes. |
|---|---|
| Set the function selector to . | |
| Turn the temperature selector to 250 °C. | |
| Do not switch on the microwave. | |
| Switch off the function selector and temperature selector after 60 minutes. | |
| Due to the resulting steam, it is best to ventilate the kitchen during this process. | |
| Note |
The appliance is fitted with a cooling fan. The fan may
continue to operate after the oven has been switched off. The oven light comes on and the transmitter behind the glass cover rotates all the time the fan is in operation. The microwave is switched off. |
The fan runs slowly to dry out the moisture and so that adjacent kitchen units are not damaged.
The microwave
The microwave can be used separately, i.e., on its own, or combined with one type of heating.
Why not try out the microwave straight away. You could heat up a cup of water for your tea, for example.
Take a large cup without gold or silver decoration and place a teaspoon inside. Insert the wire grill into the oven on level 1. Place the cup of tea in the middle of the wire grill.
Now set the power selector to 800 W and the timer knob to 1 minute.
In doing so, first set the timer to a longer time period, and immediately switch back to a setting of one minute.
A ringing signal sounds after one minute. The water for your tea is ready.
In addition to this example, many other examples can be found in the tables.
Whilst you are drinking your cup of tea, please read again the microwave safety instructions at the start of the instruction manual. They are very important.
|
Use cookware/bakeware made out of glass,
porcelain, ceramic, or heat-resistant plastic. These materials are permeable to microwave radiation. Metal cookware/bakeware, on the other hand, is impermeable to microwave radiation, which means that food in enclosed metal containers will remain uncooked. Open and flat metal bowls, e.g. made from aluminium, can be used. Take care that the metal is not too close to the oven wall, as contact could result in sparks. Metal oven accessories cannot cause sparks provided that they are used according to the instructions in the tables. Always place the cookware/bakeware on the wire grill. Exception: Warming milk bottles. If sparks do occur between the metal cookware/bakeware base with a damp cloth. Often, serving dishes can be used in cooking food. This saves you having to transfer the food as well as a lot of washing up. If your crockery features gold or silver decor, this should only be used if it is guaranteed to be microwave-suitable according to manufacturer instructions |
|
|---|---|
| Cookware/bakeware test: |
The microwave appliance must not be switched on
without food in the oven compartment. The only exception to this rule is for the following cookware/ bakeware test: Carry out the following test if you are unsure if the bakeware is microwave-suitable: Place the empty cookware/bakeware in the oven and operate at the 800 W microwave setting for ½ to 1 minute . Monitor the temperature during this period. The cookware/bakeware should still be cold or hand-hot. The cookware/bakeware is unsuitable if it becomes hot or if sparks occur. |
| Microwave power settings |
|
Setting procedure

1. Set the power selector.
2. Set the timer. For durations of less than two minutes, first turn to a longer duration and then immediately back to the required duration.
The appliance starts as soon as you have set a time and closed the door
A ringing signal sounds when the time expires. The microwave switches off and the oven light extinguishes.
□ If the oven door is opened during operation. microwave operation will automatically be interrupted and the selected duration stopped. Microwave operation will be resumed once the door has been closed.
- □ In the event that two microwave power and time settings are specified in the tables, use the first microwave power and duration settings to start with, and the second settings after the ringing signal.
- Microwave operation is cancelled if the timer knob is turned to 0.
What you should also know
| Tables | The following options and | The following tables provide you with numerous options and setting values for the microwave. | |||||
|---|---|---|---|---|---|---|---|
|
The time spe
only. They m consistency |
ecifications in the tables are guidelines
ay vary according to the quality and of the food. |
||||||
|
Time "ranges
the shortest necessary. |
Time "ranges" are often specified in the tables. Set
the shortest time first, and then extend the time if necessary. |
||||||
|
It may be tha
specified in t |
at you have different amounts to those
he table. |
||||||
|
A rule of thumb exists for this purpose:
Double the amount – double the time, half the amount – half the time. |
|||||||
| Always place | e the dish onto the wire grill on level 1. | ||||||
| Defrosting | Frozen food a plate. | Frozen food should be placed in a flat dish or on a plate. | |||||
|
Sensitive parts, such as the legs and wings of
chicken, or fatty outer layers of roasts can be covered with small pieces of aluminium foil. The foil should not come into contact with the oven walls. The aluminium foil can be removed after half the defrosting time. |
|||||||
|
Turn the food
pieces of foo |
d after the half the defrosting time. Large
od should be turned several times. |
||||||
| Leave defrost so that the te giblets can b |
sted items to stand for approx. 10 minutes
emperature can stabilize. With poultry, the be removed at this point. |
||||||
| Defrosting, wire grill at level 1 | Amount |
Select the microwave power in W
Set the duration in minutes |
|||||
| 1 chicken | 1 kg | 180 W, 10 min. + 90 W, 15 - 20 min. | |||||
| 2 chickens | 1 kg each | 180 W, 20 min. + 90 W, 15 - 25 min. | |||||
| 1 duck | 2 kg | 180 W, 20 min. + 90 W, 20 - 30 min. | |||||
| Meat (compact pieces) |
750 g
1 kg |
180 W, 5 min. + 90 W, 25 - 35 min.
180 W, 10 min. + 90 W, 25 - 35 min. |
|||||
| 2 steaks | 600 g | 180 W, 5 min. + 90 W, 10 - 15 min. | |||||
| Fish | 500 g | 180 W, 5 min. + 90 W, 10 - 15 min. | |||||
| Defrosting, wire grill at level 1 | Amount | Select the microwave power in W Set the duration in minutes |
|---|---|---|
| Butter | 250 g | 180 W, 2 min. + 90 W, 3 - 5 min. |
| Bread | 1 kg | 180 W, 10 min. + 90 W, 8 - 12 min. |
| Bread rolls | 4 pcs. | 90 W, 3 - 5 min. |
| Cake | 500 g | 180 W, 7 - 11 min. |
| Berries/stone fruit | 250 g | 180 W, 9 - 2 min. |
Cream gateaux and cream cakes are defrosted without the microwave. To do this, switch the function selector to the hot air type of heating. The temperature selector remains switched off. Insert the cake at level 1.
The fan swirls the air around the cooking compartment. This speeds up the defrosting process.
Always cover the food.
Remove the ready-to-erve meals from their aluminium packaging and cook in a microwave-compatible dish. In this way, they are cooked more quickly and evenly.
When heating several meals at the same time, these may heat up at different rates.
Stir or turn the food in between times. In this way, the food heats up more quickly and evenly.
After heating, leave the meals to stand for 1 to 2 minutes so that the temperature can stabilize.
| Preparing food in the microwave, wire grill at level 1 | Amount | Select the microwave power in W Set the duration in minutes | |
|---|---|---|---|
|
Vegetables
Add a little liquid |
|||
| Mushrooms, fresh | cooking | 250 g | 600 W, 6 - 8 min. |
| Leeks, fresh | cooking | 500 g | 600 W, 6 - 8 min. |
| Peppers, fresh | cooking | 500 g | 600 W, 8 - 10 min. |
| Mixed vegetables, frozen | cooking | 450 g | 600 W, 10 - 12 min. |
Preparing food in
the microwave
| Preparing food in the microwave, wire grill at level 1 | Amount | Select the microwave power in W Set the duration in minutes | |
|---|---|---|---|
| Vegetables, refrigerator temperature | heating | 150 g | 600 W, 2 - 3 min. |
| Side-dishes | |||
|
Potatoes,
add a little liquid |
boiling |
250 g
500 g |
600 W, 6 - 8 min.
600 W, 8 min. + 180 W, 6 - 8 min. |
| Rice (add twice as much liquid) | cooking |
125 g
250 g |
600 W, 5 min. + 180 W, 15 - 17 min.
600 W, 8 min. + 180 W, 15 - 17 min. |
|
Side-dishes,
refrigerator temperature |
heating | 250 g | 600 W, 2 - 3 min. |
| Wholemeal*, add three times the amount of liquid | cooking | 100 g | 600 W, 8 min. + 90 W, 15 - 20 min. |
|
Flour*, e. g. wheat, unripe grain,
oats, barley. Add twice the amount of liquid |
cooking | 100 g | 600 W, 5 min. + 90 W, 20 - 25 min. |
| * Depending on the type of flour | , wheat and | wholemeal requi | re a rising time of up to 30 minutes. |
| Soups and sauces | |||
| Stew, frozen | heating | 500 g | 600 W, 13 - 17 min. |
| Stew, refrigerator temperature | heating | 500 g | 600 W, 5 - 7 min. |
| Stock, frozen | heating | 400 g | 800 W, 7 - 10 min. |
| Bolognese sauce, frozen | heating | 300 g | 600 W, 8 - 11 min. |
| Bolognese sauce, refrigerator temperature | heating | 600 g | 600 W, 13 - 16 min. |
| Menu, one-course meal | |||
| One-course meal, frozen | heating | 350 - 400 g | 600 W, 6 min. + 360 W, 5 - 10 min. |
| One-course meal, refrigerator temperature | heating | 350 - 400 g | 600 W, 6 - 10 min. |
| Ready-to-serve meals, sterilized | heating | 600 W, 4 - 6 min. | |
| Desserts | |||
| Pudding | cooking | 500 g | 600 W, 6 - 8 min. |
| Compote | cooking |
250 g
500 g |
600 W, 8 - 10 min.
600 W, 10 - 15 min. |
| Preparing food in the microwave, wire grill at level 1 | Amount | Select the microwave power in W Set the duration in minutes | |
|---|---|---|---|
|
Baby food
Heat in an open dish, stir and che |
eck the tempe | rature! | |
| In a glass | heating | 200 g | 360 W, 2 min 2 min. 30 sec. |
| Milk bottle | heating | 200 ml | 800 W, 30 - 45 sec. |
| Stand the bottles directly on the f | loor in the cer | ntre of the app | liance and insert a spoon in each bottle. |
| Miscellaneous | |||
| Butter, refrigerator temperature | softening | 250 g | 90 W, 1 - 3 min. |
| Honey, crystallized | melting | 200 g | 180 W, 1 - 2 min. |
|
Cake icing
(remove from packaging) |
melting | 150 g | 600 W, 4 - 5 min. |
| Butter, refrigerator temperature | melting | 50 g | 180 W, 4 - 5 min. |
|
Beverages
Place a spoon in the container |
|||
| Coffee, tea, milk, according to desired temperature | heating |
150 ml
300 ml 500 ml 1 l |
800 W, 1 - 2 min.
800 W, 2 - 3 min. 800 W, 3 - 4 min. 800 W, 7 - 8 min. |
Advice on microwave operation
| There is no setting specified for the respective amount of food. |
Extend or shorten the cooking time according to the following rule of thumb:
Double the amount = double the time Half the amount = half the time |
|---|---|
| The food has been cooked too dry. | Select a shorter cooking time or lower microwave setting. Add more liquid and cover the food. |
| On completion of the cooking time, the food has not been defrosted, heated or cooked. |
Select a longer cooking time and a higher microwave
setting than is specified. Large amounts of food will take longer to cook. Take into consideration the depth of the food, as "deep" food will also take longer. |
| On completion of the cooking time, the food has been overcooked on the | Stir the food from time to time and select a lower heat setting and longer duration next time. |
After defrosting, the poultry or meat is partially cooked on the outside, but not fully defrosted in the middle.
the inside.
Select a lower microwave power setting. Activate the hot air function A without a temperature setting. With large amounts, turn the items to be defrosted several times.
Test meals in accordance with EN 60705
These meals are used by testing institutions to test the quality and function of microwave appliances. The power output is measured with the wire grill in shelf position 2.
The appliance is set in accordance with safety standard EN 60335.
| Moal | Ovonworo | Microwovo cotting (watto) and duration in | |
|---|---|---|---|
| INICAL | Ovenware | Levei | minutes |
| Custard | Wire grill | 1 | 360 W approx. 16 mins + 180 W approx. 17 mins |
| Sponge | Wire grill | 1 | 600 W approx. 7 mins |
| Meat loaf | Wire grill | 1 | 360 W approx. 34 mins |
Cooking with microwave only
Defrosting with microwave only
| Meal | Ovenware | Level | Microwave setting (watts) and duration in minutes |
|---|---|---|---|
| Meat | Wire grill | 2 | 180 W 6 mins + 90 W approx. 10 mins |
Combination cooking with microwave
| Meal | Ovenware | Level |
Type of
heating |
Temperature
in °C |
Microwave setting (watts) and duration in minutes |
|---|---|---|---|---|---|
| Potato gratin | Wire grill | 1 | Ĩ. | 180 | 360 W approx. 30 mins |
| Cake | Wire grill | 2 | æ | 180 | 90 W approx. 15 mins |
| Chicken* |
Wire grill and
aluminium baking tray |
2
1 |
Ĩ | 230 | 360 W approx. 30 mins |
Oven without microwave
Setting procedure

1. Use the function selector to set the type of heating.
2. Use the temperature selector to set the temperature or grill setting.
Switching off:
Switch off the function selector and temperature selector.
Oven and microwave combined
Setting procedure
Set according to points 1 and 2.

3. Set the microwave power using the power selector.
4. Enter the duration using the timer knob.
A ringing signal sounds when the time expires. Switch off the function selector and temperature selector
□ If the oven door is opened in between times. microwave operation will be interrupted. Microwave operation will be resumed once the door has been closed
- □ In the event that two microwave power and time settings are specified in the tables, use the first microwave power and duration settings to start with, and the second settings after the ringing signal.
- G For cooking times longer than 60 minutes, set the remaining time after the ringing signal.
What you should also know
Setting procedure
Example: 1 chicken of approx. 1 kg from the "Poultry" table.
Insert the wire grill at level 2. Place the uncovered dish in the centre of the grill.
Settings: S Grilling with circulating air, 230 °C, 360 W, duration 25 minutes.


1. Set the function selector to I .
2. Use the temperature selector to set 230 °C.

to 360 W using the power selector.
4. Set to 25 minutes using the timer knob.
Meat, poultry, fish
| Cookware |
You may use all heat-resistant, microwave-suitable
dishes. The universal pan (special accessory) is also suitable for large roasts. Other roasting dishes made out of metal can only be used for roasting without the microwave setting. |
| When placing meat directly on the wire grill, also insert the universal pan (special accessory) as a splash guard. | |
| Hot glass dishes should be placed on a dry kitchen towel after removal from the oven. The glass could crack if placed on a cold or wet surface. | |
| The dishes may become very hot. Always use oven gloves when removing dishes from the oven. | |
| Always place the dishes in the centre of the wire grill. | |
| Advice on roasting | The roasting result depends on the type and quality of meat. |
| The specifications on the following pages apply to roasting in high-sided, open dishes. This ensures that the roast becomes crispy and brown. | |
| 2 | Add 2 to 3 soup spoons of liquid to lean meat, and 8 to 10 soup spoons of liquid to pot roasts, depending on the size. |
| Turn the pieces of meat after half of the time. |
When the roast is ready, it should be left to stand in the switched off, closed oven for a further 10 minutes. This allows the meat juices to be better distributed.
Cooking in a closed dish ensures that the roast becomes juicier and keeps the oven clean. However, the temperature must be set 10 - 20 °C higher.

Advice on grilling

Always close the oven door when grilling.
Wherever possible, use pieces of meat that are of a similar thickness, and at least 2 to 3 cm thick. Such pieces will be browned evenly and stay juicy and soft in the middle. Steaks should only be salted after grilling.
Place the meat for grilling directly on the wire grill. When grilling a single piece, it is best to place the meat in the centre of the wire grill. Also insert the glass dish (special accessory) or the
universal pan (special accessory) at level 1. Any dripping meat juices are collected and the oven stays cleaner as a result.
The wire grill can be inserted crank up — or down —. This allows you to adjust the distance from the grill heating element. Turn the meat after two thirds of the recommended time.
Note: The grill heating element switches on and off automatically. This is normal. How often this occurs depends on the selected grill setting.
The table applies to insertion into a cold oven. The time specifications are provided as guidelines only and depend on the type and quality of the meat.
| Meat | Cookware | Level |
Type of
heating |
Temp. °C
grill |
Microwave, W
Duration, min. |
Total
duration, min. |
|
|---|---|---|---|---|---|---|---|
|
Pot-roasted
beef |
1 kg | closed | 1 | 200 - 210 |
360 W, 10
+ 180 W, 40 - 50 |
50 - 60 | |
|
(e.g. standing
rib) |
1.5 kg | 1 |
190 - 200
180 - 190 |
360 W, 10
+ 180 W, 55 - 65 |
65 - 75 | ||
| , | 2 kg | 1 |
360 W, 20
+ 180 W, 65 - 75 |
85 - 95 | |||
| Sirloin of beef | 1 kg | open | 1 | 210 - 230 | _ | 75 - 85 | |
| 1.5 kg | 1 | 200 - 220 | _ | 95 - 105 | |||
| 2 ka | 1 | 190 - 210 | _ | 115 - 125 |
Frozen meat must be fully defrosted.
Meat
| Meat | Cookware | Level |
Type of
heating |
Temp. °C
grill |
Microwave, W
Duration, min. |
Total
duration, min. |
|
|---|---|---|---|---|---|---|---|
|
Roast beef,
medium-rare* |
1 kg | open | 1 | Ĩ | 200 - 210 |
180 W, 20
+ 90 W, 10 - 15 |
30 - 35 |
|
Steaks, cooked
through Steaks, |
Wire
grill |
5 | Setting ••• | _ | 22 - 25 | ||
|
medium-rare**
* |
Wire
grill |
5 | Setting ••• | _ | 18 - 20 | ||
|
Pork without
rind (e. g. neck) |
1 kg
1.5 kg |
open |
1
1 |
Fei Fei |
190 - 200
180 - 190 |
90 W, 65 - 75
180 W, 35 + 90 W, 60 - 70 |
65 - 75
95 - 105 |
| 2 kg | 1 | Ĩ | 170 - 180 |
180 W, 40
+ 90 W, 65 - 75 |
100 - 110 | ||
|
Pork with
rind** (e. g. shoulder, leg) |
1 kg
1.5 kg 2 kg |
open |
1
1 1 |
કેન્દ્ર કિન્દ |
190 - 210
180 - 200 170 - 190 |
-
- - |
110 - 120
140 - 150 160 - 170 |
|
Smoked pork
with bone |
1 kg | open | 2 | _ | _ | 360 W, 35 - 45 | 35 - 45 |
| Meat loaf | 750 g | open | 1 | ~ | Setting • | 600 W, 20 - 30 | 20 - 30 |
| Sausage*** |
approx
. 750 g |
Wire grill | 4 | ~~ | Setting ••• | _ | 15 - 20 |
| Roast veal | 1 kg | open | 1 |
)
W |
170 - 180 | 180 W, 25 | 50 - 60 |
| 2 kg | 1 |
)
Je |
160 - 170 |
+ 90 W, 25 - 35
180 W, 45 + 90 W, 35 - 45 |
80 - 90 | ||
|
Leg of lamb
without bone |
1.5 kg | open | 2 | Ĩ | 190 - 200 |
180 W, 10
+ 90 W, 40 - 50 |
50 - 60 |
* Turn roast beef after half the cooking time. After cooking, wrap the roast beef in aluminum foil and leave in the oven to rest for 10 minutes.
** Cut the pork rind and place the pork in the dish, if the pork is to be turned, first place the pork with the rind side down.
*** Place a heat-resistant dish on the oven floor to catch any dripping meat juices.
Poultry
The table applies to insertion into the cold oven.
Frozen poultry must be completely defrosted.
Pierce the skin of duck or goose under the wings to enable the fat to run off.
Turn whole poultry after two thirds of the grilling time.
Poultry will become particularly crispy and brown if you coat it with butter, salty water, dripping fat or orange juice at the end of the roasting time.
| Poultry | Level |
Type of
heating |
Temp. °C
grill |
Microwave, W
Duration, min. |
Total
duration, min. |
||
|---|---|---|---|---|---|---|---|
|
2 chicken
halves |
400 g
each |
open | 3 | ~~~ | Setting • | 360 W, 20 - 30 | 20 - 30 |
| Chicken pieces | 500g | open | 3 | ~~~ | Setting •• | 360 W, 15 - 20 | 15 - 20 |
|
1 whole chicken
2 whole chickens |
1 kg
1 kg each |
open |
2
2 |
)
|
230 - 240
230 - 240 |
360 W, 25 - 35
360 W, 30 - 40 |
25 - 30
35 - 40 |
| Duck | 1.7 kg | open | 1 | Ĩ | 220 - 230 |
180 W, 15
+ 90 W, 35 - 45 |
50 - 60 |
| Goose | 3 kg | open | 1 | Ĩ | 200 - 210 |
180 W, 20
+ 90 W, 50 - 60 |
70 - 80 |
The table applies to insertion into the cold oven.
Fish

| Fish | Level |
Type of
heating |
Temp. °C,
grill |
Microwave, W
Duration, min. |
Total
duration, min. |
||
|---|---|---|---|---|---|---|---|
| Grilled fish* |
300 g
each 1 kg |
Wire grill |
3
2 |
Setting •••
Setting •• |
180 W, 12 - 15
360 W, 25 - 30 |
12 - 15
25 - 30 |
|
| Trout, au bleu | 300 g | closed | 1 | _ | _ | 600 W, 6 - 8 | 6 - 8 |
| Fish, frozen | 400 g | closed | 2 | _ | _ | 600 W, 12 - 15 | 12 - 15 |
|
Sliced fish
(e. g. cutlets) |
Wire grill | 4 | ~ | Setting ••• | 180 W, 15 - 20 | 15 - 20 | |
| * Place a heat | -recictant | dish on the ov | en floor | to catch ar | w drinning m | eat iuices |
Advice on roasting and grilling
| The table does not contain specifications for the weight of the roast | Select the next lowest weight from the instructions and extend the time. |
|---|---|
| How can you tell when the roast is ready. |
Use a meat thermometer (available from specialist
stores) or implement a "spoon test". Press a spoon onto the roast. If it feels firm, it is ready. If it can be pressed in, it needs to be cooked for a little longer. |
| The roast is too dark and the crackling is partly burnt. | Check the insertion level and temperature. |
| The roast looks good, but the sauce is burnt. | Next time, use a smaller roasting dish and add more liquid. |
| The roast looks good, but the sauce is too light and watery. | Next time, use a larger roasting dish and add less liquid. |
| Steam rises from the roast when the stock is added. |
Use the grilling with circulating air setting rather than
top and bottom heating. This ensures that the meat juices are not heated so intensely and consequently produce less steam. |
| The microwave setting was switched on. The roast is not cooked through. | Carve the roast, prepare the sauce in the roasting pan, place the meat slices into the sauce and finish off the cooking using the microwave setting only. |
|
Next time, use the microwave function from the start
of the cooking process. Use a meat thermometer and leave the finished roast to stand in the oven for a further 10 minutes. |
Cakes and pastries
| Cake base made from | Springform | 2 | æ | 160 - 180 | - | 25 - 35 |
|---|---|---|---|---|---|---|
|
Sponge cake, simple,
sponge cake, fine (e. g. Madeira cake)* |
Bowl/Vienna
ring/bread loaf mould |
1
2 |
&
& |
150 - 170
140 - 160 |
- |
50 - 65
60 - 70 |
| Cakes in tins | Cookware | Level |
Type of
heating |
Tempera-
ture °C |
Microwave, W
Duration, min. |
Total
duration, min. |
| Ab |
dditiona.
aking" s |
al information formation for a section |
ation can b
bllowing the |
e found in the '
e tables. |
'Advice on | |
|
T
C "r I C n A O |
he temp
onsister ranges" ower valu ext time lower te f the cal |
perature
are given ue and, i emperat ke. |
and baking
quantity of n in the tab f necessar ure will pro |
y time depend of
cake mixture. T les. Start by se y, increase the vide a more eve |
on the
This is why etting the temperature en browning |
|
| Tables |
T
C C P 1 |
he value
ooked is onsump reheat tl 0 minute |
es in the
s put into otion of e he oven, es. |
tables app
a cold ove nergy. If ho shorten th |
ly when the foc
en. This reduce owever you nee he baking times |
ed to be
es the ed to by 5 to |
| А | lways p | lace the | cake tin in | the middle of t | he wire grill. | |
|
Y
m C o |
ou may
nicrowa ombine ven she |
combine
/e setting d operat lves. |
e all types o
g. ion is not s |
of heating with
suitable for baki |
the rapid
ing on two |
|
|
W
b 0 2 w |
Vhen usi
aking tir ut of gla 50 °C), t i ill not be |
ng the n
ns made iss, porc he bakir e brown |
nicrowave,
out of met elain or pla Ig times wil ed as well. |
it is best to use
al. With baking stic (heat resist I be reduced a |
e dark
tins made tant to nd the cake |
|
| Baking tins | lt | is best t | to use da | ark baking | tins. |
Downloaded from www.Manualslib.com manuals search engine
short pastry
| Cakes in tins | Cookware | Level |
Type of
heating |
Tempera-
ture °C |
Microwave, W
Duration, min. |
Total
duration, min. |
|---|---|---|---|---|---|---|
| Cake base made from sponge mixture | Fruit cake base | 2 | æ | 150 - 170 | - | 25 - 35 |
| Swiss roll (water-based sponge) | Springform | 2 | 170 - 190 | - | 25 - 35 | |
| Nut cakes | Springform | 2 | R. | 170 - 180 | 90 W, 25 - 35 | 25 - 35 |
| Fruit or cheese cake, short pastry* | Darkspringform | 1 | Å | 170 - 190 | 360 W, 35 - 45 | 35 - 45 |
|
Fruit cake, fine sponge
mixture |
Springform/
bowl mould |
2
1 |
k
k |
160 - 180
160 - 180 |
90 W, 30 - 40
90 W, 30 - 40 |
30 - 40
30 - 40 |
|
Savoury pies*
(e. g. quiche/onion pie) |
Springform or quiche tin | 1 | Å | 170 - 180 | 180 W, 30 - 40 | 30 - 40 |
| * Allow calcos to cool in th | a appliance for app | roy 20 m | vinutoe |
* Allow cakes to cool in the appliance for approx. 20 minutes.
| Cakes on the tray | Level | Type of heating |
Tempera-
ture °C |
Baking time
in minutes |
|
|---|---|---|---|---|---|
| With dry topping (sponge mixture) |
1 tray
2 trays |
2
1 + 4 |
æ
æ |
140 - 160
130 - 150 |
30 - 40
40 - 50 |
|
With juicy topping
e.g. yeast pastry with apple crumble |
1 tray*
2 trays |
2
1 + 4 |
k
k |
160 - 180
150 - 170 |
40 - 50
50 - 60 |
| Swiss roll (preheat) | 1 tray | 1 | 190 - 210 | 15 - 20 | |
| Plaited loaf with 500 g flour | 1 tray | 1 | 180 - 200 | 30 - 40 | |
| Stollen with 500 g flour | 1 tray | 2 | 170 - 190 | 60 - 70 | |
| Pizza | 1 tray | 1 | æ | 170 - 190 | 30 - 40 |
| Yeast-risen bread from 1000 g dough** | 1 tray | 2 | R | 170 - 190 | 60 - 70 |
* For very juicy fruit flans, use the universal pan (special accessory) or glass dish (special accessory).
** Never pour water directly into the hot oven.
Note: An additional aluminium baking tray can be obtained as a special accessory from a specialist store.
| Biscuits | Level |
Type of
heating |
Temperature
°C |
Duration,
in minutes |
|
|---|---|---|---|---|---|
| Biscuits |
1 tray
2 trays |
3
1 + 4 |
L
L |
170 - 190
140 - 160 |
10 - 25
20 - 30 |
| Viennese whirls |
1 tray
1 tray 2 trays |
2
2 1 + 4 |
160 - 180
140 - 150 130 - 150 |
25 - 35
25 - 35 35 - 50 |
|
| Meringue | 1 tray | 2 | æ | 80 - 90 | 120 - 150 |
| Cream puffs | 1 tray | 2 | R | 170 - 190 | 35 - 45 |
| Macaroons |
1 tray
2 trays |
2
2 + 4 |
120 - 140
100 - 120 |
30 - 40
35 - 45 |
|
| Puff pastry |
1 tray
2 trays |
1
1 + 4 |
k
k |
170 - 190
150 - 170 |
25 - 35
35 - 45 |
| Bread rolls (e.g. rye rolls) | 1 tray | 2 | 200 - 220 | 25 - 30 |
Note: An additional aluminium baking tray can be obtained as a special accessory from a specialist store.
Soufflées, gratins, toast
The table applies to insertion into the cold oven.
Place the soufflé in a microwave-safe dish on the wire grill.
| Meal | Cookware | Level |
Type of
heating |
Temp. °C,
grill |
Microwave, W
Duration, min. |
Total
duration, min. |
|---|---|---|---|---|---|---|
|
Sweet soufflées (e. g.
quark soufflé with fruit) |
Soufflé dish | 2 | Å | 180 - 190 | 180 W, 25 - 30 | 25 - 30 |
|
Savoury soufflées made
from cooked ingredients (e. g. macaroni cheese) |
Soufflé dish | 1 | Setting • | 360 W, 20 - 30 | 20 - 30 | |
|
Savoury soufflées made
from raw ingredients* (e. g. potato gratin) |
Soufflé dish | 1 | 160 - 170 | 600 W, 25 - 30 | 25 - 30 | |
| Strudel, sweet | Soufflé dish | 1 | æ | 190 - 200 | 360 W, 20 - 30 | 20 - 30 |
|
Browning toast
9 slices |
Wire grill | 5 | ~ | Setting ••• | _ | 5 - 6 |
|
Toast with topping
9 slices |
Wire grill | 4 | Setting ••• | _ | 5 - 8 | |
| * 1 kg of raw potatoes |
Frozen foods
Please observe the instructions on the package.
The table applies to insertion into the cold oven.
Remove frozen meals from their aluminium packaging and place them in a microwave-safe dish, e. g. soup bowl, soufflé dish made out of glass or ceramic.
| Meal | Level |
Type of
heating |
Tempera-
ture °C |
Microwave, W
Duration, min. |
Total
duration, min. |
|
|---|---|---|---|---|---|---|
| Strudel with fruit filling | Baking tray | 1 | æ | 190 - 200 | 180 W, 15 - 20 | 15 - 20 |
| French fries | Baking tray | 3 | 220 - 230 | _ | 20 - 25 | |
| Pizza | Wire grill with baking paper | 1 | æ | 180 - 190 | 180 W, 15 - 20 | 15 - 20 |
| Pizza baguette | Wire grill with baking paper | 2 | A | 180 - 190 | 90 W, 15 - 20 | 15 - 20 |
Advice on baking
| You wish to bake using your own recipe. | Orientate your baking to similar items from the baking tables. |
|---|---|
| This way you can see if the sponge cake is baked through. |
Approximately 10 minutes before the end of the bak-
ing time specified in the cooking instructions, pierce the highest part of the cake using a wooden skewer. The cake is ready if no mixture sticks to the skewer. |
| The cake falls apart. |
Next time, use less liquid or decrease the oven tem-
perature by 10 degrees. Follow the stirring times in the cooking instructions. |
| The cake has risen high in the middle but not on the edge. |
Do not grease the edge of the spring form. After bak-
ing, carefully loosen the cake using a knife. |
| The cake is too dark on the top. | Insert it on a lower level, select a lower temperature and bake the cake for a little longer. |
| The cake is too dark on the bottom. |
Insert it on a higher level and select a lower tempera-
ture next time. |
| The cake is too dry. |
Use a skewer to pierce small holes in the baked cake.
Then trickle the fruit juice or liqueur over the cake. Next time, select a temperature 10 degrees higher and shorten the baking times. |
| The bread or cake (e.g. cheesecake) looks good, but is soggy inside (runny and uncooked). |
Next time, use a little less liquid and bake for a little
longer but at a lower temperature. When preparing cakes with soft toppings, bake the cake base first, then sprinkle almonds or breadcrumbs onto it and finally add the topping. Please follow the cooking in- structions and baking times. |
| The biscuits or cake will not come off the baking tray. |
Place the tray back into the oven again for a short pe-
riod. Now loosen the biscuits immediately. Next time line the baking tray with non-stick baking paper |
The cake will not come out when tipped upside down.
Once baked, allow the cake to cool for 5 to 10 minutes, as it will then be easier to remove from the tin. If it still cannot be removed, carefully loosen the edge using a knife. Turn the cake upside down again and cover the tin several times with a cold, damp cloth. Next time, grease the tin more intensely and sprinkle some breadcrumbs into the tin.
You have measured the oven temperature using your own thermometer and find that the values deviate.
The oven temperature is measured by the manufacturer by means of a test shelf placed in the middle of the oven. The measured value depends very much on the bakeware and accessories being used, meaning that any measurements carried out by yourself will produce different results.
The fruit cake is too light on the bottom. The fruit juice flows over.
You have baked on two levels. The pastry on the upper tray is darker than that on the lower tray.
Next time, use the deeper universal pan (special accessory) or glass dish (special accessory).
Select a slightly lower temperature so that the pastry bakes more evenly.
Pastries which have been inserted at the same time might not necessarily be ready at the same time. Allow the one underneath to bake for an additional 5 - 10 minutes or insert earlier.
41
Care and cleaning
| canng | |
|---|---|
| Do not under any circumstances use a highpressure or steam cleaner. | |
| Appliance exterior |
Just wipe the appliance with a damp cloth. For
stubborn soil add a few drops of washing-up liquid to the water. Dry with a dry cloth. |
|
Never use strong or abrasive cleaning agents, as
these can leave the surfaces looking dull. In the event that such cleaning agents are spilled onto the appliance, wash the surface immediately with water. |
|
| Stainless steel appliances |
Always remove any flecks of limescale, grease,
cornflour and egg white immediately. Corrosion can form under such flecks. |
| Wipe the front of the oven with water and a little washing-up liquid. Dry it with a soft cloth. | |
| Appliances with aluminium front | |
| Use a mild window-cleaning agent and a soft cloth or fluff-free microfibre cloth. Wipe the cloth horizontally over the surface and without applying pressure. | |
|
Do not use any aggressive cleaning agents,
scratching sponges or rough cleaning cloths. Clean the aluminium surface with a dry cloth. |
|
| Accessories |
It is best to soak the accessories in household
detergent immediately after use. Any left-over dirt can then be easily removed using a brush or cleaning sponge. |
| Oven | Observe the following in order to ensure the long-lasting attractiveness of your oven: |
| Never use hard scouring pads or coarse cleaning sponges. Oven cleaning agents must only be used on the enamelled surfaces of the oven |
|
The grill heating element is permanently installed.
It cannot be removed. |
||||
|---|---|---|---|---|
| For cleaning | You can switch on the oven light by setting the function selector to 🐥. | |||
| Cleaning the enamel surfaces | A slightly dirty oven can be wiped clean using hot soapy water or diluted vinegar solution. | |||
| It is best to use an oven-cleaning agent in order to clean stubborn dirt from the oven. | ||||
| Oven cleaners must only be used in a cold oven. | ||||
|
Allow the cleaning agent to take effect.
For particularly stubborn dirt, it is possible to heat up the oven to 50 °C for a maximum of 2 minutes, but no longer, otherwise the enamel could be stained. |
||||
| Rinse out the oven thoroughly. | ||||
| Notes | The oven is enamelled. Enamel must be burned in at very high temperatures, which can cause slight discoloration. | |||
| The thin edges of baking trays cannot be completely coated with enamel, and may therefore be rough. Protection against corrosion is guaranteed. | ||||
| Cleaning the door seal surfaces | Always keep the surfaces of the door seal clean so that the door closes properly. | |||
| Cleaning the door seal | The seal can be removed and washed in hot soapy water (not in a dishwasher). | |||
|
Cleaning the glass cover
on the oven ceiling |
Unscrew the glass cover from the detent (see picture, white arrow) and remove. | |||
|
For slight dirt:
Wipe the glass cover with hot soapy water. |
||||
|
For intense dirt:
Clean the glass cover in the same manner as the enamel surfaces within the oven. |
||||
| When reinserting the cover, screw in until it engages properly. | ||||
Troubleshooting
Should a malfunction occur, it is often only due to a minor fault. Please read the following instructions before calling the after-sales service:
| Problem | Possible cause | Comments/solution |
|---|---|---|
| The oven does not work. | Blown fuse. | Look in the fuse box and check that the cooker fuse is in working order. |
| Not plugged in | Plug in the oven. | |
| Power failure. | Check whether the kitchen light is working. | |
| The microwave does not switch on. | The door is not closed properly. |
Check whether left-over food or a
foreign object is trapped in the door Make sure that the seal surfaces are clean Check to see if the door seal has become twisted. |
| Timer switch not set | Set timer switch. | |
| The food takes longer than usual to heat up. | The microwave setting selected was too low. | Select a higher setting. |
| A greater amount than usual was placed in the microwave. | Double the amount = almost double the cooking time. | |
| The food was colder than usual. | Stir or turn the food during cooking. | |
|
The fan is running slowly. The
wave guide under the glass cover is turning and the oven light is on even though the microwave is switched off. |
This is not a fault. Consult the note in the "Before using for the first time" section. |
Repairs may only be carried out by fully trained after-sales service technicians. Incorrect repairs may result in serious injury to the user.
After-sales service
Our after-sales service is there for you in the event that your appliance needs to be repaired. Your nearest appliance service centre can be found in the phone book, should your appliance need repairing. The specified after-sales service centres will also be happy to inform you of a service point in your local area.
E number and FD number
When contacting the After-sales Service, always specify the product number (E no.) and production number (FD no.) of your appliance. The nameplate containing these numbers is visible when the oven door is opened. Make a note of these numbers in the space here to save time in the event of appliance malfunction.
E no.
FD no.
After-sales service 📾
|
|
|
|
|
|
|
|


 Loading...