

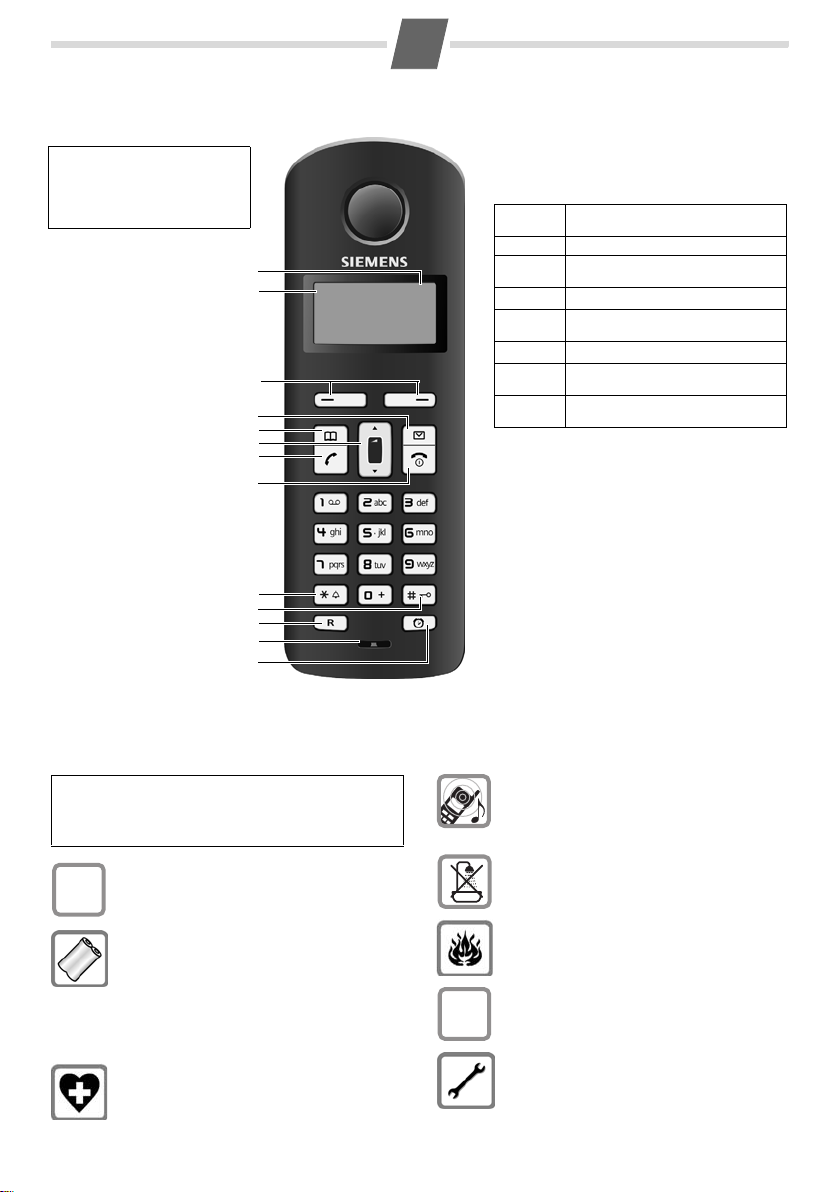
Gigaset AL13H handset
1
Please note:
New messages in the calls list/
answer machine (network mailbox) list (page 4) are indicated
by a flashing icon in the display.
1Charge status of
the battery pack
2 Internal number of
the handset
3Display keys
4Message key
5Directory key
6 Control key
7 Talk key
8 End call and
On/Off key
9Ringer on/off
(press and hold in
idle status)
10 Keypad lock on/off
(press and hold)
11 Recall key
- Confer (flash)
- Dialling pause
(press and hold)
12 Microphone
13 Alarm clock key
10
11
12
13
Display keys:
Pressing a key launches the function that
appears above that key in the display.
Display
icon
INT
1
2
2 V
11.12. 11:56
INT MENU
MENU
“
U
T
3
4
5
6
7
8
9
˜
OK
Function when pressed
Call all registered handsets.
Open main/submenu (see Menu
tree, page 7).
Go back one menu level.
Scroll up/down or adjust volume
with u.
Move cursor to left/right with u.
Backspace deletes one character at
a time.
Confirm menu function or save
entry.
Safety precautions
Read this user guide and the safety precautions
carefully before use. Explain their contents and
W
the potential hazards associated with using the
telephone to your children.
Only use th
$
Only use the approved, rechargeable battery
pack, never a conventional (non-rechargeable)
battery pack, as this could result in significant
health risks and personal injury.
Batteries should not be disposed of in general
ho
posal regulations, details of which can be
obt
you purchased the product from.
The operation of medical appliances may be
af
your particular environment, e.g. doctor's surgery.
e mains unit supplied.
usehold waste. Observe the local waste dis-
ained from your local authority or the dealer
fected. Be aware of the technical conditions in
Do not hold the rear of the handset to your ear
when it is ringing. Otherwise you risk serious
and permanent damage to your hearing.
The handset may cause an unpleasant humming noise in hearing aids.
Do not install the phone in a bathroom or
sho
wer room. The handset and base station are
not splashproof.
Do not use your phone in environments with a
tential explosion hazard (e.g. paint shops).
po
If you give your Gigaset to someone else, make
sure you also give them the user guide.
ƒ
Please remove faulty base stations from use or
have them repaired by our service, as they could
interfere with other wireless services.
2
All electrical and electronic equipment must be
disposed of separately from general household
waste using the sites designated by local
authorities.
If a product displays this symbol of a crossed-out
sh bin, the product is subject to European
rubbi
Directive 2002/96/EC.
The appropriate disposal and separate collection of used equipment serve to prevent potential harm to the environment and to health.
ey are a precondition for the re-use and recy-
Th
cling of used electrical and electronic equipment.
For further information on disposing of your
equipment, please contact your local
used
authority, your refuse collection service or the
dealer you purchased the product from.
Emergency numbers cannot be dialled if the keypad lock
(page 1) is activated!
Not all of the functions described in this user guide are
vailable in all countries.
a
ECO DECT
ECO DECT reduces power consumption by using an
energy efficient power supply.
Your handset also reduces the transmission power
dependin
g on the distance to the base station.
Setting up the telephone for use
Setting up the handset for use
Please note:
The display is protected by a plastic film.
Please remove the protective film!
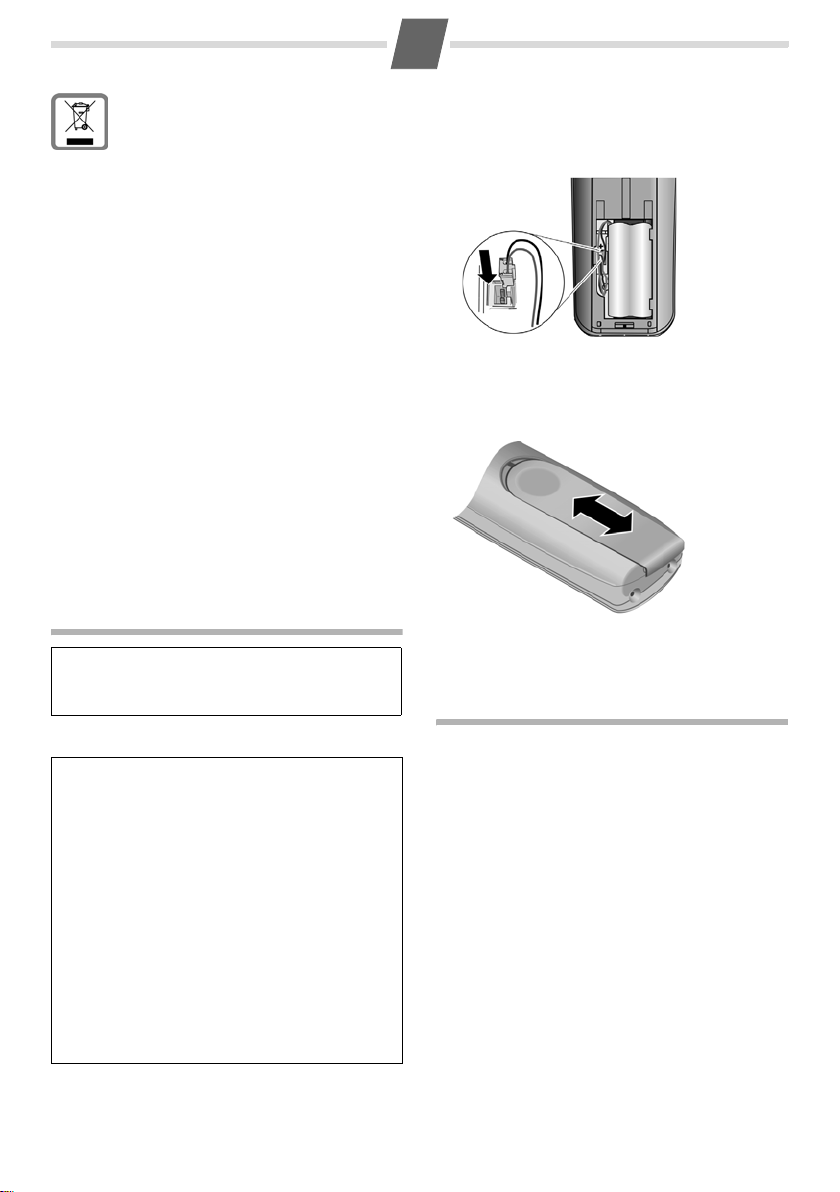
Fitting the battery pack
◆ Place the battery leads in the lead guides so
that the battery cover cannot catch on the leads
and damage them when it is closed.
◆ Use only the rechargeable battery pack rec-
ommended by Gigaset Communications GmbH
(page 5), i.e. never use a conventional (nonrechargeable) battery pack as this could result in
ficant health risks and personal injury.
signi
For example, the battery pack could explode.
e phone could also malfunction or be damaged
Th
result of using batteries that are not of the
as a
recommended type.
◆ Never use non-Gigaset battery chargers as
this could damage the battery pack.
◆ Only place the handset in the charging cradle
that is intended for it.
◆ Insert the plug into the socket as shown in the
enlarged view.
◆ Insert the battery pack.
◆ Place the leads in the lead guides.
Closing the battery cover
Place the cover on the battery compartment as
shown in
the diagram, then push it up until it clicks
into position.
Opening the battery cover
Press down on the battery cover below its upper
nd slide the cover down.
end a
Registering the handset
You must initiate handset registration on the handset and on the base station.
Once it has been registered, the handset returns to
atus. If several handsets are registered to the
idle st
base station, the internal number is shown in the
top left of the display after registration, e.g. 2.
*
If the internal numbers 1 to 4 have already been
signed (four handsets have already been registe-
as
red), handset number four is deregistered and
rwritten.
ove
On the base station
To find out how to register the handset on the base
ation, see the user guide for the base station.
st
* Gigaset Communications GmbH is a trademark
licensee of Siemens AG.
3
On the handset
MENU ¢ Settings ¢ OK ¢ Handset ¢ OK
¢ Register HS ¢ Enter the base station system
PIN (default setting: 0000)
Registering flashes in the display.
Registration takes approx. 1 minute.
Please note:
You can a lso aut
AL13H handset to the Gigaset AL130/AL135 base
ation. Precondition: The handset is not registe-
st
red to a base station. Place the handset in the
harging cradle of the base station with its dis-
c
play facing forward.
tone. Leave the handset in the base station until it
is registered.
omatically register the Gigaset
Charging the battery pack
Plug the mains unit for the charging cradle into the
socket and place the handset in the charging cradle
with the display facing forward.
To charge the battery pack, leave the handset in
he base station for approx. 7 hours. The battery
t
pack is now fully charged. The charge status of the
battery pack is only correctly displayed after uninterrupted charging/discharging. Therefore you
ould not interrupt the charging process.
sh
Charging is electronically controlled to prevent
vercharging. The battery pack heats up during
o
charging. This is normal and not dangerous. After
a while its charge capacity will decrease for technical reasons.
You must set the date and time to ensure that the
times of
page 7).
Once the phone is registered
idle display looks as shown on page 1.
If you have any questions about using your phone,
please r
tions and answers", page 6) or contact our customer service department (page 6).
calls are logged correctly (see Menu tree
ead the tips on troubleshooting ("Ques-
Activating/deactivating the handset
Press and hold the end call key a.
If you place a deactivated handset into the charging cradle, it will automatically activate itself.
¢ OK.
You will hear a confirmation
and the time set, the
Making calls
Making external calls and ending calls
External calls are calls using the public telephone
network.
~
(Enter the phone number) ¢c.
The number is dialled. (Or you can first pr
c [dial tone] and then enter the number.)
hold
During the call you can adjust the earpiece volume
t.
using
End the call/cancel dialling:
Press the end call key
You can automatically insert a network provider
diall
ing code before any phone number (see
"Preselection" Menu tree, page 7).
a.
ess and
Accepting a call
The handset indicates an incoming call by ringing
and by a display on the screen.
Press the talk key
When Aut
page 7), simply remove the handset from the base
station/charging cradle.
c to accept the call.
o Answer is activated (see Menu tree,
Using the directory and lists
Directory
To open the directory: press h.
You can save up to 40 phone numbers
(max. 32 digits) with corresponding names
(max. 14 characters).
Please note:
You can assign a number from the directory to a
k
ey for quick dialling (page 4).
Saving the first number in the directory
h
¢ New Entry? ¢ OK
~
~
Storing a number in the directory
h
~
~
Enter number and press OK.
Enter name and press OK.
¢ MENU ¢ New Entry ¢ OK
Enter number and press OK.
Enter name and press OK.
 Loading...