

Page 1
Gigaset A590
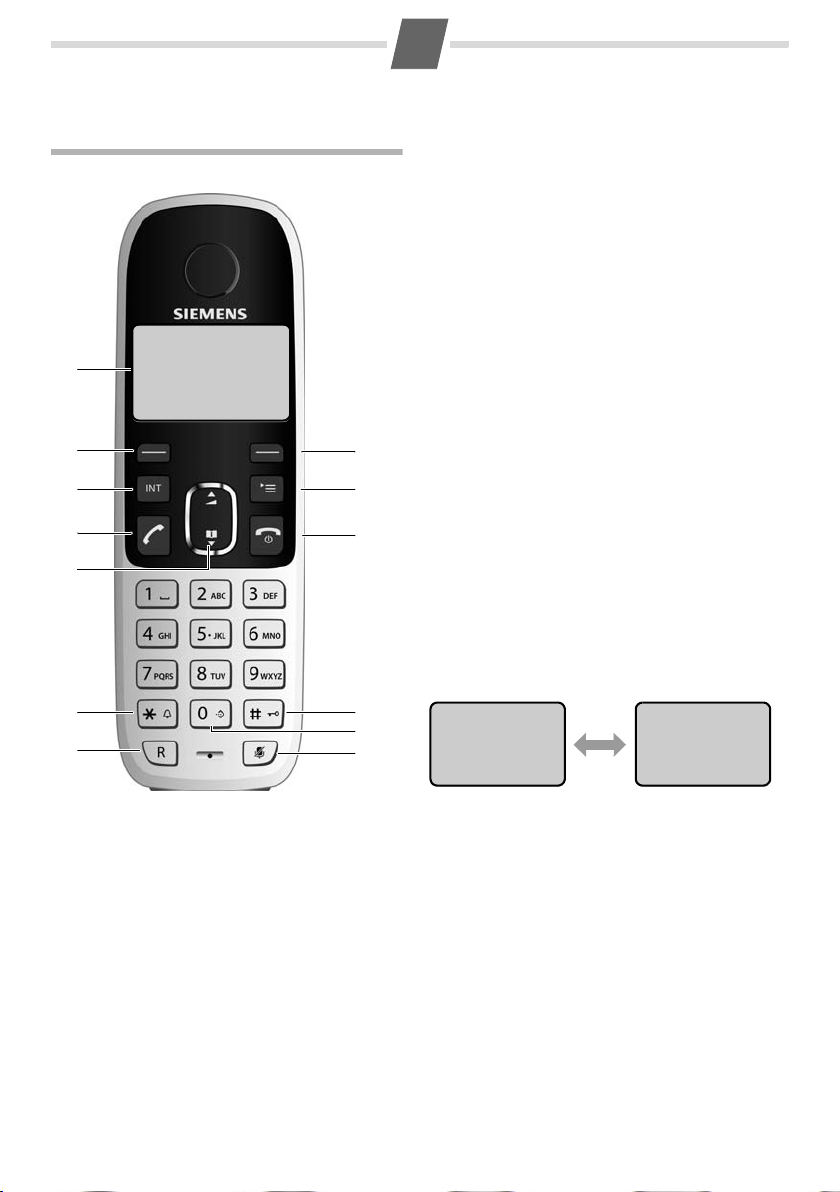
El teléfono a primera vista
ÒU
1
2 8
3
4
5
6
7
Gigaset 1
10
11
12
13
1
1 Pantalla en estado inactivo
2Tecla de retroceso : Para modificar texto: tecla de
retroceso; En el menú: volver al nivel anterior
3Tecla Comunicación interna (¢ página 19)
4Tecla de descolgar / lista de últimos números de
rellamada *
5 Tec la de con tro l: En modo inactivo: s abrir direc-
torio, t abrir lista de llamadas.
En el menú, directorio y listas: Subir/Bajar
6Tecla asterisco /
Activar/desactivar los tonos de timbre *
7Tecla de rellamada
Llamada de consulta (flash); insertar pausa*
8Tecla OK
9Tecla Menú (¢ página 12)
10 Tecla de colgar/ Encendido/Apagado *
11 Tecla numeral (#) / tecla bloqueo teclado ( blo-
9
quear/desbloquear el teclado * (¢ página 10)
12 Tecla Call by Call* (¢ página 13)
13 Tecla Silenciar (micrófono apagado, ¢ page 13)
* Para activar la función marcada con un asterisco (*)
presione prolongadamente la tecla correspondiente.
Pantalla en estado inactivo
(¢ página 16)
¤ Presione prolongadamente la tecla A para alter-
nar entre la visualización de nombre/número y
fecha/hora.
ÒU
Gigaset 1
ÒU
31/10 12-30
Íconos de la pantalla
Señal de radio
Ò
Estable: el aparato está conectado a la base
Parpadeo:el teléfono está fuera del alcance o
Ícono de batería
U
Estable: carga total, más de 1 hora de
Parpadeo:cargando
Estable: menos de 1 hora de conversación
=
Parpadeo:casi agotada
El reloj despertador está activado
¼
El timbre está desactivado
Ú
El bloqueo del teclado está activado
Ø
no está registrado
conversación
Ícono descolgar
ª
Estable: llamada en curso
Parpadeo:llamada entrante recibida
El directorio está abierto
Ícono lista de llamadas
Y
Estable: ya se revisaron las llamadas de la lista
Parp adeo: llamadas nuevas en la lista de llamadas
Apagado: no hay entradas en la lista de llamadas
En modo de edición: retroceso. Presione A
{
para eliminar un caracter a la vez
En el menú: presione A para volver al nivel
anterior o salir del menú.
Confirmar la función del menú o guardar una
|
entrada con
En menús y listas: subir /bajar con p.
V
En modo conversar: ajuste el volumen con p.
W
de llamadas
B.
Page 2
2
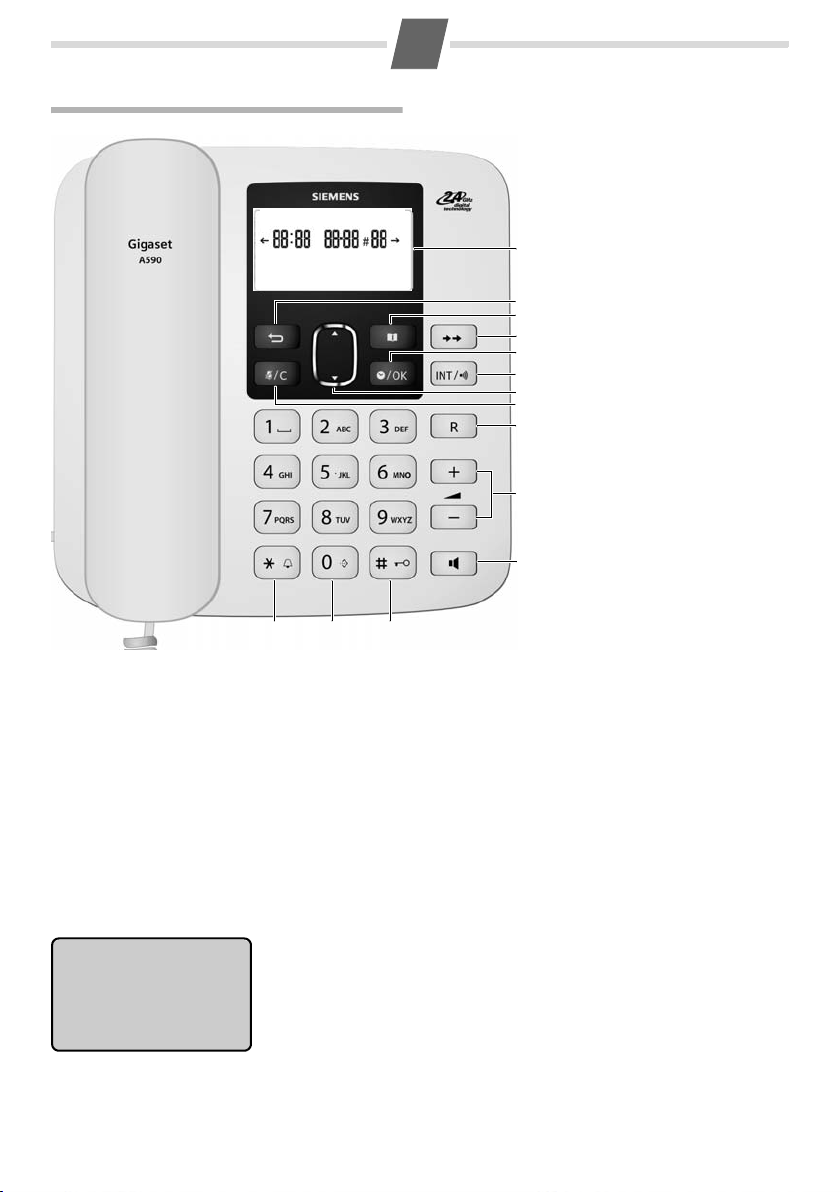
La base a primera vista
1 Pantalla en estado inactivo
2Tecla de retroceso
3 Directorio (¢ página 18)
Mostrar la primera entrada /
Agregar nueva entrada*
4Tecla de rellamada
1
(¢ página 16)
5Tecla OK / tecla reloj
despertador *
2
6Tecla de intercomunicador:
3
Localizador (¢ página 18)
4
Registro * (¢ página 18)
5
7Tecla de lista de llamadas
6
(¢ página 15)
7
Abrir / Subir/Bajar
8
8Tecla silenciar
9
(¢ página 14)/Tecla eliminar
al modificar el directorio,
las
10
11
12 1413
* Para activar la función marcada con un asterisco (*) presione prolongadamente la tecla correspondiente.
Pantalla de la base
listas o los números
premarcados
9Tecla de rellamada
Llamada de consulta (flash)
Pausa de marcación*
10 Teclas de volumen
Volu men del timbre
(¢ página 21)
Volu men de la conversación
(¢ página 14)
11 Bocina tecla (manos libres)
(¢ página 14)
12 Tecla de asterisco / tecla acti-
var/desactivar los tonos de
timbre *
13 Tecla Call by Call*
(¢ página 14)
14 Tecla numeral (#) / Tecla de
encendido/apagado*
del bloqueo del teclado
(¢ página 10)
Â12:30 31-10 #04 Ã
01234567890987
Hora (HH:MM): hora actual u hora de la llamada entrante en la lista de
Fecha (DD-MM): fecha actual o fecha de la llamada entrante en la lista de
#NN número de entradas en la lista de llamadas o en el direc-
Número de
teléfono:
llamadas
llamadas
torio, si está abierto
se muestra en la lista de llamadas, en los números marca-
dos o de rellamada y en las entradas del directorio. Â Ã
indica que se pueden visualizar más caracteres a la dere
cha o a la izquierda. Presione Ì para visualizar dígitos
ocultos.
-
Page 3

Íconos de la pantalla
ª
·
Ú
Ícono descolgar
Estable: llamada en curso
Parpadeo: llamada entrante
El micrófono está desactivado
(Silencio)
El directorio está abierto Apagado: no hay llamadas en la lista de
El timbre está desactivado
recibida
3
Ø
Y
El bloqueo del teclado está activado
Ícono lista de llamadas
Estable: ya se revisaron las llamadas de la
lista de llamadas
Parpadeo: llamadas nuevas en la lista de
llamadas
llamadas
Page 4

4
Tabla de contenidos
Gigaset A590 . . . . . . . . . . . . . . . . . . . . . . . . 1
El teléfono a primera vista . . . . . . . . . . . . . . . . . . 1
La base a primera vista . . . . . . . . . . . . . . . . . . . . . 2
Precauciones de seguridad . . . . . . . . . . . 5
Cuidados . . . . . . . . . . . . . . . . . . . . . . . . . . . . 5
Contacto con líquidos . . . . . . . . . . . . . . . . . . . . . 5
Primeros pasos . . . . . . . . . . . . . . . . . . . . . . 6
Verifique el contenido del paquete . . . . . . . . . 6
Cómo configurar la estación base y el soporte
de carga . . . . . . . . . . . . . . . . . . . . . . . . . . . . . . . . . . . 6
Cómo conectar la estación base . . . . . . . . . . . . 6
Cómo conectar el soporte de carga del
teléfono . . . . . . . . . . . . . . . . . . . . . . . . . . . . . . . . . . . 7
Cómo poner el teléfono en servicio . . . . . . . . . 7
Cómo colocar las baterías y cerrar la tapa . . . 7
Cómo ajustar la fecha y la hora . . . . . . . . . . . . . 9
Cómo usar el teléfono . . . . . . . . . . . . . . . 10
Tecla de control . . . . . . . . . . . . . . . . . . . . . . . . . . . 10
Cómo ingresar números y texto . . . . . . . . . . . 10
Cómo desplazarse para ver números largos 10
Cómo activar o desactivar el bloqueo del
teclado . . . . . . . . . . . . . . . . . . . . . . . . . . . . . . . . . . . 10
Cómo activar/desactivar el teléfono . . . . . . . 10
Cómo volver el teléfono a modo inactivo . . 10
Cómo activar o desactivar el tono del
timbre . . . . . . . . . . . . . . . . . . . . . . . . . . . . . . . . . . . . 10
Cómo usar el menú . . . . . . . . . . . . . . . . . . . . . . . 11
Árbol del menú . . . . . . . . . . . . . . . . . . . . . . . . . . . 12
Cómo hacer llamadas (teléfono) . . . . . 13
Cómo hacer una llamada externa . . . . . . . . . . 13
Cómo aceptar una llamada . . . . . . . . . . . . . . . . 13
Cómo finalizar una llamada . . . . . . . . . . . . . . . 13
Cómo ajustar el volumen de conversación . 13
Silenciado . . . . . . . . . . . . . . . . . . . . . . . . . . . . . . . . 13
Llamada en espera . . . . . . . . . . . . . . . . . . . . . . . . 13
Cómo usar las teclas de acceso directo para
marcación rápida . . . . . . . . . . . . . . . . . . . . . . . . . 13
Marcación Call by Call . . . . . . . . . . . . . . . . . . . . . 13
Cómo hacer llamadas (base) . . . . . . . . . 14
Cómo hacer una llamada externa . . . . . . . . . . 14
Cómo aceptar una llamada . . . . . . . . . . . . . . . . 14
Finalización de una llamada . . . . . . . . . . . . . . . 14
Conversación con manos libres . . . . . . . . . . . . 14
Cómo ajustar el volumen de conversación . 14
Cómo ajustar el volumen de la bocina . . . . . 14
Silenciado . . . . . . . . . . . . . . . . . . . . . . . . . . . . . . . . 14
Marcación Call by Call . . . . . . . . . . . . . . . . . . . . . 14
Lista de llamadas . . . . . . . . . . . . . . . . . . . 15
Uso de la lista de llamadas en un teléfono . 15
Cómo usar la lista de llamadas en una
estación base . . . . . . . . . . . . . . . . . . . . . . . . . . . . . 15
Lista de últimos números de
rellamada . . . . . . . . . . . . . . . . . . . . . . . . . . 16
Directorio (teléfono) . . . . . . . . . . . . . . . . 16
Cómo usar el directorio . . . . . . . . . . . . . . . . . . . 16
Cómo almacenar números para la
marcación rápida . . . . . . . . . . . . . . . . . . . . . . . . . 17
Cómo guardar números de Call by Call . . . . 17
Cómo borrar el directorio completo . . . . . . . 17
Directorio (base) . . . . . . . . . . . . . . . . . . . 18
Cómo usar varios teléfonos . . . . . . . . . 18
Cómo registrar los teléfonos . . . . . . . . . . . . . . 18
Cómo cancelar el registro de los teléfonos . 18
Cómo localizar un teléfono ("localizador") . 18
Cómo hacer llamadas internas . . . . . . 19
Cómo hacer llamadas internas (teléfono) . . 19
Cómo hacer llamadas internas (base) . . . . . . 19
Configuraciones . . . . . . . . . . . . . . . . . . . . 20
Configuraciones (teléfono) . . . . . . . . . . . . . . . . 20
Configuraciones (base) . . . . . . . . . . . . . . . . . . . . 21
Cómo cambiar el PIN . . . . . . . . . . . . . . . . . . . . . . 21
Cómo restaurar la configuración
predeterminada . . . . . . . . . . . . . . . . . . . . . . . . . . 21
Cómo conectar a una central
telefónica . . . . . . . . . . . . . . . . . . . . . . . . . . 22
Configure el prefijo . . . . . . . . . . . . . . . . . . . . . . . 22
Cómo configurar el tiempo de corte de
llamada . . . . . . . . . . . . . . . . . . . . . . . . . . . . . . . . . . 22
Cómo cambiar el modo de marcación . . . . . 22
Apéndice . . . . . . . . . . . . . . . . . . . . . . . . . . 22
Cómo escribir y editar texto . . . . . . . . . . . . . . . 22
Especificaciones generales . . . . . . . . . . . . . . . . 23
Preguntas y respuestas . . . . . . . . . . . . . . . . . . . . 23
Page 5
5
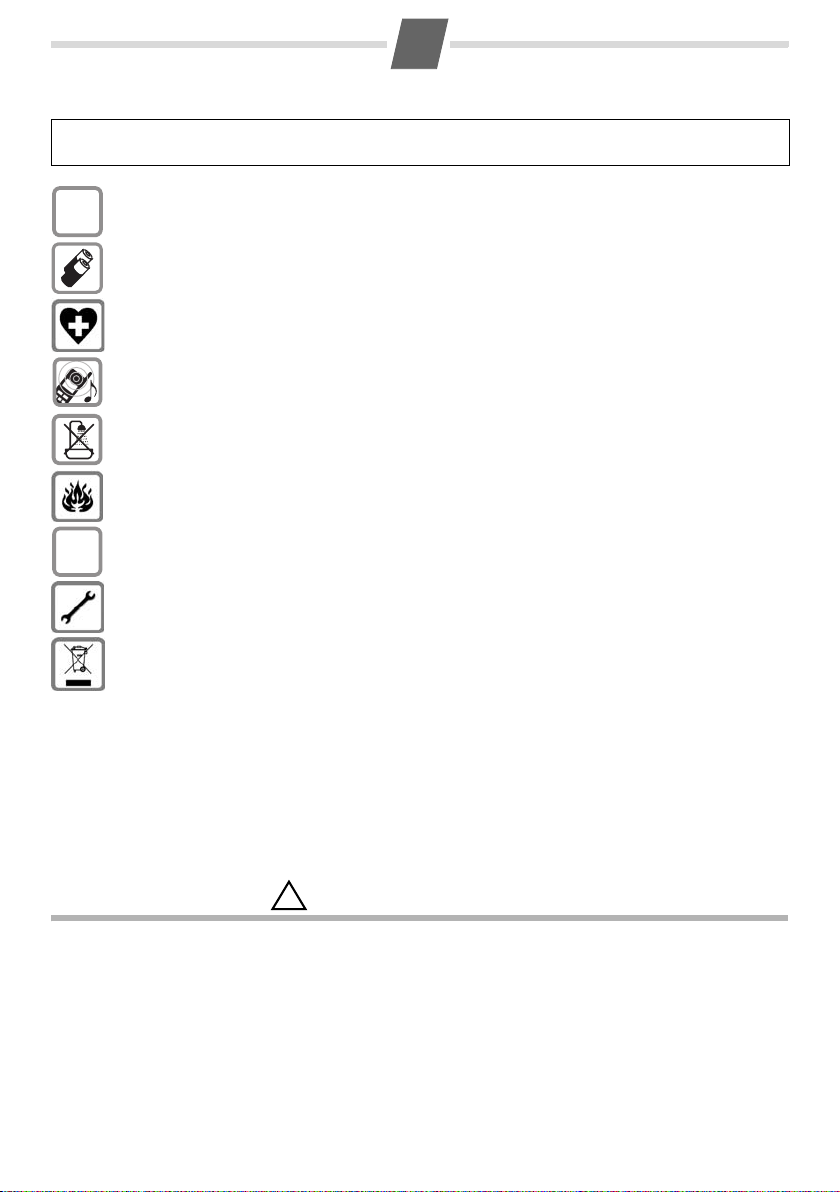
Precauciones de seguridad
Lea esta guía del usuario y las indicaciones de seguridad con cuidado antes de usarlo. Explique a sus hijos el contenido y los riesgos posibles asociados con el uso del teléfono.
Únicamente use la fuente de alimentación que se proporciona.
$
Coloque solamente las baterías (¢ página 23) recargables recomendadas. Nunca use una batería
convencional (no recargable) ni de ningún otro tipo, ya que esto podría causar graves riesgos a la
salud y lesiones personales.
El funcionamiento de dispositivos médicos puede verse afectado. Procure tener siempre presente las
condiciones técnicas en su entorno particular, por ej. el consultorio de un médico.
No sostenga la parte posterior del teléfono cuando está sonando. Si lo hace, corre el riesgo de sufrir
daños auditivos graves y permanentes.
El teléfono puede producir un desagradable zumbido en los dispositivos auditivos.
No instale el teléfono en un baño o cuarto de ducha. El teléfono y la estación base no son a prueba
de salpicaduras.
No use el teléfono en ambientes con potenciales riesgos de explosión (por ejemplo, en talleres de
pintura).
ƒ
Si cede el teléfono a otra persona, asegúrese de proveerle también la guía del usuario.
Retire del uso las estaciones base defectuosas o hágalas reparar por nuestro ser vicio, ya que podrían
interferir con otros servicios inalámbricos.
Eliminación
.Las baterías no deben tirarse a la basura convencional. Tenga en cuenta las normativas locales de eliminación de
residuos, que puede consultar en su comunidad o en la tienda en la que obtuvo el producto.
No tir e nu nc a el equ ip o co n la ba sur a do mé sti ca. Cu and o se qu ier a de sp ren der de él, dep osí te lo e n un pu nto lim pi o.
Si no sabe donde se encuentra el más cercano a su domicilio consúltelo en su ayuntamiento. El embalaje de este
producto es reciclable, deposítelo en un contenedor para papel y cartón.
El símbolo del contenedor con la cruz significa que cuando el equipo haya llegado al final de su vida útil, deberá ser
llevado a los centros de recogida previstos, y que no será gestionado como un residuo urbano.
Cuidados
Limpie la estación base y el teléfono con un paño húmedo (no utilice disolvente) o un paño antiestático. Nunca
use un paño seco. Esto puede causar estática.
Contacto con líquidos
Si el teléfono entrara en contacto con líquidos:
◆ Apague el teléfono y quite las baterías de inmediato.
◆ Permita que el líquido se escurra del teléfono.
◆ Seque todas las partes con toques suaves, luego coloque el teléfono con el compartimiento de las baterías
abierto y el teclado hacia abajo en un lugar seco y tibio, durante al menos 72
microondas, horno por convección, etc.).
◆ No vuelva a encender el teléfono hasta que se haya secado por completo.
Lo podrá usar normalmente cuando esté completamente seco.
!
horas (no en un horno de
Page 6
6
Primeros pasos
Verifique el contenido del paquete
◆ una estación base Gigaset A590,
◆ un transformador de corriente para la estación base,
◆ un teléfono con cable,
◆ un teléfono inalámbrico Gigaset A59H,
◆ un soporte de carga para el teléfono con transformador de corriente,
◆ dos baterías,
◆ una tapa para las baterías,
◆ un cable de teléfono,
◆ una guía del usuario.
Cómo configurar la estación base y el soporte de carga
La estación base y el soporte de carga están diseñados para el uso en habitaciones secas con un rango de temperatura de +5 °C a +45 °C.
¤ Instale la base y los soportes de carga en una ubicación central de su casa o apartamento sobre una superficie
plana antideslizante.
Tenga en cuenta lo siguiente:
Preste atención al alcance de la estación base.
Éste es de hasta 300 m en áreas al aire libre sin obstrucciones y de hasta 50 m dentro de edificios.
Normalmente, las patas del teléfono no dejan marcas en las superficies. Sin embargo, y debido a la gran cantidad
de barnices y abrillantadores que se usan en el mobiliario actual, no es posible asumir totalmente que no queda
rán marcas sobre la superficie.
Tenga en cuenta lo siguiente:
◆ Nunca exponga el teléfono a fuentes de calor, luz solar directa u otros electrodomésticos.
◆ Proteja su Gigaset de la humedad, el polvo, los líquidos y vapores corrosivos.
-
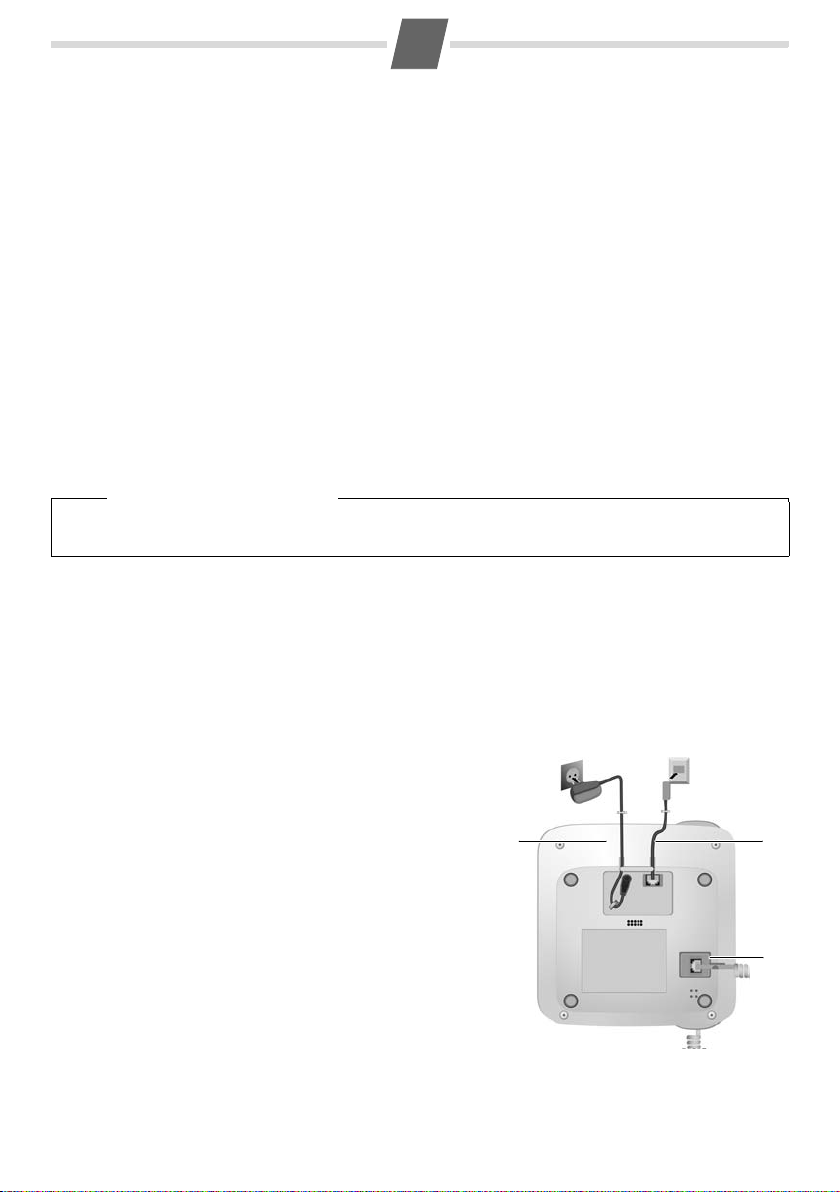
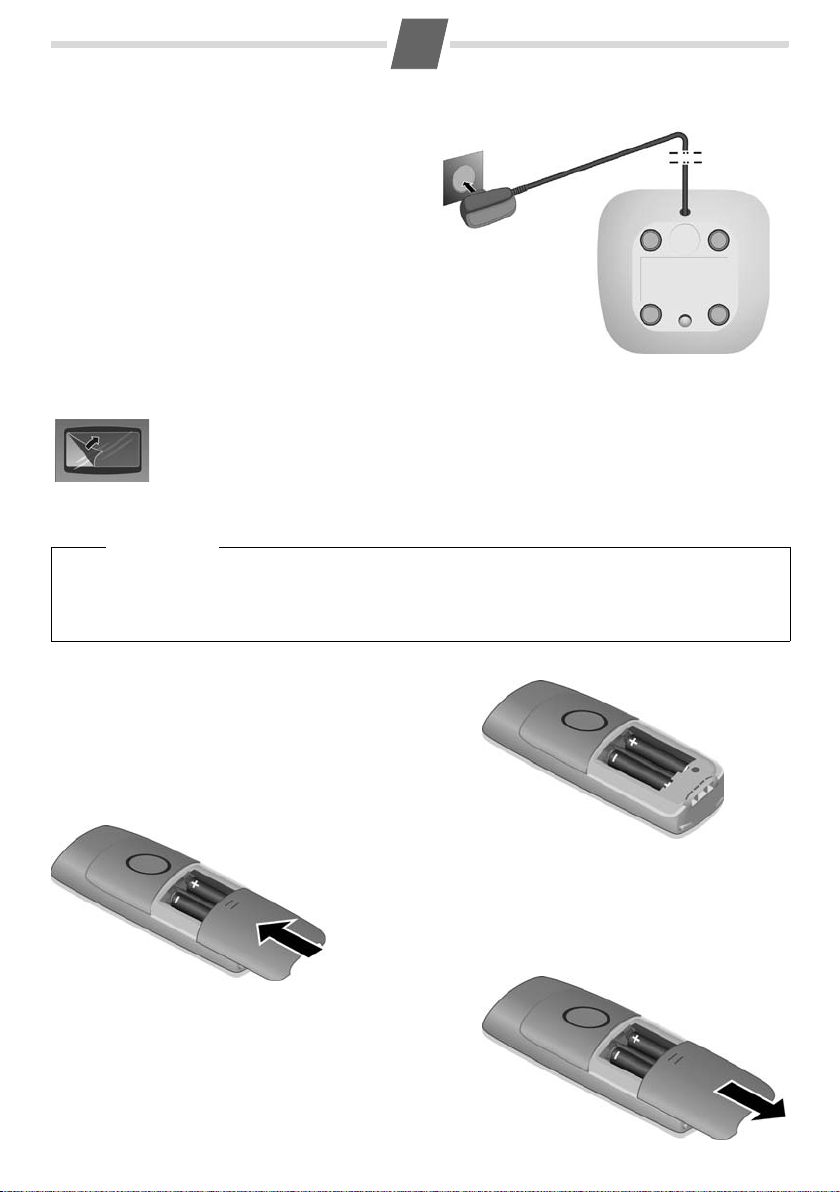
Cómo conectar la estación base
¤ Primero conecte el transformador de corriente 1.
¤ Luego, conecte el enchufe hembra del teléfono 2 e inserte
los cables en los conductos.
¤ A continuación, conecte el cable del teléfono al teléfono.
Conecte el teléfono a la estación base 3 e inserte los cables
en los conductos.
Tenga en cuenta lo siguiente:
◆ El transformador de corriente debe estar siempre conectado,
ya que el teléfono sólo cuenta con las funciones básicas sin
conexión eléctrica.
◆ Use solamente el transformador de corriente y el cable de
teléfono provistos.
◆ Las conexiones de las clavijas de los cables de teléfono pue-
den variar. Si compra un cable de repuesto para el teléfono,
asegúrese de que el enchufe hembra esté conectado
corectamente.
1
1
2
1
3
1
Page 7
7
C
Cómo conectar el soporte de carga del teléfono
¤ Conecte el transformador de corriente al enchufe
de la pared.
Cómo poner el teléfono en servicio
La pantalla está protegida por una película plástica.
¤ ¡Quite la película protectora!
Cómo colocar las baterías y cerrar la tapa
Advertencia
Use sólo las baterías recargables recomendadas por Gigaset Communications GmbH (
use una batería convencional (no recargable) u otro tipo de baterías ya que esto podría causar graves riesgos
a la salud y lesiones personales. Por ejemplo, las baterías podrían explotar. El teléfono también puede funcionar mal o dañarse como resultado de la utilización de baterías que no sean del tipo recomendado.
¢ página 23). Nunca
Cómo instalar las baterías
¤ Coloque las baterías con la orientación correcta.
La polaridad se indica en o sobre el compartimiento de las
baterías.
Cómo cerrar la tapa del compartimiento de la batería
¤ Deslice la tapa de la bate-
ómo abrir la tapa del compartimiento de la batería
Si tiene que abrir la cubierta de la batería por ejemplo para
reemplazar las baterías:
¤ presione la parte superior de la ta pa de la b ater ía y desl ícel a
hacia abajo.
ría de abajo hacia arriba
en la cubierta hasta que
calce en el lugar.
Page 8
8
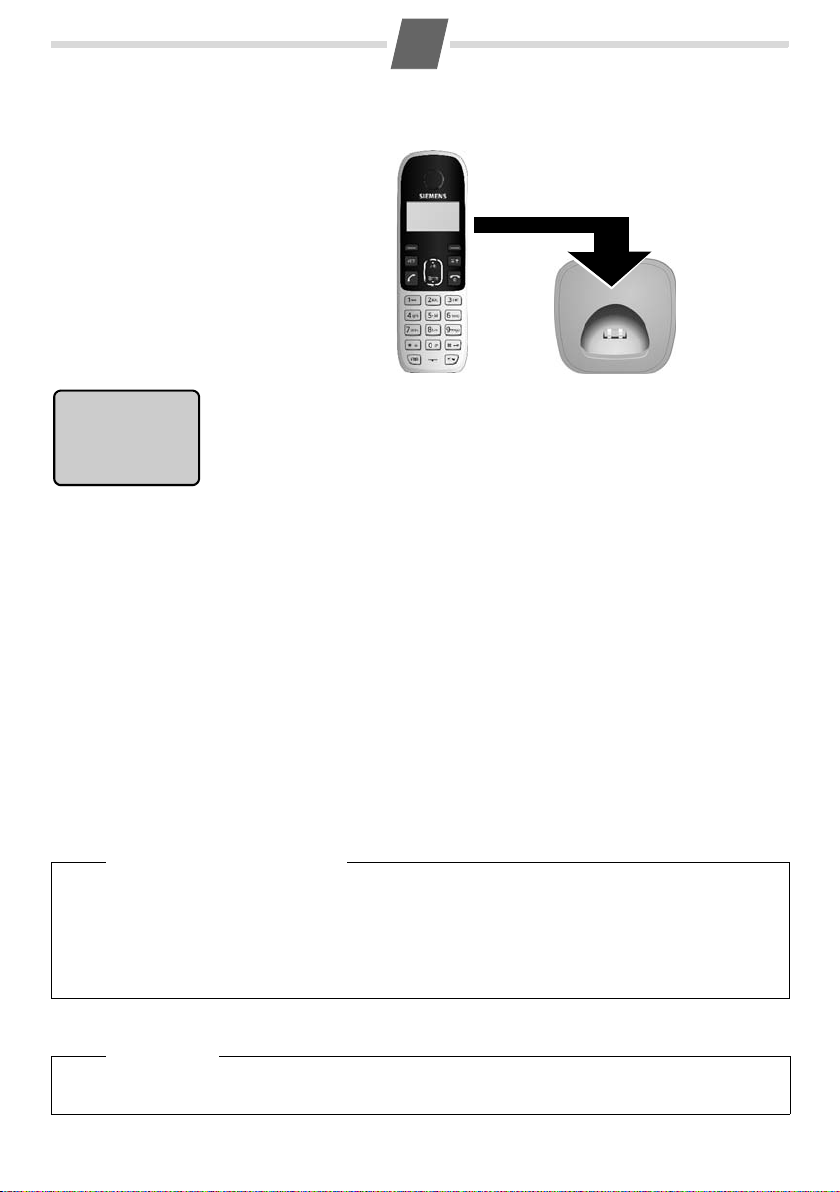
Cómo colocar el teléfono en el soporte de carga y cómo cargar las baterías
Antes de utilizar el teléfono, primero debe cargar las baterías.
¤ Coloque el teléfono con la pantalla hacia
arriba en el soporte de carga.
Ò=
Gigaset 1
Aparece la pantalla de estado inactivo. Aparece el nombre y el número interno del
teléfono. El teléfono ya se registró en la base.
Si desea registrar teléfonos adicionales, debe registrar manualmente cada teléfono
individual
A los teléfonos se les asigna el número interno más bajo disponible (1 - 4). Si se registran cuatro teléfonos, deberá anular el registro de un teléfono antes de poder registrar
otro.
(¢ página 18).
Cómo realizar la carga y la descarga inicial de las baterías
Si se activa el tel éfono, el ícono de la batería que parpadea en la par te superior derecha de la pantalla indica qu e
las baterías se están cargando. Durante el funcionamiento del teléfono, el ícono de la batería indica el estado de
carga de las baterías.
Estable: carga total, más de 1 hora de conversación
U
Parpadeo: cargando
Estable: menos de una 1 hora de conversación
=
Parpadeo: casi agotada. Coloque el teléfono en el soporte de carga para recargarlo.
El nivel de carga correcto solamente podrá mostrarse si las baterías se cargan y descargan completamente la primera vez.
¤ Coloque el teléfono en la base o en el soporte de carga durante quince horas.
¤ Luego retire el teléfono del soporte de carga y no lo vuelva a colocar hasta que las baterías estén totalmente
descargadas.
Tenga en cuenta lo siguiente:
◆ Después del primer ciclo de carga y descarga de las baterías, podrá volver a colocar el teléfono en el
soporte de carga al finalizar cada llamada.
◆ Siempre qu e haya quitado las baterías del teléfono y las vuelva a colocar, repita el procedimiento de carga
y descarga.
◆ Las baterías pueden calentarse durante el proceso de carga. Esto no es peligroso.
◆ Después de un tiempo, la capacidad de carga de las baterías disminuirá por razones técnicas.
Advertencia
Asegúrese de que el teléfono se encuentra en el soporte de carga o quite las baterías si se ausenta por un
período prolongado de tiempo (por ejemplo, vacaciones). De lo contrario podría dañar las baterías.
Page 9
9
Cómo acivar y desactivar el teléfono
¤ Presione prolongadamente la tecla a para bloquear o desbloquear el teléfono.
Si coloca un teléfono desactivado en la base de carga o en el soporte de carga, se activará automáticamente.
El teléfono está fuera de alcance
Si el teléfono está fuera de alcance de la base de carga, el ícono de la antena Ò parpadeará en la pantalla. Si la
señal es baja durante una llamada, la transmisión de voz por el auricular se efectuará entrecortadamente, y el
teléfono emitirá un tono de advertencia indicando que está fuera de alcance. En este caso, deberá acercarse a la
estación base. Si la señal es demasiado baja, la línea se desconectará.
Cómo ajustar la fecha y la hora
Configure la fecha y la hora de manera que puedan asignarse correctamente a las llamadas entrantes, y se pueda
usar la alarma.
En la estación base
¤ Presione prolongadamente Ì.
La pantalla muestra los campos de la fecha y la hora. Parpadeará la próxima posición
que deba completarse.
12:30 31-10
¤ Use ~ para introducir la hora (HH:MM) y luego la fecha (DD-MM).
¤ Para corregir un dato ingresado, use la tecla Ô.
¤ Presione Ì para guardar la nueva configuración del reloj.
La fecha y la hora están sincronizadas con todos los teléfonos registrados.
Ahora su teléfono está listo para ser usado.
Si tiene alguna pregunta sobre el uso de su teléfono, lea los consejos para la resolución de problemas ("Cómo
escribir y editar texto" ¢ página 22).
Page 10

Cómo usar el teléfono
10
Tecla de co nt ro l
Te lé fo no
En modo inactivo
t Abra la lista de llamadas.
s Abra el directorio.
En menús y listas
p Suba/baje línea a línea.
En los campos de entrada
t Muévase al caracter anterior.
t Muévase al caracter siguiente.
Durante una llamada
p Ajuste el volumen del auricular.
Base
t Muestre la primera entrada en la lista de llamadas.
t Muestre la última entrada (la más reciente) en la
lista de llamadas.
Cómo ingresar números y texto
¤ Utilice el teclado para introducir cifras o letras ~.
En el apéndice de esta guía del usuario encontrará
información sobre entradas de varias líneas,
¢ página 22.
Cuando ingrese la hora y la fecha, etc.:
¤ Sobrescriba el caracter resaltado (que parpadea).
Corrección de entradas incorrectas
En modo de edición, la pantalla muestra { en la
esquina inferior izquierda.
Para corregir los caracteres incorrectos al editar:
¤ Presione la tecla { Apara eliminar el carac-
ter que se encuentra a la izquierda del cursor.
¤ Introduzca nuevos caracteres en la posición del
cursor.
Cómo desplazarse para ver números largos
La pantalla indica que se trata de un número de teléfono que tiene más de 12 dígitos (teléfono) ó 14 dígitos (base) al mostrar  y à a la izquierda y a la derecha del número. Para mostrar dígitos adicionales:
¤ En la base presione Ì.
¤ En el teléfono presione B.
Cómo activar o desactivar el bloqueo
del teclado
¤ Presione prolongadamente # para activar el
bloqueo del teclado.
Aparecerá el ícono Ø en la pantalla cuando el bloqueo del teclado numérico esté activado.
¤ Presione prolongadamente # de nuevo para
volver a activar el teclado.
El bloqueo del teclado se desactiva automáticamente
al recibir una llamada o al activar el localizador. Al tér
mino de la llamada, vuelve a activarse.
Tenga en cuenta lo siguiente:
Si el teclado de la base está bloqueado, se encuentran disponibles los siguientes ajustes avanzados.
CAMBIAR PIN, REGISTRAR, ANULAR REG., RESTAURAR BASE, PREF. AUTOM., FLASH, MODO MARCADO
Cómo activar/desactivar el teléfono
Condición previa: el teléfono debe estar en modo
inactivo.
¤ Presione prolongadamente a durante al menos
5 minutos para apagar el teléfono.
¤ Presione a nuevamente y en forma prolongada
para volver a activar el teléfono.
Cómo volver el teléfono a modo inactivo
Para volver el teléfono a modo inactivo durante la
operación del menú o en las listas:
¤ Presionea.
Los cambios que no se confirmaron ni se guardaron
se perderán.
Si no se presiona ninguna tecla durante más de
60
segundos, el teléfono volverá automáticamente
a
modo inactivo.
Cómo activar o desactivar el tono del timbre
Para apagar el timbre:
¤ Presione prolongadamente * para apagar el
tono del timbre.
Aparecerá el ícono Ú en la pantalla cuando el timbre
esté desactivado.
¤ Presione prolongadamente * una vez más para
volver a activar el timbre.
Puede ajustar el volumen del timbre del teléfono
(¢ página 20), para la base (¢ página 21).
-
Page 11

Cómo usar el menú
Su teléfono le ofrece numerosas funciones. Éstas se
ofrecen en forma de menús. El árbol de menú está
disponible a través del teléfono.
Condición previa: el teléfono debe estar en modo
inactivo.
¤ Para abrir el menú, presione la tecla f.
¤ Use la tecla p para desplazarse a la función que
necesite.
Durante la operación del menú, la pantalla muestra
{ en la esquina inferior izquierda y | en la
esquina derecha para indicar que las correspondien
tes teclas están activadas.
|: presione B para confirmar la selección
realizada.
{: presione Apara volver al nivel anterior o
para salir del menú.
¤ Para regresar al modo inactivo: presione la tecla
a.
11
-
Page 12
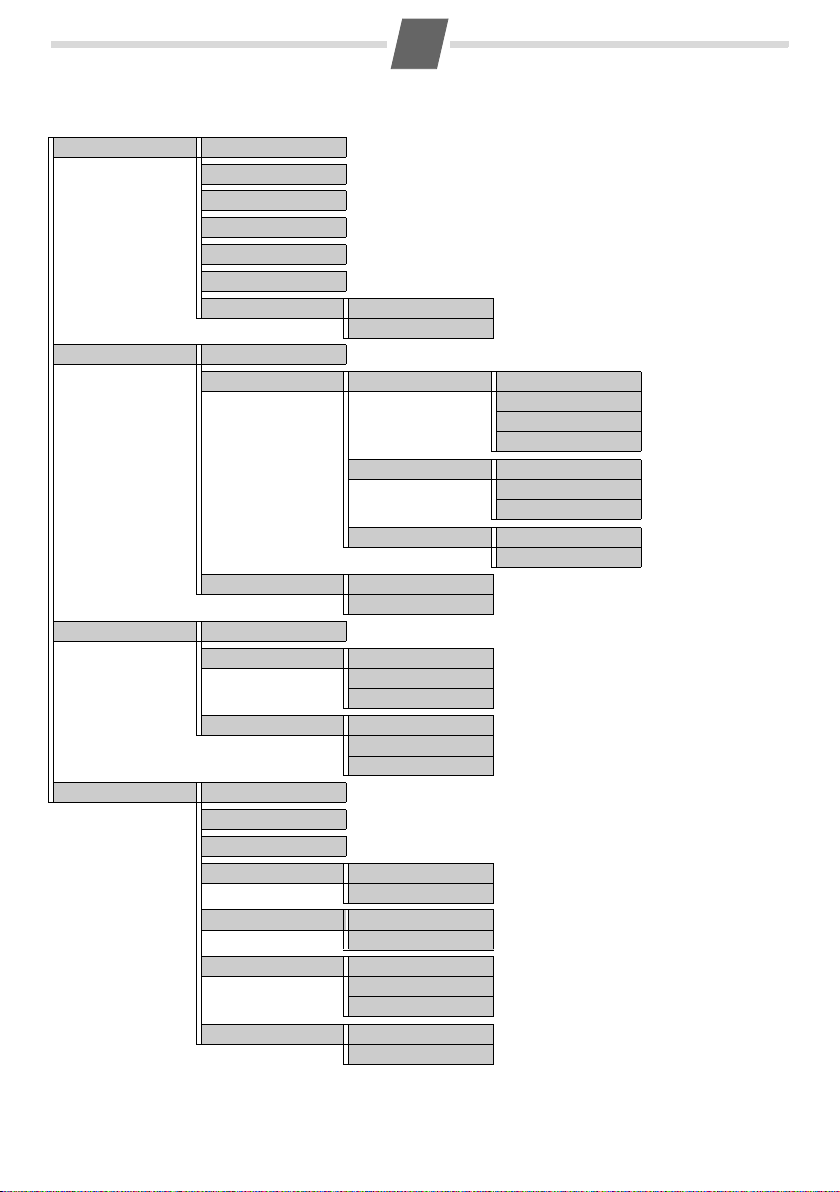
Árbol del menú
AGENDA NUEVA ENTR. ¢ página 15
LISTA LLAM. ¢ página 16
EDIT. ENTR. ¢ página 17
BORRAR ¢ página 17
BORRAR TODO ¢ página 17
CALL BY CALL ¢ página 17
MARCA RAPIDA TECLA 1 ¢ página 17
TECLA 2
AJUSTES PERS NOMBRE TELF. ¢ página 20
TONOS TELF. VOL. TIMBRE DESACTIVADO ¢ página 20
TONOS TIMBRE MELODÍA 1 ¢ página 20
TONO TECLA ACTIV. ¢ página 20
AUTORE SP. ACTIV. ¢ página 20
DESACTIVADO
RELOJ/ALARMA DIA&HORA ¢ página 20
ALARMA DESACTIVADO ¢ página 21
UNA SOLA VEZ
A DIARIO
TONO ALARMA MELODÍA 1 ¢ página 21
MELODÍA 2
MELODÍA 3
AJUSTE AVANZ CAMBIAR PIN ¢ página 21
REGISTRAR ¢ página 18
ANULAR REG. ¢ página 18
RESTAURAR TELÉFONO ¢ página 21
BASE ¢ página 21
PREF. AUTOM. ACTIV. ¢ página 22
DESACTIVADO
FLASH CORTO ¢ página 22
MEDIO
LARGO
MODO MARCADO TONO ¢ página 22
PULSO
12
NIVEL 1
...
NIVEL 4
...
MELODÍA 10
DESACTIVADO
Page 13

13
Cómo hacer llamadas (teléfono)
Cómo hacer una llamada externa
Las llamadas externas son aquellas que usan la red
telefónica pública.
~
(introduzca el número en modo inactivo) ¢c
o
c (active el modo conversar) ¢
número)
Se marca el número de teléfono.
~
(ingrese el
¤ Para cancelar el marcado, presione a.
En unos segundos, aparece en pantalla la duración de
la llamada.
Tenga en cuenta lo siguiente:
Al marcar mediante el directorio (¢ página 16),
la lista de rellamadas (¢ página 16), la lista de
llamadas (¢ página 16) o la marcación rápida
(¢ página 13), no es necesario volver a ingresar
los números o los prefijos del proveedor de red.
Cómo aceptar una llamada
Una llamada entrante se indica cuando suena o parpadea el icono ª y el Y en la pantalla.
¤ Para aceptar una llamada entrante presione c.
Si el teléfono está en el soporte de carga y la función
AUTORE SP. está activada (¢ página 20), el teléfono
responderá automáticamente la llamada al levantarlo
del soporte.
Puede ajustar el volumen del timbre, (¢ página 20)
o desactivarlo por completo (¢ página 10).
La duración de la llamada se muestra en pantalla en el
siguiente formato: HH--MM--SS.
Cómo finalizar una llamada
¤ Presione a o vuelva a colocar el teléfono en el
soporte de carga.
La duración de la llamada se muestra en pantalla en el
formato: HH--MM--SS.
Cómo ajustar el volumen de conversación
Hay tres niveles de volumen para el auricular (predeterminado: NIVEL 2). Puede ajustar el volumen del
auricular durante una llamada.
¤ Presione p para subir/bajar el volumen.
La configuración actual se muestra en pantalla.
Silenciado
Se puede silenciar el teléfono al realizar llamadas
externas. El micrófono se desactiva para que su inter
locutor no pueda oírlo.
¤ Para desactivar el micrófono, presione C.
SILENCIADO aparece en pantalla cuando el micrófono
está desactivado.
Llamada en espera
Una señal sonora le indicará la llegada de una
segunda llamada durante otra llamada. Se muestra la
información de la identificación de llamada (CLI), si
está disponible. La llamada se guarda en la lista de lla
madas, ¢ página 15.
Cómo atender una llamada en espera
(según el país)
¤ Presione Z para abandonar la llamada
activa y atender la llamada en espera. La llamada
en espera se transforma en la llamada activa.
¤ Presione Z2 para poner en espera la primera
llamada activa y atender la llamada en espera.
¤ Vuelva a presionar Z2 para alternar entre las
dos llamadas.
Cómo ignorar la llamada en espera
La llamada en espera se rechaza automáticamente
una vez transcurridos los 40 segundos.
Cómo usar las teclas de acceso directo para marcación rápida
Puede usar las teclas y 2 co mo t ecl as d e ac ces o
directo.
Condición previa: las teclas deben estar configuradas
para la marcación rápida,
¢ página 17.
¤ Presione prolongadamente las teclas ó 2.
De inmediato, se marca el número guardado en las
teclas asociadas a la marcación rápida.
Marcación Call by Call
Puede utilizar un número de Call by Call guardado en
el directorio para hacer llamadas internacionales eco
nómicas.
Condición previa: el número de Call by Call debe
estar guardado en el directorio,
En modo inactivo:
~
(ingrese el número de DDI [discado directo
internacional])
¢ página 17.
¢presione prolongadamente Q.
El Gigaset A590 seleccionará automáticamente la
línea y antepondrá el número de Call by Call guar
dado en el directorio como prefijo al número de teléfono de DDI.
-
-
-
-
Page 14

14
En modo conversar:
c (activar el modo conversar) ¢presione prolon-
gadamente Q
El teléfono llama al proveedor del servicio. Oirá un
anuncio de su proveedor.
~
¢
Ingrese el número de DDI.
También puede usar la tecla Qpara marcar el
número de Call by Call desde el directorio, la lista y de
llamadas, o la lista de rellamadas.
La función de prefijo (¢ página 22) está desactivada
al usar la función Call by Call.
Cómo hacer llamadas (base)
Cómo hacer una llamada externa
Las llamadas externas son aquellas que usan la red
telefónica pública.
~
(ingrese el número en modo inactivo)
¢ ª (levante el receptor)
o
ª(levante el receptor) ¢
Se marca el número de teléfono.
~
(ingrese el número)
¤ Para cancelar la marcación vuelva a colocar el
receptor en la base.
Tenga en cuenta lo siguiente:
Al marcar mediante el directorio (
la lista de rellamadas (
llamadas (
ingresar los números o los prefijos del proveedor
de red.
¢ página 16), no es necesario volver a
¢ página 16), o la lista de
Cómo aceptar una llamada
Una llamada entrante se indica cuando suena o parpadea el icono ª y el Y en la pantalla.
Para aceptar una llamada entrante:
ª (levante el receptor) o
presione d (conversación con manos libres)
Puede ajustar el volumen del timbre, (¢ página 21)
o desactivarlo por completo (¢ página 10).
Finalización de una llamada
Vuelva a colocar el receptor en la base o
presione d (finalice la conversación con manos
libres).
¢ página 18),
Conversación con manos libres
Cómo activarlo durante la marcación:
~
ingrese el número de teléfono ¢ d.
Cómo cambiar del modo con auricular al modo con
manos libres:
¤ Durante una llamada presione la tecla de manos
libres
d para activar o desactivar la conversa-
ción con manos libres.
Cómo ajustar el volumen de conversación
Hay tres niveles de volumen para el auricular (predeterminado: L2). Puede ajustar el volumen del auricular
durante una llamada.
¤ Presione [ / \ para subir/bajar el volumen.
La configuración actual se muestra en pantalla.
Cómo ajustar el volumen de la bocina
Hay cinco niveles de volumen de la bocina (predeterminado: L3). Puede ajustar el volumen de la bocina
durante una llamada.
Condición previa: se activa la conversación con
manos libres.
¤ Presione [ / \ para subir/bajar el volumen.
La configuración actual se muestra en pantalla.
Silenciado
Se puede silenciar el teléfono al realizar llamadas
externas. El micrófono se desactiva para que su inter
locutor no pueda oírlo.
¤ Para desactivar el micrófono, presione breve-
mente
Ô.
El ícono · aparece en pantalla cuando el micrófono
está desactivado.
Marcación Call by Call
Puede utilizar un número de Call by Call guardado en
el directorio para hacer llamadas internacionales eco
nómicas.
Condición previa: el n úme ro de Call by Ca ll se gua rda
en el directorio, a través del menú del teléfono,
¢ página 17.
En modo inactivo:
~
(ingrese el número de DDI [discado directo
internacional])
¢presione prolongadamente Q
ª (levante el receptor) o presione d.
El Gigaset A590 seleccionará automáticamente la
línea y antepondrá el número de Call by Call guar
dado en el directorio como prefijo al número de teléfono de DDI.
-
-
-
Page 15
15
En modo conversar:
ª (levante el receptor)¢ mantenga prolongada-
mente Q
El teléfono llama al proveedor del servicio. Oirá un
anuncio de su proveedor.
~
¢
Ingrese el número de DDI.
También puede usar la tecla Qpara marcar el
número de Call by Call desde el directorio, la lista y de
llamadas, o la lista de rellamadas.
Lista de llamadas
La lista de llamadas guarda las llamadas entrantes:
nombre, número, marca de tiempo (20 llamadas
como máx.).
Condición previa: la identificación de llamada (CLI)
está disponible.
El ícono Yaparece en pantalla cuando hay entradas
en la lista de llamadas. El ícono
una entrada nueva.
Cómo identificar la línea llamante (CLI)
CLI es un servicio telefónico que transmite el número
de la persona que llama y posiblemente un nombre
asociado al equipo de teléfono de la persona que
recibe la llamada.
Condición previa:
1 Su proveedor de red le permite ver el número de
la persona que llama (
2 La persona que llama le ha solicitado al proveedor
de red que identifique este número.
Yparpadea si hay
CLIP) o su nombre (CNIP).
Uso de la lista de llamadas en un teléfono
Ò YU
PETER
CNIP (Presentación de la Identificación del nombre
del llamante). Una llamada entrante sin CLI se indica
como
DESCONOCIDO.
Cómo visualizar la lista de llamadas
t (abra la lista de llamadas)
Al recibir una llamada, se
muestra el número de la persona que llama. Aparece el
nombre de la persona que
llama si está guardado en el
directorio o si se ha solicitado
¢p (desplácese por las entradas de la lista de lla-
madas, seleccione una entrada)
¢| (vea los detalles: el número)
¢| (vea los detalles: fecha/hora)
¤ Presione { para volver al modo inactivo.
Cómo marcar con la lista de llamadas
t (abra la lista de llamadas) ¢p (seleccione la
entrada)
¢c
Cómo guardar una entrada de lista de llamadas en el directorio
t (abra la lista de llamadas) ¢p (seleccione una
entrada)
¢f ¢GUARDAR NÚM. ¢|
~
¢
(ingrese un nombre) ¢|
Cómo borrar una entrada de la lista de
llamadas
t (abra la lista de llamadas) ¢p (seleccione una
entrada)
¢f ¢BORRAR ¢|
¢| (confirme la acción)
Cómo borrar la lista de llamadas
t (ingresela lista de llamadas) ¢f ¢BORRAR
TODO ¢|¢| (confirme la acción)
Cómo usar la lista de llamadas en una estación base
Y
12:30 10-31 #02
123456789
Si el número de la persona que llama es desconocido
(sin CLI), sólo se mostrará la hora y la fecha.
Cómo visualizar la lista de llamadas
t (abra la lista de llamadas, muestre la primera
entrada) o
s (abra la lista de llamadas, muestre la última
entrada)
Cuando recibe una llamada,
se muestra el número de la
persona que llamada y la
marca de tiempo.
#NN indica el número de la
entrada en la lista de
llamadas.
¢p (desplácese por las entradas de la lista de lla-
madas, seleccione una entrada)
¤ Presione Ì para mostrar los dígitos ocultos de
una entrada extensa.
Cómo marcar con la lista de llamadas
t (abra la lista de llamadas, muestre la primera
entrada) o
s (abra la lista de llamadas, muestre la última
entrada [la más reciente])
¢p (desplácese por las entradas de la lista de lla-
madas, seleccione una entrada)
¢ª (levante el receptor)
o presione d (conversación con manos libres)
Cómo guardar una entrada de lista de llamadas en el directorio
p (seleccione entrada) ¢presione prolongada-
mente ¢Ì
Page 16

16
Cómo borrar una entrada de la lista de
llamadas
p(seleccione una entrada) ¢Ô (borre la entrada)
¢| (confirme la acción)
¤ Para cancelar la eliminación, presione Ó antes
de
Ì.
Elimine las entradas caducadas para mantener al día
el almacenamiento de la lista de llamadas.
Cómo borrar por completo la lista de llamadas
t (abra la lista de llamadas) ¢presione prolongada-
mente Ô
¢| (confirme la acción)
¤ Para cancelar la eliminación, presione Ó antes
de
Ì.
Lista de últimos números de rellamada
La lista de rellamada de últimos números contiene los
últimos diez números marcados. Máximo: 24 dígitos,
incluida Pausa (P), * y #.
Cómo visualizar la lista de rellamadas
En la base: h
En el teléfono: presione prolongadamente c
¢p(desplácese por la lista de rellamadas)
La pantalla muestra el último número guardado en la
lista de rellamadas. Si la entrada coincide con la
entrada del directorio, se muestra el nombre.
Para ver los dígitos ocultos de una entrada extensa:
En la base: presione Ì.
En el teléfono: presione |
Cómo llamar desde la lista de rellamadas
p(desplácese a la entrada de la lista de rellamadas
deseada)
En la base: ª (levante el receptor) o presione d
En el teléfono: presione c
Cómo guardar el número de rellamada en el
directorio
p(desplácese a la entrada de la lista de rellamadas
deseada)
En la base: ¢ presione prolongadamente ¢
Ì
En el teléfono:¢f¢GUARDAR NÚM.¢|
~
(ingrese un nombre) ¢|
Cómo borrar un número de la lista de
rellamadas
p(desplácese a la entrada de la lista de rellamadas
deseada)
En la base: ¢ Ô ¢ Ì
En el teléfono: ¢ f¢ BORRAR¢ |¢ |
(confirme la acción)
Cómo borrar de la lista de rellamadas
En la base: h (abra la lista de rellamadas)
¢presione prolongadamente Ô ¢ Ì
(confirme
En el teléfono: presione prolongadamente c
la acción)
¢f¢BORRAR TODO¢|¢|
Directorio (teléfono)
En el directorio del teléfono se pueden guardar hasta
50 números telefónicos y sus correspondientes nom
bres. Máximo: 24 dígitos, 12 caracteres.
¤ Para obtener acceso al directorio, utilice el menú.
f ¢ AGENDA
NUEVA ENTR.
LISTA LLAM.
EDIT. ENTR.
BORRAR
BORRAR TODO
CALL BY CALL
MARCA
RAPIDA
Guarde un nuevo número de
teléfono.
Haga una lista de todos los números
guardados.
Edite la entrada seleccionada.
Borre el registro seleccionado.
Borre todas las entradas en un
directorio.
Ingrese un número de Call by Call.
Para los accesos directos, asigne la
entrada actual a una tecla.
Cómo usar el directorio
Cómo guardar un número en el directorio
f(abra el menú)¢AGENDA ¢|
¢NUEVA ENTR. ¢|
~
¢
(ingrese un nombre) ¢|
~
¢
(ingrese un número) ¢|
¤ Para mostrar números extensos, presione |.
¤ Use { como retroceso.
Si el nombre de la entrada ya existe en el directorio, la
pantalla muestra
y vuelve a la pantalla
Cómo visualizar una entrada del directorio
NOMB DUPLIC. durante 2 segundos
INTRO. NOMB..
s (abra el directorio) o
f(abra el menú)¢AGENDA
¢LISTA LLAM. ¢|
¢p (seleccione una entrada)¢|
Se muestra la entrada.
¤ Use | para desplazarse por la entrada y ver los
caracteres ocultos.
-
Page 17

17
Cómo marcar desde el directorio
s (abra el directorio) ¢p (seleccione una entrada)
¢c
Cómo guardar un número marcado en el
directorio
~
(ingrese el número) ¢f (abra el menú)
¢GUARDAR NÚM. ¢|
~
¢
(ingrese un nombre) ¢|
Cómo editar una entrada en el directorio
f(abra el menú)¢AGENDA ¢|
¢EDIT. ENTR. ¢|
¢p (seleccione una entrada)¢|
~
¢
(edite el nombre) ¢|
~
¢
(edite el número) ¢|
Cómo borrar una entrada del directorio
f(abra el menú)¢AGENDA ¢|
¢BORRAR ¢|
¢p(seleccione una entrada)¢|¢|
(confirme
Se borra la entrada.
la acción)
¤ Use { para descartar la acción y volver a la
lista del directorio.
Borre las entradas que caducaron para mantener al
día el almacenamiento del directorio.
Cómo almacenar números para la marcación rápida
En el teléfono, puede usar las teclas y 2 para la
marcación rápida.
Condición previa: el (los) números que se asignará(n)
a las teclas debe(n) estar dentro del directorio.
Cómo agregar o cambiar un número de marcación rápida
f (abra el menú)¢AGENDA ¢|
¢MARCA RAPIDA ¢|
¢p (seleccione una tecla: TECLA 1 o TECLA 2)
|
¢
Se mostrará el nombre del número de teléfono
actualmente asignado o
que
no haya números asignados.
SIN NÚMERO en caso de
¢f¢ p (seleccione AÑADIR) ¢|
¢p(elija el nombre o el número del directorio)
¢|
Se asigna el número a la tecla seleccionada.
Cómo borrar una entrada de marcación
rápida
f(abra el menú)¢AGENDA ¢|
¢MARCA RAPIDA ¢|
¢p (seleccione una tecla: TECLA 1 o TECLA 2)
|
¢
Se mostrará el nombre actual.
¢f¢ p (seleccione SUPRIMIR) ¢|
¢| (confirme la acción)
Cómo guardar números de Call by Call
Para usar la función Call by Call (¢ página 13) a tra-
vés de la tecla Q, el número de Call by Call debe
guardarse en el directorio.
Cómo visualizar el número de Call by Call
¤ Presione prolongadamente la tecla Q.
Si el número de Call by Call está guardado, se mostrará el nombre.
¤ Presione | pa ra v er o ed it ar el n úm ero de Ca ll b y
Call.
Cómo guardar un número de Call by Call en el
directorio
f(abra el menú)¢AGENDA ¢|
¢CALL BY CALL ¢|
~
¢
(ingrese un nombre: máx. 12 caracteres)
¢|
~
¢
(ingrese un número: máx. 48 caracteres)
¢|
El número de Call by Call se guarda en el directorio.
Cómo borrar el directorio completo
Esta acción borrará todas las entradas del directorio
del teléfono incluidos los números de marcación
rápida. No se eliminarán los números de Call by Call.
f (abra el menú)¢AGENDA ¢|
¢BORRAR TODO ¢|¢| (confirme la acción)
Page 18

18
Directorio (base)
En el directorio de la base se pueden almacenar hasta
30 números de teléfono (máx. 24 dígitos).
Cómo guardar un número en el directorio
Presione prolongadamente
~
¢
(ingrese el número) ¢|
¤ Use Ô como retroceso.
¤ Presione Ó para cancelar la acción.
Cómo visualizar el directorio
(abra el directorio)
¢p(desplácese por el directorio)
¤ Presione Ì para mostrar los dígitos ocultos de
una entrada extensa.
Cómo editar una entrada en el directorio
(abra el directorio) ¢p (seleccione una
entrada)
¢presione prolongadamente
~
¢
(ingrese el número) ¢|
¤ Use Ô como retroceso.
¤ Presione Ó para cancelar la acción.
Cómo marcar desde el directorio
(abra el directorio) ¢p (seleccione una
entrada)
¢ª (levante el receptor)
o presione d (conversación con manos libres)
Cómo borrar una entrada del directorio
(abra el directorio) ¢p (seleccione una
entrada)
¢Ô (borre la entrada)¢| (confirme la acción)
¤ Presione Ó para cancelar la acción.
Borre las entradas que caducaron para mantener al
día el almacenamiento del directorio.
Cómo borrar el directorio completo
(abra el directorio)
¢presione prolongadamente Ô ¢Ì
(confirme
la acción)
¤ Presione Ó para cancelar la acción.
Cómo usar varios teléfonos
Cómo registrar los teléfonos
Antes de que pueda usar el teléfono, debe registrarlo
en la estación base. Se pueden registrar hasta cuatro
teléfonos. Debe iniciar el registro en el teléfono y en la
estación base.
En la base
¤ Presione prolongadamente la tecla Ëdurante al
menos 5 segundos.
En el teléfono
f(abra el menú)¢AJUSTE AVANZ ¢|
¢REGISTRAR¢|
~
(ingrese el PIN actual, predeterminado: 0000)
¢|
Al teléfono se le asignará el menor número interno sin
asignar (1-4).
Una vez registrado correctamente el teléfono, éste
vuelve a modo inactivo. El número (predeterminado:
Gigaset) y el número interno del teléfono aparecen en
pantalla, p. ej.
Si el t elé fon o no se r egi str ó co rre cta me nte, la p ant al la
mostrará
procedimiento.
◆ Es posible que el PIN del sistema predetermi-
◆ El nombre del teléfono se puede cambiar,
Gigaset 1.
REG TELÉFONO. En este caso, repita el
Tenga en cuenta lo siguiente:
nado haya cambiado, (¢ página 21).
(¢ página 20).
Cómo cancelar el registro de los teléfonos
Tenga en cuenta lo siguiente:
¡No cancele el registro de teléfonos a menos que
sea necesario!
Condición previa: el teléfono debe estar en modo
inactivo.
f(abra el menú)¢AJUSTE AVANZ ¢|
¢ANULAR REG.¢|
~
(ingresel PIN actual)¢|
¢p (seleccione el teléfono al que desea cancelar su
registro)
¢|
Un tono de confirmación prolongado indica la cancelación exitosa del registro. La pantalla del teléfono
mostrará
REG TELÉFONO.
Cómo localizar un teléfono ("localizador")
Puede localizar los teléfonos usando la estación base.
Condición previa: la estación base debe estar en
modo inactivo.
¤ Presione brevemente la tecla del localizadorË
en la estación base.
Todos los teléfonos sonarán con una melodía de localización específica. Esto también ocurre si los tonos
del timbre están desactivados. Esta pantalla mostrará
INTERCOM X.
Page 19

19
En caso de una llamada entrante, el teléfono abandona el modo localizador y suena.
Tras 30 segundos, el teléfono y la estación base vuelven al modo inactivo.
Cómo desactivar el localizador en forma manual
¤ Vuelva a presionar prolongadamente la tecla del
localizador
Ëen la estación base.
Cómo hacer llamadas internas
Las llamadas internas son llamadas gratuitas para
otros teléfonos que están registrados en la misma
estación base o en la estación base en sí misma.
Cómo hacer llamadas internas (teléfono)
Llamada a otro participante interno
~
k¢
participante)
0 = estación base, 1-4 = número de teléfono, * = todos
Si sólo se registra un teléfono, debe ingresar un
número para llamar al teléfono desde la base.
Cómo aceptar una llamada interna
(ingrese el número interno del
¤ Para atender la llamada, presione c.
¤ Para finalizar la llamada, presione a.
Llamada entrante durante llamada interna
Una llamada entrante se indica con una señal sonora.
c (atienda la llamada externa, finalice la llamada
interna) o
k (pong a en e spera la ll amad a interna, acepte la lla-
mada externa)
¢ k(inicie una conferencia)
Llamadas internas de consulta
Si está hablando con un participante externo, puede
llamar a un participante interno al mismo tiempo
para realizar una consulta.
Presione prolongadamente k (ponga la llamada
externa en espera)
~
k¢
participante)
Se conectará con el participante interno.
k (alterne entre participante interno y externo)
Cómo transferir una llamada a otro teléfono
Puede transferir una llamada interna a otro teléfono.
Presione prolongadamente k (ponga la llamada
externa en espera)
k¢
participante)
(ingrese el número interno del
~
(ingrese el número interno del
Se conectará con el participante interno.
a (transfiera la llamada externa al modo partici-
pante interno).
Llamada en conferencia
Si está hablando con un participante externo, un
interlocutor interno puede escuchar esta llamada y
participar en una llamada en conferencia.
Cómo iniciar una llamada en conferencia
Presione prolongadamente k (ponga la llamada
externa en espera).
~
k¢
participante).
Se conectará con el participante interno.
Presione prolongadamente k (inicie la conferencia).
Cómo finalizar una llamada en conferencia
(ingrese el número interno del
¤ Presione la tecla para finalizar la llamada a.
Si un participante interno presiona la tecla para finalizar la llamada a, el otro teléfono permanece
conectado con el participante externo.
Cómo hacer llamadas internas (base)
Cómo llamar a todos los teléfonos
¤ Presione Ë. Se llamará a todos los teléfonos.
Se conecta el primer teléfono que acepta la llamada.
Se anula la llamada a los otros teléfonos.
Cómo aceptar una llamada interna
ª (levante el receptor) o presione d.
¤ Para finalizar la llamada, vuelva a colocar el recep-
tor o presione
Llamada entrante durante llamada interna
Una llamada externa entrante durante una llamada
interna se indica con una señal sonora.
d.
¤ Vuelva a colocar el receptor en la base para salir de
la llamada interna.
ª o d (acepte la llamada externa).
Llamadas internas de consulta
Si está hablando con un participante externo, puede
llamar a un participante interno al mismo tiempo
para realizar una consulta.
Ë (ponga la llamada externa en espera).
Se llamará a todos los teléfonos. Se conectará el primer teléfono que acepte la llamada.
Ë (alterne entre participante interno y externo).
Cómo transferir una llamada externa al
teléfono
Puede transferir una llamada externa al teléfono.
Ë (ponga la llamada externa en espera)
Se llamará a todos los teléfonos.
Page 20

20
Vuelva a colocar el receptor o presione d (transfiera
la llamada externa al participante interno).
Se conecta el primer teléfono que acepta la llamada.
Llamada en conferencia
Si está hablando con un participante externo, un
interlocutor interno puede escuchar esta llamada y
participar en una llamada en conferencia.
Cómo iniciar una llamada en conferencia
Ë (ponga la llamada externa en espera)
Se llamará a todos los teléfonos. Se conecta el primer
teléfono que acepta la llamada.
Presione prolongadamente Ë (inicie la conferencia)
Cómo finalizar una llamada en conferencia
¤ Vuelva a colocar el receptor o presione d.
Si un participante interno presiona la tecla para finalizar la llamada a, el otro teléfono permanece
conectado con el participante externo.
Configuraciones
Configuraciones (teléfono)
Su teléfono está preconfigurado. No obstante, puede
realizar ajustes individuales.
¤ Para cambiar la configuración del teléfono, utilice
el menú.
f ¢ AJUSTES PERS
NOMBRE TELF.
TONOS TELF.
AUTORE SP.
Cambie el nombre del teléfono.
Cambie el volumen del timbre y
el pitido de la tecla.
Active/desactive la autorespuesta.
f ¢ RELOJ/ALARMA
DIA&HORA
ALARMA
TONO ALARMA
Cómo cambiar el nombre del teléfono
Puede cambiar el nombre predeterminado del teléfono (predeterminado: Gigaset). Caracteres
máximos:
10.
Configure la fecha y la hora.
Configure el reloj despertador.
Configure una melodía para el
despertador.
f¢AJUSTES PERS ¢|
¢NOMBRE TELF.¢|
Se muestra el nombre actual, parpadea el caracter.
¤ Use { como retroceso.
~
(ingrese un nombre) ¢|
En el apéndice de esta guía encontrará información
sobre entradas de varias líneas,
¢ página 22.
Cómo cambiar el volumen del timbre
Se pueden elegir entre cinco niveles de sonido para el
volumen del timbre;
VAD O (predeterminado: NIVEL 2).
NIVEL 1 – NIVEL 4 y DESACTI-
f¢AJUSTES PERS ¢|
¢TONOS TELF.¢|
¢VOL. TIMBRE¢|
La melodía actual del timbre se reproduce con el
volumen actual.
¢p (seleccione el nivel de volumen)¢|
Si el timbre está desactivado, aparece el ícono Ú en
la pantalla. El teléfono sonará
lo esté localizando.
También puede desactivar completamente el timbre
mediante la tecla
Cómo cambiar la melodía del timbre
Se puede elegir entre 10 melodías de timbre
(predeterminado: MELODÍA 1).
*.
NIVEL 2 cuando la base
f¢AJUSTES PERS ¢|
¢TONOS TELF.¢|
¢TONOS TIMBRE¢|
¢p (seleccione una melodía)
Se reproduce la melodía seleccionada.
¤ Para confirmar la melodía seleccionada¢|
Cómo configurar el pitido de la tecla
El teléfono emitirá un pitido siempre que se presione
una tecla del teléfono. Se puede desactivar esta señal
sonora (predeterminada:
ACTIV.).
f¢AJUSTES PERS ¢|¢TONOS TELF.¢|
¢TONO TECLA¢|
¢p (seleccione ACTIV. o DESACTIVADO) ¢|
Cómo activar/desactivar la respuesta
automática
Al activar esta función, si recibe una llamada, simplemente puede levantar el teléfono del soporte de
carga sin tener que presionar la tecla de conversación
c.
f¢AJUSTES PERS ¢|¢AUTO RESP.¢|
¢p (seleccione ACTIV. o DESACTIVADO) ¢|
Cómo configurar la fecha y la hora
f¢RELOJ/ALARMA ¢|
¢ DIA&HORA¢|
~
¢
(ingrese la fecha: DD/MM) ¢|
~
¢
(ingrese la hora: HH:MM, formato de 24 horas)
¢|
¤ Use { como retroceso.
Tenga en cuenta lo siguiente:
Una vez que se establece la fecha y hora, si se pro-
duce un corte de energía en el transformador de
corriente, debe restablecer la fecha y la hora.
Page 21

21
Cómo configurar el despertador
Se puede configurar el despertador en el teléfono.
Condición previa: la fecha y la hora deben estar configuradas, ver más arriba.
Una vez por día o todos días sonará una alarma
durante 1 minuto a la hora establecida.
f¢RELOJ/ALARMA ¢|¢ALARMA¢|
¢p (seleccione UNA SOLA VEZ o A DIARIO o DESAC-
TIVADO) ¢|
Si selecciona UNA SOLA VEZ o A DIARIO
~
(ingrese la hora: HH:MM, formato de 24 horas)
¢|
¤ Use { como retroceso.
Si la alarma está activada, aparece el ícono ¼ en la
pantalla. Durante la alarma, --ALARMA-- parpadea en
la pantalla.
¤ Para apagar la alarma, presione cualquier tecla del
teclado.
Cómo configurar la melodía de la alarma
Se puede seleccionar entre tres melodías de alarma
(predeterminado:
MELODÍA 1).
f¢RELOJ/ALARMA ¢|
¢TONO ALARMA¢|
¢p (seleccione una melodía)
Se reproduce la melodía seleccionada.
¤ Para confirmar la melodía seleccionada¢|
Configuraciones (base)
Cómo configurar la fecha y la hora
Ì presione prolongadamente.
La pantalla muestra los campos de fecha y hora. Parpadeará la próxima posición que deba completarse.
~ (ingrese hora (HH:MM) y fecha (DD/MM))
¤ Para corregir los datos ingrasados, retroceda con
Ô
.
¤ Presione Ì para guardar la nueva configuración
del reloj despertador.
Cómo cambiar el volumen del timbre
Hay cuatro niveles de volumen del timbre (predeterminado: L2). Se puede ajustar el volumen del timbre.
Condición previa: la estación base debe estar en
modo inactivo.
¤ Presione [ / \.
La configuración actual se muestra en pantalla.
¤ Para apagar el timbre por completo (L0) presione
prolongadamente la tecla
Al apagar el timbre, también se desactiva el pitido de
la tecla.
*.
Cómo cambiar el PIN
La estación base está protegida a través de un PIN
contra el registro no autorizado del teléfono. Se
puede cambiar el PIN preestablecido mediante el
menú.
f¢AJUSTE AVANZ ¢|¢CAMBIAR PIN
|
¢
~
¢
(ingrese el PIN actual, predeterminado: 0000)
¢|
~
¢
(ingrese el nuevo PIN: 0 a 9 dígitos) ¢|
¤ Use { como retroceso.
Tenga en cuenta lo siguiente:
¤ Si olvidó el PIN, restablezca la unidad base a su
configuración de fábrica para restablecer el
PIN a la configuración predeterminada 0000,
¢ página 21.
Cómo restaurar la configuración predeterminada
Se puede restablecer cualquier configuración individual o cambios que se hayan realizado.
Se borran las entradas del directorio y la lista de llamadas. Tras restaurar la base, los teléfonos deben volver a registrarse.
Condición previa: el tel éf ono y l a ba se de ben es tar en
modo inactivo.
Restauración de la base
f¢AJUSTE AVANZ ¢| ¢RESTAURAR¢|
¢p (seleccione BASE) ¢|¢|
Restauración del teléfono
f¢AJUSTE AVANZ ¢|¢RESTAURAR¢|
¢p (seleccione TELÉFONO) ¢|¢|
Page 22

22
Cómo conectar a una central telefónica
El teléfono está configurado de forma predeterminara para operar en la conexión principal. Si va a operar con una central telefónica, es posible que deba
cambiar los siguientes valores. Consulte la guía del
usuario de su central telefónica.
¤ Para cambiar la configuración del teléfono, utilice
el menú.
f ¢ AJUSTE AVANZ
PREF. AUTOM.
FLASH
MODO
MARCADO
Establezca un prefijo para marcar
en línea externa.
Cómo cambiar el tiempo de corte
de llamada.
Cambie el modo de marcación.
Configure el prefijo
Puede configurar un prefijo de al menos 5 dígitos que
se agregará automáticamente al número telefónico.
Este prefijo se puede utilizar para marcar en línea
externa al utilizar el dispositivo en una central
telefónica.
Condición previa: el número se debe marcar en
modo inactivo, es decir, primero
f¢AJUSTE AVANZ ¢|
~
y luego ª.
¢PREF. AUTOM.¢|
¢p (seleccione AC TIV. o DESACTIVADO) ¢|
~
(ingrese un prefijo de 5 dígitos como máximo)
¢|
¤ Para ingresar una pausa en el prefijo, presione pro-
longadamente
duración de la pausa es de un segundo.
Ejemplo: el prefijo es ACTI V. y se establece en 65
Su marcado Número real marcado
1234 1234
12345 65P12345
#12345 65P#12345
Z. De forma predeterminada la
Cómo cambiar el modo de marcación
Puede configurar el modo de marcación en PULSO o
TONO . (Predeterminado: TONO)
f¢AJUSTE AVANZ ¢|
¢MODO MARCADO ¢|
¢p (seleccione PULSO o TONO) ¢|
Apéndice
Cómo escribir y editar texto
Al escribir texto tenga en cuenta las siguientes reglas:
◆ Controle el cursor con p.
◆ Los caracteres se introducen a la izquierda del
cursor.
◆ La primera letra del nombre en los registros del
directorio telefónico aparece automáticamente
en mayúscula, seguida por letras en minúscula.
Presione varias veces la tecla correspondiente para
introducir letras/caracteres.
Caracteres estándar en el teléfono
1x 2x 3x 4x 5x 6x
1) 1)
2
3
4
5
L
M
N
O
Q
2)
*
2)
#
1) Espacio
2) Sin efecto al introducir los nombres
1 _ < >
A B C 2 A B
D E F 3 D E
G H I 4 G H
J K L 5 J K
M N O 6 M N
P Q R S 7 P
T U V 8 ? T
W X Y Z 9 W
0 -- / \ # +
* * * * * *
# # # # # #
Cómo configurar el tiempo de corte de llamada
Puede configurar el tiempo del corte de llamada en
100 (
CORTO), 300 (MEDIO) ó 600 (LARGO) ms. (Prede-
terminado: CORTO)
¢f¢AJUSTE AVANZ ¢|
¢FLASH ¢|
¢p(seleccione CORTO, MEDIO o LARGO) ¢|
Page 23

Especificaciones generales
Datos técnicos
WDCT estándar Admitido
Cantidad de canales 80 canales dobles
Rango de frecuencia de
radio
Método doble Múltiplex por división de
Velocidad de transmisión
de bits
Modulación GFSK
Alcance hasta 300 m en espacios abier-
Suministro de alimentación de la estación base
Condiciones ambientales
para el funcionamiento
Modo de marcación DTMF/DP
Tam año de la b ase aprox. 76 x 178 x 183 mm
Tamaño del teléfono aprox. 150 x 48 x 30 mm
2400-2483.5 MHz
tiempo, longitud de trama
10
ms
576 kbit/s
tos, hasta 50 m en interiores
110 ~ 220 V, 50 - 60 Hz
+5 °C a +45 °C;
20 % a 75 % de humedad
(Hight x Width x Depth)
(Hight x Width x Depth)
23
Baterías recomendadas
Tec no lo gí a: Níquel e hidruro metálico (NiMH)
Tam añ o: AAA (Micro, HR03)
Volt aje: 1,2 V
Capacidad: 550 - 800 mAh
Recomendamos los siguientes tipos de baterías
debido a que son las únicas que garantizan los
tiempos de funcionamiento especificados, una fun
cionalidad total y una vida útil de servicio
prolongada:
◆ Sanyo NiMH 800
◆ Panasonic 700 mAh
◆ GP 700 mAh
◆ Yuasa AAA 700/800mAh
◆ Corun AAA 550/650mAh
El dispositivo se suministra con dos baterías
recomendadas.
Preguntas y respuestas
Si tiene preguntas sobre el uso de su teléfono, visítenos en www.gigaset.com/customercare en cualquier
momento.
-
Page 24

Page 25

Gigaset A590
The handset at a glance
ÒU
1
2 8
3
4
5
Gigaset 1
10
1
1 Display in idle mode
2 Back key
When editing text: backspace
In menu: go back to previous level
3 Internal communication key (¢ page 16)
4 Tal k key / Redial list* (¢ page 14)
5 Control key
In idle mode: s open phone book, t open calls
list.
In menu, phone book and lists: Scrolling up/down
6 Star key / Ringer on/off *
7 Recall key
Consultation call (flash)
Insert pause*
8 OK key
9 Menu key (¢ page 9)
10 End call key / Power on/off *
9
11 Hash (#) key / Keypad lock on/off * (¢ page 9)
12 Call-by-call key * (¢ page 11)
13 Mute key (microphone off) (¢ page 11)
* To activate a function marked with an asterisk (*)
press and hold the corresponding key.
6
7
Display icons
Radio signal
Ò
Steady: Handset is linked with base
Flashing: Handset is out of range or not
Battery icon
U
Steady: Full, more than1 hour talking time
Flashing: Charging
Steady: Less than 1 hour talking time
=
Flashing:
Alarm clock is activated
¼
Ringer is deactivated
Ú
Keypad lock is activated
Ø
registered
Almost flat
11
12
13
Display in idle mode
¤ Press and hold the A key to toggle between
name/number and date/time display.
ÒU
Gigaset 1
Tal k icon
ª
Steady: Ongoing call
Flashing: Incoming call received
Phone book is opened
Calls list icon
Y
Steady: Already inspected calls in calls list
Flashing: New calls in calls list
Off: No entry in calls list
In editing mode: Backspace. Press A to
{
delete one character at a time
In menu: Press A to g o ba ck to pre viou s le vel
or exit menu.
Confirm menu function or save entry with B.
|
In menu and lists: Scroll up/down with p.
V
In talk mode: Adjust volume with p.
W
ÒU
31/10 12-30
Page 26

2
The base at a glance
1 Display in idle mode
2 Back key
3 Phone book (¢ page 15)
Show first entry /
Add new entry*
4 Redial key (¢ page 14)
1
5 OK key / Clock key *
6 Intercom key:
Paging (¢ page 16)
2
Registration * (¢ page 16)
3
7 Calls list key (¢ page 13)
4
Open / Scrolling up/down
5
8 Mute key (¢ page 12) /
6
Delete key* when editing
7
phone book, lists or predial
8
ling
9
9 Recall key
Consultation call (flash)
10
11
12 1413
* To activate a function marked with an asterisk (*) press and hold the corresponding key.
Base display
Dialling pause*
10 Volu me keys
Ringer volume (¢ page 19)
Tal k volume (¢ page 12)
11 Loudspeaker (Hands-free) key
(¢ page 12)
12 Star key / Ringer off key*
13 Call-by-call key * (¢ page 12)
14 Hash (#) Key /
Keypad lock on/off key*
(¢ page 9)
-
Â12:30 31-10 #04 Ã
01234567890987
Display icons
ª
·
Ú
Tal k icon
Steady: Ongoing call
Flashing: Incoming call received Steady: Already inspected calls in calls list
Microphone is deactivated (Mute) Flashing: New calls in calls list
Phone book is opened Off: No call in calls list
Ringer is deactivated
Time (HH:MM): Current time or time of incoming call in calls list
Date (DD-MM): Current date or date of incoming call in calls list
#NN Number of entries in calls list or phone book if opened
Phone number: Displayed in calls list, redial and dialled numbers and
phone book entries.
characters on the right or left side to be displayed. Press
 Ãindicates that there are more
Ì to display hidden digits.
Ø
Y
Keypad lock is activated
Calls list icon
Page 27

3
Contents
Gigaset A590 . . . . . . . . . . . . . . . . . . . . . 1
The handset at a glance . . . . . . . . . . . . . . . . . 1
The base at a glance . . . . . . . . . . . . . . . . . . . . 2
Safety precautions . . . . . . . . . . . . . . . . 4
Care . . . . . . . . . . . . . . . . . . . . . . . . . . . . . . 4
Contact with liquid . . . . . . . . . . . . . . . . . . . . . 4
First steps . . . . . . . . . . . . . . . . . . . . . . . . 5
Check the pack contents . . . . . . . . . . . . . . . . 5
Setting up the base station and charging cradle
5
Connecting the base station . . . . . . . . . . . . 5
Connecting the handset charging cradle 6
Setting up the handset for use . . . . . . . . . . 6
Inserting the batteries and closing the battery
cover . . . . . . . . . . . . . . . . . . . . . . . . . . . . . . . . . . . 6
Setting the date and time . . . . . . . . . . . . . . . 8
Using the phone . . . . . . . . . . . . . . . . . . 9
Control key . . . . . . . . . . . . . . . . . . . . . . . . . . . . . 9
Entering numbers and text . . . . . . . . . . . . . . 9
Scrolling to display long numbers . . . . . . . 9
Activating/deactivating the keypad lock . 9
Activating/deactivating handset . . . . . . . . 9
Reverting handset to idle mode . . . . . . . . . 9
Activating/deactivating ringer tone . . . . . 9
Using the menu . . . . . . . . . . . . . . . . . . . . . . . . . 9
Menu tree . . . . . . . . . . . . . . . . . . . . . . . . . . . . . 10
Making calls (handset) . . . . . . . . . . . 11
Making an external call . . . . . . . . . . . . . . . . . 11
Accepting a call . . . . . . . . . . . . . . . . . . . . . . . . 11
Ending a call . . . . . . . . . . . . . . . . . . . . . . . . . . . 11
Adjusting talking volume . . . . . . . . . . . . . . 11
Muting . . . . . . . . . . . . . . . . . . . . . . . . . . . . . . . . 11
Call waiting . . . . . . . . . . . . . . . . . . . . . . . . . . . . 11
Using shortcut keys for speed dialling . . 11
Call-by-call dialling . . . . . . . . . . . . . . . . . . . . . 11
Making calls (base) . . . . . . . . . . . . . . . 12
Making an external call . . . . . . . . . . . . . . . . . 12
Accepting a call . . . . . . . . . . . . . . . . . . . . . . . . 12
Ending a call . . . . . . . . . . . . . . . . . . . . . . . . . . . 12
Hands-free talking . . . . . . . . . . . . . . . . . . . . . 12
Adjusting the talking volume . . . . . . . . . . . 12
Adjusting the loudspeaker volume . . . . . 12
Muting . . . . . . . . . . . . . . . . . . . . . . . . . . . . . . . . 12
Call-by-call dialling . . . . . . . . . . . . . . . . . . . . 12
Calls list . . . . . . . . . . . . . . . . . . . . . . . . . . 13
Using the calls list on the handset . . . . . . 13
Using the calls list on the base station . . 13
Last number redial list . . . . . . . . . . . . 14
Phone book (handset) . . . . . . . . . . . . 14
Using the phone book . . . . . . . . . . . . . . . . . 14
Storing numbers for speed dialling . . . . . 15
Storing call-by-call numbers . . . . . . . . . . . 15
Deleting the complete phone book . . . . 15
Phone book (base) . . . . . . . . . . . . . . . 15
Using several handsets . . . . . . . . . . . 16
Registering handsets . . . . . . . . . . . . . . . . . . 16
Deregistering handsets . . . . . . . . . . . . . . . . 16
Locating a handset ("paging") . . . . . . . . . . 16
Making internal calls . . . . . . . . . . . . . 16
Making internal calls (handset) . . . . . . . . . 16
Making internal calls (base) . . . . . . . . . . . . 17
Settings . . . . . . . . . . . . . . . . . . . . . . . . . 17
Settings (handset) . . . . . . . . . . . . . . . . . . . . . 17
Settings (base) . . . . . . . . . . . . . . . . . . . . . . . . . 18
Changing the PIN . . . . . . . . . . . . . . . . . . . . . . 19
Restoring to the factory settings . . . . . . . 19
Connecting to PABX . . . . . . . . . . . . . . 19
Prefix setup . . . . . . . . . . . . . . . . . . . . . . . . . . . . 19
Setting flash time . . . . . . . . . . . . . . . . . . . . . . 19
Changing the dialling mode . . . . . . . . . . . 19
Appendix . . . . . . . . . . . . . . . . . . . . . . . . 20
Writing and editing text . . . . . . . . . . . . . . . . 20
General Specifications . . . . . . . . . . . . . . . . . 20
Service (Customer Care) . . . . . . . . . . 21
Page 28

4
Safety precautions
Read this user guide and the safety precautions carefully before use. Explain their contents and the potential
hazards associated with using the telephone to your children.
Only use the mains unit supplied.
$
Fit only the recommended, rechargeable batteries (¢ page 20), i.e. never use a conventional (nonrechargeable) battery or other battery types as this could result in significant health risks and personal injury.
The operation of medical appliances may be affected. Be aware of the technical conditions in your
particular environment, e.g. doctor's surgery.
Do not hold the rear of the handset to your ear when it is ringing. Otherwise you risk serious and permanent damage to your hearing.
The handset may cause an unpleasant humming noise in hearing aids.
Do not install the phone in a bathroom or shower room. The handset and base station are not splashproof.
Do not use your phone in environments with a potential explosion hazard, e.g. paint shops.
ƒ
If you give your Gigaset to someone else, make sure you also give them the user guide.
Ple ase remo ve fa ulty bas e sta tions from use or ha ve the m rep aired by ou r ser vice, as th ey could interfere with other wireless services.
Disposal
All electrical and electronic products should be disposed of separately from the municipal waste
stream via designated collection facilities appointed by the government or the local authorities.
The correct disposal and separate collection of your old appliance will help prevent potential negative consequences for the environment and human health. It is a precondition for reuse and recycling
of used electrical and electronic equipment. For more detailed information about disposal of your
old appliance, please contact your local council refuse centre or the original supplier of the product.
Care
Wipe down the base station and handset with a damp cloth (no solvents) or an antistatic cloth. Never use a dry
cloth. This can cause static.
Contact with liquid
If the handset should come into contact with liquid:
◆ Switch the handset off and remove the batteries immediately.
◆ Allow the liquid to drain from the handset.
◆ Pat all parts dry, then with the battery compartment open and the keypad facing down place the handset in
a dry, warm place for at least 72
◆ Do not switch on the handset again until it is completely dry.
When it has fully dried out, you will normally be able to use it again.
!
hours (not in a microwave, oven etc.).
Page 29

5
First steps
Check the pack contents
◆ one Gigaset A590 base station
◆ one mains adapter for base station
◆ one corded handset with cable
◆ one cordless Gigaset A59H handset
◆ one handset charging cradle with mains adapter
◆ two batteries
◆ one battery cover
◆ one phone cord
◆ one user guide
Setting up the base station and charging cradle
The base station and charging cradle are designed for use in enclosed dry rooms with a temperature range of
+5
°C to +45 °C.
¤ Set up the base station at a central location on a flat, non-slip surface in your house or apartment.
Please note
Pay attention to the range of the base station.
This is up to 300 m in unobstructed outdoor areas and up to 50 m inside buildings.
The phone's feet do not usually leave any marks on surfaces. However, due to the multitude of different varnishes
and polishes used on today's furnishings, the occurrence of marks on the surfaces cannot be completely ruled
out.
Please note:
◆ Never expose the telephone to heat sources, direct sunlight or other electrical appliances.
◆ Protect your Gigaset from moisture, dust, corrosive liquids and vapours.
Connecting the base station
¤ First connect the mains adapter 1.
¤ Then connect the telephone jack 2 and insert the cables into
the cable ducts.
¤ Then plug the handset cable in the handset. Connect the
handset to the base station 3 and insert the cables into the
cable ducts.
Please note:
◆ The mains adapter should always be connected, as the
phone has only basic phone functions without mains connec
tion.
◆ Only use the mains adapter and phone cord supplied.
◆ Pin connections on telephone cables can vary. If you buy a
replacement phone cord, make sure that the phone jack has
the correct type of wiring.
1
1
-
2
1
3
1
Page 30

6
T
O
t
Connecting the handset charging cradle
¤ Plug the mains adapter into the plug socket.
Setting up the handset for use
The display is protected by a plastic film.
¤ Remove the protective film!
Inserting the batteries and closing the battery cover
Warn ing
Use only the rechargeable batteries recommended by Gigaset Communications GmbH (
use a conventional (non-rechargeable) battery or other battery types as this could result in significant health
risks and personal injury. For example, the batteries could explode. The phone could also malfunction or be
damaged as a result of using batteries that are not of the recommended type.
¢ page 20). Never
Inserting the batteries
¤ Insert the batteries the right way round.
he polarity is indicated in/on the battery compartment.
Closing the battery cover
¤ Slide the battery cover
pening the battery cover
If you need to open the battery cover, for instance to replace
he batteries:
¤ press the ribbing at the top of the battery cover and slide it
downward.
from bottom up onto the
casing until it clicks into
place.
Page 31

7
Placing the handset in the charging cradle and charging the batteries
Before you can use the handset, you must first charge the batteries.
¤ Place the handset with the display facing up
in the charging cradle.
Ò=
Gigaset 1
The idle screen is displayed. The handset name and the internal handset number are
displayed. The handset is already registered to the base.
If you want to register further handsets, you have to register each individual handset
manually
Handsets are assigned the lowest available internal number (1-4). If four handsets are
registered you will have to deregister one handset before you can register another.
(¢ page 16).
Initial charging and discharging of the batteries
If the handset is activated, the flashing battery icon in the top right of the display indicates that the batteries are
being charged. During handset operation, the battery icon indicates the charge status of the batteries.
Steady: Full, more than1 hour talking time
U
Flashing: Charging
Steady: Less than 1 hour talking time
=
Flashing: Almost flat. Put the handset into the charging cradle to recharge.
The correct charging level can only be displayed if the batteries are first fully charged and discharged.
¤ Place the handset in the charging cradle for fifteen hours.
¤ Then remove the handset from the charging cradle and do not replace it until the batteries are completely
discharged.
Please note
◆ After the first battery charge and discharge cycle you may replace your handset in the charging cradle
after every call.
◆ Always repeat the charging and discharging procedure if you have removed the batteries from the hand-
set and re-insert them.
◆ The batteries may warm up during charging. This is not dangerous.
◆ In a while, the charge capacity of the batteries will decrease for technical reasons.
Warn ing
Please ensure that the handset is in the charging cradle if you are absent for a long time (e.g. during holidays)
or remove the batteries from the handset. Else the batteries could be damaged.
Page 32

8
Activating/deactivating the handset
¤ Press and hold the a key to activate or deactivate the handset.
If you place a deactivated handset in the base station or charging cradle, it will automatically activate.
Handset out of range
If the handset is out of range of the base station the antenna icon Ò will flash on the display. If the signal
becomes poor during a call the earpiece will briefly intermit voice transmission by emitting an out of range warn
ing tone. In this case you should reduce the distance to the base station. If the signal becomes too low the line is
disconnected.
Setting the date and time
Set the date and time so that the correct date and time can be assigned to incoming calls and the alarm can be
used.
On the base station
¤ Press and hold Ì.
The display shows the date and time fields. The next position to be filled in will flash.
¤ Use ~ to enter the time (HH:MM) and then the date (DD-MM).
12:30 31-10
¤ To correct your input use the Ô key.
¤ Press Ì to save the new clock settings.
The date and time is synchronised with all registered handsets.
Your phone is now ready for use.
If you have any questions about using your phone, please read the tips on troubleshooting ("Writing and editing
text" ¢ page 20) or visit our website (¢ page 20).
-
Page 33

Using the phone
9
Control key
Handset
In idle mode
t Open the calls list.
s Open the phone book.
In menu and lists
p Scroll up/down line by line.
In input fields
t Move to previous character.
s Move to next character.
During a call
p Adjust the earpiece volume.
Base
t Display the first entry in the calls list.
s Display the last (recent) entry in the calls list.
Entering numbers and text
¤ Enter digits or letters using the keypad ~.
You will find information on multiple line input in the
appendix to this user guide,
When entering the time and date etc.:
¢ page 20.
¤ Overwrite the highlighted (flashing) character.
Correcting incorrect entries
In editing mode the display shows { in the lower
left corner.
To correct incorrect characters when editing:
¤ Press the { key Ato delete the character to
the left of the cursor.
¤ Insert new characters at the cursor position.
Scrolling to display long numbers
The display indicates a phone number which is longer
than 12 digits (handset) or 14 digits (base) by display
ing  and à left and right to the number. To display
the additional digits:
¤ On the base press Ì.
¤ On the handset press B.
Activating/deactivating the keypad
lock
¤ Press and hold # to activate the keypad lock.
The Ø icon appears in the display when the keypad
lock is activated.
¤ Press and hold # again to reactivate the keypad.
The keypad lock is deactivated automatically if someone calls you or if paging is activated. It is reactivated
when the call is finished.
Please note
When the base keypad is locked, the following
advanced settings are not available.
CHANGE PIN, REGISTRATION, UNREGISTER,
RESET BASE, AUTO P REFIX , FLASH TIME, DIAL MODE
Activating/deactivating handset
Precondition: handset is in idle mode.
¤ Press and hold a for at least 5 seconds to power
off the handset.
¤ Press and hold a again to reactivate the hand-
set.
Reverting handset to idle mode
To revert the handset to idle mode during menu
operation or in lists:
¤ Pressa.
Changes that you have not confirmed or saved will be
lost.
If no key is pressed for more than 60 seconds the
handset will automatically return to idle mode.
Activating/deactivating ringer tone
To switch the ringer off:
¤ Press and hold * to turn off the ringer tone.
The Ú icon appears in the display when the ringer is
deactivated.
¤ Press and hold * once again to reactivate the
ringer.
You can adjust the ringer volume for the handset
(¢ page 18), for the base (¢ page 19).
Using the menu
-
Your phone has an extensive range of features. These
are offered in the form of menus. The menu tree is
available via the handset.
Precondition: handset is in idle mode.
¤ To open the menu, press the f key.
¤ Use the p key to scroll to the function you require
During menu operation the display shows { on
the lower left corner and
cating that the corresponding keys are activated.
| on the right corner indi-
|: Press B to confirm your selection.
{: Press Ato go back to the previous level or to
exit the menu.
¤ To return to idle mode: press the a key.
Page 34

Menu tree
PHONEBOOK NEW ENTRY ¢ page 14
LIST ENTRY ¢ page 14
EDIT ENTRY ¢ page 15
DELETE ENTRY ¢ page 15
DELETE ALL ¢ page 15
CALL BY CALL ¢ page 15
SPEED DIAL KEY 1 ¢ page 15
KEY 2
PERSONAL SET HANDSET NAME ¢ page 18
HANDSET TONE RING VOLUME RINGER OFF ¢ page 18
RING TONES MELODY 1 ¢ page 18
KEY BEEP ON ¢ page 18
AUTO ANSWER ON ¢ page 18
OFF
CLOCK/ALARM DATE & TIME ¢ page 18
ALARM OFF ¢ page 18
ON ONCE
ON DAILY
ALARM TONE MELODY 1 ¢ page 18
MELODY 2
MELODY 3
ADVANCED SET CHANGE PIN ¢ page 19
REGISTRATION ¢ page 16
UNREGISTER ¢ page 16
RESET HANDSET ¢ page 19
BASE ¢ page 19
AUTO PREFIX ON ¢ page 19
OFF
FLASH TIME SHORT ¢ page 19
MEDIUM
LONG
DIAL MODE TONE ¢ page 19
PULSE
10
LEVEL 1
...
LEVEL 4
...
MELODY 10
OFF
Page 35

11
Making calls (handset)
Making an external call
External calls are calls using the public telephone network.
~
(enter number in idle mode) ¢c
or
c (activate talk mode) ¢
The phone number is dialled.
~
(enter number)
¤ To cancel the dialling press a.
The call duration is shown on the display in seconds.
Please note
Dialling using phone book (¢ page 14), redial
list (¢ page 14), calls list (¢ page 14) or speed
dialling (¢ page 11) saves you from having to reenter numbers and network provider prefixes.
Accepting a call
An incoming call is indicated by ringing and by flashing of the ª and the Y icon on the display.
¤ To accept an incoming call press c.
If the handset is in the charging cradle and the AUTO
ANSWER function is activated (¢ page 18), the
handset will take a call automatically when you lift it
from the cradle.
You can adjust the ringer volume, (¢ page 18) or
completely deactivate the ringer (¢ page 9).
Call duration is shown on the display in the format:
HH--MM--SS.
Ending a call
¤ Press a or replace the handset into the charging
cradle.
The call duration is shown on the display in the
format: HH--MM--SS.
Adjusting talking volume
There are 3 levels of earpiece volume (default: LEVEL
2). You can adjust the earpiece volume during a call.
¤ Press p to increase/decrease the volume.
The current setting is shown on the display.
Muting
You can mute your phone when making external
cal ls. T he mic roph one is deac tiva ted so th at yo ur con
versational partner can no longer hear you.
¤ To deactivate the microphone press C.
MUTE ON appears on the display when the micro-
phone is deactivated.
Call waiting
A second incoming call arriving during another call is
indicated by an acoustic signal. CLI information is dis
played if available. The call is stored in the calls list,
¢ page 13.
Answering a waiting call (country dependent)
¤ Press Z to release the active call and to
answer the waiting call. The waiting call becomes
the active call.
¤ Press Z2 to put the first active call on hold
and answer the waiting call.
¤ Press Z2 again, to toggle between the 2 call-
ers.
Ignoring the waiting call
The waiting call is automatically refused after 40 seconds.
Using shortcut keys for speed dialling
You can use key and 2 as shortcut keys.
Precondition: The keys must be set up for speed dial-
ling, ¢ page 15.
¤ Press and hold key or key 2.
The number stored on the related key for speed dialling is dialled immediately.
Call-by-call dialling
You can use a call-by-call number stored in the phone
book to economically make international calls.
Precondition: The call-by-call number is stored in the
phone book,
In idle mode:
~
(enter IDD (International Direct Dial) number)
¢ page 15.
¢press and hold Q.
Your Gigaset A590 will automatically pick the line and
add the call-by-call numbe r stored in the phone book
as a prefix to the IDD phone number.
In talk mode:
c (activate talk mode)¢press and hold Q
The service provider is called. You will hear an
announcement of your provider.
~
¢
Enter the IDD number.
You can also use the Qkey for dialling the call-bycall number from phone book, calls list, or redial list.
The prefix function (¢ page 19) is disabled when
using Call-by-call dialling.
-
-
Page 36

12
Making calls (base)
Making an external call
External calls are calls using the public telephone network.
~
(enter number in idle mode)
¢ ª (pick up receiver)
or
ª(pick up receiver) ¢
The phone number is dialled.
~
(enter number)
¤ To cancel the dialling replace the receiver.
Please note
Dialling using phone book (
list (
¢ page 14) or calls list (¢ page 14) saves
you from having to re-enter numbers and network provider prefixes.
¢ page 15), redial
Accepting a call
An incoming call is indicated by ringing and by flashing of the ª and the Y icon on the display.
To accept an incoming call:
ª (pick up receiver) or
press d (hands-free talking)
You can adjust the ringer volume (¢ page 19) or
deactivate the ringer completely (¢ page 9).
Ending a call
Replace the receiver or
press d (end hands-free talking).
Hands-free talking
Activating while dialling:
~
enter phone number ¢ d.
Switching between earpiece and hands-free mode:
¤ During a call press the hands-free key d to acti-
vate or deactivate hands-free talking.
Adjusting the talking volume
Adjusting the loudspeaker volume
There are 5 levels of loudspeaker volume (default: L3).
You can adjust the loudspeaker volume during a call.
Precondition: Hands-free talking is activated.
¤ Press [ / \to increase/decrease volume.
The current setting is shown on the display.
Muting
You can mute your phone when making external
calls. The microphone is deactivated so that your con
versational partner can no longer hear you.
¤ To deactivate the microphone briefly press Ô.
The · icon appears on the display when the microphone is deactivated.
Call-by-call dialling
You can use a call-by-call number stored in the phone
book to economically make international calls.
Precondition: The call-by-call number is stored in the
phone book via the handset menu,
In idle mode:
~
(enter IDD (International Direct Dial) number)
¢ page 15.
¢press and hold Q
ª (pick up receiver) or press d.
Your Gigaset A590 will automatically pick the line and
add the call-by-call numbe r stored in the phone book
as a prefix to the IDD phone number.
In talk mode:
ª (pick up receiver)¢press and hold Q
The service provider is called. You will hear an
announcement of your the provider.
~
¢
Enter the IDD number.
You can also use the Qkey for dialling the call-bycall number from phone book, calls list, or redial list.
-
There are 3 levels of earpiece volume (default: L2). You
can adjust earpiece volume during a call.
¤ Press [ / \ to increase/decrease volume.
The current setting is shown on the display.
Page 37

13
Calls list
The calls list stores incoming calls: name, number,
time stamp (max. 20 calls).
Precondition: CLI is available.
The Yicon appears on the display when there are
any entries in the calls list. The
is a new entry.
Calling Line Identification (CLI)
CLI is a telephone service that transmits a caller's
number and possibly an associated name to the
called party's telephone equipment.
Precondition:
1 You network provider enables to display the call-
er's number (CLIP) or name (CNIP).
2 The caller has asked the network provider for his
number to be identified.
Yicon blinks if there
Using the calls list on the handset
Ò YU
PETER
Presentation) has been requested. An incoming call
without CLI is indicated as
Viewing the calls list
t (open calls list)
When you get a call, the
caller's number will be displayed. The caller's name will
be displayed if it is stored in
the phone book or if CNIP
(Calling Name Identification
UNKNOWN.
¢p (scroll through calls list entries, select entry)
¢| (view details: number)
¢| (view details: date/time)
¤ Press { to return to idle mode.
Dialling with the calls list
t (open calls list) ¢p (select entry) ¢c
Storing a calls list entry into the phone book
t (open calls list) ¢p (select entry)
¢f ¢SAVE NUMBER ¢|
~
¢
(enter name) ¢|
Deleting an entry from the calls list
t (open calls list) ¢p (select entry)
¢f ¢DELETE ENTRY ¢|
¢| (confirm action)
Deleting the calls list
t (enter calls list) ¢f ¢DELETE ALL
¢|¢| (confirm action)
Using the calls list on the base station
Y
12:30 10-31 #02
123456789
If the caller’s number is not known (no CLI) only time
and date are displayed.
Viewing the calls list
t (open calls list, display first entry) or
s(open calls list, display last entry)
When you get a call, the
caller's number and the
time stamp will be dis
played.
#NN indicates the number
of the entry in the calls list.
-
¢p (scroll through calls list entries, select entry)
¤ Press Ì to display the hidden digits of a long
entry.
Dialling with the calls list
t (open calls list, display first entry) or
s(open calls list, display last (recent) entry)
¢p (scroll through calls list entries, select entry)
¢ª (pick up receiver)
or press d (hands-free talking)
Storing a calls list entry into the phone book
p (select entry) ¢press and hold ¢Ì
Deleting an entry from the calls list
p(select entry) ¢Ô (delete entry)
¢Ì (confirm action)
¤ To cancel the delete action press Ó before press-
ing
Ì.
Please delete expired entries to keep up the calls list
storage.
Deleting the complete calls list
t (open call list) ¢press and hold Ô
¢Ì (confirm action)
¤ To cancel the delete action press Ó before press-
ing
Ì.
Page 38

14
Last number redial list
The last number redial list contains the ten numbers
last dialled. Maximum: 24 digits, including Pause (P), *
and #.
Viewing the redial list
On the base: h
On the handset: Press and hold c
¢p(scroll through redial list)
The display shows the last stored number in redial list.
If the entry matches an entry in the phone book, the
name is shown.
To display the hidden digits of a long entry:
On the base: press Ì.
On the handset: press |
Dialling from the redial list
p(scroll to the desired redial list entry)
On the base: ª (pick up receiver) or press d
On the handset: press c
Storing the redial number into the phone
book
p(scroll to the desired redial list entry)
On the base: ¢press and hold ¢ Ì
On the handset:¢f¢SAVE NUMBER ¢|
~
(enter name) ¢|
Delete a number from the redial list
p(scroll to the desired redial list entry)
On the base: ¢Ô ¢ Ì
On the handset: ¢f¢DELETE ENTRY¢|
¢|(confirm action)
Deleting the redial list
On the base: h(open redial list)
¢press and hold Ô ¢ Ì (confirm action)
On the handset: press and hold c
¢f¢DELETE ALL¢|¢|
Phone book (handset)
In the handset’s phone book you can store up to 50
phone numbers and corresponding names. Maxi
mum: 24 digits, 12 characters.
-
¤ To access the phone book use the menu.
f ¢ PHONEBOOK
NEW ENTRY
LIST ENTRY
EDIT ENTRY
DELETE ENTRY
DELETE ALL
CALL BY CALL
SPEED DIAL
Save new phone number.
List all stored numbers.
Edit selected entry.
Delete selected entry.
Delete all entries in phone book.
Enter call-by-call number
For shortcuts, assign the current
entry to a key.
Using the phone book
Storing a number into the phone book
f(open menu)¢PHONEBOOK ¢|
¢NEW ENTRY ¢|
~
¢
(enter name) ¢|
~
¢
(enter number) ¢|
¤ To display long numbers press |.
¤ Use { as backspace.
If the input name already exists in the phone book,
the display shows
then returns to the
Viewing a phone book entry
DOUBLE NAME for 2 seconds and
ENTER NAME screen.
s (open phone book) or
f(open menu)¢PHONEBOOK
¢LIST ENTRY ¢|
¢p (select entry)¢|
The entry is displayed.
¤ Use | to scroll through the entry and display
hidden characters.
Dialling from the phone book
s (open phone book) ¢p (select entry) ¢c
Saving a dialled number in the phone book
~
(enter number) ¢f (open menu)
¢SAVE NUMBER ¢|
~
¢
(enter name)¢|
Page 39

15
Editing an entry in the phone book
f(open menu)¢PHONEBOOK ¢|
¢EDIT ENTRY ¢|
¢p(select entry) ¢|
~
¢
(edit name) ¢|
~
¢
(edit number) ¢|
Deleting an entry from the phone book
f(open menu)¢PHONEBOOK ¢|
¢DELETE ENTRY ¢|
¢p(select entry) ¢|¢| (confirm action)
The entry is deleted.
¤ Use { to discard action and return to phone
book list.
Please delete expired entries to keep up the phone
book storage.
Storing numbers for speed dialling
On the handset you can use the keys and 2 for
speed dialling.
Precondition: the number(s) to be assigned to the
key(s) must be contained in the phone book.
Adding or changing a speed dial number
f (open menu)¢PHONEBOOK ¢|
¢SPEED DIAL ¢|
¢p (select key: KEY 1 or KEY 2)¢|
The name of the currently assigned phone number
will be shown or
assigned.
NO NUMBER if there is no number
¢f¢ p (select ADD) ¢|
¢p(choose name or number from phone book)
¢|
The number is assigned to the selected key.
Deleting a speed dial entry
f(open menu)¢PHONEBOOK ¢|
¢SPEED DIAL ¢|
¢p (select key: KEY 1 or KEY 2)¢|
The current name will be shown.
¢f¢ p (select DELETE) ¢|
¢| (confirm action)
Storing call-by-call numbers
To use the call-by-call function (¢ page 11) via the
Q key the call-by-call number must be stored in the
phone book.
Viewing the call-by-call number
¤ Press and hold the Q key.
If a call-by-call number is stored the name will be displayed.
Storing a call-by-call number into the phone
book
f(open menu)¢PHONEBOOK ¢|
¢CALL BY CALL ¢|
~
¢
(enter name: max. 12 characters) ¢|
~
¢
(enter number: max. 48 digits)¢|
The call-by-call number is stored in the phone book.
Deleting the complete phone book
This action will delete all entries in the handset’s
phone book including speed dialling numbers. Callby-call numbers are not deleted.
f(open menu)¢PHONEBOOK ¢|
¢DELETE ALL ¢|¢| (confirm action)
Phone book (base)
In the base phone book you can store up to 30 phone
numbers (max. 24 digits).
Storing a number into the phone book
Press and hold
~
¢
(enter number) ¢Ì
¤ Use Ô as backspace.
¤ Press Ó to cancel the action.
Viewing the phone book
(open phone book)
¢p(scroll through the phone book)
¤ Press Ì to display the hidden digits of a long
entry.
Editing an entry in the phone book
(open phone book) ¢p(select entry)
¢press and hold
~
¢
(enter number) ¢Ì
¤ Use Ô as backspace.
¤ Press Ó to cancel the action.
Dialling from the phone book
(open phone book) ¢p(select entry)
¢ª (pick up receiver)
or press d (hands-free talking)
Deleting an entry from the phone book
(open phone book) ¢p(select entry)
¢Ô (delete entry) ¢Ì(confirm action)
¤ To cancel the delete action press Ó before press-
ing
Ì.
Please delete expired entries to keep up the phone
book storage.
Page 40

16
Deleting the complete phone book
(open phone book)
¢press and hold Ô ¢Ì (confirm action)
¤ To cancel the delete action press Ó before press-
ing
Ì.
Using several handsets
Registering handsets
Before you can use your handset, you must register it
to the base station. You can register up to four hand
sets. You must initiate handset registration on the
handset and on the base station.
On the base
¤ Press and hold the paging key Ëfor at least 5
sec.
On the handset
f(open menu)¢ADVANCED SET ¢|
¢REGISTRATION¢|
~
(enter current PIN, default: 0000) ¢|
The handset is assigned the lowest unassigned internal number (1–4).
Once the handset has been registered successfully, it
returns to idle mode. The name (default: Gigaset) and
the handset’s internal number is shown in the display,
e.g.
Gigaset 1.
If the handset was not registered successfully, the display will show PLS REG H/S. In this case repeat the procedure.
Please note
◆ The default system PIN may have been
changed,
◆ The handset name can be changed,
(¢ page 18).
(¢ page 19).
Deregistering handsets
Please note
Do not deregister handsets unless necessary!
Precondition: the handset is in idle mode.
f(open menu)¢ADVANCED SET ¢|
¢UNREGISTER¢|
~
(enter current PIN)¢|
¢p (select handset to be deregistered) ¢|
A long confirmation tone indicates the successful
deregistration. The handset display will show
PLS REG H/S.
Locating a handset ("paging")
You can locate the handsets using the base station.
Precondition: base station is in idle mode.
¤ Briefly press the paging keyË on the base sta-
tion.
All handsets will ring using a specific paging melody.
This also applies if the ringer tones are deactivated.
The displays will show
In case of an incoming call, the handset quits the paging mode and then rings.
After 30 seconds handset and base station go back to
idle mode.
Ending paging manually
INTERCOM X .
¤ Briefly press the paging key Ëon the base sta-
tion again.
Making internal calls
Internal calls are free calls to other handsets that are
registered to the same base station or to the base sta
tion itself.
Making internal calls (handset)
Calling another internal participant
~
k¢
0 = base station, 1-4 = handset number, * = all
If only 1 handset is registered you need not enter a
number to call the handset from the base.
Accepting internal call
(enter internal number of participant)
¤ To answer the call press c.
¤ To end the call, press a.
Incoming call during internal call
An incoming call is indicated by an acoustic signal.
c (answer external call, end internal call) or
k (hold internal call, accept external call)
¢ k(start conference)
Internal consultation calls
When you are speaking to an external participant,
you can call an internal participant at the same time
for consultation.
Press and hold k (put external call on hold)
~
k¢
You are connected with the internal participant.
k (toggle between internal and external partici-
pant)
(enter internal number of participant)
-
Page 41

17
Transferring a call to another handset
You can transfer an external call to another handset.
k (put external call on hold)
~
k¢
You are connected with the internal participant.
(enter internal number of participant)
a (transfer external call to internal participant)
Conference call
When you are speaking to an external participant, an
internal caller can listen in on this call and take part in
a conference call.
Starting a conference call
k (put external call on hold)
~
k¢
You are connected with the internal participant.
Press and hold k (start conference)
Ending a conference call
(enter internal number of participant)
¤ Press the end call key a.
If an internal participant presses the end call key a,
the other handset remains connected to the external
participant.
Making internal calls (base)
Calling all handsets
¤ Press Ë. All handsets will be called.
The first handset accepting the call is connected. Calling all other handsets is aborted.
Accepting internal call
ª (pick up receiver) or press d.
¤ To end the call, replace the receiver or press d.
Incoming call during internal call
An incoming external call during an internal call is
indicated by an acoustic signal.
¤ Replace the receiver to exit the internal call.
ª or d (accept external call)
Internal consultation calls
When you are speaking to an external participant,
you can call an internal participant at the same time
for consultation.
Ë (put external call on hold)
All handsets will be called. The first handset accepting
the call will be connected.
Ë (toggle between internal and external partici-
pant)
Transferring an external call to a handset
You can transfer an external call to a handset.
Ë (put external call on hold)
All handsets will be called.
Replace receiver or press d (transfer external call to
internal participant)
The first handset accepting the call is connected.
Conference call
When you are speaking to an external participant, an
internal ca lle r ca n l ist en i n on thi s ca ll a nd tak e pa rt in
a conference call.
Starting a conference call
Ë (put external call on hold)
All handsets will be called. The first handset accepting
the call is connected.
Press and hold Ë (start conference)
Ending a conference call
¤ Replace receiver or press d.
If an internal participant presses the end call key a,
the other handset remains connected to the external
participant.
Settings
Settings (handset)
Your handset is preconfigured, but you can change
the settings to suit your individual requirements.
¤ To change the handset settings use the menu.
f ¢ PERSONAL SET
HANDSET NAME
HANDSET TONE
AUTO ANSWER
f ¢ CLOCK/ALARM
DATE & TIME
ALARM
ALARM TONE
Change handset name.
Change ringer volume and key
beep.
Activate/deactivate auto answer.
Set date and time.
Set an alarm clock.
Set a melody for the alarm clock.
Page 42

18
Changing the handset name
You can change the default name of the handset
(default: Gigaset). Maximum characters: 10.
f¢PERSONAL SET ¢|
¢HANDSET NAME¢|
The current name is shown, last character flashing.
¤ Use { as backspace.
~
(enter name) ¢|
You will find information on multiple line input in the
appendix to this user guide,
Changing the ringer volume
You can choose between 5 sound levels for the ringer
volume;
LEVEL 1 – LEVEL 4 and RINGER OFF (default:
LEVEL 2).
¢ page 20.
f¢PERSONAL SET ¢|
¢HANDSET TONE¢|
¢RING VOLUME¢|
The currently set ringer melody is played with current
volume.
¢p (select volume level) ¢|
If the ringer is deactivated, the Ú icon appears in the
display. The handset will ring at
is paging it.
You can also deactivate the ringer completely using
the
* key.
Changing the ringer melody
You can choose between 10 ringer melodies
(default: MELODY 1).
LEVEL 2 when its base
f¢PERSONAL SET ¢|
¢HANDSET TONE¢|
¢RING TONES¢|
¢p (select melody)
The selected melody is played.
¤ To confirm a selected melody¢|
Setting the key beep
Your telephone will beep whenever a key on the
handset is pressed. You can deactivate this acoustical
signal (default:
ON).
f¢PERSONAL SET ¢|¢HANDSET
TONE¢|
¢KEY BEEP¢|
¢p (select ON or OFF) ¢|
Activating/deactivating auto answer
If you activate this function, when you receive a call
you can simply lift the handset out of the charging
cradle without having to press the talk key
c.
f¢PERSONAL SET ¢|¢AUTO ANSWER
¢|
¢p (select ON or OFF) ¢|
Setting date and time
f¢CLOCK/ALARM ¢|
¢ DATE & TIME¢|
~
¢
(enter date: DD/MM) ¢|
~
¢
(enter time: HH:MM, 24hrs format) ¢|
¤ Use { as backspace.
Please note
Once the date and time are set, if there is a power
cut of the mains, you should reset date and time.
Setting the alarm clock
You can set an alarm clock on the handset.
Precondition: The date and time have already been
set, see above.
An alarm will sound for 1 minute at the set time once
or daily.
f¢CLOCK/ALARM ¢|¢ALARM¢|
¢p (select ON ONCE or ON DAILY or OFF) ¢|
If you select ON ONCE or ON DAILY
~
(enter time: HH:MM, 24hr format) ¢|
¤ Use { as backspace.
If the alarm is activated, the ¼ icon appears in the display. During the alarm --ALARM-- is flashing on the
display.
¤ To cut off the alarm press any key on the keypad.
Setting the alarm melody
You can choose from 3 alarm melodies (default:
MELODY 1).
f¢CLOCK/ALARM ¢|
¢ALARM TONE¢|
¢p (select melody)
The selected melody is played.
¤ To confirm a selected melody¢|
Settings (base)
Setting date and time
Ì press and hold.
The display shows the date and time fields. The next
position to be filled in will flash.
~ (enter time (HH:MM) and date (DD/MM))
¤ To correct your input backspace withÔ.
¤ Press Ì to save the new clock settings.
Page 43
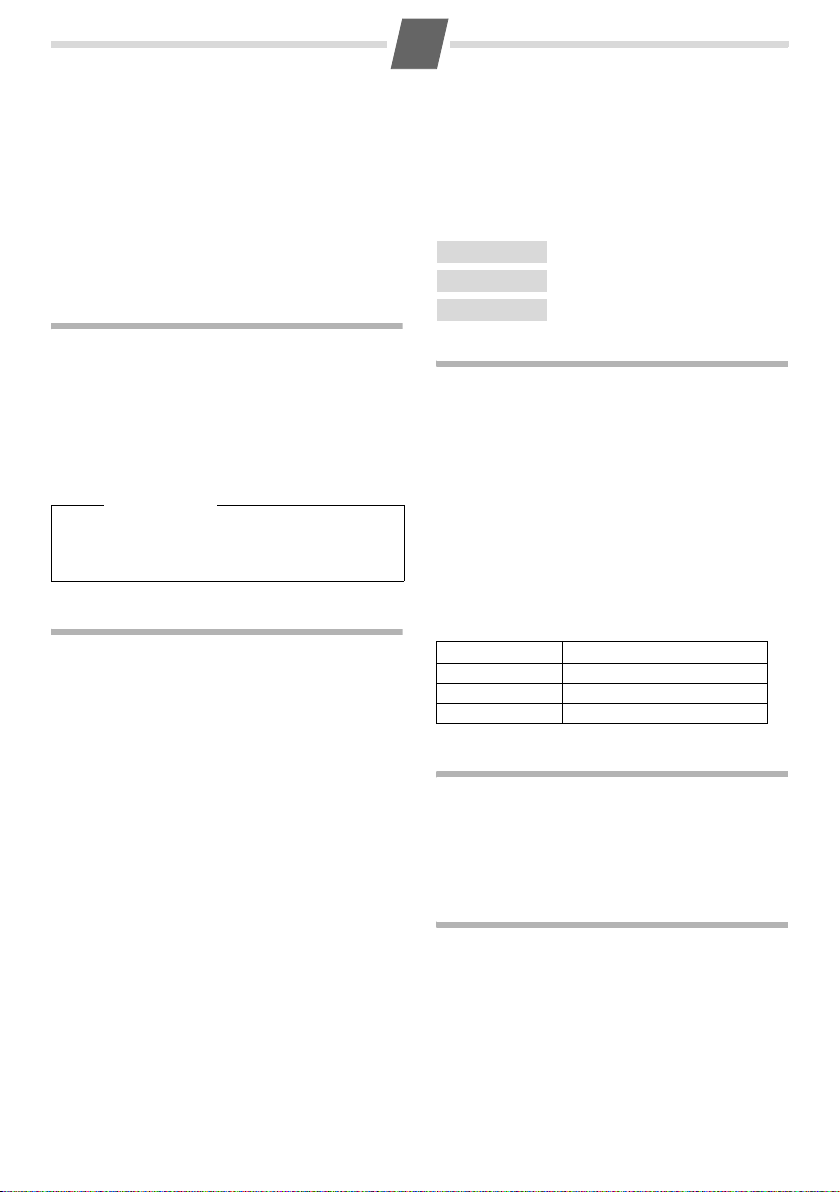
19
Changing the ringer volume
There are 4 levels of ringer volume (default: L2). You
can adjust the ringer volume.
Precondition: Base station is in idle mode.
¤ Press [ / \.
The current setting is shown on the display.
¤ To switch the ringer off completely (L0) press and
hold the
* key.
When switching the ringer off the key beep is also
deactivated.
Changing the PIN
The base station is protected via PIN against unauthorised handset registration. You can change the
preset PIN via menu.
f¢ADVANCED SET ¢|¢CHANGE PIN¢|
~
¢
(enter current PIN, default: 0000) ¢|
~
¢
(enter new PIN: 0 to 9 digits) ¢|
¤ Use { as backspace.
Please note
¤ If you have forgotten the PIN reset the base
unit to the factory settings to reset the PIN to
default setting 0000,
¢ page 19.
Restoring to the factory settings
You can reset any individual settings and changes
that you have made.
Phone book and calls list entries are not affected.
After restoring the base, handsets are not affected.
Precondition: handset and base are in idle mode.
Restoring the base
f¢ADVANCED SET ¢| ¢RESET¢|
¢p (select BASE) ¢|¢|
Restoring the handset
f¢ADVANCED SET ¢|¢RESET¢|
¢p (select HANDSET) ¢|¢|
Connecting to PABX
Your phone is preset at the factory for operation on
the main connection. For operation on a PABX, you
may have to change the following values. Please refer
to the user guide for your PABX.
¤ To change the handset settings use the menu.
f ¢ ADVANCED SET
AUTO PREFIX
FLASH TIME
DIAL MODE
Set a prefix for dialling outside line.
Change the flash time.
Change the dial mode.
Prefix setup
You can set a prefix which is automatically added to a
phone number with at least 5 digits. This prefix can be
used to dial into the outside line when operating the
device on a PABX.
Precondition: The number must be dialled in idle
mode, i.e. first
f¢ADVANCED SET ¢|
~
then ª.
¢AUTO PREFIX¢|
¢p(select ON or OFF) ¢|
~
(enter prefix, max. 5 digits) ¢|
¤ To enter a pause in the prefix press and hold Z.
Pause duration is one second by default.
Example: Prefix is ON and set to 65
You dial Really dialled number
1234 1234
12345 65P12345
#12345 65P#12345
Setting flash time
You can set the flash time to 100 (SHORT), 300
(
MEDIUM) or 600 (LONG ) ms. (Default: SHORT)
¢f¢ADVANCED SET ¢|
¢FLASH TIME ¢|
¢p(select SHORT, MEDIUM or LONG ) ¢|
Changing the dialling mode
You can set the dialling mode to PULSE or TONE.
(Default:
TONE)
f¢ADVANCED SET ¢|
¢DIAL MODE ¢|
¢p(select PULSE or TONE ) ¢|
Page 44

20
Appendix
Writing and editing text
The following rules apply when writing text:
◆ Control the cursor with p.
◆ Characters are inserted on the left of the cursor.
◆ The first letter of the name of phone book entries
is automatically capitalised.
Press the relevant key several times to enter letters/
characters.
Standard characters on the handset
1x 2x 3x 4x 5x 6x
1) 1)
2
3
4
5
L
M
N
O
Q
2)
*
2)
#
1)Space
2)without effect when entering names
1 _ < >
A B C 2 A B
D E F 3 D E
G H I 4 G H
J K L 5 J K
M N O 6 M N
P Q R S 7 P
T U V 8 ? T
W X Y Z 9 W
0 -- / \ # +
* * * * * *
# # # # # #
General Specifications
Technical Data
WDCT standard supported
Number of channels 80 cuplex cahnnels
Radio frequency range 2400-2483.5 MHz
Duplex method Time multiplex, 10 ms frame
Bit rate 576 kbit/s
Modulation GFSK
Range up to 300 m outdoors,
Base station power
supply
Environmental conditions
in operation
Dialling mode DT MF/DP
Base size aprox. 76 x 178 x 183 mm
Handset size aprox. 150 x 48 x 30 mm
Recommended batteries
Technology: Nickel-metal-hydride (NiMH)
Size: AAA (Micro, HR03)
Volt age: 1.2 V
Capacity: 550 - 800 mAh
We recommend the following battery types, because
these are the only ones that guarantee the specified
operating times, full functionality and long service
life:
◆ Sanyo NiMH 800
◆ Panasonic 700 mAh
◆ GP 700 mAh
◆ Yuasa AAA 700/800mAh
◆ Corun AAA 550/650mAh
The device is supplied with two recommended batteries.
length
up
to 50 m indoors
110 ~ 220 V, 50 - 60 Hz
+5 °C to +45 °C;
20 % to 75 % humidity
(Hight x Width x Depth)
(Hight x Width x Depth)
Questions and answers
If you have any queries about the use of your telephone, visit our website at
www.gigaset.com/customercare
for 24-hour support.
Page 45

Page 46

Issued by
Gigaset Communications GmbH
Frankenstr. 2a
D-46395 Bocholt
Manufactured by Gigaset Communications GmbH under trademark license of Siemens AG.
As of 1 Oct. 2011 Gigaset products bearing the trademark "Siemens" will exclusively use the trademark "Gigaset".
© Gigaset Communications GmbH 2010
All rights reserved. Subject to availability.
Rights of modification reserved.
www.gigaset.com
A31008-M2045-U501-1-6019
 Loading...