

Page 1
A49H/EN/A31008
M2250
Z70157619/O
i
f/10022012
Gigaset A49H
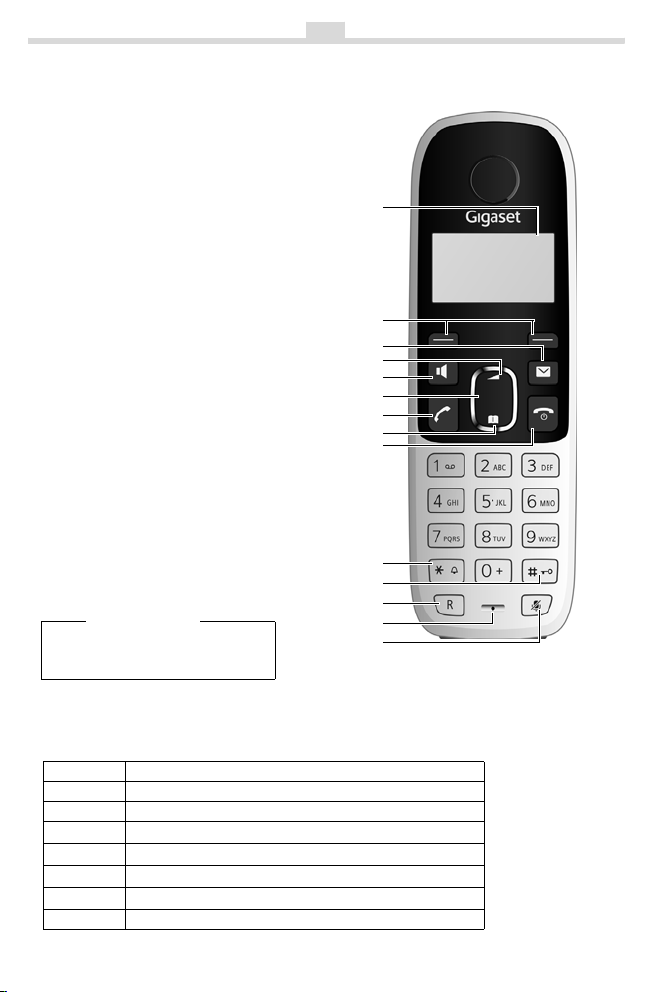
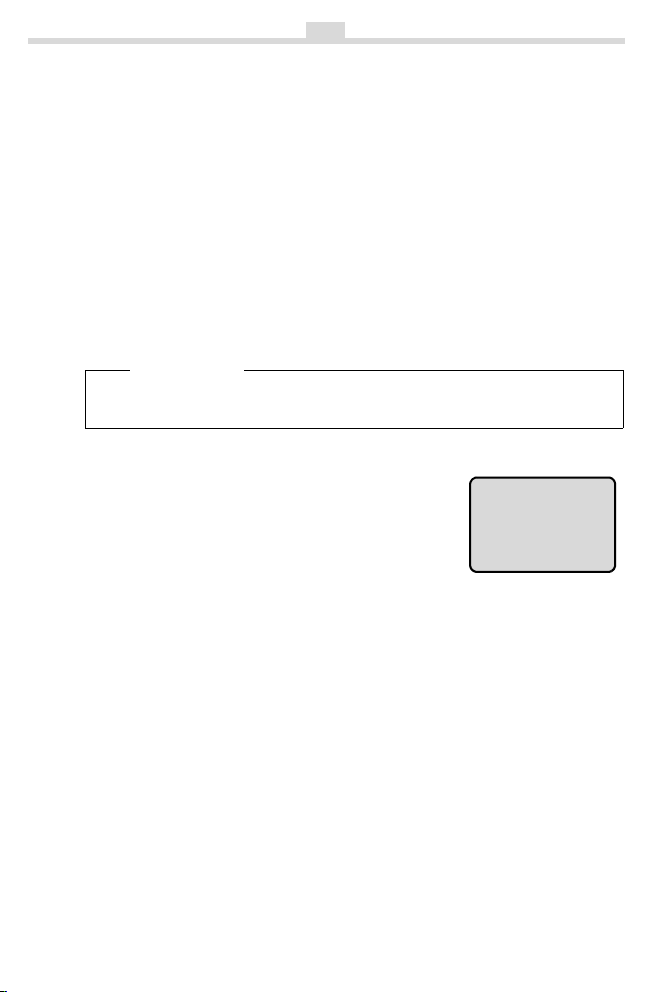
The handset at a glance
1 Charge status of the batteries
2 Display keys
3Message key
Flashes: new messages received
t to activate the menu for setting
4Use
the volume
5 Handsfree key
6 Control key (u)
7Talk key
8Directory key
(press down on the control key)
9End call key and
On/Off key
10 Ringer tone on/off
(press and hold in idle status)
11 Keypad lock on/off (press and hold)
12 Recall key
- Consultation call (flash)
- Dialling pause (press and hold)
13 Microphone
14 "Microphone off" key
Please note
Charge the handset for
18 hours before first use.
1
1
U
11.12. 11:56
INT MENU
2
3
4
5
6
7
8
9
10
11
12
13
14
d
h
Display key on handset:
Pressing a key launches the function that appears above that key in the display.
Display Function when pressed
INT
MENU
“
U
T
˜
OK
Call other registered handsets ¢ page 10.
Open main/submenu (see Menu tree ¢ page 17).
Go back one menu level.
Scroll up/down or adjust volume with u.
Move cursor to left/right with u.
Backspace deletes one character at a time.
Confirm menu function or save entry.
Page 2
A49H/EN/A31008
M2250
Z70157619/O
i
f/10022012
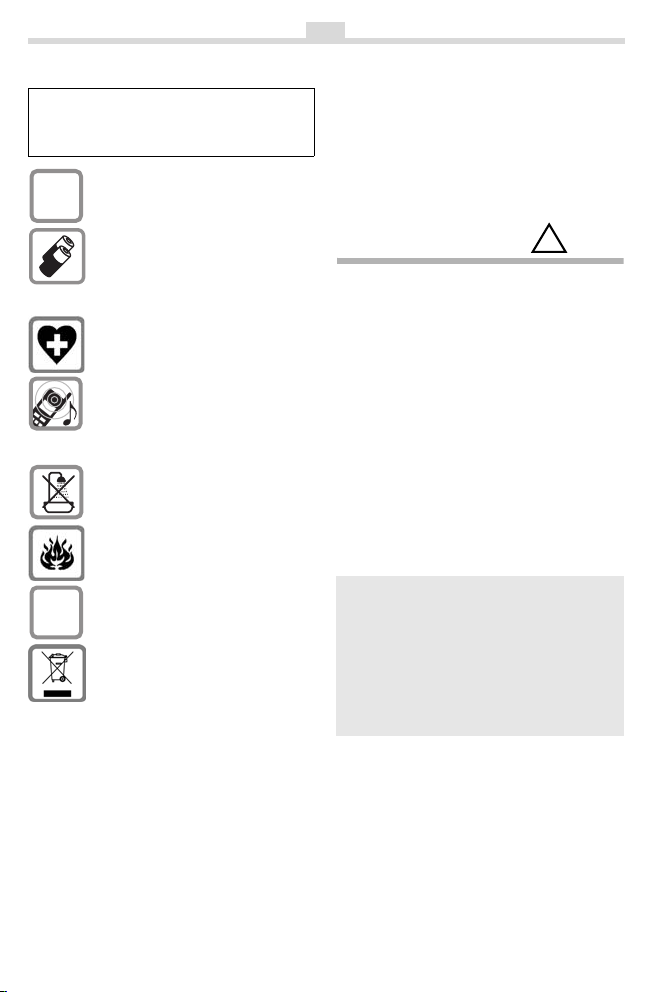
Safety precautions
Read this user guide and the safety precautions
carefully before use. Explain their contents and
the potential hazards associated with using the
telephone to your children.
Only use the mains unit supplied.
$
Fit only the recommended, rechargeable batteries (
use a conventional (non-rechargeable)
battery or other battery types as this
could result in significant health risks
and personal injury.
The operation of medical appliances
may be affected. Be aware of the technical conditions in your particula r environment, e.g. doctor's surgery.
Do not hold the rear of the handset to
your ear when it is ringing. Otherwise
you risk serious and permanent damage to your hearing.
The handset may cause an unpleasant
humming noise in hearing aids.
Do not install the phone in a bathroom
or shower room. The handset is not
splashproof.
Do not use your phone in environments with a potential explosion hazard, e.g. paint shops.
If you give your Gigaset to someone
else, make sure you also give them the
ƒ
user guide.
Disposal
Batteries should not be disposed of in
general household waste. Observe the
local waste disposal regulations,
details of which can be obtained from
your local authority or the dealer you
purchased the product from.
All electrical and electronic equip ment
must be disposed of separately from
general household waste using the
sites designated by local authorities.
The appropriate disposal and separate
collection of used equipment serve to
prevent potential harm to the environment and to health. They are a precondition for the re-use and recycling of
used electrical and electronic equipment.
For further information on disposing of
your used equipment, please contact
your local authority, your refuse collection service or the dealer you purchased the product from.
¢ page 11), i.e. never
2
Emergency numbers cannot be dialled if the
keypad lock (
Not all of the functions described in this user
guid
¢ page 1) is activated!
e are available in all countries.
Care
Wipe down the handset with a damp cloth
(no solvents) or an antistatic cloth. Never
use a dry cloth. This can cause static.
Contact with liquid
!
If the handset should come into contact
with liquid:
◆ Switch the handset off and remove the
batteries immediately.
◆ Allow the liquid to drain from the hand-
set.
◆ Pat all parts dry, then with the battery
compartment open and the keypad facing down place the handset in a dry,
warm place
a mi
for at least 72 hours (not in
crowave, oven etc.).
◆ Do not switch on the handset again
until it is completely dry.
When it has fully dried out, you will normally be able to use it again.
ECO WDCT
You are helping to protect the environment with your Gigaset A49H.
Reduced energy consumption
Your telephone has an energy-saving
adapter plug and uses less energy.
Page 3

A49H/EN/A31008
M2250
Z70157619
/
i
f/10022012
3
First steps
Check the pack contents
◆ One Gigaset A49H handset,
◆ one charging cradle with power adapter,
◆ two batteries,
◆ one battery cover,
◆ one user guide.
Setting up the charging cradle
The charging cradle is designed for use in enclosed dry rooms with a temperature
range of +5 °C to +45 °C.
¤ Set up the charging cradle on a flat, non-slip surface.
Please note
Pay attention to the range of the base station.
This is up to 300 m in unobstructed outdoor areas and up to 50 m inside buildings.
The feet do not usually leave any marks on surfac
of different varnishes and polishes used on today's furnishings, the occurrence of
marks on the surfaces cannot be completely ruled out.
Please note:
◆ Never expose the telephone to the influence of heat sources, direct sunlight or
other electrical devices.
◆ Protect your Gigaset from moisture, dust, corrosive liquids and vapours.
Connecting the charging cradle
¤ Connect the plug from the power adapter.
es. However, due to the multitude
Page 4
A49H/EN/A31008
M2250
Z70157619
/
i
f/10022012
4
Setting up the handset for use
The display is protected by a plastic film.
Please remove the protective film!
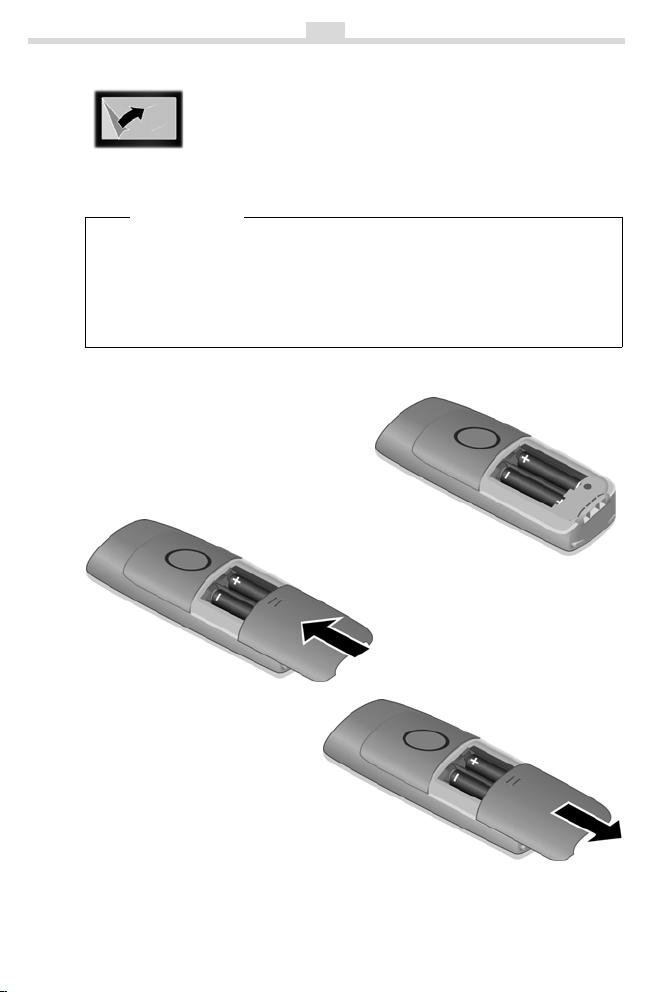
Inserting the batteries and closing the battery cover
Warn ing
Use only rechargeable batteries re
¢ page 11). Never use a conventional (non-rechargeable) battery or
GmbH (
other battery types as this could result in significant health risks and personal
. For example, the batteries could explode. The phone could also mal-
injury
function or be damaged as a result of using batteries that are not of the recommended type.
commended by Gigaset Communications
¤ Insert the batteries the right way
round.
The polarity is indicated in/on the
battery compartment.
¤ Slide the battery cover from bot-
tom up onto the casing until it
clicks into place.
¤ If you need to open the bat-
tery cover, for instance to
replace the batteries, press
the ribbing at the top of the
battery cover and slide it
downward.
Page 5
A49H/EN/A31008
M2250
Z70157619
/
i
f/10022012
5
Registering the handset to the base station
Before you can use the phone, you must first register the handset to the base station. The actual registration procedure will depend on the type of base station.
You must activate manual registration of the handset on both
the base station.
1. On the base station:
press and hold the registration/paging key for min. 3 sec.
2. On the handset:
within 60 sec. of pres
MENU ¢ Settings ¢ OK ¢ Handset ¢ OK ¢ Register HS ¢ OK
¢ Enter the system PIN of the base station (default is 0000) ¢ OK.
Registering flashes in the display.
Registration takes approx. 1 minute.
sing the registration/paging key
the handse
t and
The following is displayed after succesful
registration:
If more than one handset is registered, the internal
number of the handset is
ner.
shown in the upper left cor-
1 U
INT MENU
Initial charging and discharging of the batteries
The correct charge level can only be displayed if the b atteries are first fully charged
and discharged.
¤ Place the handset in the base station or charging cradle for 18
18 h
hours.
¤ Then remove the handset from the base station or charging cra-
dle and do not replace it until the batteries are completely discharged.
Please note
◆ To get the full talk and standby times, 2 to 3 full charge and discharge
cycles are needed.
◆ After the third battery charge and discharge you may replace your handset
in the base station or charging cradle after every call.
◆ Always repeat the charging and discharging procedure if you remove the
batteries from the handset and reinsert them.
◆ The batteries may warm up during charging. This is not dangerous.
◆ After a while, the charge capacity of the batteries will decrease for techni-
cal reasons.
Warn ing
Please ensure that the handset is in the charging cradle if you are absent for a
long ti
the batteries could be damaged.
.g. during holidays) or remove the batteries from the handset. Else
me (e
Page 6
A49H/EN/A31008
M2250
Z70157619
/
i
f/10022012
6
Charge status of the batteries
The charge status is indicated by the top right display icon. After the initial charging procedure a complete charging to full capacity takes at least 18 hours.
◆ U battery full
◆ e steady: mediuim capacity
◆ e flashes: batteries almost flat
◆ U flashes: charging when the handset is in the charging cradle
Setting the date and time
Set the date and time so that the correct date and time can be assigned to incoming calls, and so that the alarm can be used.
MENU ¢ Settings ¢ OK ¢ Date/Time ¢ OK
¢ Date: ¢ ~ (enter the day, month and year in 6-digit format) ¢ OK
¢ Time: ¢ ~ (enter hours and minutes in 4-digit format) ¢ OK
¢ a (press to return to idle status)
Please note
When entering the time and date, you can mov
left or right by pressing the control button up or down.
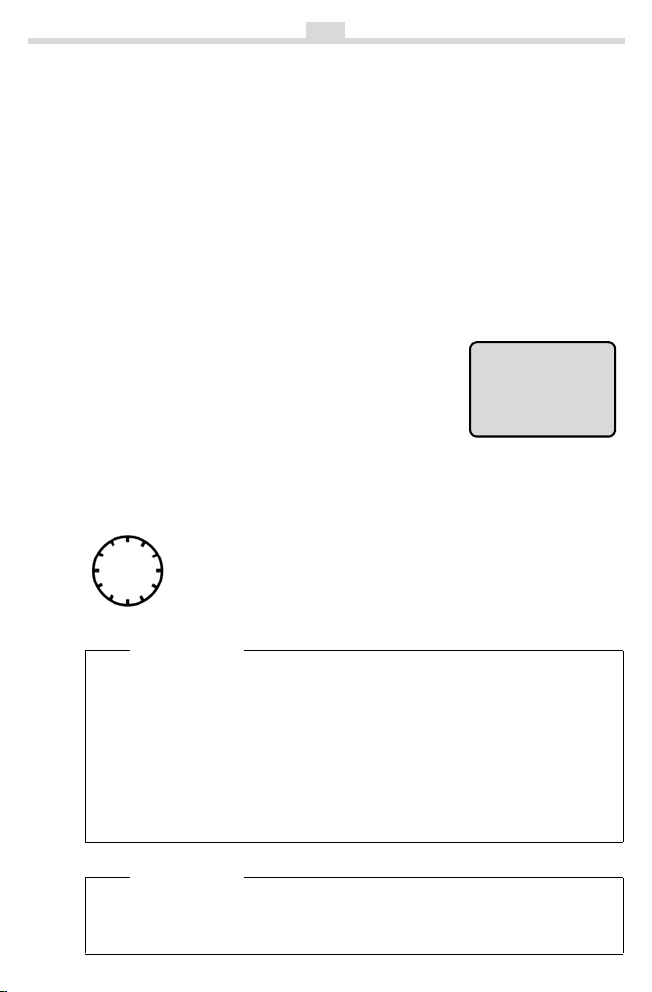
Display in idle status
Once the phone is registered and the time set, the idle
display is shown as in this example.
If more than one handset is registered, the internal
number
ner.
of the handset is
shown in the upper left cor-
Activating/deactivating the handset
Press and hold the a key to activate or deactivate the handset.
If you place a deactivated handset in the base station or charging cradle, it will
automatically acti
Your phone is now ready for use.
If you have any questions about using your phone, please read the tips on troubleshooting ("Questions and answers"
team page 12.
vate.
¢ page 11) or contact our Customer Care
e the position of an entry to the
1 U
11.12. 11:56
INT MENU
Page 7

A49H/EN/A31008
M2250
Z70157619/if/1002
2012
Making calls
Making external calls and ending calls
External calls are calls using the public telephone network.
~
(Enter the phone number) ¢c.
The phone number is dialled. (Or you can
ess and hold
first pr
and then enter the number.) During the call
you can adjust the earpiece volume using
t and set the volume with u.
End the call/cancel dialling:
Press the end call key
Accepting a call
The handset indicates an incoming call by
ringing and by a display on the screen.
Press the talk key
Auto Answer is activated (see Menu
When
¢ page 17), simply remove the hand-
tree
set from the base station/charging cradle.
In id le state, use
setting the ringer volume and use
the volume.
Calling Line Identification
When you get a call, the caller's number will
be displayed on your handset; the caller's
name will be displayed if it is stored in the
directory.
Preconditions:
ou have asked your network provider
1 Y
r the caller's number (CLIP) to be dis-
fo
played on your handset screen.
2 The caller has asked the network provid-
r his number to be identified (CLI).
er fo
®
appears in the display if you have
not requested Calling Line Identification,
Withheld appears if the caller has withheld
Unavailable appears if the caller
CLI, and
has not requested CLI.
c to hear the dial tone
a.
c to accept the call.
t to activate the menu for
u to set
7
Muting
You can mute your handset when making
external calls. Your caller can no longer hear
you but you can still hear them.
Press the Mute key
activate/deactivate the function.
m during the call to
Handsfree
Activating while dialling:
Enter the number
d. The handfree key is illumi-
free key
nated red now.
Switching between earpiece and
handsfree mod
During a call and press the handsfree key
~ and press the hands-
e:
d to activate or deactivate handsfree talk-
ing.
During a call, use
for setting the handsfree volume and use
to set the volume.
t to activate the menu
Using the directory and lists
Directory
To open the directory: press v.
You can s ave up to 80 phone numbers
(max. 32 digits) with co
(max. 14 characters). Enter letters/charac-
¢ page 11.
ters
Saving the first number in the directory
v
¢ New Entry? ¢ OK
¢ ~ (enter number) ¢ OK
¢ ~ (enter name) ¢ OK
When storing a number you also have to
store the corresponding name.
rresponding names
u
Page 8

A49H/EN/A31008
M2250
Z70157619/if/1002
2012
Storing additional entries in the directory
v ¢ MENU ¢ New Entry ¢ OK
¢ ~ (enter number) ¢ OK
¢ ~ (enter name) ¢ OK
When storing a number you also have to
store the corresponding name.
Selecting a directory entry
Open the directory with v. You hav e the
following options:
◆ Use u to scroll through the entries until
the required name is selected.
◆ Enter the first character of the name and
scroll to the entry with
u, if required.
Dialling with the directory
v
¢ u (select entry) ¢ c
Using other functions
v ¢ u (select entry) ¢ MENU
The following functions can be selected
u:
with
New Entry
Show Number
Use Number
Edit Entry
Delete Entry
Delete List
Send List
Shortcut
Save new phone number.
Display the phone
number.
Edit or add to the number.
Then dial or use other
functions with
Edit selected entry.
Delete selected entry.
Delete all directory
entries.
Send the complete list to
another handset
¢ page 8).
(
For shortcuts, assign the
current entry to a key.
MENU.
8
Using shortcut keys
You can assign directory entries to the keys
Q and 2 to O:
h / v ¢ u (select entry) ¢ MENU
¢ Shortcut ¢ OK ¢ ~ (press the key to
receive the assignment)
To d ial, press and hold the required shortcut key.
Sending the directory to another handset
Preconditions:
◆ The sending and receiving handsets
must both be registered to the same
base station.
◆ The other handset and the base station
can send and receive directory entries.
v ¢ u (select entry) ¢ MENU
¢ Send List ¢ OK ¢ u (select number of
the receiving handset) ¢ OK
Last number redial list
This list contains the 10 last dialled numbers.
Dialling from the last number redial list
c
(press briefly) ¢ u (select entry) ¢ c
Managing entries in the last number
list
redial
c
(press briefly) ¢ u (select entry)
¢ MENU
You can select the following settings:
Use Number
Copy to Dir.
Delete Entry
Delete List
Edit or add to the number.
Then dial or use other
tions with
func
Copy an entry to the direc-
tory.
Delete selected entry.
Delete all entries.
MENU.
Page 9

A49H/EN/A31008
M2250
Z70157619/if/1002
2012
Calls list/network mailbox list
The message key flashes as soon as a new
entry appears in the calls list/answer
machine list. A message appears in the display.
When you press the
displayed. If only one list contains new messages, this will be opened automatically.
Please note
If calls are saved in the network mailbox, you will receive a message if the
propriat
ap
(depending on your network provider).
Calls list
To return calls using the incoming calls list,
your phone's area code ("local area code")
and/or carrier code must be stored. For further information, please see your phone's
er gui
de.
us
Precondition: CLIP (
Depending on the type of list set
¢ page 17), the calls list contains:
(
◆ answered calls
◆ missed calls
Depending on the type of list set, all numbers of the last 25 incoming calls are saved
or just the missed call
The calls list is displayed as follows:
CallsList 01+02
Number of new entries + number of old, read
entries
f key, all the lists are
e settings have been made
¢ page 7)
s are saved.
9
Open the calls list
f
¢ CallsList 01+02 ¢ OK
The last incoming call is displayed.
If necessary, use
Using other functions
u to select another entry.
u (select entry) ¢ MENU
The following functions can be selected
u:
with
Delete Entry
Copy to Dir.
Date/Time
Status
Delete List
Delete current entry.
Copy an entry to the directory.
Call date and time (if set).
New Call: new missed call.
Old Call: entry already
read.
War ning ! All old and new
entries will be deleted.
Calling back a caller from the calls list
f
¢ CallsList 01+02 ¢ OK
¢ u (select entry) ¢ c
Assigning key 1 for fast access to the network mailbox
Simply press and hold key 1 on the handset and you will be connected directly to
the network mai
See Menu tree
lbox.
¢ page 17.
Page 10

A49H/EN/A31008
M2250
Z70157619/if/1002
2012
Using several handsets
Making internal calls
Internal calls are free calls to other handsets
that are registered to the same base station.
To make a call to other handsets, press
◆ INT ¢ ~ (1...4, enter internal number
of the handset)
called or
◆ INT ¢ star key P ¢ OK, all handsets
are called.
When a participant answers you can speak
to them. T
o end the call
¢ OK, the handset is
a.
, press
Internal consultation call/ connecting a call
You are in conversation with an external
participant. Press the
all handsets.
◆ Before the internal participant has
answered, press the end call key
call is diverted to the participant who
answers the call.
◆ After the internal participant answers,
you can talk to him. Press the end call
a to divert the call, or press the “
key
display key to reconnect to the external
participant.
INT key and call one or
a; the
Setting the alarm clock
Activating/deactivating the alarm clock
MENU ¢ Alarm Clock ¢ OK ¢ Activation ¢ OK ¢ Off or On ¢ OK
When activated:
¢ Set the wake-up time ¢ OK
When the alarm clock rings, press any key to
switch it off for 24 hours. If the alarm clock
is set, the wa
the screen and the wake-up time displays
instead of the date.
ke-up icon
l will appear on
10
Setting the wake-up time
MENU ¢ Alarm Clock ¢ OK ¢ Wakeup
time ¢ OK
Enter the wake-up time in hours and min-
, then press OK.
utes
Phone settings
For details on how to make audio settings,
see Menu tree
Changing the display language
MENU ¢ Settings ¢ OK ¢ Handset
¢ page 17.
¢ OK ¢ Language ¢ OK ¢ select the
language
If you accidentally choose a language you
do not understand, press
MENU ¢ v ¢ v ¢ v ¢ OK ¢ v
¢ OK
¢ OK ¢ OK
Select another language with u and
OK.
press
Resetting the handset
You can reset individual settings and
changes that you have made. Entries in the
directory, the calls list and the handset's
registration to the base station will be
retained.
MENU ¢ Settings ¢ OK ¢ Handset
¢ OK ¢ Reset Handset ¢ OK ¢ Reset?
¢ OK
Cancel the reset with a.
After the reset the calls list is empty!
Page 11

A49H/EN/A31008
M2250
Z70157619/if/1002
2012
Appendix
Entering letters/characters
Press the relevant key the number of times
indicated.
Briefly press the hash key
from "Abc" to "123" mode, from "123" to
"abc"mode and from "abc" to "Abc" mode.
Standard characters
1x 2x 3x 4x 5x 6x 7x 8x 9x 10x 11x 12x13x 14x
1)
1 £ $ ¥ ¤
1
a b c 2 ä á à â ã ç
2
d e f 3 ë é è ê
I
g h i 4 ï í ì î
4
j k l 5
5
m n o 6 ö ñ ó ò ô õ
L
p q r s 7 ß
M
t u v 8 ü ú ù û
N
w x y z 9 ÿ ý æ ø å
O
. , ? ! 0 + - : ¿ ¡ " ’ ; _
Q
* / ( ) < = > %
P
Abc
123
-->
-->
# @ \ & §
#
abc
123
1) Space
Specifications
Recommended batteries
Technology: Nickel-metal-hydride
(NiMH)
Size: AAA (Micro, HR03)
Voltage: 1.2 V
Capacity: 650 mAh
We recommend the following types of battery:
◆ GP 550/700 mAh
◆ Yuasa Phone 700/800 mAh
◆ Peacebay 550/650 mAh
◆ Corun Ni-MH AAAJ650 (650 mAh)
◆ Highpower HFR-44AAAJ650 (650 mAh)
(Valid at the time of going to press)
The handset is supplied with recom-
mended batteries.
# to switch
11
General specifications
WDCT standard is supported
Range up to 300 m outdoors
Operation time
(WDCT version)
– Talk time
– Standby time
Environmental conditions in operation
up to 50 m indoors
up to 6 hours
up to 144 hours
+5 °C to +45 °C, 20% to
75% elative humidity
Questions and answers
If you have any queries about the use of
your telephone, visit our website at
www.gigaset.com/service
for 24-hour support. The table below contains a list of common problems and possible solutions.
Problem Cause Solution
Nothing
appears in
the display.
No wireless
connection
e base
to th
at
ion,
st
Base
search
flashes in
the display.
No wireless
connection
e base
to th
ion,
stat
Register
HS flashes
in the display.
The handset is not
swi
on.
The batteries are flat.
The handset is outside the
ra
the base
station.
The base
station is
no
on.
The handset is not
egi
r
tche
e of
ng
t turned
stered
d
Press the end call
y a for approx.
ke
5 seconds or place
handset in the base
station.
Charge or replace the
ries.
batte
Move the handset
ser to the base
lo
c
station.
Check the mains connector on the base sta-
¢ page 3.
tion
Register the handset
¢ page 5.
the
Page 12

A49H/EN/A31008
M2250
Z70157619/if/1002
2012
Customer Service & Assistance
12
Do you have any questions? As a Gigaset customer, you can find help quickly in this User
Manual and in the service section of our Gigaset onlin
In our constantly updated online service you can find:
e portal www.gigaset.com/service.
◆ Extensive information about our products
◆ FAQ co mpi lati ons
◆ Keyword search to help find topics quickly
◆ Compatibility database: Find out which base stations and handsets can be combined.
◆ Product comparison: Compare the features of several products with each other.
◆ Downloads for user manuals and current software updates
◆ E-mail contact form for customer service
Please register your phone online right after purchase.
This enables us to provide you with even better service regarding questions or an after
sales query
email contact form from our Gigaset online portal after selecting your home country.
Our representatives are also available on the telephone hotlines for consultation.
/issue/claim. In order to contact our customer service via email, please use the
Product warranty
Congratulations
On the purchase of your new Gigaset product, we guarantee that this equipment is a
genuie manufacturer’s product and extend the following warranty:
We guarantee this product against manufacturing defects for two full years from the date
of purchase, unless specified otherwise.
Adaptors and batteries for cordless phones carry 6 months warranty from the date of purchase.
Gigaset Communications authorized Service Centres will replace or repair, if necessar y, any
defective part/parts free of charge by presenting this certificate of warranty at the Service
Centre mentioned overleaf.
Page 13

A49H/EN/A31008
M2250
Z70157619/if/1002
2012
13
Warranty
This Certificate of warranty does not apply if the telephone has:
1. Been misused, mishandled, willfull damaged,
properly repaired, tested, alter
2. A defect arising out of any failure to follow instruct
specification.
3. In case repairs are carried out of by unauthorized personnel or unau
warranty will be void.
4. A defect arising from using non-Gigaset appr
tached to or in connection with the telephone.
5. If this certificate of warranty is not signed and
6. Any other claim resulting out of or in connection with the device shall be excluded from
this warrant
y.
ed improperly in any way.
neglected, damaged by lightning, im-
ions either in the manual or product
thorized source
oved
accessories or ancillary items at-
stamped
by the authorised distributor.
Certificate of warranty
The warranty is not valid if it is not signed and stamped by the authorized distributor.
Please fill in the following details and stamp the card to validate the warranty. All details
must be filled in by the dealer and retained by the Customer. The purchase receipt shall be
required as evidence for invoking the warranty.
Customer’s Name: ______________________________________________________
Product / Model: _______________________________________________________
Dealer’s Name: _________________________________________________________
Date of Purchase: _______________________________________________________
Invoice / Cash Memo No./Date: ___________________________________________
– Ownership of devices or components replaced by and returned Gigaset communica-
tions shall vest in Gigaset communications.
– This warranty shall apply to 2.4Ghz products purchased in India only.
Dealer’s Stamp
Page 14

A49H/EN/A31008
M2250
Z70157619/if/1002
2012
Service Centres
We offer you support that is fast and tailored to your specific needs!
Our Online Support on the Internet:
www.gigaset.com/service
In some countries repair and replace services are impossible where the products are
not sold t
For the latest Service centers addresses please visit
Service Centres
hrough our authorised dealers.
www.gigaset.com/in.
14
Punjab, Ludhiana - inTarvo Technologies
Limited
B-2
2,BASEMENT OF SIDHANA ELETROVISTION , DASHMESH NAGAR, OPP BANK OF
MAHARS
HTRA, NR. GILL CHOWNK, LUDHI-
ANA, PUNJAB.
Pin Code:141003
Centre Incharge: Anil Kumar
Phone: 0161-4641235
E-mail: se.ludhiana@intarvo.com
Region South
Region North
Delhi - inTarvo Technologies Limited
G4, 5, 6 Chandra Bhawan Nehru Place, New
Delhi
Pin Code: 110 019
Centre Incharge: Ms. Suneeta Tikoo
Phone: 011-30962309
E-mail: se.np@intarvo.com
Haryana, Gurgaon- inTarvo Technologies
Limit
ed
1
2, 13, 14, First Floor, Ganpati Complex, Old
Delhi Road, Op
ria Chowk, Gurgaon, Harayana
Pin Code: 122 001
Centre Incharge: Mr. Bhasker Patni
Phone: 0124-4286829 / -4286826
E-mail: bhasker.patni@intarvo.com;
.gurgaon@intarvo.com
repair
Uttar Pradesh, Noida -
inTarvo Technologies Limited
C-32, First Floor, SECTOR-2, Near Hotel
Niru
la, Noida, Uttar Pradesh
Pin Code: 201 301
Centre Incharge: Hemant
Phone: 0120-4318632
E-mail: rcd.noida@intarvo.com
p Hudda Nersury, Near Kata-
Karnataka, Bangalore - inTarvo Technologies Limited
# 6/A, AVS Compound, Ijipura, 80 ft Road,
Kora
mangala, Bangalore, Karnataka
Pin Code: 560 034
Centre Incharge: Harish
Phone: 080-41312700/2705/2710
E-mail: rtoebl.bangalore@intarvo.com
Tamilnadu, Chennai - inTarvo Technologies Limited
No: 112, 1st Floor, Vairam Complex, Thyagaraya Road, T.Naga r, Chen nai, Ta milna du
Pin Code: 600 017
Centre Incharge: Pradeep Nair
Phone: 044-43412292/43412299/43412266
E-mail: teamlead.stbchennai@intarvo.com;
thomson.rtche
Andhra Pradesh, Hyderaba
Technologies Limited
Sangeeta Plaza, No 3-9-241, 1st Floor, Near
Police
derabad, Andhra Pradesh
Pin Code: 500 026
Centre Incharge: Narendra Babu
Phone: 040-40072514/40072513
E-mail: netgear.hydeabad@intarvo.com
nnai@intarvo.com
d - inTarvo
Station, West Marredpally, Secun-
Page 15

A49H/EN/A31008
M2250
Z70157619/if/1002
2012
Kerala, Kochi - Bits N Bytes Computers
No.43/1821 A, Post Office Building, S.R.M
Road, P
achalam, Cochin, Kerala
Pin Code: 682 012
Centre Incharge: Shalu Thomas
Phone: 9847401718 / 9744705512 / 0484-
2401718
E-mail: jinn
worldchn@vsnl.net
Andhra Pradesh, Vizag - Planet Solutions
C/o. S.N.K. IT SOLUTIONS PVT.LTD., D.NO:
50-12SEETHAMMAPETA, VISAKHAPATNAM
Pin Code: 530016
Centre Incharge: K. SOMU NAIDU
Phone: 97044-80006 / 92466-45999 / 0891-
6456269
E-mail
vizag@gmail.com
Andhra Pradesh,Vijayawada - Sigma
Technologie
# 40-5-19/4A Lakshman’s Enclave, Tikkle
Road, V
Pin Code: 520 010
Centre Incharge: KHALIL SYED
Phone: 9246472168 / 08662472168
E-mail: customercare@sigmatechnolo-
gies.info
Region West
Maharashtra, MUMBAI - inTarvo Technologies Limited
Gala No. 4/5, NEW NANDU INDUSTRIAL
ESTA
(EAST), MUMBAI (Maharashtra)
Pin Code: 400093
Centre Incharge: Kiran Chaudhary
Phone: 8268872271, 08082004837
E-mail: prakash11.ghatkar@gmail.com;
feedback.mu
y.bits@gmail.com; micro-
7/2, FIRST FLOOR, SATYA RESIDENCY,
: aishplanet@gmail.com; snk-
s
ijayawada, Andhra Pradesh
TE, MAHAKALI CAVES ROAD, ANDHERI
m@intarvo.com
15
Maharashtra, Pune - inTarvo Technologies Limited
OSWAL COMPLEX ,GROUND FLOOR, 694,
T
T STREET, M.G. ROAD, PUNE -411001
ABOO
(LANDMARK : FORMER LANE OF ABN –
AMRO BANK CAMP BRANCH, EXISTING
LANE OF ROYAL BANK OF SCOTLAND)
Pin Code: 411030
Centre Incharge: Vijay Chacko
Phone: 020-32504045
E-mail: Se.pune@intarvo.com;
@rteservices.com,
setl.pune
vijay.chacko@intarvo.com
Gujarat, Ahmedabad - inTarvo Technologies Limited
1st Floor, Rituraj Complex, 84/B, Swastik
ety,Near Swastik Cross Roads, Navrang-
Soci
pura Ahmedabad, Gujarat
Pin Code: 380009
Centre Incharge: Rashesh Rawal
Phone: 079-65499327 / 079-65495392
E-mail: setl.ahm@intarvo.com;
rahuldodiya1
Maharashtra, Nashik -Alphabetics Business Machines Pvt. Ltd
13/B Madhuvijay Colony,Vitthal Bunglow,
Coll
ege Road,Nashik - 422002
Pin Code: 422002
Centre Incharge: Sandeep Malvade
Phone: 0253-2341986 / 2342586
Email: sandeep@abmpl.com, sup-
port@abmpl.com
Gujrat, Baroda - inTarvo Technologies
Limited
Shop No
ter,Kalaghoda, Syajigunj, Baroda,Gujarat
Pin Code: 390005
Centre Incharge: Rakesh Agrawal
Phone: 0265-3911106 / 9824545727
Email: sewd.baroda@intarvo.com
990@gmail.com
.10-11, Ground Floor, Profit Cen-
Page 16

A49H/EN/A31008
M2250
Z70157619/if/1002
2012
Gujrat, Rajkot - inTarvo Technologies
Limited
G.B. Complex, Office No.306, Near Moti
Tanki C
howk, Rajkot - 360001
Pin Code: 360001
Centre Incharge:
Phone: 9033745060 / 0281-3057150
Email: se.rajkot@intarvo.com; sewd.raj-
kot@intarvo.com
Gujrat, Surat - INTARVO Partner Location
ditel Services)
(In
16 Shivshakti Appartment, Opp Ranujadham Society, Bombay Market 2, Punadam
Road, S
urat.
Pin Code: 395006.
Centre Incharge: Rahul / Mustafa
Phone: 9909797347
Email: info@inditel.co.in
Region East
West Bengal, Kolkata - inTarvo Technologies Limited
Address: 2 Ripon Street, Near Hira International Hotel, Kolkata, West Bengal
Pin Code: 700016
Centre Incharge: Ms. Susmita
Phone: 033-22277892/899
Email: se.east@intarvo.com; sus-
mita.baral@intarvo.com
16
Page 17

A49H/EN/A31008
M2250
Z70157619/if/1002
2012
17
Menu tree
Your phone has an extensive range of features. These are offered in the form of
menus.
o select a function while the phone is in
T
le status, press
id
Alarm Clock
Activation Activating/deactivating the alarm clock
Wakeup t ime Input format: HHMM
Audio Settings
Handset Volume Earpiece 3 levels available
Ringer Volume 5 levels + "Crescendo" available
Ringer Melody External Calls
Advis. Tones Switch advisory tones (e.g. positive or negative confirma-
Voice Mail
Set Key 1 Netw. Mailbx Assign key 1 with network mailbox and enter
Settings
Date/Time Enter date (DDMMYY format), then time (HHMM format) ¢ page 6
Handset Language Set the display language
Base (Menu dependent on base station)
MENU (open menu), use
Speaker
Internal Calls 10 melodies available
Alarm Clock 10 melodies available
tion, key tones) on or off.
Auto Answer Automatically activate/deactivate auto answer
Register HS Manually register the handset
CallsList Type Missed Calls ¢ page 9
Reset Handset Reset the handset
t and v keys to scroll to the function
the
you require and press
To return to idle status: pr
5 levels available
10 melodies available
the network mailbox number (in idle status, press
and hold key
Netw. Mailbx: your netw
machine; must be requested separately. The network mailbox list can be displayed if your network
ovider
pr
been assigned with the network mailbox.
1 to dial).
supports this function and if k ey 1 has
OK to confirm.
ess the a key.
ork provider's answer
¢ page 10
¢ page 7
¢ page 5
All Calls ¢ page 9
¢ page 10
Page 18

A49H/EN/A31008
M2250
Z70157619/if/1002
2012
18
Issued by
Gigaset Communications GmbH
Frankenstr. 2a
D-46395 Bocholt
© Gigaset Communications GmbH 2012
All rights reserved. Subject to availability.
Rights of modification reserved.
www.gigaset.com
A31008-M2250-Z701-5-7619
 Loading...