

Page 1

EN Dear Customer,
Gigaset Communications GmbH is the legal successor to
Siemens Home and Office Communication Devices GmbH &
Co. KG (SHC), which in turn continued the Gigaset business
of Siemens AG. Any statements made by Siemens AG or
SHC that are found in the user guides should therefore be
understood as statements of Gigaset Communications
.
GmbH
We hope you enjoy your Gigaset.
DE Sehr geehrte Kundin, sehr geehrter Kunde,
FR Chère Cliente, Cher Client,
IT Gentile cliente,
NL Geachte klant,
ES Estimado cliente,
PT SCaros clientes,
die Gigaset Communications GmbH ist Rechtsnachfolgerin
der Siemens Home and Office Communication Devices
GmbH & Co. KG (SHC), die ihrerseits das Gigaset-Geschäft
der Siemens AG fortführte. Etwaige Erklärungen der
Siemens AG oder der SHC in den Bedienungsanleitungen
sind daher als Erklärungen der Gigaset Communications
GmbH zu verstehen.
Wir wünschen Ihnen viel Freude mit Ihrem Gigaset.
la société Gigaset Communications GmbH succède en droit
à Siemens Home and Office Communication Devices GmbH
& Co. KG (SHC) qui poursuivait elle-même les activités Gigaset de Siemens AG. Donc les éventuelles explications de Siemens AG ou de SHC figurant dans les modes d’emploi
doivent être comprises comme des explications de Gigaset
Communications GmbH.
Nous vous souhaitons beaucoup d’agrément avec votre
Gigaset.
la Gigaset Communications GmbH è successore della Siemens Home and Office Communication Devices GmbH &
Co. KG (SHC) che a sua volta ha proseguito l’attività della
Siemens AG. Eventuali dichiarazioni della Siemens AG o
della SHC nei manuali d’istruzione, vanno pertanto intese
come dichiarazioni della Gigaset Communications GmbH.
Le auguriamo tanta soddisfazione con il vostro Gigaset.
Gigaset Communications GmbH is de rechtsopvolger van
Siemens Home and Office Communication Devices GmbH &
Co. KG (SHC), de onderneming die de Gigaset-activiteiten
van Siemens AG heeft overgenomen. Eventuele uitspraken
of mededelingen van Siemens AG of SHC in de gebruiksaanwijzingen dienen daarom als mededelingen van Gigaset
Communications GmbH te worden gezien.
Wij wensen u veel plezier met uw Gigaset
la Gigaset Communications GmbH es derechohabiente de la
Siemens Home and Office Communication Devices GmbH &
Co. KG (SHC) que por su parte continuó el negocio Gigaset
de la Siemens AG. Las posibles declaraciones de la
Siemens AG o de la SHC en las instrucciones de uso se
deben entender por lo tanto como declaraciones de la Gigaset Communications GmbH.
Le deseamos que disfrute con su Gigaset.
Gigaset Communications GmbH é a sucessora legal da Siemens Home and Office Communication Devices GmbH &
Co. KG (SHC), que, por sua vez, deu continuidade ao sector
de negócios Gigaset, da Siemens AG. Quaisquer declarações por parte da Siemens AG ou da SHC encontradas nos
manuais de utilização deverão, portanto, ser consideradas
como declarações da Gigaset Communications GmbH.
Desejamos que tenham bons momentos com o seu Gigaset.
DA Kære Kunde,
FI Arvoisa asiakkaamme,
SV Kära kund,
NO Kjære kunde,
EL Αγ α πητή πελάτισσα, αγαπητέ πελάτη,
HR Poštovani korisnici,
.
SL Spoštovani kupec!
Gigaset Communications GmbH er retlig efterfølger til Siemens Home and Office Communication Devices GmbH &
Co. KG (SHC), som fra deres side videreførte Siemens AGs
Gigaset-forretninger. Siemens AGs eller SHCs eventuelle
forklaringer i betjeningsvejledningerne skal derfor forstås
som Gigaset Communications GmbHs forklaringer.
Vi håber, du får meget glæde af din Gigaset.
Gigaset Communications GmbH on Siemens Home and
Office Communication Devices GmbH & Co. KG (SHC)-yri-
tyksen oikeudenomistaja, joka jatkoi puolestaan Siemens
AG:n Gigaset-liiketoimintaa. Käyttöoppaissa mahdollisesti
esiintyvät Siemens AG:n tai SHC:n selosteet on tämän
vuoksi ymmärrettävä Gigaset Communications GmbH:n
selosteina.
Toivotamme Teille paljon iloa Gigaset-laitteestanne.
Gigaset Communications GmbH övertar rättigheterna från
Siemens Home and Office Communication Devices GmbH &
Co. KG (SHC), som bedrev Gigaset-verksamheten efter Siemens AG. Alla förklaringar från Siemens AG eller SHC i
användarhandboken gäller därför som förklaringar från
Gigaset Communications GmbH.
Vi önskar dig mycket nöje med din Gigaset.
Gigaset Communications GmbH er rettslig etterfølger etter
Siemens Home and Office Communication Devices GmbH &
Co. KG (SHC), som i sin tur videreførte Gigaset-geskjeften i
Siemens AG. Eventuelle meddelelser fra Siemens AG eller
SHC i bruksanvisningene er derfor å forstå som meddelelser
fra Gigaset Communications GmbH.
Vi håper du får stor glede av din Gigaset-enhet.
η Gigaset Communications GmbH είναι η νομική διάδοχος της
Siemens Home and Office Communication Devices GmbH &
Co. KG (SHC), η οποία έχει αναλάβει την εμπορική
δραστηριότητα Gigaset της Siemens AG. Οι δηλώσεις της
Siemens AG ή της SHC στις
επομένως δηλώσεις της Gigaset Communications GmbH.
Σας ευχόμαστε καλή διασκέδαση με τη συσκευή σας Gigaset.
Gigaset Communications GmbH pravni je sljednik tvrtke
Siemens Home and Office Communication Devices GmbH &
Co. KG (SHC), koji je nastavio Gigaset poslovanje tvrtke
Siemens AG. Zato sve izjave tvrtke Siemens AG ili SHC koje
se nalaze u uputama za upotrebu treba tumačiti kao izjave
tvrtke Gigaset Communications GmbH.
Nadamo se da sa zadovoljstvom koristite svoj Gigaset
uređaj.
Podjetje Gigaset Communications GmbH je pravni naslednik
podjetja Siemens Home and Office Communication Devices
GmbH & Co. KG (SHC), ki nadaljuje dejavnost znamke
Gigaset podjetja Siemens AG. Vse izjave podjetja Siemens
AG ali SHC v priročnikih za uporabnike torej veljajo kot izjave
podjetja Gigaset Communications GmbH.
Želimo vam veliko užitkov ob uporabi naprave Gigaset.
οδηγίες χρήσ
ης αποτ
ελούν
Issued by
Gigaset Communications GmbH
Schlavenhorst 66, D-46395 Bocholt
Gigaset Communications GmbH is a trademark
licensee of Siemens AG
© Gigaset Communications GmbH 2008
All rights reserved.
Subject to availability. Rights of modifications
reserved.
www.gigaset.com
Page 2

CS Vážení zákazníci,
společnost Gigaset Communications GmbH je právním
nástupcem společnosti Siemens Home and Office
Communication Devices GmbH & Co. KG (SHC), která dále
přejala segment produktů Gigaset společnosti Siemens AG.
Jakékoli prohlášení společnosti Siemens AG nebo SHC, které
naleznete v uživatelských příručkách, je třeba považovat za
prohlášení společnosti Gigaset Communications GmbH.
Doufáme, že jste s produkty Gigaset spokojeni.
SK Vážený zákazník,
Spoločnosť Gigaset Communications GmbH je právnym
nástupcom spoločnosti Siemens Home and Office
Communication Devices GmbH & Co. KG (SHC), ktorá zasa
pokračovala v činnosti divízie Gigaset spoločnosti Siemens
AG. Z tohto dôvodu je potrebné všetky vyhlásenia
spoločnosti Siemens AG alebo SHC, ktoré sa nachádzajú v
používateľských príručkách, chápať ako vyhlásenia
spoločnosti Gigaset Communications GmbH.
Veríme, že budete so zariadením Gigaset spokojní.
PL Szanowny Kliencie,
Firma Gigaset Communications GmbH jest spadkobiercą
prawnym firmy Siemens Home and Office Communication
Devices GmbH & Co. KG (SHC), która z kolei przejęła
segment produktów Gigaset od firmy Siemens AG. Wszelkie
oświadczenia firm Siemens AG i SHC, które można znaleźć
w instrukcjach obsługi, należy traktować jako oświadczenia
firmy Gigaset Communications GmbH.
Życzymy wiele przyjemności z korzystania z produktów
Gigaset.
TR Sayın Müşterimiz,
Gigaset Communications GmbH, Siemens AG'nin Gigaset
işletmesini yürüten Siemens Home and Office
Communication Devices GmbH & Co. KG (SHC)'nin yasal
halefidir. Kullanma kılavuzlarında bulunan ve Siemens AG
veya SHC tarafından yapılan bildiriler Gigaset
Communications GmbH tarafından yapılmış bildiriler olarak
algılanmalıdır.
Gigaset'ten memnun kalmanızı ümit ediyoruz.
RO Stimate client,
Gigaset Communications GmbH este succesorul legal al
companiei Siemens Home and Office Communication
Devices GmbH & Co. KG (SHC), care, la rândul său, a
continuat activitatea companiei Gigaset a Siemens AG.
Orice afirmaţii efectuate de Siemens AG sau SHC şi incluse
în ghidurile de utilizare vor fi, prin urmare, considerate a
aparţine Gigaset Communications GmbH.
Sperăm ca produsele Gigaset să fie la înălţimea dorinţelor
dvs.
SR Poštovani potrošaču,
Gigaset Communications GmbH je pravni naslednik
kompanije Siemens Home and Office Communication
Devices GmbH & Co. KG (SHC), kroz koju je nastavljeno
poslovanje kompanije Gigaset kao dela Siemens AG. Stoga
sve izjave od strane Siemens AG ili SHC koje se mogu naći u
korisničkim uputstvima treba tuma
Gigaset Communications GmbH.
Nadamo se da ćete uživati u korišćenju svog Gigaset
uređaja.
BG Уважаеми потребители,
Gigaset Communications GmbH е правоприемникът на
Siemens Home and Office Communication Devices GmbH
& Co. KG (SHC), която на свой ред продължи бизнеса на
подразделението Siemens AG. По тази причина
всякакви изложения, направени от Siemens AG или
SHC, които се намират в ръководствата за
потребителя, следва да се разбират като изложения на
Gigaset Communications GmbH.
Надяваме се да ползвате с удоволствие вашия Gigaset.
izjave kompanije
čiti kao
RU Уважаемыи покупатель!
Компания Gigaset Communications GmbH является
правопреемником компании Siemens Home and Office
Communication Devices GmbH & Co. KG (SHC), которая,
ою очередь, приняла подразделение Gigaset в свое
в св
управление от компании Siemens AG. Поэтому любые
заявления, сделанные от имени компании Siemens AG
или SHC и встречающиеся в руководствах
пользователя, должны восприниматься как заявления
компании Gigaset Communications GmbH.
Мы надеемся, что продукты Gigaset удовлетворяют
вашим требованиям.
HU T
isztelt Vásárló!
A Siemens Home and Communication Devices GmbH & Co.
KG (SHC) törvényes jogutódja a Gigaset Communications
GmbH, amely a Siemens AG Gigaset üzletágának utódja.
Ebből következően a Siemens AG vagy az SHC felhasználói
kézikönyveiben található bármely kijelentést a Gigaset
Communications GmbH kijelentésének kell tekinteni.
Reméljük, megelégedéssel használja Gigaset készülékét.
Issued by
Gigaset Communications GmbH
Schlavenhorst 66, D-46395 Bocholt
Gigaset Communications GmbH is a trademark
licensee of Siemens AG
© Gigaset Communications GmbH 2008
All rights reserved.
Subject to availability. Rights of modifications
reserved.
www.gigaset.com
Page 3
s
Be inspired
Operating Manual
and Safety Precautions
!
Page 4

Brief overview
Base station
symbol
– Constant:
ready for dialling/receiving
calls
– Flashing:
no connection
to base station
s
s
s
1234567890
/
Handset key
– Accept/end call
– Dial call number
(when digits are
already stored)
Speed dialling
Recall key
– For PABXs and
select carrier
services
Dial pause
– Hold down!
Displays
Base station
/
symbol
Save
d
Special displays
*character
n
#character
_
Recall key
u
Pause
P
~ Memory empty
b
~~~~
Redial
Keypad lock
– Lock on/off
hold down to
activate/
deactivate!
Memory key
– For saving
– For settings
Lift handset
Keypad lock
Handset ready for
registration
Handset searching for
registered base
Handset found base
that is ready for
registration
2
Page 5
Safety information
!
$
‹
Œ
ƒ
Use only the plug-in power supply unit provided, as indicated on the bottom of the device.
Use only approved, rechargeable batteries of
the same type. In other words, never use con-
ventional (non-rechargeable) batteries, since
these can injure you and damage your health.
Insert rechargeable batteries in accordance with
polarity symbols (the instructions are found in
the handset battery compartment).
Use the batteries indicated in these operating
instructions (the instructions are found in the
handset's battery compartment).
The operation of medical equipment may be
affected. Bear in mind the technical requirements of the environment (e.g. doctor's office).
The handset can cause an unpleasant buzzing
sound in hearing aids. Do not hold the handset
too close to your ear.
Do not operate the telephone in environments
where there is risk of explosion (e.g. paint
shops).
Do not install the base station in bathrooms or
showers.The handset is not splashproof (see
page 13).
Do not pass your Gigaset on to a third party without the user guide.
Dispose of batteries and your phone in an environment-friendly manner.
When the keypad is locked (see page 11) emergency numbers cannot be dialled either.
Not all the functions described in this user guide are available in all countries.
3
Page 6
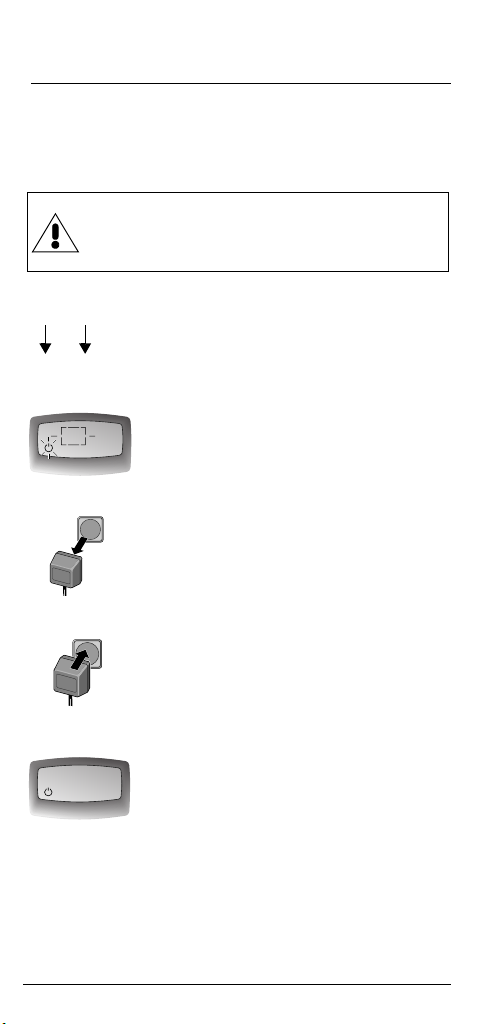
Putting the telephone into service
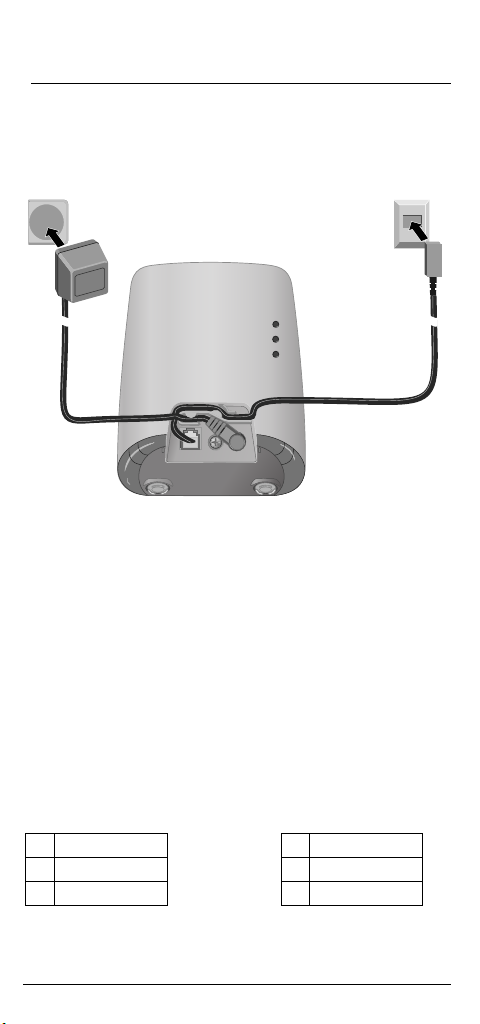
Step 1: Connecting the base station
First of all, connect your base station to the telephone jack
and the mains supply.
220 V/
230 V
• Insert the round plug of the mains cable into the jack.
• Lay the cable in the channel provided (to prevent overtensioning).
• Plug the power supply unit into the power socket.
•Plug the square connector of the phone cable supplied
into the jack.
• Lay the cable in the channel.
• Plug the phone connector into the phone socket.
* Appearance may differ, depending on country!
If you do not want to use the telephone cable supplied,
ensure that you use either a simple extension cable or a
telephone cable with 3/4 connector assignment, otherwise
your Gigaset A100 will not function correctly.
Telephone
jack*
1free 4L b
2free 5free
3L a 6free
4
Page 7
Putting the telephone into service
1
2
1
2
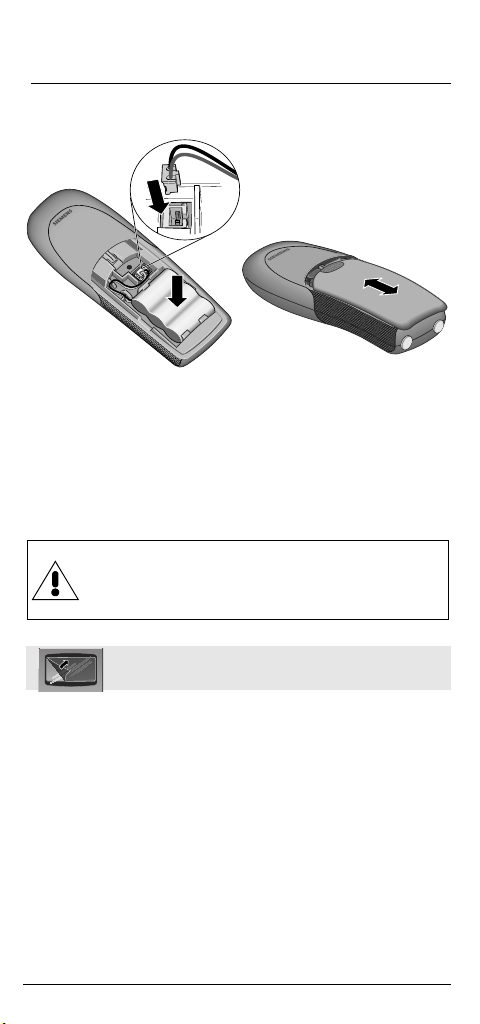
Step 2: Inserting the battery
• Insert the battery connector into the socket (see inset); it
must lock securely into place.
• Place battery in the battery compartment.
• Insert battery cable in the clip provided.
• Put the battery compartment cover on and push it up until
it latches into position. To open the compartment, press
on the ridged section of the cover and push downwards.
• Only use approved batteries.
• Never use non-Siemens charging units as these
can damage the batteries.
The display is protected by a film.
Please remove protective film.
5
Page 8
Putting the telephone into service
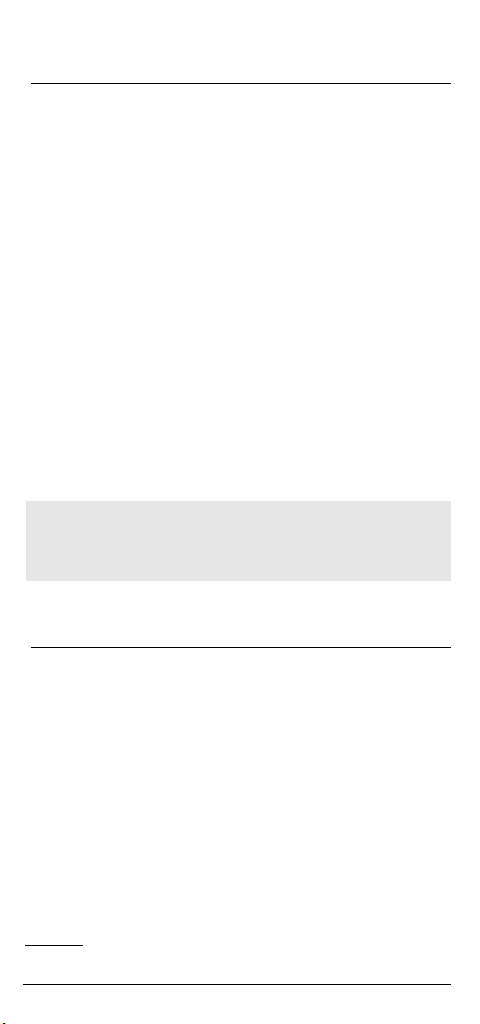
Step 3: Registering the handset at the base station
Before you can make or receieve telephone calls you need
to register the handset at the base station.
Make sure that the base station is connected to
the power supply (Step 1) and the battery is
inserted in the handset (Step 2).
Place the handset in the base station and
k
leave it there until registration is complete.
Ö
The registration display will appear. This may
take up to 5 minutes, depending on the
charge level of the battery.
The
/ symbol will flash in the display.
Unplug the power supply unit (220V/230V)
from the mains socket.
The handset must remain in the base station. Plug the power supply unit back into
the mains socket.
After about 90 seconds the
stop flashing and the normal standby display
will appear. The handset is now registered at
this base station.
6
/ symbol will
Page 9
Putting the telephone into service
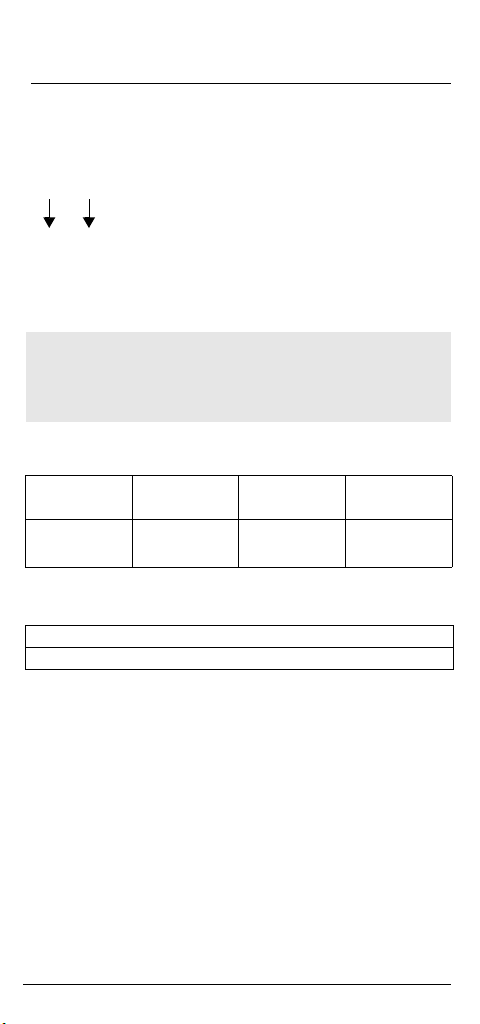
Step 4: Charging the battery
The battery supplied is not charged.
To charge the battery, place the handset in
k
Ö
Battery information
• Once the first charging operation is completed, you can
replace the handset in the base station after any call.
• The batteries warm up during charging - this is normal
and not a cause for concern.
Handset operating times/charging time
Capacity
300 (mAh) up to 100 hrs up to 10 hrs approx.
Approved battery
Nickel-cadmium (NiCd)
Type 1a (300 mAh)V30145-K1310-X147 NiCd
Batteries are available from your stockist, the Siemens
Customer Care or via the Internet, from Siemens Service
Shop at:
http://communication-market.siemens.de/serviceshop/
default.asp; alternatively see also last page.
the base station. For the first charging we
recommend a continuous charging time for
at least 16 hours. You can then make calls.
Standby
time
Ta l k t i m e
Charging
time
16 h rs
7
Page 10

Making calls
Making a call
o Enter the call number.
a Press the handset key. A connection is set
up. The icon
Did you enter the wrong number by mis-
take? If so, then press the handset key a
twice.
.
You can also dial a number by pressing the handset key first
and then entering the relevant digits.
You can use the recall key
key down). This may be necessary for international calls or
when dialling in to automatic announcement services.
b appears in the display.
R to insert a pause (hold the
Ending a call
a Press the handset key. The icon b
or
k
disappears from the display;
Place the handset in the base station.
The connection is cleared down.
Ö
Accepting a call
a Press the handset key. The connection is
set up.
Redialling a number
The last call number dialled is saved.
O Dial the call number.
a Press the handset key. The connection is
set up.
8
Page 11
Making calls
Saving/changing a call number (speed dialling)
You can save up to 10 telephone numbers as speed dialling
digits and dial them at the push of a button.
¦ C Press the memory key followed by the
e.g. Enter the speed dialling digit (0 to 9).
o Enter the call number.
¦ Save the speed dialling digit. You will hear
speed dialling key.
the confirmation beep.
Speed dialling
C Press the speed dialling key.
e.g. Select the speed dialling digit (0 to 9).
a Press the handset key. The connection is
set up.
The speed dialling digit "0" is activated automatically by
holding down number with the identification the speed dialling key. We therefore recommend assigning a frequently
dialled number to "0" (e.g. a network access number).
Cost-effective telephony
You can use the network access numbers of various providers to minimise costs (Call-by-Call
of the service provider. Like a call number, these numbers
can be saved as speed dialling digits (0 to 9).
You can, however, also dial the network access or call numbers as usual.
• Network access using a speed dialling digit
C Hold down the speed dialling key.The speed
o
a Enter the user’s call number and dial the
dial memory location "0" with the network
access number is displayed automatically.
complete number via the handset keypad.
*
), depends on the offering
* not available in all countries
9
Page 12

Cost-effective telephoning
• "Linking" or chaining of multiple speed dialling digits
You can link multiple access numbers and call numbers
that have been saved as speed dialling numbers.
C Hold down the speed dialling key.
e.g. Memory location "0" with the network
C Press the speed dialling key once more.
e.g. 5 Select the speed dialling digit (0 to 9) for a
access number is displayed.
user. The network access number and the
call number are chained and displayed.
a Press the handset key. The connection is
set up.
Further access numbers can be saved as speed dialling
numbers (0 to 9).
To use them press
key.
C and then the relevant speed dialling
Settings
Handset volume
You can set the handset volume to any of three levels.
Þ
¦
e.g. Ÿ
Ringer volume
You have three volumes to choose from.
¢
¦
Ÿ¦
e.g.
Activate the function.
¦
Change the volume (levels 1 to 3) and save.
Activate the function – the ringer sounds.
Change the ringer volume (levels 1 to 3) and
save.
10
Page 13

Settings
Ringtone
You can choose between two ringtones.
¦
´
Ÿ¦
e.g.
Keypad lock
When the keypad is locked, nothing happens if you inadvertently press a key. You can continue to accept calls in the
usual manner.
ª Hold down for more than
~~~~ The display icon appears if active.
Operating behind a PABX
If you operate your Gigaset behind a PABX, it may be necessary to change the preset Dual Tone Multifrequency Dialling
(DTMF) procedure and flash times (please refer to the operating instructions of your PABX).
Use digits 1 to 4 to set the following:
1 DTMF, long flash 250 ms
2 DTMF, short flash 100 ms
3 DP (Dial Pulsing) 1.5/1
4 DP 2/1
Activate the function – the ringer sounds.
Select the ringtone (version 1 or 2) and save.
1 second to activate/deactivate.
a Press the handset key.
Þ
¦
e.g. 4
¦
Activate the function by entering 10.
Enter the desired setting (1 to 4).
Save the setting.
a Press the handset key.
Did you enter the wrong number by mistake? Then press
the handset key
to standby.
twice or wait until the display returns
a
11
Page 14

Registering the handset manually
Handset A1 to an A100 base:
Manual registration has to be carried out if
• automatic registration has not functioned or
• the original handset supplied has been replaced.
Remove the power supply unit (220V/230V)
from its socket.
¦ 7 ¦ Prepare the handset for registration.
Place the handset in the base station and
k
leave it there until registration has been
completed.
Ö
Make sure the handset is still in the base
station. Now replug the power supply unit
into the socket.
The handset will now take about 60 seconds
searching for a base that is ready for registration.
A base that is ready for registration has been
found; registration was successful (display
appears for about 3 seconds).
No base ready for registration has been
found (display appears for about 3 seconds).
• Manual handset registration will overwrite an existing
registration.
• The search for a base that is ready for registration can be
cancelled by pressing the handset key a .
12
Page 15

Tips
Maintenance
Simply wipe your telephone with a damp cloth or an antistatic wipe. Never use a dry cloth as this can cause static
discharge!
Contact with liquid
If the handset should come into contact with liquid,
on no account switch the device on.
Remove all batteries immediately.
Allow the liquid to drip out of the device, and then dab all
parts of the device dry.
Keep the handset with the batteries removed in a warm,
dray place for at least 72 hours. In many cases, you will then
be able to use it again.
!
Troubleshooting
Malfunction Possible causes Solution
Registration did
not work.
No display. The battery is not
No reaction to
keystroke.
The battery is not
sufficiently
charged.
Handset and
base station were
not prepared for
registration.
charged.
The keypad is
locked.
Charge the battery for 16 hours
(see page 12).
Remove and then
re-insert the power supply unit.
Charge the battery or replace it
(see page 7).
Press ª for
1second.
13
Page 16

Malfunction Possible causes Solution
No radio connection to the base
station:
/ icon
flashing!
The handset is
outside the base
station range.
The handset is
not registered.
The base station
is not active.
Move closer to
the base station.
Register the
handset (see
page 12).
Insert round plug
of the mains
cable into jack
and lay the cable
in cable channel
(to prevent overtensioning).
Plug the power
supply unit into
the power socket.
Range
The range is up to 50 m indoors and approx. 300 m outdoors. The base station symbol
is exceeded.
/
flashes when the range
Customer Care
You can get assistance easily when you have technical questions or questions about how to use your device by using
our online support service on the Internet at:
www.my-siemens.com/customercare
or by referring to the section entitled Questions and
answers in this manual (page 13).
If the device needs to be repaired, please contact one of our
Customer Care Centers:
Abu Dhabi.....................................................................0 26 42 38 00
Argentina .................................................................0 80 08 88 98 78
Australia......................................................................18 00 62 24 14
Austria ........................................................................05 17 07 50 04
Bahrain .................................................................................40 42 34
Bangladesh...................................................................0 17 52 74 47
Belgium ........................................................................0 78 15 22 21
Bosnia Herzegovina ......................................................0 33 27 66 49
Brazil........................................................................0 80 07 07 12 48
Brunei ..............................................................................02 43 08 01
Bulgaria............................................................................02 73 94 88
14
Page 17

Cambodia ........................................................................12 80 05 00
Canada.....................................................................1 88 87 77 02 11
China .......................................................................0 21 50 31 81 49
Croatia ..........................................................................0 16 10 53 81
Czech Republic...........................................................02 33 03 27 27
Denmark..........................................................................35 25 86 00
Dubai ............................................................................0 43 96 64 33
Egypt ............................................................................0 23 33 41 11
Estonia.............................................................................06 30 47 97
Finland........................................................................09 22 94 37 00
France ........................................................................01 56 38 42 00
Germany.....................................................................01805 333 222
Greece.....................................................................0 80 11 11 11 16
Hong Kong.......................................................................28 61 11 18
Hungary ......................................................................06 14 71 24 44
Iceland ...............................................................................5 11 30 00
India.....................................................................01 13 73 85 89 - 98
Indonesia .................................................................0 21 46 82 60 81
Ireland.........................................................................18 50 77 72 77
Italy.............................................................................02 66 76 44 00
Ivory Coast ......................................................................80 00 03 33
Jordan...........................................................................0 64 39 86 42
Kenya.................................................................................2 72 37 17
Kuwait ...............................................................................2 45 41 78
Latvia .................................................................................7 50 11 14
Lebanon...........................................................................01 44 30 43
Libya ...........................................................................02 13 50 28 82
Lithuania .......................................................................8 22 74 20 10
Luxembourg ................................................................... 43 84 33 99
Macedonia.......................................................................02 13 14 84
Malaysia .....................................................................03 21 63 11 18
Malta ................................................................00 35 32 14 94 06 32
Mauritius ...........................................................................2 11 62 13
Mexico...................................................................01 80 07 11 00 03
Morocco ..........................................................................22 66 92 09
Netherlands.................................................................0900-3333102
New Zealand ..............................................................08 00 27 43 63
Norway ............................................................................22 70 84 00
Oman....................................................................................79 10 12
Pakistan ......................................................................02 15 66 22 00
Philippines ....................................................................0 27 57 11 18
Poland.........................................................................08 01 30 00 30
Portugal ........................................................................8 00 85 32 04
Qatar................................................................................04 32 20 10
Romania .....................................................................02 12 04 60 00
Russia....................................................................... (800) 200 10 10
Saudi Arabia..................................................................0 22 26 00 43
Serbia .........................................................................01 13 22 84 85
Singapore ........................................................................62 27 11 18
Slovak Republic ..........................................................02 59 68 22 66
Slovenia ........................................................................0 14 74 63 36
South Africa................................................................08 60 10 11 57
Spain.............................................................................9 02 11 50 61
Sweden ........................................................................0 87 50 99 11
Switzerland.................................................................08 48 21 20 00
Taiwan ........................................................................02 25 18 65 04
Thailand ........................................................................0 22 68 11 18
Tunisia ........................................................................01 71 10 81 08
15
Page 18

Turkey......................................................................0 21 65 79 71 00
Ukraine ....................................................................8 80 05 01 00 00
United Arab Emirates ...................................................0 43 31 95 78
United Kingdom.......................................................0 87 05 33 44 11
USA .........................................................................1 88 87 77 02 11
Vietnam ...........................................................................45 63 22 44
Your Gigaset is intended for operation in your country, as
depicted on the underside of the base unit. Country-specific
features have been taken into account.
The conformity of the device with the essential
requirements of the R&TTE directive is confirmed by the CE
symbol.
Excerpt from the original declaration:
"We, Siemens AG, declare, that the above mentioned product is manufactured according to our Full Quality Assurance
System certified by CETECOM ICT Services GmbH with the
registration number "Q810820M" in compliance with ANNEX
V of the R&TTE Directive 99/05/EC. The presumption of conformity with the essential requirements regarding Council
Directive 99/05/EC is ensured.“
Senior Approvals Manager
The Declaration of Conformity (DoC) has been signed. In
case of need, a copy of the original DoC can be made available via the company hotline.
16
Page 19

s
Be inspired
Notice d'utilisation
et consignes de sécurité
!
Page 20

Présentation
Symbole de la
base
– Continu : prêt
pour la numérotation/réception
– Clignotant : dé-
connexion de la
base
Mémoires
- N° abrégés
s
s
s
1234567890
/
Touche "Combiné"
– Accepter/Mettre
fin à la communication
– Prise de ligne
/Numérotation
Touche BIS
Touche "R"
– Pour services
réseau
Paus e
interchiffre
–Appui
prolongé !
Symboles de l’afficheur
Symbole de la
/
base
Programmation
d
Caractères spéciaux
Caractère *
n
Caractère #
_
Touche "R"
u
Pause
P
b
~~~~
Protection clavier
– Activer/désactiver
appui prolongé !
Touche Programmation
– Pour enregistrer
– Pour régler
Décroché / prise de
ligne
Protection du clavier
Combiné prêt pour la
déclaration
Combiné recherche
la base déclarée
Combiné a trouvé la
base déclarée
Mémoire vide
~
2
Page 21

Consignes de sécurité
Utiliser exclusivement le bloc-secteur fourni,
$
‹
Œ
ƒ
comme indiqué sous la base par le symbole.
Utiliser uniquement une batterie homologuée
(voir page 7).
Ne jamais utiliser des piles normales (non
rechargeables) qui peuvent endommager
l’appareil, représenter un risque pour la santé
et peuvent provoquer des blessures.
Raccordez la batterie en respectant la polarité
(voir page 5).
Utiliser la batterie en respectant le présent
mode d’emploi. (Dans le logement de batterie
du combiné figurent les instructions suivantes.)
Le combiné peut perturber le fonctionnement
de certains équipements médicaux. Tenir
compte des recommandations émises à ce
sujet par le corp médical.
Le combiné peut provoquer un bourdonnement
dans les aides auditives. Ne pas tenir le combiné directement à proximité de l’oreille pendant la sonnerie (lors d’un appel entrant).
Ne pas utiliser le téléphone dans un environnement présentant un risque d’explosion (p. ex.
ateliers industriels de peinture).
Ne pas implanter la base dans une salle de bain
ou une salle d’eau et plus généralment en tout
milieu humide ou en extérieur. Le combiné
mobile n’est pas étanche aux projections d’eau
(voir page 14).
Lorsque vous confiez votre Gigaset à un tiers,
toujours joindre le mode d’emploi.
!
Bien respecter les règles concernant la protection de l’environnement lorsque vous mettez au
rebut le téléphone et les batteries. Ne pas jeter
ces dernières au feu, ni les ouvrir ou les mettre
en court-circuit.
Si le verrouillage du clavier est activé (voir page 11), il est
impossible de composer même les numéros d’urgence.
Toutes les fonctions décrites dans ce mode d’emploi ne
sont pas nécessairement disponibles dans tous les pays.
3
Page 22

Mise en service du téléphone
q
Opération 1 : raccorder la base
Raccorder tout d’abord la base à la prise téléphonique et au
réseau électrique.
220 V/
230 V
3
2
4
1. I n s é r e r le connecteur rond du cordon électrique dans la prise adéquate de la base.
2. Placer le cordon dans la rainure (pour sécuriser
mécaniquement la connexion).
3. Insérer le bloc-secteur dans la prise électrique.
4. Insérer le petit connecteur du cordon téléphoni-
que fourni dans la prise adéquate de la base.
5. Placer le cordon dans la rainure.
6. Insérer le connecteur en " T " du cordon télépho-
ni
ue fourni dans la prise téléphone.
* modèle différent selon le pays
5
1
Fiche téléphonique*
6
Si vous souhaitez un autre cordon téléphonique que celui
fourni, bien veiller à utiliser une rallonge simple ou un cordon
téléphonique avec brochage de connecteur 3-/4, sinon votre
Gigaset A100 ne fonctionnera pas.
1libre 4L b
2libre 5libre
3L a 6libre
4
Page 23

Mise en service du téléphone
121
2
Opération 2 : insérer la batterie
• Insérer dans la prise le connecteur de batterie en observant le sens imposé par le détrompeur (voir agrandissement), le connecteur doit être fermement enclipsé.
• Placer la batterie dans son logement, appuyer jusqu'à
l'enclipsage.
• Coincer le câble de la batterie dans la fixation prévue.
• Positionner le couvercle à plat puis le décaler en glissant
vers le haut jusqu'à ce qu’il s’enclipse. Pour ouvrir, appuyer sur la partie striée et faire glisser vers le bas.
• N’utiliser que les batteries homologuées.
• Ne pas utiliser de chargeurs d’autres constructeurs qui risquent d’endommager la batterie.
L'afficheur est protégé par un film.
Retirer celui-ci SVP.
5
Page 24

Mise en service du téléphone
Etape 3 : déclarer le combiné sur la base
Pour pouvoir téléphoner, vous devez préalablement enregistrer le combiné sur la base.
Bien vérifier que votre base est raccordée
(étape 1) et que la batterie est insérée dans le
combiné (étape 2).
k
Ö
Placer le combiné dans la base et l’y laisser
jusqu’à ce que la déclaration soit terminée.
Selon l’état de charge de la batterie, l’affichage correspondant à la déclaration apparaît au bout de quelques minutes.
Sur l’écran, le symbole
Débrancher le bloc-secteur (220V/230V) de
la prise.
Vérifier que le combiné est toujours dans la
base. Brancher de nouveau le bloc-secteur.
Au bout de 90 secondes environ, le symbole
/ cesse de clignoter et l’affichage corres-
pondant à la position de veille apparaît à
l’écran. Le combiné est déclaré sur la base.
/ clignote.
6
Page 25

Mise en service du téléphone
Etape 4: charger la batterie
La batterie fournie n’est pas chargée.
k
Ö
Pour charger la batterie, placer le combiné
dans la base. La première fois, charger la
batterie sans interruption durant au moins 16
heures.
Après vous pouvez téléphoner.
Remarques sur la batterie
• Une fois la première charge effectuée, vous pouvez reposer le combiné sur la base après chaque communication.
• La batterie s’échauffe durant la charge ; il s’agit d’un
phénomène normal, qui ne présente aucun danger.
Autonomie / Durée de chargement du combiné
Capacité
300 (mAh) 100 h maxi. 10 h maxi. 16 h environ
Autonomie
en veille
Autonomie
en commu-
nication
Durée de
charge-
ment
Batterie homologuée
Nickel-Cadmium (NiCd)
Désignation 1a (300 mAh)V30145-K1310-X147 NiCd
Vous pouvez vous procurer les batteries auprès de magasins
spécialisés, du service clients ou de la boutique en ligne de
Siemens accessible depuis le site internet
http://communication-market.siemens.de/serviceshop).
7
Page 26

Téléphoner
Appeler
o Composer le numéro.
a Appuyer sur la touche "Combiné". La com-
munication est établie. Sur l’afficheur apparaît le symbole
Vous avez fait une erreur ?
Appuyez 2 x sur la touche "Combiné"
Pour numéroter, vous pouvez aussi appuyer tout d’abord
sur la touche "Combiné", puis entrer les chiffres.
La touche "Flashing" R permet d’insérer une pause
interchiffre (appui prolongé). Cela peut être nécessaire
pour les communications avec l’étranger ou pour sélectionner des services d’annonces automatiques.
b .
a
Mettre fin à la communication
a Appuyer sur la touche "Combiné". Le sym-
ou
k
bole
b n’est plus visible sur l’afficheur ;
Poser le combiné sur la base.
La communication est coupée.
Ö
Répétition de la numérotation (Bis)
Le dernier numéro composé est enregistré, pour le rappeler:
O Sélectionner le numéro.
a Appuyer sur la touche "Combiné". La com-
munication est établie.
Prendre un appel
a Le téléphone sonne. Appuyer sur la touche
"Combiné". La communication est établie.
8
Page 27

Téléphoner
Mémoires / Numérotation abrégée
Le Gigaset A100 permet l'enregistrement de 10 numéros en
mémoire dont l'accès indirect se fait facilement par une
numérotation abrégée ( 0 à 9).
Pour enregistrer :
¦ C
Sélectionner le numéro abrégé (0 à 9).
p. ex.
o Entrer le nouveau numéro.
¦ Valider, vous entendez un bip de confirmation.
Pour numéroter à l’aide d’un n° abrégé :
C
Sélectionner le n° abrégé (0 à 9), le numéro
p. ex.
a Appuyer sur la touche "Combiné". La com-
Appuyer sur la touche Programmation puis
sur la touche "Mémoires".
La position mémoire s'affiche à gauche de
l'écran avec :
- le symbole [
- le numéro déjà enregistré (8 caractères se
décalant vers la gauche)
Appuyer sur la touche "Mémoires".
enregistré s'affiche.
munication est établie.
~] en cas de mémoire vide
Le n° abrégé "0" est automatiquement activé par simple
appui prolongé de la touche "Mémoires"
recommandé d’enregistrer sous "0" un numéro très souvent
utilisé.
9
C. Il est donc
Page 28

Réglages
Pour chaîner préfixe et numéro
Comme pour un numéro ordinaire, vous pouvez aussi enregistrer en mémoire,sous un N° abrégé facilement utilisable
(0 à 9), des préfixes que vous pourrez ensuite compléter
manuellement ou chaîner avec le numéro d'une autre position mémoire.
• Utilisation du n° abrégé rapide (mémoire n°0)
C Appuyer de façon prolongée sur la touche
o a Compléter éventuellement par le numéro du
• "Chaînage" de préfixes et numéros
Si vous avez enregistré plusieurs préfixes et numéros
sous des numéros abrégés distincts vous pouvez les
associer.
A partir du numéro abrégé rapide (mémoire 0):
C Appuyer de façon prolongée sur la touche
C Appuyer de nouveau sur la touche "Mémoi-
p. ex.
5 Sélectionner le numéro abrégé (0 à 9) cor-
"Mémoires" . .Le préfixe ou numéro enregistré sous le n° abrégé "0" s’affiche automati-
quement.
correspondant puis composer la séquence
complète en appuyant sur la touche "Combiné".
"Mémoires". Le préfixe enregistré sous le n°
abrégé "0" s’affiche.
res".
respondant à un abonné. Le préfixe et le
numéro sont chaînés et affichés.
a Appuyer sur la touche "Combiné". La com-
munication est établie.
Vous pouvez mémoriser d’autres préfixes en tant que
numéros abrégés sous les touches 1à9.
Pour les utiliser, appuyer brièvement sur la touche
sur la touche correspondante (1 à 9) et poursuivre le chaînage comme ci-dessus.
10
C puis
Page 29

Réglages
Volume de l’écouteur du combiné
Vous avez le choix entre trois volumes pour l’écouteur du
combiné.
¦ Þ
p. ex.
¦
Ÿ
Volume de la sonnerie
Vous avez le choix entre trois volumes de sonnerie, tous
crescendo.
¦ ¢
p. ex.
Ÿ¦
Mélodie de la sonnerie
Vous avez le choix entre deux mélodies pour la sonnerie.
¦ ´
p. ex.
Ÿ¦
Activer la fonction.
Modifier le volume (niveau 1 à 3) et
enregistrer.
Activer la fonction – la sonnerie est diffusée.
Modifier le volume de la sonnerie (niveau
1à3) et enregistrer.
Activer la fonction – la sonnerie est diffusée.
Sélectionner la mélodie de la sonnerie
(variante 1 ou 2) et enregistrer.
Protection du clavier
Cette protection permet d'éviter toute manipulation involontaire des touches. Vous pouvez toutefois prendre un appel
comme d’habitude.
ª Pour activer/désactiver appuyer durant plus
~~~~ Lorsque la protection est activée, le symbole
de 1 seconde.
ci-contre s’affiche.
11
Page 30

Réglages
Installation derrière un autocommutateur
privé
Si vous utilisez votre Gigaset derrière un autocommutateur
privé, il peut être nécessaire de régler un mode de numérotation différent du mode FV et du flashing paramétrés par
défaut (voir le mode d’emploi de votre autocommutateur).
Les chiffres 1 à 4 correspondent aux réglages suivants.
1 FV, flashing long 250 ms (valeur par défaut)
2 FV, flashing court 100 ms
3 DC (numérotation décimale) 1.5/1
4 DC 2/1
a
¦ Þ
p. ex.
Appuyer sur la touche "Combiné".
Pour activer la fonction sélectionner 10.
Sélectionner le réglage souhaité (1 à 4).
4
¦
a
Vous avez fait une erreur ? Appuyez 2 x sur la touche "Combiné"
a
même à l’état de base.
Enregistrer le réglage.
Appuyer sur la touche "Combiné".
ou bien attendez que l’afficheur revienne de lui-
12
Page 31

Déclarer le combiné manuellement
Placer le combiné A1 sur la base du A100
Une déclaration manuelle est utile lorsque,
• la déclaration automatique n’a pas fonctionné,
• le combiné fourni a été échangé.
Retirez le bloc-secteur (220V/230V) de la
prise électrique.
¦ 7 ¦ Préparez le combiné pour le déclarer.
Placez le combiné dans la base et laissez l’y
k
Ö
jusqu’à ce que la déclaration soit terminée.
Veillez à ce que le combiné se trouve bien
sur la base. Placez à présent le bloc-secteur
de nouveau dans la prise électrique.
Le combiné recherche pendant env. 60
secondes une base prête pour la déclaration.
Une base prête pour la déclaration a été
trouvée, la déclaration a été effectuée avec
succès (l’affichage apparaît pendant env. 3
secondes).
Aucune base prête pour la déclaration n’a
été trouvée (l’affichage apparaît pendant
env. 3 secondes).
• La base A100 est mono combiné et ne peut avoir qu'un
seul combiné déclaré à la fois.
• La déclaration manuelle d’un combiné écrase une déclaration existante.
• La recherche d’une base prête pour la déclaration peut
être interrompue à l’aide de la touche Combiné.
13
Page 32

Conseils pratiques
Entretien
Essuyer votre téléphone avec un chiffon légèrement humidifié ou un chiffon antistatique. Ne jamais utiliser de chiffon
sec : risque de charge statique !
Contact avec les liquides
Si le poste mobile a été mis en contact avec un liquide,
il ne faut en aucun cas le mettre en marche.
Retirer tous les accumulateurs immédiatement.
Laisser le liquide s'écouler, sécher toutes les parties avec un
linge absorbant.
Placer le mobile sans accumulateurs pendant au moins 72
heures dans un endroit chaud et sec.
Ensuite, dans la plupart des cas le mobile fonctionnera à
nouveau.
Ta be l l e :
!
Remédier aux défaillances
Symptôme Cause possible Remède
La déclaration ne
s’est pas faite.
Aucun affichage. La batterie est vi-
Aucune réaction
lorsque vous appuyez sur les touches.
La batterie n’est
pas suffisamment chargée.
de.
La protection du
clavier est activée.
Charger la batterie durant
16 heurs
(voir page 6).
Débrancher le
bloc-secteur puis
le rebrancher (voir
page 13).
Charger la batterie ou la remplacer (voir page 6).
Appuyer durant
1seconde sur la
touche
ª.
14
Page 33

Symptôme Cause possible Remède
Aucune liaison radio avec la base :
le symbole
clignote !
/
Le combiné se
trouve hors de la
zone de couverture de la base.
Le combiné n’est
pas déclaré.
La base n’est pas
active.
Se rapprocher de
la base.
Déclarer le combiné (voir page
13).
Insérer le connecteur rond du cordon électrique
dans la prise et
placer le cordon
dans la rainure
(pour diminuer le
tirage). Insérer le
bloc-secteur dans
la prise électrique.
Por tée
La portée peut atteindre 50 m à l'intérieur et 300 m en
champs libre. Le symbole de la base
lorsque vous quittez la zone de couverture de la base.
/
se met à clignoter
Service Clients
Si vous avez des questions techniques ou d'utilisation de
votre appareil, le moyen le plus simple est de solliciter
l'assistance de notre site Internet:
www.my-siemens.com/customercare
vous trouverez également dans le manuel d'utilisation, chapitre Questions-réponses (voir page 14) des réponses aux
questions les plus fréquentes.
Dans le cas où une réparation s'avérerait nécessaire, adressez-vous à l'un de nos centres de SAV:
Abou Dhabi.................................................................. 0 26 42 38 00
Afrique du Sud .......................................................... 08 60 10 11 57
Allemagne .............................................................. 0 18 05 33 32 22
Arabie Saoudite ........................................................... 0 22 26 00 43
Argentine................................................................ 0 80 08 88 98 78
Australie .................................................................... 18 00 62 24 14
Autriche ..................................................................... 05 17 07 50 04
Bahrein ................................................................................ 40 42 34
Bangladesh.................................................................. 0 17 52 74 47
15
Page 34

Belgique ...................................................................... 0 78 15 22 21
Bosnie Herzégovine .................................................... 0 33 27 66 49
Brésil ...................................................................... 0 80 07 07 12 48
Brunei ............................................................................. 02 43 08 01
Bulgarie .......................................................................... 02 73 94 88
Cambodge ...................................................................... 12 80 05 00
Canada.................................................................... 1 88 87 77 02 11
Chine ...................................................................... 0 21 50 31 81 49
Côte-d'Ivoire ................................................................... 80 00 03 33
Croatie ......................................................................... 0 16 10 53 81
Danemark ....................................................................... 35 25 86 00
Dubai ........................................................................... 0 43 96 64 33
Egypte ......................................................................... 0 23 33 41 11
Emirats Arabes Unis .................................................... 0 43 31 95 78
Espagne....................................................................... 9 02 11 50 61
Estonie ........................................................................... 06 30 47 97
Finlande ..................................................................... 09 22 94 37 00
France ....................................................................... 01 56 38 42 00
Grèce...................................................................... 0 80 11 11 11 16
Hong Kong...................................................................... 28 61 11 18
Hongrie...................................................................... 06 14 71 24 44
Inde .................................................................... 01 13 73 85 89 - 98
Indonésie................................................................ 0 21 46 82 60 81
Irlande........................................................................ 18 50 77 72 77
Islande .............................................................................. 5 11 30 00
Italie........................................................................... 02 66 76 44 00
Jordanie....................................................................... 0 64 39 86 42
Kenya................................................................................ 2 72 37 17
Koweït .............................................................................. 2 45 41 78
Lettonie ............................................................................ 7 50 11 14
Liban............................................................................... 01 44 30 43
Lithuanie...................................................................... 8 22 74 20 10
Luxembourg ................................................................... 43 84 33 99
Lybie.......................................................................... 02 13 50 28 82
Macédoine...................................................................... 02 13 14 84
Malaisie ..................................................................... 03 21 63 11 18
Malte ............................................................... 00 35 32 14 94 06 32
Maroc ............................................................................. 22 66 92 09
Maurice ............................................................................ 2 11 62 13
Mexique ............................................................... 01 80 07 11 00 03
Norvège.......................................................................... 22 70 84 00
Nouvelle-Zélande ....................................................... 08 00 27 43 63
Oman................................................................................... 79 10 12
Pakistan ..................................................................... 02 15 66 22 00
Pays-Bas..................................................................... 0900-3333102
Philippines ................................................................... 0 27 57 11 18
Pologne ..................................................................... 08 01 30 00 30
Portugal ....................................................................... 8 00 85 32 04
Qatar............................................................................... 04 32 20 10
Rép. Slovaque ........................................................... 02 59 68 22 66
Rép. Tchèque ............................................................ 02 33 03 27 27
Roumanie .................................................................. 02 12 04 60 00
Royaume-Uni.......................................................... 0 87 05 33 44 11
Russie...................................................................... (800) 200 10 10
Serbie ........................................................................ 01 13 22 84 85
Singapour ....................................................................... 62 27 11 18
Slovénie....................................................................... 0 14 74 63 36
Suède .......................................................................... 0 87 50 99 11
16
Page 35

Suisse........................................................................ 08 48 21 20 00
Taiwan ....................................................................... 02 25 18 65 04
Thaïlande ..................................................................... 0 22 68 11 18
Tunisie ....................................................................... 01 71 10 81 08
Turquie ................................................................... 0 21 65 79 71 00
Ukraine ................................................................... 8 80 05 01 00 00
USA ........................................................................ 1 88 87 77 02 11
Vietnam .......................................................................... 45 63 22 44
Zimbabwe ...................................................................... 04 36 94 24
Votre Gigaset est homologué dans votre pays comme indiqué par le label figurant sous l’appareil. Les spécificités
nationales sont prises en compte.
La conformité de l’appareil avec les exigences
fondamentales de la directive européenne
R&TTE (99/05/CEE), est confirmée par le label CE.
Extrait de la déclaration originale :
"We, Siemens AG, declare, that the above mentioned product is manufactured according to our Full Quality Assurance System certified by CETECOM ICT Services GmbH
with the registration number "Q810820M" in compliance
with ANNEX V of the R&TTE-Directive 99/05/EC. La présomption de conformité avec les exigences essentielles de
la Directive 99/05/CE est assurée."
Senior Approvals Manager
The Declaration of Conformity (DoC) has been signed. In
case of need, a copy of the original DoC can be made available via the company hotline.
17
Page 36

Gigaset A100 is designed for operation in your country
as indicated on the box and on the machine. Special
country-specific features have been taken into consideration. If you have any queries with regard to differ-
ences in public telephone networks, please contact
your dealer or operator. Unit compliance with the basic
requirements of the R&TTE directive is confirmed by
the CE symbol.
"We, Siemens AG, declare, that the above mentioned
product is manufactured according to our Full Quality
Assurance System certified by CETECOM ICT Services
GmbH with the registation number Q810820M in compliance with ANNEXE V of the R&TTE Directive 99/05/
EC. The presumption of conformity with the essential
requirements regarding Council Directive 99/05/EC is
ensured."
Senior Approvals Manager
The Declaration of Conformity (DoC) has been signed.
In case of need, a copy of the original DoC can be
obtained via the company hotline.
Version: 03.02.2004
A31008- A100- B101- 1- 5819
Issued by
Information and Communication mobile
Haidenauplatz 1
D-81667 München
© Siemens AG 2004
All rights reserved. Subject to availability.
Right of modification reserved.
Printed in Germany (02/2004).
Siemens Aktiengesellschaft
http://www.siemens.com/gigaset
Order no.: A31008-A100-B101-1-5819
Version: 03.02.2004
 Loading...