

Page 1
Handbediengerät für ET 200pro-Motorstarter,
¿
À
Á
Â
Ã
Ã
ECOFAST-Motorstarter und ET 200S HF Starter
3RK1922-3BA00
Betriebsanleitung
Vor der Installation, dem Betrieb oder der Wartung des Geräts muss
diese Anleitung gelesen und verstanden werden.
VORSICHT
Eine sichere Gerätefunktion ist nur mit zertifizierten Komponenten
gewährleistet!
Inbetriebnahme
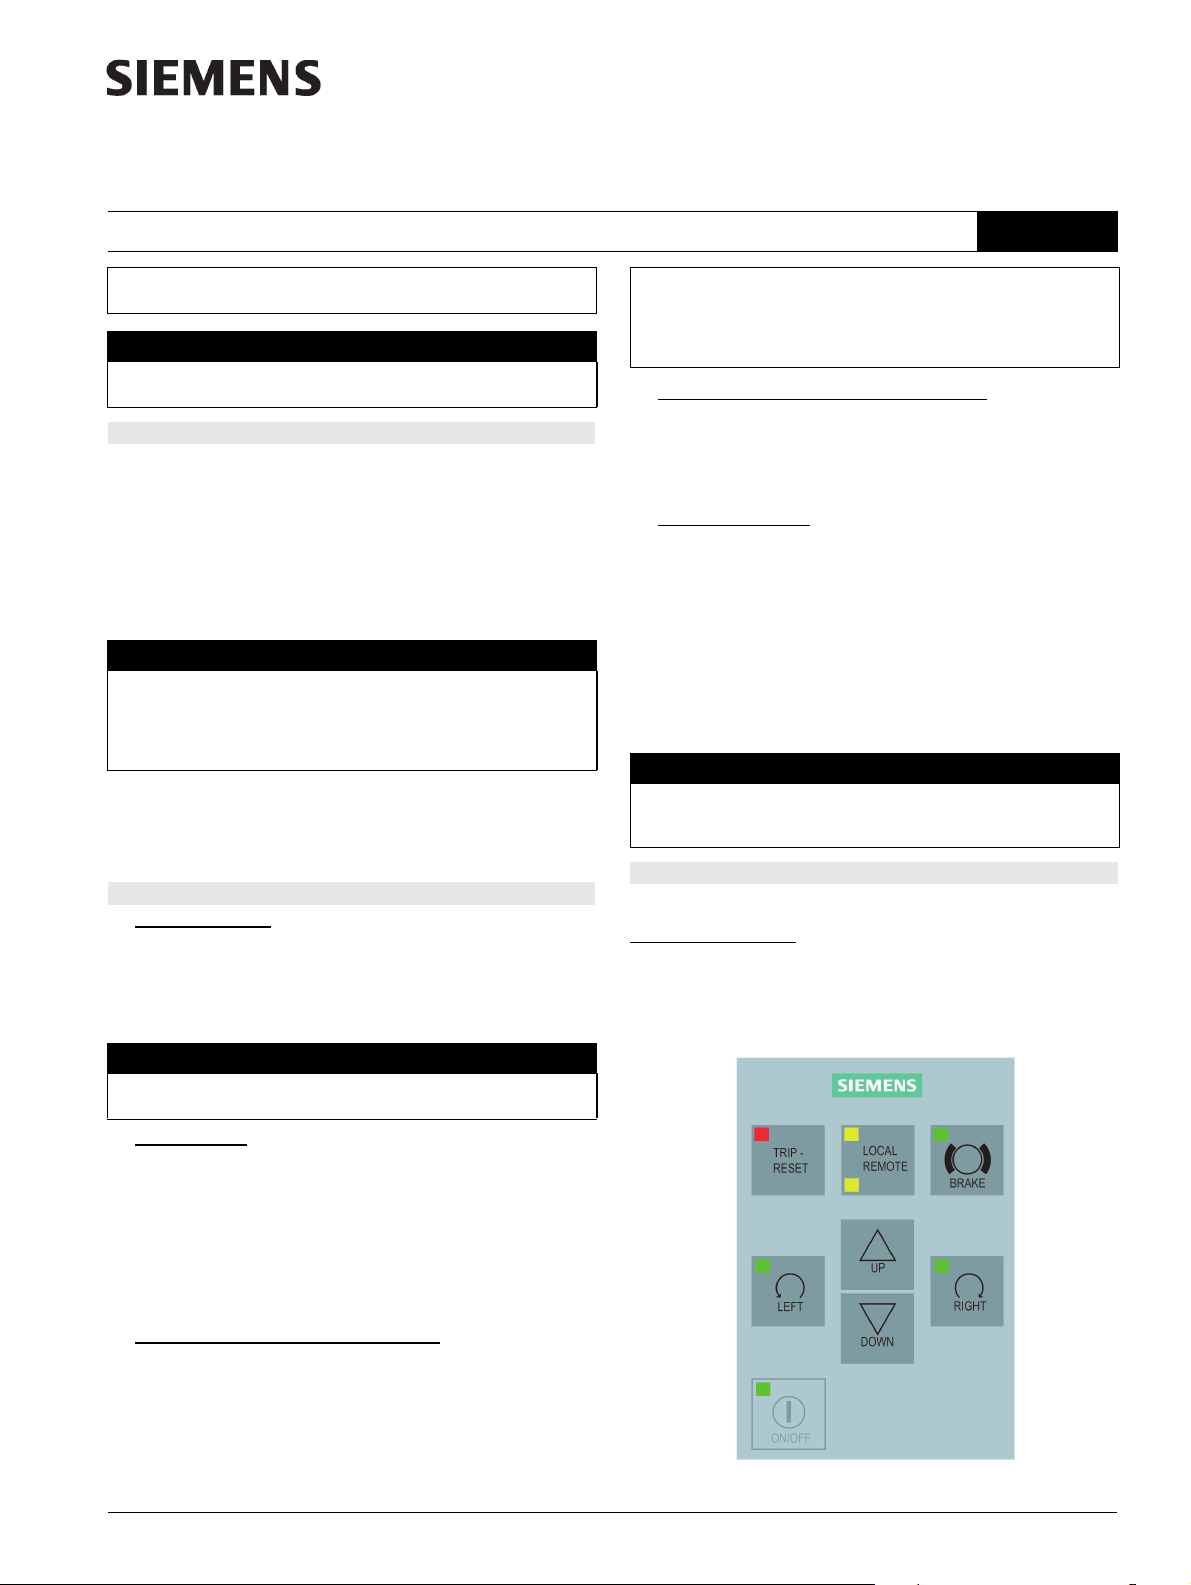
(1) ON / OFF-Taste für 2 s drücken:
• LED leuchtet (Gerät ist eingeschaltet)
• REMOTE-LED leuchtet
(2) Vor dem Umschalten auf LOCAL sollte das Handbediengerät über
das Schnittstellenkabel mit einem betriebsbereiten Motor- bzw. HF Starter verbunden werden
(3) Umschalten auf Handbetrieb:
• LOCAL-Taste drücken
• automatische Baudratenerkennung im Handbediengerät läuft an
• Verbindung ist aufgebaut, sobald die LOCAL-LED leuchtet
ACHTUNG
Falls die LOCAL-Taste gedrückt wird, ohne dass ein Starter angeschlossen ist, läuft die automatische Baudratenerkennung ins
Leere. Nach ca. 8 s wird ein Verbindungsfehler erkannt und die
LOCAL-LED blinkt. Der Fehler kann durch Rückschalten auf
REMOTE quittiert werden.
• Die LEFT-, RIGHT-, UP-, DOWN-, BRAKE und TRIP-RESET-Tas ten sind erst aktiv, wenn die LOCAL-LED dauerhaft leuchtet.
(4) Rückschalten auf Automatik-Betrieb:
• REMOTE-Taste drücken
• REMOTE-LED leuchtet
Bedienfunktionen
¿ TRIP-RESET-Taste
• Im LOCAL-Betrieb wird der DS 691) (= PAE)2)des Starters zyklisch
gelesen. Wenn hier das Bit DI0.2 auf "1" steht (= Sammelfehler),
leuchtet die LED rot. Beim Drücken der Taste wird der DS 68
(= PAA)3) mit Bit DO0.3 = 1 (= TRIP-RESET) gesendet.
• DS 68 mit Bit DO0.3 wird gesendet, solange die Taste
gedrückt wird.
ACHTUNG
Die TRIP-RESET-Taste wirkt nur im LOCAL-Betrieb. Die TRIPRESET-Taste ist fest auf Tippbetrieb eingestellt.
Deutsch
Der Reduktionsfaktor wird bei Betätigung der LEFT- / RIGHTTaste im DS 68 mit übertragen. Ein gewählter Reduktionsfaktor
bleibt bis zum Ausschalten des Handbediengerätes eingestellt. Die
UP- / DOWN-Tasten können auch zusammen mit LEFT- / RIGHT
(im Tipp- und im Dauerbetrieb) betätigt werden.
 BRAKE-Taste (für separate Bremsansteuerung)
• Tippbetrieb: Bremse wird bei jeder Betätigung angesteuert, LED
leuchtet solange Taste gedrückt ist
• Dauerbetrieb: Bremse wird nach einmaliger Betätigung dauernd an-
gesteuert, LED leuchtet solange die Bremse angesteuert wird. Ausschalten durch erneute Tastenbetätigung, LED schaltet sich aus.
à LEFT / RIGHT-Tasten
• Tippbetrieb (Default): DS 68 wird gesendet, solange eine der beiden
Tasten gedrückt ist (zugehörige LED leuchtet, solange Taste gedrückt).
• Dauerbetrieb: DS 68 wird nach einmaliger Betätigung einer Taste
dauernd gesendet (zugehörige LED leuchtet, solange gesendet wird).
• Betriebsartumschaltung: Zum Umschalten auf Dauerbetrieb beide
Tasten gleichzeitig für > 5 s drücken, beide LEDs leuchten; Umschaltung auf Dauerbetrieb ist erfolgt, sobald beide LED´s blinken.
Zum Rückschalten auf Tippbetrieb beide Tasten nochmals gleichzeitig für > 0,5 s drücken, LEDs leuchten, LEDs blinken; Rückschaltung auf Tippbetrieb ist erfolgt.
Tasten loslassen, LEDs aus.
ACHTUNG
Das LEFT-Signal wird nur vom RSe-Starter ausgewertet.
Die Bremse wird jedoch bei jeder Betätigung von LEFT- / RIGHT
mit angesteuert.
Lieferumfang und verwendbares Zubehör
Im Lieferumfang sind das Handbediengerät 3RK1922-3BA00, das
Ladegerät "POWER ADAPTOR" sowie die Betriebsanleitung enthalten.
Verwendbares Zubehör:
• RS232-Schnittstellenkabel für ET 200pro-Motorstarter
(3RK1922-2BP00)
• RS232-Schnittstellenkabel für ET 200S HF Starter
(6ED1057-1AA00-0BA0)
• RS232-Schnittstellenkabel für ECOFAST-Motorstarter
(3RK1911-0BN20)
À ON / OFF-Taste
• Ein: 2 s drücken, Gerät und LED schalten sich ein
• Aus: 2 s drücken, Gerät und LED schalten sich aus
• Restkapazitätsanzeige: LED blinkt, wenn 10 min Restlaufzeit unter-
schritten werden. Zum Kalibrieren der Restkapazitätsanzeige muss
der Akku einmal vollständig geladen werden.
• Ladeanzeige: LED blinkt, solange der Akku geladen wird. LED
leuchtet, wenn Akku voll geladen ist.
• Stromsparmodus: Nach 5 min ohne Tastenbetätigung (Ausnahme
Dauerbetrieb + Funktion) schaltet sich das Gerät aus.
Á UP / DOWN-Tasten (nur für R2SS / 3RW44)
• R2SS: Jede Betätigung reduziert / erhöht den Reduktionsfaktor um 1
Schrittweite. Bei Dauerbetätigung wird der Reduktionsfaktor in 1 sStufen reduziert / erhöht.
• 3RW44: Nach 8 Betätigungen bzw. 8 s Dauerbetätigung wird auf
Schleichgang umgeschaltet.
1) DS = Datensatz
2) PAE = Eingangsprozessabbild der SPS (speicherprogrammierbare Steuerung)
3) PAA = Ausgangsprozessabbild der SPS
A5E00815583-01 Last update: 09 May 2006
Handbediengerät 3RK1922-3BA00
Page 2

Hand-Held Terminal for ET 200pro Motor Starters,
¿
À
Á
Â
Ã
Ã
ECOFAST Motor Starters and ET 200S HF Starters
3RK1922-3BA00
Operating Instructions
Read and understand these instructions before installing,
operating, or maintaining the equipment.
CAUTION
Reliable functioning of the equipment is only ensured with
certified components.
Commissioning
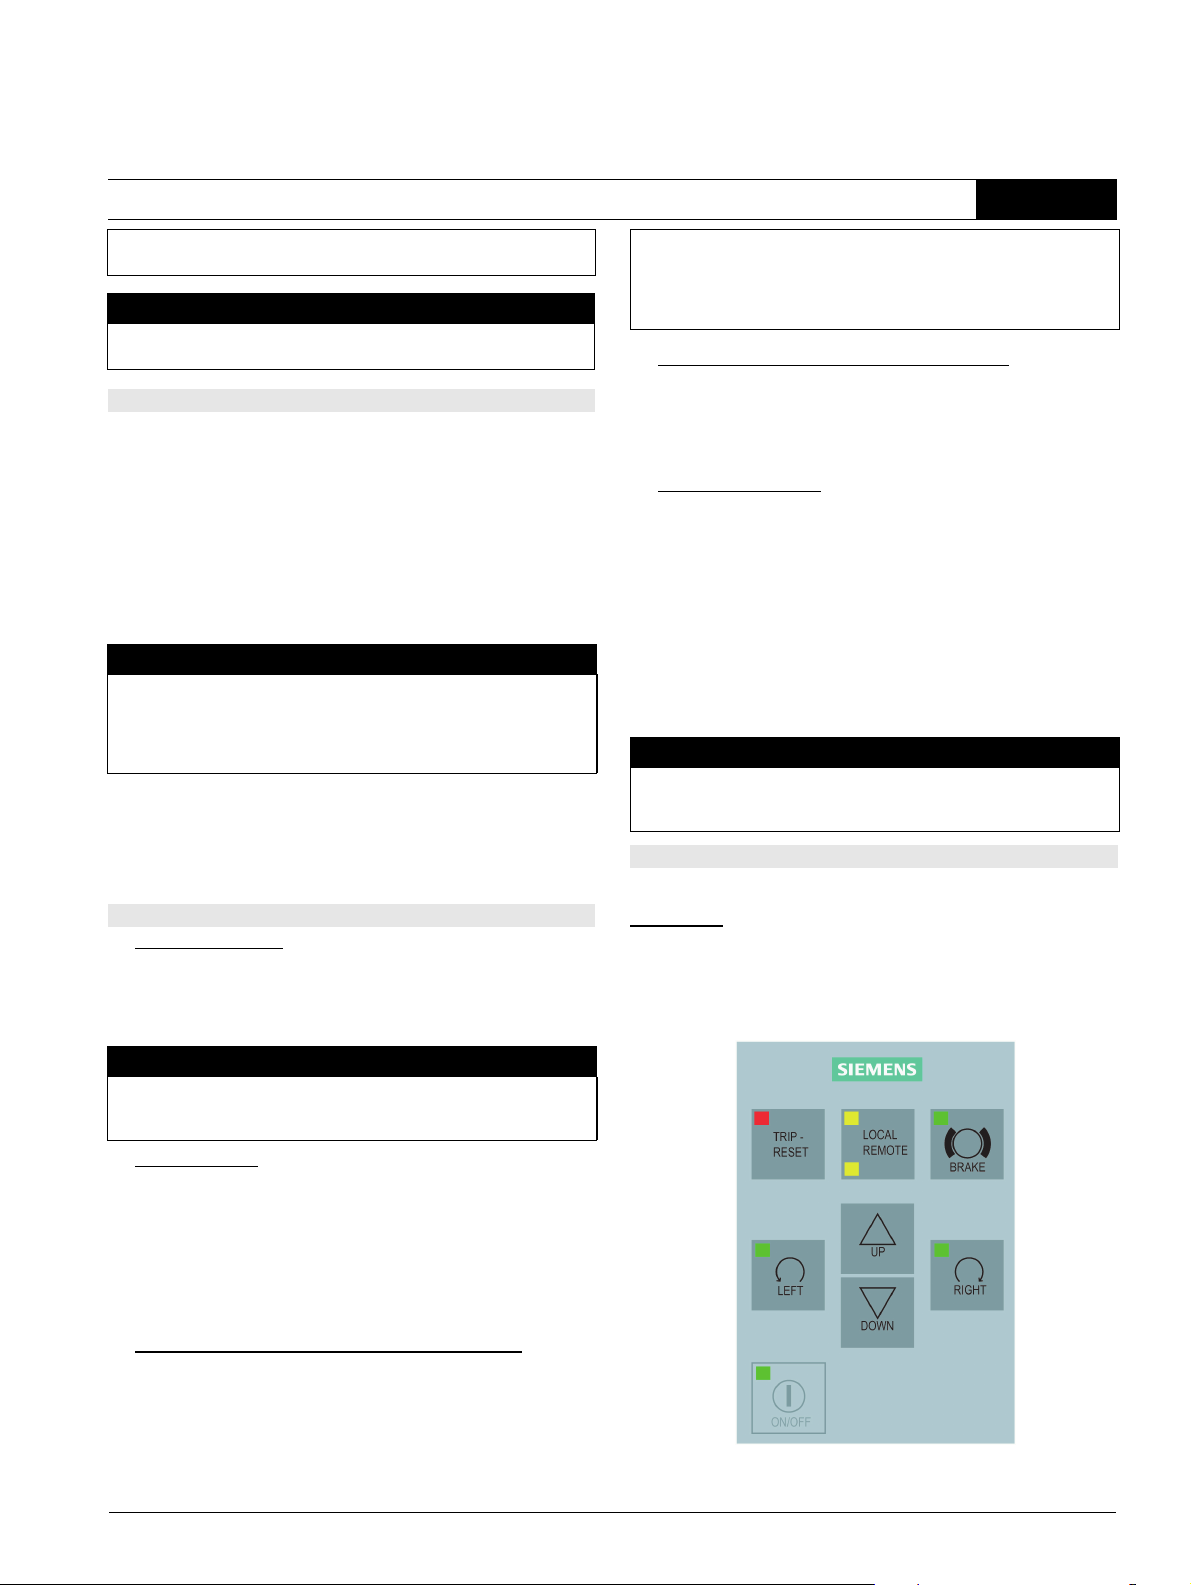
(1) Press the ON / OFF button for 2 s:
• LED lights up (device is ON)
• The REMOTE LED lights up
(2) Before changeover to LOCAL, the hand-held terminal should be
connected to a motor or HF starter ready for operation
via the interface cable
(3) Changeover to manual operation:
• Press the LOCAL button
• Automatic baud rate detection in the hand-held terminal starts
• The connection has been established as soon as the LOCAL
LEDlights up
NOTICE
If the LOCAL button is pressed without a starter being connected,
the automatic baud rate detection does not take effect. After
approximately 8 s, a connection error is detected and the LOCAL
LED blinks. The error can be acknowledged by resetting to
REMOTE.
• The LEFT, RIGHT, UP, DOWN, BRAKE and TRIP-RESET buttons
are only active when the LOCAL LED lights up permanently.
(4) Reset to automatic operation:
• Press the REMOTE button
• The REMOTE LED lights up
Operating Functions
¿ TRIP-RESET button
• In LOCAL operation, the DS 691) (= PAE)2)of the starter is read
cyclically. When the DI0.2 bit is set to "1" (= general fault),
the LED lights up red. When the button is pressed, the DS 68
(= PAA)3) is sent with the DO0.3 bit = 1 (= TRIP-RESET).
• DS 68 with the DO0.3 bit is sent as long as the button
is pressed.
NOTICE
The TRIP-RESET button only takes effect in LOCAL operation.
The TRIP-RESET button is permanently set to inching motion.
À ON / OFF button
• ON: Press for 2 s, device is turned on and LED lights up
• OFF: Press for 2 s, device and LED are turned off
• Remaining capacity display: LED blinks, when the remaining time
falls below 10 min. The storage battery must be completely charged
once for the calibration of the remaining capacity display.
• State of charge display: LED blinks as long as the battery is
charged. LED lights up as soon as the battery is fully charged.
• Power conserving mode: When no button is pressed for 5 min
(exception continuous operation + function), the device switches off
automatically.
Á UP / DOWN buttons (R2SS / 3RW44 only)
• R2SS: Each operation reduces / increases the reduction factor by 1
increment. Continuous operation leads to a reduction / increase of the
reduction factor by 1 s increment.
• 3RW44: After 8 operations or 8 s of continuous operation, creep feed
1) DS = data set
2) PAE = input process image of the PLC (programmable logic controller)
3) PAA = output process image of the PLC
is automatically selected.
English
The reduction factor is transmitted in the DS 68 when the LEFT /
RIGHT button is pressed. The selected reduction factor remains
active until the hand-held device is switched off. The UP / DOWN
buttons can also be operated in combination with the LEFT / RIGHT
buttons (inching and continuous operation).
 BRAKE button (for separate brake control)
• Inching operation: The brake is controlled with each operation, the
LED lights up as long as the button is pressed
• Continuous operation: The brake is controlled permanently when
the button is pressed once, the LED lights up as long as the brake is
controlled. Switched off when the button is pressed again, the LED
turns off.
à LEFT / RIGHT buttons
• Inching operation (default): DS 68 is sent as long as one of the two
buttons is pressed (corresponding LED lights up as long as the button
is pressed)
• Continuous operation: DS 68 is sent continuously after a button has
been pressed once (corresponding LED lights up as long as the data is
sent).
• Operating mode changeover: Press both buttons simultaneously for
> 5 s to switch to continuous operation, both LEDs light up;
changeover is successful as soon as both LEDs blink.
Once again, press both buttons simultaneously for
> 0.5 s to switch back to inching operation, LEDs light up, LEDs
blink; successful reset to inching operation.
Release buttons, LEDs are turned off.
NOTICE
The LEFT signal is only evaluated by the RSe starter.
However, the brake is controlled with each operation of the LEFT /
RIGHT button.
Scope of Supply and Utilizable Accessories
The scope of supply includes the 3RK1922-3BA00 hand-held terminal,
the "POWER ADAPTER" charger as well as the operating instructions.
Utilizable accessories:
• RS232 interface cable for ET 200pro motor starters
(3RK1922-2BP00)
• RS232 interface cable for ET 200S HF starters
(6ED1057-1AA00-0BA0)
• RS232 interface cable for ECOFAST motor starters
(3RK1911-0BN20)
3RK1922-3BA00 hand-held terminal
2 A5E00815583-01
Page 3
Terminal de dialogue portatif pour départ-moteur ET 200pro,
¿
À
Á
Â
Ã
Ã
départ-moteur ECOFAST et démarreur ET 200S HF
3RK1922-3BA00
Instructions de service
Ne pas installer, utiliser ou intervenir sur cet équipement avant
d'avoir lu et assimilé ces instructions.
PRUDENCE
Le fonctionnement sûr de l'appareil n'est garanti qu'avec des
composants certifiés.
Mise en service
(1) Appuyer sur la touche ON / OFF pendant 2 s :
• la LED s’allume (l’appareil est en marche)
• la LED REMOTE s’allume
(2) Il est nécessaire de relier le terminal de dialogue portatif avant la
commutation sur LOCAL
via le câble interface avec le départ-moteur ou le démarreur HF
opérationnel
(3) Commutation sur le mode manuel :
• Appuyer sur la touche LOCAL
• La détection automatique de la vitesse de transmission dans le
terminal de dialogue portatif est activée
• La liaison est établie dès que la LED LOCAL s’allume
IMPORTANT
La détection automatique de la vitesse de transmission fonctionne
pour rien si la touche LOCAL est enclenchée sans raccordement à
un démarreur. Une erreur de liaison est détectée après 8 s env. et
la LED LOCAL clignote. Il est possible d’acquitter l'erreur par
commutation inverse sur REMOTE.
• Les touches LEFT, RIGHT, UP, DOWN, BRAKE et TRIP-RESET
ne seront activées que lorsque la LED LOCAL sera allumée en
permanence.
(4) Commutation inverse sur mode automatique :
• Appuyer sur la touche REMOTE
• la LED REMOTE s’allume
Fonctions de commande
¿ Touche TRIP-RESET
• En mode LOCAL, le DS 691) (= PAE)2)du démarreur est lu de
manière cyclique. Si le bit DI0.2 est sur "1" (= défaut groupé)
la LED rouge s’allume. L’activation de la touche émet le DS 68
(= PAA)3) avec le bit DO0.3 = 1 (= TRIP-RESET).
• DS 68 et le bit DO0.3 est émis tant que la touche est appuyée.
IMPORTANT
La touche TRIP-RESET est fonctionnelle uniquement en mode
LOCAL. La touche TRIP-RESET est réglée par défaut sur marche
par à-coups.
À Touche ON / OFF
• Marche : appuyer 2 s, l’appareil et la LED s'allument
• Arrêt : appuyer 2 s, l’appareil et la LED s’éteignent
• Affichage de la capacité résiduelle : la LED clignote dès qu'il reste
moins de 10 min. Pour le calibrage de la capacité résiduelle,
l’accumulateur doit être en pleine charge.
• Affichage de la charge : la LED clignote dès que l’accumulateur est
en charge. la LED s’allume lorsque l’accumulateur est chargé
complètement.
• Mode d’économie de courant : après 5 min. sans activation de
touches (exception mode permanent + fonction), l’appareil s’arrête.
Á Touches UP / DOWN (uniquement pour R2SS / 3RW44)
• R2SS : chaque activation réduit ou augmente le facteur de
réduction de 1 pas. Le facteur de réduction est réduit ou augmenté de
1 s cas d'activation permanente.
• 3RW44 : l'appareil commute sur petite vitesse après 8 activations ou
8 s.
1) DS = jeu de données
2) PAE = mémoire image des entrées de l'API (automate programmable industriel)
3) PAA = mémoire image des sorties de l'API
Français
Le facteur de réduction est transmis en actionnant la touche
LEFT / RIGHT dans le jeu DS 68. Un facteur de réduction
sélectionné reste réglé jusqu'à l'arrêt du terminal de dialogue
portatif. Les touches UP / DOWN peuvent être actionnées avec
LEFT / RIGHT (en mode marche par à-coups et permanent).
 Touche BRAKE (pour commande de frein séparée)
• Marche par à-coups : le frein est excité à chaque actionnement, la
LED s'allume tant que la touche est enfoncée.
• Mode permanent : le frein est excité en permanence après un seul
actionnement, la LED reste allumée tant que le frein est excité. Arrêt
en actionnant à nouveau la touche, la LED s'éteint.
à Touches LEFT / RIGHT
• Marche par à-coups (par défaut) : DS 68 est envoyé tant que l'une
des deux touches est enfoncée (la LED correspondante est allumée
tant la touche est enfoncée).
• Mode permanent : DS 68 est envoyé en permanence après avoir
actionné la touche une fois (la LED correspondante est allumée le
temps de l'émission).
• Commutation de mode : pour commuter sur le mode permanent,
enfoncer les deux touches simultanément pendant > 5 s, les 2 LED
s'allument ; la commutation sur mode permanent est achevée dès
que les 2 LED clignotent. Enfoncer à nouveau pendant > 0,5 s les
deux touches simultanément pour revenir au mode marche par àcoups, les LED s'allument, clignotent ; le retour sur mode par à-coups
est achevé. Relâcher les touches, les LED s'éteignent.
IMPORTANT
Le signal LEFT n'est évalué que par le départ-moteur RSe.
Le frein est toutefois également excité à chaque activation de
LEFT / RIGHT.
Fourniture et accessoires utilisés
Sont fournis le terminal de dialogue portatif 3RK1922-3BA00, le chargeur POWER ADAPTOR et la notice d'utilisation.
Accessoires :
• Câble d'interface RS232 pour départ-moteur ET 200pro
(3RK1922-2BP00)
• Câble d'interface RS232 pour départ-moteur ET 200S HF
(6ED1057-1AA00-0BA0)
• Câble d'interface RS232 pour départ-moteur ECOFAST
(3RK1911-0BN20)
Terminal de dialogue portatif 3RK1922-3BA00
A5E00815583-01 3
Page 4

Terminal para arrancadores de motor ET 200pro y
¿
À
Á
Â
Ã
Ã
ECOFAST, así como arrancadores ET 200S HF
3RK1922-3BA00
Instructivo
Leer y comprender este instructivo antes de la instalación,
operación o mantenimiento del equipo.
PRECAUCIÓN
El funcionamiento seguro del aparato sólo está garantizado con componentes certificados
Puesta en funcionamiento
(1) Pulsar la tecla ON / OFF para 2 segundos:
• Se ilumina el LED (equipo encendido)
• Se ilumina el LED de REMOTE
(2) Antes de cambiar al modo LOCAL, es aconsejable conectar el terminal
con un arrancador de motor o HF listo para funcionar por medio del cable
de interfaz.
(3) Cambiar al modo manual:
• Pulsar la tecla LOCAL
• Se inicia el proceso de detección automática de la velocidad en baudios
en el terminal
• Una vez establecida la comunicación, se ilumina el LED LOCAL
.
ATENCIÓN
Pulsando la tecla LOCAL sin haber conectado ningún arrancador,
irá fallando la detección automática de la velocidad en baudios.
Transcurridos unos 8 segundos, el sistema detecta y señaliza falla
de comunicación, parpadeando el LED LOCAL. Para confirmar el
mensaje del sistema, vuelva a activar el modo REMOTE.
• Las teclas LEFT, RIGHT, UP, DOWN, BRAKE y TRIP-RESET no
estarán disponibles antes de que aparezca iluminado el LED LOCAL.
(4) Volver a activar el modo automático:
• Pulsar la tecla REMOTE
• Se ilumina el LED de REMOTE
Funciones de manejo
¿
Tecla TRIP-RESET
• En el
modo LOCAL
arrancador.
De haber puesto el bit DI0.2 en "1" (= falla común), el LED aparece iluminado rojo. Pulsando la tecla, se transmite el DS 68 (= PAA)
DO0.3 = 1 (= TRIP-RESET).
• La información DS 68 con bit DO0.3 se seguirá transmitiendo hasta soltar
la tecla.
, se consulta periódicamente el DS 691) (= PAE)2)del
3)
con el bit
ATENCIÓN
La tecla TRIP-RESET únicamente está operativa en modo LOCAL. La
tecla TRIP-RESET está asignada al modo de paso a paso, sin la posibilidad de reasignar la función.
À
Tecla ON / OFF
•
ON:
Pulsar para 2 s para encender el equipo y el LED
•
OFF:
Pulsar para 2 s para apagar el equipo y el LED
Indicación de la capacidad restante:
•
capacidad restante es inferior a 10 minutos.
Para calibrar el indicador de la capacidad restante es imprescindible
cargar una vez por completo el acumulador.
Indicación del estado de carga:
•
proceso de carga del acumulador. El LED se ilumina, una vez que se haya
cargado el acumulador.
Modo económico:
•
el equipo automáticamente (excepto modo continuo + función).
Á
Teclas UP / DOWN (sólo R2SS / 3RW44)
•
R2SS:
Cada vez que se pulse la tecla se disminuye / aumenta el factor de
reducción en pasos de 1 etapa. Manteniendo pulsada la tecla, el factor de
reducción se disminuye / aumenta en pasos de 1 segundo.
3RW44:
•
1) DS = juego de datos
2) PAE = imagen de proceso de la PLC (controlador de lógica programable), lado de entrada
3) PAA = imagen de proceso de la PLC, lado de salida
Tras pulsar 8 veces la tecla, o bien pulsando la tecla para más de
8 segundos, el sistema cambia al modo de velocidad lentísima.
Transcurridos 5 min. sin pulsar ninguna tecla, se apaga
El LED aparece parpadeando si la
El LED aparece parpadeando durante el
Español
Pulsando la tecla LEFT / RIGHT, se transmite el factor de
reducción con el DS 68. El factor de reducción seleccionado per-
manece operativo hasta que se apague el terminal. Las teclas UP /
DOWN se pueden pulsar en combinación con las teclas LEFT /
RIGHT (en modo de paso a paso y en modo continuo).
Â
Tecla BRAKE (control de freno independiente)
•
Modo paso a paso:
LED aparece iluminado hasta soltar la tecla.
Modo continuo:
•
permanente.El LED permanece iluminado hasta que se desactive el freno.
Para desactivar, se debe pulsar la tecla nuevamente. Se apaga el LED.
Ã
Teclas LEFT / RIGHT
•
Modo paso a paso (por defecto):
cuando se pulse una de las dos teclas (el correspondiente LED aparece
iluminado hasta soltar la tecla).
Modo continuo:
•
temente el DS 68 (el correspondiente LED aparece iluminado durante la
transmisión).
Cambiar modo de funcionamiento:
•
sar las dos teclas simultáneamente para > 5 segundos. Se iluminan los
dos LED. Los dos LED parpadeando señalizan el modo continuo activado.
Para volver a activar el modo de paso a paso, pulsar nuevamente las dos
teclas a la vez para > 0,5 segundos; LEDs iluminados, LEDs parpadeando;
modo paso a paso activado nuevamente. Soltar las teclas, se apagan los
LED.
ATENCIÓN
La señal LEFT sólo se procesa en el arrancador RSe. No obstante,
se activa el freno cada vez que se pulse las teclas LEFT / RIGHT.
Alcance del suministro y accesorios
El suministro incluye el terminal 3RK1922-3BA00, el cargador "POWER
ADAPTOR", así como el manual de usuario.
Accesorios:
• Cable de interfaz RS232 para arrancador de motor ET 200pro
(3RK1922-2BP00)
• Cable de interfaz RS232 para arrancador ET 200S HF
(6ED1057-1AA00-0BA0)
• Cable de interfaz RS232 para arrancador de motor ECOFAST
(3RK1911-0BN20)
Se activa el freno cada vez que se pulse la tecla. El
Pulsando la tecla una vez, se activa el freno de forma
Se transmite el DS 68, siempre y
Una vez pulsada una de las teclas, se transmite constan
Para cambiar al modo continuo, pul
Terminal 3RK1922-3BA00
4 A5E00815583-01
Page 5

Apparecchio manuale per starter motore ET 200pro,
¿
À
Á
Â
Ã
Ã
starter motore ECOFAST e starter ET 200S HF
3RK1922-3BA00
Istruzioni operative
Leggere con attenzione queste istruzioni prima di installare,
utilizzare o eseguire manutenzione su questa apparecchiatura.
CAUTELA
Il funzionamento sicuro dell'apparecchiatura è garantito soltanto
con componenti certificati.
Messa in servizio
1) Premere il pulsante ON / OFF per 2 s:
• il LED si illumina (l'apparecchio è attivato)
• il LED REMOTE si illumina
(2) Prima di commutare su LOCAL l'apparecchio manuale dovrebbe
essere collegato con uno starter motore o uno starter HF
tramite il cavo d'interfaccia.
(3) Commutare su funzionamento manuale:
• premere il tasto LOCAL
• il riconoscimento automatico della velocità di trasmissione dei dati
nell'apparecchio manuale si avvia
• il collegamento è avvenuto non appena il LED LOCAL si illumina
ATTENZIONE
Se si preme il tasto LOCAL senza che sia collegato uno starter, il
riconoscimento automatico della velocità di trasmissione dei dati
non funziona. Dopo ca. 8 s viene riconosciuto un errore di collegamento e il LED LOCAL lampeggia. L'errore può essere confermato
tramite il ripristino di REMOTE.
• I tasti LEFT-, RIGHT-, UP-, DOWN-, BRAKE e TRIP-RESET
sono attivi soltanto se il LED LOCAL si illumina in modo
permanente.
(4) Ripristino del funzionamento automatico:
• premere il tasto REMOTE
• il LED REMOTE si illumina
Funzioni di controllo
¿ Tasto TRIP-RESET
• Nel funzionamento LOCAL il DS 691) (= PAE)2)dello starter viene
letto ciclicamente. Se qui il Bit DI0.2 è su "1" (= errore cumulativo)
il LED si illumina di rosso. Premendo il tasto il DS 68
(= PAA)3) con Bit DO0.3 = 1 (= TRIP-RESET) viene inviato.
• DS 68 con Bit DO0.3 viene inviato finchè si preme il tasto.
ATTENZIONE
Il tasto TRIP-RESET agisce solo nel funzionamento LOCAL. Il
tasto TRIP-RESET è preimpostato sul funzionamento a intermittenza.
Italiano
Anche il fattore di riduzione viene trasmesso all'attivazione del
tasto LEFT- / RIGHT nel DS 68. Un fattore di riduzione selezionato
rimane impostato fino alla disattivazione dell'apparecchio manuale.
I tasti UP- / DOWN possono essere attivati anche insieme a LEFT- /
RIGHT (nel funzionamento a intermittenza e in quello continuo).
 Tasto BRAKE (per comando del freno separato)
• Funzionamento a intermittenza: il freno viene attivato ad ogni
azionamento, il LED si illumina finchè il tasto è premuto
• Funzionamento continuo: il freno viene continuamente attivato dopo
un unico azionamento, il LED è illuminato finchè il freno è attivato.
Disattivare tramite ulteriore attivazione tasto, LED si spegne.
à Tasti LEFT / RIGHT
• Funzionamento a intermittenza (default): DS 68 viene inviato, fin-
chè uno dei due tasti è premuto (il rispettivo LED è illuminato finchè il
tasto è premuto).
• Funzionamento continuo: DS 68 viene continuamente inviato dopo
l'attivazione di un tasto (il rispettivo LED è illuminato finchè si invia).
• Commutazione del tipo di funzionamento: per commutare in fun-
zionamento continuo premere entrambi i tasti contemporaneamente
per > 5 s, entrambi i LED si illuminano; la commutazione in funzionamento continuo è avvenuta non appena entrambi i LED si illuminano.
Per il ripristino del funzionamento a intermittenza premere di nuovo
entrambi i tasti contemporaneamente per > 0,5 s, i LED si illuminano,
i LED lampeggiano; il ripristino del funzionamento a intermittenza è
avvenuto. Rilasciare i tasti, LED spenti.
ATTENZIONE
Il segnale LEFT viene valutato solo dallo starter RSe.
Il freno viene comunque attivato ad ogni azionamento di LEFT- /
RIGHT.
Fornitura e accessori utilizzabili
Nella fornitura sono compresi l'apparecchio manuale 3RK1922-3BA00,
il caricabatterie "POWER ADAPTOR" oltre alle istruzioni per l'uso.
Accessori utilizzabili:
• RS232-cavo d'interfaccia per starter motore ET 200pro
(3RK1922-2BP00)
• RS232-cavo d'interfaccia per starter ET 200S HF
(6ED1057-1AA00-0BA0)
• RS232-cavo d'interfaccia per starter motore ECOFAST
(3RK1911-0BN20)
À Tasto ON / OFF
• Acceso: premere per 2 s, apparecchio e LED si attivano
• Spento: premere per 2 s, apparecchio e LED si disattivano
• Indicazione capacità residua: LED lampeggia quando si scende al
di sotto dei 10 min di tempo residuo. Per calibrare l'indicazione della
capacità residua la batteria deve essere ricaricata completamente.
• Indicazione di carica: LED lampeggia finchè la batteria viene
ricaricata. LED si illumina quando la batteria è totalmente carica.
• Modo risparmio energetico: dopo 5 min senza attivazione tasti
(eccezione funzionamento continuo + funzione) l'apparecchio si
disattiva.
Á Tasti UP / DOWN (solo per R2SS / 3RW44)
• R2SS: ogni attivazione riduce / aumenta il fattore di riduzione di 1
passo. In caso di funzionamento continuo il fattore di riduzione viene
ridotto / aumentato a passi di 1 s.
• 3RW44: dopo 8 attivazioni o 8 s di funzionamento continuo avviene la
commutazione in corsa lenta.
1) DS = set di dati
2) PAE = schema di processo di ingresso del PLC (controllore a logica programmabile)
3) PAA = schema di processo di uscita del PLC
A5E00815583-01 5
Apparecchio manuale 3RK1922-3BA00
Page 6

Dispositivo para operação manual para Motorstarter
¿
À
Á
Â
Ã
Ã
ET 200pro, Motorstarter ECOFAST e Starter ET 200S HF
3RK1922-3BA00
Instruções de Serviço
Ler e compreender estas instruções antes da instalação,
operação ou manutenção do equipamento.
CUIDADO
O funcionamento seguro do aparelho apenas pode ser garantido
se forem utilizados os componentes certificados.
Colocação em serviço
1) Pressionar tecla ON / OFF por 2 s:
• LED brilha (dispositivo está ligado)
• REMOTE-LED brilha
(2) Antes da comutação a LOCAL, o dispositivo de operação manual
deveria ser conectado ao um arrancador de motor resp. de alta fre quência pronto para serviço, através do cabo para interface.
(3) Comutação à operação manual:
• Pressionar a tecla LOCAL
• reconhecimento automático da taxa de transmissão no dispositivo
de operação manual está entrando em funcionamento
• a comunicação está estabelecida, assim que o LED-LOCAL brilhar
ATENÇÃO
Se a tecla LOCAL for pressionada sem que um arrancador estiver
conectado, o reconhecimento automático da taxa de transmissão
corre em vazio. Depois de 8 s é reconhecido um erro de comunicação e o LED-LOCAL pisca. O erro pode ser quitado através da
reconexão a REMOTE.
• As teclas LEFT, RIGHT, UP, DOWN, BRAKE e TRIP-RESET
estão ativas apenas quando o LED-LOCAL brilha permanen temente.
(4) Reconexão à operação automática:
• Pressionar a tecla REMOTE
• REMOTE-LED brilha
Funções de operação
¿ Tecla TRIP-RESET
• Na operação LOCAL o DS 691) (= PAE)2)do
arrancador é lido cíclicamente. Quando o Bit DI0.2 estiver aqui em "1"
(= erro coletivo) brilha o LED vermelho. Quando da pressão da tecla
será enviado o DS 68 (= PAA)
• DS 68 com Bit DO0.3 é enviado enquanto a tecla for pressionada.
3)
com Bit DO0.3 = 1 (= TRIP-RESET).
ATENÇÃO
A tecla TRIP-RESET atua somente em operação LOCAL. A tecla
TRIP-RESET está ajustada de maneira fixa ao regime intermitente.
À Tecla ON / OFF
• Ligado: 2pressionar 2 s, o dispotivo e o LED se ligam
• Desligado: 2pressionar 2 s, o dispositivo e o LED se desligam
• Indicação da capacidade restante: LED pisca, quando o tempo de
execução restante passa a ser menor que 10 .
Para calibrar a indicação da capacidade restante, o acumulador
deve ser carregado uma vez completamente.
• Indicação de carga: LED pisca, enquanto o acumulador estiver
sendo carregado. LED
brilha quando o acumulador estiver completamente carregado.
• Modo de economizar energia: Após 5 min sem acionamento de
tecla (exceção é a operação permanente + função) o aparelho
desliga.
Á Teclas UP / DOWN (somente para R2SS / 3RW44)
• R2SS: Cada acionamento reduz / eleva o fator de redução por 1
passo. Em caso de acionamento permanente, o fator de redução se
reduz / eleva numa escala de 1 s.
• 3RW44: Após 8 acionamentos resp. 8 s de acionamento permanente
1) DS = Conjunto de dados
2) PAE = Projeção do processo de entrada do SPS (controle do software)
3) PAA = Projeção do processo de saída do SPS (controle do software)
é comutado a avanço lento.
Português
O fator de redução é transmitido junto com o DS 68 quando do
acionamento da tecla LEFT / RIGHT. Um fator de redução selecionado permanece ajustado até o desligamento do dispositivo de
operação manual. As teclas UP / DOWN também podem ser acionadas junto com as teclas LEFT / RIGHT (em regime intermitente e
operação permanente).
 Tecla BRAKE (para acionamento de frenagem separado)
• Regime intermitente: O freio é acionado com qualquer acionamento,
o LED brilha enquanto a tecla está pressionada
• Operação permanente: O freio é acionado continuamente após um
único acionamento o LED brilha enquanto o freio está sendo
acionado. Desligamento através de reacionamento da tecla; o LED
desliga.
à Teclas LEFT / RIGHT
• Regime intermitente (Default): DS 68 é transmitido enquanto uma
das duas teclas está pressionada (o respectivo LED brilha, enquanto
a tecla está pressionada).
• Operação permanente: DS 68 é transmitido continuamente após um
único acionamento de uma tecla (o respectivo LED brilha, enquanto
houver transmissão).
• Comutação de operação: Para mudar para a operação permanente,
pressionar as duas teclas simultaneamente por > 5 s, os dois LEDs
brilham; a comutação à operação permanente foi realizada assim que
os dois LEDs piscarem. Para voltar ao regime intermitente, pressionar novamente as duas teclas simultaneamente por > 0,5 s, os LEDs
brilham; LEDs piscam; recolocação ao regime intermitente foi realizada. Soltar as teclas, LEDs desligados.
ATENÇÃO
O sinal LEFT somente é avaliado pelo arrancador RSe. O freio,
porém, também é acionado através de qualquer acionamento de
LEFT / RIGHT.
Escopo de fornecimento e acessórios utilizados
No escopo de fornecimento estão incluidos o dispositivo de operação
manual 3RK1922-3BA00, o carregador de acumuladores "POWER
ADAPTOR", como também a instrução de serviço.
Acessórios utilizados:
• Cabo para interface RS232 para motor de arranque ET 200pro
(3RK1922-2BP00)
• Cabo para interface RS232 para arrancador ET 200S HF
(6ED1057-1AA00-0BA0)
• Cabo para interface RS232 para motor de arranque ECOFAST
(3RK1911-0BN20)
Dispositivo de operação manual 3RK1922-3BA00
6 A5E00815583-01
Page 7

ET 200pro-Motor starter, ECOFAST Motor starter ve ET
¿
À
Á
Â
Ã
Ã
200S HF Starter için manüel kullanım cihazı
3RK1922-3BA00
İşletme kılavuzu
Cihazın kurulumundan, çalı ştırılmasından veya bakı ma tabi
utulmasından önce, bu kı lavuz okunmuş ve anlanmı ş olmalıdır.
ÖNEMLİ DİKKAT
Cihazın güvenli çalışması ancak sertifikalı bileşenler kullanılması
halinde garanti edilebilir.
Çalıştırma
(1) AÇMA / KAPAMA (ON / OFF) tuşuna 2 sn süreyle basınız:
• LED yanar (Cihaz açılmış durumdadır)
• REMOTE-LED yanar
(2) LOKAL’e (LOCAL) çevirmeden önce manüel kullanım cihaz, arayüz
kablosu üzerinden işletime hazır bir motor veya HF starter’ı ile
bağlanmalıdır.
(3) Manüel işletime çevirme:
• LOKAL (LOCAL) tuşuna basınız
• Otomatik veri iletişim hızı (Baud oranı) teşhis fonksiyonu, cihazda
çalışmaya başlar
• LOKAL-LED göstergesi (LOCAL-LED) yanar yanmaz, bağlantı
kurulmuş demektir
DİKKAT
Bir starter bağlı olmadan LOKAL (LOCAL) tuşuna basılması
halinde, Otomatik veri iletişim hı zı (Baud oranı) teşhis fonksiyonu
boşa çalışı r. Yaklaşık 8 sn sonra bağlantı hatası teşhis edilir ve
LOKAL-LED göstergesi (LOCAL-LED) yanıp sönmeye başlar.
Hata, UZAK’a (REMOTE) geri dönerek alınıp sıfırlanabilir.
• SOL-SAĞ (LEFT-RIGHT), YUKARI-AŞAĞI (UP-DOWN), FREN
(BRAKE) ve TRIP-RESET tuşları, ancak LOKAL LED (LOCAL-LED)
göstergesinin sürekli yanması halinde aktif durumdadırlar.
(4) Otomatik işletime geri dönüş:
• UZAK (REMOTE) tuşuna basınız
• UZAK (REMOTE) LED göstergesi yanar
Kullanım fonksiyonları
¿ TRIP-RESET tuşu
• LOKAL işletimde starter’ın DS 691) (= PAE)2)’si çevrimsel olarak
okunur. Bit DI0.2 "1" de duruyorsa (= Toplu hata)
LED göstergesi kırmızı yanar. Tuşa basılması halinde, DS 68
(= PAA)3) Bit DO0.3 = 1 (= TRIP-RESET) ile gönderilir.
• Tuşa basıldığı sürece Bit DO0.3 ile DS 68 gönderilir.
DİKKAT
TRIP-RESET tuşu sadece LOKAL işletimde etkilidir. TRIP-RESET
tuşu sabit olarak basmalı işletime ayarlıdır.
À AÇMA / KAPAMA (ON / OFF) tuşu
• Açık: 2 sn basınız, cihaz ve LED göstergesi devreye girer
• Kapalı: 2 sn basınız, cihaz ve LED göstergesi devreden çıkar
• Kalan kapasite göstergesi: 10 dakikalık kalan yürütüm süresinin altına
düşüldüğünde, LED göstergesi yanıp söner. Kalan kapasite göstergesinin
ayarlanması için akünün bir kez bütünüyle şarj edilmesi gereklidir.
• Şarj göstergesi: Akü şarj olduğu sürece, LED göstergesi yanıp söner.
Akünün tamamen şarj olması halinde, LED göstergesi yanar.
• Elektrik tasarruf modu: 5 dakika süreyle tuşlara basılmaması halinde
(sürekli işletim fonksiyonu haricinde) cihaz kendiliğinden kapanır.
Türkçe
DS 68’de SOL / SAĞ (LEFT- / RIGHT) tuşuna basılmasında redüksyon
faktörü birlikte aktarılır. Seçilen redüksiyon faktörü, manüel kullanım
cihazının kapatılmasına kadar aynı ayarda kalır. YUKARI / AŞAĞI (UP/ DOWN) tuşları, SOL / SAĞ (LEFT- / RIGHT) tuşları ile birlikte de
(basmalı ve sürekli işletimde) kullanılabilir.
 FREN (BRAKE) tuşu (Ayrı fren yönlendirmesi için)
• Basmalı işletim: Fren her basışta yönlendirilir, LED göstergesi tuşa
basıldığı sürece yanar.
• Sürekli işletim: Fren, bir kez basmak suretiyle sürekli yönlendirilir, LED
göstergesi, fren yönlendirmede olduğu sürece yanar. Tuşa tekrar basmak
suretiyle devreden çıkarılır, LED göstergesi söner.
à SOL / SAĞ (LEFT- / RIGHT) tuşları
• Basmalı işletim (Default): Bu iki tuştan biri basılı tutulduğu sürece,
DS 68 gönderilir (Tuş basılı olduğu sürece, ilgili LED göstergesi yanar).
• Sürekli işletim: Tuşlardan birine bir kez basılması ile D 68 sürekli
gönderilir (Gönderim sürdüğü sürece, ilgili LED göstergesi yanar).
• İşletim türünü değiştirme: Sürekli işletime geçmek için her iki tuşa aynı
anda > 5 sn süreyle basınız, her iki LED göstergesi de yanar; her iki LED
göstergesinin de yanıp sönmesi halinde, sürekli işletime geçiş işlemi
tamamlanmış demektir.
Basmalı işletime geri dönmek için tekrar her iki tuşa aynı anda > 5 sn
süreyle basınız, LED göstergeleri yanar, LED göstergeleri yanıp sönmeye
başlar; basmalı işletime geçiş işlemi tamamlanmış demektir.
Tuşları bırakınız, LED göstergeleri söner.
DİKKAT
SOL (LEFT) sinyal, sadece RSe-Starter’ı tarafından değerlendirilir.
Fren ise, SOL / SAĞ tuşuna (LEFT- / RIGHT) her basışta
beraber yönlendirilir.
Teslimat kapsamı ve kullanılabilecek aksesuarlar
Teslimat kapsamında 3RK1922-3BA00 manüel kullanım cihazı, "POWER
ADAPTOR" şarj aleti ve kullanma talimatı yer almaktadır.
Kullanılabilecek aksesuar:
• ET 200pro-Motorstarter için RS232 arayüz kablosu
(3RK1922-2BP00)
• ET 200S HF Starter için RS232 arayüz kablosu
(6ED1057-1AA00-0BA0)
• ECOFAST-Motorstarter RS232 arayüz kablosu
(3RK1911-0BN20)
Á YUKARI / AŞAĞI (UP / DOWN) tuşları (sadece R2SS / 3RW44 için)
• R2SS: Her basış, redüksiyon faktörünü 1 adım aralığı düşürür/arttırır.
Sürekli işletimde redüksiyon faktörü 1 sn basamaklarında düşürülür/
arttırılır.
• 3RW44: 8 basıştan veya 8 sn sürekli işletimden sonra yavaş işleyişe
geçilir.
1) DS = Veri kümesi
2) PAE = SPS’in (hafıza programlanır kumanda) giriş süreci yansıması
3) PAA = SPS’in (hafıza programlanır kumanda) çıkış süreci yansıması
A5E00815583-01 7
3RK1922-3BA00 manüel kullanım cihazı
Page 8

Прибор ручного управления для пусковых устройств
¿
À
Á
Â
Ã
Ã
двигателей ET 200pro, ECOFAST и ET 200S HF
3RK1922-3BA00
Инструкция по эксплуатации
Перед установкой, вводом в эксплуатацию или обслуживанием
устройства необходимо прочесть и понять данное руководство.
ОСТОРОЖНО
Безопасность работы устройства гарантировано только при
использовании сертифицированных компонентов.
Запуск в эксплуатацию
(1) Нажать кнопку ON / OFF (ВКЛ/ВЫКЛ) на 2 с:
• загорается светодиод (прибор включен)
• загорается светодиод REMOTE (ДИСТАНЦИОННОЕ УПР.)
(2) Перед переключением в режим LOCAL (ЛОКАЛЬНОЕ УПР.) прибор
ручного управления должен быть соединен с помощью интерфейсного
кабеля с готовым к работе двигателем или пусковым устройством
(3) Переключение в ручной режим:
• нажать кнопку LOCAL
• в приборе ручного управления
определения скорости обмена данными
• загорание светодиода LOCAL свидетельствует об установлении связи
для обмена данными
запускается схема автоматического
ВНИМАНИЕ
Если кнопка LOCAL нажимается без подключения прибора к пусковому
устройству, то схема автоматического определения скорости обмена
данными запускается вхолостую. Спустя приблизительно 8 с
обнаруживается ошибка связи и мигает светодиод LOCAL. Эту ошибку
можно квитировать переключением в режим REMOTE.
• Кнопки LEFT- (ВЛЕВО), RIGHT- (ВПРАВО), UP- (ВВЕРХ), DOWN- (ВНИЗ),
BRAKE (ТОРМОЗ) и TRIP-RESET- (СБРОС) становятся активными только
при длительном свечении светодиода LOCAL.
(4) Возврат в автоматический режим:
• нажать кнопку REMOTE
• загорается светодиод REMOTE
Функции управления
¿
Кнопка TRIP-RESET
• В
режиме LOCAL
(= PAE)2)пускового устройства. Если в этом наборе бит DI0.2 установлен на
"1" (= общая ошибка), горит красный светодиод. При нажатии кнопки
посылается набор данных DS 68(= PAA)
(= TRIP-RESET).
• DS 68 с битом DO0.3 передается до тех пор, пока нажата кнопка.
циклически считывается набор данных DS 69
3)
, в котором бит DO0.3 = 1
1)
ВНИМАНИЕ
Кнопка TRIP-RESET действует только в режиме LOCAL. Кнопка TRIPRESET действует только в импульсном режиме при нажатии кнопки.
À
Кнопка ON / OFF
•
Вкл:
2нажать кнопку на с, прибор включается и горит светодиод
•
Выкл:
2нажать кнопку на с, прибор выключается и светодиод гаснет
•
Индикация остаточного заряда:
время работы становится меньше 10 мин. Для калибровки схемы индикации остаточного заряда нужно один раз полностью зарядить аккумулятор.
•
Индикация зарядки:
аккумулятора. Светодиод горит непрерывно, если аккумулятор полностью
заряжен.
•
Режим экономии электроэнергии:
ни одна кнопка (исключение составляет активный длительный
режим + включение функции), прибор выключается.
Á
Кнопки UP / DOWN (только для R2SS / 3RW44)
•
R2SS:
Каждое нажатие кнопки приводит к уменьшению / увеличению
понижающего коэффициента на величину одного шага. При непрерывном
нажатии кнопки понижающий коэффициент уменьшается / увеличивается
с интервалом в 1 секунду.
•
3RW44:
После 8 нажатий или после непрерывного нажатия в течение 8 с
производится переключение двигателя на замедленный ход.
1) DS = набор данных
2) PAE = отображение входов в памяти микроконтроллера программного управления
3) PAA = отображение выходов в памяти микроконтроллера программного управления
Technische Änderungen vorbehalten. Zum späteren Gebrauch aufbewahren.
Светодиод мигает в течение всего процесса зарядки
Subject to change without prior notice. Store for use at a later date.
© Siemens AG 2006
Светодиод мигает когда остаточное
Если в течение 5 мин не нажимается
Русский
Понижающий
RIGHT в наборе данных DS 68. Выбранный понижающий коэффициент
сохраняется до выключения прибора ручного управления. Кнопки UP- /
DOWN могут нажиматься вместе с кнопками LEFT- / RIGHT
(в импульсном и длительном режимах).
Â
Кнопка BRAKE (предназначена для отдельного управления тормозом)
•
Импульсный режим:
светодиод горит, пока нажата кнопка.
•
Длительный режим работы:
времени после однократного нажатия кнопки, светодиод горит в течение
всего времени управления тормозом. Выключение управления тормозом
производится повторным нажатием кнопки, светодиод гаснет.
Ã
Кнопки LEFT / RIGHT
•
Импульсный режим (по умолчанию):
течение всего времени нажатия одной из двух кнопок (соответствующий
светодиод горит, пока нажата кнопка).
•
Длительный режим работы:
после однократного нажатия кнопки (соответствующий светодиод горит в
течение всего времени передачи).
•
Переключение режимов работы:
работы следует одновременно нажать обе кнопки на >5с, горят оба
светодиода; завершение переключения в длительный режим работы
индицируется миганием обоих светодиодов. Для переключения в
импульсный режим следует еще раз одновременно нажать обе кнопки на
>0,5с, светодиоды горят, светодиоды мигают; возврат в импульсный
режим завершен. Отпустить кнопки, светодиоды гаснут.
ВНИМАНИЕ
Сигнал кнопки LEFT обрабатывается только реверсивным пусковым
устройством RSe.
Тормоз же управляется при каждом нажатии кнопок LEFT- / RIGHT.
Комплект поставки и используемые принадлежности
В комплекте поставки содержатся прибор ручного управления 3RK1922-3BA00,
зарядное устройство "POWER ADAPTOR" и инструкция по эксплуатации.
Используемые принадлежности:
• кабель последовательного интерфейса RS232 для пускового устройства
двигателей ET 200pro (3RK1922-2BP00)
• кабель последовательного интерфейса RS232 для пускового устройства
ET 200S HF (6ED1057-1AA00-0BA0)
• кабель последовательного интерфейса RS232 для пускового устройства
двигателей ECOFAST
коэффициент
Прибор ручного управления 3RK1922-3BA00
передается при нажатии кнопки LEFT- /
тормоз управляется при каждом нажатии кнопки,
тормоз управляется в течение длительного
набор данных DS 68 передается в
набор данных DS 68 передается непрерывно
Для переключения в длительный режим
(3RK1911-0BN20)
Printed in the Federal Republic of Germany
A5E00815583-01
 Loading...