

Page 1

SpeedStream
SpeedStream
SpeedStreamSpeedStream
2614
4-Port DSL/Cable Router
4-Port DSL/Cable Router
4-Port DSL/Cable Router4-Port DSL/Cable Router
User Guide
®
Part No. 007-0207-001
Page 2

T
ABLE OF CONTENTS
1 Introduction . . . . . . . . . . . . . . . . . . . . . . . . . . . . . . . . . . . . . . . . . . . . . . . . . . . . . . . . . 1-1
About the SpeedStream 2614 . . . . . . . . . . . . . . . . . . . . . . . . . . . . . . . . . . . . . . . . . . . . . . . . . . . . . 1-1
Features and Benefits . . . . . . . . . . . . . . . . . . . . . . . . . . . . . . . . . . . . . . . . . . . . . . . . . . . . . . . . . . .1-1
Applications . . . . . . . . . . . . . . . . . . . . . . . . . . . . . . . . . . . . . . . . . . . . . . . . . . . . . . . . . . . . . . . . . . . 1-2
2 Installing the SpeedStream 2614 . . . . . . . . . . . . . . . . . . . . . . . . . . . . . . . . . . . . . . . . 2-1
Package Contents . . . . . . . . . . . . . . . . . . . . . . . . . . . . . . . . . . . . . . . . . . . . . . . . . . . . . . . . . . . . . . . . . . 2-1
Description of Hardware . . . . . . . . . . . . . . . . . . . . . . . . . . . . . . . . . . . . . . . . . . . . . . . . . . . . . . . . . . . .2-1
System Requirements . . . . . . . . . . . . . . . . . . . . . . . . . . . . . . . . . . . . . . . . . . . . . . . . . . . . . . . . . . . . . . . 2-3
Hardware Installation . . . . . . . . . . . . . . . . . . . . . . . . . . . . . . . . . . . . . . . . . . . . . . . . . . . . . . . . . . . . . . . 2-3
Before Starting . . . . . . . . . . . . . . . . . . . . . . . . . . . . . . . . . . . . . . . . . . . . . . . . . . . . . . . . . . . . . . . . . 2-3
Installation Procedure . . . . . . . . . . . . . . . . . . . . . . . . . . . . . . . . . . . . . . . . . . . . . . . . . . . . . . . . . . . 2-3
3 Configuring the SpeedStream 2614 . . . . . . . . . . . . . . . . . . . . . . . . . . . . . . . . . . . . . . 3-1
Web Browser Manageme nt Interface . . . . . . . . . . . . . . . . . . . . . . . . . . . . . . . . . . . . . . . . . . . . . . . . . .3-1
Navigating the Management Interface . . . . . . . . . . . . . . . . . . . . . . . . . . . . . . . . . . . . . . . . . . . . . . 3-1
Menu Selections . . . . . . . . . . . . . . . . . . . . . . . . . . . . . . . . . . . . . . . . . . . . . . . . . . . . . . . . . . . . . . . . 3-2
Configuration Changes. . . . . . . . . . . . . . . . . . . . . . . . . . . . . . . . . . . . . . . . . . . . . . . . . . . . . . . . . . . 3-3
View Network and Status Device . . . . . . . . . . . . . . . . . . . . . . . . . . . . . . . . . . . . . . . . . . . . . . . . . . . . . . 3-3
Simple Setup Procedures . . . . . . . . . . . . . . . . . . . . . . . . . . . . . . . . . . . . . . . . . . . . . . . . . . . . . . . . . . . . 3-4
Set or Change a Password . . . . . . . . . . . . . . . . . . . . . . . . . . . . . . . . . . . . . . . . . . . . . . . . . . . . . . . . 3-4
Set the Time Zone . . . . . . . . . . . . . . . . . . . . . . . . . . . . . . . . . . . . . . . . . . . . . . . . . . . . . . . . . . . . . . 3-4
Configure the WAN Connection . . . . . . . . . . . . . . . . . . . . . . . . . . . . . . . . . . . . . . . . . . . . . . . . . .3-5
Dynamic IP Address (DHCP) . . . . . . . . . . . . . . . . . . . . . . . . . . . . . . . . . . . . . . . . . . . . . . . . 3-5
Static IP Address (Fixed IP) . . . . . . . . . . . . . . . . . . . . . . . . . . . . . . . . . . . . . . . . . . . . . . . . . .3-6
PPP over Ethernet (PP Po E) . . . . . . . . . . . . . . . . . . . . . . . . . . . . . . . . . . . . . . . . . . . . . . . . . . 3-6
Dial-up on Demand (Modem) . . . . . . . . . . . . . . . . . . . . . . . . . . . . . . . . . . . . . . . . . . . . . . . .3-6
Advanced Setup Procedur es . . . . . . . . . . . . . . . . . . . . . . . . . . . . . . . . . . . . . . . . . . . . . . . . . . . . . . . . . . 3-8
Configure LAN Gateway and C lient Services . . . . . . . . . . . . . . . . . . . . . . . . . . . . . . . . . . . . . . . . 3-8
Enable Firewall Protection . . . . . . . . . . . . . . . . . . . . . . . . . . . . . . . . . . . . . . . . . . . . . . . . . . . . . . . 3-9
Enable Virtual Server . . . . . . . . . . . . . . . . . . . . . . . . . . . . . . . . . . . . . . . . . . . . . . . . . . . . . . . . . . . 3-9
Automatically Entering Port Information. . . . . . . . . . . . . . . . . . . . . . . . . . . . . . . . . . . . . . . . 3-9
Network Address Transla tion – NAT . . . . . . . . . . . . . . . . . . . . . . . . . . . . . . . . . . . . . . . . . 3-10
Configure Special Applica tions . . . . . . . . . . . . . . . . . . . . . . . . . . . . . . . . . . . . . . . . . . . . . . . . . . . 3-10
Automatically Entering Port Information. . . . . . . . . . . . . . . . . . . . . . . . . . . . . . . . . . . . . . . 3-10
Configure Client Filtering . . . . . . . . . . . . . . . . . . . . . . . . . . . . . . . . . . . . . . . . . . . . . . . . . . . . . . . 3-11
Configure Miscellaneous Features. . . . . . . . . . . . . . . . . . . . . . . . . . . . . . . . . . . . . . . . . . . . . . . . .3-11
System Tools . . . . . . . . . . . . . . . . . . . . . . . . . . . . . . . . . . . . . . . . . . . . . . . . . . . . . . . . . . . . . . . . . . . . . 3-12
Set or Change a Password . . . . . . . . . . . . . . . . . . . . . . . . . . . . . . . . . . . . . . . . . . . . . . . . . . . . . . . 3-12
Set the Time Zone . . . . . . . . . . . . . . . . . . . . . . . . . . . . . . . . . . . . . . . . . . . . . . . . . . . . . . . . . . . . . 3-12
Reset the Router. . . . . . . . . . . . . . . . . . . . . . . . . . . . . . . . . . . . . . . . . . . . . . . . . . . . . . . . . . . . . . . 3-13
Restore Factory Defaul ts . . . . . . . . . . . . . . . . . . . . . . . . . . . . . . . . . . . . . . . . . . . . . . . . . . . . . . . .3-13
Update Firmware . . . . . . . . . . . . . . . . . . . . . . . . . . . . . . . . . . . . . . . . . . . . . . . . . . . . . . . . . . . . . . 3-13
Backup Settings . . . . . . . . . . . . . . . . . . . . . . . . . . . . . . . . . . . . . . . . . . . . . . . . . . . . . . . . . . . . . . . 3-13
Restore Settings . . . . . . . . . . . . . . . . . . . . . . . . . . . . . . . . . . . . . . . . . . . . . . . . . . . . . . . . . . . . . . . 3-13
4 Configuring Client TCP/IP . . . . . . . . . . . . . . . . . . . . . . . . . . . . . . . . . . . . . . . . . . . . . . 4-1
Install the TCP/IP Protoc ol . . . . . . . . . . . . . . . . . . . . . . . . . . . . . . . . . . . . . . . . . . . . . . . . . . . . . . . . . .4-1
Configure TCP/IP for the SpeedStream 2614 . . . . . . . . . . . . . . . . . . . . . . . . . . . . . . . . . . . . . . . . . . .4-2
Dynamic IP Allocation via a DHCP Server . . . . . . . . . . . . . . . . . . . . . . . . . . . . . . . . . . . . . . . . . . 4-2
Manual IP Configuration . . . . . . . . . . . . . . . . . . . . . . . . . . . . . . . . . . . . . . . . . . . . . . . . . . . . . . . . 4-3
TCP/IP Verification . . . . . . . . . . . . . . . . . . . . . . . . . . . . . . . . . . . . . . . . . . . . . . . . . . . . . . . . . . . . 4-3
i
Page 3

5 Configuring Printer Services . . . . . . . . . . . . . . . . . . . . . . . . . . . . . . . . . . . . . . . . . . . 5-1
Install the Print Server Progr am . . . . . . . . . . . . . . . . . . . . . . . . . . . . . . . . . . . . . . . . . . . . . . . . . . . . . . .5-1
Configure the Printer Port . . . . . . . . . . . . . . . . . . . . . . . . . . . . . . . . . . . . . . . . . . . . . . . . . . . . . . . . . . . 5-4
Windows 95/98/NT/ME . . . . . . . . . . . . . . . . . . . . . . . . . . . . . . . . . . . . . . . . . . . . . . . . . . . . . . . 5-4
Windows 2000 . . . . . . . . . . . . . . . . . . . . . . . . . . . . . . . . . . . . . . . . . . . . . . . . . . . . . . . . . . . . . . . . . 5-5
Unix . . . . . . . . . . . . . . . . . . . . . . . . . . . . . . . . . . . . . . . . . . . . . . . . . . . . . . . . . . . . . . . . . . . . . . . . . 5-7
Appendixes
A Troubleshooting . . . . . . . . . . . . . . . . . . . . . . . . . . . . . . . . . . . . . . . . . . . . . . . . . . . . . A-1
Technical Support . . . . . . . . . . . . . . . . . . . . . . . . . . . . . . . . . . . . . . . . . . . . . . . . . . . . . . . . . . . . . . . . . A-2
B Cables . . . . . . . . . . . . . . . . . . . . . . . . . . . . . . . . . . . . . . . . . . . . . . . . . . . . . . . . . . . . . .B-1
Ethernet Cable . . . . . . . . . . . . . . . . . . . . . . . . . . . . . . . . . . . . . . . . . . . . . . . . . . . . . . . . . . . . . . . . . . . .B-1
Cable Types and Specifications . . . . . . . . . . . . . . . . . . . . . . . . . . . . . . . . . . . . . . . . . . . . . . . . . . .B-1
Twisted-pair Cable . . . . . . . . . . . . . . . . . . . . . . . . . . . . . . . . . . . . . . . . . . . . . . . . . . . . . . . . . . . . .B-1
RJ-45 Pin Numbering . . . . . . . . . . . . . . . . . . . . . . . . . . . . . . . . . . . . . . . . . . . . . . . . . . . . . . .B-2
RJ-45 Pin Assignments . . . . . . . . . . . . . . . . . . . . . . . . . . . . . . . . . . . . . . . . . . . . . . . . . . . . . . . . . . . . . .B-2
Serial Port Pin Assignmen ts . . . . . . . . . . . . . . . . . . . . . . . . . . . . . . . . . . . . . . . . . . . . . . . . . . . . . . . . . .B-2
DB-9 Port Pin Assignments . . . . . . . . . . . . . . . . . . . . . . . . . . . . . . . . . . . . . . . . . . . . . . . . . . . . . .B-3
Serial Port to 9-Pin COM Port on computer . . . . . . . . . . . . . . . . . . . . . . . . . . . . . . . . . . . . . . . . .B-3
Serial Port to 25-Pin DCE Port on Modem . . . . . . . . . . . . . . . . . . . . . . . . . . . . . . . . . . . . . . . . .B-3
Serial Port to 25-Pin DTE Port on Computer . . . . . . . . . . . . . . . . . . . . . . . . . . . . . . . . . . . . . . . .B-4
Printer Port Pin Assignments . . . . . . . . . . . . . . . . . . . . . . . . . . . . . . . . . . . . . . . . . . . . . . . . . . . . . . . . .B-4
DB-25 Printer Port Pin Assign ments . . . . . . . . . . . . . . . . . . . . . . . . . . . . . . . . . . . . . . . . . . . . . . .B-5
C Technical Specifications . . . . . . . . . . . . . . . . . . . . . . . . . . . . . . . . . . . . . . . . . . . . . . .C-1
ii
Page 4

C
HAPTER
I
NTRODUCTION
Congratulations on your purchase of the SpeedStream 2614 DSL/Cable Router. Siemens is proud to
provide you with a powerful yet simple communication device for connecting your local area network
(LAN) to the Internet.
About the SpeedStream 2614
The SpeedStream 2614 provides Internet access to multiple users by sharing a single-user account. The
most outstanding feature of the SpeedStream 2614 is the
connect to an xDSL or cable
provides
services for any client attached to a LAN port.
The SpeedStream 2614 supports dial-on-demand for ISDN/PSTN servi ce, a utomatically connectin g to t he
Internet when there are re quest s, and ter minati ng the conne ction when no fur ther request s occur. This dualport design also supports fail-over Internet access through the secondary WAN port, which enables the
serial port to be used for primary or backup Internet access.
This new SpeedStream 2614 te chnology pro vides many cost-ef fective functions and management be nefits.
It is simple to configure, and can be up and running in minutes.
extensive firewall protection and Virtual Private Network (VPN) services. It also provides print
modem, or an ISDN TA or PSTN analog modem. The
dual-port WAN interface which allows you to
SpeedStream 2614
1
Features and Benefits
• Internet connection to xDSL or cable modem via 10 Mbps WAN port.
• Internet connection to ISDN TA or PSTN modem via RS232 console port.
• Local network connection via 10/100 Mbps Ethernet ports.
• Print services for any client attached to the LAN.
• DHCP for dynamic IP configuratio n, and DNS for domain name mapping.
• Firewall with client privileges, hacker prevention, and NAT.
• Network Address Translation, or NAT, for multi-user access with a single-user account, and virtual
server functionality providing prot ected access to Internet services such as Web, FTP, mai l and Telnet.
• Virtual Private Network using PPTP, L2TP or IPSec.
• User-definable application-s e nsin g tunnel that supports applications requiring multiple connections.
• Support for CHAP authenticatio n protocol for dial-up identification.
• Support for PPP dial-in connection using standard dial-up program.
• Easy setup through a Web browser on any operating system that supports TCP/IP.
• Compatibility with all popular Int e rnet applications.
1-1
Page 5

Applications
The SpeedStream 2614 by Siemens provides many advanced features and functionality:
•
LAN Access
create a network in small offices or homes.
•
Internet Access
connection. Since many DSL providers use PPPoE to establish communication s with end users, the
SpeedStream 2614 includes a built-in PPPoE client, eliminating the need to install this service on your
computer.
•
Shared IP Address
shared IP address. Using only one ISP acc ount, multiple users on your network can browse the Web at
the same time.
•
Virtual Server
host for network address translation. Remote users access various services at your site via a constant IP
address. Then, depending on the requested service (or port number), the SpeedStream 2614 can route the
request to the appropriate server at another internal IP address. This secures your network from direct
attack by hackers, and provides more fle xible management by allowing you to change inte rnal IP
addresses without affecting outside access to your network.
•
User-Definable Application-Sensing Tunnel
multiple connections such as Internet gaming, video conferencing, and Internet telephony. The
SpeedStream 2614 will then sense the app lication type and open a multi-port tunnel for it.
DMZ Host Support
•
Internet. This function is used when the special application-sensing tunnel feature is insufficient to allow
an application to function correctly.
– The SpeedStream 2614 provides connectivity to 10/100 Mbps devices, making it easy to
– This device supports Internet access through an xDSL, cable, ISDN or PSTN
– The SpeedStream 2614 provides Internet access for up to 253 users with a single
– If you have a fixed IP address, you can set up the SpeedStream 2614 to act as a virtual
– You can define special applications that require
– The SpeedStream 2614 allows a networked computer to be fully exposed to the
•
Security
users, or filter all requests for specific services the administrator does not want to serve. The
SpeedStream 2614’s firewall can also block common hacker attacks, including IP Spoofing, Land
Attack, Ping of Death, IP with zero length, Smurf Attack, UDP port loopback, Snork Attack, TCP null
scan, and TCP SYN flooding.
•
Virtual Private Network
protocols: PPTP, L2TP and IPSec . Th ese prot ocols allow remote users to establish a secure connection
to their corporate network. If your service provider supports VPNs, any of these protocols can be used to
create an authenticated and encrypted tunnel for passing secure data over the Internet. The VPN protocols
supported by the SpeedStream 2614 are briefly described below:
- Point-to-Point Tunneling Protocol provides a secure tunnel for remote client access to a PPTP
- Layer Two Tunneling Protocol includes most of the features provided by PPTP, but has less
- IP Security provide s IP network-l ayer encrypt ion and can suppo rt large enc ryption netwo rks, such
– The SpeedStream 2614 supports secu rity features that can deny Internet access to specified
– The SpeedStream 2614 supports three of the m ost commonly used VPN
security gateway. PPTP includes provisions for call origination and flow control required by ISPs.
overhead and is more suited for managed networks.
as the Internet, by using digital certificates for device authentication.
1-2
Page 6

C
HAPTER
2
I
NSTALLING THE SPEEDSTREAM
Before installing the SpeedStream 2614 DSL/Cable Router, verify that you have all the items listed under
“Package Contents,” and that you have all the necessary cabling. If any of the items are missing or
damaged, contact Technical Support (see Appendix A, “Troubleshooting”). After installing the
SpeedStream 2614, refer to the subsequent chapters for additional instructions:
• Chapter 3, “Configuring the SpeedStream 2614” to configure the router settings .
• Chapter 4, “Configuring Client TCP/IP” to install and configure the TCP/IP protoc ol on network
computers.
Package Contents
• SpeedStream 2614 DSL/Cable Router
• Power adapter (5V, 2.4A)
• Installation CD (contains User Gui de, Printer Port Monitor, other files and documents)
• Quick Start Guide
• Safety and Certifications Declara tions
• Extended Warranty and Registration Card
2614
Description of Hardware
You can connect the SpeedStream 2614 DSL/Cable Router to the Internet or to a remote site using its RJ45 WAN port or RS232 serial port. You can connect it directly to your computer or to a local area network
using any of the four Fast Etherne t LAN port s. The SpeedStream 2614 can even function as a pri nt serv er.
Access speed to the Internet depends on your service type. Full-rate ADSL provides up to 8 Mbps
downstream and 640 Mbps upstream. G.lite (or splitterless) ADSL provides up to 1.5 Mbps downstream
and 512 Kbps upstream. Cable modems can provide up to 36 Mbps downstream and 2 Mbps upstream.
ISDN can provide up to 128 Kbps when using two bearer channels. And PSTN analog connections can
now run up to 56 Kbps. However, you should note that the actual rate provided by specific service
providers may vary dramatically from these upper limits.
Although access speed to the Internet is determined by the service and type of modem connected to your
SpeedStream 2614, data passing between devices connected to your local area network can run up to
100 Mbps over the Fast Ethernet ports!
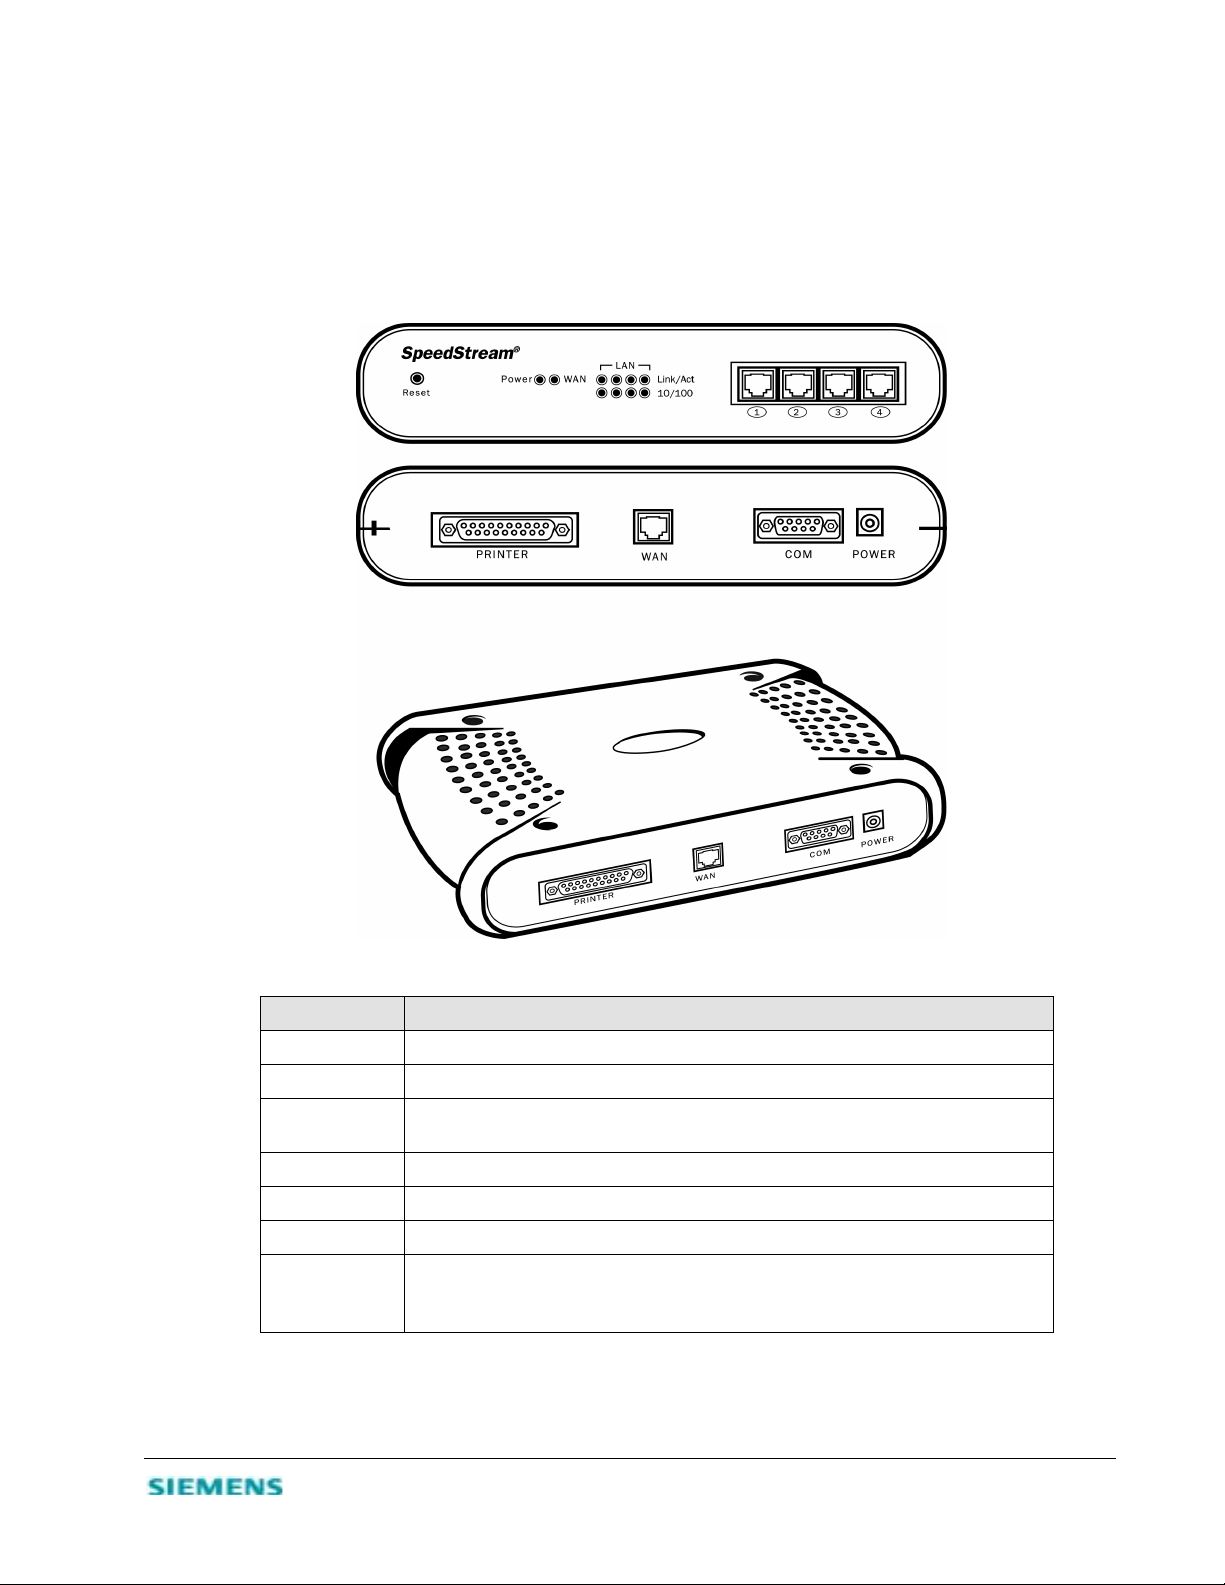
The SpeedStream 2614 includes an LED display on the front panel for system power and port indicators
that simplify installation and network troubleshooting. It also provides four RJ-45 LAN ports on the front
panel, and one RJ-45 WAN port, one RS232 serial port and one parallel printer port on the rear panel:
• (1) RS232 serial port to connect to an ISDN Terminal Adapter (TA) or to a PSTN analog modem.
• (1) Parallel printer port that can be connected to a print er. This printer can then be shared by any LAN
users.
• (4) RJ-45 LAN ports for connection to a 10BASE-T/100BASE-TX Ethernet Local Area Network (LAN).
2-1
Page 7
These ports can auto-negotiate the operating speed to 10/100 Mbps, the mode to half/full duplex, and the
pin signals to MDI/MDI-X, allowing these ports to be connected to any network device with straightthrough cable. The ports can be connected directly to a computer or to a server equipped with an Ethernet
network interface card, or to a networkin g device such as an Ethernet hub or switch.
• (1) RJ-45 WAN port for connection to an xDS L or cable modem. This port is fixed at 10 Mbps fullduplex and only supports MDI-X pin sign als. Consequently, you will have to use either a straightthrough or crossover cable, depend ing on the port type used with the modem.
Figure 2-1. SpeedStream 2614
Item Description
Reset Button Resets the power and restores the default factory settings.
LEDs Power, WAN and LAN port status indicators.
LAN Ports Fast Ethernet ports (RJ-45). Connect devices on you r local area network to these ports
(such as a computer, hub or switch).
Printer Port Parallel port (25-pins, D-type, female) to connect a shared printer.
WAN Port WAN port (RJ-45) to connect your xDSL/cable modem or Ethernet router.
COM Port Serial port (9-pins, D-type, male) to connect your ISDN TA or 56K analog modem.
Power Inlet Connector for the included power adapter.
Caution: The included power adapter is DC 5V/2.4A. Using the wrong type of power
adapter may cause damage.
Table 2-1. SpeedStream 2614 Components
2-2
Page 8

System Requirements
You must have access to a network that meets the following minimum requirements:
• Internet access from your local telepho ne company or Internet Service Provider (ISP) using an xDSL
modem, cable modem, ISDN TA, or PSTN analog modem. You may also have access over the telephone
system to an analog modem at another site.
• A computer using a fixed IP address or dynamic IP address assignment via DHCP, as well as a Gateway
server address and DNS server address from your service provider.
• A computer equipped with a 10 Mbps, 100 Mbps, or 10/100 Mbps Fast Ethernet card, or a USB -toEthernet converter.
• TCP/IP network protocol installed on each computer that needs to access the Internet.
• A Java-enabled Web browser (such as Microsoft Internet Explorer 4.0 or above, or Netsc ape
Communicator 4.0 or above) installed on your host computer.
Hardware Installation
Before Starting
Please collect the following information from your ISP before setting up the SpeedStream 2614:
• An ISP account which includes ISP dial-up user name and password.
• ISP dial-up phone number.
• IP address for your ISP’s Gateway Serve r and Domain Name Server.
• ISP authentication type or script (if not PAP/CHAP).
• IP Address and Subnet mask (for fixed IP user s only).
You can position the SpeedStream 2614 at any convenient location in your office or home. No special
wiring or cooling requirements are needed. You should, however, comply with the following guidelines:
• Keep the SpeedStream 2614 away fro m any heating devices.
• Do not place the SpeedStream 2614 in a dusty or wet environment.
Installation Procedure
1. Power off all equipment. Before installing the SpeedStream 2614, turn off the power on your
computer and DSL/cabl e modem. You can leave the modem c onnected to its phone line or c able outl et.
2. Connect the LAN.
Run Ethernet cable from one of the LAN ports on the SpeedStream 2614 to your computer’s network
adapter or to another network device.
Connect the SpeedStream 2614 LAN port to your computer, or to a hub or switch.
2-3
Page 9
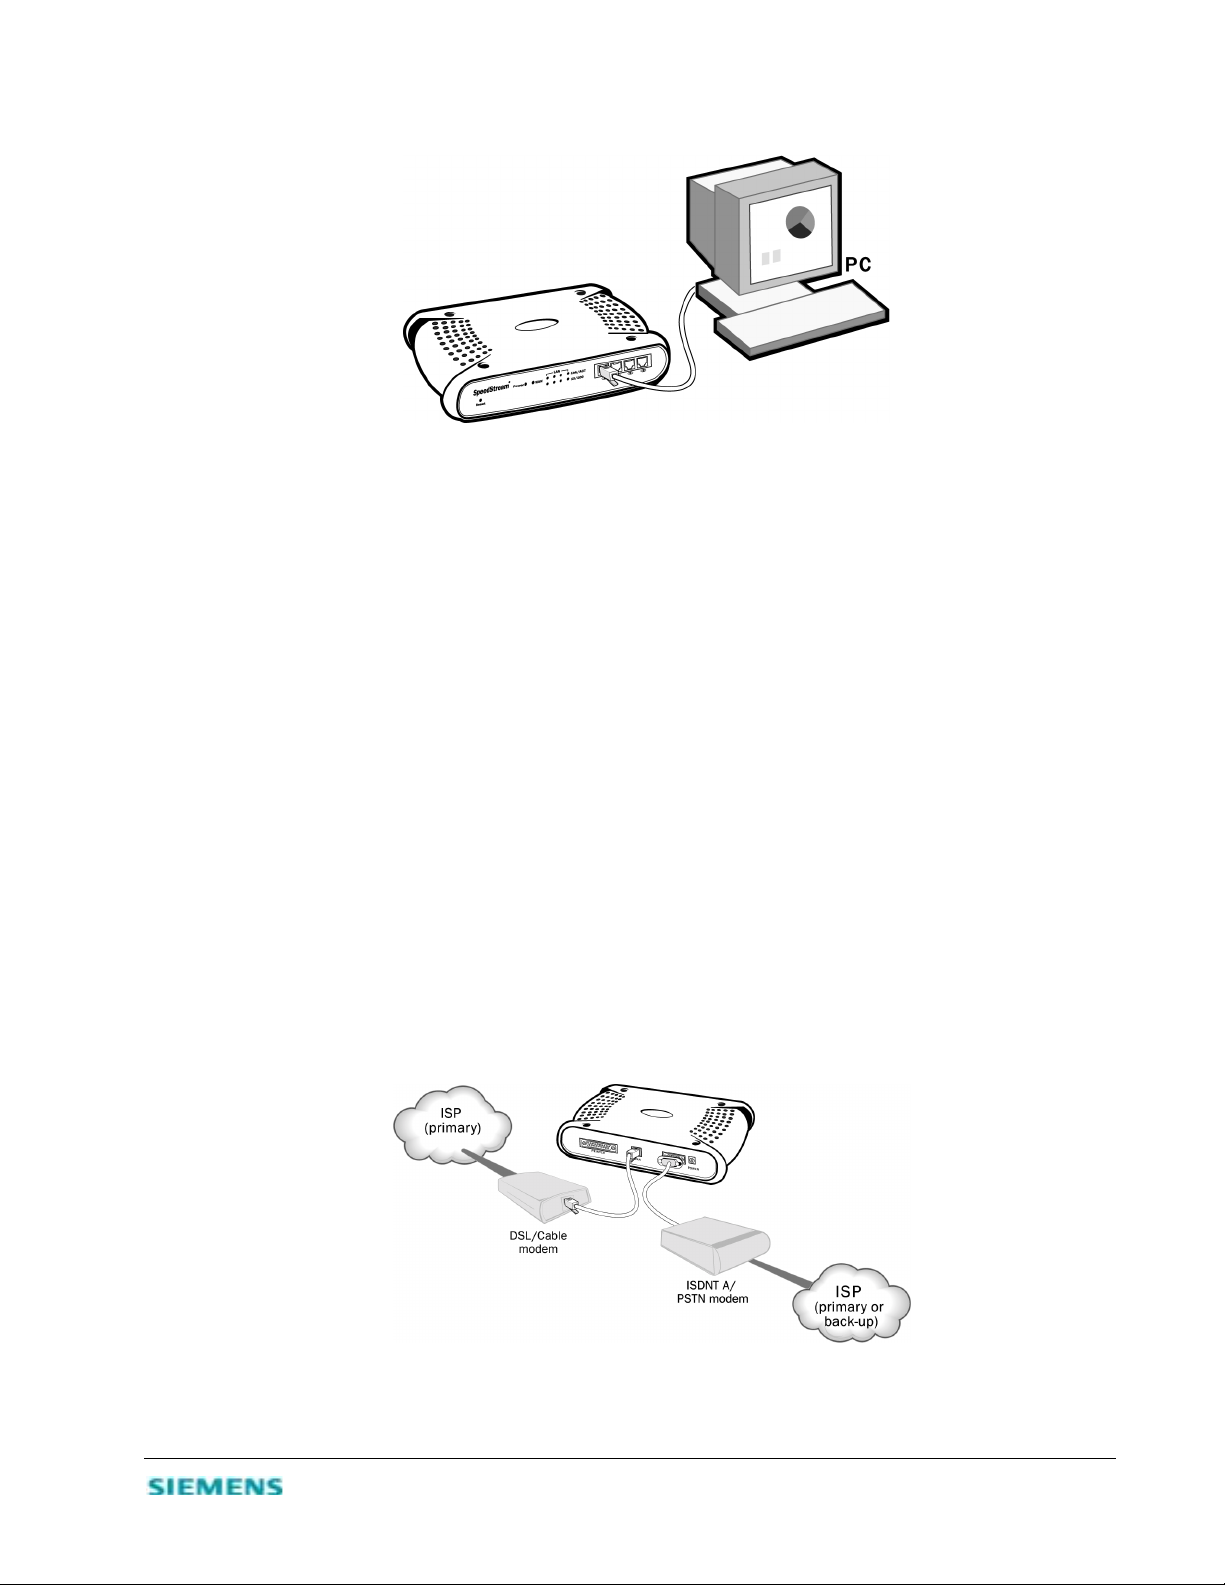
Figure 2-2. Connecting the SpeedStream 2614
Caution
Do not plug a phone jack connector into any RJ-45 port. This may damage the SpeedStream 2614.
Instead, use only twisted-pair cables with RJ-45 connectors that conform to FCC standards.
The four LAN ports on the SpeedStream 2614 can auto-negotiate the connection speed to 10 Mbps
Ethernet or 100 Mbps Fast Ethernet, and can negotiate the transmission mode to half-duplex or fullduplex. The LAN ports also support auto-configuration for pin signals (auto-MDI/MDI-X), allowing
you to use straight-through cable to connect the SpeedStream 2614 to any network device. (See
Appendix B, “Cables” for details on wiring.)
Use twisted-pair cable to connect any of the four LAN ports on the SpeedStream 2614 to an Ethernet
adapter on your computer. You can also cascade any of the LAN ports on the SpeedStream 2614 to an
Ethernet hub or switch, and then connect your computer or other network equipment to the hub or
switch. When inserting an RJ-45 plug, be sur e th e tab on the plug cl ic ks int o posi t ion to ensur e pro per
seating.
Note:
Make sure each twisted-pair cable does not exceed 100 meters (328 feet).
3. Connect the WAN. Use an Ethernet cable to connect th e
or Ethernet router; or use a serial
cable to connect the SpeedStream 2614 to an ISDN TA or PSTN
modem.
Figure 2-3. WAN Connections
SpeedStream 2614 to a cable or xDSL modem
2-4
Page 10

If Internet service s are prov ided thr ough an xDSL or ca ble modem, use unshi elded or shielded t wist edpair Ethernet cabl e with RJ-45 pl ugs t o conne ct the broad band modem d irect ly t o the WAN port on the
SpeedStream 2614. Use eithe r straight- through or cr ossover ca ble dependi ng on the port ty pe provided
by the modem (see Appendix B, “Cables”).
For ISDN
or PSTN service, attac h t he acc ess device to the
RS232 serial port on the SpeedStream 2614
4. Connect a printer. By connecting a printer to the Sp eedStr eam 2614, a ll comput ers c onnect ed to you r
LAN can access print services. Connect a standard parallel printer cable to the printer port on the
SpeedStream 2614 and configure printer services as instructed in Chapter 5, “Configuring Printer
Services.”
5. Connect the power adapter and power up the router, modem and network computers. Plug the
power adapter into the power socket on the SpeedStream 2614, and plug the other end into a power
outlet. Check the Power indicator on the front panel to be sure it is on. If the Power indicator does not
light up
, refer to Appendix A, “Troubleshooting
.”
6. Verify the port status. Confirm that all connections are successful by checking the
status indicators as shown in the following table
LED Ports Color Condition Status
Power n/a Green On SpeedStream 2614 is receiving power.
WAN n/a Green On The WAN port has establish ed a valid network c onnection.
Flashing The WAN port is transmitting or receiving traffic.
LAN
- Link/Act 1-4 Green On The indicated LAN port has established a valid network
Flashing The indicated LAN port is transmitting or rec eiving traffic.
- 10/100 1-4 Amber On The indicated LAN port is operating at 100 Mbps.
Flashing The indicated LAN por t is operating at 10 Mb ps.
Table 2-2. LED Status Indicators
.
connection.
power and port
2-5
Page 11

7. Configure the SpeedStream 2614. Configure the SpeedStream 2614 as detailed in Chapter 3,
“Configuring the SpeedStream 2614.”.
8. Configure TCP/IP. Configure the TCP/IP prot ocol on your network computers as d eta il ed i n Chapter
4, “Configuring Client TCP/IP.” If TCP/IP is not on your system, this chapter also includes
installation instructions.
9. Install the Printer Port Monitor and configure printer services. Install the Printer Port Moni tor
from the SpeedStream 2614 installation CD and configure printer services as detailed in Chapter 5,
“Configuring Printer Services.”
10. Reboot the computer when prompted.
2-6
Page 12

C
HAPTER
3
C
ONFIGURING THE SPEEDSTREAM
Before you can config ure the S peedStr eam 2614 DSL/Cable Router, the TCP/IP protocol must be i nstalle d
on all computers on your network. If you need to install TCP/IP, refer to Chapter 4, “Installing and
Configuri ng TCP/IP.”
After TCP/IP is installed and configured on your network computers, you can configure the SpeedStream
2614 from any Java-supported Web browser, including Internet Explorer or Netscape Navigator, versions
4.0 or above. The ma nagement inte rface all ows you to co nfigur e set tings for the router, view status, update
firmware, and access the many features of this unit.
Web Browser Management Interface
To access the SpeedStream 2614 management interface:
1. Open your Web browser and enter the SpeedStream IP address http://192.168.254.254 in the browser
Address box. The SpeedStream 2614 will automatically switch to port 88 for management access.
2. On the Login Screen, enter admin in th e Password box; then click Login to display the Status screen
of the management interface.
2614
Figure 3-1. Login Screen
Navigating the Management Interface
Using the management interfac e, you can defi ne sys te m parame ter s, mana ge and co ntr ol the Spee dSt rea m
2614 and its ports, or monitor network conditions. The management interface includes five menus:
•
•
•
– View the WAN/LAN connection status, firmware and hardware version numbers, any illegal
Status
attempts to access your network, and information on all DHCP clients connected to your network.
Simple Set up
entries and client filtering, and configure the WAN settings.
Advanced Setup
– Restrict management access based on a specific password, set the local time zone for log
– Configure LAN settings, firewall protection, virtual server, special applications,
3-1
Page 13

client filtering, and various other settings.
•
•
– Reset the SpeedStream 2614, restore the factory settings, or upgrade on-board firmware.
Tools
– View descriptions of menu items, troubleshooting tips, glossary of terms, and contact information
Help
for SpeedStream support, driver updates, Web site, and FTP site.
Menu Selections
The following table briefly describes the selections available from the management interface:
Menu Item Description
Status
Internet Displays WAN connection type and status.
Gateway Displays system IP settings, as well as DHCP, NAT, Firewall and Printer status.
Information Displays the number of attached clients, the firmware versions, the physical MAC address for
Security Log Displays any illegal attempts to access your network.
DHCP Client Log Displays information on all DHCP clients attached to your network.
Simple Setup
Change Password Sets/changes the password for administrator access.
Set Time Zone Sets the local time zone.
WAN Specifies the Internet connection type: Dynamic IP Address, Static IP Address, PPPo E , o r
Advanced Setup
LAN Sets the TCP/IP configuration for the SpeedStream 2614 LAN interface and all DHCP clients.
Firewall Enables hacker attack monitoring and logging to block IP Spoofing, Land Attack, Pin of
Virtual Server Allows remote users accessing services such as Web or FTP at your local site via public IP
Special Applications Provides for applications requiring multiple connections, such as Internet gaming or
Client Filtering Allows you to filter Internet access for local clients based on IP addresses, application types
Misc Specifies administrator time-out, PING discard from WAN side, remote management for
Tools
Change Password Sets/changes the password for administrator access.
Set Time Zone Sets the local time zone.
Reset Router Reboots the system and retains all of your configuration settings.
Displays general connection, firmware and hardware information.
each media interface, as well as the hard ware version and serial number.
Configures TCP/IP settings and client services.
Dial-up on Demand.
Configures a variety of packet filter ing and specialized functions.
Death, IP with Zero Length, Smurf Attack, UDP Port Loopback, Snork Attack, TCP Null
Scan, TCP SYN Flooding, and others.
addresses to be automatically redirected to local servers configured with private IP addresses.
conferencing, by opening ports for inbound traffic.
(i.e., HTTP port), and time of day.
administrator, and virtual DMZ host.
Contains options to reset the system, restore configuration settings, or update system
firmware.
Restore Factory Settings Restores all your configuration settings and restores the factory defaults.
Update Firmware Upgrades the system with firmware obtained from the SpeedStream Web site.
Help
Contains product support and contact information, troubleshooting suggestions, and glossary
of terms.
Table 3-1. Management Interface Main Menu
3-2
Page 14

Configuration Changes
Configurable parameters are available by means of dialog boxes or drop-down lists. After you change a
configuration, be sure to click the Enter button at the bottom of the page to confirm the new setting.
To ensure proper screen refresh after a command entry, configure Internet Explorer 5.0 as follows (other
browsers or later browser versions may vary somewhat):
1. From the browser menu bar, click Tools.
2. On the Tools menu, click Internet Options.
3. On the Internet Options menu, click the General tab.
4. In the General box, select Temporary Internet Files.
5. In the Settings, box, select Every visit to the page to check for newer versions of stored pages each
time you connect to the server.
View Network and Device Status
From the Status screen, you can view WAN and LAN connection status, firmware and hardware version
numbers, any illegal attempts to access your network, and information on all DHCP clients connected to
your network.
Figure 3-2. Main/Status
3-3
Page 15

The Status screen provides the following information:
Field Description
Internet Displays WAN connection type and status.
Gateway Displays system IP settings, as well as DHCP, NAT, Firewall and Printer status.
Information Displays the number of attached clients, the firmware versions, the physical
Security Log Displays any illegal attempts to access your network.
DHCP Client Log Displays information on all DHCP clients on your network.
MAC address for each media interface, and the hardware version and serial
number.
Table 3-2. Status Menu Options
Simple Setup Procedures
The management interface will guide you through sequence of steps required to configure the
SpeedStream 2614 for use with an ISDN TA or 56k, cable or DSL modem. As you click Enter on each
screen to accept the settings you enter, the next screen in sequence will display. You can, of course, jump
from one topic to another by simply clicking that topic in the main menu.
•
Change Password
Set Time Zone
•
– Specify the WAN connection type required by your Internet Service Provider (ISP).
WAN
•
– Set or change the administrator password.
– Select the local time zone.
Set or Change a Password
From the Simple Setup | Change Password screen, you can set a new password or change an existing
password to restrict management access. Although any user can access the Status and Help menus, the
Setup and Tools configuration options are permissio n-b ased and r equire a password . The defaul t pass word
is admin. To ensure system security, it is recommended that you assign your Administrator a unique
password as soon as possible.
Note:
If your password is l ost or y ou cannot g ain acces s to the management i nterface , restor e the fa ctory def aults.
Press and hold the Reset button for at least five seconds.
Note that passwords can consist of 3 to 12 alphanumeric characters and are not case-sensitive.
1. On the main menu, click Simple Setup.
2. On the Simple Setup menu, click Change Password.
3. On the Change Password screen, enter the current password in the first text box; then enter the new
password in the next two text boxes.
4. Click Enter to save the settings and continue.
Set the Time Zone
The time zone setting is used for log entries and client filtering.
1. On the main menu, click Simple Setup.
3-4
Page 16

2. On the Simple Setup menu, click Set Time Zone.
3. On the Set Time Zone screen, select the correct time zone in the drop-down list box.
4. Click Enter to save the setting and continue.
Configure the WAN Connection
You must specify the WAN connection type required by your Internet Service Provider (ISP):
•
Dynamic IP Address
Static IP Address
•
PPP over Ethernet
•
•
Dial-up on Demand
- IP address is obtained automatically.
- Your ISP has assigned you a static (or fixed) IP addr ess.
- Some ISPs require PPPoE to connect to their services.
- If you use an analog or digital modem to connect to the Internet.
To begin configuring your WAN connection:
1. From the main menu, click Si mp le Setup; then click WAN.
2. On the Simple Setup | WAN screen, click to select the correct connection type.
• To configure a WAN connection through the RJ-45 port to an xDSL modem or cable modem, specify
one of the first three options.
• If you want to provide Internet services, such as a Web or FTP server, you may need a fixed address.
Contact your ISP to obtain a static IP address.
• To configure a WAN connection through the serial port to an ISDN TA or PSTN modem, select the
Dial-up on De mand
Note:
option.
If WAN connections are configured for both the RJ-45 and serial port, the serial port will be used as a
backup Internet connection should the primary RJ-45 WAN connection fails.
3. Click More Configuration to provide the detailed configuration parameters for that type, as detailed
in the next sections.
Dynamic IP Address (DHCP)
If you selected Dynamic IP Address as your WAN connection type, the Simple Setup | WAN | DHCP
screen displays when you click More Configuration.
1. In the Host Name box, enter the host name. Host names are primarily used by cable modem service
providers and may not be required by your ISP.
2. To automatically enter the MAC (hardware) address of the Ethernet card provided and installed by
your ISP, click Clone MAC Address. You can also manually enter the MAC address
when registering
for Internet service, and do not change it unless required by your ISP.
. Use this address
3. Click Enter to accept the settings and continue.
3-5
Page 17

Static IP Address (Fixed IP)
If your sele cted Static IP Address as your WAN connection type, the Simple Setup | WAN | Fixed IP
screen displays when you click More Configuration.
1. In the IP address assigned by your ISP boxes, enter your IP address.
2. In the Subnet Mask boxes, enter the subnet mask for the SpeedStream 2614: 255, 255, 255, 0
3. In the ISP Gateway Address boxes, enter the gateway address of your ISP.
Note:
You may need a fixed address if you want to p rovide Inter net ser vices such as a Web se rver or FTP serve r.
Most ISPs can provide you with a fixed address, most often for an additional monthly fee.
PPP over Ethernet (PPPoE)
If you selected PPP over Ethernet as yo ur WAN connection type , the Simple Setup | WAN | PPPoE screen
displays when you click More Configuration.
1. In the User Name box, enter the user name assigned by your ISP.
2. In the Password box, enter the password assigned by your ISP.
3. In the Please retype your password box, enter the same password.
4. In the Service Name box, enter the service name if it is required by your ISP.
5. Click Enter to accept the settings and continue.
Dial-up on Demand (Modem)
If you selected Dial-up on Demand as your WAN connection type (via an ISDN TA or PSTN modem
attached to the SpeedStream 2614 serial port), the Simple Setup | WAN | Dial-up Modem screen displays
when you click More Configuration.
Note:
If your ISP has given you a secondary phone number, or if you have a secondary Internet service account,
3-6
Page 18

fill in the re levant fields under Secondary Dial-up.
Figure 3-3. Simple Setup | WAN | Dial-up Modem
1. In the Check if you only use a dial-up modem to co nnect to t he Interne t check box, clic k to sele ct it
if the serial port is used for primary Internet access. If not selected, this connection will only be used
for backup access if the primary WAN link fails.
2. In the Dial-Up Service Phone Number boxes, enter the access phone numbers provided by your ISP.
3. In the Dial-Up Account Information boxes, enter your ISP account user name and password.
4. In the Modem Initialization string boxes, enter the initialization string provided by your modem
manufacturer. The following is an example of a modem initialization string: ATQ1S0=1&D0&K0&W
5. In the Has your Internet Service Provider given you an IP address? box, select No if you are
assigned a dynamic IP address every time you dial up. However, if your ISP has assigned a fixed IP
3-7
Page 19

address for you to use, select Yes and enter the designated IP address and subnet mask.
Advanced Setup Procedures
After completing the Simple Setup menu options, you will next move to the Adva nced Set up options.
You may also go directly to any of these screens by clicking that option on the main menu.
The SpeedStream 2614 DSL/Cabl e Router supports adva nced function s including hack er attack prot ection,
virtual servers, special applications configuration, virtual server, client filtering, and remote management.
We highly recommend you keep the default settings.
Configure LAN Gateway and DHCP Settings
From this screen, you can dynamically assign the IP addresses for client computers, enable the DHCP
server, set the lease time, and specify the address range.
Note:
Remember to configure all of your client computers for dynamic address allocation.
Valid IP addresses consist of four numbers separated by periods. The first three fields are the network
portion, and can b e from 0–255 , while th e last f ield is th e host portion and can be from 1 to 254. Remember
not to include the gateway address of the SpeedStream 2614 in the client address pool.
Figure 3-4. Advanced Setup | LAN
3-8
Page 20

Enable Firewall Protection
From the Advanced Setup | Firewall screen, you can enable the SpeedStream 2614 firewall to block
common hacker attacks, including IP Spoofing, Land Attack, Ping of Death, IP with zero length, Smurf
Attack, UDP port loopback, Snork Attack, TCP null scan, and TCP SYN flooding. The firewall does not
significantly affect system performance, so we advise leaving it enabled to protect your network users.
Enable Virtual Server
From the Advanced Setup s creen, you can enab le Virtual Server . If you co nfigure t he SpeedSt ream 2614 as
a virtual server, remote users accessing services such as Web or FTP at your local site via public IP
addresses can be a utomati call y redi rec ted t o local serve rs con figur ed with priva te IP a ddr esses. Dependin g
on the requested service (TCP/UDP port number), the SpeedStream 2614 redirects the external service
request to the appropriate server located at another internal IP address.
To use the Virtual Server, the WAN interface must have a fixed IP address. Some of the more common
TCP service ports include HTTP: 80, FTP: 21, Telnet: 23 and POP3: 110.
Figure 3-5. Advanced Setup | Virtual Server
1. Specify the Private IP, Private Port, Type, and Public Port information.
2. Click Enter to save the settings and continue.
Automatically Entering Port Informatio n
You can have the system automatically enter the most common application ports:
1. Scroll to the bottom of the Advanced Setup | Virtual Server screen.
2. In the Well known services box, select the desired service.
3. Click in the box to the right of Copy to and select the line number to which the system will enter that
3-9
Page 21

information.
4. Click Copy to to enter that information in the Public Port boxes on the designated line.
Network Address Translation (NAT)
Network Address Translation, or NAT, is automatically enabled when you enable multi-user Internet
access or en able the Virtual Server function. NAT provides multiple users with access to the Intern et via a
single user account, or maps the local address for an IP server (such as Web or FTP) to a public address.
This secures your network from direct attack by hackers, and provides more flexible management by
allowing you to change internal IP addresses without affecting outside access to your network.
Configure Special Applications
Use the Advanced Setup menu to configure applications that require multiple connections, such as
Internet games, video-conferencing, and Internet telephony. These applications may not work when
Network Address Translation (NAT) is enabled. If you need to run applications that require multiple
connections, use the following screen to specify the additional public ports to be opened for each
application.
Figure 3-6. Advanced Setup | Special Applications
1. In the Trigger Port box, specify the port normally associated with an application.
2. Select TCP or UDP as the protocol type.
3. In the Public Port box, ent er the public ports associ ated with the tr igger port to open them for in bound
traffic.
Automatically Entering Port Informatio n
You can have the system automatically enter the most common application ports:
1. Scroll to the bottom of the Advanced Setup | Special Applications screen.
2. In the Popular applications box, select the desired application.
3-10
Page 22

3. Click in the box to the right of Copy to and select the line number to which the system will enter that
information.
4. Click Copy to to enter that information in the Public Port boxes on the designated line.
If an application still cannot function correctly after enabling multiple ports via the Special Application
screen, you may need to use the Virtual DMZ Host option to open the client computer for full Internet
access. (Refer to the “Miscellaneous Services” section for instructions.)
Configure Client Filtering
You can filter Internet access for local clients based on IP address, application type (i.e., HTTP port), and
time of day.
For example, the following screen indicates that clients in the address range 192.168.254.50 to
192.168.254.99 are permanently restricted from using FTP (port 21), while clients in the address range
192.168.254.110 to 192.168.254.119 are blocked from browsing the Internet from 8:00 a.m. to 5:00 p.m.,
Monday through Friday.
Figure 3-7. Advanced Setup | Client Filtering
Configure Miscellaneous Features
From the Advanced Setup | Misc screen, you can configure these additional features:
•
Administrator Time- Out
automatically closes the Administrator session. To disable this function, enter
•
Discard PING from WAN side
SpeedStream 2614.
•
Remote Management
However, you can also manage the SpeedStream 2614 from a remote host by adding the IP address of an
administrator.
Caution:
If you specify an IP address of 0.0.0.0, any host can manage the SpeedStream 2614.
•
IP Address of Virtual DMZ Host
applications from behind the NAT firew a ll or after configuring the Special Application s function. This
feature allows you to open the client up to unrestricted two-way Internet access. Enter the IP address of
– Specify the amount of time of inactivity be fore the SpeedStream 2614
– When this feature is enabled, hosts on the WAN cannot ping the
– By default, management access is only available to users on your local network.
– You may encounter a client PC that cannot properly run Internet
.
0
3-11
Page 23

a DMZ host.
Caution:
Adding a client to the DMZ (demilitarized zone) may expose your local network to a variety of security
risks. Use this option as a last resort only!
System Tools
From the Tools screen, you can manage additional features and functions of the SpeedStream 2614.
•
Change Password
Set Time Zone
•
Reset Router
•
•
Restore Factory Defaults
– Set a new password or change the existing one.
– Choose the local time zone.
– Reboot the router and retain all your configuration settings.
– Reboot the router, remove your configuration settings, and return them to
the factory default settings.
•
Update Firmware
•
Backup Settings
Restore Settings
•
– Upgrade the router firmware by downloadi ng from the SpeedStream Web site.
– Save the settings to your computer hard drive.
– Reinstate your most recently saved settings.
Set or Change a Password
From the Simple Setup | Change Password screen, you can set a new password or change an existing
password to restrict management access. Although any user can access the Status and Help menus, the
Simple Setup, Advanced Setup, and Tools configuration options are permission-based and require a
password. The default password is admin. To ensure system security, it is recommended that you assign
your Administrator a unique password as soon as possible.
Note:
If your password is l ost or y ou cannot g ain acces s to the management i nterface , restor e the fa ctory def aults.
Press and hold the Reset button for at least five seconds.
Note that passwords can consist of 3 to 12 alphanumeric characters and are not case-sensitive.
1. On the main menu, click Tools.
2. On the Tools menu, click Change Password.
3. On the Change Password screen, enter the current password in the first text box; then enter the new
password in the next two text boxes.
4. Click Enter to save settings and continue.
Set the Time Zone
The time zone setting is used for log entries and client filtering.
1. On the main menu, click Tools; then click Set Time Zone.
2. On the Tools | Set Time Zone screen, click to select the correct time zone.
3-12
Page 24

Reset Router
On the Tools menu or screen, click Reset Router to reboot the router and retain all your configuration
settings.
Restore Factory Defaults
On the Tools menu or screen, click Restore Factory Defaults to reboot the router, overwriting your
configuration settings with those of the factory defaults.
Update Firmware
On the Tools menu or screen, click Update Firmware to download the newest version of the firmware
from the SpeedStream support Web site. You will be directed to download the update file; then clic k Enter.
to install.
Backup Settings
On the Tools screen, click Backup Settings to save your configurations. The File Download dialog box
displays. Select a location to which the system will download the config.bin file.
Restore Settings
On the Tools screen, click Restore to restore the last saved config.bin file.
3-13
Page 25

C
HAPTER
4
I
NSTALLING AND CONFIGURING
To access the Internet through the SpeedStream 2614 DSL/Cable Router, you must configure it and your
network computers with same IP subnet. Manually configure the IP addr es s for client computers or obtain
it automatically from the SpeedStream 2614’s DHCP service.
The default network settings for the SpeedStream 2614 are:
IP Address: 192.168.254.254
Subnet Mask: 255.255.255.0
Password: admin
You can change these settings to comply with your network requirements; however, you must first
configure at least one computer to access the SpeedStream 2614 management interface.
TCP/IP
Install the TCP/IP Protocol
If TCP/IP is not installed on your computer, follow these instructions:
1. Click Start/Settings; then click Control Panel.
2. Double-click Network to display the Configuration tab in the Network window.
3. Click Add to add a network component to your computer.
4. Double-click Protocol to add the TCP/IP protocol.
Figure 4-1. Select Network Component Type
5. In the manufacturers list, select Microsoft; then select TCP/IP in the Network Protocols list. Click
OK to return to the Network window.
4-1
Page 26

Figure 4-2. Select Network Protocol
6. The TCP/IP protocol will be listed in the Network window. Click OK to complete the install
procedure, and restart your computer to enable the TCP/IP protocol.
Configure TCP/IP for the SpeedStream 2614
When TCP/IP is installed on your computer, follow these instructions to configure it for the SpeedStream
2614:
1. On the Windows taskbar, click Start | Settings | Control Panel.
2. Double-click the Network icon; then click the Configuration tab and select the TCP/IP for your
network card.
3. Click the Properties button to enter the TCP/IP properties for the SpeedStream 2614. You can
dynamically assign TCP/IP address settings to a client, or you can manually configure a client with
address settings to meet your specific network requirements. (Note that the default IP address of the
SpeedStream 2614 is 192.168.254.254.)
Dynamic IP Allocation via a DHCP Ser ver
1. On the IP Address tab, sele ct Obtain an IP address automaticall y.
2. Do not enter any values under the Gateway tab.
3. On the DNS Configuration tab, select Disable DNS. These settings will be automatically configured
by the DHCP server.
4-2
Page 27

4. Click OK and reboot your system to implement the changes.
Figure 4-3. TCP/IP Properties Sheets
Manual IP Configuration
1. On the IP Address tab, sele ct Specify an IP address. Select the IP address based on the default
network 192.168.254.X, where X is
from 1 to 253. Enter
255.255.255.0
for the subnet mask.
2. On the Gateway tab, add the IP addr ess of the Spe edStream 2614 (default addr ess is 192.1 68.254.254 )
in the New gateway box; then click Add.
3.
On the
DNS Configuration
tab, add the IP address for the SpeedStream 2614; then
click Add. This
automatically rel ays DNS req uests to the DNS ser ver(s ) pr ovide d by your ISP. Otherwise, add specific
DNS servers into the DNS Server Search Order field; then click
Add
.
4. After finishing TCP/IP setup, click OK; then reboot the computer. You can now set up other
computers on the LAN according to the procedures described above.
TCP/IP Verification
After you install the TCP/IP communication protocol and configure an IP address in the same network
with the SpeedStream 2614, you can use the ping command to verify that your computer is successfully
connected to the SpeedStream 2614.
1. Open an MS-DOS window and type ping 192.168.254.254.
If the following message appe ar s, a c ommun ic at ion l in k between your computer and the Sp eed Str eam
2614 was successfully established:
Pinging 192.168.254.254 with 32 bytes of data:
Reply from 192.168.254.254: bytes=32 time=2ms TTL=64
4-3
Page 28

However, if the following message appears, there may be something wrong in your installation
procedure:
Pinging 192.168.254.254 with 32 bytes of data:
Request timed out.
2. If the request times out, confirm the following items in sequence:
•
Is the Ethernet cable correctly connected between the SpeedStream 2614 and your computer?
The LAN LED on the SpeedStream 2614 and the Link LED of the n etwork car d on your computer
must be on.
•
Is TCP/IP properly configured on your computer?
If the IP address of the SpeedStream 2614 is 192.168.254.254, the IP address of your computer
must be from 192.168.254.1 to 192.168.254.253, and the default gateway must be 192.168.254.1.
3. When you can successfully ping the SpeedStream 2614, you are ready to connect to the Internet!
4-4
Page 29

C
HAPTER
C
ONFIGURING PRINTER SERVICES
5
The SpeedStream 2614
configure print services for devices attached to the SpeedStream 2614:
1. Install the print server program from the SpeedStream 2614 CD-ROM.
2. Configure
the SpeedStream 2614 printer port for yo ur operating system.
printer server supports Windows 95/98/NT/2000/ME and Unix platforms. To
Install the Print Server Program
1. Insert the installation CD into your CD-ROM drive. If autorun is enabled on your system, the
installation progr am will begi n automati cally. If not, double-click setup.exe on the the CD to manually
start the program.
Figure 5-1. Printer Server Setup Program
2. Close any open Windows programs; then click Next on the Welcome screen.
3. On the Choose Destination Location screen, accept the default folder location or click Browse to
navigate to a new location; then click Next. The setup program will install the programs in the
5-1
Page 30

specified location.
Figure 5-2. Choose Destination Location
4. Select the folder to contain the program icons; then click Next.
Figure 5-3. Select Program Folder
5-2
Page 31

5. Enter the printer port name that will identify the port monitor in you r system; then click Next.
Figure 5-4. Select Port Name
6. When the setup program finishes installing the port monitor, select Yes, I want to restart my
computer now; then click OK.
Figure 5-5. Reboot
7. Reboot your computer; then confi gure t he Speed Stream 2 614 p rinter port f or your sy stem as descr ibed
in the follow ing section.
5-3
Page 32

Configure the Printer Port
After you install the print server program, locate the instructions below that are specific to your operating
system: Windows 95/98/NT/ME, Windows 2000, or Unix.
Windows 95 / 98 / NT / ME
1. On the Windows desktop, double-click
My Computer | Printers | Add Printer.
Figure 5-6. Printer s
2. Follow the prompts to add a Local printer to your system.
Figure 5-7. Add Local Printer
5-4
Page 33

3. Select the port you want to use with this printer; then click Next.
Figure 5-8. Select Printer Port
4. Follow the prompts to complete the SpeedS tream 2614 printe r port confi guratio n. The printer type you
specified will now be added to your Printers menu.
Windows 2000
1. On the Windows 2000 desktop, double-click My Computer |Printers |
Figure 5-9. Printer s
Add Printer
.
5-5
Page 34

2. Select Local printer; the n click Next.
Figure 5-10. Select Network Printer
5-6
Page 35

3. Select the printer port; then click Next.
Figure 5-11. Select Printer Port
4. Follow the prompts to complet e the prin ter po rt configu rati on. The pri nter t ype you spec ifie d will now
be added to your Printers menu.
Unix Systems
Follow the traditional configuration procedure on Unix platforms to set up the SpeedStream 2614 print
server. The printer na me is “lp.”
5-7
Page 36

Appendix A
T
ROUBLESHOOTING
This section describes common problems you may encounter and their possible solutions. Use the panel
indicators to monitor and identify problems with the SpeedStream 2614. If you cannot resolve any
connection problems after checking the indicators, refer to the following table.
Symptom Action
LED Indicators
Power LED is Off
Link LED is Off
• External power supply has failed or is disconnected.
• Check connections between the SpeedStream 2614, the external power supply, and
the wall outlet.
• If the power indicator does not turn on when the power cord is plugged in, you may
have a problem with the power outlet, powe r cord, or external power supply.
• If the unit powers off af ter running for a while, check for loose power conne ctions,
power losses or surges at the power outlet.
• If you still cannot isolate the problem, then the external power supply may be
defective. In this case, contact Siemens Technical Support for assistance.
• Verify that the SpeedStream 2614 and attached device are powered on.
• Be sure the cable is plugged into both the SpeedStream 2614 and the corresponding
device.
• Verify that the proper ca ble type is used and that its length doe s not exc eed th e
specified limits.
• Be sure that the network interface on the attached device is configured for the proper
communication speed and duplex mode.
• Check the adapter on the attached device and cable connections for possible defects.
Replace any defective adapter or cable if necessary.
Network Connection Problems
Cannot ping the
SpeedStream 2614
from the attached
LAN, or the
SpeedStream 2614
cannot ping any
device on the attached
LAN
Management Problems
Cannot connect using
the Web browser
Forgot or lost the
password
• Verify that the IP addresses are properly configured. For most applications, you
should use the SpeedStream 2614 DHCP function to dynamically assign IP addresses
to any host on the attached LAN. However, if you manu ally configure any IP
addresses on the LAN, verify that the same network address (network component of
the IP address) and subnet mask are used for both the SpeedStream 2614 and any
attached LAN device s .
• Be sure the device you want to ping (or from which you are pinging) has been
configured fo r TCP/IP.
• Be sure you configure d the Spe edStre a m 2614 with a valid IP address, subnet mask
and default gateway.
• Check that you have a valid network connection to the SpeedStream 2614 and that the
port you are using has not been disabled.
• Check the network cabling be tween the management station and the SpeedStream
2614.
• Press the Reset button on the front panel (holding it down for at least five seconds) to
restore the factory defaults.
A-1
Page 37

Symptom Action
Printer Server
The printer cannot
print or prints garbage
• Make sure the parallel cable between the SpeedStream 2614 and printer is connected
and is in good condition
Table A-1. Troublesh ooting Chart
Technical Support
Before contacting Technical Support, please refer to the previous Troubleshooting table. If you are still
unable to resolve the problem, be prepared to provide the following information:
• Model number (SpeedStream 2614 )
• Software version
• Date of pu rchase or in stallation
• Description of the problem
T ech nic al Support for Nort h America is avai lable 24 hours a day, 7 days a week, by phone, email or online :
• Phone: 877-823-6722
• Email: support@s peed stream.com
• Online: http://ww w. speedstream.com
• FTP: ftp.speedstream.com
A-2
Page 38

Appendix B
C
Ethernet Cable
Cable Types and Specifications
Cable Type Max. Length Connector
10BASE-T Cat. 3, 4, 5 100-ohm UTP 100 m (328 ft) RJ-45
100BASE-TX Cat. 5 100-ohm UTP 1 00 m (328 ft) RJ-45
Table B-1. Cable Types and Specifications
Twisted-pair Cable
Caution: DO NOT plug a phone jack connector into any RJ-45 port. Use only twisted-pair cables with
RJ-45 connectors that conform with FCC standards.
For 10BASE-T/100BASE-TX connections, a twisted-pair cable must have two pairs of wires. Each wire
pair is identified by two different colors. An RJ-45 connector must be attached to both ends of the cable.
Except for the WAN port, all RJ-45 ports on the SpeedStream 2614 support automatic MDI/MDI-X
configuration, so you can use straight-through cable to attach the LAN ports to any network device.
However, when connecting the WAN port to a broadband modem, you will need to use either straightthrough or crossover cable, depending on the port type used on the modem.
ABLES
The figure below il lustr ates h ow the pi n numberi ng on the RJ-4 5 connec tor. Be sure to hold the connectors
in the same orientation when attachi ng the wires to the pins.
Figure B-1. RJ-45 Pin Numbering
B-1
Page 39

RJ-45 Pin Numbering
Straight-Through Cable Crossover Cable
End 1 End 2 End 1 End 2
1 (TD+) 1 (TD+) 1 (TD+) 3 (RD+)
2 (TD-) 2 (TD-) 2 (TD-) 6 (RD-)
3 (RD+) 3 (RD+) 3 (RD+) 1 (TD+)
6 (RD-) 6 (RD-) 6 (RD-) 2 (TD-)
Pins 4, 5, 7 and 8 are not connected. Pins 4, 5, 7 and 8 are not connected.
Table B-2. RJ-45 Pin Numbering
RJ-45 Pin Assignments
All LAN ports on the SpeedStream 2614 support automatic MDI/MDI-X configuration. This means that
the pin signals in use will depend on whether the LAN port is operating in MDI or MDI-X mode. The
WAN port is configured only for MDI-X mode.
Pin MDI Signal Name* MDI-X Signal Name*
1 Transmit Data (TD+) Receive Data (RD+)
2 Transmit Data (TD-) Receive Data (RD-)
3 Receive Data (RD+) Transmit Data (TD+)
6 Receive Data (RD-) Transmit Data (RD-)
Pins 4, 5, 7 and 8 are not connected.
* The “+” and “-” signs represent the polarity of the wires that make
up each wire pair.
Table B-3. RJ-45 Pin Assignments
Serial Port Pin Assignments
The DB-9 serial port on the rear panel is used to connect the SpeedStream 2614 to an ISDN TA or PSTN
modem.
Figure B-2. DB-9 Serial Port Pin Numbers
The following tables detail the pin assignments used to connect to the DB-9 port:
B-2
Page 40

DB-9 Port Pin Assignments
EIA
Circuit
CF 109 DCD (Data Carrier
BB 104 RxD (Received Data)223<-----BA 103 TxD (Transmitted Data)332------>
CD 108.2 DTR (Data Terminal Ready) 4 4 20 ------>
AB 102 SG (Signal Ground)557------CC 107 DSR (Data Set Ready)666<-----CA 105 RTS (Request-to-Send)774------>
CB 106 CTS (Clear-to-Send)885<-----CE 125 RI (Ring Indicator) 9 9 22 <------
CCITT
Signal
Description Gateway’s
DB9 DTE
Pin #
118<------
Detected)
Table B-4. DB-9 Port Pi n Assignment
Computer
DB9 DTE
Pin #
Modem
DB25 DCE
Pin #
Signal
Direction
DTE-DCE
Serial Port to 9-Pin COM Po rt on Computer
SpeedStream 2614’s
9-Pin Serial Port
1 DCD -----------DCD ------------ 1
2 RXD <---------TXD ------------ 3
3 TXD -----------RXD ----------> 2
4 DTR -----------DSR ----------> 6
5 SGND -----------SGND ---------- 5
6 DSR -----------DTR ------------ 4
7 RTS -----------CTS -----------> 8
8 CTS <---------RTS ------------- 7
9 RI -----------RI --------------- 9
CCITT Signal Computer’s
9-Pin COM Port
Table B-5. Serial Port to 9-Pin COM Port on Computer
Serial Port to 25-Pin DCE Po rt on Modem
SpeedStream 2614’s
9-Pin Serial Port
1 <---------DCD ------------ 8
2 <---------RXD ------------ 3
3 -----------TXD ----------> 2
4 -----------DTR ----------> 20
5 -----------SGND ---------- 7
6 <---------DSR ------------ 6
7 -----------RTS -----------> 4
8 <---------CTS ------------- 5
9 <---------RI --------------- 22
Table B-6. Serial Port to 25-Pin DCE Port on Modem
CCITT Signal Modem’s
25-Pin DCE Port
B-3
Page 41

Serial Port to 25-Pin DTE Port on Computer
SpeedStream
2614’s 9-Pin Serial
Port
1 DCD 8 DCD
2 RXD 3 TXD
3 TXD 2 RXD
4 DTR 20 DTR
5 SGND 7 SGND
6 DSR 6 DSR
7 RTS 4 RTS
8 CTS 5 CTS
9 RI 22 RI
Table B-7. Serial Port to 25-Pin DTE Port on Computer
Null Modem Computer’s 25-
Pin DTE Port
11
23
32
48
520
67
Printer Port Pin Assignments
The DB-25 parallel port on t he SpeedSt ream 261 4’s rear panel is used to connect the SpeedSt ream 2614 to
a printer. When a printer is attached to this port, any computers attached to the SpeedStream 2614’s LAN
ports can pass files to the printer. The pin assignments used to connect to the printer port are provided in
the following table.
25
Figure B-3. DB-25 Printer Port Pin Numbers
B-4
Page 42

DB-25 Printer Port Pin Assignments
Pin Signal Name Direction
1 -Strobe To printer
2 +Data 0 To printer
3 +Data 1 To printer
4 +Data 2 To printer
5 +Data 3 To printer
6 +Data 4 To printer
7 +Data 5 To printer
8 +Data 6 To printer
9 +Data 7 To printer
10 - ACK To print server
11 + Busy To print server
12 + Paper End To print server
13 + Select To print server
14 - Auto Feed No connection
15 - Error To print server
16 - Init To printer
17 - Select No connection
18-25 GND Ground
Table B-8. DB-25 Printer Port Pin Assignmen t
B-5
Page 43

WAN Interface
10BASE-T, 1 RJ-45 port
(1) DB-9 RS-232 port for PSTN/ISDN connections
LAN Interface
10BASE-T/100Base-TX
(4) RJ-45 ports
Printer Interface
Parallel
(1) DB-25 printer port
Management
Web management interface
Advanced Features
Dynamic IP Address Configuration – DHCP, DNS
Firewall – Client privileges, hacker prevention and logging, NAT
Virtual Private Network – PPTP, L2TP, IPSec
Backup Internet Connection – Dial-on-demand via s econdary WAN port
Print server
A
PPENDIX
C
Specifications
Internet Standards
ARP (RFC 826), IP (RFC 791), ICMP (RFC 792), UDP (RFC 768), TCP (RFC 793), Telnet (RFC 854-859), MD5 (RFC
1321), BOOTP Extension (RFC 1497), PPP LCP Extension (RFC 1570), PPPoE (RFC 2516), NAT (RFC 1631), PPP
(RFC 1661), HTML (RFC 1866), HTTP (RFC 1945), CHAP (RFC 1944), DHCP (RFC 2131), PPTP (RFC 2637)
Indicator Panel
LAN (Link, Activity), WAN (Link, Activity), Power
Dimensions
8 x 4.5 x 2 in. (203 x 114.3 x 50 mm.)
Weight
12.08 oz. (362 g)
Input Power
5V DC (2.4A)
Maximum Current
0.40A RMS max.@110V, 0.4A RMS max.@240V
Power Consumption
6.5 Watts max. @ 100-240 VAC
Heat Dissipation
144 BTU/hr max. @ 100-240 VAC
C-1
Page 44

Temperature
Operating 32 to 104°F (0 to 40°C)
Storage -40 to 158°F (-40 to 70°C)
Humidity
5% to 95% (noncondensing)
C-2
 Loading...