

Page 1
s
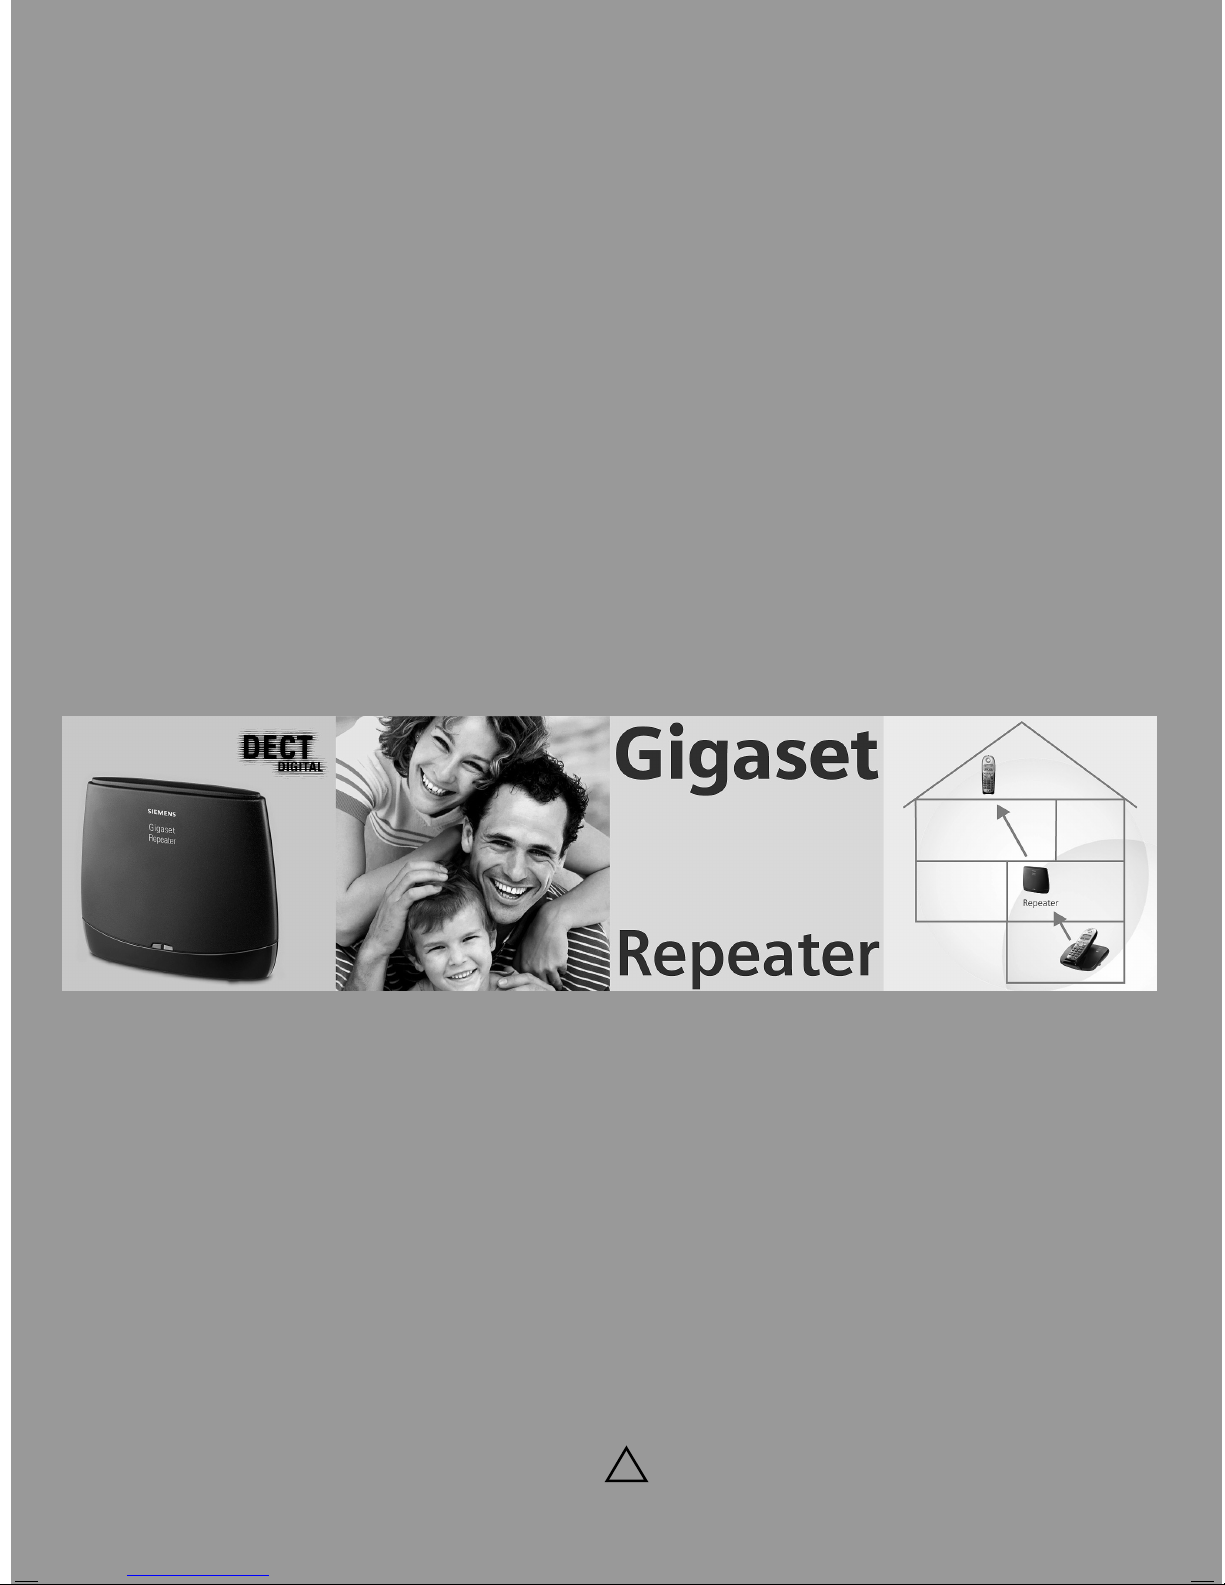
Be inspired
Bedienungsanleitung
Operating instructions
Mode d’emploi
Istruzioni per l’uso
Instrucciones de manejo
Gebruiksaanwijzing
Instruções de utilização
Betjeningsvejledning
Käyttöohje
Bruksanvisningen
Bruksanvisning
and safety precautions
!
Page 2

Wichtige Hinweise
Anwendung
Sicherheitshinweise
Wichtige Hinweise
Der Gigaset Repeater ist für Gigaset Schnurlostelefone ab
Gigaset 3000 einsetzbar.
Verwenden Sie nur das mitgelieferte Steckernetz-
●
gerät, wie auf der Unterseite des Gerätes gekennzeichnet.
Medizinische Geräte können in ihrer Funktion beein-
●
flußt werden.
Halten Sie einen ausreichenden Abstand zu anderen
●
elektronischen geräten (z. B. PC), da diese den
Betrieb stören könnten.
Das Gerät nicht in explosionsgefährdeten Umgebun-
●
gen betreiben.
DEUTSCH
Verpackungsinhalt
Pflege
Betreiben Sie Ihr Gerät nicht im Bad oder in Dusch-
●
räumen.
Geben Sie Ihren Gigaset Repeater nur mit Bedie-
●
nungsanleitung an Dritte weiter.
Entsorgen Sie Ihr Gerät umweltgerecht.
●
1 Gigaset Repeater
1 Netzgerät für Gigaset Repeater
2 Schrauben und Dübel
diese Bedienungsanleitung
Wischen Sie den Gigaset Repeater einfach mit einem
feuchten Tuch oder einem Antistatiktuch ab. Niemals ein
trockenes Tuch (statische Aufladung) verwenden
1
Page 3
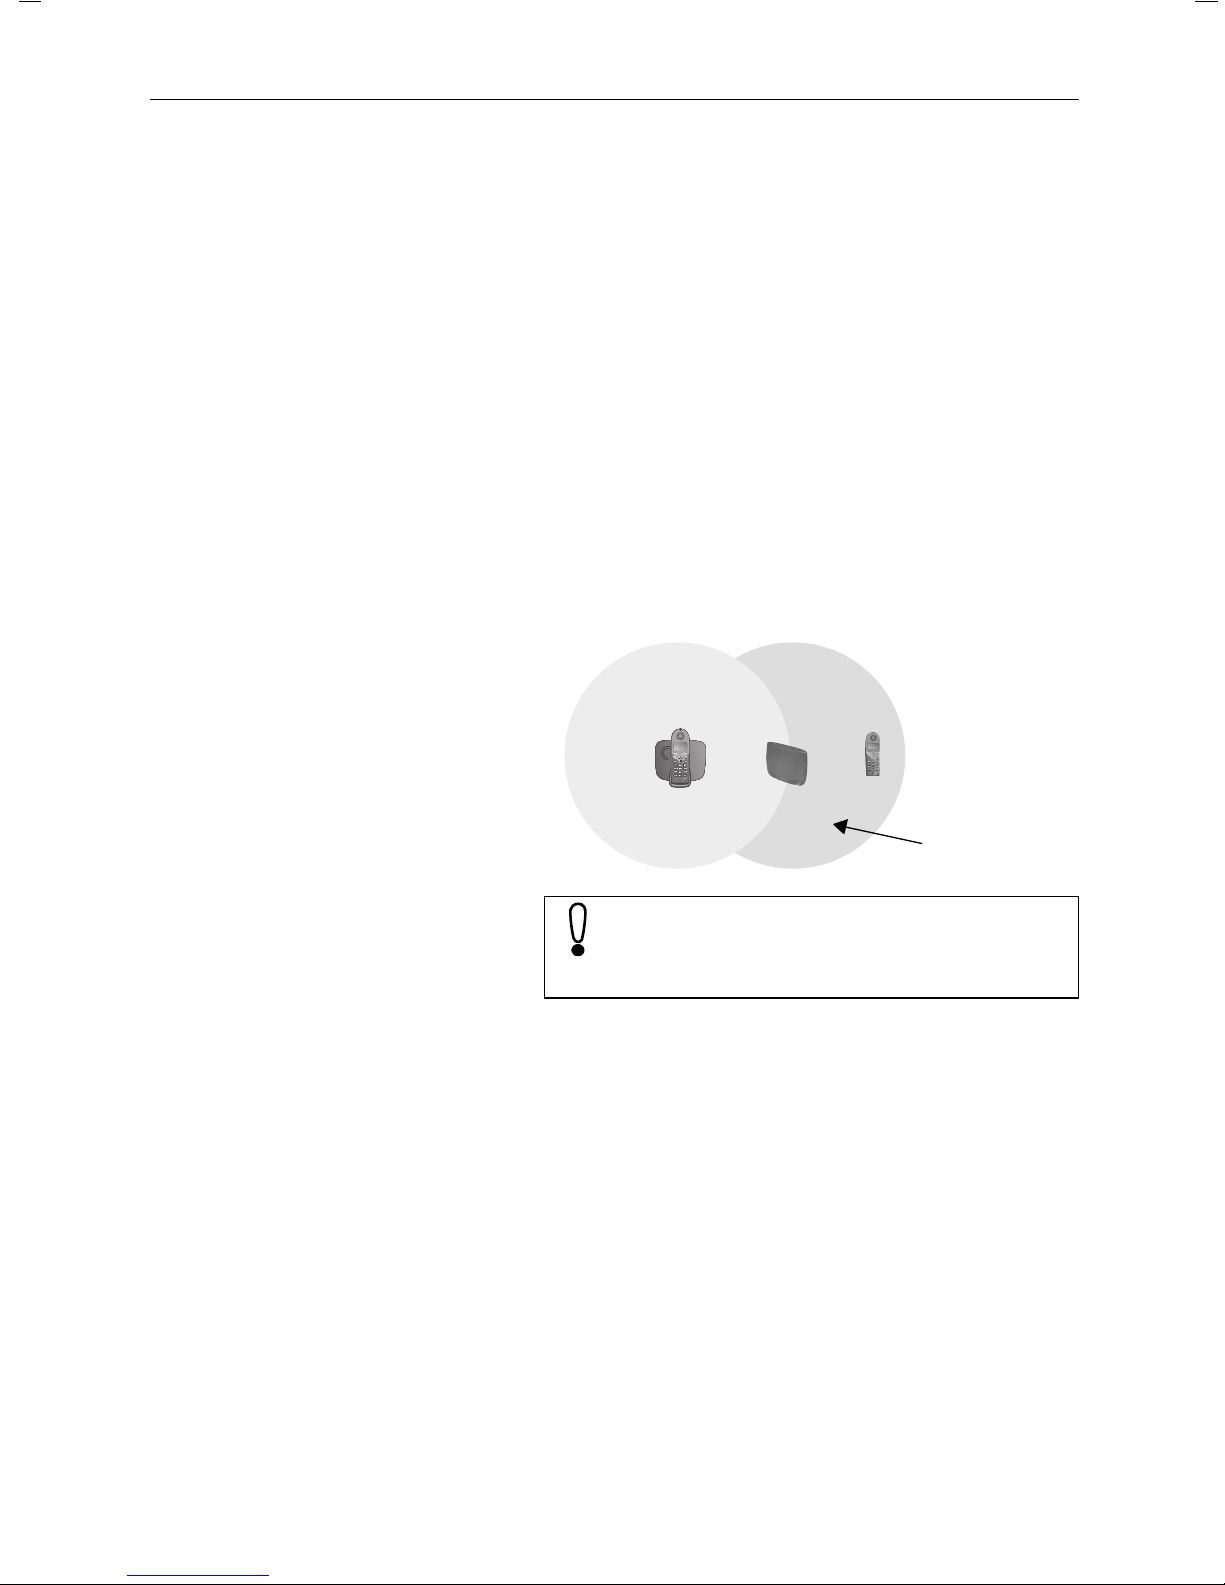
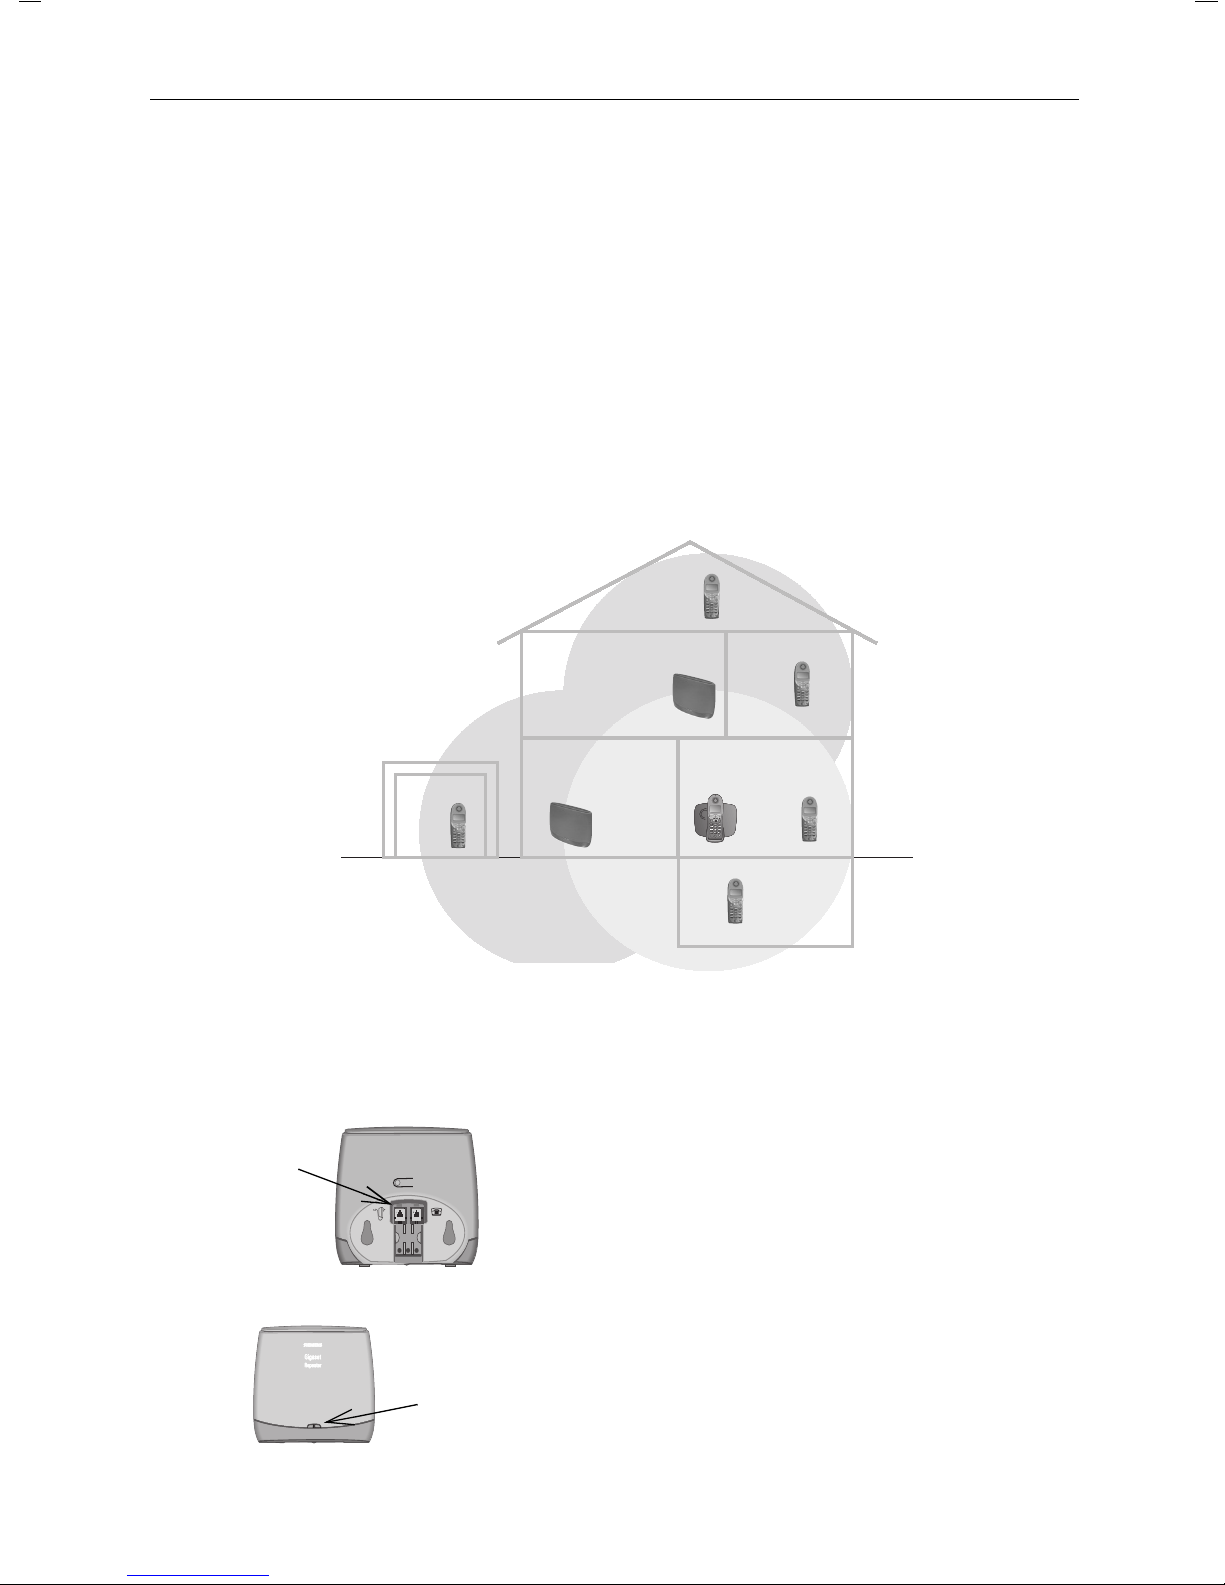
Einleitung
Einleitung
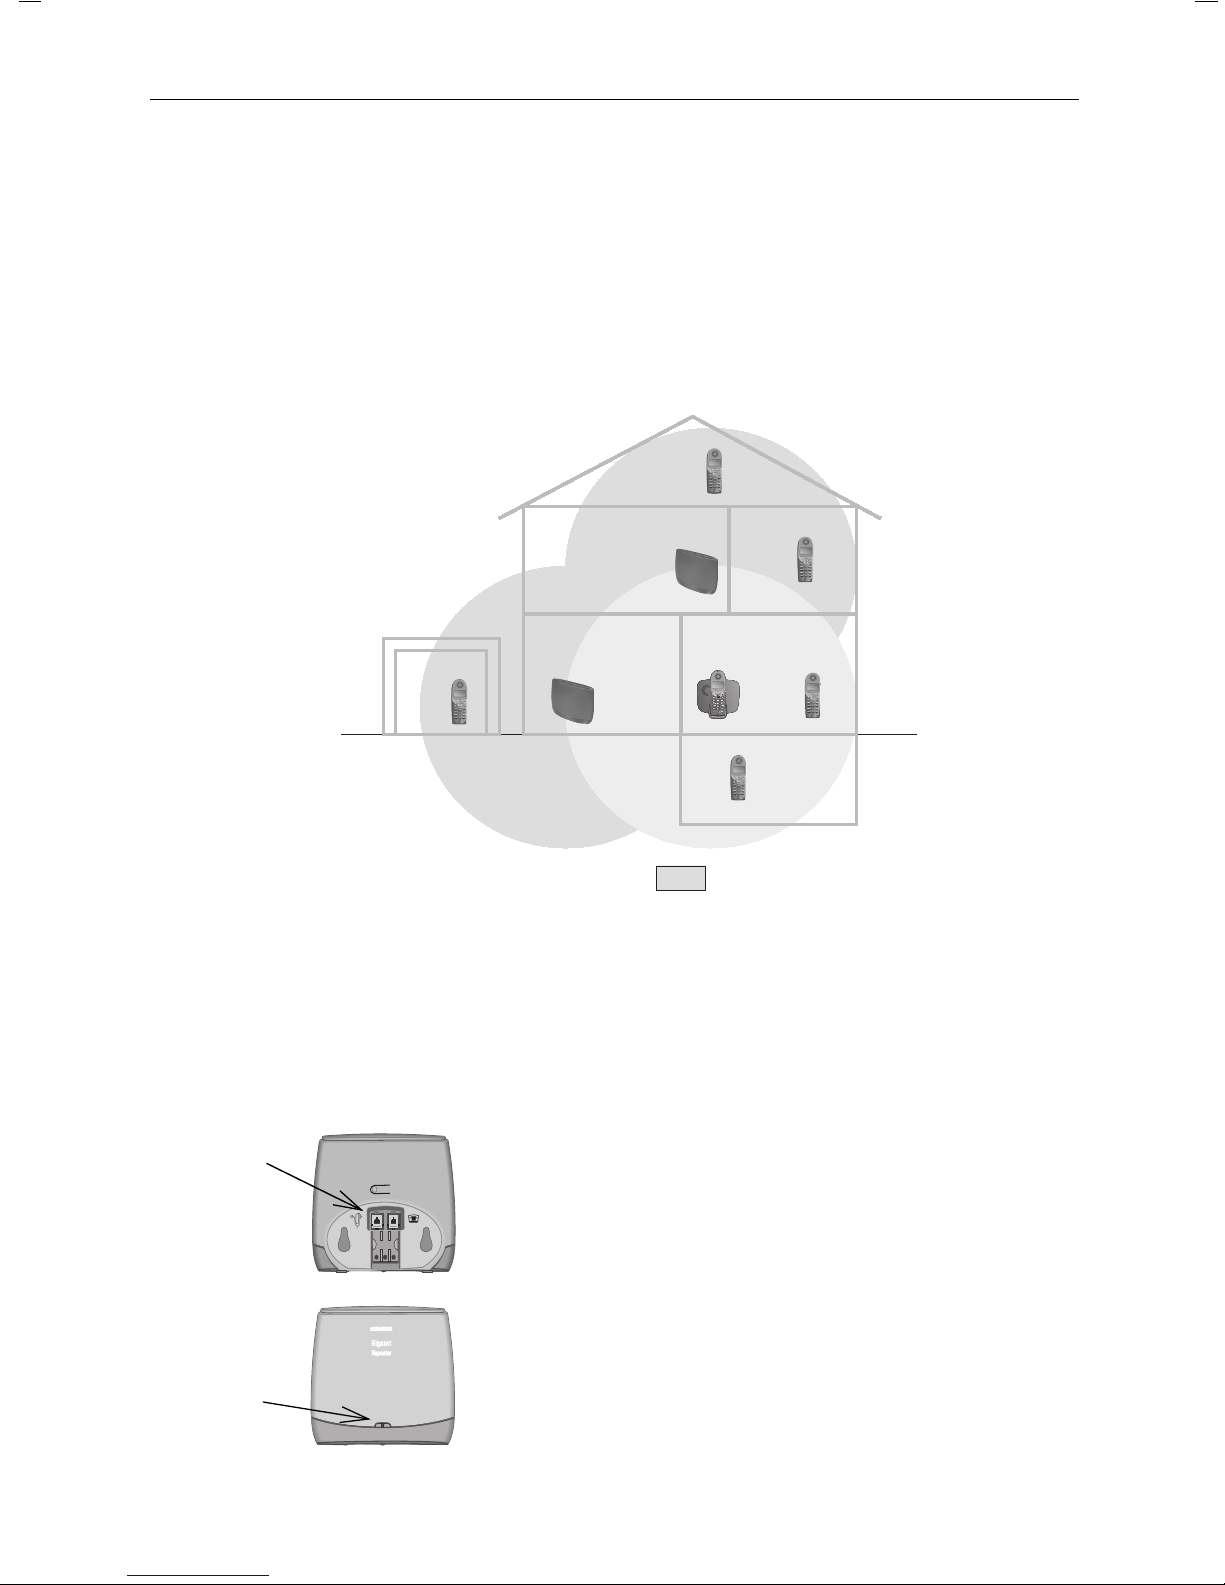
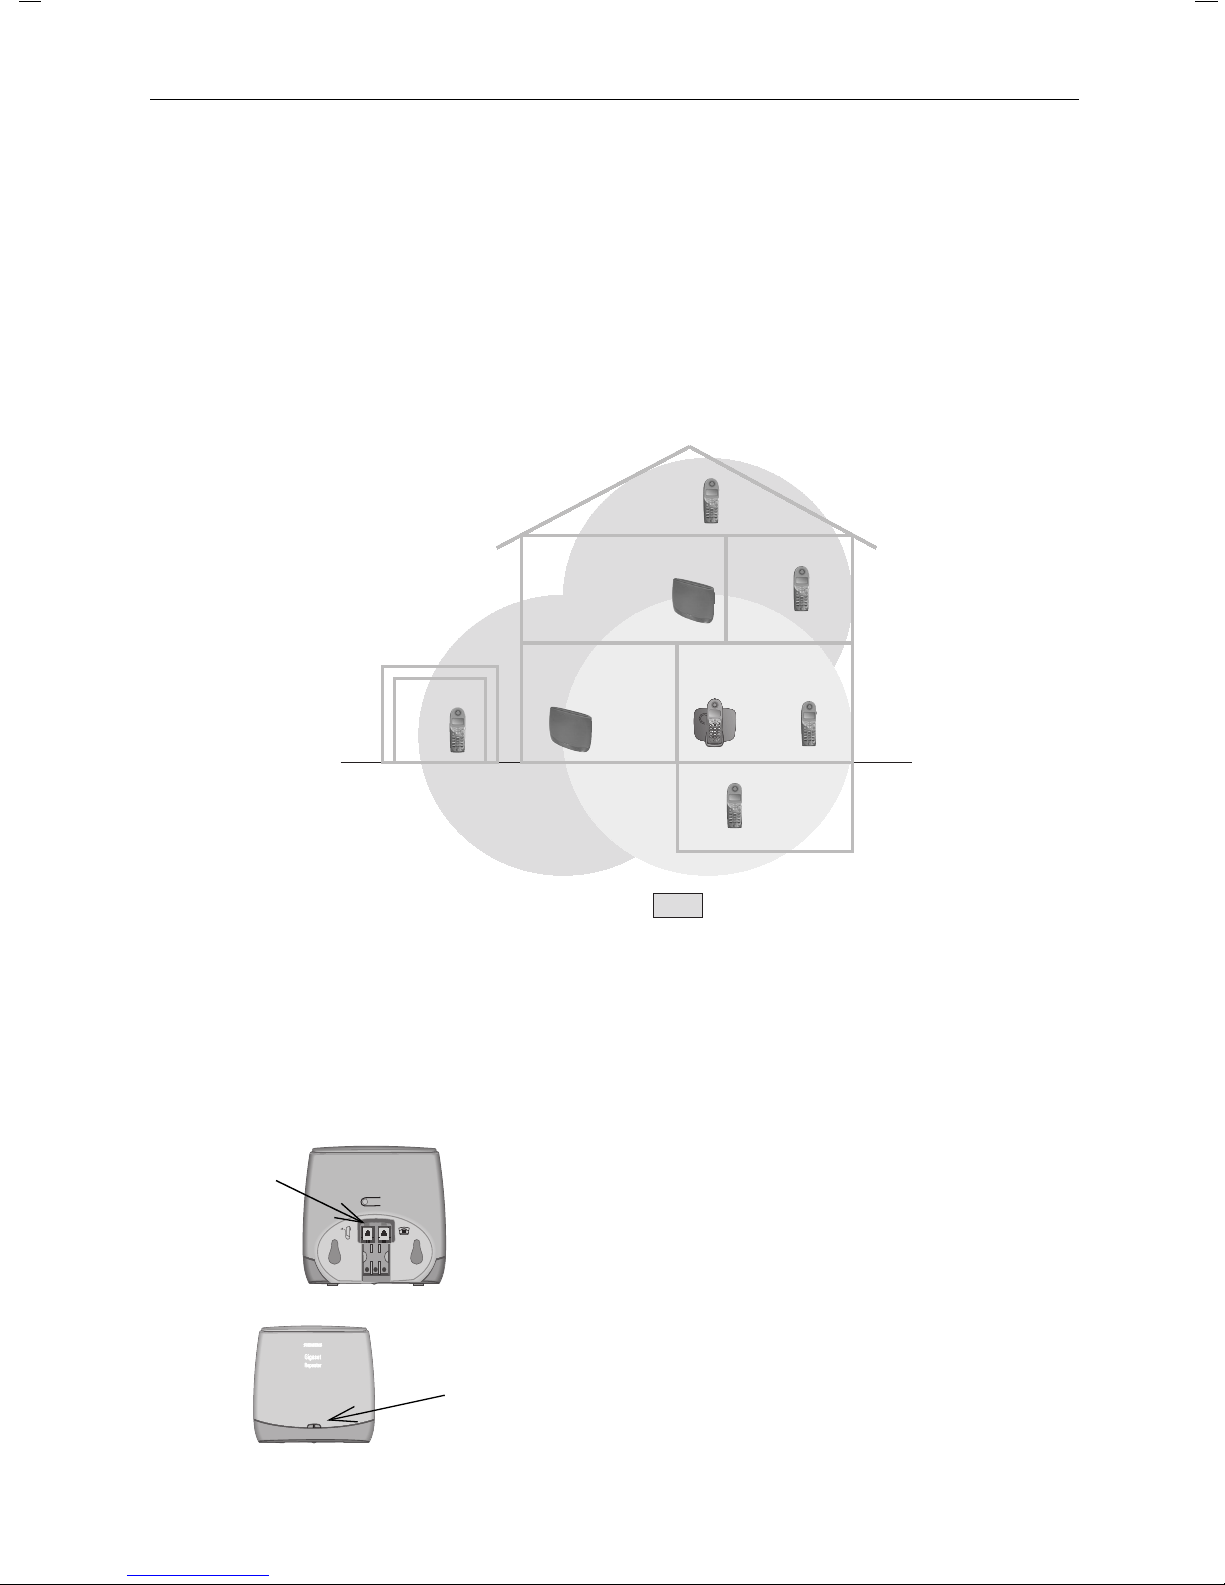
Mit dem Gigaset Repeater können Sie den Empfangsbereich von max. 2 Mobilteilen vergrößern. Bis zu 6 Gigaset
Repeater können an einer Basisstation gleichzeitig
genutzt werden, wodurch weitere erweiterte Empfangsbereiche für jeweils 2 Mobilteile zur Verfügung stehen.
Die Anzahl der anmeldbaren Mobilteile an Ihrer Basisstation wird durch den Gigaset Repeater nicht beeinflußt.
Gigaset Repeater
s
Gigaset
Re
p
eat
er
Buchse
für
NetzteilKabel
Gigaset Repeater
s
G
iga
set
R
ep
e
a
te
r
Beispiel mit 2 Gigaset Repeatern
Bevor Sie mit der Anmeldung beginnnen, stellen Sie den
Gigaset Repeater in umittelbarer Nähe zur Basisstation
und zu einem Stromanschluß auf. Sollten Sie bereits Gigaset Repeater verwenden, müssen diese für den Anmeldevorgang eingeschaltet neben der Basiststation aufgestellt sein.
Auf der Rückseite wird das mitgelieferte Netzteil-Kabel in
die Buchse gesteckt. Anhand der angegebenen Abmessungen können Sie entsprechende Bohrungen vornehmen, um das Gerät mit Hilfe der mitgelieferten Schrauben
und Dübel an einer Wand zu montieren.
Basisstation
Zusätzliche Empfangsbereiche
durch Gigaset Repeater
Leuchtdioden
2
Auf der Vorderseite werden durch zwei Leuchtdioden die
verschiedenen Betriebszustände angezeigt (Erläuterung
siehe Seite 6).
Page 4

Vorbereitung
Vorbereitung
Für den Betrieb des Repeaters müssen einige Basisstationen dafür vorbereitet werden.
Wenn Sie eine Gigaset Basisstation einsetzen, die hier
nicht aufgeführt ist, können Sie direkt mit der Anmeldung
auf Seite 6 fortfahren.
Vorbereitung für Gigaset 2015/2016plus
Führen Sie folgende Prozedur am Mobilteil durch:
B#1
Tas ten d rücken
4 stelligen Systemcode eingeben.
Tas ten d rücken
Die Vorbereitung ist abgeschlossen und Sie können mit
der Anmeldung auf Seite 5 fortfahren.
INT SET
O441B
oder
4 4 1
WAHLW.
oder
# 1
o
SET
DEUTSCH
Vorbereitung für Gigaset 3010/3015
Führen Sie folgende Prozedur am Mobilteil durch:
B4 ¤
oder
SET OK
INT
4 ¤
o
1
„
„
„
Tas ten d rücken
4 stelligen Systemcode eingeben.
Tas ten d rücken
Die Vorbereitung ist abgeschlossen und Sie können mit
der Anmeldung auf Seite 5 fortfahren.
3
Page 5
Vorbereitung
Vorbereitung für Gigaset 2060isdn/3060isdn
Führen Sie folgende Prozedur am Mobilteil durch:
(nur möglich mit Mobilteilen mit Komfort-Bedienung)
1. Schritt:
t
.
t
2. Schritt:
t
.
t
Service
Lieferzustand
Service
Lieferzustand
OK OK OK
t
Systemeinst.
nicht
Sichern
OK OK OK
t
nicht
Sichern
OK
drücken
o
„1057“ anschließend „18156 41055 32842“ eingeben
drücken
Systemeinst.
OK
drücken
o
„1057“ anschließend „17996 41297 20449“ eingeben
drücken
$
Netzstecker der Basisstation ziehen und wieder einstekken. Die Vorbereitung ist abgeschlossen und Sie können
o
o
System Code eingeben
System Code eingeben
mit der Anmeldung auf Seite 5 fortfahren.
Vorbereitung für Gigaset 3070isdn/3075isdn/4170isdn/4175isdn
Führen Sie folgende Prozedur am Komfortmobilteil durch:
(Bei 3070/75isdn bitte „Service“ wählen!)
t
.
OK OK OK
Basis einstellen
t
Sonderfunktion
OK OK
t
Einstellungen
t
Repeater
t
System-Einstell.
Den anschließenden Hinweistext im Display, bestätigen
Sie bitte mit .
WEITER
Die Vorbereitung ist abgeschlossen, und sie können mit
der Anmeldung auf Seite 5 fortfahren.
Vorbereitung für Gigaset 3035/3035isdn/4035/4035isdn und
für Gigaset 4000 Basisstationen
Lesen Sie bitte hierzu in der Bedienungsanleitung zur
Basisstation im Kapitel „Zubehör“ bzw. unter dem Stich-
wort „Repeater“ nach.
4
Page 6
Anmeldung
Anmeldung
Führen Sie folgende Schritte durch:
$
$
Gigaset Repeater ist
ausgeschaltet
(Netzstecker gezo-
gen).
Bereiten Sie die Basis für die Repeater-Anmeldung so vor,
wie bei manueller Anmeldung eines Mobilteiles. Siehe
dazu die Bedienungsanleitung Ihrer Basisstation.
Achten sie darauf, daß sich während dieses
Vorgangs keine weiteren Basisstationen im Umfeld des Gigaset Repeaters im Anmeldezustand
befinden.
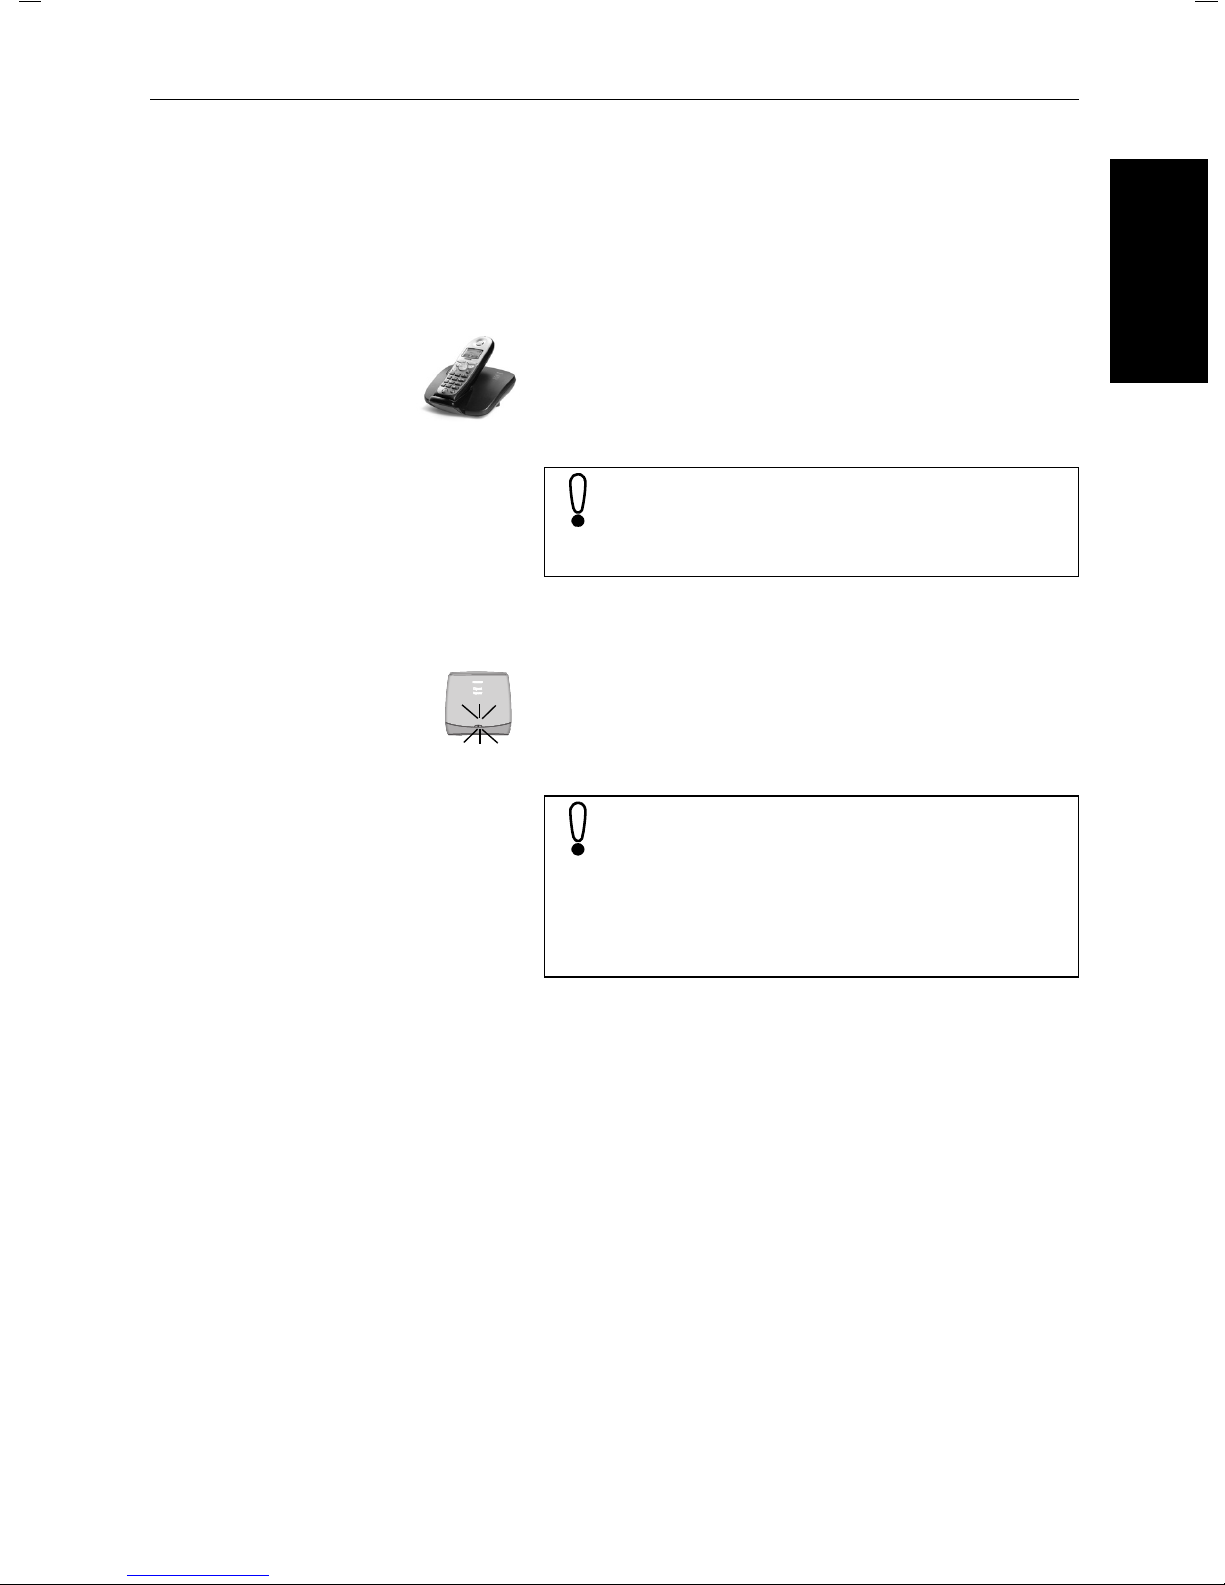
Netzstecker am Gigaset Repeater einstecken.
Die linke Leuchtdiode am Gigaset Repeater zeigt ein
unterbrochenes Blinken. Nach kurzer Zeit leuchtet die Diode permanent, womit der Abschluß der Anmeldung und
die Betriebsbereitschaft angezeigt wird.
Die Anmeldung des Gigaset Repeaters ist unabhängig von der Dauer eines hörbaren Anmeldetons oder einer Anzeige der Basisstation.
Sollte die Anmeldung nicht gelingen, wird dies
durch ständiges Blinken der Leuchtdiode am
Gigaset Repeater angezeigt. In diesem Falle
wiederholen Sie bitte diese Prozedur.
DEUTSCH
Anmeldung wiederholen
Sie können den Gigaset Repeater jederzeit erneut anmelden, falls die Anmeldung nicht erfolgreich war, oder eine
Neuanmeldung an einer anderen Basisstation durchgeführt werden soll.
Führen Sie bitte vorher folgende Rücksetzprozedur am
Gigaset Repeater durch:
Gerät ausschalten (Netzstecker gezogen)
$
1 bis 5 Sekunden einschalten und
$
wieder ausschalten
25 bis 35 Sekunden einschalten und
$
wieder ausschalten.
Jetzt ist der Gigaset Repeater für eine neue Anmeldung,
wie oben beschrieben, bereit. Dies wird durch ein unterbrochenes Blinken der Leuchtdiode nach erneutem Einstecken des Netzsteckers signalisiert.
5
Page 7
Aufstellung
Aufstellung
Nach der erfolgreich durchgeführten Anmeldung können
Sie den Gigaset Repeater dort aufstellen, wo Sie eine Erweiterung des Empfangsbereiches Ihrer Mobilteile wün-
schen. Achten Sie jedoch darauf, daß ein Stromanschluß
am Aufstellort vorhanden ist und das die linke Leuchtdiode am Gerät nach dem Einschalten konstant leuchtet.
Falls die linke Leuchtdiode blinkt, ist der Gigaset Repeater
zu weit von der Basisstation entfernt bzw. ist der Empfang durch z.B. dicke Mauern oder Metallgegenständen
(z.B. Heizkörper) beeinträchtigt.
Bei der Suche nach dem passenden Aufstellort kann
Ihnen auch ein Mobilteil helfen, welches am Aufstellort
des Gigaset Repeaters eine gute Verbindung zur Basisstation haben muß.
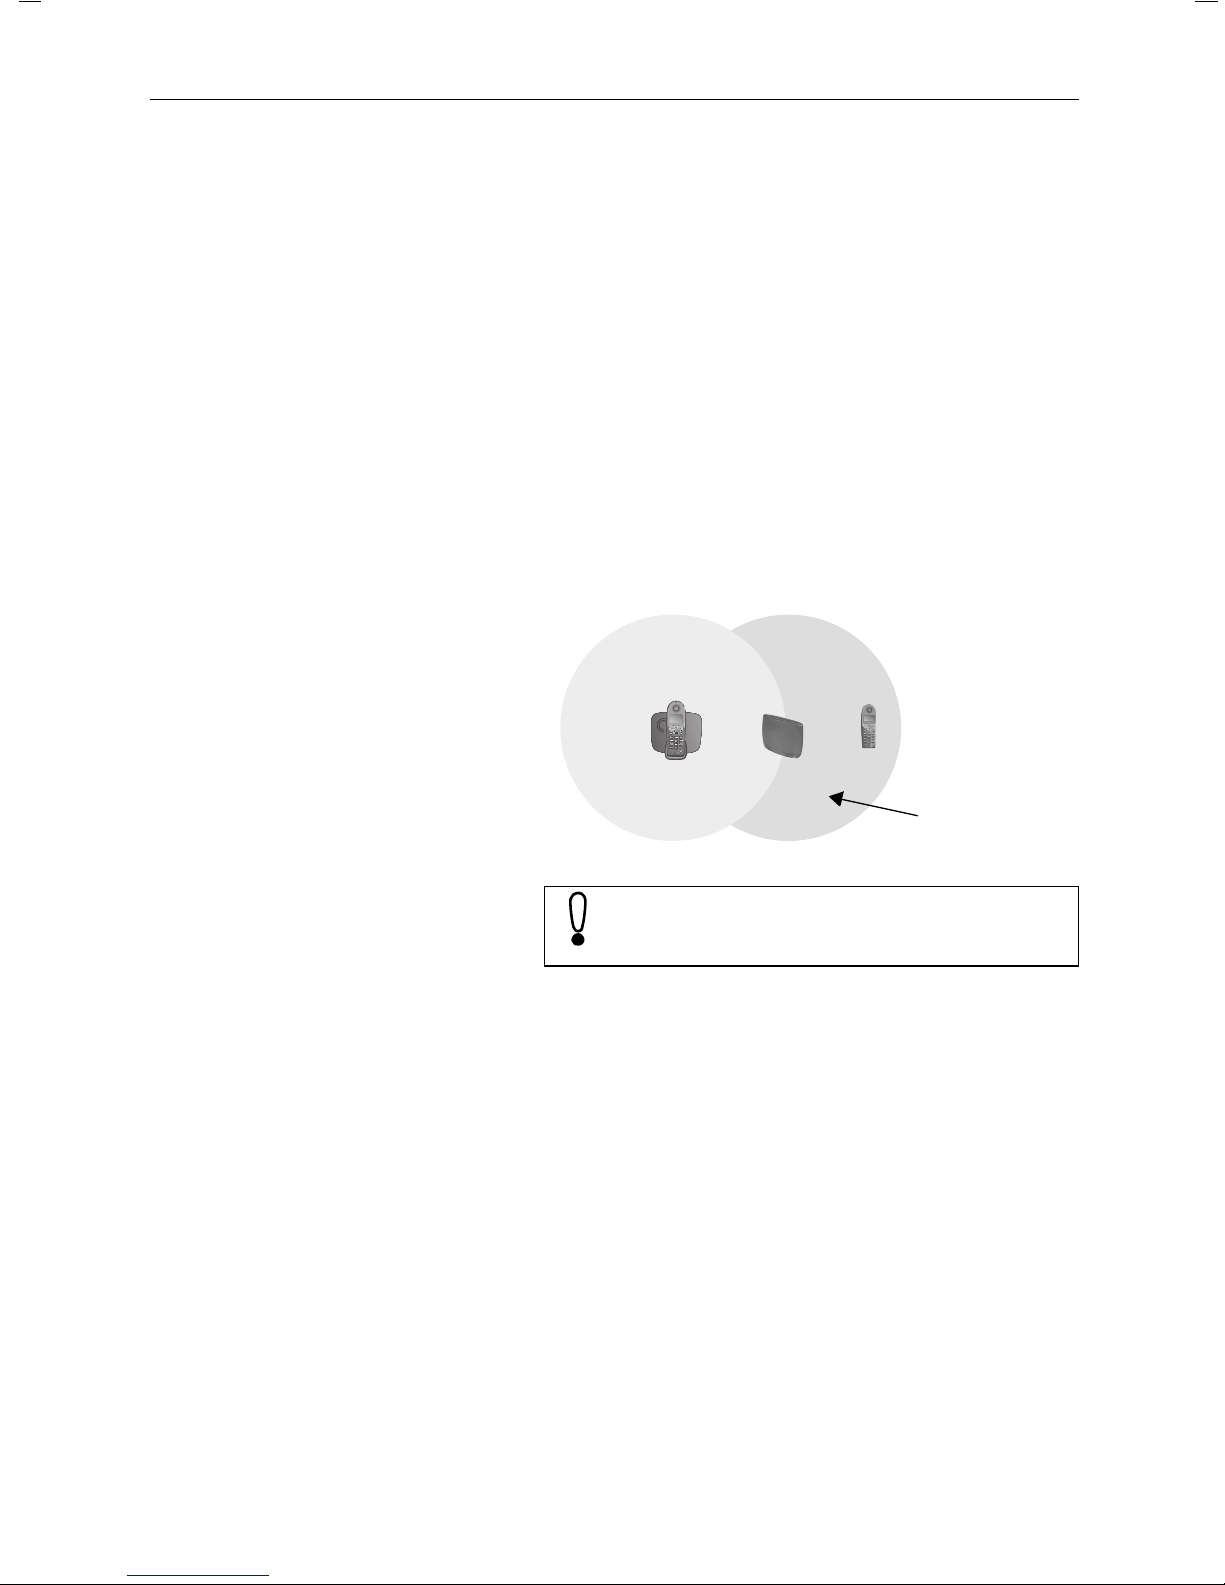
Zum erstmaligen Betrieb eines Mobilteiles im erweiterten
Bereich des Gigaset Repeaters schalten Sie das Mobilteil
innerhalb des neuen Empfangsbereiches des Gigaset
Repeaters, aber außerhalb des Empfangsbereiches der
Basistation aus und anschließend wieder ein:
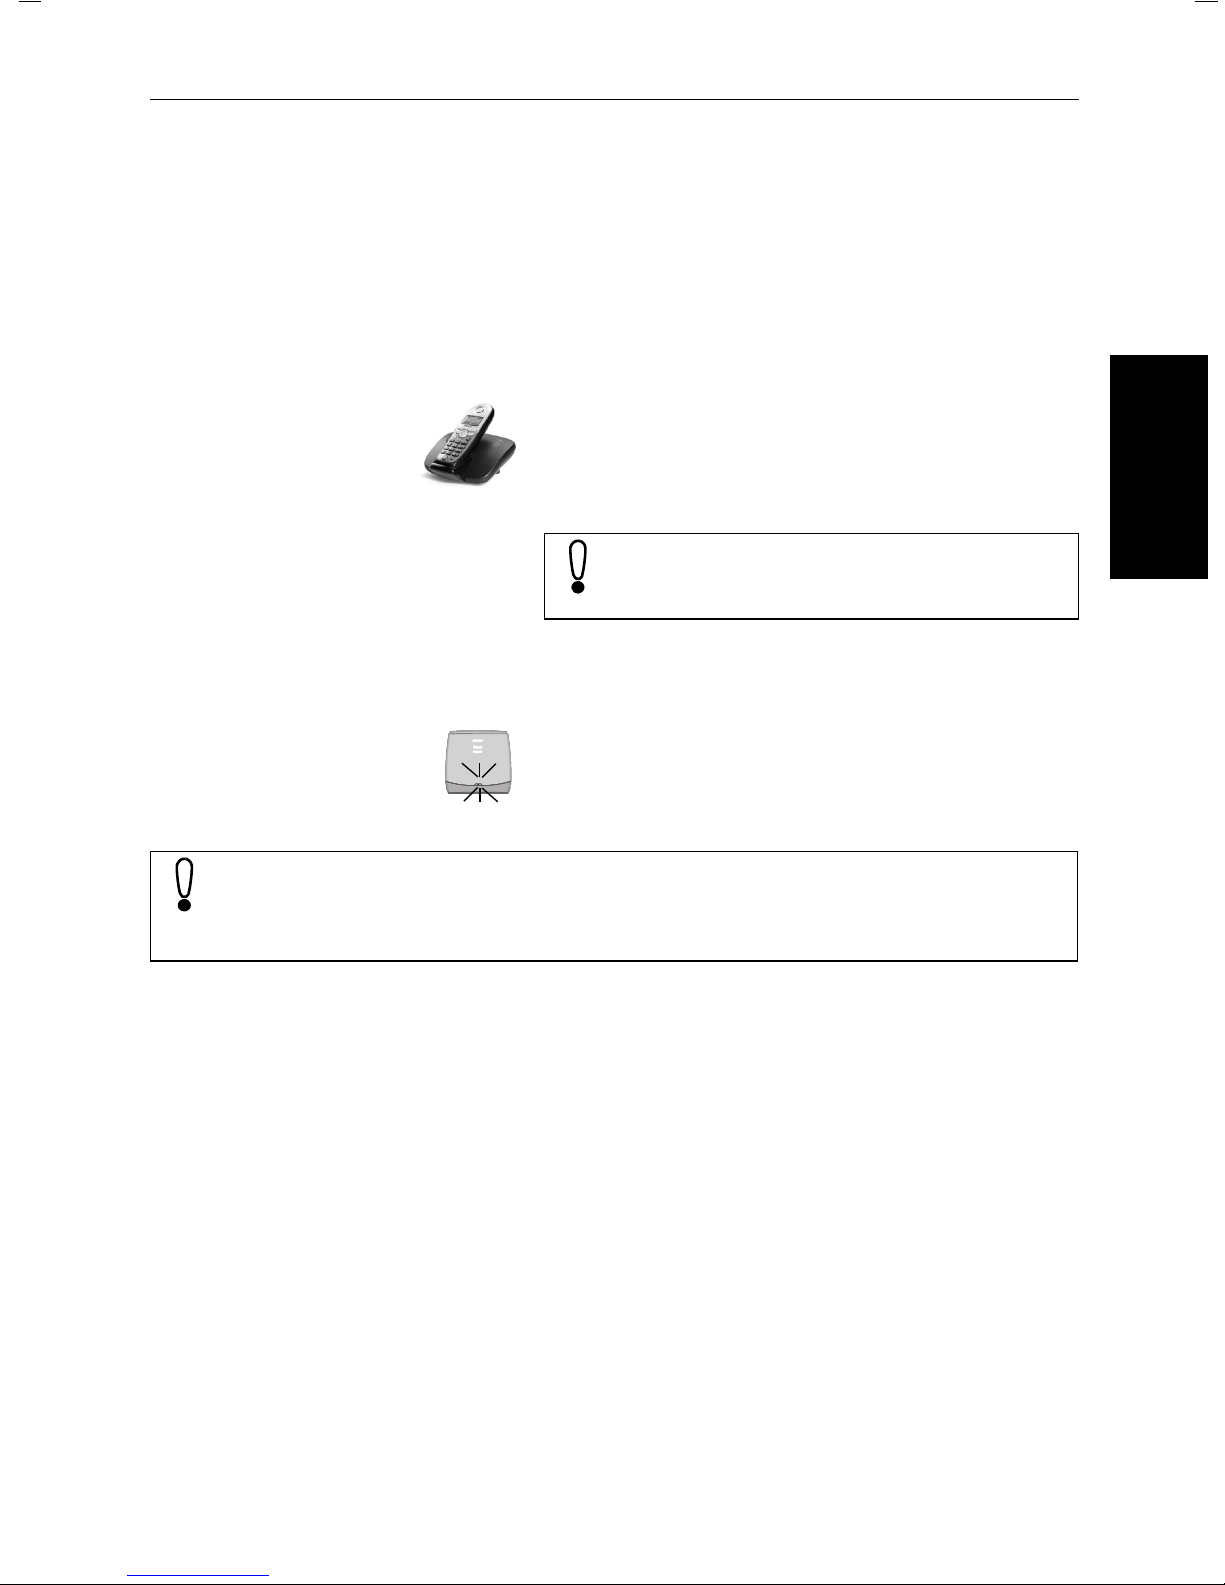
LED-Funktionsanzeige
Basisstation
Gigaset Repeater
s
Gigaset
Repeater
Erweiterter Empfangsbereich
Verwenden Sie mehr als einen Gigaset Repeater im Bereich Ihrer Basisstation, muß ein Mindestabstand von 10 m zwischen den Gigaset
Repeatern eingehalten werden.
Es gibt zwei grüne LEDs auf der Vorderseite des Gehäu-
ses. Die linke LED zeigt den Anmelde-zustand und die Betriebsbereitschaft an, die rechte signalisiert die MobilteilVerbindungen über den Repeater.
Linke LED Zustände:
Dunkel Stromversorgung AUS
Blinkt keine Verbindung zur Basis-
station
Dauerndes Leuchten normale Verbindung zur Basis-
station
Unterbrochenes Blinken Anmeldebereitschaft EIN
Rechte LED Zustände:
Dunkel Kein Verkehr
Blinkt einmal ein Mobilteil über Repeater ver-
bunden
Blinkt zweimal zwei Mobilteil über Repeater ver-
bunden
6
Page 8
Kontrollton verwenden
Aufstellung
Mit dem Kontrollton haben Sie die Möglichkeit festzustellen, ob das Mobilteil im erweiterten Bereich des Gigaset
Repeaters funktioniert. Dieser Kontrollton ist am aktivierten Mobilteil hörbar, solange dieses mit dem Gigaset
Repeater verbunden ist.
Zum Ein- und Ausschalten des Kontrolltons führen Sie
folgende Prozedur am Gigaset Repeater durch:
DEUTSCH
$
$
$
$
Gerät ausschalten (Netzstecker gezogen)
1 bis 5 Sekunden einschalten und wieder ausschalten.
Erneut einschalten. Wenn die linke Leuchtanzeige am Ge-
rät langsam blinkt, wieder ausschalten.
Erneut einschalten, womit der Kontrollton aktiviert bzw.
deaktiviert ist.
Gesprächsfortführung
In dieser Tabelle ist dargestellt, ob eine Gesprächsfortführung beim Wechsel der Empfangsbereiche möglich ist:
mit Basisstation
Gigaset
2010, 2011,
2015, 2016
2020, 2030, 3020, 3025 nein ja nein
2015 plus, 2016 plus,
2060isdn, 3010, 3015,
3030isdn, 3035,
3035isdn, 3060isdn,
3070isdn, 3075isdn
sowie alle Gigaset 4000
Basisstationen
1)
Basisstation Repeater Repeater
zum Repeater zur Basisstation zum Repeater
Bereichsdurchquerung mit dem Mobilteil
2)
ja
ja
3)
ja ja
ja ja
1) Gilt auch für Comfort-, Pocket- und Micro-Versionen.
2) Voraussetzung: das Mobilteil ist im erweiterten Gigaset Repeater Bereich eingeschaltet worden
und hat die Empfangsbereiche nicht verlassen (kein erneutes Ausschalten oder Öffnen des
Akkufachs).
3) Voraussetzung: Vorbereitung auf Seite 3 ist erfolgt.
7
Page 9
Sonstiges
Sonstiges
Fehlersuche
Problem Ursache Abhilfe
Linke LED blinkt ständig nach
Beenden der Anmeldung
Linke LED blinkt ständig am
ausgewählten Standort
Linke LED leuchtet überhaupt
nicht
Kein Empfang des Mobilteiles
im Bereich des Repeaters
Keine Funkverbindung zur
Basisstation
Keine Funkverbindung zur
Basisstation
Keine Stromversorgung Stromanschluß überprüfen
Repeater nicht angemeldet
Keine Funkverbindung zur
Basisstation
Anmeldung wiederholen
Neuen Standort auswählen
Anmeldung wiederholen
Neuen Standort auswählen
Gesprächsabbruch beim
Wechsel der Empfangsbereiche
Technische Daten
Mobilteil findet Repeater
nicht
Fehlende Unterstützung siehe Tabelle „Gesprächsfortfüh-
Standards: DECT, GAP
Funkfrequenzbereich: 1880 MHz - 1900 Mhz
Sendeleistung: 10 mW mittlere Leistung pro Kanal
Reichweite: bis zu 300 m im Freien,
Stromversorgung: 220/230 V, 50 Hz (Steckernetz-
Stromverbrauch: 6 VA
Zul. Umgebungsbe-
dingungen:
Abmessungen (mm): 131 x 111 x 50 (LxBxH)
Gewicht: 136 g
Länge Netzanschluß-
kabel:
Mobilteil aus- und einschalten
rung“ oben
bis zu 50 m in Gebäuden
gerät)
-10 °C bis + 50°C
ca. 3 m
8
Page 10

Garantie
Garantie
Dem Verbraucher (Kunden) wird unbeschadet seiner Mängelansprüche gegenüber dem
Verkäufer eine Haltbarkeitsgarantie zu den nachstehenden Bedingungen eingeräumt:
Neugeräte und deren Komponenten, die aufgrund von Fabrikations- und/oder Materi-
●
alfehlern innerhalb von 24 Monaten ab Kauf einen Defekt aufweisen, werden von Siemens nach eigener Wahl gegen ein dem Stand der Technik entsprechendes Gerät kostenlos ausgetauscht oder repariert. Für Verschleißteile (z.B. Akkus, Tastaturen,
Gehäuse) gilt diese Haltbarkeitsgarantie für 6 Monate ab Kauf.
Diese Garantie gilt nicht, soweit der Defekt der Geräte auf unsachgemäßer Behand-
●
lung und/oder Nichtbeachtung der Handbücher beruht.
Diese Garantie erstreckt sich nicht auf vom Vertragshändler oder vom Kunden selbst
●
erbrachte Leistungen (z.B. Installation, Konfiguration, Softwaredownloads). Handbü-
cher und ggf. auf einem separaten Datenträger mitgelieferte Software sind ebenfalls
von der Garantie ausgeschlossen.
Als Garantienachweis gilt der Kaufbeleg, mit Kaufdatum. Garantieansprüche sind in-
●
nerhalb von zwei Monaten nach Kenntnis des Garantiefalles geltend zu machen.
Ersetzte Geräte bzw. deren Komponenten, die im Rahmen des Austauschs an Sie-
●
mens zurückgeliefert werden, gehen in das Eigentum von Siemens über.
Diese Garantie gilt für in Deutschland erworbene Neugeräte.
●
Garantiegeberin ist die Siemens Aktiengesellschaft, Schlavenhorst 88,
D-46395 Bocholt.
Weitergehende oder andere Ansprüche als die in dieser Herstellergarantie genannten
●
sind ausgeschlossen. Siemens haftet nicht für Betriebsunterbrechung, entgangenen
Gewinn und den Verlust von Daten, zusätzlicher vom Kunden aufgespielter Software
oder sonstiger Informationen. Die Sicherung derselben obliegt dem Kunden. Der Haftungsausschluss gilt nicht, soweit zwingend gehaftet wird, z.B. nach dem Produkthaftungsgesetz, in Fällen des Vorsatzes, der groben Fahrlässigkeit, wegen der Verletzung
des Lebens, des Körpers oder der Gesundheit oder wegen der Verletzung wesentlicher Vertragspflichten. Der Schadensersatzanspruch für die Verletzung wesentlicher
Vertragspflichten ist jedoch auf den vertragstypischen, vorhersehbaren Schaden begrenzt, soweit nicht Vorsatz oder grobe Fahrlässigkeit vorliegt oder wegen der Verletzung des Lebens, des Körpers oder der Gesundheit oder nach dem Produkthaftungsgesetz gehaftet wird.
Durch eine erbrachte Garantieleistung verlängert sich der Garantiezeitraum nicht.
●
Soweit kein Garantiefall vorliegt, behält sich Siemens vor, dem Kunden den Austausch
●
oder die Reparatur in Rechnung zu stellen.
Eine Änderung der Beweislastregeln zum Nachteil des Kunden ist mit den vorstehen-
●
den Regelungen nicht verbunden.
DEUTSCH
Zur Einlösung der Garantie wenden Sie sich bitte an Ihr Customer Care Center (Seite 10).
9
Page 11

Kundenservice (Customer Care )
Kundenservice (Customer Care )
Wir bieten Ihnen schnelle und individuelle Beratung!
Sie haben drei Möglichkeiten:
Unser Online Support im Internet:
www.my-siemens.com/customercare
Immer und überall erreichbar. Sie erhalten 24 Stunden Unterstützung rund um unsere
Produkte. Sie finden dort ein interaktives Fehler-Suchsystem, eine Zusammenstellung
der häufigst gestellten Fragen und Antworten sowie Bedienungsanleitungen und aktuelle
Software-Updates zum Download.
Die häufigst gestellten Fragen und Antworten finden Sie auch in dieser Bedienungsanleitung im Kapitel Fehlersuche (Seite 8).
Eine persönliche Beratung zu unserem Angebot erhalten Sie bei der
Premium-Hotline 0190-7 45822 (
Nur innerhalb Deutschlands möglich!
1,24 Euro/Min.)
Es erwarten Sie qualifizierte Siemens-Mitarbeiter, die Ihnen bezüglich Produktinformation und Installation kompetent zur Seite stehen.
Im Falle einer notwendigen Reparatur, evtl. Garantie- oder Gewährleistungsansprüche er-
halten Sie schnelle und zuverlässige Hilfe bei unseren Service-Centren in
Deutschland 01805-333 222 (
Österreich 0517 07-5004
Schweiz 0848 212 000
0,12 Euro/Min.)
(zum Ortstarif)
(zum Ortstarif
Bitte halten Sie Ihren Kaufbeleg bereit.
Die persönliche Abgabe Ihres Siemens-Gerätes ist ausschließlich möglich in
Österreich:
Siemens Service Shop
Erdberger Lände 28, 1030 Wien
oder
Siemens Service Shop
Quellenstraße 2, 1100 Wien
Montag bis Freitag von 8 - 18 Uhr.
der Schweiz:
EMTS (Schweiz) AG
Im Schörfli 1, 8600 Dübendorf
10
Page 12
Zulassung und Konformität
Kundenservice (Customer Care )
Ihr Gigaset Repeater ist zum Betrieb in Ihrem Land vorgesehen, wie auf der Unterseite des Gerätes gekennzeich-
net.
Die Übereinstimmung des Gerätes mit den grundlegenden Anforderungen der R&TTE ist durch das CE-Kennzeichen bestätigt.
Hereby the manufacturer declares that the above mentioned product is in compliance with the essential requirements and other relevant provisions of the Directive 1999/
5/EC.
The Declaration of Conformity (DoC) has been signed. In
case of need, a copy of the original DoC can be made
available via the company hotline.
DEUTSCH
11
Page 13

Kundenservice (Customer Care )
12
Page 14

Important information
Application
Safety precautions
Important information
The Gigaset Repeater can be used with Gigaset cordless
phones in Gigaset 3000 and later models.
Only use the plug-in power unit supplied as indicated
●
on the underside of your repeater.
The repeater can interfere with the operation of sen-
●
sitive electronic medical equipment.
Do not locate the device close to other electronic
●
equipment (e.g. PC) as this may cause interference.
Do not operate in areas subject to explosion hazards.
●
Do not operate in the bathroom.
●
Ensure that the operating instructions are included
●
when passing on your Gigaset Repeater to a third
party.
ENGLISH
Contents of the package
Maintenance
At the end of its service life, please ensure that the
●
repeater is disposed of in an environmentally friendly
manner.
1 Gigaset Repeater
1 power supply unit for Gigaset Repeater
2 screws and plugs
These operating instructions
Simply wipe your Gigaset Repeater with a damp cloth or
an antistatic wipe. Never use a dry cloth (causes static
charge).
13
Page 15
Introduction
Introduction
Your Gigaset Repeater extends the reception range of a
maximum of 2 handsets. Up to 6 Gigaset Repeater units
can be used with a single base station thus making available extra extended reception range for each 2 handsets
respectively.
The maximum number of handsets that can be registered
at your base station is not affected by the Gigaset
Repeater.
Gigaset Repeater
s
Gigaset
R
e
p
eater
Socket
for
power
lead
Gigaset Repeater
s
Gigaset
R
e
p
e
a
te
r
Example with 2 Gigaset Repeaters Additional reception ranges with
Beispiel mit 2 Gigaset Repeatern
Base station
Zusätzliche Empfangsbereiche
Gigaset Repeater
durch Gigaset Repeater
Before you start to register the units, install the Gigaset
Repeater in close proximity to the base station and a power supply point. If a Gigaset Repeater is already in use, it
must be switched on and positioned next to the base
station before registration can commence.
The power lead supplied is plugged into the socket on the
Gigaset Repeater’s rear side. Using the specified mea-
surements, drill the necessary holes in the wall to mount
the device using the screws and plugs supplied.
14
The different operating modes are indicated on the front
of the Repeater unit by means of two LED’s (for an expla-
nation, see page 18).
LED’s
Page 16

Preparing
Some base stations have to be prepared for operation of
the repeater.
If you are using a Gigaset base station which is not
mentioned here, you can proceed to the registration
procedure on page 17.
Preparing the Gigaset 2015/2016plus
Preparing
B#1
or
INT SET
# 1
o
O441B
or
4 4 1
REDIAL
SET
Preparing the Gigaset 3010/3015
Carry out the following procedure on your handset:
Press the following keys.
Enter the 4-digit system code.
Press the following keys.
This completes the preparatory steps. You may now
continue on with the registration procedure on page 17.
Carry out the following procedure on your handset:
ENGLISH
B4 ¤ „
INT
SET
4 ¤
or
OK
„
o
1 „
Press the following keys
Enter the 4-digit system code.
Press the following keys.
This completes the preparatory steps. You may now
continue on with the registration procedure on page 17.
15
Page 17
Preparing
Preparing the Gigaset 3030isdn/3035/3035isdn/4035/4130isdn/4135isdn
Please refer to the chapter “Accessories“ in the operating
instructions for the base station.
Preparing the Gigaset 2060isdn/3060isdn
Carry out the following procedure on your handset (only
possible with comfort handsets):
Step 1:
t
.
t
Step 2:
t
.
t
Service
Initialization
Service
Initialization
OK OK OK
t
System settings
do not
press
o
Press
OK OK OK
t
System settings
do not
press
o
Press
$
OK
enter “1057” followed by “18156 41055 32842”
Save
OK
Enter “1057” followed by “17996 41297 20449”
Save
Disconnect the power plug from the base station and
reconnect it. This completes the preparatory steps. You
o
o
Enter system code
Enter system code
may now continue with the registration procedure on
page 17.
Preparing for Gigaset 3070isdn/3075isdn/4170isdn/4175isdn
t
.
16
Service Set Up
t
Spec. function
Carry out the following procedure on your comfort handset:
(On 4170/75isdn choose “Service“instead of “System
settings“)
OK OK OK
t
Settings
OK OK
t
Repeater
Confirm the text shown in the display with .
t
System settings
NEXT
This completes the preparatory steps. You may now
continue with the registration procedure on page 17.
Page 18

Preparing for Gigaset 4000 base stations
Please refer to the operating instructions of your Gigaset
4000 base station under the catchword „Repeater“.
Registration
Carry out the following steps:
Registration
$
$
The Gigaset Repeater can be registered independently of the length of an audible registration tone or a display at the base station.
If registration is not successful, the LED on the Gigaset Repeater will flash continuously. In this case, repeat the procedure.
Switch off the Gigaset Repeater (disconnect the power
plug).
Place the base station in Repeater registration mode in
the same way as you would to manually register a handset. Please refer to the operating instructions for your
base station.
Ensure that other base stations close to the
Gigaset Repeater are not in registration mode
during this process.
Switch on the Gigaset Repeater (connect the power
plug).
The left LED on the Gigaset Repeater flashes continually.
After a short while the LED stays on permanently indicating that registration is complete and that the unit is ready
for operation.
ENGLISH
Repeating registration
You can reregister the Gigaset Repeater at any time, for
example if initial registration was unsuccessful, or if the
Gigaset Repeater is to be registered at another base
station for the first time.
Before registering the Gigaset Repeater once again (e.g.
at a different base station), please reset the Gigaset
Repeater beforehand as described below:
Switch off the unit (disconnect the power
$
plug)
Switch on for 1 to 5 seconds and
$
switch it off again
Switch on for 25 to 35 seconds and
$
switch it off again.
The Gigaset Repeater is now ready to be registered again
as described above. This is signalled by the LED which
flashes continually once the power plug is reconnected.
17
Page 19
Installation
Installation
Once you have registered your Gigaset Repeater you can
install it wherever you would like to extend the reception
range of your handsets. However, you must ensure that
there is a power point at the place of installation and that
the left LED remains on constantly after the device has
been switched on.
If the left LED flashes, the Gigaset Repeater is too far
away from the base station or reception is being hindered
by thick walls or metal objects for example (e.g. radiators).
When looking for a suitable installation site, a useful guide
is a handset which requires a good connection with the
base station at the Gigaset Repeater installation site.
To operate a handset for the first time in the extended
Gigaset Repeater area, switch off the handset within the
new reception range of the Gigaset Repeater, but outside
the reception range of the base station and then switch it
back on again:
LED display of functions
Base station
Gigaset Repeater
s
Gigaset
Repeater
Extended reception area
If you are using more than one Gigaset Repeater
in the area of your base station, you must keep
the Gigaset Repeaters at least 10m apart.
There are two green LEDs on the centre front of the housing. The left LED displays registration and operation function, the right LED displays the handset-traffic via this repeater:
Left LED states:
Dark power supply off
Flashing no link to basestation
Continuous lighting normal link to basestation
18
Intermittent flashing ready to register
Right LED states:
Dark no traffic
Flashing once one handset link via repeater
Flashing twice two handset link via repeater
Page 20
Using the verification tone
Installation
The verification tone enables you to establish whether or
not the handset is working in the extended area of the
Gigaset Repeater. This tone is audible on the activated
handset as long as the unit is connected to the Gigaset
Repeater.
Carry out the procedure described below on your Gigaset
Repeater in order to switch the verification tone on and
off:
$
$
$
$
Switch off the unit (disconnect the power plug)
Switch on for 1 to 5 seconds and switch it off again.
Switch on again. If the left LED on the unit is flashing
slowly, switch it off again.
Switch it on again. The verification tone is then activated
or deactivated.
Call continuity
This table indicates whether or not a call is continued
when you move from one reception range to another:
With base station
Gigaset
2010, 2011,
2015, 2016
2020, 2030, 3020, 3025 no yes no
2015 plus, 2016 plus,
2060isdn, 3010, 3015,
3030isdn, 3035,
3035isdn, 3060isdn
3070isdn, 3075isdn
as well as all Gigaset
4000 base stations
1)
Base station Repeater Repeater
to repeater to base station to repeater
2)
yes
3)
yes
Roaming with the handset
yes yes
yes yes
ENGLISH
1) Also applies to enhanced, pocket and micro versions.
2) Prerequisite: the handset has been switched on in the extended Gigaset Repeater area
and has not left the reception ranges (it has not been switched off again or the battery
compartment opened).
3) Prerequisite: preparatory steps described on page 15 and page 16 have been carried out.
19
Page 21
Miscellaneous
Miscellaneous
Troubleshooting
Problem Cause Action
Left LED flashes continuously
when the registration procedure has been concluded
Left LED flashes continuously
at a selected location
Left LED does not light up at all No power Check the power point
No reception of the handset in
the area of the repeater
No radio connection to the
base station
No radio connection to the
base station
Repeater not registered
No radio connection to the
base station
Repeat registration
Select a new location
Repeat registration
Select a new location
Call is interrupted when moving from one reception range
to another
Technical data
Handset cannot find the
repeater
No support Refer to the table above “Call conti-
Standards: DECT, GAP
Radio frequency
range:
Transmit power: 10 mW average power per channel
Range: max. 300 m outdoors,
Power supply: 220/230 V, 50 Hz (plug-in power
Power consumption: 6 VA
Operating tempera-
ture:
Dimensions (mm): 131 x 111 x 50 (LxBxH)
Weight: 136 g
Power cable length: approx. 3 m
Switch handset on and off
nuity”
1880 MHz - 1900 MHz
max. 50 m indoors
unit)
-10 °C to + 50°C
20
Page 22

Guarantee
Guarantee
Scope
This equipment guarantee applies to end users (“customers”). This guarantee does
●
not in any way affect the customer's statutory rights.
The guarantee applies to the supplied devices and all their components but not to their
●
installation or configuration or to the services provided by the dealer. Manuals and any
software supplied on a separate data medium are excluded from the guarantee. This
guarantee does not apply to decorative covers or any other personalised parts or software not included in the scope of supply. The guarantee also does not apply to decorative top or bottom shells for special editions.
The guarantee provides for devices or components that, despite proper care and use,
●
have demonstrably developed defects due to faulty workmanship and/or faulty materials to be replaced or repaired at our discretion free of charge. The guarantee does not
cover normal wear and tear. Alternatively, we reserve the right to replace the defective
device with a successor model or reimburse the original purchase price on return of
the defective device. Our decision is final. Any legal claims are excluded.
Claims under the guarantee cannot be made if
●
– the defect or damage was caused by improper care or use.
Improper care or use includes the following:
ENGLISH
– Opening the device (this is classed as third-party intervention)
– Manipulating components on the printed circuit board
– Manipulating the software
– Defects or damage caused by dropping, breaking, lightning or ingress of moisture.
This also applies if defects or damage was caused by mechanical, chemical, radio
interference or thermal factors (e.g. microwave, sauna, etc.).
– Repairs or other work done by persons not authorised by us.
– Devices fitted with accessories not authorised by Siemens.
Any further claims due to damage are excluded, such as damage arising outside the
●
device, provided this was not due to gross negligence and/or intent on our part.
Claims under the guarantee must be made as soon as the defect is noticed.
●
A till receipt showing the date of purchase must be presented as proof. Each claim un-
●
der the guarantee is accepted with the express reservation that subsequent investigations confirm the validity of the claim.
Any devices or components that are replaced become our property.
●
The costs of materials and labour will be borne by us, but not the costs of transport,
●
postage or freight.
We are entitled, at our discretion, to make technical changes (such as firmware up-
●
dates) beyond repair or replacement in order to upgrade the device to the latest state
of the art. There is no additional charge to the customer for this work. Our decision is
final. Any legal claims are excluded.
The guarantee is valid in the country of purchase. It applies only if the device is oper-
●
ated in the relevant geographical area in accordance with the information on the packaging and in the operating instructions.
21
Page 23
Guarantee
Any further claims are excluded. Siemens is not liable in any circumstances for down-
●
time, loss of profits, loss of data or loss of any other information. The customer alone
is responsible for safeguarding such data and information.
Changes to this guarantee require prior approval by Siemens in writing.
●
Guarantee period
The guarantee applies in countries in the EU from 1 January 2002 for a period of 24
●
months.
In all other countries the guarantee period shall be the relevant minimum statutory
●
guarantee period, but no longer than 24 months.
The guarantee period starts on the day of purchase by the customer.
●
A successful claim under the guarantee does not extend the guarantee period.
●
Work under the guarantee is handled by our Customer Care Centers.
●
The guarantor is Siemens Aktiengesellschaft Deutschland, Schlavenhorst 88, D-46395 Bocholt.
To redeem the guarantee please contact your local Customer Care Center
(see page 23).
22
Page 24
Customer Care
Customer Care
You can get assistance easily when you have technical questions or questions about how
to use your device by using our online support service on the Internet at:
www.my-siemens.com/customercare.
If the device needs to be repaired, please contact one of our Customer Care Centers:
Abu Dhabi..........................0 26 42 38 00
Australia...........................18 00 62 24 14
Argentina ......................0 80 08 88 98 78
Austria .............................05 17 07 50 04
Bahrain ......................................40 42 34
Bangladesh ........................0 17 52 74 47
Belgium .............................0 78 15 22 21
Brunei .................................. 02 43 08 01
Bulgaria.................................02 73 94 88
Cambodia .............................12 80 05 00
Canada..........................1 88 87 77 02 11
China ............................0 21 50 31 81 49
Croatia ...............................0 16 10 53 81
Czech Republic ...............02 33 03 27 27
Denmark...............................35 25 86 00
Dubai .................................0 43 55 99 88
Egypt .................................0 13 31 31 44
Estonia....................................6 30 47 35
Finland ............................. 09 22 94 37 00
France.............................. 01 56 38 42 00
Germany....................... 0 18 05 33 32 22
Greece...............................0 16 86 43 89
Hong Kong............................22 58 36 36
Hungary ...........................06 14 71 24 44
Iceland ....................................5 11 30 00
India.................................01 16 92 39 88
Indonesia .........................02 14 61 50 81
Ireland..............................18 50 77 72 77
Italy ..................................02 66 76 44 00
Ivory Coast............................ 80 00 03 33
Jordan................................0 79 55 96 63
Kuwait .................................... 4 81 87 49
Latvia ......................................7 50 11 14
Lebanon................................01 44 30 43
Libya ................................02 13 35 02 31
Lithuania .................................2 39 77 79
Luxembourg ....................... 43 84 33 99
Malaysia ..........................03 79 52 51 84
Malta .....................00 35 32 14 94 06 32
Mauritius..... ............................... 2 11 62 13
Morocco...... ............................. 22 66 92 32
Netherlands ..................... 0 90 03 33 31 02
Norway ....... ............................. 22 70 84 00
Oman.......... .................................. 79 10 12
Pakistan ...... ........................ 02 15 67 35 65
Philippines... ............................. 28 14 98 88
Poland ......... ........................ 08 01 30 00 30
Portugal....... .......................... 8 00 85 32 04
Qatar........... ................... 00 97 44 69 67 00
Russia ......... ........................ 09 57 37 29 51
Saudi Arabia .......................... 0 26 51 50 94
Sharjah ........ .......................... 0 65 33 66 42
Singapore.... ............................... 8 45 48 18
Slovak Republic 07 59 68 22 66
Slovenia ...... .......................... 0 14 74 63 36
South Africa ........................ 08 60 10 11 57
Spain .......... .......................... 9 02 11 50 61
Sweden....... .......................... 0 87 50 99 11
Switzerland . .......................... 0 12 12 00 90
Taiwan ........ ........................ 02 25 18 65 04
Thailand....... .......................... 0 27 15 51 00
Tunisia......... ............................. 01 86 19 02
Turkey ......... ..................... (0216) 579 71 00
United Kingdom ............... 0 87 05 33 44 11
USA............. ....................... 1 800 777 0211
Vietnam....... ............................. 45 63 22 44
Zimbabwe ... ............................. 04 36 94 24
ENGLISH
Your Gigaset Repeater is intended for operation in your country, as depicted on the underside of the base station. Country-specific features have been taken into account.
The conformity of the device with the essential requirements of the R&TTE directive is
confirmed by the CE symbol.
23
Page 25
Customer Care
Excerpt from the original declaration
„We, Siemens AG, declare, that the above mentioned product is manufactured according to our Full
Quality Assurance System certified by CETECOM ICT Services GmbH with the registration number
„Q810820M“ in compliance with ANNEX V of the R&TTE-Directive 99/05/EC. The presumption of
conformity with the essential requirements regarding Council Directive 99/05/EC is ensured.“
Senior Approvals Manager
The Declaration of Conformity (DoC) has been signed. If necessary, a copy of the original DoC can
be made available via the company hotline.
24
Page 26

Remarques importantes
Application
Consignes de sécurité
Remarques importantes
Le Gigaset Repeater peut être utilisé sur les téléphones
san fil à partir du Gigaset 3000.
Utiliser exclusivement le bloc-secteur fourni, comme
●
indiqué sous l’appareil.
Attention aux interférences possibles avec les appa-
●
reils médicaux.
Contenu de l’emballage
Entretien
Placer à une distance suffisante des autres appareils
●
électroniques (PC, par exemple) car ceux-ci peuvent
perturber le fonctionnement.
Ne pas utiliser l’appareil en atmosphère déflagrante.
●
Ne pas utiliser l'appareil en extérieur ou en milieu hu-
●
mide (salle de bains,salle d'eau, etc.).
Lorsque vous confiez votre Gigaset Repeater à un
●
tiers, toujours joindre le mode d’emploi.
Mettre au rebut en respectant les règles de protec-
●
tion de l’environnement.
1 Gigaset Repeater
1 bloc-secteur pour le Gigaset Repeater
2 vis et chevilles
le présent mode d’emploi.
Nettoyer simplement le Gigaset Repeater à l‘aide d‘un
chiffon légèrement humidifié ou d‘un chiffon antistatique.
Ne jamais utiliser de chiffon sec (charge statique).
FRANÇAIS
25
Page 27
Introduction
Introduction
Le Gigaset Repeater permet d'augmenter la portée de
votre base Gigaset en incluant les zones périphériques où la
réception était jusqu'ici impossible.
Dans cette zone de réception plus étendue vous pouvez
utiliser toutes les fonctionnalités du combiné comme avec la
base.
Dans la zone couverte par un Repeater il n'est possible d'utiliser que 2 combinés simultanémént. Au delà il est nécessaire
d'utiliser plusieurs Repeaters.
Une même base peut gérer jusqu'à 6 Repeaters, installés en
étoile, sans interférer sur le nombre de combinés pouvant
être raccordés sur cette base.
L'installation des repeaters en cascade n'est pas
possible.
Prise
du
câble du
bloc-secteur
Gigaset Repeater
s
Gigaset
R
e
p
e
a
te
r
Gigaset Repeater
s
Gigaset
Re
p
e
a
ter
Base
Avant de procéder à la déclaration, placer le Gigaset
Repeater à proximité immédiate de la base et d’une prise
électrique. Si vous utilisez déjà des Gigaset Repeater,
ceux-ci doivent être allumés à côté de la station de base
pour la déclaration.
Au dos de l’appareil, insérer le câble du bloc-secteur dans
la prise. Reportez-vous aux dimensions indiquées pour
effectuer les perçages correspondants et fixer l’appareil
au mur, à l’aide des vis et chevilles fournies.
Voyant lumineux
26
Sur la face avant, deux voyants lumineux (DEL) signalent
les différents états de fonctionnement (explications voir
page 30).
Page 28

Préparatifs
Afin de pouvoir utiliser le Repeater avec certains bases,
vous devez effectuer des préparatifs sur ces bases comme indiqué ci après.
Si vous disposez d’une base Gigaset différente de celles
indiquées ici, vous pouvez passer directement à la déclaration, page 29.
Préparatifs pour Gigaset 2015/2016plus
Effectuez les opérations suivantes sur le combiné
G2000S ou G2000C.
B#1
Appuyez sur les touches.
INT PROG.
ou
# 1
Préparatifs
FRANÇAIS
o
Entrez les 4 caractères du code système.
O441B
Appuyez sur les touches.
BIS
4 4 1
ou
PROG.
Les préparatifs sont terminés, vous pouvez passer à la
déclaration, page 29.
Préparatifs pour Gigaset 3010/3015
Effectuez les opérations suivantes sur le combiné
G3000Classic ou G3000Comfort :
B4 ¤ „
Appuyez sur les touches
Entrez les 4 caractères du code système.
INT PROG.
4
¤
o „
ou
OK
1 „
Appuyez sur les touches
Les préparatifs sont terminés, vous pouvez passer à la
déclaration, page 29.
27
Page 29
Préparatifs
Préparatifs pour Gigaset 3030isdn/3035/3035isdn/4035/4130isdn/4135isdn
Consultez SVP le mode d’emploi de la base, chapitre
"Accessoires".
Préparatifs pour Gigaset 2060isdn/3060isdn
Effectuez les opérations suivantes sur le combiné (possible uniquement avec les combinés disposant des commandes de confort).
1ère opération :
t
.
Service
t
Config. usine
2ème opération :
t
.
Service
t
Config. usine
OK OK OK
t
Réglages syst.
ne pas appuyer sur
o
Sauver
OK OK OK
t
Réglages syst.
ne pas appuyer sur
o
Sauver
$
Entrez „1057“ puis „18156 41055 32842“
Appuyez sur la touche.
Entrez „1057“ puis „17996 41297 20449“
Appuyez sur la touche
Débranchez brièvement puis rebranchez la prise électrique de la base. Les préparatifs sont terminés, vous pou-
OK
OK
o
o
Entrez le code système
Entrez le code système
vez passer à la déclaration page 29.
Préparatifs pour Gigaset 3070isdn/3075isdn/4170isdn/4175isdn
t
t
Service
Fonct. Spéc.
.
28
OK OK OK
Effectuer la procédure suivante sur le combiné de
confort : (sur le 4170/75isdn, sélectionner "Réglage base"
au lieu de "Service" !)
t
Réglages
OK OK
t
Répéteur
Validez le texte qui s’affiche à l’écran avec .
Les préparatifs sont maintenant terminés et vous pouvez
passer à la déclaration, page 29.
t
Régl. Système
SUITE
Page 30
Préparatifs pour stations de base Gigaset 4000
Consulter pour cela le mode d’emploi de la base Gigaset
4000 .correspondante, chapitre "Repeater".
Déclaration
Effectuez les opérations suivantes :
Déclaration
$
$
La déclaration du Gigaset Repeater est indépendante de la durée du signal sonore de
déclaration émis ou de l’affichage par la base.
Lorsque le voyant continue à clignoter, cela signifie que la déclaration n’a pas réussi
sur le Gigaset Repeater. Dans ce cas, répétez la procédure.
Le Gigaset Repeater doit être
débranchée).
Pour déclarer le Repeater, préparer la base de la même
manière que pour la déclaration d’un combiné. Consulter
pour cela le mode d’emploi de votre base.
Lorsque vous effectuez cette opération, veillez
bien à ce qu’il n’y ait pas d’autres bases en
position de déclaration à proximité du Repeater.
Mettez en marche le Gigaset Repeater (insérez la prise
secteur).
Le voyant gauche du Gigaset Repeater clignote avec des
interruptions. Au bout d’un certain temps, le voyant reste
allumé en permanence, ce qui signale la fin de la déclaration et indique que l’appareil est prêt à fonctionner.
à l’arrêt
(prise secteur
FRANÇAIS
Répéter la déclaration
Vous pouvez effectuer à tout moment une nouvelle décla-
ration si la première tentative n’a pas abouti ou bien si une
déclaration sur une autre base doit avoir lieu.
Avant de déclarer de nouveau le Gigaset Repeater (p. ex.
sur une autre base), réaliser les opérations de déclaration
suivantes sur le Gigaset Repeater :
Arrêter l’appareil (débrancher)
$
Mettre en marche durant 1 à 5 s puis arrêter de
$
nouveau
Mettre en marche durant 25 à 35 s puis
$
arrêter de nouveau.
Le Gigaset Repeater est maintenant prêt pour une nouvelle déclaration selon les modalités figurant ci-dessus.
Cela vous est indiqué par le clignotement du voyant lorsque vous insérez le bloc-secteur.
29
Page 31

Implantation
Implantation
Une fois la déclaration effectuée, vous pouvez installer le
Gigaset Repeater à l’endroit où vous souhaitez augmenter
la portée de vos combinés. Assurez-vous toutefois qu’une
prise électrique est bien disponible à cet endroit et que la
voyant de l’appareil reste allumé en permanence après la
mise en marche.
Si le voyant gauche clignote, cela signifie que le Gigaset
Repeater est trop loin de la base ou bien que la réception
est perturbée par des murs trop épais ou des objets de
métal (radiateurs par exemple).
Lors de la recherche d’un emplacement adapté, vous
pouvez vous aider d’un combiné qui doit disposer d’une
bonne liaison avec la base.
Pour utiliser pour la première fois un combiné dans la zone
de couverture du Gigaset Repeater, placez-vous dans la
zone de couverture du Gigaset Repeater, mais en dehors
de la zone de la base, puis arrêtez et remettez en marche
le combiné:
Voyants lumineux (LED)
Base
Gigaset Repeater
s
Gigaset
Repeater
Extension de la zone
de réception
Si vous utilisez plusieurs Gigaset Repeater avec
votre base, respectez une distance de 10 m
entre les Gigaset Repeater.
La face avant du boîtier comprend deux voyants lumineux
verts (LED). Le voyant gauche signale que l’appareil est
déclaré et prêt à fonctionner, le voyant droit indique que le
combiné communique avec la base via le répéteur.
Etats du voyant gauche
Eteint Alimentation électrique ARRET
Clignotant Aucune liaison avec la base
Allumé en permanence Liaison normale avec la base
Clignotement périodiqueRepeater prêt pour déclaration
30
Etats du voyant droit
Eteint Aucun trafic
Un clignotement Un combiné communique avec
la base via le répéteur.
Deux clignotements Deux combinés communiquent
avec la base via le répéteur.
Page 32

Tonalité de contrôle
Implantation
La tonalité de contrôle vous permet de vérifier si le com-
biné fonctionne bien dans la zone de couverture étendue
du Gigaset Repeater . Cette tonalité se fait entendre sur
le combiné activé tant que ce dernier est en liaison avec
le Gigaset Repeater.
Pour activer et désactiver la tonalité de contrôle, réalisez
la procédure ci-après sur le Gigaset Repeater.
$
$
$
$
Arrêtez l’appareil (prise secteur débranchée)
Mettez en marche durant 1 à 5 s puis arrêtez.
Remettez en marche. Lorsque le voyant gauche de l’ap-
pareil clignote lentement, arrêtez de nouveau.
Remettez en marche, ce qui a pour effet d’activer ou de
désactiver la tonalité de contrôle.
Poursuivre la communication
Le tableau ci-dessous indique si la poursuite d'une communication établie est possible ou non en cas de changement de zone de couverture.
Avec base
Gigaset
1)
Base Repeater Repeater
vers Repeater vers Base vers Repeater
2010, 2011,
oui
2015, 2016
2020, 2030, 3020, 3025 non oui non
2015 plus, 2016 plus,
oui
2060isdn, 3010, 3015,
3030isdn, 3035,
3035isdn, 3060isdn,
3070isdn, 3075isdn
et toutes les stations de
base Gigaset 4000
Zone traversée avec le combiné
2)
3)
oui oui
oui oui
FRANÇAIS
1) S’applique aux versions Comfort, Pocket et Micro.
2) Condition : le combiné a été mise en marche dans la zone de couverture étendue du Gigaset
Repeater et n’a pas quitté les zones de réception (pas de mise à l’arrêt ou d’ouverture du logement
des batteries).
3) Condition : les préparatifs indiqués page 28 ont été réalisés.
31
Page 33

Divers
Divers
Recherche des défauts
Problème Cause Remède
Le voyant gauche (LED) clignote en continu une fois la décla-
ration terminée
Le voyant gauche (LED) clignote en permanence sur l‘empla-
cement sélectionné
Le voyant gauche (LED) ne s‘al-
lume pas
Aucune réception dans la zone
de couverture du Repeater
Pas de liaison radio avec la
base
Pas de liaison radio avec la
base
Pas d’alimentation électrique Vérifier l’alimentation électrique
Repeater non déclaré
Pas de liaison radio avec la
base
Répérer la déclaration
Sélectionner un nouvel emplacement
Répéter la déclaration
Sélectionner un nouvel emplacement
Le combiné ne trouve pas le
Repeater
Interruption de la communication lors du passage d’une
zone de couverture à une autre
Fonction non supportée Voir tableau „Poursuivre la communi-
Caractéristiques techniques
Arrêter puis remettre en marche le
combiné
cation“ ci-dessus
Normes: DECT, GAP
Plage de fréquences
radio :
Puissance d‘émission : 10 mW, puissance moyenne par
Portée : 300 m au maximum en champs
Alimentation
électrique :
Consommation électrique :
Te mp érature ambiante : -10 °C à + 50°C
Dimensions (mm) : 131 x 111 x 50
Poids : 136 g
Longueur du cordon
d’alimentation électrique :
1880 MHz à 1900 Mhz
canal
libre,
50 m au maximum à l‘intérieur
220/230 V, 50 Hz (bloc-secteur)
6 VA
(longueur x largeur x hauteur)
3 m env.
32
Page 34

Service Clients
Service Clients
Si vous avez des questions techniques ou d'utilisation de votre appareil, le moyen le plus
simple est de solliciter l'assistance de notre site Internet:
www.my-siemens.fr.
Dans le cas où une réparation s'avérerait nécessaire, adressez-vous à l'un de nos centres
de SAV:
Abu Dhabi..........................0 26 42 38 00
Australia...........................18 00 62 24 14
Argentina ......................0 80 08 88 98 78
Austria .............................05 17 07 50 04
Bahrain ......................................40 42 34
Bangladesh ........................0 17 52 74 47
Belgium .............................0 78 15 22 21
Brunei .................................. 02 43 08 01
Bulgaria.................................02 73 94 88
Cambodia .............................12 80 05 00
Canada..........................1 88 87 77 02 11
China ............................0 21 50 31 81 49
Croatia ...............................0 16 10 53 81
Czech Republic ...............02 33 03 27 27
Denmark...............................35 25 86 00
Dubai .................................0 43 55 99 88
Egypt .................................0 13 31 31 44
Estonia....................................6 30 47 35
Finland ............................. 09 22 94 37 00
France.............................. 01 56 38 42 00
Germany....................... 0 18 05 33 32 22
Greece...............................0 16 86 43 89
Hong Kong............................22 58 36 36
Hungary ...........................06 14 71 24 44
Iceland ....................................5 11 30 00
India.................................01 16 92 39 88
Indonesia .........................02 14 61 50 81
Ireland..............................18 50 77 72 77
Italy ..................................02 66 76 44 00
Ivory Coast............................ 80 00 03 33
Jordan................................0 79 55 96 63
Kuwait .................................... 4 81 87 49
Latvia ......................................7 50 11 14
Lebanon................................01 44 30 43
Libya ................................02 13 35 02 31
Lithuania .................................2 39 77 79
Luxembourg ....................... 43 84 33 99
Malaysia ..........................03 79 52 51 84
Malta .....................00 35 32 14 94 06 32
Mauritius..... ............................... 2 11 62 13
Morocco...... ............................. 22 66 92 32
Netherlands ..................... 0 90 03 33 31 02
Norway ....... ............................. 22 70 84 00
Oman.......... .................................. 79 10 12
Pakistan ...... ........................ 02 15 67 35 65
Philippines... ............................. 28 14 98 88
Poland ......... ........................ 08 01 30 00 30
Portugal....... .......................... 8 00 85 32 04
Qatar........... ................... 00 97 44 69 67 00
Russia ......... ........................ 09 57 37 29 51
Saudi Arabia .......................... 0 26 51 50 94
Sharjah ........ .......................... 0 65 33 66 42
Singapore.... ............................... 8 45 48 18
Slovak Republic 07 59 68 22 66
Slovenia ...... .......................... 0 14 74 63 36
South Africa ........................ 08 60 10 11 57
Spain .......... .......................... 9 02 11 50 61
Sweden....... .......................... 0 87 50 99 11
Switzerland . .......................... 0 12 12 00 90
Taiwan ........ ........................ 02 25 18 65 04
Thailand....... .......................... 0 27 15 51 00
Tunisia......... ............................. 01 86 19 02
Turkey ......... ..................... (0216) 579 71 00
United Kingdom ............... 0 87 05 33 44 11
USA............. ....................... 1 800 777 0211
Vietnam....... ............................. 45 63 22 44
Zimbabwe ... ............................. 04 36 94 24
FRANÇAIS
Votre Gigaset est homologué dans votre pays comme indiqué par le label figurant sous
l’appareil. Les spécificités nationales sont prises en compte.
La conformité de l’appareil avec les exigences fondamentales de la directive européenne
R&TTE (99/05/CEE), est confirmée par le label CE.
33
Page 35

Service Clients
Extrait de la déclaration originale
"We, Siemens AG, declare, that the above mentioned product is manufactured according to our Full
Quality Assurance System certified by CETECOM ICT Services GmbH with the registration number
"Q810820M" in compliance with ANNEX V of the R&TTE-Directive 99/05/EC. La présomption de conformité avec les exigences essentielles de la Directive 99/05/CE est assurée."
Senior Approvals Manager
The Declaration of Conformity (DoC) has been signed. In case of need, a copy of the original DoC
can be made available via the company hotline.
34
Page 36

Istruzioni importanti
Applicazione
Istruzioni di sicurezza
Istruzioni importanti
Il Gigaset Repeater è compatibile con tutti i portatili
SIEMENS DECT a partire dalla famiglia di prodotti Gigaset 3000.
Utilizzare soltanto l’alimentatore in dotazione. Atte-
●
nersi alle indicazioni riportate sul lato inferiore dell’ap-
parecchio.
L’apparato può creare interferenze, ovvero disturbi di
●
funzionamento, alle apparecchiature elettromedicali.
È pertanto necessario accertarsi che l’ambiente di installazione sia adeguato.
Durane l’installazione accertarsi che non si verifichino
●
interferenze o disturbi di funzionamento con altri apparecchi elettronici (p. e. PC). In tal caso è necessario
aumentare la distanza.
ITALIANO
Contenuto della confezione
Cura dell’apparecchio
Non utilizzare l’apparecchio in ambienti dove sussisto-
●
no pericoli di esplosione.
Non utilizzare l’apparecchio in stanze da bagno o cabi-
●
ne della doccia.
Se cedete il Gigaset Repeater a terze persone, fornire
●
anche le istruzioni d’uso.
Smaltire l’apparecchio in conformità alle norme sulla
●
tutela dell’ambiente.
1 Gigaset Repeater
1 alimentatore
2 viti e rispettivi tasselli
le istruzioni d’uso
Pulire il Gigaset Repeater con un panno umido o antistatico. Non utilizzare mai un panno asciutto (poichè si potrebbero creare cariche elettrostatiche pericolose per l’appara-
to che potrebbe danneggiarsi).
35
Page 37

Introduzione
Introduzione
Il Gigaset Repeater consente di estendere l’area di ricezione di 2 portatili. Su una stazione base si possono utilizzare
contemporaneamente fino a 6 Gigaset Repeater installabili in configurazione circolare (non seriale) rispetto alla
stazione base di riferimento, i quali permettono di ampliare l’area di copertura rispettivamente per 2 portatili ciascuno.
Il Gigaset Repeater non influisce sul numero dei portatili
registrabili su una stazione base.
Gigaset Repeater
s
Gigaset
R
e
p
e
a
te
r
Presa
del cavo
dell’alimentatore
Gigaset Repeater
s
G
igaset
R
e
p
eate
r
Esempio con 2 Gigaset Repeater
Beispiel mit 2 Gigaset Repeatern
Prima di iniziare la registrazione, disporre il Gigaset Repeater vicino alla stazione base e in prossimità di una presa
di corrente. Se vengono utilizzati ripetitori Gigaset, questi
devono essere attivati e posizionati accanto alla stazione
base prima di iniziare la registrazione.
Sul lato posteriore, innestare nell’apposita presa il cavo
dell’alimentatore in dotazione. Potete fare due fori alla parete e montarvi l’apparecchio con le viti e i tasselli forniti.
Stazione base
Aree di copertura supplementari create dal
Zusätzliche Empfangsbereiche
Gigaset Repeater
durch Gigaset Repeater
36
LED
Sul lato anteriore si trovano due LED che segnalano i diversi stati di funzionamento (per ulteriori indicazioni vedi
pag. 41).
Page 38

Preparazione
Per il funzionamento del Repeater, alcune stazioni base
devono essere appositamente preparate.
Se viene utilizzata una stazione base Gigaset non qui
riportata, potete continuare direttamente con la registrazione descritta a pag. 40.
Preparazione per la registrazione su Gigaset 2015/2016plus
Dal portatile eseguire la seguente procedura:
B#1
Premere i tasti indicati
INT SET
oppure
# 1
Preparazione
o
Inserire il PIN di sistema a 4 cifre.
O441B
Premere i tasti indicati.
RIP.NR
4 4 1
oppure
SET
La fase preliminare è conclusa e potete continuare con la
registrazione descritta a pag. 40.
Preparazione per la registrazione su Gigaset 3010/3015
Dal portatile eseguire la seguente procedura:
B4 ¤ „
INT
SET
4 ¤
oppure
OK
„
o
Premere i tasti indicati
Inserire il PIN di sistema a 4 cifre.
ITALIANO
1 „
Premere i tasti indicati
La fase preliminare è conclusa e potete continuare con la
registrazione descritta a pag. 40.
37
Page 39

Preparazione
Preparazione per la registrazione Gigaset 3030isdn/3035/3035isdn/
4035/4130isdn/4135isdn
Consultare il capitolo „Accessori“ nelle presenti istruzioni
d’uso.
Preparazione per la registrazione su Gigaset 2060isdn/3060isdn
Dal portatile eseguire la seguente procedura (possibile
solo con portatili Comfort):
a
1
fase:
.
a
fase:
2
.
t
Servizio
t
Param.Iniziali
t
Servizio
t
Param.Iniziali
OK OK OK
t
Impostaz.Sistema
non
premere
o
Salva
OK OK OK
t
Impostaz.Sistema
non
premere
o
Salva
$
OK
Inserire “1057“ e infine “18156 41055 32842“
premere
OK
Inserire “1057“ e infine “17996 41297 20449“
premere
Staccare e riattaccare l’alimentatore della stazione base.
La fase preliminare è conclusa e potete continuare con la
o
o
PIN di sistema
PIN di sistema
registrazione descritta a pag. 40.
38
Page 40

Preparazione
Preparazione per la registrazione su 3070isdn/3075isdn/4170isdn/4175isdn
Eseguire la seguente procedura da un portatile Comfort:
(Per il 4170/75isdn invece di „Servizio“ scegliere „Impo-
staz.base“!):
.
t
t
Servizio
Funz. Speciale
OK OK OK
t
Impostazioni
OK OK
t
Repeater
Confermare con il messagio che appare sul
display a seguito di questa procedura.
La preparazione è conclusa e a questo punto potete continuare con la registrazione descritta a pag. 40.
t
Impostaz. Sistema
AVANTI
Preparazione per la registrazione sulle stazioni base Gigaset 4000
Vedere a tale scopo le istruzioni per l’uso della rispettiva
stazione base Gigaset 4000 alla voce Repeater.
ITALIANO
39
Page 41

Registrazione
Registrazione
Eseguire quanto descritto qui di seguito:
$
$
Il Gigaset Repeater è
spento
(alimentatore staccato).
Predisporre la base per la registrazione del Repeater
come se si stesse eseguendo la registrazione manuale di
un portatile. Vedere a tale scopo le istruzioni per l’uso del
propro terminale cordless.
Durante questa procedura, fare attenzione che
nel campo di copertura del Gigaset Repeater
non ci siano altre stazioni base in fase di registrazione.
Accendere il Gigaset Repeater (collegare l’alimentatore).
Il LED sinistro del Gigaset Repeater lampeggia irregolarmente. Quando il LED smette di lampeggiare (resta acceso), significa che la registrazione è conclusa e l’apparec-
chio è pronto al funzionamento.
La registrazione del Repeater è indipendente
dalla durata del tono di registrazione o dei messaggi che compaiono sulla stazione base.
Se il LED continua a lampeggiare, significa che
la registrazione non è riuscita e va quindi ripetuta la procedura.
Ripetere la registrazione
Potete ripetere la procedura di registrazione del Gigaset
Repeater in qualunque momento qualora il primo tentativo di registrazione non si andato a buon fine oppure se
dovete registrare il Repeater su un’altra stazione base.
Prima di ripetere la registrazione, eseguire la seguente
operazione di reset sul Gigaset Repeater stesso:
spegnere l’apparecchio (staccare
$
l’alimentatore)
riaccenderlo per 1 - 5 secondi e rispegnerlo
$
riaccenderlo per 25 - 35 secondi e
$
rispegnerlo.
Il Gigaset Repeater è pronto per una nuova registrazione
come descritto sopra. Ciò viene segnalato dal lampeggiamento irregolare del LED dopo aver ricollegato l’alimenta-
tore.
40
Page 42

Collocazione
Collocazione
Una volta eseguita la registrazione, collocare il Gigaset
Repeater laddove desiderate ampliare l’area di ricezione
dei portatili. Non dimenticare che sul luogo di collocazione
deve essere presente una presa di corrente ed una volta
acceso l’apparecchio, accertarsi che il LED di sinistra sia
acceso.
Se il LED di sinistra lampeggia, significa o che il Gigaset
Repeater è troppo distante dalla stazione base, o che la
propagazione delle onde radio è ostacolata p. e. da muri
spessi, oggetti metallici (come termosifoni) ecc.
Per la ricerca di un luogo adeguato all’installazione potete
avvalervi di un portatile che vi servirà per valutare la qualità
del collegamento con la stazione base.
Quando si utilizza per la prima volta un portatile nell’area
di copertura radiotelefonica creata dal Gigaset Repeater,
spegnere il portatile dentro l’area del Repeater, ma fuori
da quella della stazione base, e riaccenderlo:
Spia di funzionamento LED
Stazione base
Gigaset Repeater
s
Gigaset
Repeater
ampliamento dell'area
di copertura
Se nell’area di copertura della vostra stazione
base viene montato più di un Gigaset Repeater,
va tenuta una distanza di almeno 10 metri tra un
apparato e l’altro.
Sul lato anteriore del contenitore sono situati due LED verdi. Il LED sinistro indica lo stato della registrazione e il funzionamento, quello destro segnala le connessioni dei portatili attraverso il Repeater.
Stati del LED sinistro:
Spento Alimentazione OFF
Lampeggiante Nessun collegamento con la sta-
zione base
Acceso Normale collegamento con la
stazione base
Lampeggio continuo Disponibilità alla registrazione
ON
Stati del LED destro:
Spento Nessun traffico
Lampeggia una volta Un portatile collegato al
Repeater
Lampeggia due volte Due portatili collegati al Repea-
ter
ITALIANO
41
Page 43

Collocazione
Utilizzare il tono di controllo
Il tono di controllo vi consente di determinare se il portatile funziona nell’area di copertura radiotelefonica creata dal
Gigaset Repeater. Detto tono viene emesso dal portatile
fino a quando sussiste il collegamento con il Repeater.
Per attivare e disattivare il tono di controllo, eseguire sul
Gigaset Repeater quanto descritto qui di seguito:
$
$
$
$
Spegnere l’apparecchio (staccare l’alimentatore)
Riaccenderlo per 1 - 5 secondi e rispegnerlo.
Riaccenderlo. Quando il LED sinistro lampeggia lenta-
mente, rispegnerlo.
Riaccenderlo: il tono di controllo è attivato o disattivato.
Continuità del collegamento
Nella tabella sono riportati i modelli con i quali passando
da un’area di copertura a un’altra il collegamento rimane
attivo. Ovvero se è possibile continuare la conversazione:
con stazione base
Gigaset
2010, 2011,
2015, 2016
2020, 2030, 3020, 3025 no sì no
2015 plus, 2016 plus,
2060isdn, 3010, 3015,
3030isdn, 3035,
3035isdn, 3060isdn,
3070isdn, 3075isdn
e tutte le stazioni base
Gigaset 4000
1)
stazione base Repeater Repeater
verso Repeater verso stazione base verso Repeater
Attraversamento dell’area con il portatile
2)
sì
sì
3)
sì sì
sì sì
1) vale anche per le versioni Comfort,Pocket e Micro.
2) Presupposto: il portatile è stato acceso nell’area ampliata creata dal Gigaset Repeater
e non è mai uscito dalle aree di copertura (non è stato spento o non è stato aperto
lo scomparto delle batterie).
3) Presupposto: è stata eseguita la preparazione come descritto a pag. 37 o pag. 39.
42
Page 44

Altro
Ricerca di guasti
Problema Causa Rimedio
Il LED sinistro lampeggia continuamente una volta conclusa la
procedura di registrazione
Sul luogo dove è stato collocato, il LED sinistro lampeggia
continuamente
Il LED sinistro è spento Manca corrente Controllare la presa di corrente
Nessun segnale di ricezione
nell’area del Repeater
Manca il collegamento radio
con la stazione base
Manca il collegamento radio
con la stazione base
Il Repeater non è registrato
Manca il collegamento radio
con la stazione base
Ripetere la registrazione
Scegliere un altro luogo
Ripetere la registrazione
Scegliere un altro luogo
Altro
Interruzione del collegamento
(conversazione telefonica)
al cambio delle aree di ricezione
Dati tecnici
Il portatile non trova il Repeater
Manca il supporto vedi tabella “Continuità del collega-
Standard: DECT, GAP
Frequenza radio: 1880 MHz - 1900 Mhz
Potenza di trasmissio-
ne: 10 mW potenza media per canale
Portata: fino a 300 m all’esterno,
Alimentazione: 220/230 V, 50 Hz (con alimentatore)
Consumo di corrente: 6 VA
Temperature di
funzionamento: da -10 °C a + 50°C
Dimensioni (mm): 131 x 111 x 50 (LxPxH)
Peso: 136 g
Lunghezza del cavo
della corrente: ca. 3 m
Spegnere e riaccendere il portatile
mento“
fino a 50 m all’interno
ITALIANO
43
Page 45

Servizio Clienti
Servizio Clienti
Se desiderate porre domànde tecniche o relative all’uso dell’apparato potete consultare
nostri siti Internet:
www.my-siemens.com/customercare
oppure
www.my-siemens.it
.
nell’area Customer Care o in alternativa
Potete rivolgervi al servizio clienti del vostro paese che vi supporterà per ogni esigenza.
Abu Dhabi..........................0 26 42 38 00
Australia...........................18 00 62 24 14
Argentina ......................0 80 08 88 98 78
Austria .............................05 17 07 50 04
Bahrain ......................................40 42 34
Bangladesh ........................0 17 52 74 47
Belgio ................................0 78 15 22 21
Brunei .................................. 02 43 08 01
Bulgaria.................................02 73 94 88
Cambogia .............................12 80 05 00
Canada..........................1 88 87 77 02 11
Cina ..............................0 21 50 31 81 49
Croazia ...............................0 16 10 53 81
Rep. Ceca .......................02 33 03 27 27
Danimarca.............................35 25 86 00
Dubai .................................0 43 96 64 33
Egitto .................................0 23 33 41 11
Estonia....................................6 30 47 35
Finlandia ..........................09 22 94 37 00
Francia ............................. 01 56 38 42 00
Germania ......................0 18 05 33 32 26
Grecia ................................0 16 86 43 89
Hong Kong............................22 58 36 36
Ungheria ..........................06 14 71 24 44
Islanda ....................................5 11 30 00
India.................................01 16 92 39 88
Indonesia .........................02 14 61 50 81
Irlanda ..............................18 50 77 72 77
Italia .................................02 66 76 44 00
Costa d'Avorio ......................80 00 03 33
Giordania ...........................0 64 39 86 42
Kuwait .................................... 2 45 41 78
Lettonia .................................. 7 50 11 14
Libano...................................01 44 30 43
Libia .................................02 13 35 02 31
Lituania ...................................2 39 77 79
Lussemburgo ..................... 43 84 33 99
Malesia ............................03 79 52 51 84
Malta .....................00 35 32 14 94 06 32
Mauritius..... ............................... 2 11 62 13
Marocco...... ............................. 22 66 92 32
Olanda......... ..................... 0 90 03 33 31 00
Norvegia...... ............................. 22 70 84 00
Oman.......... .................................. 79 10 12
Pakistan ...... ........................ 02 15 66 22 00
Filippine ...... ............................. 28 14 98 88
Polonia ........ ........................ 08 00 22 09 90
Portogallo.... .......................... 8 00 85 32 04
Qatar........... ............................. 04 32 20 10
Russia ......... ........................ 09 57 37 29 51
Arabia Saudita ........................ 0 22 26 00 43
Ash Shäriqah.......................... 0 65 33 66 42
Singapore.... ............................... 8 45 48 18
Rep. Slovacca 07 59 68 22 66
Slovenia ...... .......................... 0 14 74 63 36
Sud Africa ... ........................ 08 60 10 11 57
Spagna ....... .......................... 9 02 11 50 61
Svezia.......... .......................... 0 87 50 99 11
Svizzera....... .......................... 0848 212 000
Taiwan ........ ........................ 02 25 18 65 04
Tailandia ...... .......................... 0 27 15 51 00
Tunisia......... ............................. 01 86 19 02
Turchia ........ ..................... (0216) 579 71 00
Gran Bretagna .................. 0 87 05 33 44 11
U.S.A........... ..................... 1 87 76 87 16 71
Vietnam....... ............................. 45 63 22 44
Zimbabwe ... ............................. 04 36 94 24
Centro di riparazioni per la Svizzera:
EMTS (Schweiz) AG
Im Schörli 1
8600 Dübendorf
44
Page 46

Garanzia
Garanzia
Il consumatore è tutelato dal regime di garanzia introdotto dalla Direttiva Comunitaria 99/
44/CE recepita in italia con DL N. 24 del 2 febbraio 2002.
Descrizione delle condizioni di garanzia sono disponibili sul sito www.my-siemens.it. op-
pure contattando il servizio clienti al numero 02-66 76 44 00.
Omologazione e conformità
Il Gigaset Repeater è progettato per l’utilizzo nel vostro Paese come riportato sul lato inferiore dell’apparecchio. Vengono osservate le specifiche nazionali.
La conformità dell’apparecchio alla Direttiva R&TTE (1999/05/CEE) è confermata dalla pre-
senza del marchio CE.
Copia integrale della dichiarazione di conformità può essere richiesta al servizio clienti
(vedi pag. 44).
Hereby the manufacturer declares that the above mentioned product is in compliance with the essential requirements and other relevant provisions of the Directive 1999/5/EC.
The Declaration of Conformity (DoC) has been signed. In case of need, a copy of the original DoC
can be made available via the company hotline.
ITALIANO
45
Page 47

Garanzia
46
Page 48

Indicaciones importantes
Area de aplicación
Indicaciones de seguridad
Indicaciones importantes
El Gigaset Repeater puede aplicarse en todas los terminales inalámbricos Gigaset a partir de la familia
Gigaset 3000.
Utilice sólo el alimentador enchufable suministrado
●
junto con el equipo, tal como se indica en la parte
inferior del mismo.
El Gigaset Repeater puede influir en el funcionamien-
●
to de los equipos médicos.
Mantenga una distancia suficiente con respecto a
●
otros equipos electrónicos (p.ej. PC), ya que éstos
pueden ocasionar anomalías en el funcionamiento.
No conecte el equipo en las cercanías de lugares que
●
representen peligro de explosión.
Contenido del embalaje
Cuidado del equipo
No utilice el Gigaset Repeater en el cuarto de baño o
●
cerca de la ducha.
Si transfiere su Gigaset Repeater a terceros, entré-
●
guelo siempre junto con las instrucciones de manejo.
Elimine el equipo siguiendo las normas relativas a la
●
conservación del medio ambiente.
1 Gigaset Repeater
1 alimentador de red para el Gigaset Repeater
2 tornillos y tacos
estas instrucciones de manejo
Limpie el Gigaset Repeater simplemente con un paño
húmedo o antiestático. No utilice en ningún caso un paño
seco (carga estática).
ESPAÑOL
47
Page 49

Introducción
Introducción
El Gigaset Repeater permite ampliar el área de cobertura
para un máx. de 2 terminales inalámbricos. Se puede utilizar hasta 6 Gigaset Repeater en una estación base simultáneamente, poniendo así a disposición áreas de cobertura adicionales ampliadas para 2 terminales inalámbricos
cada una.
El Gigaset Repeater no influye en la cantidad máxima de
terminales inalámbricos que se pueden dar de alta en la
estación base.
Gigaset Repeater
s
Gigaset
R
e
p
e
a
te
r
Tom a par a
el cable del
alimentador
Gigaset Repeater
s
G
igaset
R
e
p
eate
r
Ejemplo con 2 Gigaset Repeater
Beispiel mit 2 Gigaset Repeatern
Antes de efectuar el proceso para dar de alta deberá colocar el Gigaset Repeater junto a la estación base, cerca de
un enchufe de red. Si ya utiliza Gigaset Repeater, éstos
deben estar activados y encontrarse junto a la estación
base antes de poder darlos de alta.
En la parte posterior se enchufa el cable de alimentador
suministrado junto con el equipo. Siguiendo las medidas
indicadas, se realizan los orificios correspondientes para
montar el equipo en la pared utilizando los tornillos y tacos
suministrados.
Estación base
Areas de cobertura adicionales
Zusätzliche Empfangsbereiche
obtenidas con el Gigaset Repeater
durch Gigaset Repeater
Diode
Luminiscente
48
En la parte frontal se indican los diferentes estados de
servicio mediante dos diodos luminiscente (LED)
(Explicación v. página 54).
Page 50

Preparativos
Para el funcionamiento del Repeater se deben preparar
algunas estaciones base.
Si utiliza una estación base Gigaset, no incluida en esta
descripción, puede proceder directamente al registro,
página 51.
Preparativos para Gigaset 2015/2016plus
Ejecute el siguiente proceso en el terminal inalámbrico:
B#1
Pulse las teclas
o
INT AJUST
# 1
o
Introduzca el código del sistema de 4 dígitos.
Preparativos
O441B
Pulse las teclas
o
4 4 1
RELLAM.
AJUST
Con ello finalizan los preparativos, y puede proseguir con
el registro, tal como se indica en la página 51
Preparativos para Gigaset 3010/3015
Ejecute el siguiente proceso en el terminal inalámbrico:
B4 ¤ „
o
INT
AJUST OK
4 ¤
o „
1 „
Pulse las teclas
Introduzca el código del sistema de 4 dígitos.
Pulse las teclas
ESPAÑOL
Con ello finalizan los preparativos, y puede proseguir con
el registro, tal como se indica en la página 51.
49
Page 51

Preparativos
Preparativos para Gigaset 3030isdn/3035/3035isdn/
4035/4130isdn/4135isdn
Consulte al respecto las instrucciones de manejo de la
estación base, capítulo „Accesorios“.
Preparativos para Gigaset 2060isdn/3060isdn
Ejecute el siguiente proceso en el terminal inalámbrico
(sólo es posible en terminales inalámbricos con funciones
de manejo de confort):
er
1
paso:
t
.
t
2° paso:
t
.
t
Servicio
OK OK OK
Estado suminist
Servicio
OK OK OK
Estado suminist
t
Ajustes sistema
No
pulse
o
Almacenar
t
Ajustes sistema
No
pulse
o
Almacenar
$
o
OK
Introd. código sistema
Introduzca “1057“, a continuación “18156 41055 32842“
Pulse
o
OK
Introd. código sistema
Introduzca “1057“, a continuación “17996 41297 20449“
Pulse
Extraiga el enchufe de red de la estación base y enchúfelo
de nuevo. Con ello finalizan los preparativos y puede proseguir con el registro como se indica en la página 51.
Preparativos para Gigaset 3070isdn/3075isdn/4170isdn/4175isdn
t
t
Servicio
Función esp.
.
50
OK OK OK
Ejecute el siguiente proceso en el terminal de confort:
(Si se trata de un 4170/75isdn, en lugar de “Servicio“
debe seleccionar “Ajustes base“)
t
Ajustes
OK OK
t
Repitidor
Confirme el texto de aviso que aparece a continuación en
el display con .
MÁS
De este modo finaliza la preparación; puede proseguir con
el registro, página 51.
t
Ajustes sistema
Page 52

Preparativos para Estaciones Base Gigaset 4000
Consulte las instrucciones de operación de la correspondiente estación base Gigaset 4000 bajo el apartado dedicado al Repeater.
Dar de alta el equipo
Ejecute el siguiente proceso en el terminal inalámbrico:
Dar de alta el equipo
$
$
El Gigaset Repeater está
desenchufado).
Prepare la base para el registro del Repeater del mismo
modo que para el registro manual de un terminal inalám-
brico. Consulte para ello las instrucciones de operación
de la estación base.
Al efectuar este proceso, asegúrese de que no
haya otras estaciones base en el estado de registro las inmediaciones del Gigaset Repeater.
Conecte el Gigaset Repeater
(enchufando el enchufe de red).
El diodo izquierdo luminiscente del Gigaset Repeater parpadea de forma irregular. Tras breves instantes, el diodo
luminiscente queda encendido de forma permanente, lo
cual indica que el equipo ha sido dado de alta y funciona.
El Gigaset Repeater puede estar dado de alta y
sin embargo la estación base sigue emitiendo
tonos o sigue indicando algo en el display.
Si el registro no se efectúa, esto se indica mediante un parpadeo constante del diodo luminiscente del Gigaset Repeater. En este caso deberá repetir de nuevo el procedimiento para dar de
alta.
apagado
(enchufe de red
ESPAÑOL
51
Page 53

Dar de alta el equipo
Repetir el proceso para dar de alta el equipo
El registro del Gigaset Repeater se puede volver a ejecutar tantas veces como se desee si no se ha conseguido
dar de alta en el sistema, o si es necesario darlo de alta
en otra estación base.
Antes de dar de alta otra vez un Gigaset Repeater (p.ej.
en otra estación base), deberá efectuar el siguiente proceso de reposición en el
Gigaset Repeater:
Apagar el equipo (extraer el enchufe)
$
Encender durante 1 a 5 segundos y
$
apagar de nuevo
Encender durante 25 y 35 segundos y
$
apagar de nuevo.
A continuación, el Gigaset Repeater se encuentra en disposición para un nuevo registro, tal y como se describe
más arriba. Esto se indica mediante un parpadeo irregular
del diodo luminiscente al enchufar de nuevo el enchufe
de red.
52
Page 54

Colocación
Colocación
Una vez llevado a cabo el registro correctamente puede
colocar el Gigaset Repeater en el lugar en que desea ampliar el área de cobertura de sus terminales inalámbricos.
Cerciórese de que se dispone de una toma de red en el
lugar de instalación, el diodo luminiscente izquierdo del
equipo debe permanecer encendido al efectuar la conexión.
Si el diodo izquierdo parpadea, ésto significa que el Gigaset Repeater se encuentra demasiado apartado de la estación base o bien su capacidad de recepción obstaculizada por muros gruesos u objetos de metal (p.ej.
calefacciones).
A la hora de elegir el lugar de colocación puede utilizar
también un terminal inalámbrico como ayuda, el cual
deberá presentar una buena conexión con la estación
base al colocarlo en el lugar de instalación del Gigaset
Repeater.
Para iniciar el funcionamiento de un terminal inalámbrico
en el área de ampliación del Gigaset Repeater deberá apagar el terminal dentro de la nueva área de cobertura del
Gigaset Repeater, pero abandonando el área de cobertura
de la estación base, y encenderlo de nuevo:
Estación ba se
Gigaset Repeater
s
Gigaset
Repeater
Area de cobertura ampliada
Si utiliza más de un Gigaset Repeater en el área
de la estación base, deberá guardar una distancia mínima de 10 m entre los diferentes Gigaset
Repeater.
ESPAÑOL
53
Page 55

Colocación
Indicadores de funcionamiento LED
En el frontal de la caja existen dos diodos luminiscentes
verdes. El LED izquierdo indica el estado de registro y la
disponibilidad de funcionamiento, el diodo derecho indica
las conexiones de los terminales inalámbricos a través del
Repeater.
Estados LED izquierdo:
apagado alimentación eléctrica
parpadea ninguna conexión con la estación
iluminación continua conexión normal con la estación
Parpadeo irregular Disposición para registro
Estados LED derecho:
apagado ninguna comunicación
parpadea una vez un terminal inalámbrico conecta-
parpadea dos veces dos terminales inalámbricos co-
DESCONECTADA
base
base
activada
do a través del Repeater
nectados a través del Repeater
Utilización del tono de control
$
$
$
$
El tono de control permite comprobar si el terminal inalámbrico funciona en el área de ampliación del Gigaset
Repeater. Este tono puede oirse en el terminal activado
siempre que éste se encuentre conectado al repetidor.
Para apagar y encender el tono de control deberá efectuar
el siguiente proceso en el Gigaset Repeater:
Apagar el equipo (extraer el enchufe)
Encenderlo durante 1 a 5 segundos y apagarlo de nuevo.
Encender de nuevo. Cuando el LED izquierdo parpadea
lentamente, apagar de nuevo.
Encender, se activa o desactiva el tono de control.
54
Page 56

Comunicación continuada
Otros
La siguiente tabla indica los casos en que es posible continuar con una comunicación en curso al cambiar de área
de cobertura:
Con estación base
Gigaset
2010, 2011,
2015, 2016
2020, 2030, 3020, 3025 no sí no
2015 plus, 2016 plus,
2060isdn, 3010, 3015,
3030isdn, 3035, 3035isdn,
3060isdn,
3070isdn, 3075isdn
así como todas las estaciones base Gigaset 4000
1) Válido también para versiones Comfort, Pocket y Micro.
2) Requisito: el terminal inalámbrico ha sido conectado en la zona ampliada del repetidor Gigaset
y no ha abandonado las áreas de cobertura (no ha sido apagado manualmente ni se ha abierto el
compartimento de las baterías).
3) Requisito: Se han ejecutado los preparativos siguiendo las instrucciones de la página 49 y
página 50.
1)
Estación base Repeater Repeater
hacia Repeater hacia estación base hacia Repeater
Traspaso con el terminal inalámbrico
2)
sí
sí
3)
sí sí
sí sí
Otros
ESPAÑOL
Cómo detectar errores en el equipo
Problema Causa Solución
El LED izquierdo parpadea
constantemente al finalizar el
registro
El LED izquierdo parpadea
constantemente en el lugar de
instalación elegido
El LED izquierdo no se encien-deNo hay alimentación Comprobar la conexión a la red
El terminal inalámbrico no
obtiene cobertura en el área
del Repeater
Interrupción de la comunicación al cambiar de área de
cobertura
No hay conexión radioeléctri-
ca con la estación base
No hay conexión radioeléctri-
ca con la estación base
El Repeater no ha sido dado
de alta
No hay conexión radioeléctri-
ca con la estación base
El terminal inalámbrico no
detecta el Repeater
No se soporta la funciónVéase la tabla “Comunicación conti-
Repetir el proceso para dar de alta
Elegir otro lugar de instalación
Repetir el proceso para dar de alta
Elegir otro lugar de instalación
Apagar y encender el terminal
nuada“ más arriba
55
Page 57

Otros
Características técnicas
Estándares: DECT, GAP
Area de frecuencia
radioeléctrica:
Potencia de emisión: 10 mW de potencia media por
Alcance: hasta 300 m al aire libre,
Alimentación: 220/230 V, 50 Hz (alimentador
Consumo: 6 VA
Condiciones ambien-
tales admisibles:
Dimensiones (mm): 131 x 111 x 50 (largo x ancho x alto)
Peso: 136 g
Longit. cable de red: aprox. 3 m
1880 MHz - 1900 Mhz
canal
hasta 50 m dentro de edificios
enchufable)
-10 °C hasta + 50°C
56
Page 58

Customer Care (Service)
Customer Care (Service)
Obtendrá una asistencia sencilla y sin complicaciones en caso de cuestiones técnicas y
de manejo de su aparato a través de nuestro soporte en línea en la página de Internet
www.my-siemens.com/customercare.
En caso de ser necesaria una reparación, sírvase dirigirse a uno de nuestros centros de
servicio:
Abu Dhabi..........................0 26 42 38 00
Australia...........................18 00 62 24 14
Argentina ......................0 80 08 88 98 78
Austria .............................05 17 07 50 04
Bahrain ......................................40 42 34
Bangladesh ........................0 17 52 74 47
Belgium .............................0 78 15 22 21
Brunei .................................. 02 43 08 01
Bulgaria.................................02 73 94 88
Cambodia .............................12 80 05 00
Canada..........................1 88 87 77 02 11
China ............................0 21 50 31 81 49
Croatia ...............................0 16 10 53 81
Czech Republic ...............02 33 03 27 27
Denmark...............................35 25 86 00
Dubai .................................0 43 55 99 88
Egypt .................................0 13 31 31 44
Estonia....................................6 30 47 35
Finland ............................. 09 22 94 37 00
France.............................. 01 56 38 42 00
Germany....................... 0 18 05 33 32 22
Greece...............................0 16 86 43 89
Hong Kong............................22 58 36 36
Hungary ...........................06 14 71 24 44
Iceland ....................................5 11 30 00
India.................................01 16 92 39 88
Indonesia .........................02 14 61 50 81
Ireland..............................18 50 77 72 77
Italy ..................................02 66 76 44 00
Ivory Coast............................ 80 00 03 33
Jordan................................0 79 55 96 63
Kuwait .................................... 4 81 87 49
Latvia ......................................7 50 11 14
Lebanon................................01 44 30 43
Libya ................................02 13 35 02 31
Lithuania .................................2 39 77 79
Luxembourg ....................... 43 84 33 99
Malaysia ..........................03 79 52 51 84
Malta .....................00 35 32 14 94 06 32
Mauritius..... ............................... 2 11 62 13
Morocco...... ............................. 22 66 92 32
Netherlands ..................... 0 90 03 33 31 02
Norway ....... ............................. 22 70 84 00
Oman.......... .................................. 79 10 12
Pakistan ...... ........................ 02 15 67 35 65
Philippines... ............................. 28 14 98 88
Poland ......... ........................ 08 01 30 00 30
Portugal....... .......................... 8 00 85 32 04
Qatar........... ................... 00 97 44 69 67 00
Russia ......... ........................ 09 57 37 29 51
Saudi Arabia .......................... 0 26 51 50 94
Sharjah ........ .......................... 0 65 33 66 42
Singapore.... ............................... 8 45 48 18
Slovak Republic 07 59 68 22 66
Slovenia ...... .......................... 0 14 74 63 36
South Africa ........................ 08 60 10 11 57
Spain .......... .......................... 9 02 11 50 61
Sweden....... .......................... 0 87 50 99 11
Switzerland . .......................... 0 12 12 00 90
Taiwan ........ ........................ 02 25 18 65 04
Thailand....... .......................... 0 27 15 51 00
Tunisia......... ............................. 01 86 19 02
Turkey ......... ..................... (0216) 579 71 00
United Kingdom ............... 0 87 05 33 44 11
USA............. ....................... 1 800 777 0211
Vietnam....... ............................. 45 63 22 44
Zimbabwe ... ............................. 04 36 94 24
ESPAÑOL
57
Page 59

Customer Care (Service)
Su Gigaset Repeater está previsto para el servicio en su país, tal y como se especifica en
la parte inferior del equipo. Se han observado las características específicas del país.
El sello CE corrobora la conformidad del equipo con los requerimientos básicos de
R&TTE.
Extracto de la declaración original:
„We, Siemens AG, declare, that the above mentioned product is manufactured according to our Full
Quality Assurance System certified by CETECOM ICT Services GmbH with the registration number
„Q810820M" in compliance with ANNEX V of the R&TTE-Directive 99/05/EC. The presumption of
conformity with the essential requirements regarding Council Directive 99/05/EC is ensured."
Senior Approvals Manager
The Declaration of Conformity (DoC) has been signed. In case of need, a copy of the original DoC
can be made available via the company hotline.
58
Page 60

Belangrijke aanwijzingen
Toepassing
De Gigaset Repeater kan met alle Gigaset draadloze
handsets vanaf Gigaset 3000 worden gebruikt.
Veiligheidsinstructies
Gebruik uitsluitend de meegeleverde adapter.
●
Het typenummer van de adapter staat aangegeven op
de onderkant van de Repeater.
De werking van medische apparaten kan worden
●
beïnvloed.
Houd voldoende afstand van andere elektronische
●
apparaten (zoals PC’s), omdat deze de werking
kunnen storen.
Gebruik het apparaat niet in een omgeving met
●
explosiegevaar.
Belangrijke aanwijzingen
Inhoud van de verpakking
Onderhoud
Gebruik het apparaat niet in badkamer of
●
doucheruimte.
Draag uw Gigaset Repeater alleen inclusief de
●
gebruiksaanwijzing over aan derden.
Oude of defecte apparaten zijn klein chemisch afval
●
(KCA). De verwijdering van deze apparaten dient te
geschieden volgens de geldende milieuvoorschriften.
1 Gigaset Repeater
●
1 adapter voor Gigaset Repeater
●
2 schroeven en pluggen
●
deze gebruiksaanwijzing
●
Voor het schoonmaken van de Gigaset Repeater kunt u
het beste gebruik maken van een vochtige doek of een
antistatische doek. Gebruik nooit een droge doek i.v.m.
statische lading.
NEDERLANDS
59
Page 61

Inleiding
Inleiding
Met de Gigaset Repeater kunt u het ontvangstbereik van
maximaal 2 handsets vergroten. Er kunnen maximaal 6
Gigaset Repeaters tegelijk met één basisstation worden
gebruikt. Met elke Gigaset Repeater beschikt u over een
groter groter ontvangstbereik voor telkens 2 handsets.
De Gigaset Repeater heeft geen invloed op het maximum aantal handsets dat bij uw basisstation kan worden
aangemeld
.
Gigaset Repeater
s
Gigaset
R
e
p
e
a
te
r
Voorbeeld met 2 Gigaset Repeaters
Beispiel mit 2 Gigaset Repeatern
Aansluiting
voor
voedingskabel
Gigaset Repeater
s
Gigaset
R
e
p
e
a
te
r
Basi sst ati on
Vergroot ontvangstbereik dankzij de Gigaset
Zusätzliche Empfangsbereiche
durch Gigaset Repeater
Repeaters
Voordat u met de aanmeldprocedure begint, plaatst u de
Gigaset Repeater in de buurt van het basisstation en een
stopcontact. Mocht u de Gigaset Repeater reeds gebruiken, dan moet deze t.b.v. de aanmeldprocedure ingeschakeld naast het basisstation zijn geplaatst.
Steek het meegeleverde aansluitsnoer in de aansluiting
aan de achterkant. Aan de hand van de aangeduide afmetingen kunt u gaten boren om het apparaat met behulp
van de meegeleverde schroeven en pluggen aan de muur
te bevestigen
.
controlelampje
60
Aan de voorkant bevinden zich twee controlelampjes,
waarvan de linker de status van het apparaat weergeeft
(toelichting zie pagina 66).
Page 62

Voorbereiding
Om de Repeater te kunnen gebruiken, moet u eerst de
betreffende basisstations voorbereiden.
Als u een Gigaset basisstation gebruikt welke hier niet
wordt vermeld, kunt u direct doorgaan met de aanmeldprocedure zoals beschreven op pagina 64.
Voorbereiding voor Gigaset 2015/2015plus
Voer op de handset de volgende procedure uit:
Voorbereiding
B#1
o
O441B
Druk op deze toetsen
Voer de 4-cijferige systeemcode in.
Druk op deze toetsen
De voorbereiding is voltooid en u kunt verdergaan met
de aanmeldprocedure zoals beschreven op pagina 64.
Voorbereiding voor Gigaset 3010/3015
Voer op de handset de volgende procedure uit:
B4 ¤ „
Druk op deze toetsen
INT
SET
4 ¤
of
OK
o „
1 „
Voer de 4-cijferige systeemcode in.
Druk op deze toetsen
NEDERLANDS
Voorbereiding voor Gigaset 4000 basisstations
Instell. Basis [
D
Spec. Functies [
D
D Repeatermodus [
©
Ja
De voorbereiding is voltooid en u kunt verdergaan met
de aanmeldprocedure zoals beschreven op pagina 64.
Voer op de handset de volgende procedure uit.
Menu openen.
Selecteren en bevestigen.
Selecteren en bevestigen.
Selecteren en bevestigen.
Beveiligingsmeldtekst bevestigen.
De voorbereiding is voltooid en u kunt verdergaan met de
aanmeldprocedure zoals beschreven op pagina 64.
61
Page 63

Voorbereiding
Voorbereiding voor Gigaset 2060isdn
Voer op de handset de volgende procedure uit (voorbereiding alleen mogelijk met de Comfort-handset):
e
stap:
1
.
OK
e
stap:
2
.
OK
Service
t
Standaardinstel
t
Service
t
Standaardinstel
t
OK OK
op
OK OK
op
Systeeminstell.
t
niet op drukken
o
Bewaar
Systeeminstell.
t
niet op drukken
o
Bewaar
$
OK
„1057“ en vervolgens „18156 41055 32842“ invoeren
drukken
OK
„1057“ en vervolgens „17996 41297 20449“ invoeren
drukken
Verwijder de adapter uit het stopcontact en steek de
adapter vervolgens weer in het stopcontact. De voorbereiding is voltooid en u kunt verdergaan met de aanmeldprocedure zoals beschreven op pagina 64.
o
o
Systeemcode invoeren
Systeemcode invoeren
Voorbereiding voor Gigaset 3070isdn/4170isdn/4175isdn
Service
t
.
t
Spec. functie
62
OK OK OK
Voer de volgende procedure uit op de Comfort-handset:
(bij 4170/75isdn i.p.v.
kiezen!)
Instellingen
t
OK OK
t
Repeater
Vervolgens de tekst op het display met
tigen
.
De voorbereiding is voltooid en u kunt verdergaan met
de aanmeldprocedure zoals beschreven op pagina 64.
„Service“ a.u.b. „Basis instellen“
Systeeminstell.
t
VERDER
beves-
Page 64

Voorbereiding voor Gigaset 3035isdn/4135isdn
Als u een repeater bij de Gigaset 4135isdn wilt aanmelden, moet u de volgende programmering uitvoeren
Voorbereiding
.
.
Z Instellingenƒƒƒƒƒ [
Z Systeem-instell. [
Z Spec. functie [
Z Repeater [
en
A
B
Menu openen.
Instellingen selecteren en bevestigen.
Systeem-instellingen selecteren en bevestigen.
Speciale functie selecteren en bevestigen.
Repeater selecteren en bevestigen. Bij ingeschakelde
functie is de weergave gemarkeerd.
Hoorn opnemen en weer neerleggen
Om de Repeater te kunnen aanmelden, dient u de
½
Gigaset 4135isdn op de aanmelding voor te bereiden
.
De voorbereiding is voltooid en u kunt verdergaan met de
aanmeldprocedure zoals beschreven op pagina 64.
.
63
NEDERLANDS
Page 65

Aanmeldprocedure
Aanmeldprocedure
Voor het aanmelden van de Repeater op een Gigasetbasisstation voert u de volgende stappen uit
:
$
$
De Gigaset Repeater is uitgeschakeld (de adapter is uit
het stopcontact).
Bereid de basis bij het aanmelden van de Repeater op
dezelfde wijze voor als bij het handmatig aanmelden van
een Comfort-handset. Zie hiervoor ook de gebruiksaanwijzing van het basisstation .
Let op dat zich tijdens deze aanmeldprocedure
geen andere basisstations in de omgeving van
de Gigaset Repeater in de aanmeldmodus
bevinden.
Schakel de Gigaset Repeater in (steek de adapter in het
stopcontact).
Het linker controlelampje op de Gigaset Repeater knippert. Na een korte tijd blijft het controlelampje branden.
Dit betekent dat de aanmeldprocedure is beëindigd en
dat de Gigaset Repeater gebruiksklaar is.
64
U hoeft tijdens de aanmeldprocedure niet te
letten op het display van de handset of op
acoustische signalen.
Als de aanmeldprocedure niet meteen lukt,
wordt dit aangegeven door het voortdurend
knipperen van het controlelampje van de
Gigaset Repeater. In dit geval dient u de
aanmeldprocedure te herhalen.
Page 66

Aanmeldprocedure herhalen
Aanmeldprocedure
U kunt de Gigaset Repeater op elk gewenst moment
opnieuw aanmelden als de aanmeldprocedure is mislukt
of als een nieuwe aanmeldprocedure bij een ander
basisstation moet worden uitgevoerd.
Voordat u de Gigaset Repeater opnieuw aanmeldt
(bijvoorbeeld op een ander basisstation), moet u de
volgende reset-procedure uitvoeren op de Gigaset
Repeater:
Schakel het apparaat uit (trek de adapter
$
uit het stopcontact)
Schakel het apparaat gedurende 1-5
$
seconden in.
Schakel het apparaat uit (trek de adapter
$
uit het stopcontact).
Schakel het apparaat gedurende 25-35
$
seconden in.
Schakel het apparaat uit (trek de adapter
$
uit het stopcontact).
Nu is de Gigaset Repeater gereed voor een nieuwe aanmeldprocedure, zoals hierboven is beschreven. Dit wordt
aangegeven door het knipperende controlelampje nadat
de adapter opnieuw in het stopcontact is gestoken.
65
NEDERLANDS
Page 67

Plaatsing
Plaatsing
Als het aanmelden is gelukt, kunt u de Gigaset Repeater
daar plaatsen waar u het ontvangstbereik van uw handsets wilt vergroten. Plaats het apparaat bij een stop-contact en controleer of het linker controlelampje op het
apparaat na het inschakelen onafgebroken brandt. Als het
linker controlelampje knippert, is de Gigaset Repeater te
ver van het basisstation verwijderd of wordt de ontvangst gehinderd door bijvoorbeeld dikke muren of metalen voorwerpen (zoals radiatoren).
Bij het zoeken naar een geschikte plaats voor de Gigaset
Repeater kunt u gebruikmaken van een handset. Deze
moet op de plaats waar de Gigaset Repeater komt te
staan, een goede verbinding hebben met het basisstation.
Als u een handset voor de eerste keer in het vergrote
bereik van de Gigaset Repeater gebruikt, dient u de
handset binnen het ontvangstbereik van de Gigaset
Repeater, maar buiten het ontvangstbereik van het basisstation, uit- en vervolgens weer in te schakelen:
Basisstation
Gigaset Repeater
s
Gigaset
Repeater
Als u binnen het bereik van uw basisstation
meerdere Gigaset Repeaters gebruikt, moet u
tussen de Gigaset Repeaters een afstand van
minimaal 10 m bewaren.
Functie-aanduiding met controlelampjes
Aan de voorzijde van het toestel bevinden zich twee groene controlelampjes. Het linker controlelampje geeft de
aanmeldstatus en de bedrijfsstatus weer. Met het rechter
controlelampje wordt de verbinding van de handsets
weergegeven die via de Repeater verlopen.
Linker controlelampje:
Uit Stroomvoorziening UIT
Knippert Geen verbinding met basissta-
Continu oplichten normale verbinding met het
Onderbroken knipperen Gereed voor aanmelden AAN
Rechter
Donker Geen verkeer
Knippert een keer Eén handset via Repeater ver-
Knippert twee keer Twee handsets via Repeater ver-
controlelampje
Vergroot ontvangstbereikt
tion
basisstation
:
bonden
bonden
66
Page 68

De controletoon gebruiken
Plaatsing
Met de controletoon kunt u vaststellen of de handset in
het vergrote bereik van de Gigaset Repeater functioneert. Deze controletoon is op de geactiveerde handset
te horen zolang deze met de Gigaset Repeater verbonden is.
Voer de volgende procedure uit op de Gigaset Repeater
om de controletoon in- of uit te schakelen:
$
$
$
$
$
Wissel van ontvangstbereik
met basisstation
Gigaset
2010, 2015 ja
2015 plus, 2060isdn,
3010, 3015, 3035isdn,
3070isdn
en alle Gigaset 4000
basisstations
1)
basisstation Repeater Repeater
naar Repeater naar basisstation naar Repeater
Schakel het apparaat uit (trek de adapter uit het stopcontact)
Schakel het apparaat gedurende 1-5 seconden in en
vervolgens weer uit.
Schakel het apparaat uit (trek de adapter uit het stopcontact).
Schakel het apparaat opnieuw in. Wanneer het linker
controlelampje op het apparaat langzaam knippert, schakelt u het apparaat weer uit.
Schakel het apparaat opnieuw in. Hiermee is de controletoon geactiveerd resp. gedeactiveerd.
In de volgende tabel is aangegeven of het gesprek bij het
wisselen van het ontvangstbereik van de Gigaset Repeater naar het bereik van het basisstation automatisch
wordt voortgezet:
Bereikoverschrijding met de handset
ja
2)
3)
ja ja
ja ja
NEDERLANDS
1) Geldt ook voor de Classic, Comfort , Pocket- en Micro-versies.
2) Voorwaarde: de handset is in het vergrote bereik van de Gigaset Repeater ingeschakeld
en heeft het ontvangstbereik niet verlaten (de handset is niet opnieuw uitgeschakeld en het
batterijvak is niet geopend).
3) Voorwaarde: de voorbereiding op pagina 61 en pagina 62 is uitgevoerd.
67
Page 69

Overig
Overig
Zelf problemen verhelpen
Storing Oorzaak Oplossing
Linker Controlelampje blijft
knipperen na beëindiging van de
aanmeldprocedure
Linker Controlelampje blijft
knipperen op de gekozen plaats
Linker Controlelampje brandt
helemaal niet
Geen ontvangst van de handset
in het bereik van de Repeater
Geen radioverbinding met het
basisstation
Slechte radioverbinding met het
basisstation
Geen 230V-spanning Aansluiting controleren
Repeater is niet aangemeld
Slechte radioverbinding met het
basisstation
Aanmeldprocedure herhalen
Nieuwe plaats kiezen
Aanmeldprocedure herhalen
Nieuwe plaats kiezen
Verbinding wordt verbroken bij
het wisselen van het bereik van
het basisstation naar het bereik
van de Gigaset Repeater
Technische gegevens
Handset kan Repeater niet
vinden
Ondersteuning ontbreekt Zie tabel „Wissel van
Standaard: DECT, GAP
Frequentiebereik: 1880 MHz - 1900 Mhz
Zendvermogen: 10 mW gemiddeld vermogen per kanaal
Bereik: max. 300 m buitenshuis,
max. 30 m binnenshuis
Stroomvoorziening: 220/230 V, 50 Hz (adapter)
Stroomverbruik: 6 VA
Toegestane
omgevingsvoorwaarden:
Afmetingen (mm): 131 x 111 x 50 (l x b x h)
Gewicht: 136 g
Lengte aansluitsnoer: ca. 3 m
-10 °C tot + 50°C
Handset uit- en inschakelen
ontvangstbereik“ hierboven
68
Page 70

Overig
Garantie
Siemens verleent de consument een garantie van 24 maanden voor dit toestel, te
rekenen vanaf de datum van aankoop. Als bewijs hiervoor geldt de aankoopfactuur.
Binnen de garantietermijn zal Siemens alle gebreken die het gevolg zijn van materiaal- en/
of productiefouten kosteloos repareren of het defecte toestel vervangen. In dit geval kan
contact worden opgenomen met de Siemens Klantenservice, alwaar de reparatie dient
te worden aangemeld. Bij de Klantenservice worden een zogenaamd RMA nummer
(Return Material Authorisation) en verzendinstructies verstrekt. Wanneer de consument
wordt verzocht het product aan Siemens Nederland ter reparatie aan te bieden, zullen de
verzendkosten voor eigen rekening zijn.
De garantie vervalt indien:
reparaties, vervanging of uitbreidingen aan het toestel zijn verricht door anderen dan
●
Siemens zonder haar schriftelijke toestemming;
het toestel naar het oordeel van Siemens is verwaarloosd dan wel onvoorzichtig en/of
●
ondeskundig is gebruikt, behandeld en/of onderhouden, en/of er sprake is van normale
slijtage;
typenummers en/of serienummers en/of garantiestickers zijn beschadigd, verwijderd
●
en/of veranderd;
wijzigingen in garantiekaart en/of aankoopfactuur zijn aangebracht;
●
door verkeerd inleggen en/of lekkage van vervangbare accu's (oplaadbare batterijen)
●
door gebruik van niet voorgeschreven accu's (oplaadbare batterijen) defecten zijn
ontstaan;
defecten zijn ontstaan door het niet volgens voorschriften aansluiten en/of installeren
●
van de (goedgekeurde) zaken;
defecten zijn ontstaan ten gevolge van afwijkende omgevingscondities, voor zover
●
dergelijke condities zijn aangegeven;
defecten zijn ontstaan door overige van buitenaf komende oorzaken;
●
de verzegeling, voorzover aanwezig, is verbroken.
●
NEDERLANDS
N.B.: Batterijen zijn van garantie uitgesloten.
De garantietermijn wordt niet verlengd of vernieuwd door uitvoering van garantiewerk-
zaamheden, met dien verstande dat de garantie op uitgevoerde werkzaamheden drie
maanden bedraagt.
Wettelijke aanspraken van de consument, waaronder tevens begrepen wettelijke
aanspraken jegens de verkoper, worden door deze garantie noch uitgesloten, noch
beperkt.
Deze garantie wordt verleend door:
Siemens Nederland N.V.,
69
Page 71

Overig
Service
De Klantenservice van Siemens Nederland is te bereiken onder het volgende hotlinenummer:
0900 333 3102 (EUR 1,00 per gesprek)
Veel gestelde vragen met bijbehorende antwoorden over verschillende Gigaset-toestel-
len zijn te vinden op het Internet onder het volgende adres:
hhtp://www.siemens.com/troubleshooting.
Bel de service-afdeling van Siemens alleen bij storingen van het apparaat. Neem bij vragen over de
bediening van het toestel contact op met uw Siemens-leverancier. Voor vragen over de telefoonaansluiting kunt u contact opnemen met uw netwerkaanbieder.
Het toestel voldoet aan de basiseisen van de R&TTE-richtlijn. Dit wordt bevestigd door de CEmarking.
Uittreksel uit de oorsponkelijke verklaring
We, Siemens AG, declare, that the above mentioned product is manufactured according to our Full
Quality Assurance System certified by CETECOM ICT Services GmbH with the registration number
„Q810820M“ in compliance with ANNEX V of the R&TTE-Directive 99/05/EC. The presumption of
conformity with the essential requirements regarding Council Directive 99/05/EC is ensured.
Senior Approval Manager
The Declaration of Conformity (DoC) has been signed. In case of need, a copy of the original DoC
can be made available via the company hotline.
70
Page 72

Informações importantes
Utilização
Indicações de segurança
Informações importantes
O Gigaset Repeater pode ser utilizado com as bases Gigaset a partir da familia Gigaset 2000.
Utilize apenas o alimentador fornecido, o qual se
●
encontra referido na parte de trás do equipamento.
O funcionamento normal de equipamentos médicos
●
poderá ser afectado.
Para evitar possíveis interferências com outros
●
equipamentos electrónicos (por ex., PC) escolha o
local de instalação a uma distância adequada destes.
Este equipamento não deverá ser utilizado em locais
●
com perigo de explosão, por ex., oficina de pinturas.
Não instale este equipamento na casa de banho ou
●
em outros ambientes húmidos.
Conteúdo da embalagem
Manutenção
Apenas entregue o seu Gigaset Repeater a qutras
●
pessoas, quando acompanhado deste manual de instruções.
Quando tiver que eliminar este equipamento, faça-o
●
sem prejudicar o meio ambiente.
1 Gigaset Repeater
1 alimentador para o Gigaset Repeater
2 parafusos e buchas
estas manual de instruções
Para limpar o Gigaset Repeater, utilize um pano húmido
ou anti-estático mas nunca um pano seco, pois existe o
perigo de induzir cargas estáticas!
PORTUGUESE
71
Page 73

Introdução
Introdução
Com o Gigaset Repeater poderá ampliar a área disponível
para a utilização simultânea de até 2 terminais móveis.
Poderão ser utilizados até 6 Gigaset Repeater na mesma
base, permitindo assim maior mobilidade para mais 2 terminais móveis por cada Repeater.
O número máximo de terminais móveis que podem ser
registados na sua base não é influenciado pelo número de
Gigaset Repeater utilizados.
Gigaset Repeater
s
Gigaset
R
ep
eater
To m ad a
para o
cabo do
alimentador
Gigaset Repeater
s
Gigaset
R
e
p
e
a
te
r
Exemplo com 2 Gigaset Repeater
Beispiel mit 2 Gigaset Repeatern
Antes de iniciar o procedimento de registo do Gigaset
Repeater na base, coloque-o perto desta e de uma tomada eléctrica. Se outros Gigaset Repeater estiverem a ser
utilizados, estes deverão ser ligados próximo da base
antes de iniciar o registo.
Na parte de trás do Gigaset Repeater existe uma tomada
para encaixar o cabo do alimentador. Tendo em conta as
medidas indicadas, poderão ser feitos os furos necessá-
rios para a montagem do equipamento na parede utilizando os parafusos e buchas fornecidas.
Base
Áreas adicionais disponibilizadas pelo
Zusätzliche Empfangsbereiche
Gigaset Repeater
durch Gigaset Repeater
72
LEDs
Na parte da frente do Gigaset Repeater existem dois
LEDs que indicam os diversos estados de funcionamento
(ver explicações na pág. 76).
Page 74

Preparação
A instalação do Repeater requer uma a preparação prévia
de alguns modelos de bases Gigaset.
No caso de possuir uma base Gigaset que não está referida neste capítulo, deverá continuar directamente com o
procedimento de registo na pág. 75.
Preparação de uma base Gigaset 2015/2016*plus
Efectuar as seguintes operações no terminal móvel:
B#1
Premir as teclas
Digitar o PIN da base (de fábrica: 0000).
PROG
INT
ou
# 1
o
Preparação
O441B
Premir as teclas
REPET.
4 4 1
ou
PROG
A preparação está concluída, deverá continuar com o
procedimento de regsto na pág. 75.
Preparação de uma base Gigaset 3010/3015
Efectuar as seguintes operações no terminal móvel:
B4 ¤ „
INT
4 ¤
PROG OK
ou
o „
1 „
Premir as teclas
Digitar o PIN da base (de fábrica: 0000).
Premir as teclas
A preparação está concluída, deverá continuar com o
procedimento de regstna pág. 75.
PORTUGUESE
Preparação de uma base Gigaset 3030isdn*/3035*/3035isdn
/4035*/4130isdn*/4135isdn
*) Não disponível em Portugal
*
*
Para este procedimento, é favor consultar o manual de
instruções da base, no capítulo "Acessórios".
73
Page 75

Preparação
Preparação de uma base Gigaset 2060isdn/3060isdn
Realizar as seguints etapas com um terminal móvel de
conforto:
1ª etapa:
t
.
t
2ª etapa:
t
.
t
Serviço
Estado fábrica
Serviço
Estado fábrica
OK OK OK
t
Progr. sistema.
Não
premir
o
Premir
OK OK OK
t
Progr. sistema.
Não
premir
OK
Introduzir "1057" e em seguida "18156 41055 32842"
Memorizar
OK
o
o
Digitar o PIN da base
(de fábrica: 0000).
Digitar o PIN da base
(de fábrica: 0000).
*
o
Premir
$
Introduzir "1057" e em seguida "17996 41297 20449"
Memorizar
Desligar a alimentação eléctrica da base e voltar a ligar. A
preparação está concluída, deverá continuar com o procedimento registo na pág. 75.
Preparação de uma base Gigaset 3070isdn/3075isdn*/4170isdn/4175isdn*
Realize o procedimento a seguir descrito com um terminal móvel de conforto: (no caso de 4170/75isdn, seleccione “Config. Base” em vez de “Serviços”!)
.
t
t
Serviços
Funções Adic.
OK OK OK
t
Programações
OK OK
t
Repeater
t
Config. Base
ou
.
t
Config. Base
t
Funções Extra
OK OK OK
t
Configurar
OK OK
t
Repeater
t
Config. Base
A preparação está concluída. Poderá continuar com o
registo como indicado na pág. 75.
Preparação para as bases Gigaset 4000
*)Não disponivel em Portugal
74
Consulte o manual de instruções da base Gigaset 4000 e
procure no índice remissivo a palavra ‘Repeater’.
Page 76

Registo
Registo
Realizar de acordo com as seguintes etapas:
$
$
Garantir que o Gigaset Repeater está
desligado
(retirar o
alimentador da tomada eléctrica).
Deverá colocar a base em mondo de registo como se tra-
tasse do registo de um terminal móvel. Consulte o manual de instruções da sua base.
Atenção: Deverá ser assegurado que qualquer
outra base próxima do Gigaset Repeater não se
encontra também em modo de registo.
Ligar o Gigaset Repeater (ligar o alimentador à tomada
eléctrica).
O LED esquerdo do Gigaset Repeater ficará a piscar de
forma intermitente. Após um breve intervalo, o LED fica
permanentemente iluminado, indicando que o registo foi
concluído e que o equipamento está pronto a funcionar.
O registo do Gigaset Repeater é independente
da duração do sinal acústico de registo na base
ou de qualquer indicação no display da base.
Se o registo não for realizado com sucesso, o
LED do Gigaset Repeater continuará a piscar de
forma intermitente. Neste caso, o procedimento deverá ser repetido.
Repetir o registo
Sempre que for necessário, poderá voltar a repetir o
procedimento de registo aqui descrito. Por exemplo, se a
tentativa de registo não foi realizada com sucesso ou se
pretender utilizar o Gigaset Repeater numa outra base.
Antes de registar novamente o Gigaset Repeater, este
deverá ser reinicializado da seguinte forma:
Desligar o alimentador da tomada eléctrica.
$
Ligar durante 1 a 5 segundos e desligar de novo.
$
Ligar durante 25 a 35 segundos e desligar de novo.
$
O Gigaset Repeater está pronto para um novo registo de
acordo com o procedimento já descrito. Este estado é
confirmado pelo LED esquerdo, que deverá piscar de forma intermitente quando o alimentador voltar a ser ligado.
75
PORTUGUESE
Page 77

Instalação
Instalação
Após ter registado o Gigaset Repeater, poderá instalá-lo
no local onde desejar ampliar a mobilidade dos terminais
móveis. Deverá assegurar-se de que tem disponível uma
tomada eléctrica nesse local e de que o LED esquerdo
permanece iluminado após o equipamento ter sido ligado.
Se o LED esquerdo ficar a piscar, o Gigaset Repeater está
demasiado afastado da base ou o contacto radioeléctrico
com esta é dificultado, por ex., por paredes espessas ou
objectos metálicos (como, por ex., radiadores).
Ao procurar um local de instalação adequado, é possível
recorrer à ajuda de um terminal móvel, o qual deverá ter
uma boa ligação à base no local escolhido para instalação
do Gigaset Repeater.
Para utilizar pela primeira vez um terminal móvel na área
de cobertura do Gigaset Repeater, é recomendável desligar o terminal móvel e voltar a ligá-lo na área coberta
exclusivamente pelo Gigaset Repeater e fora do alcance
da base.
Indicações dos LEDs
Base
Gigaset Repeater
s
Gigaset
Repeater
Área de cobertura adicional
Se a sua base utilizar mais do que um Gigaset
Repeater estes deverão estar afastados entre si
por, pelo menos, 10 m.
Existem dois LEDs verdes na parte de fente do Repeater.
O LED esquerdo é utilizado durante o procedimento de
registo e indica quando o Repeater está pronto a funcionar. O LED rieito sinaliza as chamadasestabeöecodas por
terminals movels na area de cobertura do Repeater.
Sinalização do LED esquerdo:
Apagado Equipamento desligado
A piscar Não há ligação com a base
Aceso Ligação normal com a base
A piscar com interrupçõesPronto para o registo
76
Sinalização do LED direito:
Apagado Não existem chamadas*
A piscar uma vez Um terminal em utilização*
A piscar duas vezes Dois terminais em utilização*
* na área de covertura do Repeater
Page 78

Utilizar o sinal de controlo
Instalação
Com o sinal de controlo poderá determinar se o terminal
móvel encontra-se actualmente na área adicional coberta
pelo Gigaset Repeater. Enquanto o terminal móvel se
encontrar nesta área, é possível ouvir o sinal de controlo
através do terminal.
Para activar/desactivar o sinal de controlo, efectuar as
seguintes operações no Gigaset Repeater:
$
$
$
$
Desligar o alimentador da tomada eléctrica.
Ligar durante 1 a 5 segundos e desligar de novo.
Ligar novamente. Se o LED esquerdo do Repeater piscar
lentamente, desligar de novo.
Ligar novamente. O sinal de controlo é assim activado ou
desactivado.
Continuação da chamada
Esta tabela indica se é ou não possível continuar uma chamada já establecida ao mudar de uma área de cobertura
para outra:
Com base
Gigaset
2010, 2011,
2015, 2016
2020, 2030, 3020, 3025 nãosim não
2015 plus, 2016 plus,
2060isdn, 3010, 3015,
3030isdn, 3035, 3035isdn,
3060isdn,
3070isdn, 3075isdn
bem como todas as
estações base Gigaset 4000
1)
da base do Repeater do Repeater
para o Repeater para a base para outro
sim
sim
O terminal móvel desloca-se da área:
Repeater
2)
3)
sim sim
sim sim
PORTUGUESE
1) Também válido para as versões Comfort, Pocket e Micro.
2) Requisito: o terminal móvel foi ligado na área da cobertura do Gigaset Repeater
e não se afastou das áreas cobertas (não foi desligado e o compartimento da
bateria não foi aberto).
3) Requisito: preparação realizada de acordo as indicações nas pág. 73 e pág. 74.
77
Page 79

Indicações gerais
Indicações gerais
Ajuda em caso de mau funciomento
Sintoma Causa provável Solução
Após terminar o procedimento
de registo o LED esquerdo
continua a piscar de forma
intermitente.
O LED esquerdo pisca de forma intermitente ao instalar a
base num determinado local.
O LED esquerdo não acende. Não há alimentação Verificar a ligação à tomada eléctrica.
Não há sinal num terminal
móvel na área do Repeater.
Não há ligação radioeléctrica
com a base.
Não há ligação radioeléctrica
com a base.
O Gigaset Repeater não está
registado.
Não há ligação radioeléctrica
com a base.
Repetir o procedimento de registo.
Seleccionar um novo local para a
instalação do Gigaset Repeater.
Repetir o procedimento de registo.
Seleccionar um novo local para a
instalação do Gigaset Repeater.
Interrupção da chamada ao
mudar de área de cobertura.
Características técnicas
O terminal móvel não encontra o Repeater.
A deslocação em causa não
é suportada.
Standards: DECT, GAP
Frequências: 1880 MHz - 1900 MHz
Potência média: 10 mW por canal
Alcance: até 300 m em espaços abertos,
Alimentação: 220/230 V, 50 Hz (transformador)
Consumo: 6 VA
Temperatura de
funcionamento:
Dimensões (mm): 131 x 111 x 50 (CxAxL)
Peso: 136 g
Comprimento do
cabo do alimentador:
Desligar e voltar a ligar o terminal
móvel.
Consultar a tabela "Continuação da
chamada".
até 50 m em interiores
-10 °C até + 50°C
aprox. 3 m
78
Page 80

Garantia
Garantia
Âmbito da garantia
A garantia deste equipamento é válida para o consumidor final
●
(Cliente).
Exigências legais do Cliente, também contra o fornecedor/vendedor, não são aqui excluídas nem limitadas.
A garantia cobre o equipamento e todos os componentes fornecidos, excluindo a ins-
●
talação, configuração e características apresentadas especificamente pelo fornecedor/
vendedor. Manuais de instruções e eventuais dispositivos para suporte de dados fornecidos com software, são excluídos da garantia. Esta também não é válida para a pintura dos revestimentos (incluindo edições especiais), nem para componentes ou software personalizados e que não correspondam ao aspecto original de fábrica.
A garantia cobre avarias resultantes de defeitos, de fabricação ou nos materiais do
●
equipamento ou componentes fornecidos, devidamente comprovados pelo fornecedor, ou pelo concessionário respectivamente certificado pelo fornecedor, apesar de terem sido seguidas as instruções de utilização e observados os cuidados
apropriados. De acordo com a análise realizada, pelo fornecedor ou concessionário respectivamente certificado pelo fornecedor, o equipamento ou componentes serão reparados ou trocados gratuitamente. Esta garantia não cobre a deterioração normal do
aspecto do equipamento. Em alternativa, reservamo-nos o direito de
trocar o equipamento defeituoso por outro equivalente ou a restituir ao comprador o
valor de compra do produto, em troca do equipamento defeituoso (neste caso, cessarão todos os direitos sobre o produto retomado).
A garantia não será válida quando:
●
– o defeito ou dano tenha sido originado por utilização imprópria.
Serão consideradas utilizações impróprias, por exemplo:
– Abrir o equipamento (tratado como intervenção não autorizada).
– Manipulação de componentes que constituem o equipamento.
– Manipulação do software.
– Defeitos ou danos resultantes de quedas, quebras, derramamento de líquidos ou
curto-circuito provocado por raios; danos mecânicos, químicos, térmicos ou por
tecnologias rádio (por exemplo, microondas, sauna,...).
– Reparações ou intervenções efectuadas por técnicos que para tal não tenham sido
qualificados pela Siemens.
– Componentes complementares ou acessórios que não sejam originais.
79
PORTUGUESE
Page 81

Garantia
Estão excluídos outros direitos devido a danos que ocorram, por exemplo, fora do equi-
●
pamento, desde que tenham sido causados por grave negligência ou de forma propositada.
Os direitos da garantia entrarão em vigor imediatamente após verificação do defeito
●
ou dano.
Como comprovativo da garantia deverá ser apresentado o recibo de compra com a
●
data correspondente. Serão aceites todas os pedidos de garantia, condicionados a
confirmação posterior sobre a validade de aplicação desta.
O equipamento ou componentes trocados passam a ser propriedade da Siemens.
●
Os custos relativos aos materiais utilizados e aos trabalhos de reparação executados
●
serão suportados integralmente pela Siemens, à excepção dos custos de transporte.
Reservamo-nos o direito de, durante a execução da reparação, proceder a alterações
●
técnicas (por exemplo, actualizações de firmware) de forma a adaptar o equipamento
ao estado actual das técnicas utilizadas, sem que isto venha a representar encargos
adicionais para o Cliente. Direitos anteriores não serão preservados.
A garantia é válida no país de aquisição do equipamento. Esta apenas será aplicável no
●
caso do equipamento ser utilizado na área
geográfica correspondente, tendo em conta as indicações na embalagem e no manual
de instruções.
Não serão considerados pedidos de garantia de cariz diferente do aqui estabelecido. A
●
Siemens não se responsabilizará em nenhuma circunstância por interrupções de funcionamento ou pela perda de dados ou outras informações cuja preservação é responsabilidade única do Cliente.
Alterações às condições estabelecidas nesta garantia requerem autorização prévia e
●
por escrito por parte da Siemens.
Duração da garantia
Nos países da Comunidade Europeia, e a partir de 01.01.2002, a duração da garantia é
●
válida por 24 meses (até 31.12.2001: 12 meses).
Nos restantes países, a garantia é válida pelo mínimo período legal, com o máximo de
●
24 meses.
O início da duração da garantia é contabilizado a partir da data de compra.
●
A duração da garantia não será prolongada após a aplicação desta.
●
A aplicação da garantia será acompanhada nos diferentes países pelo serviço de Cus-
●
tomer Care correspondente.
O emissor da garantia é: Siemens Aktiengesellschaft Deutschland, Schlavenhorst 88, D-46395 Bocholt.
Para usufruir de informações adicionais desta garantia, por favor, contacte o Customer
Care (Serviço de Apoio a Clientes) correspondente (ver página 81)
80
Page 82

Customer Care (Service)
Customer Care (Service)
Um auxílio simples e descomplicado às sua perguntas sobre a técnica e sobre a uitlização
do seu equipamento você encontrará no nosso Serviço Online na internet:
www.my-siemens.com/customercare.
No caso de uma eventual reparação, recorra, por favor, a um dos nos centros de serviços:
Abu Dhabi......................... 0 26 42 38 00
Australia......................... 18 00 62 24 14
Argentina .....................0 80 08 88 98 78
Austria ............................05 17 07 50 04
Bahrain .....................................40 42 34
Bangladesh .......................0 17 52 74 47
Belgium ............................0 78 15 22 21
Brunei ................................. 02 43 08 01
Bulgaria................................02 73 94 88
Cambodia ............................12 80 05 00
Canada.........................1 88 87 77 02 11
China ...........................0 21 50 31 81 49
Croatia ..............................0 16 10 53 81
Czech Republic ..............02 33 03 27 27
Denmark..............................35 25 86 00
Dubai ................................0 43 55 99 88
Egypt ................................0 13 31 31 44
Estonia...................................6 30 47 35
Finland ............................09 22 94 37 00
France.............................01 56 38 42 00
Germany......................0 18 05 33 32 22
Greece..............................0 16 86 43 89
Hong Kong...........................22 58 36 36
Hungary ..........................06 14 71 24 44
Iceland ...................................5 11 30 00
India................................01 16 92 39 88
Indonesia ........................02 14 61 50 81
Ireland.............................18 50 77 72 77
Italy .................................02 66 76 44 00
Ivory Coast...........................80 00 03 33
Jordan...............................0 79 55 96 63
Kuwait ...................................4 81 87 49
Latvia .....................................7 50 11 14
Lebanon...............................01 44 30 43
Libya ...............................02 13 35 02 31
Lithuania ................................2 39 77 79
Luxembourg ...................... 43 84 33 99
Malaysia .........................03 79 52 51 84
Malta ....................00 35 32 14 94 06 32
Mauritius..... ............................... 2 11 62 13
Morocco...... ............................. 22 66 92 32
Netherlands ..................... 0 90 03 33 31 02
Norway ....... ............................. 22 70 84 00
Oman.......... .................................. 79 10 12
Pakistan ...... ........................ 02 15 67 35 65
Philippines... ............................. 28 14 98 88
Poland ......... ........................ 08 00 22 09 90
Portugal....... .......................... 8 00 85 32 04
Qatar........... ................... 00 97 44 69 67 00
Russia ......... ........................ 09 57 37 29 51
Saudi Arabia .......................... 0 26 51 50 94
Sharjah ........ .......................... 0 65 33 66 42
Singapore.... ............................... 8 45 48 18
Slovak Republic 07 59 68 22 66
Slovenia ...... .......................... 0 14 74 63 36
South Africa ........................ 08 60 10 11 57
Spain .......... .......................... 9 02 11 50 61
Sweden....... .......................... 0 87 50 99 11
Switzerland . .......................... 0 12 12 00 90
Taiwan ........ ........................ 02 25 18 65 04
Thailand....... .......................... 0 27 15 51 00
Tunisia......... ............................. 01 86 19 02
Turkey ......... ..................... (0216) 579 71 00
United Kingdom ............... 0 87 05 33 44 11
USA............. ....................... 1 800 777 0211
Vietnam....... ............................. 45 63 22 44
Zimbabwe ... ............................. 04 36 94 24
PORTUGUESE
O Gigaset Repeater foi concebido para o funcionamento no país de aquisição como referido na parte inferior do equipamento. As particularidades especiais dos países estão previstas.
A conformidade do equipamento com os requisitos básicos da directiva R&TTE é confirmada pelo símbolo CE.
81
Page 83

Customer Care (Service)
Excerto da declaração original:
“We, Siemens AG, declare, that the above mentioned product is manufactured according to our Full
Quality Assurance System certified by CETECOM ICT Services GmbH with the registration number
„Q810820M“ in compliance with ANNEX V of the R&TTE-Directive 99/05/EC. The presumption of
conformity with the essential requirements regarding Council Directive 99/05/EC is ensured.“
Senior Approvals Manager
The Declaration of Conformity (DoC) has been signed. In case of need, a copy of the original DoC
can be made available via the company hotline.
82
Page 84

Vigtige oplysninger
Anvendelse
Sikkerhedsanvisninger
Vigtige oplysninger
Gigaset Repeateren kan anvendes til trådløse Gigaset
telefoner fra Gigaset 3000.
Anvend udelukkende den medleverede strømfor-
●
syning som angivet på undersiden af Repeateren.
Repeateren kan have indflydelse på hospitalsudstyrs
●
funktion.
Hold en tilstrækkelig god afstand til andre elektronis-
●
ke apparater (f.eks. pc), da disse kan forårsage forstyrrelser.
Repeateren må ikke anvendes i områder, hvor der er
●
fare for eksplosioner.
Repeateren må ikke anvendes i fugtige omgivelser
●
som f.eks. badeværelser.
Dansk
Pakkens indhold
Vedligeholdelse
Repeateren bør kasseres miljøvenligt.
●
1 Gigaset Repeater
1 strømforsyning til Gigaset Repeater
2 skruer og rawlplugs
denne betjeningsvejledning
Rengør Repeateren med en lettere fugtet klud, uden kemiske rengøringsmidler. Eller antistatisk klud. Anvend aldrig en tør klud (statisk elektricitet)
Beskyt Repeateren mod stød og slag.
●
Beskyt Repeateren mod nedbør, fugt og væske.
●
Beskyt Repeateren mod støv og snavs.
●
Undgå at montere Repeateren i kolde eller fugtige
●
omgivelser.
Undgå at montere Repeateren i varme omgivelser
●
DANSK
83
Page 85

Indledning
Indledning
Ved hjælp af Gigaset Repeater kan rækkevidden af maks.
2 håndsæt øges. Op til 6 Gigaset Repeatere kan anvendes
samtidig i forbindelse med en basestation. Antallet af
håndsæt kan øges i overensstemmelse hermed.
Gigaset Repeateren har ingen indflydelse på det maksimalt mulige antal håndsæt, som kan tilmeldes basestationen.
Gigaset Repeater
s
Gigaset
R
e
p
e
a
te
r
Bøsning
til
strømforsyning
Gigaset Repeater
s
Gigaset
R
ep
e
ater
Eksempel med 2 Gigaset Repeater
Beispiel mit 2 Gigaset Repeatern
Inden tilmelding skal Gigaset Repeateren placeres i umiddelbar nærhed til basestationen og en stikkontakt. Hvis
der allerede anvendes en Gigaset Repeater, skal denne
hhv. disse placeres ved siden af basestationen under
tilmelding.
På undersiden af Repeateren stikkes strømforsyningen i
bøsningen. Til vægmontering kan der bores tilsvarende
huller (skruer og rawlplugs medleveres).
Almindelig rækkevidde med
Zusätzliche Empfangsbereiche
Gigaset Repeater
durch Gigaset Repeater
Lysdiode
84
På oversiden signalerer to lysdioden de forskellige driftstilstande (forklaring på side 88).
Page 86

Forberedelse
For at kunne anvende Repeateren skal nogle
basestationer klargøres til dette formål.
Hvis du bruger en Gigaset basestation, som ikke er anført
her, kan du fortsætte direkte med tilmeldingen på side 7.
Forberedelse af Gigaset 2015/2016plus
Udfør nedenstående procedure på håndsættet:
B#1
Try k på tasterne
INT PROG.
eller
# 1
Forberedelse
Dansk
Indtast den 4-cifrede systemkode.
Try k på tasterne
O441B
REDIAL
4 4 1
o
eller
PROG.
Forberedelsen er afsluttet, og der kan fortsættes med
tilmeldingen på side 87.
Forberedelse af Gigaset 3010/3015
Udfør nedenstående procedure på håndsættet:
B4 ¤ „
eller
PROG.
INT
4 ¤
OK
o „
1 „
Try k på tasterne.
Indtast den 4-cifrede systemkode.
Try k på tasterne.
DANSK
Forberedelse af Gigaset 3030isdn/3035/3035isdn/4035/4130isdn/4135isdn
Forberedelsen er afsluttet, og der kan fortsættes med
tilmeldingen side 87.
Læs venligst kapitlet „Tilbehør“ i betjeningsvejledningen
til basestationen.
85
Page 87

Forberedelse
Forberedelse af Gigaset 2060isdn/3060isdn
Udfør nedenstående procedure på håndsættet (kun mulig
i forbindelse med håndsæt med komfortbetjening):
1. trin:
.
t
t
Service
Initialisering
OK OK OK
t
System settings
ikke
tryk
o
SAVE
OK
på
Indtast „1057“ og dernæst „18156 41055 32842“.
Try k på tasten.
indtast systemkoden
o
2. trin:
.
t
t
Service
Initialisering
OK OK OK
t
System settings
ikke
tryk
o
SAVE
$
o
OK
på
Indtast „1057“ og dernæst „17996 41297 20449“.
Try k på tasten.
Tr æk netstikket på basestationen ud og sæt det i igen.
Forberedelsen er afsluttet, og der kan fortsættes med
indtast systemkoden
tilmeldingen på side 87.
Forberedelse af Gigaset 3070isdn/3075isdn/4170isdn/4175isdn
Udfør følgende procedure på komforthåndsættet:
(Vælg “Justering af basestation” ved 4170/75isdn i stedet
for “Service“!)
.
t
t
Service
Specialfunktion
OK OK OK
t
Indstillinger
OK OK
t
Repeater
Den efterfølgende henvisning på displayet skal bekræftes
VIDERE
med .
Forberedelsen er afsluttet, og du kan fortsætte med
tilmeldingen på side 7.
Forberedelse af Gigaset 4000 basestationer
Se betjeningsvejledningen til den relevante Gigaset 4000
basestation under stikordet Repeater.
86
t
system-indstill.
Page 88

Tilmelding
Tilmelding
Udfør nedenstående procedure:
$
$
Gigaset Repeateren er
tet).
Klargør basestationen til tilmelding af repeateren på
samme måde som ved manuel tilmelding af et håndsæt.
Se betjeningsvejledningen til din basestation herom.
Sørg for, at der herunder ikke er andre basestationer i tilmeldingstilstand i nærheden af
Gigaset Repeateren.
Tænd Gigaset Repeateren (sæt netstikket i).
Lysdioden venstre på Gigaset Repeateren blinker uafbrudt. Kort tid efter lyser dioden konstant, hvilket indikerer afslutningen af tilmeldingen, samt at Gigaset Repeateren er klar til at blive taget i brug.
Tilmeldingen af Gigaset Repeateren er uafhæn-
gig af varigheden af tilmeldingstonen eller
visning på basestationen.
Hvis tilmelding ikke kunne gennemføres, vises
dette ved, at lysdioden blinker stadigt på Gigaset Repeateren. I så fald skal proceduren gentages.
slukket
(netstikket er ikke tilslut-
Dansk
Gentag tilmelding
Du kan til enhver tid tilmelde Gigaset Repeateren igen,
hvis tilmeldingen ikke lykkedes, eller den skal tilmeldes til
en anden basestation.
Inden Gigaset Repeateren forsøges tilmeldt igen (f.eks. til
en anden basestation), skal
nedenstående nulstillingsprocedure udføres på
Gigaset Repeateren:
Sluk Gigaset Repeateren (tag netstikket ud).
$
Tænd Gigaset Repeateren i 1 til 5 sekunder
$
og sluk den igen.
Tænd Gigaset Repeateren i 25 til 35
$
sekunder og sluk den igen.
Nu er Gigaset Repeateren klar til en ny tilmelding som
beskrevet ovenfor. Dette angives ved, at lysdioden blinker
konstant, efter at netstikket er sat i på ny.
87
DANSK
Page 89

Placering
Placering
Når Gigaset Repeateren er tilmeldt, kan den placeres,
hvor dækningsområdet til håndsættene ønskes udvidet.
Vær dog opmærksom på, at der er en stikkontakt i nærheden, og at venstre lysdioden på Repeateren lyser konstant, når den er blevet tændt.
Hvis venstre lysdioden blinker, er afstanden mellem Gigaset
Repeateren og basestationen for stor hhv. forstyrres radiokontakten af f.eks. tykke mure eller metalgenstande
(f.eks. radiotorer).
Et håndsæt kan anvendes til at finde den optimale placering, ved at der skal være god radiokontakt mellem
håndsættet og basestationen dér, hvor Gigaset
Repeateren ønskes placeret.
Når et håndsæt skal anvendes første gang i det udvidede
dækningsområde af Gigaset Repeateren, skal håndsættet
slukkes i dette nye dækningsområde, men må samtidig
ikke være i basestationens dækningsområde, og skal
efterfølgende tændes igen:
LED-funktionsindikator
Basesta tion
Gigaset Repeater
s
Gigaset
Repeater
Udvidet dækningsområde
Hvis der anvendes flere end én Gigaset Repeater i basestationens dækningsområde, skal der
være en afstand på mindst 10 m mellem Gigaset Repeaterne.
Der er to grønne lysdioder (LED) på forsiden af kabinettet.
Venstre lysdiode viser tilmeldingstilstanden, og om udstyret er klar til brug, mens højre lysdiode signalerer
håndsæt-forbindelserne via Repeateren.
Tilstande, som indikeres af venstre lysdiode:
Mørk Strømforsyning SLUKKET
Blinker Der er ingen forbindelse til base-
stationen
Konstant lys Der er normal forbindelse til ba-
sestationen
Ved intermitterende blink kan apparatet tilmeldes
Tilstande, som indikeres af højre lysdiode:
Mørk Ingen trafik
Blinker én gang Der er et håndsæt tilsluttet via
Repeateren
Blinker to gange Der er to håndsæt tilsluttet via
Repeateren
88
Page 90

Anvend kontroltone
Placering
Kontroltonen angiver, om håndsættet fungerer i Gigaset
Repeaterens udvidede dækningsområde. Denne kontrol-
tone kan høres via det aktive håndsæt, så længe dette er
i radiokontakt med Gigaset Repeateren.
For at aktivere hhv. deaktivere kontroltonen skal følgende
procedure udføres på Gigaset Repeateren:
Dansk
$
$
$
$
Sluk Gigaset Repeateren (tag netstikket ud).
Tænd Repeateren i 1 til 5 sekunder og sluk den igen.
Tænd Repeateren igen. Hvis den venstre lysdioden blin-
ker langsomt, sluk igen.
Tænd Repeateren igen. Nu er kontroltonen aktiveret hhv.
deaktiveret.
Fortsættelse af samtale
I denne tabel vises, om en eksisterende samtale kan fortsættes uden afbrydelse, når der skiftes mellem de forskellige dækningsområder:
Med basestation
Gigaset
1)
2010, 2011,
2015, 2016
2020, 2030, 3020, 3025 nej ja nej
2015 plus, 2016 plus,
2060isdn, 3010, 3015,
3030isdn, 3035,
3035isdn, 3060isdn,
3070isdn, 3075isdn
samt alle Gigaset 4000
basestationer
Når håndsættet flyttes fra et dækningsområde til et andet
Basestation Repeater Repeater
til Repeater til basestation til Repeater
2)
ja
ja
3)
ja ja
ja ja
1) Gælder også Comfort-, Pocket- og Micro-modellerne.
2) Forudsætning: Håndsættet er blevet tændt i det udvidede dækningsområde af Gigaset
Repeateren og har ikke forladt dækningsområdet (er ikke blevet slukket og batterirummet er ikke
blevet åbnet).
3) Forudsætning: Forberedelsesproceduren på side 85 hhv. side 85 er blevet udført.
DANSK
89
Page 91

Andet
Andet
Afhjælpning af fejl
Problem Årsag Afhjælpning
Venstre LED‘en blinker kon-
stant efter afslutning af tilmeldingen.
Venstre LED‘en bliver ved med
at
blinke på den valgte plads.
Venstre LED‘en lyser ikke. Ingen strømforsyning. Kontrollér strømforsyningen.
Ingen radiokontakt til håndsæt-
tet i Repeaterens dæknings-
område.
Ingen radiokontakt til basestationen.
Ingen radiokontakt til basestationen.
Repeateren er ikke blevet
tilmeldt.
Ingen radiokontakt til basestationen.
Gentag tilmelding.
Placér Gigaset Repeateren et andet
sted.
Gentag tilmelding.
Placér Repeateren et andet sted.
Samtaler afbrydes ved skift af
dækningsområde.
Tekniske d a t a
Håndsættet kan ikke finde
Repeateren.
Funktionen understøttes
ikke.
Standarder: DECT, GAP
Frekvensområde: 1880 MHz - 1900 Mhz
Transmissionsstyrke: I gennemsnit 10 mW pr. kanal
Rækkevidde: Op til 300 m udendørs,
Strømforsyning: 220/230 V, 50 Hz (netstik)
Strømforbrug: 6 VA
Godkendt
temperaturområde:
Mål (mm): 131 x 111 x 50 (lxbxh)
Vægt: 136 g
Kabellængde: ca. 3 m
Sluk og tænd håndsættet igen.
Se tabellen „Fortsættelse af
samtaler“ ovenfor.
op til 50 m indendørs
-10 °C til + 50°C
90
Page 92

Garanti og reklamationsret
Garanti og reklamationsret
Garantien omfatter det leverede udstyr, inkl. alle dele, undtaget er installation og konfiguration. Garantien omfatter ikke almindelig slitage.
Garantien dækker ikke:
Hvis købsbevis er bortkommet, ændret eller på anden måde gjort ugyldigt.
●
Hvis model- eller produktnummer er fjernet, ændret eller på anden måde gjort ugyldigt.
●
Hvis indgreb er foretaget af uautoriseret værksted eller reparatør.
●
Hvis skade er opstået som følge af væske, lynnedslag, skade forårsaget ved tab eller fejlagtig
●
anvendelse eller fejlagtig installation i henhold til betjeningsvejledningen.
Eftersyn, vedligeholdelse, reparation og udskiftning af dele som følge af normal slitage.
●
Som garantibevis gælder en kvittering med dato for købet. Såfremt der ikke kan konstateres fejl efter
gennemgang af produktet, forbeholder Siemens sig ret til at afvise garantidækning af undersøgelse.
Vi forbeholder os retten til de udskiftede apparater eller dele.
Vi afholder omkostninger til materialer og arbejdstid, men ikke omkostninger til transport, porto og
fragt.
Garantien opfatter ikke ændringer, justeringer, og tilpasninger, der er nødvendig for at bringe produktet til anvendelse i andre lande, end det land – hvortil det er produceret.
Siemens er under ingen omstændigheder ansvarlig for driftstab, tabt fortjeneste og tab af data, øv-
rige informationer samt opsætning. Siemens kan ikke holdes ansvarlig for tabte downloadede applikationer via telefonen. Ændringer af denne garanti kræver forudgående skriftlig samtykke fra Siemens.
Dansk
DANSK
91
Page 93

Customer Care (service)
Customer Care (service)
Via vores online-support på nedenstående websted kan du få enkel og let tilgængelig
hjælp ved tekniske spørgsmål og spørgsmål vedr. betjeningen af din telefon:
www.my-siemens.dk/Service
Hvis en reparation er påkrævet, skal du henvende dig til et vores servicecentre:
Abu Dhabi..........................0 26 42 38 00
Australia...........................18 00 62 24 14
Argentina ......................0 80 08 88 98 78
Austria .............................05 17 07 50 04
Bahrain ......................................40 42 34
Bangladesh ........................0 17 52 74 47
Belgium .............................0 78 15 22 21
Brunei .................................. 02 43 08 01
Bulgaria.................................02 73 94 88
Cambodia .............................12 80 05 00
Canada..........................1 88 87 77 02 11
China ............................0 21 50 31 81 49
Croatia ...............................0 16 10 53 81
Czech Republic ...............02 33 03 27 27
Denmark...............................35 25 86 00
Dubai .................................0 43 55 99 88
Egypt .................................0 13 31 31 44
Estonia....................................6 30 47 35
Finland ............................. 09 22 94 37 00
France.............................. 01 56 38 42 00
Germany....................... 0 18 05 33 32 22
Greece...............................0 16 86 43 89
Hong Kong............................22 58 36 36
Hungary ...........................06 14 71 24 44
Iceland ....................................5 11 30 00
India.................................01 16 92 39 88
Indonesia .........................02 14 61 50 81
Ireland..............................18 50 77 72 77
Italy ..................................02 66 76 44 00
Ivory Coast............................ 80 00 03 33
Jordan................................0 79 55 96 63
Kuwait .................................... 4 81 87 49
Latvia ......................................7 50 11 14
Lebanon................................01 44 30 43
Libya ................................02 13 35 02 31
Lithuania .................................2 39 77 79
Luxembourg ....................... 43 84 33 99
Malaysia ..........................03 79 52 51 84
Malta .....................00 35 32 14 94 06 32
Mauritius..... ............................... 2 11 62 13
Morocco...... ............................. 22 66 92 32
Netherlands ..................... 0 90 03 33 31 02
Norway ....... ............................. 22 70 84 00
Oman.......... .................................. 79 10 12
Pakistan ...... ........................ 02 15 67 35 65
Philippines... ............................. 28 14 98 88
Poland ......... ........................ 08 01 30 00 30
Portugal....... .......................... 8 00 85 32 04
Qatar........... ................... 00 97 44 69 67 00
Russia ......... ........................ 09 57 37 29 51
Saudi Arabia .......................... 0 26 51 50 94
Sharjah ........ .......................... 0 65 33 66 42
Singapore.... ............................... 8 45 48 18
Slovak Republic 07 59 68 22 66
Slovenia ...... .......................... 0 14 74 63 36
South Africa ........................ 08 60 10 11 57
Spain .......... .......................... 9 02 11 50 61
Sweden....... .......................... 0 87 50 99 11
Switzerland . .......................... 0 12 12 00 90
Taiwan ........ ........................ 02 25 18 65 04
Thailand....... .......................... 0 27 15 51 00
Tunisia......... ............................. 01 86 19 02
Turkey ......... ..................... (0216) 579 71 00
United Kingdom ............... 0 87 05 33 44 11
USA............. ....................... 1 800 777 0211
Vietnam....... ............................. 45 63 22 44
Zimbabwe ... ............................. 04 36 94 24
Din Gigaset Repeater er beregnet til brug i dit land, således som anført på bunden af
apparatet. Der er taget hensyn til specielle forhold i de enkelte lande.
CE-mærkningen bekræfter, at produktet er i overensstemmelse med kravene i Rådets
teleterminaldirektiv.
92
Page 94

Customer Care (service)
Uddrag fra originalerklæringen:
"We, Siemens AG, declare, that the above mentioned product is manufactured according to our Full
Quality Assurance System certified by CETECOM ICT Services GmbH with the registration number
"Q810820M" in compliance with ANNEX V of the R&TTE-Directive 99/05/EC. The presumption of
conformity with the essential requirements regarding Council Directive 99/05/EC is ensured".
Senior Approvals Manager
The Declaration of Conformity (DoC) has been signed. In case of need, a copy of the original DoC
can be made available via the company hotline.
Dansk
DANSK
93
Page 95

Customer Care (service)
94
Page 96

Tärkeitä ohjeita
Käyttö
Turvallisuusohjeet
Tärkeitä ohjeita
Gigaset Repeateria voidaan käyttää langattomien Gigasetpuhelinten yhteydessä Gigaset 3000 -tuoteperheestä
alkaen.
Käytä ainoastaan toimituksen mukana tullutta verkko-
●
laitetta, jonka tyyppikoodi on merkitty laitteen pohjaan.
Gigaset Repeater voi aiheuttaa häiriöitä sairaalassa
●
käytettäviin laitteisiin.
Pidä riittävä etäisyys muihin elektronisiin laitteisiin
●
(esim. PC:hen), sillä ne saattavat aiheuttaa
toimintahäiriöitä.
Älä käytä laitetta räjähdysalttiissa ympäristössä.
●
Suomi
Pakkaussisältö
Hoito-ohje
Älä käytä laitetta kylpy-/suihkuhuoneessa.
●
Kun luovutat Gigaset Repeaterin toiselle henkilölle,
●
liitä mukaan myös käyttöohje.
Hävitä laite ympäristöystävällisesti määräysten
●
mukaan.
1 Gigaset Repeater
1 Gigaset Repeaterin verkkolaite
2 ruuvia ja proppua
tämä käyttöohje
Puhdista Gigaset Repeater antistaattisella liinalla. Älä
koskaan käytä kuivaa liinaa (staattisen sähkön vaara). Älä
myöskään käytä märkää liinaa, koska siitä valuva vesi voi
vioittaa laitetta.
SUOMI
95
Page 97

Johdanto
Johdanto
Voit kasvattaa Gigaset Repeaterin avulla enintään kahden
langattoman luurin kuuluvuusaluetta. Voit liittää jopa kuusi
Gigaset Repeateria yhtä aikaa yhteen tukiasemaan, jolloin
kutakin Gigaset Repeateria kohden kasvaa kahden luurin
kuuluvuusalue.
Tukiasemaan rekisteröitävien luurien lukumäärää ei voi
kasvattaa Gigaset Repeaterin avulla.
Gigaset Repeater
s
G
ig
a
s
et
Repeater
pistokepaikka
sähköjohtoa
varten
Gigaset Repeater
s
G
ig
a
se
t
Re
p
eater
Esimerkki: 2 Gigaset Repeateria
Beispiel mit 2 Gigaset Repeatern
Sijoita Gigaset Repeater tukiaseman ja sähköpistorasian
välittömään läheisyyteen ennen rekisteröinnin aloittamista. Jos käytössäsi on jo Gigaset Repeatereita, pitää
niiden olla käyttövalmiita rekisteröintiä varten.
Ty önnä toimituksen mukana tullut sähköjohto laitteen
takana olevaan pistokepaikkaan. Annettujen mittojen
perusteella voit porata reiät ja kiinnittää laitteen toimituksen mukana tulleiden ruuvien ja proppujen avulla seinään.
Tuk i as em a
Gigaset Repeatereiden
Zusätzliche Empfangsbereiche
laajentamat kuuluvuusalueet
durch Gigaset Repeater
ledi
96
Laitteen etupuolella olevasta kahdesta ledistä näkyy laitteen
kulloinenkin toimintatila (kuvaus katso sivu 100).
Page 98

Valmistelut
Joissain tukiasemissa pitää suorittaa tietyt
alkuvalmistelut ennen Repeaterin käyttöönottoa
Jos asennat Gigaset-tukiaseman, jota ei ole esitelty tässä,
voit siirtyä suoraan kohtaan "Rekisteröinti" sivu 99.
Alkuvalmistelut, kun tukiasema on Gigaset 2015/2016plus
Tee seuraavat toimet luurilla:
Valmistelut
B#1
Paina näppäimiä.
Anna 4-numeroinen järjestelmäkoodi.
Paina näppäimiä.
Alkuvalmistelut on nyt tehty, ja voit aloittaa rekisteröinnin
(sivu 99)
PROG.
INT
O441B
4 4 1
REDIAL
tai
# 1
o
tai
PROG.
Alkuvalmistelut, kun tukiasema on Gigaset 3010/3015
Tee seuraavat toimet luurilla:
B4 ¤ „
INT
PROG.
4 ¤
o
tai
OK
„
Paina seuraavia näppäimiä
Anna 4-numeroinen järjestelmäkoodi.
Suomi
Alkuvalmistelut, kun tukiasema on Gigaset 3030isdn/3035/3035isdn/
4035/4130isdn/4135isdn
1 „
Paina seuraavia näppäimiä.
Alkuvalmistelut on nyt tehty, ja voit jatkaa rekisteröintiä
(sivu 99).
SUOMI
Saat näitä tukiasemia koskevia ohjeita tukiaseman käyt-
töohjeiden luvusta “Lisävarusteet“.
97
Page 99

Valmistelut
Alkuvalmistelut, kun tukiasema on Gigaset 2060isdn/3060isdn
Tee seuraavat toimet luurilla (mahdollista ainoastaan
Comfort-luurien kanssa):
Vaih e 1 :
t
.
t
Vaih e 2 :
t
.
t
Service
Initialization
Service
Initialization
Press
OK
OK
t
System settings
älä paina
o
Paina
t
System settings
älä paina
o
$
OK OK
OK
Anna järjestelmä-koodi
o
näppäile ensin “1057” ja sitten “18156 41055 32842”
Save
OK OK
OK
Anna järjestelmä-
o
koodi
Paina ensin “1057” ja sitten “17996 41297 20449”
Save
Irrota virtajohto tukiasemasta ja kytke se uudelleen tukiasemaan. Tämän jälkeen alkuvalmistelut on tehty, ja voit
jatkaa rekisteröintiä (sivu 99).
Alkuvalmistelut, kun tukiasema on Gigaset 3070isdn/3075isdn/
4170isdn/4175isdn
t
.
Service Set Up
t
Spec. function
Alkuvalmistelut, kun tukiasema on Gigaset 4000
98
OK
OK
Tee seuraavat toimet Comfort-luurilla:
(4170/75isdn: valitse “Service“:n sijaan “Base settings“!)
t
t
Settings
Repeater
OK OK
OK
t
System settings
Vahvista näytöllä näkyvä ohjeteksti painamalla .
Tämän jälkeen alkuvalmistelut on tehty, ja voit jatkaa rekis-
teröintiä (sivu 99).
Katso kyseessä olevan Gigaset 4000 -tukiaseman käyt-
töohjetta "Repeater" -kohdasta.
SEURAV.
Page 100

Rekisteröinti
Rekisteröinti
Kun haluat rekisteröidä Gigaset Repeaterin Gigaset 2015/
2016plus -tukiasemaan tai Gigaset 2060isdn -tukiasemaan, tee ensin vaadittavat alkuvalmistelut (sivu 97).
Muiden tukiasemien ollessa kyseessä voit aloittaa rekisteröinnin suoraan tältä kohdalta.
Tee seuraavat toimet::
$
$
Gigaset Repeater on
kytketty pois päältä
(verkkolaite on
irrotettu pistorasiasta).
Tee tukiasemalle Repeaterin rekisteröintiä varten samat
alkuvalmistelut kuin luurin manuaalisessa rekisteröinnis-
sä. Katso tarkemmat ohjeet tukiaseman käyttöohjeesta.
Varmista, ettei Gigaset Repeaterin läheisyydes-
sä ole rekisteröinnin aikana muita rekisteröintitilassa olevia tukiasemia.
Kytke Gigaset Repeater päälle verkkolaitteella (laita verkkolaite pistorasiaan).
Gigaset Repeaterin ledi vasen vilkkuu jaksottaisesti. Lyhyen ajan kuluttua ledi palaa jatkuvasti. Rekisteröinti on täl-
löin tehty, ja laite on käyttövalmis.
Gigaset Repeaterin rekisteröinti on riippumaton
tukiasemasta kuuluvan rekisteröintiäänen
kestosta.
Jos rekisteröinti ei onnistunut, ledi jatkaa vilkkumista. Toista silloin edellä mainitut rekisteröinti-
toimet.
Suomi
Rekisteröinti toistaminen
Voit rekisteröidä Gigaset Repeaterin uudelleen, jos rekisteröinti ei onnistunut tai jos haluat rekisteröidä laitteen toiseen tukiasemaan.
Ennenkuin rekisteröit Gigaset Repeaterin uudelleen
(esim. toiseen tukiasemaan), nollaa Gigaset Repeater
ensin:
kytke laite pois päältä (irrota verkkolaite
$
pistorasiasta)
kytke laite 1 - 5 sekunniksi päälle ja
$
kytke se taas pois päältä
kytke laite 25 - 35 sekunniksi päälle ja
$
kytke se taas pois päältä.
Nyt Gigaset Repeater on valmis uuteen rekisteröintiin,
kuten yllä on kuvattu. Tämä ilmaistaan ledien jaksottaisella palamisella, kun verkkolaite on kytketty pistorasiaan.
99
SUOMI
 Loading...