

Page 1

Putting the phone into operation
s
1
–
+
–
+
–
+
–
+
–
+
–
+
2
Be inspired
3
5 h
User guide
and safety information
!
Issued by
Information and Communication mobile
Haidenauplatz 1
D-81667 Munich
© Siemens AG 2001
All rights reserved. Subject to availability.
Right of modification reserved.
Printed in Germany. (09/2001)
Siemens Aktiengesellschaft
http://www.my-siemens.com
Order no.A31008-G200-B101-1-7619
A31008-G200- B101- 1- 7619
Page 2
Gi ga se t 2 00 , GBR, A31008-G200 -B 101-1- 7619 UM SC HL _V.F M 28 .0 9. 01
-
-
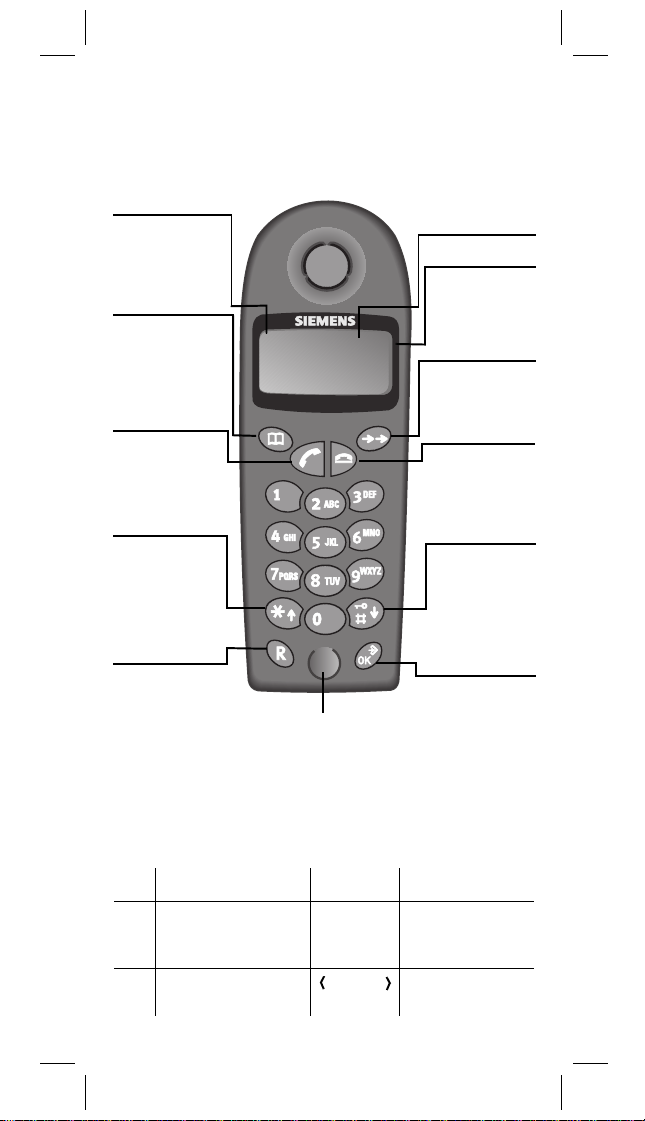
Brief overview of the handset
List item
Indicates the list
item for an entry
Phone book
key
- Open phone
book
- Call list item "0"
(hold down)
Off-hook key
-Answer call
- Dial call
number
Star key
- Page up
- Call multifrequency
signaling
method
(hold down)
R key
R key function
(flash)
Dialing pause
(hold down)
Microphone
E
Display
Battery status
H
empty
E
full
Redial key
Open redial list
On-hook key
- Terminate
call
- Cancel
function
Hash key
-Page down
- Activate/
deactivate
key lock
(hold down)
Set/OK key
- Open menu
- Confirm
(store) entry
Display symbols and special characters
Star (*)
Hash (#)
Key lock Phone list
2
R
P
NUMBER
R key
Pause
Hold down
R key
empty
Page 3

Gi ga se t 2 00 , GBR, A31008-G200 -B 101-1- 7619 UM SC HL _V.F M 28 .0 9. 01
Congratulations
on purchasing your Siemens Gigaset!
In order to be able to use your phone with ease, read
the following pages to find out how it works.
3
Page 4
Gi ga se t 2 00 , GBR, A31008-G200 -B 101-1- 7619 UM SC HL _V.F M 28 .0 9. 01
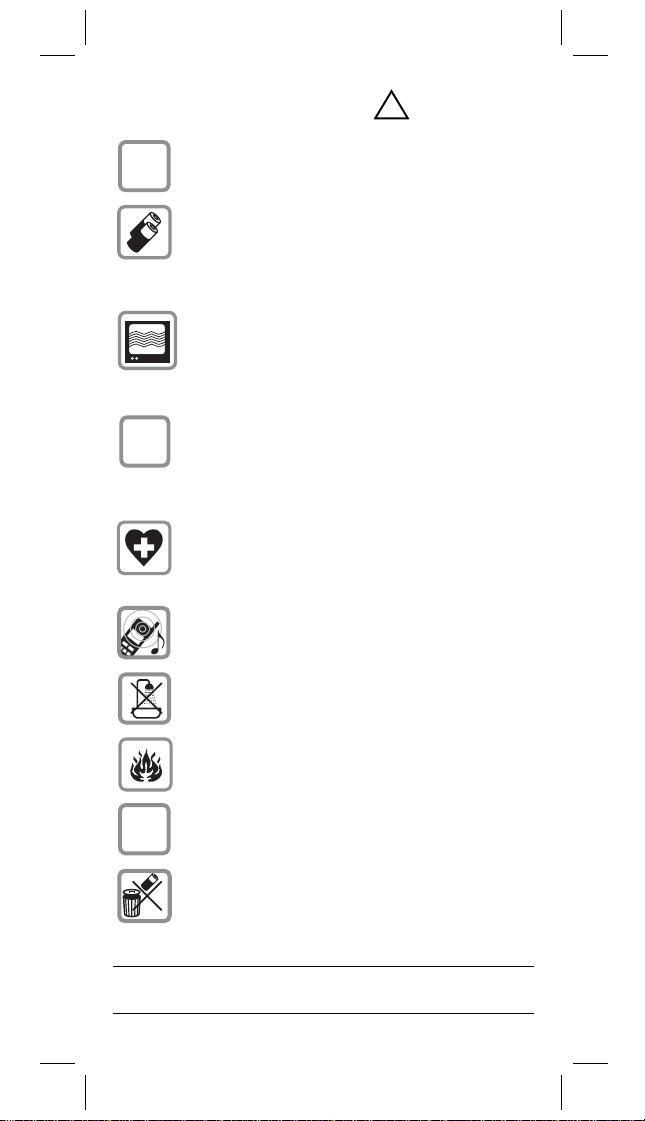
Safety information
Use
only the plug-in power supply unit
+
,
provided
device.
Use only
ies of the same type
use conventional (non-rechargeable) batteries, since these can injure you and damage
your health.
Do not position the device
ate vicinity of other devices
hi-fi systems, televisions, microwave ovens
or office equipment. This could cause mutual interference.
Ensure that you insert the rechargeable
batteries with the correct polarity and that
you use the type of battery specified in this
user guide (note the sign i
compartments of the handset)
The operation of medical equipment may be
affected. Bear in mind the technical requirements of the environment (e.g. doctor's
office).
The handset can cause an unpleasant
buzzing sound in hearing aids. Do not hold
the handset too close to your ear.
Do not set up the base unit in bathrooms or
shower rooms.
, as indicated on the bottom of the
approved, rechargeable batter-
!
. In other words, never
in the immedi-
such as
n the battery
.
)
8
4
Do not use the phone in potentially explosive environments (e.g. paint shops).
Do not pass your Gigaset on to a third party
without the user guide.
Dispose of batteries and your phone in an
environment-friendly manner.
Not all the functions described in this user
guide are available in all countries.
Page 5

Gi ga se t 2 00 , GBR, A31008-G200 -B 101-1- 7619 410 _Jako bIVZ.fm 28 .0 9. 01
Contents
Brief overview of the handset . . . . . . . 2
Safety information . . . . . . . . . . . . . . . . . 4
Putting your phone into operation . . . . 6
Making a phone call. . . . . . . . . . . . . . . 10
Calling . . . . . . . . . . . . . . . . . . . . . . . . . . . . . . . . . 10
Accepting a call. . . . . . . . . . . . . . . . . . . . . . . . . . 10
Redialing . . . . . . . . . . . . . . . . . . . . . . . . . . . . . . . 10
Displaying the caller's number (CLIP) . . . . . . . . . 11
Activating/deactivating the key lock . . . . . . . . . . 11
Phone book. . . . . . . . . . . . . . . . . . . . . . . . . . . . . 12
Registering the handset with the
base unit. . . . . . . . . . . . . . . . . . . . . . . . . 13
Settings of the handset . . . . . . . . . . . . 15
Volumes and tunes . . . . . . . . . . . . . . . . . . . . . . . 15
Changing the display language . . . . . . . . . . . . . . 16
Resetting the handset to the factory defaults . . 16
Settings of the base unit . . . . . . . . . . . 18
Signaling method . . . . . . . . . . . . . . . . . . . . . . . . 18
Flash times („R key“) . . . . . . . . . . . . . . . . . . . . . 18
Pulse/no-pulse ratio. . . . . . . . . . . . . . . . . . . . . . . 19
Deactivating and reactivating automatic
attenuation equalization . . . . . . . . . . . . . . . . . . . 19
Resetting the base unit to the factory defaults. . 20
Appendix . . . . . . . . . . . . . . . . . . . . . . . . 21
Caring for your phone . . . . . . . . . . . . . . . . . . . . . 21
Troubleshooting . . . . . . . . . . . . . . . . . . . . . . . . . 21
Range . . . . . . . . . . . . . . . . . . . . . . . . . . . . . . . . . 22
Guarantee . . . . . . . . . . . . . . . . . . . . . . . . . . . . . . 22
Service . . . . . . . . . . . . . . . . . . . . . . . . . . . . . . . . 23
Menu overview . . . . . . . . . . . . . . . . . . . 24
Index . . . . . . . . . . . . . . . . . . . . . . . . . . . . 26
Pleas e also note the ind ex– page 26!
5
Page 6
Gi ga se t 2 00 , GBR, A31008-G200 -B 101-1- 7619 VOR BE REI.FM 28 .0 9. 01
h
Putting your phone into operation
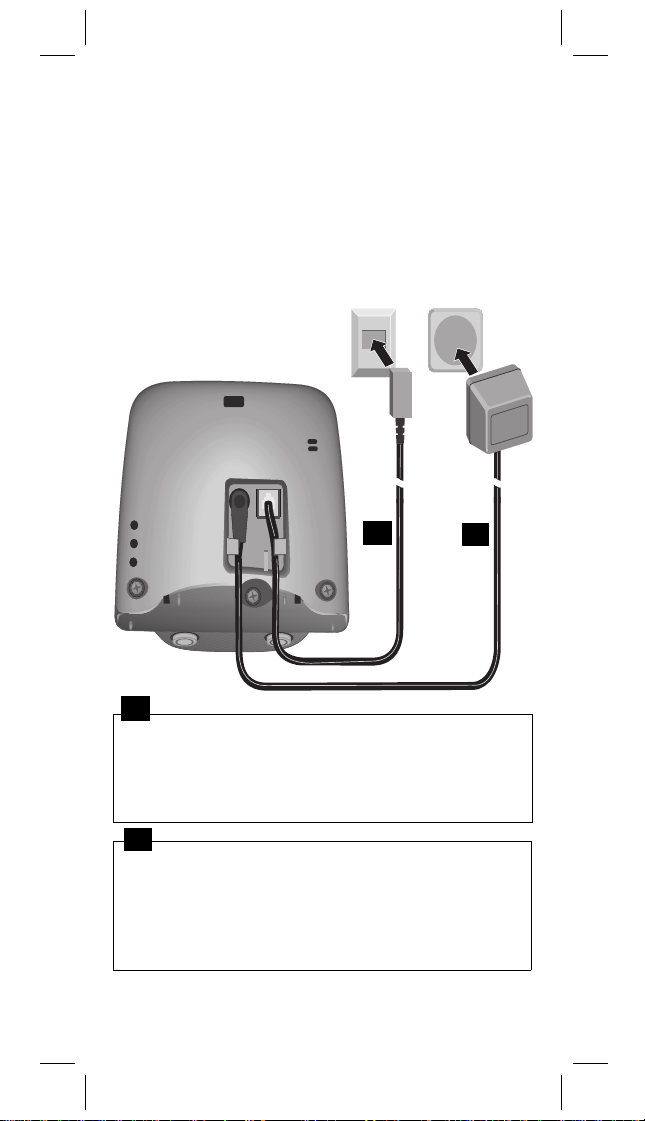
Step 1: Connect up the base unit
For the analog landline network
Plug-in power supply unit wit
power cable (220/230 V)*
Phone connector
with phone cable
1
1
Insert the small connector of the
●
line cord
the socket (engages).
Insert the cable in the cable duct.
●
Insert the phone connector in the phone socket.
●
2
Insert the small connector of the
●
power cable
into the socket.
Insert the cable in the cable duct.
●
Plug the 3-pin adaptor into a mains power socket
●
and switch on.
*Country-specific
6
2
into
Page 7
Gi ga se t 2 00 , GBR, A31008-G200 -B 101-1- 7619 VOR BE REI.FM 28 .0 9. 01
Use
only the plug-in power supply unit
!
●
provided
, as indicated on the bottom of
the base unit.
Important: new phone cable. Use only the
●
enclosed cable type.
If you purchase another cable, ensure that it
●
has the correct connector pin assignment.
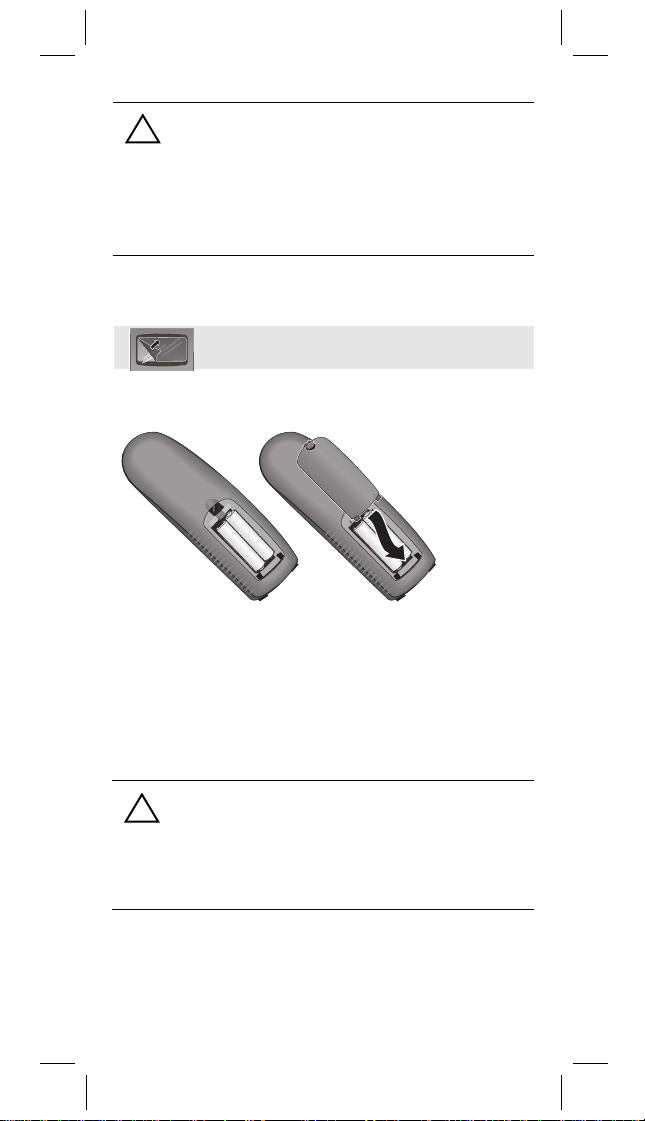
Step 2: Put the handset into operation
The display is protected by a plastic foil.
Please remove the protective foil.
Inserting the batteries
–
+
–
+
–
+
Insert the batteries with the
●
–
+
–
+
–
+
correct polarity
figure.
Put the lower end of the battery compartment cover
●
in position (see arrow), and press against the
_ribbing at the top until it engages.
To o pe n i t ,
●
!
lift the cover by the ribbing.
Use only
●
approved, rechargeable batter-
ies of the same type
. Otherwise you risk
damaging your health and the product.
Do not use charging units belonging to
●
other devices because they could damage
the batteries.
– see
7
Page 8

Gi ga se t 2 00 , GBR, A31008-G200 -B 101-1- 7619 VOR BE REI.FM 28 .0 9. 01
Step 3: Place the handset on
the base unit
In order to make calls, you need to register your handset with the base unit (to make it known to it). The following text appears on the display: "SEARCH BASE".
Put the handset on the base unit with the
. The following text appears on the display:
visible
"REGISTER HS".
It takes around
registered with the base unit. The idle display (battery
symbol) appears instead of the display "REGISTER
HS".
a minute
for the handset to be
Step 4: Charge the batteries
Leave the handset on the base unit for around five
hours in order to charge the batteries. A charging
indicator on the handset shows that the batteries are
being charged:
Batteries empty
H
(symbol flashes)
Batteries
F
Your phone is now ready for operation; you can start
calling.
2
charged
/
3
Batteries
G
charged
Batteries full
E
display
1
/
3
C
5 h
Note on the battery
After the batteries are charged for the first
8
8
●
time, you can put the handset back on the
base unit again after each call. Charging is
controlled electronically. This ensures that
the batteries are charged optimally and
economically.
The batteries become warm during charg-
●
ing; this is normal and not dangerous.
The charging status of the batteries is only
●
displayed correctly after an uninterrupted
charging/discharging process. You should
therefore avoid opening the battery
compartment unnecessarily.
Page 9
Gi ga se t 2 00 , GBR, A31008-G200 -B 101-1- 7619 VOR BE REI.FM 28 .0 9. 01
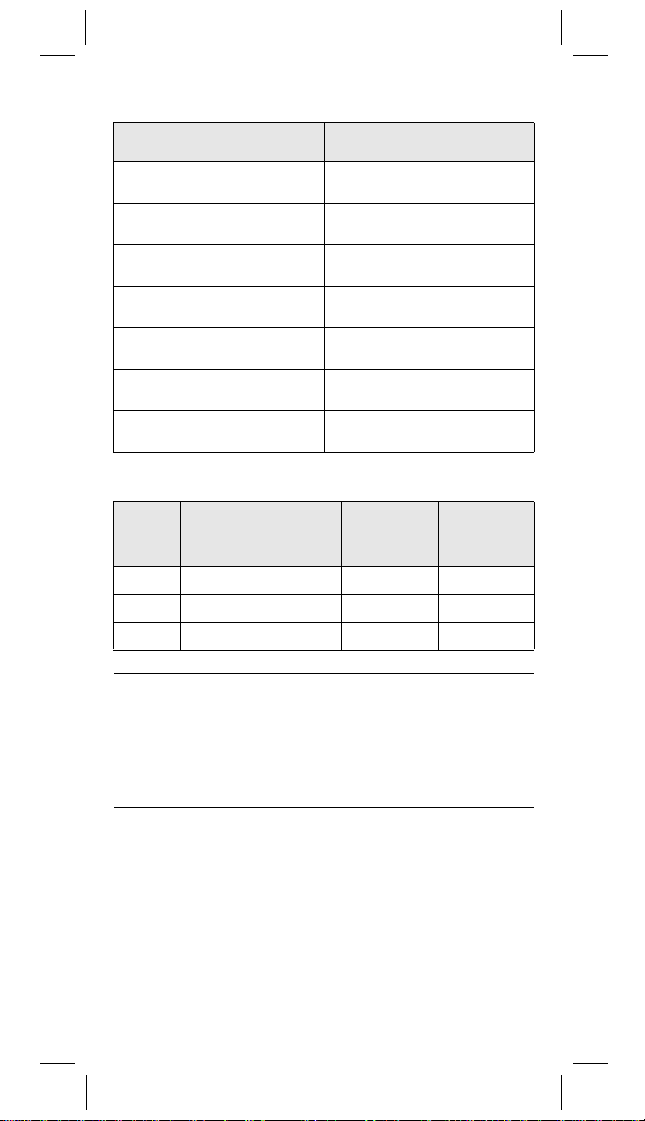
Recommended batteries
Nickel cadmium
Sanyo N-3U
(700 mAh)
Mobile Power 700
(700 mAh)
Panasonic 600 DT
(600 mAh)
Emmerich 700
(700 mAh)
(NiCd)
Nickel-metal hybrid
(NiMH)
Saft RH 6 NiMH 1300
(1300 mAh)
Panasonic HHR-110 AA
(1100 mAh)
Panasonic Pro+ 1500
(1500 mAh)
Sanyo HR-3U
(1600 mAh)
GP GP130 AAHC
(1300 mAh)
Varta Phone Power
(1300 mAh)
Emmerich 1300
(1300 mAh)
Operating times/charging times
Capa-
city
(mAh)
700 Up to 200 (8 days) Over 10 Approx. 5
1200 Up to 320 (13 days) Over 17 Approx. 9
1600 Up to 400 (16 days) Over 23 Approx. 12
Standby time
(hours)
Tal k ti me
(hours)
Charging
(hours)
time
The first time you charge the batteries, we
8
recommend an uninterrupted charging time as
specified in the table, regardless of the charging
status displayed.
The charging capacity of the batteries decreases as the years go by due to technical reasons.
9
Page 10

Gi ga se t 2 00 , GBR, A31008-G200 -B 101-1- 7619 TE LE F.FM 28 .0 9. 01
#
Making a phone call
Calling
Enter the call number.
or
8
!
C
You can also press the off-hook key
●
first
digit is selected immediately.
You can press the on-hook key to cancel
●
dialing.
You can use the key to enter a dialing
●
pause (hold it down). This is important for
foreign connections, for example.
Press the off-hook key.
Press the on-hook key to terminate the call
place the handset on the base
unit.
then
and
enter the call number – each
Accepting a call
Your phone rings (ringing tone).
Press the off-hook key to accept
the call.
Redialing
Your handset automatically saves the last five call
numbers selected.
Press the redial key. The redial list
appears.
34
10
Select the desired call number.
Press the off-hook key – the call
number is dialed.
Page 11

Gi ga se t 2 00 , GBR, A31008-G200 -B 101-1- 7619 TE LE F.FM 28 .0 9. 01
Displaying the caller's number (CLIP)
The prerequisites for this function are as follows:
You must have applied for CLIP from your network
●
provider.
The network provider must support call number
●
display (CLIP).
The call number must be transmitted when the
●
caller calls.
When a call is made,
the call number
appears on the display
(example).
8
If the call number consists of more than
twelve digits, an omission mark appears at
the beginning of the line ( ).
If the call number is not displayed, the following
appear:
If you have not applied for CLIP.
If the display of the number is "suppressed" by the caller or if the caller has
not applied for call number transmission.
--
E
Activating/deactivating the key lock
If you "lock" the keys, any inadvertent touching of the
keys remains without effect. In order to answer an
incoming call, press the off-hook key
3
To activate the lock, hold down
the key – you will here an
acknowledgment tone
symbol appears on the display.
To deactivate the lock, hold down
the
The symbol disappears.
3
key again.
.
*
. The
* Acknowledgment tone = ascending sequence of
tones
Error tone = descending sequence of tones
11
Page 12

Gi ga se t 2 00 , GBR, A31008-G200 -B 101-1- 7619 TE LE F.FM 28 .0 9. 01
#
#
Phone book
The
phone book
numbers. A maximum of 22 digits are possible for
each entry.
Storing a new entry
makes it easier to dial ten call
34
Open the phone book.
Select and confirm your desired
item from the list.
Enter the call number.
Confirm your entry.
Changing an entry
34
Open the phone book.
Select and confirm the desired
call number.
Change the call number.
Confirm your entry.
Using the phone book to dial
34
8
If no number is stored,
Open the phone book.
Page to the desired entry.
Press the off-hook key.
The call number is dialed.
NUMBER
.
Rapid dialing with the key
If you hold down the key, the number stored under
the list item "0"
hook key.
you dial frequently under "0" (e.g. the access number
of a network provider).
12
is selected. To dial it, press the off-
It is therefore advisable to store a number
Page 13

Gi ga se t 2 00 , GBR, A31008-G200 -B 101-1- 7619 mo bi lt _a n. fm 28 .0 9. 01
Registering the handset with the base unit
In order to make calls with your handset, you need to
register it with the base unit. This happens automatically the first time you use a handset.
8
Automatic registration:
Gigaset 200 handset to Gigaset 200
base unit
To find out how to register your handset with the base
unit (i.e. make it known to it), refer to
(see page 8).
Manual registration:
Gigaset 200 handset to Gigaset 200
base unit
Manual registration is necessary when:
●
●
Only one handset can be registered at any one
time.
"Step 3"
Automatic registration is not completed
successfully.
The handset provided is replaced.
after
Step 1:
REGISTER HS
3
BASE
Step 2:
Place the handset on the base unit.
After being successfully registered with the base unit,
the handset returns to the idle state.
Open the menu.
Select and confirm.
Confirm.
13
Page 14

Gi ga se t 2 00 , GBR, A31008-G200 -B 101-1- 7619 mo bi lt _a n. fm 28 .0 9. 01
#
Manual registration:
Gigaset 200 handset to other GAP base
units
Step 1:
Put the base unit on standby for registration (see the
user guide for the base unit).
Step 2:
REGISTER HS
3
GAP 1
3
After being successfully registered with the base unit,
the handset returns to the idle state.
Open the menu.
Select and confirm.
Select and confirm. "PIN" appears
on the display.
Enter the registration PIN (max. 8
digits) of the GAP base unit that
is on standby for registration
(e.g. "0000").
Confirm your entry.
14
Page 15

Gi ga se t 2 00 , GBR, A31008-G200 -B 101-1- 7619 MO BI LT.FM 28 .0 9. 01
Settings of the handset
You can change the settings of your handset to suit
your requirements. The current setting always has a
check mark against it.
Volumes and tunes
Receiver volume
There are three settings for the receiver volume.
HANDSET VOL
SET LEVEL 2
3
Ringing tone volume
There are four settings for the ringing tone volume.
RINGER VOL
3
SET LEVEL 2
3
Open the menu.
Confirm.
The receiver volume and the
associated number are displayed.
Select and confirm the desired
setting (1–3).
Open the menu.
Select and confirm.
The current volume is emitted,
and the associated number is
displayed. Select and confirm the
desired setting (1–4).
Ringing tone tune
There are five different tunes to choose from.
3
3
MELODY
MELODY 4
Open the menu.
Select and confirm.
The current tune is emitted, and
the associated number is
displayed. Select and confirm the
desired tune (1–5).
15
Page 16

Gi ga se t 2 00 , GBR, A31008-G200 -B 101-1- 7619 MO BI LT.FM 28 .0 9. 01
Changing the display language
The menu overview provides orientation here (see
page 24).
LANGUAGE
3
ENGLISH
3
If you inadvertently set the wrong language
8
(i.e. one you don't understand), you can change
the setting by pressing
the handset. You can then select the correct
language by paging through the menu and
confirming it with the
You will find a list of the available languages in
the menu overview on page 24.
Open the menu.
Select and confirm.
Select and confirm the
desired language (e.g. English).
followed by .on
key.
Resetting the handset to the factory defaults
HS RESET
3
RESET YES?
3
or
RESET NO?
After the handset is reset, it must be replaced
8
on the base unit with the
front
, see "
16
Open the menu.
Select and confirm.
Select and confirm.
The handset has the factory
defaults again.
select and confirm.
Step 3
display visible at the
" (page 8).
Page 17

Gi ga se t 2 00 , GBR, A31008-G200 -B 101-1- 7619 MO BI LT.FM 28 .0 9. 01
Factory defaults of the handset:
Function Factory default
Receiver volume 1
Ringing tone volume 3
Ringing tone tune 1
Display language Country-specific
Redial list Deleted
Phone book Deleted
Key lock Off
Standby for registration On
17
Page 18

Gi ga se t 2 00 , GBR, A31008-G200 -B 101-1- 7619 BAS ISST.F M 28.09.01
Settings of the base unit
Normally, no changes are necessary to settings in the
base unit.
Settings in the base unit can be easily changed by
using the mobile part if necessary.
Prerequisite:
The handset must be registered with the base unit.
Signaling method
You use this function to change to the pulse signaling
method.
Factory default: Multifrequency signaling method.
DIAL MODE
PULSE
3
or
TONE
Press the off-hook key.
The following appears on the
display
Open the menu.
Confirm.
Select and confirm your desired
signaling method
select and confirm.
"
.
"
8
If you hold down the 4 key, you
cally
subsequent call.
Press the on-hook key.
automati-
have multifrequency signaling for the
Flash times („R key“)
This function allows you to change the set flash time
(factory default see page 20).
3
3
18
TBR
180 MS
Press the off-hook key.
Open the menu.
Select and confirm.
Select and confirm the desired
flash time (80, 100, 120, 180,
250, 300 or 600 ms).
Press the on-hook key.
Page 19

Gi ga se t 2 00 , GBR, A31008-G200 -B 101-1- 7619 BAS ISST.F M 28.09.01
Pulse/no-pulse ratio
This function changes the pulse/no-pulse ratio (for
pulse signaling).
Press the off-hook key.
PULSE PAUSE
3
2 - 1
3
Open the menu.
Select and confirm.
Select and confirm the desired
pulse/no-pulse ratio.
Press the on-hook key.
Deactivating and reactivating automatic attenuation equalization
If a device is delivered with automatic attenuation
equalization, automatic attenuation equalization is
always activated on delivery and should (normally)
remain activated.
Automatic attenuation equalization can be deactivated
in the following
unit is connected to a telephone system.
AGC
3
AGC OFF
or
AGC ON
3
exceptional
Press the off-hook key.
Open the menu.
Select and confirm.
Select and confirm.
Select and confirm.
Press the on-hook key.
*
case: when your base
* Not available in all countries
19
Page 20

Gi ga se t 2 00 , GBR, A31008-G200 -B 101-1- 7619 BAS ISST.F M 28.09.01
Resetting the base unit to the factory defaults
The handset remains registered when the base unit is
reset.
Press the off-hook key.
BASE RESET
3
RESET YES?
3
or
RESET NO?
Factory defaults of the base unit:
Function Factory default
Signaling method Multifrequency signaling
Flash time 100 ms
Open the menu.
Select and confirm.
Select and confirm.
The base unit has the factory
defaults again
select and confirm.
Press the on-hook key.
20
Page 21

Gi ga se t 2 00 , GBR, A31008-G200 -B 101-1- 7619 An ha .f m 28 .0 9. 01
Appendix
Caring for your phone
Wipe the base unit and handset with a
antistatic cloth.
of static charge.
use a dry cloth. There is a risk
Never
damp cloth
Troubleshooting
Should your phone not be doing what you want it to
do, try to solve the problem yourself with the help of
the following list.
or
Problem Possible
Nothing appears
on the display.
No response to
keystroke.
No radio link to
the base unit –
the following
message
appears on the
display:
"SEARCH BASE".
The number of
the caller is not
displayed in spite
of CLIP (see
page 11).
cause
The batteries are
empty.
The key lock is
switched on.
The handset is
outside the
range of the
base unit.
The handset is
not registered
with the base
unit.
The base unit is
not switched on.
Number transmission is
disabled.
Solution
Charge or replace the batteries. (see page 8).
Hold down the
key.
3
Reduce the distance between
the handset and
the base unit.
Register the
handset with the
base unit (see
page 13).
Check the power
plug on the base
unit
(see page 6).
The caller must
apply to the
network provider
to have his or her
number transmitted.
21
Page 22

Gi ga se t 2 00 , GBR, A31008-G200 -B 101-1- 7619 An ha .f m 28 .0 9. 01
Range
The range outdoors when there are no obstructions is
around 200 m. Indoors, ranges of up to 30 m are possible. If you exceed the range, the following message
appears on the display: "SEARCH BASE".
Guarantee
Over the guarantee period from the date of purchase
from the stockist, Siemens AG will rectify all material
or manufacturing defects by repairing or replacing the
defective device.
As of 01.01.2002, the European guarantee period will
be 24 months (until 31.12.2001: 12 months).
The guarantee does not cover damage caused by
improper use, wear and tear or third party access. The
guarantee shall not cover consumables or defects
which only slightly decrease the value or serviceability
of the device.
Warranty giver for United Kingdom:
Siemens plc, ICM
Siemens House, Oldbury, Bracknell
Berkshire RG12 8FZ
Warranty giver for Ireland:
Siemens Limited, ICM
Fitzwilliam Court, Leeson Close
Dublin 2
22
Page 23

Gi ga se t 2 00 , GBR, A31008-G200 -B 101-1- 7619 An ha .f m 28 .0 9. 01
Service
United
Kingdom:
Ireland:
Siemens Service should be contacted if prob-
8
lems arise with the unit. Your specialist dealer will
be happy to answer any questions on unit operation. Contact your network provider for questions
concerning telephone connections.
Your Gigaset is intended for operation in your country,
as depicted on the underside of the base unit.
Country-specific features have been taken into
account.
The conformity of the device with the essential
requirements of the R&TTE directive is confirmed by
the CE symbol.
Excerpt from the original declaration:
"We, Siemens AG, declare, that the above mentioned
product is manufactured according to our Full Quality
Assurance System certified by CETECOM ICT Services GmbH with the registration number "Q810820M" in
compliance with ANNEX V of the R&TTE Directive 99/
05/EC. The presumption of conformity with the essential requirements regarding Council Directive 99/05/EC
is ensured.
Siemens hotline
Tel.: 08705 334411
Siemens hotline
Tel.: 01850777277
Senior Approvals Manager“
The Declaration of Conformity (DoC) has been signed. In
case of need, a copy of the original DoC can be made available via the company hotline.
23
Page 24

Gi ga se t 2 00 , GBR, A31008-G200 -B 101-1- 7619 Menu.fm 28.09.01
Menu overview
You can select a menu function more quickly if, rather
than paging through the menu, you simply press the
relevant keys when the device is in the idle state.
Examples:
To se t the
handset
, press
display language.
You select the desired language by paging through the
menu and confirming it with the
To set the
base unit
, press
signaling method.
You select the desired signaling method by paging
through the menu and confirming it with the
You then press the key.
If the language “4_15” is set, the numeric
8
values (“1 _ 1”) contained in the menu overview appear on the display
and then call .=
key.
and then call =
key.
Settings of the handset:
1 _ HANDSET VOL 1 _ 1 SET LEVEL 1
24
2 _ RINGER VOL 2 _ 1 SET LEVEL 1
--
3 _ MELODY 3 _ 1 MELODY 1
4 _ LANGUAGE 4 _ 1 GERMAN 4 _ 9 NORWEGIAN
..
1 _ 2 SET LEVEL 2
1 _ 3 SET LEVEL 3
2 _ 2 SET LEVEL 2
2 _ 3 SET LEVEL 3
2 _ 4 SET LEVEL 4
3 _ 2 MELODY 2
3 _ 3 MELODY 3
3 _ 4 MELODY 4
3 _ 5 MELODY 5
4 _ 2 ENGLISH 4 _ 10 SWEDISH
4 _ 3 FRENCH 4 _ 11 FINNISH
4 _ 4 ITALIAN 4 _ 12 CZECH
4 _ 5 SPANISH 4 _ 13 POLISH
4 _ 6 PORTUGUESE 4 _ 14 TURKISH
4 _ 7 DUTCH 4 _ 15 4 _ 15
4 _ 8 DANISH
Page 25

Gi ga se t 2 00 , GBR, A31008-G200 -B 101-1- 7619 Menu.fm 28.09.01
5 _ HS RESET 5 _ 0 RESET NO?
//
6 _ REGISTER HS 6 _ 1 BASE
00
5 _ 1 RESET YES?
6 _ 2 GAP 1
6 _ 3 GAP 2
Settings of the base unit:
2 _ TBR 2 _ 80 MS 80 MS
--
3 _ BASE RESET 3 _ 1 RESET NO?
4 _ PULSE PAUSE 4 _ 1_5 - 2 1_5 - 1
..
5 _ AGC* 5 _ 0 AGC OFF
//
1 _ 2 PULSE
2 _ [..] MS [..] ms
2 _ 600 MS 600 MS
3 _ 2 RESET YES?
4 _ 2 - 1 2 - 1
5 _ 1 AGC ON
1 _ DIAL MODE 1 _ 1 TONE
* Not available in all countries
25
Page 26

Gi ga se t 2 00 , GBR, A31008-G200 -B 101-1- 7619 410 _Jako bSIX.fm 2 8. 09 .01
Index
A
Acknowledgment tone 11, 19
Activating
automatic attenuation
equalization 19
key lock 11
Answering a call 10
Automatic attenuation
equalization 19
Automatic registration 13
B
Base unit
connecting up 6
resetting to factory
defaults 20
Batteries
charging 8
inserting 7
recommended batteries 9
Brief overview 2
C
Call
answering 10
terminating 10
Call number
changing 12
dialing 10
displaying (CLIP) 11
redialing 10
storing 12
Calling 10
Canceling (a function) 2
Caring for your phone 21
Changing 16
Charging indicator 8
Charging times and
capacity 9
Check mark (on the
display) 15
CLIP (call number
display) 11
Connector pin assignment 6
D
Deactivating
automatic attenuation
equalization 19
key lock 11
Dialing 10
Display 2
Display language 16
Display symbols 2
E
Entry (phone book) 12
Error tone 11, 19
F
Factory defaults
of the base unit 20
of the handset 16
Flash times 18
G
GAP base units 14
Guarantee 22
H
Handset
disabling 11
putting into operation 7
resetting to factory
defaults 16
Hearing aids 4
Help with problems 21
I
Idle display 8
K
Key lock 11
Keys 2
L
Language (display) 16
List item 2, 12
26
Page 27

Gi ga se t 2 00 , GBR, A31008-G200 -B 101-1- 7619 410 _Jako bSIX.fm 2 8. 09 .01
M
Manual registration 13
Medical equipment 4
Menu overview 24
Multifrequency signaling
method 18
N
Network provider 11
New entry (phone book) 12
Number, see call number 11
O
Operating times 9
Operation, putting your
phone into 6
P
Pause 10
Phone book 12
changing an entry 12
dialing a call number 12
storing a new entry 12
Phone cable 6
Phone connector 6
Phone, putting into
operation 6
Phoning
answering a call 10
calling 10
Plug-in power supply unit 6
Power cable 6
Protective foil 7
Pulse signaling method 18
Pulse/no-pulse ratio 19
R
Range 22
Rapid dialing 12
Receiver volume 15
Redialing 10
Registration (handset)
automatically 13
manually 13
to other GAP base units 14
Ringing tone 15
Ringing tone tune 15
Ringing tone volume 15
S
Safety information 4
Service 23
Settings
display language 16
of the base unit 25
of the handset 15, 24
Settings of the base unit 18
Signaling method 18
Special characters 2
Symbols 2
T
Troubleshooting 21
Tune 15
V
Volume 15
27
 Loading...