

Page 1
MODEL W1704
BENCH TOP LATHE
INSTRUCTION MANUAL
Phone: 1-360-734-3482 • On-Line Technical Support: tech-support@shopfox.biz
COPYRIGHT © DECEMBER, 2003 BY WOODSTOCK INTERNATIONAL, INC. REVISED APRIL, 2013 (TR)
WARNING: NO PORTION OF THIS MANUAL MAY BE REPRODUCED IN ANY SHAPE OR FORM WITHOUT
THE WRITTEN APPROVAL OF WOODSTOCK INTERNATIONAL, INC.
Printed in China#5378TR
Page 2

This manual provides critical safety instructions on the proper setup,
operation, maintenance, and service of this machine/tool. Save this
document, refer to it often, and use it to instruct other operators.
Failure to read, understand and follow the instructions in this manual
may result in fire or serious personal injury—including amputation,
electrocution, or death.
The owner of this machine/tool is solely responsible for its safe use.
This responsibility includes but is not limited to proper installation in
a safe environment, personnel training and usage authorization,
proper inspection and maintenance, manual availability and comprehension, application of safety devices, cutting/sanding/grinding tool
integrity, and the usage of personal protective equipment.
The manufacturer will not be held liable for injury or property
damage from negligence, improper training, machine modifications or
misuse.
Some dust created by power sanding, sawing, grinding, drilling, and
other construction activities contains chemicals known to the State of
California to cause cancer, birth defects or other reproductive harm.
Some examples of these chemicals are:
• Lead from lead-based paints.
• Crystalline silica from bricks, cement and other masonry products.
• Arsenic and chromium from chemically-treated lumber.
Your risk from these exposures varies, depending on how often you
do this type of work. To reduce your exposure to these chemicals:
Work in a well ventilated area, and work with approved safety equipment, such as those dust masks that are specially designed to filter
out microscopic particles.
Page 3

CONTENTS
INTRODUCTION ............................................................................................ 2
About Your New Lathe ......................................................................................... 2
Woodstock Technical Support .................................................................................2
Warranty and Returns .......................................................................................... 3
Specifications .................................................................................................. 3
SAFETY ...................................................................................................... 4
Standard Safety Instructions .................................................................................. 4
Know Your Machine ............................................................................................. 6
Important Lathe Terms & Definitions ........................................................................ 7
Safety Instructions for Your Lathe ........................................................................... 8
Avoiding Potential Injuries .................................................................................... 9
110V Operation ............................................................................................... 10
Extension Cords ............................................................................................... 10
Grounding ...................................................................................................... 10
INTRODUCTION
SAFETY
ASSEMBLY
ASSEMBLY ..................................................................................................11
Unpacking ...................................................................................................... 11
Inventory ....................................................................................................... 11
Shop Preparation ............................................................................................. 12
Initial Cleaning ................................................................................................ 12
Installing Centers ............................................................................................. 13
Removing Centers ............................................................................................ 13
Face Plate ..................................................................................................... 14
Tool Rest ....................................................................................................... 14
ADJUSTMENTS ............................................................................................15
Lock Handles .................................................................................................. 15
Tailstock Barrel ............................................................................................... 15
OPERATIONS...............................................................................................16
Test Run ........................................................................................................ 16
Operation Tips ................................................................................................ 17
Selecting Turning Tools ...................................................................................... 18
Spindle Turning ................................................................................................ 19
Face Plate Turning ............................................................................................ 20
Sanding/Finishing ............................................................................................. 21
MAINTENANCE ............................................................................................22
General ......................................................................................................... 22
Lubrication .................................................................................................... 22
ADJUSTMENTS
OPERATIONS
MAINTENANCE
WIRING DIAGRAM .........................................................................................23
PARTS ...................................................................................................... 24
TROUBLESHOOTING ......................................................................................26
USE THE QUICK GUIDE PAGE LABELS TO SEARCH OUT INFORMATION FAST!
PARTS
Page 4

INTRODUCTION
This machine has been specially designed to provide many years of trouble-free service. Close attention
to detail, ruggedly built parts and a rigid quality control program assure safe and reliable operation.
Woodstock International, Inc. is committed to customer satisfaction. Our intent with this manual is to
include the basic information for safety, setup, operation, maintenance, and service of this product.
We stand behind our machines! In the event that questions arise about your machine, please contact
Woodstock International Technical Support at (360) 734-3482 or send e-mail to: tech-support@shopfox.
biz. Our knowledgeable staff will help you troubleshoot problems and process warranty claims.
If you need the latest edition of this manual, you can download it from http://www.shopfox.biz.
If you have comments about this manual, please contact us at:
INTRODUCTION
Woodstock Technical Support
Woodstock International, Inc.
Attn: Technical Documentation Manager
P.O. Box 2309
Bellingham, WA 98227
Email: manuals@woodstockint.com
-2-
Page 5

WARRANTY
WARRANTY
Woodstock International, Inc. warrants all Shop Fox machinery to be free of defects from workmanship
and materials for a period of two years from the date of original purchase by the original owner.
This warranty does not apply to defects due directly or indirectly to misuse, abuse, negligence or
accidents, lack of maintenance, or reimbursement of third party expenses incurred.
Woodstock International, Inc. will repair or replace, at its expense and at its option, the Shop Fox
machine or machine part, which in normal use has proven to be defective, provided that the original
owner returns the product prepaid to a Shop Fox factory service center with proof of their purchase
of the product within two years, and provides Woodstock International, Inc. reasonable opportunity to
verify the alleged defect through inspection. If it is determined there is no defect, or that the defect
resulted from causes not within the scope of Woodstock International Inc.'s warranty, then the original
owner must bear the cost of storing and returning the product.
This is Woodstock International, Inc.'s sole written warranty and any and all warranties that may
be implied by law, including any merchantability or fitness, for any particular purpose, are hereby
limited to the duration of this written warranty. We do not warrant that Shop Fox machinery complies
with the provisions of any law or acts. In no event shall Woodstock International, Inc.'s liability under
this warranty exceed the purchase price paid for the product, and any legal actions brought against
Woodstock International, Inc. shall be tried in the State of Washington, County of Whatcom. We shall
in no event be liable for death, injuries to persons or property or for incidental, contingent, special or
consequential damages arising from the use of our products.
INTRODUCTION
INTRODUCTION
Every effort has been made to ensure that all Shop Fox machinery meets high quality and durability
standards. We reserve the right to change specifications at any time because of our commitment to
continuously improve the quality of our products.
Specifications
Motor Size ..........................................................1⁄3 HP, 110V, Universal-Type Motor
Motor Speed ................................................................................ 700-3200 RPM
Amp Draw ................................................................................................ 4 A
Distance Between Centers ............................................................................ 13"
Turning Diameter .........................................................................................8"
Spindle Taper ......................................................................................... MT #1
Tailstock Taper ....................................................................................... MT #1
3
Spindle Size .............................................................................
Machine Weight ......................................................................................45 lbs
Footprint .........................................................................................23
⁄4" x 16 TPI (RH)
1
⁄2" X 5"
-3-
Page 6

SAFETY
SAFETY
READ MANUAL BEFORE OPERATING MACHINE.
FAILURE TO FOLLOW INSTRUCTIONS BELOW WILL
SAFETY
1. READ THROUGH THE ENTIRE MANUAL BEFORE STARTING MACHINERY. Machinery presents serious
2. ALWAYS USE ANSI APPROVED SAFETY GLASSES WHEN OPERATING MACHINERY. Everyday eye-
3. ALWAYS WEAR A NIOSH APPROVED RESPIRATOR WHEN OPERATING MACHINERY THAT PRODUCES
RESULT IN PERSONAL INJURY.
Indicates an imminently hazardous situation which, if not avoided, WILL
result in death or serious injury.
Indicates a potentially hazardous situation which, if not avoided, COULD
result in death or serious injury.
Indicates a potentially hazardous situation which, if not avoided, MAY
result in minor or moderate injury.
This symbol is used to alert the user to useful information about proper
NOTICE
operation of the equipment, and/or a situation that may cause damage
to the machinery.
Standard Safety Instructions
Standard Machinery Safety
injury hazards to untrained users.
glasses only have impact resistant lenses—they are NOT safety glasses.
DUST. Wood dust is a carcinogen and can cause cancer and severe respiratory illnesses.
4. ALWAYS USE HEARING PROTECTION WHEN OPERATING MACHINERY. Machinery noise can cause
permanent hearing damage.
5. WEAR PROPER APPAREL. DO NOT wear loose clothing, gloves, neckties, rings, or jewelry which may
get caught in moving parts. Wear protective hair covering to contain long hair and wear non-slip
footwear.
6. NEVER OPERATE MACHINERY WHEN TIRED, OR UNDER THE INFLUENCE OF DRUGS OR ALCOHOL.
Be mentally alert at all times when running machinery.
7. ONLY ALLOW TRAINED AND PROPERLY SUPERVISED PERSONNEL TO OPERATE MACHINERY. Make
sure operation instructions are safe and clearly understood.
8. KEEP CHILDREN AND VISITORS AWAY. Keep all children and visitors a safe distance from the work
area.
9. MAKE WORKSHOP CHILD PROOF. Use padlocks, master switches, and remove start switch keys.
-4-
Page 7

10. NEVER LEAVE WHEN MACHINE IS RUNNING. Turn power OFF and allow all moving parts to come to
a complete stop before leaving machine unattended.
11. DO NOT USE IN DANGEROUS ENVIRONMENTS. DO NOT use machinery in damp, wet locations, or
where any flammable or noxious fumes may exist.
12. KEEP WORK AREA CLEAN AND WELL LIT. Clutter and dark shadows may cause accidents.
13. USE A GROUNDED EXTENSION CORD RATED FOR THE MACHINE AMPERAGE. Undersized cords over-
heat and lose power. Replace extension cords if they become damaged. DO NOT use extension cords
for 220V machinery.
14. ALWAYS DISCONNECT FROM POWER SOURCE BEFORE SERVICING MACHINERY. Make sure switch is
in OFF position before reconnecting.
15. MAINTAIN MACHINERY WITH CARE. Keep blades sharp and clean for best and safest performance.
Follow instructions for lubricating and changing accessories.
16. MAKE SURE GUARDS ARE IN PLACE AND WORK CORRECTLY BEFORE USING MACHINERY.
17. REMOVE ADJUSTING KEYS AND WRENCHES. Make a habit of checking for keys and adjusting
wrenches before turning machinery ON.
SAFETY
18. CHECK FOR DAMAGED PARTS BEFORE USING MACHINERY. Check for binding and alignment of
parts, broken parts, part mounting, loose bolts, and any other conditions that may affect machine
operation. Repair or replace damaged parts.
19. USE RECOMMENDED ACCESSORIES. Refer to the instruction manual for recommended accessories.
The use of improper accessories may cause risk of injury.
20. DO NOT FORCE MACHINERY. Work at the speed for which the machine or accessory was designed.
21. SECURE WORKPIECE. Use clamps or a vise to hold the workpiece when practical. A secured
workpiece protects your hands and frees both hands to operate the machine.
22. DO NOT OVERREACH. Keep proper footing and balance at all times.
23. MANY MACHINES WILL EJECT THE WORKPIECE TOWARD THE OPERATOR. Know and avoid condi-
tions that cause the workpiece to "kickback."
24. ALWAYS LOCK MOBILE BASES (IF USED) BEFORE OPERATING MACHINERY.
25. BE AWARE THAT CERTAIN DUST MAY BE HAZARDOUS to the respiratory systems of people and
animals, especially fine dust. Make sure you know the hazards associated with the type of dust you
will be exposed to and always wear a respirator approved for that type of dust.
-5-
Page 8
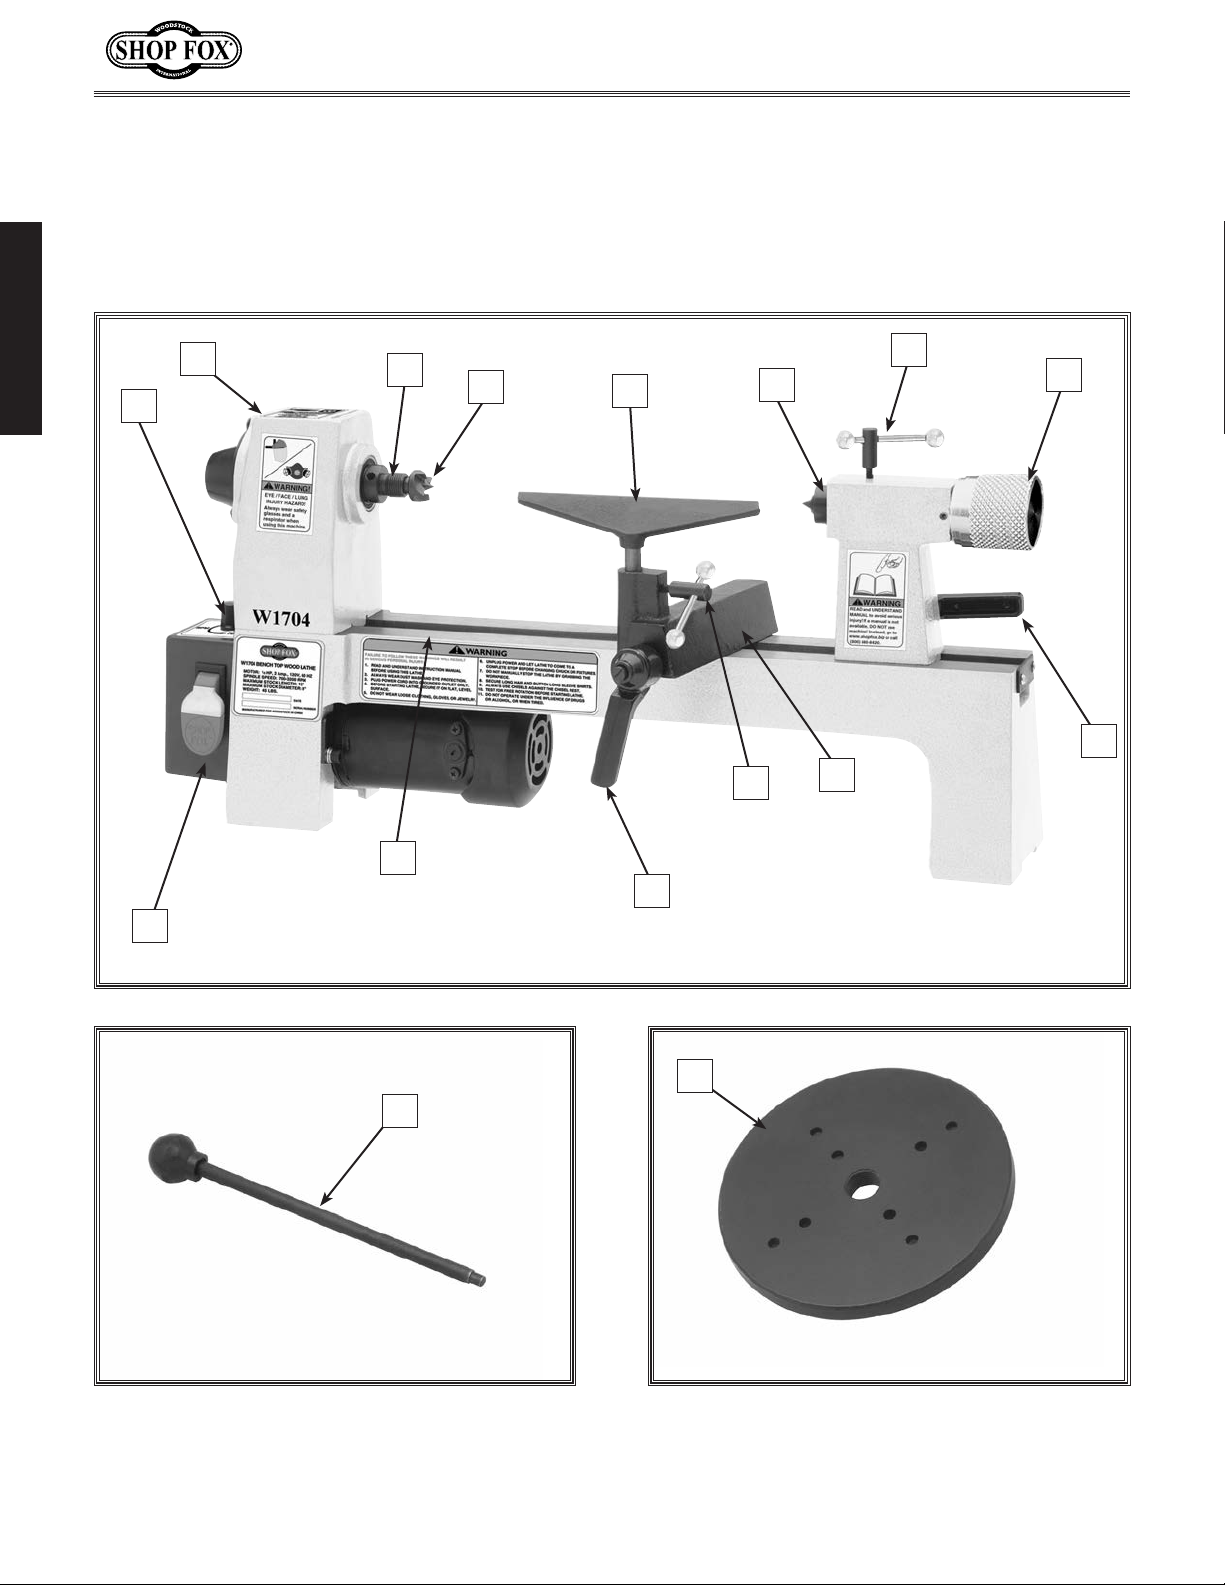
Know Your Machine
An important part of safety is knowing your machine and its components. Please take the time to learn
the items shown in the pictures below. The letters in the picture correspond to the following descriptions in the text.
SAFETY
B
A
N
C
M
D
E
L
F
K
J
G
H
I
P
O
-6-
Page 9

A. Variable Speed Control Dial—Controls the
speed of the lathe spindle. Always turn this
dial to the lowest setting before starting the
lathe.
B. Headstock—The housing that holds the spin-
dle on the lathe.
C. Headstock Spindle—Tapered at the inside
end to accept the shank of a Morse Taper
#1 (MT#1) spur center and threaded on the
outside end to accept the threads of a face
plate. The headstock spindle is also hollow
for easy removal of the spur center with a
knock-out tool.
D. Spur Center—Attaches the workpiece to the
spindle for turning operations.
E. Tool Rest—Supports tools used during turn-
ing operations.
M. Lathe Bed—Provides a sliding surface for
the tool rest holder and tailstock adjustments.
N. Lock-Out Paddle Switch—Turns lathe ON/
OFF only when the safety key is installed.
O. Knock-Out Tool—Used to remove the spur
and live centers from their tapered spindles.
P. Face Plate—Threads onto the headstock
spindle for non-spindle turning (usually used
for making bowls or other items that cannot
be supported from the tailstock).
Important Lathe
Terms & Definitions
SAFETY
F. Live Center—Mounts in the tailstock barrel
taper and supports the workpiece from the
opposite side of the spur center by engaging
in the workpiece and spinning freely.
G. Tailstock Barrel Lock—Locks the tailstock
barrel in place after being driven into the
workpiece and before starting the lathe.
H. Tailstock Adjustment Knob—Moves the
tailstock barrel in/out to firmly embed the
live center into the workpiece.
I. Tailstock Lock—Locks the tailstock into
position along the bed.
J. Tool Rest Holder—Mounts the tool rest to
the bed and adjusts perpendicular to the
bed to bring the tool rest closer/farther
from the workpiece.
K. Tool Rest Lock—Secures the tool rest into
position at the proper height needed for the
workpiece.
In order for the safety warnings and operation
instructions to be fully understood, please take
time to learn these important lathe terms and
definitions.
Spindle Turning—When a workpiece is mounted between both spur (headstock) and live
(tailstock) centers.
Face Plate Turning—When a workpiece is
mounted to the face plate, which is mounted to
the headstock spindle. The face plate has holes
for attaching the workpiece or a backing block
with screws.
Backing Block—A waste board that is screwed
or bolted to the face plate, then centered and
glued to the workpiece, so that the workpiece
can be attached to the face plate without drilling or screwing marks.
Center Line—The imaginary line running from
the center of the headstock spindle to the center of the tailstock barrel.
L. Tool Rest Holder Lock—Secures the tool
rest holder when the tool rest is the proper
distance from the workpiece.
Rough Cutting—The initial stage of all turning
operations when the workpiece still has corners
and has not been rounded. Rough cutting strains
the lathe and operator more than regular turning; therefore, special precautions will apply.
-7-
Page 10

1. KEEPING GUARDS IN PLACE. Make sure all guards are in place and that the lathe sits on a flat, stable
2. EYE/FACE PROTECTION. Always wear eye protection or a face shield when operating the lathe.
3. RESPIRATORY PROTECTION. Always wear a respirator when using this machine. Wood dust may
SAFETY
SAFETY
4. MOUNTING WORKPIECE. Before starting, be certain the workpiece has been properly imbedded on
5. WORKPIECE CONDITION. Always inspect the condition of your workpiece. DO NOT turn pieces with
6. ADJUSTING TOOL REST. Adjust tool rest to provide proper support for the turning tool you will be
7. TURNING SPEED. Select the correct turning speed for your work, and allow the lathe to gain full
Additional Safety for Wood Lathes
surface.
cause allergies or long-term respiratory health problems.
the headstock and tailstock centers and that there is adequate clearance for the full rotation.
knots, splits, and other potentially dangerous conditions. Make sure joints of glued-up pieces have
high quality bonds and won't fly apart during operation.
using. Test tool rest clearance by rotating workpiece by hand before turning lathe ON.
speed before using.
8. USING SHARP CHISELS. Keep lathe chisels properly sharpened and held firmly in position when turning.
9. OPERATING DAMAGED LATHE. Never operate the lathe with damaged or worn parts.
10. ADJUSTMENTS/MAINTENANCE. Make sure your wood lathe is turned OFF, disconnected from its
power source, and all moving parts have come to a complete stop before starting any inspection,
adjustment, or maintenance procedure.
11. STOPPING LATHE. DO NOT stop the lathe by using your hand against the workpiece. Allow the lathe
to stop on its own.
12. AVOIDING ENTANGLEMENT. Keep long hair and loose clothing articles such as sleeves, belts, and
jewelry items away from the lathe spindle.
13. FACEPLATE TURNING. When face plate turning, use lathe chisels on the downward spinning side of
the workpiece only.
14. SANDING/POLISHING. Remove the tool rest when performing sanding or polishing operations on the
rotating spindle.
15. MATERIAL REMOVAL RATE. Removing too much material at once may cause workpiece to fly out of
the lathe.
16. REDUCING WORKPIECE VIBRATION. If the workpiece vibrates, immediately turn the lathe OFF.
Check to make sure the workpiece is centered and balanced. Trim excess waste off corners with a
bandsaw or table saw to reduce vibration. Make sure workpiece is securely attached in setup.
-8-
-8-
Page 11

Avoiding Potential Injuries
SAFETY
Figure 1. Center fully embedded in workpiece.
Figure 3. Sleeves rolled up and out of the way
of the moving machinery.
Figure 2. DO NOT operate without centers
firmly embedded in workpiece.
Figure 4. DO NOT operate with long sleeves
rolled down near moving machinery.
Figure 5. Always use the tool rest.
Figure 6. DO NOT cut without using tool rest.
-9-
Page 12

ELECTRICAL
The Model W1704 is wired for 110V operation. Always connect this machine to a dedicated circuit (wire, breaker,
plug, receptacle) with a verified ground, using the recommended circuit size and plugs/receptacles listed at the
SAFETY
SAFETY
bottom of this page.
We recommend connecting this machine to a dedicated
circuit with a verified ground, using the circuit size given
below. Never replace a circuit breaker with one of higher
amperage without consulting a qualified electrician to
ensure compliance with wiring codes.
This machine must be grounded! The electrical cord supplied with this machine comes with a grounding pin. If
your outlet does not accommodate a ground pin, have it
replaced by a qualified electrician.
If you are unsure about the wiring codes in your area
or you plan to connect your machine to a shared circuit, you may create a fire or circuit overload hazard—
consult a qualified electrician to reduce this risk.
We do not recommend using an extension cord; however,
if you have no alternative, use the following guidelines:
110V Operation
Extension Cords
110V
5-15 PLUG
Figure 7. 5-15 plug and receptacle.
DO NOT work on your electrical system
if you are unsure about electrical
codes and wiring! Seek assistance from
a qualified electrician. Ignoring this
warning can cause electrocution, fire,
or machine damage.
GROUNDED
5-15 RECEPTACLE
Grounding Prong
Neutral Hot
• Use a cord rated for Standard Service (S).
• Do not use a cord longer than 50 feet.
• Ensure that the cord has a ground wire and pin.
• Use the gauge size listed below as a minimum.
Electrical Specifications
Operating Voltage Amp Draw Min. Circuit Size Plug/Receptacle Extension Cord
110V Operation
4A
15A NEMA 5-15 14 Gauge
-10-
-10-
Page 13

ASSEM BLY
Unpacking
Read and understand this
entire instruction manual before performing
any operations with your
machine. Serious personal
injury may occur if safety
and operational information is not understood and
followed.
The SHOP FOX® Model W1704 has been carefully packaged for safe transporting. If you notice
the machine has been damaged, please contact
your authorized SHOP FOX
®
dealer immediately.
ASSEMBLY
Inventory
Layout and inventory the package contents listed below and familiarize yourself with the com-
The Model W1704 is
a heavy machine at
46 lbs. Use assistance
when lifting or moving
the machine.
4
2
6
ponents shown in Figure 8 to ease assembly.
Note: Some parts and hardware may already
be installed on the machine. Check the machine
when you use this inventory list.
Item Qty.
1. Lathe Unit (not shown) ....................... 1
2. Spur Center..................................... 1
3. Live Center ..................................... 1
4. Face Plate ...................................... 1
1
⁄4" Tool Rest .................................. 1
5. 4
6. 7" Tool Rest ..................................... 1
7. Knock-Out Tool ................................ . 1
3
5
7
Figure 8. Loose parts shipped with the lathe.
-11-
Page 14

Machine Placement
Cleaning Machine
• Floor Load: Some workbenches may require
additional reinforcement to support both
the machine and the operator. Make sure
you take these precautions.
• Working Clearances: Consider existing and
anticipated needs, size of material to be
processed through the machine, and space
for auxiliary stands, work tables or other
machinery when establishing a location for
your lathe.
• Lighting: Lighting should be bright enough
to eliminate shadow and prevent eye strain.
• Electrical: Electrical circuits must be
ASSEMBLY
dedicated or large enough to handle
amperage requirements. Outlets must be
located near each machine, so power or
extension cords are clear of high-traffic
areas. Follow local electrical codes for
proper installation of new lighting, outlets,
or circuits.
The bed and other unpainted parts of your lathe
are coated with a waxy grease that protects
them from corrosion during shipment. Clean this
grease off with a solvent cleaner or citrus-based
degreaser. DO NOT use chlorine-based solvents
such as brake parts cleaner or acetone—if you
happen to splash some onto a painted surface,
you will ruin the finish.
NEVER use gasoline or
other petroleum-based
solvents to clean with.
Most have low flash
points, which make them
extremely flammable.
A risk of explosion and
burning exists if these
products are used. Serious
personal injury may occur
if this warning is ignored!
The Model W1704 is a
heavy machine. DO NOT
over-exert yourself while
unpacking or moving your
machine—get assistance.
MAKE your shop “child
safe.” Ensure that your
workplace is inaccessible
to youngsters by closing
and locking all entrances
when you are away. NEVER
allow untrained visitors in
your shop when assembling, adjusting or operating equipment.
ALWAYS work in wellventilated areas far from
possible ignition sources
when using solvents to
clean machinery. Many
solvents are toxic when
inhaled or ingested. Use
care when disposing
of waste rags and
towels to be sure they
DO NOT create fire or
environmental hazards.
-12-
Page 15

Installing Centers
Figure 9.
UNPLUG-POWER CORD
before you do any assembly or adjustment tasks!
Otherwise, serious personal injury to you or others may occur!
Installing spur center into
headstock spindle.
The spur and live centers are taper-fit components that install in the same manner; however,
the spur center always goes into the headstock
spindle and the live center always goes into the
tailstock barrel.
To install the centers, do these steps:
1. UNPLUG THE LATHE!
2. Insert the tapered end of the center into
the spindle and push firmly, as shown in
Figure 9.
3. Check that the center is securely installed
by giving it a quick tug. (A properly installed
center will not pull out by hand.)
Removing Centers
A knock-out tool is included with your lathe to
remove the spur and live centers.
ASSEMBLY
Figure 10. Removing spur center with
knock-out tool.
To remove the centers with the knock-out
tool, do these steps:
1. UNPLUG THE LATHE!
2. Hold a clean rag under the spindle to catch
the center when you remove it.
3. Using the knock-out tool, tap the center
from the outside end of the spindle (as
shown in Figure 10) and catch the center as
it falls out.
-13-
Page 16

Face Plate
The face plate can be installed only if the spur
center has been removed from the headstock
spindle.
To install the face plate, do these steps:
1. UNPLUG THE LATHE!
2. Thread the face plate onto the headstock
spindle.
3. Tighten the face plate by placing a wrench
on the spindle flats and inserting the knockout tool into the spindle shoulder to hold
it in position during tightening. See Figure
ASSEMBLY
11.
Note: Reverse steps 2-3 to remove the face
plate.
Tool Rest
UNPLUG- the power cord
before you do any assembly or adjustment tasks!
Otherwise, serious personal injury to you or others may occur!
Figure 11. Tightening face plate to
headstock spindle.
Before installing a tool rest, decide which
one will be best for your application. Unless
workpiece clearance is an issue, install the
larger tool rest to give yourself more room to
work.
To install the tool rest, do these steps:
1. Insert the tool rest into the tool holder as
shown in Figure 12.
2. Lock the tool rest in place with the tool rest
lock.
Tool Rest
Lock
Figure 12. Tool rest installed on lathe bed.
-14-
Page 17

ADJUSTMENTS
Lock Handles
UNPLUG- the power cord
before you do any assembly or adjustment tasks!
Otherwise, serious personal injury to you or others may occur!
The lock handles on the tool rest holder and the
tailstock can be tightened for a stronger locking action if the factory set locking action is not
tight enough for your needs. However, take care
not to over-tighten any of the parts.
To tighten the lock handles, do these steps:
1. UNPLUG THE LATHE!
1
2. Using a 12mm socket or wrench, tighten
turn one of the lock nuts shown in Figure
13, depending on which component you
wish to tighten.
3. Check the locking mechanism:
• If it is satisfactory, no further adjustments are necessary.
• If it is not satisfactory, repeat steps 2-
3.
⁄4
ADJUSTMENTS
Figure 13. Tool rest holder and tailstock lock
nuts for adjusting lock handles.
Figure 14. Tailstock barrel alignment slot.
Tailstock Barrel
If you find that the tailstock adjustment handle
spins without moving the tailstock barrel, the
tailstock barrel lock may need to be re-aligned
with the catch slot in the tailstock barrel.
To re-align tailstock barrel lock with the catch
slot, do these steps:
1. UNPLUG THE LATHE!
2. Loosen the small setscrew from the side of
the tailstock and loosen the tailstock barrel
lock.
3. Pull the tailstock adjustment handle to slide
the barrel out of the tailstock.
4. Locate the catch slot, shown in Figure 14,
and align it with the barrel lock.
5. Insert the barrel, replace the setscrew, and
barely tighten the barrel lock, then back it
1
⁄4 to 1⁄2 of a turn.
off
-15-
Page 18

OPERATIONS
Test Run
The purpose of a test run is to identify any
unusual noises and vibrations, as well as to
confirm that the machine is performing as
intended.
To test run the Model W1704, do these steps:
1. Turn the variable speed control knob all the
way counter-clockwise or in the LOW direction as far as it will go.
2. Make sure that the spur center has been
removed from the spindle.
3. Pull the paddle switch up to start the lathe.
Once the lathe is running, listen for any
unusual noises. The machine should run
smoothly with little or no vibrations.
• If there are any unusual noises or vibra-
tions, STOP the lathe immediately by
pushing the paddle switch down.
4. Unplug the lathe and investigate the source
of the noise or vibration. DO NOT make any
adjustments to the lathe while it is plugged
in. The lathe should not be run any further
until the problems are corrected.
Projectiles thrown from the machine
could cause serious eye/face injury.
Wear a face shield during assembly
and operation.
Loose hair and clothing could get
caught in machinery and cause serious
personal injury. Keep loose clothing
rolled up and long hair tied up and
away from machinery.
OPERATIONS
-16-
Page 19

Operation Tips
Workpiece
Center Line
Distances
Tool Rest
1
/8"
1
/
4
"
• Mount the workpiece correctly; otherwise,
the operation may be difficult and dangerous. Read the “Spindle Turning” & “Face
Plate Turning” instructions for ideas on how
to set up your lathe correctly.
1
• Position the tool rest approximately
above the center line of the workpiece and
1
approximately
⁄4" away from the workpiece.
See Figure 15 for more details.
⁄8"
Figure 15. Tool rest set 1⁄8" above the
1
centerline and
⁄4" away from workpiece.
Figure 16. Speed dial turned all the way down
to the lowest speed.
• When turning the lathe ON, stand to the
side of the spinning direction until the lathe
reaches full speed and you can verify that
the lathe will not throw the workpiece.
• Always start the lathe and perform all rough
cutting with the speed setting at the lowest
point, as shown in Figure 16.
• Select the right speed for the size of
workpiece you are turning. Use the slower
range on the speed dial for large workpieces
(4" diameter and over); use the middle
range on the speed dial for medium sized
workpieces (2" to 4" diameter); and use
the faster range on the speed dial for small
sized workpieces (under 2" in diameter).
• Keep the turning tool on the tool rest the
ENTIRE time that it is in contact with the
workpiece.
• When turning pieces thicker than 2" x 2", cut
off the corners first (so the workpiece profile
looks similar to the illustrated workpiece in
Figure 15). Figure 17 shows a workpiece
too big for turning with the corners still
on.
OPERATIONS
Figure 17. DO NOT attempt to turn workpieces
thicker than 2" x 2" without first cutting the
corners off!
• When rough cutting face plate work, use
the live center in the tailstock for support,
as can be seen in the setup in Figure 17.
After the rough cutting is complete, move
the tailstock out of the way.
• Learn the correct techniques for each tool
you will use. If you are unsure, read books
or magazines about lathe techniques and
seek training from experienced users.
-17-
Page 20

Selecting Turning
Tools
Lathe tools (Figure 18) come in a variety of
shapes and sizes and usually fall into five major
categories.
• Gouges—Mainly used for rough cutting,
detail cutting, and cove profiles. The rough
gouge is a hollow, double-ground tool with
a round nose, and the detail gouge is a
hollow, double-ground tool with either a
round or pointed nose. Figure 19 shows an
example of a gouge.
• Skew Chisel—A very versatile tool that can
be used for planing, squaring, V-cutting,
beading, and parting off. The skew chisel
is flat, double-ground with one side higher
than the other (usually at an angle of 2040˚). Figure 20 shows an example of a skew
chisel.
• Scrapers—Mainly used where access for
other tools is limited, such as hollowing
operations. This is a flat, double-ground
tool that comes in a variety of profiles
(Round Nose, Spear Point, Square Nose,
etc.) to match many different contours.
Figure 21 shows an example of a round nose
scraper.
Figure 18. Basic set of lathe turning tools.
Figure 19. Gouge.
• Parting Tools—Used for sizing and cutting
off work. This is a flat tool with a sharp
OPERATIONS
pointed nose that may be single- or doubleground. Figure 22 shows an example of a
parting tool.
• Specialty Tools—These are the unique, special function tools to aid in hollowing, bowl
making, cutting profiles, etc.
Figure 20. Skew chisel.
Figure 21. Round nose scraper.
Figure 22. Parting tool.
-18-
Page 21

Figure 23. Typical spindle turning operation.
Spindle Turning
Spindle turning (Figure 23) is the operation performed when a workpiece is mounted between
the headstock and the tailstock.
To set up a spindle turning operation, do
these steps:
1. Mark both ends of your workpiece by draw-
ing diagonal lines from corner to corner.
The intersection point of these lines will
show you the center of your workpiece. See
Figure 24 for details.
2. Using a wood mallet, tap the point of
the spur center into the center of the
workpiece, so that it leaves a center mark,
then remove the spur center.
1
3. Using a
the center mark. (Additionally, if the end of
your workpiece is square, cut
kerfs across the corners to help embed the
spur center.)
⁄4" drill bit, drill a 1⁄4" deep hole at
1
⁄8" deep saw
Figure 24. Workpiece marked diagonally from
corner to corner to determine the center.
Figure 25. Spur center properly embedded into
workpiece.
4. Drive the spur center into the center of the
workpiece with the wood mallet to embed
1
it at least
⁄4", as shown in Figure 25.
5. With the workpiece still attached, insert
the spur center into the headstock spindle.
6. With the live center installed in the tailstock,
slide the tailstock toward the workpiece
until the live center touches the workpiece,
then lock the tailstock in this position.
7. Use the tailstock adjustment knob to push
the live center into the workpiece at least a
1
⁄4".
Projectiles thrown from the machine
could cause serious eye/face injury.
Wear a face shield during assembly
-19-
and operation.
OPERATIONS
Page 22

Face Plate Turning
Face Plate turning (Figure 26) is when a
workpiece is mounted to the face plate, which
is mounted to the headstock spindle.
To mount your workpiece to the face plate, do
these steps:
1. Find the center of your workpiece by draw-
ing diagonal lines from corner to corner
on the side of the workpiece that will be
mounted to the face plate. The intersection
point of these lines will show you the center
of your workpiece.
2. Cut off the corners of the workpiece if it is
thicker than 2" x 2".
3. Center the face plate on the workpiece and
attach it through the face plate holes with
wood screws, as shown in Figure 27.
Figure 26. Typical face plate turning operation.
NOTICE: Only use tap screws or wood
screws with non-tapered heads (Figure 27)
to attach the face plate to the workpiece.
Do NOT use drywall screws or screws with
tapered heads because these can split the
face plate, or the screws may snap off
during operation.
4. Thread the face plate onto the headstock
spindle and tighten securely.
Note: If screws cannot be placed in the
OPERATIONS
workpiece, then a backing block can be
glued to the workpiece then attached to
the face plate with screws.
To mount your workpiece to a backing block,
do these steps:
1. Make the backing block from a piece of
scrap wood that is flat on both sides.
2. Locate and mark the center of both the workpiece and the backing block.
Figure 27. Mounting face plate to a backing
block, which is glued to the workpiece.
1
3. Drill a
4. Glue the center of the backing block to the center of the workpiece (look through the drilled hole to
line up centers), clamp the backing block to the workpiece, and wait for the glue to cure according
to the manufacturer’s recommendation.
⁄4" hole in the center of the backing block.
-20-
Page 23

Figure 28. Typical spindle sanding operation.
Sanding/Finishing
After turning, the workpiece can be sanded
(see example in Figure 28) and finished before
removing it from the lathe.
Wrapping the sandpaper
completely around the
workpiece, will pull your
hands into the moving
workpiece and may cause
injury. Never wrap sandpaper completely around
the workpiece!
Whenever sanding or finishing on the Model
W1704, remove the tool rest holder to increase
personal safety and gain adequate working
room.
Figure 29. Removing tool rest.
To remove the tool rest holder, do these
steps:
1. UNPLUG THE LATHE!
2. Remove the tool rest from the holder, as
shown in Figure 29.
3. Using a 12mm socket or wrench, remove the
lock nut (Figure 30) that is located under
the tool rest holder on the bottom side of
the bed.
4. Pull the tool rest holder off the bed and
replace the lock nut on the threads, so that
it does not get lost.
OPERATIONS
Figure 30. Lock nut that secures the tool
holder to the bed (lathe turned upside-down
for clarity).
-21-
Page 24

MAINTENANCE
Make sure that your
machine is unplugged
during any maintenance
procedures except
where instructed otherwise! If this warning
is ignored, serious personal injury may occur.
General
To ensure optimum performance from your
lathe, make a habit of inspecting it before each
use. Check for the following conditions and
repair or replace when necessary:
• Loose mounting bolts.
Figure 31. Cleaning/lubricating unpainted part
of the bed.
• Worn switch.
• Worn or damaged cords and plugs.
• Any other condition that could hamper the
safe operation of this machine.
Since all bearings are shielded and permanently
lubricated, simply leave them alone until they
need to be replaced. DO NOT lubricate them.
Lubricate the unpainted parts of the bed regularly (Figure 31) to prevent rust and ensure a
smooth sliding action from the tool post holder
and the tailstock. Your goal is to achieve adequate lubrication. However, too much lubrication will attract dirt and sawdust, which may
MAINTENANCE
cause these components to lose their freedom
of movement.
Lubrication
Figure 32. Cleaning spindle tapers.
In addition, clean the headstock and tailstock
barrel tapers (Figure 32) on a regular basis.
-22-
Page 25

WIRING DIAGRAM
PADDLE SWITCH
Bk
Wt
Gn
Wt
Gn
Bk
Bk
Bk
Wt
FUSE
Bk
Wt
Gn
Green
Ground
Wt
Gn
Bk
White
Neutral
Black
Hot
110
VAC
5-15 Plug
CIRCUIT
Wt
Wt
BOARD
Bk
Gn
Wt
Wt
Wt
Wt
Ground
CIRCUIT BREAKER
MOTOR
VARIABLE SPEED
DIAL
PARTS
-23-
Page 26

16
9
7
10
6
5
15
17
18
23
22
55
26
27
28
47
35
8
38
58
32
36
37
53
60
25
34
39
40
41
33
42
43
56
44
50
50A
45
49
48
54
24
52
51
7-1
1
2
3
4
57
14
19
20
21
29
30
31
46
24
11
59
PARTS
PARTS
-24-
Page 27

REF PART # DESCRIPTION REF PART # DESCRIPTION
1 X1704001 BED 35 X1704035 POWER CORD
2 X1704002 RETAINING PLATE 36 X1704036 CIRCUIT BOARD W/BOX
3 XPS05M PHLP HD SCR M5-.8 X 8 37 XPS07M PHLP HD SCR M4-.7 X 8
4 XPSS03M SET SCREW M6-1 X 8 38 XPSB40M CAP SCREW M8-1.25 X 35
5 X1704005 HANDWHEEL 39 XPSB74M CAP SCREW M6-1 X 18
6 X1704006 TAILSTOCK 40 X1704040 MOTOR PLATE
7 X1704007 T-LOCK KNOB BOLT M6-1 X 28 41 X1704041 MOTOR
7-1 X1704007-1 T-LOCK KNOB BOLT M6-1 X 18 42 X1704042 MACHINE NAMEPLATE LABEL
8 XPSB35M CAP SCREW M8-1.25 X 60 43 XPR39M EXT RETAINING RING 8MM
9 X1704009 SLEEVE 44 X1704044 TOOL REST BASE
10 X1704010 ECCENTRIC AXIS 45 X1704045 SPECIAL BOLT M8-1.25 X 32
11 X1704011 TAILSTOCK 46 X1704046 PLATE
14 X1704014 LIVE CENTER ASSEMBLY 47 XPLW04M LOCK WASHER 8MM
15 X1704015 SPUR CENTER 48 X1704048 SLEEVE
16 X1704016 LOCK HANDLE 49 X1704049 ECCENTRIC ROD
17 X1704017 FACE PLATE 50 X1704050 TOOL REST 7" (LARGE)
18 X1704018 HEADSTOCK SPINDLE 50A X1704050A TOOL REST 4-1/2" (SMALL)
19 XP6004 BALL BEARING 6004ZZ 51 X1704051 SPECIAL BOLT M8-1.25 X 32
20 XPR34M EXT RETAINING RING 40MM 52 X1704052 PLATE
21 XPR34M EXT RETAINING RING 40MM 53 X1704053 ELECTRICITY LABEL
22 XP6004 BALL BEARING 6004ZZ 54 X1704016 LOCK HANDLE
23 X1704023 HEADSTOCK 55 X1704055 UNPLUG MACHINE LABEL
24 XPLN04M LOCK NUT M8-1.25 56 X1704056 LATHE WARNING LIST LABEL
25 X1704025 SPEED DIAL LABEL 57 X1704057 READ MANUAL LABEL
26 X1704026 HEADSTOCK SPINDLE NUT 58 XPSW09 SHOP FOX PADDLE SWITCH
27 X1704027 OUTBOARD SPINDLE COVER 59 X1704059 FUSE 8A
28 XPS07M PHLP HD SCR M4-.7 X 8 60 X1704060 VARIABLE SPEED DIAL SWITCH
29 X1704029 DUST MASK WARNING LABEL 61 XPW01M FLAT WASHER 8MM
30 XPSS01M SET SCREW M6-1 X 10 62 XPW04M FLAT WASHER 10MM
31 X1704031 DRIVE PULLEY 63 XPSB100M CAP SCREW M8-1.25 X 15
32 X1704032 BELT K-516 64 XPS74M PHLP HD SCR M4-.7 X 14
33 XPSS01M SET SCREW M6-1 X 10 65 X1704065 CABLE HOLDER
34 X1704034 MOTOR PULLEY
-25-
PARTS
Page 28

TROUBLESHOOTING
SYMPTOM
Motor will not start.
Motor will not start; fuses or
circuit breakers blow.
Motor overheats.
Motor stalls, resulting in blown
fuses or tripped circuit.
POSSIBLE CAUSE
1. Low voltage.
2. Open circuit in motor or loose connections.
3. Lathe switch fuse blown.
1. Short circuit in line cord or plug.
2. Short circuit in motor or loose connections.
3. Incorrect fuses or circuit breakers
in power line.
1. Motor overloaded.
2. Air circulation through the motor
restricted.
1. Short circuit in motor or loose connections.
2. Low voltage.
3. Incorrect fuses or circuit breakers
in power line.
4. Motor overloaded.
HOW TO REMEDY
1. Check power line for proper voltage.
2. Inspect all lead connections on motor for loose or open connections.
3. Replace switch fuse located under threaded cap on the backside of the switch box.
1. Inspect cord or plug for damaged insulation and shorted
wires.
2. Inspect all connections on motor for loose or shorted terminals or worn insulation.
3. Install correct fuses or circuit breakers.
1. Reduce load on motor.
2. Clean out motor to provide normal air circulation.
1. Inspect connections on motor for loose or shorted terminals
or worn insulation.
2 Correct the low voltage conditions.
3. Install correct fuses or circuit breakers.
4. Reduce load on motor.
Machine slows or bogs down
when operating.
Loud, repetitious noise coming
from machine
Motor sounds like it is running,
but headstock spindle does not
spin.
Tailstock will not push into
workpiece when handle is
turned.
Tailstock or tool rest holder will not lock down tight
enough.
1. Motor overloaded.
2. Brushes worn.
1. Pulley set screws are missing or
loose.
2. Motor fan is hitting the cover.
3. V-belt is defective.
1. V-belt broken or slipped off pulleys.
1. Tailstock barrel lock not aligned
with catch slot in tailstock barrel.
1. Lock nut needs to be tightened.
1. Reduce load on motor.
2. Replace motor brushes.
1. Inspect pulley set screws. Replace or tighten if necessary.
2. Tighten fan or shim cover.
3. Replace V-belt.
1. Inspect/replace the V-belt.
1. Re-align tailstock barrel lock with catch slot in tailstock barrel, as described on page 15.
1. Tighten the lock nut as described on page 15.
-26-
Page 29

Warranty Registration
Name ___________________________________________________________________________________
Street __________________________________________________________________________________
City _________________________ State ___________________________ Zip ________________________
Phone # ______________________ Email___________________________Invoice # ___________________
Model #_________Serial #______________Dealer Name__________________Purchase Date___________
The following information is given on a voluntary basis. It will be used for marketing purposes to help us
develop better products and services. Of course, all information is strictly confidential.
1. How did you learn about us?
_____ Advertisement _____ Friend ____ Local Store
_____ Mail Order Catalog _____ Website ____ Other:
2. How long have you been a woodworker/metalworker?
_____ 0-2 Years _____ 2-8 Years ____ 8-20 Years _____ 20+ Years
®
3. How many of your machines or tools are Shop Fox
_____ 0-2 _____ 3-5 ____ 6-9 _____ 10+
4. Do you think your machine represents a good value? _____ Yes ____ No
?
CUT ALONG DOTTED LINE
®
5. Would you recommend Shop Fox
products to a friend? _____ Yes ____ No
6. What is your age group?
_____ 20-29 _____ 30-39 ____ 40-49
_____ 50-59 _____ 60-69 ____ 70+
7. What is your annual household income?
_____ $20,000-$29,000 _____ $30,000-$39,000 ____ $40,000-$49,000
_____ $50,000-$59,000 _____ $60,000-$69,000 ____ $70,000+
8. Which of the following magazines do you subscribe to?
____ Cabinet Maker
____ Family Handyman
____ Hand Loader
____ Handy
____ Home Shop Machinist
____ Journal of Light Cont.
____ Live Steam
____ Model Airplane News
____ Modeltec
____ Old House Journal
____ Popular Mechanics
____ Popular Science
____ Popular Woodworking
____ Practical Homeowner
____ Precision Shooter
____ Projects in Metal
____ RC Modeler
____ Rie
____ Shop Notes
____ Shotgun News
____ Today’s Homeowner
____ Wood
____ Wooden Boat
____ Woodshop News
____ Woodsmith
____ Woodwork
____ Woodworker West
____ Woodworker’s Journal
____ Other:
9. Comments: __________________________________________________________________
_____________________________________________________________________________
_____________________________________________________________________________
_____________________________________________________________________________
_____________________________________________________________________________
Page 30

FOLD ALONG DOTTED LINE
FOLD ALONG DOTTED LINE
Place
Stamp
Here
WOODSTOCK INTERNATIONAL INC.
P.O. BOX 2309
BELLINGHAM, WA 98227-2309
TAPE ALONG EDGES--PLEASE DO NOT STAPLE
Page 31

Page 32

 Loading...