

Page 1

Electronic Balance
Instruction Manual
321-56867-21A
Sep. 2009
WEIGHING
BEFORE
TW223L
•
TWC323L
TX223L
•
TX2202L
TXC323L
TXB222L
TXB2201L
TW323L
•
TWC623L
TX323L
•
TX3202L
•
TXC623L
•
TXB422L
•
TXB4201L
•
TW423L
•
TX423L
•
TX4202L
•
TXB622L
•
TXB6201L
•
TXB621L
•
TXB6200L
Name and Function of Components
Installation
Weighing
Outputting Weight Readings
Selecting the Display
Ending Weighing
Menu Settings
Calibration
Functions Relating to Taring
Adjusting Response and Stability
Setting Units
Application Function Mode
Comparator Function
Connection and Communication
with Peripheral Devices
BALANCE
USING MORE CONVENIENTLYUSING THE
MAINTENANCE
Maintaining the Balance
Inspection
About Weights
What to Do If...
Responding to Messages...
Turning the Power ON and OFF
Backlight ON / OFF (TXB Only)
Changing the Password
GLP Output Function
Specifications
Maintenance Parts
List of Functions That Can Be Used
in Combination
Menu Map
TROUBLESHOOTING
INFORMATION
FOR YOUR
Page 2
Requests
Provide this manual to the next user in the event that the instrument is transferred.
•
To ensure safe operation, contact your Shimadzu Balance representative for installation, adjustment, or
•
reinstallation after moving the instrument to a different site.
Notices
The content of this manual is subject, without notice, to modications for the sake of improvement.
•
Every effort has been made to ensure that the content of this manual was correct at the time of creation.
•
However, in the event that any mistakes or omissions are discovered, it may not be possible to correct
them immediately.
The copyright of this manual is owned by Shimadzu Corporation. Reproduction and duplication of whole
•
or part of the content without permission of the company are strictly prohibited.
© 2007-2009 Shimadzu Corporation. All rights reserved.
"Microsoft", "Windows", "Windows Vista" and "Excel" are registered trademarks of Microsoft
•
Corporation of the U.S.A. in the United States and other countries. All other company names and product
names that appear in this manual are trademarks or registered trademarks of the companies concerned.
Note that ™ and ® indications are not used.
The company names, organization names and product names in this manual are trademarks or registered
•
trademarks of the companies and organizations concerned.
Shimadzu does not guarantee that the WindowsDirect communication function will operate without
•
problems on all PCs. Shimadzu will accept no responsibility for any trouble that arises as a result of using
this function. You are recommended to back up all important data and programs in advance.
2
Page 3

Introduction
Thank you for purchasing a Shimadzu TW/TX/TXB series
electronic balance.
The TW/TX/TXB series models are high performance electronic
balances that we condently recommend based on over 80 years of
precision balance manufacture. While these models are of course
capable of fast and accurate weighing, the TW/TX models all
use the Unibloc cells that Shimadzu started using for electronic
balances in 1989, and the TXB models use our unique, newly
developed and robust load cells, improving the reliability of the
balances still further.
The new TW/TX/TXB series balances also feature operation keys
for four directions, improving operating convenience and making
the balances easier to use.
These balances also feature a variety of other functions that
make it more convenient for customers to use them for their
own applications, including the WindowsDirect communication
function, which enables measuring results to be transferred to a
PC without installing any software.
To ensure that you can make full use of the performance
and functions of your TW/TX/TXB series balance, read this
instruction manual carefully and use the balance correctly in
accordance with the directions in the manual. When you have
nished reading the manual, keep it in a safe place together with
the balance so that you can refer to it at any time.
For information on the following points, please contact your
Shimadzu Balance representative.
Product warranty
•
After service
•
3
Page 4
How to Find the Information You Need
This manual allows you to search for a function or operating procedure in a number of ways.
"Cover index"
"What You Can Do", page 6
"Menu Map", page 150
"Table of Contents", page 14
"Index", page 154
Conventions used in menu operations
Search for the information by thumbing through the manual.
Search for what you want to do.
Search quickly for the menu option you want to use.
Search for information based on its order of appearance in the
manual.
Search for information based on a key word.
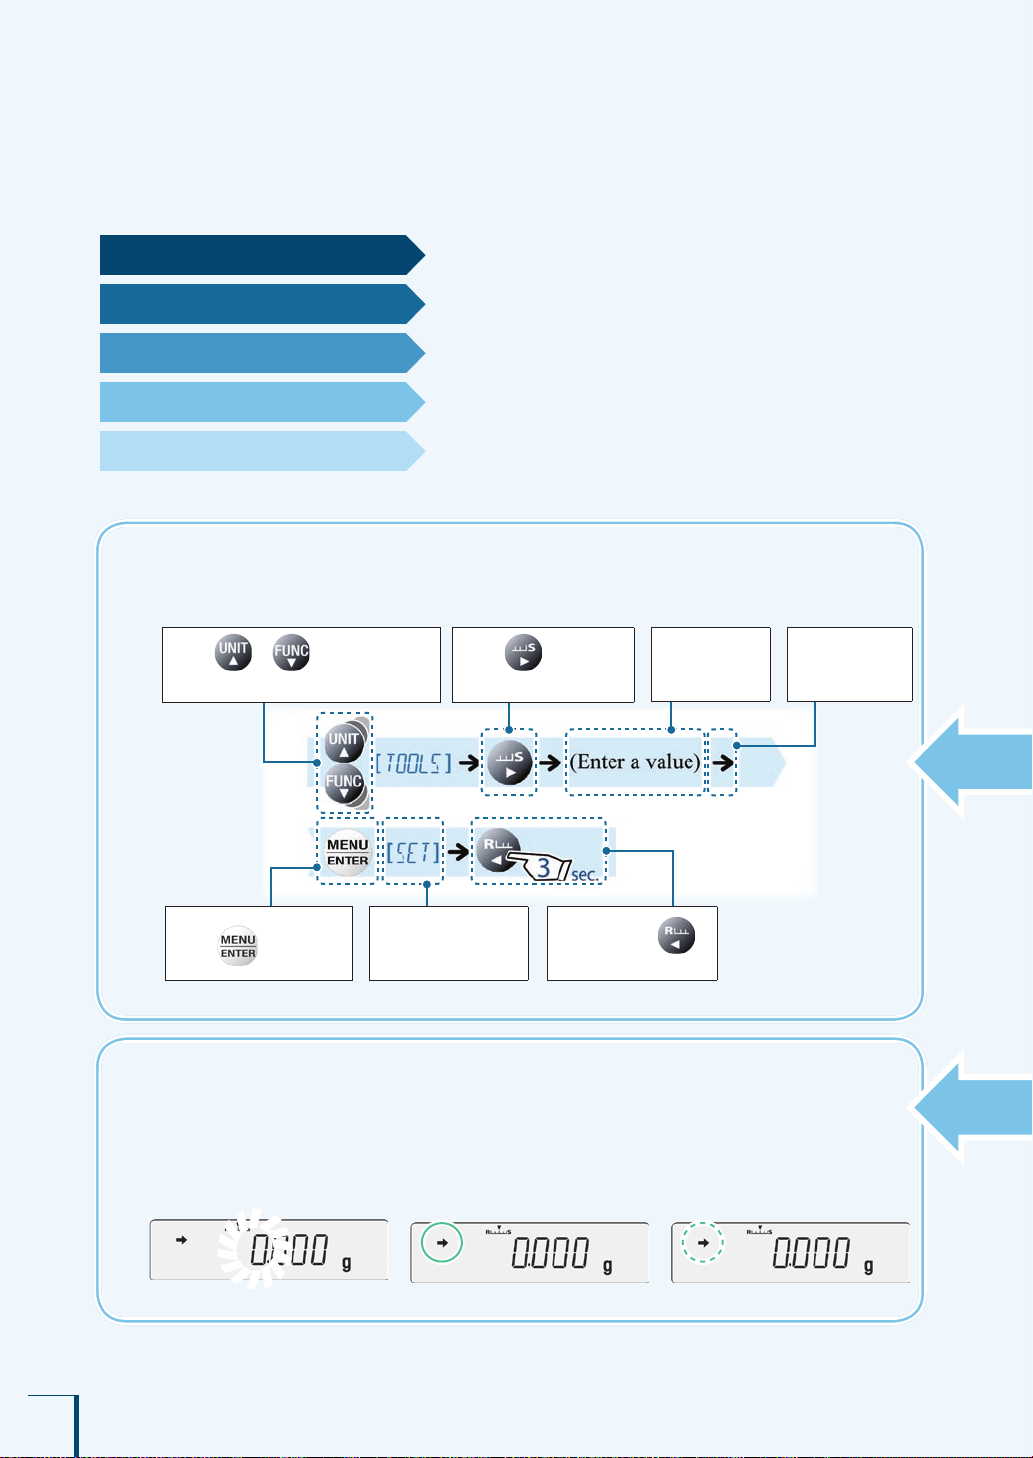
The instruction manual describes menu operations in a simplied form.
Example:
Press or a number of times
to search for the next menu option.
Press to proceed
to the next menu option.
User
operations
Flow of menu
operations
Press to conr m.
Conventions used for the display panel
Information indicated
in the display panel
Press and hold
(about 3 seconds).
This instruction manual depicts the display panel in relation to particular operating procedures.
The actions of the display panel (ashing, lighting up, conrmation) are shown in the following
way.
Flashing• Lit• Conrmation•
/
/
/
/
/
/
/
/
/
/
/
/
/
/
4
Page 5
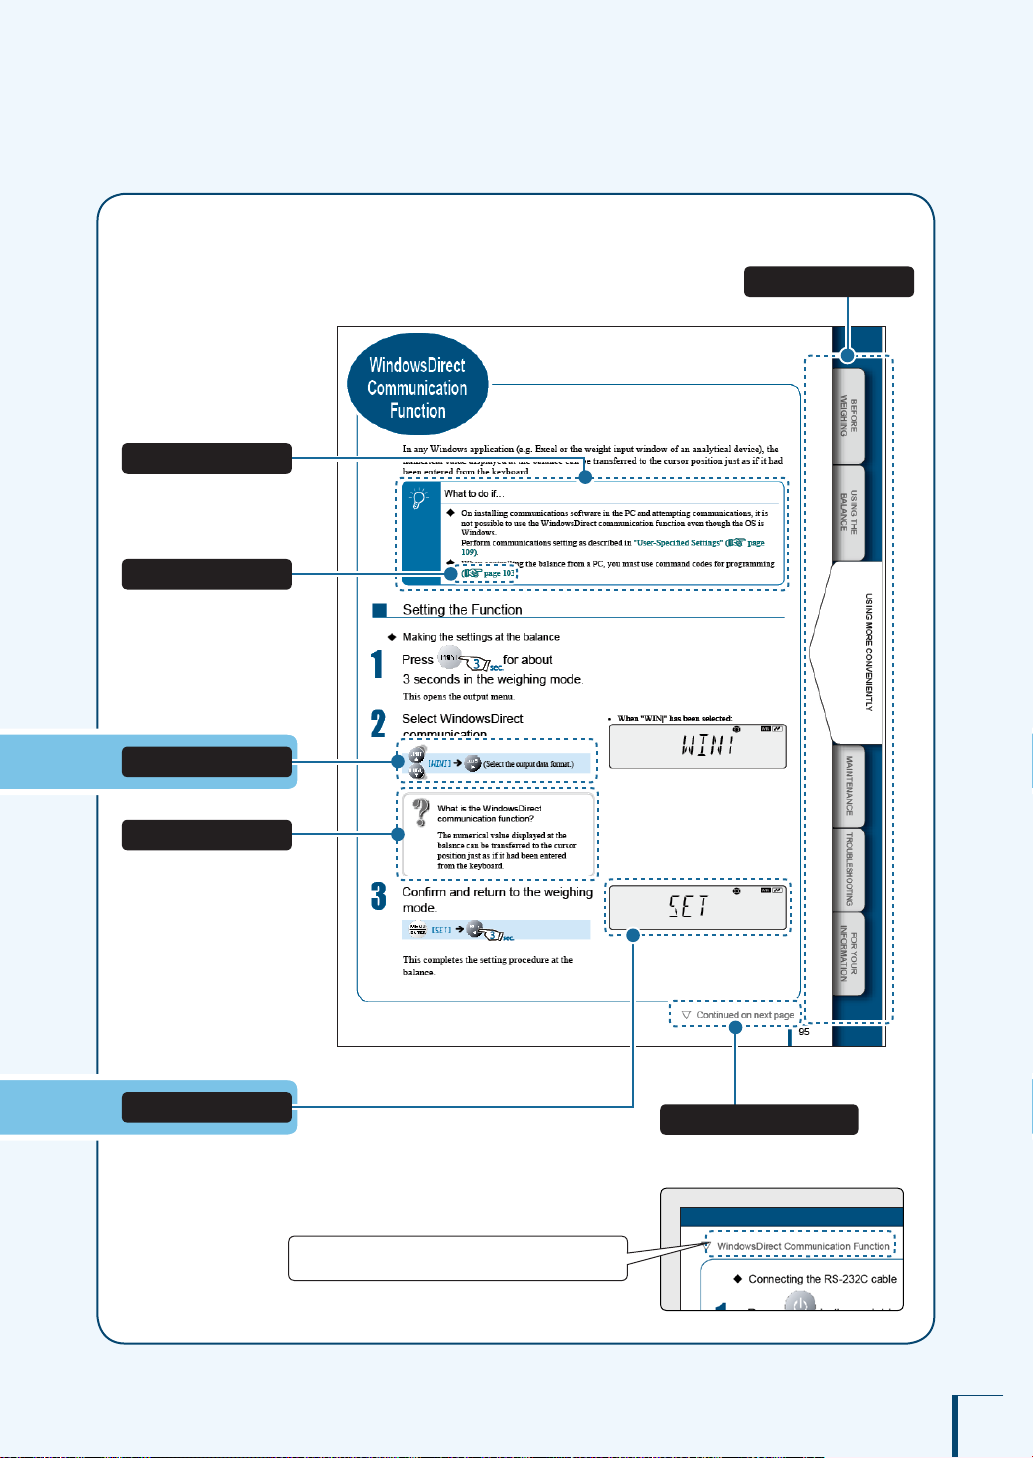
Example page
Notes
Infor mation to help use the
balance correctly
Reference
Menu operation
Explanation of ter ms
Linked to the cover index (right-hand pages only)
Index
Depiction of the display
Continued on next pag e
The symbol shown i n the gure below
appears at the head of the next page.
The title of the previous page appears here.
5
Page 6
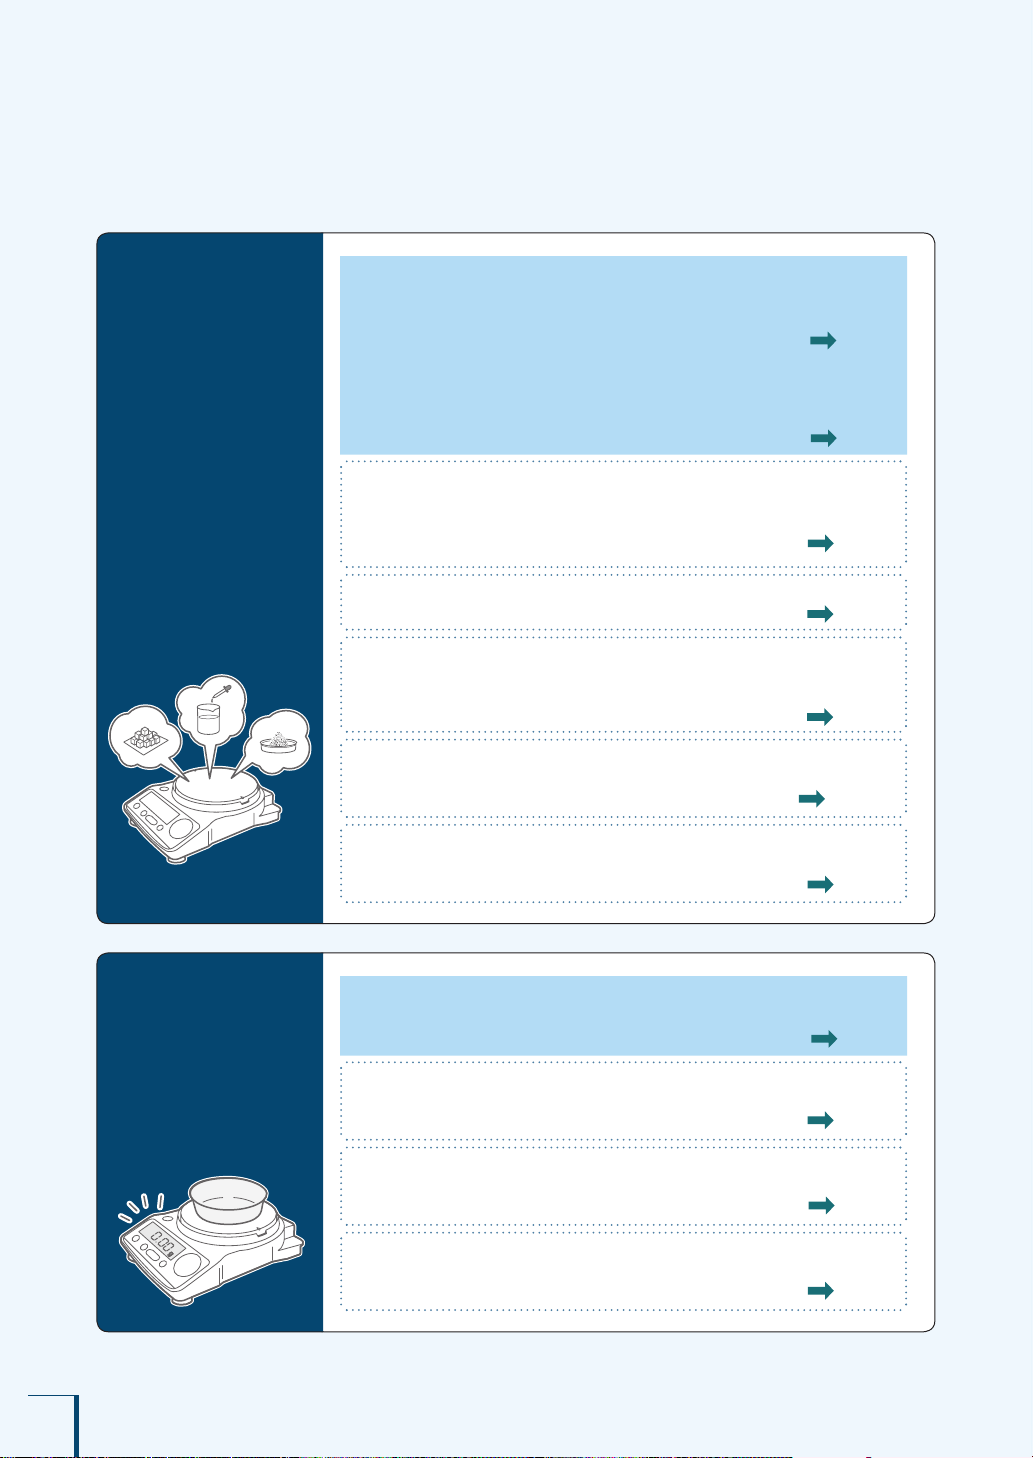
What You Can Do
This section lets you search for a method you would like to try or a function you want to know about.
Various
weighing
methods
I want to weigh up to a xed quantity by adding
increments of the same sample (item to be weighed:
powder, liquid, etc.) a little at a time.
Pouring Mode page 77
I want to make ne adjustments during weighing,
like increasing the reaction speed of the display or
stabilizing the display.
Easy Setting page 78
I want to use the balance to count items.
I want to set unit weights (the weight of a single piece of the
item being weighed) for multiple samples in advance.
Piece Counting page 87
I want to weigh in percentages.
Percentage Weighing page 92
I want to weigh a xed amount of each of a number of
different samples (items to be weighed: powder, liquid, etc.)
and to mix these samples according to a formula.
Formulation page 96
I want to check excess or deciency with respect to a target
value and make "pass or fail" judgments accordingly.
Comparator Function page 102
I want to adjust the conditions under which the stability mark
lights up.
Adjusting the Stability Mark page 79
Zero point,
and taring
6
I want to stabilize the display at zero when an empty
sample container is placed on the pan.
Zero Tracking Function page 71
I want to automatically return the display to zero after
weighing.
Auto Zero Function page 72
I want to automatically tare the balance (set the display to
zero) after outputting a weight reading.
Auto Tare Function page 74
I want to tare the balance without waiting for the stability
mark to light up.
Zero / Tare Timing Change Function page 75
Page 7
Calibration
I want to adjust the balance so that it is very accurate
after stabilization.
Span Calibration and Adjustment page 56
I want to carry out calibration and output a record.
Leaving a Record of Calibration page 67
I want to check the degree of drift in the balance's sensitivity.
Calibration Check page 60
Printing /
output
Miscellaneous
I want to send data to a PC (e.g. to Excel).
WindowsDirect Communication Function page 111
After weighing, I want to output automatically upon
stabilization.
Auto Print Function page 106
I want to output data continuously.
Continuous Output Function page 108
I want to output data either immediately or af ter stabilization.
Output Timing Change Function page 129
I want to change the format of the decimal point
(comma or period) in the output data.
Selecting the Decimal Point Display Symbol page 42
I want to add the balance model name,
ID and other information to weight readings.
GLP Output Function page 142
I want to display weights in units other than g (grams).
Switching Units page 41
Setting the Units page 82
I want the power to turn off automatically when I am
not using the balance.
Auto Power-Off Function page 138
I want to go directly into weighing mode when the power is
switched ON.
Setting the Startup Display page 139
7
Page 8

Safety Precautions
To be strictly observed
To ensure that you use the balance safely and correctly, read the following precautions carefully and observe
them.
The levels of danger and damage that will arise if the balance is used incorrectly are classied and
indicated as shown below.
!
CAUTION
Indicates a potentially hazardous situation which, if not avoided, may result in minor to
moderate injury or equipment damage.
Precautions are classied and explained by using one of the symbols below, depending on the nature
of the precaution.
Instru ction s
Indicates an action that must be
perfor med.
Prohibi tions
Indicates an action that must
NOT be performed
! CAUTION
Prohibi tions
Never disassemble, modify or attempt to
repair this product or any accessory.
You could sustain an electric shock or the product could
operate abnor mally.
If you believe that the balance has failed, contact you r
Shimadzu representative.
Prohibi tions
Do not use the balance
outdoors or anywhere where
it will be exposed to water.
You could sustain an electric shock or
the product could operate abnormally.
Use the balance with the specied power
Instru ction s
supply and voltage.
Using the balance with an i ncor rect power supply or
voltage will lead to re or trouble with the balance.
Note also that if the power supply or voltage is u nstable
or if the power supply capacity is insufcient, it will not
be possible to obtai n satisfactor y per formance from the
balance.
Instru ction s
If you detect anything
abnormal (e.g. a burning
smell) disconnect the AC
adapter immediately.
Continuing to use the balance with
an abnor mality could lead to re or
an electric shock.
Do not connect anything other than
peripheral devices specied by Shimadzu
Prohibi tions
8
to the balance’s connector.
If you do, the balance may stop work ing nor mally.
In order to avoid trouble, always connect peripheral
devices in accordance with the directions in this manual.
Prohibi tions
Do not use the balance
anywhere exposed to
explosive, combustible or
corrosive gases.
This could cause re or t rouble.
Page 9
Prohibi tions
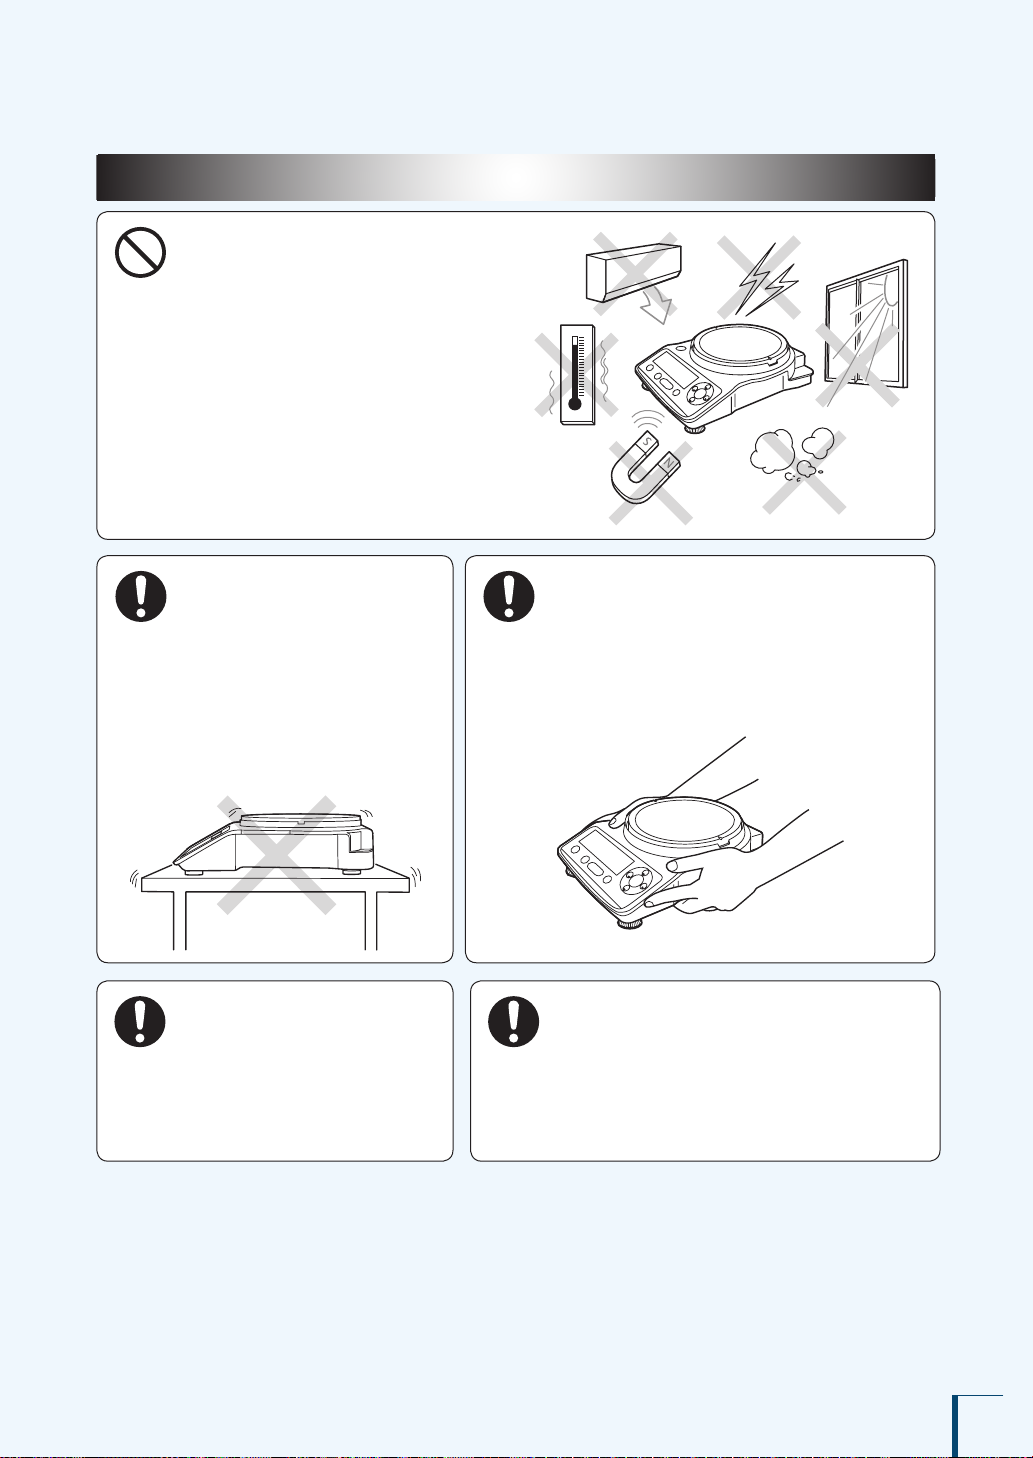
Precautions on Use
Avoid locations where the balance
will be exposed to any of the
following.
You may not be able to obtai n correct weight
readings.
Air ow from an ai r conditioner, ventilator,
•
door or window
Extreme temperature changes
•
Vibration
•
Direct sunlight
•
Dust, electromagnetic waves or a magnetic
•
eld
Instru ction s
Instru ction s
Install the balance on a
strong and stable at table
or oor.
Placing the balance in an unst able site
could lead to injury or t rouble with
the bala nce.
When selecting the installation site,
take into account the combined
weight of the balance and the item to
be weighed.
After a power outage, turn
the power back ON.
When a power outage occurs, the
power is shut off automat ically.
Therefore, begin operation from
"Turning the Power ON" (^ page
31) again.
Instru ction s
Instru ction s
Treat the balance with care and respect.
The balance is a precision instrument. Subjecting it to
impacts could cause it to fail.
When moving the balance, remove pan and pan
suppor ter. Grasp it rmly with bot h hands to car ry it.
If the balance has to be stored for a long t ime, store it in
the packaging box in which it was delivered.
Use the correct weighing units.
Using incorrect weighing un its can lead to accidents as
a result of weighing errors.
Check that the weighing u nits are cor rect before
star ting weighing.
9
Page 10
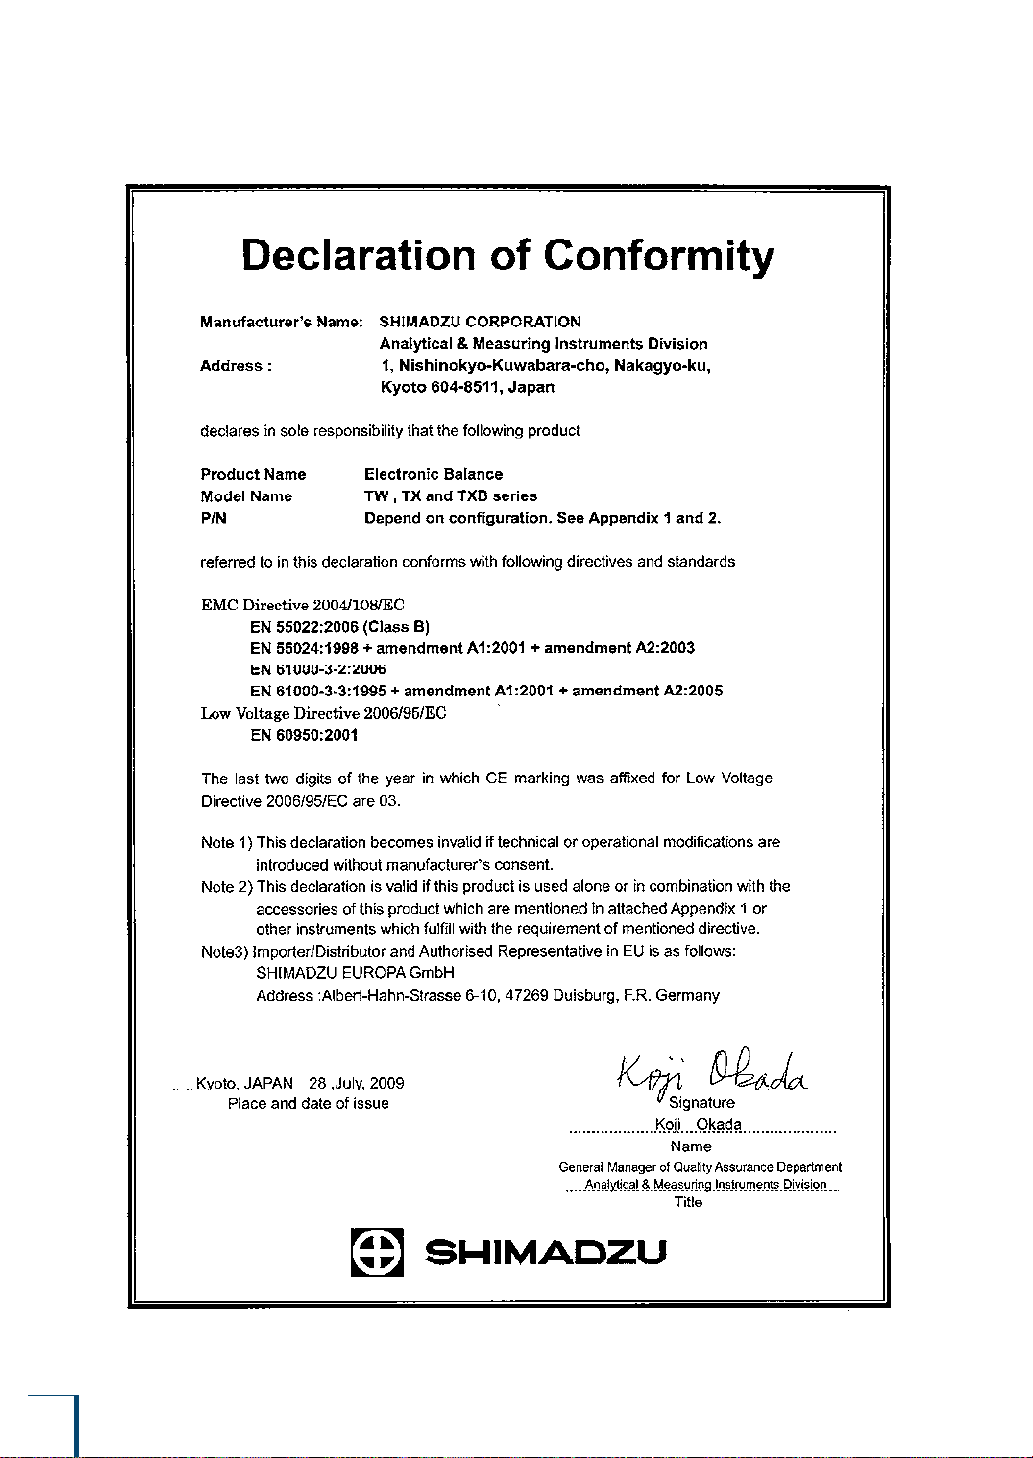
This Declaration of Conformity is valid only for models that bear the CE mark on the main body of
the balance.
10
Page 11

Electromagnetic Compatibility
Descriptions in this section apply to all models:
TW , TX , TXB series
This product complies with European standard EN55022 : 2006 , class B for electromagnetic
interference (Emissions) and minimum requirement for electromagnetic susceptibility
(Immunity).
EN55022 Emissions (Electromagnetic Interference)
This is a class B product.
When this product causes an electromagnetic disturbance to devices being used near this
product, create an appropriate distance between those devices and this product in order to
eliminate the disturbance.
EN55024 Immunity (Electromagnetic Susceptibility)
Test conditions are as follows.
EN 61000-4-2 Electrostatic Discharge: Air: 8 kV, Contact: 4 kV
EN 61000-4-3 Radiated, Radio-Frequency, Electromagnetic Field: 3 V/m
EN 61000-4-4 Transient/Burst (Electrical Fast Transients): 1 kV to AC power line and
ground
EN 61000-4-5 Voltage Surge: 1 kV line to line, 2 kV line
to ground
EN 61000-4-6 Conducted RF Immunity: 3 V
EN 61000-4-8 Power Frequency Magnetic Field Immunity: 1 A/m
EN 61000-4-11 Voltage Variations/Dips/Interrupts: >95% drop
Compliance with these standards does not ensure that the product can operate at a level of
electromagnetic interference that is stronger than the level tested. Interference stronger than the
values specied above may cause the product to malfunction.
When installing or using this product, especially in an industrial location:
Locate the product away from any device emitting strong levels of electromagnetic noise.
Use a power source that is separated from the power source of any device emitting strong
levels of electromagnetic noise.
To prevent static electricity:
Prior to touching the product, the operator should be sure to discharge the static
electricity stored in their body by rst touching a grounded metallic structure.
Do not touch any terminals or connectors that are not connected to cables while the
product is turned ON.
11
Page 12

Shimadzu Balances and 21 CFR Part 11
21 CFR Part 11
21 CFR Part 11, Electronic Records, Electronic Signatures, Final
Rule (often referred to as Part 11) is the United States Food and Drug
Administration (FDA) regulation affecting computer resources and
electronic records that are used for any document that is required to be
kept and maintained by FDA regulations.
Requirements concerning computer resources security are key
elements in Part 11.
The controls implemented as a result of security related requirements
are intended to result in trusted records.
Shimadzu CLASS-Balance Agent
Shimadzu provides a means for compliance with 21 CFR Part 11 with
Shimadzu CLASS-Balance Agent software, part of a comprehensive
laboratory data management system, Shimadzu CLASS Agent.
Ask your Shimadzu representative about it.
Shimadzu WindowsDirect
When Shimadzu balances are integrated with laboratory software by
means of our WindowsDirect function, no communication software is
required or used.
The Shimadzu balance functions as a primary device in the system,
just as a keyboard, mouse or other data entry hardware does.
For this reason, system validation and compliance may be greatly
simplied with the use of Shimadzu balances.
Two-way Communication
Shimadzu balances have always been computer friendly and they can
be set up for bi-directional communication as part of a fully automated
production system or LIMS.
This manual includes the command codes and information needed by
programmers to integrate Shimadzu balances with their software.
12
Page 13

Action for Environment (WEEE)
To all user of Shimadzu equipment in the European Union:
Equipment marked with this symbol indicates that it was sold on or after 13th August 2005,
which means it should not be disposed of with general household waste. Note that our equipment
is for industrial/professional use only.
Contact Shimadzu service representative when the equipment has reached the
end of its life. They will advise you regarding the equipment take-back.
With your co-operation we are aiming to reduce contamination
from waste electronic and electrical equipment and preserve natural
resource through re-use and recycling.
Do not hesitate to ask Shimadzu service representative, if you require
further information.
WEEE Mark
13
Page 14

Table of Contents
Table of Contents
1 BEFORE WEIGHING 20
Name and Function of Components . . . . . . . . . . . . . . . . . . . . . . . . . 20
TW/TX Series . . . . . . . . . . . . . . . . . . . . . . . . . . . . . . . . . . . . . . . . . . . . . . . . . . . . . . . . 20
■
TXB Series . . . . . . . . . . . . . . . . . . . . . . . . . . . . . . . . . . . . . . . . . . . . . . . . . . . . . . . . . .21
■
Operation Keys . . . . . . . . . . . . . . . . . . . . . . . . . . . . . . . . . . . . . . . . . . . . . . . . . . . . . . .22
■
Menu Operation Keys . . . . . . . . . . . . . . . . . . . . . . . . . . . . . . . . . . . . . . . . . . . . . . . . .22
■
Display Panel . . . . . . . . . . . . . . . . . . . . . . . . . . . . . . . . . . . . . . . . . . . . . . . . . . . . . . . .23
■
Installation . . . . . . . . . . . . . . . . . . . . . . . . . . . . . . . . . . . . . . . . . . . . . 24
Choosing the Installation Site . . . . . . . . . . . . . . . . . . . . . . . . . . . . . . . . . . . . . . . . . . .24
■
Unpacking and Delivery Inspection . . . . . . . . . . . . . . . . . . . . . . . . . . . . . . . . . . . . . . .26
■
Installing the Components . . . . . . . . . . . . . . . . . . . . . . . . . . . . . . . . . . . . . . . . . . . . . .27
■
Adjusting the Level of the Balance . . . . . . . . . . . . . . . . . . . . . . . . . . . . . . . . . . . . . . . .29
■
Turning the Power ON . . . . . . . . . . . . . . . . . . . . . . . . . . . . . . . . . . . . . . . . . . . . . . . . .31
■
Warming Up . . . . . . . . . . . . . . . . . . . . . . . . . . . . . . . . . . . . . . . . . . . . . . . . . . . . . . . . .33
■
Performing Span Calibration . . . . . . . . . . . . . . . . . . . . . . . . . . . . . . . . . . . . . . . . . . . .34
■
2 USING THE BALANCE 38
Weighing . . . . . . . . . . . . . . . . . . . . . . . . . . . . . . . . . . . . . . . . . . . . . . 38
Outputting Weight Readings . . . . . . . . . . . . . . . . . . . . . . . . . . . . . . . 40
Selecting the Display . . . . . . . . . . . . . . . . . . . . . . . . . . . . . . . . . . . . . 41
Switching Units . . . . . . . . . . . . . . . . . . . . . . . . . . . . . . . . . . . . . . . . . . . . . . . . . . . . . . .41
■
Selecting the Minimum Number of Displayed Digit . . . . . . . . . . . . . . . . . . . . . . . . . . . 41
■
Selecting the Decimal Point Display Symbol . . . . . . . . . . . . . . . . . . . . . . . . . . . . . . . .42
■
Ending Weighing . . . . . . . . . . . . . . . . . . . . . . . . . . . . . . . . . . . . . . . . 43
Turning the Power OFF . . . . . . . . . . . . . . . . . . . . . . . . . . . . . . . . . . . . . . . . . . . . . . . .43
■
3 MENU SETTINGS 46
What Is the Menu? . . . . . . . . . . . . . . . . . . . . . . . . . . . . . . . . . . . . . . 46
The Structure of the Menu . . . . . . . . . . . . . . . . . . . . . . . . . . . . . . . . . . . . . . . . . . . . . .46
■
Menu Map . . . . . . . . . . . . . . . . . . . . . . . . . . . . . . . . . . . . . . . . . . . . . . . . . . . . . . . . . .47
■
Instruction Manual . . . . . . . . . . . . . . . . . . . . . . . . . . . . . . . . . . . . . . . . . . . . . . . . . . . .47
■
Menu Operation Key Symbol . . . . . . . . . . . . . . . . . . . . . . . . . . . . . . . . . . . . . . . . . . . . 47
■
Basic Menu Operations . . . . . . . . . . . . . . . . . . . . . . . . . . . . . . . . . . . 48
14
Page 15

Entering Numerical Values . . . . . . . . . . . . . . . . . . . . . . . . . . . . . . . . 49
Changing the Numerical Value . . . . . . . . . . . . . . . . . . . . . . . . . . . . . . . . . . . . . . . . . .49
■
Changing the Position of the Decimal Point . . . . . . . . . . . . . . . . . . . . . . . . . . . . . . . . .50
■
Convenient Functions for Menu Setting . . . . . . . . . . . . . . . . . . . . . . . 51
Returning to the Default Settings (Menu Reset) . . . . . . . . . . . . . . . . . . . . . . . . . . . . .51
■
Prohibiting Changes to the Menu Settings (Menu Lock) . . . . . . . . . . . . . . . . . . . . . . .52
■
Outputting the Menu Setting Information . . . . . . . . . . . . . . . . . . . . . . . . . . . . . . . . . . .53
■
4 CALIBRATION 54
Before Starting Calibration… . . . . . . . . . . . . . . . . . . . . . . . . . . . . . . . 54
Span Calibration and Adjustment . . . . . . . . . . . . . . . . . . . . . . . . . . . 56
WEIGHING
BEFORE
USING THE
BALANCE
Calibration Check . . . . . . . . . . . . . . . . . . . . . . . . . . . . . . . . . . . . . . . 60
Calibration of the Internal Weight (TW Only) . . . . . . . . . . . . . . . . . . . 64
Leaving a Record of Calibration . . . . . . . . . . . . . . . . . . . . . . . . . . . . 67
Example Printout of a Calibration Record . . . . . . . . . . . . . . . . . . . . . . . . . . . . . . . . . . 67
■
Setting Output of a Calibration Record . . . . . . . . . . . . . . . . . . . . . . . . . . . . . . . . . . . .68
■
Setting a Balance ID . . . . . . . . . . . . . . . . . . . . . . . . . . . . . . . . . . . . . . . . . . . . . . . . . .69
■
5 FUNCTIONS RELATING TO TARING 70
Zero Tracking Function . . . . . . . . . . . . . . . . . . . . . . . . . . . . . . . . . . . 71
Auto Zero Function . . . . . . . . . . . . . . . . . . . . . . . . . . . . . . . . . . . . . . 72
Auto Tare Function . . . . . . . . . . . . . . . . . . . . . . . . . . . . . . . . . . . . . . 74
Zero / Tare Timing Change Function . . . . . . . . . . . . . . . . . . . . . . . . . 75
6 ADJUSTING RESPONSE AND STABILITY 76
Selecting the Weighing Mode . . . . . . . . . . . . . . . . . . . . . . . . . . . . . . 77
Selecting the General Weighing Mode . . . . . . . . . . . . . . . . . . . . . . . . . . . . . . . . . . . .77
■
Selecting the Pouring Mode . . . . . . . . . . . . . . . . . . . . . . . . . . . . . . . . . . . . . . . . . . . . .77
■
USING MORE CON VENIENTLY MAINTENANCE
TROUBLESHOOTING
INFORM ATION
FOR YOUR
Easy Setting of Response and Stability . . . . . . . . . . . . . . . . . . . . . . . 78
15
Page 16

Adjusting the Stability Mark . . . . . . . . . . . . . . . . . . . . . . . . . . . . . . . . 79
Setting the Stability Detection Range . . . . . . . . . . . . . . . . . . . . . . . . . . . . . . . . . . . . .79
■
Setting the Stability Mark Lighting Timing . . . . . . . . . . . . . . . . . . . . . . . . . . . . . . . . . .80
■
7 SETTING UNITS 82
Units That Can Be Displayed and Conversion Factors . . . . . . . . . . . . . . . . . . . . . . . .82
■
Selecting Units to Display . . . . . . . . . . . . . . . . . . . . . . . . . . . . . . . . . 83
Setting User-Specied Units . . . . . . . . . . . . . . . . . . . . . . . . . . . . . . . 84
Conversion Factors . . . . . . . . . . . . . . . . . . . . . . . . . . . . . . . . . . . . . . . . . . . . . . . . . . .84
■
Minimum Indication . . . . . . . . . . . . . . . . . . . . . . . . . . . . . . . . . . . . . . . . . . . . . . . . . . .85
■
8 APPLICATION FUNCTION MODE 86
Counting Pieces by Weight (Piece Counting) . . . . . . . . . . . . . . . . . . 87
Preparation for Piece Counting (Including Setting the Unit Weight) . . . . . . . . . . . . . .87
■
Counting Numbers of Pieces . . . . . . . . . . . . . . . . . . . . . . . . . . . . . . . . . . . . . . . . . . . .90
■
Changing a Unit Weight, or Adding a New Unit Weight . . . . . . . . . . . . . . . . . . . . . . . .91
■
Percentage Weighing . . . . . . . . . . . . . . . . . . . . . . . . . . . . . . . . . . . . 92
Preparation for Percentage Weighing . . . . . . . . . . . . . . . . . . . . . . . . . . . . . . . . . . . . . 92
■
Weighing Percentages . . . . . . . . . . . . . . . . . . . . . . . . . . . . . . . . . . . . . . . . . . . . . . . . .95
■
16
Formulation . . . . . . . . . . . . . . . . . . . . . . . . . . . . . . . . . . . . . . . . . . . . 96
Performing Formulation . . . . . . . . . . . . . . . . . . . . . . . . . . . . . . . . . . . . . . . . . . . . . . . .96
■
Outputting Component Numbers . . . . . . . . . . . . . . . . . . . . . . . . . . . . . . . . . . . . . . . . .99
■
Outputting the Gross Weight . . . . . . . . . . . . . . . . . . . . . . . . . . . . . . . . . . . . . . . . . . .100
■
9 COMPARATOR FUNCTION 102
Target Mode . . . . . . . . . . . . . . . . . . . . . . . . . . . . . . . . . . . . . . . . . . 102
Checkweighing Mode . . . . . . . . . . . . . . . . . . . . . . . . . . . . . . . . . . . 104
Page 17

10 CONNECTION AND COMMUNICATION
WITH PERIPHERAL DEVICES 10
Convenient Functions Relating to Output . . . . . . . . . . . . . . . . . . . . 106
Printing / Outputting Automatically (Auto Print Function) . . . . . . . . . . . . . . . . . . . . . .106
■
Printing / Outputting Continuously (Continuous Output Function) . . . . . . . . . . . . . . . 108
■
6
WEIGHING
BEFORE
WindowsDirect Communication Function . . . . . . . . . . . . . . . . . . . . .111
What Is the WindowsDirect Communication Function? . . . . . . . . . . . . . . . . . . . . . . . 111
■
Setting the Function . . . . . . . . . . . . . . . . . . . . . . . . . . . . . . . . . . . . . . . . . . . . . . . . . . 111
■
Troubleshooting the WindowsDirect Communication Function . . . . . . . . . . . . . . . . . 116
■
Connecting to a PC (RS-232C) . . . . . . . . . . . . . . . . . . . . . . . . . . . . .117
Cable Connection Method . . . . . . . . . . . . . . . . . . . . . . . . . . . . . . . . . . . . . . . . . . . . . 117
■
Data Format . . . . . . . . . . . . . . . . . . . . . . . . . . . . . . . . . . . . . . . . . . . . . . . . . . . . . . . . 118
■
Command Codes . . . . . . . . . . . . . . . . . . . . . . . . . . . . . . . . . . . . . . . . . . . . . . . . . . . . 120
■
Connecting to a Printer . . . . . . . . . . . . . . . . . . . . . . . . . . . . . . . . . . 124
Communication Settings . . . . . . . . . . . . . . . . . . . . . . . . . . . . . . . . . 125
Standard Settings (MODE) . . . . . . . . . . . . . . . . . . . . . . . . . . . . . . . . . . . . . . . . . . . .126
■
User-Specied Settings . . . . . . . . . . . . . . . . . . . . . . . . . . . . . . . . . . . . . . . . . . . . . . .126
■
Output Timing Change Function . . . . . . . . . . . . . . . . . . . . . . . . . . . 129
11 MAINTENANCE 130
Maintaining the Balance . . . . . . . . . . . . . . . . . . . . . . . . . . . . . . . . . 130
Removing the Glass Door . . . . . . . . . . . . . . . . . . . . . . . . . . . . . . . . . . . . . . . . . . . . . 131
■
USING THE
BALANCE
USING MORE CON VENIENTLY MAINTENANCE
Inspection . . . . . . . . . . . . . . . . . . . . . . . . . . . . . . . . . . . . . . . . . . . . 132
Daily Inspections . . . . . . . . . . . . . . . . . . . . . . . . . . . . . . . . . . . . . . . . . . . . . . . . . . . . 132
■
Periodic Inspections . . . . . . . . . . . . . . . . . . . . . . . . . . . . . . . . . . . . . . . . . . . . . . . . . .133
■
About Weights . . . . . . . . . . . . . . . . . . . . . . . . . . . . . . . . . . . . . . . . . 134
Types of Weight and Their Selection . . . . . . . . . . . . . . . . . . . . . . . . . . . . . . . . . . . . .134
■
12 TROUBLESHOOTING 136
What to Do If…. . . . . . . . . . . . . . . . . . . . . . . . . . . . . . . . . . . . . . . . . 136
Responding to Messages . . . . . . . . . . . . . . . . . . . . . . . . . . . . . . . . 137
17
TROUBLESHOOTING
INFORM ATION
FOR YOUR
Page 18

13 FOR YOUR INFORMATION 138
Turning the Power ON and OFF . . . . . . . . . . . . . . . . . . . . . . . . . . . 138
Auto Power-Off Function . . . . . . . . . . . . . . . . . . . . . . . . . . . . . . . . . . . . . . . . . . . . . .138
■
Setting the Startup Display . . . . . . . . . . . . . . . . . . . . . . . . . . . . . . . . . . . . . . . . . . . .139
■
Backlight ON/OFF (TXB Only) . . . . . . . . . . . . . . . . . . . . . . . . . . . . . 140
Changing the Password . . . . . . . . . . . . . . . . . . . . . . . . . . . . . . . . . . 141
GLP Output Function . . . . . . . . . . . . . . . . . . . . . . . . . . . . . . . . . . . . 142
Setting the GLP Output Function . . . . . . . . . . . . . . . . . . . . . . . . . . . . . . . . . . . . . . . . 142
■
Setting a Balance ID . . . . . . . . . . . . . . . . . . . . . . . . . . . . . . . . . . . . . . . . . . . . . . . . .144
■
Specications . . . . . . . . . . . . . . . . . . . . . . . . . . . . . . . . . . . . . . . . . 145
TW/TX Series . . . . . . . . . . . . . . . . . . . . . . . . . . . . . . . . . . . . . . . . . . . . . . . . . . . . . . . 145
■
TXB Series . . . . . . . . . . . . . . . . . . . . . . . . . . . . . . . . . . . . . . . . . . . . . . . . . . . . . . . . .146
■
Maintenance Parts. . . . . . . . . . . . . . . . . . . . . . . . . . . . . . . . . . . . . . 147
TW/TX Series . . . . . . . . . . . . . . . . . . . . . . . . . . . . . . . . . . . . . . . . . . . . . . . . . . . . . . . 147
■
TXB Series . . . . . . . . . . . . . . . . . . . . . . . . . . . . . . . . . . . . . . . . . . . . . . . . . . . . . . . . .148
■
List of Functions That Can Be Used in Combination . . . . . . . . . . . . 149
Menu Map . . . . . . . . . . . . . . . . . . . . . . . . . . . . . . . . . . . . . . . . . . . . 150
Reading the Menu Map . . . . . . . . . . . . . . . . . . . . . . . . . . . . . . . . . . . . . . . . . . . . . . .150
■
Main Menu . . . . . . . . . . . . . . . . . . . . . . . . . . . . . . . . . . . . . . . . . . . . . . . . . . . . . . . . . 151
■
Data Output Menu . . . . . . . . . . . . . . . . . . . . . . . . . . . . . . . . . . . . . . . . . . . . . . . . . . .152
■
Unit Setting Menu . . . . . . . . . . . . . . . . . . . . . . . . . . . . . . . . . . . . . . . . . . . . . . . . . . . .153
■
Calibration Menu . . . . . . . . . . . . . . . . . . . . . . . . . . . . . . . . . . . . . . . . . . . . . . . . . . . . 153
■
Zero / Tare Menu . . . . . . . . . . . . . . . . . . . . . . . . . . . . . . . . . . . . . . . . . . . . . . . . . . . . 153
■
18
Page 19
MEMO
WEIGHING
BEFORE
USING THE
BALANCE
USING MORE CON VENIENTLY MAINTENANCE
19
TROUBLESHOOTING
INFORM ATION
FOR YOUR
Page 20
1
BEFORE WEIGHING
Name and Function
of Components
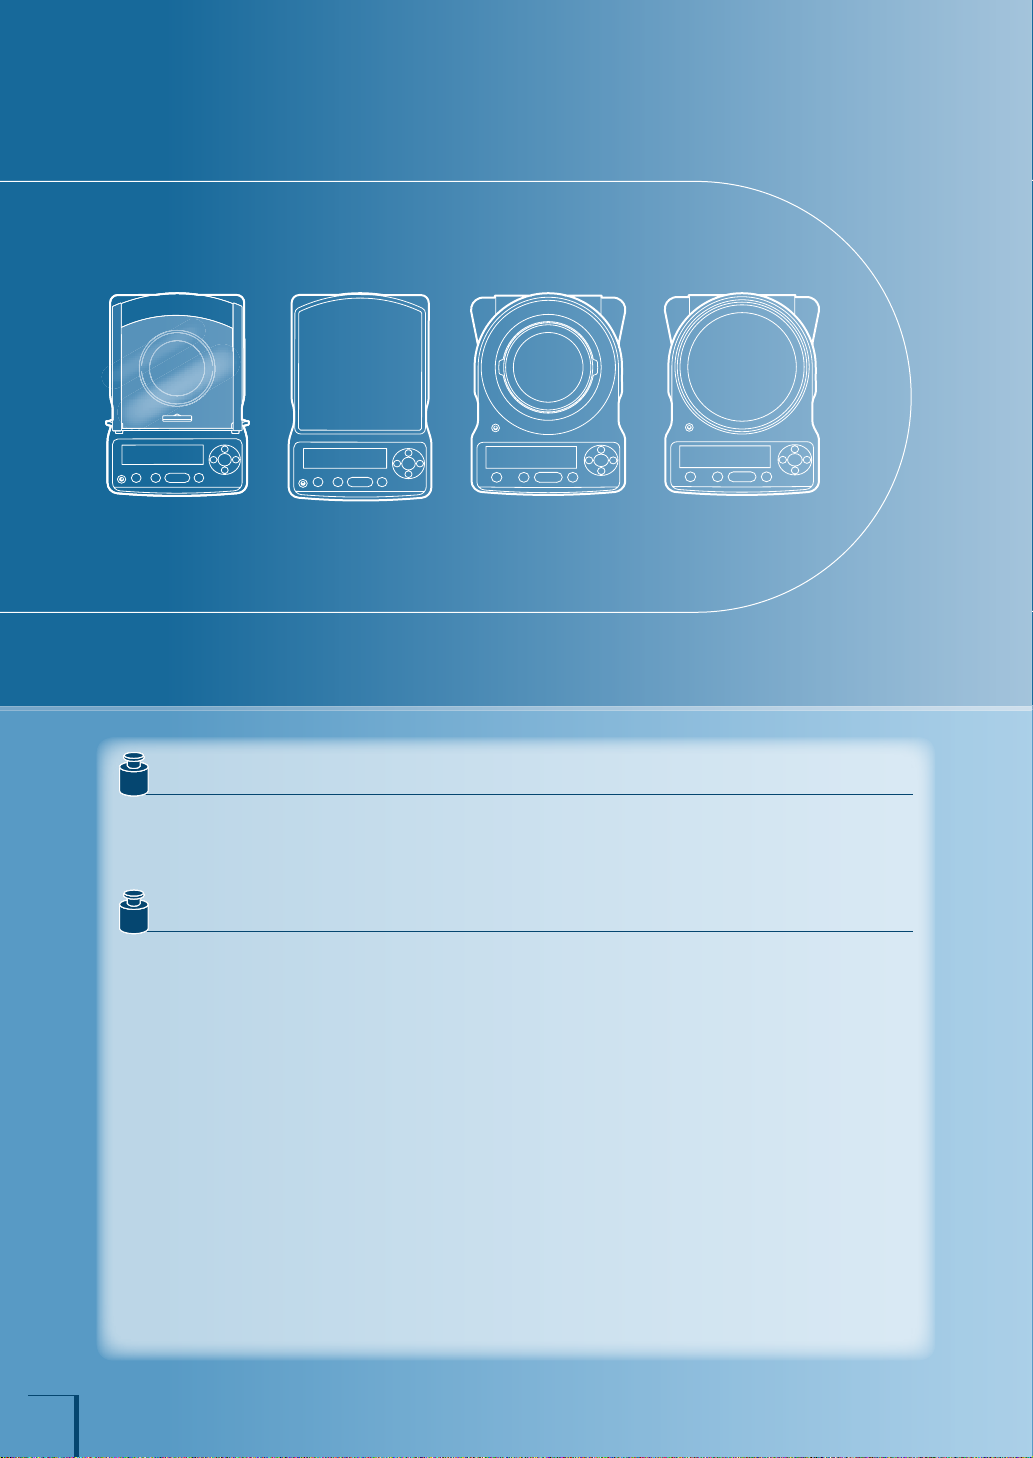
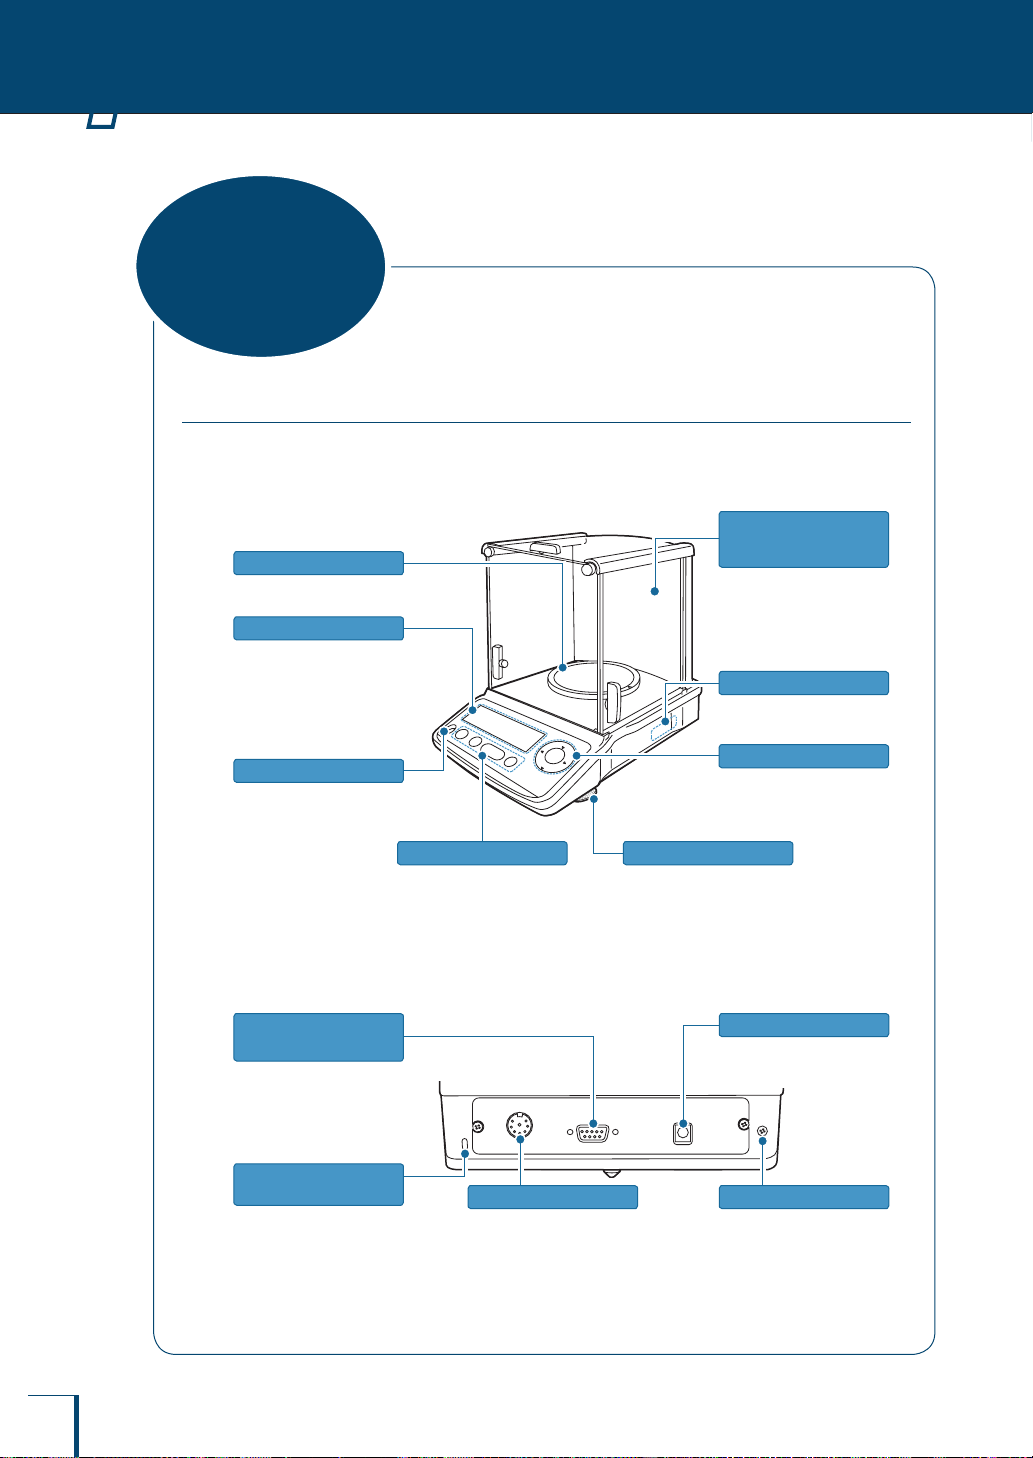
TW/TX Series
The TW/TX Series comprises toploading electromagnetic balances with UniBloc weighing
mechanism.
Main body
Pan
Place the object to be weighed
here.
Display panel
Shows the weighing results,
information for making
function settings, the current
function setting, errors, codes
and other information.
(^ page 23)
Level
Indicates the level of the
balance.
(^ page 29)
Operation keys
Used to tare the balance,
perform calibration and print.
(^ page 2 2)
Level screws
Adjust to level the balance.
(^ page 29)
Windbreak
(included with small
pan models only)
Even a slight breeze may affect
measurement, so the windbreak
is provided to avoid air
movements in the surroundings
inuencing the weight reading.
Product label
The model name and serial
number are stated here.
Menu operation keys
Used to specify function
settings and menu operations.
(^ page 2 2)
20
Back of the unit
RS-232C connector
(9-pin socket)
Used to make a serial
connection to a PC or other
equipment.
Kensing ton Security
Slot
This is a slot in which a lock can
be tted for anti-theft purposes.
The socket c onforms to the
specications of the Kensington
company.
DATA I/O connector
Used to connect to a pr inter
(e.g. EP-80 or EP-90).
(^ page 124)
DC IN connector
Used to connect an AC
adapter for power supply.
Ground terminal
Connect this terminal to
ground if necessary.
Page 21
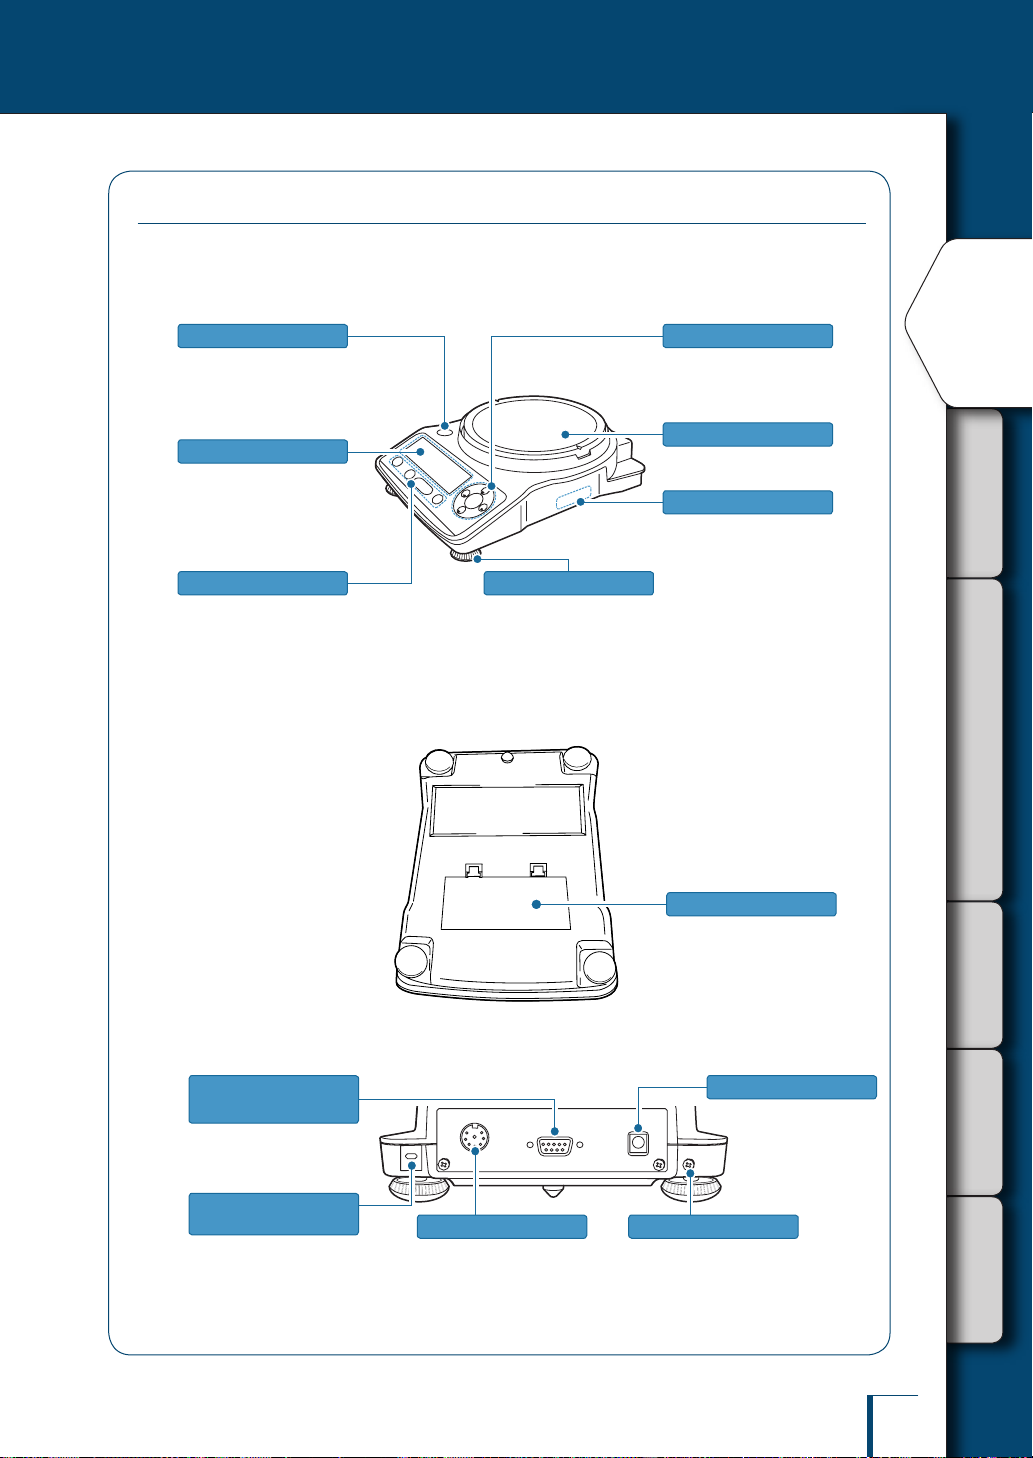
TXB Series
The TXB Series comprises load cell type toploading balances that can be powered by batteries
as well as AC power.
Main body
WEIGHING
BEFORE
Level
Indicates the level of the
balance.
(^ page 29)
Display panel
Shows the weighing results,
information for making function
settings, the cur rent function
setting, errors and other
information. (^ page 23)
Operation keys
Used to tare the balance,
perform calibration and print.
(^ page 2 2)
Underside of the unit
Level screws
Adjust to level the balance.
(^ page 29)
Menu operation keys
Used to specify function
settings and menu operations.
(^ page 2 2)
Pan
Place the object to be weighed
on here.
Product label
The model name and serial
number are stated here.
Battery compartment
Six size A A alkaline batteries
(^ page 32)
USING THE
BALANCE
USING MORE CON VENIENTLY MAINTENANCE
Back of the unit
RS-232C connector
(9-pin socket)
Used to make a serial
connection to a PC or other
equipment.
Kensing ton Security
Slot
This is a slot in which a lock can
be tted for anti-theft purposes.
The socket c onforms to the
specications of the Kensington
company.
DATA I/O connector Ground terminal
Used to connect to a pr inter
(EP-80, EP-9 0, etc.).
(^ page 124)
Connect this terminal to
ground if necessary.
Continued on next page
DC IN connector
To run the balance on
AC power, connect
the AC adapter here.
21
TROUBLESHOOTING
INFORM ATION
FOR YOUR
Page 22
BEFORE WEIGHING
1
Name and Function of Components
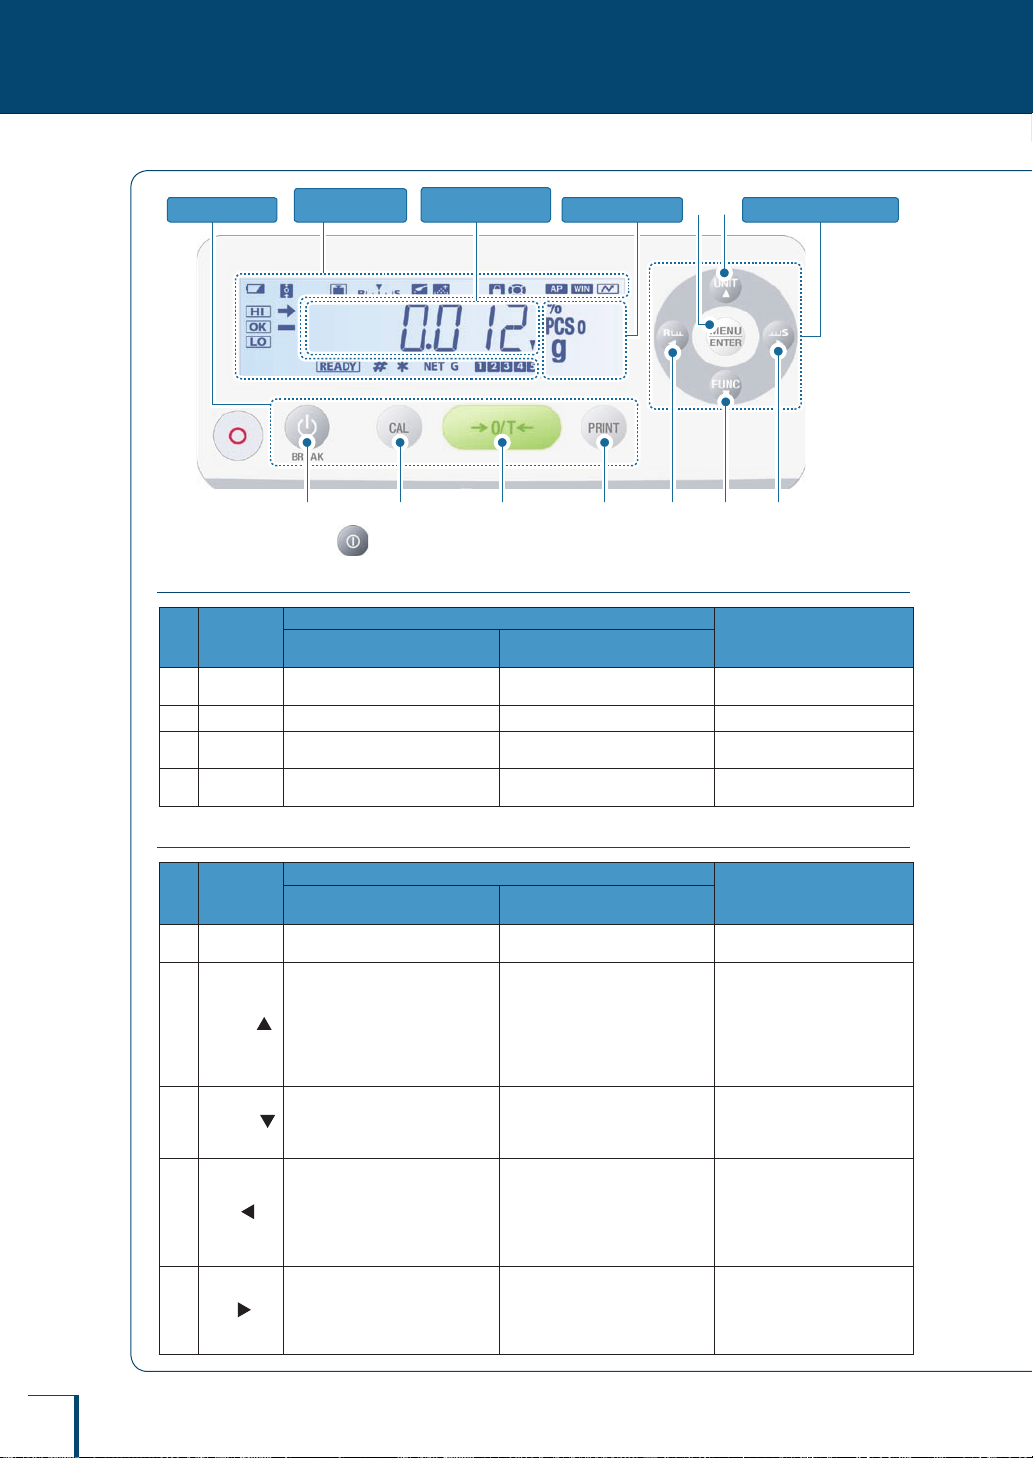
Operation k eys
∗1 With the TXB se ries, is provided.
Operation Keys
No. Key
[BREA K]
1
[CAL] Performs calibration Enters the calibration menu -
2
[O/T]
3
[PRINT]
4
Symbo l display
area
∗1
1 2 3 4 8 7 9
Press Once and Release ...
Switch between t he oper ation
and sta ndby modes
Tares the balance (setting it to
zero)
Outputs the weight read ing to a
peripheral device (printer or PC)
Numer ic valu e /
menu di splay a rea
During Weighing
Press and Hold for About
Opens the zero / tare menu -
Opens the dat a output menu -
Unit di splay a rea Menu op erat ion keys
3 Seconds ...
-
65
During Menu Operat ion
Suspends calibration /
numer ical value entr y.
22
Menu Operation Keys
No. Key
[MEN U/
5
ENTER]
[UN IT]
6
[FUNC]
7
[Res]
8
[Stb]
9
Press Once and Release ...
Displays the main menu Shows the menu displayed last
In the weighing mode: Used
•
to select the unit
•
When piece counting:
Displays the unit weight
•
When perfor ming percentage
weighing: Displays the
reference weight
Switches between the weighing
mode and the application
function mode
The response of the display is
increased.
The stability of the display is
increased.
During Weighing
Press and Hold for About
In the weighing mode: Opens
•
the unit sett ing menu
When piece counting: Used to
•
select the item number
When perfor ming percentage
•
weighing: Used to select the
percentage reference
Selects the minimum number of
displayed digits
3 Seconds ...
-
-
During Menu Operat ion
Conrms a nd sets t he
displayed entr y
Scrolls backwa rd through
•
menu options
When entering numerical
•
values: Increases the value
Scrolls forward through
•
menu options
When entering numerical
•
values: Reduces the value
Takes you to a higher level
•
in the menu hierarchy
When entering numerical
•
values: Moves the focus
one digit to the left
Suspends menu operation
•
Takes you to a lower level
•
in the menu hierarchy
When entering numerical
•
values: Moves the focus
one digit to the rig ht
Page 23
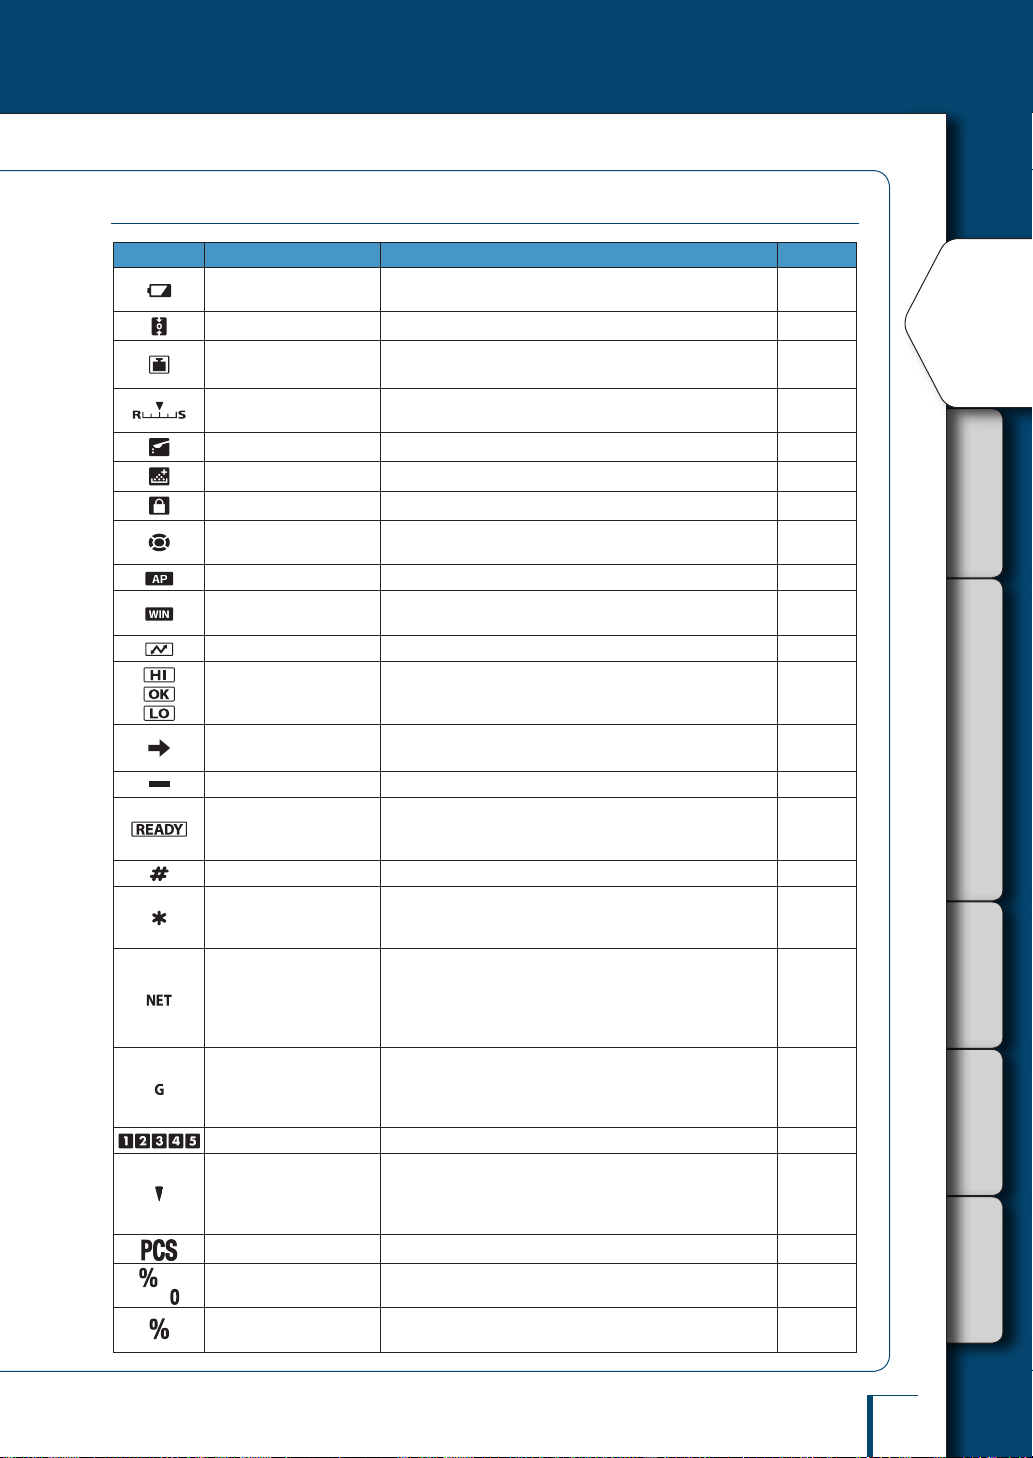
Display Panel
Display Name Description
Battery sy mbol
Zero tracking symbol Lit when the zero tracking function is set ON. Page 71
Weight symbol This symbol is lit during calibration.
Easy setting indicator
Pouring symbol
Formulation symbol Lit during mixing measurement (formulation) operations. Page 96
Menu lock symbol Lit while the menu is locked. Page 52
Menu operation key
symbol
Auto pri nt symbol Lit when the auto print function is set. Page 108
Win symbol
Communication symbol Indicates that dat a is being exchanged with an external device. -
Lights up when the power supply voltage is low, for example
when the battery voltage is low.
Indicates what level the response a nd stability are currently
set to.
Lit when the pouring mode is set.
During menu operation, indicates which of the menu operation
keys can be used.
Lit when the WindowsDi rect communication function has
been set.
See:
Page 33
Page 57
Page 62
Page 78
Page 77
Page 47
Page 112
WEIGHING
BEFORE
USING THE
BALANCE
USING MORE CON VENIENTLY MAINTENANCE
Comparator sy mbol
Stability mark
Minus symbol Lit when the weight reading is negative. -
Ready sy mbol
Number symbol Lit when it is possible to enter numerical values. Page 49
Hold symbol
Net weight symbol
Gross weight symbol
Item number indication Shows the item number in the piece counting mode. Page 90
Inverse triangle symbol
Piece cou nting symbol Lit while the piece counting mode is i n effect. Page 90
Specic percentage
weighing symbol
Percentage weighing
symbol
When the comparator f unction (Check weighing) has been set,
indicates the compar ison judgment.
Lit when the weight reading is stable. Lit when the option
currently set in menu setting is displayed.
Lit during the standby mode (TW/TX Series only). During
weighing, lit to indicate the ready to weigh status, for example
when using the for mulation function.
Lit when a value that is not the real-time weight reading (for
example the indication of the unit weight in piece counting) is
displayed.
Indicates that the weight reading displayed in mixing
measu rement (formulation) is the net weight of the current
component with the weight of the container and prior
components. Also indicates that a measuring operation is in
progress.
Indicates that the weight reading displayed in mixing
measu rement (formulation) is the tot al weight of all of the
components of the mixture with the weight of the cont ainer
subtracted.
When this symbol is lit when changing the position of the
decimal point i n the conversion factor wit h the of user-
specied units, numerical values can be entered without a
decimal point.
Lit when the specic percentage reference has been set for
percentage weighing.
Lit during percentage weighi ng. Page 95
Page 102
Page 48
Page 79
Page 43
Page 96
Page 90
Page 95
Page 97
Page 97
Page 50
Page 94
TROUBLESHOOTING
INFORM ATION
FOR YOUR
23
Page 24
BEFORE WEIGHING
1
Installation
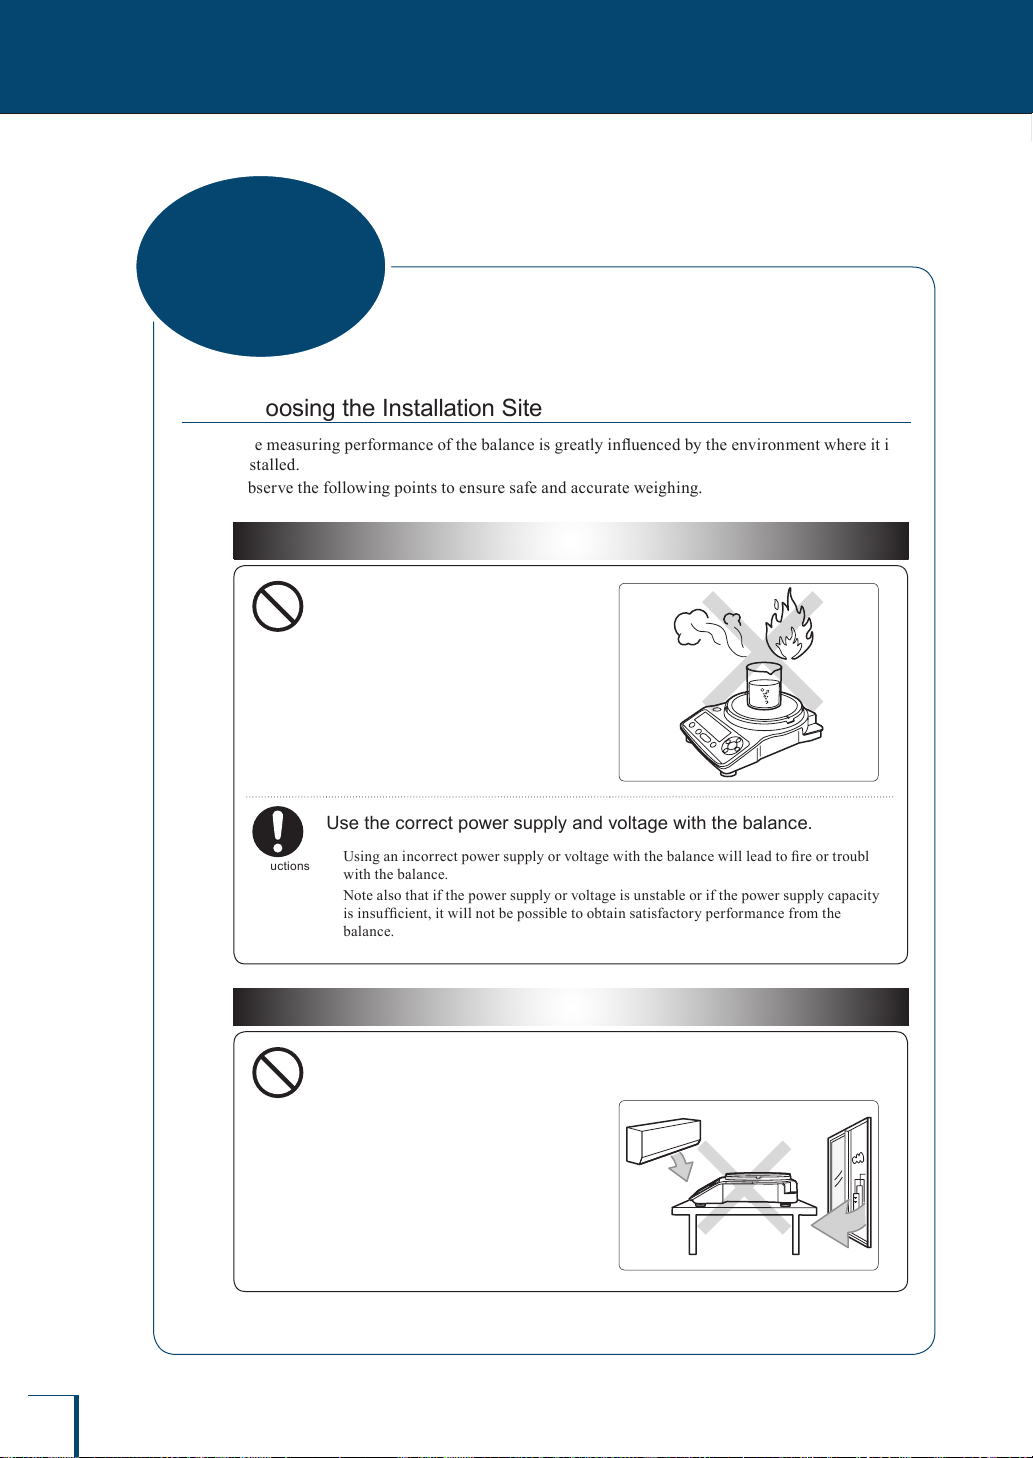
Choosing the Installation Site
The measuring performance of the balance is greatly inuenced by the environment where it is
installed.
Observe the following points to ensure safe and accurate weighing.
! Caution
Do not use the balance anywhere
exposed to explosive, combustible
Prohibi tions
or corrosive gases.
This could cause re or t rouble.
Instru ction s
Prohibi tions
Use the correct power supply and voltage with the balance.
Using an incorrect power supply or voltage with the balance will lead to re or trouble
with the balance.
Note also that if the power supply or voltage is u nstable or if the power supply capacit y
is insufcient, it will not be possible to obtain sat isfactory perfor mance from the
balance.
Precautions on Use
Avoid locations where the balance will be exposed to any of the
following.
Air ow from an ai r conditioner,
•
ventilator, door or window
24
Page 25

Precautions on Use
Prohibi tions
Avoid locations where the balance will be exposed to any of the
following.
Extreme temperature changes•
Vibration from surroundi ngs or nea rby
•
equipment
Direct sunlight•
WEIGHING
BEFORE
USING THE
BALANCE
USING MORE CON VENIENTLY MAINTENANCE
Instru ction s
Dust, electromagnetic waves or a
•
magnetic eld
Install the balance on a strong and stable at table or oor.
Placing the balance in an unst able site could lead to injur y or trouble with the balance.
When selecting the installation site, take into account t he combined weight of the
balance and the item to be weighed.
Continued on next page
25
TROUBLESHOOTING
INFORM ATION
FOR YOUR
Page 26
BEFORE WEIGHING
1
Installation
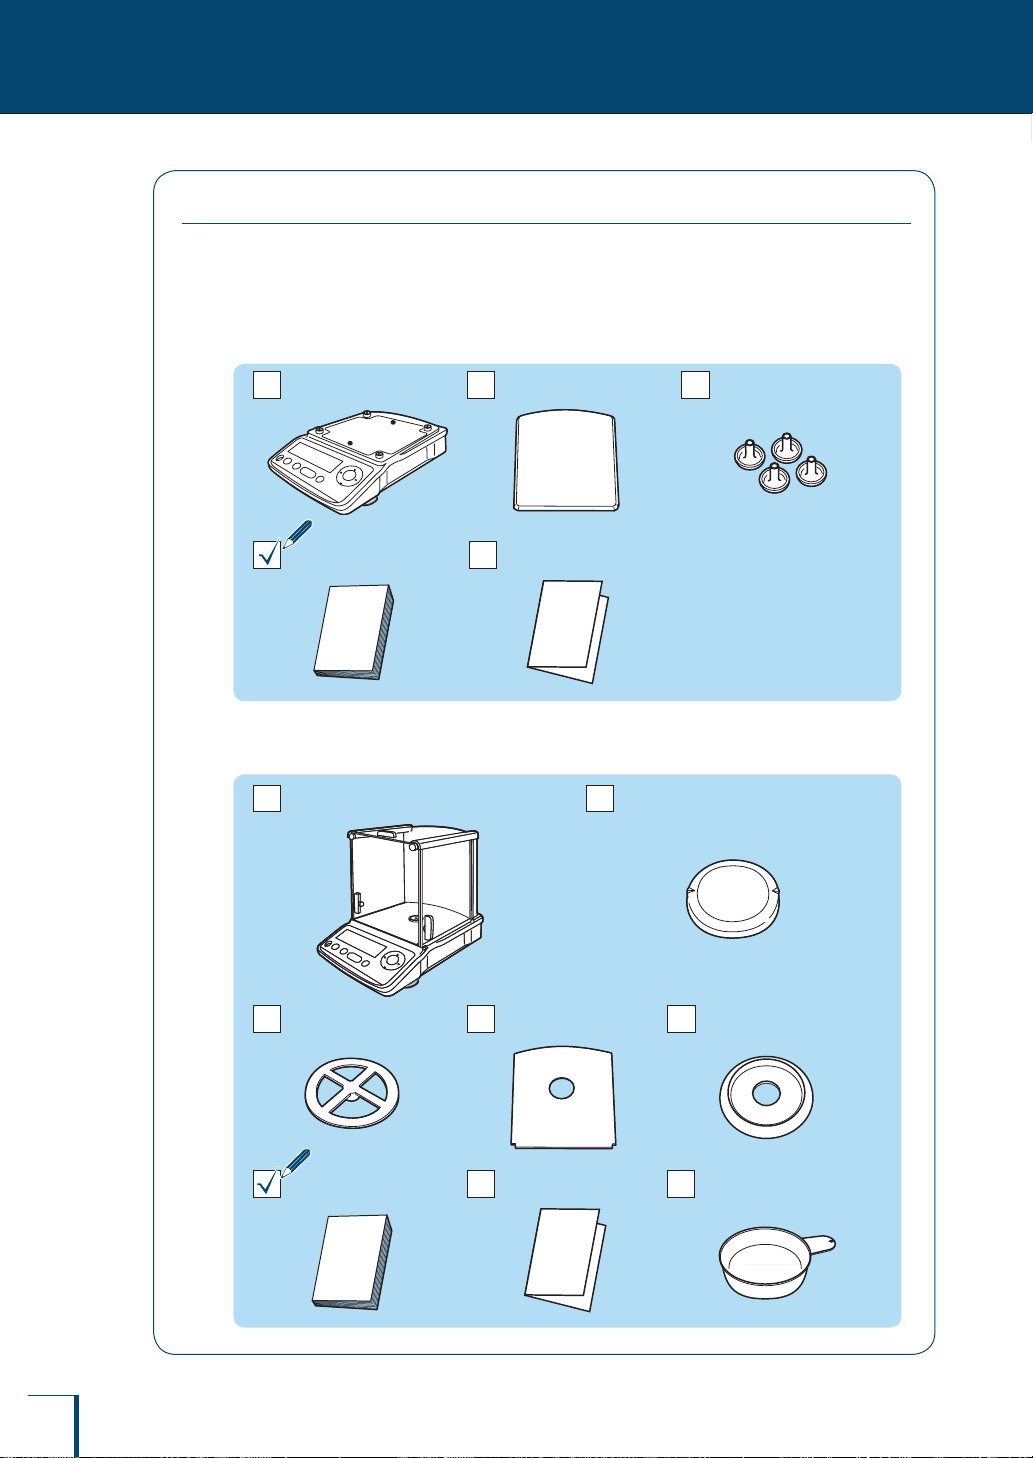
Unpacking and Delivery Inspection
The items packed will differ depending on the model of balance ordered.
Check that all of the items indicated below are included in the package, and that nothing has
been damaged.
The numbers in the boxes [ ] indicate the quantity of each item.
TX Series (large pan model) TX***2L
Balance main body [1] Pan [1]
Inst ruction manual [1]
TW/TX Series (small pan model) TW**3L, TX**3L
Menu map sheet
TW/TX Series (carat model) TWC**3L, TXC**3L
Balance main body (with wi ndbreak) [1] Pan [1]
Pan supporter cap [4]
[1]
26
Pan supporter [1]
Inst ruction manual [1]
Underplate [1] Pan r ing [1]
(TWC**3L, TXC**3L only)
Menu map sheet
[1]
Pan with grip [1]
(TWC**3L, TXC**3L only)
Page 27
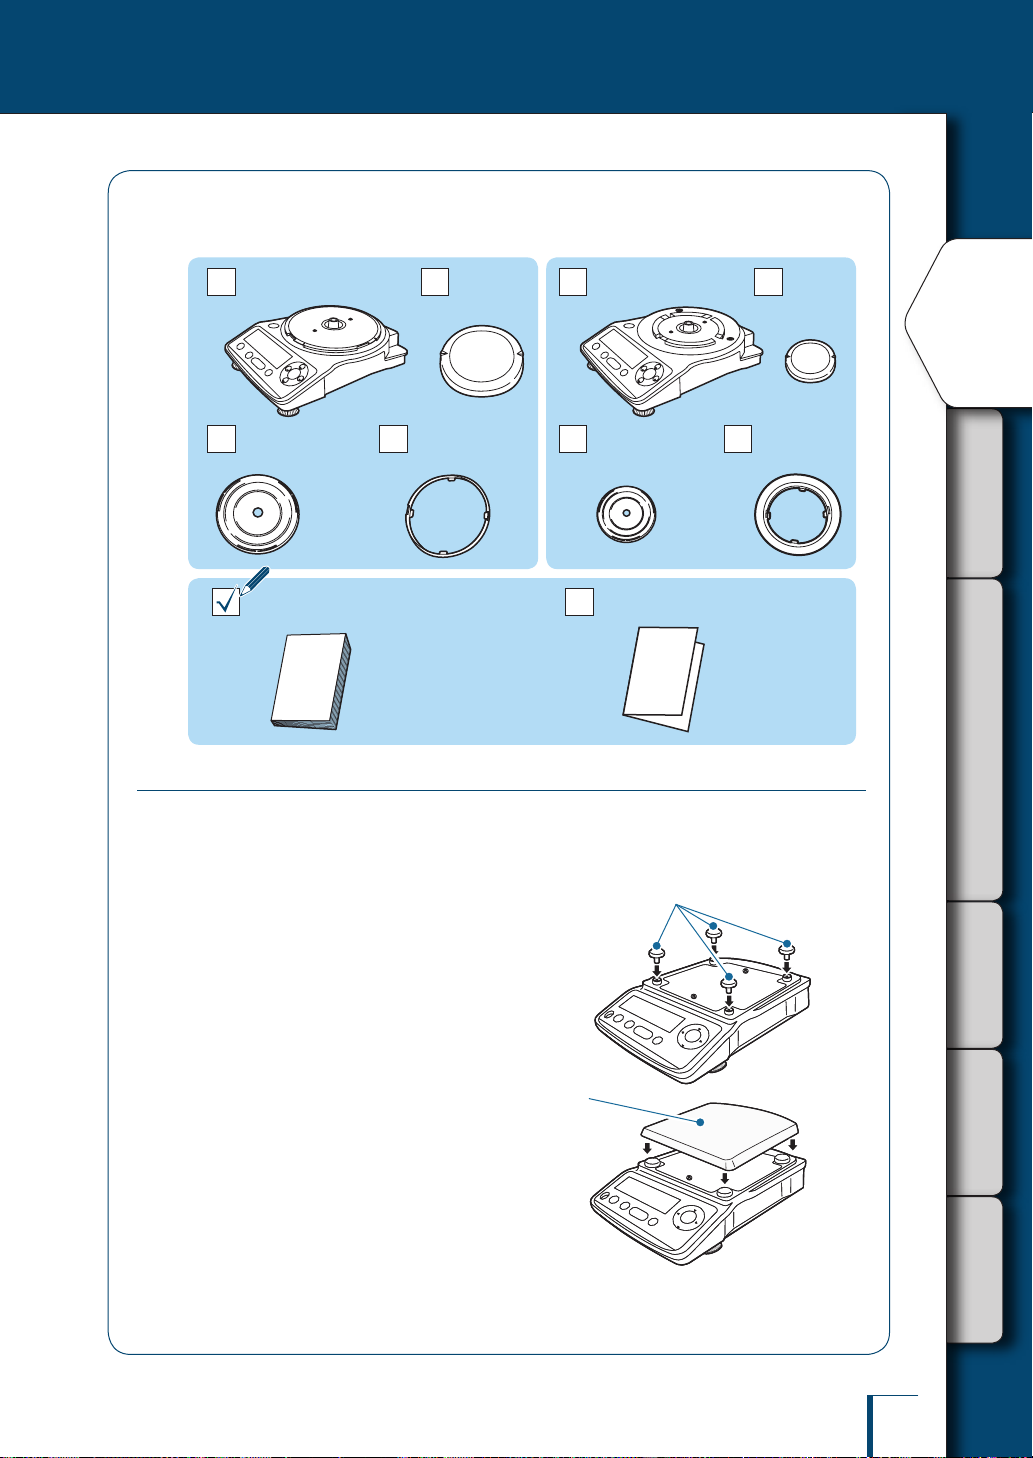
TXB Series (large pan model)
TXB Series (small pan model)
TXB***1L, TXB***0L
TXB**2L, TXB**1L
Balance main body [1]
Pan supporter [1]
Inst ruction manual [1]
Installing the Components
The procedure for tting the components differs depending on the model of the balance.
Pan [1] Balance main body [1] Pan [1]
Pan ring [1]
Pan supporter [1]
Menu map sheet
[1]
Pan ring [1]
WEIGHING
BEFORE
USING THE
BALANCE
USING MORE CON VENIENTLY MAINTENANCE
TX Series (large pan model) TX***2L
Fit the four pan supporter caps.
1
Place the pan on the pan supporters.
2
PanPan
Pan suppor ter capsPan suppor ter caps
Continued on next page
27
TROUBLESHOOTING
INFORM ATION
FOR YOUR
Page 28
BEFORE WEIGHING
1
Installation
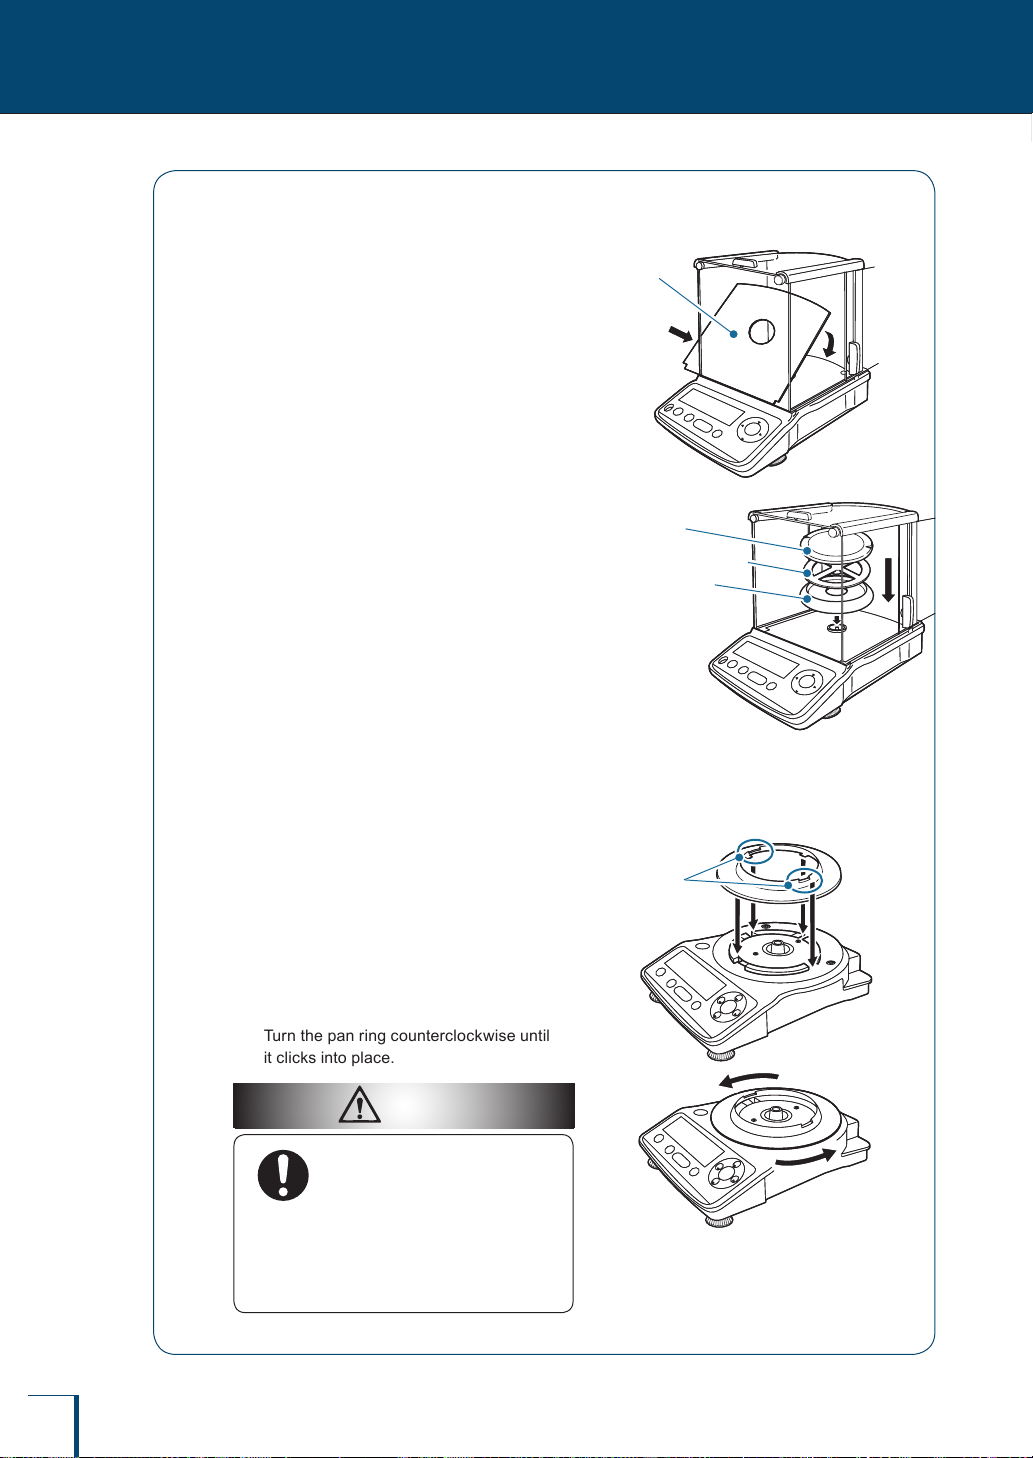
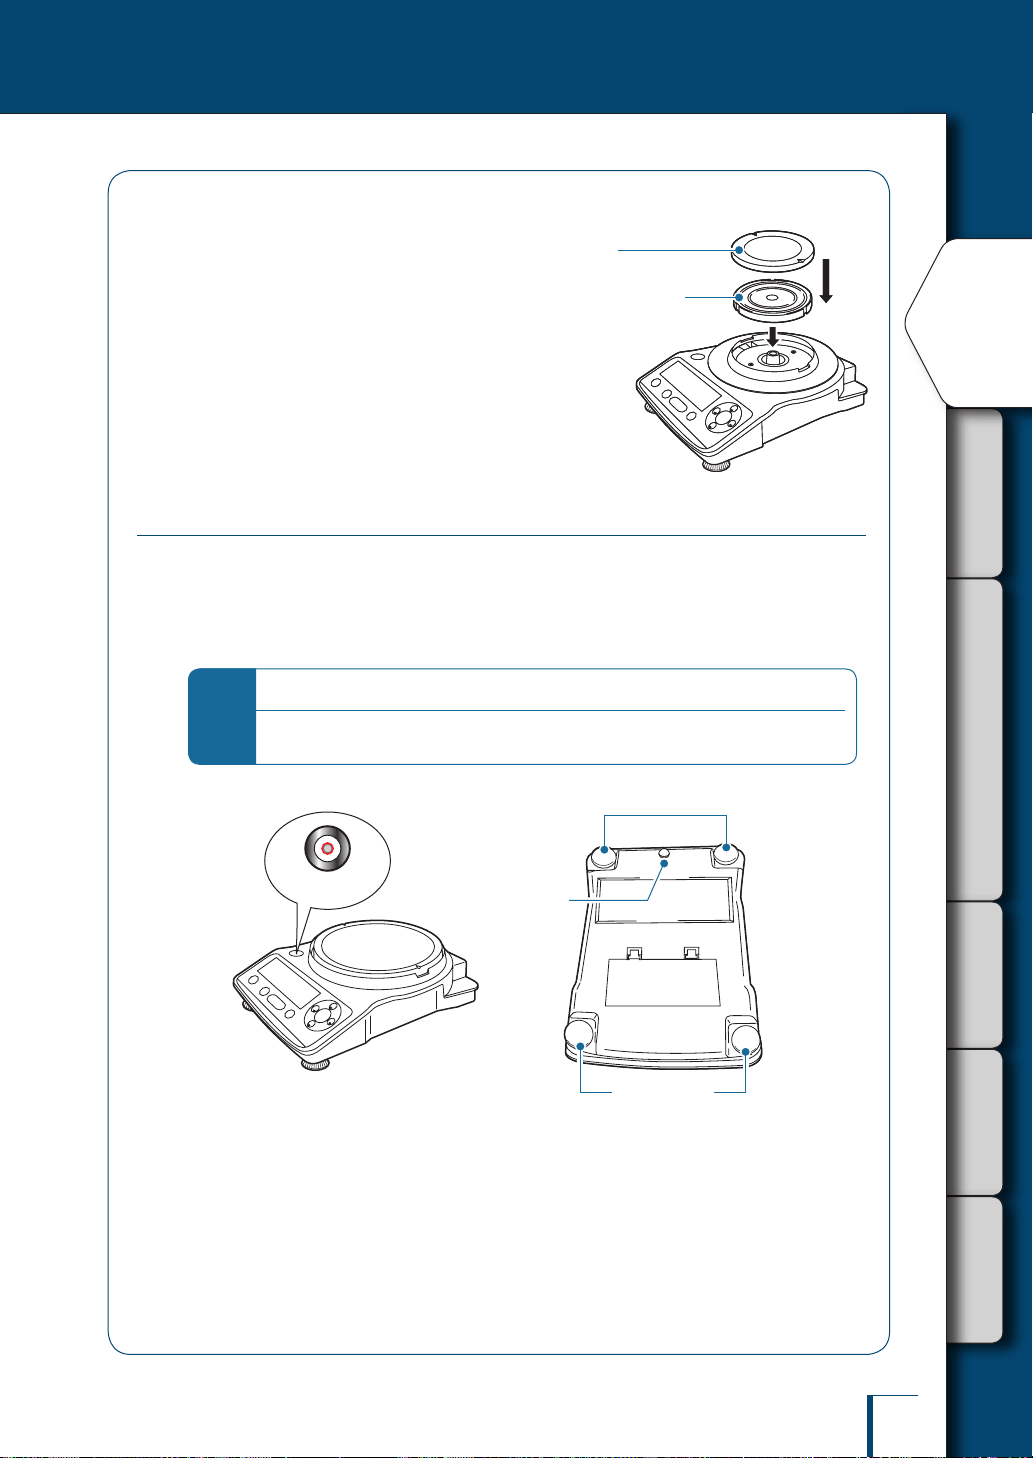
TW/TX Series (small pan model) TW**3L, TX**3L
TW/TX Series (carat model) TWC**3L, TXC**3L
Fit the underplate.
1
Open the glass door and insert the underplate
slowly while tilting it.
Be careful not to knock against the surroundings.
Fit the pan ring.
2
(TWC**3L, TXC**3L only)
Place the pan supporter.
3
Place the pan on the pan supporters.
4
Align the two pan notches with the left and right
on the balance main body.
TXB Series (common to large pan models and small pan models)
Fit the pan ring.
1
1
Align the two pan ring notches with the
left and right on the balance main body,
and engage the four projections on the
pan ring in notches in the balance main
body.
UnderplateUnderplate
Pan
Pan
Pan suppor ter
Pan suppor ter
Pan ring
Pan ring
Notches in the
Notches in the
pan ring
pan ring
28
Turn the pan ring counterclockwise until
2
it clicks into place.
Caution
Turn the pan ring until it
Instru ction s
clicks into place.
If the pan ring is not tu rned
sufciently, it will come into
contact with the pan, and the
display of the balance will become
unstable.
Page 29
Place the pan supporter.
Pan
Pan
2
Pan suppor ter
Pan suppor ter
Place the pan on the pan supporter.
3
Align the two pan notches with the left and right
on the balance main body.
Adjusting the Level of the Balance
The level of this balance is maintained by three-point suppor t involving a single xed foot at
center rear on the underside of the main body and two level screws on left and right at the f ront
of the underside of the main body.
The large pan model also has level screws on left and right at the back, but they are used in an
auxiliary role to prevent the balance from tilting when a heavy sample is placed on the pan.
Operation of the level screws
*
Turning the level screws clockwise, as viewed from above, extends t hem and raises the
balance, while t ur ning them counterclockwise retracts them and lowers the balance.
Level screws (auxiliar y)
Large pan model only
WEIGHING
BEFORE
USING THE
BALANCE
USING MORE CON VENIENTLY MAINTENANCE
Level
Level the balance by following the procedure below.
Fixed foot
Level screws
Turn all the level screws (total of four at front and rear)
1
counterclockwise as viewed from above until they come to a gentle
stop.
The balance will now be tilting toward the front, with the auxiliar y level screws at the back of
the large pan model lifted off the installation surface.
Continued on next page
29
TROUBLESHOOTING
INFORM ATION
FOR YOUR
Page 30
BEFORE WEIGHING
1
Installation
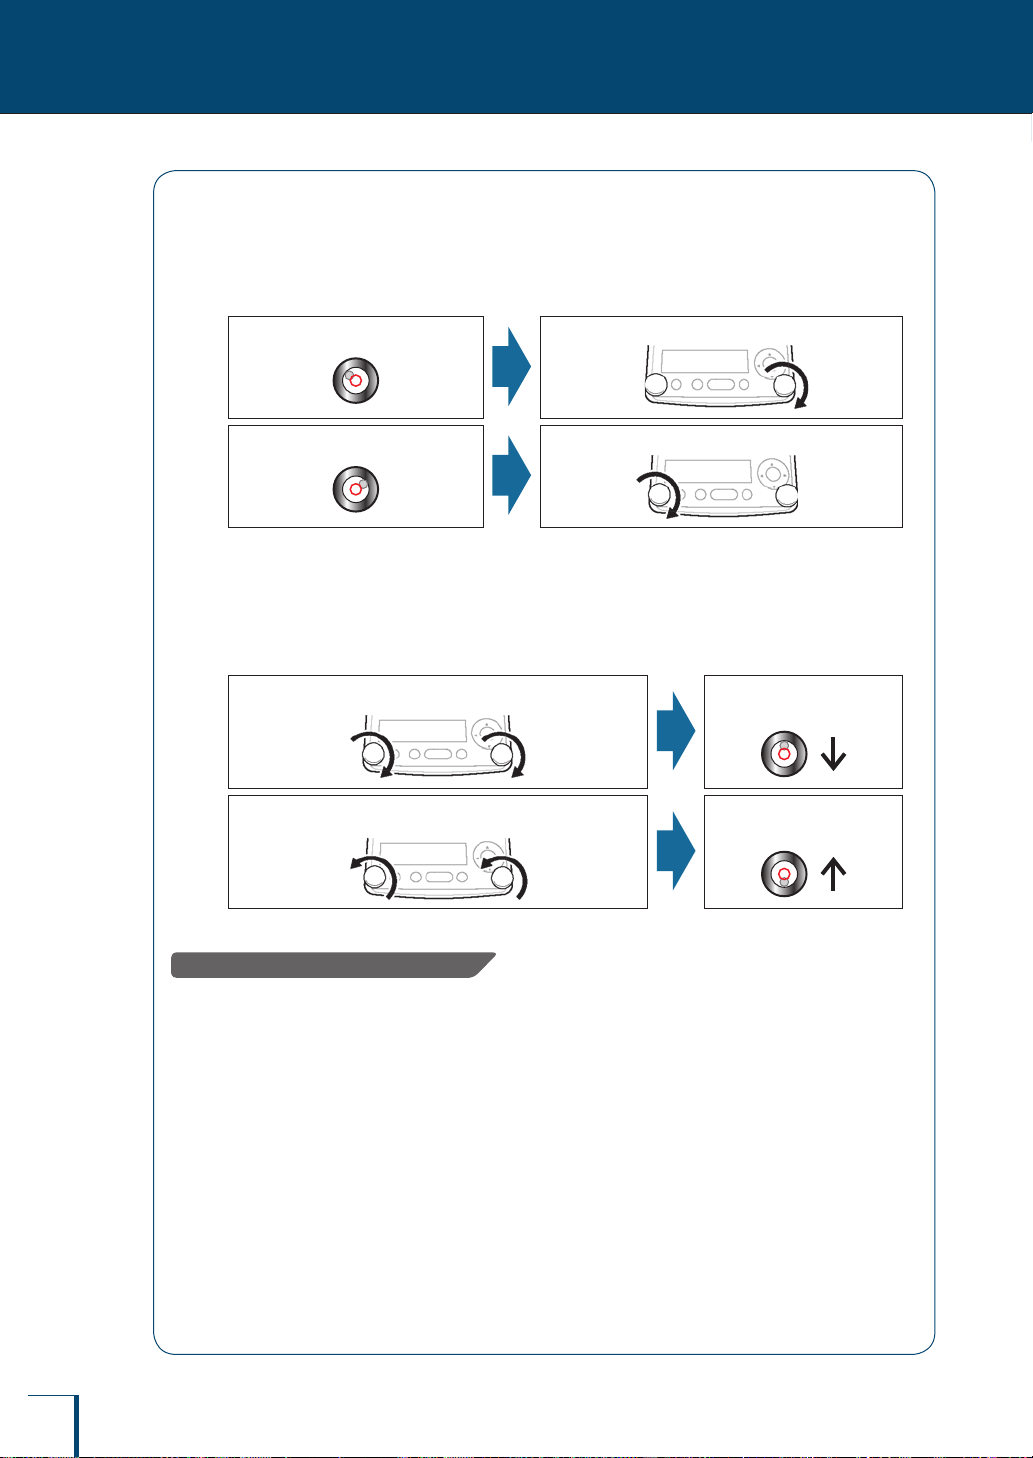
Adjust the two level screws at the front so that the air bubble in the
2
level becomes centered in the left/right direction.
At this stage it doesn't matter if the air bubble isn't centered in the front/rear direction.
If the air bubble is left of center
Turn the front right level screw clockwise.
If the air bubble is right of center
Turn both the level screws at the front in the same direction at the
3
same time to center the air bubble in the level in the front/back
direction.
Adjust so as to bring the air bubble into the center of the circle.
On turning the t wo level screws at the f ront in t he clockwise
direction…
On turning the t wo level screws at the f ront in t he
counterclockwise direct ion…
With the large pan model…
Turn both of the auxiliary level screws at the rear clockwise to extend
4
them to the point where they make light contact with the installation
surface.
Note that if you overextend the auxiliary level screws at the rear the balance will become unstable.
Turn the front left level screw clockwise.
The bubble moves toward
the front.
The bubble moves toward
the back.
30
Page 31

Turning the Power ON
Insert the plug of the AC adapter into
1
the DC IN connector on the back of the
balance.
Connect the AC adapter to the power
2
outlet (with the TXB series, press ).
The display will automatically go through the changes
indicated below, ending with the OFF display.
The rst infor mation displayed is the software version
number. Depending on the product, this may differ from the
example shown below.
(This is the balanc e's self check display.)
!2.0!0,0!0,0!0
! !C!H!E! !3
...
! !C!H!E! !0
! !O!F!F! !
For the TW series…
*
An operation check on the i nter nal
weight mechanism is performed
automat ically. During t his check, a
small motor noise will be heard.
WEIGHING
BEFORE
USING THE
BALANCE
USING MORE CON VENIENTLY MAINTENANCE
If "ERR H" is displayed…
*
See "Responding to Messages"
(^ page 137).
Press ( with the TXB series).
3
All segments will light up momentarily, then the gram display will be shown.
Continued on next page
31
TROUBLESHOOTING
INFORM ATION
FOR YOUR
Page 32

BEFORE WEIGHING
1
Installation
Using batteries (TXB Series only)
Remove the pan and pan supporter.
1
Turn the balance upside down.
2
Press the two catches on the battery
3
Caution
Do not remove the pan ring.
Prohibi tions
compartment simultaneously in the
direction indicated by the arrows.
The cover will come off.
Attempting to do so could break it.
The pan ring protects the weighing
mechanism when the balance is
tur ned over.
Pan
Pan
Pan suppor ter
Pan suppor ter
Pan ring
Pan ring
Caution
Do not open covers where a
Prohibi tions
Insert the batteries and replace the
4
cover.
Take care to insert the batteries with the correct
polarity.
Press
5
The display will automatically go through the
changes indicated below, ending with the OFF
display.
(This is the balanc e's self check display.)
seal is afxed.
On no account open the covers
inside the battery compar tment
that have seals afxed to t hem.
! !C!H!E! 3
...
! !C!H!E! !0
! !O!F!F! !
32
Page 33

Press
6
The whole display will light up momentarily, then the gram display will be shown.
If (the battery symbol) lights up at this point, the probable cause is that the battery voltage is
low.
Replace the batteries with new ones.
If you are not going to use the balance for a long time (a month or longer)…
*
In order to prevent d amage by liquid leakage f rom the batteries, remove them from the battery
compar tment.
^ "Turning the Power OFF", page 43
Warming Up
Before performing span calibration on the balance or measuring its accuracy, you must ensure
that it is in a stable state.
When stabilizing the balance, it is important that its temperature is stable.
Put the balance in weighing mode (for example showing the gram display) and leave it with
the power ON for at least an hour (two hours for the carat models TWC**3L and TXC**3L) in
advance of calibration.
This is called "warming up".
With the T W/TX Series…
Warming up is also accomplished in the standby mode.
For details on the standby mode, see "Turning the Power OFF" (^ page 43).
(* The standby mode is a function available with the TW/TX Series only. It is not featured on the
TXB series.)
WEIGHING
BEFORE
USING THE
BALANCE
USING MORE CON VENIENTLY MAINTENANCE
With the T XB Ser ies…
When the auto power-off function operates, the power is shut off completely.
Before warming up for calibration, cancel the auto power-off function so that it cannot operate.
For details on the auto power-off function, see "Auto Power-Off Function" (^ page 138).
Continued on next page
33
TROUBLESHOOTING
INFORM ATION
FOR YOUR
Page 34

BEFORE WEIGHING
1
Installation
Press
1
Performing Span Calibration
Always perform span calibration for a balance after moving it. Weights are required for span
calibration of the TX and TXB series. For details on weights, see "About Weights" (^ page
134).
Before performing span calibration, warm up the balance in advance.
Also, carry out the adjustment at a location where there are few people moving around and there
is no air ow or vibration.
TW Series
Calibration using the internal weight starts
automatically.
If "WAIT" is displayed…
! !C!A!L!3
*
The calibration record is being output.
When output has nished, span
calibration will start automatically.
! !C!A!L!2
If "BUSY" is displayed…
*
There is someth ing placed on the pan.
When this item is taken off the pan,
span calibration will star t automatically.
To cancel scan calibration, press
If "ERR H" is displayed…
*
See "Responding to Messages" (^
page 137).
If "ERR C" is displayed…
*
Span calibration was not completed for
one of the following reasons.
There is too large a discrepancy
between the zero point of the
balance and the sensitivity.
A container has been placed on the
pan.
The pan is not on the balance.
There is too large a discrepancy in
the value of the internal weight.
Press and redo the operation from
the beginning. If even on doing this the
same display reappears, calibrate t he
inter nal weig ht (^ page 64).
! !C!A!L!1
! !C!A!L!0
! !W!A!I!T
* This may not
be displayed.
!E!N!D
34
"END" will be displayed and the balance will
return to the weighing mode.
Page 35

Caution
Instru ction s
TX/TXB Series
Press
1
The weight value will ash.
If "WAIT" is displayed…
*
If "BUSY" is displayed…
*
If calibration doesn't end
normally and the balance
stops, do not move it nor
leave it as it is.
Moving the balance in such a
condition may cause failu re
because the internal weight is not
held correctly.
Before moving the balance, be
sure to tur n the power on and st art
it up correctly (so that the internal
weight is cor rectly held).
The calibration record is being output.
When output has nished, span
calibration will start automatically.
There is someth ing placed on the pan.
Take the item off t he pan and follow the
procedure below.
To cancel scan calibration, press
( with the TXB series).
/
/
/
/
/
/
/
/
/
/
/
/
/
/
/
/
/
/
/
/
/
/
/
/
!3!0!0.0!0!0
!3!0!0.0!0!0
/
/
/
/
/
/
/
/
/
/
/
/
/
/
/
/
/
/
/
/
/
/
WEIGHING
BEFORE
USING THE
BALANCE
/
/
/
/
/
/
/
/
/
/
/
/
/
/
/
/
USING MORE CON VENIENTLY MAINTENANCE
If no operation is performed within
*
60 seconds…
"ERR C" (calibration er ror) is displayed.
Press ( with the TXB ser ies)
and repeat the operation from the
begin ning.
Continued on next page
35
TROUBLESHOOTING
INFORM ATION
FOR YOUR
Page 36

BEFORE WEIGHING
1
Installation
Enter the weight value.
2
With models that don’t feature the windbreak
Place the calibration weight on the
3
If necessary, change the weight value to match
the weight that will be used for calibration. If
there is no need to change it, proceed to step 3.
(If necessary enter the weight value.)
"Entering Numerical Values", page 49
^
For details on the weight values that can be
entered, see "Specications" (^ page 145).
pan.
Wait until the ashing weight value display
changes to a ashing zero.
/
/
/
/
/
/
/
/
/
/
/
/
/
/
/
/
/
/
/
/
/
/
!3!0!0.0!0!0
!3!0!0.0!0!0
/
/
/
/
/
/
/
/
/
/
/
/
/
/
/
/
/
/
/
/
/
/
/
/
/
!2!9!9.9!9!8
!2!9!9.9!9!8
/
/
/
/
/
/
/
/
/
/
/
/
/
/
/
/
/
/
/
/
/
/
/
/
/
/
/
/
/
/
/
/
/
/
/
If "ERR C" is displayed…
*
Span calibration was not completed for
one of the following reasons.
There is too large a discrepancy
between the zero point of the
balance and the sensitivity.
A container has been placed on the
pan.
The pan is not on the balance.
The wrong weight has been placed
on the pan.
No operation has been performed
within 60 seconds of the ashing
weight value or zero display.
Press ( with the TXB ser ies)
and repeat the operation from the
begin ning.
Take the weight off the pan.
4
"END" will be displayed and the balance will
return to the weighing mode.
/
/
/
/
/
/
/
/
/
/
/
/
/
/
/
/
/
/
! ! !0.0!0!0
! ! !0.0!0!0
/
/
/
/
/
/
/
/
/
/
/
/
/
/
/
/
/
/
/
/
/
/
/
/
/
/
/
/
/
/
36
!E!N!D !E!N!D
Page 37

With models that feature the windbreak
Place the calibration weight on
3
the pan.
Open the glass door in the windbreak, place
the weight on the pan, and shut the glass door
again.
Wait until the ashing weight value display
changes to a ashing zero.
Shut the glass door fully.
*
After placing a weight on the pan or
removing a weight from the pa n, check
that the glass door is fully shut.
Take the calibration weight off the pan.
4
Open the glass door in the windbreak, remove
the weight from the pan and shut the glass door
again.
"END" will be displayed and the balance will
return to the weighing mode.
/
/
/
/
/
/
/
/
/
/
/
/
/
/
/
/
/
/
! ! !0.0!0!0
! ! !0.0!0!0
/
/
/
/
/
/
/
/
/
/
/
/
/
/
/
/
WEIGHING
BEFORE
USING THE
BALANCE
/
/
/
/
/
/
/
/
/
/
/
/
/
/
USING MORE CON VENIENTLY MAINTENANCE
The procedure described above is the default
standard span calibration procedure.
For details, see "4. CALIBRATION" (^ page
54).
!E!N!D !E!N!D
37
TROUBLESHOOTING
INFORM ATION
FOR YOUR
Page 38

2
USING THE BALANCE
Weighing
Enter the weighing mode.
1
What is the weighing mode?
The balance is in the state where it indicates the units (for example grams) of the weight on the
pan.
To establish the weighing mode, follow the steps below depending on the current status of the
balance.
Status of the Balance To Establish the Weighing Mode….
The display is off.
"OFF" indication, all segment s lit, or
(ready symbol) lit
The application f unction mode is
established.
A menu indication is displayed.
Press ( with the TXB ser ies). When the "OFF"
indication appears or all segments are lit, press any key.
Press a ny key.
Press
Press for about 3 seconds.
The balance is accepting numerical
value ent ry.
With models that don't feature the windbreak
Place a container on the pan.
Press ( with the TXB ser ies) to cancel numer ical
value ent ry, then press for about 3 seconds.
2
Once the display has stabilized (
3
has lit), press
The indication changes to zero.
Insert the sample (item to be
4
measured) into the container.
When the display has stabilized,
5
(the stability mark) lights up, read
the display.
38
Page 39

If an indication like "OL" or "-OL" appears during measurement…
*
See "Responding to Messages" (^ page 137).
With models that feature the windbreak
Place a container on the pan.
2
Open the glass door in the windbreak, place the
container on the pan and shut the glass door again.
With the TXC323L and TXC623L, the pan with
grip supplied as a standard accessory can be used.
Once the display has stabilized (
3
has lit), press
The indication changes to zero.
Insert the sample (item to be
4
measured) into the container.
Open the glass door of the windbreak, place the
sample (item to be weighed) on the pan and shut
the glass door again.
WEIGHING
BEFORE
USING THE
BALANCE
USING MORE CON VENIENTLY MAINTENANCE
When the display has stabilized,
5
(the stability mark) lights up, read
the display.
Shut the glass door fully.
*
Check that the glass door is fully shut before reading the balance display.
With the TWC**3L, TXC**3L…
*
Avoid doing the following:
Putt ing your hand inside the glass door of the wi ndbreak
Touching the container or sample with bare hands
Weighing samples (items to be weighed) of dif ferent temperatu res
The heat will lead to convection, and this may make the balance display unstable.
Use forceps or gloves to carr y containers and samples.
When dealing with sa mples (items to be weighed) at different temperatures, eliminate the temperat ure
difference by leaving the samples around the pan inside the glass door before weighing.
39
TROUBLESHOOTING
INFORM ATION
FOR YOUR
Page 40

USING THE BALANCE
SHIMADZU CORP.
D
465412345
300.000
g
TX
323
L
2
Outputting Weight
Readings
When the balance is connected to a PC and a printer (option), you can output a weight reading,
settings, and so on for each measurement. The WindowsDirect communication function (^
page 111) is convenient for output to a PC.
When the GLP output function (^ page 142) is set to OFF, only the weight reading is output.
•
When the GLP output function (^ page 142) is set to ON, the following information is output.
•
Example printout from printer
(When the GLP output function is set to ON)
Name of manufacturer
Balance model name
Balance serial number
Balance ID
Weight reading
The person who carried out
measurement signs here.
40
Page 41

Selecting the
Display
Switching Units
You can display different units from among those set to be available.
Press in the weighing mode.
1
Repeatedly pressing this key will cycle you
through the registered units.
When the balance is shipped from the factory,
the only unit registered is grams (for TWC**3L
and TXC**3L, "g" and "ct" only).
To be able to switch to other units, you must rst
register the units you wish to use.
"Selecting Units to Display", page 83
^
When user-specied units have been selected,
the characters and symbols that indicate the
units don't light up.
Unit display after restarting
*
When the power is t urned off and back on, the balance starts up displaying the units that were in use
before the power was turned off.
! ! !0.0!0!0
0.0!0!0!0!0!0
! ! ! 0.0!0
WEIGHING
BEFORE
USING THE
BALANCE
USING MORE CON VENIENTLY MAINTENANCE
Selecting the Minimum Number of Displayed Digit
If necessary, the minimum number of displayed digit can be reduced by one digit.
Press for about
1
3 seconds.
The minimum number of displayed digit will be
reduced by one.
Press again for about
2
3 seconds.
The minimum number of characters displayed
will retur n to the original setting.
Display after selection
! ! !0.0!0!0
! ! !0.0!0!0
! ! !0.0!0
! ! !0.0!0
*
The decimal place doesn't change. Note also that when one digit is removed the d isplay area for the nal
digit appears as a blank.
Continued on next page
41
TROUBLESHOOTING
INFORM ATION
FOR YOUR
Page 42

USING THE BALANCE
2
Selecting the Display
Selecting the Decimal Point Display Symbol
The decimal point can be displayed as either "." (a period) or "," (a comma).
Press in the weighing mode.
1
This opens the main menu.
Select decimal point display
2
setting.
Select the decimal point display
3
symbol.
To select "." (period):
! !P!O!I!NT ! !P!O!I!NT
[TOOLS] [SYSTEM]
[POINT]
[PERIOD]
To select "," (comma):
[COMMA]
When outputting to the ER-50/EP-
*
Conrm and return to the weighing
4
mode.
The way the decimal is displayed has now
changed.
*
60A electronic printer (old type)…
Do not select "," (comma). The pr inter
may not print it cor rectly.
[SET]
Selecting the decimal point display
symbol
When the decimal point display is
changed, the decimal point changes
accordingly i n data output to exter nal
devices such as pr inters.
!P!E!R!I!O!D !P!E!R!I!O!D
! !C!O!M!M!A ! !C!O!M!M!A
! !S!E!T!
! !S!E!T!
To select the period
•
To select the period
•
!P!E!R!I!O!D
!P!E!R!I!O!D
To select the comma
•
To select the comma
•
! !C!O!M!M!A
! !C!O!M!M!A
42
Page 43

Ending Weighing
Turning the Power OFF
Establish the weighing mode.
1
"Weighing", page 38
^
Press
2
If the status described below is not established, press again.
With the T W/TX Series…
(the ready symbol) will light and the
standby mode will be established.
Normally, leave the balance on standby in this
state until the next weighing.
To shut the power off completely, disconnect the
AC adapter.
The ready symbol lights up.The ready symbol lights up.
WEIGHING
BEFORE
USING THE
BALANCE
USING MORE CON VENIENTLY MAINTENANCE
What is the standby mode?
This is the status in which the balance stands by, saving electr icity although it can still be used
right away.
On pressing in the weighing mode the display is tu rned off, (the ready
symbol) is lit and the power saving status (standby mode) is established.
During the standby mode, the interior of the balance is powered and in the warming-up stat us,
ready for i mmediate use.
(* The standby mode is a f unction feat ured with the TW/TX Series only.)
With the T XB Ser ies…
The power is shut off. The standby mode is not
established.
Normally, leave the balance in this state until
the next weighing.
If batteries are installed in the balance and it is
not going to be used for a long time, remove the
batteries.
Continued on next page
43
TROUBLESHOOTING
INFORM ATION
FOR YOUR
Page 44

USING THE BALANCE
2
Ending Weighing
Prohibi tions
! Caution
While [WAIT] or [SET] is displayed, on no account disconnect the AC
adaptor or remove the batteries.
There is a risk that dat a in the scale will be cor rupted.
44
Page 45

MEMO
WEIGHING
BEFORE
USING THE
BALANCE
USING MORE CON VENIENTLY MAINTENANCE
45
TROUBLESHOOTING
INFORM ATION
FOR YOUR
Page 46

3
MENU SETTINGS
What Is the Menu?
With the TW/TX/TXB series, the menu is used to efciently select the right functions for the user's
application.
The Structure of the Menu
The menu is divided into ve groups according to the setting made.
Menu Group Description
Main menu
Calibration menu
Zero / tare menu
Data output menu
Unit setting menu
Used to set the application function mode, comparator, stability adjust ment, etc.
Used to set the details for calibrat ion
Used to set the details for taring
Used to set the functions for transmitting data to a PC or out putt ing them to a
printer
Used to set wh ich units may be displayed i n weighi ng mode
You can open each menu group by pressing the various operation keys and menu operation keys.
Press and hold for
Press and hold for
about 3 seconds
Calibration menu
Press and hold for
about 3 seconds
Zero / tare menu
Within each menu group are a number of
hierarchical menu levels.
You can move between levels in the menu
hierarchy by pressing and
You can scroll through the options within
each level of the hierarchy by pressing
or
Press and hold for
about 3 seconds
Data out put menu
Arrangement of the Menu
Arrangement of the Menu
RESET
RESET
POINTSYSTEM PERIOD
POINTSYSTEM PERIOD
AUTO.OFF
AUTO.OFF
about 3 seconds
Unit setting menu
Press once and
release
Displays the mai n menu
COND.OUT
COND.OUT
BC.LIT
BC.LIT
: :
: :
46
Page 47

Menu Map
The menu map represents the organization of the menu options graphically to make it easy to
understand.
It is useful for quickly accessing the menu option you want to use.
For more on the menu map, see "Menu Map" (^ page 150) and "Menu Map Sheet".
Instruction Manual
The instruction manual describes specic parts of the menu operations in a simplied form.
Press or a number
of times to search for the next
menu option.
Press to proceed
to the next menu
option.
User
operations
Flow of menu
operations
WEIGHING
BEFORE
USING THE
BALANCE
USING MORE CON VENIENTLY
Press to conrm.
Menu Operation Key Symbol
On entering menu operation, (the menu operation key mark) lights up.
The keys represented by lid segments can be used.
Information displayed in
the menu display area
The menu operation key symbol is divided into ve
segments, and these segments correspond to the
menu operation keys that are arranged in the same
layout.
!!0.0!0!0
Example of numeric value entr y
Press and hold
(about 3 seconds).
Menu operation keys
MAINTENANCE
TROUBLESHOOTING
INFORM ATION
FOR YOUR
47
Page 48

MENU SETTINGS
3
Basic Menu
Operations
Open the target menu from the weighing mode.
1
Set menu options by pressing the menu operation keys.
2
The method used to open a menu option differs depending on the group.
For details on the methods used for menu opening from each group, see "The Structure of the
Menu" (^ page 46).
The menu operation keys are used to set functions and to enter
numerical values.
For details on how to operate the menu operation keys, see
"What Is the Menu?" (^ page 46).
For details on the operating procedure for entering numerical
values, see "Entering Numerical Values" (^ page 49).
Menu operation keysMenu operation keys
For a menu option that is already set…
*
(the stability ma rk) appea rs in the menu display.
Conrm and return to the weighing mode.
3
The operation after conr ming the menu selection differs depending on the menu, and you will
either be returned to the weighing mode automatically or will need to do it manually.
To return manually, press for approximately 3 seconds.
If you open the menu again…
*
The recently set menu option will be displayed rst.
Note also that, when the set menu option is displayed, (the stabilit y mark) also appears.
48
Page 49

Entering Numerical
Values
Numerical values sometimes have to be entered for menu settings, for example the weight value of a
calibration weight, condition values for operating functions, the balance ID, passwords, etc.
Operations of the operation keys
Operation Key Operation During Numerical Value Entr y
Conrms the entered numerical value
Increases the value of the digit to be entered (the ashing dig it)
Pressing this key while the deci mal poi nt is ashing shifts the decimal point to the left.
Decreases the value of the digit to be entered (the ashing digit)
Pressing this key while the deci mal poi nt is ashing shifts the decimal point to the right.
Shifts the digit to be entered (the ashing digit) one digit to the left
Shifts the digit to be entered (the ashing digit) one digit to the right
Cancels entr y
WEIGHING
BEFORE
USING THE
BALANCE
USING MORE CON VENIENTLY
Changing the Numerical Value
As an example, here is the procedure for changing "120.000 g" to "200.000 g".
Enter the numeric value entry
1
mode.
(the number symbol) lights and the leftmost
digit (highest digit) in the range where the value
can be changed ashes.
Press once.
2
The numerical value of the ashing digit
increases by one, so that it changes from "1" to
"2".
Press
3
The ashing shifts to the second digit from the
left.
/
/
/
/
/
/
/
/
/
/
/
/
/
/
/
/
/
/
/
/
!1!2!0.0!0!0
!1!2!0.0!0!0
/
/
/
/
/
/
/
/
/
/
/
/
/
/
/
/
/
/
/
/
/
/
/
/
/
/
/
/
!2!2!0.0!0!0
!2!2!0.0!0!0
/
/
/
/
/
/
/
/
/
/
/
/
/
/
/
/
/
/
/
/
/
/
/
/
/
/
/
/
!2!2!0.0!0!0
!2!2!0.0!0!0
/
/
/
/
/
/
/
/
Continued on next page
49
MAINTENANCE
TROUBLESHOOTING
INFORM ATION
FOR YOUR
Page 50

MENU SETTINGS
3
Entering Numerical Values
Press twice.
4
Press
5
/
/
/
/
/
/
/
/
/
/
/
/
/
/
/
/
/
The numerical value of the second digit from
the left decreases two times, so that it changes
from "2" to "1" to "0".
This conr ms the entered numerical value.
The indication shown to the right remains
displayed for several seconds, then the display
automatically moves on to the next step.
!2!0!0.0!0!0
!2!0!0.0!0!0
! !S!E!T! ! ! !S!E!T! !
/
/
/
/
/
/
/
/
/
/
/
Changing the Position of the Decimal Point
The position of the decimal point can only be changed when entering a conversion factor with
the user-specied units.
"Conversion Factors", page 84
^
As an example, here is the procedure for shifting the position of the decimal point one digit to
the left, to change the displayed value from "100.000" to "10.0000".
Establish the numeric value entry
1
mode.
(the number symbol) lights and the leftmost
digit (highest digit) in the range where entry
(change) is possible ashes.
Press several times until
2
the decimal point ashes.
Press or several times.
3
This will move the decimal point to the left or
right.
To set a numerical value with no
*
decimal point…
Press several times until (the
inverse triangle symbol) ashes.
Press
4
This conr ms the entered numerical value.
The indication shown to the right remains
displayed for several seconds, then the display
automatically moves on to the next step.
/
/
/
/
/
/
/
/
/
/
/
/
/
/
/
/
/
/
/
/
!1!0!0.0!0!0
!1!0!0.0!0!0
/
/
/
/
/
/
/
/
/
/
/
/
/
/
/
/
/
!1!0!0.0!0!0
!1!0!0.0!0!0
!1!0.0!0!0!0
!1!0.0!0!0!0
/
/
/
/
/
/
/
/
/
/
/
/
/
/
/
/
/
/
/
/
/
/
/
/
/
/
/
! !S!E!T! ! ! !S!E!T! !
50
Page 51

Convenient
Functions for Menu
Setting
Returning to the Default Settings (Menu Reset)
If you want to retur n the menu settings to the default settings, reset the menu.
The default settings are indicated by asterisks in the menu map (^ page 150) and on the menu
map sheet.
Press in the weighing mode.
1
This opens the main menu.
Select menu reset.
2
[TOOLS] [SYSTEM]
[RESET] [OK?]
Enter the password.
3
The password is set to "9999" before shipment.
If the default setting is not changed, enter
"9999".
"Entering Numerical Values", page 49
^
"Changing the Password", page 141
^
! !R!E!S!E!T
! !R!E!S!E!T
! !O!K!?!
! !O!K!?!
/
/
/
/
/
/
/
/
/
P!-! !0!0!0!0
P!-! !0!0!0!0
/
/
/
WEIGHING
BEFORE
USING THE
BALANCE
USING MORE CON VENIENTLY
/
/
/
/
/
/
/
/
/
/
/
/
/
/
/
/
MAINTENANCE
Conrm.
4
[WAIT] [SET]
The default menu settings are reinstated and
the balance automatically returns to weighing
mode.
! !W!A!I!T
! !W!A!I!T
! !S!E!T!
! !S!E!T!
Continued on next page
51
TROUBLESHOOTING
INFORM ATION
FOR YOUR
Page 52

MENU SETTINGS
3
Convenient Functions for Menu Setting
Press until the display
1
Prohibiting Changes to the Menu Settings (Menu Lock)
In order to ensure that the menu settings are not changed by mistake, the person managing the
balance controls the password and can prohibit menu operation.
The default password is "9999". To change the password, see "Changing the Password"
(^ page 141).
Operation in the menu lock status
*
Even when the menu is locked it is possible to perform calibration ( ), change the weight
value, and switch the weighing mode and application function mode ( ).
OFF display after supplying power
•
OFF display after supplying power
•
changes (about three seconds)
! !O!F!F
while "OFF" is displayed after
supplying power or while in the
standby mode.
With the TXB series the balance
*
doesn't go into the standby mode.
! !O!F!F
Standby mode•
Standby mode•
If the "OFF" display doesn't appear, see
"Setting the Star tup Display"
(^ page 139).
Enter the password.
2
"Entering Numerical Values", page 49
^
Press
3
The password will be accepted.
The menu will be locked and the display will
return to the indication in step 1 .
If the password is wrong…
The error message shown to the right will be
displayed and the display will return to the
indication in step 1.
Conrm.
4
On entering the weighing mode…
(the menu lock symbol) is shown in the
display.
On pressing any menu operation key…
"LOCKED" is displayed and menu operation is
not possible.
/
/
/
/
/
/
/
/
/
/
/
/
/
!P!-!0!0!0!0
!P!-!0!0!0!0
! !L!O!C!K
! !L!O!C!K
The menu lock symbol will light up.
The menu lock symbol will light up.
/
/
/
/
/
/
/
! !E!R!R! !N ! !E!R!R! !N
! ! !0!0!0!0 ! ! !0!0!0!0
!L!O!C!K!E!D !L!O!C!K!E!D
/
/
/
/
/
/
/
/
52
Page 53

Releasing the menu lock
SHIMADZU CORP.SHIMADZU CORP.
*
To release the menu lock, perform steps 1 through 3 agai n.
Outputting the Menu Setting Information
You can output the menu settings to make a record of the balance settings.
WEIGHING
BEFORE
Connect the balance to a PC or
1
printer (option).
"10. CONNECTION AND
^
COMMU NICATION WITH
PERIPHERAL DEVICES", page 106
Press in the weighing mode.
2
This opens the main menu.
Select output of menu setting
3
information.
[TOOLS] [SYSTEM]
[COND.OUT] [OK?]
To output the settings, proceed to step 4.
To cancel, press ( with the TXB
series).
Conrm.
4
[WAIT]
On conrmation, the menu setting information
is output to the PC or printer.
On completion of output, the balance returns to
weighing mode.
C!O!N!D.O!U!T
C!O!N!D.O!U!T
! ! !O!K!?
! ! !O!K!?
! ! !W!A!I!T
! ! !W!A!I!T
During output the c ommunication symbol is lit.
During output the c ommunication symbol is lit.
USING THE
BALANCE
USING MORE CON VENIENTLY
MAINTENANCE
TROUBLESHOOTING
53
INFORM ATION
FOR YOUR
Page 54

4
CALIBRATION
In order to weigh accurately with an electronic balance, the balance must be calibrated after it has been
moved or if the room temperature has changed substantially.
You are also advised to carry out calibration routinely (before use every day).
Before Starting
Calibration…
Two kinds of calibration operation are possible with the TW/TX/TXB series: "span calibration" and the
"calibration check", and for each of them you can select the use of either the internal weight (TW only) or
the external weight.
By registering either of these for , the registered operation can be started by just pressing
Adjust to achieve cor rect balance sensitivity using either the i nter nal weight (TW only)
Span calibration
Calibration check
or the external weight.
Drif t in the sensitivity is corrected (default setting).
Investigate the drift in the balance’s sensitivity by using either the internal weight (TW
only) or the external weight.
The operation to calibrate the internal weight itself cannot be registered in
*
To calibrate the internal weight itself, refer to "Calibration of the Internal Weight (TW On ly)"
(^ page 64).
Use the following procedure to set the preferred operation for
Press for about 3 seconds.
1
This opens the calibration menu.
Select either "span calibration" or
2
"calibration check".
Example of registering "span calibration using the inter nal weight"
[CAL.EXE] [I.CAL]
Example of registering "span calibration using the external weight"
[CAL.EXE] [E.CAL]
! ! !I.C!A!L ! ! !I.C!A!L
! ! !E.C!A!L ! ! !E.C!A!L
54
Page 55

Example of registering a "calibration check using the internal weight"
[CAL.EXE] [I.TEST]
Example of registering a "calibration check using the external weight"
! !I.T!E!S!T ! !I.T!E!S!T
WEIGHING
BEFORE
[CAL.EXE] [E.TEST]
Conrm and return to the weighing
3
mode.
[SET]
"Span calibration" or "calibration check",
whichever was selected in step 2, is set for
and the balance retur ns to the weighing
mode.
When executing "span calibration", see "Span Calibration and Adjustment" (^ page 56).
When executing a "calibration check", see "Calibration Check" (^ page 60).
! !E.T!E!S!T ! !E.T!E!S!T
! !S!E!T! !
! !S!E!T! !
When "span calibration using the external weight"
•
When "span calibration using the external weight"
•
has been selected
has been selected
! ! !E.C!A!L
! ! !E.C!A!L
USING THE
BALANCE
USING MORE CON VENIENTLY
MAINTENANCE
55
TROUBLESHOOTING
INFORM ATION
FOR YOUR
Page 56

CALIBRATION
I.CAL
4
Span Calibration
and Adjustment
Adjust to achieve correct balance sensitivity using either the internal weight (TW only) or the external weight.
Set the relevant "span calibration" in in advance by following the procedure in "Before Starting
Calibration …" (^ page 54). (As the default setting, "span calibration using the internal weight" is set
for TW, and "span calibration using the external weight" is set for TX.)
1
Span calibration using the internal weight (TW series only)
Press
Span calibration using the inter nal weight will
start automatically.
If "WAIT" is displayed…
*
The calibration record is being output.
When output has nished, span
calibration will start automatically.
If "BUSY" is displayed…
*
There is someth ing placed on the pan.
When this item is taken off the pan, the
span calibration will star t automatically.
To cancel the span calibration, press
! !C!A!L!3
! !C!A!L!3
! !C!A!L!2
! !C!A!L!2
! !C!A!L!1
! !C!A!L!1
56
If "ERR H" is displayed…
*
See "Responding to Messages" (^
page 137).
! !C!A!L!0
If "ERR C" is displayed…
! !C!A!L!0
*
Span calibration was not completed for
one of the following reasons.
There is too large a discrepancy
between the zero point of the
balance and the sensitivity.
A container has been placed on the
pan.
The pan is not on the balance.
There is too large a discrepancy in
the value of the internal weight.
Press and redo the operation from
the beginning. If even on doing this the
same display reappears, calibrate t he
inter nal weig ht (^ page 64).
"END" will be displayed and the balance will return to the weighing mode.
! !W!A!I!T
! !W!A!I!T
!E!N!D
!E!N!D
* This may not
be displayed.
Page 57

Caution
E.CAL
If calibration doesn't end
normally and the balance
Instru ction s
stops, do not move it nor
leave it as it is.
Moving the balance in such a
condition may cause failu re
because the internal weight is not
held correctly.
Before moving the balance, be
sure to tur n the power on and st art
it up correctly (so that the internal
weight is cor rectly held).
Span calibration using the external weight
Press in the weighing mode.
1
When the GLP output function (^ page
142) has been set to ON, initially the indication
"WAIT" is displayed, then the balance model
name and other information is output.
After a little while (the weight symbol)
lights up and the weight value of the weight to
be placed on the pan ashes.
If "WAIT" is displayed…
*
The calibration record is being output.
When output has nished, span
calibration will start automatically.
/
/
/
/
/
/
/
/
/
/
/
/
/
/
/
/
/
/
/
/
/
/
/
/
!3!0!0.0!0!0
!3!0!0.0!0!0
/
/
/
/
/
/
/
/
/
/
/
/
/
/
/
/
/
/
/
/
/
/
/
/
WEIGHING
BEFORE
USING THE
BALANCE
/
/
/
/
/
/
/
/
/
/
/
/
/
/
USING MORE CON VENIENTLY
MAINTENANCE
If "BUSY" is displayed…
*
There is someth ing placed on the pan.
Take the item off t he pan and follow the
procedure below.
To cancel scan calibration, press
( with the TX B series).
If no operation is performed within
*
60 seconds…
"ERR C" (calibration er ror) is displayed.
Press ( with the TXB ser ies)
and repeat the operation from the
begin ning.
Continued on next page
57
TROUBLESHOOTING
INFORM ATION
FOR YOUR
Page 58

CALIBRATION
4
2
3
Span Calibration and Adjustment
Enter the calibration weight value.
If necessary change the weight value displayed
to match the weight that will be used for
calibration. If there is no need to change it,
proceed to step 3.
(Enter a weight value if necessary.)
"Entering Numerical Values", page 49
^
For details on the range of weight values that
can be used, see "Specications" (^ page
145).
With models that don't feature the windbreak
Place the calibration weight on the
pan.
Wait until the ashing weight value display
changes to a ashing zero.
/
/
/
/
/
/
/
/
/
/
/
/
/
/
/
/
/
/
/
/
!3!0!0.0!0!0
!3!0!0.0!0!0
/
/
/
/
/
/
/
/
/
/
/
/
/
/
/
/
/
/
/
/
/
/
/
/
/
/
/
/
/
/
/
/
!2!9!9.9!9!8
!2!9!9.9!9!8
/
/
/
/
/
/
/
/
/
/
/
/
/
/
/
/
/
! ! !0.0!0!0
! ! !0.0!0!0
/
/
/
/
/
/
/
/
/
/
/
/
/
/
/
/
/
/
/
/
/
/
/
/
/
/
/
/
/
/
/
/
/
/
/
/
/
/
/
/
/
/
/
/
/
/
/
/
/
/
/
/
/
/
/
/
/
/
/
/
/
/
/
/
/
/
/
/
/
Take the calibration weight off the
4
pan.
"END" will be displayed and the balance will
return to the weighing mode.
If "ERR C" is displayed…
*
Calibration has failed for one of the
reasons given below.
There is too large a discrepancy
between the zero point of the
balance and the sensitivity.
A container has been placed on the
pan.
The pan is not on the balance.
The wrong weight has been placed
on the pan.
No operation has been performed
within 60 seconds of the ashing
weight value or zero display.
Press ( with the TXB ser ies)
and repeat the operation from the
begin ning.
!E!N!D !E!N!D
58
Page 59

With models that feature the windbreak
Place the weight on the pan.
3
Open the glass door in the windbreak, place the
weight on the pan, and shut the glass door again.
Wait until the ashing weight value display
changes to a ashing zero.
Shut the glass door fully.
*
After placing a weight on the pan or
removing a weight from the pa n, check
that the glass door is fully shut.
Take the calibration weight off the
4
pan.
Open the glass door in the windbreak, remove
the weight from the pan and shut the glass door
again.
"END" will be displayed and the balance will
return to the weighing mode.
With the TWC**3L, TXC**3L…
*
Avoid doing the following:
Putt ing your hand inside the glass door of the wi ndbreak
Touching the container or sample with bare hands
Weighing samples (items to be weighed) of dif ferent temperatu res
The heat will lead to convection, and this may make the balance display unstable.
You are recommended to use forceps or gloves to carr y cont ainers and samples.
When dealing with sa mples (items to be weighed) at different temperatures, eliminate the temperat ure
difference by leaving the samples around the pan inside the glass door before weighing.
/
/
/
/
/
/
/
/
/
/
/
/
/
/
/
/
/
/
/
! ! !0.0!0!0
! ! !0.0!0!0
/
/
/
/
/
/
/
/
/
/
/
/
/
/
/
!E!N!D !E!N!D
/
/
/
/
/
/
/
/
/
/
/
/
/
/
WEIGHING
BEFORE
USING THE
BALANCE
USING MORE CON VENIENTLY
59
MAINTENANCE
TROUBLESHOOTING
INFORM ATION
FOR YOUR
Page 60

CALIBRATION
I.TEST
4
Calibration Check
This means checking for drift in the sensitivity of the balance by using the internal weight (TW only) or
the external weight.
Set "calibration check" for in advance by following the procedure in "Before Starting Calibration
…" (^ page 54). (As the default setting, "span calibration" is set.)
1
Calibration check using the internal weight (TW series only)
Press
A calibration check using the internal weight
will start automatically, and the sensitivity drift
will be displayed.
If "WAIT" is displayed…
*
The calibration record is being output.
When output has nished, span
calibration will start automatically.
!T!E!S!T!3
!T!E!S!T!3
!T!E!S!T!2
!T!E!S!T!2
If "BUSY" is displayed…
*
There is someth ing placed on the
pan. When this item is taken off the
pan, the calibration check will start
automat ically.
To cancel the calibration check, press
If there is no need to change the
*
^
sensitivity drift…
On pressing ( with t he TXB
series) "ABORT" is displayed and
calibration check ends.
"What is sensitivity drift?", page 63
If "ERR H" is displayed…
*
See "Responding to Messages" (^
page 137).
!T!E!S!T!1
!T!E!S!T!1
!T!E!S!T!0
!T!E!S!T!0
E!-! !0.0!0!5
E!-! !0.0!0!5
60
Page 61

If "ERR C" is displayed…
*
The calibration check has failed for one
of the reasons given below.
There is too large a discrepancy
between the zero point of the
balance and the sensitivity.
A container has been placed on the
pan.
The pan is not on the balance.
There is too large a discrepancy in
the value of the internal weight.
Press and redo the operation from
the beginning. If even on doing this the
same display reappears, calibrate t he
inter nal weig ht (^ page 64).
Press
2
"END" will be displayed. The sensitivity drift
is adjusted and the balance will ret ur n to the
weighing mode.
Caution
If calibration doesn't end
normally and the balance
Instru ction s
stops, do not move it nor
leave it as it is.
Moving the balance in such a
condition may cause failu re
because the internal weight is not
held correctly.
Before moving the balance, be
sure to tur n the power on and st art
it up correctly (so that the internal
weight is cor rectly held).
!E!N!D !E!N!D
WEIGHING
BEFORE
USING THE
BALANCE
USING MORE CON VENIENTLY
MAINTENANCE
Continued on next page
61
TROUBLESHOOTING
INFORM ATION
FOR YOUR
Page 62

CALIBRATION
E.TEST
4
1
Calibration Check
Calibration check using the external weight
Press in the weighing mode.
(the weight symbol) will light up and the
value of the weight that should be placed on the
pan will ash.
If "WAIT" is displayed…
*
The calibration record is being output.
When output has nished, span
calibration will start automatically.
If "BUSY" is displayed…
*
There is someth ing placed on the pan.
Take the item off t he pan and follow the
procedure below.
To cancel calibration check, press
( with the TX B series).
/
/
/
/
/
/
/
/
/
/
/
/
/
/
/
/
/
/
/
/
/
/
!3!0!0.0!0!0
!3!0!0.0!0!0
/
/
/
/
/
/
/
/
/
/
/
/
/
/
/
/
/
/
/
/
/
/
/
/
/
/
/
/
/
/
/
/
/
/
/
/
/
/
/
/
If no operation is performed within
*
60 seconds…
"ERR C" (calibration er ror) is displayed.
Press ( with the TXB ser ies)
and repeat the operation from the
begin ning.
Enter the calibration weight value.
2
If necessary change the weight value displayed
to match the weight that will be used for
calibration. If there is no need to change it,
proceed to step 3.
(Enter a weight value if necessary.)
"Entering Numerical Values", page 49
^
For details on the range of weight values that
can be used, see "Specications" (^ page
145).
Place the calibration weight on the
3
pan.
Wait until the ashing weight value display
changes to a ashing zero.
/
/
/
/
/
/
/
/
/
/
/
/
/
/
/
/
/
/
/
/
!3!0!0.0!0!0
!3!0!0.0!0!0
/
/
/
/
/
/
/
/
/
/
/
/
/
/
/
/
/
/
/
/
/
/
/
/
/
/
/
/
/
/
/
/
!3!0!0.0!0!0
!3!0!0.0!0!0
/
/
/
/
/
/
/
/
/
/
/
/
/
/
/
/
/
! ! !0.0!0!0
! ! !0.0!0!0
/
/
/
/
/
/
/
/
/
/
/
/
/
/
/
/
/
/
/
/
/
/
/
/
/
/
/
/
/
/
/
/
/
/
/
/
/
/
/
/
/
/
/
/
/
/
/
/
/
/
/
/
/
/
/
/
/
/
/
/
/
/
/
/
/
/
/
/
/
62
Page 63

With models that feature the
*
windbreak...
After placing a weight on the pan or
removing a weight from the pa n, check
that the glass door is fully shut.
If "ERR C" is displayed…
*
Calibration check has failed for one of
the reasons given below.
There is too large a discrepancy
between the zero point of the
balance and the sensitivity.
A container has been placed on the
pan.
The pan is not on the balance.
The wrong weight has been placed
on the pan.
No operation has been performed
within 60 seconds of the ashing
weight value or zero display.
Press ( with the TXB ser ies)
and repeat the operation from the
begin ning.
Take the calibration weight off the
4
pan.
The sensitivity drift is displayed.
E!-! !0.0!0!5E!-! !0.0!0!5
WEIGHING
BEFORE
USING THE
BALANCE
USING MORE CON VENIENTLY
If there is no need to change the
*
sensitivity drift…
On pressing ( with t he TXB
series) "ABORT" is displayed and
calibration check ends.
Press
5
"END" will be displayed. The sensitivity drift
is adjusted and the balance will ret ur n to the
weighing mode.
What is sensitivity drift?
The sensitivit y drift is the amou nt by which the balance weight reading is off the true value when a
weight close to the weighing capacity is placed on t he pan.
For example, with the TX323L (weighing capacity of 320 g, minimum display digit of 0.001 g), if a
300 g weight is placed on the pan af ter a d rif t of "-0.005 g" has been indicated, the weight reading will
be "299.995 g".
To correct sensitivity drift by adjust ment, perfor m "span calibration" (^ page 56).
!E!N!D !E!N!D
63
MAINTENANCE
TROUBLESHOOTING
INFORM ATION
FOR YOUR
Page 64

CALIBRATION
P.CAL
4
Calibration of the
Internal Weight
In the TW series, the weight for calibration is built in. The inter nal weight itself is calibrated on shipment
from the factory, but it is possible to recalibrate it using external weights. This is called
For the range of values for the external weights that can be used, refer to "Specications" (^ page 145).
1
2
(TW Only)
Press for about 3 seconds.
This opens the calibration menu.
Select calibration of the internal weight.
[CAL.EXE] [P.CAL]
Enter the administrator’s password.
3
"Entering Numerical Values", page 49
^
"Changing the Password", page 141
^
Press
4
The password is acknowledged and the reference
weight value for calibration ashes.
If "WAIT" is displayed…
*
The calibration record is being output.
When output has nished, span
calibration will start automatically.
If the password is wrong…
The error message shown to the right will be
displayed and the display will return to the
indication in step 1.
/
/
/
/
/
!P!-!0!0!0!0
!P!-!0!0!0!0
/
/
/
/
/
/
/
/
/
/
/
/
/
/
/
/
/
/
/
/
/
/
/
/
/
/
/
/
/
/
/
/
!2!0!0.0!0!0
!2!0!0.0!0!0
/
/
/
/
/
/
/
/
/
/
/
/
/
/
/
/
/
/
/
/
/
/
/
/
/
/
/
/
/
/
/
/
/
/
/
/
/
/
/
/
/
/
/
/
/
/
/
/
/
/
/
/
/
/
/
/
/
/
/
/
/
/
/
/
/
/
/
/
/
! !E!R!R! !N ! !E!R!R! !N
/
/
/
/
/
/
/
/
/
/
/
/
/
/
/
/
/
/
/
/
/
/
/
/
/
/
/
/
/
/
/
/
/
/
/
/
/
/
/
/
/
/
/
/
/
/
64
Page 65

If necessary, enter a weight value.
5
If no change is to be made, proceed to step 6
without doing anything.
/
/
/
/
/
/
/
/
/
/
/
/
/
/
/
/
/
/
/
/
!2!0!0.0!0!0
!2!0!0.0!0!0
/
/
/
/
/
/
/
/
WEIGHING
BEFORE
(If necessary, enter a weight value.)
"Entering Numerical Values", page 49
^
For the range of weight values that can be used,
refer to "Specications" (^ page 145).
Place the weight on the pan.
6
Wait until the ashing weight value indication
changes to a ashing zero indication.
If "ERR C" is displayed…
*
The internal weight has not been
calibrated for one of the following
reasons.
The wrong weight has been placed
on the pan.
No operation has been performed
within 60 seconds of the ashing
weight value or zero display.
Press and repeat the operation
from the beginning.
/
/
/
/
/
/
/
/
/
/
/
/
/
/
/
/
/
/
/
/
/
/
/
/
!2!0!0.0!0!0
!2!0!0.0!0!0
/
/
/
/
/
/
/
/
/
/
/
/
/
/
/
/
/
! ! !0.0!0!0
! ! !0.0!0!0
/
/
/
/
/
/
/
/
/
/
/
/
/
/
/
/
/
/
/
/
/
/
/
/
/
/
/
/
/
/
/
/
/
/
/
/
/
/
/
/
/
/
/
/
/
/
/
/
/
/
/
/
/
USING THE
BALANCE
/
/
/
/
/
/
/
/
/
/
/
/
/
/
/
/
USING MORE CON VENIENTLY
MAINTENANCE
Continued on next page
65
TROUBLESHOOTING
INFORM ATION
FOR YOUR
Page 66

CALIBRATION
4
7
Calibration of the Internal Weight (TW Only)
Take the calibration weight off the
pan.
Open the glass door of the windbreak, take the
weight off the pan, and close the glass door.
If "BUSY" is displayed…
*
There is someth ing placed on the pan.
When this item is taken off the pan,
inter nal weig ht calibration will start
automat ically.
To cancel inter nal weight calibration,
press
!P.C!A!L!3
!P.C!A!L!3
!P.C!A!L!2
!P.C!A!L!2
If "ERR H" is displayed…
*
See "Responding to Messages" (^
page 137).
If "ERR C" is displayed…
*
The internal weight has not been
calibrated for one of the following
reasons.
There is too large a discrepancy
between the zero point of the
balance and the sensitivity.
A container has been placed on the
pan.
The pan is not on the balance.
There is too large a discrepancy in
the value of the internal weight.
Press and repeat the operation
from the beginning.
"END" is displayed, then span calibration using
the internal weight starts.
When span calibration using the inter nal weight
ends, the balance returns to the weighing mode.
"Span Calibration and Adjustment"
^
page 56
!P.C!A!L!1
!P.C!A!L!1
!P.C!A!L!0
!P.C!A!L!0
! !W!A!I!T
! !W!A!I!T
!E!N!D
!E!N!D
* This may not
be displayed.
66
Instru ction s
Caution
If calibration doesn't end normally and the balance stops, do not
move it nor leave it as it is.
Moving the balance in such a condition may cause failu re because the inter nal weig ht is
not held correctly.
Before moving the balance, be sure to turn the power on and start it up cor rectly (so that
the internal weight is correctly held).
Page 67

D
465412345
300.000
g
300.001
g
300.000
g
Leaving a Record
of Calibration
You can leave a record of execution of calibration and set an ID for a balance to facilitate management of
multiple balances.
Example Printout of a Calibration Record
You can output a record of execution of calibration to a PC or printer (option).
The WindowsDirect communication function (^ page 111) is useful for output to a PC.
The output calibration record includes the following items.
Example printout from printer
(When the GLP output function is set to ON)
Type of calibration
Name of manufacturer
Balance model name
Balance serial number
Balance ID
WEIGHING
BEFORE
USING THE
BALANCE
USING MORE CON VENIENTLY
*
Weight used
Balance weight reading before
calibration (span calibration)
Balance weight reading after
calibration (span calibration)
The person who carried out
the calibration signs here.
Outputting the date and time
Since the TW/TX/TXB series doesn't incor porate a clock function, it is not possible to output the date
and time from t he balance.
Continued on next page
67
MAINTENANCE
TROUBLESHOOTING
INFORM ATION
FOR YOUR
Page 68

CALIBRATION
4
Output of the calibration record can be set by turning the GLP output function (^ page 142) ON and
OFF.
1
2
3
Leaving a Record of Calibration
Setting Output of a Calibration Record
Press for about 3 seconds.
This opens the calibration menu.
Select the GLP output function.
[GLP.OUT]
Stability M ark GLP Output Function
Lit
Unlit
Change the setting.
Pressing alternately sets the ON and OFF
settings.
ON
OFF
Check the presence or absence of the
Check the presence or absence of the
stability mark.
stability mark.
!G!L!P.O!U!T
!G!L!P.O!U!T
! !S!E!T! !
! !S!E!T! !
[SET]
Return to the weighing mode.
4
!G!L!P.O!U!T
!G!L!P.O!U!T
When ON is set the stability mark is lit.
When ON is set the stability mark is lit.
68
Page 69

Setting a Balance ID
When managing multiple balances, you can set a four-digit management number (ID) for each
balance which will be indicated as part of calibration records output.
Press in the weighing mode.
1
This opens the main menu.
Select setting of a balance ID.
2
[TOOLS] [SYSTEM]
[BAL.ID]
Enter the required numerals
3
(max. 4 digits).
(Enter the ID.) [SET]
"Entering Numerical Values", page 49
^
The default ID is "0000".
! !B!A!L.I!D ! !B!A!L.I!D
! ! !0!0!0!0
! ! !0!0!0!0
! !S!E!T! !
! !S!E!T! !
WEIGHING
BEFORE
USING THE
BALANCE
USING MORE CON VENIENTLY
Return to the weighing mode.
4
! !B!A!L.I!D
! !B!A!L.I!D
MAINTENANCE
TROUBLESHOOTING
INFORM ATION
FOR YOUR
69
Page 70

5
FUNCTIONS RELATING TO TARING
The TX/TXB series has the following functions relating to the zero point and taring.
Make use of these functions in accordance with the weighing environment and the application.
Zero / Taring Functions
Zero tracking function
Fluctuations in the zero point that occur
immediately after turning the power ON and as a
result of temperature changes are compensated
for, so the zero indication is maintained.
(^ page 71)
Auto tare function
After outputting a weight reading, taring is
executed automatically.
(^ page 74)
What is taring?
This is a function whereby the weight of the container placed on the pan is subtracted to set the display to zero, so
that only the weight of the sample placed inside the container is indicated.
What is the zero point?
This means the state where nothing is placed on the pan, zero is i ndicated, and weighing can be star ted.
Drift of the zero point that occurs as a result of
material left on the pan after measurement is
automatically compensated for.
Zero / tare timing change function
After waiti ng for (the stability mark) to light up,
zero poi nt setting / t ari ng is executed.
Auto zero function
(^ page 72)
(^ page 75)
70
Page 71

Zero Tracking
Function
When the zero tracking function is set, when the indication is zero (including when taring is performed)
the uctuations in the zero point that occur immediately after turning the power ON and due to
temperature changes and other factors are compensated for and the zero indication is maintained.
(In the default setting the zero tracking function is ON.)
Check (the zero tracking symbol)
1
in the weighing mode.
Zero Tracking
Symbol
Lit
Unlit
If you proceed to the next step while zero
tracking is ON, it goes OFF.
Press
2
This opens the main menu.
Setting from the zero / taring menu
Zero Tracking Function
ON
OFF
! ! 0!.!0!0!0
! ! 0!.!0!0!0
Check the presence or absence of the
Check the presence or absence of the
zero tracking symbol.
zero tracking symbol.
*
You can also press
for about 3 seconds and make the setting
from the zero / taring menu.
Select the zero tracking function.
3
[Z.TRC]
! ! !Z.T!R!C ! ! !Z.T!R!C
WEIGHING
BEFORE
USING THE
BALANCE
USING MORE CON VENIENTLY
MAINTENANCE
Conrm the ON or OFF selection.
4
The ON or OFF status will be selected and
the balance will automatically return to the
weighing mode.
After setting "ON", (the zero tracking
symbol) lights up.
When the setting has been made from the zero / taring menu
! !S!E!T! !
! !S!E!T! !
! ! 0!.!0!0!0
! ! 0!.!0!0!0
! ! !Z.T!R!C
! ! !Z.T!R!C
When the zero tracking function is ON,
When the zero tracking function is ON,
the stability mark is lit in the menu display.
the stability mark is lit in the menu display.
71
TROUBLESHOOTING
INFORM ATION
FOR YOUR
Page 72

FUNCTIONS RELATING TO TARING
5
Auto Zero Function
When the auto zero function is set, any drift of the zero point that occurs as a result of material left on
the pan after weighing is automatically compensated for so that zero is displayed.
Note that the auto zero function cannot be used in combination with formulation.
Press for about
1
3 seconds in the weighing mode.
This opens the zero / taring menu.
Select the auto zero function.
2
[A.ZERO]
Check the presence or absence of
Check the presence or absence of
the stability mar k.
the stability mar k.
! !A.Z!E!R!O
! !A.Z!E!R!O
What is the current situation? What do you want to do?
Stability
Mark
Lit
Unlit
Auto Zero
Function
ID is ON
ID is OFF
Enter the value for the range for
3
automatic compensation to the
zero point (auto zero range).
(Enter the zero range value.) [SET]
"Entering Numerical Values", page 49
^
If there is anything with a weight lower than or
equal to the auto zero range value left on the pan
after weighing the sample, it will automatically
be compensated for and the zero point will be
established when (the stability mark) lights
up.
To set or Update… To Cancel…
Press and go to step 3.
Press and go to step 3.
! ! !0.0!0!0
! ! !0.0!0!0
! !S!E!T! !
! !S!E!T! !
! !A.Z!E!R!O
! !A.Z!E!R!O
When ON is set the stability mark is lit.
When ON is set the stability mark is lit.
Press and go to step 4.
Go to step 4.
/
/
/
/
/
/
/
/
/
/
/
/
/
/
/
/
/
/
/
/
/
/
/
/
/
/
/
/
72
Page 73

Auto zero range value
*
The auto zero range value is only
effective in the units that are displayed
when the value is entered.
If other u nits are later selected,
change (update) the setting for the
zero range value by following the
procedu re from step 1 while these new
units are displayed.
The upper limit value for the zero range
is 99 d. 1 d is the minimum i ndication
in the displayed units.
For example, for a balance w ith a
minimum indicat ion of 0.001 g, the
situation is as follows.
Minimum
Units
Indication
g 0.001 g 0.099 g
ct 0.01 ct 0.99 ct
Return to the weighing mode.
4
Upper Limit
Value for the
Zero Range
WEIGHING
BEFORE
USING THE
BALANCE
USING MORE CON VENIENTLY
73
MAINTENANCE
TROUBLESHOOTING
INFORM ATION
FOR YOUR
Page 74

FUNCTIONS RELATING TO TARING
5
Auto Tare Function
When the auto tare function is set, the balance is automatically tared after the weight reading has been
output, and the indication at that point is set to zero.
Press for about
1
3 seconds in the weighing mode.
This opens the zero / taring menu.
Select the auto tare function.
2
[A.TARE]
Check the presence or absence of the
Check the presence or absence of the
stability mark.
stability mark.
! !A.T!A!R!E
! !A.T!A!R!E
Stability M ark Auto Tare Funct ion
Lit
Unlit
Change the setting.
3
Pressing alternately sets the ON and OFF
settings.
[SET]
Return to the weighing mode.
4
ON
OFF
! !S!E!T! !
! !S!E!T! !
! !A.T!A!R!E
! !A.T!A!R!E
When ON is set the stability mark is lit.
When ON is set the stability mark is lit.
74
Page 75

Zero / Tare Timing
Change Function
The zero / tare timing change function allows you to select whether setting of the zero point / taring is
executed without waiting for (the stability mark) to light up, or after waiting for (the stability
mark) to light up after pressing
This function can also be applied to operations under the auto zero f unction and the auto tare function.
(The default setting is for execution without waiting for (the stability mark) to light up.)
Press for about
1
3 seconds in the weighing mode.
This opens the zero / taring menu.
Select the zero / tare timing
2
change function.
[TARE.F] [SOON]
! !T!A!R!E.F
! !T!A!R!E.F
WEIGHING
BEFORE
USING THE
BALANCE
USING MORE CON VENIENTLY
Stability
Mark
Lit
Unlit
Change the setting.
3
Pressing alternately selects the "wait for
stability" and "don't wait for stability" settings.
[SET]
Return to the weighing mode.
Zero / Tare Timing
Change Function
The balance doesn't wait for
stability
The balance waits for stability.
4
! ! !S!O!O!N
! ! !S!O!O!N
Check the presence or absence of the
Check the presence or absence of the
stability mark.
stability mark.
! !S!E!T! !
! !S!E!T! !
! ! !S!O!O!N
! ! !S!O!O!N
When "don' t wait for stabilit y" is
When "don' t wait for stabilit y" is
selected, the stability mark lights up.
selected, the stability mark lights up.
MAINTENANCE
TROUBLESHOOTING
INFORM ATION
FOR YOUR
75
Page 76

6
ADJUSTING RESPONSE AND STABILITY
The response and stability of the balance can be adjusted in several ways in accordance with the
installation environment (degree of vibration and so on) and the weighing application (whether solid
objects / clumps or poured liquids / powders are being weighed).
Stability: The degree to which the weight reading is stable, with little uctuation
•
•
Response: The speed of the reaction to changes in the weight on the pan
Set the optimum conditions for your application by following the procedure below.
Selecting the weighing mode
The TW/TX /TXB series offers two basic weighing modes.
Selec t the right one in advance in accordance with the environment of use and the application.
General weighing mode
This is the fundamental mode in which
response and stability are given equal
emphasis.
(^ page 77)
This is a weighing mode where response is
given priority over stability, which is suited to
operations where substanc es like liquids or
powders are poured out until a target weight
is reached.
Pouring mode
(^ page 77)
Adjusting the response and stability in real time
The ratio of response to st abilit y and stability can be changed in stages by pressing
and
"Easy Setting of Response and St ability" (^ page 78)
Adjusting (the stability mark)
The conditions for making (the stability mark) light up (the stability detection range and the
stability mark light ing timing) can be adjusted.
76
"Adjusting the St ability Mark" (^ page 79)
Page 77

Selecting the
Weighing Mode
TW/TX/TXB series balances have the following two ty pes of weighing mode.
Set the right mode in advance depending on the environment of use and the weighing application.
Selecting the General Weighing Mode
This is the fundamental mode in which response and stability are given equal emphasis.
Press in the weighing mode.
1
This opens the main menu.
WEIGHING
BEFORE
USING THE
BALANCE
Select the general weighing mode.
2
! !S!T!A!N!D
[STAND] [SET]
The balance has been set in the general
weighing mode.
Selecting the Pouring Mode
This is the weighing mode suited to pouring out a sample (substance being weighed such as a
powder or liquid) until a target weight is reached.
The update of the display is fast and the nal value can be stabilized for reading.
Press in the weighing mode.
1
This opens the main menu.
Select the pouring mode.
! !S!T!A!N!D
! !S!E!T! !
! !S!E!T! !
2
P!O!U!R!I!N!G
[POURING] [SET]
The pouring mode is established and
(the pouring symbol) lights up.
P!O!U!R!I!N!G
! !S!E!T! !
! !S!E!T! !
USING MORE CON VENIENTLY
MAINTENANCE
TROUBLESHOOTING
INFORM ATION
FOR YOUR
! ! 0!.!0!0!0
! ! 0!.!0!0!0
77
Page 78

ADJUSTING RESPONSE AND STABILITY
6
Easy Setting
of Response and
Stability
During weighing, the response and stability of the weighing mode can be adjusted in stages in
accordance with the installation environment and the weighing application.
The TW/TX/TXB series balances feature excellent response and stability, but since response and
stability are generally antagonistic, if one is prioritized it will to some extent weaken the characteristics
of the other.
Easy Setting allows quick adjustment to match your preference, requirements or particular application.
Easy setting indicator
! ! !0.0!0!0
Priority Given to Response Priority Given to Stability
Easy setting
indicator
Press
The more times you press this key, the
fur ther (the level indicator) moves to
the R side, increasing the response of the
display in stages.
•
When you want to weigh things quickly
When you want to improve working
•
efciency
When weig hing out target quantities of
•
a liquid or powder or when making a
formulation
Operation
For these
circumstances…
The more times you press this key, the
fur ther
the S side, increasing the stability of the
display in stages.
When you want to weigh things with
•
conrmed accuracy
•
When the display is unstable
•
When the balance is used in a location
where there is a constant and relatively
large vibration
When the balance is subject to constant
•
air movements and t he indication
wavers
Press
(the level indicator) moves to
78
Page 79

Adjusting the
Stability Mark
The stability mark is a symbol ( ) that is displayed when it is determined that the weight reading has
stabilized.
The following settings adjust conditions for lighting up of (the stability mark).
Stability detection range
•
Stability mark lighting timing
•
Normally there is no need to change these settings. (Change the settings if, for example, you want to
relax the conditions and make (the stability mark) light more easily because the environment is
unstable, or to speed up operation if stability is used to automatically print or output data.
Lighting up of (the stability mark)
*
The lighting up of (the stabilit y mark) indicates the fact that the weight reading is stable.
If the load is being changed slowly, or due to the set tings relating to st abilit y detection, the weight
reading may change while (the stability mark) remains lit, or (the stabilit y mark) may light
tempor arily and then the weight reading may change.
Setting the Stability Detection Range
The stability detection range is a value set as a count of the smallest digit that is displayed, and
the display is judged to be stable if uctuation in the weight reading is within this count during a
xed time.
(The default setting for the stability detection range is 1 count (1d).)
WEIGHING
BEFORE
USING THE
BALANCE
USING MORE CON VENIENTLY
Effect of reducing the stability
detec tion range
Effect of inc reasing the stability
detec tion range
Press in the weighing mode.
1
This opens the main menu.
Select setting of the stability
2
detection range.
[TOOLS] [PARAM.W]
[BAND]
It takes some time for (the stability mark) to light up, but
after it has lit the weight reading is stable (improvement in
reliability).
(the stability ma rk) can be made to lig ht more quickly
but the weight reading is liable to uct uate after it has lit
(improvement of weighi ng and data out put speeds).
! ! !B!A!N!D ! ! !B!A!N!D
Continued on next page
79
MAINTENANCE
TROUBLESHOOTING
INFORM ATION
FOR YOUR
Page 80

ADJUSTING RESPONSE AND STABILITY
6
Adjusting the Stability Mark
Select the value for the stability
3
detection range.
(stability detection range that you
wish to select)
Select the stability detection range from
among the following options depending on the
weighing application and purpose: 0.5d, 1d, 10d,
50d, 100d, 1000d.
Conrm and return to the
4
weighing mode.
[SET]
The stability detection range has now been set.
! ! ! !1!0!D ! ! ! !1!0!D
! !S!E!T! !
! !S!E!T! !
! ! ! !1!0!D
! ! ! !1!0!D
Upon setting, the stabilit y mark
Upon setting, the stabilit y mark
lights up.
lights up.
If data output is slow…
*
There are factors in t he installation env iron ment and the sample that make the display unstable. If data
output t riggered by stabilit y detection is very slow, increase the stability detection range.
Setting the Stability Mark Lighting Timing
The timing according to which
application and required accuracy.
Effect of speeding up
the timing for lighting
up of the stability
mark
Effect of setting
the stability mar k
lighting timing to the
standard set ting
At the same time as stability is detected, (the stability mark) lights up.
The weight readi ng after (the stability mark) lights up becomes more
susceptible to uctuation since many samples can be weighed in succession
and the working time can be used more efciently (improvement of weighing
speed).
When stability is detected and remains detected for a xed t ime, (the
stability mark) lights up.
reading is stable after it has lit, so highly accurate weighing is possible
(improvement of reliability of data).
(the stability mark) lights can be set in accordance with the
(the stability ma rk) lighting judg ments become stricter and the weight
80
Page 81

Press in the weighing mode.
1
This opens the main menu.
Select setting of (the stability
2
mark) lighting timing.
[TOOLS] [PARAM.W]
[STB.MK]
Check the lighting timing setting.
3
Change (the stability mark)
4
[FAST]
Stability
Mark
Lit
Unlit
lighting timing.
Pressing alternately sets the "fast" and
"standard" settings.
Stability M ark Lighting
Timing
Fast
Standard
! !S!T!B.M!K ! !S!T!B.M!K
! ! !F!A!S!T
! ! !F!A!S!T
Check the presence or absence of the
Check the presence or absence of the
stability mark.
stability mark.
! !S!E!T! !
! !S!E!T! !
! !S!T!B.M!K ! !S!T!B.M!K
WEIGHING
BEFORE
USING THE
BALANCE
USING MORE CON VENIENTLY
[SET]
Return to the weighing mode.
5
! ! !F!A!S!T
! ! !F!A!S!T
When the timing is set to "fast " the
When the timing is set to "fast " the
stability mark lights up.
stability mark lights up.
81
MAINTENANCE
TROUBLESHOOTING
INFORM ATION
FOR YOUR
Page 82

7
SETTING UNITS
TW/TX/TXB series balances can be made to indicate weights in units other than the basic units of
grams by switching units with the key in the weighing mode.
You must register the units you will require in advance.
On shipment from the factory, the only unit registered is g (grams) (for the TWC**3L and TXC**3L, it
is g and ct only).
"Switching Units", page 41
^
Units That Can Be Displayed and Conversion Factors
Some of the units below can not be selected in some countries due to legal restrictions.
Weight Unit (Weight Name) Gram Conversion
g (gram) 1 1
mg (miligr am)
kg (kilogram)
ct (carat)
mom (momme) 3.75 0.2666667
lb (pou nd) 453.592 0.00220462
oz (ounce) 28.34955 0.035274
ozt (troy ounce) 31.1035 0.0321507
dwt (pennyweight) 1.55517 0.643015
GN (grain) 0.064799 15.4324
HTl (Hong Kong tael) 37.429 0.0267173
STl (Singapore tael) 37.79936 0.0264554
TTl (Taiwan t ael)
MTl (Malaysian tael) 37.79289 0.0264600
m (mesghal) 4.6083 0.216999
o (par ts pound) 0.88592 1.12877
B (baht) 15.2 0.0657895
S (sawaran) 7.999 0.1250156
Ks (kyats) 16.606 0.0602191
T (tola) 11.664 0.0857339
User
*1 If we t ake the value in t he Gram conver sion column to be "a", the formula is as follows.
"a" × balance weight reading (each unit) = value in gram units
*2 If we t ake the conversion factor to be "k", the for mula is as follows.
"k" × value in gram unit s = balance weight value (selecte d units)
*3 mg ca nnot be selected on models whose minimum ind ication is 10 mg or greater.
*4 kg cannot b e selected on the T WC**3L and TXC**3L.
*5 The min imum i ndication for ct (carat) may var y depending on the production lot even if they are the same model.
*6 There are ve kind s of Taiwan tael (TTL -1 to TTl- 4).
The conversion fact or is the same, but t he minimu m indication is as follows.
TTl-1 A value 5 ti mes that of TTl-2
TTl-2 T he minimu m value
TTl-3 A value twice that of TTl-2
TTl-4 A value 10 time s that of TTl-2
*7 With user-sp ecie d unit s, the conversion factor (*2) and mini mum indication can be set as required.
For details on the met hod for set ting user-specied units, see
*3
*4
*5
*6
*7
(*1)
Conversion Factor
0.001 1000
1000 0.001
0.2 5
37.5 0.0266667
Can be set as required by the user
"Sett ing User-Specied Units" (^ page 84).
(*2)
(*7)
82
Page 83

Selecting Units to
Display
Select and set the units you require to display so that they can be called up by pressing during
weighing operation.
For details on user-specied units, see "Setting User-Specied Units" (^ page 84).
Press for about 3 seconds
1
in the weighing mode.
This opens the unit setting menu.
WEIGHING
BEFORE
USING THE
BALANCE
Select the units to be called up
2
and check if (the stability mark)
is displayed or not.
(Select the units.)
Stability M ark Registering Units
Lit
Unlit
Change the setting for units.
3
Pressing alternately sets the ON and OFF
settings.
[SET]
To set or cancel other units, go to step 2.
To quit, go to step 4.
Return to the weighing mode.
OFF
4
ON
!U!N!I!T!-
!U!N!I!T!-
Check the presence or absence
Check the presence or absence
of the stability mark.
of the stability mark.
! !S!E!T! !
! !S!E!T! !
!U!N!I!T!-
!U!N!I!T!-
When ON is set the stability mark
When ON is set the stability mark
is lit.
is lit.
USING MORE CON VENIENTLY
MAINTENANCE
TROUBLESHOOTING
Press to call up selected
5
units.
"Switching Units", page 41
^
83
INFORM ATION
FOR YOUR
Page 84

SETTING UNITS
7
User-Specied
1
2
Setting
Units
Conversion Factors
Numerical values (multipliers) by which the weight reading (in grams) is multiplied can be set
without restriction.
Press for about 3 seconds
in the weighing mode.
Check the presence or absence of the
This opens the unit setting menu.
Select the user-specied units.
[UNIT-U]
Check the presence or absence of the
stability mark.
stability mark.
!U!N!I!T!-!U!
!U!N!I!T!-!U!
What is the current situation? What do you want to do?
Stability
Mark
Lit
Unlit
Select setting of the conversion
3
factor.
Enter the conversion factor.
User- Specied
Units
Set
Cancelled
[CONV.K]
4
(Enter the conversion factor.) [SET]
"Entering Numerical Values", page 49
^
Changing the position of the
*
decimal point
When entering a conversion factor, the
position of the decimal point can be
changed
(^ page 50)
.
To Set / Update To Cancel
Press and go to step 3.
and go to step 3.
Press and go to step 5.
Go to step 5.
! !C!O!N!V.K ! !C!O!N!V.K
/
/
/
/
/
/
/
/
/
/
/
/
/
/
/
/
/
/
/
/
/
/
1!.0!0!0!0!0
1!.0!0!0!0!0
/
/
/
/
/
/
! !S!E!T! !
! !S!E!T! !
! !C!O!N!V.K
! !C!O!N!V.K
84
Page 85

Calculation formula for the
*
conversion factor
If we take the conversion factor to be
"k" the formula is as follows.
"k" × value in gram units = balance
weight reading (user-speci ed un its)
Return to the weighing mode.
5
Press to call up the user-
6
specied units.
"Switching Units", page 41
^
Minimum Indication
You can set the minimum weight reading for the user-specied units.
Make the setting by replacing steps 3 and 4 of the conversion factor procedure (^ page 84)
with the following procedure.
Select setting of the minimum
3
indication.
! ! !0.0!0!0
! ! !0.0!0!0
When user-specied units are called up,
When user-specied units are called up,
no indication of units is given.
no indication of units is given.
! ! !M!I!N.D ! ! !M!I!N.D
WEIGHING
BEFORE
USING THE
BALANCE
USING MORE CON VENIENTLY
[MIN.D]
Enter the minimum indication.
4
(Enter the smallest indication.) [SET]
"Entering Numerical Values", page 49
^
About the minimum weight reading for user-specied units…
*
This can be set to any required value but in some cases it will not be possible to gu arantee the stability
of the weight reading display.
/
/
/
/
/
/
/
/
/
/
/
/
/
/
/
/
/
/
/
/
/
/
!0.0!0!1!0!0
!0.0!0!1!0!0
/
/
/
/
/
/
! !S!E!T! !
! !S!E!T! !
! ! !M!I!N.D
! ! !M!I!N.D
85
MAINTENANCE
TROUBLESHOOTING
INFORM ATION
FOR YOUR
Page 86

8
APPLICATION FUNCTION MODE
Application Function Mode
You can choose one of the three modes indicated below to suit the application.
Piece counting
You can set the unit weight
of the sample (item to be
weighed) and then "count"
the number of pieces
present.
(^ page 87)
When the application function mode is set…
*
Pressing alternately selects the weig hing mode (gram or other unit indication) and the application
function mode in use.
It can be used in combination with the compa rator function (^ page 102).
If the power is turned OFF and back ON the balance will sta rt up i n the weighing mode but the application
function mode settings will be retained.
Pressing displays the menu for setting the variou s application function modes.
If you then press or , the top hierarchical level of the main menu appears.
The ow of the operation for displaying t he menu is shown below.
Piece counting Percentage weighing Formulation
Percentage
weighing
You can measure weights
as a percentage of a
reference weight.
(^ page 92)
Press
Formulation
This mode is convenient
when mixing a number of
different samples together
according to a formula.
(^ page 9 6)
86
Unit weight setting menu
5
100
Percentage reference
value setting menu
100 REF
etc.
Press or
Displays the main menu.
STAND
TOOLS
Component number and
gross weight setting menu
ELM.NUM
TOTAL
Page 87

Counting
Pieces by Weight
(Piece Counting)
You can set the unit weight (weight of a single piece) of the item in advance and then display the number
of pieces in the sample.
The unit weight is recorded by placing a sample on the pan that comprises the "number of pieces used for
setting".
Unit weights for up to ve different types of items can be set at the same time.
Points where care is necessary
*
If the sample is spread out too much or unevenly in the cont ainer on the pan, accurate piece
counting will not be possible.
If a large quantity sample is to be weighed, and the quantit y in the sample greatly exceeds t he
quantity used to set the unit weight, there may be a large counting error.
To minimize the counting error…
*
In step 5 of "P reparation for Pi ece Counting", make the numbe r of piec es us ed for se tting the
un it weight as la rg e a s p os sible.
When actually measuring numbers of pieces, don't place a large quantity of the sample on the pan
at one time but rather add a small portion at a time and, when the display has st abilized, press
for at least 3 seconds to update the unit weight. Keep repeating this operation.
WEIGHING
BEFORE
USING THE
BALANCE
USING MORE CON VENIENTLY
Preparation for Piece Counting (Including Setting the Unit Weight)
The preparations for piece counting are explained here. Only make the setting in the following
circumstances.
You are performing piece counting for the rst time.
•
You are switching from another application function mode to piece counting.
•
Press in the weighing mode.
1
This opens the main menu.
Select piece counting.
2
[APL.FUNC] [PCS]
[SET]
! ! ! ! P!C!S ! ! ! ! P!C!S
Continued on next page
87
MAINTENANCE
TROUBLESHOOTING
INFORM ATION
FOR YOUR
Page 88

APPLICATION FUNCTION MODE
8
Counting Pieces by Weight (Piece Counting)
Select the item number.
3
[SAMPLE]
.)
Check the number of pieces
4
indication.
The display will indicate whether a unit weight has already been set.
When no unit weight has been set for the item
number:
(Item number: select from
[SET]
!S!A!M!P!L!E
!S!A!M!P!L!E
Five different unit weight settings
Five different unit weight settings
(
(
! !S!E!T!
! !S!E!T!
) can be rec orded.
) can be rec orded.
[---]
When a unit weight has already been set for the
item number:
(The number of pieces is indicated.)
To update the unit weight, proceed to step 5.
•
If you are not i ntend ing to update the unit weight, the procedure from step 5 on is unnecessar y. You
•
can start piece counting r ight away.
^""Counting Numbers of Pieces", page 90
Select the number of pieces used
5
for setting.
(Select the number of pieces used for setting.)
Number of pieces used for setting
*
The number of pieces used for setti ng
can be selected from among 5 pieces,
10 pieces …. X pieces.
In order to min imi ze counting error,
make the number of pieces used for
setting the u nit weight as large as
possible.
! ! ! ! ! !5 ! ! ! ! ! !5
On pressing or …
*
A menu option other than the number
of pieces for setting may be displayed
but this is not abnor mal.
Press or several times to
retu rn to the number of pieces for
setting display.
88
Page 89

Place the container on the pan
6
and press
The balance will be tared.
Put a quantity of the item to be
7
counted corresponding to the
selected "number of pieces used
for setting" into the container.
Check that (the stability
8
mark) lights up, then conrm.
[SET]
! ! ! ! ! !5 ! ! ! ! ! !5
WEIGHING
BEFORE
USING THE
BALANCE
The unit weight will be set and the number of
pieces of the sample will be indicated.
You can now start piece counting.
"Counting Numbers of Pieces", page 90
^
If you wish to add the unit weight for another
item to be counted, see "Changing a Unit
Weight, or Adding a New Unit Weight"
(^ page 91).
USING MORE CON VENIENTLY
MAINTENANCE
TROUBLESHOOTING
Continued on next page
89
INFORM ATION
FOR YOUR
Page 90

APPLICATION FUNCTION MODE
8
Counting Pieces by Weight (Piece Counting)
Counting Numbers of Pieces
Enter the piece counting mode
1
If you have returned to the weighing mode (mode
where grams or other units are displayed) from
the piece counting mode, then press to
enter the counting mode.
If the piece counting mode is not
*
Select the item number.
2
Each time is pressed for about three
seconds, the selection moves to the next item
number and the cor responding item number
indication (from to ) is displayed.
established…
The preparations for piece counting
have not been completed. Make setti ngs
according to "Preparation for Piece
Counting (Including Setting the Unit
Weight)" (^ page 87).
! ! ! ! ! !5
! ! ! ! ! !5
The piece counting symbol will light up.
The piece counting symbol will light up.
! ! ! ! !1!0 ! ! ! ! !1!0
If the display appears as shown to
*
Place a container on the pan and
3
press
The balance will be tared.
Add the sample to be counted into the container.
4
The number of pieces in the sample is indicated.
The operations of each of the keys after setting are summarized below.
On pressing ...
On pressing ...
On pressing
for about 3 seconds…
On pressing ...
the right…
This means that the u nit weight has not
been set for the selected item number. To
make this setting, follow the procedure
in "Changing a Unit Weight, or Adding a
New Unit Weight" (^ page 91).
Establishes the unit weight set ting menu. ( ^ step 3 onward on page 91.)
Pressing this key alte rnately displays the set unit weight (in g rams) and the number
of pieces.
Press while the u nit weight is displayed to out put the unit weig ht.
While the un it weight is displayed, (the hold display symbol) is displayed.
The un it weight is recalculated and upd ated.
The weighing mode is established.
Pressing the key once more retu rns you to the piece counting mo de.
! !-!-!-! ! ! !-!-!-! !
90
Page 91

Changing a Unit Weight, or Adding a New Unit Weight
Establish the piece counting mode.
1
While the weighing mode (mode where grams
or other units are displayed) is established, press
to switch to the application function mode.
Select the item number whose unit
2
weight you want to change, or for
which you want to add a unit
weight.
Each time you press for about 3 seconds,
the next item number is displayed.
"Counting Numbers of Pieces", page 90
^
Press
3
The number of pieces used for setting will be
displayed.
Select the number of pieces used
4
for setting.
(Select the number of pieces used for setting.)
! ! ! ! ! !5 ! ! ! ! ! !5
! !-!-!-! ! ! !-!-!-! !
! ! ! ! ! !5 ! ! ! ! ! !5
! ! ! ! !1!0 ! ! ! ! !1!0
WEIGHING
BEFORE
USING THE
BALANCE
USING MORE CON VENIENTLY
Place the container on the pan and
5
press
The balance will be tared.
Put a quantity of the item to be
6
counted corresponding to the
selected "number of pieces used
for setting" into the container.
Check that (the stability mark)
7
lights up, then conrm.
[SET]
The unit weight will be added, and piece
counting will become possible.
! ! ! ! !1!0 ! ! ! ! !1!0
91
MAINTENANCE
TROUBLESHOOTING
INFORM ATION
FOR YOUR
Page 92

APPLICATION FUNCTION MODE
8
Percentage
Weighing
In this mode the weight of the sample is converted to a percentage of the reference weight.
The following two setting methods are available for percentage weighing.
100% Reference
Specic Percentage
Reference
Preparation for Percentage Weighing
Press in the weighing mode.
1
This opens the main menu.
Select percentage weighing.
The reference weight is set as 100%.
The reference weight is set as a percent age value of your choice.
2
[APL.FUNC] [PERCENT]
[SET]
The setting beyond this point differs depending
on the percentage value you are assigning to the
reference weight.
If the reference weight is being set as 100%, see "W hen set ting the reference as 100%…" (^ page 93).
If the reference weight is being set as a specic percent age, see "When setting the reference as a
percentage of your choice…" (^ page 94).
P!E!R!C!E!N!TP!E!R!C!E!N!T
92
Page 93

When setting the reference as 100%…
Select the 100% reference.
3
[SAMPLE] [SET]
(Check the indication.)
!S!A!M!P!L!E
!S!A!M!P!L!E
WEIGHING
BEFORE
The indication differs depending on whether a
reference value has already been set or not.
When no percentage reference value has been set
[---]
When a percentage reference value has already been set
(The percentage reference value is displayed.)
To update the percent age reference value, proceed to step 4.
•
If you are not updating the percentage reference value, the following steps are not necessar y.
•
^ "Weighing Percentages", page 95
Select 100% reference setting.
4
Place the container on the pan and
5
Place the sample that is to provide
6
[100 REF]
press
The balance will be tared.
the reference weight in the
container.
! !S!E!T!
! !S!E!T!
1!0!0! !R!E!F1!0!0! !R!E!F
USING THE
BALANCE
USING MORE CON VENIENTLY
MAINTENANCE
Check that (the stability
7
mark) lights up, then conrm.
[SET]
A percentage value with the reference weight
taken to be 100% is displayed.
Percentage Weighing is now possible.
"Weighing Percentages", page 95
^
What to do if….
*
It is not possible to use a reference weight that weighs less than 100 times the min imum indication of
the bala nce as the reference weight.
! !S!E!T!
! !S!E!T!
! !1!0!0.0!0
! !1!0!0.0!0
Continued on next page
93
TROUBLESHOOTING
INFORM ATION
FOR YOUR
Page 94

APPLICATION FUNCTION MODE
8
Percentage Weighing
When setting the reference as a percentage of your choice…
Select the specic percentage
3
reference.
[OPTION] [SET]
!O!P!T!I!O!N
!O!P!T!I!O!N
(Check the indication.)
The indication differs depending on whether a
reference value has already been set or not.
When no percentage reference value has been set
[---]
When a percentage reference value has already been set
(The percentage reference value is displayed.)
To update the percent age reference value, proceed to step 4.
•
If you are not updating the percentage reference value, the following steps are not necessar y.
•
^ "Weighing Percentages", page 95
Enter a percentage value of your
4
choice.
[OPT REF]
(Enter the percentage value.)
"Entering Numerical Values", page 49
^
Place the container on the pan and
5
press
The balance will be tared.
! !S!E!T!
! !S!E!T!
O!P!T! !R!E!F
O!P!T! !R!E!F
/
/
/
/
/
/
/
/
/
/
/
/
/
/
/
/
/
! ! !5!0.0!0
! ! !5!0.0!0
O!P!T! !R!E!F
O!P!T! !R!E!F
/
/
/
/
/
/
/
/
/
/
/
94
Place the sample that is to
6
provide the reference weight in the
container.
Check that (the stability mark)
7
lights up, then conrm.
[SET]
A percentage value calculated by conversion on
the basis that the reference weight is equal to the
set percentage is displayed.
Percentage weighing is now possible.
"Weighing Percentages", page 95
^
! !S!E!T!
! !S!E!T!
! ! !5!0.0!0
! ! !5!0.0!0
The specic perc entage weighing symbol lights
The specic perc entage weighing symbol lights
up.
up.
Page 95

What to do if….
*
It is not possible to use a reference
weight such that the weight
correspond ing to 100% is less than 100
times the minimu m indication of the
balance.
Weighing Percentages
WEIGHING
BEFORE
Establish the percentage weighing
1
mode.
If you have returned to the weighing mode (mode
where grams or other units are displayed) from
the percentage weighing mode, then pressing
will take you back to the percentage
weighing mode.
If the percentage weighing mode
*
is not established…
The preparations for percent age
weighing have not been completed.
Make set ting in accordance with
"Preparation for Percentage Weighing"
(^ page 92).
! !1!0!0.0!0
! !1!0!0.0!0
The percentage weighing symbol
The percentage weighing symbol
lights up.
lights up.
Place the container on the pan and press
2
The balance will be tared.
Insert the sample (item to be measured) into the container.
3
A percentage value obtained by conversion based on the set reference percentage value and
reference weight is displayed.
USING THE
BALANCE
USING MORE CON VENIENTLY
MAINTENANCE
The operations of each of the keys after setting are summarized below.
On pressing ...
On pressing ...
On pressing
for about 3 seconds…
On pressing ...
The percentage reference value setti ng menu is d isplayed. (^ step 4
onward on pages 93 and 94.)
The set reference weight (in grams) and the percentage indication are
displayed alter nately. Press while the reference weight is displayed to
output the reference weight. While the reference weight is displayed, (the
hold display symbol) is displayed.
The 100% reference and speci c percentage value are d isplayed alternately.
The mode is switched to the weighing mode.
Pressing the key again will ret ur n you to the percentage weighing mode.
95
TROUBLESHOOTING
INFORM ATION
FOR YOUR
Page 96

APPLICATION FUNCTION MODE
8
Formulation
This function is useful when mixing multiple components together by weight, according to a formula.
Use this function while the printer is connected to a printer or PC.
The weight of each component is measured and output or added, and on completion of the formulation
the gross weight is output.
During formulation the auto zero function (^ page 72) will not work.
Performing Formulation
Press in the weighing mode.
1
This opens the main menu.
The formulation symbol lights up.
The formulation symbol lights up.
Set the balance to the formulation
2
mode.
[APL.FUNC] [FORMULA]
[SET]
The balance is now ready to weigh.
If necessary, set output of the component
numbers and output of the gross weight.
"Outputting Component Numbers",
^
page 99
"Outputting the Gross Weight", page 100
^
Place the container on the pan and
3
press
The balance will be tared.
Press
4
Formulation starts.
F!O!R!M!U!L!A
F!O!R!M!U!L!A
! !S!E!T!
! !S!E!T!
! ! !0.0!0!0
! ! !0.0!0!0
The ready symbol lights up, indicating
The ready symbol lights up, indicating
that the balance is ready to weigh.
that the balance is ready to weigh.
! ! !0.0!0!0
! ! !0.0!0!0
96
The ready symbol goes out.
The ready symbol goes out.
Page 97

When the GLP output function
*
(^ page 142) is set to ON…
The balance ID ( ^ page 144) and
other information is printed.
Insert the component into the
5
container.
Press
6
The weight value of the cur rent sample (item to
be weighed: element) is output / recorded and
the balance is automatically tared.
Now repeat the operations in steps 5 and 6 to add the other components to the for mulation.
On completion of formulation,
7
press ( with the TXB
series).
The total of the individual weight values up to
this point (gross weight) is displayed and the
balance returns to the ready to weigh status.
To output the gross weight…
*
Make the setting in "Outputting the
Gross Weight" ( ^ page 100) in
advance.
When the GLP output function
*
(^ page 142) is set to ON…
! ! !0.3!2!5 ! ! !0.3!2!5
! ! !0.0!0!0
! ! !0.0!0!0
The net weight symbol lights up.
The net weight symbol lights up.
/
! ! !6.2!0!4
! ! !6.2!0!4
The gross weight symbol ashes.
The gross weight symbol ashes.
! ! !6.2!0!4
! ! !6.2!0!4
The ready symbol lights up, indicating
The ready symbol lights up, indicating
that the balance is ready to weigh.
that the balance is ready to weigh.
/
/
/
/
/
/
/
/
/
/
/
/
/
/
/
/
/
WEIGHING
BEFORE
USING THE
BALANCE
USING MORE CON VENIENTLY
MAINTENANCE
TROUBLESHOOTING
The signature panel is printed after the
total weig ht.
Continued on next page
97
INFORM ATION
FOR YOUR
Page 98

APPLICATION FUNCTION MODE
SHIMADZU CORP.
CMP001=
0.900g
CMP002=
1.280g
CMP003=
199.610g
TOTAL=
201.790g
D
465412345
8
Formulation
The operation after setting is as follows.
When in the ready to weigh status:
On pressing ...
When weighing is in progress:
On pressing ...
Name of manufacturer
Balance model name
Balance serial number
Balance ID
The weighing mode is established.
Pressing the key once more returns you to the ready to weigh status.
The gross weight of the components weighed up to that point is displayed for
about 2 seconds.
Example printout from printer
(When the GLP output function is set to ON)
98
The person who carried out
measurement signs here.
Page 99

Outputting Component Numbers
The numbers for each component are automatically assigned to the output results.
Press in ready to weigh status
1
while in the formulation mode.
This opens the main menu.
If the ready to weigh status is not
*
established…
Perform steps 1 and 2 of formulation
(^ page 96)
.
Select component number output
2
setting.
[ELM.NUM]
!E!L!M.N!U!M
!E!L!M.N!U!M
Check the presence or absence of the
Check the presence or absence of the
stability mark.
stability mark.
WEIGHING
BEFORE
USING THE
BALANCE
USING MORE CON VENIENTLY
Stability M ark
Lit
Unlit
Outputting Component
Numbers
ON
OFF
Change the output setting.
3
Pressing alternately sets ON and OFF for
the output setting.
[SET]
Return to ready to weigh status.
4
! !S!E!T!
! !S!E!T!
!E!L!M.N!U!M
!E!L!M.N!U!M
When ON is set the stability mark is
When ON is set the stability mark is
lit.
lit.
Component
Component
number
number
Weight reading for
Weight reading for
each component
each component
(output regardless
(output regardless
of the ON/OFF
of the ON/OFF
status of component
status of component
number output)
number output)
MAINTENANCE
TROUBLESHOOTING
INFORM ATION
FOR YOUR
Continued on next page
99
Page 100

APPLICATION FUNCTION MODE
8
Formulation
Outputting the Gross Weight
The gross weight for a formulation weighing operation is output at the same time it is displayed.
The gross weight is output together with the printed indication: "TOTAL =".
Press in ready to weigh status
1
while in the formulation mode.
This opens the main menu.
If the ready to weigh status is not
*
Select gross weight output setting.
established…
Perform steps 1 and 2 of formulation
(^ page 96)
2
[TOTAL]
Stability M ark
Lit
Unlit
.
Outputting the Gross
Weight
ON
OFF
! !T!O!T!A!L
! !T!O!T!A!L
Check the presence or absence of the
Check the presence or absence of the
stability mark.
stability mark.
Change the output setting.
3
Pressing alternately sets ON and OFF for
the output setting.
[SET]
Return to ready to weigh status.
4
! !S!E!T!
! !S!E!T!
! !T!O!T!A!L
! !T!O!T!A!L
When ON is set the stability mark is
When ON is set the stability mark is
lit.
lit.
Gross
Gross
weight
weight
100
 Loading...