

Page 1
Dear Loyal Customer:
First, thank you for purchasing the Zaurus K-PDA and
welcome to the Zaurus family. We are sure you will soon
find that your new assistant will change your life and the
way you do business. We would briefly like to share with
you our vision.
Your Zaurus exists today thanks to an incredible amount of
effort and determination from our entire Zaurus team (not to
mention numerous pots of black coffee). Our team at Sharp
has a dream to change the way we all do business. As a
business person, you already know that access to
information and people anytime, anywhere is the key to
gaining a competitive edge in this fast-paced information
age. We feel Zaurus is the tool that can deliver this to you. It
is simple to use, has months of battery life, and fits in your
pocket.
How did we come up with the idea for Zaurus? Many of us
found that we were lugging around notebook computers to
take notes, generate summaries, and report back to our
office and clients. We also found that we had a lot of "down
time" that could be put to better use; sitting on trains and
planes, waiting for clients, and even in meetings. Now that
we are using the Zaurus, we travel lighter, work smarter,
and stay more in touch with our contacts and each other.
Best of all, we have very little "down time" as our "Zauri" are
always with us. Now you know why we say that "Zaurus
means business anytime, anywhere".
We need your help to spread the word. Show a friend or
someone at work how you use your Zaurus and what it can
do for them. As more and more people start using the
Zaurus, we can spend even more resources on developing
new accessories, add-on software programs, and new
versions of the Zaurus. Better yet, if you have a mobile staff
or sales force that you would like to equip with Zauri, give us
a call at 800-BE-SHARP. We'll show you how you can
improve their efficiency and productivity as well as enable
them to better keep in touch with their clients and each
other.
Finally, let us know how you feel about your Zaurus. We
look forward to getting letters from our users about how you
use it and improvements you would like to see. We cannot
promise to answer every letter, but you can be sure we read
all of the suggestions you send us. We value feedback from
our customers and try to incorporate as many requests as
we can in our new products. Each of us takes an incredible
amount of personal pride in our work and the Zaurus. We
are all Zaurus users. We believe this makes a difference in
the products we create. After using the Zaurus, we think
you'll agree.
Thanks again for purchasing the Zaurus and sharing our
dream. We look forward to shaping the future of the
information age with you.
Sincerely,
The Z Team
1
Page 2

Notices
• For any electronic memory device, data may be
lost or altered under certain circumstances.
Sharp strongly recommends that you keep
separate written records of all important data.
• Sharp assumes no responsibility for data lost or
altered as a result of improper use, repairs,
defects, battery replacement/failures or any other
cause.
• Sharp assumes no responsibility, directly or
indirectly , for financial losses or claims from third
parties resulting from the use of this product and
any of its functions, such as stolen credit card
numbers, loss or alteration of stored data, etc.
• Information provided in this manual is subject to
change without notice.
• All company and/or product names are trademarks and/or registered trademarks of their
respective holders.
• There are only two differences between the ZR5700 and ZR-5800 models:
Memory capacity: ZR-5700 ... 1 MB
ZR-5800 ... 2 MB
Backlight: ZR-5700 ... Not supported
ZR-5800 ... Supported
• The display examples and keyboard illustrations
used in this manual are taken from the ZR-5800,
although they apply equally to both models.
• Unless otherwise specified, the information in this
manual applies to both models.
The Zaurus will be referred to as the "unit"
throughout this manual.
Check the contents
Please check the contents carefully . Your unit
should come with the following:
• ZR-5700/ZR-5800 Main Unit
• Touch pen (installed)
• Operating batteries: LR6(AA) x 2
• Memory backup battery (installed): CR2032 x 1
• ZR-5700/ZR-5800 Operation Manual
• Spreadsheet and Communications Manual
• Registration Card
If there are problems with any of these contents,
contact your Sharp dealer.
2
Page 3

Contents
Quick Start ..................................................9
Important things to do....................................9
Installing the batteries ................................. 10
Initializing..................................................... 11
Adjust LCD contrast.....................................12
Adjusting the touch panel ............................ 13
Setting the time and date.............................14
Setting the start-up display..........................15
Making your first entry ................................. 16
Entering an appointment ............................. 17
Entering a To Do item .................................. 18
Using the Calendar Views ........................... 19
Taking notes ................................................ 20
Making a letter ............................................. 21
Searching for information ............................ 22
Finding an entry from the Index view........... 23
Editing an entry ........................................... 24
Deleting entries ........................................... 25
Assigning an entry to Filer folders ............... 26
Using Filer ................................................... 27
Sending a fax............................................... 28
Copying and pasting text ............................. 29
Tools ............................................................ 30
Drawing pictures.......................................... 32
Using the Calculator .................................... 33
Commonly asked Questions & Answers ..
What your unit can do................................. 41
About this Manual....................................... 42
Chapters .......................................................42
Conventions used....................................... 44
Caring for your unit ..................................... 45
35
CHAPTER 1 Getting Started................. 47
Before Use.................................................. 47
Part Names and Functions ......................... 48
Touch pen .....................................................50
Display angle adjustment..............................50
GUI operations ........................................... 51
Display layout ............................................. 52
Touch panel display .................................... 52
Display symbols.......................................... 53
Keyboard layout ............................................53
3
Page 4

Detail View and Index View......................... 54
Tool bar ......................................................... 54
Help Function ............................................. 55
Key Sound .................................................. 55
Save Battery Life ........................................ 56
Sleep function ...............................................56
External power supply...................................56
Backlight Function ...................................... 56
CHAPTER 2 Desk Accessories ............ 57
Calculator ................................................... 57
Movable window display................................58
Paperless printer...........................................58
Date calculations...........................................60
Data from other entries .................................62
Error indicator E ............................................62
Scrapbook .................................................. 63
Drawing tools ................................................ 64
Finding entries ..............................................64
Selecting an area .......................................... 65
Moving or copying graphics ..........................65
Adding text strings to Scrapbook .................. 66
The Stamps tool............................................67
Deleting Scrapbook entries...........................69
Filer............................................................. 69
Assigning entries to folders...........................69
Collect related entries to one folder ..............70
Viewing entries via Filer................................ 72
Editing folder entries .....................................73
New Assigned Entry...................................... 73
Delete an entry from Filer ............................. 74
Removing entries from folders ......................74
Empty a folder...............................................75
Merging (Moving) folders ..............................75
Sending folders .............................................76
Generate a Report ........................................77
Search ........................................................ 78
Help ............................................................ 79
Tools ........................................................... 80
Utilities ..........................................................80
Preferences................................................... 80
Personal ........................................................80
Memory.........................................................81
Display .......................................................... 82
Sound............................................................82
Start-up .........................................................83
Sleep.............................................................84
Secret............................................................85
Word List.......................................................88
RAM Card .....................................................90
Backlight set-up ............................................90
4
Page 5

Clock........................................................... 91
Daylight Saving Time ....................................91
World City .....................................................91
User's City..................................................... 92
Setting daily alarms ...................................... 93
Disabling alarm sound ..................................94
MORE......................................................... 95
Spreadsheets ............................................. 95
CHAPTER 3 General Operations ......... 97
Opening Applications and Accessories ...... 97
Tool Bar Functions...................................... 98
Views/Index................................................... 98
To change Index/Detail View .........................99
Filter ..............................................................100
Show .............................................................102
Set Up ...........................................................102
Edit................................................................103
Link To...........................................................104
Links..............................................................104
File It .............................................................105
Send..............................................................105
General Editing Techniques........................ 105
Fields ............................................................105
Resume.........................................................106
Cursor ...........................................................106
Entering text..................................................106
Moving around the display ............................107
Moving between fields ..................................107
Inserting text ................................................. 107
Deleting text ..................................................107
Blocks of text.................................................108
Deleting blocks of text ...................................108
Cut, Copy and Paste .....................................108
Scroll bars .....................................................108
Finding Specific Entries.............................. 109
Index View.....................................................109
Keyword Search............................................110
Global Search ...............................................111
Using Filer.....................................................112
By Date .........................................................112
Deleting Entries .......................................... 112
Deleting single entries from the keyboard..... 112
Deleting single entries .................................. 113
Deleting group entries...................................113
Cut, Copy and Paste................................... 114
Copying or moving blocks of text ..................114
Copying or moving entries ............................ 115
Time Stamp and Date Stamp ..................... 116
Symbols and Special Characters ............... 116
5
Page 6

CHAPTER 4 Time Management............ 119
Calendar views ........................................... 119
Calendar view format ....................................119
Changing Activities Setup ............................. 120
Calendar views .............................................120
Accessing entries using calendar views .......124
Selecting a date ............................................124
Appointments.............................................. 125
Making new Appointment entries..................125
Making an Appointment entry.......................125
Finding entries ..............................................126
Editing Appointment entries ..........................127
Deleting a single entry .................................. 128
Deleting group entries...................................128
Making entries for recurring or extended events...
Using the Appointment Repeat function .......130
Appointment alarms......................................131
Clearing a set alarm......................................131
Birthday/Anniversary .................................. 132
Reminder function.........................................132
Making new entries in Birthday/Ann..............132
Finding Birthday/Ann entries......................... 133
Editing an deleting entries ............................133
Holiday........................................................ 134
Making new entries .......................................134
Finding Holiday entries .................................135
Editing and deleting entries .......................... 135
129
To Do .......................................................... 136
Making a new To Do entry.............................137
Entering a Monthly Goal ............................... 138
Finding To Do entries ....................................138
Checking off completed entries.....................139
Using Labels .................................................140
Making To Do entries with labels...................140
Reviewing the To Do list by Labels................ 142
Editing labels.................................................142
Copying a To Do entry...................................142
Editing and deleting To Do entries ................144
Changing Activity type ..................................144
CHAPTER 5 Databases......................... 145
Contacts and Data Files ............................. 145
Selecting a file...............................................146
Making a new Contacts entry........................146
Finding entries ..............................................147
Using Index View ..........................................147
Keyword search ............................................148
Direct search.................................................149
Filter function ................................................149
Link function ............................................... 150
Linked Entries ...............................................150
New Linked Entry..........................................150
Link by Searching .........................................151
Viewing linked entries ...................................152
6
Page 7

Link To function ............................................. 153
Jump T o function........................................... 154
Breaking Links ..............................................155
Editing Contacts and Data Files entries ..... 155
Deleting Groups of entries ............................156
Picture fields ............................................... 156
Adding a picture to an entry.......................... 157
Editing contents of picture fields ...................158
Setup for Contacts and Data Files.............. 159
Configuring Contacts and Data Files ............159
Fax number field ...........................................160
CHAPTER 6 Writing and Letters .......... 161
Notes .......................................................... 161
Taking Notes ................................................. 161
Notes window................................................163
Changing Notes Setup..................................163
Review Notes ................................................164
Edit Notes .....................................................165
Documents ................................................. 165
Making a new entry based on an existing entry....
Finding entries ..............................................167
Editing a Documents entry............................ 167
Deleting Documents entries.......................... 167
Changing display character size ...................168
Find T ext........................................................168
Text styles .....................................................169
166
Tabs and indents...........................................170
Word wrap.....................................................173
Document size ..............................................173
Display size................................................... 173
Page Setup ................................................... 174
Inserting a page break ..................................175
Print Preview.................................................176
Check Spelling ..............................................176
Make a Letter function ..................................177
Documents with pictures...............................180
Headers and Footers .................................... 180
Exchange Documents with PC Files.............181
Outlines ...................................................... 182
Example outline ............................................183
Creating an Outlines entry ............................183
Finding outlines.............................................184
Full Topics or 1 Line Topics ...........................184
Revising outlines...........................................185
Outline deletion .............................................188
Using subtopics (children).............................188
Expanding and Collapsing ............................189
CHAPTER 7 Optional Accessories ....... 191
Tools Utilities .................................................191
Preferences................................................... 191
Printing ....................................................... 192
Paper source................................................. 192
Printer connection ......................................... 192
7
Page 8

Printing restrictions ....................................... 193
Printing the current display ...........................194
Faxes .......................................................... 195
Fax Directory.................................................196
Setting fax options ........................................197
Cover sheets and headers............................ 198
Speed buttons...............................................199
Sending a fax ................................................200
Manual fax dialing .........................................202
Fax Log .........................................................202
About fax numbers........................................ 203
Conditions for sending faxes.........................203
Optional Cards............................................ 203
Using PC cards .............................................205
SRAM and FLASH Memory Cards ............... 206
SRAM cards..................................................207
FLASH cards.................................................210
Fax/Modem cards .........................................212
More ........................................................... 213
Add-on software programs............................ 213
PC Files ........................................................215
Data Exchange ........................................... 217
Data Transfer with Other Sharp Devices..... 219
Data transfer between ZR-5700/ZR-5800s or with ZR-5000 ...
Wireless infrared transfer (Beaming) ............219
Quick transfer................................................220
Unit to Unit transfer .......................................220
219
Data Transfer with Other Computers .......... 223
PC Link .........................................................223
Organizer Link software for Other Sharp Products ...
224
Special Communications Applications........ 226
Remote Link..................................................226
Terminal Mode ..............................................226
Message .......................................................226
CompuServe Access ....................................227
AT&T Mail Access .........................................227
ZR-Pager ......................................................228
Appendices.............................................. 229
A. Key Notations ......................................... 229
B. Reset...................................................... 234
All Reset operation........................................234
C. Troubleshooting...................................... 235
D. Battery Replacement ............................. 236
General guidelines ........................................236
Replacing operating batteries .......................236
Replacing the memory backup battery ......... 238
E. Specifications ......................................... 240
Index......................................................... 245
8
Page 9
Quick Start
his section should be read and all necessary operations performed before you start
using your unit.
T
Important things to do
1.
Complete and send in the registration
card. This registers your purchase and
allows us to notify you of new
developments and products as they
become available.
2.
Read through this Quick Start section. It
will quickly get you up and running. Refer
to the rest of the manual for more details
about particular operations.
3.
If you have any particular questions about
your unit, read through the list of
commonly asked questions and answers.
There is a good chance that any questions
you have will be answered there.
4.
When you need help with any operation,
touch
screen help is a topic-specific quick
reference guide that explains features and
their functions.
at the left of the display. On-
HELP
9
Page 10

Installing the batteries
2
1
Before operation you will need to install the two operating batteries. The memory backup battery (CR2032) is installed at
the factory and should last five years if operating batteries are replaced as required.
1.
Set the battery replacement switch on the back to
"REPLACE BA TTERIES" (expose the red dot).
2.
Slide the operating battery cover off.
3.
Insert the two LR6(AA) operating batteries.
Make sure the batteries are correctly aligned for
polarity (+ and -).
Battery
replacement
switch
1
2
10
4.
Replace the operating battery cover.
5.
Set the battery replacement switch to "NORMAL
OPERATION".
On average, you can expect to get about two months
of battery life. Actual battery life will vary depending
on individual use.
If this is the first time you have installed batteries, you must also initialize your unit.
+
+
Page 11
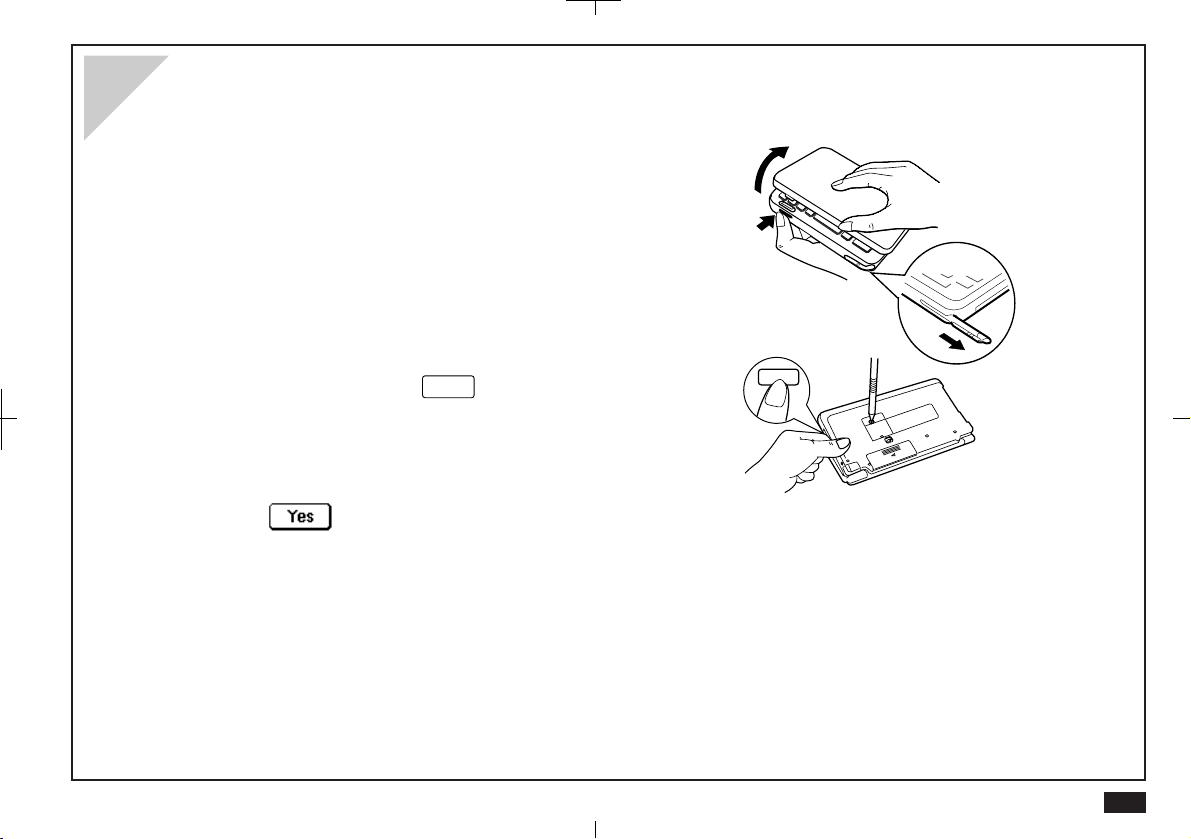
Initializing
ON
Y our unit must be initialized the first time it is used.
1.
Press the lock button and open the display .
2.
Remove the touch pen.
3.
While holding down the
key, push the
ON
RESET button on the back with the touch pen.
4.
Touch to initialize.
After initialization, the Start-up display appears.
Open
Press
11
Page 12
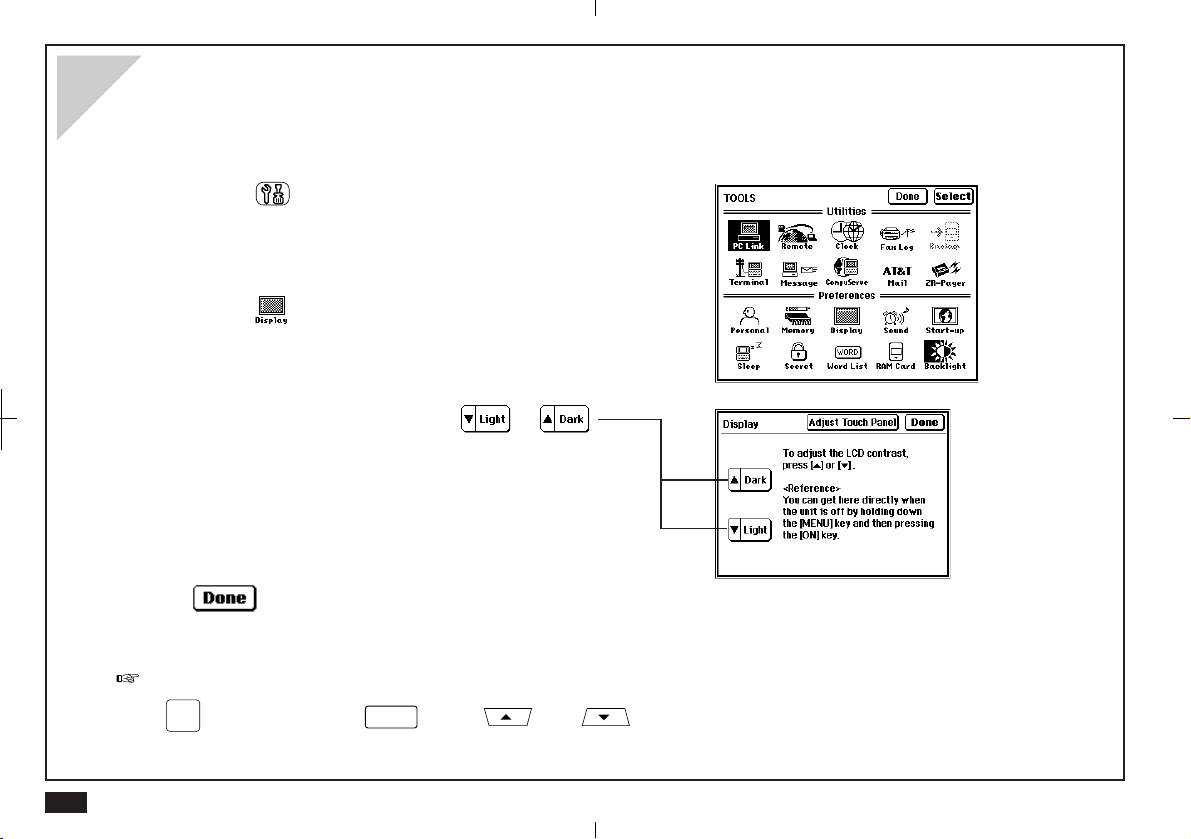
Adjust LCD contrast
LCD contrast may sometimes need adjustment to suit certain lighting conditions.
1.
Touch
2.
Touch (under Preferences) twice.
3.
To adjust LCD contrast, touch or .
4.
When you are satisfied with the setting, touch
If LCD contrast is too light or dark to see the display , you can adjust the contrast directly. Turn the unit off, hold down the
at the left of the display .
TOOLS
.
12
MENU
key and then press
. Press and to adjust the contrast.
ON
Page 13
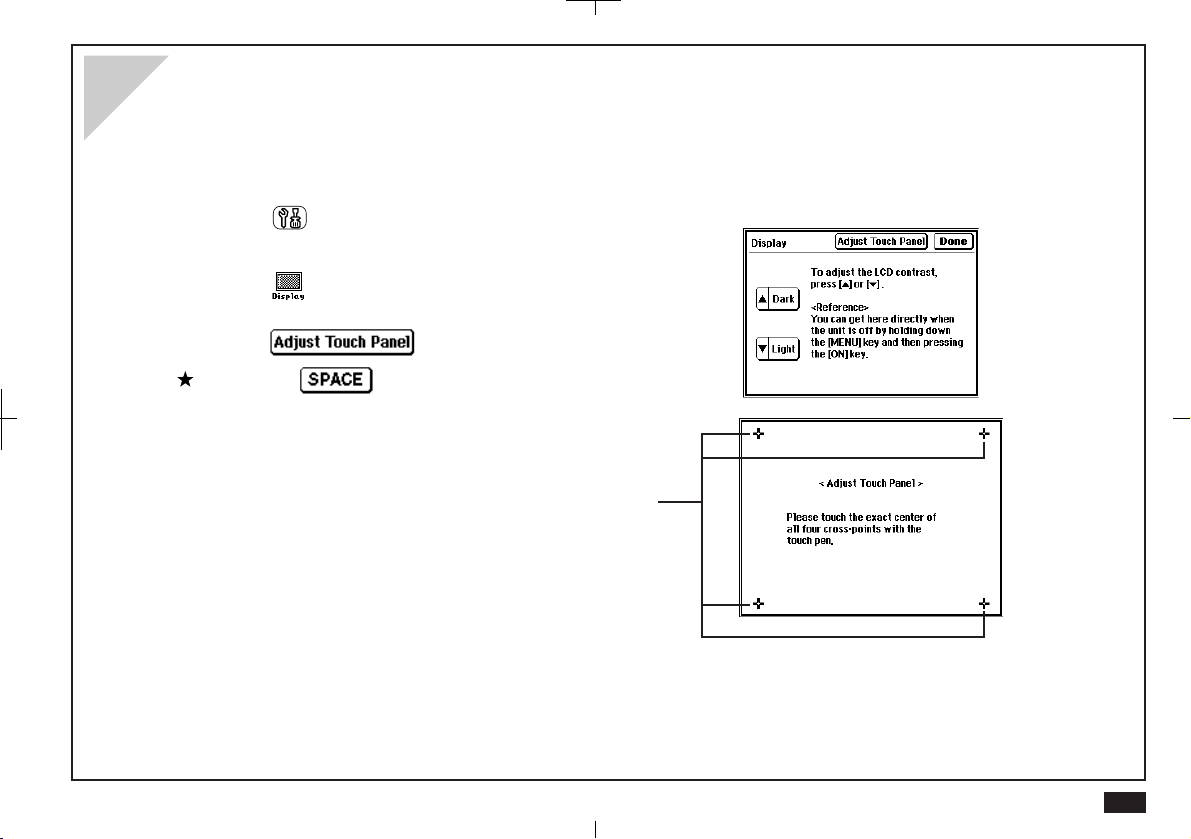
Adjusting the touch panel
Each person holds a pen differently. The touch panel can be adjusted to respond correctly to your individual style of writing,
drawing and selecting touch buttons.
1.
Touch
2.
Touch (under Preferences) twice.
3.
Touch .
Press the key .
4.
Touch the exact center of all four cross-points with
the touch pen.
• As each cross-point is touched it will turn grey. When
all four are touched, "Adjusted!" is displayed.
• If for some reason the adjustment fails, a "Sorry,
please try again..." message is displayed. Touch the
centers of all four cross-points again until "Adjusted!"
is displayed.
TOOLS
.
13
Page 14
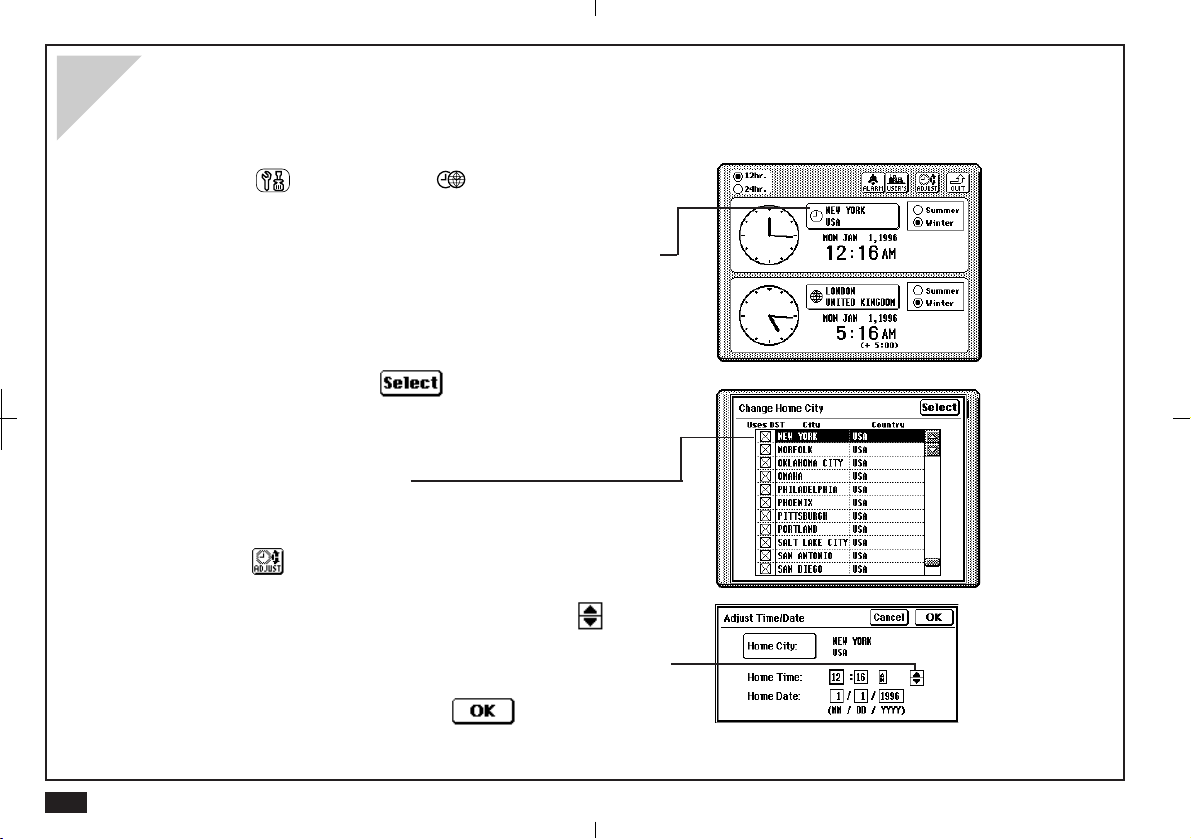
Setting the time and date
For time-based functions to be effective, the built-in clock must be set to the correct Home City time and date.
1.
Touch
2.
To select a different Home city , touch the Home City
name.
New York, USA is the default Home City.
3.
Select your city (if available) or a city in your time
zone and then touch .
Use the scroll bars to see more cities.
By default, all cities are set to observe daylight saving
time (DST). If your city does not use DST, touch the
check box to disable it.
4.
Touch to set the time and date for your Home
City .
Touch each time/date field box and then use to
change the value.
Alternately , you can enter the values from the keyboard.
and then touch
TOOLS
Clock
twice.
14
5.
When you are finished touch .
Page 15
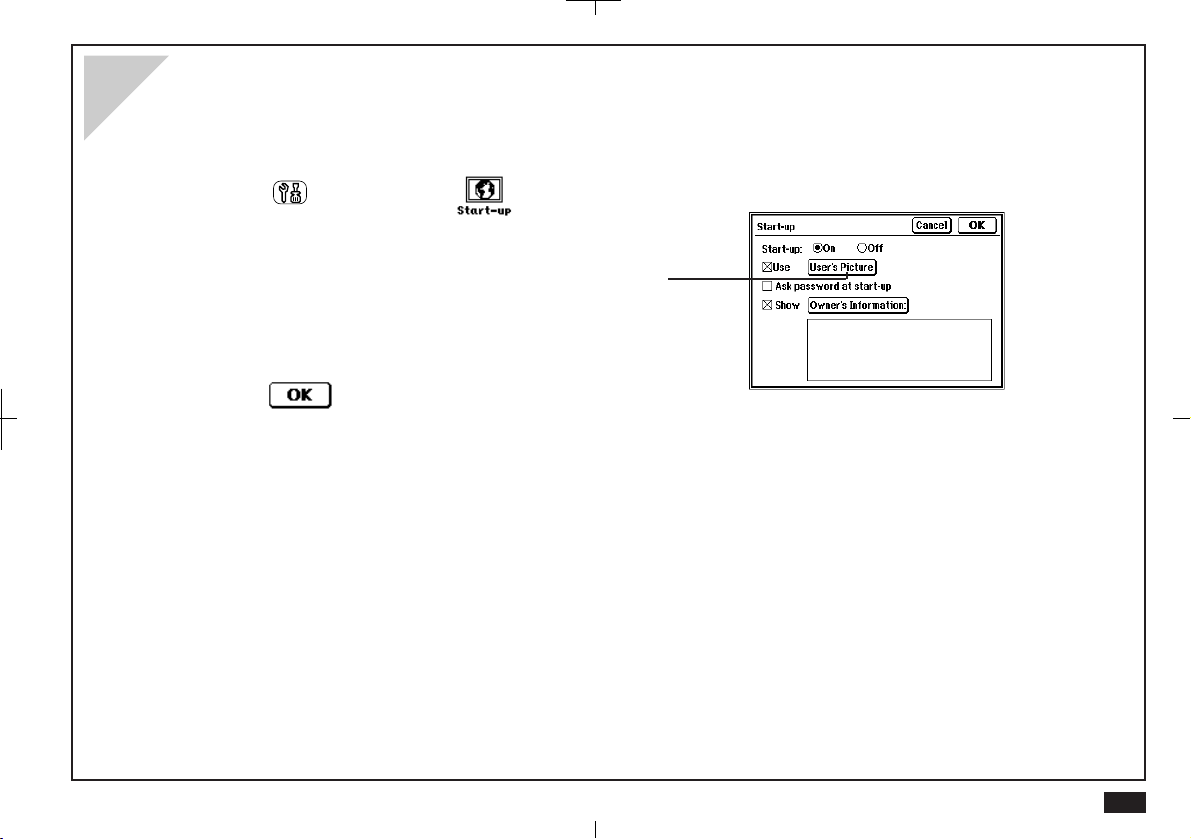
Setting the start-up display
Each time the unit is turned on, it can display your name, telephone number and address on one of two graphic backgrounds.
1.
Touch
2.
Select the required setting in each field.
Select User's Picture when you want to use your own
original start-up picture.
For details, see p. 83.
3.
Touch to save your settings.
and then touch twice.
TOOLS
15
Page 16
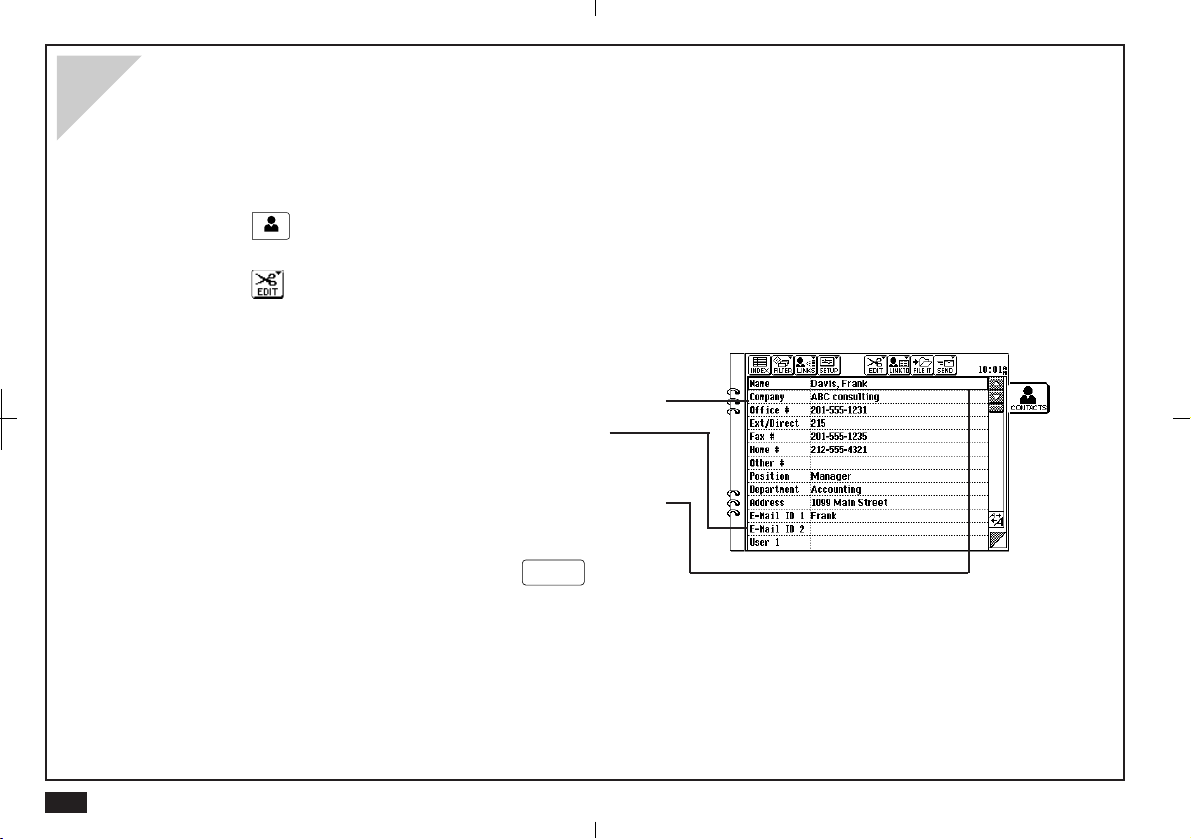
Making your first entry
Your first entry will be a Contacts entry. The procedures described below can be used with other applications.
To make a new Contact 1 entry:
1.
Touch
2.
Touch and select "New Business(1)".
“Business“ is the default file name of Contact 1.
3.
Enter a name.
• Select the Company field and enter a company name.
• Select the Address field and enter an address.
4.
When you complete the entry , press
it.
at the right of the display.
CONTACTS
Touch a field name to select the field for data entry.
Dark outlines around a field indicate that it is selected.
ENTER
to save
16
Page 17

Entering an appointment
1.
Touch
Touch
displayed.
2.
Touch and drag the pen across the start and end
times of the appointment on the time bar.
When you lift the pen, a new appointment will appear.
3.
Touch the text box and enter a description.
at the right of the display .
ACTIVITIES
again if the Day view has not been
ACTIVITIES
4.
When you complete your entry, press
ENTER
.
17
Page 18
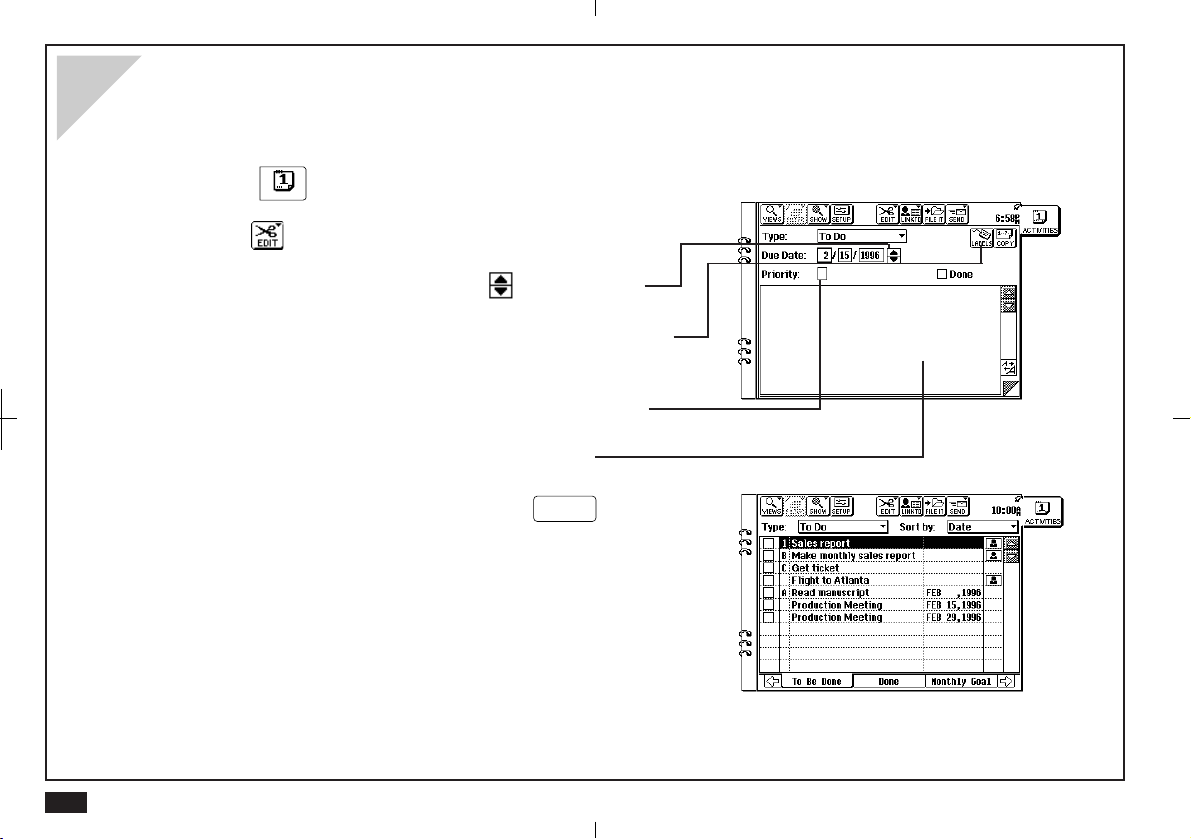
Entering a T o Do item
To Do lets you organize tasks and objectives.
1.
Touch
2.
Touch and select "New To Do".
3.
Touch the date box and then use to select the
due date (if the To Do item has one).
You can assign up to five labels to a task, then later use
these to filter the item in a To Do list.
4.
Enter a priority level (number or letter) as required.
5.
Move to the text box and enter a description.
at the right of the display.
ACTIVITIES
18
6.
When you complete your entry, press
save it.
ENTER
to
Page 19
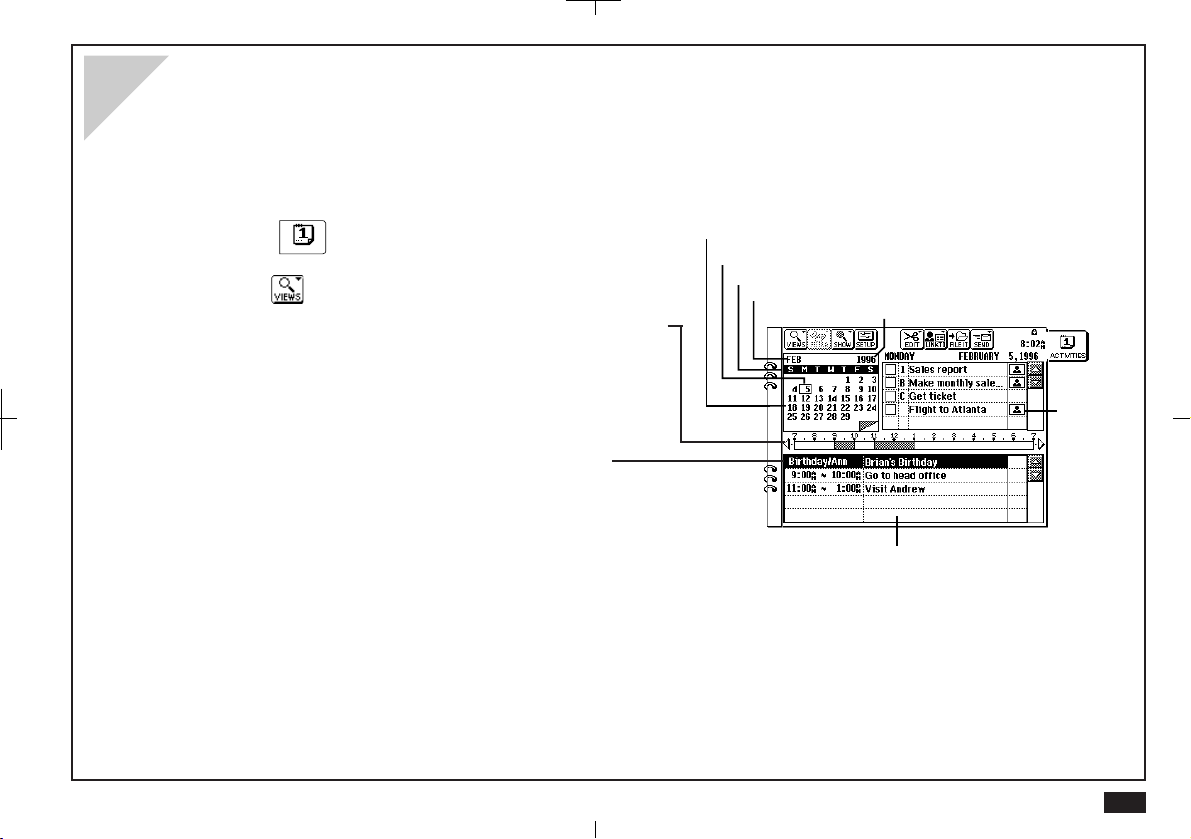
Using the Calendar Views
Activities has five different calendar views: Day (initial default view), Week, Weekly Graph, Month and Year. These calendar
views can be used to show Appointment, Birthday/Ann, Holiday and To Do entries.
T o use the calendar views:
1.
Touch
2.
Touch and, if necessary, select "Day" view.
The time bar shows your appointments and free time.
3.
Touch any entry twice to see details or make
at the right of the display.
ACTIVITIES
changes.
Touch any date to select that day. The flashing date
indicates the currently selected date.
This box indicates today's date.
Touch here to view a week at a glance.
Touch here to see a month at a glance.
Touch here to see a year at a glance.
To Do list
Displays Birthday/Ann, Holiday and Appointment
entries for the Selected day.
19
Page 20
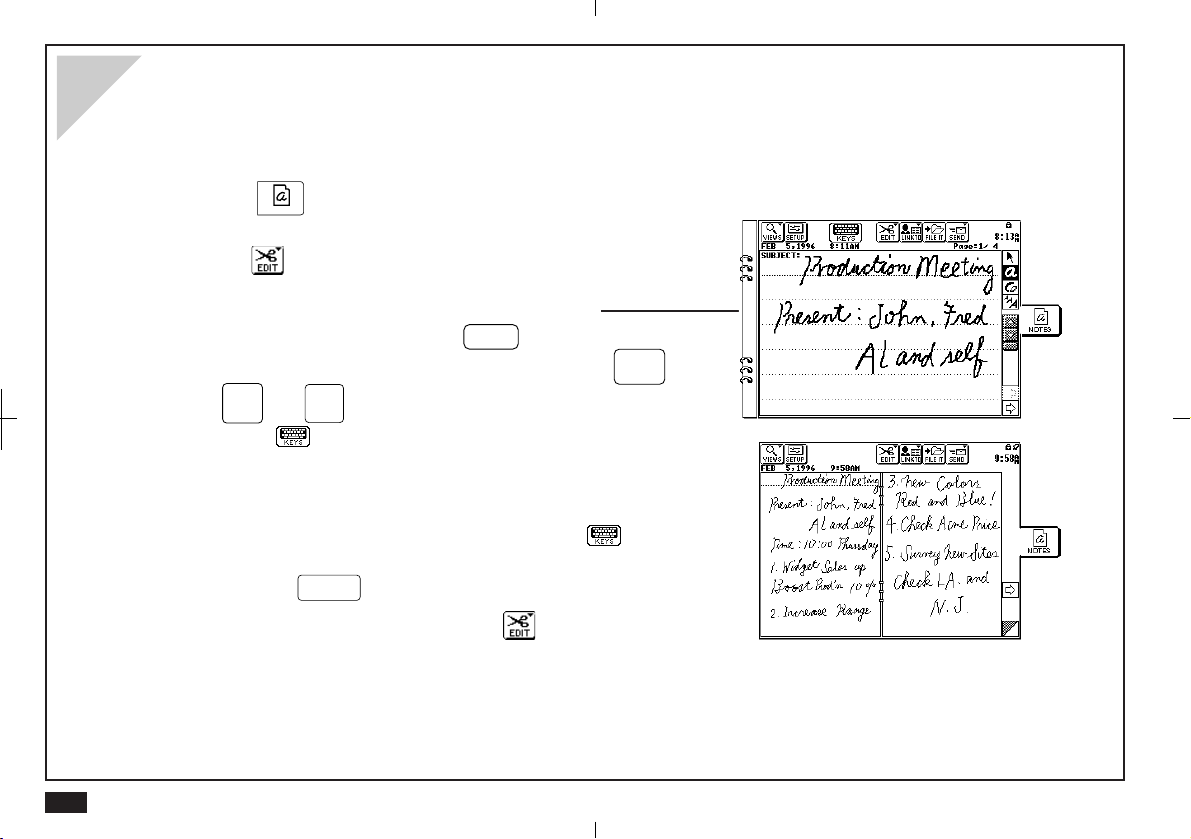
Taking notes
DEL
Notes is an electronic writing pad that lets you make handwritten notes during meetings and appointments.
1.
Touch
2.
Touch and select "New Note".
3.
Use the touch pen to make your Notes entry.
The entire keyboard including
disabled when entering Notes, so operations like
at the right of the display.
NOTES
OFF
and others is
,
20
CANCEL
Touch
The keyboard is automatically unlocked when you select
another application.
4.
When you complete your Notes entry, touch to
MENU
and
do not work.
to unlock the keyboard.
unlock the keyboard (unless it is already unlocked)
then press
To give your entry a text title, touch and select
"T opic Title".
ENTER
.
Page 21
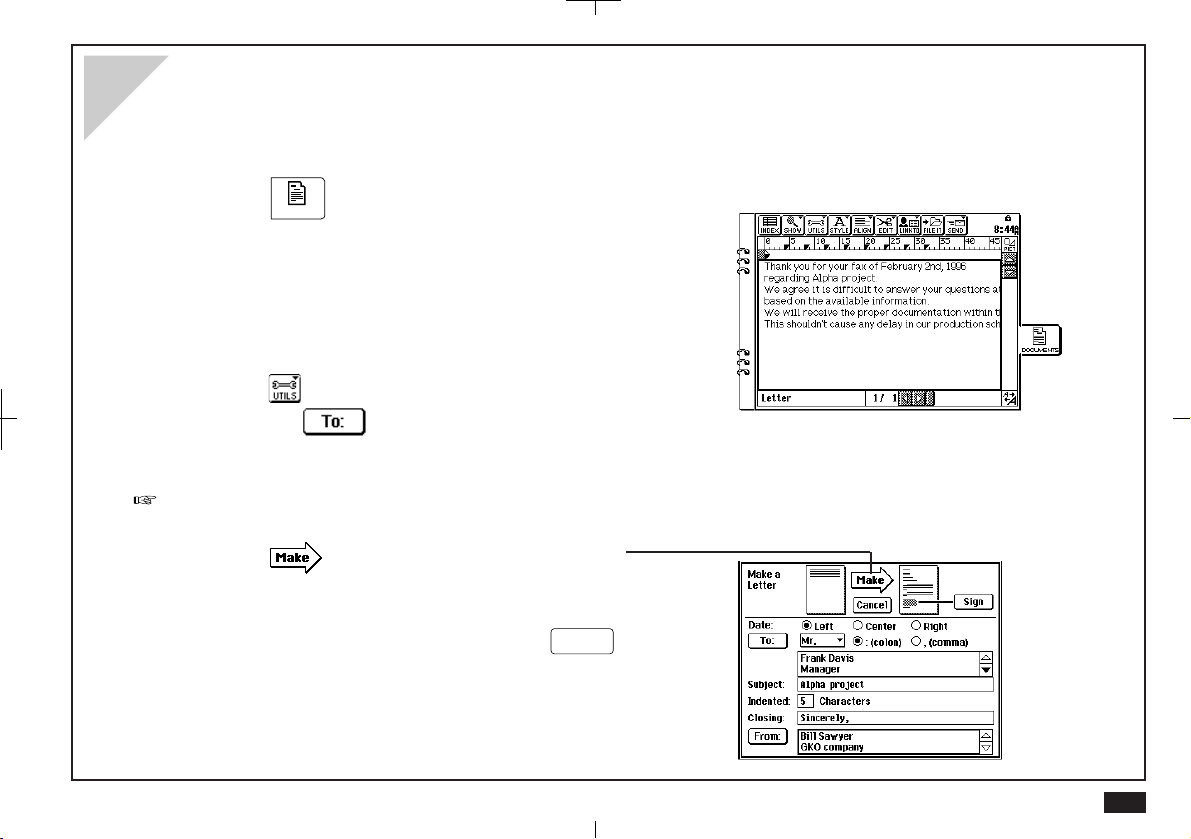
Making a letter
The "Make a Letter" feature converts an unformatted Documents entry into a professional looking business letter.
1.
Touch
For details on making a Documents entry, see Documents on p. 165.
2.
Select the entry you want to make into a letter, or
create a new entry .
3.
Touch and select "Make a Letter".
• Touch to select a recipient.
• Adjust other settings or simply accept the defaults.
For details, see Make a Letter function on p. 177.
4.
Touch and the Documents entry will be
converted into a letter.
at the right of the display.
DOCUMENTS
5.
When you complete your letter, press
save it.
ENTER
to
21
Page 22
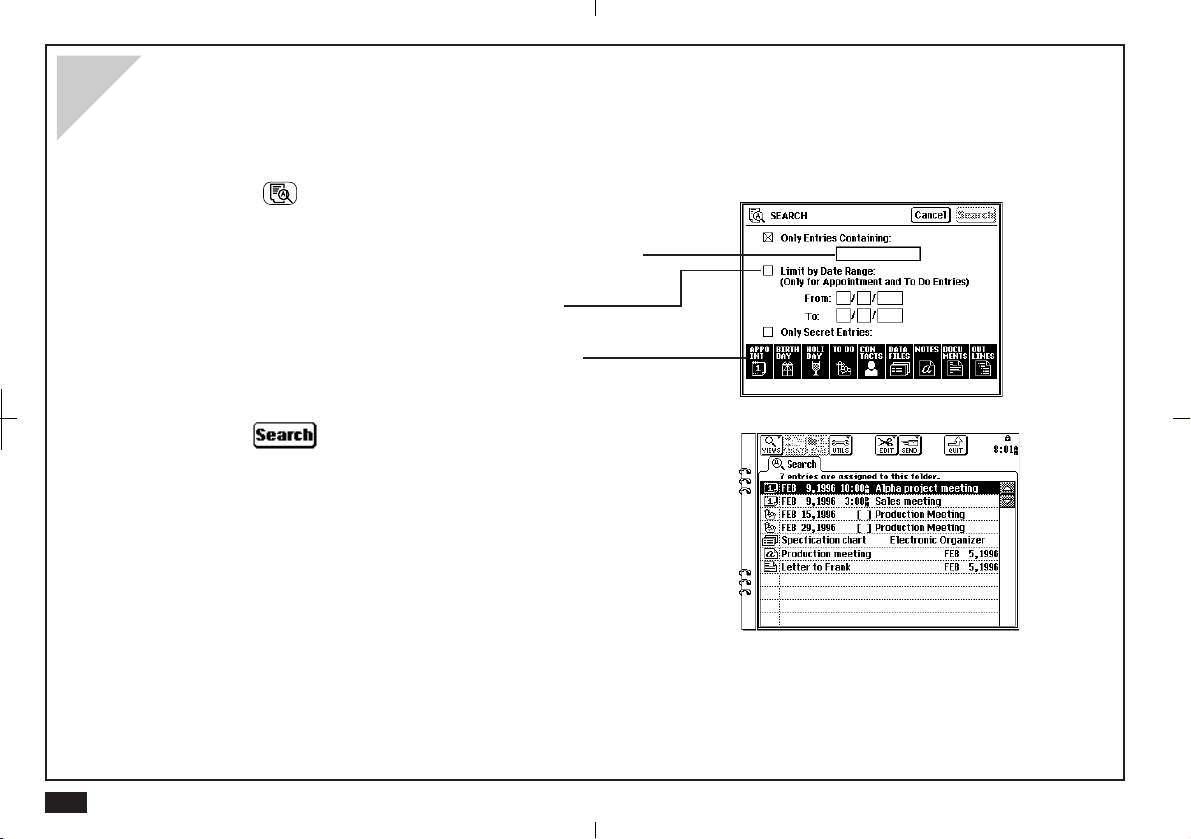
Searching for information
The search function lets you search for a keyword in the entries of selected applications.
1.
Touch
2.
Enter a keyword in the "Only Entries Containing"
field.
Select "Limit by Date Range" as required.
3.
Select the applications you want to search.
All applications are selected for the search by default.
4.
Touch .
Matching entries are assigned temporarily to the Search
folder in Filer.
5.
Touch the entry you want to view twice.
at the left of the display .
SEARCH
22
Page 23
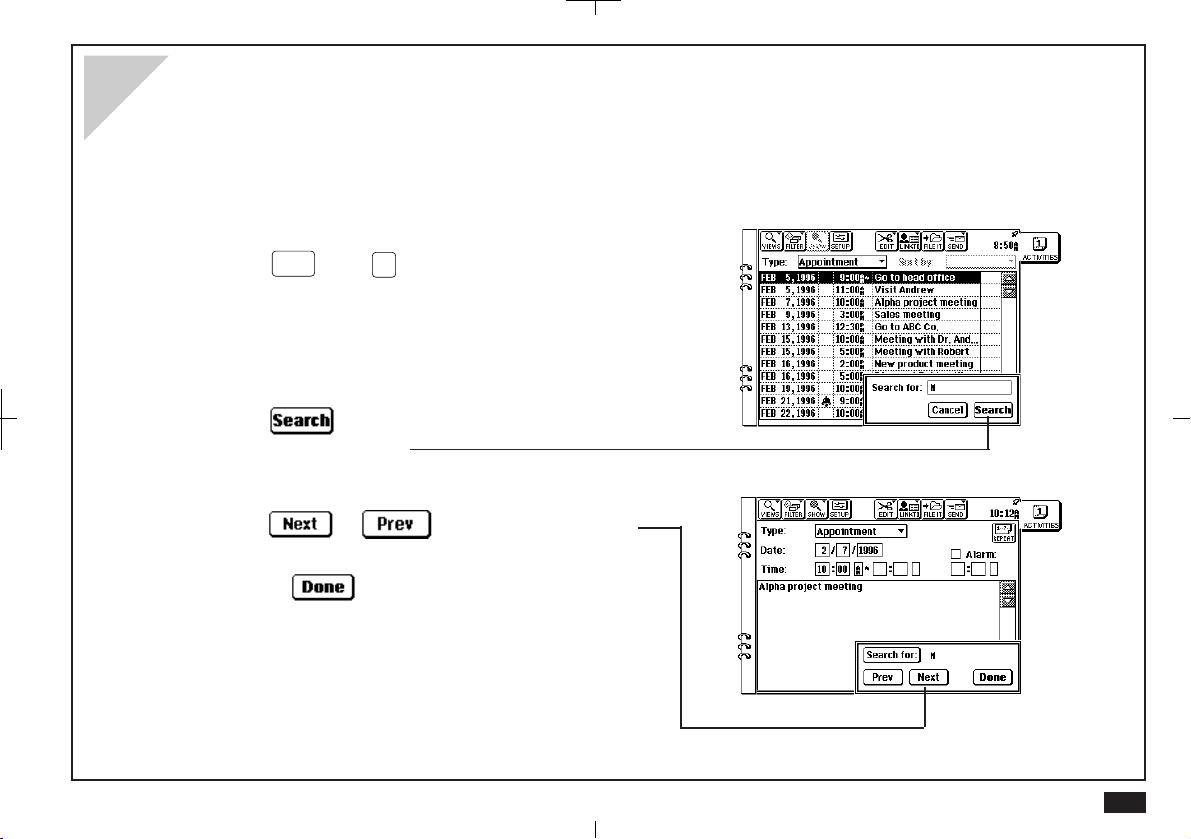
Finding an entry from the Index view
Keyword search lets you search for entries containing any word in Activities, Contacts, Data Files, Notes, Outline and
Documents.
1.
Select the application and go to the Index View .
2.
Press
3.
Enter the first few letters of the keyword (the word
2nd
then F
.
you are searching for).
4.
Touch to jump to the first entry that
contains the keyword.
5.
Touch or until you see the entry
you are looking for.
Touch to end the search.
23
Page 24
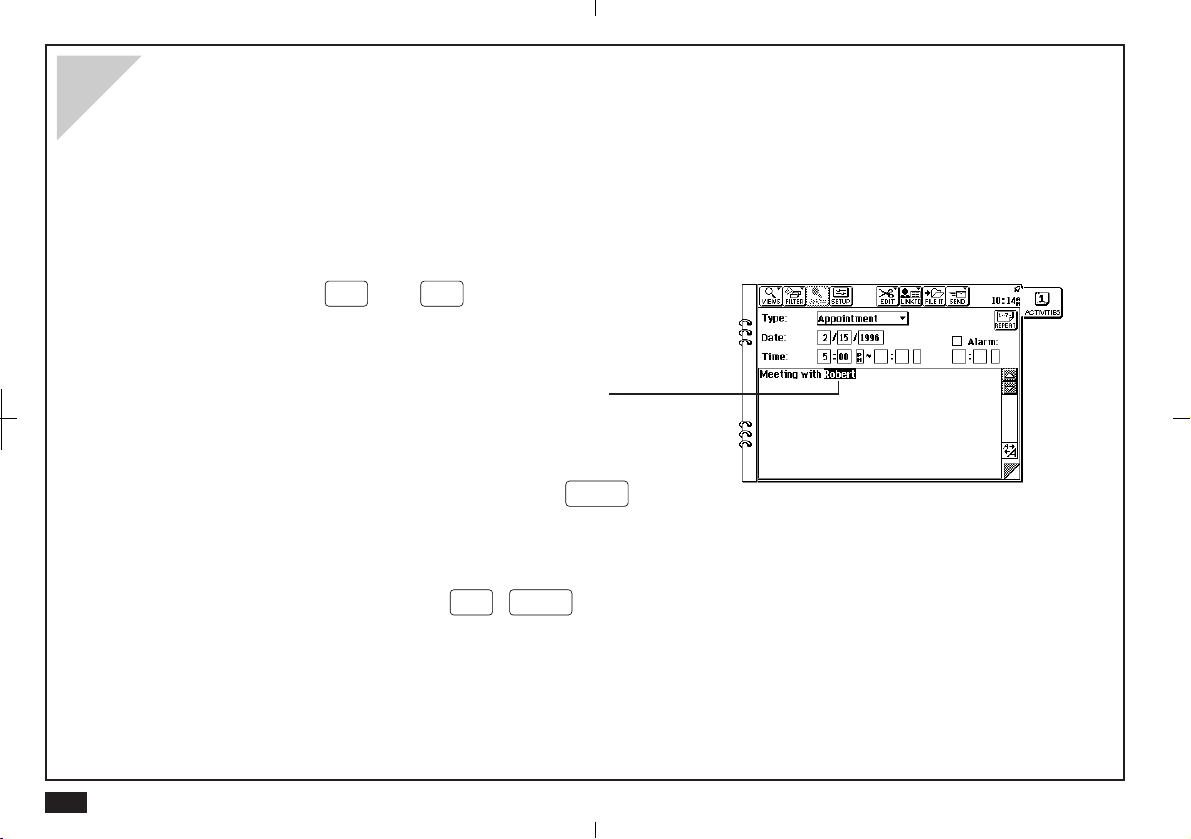
Editing an entry
Entries can be edited quickly and easily.
1.
Display the entry you wish to edit in Detail View.
2.
Make any necessary changes.
Use the scroll bars and cursor keys to move within the
display , use
new entries from the keyboard.
You can also drag the pen over text to select it, then cut
the text and paste it elsewhere, or just delete it.
BS
and
DEL
to delete text, and make
24
3.
When you complete your changes, press
save them.
If you want to save these changes as a new entry (and
preserve the original) press
2nd
ENTER
ENTER
.
to
Page 25
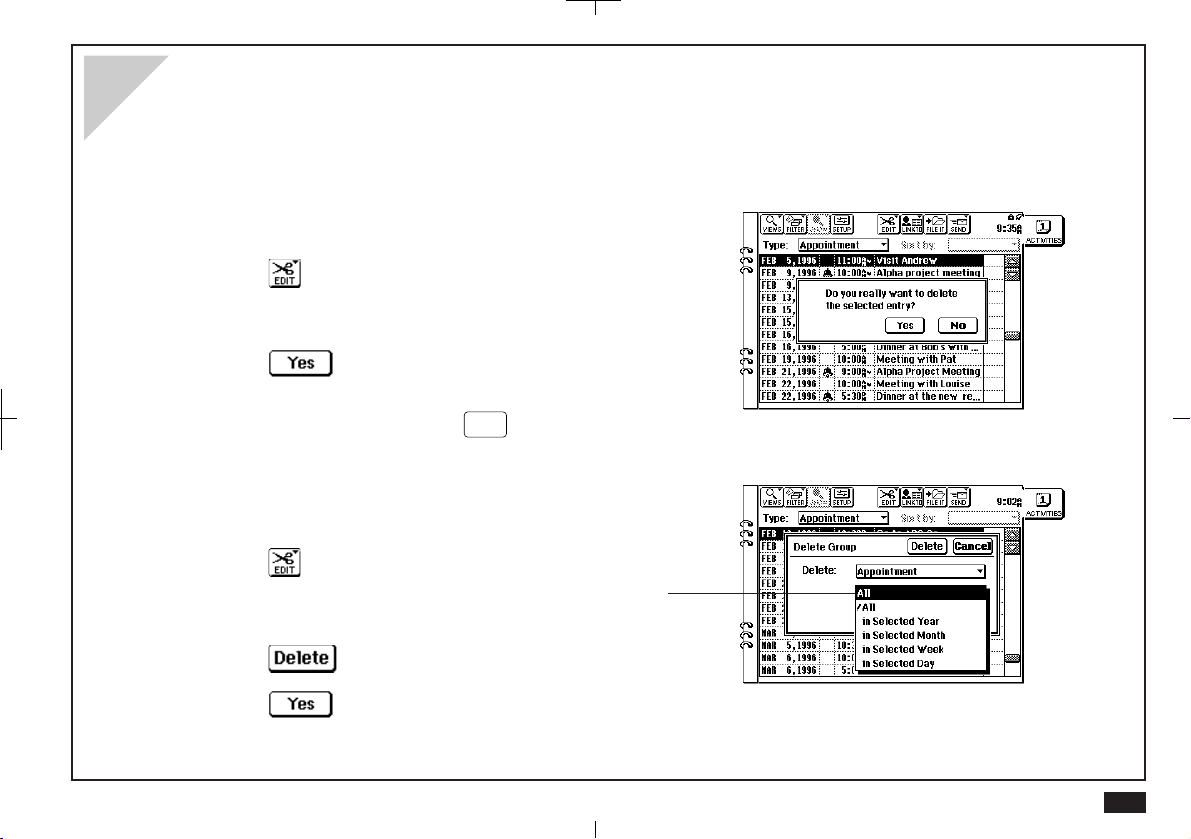
Deleting entries
Y ou can delete single entries or specific groups of entries.
To delete a single entry:
1.
Select the entry that you wish to delete in Index View
or display it in Detail View .
2.
Touch and select "Delete Entry".
("Delete Note" in Notes; "Delete Document" in Documents; "Delete Outline" in Outline)
3.
Touch to confirm the deletion.
Single entries can also be deleted by selecting the entry
in Index View and pressing
To delete multiple entries:
1.
Select the application that you want to delete entries
from.
2.
Touch and select "Delete Group".
Use the pop-up menus to select the group entries for
deletion.
3.
Touch .
DEL
.
4.
Touch to confirm the deletion.
25
Page 26
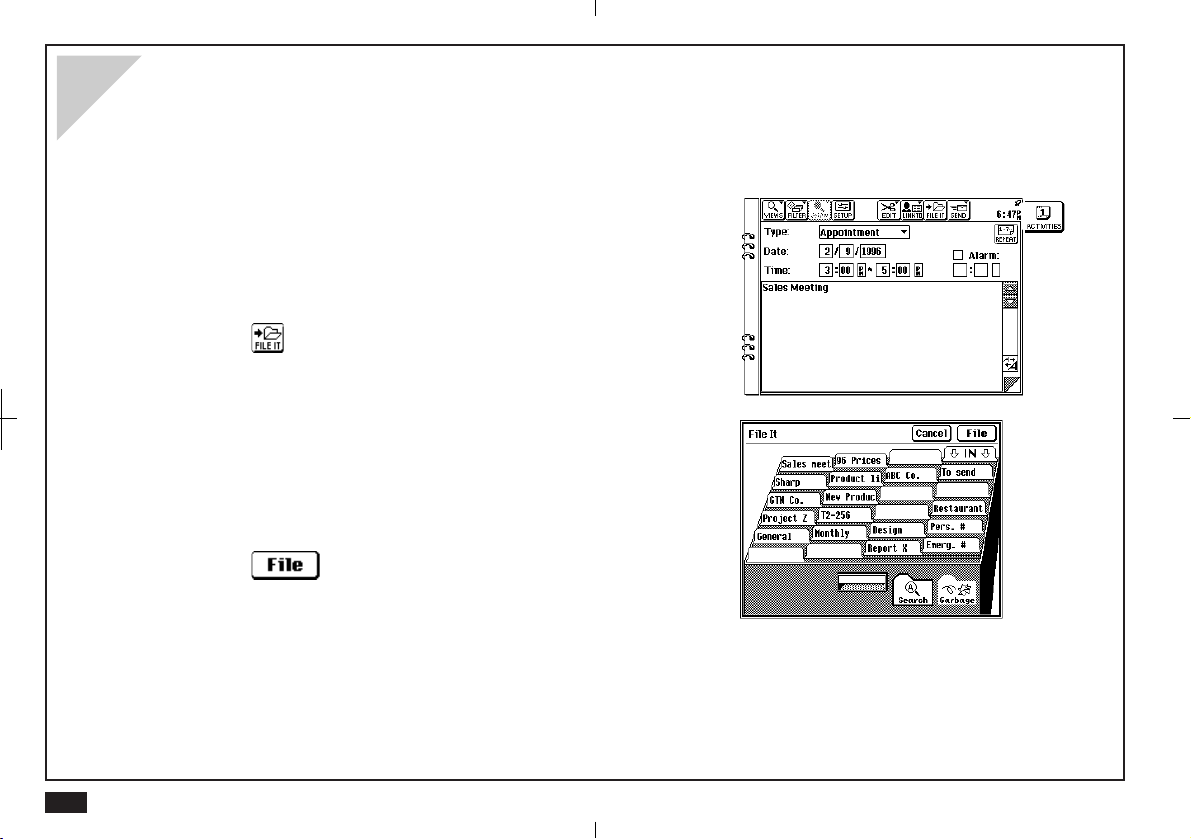
Assigning an entry to Filer folders
Filer allows you to group entries into folders. Filer entries are not copied or moved to the folder, they are just assigned to the
folder.
1.
Display the entry you wish to assign to a folder in
Index or Detail View .
2.
Touch .
3.
Touch the folder(s) you want to assign the entry to.
• Y ou can select multiple folders.
• Touch once to select a folder.
Touch again to cancel the selection.
4.
Touch when you finish selecting the
folder(s).
26
Page 27
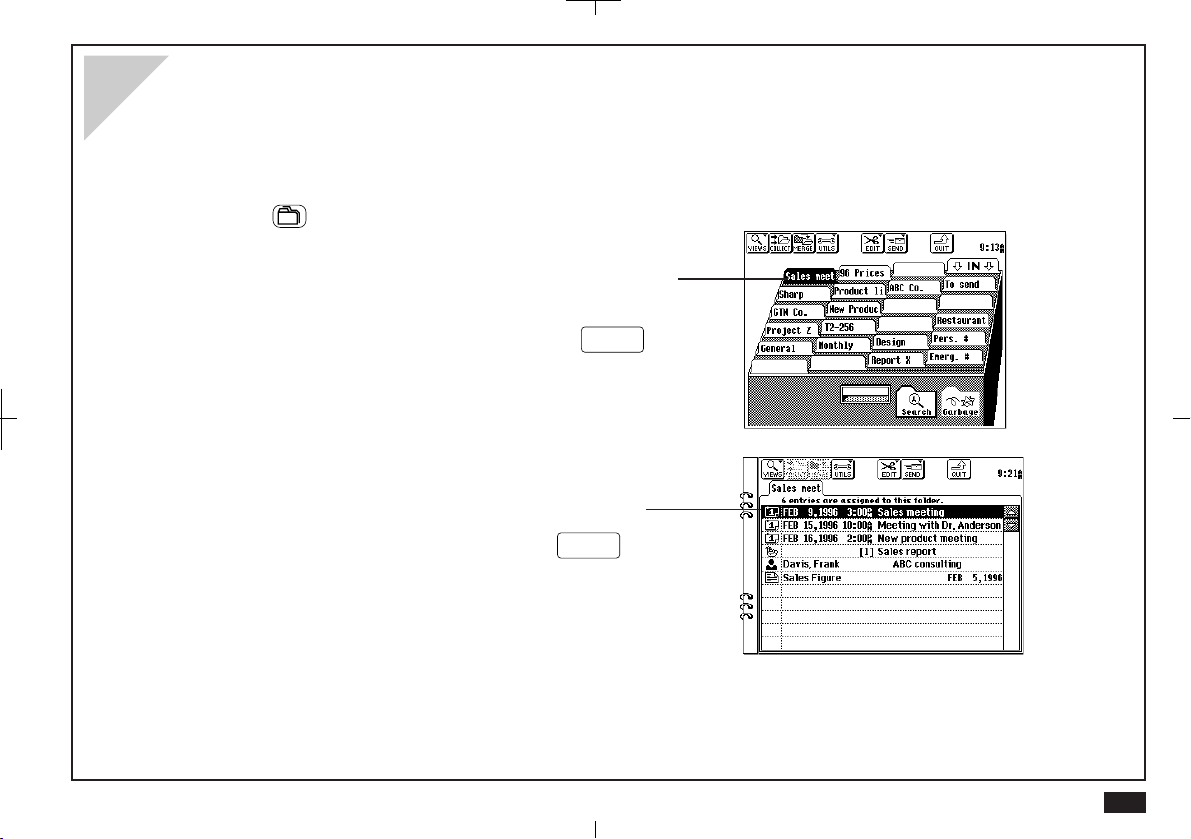
Using Filer
Filer allows you to manage information by subject instead of by entry type.
Filer entries can be accessed and changed using the original application.
1.
Touch
2.
Touch a folder tab twice to view entries assigned to
that folder.
at the left of the display .
FILER
You can also select a folder tab and press
view entries.
3.
Touch an entry twice to examine it in Detail View.
You can also select the entry and press
it in Detail View.
ENTER
ENTER
to
to see
27
Page 28
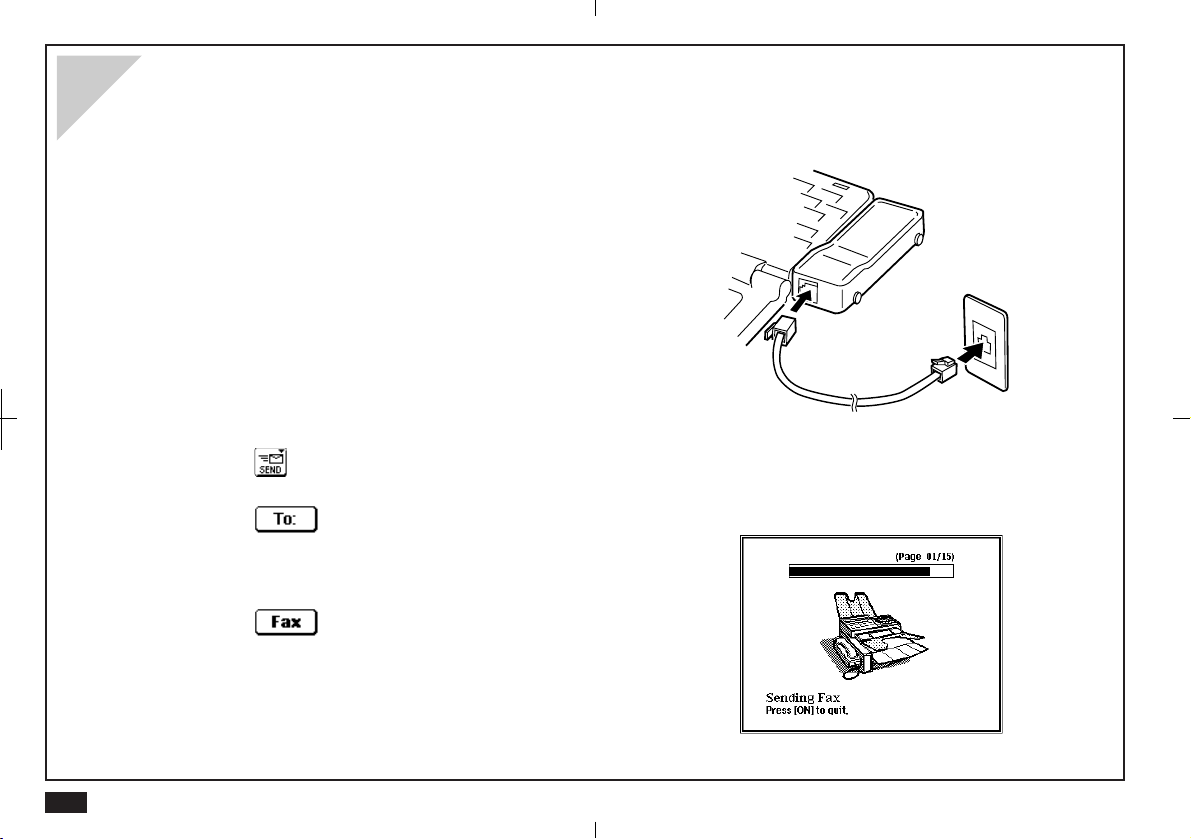
Sending a fax
With the optional CE-FM4 Fax/Modem connected to your unit, you can fax Filer, Documents, Notes or Scrapbook entries to
a remote facsimile machine.
1.
Connect your unit and the CE-FM4 Fax/Modem.
Make sure the Fax/Modem is plugged into a wall
jack.
For details about connecting the CE-FM4, see the CEFM4 manual.
2.
Select a single entry or a Filer folder to be sent.
3.
Touch and select "Fax".
4.
Touch and select a recipient from your
Contacts file.
5.
Touch .
28
For details, see Faxes on p. 195.
Page 29
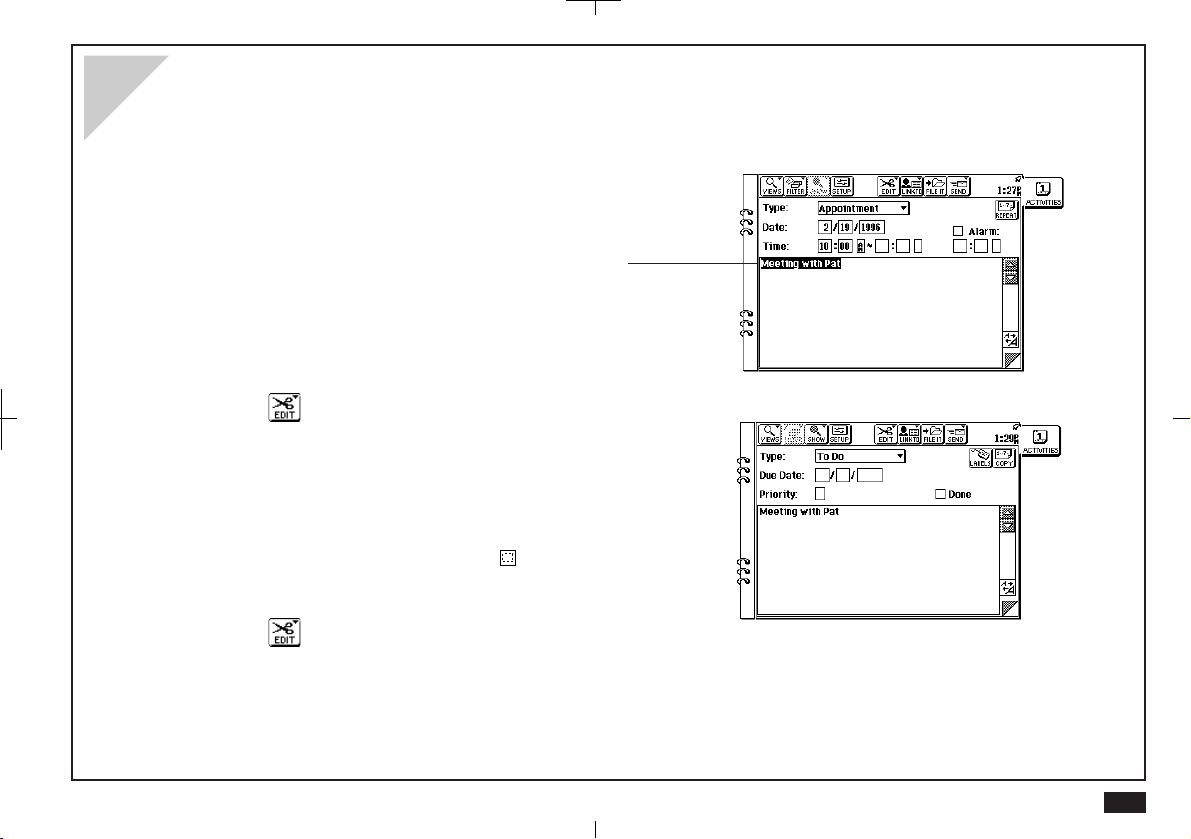
Copying and pasting text
Y ou can copy text from one place to another.
1.
Display the entry you want to copy text from in
Detail View .
2.
Drag the touch pen over a word or sentence.
The text will be displayed in reverse (white on black)
to indicate it is selected.
To cancel the selection, touch any unhighlighted
area.
3.
Touch and select "Copy".
4.
Display the entry you want to add the text to in
Detail View .
5.
Touch the required place of insertion.
(In Scrapbook, use the area tool to select an area
to paste into.)
6.
Touch and select "Paste".
29
Page 30
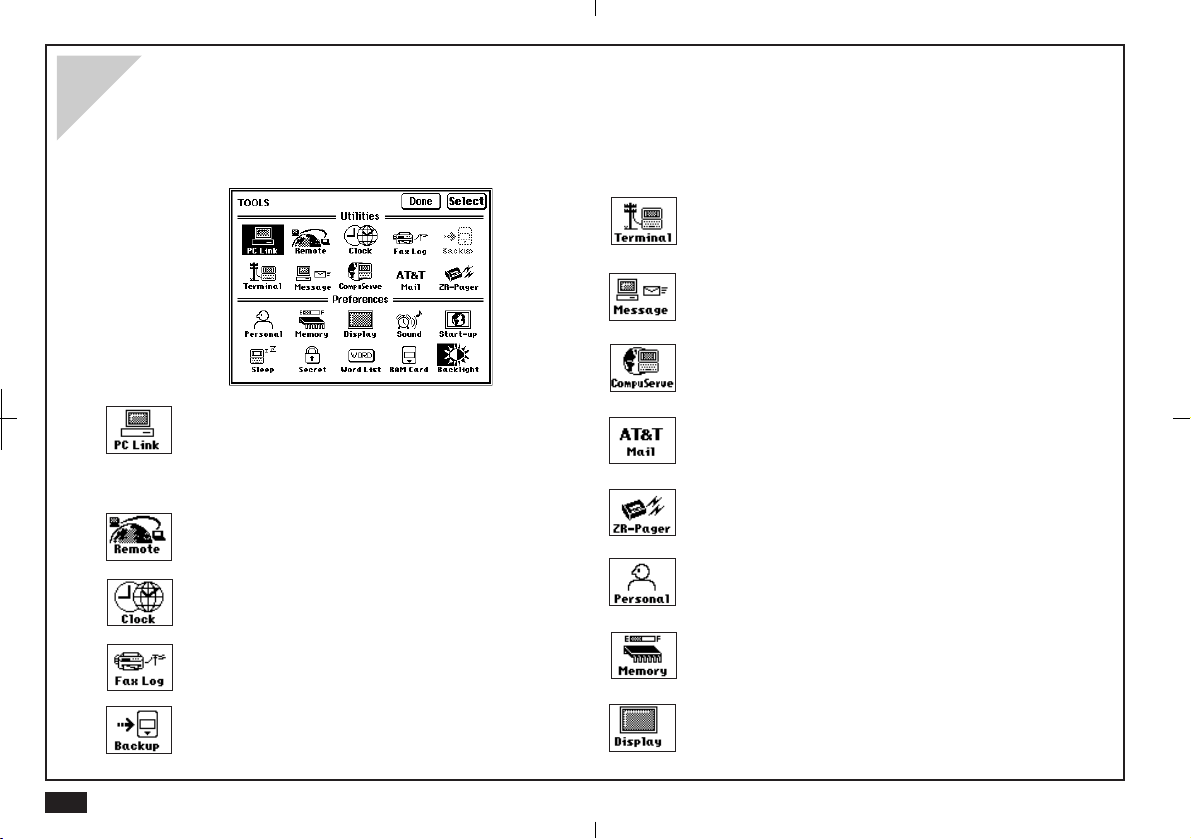
Tools
Tools provides a range of utilities that let you customize your unit to your personal taste. Tools is also used to set up communications and peripheral operations.
Transfer data with a remote computer via a modem
and phone line.
Send/receive messages (email) to a remote
computer.
Connect to CompuServe.
30
Exchange data with a personal computer or
use PC Link for the Sharp Electronic Organizer (OZ-7000/OZ-8000/YO-600/ZQ-5000
series).
Access and exchange data with a remote PC
via a modem and phone line.
Check the time at home and abroad.
Check the status of sent faxes.
Make a backup copy of main memory onto a
memory card.
Send and receive AT&T Mail messages.
Send and (with Pager card) receive Pager messages.
Enter your name, etc. and set your password and
signature.
Check the amount of storage memory available.
Adjust the screen contrast and calibrate the touch
panel.
Page 31

Turn key and alarm sounds on and off.
Set the start-up display.
Set the sleep interval.
Show/hide secret entries.
Stores commonly used words or phrases.
Select the data source for applications.
Control duration of the ZR-5800's Backlight.
31
Page 32

Drawing pictures
Scrapbook lets you make quick handwritten notes,
drawings and maps directly on the display.
1.
Touch
2.
Touch and select "New Entry".
You can also just start drawing.
3.
Write whatever you like directly on the
display with the touch pen.
You can also use the stamp function to
insert some useful built-in pictures.
at the left of the display .
SCRAP
BOOK
32
4.
Press
ENTER
when you are finished
drawing.
A similar drawing capability is available in Documents and the picture fields of Contacts and Data
Files.
Page 33

Using the Calculator
Calculator works as a standard 10-digit calculator.
1.
Touch
2.
Enter calculations by touching the key pad.
3.
Touch when finished.
at the left of the display .
CALC
33
Page 34

34
Page 35

Commonly asked Questions & Answers
Q: I currently also own a Sharp Wizard and
would like to move my information from
my Sharp Wizard to the ZR-5700/ZR-5800.
How can I do it?
A: If you own an OZ-5000/OZ-6000/OZ-9000 series
you can use wireless infrared transfer to move the
information over:
• Line up the two units so the infrared ports are
facing each other.
• On the ZR-5700/ZR-5800, select an application
(e.g. Activities) and display the index of that
application. (Note: Select "Holiday Yearly by
Day Index" when transferring "Ann2" from the
Organizer.)
• Select "Unit to Unit" from the SEND menu.
Touch "Receive" and then "OK".
• On the Wizard, select the application (e.g.
Schedule) and select "VIA INFRARED PORT" in
SET UNIT TO UNIT PATH from the Global
setting, then select "SEND ALL IN THIS MODE
(FILE)" in UNIT TO UNIT TRANSFER.
• Repeat for each application you want to transfer.
(See p. 218 for details.)
Be sure that the sending unit does not have a
blank (no characters) Telephone/Contact or User
File/Data File
be able to receive information (an error message
will appear).
If you own an OZ-8000/OZ-7000 series or YO-600/
ZQ-5000 series Electronic Organizer you can get
information using PC/Macintosh link software kits
(OZ-791/792/793/890/892/893/895).
PC/Macintosh Link instructions:
• Transfer the data from the OZ-8000/7000, YO600/ZQ-5000 series to the PC or Macintosh
using the above software.
• Connect your cable to the PC and the ZR-5700/
ZR-5800.
• Put your ZR-5700/ZR-5800 into a special import
mode by touching TOOLS, and selecting
PC-Link and Cable (Import).
• Select the PC/Macintosh Link command to "Send
data" to your Wizard.
The ZR-5700/ZR-5800 will "pretend" to be a
Wizard for purposes of receiving the information.
• When finished, disconnect the ZR-5700/ZR-5800
and press ON to cancel PC-Link mode.
(See p. 223 for details.)
field name
or else the Zaurus will not
35
Page 36

Q: What does PC card mean?
Can I use any PC card I find on the market
on my ZR-5700/ZR-5800?
A: PC card (formally "PCMCIA") is an industry
standard card format. Many popular PC cards
available on the market are compatible with your
ZR-5700/ZR-5800. Check with your Sharp dealer
for more information, or call our automated fax-ondemand service (612-397-8601) to obtain a
complete and up-to-date list of
ZR-5700/ZR-5800 compatible PC cards.
Warning
Use only recommended PC cards. Attempt to use cards
that are not recommended may result in damage to the
main unit and/or data loss.
Memory cards:
Memory cards are good for backups because you
can make multiple backups (space permitting) and
they are more reliable than SRAM cards (they
require no backup battery).
Communication cards, etc.:
Sharp has provided a number of drivers for many
of the input/output cards. Note that certain high
power cards require that you use the EA-23E AC
adaptor in conjunction with these cards in order to
prevent excessive battery consumption. Other
cards require an add-on software program to be
loaded onto the ZR-5700/ZR-5800.
Q: I am using the CE-FM4 attachable Fax/
modem for my ZR-5700/ZR-5800. Exactly
where can I fax from?
36
In general, you will find that you can use most
SRAM memory cards and Flash Memory cards.
You can use SRAM cards for additional memory
storage (for the built-in application's data) or for
making a single complete backup of that data. In
addition, you can load add-on software programs
onto a memory card. Flash Memory cards can be
used to store multiple archives of the built-in
application data (for backup purposes) as well as
for loading add-on software programs. Flash
A: You can use virtually any standard phone line. This
includes a jack on:
• The wall of your home or office
• New public pay phones found at hotels, airports,
convention centers, etc.
• Many hotel room phones (commonly labeled
"Data jack")
• GTE and AT&T air phones found on many
commercial jets.
Page 37

Just plug the included RJ-11 phone cable into the
CE-FM4 modem and the phone jack.
Note that you cannot use this device with digital
phone lines. Digital phone lines are likely to be
found at your office, typically when you have a
PBX system installed.
The basic rule to follow is that if you can use a
standard fax machine on the phone line, then it is
analog and can be used with the ZR-5700/ZR5800/CE-FM4. Check with the proper facilities
personnel in your company to be sure.
Q: My batteries only lasted about one month.
Is this normal? How long should I expect
them to last?
A: There is probably nothing wrong with your unit.
Battery life will vary from user to user.
A number of factors will affect battery life, including
how much the unit is used. The battery life is rated
at 70 hours of continuous use. Assuming an
average of one hour per day of continuous use,
you would get about two months of battery life.
You can also use the optional EA-23E AC Adaptor
or the CE-BK1 battery pack.
Q: How do I add software to my ZR-5700/ZR-
5800 to expand its capabilities?
A: In general, ZR-5700/ZR-5800 Add-on software
come on computer floppy disks (PC format). You
will need a computer, of course, and either the
ZR-5700/ZR-5800 PC-Link cable (see registration
card special offer) or an infrared adaptor (such as
CE-IR4). Note that if you own either the cable or
an infrared adaptor for one of Sharp's various
Wizards, it will also work.
To download an Add-on software program simply
start the installation program included on the
computer floppy disk. Follow the on-screen
instructions to install the software. Once installed,
you can access any Add-on software program by
simply touching MORE and then touching the
program icon in the MORE screen. Note that these
Add-on software programs can be downloaded to
the unit's internal memory or onto an optional PC
memory card.
37
Page 38

Q: How do I backup my important
information?
A: It is important to always have a back-up of your
important electronic information. Here are some
ways to do this:
• You can print out a hard copy using the Sharp
CE-IR1 infrared adaptor for printing. You will also
need a PC-compatible printer (see page 192 for
details).
• You can backup your entire unit using either a PC
SRAM Memory card or a PC Flash Memory card.
Flash Memory cards (space permitting) can hold
multiple back-ups and require no battery backup
system. In both cases, be sure the capacity of
the card can handle the roughly 650 KB of user
storage on ZR-5700 and 1700 KB on ZR-5800
(i.e. use 1 MB cards or higher).
• You can use an MS Windows or Macintosh data
transfer utility program to back-up your data onto
either a hard drive or a floppy disk. See the
enclosed registration card for details about the
free ($6.95 S&H) software offer from Sharp as
well as details about a transfer cable offer .
MS Windows is a registered trademark of
Microsoft Corporation.
Macintosh is a registered trademark of Apple
Computer, Inc.
38
Q: How do I exchange information with my
personal computer? For example, can I
take telephone numbers I already have in
another software program and load them
into my ZR-5700/ZR-5800? Can I take
letters I have written on my ZR-5700/ZR5800 and send them to my favorite word
processing program?
A: Sharp offers both MS Windows and Macintosh
transfer utility software that allows you to easily
exchange information with your personal
computer. This software can convert your ZR5700/ZR-5800 information into computer formats
that many popular software programs can read. In
addition, you can save information from your
favorite software programs using one of these
formats and then transfer the information to the
ZR-5700/ZR-5800 using this utility software.
Formats supported include:
.RTF (Rich Text Format), which many word
processors support (e.g. MS Word).
.TXT (text), which almost all text-oriented pro-
grams support.
.CSV (Comma Separated Values), which many
databases, PIMs, etc. support.
Note: CSV is for multi-field/multi-record informa-
Page 39

tion. This utility software also allows you to "map"
the fields to fit almost any program that supports
CSV formats.
.BMP/PICT, which is used by many programs to
exchange graphics files.
dropped, for example, it may have to be reset.
This will not delete your data. If for any reason
data is missing after resetting the unit, it was lost
before you pressed the RESET switch, which
simply re-starts the unit.
You can, of course, also use this software to backup your information to your personal computer.
To get this software for just $6.95 S&H, see the
enclosed Registration Card for details.
Q: I can't seem to turn my unit on. I changed
the batteries but still nothing happens.
What should I do?
A: Check the following before sending the ZR-5700/
ZR-5800 in for service:
Check that the battery replacement switch on the
back of the unit is in the "NORMAL OPERATION"
position. If the switch is in the "REPLACE BATTERIES" position, the unit cannot be turned on.
Check or replace the operating batteries, even if
you have just replaced the batteries. It is possible
that the batteries were not fresh when you purchased them.
Press the RESET switch. If the unit has been
If none of the procedures above help, you should
send the unit to a service center. Call 800-BESHARP for the nearest service center. Give the
service center a call and ask for more information
about getting your ZR-5700/ZR-5800 repaired.
Q: Why should I send in the registration
card?
A: This is your way of registering your product with
Sharp, and allows us to keep you informed about
new products and software available for your unit.
It also gives us valuable information about our
users so that we can design products that continue
to meet your needs. Sharp never sells its customer
list, so registering your unit will not result in you
receiving loads of new junk mail from other
companies.
39
Page 40

Q: I would like to use the Filer feature but I
am afraid of using up memory. How does
the Filer work? Does it make a copy of
each entry?
A: When you assign an entry to a folder in the Filer, it
uses only a negligible amount of extra memory .
The unit doesn't actually make a copy of the entry,
it simply assigns the entry to a folder. Entries are
still stored in each individual application (Contacts,
Documents, etc.). The Filer is a great way to
organize your information and there is no reason
not to use it.
Q: What is the Outlines application? Why
would I want to use it sometimes instead
of Documents?
A: The Outlines application allows you to group and
categorize information using a hierarchical
structure. Everyone has a lot of small but
important pieces of information that have to be
memorized or kept track of in a written record; for
example, important personal information such as
Social Security number, credit card numbers,
various ID numbers, account numbers, clothing
sizes, etc. Using the unit, you could make a
number of Documents entries for each piece of
information, but a better way to manage the
information would be to make a single Outlines file
called "Personal information".
This file could then contain a number of headings
(such as Car info., Travel info., Health info.,
Financial info., etc.), under which relevant pieces
of information could be stored. This makes it
easier to access information and prevents your
unit from becoming cluttered with hundreds of
individual entries.
Additional Outlines files could also be made,
including a favorite movies list, project management file, price lists, product line-up and specification files, business plans, product proposals, and
meeting notes.
Many types of information can be more easily and
efficiently managed in an Outline structure.
Another use of Outlines is document preparation.
Many times you might want to write a memo, letter,
proposal, marketing plan, etc., but find it difficult to
write an entire document from scratch. Outlines
allows you to capture your thoughts and ideas,
then rearrange and categorize them at any time.
You can also copy an Outlines file and paste it into
Documents to finish the document there, adding
text to the major topics.
40
Page 41

What your unit can do
Y our new ZR-5700/ZR-5800 is a full-featured, pocketsized information manager, designed to enhance any
information-based task, whether in the home, at the
office or on the road. Its large, easy-to-read screen and
graphical user interface makes it very easy to use for
novices and experienced users alike. Pen-based touchpanel operation offers tremendous user-friendliness in a
pocket-size device.
Time Management
The ACTIVITIES application helps you manage
your time better than ever:
• Appointment lets you record appointments,
meetings and other date-based events
• Birthday/Ann lets you record anniversaries,
birthdays and other important annual events
• Holiday lets you record your planned vacations
and public holidays
• To Do helps you track tasks and goals according
to priorities you assign
• Calendar displays all your Appointment, Birthday/
Ann, Holiday and To Do items in convenient daily,
weekly, monthly or yearly formats
Information Databases
Your unit allows you to store a wide range of
information according to your needs:
• Contacts is used to store names, phone numbers
and other information
• Data Files lets you set up custom databases
• Spreadsheets provides a full-featured
spreadsheet utility
Letters & Documents
The unit offers powerful facilities for creating
documents, letters and even hand-written notes:
• Documents provides sophisticated word processing and document formatting features
• Outlines lets you organize your ideas and
information using topics and sub-topics
• Notes lets you make hand-written notes directly
onto the screen using the touch-pen.
Desk Accessories
A variety of other functions are provided to make
common tasks quick and convenient:
• Calculator performs standard mathematical and
date calculations
• Scrapbook lets you create and edit pictures,
drawings and maps
• Filer lets you group together entries from any
applications except Spreadsheets
41
Page 42

About this Manual
Fax & Information Exchange
Your unit allows you to send and receive information via a wide range of popular data methods and
information services, including:
• Fax
• AT&T Mail
• CompuServe
• Pager
• Other systems and networks
Utilities
The unit offers additional utilities to manage and
access your data easily:
• Clock displays both local and international time
• Filter selects only those entries you specify
• Search helps you find particular entries
• Cut & Paste lets you conveniently copy text and
graphics between different applications
Y our new unit of fers even more features too
numerous to mention here. But you can extend its
capabilities even further by adding new functions
via Add-on software. Features and enhancements
such as these, together with remarkable userfriendliness, make the ZR-5700/ZR-5800 among
the world's most powerful and sophisticated handheld information managers.
You will find two manuals with your unit. This manual is
designed to help you quickly learn and understand the
capabilities and operation of your unit. The other manual
contains detailed explanations of Spreadsheets, Terminal, CompuServe, AT&T Mail and ZR-Pager.
Chapters
The chapters are organized by task type so you
can focus your attention on the features that meet
your needs.
Quick Start
Commonly asked Questions & Answers
These sections show you how to quickly set up
and use the essential features of your unit.
Getting Started
Introduces part names and functions, and GUI
features.
Desk Accessories:
Explains the desk accessories: Calculator;
Scrapbook; Filer; Search; Help; Tools; and More.
These are located at the left of the display, and
can be selected whenever they are needed.
42
Page 43

General Operations:
Optional Accessories:
Introduces operations that are common to all of
the built-in applications. These operations are
accessed through the tool bar at the top of the
display and change to suit the application.
Time Management:
Explores Activities operations: Appointment;
Birthday/Ann; Holiday; To Do; and the Calendar
views. Activities helps you manage your time and
keep track of important events.
Databases:
An introduction to Contacts and Data Files,
personal databases which store information such
as addresses and phone numbers, but can also be
configured to manage other types of information.
Writing and Letters:
Shows you how to manage handwritten notes and
create professional looking documents using the
Notes and Documents features. Also explains how
to use the Outlines feature.
Introduces peripheral operations including:
printing; data transfer with other units; sending
faxes; data exchange with personal computers;
optional Add-on software programs; and PC cards.
Appendices
A. Key Notations
B. Reset
C. Troubleshooting
D. Battery Replacement
E. Specifications
43
Page 44

Conventions used
The following keyboard and symbol conventions are
used in this manual:
• ACTIVITIES, CALC, SEARCH, ON, MENU, ENTER
Done, Cancel and other bold notations indicate
buttons on the display that are touched with the touch
pen, or keys on the keyboard that are pressed with a
finger.
• Letters and numbers to be entered in examples are
shown in italics, for example
that "Lunch at 12:00" should be entered from the
keyboard.
• Activities, Notes, Filer, Search and similar notations
written with initial capitals are names of applications
and accessories. If the associated touch buttons on the
display are to be touched as part of a procedure, they
will be written in bold uppercase, for example: touch
ACTIVITIES, touch NOTES or touch SEARCH.
• Some keys have other functions that are accessed by
pressing the key in combination with the
2nd key . For example: pressing
the Return (
) key inputs a tab.
"Lunch at 12:00"
(Shift) or
and also pressing
indicates
• For a full list of key notations, see Appendix A.
Indicates a tip or important point.
Indicates alternative methods. There is often
more than one way that you can perform an
operation.
44
Page 45

Caring for your unit
This unit contains delicate circuitry and a glass display
panel which can be damaged if not cared for properly.
The following precautions should ensure your unit gives
you many years of reliable use.
• Keep your unit away from extreme heat. Do not leave it
on the dashboard of a car or near a
heater. Do not leave it in any place
that is extremely damp or dusty.
• Do not drop your unit or subject it to severe impacts.
Bending the body can damage the
circuitry. Do not use extreme force
when pressing the display or keys.
• Do not use sharp, pointed objects or your fingernails to
touch the display screen. We
recommend you use only the
supplied touch pen to touch or write
on the screen.
• Hard, sharp objects can scratch your unit, so ensure it
is closed and/or protected when
carried with other objects.
Wrong
Wrong
Wrong
Wrong
• Do not use solvents to clean your unit. Use only a soft,
dry cloth.
• Do not carry your unit in your back pocket as it may
break when you sit down. The
display is made of glass and is
particularly fragile.
• Replace the batteries as soon as they become weak.
Failing to replace weak batteries may result in lost data
or damage from battery leaks.
Wrong
Wrong
45
Page 46

46
Page 47

CHAPTER 1
Getting Started
A major feature of the unit is its graphical user
interface (GUI) which makes operation easy to
understand through a combination of graphic
images and text. The GUI is easy to use and
provides a great deal of versatility. Operations can
be entered using the touch pen on the display,
pressing keys on the keyboard, or a combination
of both.
Before Use
Before using your unit, the following operations are
required. If you have not performed these operations,
read the Quick Start section.
1.
Battery installation ... see "Installing the
batteries" on page 10.
2.
Initializing ... see "Initializing" on page 11.
3.
Adjusting the LCD contrast ... see "Adjust
LCD contrast" on page 12.
4.
Adjusting the touch panel ... see "Adjusting
the touch panel" on page 13.
5.
Setting the Clock ... see "Setting the time and
date" on page 14.
1
47
Page 48

Part Names and Functions
CALC
SCRAP
BOOK
FILER
SEARCH
HELP
TOOLS
MORE
QUIT
CANCEL
SEND
%
$
R
CV
?
SMBL
48
OFF
ON
GET
!@
QW
COMPUTER LINK
#
E
ASDFG
ZX
WORD
2nd
CAPS
BackLight
NEW
MENU
ENTRY
^
&
TY
H
B
SPACE
(
*
9087654321
U
JK
M
N
DEL
)
I
,
,
ACTIVITIES
CONTACTS
DATA FILES
NOTES
DOCUMENTS
OUTLINES
SPREADSHEET
ADAPTOR
PREV
NEXT
+
=
-
BS
OP
TAB
L
:
.
ENTER
EJECT PC CARD
Accessory buttons
Touch to select the accessory.
Display
Shows information and also functions as a "touch
panel" for selecting operations, data entry, etc.
Application buttons
Touch to select the application.
OFF key
Press to turn the unit off.
ON key
Press to turn the unit on.
ADAPTOR
Connector for the optional EA-23E
AC Adaptor or the CE-BK1 battery pack.
Keyboard
For entry of characters and commands.
Touch pen holder
Holds the touch pen when not in use.
Touch pen
Selects touch buttons and writes on the
touch panel.
Lock button
Press to open the unit.
Computer Link
A 15-pin connector for the optional CE-FM4
Fax/Modem, CE-315L Data Transfer Cable, or
CE-137T Level Converter for other fax/modem
connections, computer links, etc.
Page 49

Memory back-up battery compartment
Holds memory back-up battery: CR2032 x 1
Reset button
Press to reset and initialize the unit.
Battery replacement switch
Allows access to the battery compartment.
Operating battery compartment
Holds operating batteries: LR6(AA) x 2
Infrared port
For wireless infrared communications with other
units (including ZR-5700/ZR-5800, ZR-5000,
OZ-9000/OZ-6000/OZ-5000 series) and optional
Wireless Interfaces CE-IR1/IR4.
1
Serial number
Indicates you unit's serial number.
(on some units may be within the
battery compartment)
PC card slot
For inserting a PC card.
PC card eject button
Press to eject a PC card.
The unit will not operate if the battery replacement
switch is in the "REPLACE BATTERIES" position.
49
Page 50

T ouch pen
Display angle adjustment
The touch pen is stored at the right front of the
keyboard.
To remove the touch pen, pull it in the direction
shown by the arrow.
To replace the touch pen, push the pen back into
place (in the opposite direction to the arrow).
Check the ridge grip on the touch pen aligns
correctly with the mounting slot.
Caution:
Use only the supplied touch pen to operate the
display. Do not use pens, pencils or other sharp,
pointed objects. Keep the touch pen and display
clean to avoid scratches and damage to the
display .
The display can be adjusted to any angle that suits
your reading style.
3/4
position
When attempting a wireless infrared transfer, be
sure not to open the display more than 3/4 of the
way, or the IR port may become blocked.
50
Page 51

GUI operations
A key feature of the graphical user interface (GUI) is its
system of displays and menus which can be used to
quickly execute commands and perform operations.
• Insertion mode is used for all text input except time and
dates. There is no overwrite mode.
• All Detail Views (except Notes and Scrapbook) have a
blinking cursor.
• Selecting an application (except Activities and
Spreadsheets) containing no entries brings up a New
Entry display with a blinking cursor.
• Cut, Copy and Paste from the tool bar EDIT menu can
be used to copy or move entries.
• In Detail View, the cursor can be moved to another field
by touching the field or pressing the cursor keys.
• Selected text is indicated by highlighted (reverse) text.
• Detail View supports rapid cursor movements as
follows:
2nd
2nd
2nd
2nd
• Pop-up menus, radio buttons and check boxes can
only be used by touch operations.
• Touch scroll bars to move through displayed information. In Notes, one grid block is scrolled as one line.
Moves cursor to top of field
Moves cursor to bottom of field
Moves cursor to beginning of line
Moves cursor to end of line
Index View
Detail View
Scroll screen one line up.
Scroll screen one line down.
Scroll up one display "page".
Scroll display by dragging.
Scroll down one display "page".
Scroll screen one line up.
Scroll screen one line down.
Scroll up one display "page".
Scroll display by dragging.
Scroll down one display "page".
Change display font size (zoom).
Display previous entry.
1
Display next entry.
51
Page 52

Display layout
Touch panel display
The display layout has the following features:
• The touch buttons at the left of the display
provide access to accessories and utilities.
TOOLS provides access to communications
utilities and user settings. MORE provides
access to optional Add-on software (if installed)
in either the main memory or in a PC card.
• The touch buttons at the right of the display
provide access to applications.
• The touch buttons along the top of the display
are called the "tool bar" (application-specific
tools).
Tool bar
CALC
SCRAP
BOOK
FILER
SEARCH
HELP
TOOLS
MORE
ACTIVITIES
CONTACTS
DATA FILES
NOTES
DOCUMENTS
OUTLINES
SPREADSHEET
The display not only shows information, it is also a
"touch panel" that lets the touch pen select functions
and enter information. Some operations which are
carried out by touch buttons can also be carried out by
pressing keys on the keyboard. The touch button in bold
at the right of the display has the same function as
pressing the ENTER key (see Fig.) To store a setting for
example, you can touch OK on the display or press
ENTER on the keyboard. When a display symbol
matches a key or symbol on the keyboard, either can be
used. For example, touching Cancel functions the same
as pressing CANCEL.
Touching
this button is
the same as
pressing the
ENTER key.
1-2-6
52
1-2-5
Page 53

Display symbols
The following display symbols appear at the top right of
the display to indicate various conditions:
XX:XX Real time and date display. Touch to toggle
between time and date display .
BATT Operating batteries are weak and need
replacing.
CARD A PC card (RAM card) is currently selected
as the data source.
2nd 2nd key has been pressed.
CAPS CAPS has been pressed, the keyboard is in
caps lock mode, and all letters will be
entered in uppercase. Press CAPS again to
turn caps lock off.
*
Indicates the current entry is secret and can
only be accessed when the unit is unlocked.
The unit is locked. Entries marked as secret
cannot be recalled until your unit is unlocked
by entering a password.
Alarm sound is enabled.
The display symbols may be hidden in some
dialogue.
Keyboard layout
The keyboard is laid out in a standard QWERTY
format, like a typewriter or computer.
• The
• The CAPS key has the same function as a Caps
• The unit operates permanently in insertion mode
• Symbols in white above a key, such as ' or :, can
• Special symbols and characters, such as ù and Ç,
QUIT
OFF
ON
!@
QW
COMPUTER LINK
ASDFG
ZX
2nd
CAPS
BackLight
key has the same function as the Shift key
on a typewriter or computer.
Lock key.
except for entering the time and date (there is no
overwrite mode).
be used by holding down
required key. Refer to Appendix A Key Notations.
can be entered using the SMBL key. (See p. 116
for details.)
SEND
GET
$
#
E
R
CV
?
WORD
SMBL
CANCEL
MENU
^
%
TY
NEW
ENTRY
B
SPACE
and pressing the
&
*
U
JK
H
N
(
9087654321
I
M
DEL
PREV
)
+
-
OP
L
,
:
.
,
ENTER
ADAPTOR
NEXT
=
BS
TAB
1
EJECT PC CARD
53
Page 54

Detail View and Index View
The application tool bar across the top of the display
normally offers a choice of either Detail View or Index
View for examining unit entries. For a particular application, Detail View lets you examine the detailed contents
of an entry, and Index View lets you examine a list of
entry titles.
1-2-9
Detail View
1-2-10
Tool bar
There is a special tool bar for each application.
The tool bar is located across the top of the
display and has the following features:
• A small pointer ("
bar item indicates a menu will be displayed if it is
touched.
• For some tool bar menus;, current settings are
indicated by a check mark "
• Menus may be separated into categories by
dashed lines.
• Menu items that lead to dialogue are followed by
"...".
• If a particular tool bar item cannot be used for a
specific screen, it is "faded" out.
• Tool bar menus can be accessed from the
keyboard by pressing MENU then using the
PREV, NEXT,
") in the upper right of a tool
".
, , ENTER and CANCEL keys.
1-2-11
54
Index View
Page 55

Help Function
Key Sound
The built-in Help feature is a convenient, topic-specific,
on-line reference source. You can view Help at any time
by touching HELP at the left of the display. Messages
are also displayed during normal operations for your
guidance.
1-2-12
A sound (beep) is made each time a key or button is
pressed or the display is touched. Key Sound enabled
as the default setting.
T o turn the key sound off:
1.
Touch TOOLS and then touch Sound twice.
1-2-13
The Key Sound box is checked to show it is on.
2.
Touch Key Sound (so the cross disappears)
to turn the key sound off.
3.
Touch Done to save the setting.
1
55
Page 56

Save Battery Life
Sleep function
To conserve battery power, the Sleep function
turns your unit off if it is not used for a set time
period (the default setting is 15 minutes).
• Sleep is disabled when communicating with other
devices to avoid interrupting data transfers.
• If you are storing an entry and the Sleep function
turns off power before the entry is finished, data
will not be lost. When you press ON, operation
resumes from the state before power was turned
off.
• When the unit is connected to the AC adaptor or
battery pack, the Sleep function is disabled.
External power supply
Power can be supplied to your unit from the
optional EA-23E AC adaptor or the CE-BK1
battery pack. The AC adaptor can be used whenever a normal AC electricity outlet is nearby. The
battery pack can be used as an alternative power
source when no AC power supply is available. This
greatly increases your unit's portability by allowing
you to operate your unit for long periods of time
without depleting the operating batteries, e.g.,
while traveling on long journeys or working
outdoors.
To use the EA-23E AC adaptor or CE-BK1 battery
pack, first turn off the unit, then connect the plug to
the ADAPTOR socket at the right of the keyboard,
then turn your unit back on.
• When using the CE-BK1 battery pack, make sure
the mode switch is set to OPERATION.
• If the operating batteries are not installed, or are
depleted, the AC adapter or battery pack will not
supply power to the unit.
• Be sure to turn your unit off before disconnecting
the AC adaptor or battery pack.
• Check that the AC adaptor or battery pack is
connected when the unit is on, especially during
data transfer. Disconnecting the unit will abort the
data transfer.
Backlight Function
The ZR-5800 provides a built-in Backlight, which allows
you to view the display and use the unit even in low-light
conditions, eg. in a theater, restaurant, or business
presentation. Press 2nd and CAPS to illuminate the
display. You can set up the Backlight duration. See page
90.
56
Page 57

CHAPTER 2
Desk Accessories
he desk accessories along the left side of
the display are handy utilities that round off
the Application suite:
T
• Calculator can perform calculations on numbers
entered from the display, keyboard, or from other
entries.
• Scrapbook lets you make quick handwritten
notes and drawings directly on the display.
Scrapbook entries can be attached to Contacts
or Data Files entries, or integrated into a document.
• Filer lets you manage your data and information
by topic rather than by entry type.
• Search lets you locate a particular keyword from
among many different entries.
• Help provides quick access to topic-specific help
messages at any time.
• Tools provides many utilities such as Clock and
PC Link.
• More accesses the PC card and the Add-on
software setup functions. Full details are given in
chapter 7.
Calculator
Calculator is a standard 10-digit calculator which:
• Performs mathematical operations, including square
root, percentage and memory (R•CM, M- and M+).
• Can calculate dates and time durations, such as the
number of days to project completion.
• Has a paperless printer mode which shows all calculations in a vertical column on the display.
• Performs operations on data copied from other entries.
T o perform calculations:
1.
Touch CALC at any time.
The calculator's key pad appears on the display.
2-1-1
2.
Enter the calculation by touching the display
keypad or using the keyboard number and
symbol keys.
• To clear an entered value, touch C•CE once.
To clear a calculator operation, touch C•CE twice.
• Calculations are performed in order of entry, not
by algebraic convention, i.e. 8+2x3 = (8+2)x3, not
8+(2x3).
2
57
Page 58

• M on the display indicates a number is stored in
memory . Touch R•CM twice to clear the memory.
• Press
• E on the display indicates an error.
Touch C•CE to clear errors.
• Touch +/- to change the sign of a displayed value.
3.
To quit Calculator, touch QUIT.
to erase the last digit entered.
Movable window display
Calculator opens as a movable window over the
last display that was used. To move the Calculator
display, touch the top left corner and drag it to the
new location. After moving the Calculator display,
make sure to return it to its original location.
Otherwise, it may hide the paperless printer
display when that mode is selected.
• =, M-, M+ and % terminate a calculation sequence. Any value entered after these keys
begins a new calculation.
• Calculation steps are retained and can be
recalled with PREV or NEXT (even after the
display has been cleared with C•CE), until a new
sequence is entered or all steps are deleted
using DEL.
• Up to 50 steps can be stored in a calculation
sequence.
• Functions are the same as for the basic calculator, except power calculations must be performed
using repeated multiplication.
Using the paperless printer calculator:
1.
Touch CALC and select PRINT.
Paperless printer
In the basic calculator mode, only calculation
results are displayed. In paperless printer mode,
the calculation steps are retained and you can edit
the sequence:
• This allows you to change numbers and opera-
58
tors (
+,
, x, , =) and return to intermediate
-
results so that you do not have to reenter entire
calculations.
2-1-2
Page 59

2.
Enter the calculation.
• marks the starting entry.
• The value on the key pad display is the value just
entered or the final calculation result (indicated
by ENTRY or ANSWER shown above the value).
3.
Touch "=" to get the result.
Using intermediate results:
1.
Touch PREV or NEXT until you reach the
calculation line you want to check. The result
up to and including the highlighted line is
displayed.
Inserting new values:
1.
Move to the line above the point where you
want to insert the new value.
2.
Touch Insert.
3.
Enter the operator and value to be inserted,
then press ENTER.
4.
Press ENTER again to get the new result.
Changing part of a calculation:
1.
Move to the entry you want to change by
touching PREV or NEXT (or pressing PREV
or NEXT keys).
2
2-1-2A
2.
Touch C•CE once to return to the display of
the final result, and touch C•CE again to clear
the display .
2.
Make sure that the Entry radio button is
selected, then enter the new operator and
value, and press ENTER.
3.
Press ENTER again to get the new result.
59
Page 60

Deleting a line:
1.
Move to the line you want to delete using
PREV or NEXT.
2.
Press DEL.
3.
Press ENTER to get the new result.
2.
Touch CANCEL to clear the current date and
enter a different start date, if desired.
• Prefix single-digit months or dates with 0.
• You can modify part of a date by touching it and
then entering the required numbers.
3.
Touch TO.
4.
Enter the end date.
Date calculations
Calculator can calculate the period of time (in
days) between two specified dates. It can also
calculate the date a specified number of days
before or after a set start date.
Calculating the number of days between two dates:
1.
Touch DATE to switch to the date calculator.
The current date is
the default start date.
60
2-1-3
5.
Touch CALCULA TE.
The number of days between the two dates is
shown.
If you enter an invalid date, for example if you
forget to enter the year, the operation will not be
recognized and nothing will happen when you
touch CALCULATE. If you make a mistake, touch
CANCEL to return to the previous step.
Page 61

Calculating the date from the number of days:
1.
Touch DATE to switch to the date calculator.
The current date is the default start date.
2.
Touch CANCEL to clear the current date and
enter a different start date, if desired.
• Prefix single-digit months or dates with 0.
• You can modify part of a date by touching it and
then entering the required numbers.
3.
Touch AFTER to get a date in the future.
Touch BEFORE to get a date in the past.
4.
Enter the number of days in the past or
future.
2-1-4
5.
Touch CALCULATE and the final date is
displayed.
Y ou can continue to calculate other dates using
the calculated date as a new start date. Press
or - keys and the calculated date is automatically
entered in the FROM field. If you make a mistake,
touch CANCEL to return to the previous step.
+
2
61
Page 62

Data from other entries
You can perform calculations on numbers contained in other entries. You can also transfer
calculated values into another entry .
From another entry to Calculator:
1.
Select the entry with the data you want to
calculate.
2.
Drag the touch pen to highlight the
calculation data.
2-1-4A
3.
Touch EDIT and select "Copy" to copy the
data.
4.
Touch CALC to open Calculator, then press
2nd V to paste the calculation data. The
copied calculation is performed and the result
is displayed.
From Calculator to another entry:
1.
After a calculation, touch the result to
highlight it, then press 2nd C to copy it.
2.
Open an entry in Detail View, and touch the
position where you want to enter the
calculated value.
3.
Touch EDIT and select "Paste".
The copied value is now included in the entry.
Error indicator E
The error indicator, E, appears when any of the
following situations occur:
• Integer part of the rough result has 11 to 20
digits. For example: 4567890123 x 456 =
208.2957896 is displayed with E to indicate that
208.2957896 x 10
rough result. Rough results are not available in
paperless printer mode.
• Integer part of the result exceeds 20 digits.
• Integer part of the value in memory exceeds 10
digits.
• A number has been divided by 0.
Touch C•CE to clear the error indicator.
10
= 2,082,957,896,000 is the
62
Page 63

Scrapbook
Scrapbook lets you make quick hand-written notes,
sketches and maps directly on the display. The stamp
function lets you add built-in images of buildings,
intersections and railways to make your maps more
accurate and clear.
Scrapbook entries can be added to Contacts and Data
Files entries as part of those databases, or can be
included in Documents entries. For more information on
adding Scrapbook entries to other entries, see p. 157
and p. 180.
Scrapbook entries take up much more space in memory
than text, so it is a good idea to delete unwanted
Scrapbook entries or copy them to a RAM card.
When
Scrapbook is in Detail View and you can scroll the
entries by touching
Touching the upper left corner of
previous entry, and touching the lower right corner
moves to the next entry.
Touching the display makes
change an entry.
If Scrapbook is currently displayed and you select
another application (or you touch SMALL), the
Scrapbook display is reduced to a movable window. To
move this window, touch the top left corner and drag it to
the new location. To enlarge the Scrapbook window and
continue drawing, touch LARGE. Scrapbook will remain
on the display until you touch QUIT.
is displayed at the lower right of the display,
.
moves to the
disappear so you can
Making a new Scrapbook entry:
1.
Touch SCRAPBOOK.
A "blank" page is displayed.
2.
Use the touch pen to write or draw on the
display .
• Select drawing tools on the left.
• Default drawing tool width is medium.
3.
When you complete your entry, press
ENTER.
The entry is saved and the display changes to
Detail View. To make another entry, touch EDIT
and select "New Entry" (or press NEW ENTRY).
4.
To close Scrapbook, touch QUIT.
2
63
Page 64

Drawing tools
Finding entries
The Scrapbook drawing tools add versatility to
creating graphics. The pencil tool is the default
selection when you first touch the display with the
touch pen.
2-3-1
[Pencil] Draws freehand lines.
[Ruler] Draws straight lines.
[Grid] Draws the lines vertically or
holizontally.
[Stamp] Inserts built-in stamps.
[Area] Defines areas for editing opera-
tions.
[Eraser] Deletes graphics.
[Pattern] Selects drawing pattern from
white, hatch or black. White is
useful for deleting details that
cannot be easily removed by the
eraser.
[Width] Sets width of drawing tools.
Scrapbook entries are saved in the order entered.
• To find a Scrapbook entry, touch
through all the entries (or press PREV or NEXT).
• Y ou can also touch SHOW and select "First
Entry" or "Last Entry" to move to the top or
bottom of the entry list.
To edit an entry:
1.
Display the entry you want to edit.
2.
Select the drawing tool you want to use.
3.
Make any required changes.
4.
To save the changes and quit Scrapbook,
touch QUIT.
To save the changes and remain in
Scrapbook, press ENTER.
to step
64
Page 65

Selecting an area
Moving or copying graphics
The area tool lets you select a Scrapbook area for
copying, deleting and other operations.
To select an area:
1.
Display the entry you want to revise and
select the area tool ( ).
Area tool
2.
Drag the touch pen from the upper left to the
lower right of the area you wish to select. A
rectangular outline will indicate the selected
area.
3.
Perform the required operation on the
selected area (as shown below). To deselect
the area, touch anywhere in the drawing area
or select another tool.
2-3-2
Graphics sections can only be moved or copied
within Scrapbook.
T o move or copy graphics:
1.
Touch the area tool and select the graphics
area you want to copy or move.
2.
Touch EDIT and select "Cut" (to move) or
"Copy".
3.
Select the area where you want to paste the
graphics.
2
2-3-2A
4.
Complete your changes, then press ENTER.
65
Page 66

4.
Touch EDIT and select "Paste".
Deleting sections of graphic entries:
1.
Use the area tool to select the area to be
deleted.
2.
Press DEL to delete the selection.
N2-3-2B
Adding text strings to Scrapbook
You can import text into Scrapbook from other
application entries.
To add text strings to a Scrapbook entry:
1.
Display the entry with the text you want to
import.
2.
Highlight the required text by dragging the
touch pen.
3.
Touch EDIT and select "Copy".
4.
Touch SCRAPBOOK and display an entry.
For a new entry, touch EDIT and select " New
Entry".
66
Page 67

5.
Select the area where you want to place the
text.
6.
Touch EDIT and select "Paste".
Text is pasted to fit the area you specify, and it is
split over several lines if necessary. If the area is
not large enough, only part of the text is pasted.
N2-3-3A
2-3-3
The Stamps tool
You can use the Stamp tool to add one of the 64
built-in stamps to your Scrapbook entry.
To use the stamp tool:
1.
Display the entry you want to add a stamp to.
2.
Touch the Stamp tool at the left.
The stamp menu appears at the top of the
display.
2
N2-3-4
67
Page 68

3.
Touch the stamp you desire to select.
To scroll the stamp menu, touch or ( or press
PREV or NEXT).
4.
Touch the location where you want the stamp
inserted.
• The stamp can be dragged to any location until
the pen is lifted from the display . Once the pen is
lifted, the stamp is set and cannot be moved.
• A stamp can be inserted in multiple locations.
• To remove a stamp, select the stamp with the
area tool, then press DEL.
• The stamp menu is a movable window. To move
the stamp menu, touch the left corner and drag
to the new location.
N2-3-5
5.
When you complete your entry, press
ENTER.
N2-3-6A
68
Page 69

Filer
Deleting Scrapbook entries
Deleting a single Scrapbook entry:
1.
Display the Scrapbook entry you want to
delete.
2.
Touch EDIT and select "Delete Entry".
Press DEL.
3.
Touch Yes to confirm the deletion.
Deleting all Scrapbook entries:
1.
Touch SCRAPBOOK.
2.
Touch EDIT and select "Delete Group".
3.
Touch Delete.
4.
Touch Yes to confirm the deletion.
Filer is a unique, easy-to-use accessory that helps you
manage your information by topics rather than by entry
type. Filer folders let you organize information in a
similar way to office folders.
For example, suppose you have a project called
"Andromeda". You might have the names and phone
numbers of three project personnel in a Contacts file,
two pages of meeting notes in Notes, a project outline in
Outlines, three To Do action items, and five meeting
dates in Appointments.
With Filer, you can assign all entries related to the
Andromeda project to a single folder. This folder can
then be selected when you want to work specifically on
Andromeda project information.
Y ou cannot assign Spreadsheets entries to Filer.
Assigning entries to folders
Before using Filer, you must first assign entries to
the folders. There are three ways of assigning
entries to a folder: you can assign a group of
entries to one folder, you can assign individual
entries to one or more folders, or you can make a
new assigned entry . With all methods, the entries
themselves are not moved or stored in the folder,
they are just assigned to it. (Entries are retained in
the applications that created them).
2
69
Page 70

Collect related entries to one folder
The Collect function is used to assign entries
linked by a common keyword to a specified folder.
You can select the applications that are searched
for the keyword.
T o collect related entries to one folder:
2.
Touch a tab to specify the folder to hold the
collected entries, then touch COLLECT in the
tool bar.
70
1.
Touch FILER.
• Note the Search and Garbage folders at the front
of Filer Drawer. The Search folder provides
temporary storage for entries that match the
keyword Search criteria. The Garbage folder
provides temporary storage for deleted folder
entries.
2-4-1
If the selected folder contains entries and you
touch COLLECT, a message indicates that if you
proceed all existing entries will be unassigned
from that folder. Touch Yes to proceed (or touch
No to cancel and choose another folder).
3.
Complete the Collect Entries display as
required.
• Enter a keyword of up to 16 characters in the
"Only Entries Containing" field, using letters,
numbers and symbols.
• Check the Limit by Date Range box to set a date
range (only for Appointments and To Do entries).
The keyword is optional in this case.
2-4-2
Page 71

• Touch the Only Secret Entries check box to
collect only secret entries (not displayed if the
unit is locked.) The keyword is optional in this
case.
4.
All applications are selected by default.
Deselect any applications you do not need.
5.
Touch Collect.
A "Collecting" message appears.
• A message indicates if no entries contain the
keyword. You can try again using a different
keyword, or touch Cancel to close the box.
• All entries containing the keyword are assigned
to the specified folder. The first ten characters of
the keyword are displayed as the folder name
(Untitled is displayed when entries are collected
without specifying a keyword).
• The folder name can be easily changed, see p.
72.
Assigning a single entry to multiple folders:
1.
Display the entry that you want to assign to a
folder.
2.
Touch FILE IT.
3.
Touch all the folders the entry is to be
assigned to. Touch any folder again to
deselect it.
4.
Touch File.
The "Filed!" message is displayed and the entry is
assigned to the selected folder(s).
If you assign the entry to an empty folder, the first
ten characters from the first text field of the entry
are shown on the name tab.
2
2-4-3
71
Page 72

Naming or renaming folders:
1.
In Filer Drawer, touch a tab to select the
folder (except IN folder) that you want to
name (or rename).
2.
Touch EDIT and select "Folder Name".
3.
Enter any folder name of up to ten characters
using letters, numbers and symbols.
4.
Touch OK to save the folder name.
Viewing entries via Filer
2-4-4
T o view an entry from Filer:
1.
Touch FILER and touch twice the tab of the
folder that contains the entries you want to
view.
• Only one folder can be opened at a time.
• Folder entries are sorted by entry type.
• If the folder has more than eleven entries, use
the scroll bar to move to other entries.
2.
Touch the desired entry twice. It will be shown
in the entry mode of the original application.
3.
Touch FILER to return to the Filer Index.
2-4-5
72
Once an entry has been assigned to a Filer folder,
it can be easily viewed so you can access information by topic rather than by entry type.
4.
Touch VIEWS and select "Drawer" to return
to Filer Drawer.
Page 73

Editing folder entries
New Assigned Entry
Once an entry is assigned to a Filer folder (or
folders), any changes made to the entry in its
source application will be reflected in all related
folders. The entry is edited in the entry mode of
the source application.
To edit a folder entry:
1.
Open the desired folder.
2.
Touch the entry to be edited twice. The
display changes to the entry mode of the
original application.
3.
Make the desired changes to the entry .
4.
When you complete your changes, press
ENTER then touch FILER to return to the
Filer Index.
Y ou can create a new assigned entry in another
application directly from within Filer.
To make a new assigned entry:
1.
Open the Filer Drawer then touch a tab.
2.
Touch EDIT and select "New Assigned
Entry".
The new entry will be assigned in the currently
selected folder.
3.
Select the new entry type and then touch
NEW.
4.
Create your new entry .
2
2-4-6
73
Page 74

5.
When you complete the entry, press ENTER.
The new entry appears in the Index of the
selected application and the entry is
automatically assigned to the folder.
Touch FILER to see the new entry in the Filer
Index.
Removing entries from folders
If you assign an entry to the wrong folder, or no
longer require a particular entry to be assigned to
a folder, you can remove (unassign) single entries
from folders. Removed entries are not deleted
from the source application.
Delete an entry from Filer
Folder entries can be deleted directly from the
Filer Index.
The deleted entry will be deleted from the original
application and the Filer Index.
To delete a Filer Index entry:
1.
In Filer Index, select the entry to be deleted.
2.
Touch EDIT and select "Delete Entry".
3.
Touch Yes to confirm the deletion. The entry
is deleted and disappears from the Filer
Index.
74
T o remove a single entry from a folder:
1.
From Filer Drawer, select the folder that
contains the entry you want to remove.
2.
In Filer Index, select the entry to be removed.
3.
Touch UTILS and select "Remove This
Entry".
A message indicates the entry has been removed.
Page 75

Empty a folder
Merging (Moving) folders
Y ou can empty a folder. This will remove
(unassign) all entries from the folder. Removed
entries are not deleted from the original application.
To empty a folder:
1.
In Filer Drawer, select the folder you want to
empty .
2.
Touch UTILS and select "Empty This
Folder".
3.
Touch Yes to confirm the folder is to be
emptied.
The folder contents are removed and the name
tab becomes blank, indicating an empty folder.
At times, you may have two folders whose contents, names or purpose are duplicated. You might
want to merge (combine) the two folders into a
single folder.
• To delete all entries in a folder, an alternate
method is to merge that folder with the Garbage
folder, then touch EDIT and select "Delete
Garbage Contents".
• To undo the deletion of a folder you can merge
the Garbage folder with an empty folder.
T o merge folders:
1.
From Filer Drawer, select the first folder to be
merged.
2.
Touch MERGE.
2
N2-4-7
75
Page 76

3.
Select the second (destination) folder that will
be merged, and touch Merge. The contents
of the first folder will be appended to the
destination folder.
• The name of the destination folder has priority.
• If the folder contains duplicate entries, the
duplicates will be removed.
Sending folders
You can send all entries assigned to a folder to
another unit via infrared transmission or via
optional cable. Sent folder entries will be assigned
to the IN folder of the receiving unit. For more
information about Unit to Unit transfers, see p. 220.
To send a folder to another unit via infrared transmission:
1.
Press GET on the receiving unit.
Touch SEND in the tool bar, select "Unit to Unit",
and then select Receive and touch OK.
2.
Touch FILER on the sending unit.
3.
Select the folder in Filer Drawer.
4.
Press SEND.
The folder entries will be sent to the receiving unit
and assigned to the IN folder.
Touch SEND in the tool bar and select "Unit to
Unit", then select Send and touch OK.
76
Page 77

Generate a Report
Generate a Report makes a new Documents
based on the contents of a Filer folder. This makes
a new Document entry containing information on
entries assigned to a particular folder.
For example, you might want to fax a report on
your activities for a specified week. The Collect
tool can be used to gather your activities into a
single folder with a set date range. You can then
touch SEND and select "Generate a Report" to
make a Documents report entry. In Documents,
edit the report and then send it by fax.
2-4-8
Report format
Please note the following important points:
• The generated report page format is letter size,
with all margins set at 1 inch and uses Elite (12
cpi) font.
• For Appointment, alarm time and repeat information are not included.
• For Birthday/Ann, reminder information is not
included.
• For Contacts/Data Files, pictures and link
information are not included.
• For Notes, drawings and modified time information are not included in the report.
• For Documents, pictures and header, footer and
text style information are not included.
• For Outlines, topic text is not indented in accordance with the topic level.
2
77
Page 78

Search
The Search function lets you locate entries containing a
specific keyword, even if you do not know the entry title
or the application it was created in. The search can be
limited to a specific date range for Appointments and To
Do entries, or limited to secret entries. The Search
function selects all applications as a default setting for
the search, but you can deselect applications as desired. When the search is completed, entries that match
the search criteria are assigned to the Search folder in
Filer.
You cannot use the search function in the
Spreadsheets application.
T o use the Search keyword function:
1.
From any application, touch SEARCH at the
left.
2.
Enter the search keyword in the "Only Entries
Containing" field. You can use up to 16
characters (letters, numbers and symbols).
3.
Check the Limit by Date Range box to enter a
search date range for Appointment and To Do
entries.
4.
Check the Only Secret Entries box to limit the
search to Secret Entries.
5.
Select the applications you want searched.
All applications is the default selection.
6.
Touch Search.
All entries that match the search criteria are
assigned to the Search folder in Filer. The
Search folder is displayed, and you can view
its contents with Filer.
78
N2-5-1
In the application's Index View, it is also possible
to use the Keyword Search function without
touching SEARCH. See details in General
Operations.
Page 79

Help
The built-in Help feature is a convenient, on-line help
and reference source. You can access Help at any time
by touching the HELP button on the left of the display.
To use Help:
1.
Touch HELP.
Applications and
accessories list
Help item list
2.
Select an application or accessory from the
top list.
The current application is initially selected.
3.
Select the Help item from the bottom list.
Use the scroll bars to move through the list.
4.
When you complete your selection, touch
Details.
5.
Touch Index to return to the previous display.
Touch Cancel to exit the Help function.
2
79
Page 80

Tools
Touching the Tools accessory produces the following
display:
2-6-1
Utilities
The communications utilities ensure your unit is
much more than just a hand-held personal information manager. They make your unit a powerful
management and communications tool that links
you to your busy world through PC links, terminal
mode, data transfers, backups, faxes, messages,
etc.
The utilities shown in the top half of the TOOLS
display are: PC Link; Remote; Clock; Fax Log;
Backup; Terminal; Message; CompuServe; AT&T
Mail; and ZR-Pager. Clock is described on page 91
in this chapter and other Tools utilities are described in chapter 7, "Optional Accessories".
Terminal, CompuServe, AT&T Mail and ZR-Pager
are described in the manual provided separately.
Preferences
Preferences let you configure your unit to suit your
own personal requirements.
Personal
Personal lets you enter your personal information
for use at start-up, when sending faxes, making
letters, etc.
T o enter your personal information:
1.
Touch TOOLS and touch Personal twice.
2-6-2
2.
Enter your own information for owner (your
name), company , position, phone number, fax
number and address.
3.
Touch Password to set the password. For
more information on the password function,
see p. 85.
80
Page 81

4.
Touch Sign to enter your signature for use
with the Make a Letter function in Documents.
For more information on the signature
function, see p. 179.
5.
When you complete your Personal entry ,
touch OK.
Memory
The memory in your unit (ZR-5700: 1MB; ZR5800: 2MB) provides you with a certain amount
(ZR-5700: approx. 600 KB; ZR-5800: approx.
1,624 KB) to store your entries and Add-on
software. If you get close to using all the available
memory , certain features may not function.
To avoid such problems, you should regularly
check the available memory and free up space if
necessary by deleting unwanted entries.
The Memory function allows you to check the
amount of memory available in the main unit (and
the RAM card if installed).
T o check the memory:
1.
Touch TOOLS and touch Memory twice.
If a RAM card is installed, you can select Card
Memory to check available memory on the card. If
there is no RAM card installed, this button will be
disable (unavailable).
2.
When you complete your memory check,
touch Done.
• The Memory display might show a small amount
of free memory available, but this may not be
enough for some features to function.
• If you set a value for Extra Workspace for
Spreadsheets using the Setup menu (in Index
View), this is indicated by the gray shaded
portion in the memory graph.
2
2-6-4A
81
Page 82

Display
Sound
The Tools Display accessory can be used to:
• Adjust the contrast of the LCD display
• Adjust the touch panel display for best touch pen
operation.
LCD contrast
The LCD contrast may sometimes require adjustment. For example, a setting that is good indoors
may not be adequate when outside.
• You can also adjust the LCD contrast directly at
start-up. Turn the unit of f, hold down the MENU
key then press ON.
• Press SP ACE to go to Adjust Touch panel.
For more information, see Quick Start.
T ouch panel
The touch panel should be adjusted to suit your
style of writing, drawing and touching the display .
For more information, see Quick Start.
The Tools Sound accessory is used to set Key
Sound and Alarm Sound. Key Sound is set on as
the default setting, so a beep sound is made each
time a key or touch button is pressed or the display
is touched. Alarm Sound is off as a default setting,
but if you set a schedule or daily alarm, it is
automatically turned on.
To change sound settings:
1.
Touch TOOLS and touch Sound twice.
2-6-7
2.
Touch Key Sound to turn it on or off.
3.
Touch Alarm Sound to turn it on or off.
• Y ou must also set Daily alarms, see p. 93 or
Appointment alarms, see p. 131.
4.
When you complete your settings, touch
Done.
82
Page 83

Start-up
Start-up lets you configure the start-up display to
suit your own requirements.
2-6-3
The Start-up display can be used to set the
following:
• Start-up: Can be set to On, Off.
• Picture: Globe is the default picture graphics. You
can also touch User's Picture to make a graphic
entry or load an entry through Scrapbook.
• Ask password at start-up: Start-up display can be
set to ask for a password at start-up, thus
protecting all entries. You must first register a
password by touching Password in TOOLS
Personal.
• Show Owner's Information: Start-up can be set to
Show Owner's Information (increasing the
chances of your unit being returned if it is lost).
Y our personal information must first be registered
with TOOLS Personal, see p. 80.
T o display owner's information at start-up:
1.
Touch TOOLS and touch Start-up twice.
2.
Touch On to set Start-up to On.
3.
The start-up display picture will be the default
Picture. To use a User's Picture, check the
Use box and then touch User's Picture. You
can then draw pictures or paste a picture
from Scrapbook.
4.
You can check the Ask password at start-up
box. For more information on the Secret
Password function, see p. 85.
2
83
Page 84

5.
Check the Show box, then touch the Owner's
Information button.
N2-6-4
6.
Select the owner's information to be shown at
start-up. When you complete your selection,
touch OK.
• Selecting the owner's information is only useful if
you first use Tools Personal to enter your personal information.
7.
Complete your Start-up display settings and
touch OK. Your owner's information will now
be shown at start-up.
Sleep
Sleep turns the unit off if there is no activity within
a set time period. This extends the life of the
operating batteries.
• Default Sleep time period is 15 minutes.
• Sleep function is disabled if the unit is powered
by the optional AC Adaptor EA-23E or the
CE-BK1 battery pack.
To change the Sleep time period setting:
1.
Touch TOOLS and touch Sleep twice.
2.
Use the touch pen to touch and drag the
Sleep setting. Sleep time can be set to 1, 5,
15 or 30 minutes.
3.
When you complete your setting, touch OK.
2-6-8A
84
Page 85

Secret
The Secret function keeps your information secure
(hidden) requiring a password that you specify.
Entries marked as secret are hidden until the
password is entered. Individual entries can be
marked as secret, or you can simply prevent
access to the entire machine by requiring a
password each time the unit is turned on. Marking
entries as secret has no effect until a password is
registered.
If you forget your password, you will not be able to
unlock your unit. To use the Secret function, you
must delete the old password, and this will also
delete all entries marked as secret. If you are
worried you might forget your password, write it
down and keep it in a safe place.
To register a password:
1.
Touch TOOLS and touch Personal twice.
2.
T ouch Password.
2-6-9
3.
Enter a password of up to seven characters
using letters, numbers and symbols.
• Choose your password carefully. W e recommend
you use an easy to remember word.
• Password recognizes uppercase and lowercase.
For example:
secret
.
4.
Touch Set to store the password.
5.
Touch OK.
Marking entries as secret
Y ou can mark any entry (except those in Scrapbook) as secret.
To mark an entry as secret:
1.
Open the application and select the entry.
2.
Open the entry you want to mark as secret.
3.
Touch EDIT and select "Secret Entry".
An asterisk (*) appears in the top right corner to
indicate this is a secret entry.
SECRET
is different from
Secret
2
or
85
Page 86

If your unit is locked to hide secret entries, an
entry which has just been marked as secret will
still be displayed until you select another entry.
Once you leave the entry marked as secret, it will
be hidden with all other secret entries.
Accessing secret entries
Entries marked as secret are not shown in any
application Index, and they cannot be accessed by
any search method. To view secret entries, your
unit must first be unlocked.
To change a secret entry to a normal entry:
1.
Unlock your unit with the procedure above.
2.
Display the secret entry you want to make
normal.
3.
Touch EDIT and select "Normal Entry".
The asterisk disappears from the top right corner
and the entry is no longer secret.
Locking your unit
86
T o unlock the unit:
1.
Touch TOOLS and touch Secret twice.
2.
Select Unlock and touch OK.
3.
Enter your password and touch Unlock.
The "Unlocked!" message is displayed.
2-6-10
When a password has been registered, even if you
unlock your unit using the procedure above, it will
automatically lock itself each time you turn it off.
This feature guards your secret entries in case you
forget to lock your unit, and remains in effect as
long as a password is registered.
T o lock your unit:
1.
Touch TOOLS and touch Secret twice.
2.
Touch Lock.
is displayed to indicate your unit is locked.
Page 87

Changing the password
If you forget your password
To register a new password, you must first enter
the current password, then enter the new password. To delete the current password, leave the
new password field blank.
T o change your password:
1.
Touch TOOLS and touch Personal twice.
2.
T ouch Password.
2-6-11
3.
Enter your current password and enter the
new password.
Leave New password blank if deleting the current
password.
4.
Touch Set.
5.
Touch OK.
If you delete the current password, a message
indicates that your unit is unlocked. Entries marked
as secret are unprotected until a new password is
registered.
If you forget your password, to use the Secret
function again you must delete all entries marked
secret.
If you have installed an optional RAM card
which has the same password as the main unit,
secret data on the card will also be deleted by this
operation.
To delete all secret entries:
1.
Touch TOOLS and touch Secret twice.
2.
Touch Delete Secret Data.
3.
Touch Yes to confirm deletion of all secret
entries.
Y ou will now be able to enter a new password.
If you set the Start-up display to Ask password at
start-up, and then forget your password, you will
be required to do an All Reset operation, which
will cause the loss of all data on your unit. (See p.
234 for details).
2
87
Page 88

RAM cards and the Secret function
If you use a RAM card in your unit, that card is
also protected by your password. If you remove a
RAM card and change your password, or register
a password for the first time, you will not be able to
use the card in your unit unless you re-register the
original password, or delete your current password. It is therefore crucial to keep track of
passwords used with specific RAM cards. Also,
before you use a new RAM card for the first time,
you must delete your current password or unit will
not recognize the card.
Word List
You may find that you must enter the same word
many times, for example in lists, or you may need
to write several memos or letters on the same
topic. The WORD key lets you easily insert words,
numbers, or phrases (up to 32 characters long) in
any entry with the press of a key.
Word List entries
The Word list has no default words, so you must
first register your own words or phrases.
88
You cannot register a password for a Flash
Memory card. However, if you archive unit data
that includes a password into a Flash Memory
card, the password is also stored in the card.
T o make Word list entries:
1.
Touch TOOLS and touch Word List twice.
2-6-12
2.
Touch New.
2-6-13
Page 89

3.
Enter a word, phrase or numbers (up to 32
characters) you want to recall with the WORD
key .
4.
Touch OK.
Repeat steps 2 and 3 to make other Word list
entries.
The entries are registered and sorted alphabetically.
5.
When you complete your entries, touch
Close.
3.
Select the word, phrase or number you want
to insert. Use the scroll bar to move through
the list.
4.
Touch Recall. The Word window closes and
the word is inserted in the entry at the cursor
position.
In step 3 above, touching the word twice also
inserts it into the entry.
Editing a Word list entry
2
Using the WORD key:
1.
When entering or editing an entry, place the
cursor where you want to enter a word.
2.
Press the WORD key .
2-6-14
Y ou can edit any Word list entry using a similar
procedure to making Word list entries, but instead
of touching New in step 2 on page 88, touch the
word you want to edit twice.
2-6-15
Make any changes and then touch OK.
Deleting Word list entries
If you find you no longer need a particular Word list
entry, it is easy to delete it from the Word list.
Select the Word List entry in step 2 on page 88,
press DEL, and then touch Yes to confirm.
89
Page 90

RAM Card
Backlight set-up
When a RAM card is installed in the unit, you can
select the RAM card or main unit to save and
retrieve data.
1.
Touch TOOLS and touch RAM Card twice.
N2-6-17:
2.
Select Main Unit or PC Card.
3.
Touch OK.
You can specify how you want the Backlight of
your ZR-5800 to operate.
1.
Touch TOOLS and then touch Backlight
twice.
2.
Using the pen, drag the slider to the desired
number of seconds after which you want the
Backlight to turn off automatically.
OPTION: Touch the check box if you want the
Backlight to come on automatically whenever you
type or touch the display. This would be useful
when using the unit for long periods in a dark
location. If you turn off the unit, the Options box
will be unchecked the next time you use the unit.
90
3.
Touch OK.
Page 91

Clock
Clock is a built-in, dual-display clock that shows the
current time and date in your Home City and the time
and date in another World City . When Clock is selected
from Tools, the clock remains displayed until another
application is selected.
Y ou can choose from a built-in list of 212 cities. If you
cannot find the city you require, you can make your own
customized list of three User's Cities. Clock Home City
time is used for all time-based operations.
• Home City selection is described in the Quick Start
section. A similar procedure is used for World City.
• Daylight saving time (DST) is set as the default for all
cities. You can change this setting for any city.
Daylight Saving Time
Cities that use daylight saving time (DST) normally
set their time ahead one hour in the summer.
If Uses DST is selected in either Change Home
City or Change World City , and Summer is selected in World Clock display, the time will be
advanced one hour. To disable DST, select Winter.
World City
World City display is very handy for international
phone calls and overseas travel. Once you make
your selection, World City time and date are
automatically calculated from the time difference to
your Home City.
T o select your World City:
1.
Touch TOOLS and then touch Clock twice.
London, UK is the default World City .
2.
To select your own world city, touch the World
City name button of the lower clock.
2-2-1
If World City has been set before, a list of the last
six cities selected will be displayed.
2
91
Page 92

3.
Select your World City .
If the city you want is not on the list, touch More
Cities and another list will appear.
2-2-2
The first three cities are User's Cities you can
specify. The rest of the list is in alphabetical order
by country and by city.
4.
Use the scroll bar to find your world city, then
touch and highlight it. As a shortcut, enter the
first letter of the country, e.g. enter U for
United Kingdom.
As a default setting, Uses DST is set to on for all
cities. If your world city doesn't use daylight saving
time, touch the box to turn it off.
5.
Complete your World City selection, then
touch Select.
World Clock is displayed with Home City time on
the upper clock and World City time on the lower
clock.
2-2-3
6.
If DST is currently in use for your World City,
select Summer. If DST is not currently in use,
select W inter.
User's City
To use cities that are not already listed, you can
enter three cities of your own choice as User's
Cities. These cities can then be selected as your
Home City or World City.
92
Page 93

To enter User's Cities:
1.
Touch TOOLS and then touch Clock twice.
2.
Touch USER'S at the top of the Clock display.
Setting daily alarms
Daily alarms are set like a regular alarm clock and
sound even if your unit is turned off. You can set up
to seven daily alarms (and these are separate from
Activities alarms). This is handy when you need to
quickly set a wake-up alarm, but do not want to
make an Activities entry.
2
2-2-4
New York, USA is set as the default User's City 1.
3.
Enter User's City names, countries and GMT
values from the keyboard.
• GMT value is the time difference between the
User's City time and Greenwich Mean Time
(international time reference). Enter a value from
-11.5 to +12, with 0.5 hours precision.
• Uses DST is the default setting. If the city doesn't
use DST, touch the box to deselect it.
4.
Complete your User's City settings, then
touch OK.
You can now select a User's City as Home or
World City .
T o set daily alarms:
1.
Touch TOOLS and then touch Clock twice.
2.
Touch ALARM at the top of the Clock display.
2-2-5
3.
Touch and highlight the alarm you want to
set.
• Touch the Set box (a cross appears).
• Touch
to set the alarm time.
93
Page 94

4.
When you complete your daily alarm settings,
touch OK.
appears at the top right of the display to show
that alarms will sound at the set alarm times.
4.
Press DEL.
The set alarm time disappears.
5.
When you complete your setting changes,
touch OK.
When an alarm sounds:
• Press ON to stop the alarm.
• After turning off the alarm, press CANCEL to go
back to the previous screen.
• Alarms turn off automatically after 15 seconds.
T o remove a set alarm:
1.
Touch TOOLS and then touch Clock twice.
2.
Touch ALARM at the top of the Clock display.
3.
Touch and highlight the set alarm you want to
remove.
94
2-2-6
Disabling alarm sound
Once you have set alarms, they will sound at the
set times whether your unit is on or off.
top right of the display indicates if alarms are set.
There may be times when you want to disable all
set alarms.
T o disable alarm sound:
1.
Touch TOOLS and touch Sound twice.
2.
Touch the Alarm Sound box to disable the
alarm sound for all of the alarms.
disappears from the top right of the display and
all set alarms will no longer be heard. However,
alarms will still be indicated on the display at the
set time, even if your unit is turned off.
You can enable and disable each alarm by
touching the corresponding check box. Even if an
alarm time is set, the alarm will not sound if the
box is unchecked.
at the
Page 95

MORE
Y ou can install and manage add-on software and load
PC files received via data transfer by touching MORE.
For example, you could install some new software
located on your PC card, use it for a while, then delete it
if you decide not to use it anymore. Or you could convert
a text file received by PC data transfer into a Documents
entry.
For full details of using MORE, see p. 213.
Spreadsheets
The unit's Spreadsheets application is a sophisticated
utility for managing financial, statistical and other
numeric data in a flexible spreadsheet format. With its
worksheets and editing features, Spreadsheets looks
and feels similar to most of the popular spreadsheet
programs currently available, so you can get used to it in
no time. It even allows Spreadsheets data to be imported and exported between Microsoft Excel for
compatibility with your home or office PC.
Spreadsheets offers a comprehensive range of powerful
built-in functions, as well as built-in worksheet templates.
You can use these together to quickly and easily:
• Create expense reports
• Analyze budgets
• Run a scenario analysis for forecasts
• Tabulate, summarize and chart data for any purpose.
For full details and instructions for using Spreadsheets,
see the manual provided separately .
2
95
Page 96

96
Page 97

CHAPTER 3
General Operations
his section describes general operations
that can be used with your unit. Contacts
and Scrapbook are normally used for
T
examples of these operations. However, the
operations described can be applied to most
applications and accessories (which are described
in detail elsewhere in this manual). For a full
explanation of Contacts, see Section 5 Databases.
For a full explanation of Scrapbook, see Section 2
Desk Accessories.
Opening Applications and Accessories
To start using an application or accessory, touch the
required touch button at the right or left side of the
display. Each time you touch a button, the selected
application or accessory will appear.
• Any application that is currently open on the display will
be hidden when a new application is selected.
• You can return to any application at the exact point
where you left off by touching it again.
3
97
Page 98

Tool Bar Functions
The tool bar across the top of the display has many
common functions as follows:
VIEWS/INDEX
FIL TER
SHOW
LINKS
SET UP
EDIT
LINK TO
FILE IT
SEND
A small pointer (" ") on the upper right of a tool
bar item indicates a menu will be displayed if
touched.
Views/Index
VIEWS/INDEX in the tool bar is used to select the
display mode. Once an application is open, you
can use VIEWS/INDEX to switch display modes.
Each display mode has its own unique variations,
functions and purposes.
Detail View
Detail View allows you to see the details for an
entry .
A basic Detail View is available for Contacts, Data
Files, Documents and Outlines. More advanced
Detail Views are available for Activities, Notes and
Filer.
Index View
Index View shows a one line view for each entry ,
making it easier to find a particular entry.
3-2-1
98
Page 99

T o change Index/Detail View
To change the display mode for Activities:
1.
Touch ACTIVITIES.
2.
Touch VIEWS in the tool bar at the top of the
display .
3.
Use the touch pen to select the Detail View
from the list in the menu.
For example, select "Weekly Graph".
The display should now be similar to that shown
below.
3-2-2
4.
Touch VIEWS and select an Index View from
the list.
For example: touch VIEWS and select "To Do
Index".
The display should now be similar to that shown
below.
3
N3-2-3
99
Page 100

100
Filter
The Filter function lets you focus on entries that
contain specific information. For example, you
could recall all entries related to a particular
company name. The Filter function does this by
hiding all entries that do not match the filter
criteria.
• Only Filtered entries can then be viewed or
edited.
• The Filter function is available only for Appointments, Contacts and Data Files.
To turn on the filter for Appointments:
1.
Touch ACTIVITIES and select Index or Detail
View of Appointments.
2.
Touch FILTER and select "Filter".
3.
Enter the filter keyword.
• For Appointments the keyword must be in the
description field.
• If a block of text is selected before touching
FILTER, the text will be automatically displayed
as the filter description.
• Check the "Secret Only" box to filter only secret
entries (not displayed if the unit is locked).
N3-2-4
4.
Touch Filter.
Filtered entries that match your criteria can be
viewed in Index View.
A message indicates if no entries match your
request.
T o turn on the filter for Contacts and Data Files:
1.
Open Contacts or Data Files in the Index or
Detail View .
2.
T ouch FIL TER and select "Filter".
3-2-5
3.
Select any field and enter the filter keyword.
• Check the "Secret Only" box to extract only
secret entries (not displayed if the unit is locked.)
4.
Touch Filter.
Filtered entries that match your criteria can be
viewed in Index View.
A message indicates if no entries match your
request.
 Loading...