

Page 1

XL-UH240W Micro Component System consisting of XL-UH240W (main
unit) and CP-UH240W (speaker system).
Sistema micro componente XL-UH240W que consta de XL-UH240W
(aparato principal) y CP-UH240W (sistema de altavoces).
MICRO COMPONENT SYSTEM
SISTEMA MICRO COMPONENTE
MODEL
MODELO
XL-UH240W
OPERATION MANUAL
MANUAL DE MANEJO
Note:
This product is not compatible with MTP and AAC file systems.
Nota :
Este producto no es compatible con sistemas de archivos MTP y AAC.
ENGLISH
ESPAÑOL
Please refer to pages E-1 to E-34.
Consulte las páginas S-1 a S-34.
SHARP CORPORATION
Page 2
XL-UH240W
ENGLISH
Special notes
WARNINGS
When the ON/STAND-BY button is set at STAND-BY position,
mains voltage is still present inside the unit. When the ON/
STAND- BY button is set at STAND-BY position, the unit may be
brought into operation by the timer mode or remote control.
This unit contains no user serviceable parts. Never remove covers
unless qualified to do so. This unit contains dangerous voltages,
always remove mains plug from the socket before any service operation and when not in use for a long period.
To prevent fire or shock hazard, do not expose this appliance to
dripping or splashing. No objects filled with liquids, such as vases,
shall be placed on the apparatus.
Note:
Audio-visual material may consist of copyrighted works which must
not be recorded without the authority of the owner of the copyright.
Please refer to the relevant laws in your country.
NOTE
This equipment has been tested and found to comply with the limits for a
Class B digital device, pursuant to Part 15 of the FCC Rules. These
limits are designed to provide reasonable protection against harmful interference in a residential installation. This equipment generates, uses,
and can radiate radio frequency energy and, if not installed and used in
accordance with the instructions, may cause harmful interference to ra-
Important Instruction
dio communications. However, there is no guarantee that interference
will not occur in a particular installation. If this equipment does cause
harmful interference to radio or television reception, which can be determined by turning the equipment off and on, the user is encouraged to try
to correct the interference by one or more of the following measures:
Reorient or relocate the receiving aerial.
Increase the separation between the equipment and receiver.
Connect the equipment into an outlet on a circuit different from that to
which the receiver is connected.
Consult the dealer or an experienced radio/TV technician for help.
WARNING
FCC Regulations state that any unauthorised changes or modifications
to this equipment not expressly approved by the manufacturer could void
the user's authority to operate this equipment.
E-1
ENGLISH
CAUTION
This product is classified as a CLASS 1 LASER product.
Use of controls, adjustments or performance of procedures other
than those specified herein may result in hazardous radiation exposure.
As the laser beam used in this compact disc player is harmful to
the eyes, do not attempt to disassemble the cabinet. Refer servicing to qualified personnel only.
Laser Diode Properties
Material: GaAIAs
Wavelength: 795 nm
Emission Duration: continuous
Laser Output: max. 0.6 mW
CAUTION-INVISIBLE LASER RADIATION WHEN OPEN.
DO NOT STARE INTO BEAM OR VIEW DIRECTLY WITH
OPTICAL INSTRUMENTS.
WARNUNG-UNSICHTBARE LASERSTRAHLUNG WENN GERÄT
GEÖFFNET. NICHT IN DIE STRAHLUNG SCHAUEN ODER
DIREKT MIT OPTISCHEN HILFSMITTELN BETRACHTEN.
ATTENTION-RAYON LASER INVISIBLE EN CAS D'OUVERTURE.
NE PAS REGARDER LE FAISCEAU DIRECTEMENT OU AVEC DES
INSTRUMENTS OPTIQUES.
03/12/17 XL-UH240W _1-7.fm
Page 3
Introduction
Thank you for purchasing this SHARP product. To obtain the best
performance from this product, please read this manual carefully. It
will guide you in operating your SHARP product.
Special Note
Supply of this product does not convey a license nor imply any right
to distribute content created with this product in revenue-generating
broadcast systems (terrestrial, satellite, cable and/or other distribution channels), revenue-generating streaming applications (via Internet, intranets and/or other networks), other revenue-generating
content distribution systems (pay-audio or audio-on-demand applications and the like) or on revenue-generating physical media (compact discs, digital versatile discs, semiconductor chips, hard drives,
memory cards and the like). An independent license for such use is
required. For details, please visit http://mp3licensing.com.
MPEG Layer-3 audio coding technology licensed from Fraunhofer
IIS and Thomson.
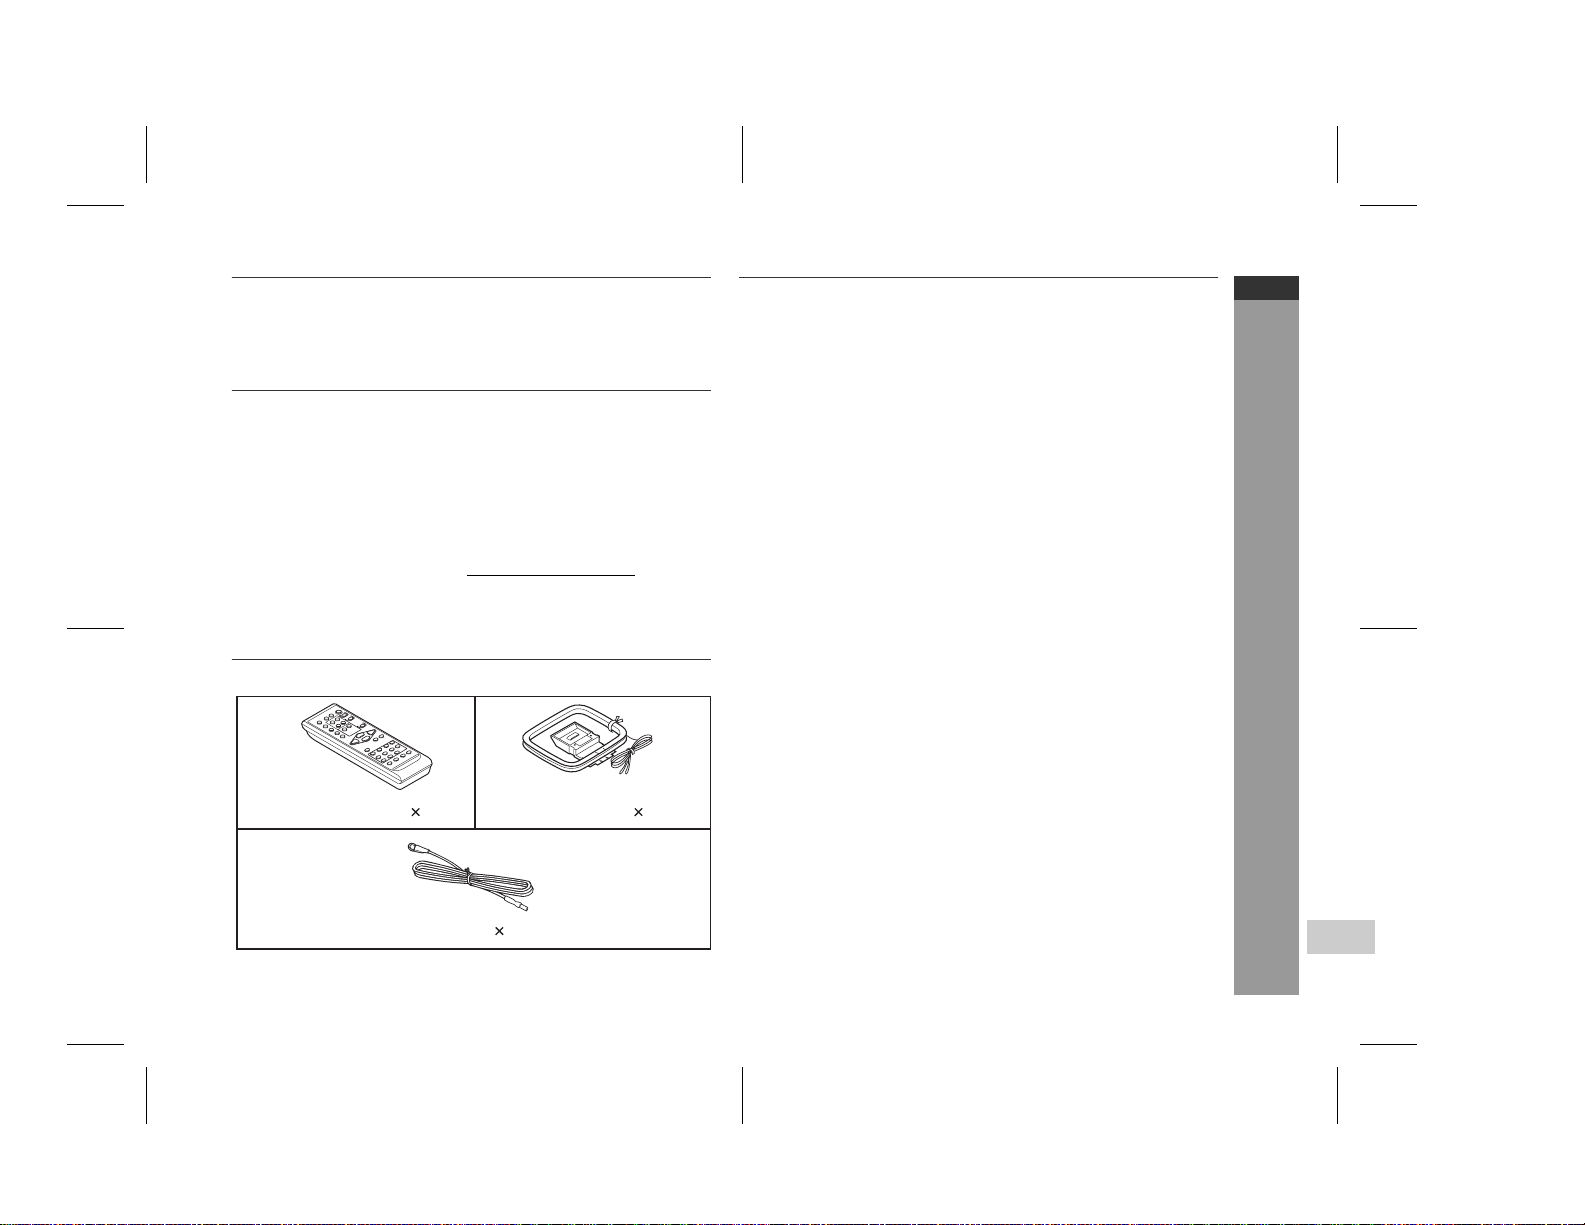
Accessories
Please confirm that the following accessories are included.
Remote control 1 AM loop aerial 1
Contents
Page
General Information
Precautions . . . . . . . . . . . . . . . . . . . . . . . . . . . . . . . . . . . . . . . . . 3
Controls and indicators . . . . . . . . . . . . . . . . . . . . . . . . . . . . .4 - 6
Preparation for Use
System connections . . . . . . . . . . . . . . . . . . . . . . . . . . . . . . . 7 - 10
Remote control . . . . . . . . . . . . . . . . . . . . . . . . . . . . . . . . . . . . . 11
Basic Operation
General control . . . . . . . . . . . . . . . . . . . . . . . . . . . . . . . . . . . . . 12
Setting the clock (Remote Control only) . . . . . . . . . . . . . . . . . 13
CD or MP3/WMA disc Playback
Listening to a CD or MP3/WMA disc . . . . . . . . . . . . . . . . .14 - 16
Advanced CD or MP3/WMA disc playback . . . . . . . . . . . . 16 - 17
Advanced CD playback . . . . . . . . . . . . . . . . . . . . . . . . . . . . . . . 18
MP3/WMA folder mode (only for MP3/WMA files) . . . . . . .19 - 20
USB Memory Playback
Listening to USB mass storage device / MP3 Player . . .21 - 22
To remove USB memory device . . . . . . . . . . . . . . . . . . . . . . . . 22
Advanced USB playback . . . . . . . . . . . . . . . . . . . . . . . . . . . . . . 23
Radio
Listening to the radio . . . . . . . . . . . . . . . . . . . . . . . . . . . . .24 - 25
Advanced Features
Timer and sleep operation (Remote Control only) . . . . . .26 - 29
Enhancing your system . . . . . . . . . . . . . . . . . . . . . . . . . . .30 - 31
XL-UH240W
ENGLISH
General Information
FM aerial 1
Note:
Only the above accessories are included.
References
Troubleshooting chart . . . . . . . . . . . . . . . . . . . . . . . . . . . . .31 - 33
Maintenance . . . . . . . . . . . . . . . . . . . . . . . . . . . . . . . . . . . . . . . . 33
Specifications . . . . . . . . . . . . . . . . . . . . . . . . . . . . . . . . . . . . . . 34
E-2
03/12/17 XL-UH240W _1-7.fm
Page 4
XL-UH240W
ENGLISH
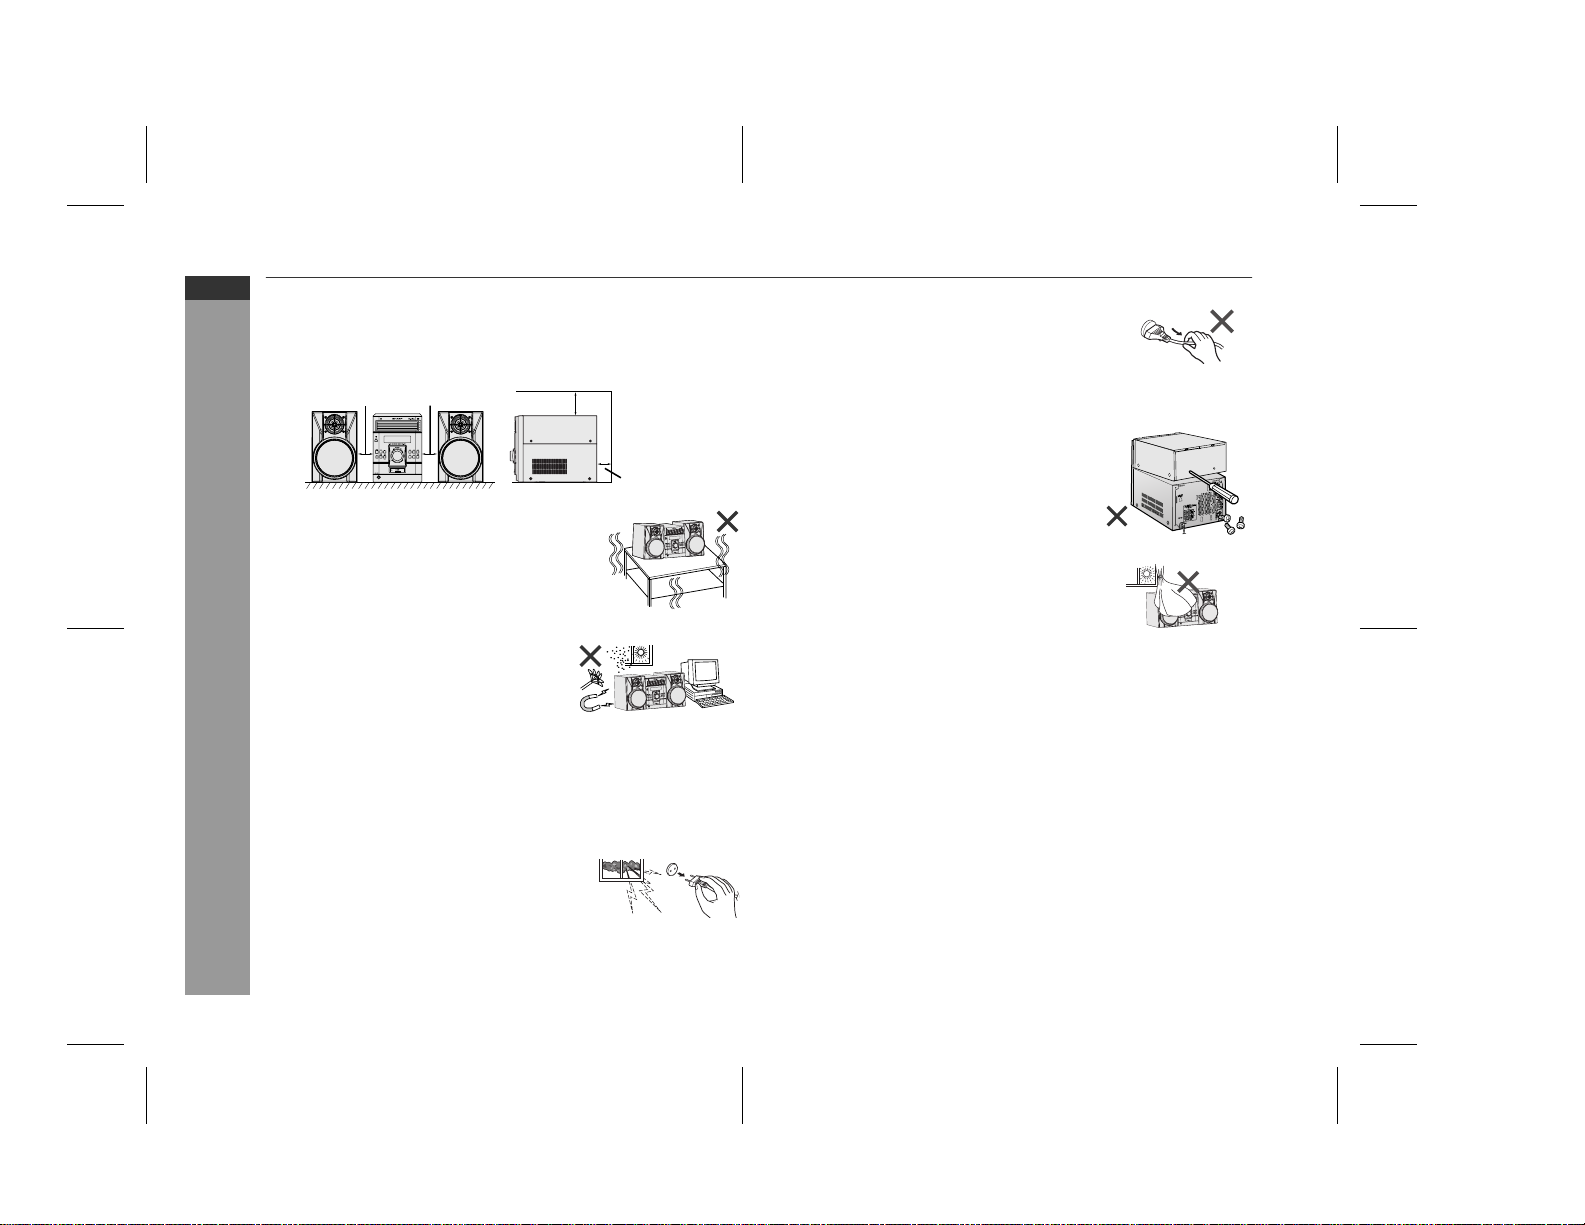
Precautions
General
Please ensure that the equipment is positioned in a well-ventilated
area and ensure that there is at least 10 cm (4") of free space
along the sides, top and back of the equipment.
Use the unit on a firm, level surface free from
vibration.
Keep the unit away from direct sunlight,
strong magnetic fields, excessive dust,
humidity and electronic/electrical equipment (home computers, facsimiles, etc.)
which generate electrical noise.
Do not place anything on top of the unit.
General Information
Do not expose the unit to moisture, to temperatures higher than
60
˚
C (140
˚
F) or to extremely low temperatures.
If your system does not work properly, disconnect the AC power
lead from the wall socket. Plug the AC power lead back in, and
then turn on your system.
In case of an electrical storm, unplug the
unit for safety.
E-3
Hold the AC power plug by the head when
removing it from the wall socket, as pulling
the lead can damage internal wires.
The AC power plug is used as disconnect
device and shall always remain readily
10 cm (4") 10 cm (4")
10 cm (4")
operable.
Do not remove the outer cover, as this
may result in electric shock. Refer
10 cm (4")
VIDEO
TUNER
/AUX
(BAND)
CD
USB
OPEN/
CLOSE
internal service to your local SHARP
service facility.
The ventilation should not be impeded by
covering the ventilation openings with
items, such as newspapers, tablecloths,
curtains, etc.
OPEN/
CLOSE
VIDEO
TUNER
/AUX
(BAND)
CD
USB
No naked flame sources, such as lighted candles, should be
placed on the apparatus.
OPEN/
CLOSE
VIDEO
TUNER
/AUX
(BAND)
CD
USB
Attention should be drawn to the environmental aspects of battery
disposal.
This unit should only be used within the range of 5˚C - 35˚C
(41˚F - 95˚F).
Warning:
The voltage used must be the same as that specified on this unit. Using this product with a higher voltage other than that which is specified is dangerous and may result in a fire or other type of accident
causing damage. SHARP will not be held responsible for any damage resulting from use of this unit with a voltage other than that which
is specified.
Volume control
The sound level at a given volume setting depends on speaker efficiency, location, and various other factors. It is advisable to avoid exposure to high volume levels. Do not turn the volume on to full at
switch on and listen to music at moderate levels.
03/12/17 XL-UH240W _1-7.fm
Page 5
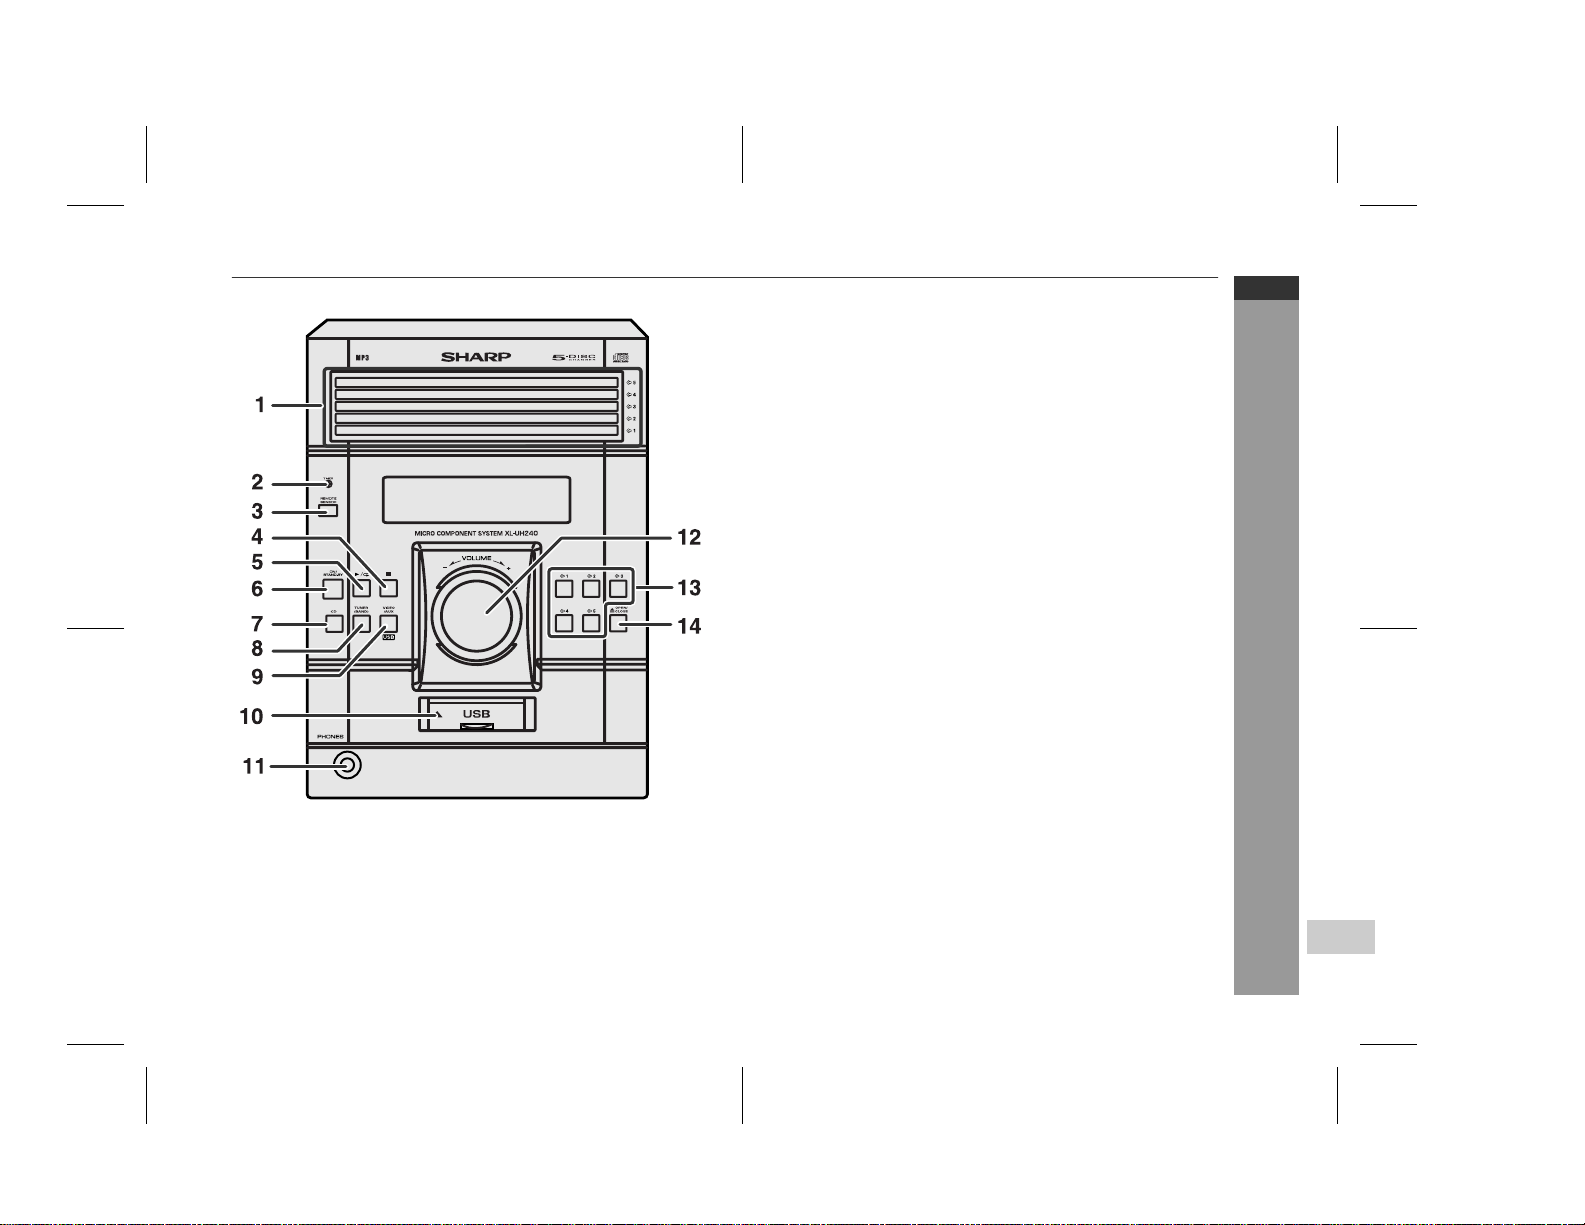
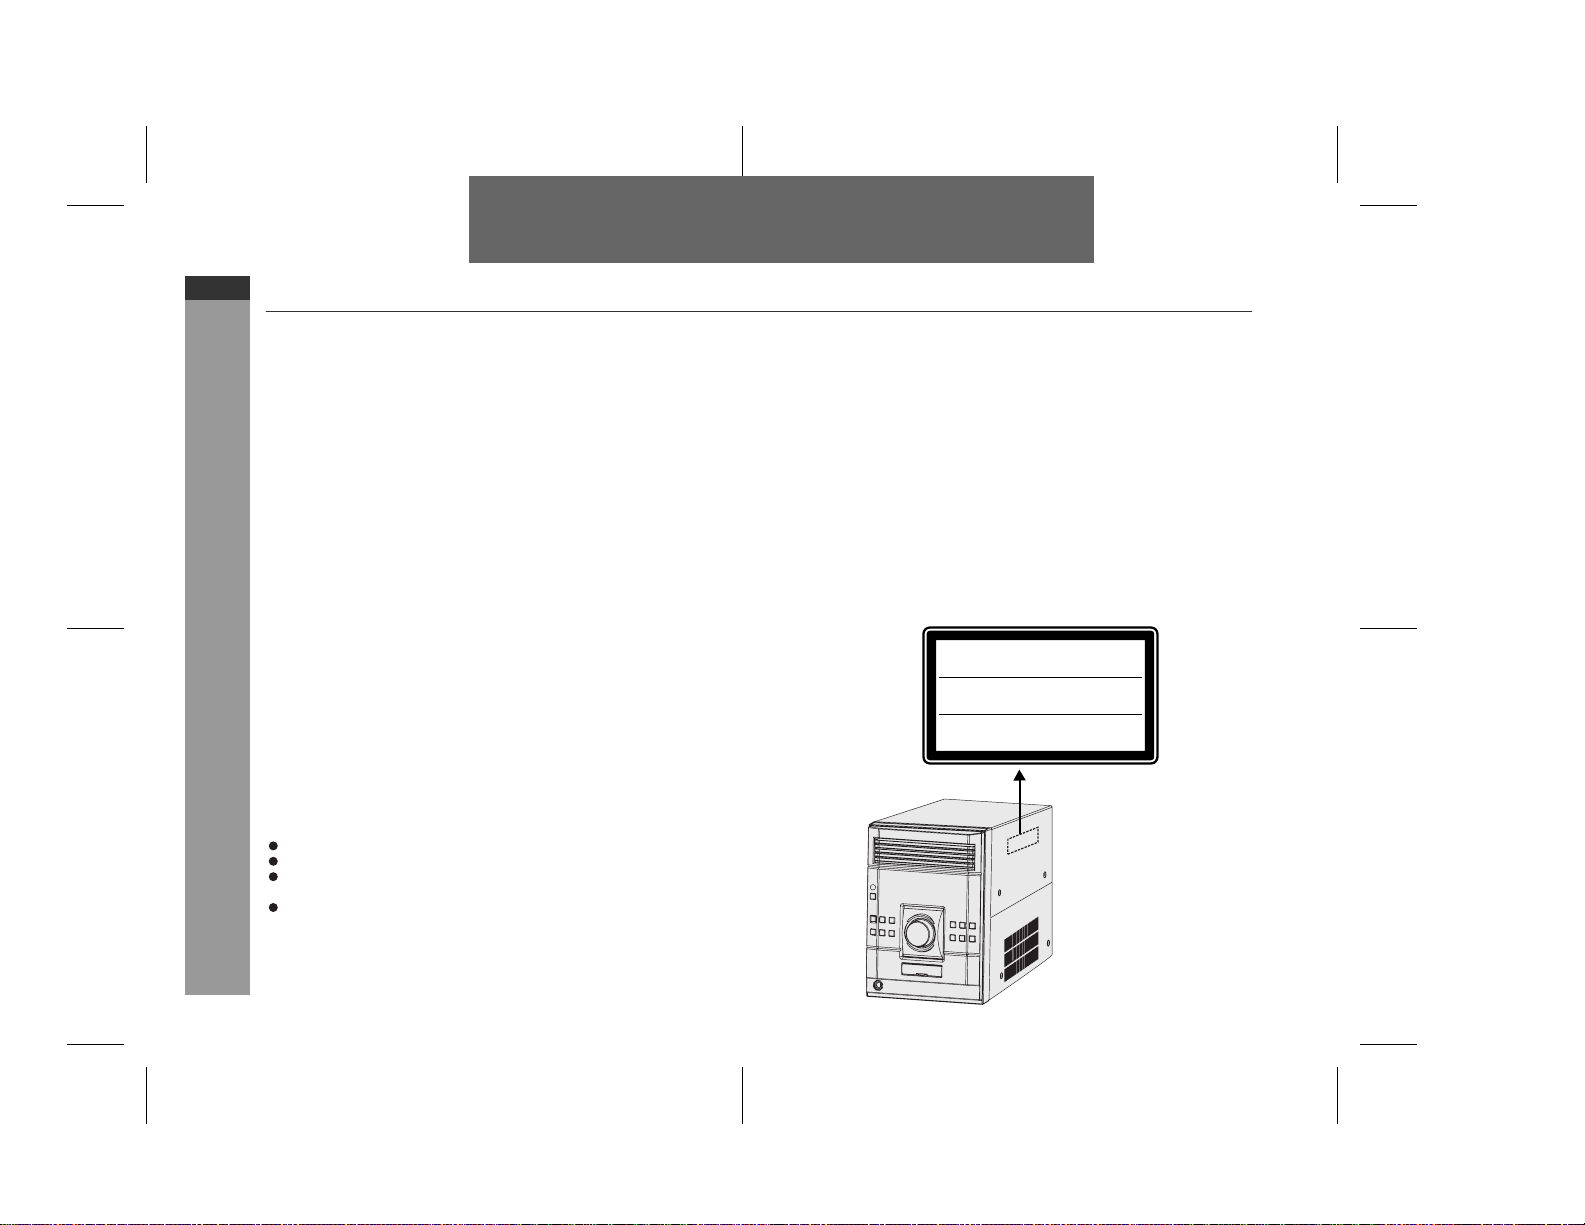
Controls and indicators
Front panel
Reference page
1. Disc Trays . . . . . . . . . . . . . . . . . . . . . . . . . . . . . . . . . . . . . . . 15
2. Timer Indicator . . . . . . . . . . . . . . . . . . . . . . . . . . . . . . . . . . . 27
3. Remote Sensor . . . . . . . . . . . . . . . . . . . . . . . . . . . . . . . . . . . 11
4. Disc or USB Stop Button . . . . . . . . . . . . . . . . . . . . . . . . . . . 16
5. Disc or USB Play or Repeat Button . . . . . . . . . . . . . . . 14, 17
6. ON/STAND-BY Button . . . . . . . . . . . . . . . . . . . . . . . . . . . . . 12
7. CD Button . . . . . . . . . . . . . . . . . . . . . . . . . . . . . . . . . . . . . . . 14
8. Tuner (Band) Button . . . . . . . . . . . . . . . . . . . . . . . . . . . . . . 24
9. Video/Auxiliary/USB Button . . . . . . . . . . . . . . . . . . . . . . . . 30
10. USB Terminal . . . . . . . . . . . . . . . . . . . . . . . . . . . . . . . . . . . . 21
11. Headphone Socket . . . . . . . . . . . . . . . . . . . . . . . . . . . . . . . . 30
12. Volume Control . . . . . . . . . . . . . . . . . . . . . . . . . . . . . . . . . . 12
13. Disc Number Select Buttons . . . . . . . . . . . . . . . . . . . . . . . . 14
14. Disc Tray Open/Close Button . . . . . . . . . . . . . . . . . . . . . . . 14
XL-UH240W
ENGLISH
General Information
03/12/17 XL-UH240W _1-7.fm
E-4
Page 6
5
XL-UH240W
ENGLISH
Controls and indicators (continued)
12 3 45 67
General Information
1
2
3
4
13 14
15
16
9 10 11
8
5
6
7
8
9
10
11
12
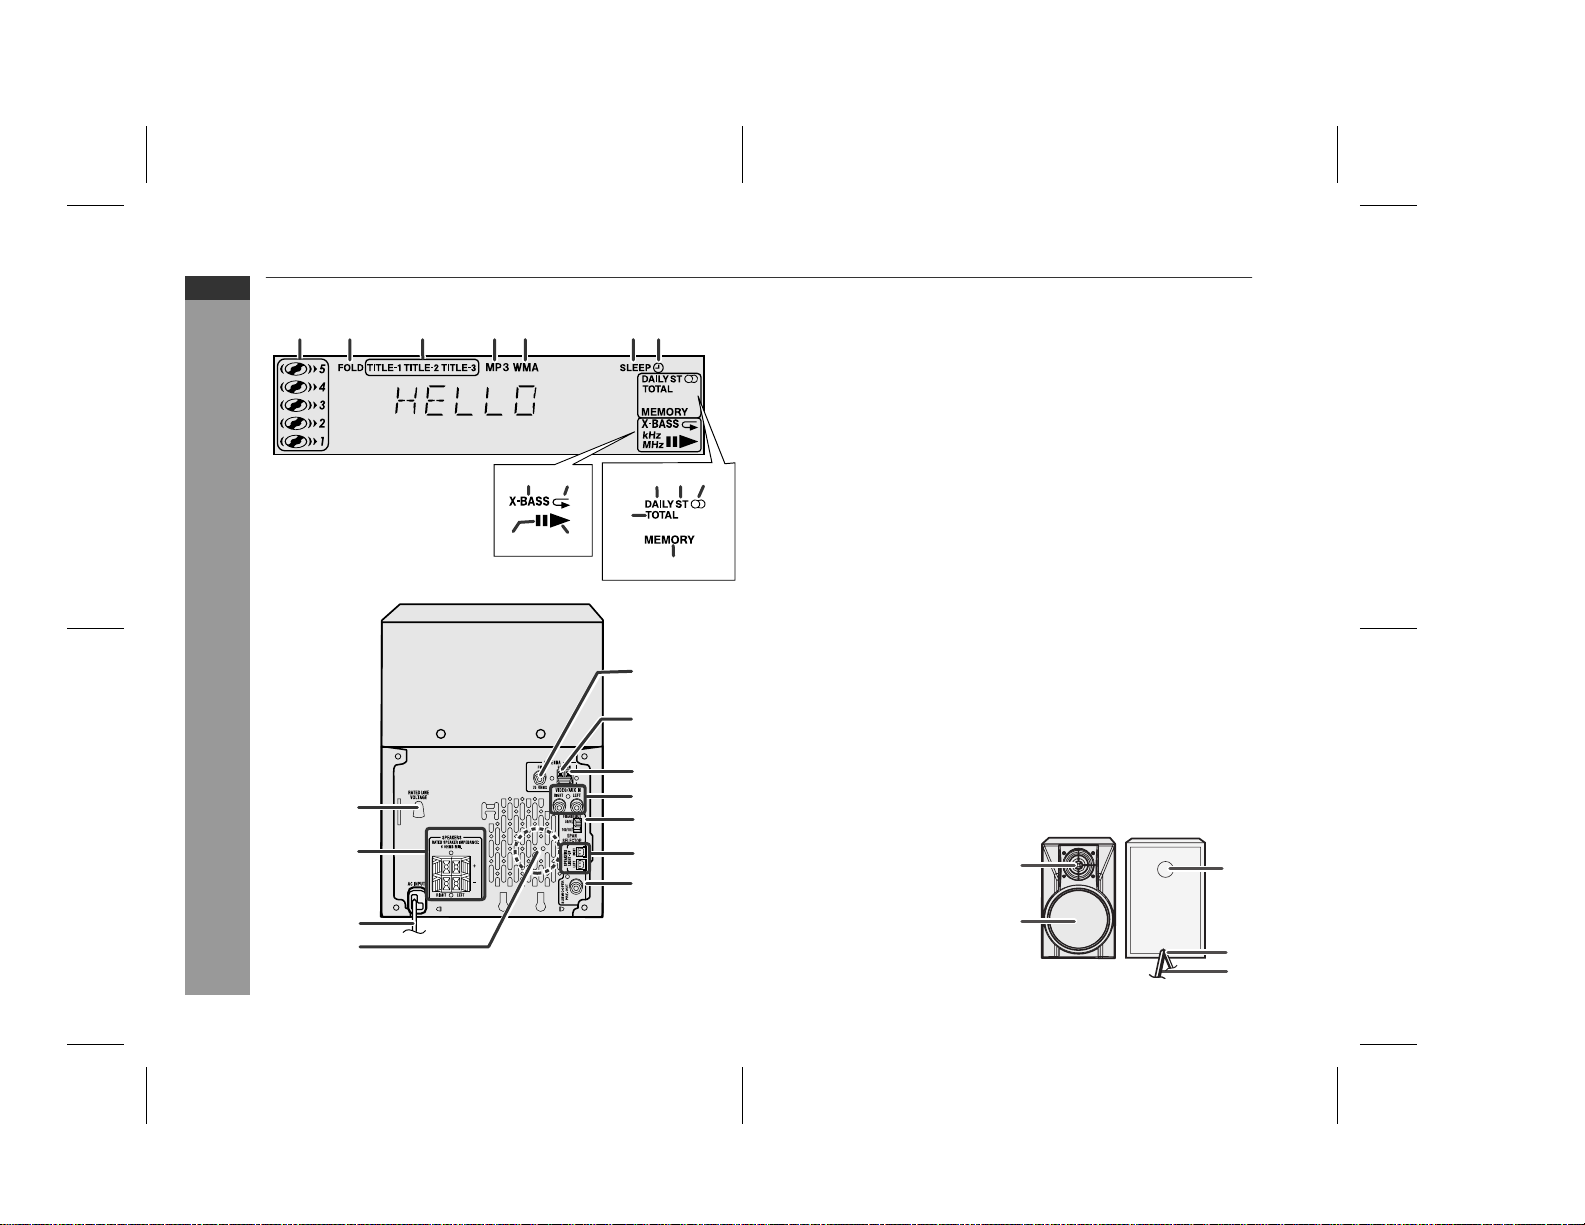
Display
1. Disc Number Indicators . . . . . . . . . . . . . . . . . . . . . . . . . . . . 18
2. MP3/WMA Folder Indicator . . . . . . . . . . . . . . . . . . . . . . . . . 20
3. MP3/WMA Title Indicators . . . . . . . . . . . . . . . . . . . . . . . . . . 20
4. MP3 Indicator . . . . . . . . . . . . . . . . . . . . . . . . . . . . . . . . . . . . 15
5. WMA Indicator . . . . . . . . . . . . . . . . . . . . . . . . . . . . . . . . . . . 15
6. Sleep Indicator . . . . . . . . . . . . . . . . . . . . . . . . . . . . . . . . . . . 29
7. Timer Play Indicator . . . . . . . . . . . . . . . . . . . . . . . . . . . . . . . 27
8. MP3/WMA Total Indicator . . . . . . . . . . . . . . . . . . . . . . . . . . 20
9. Daily Timer Indicator . . . . . . . . . . . . . . . . . . . . . . . . . . . . . . 27
10. FM Stereo Mode Indicator . . . . . . . . . . . . . . . . . . . . . . . . . . 24
11. FM Stereo Receiving Indicator . . . . . . . . . . . . . . . . . . . . . . 24
12. Memory Indicator . . . . . . . . . . . . . . . . . . . . . . . . . . . . . . . . . 18
13. Extra Bass Indicator . . . . . . . . . . . . . . . . . . . . . . . . . . . . . . . 12
14. Disc or USB Repeat Play Indicator . . . . . . . . . . . . . . . . 17, 23
15. Disc or USB Pause Indicator . . . . . . . . . . . . . . . . . . . . . . . . 16
16. Disc or USB Play Indicator . . . . . . . . . . . . . . . . . . . . . . 15, 23
Rear panel
1. AC Voltage Selector . . . . . . . . . . . . . . . . . . . . . . . . . . . . . . . 9
2. Speaker Terminals . . . . . . . . . . . . . . . . . . . . . . . . . . . . . . . . . 8
3. AC Power Lead . . . . . . . . . . . . . . . . . . . . . . . . . . . . . . . . . . . . 9
4. Cooling Fan . . . . . . . . . . . . . . . . . . . . . . . . . . . . . . . . . . . . . . . 9
5. FM 75 Ohms Aerial Socket . . . . . . . . . . . . . . . . . . . . . . . . . . 8
6. AM Aerial Earth Terminal . . . . . . . . . . . . . . . . . . . . . . . . . . . 8
7. AM Loop Aerial Terminal . . . . . . . . . . . . . . . . . . . . . . . . . . . . 8
8. Video/Auxiliary (Audio Signal) Input Sockets . . . . . . . . . . 30
9. Span Selector Switch . . . . . . . . . . . . . . . . . . . . . . . . . . . . . . 10
10. Speaker Light-up Sockets . . . . . . . . . . . . . . . . . . . . . . . . . . . 8
11. Subwoofer Pre-output Socket . . . . . . . . . . . . . . . . . . . . . . . 31
Reference page
Reference page
Speaker system
1.Tweeter
2.Woofer
3.Bass Reflex Duct
4.Speaker Wire
5.Speaker Light-up Wire
1
3
2
4
E-5
03/12/17 XL-UH240W _1-7.fm
Page 7
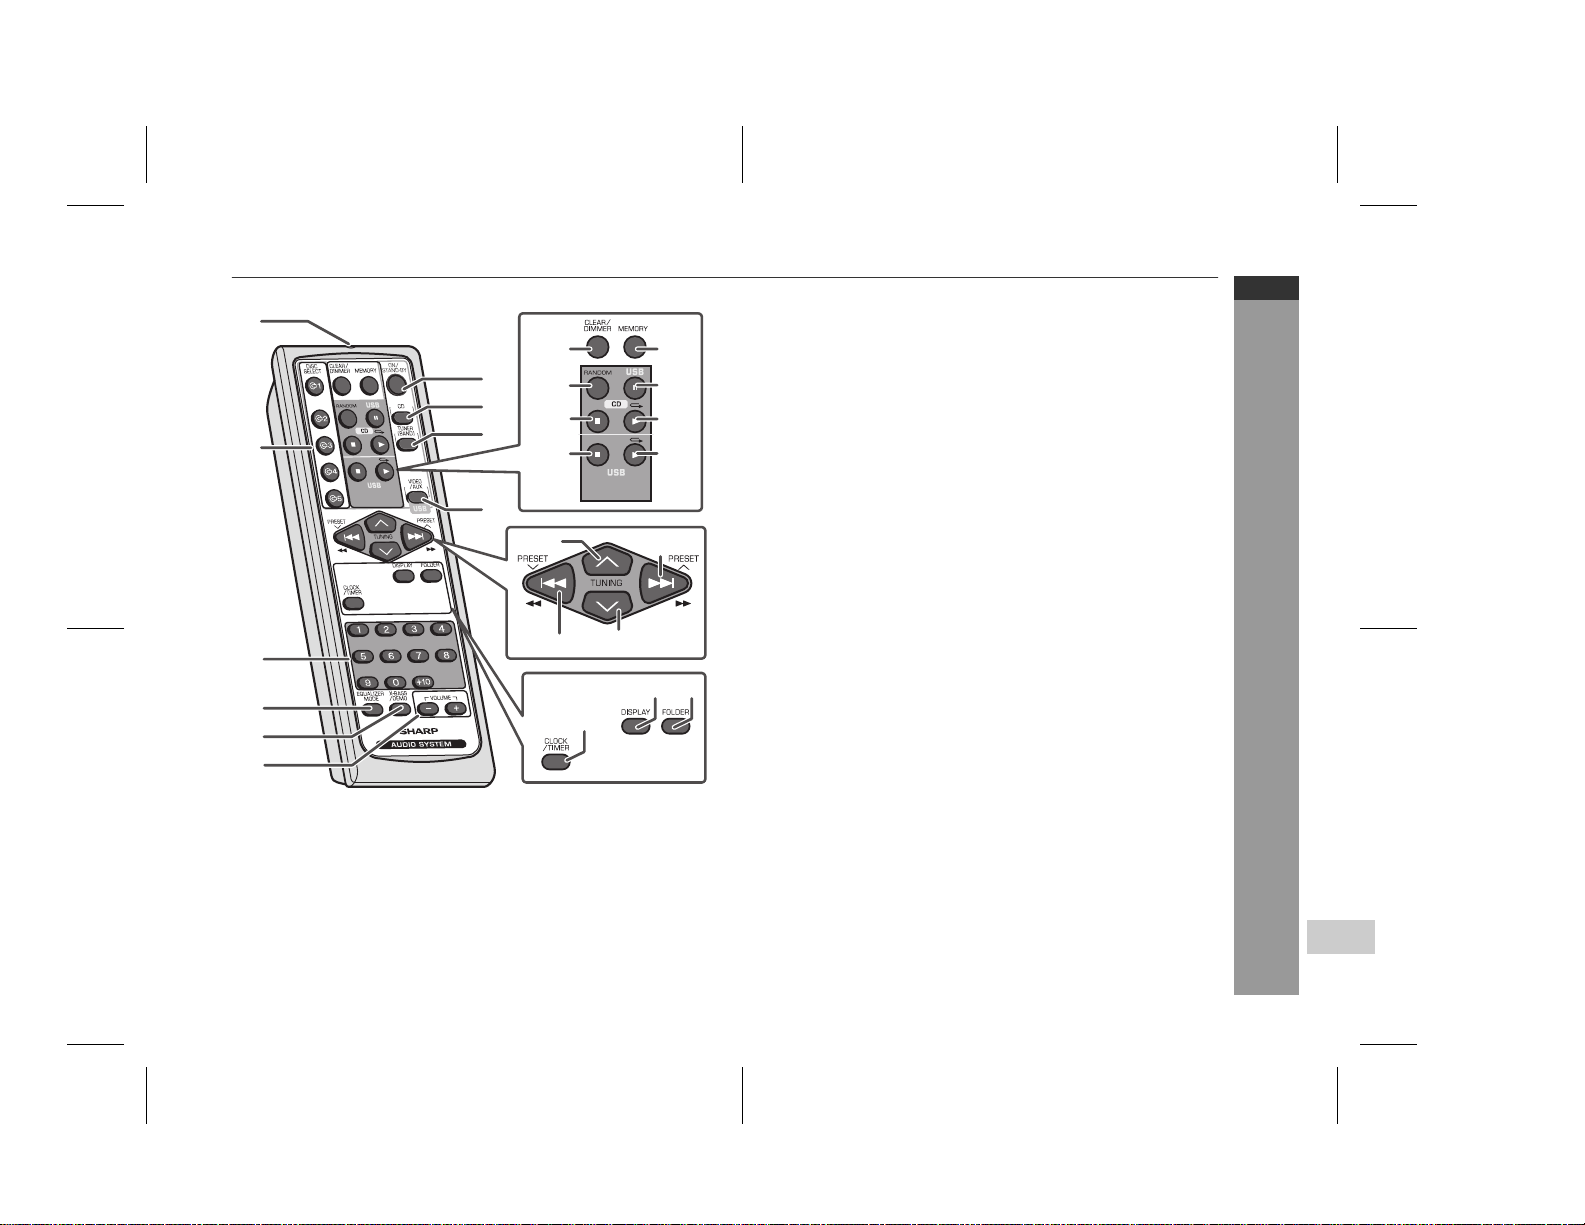
1
11
7
12
8
13
2
9
14
15
16
17
18
10
19 20
3
2221
23 24
4
25
5
6
Remote control
Reference page
1. Remote Control Transmitter . . . . . . . . . . . . . . . . . . . . . . . . 11
2. Disc Number Select Buttons . . . . . . . . . . . . . . . . . . . . . . . . 14
3. Disc Direct Search Buttons . . . . . . . . . . . . . . . . . . . . . . . . . 16
4. Equaliser Mode Select Button . . . . . . . . . . . . . . . . . . . . . . 12
5. Extra Bass/Demo Button . . . . . . . . . . . . . . . . . . . . . . . . . . . 12
6. Volume Up and Down Buttons . . . . . . . . . . . . . . . . . . . . . . 12
7. Power On/Stand-by Button . . . . . . . . . . . . . . . . . . . . . . . . . 12
8. CD Button . . . . . . . . . . . . . . . . . . . . . . . . . . . . . . . . . . . . . . . 14
9. Tuner (Band) Button . . . . . . . . . . . . . . . . . . . . . . . . . . . . . . 24
10. Video/Auxiliary/USB Button . . . . . . . . . . . . . . . . . . . . . . . . 21
11. Disc Clear/Dimmer Button . . . . . . . . . . . . . . . . . . . . . . 12, 18
12. Disc Random Button . . . . . . . . . . . . . . . . . . . . . . . . . . . 17, 23
13. Disc Stop Button . . . . . . . . . . . . . . . . . . . . . . . . . . . . . . . . . 16
14. USB Stop Button . . . . . . . . . . . . . . . . . . . . . . . . . . . . . . . . . 21
15. Memory Button . . . . . . . . . . . . . . . . . . . . . . . . . . 13, 18, 25, 29
16. Disc/USB Pause Button . . . . . . . . . . . . . . . . . . . . . . . . . . . . 16
17. Disc Play or Repeat Button . . . . . . . . . . . . . . . . . . . . . . 14, 17
18. USB Play or Repeat Button . . . . . . . . . . . . . . . . . . . . . . . . . 21
19. Tuning Up Button . . . . . . . . . . . . . . . . . . . . . . . . . . . . . . . . 24
20. CD Track Up or Fast Forward, Tuner Preset Up,
Time Up Button . . . . . . . . . . . . . . . . . . . . . . 13, 21, 25, 26, 29
21. CD Track Down or Fast Reverse, Tuner Preset Down,
Time Down Button . . . . . . . . . . . . . . . . . . . 13, 21, 25, 26, 29
22. Tuning Down Button . . . . . . . . . . . . . . . . . . . . . . . . . . . . . . 24
23. Display Button . . . . . . . . . . . . . . . . . . . . . . . . . . . . . . . . . . . 21
24. Folder Button . . . . . . . . . . . . . . . . . . . . . . . . . . . . . . . . . 19, 21
25. Clock/Timer Button . . . . . . . . . . . . . . . . . . . . . . . . . 13, 26, 29
XL-UH240W
ENGLISH
General Information
03/12/17 XL-UH240W _1-7.fm
E-6
Page 8
XL-UH240W
ENGLISH
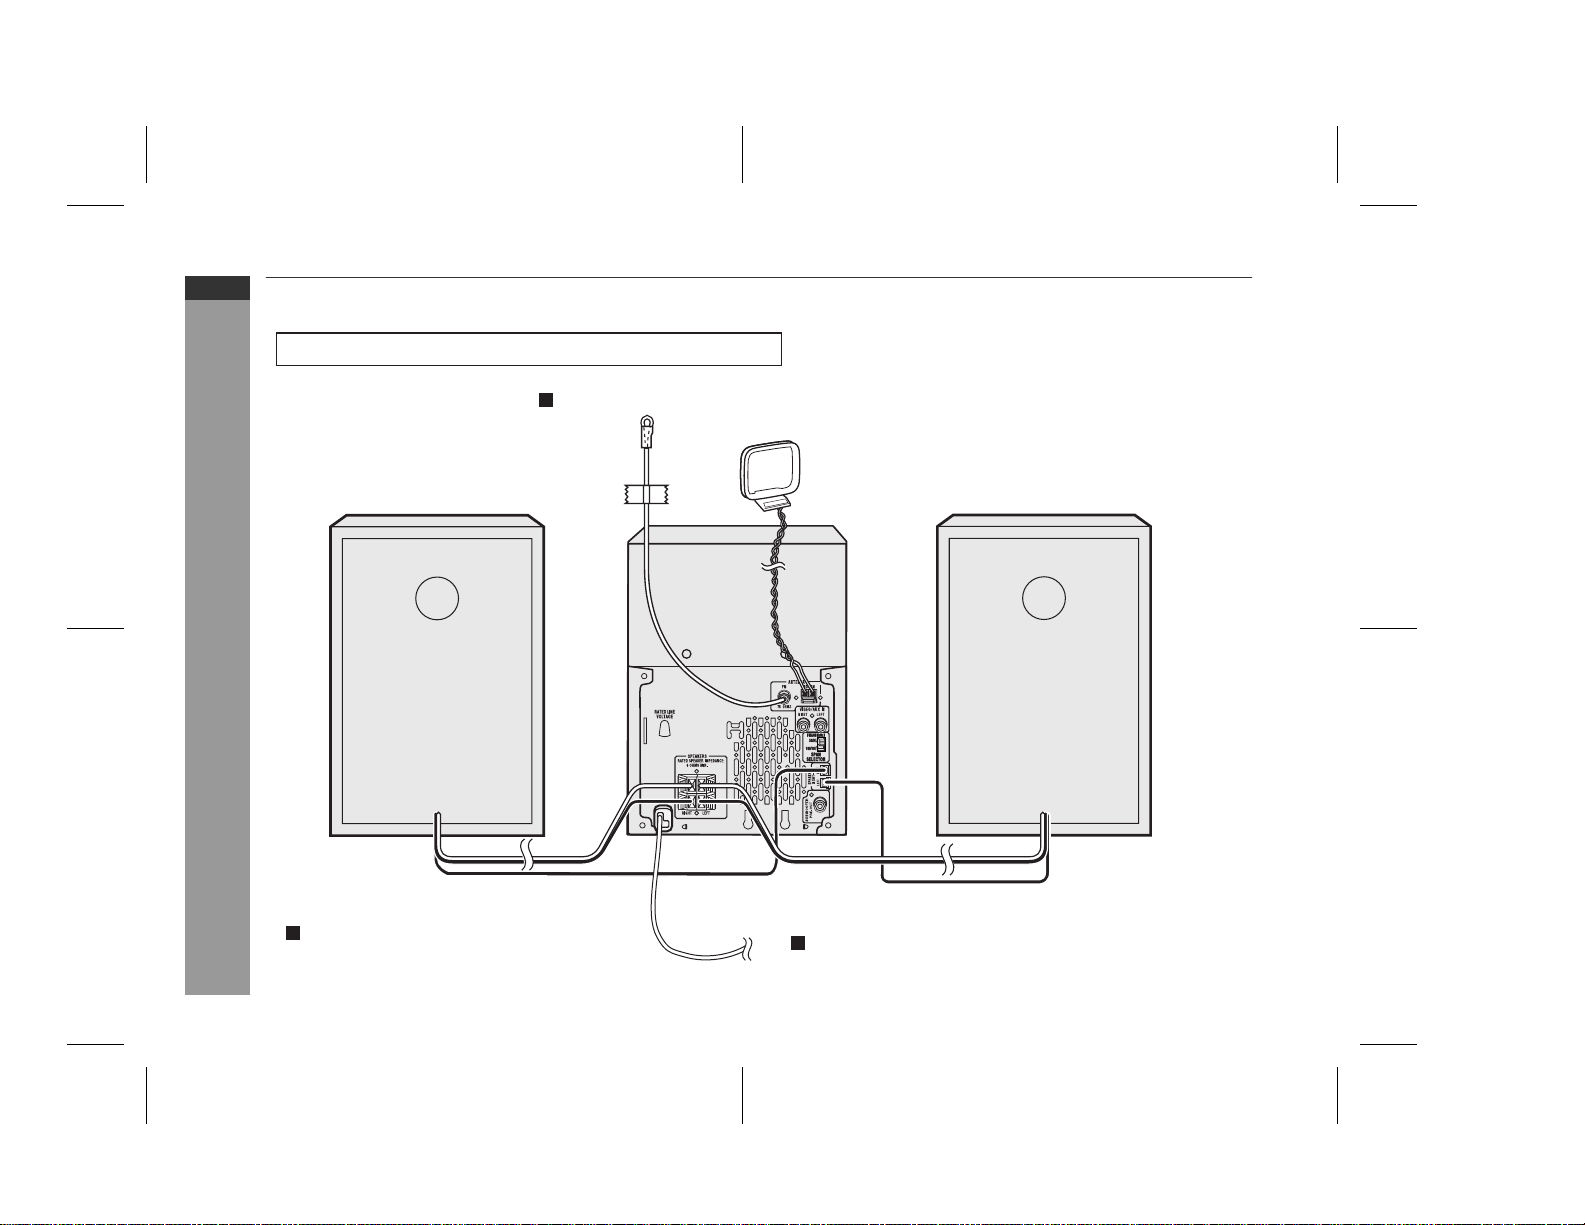
System connections
Make sure to unplug the AC power lead before any connections
Make sure to unplug the AC power lead before any connections
Preparation for Use
Aerial connection (see page 8)
Aerial connection (see page 8)
AM loop aerialFM aerial
AM loop aerialFM aerial
Left speakerRight speaker
Left speakerRight speaker
E-7
Speaker connection (see page 8)
Speaker connection (see page 8)
Speaker light-up wireSpeaker light-up wire
Speaker light-up wireSpeaker light-up wire
AC power connection (see page 9)
AC power connection (see page 9)
03/12/17 XL-UH240W _1-7.fm
Page 9
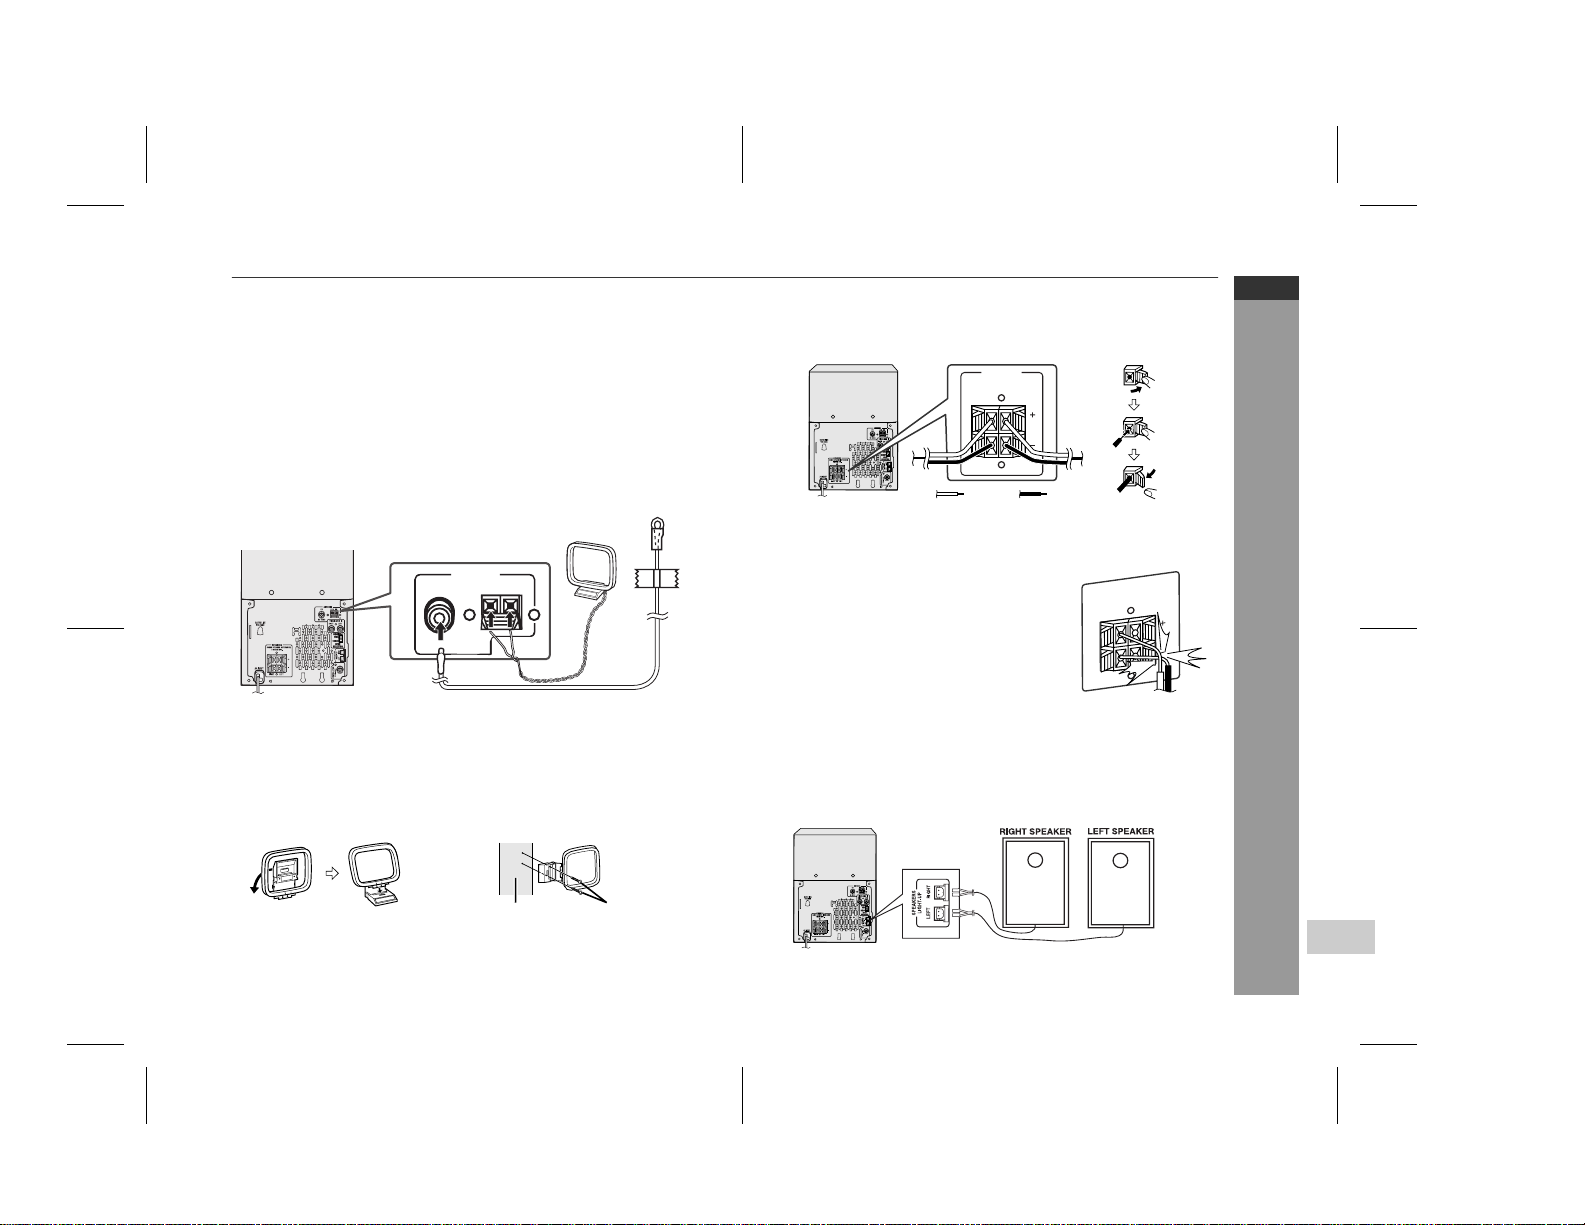
Aerial connection
Supplied FM aerial:
Connect the FM aerial wire to the FM 75 OHMS socket and position
the FM aerial wire in the direction where the strongest signal can be
received.
Supplied AM loop aerial:
Connect the AM loop aerial to the AM and GND terminals. Position
the AM loop aerial for optimum reception. Place the AM loop aerial
a shelf, etc., or attach it to a stand or a wall with screws (not
on
supplied).
ANTENNA
FM
GND
AM
75 OHMS
Note:
Placing the aerial on the unit or near the AC power lead may cause
noise pickup. Place the aerial away from the unit for better reception.
Installing the AM loop aerial:
< Assembling > < Attaching to the wall >
Speaker connection
Connect the black wire to the minus (-) terminal, and the red wire to
the plus (+) terminal.
SPEAKERS
RATED SPEAKER IMPEDANCE:
6 OHMS MIN.
RIGHT
LEFT
BlackRed
Caution:
Use speakers with an impedance of 6 ohms or more, as lower
impedance speakers can damage the unit.
Do not mistake the right and the left
channels. The right speaker is the one on the
right side when you face the unit.
SPEAKERS
RATED SPEAKER IMPEDANCE:
6 OHMS MIN.
Do not let the bare speaker wires touch
each other.
Do not allow any objects to fall into or to be
placed in the bass reflex ducts.
Do not stand or sit on the speakers. You may
be injured.
LEFT
RIGHT
Incorrect
Speaker Light-Up connection
Connect the speaker light-up wires to the SPEAKERS LIGHT-UP
sockets for speaker illumination. To turn off the speaker light-up
feature, press the CLEAR/DIMMER button on the remote control for
2 seconds or more.
XL-UH240W
ENGLISH
Preparation for Use
Wall Screws (not supplied)
Note:
Placing the right speaker light-up wire to the RIGHT socket and the
left speaker light-up wire to the LEFT socket.
XL-UH240W_8-16.fm
E-8
Page 10
2
XL-UH240W
ENGLISH
System connections (continued)
Preparation for Use
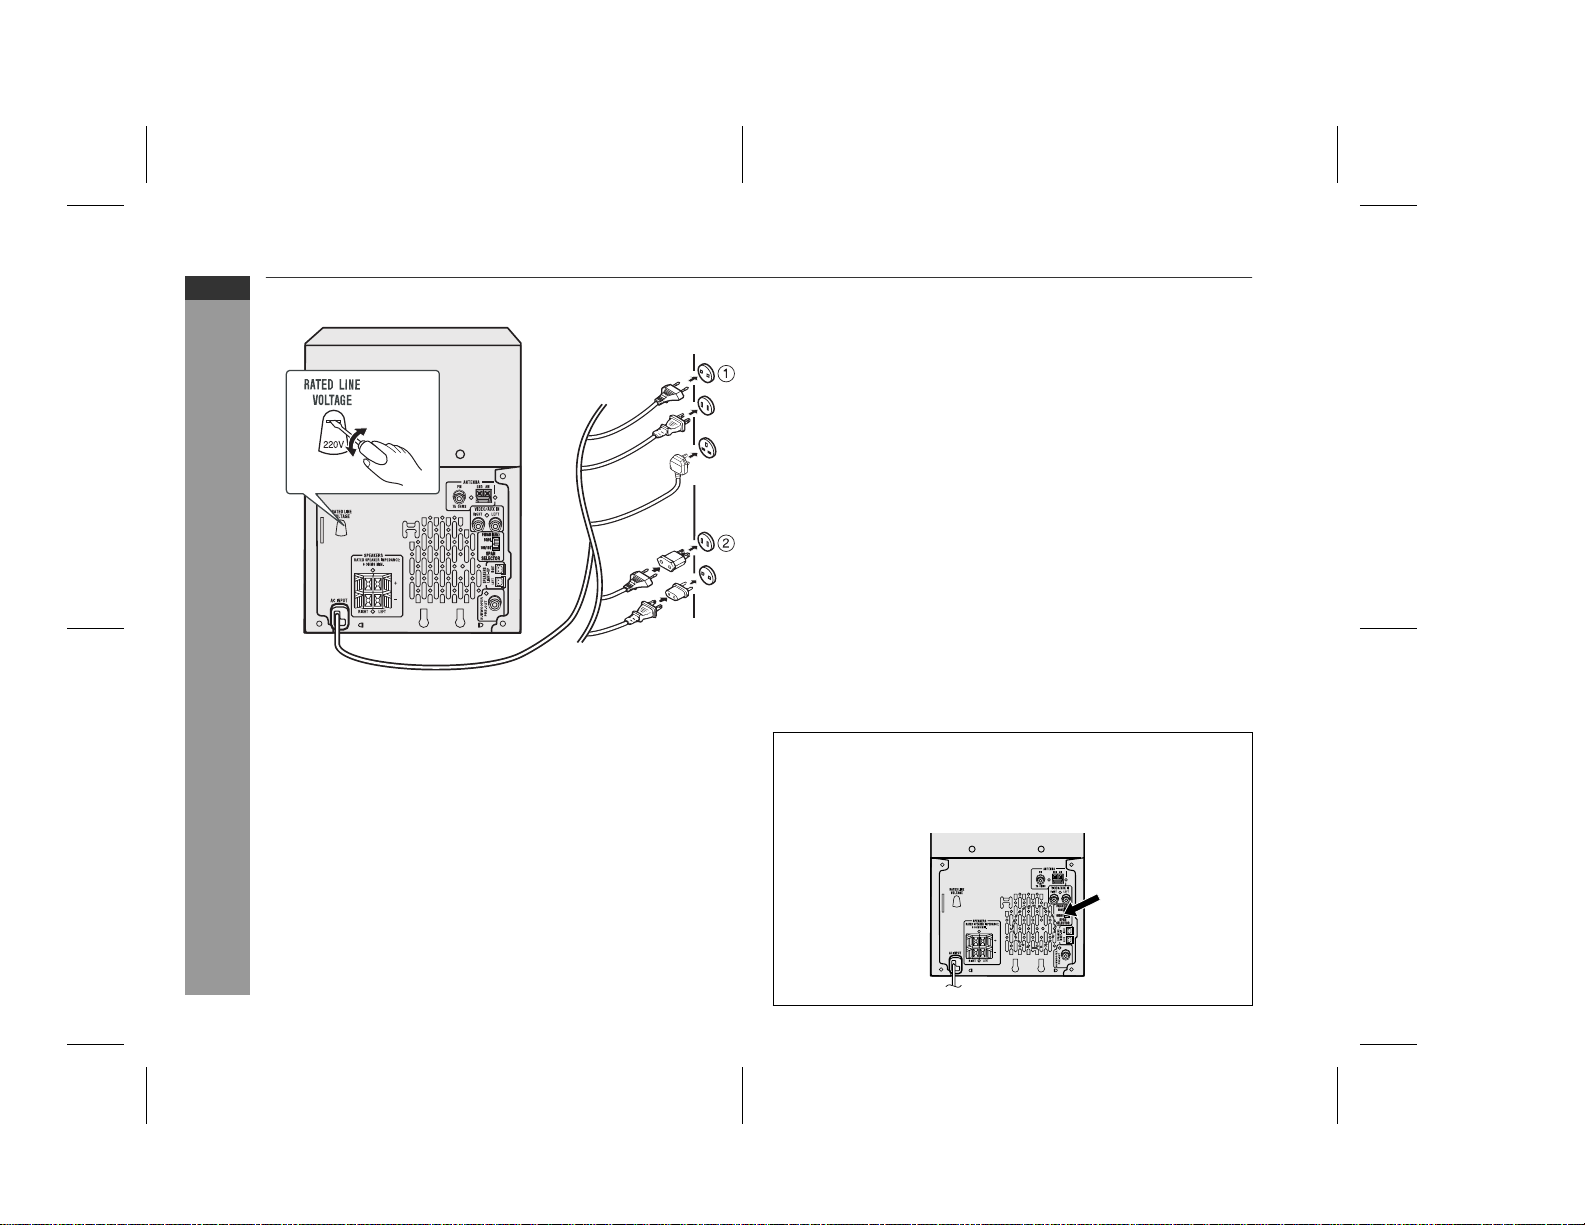
Setting the AC voltage selector
Check the setting of the AC voltage selector located on the rear
panel before plugging the unit into the wall socket. If necessary,
adjust the selector to correspond to the AC power voltage used in
your area.
Turn the selector with a screwdriver until the appropriate voltage number appears in the window (110 V, 127 V, 220V or 230 V240 V AC).
Connecting the AC power lead
After checking all the connections have been made correctly, plug
the AC power lead of this unit into the wall socket. If you plug the unit
first, the unit will enter the demonstration mode (see page 10).
Notes:
The unit will start the tape initialisation when plugged into the wall
socket. During this process, initialising sound will be heard and
the unit cannot be turned on. Wait until the process is finished.
Unplug the AC power lead from the wall socket if the unit will not
be in use for a prolonged period of time.
AC Plug Adaptor
In areas (or countries) where the wall socket as shown in illustration
is used, connect the unit using the AC plug adaptor supplied with
the unit, as illustrated. The AC plug adaptor is not included in areas
where the wall socket and AC power plug can be directly connected
(see illustration 1 ).
Cooling fan:
The main unit is built with a cooling fan at the rear of the unit for improved cooling. Please do not cover the opening of the fan with any
obstacles, as this will block proper ventilation.
E-9
XL-UH240W_8-16.fm
Page 11
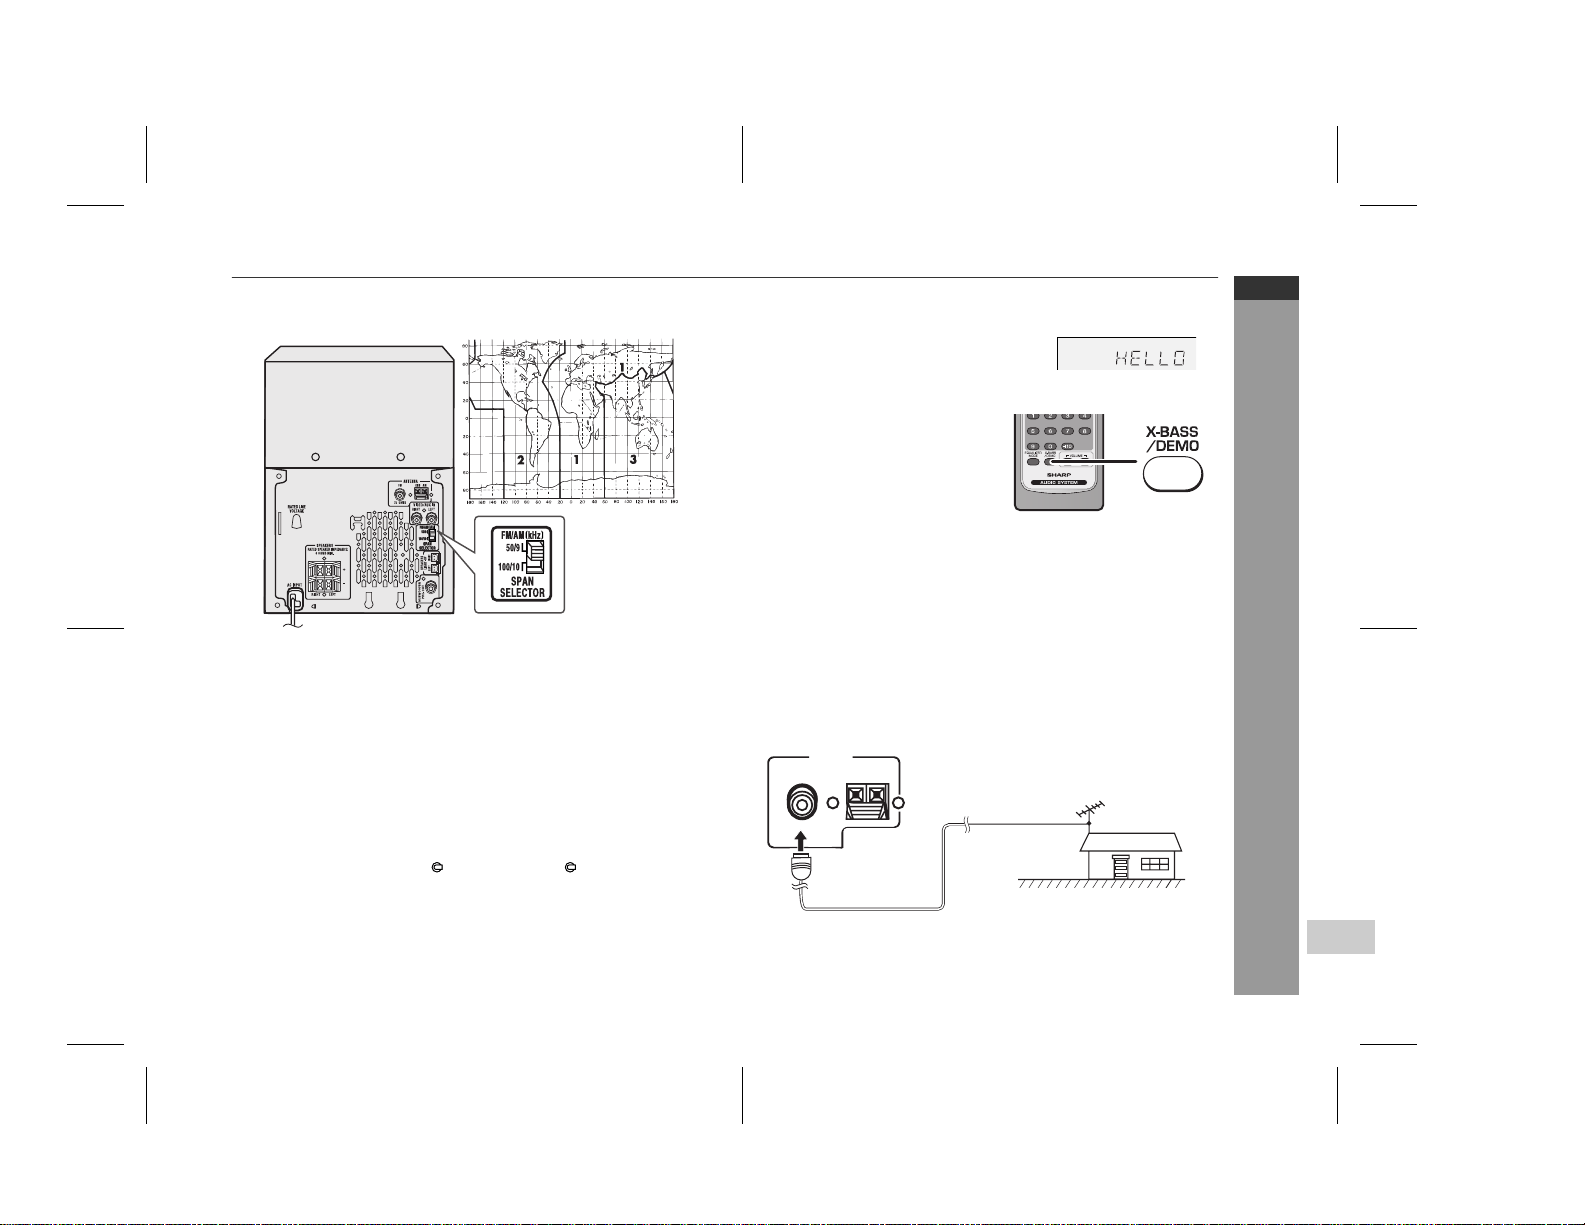
Setting the FM/AM span selector
The International Telecommunication Union (ITU) has established
that member countries should maintain either a 100 kHz or a 50 kHz
interval between broadcasting frequencies of FM stations and 10
kHz or 9 kHz for AM station. The illustration shows the 50/9 kHz
zones (regions 1 and 3), and the 100/10 kHz zone (region 2).
Before using the unit, set the SPAN SELECTOR switch (on the rear
panel) to the interval (span) of your area.
To change the tuning zone:
1 Press the ON/STAND-BY button to enter the stand-by mode.
2 Set the SPAN SELECTOR switch (on the rear panel) as follows.
For 50 kHz FM interval (9 kHz in AM) → 50/9
For 100 kHz FM interval (10 kHz in AM) → 100/10
3 Whilst pressing down the 1 button and the 5 button, press the
ON/STAND-BY button until "CLEAR ALL" appears.
Caution:
This operation will erase all data stored in memory including clock,
timer settings, tuner preset, and CD programme.
Demonstration mode
The first time the unit is plugged in, the
unit will enter the demonstration mode.
You will see words scroll.
To cancel the demonstration mode:
When the unit is in the power standby mode (demonstration mode),
press the X-BASS/DEMO button.
The demonstration mode will be
cancelled and the display will
disappear.
To return to the demonstration mode:
When the unit is in the power stand-by mode, press the X-BASS/
DEMO button again.
Note:
When the power is on, the X-BASS/DEMO button can be used to select the extra bass mode.
External FM aerial
Use an external FM aerial if you require better reception.
Consult your dealer.
ANTENNA
FM
GND
AM
75 OHMS
75 ohms
coaxial cable
Note:
When an external FM aerial is used, disconnect the supplied FM
aerial wire.
External FM
aerial
XL-UH240W
ENGLISH
Preparation for Use
XL-UH240W_8-16.fm
E-10
Page 12
XL-UH240W
ENGLISH
Remote control
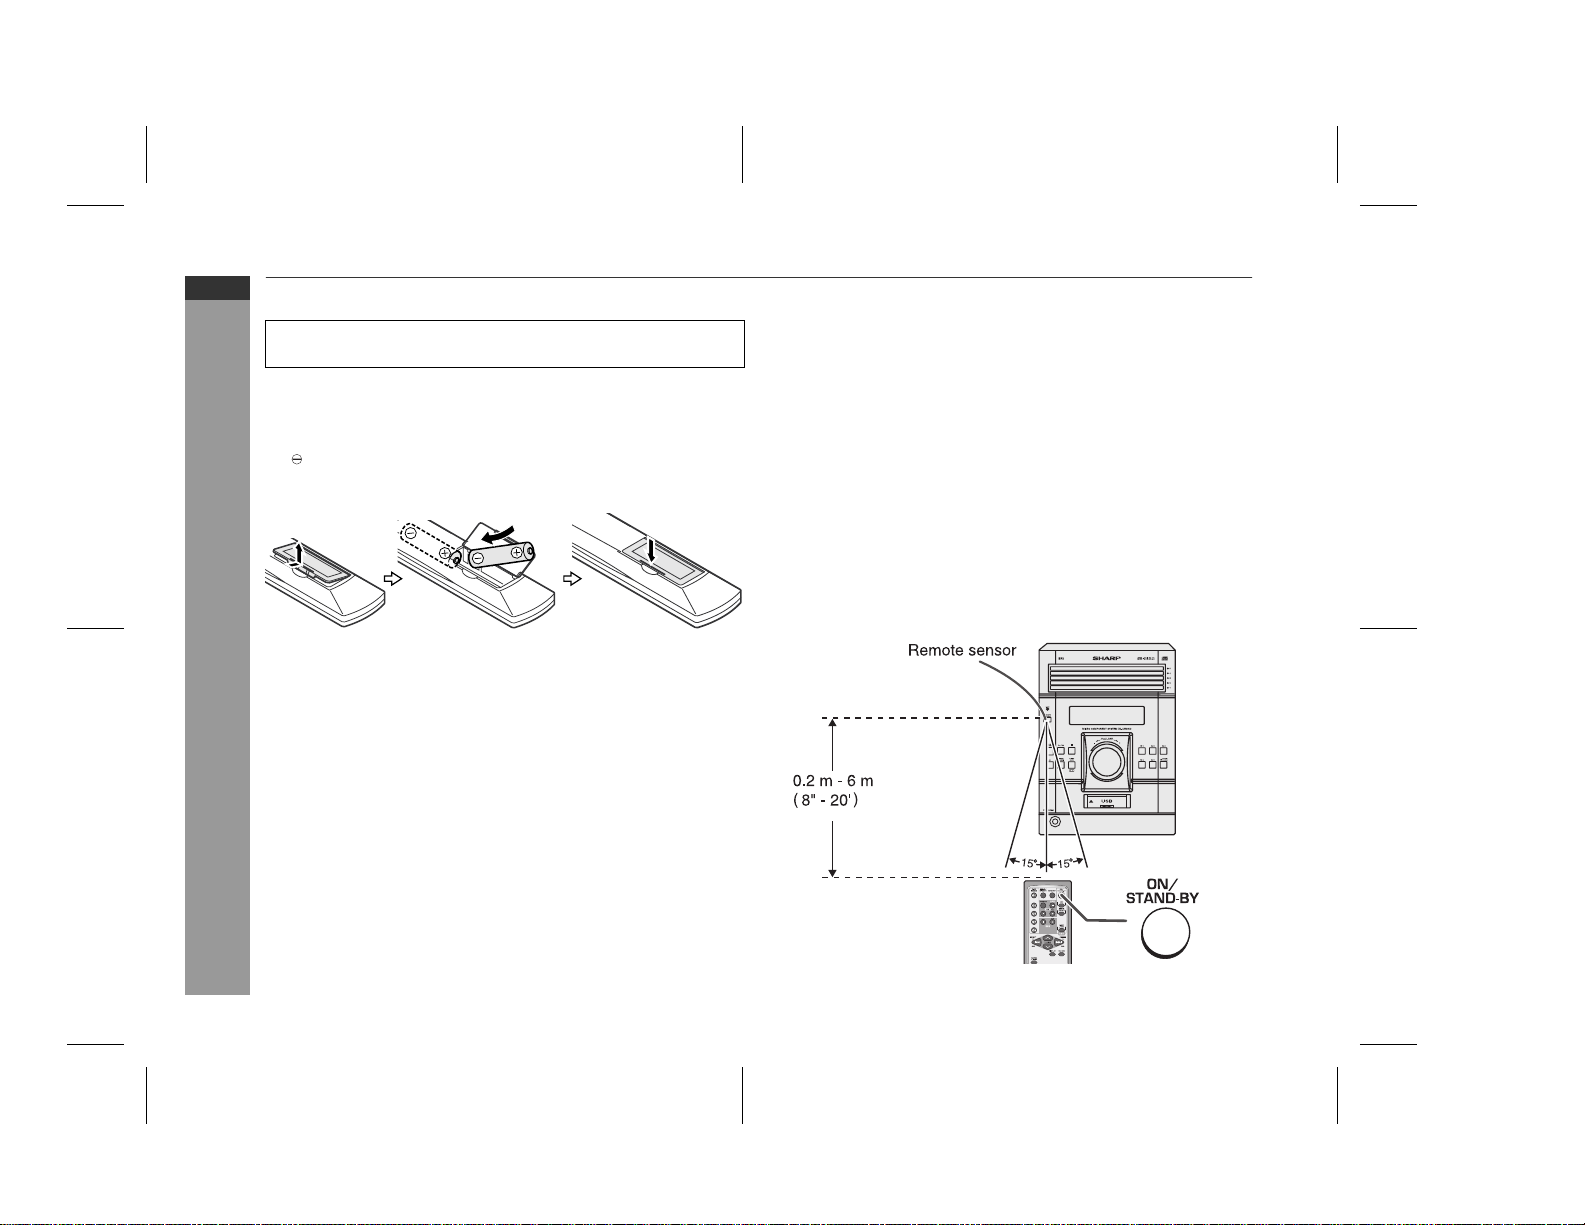
Battery installation
Use 2 "AA" size batteries (UM/SUM-3, R6, HP-7 or similar).
Batteries are not included.
1 Open the battery cover.
2 Insert the batteries according to the direction indicated in
the battery compartment.
When inserting or removing the batteries, push them towards the
battery terminals.
3 Close the cover.
Precautions for battery use:
Replace all old batteries with new ones at the same time.
Do not mix old and new batteries.
Remove the batteries if the unit will not be used for long periods
Preparation for Use
of time. This will prevent potential damage due to battery leakage.
Caution:
Do not use rechargeable batteries (nickel-cadmium battery, etc.).
Installing the batteries incorrectly may cause the unit to
malfunction.
Battery removal:
Open the battery cover and pull up the battery to take out.
Notes concerning use:
Replace the batteries if the operating distance is reduced or if the
operation becomes erratic.
Periodically clean the transmitter on the remote control and the
sensor on the unit with a soft cloth.
Exposing the sensor on the unit to strong light may interfere with
operation. Change the lighting or the direction of the unit if this
occurs.
Keep the remote control away from moisture, heat, shock, and
vibrations.
Test of the remote control
Check the remote control after checking all the connections (see
pages 7 - 10).
Point the remote control directly at the remote sensor on the unit.
The remote control can be used within the range shown below:
Press the ON/STAND-BY button. Does the power turn on? Now, you
can enjoy music.
E-11
XL-UH240W_8-16.fm
Page 13
j
General control
ON/
STAND-BY
To turn the power on
Press the ON/STAND-BY button to turn the power on.
After use:
Press the ON/STAND-BY button to enter the power stand-by mode.
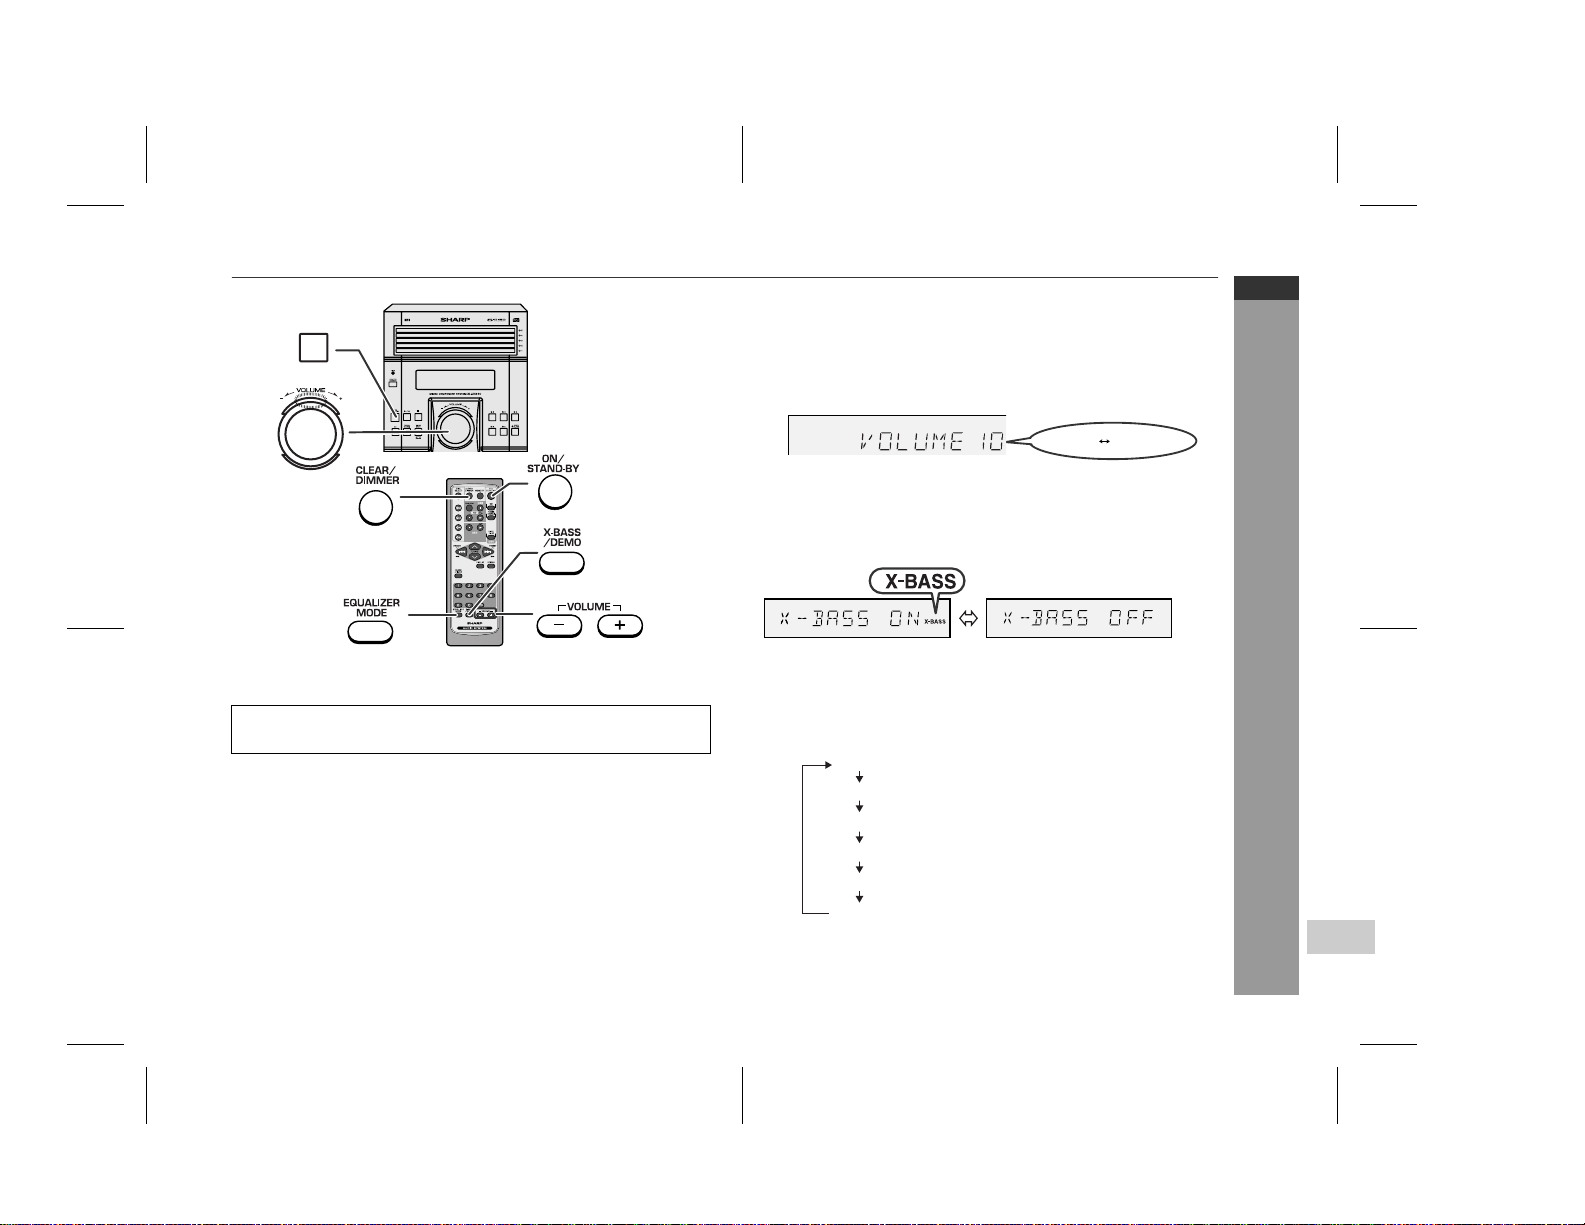
Illumination light control
When the power is turned on, ring around the volume control light
up. To turn on/off the light, hold down the CLEAR/DIMMER button
on the remote control for more than 2 seconds.
Speaker light up control
The speaker will light up according to the level of the music source
played back. To turn on/off the light, hold down the CLEAR/DIMMER
button on the remote control for 2 seconds or more.
Volume auto fade-in
If you turn off and on the main unit with the volume set to 27 or
higher, the volume starts at 16 and fades in to the last set level.
Volume control
Main unit operation:
When the VOLUME control is turned clockwise, the volume will
increase. When it is turned anti-clockwise, the volume will decrease.
Remote control operation:
Press the VOLUME (+ or -) button to increase or decrease the volume.
.....
30 MAXIMUM0
Bass control
When the power is first turned on, the unit will enter the extra bass
mode which emphasises the bass frequencies, and "X-BASS" will
appear. To cancel the extra
button on the remote control
bass mode, press the X-BASS/DEMO
.
Equaliser
When the EQUALIZER MODE button is pressed, the current mode
setting will be displayed. To change to a different mode, press the
EQUALIZER MODE button repeatedly until the desired sound mode
appears.
FLAT No equalisation.
ROCK For rock music.
CLASSIC For classical music.
POPS For pop music.
VOCAL Vocals are enhanced.
JAZZ For
azz.
XL-UH240W
ENGLISH
Basic Operation
E-12
XL-UH240W_8-16.fm
Page 14
XL-UH240W
ENGLISH
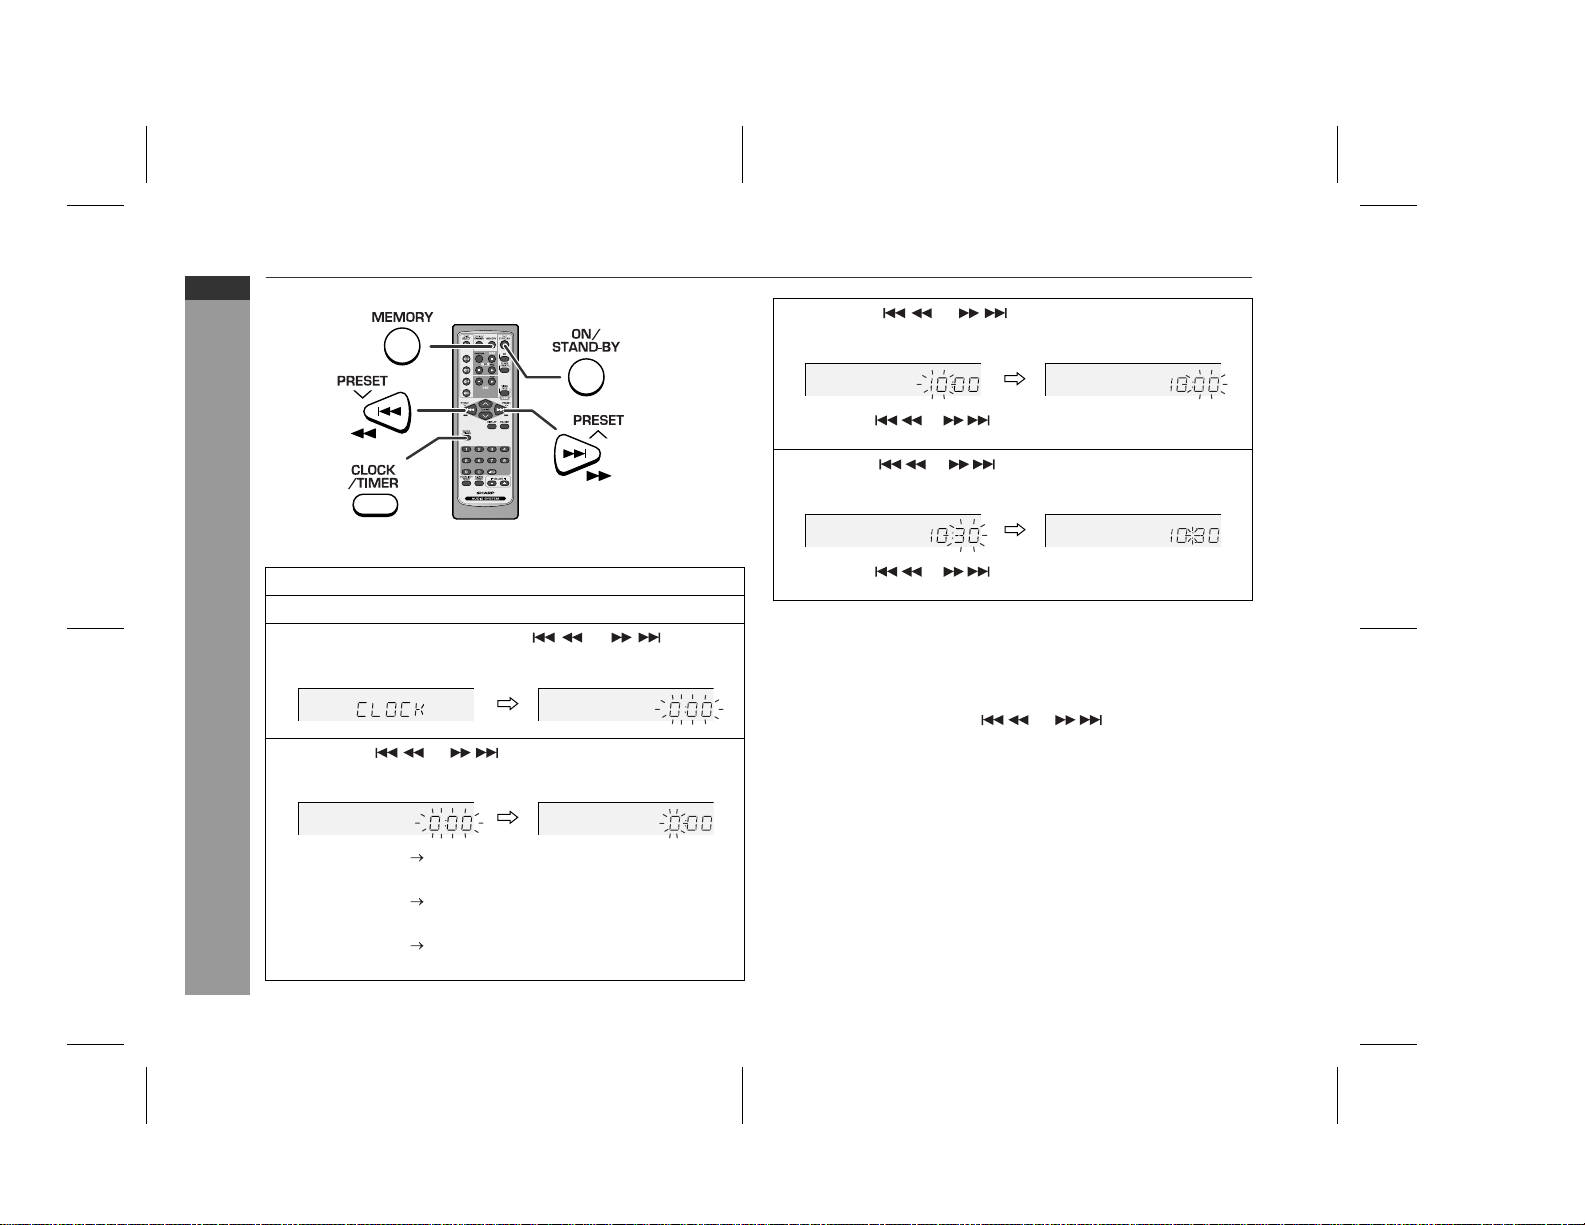
Setting the clock (Remote Control only)
In this example, the clock is set for the 24-hour (0:00) display.
1
Press the ON/STAND-BY button to turn the power on.
2
Press the CLOCK/TIMER button.
3
Within 10 seconds, press the or button to
select "CLOCK", and press the MEMORY button.
Basic Operation
4
Press the or button to select 24-hour or 12hour display and then press the MEMORY button.
"0:00" The 24-hour display will appear.
(0:00 - 23:59)
"AM 12:00" The 12-hour display will appear.
(AM 12:00 - PM 11:59)
"AM 0:00" The 12-hour display will appear.
(AM 0:00 - PM 11:59)
5
Press the or button to adjust the hour and
then press the MEMORY button.
Press the or button once to advance the time by
1 hour. Hold it down to advance continuously.
6
Press the or button to adjust the minutes and
then press the MEMORY button.
Press the or button once to advance the time by
1 minute. Hold it down to change the time in 5-minute intervals.
To confirm the time display:
[When the unit is in the stand-by mode]
Press the CLOCK/TIMER button.
The time display will appear for about 10 seconds.
[When the power is on]
Press the CLOCK/TIMER button.
Within 10 seconds, press the or button to display the
time.
The time display will appear for about 10 seconds.
Note:
The "CLOCK" will appear or time will flash to confirm the time
display when the AC power supply is restored after a power failure
or unplugging the unit. If incorrect, readjust the clock as follows.
To readjust the clock:
Perform "Setting the clock" from step 1. If the "CLOCK" does not
appear in step 3, step 4 (for selecting the 24-hour or 12-hour
display) will be skipped.
To change the 24-hour or 12-hour display:
1 Clear all the programmed contents. [Refer to "Clearing all the
memory (reset)" on page 32 for details.]
2 Perform "Setting the clock" from step 1.
E-13
XL-UH240W_8-16.fm
Page 15
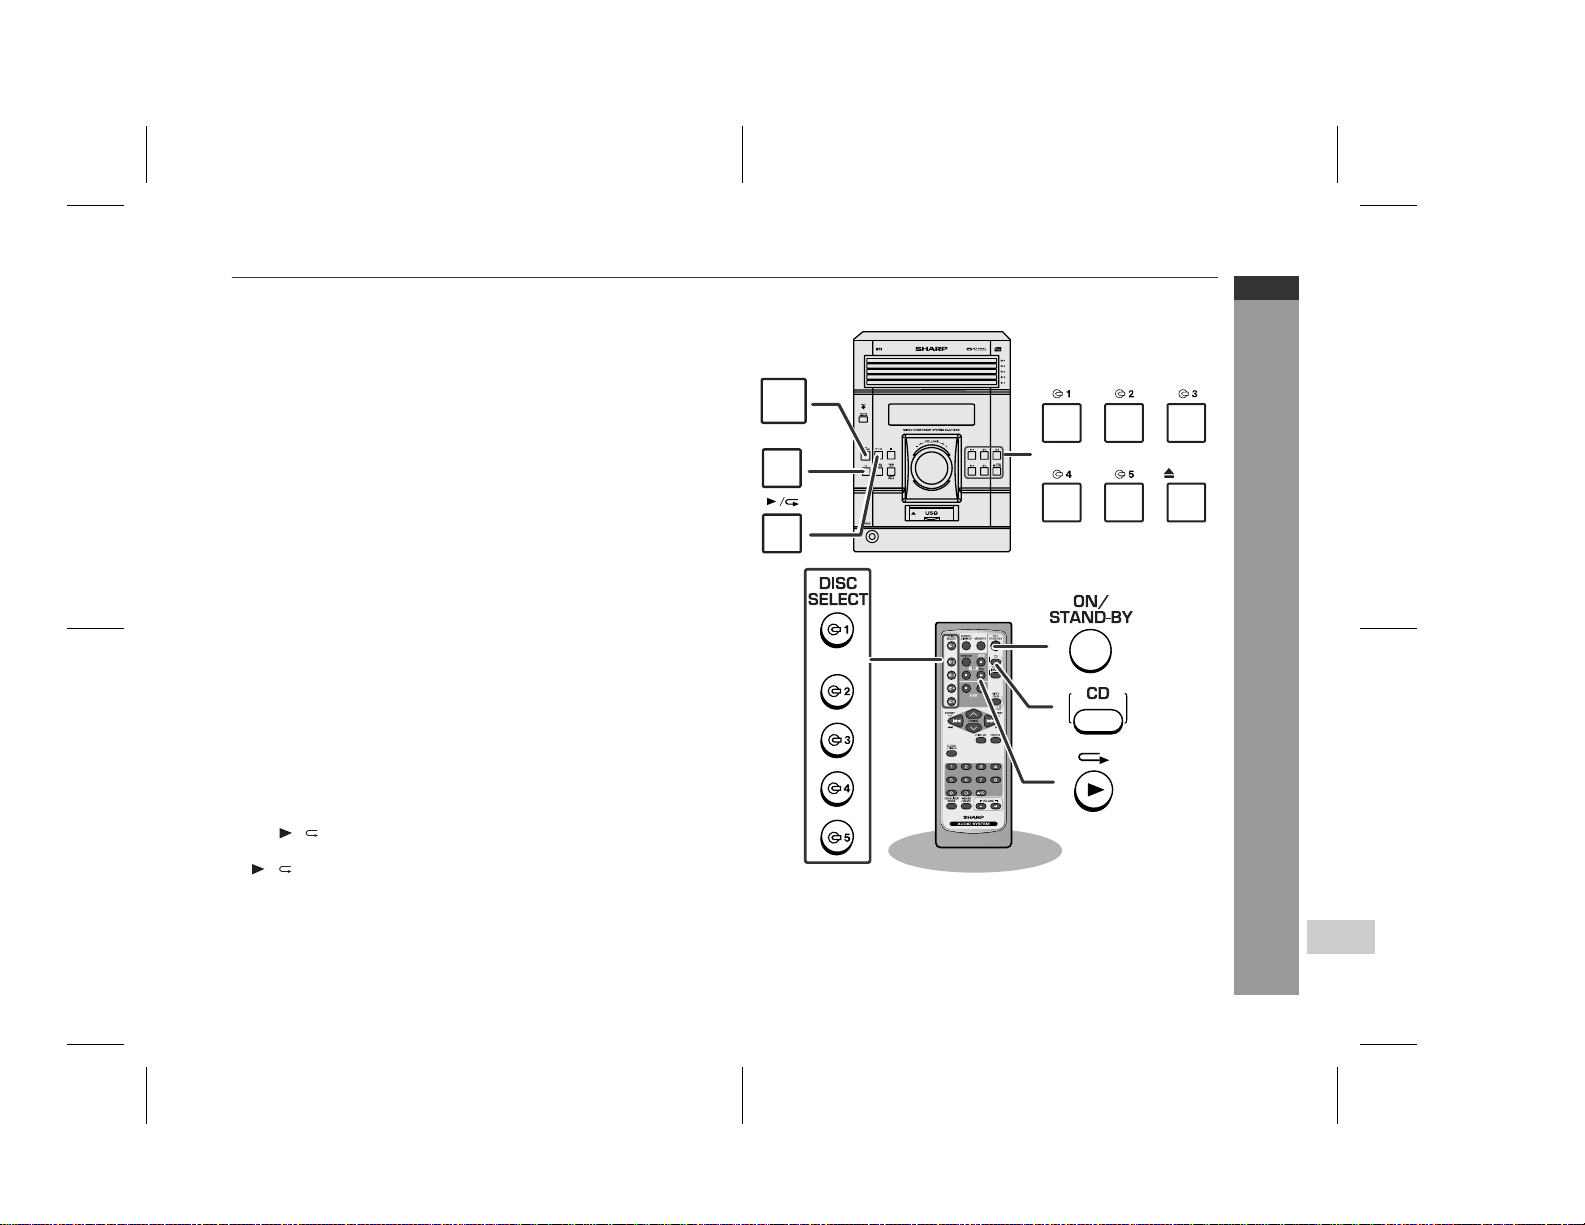
Listening to a CD or MP3/WMA disc
This system can play back a standard CD, CD-R/RW in the CD format
and CD-R/RW with MP3 or WMA files, but cannot record on them.
Some audio CD-R and CD-RW discs may not be playable due to the
state of the disc or the device that was used for recording.
MP3:
MP3 is a form of compression. It is an acronym which stands
for MPEG Audio Layer 3.
MP3 is a type of audio code which is processed by significant
compression from the original audio source with very little loss
in sound quality.
This system supports MPEG 1 Layer 3, MPEG 2 Layer 3, and
VBR files.
During VBR file playback, time counter in the display may differ
from its actual playback time.
Bitrate which is supported by MP3 is 32 ~ 320 kbps.
WMA:
WMA files are Advanced System Format files that include audio
files which are compressed with Windows Media Audio codec.
WMA is developed by Microsoft as an audio format file for
Windows Media Player.
"MP3" and "WMA" indicator will light up after the unit reads
information on an MP3 or WMA disc.
Bitrate which is supported by WMA is 64 ~ 160 kbps.
Auto power on function:
When you press any of the following buttons, the unit turns on.
CD button (main unit and remote control): The unit turns on and
the "CD" function is activated.
CD / button on the remote control: The unit turns on and CD
playback starts (regardless of the last function).
/ button on the main unit: The unit turns on and playback of
the last function starts (CD,TUNER,VIDEO/AUX/USB).
ON/
STAND-BY
CD
OPEN/
CLOSE
XL-UH240W
ENGLISH
CD or MP3/WMA disc Playback
Auto power off function:
In the stop mode of CD, MP3 or WMA operation, the main unit enters
the stand-by mode after 15 minutes of inactivity.
E-14
XL-UH240W_8-16.fm
Page 16
XL-UH240W
ENGLISH
Listening to a CD or MP3/WMA disc (continued)
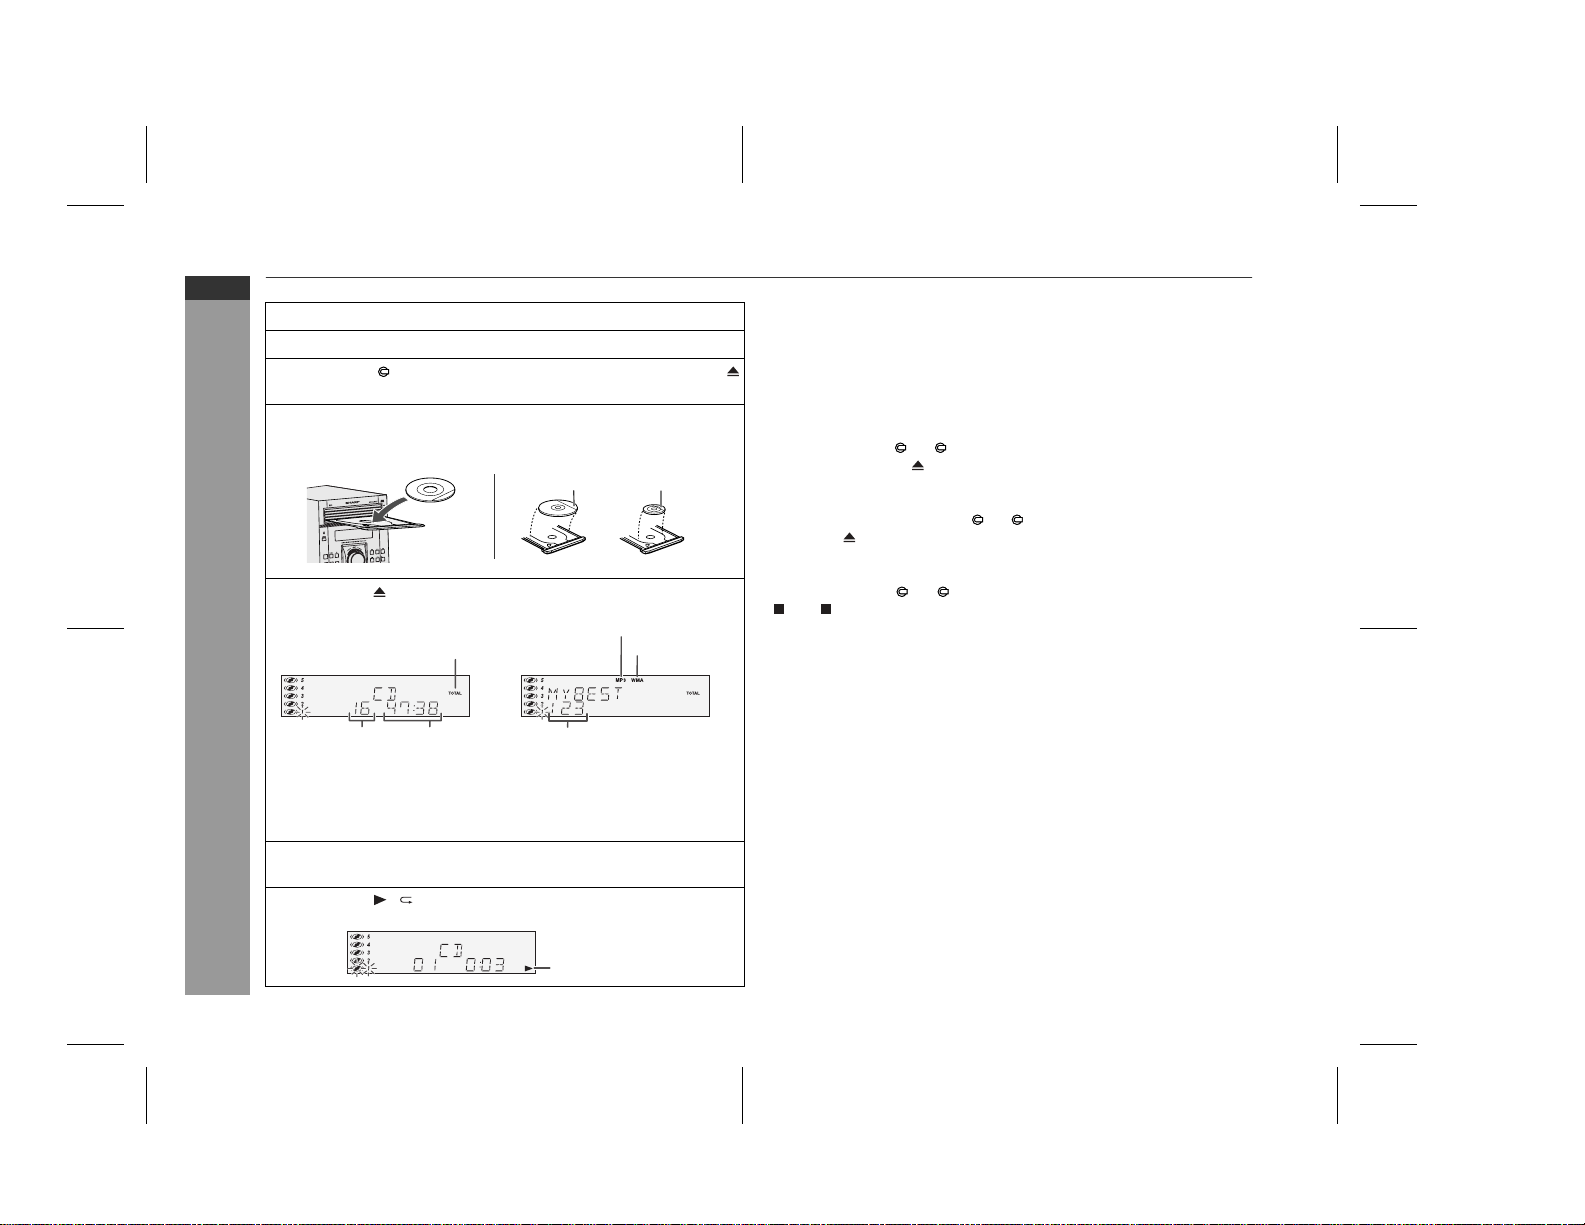
1 Press the ON/STAND-BY button to turn the power on.
2 Press the CD button.
3 Press the 1 button and within 5 seconds, press the
OPEN/CLOSE button to open the disc tray 1.
4 Place the disc on the disc tray 1, label side up.
Be sure to place 8 cm (3") disc in the middle of the disc trays.
ON
STAND-BY
OPEN/
CLOSE
VIDEO/
TUNER/
AUX/USB
(BAND)
CD
5 Press the OPEN/CLOSE button to close the disc tray 1.
[CD]
Total number of
tracks on the disc
Total playing
time of the disc
Due to the structure of the disc information, it takes longer to
CD or MP3/WMA disc Playback
read an MP3/WMA disc than a normal CD (approximately 20
to 90 seconds).
6 You can place discs on the trays 2 - 5 by following steps
3 - 5.
7 Press the / button to start playback.
12 cm (5") 8 cm (3")
MP3 indicator
[MP3/WMA]
WMA indicatorTOTAL indicator
Total number
of files
Playback will begin from track 1 on DISC 1. After that disc
finishes playing, the next disc will automatically play.
After the last track on the fifth disc is played, the unit will stop
automatically.
When there is no disc in one of the disc trays (1 - 5), the empty
tray will be skipped to the next tray with a disc.
To exchange other discs whilst playing a disc:
Press one of the 1 - 5 buttons for the stopped disc and within 5
seconds, press the OPEN/CLOSE button and exchange discs.
To remove the discs:
In the stop mode, press the 1 - 5 buttons and within 5 seconds,
press the OPEN/CLOSE button.
To skip to a desired disc:
Press one of the 1 - 5 buttons and within 5 seconds, press the
(CD ) button.
Caution:
Do not place two discs in one disc tray.
Do not play discs of special shapes (heart, octagon, etc).
It may cause malfunctions.
Do not push the disc tray whilst it is moving.
If the power fails whilst the tray is open, wait until the power is
restored.
If the disc tray is stopped with force, "ER-CD20" will appear on the
display for 3 seconds and the unit will not function. If this occurs,
press the ON/STAND-BY button to enter the power stand-by
mode and then turn the power on again.
If TV or radio interference occurs during CD operation, move the
unit away from the TV or radio.
If a disc is damaged, dirty, or loaded upside down, the disc will be
skipped.
E-15
Disc play indicator
XL-UH240W_8-16.fm
Page 17
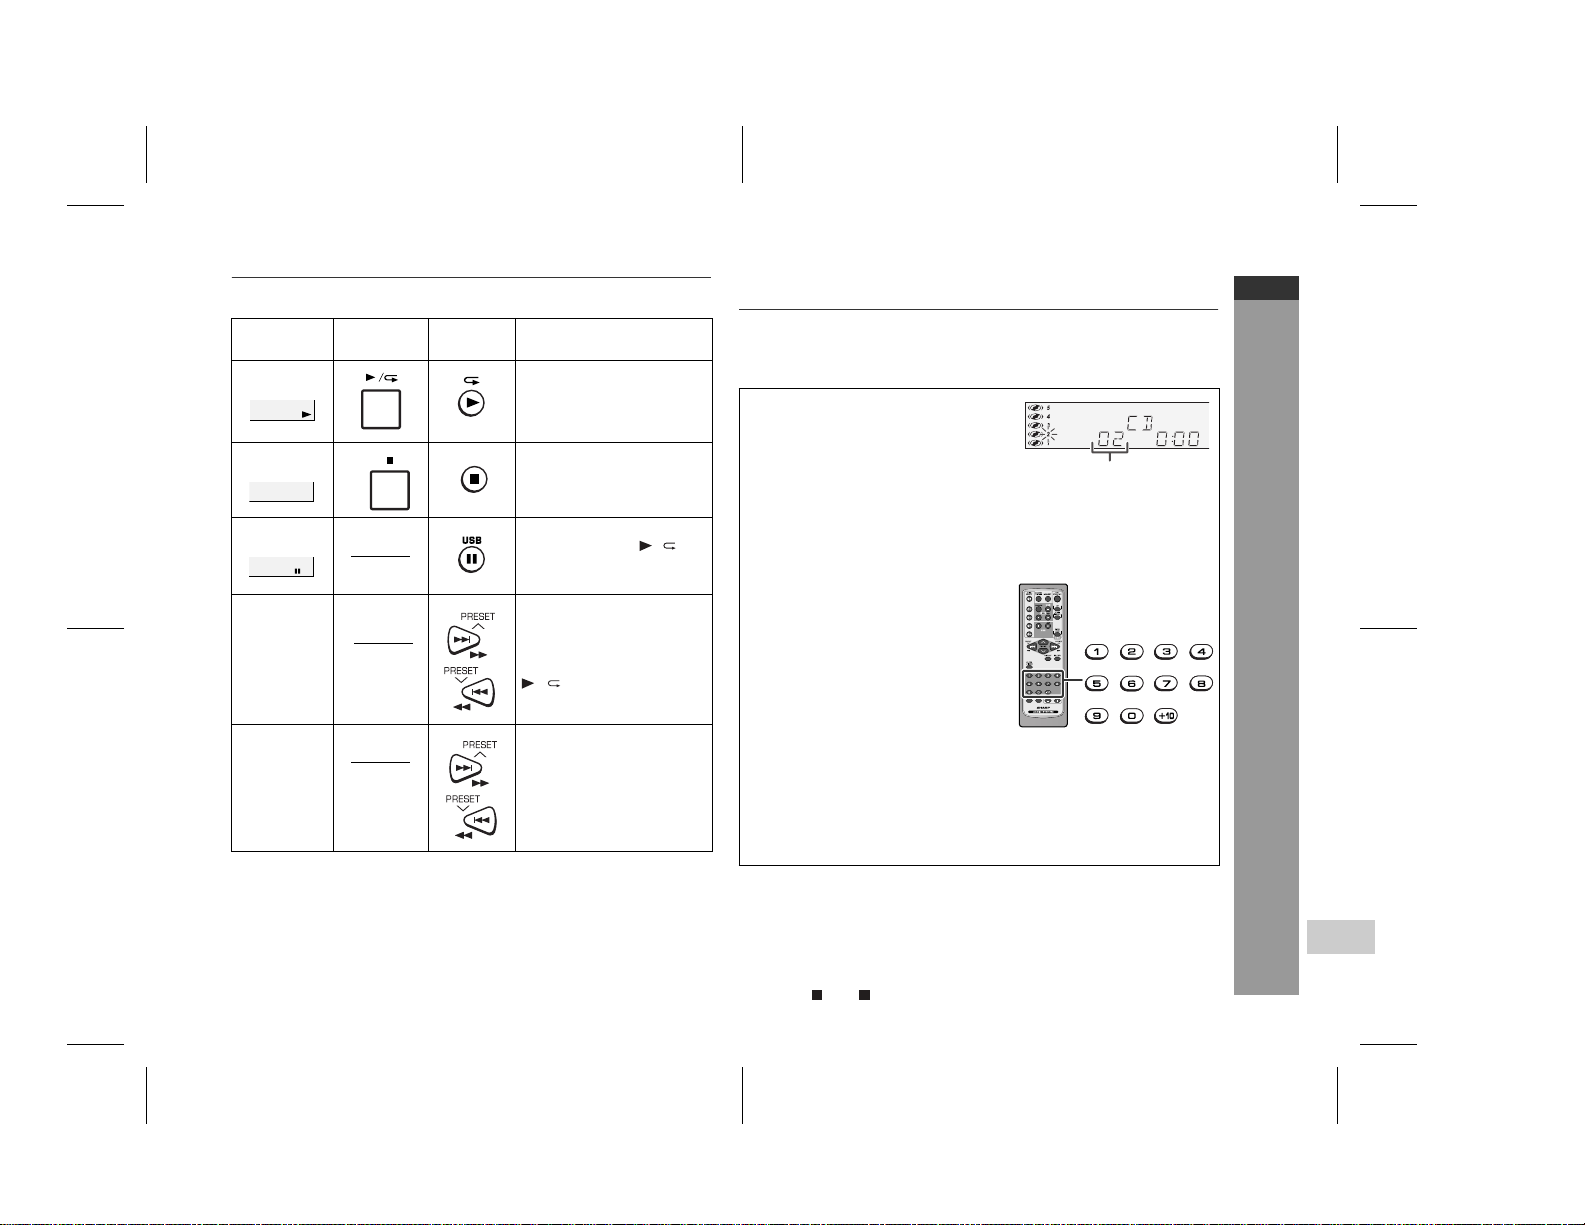
Various disc functions
Function Main unit Remote
control
Play Press in the stop mode.
Stop Press in the playback
Pause Press in the playback
Track up/
Track down
Fast forward/Fast
reverse
Notes for CD or MP3/WMA disc:
Track up/track down is possible only within individual discs.
Fast forward/fast reverse is possible only within individual discs.
When the end of the last track is reached during fast forward,
"END" will appear on the display and CD operation will be paused.
When the beginning of the first track is reached during fast
reverse, the unit will enter the playback mode.
Rewritable multi session discs which writing is not finished, can
still be played.
Operation
mode.
mode. Press the / button to resume playback
from the paused point.
Press in the playback or
stop mode.
If you press the button in
the stop mode, press the
/ button to start the
desired track.
Press and hold down in
the playback mode.
Release the button to resume playback.
Advanced CD or MP3/WMA disc
playback
Direct track search
By using the direct search buttons, the desired tracks on the current
disc can be played.
Use the direct search buttons on
the remote control to select the desired track whilst playing the selected disc.
Selected track number
The direct search buttons allow you to select up to number 9.
When selecting number 10 or higher, use the "+10" button.
A. For example, to choose 13
1 Press the "+10" button once.
2 Press the "1" button.
3 Press the "3" button.
B. For example, to choose 130
1 Press the "+10" button twice.
2 Press the "1" button.
3 Press the "3" button.
4 Press the "0" button.
Notes:
A track number higher than the number of tracks on the disc can-
not be selected.
During random play, direct search is not possible.
To stop playback:
Press the (CD ) button.
XL-UH240W
ENGLISH
CD or MP3/WMA disc Playback
E-16
XL-UH240W_8-16.fm
Page 18
XL-UH240W
ENGLISH
Advanced CD or MP3/WMA disc playback (continued)
Repeat play
Repeat play can play one disc, all 5 discs or a programmed
sequence continuously.
To repeat one disc:
Press the / button twice.
To repeat all tracks on up to 5 discs:
Press the / button three times.
To repeat desired tracks (CD only):
Perform steps 1 - 6 in "Programmed play" section on page 18 and
then press the / button twice.
To cancel repeat play:
Press the / button again until " " disappear.
CD or MP3/WMA disc Playback
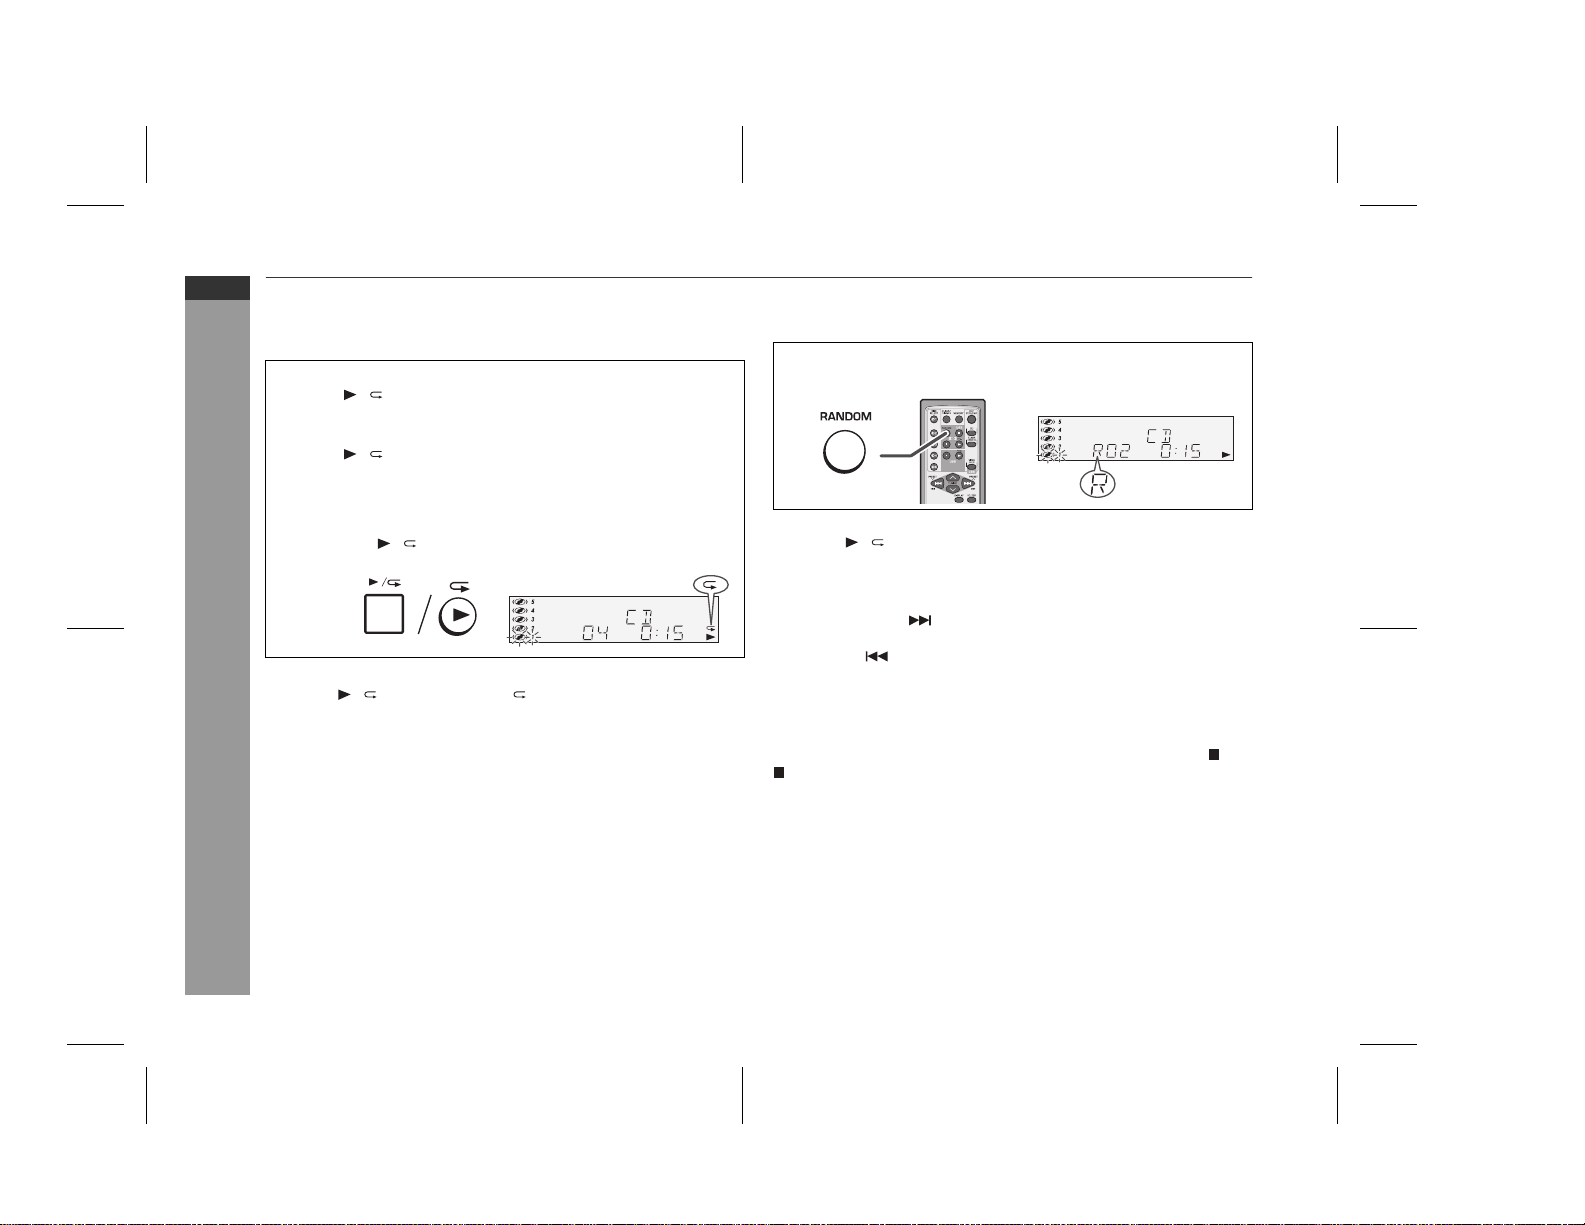
Random play
The tracks on the disc(s) can be played in random order automatically.
To random play all tracks on up to 5 discs:
Press the RANDOM button on the remote control.
To cancel random play:
Press the / button.
"R" will disappear.
Notes:
If you press the button during random play, you can move to
the track selected next by the random operation. On the other
hand, the button does not allow you to move to the previous
track. The beginning of the track being played will be located.
In random play, the unit will select and play tracks automatically.
(You cannot select the order of the tracks.)
Caution:
After performing repeat or random play, be sure to press the (CD
) button. Otherwise, the disc(s) will play continuously.
E-17
03/12/17 XL-UH240W 17-25.fm
Page 19
Advanced CD playback
Programmed play
You can choose up to 32 selections for playback in the order you like.
1
Whilst in the stop mode, press
the MEMORY button on the re-
mote control to enter the programming save mode.
2
Press one of the 1 - 5 buttons
to select the desired disc.
Selected disc number
3
Press the direct search buttons
on the remote control to select
the desired track.
Selected track number
You can also select a track by pressing the or button.
4
Press the MEMORY button to
save the track number.
5
Repeat steps 2 - 4 for other tracks. Up to 32 tracks can be
programmed.
If you make a mistake, the programmed tracks can be cleared
by pressing the CLEAR/DIMMER button.
6
Press the (CD ) button.
The total number in memory will appear.
7
Press the / button to start playback.
To clear the programmed selections:
Press the CLEAR/DIMMER button on the remote control whilst the "MEMORY" indicator
is flashing.
Each time the button is pressed, one track will
be cleared, beginning with the last track programmed.
To cancel the programmed play mode:
Whilst in the stop mode and the "MEMORY" indicator is lit, press the
CLEAR/DIMMER button on the remote control. The "MEMORY" indicator will disappear and all the programmed contents will be
cleared.
Adding tracks to the programme:
If a programme has been previously stored, the "MEMORY" indicator
will be displayed. Then follow steps 1 - 6 to add tracks. The new
tracks will be stored after the last track of the original programme.
To check which tracks are programmed:
Whilst the unit is stopped in the programmed play mode, press the
or button.
Notes:
When a disc with programmed tracks is ejected, the programme
is automatically cancelled.
Even if you press the ON/STAND-BY button to enter the stand-by
mode or change the function from CD to another, the programmed
selections will not be cleared.
During the programme operation, random play is not possible.
XL-UH240W
ENGLISH
CD or MP3/WMA disc Playback
03/12/17 XL-UH240W 17-25.fm
E-18
Page 20
XL-UH240W
ENGLISH
MP3/WMA folder mode (only for MP3/WMA files)
To playback MP3/WMA (Windows Media Audio) file
There are many music sites on the internet that you can download
MP3/WMA (Windows Media Audio) music files. Follow the
instructions from the website on how to download the music files.
You can then playback these downloaded music files by burning
them to a CD-R/RW disc or by connecting a USB Memory Player
device.
Your downloaded song/files are for personal use only. Any other
usage of the song without owner’s permission, is against the law.
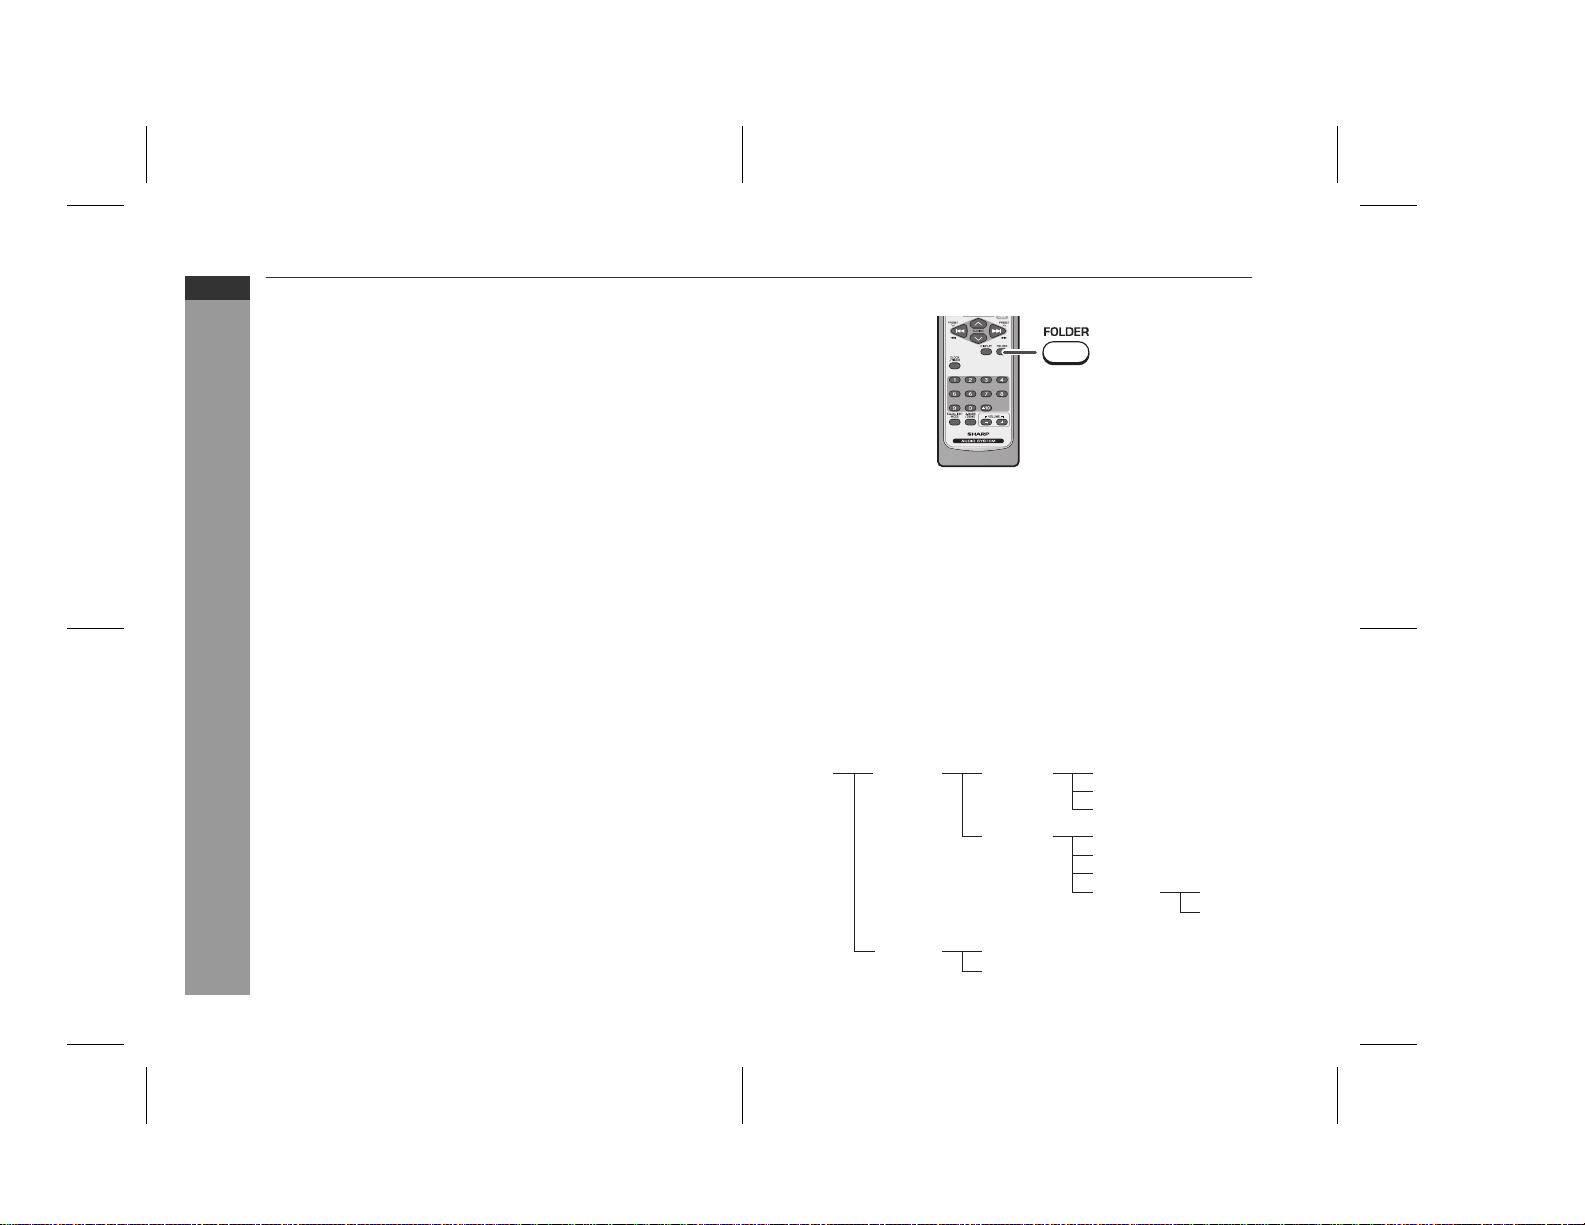
About folder playback order
If MP3/WMA files are recorded in several folders, a folder number will
be set to each folder automatically.
These folders can be selected by the FOLDER button on the remote
control. If there is no supported file formats inside the selected folder,
the folder is skipped and the next folder will be selected.
Example: How to set folder number if MP3/WMA format files are
recorded as below figure.
1. ROOT folder is set as folder 1.
2. As for folders inside ROOT folder (Folder A and Folder B), the
folder which is recorded earlier on the disc will be set as folder 2.
3. As for folder inside Folder A (Folder C and Folder D), the folder
which is recorded earlier on the disc will be set as folder 3.
4. Because there is no folder in Folder C, Folder D will be set as
folder 4.
5. Folder E that is inside Folder D will be set as folder 5.
6. Folder B inside ROOT folder will be set as folder 6.
* The folder and file order information which is recorded on the disc
CD or MP3/WMA disc Playback
depends on the writing software. There maybe possibilities that this
unit will playback the files not according to our expected playback
order.
Folder mode on/off can be operated by the FOLDER button on the
remote control. Files that are played when folder mode is set to the
on position, may differ from those played back when folder mode is
turned off.
Folder Mode Off case:
All the files starting from the selected folder or file will be played back.
If file 3 inside Folder C is selected, all the files starting from file 3 will
be played back.
Folder Mode On case:
All the files inside the selected folder will be played back.
In case Folder D is selected, file 4, 5 and 6 will be played back. File
7 and 8 in Folder E will not be played back.
ROOT
(FOLDER 1)
FOLDER A
(FOLDER 2)
FOLDER C
(FOLDER 3)
FOLDER D
(FOLDER 4)
FILE 1
FILE 2
FILE 3
FILE 4
FILE 5
FILE 6
FOLDER E
(FOLDER 5)
FILE 7
FILE 8
E-19
FOLDER B
(FOLDER 6)
FILE 9
FILE 10
03/12/17 XL-UH240W 17-25.fm
Page 21
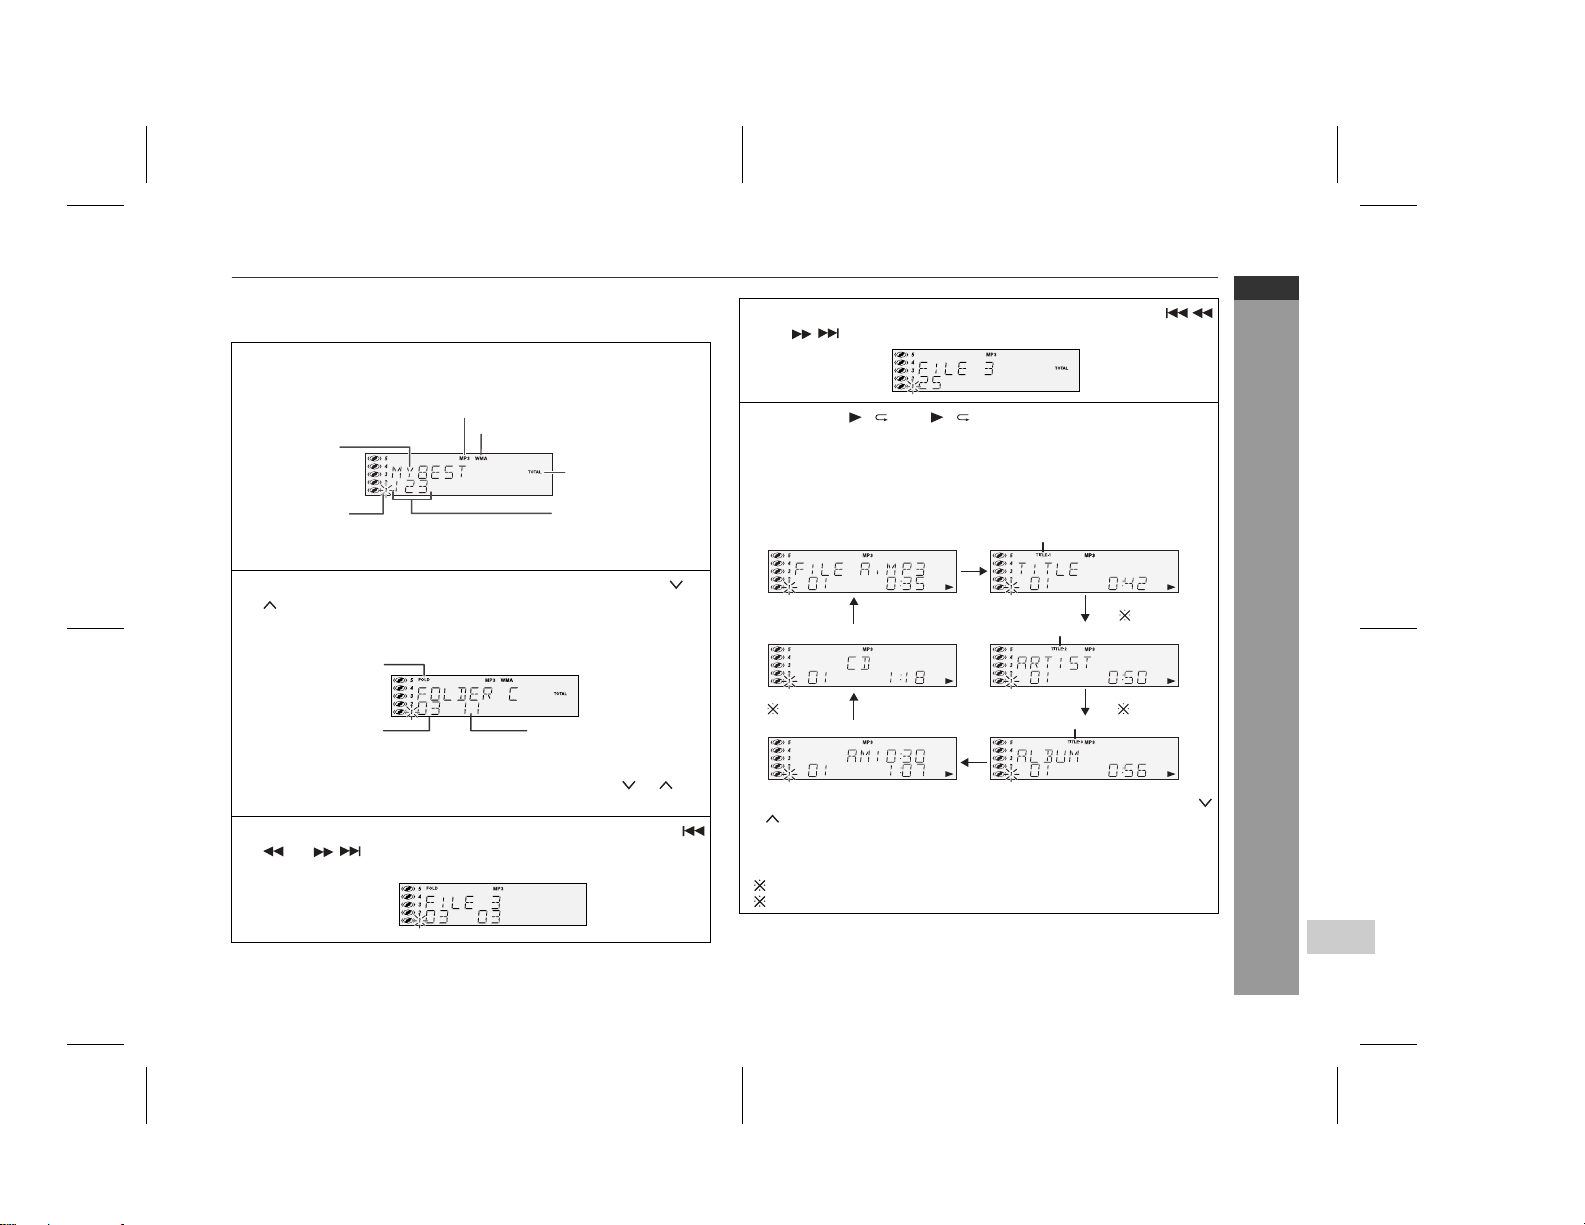
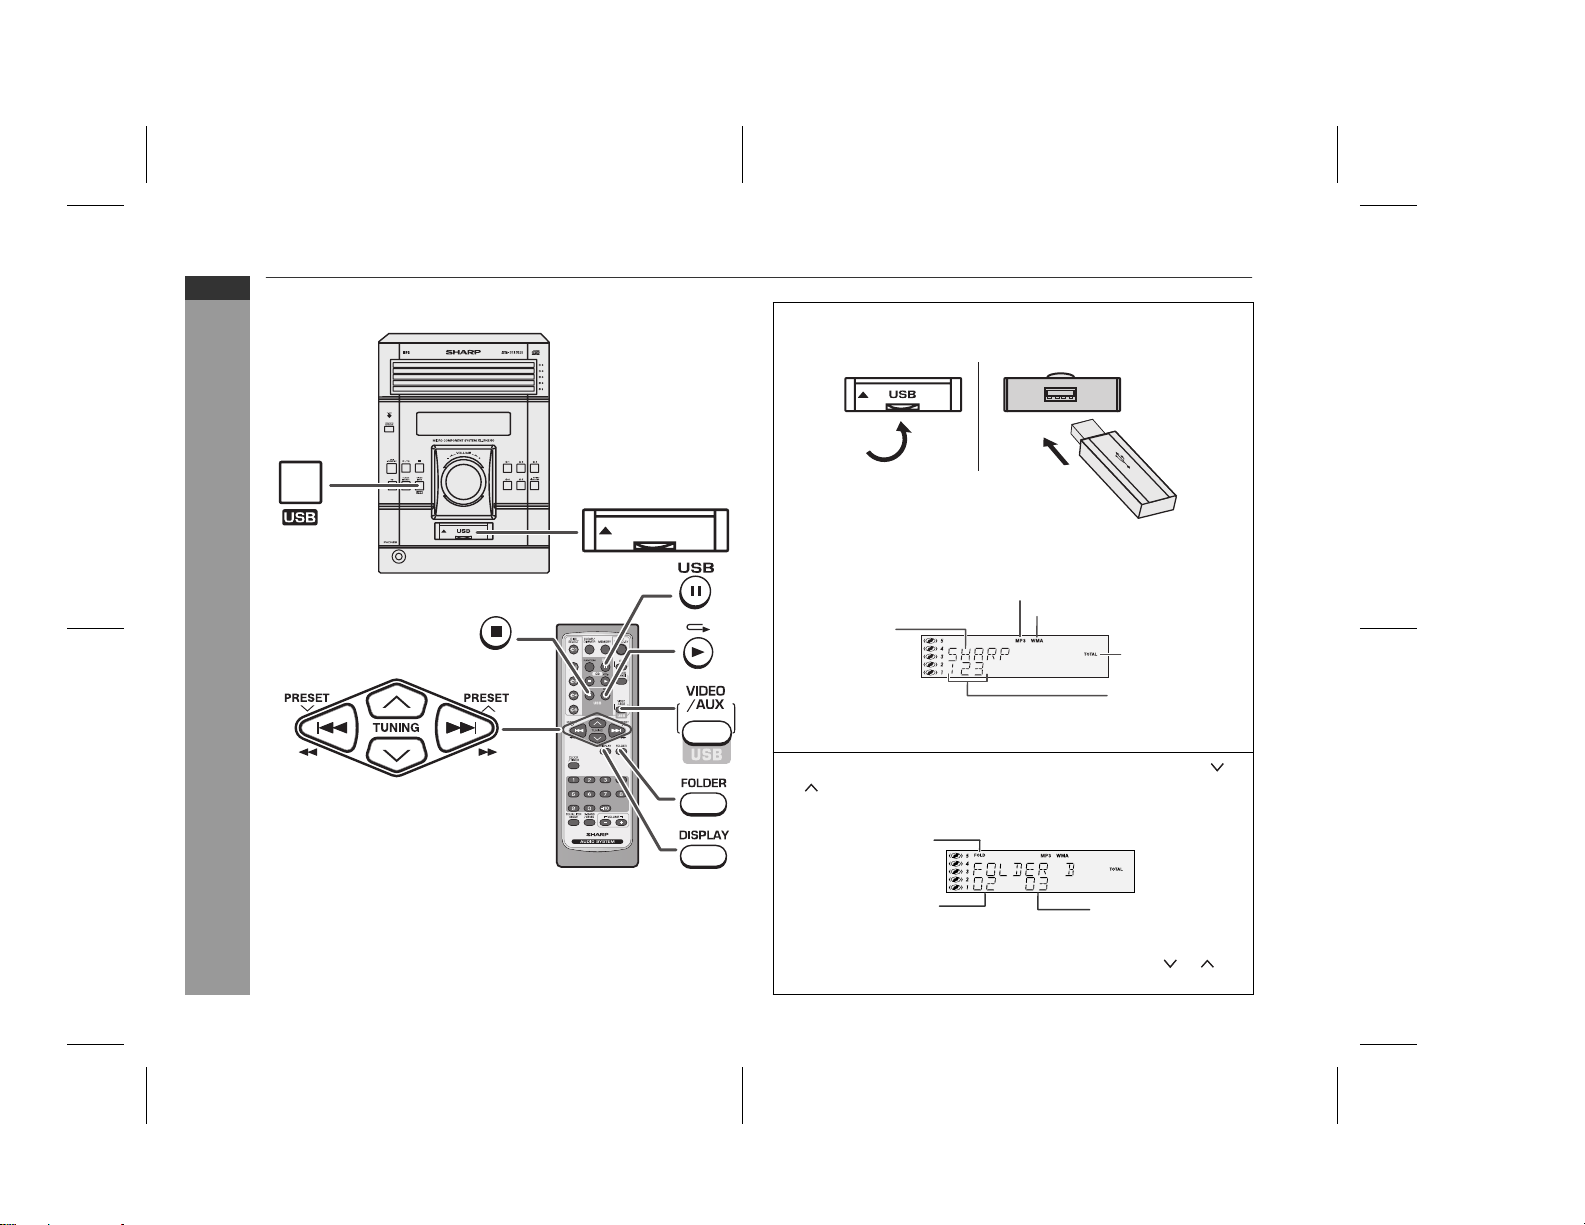
Procedure to playback MP3/WMA disc
To playback CD-R/RW.
1
Press the CD button, and load a MP3/WMA disc.
After disc is loaded, disc info will be displayed.
MP3 indicator
Disc Name
Disc 1 Blinking
In case folder is selected, proceed to step 2.
In case file is selected, proceed to step 4.
2
Press the FOLDER button, and press the TUNING ( or
) button to select desired playback folder. (Folder mode
on)
FOLDER indicator
WMA indicator
TOTAL indicator
Total number of files
4
Select desired file to be played back by pressing the
or button. (Folder mode off)
5
Press the
Playback will start and file name will be displayed.
Title, Artist & Album name is displayed if it is recorded on the
disc.
Display content can be changed by pressing the DISPLAY
button.
File Name Display Title Display
Function Display Artist Display
/
(CD
/
) button.
TITLE-1 Indicator
TITLE-2 Indicator
XL-UH240W
ENGLISH
( 1)
FOLDER number
To start playback with folder mode on, go to step 5.
To change the playback folder, press the TUNING ( or ) to
select another folder.
3
Select desired file to be played back by pressing the
or button. Proceed to step 5.
Total files in Folder 3
Clock Display Album Display
In case of playback with the folder mode on, press the
or )
button, and the folder can be selected even though it is in
playback/pause mode.
It will continue playback/pause mode in the 1st track of the
selected folder.
( 1)
MP3 ID3-Tag only support version 1.x.
( 2)
Only appears when clock is already set.
Note:
If "NO SUPPORT" is displayed, it means "Copyright protected
WMA file" or "Not supported playback file" is selected.
TITLE-3 Indicator
( 1) ( 2)
TUNING (
03/12/17 XL-UH240W 17-25.fm
CD or MP3/WMA disc Playback
E-20
Page 22
XL-UH240W
ENGLISH
Listening to USB mass storage device / MP3 Player
VIDEO
/AUX
USB Memory Playback
USB
1
Press the VIDEO/AUX/USB (USB/AUX) button, and push up
the USB door. Connect the USB Memory device that has
MP3/WMA format files on the unit.
When the USB memory is connected to the main unit, the
device information will be displayed.
MP3 indicator
Volume ID
In case folder is selected, proceed to step 2.
In case file is selected, proceed to step 4.
2
Press the FOLDER button, and press the TUNING ( or
) button to select desired playback folder. (Folder mode
on)
FOLDER indicator
WMA indicator
TOTAL indicator
Total number of files
E-21
Note:
This product is not compatible with MTP and AAC file systems.
FOLDER number
To start playback with folder mode on, go to step 5.
To change the playback folder, press the TUNING ( or )
button to select another folder.
Total files in Folder 2
03/12/17 XL-UH240W 17-25.fm
Page 23

3
Select desired file to be played back by pressing the
or button. Proceed to step 5.
4
Select desired file to be played back by pressing the
or button. (Folder mode off)
5
Press the
Playback will start and the file name will be displayed.
Title, Artist & Album name are displayed if they are recorded in
the USB memory device.
Display content can be changed by pressing the DISPLAY
button.
File Name Display Title Display
Function Display Artist Display
Clock Display Album Display
( 1) MP3 ID3-Tag only supports version 1.x.
( 2) Only appears when clock is already set.
Note:
To pause playback:
Press the
Auto power off function:
In the stop mode of USB operation, the main unit enters the standby mode after 15 minutes of inactivity.
/
CD/USB button.
(USB
/
) button.
TITLE-1 Indicator
TITLE-2 Indicator
TITLE-3 Indicator
( 1)
( 1) ( 2)
To remove USB memory device
1
Press the USB button on remote control. Wait until
"UNPLUG OK" appears on FL display.
2
Disconnect USB memory device from the USB terminal.
Notes:
SHARP will not be held liable for the loss of data whilst the USB
memory device is connected to the audio system.
Files compressed in MP3 and / or WMA format can be played
when connected to the USB terminal.
This USB memory’s format supports FAT16 or FAT32.
SHARP cannot guarantee that all USB memory devices will work
on this audio system.
This USB memory cannot be operated via USB hub.
If "NO SUPPORT" is displayed, it means "Copyright protected
WMA file" or "Not supported playback file" is selected.
In case the data inside the USB memory is large, it may take
longer time for data to be read.
The USB terminal in this unit is not intended for a PC connection
but is used for music streaming with a USB memory device.
XL-UH240W
ENGLISH
USB Memory Playback
03/12/17 XL-UH240W 17-25.fm
E-22
Page 24

XL-UH240W
ENGLISH
Advanced USB playback
Repeat play
Repeat play can play all tracks sequence continuously.
To repeat all tracks:
Press the / button twice.
To cancel repeat play:
Press the / button again until " " will disappear.
Random play
The tracks can be played in random order automatically.
To random play all tracks:
Press the RANDOM button on the remote control.
To cancel random play:
USB Memory Playback
Press the / button.
"R" will disappear.
Notes:
If you press the button during random play, you can move to
the track selected next by the random operation. On the other
hand, the button does not allow you to move to the previous
track. The beginning of the track being played will be located.
In random play, the unit will select and play tracks automatically.
(You cannot select the order of the tracks.)
Caution:
After performing repeat, be sure to press the (USB ) button.
Otherwise, it will play continuously.
Note:
( ) When folder mode is on, the selected playmode can be used for
the files in the selected folder only.
Notes:
This unit only supports "MPEG-1 Audio Layer-3" format.
(Sampling Frequency fs is 32, 44.1, 48kHz)
"MPEG-2 Audio Layer-3" , "MPEG-2.5 Audio Layer-3" and MP1,
MP2 format are not supported.
Programme playback for USB memory is not available.
Playback order for MP3 files may differ sometimes depending on
the writing software used during file download.
Bitrate which is supported by MP3 is 32~320 kbps, WMA is
64~160 kbps.
For MP3/WMA files, please put ".MP3" ".WMA" extension. Files
cannot be played back if there is no MP3/WMA extension.
Playlists are not supported by this unit.
This unit can display Folder Name or File Name up to 32
characters.
This unit only supports MP3 ID3-Tag version 1.x.
The display playback time may not be displayed correctly when
playing back a variable bitrate file.
Time display cannot be changed by the DISPLAY button.
Title name and artist name can be displayed by pressing the
DISPLAY button during file playback or pause mode.
WMA meta tag also supports title, artist and album name which
are recorded in WMA files.
Copyright protected WMA files cannot be played back.
E-23
03/12/17 XL-UH240W 17-25.fm
Page 25

Listening to the radio
ON/
STAND-BY
TUNER
(BAND)
Auto power on function:
When you press any of the following buttons, the unit turns on.
TUNER (BAND) button (main unit and remote control): The unit
turns on and the "TUNER" function is activated.
/ button on the main unit: The unit turns on and playback of
the last function starts (CD,TUNER,VIDEO/AUX/USB).
Tuning
1 Press the ON/STAND-BY button to turn the power on.
2 Press the TUNER (BAND) button repeatedly to select the
desired frequency band (FM or AM).
3 Press the TUNING ( or ) button on the remote control
to tune in to the desired station.
Manual tuning:
Press the TUNING ( or ) button as many times as required
to tune in to the desired station.
Auto tuning:
When the TUNING ( or ) button is pressed for more than
0.5 seconds, scanning will start automatically and the tuner
will stop at the first receivable broadcast station.
Notes:
When radio interference occurs, auto scan tuning may stop
automatically at that point.
Auto scan tuning will skip weak signal stations.
To stop the auto tuning, press the TUNING ( or ) button
again.
To receive an FM stereo transmission:
Press the TUNER (BAND) button to display the "ST" indicator.
" " will appear when an FM broadcast is in stereo.
If the FM reception is weak, press the TUNER (BAND) button to
extinguish the "ST" indicator. The reception changes to
monaural, and the sound becomes clearer.
FM stereo mode indicator
FM stereo receiving indicator
XL-UH240W
ENGLISH
Radio
E-24
03/12/17 XL-UH240W 17-25.fm
Page 26
XL-UH240W
ENGLISH
Radio
Listening to the radio (continued)
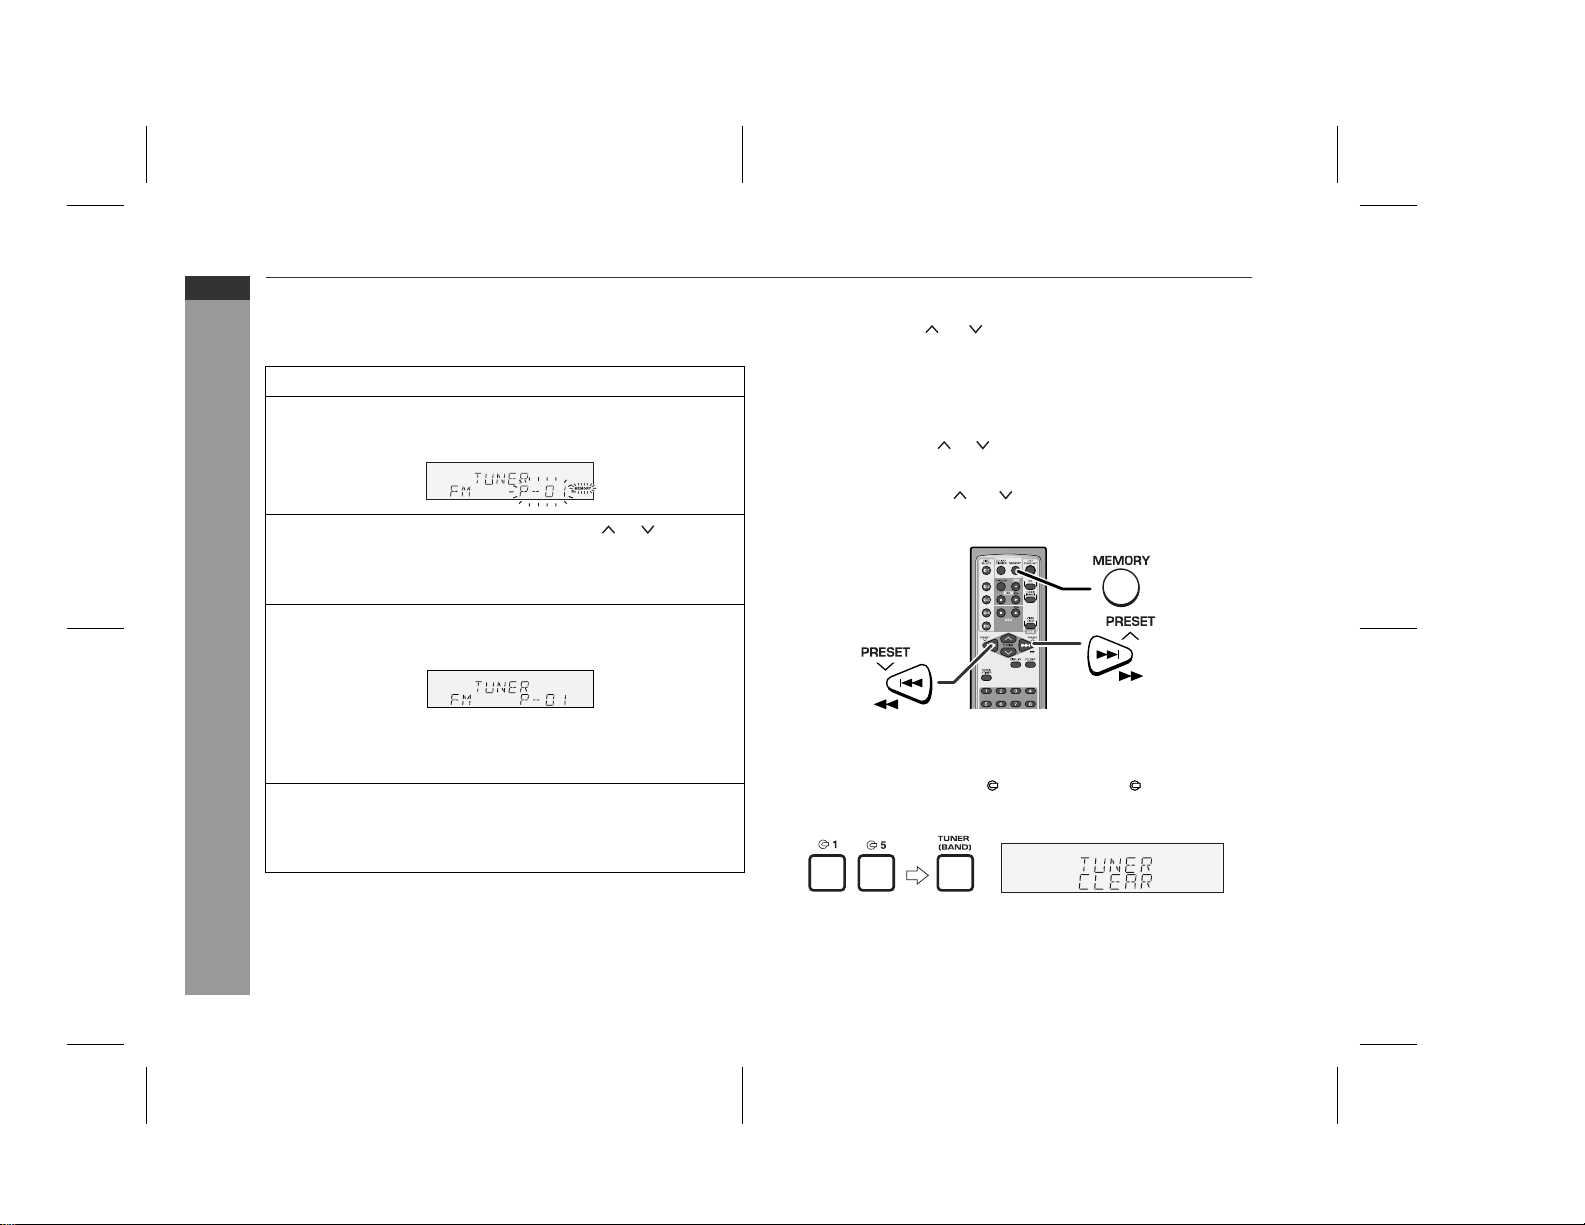
Memorising a station
You can store 40 AM and FM stations in memory and recall them at
the push of a button. (Preset tuning)
1 Perform steps 1 - 3 in "Tuning" on page 24.
2 Press the MEMORY button to enter the preset tuning
saving mode.
3 Within 30 seconds, press the PRESET ( or ) button to
select the preset channel number.
Store the stations in memory, in order, starting with preset
channel 1.
4 Within 30 seconds, press the MEMORY button to store that
station in memory.
To recall a memorised station
Press the PRESET ( or ) button for less than 0.5 seconds to
select the desired station.
To scan the preset stations
The stations saved in memory can be scanned automatically.
(Preset memory scan)
Press the PRESET
1
The preset number will flash and the programmed stations will be
tuned in sequentially, for 5 seconds each.
2 Press the PRESET ( or ) button again when the desired
station is located.
( or )
button for more than 0.5 seconds.
E-25
If the "MEMORY" and preset number indicators disappear
before the station is memorised, repeat the operation from step
2.
5 Repeat steps 1 - 4 to set other stations, or to change a
preset station.
When a new station is stored in memory, the station previously
memorised for that preset channel number will be erased.
Note:
The backup function protects the memorised stations for a few
hours should there be a power failure or the AC power lead become
disconnected.
To erase entire preset memory
1 Press the ON/STAND-BY button to enter the stand-by mode.
2 Whilst pressing down the 1 button and the 5 button, press
the TUNER (BAND) button until "TUNER CLEAR" appears.
03/12/17 XL-UH240W 17-25.fm
Page 27
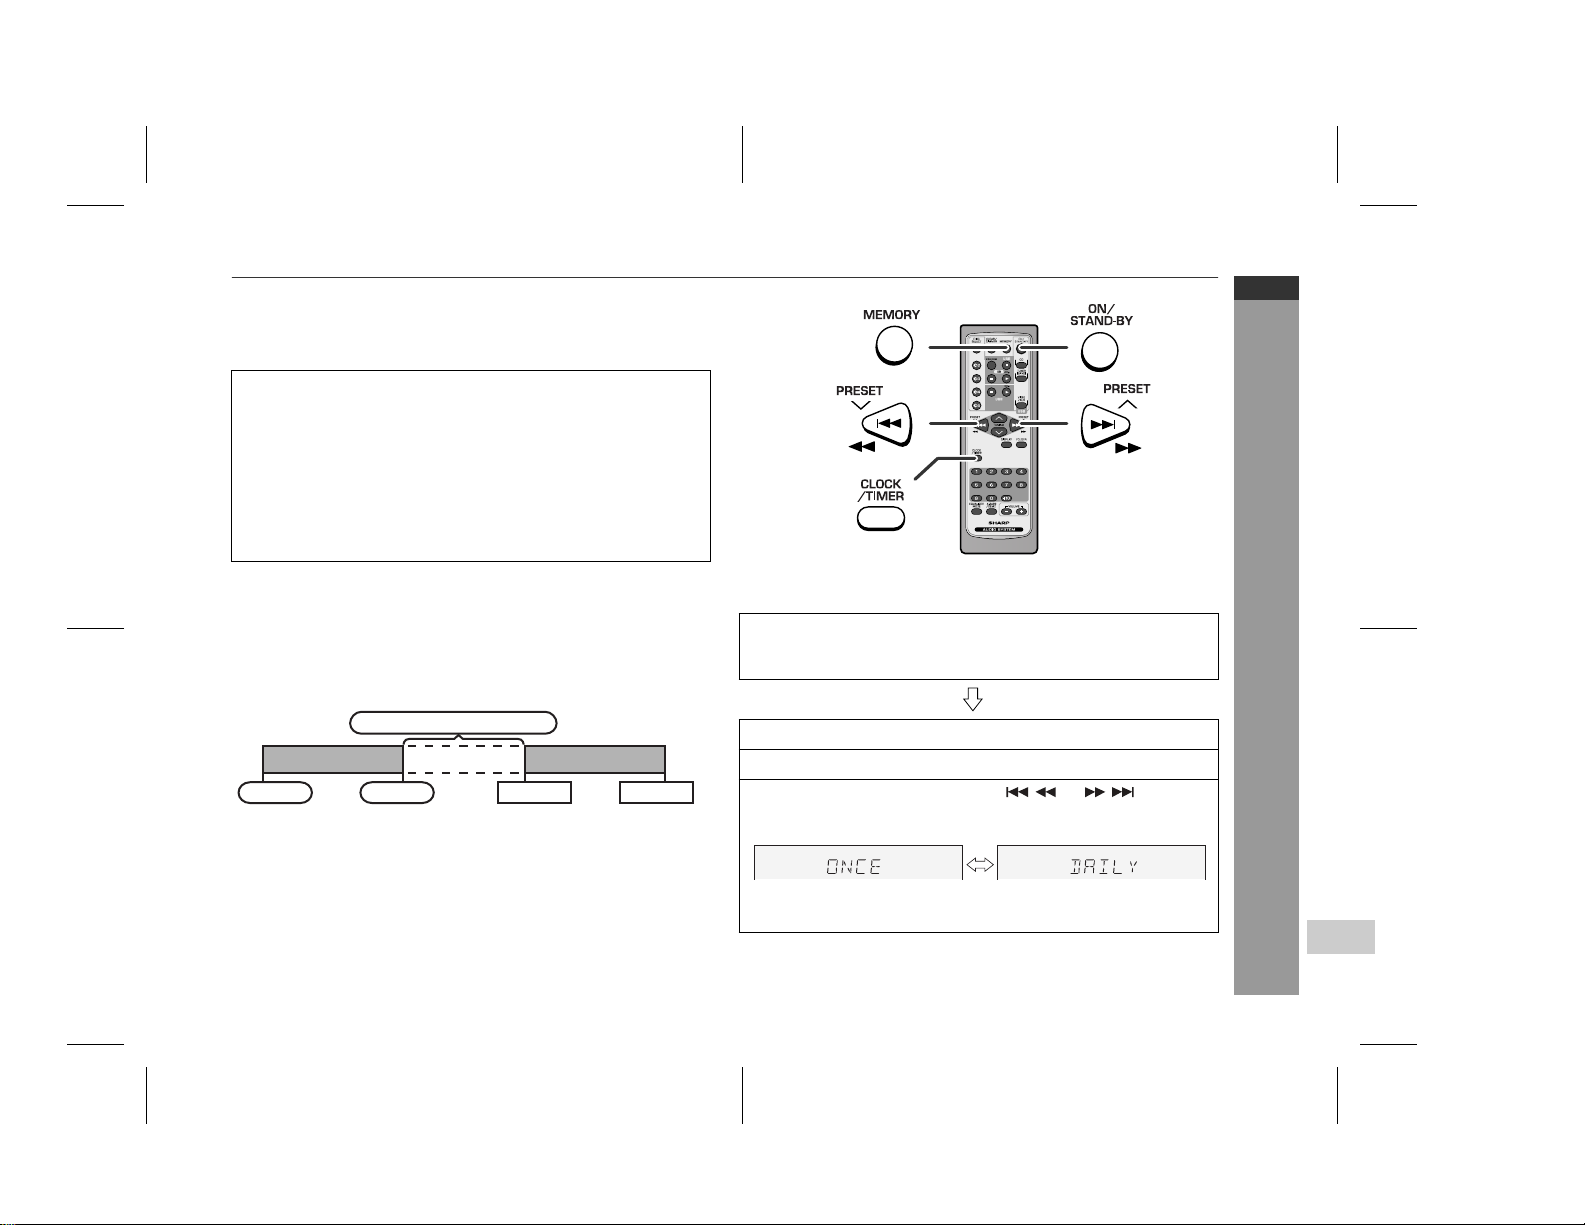
Timer and sleep operation (Remote Control only)
Timer playback:
The unit turns on and plays the desired source (CD, TUNER, USB,
AUX) at a preset time.
This unit has 2 types of timer: ONCE TIMER and DAILY TIMER.
Once timer: Once timer play works for one time only at a preset
Daily timer: Daily timer play works at the same preset time
For example, set the timer as a wake-up call every morning.
Using the once timer and daily timer in combination:
For example, use the once timer to listen to a radio programme, and
use the daily timer to wake up.
1 Set the daily timer (pages 26 - 28).
2 Set the once timer (pages 26 - 28).
Start
Note:
When set times for the daily timer and once timer overlap, the once
timer takes priority. Allow an interval of at least 1 minute between
operations.
time.
every day.
Daily timer
1 minute or more
Once timer
Stop Start Stop
Timer playback
Before setting timer:
1 Check that the clock is set to the correct time (refer to page 13).
If it is not set, you cannot use the timer function.
2 For timer playback: Load discs to be played.
1
Press the ON/STAND-BY button to turn the power on.
2
Press the CLOCK/TIMER button.
3
Within 10 seconds, press the or button to
select "ONCE" or "DAILY", and press the MEMORY button.
Set the clock to the correct time if "ONCE" or "DAILY" does not
appear.
XL-UH240W
ENGLISH
Advanced Features
Continued to the next page
03/12/17 XL-UH240W 26-34.fm
E-26
Page 28

XL-UH240W
ENGLISH
Timer and sleep operation (Remote Control only) (continued)
4
Within 10 seconds, press the or button to
select "ONCE SET" or "DAILY SET", and press the
MEMORY button.
5
Press the or button to adjust the hour and
then press the MEMORY button.
The illustrations show the timer playback setting in the daily
timer mode.
6
Press the or button to adjust the minutes and
then press the MEMORY button.
7
Advanced Features
Set the time to finish as in steps 5 and 6 above.
8
Switch input with the or button, and then
press the MEMORY button.
To select the timer playback source: CD, TUNER, USB or
AUX.
When you select the tuner, select a station by pressing the
or button, and then press the MEMORY
button.
If a station has not been programmed, "NO PRESET" will
be displayed and timer setting will be cancelled.
9
Adjust the volume using the VOLUME control, and then
press the MEMORY button.
Do not turn the volume up too high.
10
Press the ON/STAND-BY button to enter the power standby mode.
The "TIMER" indicator lights up and the unit is ready for timer
playback.
E-27
Continued to the next page
03/12/17 XL-UH240W 26-34.fm
Page 29
11
When the preset time is reached, playback will start.
The volume will increase gradually until it reaches the preset
volume.
12
When the timer end time is reached, the system will enter
the power stand-by mode automatically.
Once timer:
The timer will be cancelled.
Daily timer:
The timer will operate at the same time every day. It will
continue until the daily timer setting is cancelled. Cancel the
daily timer when it is not in use.
Note:
When performing timer playback using another unit connected to the
USB terminal or AUX IN sockets, select "USB" or "AUX" in step 8.
This unit will turn on or enter the power stand-by mode automatically,
however, the connected unit to AUX IN sockets will not turn on or off.
Checking the timer setting in the timer stand-by mode:
1 Press the CLOCK/TIMER button.
2 Within 10 seconds, press the or button to select
"ONCE" or "DAILY", and press the MEMORY button.
3 Within 10 seconds, press the or button to select
"ONCE CALL" or "DAILY CALL", and press the MEMORY button.
The unit returns to the timer stand-by mode after displaying the
settings in order.
Cancelling the timer setting in the timer stand-by mode:
1 Press the CLOCK/TIMER button.
2 Within 10 seconds, press the or button to select
"ONCE" or "DAILY", and press the MEMORY button.
3 Within 10 seconds, press the or button to select
"ONCE OFF" or "DAILY OFF", and press the MEMORY button.
Timer will be cancelled (the setting will not be cancelled).
Reusing the memorised timer setting:
The timer setting will be memorised once it is entered. To reuse the
same setting, perform the following operations.
1 Turn the power on and press the CLOCK/TIMER button.
2 Within 10 seconds, press the or button to select
"ONCE" or "DAILY", and press the MEMORY button.
3 Within 10 seconds, press the or button to select
"ONCE ON" or "DAILY ON", and press the MEMORY button.
4 Press the ON/STAND-BY button to enter the power stand-by
mode.
XL-UH240W
ENGLISH
Advanced Features
03/12/17 XL-UH240W 26-34.fm
E-28
Page 30

XL-UH240W
ENGLISH
Timer and sleep operation (Remote Control only) (continued)
Sleep operation
The radio, compact disc and USB can be turned off automatically.
1
Play back the desired sound source.
2
Press the CLOCK/TIMER button.
3
Within 10 seconds, press the
or button to select
"SLEEP", and press the
MEMORY button.
4
Press the or button to select the time.
(Maximum: 3 hours - Minimum: 1 minute)
3 hours - 5 minutes 5-minute intervals
5 minutes - 1 minute 1-minute intervals
5
Press the MEMORY button.
"SLEEP" will appear.
6
The unit will enter the power stand-by mode automatically
after the preset time has elapsed.
Advanced Features
The volume will be turned down 1 minute before the sleep
operation finishes.
To confirm the remaining sleep time:
1 Whilst "SLEEP" is indicated, press the CLOCK/TIMER button.
2 Within 10 seconds, press the or button to select
"SLEEP X : XX".
"X : XX" is sleep remaining time.
The remaining sleep time is displayed for about 10 seconds.
You can change the remaining sleep time whilst it is displayed by
pressing the MEMORY button (steps 4 - 5).
To cancel the sleep operation:
Press the ON/STAND-BY button whilst "SLEEP" is indicated.
To cancel the sleep operation without setting the unit to the stand-by
mode, proceed as follows.
1 Whilst "SLEEP" is indicated, press the CLOCK/TIMER button.
2 Within 10 seconds, press the or button to select
"SLEEP OFF", and press the MEMORY button.
To use timer and sleep operation together
Sleep and timer playback:
For example, you can fall asleep listening to the radio and wake up
to CD in the next morning.
1 Set the sleep time (see left, steps 1 - 5).
2 Whilst the sleep timer is set, set the timer playback
(steps 2 - 10, pages 26 - 27).
Sleep timer setting Timer playback setting
1 minute - 3 hours Desired time
Sleep operation will
automatically stop.
Timer playback start time
End time
E-29
03/12/17 XL-UH240W 26-34.fm
Page 31
Enhancing your system
The connection lead is not included. Purchase a commercially
available lead as shown below.
VIDEO/AUX IN
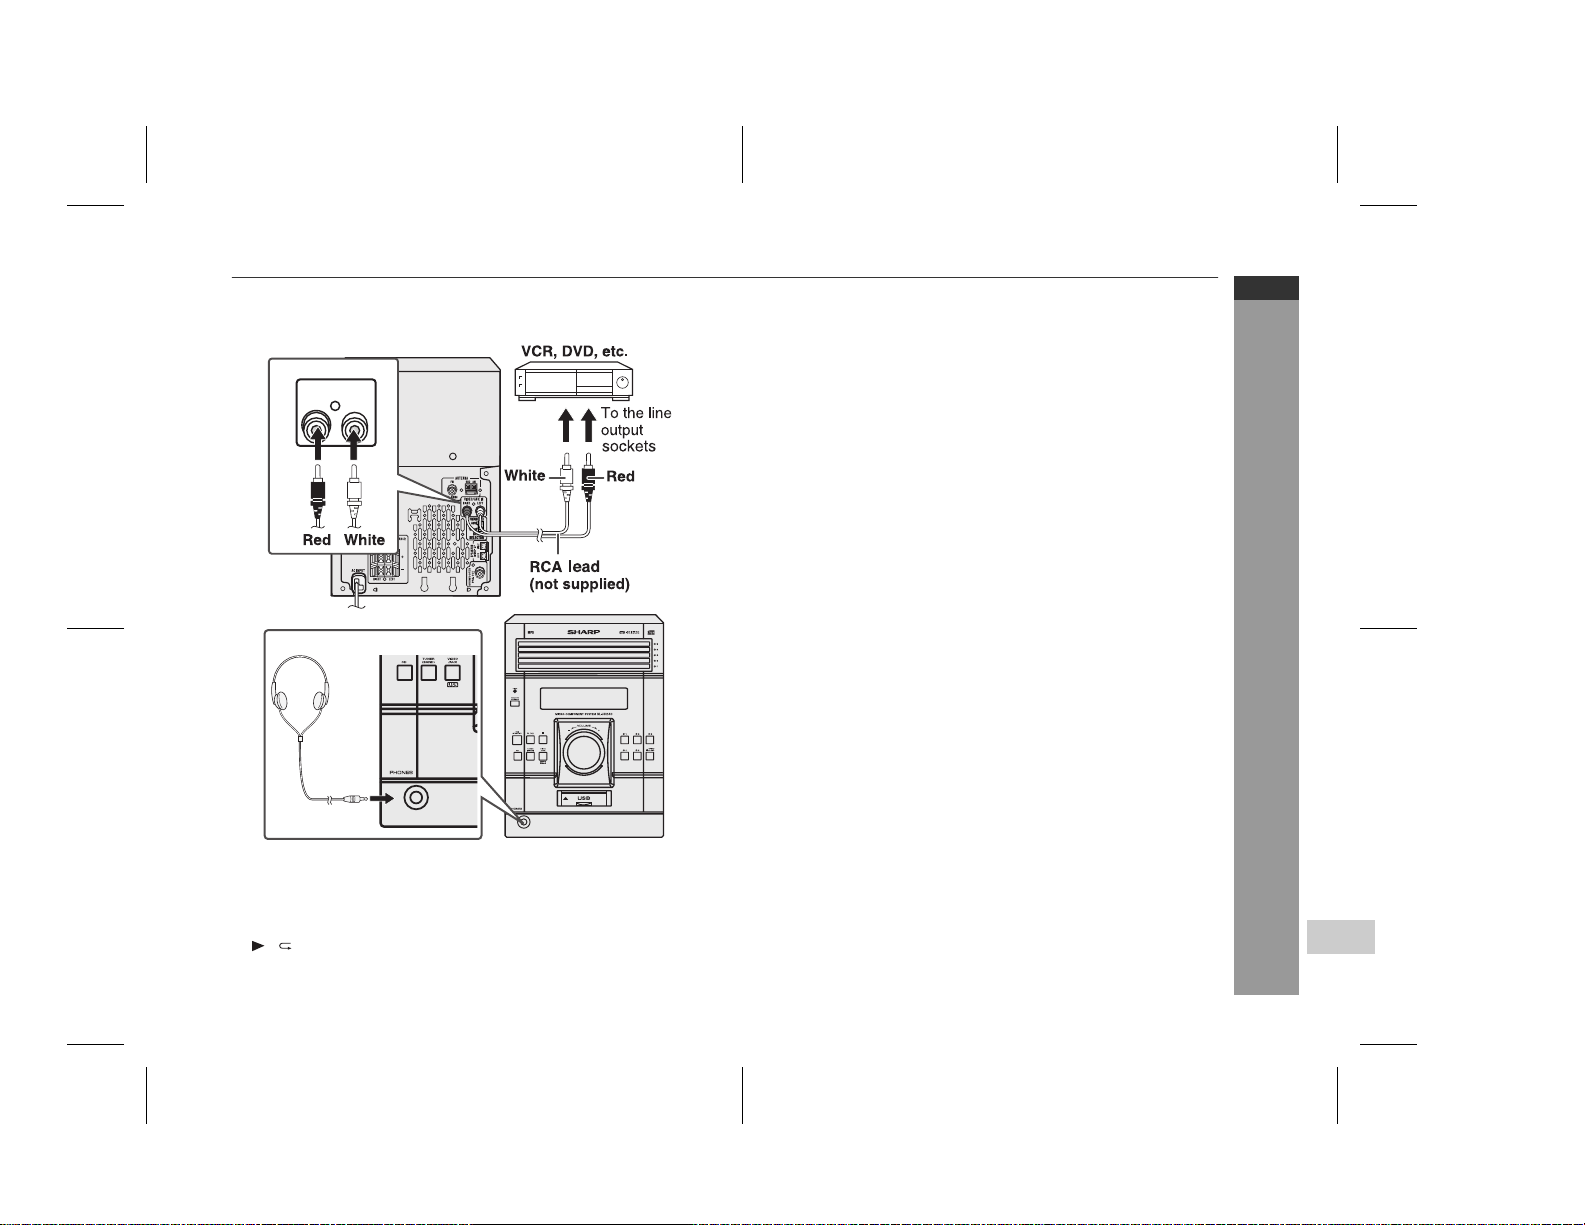
RIGHT LEFT
Listening to the playback sounds from VCR,
DVD, etc.
1
Use a connection lead to connect the VCR, DVD, etc. to the
VIDEO/AUX IN sockets.
When using video equipment, connect the audio output to this
unit and the video output to a television.
2
Press the ON/STAND-BY button to turn the power on.
3
Press the VIDEO/AUX/USB button.
4
Play the connected equipment.
Note:
To prevent noise interference, place the unit away from the
television.
Headphones
Before plugging in or unplugging the headphones, reduce the
volume.
Be sure your headphones have a 3.5 mm (1/8") diameter plug
and impedance between 16 and 50 ohms. The recommended
impedance is 32 ohms.
Plugging in the headphones disconnects the speakers
automatically. Adjust the volume using the VOLUME control.
XL-UH240W
ENGLISH
Advanced Features
Auto power on function:
When you press any of the following buttons, the unit turns on.
VIDEO/AUX/USB button (main unit and remote control): The unit
turns on and the "USB" or "AUX" function is activated.
/ button on the main unit: The unit turns on and playback of
the last function starts (CD,TUNER,VIDEO/AUX/USB).
E-30
03/12/17 XL-UH240W 26-34.fm
Page 32

XL-UH240W
ENGLISH
Enhancing your system (continued)
Subwoofer connection
When a commercially available subwoofer with a built-in amplifier is
connected to this unit, you can enjoy sound with emphasised bass.
Connect an RCA lead from a commercially available speaker with a
built-in amplifier to the SUBWOOFER PRE-OUT socket.
Advanced Features
PRE-OUT
SUBWOOFER
Subwoofer with a
built-in amplifier
Troubleshooting chart
Many potential problems can be resolved by the owner without calling a service technician.
If something is wrong with this product, check the following before
calling your authorised SHARP dealer or service centre.
General
Symptom Possible cause
The clock is not set to the
correct time.
When a button is pressed,
the unit does not respond.
No sound is heard.
CD player
Symptom Possible cause
Playback does not start. Is the disc loaded upside down?
Playback stops in the
middle or is not performed
properly.
Playback sounds are
skipped, or stopped in the
middle of a track.
Did a power failure occur? Reset
the clock.
Set the unit to the power stand-
by mode and then turn it back on.
If the unit still malfunctions, reset
it.
Is the volume level set to "0"?
Are the headphones connected?
Are the speaker wires
disconnected?
Does the disc satisfy the
standards?
Is the disc distorted or
scratched?
Is the unit located near excessive
vibrations?
Is the disc very dirty?
Has condensation formed inside
the unit?
E-31
03/12/17 XL-UH240W 26-34.fm
Page 33

Remote control
Symptom Possible cause
The remote control does
not operate.
Is the AC power lead of the unit
plugged in?
Is the battery polarity correct?
Are the batteries dead?
Is the distance or angle
incorrect?
Does the remote control sensor
receive strong light?
Tuner
Symptom Possible cause
The radio makes unusual
noises continuously.
Is the unit placed near the TV or
computer?
Is the FM aerial or AM loop aerial
placed properly? Move the aerial
away from the AC power lead if
it's located nearby.
Condensation
Sudden temperature changes, storage or operation in an extremely
humid environment may cause condensation inside the cabinet (CD
pickup, etc.) or on the transmitter on the remote control.
Condensation can cause the unit to malfunction. If this happens,
leave the power on with no disc in the unit until normal playback is
possible (about 1 hour). Wipe off any condensation on the transmitter
with a soft cloth before operating the unit.
If trouble occurs
When this product is subjected to strong external interference
(mechanical shock, excessive static electricity, abnormal supply
voltage due to lightning, etc.) or if it is operated incorrectly, it may
malfunction.
If such a problem occurs, do the following:
1 Set the unit to the stand-by mode and turn the power on again.
2 If the unit is not restored in the previous operation, unplug and
plug in the unit, and then turn the power on.
Note:
If neither operation above restores the unit, clear all the memory by
resetting it.
Clearing all the memory (reset)
1 Press the ON/STAND-BY button to enter the power stand-by
mode.
2 Whilst pressing down the 1 button and the 5 button, press
the ON/STAND-BY button until "CLEAR ALL" appears.
ON/
STAND-BY
Caution:
This operation will erase all data stored in memory including clock,
timer settings, tuner preset, and CD programme.
XL-UH240W
ENGLISH
References
03/12/17 XL-UH240W 26-34.fm
E-32
Page 34

XL-UH240W
ENGLISH
References
Troubleshooting chart (continued)
Before transporting the unit
Remove all CDs from the unit. Make sure there is no CD in the disc
tray. Then, set the unit to the power stand-by mode. Carrying the
unit with discs left inside can damage the unit.
Care of compact discs
Compact discs are fairly resistant to damage, however mistracking
can occur due to an accumulation of dirt on the disc surface. Follow
the guidelines below for maximum enjoyment from your CD
collection and player.
Do not write on either side of the disc, particularly the non-label
side from which signals are read. Do not mark this surface.
Keep your discs away from direct sunlight, heat, and excessive
moisture.
Always hold the CDs by the edges. Fingerprints, dirt, or water on
the CDs can cause noise or mistracking. If a CD is dirty or does
not play properly, clean it with a soft, dry cloth, wiping straight out
from the centre, along the radius.
NO YES
Correct
Maintenance
Cleaning the CD pickup lens
In order to ensure proper operation of the CD player, preventative
maintenance (cleaning of the laser pickup lens) should be
performed periodically. Lens cleaners are commercially available.
Contact your local CD software dealer for options.
Cleaning the cabinet
Periodically wipe the cabinet with a soft cloth and a diluted soap
solution, then with a dry cloth.
Caution:
Do not use chemicals for cleaning (petrol, paint thinner, etc.). It
may damage the cabinet finish.
Do not apply oil to the inside of the unit. It may cause
malfunctions.
E-33
03/12/17 XL-UH240W 26-34.fm
Page 35

Specifications
As part of our policy of continuous improvement, SHARP reserves
the right to make design and specification changes for product
improvement without prior notice. The performance specification
figures indicated are nominal values of production units. There may
be some deviations from these values in individual units.
General
Power source AC 110/127/220/230-240 V, 50/60 Hz
Power
consumption
Dimensions Width: 175 mm (6-3/4")
Weight 5.7 kg (12.6 lbs.)
Amplifier
Output power MPO : 320 W ( 160 W + 160 W) (10% T.H.D.)
Output terminals Speakers: 6 ohms
Input terminals Video/Auxiliary (audio signal):
USB
Class Mass storage class
Support File MP3/WMA (do not support DRM file)
Format support FAT 16 or FAT 32
Bitrate support MP3 (32 ~ 320 kbps)
Other MP3 lD3 - tag only supports version 1.x
90 W
Height: 240 mm (9-1/2")
Depth: 315 mm (12-1/5")
RMS : 160 W ( 80 W + 80 W) (10% T.H.D.)
RMS : 130 W ( 65 W + 65 W) (0.9% T.H.D.)
Headphones: 16 - 50 ohms
(recommended: 32 ohms)
Subwoofer pre-out (audio signal):
200 mV/10 k ohms at 70 Hz
500 mV/47 k ohms
WMA (64 ~ 160 kbps)
USB supports version 2.0
CD player
Type 5-disc multi-play compact disc player
Signal readout Non-contact, 3-beam semiconductor laser
D/A converter 1-bit D/A converter
Frequency
response
Dynamic range 90 dB (1 kHz)
pickup
20 - 20,000 Hz
Tuner
Frequency range FM: 88 - 108 MHz
AM: 531 - 1,602 kHz
Speaker
Type 2-way type light-up speaker system
5 cm (2") tweeter
13 cm (5-1/8") woofer
Maximum input
power
Rated input power 80 W
Impedance 6 ohms
Dimensions Width: 165 mm (6-1/2")
Weight 2.5 kg (5.5 lbs.)/each
160 W
Height: 260 mm (10-1/4")
Depth: 245 mm (9-5/8")
XL-UH240W
ENGLISH
References
E-34
03/12/17 XL-UH240W 26-34.fm
Page 36

XL-UH240W
ESPAÑOL
Notas especiales
ADVERTENCIAS
Si el botón ON/STAND-BY se encuentra en la posición STAND-
BY, el voltaje principal estará todavía presente dentro de la
unidad. Si el botón ON/STAND-BY está puesto en la posición
STAND-BY, la unidad podrá ser puesta en funcionamiento a
través del modo de temporizador o el mando a distancia.
Esta unidad no contiene partes útiles para el usuario. Nunca quite
las cubiertas al menos que sea alguien calificado para hacerlo.
Esta unidad contiene voltajes peligrosos. Desenchúfela siempre
antes de cualquier maniobra de servicio y cuando no la utilice
durante un período largo.
Para prevenir incendios o daños, no exponga este dispositivo al
goteo o salpicadura de líquidos. No coloque objetos que
contengan líquidos, como floreros, sobre el aparato.
Nota:
El material audiovisual puede tratarse de trabajos con derechos de
autor que no deben ser grabados sin la autorización del propietario
de los derechos de autor. Por favor remítase a las leyes vigentes en
su país.
NOTA
Este equipo ha sido probado y se ha confirmado que cumple los límites
para dispositivos digitales de Clase B, según la Parte 15 de las normas de
FCC. Estos límites han sido diseñados para proporcionar una protección
razonable contra interferencias perjudiciales en instalaciones
residenciales. Este equipo genera, emplea y puede radiar energía de
radiofrecuencias y, si no se instala y utiliza de acuerdo con las
instrucciones, puede causar interferencias perjudiciales en las
radiocomunicaciones. No obstante, no se garantiza que no ocurrirán
interferencias en una instalación en particular. Si este equipo causa
Instrucciones importantes
interferencias perjudiciales con la recepción de radio o de televisión, lo
cual podrá determinarse desconectando y conectando la alimentación
del aparato, se aconseja al usuario que trate de solucionar las
interferencias mediante una o más de las medidas siguientes:
Reoriente la antena de recepción o cámbiela de posición.
Aumente la separación entre el equipo y el receptor.
Conecte el equipo a una toma de corriente de un circuito distinto al que
se haya conectado el receptor.
Consulte al distribuidor o solicite ayuda a un técnico especializado en
radio/TV.
ADVERTENCIA
Las regulaciones de FCC declaran que cualquier cambio o modificación
no autorizados en este equipo que no estén expresamente aprobados
por el fabricante, puede anular la autoridad del usuario para la
S-1
operación de este equipo.
ESPAÑOL
PRECAUCIÓN
Este producto está clasificado como un producto de LÁSER
CLASE 1.
El empleo de mandos, ajustes o funcionamiento de los
procedimientos, como otros especificados aquí pueden causar la
exposición riesgosa a la radiación.
Como el rayo láser utilizado en este reproductor de disco
compacto es dañino para los ojos, no intente desmontar el
gabinete. Mándelo a revisar sólo por personal cualificado.
Propiedades del diodo láser
Material: GaAIAs
Longitud de onda: 795 nm
Duración de emisión: Salida continua
Salida láser: máx. 0,6 mW
CAUTION-INVISIBLE LASER RADIATION WHEN OPEN.
DO NOT STARE INTO BEAM OR VIEW DIRECTLY WITH
OPTICAL INSTRUMENTS.
WARNUNG-UNSICHTBARE LASERSTRAHLUNG WENN GERÄT
GEÖFFNET. NICHT IN DIE STRAHLUNG SCHAUEN ODER
DIREKT MIT OPTISCHEN HILFSMITTELN BETRACHTEN.
ATTENTION-RAYON LASER INVISIBLE EN CAS D'OUVERTURE.
NE PAS REGARDER LE FAISCEAU DIRECTEMENT OU AVEC DES
INSTRUMENTS OPTIQUES.
03/12/17 XL-UH240W LS _1-7.fm
Page 37

Introducción
Muchas gracias por haber adquirido este producto SHARP. Lea atentamente este manual para conseguir el mejor rendimiento del
aparato. Le servirá también como guía operativa de este producto
SHARP.
Notas especiales
El suministro de este producto no transmite una licencia ni implica
algun derecho de distribución del contenido creado con este producto por medio de entradas provenientes de los sistemas de radiodifución (terrestre, satelitar, cable y/u otros canales de distribución),
entradas provenientes del uso de la red (vía Internet, intranets y/o
otras redes), otros de los sistemas de distribución regulados (aplicaciones pay-audio o audio-on-demand y similares) o a travès de material mediático (discos compactos, discos digitales reescribibles,
semiconductor chips, disco duro, tarjetas de memoria y similares).
Se requiere una licencia independiente para dichos usos. Para màs
detalles, visite por favor el sito http://mp3licensing.com
Tecnología de codificación del audio MPEG Layer-3 licenciada por
Fraunhofer IIS y Thomson.
.
Accesorios
Verifique que estén incluidos los accesorios siguientes.
Controlador remoto 1
Antena de cuadro de AM 1
Índice
Página
Información general
Precauciones . . . . . . . . . . . . . . . . . . . . . . . . . . . . . . . . . . . . . . . . 3
Controles e indicadores . . . . . . . . . . . . . . . . . . . . . . . . . . . . . 4 - 6
Preparación para su utilización
Conexiones del sistema . . . . . . . . . . . . . . . . . . . . . . . . . . . . 7 - 10
Controlador remoto . . . . . . . . . . . . . . . . . . . . . . . . . . . . . . . . . . 11
Operación básica
Control general . . . . . . . . . . . . . . . . . . . . . . . . . . . . . . . . . . . . . 12
Ajuste del reloj (Sólo mando a distancia) . . . . . . . . . . . . . . . . 13
Reproducción de discos CD o MP3/WMA
Audición de un disco CD o MP3/WMA . . . . . . . . . . . . . . . .14 - 16
Reproducción avanzada de discos CD o MP3/WMA . . . .16 - 17
Reproducción de CD avanzada. . . . . . . . . . . . . . . . . . . . . . . . . 18
Modo de carpeta MP3/WMA (sólo para archivos MP3/WMA) . .
. . . . . . . . . . . . . . . . . . . . . . . . . . . . . . . . . . . . . . . . . . . . . . . .19 - 20
Reproducción de memoria USB
Para escuchar el dispositivo de almacenamiento masivo
USB / Reproductor MP3 . . . . . . . . . . . . . . . . . . . . . . . . . . . .21 - 22
Para quitar el dispositivo de memoria USB . . . . . . . . . . . . . . . 22
Reproducción de USB avanzada. . . . . . . . . . . . . . . . . . . . . . . . 23
Radio
Audición de la radio . . . . . . . . . . . . . . . . . . . . . . . . . . . . . .24 - 25
Características avanzadas
Operación del temporizador y de desconexión
automática (Sólo mando a distancia) . . . . . . . . . . . . . . . . .26 - 29
Mejoramiento de su sistema . . . . . . . . . . . . . . . . . . . . . . . .30 - 31
XL-UH240W
ESPAÑOL
Información general
Antena de FM 1
Nota:
Sólo se incluyen los accesorios de arriba.
Referencias
Cuadro para localización de averías . . . . . . . . . . . . . . . . .31 - 33
Mantenimiento . . . . . . . . . . . . . . . . . . . . . . . . . . . . . . . . . . . . . . 33
Especificaciones técnicas . . . . . . . . . . . . . . . . . . . . . . . . . . . . 34
S-2
03/12/17 XL-UH240W LS _1-7.fm
Page 38

XL-UH240W
ESPAÑOL
Precauciones
General
Asegúrese de que el equipo esté colocado en un área bien
ventilada y asegúrese de que haya por lo menos 10 cm de
espacio libre a lo largo de los lados, parte superior y parte
posterior del equipo.
Use el aparato sobre una superficie nivelada
y firme, en un lugar que no esté expuesto a
vibraciones.
Mantenga el aparato apartado de la luz di-
recta del sol, fuertes campos magnéticos,
polvo excesivo, humedad y de equipos
electrónicos/eléctricos (computadoras del
hogar, facsímiles, etc.) que generan ruido
eléctrico.
Información general
No ponga nada encima del aparato.
No exponga el aparato a la humedad, a temperaturas superiores
a 60˚C ni a temperaturas muy bajas.
Si su sistema no funciona correctamente, desconecte el cable de
alimentación de CA de la toma de CA. Enchufe otra vez el cable
de alimentación de CA, y luego conecte la alimentación del
sistema.
Si se produce una tormenta con rayos, des-
enchufe el aparato por razones de seguridad.
Sujete la clavija de alimentación de corriente
alterna al quitar esta clavija del tomacorriente.
Si la quita tirando del cable puede romper o
estropear los hilos y conexiones internas.
El enchufe de CA (corriente alterna) es
utilizado como dispositivo de desconexión y
10 cm10 cm
10 cm
deberá estar siempre fácilmente operable.
No quite la tapa exterior dado que
pueden producirse descargas eléctricas. Solicite el servicio técnico a un
10 cm
VIDEO
TUNER
/AUX
(BAND)
CD
OPEN/
CLOSE
USB
centro de servicio local SHARP.
Procure no bloquear la ventilación
colocando diferentes artículos, como
periódicos, manteles, cortinas, etc, en las
aperturas de ventilación.
OPEN/
CLOSE
VIDEO
TUNER
/AUX
(BAND)
CD
USB
Procure no colocar ninguna fuente inflamable, como velas sobre
el aparato.
Procure prestar atención a los aspectos ambientales relacionados
OPEN/
CLOSE
VIDEO
TUNER
/AUX
(BAND)
CD
USB
con la eliminación de baterías.
Este aparato sólo debe ser utilizado dentro de un margen de
temperaturas de 5˚C - 35˚C.
Advertencia:
Se debe usar la misma tensión que la especificada en el aparato. Si
usa este aparato con una tensión más alta que la especificada, es
peligroso y puede provocar incendios o accidentes que causen
daños. SHARP no asumirá responsabilidad alguna por cualquier
daño de este aparato que resulte del uso de una tensión distinta a la
especificada.
Control de volumen
El nivel de sonido de una determinada configuración de volumen
depende de la calidad del altavoz, la posición, y otros factores. Es
aconsejable evitar los niveles de volumen altos. No ponga el
volumen al máximo en el interruptor y escuche la música a niveles
moderados.
S-3
03/12/17 XL-UH240W LS _1-7.fm
Page 39

Controles e indicadores
Panel frontal
Página de referencia
1. Bandejas de discos . . . . . . . . . . . . . . . . . . . . . . . . . . . . . . . 15
2. Indicador del temporizador . . . . . . . . . . . . . . . . . . . . . . . . . 27
3. Sensor remoto. . . . . . . . . . . . . . . . . . . . . . . . . . . . . . . . . . . . 11
4. Botón de parada de disco o USB . . . . . . . . . . . . . . . . . . . . 16
5. Botón de reproducción o repetición de disco o USB . 14, 17
6. Botón ON/STAND-BY . . . . . . . . . . . . . . . . . . . . . . . . . . . . . . 12
7. Botón de CD . . . . . . . . . . . . . . . . . . . . . . . . . . . . . . . . . . . . . 14
8. Botón del sintonizador (banda) . . . . . . . . . . . . . . . . . . . . . . 24
9. Botón de Vídeo /Auxiliar /USB . . . . . . . . . . . . . . . . . . . . . . 30
10. Terminal USB . . . . . . . . . . . . . . . . . . . . . . . . . . . . . . . . . . . . 21
11. Toma de auriculares. . . . . . . . . . . . . . . . . . . . . . . . . . . . . . . 30
12. Control de volumen . . . . . . . . . . . . . . . . . . . . . . . . . . . . . . . 12
13. Botones selectores del número de disco. . . . . . . . . . . . . . 14
14. Botón de abertura/cierre de la bandeja de discos. . . . . . . 14
XL-UH240W
ESPAÑOL
Información general
03/12/17 XL-UH240W LS _1-7.fm
S-4
Page 40

5
XL-UH240W
ESPAÑOL
Controles e indicadores (continuación)
12 3 45 67
Información general
1
2
3
4
13 14
15
16
9 10 11
8
5
6
7
8
9
10
11
12
Visualización
1. Indicadores del número de disco . . . . . . . . . . . . . . . . . . . . 18
2. Indicador de carpetas MP3/WMA . . . . . . . . . . . . . . . . . . . . 20
3. Indicadores de títulos MP3/WMA . . . . . . . . . . . . . . . . . . . . 20
4. Indicador MP3 . . . . . . . . . . . . . . . . . . . . . . . . . . . . . . . . . . . . 15
5. Indicador WMA . . . . . . . . . . . . . . . . . . . . . . . . . . . . . . . . . . . 15
6. Indicador de desconexión automática . . . . . . . . . . . . . . . . 29
7. Indicador de reproducción con temporizador . . . . . . . . . . 27
8. Indicador del total de MP3/WMA . . . . . . . . . . . . . . . . . . . . . 20
9. Indicador del temporizador diario . . . . . . . . . . . . . . . . . . . 27
10. Indicador del modo de FM en estéreo . . . . . . . . . . . . . . . . 24
11. Indicador de recepción de FM en estéreo . . . . . . . . . . . . . 24
12. Indicador de memoria . . . . . . . . . . . . . . . . . . . . . . . . . . . . . 18
13. Indicador de graves extra . . . . . . . . . . . . . . . . . . . . . . . . . . 12
14. Indicador de repetición de disco o USB . . . . . . . . . . . 17, 23
15. Indicador de pausa de disco o USB . . . . . . . . . . . . . . . . . . 16
16. Indicador de reproducción de disco o USB . . . . . . . . . 15, 23
Panel posterior
1. Selector de voltaje de CA . . . . . . . . . . . . . . . . . . . . . . . . . . . . 9
2. Terminales de altavoces . . . . . . . . . . . . . . . . . . . . . . . . . . . . 8
3. Cable de alimentación de CA . . . . . . . . . . . . . . . . . . . . . . . . 9
4. Ventilador de enfriamiento . . . . . . . . . . . . . . . . . . . . . . . . . . 9
5. Toma de antena de FM de 75 ohmios . . . . . . . . . . . . . . . . . . 8
6. Terminal de tierra de la antena de AM . . . . . . . . . . . . . . . . . 8
7. Terminal de la antena de cuadro de AM . . . . . . . . . . . . . . . . 8
8. Tomas de entrada de vídeo /auxiliar (señal de audio). . . . 30
9. Interruptor selector de banda . . . . . . . . . . . . . . . . . . . . . . . 10
10. Enchufe de encendido del altavoz . . . . . . . . . . . . . . . . . . . . 8
11. Pre-toma de salida de subwoofer . . . . . . . . . . . . . . . . . . . 31
Página de referencia
Página de referencia
Sistema de altavoces
1.Altavoz de agudos
2.Altavoz de graves
3.Conducto de reflejo de bajo
4.Cable del altavoz
5.Cable de encendido del
altavoz
1
2
3
4
S-5
03/12/17 XL-UH240W LS _1-7.fm
Page 41

1
11
7
12
8
13
2
9
14
15
16
17
18
10
19 20
3
2221
23 24
4
25
5
6
Controlador remoto
Página de referencia
1. Transmisor de control remoto. . . . . . . . . . . . . . . . . . . . . . . 11
2. Botones selectores del número de disco. . . . . . . . . . . . . . 14
3. Botones de búsqueda directa de discos . . . . . . . . . . . . . . 16
4. Botón de selección del modo del ecualizador. . . . . . . . . . 12
5. Botón de extra bajo (surround)/demo. . . . . . . . . . . . . . . . . 12
6. Botones de aumento y reducción del volumen . . . . . . . . 12
7. Botón de encendido /stand-by (reserva) . . . . . . . . . . . . . . 12
8. Botón de CD . . . . . . . . . . . . . . . . . . . . . . . . . . . . . . . . . . . . . 14
9. Botón del sintonizador (banda) . . . . . . . . . . . . . . . . . . . . . . 24
10. Botón de vídeo /auxiliar /USB . . . . . . . . . . . . . . . . . . . . . . . 21
11. Botón de borrado de discos/
regulación de la iluminación . . . . . . . . . . . . . . . . . . . . . 12, 18
12. Botón de reproducción aleatoria de discos. . . . . . . . . 17, 23
13. Botón de parada de disco . . . . . . . . . . . . . . . . . . . . . . . . . . 16
14. Botón de parada de USB . . . . . . . . . . . . . . . . . . . . . . . . . . . 21
15. Botón de memoria . . . . . . . . . . . . . . . . . . . . . . . 13, 18, 25, 29
16. Botón de pausa de disco/USB . . . . . . . . . . . . . . . . . . . . . . 16
17. Botón de reproducción o repetición . . . . . . . . . . . . . . 14, 17
18. Botón de reproducción o repetición de USB . . . . . . . . . . . 21
19. Botón de sintonización hacia arriba . . . . . . . . . . . . . . . . . . 24
20. Botón de próxima pista o adelantado rápido, sintonizador
hacia arriba, tiempo hacia adelante . . . . . . 13, 21, 25, 26, 29
21. Botón de pista anterior o rebobinado rápido, sintonizador
hacia abajo, tiempo hacia atrás . . . . . . . . . 13, 21, 25, 26, 29
22. Botón de sintonización hacia abajo . . . . . . . . . . . . . . . . . . 24
23. Botón de visualización . . . . . . . . . . . . . . . . . . . . . . . . . . . . 21
24. Botón de carpeta . . . . . . . . . . . . . . . . . . . . . . . . . . . . . . 19, 21
25. Botón del reloj/temporizador. . . . . . . . . . . . . . . . . . 13, 26, 29
XL-UH240W
ESPAÑOL
Información general
03/12/17 XL-UH240W LS _1-7.fm
S-6
Page 42

XL-UH240W
ESPAÑOL
Conexiones del sistema
Asegúrese de desenchufar el cable de alimentación de CA antes de hacer cualquier conexión.
Preparación para su utilización
Conexión de la antena (vea la página 8)
Antena de FM Antena de cuadro de AM
Altavoz izquierdoAltavoz derecho
S-7
Conexión de los altavoces
(vea la página 8)
Cable de encendido del altavozCable de encendido del altavoz
Conexión de CA (vea la página 9)
03/12/17 XL-UH240W LS _1-7.fm
Page 43
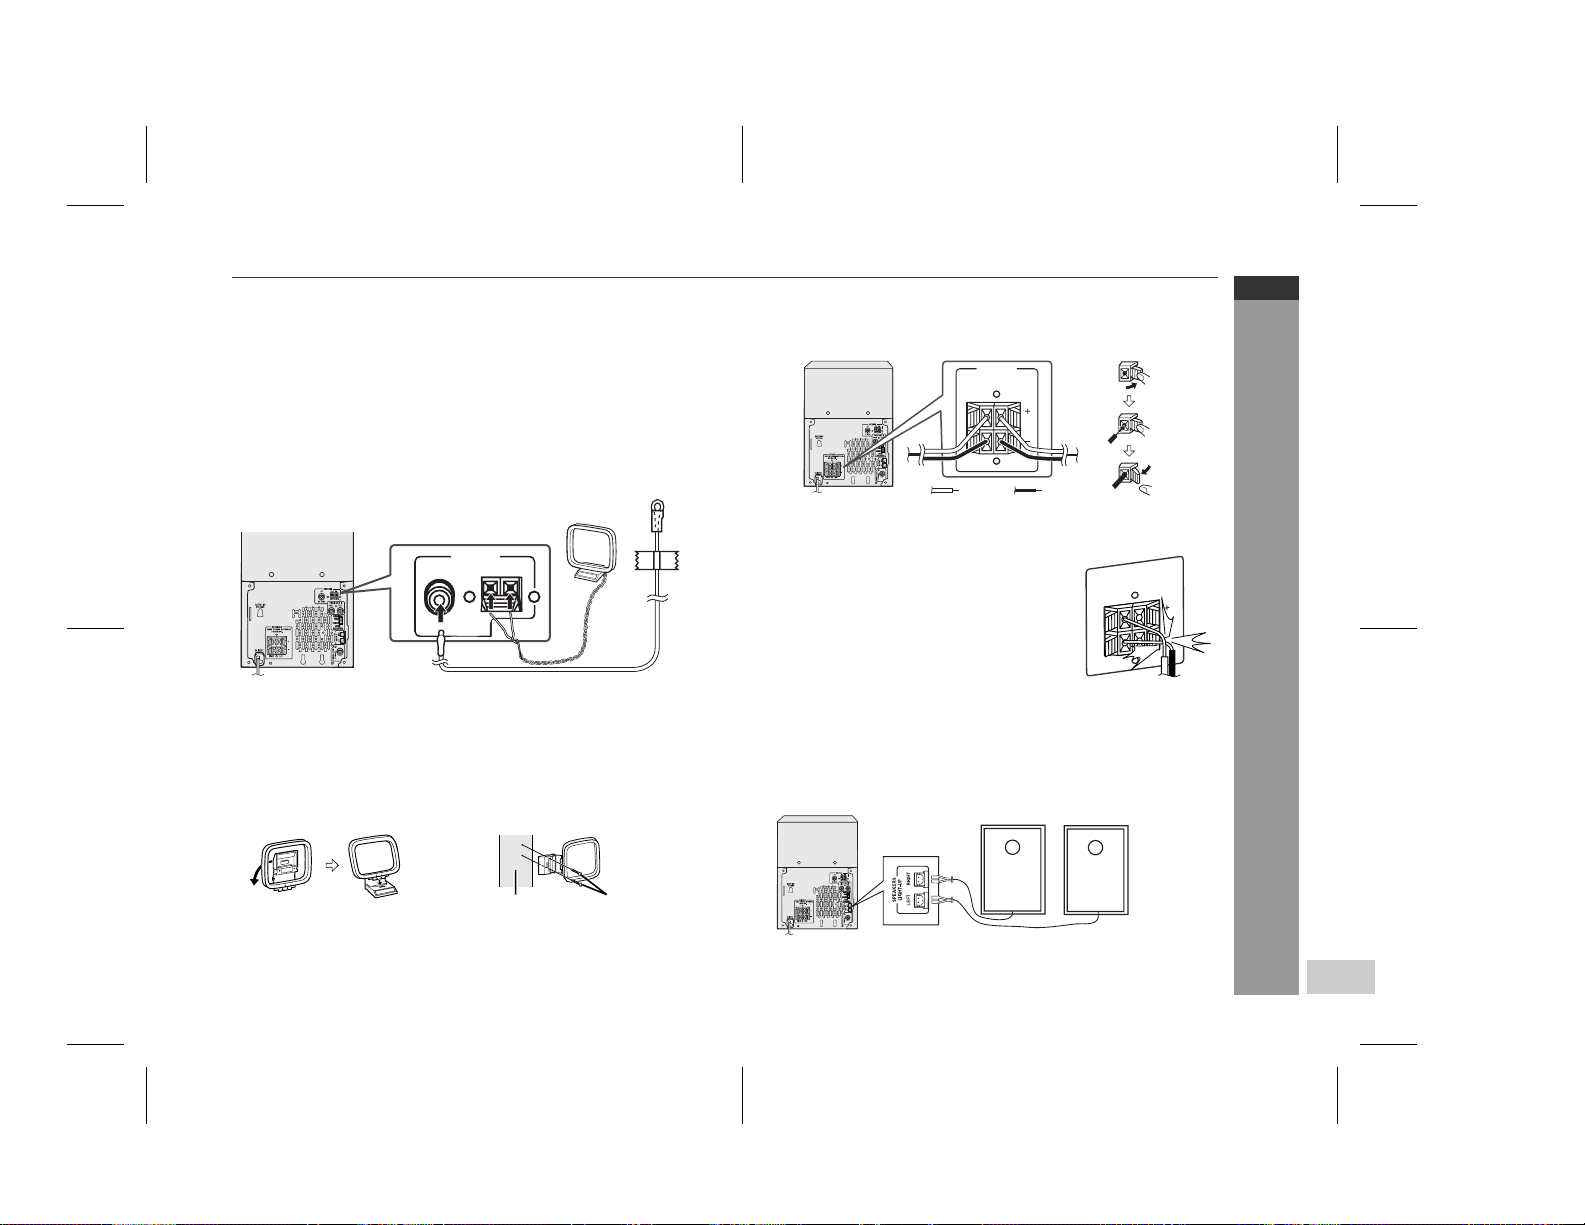
Conexión de la antena
Antena de FM suministrada:
Conecte el cable de la antena de FM al toma FM 75 OHMS y
posicione el cable de antena de FM en la dirección que proporcione
la mejor recepción posible.
Antena de cuadro de AM suministrada:
Conecte la antena loop (o circular) de AM a las terminales AM y
GND. Posicione la antena loop para una recepción óptima. Ponga la
antena loop sobre un anaquel, etc., o colóquela con un soporte o
sobre una pared con tornillos (no incluidos).
ANTENNA
FM
GND
AM
75 OHMS
Nota:
Si pone la antena sobre el aparato o cerca del cable de alimentación
de CA, podrá causarse generación de ruido. Ponga la antena
separada del aparato para obtener una recepción mejor.
Instalación de la antena de cuadro de AM:
<Montaje> <Fijación a la pared>
Conexión de los altavoces
Conecte el cable negro al terminal negativo (-) y el cable rojo al terminal positivo (+).
SPEAKERS
RATED SPEAKER IMPEDANCE:
6 OHMS MIN.
RIGHT
LEFT
NegroRojo
Precaución:
Utilice altavoces con una impedancia de 6 ohmios o más, ya que
los altavoces con una impedancia inferior pueden dañar la unidad.
No confunda los canales derecho e izquierdo.
El altavoz derecho es el que está en el lado
derecho cuando se mira el aparato desde
SPEAKERS
RATED SPEAKER IMPEDANCE:
6 OHMS MIN.
delante.
No deje que los cables desnudos de los
altavoces se pongan en contacto entre sí.
No permita que ningún objeto caiga o sea
colocado en el conducto de reflejo de bajo.
No se suba ni se siente encima de los altav-
oces. Podría herirse.
LEFT
RIGHT
Incorrecto
Conexión de encendido del altavoz
Conecte los cables de encendido del altavoz a los enchufes
SPEAKERS LIGHT-UP para que se iluminen los altavoces. Para
apagar la iluminación de los altavoces, pulse el botón CLEAR/
DIMMER en el mando a distancia durante 2 segundos o más.
ALTAVOZ IZQUIERDOALTAVOZ DERECHO
XL-UH240W
ESPAÑOL
Preparación para su utilización
Pared Tornillos
(no suministra dos)
Nota:
Colocando el cable de encendido del altavoz derecho en el enchufe
RIGHT (derecho) y el cable de encendido del altavoz izquierdo en el
enchufe LEFT (izquierdo).
XL-UH240W LS_8-16.fm
S-8
Page 44

XL-UH240W
ESPAÑOL
Conexiones del sistema (continuación)
Preparación para su utilización
Ajuste del selector de voltaje de CA
Compruebe el ajuste del selector de voltaje de CA localizado sobre
el panel trasero antes de enchufar la unidad en la salida de CA. Si
fuera necesario, ajuste al selector para corresponder al voltaje de
CA usado en su área.
Gire el selector con un destornillador hasta que el número de
voltaje apropiado aparezca en la ventana (110 V, 127 V, 220V ó
230 V- 240 V de CA).
Conexión del cable de corriente alterna (CA)
Después de comprobar que se hayan hecho correctamente todas
las conexiones, enchufe el cable de alimentación de CA de este
aparato en la toma de la pared. Si enchufa al principio el aparato, se
establecerá en el modo de demostración (vea la página 10).
Notas:
El aparato comenzará la inicialización de la cinta cuando se
enchufe en la toma de corriente de CA. Durante este proceso, se
oirá el sonido de inicialización y no podrá conectarse la
alimentación del aparato. Espere a que termine el proceso.
Desenchufe el aparato si no lo utilizará durante un largo período
de tiempo.
Adaptador de enchufe de CA
En áreas (o países) donde se usa la salida de CA mostrada en la
ilustración 2 , conecte la unidad utilizando el adaptador del enchufe
de CA suministrado con la unidad, como está ilustrado. El adaptador
del enchufe de CA no está incluido para áreas donde la salida de CA
y el enchufe de CA no pueden ser conectados directamente (mirar
la ilustración 1 ).
Ventilador de enfriamiento:
Esta unidad principal incluye un ventilador refrigeración en su parte
trasera para mejorar la refrigeración. No cubra la abertura del ventilador con ningún tipo de obstáculo, para no bloquear la salida, y
lograr una ventilación adecuada.
S-9
XL-UH240W LS_8-16.fm
Page 45

Ajuste de selector de banda FM/AM
La Unión Internacional de Telecomunicaciones (UIT) ha establecido
que los países miembros deberían mantener 100 kilohercios o un
intervalo de 50 kilohercios entre la difusión de las frecuencias de
estaciones de FM y 10 kilohercios o 9 kilohercios para las estaciones
de AM. La ilustración muestra las zonas de kilohercio 50/9 (regiones
1 y 3), y la zona de kilohercio 100/10 (la región 2).
Antes de la utilización de la unidad, ponga el interruptor de SPAN
SELECTOR (en el panel trasero) al intervalo (banda) de su área.
Para cambiar la zona de sintonización:
1 Pulse el botón ON/STAND-BY para entrar en el modo de reserva.
2 Ponga el interruptor SPAN SELECTOR (en el panel trasero) de la
siguinte manera.
Para un intervalo de 50 kilohercios (9 kilohercios en AM)
Para un intervalo de 100 kilohercios (10 kilohercios en AM) →
100/10
3 Mientras mantiene pulsados el botón 1 y el botón 5, pulse el
botón ON/STAND-BY hasta que aparezca "CLEAR ALL".
Precaución:
Esta operación borrará todos los datos almacenados en la memoria
incluyendo el reloj, ajustes de temporizador, sintonizador
predeterminado, y el programa de CD.
→
50/9
Modo de demostración
Cuando se enchufe por primera vez el aparato, se establecerá en el modo de demostración. Usted verá aparecer palabras.
Para cancelar el modo de demostración:
Cuando el aparato esté en el modo
de reserva de alimentación (modo
de demostración), pulse el botón XBASS /DEMO. El modo de
demostración será cancelado y
desaparecerá el visualizador.
Para volver al modo de demostración:
Cuando el aparato esté en el modo de reserva de alimentación,
pulse de nuevo el botón X-BASS/DEMO.
Nota:
Cuando está encendido, el botón X-BASS/DEMO puede ser usado
para seleccionar el modo de bajo suplementario.
Antena externa de FM
Emplee una antena de FM externa si necesita mejorar la recepción.
Consulte a su distribuidor.
ANTENNA
FM
GND
AM
75 OHMS
Cable coaxial
de 75 ohmios
Nota:
Cuando se utilice una antena de FM exterior, desconecte el cable
de la antena de FM suministrada.
Antena externa
de FM
XL-UH240W
ESPAÑOL
Preparación para su utilización
S-10
XL-UH240W LS_8-16.fm
Page 46

XL-UH240W
ESPAÑOL
Controlador remoto
Instalación de las pilas
Use 2 pilas del tamaño "AA" (UM/SUM-3, R6, HP-7 o equivalentes).
Las pilas no están incluidas.
1 Abra la cubierta de las pilas.
2 Inserte las pilas de acuerdo con la dirección indicada en el
compartimiento de las pilas.
Cuando inserte o extraiga las pilas, púlselas hacia los terminales
de las pilas.
3 Cierre la tapa.
Precauciones a tener con las pilas:
Reemplace todas las pilas gastadas por pilas nuevas al mismo
tiempo.
No mezcle las pilas viejas con las nuevas.
Quite las pilas cuando no utilice el aparato durante períodos
largos de tiempo. Así prevendrá daños potenciales debido a
pérdidas de las pilas.
Precaución:
Preparación para su utilización
No emplee baterías recargables (batería de níquel-cadmio, etc.).
La inserción de las pilas en la dirección opuesta puede ocasionar
un mal funcionamiento del aparato.
Retiro de la batería:
Abra la tapa de la batería y saque la batería.
Notas sobre el uso:
Reemplace las pilas si se reduce la distancia de operación o si el
funcionamiento es errático.
Limpie periódicamente el transmisor del controlador remoto y el
sensor del aparato con un paño suave.
Una luz muy intensa que caiga sobre el sensor del aparato puede
interferir con el funcionamiento. Cambie la iluminación o la
dirección de la unidad si esto ocurre.
Mantenga el controlador remoto en lugares sin excesiva
humedad o calor y no lo someta a golpes ni vibraciones.
Prueba del controlador remoto
Compruebe el controlador remoto después de haber comprobado
todas las conexiones (vea las páginas 7 - 10).
Oriente directamente el controlador remoto al sensor remoto del
aparato.
Se podrá emplear el controlador remoto dentro del alcance
mostrado a continuación:
Pulse el botón ON/STAND-BY. ¿Se conecta la alimentación? Ahora,
podrá disfrutar de la música.
S-11
XL-UH240W LS_8-16.fm
Page 47

Control general
ON/
STAND-BY
Para conectar la alimentación
Pulse el botón ON/STAND-BY para conectar la alimentación.
Después del uso:
Pulse el botón ON/STAND-BY para entrar en el modo de reserva
de alimentación.
Control de cuadro con iluminación
Cuando se enciende el equipo, el anillo que rodea al regulador de
volumen se enciende. Para encender o apagar la luz, mantenga
apretado el botón CLEAR/DIMMER en el mando a distancia
durante 2 segundos o más.
Controlador de luz de altavoces
Las luces de los altavoces se encenderán según el volumen de
música puesta. Para encender o apagar las luces, mantenga
apretado el botón CLEAR/DIMMER en el mando a distancia
durante 2 segundos o más.
Volumen automático (fade-in)
Si usted apaga y enciende la unidad principal con el volumen ajustado a 27 o más alto, el volumen comenzará en 16 hasta llegar al
último volumen ajustado.
Control de volumen
Operación con el aparato principal:
Cuando se gira el control VOLUME hacia la derecha, se incrementa
el volumen. Cuando se gira hacia la izquierda, se reduce el volumen.
Operación con el controlador remoto:
Pulse el botón VOLUME (+ o -) para subir o bajar el volumen
.....
30 MAXIMUM0
.
Controlador de bajos
Apenas se encienda, la unidad entrará en el modo de bajo suplementario, que acentúa las frecuencias graves, y aparecerá "XBASS". Para cancelar este modo, pulse el botón X-BASS/DEMO en
el mando a distancia.
Ecualizador
Cuando se pulse el botón EQUALIZER MODE, se visualizará el
ajuste del modo actual. Para cambiar a un modo dis tinto, pulse el
botón EQUALIZER MODE repetida mente hasta que aparezca el
modo de sonido deseado.
FLAT
ROCK
CLASSIC
POPS
VOCAL
JAZZ
Sin ecualización.
Para música "rock".
Para música clásica.
Para música "pop".
Se mejoran los sonidos vocales.
Para jazz.
XL-UH240W
ESPAÑOL
Operación básica
S-12
XL-UH240W LS_8-16.fm
Page 48

XL-UH240W
ESPAÑOL
Ajuste del reloj (Sólo mando a distancia)
En este ejemplo, el reloj está ajustado para la visualización de 24 horas (0:00).
1
Pulse el botón ON/STAND-BY para conectar la alimentación.
2
Pulse el botón CLOCK/TIMER.
3
Antes de que transcurran 10 segundos, pulse el botón
o para seleccionar "CLOCK", y pulse el botón
MEMORY.
Operación básica
4
Pulse el botón o para seleccionar la
visualización de 24 horas o la de 12 horas y luego pulse el
botón MEMORY.
"0:00" Aparecerá el visualizador de 24 horas.
(0:00 - 23:59)
"AM 12:00" Aparecerá el visualizador de 12 horas.
(AM 12:00 - PM 11:59)
"AM 0:00" Aparecerá el visualizador de 12 horas.
(AM 0:00 - PM 11:59)
S-13
5
Pulse el botón o para ajustar la hora y luego
pulse el botón MEMORY.
Pulse el botón
en 1 hora. Manténgalo pulsado para adelantarla continuamente
6
Pulse el botón o para ajustar los minutos y
luego pulse el botón MEMORY.
Pulse el botón o una vez para avanzar la hora
en 1 minuto. Manténgalo pulsado para que avancen en intervalos de 5 minutos.
Para comprobar la visualización de la hora:
[Cuando el aparato esté en el modo de reserva]
Pulse el botón CLOCK/TIMER.
Aparecerá la visualización de la hora durante unos 10 segundos.
[Cuando la alimentación esté conectada]
Pulse el botón CLOCK/TIMER.
Antes de 10 segundos, pulse el botón o para
visualizar la hora.
Aparecerá la visualización de la hora durante unos 10 segundos.
Nota:
Cuando se reponga la alimentación de CA después de una falla de
la alimentación o despúes de haberse desenchufado el aparato,
aparecerá "CLOCK" o parpadeará la hora para confirmar la
visualización de la hora. Si es incorrecta, reajuste el reloj de la
forma siguiente.
Para reajustar el reloj:
Efectúe "Ajuste del reloj" desde el paso 1. Si "CLOCK" no aparece
en el paso 3, se saltará el paso 4 (para seleccionar la visualización
de 24 horas o de 12 horas).
Para cambiar la visualización de 24 horas o de 12 horas:
1
Borre todo el contenido programado. [Para más detalles, consulte
"Borrado de toda la memoria (reposición)" de la página 32.]
2 Efectúe "Ajuste del reloj" desde el paso 1.
o
una vez para adelantar la hora
.
XL-UH240W LS_8-16.fm
Page 49

Audición de un disco CD o MP3/WMA
Este sistema puede reproducir un CD estándar, CD-R/RW en el
formato de CD y CD-R/RW con archivos MP3 o WMA, pero no
puede grabar en ellos. Es posible que algunos discos CD-R y CDRW de audio no puedan reproducirse debido al estado del disco o
al equipo utilizado para su grabación.
MP3:
MP3 es una forma de compresión. Es un acrónimo que
significa MPEG Audio Layer 3.
MP3 es un tipo de código de audio que se procesa mediante
compresión significante desde la fuente de audio original con
muy poca pérdida en la calidad del sonido .
Este sistema es compatible con MPEG 1 Layer 3, MPEG 2 Layer
3, y archivos VBR.
Durante la reproducción de archivos VBR, el contador de tiempo
del visualizador podría diferir del tiempo real de reproducción.
El bitrate (flujo de bits/datos) que admite por MP3 es de 32 a 320
kbps.
WMA:
Los archivos WMA son archivos de Formato de Sistema
Avanzado que incluyen archivos de audio que son
comprimidos con un códec de Windows Media Audio.
WMA es desarrollado por Microsoft como un archivo de
formato de audio para Windows Media Player.
El indicador de "MP3" y "WMA" se encenderá después de que la
unidad lea la información en un disco MP3 o WMA.
El bitrate que admite por WMA es de 64 a 160 kbps.
Función de conexión automática de la alimentación:
Cuando pulsa alguno de los botones siguientes, se conecta la
alimentación del aparato.
Botón CD (unidad principal y controlador remoto): Se conecta la
alimentación del aparato y se activa la función "CD".
Botón CD / en el controlador remoto: La unidad se enciende
y comienza la reproducción de un CD (independientemente de la
última función).
Botón / en la unidad principal: La unidad se enciende y
comienza la reproducción de las últimas funciones
(CD,TUNER,VIDEO/AUX/USB).
Función de apagado automático:
En el modo de parada de funcionamiento de CD, MP3 o WMA, la
unidad principal entra en el modo de reserva (stand-by) después de
15 minutos de inactividad.
ON/
STAND-BY
CD
OPEN/
CLOSE
XL-UH240W
ESPAÑOL
Reproducción de discos CD o MP3/WMA
S-14
XL-UH240W LS_8-16.fm
Page 50

XL-UH240W
ESPAÑOL
Audición de un disco CD o MP3/WMA (continuación)
1 Pulse el botón ON/STAND-BY para conectar la
alimentación.
2 Pulse el botón CD.
3 Pulse el botón 1 y antes de 5 segundos, pulse el botón
OPEN/CLOSE para abrir la bandeja de discos 1.
4 Ponga el disco en la bandeja de discos 1, con la cara de la
etiqueta hacia arriba.
Asegúrese de poner el disco de 8 cm en el centro de las
bandejas de discos.
12 cm 8 cm
ON
STAND-BY
OPEN/
CLOSE
VIDEO/
TUNER/
AUX/USB
(BAND)
CD
5 Pulse el botón
discos 1.
[CD]
Número total de
pistas en el disco
//// OPEN/CLOSE para cerrar la bandeja de
Indicador MP3
Indicador TOTAL
Tiempo total de
reproducción del disco
[MP3/WMA]
Número total
de archivos
Debido a la estructura de la información del disco, tarda más
en leer un disco MP3/WMA que un disco CD normal
(aproximadamente 20 a 90 segundos).
6 Podrá colocar los discos en las bandejas 2 - 5 siguiendo
Reproducción de discos CD o MP3/WMA
los pasos 3 - 5.
7 Pulse el botón / para iniciar la reproducción.
Indicador de
reproducción de discos
S-15
Indicador WMA
La reproducción se iniciará desde la pista 1 del DISCO 1.
Después de terminarse la reproducción de este disco, el siguiente
disco se reproducirá automáticamente.
Después de haberse reproducido la última pista del quinto disco,
el aparato se parará automáticamente.
Cuando no hay ningún disco en una de las bandejas de discos
(1 - 5), se saltará la bandeja vacía a la siguiente bandeja con un
disco.
Para cambiar otros discos mientras se está reproduciendo un
disco:
Pulse uno de los botones 1 - 5 para el disco que está parado y
antes de 5 segundos, pulse el botón OPEN/CLOSE y cambie los
discos.
Para extraer los discos:
En el modo de parada, pulse el botónes 1 - 5 y antes de 5 segundos, pulse el botón OPEN/CLOSE.
Para seleccionar un disco deseado:
Pulse uno de los botones 1 - 5 y en menos de 5 segundos, pulse
el botón (CD ).
Precaución:
No coloque dos discos en una misma bandeja.
No reproduzca discos de formatos especiales (corazón,
octágono, etc.). Esto puede causar un mal funcionamiento.
No empuje la bandeja de discos mientras está moviendo.
Si hay un corte de alimentación eléctrica mientras la bandeja está
abierta, espere a que se restaure la alimentación.
Si la bandeja del disco se detiene forzosamente, aparecerá "ER-
CD20" en el visualizador durante 3 segundos y el aparato no
funcionará. En este caso, pulse el botón ON/STAND-BY para
establecer el modo de reserva de la alimentación y luego conecte
de nuevo la alimentación.
Si hay interferencias en la televisión o en la radio durante el
funcionamiento del reproductor CD, coloque el aparato alejado de
la televisión o de la radio. No ponga dos discos en una misma
bandeja de disco.
Si un disco está dañado, sucio, o cargado al revés, será expulsa-
do.
XL-UH240W LS_8-16.fm
Page 51

Funciones diversas de discos
Función Unidad
Reproducción
Parada Púlselo en el modo de re-
Pausa Púlselo en el modo de re-
Avance de
pista/retroceso de
pista
Avance
rápido/inversión
rápida
Aclaraciones para discos CD o MP3/WMA:
El avance de pista/retroceso de pista es posible sólo en discos individuales.
El avance rápido/inversión rápida es posible sólo en discos individuales.
Cuando se llegue al final de la última pista durante el avance rápido,
aparecerá "END" en el visualizador y se pausará la operación del CD.
Cuando se llegue al principio de la primera pista durante la inversión
rápida, el aparato se establecerá en el modo de reproducción.
Los discos de sesión múltiple regrabables, cuya grabación no ha sido
terminada, pueden ser reproducidos de todas maneras.
principal
Controla-
dor remoto
Operación
Púlselo en el modo de
parada.
producción.
producción. Pulse el botón
/ para reanudar la reproducción a partir del
punto en el que se pausó.
Púlselo en el modo de reproducción o parada.
Si pulsa el botón en el
modo de parada, pulse el
botón / para iniciar la
pista deseada.
Pulse y manténgalo pulsado en el modo de reproducción.
Suelte el botón para reanudar la reproducción.
Reproducción avanzada de
discos CD o MP3/WMA
Búsqueda directa de pistas
Empleando los botones de búsqueda directa, se pueden reproducir
las pistas deseadas del disco actual.
Emplee los botones de búsqueda
directa del controlador remoto
para seleccionar la pista deseada
mientras está reproduciendo el
disco seleccionado.
Los botones de búsqueda directa le permiten seleccionar
hasta el número 9.
Para seleccionar el número 10 o superior, emplee el botón
"+10".
A. Por ejemplo, para seleccio nar 13
1 Pulse una vez el botón "+10".
2 Pulse el botón "1".
3 Pulse el botón "3".
B. Por ejemplo, para seleccionar 130
1 Pulse dos veces el botón "+10".
2 Pulse el botón "1".
3 Pulse el botón "3".
4 Pulse el botón "0".
Notas:
No puede seleccionar un número de pista más alto que el número
de pistas en el disco.
Durante la reproducción aleatoria, no es posible el sistema de
búsqueda directa.
Para detener la reproducción:
Pulse el botón (CD ).
Número de la pista seleccionada
XL-UH240W
ESPAÑOL
Reproducción de discos CD o MP3/WMA
S-16
XL-UH240W LS_8-16.fm
Page 52

XL-UH240W
ESPAÑOL
Reproducción avanzada de discos CD o MP3/WMA (continuación)
Repetición de la reproducción
La repetición puede hacerse con un disco, los 5 discos o una
secuencia programada de manera contínua.
Para repetir un disco:
Pulse dos veces el botón / .
Para repetir todas las pistas de hasta 5 discos:
Pulse el botón / tres veces.
Para repetir las pistas deseadas (Sólo CD):
Efectúe los pasos 1 - 6 de la sección "Reproducción programada"
de la página 18 y luego pulse dos veces el botón / .
Para cancelar la repetición de la reproducción:
Pulse otra vez el botón / hasta que " " desaparezca.
Reproducción de discos CD o MP3/WMA
Reproducción aleatoria
Las pistas del disco (o de los discos) pueden reproducirse
automáticamente en orden al azar.
Para reproducir aleatoriamente todas las pistas de hasta 5
discos:
Pulse el botón RANDOM del controlador remoto.
Para cancelar la reproducción aleatoria:
Pulse el botón / .
"R" desaparecerá.
Notas:
Si usted pulse el botón durante la reproducción aleatoria,
puede cambiar a la pista seleccionada después de la reproducción aleatoria. Por otro lado, el botón no le permitirá saltar a la
pista anterior. Se buscará el principio de la pista que se está reproduciendo.
En la reproducción aleatoria, el aparato seleccionará y
reproducirá las pistas automáticamente. (No podrá seleccionar el
orden de las pistas.)
Precaución:
Después de utilizar la repetición de reproducción o la reproducción
aleatoria, asegúrese de pulsar el botón (CD ). De lo contrario, el
disco compacto (los discos compactos) se reproducirá
continuamente.
S-17
06/4/5 XL-UH240W LS 17-25.fm
Page 53

Reproducción de CD avanzada
Reproducción programada
Podrá seleccionar hasta 32 selecciones para la reproducción en el
orden que usted prefiera.
1
Mientras esté en el modo parada,
pulse el botón de MEMORY en el
mando a distancia para ingresar
en el modo de almacenamiento
de programación.
2
Pulse uno de los botones 1 5 para seleccionar el disco
deseado.
Número del disco seleccionado
3
Pulse los botones de búsqueda
directa del controlador remoto
para seleccionar la pista deseada.
También podrá seleccionar una pista pulsando el botón o
.
4
Pulse el botón MEMORY para almacenar el número de pista.
Repita los pasos 2 - 4 para otras pistas. Podrán progra-
5
marse hasta 32 pistas.
Si se ha cometido un error, se pueden borrar las pistas programadas pulsando el botón CLEAR/DIMMER.
6
Pulse el botón (CD ).
Aparecerá el número total de memoria.
7
Pulse el botón / para iniciar la reproducción.
Número de la pista seleccionada
Para borrar las selecciones programadas:
Pulse el botón CLEAR/DIMMER del
controlador remoto mientras esté
parpadeando el indicador "MEMORY".
Cada vez que se pulse el botón, se borrará
una pista, empezando por la última pista
programada.
Para cancelar el modo de reproducción programada:
Mientras el indicador "MEMORY" esté encendido en el modo de
parada, pulse el botón CLEAR/DIMMER del controlador remoto. El
indicador "MEMORY" desaparecerá y se borrará todo el contenido
programado.
Para añadir pistas al programa:
Si un programa ha sido almacenado anteriormente, el indicador
"MEMORY" se visualizará. Luego, siga los pasos 1 - 6 para añadir
las pistas. Se almacenarán las pistas nuevas después de la última
pista del programa original.
Para comprobar las pistas que se han programado:
Mientras el aparato esté parado en el modo de reproducción programada, pulse el botón o .
Notas:
Cuando se expulsa un disco con pistas programadas, el progra-
ma se cancela automáticamente.
Aunque pulse el botón ON/STAND-BY para entrar en el modo de
reserva, o aunque cambie la función desde CD a otra función,
las selecciones programadas no se borrarán.
Durante el funcionamiento programado, no es posible la repro-
ducción aleatoria.
XL-UH240W
ESPAÑOL
Reproducción de discos CD o MP3/WMA
S-18
06/4/5 XL-UH240W LS 17-25.fm
Page 54

XL-UH240W
ESPAÑOL
Modo de carpeta MP3/WMA (sólo para archivos MP3/WMA)
Para reproducir archivos MP3/WMA (Windows Media Audio)
Hay muchos sitios de música en Internet en los que puede
descargar archivos de música MP3/WMA (Windows Media Audio).
Siga las instrucciones del sitio web sobre cómo descargar los
archivos de música.
Usted puede entonces reproducir estos archivos de música
descargados, grabándolos a un disco CD-R/RW o conectando un
dispositivo de reproductor de memoria USB.
Sus canciones/archivos descargados son sólo para uso personal.
Cualquier otra utilización de estos archivos sin el permiso del
propietario, es ilegal.
Sobre el orden de reproducción de la carpeta
Si los archivos MP3/WMA están guardados en varias carpetas, se le
pondrá automáticamente un número de carpeta a cada una.
Estas carpetas pueden ser seleccionadas con el botón FOLDER del
mando a distancia. Si no hay ningún formato de archivo compatible
dentro de la carpeta seleccionada, la carpeta será saltada y la siguiente carpeta será seleccionada.
Ejemplo: Cómo numerar una carpeta si los archivos de formato de
MP3/WMA están registrados como en la imagen de abajo.
1. La carpeta ROOT es configurada como la carpeta 1.
2. Para carpetas dentro de la carpeta ROOT (carpeta A y carpeta
B), la carpeta que fue registrada antes en el disco será configurada como carpeta 2.
3. Para carpetas dentro de la carpeta A (carpeta C y carpeta D), la
carpeta que fue registrada antes en el disco será configurada
como carpeta 3.
4. Debido a que no hay ninguna carpeta en la carpeta C, la carpeta
D será programada como carpeta 4.
5. La carpeta E que está dentro de la carpeta D será configurada
Reproducción de discos CD o MP3/WMA
como carpeta 5.
6. La carpeta B dentro de la carpeta ROOT será programada como
carpeta 6.
* El orden de información de las carpetas y archivos es guardado en
el disco según el software de escritura. Existe la posibilidad de que
la unidad no reproduzca los archivos según nuestro orden de
reproducción esperado.
S-19
El modo encendido/apagado de carpeta puede ser manejado desde
el botón FOLDER en el mando a distancia. Los archivos que son
reproducidos cuando el modo de carpeta está en la posición de
encendido, pueden diferenciarse de aquellos programados cuando
el modo de carpeta está en apagado.
Ejemplo de modo de carpeta apagado:
Todos los archivos de la carpeta seleccionada serán repdroducidos.
Si el archivo 3 de la carpeta C es seleccionado, todos los archivos
que comienzan en el archivo 3 serán reproducidos.
Ejemplo de modo de carpeta encendido:
Todos los archivos contenidos en la carpeta seleccionada serán
reproducidos.
En caso de que se seleccione la carpeta D, se reproducirán los
archivos 4, 5 y 6. Los archivos 7 y 8 de la carpeta E no serán
reproducidos.
ROOT
(FOLDER 1)
FOLDER A
(FOLDER 2)
FOLDER B
(FOLDER 6)
FOLDER C
(FOLDER 3)
FOLDER D
(FOLDER 4)
FILE 9
FILE 10
FILE 1
FILE 2
FILE 3
FILE 4
FILE 5
FILE 6
FOLDER E
(FOLDER 5)
FILE 7
FILE 8
06/4/5 XL-UH240W LS 17-25.fm
Page 55

Procedimiento para la reproducción de discos
MP3/WMA
Para reproducir CD-R/RW.
1
Pulse el botón de CD, y cargue un disco MP3/WMA.
Después de que el disco sea cargado, se mostrará la infor-
mación del disco.
Indicador MP3
Nombre de disco
Disco 1 titilando
Cuando haya seleccionado la carpeta, continúe con el paso 2.
Cuando haya seleccionado el archivo, continúe con el paso 4.
2
Pulse el botón FOLDER, y pulse el botón TUNING ( o
) para seleccionar la reproducción de carpeta deseada.
(Modo de carpeta encendida)
Indicador de CARPETA
Número de CARPETA
Indicador WMA
Indicador TOTAL
Número total de archivos
Total de archivos en Carpeta 3
4
5
El título, el artista y el nombre del álbum son mostrados si se
encuentran almacenados en el disco.
El contenido de visualización puede ser cambiado presionando
el botón DISPLAY.
Visualización del nombre del archivo
Visualización de la función
( 2)
Visualización del reloj
Seleccione el archivo deseado para ser reproducido presionando el botón o . (Modo de carpeta apagado)
Pulse el botón
La reproducción comenzará y el nombre del archivo será
mostrado.
/
(CD
/
).
Indicador del TÍTULO 1
Indicador del TÍTULO 2
Indicador del TÍTULO 3
Visualización
del título
Visualización
del artista
Visualización
del álbum
XL-UH240W
ESPAÑOL
( 1)
( 1)
Para comenzar la reproducción con el modo de carpeta encen-
dida, vaya al paso 5.
Para cambiar la carpeta de reproducción, pulse TUNING ( o
) para seleccionar otra carpeta.
3
Seleccione el archivo deseado para ser reproducido presionando el botón o . Pase al paso 5.
En caso de reproducción con el modo de carpeta encendida,
pulse el botón TUNING ( o ), y la carpeta podrá ser
seleccionada aún cuando esté en el modo de reproducción/pausa.
Continuará el modo reproducción/pausa en la 1ra pista de la
carpeta seleccionada.
( 1)
La eiqueta MP3 ID3 admite sólo la versión 1.x.
( 2) Sólo aparece cuando el reloj ya se encuentra programado.
Nota:
Si aparece "NO SUPPORT" en pantalla, quiere decir que se se-
leccionó "Archivo WMA con derechos de autor protegidos" o "Archivo de reproducción no admitida".
06/4/5 XL-UH240W LS 17-25.fm
Reproducción de discos CD o MP3/WMA
S-20
Page 56

XL-UH240W
ESPAÑOL
Para escuchar el dispositivo de almacenamiento masivo USB /
Reproductor MP3
VIDEO
/AUX
Reproducción de memoria USB
USB
1
Pulse el botón VIDEO/AUX/USB (USB/AUX), y haga subir la
puerta USB. Conecte el dispositivo de Memoria USB que
tiene archivos de formato de MP3/WMA sobre la unidad.
Cuando la memoria USB es conectada a la unidad principal,
la información de dispositivo será mostrada.
Indicador MP3
Identificador
de volumen
Cuando haya seleccionado la carpeta, continúe con el
paso 2.
Cuando haya seleccionado el archivo, continúe con el paso 4.
2
Pulse el botón FOLDER, y pulse el botón TUNING ( o )
para seleccionar la reproducción de carpeta deseada.
(Modo de carpeta encendida)
Indicador de CARPETA
Indicador WMA
Indicador
Número total de archivos
TOTAL
S-21
Nota:
Este producto no es compatible con sistemas de archivos MTP y
AAC.
Número de CARPETA
Para comenzar la reproducción con el modo de carpeta encen-
dida, vaya al paso 5.
Para cambiar la carpeta de reproducción, pulse TUNING ( o
) para seleccionar otra carpeta.
Total de archivos en Carpeta 2
06/4/5 XL-UH240W LS 17-25.fm
Page 57

Seleccione el archivo deseado para ser reproducido pre-
3
sionando el botón o . Pase al paso 5.
4
Seleccione el archivo deseado para ser reproducido presionando el botón o . (Modo de carpeta apagado)
5
Pulse el botón
La reproducción comenzará y el nombre del archivo será
mostrado
El título, el artista y el nombre del álbum se reflejarán en la
pantalla si se encuentran registrados en el dispositivo de
memoria USB.
El contenido de visualización puede ser cambiado presionando el
botón DISPLAY.
Visualización del nombre del archivo
Visualización de la función
( 2)
Visualización del reloj
( 1)
( 2) Sólo aparece cuando el reloj ya se encuentra programado.
Nota:
Para detener la reproducción:
Pulse el botón
Función de apagado automático:
En el modo parada de funcionamiento de USB, la unidad principal
entra en el modo de reserva después de 15 minutos de inactividad.
La eiqueta MP3 ID3 admite sólo la versión 1.x.
/
CD/USB .
(USB
/
).
Indicador del TÍTULO 1
Indicador del TÍTULO 2
Indicador del TÍTULO 3
Visualización
del título
( 1)
Visualización
del artista
( 1)
Visualización
del álbum
Para quitar el dispositivo de
memoria USB
1
Pulse el botón USB del mando a distancia. Espere hasta
que aparezca "UNPLUG OK" en la pantalla fluorescente.
2
Desconecte el dispositivo de memoria USB del terminal
USB.
Notas:
SHARP no se responsabiliza de la pérdida de datos mientras el
dispositivo de memoria USB esté conectado al sistema de
audio.
Los archivos comprimidos en formatos MP3 y /o WMA pueden
ser reproducidos cuando esté conectado al terminal USB.
Este formato de memoria USB admite FAT16 o FAT32.
SHARP no puede garantizar que todos los dispositivos de
memoria USB funcionen en este sistema de audio.
Esta memoria USB no puede ser operada desde un hub
(dispositivo con varios puertos USB) USB.
Si aparece "NO SUPPORT" en pantalla, quiere decir que se
seleccionó "Archivo WMA con derechos de autor protegidos" o
"Archivo de reproducción no admitida".
En caso de que los datos dentro de la memoria USB sean
grandes, puede demorar un tiempo largo en leer los datos.
El terminal USB en esta unidad no está pensado para una
conexión de ordenador personal, pero es usado para escuchar
música con un dispositivo de memoria USB.
XL-UH240W
ESPAÑOL
Reproducción de memoria USB
S-22
06/4/5 XL-UH240W LS 17-25.fm
Page 58

XL-UH240W
ESPAÑOL
Reproducción de USB avanzada
Repetición de la reproducción
La repetición puede reproducir toda la secuencia de pistas continuamente.
Para repetir todas las pistas:
Pulse dos veces el botón / .
Para cancelar la repetición de la reproducción:
Pulse otra vez el botón / hasta que " " desaparezca.
Reproducción aleatoria
Las pistas pueden ser reproducidas en el orden aleatorio automáticamente.
Para reproducir todas las pistas aleatoriamente:
Pulse el botón RANDOM del controlador remoto.
Para cancelar la reproducción aleatoria:
Pulse el botón / .
"R" desaparecerá.
Notas:
Reproducción de memoria USB
Si usted pulse el botón durante la reproducción aleatoria,
puede cambiar a la pista seleccionada después de la reproducción aleatoria. Por otro lado, el botón no le permitirá saltar a la
pista anterior. Se buscará el principio de la pista que se está reproduciendo.
En la reproducción aleatoria, el aparato seleccionará y repro-
ducirá las pistas automáticamente. (No podrá seleccionar el
orden de las pistas.)
Precaución:
Después de realizar la repetición, asegúrese de presionar el botón
S-23
(USB ).
De lo contrario, reproducirá continuamente.
Nota:
( ) Cuando el modo de carpeta está encendido, el modo de repro-
ducción seleccionado puede ser usado sólo para los archivos en
la carpeta seleccionada.
Notas:
Esta unidad sólo admite formato "MPEG-1 Audio Layer-3".
(El rango de frecuencia fs es 32, 44.1, 48kHz) Los formatos
"MPEG-2 Audio Layer-3", "MPEG-2.5 Audio Layer-3" y MP1,
MP2 no son admitidos.
El programa para la reproducción de dispositivos de memoria
USB no está disponible.
El orden de reproducción para archivos MP3 puede
diferenciarse a veces según el software de escritura utilizado
durante la descarga de archivos.
El bitrate admitido por MP3 es de 32 a 320 kbps, y de WMA es
de 64 a160 kbps.
Para archivos MP3/WMA, por favor agregue la extensión ".MP3"
".WMA". Los archivos no pueden reproducidos si no está la
extensión MP3/WMA.
Las listas de reproducción no son admitidas por esta unidad.
Esta unidad puede mostrar nombre de carpeta o de archivo de
hasta 32 carácteres.
Esta unidad sólo admite la versión 1.x de la etiqueta MP3 ID3.
La visualización del tiempo de reproducción puede que no se
vea correctamente si se pone un archivo de bitrate alternativo.
La visualización de la hora no puede ser cambiada con el botón
de DISPLAY.
El nombre de título y el nombre de artista pueden ser
visualizados, presionando el botón de DISPLAY durante la
reproducción del archivo o en el modo de pausa.
La meta-etiqueta WMA también admite el título, el artista y el
nombre de álbum que son grabados en archivos WMA.
Los archivos WMA con derechos de autor protegidos no pueden
ser reproducidos.
06/4/5 XL-UH240W LS 17-25.fm
Page 59

Audición de la radio
ON/
STAND-BY
TUNER
(BAND)
Función de conexión automática de la alimentación:
Cuando pulsa alguno de los botones siguientes, se conecta la
alimentación del aparato.
Botón TUNER (BAND) (unidad principal y controlador remoto): Se
conecta la alimentación del aparato y se activa la función
"TUNER".
Botón / en la unidad principal: Se conecta la alimentación del
aparato y se inicia la reproducción de la última función utilizada
(CD, TUNER,VIDEO/AUX/USB).
Sintonización
1
Pulse el botón ON/STAND-BY para conectar la alimentación
.
2 Pulse repetidamente el botón TUNER (BAND) para selec-
cionar la banda de frecuencia deseada (FM o AM).
3 Pulse el botón TUNING ( o ) del mando a distancia
para sintonizar la estación deseada.
Sintonización manual:
Pulse el botón TUNING (X o W) tantas veces como sea
necesario para sintonizar la emisora deseada.
Sintonización automática:
Cuando se pulse el botón
segundos, la exploración se iniciará automáticamente y el
sintonizador se parará en la primera emisora difusora que pueda
recibirse
.
Notas:
Cuando ocurren interferencias de radio, la sintonización por
exploración automática puede detenerse automáticamente en
este punto.
La sintonización por exploración automática saltará las emisoras
que tengan señales débiles.
Para detener la sintonización automática, pulse de nuevo el botón
TUNING (X o W).
Para recibir una transmisión de FM en estéreo:
Pulse el botón TUNER (BAND) para que se visualice el indicador
"ST".
" " aparecerá cuando una difusión de FM sea en estéreo.
Si la recepción de FM es débil, pulse el botón TUNER (BAND)
para que se apague el indicador "ST". La recepción cambia a
monoaural, y el sonido se hace más claro.
TUNING (X o W)
Indicador del modo de FM en estéreo
Indicador de recepción de FM en estéreo
durante más de 0,5
XL-UH240W
ESPAÑOL
Radio
S-24
06/4/5 XL-UH240W LS 17-25.fm
Page 60

XL-UH240W
ESPAÑOL
Radio
Audición de la radio (continuación)
Memorización de una emisora
Podrá almacenar 40 emisoras de AM y FM en la memoria y
llamarlas pulsando un botón. (Sintonización preajustada)
1 Efectúe los pasos 1 - 3 del apartado "Sintonización" de la
página 24.
2 Pulse el botón MEMORY para entrar en el modo de
almacenamiento de emisoras preajustadas.
3 Antes de 30 segundos, pulse el botón PRESET ( o )
para seleccionar el número de canal preajustado.
Almacene las emisoras en la memoria por orden, empezando
por el canal prefijado 1.
4 Antes de 30 segundos, pulse el botón MEMORY para
almacenar esa emisora en la memoria.
Para llamar una emisora memorizada
Pulse el botón PRESET ( o ) durante menos de 0,5 segundos
para seleccionar la emisora deseada.
Para explorar las emisoras preajustadas
Las emisoras almacenadas en la memoria pueden explorarse
automáticamente. (Exploración de memoria de preajustes)
1 Pulse el botón PRESET ( o ) durante más de 0,5 segundos.
El número preajustado parpadeará y se recibirán consecutivamente las emisoras programadas durante 5 segundos cada una.
2 Pulse de nuevo el botón PRESET ( o ) cuando se localice la
emisora deseada.
S-25
Si la palabra "MEMORY" y los indicadores de número
predeterminados desaparecen antes de que la estación sea
memorizada, repita la operación del paso 2.
5 Repita los pasos 1 - 4 para ajustar otras emisoras o para
cambiar una emisora preajustada.
Cuando se almacene una nueva emisora en la memoria, la
estación memorizada previamente para ese número de canal
será borrada.
Nota:
La función de seguridad protege todas las emisoras memorizadas
durante algunas horas en el caso de una falla de alimentación o de
la desconexión del cable de alimentación de CA.
Para borrar toda la memoria de preajustes
Pulse el botón ON/STAND-BY para entrar en el modo de reserva.
1
2 Mientras mantiene pulsados el botón 1 y el botón 5, pulse
el botón TUNER (BAND) hasta que aparezca "TUNER CLEAR".
06/4/5 XL-UH240W LS 17-25.fm
Page 61
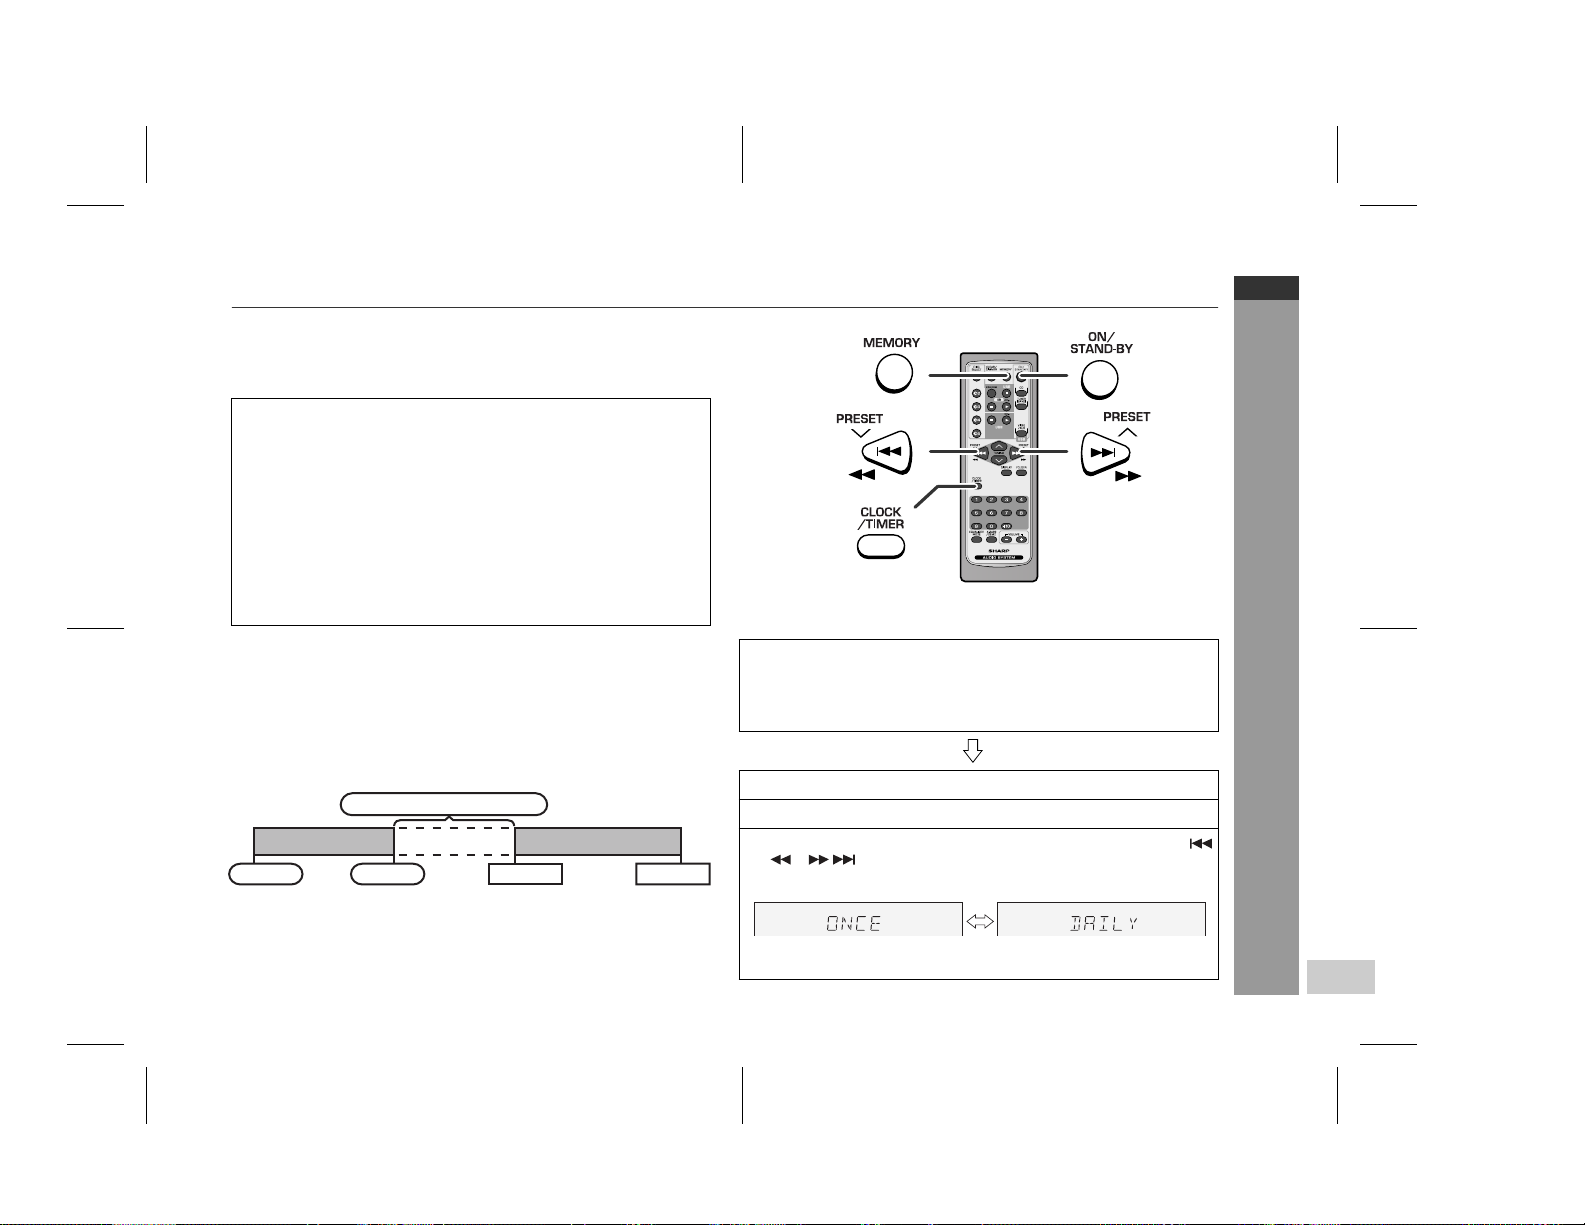
Operación del temporizador y de desconexión automática
(Sólo mando a distancia)
Reproducción con temporizador:
El aparato se conectará y reproducirá la fuente deseada (CD,
TUNER, USB, AUX) a la hora preajustada.
Este aparato tiene 2 tipos de temporizadores: ONCE TIMER y
DAILY TIMER.
Temporizador para una
vez:
Temporizador diario:
Por ejemplo, ajuste el temporizador para despertarse cada mañana
Empleo combinado del temporizador para una vez y el temporizador diario:
Por ejemplo, utilice el temporizador único para escuchar un programa de radio, y el temporizador diario para despertarse.
1 Ajuste el temporizador diario (páginas 26 - 28).
2 Ajuste el temporizador para una vez (páginas 26 - 28).
Temporizador diario
Comenzar
Nota:
Cuando se sobreponen las horas ajustadas para el temporizador
diario y para el temporizador para una vez, el temporizador para una
vez tiene prioridad. Deje por lo menos un intervalo de un minuto
entre operaciones.
El temporizador de reproducción única funciona
sólo una vez a la hora preestablecida.
El temporizador de reproducción diario funciona
cada día a la misma hora predeterminada.
1 minuto o más
Temporizador para una vez
Parada Comenzar Parada
Repetición de temporizador
.
Antes de ajustar el temporizador:
1 Compruebe que el reloj esté ajustado a la hora correcta (vea la
página 13).
Si no está ajustado, no podrá emplear la función del temporizador.
2 Para reproducción
con temporizador:
Pulse el botón ON/STAND-BY para conectar la alimentación.
1
2
Pulse el botón CLOCK/TIMER.
3
Antes de que transcurran 10 segundos, pulse el botón
o para seleccionar "ONCE" o "DAILY", y pulse el
botón MEMORY.
Ponga el reloj en la hora correcta si "ONCE" o "DAILY" no
aparece.
Cargue los discos para ser reproducidos.
Continúa en la página siguiente
XL-UH240W
ESPAÑOL
Características avanzadas
S-26
03/12/17 XL-UH240W LS 26-34.fm
Page 62
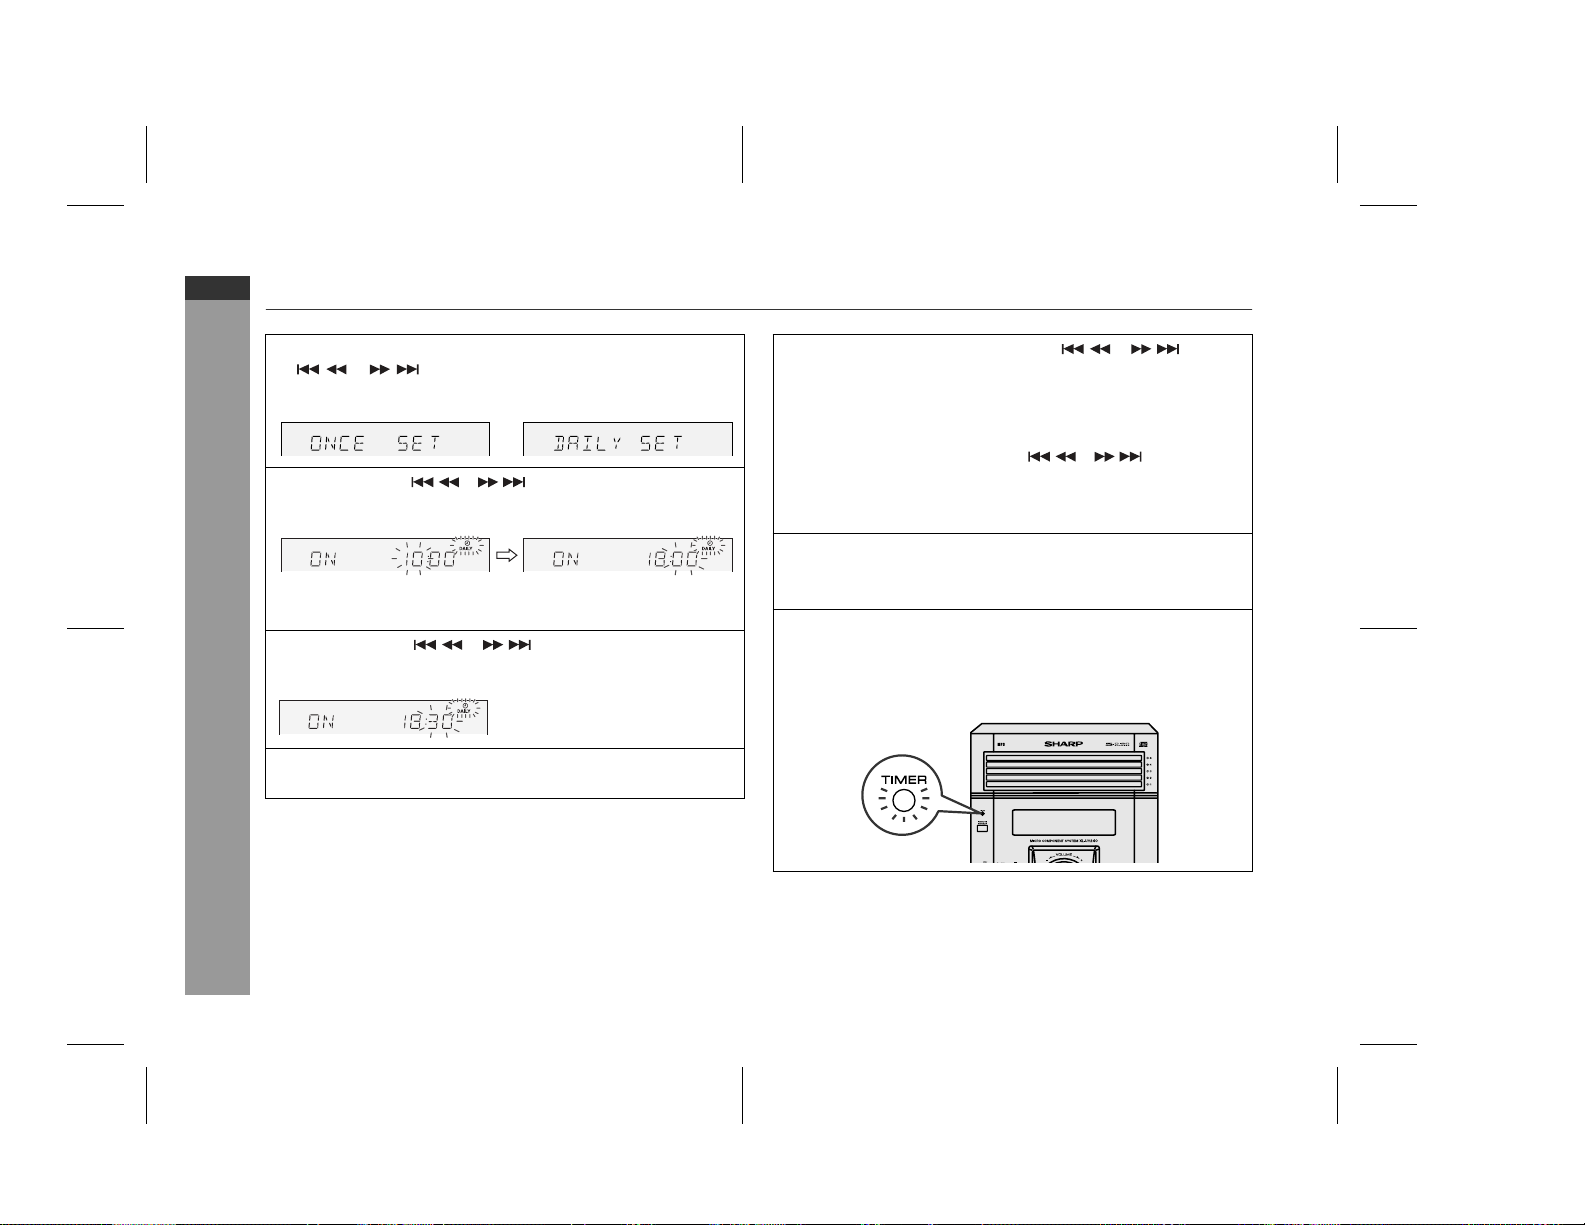
XL-UH240W
ESPAÑOL
Operación del temporizador y de desconexión automática (Sólo mando a
distancia) (continuación)
4
Antes de que transcurran 10 segundos, pulse el botón
o para seleccionar "ONCE SET" o "DAILY
SET", y pulse el botón MEMORY.
5
Pulse el botón o para ajustar la hora y luego
pulse el botón MEMORY.
La ilustración muestra el ajuste de la reproducción con
temporizador en el modo del temporizador diario.
6
Pulse el botón o para ajustar los minutos y
luego pulse el botón MEMORY.
7
Ajuste el tiempo de finalización como en los pasos 5 y 6
Características avanzadas
anteriores.
8
Cambie la entrada con el botón o , y luego
pulse el botón MEMORY.
Para seleccionar la fuente de reproducción con temporizador:
CD, TUNER, USB o AUX.
Cuando haya seleccionado el sintonizador, seleccione una
emisora pulsando el botón o , y luego pulse
el botón MEMORY.
Si no se ha programado ninguna emisora, se visualizará
"NO PRESET" y se cancelará el contenido ajustado.
9
Ajuste el volumen empleando el control VOLUME, y pulse
el botón MEMORY.
No suba demasiado el volumen.
10
Pulse el botón ON/STAND-BY para entrar en el modo de
reserva de alimentación.
El indicador de "TIMER" se enciende y la unidad está lista
para la reproducción de temporizador.
S-27
Continúa en la página siguiente
03/12/17 XL-UH240W LS 26-34.fm
Page 63
11
Cuando llegue el tiempo predeterminado, comenzará la
reproducción.
El volumen se incrementará gradualmente hasta que se
llegue al volumen preajustado.
12
Cuando se llegue al final de la hora de parada del
temporizador, el sistema se establecerá automáticamente
en el modo de reserva de alimentación.
Temporizador para una vez:
Se cancelará el temporizador.
Temporizador diario:
El temporizador operará a la misma hora cada día.
Continuará hasta que se cancele el ajuste del temporizador
diario. Cancele el temporizador diario cuando no lo emplee.
Nota:
Cuando utilice el temporizador con otra unidad conectada al terminal
USB o en las entradas de AUX IN, seleccione "USB" o "AUX" en el
paso 8.
Esta unidad encenderá o entrará automáticamente en el modo de
reserva de encendido, por más que la unidad conectada a las entradas AUX IN sea encendida o apagada.
Comprobación del ajuste del temporizador en el modo de reserva
del temporizador:
1 Pulse el botón CLOCK/TIMER.
2 Antes de que transcurran 10 segundos, pulse el botón o
para seleccionar "ONCE" o "DAILY", y pulse el botón
MEMORY.
3 Antes de que transcurran 10 segundos, pulse el botón o
para seleccionar "ONCE CALL" o "DAILY CALL", y pulse
el botón MEMORY.
El aparato retorna al modo de reserva del temporizador después
de haberse visualizado en orden el contenido de los ajustes.
Cancelación del ajuste del temporizador en el modo de reserva
del temporizador:
1 Pulse el botón CLOCK/TIMER.
2 Antes de que transcurran 10 segundos, pulse el botón o
para seleccionar "ONCE" o "DAILY", y pulse el botón
MEMORY.
3 Antes de que transcurran 10 segundos, pulse el botón o
para seleccionar "ONCE OFF" o "DAILY OFF", y pulse el
botón MEMORY.
Se cancelará el temporizador (no se cancelará el contenido
ajustado).
Reutilización del ajuste memorizado del temporizador:
El ajuste del temporizador se memorizará una vez se haya
introducido. Para emplear de nuevo el mismo ajuste, efectúe las
operaciones siguientes.
1 Conecte la alimentación y pulse el botón CLOCK/TIMER.
2 Antes de que transcurran 10 segundos, pulse el botón o
para seleccionar "ONCE" o "DAILY", y pulse el botón
MEMORY.
3 Antes de que transcurran 10 segundos, pulse el botón o
para seleccionar "ONCE ON" o "DAILY ON", y pulse el
botón MEMORY.
4 Pulse el botón ON/STAND-BY para entrar en el modo de reserva
de alimentación.
XL-UH240W
ESPAÑOL
Características avanzadas
03/12/17 XL-UH240W LS 26-34.fm
S-28
Page 64

a
XL-UH240W
ESPAÑOL
Operación del temporizador y de desconexión automática (Sólo mando a
distancia) (continuación)
Operación de desconexión automática
La radio, el CD y USB pueden ser apagados automáticamente.
1
Reproduzca la fuente de sonido deseada.
2
Pulse el botón CLOCK/TIMER.
3
Antes de que transcurran 10
segundos, pulse el botón
o para seleccionar
"SLEEP", y pulse el botón
MEMORY.
4
Pulse el botón o para seleccionar el tiempo.
(Máximo: 3 horas - Mínimo: 1 minuto)
3 horas - 5 minutos intervalos de 5 minutos
5 minutos - 1 minuto intervalos de 1 minuto
5
Pulse el botón MEMORY.
"SLEEP" aparecerá.
6
El aparato se establecerá automáticamente en el modo de
reserva de la alimentación después de haber transcurrido
el tiempo preajustado.
Características avanzadas
S-29
El volumen se reducirá 1 minuto antes de terminar la operación
de desconexión automática.
Para confirmar el tiempo remanente de desconexión automática:
1 Mientras se indica "SLEEP" pulse el botón CLOCK/TIMER.
2 Antes de que transcurran 10 segundos, pulse el botón o
para seleccionar "SLEEP X : XX".
"X : XX" es el tiempo permanente de sueño.
Se visualiza el tiempo restante de desconexión automática
durante unos 10 segundos.
Podrá cambiar el tiempo remanente para la desconexión
automática mientras se esté visualizado pulsando el botón
MEMORY (pasos 4 - 5).
Para cancelar la operación de desconexión automática:
Pulse el botón ON/STAND-BY mientras se indique "SLEEP".
Para cancelar la operación de desconexión automática sin ajustar el
sistema en el modo de reserva, realice lo siguiente.
1 Mientras se indica "SLEEP", pulse el botón CLOCK/TIMER.
2 Antes de que transcurran 10 segundos, pulse el botón o
para seleccionar "SLEEP OFF", y pulse el botón MEMO-
RY.
Para utilizar simultáneamente la operación del
temporizador y de desconexión automática
Desconexión automática y reproducción con temporizador:
Por ejemplo, podrá irse a dormir escuchando la radio y despertarse
con el sonido de un CD la mañana siguiente.
1 Ajuste el tiempo de desconexión automática (vea a la
izquierda, los pasos 1 - 5).
2 Mientras el temporizador de desconexión automática esté
ajustado, ajuste la reproducción con temporizador o la
grabación con temporizador (pasos 2 - 10, páginas 26 - 27).
Ajuste del temporizador
de desconexión automática
1 minuto - 3 horas
Se detiene automáticamente
la operación de desconexión
automática.
Ajuste de reproducción
de temporizador
Comienzo de reproducción
de temporizador
Hora de parad
Hora deseada
03/12/17 XL-UH240W LS 26-34.fm
Page 65

Mejoramiento de su sistema
No está incluido el cable de conexión. Compre un cable disponible
en las tiendas del ramo como se muestra a continuación.
VIDEO/AUX IN
RIGHT LEFT
Rojo
Blanco
Cable RCA
(no suministrado)
A las tomas
de salida
de línea
RojoBlanco
Escuchando los sonidos de reproducción de
VCR, DVD, etc.
1
Utilice un cable de conexión para conectar el VCR, el DVD,
etc. a las entradas de VIDEO/AUX IN.
Cuando utilice el equipo de vídeo, conecte la salida de audio a
esta unidad y la salida de vídeo a un televisor.
2
Pulse el botón ON/STAND-BY para conectar la alimentación.
Pulse el botón VIDEO/AUX/USB.
3
4
Reproduzca el sonido del equipo conectado.
Nota:
Para evitar interferencias de ruido, ponga el aparato alejado de un
televisor.
Auriculares
Antes de enchufar o desenchufar los auriculares, baje el volumen.
Asegúrese de que sus auriculares tengan una clavija de 3,5 mm
de diámetro y una impedancia de 16 ohmios a 50 ohmios. La
impedancia recomendada es de 32 ohmios.
Si se enchufan los auriculares, se desconectan automáticamente
los altavoces. Ajuste el volumen empleando el control.
XL-UH240W
ESPAÑOL
Características avanzadas
Función de conexión automática de la alimentación:
Cuando pulsa alguno de los botones siguientes, se conecta la
alimentación del aparato.
Botón VIDEO/AUX/USB (unidad principal y controlador remoto):
Se conecta la alimentación del aparato y se activa la función
"USB" o "AUX" .
Botón / en la unidad principal: La unidad se enciende y
comienza la reproducción de las últimas funciones (CD,
TUNER,VIDEO/AUX/USB).
S-30
03/12/17 XL-UH240W LS 26-34.fm
Page 66

XL-UH240W
ESPAÑOL
Mejoramiento de su sistema
(continuación)
Conexión de subwoofer
Cuando un subwoofer disponible comercialmente con un amplificador empotrado es conectado a esta unidad, usted puede disfrutar del
sonido del bajo acentuado. Conecte un cable RCA de un altavoz disponible comercialmente con un amplificador empotrado a la pretoma de salida SUBWOOFER PRE-OUT.
Características avanzadas
PRE-OUT
SUBWOOFER
S-31
Subwoofer
con un
amplificador
empotrado
Cuadro para localización de averías
Muchos posibles problemas podrán ser solucionados por el
propietario sin tener que llamar al técnico en reparaciones.
Si parece que falla algo en este producto, compruebe la tabla
siguiente antes de llamar a su concensionario SHARP autorizado o
a un centro de reparaciones.
General
Síntoma Causa posible
El reloj no está ajustado a
la hora correcta.
Cuando se pulsa un
botón, el aparato no
responde.
No se oye ningún sonido. ¿Se ha ajustado el nivel de
Reproductor de CD
Síntoma Causa posible
La reproducción no se
inicia.
La reproducción se
detiene a mitad o no se
lleva a cabo
correctamente.
Se producen saltos en el
sonido de reproducción o
se detiene el sonido de
reproducción a mitad de
una pista.
¿Se ha producido un corte de la
alimentación? Reajuste el reloj.
Ponga el aparato en el modo de
reserva de alimentación y
entonces vuelva a conectar la
alimentación del aparato.
Si el aparato funciona
defectuosamente, repóngalo.
volumen a "0"?
¿Están enchufados los
auriculares?
¿Están desconectados los
cables de los altavoces?
¿Se ha insertado el disco al
revés?
¿Satisface el disco las normas?
¿Está deformado o rayado el
disco?
¿Está el aparato situado cerca
de vibraciones excesivas?
¿Está muy sucio el disco?
¿Se ha formado condensación
de humedad en el interior del
aparato?
03/12/17 XL-UH240W LS 26-34.fm
Page 67

Controlador remoto
Síntoma Causa posible
El controlador remoto no
funciona.
¿Está enchufado el cable de ali-
mentación de CA del aparato?
¿Se respeta la polaridad de la pi-
la?
¿Están gastadas las pilas?
¿Es la distancia o ángulo incor-
recto?
¿Está el sensor de control remo-
to recibiendo una luz fuerte?
Sintonizador
Síntoma Causa posible
La radio produce continu-
amente ruido anormal.
¿Está el aparato cerca del televi-
sor o de una computadora?
¿La antena de FM o la antena de
cuadro de AM están correctamente situadas? Separe la antena del cable de alimentación de
CA está demasiado cerca.
Condensación
Los cambios súbitos de la temperatura, y el almacenaje u operación
en lugares muy húmedos pueden causar condensación de humedad
dentro de la caja (fonocaptor de CD, etc.) o en el transmisor del
controlador remoto.
La condensación puede causar mal funcionamiento en el aparato. Si
así sucede, deje la alimentación conectada sin ningún disco en el
aparato hasta que sea posible la reproducción normal
(aproximadamente 1 hora). Frote la humedad condensada en el
transmisor con un paño suave antes de poner el aparato en
funcionamiento.
Si ocurre algún problema
Si se somete este producto a fuertes interferencias externas (golpes
mecánicos, electricidad estática excesiva, tensión de alimentación
anormal debido a rayos, etc.) o si se opera incorrectamente, puede
funcionar mal.
Si ocurre uno de estos problemas, haga lo siguiente:
1 Ponga el aparato en el modo de reserva y conecte de nuevo la
alimentación.
2 Si no se repone el aparato en la operación anterior, desenchufe
y enchufe el aparato, y luego conecte la alimentación.
Nota:
Si el aparato no se repone con ninguna de las operaciones
anteriores, borre toda la memoria reponiéndolo.
Borrado de toda la memoria (reposición)
1 Pulse el botón ON/STAND-BY para entrar en el modo de reserva
de alimentación.
2 Mientras mantiene pulsados el botón 1 y el botón 5, pulse el
botón ON/STAND-BY hasta que aparezca "CLEAR ALL".
ON/
STAND-BY
Precaución:
Esta operación borrará todos los datos almacenados en la memoria
incluyendo los ajustes del reloj y del temporizador, preajustes del
sintonizador, y el programa de CD.
XL-UH240W
ESPAÑOL
Referencias
S-32
03/12/17 XL-UH240W LS 26-34.fm
Page 68

XL-UH240W
ESPAÑOL
Cuadro para localización de averías
(continuación)
Antes de transportar el aparato
Extraiga todos los discos CD. Asegúrese de que no haya ningún CD
en la bandeja de discos. Entonces, ajuste el aparato al modo de
reserva de la alimentación. Si transporta el aparato con discos en su
interior, pueden producirse daños.
Cuidados de los discos compactos
Los discos compactos son bastante resistentes a posibles daños,
sin embargo se puede producir un mal seguimiento de la pista
debido a una acumulación de polvo en la superficie de los discos.
Tenga presente las instrucciones siguientes para poder disfrutar lo
máximo posible de su colección de discos compactos y de este
reproductor.
No escriba en ninguna cara del disco, particularmente en la cara
Mantenga los discos alejados de los rayos directos del sol, de
Sujete siempre los discos por sus bordes. Huellas digitales, polvo
Referencias
que no tiene etiqueta donde se leen las señales musicales. No
estropee esta superficie.
focos de calor y de humedad excesiva.
o agua en los discos compactos pueden causar ruidos o un mal
seguimiento de la pista. Si un disco compacto está sucio o no se
reproduce adecuadamente, límpielo con un paño seco y suave,
pasándolo en dirección del centro hacia afuera a lo largo del
radio.
Mantenimiento
Limpieza de la lente del CD
Para asegurar un correcto funcionamiento del reproductor de CD,
deberá realizar de vez en cuando tareas de mantenimiento (la
limpieza de la lente láser). Los productos para la limpieza de lentes
se encuentran disponibles en cualquier comercio del rubro. Póngase
en contacto con su distribuidor de software de CD local para ver las
posibilidades.
Limpieza del mueble
Limpie periódicamente el mueble con un paño suave y una solución
jabonosa diluida, y luego séquelo con un paño seco.
Precaución:
No use productos químicos para la limpieza (gasolina, diluyentes
de pintura, etc.). Podría dañar el acabado del mueble.
No aplique aceite al interior del aparato. Podría causar mal
funcionamiento.
S-33
NO
SÍ
Correcto
03/12/17 XL-UH240W LS 26-34.fm
Page 69

Especificaciones técnicas
Como parte de la política de mejoras continuas, SHARP se reserva
el derecho de realizar cambios en el diseño y especificaciones para
la mejora del producto sin previo aviso. Las figuras indicadas que especifican el rendimiento son valores nominales de los aparatos de
producción. Puede haber algunas desviaciones de estos valores en
los aparatos individuales.
General
Fuente de alimentación 110/127/220/230-240 V de CA, 50/60Hz
Consumo de potencia 90 W
Dimensiones Ancho: 175 mm
Peso 5,7 kg
Amplificador
Potencia de
salida
Terminales de
salida
Terminales de
entrada
USB
Clase Clase de almacenamiento masivo
Archivo admiti-doMP3/WMA (no admite archivo DRM)
Admisión de formato
Admisión de bitrate
Otro MP3 lD3 - la etiqueta sólo admite la versión 1.x
Alto: 240 mm
Profundo: 315 mm
MPO : 320 W (160 W + 160 W) (10% T.H.D.)
RMS : 160 W (80 W + 80 W) (10% T.H.D.)
RMS : 130 W (65 W + 65 W) (0,9% T.H.D.)
Altavoces: 6 ohmios
Auriculares: 16 - 50 ohmios
(recomendada: 32 ohmios)
Pre-salida de Subwoofer (señal de audio):
200 mV/10 k ohmios en 70 Hz
Vídeo/Auxiliar (señal de audio):
500 mV/ 47 k ohmios
FAT 16 o FAT 32
MP3 (32 a 320 kbps)
WMA (64 a 160 kbps)
USB admite la versión 2.0
Reproductor de CD
Tipo Reproductor de discos compactos con re-
Lectura de las
señales
Convertidor D/A Convertidor D/A de 1 bit
Respuesta de
frecuencia
Gama dinámica 90 dB (1 kHz)
producción múltiple de 5 discos
Fonocaptor de láser semiconductor de 3
rayos, sin contacto
20 - 20.000 Hz
Sintonizador
Gama de
frecuencias
FM: 88 - 108 MHz
AM: 531 - 1.602 kHz
Altavoces
Tipo Sistema de luces de altavoz de tipo de 2
Potencia máxima
de entrada
Potencia nominal
de entrada
Impedancia 6 ohmios
Dimensiones Ancho: 165 mm
Peso 2,5 kg/cada uno
vías
Altavoz de agudos de 5 cm
Altavoz de graves de 13 cm
160 W
80 W
Alto: 260 mm
Profundo: 245 mm
XL-UH240W
ESPAÑOL
Referencias
S-34
03/12/17 XL-UH240W LS 26-34.fm
Page 70

03/11/4 240_MEMO.fm
TINSKA001AWZZ
MEMO/MEMORÁNDUM
Page 71

03/11/4 240_MEMO.fm
TINSKA001AWZZ
MEMO/MEMORÁNDUM
Page 72

CONSUMER LIMITED WARRANTY
SHARP ELECTRONICS CORPORATION warrants to the first consumer purchaser that this Sharp brand product (the “Product”), when shipped in its original con-
tainer, will be free from defective workmanship and materials, and agrees that it will, at its option, either repair the defect or replace the defective Product or part thereof
with a new or remanufactured equivalent at no charge to the purchaser for parts or labor for the period(s) set forth below.
This warranty does not apply to any appearance items of the Product nor to the additional excluded item(s) set forth below nor to any Product the exterior of which has
been damaged or defaced, which has been subjected to improper voltage or other misuse, abnormal service or handling, or which has been altered or modified in
design or construction.
In order to enforce the rights under this limited warranty, the purchaser should follow the steps set forth below and provide proof of purchase to the servicer.
The limited warranty described herein is in addition to whatever implied warranties may be granted to purchasers by law. ALL IMPLIED WARRANTIES INCLUDING
THE WARRANTIES OF MERCHANTABILITY AND FITNESS FOR USE ARE LIMITED TO THE PERIOD(S) FROM THE DATE OF PURCHASE SET FORTH BELOW.
Some states do not allow limitations on how long an implied warranty lasts, so the above limitation may not apply to you.
Neither the sales personnel of the seller nor any other person is authorized to make any warranties other than those described herein, or to extend the duration of any
warranties beyond the time period described herein on behalf of Sharp.
The warranties described herein shall be the sole and exclusive warranties granted by Sharp and shall be the sole and exclusive remedy available to the purchaser.
Correction of defects, in the manner and for the period of time described herein, shall constitute complete fulfillment of all liabilities and responsibilities of Sharp to the
purchaser with respect to the Product, and shall constitute full satisfaction of all claims, whether based on contract, negligence, strict liability or otherwise. In no event
shall Sharp be liable, or in any way responsible, for any damages or defects in the Product which were caused by repairs or attempted repairs performed by anyone
other than an authorized servicer. Nor shall Sharp be liable or in any way responsible for any incidental or consequential economic or property damage. Some states
do not allow the exclusion of incidental or consequential damages, so the above exclusion may not apply to you.
THIS WARRANTY GIVES YOU SPECIFIC LEGAL RIGHTS. YOU MAY ALSO HAVE OTHER RIGHTS WHICH VARY FROM STATE TO STATE.
Model Specific Section
Your Product Model Number & Description:
Warranty Period for this Product: One (1) year parts and labor from the date of purchase.
Additional Item(s) Excluded from Warranty Coverage (if any): Non-functional accessories, supplies, and consumable items.
Where to Obtain Service: At a Sharp Authorized Servicer located in the United States.
What to do to Obtain Service: Ship prepaid or carry in your Product to a Sharp Authorized Servicer.
(Be sure to have this information available when you need service for your Product.)
To find a location of the nearest Sharp Authorized Servicer, call Sharp toll free at 1-800-BE-SHARP.
Be sure to have Proof of Purchase available. If you ship the Product, be sure it is insured and
packaged securely.
TO OBTAIN SUPPLY, ACCESSORY OR PRODUCT INFORMATION, CALL 1-800-BE-SHARP.
SHARP CORPORATION
03/12/17 XL-UH240W_BACK.fm
0311
TINSZA207AWZZ
06G R AS 2
Page 73

documentation manual, user maintenance, brochure, user reference, pdf manual
This file has been downloaded from:
User Manual and User Guide for many equipments like mobile phones, photo cameras, monther board, monitors, software, tv, dvd, and othes..
Manual users, user manuals, user guide manual, owners manual, instruction manual, manual owner, manual owner's, manual guide,
manual operation, operating manual, user's manual, operating instructions, manual operators, manual operator, manual product,
 Loading...