

Page 1

ELECTRONIC ORGANIZER
MODEL
OPERATION MANUAL
Instrucciones abreviadas en español
CONTENTS
Part Names and Key Assignments ..................................................... 1
Using the Organizer for the First Time ............................................... 2
Auto Power Off Function .............................................................. 3
Backlight ....................................................................................... 3
Adjusting the LCD Contrast ......................................................... 3
Turning the key sound On and Off .............................................. 3
Memory Check ............................................................................. 3
Display Symbols ..................................................................................4
Entering Characters ............................................................................ 5
Built-in Calendar and Clock ................................................................ 6
Clock Mode .......................................................................................... 6
Alarm ................................................................................................... 8
Telephone Mode .................................................................................. 9
Calendar Mode ..................................................................................11
Schedule Mode ................................................................................. 12
Anniversary Mode ............................................................................. 14
To Do Mode ....................................................................................... 15
OZ-290H
Memo Mode ....................................................................................... 17
Expense Mode ................................................................................... 18
Editing Listings .................................................................................. 20
Deleting Listings ................................................................................ 20
Word Translator Mode ....................................................................... 21
Spell Checker Mode .......................................................................... 22
Diet Function Mode ........................................................................... 22
Calculator Mode ................................................................................ 27
Conversion Mode .............................................................................. 28
Secret Function ................................................................................. 30
Game Mode ....................................................................................... 31
Managing the Organizer’s Memory ................................................... 33
Using the Included PC Software .......................................................33
Battery Replacement ......................................................................... 38
Specifications .................................................................................... 39
Appendix ............................................................................................ 42
Instrucciones abreviadas en espanõl ............................................. S-1
Page 2

NOTICE
• SHARP strongly recommends that separate permanent written records be kept of all important data. Data may be lost or altered in virtually any
electronic memory product under certain circumstances. Therefore, SHARP assumes no responsibility for data lost or otherwise rendered
unusable whether as a result of improper use, repairs, defects, battery replacement, use after the specified battery life has expired, or any other
cause.
• SHARP assumes no responsibility, directly or indirectly, for financial losses or claims from third persons resulting from the use of this product and
any of its functions, such as stolen credit card numbers, the loss of or alteration of stored data, etc.
• The information provided in this manual is subject to change without notice.
CAUTIONS
• Do not carry the Organizer in the back pocket of slacks or trousers.
• Do not drop the Organizer or apply excessive force to it.
• Do not subject the Organizer to extreme temperatures.
• Since this product is not waterproof, do not use it or store it where fluids can splash onto it. Raindrops, water spray, juice, coffee, steam,
perspiration, etc. will also cause malfunction.
• Clean only with a soft, dry cloth.
• Use only a SHARP approved service facility.
NOTES
• All company and/or product names are trademarks and/or registered trademarks of their respective manufactures.
Page 3
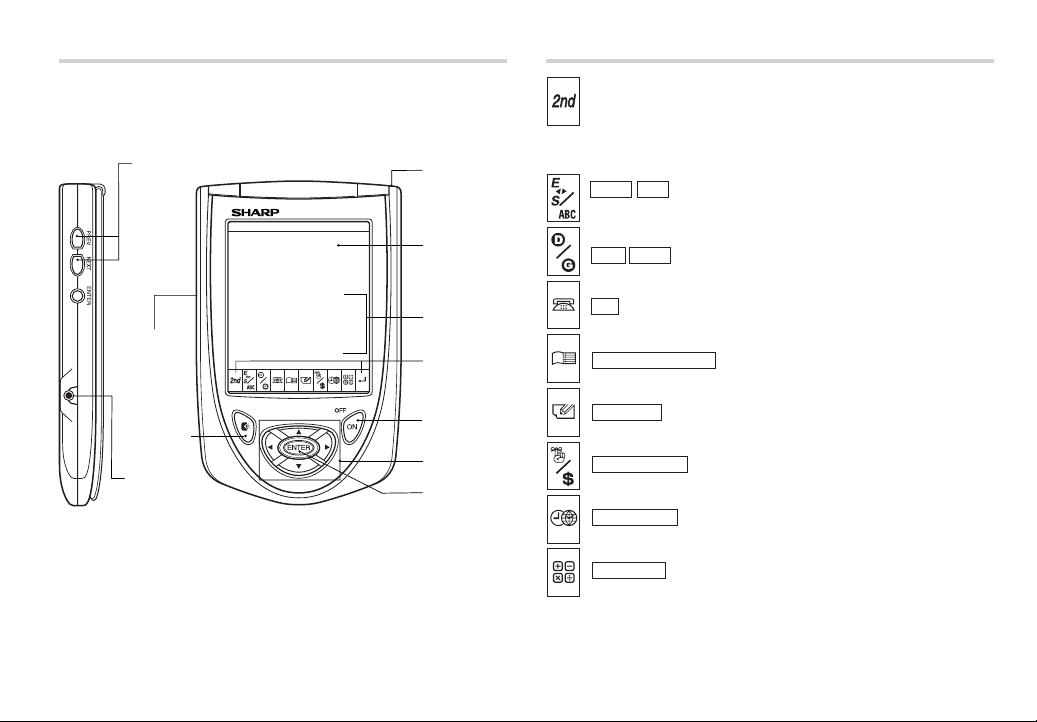
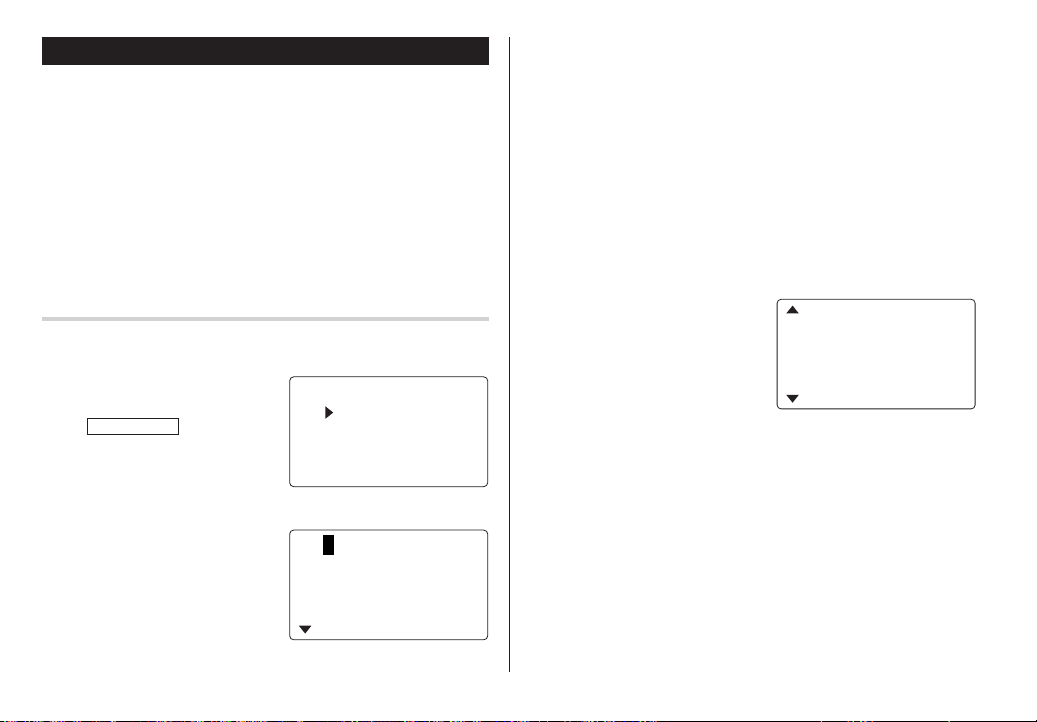
Part Names Key Assignments
: 2nd Function key
Activates the second function specifically assigned to the next
Search keys
Stylus
key tapped.
▲
▼
E
S
(
ABC ): English-Spanish word translator/Spell Checker
mode key
RESET
switch
(on the back
of the unit)
Backlight key
Option port
Display
Touch Keyboard
section
Mode keys
Power
ON/OFF key
Cursor keys
ENTER key
DIET GAME ): Diet Function/Game mode key
(
TEL ): Telephone mode key
(
SCHEDULE/CALENDAR
(
MEMO/ANN ): Memo/Anniversary mode key
(
TO DO/
EXPENSE
(
CLOCK/
ALARM
(
CALC/CONV ): Calculation/Conversion mode key
(
): Schedule/Calendar mode key
): To Do/Expense mode key
): Home Clock/World Clock/Alarm mode key
• In this manual, these Mode keys are represented with icons in parentheses.
1
Page 4
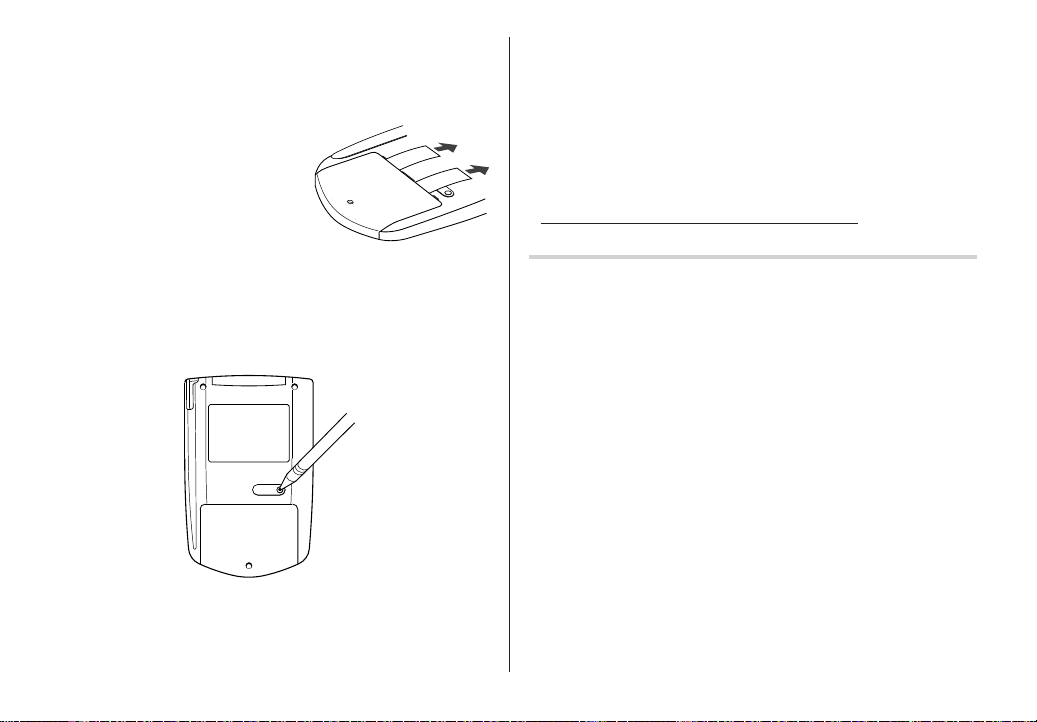
Using the Organizer for the First Time
Be sure to perform the following operations before using the Organizer
for the first time.
1. Pull out the battery insulation sheets
from the battery compartment on the
back of the unit.
The Organizer starts operation.
(The battery insulation sheets were
inserted at the factory to prevent
battery wear.)
2. Press the RESET switch.
A message, “RESET?” is displayed.
R
E
S
E
T
3. Tap
To tap the touch keys, use the stylus (included in the package).
The message will appear as “RESET!”.
The Organizer is now initialized. Proceed to set the date and time of
the clock (see page 6).
Note:
• Press the RESET switch using the stylus or similar object.
Do not use an object with a breakable or sharp tip.
If a malfunction occurs under abnormal conditions
If the Organizer is subjected to strong extraneous electrical noise or
shock during use, on rare occasions, all the functions will not work
properly and data may be displayed incorrectly. In such cases, follow
the procedures as shown below.
1. Press the RESET switch.
2. When a message, "RESET?" is displayed, press any key EXCEPT
FOR
If the first procedure doesn't work, follow the next procedure to
initialize the Organizer's memory. In this case, all the stored data will
RESET
be deleted.
1. Press the RESET switch.
2. When a message, "RESET?" is displayed, tap
x
f
, then
f or
.
x
x
.
.
f
, then press
2
Page 5

Auto Power Off Function
When none of the keys has been pressed or tapped for approximately 7 minutes, the Organizer automatically turns the power off to
save the batteries.
Backlight
The Backlight allows you to view the display and use the Organizer
even in low-light conditions. Pressing
z
the display for as long as you continue to use the Organizer; if no
key activities are detected within the specified interval, it will be
turned off automatically.
• To turn the Backlight off, press
z
• The Backlight may remain on for less than the preset interval or it
may not function if the battery level is low.
• The Backlight does not function in the PC Link mode.
Do not use the Backlight unnecessarily.
• Since the Backlight drains power, excessive use of the Backlight
will significantly reduce the life of your batteries.
Setting up the Backlight
• The Backlight can be set to turn off at a specified interval.
CLOCK/ALARM MENU
1. Tap
m
, and press
x
, select "BL TIME SET" by using k or
.
2. By using k or m, select a desired interval (10, 20, or 30
x
seconds) and press
.
once illuminates
again.
Adjusting the LCD Contrast
CLOCK/ALARM MENU
1. Tap
k
or m, and press
, select "LCD CONTRAST" by using
x
.
2. Press k or m to darken/lighten the display (within 1 through 8).
x
3. When done, press
.
Turning the key sound On and Off
CLOCK/ALARM MENU
1. Tap
m
, and press
x
, select "KEY TONE" by using k or
.
2. Select the key sound function on/off by using k or m.
x
3. When done, press
.
Memory Check
CLOCK/ALARM MENU
Tap
or m, and press
x
The memory check display will appear and indicate the remaining
memory space.
The previous screen will appear after 2 seconds.
, select "MEMORY CHECK" by using
.
k
3
Page 6
Display Symbols
Display Symbols
Hourly Alarm: The Hourly Alarm is ON and will sound every
hour.
Schedule sign: Appears when the Home clock time reaches a
Reminder time or a Start time of a schedule listing. Disappears when the time reaches the End time of the listing.
Anniversary sign: Appears when a special day will arrive
within days as set in Anniversary Reminder.
>
UP sign: More information exists above the current display.
k
(Press
<
DOWN sign: More information exists below the current display.
(Press
C
CAPS LOCK sign: Capital (uppercase) letters will be entered.
To enter small (lowercase) letters, tap
off.
b
Beep sound: Key touch sound (beep) is ON.
E
EDIT mode: The listing on the display can be edited.
.)
m
.)
$
to turn “CAPS”
2
2nd function: Indicates that f has been activated.
Daily Alarm: The Daily Alarm is ON and is set to go off at the
specified time every day.
B
Low Battery sign: Indicates that the battery level is extremely
low. (Replace the battery with a new one immediately.)
Secret sign: Secret function is in effect.
(Listings cannot be recalled without a password.)
• The display examples in this manual show only the symbols required
for each explanation.
4
Page 7

Entering Characters
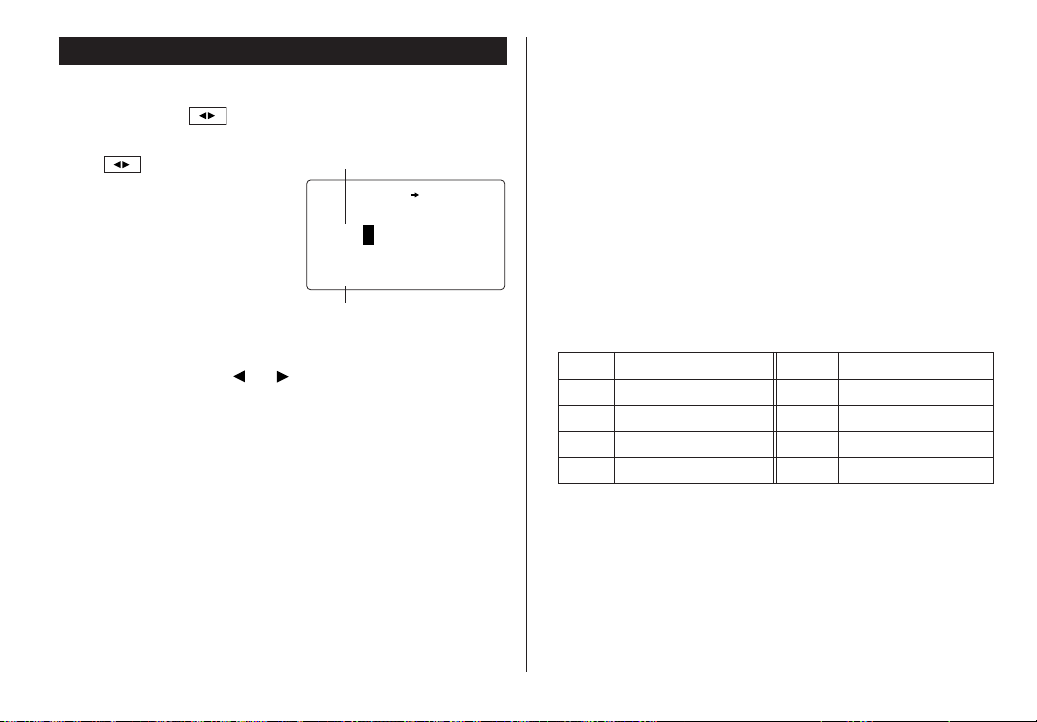
Moving the Cursor
Move the cursor by pressing j, l, k, or m .
Entering Characters
Entering letters and numbers
The initial setting for entering letters is small (lowercase) letters. To
enter capital (uppercase) letters, turn “CAPS” on by tapping
Touch Keyboard
Alphabet entry mode Number entry mode
• Each time f is tapped, the touch keyboard switches between the
Alphabet entry mode and the Number entry mode.
To tap the touch keys, use the stylus (included in the package).
• Tap towards the center of each key.
• Numbers, alphanumeric letters, symbols, and “+ – x ÷ .” can be
entered.
Other characters
s
Tap
symbols and characters to be selected. To select the desired
symbol/special character, tap
times at the position where you would like to insert it.
to display the symbol entry mode, allowing a total of 32
s
the appropriate number of
$
.
Making Corrections
1. Inserting or Overwriting characters
2. Deleting characters
Characters assigned to
Tap i, once or twice, to insert or overwrite characters.
c
can be used for deletion of data in Calculator mode and Rate
figure in Conversion mode.
d
can be used for deletion of characters.
d
can also be used to delete listings.
s
:
5
Page 8
Built-in Calendar and Clock
Precautions
• Calendar, Schedule, Expense, and Clock modes allow you to
enter the desired date and time between Jan. 1, 1950 and Dec.
31, 2150.
• If an attempt is made to store an invalid time or date, you will not
be able to move the cursor to date entering, or store the time and
x
date by pressing
x
again.
• The Organizer has 43 cities according to the time zones (see
page 42).
. Enter the correct value and press
Clock Mode
The Organizer has both Home Clock and World Clock modes. The
display switches between Home and World clock each time
CLOCK/ALARM
NEWYORK
1
2nd
Home Clock Mode World Clock Mode
is tapped.
<
HOM
E
>
–1–
2005 SAT
12:00:00
<
WORLD
>
LON
ON
D
2005 SAT
1–1
–
M
2nd
A
5:00:00
A
M
Setting the Home Clock
1. If the display is in other mode or World Clock mode, tap
CLOCK/ALARM
Note:
• During the period of the Daylight Saving Time (summer time), set the
DST ON beforehand as described on page 7, "Setting Daylight
Saving Time ON/OFF".
2. Tap
e
The Organizer will enter the clock setting mode.
3. Select your Home city using
<
City names can be edited, if
necessary.
4. Press
Month position.
5. Enter the appropriate month.
Enter the day and then year in the
same way.
6. Press
the Hour position.
7. Enter the appropriate hour.
8. Enter the minutes and seconds in the same manner.
9. Select AM or PM using
to enter the Home Clock mode.
.
or >.
m
to move the cursor to the
m
to move the cursor to
(
.
NEWYORK
01
–01–
12:05:35
WYO
NE
01
–01–
2nd
12:05:35
WYO
NE
01
–24–
2nd
12:05:35
<
HOM
<
HOM
<
HOM
E
>
2005
E
>
RK
5
200
E
>
RK
5
200
SAT
A
M
SAT
A
M
SAT
A
M
6
Page 9
10
.Press
x
to set the Clock.
The clock starts from exactly the
set time.
2nd
Selecting the date format (Default: Month-Day-Year)
MENU
1. Tap
x
2. Select the desired date format by using
Mode Month-Day-Year Year-Month-Day Day-Month-Year
Jan 24,2005
Note:
• The selected date format affects each mode in the Organizer.
Selecting the 12- or 24-hour time system (Default: 12 hour)
1. Tap 12/24 the appropriate number of times to select the 12 hour or
24 hour system.
12 hour 24 hour
2nd
, select "DATE FORMAT" by using k or m, and press
.
(MM-DD-YYYY) (YYYY-MM-DD) (DD-MM-YYYY)
01-24-2005 2005-01-24 24-01-2005
<
HOM
E
>
NEWYORK
1
–24–
2005
3:23:17
M
P
ON
M
NEWYORK
2nd
<
HOM
NEWYORK
1
–24–
2005
10:16:15
k
or m, and press
<
HOM
E
1
–24–
2005MON
15:23:17
E
>
>
x
M
A
ON
M
Setting Daylight Saving Time (DST: Summer time) ON/OFF
1. Tap C once to switch the DST
Changing the World Clock city to the Home Clock city
.
A different city in another time zone can be set as the home city at will,
without adjusting the stored correct time.
1. Tap
2. To set the new home city, select the desired city by using
3. Tap
• The previous home city is now set as the world city.
4. Tap
• The selected city in step 2 is now set as the home city.
setting. When the DST is ON, “
appears.
CLOCK/ALARM
>
e
clocks.
CLOCK/ALARM
.
to change the cities between the Home and the World
once or twice to display the World clock.
to check the home city.
<
HOM
E
”
NEWYORK
8
–12–
2nd
9:43:21
>
200 FRI
5
A
M
<
or
In the 12-hour system, 12:00 AM: midnight, 12:00 PM: noon.
7
Page 10
Alarm
The Organizer has 3 kinds of alarm:
1. Daily Alarm..........Sounds every day at the specified time(for
approx. 1 minute), when "
Up to 3 alarms can be set separately (Alarm1,
Alarm2, and Alarm3).
2. Hourly Alarm........Sounds every hour precisely (every time minutes
reach "00"), when "
3. Schedule Alarm... Sounds at the specified times of schedule listings
(see page 12).
Press any key to stop the Alarm sounding.
" is displayed.
" is displayed.
Setting the Daily Alarm time
Set up the Daily Alarm to go off at a specified time.
1. Tap
2. Press
3. Press
Turning the Daily and Hourly Alarms ON/OFF
The Daily and Hourly Alarms can sound when the respective
symbols ("
1. Tap
three times.
The Alarm display will appear.
2. Tap "
of symbols switches.
Note:
• Alarms will sound even when the Organizer is turned off.
" and " ") are displayed.
CLOCK/ALARM
once twice, or
<
ALARM1
>
––:––
" appropriate times. Each time you tap " ", the combination
4. Tap
5. Enter the desired time.
6. Press
Note:
• You can turn the respective alarms (Alarms 1 to 3) ON/OFF. Display
CLOCK/ALARM
The Alarm display will appear.
<
the Alarm1, Alarm2, or Alarm3.
j
or l to turn on the Alarm.
(The display differs between the
12 hour and 24 hour systems.)
e
x
the desired Alarm following the above steps 1 and 2, then press
or l to display the time (ON) or to hide the time (OFF). When turned
off, the Alarm will not sound even when the "
once, twice, or three times.
or > to select
to specify the time.
.
<
ALARM3
>
––:––
(Alarm3 is OFF)
<
ALARM3
12 00 A
(Alarm3 is ON)
" is displayed.
>
:
M
j
8
Page 11
Telephone Mode
There are three telephone listing categories, Unfiled, Personal, and
Business. Each listing can be simply classified for easy access to
the data.
v
, select the desired category by using k or m, and press
Tap
x
.
<
U
NF I ED
<
>
L
SEARCHNAME?
<
BUS I NESS
>
PERSONAL
SEARCHNAME?
>
Each entry has the following 14 fields.
SEARCHNAME?
• Numbers, spaces, and hyphens (“-”) can be entered in the Home#,
Office#, Fax#, and Mobile# fields.
Maximum number of
Field Name alphanumeric characters
1 Last name: 48
2 First name: 48
3 Company: 96
4 Home#: 48
5 Office#: 48
6 Fax#: 48
7 Mobile#: 48
8 E-mail: 48
9 Address: 96
10 City: 48
11 State: 48
12 Zip code: 48
13 Country: 48
14 Note: 96
9
Page 12

Entry
<Example>
v
1. Tap
2. Tap
3. Enter the Last name.
4. Press
5. Press
, and select “BUSINESS”,
x
then press
The Business search display will
appear.
e
The display will change to the
record input mode.
For example, “Smith”.
m
, then enter the First name. For example, “John”.
m
to move the cursor to the Company field and enter “ABC
International Co.”.
.
.
<
BUS I NESS
>
SEARCHNAME?
<
BUS I NESS
>
LAST NAME:0
FIRST NA
COM
PANY
:
M
E
:
m
6. Press
7. Enter “585-4280”.
8. Press
9. Enter each field in the same manner.
10.
to move the cursor to the Home # field.
m
to move the cursor to the Office # field and enter “619-542-
7320”.
At the Note field, press
The Business search display will appear.
x
to store the telephone listing.
10
Page 13
Search
Last Name Alphabetical Search
1. Tap v and select the Category by using k or m key, then press
x
.
The search display will appear.
2. Press < or > to search for the target listing in alphabetical
order.
Last Name Direct Search
1. Tap v and select the Category
(Business, in this example) by
k
or m key, then press
using
x
.
The search display will appear.
2. Enter some of the last name letters in order.
Up to 10 letters can be entered.
3. Press
x
to search for the target listing.
If there is no data matched, “NOT FOUND!” will appear, and then
the screen will return to the initial display.
See also
Entering Characters ................................................... 5
Editing Listings ......................................................... 20
Deleting Listings ....................................................... 20
<
BUS I NESS
>
SEARCHNAME?
s
m
is
Calendar Mode
Navigating the Monthly Calendar Display
CALENDAR/SCHEDULE
1. Tap
The monthly calendar of the current month will appear.
The current day will be flashing.
Navigate the calendar using the following keys:
< >
j
: Go to previous day
l
: Go to next day
k
: Go to the previous week
m
: Go to the next week
•
j, l, k
displayed.
and m cursors can move only within the month
once or twice to enter the Calendar mode.
: displays the following or previous month.
8–2005
12345
7890123
4151617181920
1
2nd
21 22 23 24 25 26 27
6
1111
11
Page 14
Directly go to the target month
1. At the Calendar mode, tap =.
Date input screen will appear.
2. Enter the target date.
3. Press
x
.
The monthly calendar of the target
date will appear.
Note:
• In the Calendar mode, monthly calendars from January 1950
to December 2150 are available.
<
C
ALENDAR
SEARCH DATE?
–12–
08
2nd
>
2005
Confirmation of the Schedule, To Do, and Anniversary
Mode entries
You can see the dates to which you assigned a Schedule, To Do or
Anniversary on the monthly calendar display.
The indication marks are displayed as follows:
Schedule
To Do
Anniversary
Schedule Mode
Entry
<Example>
A project meeting will be held from 10:00 AM to 11:00 AM on
September 11, 2005
CALENDAR/SCHEDULE
1. Tap
twice to enter the Schedule mode.
The Schedule search display will
appear.
The current date will be displayed and the cursor at the first number
flashes.
The first number depends on your Date Format selection. These
examples are in the MM-DD-YYYY format.
e
2. Tap
display will appear. Enter 09 for
month.
3. Enter the target day/year in the
same manner.
4. Press
Start time.
. The Schedule entry
m
, and enter 10:00AM for
once or
<
SCHEDULE
SEARCH DATE?
–12–
08
2nd
2005
09–12–2005
START:05:54 P
END:05:54 P
M
:
<
YES
ALAR
2nd
REMI NDER
09–11–2005
START:10:00 A
END:05:54 P
M
:
<
YES
ALAR
2nd
REMI NDER
>
M
M
>
:
M
M
>
:
12
Page 15
5. Press m.
The End time will automatically change to 30 minutes after the Start
time. (However, the End time will remain within the specified day.)
6. Enter 11:00AM for the End time, and press
7. Press
<
or > to select
“Yes” or “No” for Alarm setting, and
m
.
press
If you select “Yes ”, the Schedule
Alarm will sound at the time set in
Reminder minutes before the Start time. If you select “No”, Schedule
Alarm will not sound.
Note:
• If you select “No” in step 7, “PLAN”
will appear instead.
Go step 9 to continue.
m
.
START:10:00 A
END:11:00 A
:
ALAR
M
<
YES
REMI NDER
2nd
00
M
IN. BEFORE
END:11:00 A
:
ALAR
M
<
N
REMI NDER
00
M
IN. BEFORE
>
:
O
>
:
–––––
9. Enter the name of the scheduled item into the PLAN field. (Project
10.
Note:
M
• When the Home clock time reaches a Reminder time, the Schedule
M
Search
M
Search today’s schedule
1. Tap
2. Tap
PLAN:0
8. Enter the appropriate time for
m
Reminder and press
Schedule Alarm will sound at the
entered time before the Start time.
You can select any number from
00 to 99.
Note:
• Enter the number in two-digit format.
.
END:11:0S0A
:
ALAR
M
<YE>
REMI NDER
05
M
IN. BEFORE
M
:
PLAN:0
meeting).
Up to 96 alphanumeric characters can be entered.
Press
x
to store the schedule listing.
Alarm will sound for approx. 30 seconds even while the power is
turned off. Press any key to stop the Alarm sounding. When
is pressed, the listing can be seen in detail in the Schedule mode.
CALENDAR/SCHEDULE
<
or > to search for
the target schedule listing.
The listings stored in the
Organizer will be displayed in
chronological order.
once or twice to enter the Schedule mode.
8–12–2005
START:12:15 P
END:12:45 P
ALAR
RE
M
M
I NDER
2nd
:
YES
x
M
M
:
13
Page 16
Date search
CALENDAR/SCHEDULE
1. Tap
2. Set the desired date.
Select the month, day and year
field, and enter the desired
number.
x
3. Press
target schedule listing of the
specific date.
<
Pressing
display the listings on that day.
See also
Entering Characters ................................................... 5
Editing Listings ......................................................... 20
Deleting Listings ....................................................... 20
once or twice to enter the Schedule mode.
<
SCHEDULE
SEARCH DATE?
–11–
09
2nd
to search for the
9–11–2005
START:10:00 A
END:11:00 A
or > can
2nd
ALAR
RE
M
I NDER
M
2005
:
YES
Anniversary Mode
In Anniversary mode, you can specify the month and day (such as
>
wedding anniversaries and birthdays).
Once data is stored as an anniversary, a flag appears on the date
set in the calendar (see page 12). And when within the specified
period, the anniversary sign will appear.
The maximum number of characters for each description is 96
alphanumeric characters.
M
Entry
M
:
<Example>
“Nancy’s Birthday” is on February 12th.
MEMO/ANN
1. Tap
enter the Anniversary mode.
2. Tap e.
The Anniversary entry display will
be displayed and Date will appear.
3. Enter the date, 02 for month and
12 for day.
m
4. Press
Reminder date will be flashing.
once or twice to
.
<
ANN I VERSARY
SEARCH DATE?
08
–
12
2nd
DATE:02–12
RE
M
I NDER
5 DAYS
DES
C
2nd
RIPTI
:
BEF
O
O
N
R
>
E
:
14
Page 17

5. Enter the Reminder date from 0 to 9.
6. Press
m
.
7. Enter “Nancy’s Birthday”.
8. Press
x
to store the anniversary listing.
A
The anniversary sign (
Reminder.
) will not appear until the day is set in
Search
Sequential search
MEMO/ANN
1. Tap
2. Press
<
once or twice to enter the Anniversary mode.
or > to search for the listing.
To Do Mode
In the To Do mode, you can store your important To Do items with a
priority index.
Entry
<Example>
You have to visit the HK Exhibition by December 10, 2005.
TO DO/EXPENSE
1. Tap
to enter the To Do mode.
once or twice
<
TOD
SEARCHDATE?
–12–
08
2nd
2005
O
>
Date search
Enter the date to go to the target date in the above step 2 and then
x
press
See also
Entering Characters ................................................... 5
Editing Listings ......................................................... 20
Deleting Listings ....................................................... 20
.
2. Tap
3. Enter 12 into the month field and enter 10 and 2005 respectively.
4. Press
e
.
The To Do entry display will
appear.
m
and select the Priority number from 1 (High) to 9 (Low)
<
using
or > (or enter the number), then press m.
08–12–2005
PR IORITY
<
PENDIN
DESCRIPTION
2nd
G
>
:
>
<
1
:
15
Page 18

m
5. Press
6. In the description field, enter what you have to do by the target day.
7. Press
to let the status as "PENDING".
Enter “Visit HK Exhibition”.
Up to 96 alphanumeric characters can be entered.
x
to store the To Do listing.
Search
Sequential search
TO DO/EXPENSE
1. Tap
2. Press
<
The To Do listings are stored in order of their date, pending/done
status, and priorities.
once or twice to enter the To Do mode.
or > to search for the target To Do listing.
Date search
TO DO/EXPENSE
1. Tap
2. Select the month, day or year
field, and enter the desired date.
3. Press
x
date.
once or twice to enter the To Do mode.
<
SEARCHDATE?
–10–
12
2nd
to search for the target To Do listing of the specific
DONE Completed Items
TO DO/EXPENSE
1. Tap
2. Press
3. Tap
e m m
4. Press
<
<
once or twice to enter the To Do mode.
or > to select the To Do items.
to enter the status field.
or > to select "DONE", then press
See also
Entering Characters ................................................... 5
Editing Listings ......................................................... 20
Deleting Listings ....................................................... 20
TOD
2005
x
O
>
.
16
Page 19
Memo Mode
You can store memos using the Memo mode. Up to 96 alphanumeric characters can be entered per one listing.
Entry
<Example>
Enter your passport number: 12AB34567
MEMO/ANN
1. Tap
enter the Memo mode.
once or twice to
<
MEM
SEARCH
O
>
?
F
2. Tap
e
and enter as follows.
Passport No. 12AB34567
MEM
<
MEM
O
:
O
PaAsspo5rt
>
No . 12 B34 67A
3. Press
x
to store the memo listing.
Search
Sequential Search
MEMO/ANN
1. Tap
The Memo mode search display will appear.
2. Press < or > to search for the listing.
Direct Search
MEMO/ANN
1. Tap
The search display will appear.
2. Enter the first letter(s) of the
desired memo (ex. “pass”).
Up to 10 letters can be entered.
x
3. Press
target listing.
See also
Entering Characters ................................................... 5
Editing Listings ......................................................... 20
Deleting Listings ....................................................... 20
once or twice to enter the Memo mode.
once or twice to enter the Memo mode.
Pas po r t
2AB34
1
to search for the
s
No .
567
17
Page 20
Expense Mode
The Expense record function is an easy-to-use method of tracking
personal and business expense information. The Expense Report
allows you to see the total expenses for a single day or for a certain
period.
1 Expense: Item-by-item expense entry and view mode
2 Report: Display the total expenses for a single day or
a certain period
3 Category: Assign a new category name (up to 7
characters for each)
Entry
<Example>
The date is August 18, 2005.
You bought flight tickets for a
business trip costing $1200.
TO DO/EXPENSE
1. Tap
to enter the Expense mode.
k
2. Press
3. Tap
or m to select "EXPENSE", then press
The Expense search display will
appear.
e
The Expense record entry display
will appear. The current date will
be displayed.
once or twice
.
<
E PENS
X
EPENS
X
O
R
REP
CAT
2nd
GORYE
x
08–18–2005
C
ATEGORY
<
AMO
UNT
2nd
E
T
M
ea l s
:
E
>
.
:
>
0.
The first number depends on your Date Format selection. These
examples are in the MM-DD-YYYY format.
4. Enter the date, if necessary.
5. Press
m
.
6. Select the expense category using
There are 8 preset categories to select.
Meals
➠
Hotel ➠ Car ➠ Phone ➠ Fares
(Enter’t ) Entertainment ➠ Tips ➠ (Misc) Miscellaneous ➠...
7. Press
m
, and enter 1200.
Up to 12 digits can be entered.
8. Press m.
9. Select the payment using
or >.
There are 4 preset payment
systems to select.
Cash
➠
Check ➠ Card ➠ Others ➠...
<
<
2nd
or >.
➠
A
MOUNT
PAYMEN
<
Fare12s
:
:
T
CHEC
<
00
K
>
.
>
18
Page 21
10.
Press m, and select “YES” or
<
“NO” using
“RECEIPT” field.
11.
Press m, and enter “Flight ticket” in the “MEMO” field.
12.
Press
x
or > in the
to store the data.
AMO
PAY
2nd
RECEIPT
UNT
M
Recall
Sequential Search
TO DO/EXPENSE
1. Tap
k
2. Press
The Expense search display will appear.
3. Press
Date Search
1. Tap
2. Press
3. Enter the date you wish to search.
4. Press
or m to select "EXPENSE", then press
<
record.
TO DO/EXPENSE
k
or m to select "EXPENSE", then press
The Expense search display will appear.
x
Scroll the page using
once or twice to enter the Expense mode.
to view the next record, > to view the previous
once or twice to enter the Expense mode.
.
k
or m.
:
ENT
<
x
x
1200 .
:
C
HECK
:
<
YES
.
.
>
Summary Report
TO DO/EXPENSE
1. Tap
to enter the Expense mode.
>
k
2. Press
3. Enter the first date from you wish
4. Press
5. Enter the last date at you wish to summarize the expense. (August
6. Press
or m to select "RE-
PORT", then press
to summarize the expense. (July
10, 2005)
m
to move the cursor to the last date.
10, 2005)
x
Total amount report during the
period will be displayed.
Scroll the page using
once or twice
x
.
k
.
or m.
2nd
2nd
2nd
F
T
TOTAL
M
H
<
E PENS
X
EPENS
REP
CAT
M
O
X
T
O
R
GORYE
<
EXPENSE
––
REPORT
:
–18–
08
:
–18–
08
E
ea l s
ot
el
E
>
>
––
2005
2005
443 ..5
53 5
19
Page 22

Edit the Category
You can change the category name for your convenience.
TO DO/EXPENSE
1. Tap
2. Press
k
or m to select
"CATEGORY", then press
x
.
The edit category display will
appear.
3. Select the category you wish to change using
4. Tap
e
5. Delete the preset category name using
6. Enter the new category name. (e.g. Books)
Up to 7 characters can be entered for the category name.
7. Press
x
8. Press
x
All the revisions are stored.
Note:
• Entries previously stored under the former category will appear
under the new category after the revisions are made.
See also
Entering Characters ................................................... 5
Editing Listings ......................................................... 20
Deleting Listings ....................................................... 20
once or twice to enter the Expense mode.
ED I T CATEGO
M
ea l s
Hotel
Ca r
Phone
k
or m.
.
d
.
. Repeat the steps 3 to 7, if necessary.
.
RY
Editing Listings
Edit
1. Recall a listing in the desired mode.
2. Tap
e
.
The display will change to the edit mode.
3. Edit the data.
j l k m
d
i: changes between the INSERT mode and the OVERWRITE mode
4. Press
: move the cursor to left, right, up or down, respectively
: can be used to delete characters
x
to store.
Deleting Listings
Delete
1. Recall a listing in the desired mode.
2. Tap
d
.
The confirmation display will appear.
f
• To cancel deleting, tap
3. Press
x
to delete the listing.
.
20
Page 23
Word Translator Mode
The Organizer offers an English-Spanish bi-directional word translator
E S
function. Each time
Word Translator mode and the Spell Checker mode.
E S
1. Tap
the English
translation mode; Tap
enter the Spanish
mode.
2. Enter the desired source word
and press
The matching English or Spanish
word will then be displayed.
• When the small symbol “
To view the remaining letters of long words that cannot be
accommodated on the screen, use
• If there is no matching word, “NOT FOUND!” is displayed. The word
next in alphabetical order will then be displayed.
• Press
word using the keyboard, and press
once or twice to enter
→
x
<
or > to scroll through the word list, or enter a new
is tapped, the mode switches between the
English field
Spanish
j
→
English
.
or l to
” or “ ” is turned on, more letters exist.
j
<
ENGSPA
E:1
:
S
Spanish field
or l to scroll.
x
for another search.
>
Notes:
• Indications are set as follows:
(Am): American English
(Br): British English
(adj): Adjective
(adv): Adverb
(n): Noun
(pron): Pronoun
(v): Verb
(f.): Feminine form
(m.): Masculine form
• Sometimes, two identical words may appear in the word list.
• Enter European characters and spaces correctly. Otherwise, the unit
may not be able to complete the search.
• In the Spanish field, you can enter the following letters. Press
respective letter key repeatedly after tapping
• Activate “CAPS” ON to enter capitalized letters.
s
.
Key Letters Key Letters
A á à â ä N ñ
C ç O ó ò ô ö
E é è ê ë U ú ù û ü
I í ì î ï Y ´y ÿ
21
Page 24

Spell Checker Mode
Diet Function Mode
The Spell Checker Mode can be helpful when the exact spelling of a
query word is not known. Each time
switches between the Spell Checker mode and the Word Translator
mode.
is tapped, the mode
ABC
The Diet Function can organize your daily calories burned by walking,
as well as managing your daily caloric intake. Tap
to display the Diet Function mode screen and the Game mode screen
(Diet Function
...).
Searching a word with ambiguous spelling
1. Tap
2. To check spelling, enter the word
once or twice to enter the Spell Checker Mode.
ABC
PEL L
><
ENTER
and press
checking. Maximum length of the
entry word is 36 characters.
• If the word is correctly spelled, a
message “CORRECT!” appears
briefly, then returns to the entry
screen.
• If the spelling of the entry word is found incorrect, then a number
of related words appears; use
installed Spell Checker is unable to find any related word, then “0”
appears, followed by the initial entry screen.
• The Spell Checker Mode looks for a match of a given word against
the installed database containing approximately 12000 words.
• Variants of a given word, or the root of a given variant, may not
always be specifically suggested.
to start
k
or m to browse the words. If the
S
na lper so
The Diet Function calculates the estimated calories burned by using
the built-in pedometer, and compares the value with the entered target
value. * The consumption by basal metabolism is not counted as part
of this calculation.
Food items can be selected from the Food Database, or programmed
as desired. Have the Organizer compare the value with the entered
target intake value.
* Basal metabolism is the energy required to maintain your body’s
vital functions such as breathing, your heart beating, and
maintaining your body temperature.
• Follow the guidance of your physician when using this unit to
organize your diet.
• Prior to using this function, you will need to measure your stride
length and weight.
DIET
several times
→
BLACKJACK → ALPHA ATTACK → Diet Function
IET
><
D
ETERPED
O
M
M
PT IONCONSU
EINTAK
TREPOR
22
Page 25

Measuring your stride length
In order for the Diet function to work properly, you must first measure
your stride length.
Note:
• A “stride length” in this manual refers to the distance from the tip of
your toe of one foot to the tip of your toe on the other when taking a
step.
1. Walk 10 normal steps, as shown in the illustration.
2. Measure the distance you have traveled.
3. Divide the distance by 10. Record the result as your stride length.
Example:
Distance traveled = 320 inches
Stride length = 320 ÷ 10 = 32 inches
User Profile Mode
Enter information such as your previously measured Stride length and
Weight.
DIET
1. Tap
Mode.
2. Select “USER PROFILE” using
Note:
• When using the Diet Function Mode for the first time, or after the
once, twice, or three times to enter the Diet Function
k
or m, and press
Organizer has been reset, you will automatically be guided to the
User Profile Mode.
ENTER
.
3. Fill the STRIDE entry field with
your stride length value obtained
from the above method, and tap
m
.
4. Enter your body weight value in
the WEIGHT field, and tap
5. If necessary, follow the above steps to enter the target values for
your daily calorie and nutrient intake.
Enter the following ten parameters:
• Value of Calories for Intake
• Value of Total Fat for Intake
• Value of Saturated Fat for Intake
• Value of Cholesterol for Intake
• Value of Sodium for Intake
• Value of Carbohydrate for Intake
• Value of Dietary Fiber for Intake
• Value of Sugars for Intake
• Value of Protein for Intake
• Value of Calories for Consumption
6. Then press
Notes:
• It is recommended that you refer to the appropriate documentation,
or consult your physician before setting all target values such as
your Daily target value of caloric intake.
• Units such as STRIDE and WEIGHT can be changed in the MENU
mode.
Select “UNIT SET” in the MENU mode, press
desired UNIT (inch/cm, lb/kg) using
• To edit, tap
2nd
m
.
ENTER
to store the setting.
EDIT
before proceeding to step 3.
<
USER
W
EIG
ENTER
or >.
O
FILE
PR
D
E i nchSTR I
HT l b
, then select a
><
32.
0.
23
Page 26

Positioning the unit
Close the cover, and insert the unit into the carrying case as shown in
the illustration, then make sure that the top flap is fastened.
The unit may not count steps correctly if you:
• Walk at an irregular pace, or in a crowded place.
• Shuffle legs excessively.
• Wear sandals when walking.
• Vary your movement (play sports, for example).
• Move up/down excessively.
• Are in a vehicle with vertical and horizontal motions.
• Attach the unit improperly (tilted, for example).
Clip
Secure the carrying case clip to your belt or to the top of your shorts or
pants.
The unit must be attached in vertical position to the ground in order to
count steps correctly.
• Make sure that the holder’s clip is secured firmly in place. If worn
improperly, the unit may be detached or may result in incorrect
measurements.
• The belt clip is designed to hold the unit while walking. The clip may
not hold the unit or may break if it is exposed to a high-impact
condition such as running, or playing basketball.
24
Pedometer Mode
Set the pedometer to ON/OFF. To count steps, set it to ON.
CLOCK
Tap
mode, then press
ENTER
Viewing the step count and calorie values
1. Tap the
Mode.
2. Select “PEDOMETER” using
m
, and press
display the interim report of
calories burned and total step
count.
Tap
previous screen.
• Step count of the day will be registered automatically when the
time is at “23:59:59”.
• This unit calculates the calorie consumption with the following
formula*:
Calorie consumption [Kcal] = (step
3.5)
MENU
, tap
and start walking. To turn off the pedometer, select “OFF”.
DIET
, and select “PEDOMETER SET” in the MENU
ENTER
, use k or m to select “ON”, then press
once, twice, or three times to enter the Diet Function
k
ENTER
or
twice to
O
–20053– 21
R
IE KcalCAL
80. 21
STEP
C•CE
to return to the
×
weight [lb] × 0.45359237 × 0.005
×
stride [inch] × 2.54 × 0.001 +
150.
3
Page 27

• The calculation runs once every minute to accumulate values.
* Based on “ACSM’s Guidelines for Exercise Testing and
Prescription”, © American College of Sports Medicine, 2000.
Published by Lippincott Williams & Wilkins, 2000.
• The displayed calorie value is rounded off to three decimal places.
You can add to or edit the database, and these changes can be
exchanged to/from the PC as an export/import item.
Categories:
Note:
• Check the memory on a regular basis.
• When the memory is full, an alert message is displayed, and the
pedometer will not record your data. You will need to delete
unnecessary data, or invoke the Memory management. To clear the
ENTER
alert display, press
.
• Under the low battery condition, step count function of the
pedometer, and the calorie calculation may not be available.
Value of Calories
Value of Saturated Fats (FA SAT)
Value of Monounsaturated Fats (FA MONO)
Value of Polyunsaturated Fats (FA POLY)
Value of Cholesterol
Value of Sodium
Value of Carbohydrates
Value of Dietary Fiber (DIET. FIBER)
Value of Sugars
Value of Proteins
Consumption Mode
The daily calorie consumption and step count for the day can be
viewed.
DIET
1. Tap
once, twice, or three times to enter the Diet Function
Mode.
2. Select “CONSUMPTION” using
<
3. Use
and > to select a day you wish to display. To display
k
or m, and press
ENTER
.
step count and calorie consumption.
• If no data is stored, a message “NOT FOUND!” is displayed.
Food Database Mode
Download the Food Database from the CD-ROM. (see page 37.)
The Food database contains 10 item categories of 800 foods.
In the Intake mode and the Report mode, the Total Fat value is
calculated as follows:
Total Fat Value = FA SAT + FA MONO + FA POLY
Notes:
• The food list contained in the CD-ROM is based on the Food
Database Release 16 (Abbreviated Version) issued by the United
States Department of Food and Agriculture. Word ordering of items,
as well as the ( ” ) symbol within some items, may have been
modified.
• All companies and/or product names are trademarks and/or
registered trademarks of their respective holders.
25
Page 28

Intake Mode
EDIT
ENTER
Enter your daily food intake by selecting items from the FOOD
Searching and Editing
1. Tap
DATABASE. Download the Food Database from the CD-ROM. (see
page 37.)
DIET
1. Tap
once, twice, or three times to enter the Diet Function
2. Select “FOOD DATABASE” using
3. Press
Mode.
2. Select “INTAKE” using
EDIT
3. Tap
, then use k and m to select “FOOD” in the selection
field.
k
or m, and press
ENTER
.
4. Use
You can enter the first few letters of the desired food name, then
<
browse the items using
When no match is found, then a message "NOT FOUND!" is
displayed.
4. Use
k
and m to select the entry
field for each AMOUNT and the
DATE of the intake to enter
values.
ENTER
5. Press
• Tap
to write the entry.
C•CE
to return to the initial
or >.
2nd
OO
D
LTED
5. To edit the selected item, tap
–200503–25
:
BUTTER SAF
TAMOUN
,
6. Press
717.
:
Note:
• The displayed calorie value is rounded off to three decimal places.
display.
DIET
once, twice, or three times to enter the Diet Function
Mode.
k
or m, and press
<
or > to select a desired food name.
ENTER
.
• You can enter the first few letters of the desired food name, then
browse the items using
<
or >. When no match is found,
then a message “NOT FOUND!” is displayed.
k
or m to display the calorie
value and other information.
C•CE
• Tap
to return to the initial
screen.
E,C
IE KcalCALOR
O
LBYCHEES
394.
TgFA SA
. Move between the entry
k
fields using
or m as you enter
food names, calorie, and other values.
ENTER
to register the entries.
20. 218
Adding items to the Database
DIET
1. Tap
once, twice, or three times to enter the Diet Function
Mode.
2. Select “FOOD DATABASE” using
EDIT
3. Tap
4. Use
, enter a desired food name of up to 96 characters.
m
to jump the field to the next, then enter values for 10
categories, followed by
C•CE
• Tap
to return to the initial screen.
26
ENTER
k
or m, and press
.
ENTER
Report Mode
The intake/consumption report for a specified period can be viewed.
DIET
1. Tap
.
Mode.
2. Select “REPORT” using
3. Select “INTAKE” or “CONSUMPTION” using
once, twice, or three times to enter the Diet Function
k
or m, and press
ENTER
.
k
or m, and press
.
Page 29

Use < or > to select an item to be displayed in the
REPORT. If “INTAKE” is selected, one of the following ten items can
be selected: ALL, CALORIE, TOTAL FAT, SATURATED FAT,
CHOLESTEROL, SODIUM, CARBOHYDRATE, DIETARY FIBER,
SUGARS, or PROTEIN. For “CONSUMPTION”, select one of three
items: ALL, CALORIE, or STEP.
m
, and input values for
4. Tap
START DATE and END DATE,
ENTER
k
or m to switch
O
R
IE KcalCAL
.
2000.
20
The icon is displayed when a result
exceeds the target value.
The present calorie
A comparison against the day’s target
0.
(more/less) is indicated.
followed by
5. A report is displayed.
• INTAKE : Use
display the selected item report.
• CONSUMPTION : The report of
the selected item is displayed.
2nd
Note:
• The displayed calorie value is rounded off to three decimal places.
<
I NTAKE
–
REPORT
––
:
ITE
M
:
F
M
3
0
2nd
:
T
O
03
<
ALL
–20–
–20–
>
–
>
2005
2005
Calculator Mode
The Organizer’s built-in calculator can perform arithmetic calculations in up to 12 digits.
Calculator mode is selected by
q
tapping
appropriate number of times.
Each time you press the key, the
display switches as follows:
Calculation mode ➠ Currency Conversion mode
Metric Conversion mode ➠...
Before performing any calculations, tap
display.
• An error occurs if the integer section of the calculation result
exceeds 12 digits, if the memory exceeds 12 digits, or a number
is divided by zero. (“E” is displayed.)
c
Tap
the
to clear the error message.
<
CALC
➠
c
twice to clear the
ULATOR
>
O.
27
Page 30

Example Operation Display
(–24+2) ÷ 4=
34 + 57 = 34 + 57
45 + 57 = 45
68 x 25 = 68 * 25
68 x 40 = 40
10% of 200 200 * 10
Percentage 9 of 369 /
10% mark-up 200 + 10
20% discount 200 - 20
√
25 – 925
3
4
1/8 8
25 x 5 =
–) 84 ÷ 3 = 84 / 3
+) 68 +17 68 + 17
(Total) =
123456789098 x
145 = 123456789098 * 145
17901234419210 E17.9012344192
Mixed calculation
-
24 + 2 / 4
Constant/repeat calculation
The second figure is a constant value
(+ addition, - subtraction, / division)
=
The first figure is a constant value
(* multiplication)
=
Percentage
36
Root
-
9
n
A
4
* = =
Unit division
/ =
Memory function
R
25 * 5
T
(17.9012344192 x 1012 = 17901234419200)
=
=
=
I
I
I
I
= O
U
Y
U
=
–5.5
91.
102.
1700.
2720.
20.
25.
220.
160.
4.
64.
0.125
M 125.
M 28.
M 85.
M 182.
Conversion Mode
Each time you tap
Calculation mode
Metric Conversion mode ➠...
Conversion Table
Fahrenheit (°F)
ounce (oz)
US gallon (gal)
UK gallon (gal)
Note:
• The conversion result may have a slight calculation error as a result
of rounding off the number. Use the result for reference only.
q
➠
Currency Conversion mode
, the display switches as follows:
➠
Conversion Pattern
Unit 1 Unit 2
5 currency conversions are available.
Metric Conversion Patterns
inch
yard
mile
feet
pound (lb)
⇔
⇔
⇔
⇔
⇔
⇔
⇔
⇔
⇔
centimeter (cm)
meter (m)
kilometer (km)
Celsius (°C)
meter (m)
gram (g)
kilogram (kg)
liter (l US)
liter (l UK)
28
Page 31

Currency Conversion Mode
Currency conversion has 5 stages of programmable conversion.
Each stage is capable of 12-digit calculation.
Setting a new currency conversion rate
<Example> Set the following rate: £1 = $1.45
1. Tap
q
number of times to select the
Currency Conversion mode.
<
2. Press
the appropriate currency
conversion stage.
e
3. Tap
The setting mode will appear.
The preset currency names can be renamed here.
4. Rename the left currency if necessary, then press
Note:
• Up to 4 characters can be entered for the name of the currency
unit.
5. Rename the right currency if necessary, then press
the appropriate
or > to select
.
<
C
C
AD U=SD
RATE
URRENCY
l
.
m
.
>
1
.
6. Enter the rate; 1.45.
Up to 12 numeric characters can
be entered for the rate.
If you need to clear the rate
c
number, tap
7. Press
x
Currency conversion
Be sure to set the rate before starting a conversion.
➠
<e.g. £
1. Tap
2. Press
3. Enter the amount. (e.g. £50)
4. Press
<e.g. $
5. Enter the amount. (e.g. $120)
6. Press
$>
q
Currency Conversion mode.
<
stage.
l
.
(£50=approx. $72.5)
➠
£>
j
.
($120=approx. £82.76)
j
or l to change the
Use
conversion direction.
Tap c to clear the calculation
result.
.
to store the setting.
the appropriate number of times to select the
or > to select the appropriate currency conversion
<
C
URRENCY
G
BP USD
=
RATE
<
C
URRENCY
G
BP USD
<
C
URRENCY
G
BP USD
2.8 758620
>
1
.45
>
50 .
27.5
>
201.
8696
29
Page 32

Metric Conversion Mode
Metric conversion is capable of 12-digit calculation.
Convert metric unit
<Example>
Calculate 68°F to °C
1. Tap
q
Metric Conversion mode.
2. Tap < or > to select the
appropriate conversion stage.
3. Enter the amount, “68”.
l
4. Press
(68°F=approx. 20°C)
c
Ta p
result.
the appropriate number of times to select the
<
M
ETRI
°
F
°
C
=
RATE
(
F–32
.
to clear the calculation
<
M
ETRI
°
F
°
C
C
>
)
5x/9
C
>
68 .
20 .
Secret Function
The Secret function allows you to protect listings with a password,
so that no unauthorized person can reach them.
You can use up to a 6 characters as its password.
Registering a Password
As a safeguard, make a written record of the password. Also, be aware
that the password is case-sensitive.
(secret) in the Home Clock
1. Tap
mode.
The password entry display will
appear.
2. Enter the characters you wish to use.
x
3. Press
4. When the display "RECONFIRM!" appears, reenter the password,
then press
Accessing listings
If the Secret function is on, when you press v,
TO DO/EXPENSE
entry display will appear.
1. Enter the password, then press
Be aware that the password is case-sensitive.
The screen of the target mode will be displayed.
.
x
. The Secret function will be turned on.
or you enter the Schedule mode etc., the password
x
<
PASSWO
0
.
SECRET
RD
MEMO/ANN
>
:
,
30
Page 33

Changing the Password
1. In the Home Clock mode, tap
The password entry display will appear.
2. Enter the current password.
3. Press
x
. The Secret function setting display will appear.
4. Select “EDIT PASSWORD” by
using k or m, then press
x
.
5. Enter a new password.
6. Press
x
.
7. When the screen "RECONFIRM!" appears, reenter the password,
x
then press
.
(secret).
UNL
<
SECRET
PASSWO
OC
K DATA
>
RDED I T
Game Mode
Tap
Diet Function mode screen (Diet Function
ATTACK
BLACKJACK (Twenty-one)
Make your “hand” (the total of the numbers on the cards) close to 21,
without going over 21.
1. Tap
2. Press
Turning the Secret Function Off
1. In the Home Clock mode, tap
The password entry display will appear.
2. Enter the current password, then press
3. Select "
4. Press
UNLOCK DATA
UNLOCK DATA
"
x
function off.
" by using k or m, then press
?" will be displayed.
to delete the password and to turn the Secret
(secret).
x
.
x
3. Agree the left-displayed flashing maximum bet (up to 10) or enter
.
4. Tap
GAME
several times to display the Game mode screen and the
→
BLACKJACK → ALPHA
→
Diet Function → ...).
GAME
once, twice, or three
times to display the following
Game mode screen.
x
to start a game.
The left 2 cards are dealt for
you. (One is faced up and the
other is faced down.)
the fewer bet.
@
to see your hand. Each time you tap
card is dealt.
<
BLACKJ
@
ACK
, a new
>
30
Your chips
31
Page 34

•“J”, “Q”, and “K” are counted as
10.
•“A” can be counted as 1 or 11.
• When first 2 cards are “A” and
a face card (“J”, “Q”, or “K”),
your hand is “BLACKJACK”.
x
5. Press
and hold your hand. The dealer’s
hand and the results are displayed.
• When you win, your total
flashes and your bet is
doubled.
• When you win with “BLACK-
JACK”, your bet is tripled.
6. Press
Game mode screen.
• When you have no more chips
to bet, the game is over.
• To quit the game, tap any mode key. Your chips are stored for the
next time.
to stop being dealt
x
and display the
<
J28 04
<
J28 32K4
20 19
The dealer’s handYour hand
BLACKJACK
10 20
The dealer’s totalYour total
BLACKJACK
20 20
>
Your chipsYour bet
>
Your chipsYour bet
ALPHA ATTACK
Type in characters (A to Z) displayed on the bottom line to clear them.
The game is divided into 20 levels in speed.
GAME
1. Tap
times to display the following
Game mode screen.
2. Press
the level.
• 01: slow, 20: fast
3. Press
once, twice, or three
<
/ > to select
x
to start a game.
ALPHAATTA
LEVEL:01
ALPHAATTA
C<K
C<K
>
>
LEVEL:03
W
EYK
4. Tap the same key as the first character at the left end of the bottom
line. (In this case, tap keys in the order: E
• Tapping the correct keys in the correct order deletes the
characters.
• When 12 characters are displayed in each level, the game
continues in the faster level (up to 20).
• When no more characters can be displayed, the game is over.
The Game mode screen with the level when the game is over is
displayed.
• To quit the game, tap any mode key.
→
Y → K → W.)
32
Page 35

Managing the Organizer's Memory
Using the Included PC Software
Use the memory management function to utilize the Organizer's
memory more efficiently.
Note:
• Before performing memory management, back up your data.
• While the memory management is in progress, do not press the
Synchronization Software:
RESET switch. Doing so may result in losing all the data stored in
the Organizer.
CLOCK/ALARM MENU
1. Tap
k
or m, and press
, select "MANAGE MEMORY" by using
x
.
2. A dialog "MANAGE MEMORY YES/NO" appears.
k
Select "Yes" using
select "No" using
or m, then press
k
or m, then press
x
to continue, or
x
to go back to the list
Desktop Utilities:
Minimum System Requirements:
of Menu items.
3. When "Yes" is selected, a message "PLEASE WAIT..." appears to
indicate that the memory management is in progress.
When done, the display will return to indicate the clock mode.
Note:
• By performing memory management, the amount of reusable
memory (indicated in "MEMORY CHECK" under MENU) will be
utilized.
Additional System Requirements:
The CD-ROM contains software to enable exchange of data with a
PC.
The software consists of:
®
Can be used to synchronize Microsoft
Outlook® data, such as
Contacts, Calendar, Tasks, and Notes, with the Organizer.
Can be used to backup/restore data in the Organizer, and export/
import data to different file formats.
• IBM PC or 100% compatible
• Microsoft
• Pentium
• 50MB free hard disk space
• 64MB RAM for Microsoft
• 128MB RAM for Microsoft
®
Windows® 98/98SE/2000 Professional/Me/XP Home/XP
Professional
®
300MHz or higher
Me
®
Windows® 98/98SE/2000 Professional/
®
Windows® XP Home/XP Professional
• One available USB 1.1 / 2.0 compliant port
• CD-ROM drive
• Mouse or compatible pointing device
®
• Microsoft
Outlook® 98/2000/2002/2003 must be installed to utilize
the Synchronization Software between the Organizer and your PC.
33
Page 36

Note:
Proper operation cannot be guaranteed on the following types of PCs:
• Self-built PCs
• PCs upgraded from Windows
®
95
• PCs with retrofit USB ports that are not factory installed
* This software is not guaranteed to operate on all PCs with
recommended hardware/software environment.
About USB Ports
• Activating the power saving mode (such as suspend, resume, or
sleep function) of some PCs may result in the USB port malfunctioning. If such case is observed, disable the power saving mode.
• The software may not operate properly with a commercially
available USB card installed in a PCI slot.
• If the USB port on your PC or the USB hub connected to the
device does not operate properly, follow the steps below:
– If your PC comes equipped with several USB ports, try using a
different USB socket.
– If other USB devices are connected to your PC, disconnect them
from your PC to avoid possible conflicts.
• Since the USB hub may introduce problems, try bypassing the
USB hub by connecting the unit directly to your PC.
• Do not remove and connect the USB cable from/to the PC in a
short period of time.
Limitations when using with Windows® XP/2000
Windows® XP
• Log onto your PC with administrator privileges; the software may
not be installed properly otherwise. Upon using the software, you
will need to log on as an administrator. If you are logged in as a
non-administrative account, then you must first log off to log into
an administrator's account.
Windows
• When installing as well as using the software, you will need to log
on as an administrator. If necessary, you may need to contact the
administrator of the PC in a work environment.
Installing
Precautions:
• Prior to installing the Synchronization Software, make sure
that Microsoft
install and set up the Outlook
Synchronization Software.
• Disconnect the USB cable before the installation. If the
installation is proceeded with the USB cable connected, you
must disconnect the cable, then follow the Read Me file on
the CD-ROM to start over the installation procedure.
1. Insert the PC software CD-ROM into your CD-ROM drive.
Installation process should automatically start.
If the PC software screen does not appear, double-click “My
Computer” to locate the CD-ROM drive directory, then double-click
to launch “installer.exe” found on the CD-ROM.
2. Click the "Install" button.
®
2000
®
Outlook® is installed and set up. If not,
®
first, then install the
34
Page 37

3. Follow the installation instructions that appear on the screen.
4. When the installation is complete, click the "Finish" button to finish
the installation process.
Serial Port Setup
The serial port setting dialog box appears
after you have finished software installation.
5. When the USB cable detection window
appears, connect the USB connector of the
USB PC-Link cable to the PC’s USB port, then
click “Next”. Do not connect the Organizer yet.
6. The USB driver installation window appears.
7. Follow the installation instructions on the
Connecting the Organizer to your PC
1.
2.
screen.
8. When the installation is complete, click the
3.
“Finish” button to finish the installation
process.
9. When the USB cable detection window appears, click “Next” to have
the USB cable detected. Click “Finish” to complete the detection
procedure.
Note:
• If the cable is not detected, refer to the Read Me file on the CD-ROM
to start over the procedure.
Click “Auto Detect...” to allow the Synchronization to automatically detect the appropriate serial port. Make sure
that the unit is physically connected with the PC first, then click this
button.
If the desired serial port is not found, manually select the serial port
from the drop-down list.
10. The procedure will then be followed by the Serial Port Setup, and
the Synchronization setting window.
Note:
• For Windows2000
®
Professional and Windows® XP, install/uninstall
programs after logging on as an Administrator.
• Apply the USB cable for use with OZ-290H only. The cable cannot be
used with other devices.
Turn off the Organizer.
Connect the other end of the USB PC-
Link cable to the Organizer’s option
port.
Turn on the Organizer.
35
Page 38

Synchronization Software
After the Serial Port Setup is
complete, the Settings window will
appear.
To bring up the Settings window
manually, right-click on the
Synchronization icon on the
®
Windows
"Settings..." in the menu.
General tab
This tab allows you to select the application that you want to
synchronize with the PC.
• Click on the checkbox for each application to enable synchroni-
• Use the "Option" button, or double-click the desired settings row
• Click the "Default" button to reset all settings to the default
Synchronization action:
system tray, then select
zation.
to configure the communication method.
values, including the Options settings.
: Merges the data between the PC and the unit.
: PC overwrites the data of the unit.
: The unit overwrites the PC data.
The Conflict Resolution Tab
The Synchronization software’s Conflict Resolution tab allows you
to select the way data conflicts are resolved when data modifications are made and the “Synchronize” option is selected on the
General tab.
• Add all conflicting items: Each modification on both the unit and
the PC is reflected and saved respectively after synchronization.
• Unit overwrites PC data: The PC data will be overwritten. The
modifications made on the unit are reflected on the PC after
synchronization.
• PC overwrites unit data: The unit data will be overwritten. The
modifications made on the PC are reflected on the unit after
synchronization.
The PIM Tab
The PIM tab allows you to configure the download settings of the PIM
data.
• Use Outlook HOME ‘Address’ and ‘Fax number’: Downloads or
synchronizes only data of HOME addresses and FAX numbers.
• Use Outlook WORK ‘Address’ and ‘Fax’ number: Downloads or
synchronizes only data of WORK addresses and FAX numbers.
• Today forward: Downloads or synchronizes only data of today and
forward.
• All: Downloads or synchronizes all schedule data.
36
Page 39

The Connection tab
This tab allows you to change settings for the serial port and the
password.
• Serial port : Specify the serial port to connect the unit to the PC.
• Auto Detect : Click to allow the PC to detect the appropriate serial
port.
Desktop Utilities
Launch "Desktop Utilities" from the Start
menu, or right-click on the Synchronization
icon on the Windows
select "Desktop Utilities..." in the menu.
Utilize the Desktop Utilities via the
following graphic interface:
Backup/Restore
The Backup/Restore menu of the Desktop
Utilities allows you to make a backup file of
the unit data, or to restore it back to the
internal memory of the unit. Be noted that the setup parameters, won't
be backed up.
• Backup: Select “Backup...” from button, then enter the desired
name of the file to be backed up.
• Restore: Select “Restore...” from button, then select the desired
name of the file to be restored.
®
system tray, then
Export/Import
The Export/Import menu of the Desktop Utilities allows you to import
data created by each PC application to the unit, or export data out of
the unit.
•
Export: Select the desired item (application data, Food Database,
Consumption Record, or Intake Record), then click “Export...” and
enter the desired filename to which you wish to export data.
•
Import: Select the desired application name or Food Database,
then click “Import...” and enter the desired filename from which
you wish to import data.
Un-installing the PC software
Prior to uninstalling the PC software, quit all programs.
1. Within the Control Panel, launch “Add or Remove Programs”. In the
list of installed software, select the PC software, then click the
“Change/Remove...” button.
2. When the Install Shield program screen appears, select “Remove”,
then click “Next”.
3. For the verification prompt, click on the “OK” button. When the
Uninstall window for the USB driver is displayed, disconnect the USB
cable and click “Next” to execute the un-installation procedure.
4. When the un-installation procedure is complete, click the “Finish”
button to finish.
37
Page 40

Battery Replacement
Batteries used
Type Model Quantity Use
Lithium battery CR2032 2
• Be sure to write down any important information stored in the
memory before replacing the batteries.
Unit operation
and backlighting
When the
Precautions
Since improper use of the batteries may cause leakage or
explosion, strictly observe the following instructions:
• If fluid from a leaking battery accidentally gets into your eyes, it
may result in serious injury. Should this occur, flush your eyes
with clean water and consult a physician immediately.
• Should fluid from a leaking battery come into contact with your
skin or clothes, immediately wash with clean water.
• If the Organizer will not be used for an extended period of time, to
avoid damaging the Organizer remove batteries and store in a
safe place.
• Do not leave exhausted batteries inside the Organizer.
• Do not use different types of batteries or partially used batteries.
• Insert the battery with its positive side (+) correctly oriented.
• Never throw batteries into a fire because they might explode.
• Keep batteries out of reach of children.
• When batteries become near exhaustion, remove them from the
Organizer immediately to avoid battery leakage and corrosion
inside the Organizer.
Because the batteries in the Organizer were installed at the factory,
they may become exhausted before the specified expiration time is
reached.
38
Note:
• After the battery replacement, check also that the Backlight functions
Caution:
• PC Link may not be available when the battery level is low.
• Expense Report (Summary Report) may not be available when the
• Under the low battery condition, new data entry and editing of
When the Backlight Won’t Function
B
Symbol Appears
When “
B
” is displayed, immediately replace the operation
battery with a new one.
The operation battery holder is indicated as "For OPERATION"
in the battery compartment.
If the battery level is low, the alarm may not sound, or similarly the
Backlight may not function or remain on for less than the set
interval. Continued use of the Organizer with low battery can alter or
clear the memory contents. Memory contents may be lost if the
battery is improperly replaced or if the following instructions are
disregarded.
properly.
battery level is low.
existing data may not be performed in some modes. Also Clock
settings, step count function of the pedometer, and the calorie
calculation may not be available.
When the Backlight cannot be turned on (except when “
displayed or the Organizer is in the PC Link mode), replace the
battery for the backlight ("For BACKLIGHT & OPERATION").
The backlight and operation battery holder is indicated as "For
BACKLIGHT & OPERATION" in the battery compartment.
B
” is
Page 41

Replacing the batteries
• Make sure the power is turned off before replacing the batteries.
• Do not press
completed.
• Do not remove all of the batteries at once. Remove and replace
batteries one by one.
o
1. Press
2. Loosen the screw (turn counterclockwise) and
remove the battery holder cover on the back
of the unit.
o
until the battery replacement procedure is
to turn the power off.
RESET
Specifications
Model: OZ-290H
Product name: Electronic Organizer
Display: 14 columns x 5 lines with the Backlight
Memory capacity: 1.5 MB Equivalent*
User area: Approx. 896 KB
Clock mode
Accuracy: ±60 seconds/month (at 25°C/77°F)
Display: Year, month, day, day of the week, hour, minute,
3. Remove one used battery using a ball-point
pen or similar object.
Clock system: 12-hour/24-hour format (switchable), 3 types of
• Do not use a mechanical pencil or sharp
pointed object.
4. Install one new battery with the positive side
(+) facing up.
5. Repeat step 3 and 4 for replacing both
RESET
Telephone mode: Entry and recall of Last name, First name,
batteries, if necessary.
6. Replace the battery holder cover and secure
with the screw.
7. The power will be turned on 2 to 3 seconds
after
o
is pressed.
RE
SET
Calendar mode: From Jan.,1950 to Dec., 2150, Confirmation of
• If nothing appears on the display, press the
RESET switch and press
x
. This key sequence will clear all the memory contents.
<
. Do not tap
f and press
Schedule mode: Entry and recall of schedule (year, month, day,
8. Set the clock to the correct time. (see page 6)
Caution:
• Clock settings and/or other settings and listings may be lost when
batteries are removed for a long time. Replace the batteries as
quickly as possible.
• Make sure to confirm all settings are set correctly after replacing the
batteries.
second, AM/PM, city name
date format (switchable), World clock function,
daylight saving time/summer time display
function, daily/hourly/schedule alarm function
Company, Home#, Office#, Fax#, Mobile#,
E-mail, Address, City, State, Zip code, Country,
Note
the Schedule, To Do, and Anniversary mode
entries can be made by the indication marks
seen on the right side of the date
hour and minute), schedule alarm and
Description
39
Page 42

Anniversary mode: Entry and recall of month, day and description
of anniversaries
To Do mode: Entry and recall of To Do listings (Due Date,
Priority and Description)
Memo mode: Entry and recall of memo listings
Expense mode: Entry and recall of Expense listings (Date,
Word translator mode:
Spell checker mode
Diet function mode
Calculator mode:
Currency/Unit conversion mode:
Game mode: 2 games
Category, Amount, Payment, Receipt and
Memo) and Summary Report during a specified
period to display the total amount spent in a
preset category, Meals, Hotel, Car, Phone,
Fares, Entertainment, Tips and Miscellaneous,
that can be changed with the selection of edit
Category.
English from/to Spanish, approx. 12000 words
for each language
: Approx. 12000 English words can be referred to
as suggested entries.
: Step count precision: within ±10 % (by vibration
testing machine)
Food Database: 800 foods
Value entry: 9 fields (Calorie, Carbohydrate,
Total Fat, Saturated Fat, Cholesterol, Dietary
Fiber, Sodium, Sugars, Protein)
12 digits (with calculation status symbol) Addition,
subtraction, multiplication, division, percentage,
square root, memory calculation, etc.
12 digits, 14 combinations of currencies (5) and
metric (9) conversions
Secret function: Protects listings with a password
Power consumption:
Operating temperature:
Power supply:
–
(DC) (Lithium battery CR2032 x 2)
3.0V ...
Auto Power Off Function:
Battery life: (at 25°C/77°F)
Weight: Approx. 105 g (0.23 lb.) (Including batteries)
Dimensions:
0.13 W
0°C ~ 40°C (32°F ~ 104°F)
Approx. 7 minutes
• Approx. 6 months
While PEDOMETER is set to ON, with 5 minutes of
data search, 55 minutes of data display, and 10000
step counts per day.
• Approx. 1800 hours
When data is continuously displayed with
PEDOMETER set to OFF.
• Approx. 1200 hours
When data is searched for 5 minutes and displayed for
55 minutes per hourly use with PEDOMETER set to
OFF
• Approx. 2 years
When turned off and the clock is running with
PEDOMETER set to OFF
• Approx. 4000 times
When the Backlight is turned on for 10 seconds and
turned off for 50 seconds per minute while the display
is activated.
71.6 mm (W) x 112.5 mm (D) x 16.9 mm (H)
2-13/16" (W) x 4-7/16" (D) x 21/32" (H)
40
Page 43

Accessories:
* Memory at 1.5MB Equivalent. Approx. 7,000 telephone names &
numbers (names & numbers <home, office, fax and mobile> are 14
characters and address is 38 characters per entry) can be stored by
using compression technology. (Compression Rate: Approx. 1.5:1)
2 lithium batteries (installed), CD-ROM software,
USB PC-Link cable, operation manual, stylus, carrying
case with belt clip
41
Page 44

Appendix
Names and zone numbers of the cities in the clock
Zone No. City
0 TONGA
1 AUCKLAND
WELLINGTON
2 NOUMEA
3 GUAM
SYDNEY
3. 3 ADELAIDE
4 TOKYO
5 SINGAPORE
HONG KONG
BEIJING
6 BANGKOK
6. 3 YANGON
7 DHAKA
7. 3 DELHI
8 KARACHI
8. 3 KABUL
9 DUBAI
9. 3 TEHRAN
10 RIYADH
MOSCOW
Zone No. City
11 CAIRO
HELSINKI
12 BARCELONA
AMSTERDAM
ROME
BERLIN
PARIS
13 LISBON
LONDON
14 AZORES ISLANDS
15 ––––––
MID ATLANTIC
16 RIO DE JANEIRO
17 CARACAS
18 TORONTO
NEW YORK
19 CHICAGO
20 DENVER
21 LOS ANGELES
22 ANCHORAGE
23 HONOLULU
24 MIDWAY ISLANDS
42
Page 45

Declaration of Conformity
Electronic Organizer : OZ-290H
USB PC-Link cable: CE-179T
This device complies with Part 15 of the FCC Rules. Operation is subject
to the following two conditions: (1) This device may not cause harmful
interference, and (2) this device must accept any interference received,
including interference that may cause undesired operation.
Responsible Party:
SHARP ELECTRONICS CORPORATION
Sharp Plaza, Mahwah, New Jersey 07430-1163
TEL: 1-800-BE-SHARP
Tested To Comply With FCC Standards
FOR HOME OR OFFICE USE
WARNING – FCC Regulations state that any unauthorized changes or
modifications to this equipment not expressly approved by the manufacturer could void the user's authority to operate this equipment.
Note: This equipment has been tested and found to comply with the limits
for a Class B digital device, pursuant to Part 15 of the FCC Rules.
These limits are designed to provide reasonable protection against
harmful interference in a residential installation. This equipment
generates, uses, and can radiate radio frequency energy and, if not
installed and used in accordance with the instructions, may cause harmful
interference to radio communications.
However, there is no guarantee that interference will not occur in a
particular installation. If this equipment does cause harmful interference
to radio or television reception, which can be determined by turning the
equipment off and on, the user is encouraged to try to correct the
interference by one or more of the following measures:
– Reorient or relocate the receiving antenna.
– Increase the separation between the equipment and receiver.
– Connect the equipment into an outlet on a circuit different from that to
which the receiver is connected.
– Consult the dealer or an experienced radio/TV technician for help.
Note: A shielded interface cable is required to ensure compliance with
FCC regulations for Class B certification.
If you have read the ORGANIZER operation manual, but you still require
product support, you can:
Call a SHARP Customer Assistance Center
630-378-3590
(7am to 7pm CST M – F)
Visit our Web Site
http://www.sharpusa.com
Send an E-mail
pdasupport@sharpsec.com
Write to our Customer Assistance Center
SHARP Electronics Corp.
Customer Assistance Center
Att: WIZARD HELP
1300 Naperville Drive
Romeoville, IL 60446
PRODUCT SUPPORT
43
Page 46

MEMO
44
Page 47

Instrucciones abreviadas en español
ÍNDICE
Empleo del organizador por primera vez ................................ S-1
Función de desconexión automática ....................................... S-2
Luz de fondo ............................................................................ S-2
Ajuste del contraste de LCD .................................................... S-2
Activación y desactivación del sonido de las teclas ............... S-2
Comprobación de la memoria ................................................. S-2
Teclado táctil ............................................................................ S-3
Modo de reloj ........................................................................... S-3
Modo de teléfono ..................................................................... S-4
Modo de calendario ................................................................. S-5
Modo de programa de actividades .......................................... S-5
Modo de aniversario ................................................................ S-7
Modo de cosas a hacer (“To Do”) ............................................ S-8
Modo de apuntes ..................................................................... S-9
Modo de gastos ...................................................................... S-10
Edición de listas ..................................................................... S-12
Borrado de listas .................................................................... S-12
Modo del traductor de palabras ............................................. S-12
Modo de corrector ortográfico ............................................... S-13
Modo de función dieta ........................................................... S-14
Modo de conversión ............................................................... S-19
Modo de juego ....................................................................... S-20
Utilización del software de PC incluido ................................. S-21
Reemplazo de las pilas .......................................................... S-26
ESPAÑOL
Empleo del Organizador por primera vez
Asegúrese de realizar las operaciones siguientes antes de emplear el
Organizador por primera vez.
1. Saque las hojas de aislamiento de las
pilas del compartimiento de las pilas
situado en la parte posterior de la
unidad.
El Organizador empieza a funcionar.
(Las hojas de aislamiento de las pilas
fueron insertadas en la fábrica para
impedir que se agoten las pilas.)
2. Pulse el interruptor RESET.
Se visualizará el mensaje “RESET?”.
f
, y luego
x
3. Pulse
.
Para pulsar las teclas táctiles, emplee
el lapicero (incluido en el paquete).
Aparecerá el mensaje “RESET!”.
El Organizador se inicializará ahora. Ponga la fecha y la hora en el
reloj (consulte la página S-3).
Nota
• Pulse el interruptor RESET con el lapicero incorporado o con un
objeto similar.
No utilice un objeto cuya punta pueda romperse o esté muy afilada.
RESET
RESET
S-1
Page 48

Función de desconexión automática
Cuando ninguna de las teclas haya sido pulsada o tocada durante
aproximadamente 7 minutos, el Organizador desconectará
automáticamente la alimentación para ahorrar energía de las pilas.
Luz de fondo
La luz de fondo le permitirá ver el visualizador y utilizar el
Organizador incluso en condiciones de baja iluminación. Al pulsar
z
como se utiliza el Organizador; si no se detecta ninguna actividad
de las teclas dentro del intervalo especificado, el Organizador se
apagará automáticamente.
• Para apagar la luz de fondo, vuelva a pulsar
• La luz de fondo puede permanecer encendida durante menos
• La luz de fondo no funciona en el modo PC Link.
No utilice innecesariamente la luz de fondo.
• Dado que la luz de fondo consume energía, su abuso podrá
Apagado de la luz de fondo
• La luz de fondo puede ajustarse para que se apague una vez
1. Pulse
una vez se ilumina el visualizador durante tanto tiempo
z
.
tiempo del preajustado o puede no funcionar si el nivel de las
pilas está bajo.
reducir considerablemente la vida útil de las pilas.
transcurrido un intervalo especificado.
CLOCK/ALARM MENU
utilizando
k
o m, y pulse
, seleccione "BL TIME SET"
x
.
2. Utilizando k o m, seleccione un intervalo de tiempo deseado
x
(10, 20 o 30 segundos) y pulse
.
Ajuste del contraste de LCD
CLOCK/ALARM MENU
1. Pulse
utilizando
k
o m, y pulse
, seleccione “LCD CONTRAST”
x
.
2. Pulse k o m para oscurecer/iluminar el visualizador (entre 1 y
8).
x
3. Cuando termine, pulse
.
Activación y desactivación del sonido de las teclas
CLOCK/ALARM MENU
1. Pulse
k
o m, y pulse
x
, seleccione “KEY TONE” utilizando
.
2. Seleccione la activación/desactivación de la función de sonido de
k
las teclas utilizando
3. Cuando termine, pulse
o m.
x
.
Comprobación de la memoria
CLOCK/ALARM MENU
Pulse
k
utilizando
o m, y pulse
La visualización de verificación de la memoria aparecerá e indicará
el espacio que queda libre en la memoria.
La pantalla anterior aparecerá después de transcurridos 2
segundos.
, seleccione “MEMORY CHECK”
x
.
S-2
Page 49

Teclado táctil
Modo de introducción de letras Modo de introducción de números
3. Seleccione su ciudad de residencia
utilizando
<
o >.
<
HOM
NEWYORK
01
–01–
2005
E
>
SAT
f
• Cada vez que se pulse
de introducción de letras y el modo de introducción de números.
Para pulsar las teclas táctiles, utilice el lapicero (incluido en el
paquete).
• Pulse sobre el centro de cada tecla.
• Se pueden introducir numeros, caracteres alfanuméricos, símbolos y
“+ – x ÷ .”.
, el teclado táctil cambiará entre el modo
Modo de reloj
Ajuste del reloj local
1. Si el visualizador está en otro modo o en el modo del reloj mundial,
CLOCK/ALARM
pulse
Nota:
• Durante el periodo de la hora de verano, ponga de antemano DST
(horario de verano) en ON. Pulse
ajuste de la DST.
2. Pulse
e
El Organizador entrará en el modo de ajuste del reloj.
para entrar en el modo del reloj local.
C
una vez para conmutar el
.
4. Pulse
5. Introduzca el mes apropiado.
Introduzca de la misma forma el día y luego el año.
6. Pulse
7. Introduzca la hora apropiada.
8. Introduzca de la misma forma los minutos y luego los segundos.
9. Seleccione AM o PM utilizando
10
.Pulse
reloj.
El reloj empieza exactamente a
partir de la hora ajustada.
m
para mover el cursor a la posición Month.
m
para mover el cursor a la posición Hour.
(
.
x
para ajustar el
NEWYORK
1
–24–
2nd
12:05:35
<
HOM
2005
10:16:15
A
E
>
M
A
M
ON
M
S-3
Page 50

Modo de teléfono
Entrada
<Ejemplo>
v
1. Pulse
NESS”, y luego pulse
2. Pulse
El visualizador cambiará al modo de introducción de registro.
3. Introduzca el apellido.
Por ejemplo, “Smith”.
4. Pulse
5. Pulse
introduzca “ABC International Co.”
6. Pulse m para mover el cursor al campo Home #.
7. Introduzca “585-4280”.
8. Pulse
542-7320”.
9. Entre en cada campo de la misma forma.
10.
En el campo Notes, pulse
teléfonos.
Aparecerá la visualización de búsqueda Business.
, seleccione “BUSI-
x
.
e
.
m
y luego introduzca el nombre. Por ejemplo, “John”.
m
para mover el cursor al campo de las compañías e
m
para mover el cursor al campo Office # e introduzca “619-
x
para guardar las listas de
<
BUS I NESS
SEARCHNAME?
>
Búsqueda
Búsqueda alfabética del apellido
1. Pulse v y seleccione la categoría utilizando la tecla k o m,
x
luego pulse
Aparecerá la visualización de búsqueda.
2. Pulse < o > para buscar en orden alfabético la lista
deseada.
Búsqueda directa del apellido
1. Pulse v y seleccione la
categoría (Business, en este
ejemplo) utilizando la tecla
m
, luego pulse
Aparecerá la visualización de
búsqueda.
2. Introduzca en orden algunas de las letras del apellido.
Se puede introducir un máximo de 10 letras.
x
3. Pulse
Si no hay datos que coincidan aparecerá “NOT FOUND!”, y la
pantalla volverá luego a la visualización inicial.
Consulte también
Edición de listas ................................................... S-12
Borrado de listas .................................................. S-12
.
<
BUS I NESS
k
o
x
.
para buscar la lista deseada.
SEARCHNAME?
s
m
is
>
S-4
Page 51

Modo de calendario
Navegación en la visualización del calendario mensual
1. Pulse
CALENDAR/SCHEDULE
de calendario.
Aparecerá el calendario mensual del mes actual.
Parpadeará el día actual.
Navegue por el calendario utilizando las teclas siguientes:
< >
posterior o anterior.
j
: Vaya al día anterior
l
: Vaya el día siguiente
k
: Vaya a la semana anterior
m
: Vaya a la semana siguiente
• Los cursores
mes visualizado.
: visualiza el mes
una o dos veces para entrar en el modo
8–2005
12345
j, l, k
7890123
4151617181920
1
2nd
21 22 23 24 25 26 27
y m sólo se pueden mover dentro del
1111
3. Pulse
x
.
Aparecerá el calendario mensual de la fecha deseada.
Nota:
• En el modo de calendario se encontrarán disponibles los calendarios
mensuales de enero de 1950 a diciembre de 2150.
Confirmación de las entradas de los modos de programa
de actividades, cosas a hacer y aniversario
En la visualización del calendario mensual usted puede ver las
fechas a las que ha asignado un programa de actividades, cosas a
6
hacer o un aniversario.
Las marcas de indicación se visualizan de la forma siguiente:
Schedule (programa de actividades)
To Do (cosas a hacer)
Anniversary (aniversario)
Vaya directamente al mes deseado
1. En el modo de calendario, pulse
=
.
Aparecerá la pantalla de
introducción de la fecha.
2. Introduzca la fecha deseada.
<
C
ALENDAR
SEARCH DATE?
–12–
08
2nd
2005
>
Modo de programa de actividades
Entrada
<Ejemplo>
El 11 de septiembre de 2005 se celebrará una reunión de las 10:00
AM a las 11:00 AM.
S-5
Page 52

1. Pulse
2. Pulse
3. Introduzca el día/año deseado de la misma forma.
4. Pulse
5. Pulse
6. Introduzca 11:00 AM para la hora de finalización y pulse
CALENDAR/SCHEDULE
dos veces para entrar en el modo
de programa de actividades.
Aparecerá la visualización de
búsqueda del programa de
actividades.
La fecha actual se visualizará y el cursor situado en el primer
número parpadeará.
El primer número depende de su elección del formato de la fecha.
Estos ejemplos están en el formato MM-DD-AAAA.
e
. Aparecerá la
visualización de introducción del
programa de actividades.
Introduzca 09 para el mes.
m
, e introduzca 10:00AM para la hora de inicio.
m
.
La hora de finalización cambiará automáticamente a 30 minutos
después de la hora de inicio. (Sin embargo, la hora de finalización
permanecerá dentro del día especificado.)
una o
<
SCHEDULE
SEARCH DATE?
–12–
08
2nd
2005
09–12–2005
START:05:54 P
END:05:54 P
M
:
<
YES
ALAR
2nd
REMI NDER
>
>
:
m
.
7. Pulse < o > para
seleccionar “Yes” o “No” para el
m
ajuste de la alarma y pulse
Si usted selecciona “Yes ”, la
alarma del programa de
actividades sonará al llegar al
comienzo del tiempo restante establecido para antes de la hora de
inicio. Si selecciona “No”, la alarma del programa de actividades no
sonará.
Nota:
• Si selecciona “No” en el paso 7,
aparecerá “PLAN”.
M
Vaya al paso 9 para continuar.
.
M
8. Introduzca el tiempo apropiado para el tiempo restante y pulse
m
.
La alarma del programa de actividades sonará al llegar al comienzo
del tiempo restante introducido para antes de la hora de inicio.
Usted puede seleccionar cualquier número del 00 al 99.
Nota:
• Introduzca el número en el formato de dos dígitos.
9. Introduzca el nombre del elemento programado en el campo.
(Encuentro).
Puede introducir un máximo de 96 caracteres alfanuméricos.
10.
Pulse
x
para guardar la lista de programas de actividades.
START:10:00 A
END:11:00 A
M
00
M
IN. BEFORE
:
<
YES
ALAR
REMI NDER
2nd
END:11:00 A
M
:
<
N
ALAR
REMI NDER
00
M
IN. BEFORE
PLAN:0
M
M
>
:
M
O
>
:
–––––
S-6
Page 53

Búsqueda
Búsqueda del programa de actividades para hoy
1. Pulse
2. Pulse < o > para buscar
Búsqueda de fecha
1. Pulse
2. Ponga la fecha deseada.
3. Pulse
Consulte también
Edición de listas ................................................... S-12
Borrado de listas .................................................. S-12
CALENDAR/SCHEDULE
de programa de actividades.
una o dos veces para entrar en el modo
8–12–2005
START:12:15 P
la lista del programas de
actividades deseada.
Las listas guardadas en el
Organizador se visualizarán en orden cronológico.
CALENDAR/SCHEDULE
de programa de actividades.
una o dos veces para entrar en el modo
END:12:45 P
:
ALAR
M
2nd
RE
YES
M
I NDER
<
SCHEDULE
:
SEARCH DATE?
Seleccione el campo del mes, día
y año, e introduzca el número
deseado.
x
para buscar la lista de programas de actividades
deseada de la fecha especificada.
Al pulsar < o > se pueden visualizar las listas de ese día.
–11–
09
2nd
2005
>
Modo de aniversario
Entrada
<Ejemplo>
M
M
“Nancy’s Birthday” el 12 de febrero.
1. Pulse
2. Pulse
3. Introduzca la fecha, 02 para el
4. Pulse
5. Introduzca la fecha del recordador de 0 a 9.
6. Pulse
7. Introduzca “Nancy’s Birthday”.
8. Pulse
MEMO/ANN
veces para entrar en el modo de
aniversario.
e
Aparecerá la visualización de
introducción de aniversario.
mes y 12 para el día.
m
La fecha del recordador
parpadeará.
m
x
El signo de aniversario (
día en el recordador.
una o dos
.
.
.
para guardar la lista de aniversario.
A
) no aparecerá hasta que se ponga el
<
ANN I VERSARY
SEARCH DATE?
08
–
12
2nd
DATE:02–12
RE
M
I NDER
5 DAYS
DES
C
2nd
RIPTI
:
BEF
O
O
N
R
>
E
:
S-7
Page 54

Búsqueda
Búsqueda secuencial
1. Pulse
2. Pulse < o > para buscar las listas.
Búsqueda de fechas
Introduzca la fecha para ir a la fecha deseada en el paso 2 de arriba y
luego pulse
Consulte también
Edición de listas ................................................... S-12
Borrado de listas .................................................. S-12
MEMO/ANN
aniversario.
una o dos veces para entrar en el modo de
x
.
Modo de cosas a hacer
2. Pulse e.
Aparecerá la visualización de
cosas a hacer.
3. Introduzca 12 en el campo del mes y luego introduzca 10 y 2005
respectivamente.
4. Pulse
(baja) utilizando
pulse
5. Pulse
6. En el campo de descripción, introduzca lo que tiene que hacer para
el día deseado.
Introduzca “Visit HK Exhibition”.
Puede introducir un máximo de 96 caracteres alfanuméricos.
7. Pulse
Entrada
<Ejemplo>
Usted tiene que visitar HK Exhibition el 10 de diciembre de 2005.
1. Pulse
TO DO/EXPENSE
veces para entrar en el modo de
cosas a hacer.
una o dos
<
TOD
SEARCHDATE?
–12–
08
2nd
2005
O
>
Búsqueda
Búsqueda secuencial
1. Pulse
cosas a hacer.
2. Pulse
deseada.
08–12–2005
:
G
>
<
>
1
:
PR IORITY
<
PENDIN
DESCRIPTION
2nd
m
y seleccione el número de prioridad, desde 1 (alta) a 9
<
o > (o introduzca el número), y luego
m
.
m
para dejar el estado como “PENDING”.
x
para guardar la lista de cosas a hacer.
TO DO/EXPENSE
<
una o dos veces para entrar en el modo de
o > para buscar la lista de cosas a hacer
S-8
Page 55

Búsqueda de fecha
1. Pulse
2. Seleccione el campo del mes, el
3. Pulse
DONE Elementos completados
1. Pulse
2. Pulse < o > para seleccionar los elementos de cosas a
3. Pulse
4. Pulse
Consulte también
Edición de listas ................................................... S-12
Borrado de listas .................................................. S-12
TO DO/EXPENSE
veces para entrar en el modo de
cosas a hacer.
día o el año y luego introduzca la
fecha deseada.
x
fecha especificada.
TO DO/EXPENSE
cosas a hacer.
hacer.
e m m
<
x
.
una o dos
para buscar la lista de cosas a hacer deseada de una
una o dos veces para entrar en el modo de
para entrar en el campo de estado.
o > para seleccionar “DONE”, y luego pulse
<
TOD
SEARCHDATE?
–10–
12
2nd
2005
O
>
Modo de apuntes
Puede guardar apuntes empleando el modo de apuntes. Se puede
introducir un máximo de 96 caracteres alfanuméricos por lista.
Entrada
<Ejemplo>
Introduzca su número de pasaporte: 12AB34567
1. Pulse
2. Pulse e e introduzca lo
3. Pulse
MEMO/ANN
veces para entrar en el modo de
apuntes.
siguiente.
Passport No. 12AB34567
x
una o dos
<
MEM
SEARCH
F
<
MEM
:
MEM
O
PaAsspo5rt
No . 12 B34 67A
para guardar la lista de apuntes.
O
>
?
O
>
S-9
Page 56

Búsqueda
Búsqueda secuencial
1. Pulse
2. Pulse
Búsqueda directa
1. Pulse
2. Introduzca la(s) primera(s) letra(s)
3. Pulse
Consulte también
Edición de listas ................................................... S-12
Borrado de listas .................................................. S-12
MEMO/ANN
apuntes.
Aparecerá la visualización de búsqueda del modo de apuntes.
<
MEMO/ANN
apuntes.
Aparecerá la visualización de
búsqueda.
del apunte deseado (ej. “pasa”).
Se puede introducir un máximo de
10 letras.
x
una o dos veces para entrar en el modo de
o > para buscar las listas.
una o dos veces para entrar en el modo de
Pas po r t
s
567
2AB34
1
para buscar la lista deseada.
No .
Modo de gastos
Entrada
<Ejemplo>
La fecha es 18 de agosto de
2005.
Usted adquirió billetes de avión
por un importe de 1200 $ para un
viaje de negocios.
TO DO/EXPENSE
1. Pulse
veces para entrar en el modo de gastos.
2. Pulse k o m para seleccionar
“EXPENSE”, y luego pulse
x
.
Aparecerá la visualización de
búsqueda de gastos.
e
3. Pulse
El primer número depende de su elección del formato de la fecha.
Estos ejemplos están en el formato MM-DD-AAAA.
4. Introduzca la fecha si es necesario.
5. Pulse
.
m
.
una o dos
<
E PENS
X
EPENS
X
O
REP
CAT
2nd
08–18–2005
C
ATEGORY
AMO
2nd
UNT
R
GORYE
<
E
T
M
ea l s
:
E
>
:
0.
>
S-10
Page 57

6. Seleccione la categoría de gastos utilizando < o >.
Hay 8 categorías preajustadas para elegir.
➠
Hotel ➠ Car ➠ Phone ➠ Fares
Meals
(Enter’t ) Entertainment ➠ Tips ➠ (Misc) Miscellaneous ➠...
m
7. Pulse
8. Pulse
9. Seleccione el pago utilizando
10.
11.
12.
e introduzca 1200.
Se puede introducir un máximo de 12 dígitos.
m
.
<
o >.
Hay 4 sistemas de pago
preajustados para elegir.
Cash
➠
Check ➠ Card ➠ Others ➠...
Pulse m, y seleccione “YES” o
<
“NO” utilizando
el campo “RECEIPT”.
Pulse m, e introduzca “Flight ticket” en el campo “MEMO”.
Pulse
x
o > en
para guardar los datos.
➠
A
MOUNT
PAYMEN
2nd
AMO
PAY
2nd
RECEIPT
UNT
M
ENT
<
Fare12s
:
:
T
CHEC
<
:
:
<
C
:
HECK
<
00
K
1200 .
YES
>
Recuperación
Búsqueda secuencial
TO DO/EXPENSE
1. Pulse
gastos.
k
2. Pulse
Aparecerá la visualización de búsqueda de gastos.
3. Pulse
>
o m para seleccionar “EXPENSE”, y luego pulse
<
registro anterior.
una o dos veces para entrar en el modo de
para ver el siguiente registro, o > para ver el
.
Consulte también
>
Edición de listas ................................................... S-12
Borrado de listas .................................................. S-12
>
x
.
S-11
Page 58

Edición de listas
1. Edición
1. Recupere una lista en el modo deseado.
2. Pulse
e
.
La visualización cambiará al modo de edición.
3. Edite los datos.
j l k m
respectivamente.
d
i
4. Pulse
: mueve el cursor a la izquierda, derecha, arriba o abajo
: se puede utilizar para borrar caracteres.
: cambia entre el modo INSERT y el modo OVERWRITE.
x
para guardar.
Borrado de listas
Borrado
1. Recupere una lista en el modo deseado.
d
2. Pulse
Aparecerá la visualización de confirmación.
• Para cancelar el borrado, pulse
3. Pulse
.
x
para borrar la lista.
f
.
Modo del traductor de palabras
Este aparato ofrece una función de traducción de inglés a español y
E S
viceversa. Cada vez que toque
modo de traducción de palabras y el modo de corrector ortográfico.
E S
1. Pulse
veces para entrar en el modo
de traducción de inglés
español.
Pulse
veces para entrar en el modo
de traducción de español
inglés.
2. Introduzca la palabra que desee traducir y pulse
Luego se visualizará la correspondiente palabra inglesa o española.
• Cuando se encienda el pequeño símbolo “
que existen más letras. Para ver las letras restantes de palabras
largas que no caben en la pantalla, utilice
palabra.
• Si no se encuentra la palabra correspondiente se visualiza “NOT
FOUND!”. Luego se visualizará la siguiente palabra en orden
alfabético.
• Pulse
introduzca una palabra nueva utilizando el teclado, y pulse
para hacer otra búsqueda.
una, dos, o tres
→
E S
una, dos, o tres
<
o > para desplazarse por la lista de palabras, o
, el modo cambiará entre el
Campo del inglés
E:1
S
→
Campo del español
j
<
ENGSPA
>
:
x
.
” o “ ”, esto indicará
o l para desplazar la
x
S-12
Page 59

Notas:
ABC
• Las abreviaturas indican lo siguiente:
(Am): Inglés americano
(Br): Inglés británico
(adj): Adjetivo
(adv): Adverbio
(n): Nombre
(pron): Pronombre
(v): Verbo
(f.): Género femenino
(m.): Género masculino
• Algunas veces es posible que aparezcan dos palabras idénticas en
la lista de palabras.
• Introduzca correctamente los caracteres europeos y los espacios.
De otra forma, la unidad tal vez no pueda realizar la búsqueda.
• En el campo del español, usted podrá introducir las letras
siguientes. Pulse repetidamente la tecla de la letra respectiva
después de pulsar
Tecla Letras Tecla Letras
A á à â ä N ñ
C ç O ó ò ô ö
E é è ê ë U ú ù û ü
I í ì î ï Y ´y ÿ
• Active “CAPS” para introducir letras mayúsculas.
s
.
Modo de corrector ortográfico
El modo de corrector ortográfico será muy útil cuando no se conozca
la ortografía de una palabra que desee buscarse. Cada vez que toque
modo de traducción de palabras.
Búsqueda de una palabra con ortografía ambigua
1. Dé un toque en
de corrector de ortografía.
2. Para comprobar la ortografía,
introduzca la palabra y dé un
toque en
comprobación de ortografía.
La longitud máxima de la palabra
introducida es de 36 caracteres.
• Si la palabra introducida es ortográficamente correcta, aparecerá
• Si la palabra introducida es ortográficamente incorrecta, se
• El modo del corrector de ortografía busca una correspondencia
• Es posible que no siempre se den específicamente las variantes
, el modo cambiará entre el modo de corrector ortográfico y el
una, dos, o tres veces para entrar en el modo
ABC
PEL L
><
S
ENTER
para iniciar la
brevemente el mensaje “CORRECT!” (correcto), y después
reaparacerá la visualización de una palabra..
visualizará cierto número de palabras relacionadas; utilice
para desplazarse por las palabras. Si la palabra introducida es
ortográficamente incorrecta, se visualizarán palabras
relacionadas. Si el corrector de ortografía es incapaz de encontrar
palabras relacionadas, después aparecerá “0”, seguido por la
pantalla inicial de introducción.
de una palabrada dada en la base de datos instalada que
contiene unas 12000 palabras.
de una palabra dada o la raíz de una variante dada.
na lper so
k
o
m
S-13
Page 60

Modo de función dieta
ENTER
La función de dieta podrá organizar su consumo diario de calorías al
caminar, así como administrar su toma diaria de calorías. Toque
varias veces
de función dieta y la pantalla del modo de juegos (función de dieta
BLACKJACK → ALPHA ATTACK → función de dieta ...).
DIET
para hacer que se visualice la pantalla del modo
IET
><
D
ETERPED
O
M
M
PT IONCONSU
→
EINTAK
TREPOR
La función de dieta de esta unidad calculará el consumo estimado de
calorías con el pedómetro incorporado, y comparará el valor con el
valor de consumo de consumo objetivo. * El consumo mediante
metabolismo basal no se contará como parte de este cálculo.
Los artículos alimentarios podrán seleccionarse de la base de datos
de alimentos, o programarse en la forma deseada. Haga que el
Organizador compare el valor con el valor de toma objetivo
introducido.
* El metabolismo basal es la energía requerida para mantener las
funciones vitales de su cuerpo, tales como respiración, pulso, y
mantenimiento de la temperatura de su cuerpo.
• Siga las indicaciones de su médico cuando utilice esta unidad para
organizar su dieta.
• Antes de utilizar esta función, tendrá que medir la longitud de su
zancada y su peso.
Medición de la longitud de su zancada
Para que la Función de Dieta trabaje adecuadamente, tendrá que
medir en primer lugar la longitud de su zancada.
Nota:
• En este manual, “longitud de zancada” se refiere a la distancia
desde la punta de un pie a la del otro.
1. Camine normalmente 10 pasos, como se muestra en la ilustración.
2. Mida la distancia que ha recorrido.
3. Divida la distancia por 10. Escriba el resultado como “longitud de
zancada”.
Ejemplo:
Distancia recorrida = 320"
Longitud de zancada = 320" ÷ 10 = 32"
Modo de currículo del usuario
Introduzca la información sobre la longitud de su zancada y su peso
previamente medidos.
DIET
1. Toque
función dieta.
2. Seleccione “USER PROFILE” utilizando
Nota:
• Cuando utilice el modo de función de dieta por primera vez, o
después de la operación de reposición (RESET) del Organizador,
pasará automáticamente al modo de currículo del usuario.
una, dos o tres veces para entrar en el modo de
k
o m, y presione
.
S-14
Page 61

3. Rellene el campo de introducción
ENTER
de STRIDE (zancada) con el valor
de la longitud de su zancada
obtenido con el método
anteriormente indicado, y toque
m
.
4. Introduzca el valor del peso de su cuerpo en el campo WEIGHT
m
(peso), y toque
5. Si es necesario, siga los pasos de arriba para introducir valores
objetivos de su toma diaria de calorías y alimentación.
Introduzca los parámetros siguientes:
• Value of Calories for Intake (calorías de la toma)
• Value of Total Fat for Intake (grasas totales de la toma)
• Value of Saturated Fat for Intake (grasas saturada de la toma)
• Value of Cholesterol for Intake (colesterol de la toma)
• Value of Sodium for Intake (sodio de la toma)
• Value of Carbohydrate for Intake (carbonohidratos de la toma)
• Value of Dietary Fiber for Intake (fibra dietética de la toma)
• Value of Sugars for Intake (azúcares de la toma)
• Value of Protein for Intake (proteínas de la toma)
• Value of Calories for Consumption (calorías del consumo)
6. Presione
Nota:
• Se le recomienda referirse a la documentación apropiada, o
consultar a un médico antes de introducir todos los valores objetivo,
tales como el valor objetivo diario de calorías a tomar.
• Las unidades tales como STRIDE (zancada) y WEIGHT (peso)
podrán cambiarse en el modo MENU.
.
ENTER
para almacenar el ajuste.
2nd
USER
W
EIG
PR
D
E i nchSTRI
HT l b
O
FILE
><
32.
0.
Colocación de la unidad
Cierre la cubierta, y coloque la unidad en la funda de transporte, como
se muestra en la ilustración, y después cerciórese de que la solapa
superior esté cerrada.
Asegure la presilla de la funda de transporte a su cinturón o a la parte
superior de su pantalón o falda.
La unidad deberá fijarse en posición vertical a la tierra a fin de poder
contar correctamente los pasos.
Seleccione “UNIT” (unidad) en el modo MENU, y después presione
. Utilice k m para seleccionar “STRIDE” (zancada) o
“WEIGHT” (peso), y después seleccione la UNIT (unidad) deseada
<
(pulgadas/cm, libras/kg) utilizando
Cubierta
o >.
Presilla
S-15
Page 62

• Cerciórese de que la presilla haya quedado firmemente asegurada
en su lugar. Si colocase inadecuadamente la unidad, podría
desprenderse u ofrecer mediciones incorrectas.
• La presilla para el cinturón ha sido diseñada para sujetar la unidad
mientras camine. La presilla puede no sujetar la unidad o puede
romperse si la expone a una condición de fuerte impacto, como
cuando corra o juegue al béisbol.
La unidad puede no contar correctamente los pasos si:
• Camina a un ritmo irregular, o en un lugar muy concurrido.
• Arrastra excesivamente los pies.
• Se ha calzado sandalias.
• Va ría su movimiento (hace deporte, por ejemplo).
• Se mueve excesivamente hacia arriba/abajo.
• Está en un vehículo con movimientos verticales y horizontales.
• La ha fijado incorrectamente (inclinada, por ejemplo).
Modo de pedómetro
Cambie el estado del pedómetro a ON (activado) o OFF (desactivado).
Para contar pasos, active esta función.
CLOCK
Toque
(ajuste ped.) en el modo MENU, y pulse
seleccionar “ON” (activado), presione
Para desactivar el pedómetro, seleccione “OFF” (desactivado).
, y toque
MENU
, y seleccione “PEDOMETER SET”
ENTER
. Utilice k o m para
ENTER
, y comience a caminar.
2. Seleccione “PEDOMETER”
Nota:
• Compruebe regularmente la memoria.
• Cuando la memoria esté llena, el registro del pedómetro no podrá
registrarse.
• Cuando el nivel de carga de la pila esté bajo, es posible que no
estén disponibles la función de cómputo de pasos del pedómetro, y
el cálculo de calorías.
• El valor de calorías visualizado se redondea a tres decimales.
Para ver el cómputo de pasos y de los valores de calorías
1. Toque
DIET
una, dos o tres veces para entrar en el modo de
función dieta.
k
(pedómetro) utilizando
presione
hacer que se visualice el informe
provisional del consumo de
calorías y el cómputo total de
pasos.
Para volver a la pantalla anterior, toque
• El cómputo de pasos se registrará automáticamente cuando el
• Esta unidad calcula el consumo de calorías con la fórmula
ENTER
reloj señale las “23:59:59”.
siguiente*:
Consumo de calorías [Kcal] = (paso
×
0,001 + 3,5) × peso [libras] × 0,45359237 × 0,005
•
El cálculo se ejecuta una vez por minuto para acumular valores.
* Basándose en las “Guías para Prueba y Prescripción de
Ejercicio del ACSM” © Colegio Médico de Medicina Deportiva,
2000. Publicados por Lippincott Williams & Wilkins, 2000.
o m, y
dos veces para
×
–20053– 21
IE KcalCAL
O
R
80. 21
3
STEP
150.
C•CE
.
zancada [pulgadas] × 2,54
S-16
Page 63

Modo de consumo
Usted podrá ver el consumo diario de calorías y el cómputo de pasos
del día.
1. Toque
2. Seleccione “CONSUMPTION” (consumo) utilizando
3. Utilice
DIET
presione
<
una, dos o tres veces para entrar en el modo de dieta.
ENTER
.
y > para seleccionar el día que desee visualizar.
k
o m, y
Para hacer que se visualice el cómputo de paso y el consumo de
calorías.
• Si no hay datos almacenados, se visualizará el mensaje “NOT
FOUND!” (no encont).
Modo de toma
Introduzca los artículos alimentarios diarios seleccionándolos de la
base de datos de alimentos. Descargue la base de datos de alimentos
del CD-ROM. (Consulte la página S-25.)
1. Toque
función dieta.
2. Seleccione “INTAKE” (toma) utilizando k o m, y presione
3. Toque
alimentación en el campo de selección.
Usted podrá introducir las primeras letras del nombre del alimento
deseado, y después desplazarse por los elementos utilizando
<
Modo de base de datos de alimentos
Descargue la base de datos de alimentos del CD-ROM. (Consulte la
página S-25.)
La base de datos contiene 10 categorías de elementos de 800
nombres de alimentos. El contenido de la base da datos podrá
aumentar o editarse, y podrá intercambiarse con un PC como
elemento de exportación/importación.
Nota:
• La lista de alimentos contenida en el CD-ROM se basa en “Food
Database Release 16” (versión abreviada) emitida por el
Departamento de Alimentos y Agricultura de los Estados Unidos. El
orden de las palabras de los elementos, así como el símbolo ( ” ) de
algunos elementos pueden estar modificados.
• Todos los nombres de compañías y/o productos son marcas
comerciales y/o registradas de sus respectivos propietarios.
visualizará “NOT FOUND!” (no encont!).
4. Utilice k y m para seleccionar el
campo de introducción para cada
AMOUNT (cantidad) y DATE
(fecha) de la toma a fin de
introducir valores.
5. Presione
introducción.
• Toque
Adición de elementos a la base de datos
1. Toque
2. Seleccione “FOOD DATABASE” (bd alim.) utilizando k o m, y
presione
3. Toque
máximo de 96 caracteres.
4. Utilice m para pasar al campo siguiente, y después introduzca los
valores totales de calorías y hidratos de carbono, seguido por
ENTER
DIET
una, dos o tres veces para entrar en el modo de
ENTER
EDIT
, y después utilice k y m para seleccionar
o >. Cuando no haya ninguna concordancia, se
–200503–25
OO
D
:
BUTTER SAF
,
LTED
ENTER
para escribir la
C•CE
para volver a la visualización inicial.
DIET
una, dos o tres veces para entrar en el modo de dieta.
ENTER
EDIT
.
, introduzca el nombre del alimento deseado con un
2nd
.
717.
TAMOUN
:
S-17
.
Page 64

C•CE
ENTER
• Toque
Búsqueda y edición
1. Toque
2. Seleccione “FOOD DATABASE” (bd alim.) utilizando
presione
3. Presione
deseado.
• Usted podrá introducir las primeras letras del nombre del alimento
deseado, y después desplazarse por los elementos utilizando
<
visualizará “NOT FOUND” (no encont).
4. Utilice
demás información.
• Toque
5. Para editar el elemento
seleccionado, toque
Muévase entre los campos de
introducción utilizando
para introducir los nombres de los
alimentos, las calorías, y demás
valores.
6. Presione
Nota:
• El valor de calorías visualizado se redondea a tres decimales.
para volver a la pantalla inicial.
DIET
una, dos o tres veces para entrar en el modo de dieta.
k
o m, y
ENTER
.
<
o > para seleccionar el nombre del alimento
o >. Cuando no haya ninguna concordancia, se
k
o m para hacer que se visualice el valor de calorías y
C•CE
para volver a la pantalla inicial.
E,C
O
EDIT
k
o
.
m
LBYCHEES
IE KcalCALOR
394.
TgFA SA
20. 218
ENTER
para registrar las introducciones.
Modo de informe
Usted podrá ver el informe de toma/consumo de un período
especificado.
S-18
1. Toque
2. Seleccione “REPORT” (informe) utilizando
3. Presione
4. Presione
5. Se visualizará un informe.
Nota:
• El valor de calorías visualizado se redondea a tres decimales.
DIET
una, dos o tres veces para entrar en el modo de dieta.
.
ENTER
tomas) o “CONSUMPTION” (consumo).
<
Utilice
visualizar en REPORT. Si selecciona “INTAKE”, podrá elegir uno de
los diez elementos siguientes: ALL (todo), CALORIE (calorías),
TOTAL FAT (grasas totales), SATURATED FAT (grasas saturadas),
CHOLESTEROL (colesterol), SODIUM (sodio), CARBOHYDRATE
(carbonohidratos), DIETARY FIBER (fibra dietética), SUGARS
(azúcares), o PROTEIN (proteínas). Para “CONSUMPTION”,
seleccione uno de los tres elementos siguientes: ALL, CALORIE, o
STEP (paso).
valores para fecha de empiezo y
fecha de terminación, seguido
ENTER
por
• INTAKE: Utilice k y m para
cambiar entre la visualización
del total de calorías y la del total de hidratos de carbono.
• CONSUMPTION: Se visualizará el valor del consumo total de
calorías.
, y utilice k y m para seleccionar “INTAKE” (info.
o > para seleccionar el elemento que desee
m
, e introduzca los
.
O
R
IE KcalCAL
2000.
2nd
20
0.
k
o m, y presione
<
I NTAKE
–
REPORT
––
:
I
T
E
M
:
F
M
3
0
2nd
:
T
O
03
Icono que indica que el resultado ha
sobrepasado el valor objetivo.
Carbohidratos actuales
Indicación de la comparación con el
objetivo del día (más/menos).
<
ALL
–20–
–20–
>
–
>
2005
2005
Page 65

Modo de conversión
Modo de conversión de divisas
La conversión de divisas tiene 5 etapas de conversión programable.
Cada etapa es capaz de hacer cálculos con 12 dígitos.
Ajuste de una nueva tasa de conversión de divisas
<Ejemplo> Ajuste de la tasa siguiente: £1 = $1,45
q
1. Pulse
apropiado de veces para
seleccionar el modo de
conversión de divisas.
<
2. Pulse
seleccionar la etapa de
conversión de divisas apropiada.
e
3. Pulse
Aparecerá el modo de ajuste.
Los nombres de divisas preajustados se pueden cambiar aquí.
4. Cambie el nombre de la divisa de la izquierda si es necesario, y
luego pulse
Nota:
• Para el nombre de la unidad de divisa se puede introducir un
máximo de 4 caracteres.
5. Cambie el nombre de la divisa de la derecha si es necesario, y
luego pulse
el número
o > para
.
l
.
m
.
<
C
C
AD U=SD
RATE
URRENCY
>
1
6. Introduzca la tasa; 1,45.
7. Pulse
Conversión de divisas
<Ej. £
1. Pulse
.
2. Pulse < o > para seleccionar la etapa de conversión de
3. Introduzca la cantidad. (Ej. £50)
4. Pulse
<Ej. $
5. Introduzca la cantidad. (Ej. $120)
6. Pulse
<
C
Para la tasa se puede introducir
un máximo de 12 caracteres
alfanuméricos.
Si necesita borrar el número de la
c
tasa, pulse
x
Asegúrese de ajustar la tasa antes de iniciar una conversión.
➠
$>
q
el modo de conversión de divisas.
divisas apropiada.
l
(£50 = $72,5 aproximadamente)
➠
£>
j
($120 = £82,76
aproximadamente)
j
Utilice
dirección de conversión.
Pulse c para borrar el resultado del cálculo.
.
para almacenar el ajuste.
el número apropiado de veces para seleccionar
.
.
o l para cambiar la
URRENCY
G
BP USD
=
RATE
<
C
URRENCY
G
BP USD
<
C
URRENCY
G
BP USD
2.8 758620
>
1
.45
>
50 .
27.5
>
201.
8696
S-19
Page 66

Modo de juego
GAME
Pulse
o “ALPHA ATTACK”.
Cada vez que usted pulse
“BLACKJACK” y “ALPHA ATTACK”.
BLACKJACK (Veintiuno)
Procure que su “mano” (la suma total de los números
correspondientes a sus cartas) sea 21 o se aproxime a este número,
pero sin rebasarlo.
1. Pulse
para visualizar la pantalla del
modo de juego siguiente.
2. Pulse
juego. Las 2 cartas de la
izquierda son para usted. (Una
de ellas descubierta y la otra
tapada.)
3. Acepte la apuesta máxima que se visualiza parpadeando a la
izquierda (un máximo de 10) o introduzca una apuesta inferior.
una o dos veces para reproducir el juego “BLACKJACK”
GAME
, la visualización cambiará entre
GAME
una o dos veces
x
para empezar un
<
BLACKJ
ACK
>
30
Sus fichas
4. Pulse
@
para ver su mano.
@
Cada vez que pulsa
le entrega una carta nueva.
• ”J”, “Q” y “K” cuentan como 10.
• ”A” puede contar como 1 o
como 11.
• Cuando las 2 primeras cartas
sean “A” y una carta de figura
(“J”, “Q” o “K”), su mano será “BLACKJACK”.
x
5. Pulse
cartas y quedarse plantado. A
continuación se verá la mano de
quien reparte las cartas y los
resultados.
• Cuando usted gane, su total
parpadeará y su apuesta se
doblará.
• Cuando usted gane con “BLACKJACK”, su apuesta se triplicará.
6. Pulse
• El juego terminará cuando usted no tenga más fichas para
apostar.
• Pulse cualquier tecla de modo para abandonar el juego. Sus
fichas quedarán guardadas par la próxima vez.
para no recibir más
x
y visualice la pantalla del modo de juego.
, se
Su mano
<
J28 04
Su total
<
J28 32K4
20 19
La mano de quien
reparte cartas
BLACKJACK
10 20
El total de quien
reparte cartas
BLACKJACK
20 20
>
Sus fichasSu apuesta
>
Sus fichasSu apuesta
S-20
Page 67

ALPHA ATTACK
Escriba los caracteres (A a Z) visualizados en la línea del fondo para
borrarlos. El juego se divide en 20 niveles de velocidad.
GAME
1. Pulse
para visualizar la pantalla del
modo de juego siguiente.
2. Pulse
seleccionar el nivel.
• 01: lento, 20: rápido
3. Pulse
juego.
una o dos veces
<
/ > para
x
para iniciar un
ALPHAATTA
LEVEL:01
ALPHAATTA
C<K
C<K
>
>
LEVEL:03
4. Pulse la tecla correspondiente al
primer carácter del extremo
izquierdo de la línea del fondo.
(En este caso, pulse las teclas en el orden siguiente: E
→
W.)
• Al pulsar las teclas correctas en el orden correcto se van
borrando los caracteres.
• Cuando se visualicen 12 caracteres en cada nivel, el juego
continuará a un nivel más rápido (hasta alcanzar el 20).
• El juego terminará cuando no se puedan visualizar más
caracteres. Entonces se visualizará la pantalla del modo de
juego mostrando el nivel con el que finalizó el juego.
• Para abandonar el juego, pulse o cualquier tecla de modo.
EYK
W
→
Y → K
Utilización del software de PC incluido
El CD-ROM contiene software para activar el intercambio de datos
con un PC. El software consiste en:
Software de sincronización:
Puede resultar útil para sincronizar datos de Microsoft
como, por ejemplo, contactos, calendarios, tareas y apuntes, con el
Organizador.
Utilidades de escritorio:
Pueden utilizarse para realizar una copia de seguridad/restablecer
datos en el Organizador, así como para descargar la base de datos
para varias funciones, y exportar/importar en diferentes formatos
de archivo.
Requerimientos mínimos del sistema:
• PC IBM o 100% compatible
• Microsoft
• Pentium
• 50 MB de espacio libre en el disco duro
• RAM de 64 MB para Microsoft
• RAM de 128 MB para Microsoft
• Un puerto compatible con USB 1.1 / 2.0
• Unidad de CD-ROM
• Ratón o puntero compatible
Requerimientos adicionales del sistema:
• Microsoft
para utilizar el software de sincronización entre el Organizador y
su PC.
®
XP Professional
Professional/Me
Professional
Windows® 98/98SE/2000 Professional/Me/XP Home/
®
300 MHz o más
®
Windows® 98/98SE/2000
®
Windows® XP Home/XP
®
Outlook® 98/2000/2002/2003 deberá estar instalado
®
Outlook
®
S-21
Page 68

Acerca de los puertos USB
• La activación del modo de ahorro de energía (como la función de
suspensión, reanudación, o descanso) de algunos PC puede
resultar en mal funcionamiento del puerto USB. En tal caso,
desactive el modo de ahorro de energía.
• El software puede no funcionar adecuadamente con una tarjeta
USB adquirida en un establecimiento del ramo e instalada en una
ranura PCI.
• Si el puerto USB de su PC o el concentrador USB conectado al
dispositivo no funciona adecuadamente, realice los pasos
siguientes:
– Si su PC está equipado de varios puertos USB, trate de utilizar
otro diferente.
– Si hay otros dispositivos USB conectados a su PC,
desconéctelos para evitar posibles conflictos.
• Como el concentrador USB puede introducir problemas, pruebe a
desviarlo conectando la unidad directamente a su PC.
• No desconecte y conecte el cable USB de/en su PC en un corto
período de tiempo.
Limitaciones cuando utilice Windows® XP/2000
Windows® XP
• Entre en su PC con privilegios de administrador, ya que de lo
contrario es posible que el software no se instalase
adecuadamente. Después de utilizar el software, tendrá que iniciar
la sesión como administrador. Si entra en sesión con una cuenta
no administrativa, tendrá que salir de sesión y volver a entrar con
una cuenta de administrador.
®
Windows
2000
• Cuando instale o utilice el software, tendrá que entrar en sesión
como administrador. Si es necesario, tendrá que ponerse en
contacto con el administrador del PC en un entorno de trabajo.
Instalación
Precauciones:
• Antes de instalar el software de sincronización, cerciórese
de haber instalado y configurado Microsoft
caso contrario, instale y configure en primer lugar Outlook
®
Outlook®. En
®
,
y después el software de sincronización.
• Desconecte el cable USB antes de la instalación. Si
realizase la instalación con el cable USB conectado, tendría
que desconectar dicho cable y después referirse al archivo
Read Me del CD-ROM para volver a realizar el procedimiento
de instalación.
1. Inserte el CD-ROM con el software de PC en su unidad CD-ROM.
El proceso de instalación deberá empezar automáticamente.
Si no aparece la pantalla del software de PC, haga doble clic en
“My Computer” para localizar el directorio de la unidad CD-ROM, y
luego haga doble clic para lanzar “installer.exe” que se encuentra
en el CD-ROM.
2. Haga clic en el botón "Install"
3. Siga las instrucciones de instalación que aparecen en la pantalla.
4. Cuando termine la instalación, haga clic en el botón "Finish" para
finalizar el proceso de instalación.
S-22
Page 69

5. Cuando aparezca la ventana de detección de
cable USB, conecte el conector del cable USB
PC-Link al puerto USB del PC, y después haga
clic en “Next”. No conecte todavía el
Organizador.
6. Aparecerá la ventana de instalación del
controlador USB.
7. Siga las instrucciones de instalación de la
pantalla.
8. Cuando termine la instalación, haga clic en el botón "Finish" para
finalizar el proceso de instalación.
9. Cuando aparezca la ventana de detección del cable USB, haga clic
en “Next” para que se detecte el cable USB. Para finalizar el
proceso de detección, haga clic en “Finish”.
Nota:
• Si el cable no se detecta, consulte el archivo Read Me del CD-ROM
para volver a realizar el procedimiento de detección.
10.Al procedimiento anterior le seguirá el de Serial Port Setup, y la
ventana de de ajuste de sincronización.
Note:
• Para Windows
programas después de iniciar la sesión como Administrator.
• Utilice solamente el cable USB indicado para OZ-290H. Este cable
no podrá utilizarse con otros dispositivos.
®
2000 Professional y Windows® XP, instale/desinstale
Conexión del Organizador al PC
1. Apague el Organizador.
2. Conecte el otro extremo del cable USB
3. Encienda el Organizador.
Haga clic en “Auto Detect...” para permitir que la sincronización
detecte automáticamente el puerto serial apropiado. Asegúrese
primero de que la unidad esté conectada físicamente al PC, y luego
haga clic en este botón.
Si no se encuentra el puerto serial deseado, selecciónelo
manualmente desde la lista desplegable.
Software de sincronización
Después de completar la
preparación del puerto serial
aparecerá la ventana de ajustes.
Para mostrar manualmente la
ventana de ajustes, haga clic con
el botón derecho del ratón en el
icono de sincronización de la
bandeja del sistema Windows®, y
luego seleccione el elemento de
ajuste deseado en el menú.
Preparación de puerto serial
El cuadro de diálogo del ajuste del puerto
serial aparece después de que usted haya
terminado de instalar el software.
PC-Link al puerto para opciones del
Organizador.
S-23
Page 70

Ficha general
En la ficha general usted podrá:
• Hacer clic en la casilla de verificación de cada aplicación para
activar la sincronización con el PC.
• Utilizar el botón “Option” o hacer doble clic en la fila de ajustes
deseada para configurar el método de comunicación.
• Hacer clic en el botón “Default” para reponer los ajustes de
opciones.
Acción de sincronización:
: Fusiona los datos entre el PC y la unidad.
: El PC escribe sobre los datos de la unidad.
: La unidad escribe sobre los datos del PC.
La ficha PIM
La ficha PIM le permite configurar los ajustes de descarga de los
datos PIM
• Utilización de Outlook HOME “Address” y “Fax number”: Descarga
o sincroniza solamente los datos de las direcciones HOME y los
números de FAX.
• Utilización de Outlook WORK “Address” y “Fax number”: Descarga
o sincroniza solamente los datos de las direcciones WORK y los
números de FAX.
• Hoy y en adelante: Descarga o sincroniza solamente los datos de
hoy y en adelante.
• Todos: Descarga o sincroniza todos los datos de programas.
Ficha de resolución de conflictos
La ficha de resolución de conflictos del software de sincronización
le permite seleccionar la forma en que los conflictos de datos se
resuelven cuando se hacen modificaciones en los datos y se
selecciona la opción “Synchronize” en la ficha general.
• Add all conflicting items: Cada modificación en la unidad y en el
PC se refleja y guarda respectivamente después de la
sincronización.
• Unit overwrites PC data: Se escribirá sobre los datos del PC. Las
modificaciones hechas en la unidad se reflejan en el PC después
de la sincronización.
• PC overwrites unit data: Se escribirá sobre los datos de la unidad.
Las modificaciones hechas en el PC se reflejan en la unidad
después de la sincronización.
S-24
Casilla Connection
Esta casilla le permitirá cambiar los ajustes para el puerto en serie y la
contraseña.
• Serial port : Especifique el puerto en serie para conectar la
unidad al PC.
• Auto Detect : Haga clic aquí para permitir que el PC detecte el
puerto en serie apropiado.
Page 71

Utilidades de escritorio
Haga clic con el botón derecho del ratón
en el icono de sincronización de la
bandeja del sistema Windows
seleccione "Desktop Utilities..." en el
menú.
Utilice las utilidades de escritorio vía la
interfaz de gráficos siguiente:
Copia de seguridad/Restauración
El menú de copia de seguridad/restaurar
las utilidades del escritorio le permite
hacer copias de seguridad de los datos de la unidad, o restaurarlos en
la memoria interna de la unidad.
• Copia de seguridad: Seleccione “Backup...” con el botón, y luego
introduzca el nombre deseado del archivo del que va a hacer una
copia de seguridad.
• Restauración: Seleccione “Restore...” con el botón, y luego
seleccione el nombre deseado del archivo que va a restaurar.
®
, y luego
• Importar: Seleccione el nombre de la aplicación deseada o la base
de datos de alimentos, y luego haga clic en “Import...”, y a
continuación introduzca el nombre del archivo deseado del que
usted quiere importar datos.
Desinstalación del software del PC
Antes de desinstalar el software del PC, cierre todos los programas.
1. En el panel de control, abra “Add or Remove Programs”. En la lista
del software instalado, seleccione el software del PC. Y después
haga clic en el botón “Change/Remove...”.
2. Cuando aparezca la pantalla del programa Install Shield, seleccione
“Remove”, y después haga clic en “Next”.
3. Cuando aparezca el mensaje de verificación, haga clic en el botón
“OK”. Cuando aparezca la ventana Uninstall para el controlador
USB, desconecte el cable USB y haga clic en “Next” a fin de
ejecutar el procedimiento de desinstalación.
4. Cuando termine la desinstalación, haga clic en el botón "Finish"
para finalizar el proceso de desinstalación.
Exportar/Importar
El menú de exportar/importar de la utilidad del escritorio le permite
importar a la unidad datos creados por cada aplicación de PC, o
exportar datos de la unidad.
• Exportar: Seleccione el nombre de la aplicación deseada (datos
de aplicación, base de datos de alimentos, registro de consumo, o
registro de toma) y luego haga clic en “Export...”, y a continuación
introduzca el nombre del archivo deseado del que usted quiere
exportar datos.
S-25
Page 72

Reemplazo de las pilas
Pilas utilizadas
Tipo Modelo Cantidad Uso
Funcionamiento de la
Pila de litio CR2032 2 unidad e iluminación
de fondo
• Asegúrese de escribir cualquier información importante
almacenada en la memoria antes de cambiar las pilas.
Cuando se visualice
Precauciones
Como el uso inapropiado de las pilas puede producir fugas o
explosión, observe al pie de la letra las instrucciones siguientes:
• Si el fluido de una pila que tiene fugas entra por accidente en sus
ojos podrá causarle una grave lesión. Si le ocurre esto, lave sus
ojos con abundante agua limpia y consulte inmediatamente a un
médico.
• Si el fluido de una pila que tiene fugas entra en contacto con su
piel o ropas, lave inmediatamente la parte afectada con agua
limpia.
• Si el Organizador no va a ser utilizado durante un largo periodo
de tiempo, para evitar que se estropee, retire las pilas y guárdelo
en un lugar seguro.
• No deje las pilas agotadas dentro del Organizador.
• No utilice tipos de pilas diferentes ni pilas parcialmente usadas.
• Inserte la pila con su lado positivo (+) posicionado
correctamente.
• No arroje nunca las pilas al fuego porque podrán explotar.
• Guarde las pilas fuera del alcance de los niños.
• Cuando las pilas estén muy descargadas, sáquelas
inmediatamente del Organizador para evitar el riesgo de fugas y
corrosión en el interior del Organizador.
Debido a que las pilas entregadas con el Organizador han sido
instaladas en fábrica, éstas podrán descargarse antes de transcurrir
el tiempo de duración especificado.
S-26
Nota:
• Después de reemplazar la pila, compruebe también que la luz de
Precaución:
• PC Link puede que no esté disponible cuando el nivel de carga de la
• El informe de gastos (informe sumario) puede que no esté disponible
• Cuando el nivel de carga de la pila esté bajo, puede que en algunos
Cuando la luz de fondo no funciona
B
Reemplace inmediatamente la pila de funcionamiento por otra nueva
cuando se visualice “
El portapila de la pila de funcionamiento se indica con la
palabra “For OPERATION” en el compartimiento de las pilas.
Si la pila tiene poca carga, puede que no suene la alarma, o que la
luz de fondo no funcione o funcione durante menos tiempo que el
establecido. El uso continuado del Organizador con una pila que
tiene poca carga puede alterar o borrar el contenido de la memoria.
El contenido de la memoria se puede perder también si la pila se
reemplaza incorrectamente o si no se siguen las instrucciones
siguientes.
fondo funcione correctamente.
pila esté bajo.
cuando el nivel de carga de la pila esté bajo.
modos no se puedan introducir datos nuevos ni editar datos
existentes. Y puede que tampoco se puedan realizar ajustes del reloj
u otros ajustes.
Cuando la luz de fondo no pueda encenderse (excepto cuando se
visualice “
cambie la pila de la luz de fondo (“For BACKLIGHT &
OPERATION”).
El portapila de la pila de la luz de fondo y la operación se
indica con la palabra “For BACKLIGHT & OPERATION” en el
compartimiento de las pilas.
B
B
”.
” o el Organizador esté en el modo PC Link),
Page 73

Cambio de las pilas
• Asegúrese de desconectar la alimentación antes de cambiar las
pilas.
• No pulse o hasta después de completar el procedimiento de
cambio de las pilas.
• No retire todas las pilas en el mismo tiempo. Retire y instale las
pilas una a la vez.
1. Pulse
o
para desconectar la alimentación.
2. Afloje el tornillo (hacia la izquierda) y retire la
cubierta del compartimiento de las pilas
ubicada en la parte posterior de la unidad.
3. Retire una pila usada con un bolígrafo u otro
objeto similar.
• No emplee un lápiz mecánico ni un objeto
puntiagudo.
4. Instale una pila nueva con el lado positivo
(+) hacia arriba.
5. Repita los pasos 3 y 4 para reemplazar ambas
pilas en caso de ser necesario.
6. Vuelva a poner la cubierta del compartimiento
de las pilas y asegúrela con el tornillo.
7. La alimentación se conectará á 2 a 3
o
segundos después de pulsar
.
• Si no aparece nada en la pantalla, presione el interruptor RESET
<
y luego pulse
No dé un toque en
.
f y pulse
x
. La secuencia se borrará
todo el contenido de la memoria.
R
E
S
E
T
RESET
RESET
8. Ajuste el reloj a la hora correcta. (Consulte la página S-3.)
Precaución:
• Los ajustes del reloj y/u otros ajustes y listines podrán perderse
cuando las pilas sean retiradas durante mucho tiempo. Reemplace
las pilas lo más rápidamente posible.
• Confirme que todos los ajustes sean los correctos después de
cambiar las pilas.
S-27
Page 74

APUNTES
S-28
Page 75

LIMITED WARRANTY
SHARP ELECTRONICS CORPORATION warrants to the first consumer
purchaser that this Sharp brand product (the “Product”), when shipped
in its original container, will be free from defective workmanship and materials,
and agrees that it will, at its option, either repair the defect or
replace the defective Product or part thereof with a new or remanufactured
equivalent at no charge to the purchaser for parts or labor for the period(s)
set forth below.
This warranty does not apply to any appearance items of the Product nor
to the additional excluded item(s) set forth below nor to any Product the
exterior of which has been damaged or defaced, which has been subjected
to improper voltage or other misuse, abnormal service or handling, or
which has been altered or modified in design or construction.
In order to enforce the rights under this limited warranty, the purchaser
should follow the steps set forth below and provide proof of purchase to
the servicer.
The limited warranty described herein is in addition to whatever implied
warranties may be granted to purchasers by law. ALL IMPLIED
WARRANTIES INCLUDING THE WARRANTIES OF
MERCHANTABILITY AND FITNESS FOR USE ARE LIMITED TO THE
PERIOD(S) FROM THE DATE OF PURCHASE SET FORTH BELOW.
Some states do not allow limitations on how long an implied warranty
lasts, so the above limitation may not apply to you.
Neither the sales personnel of the seller nor any other person is authorized
to make any warranties other than those described herein, or to extend
the duration of any warranties beyond the time period described herein
on behalf of Sharp.
The warranties described herein shall be the sole and exclusive warranties
granted by Sharp and shall be the sole and exclusive remedy available
to the purchaser. Correction of defects, in the manner and for the period
of time described herein, shall constitute complete fulfillment of all liabilities
and responsibilities of Sharp to the purchaser with respect to the Product,
and shall constitute full satisfaction of all claims, whether based on
contract, negligence, strict liability or otherwise. In no event shall Sharp
be liable, or in any way responsible, for any damages or defects in the
Product which were caused by repairs or attempted repairs performed
by anyone other than an authorized servicer. Nor shall Sharp be liable or
in any way responsible for any incidental or consequential economic or
property damage. Some states do not allow the exclusion of incidental
or consequential damages, so the above exclusion may not apply to you.
THIS WARRANTY GIVES YOU SPECIFIC LEGAL RIGHTS. YOU MAY
ALSO HAVE OTHER RIGHTS WHICH VARY FROM STATE TO STATE.
Your Product : Electronic Organizer
Warranty Period for this One (1) year parts and labor from date
Product : of purchase.
Additional Items Excluded Any consumable items such as paper,
from Warranty Coverage : maintenance cartridge, ink cartridges
Where to Obtain Service : At a Sharp Authorized Servicer located
What to do to Obtain Service : Ship (prepaid) or carry in your Product to
supplied with the Product or to any
equipment or any hardware, software,
firmware, fluorescent lamp, power cords,
covers, rubber parts, or peripherals other
than the Product.
in the United States. To find out the
location of the nearest Sharp Authorized
Servicer, call Sharp toll free at 1-800-BESHARP.
a Sharp Authorized Servicer. Be sure to
have proof of purchase available. If you
ship or mail the Product, be sure it is
packaged carefully.
TO OBTAIN SUPPLY, ACCESSORY OR PRODUCT INFORMATION, CALL 1-800-BE-SHARP.
Page 76

SHARP ELECTRONICS CORPORATION
Sharp Plaza, Mahwah, New Jersey 07430-1163
PRINTED IN CHINA/IMPRESO EN CHINA
04DT (TINSE0747EHZZ)
 Loading...